

ELECTRIC SCOOTER
yeep.me 100 (2020)
Please read this manual carefully before rst use
Original Instructions
BEFORE FIRST USE, IT IS RECOMMENDED THAT YOU CHECK YOUR TYRE
PRESSURE AND THE BATTERY CHARGING LEVEL OF YOUR DEVICE.


Thank you for your purchase.
Welcome to the yeeper community!
Table of contents
1. SAFETY GUIDELINES 04
2. CONTENTS OF THE BOX 08
3. DESCRIPTION OF THE DEVICE 09
4. USER GUIDE 10
5. TECHNICAL SPECIFICATIONS 14
6. BATTERY 14
7. MAINTENANCE AND CLEANING 15
8. FAQ 17
9. WARRANTY TERMS AND LIMITATIONS OF LIABILITY 19
Before using this product, carefully read the user guidelines. These will allow
you to properly understand, use and service this product, and to get to know its
performances and features.
Keep this manual for future reference. If selling or giving this product to someone
else, please ensure you include this manual along with it.
03

1. SAFETY GUIDELINES
1. This device is designed to transport one person, and is intended for use by
teenagers and adults.
This device may be used by children aged 12 and up, and may also be used
by persons with physical, sensory or mental disabilities, on condition that
adequate supervision is provided or they have been instructed on how to
operate the device safely and are aware of any potential risks. Children should
not be allowed to play with the device. Cleaning and user maintenance should
not be performed by unsupervised children. Parents should not let their child
use this device unsupervised.
Do not transport an additional person, children, or goods. Exceeding the weight
limit may cause injuries and damage the device. That the user is within the
weight limit does not mean they are tall enough to maintain control of the
device.
2. This is an individual transportation device. It is therefore not suitable for
competitions or extreme sports, and must never be used in a skate park.
Do not use the scooter to go up or down stairs, perform jumps, jump over
obstacles, or perform tricks or dangerous acts.
This device is neither a toy nor a tness device. Children should not play with
it.
This product has not been designed for professional or commercial use, such
as: rentals, forming a eet of vehicles, business trips.
3. This device should be used with caution on a surface that is at, clean,
dry and free of gravel and grease, as there needs to be friction between the
wheels and the ground to move forward. Avoid obstacles, holes, bumps, and
sewer grates that may cause accidents. Slow down for speed bumps.
Stay away from other road users and observe trafc rules. You are not safe
from the risks posed by the behaviour of others. Anticipate obstacles and
trafc by driving at an appropriate speed. Stopping distance depends on
your speed. Avoid abrupt manoeuvres and sudden braking; the device may
skid, lose its balance, or fall, even on a smooth, at surface. In addition, be
careful to anticipate braking distances in wet weather and/or on wet roads.
The same applies to pedestrians who might cross without having seen you.
Always be vigilant and stay away from other pedestrians and users on public
04

thoroughfares. WARNING! Never use the product outside the areas permitted
by regulations.
4. Caution! This appliance is designed for outdoor use. It is your responsibility
to know and comply with the regulations in force on the public and private
thoroughfares where you use the device.
5. Learn how to use the device in an open and at location without many
other road users around you, and make sure you wear a helmet.
Always wear sturdy shoes and trousers when using this device. Do not operate
this device if you are barefoot or wearing open sandals. Avoid wearing loose
clothing or clothing with dangling cords or ties, scarves, etc., which could get
caught in the wheel and cause choking, falls and/or collisions.
6. Do not use the throttle if you are walking alongside the scooter, or make
sure you turn it off rst.
7. Do not ride in rain, snow, puddles, mud, or other wet areas with a water
depth of over 2 cm that would allow water to seep into the device. To clean
your device, follow the advice in section 7.1.
Do not use this device if visibility is poor. If you are riding at night or in dark
weather, we recommend wearing reective clothing or equipment, such as
a high-visibility jacket or armband. In addition to this recommendation, you
should refer to the applicable equipment requirements in the location and
country of use.
8. Do not use this device under the inuence of alcohol or other drugs. For
your safety, such use is strictly prohibited.
9. Do not leave the product within the reach of anyone who could start it
without the authorisation of the main user or without prior information and
knowledge of these safety measures/guidelines and use.
If you lend the device to someone, ensure the other person knows how to use
it and explain to them all the safety guidelines. The person you are lending
the scooter to must be reminded to follow trafc regulations and to wear
protective gear while riding.
To prevent unauthorised use, be sure to remove the key from the ignition
between uses, in order to prevent unintentional or intentional misuse.
05

10. This device must be turned off before being folded and stored away. For
instructions on this, please refer to the “User guide” section of this manual.
11. Always inspect the device prior to each use. If you notice any pieces have
come loose, low battery level alerts, at tyres, excessive wear and tear,
strange noises, improper functioning or any other abnormality, stop using the
device immediately and seek professional assistance.
If the device is equipped with mechanical brakes, make sure they are not
rubbing due to cable tension or exhibiting any other problems, as this
may cause the unit to slow down and prevent it from operating normally.
Overheating may impact the brake's efciency.
Ensure the steering system has been properly adjusted and that all connecting
parts and screws are tight and in good working order before each use. If the
screws are still loose after tightening them, posing a safety hazard to drive
on, contact your retailer for more information or assistance.
Double check that all safety features work properly (brakes, lights). The
folding mechanism must be securely locked into its vertical driving position.
12. DO NOT USE THE DEVICE OR CHARGE ITS BATTERY IN THE FOLLOWING
CIRCUMSTANCES:
• The product is damaged.
• The battery is emitting an abnormal smell and heat.
• Brake controls, or other braking or safety devices (lights) are damaged.
Discontinue use and do not touch any liquid leaking out of the device. Do not
expose the device's battery to excessive heat.
13. The battery must not be replaced by the user. Please contact your retailer or
the brand's after-sales service for any device modications or maintenance.
14. The batteries must be disposed of appropriately. If you are unable to
return your product to your retailer, place it in the containers provided for this
purpose (see the brand’s manual for more information) in order to protect the
environment.
06

15. Cleaning, maintenance and all other handling of the device must never be
performed by anyone under the age of 12. The product should be stored out
of the reach of children. Double check that all safety features work properly
(brakes, lights). The folding mechanism must be securely locked into its
driving position.
16. Any opening of the device or product may modify the safety of the device
or product, and the brand does not take responsibility for this. Please note
that opening the device will void the warranty of the device or product. Should
you nevertheless wish to carry out repairs on your device yourself, the brand
does not take any responsibility for the reliability of the repairs and potential
damage these may incur. Accidents that may occur as a result of these
repairs are not the brand's responsibility. In case of doubt or when in need of
assistance, contact an authorised retailer or the brand's customer support.
07
Pictogram Meaning
Always read the user manual carefully.
An exclamation mark within an equilateral triangle is intended to alert
the user to the presence of important operating and maintenance
instructions in the device’s user manual.
This device must not come into contact with water. Do not store the
device in a damp environment.
The lightning ash with an arrowhead symbol within an equilateral
triangle is intended to alert the user to the presence of “dangerous
voltage” within the device that may be of sufcient magnitude to
constitute a risk of electric shock.
This symbol indicates that this device is equipped with a double
electrical insulation between the power supply's (dangerous) voltage
and the parts that are accessible by the user.
Caution! Protective equipment including wrist guards, gloves, knee
pads, helmet and elbow pads should be worn.
Electrical and electronic equipment must be sorted and disposed of
separately. Do not dispose of electrical and electronic equipment with
normal and unsorted household waste, bring it to a recycling centre
instead.
This marking is used on the nameplate to indicate that the equipment
operates on direct current only or to identify the corresponding
terminals.
This marking is used to identify the electronic device comprising the
transformer and the electronic circuit, which converts electrical energy
to one or more output connectors.
This marking is used to identify the electronic device comprising the
transformer and the electronic circuit, which converts electrical energy
to one or more output connectors.
2. CONTENTS OF THE BOX
This pack contains:
eep.me 100 electric scooter
• y
• Tools
• Original mains charger
• Starter keys (2 keys provided)
• User manual
• CE declaration
• Warranty card TO BE KEPT (it contains the device’s serial number and manufacture date,
essential information for warranty purposes)
08

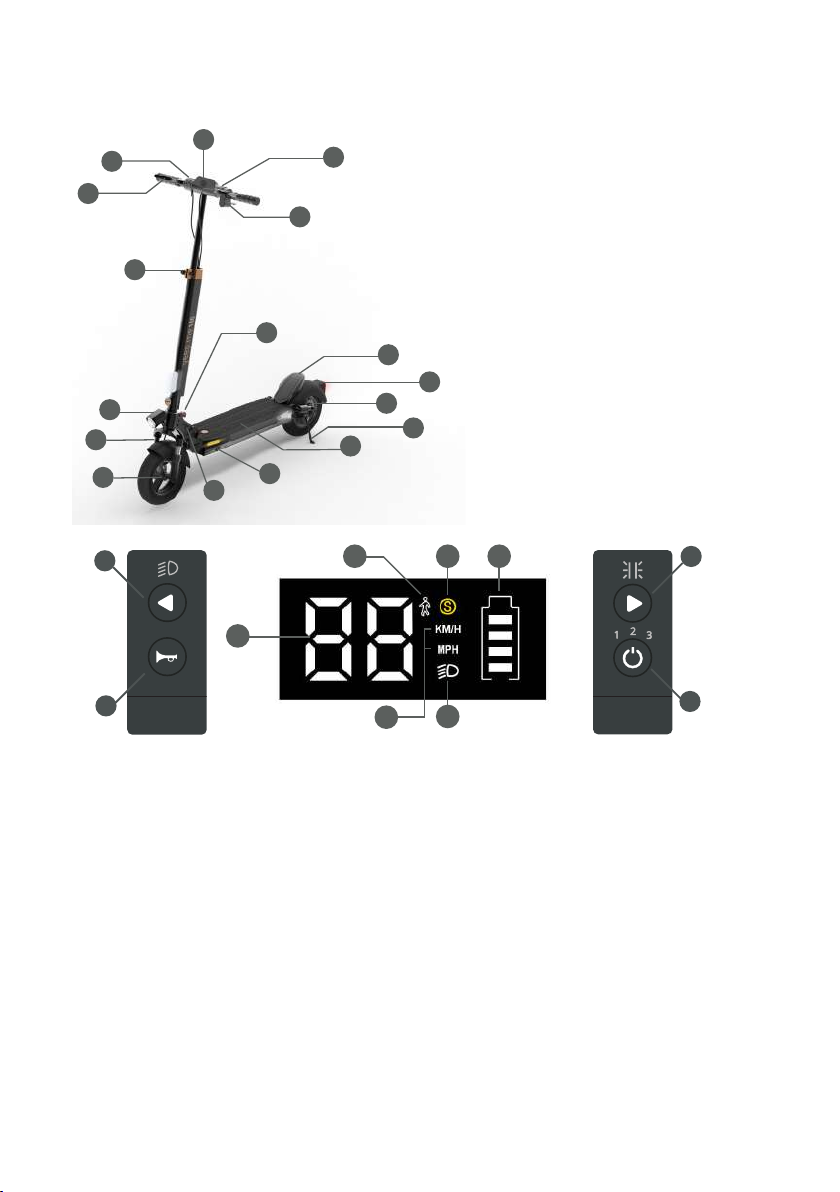
3. DESCRIPTION OF THE DEVICE
4
2
5
1
3
(1). Lights, horn, and change of speed
modes
(2). Accelerator
(3). Starter key
(4). DISplay
(5). Brake handle
6
(6). Handlebar adjustment clamp
(7). LED lighting
(8). Shock absorbers
9
10
7
8
12
23
24
13
14
17
12
15
18 19 20
21
(9). Release lever
(10). Footrest
(11). Rear brake light
11
(12). Disc brakes
(13). Charging port
16
(14). Folding/unfolding safety lever
(15). Anti-slip platform
(16). Crutch
22
25
26
(17). Instant speed (18). Speed mode 1 (19). Speed modes 2 & 3 (20). Battery level indicator
(21). Speed type indicator (22). Light activation indicator
(23). Headlight activation button and left turn indicator (24). Horn (25). Red LED activation
button and right turn indicator (26). ON/OFF button and speed mode.
• To activate or deactivate the LED lighting, press and hold the buttons
located on the left handle (23) and on the right handle (25) for 3 seconds
for the LED strips on the sides.
• To activate the left turn indicator, briefly press the button located on the
left handle (23). To activate the right turn indicator, briefly press the button
located on the right handle (25).
• The brake light (11) is only active when the LED lighting (7) is active.
09

• To turn the device on and off: use the starter key provided with the
device and press and hold the ON/OFF button (26). The device turns off
automatically after 180 seconds of inactivity.
• To change modes: briefly press the ON/OFF button (26).
There are 3 speed modes:
• Mode 1 (pedestrian icon) (18) limited to 6 km/h
• Mode 2 (yellow S icon) (19) is the ECO speed mode and is limited to 15 km/h.
• Mode 3 (red S icon) (19) is the maxi mode and is limited to 25 km/h.
4. USER GUIDE
4.1. UNPACKING AND ASSEMBLING THE DEVICE
To unpack the product, it is recommended to have a clear surface that is
large enough to unpack and prepare the device. Take the device out of its
packaging, making sure to not injure yourself or damage other products or
your surroundings. Have someone help you if the product is too heavy for you
to handle on your own (the weight of the device is indicated on the packaging).
Before using the product, the handles must be assembled. To do this, unfold
the device (see following sections) and screw on the handles:
An adult must unpack and assemble the device.
• Use the markings on the handles to help you. R marks the right-hand
handle and L marks the left-hand handle.
• Screw on each handle in alignment with the handlebar axis. Do not tighten
or apply force if the handle is crooked. It should be possible to tighten the
handle without applying force.
• Ensure you have properly tightened the handle once it reaches the stop.
4.2. FOLDING/UNFOLDING THE DEVICE
The device can be folded and unfolded easily using the release lever (9)
and the folding/unfolding safety lever (14). You should always perform this
operation with care in order to avoid getting pinched or jammed.
Unfolding
1. Place the device in front of you in a horizontal position.
2. Start unfolding by pushing the lever (14).
3. Lift the scooter frame by about 90 degrees until you hear a soft click.
10

4. Lift and close the release lever (9) until it fully engages the hinge.
5. If the device is equipped with fold-away handles, set them up by pulling
them apart. If not, the handles are already set up in the correct position.
6. The process is complete.
Folding
1. Place the device in front of you in a horizontal position.
2. If the device is equipped with folding handles, fold them away to the sides
if needed.
3. Unlock the device by lowering the lever (9).
4. Push the folding lever (14).
5. Lower the scooter frame by 90 degrees.
6. The process is complete.
4.3. CHARGING AND BATTERY INDICATOR
Charge the battery before rst use. To do so, charge the device using the
charger supplied.
Important: Only charge the device with the original charger supplied with
the device by the manufacturer. In case of doubt, loss or malfunction, avoid
charging the device with another charger and get a new one from your retailer.
All information is available via support_uk@yeep.me
Next, check the battery charge level before use, using the battery level indicator (20).
Notice: We recommend you fully recharge the battery after each use and at
least once a month.
WARNING: The device must be unfolded and on its stand for charging to avoid
damaging the charging plug.
1. Remove the charging port cover and ensure there is no water or any other
liquid inside the charging connector, and that it is free of any objects that
could cause a short circuit or prevent the plug from being properly and safely
plugged in. Then, connect one end of the charging cable to the charging port
(13) BEFORE connecting the other end to a power source. BEFORE connecting
the plug to the mains, ensure that the charger is rst connected to the device
correctly by referring to the codes on the device.
11

2. The charger indicator will light up red when charging.
3. The charger indicator will light up green once charging is complete.
4. When charging is complete, disconnect the mains plug from the outlet
rst, then unplug the charger from the device. Finally, close the cover to prevent liquids or other objects from entering the charging connector.
4.4. ADJUSTING THE STEM HEIGHT
Take care not to catch your ngers
when adjusting the stem height.
1. Pull on the clamp lever (6) to loosen the stem. Then slide the stem up or
down to reach the desired position.
When adjusting the stem, make sure that the pin
engages and disengages from the tube.
2. After adjusting the stem height, press the clamp lever (6) to secure the
stem.
Notice: The tension of the clamp lever can be adjusted by tightening or
loosening the two bolts connecting the clamp. Be sure to tighten the clamp
lever to secure the stem.
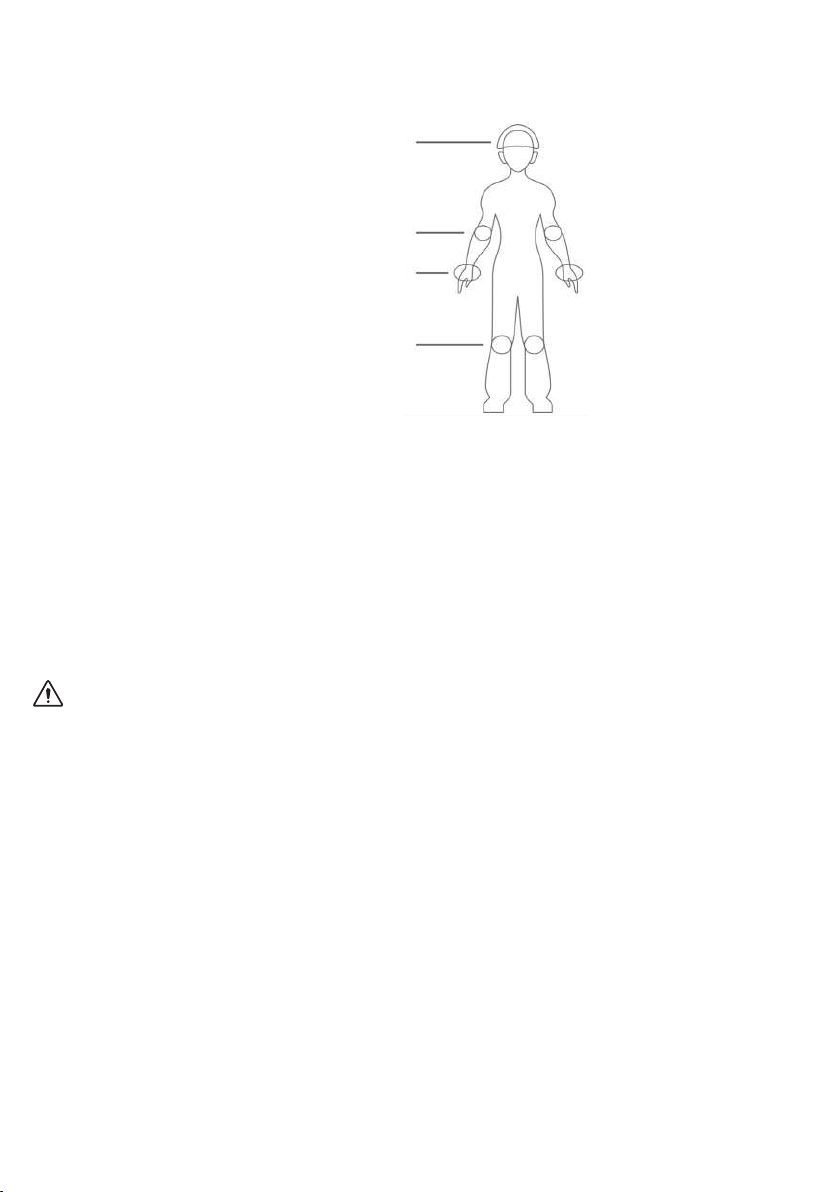
4.5. PREPARATION
It is essential to learn to use the scooter under comfortable conditions:
• Wear a helmet and appropriate protection equipment (knee pads, elbow
pads and wrist guards....).
• Wear flat, comfortable and sturdy shoes.
• Wear thick gloves.
12
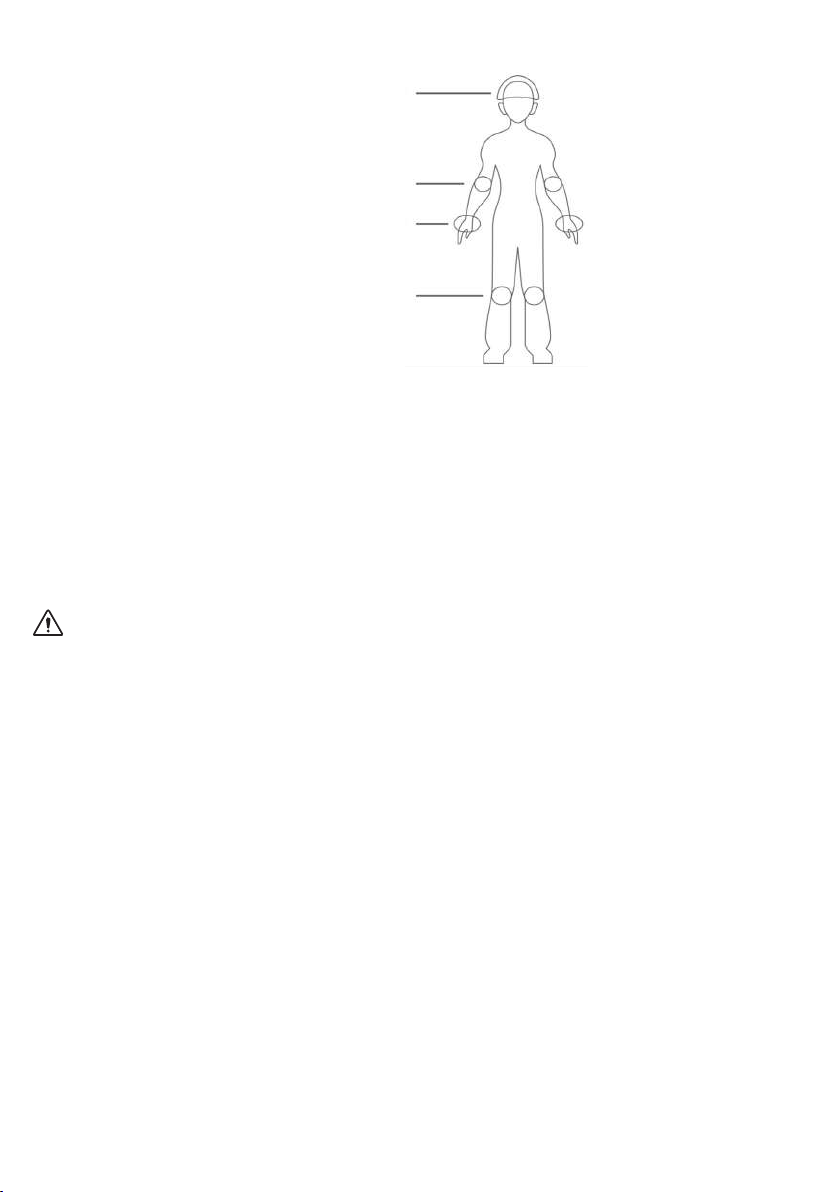
Helmet
Elbow support
Wrist guard
Knee pad
For your own safety, we recommend you use this device in comfortable
conditions, wearing protection equipment such as a helmet and appropriate
protective gear for your joints (knee pads, elbow pads).
For your own safety
as well as that of others, drive the scooter wearing closed and preferably at
shoes to ensure you have a good grip and stability. It is also recommended to
wear gloves.
4.6. HOW TO USE THE DEVICE
(read before rst use)
WARNING: it is absolutely necessary to disconnect the charger from the
device before switching it on or starting it up.
1. Insert the starter key and turn clockwise, then press and hold the ON/OFF
(26) for 3 seconds to start the device.
2. Assisted start: Holding the handlebar with both hands, move forward by
keeping one foot on the platform and pushing with the other foot.
Gradually press the accelerator to start the electrical assistance of the
device.
3. As soon as the electric assistance kicks in, put your other foot on the
platform.
IMPORTANT: The platform is equipped with an anti-slip device, so it is
recommended to check that the traction is adequate before and during any
use. Water, grease, snow, or dirt on the platform or inappropriate shoes may
affect the grip and safety of the device.
4. The device has 3 speed modes. Refer to section “3. Device overview" for
information on what the current speed mode indicators are and how to
change modes.
5. To stop, slowly come to a halt using the brakes: lever(s) or other devices
depending on the model; then, once you have nearly come to a halt, put on
13

foot on the ground to regain your balance. Step off fully once the scooter is
fully stopped.
4.7. SPEED LIMITS
The product is designed to travel at a maximum speed of 25 km/h.
Ensure you are following the usage restrictions of this product in terms of the
road safety norms of the country where you are using it.
4.8. DRIVER WEIGHT
The driver's weight cannot exceed 120 kg.
Note: not respecting this weight limit increases the risk of falling or damaging the product.
5. TECHNICAL SPECIFICATIONS
Battery: LiFePO4 (lithium iron phosphate) 15,000 mAh
48V
Charge time: 7-9 hr
Battery life:
Speed:
Motor:
Charger input-output: 100-240V - 54.6V 2A
Maximum weight supported: 120 kg
Device dimensions: 1180 x 220 x 1250 mm
Device weight:
50 km max*
25 km/h max*
500W rated power
23.4 kg
* Generally speaking, range and speed are given as an indication. These
vary according to the weight of the user and the conditions of use (slope,
outside temperature, humidity, speed and motor load). Specications may
change. These speed and range guidelines do not constitute a contractual
commitment on the part of the retailer or the CIBOX INTERACTIVE company.
6. BATTERY
The capacity of lithium batteries decreases after several charging and
recharging cycles throughout its lifespan. The concept of life cycle exists for
lithium batteries (for example, about 300 on a scooter).This means that from
14

300 COMPLETE cycles of charges and discharges, the battery will begin to
lose its capacity (similar to a smartphone battery).
This partial loss of capacity will not prevent the battery from functioning, but
will alter its performances and especially its operating life.
The device must be used and its battery recharged at least once a month: a
lithium battery will lose its charge even when the product is off. This is why a
battery that has not been charged for several weeks or less could lose some
of its capacity and become impossible to recharge.
In addition, it is possible to recharge a lithium battery after each use because
there is no memory effect.
WARNING: charging the battery must only be done indoors or in a place that
is protected from weather (rain, snow, excessive heat...)
In order to better preserve your device’s battery, here are some reminders
and instructions for use:
• Do not unplug the charger before the battery is fully charged.
• Store the product containing the battery in a cool place (temperature >
0°C), preferably around 15°C. Be careful, as excessive heat will also damage
the battery.
• Avoid deep discharges.
• Avoid recharging the battery right after use. Allow the device to rest for
between 15 minutes and 1 hour after use before charging.
• Avoid overloads. Do not leave the charger plugged in for more than
24 hours, as it will heat up needlessly.
• When the product is not in use, recharge the battery once a month.
Important: If you are not near a charging point when the battery is down to its
last quarter, we recommend switching to eco mode.
Tip: As you drive, the battery level indicator on the display may suddenly
decrease depending on your driving style and conditions (heavy use of the
accelerator, riding uphill, outside temperature below 10°C, etc.). Be aware
that the actual battery level displayed will be most accurate when the device
is turned off.
7. MAINTENANCE AND CLEANING
Your product requires routine inspection and maintenance.
This chapter describes maintenance and operation steps.
Before performing the following operations, make sure that the power is off
and that the charging cable is unplugged.
15

7.1. INSPECTING AND CLEANING YOUR DEVICE
• Regularly check the steering column, head tube, handles and tire wear.
• We recommend that you regularly check that the screws on the front and
rear wheels, the shock absorbers, and the front cover are tight enough
and that you tighten them if needed. These adjustments may be needed
because of vibrations caused by using the device.
• Regularly check the inflation of the rear wheel and inflate with a bicycle
pump or equivalent when required.
Here are some instructions and precautions for cleaning the device:
• Unplug all the device’s charging cables before cleaning it.
• Do not immerse it in water.
• Do not use a high-pressure cleaner, water jet or any other appliance or
washing method that would allow water to seep into the device.
• Clean the device with a sightly damp sponge or a soft cloth, avoiding the
connectors and buttons and making sure water is not allowed to seep into
the plugs, circuits or inside the product.
• Do not use water or liquid cleaners directly on the device to clean it.
• Do not use abrasive products or solvents as these could damage the paint
on your device.
• Be careful when cleaning and wiping plastic parts.
• Do not use abrasive products or solvents to clean metal or plastic parts.
7.2. MAINTAINING YOUR DEVICE
If the product, a component, or the battery are worn out, please contact an
authorised service centre to repair or recycle your product. Tutorials on how
to maintain your device as well as a catalogue of spare parts are available on
the website: https://yeep.me
The device is equipped with bearings. Regularly verify that both wheels are
functioning properly by lifting the device and running the wheels idle. Also
check the steering column regularly and before each use to ensure nothing
prevents it from turning. If you notice a noise, or the unit doesn't run smoothly,
carry out clamping operations if this may improve the issue. Discontinue use
of the device and contact your dealer or support centre for maintenance
repairs if the problem persists.
7.3. STORING YOUR DEVICE
• Fully charge your device before storing it.
• Store your product indoors in a clean and dry place with an ambient
temperature ranging from 0°C to 40°C.
16

8. FAQ
If your device cannot be unlocked:
Check that the unlock button can be moved and is not damaged. Check that
the entire mechanism is clean before attempting to fold/unfold the device
again. If the problem persists, please contact an authorised service centre
for repairs.
Your device does not turn on
Check that the ON/OFF button is not damaged and recharge your device before trying again.
Your device cannot be recharged
Check that the connections of the product and the original charger are not
damaged.
In order to identify whether the charger or the device is faulty, check that the
charge indicator on the charger is on. When the charger is connected to the
mains and to the product, the indicator will be:
• RED (indicates that the device is charging)
• GREEN: indicates that the device is fully charged.
• RED-GREEN: flashing alternatively. This happens when the battery is very
low. Wait 15 minutes while staying nearby. If the indicator turns red, the
device is now charging normally.
If the indicator keeps ashing, that means there is an issue with the charger
or the product (battery, connector...).
If the problem persists, please contact an authorised service centre for
repairs.
17

Error codes:
N° Meaning Action to be taken
2 Brake problem Discontinue use. Consult your retailer or the customer
service at support_uk@yeep.me and provide the
corresponding error code
6 Battery voltage too low Recharge using original charger supplied. If the
problem persists, discontinue use and consult your
dealer or customer service at: support_uk@yeep.me,
quoting the error code
7 Engine problem
8 Accelerator problem
9 Controller problem
10 Loss of internal connection
(data reception)
11 Loss of internal connection
(data transmission)
12 BMS (Battery Management
System) failure
13 Headlight breakdown Consult your dealer or customer service at
Discontinue use. Consult your dealer or the customer
service at support_uk@yeep.me, quoting the error code
support_uk@yeep.me, quoting the error code.
Do not drive at night or in the dark without having
carried out repairs.
If the device is not running smoothly:
This can happen when you overload the engine while the battery is not fully
charged. In such a case, it is necessary to press the accelerator more slowly
and especially to check that the battery is fully charged.
Can the battery be replaced?
Yes, however the device has been designed to have its battery replaced only
by a professional.
18

9. WARRANTY TERMS AND LIMITATIONS OF
LIABILITY
This product is covered by a 24-month warranty (as dened by local laws,
and as attested by the date on the sales receipt). This warranty runs from the
date of purchase and covers any defects in materials or workmanship, but
does not cover damages resulting from improper installation, improper use
or normal wear and tear of the product.
The warranty thus covers: labour, spare parts, the original battery and
functional accessories included in the box.
More specically, the warranty does not cover:
• Damages or problems caused by improper use, an accident, a shock, or any
alteration done to use an electrical connection with improper current or
voltage.
• Modified products, those whose warranty seal or serial number were
damaged, altered, removed or oxidised.
• Battery failure caused by excessive charging or failing to observe safety
guidelines in the user manual.
Any damage or accident caused by not observing the safety guidelines,
information on use, maintenance, cleaning or storage as described in this
manual, as well as not observing local legislation, or damage caused by a
third party cannot be the manufacturer's responsibility.
Reminder: Battery usage intensity has an impact over its lifespan. As such a
battery will lose capacity throughout its lifespan. This partial loss of capacity
will not prevent the battery from functioning, but will alter its performance
and its operating life in particular. It is therefore necessary to use and charge
the product's battery at least once a month. If the battery is left unused and
without charging for several weeks or months it may stop being functional
and become impossible to charge. In this case the battery is no longer under
warranty against manufacturing defects. The battery should equally not be
charged for excessively long periods.
• Cosmetic damage, including scratches, dents, or any other damage.
• Damage caused by servicing by a non-approved person.
• Defects caused by abnormal use or due to the product's normal ageing.
19

• Any product failure due to using with accessories not provided or
recommended by the supplier.
• Products that have oxidised following immersion in water or having been
stored in a damp environment.
• Products that have been repaired or replaced with different components
to those originally furnished.
• Parts with normal wear and tear: tyres, inner tube, brakes, etc.
• Products that do not have a fault or for which the product fault/defect, as
opposed to incorrect use, could not be reproduced.
IMPLEMENTATION MODALITIES
To obtain servicing under warranty, please contact your dealer or follow the
manufacturer returns procedure if needed:
• Have your proof of purchase (receipt, invoices, etc.)
• Have the complete product as well as the accessories and original charger
provided
• And where possible its original packaging.
It is imperative to have the following information on hand: date of purchase,
model and serial number (this information can generally be found on the
product, the packaging, or on your proof of purchase). A warranty card can
be found with the documents provided with your product, stating your serial
number. Please store this safely along with your proof of purchase. The serial
number can also be found on a label (underneath the product).
When processing a warranty claim, your after-sales service may at its
discretion, within the limits of local laws, either:
• Repair and replace faulty parts.
• Exchange the returned product with a product that has at least the same
functions and is equivalent in terms of performance.
In the event of a breakdown, or for any other questions concerning
maintenance, operation, safety, or any other queries concerning your device,
contact our customer support at support_uk@yeep.me
Returns requesting coverage under warranty for a product or situation subject
to a warranty exclusion or a product with no proven faults, or in the instance
that the fault cannot be reproduced, will be subject to an estimate for repair
and/or transport and/or service costs.
20

FR - Service Clients Cibox Interactive
17 allée Jean Baptiste Preux , 94140 ALFORTVILLE.
support_uk@yeep.me
https://yeep.me
yeep.me 100 (2020)
CIBOX INTERACTIVE
17 allée Jean Baptiste preux
94140 ALFORTVILLE
France
Made in China
Produced in 2020
YEEP031-092020-V1.2

TROTTINETTE ELECTRIQUE
yeep.me 100 (2020)
Lisez attentivement ce manuel avant la première utilisation
Notice Originale
AVANT TOUTE PREMIÈRE UTILISATION IL EST RECOMMANDÉ DE VÉRIFIER LA
PRESSION DE VOS PNEUS ET LE TAUX DE CHARGE DE VOTRE APPAREIL


Merci pour votre achat.
Bienvenue dans la communauté des yeeper’s !
Table des matières
1. CONSIGNES DE SÉCURITÉ 25
2. CONTENU DE LA BOITE 29
3. PRESENTATION DE L’APPAREIL 30
4. GUIDE D’UTILISATION DE L’APPAREIL 31
5. DONNÉES TECHNIQUES 35
6. BATTERIE 36
7. ENTRETIEN ET NETTOYAGE 37
8. FAQ 38
9. CONDITIONS DE GARANTIE ET LIMITES DE RESPONSABILITÉ 40
Avant d’utiliser le produit, veuillez lire attentivement les consignes d’utilisation.
Celles-ci vous permettront de comprendre, d’utiliser et d’entretenir correctement ce
produit, et de connaître ses performances et fonctionnalités.
Conservez ce manuel pour toute référence ultérieure. Si vous cédez le produit veillez
à transmettre le manuel avec celui-ci.
24

1. CONSIGNES DE SÉCURITÉ
1. Cet appareil est conçu pour se déplacer de façon individuelle, pour les
adolescents et les adultes.
Cet appareil peut être utilisé par des enfants âgés d’au moins 12 ans et par
des personnes ayant des capacités physiques, sensorielles ou mentales
réduites ou dénuées d’expérience ou de connaissance, s’ils (si elles) sont
correctement surveillé(e)s ou si des instructions relatives à l’utilisation de
l’appareil en toute sécurité leur ont été données et si les risques encourus
ont été appréhendés. Les enfants ne doivent pas jouer avec l’appareil. Le
nettoyage et l’entretien par l’usager ne doivent pas être effectués par des
enfants sans surveillance. Il en va de la responsabilité des parents et convient
de ne jamais laisser un enfant sans surveillance utiliser cet appareil.
Ne pas transporter une autre personne notamment un ou des enfants ni des
biens. Le dépassement de la limite de poids peut être une cause de blessure
et d’endommagement de l‘appareil. Le poids de l’utilisateur ne signie pas
que sa taille peut convenir à garder le contrôle de l’appareil.
2. C’est un appareil de déplacement individuel. Ce n’est donc pas un appareil
conçu pour les compétitions, les sports extrêmes et ne doit jamais être utilisé
dans un skate park. Vous ne devez pas l’utiliser pour monter ou descendre
des escaliers, faire des sauts, franchir des obstacles, réaliser des gures ou
des actes dangereux.
Cet appareil n’est ni jouet ni un accessoire de tness. Ne pas laisser les
enfants jouer avec.
Ce produit n’a pas été conçu pour un usage à des ns professionnels
ou commerciales, telles que : la location, une otte de véhicules, des
déplacements professionnels.
3. Cet appareil doit être utilisé avec prudence sur une surface plane, propre,
sèche, exempte de graviers et de graisse car l’appareil a besoin de friction
entre les roues et le sol pour avancer. Évitez les obstacles, trous, bosses et
les grilles d’égouts pouvant provoquer des accidents. Ralentissez sur les dos
d’âne.
Tenez-vous à distance des autres usagers et respectez les règles de la sécurité
routière. Vous n’êtes pas à l’abri des risques encourus par le comportement
des autres usagers. Anticipez les obstacles et la circulation par une vitesse
25

adaptée. La distance d’arrêt est corrélée à votre vitesse. Evitez les manœuvres
et freinages brusques ; l’appareil peut glisser, perdre l’équilibre, voire tomber,
même sur une surface lisse et plate. Soyez également vigilant à anticiper les
distances de freinages par temps et/ou chaussée humide. Il en va de même
avec les piétons qui pourraient traverser sans vous avoir vu. Vous devez
toujours être très vigilant et rester à l’écart des autres piétons et usagers
sur la voie publique. AVERTISSEMENT ! Ne jamais utiliser le produit hors des
espaces autorisés par la réglementation.
4. Attention ! Cet appareil est conçu pour un usage en extérieur. Il est de votre
responsabilité de connaitre et de respecter les règlementations en vigueur
pour et sur le lieu d’utilisation sur les voies publiques ou privées.
5. Effectuer la période d’apprentissage de l’appareil dans un lieu ouvert et
plat sans trop d’usagers autour de vous, en prenant soin de porter un casque
de protection.
Lorsque vous vous déplacez avec cet appareil, vous devez toujours porter des
chaussures solides et un pantalon. Ne faites pas fonctionner cet appareil si
vous êtes pieds nus ou si vous portez des sandales ouvertes. Évitez de porter
des vêtements trop amples ou munis de cordons ou d’attaches qui pendent,
écharpes etc... qui pourraient être happés par la rotation de la roue pouvant
entraîner des risques d’étouffement, de chute et/ou de collision.
6. Ne pas appuyer sur l’accélérateur si vous marchez en poussant la trottinette
ou veillez à l’avoir éteinte avant.
7. Ne pas rouler sous la pluie, sous la neige, dans des aques d’eau, dans la
boue ou tout autre point humide de plus de 2cm d’eau au sol qui permettrait
à l’eau de s’inltrer à l’intérieur de l’appareil. Pour le nettoyage de votre
appareil, appliquer les consignes de la rubrique 7.1.
Ne pas utiliser cet appareil si la visibilité est mauvaise. Si vous circulez de
nuit ou par temps sombre il est recommandé de porter un vêtement ou
équipement rétro-rééchissant (par exemple un gilet, un brassard, ...). Au-
delà de cette recommandation, vous devez vous référer aux obligations en
vigueur sur le lieu et pays d’utilisation en matière d’équipement.
8. Ne pas utiliser cet appareil si vous êtes sous l’emprise de l’alcool ou de
drogues. Pour votre sécurité, un tel usage est formellement interdit.
26

Ne pas laisser le produit à la portée de quelconque personne pouvant
9.
démarrer le produit sans l’autorisation de l’utilisateur principal ou sans
information et connaissance préalable de ces mesures/consignes de
sécurité et utilisation.
Si vous prêtez cet appareil à quelqu’un, veillez à ce qu’il sache comment
l’utiliser et lui expliquer toutes ces consignes de sécurité. Vous devez lui
rappeler de respecter le code de la route et le port d’un équipement de
sécurité adapté.
An d’empcher une utilisation non autorisée veillez à utiliser le dispositif de
démarrage par clé en retirant la clé entre chaque utilisation an de prévenir
une mise en route ou toute mauvaise manipulation intentionnelles ou non.
10. Cet appareil doit tre éteint avant d’tre pliée et rangé. Pour cela,
consultez la rubrique « Guide d’utilisation de l’appareil » de ce manuel.
11. Veuillez inspecter l’appareil avant chaque utilisation. Si vous remarquez
des pièces desserrées, des alertes de niveau de batterie faible, des pneus
crevés, une usure excessive, des bruits étranges, un mauvais fonctionnement
et tout autre élément anormal, arrêtez immédiatement de rouler avec cet
appareil et demandez l’aide de professionnels.
Si l’appareil est équipé de freins mécaniques, veuillez-vous assurer qu’ils ne
sont pas en frottement par une tension de câbles ou autre problème car cela
entrainerait un ralentissement empêchant l’appareil de rouler normalement.
De plus un échauffement des freins peut altérer leur efcacité.
Assurez-vous que le système de direction est correctement réglé et que tous
les éléments de raccordement et vis sont bien serrés et en bon état avant
chaque utilisation. Si après resserrage des vis, vous constatez qu’il y a un
jeu pouvant altérer une conduite en sécurité, contactez votre revendeur pour
plus d’information ou pour une intervention.
Vérier le bon fonctionnement de tous les dispositifs de sécurité (freinage,
éclairage). Le dispositif du système de pliage doit être bien verrouillé dans sa
position verticale de conduite.
27

12. NE PAS UTILISER L’APPAREIL OU CHARGER LA BATTERIE DANS LES
CIRCONSTANCES SUIVANTES :
• Le produit est endommagé.
• Une odeur et une chaleur anormales se dégagent de la batterie.
• Les commandes de freins, autres dispositifs de freinage ou de sécurité
(éclairages) sont endommagés.
Cessez l’utilisation et ne touchez aucun liquide émanant de l’appareil en cas
de fuite. La batterie de l’appareil ne doit jamais être exposée à une chaleur
excessive.
13. La batterie ne peut pas être remplacée par l’utilisateur. Veuillez consulter le
service aprs-vente de votre revendeur ou la marque pour toute modication/
entretien de l’appareil.
14. La batterie comme les piles doivent être mises au rebut de manière
convenable. En cas d’impossibilité de retourner votre produit auprès
de votre revendeur, placez-les dans des containers prévus à cet effet
(consultez le support de la marque pour plus d’informations) an de protéger
l’environnement.
15. Le nettoyage, l’entretien ou toutes manipulations sur l’appareil ne doivent
pas être effectués par des enfants de moins de 12 ans. Le produit doit être
rangé hors de portée des enfants. Vérier le bon fonctionnement de tous les
dispositifs de sécurité (freinage, éclairage). Le dispositif du système de pliage
doit être bien verrouillé dans sa position de conduite.
16. Toute ouverture de l’appareil ou du produit peut engendrer une modication
à la sécurité pour laquelle la marque ne se porte pas responsable. Il est
important de noter également que cette ouverture annule la garantie dudit
appareil ou produit. Si vous souhaitez malgré tout effectuer les réparations
de votre appareil ou produit, la marque décline toute responsabilité quant à la
abilité de la réparation et des potentiels dommages liés à cette réparation.
Un accident qui pourrait survenir à la suite de cette réparation ne sera en
rien la responsabilité de la marque. En cas de doute ou besoin d’assistance,
veuillez-vous rapprocher d’un revendeur agréé ou du support client de la
marque.
28
Pictogramme Signification
Lisez toujours attentivement la notice d’utilisation.
Le point d’exclamation inscrit dans un triangle équilatéral indique la
présence d’importantes consignes d’utilisation et d’entretien (entretien
et réparation) dans la notice d’utilisation de l’appareil.
Cet appareil ne doit pas entrer en contact avec l’eau. N’entreposez pas
l’appareil dans un endroit humide.
L’éclair éché dans un triangle équilatéral indique la présence d’une «
tension dangereuse » à l’intérieur de l’appareil et d’une valeur sufsante
pour constituer un risque d’électrocution.
Ce symbole indique que cet appareil est muni d’une double isolation
électrique entre la tension (dangereuse) de la source d’alimentation et
les parties accessibles par l’utilisateur.
Attention ! Un équipement de protection comprenant des protections
pour les poignets, des gants, des genouillères, un casque et des
coudières doit être porté.
Les équipements électriques et électroniques doivent être triés et
mis au rebut séparément. Ne jetez pas les équipements électriques et
électroniques avec les déchets ménagers normaux et non triés, mais
rapportez-les dans un centre de tri sélectif.
Ce marquage est utilisé sur la plaque signalétique pour indiquer que
l’équipement fonctionne uniquement sur courant continu ou pour
identier les bornes correspondantes.
Ce marquage est utilisé pour identier le dispositif électronique
comprenant le transformateur et le circuit électronique, qui convertit
l’énergie électrique vers un ou plusieurs connecteurs de sorties.
Ce marquage est utilisé pour identier le dispositif électronique
comprenant le transformateur et le circuit électronique, qui convertit
l’énergie électrique vers un ou plusieurs connecteurs de sorties.
2. CONTENU DE LA BOITE
Ce pack contient :
• Trottinette électrique yeep.me 100
• Outils
• Chargeur secteur d’origine
• Clés de démarrage (2 clés fournies)
• Manuel utilisateur
• Déclaration CE
• Carte de garantie A CONSERVER (elle contient le n° de série de l’appareil et sa date de
fabrication, informations indispensable pour la garantie de l’appareil)
29
3. PRESENTATION DE L’APPAREIL
4
2
5
1
3
(1). Lumière, klaxon et changement de
mode de vitesse
(2). Accélérateur
(3). Clé de démarrage
(4). Écran
(5). Poignée de frein
6
(6). Collier de réglage de guidon
(7). Éclairage LED
(8). Amortisseurs
9
10
7
8
12
23
24
13
14
17
12
15
18 19 20
21
(9). Levier de déverrouillage
(10). Repose pied
(11). Feu stop arrière
11
(12). Freins à disque
(13). Port de charge
16
(14). Levier de sécurité pliage/dépliage
(15). Plateau avec tapis anti dérapant
(16). Béquille
22
25
26
(17). Vitesse instantannée (18). Mode de vitesse 1 (19). Mode de vitesse 2 & 3 (20). Indicateur
niveau de batterie (21). Indicateur type vitesse (22). Indicateur d’activation des feux
(23). Bouton activation feux et clignotant gauche (24). Klaxon (25). Bouton activation LED
rouges et clignotant droit (26). Bouton ON/OFF et mode de vitesse.
• Pour activer ou désactiver les éclairages LED appuyez 3 secondes sur les
boutons situés sur la poignée gauche (23). et sur le bouton sur la poignée
droite (25). pour les bandeaux LED sur les côtés.
• Pour activer les clignotants à gauche appuyez brivement sur le bouton de
la poignée gauche (23). Pour les clignotant à droite appuyez brivement
sur le bouton de la poignée droite (25).
• Le feu de stop (11) n’est actif que lorsque l’éclairage LED (7) est actif.
• Pour allumer/éteindre l’appareil : utilisez la clé de démarrage fournie
avec l’appareil puis maintenez le bouton ON/OFF (26). ,l’appareil s’éteint
automatiquement après 180 secondes d’inactivité.
30

• Pour changer le mode de l’appareil : appuyez brivement sur le bouton ON/
OFF (26).
Il y a 3 modes de vitesse :
• Le mode 1 (icone pièton) (18). limité à 6km/h
• Le mode 2 (icone S jaune) (19). est le mode ECO et est limité 15km/h.
• Le mode 3 (icone S rouge) (19). est le mode Maxi qui est lui limité à 25km/h.
4. GUIDE D’UTILISATION DE L’APPAREIL
4.1. DÉBALLAGE ET MONTAGE DE L’APPAREIL
Pour déballer le produit, il est conseillé de prévoir une surface dégagée et
assez grande pour opérer le déballage et préparation de l’appareil. Sortez
l’appareil de son carton en veillant à ne pas vous blesser ou à endommager
d’autres produits ou le local autour de vous. Faites vous aider d’une personne
si le poids du produit est trop lourd pour vous (le poids est indiqué sur
l’emballage).
Avant d’utiliser le produit, il est nécessaire de procéder au montage des
poignées. Pour cela, procédez au dépliage (voir sections suivantes) puis
vissez les poignées :
Le déballage et le montage doivent être effectués par un adulte.
• Utilisez le marquage sur les poignées pour vous aider, R pour poignée
droite et L pour la poignée gauche.
• Vissez les poignées une par une en étant dans l’axe du guidon. Ne pas visser
et forcer si la poignée est de travers. La poignée doit se visser sans forcer.
• Veillez à bien serrer la poignée lorsqu’elle aura atteint la butée.
4.2. PLIAGE / DÉPLIAGE DE L’APPAREIL
L’appareil peut être plié et déplié aisément grâce au levier de déverrouillage (9)
et le levier de sécurité pliage/dépliage (14). Toutefois, il convient d’effectuer
la manipulation avec précaution pour éviter tout pincement ou coincement.
Dépliage
1. Placez l’appareil horizontalement devant vous.
2. Activez le dépliage du produit en poussant le levier (14).
3. Relevez le montant de l’appareil à 90° environ jusqu’à entendre un léger
cliquetis.
31

4. Relevez et fermez le levier de verrouillage (9) jusqu’à ce qu’il pénètre
entièrement dans la charnière.
5. Si l’appareil est équipé de poignées rabattables, mettez-les en place en les
écartant. Dans le cas contraire, les poignées sont déjà en place.
6. L’opération est alors terminée.
Pliage
1. Placez l’appareil horizontalement devant vous.
2. Seulement si l’appareil est équipé de poignées rabattables, repliez-les sur
les côtés si vous le souhaitez.
3. Déverrouillez l’appareil en abaissant le levier (9).
4. Poussez le levier de pliage (14).
5. Abaissez le montant de l’appareil à 90°.
6. L’opération est alors terminée.
4.3. MISE EN CHARGE ET INDICATEUR DE BATTERIE
Chargez la batterie avant la premire utilisation. Pour cela, veuillez recharger
cet appareil à l’aide du chargeur fourni.
Impératif: Toutes les opérations de charge doivent être impérativement
effectuées avec le chargeur d’origine fourni avec l’appareil. En cas de doute,
de perte ou de non fonctionnement, ne pas charger l’appareil avec un autre
chargeur et il convient de vous en procurer un nouveau auprès de votre
revendeur. Toutes les informations disponibles sur support@yeep.me
Par la suite, vériez le niveau de charge de la batterie avant toute utilisation,
grâce à l’indicateur de niveau de batterie (20).
Remarque : Nous vous recommandons de recharger la batterie après chaque
utilisation et au minimum une fois par mois.
ATTENTION : L’appareil doit être déplié lors de la charge et sur sa béquille
pour ne pas endommager la prise de charge.
1. Retirez le capuchon du port de chargement et veuillez vous assurer que le
connecteur de charge ne contient pas d’eau ou autre liquide, objet pouvant
causer un court circuit ou empcher la prise du chargeur de s’encher
correctement et en toute sécurité. Branchez ensuite l’embout du câble de
chargement au port de chargement (13) AVANT de brancher l’autre embout
à la source d’alimentation. Assurez vous de toujours brancher en premier et
32

correctement le chargeur sur l’appareil en suivant les dispositifs détrompeurs
AVANT de brancher ensuite la prise sur le secteur.
2. Le voyant du chargeur s’allume en rouge pendant le chargement.
3. Le voyant du chargeur s’allume en vert une fois le chargement terminé.
4. Lorsque le chargement est terminé, débranchez dans l’ordre la prise du
secteur en premier, puis débranchez le connecteur du chargeur sur l’appareil.
Enn, refermez bien le bouchon pour empcher la pénétration de liquide ou
autre objet dans le connecteur de charge.
4.4. AJUSTER LA HAUTEUR DE LA POTENCE
Attention à ne pas mettre vos
doigts au moment de régler la
hauteur de la potence pour éviter
tout coincement
1. Tirez sur le levier du collier de serrage (6). pour desserrer la potence.
Faites ensuite glisser la potence vers le haut ou le bas sur la position
souhaitée.
Lors du réglage de la potence, veillez à ce que l’ergot
soit bien enclenché et ressorte du tube.
2. Après avoir réglé la hauteur de la potence, appuyez sur le levier du collier
de serrage (6). pour serrer la potence.
Remarque : La tension du levier du collier de serrage peut être ajustée en
serrant ou en desserrant les deux boulons qui relient celui-ci. Veillez à bien
serrer le levier du collier de serrage pour sécuriser la xation de la potence.
4.5. PRÉPARATION
Il est essentiel d’apprendre dans des conditions confortables:
• Portez un casque et des protections appropriées (genouillres, coudires
protège poignets...).
33
• Portez des chaussures plates confortables et robustes.
• Portez des gants épais.
Casque
Coudière
Protge-poignet
Genouillère
Pour votre sécurité, nous vous recommandons d’utiliser cet appareil dans des
conditions confortables avec un équipement de protection tel qu’un casque et
des protections appropriées pour vos articulations (genouillères, coudières).
Pour pour votre sécurité et celles des autres, vous devez conduire et utiliser
l’appareil en portant des chaussures fermées ; et de préférence plates an
d’avoir une bonne adhérence et stabilité. Il est également recommandé
d’utiliser des gants.
4.6. COMMENT UTILISER L’APPAREIL (à lire avant toute première utilisation)
ATTENTION: il est impératif de débrancher le chargeur de l’appareil avant de
l’allumer ou la démarrer.
1. Insérez la clé de démarrage et tournez-la vers la droite puis appuyez sur le
bouton ON/OFF (26) pendant 3 sec pour allumer l’appareil.
2. Démarrage assisté : En maintenant le guidon à deux mains, avancez en
posant un pied sur le plateau tout en poussant avec le second pied.
Actionnez progressivement l’accélérateur pour démarrer l’assistance
électrique de l’appareil.
3. Dès que l’assistance électrique prend le relai, vous pouvez poser le second
pied sur le plateau.
IMPORTANT : La plateau est équipé d’un dispositif antidérapant, pour autant
il est conseillé de vérier que l’adhérence est bonne avant et pendant toute
utilisation. La présence d’eau, de matières grasses, de neige, terre... sur le
plateau ou les chaussures peuvent générer un manque d’adhérence et altérer
la sécurité.
34

4. L’appareil dispose de 3 modes de vitesses. Référez-vous à la partie
« 3. Présentation de l’appareil » pour voir quels sont les indicateurs du mode
de vitesse actif et comment en changer.
5. Pour s’arrter, freinez progressivement à l’aide des freins : levier(s) ou
autres dispositifs selon modèles ; puis quand vous êtes quasiment à l’arrêt,
posez un pied au sol an de retrouver l’équilibre. Puis descendez entirement
lorsque l’engin est entièrement à l’arrêt.
4.7. LIMITES DE VITESSE
Le produit est conçu pour rouler à une vitesse maximale de 25 km/h.
Veillez cependant à respecter les restrictions d’utilisation de votre produit
conformément aux règles de sécurité routière applicables dans le pays.
4.8. POIDS DU CONDUCTEUR
Le poids du conducteur ne doit pas être supérieur à 120 kg.
A noter : le non-respect de cette limite de poids accroît le risque de chute ou
d’endommagement du produit.
5. DONNÉES TECHNIQUES
Batterie : LiFePO4 (lithium fer phosphate) 15000mAh
48V
Temps de chargement : 7-9h
Autonomie : 50 km max*
Vitesse : 25 km/h max*
Moteur : 500W Nominal
Chargeur Input-output : 100-240V - 54,6V 2A
Poids maximal supporté : 120 Kg
Dimensions de l’appareil : 1180 x 220 x 1250 mm
Poids de l’appareil : 23,4 Kg
* D’une façon générale, l’autonomie et la vitesse sont données à titre indicatif.
Elles varient selon le poids de l’utilisateur et les conditions d’utilisation (pente,
température extérieure, hygrométrie, vitesse et solicitation du moteur). Les
spécications sont susceptibles d’évoluer. Ces indications de vitesse et
d’autonomie ne constituent pas un engagement contractuel de la part du
revendeur ou de la société CIBOX INTERACTIVE.
35

6. BATTERIE
Une batterie au lithium perd de sa capacité au l des cycles de charge et
décharge tout au long de sa durée de vie. La notion de cycle de vie existe
sur les batteries lithium (env. 300 sur une trottinette par exemple). c’est à
dire qu’à partir de 300 cycles COMPLETS de charges et décharges, la batterie
commencera à perdre de sa capacité (exemple du smartphone).
Cette perte de capacité partielle n’empêche pas la batterie de fonctionner
mais altère ses performances et notamment son autonomie.
Il est impératif d’utiliser l’appareil et surtout de recharger au moins une fois
par mois sa batterie : en effet, une batterie au lithium se décharge seule
même lorsque le produit est éteint. C’est pourquoi une batterie sans recharge
pendant plusieurs semaines ou moins pourrait perdre de sa capacité et être
dans l’impossibilité de se recharger.
De plus, Il est possible de recharger une batterie au lithium après chaque
utilisation car il n’y a pas d’effet mémoire.
ATTENTION : la charge de la batterie doit s’effectuer exclusivement en intérieur
ou dans un local à l’abri des intempéries (pluie, neige, chaleur excessive…)
An de préserver au mieux la batterie de votre appareil, quelques rappels et
conseils d’usage :
• Ne débranchez pas le chargeur avant que la batterie soit complètement
chargée.
• Stocker le produit contenant la batterie dans un endroit frais (température
> 0°) la plus proche possible des 15°C. Attention, la chaleur excessive
détériore également la batterie.
• Éviter les décharges profondes.
• Éviter les recharges à chaud. Laisser reposer l’appareil 15 minutes à 1 heure
après utilisation avant de la recharger.
• Eviter les surcharges. Ne pas laisser le chargeur branché plus de 24 heures
car il chauffe inutilement.
• En cas de non utilisation du produit, recharger la batterie 1 fois par mois.
Important : Lorsqu’il ne reste qu’un quart de batterie, si votre trajet pour
rejoindre le lieu de recharge n’est pas proche, nous vous conseillons de
passer en éco-mode
Conseil : Lorsque vous roulez l’indicateur de niveau de batterie sur l’écran peut
diminuer instantanément selon votre mode de conduite (grande sollicitation
de l’accélérateur, trajet sur en côte, température extérieure inférieure à
10°C...). Sachez que le niveau réel de la batterie s’afchera de façon plus juste
quand l’appareil est à l’arrêt.
36

7. ENTRETIEN ET NETTOYAGE
Votre produit demande une inspection et de la maintenance de routine.
Ce chapitre décrit les étapes d’entretien et de fonctionnement.
Avant d’effectuer les opérations suivantes assurez-vous que l’alimentation
est coupée et le câble de charge est débranché.
7.1. INSPECTION ET NETTOYAGE DE VOTRE APPAREIL
• Vérifier régulièrement la colonne, le tube de direction, les poignées et
l’usure des pneus.
• Nous vous recommandons de vérifier régulièrement le serrage des vis
de la roue avant, de la roue arrière, des amortisseurs et du capot et de
resserrer si nécessaire. Les vibrations occasionnées par la conduite de
l’appareil sont à l’origine de ces besoin d’ajustements.
• Vérifier régulièrement le gonflage de la roue arrière et gonfler dès que
nécessaire à l’aide d’une pompe à vélo ou équivalent.
Quelques consignes et précautions pour le nettoyage de l’appareil :
• Débrancher tous les câbles de chargement de l’appareil avant de le
nettoyer.
• Ne l’immerger pas dans l’eau.
• Ne pas utiliser de nettoyeur haute pression, jet d’eau ou tout autre appareil
et méthode de lavage qui permettrait à l’eau de s’infiltrer à l’intérieur de
l’appareil.
• Nettoyer l’appareil avec une éponge légèrement humide ou un chiffon
doux en évitant les connecteurs et les boutons et en veillant à ne pas faire
pénétrer de l’eau sur les prises, circuits ou à l’intérieur du produit.
• Ne pas mettre de l’eau ni des nettoyants liquides directement sur le produit
pour le nettoyage.
• Ne pas utiliser de produits abrasifs ni de solvants qui pourraient
endommager la peinture de votre appareil.
• Soyez prudent(e) lorsque vous nettoyez et essuyez les parties en plastique.
• N’utiliser pas d’abrasifs ou de solvants pour nettoyer les parties en métal
ou plastique.
7.2. MAINTENANCE DE VOTRE APPAREIL
Si le produit, un composant ou la batterie sont usés, veuillez-vous rapprocher
d’un centre agréé pour la réparation ou le recyclage de votre produit. Des
tutoriels d’entretiens de votre appareil ainsi qu’un catalogue en ligne de
pièces détachées sont disponibles sur le site internet : https://yeep.me
37

L’appareil est équipé de roulements. Vériez périodiquement le bon
fonctionnement des roues en soulevant l’appareil et en faisant tourner
à vide les roues. Vériez également le bon fonctionnement de la direction
périodiquement et avant chaque usage pour vous assurer que rien n’empêche
la direction de tourner. Si un bruit apparait, ou un défaut de uidité est visible,
menez les opérations de serrage si cela peut conduite à une amélioration.
N’utilisez plus l’appareil et contactez votre revendeur ou le support si le
problème persiste pour effectuer une réparation d’entretien.
7.3. ENTREPOSER VOTRE APPAREIL
• Recharger complètement votre produit avant de le ranger.
• Ranger votre produit à l’intérieur dans un endroit propre et sec avec une
température ambiante comprise entre 0° et 40°C.
8. FAQ
Si votre appareil ne se déverrouille pas :
Vérier que le bouton de déverrouillage est mobile et qu’il n’est pas endommagé. Vérier que l’ensemble du mécanisme est propre avant toute nouvelle
tentative de pliage/dépliage. Si le problème persiste, veuillez-vous rapprocher d’un centre agréé pour la réparation.
Votre appareil ne s’allume pas
Vérier que le bouton ON/OFF n’est pas endommagé, et rechargez votre appareil avant de faire une nouvelle tentative.
Votre appareil ne se recharge pas
Vérier que la connectique du produit et du chargeur d’origine ne soient pas
endommagées.
An d’identier si c’est le chargeur ou l’appareil qui est en défaut, vériez
que le voyant de charge sur le chargeur est allumé correctement. Lorsque le
chargeur est branché au secteur et au produit, le voyant peut être :
• ROUGE non clignotant (signifie que l’appareil charge)
• VERT : signifie que l’appareil est chargé.
• ROUGE – VERT : clignotant de façon alternative. Cela peut arriver quand
la batterie est très faible. Attendre 15 minutes en restant à proximité. Si le
voyant passe au rouge, c’est que la charge normale a débuté.
Si le voyant reste clignotant c’est qu’il y a un problème de chargeur ou sur le
produit (batterie, connecteur...).
38

Si le problème persiste, veuillez-vous rapprocher d’un centre agréé pour la
réparation.
Codes d’erreurs:
N° Signication Action à mener
2 Problme de frein Ne pas utiliser le produit. Consultez votre revendeur ou
le service client support@yeep.me en indiquant votre
code erreur
6 Tension de batterie trop
basse
7 Problme moteur
8 Problme accélérateur
9 Problme de contrôlleur
10 Perte de liaison interne
(réception de données)
11 Perte de liaison interne
(émission de données)
12 Panne de BMS (Battery
Management System)
13 Panne de phare Consultez votre revendeur ou le service client
Recharger à l’aide du chargeur d’origine fourni.
Si le problème persiste, ne pas utiliser le produit
et consultez votre revendeur ou le service client
support@yeep.me en indiquant le code erreur
Ne pas utiliser le produit. Consultez votre revendeur ou
le service client support@yeep.me en indiquant le code
erreur
support@yeep.me en indiquant le code erreur.
Ne pas rouler de nuit ou dans l’obscurité sans
réparation.
Si l’appareil fonctionne de manière saccadée :
Si vous sollicitez le moteur fortement alors que la batterie n’est pas complètement chargée, cela peut arriver. Il faut soit alors doser plus faiblement
l’accélérateur et surtout vérier que la batterie est bien chargée.
La batterie est-elle remplaçable ?
Oui, mais l’appareil n’est pas conçue pour un changement de la batterie hors
atelier.
39

9. CONDITIONS DE GARANTIE ET LIMITES DE
RESPONSABILITÉ
Ce produit est garanti pour une période de 24 mois (dénie par la législation
locale, période sur le ticket de caisse faisant foi). Cette garantie s’applique
à partir de la date d’achat, contre toute défaillance résultant d’un vice de
fabrication de matériaux et ne couvre pas les dommages résultant d’une
mauvaise installation, une utilisation incorrecte, ou de l’usure normale du
produit.
La garantie couvre ainsi : la main d’œuvre, les pièces détachées, la batterie
d’origine et les accessoires fonctionnels fournis dans l’emballage.
Plus précisément, la garantie ne couvre pas :
• Les dommages ou problèmes causés par une utilisation incorrecte,
un accident, un choc, une altération pour un branchement électrique
d’intensité de tension inappropriée.
• Les produits modifiés, ceux dont le scellé de garantie ou le numéro de série
ont été endommagés, altérés, supprimés ou oxydés.
• La défaillance de la batterie, survenue par un chargement trop long ou par
le non-respect des consignes de sécurité expliquées dans la notice.
Tout dommage ou accident causé par le non respect des consignes de
sécurité, informations sur l’utilisation, l’entretien, nettoyage et entreposage
décrits au présent manuels ainsi qu’au non respect de la législation en
vigueur dans le lieu d’utilisation ou causés par un tiers ne sauraient être de la
responsabilité de l’entreprise du fabricant.
Pour rappel : L’intensité d’usage d’une batterie impacte sa durée de vie.
Ainsi une batterie perdra de sa capacité pendant sa durée de vie qui est
notamment liée au nombre de cycles de charge et décharge. Cette perte de
capacité partielle n’empêche pas la batterie de fonctionner mais altérera
les performances et notamment l’autonomie. Il est impératif d’utiliser son
produit et donc de recharger au moins une fois par mois sa batterie. Une
batterie sans recharge pendant plusieurs semaines ou mois pourrait perdre
son fonctionnement et l’impossibilité de se recharger. La batterie ne serait
plus garantie contre un vice de fabrication dans ce cas de gure. Il ne faut
également pas laisser une batterie en charge trop longtemps.
40

• Les dommages esthétiques, incluant les rayures, bosses ou tout autre
élément.
• Les dommages causés par toutes interventions effectuées par une
personne non-agréée.
• Les défauts causés par une utilisation anormale ou dus au vieillissement
normal du produit.
• Les défaillances du produit dues à l’utilisation sans les accessoires fournis
avec le produit ou homologués par le fabricant.
• Les produits oxydés suite à immersion ou car stockés dans un milieu
humide.
• Les produits réparés ou remplacés avec des composants différents de
ceux d’origine.
• Les pièces pour l’usure normale ou dommages d’utilisation : pneus,
chambre à air, freins, …
• Les produits ne présentant pas de panne ou pour lesquels la panne / défaut
lié au produit et non à l’utilisation ne serait pas reproductible.
MODALITÉS DE MISE EN ŒUVRE
Pour obtenir un service de prise en charge sous garantie, vous tes priés
de contacter votre revendeur ou de suivre la procédure de retour en direct
fabricant le cas échéant :
• Muni de votre preuve d’achat (ticket de caisse, factures, ...)
• Du produit complet avec les accessoires et chargeur initialement fournis
• Et si possible son emballage d’origine.
Il est indispensable d’avoir comme informations : la date d’achat, le
modèle et le numéro de série de l’appareil (Ces informations apparaissent
généralement sur le produit, l’emballage ou votre preuve d’achat). Vous
trouverez dans les documents qui accompagnent votre produit, une carte de
garantie sur laquelle est reporté votre n° de série. Nous vous invitons à la
conserver précieusement avec votre facture d’achat. Le numéro de série se
trouve également sur une étiquette (sous le produit).
Dans le cadre de la demande en garantie, le service après-vente pourra à sa
discrétion, en limite de la législation locale, soit :
• Réparer ou remplacer les pièces défectueuses.
• Échanger le produit retourné avec un produit qui a au moins les mêmes
fonctionnalités et équivalent en termes de performance.
41

En cas de panne ou pour toute question relative à l’entretien, le fonctionnement,
la sécurité ou toute autre demande sur votre appareil ou produit, écrivez à
notre support client : support@yeep.me
Ainsi tout retour, pour demande de prise en charge sous garantie d’un produit
ou situation faisant l’objet d’une exclusion de garantie ou un produit ne
présentant aucune panne avérée ou si la panne n’est pas reproduite, fera
selon le cas l’objet d’un devis pour réparation et/ou de frais liés au transport
et/ou main d’œuvre pour les produits ne présentant aucune panne.
42

FR - Service Clients Cibox Interactive
17 allée Jean Baptiste Preux, 94140 ALFORTVILLE.
support@yeep.me
https://yeep.me
yeep.me 100 (2020)
CIBOX INTERACTIVE
17 allée Jean Baptiste preux
94140 ALFORTVILLE
France
Made in China
Produit en 2020
YEEP031-092020-V1.2

PATINETE ELÉCTRICO
yeep.me 100 (2020)
Lea atentamente este manual antes del primer uso
Manual original
ANTES DE USAR EL PATINETE POR PRIMERA VEZ, SE RECOMIENDA COMPROBAR
LA PRESIÓN DE LOS NEUMÁTICOS Y EL NIVEL DE LA CARGA DE LA BATERÍA.


Gracias por su compra.
¡Le damos la bienvenida a la comunidad yeeper's!
Índice
1. INSTRUCCIONES DE SEGURIDAD 47
2. CONTENIDO DE LA CAJA 51
3. PRESENTACIÓN DEL PATINETE 52
4. GUÍA DE USO DEL PATINETE 53
5. ESPECIFICACIONES TÉCNICAS 57
6. BATERÍA 58
7. LIMPIEZA Y MANTENIMIENTO 59
8. PREGUNTAS FRECUENTES 60
9. CONDICIONES DE GARANTÍA Y LÍMITES DE RESPONSABILIDAD 63
Antes de utilizar el producto, lea atentamente las instrucciones de uso. Le permitirán
comprender, utilizar y mantener de forma correcta el producto y conocer todas sus
características y funcionalidades.
Conserve este manual para futuras consultas. Entregue este manual junto al
patinete si lo cede a alguien.
46

1. INSTRUCCIONES DE SEGURIDAD
1. Este patinete ha sido diseñado para el desplazamiento individual de
adolescentes y adultos.
Este aparato puede ser utilizado por niños a partir de los 12 años y personas
con alguna discapacidad física, sensorial o mental, o sin experiencia ni
conocimientos, siempre que estén vigilados debidamente, hayan recibido las
instrucciones adecuadas y sean conscientes de los peligros inherentes. Los
niños no deben jugar con el aparato. La limpieza y el mantenimiento no deben
estar a cargo de niños sin la debida supervisión. La responsabilidad recae
en los padres y nunca se debe permitir a los niños sin supervisión utilizar el
patinete.
No utilice el patinete para transportar a otras personas ni bienes. Exceder la
carga máxima puede provocar lesiones y daños en el patinete. El peso del
usuario no es indicativo de que su tamaño sea adecuado para mantener el
control del patinete.
2. El patinete está previsto para desplazamientos individuales. Este no es
un patinete diseñado para competiciones ni deportes extremos, por lo que
nunca se debe utilizar en pistas para patinetes. No lo utilice para subir ni bajar
escaleras. Tampoco lo debe usar para realizar saltos, superar obstáculos,
hacer piruetas ni trucos peligrosos.
Este patinete no es un juguete ni un accesorio gimnástico. No permita que los
niños jueguen con él.
Este patinete no ha sido diseñado para nes profesionales ni comerciales,
como pueden ser el alquiler, las otas de vehículos o los desplazamientos
profesionales.
3. Este patinete se debe utilizar con prudencia sobre supercies planas,
limpias, secas y libres de grava y aceite, ya que necesita de la fricción entre
las ruedas y el suelo para avanzar. Evite obstáculos como agujeros, salientes
y las rejillas de las alcantarillas que puedan provocar accidentes. Reduzca la
velocidad en los badenes.
Mantenga la distancia respecto a otros usuarios y respete las normas de
seguridad vial. No está a salvo de los peligros debidos al comportamiento
de otros usuarios. Anticípese a los obstáculos y a la circulación adaptando
47

la velocidad. La distancia de frenado depende de la velocidad. Evite las
maniobras y las frenadas bruscas; el patinete puede resbalar y usted podría
perder el equilibrio e, incluso, caerse, particularmente en supercies lisas
y planas. Además, tenga en cuenta que las distancias de frenado varían en
función del tiempo y/o la humedad de la calzada. Lo mismo puede suceder
con los peatones que se crucen sin haberle visto. Siempre debe prestar
atención y mantener la distancia con los peatones y otros usuarios en la vía
pública. ¡AVISO! Nunca utilice el producto fuera de los espacios autorizados
recogidos en las normativas.
4. ¡Atención! Este patinete está diseñado para su uso en exteriores. Usted es
responsable de conocer y respetar las normas vigentes de uso en las vías
públicas o privadas.
5. Realice el periodo de aprendizaje del patinete en un lugar abierto y plano
y sin muchos usuarios alrededor, llevando el casco de protección en todo
momento.
Cuando se desplace con el patinete, siempre debe llevar zapatos resistentes
y un pantalón. No utilice este patinete con los pies descalzos ni con sandalias
abiertas. Evite llevar ropa demasiado holgada o provista de cordones o
complementos que cuelguen, bufandas, etc., que se puedan pillar con las
ruedas a n de evitar riesgos de asxia, caída y/o colisión.
6. No accione el acelerador mientras vaya caminando y empujando el patinete
o asegúrese de haberlo apagado antes.
7. No circule cuando llueva o nieve. Tampoco lo haga sobre charcos de agua,
sobre el barro ni en ninguna otra zona con un nivel de agua de más de 2 cm,
ya que el agua podría penetrar en el interior del patinete. Para la limpieza del
patinete, siga las instrucciones de la sección 7.1.
No utilice este patinete si la visibilidad es reducida. Si circula de noche o en
entornos oscuros, se recomienda llevar ropa o dispositivos reectantes (p. ej.,
un chaleco, un brazalete, etc.). Además de esta recomendación, debe cumplir
con las obligaciones vigentes en relación con el equipamiento del territorio o
el país donde se encuentre.
8. No utilice este patinete si se encuentra bajo la inuencia del alcohol o las
drogas. Por su seguridad, se prohíbe categóricamente dicho uso.
48

9. No deje el producto al alcance de ninguna persona que pueda arrancarlo sin
el permiso del usuario principal o sin contar previamente con la información ni
los conocimientos concernientes a las medidas e instrucciones de seguridad
y uso.
Si le presta el patinete a alguien, asegúrese de que sepa cómo utilizarlo y
explíquele todas las instrucciones de seguridad. Debe recordarle que respete
las normas de tráco y lleve equipamiento de seguridad apropiado.
Con el n de impedir un uso no autorizado, asegúrese de utilizar el dispositivo
de arranque por llave y retire la llave después de cada uso para evitar la
puesta en marcha o un uso indebido, ya sea intencionado o no.
10. Debe apagar el patinete antes de plegarlo y guardarlo. Para ello, consulte
la sección "Guía de uso del patinete" de este manual.
11. Asegúrese de inspeccionar el patinete antes de cada uso. Si observa que
hay alguna pieza oja, avisos de nivel de carga baja de la batería, neumáticos
pinchados, un desgaste excesivo, ruidos extraños, un mal funcionamiento o
cualquier otra anomalía, detenga el patinete inmediatamente y solicite la
ayuda de un profesional.
Si el patinete cuenta con frenos mecánicos, asegúrese de que no existan
roces como consecuencia de la tensión de los cables ni ningún otro problema,
ya que ello conllevaría una disminución de la velocidad e impediría que el
patinete rodara con normalidad. Además, el recalentamiento de los frenos
puede alterar su ecacia.
Asegúrese de que el sistema de dirección esté bien regulado y que todos los
elementos de conexión y los tornillos estén bien apretados y en buen estado
antes de cada uso. Si después de apretar los tornillos, nota que existe alguna
holgura que pueda alterar una conducción segura, póngase en contacto con
su distribuidor para obtener más información o proceder a una reparación.
Compruebe el buen funcionamiento de todos los dispositivos de seguridad
(frenado e iluminación). El dispositivo del sistema de plegado debe estar bien
bloqueado en su posición vertical de conducción.
49

12. NO UTILICE EL PATINETE NI CARGUE LA BATERÍA EN LAS SIGUIENTES
CIRCUNSTANCIAS:
• El producto está dañado.
• La batería desprende un olor anómalo y se sobrecalienta.
• Los mandos de los frenos y otros dispositivos de frenado o seguridad
(iluminación) están dañados.
Cese el uso y no toque ningún líquido que pueda salir del patinete en caso de
fuga. Nunca exponga la batería del patinete a un calor excesivo.
13. El usuario no debe reemplazar la batería. Consulte con el servicio posventa
de su distribuidor o con el fabricante antes de realizar cualquier modicación
o mantenimiento del patinete.
14. Tanto la batería como las pilas se deben eliminar debidamente. En caso
de que no pueda devolvérselas al distribuidor, llévelas a los contenedores
previstos a tal efecto con vistas a proteger el medioambiente (consulte con
el fabricante para obtener más información).
15. Los niños menores de 12 años no deben realizar la limpieza, el
mantenimiento ni ninguna otra manipulación similar. El producto se debe
guardar fuera del alcance de los niños. Compruebe el buen funcionamiento de
todos los dispositivos de seguridad (frenado e iluminación). El dispositivo del
sistema de plegado debe estar bien bloqueado en su posición de conducción.
16. La apertura del patinete puede dar lugar a modicaciones en cuanto a la
seguridad de las que el fabricante no se hará responsable. Además, tenga
en cuenta que la apertura del patinete anula su garantía. Si, a pesar de
todo, desea llevar a cabo una reparación del patinete, el fabricante rechaza
cualquier tipo de responsabilidad respecto a la reparación y a los posibles
daños como consecuencia de dicha reparación. Cualquier accidente que
se pueda producir como consecuencia de dichas reparaciones no será
en absoluto responsabilidad del fabricante. En caso de duda o si necesita
ayuda, consulte con su distribuidor autorizado o con el Servicio de Atención
al Cliente del fabricante.
50

Pictograma Signicado
Lea atentamente el manual de instrucciones.
El signo de exclamación en el interior de un triángulo equilátero indica
la presencia de instrucciones de uso y mantenimiento importantes
(mantenimiento y reparación) en el manual de instrucciones del patinete.
El patinete no debe entrar en contacto con el agua. No almacene el
patinete en lugares húmedos.
El rayo con punta de echa dentro de un triángulo equilátero indica
la presencia de una "tensión peligrosa" en el interior del patinete y
de un valor lo sucientemente alto como para entrañar un peligro de
electrocución.
Este símbolo indica que el patinete está provisto de un doble aislamiento
eléctrico entre la tensión (peligrosa) de la fuente de alimentación y las
partes a las que el usuario tiene acceso.
¡Atención! Se debe llevar un equipo de protección conformado por
muñequeras, guantes, rodilleras, casco y coderas.
Los equipos eléctricos y electrónicos se deben clasicar y desechar de
forma separada. No tire los equipos eléctricos y electrónicos junto a
los desechos domésticos comunes y sin clasicar; llévelos a un centro
de reciclaje.
Este símbolo en la placa de características se usa para indicar que el
equipo funciona únicamente con corriente continua o para identicar
los bornes correspondientes.
Este símbolo identica el dispositivo electrónico —compuesto por
el transformador y el circuito electrónico— que convierte la energía
eléctrica hacia uno o más conectores de salida.
Este símbolo identica el dispositivo electrónico que comprende
el transformador y el circuito electrónico, que convierte la energía
eléctrica hacia uno o más conectores de salida.
2. CONTENIDO DE LA CAJA
Este paquete contiene:
• Patinete eléctrico yeep.me 100
• Herramientas
• Un cargador conectable a la red eléctrica
• Llaves de arranque (2 llaves suministradas)
• Manual de usuario
• Declaración CE de conformidad
• CONSERVE
fabricación, datos indispensables para la garantía del patinete)
el certificado de garantía (contiene el n.° de serie del patinete y su fecha de
51

3. PRESENTACIÓN DEL PATINETE
4
2
5
1
3
(1). Luz, claxon y cambio de modo de
velocidad.
(2). Acelerador
(3). Llave de arranque
(4). Pantalla
(5). Palanca de freno
6
(6). Abrazadera de ajuste del manillar
(7). Iluminación led
(8). Amortiguadores
9
10
7
8
12
13
14
12
15
(9). Palanca de desbloqueo
(10). Reposapiés
(11). Luz de parada trasera
11
(12). Frenos de disco
(13). Puerto de carga
16
(14). Palanca de plegado/despliegue
(15). Plataforma con alfombrilla anti-
deslizante
(16). Pata de cabra
23
17
24
18 19 20
21
22
25
26
(17). Velocidad instantánea (18). Modo de velocidad 1 (19). Modos de velocidad 2 y 3
(20). Indicador de nivel de batería (21). Indicador de tipo de velocidad (22). Indicador de
activación de las luces
(23). Botón de activación de las luces y del intermitente izquierdo (24). Claxon (25). Botón de
activación de los ledes rojos y del intermitente derecho (26). Botón de encendido y apagado, y
de cambio de modo de velocidad.
• Para activar o desactivar las luces led, mantenga pulsados durante
3 segundos los botones situados en la manilla izquierda (23) y el botón
situado en la manilla derecha (25) (para las bandas led a los lados).
• Para activar los intermitentes de la izquierda, pulse el botón de la manilla
izquierda (23). Para activar los intermitentes de la derecha, pulse el botón
de la manilla derecha (25).
• La luz de parada (11) solo se activa si la luz led (7) se activa.
52

• Para encender/apagar el patinete, utilice la llave de arranque suministrada
con el aparato y, seguidamente, pulse el botón de encendido y apagado
(26). El patinete se apaga automáticamente después de 180 segundos de
inactividad.
• Para alternar entre los diferentes modos del patinete, pulse el botón de
encendido y apagado (26).
Hay 3 modos de velocidad:
• El modo 1 (icono de peatón) (18) limitado à 6 km/h.
• El modo 2 (icono de una S amarilla [19]) es el modo económico («ECO») y
limita la velocidad a 15 km/h.
• El modo 3 (icono de una S roja [19]) es el modo de velocidad máxima
(«Maxi») y limita la velocidad a 25 km/h.
4. GUÍA DE USO DEL PATINETE
4.1. DESEMBALAJE Y MONTAJE DEL PATINETE
Para desembalar el patinete, se aconseja hacerlo en una supercie despejada
y lo sucientemente grande para su preparación. Saque el patinete de la caja
teniendo cuidado de no lesionarse, dañar otros productos ni ocasionar daños
en el lugar en el que usted se encuentre. Pídale a otra persona que le ayude si
el patinete es demasiado pesado para usted (el peso se indica en el embalaje).
Realice el montaje de las manillas antes de utilizar el patinete. Para ello,
proceda al despliegue (consulte las secciones siguientes) y, seguidamente,
enrosque las manillas:
El desembalaje y el montaje deben estar a cargo de un adulto.
• Utilice las marcas sobre las manillas para identificarlas: R corresponde a
la manilla derecha y L corresponde a la manilla izquierda.
• Una vez colocadas en el eje del manillar, apriete las manillas, una a una. No
atornille ni fuerce la manilla si está torcida. Las manillas se deben apretar
sin forzarlas.
• Asegúrese de apretar bien las manillas cuando hayan alcanzado el tope.
4.2. PLEGADO/DESPLIEGUE DEL APARATO
El aparato se puede plegar y desplegar fácilmente gracias a la palanca de
desbloqueo (9) y a la palanca de seguridad de plegado/despliegue (14). No
obstante, conviene efectuar la manipulación con precaución para evitar
pillarse los dedos.
53

Despliegue
1. Coloque el patinete de forma horizontal delante de usted.
2. Para desplegar el producto, empuje la palanca (14).
3. Levante el soporte del patinete a 90° aproximadamente hasta que oiga un
leve sonido.
4. Levante y cierre la palanca de bloqueo (9) hasta que entre completamente
en la bisagra.
5. Si el patinete está equipado con manillas retráctiles, fíjelas en su sitio
abriéndolas. En caso contrario, las manillas ya estarían en su lugar.
6. El procedimiento ha nalizado.
Plegado
1. Coloque el patinete de forma horizontal delante de usted.
2. Solo si el patinete está equipado con manillas retráctiles, pliéguelas a los
lados si así lo desea.
3. Desbloquee el patinete bajando la palanca (9).
Empuje la palanca de plegado (14).
4.
5. Baje el soporte del patinete a 90°.
6. El procedimiento ha nalizado.
4.3. CARGA E INDICADOR DEL NIVEL DE CARGA DE LA BATERÍA
Cargue la batería antes del primer uso. Para ello, asegúrese de cargar el
patinete mediante el cargador suministrado.
Importante: todas las cargas se deben realizar obligatoriamente con el
cargador original suministrado con el patinete. En caso de duda, de pérdida
o del mal funcionamiento, no cargue el patinete con otro cargador y diríjase
a su distribuidor para conseguir uno nuevo. Puede escribir a la dirección de
correo electrónico support_sp@yeep.me para solicitar toda la información.
Posteriormente, compruebe el nivel de carga de la batería antes de cada uso,
mediante el indicador del nivel de carga de la batería (20).
Observación: le recomendamos recargar la batería después de cada uso y
una vez al mes como mínimo.
ATENCIÓN: durante la carga, el patinete debe estar plegado y sobre su caballete para no dañar la toma de carga.
54

1. Retire la tapa del puerto de carga y asegúrese de que el conector de carga
no contenga agua ni otros líquidos, lo que podría provocar un cortocircuito o
impedir que el enchufe del cargador se conecte correctamente y con total
seguridad. A continuación, enchufe el conector delcable de carga al puerto
de carga (13) ANTES de enchufar el otro conector a la fuente de alimentación.
siempre asegúrese de conectar primera y correctamente el cargador en el
patinete según los dispositivos de posicionamiento, ANTES de conectar el
enchufe a la red eléctrica.
2. El piloto del cargador se iluminará de color rojo durante la carga.
3. El piloto del cargador se iluminará de color verde una vez que la carga haya
nalizado.
4. Cuando la carga haya nalizado, desconecte primeramente el enchufe de
la red eléctrica y, a continuación, desconecte el conector del cargador del
patinete. Finalmente, vuelva a cerrar bien la tapa para impedir la entrada de
líquido u otros objetos en el conector de carga.
4.4. AJUSTE DE LA ALTURA DEL EJE DEL MANILLAR
Tenga cuidado de no pillarse los
dedos durante el ajuste de la
altura del eje del manillar.
1. Tire de la palanca de la abrazadera para tubos (6), de manera de bajar el eje
del manillar. A continuación, deslice el eje del manillar hacia arriba o hacia
abajo hasta encontrar la posición deseada.
Mientras ajuste la potencia, asegúrese de que la
pestaña esté bien enganchada y salga del tubo.
2. Después de haber ajustado la altura del eje del manillar, presione sobre la
palanca de la abrazadera para tubos (6) para asegurarlo.
55

Observación: La tensión de la palanca de la abrazadera para tubos se puede
regular apretando o aojando los dos pernos que la unen. Asegúrese de
apretar debidamente la palanca de la abrazadera para tubos, de manera de
asegurar la jación del eje del manillar.
4.5. PREPARACIÓN
Es muy importante aprender en condiciones favorables:
• Lleve casco y protecciones adecuadas (rodilleras, coderas, muñequeras...).
• Lleve zapatos planos cómodos y resistentes.
• Lleve guantes gruesos.
Casco
Codera
Muñequera
Rodillera
Por su seguridad, le recomendamos utilizar este patinete en condiciones
favorables y con equipamiento de protección, a saber: casco y protecciones
adecuadas para las articulaciones (rodilleras y coderas). Por su seguridad
y la de los demás, cuando circule y utilice el patinete, debe llevar zapatos
cerrados y, preferiblemente, planos para conseguir una buena adherencia y
estabilidad. También se recomienda llevar guantes.
4.6. CÓMO UTILIZAR EL APARATO (lea antes del primer uso)
ATENCIÓN: es muy importante desconectar el cargador del patinete antes de
encenderlo o arrancarlo.
1. Inserte la llave de arranque y gírela a la derecha y, seguidamente, pulse
el botón de encendido y apagado (26) durante 3 segundos para encender el
patinete.
2. Arranque asistido: sujetando el manillar con las dos manos y con un pie
sobre la plataforma, utilice el otro pie para impulsarse y avanzar.
Accione gradualmente el acelerador para iniciar el accionamiento asistido
eléctricamente del patinete.
56

3. Puede colocar el segundo pie sobre la plataforma una vez puesto en
marcha el sistema de desplazamiento asistido eléctricamente.
IMPORTANTE: la plataforma cuenta con una supercie antideslizante;
no obstante, se recomienda comprobar que tenga una buena adherencia
antes y durante cada uso. La presencia de agua, aceite, nieve, arena, etc.
en la plataforma o en los zapatos puede reducir la adherencia y afectar a la
seguridad.
4. El aparato cuenta con 3 modos de velocidad. Consulte la sección 3.
(«Presentación del aparato») para conocer los distintos indicadores del modo
de velocidad activo y cómo alternar entre ellos.
5. Para detenerse, frene progresivamente con la ayuda de los frenos (palan-
cas u otros dispositivos según el modelo) y, seguidamente, cuando casi se
haya detenido, coloque un pie sobre el suelo para mantener el equilibrio. A
continuación, descienda completamente cuando el motor se haya parado.
4.7. LÍMITES DE VELOCIDAD
El producto está diseñado para rodar a una velocidad máxima de 25 km/h.
No obstante, asegúrese de respetar las restricciones de uso del producto según las normas de seguridad vial vigentes en el país donde circule con el
patinete.
4.8. PESO DEL CONDUCTOR
El peso del conductor no debe superar los 120 kg.
Observación: no respetar este límite de peso aumenta el riesgo de caída o
daños en el producto.
5. ESPECIFICACIONES TÉCNICAS
Batería: LiFePO4 (litio-ferrofosfato), 15 000 mAh y 48 V
Tiempo de carga: 7-9 h
Autonomía:
Velocidad:
Motor:
Entrada/salida del cargador: 100-240 V/54,6 V y 2 A
Carga máxima: 120 kg
Dimensiones del patinete: 1180 x 220 x 1250 mm
Peso del patinete:
50 km, máx.*
25 km/h, máx.*
500 W (nominal)
23,4 kg
57

* La autonomía y la velocidad se ofrecen con nes ilustrativos. Varían según
el peso del usuario y las condiciones de uso (pendiente, temperatura exterior,
humedad del aire, velocidad y el esfuerzo al que se somete el motor). Las
especicaciones están sujetas a cambios. Estas indicaciones de velocidad
y autonomía no constituyen ningún compromiso contractual por parte del
distribuidor ni de la empresa CIBOX INTERACTIVE.
6. BATERÍA
Las baterías de iones de litio van perdiendo capacidad a lo largo de su vida
útil con los ciclos de carga y descarga. La vida útil de las baterías de litio se
mide por ciclos (aprox. 300 para un patinete, por ejemplo). Esto quiere decir
que, a partir de los 300 ciclos COMPLETOS de carga y descarga, la batería
comenzará a perder su capacidad (como en los teléfonos móviles).
Esta pérdida de capacidad parcial no impide que la batería funcione, pero
afecta de forma notable a su rendimiento y autonomía.
Es muy importante utilizar el patinete regularmente y, sobre todo, recargar
la batería al menos una vez al mes, ya que las baterías de litio se descargan
solas incluso cuando no se utilizan. Por eso, si la batería no se recarga durante
varias semanas o meses, podría perder su capacidad y luego resultar incluso
imposible recargarla.
Además, las baterías de litio se pueden recargar después de cada uso porque
no tienen efecto memoria.
ATENCIÓN: La carga de la batería se debe realizar únicamente en interiores o
en lugares al abrigo de la intemperie (lluvia, nieve, calor excesivo, etc.).
A continuación, encontrará algunos consejos de uso para una mejor
preservación de la batería del patinete:
• No desconecte el cargador antes de que la batería se haya cargado
completamente.
• Almacene el patinete con la batería en un lugar fresco (temperatura > 0 °C),
idealmente a una temperatura lo más próxima a los 15 °C. Atención: el calor
excesivo también deteriora la batería.
• Evite las descargas completas.
• Evite las recargas a alta temperatura. Deje descansar el patinete entre
15 minutos y 1 hora después de su uso antes de recargarlo.
• Evite las sobrecargas. No deje el cargador conectado más de 24 horas para
evitar que se caliente innecesariamente.
• En caso de que no utilice el producto, recargue la batería 1 vez al mes.
58

Importante: cuando quede un cuarto de carga de batería y si se encuentra
lejos del punto de carga, le aconsejamos pasar al modo económico.
Consejo: mientras conduce, el indicador del nivel de la batería en la pantalla
puede disminuir instantáneamente según el modo de conducción (uso
excesivo del acelerador, recorrido en pendiente, temperatura exterior inferior
a los 10 °C, etc.). Tenga en cuenta que el nivel real de la batería se visualizará
mejor cuando el patinete se haya detenido.
7. LIMPIEZA Y MANTENIMIENTO
El producto exige inspecciones y mantenimientos regulares.
En este capítulo, se describen los procedimientos de mantenimiento y
funcionamiento.
Antes de realizar las operaciones siguientes, asegúrese de haber cortado la
alimentación y de haber desconectado el cable de carga.
7.1. INSPECCIÓN Y LIMPIEZA DEL APARATO
• Compruebe regularmente el eje del manillar, el manillar, las manillas y el
desgaste de los neumáticos.
• Le recomendamos comprobar regularmente la fijación de los tornillos de
las ruedas delantera y trasera; de los amortiguadores, y de la cubierta, y
apretarlos si fuera necesario. Las vibraciones que se producen al conducir
el patinete hacen que sea necesario realizar estos ajustes.
• Compruebe regularmente la presión de la rueda trasera e ínflela cuando
sea necesario mediante una bomba de bicicleta o una equivalente.
Instrucciones y precauciones para la limpieza del patinete:
• Desconecte todos los cables de carga del patinete antes de limpiarlo.
• No lo sumerja en agua.
• No utilice limpiadores de alta presión, chorros de agua ni ningún otro
aparato o método de lavado mediante el cual el agua pueda penetrar en el
interior del patinete.
• Limpie el patinete con una esponja levemente humedecida o un paño
suave, evitando los conectores y los botones, y prestando atención a que el
agua no penetre en las tomas, circuitos ni en su interior.
• No utilice agua ni productos de limpieza líquidos directamente sobre el
producto para su limpieza.
• No utilice productos abrasivos ni solventes que puedan dañar la pintura
del patinete.
• Tenga cuidado al limpiar y secar las partes plásticas.
59

• No utilice productos abrasivos ni solventes para limpiar las partes
metálicas o plásticas.
7.2. MANTENIMIENTO DEL APARATO
Si el producto, algún componente o la batería están desgastados, llévelos
a un centro autorizado para su reparación o reciclaje. Hay tutoriales de
mantenimiento del patinete disponibles, así como un catálogo en línea de
recambios en el sitio de internet https://yeep.me
El patinete cuenta con rodamientos. Compruebe de forma periódica el buen
funcionamiento de las ruedas levantando el patinete y haciéndolas girar.
Igualmente compruebe el buen funcionamiento de la dirección de forma
regular y antes de cada uso, y asegúrese de que nada impida que la dirección
gire. Si percibe algún ruido u observa algún defecto en el movimiento, realice
los ajustes necesarios. Si el problema persiste, no utilice el patinete y póngase
en contacto con su distribuidor o el servicio posventa para su reparación.
7.3. ALMACENAMIENTO DEL PATINETE
• Recargue completamente el producto antes de guardarlo.
• Guarde el producto en un espacio interior, en un lugar limpio y seco con
una temperatura ambiente comprendida entre los 0 °C y los 40 °C.
8. PREGUNTAS FRECUENTES
Si el patinete no se desbloquea:
Compruebe la movilidad del botón de desbloqueo y asegúrese de que no
esté dañado. Compruebe que el conjunto del mecanismo esté limpio antes
de cualquier nuevo intento de plegado/desplegado. Si el problema persiste,
acuda a un centro autorizado para su reparación.
El patinete no se enciende
Compruebe que el botón de ENCENDIDO/APAGADO no esté dañado y recargue el patinete antes de volver a intentarlo.
El patinete no se recarga
Compruebe que los conectores eléctricos del producto y el cargador original
estén en buen estado.
Para saber si el problema se debe al cargador o al patinete, compruebe
que el piloto de carga del cargador esté correctamente encendido. Cuando
60

el cargador esté conectado a la red eléctrica y al producto, el piloto puede
iluminarse de color:
• ROJO (sin parpadear): significa que el patinete se está cargando.
• VERDE: significa que el patinete está cargado.
• ROJO-VERDE: parpadeando alternativamente. Puede suceder si la carga de
la batería está muy baja. Espere 15 minutos y manténgase cerca. La carga
norma comienza cuando el piloto se ilumina de color rojo.
Si el piloto sigue parpadeando, quiere decir que hay algún problema con el
cargador o el producto (batería, conector, etc.).
Si el problema persiste, acuda a un centro autorizado para su reparación.
Códigos de error:
N.º Signicado Solución
2 Problema de frenos No utilice el producto. Consulte con su
distribuidor o el Servicio de Atención al Cliente
(support_sp@yeep.me) e indique el código de error.
6 Tensión de la batería
demasiado baja
7 Problema en el motor
8 Problema del acelerador
9 Problema del controlador
10 Pérdida de la conexión interna
(recepción de información)
11 Pérdida de la conexión interna
(envío de información)
12 Avería del sistema de gestión
de la batería (BMS, por sus
siglas en inglés).
13 Avería del faro Consulte con su distribuidor o con el Servicio de
Recargue mediante el cargador original provisto.
Si el problema continúa, no utilice el patinete
y consulte con su distribuidor o el Servicio de
Atención al Cliente enviando un mensaje de correo
electrónico (indicando el código de error) a la
dirección support_sp@yeep.me.
No utilice el producto. Consulte con su distribuidor
o con el Servicio de Atención al Cliente enviando un
mensaje de correo electrónico (indicando el código
de error) a la dirección support_sp@yeep.me.
Atención al Cliente enviando un mensaje de correo
electrónico (indicando el código de error) a la
dirección support_sp@yeep.me.
No circule de noche ni en la oscuridad con el faro
averiado.
61

Si observa sacudidas durante el funcionamiento del patinete:
Puede suceder si le exige demasiado al motor cuando la batería no está
completamente cargada. Entonces es necesario reducir la aceleración y,
sobre todo, comprobar que la batería esté bien cargada.
¿La batería es reemplazable?
Sí; no obstante, el patinete ha sido diseñado para que la batería se reemplace
en un taller.
62

9. CONDICIONES DE GARANTÍA Y LÍMITES DE
RESPONSABILIDAD
Este producto está garantizado durante un periodo de 24 meses (denido por
la legislación local, el periodo está marcado en el recibo de compra para dar
fe). La garantía se aplica a partir de la fecha de compra, en caso de defecto
de fabricación de los materiales, y no cubre los daños producidos como
consecuencia de una instalación incorrecta, un uso indebido o el desgaste
normal del producto.
La garantía también cubre la mano de obra, las piezas de recambio, la batería
original y los accesorios funcionales provistos en el embalaje.
Concretamente, la garantía no cubre:
• Los daños o problemas provocados por un uso indebido, accidentes, golpes
y cualquier alteración provocada por una conexión eléctrica de tensión
incorrecta.
• Los productos modificados y aquellos cuyos sellos de garantía o números
de serie se hayan dañado, alterado, eliminado u oxidado.
• Las averías de la batería producidas por cargas demasiado largas o sin
respetar las instrucciones de seguridad anteriormente expuestas.
Cualquier daño o accidente provocado por el incumplimiento de las
instrucciones de seguridad, uso, mantenimiento, limpieza y almacenamiento
descritas en el manual, así como los daños debidos al incumplimiento de
la legislación vigente en el lugar de uso o provocados por terceros no serán
responsabilidad de la empresa fabricante.
Recuerde: la intensidad de uso de la batería afecta a la duración de su vida
útil. Igualmente, la batería irá perdiendo capacidad durante su vida útil, lo
cual está directamente relacionado con el número de ciclos de carga y
descarga. Dicha pérdida de capacidad parcial no impide que la batería pueda
funcionar, pero afecta al rendimiento y, principalmente, a la autonomía. Es
muy importante utilizar el producto y recargar la batería al menos una vez al
mes. Si la batería no se carga durante varias semanas o meses, puede dejar
de funcionar y quizás no se pueda volver a recargar. En dicho caso, la batería
no estaría cubierta por la garantía por defecto de fabricación. Igualmente, no
debe dejar que la batería se cargue durante demasiado tiempo.
63

• Los daños superficiales, incluyendo los rayones, las abolladuras y otros
similares.
• Los daños provocados por la intervención de personas no autorizadas.
• Los defectos provocados por un uso indebido o como consecuencia del
desgaste normal del producto.
• Las averías del patinete debidas a no haber utilizado los accesorios
suministrados con el producto u homologados por el fabricante.
• Los productos oxidados como consecuencia de la inmersión o por su
almacenamiento en lugares húmedos.
• Los productos reparados con recambios no originales.
• Las piezas con desgaste normal o dañadas por el uso (neumáticos, cámara
de aire, frenos, etc.).
• Los productos que no presenten averías o en los que las averías o
los defectos estén ligados al producto (y no a su uso) y que no sean
reproducibles.
MODALIDADES DE INSTRUMENTACIÓN
Para solicitar el servicio de asistencia por garantía, debe ponerse en contacto
con su distribuidor o seguir el proceso de devolución directamente con el
fabricante si fuera necesario:
• Presentación de la prueba de compra (recibo de caja, facturas, etc.).
• El producto al completo, con sus accesorios y el cargador originalmente
suministrado.
• De ser posible, el embalaje original.
Es indispensable contar con los siguientes datos: la fecha de compra, el
modelo y el número de serie del patinete (por lo general, estos datos se
encuentran en el producto, el embalaje o la prueba de compra). Entre los
documentos que acompañan al producto, encontrará un certicado de
garantía en el que aparece el n.º de serie. Le rogamos que lo conserve junto a
la factura de compra. El número de serie también aparece sobre una etiqueta
(en la parte inferior del producto).
Cuando decida hacer uso de la garantía, el servicio posventa podrá a su
discreción y dentro del marco de la legislación local:
• Reparar o reemplazar las piezas defectuosas.
• Cambiar el producto devuelto por otro que tenga al menos las mismas
funcionalidades y sea equivalente en términos de rendimiento.
64

En caso de avería o para cualquier otro asunto relacionado con el
mantenimiento, la seguridad o dudas sobre el patinete, escriba a nuestro
Servicio de Atención al Cliente: support_sp@yeep.me
Así, cualquier devolución por solicitud de asistencia por garantía de un
producto o situación que sea objeto de exclusión de la garantía o la devolución
de un producto que no presente ninguna avería demostrable o que no se
pueda reproducir será objeto, según proceda, de un cargo por reparación y/o
por los gastos relativos al transporte y/o mano de obra en relación con los
productos que no presenten ninguna avería.
65

Servicio de Atención al Cliente de Cibox Interactive, Francia
Allée Jean Baptiste Preux 17, 94140 ALFORTVILLE.
support_sp@yeep.me
https://yeep.me
yeep.me 100 (2020)
CIBOX INTERACTIVE
Allée Jean Baptiste Preux 17
94140 ALFORTVILLE
Francia
Fabricado en China
Producido en 2020
YEEP031-092020-V1.2

MONOPATTINO ELETTRICO
yeep.me 100 (2020)
Leggere attentamente il presente manuale prima di utilizzare il
prodotto per la prima volta.
Manuale di istruzioni originale
PRIMA DEL PRIMO UTILIZZO, SI RACCOMANDA DI VERIFICARE LA PRESSIONE
DEI PNEUMATICI E IL LIVELLO DI CARICA DELL'APPARECCHIO.


Grazie per aver acquistato questo prodotto.
Benvenuti nella community degli yeeper!
Indice
1. NORME DI SICUREZZA 70
2. CONTENUTO DELLA SCATOLA 74
3. DESCRIZIONE DELL’APPARECCHIO 75
4. ISTRUZIONI PER L’USO DELL’APPARECCHIO 76
5. DATI TECNICI 81
6. BATTERIA 81
7. MANUTENZIONE E PULIZIA 82
8. FAQ 84
9. CONDIZIONI DI GARANZIA E LIMITAZIONI DI RESPONSABILITÀ 86
Leggere attentamente le istruzioni per l’uso prima di utilizzare il prodotto. Ciò
vi aiuterà a comprendere, utilizzare e mantenere il prodotto in modo corretto e a
conoscerne le prestazioni e le caratteristiche.
Conservare il presente manuale come riferimento futuro. Se si cede il prodotto a
terzi, si raccomanda di fornire assieme ad esso il presente manuale.
69

1. NORME DI SICUREZZA
1. Questo prodotto è pensato per spostamenti individuali e può essere
utilizzato dai ragazzi e dagli adulti.
Questo apparecchio può essere utilizzato da bambini di età inferiore ai
12 anni e da persone con capacità siche, sensoriali o mentali ridotte o prive
dell’esperienza o delle conoscenze necessarie, purché adeguatamente
sorvegliati o istruiti in merito all’uso sicuro dell'apparecchio e informati sugli
eventuali rischi legati all'uso dello stesso. I bambini non devono giocare
con l'apparecchio. Le operazioni di pulizia e manutenzione di competenza
dell’utente non devono essere eseguite dai bambini senza la sorveglianza di
un adulto. È responsabilità dei genitori non lasciare mai i bambini incustoditi
durante l’uso dell’apparecchio.
Non trasportare altre persone, in particolare bambini, o oggetti. Fare
attenzione a non superare il limite di peso, poiché ciò può causare lesioni
siche o danni all’apparecchio. Il peso del conducente non implica che questo
abbia l’altezza giusta per poter mantenere il controllo dell’apparecchio.
2. Questo apparecchio è pensato per spostamenti individuali. Non è pertanto
progettato per competizioni, sport estremi e non deve mai essere utilizzato
in uno skate park. Non utilizzare l’apparecchio per salire o scendere le scale,
effettuare dei salti, saltare ostacoli, realizzare gure o compiere azioni
pericolose.
L’apparecchio non è un giocattolo, né un accessorio per il tness. Non lasciare
che i bambini giochino con l’apparecchio.
Questo apparecchio non è pensato per un uso professionale o commerciale,
come ad esempio il noleggio, l'inclusione in un parco auto o per trasferte
professionali.
3. Questo apparecchio deve essere utilizzato con prudenza su una supercie
piana, pulita, asciutta e priva di ghiaia e grasso, poiché è necessario garantire
la massima aderenza delle ruote sul terreno per potersi spostare in sicurezza.
Evitare ostacoli, buchi, dislivelli, e tombini, in quanto potrebbero causare
incidenti. Rallentare in prossimità di dossi.
Tenersi a debita distanza dagli altri e rispettare le norme di sicurezza stradale.
Il comportamento degli altri utenti della strada può comportare gravi rischi.
70

Anticipare gli ostacoli e non intralciare la circolazione procedendo ad una
velocità adeguata. Lo spazio di frenata dipende dalla velocità. Evitare manovre
e frenate brusche, poiché l’apparecchio può scivolare, perdere l’equilibro
e cadere anche su una supercie liscia e piana. Fare inoltre attenzione a
prevedere lo spazio di frenata in caso di pioggia e/o strada bagnata. Inoltre,
fare molta attenzione ai pedoni, che potrebbero attraversare la strada senza
vedervi. Essere sempre assolutamente vigili e mantenersi a distanza dai
pedoni e dagli altri utenti della strada. AVVERTENZA! Non utilizzare mai il
prodotto fuori dagli spazi autorizzati ai sensi della normativa vigente.
4. Attenzione! L’apparecchio è pensato unicamente per l’uso in ambienti
esterni. Si raccomanda di acquisire familiarità con e rispettare le norme in
vigore nel luogo di utilizzo e applicabili sulle strade pubbliche e private.
5. Seguire un periodo di prova dell’apparecchio, utilizzandolo in un luogo
aperto e su una supercie regolare, senza troppe persone, facendo attenzione
a indossare un casco di protezione.
Durante gli spostamenti con l’apparecchio, indossare sempre scarpe chiuse
e pantaloni. Non utilizzare l’apparecchio a piedi nudi o se si indossano sandali
aperti. Evitare di indossare vestiti troppo larghi o con cordoni o lacci pendenti,
sciarpe, ecc., poiché potrebbero impigliarsi nelle ruote e comportare il rischio
di soffocamento, caduta e/o collisioni.
6. Non premere sull’acceleratore quando si cammina spingendo il
monopattino, oppure assicurarsi di averlo spento.
7. Non utilizzare l’apparecchio in caso di pioggia o neve, nelle pozzanghere,
nel fango o in altri ambienti umidi con più di 2 cm di acqua a terra, poiché
l’acqua potrebbe penetrare all’interno dell’apparecchio. Per la pulizia
dell’apparecchio, attenersi alle istruzioni fornite nel paragrafo 7.1.
Non utilizzare l’apparecchio in condizioni di scarsa visibilità. Se si circola
durante la notte o al buio, si raccomanda di indossare indumenti o dispositivi
catarifrangenti (ad esempio un gilet o una fascia ad alta visibilità, ecc.). Inoltre,
fare sempre riferimento agli obblighi in materia di dispositivi di sicurezza in
vigore nel luogo e nel paese di utilizzo.
8. Non utilizzare l’apparecchio sotto gli effetti di alcol o droghe. Per tutelare
la vostra sicurezza, è vietato condurre l’apparecchio in simili condizioni.
71

9. Non lasciare l’apparecchio alla portata di chiunque possa avviarlo senza
l’autorizzazione dell’utente principale o senza essere stati informati e aver
acquisito familiarità con le presenti misure/linee guida di sicurezza e di
utilizzo.
Nel caso in cui l’apparecchio venga prestato, assicurarsi che l’utilizzatore
nale in questione sia in grado di utilizzarlo e fornire le informazioni
necessarie in merito alle misure di sicurezza applicabili. Si raccomanda,
inoltre, di fare presente che è importante rispettare il codice della strada e
indossare dispositivi di sicurezza adatti.
Per prevenire l’uso non autorizzato, assicurarsi di utilizzare il dispositivo di
avviamento a chiave rimuovendo la chiave tra un uso e l’altro, per evitare
l’avviamento intenzionale o involontario o la manomissione dell’apparecchio.
10. Si raccomanda di spegnere l’apparecchio prima di chiuderlo e riporlo al
termine di ogni utilizzo. Per fare ciò, fare riferimento al paragrafo "Istruzioni
per l’uso dell’apparecchio" del presente manuale.
11. Ispezionare l’apparecchio prima di ogni utilizzo. Se sono presenti parti
allentate, avvisi di batteria scarica, pneumatici sgon, segni di usura
eccessiva, rumori strani, malfunzionamento o qualsiasi altra condizione
anomala, interrompere immediatamente l’uso dell’apparecchio e rivolgersi
ad un professionista.
Se l’apparecchio è dotato di freni meccanici, assicurarsi che non vi sia uno
sfregamento a causa della tensione dei cavi o di altri problemi, in quanto ciò
causerebbe un rallentamento dell’apparecchio e ne impedirebbe il normale
utilizzo. Inoltre, il surriscaldamento dei freni può comprometterne l’efcienza.
Prima di ogni utilizzo, assicurarsi che il gruppo sterzo sia regolato
correttamente e che tutti gli elementi di collegamento e le viti siano stretti e
in buone condizioni. Se, dopo avere serrato nuovamente le viti, si riscontra un
gioco che può compromettere la sicurezza di guida, contattare il rivenditore
per ulteriori informazioni o per richiedere assistenza.
Vericare il corretto funzionamento di tutti i dispositivi di sicurezza (freni,
luci). Il dispositivo del sistema di chiusura deve essere bloccato in modo
sicuro nella posizione di guida verticale.
72

12. NON UTILIZZARE L’APPARECCHIO O RICARICARE LA BATTERIA NELLE
SEGUENTI CIRCOSTANZE:
• Il prodotto è danneggiato.
• La batteria emette un odore e un calore anomali.
• I comandi dei freni e altri dispositivi di frenata o di sicurezza (luci) sono
danneggiati.
Interrompere l’utilizzo dell’apparecchio e non toccare il liquido che fuoriesce
in caso di perdite. Non esporre la batteria dell’apparecchio ad un calore
eccessivo.
13. La batteria non può essere sostituita dall’utente. Contattare il servizio
assistenza del rivenditore o del fabbricante per eventuali modiche/
riparazioni dell’apparecchio.
14. La batteria, come le altre pile, deve essere smaltita in modo adeguato.
Se non è possibile restituire il prodotto al rivenditore, gettare le batterie
nei contenitori previsti a tale scopo (rivolgersi al servizio assistenza del
fabbricante per ulteriori informazioni) al ne di garantire la protezione
dell’ambiente.
15. La pulizia, la manutenzione e ogni tipo di intervento sull'apparecchio non
devono essere eseguiti da bambini di età inferiore ai 12 anni. Tenere il prodotto
fuori dalla portata dei bambini. Vericare il corretto funzionamento di tutti i
dispositivi di sicurezza (freni, luci). Il dispositivo del sistema di chiusura deve
essere bloccato in modo sicuro nella posizione di guida.
16. L’eventuale apertura dell’apparecchio o del prodotto può alterare le
condizioni di sicurezza e, in questo caso, il fabbricante non sarà in alcun
modo responsabile. Inoltre, è importante notare che l’apertura annulla la
garanzia applicata all’apparecchio o al prodotto. Se tuttavia desiderate
effettuare riparazioni al vostro apparecchio o prodotto, il fabbricante declina
ogni responsabilità per l’afdabilità della riparazione e per eventuali danni
associati a tale riparazione. Qualsiasi incidente che possa vericarsi a seguito
di questa riparazione non sarà in alcun modo responsabilità del fabbricante.
In caso di dubbi o di necessità di assistenza, contattare un rivenditore
autorizzato o l’assistenza clienti del fabbricante.
73

Pittogramma Signicato
Leggere sempre con molta attenzione le istruzioni per l’uso.
Il punto esclamativo all’interno di un triangolo equilatero indica
la presenza di importanti istruzioni per l’uso e la manutenzione
(manutenzione e riparazione) nel manuale di istruzioni dell’apparecchio.
L’apparecchio non deve entrare in contatto con l’acqua. Non riporre
l’apparecchio in un ambiente umido.
Il simbolo del fulmine con la punta a freccia all’interno di un triangolo
equilatero indica la presenza di una "tensione pericolosa" all’interno
dell’apparecchio di entità tale da costituire un rischio di scosse
elettriche.
Questo simbolo indica che l’apparecchio è dotato di un doppio
isolamento elettrico tra l’uscita della tensione (pericolosa) della
sorgente di alimentazione e le parti accessibili dall’utente.
Attenzione! Devono essere indossati dispositivi di protezione, tra cui
protezioni per i polsi, guanti, ginocchiere, casco e gomitiere.
Le apparecchiature elettriche ed elettroniche devono essere raccolte
e smaltite separatamente. Non gettare le apparecchiature elettriche
ed elettroniche con i normali riuti domestici non differenziati, ma
consegnarli presso un centro di raccolta differenziata.
Questo simbolo è riportato sulla targhetta di identicazione per
indicare che l'apparecchio funziona unicamente a corrente continua, o
per identicare i terminali corrispondenti.
Questo simbolo viene utilizzato per identicare un dispositivo
elettronico dotato di trasformatore e circuito elettronico, che
trasferisce l'energia elettrica verso uno o più connettori in uscita.
Questo simbolo viene utilizzato per identicare un dispositivo
elettronico dotato di trasformatore e circuito elettronico, che
trasferisce l'energia elettrica verso uno o più connettori in uscita.
2. CONTENUTO DELLA SCATOLA
La confezione contiene:
• Monopattino elettrico yeep.me 100
• Utensili
• Caricabatteria con adattatore di rete originale
• Chiavi di avviamento (vengono fornite 2 chiavi)
• Manuale dell’utente
• Dichiarazione CE
• Scheda di garanzia DA CONSERVARE (contiene il n. di serie dell’apparecchio, la data di
fabbricazione e le informazioni necessarie per convalidare la garanzia dell’apparecchio).
74

3. DESCRIZIONE DELL’APPARECCHIO
4
2
5
1
3
(1). Luce, clacson e modica della mo-
dalità di velocità
(2). Acceleratore
(3). Chiave di avviamento
(4). DISPLAY
(5). Impugnatura del freno
6
(6). Ghiera di regolazione del manubrio
(7). Luce a LED
(8). Ammortizzatori
(9). Leva di sblocco
9
10
7
8
12
13
14
12
15
(10). Piastra di appoggio per riposare il
piede
(11). Luce dello stop posteriore
11
(12). Freni a disco
(13). Porta di ricarica
16
(14). Leva di sicurezza per chiudere/
aprire il monopattino
(15). Piastra poggiapiedi con fondo
antiscivolo
(16). Cavalletto
23
17
24
18 19 20
21
22
25
26
(17). Velocità istantanea (18). Modalità di velocità 1 (19). Modalità di velocità 2 e 3 (20). Indicatore
di livello della batteria (21). Indicatore della modalità di velocità (22). Indicatore di attivazione
delle luci
(23). Pulsante di attivazione delle luci e dell'indicatore di direzione di sinistra(24). Clacson (25).
Pulsante di attivazione dei LED rossi e dell'indicatore di direzione di destra (26). Pulsante di
accensione/spegnimento e di selezione della modalità di velocità.
• Per attivare o disattivare le luci a LED, premere per 3 secondi i pulsanti
situati sull'impugnatura sinistra (23) e premere il pulsante sull'impugnatura
destra (25). per accendere le bande a LED laterali.
• Per attivare gli indicatori di direzione di sinistra, premere brevemente
il pulsante sull'impugnatura sinistra (23). Per attivare gli indicatori di
direzione di destra, premere brevemente il pulsante sull'impugnatura
destra (25).
75

• La luce dello stop (11) si attiva solo quando la luce a LED (7) è accesa.
• Per accendere/spegnere l'apparecchio, utilizzare la chiave di avviamento
fornita in dotazione, quindi premere il pulsante di accensione/spegnimento
(26). L’apparecchio si spegne automaticamente dopo 180 secondi di
inutilizzo.
• Per modificare la modalità della velocità dell'apparecchio, premere
brevemente il pulsante di accensione/spegnimento (26).
Ci sono 3 modalità di velocità:
• La modalità 1 (icona del pedone) (18), la cui velocità è limitata a 6 km/h.
• La modalità 2 (icona della S gialla) (19) corrisponde alla modalità ECO, la
cui velocità è limitata a 15 km/h.
• La modalità 3 (icona della S rossa) (19) corrisponde alla modalità Maxi, la
cui velocità è limitata a 25 km/h.
4. ISTRUZIONI PER L’USO DELL’APPARECCHIO
4.1. DISIMBALLAGGIO E ASSEMBLAGGIO DELL'APPARECCHIO
Per disimballare il prodotto, si raccomanda di predisporre una supercie libera
e abbastanza grande in modo da poter procedere al disimballaggio e alla
preparazione dell’apparecchio senza impedimenti. Estrarre l’apparecchio dal
cartone, facendo attenzione a non ferirsi o danneggiare altri prodotti o il locale
in cui si opera. Farsi aiutare da un’altra persona se il peso dell’apparecchio è
troppo elevato (il peso è indicato sull’imballaggio).
Prima di utilizzare il prodotto, è necessario procedere al montaggio delle
impugnature. Per fare ciò, aprire il monopattino (vedere le sezioni di seguito
riportate), quindi avvitare le impugnature.
Il disimballaggio e l’assemblaggio devono essere effettuati da un adulto.
• Fare riferimento alle lettere riportate sull’impugnatura per aiutarsi durante
il montaggio: R per la destra e L per la sinistra.
• Avvitare le impugnature una alla volta sull’asse del manubrio. Non avvitare
e non forzare se l’impugnatura non è perfettamente dritta. L’impugnatura
deve potere essere avvitata senza esercitare alcuna forza.
• Stringere bene l’impugnatura fino a fine corsa.
4.2. ISTRUZIONI PER CHIUDERE/APRIRE IL MONOPATTINO
L’apparecchio può essere chiuso e aperto facilmente grazie alla leva di
sblocco (9) e alla leva di sicurezza di chiusura/apertura (14). Tuttavia, si
76

raccomanda di effettuare questa operazione con la massima attenzione per
evitare di rimanere impigliati o di schiacciarsi.
Apertura
1. Posizionare l’apparecchio orizzontalmente davanti a sé.
2. Aprire l'apparecchio spingendo la leva (14).
3. Sollevare il montante dell’apparecchio no a circa 90°, no a sentire un
leggero clic.
4. Sollevare e chiudere la leva di blocco (9), vericando che si inserisca
completamente nella cerniera.
5. Se l’apparecchio è dotato di impugnature pieghevoli, tirarle per metterle
in posizione. In caso contrario, le impugnature non dovranno essere
riposizionate.
6. A questo punto, l’operazione è terminata.
Chiusura
1. Posizionare l’apparecchio orizzontalmente davanti a sé.
2. Solo se l’apparecchio è dotato di impugnature pieghevoli, è possibile
ripiegarle sui lati se lo si desidera.
3. Sbloccare l'apparecchio abbassando la leva (9).
4. Spingere la leva per piegare il monopattino (14).
5. Abbassare il montante dell'apparecchio a 90°.
6. A questo punto, l’operazione è terminata.
4.3. RICARICA E INDICATORE DELLA BATTERIA
Ricaricare la batteria prima di utilizzare l’apparecchio per la prima volta. Per
fare ciò, utilizzare il caricabatteria fornito in dotazione.
Attenzione: tutte le operazioni di ricarica devono essere effettuate
obbligatoriamente con il caricabatteria originale fornito in dotazione con
l’apparecchio. In caso di dubbi, perdita o malfunzionamento, non ricaricare
l’apparecchio con un altro caricabatteria e acquistarne uno nuovo presso il
rivenditore. Per ulteriori informazioni, scrivere a support_it@yeep.me
Successivamente, vericare il livello di carica della batteria prima di ogni
utilizzo, servendosi dell’indicatore di carica della batteria (20).
Nota: si raccomanda di ricaricare la batteria dopo ogni utilizzo e almeno una
volta al mese.
77

ATTENZIONE: l’apparecchio deve essere aperto durante la ricarica e deve
essere posizionato sul cavalletto, per non danneggiare la presa di ricarica.
1. Rimuovere il coperchio della porta di carica e assicurarsi che il connettore
di carica sia privo di acqua o altri liquidi, poiché ciò potrebbe causare un
cortocircuito o impedire il corretto e sicuro inserimento della presa del
caricatore. Successivamente, collegare l'estremità del cavo di carica
alla porta di carica (13)
PRIMA di collegare l'altra estremità alla fonte di
alimentazione. Assicurarsi sempre di collegare per primo e correttamente il
caricabatteria all’apparecchio e i dispositivi di sicurezza,
PRIMA di collegarsi
alla presa della rete elettrica.
2. La spia del caricabatteria si accende di rosso durante la ricarica.
3. La spia del caricabatteria si accende di verde una volta completata la ricarica.
4. Al termine della ricarica, scollegare per prima la spina dalla presa della
rete elettrica e, successivamente, il connettore del caricabatteria collegato
all’apparecchio. Inne, richiudere il coperchio per impedire che liquidi o altri
oggetti penetrino nel connettore di carica.
4.4. REGOLAZIONE DELL'ALTEZZA DELLA STAFFA DI SUPPORTO
Fare attenzione a non schiacciarsi
le dita durante la regolazione
dell'altezza della staffa di
supporto.
1. Tirare la leva della ghiera di serraggio (6) per allentare la staffa di supporto.
A questo punto, far scivolare la staffa di supporto verso l'alto o il basso nella
posizione desiderata.
Durante la regolazione della staffa di supporto,
assicurarsi che il perno si chiuda bene e fuoriesca
dal tubo.
78
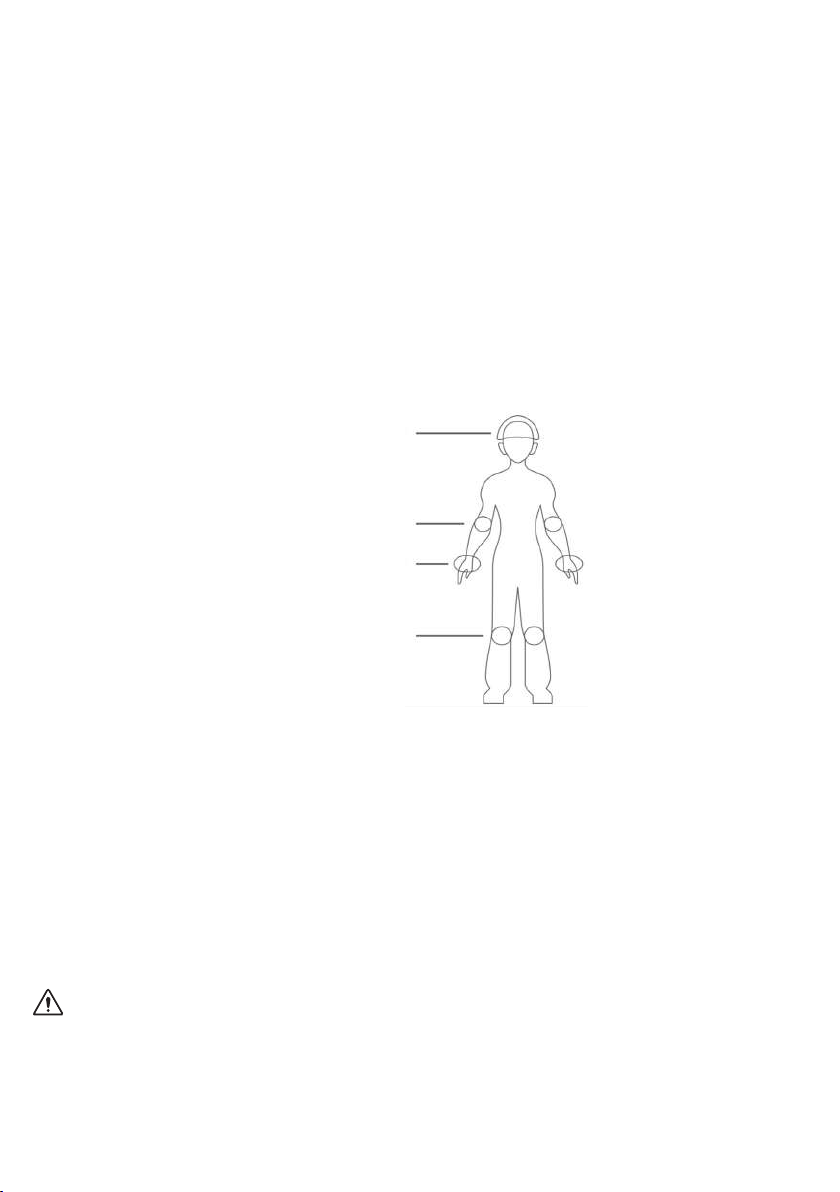
2. Una volta regolata l'altezza della staffa di supporto, spingere la leva della
ghiera di serraggio (6) per bloccare in posizione la staffa di supporto.
Nota: La tensione della leva della ghiera di serraggio può essere regolata
stringendo o allentando i due bulloni situati sulla leva stessa. Fare attenzione
a stringere bene la leva della ghiera di serraggio per garantire la stabilità
della staffa di supporto.
4.5. PREPARAZIONE
È fondamentale imparare ad utilizzare l’apparecchio in condizioni sicure:
• Indossare il casco e le protezioni adeguate (ginocchiere, gomitiere,
protezioni per i polsi, ecc.).
• Indossare scarpe basse, comode e robuste.
• Indossare dei guanti resistenti.
Casco
Gomitiera
Protezione per il polso
Ginocchiera
Per garantire la vostra sicurezza, si raccomanda di utilizzare l’apparecchio in
condizioni adeguate e indossare i dispositivi di protezione necessari, come ad
esempio il casco o le protezioni per le articolazioni (ginocchiere e gomitiere).
Inoltre, per garantire la vostra sicurezza e quella delle altre persone, si
raccomanda di utilizzare l’apparecchio indossando sempre scarpe chiuse e
preferibilmente basse, in modo da avere aderenza e stabilità buone. Inne,
utilizzare sempre i guanti di protezione.
4.6. MODALITÀ DI UTILIZZO DELL'APPARECCHIO (leggere prima del primo
utilizzo)
ATTENZIONE: è obbligatorio scollegare il caricabatteria dall’apparecchio
prima di accenderlo o avviarlo.
1. Inserire la chiave di avviamento e girarla verso destra, quindi premere il
pulsante di accensione/spegnimento (26) per 3 secondi per accendere
l'apparecchio.
79

2. Avvio assistito: tenendo il manubrio con entrambe le mani, avanzare
appoggiando un piede sulla piastra poggiapiedi e spingendo con l'altro piede.
Azionare progressivamente l’acceleratore per avviare l’assistenza elettrica
dell’apparecchio.
3. Quando l'assistenza elettrica si innesca, è possibile appoggiare anche il
secondo piede sulla piastra poggiapiedi.
IMPORTANTE: la piastra poggiapiedi è dotata di un dispositivo antiscivolo,
pertanto si raccomanda di vericare che vi sia sempre una buona aderenza
prima e durante l’uso. La presenza di acqua, grasso, neve, terra, ecc. sulla
piastra poggiapiedi o sotto le scarpe può ridurre l’aderenza e compromettere
la sicurezza dell’apparecchio.
4. L'apparecchio dispone di 3 modalità di velocità: Fare riferimento alla
sezione "3. Presentazione dell'apparecchio" per informazioni sugli indicatori
corrispondenti alle diverse modalità di velocità e su come passare da una
modalità all'altra.
5. Per fermarsi, frenare progressivamente utilizzando i freni, cioè le leve o altri
dispositivi, a seconda dei modelli; successivamente, quando l'apparecchio si
è fermato quasi completamente, appoggiare un piede a terra per ritrovare
l'equilibrio. Scendere solo quando l'apparecchio si è fermato completamente.
4.7. LIMITI DI VELOCITÀ
Il prodotto è pensato per spostarsi ad una velocità massima di 25 km/h.
Si raccomanda, tuttavia, di rispettare i limiti di utilizzo del prodotto in
conformità con le norme di sicurezza stradale applicabili nel paese di
interesse.
4.8. PESO DEL CONDUCENTE
Il peso del conducente non deve essere superiore a 120 kg.
Nota: il mancato rispetto del limite di peso aumenta il rischio di caduta o di
danneggiamento del prodotto.
80

5. DATI TECNICI
Batteria: LiFePO4 (Litio-Ferro-Fosfato) da 15000 mAh
48 V
Tempo di ricarica: 7-9 ore
Autonomia:
Velocità:
Motore:
Ingresso-uscita caricabatteria: 100-240 V - 54,6 V 2 A
Peso massimo supportato: 120 Kg
Dimensioni dell’apparecchio: 1180 x 220 x 1250 mm
Peso dell’apparecchio:
* In generale, i dati relativi all’autonomia e alla velocità vengono forniti a titolo
indicativo. Infatti, variano a seconda del peso dell’utente e delle condizioni di
utilizzo (pendenza, temperatura esterna, igrometria, velocità e sollecitazione
del motore). Le speciche possono, dunque, cambiare. Le indicazioni relative
alla velocità e all’autonomia non sono vincolanti per il rivenditore o la società
CIBOX INTERACTIVE.
50 km max*
25 km/h max*
Potenza nominale 500 W
23,4 Kg
6. BATTERIA
La capacità della batteria al litio diminuisce ad ogni ciclo di ricarica e scarica
durante la vita utile della batteria stessa. La nozione di ciclo di vita si applica
anche alle batterie al litio (ad esempio, circa 300 cicli per un monopattino).
Pertanto, a partire da 300 CICLI COMPLETI di ricarica e scarica, la capacità
della batteria inizierà a diminuire (basti pensare, ad esempio, agli smartphone).
Questa perdita parziale di capacità non impedisce alla batteria di funzionare
ma ne riduce le prestazioni e, in particolare, l’autonomia.
Si raccomanda di utilizzare l’apparecchio e, soprattutto, di ricaricare la
batteria almeno una volta al mese; in effetti, la batteria al litio si scarica
anche quando il prodotto è spento. Per questo motivo, se la batteria non viene
ricaricata per diverse settimane o mesi, potrebbe subire una riduzione della
capacità o potrebbe addirittura non poter essere ricaricata.
Inoltre, è possibile ricaricare la batteria al litio dopo ogni utilizzo, in quanto
non risente del cosiddetto effetto memoria.
81

ATTENZIONE: la batteria deve essere ricaricata solo in ambienti interni o in
locali al riparo dalle intemperie (pioggia, neve, calore eccessivo, ecc.).
Per conservare al meglio la batteria dell’apparecchio, riportiamo di seguito
alcuni promemoria e consigli per l’uso:
• Non scollegare il caricabatteria prima che la batteria si sia ricaricata
completamente.
• Conservare il prodotto con la batteria installata in un luogo fresco
(temperatura > 0 °C), assicurandosi che la temperatura sia prossima a
15 °C. Attenzione: anche un calore eccessivo può deteriorare la batteria.
• Evitare di scaricare completamente la batteria.
• Evitare di ricaricare la batteria in ambienti caldi. Lasciar riposare
l’apparecchio per un tempo compreso tra 15 minuti e un’ora dopo l’uso,
prima di ricaricare la batteria.
• Evitare i sovraccarichi. Non lasciare il caricabatteria collegato per più di
24 ore, in quanto si riscalda inutilmente.
• Se il prodotto non viene utilizzato, ricaricare la batteria 1 volta al mese.
Importante: quando rimane solo un quarto della capacità della batteria e il
tragitto per raggiungere il punto di ricarica non è vicino, si raccomanda di
passare in modalità Eco.
Consiglio: durante gli spostamenti, l’indicatore di livello della batteria sul
display può diminuire improvvisamente, a seconda della modalità di guida
(forti sollecitazioni dell’acceleratore, tragitto in salita, temperatura esterna
inferiore a 10 °C...). È importante ricordare che il livello reale della batteria
viene visualizzato in modo più preciso quando l’apparecchio è spento.
7. MANUTENZIONE E PULIZIA
Il prodotto deve essere ispezionato regolarmente e sottoposto ad una
manutenzione ordinaria.
Nel presente capitolo viene descritta la procedura di manutenzione e
funzionamento.
Prima di eseguire le operazioni seguenti, assicurarsi che l’alimentazione sia
stata scollegata e il cavo di ricarica sia stato disinserito.
7.1. ISPEZIONE E PULIZIA DELL'APPARECCHIO
• Verificare regolarmente la colonna, il tubo di sterzo, le impugnature e
l’usura delle ruote.
• Si raccomanda di verificare regolarmente il serraggio delle viti delle ruote
anteriore e posteriore, degli ammortizzatori e del coperchio del vano
batteria e stringerle nuovamente, se necessario. Le vibrazioni generate
82

dalla guida dell’apparecchio comportano la necessità di successive
regolazioni.
• Verificare regolarmente che la ruota posteriore sia gonfia e gonfiarla se
necessario, utilizzando una pompa per biciclette o un attrezzo simile.
Di seguito vengono forniti alcuni consigli e precauzioni per la pulizia
dell’apparecchio:
• Scollegare i cavi di ricarica dall’apparecchio prima di procedere alla pulizia.
• Non immergere nell’acqua.
• Non utilizzare un’idropulitrice ad alta pressione, un getto d’acqua o ogni
altro sistema e metodo di lavaggio che potrebbe comportare l’infiltrazione
dell’acqua all’interno dell’apparecchio.
• Pulire l’apparecchio con una spugna leggermente umida o un panno
morbido, evitando i connettori e i pulsanti e facendo attenzione a non far
penetrare l’acqua sulle prese, nei circuiti o all’interno del prodotto.
• Non versare acqua o detergenti liquidi direttamente sul prodotto durante
la pulizia.
• Non utilizzare prodotti abrasivi o solventi che potrebbero danneggiare la
vernice dell’apparecchio.
• Fare molta attenzione durante la pulizia e asciugare le parti in plastica.
• Non utilizzare prodotti abrasivi o solventi per pulire le parti metalliche o in
plastica.
7.2. MANUTENZIONE DELL'APPARECCHIO
Se il prodotto, un componente o la batteria sono usurati e devono essere
smaltiti, rivolgersi ad un centro autorizzato per la riparazione o il riciclaggio. I
tutorial per la manutenzione dell'apparecchio e il catalogo online dei pezzi di
ricambio sono disponibili sul sito internet: https://yeep.me
L’apparecchio è dotato di cuscinetti. Vericare periodicamente il corretto
funzionamento delle ruote sollevando l’apparecchio e facendo girare le
ruote a vuoto. Vericare inoltre periodicamente e prima di ogni utilizzo il
corretto funzionamento dello sterzo, in modo da essere sicuri che possa
sterzare senza problemi. In caso di rumori anomali o di movimenti non uidi,
eseguire l’operazione di serraggio per garantire un migliore funzionamento.
Non utilizzare l’apparecchio e contattare il rivenditore o l’assistenza se il
problema persiste, in modo da eseguire la riparazione necessaria.
7.3. CONSERVAZIONE DELL'APPARECCHIO
• Ricaricare completamente il prodotto prima di riporlo.
• Riporre il prodotto in un ambiente pulito e asciutto, con una temperatura
ambiente compresa tra 0 e 40 °C.
83

8. FAQ
Se l’apparecchio non si sblocca:
Vericare che il pulsante di sblocco possa muoversi e che non sia danneggiato.
Vericare che il meccanismo sia pulito prima di provare a chiudere/aprire
l’apparecchio. Se il problema persiste, rivolgersi ad un centro assistenza
autorizzato per richiederne la riparazione.
L’apparecchio non si accende
Vericare che il pulsante di accensione/spegnimento non sia danneggiato e
ricaricare l’apparecchio prima di provare nuovamente ad accenderlo.
L’apparecchio non si ricarica
Vericare che i connettori del prodotto e il caricabatteria forniti in dotazione
non siano danneggiati.
Per vericare se il caricabatteria o l’apparecchio non funzionano in modo
adeguato, accertarsi che la spia di ricarica sul caricabatteria si accenda
correttamente. Quando il caricabatteria è collegato alla rete elettrica e al
prodotto, la spia può essere:
• ROSSA non lampeggiante (significa che il prodotto è in carica)
• VERDE: indica che l'apparecchio è carico.
• ROSSA - VERDE: lampeggiante alternativamente. Ciò si verifica, ad
esempio, quando la batteria è molto scarica. Attendere 15 minuti rimanendo
in prossimità dell’apparecchio. Se la spia diventa rossa, significa che si è
avviata la ricarica normale.
Se la spia continua a lampeggiare, signica che il caricabatteria o il prodotto
presentano un problema (batteria, connettore, ecc.).
Se il problema persiste, rivolgersi ad un centro assistenza autorizzato per
richiederne la riparazione.
84

Codici di errore:
N. Signicato Azione da svolgere
2 Problema del freno Non utilizzare il prodotto. Consultare il rivenditore o
l’assistenza clienti all’indirizzo support_it@yeep.me
indicando il codice di errore.
6 Tensione della batteria
troppo bassa
7 Problema del motore
8 Problema dell'acceleratore
9 Problema del controller
10 Perdita di collegamento
interno (ricezione dei dati)
11 Perdita di collegamento
interno (trasmissione dei
dati)
12 Guasto del BMS (sistema di
gestione della batteria)
13 Guasto del faro Consultare il rivenditore o l'assistenza clienti
Ricaricare la batteria utilizzando il caricabatteria
fornito in dotazione. Se il problema persiste, non
utilizzare l'apparecchio e consultare il rivenditore o
l'assistenza clienti all'indirizzo support_it@yeep.me
indicando il codice di errore.
Non utilizzare il prodotto. Consultare il rivenditore o
l'assistenza clienti all'indirizzo support_it@yeep.me
indicando il codice di errore.
all'indirizzo support_it@yeep.me indicando il codice di
errore.
Non utilizzare l'apparecchio di notte o in condizioni di
scarsa luminosità senza aver riparato il faro.
L’apparecchio funziona a scatti:
Ciò può accadere quando il motore viene sollecitato eccessivamente e la
batteria non è completamente carica. In questo caso, ridurre la potenza
regolando l’acceleratore e, soprattutto, vericare che la batteria sia carica.
La batteria può essere sostituita?
Sì, ma l’apparecchio deve essere portato presso un’ofcina autorizzata per la
sostituzione della batteria.
85

9. CONDIZIONI DI GARANZIA E LIMITAZIONI DI
RESPONSABILITÀ
Questo prodotto è garantito per un periodo di 24 mesi (come previsto dalla
legge locale in vigore, facente fede il periodo riportato sullo scontrino). La
garanzia si applica a partire dalla data di acquisto e copre qualsiasi guasto
derivante da difetti di lavorazione dei materiali, ma non copre i danni derivanti
da un’installazione errata, da un uso improprio o dalla normale usura del
prodotto.
La garanzia copre, dunque: i costi di manodopera, i pezzi di ricambio, la
batteria originale e gli accessori funzionali forniti in dotazione.
Al contrario, la garanzia non copre:
• Danni o problemi causati da un uso improprio, incidenti, urti, manomissioni
dei collegamenti elettrici per l’uso ad una tensione inadeguata.
• I prodotti modificati, quelli il cui sigillo di garanzia o il numero di serie sono
stati danneggiati, alterati, cancellati o si sono ossidati.
• Il malfunzionamento della batteria causato da un tempo di ricarica troppo
lungo o dall’inosservanza delle norme di sicurezza riportate nel manuale.
Eventuali danni o incidenti causati dalla mancata osservanza delle norme
di sicurezza, delle informazioni sull’uso, la manutenzione, la pulizia e la
conservazione descritte nel presente manuale, nonché dal mancato rispetto
della legislazione vigente nel luogo di utilizzo o causati da terzi non possono
essere imputabili al fabbricante.
Importante da ricordare: l’intensità di utilizzo della batteria inuisce sulla
sua durata. La capacità della batteria si riduce durante la sua vita utile,
in base ai cicli di ricarica e scarica. Questa perdita parziale di capacità
non impedisce alla batteria di funzionare ma ne riduce le prestazioni e, in
particolare, l’autonomia. Si raccomanda di utilizzare il prodotto ricaricando
la batteria almeno una volta al mese. Se la batteria non viene ricaricata per
diverse settimane o mesi, potrebbe smettere di funzionare o potrebbe non
potere essere ricaricata. In questo caso, la batteria non sarà coperta dalla
garanzia contro difetti di fabbricazione. Inoltre, si raccomanda di non lasciare
la batteria in carica troppo a lungo.
• Danni estetici, compresi graffi, ammaccature o altri difetti simili.
• Danni causati da interventi eseguiti da persone non autorizzate.
86

• Malfunzionamenti causati da un uso improprio o dalla normale usura del
prodotto.
• Malfunzionamenti del prodotto dovuti all’uso di accessori non omologati
dal fabbricante.
• I prodotti che si sono ossidati in seguito all’immersione in liquidi o perché
sono stati conservati in un ambiente umido.
• I prodotti riparati o sostituiti con componenti non originali.
• I pezzi soggetti a normale usura o a danni dovuti al loro utilizzo: pneumatici,
camere d’aria, freni, ecc.
• I prodotti che non presentano guasti o i cui guasti/difetti legati al prodotto
e non all'uso non sarebbero riproducibili.
NORME DI ATTUAZIONE
Per ottenere il servizio di garanzia, contattare il rivenditore o di seguire la
procedura di restituzione diretta del fabbricante, ove applicabile:
• Munirsi della prova di acquisto (scontrino, fatture, ecc.)
• Restituire il prodotto completo con tutti gli accessori e il caricabatteria
inizialmente fornito in dotazione
• Se possibile, utilizzare l’imballaggio originale.
È indispensabile fornire le seguenti informazioni: data di acquisto, modello
e numero di serie dell’apparecchio (queste informazioni sono generalmente
riportate sul prodotto sull’imballaggio o sulla prova di acquisto). Tra i
documenti di accompagnamento del prodotto vi è una scheda di garanzia
sulla quale è riportato il n. di serie. Vi invitiamo a conservarlo con cura assieme
alla fattura di acquisto. Il numero di serie può trovarsi anche sull’etichetta
applicata nella parte inferiore del prodotto.
In caso di richiesta in garanzia, il servizio assistenza potrà, a sua discrezione
e nei limiti della legislazione locale vigente, decidere di:
• Riparare o sostituire i pezzi difettosi.
• Sostituire il prodotto restituito con un prodotto avente le medesime
funzionalità ed equivalente in termini di prestazioni.
In caso di guasto o per qualunque domanda relativa a manutenzione,
funzionamento, sicurezza o per qualsiasi altra richiesta riguardante
l’apparecchio o il prodotto, contattare l’assistenza clienti all’indirizzo:
support_it@yeep.me.
87

Inne, qualsiasi restituzione, in seguito ad una richiesta di servizio di garanzia
per un prodotto o una situazione soggetta ad esclusione di garanzia o un
prodotto che non presenta un guasto comprovato o se il guasto non è noto,
sarà soggetta ad un preventivo che specicherà i costi di riparazione e/o i
costi relativi al trasporto e/o i costi di manodopera applicata a prodotti che
non presentano alcun guasto.
88

FR - Servizio clienti Cibox Interactive
17 allée Jean Baptiste Preux, 94140 ALFORTVILLE.
support_it@yeep.me
https://yeep.me
yeep.me 100 (2020)
CIBOX INTERACTIVE
17 allée Jean Baptiste preux
94140 ALFORTVILLE
Francia
Fabbricato in Cina
Prodotto nel 2020
YEEP031-092020-V1.2

yeep.me 100 (2020)
电动滑板车
首次使用前,请仔细阅读本手册
原版说明书
首次使用之前,建议检查设备轮胎的压力和充电率


感谢您购买本产品。
欢迎进入
yeeper’s 社区!
目录
1. 安全注意事项 93
2. 装箱单 96
3. 设备介绍 97
4. 设备使用指南 98
5. 技术参数 101
6. 电池 102
7. 保养和清洁 102
8. 常见问题 103
9. 保修条件和责任范围 105
使用本产品之前,请仔细阅读使用说明。它们能够帮助您正确理解、使用以及保养
本产品,并了解其性能和功能。
请妥善保管本手册以供后期参考之用。如果您转让该产品,请连同本手册一同
转让。
92

1. 安全注意事项
1.该设备适用于青少年和成人的个人出行。
该设备也可供12 岁或 12 岁以上的儿童以及有身体、感知或智力缺陷的人
员或无相关经验或知识的人员使用,但需要予以正确监督或者需要向其说
明设备安全使用的相关知识以及相关风险。儿童不得将该设备作为玩具。
儿童不得在无监督的情况下进行用户清洁和保养。父母有责任且绝不能让
儿童在无监督的情况下独自使用该设备。
不得搭载他人,尤其不得搭载一名或多名儿童以及物品。超过重量限制
可能会造成人身伤害和设备损坏。用户体重并不意味着其身高适合控制
设备。
2.这是一台个人出行设备,因此,它不能用于竞赛和极限运动,并且决不能
在滑板场中使用。您不能用它上下楼梯、跳跃、跨越障碍、做危险动作。
该设备既不是玩具也不是健身器械。不得将其留给儿童玩耍。
该产品不适用于职业或商业用途,例如:租赁、车队、职业出行等。
3.该设备应在平坦、干净、干燥且无砂砾和油脂的表面上小心使用,因为它
需要借助轮胎和地面之间的摩擦力来前进。避开可能引起事故的障碍物、
孔洞、凸地以及下水道格栅。减速带区域应减速。
应与其他用户保持距离并遵守道路安全规定。您可能会承受其他用户行为
所造成的风险。应该以合适的速度提前避开障碍物和车辆。停车距离和您
的速度有关。避免突然动作和刹车;即使在光滑平坦的表面上设备也可能
会打滑、失去平衡、甚至跌倒。同时要注意预测在不同天气和/或潮湿道路
上的刹车距离。对于没有看见您而横穿马路的行人也要注意刹车距离。您
应该始终保持警惕,并且在公共道路上与其他行人和用户保持一定距离。
警告!切勿在法律规定范围以外的地方使用本产品。
4.注意!本产品用于室外。您有责任了解并遵守使用地关于公共或私人道
路的相关现行规定。
5.在学习骑行设备期间,应选一处开阔平坦地带且无过多人员在您周围,
同时需佩戴防护头盔。
当您使用该设备出行时,您应始终穿戴结实的鞋子和裤子。如果您未穿鞋
或穿了拖鞋,请勿操作该设备。应避免穿戴过于宽松的衣物或有细绳或下
垂系扣、吊带等的衣物……因为它们可能会因车轮旋转而被缠住,可能导
致窒息、跌落和/或碰撞风险。
93

6.如果您推着滑板车步行,不得按下加速器装置或注意在此之前将电源
关闭。
7.不得在雨天、雪天、水坑中、泥浆中或地面水深超过 2cm 的其他任何潮湿
地带骑行,这可能会导致水进入设备内部。关于设备的清洁,参阅 7.1 章节
中的注意事项。
如果能见度差,则不得使用该设备。如果您在夜间或阴暗天气骑行,建议穿
戴反光的衣物或装备(例如,马甲、臂章……)。除此之外,您还应遵守设备
使用地区和国家的有关现行规定要求。
8.如果您饮酒或吸食毒品,则不得使用该设备。为了您的安全考虑,切勿实
施这一做法。
9.未经主要用户许可或没有事先了解关于使用和安全的措施/注意事项,不
得将产品放在任何可以启动它的人员手中。
如果您将设备借给别人使用,务必使其了解如何使用设备并向其解释所有
的安全注意事项。您应提醒其遵守道路规则并佩戴相应的安全装备。
为了防止他人擅自使用,应使用钥匙启动装置并在每次用完之后将其拔
出,以防止有意或无意的启动或误操作。
10.该设备在折叠放置之前应处于关机状态。为此,请参阅本手册的“设备使
用指南”部分。
11.每次使用前,请检查设备。如果您发现零件松动、电池电量低警报、轮胎
爆裂、过度磨损、噪音异常、运行不良等任何其他异常情况,应立即停止骑
行并向专业人员求助。
如果设备配有机械刹车装置,请确保此类装置不会因电缆张力或其他问题
而产生摩擦,因为这可能会导致减速,妨碍设备的正常运行。此外,刹车装
置发热可能会影响其功效。
每次使用之前,请确保转向系统经过正确调整且所有连接元件和螺丝均予
以紧固并处于良好状态。如果紧固螺丝后,您发现了可能会影响安全骑行
的间隙,应联系经销商寻求更多信息或进行维护。
检查所有安全装置(刹车、照明)运行良好。折叠系统装置应在其行驶垂直
位置处锁定。
94

12.不得在下列情形中使用设备或对电池进行充电:
• 产品受损。
• 电池有异味和异常发热。
• 刹车控制装置、其他刹车装置或安全(照明)装置受损。
如有泄露,停止使用设备且不得接触任何渗漏出的液体。设备的电池决不
能暴露在过热环境中。
13.用户不得更换电池。请向经销商的售后部门或品牌方咨询设备的任何更
改/保养问题。
14.电池,例如电池组,应进行妥善处理回收。如果您的经销商不能回收您的
产品,应将其放在专用的容器(更多内容请咨询品牌方的支持部门)中以保
护环境。
15.年龄小于 12 岁的儿童不得对设备进行清洁、保养或其他所有操作。产品
应放置在儿童接触不到的地方。检查各安全装置(刹车、照明)运行良好。折
叠系统装置应在其行驶位置处锁定。
16.打开设备或产品可能会更改安全性能,品牌方对此不负任何责任。同时
还需要注意,打开后上述设备或产品的保修也会失去效力。如果您仍然希
望对您的设备或产品进行维修,那么不管是维修的可靠性还是与此维修有
关的潜在损坏情况,品牌方均不承担任何责任。此次维修后如果发生事故,
品牌方概不负责。如有疑问或需要帮助,请联系授权经销商或品牌方的客
户支持部门。
95

图标 含义
始终仔细阅读使用说明书。
等边三角形内嵌感叹号图标表示设备使用说明书中规定的关于使用
和保养(保养和维修)的重要注意事项。
本设备不得直接与水接触。请勿将设备存放在潮湿环境中。
等边三角形内嵌闪电箭头图标表示设备内部有“危险电压”且其电压
值可导致触电风险。
该标志表示该设备在电源(危险)电压和用户可接触部件之间设有双
重电绝缘。
注意!警告!应佩戴一套包括护腕、防护手套、护膝、头盔和护肘的防
护装备。
电气和电子设备应分别分类和处理。不得将电气和电子设备与未分
类的普通生活垃圾一同丢弃,应该将其送至分类处理中心。
该标志用在铭牌上,表示设备只在交流电工况下运行或者标识相应
的端子。
该标志用于标识包括变压器和电子回路的电子装置,该电子装置能
将电能转换为一个或多个输出连接器。
该标志用于标识包括变压器和电子回路的电子装置,该电子装置能
将电能转换为一个或多个输出连接器。
2. 装箱单
该包装箱包括:
• yeep.me 100 电动滑板车
• 工具
• 原装电源充电器
• 启动钥匙(2把)
• 用户手册
• CE 声明
• 保修卡需妥善保管(保修卡包括设备的序列号及其生产日期,以及设备保修的必要
信息)
96

3. 设备介绍
4
2
5
1
3
(1).前大灯、喇叭和换挡开关
(2).加速器
(3).启动钥匙
(4).显示屏
(5).刹车手柄
(6).手把高度调节锁扣
6
(7).LED 照明灯
(8).减振器
(9).解锁手柄
9
10
7
8
12
23
24
13
14
17
12
15
18 19 20
21
(10).脚踏板
(11).后刹车灯
(12).碟刹
11
(13).充电口
(14).安全折叠/展开手柄
16
(15).带防滑带的踏板
(16).脚撑
22
25
26
(17).瞬时速度(18)。速度模式 1(19)。速度模式 2 & 3(20)。电池电量显示器 (21)。 速度类型显示
器 (22)。 灯光启动显示器 (23).灯光启动按钮和左转向灯(24)。喇叭(25).红色 LED 灯启动按钮
和右转向灯(26)。开关和速度模式按钮。
• 长按左把手上的按钮 (23) 3 秒以启动或关闭 LED 照明灯,长按右把手上
的按钮 (25) 3 秒以启动或关闭两侧的 LED 灯带。
• 短按左把手上的按钮 (23) 以启动左转向灯。短按右把手上的按钮 (25) 以
启动右转向灯。
• 刹车灯 (11) 只有当 LED 照明灯 (7) 亮起时才会亮起。
• 设备开机/关机:使用设备随附的原装启动钥匙,然后按下开关按钮 (26)。
如果 180 秒内无其他动作指令,设备自动关机。
• 设备更换模式:短按开关按钮 (26)。
97

共有 3 种速度模式:
• 模式 1(
• 模式 2(黄色 S 图标)(19) 为节能 (ECO) 模式 ,限定速度 15km/h。
• 模式 3(红色 S 图标)(19) 为最大模式 ,限定速度25km/h。
行人图标)(18) 限定速度 6hm/h
4. 设备使用指南
4.1.设备开箱和组装
关于产品开箱,建议准备一个面积足够大的开阔表面进行产品开箱和准备
工作。从包装箱中取出设备,同时注意不要伤到自己或损坏其他产品或您
周围的场所。如果产品对您来说太重(包装箱上标有重量),您可以向别人
求助。
使用产品之前,需要组装把手。因此,需要先展开设备(见下一章节)然后再
拧紧把手:
开箱和组装工作应由成人进行。
• 可以借助把手上的标志进行组装,R
• 以车把轴为参考,逐个拧紧两个把手。如果把手有倾斜,不得强行拧紧。
把手不得用力强行紧固。
• 把手碰到挡块时,注意将其拧紧。
4.2.设备折叠/展开
设备借助解锁手柄 (9) 和安全折叠/展开手柄 (14) 可以灵活折叠和展开。
但是,操作时还需谨慎小心以免被夹住或卡住。
展开
1.将设备水平放置在您面前。
2.抬起手柄 (14) 将产品展开。
3.将设备立杆抬高约 90° 直到听到轻微的咔哒声。
4.抬起并关闭锁定手柄 (9) 直到其完全进入铰链中。
5.如果设备配备折叠把手,应先将其展开后再安装就位。如果没有配备,
则把手已安装就位。
6.操作完成。
折叠
1.将设备水平放置在您面前。
2.如果设备配备折叠把手,将其折叠到两边(如有需要)。
3.按下手柄 (9) 将设备解锁。
为右把手,L 为左把手。
98

4.抬起折叠手柄(14)。
5.将设备立杆放低至 90°。
6.操作完成。
4.3.电池充电和显示器
首次使用之前,请对电池进行充电。充电时,请使用原装充电器进行充电。
要求:所有充电操作必须通过设备随附的原装充电器进行。充电器如出现
问题、发现丢失或故障,请勿使用其他充电器充电,而应向零销商另外购买
一个新充电器。所有信息均可访问 support_cn@yeep.me 网站
然后,每次使用之前,借助电池电量显示器 (20) 检查电池电量。
注:我们建议您在每次使用后对电池进行充电,且至少每月充电一次。
注意:充电时应将设备展开并打开脚撑支撑,以免损坏充电插头。
1.取下充电口的盖帽并确保充电器接头上没有水或其他液体,它们可能引
起短路或使充电器插头不能正确且安全地插入插座。接着先将充电线的一
端连接到充电口 (13) 然后再将另一端接通电源。始终先确保充电器正确连
接设备然后再将插头接通电源。
2.充电时,充电器指示灯红灯常亮。
3.一旦充电完成,充电器指示灯绿灯亮起。
4.充电完成后,按照顺序先断开电源插头,然后再断开设备充电器接头。最
后,重新盖上盖帽以免液体或其他物体进入充电器接头中。
4.4.调节立杆高度
调节立杆高度时注意不要把手
指放进去,以免被夹住
99

1.拉开锁紧环 (6) 手柄以松开立杆。
调节立杆时,应注意将定位销定位好并且从立杆
管凸出一部分。
然后向上或向下滑动立杆至所需位置。
2.立杆高度调节完以后,向下按锁紧环 (6) 手柄以紧固立杆。
注:通过紧固或拧松连接锁紧环手柄的两个螺栓可以调节锁紧环手柄的张
力。注意拧紧锁紧环手柄以保证立杆紧固牢靠。
4.5.准备
在舒适的条件下学习很重要:
• 佩戴头盔和适当的防护用品(护膝、护肘、护腕……)。
• 穿舒适结实的平底鞋。
• 佩戴厚手套。
头盔
护肘
护腕
护膝
为了您的安全考虑,我们建议您在舒适的条件下使用该设备,佩戴头盔等
防护设备以及适当的关节防护用品(护膝、护肘)。为了您和他人的安全考
虑,您驾驶和使用该设备时应穿封闭式的鞋子;最好是平底鞋,以保证良好
的附着力和稳定性。同时还建议佩戴手套。
4.6.如何使用设备(首次使用前请阅读)
注意:设备开机或启动之前,必须先断开充电器。
1.插入启动钥匙并向右转动,然后长按开关按钮 (26) 3 秒将设备开机。
2.辅助启动:双手扶住车把,将一只脚放在踏板上另一只脚推动前行。
慢慢开启加速器以启动设备的电气辅助。
100
 Loading...