

Yeelight YLXD09YL User Manual [ru]
For further information, please go to www.yeelight.com
Manufactured by: Qingdao Yeelink Information Technology Co., Ltd.
Address: F10-B4, Bldg. B, International Innovation Park, 169 Songling Rd.,
Laoshan District, Qingdao, China
Para obtener más información, visite www.yeelight.com
Fabricado por: Qingdao Yeelink Information Technology Co., Ltd.
Dirección: F10-B4, Edif. B, International Innovation Park, 169 Songling Rd.,
Distrito Laoshan, Qingdao, China
Дополнительные сведения вы найдете на странице www.yeelight.com
Изготовитель: Qingdao Yeelink Information Technology Co., Ltd.
Адрес: F10-B4, здание B, Международный парк инновационных технологий,
169, улица Сунлин, р-н Лаошань, г. Циндао, Китай
Yeelight Crystal LED Ceiling Light Mini
User Manual
Read this manual carefully before use, and retain it for future reference.
Lea detenidamente este manual antes de usar el producto y consérvelo para
futuras consultas.
Перед использованием внимательно прочтите это руководство.
Сохраните его— оно может понадобиться вам в дальнейшем.
Product Introduction
Silicone sleeve
Wiring
terminal
Cover o f
terminal box
Lampshade Backboard
× 2× 2
Expansion tube Silicone pad
* To avoid electric shock, the power supply must be cut off before installation.
During installation, the instructions should be followed strictly.
Improper installation may cause such accidents as fire, electric shock and lamp
falling off, etc.
To avoid dangers, please entrust the specialized electric personnel for installation
and maintenance.
Self-tapping screw
× 2
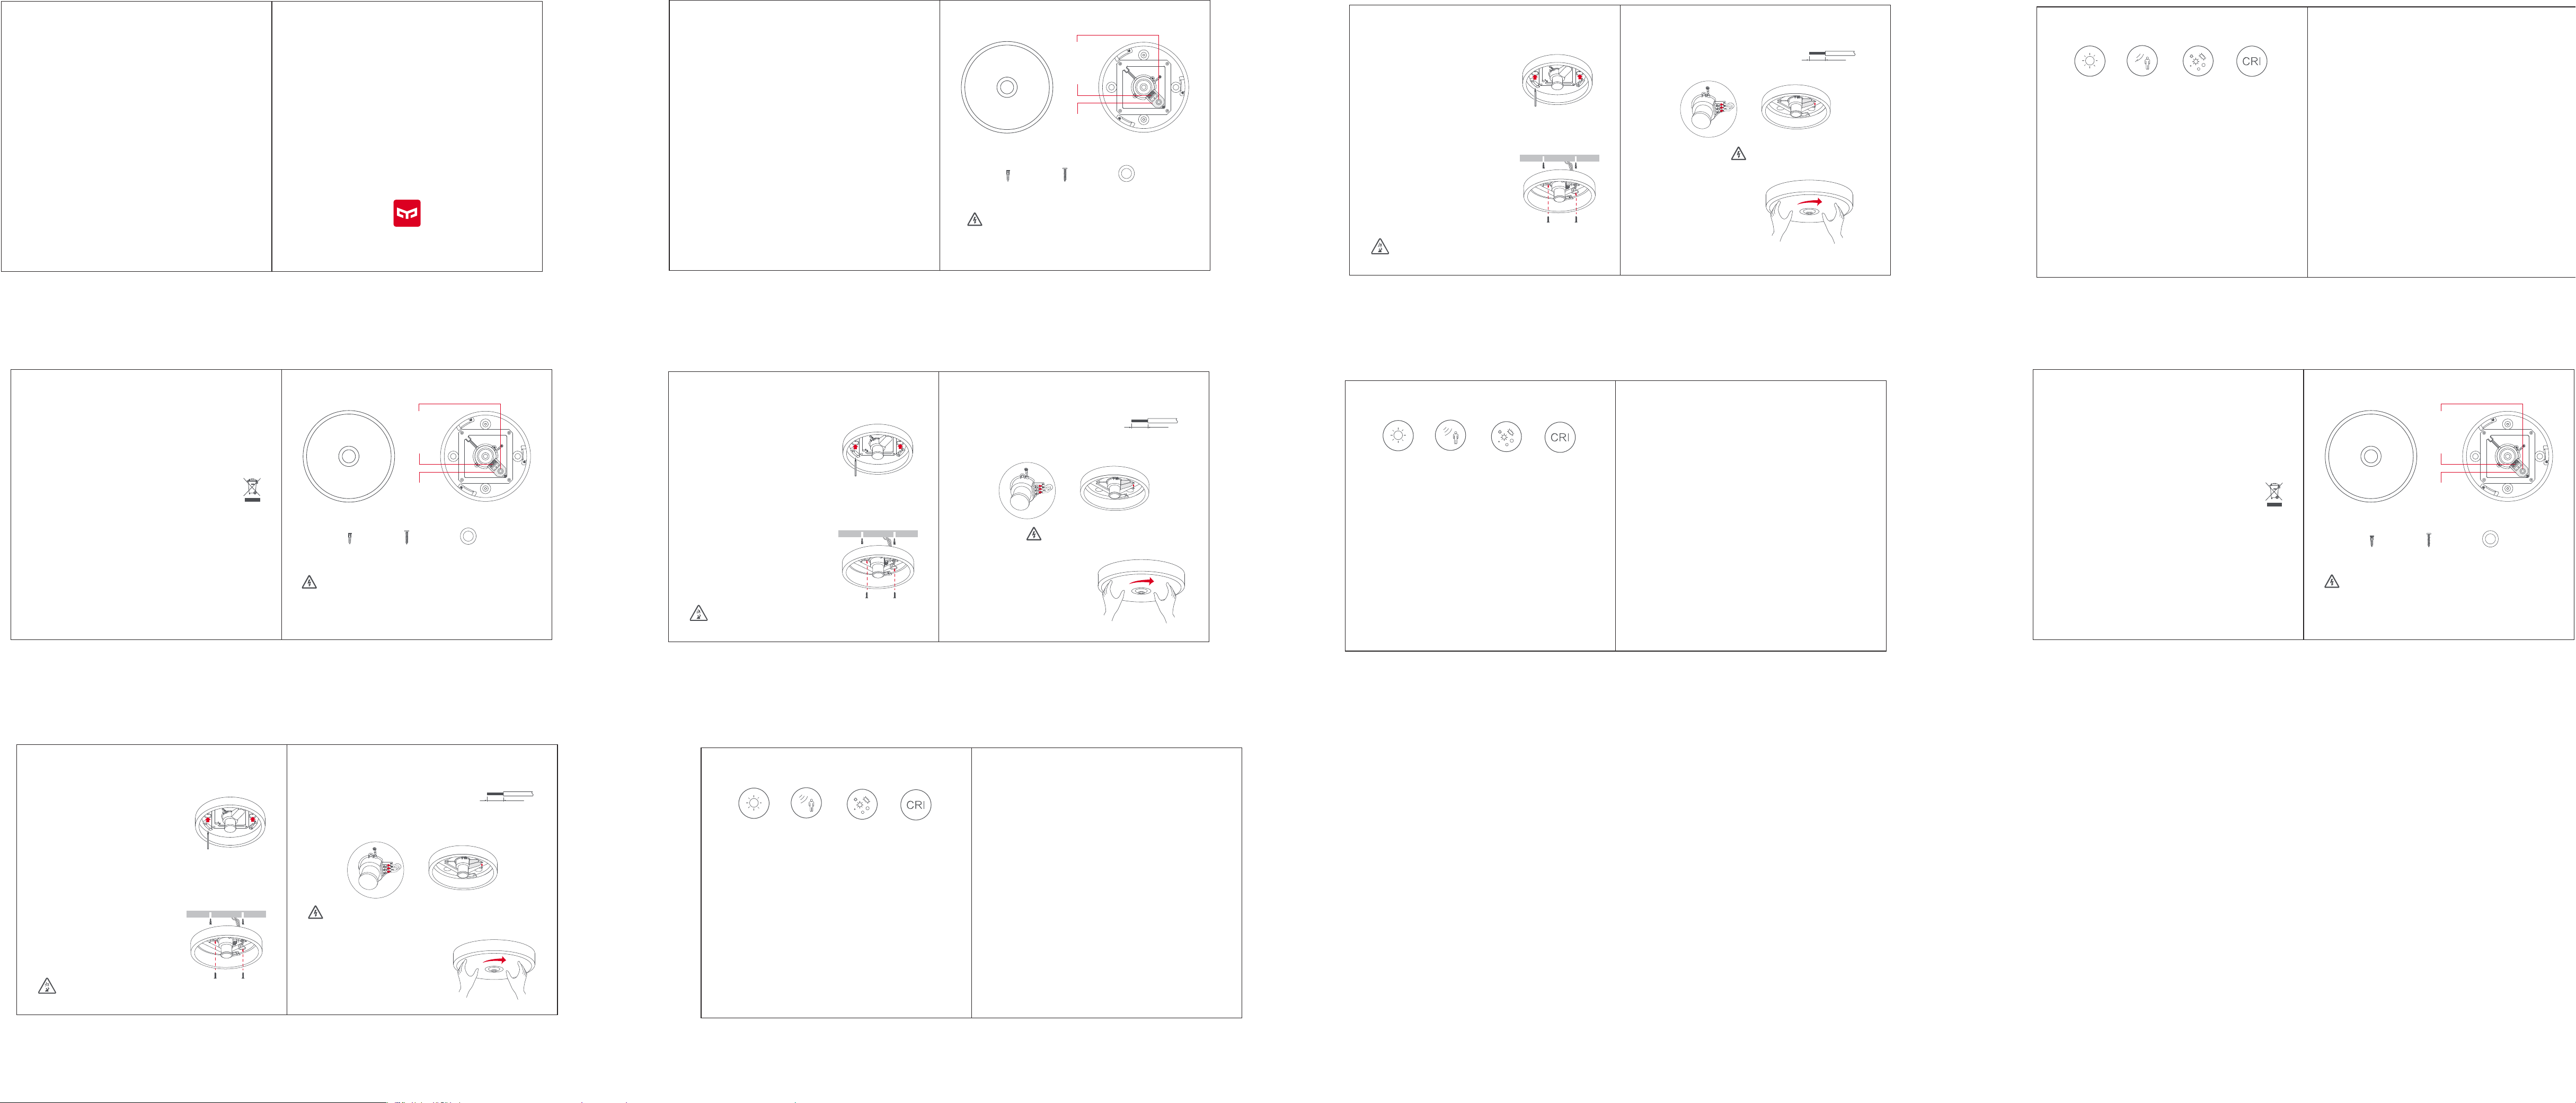
Installation Instructions
I. Drill holes
1.Open t he package, t ake out the ceil ing light, and
then re move the lampshade by rotating it in
counterclockwise direction.
2.Put t he backboar d at the mounting posi tion,
use a mar king pen to make a mark at the hole
posit ions, and th en remove the backboard;
3.Make t he holes wit h φ6mm drill, the drilling
depth s hould be ≥40 mm, and then place
expansion tubes into the holes.
II. Fix backboard
1.Insert the powe r cord throug h the silicone
sleeve on the backboard.
2.Use self-tapping screw s to mount the
backboard on t he ceiling.
* Aer installation, please check whether the backboard is installed in place;
if not, there may be a danger of lamp falling off.
III. Connect power cord
1.Peel the pow er cord about 6-8mm, con nect the
null line, live wire and ground wire to the ceiling
light , use screwd river to tighten th e terminal
screw, a nd then use screws to fi x the cover of
terminal box.
* This product must be grounded!!
IV. Install lampshade
1. Inst all the lampshade by rotat ing it
in clockwise direction.
Power cord
6-8mm
Product Features
Light sensitivity
Motion sensitivity
Anti-insects
High color
rendering index
Basic Parameters
Product model: YLXD09YL
Rated power: 10W
Operating humidity: 0%-85%RH
Operating temperature: -10℃ ~ 40℃
Rated input: 220-240V ~ 50/60Hz 0.08A
Induction range: within the radius (R), between the ceiling light and the floor (120cm≤R≤200cm)
Notes:
1、The ceil ing light will b e on and enter int o test mode wh en it is powere d on at the first t ime.
The sel f-test will be fi nished if no hum an activit y is detecte d during the fir st test.
2、There may b e certain er rors to the in duction ran ge due to user hei ght, indoo r temperatur e
and other factors;
3、The ind uction rang e R takes the st orey height of 2 90cm as the d etection di stance.
Power factor: 0.5
Luminous flux: 670lm
Color temperature range: 5700K
Sensitive time: 60s (rated)
Safety Precautions
1. Make sure the voltage is consistent with the product's working voltage before
using. Using the incorrect voltage may damage the product and cause a
potential safety hazard.
2. The light source is non-replaceable. Do not aempt to disassemble the
product. When the light source reaches the end of its lifespan, replace the
entire light.
3. The ceiling light will produce heat during operation. Please ensure
cross-ventilation to facilitate heat dissipation.
4. The light can be controlled by a remote controller (non-standard) and smart
phone soware. When turning the light off with a remote controller
(non-standard) or smart phone soware, this does not mean that the power
supply is switched off. In this case, the light should not be touched, replaced
or disassembled, otherwise there are risks of electric shocks or even injuries
or death.
5. The light should be installed by a qualified electrician and any wiring must
comply with IEEE electrical standards or national standards.
WEEE Disposal and Recycling
Correct Disposal of this product. This marking indicates that this product should
not be disposal with other household wastes throughout the EU.
To prevent possible harm to the environment or human health from
uncontrolled waste disposal, rescycle it responsibly to promote the sustainable
reuse of material resources.
To return your used device, please use the return and collection systems or
contact the retailer where the product was purchased. They can take this
product for environmental safe recycling.
Presentación de producto
Manguito
de silicona
Terminal d e
conexión
Cubier ta de
la caja d e
Pantalla Placa de espalda
Tubo de
expansión
*Previamente al montaje, por favor corte obligatoriamente la fuente de alimentación
para evitar el choque eléctrico. El montaje debe efectuarse en escrito cumplimiento
con los pasos instruidos.
En caso de montaje inadecuado, tienen lugar fácilmente los accidentes tales como
incendio, choque eléctrico o caída del cuerpo de lámpara, etc.
Por favor encargue a profesional eléctrico para que realice el montaje o inspección y
reparación, de manera de evitar riesgos.
conexiones
× 2× 2
Tornillo
autorroscante
separador
de silicona
× 2
Instrucciones de montaje
I. Uno. Perforación
1.Se abre el emp aque para ret irar la lámpara de
techo, y se gira la pant alla a la izquierda par a
desarmarla;
2.La placa de e spalda se coloca pre viamente en
la posi ción de montaje, y en la p osición del
aguje ro, se hace marca por ro tulador, y se
retir a la placa de esp alda;
3.Se hace per foración c on una broca de φ6mm
cuya pr ofundidad es ≥40m m, y se introdu ce el
tubo de ex pansión
II. Dos. Fijación de la placa de espalda
1.IEl ca ble de potencia atra viesa y sale de l
mangu ito de silicon a en la placa de esp alda;
2.Med iante tornil los autorro scantes, la placa d e
espal da se afirma en el te cho falso.
* Luego de t erminar el mon taje, por fav or confirme si e l montaje est á bien hecho, y
en caso d e montaje inad ecuado, el pro ducto corr e el riesgo de cae r.
III. Tres. Conexión del cable de potencia
1.Se monda el cable de p otencia has ta que un
tramo de 6-8mm esté expuesto, e l alambre
neutr al, el carga do y el de tierra s e enlazan a la
lámpara de tec ho, se emplea de stornillador par a
apret ar los tornil los de los term inales, y la
cubier ta de la caja de conex iones se fija por
tornillos.
* Este producto se obliga a estar puesto a tierra.
IV. Cuatro. Montaje de pantalla
1. La pantalla debe montarse girándosela
a la dere cha.
Cable de potencia
6-8mm
Características de productos
Inducción
de luz
inducción del
cuerpo humano
prevención de
mosquitos e
insectos
índice alto de
representación
de calor
Parámetros básicos
Modelo de producto: YLXD09YL
Potencia nominal: 10W
Humedad de trabajo: 0%-85%RH
Temperatura de trabajo: -10℃ ~ 40℃
Entrada nominal:
220-240V~ 50/60Hz 0.08A
Rango de inducción: dentro del radio R en el suelo justamente bajo la lámpara de techo
(120cm≤R≤200cm)
Notas:
1. Al elec trizar la lám para de techo p or primera ve z, ésta siem pre se enciend e y entra en el
modo de de tección, y la a uto- detec ción termina cu ando las acti vidades de l cuerpo
humano no s ean detect adas por prim era vez;
2. El rang o de inducción p resenta cie rta difer encia debido a l os factores t ales como ta lla del
usuario, temperatura del interior, etc.;
3. TEl ran go de inducció n R tiene como dis tancia de de tección, la al tura de piso de 2 90cm.
Factor de potencia: 0.5
Flujo luminoso: 670lm
Rango de temperatura de calor: 5700K
Tiempo de inducción:
60s como valor nominal
WEEE Disposal and Recycling
Precauciones de seguridad
1. Antes de usarlo, asegúrese de que la tensión se ajuste a la tensión de
funcionamiento del producto. Usar una tensión incorrecta puede dañar el
producto y provocar posibles peligros de seguridad.
2. La fuente de luz de la lámpara no se puede reemplazar. No intente desmontar
el producto. Cuando la fuente de luz llegue al final de su vida útil, reemplace
toda la lámpara.
3. La lámpara de techo producirá calor cuando esté en funcionamiento.
Asegúrese de que tenga una ventilación cruzada para facilitar la disipación del
calor.
4. La luz se puede controlar con un mando a distancia (no estándar) y un
Correct Disposal of this product. This marking indicates that this product should
not be disposal with other household wastes throughout the EU.
To prevent possible harm to the environment or human health from uncontrolled
waste disposal, rescycle it responsibly to promote the sustainable reuse of
material resources.
To return your used device, please use the return and collection systems or
contact the retailer where the product was purchased. They can take this
product for environmental safe recycling.
Обзор изделия
Силиконо
вая муфта
Проводно
й отсек
Крышка
клеммной
Абажур Основание
коробки
soware para móviles inteligentes. Cuando apague la luz con el mando a
distancia (no estándar) o con el soware para móviles, no querrá decir que la
fuente de alimentación se ha desconectado. En este caso, no debe tocar,
remplazar ni desmontar la lámpara, de lo contrario, existe el riesgo de que se
puedan producir descargas eléctricas o incluso lesiones o la muerte.
5. La lámpara deberá instalarla un electricista cualificado, y el cableado debe
cumplir con los estándares eléctricos IEEE o con las leyes nacionales.
* Во избежание поражения электрическим током перед установкой необходимо
× 2
Дюбель Силиконовая шайба
отключить электропитание. Во время установки следует строго следовать инструкции
Неправильная установка может привести к таким последствиям, как пожар,
поражение электрическим током и падение лампы и т.д.
Чтобы избежать опасностей и повреждений, светильник должен устанавливать
квалифицированный электрик, а провода должны соответствовать
электротехническим стандартам IEEE или государственным стандартам.
× 2
Саморез
× 2
Инструкция по установке
I. Просверлить отверстия
1.Откройте у паковку, выньте п отолочный
свети льник, а затем снимите абаж ур, враща я
его прот ив часовой стрелки .
2.Поме стите зад нюю панель в монтажн ое
положение на потолок, используйте карандаш,
чтобы с делать отме тку в положени ях отверст ий,
а затем удалите основание;
3.Сделайте отверстия сверлом φ6 мм, глубин а
сверления дол жна быть ≥40 мм , а затем
поместите дюбели в отверстия.
II. Монтаж основания
1.Вставьте шну р питания чере з силиконову ю
муфту на задней панели.
2.Используйте саморезы для крепления
основания на потолке.
* AПосле установки проверьте прочность установки
основания; иначе может возникнуть опасность
падения лампы.
III. Подключение питания
1.Очист ите шнур пита ния примерно на 6 -8 мм,
подк лючите прово д фазы, нулевую линию и пр овод
заземления к потолочному с ветильник у,
исполь зуйте отвертк у, чтобы затянуть к леммный
винт, а зат ем использу йте винты дл я фиксации
крышки клеммной коробки.
* Это устройство должно быть заземлено!
IV. Установка лампы
1. Установите абажур, вращая его по
часовой стрелке.
Кабель питания
6-8mm
Особенности
Светочувствит
ельность
Индукционн
ый датчик
присутствия
Защита от
пыли и
насекомых
Высокая
цвето-передача
Базовые характеристики:
Модель: YLXD09YL
Мощность: 10W
Рабочая влажность: 0%-85%RH
Рабочая температура: -10℃ ~ 40℃
Входное напряжение: 220-240V ~ 50/60Hz 0.08A
Диапазон индукции: в радиусе (R) между потолочным освещением и полом (120 см≤R≤200 см)
Notes:
1、Светильник будет включен в тестовом режим, когда он будет подключен в первый раз.
Самотестирование будет завершено, если во время первого теста не будет
обнаружено никакой активности человека.
2、Могут быть определенные погрешности в диапазоне индукции из-за высоты
пользователя, температуры в помещении и других факторов;
3、Диапазон индукции R расчитан на высоту помещения 290 см в качестве расстояния
обнаружения.
Коэффициент мощности: 0.5
Световой поток: 670lm
Цветовая температура: 5700K
Таймер сенсора: 60s (rated)
Меры безопасности
1. Перед использованием убедитесь, что напряжение сети соответствует
рабочему напряжению изделия. Использование неправильного
напряжения может повредить изделие и создать угрозу безопасности.
2. Источники света светильника не подлежат замене. Не разбирайте
устройство. Замените светильник, когда источники света перегорят.
3. Потолочный светильник выделяет тепло во время работы. Для лучшего
рассеивания тепла обеспечьте сквозную вентиляцию.
4. Светильником можно управлять с помощью пульта дистанционного
управления (не входит в комплект) и ПО для смартфона. Отключение
светильника с помощью пульта дистанционного управления или ПО для
смартфона не означает выключение питания. В этом случае запрещено
касаться светильника, заменять или разбирать его, в противном случае
существует опасность поражения электрическим током, получения травм
и даже смерти.
5. Светильник должен устанавливать квалифицированный электрик, а
провода должны соответствовать электротехническим стандартам IEEE
или государственным стандартам.
 Loading...