

Page 1
ALLOY
WOLFER
TREXX
User manual
Page 2
3
Yedoo
Wolfer 28″/ 20″
Maximal load:
120 kg
Trexx 26″/ 20″
Maximal load:
130 kg
i
5 mm4 mm 6 mm
+
Yedoo Wolfer
EN 5
CZ 12
DE 19
RU 26
SK 33
Contents
Visit our website www.yedoo.eu
for more language versions.
2
Page 3
4
5 mm4 mm 6 mm
+
Yedoo Trexx
Introduction
We recommend to entrust the installation, adjustment and
regular maintenance to a specialised bicycle shop. Improper
intervention can lead to damage of the scooter or to an accident
with serious health consequences.
If you are technically capable, do not worry and let’s assemble
this scooter with us.
Send your questions, comments and suggestions for
improvement of our products to our e-mail box: info@yedoo.eu.
More information from the
world of scooters and the list
of distributors can be found at
www.yedoo.eu.
EN
5
Page 4
76
EN EN
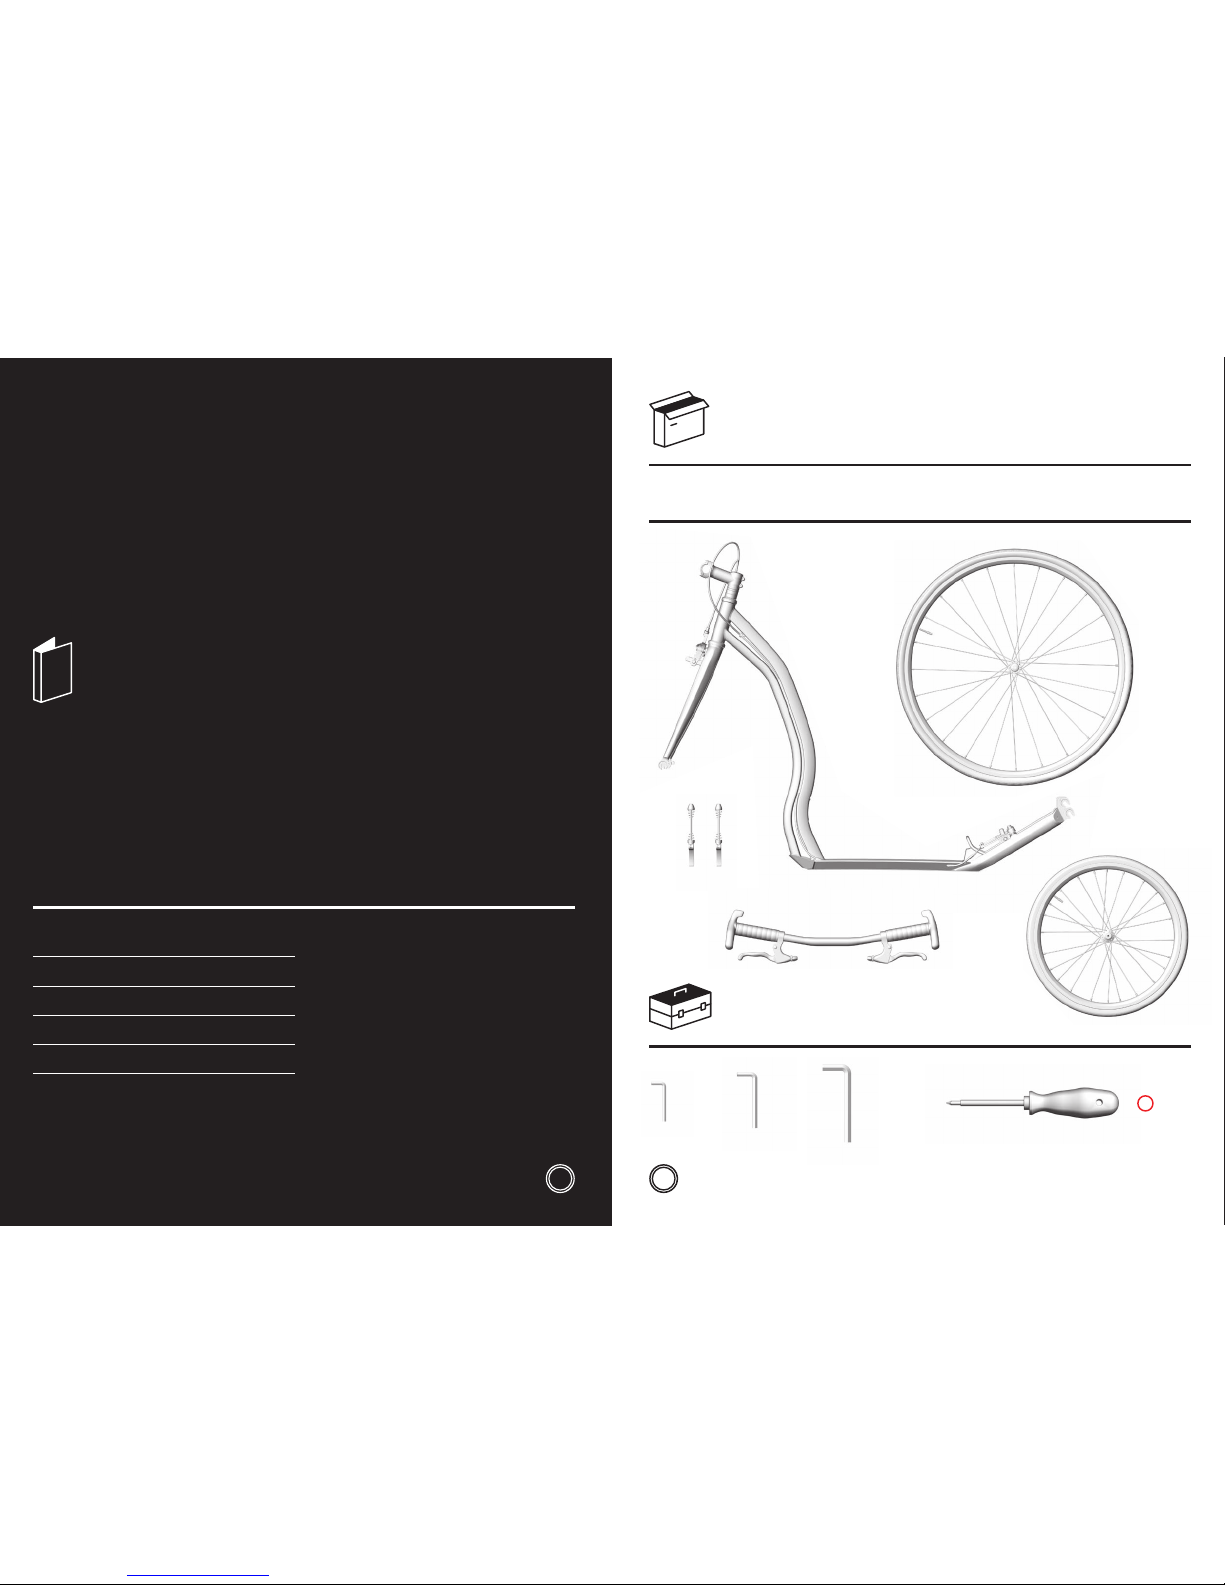
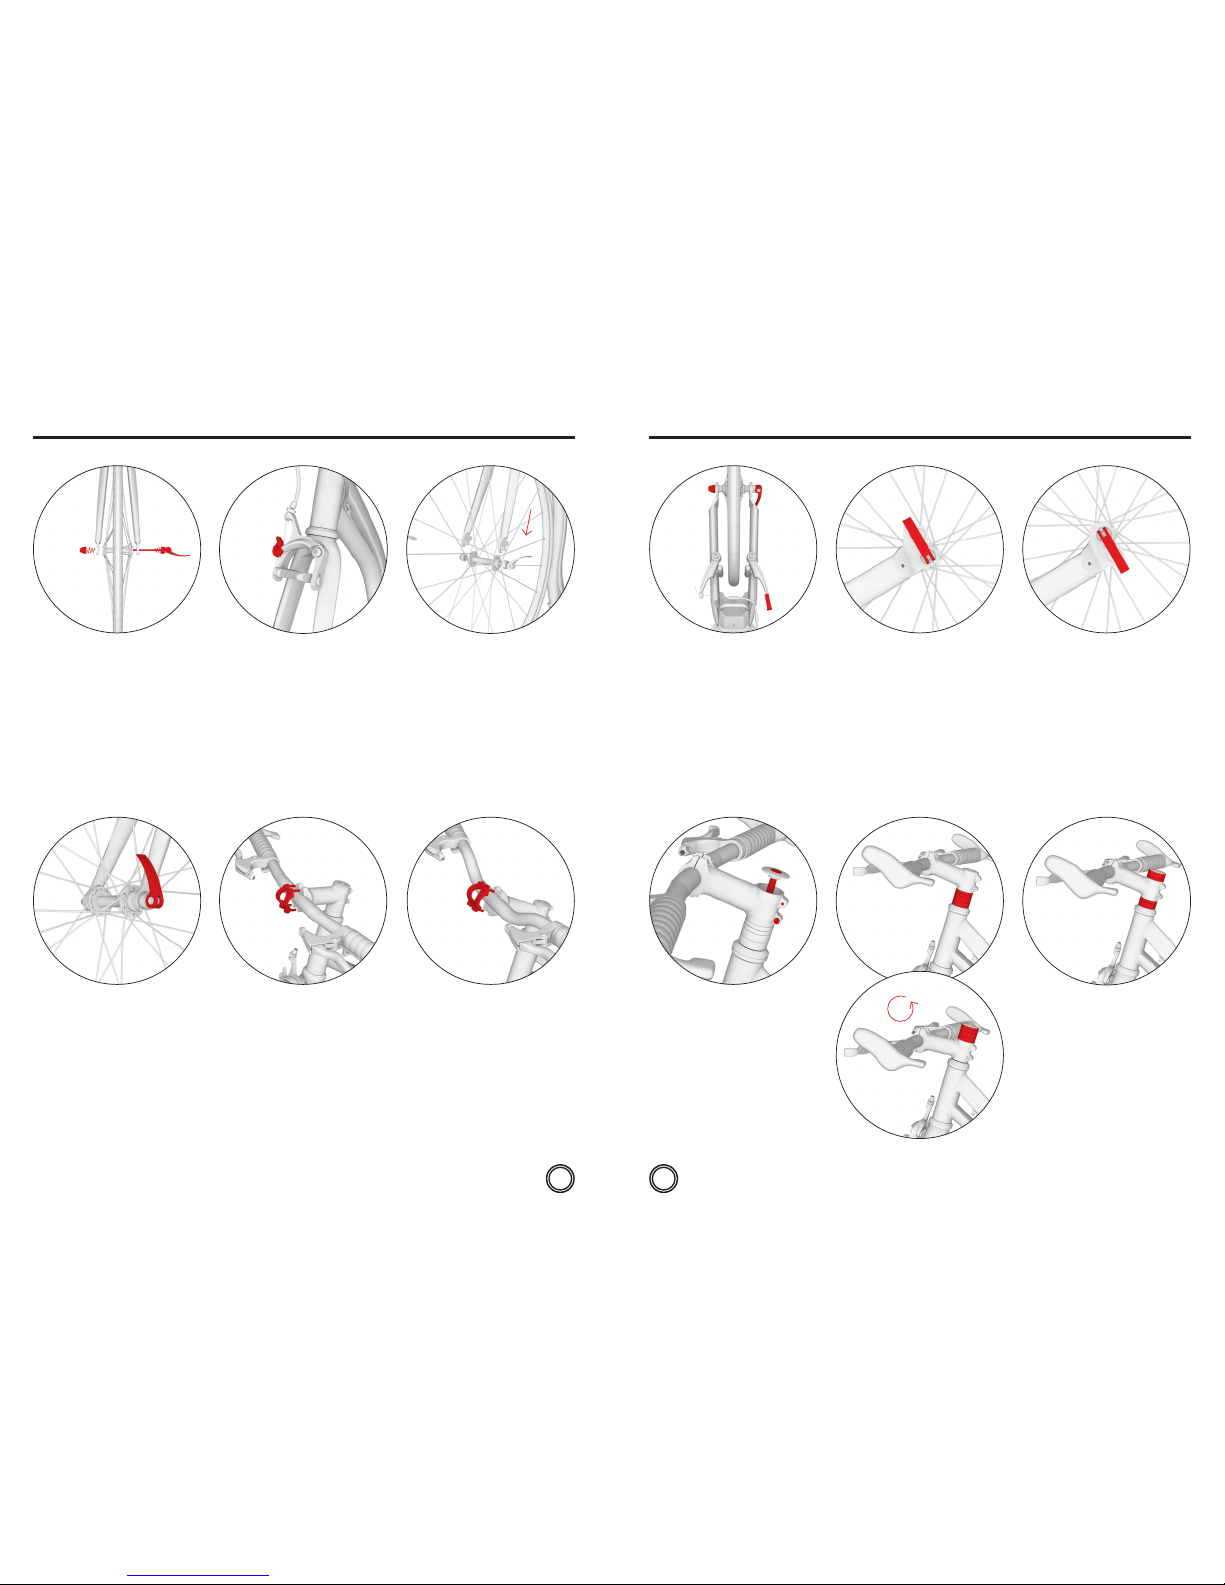
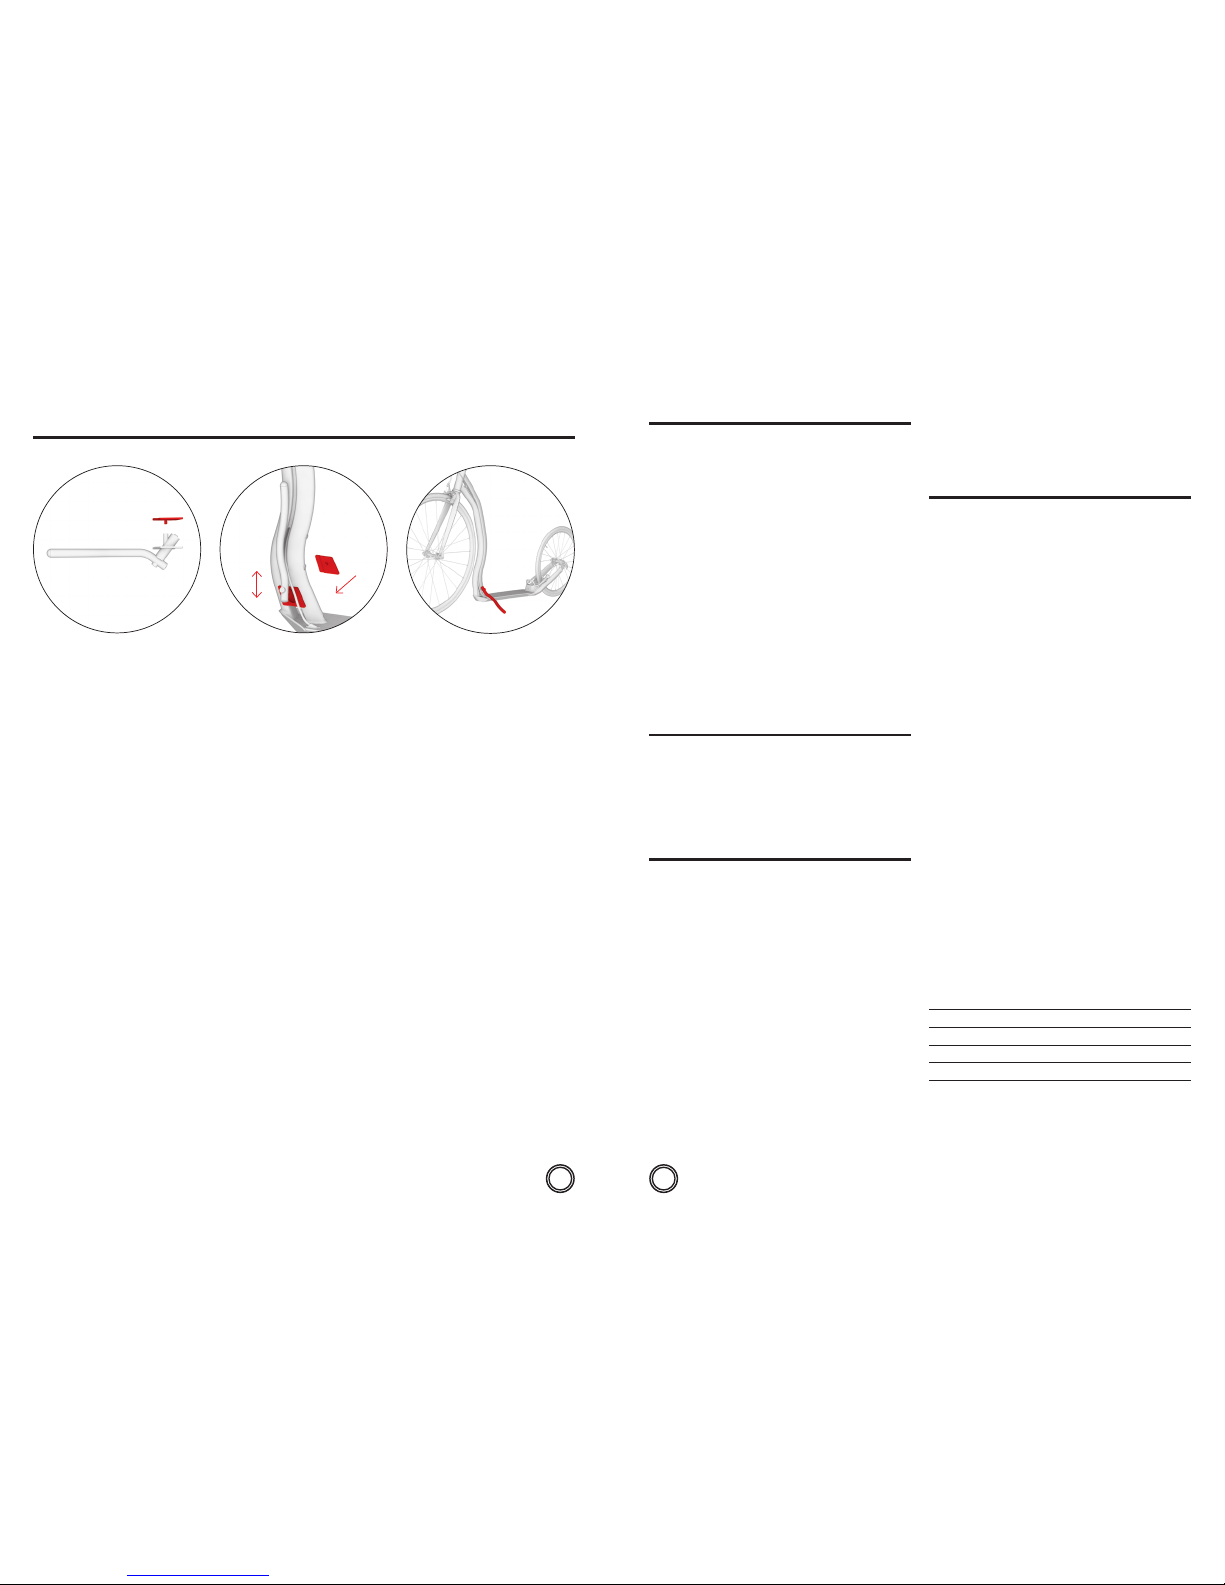
2.
5.
3.1.
4.
The installation is the same for both
models (Wolfer, Trexx), it diers only
inminor details (see additional pictures).
When tightening the connections do not
exceed the specified tightening torque.
Installing the front wheel
Insert the quick release into the wheel,
soon the both sides of the wheel the
narrow ends of the springs face the
center of the wheel.
Tighten the adjustment nut of the quick
release so you will feel a noticeable
resistance just before you close it
completely. Close the quick release lever
in a position so it does not touch the fork
and simultaneously it cannot be opened
accidentally while riding.
Handlebars installation
Insert the handlebars on the stem
and tighten the screws of the sleeve.
The labels (not shown in a picture)
should be clearly visible from
the front view.
Firstly, check the front fork of the
scooter if it is in the right direction
(V-brakes shoulders should point
forwards), then release the brake
jaws byrotating the lever.
Insert the wheel into the front fork
so it is exactly in the middle. Caution:
The tire tread should face forward in the
riding direction (see arrow on the side of
the casing).
Wolfer
Trexx
6.a 6.c
7.a 7.b 7.d
7.c
6.b
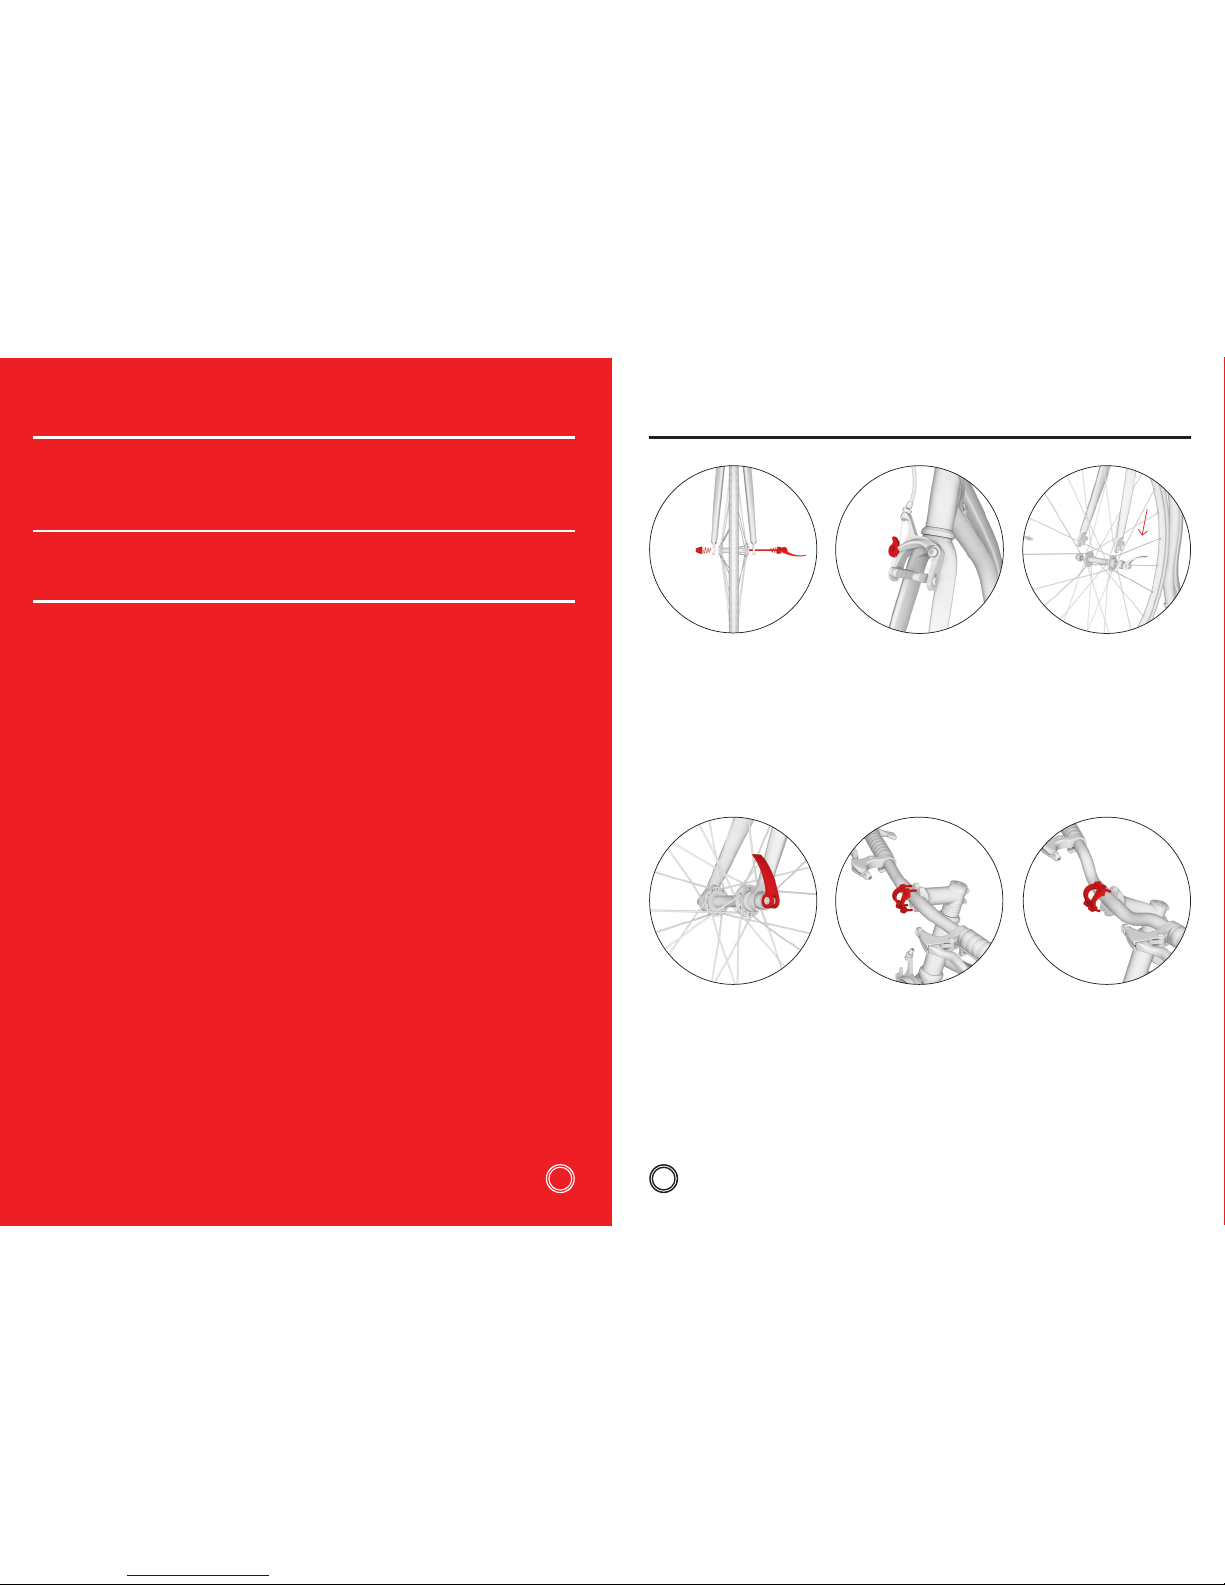
Installing the rear wheel
Release the brake wire from the guide
(1), Put the wheel in one of the two fork
dropouts (see 6.b, 6.c.) then center the
wheel and tighten the quick release (2).
Two-position rear fork enables to
adjust the height of the footrest. Use the
bottom position for riding in a terrain.
Close the quick release lever. It should
point upwards.
The upper fork position, which reduces
the height of the footrest, is designed to
ride on a smooth, flat surface. Riding will
be less physically demanding. Close the
quick release lever downwards.
Adjusting the height of the handlebars
Loosen the screws on the stem and
adjust the handlebars to the desired
height using spacer rings. To set the
handlebars to the lowest position,
turn the stem so it points downwards,
see fig.7.c. After adjusting the handlebar
height, first tighten the headset screw
(1), then the side screws (2, 3).
1
1
2
2
3
5–6 Nm 5–6 Nm
5–6 Nm
Installation manual
6–8 Nm
Page 5

98
EN EN
9.b9.a
Adjusting the angle of the brake levers
On both brake levers loosen the screw
on the sleeve. For the best results, stand
on the footrest, grab the handlebars and
stretch your fingers so they extend the
straight line of your hands. Set the brake
levers in this position and tighten the
two mounting screws.
You can adjust the position of the
corners on the Yedoo Wolfer model
using the mounting screws on the
picture.
Check the brake pads if they moved
away from the rim suiciently (1–2mm)
when the brake lever is released.
Distance of the brake pads can be
adjusted by tightening or releasing of
the brake wire anchor bolt (1). If the
wheel during the rotation crossed the
brake pad at some point, adjust the
distance of the brake arms symmetrically
with tensioning bolts (2).
Adjusting the rear brake is the same for
both models.
Insert the brake wire back into the guide
(1). Check the brake pads during braking
if their entire surface fit tightly to the
side of the rim. If not, adjust the screw
(2), which attaches the brake pads to
the shoulders of V- brakes. Brake Shoes
must not touch the tyre.
Check the brake pads if they moved
away from the rim suiciently (1–2mm)
when the brake lever is released.
Distance of the brake pads can be
adjusted by tightening or releasing of
the brake wire anchor bolt (1). If the
wheel during the rotation crossed the
brake pad at some point, adjust the
distance of the brake arms symmetrically
with tensioning bolts (2).
8.
Installing brake wires
Squeeze the brake lever to the maximum
and insert the end of the brake wire into
the round lug (1) Insert the wire into the
groove and tighten the set screw (2)
and the nut (3). Repeat the process with
the other brake. The rear brake wire is
usually mounted to the right brake lever
and the front brake wire to the left.
1
2
12. 13.11.b
1
1
1
2 2
2 2
2 2
3
10.b
Adjusting the front brakes – Wolfer
The entire surface of the brake pads
should fit tightly to the side of the rim
while braking. If not, adjust the position
of the brake pads using the screws,
which attaches the brake pads to the
arms of the brake (1). The pads may
not touch the tyre and while the brake
levers are released they should be
1–2mm away from the rim. The distance
of the brake pads can be adjusted by
tightening or releasing of the brake wire
in the anchor bolt (2).
If the wheel touches the brake pad at
some point during the rotation, turn the
whole brake mechanism until the brake
arms are evenly spaced from the rim.
To lock the position of the arms, turn the
lever downwards (1).
11.a 14.b14.a
Adjusting the bowden cables
Adjust the position of the cables
and make sure they do not exceed
over the frame of the scooter
(especially in the rear fork area).
Attach them to the socket in front of
the frame.
Adjusting the front brakes – Trexx
Insert the brake wire back into the guide
(1) and check the brake pads during
braking if their entire surface fits tightly
to the side of the rim. If not, adjust the
brake shoes position with the screw (2),
which attaches the brake pads to the
shoulders of V-brakes. Brake pads must
not touch the tyre.
15.
Anti-slip tapes
Use the spare anti-slip tapes to enhance
the anti-slip eect of the footrest. Easily
stick the into the empty slots of the
footrest. Caution: Clean and degrease
the footrest thoroughly before the
installation.
1
2 2
10.a
2
1 1
1
6–7 Nm 6–7 Nm
Installation manual
Page 6
1110
EN EN
1. 2. 3.
Assembling the stand
The stand is not included. You can
purchase it together with other Yedoo
accessories at your local dealer.
See www.yedoo.eu.
Mount the stand in the area where the
front profile of the frame is spread out.
For the best stability for a given model
choose the right height for the stand
to mount. The stand should not exceed
the frame of the scooter in the location
designated for riding.
The maximum capacity of the stand
is about 15kg. Do not stand on the
parked scooter.
Installation manual
Safety recommendations
The scooter in the basic equipment was designed for riding in
daylight in areas designated for sport and recreation, ideally on
a smooth, dry surface.
For riding on roads and in the dark you must equipped the
scooter with additional safety devices (lights, reflectors etc.)
in compliance with applicable regulations in your country.
Observe traic rules, principles of safe riding and wear
personal protective equipment (helmet, bike gloves, knee and
elbow pads, boots, etc.).
Before each ride check your brakes and overall technical
condition of the scooter. Inflate the tires to the recommended
maximum pressure value (see the side of the tire). Do not
exceed its capacity. The scooter is designed only for one rider.
Do not overload the scooter thus it is not intended for jumps or
an acrobatic ride.
All components decreasing the speed (brake pads, rims, tires,
etc.) get hot while in use. Do not touch any of the parts until
they have cooled down!
Riding instructions
Keep both hands on handlebars while riding. While you use
one leg for taking o, use your second leg for standing on the
footrest. Alternate your legs regularly. Press the brake levers on
the handlebars to apply the brakes. Caution: Sudden braking
may cause a fall.
Maintenance
Proper maintenance will improve safety and extend the life of
your scooter. Therefore, tighten the screw connections, check
the condition of the quick release, tire pressure and lubricate
moving parts (bearings in the wheels and handlebars, brake
lever pins, brake pads, brake wires, etc.) regularly.
Make sure that the applied lubricant has not get on the rims
and brake pads. Grease reduces their eect! If that happens,
degrease soiled areas with for example technical gasoline.
Check the height of the tread of the tires regularly and replace
the tires with new ones with the same parameters if necessary.
Properly mark the scooter, which is not ready for use.
Check the condition of self-locking nuts regularly, if they get
loose spontaneously, replace them with new ones). Regularly
check the wheel spokes, uneven tension of the wires can cause
cracking or decentralization of the wheels.
The product complies with the relevant EU standards
(EN14619) and it also received certificates of quality and safety
by a leading Czech testing institute (Strojírenský zkušební
ústav,s.p.) as well as by an internationally recognized TÜV SÜD
Czech s.r.o.
The manufacturer and importer in the EU is INTREA – PIKO, Ltd.,
Sasanková 2657/2, 106 00 Prague 10, Czech Republic,
www.yedoo.eu.
Exercise of rights arising
from defective performance
General provisions
Content, scope and duration of the purchaser’s rights arising
from defective performance is governed by the applicable laws
of the Czech Republic, in particular the relevant regulations
of the Civil Code (Act No. 89/2012 Coll.) And the Consumer
Protection Act (Act No. 634/1992 Coll.). The rights of the
purchaser within these regulations are not aected by this
document or the information contained in it.
Period for exercise of rights arising from defective
performance
The purchaser can apply the right from defects in newly bought
scooter Yedoo (hereinafter goods) within a period of 24 months
from the day of receipt. If the buyer defines the defect of the
goods legitimately, the period for exercising rights arising from
defective performance is suspended for the time during which
the buyer cannot use the goods.
Specifications of application of rights arising from the
defective performance
Rights arising from the defective performance are applied to
the dealer where the goods were purchased (see details below).
We recommend to submit this document, proof of purchase
and a complete scooter free from any impurities when applying
the rights from defects.
The seller will issue a written confirmation of the exercise of rights
arising from defective performance or a confirmation of repair.
Specification of rights of defective performance
When assembling the scooter the instructions given in the
installation manual must be followed. The scooter must be used
exclusively for the purpose for which it was made. The scooter
must be stored and maintained according to the provided
manufacturer’s instructions. The manufacturer’s liability does
not apply to defects caused exclusively by improper installation
or use of scooters in conflict with the user manual.
Model of the scooter:
Serial number of the frame:
Date of sale:
Vendor:
Stamp and signature:
Page 7
13
Úvod
Montáž, seřízení a pravidelnou údržbu doporučujeme svěřit
odbornému cykloservisu. Neodborné zásahy mohou vést
k poškození koloběžky či nehodě s vážnými zdravotními následky.
Pokud jste ale technicky zdatní, ničeho se nebojte a s chutí
sedomontáže pusťte s námi.
Dotazy, připomínky a náměty na zlepšení našich výrobků
námprosím posílejte na e-mail: info@yedoo.cz.
Více informací ze světa
koloběžek a seznam distributorů
najdete na www.yedoo.cz.
CZ CZ
2.
5.
3.1.
4.
Postup montáže je pro oba
modely koloběžek (Wolfer, Trexx)
stejný, liší se jen v detailech,
viz doplňující obrázky.
Při utahování spojů nepřekračujte
uvedený moment utažení.
Montáž předního kola
Do kola vložte rychloupínák tak,
aby na každé straně byla jedna pružinka
se zúžením směřujícím ke středu kola.
Dotáhněte seřizovací matici
rychloupínáku, těsně před dovřením
rychloupínací páčky byste měli cítit
znatelný odpor. Páčku zavřete v takové
pozici, aby se nedotýkala vidlice
a zároveň nemohlo dojít k jejímu
náhodnému otevření během jízdy.
Instalace řídítek
Řídítka nainstalujete na představec
a utáhněte šrouby objímky. Nápisy na
řídítkách (nejsou zobrazené na obrázku)
by měly být při čelním pohledu čitelné.
Nejprve zkontrolujte, zda je přední
vidlice koloběžky natočená ve
správném směru (ramena V-brzdy
směřují dopředu), pak uvolněte
brzdové čelisti pootočením páčky.
Kolo vsaďte do přední vidlice tak,
aby bylo přesně uprostřed. Pozor:
Vzorek pneumatiky by měl směřovat
dopředu po směru jízdy, viz směrová
šipka na boku pláště.
Wolfer
Trexx
5–6 Nm 5–6 Nm
Montážní návod
12
Page 8

1514
CZ
6.a 6.c
7.a 7.b 7.d
7.c
6.b
Montáž zadního kola
Uvolněte brzdové lanko z vodítka (1),
vložte kolo do jednoho ze dvou
úchytů vidlice, viz obr. 6.b, 6.c.,
kolo vycentrujte a dotáhněte
rychloupínák (2).
Dvoupolohová zadní vidlice
umožňuje uzpůsobit výšku stupátka.
Spodní úchyt použijte pro jízdu terénem.
Rychloupínací páčku dovřete tak,
aby směřovala nahoru.
Horní úchyt vidlice, který sníží výšku
stupátka a zároveň odlehčí stojné noze,
je určen pro jízdu na hladkém a rovném
povrchu. Jízda bude méně fyzicky
namáhavá. Rychloupínací páčku dovřete
směrem dolů.
Nastavení výšky řídítek
Uvolněte šrouby na představci a nastavte
požadovanou výšku řídítek pomocí
vymezovacích kroužků. Pro nastavení
nejnižší polohy přetočte představec
tak, aby směřoval dolů, viz obr. 7.c.
Po nastavení výšky řídítek nejprve
dotáhněte šroub hlavového složení (1),
pak teprve boční šroubky (2, 3).
1
1
2
2
3
6–8 Nm
5–6 Nm
9.b
10.b
9.a
Nastavení sklonu brzdových páček
U obou brzdových páček povolte
upevňovací šroubek na objímce. Správný
sklon brzdových páček nastavíte tak,
že si stoupnete na stupátko, uchopíte
řídítka a natáhnete prsty tak, aby
prodlužovaly přímku ruky. Do této polohy
nastavte páčky a u obou dotáhněte
upevňovací šroubek.
U modelu Yedoo Wolfer můžete
pomocí upevňovacích šroubků na
obrázku upravit také polohu rohů.
Seřízení přední brzdy – Wolfer
Brzdové špalíky by při zabrzdění měly
dosedat celou svou plochou na bok
ráfku. Pokud ne, upravte jejich polohu
pomocí šroubku, kterým jsou špalíky
přichyceny k ramenům brzdy (1). Špalíky
se nesmí dotýkat pláště a při uvolnění
brzdové páčky by se měly 1–2 mm
oddálit od ráfku. Vzdálenost špalíků
lze upravit přitažením nebo povolením
brzdového lana v kotevním šroubu (2).
Pokud kolo při otáčení škrtá o brzdový
špalík, pootočte celým brzdovým
mechanismem tak, aby byla brzdová
ramena stejnoměrně vzdálena od ráfku.
Polohu ramen uzamkněte otočením
páčky směrem dolů (1).
11.a
Seřízení přední brzdy – Trexx
Vložte brzdové lanko zpět do vodítka (1)
a zkontrolujte, zda brzdové špalíky při
zabrzdění dosedají celou svou plochou
na bok ráfku. Pokud ne, upravte jejich
polohu pomocí šroubku (2), kterým jsou
špalíky přichyceny k ramenům V-brzdy.
Špalíky se nesmí dotýkat pláště.
8.
Instalace brzdových lanek
Zmáčkněte brzdovou páčku na
maximum a do kulatého očka (1) vložte
konec brzdového lanka. Lanko vložte
do drážky a utáhněte stavěcí šroub (2)
a matici (3). Stejný postup zopakujte
i na druhé brzdě. Zadní brzdové lanko
se zpravidla upevňuje do pravé brzdové
páčky, přední do levé.
1
1
2
2 2
1
3
6–7 Nm 6–7 Nm
Montážní návod
CZ
10.a
2
1 1
Page 9

1716
14.b14.a
Zkontrolujte, zda se špalíky při uvolnění
brzdové páčky dostatečně oddálí
od ráfku (1–2 mm). Vzdálenost špalíků
lze upravit přitažením či povolením
brzdového lanka v kotevním šroubu
(1). Pokud kolo při otáčení v některém
místě škrtá o brzdový špalík, symetricky
upravte vzdálenost brzdových ramen
napínacími šroubky (2).
Seřízení zadní brzdy je pro oba
modely stejné.
Vložte brzdové lanko zpět do vodítka
(1). Zkontrolujte, zda brzdové špalíky při
zabrzdění dosedají celou svou plochou
na bok ráfku. Pokud ne, upravte jejich
polohu pomocí šroubku (2), kterým jsou
špalíky přichyceny k ramenům V-brzdy.
Špalíky se nesmí dotýkat pláště.
Zkontrolujte, zda se špalíky při uvolnění
brzdové páčky dostatečně oddálí
od ráfku (1–2 mm). Vzdálenost špalíků
lze upravit přitažením či povolením
brzdového lanka v kotevním šroubu
(1). Pokud kolo při otáčení v některém
místě škrtá o brzdový špalík, symetricky
upravte vzdálenost brzdových ramen
napínacími šroubky (2).
Upravení bowdenů
Upravte polohu bowdenů tak,
aby nikde (obzvláště u zadní vidlice)
nepřesahovaly rám koloběžky.
Vpřední části rámu jej upevněte
do objímky.
15.
Protiskluzové pásky
Pro zvýšení protiskluzového účinku
stupátka použijte náhradní protiskluzové
pásky, které jednoduše nalepíte do
prázdných drážek stupátka. Pozor:
Před aplikací stupátko řádně očistěte
a odmastěte.
Montážní návod
1. 2. 3.
Montáž stojánku
Stojánek není součástí balení,
stejně jako ostatní doplňky Yedoo si jej
můžete dokoupit. Více na yedoo.cz.
Stojánek namontujte v místě,
kde je přední profil rámu rozevřen.
Výšku upevnění stojánku zvolte tak,
aby pro daný model poskytl největší
stabilitu. Stojánek by v záložní poloze
neměl přesahovat rám koloběžky.
Maximální nosnost stojánku je cca 15 kg.
Na zaparkovanou koloběžku nestoupejte.
CZ CZ
12. 13.11.b
1
1
1
2 2
2 2
2 2
Page 10

1918
Bezpečnostní doporučení
Koloběžka je v základní výbavě určena pro jízdu za denního
světla v prostorách vymezených pro sport a rekreaci,
ideálně nahladkém a suchém povrchu.
Pro jízdu na pozemních komunikacích a pro jízdu za tmy
jimusíte dovybavit bezpečnostními prvky (světla, odrazky atd.)
v souladu s platnými předpisy ve vaší zemi. Dodržujte pravidla
silničního provozu, zásady bezpečné jízdy a noste osobní
ochranné pomůcky (přilbu, cyklistické rukavice, chrániče kolen
a loktů, pevné boty apod.).
Před každou jízdou zkontrolujte funkčnost brzd a celkový
technický stav koloběžky. Pneumatiky hustěte na maximální
doporučenou hodnotu tlaku, viz boční strana pláště.
Nepřekračujte její nosnost. Koloběžka je určena pouze pro
jednoho jezdce. Vyvarujte se přetěžování koloběžky, koloběžka
není určena pro skoky ani akrobatickou jízdu.
Všechny komponenty snižující rychlost (brzdové špalíky, ráfky,
pneumatiky apod.) se při používání zahřívají, nedotýkejte se
jich, dokud nevychladnou!
Jízdní pokyny
Při jízdě mějte vždy obě ruce na řídítkách. Zatímco se jednou
nohou odrážíte, druhou nohou stůjte na stupátku koloběžky.
Pravidelně střídejte odrazovou nohu. Pro zabrzdění stiskněte
brzdové páčky na řídítkách. Pozor: Prudké zabrzdění může
způsobit pád.
Údržba
Řádná údržba zvýší bezpečnost a prodlouží životnost vaší
koloběžky. Proto pravidelně dotahujte šroubové spoje,
kontrolujte stav rychloupínáků, tlak v pneumatikách
apromazávejte pohyblivé části (ložiska kol a řídítek,
čepy brzdových páček, čelisti brzd, brzdová lanka, atd.).
Dejte však pozor, aby se mazivo nedostalo na ráfky a brzdové
destičky. Mastnota snižuje jejich účinek! Pokud se tak stane,
odmastěte znečištěné části např. technickým benzínem.
Pravidelně kontrolujte výšku vzorku na pláštích kol, v případě
potřeby vyměňte pláště za nové se shodnými parametry.
Koloběžku, která není připravena pro použití, vhodně označte.
Kontrolujte stav samojistných matic (pokud se za jízdy
samovolně uvolňují, vyměňte je za nové). Pravidelně kontrolujte
výplet kol, nestejnoměrné napnutí drátů ve výpletu může
způsobit jejich praskání nebo rozcentrování kol.
Výrobek splňuje náležité normy EU (ČSN EN 14619 SPORTOVNÍ
POTŘEBA) a získal certifikáty kvality a bezpečnosti od předního
českého zkušebního ústavu (Strojírenský zkušební ústav, s. p.)
imezinárodně uznávaného TÜV SÜD Czech s. r. o.
Výrobce a dovozce do EU INTREA – PIKO, s.r.o., Sasanková
2657/2, 106 00 Praha 10, Česká republika, www.yedoo.cz.
Uplatnění práv
z vadného plnění
Obecná ustanovení
Obsah, rozsah a trvání práv kupujícího z vadného plnění
zboží se řídí platnými právními předpisy České republiky,
ato především příslušnými ustanoveními občanského
zákoníku (z.č.89/2012 Sb.) a zákona o ochraně spotřebitele
(z.č.634/1992 Sb.). Práva kupujícího ve smyslu těchto předpisů
nejsou tímto dokladem, ani v něm uvedenými informacemi nijak
dotčena.
Doba pro uplatnění práv z vadného plnění
Právo z vady u nově zakoupené koloběžky Yedoo (dále jen
zboží) může kupující uplatnit v době 24 měsíců od jejího
převzetí. Vytkne-li kupující vadu zboží oprávněně, lhůta pro
uplatnění práv z vadného plnění neběží po dobu, po kterou
kupující nemůže zboží užívat.
Způsob uplatnění práv z vadného plnění
Práva z vadného plnění se uplatňují u prodejce, u kterého
kupující zboží zakoupil (viz údaje níže). Při uplatnění vad
zboží doporučujeme předložit tento doklad, doklad o koupi
akompletní nečistot zbavenou koloběžku. O uplatnění práv
zvadného plnění, případně o provedení opravy vystaví
prodejce kupujícímu písemné potvrzení.
Podmínky trvání práv z vadného plnění
Při montáži koloběžky musí být dodrženy pokyny uvedené
vmontážním návodu. Koloběžka musí být používána výhradně
kúčelu, k jakému byla vyrobena. Koloběžka musí být
skladována a udržována podle výrobcem uvedených pokynů.
Na vady způsobené výlučně nesprávnou montáží či používáním
koloběžky v rozporu s uživatelskou příručkou se odpovědnost
výrobce nevztahuje.
Model koloběžky:
Výrobní číslo rámu:
Datum prodeje:
Prodejce:
Razítko a podpis:
CZ
Einleitung
Grundsätzlich empfehlen wir die Montage, Einstellung und
regelmäßige Wartung einem spezialisierten Fahrradservice
zuüberlassen. Unsachgemäße Einsatz oder Veränderungenen
am Tretroller können Materialschäden und schwere Unfälle
zurFolge haben.
Falls Sie technische Fertigkeiten besitzen und sich nicht davor
scheuen, werden Sie allerdings sehen, dass die Montage ganz
leicht ist.
Fragen, Bemerkungen und Verbesserungsvorschläge zu unseren
Produkten schicken Sie uns bitte an unsere E-Mail Adresse:
info@yedoo.eu.
Mehr Informationen aus der
„Tretroller-Welt“ und eine Liste
der Vertreiber finden Sie unter
www.yedoo.eu.
19
DE
Page 11

2120
DE DE
2.
5.
3.1.
4.
Die Vorgehensweise ist für beide
Modelle (Wolfer, Trexx) gleich,
sie unterscheidet sich nur in Details,
siehe ergänzende Bilder.
Beim Festziehen überschreiten Sie nicht
den angegebenen Festziehmoment.
Montage des vorderen Rades
Setzen Sie den Schnellspannhebel in
das Rad so ein, dass an jeder Seite eine
Feder mit Verengung zur Radmitte ist.
Drehen Sie die Schraubenmutter nur so
nach, dass Sie vor dem Schließen des
Schnellspannhebels einen Widerstand
fühlen. Schließen Sie den Hebel so,
dass er die Gabel nicht berührt und sich
während der Fahrt nicht önen kann.
Anbringen der Lenkerstange
Installieren Sie die Lenkerstange an den
Anbau und ziehen Sie die Schrauben des
Lenkstangenvorbaus fest. Die Logos
(auf der Abbildung nicht dargestellt)
sollten bei Frontansicht lesbar sein.
Bringen Sie die Vordergabel des
Tretrollers so in Position, dass die Arme
der V-Bremse nach vorne gerichtet sind,
dann önen Sie die Bremsarme durch
Drehen des Hebels.
Führen Sie die Radachse in die Schlitze
der vorderen Gabel so, dass es in der
Mitte ist. Achtung: Das Laulächenprofil
des Reifens (Rillen in Form von Pfeilen)
muss nach vorne in Fahrrichtung zeigen.
Wolfer
Trexx
6.a 6.c
7.a 7.b 7.d
7.c
6.b
Montage des hinteren Rades
Hängen Sie das Bremsseil aus (1),
setzen Sie das Rad in einen der
beiden Gabelhalter ein, siehe Abb.
6.b, 6.c., das Rad zentrieren und den
Schnellspannhebel (2) festziehen.
Die hintere Gabel mit zwei
Positionen ermöglicht die Einstellung
der Trittbretthöhe. Die untere
Gabelhalterung ist für Geländefahrten
bestimmt. Schließen Sie den
Schnellspannhebel so, dass er nach
oben zeigt.
Die obere Gabelhalterung, verringert
die Höhe des Trittbretts und entlastet
zugleich das Standbein, ist für Fahrten
auf ebener Oberfläche bestimmt.
DieFahrt ist somit weniger anstrengend.
Schließen Sie den Schnellspannhebel so,
dass er nach unten zeigt.
Einstellung der Lenkerhöhe
Lockern Sie die Schrauben des
Lenkstangenvorbaus und stellen Sie
die gewünschte Höhe des Lenkers mit
Hilfe der Ringe ein. Um die niedrigste
Position einzustellen, drehen Sie den
Lenkstangenvorbau nach unten, siehe
Abb. 7.c. Nach der Einstellung ziehen Sie
zuerst die Kopfschraube (1) fest, dann
die Seitenschrauben (2, 3).
1
1
2
2
3
5–6 Nm 5–6 Nm
6–8 Nm
5–6 Nm
Montageanleitung
Page 12

2322
DE
9.b
10.b
9.a
Einstellen der Bremshebel
Lösen Sie bei beiden Bremshebeln
die Schrauben Bremshebelfassung.
Richtiger Winkel der Bremshebel: Stellen
Sie sich auf das Trittbrett, greifen Sie
die Lenkstange so, damit sie die Gerade
der Hände verlängert. Fixieren Sie die
Bremshebel in diesem Winkel mit Hilfe
der Schraube.
Beim Yedoo Wolfer-Modell können Sie
mit Hilfe von Schrauben siehe Abbildung
auch die Position der Hörner einstellen.
Einstellung der vorderen Bremse –
Wolfer
Die Bremsbeläge sollten beim
Bremsen mit ihrer ganzen Fläche auf
der Seitenwand der Felge aufliegen.
Falls nicht, lösen Sie die Schraube
der Bremsklötze an den Armen der
V-Bremse (1) und positionieren diese.
Die Klötze dürfen nie den Mantel des
Reifens berühren und bei unbetätigtem
Bremshebel sollte deren Abstand von
der Felge etwa 1–2 mm betragen.
Dieser Abstand lässt sich durch
Anziehen oder Lockern des Bremsseils
in der Fixierschraube (2) regulieren.
Falls der Reifen beim Drehen an
irgendeiner Stelle den Bremsbelag
streift, drehen Sie das ganze
Bremssystem so, dass die Bremsarme
von der Felge gleichmäßig entfernt
sind. Durch das Drehen des Hebels nach
unten (1) stellen Sie die Position ein.
11.a 14.b14.a
Überprüfen Sie, dass der Abstand
der Bremsbeläge von der Felge bei
unbetätigtem Bremshebel etwa 1–2mm
beträgt. Dieser Abstand lässt sich
durch das Anziehen oder Lockern des
Bremsseils in der Fixierschraube (1)
regulieren. Falls der Reifen beim Drehen
an irgendeiner Stelle den Bremsbelag
streift, stellen Sie die Entfernung der
Bremsarme durch die Spannschrauben
(2) symmetrisch ein.
Einstellung der hinteren Bremse
ist fürbeide Modelle gleich.
Bremsseil in den Bremsenzug einhängen
(1) und prüfen Sie, ob die Bremsbeläge
beim Bremsen mit ihrer ganzen Fläche
auf der Seitenwand der Felge aufliegen.
Falls nicht, korrigieren Sie die Position
mit Hilfe der Feststellschraube (2),
mitder die Bremsklötze am Armen der
V-Bremse fixiert sind. Die Klötze dürfen
den Mantel des Reifens nicht berühren.
Überprüfen Sie, dass der Abstand
der Bremsbeläge von der Felge bei
unbetätigtem Bremshebel etwa 1–2mm
beträgt. Dieser Abstand lässt sich
durch das Anziehen oder Lockern des
Bremsseils in der Fixierschraube (1)
regulieren. Falls der Reifen beim Drehen
an irgendeiner Stelle den Bremsbelag
streift, stellen Sie die Entfernung der
Bremsarme durch die Spannschrauben
(2) symmetrisch ein.
Bowden-Einstellung
Positionieren Sie die Bowdens so, damit
sie den Rahmen des Tretrollers nicht
überschreiten (insbesondere bei
hinterer Gabel).
Im vorderen Teil des Rahmens in der
Fassung fixieren.
Einstellung der vorderen Bremse –
Trexx
Bremsseil in den Bremsenzug einhängen
(1) und prüfen Sie, ob die Bremsbeläge
beim Bremsen mit ihrer ganzen Fläche
auf der Seitenwand der Felge aufliegen.
Falls nicht, korrigieren Sie die Position
mit Hilfe der Feststellschraube (2),
mit der die Bremsklötze am Armen der
V-Bremse fixiert sind. Die Klötze dürfen
den Mantel des Reifens nicht berühren.
15.
Antirutschstreifen
Für das Trittbrett verwenden Sie
diebeiliegenden Antirutschstreifen,
die einfach in die Rillen des Trittbretts
geklebt werden. Achtung: Das Trittbrett
vor der Anwendung säubern und
entfetten.
8.
Montage der Bremszüge
Ziehen Sie den Bremshebel auf das
Maximum an und schieben Sie das
verdickte Ende des Bremsseils in die
Halterung. (1). Schieben Sie das Seil in
die Nut und zeihen Sie die Stellschraube
(2) und Mutter (3) fest. Wiederholen
Sie den gleichen Vorgang bei beiden
Hebeln. Der hintere Bremsteil wird in der
Regel im rechten Bremshebel befestigt,
der vordere im linken.
1
1
2
2 2
1
3
6–7 Nm 6–7 Nm
Montageanleitung
12. 13.11.b
1
1
1
2 2
2 2
2 2
10.a
2
1 1
Page 13

2524
DE DE
1. 2. 3.
Montage des Ständers
Der Ständer ist im Lieferumfang nicht
enthalten, sowie weiteres Zubehör,
dass Sie bestellen können.
Montieren Sie den Ständer an der Stelle,
wo das vordere Rahmenprofil geönet
ist. Wählen Sie bei gegebenem Modell
solche Befestigungshöhe, damit der
Ständer genügend Stabilität bieten
kann. Während der Fahrt sollte der
Stände nicht den Rahmen des Tretrollers
überschreiten.
Maximale Tragfähigkeit des Ständers
beträgt ca.15 kg. Bei ausgeklappten
Ständer nicht auf den Tretroller steigen.
Montageanleitung
Sicherheits -Empfehlungen
Der Tretroller ist in seiner Grundausstattung für eine Fahrt
bei Tageslicht auf Sportplätzen und Geländen in mäßig
strukturiertem Gelände bestimmt.
Für die Fahrten auf Verkehrswegen und für die Fahrt im
Dunkeln ist er mit Sicherheitselementen (Licht, Rückstrahler
usw.) gemäß den geltenden Straßenvorschriften in Ihrem Land
auszustatten. Halten Sie die Straßenverkehrsregeln sowie
die Grundsätze des sicheren Betriebes ein und benutzen Sie
Schutzmittel (Helm, Handschuhe, Ellbogen- und Knieschützer,
feste Schuhe usw.).
Überprüfen Sie vor jeder Fahrt die Funktionsfähigkeit
der Bremsen und den gesamten technischen Zustand
des Tretrollers. Überschreiten Sie auf keinen Fall den
max. Reifendruck, siehe an der Seite des Reifenmantels.
Überschreiten Sie nicht die max. Tragfähigkeit. Der Tretroller
ist nur für eine Person bestimmt. Der Tretroller ist nicht für
Belastungen wie Akrobatik und Sprünge ausgelegt.
Alle Bauteile, die die Geschwindigkeit regulieren (Bremsbeläge,
Felgen, Reifen usw.) erwärmen sich während der Nutzung,
fassen Sie diese nicht an, solange sie nicht abgekühlt sind!
Fahranweisungen
Halten Sie während der Fahrt immer beide Hände auf der
Lenkstange. Während Sie sich mit einem Fuß abstoßen, stehen
Sie mit dem anderen Fuß auf dem Trittbrett des Tretrollers.
Wechseln Sie regelmäßig das Bein, mit dem Sie sich abstoßen.
Zum Bremsen benutzen Sie die Bremshebel an der Lenkerstange.
Achtung: Ein scharfes Bremsen kann einen Sturz zur Folge haben.
Wartung
Richtige und regelmäßige Wartung erhöht die Sicherheit und
verlängert die Lebensdauer Ihres Tretrollers. Deshalb ziehen
Sie regelmäßig die Schraubenverbindungen nach, prüfen Sie
den Zustand der Schnellspannhebel, den Luftdruck in den
Reifen und schmieren Sie die beweglichen Teile (Lager der
Räder und Lenkerstange, Stifte der Bremshebel, Bremsbacken,
Bremsseileusw.)
Achten Sie aber darauf, dass das Schmiermittel nicht auf die
Felgen oder Bremsbeläge gelangt. Das Schmiermittel reduziert die
Bremswirkung entscheidend! Falls es trotzdem passiert, entfetten
Sie die verunreinigten Teile z.B. mit technischem Benzin. Prüfen
Sie regelmäßig die Profiltiefe an den Reifen, bei Bedarf gegen
neue mit gleichen Parametern tauschen. Fahruntüchtige Tretroller
sollten geeignet gekennzeichnet werden.
Prüfen Sie den Zustand der Sicherheitsmutter (werden sie
während der Fahrt locker, tauschen Sie sie gegen neue).
Prüfen Sie regelmäßig die Radbespannung, ungleichmäßige
Bespannung kann zum Bruch führen.
Das Produkt erfüllt die erforderlichen EU Normen (ČSNEN
14619 SPORTBEDARF) und erhielt ein Qualitäts- und
Sicherheitszertifikat von der führenden tschechischen
Prüfanstalt (Maschinenbau-Prüfanstalt, s. p.) und dem
international anerkannten TÜV SÜD Czech s. r. o.
Hersteller und Einführer in EU INTREA – PIKO, s.r.o.,
Sasanková 2657/2, 106 00 Praha 10, Tschechische Republik,
www.yedoo.eu.
Garantieschein
Allgemeine Bestimmungen
Der Inhalt, Umfang, sowie die zeitliche Gültigkeit der Garantie
richten sich nach den gesetzlichen Rechtsvorschriften
der Tschechischen Republik, insbesondere nach den
Bestimmungen des Bürgerlichen Gesetzbuches (Nr. 89/2012
Slg.) und des Verbraucherschutzgesetzes (Nr. 634/1992 Slg.).
Die Käuferrechte bleiben im Sinne dieser Vorschriften durch
diese Informationen unberührt.
Garantiebedingungen
Das Produkt muss gemäß der Montageanleitung
zusammengebaut werden. Der Tretroller muss gemäß den
Herstelleranweisungen gelagert und gewartet werden und
darf nicht zweckentfremdet verwendet werden. Der Hersteller
haftet nicht für Schäden, die durch falsche Montage oder
durch Nutzung in anderer als in diesem Benutzerhandbuch
erläuterten Art und Weise entstehen.
Garantieanspruch
Der Garantianspruch wird beim Händler geltend gemacht, bei
dem die Ware gekauft wurde (siehe unten). Wir empfehlen, die
Rechnung, die ausgefüllte Garantiekarte, sowie das vollständig
gereinigte Produkt beim Händler vorzulegen. Der Händler wird
dem Käufer im Gegenzug eine Übergabebestätigung für die
Übernahme zur Garantieabwicklung aushändigen.
Garantiebedingungen
Das Produkt muss gemäß der Montageanleitung
zusammengebaut werden. Der Tretroller muss gemäß den
Herstelleranweisungen gelagert und gewartet werden und
darf nicht zweckentfremdet verwendet werden. Der Hersteller
haftet nicht für Schäden, die durch falsche Montage oder
durch Nutzung in anderer als in diesem Benutzerhandbuch
erläuterten Art und Weise entstehen.
Produkt/Modell:
Produktionsnummer des Rahmens:
Verkaufsdatum:
Verkäufer:
Stempel und Unterschrift:
Page 14

2726
RU
Введение
Для монтажа, настройки и регулярного ухода рекомендуем
обратиться в квалифицированный велосервис.
Непрофессиональные вмешательства могут привести
к повреждению самоката или аварии с серьёзными
последствиями для здоровья.
Однако если вы технически подкованы, ничего не бойтесь
и можете монтаж провести и собственными силами вместе
с нами.
Вопросы, замечания и предложения по улучшению
наших изделий, пожалуйста, посылайте нам на e-mail:
info@yedoo.eu.
Больше информации
из области самокатов
и список дистрибуторов
находится на www.yedoo.eu.
RU
26
2. 3.1.
Порядок монтажа обеих моделей
(Wolfer, Trexx) одинаков, отличается
только в деталях, см. дополнительные
рисунки. При затяжке соединений
не превышайте указанного момента
затяжки.
Монтаж переднего колеса
В колесо вложите эксцентрик так, чтобы
на каждой стороне была одна пружинка
со суженным концом, направленным
к центру колеса.
Сначала сконтролируйте, повёрнута
ли передняя вилка в правильном
направлении (рычаги ободного тормоза
направлены вперёд), затем ослабьте
плечи тормоза, повернув рычажок.
Колесо вставьте в переднюю вилку
так, чтобы оно было точно посередине.
Внимание: Рисунок покрышки должен
быть направлен в сторону езды,
см. стрелку направления на боку
покрышки.
5.4.
Затяните настроечную гайку
эксцентрика так, чтобы незадолго
перед закрытием рычажка эксцентрика
вы почувствовали значительное
сопротивление. Рычажок закройте
в таком положении, чтобы он не
прикасался к вилке, и в то же время
чтобы исключить его случайное
открытие во время езды.
Установка руля
Руль установите на вынос руля
и затяните болты хомута. Логотипы
(не изображены на рисунке) должны
быть читаемыми при взгляде спереди.
Wolfer
Trexx
5–6 Nm 5–6 Nm
Инструкция по монтажу
Page 15

28
RU RU
6.a 6.c
7.a 7.b 7.d
7.c
6.b
Монтаж заднего колеса
Выньте тормозной трос из хомута (1),
вложите колесо в одну из скоб вилки,
см. рис. 6.b, 6.c., колесо отцентрируйте
и затяните эксцентрик (2).
Двухпозиционная задняя вилка
позволяет приспособить высоту деки.
Нижнюю скобу примените для езды
по бездорожью. Эксцентрик закройте
так, чтобы его рычажок был направлен
наверх.
Верхняя скоба вилки, которая снизит
высоту деки и в то же время разгрузит
стоящую ногу, предназначена для
езды по гладкой и ровной поверхности.
Езда будет менее тяжёлой. Рычаг
эксцентрика закройте в направлении
вниз.
Настройка высоты руля
Ослабьте болты на выносе руля
и настройте требуемую высоту руля
с помощью дистанционных колец. Для
настройки минимального положения
поверните вынос руля так, чтобы
он был направлен вниз, см. рис. 7.c.
После настройки высоты руля сначала
затяните болт головной структуры (1),
только после этого боковые болтики
(2, 3).
1
1
2
2
3
6–8 Nm
5–6 Nm
9.b
10.b
9.a
Настройка наклона ручек тормоза
Ослабьте крепёжный болтик на
хомутике обеих ручек тормоза.
Правильный наклон ручек тормоза
настроите так: встаньте на деку,
возьмитесь за руль и натяните пальцы
так, чтобы они продолжали прямую
руку. В это положение настройте ручки,
и затяните крепёжный болтик обеих
ручек.
В модели Yedoo Wolfer можете
с помощью крепёжных болтиков на
рисунке также настроить положение
рогов.
Настройка переднего тормоза –
Wolfer
Тормозные колодки при торможении
должны прилегать всей своей
поверхностью на бок обода.
В противном случае измените их
положение с помощью болтика,
которым эти колодки прикреплены
к плечам тормоза (1). Колодки не
должны прикасаться к покрышке
и при отпуске ручки тормоза должны
быть на расстоянии 1–2 мм от обода.
Расстояние между колодками и ободом
можно настроить, прижав или ослабив
тормозной трос в крепёжном болте (2).
Если колесо при вращении трётся
о тормозную колодку, поверните слегка
весь тормозной механизм так, чтобы
плечи тормоза были на одинаковом
расстоянии от обода. Положение плеч
зафиксируйте, повернув рычажок
в направлении вниз (1).
11.a
Настройка переднего тормоза –
Trexx
Вложите тормозной трос обратно
в хомут (1) и проверьте, чтобы
тормозные колодки при торможении
прилегали всей своей поверхностью
на бок обода. В противном случае
настройте их положение с помощью
болтиков (2), которым колодки
прикреплены к рычагам ободного
тормоза. Колодки не должны
прикасаться к покрышке.
8.
Установка тормозных тросов
Нажмите ручку тормоза до упора,
а в круглую петлю (1) вложите конец
тормозного троса. Трос вложите
в канавку и затяните установочный
болт (2) и гайку (3). Монтаж второго
тормоза проводится аналогичным
способом. Задний тормозной трос,
как правило, крепится в правую ручку
тормоза, передний в левую.
1
1
2
2 2
1
3
6–7 Nm 6–7 Nm
Инструкция по монтажу
10.a
2
1 1
Page 16

3130
RU RU
Проверьте, чтобы при отпускании ручки
тормоза колодки достаточно удалились
от обода (1–2 мм). Расстояние между
колодками и ободом можно настроить,
прижав или ослабив тормозной трос
в крепёжном болте (1). Если колесо
при вращении в каком-либо месте
трётся о тормозную колодку, измените
симметрично расстояние до рычагов
тормоза с помощью натяжных болтиков
(2).
Настройка заднего тормоза для обеих
моделей одинакова
Вложите тормозной трос обратно
в хомут (1). Проверьте, чтобы тормозные
колодки при торможении прилегали
всей своей поверхностью на бок
обода. В противном случае настройте
их положение с помощью болтиков
(2), которым колодки прикреплены
к рычагам ободного тормоза. Колодки не
должны прикасаться к покрышке.
Проверьте, чтобы при отпускании
ручки тормоза колодки достаточно
удалились от обода (1–2 мм).
Расстояние между колодками и ободом
можно настроить, прижав или ослабив
тормозной трос в крепёжном болте (1).
Если колесо при вращении в каком-
-либо месте трётся о тормозную
колодку, измените симметрично
расстояние до рычагов тормоза
с помощью натяжных болтиков (2).
14.b14.a
Настройка тросов Боудена
Настройте положение тросов Боудена
так, чтобы они нигде (особенно
в области задней вилки) не выходили
за пределы рамы самоката.
В передней части рамы закрепите её
в хомут.
15.
Противоскользящие ленты
Для повышения противоскользящих
свойств деки применяйте запасные
противоскользящие ленты, которые
легко вклеите в пустые канавки деки.
Внимание: Перед применением деку
тщательно очистите и обезжирьте её.
Инструкция по монтажу
1. 2. 3.
Монтаж подножки
Подножка не входит в состав упаковки;
её и остальные принадлежности Yedoo
можете дополнительно купить.
Подножку установите в месте, где
раскрывается передний профиль
рамы. Высоту крепления подножки
выберите так, чтобы для данной
модели обеспечить максимальную
стабильность. Подножка в резервном
положении не должна выходить за
пределы рамы самоката.
Максимальная несущая способность
подножки – около 15 кг. Не становитесь
на запаркованный самокат.
12. 13.11.b
1
1
1
2 2
2 2
2 2
Page 17

3332
Úvod
Montáž, nastavenie a pravidelnú údržbu odporúčame zveriť
odbornému cykloservisu. Neodborné zásahy môžu poškodiť
kolobežku alebo zapríčiniť nehodu s vážnymi zdravotnými
následkami.
Ak ste však technicky zdatní, ničoho sa nebojte a s chuťou sa
domontáže pusťte s nami.
Otázky, pripomienky a návrhy na zlepšenie našich výrobkov nám
prosím posielajte na e-mail: info@yedoo.eu.
Viac informácií zo sveta
kolobežiek a zoznam distribútorov
nájdete na www.yedoo.eu.
33
SK
Рекомендации
по безопасности
Самокат с базовым оснащением предназначен для езды
при дневном свете на площадках, предназначенных для
спорта и отдыха, в идеальном случае на гладкой и сухой
поверхности.
Для езды по дорогам и для езды при езде в тёмное время
суток его необходимо дооснастить элементами безопасности
(фонари, катафоты и т.д.) в соответствии с предписаниями,
действующими в вашей стране. Соблюдайте правила дорожного
движения, принципы безопасной езды и носите индивидуальные
защитные средства (шлем, велосипедные рукавицы, защитные
наколенники и налокотники, прочную обувь и т.д.)
Перед каждой ездой проверьте функциональность тормозов
и общее техническое состояние самоката. Покрышки
накачивайте на максимальное рекомендуемое значение
давления, см. боковую сторону покрышки. Не превышайте
несущую способность самоката. Самокат предназначен только
для одного ездока. Избегайте перегрузки самоката, самокат
не предназначен для скачков или акробатической езды.
Все компоненты, снижающие скорость (тормозные колодки,
обода, покрышки и т.д.) при применении нагреваются,
не прикасайтесь к ним, пока они не остынут!
Указания по езде
При езде всегда держитесь обеими руками за руль.
При отталкивании одной ногой, вторая нога должна
находиться на деке самоката. Регулярно чередуйте
толчковую ногу. Для торможения нажмите ручки тормоза на
руле. Внимание: Резкое торможение может быть причиной
падения.
Уход
Надлежащий уход способствует повышению безопасности
и увеличивает срок службы вашего самоката. Поэтому
регулярно затягивайте болтовые соединения, контролируйте
состояние эксцентриков, давление в колёсах и смазывайте
движущиеся части (подшипники колёс, пальцы ручек
тормоза, губки тормозов, тормозные тросы и т.д.).
Но следите за тем, чтобы смазка не попала на обод
и тормозные колодки. Наличие жира на них снижает
их действие! При попадании жира, обезжирьте загрязнённые
части, например, техническим бензином. Регулярно
контролируйте высоту рисунка на покрышках колёс, при
необходимости замените покрышки новыми с подобными
параметрами. Самокат, не подготовленный к применению,
обозначьте подходящим способом.
Контролируйте состояние самостопорных гаек (если они при
езде самопроизвольно ослабляются, то замените их новыми).
Регулярно контролируйте спицовку колёс, в случае
неодинакового натяжения спиц в спицовке спицы могут
лопаться или может произойти расцентровка колёс.
Изделие отвечает соответствующим нормам ЕС (ČSN EN
14619 СПОРТИВНЫЕ СРЕДСТВА) и получило сертификаты
качества и безопасности от передового чешского
испытательного института (ГУ «Машиностроительный
испытательный центр») и признанного во всём мире
TÜV SÜD Czech s. r. o. Производитель и импортёр
в ЕС INTREA – PIKO, s.r.o., ул. Сасанкова 2657/2,
106 00 Прага 10, Чешская Республика, www.yedoo.eu.
Порядок предъявления
рекламаций
Общие положения
Содержание, диапазон и продолжительность гарантийного
периода руководствуются правовыми нормами Чешской
Республики, главным образом соответствующими
положениями Гражданского кодекса (закон № 89/2012 Св.),
и закона об охране потребителя (закон № 634/1992 Св.).
Права покупателя в соответствии с данными правовыми
нормами не затронуты ни настоящим документом,
ни содержащейся в нём информацией.
Гарантийный период
Гарантийный период на новый купленный самокат Yedoo
(далее только «товар») составляет 24 месяца от момента его
первого приобретения. В случае обоснованной рекламации
покупателя, гарантийный период продлевается на время,
в течение которого покупатель не мог товаром пользоваться.
Порядок подачи рекламации
Рекламация подаётся у продавца, у которого покупатель
товар купил (см. данные ниже). При подаче рекламации
рекомендуем предъявить настоящий документ, документ,
подтверждающий покупку, и комплектный очищенный
от нечистот самокат. О предъявлении рекламации
и о возможном проведении ремонта продавец оформит
письменное подтверждение для покупателя.
Гарантийные условия
При монтаже самоката должны соблюдаться указания,
приведённые в инструкции по монтажу. Самокат должен
применяться исключительно для целей, для которых он был
произведён. Самокат должен храниться и обслуживаться
в соответствии с указаниями, установленными
производителем. На дефекты, возникшие в результате
исключительно неправильного монтажа или применения
самоката в противоречии с инструкцией по применению,
не распространяется ответственность производителя.
Модель самоката:
Серийный номер рамы:
Дата продажи:
Продавец:
Печать и подпись:
Page 18

3534
SK SK
2.
5.
3.1.
4.
Postup je pre oba modely
(Wolfer, Trexx)
rovnaký, líši sa len
v detailoch, pozri doplňujúce obrázky.
Pri uťahovaní spojov neprekročte
uvedený moment utiahnutia.
Montáž predného kolesa
Do kolesa vložte rýchloupínač tak,
aby na každej strane bola jedna pružinka
so zúžením smerujúcim k stredu kolesa.
Dotiahnite nastavovaciu maticu
rýchloupínača tak, aby ste tesne
pred dovretím rýchloupínacej páčky
cítili značný odpor. Páčku zavrite
v takej pozícii, aby sa nedotýkala
vidlice a zároveň nemohlo dôjsť k jej
náhodnému otvoreniu počas jazdy.
Montáž riadidiel
Riadidlá inštalujete na predstavec
a utiahnite skrutky objímky. Logá
(nie sú zobrazené na obrázku) by mali
byť pri čelnom pohľade čitateľné.
Najprv skontrolujte, či predná vidlica
kolobežky je natočená v správnom
smere (ramená V-brzdy smerujú
dopredu), potom uvoľnite brzdové
čeľuste pootočením páčky.
Koleso vsaďte do prednej vidlice tak,
aby bolo presne uprostred. Pozor:
vzor pneumatiky by mal smerovať
dopredu v smere jazdy, pozri smerovú
šípku na boku plášťa.
Wolfer
Trexx
5–6 Nm 5–6 Nm
Návod na montáž
6.a 6.c
7.a 7.b 7.d
7.c
6.b
Montáž zadného kolesa
Uvoľnite brzdové lanko z vodidla (1),
koleso vložte do jedného z dvoch
úchytov vidlice, pozri obr. 6.b, 6.c.,
koleso vycentrujte a dotiahnite
rýchloupínač (2).
Dvojpolohová zadná vidlica umožňuje
prispôsobiť výšku stúpadla. Spodný
úchyt použite pri jazde po teréne.
Rýchloupínaciu páčku dovrite tak,
aby smerovala nahor.
Horný úchyt vidlice, ktorý zníži výšku
stúpadla a zároveň odľahčí stojacej nohe,
je určený pre jazdu na hladkom a rovnom
povrchu. Jazda bude fyzicky menej
namáhavá. Rýchloupínaciu páčku dovrite
tak, aby smerovala nadol.
Nastavenie výšky riadidiel
Uvoľnite skrutky na predstavci a nastavte
požadovanú výšku riadidiel pomocou
vymedzovacích krúžkov. Pre nastavenie
najnižšej polohy pretočte predstavec
tak, aby smeroval dolu, pozri obr. 7.c.
Po nastavení výšky riadidiel najprv
dotiahnite skrutku hlavového zloženia (1),
potom bočné skrutky (2, 3).
1
1
2
2
3
6–8 Nm
5–6 Nm
Page 19

3736
SK SK
9.b9.a
Nastavenie sklonu brzdových páčok
U oboch brzdových páčok povoľte
upevňovaciu skrutku na objímke.
Správny sklon brzdových páčok
nastavíte tak, že si stúpnete na stúpadlo,
uchopíte riadidlá a natiahnete prsty tak,
aby predĺžili priamku ruky. V tejto polohe
nastavte páčky a u oboch dotiahnite
upevňovaciu skrutku.
Pri modeli Yedoo Wolfer môžete
pomocou upevňovacích skrutiek
na obrázku upraviť aj polohu rohov.
8.
Montáž brzdových laniek
Stlačte brzdovú páčku na maximum
a do guľatého očka vložte koniec
brzdového lanka (1). Lanko vložte do
drážky a utiahnite stavaciu skrutku (2)
a maticu (3). Rovnaký postup zopakujte
aj s druhou brzdou. Zadné brzdové lanko
sa spravidla upevňuje do pravej brzdovej
páčky, predné do ľavej.
1
2
3
6–7 Nm 6–7 Nm
Skontrolujte, či sa špalky pri uvoľnení
brzdovej páčky dostatočne oddialia
odráfika (1–2 mm). Vzdialenosť špalkov
možno upraviť pritiahnutím alebo
povolením brzdového lanka v kotevnej
skrutke (1). Ak sa koleso pri otáčaní
vniektorom mieste trie o brzdový
špalok, symetricky upravte vzdialenosť
brzdových ramien napínacími
skrutkami(2).
Nastavenie zadnej brzdy je rovnaké pre
oba modely.
Vložte brzdové lanko naspäť do vodidla
(1) a skontrolujte, či brzdové špalky
pri zabrzdení dosadajú celou svojou
plochou na bok ráfika. Ak nie, upravte
ich polohu pomocou skrutiek (2),
ktorými sú špalky prichytené k ramenám
V-brzdy. Špalky sa nesmú dotýkať plášťa.
Skontrolujte, či sa špalky pri uvoľnení
brzdovej páčky dostatočne oddialia
odráfika (1–2 mm). Vzdialenosť špalkov
možno upraviť pritiahnutím alebo
povolením brzdového lanka v kotevnej
skrutke (1). Ak sa koleso pri otáčaní
vniektorom mieste trie o brzdový
špalok, symetricky upravte vzdialenosť
brzdových ramien napínacími
skrutkami(2).
10.b
Nastavenie prednej brzdy – Wolfer
Brzdové špalky by pri zabrzdení mali
dosadať celou svojou plochou na
bok ráfika. Ak nie, upravte ich polohu
pomocou skrutiek, ktorými sú špalky
prichytené k ramenám brzdy (1). Špalky
sa nesmú dotýkať plášťa a pri uvoľnení
brzdovej páčky by sa mali 1–2 mm oddialiť
od ráfika. Vzdialenosť špalkov možno
upraviť pritiahnutím alebo uvoľnením
brzdového lana v kotevnej skrutke (2).
Ak sa koleso pri otáčaní trie o brzdový
špalok, pootočte celým brzdovým
mechanizmom tak, aby brzdové ramená
boli rovnomerne vzdialené od ráfika.
Polohu ramien uzamknite otočením
páčky smerom dolu (1).
11.a
Nastavenie prednej brzdy – Trexx
Vložte brzdové lanko naspäť do vodidla
(1) a skontrolujte, či brzdové špalky
pri zabrzdení dosadajú celou svojou
plochou na bok ráfika. Ak nie, upravte
ich polohu pomocou skrutiek (2), ktorými
sú špalky prichytené k ramenám V-brzdy.
Špalky sa nesmú dotýkať plášťa.
1
2 2
1
14.b14.a
Upravenie bowdenov
Polohu bowdenov upravte tak, aby nikde
(najmä pri zadnej vidlici) nepresahovali
rám kolobežky.
V prednej časti rámu ich upevnite
doobjímky.
15.
Protišmykové pásky
Na zvýšenie protišmykového účinku
stúpadla použite náhradné protišmykové
pásky, ktoré jednoducho nalepíte do
prázdnych drážok stúpadla. Pozor:
Pred aplikáciou stúpadlo dobre očistite
azbavte mastnoty.
Návod na montáž
12. 13.11.b
1
1
1
2 2
2 2
2 2
10.a
2
1 1
Page 20

3938
SK SK
1. 2. 3.
Montáž stojančeka
Stojanček nie je súčasťou balenie,
podobne ako ostatné doplnky Yedoo si
ho môžete dokúpiť. Viac na yedoo.cz.
Stojanček namontujte na mieste,
kde je predný profil rámu roztvorený.
Výšku upevnenia stojančeka zvoľte tak,
aby pre daný model poskytla najväčšiu
stabilitu. Stojanček by v záložnej polohe
nemal presahovať rám kolobežky.
Maximálna nosnosť stojančeka je
cca 15 kg. Na zaparkovanú kolobežku
nestúpajte.
Bezpečnostné odporúčania
Kolobežka je v základnej výbave určená pre jazdu za denného
svetla v priestoroch určených pre šport a rekreáciu, ideálne na
hladkom a suchom povrchu.
Pre jazdu na pozemných komunikáciách a pre jazdu za tmy ju
treba vybaviť bezpečnostnými prvkami (svetlami, odrazovými
svetlami atď.) v súlade s platnými predpismi v príslušnom štáte.
Dodržujte pravidlá cestnej premávky, zásady bezpečnej jazdy
a noste osobné ochranné pomôcky (prilbu, cyklistické rukavice,
chrániče kolien a lakťov, pevnú obuv a pod.).
Pred každou jazdou skontrolujte funkčnosť bŕzd a celkový
technický stav kolobežky. Pneumatiky hustite na maximálnu
odporúčanú hodnotu tlaku, pozri bočnú strana plášťa.
Neprekračujte jej nosnosť. Kolobežka je určená len pre jedného
jazdca. Vyvarujte sa preťažovania kolobežky, kolobežka nie je
určená pre skoky ani akrobatickú jazdu.
Všetky komponenty znižujúce rýchlosť (brzdové tyčky, ráfiky,
pneumatiky a pod.) sa pri používaní zahrievajú, nedotýkajte sa
ich, dokým nevychladnú!
Pokyny pre jazdu
Pri jazde majte vždy obe ruky na riadidlách. Zatiaľ čo sa jednou
nohou odrážate, druhou nohou stojte na stúpadle kolobežky.
Pravidelne striedajte odrazovú nohu. Na zabrzdenie stlačte
brzdové páčky na riadidlách. Pozor: Prudké zabrzdenie môže
spôsobiť pád.
Údržba
Dobrá údržba zvýši bezpečnosť a predĺži životnosť kolobežky.
Preto pravidelne doťahujte skrutkové spoje, kontrolujte stav
rýchloupínáčov, tlak v pneumatikách a mažte pohyblivé časti
(ložiská kolies a riadidiel, čapy brzdových páčok, čeľuste bŕzd,
brzdové lanká atď.).
Dajte však pozor, aby sa mazivo nedostalo na ráfiky a brzdové
doštičky. Mastnota znižuje ich účinky! Ak sa tak stane,
znečistené časti zbavte mastnoty napr. technickým benzínom.
Pravidelne kontrolujte výšku vzoru na plášťoch kolies a podľa
potreby vymeňte plášte za nové so zhodnými parametrami.
Kolobežku, ktorá nie je pripravená na použitie, vhodne označte.
Kontrolujte stav samoistiacich matíc (ak sa za jazdy samovoľne
uvoľňujú, vymeňte ich za nové). Pravidelne kontrolujte výplet
kolies, nerovnomerné napnutie drôtu vo výplete môže spôsobiť
ich praskanie alebo porušenie centrovania kolies.
Výrobok spĺňa príslušné normy EÚ (ČSN EN 14619 ŠPORTOVÁ
POTREBA) a získal certifikáty kvality a bezpečnosti od
popredného českého skúšobného ústavu (Strojárenský
skúšobný ústav, s. p.) aj medzinárodne uznávaného TÜV SÜD
Czech s. r. o.
Výrobca a dovozca v EÚ INTREA – PIKO, s.r.o., Sasanková 2657/2,
106 00 Praha 10, Česká republika, www.yedoo.eu.
Uplatnenie práv pri
nedostatočnej kvalite
Všeobecné ustanovenia
Obsah, rozsah a trvanie práv kupujúceho pri nedostatočnej
kvalite tovaru sa riadia platnými právnymi predpismi
Českej republiky, predovšetkým príslušnými ustanoveniami
občianskeho zákonníka (z. č. 89/2012 Zb.) a zákona o ochrane
spotrebiteľa (z. č. 634/1992 Zb.). Práva kupujúceho podľa
týchto predpisov nie sú týmto dokladom, ani v ňom uvedenými
informáciami nijako porušené.
Lehota na uplatnenie práva pri nedostatočnej kvalite
Právo pri nedostatočnej kvalite u novo zakúpenej kolobežky
Yedoo (ďalej len tovar) môže kupujúci uplatniť v lehote
24mesiacov od jej prevzatia. Ak kupujúci oprávnene vytkne
nedostatočnú kvalitu, do lehoty na uplatnenie práva pri
nedostatočnej kvalite sa nepočíta čas, počas ktorého kupujúci
nemohol tovar používať.
Spôsob uplatnenia práva pri nedostatočnej kvalite
Právo pri nedostatočnej kvalite sa uplatňuje u predajcu,
u ktorého kupujúci tovar kúpil (pozri údaje nižšie). Pri uplatnení
práva pri nedostatočnej kvalite odporúčame predložiť
tento doklad, doklad o kúpe a kompletnú, nečistôt zbavenú
kolobežku. O uplatnenie práva pri nedostatočnej kvalite,
prípadne o vykonaní opravy vystaví predajca kupujúcemu
písomné potvrdenie.
Podmienky trvania práva z nedostatku kvality
Pri montáži kolobežky treba dodržať pokyny uvedené v návode
na montáž. Kolobežku možno používať iba na účel, na aký bola
vyrobená. Kolobežku treba skladovať a udržovať podľa pokynov
výrobcu. Na poruchy spôsobené výlučne nesprávnou montážou
alebo používaním kolobežky v rozpore s užívateľskou príručkou
sa zodpovednosť výrobcu nevzťahuje.
Model kolobežky:
Výrobné číslo rámu:
Dátum predaja:
Predajca:
Pečiatka a podpis:
Návod na montáž
Page 21

Yedoo Wolfer
Yedoo Trexx
www.yedoo.eu
Notes
Page 22

Page 23

 Loading...