

Page 1
yedoo
mezeq
max 150 kg | 330 lb s
min 150 cm | 59 i n
user manual
Page 2
contents / obsah
. . . . . . . . . . . . . . . . . . . . . . . . . . . . . . . . . . . . 4
CZ
. . . . . . . . . . . . . . . . . . . . . . . . . . . . . . . . . . . 10
DE
. . . . . . . . . . . . . . . . . . . . . . . . . . . . . . . . . . . 16
EN
. . . . . . . . . . . . . . . . . . . . . . . . . . . . . . . . . . .22
ES
. . . . . . . . . . . . . . . . . . . . . . . . . . . . . . . . . . .28
FR
. . . . . . . . . . . . . . . . . . . . . . . . . . . . . . . . . . .34
HU
IT
. . . . . . . . . . . . . . . . . . . . . . . . . . . . . . . . . . .40
NL
. . . . . . . . . . . . . . . . . . . . . . . . . . . . . . . . . . .46
RU
. . . . . . . . . . . . . . . . . . . . . . . . . . . . . . . . . . . 52
SE
. . . . . . . . . . . . . . . . . . . . . . . . . . . . . . . . . . .58
SK
. . . . . . . . . . . . . . . . . . . . . . . . . . . . . . . . . . .64
Page 3
CZ
Montáž, seřízení apravidelnou údržbu
doporučujeme svěřit odbornému
cykloservisu. Neodborné zásahy mohou
vést kpoškození koloběžky či nehodě
svážnými zdravotními následky.
Pokud se cítíte jako technický
typ, ničeho se nebojte aschutí se
domontáže pusťte snámi.
Dotazy, připomínky anáměty nazlepšení našich výrobků
nám prosím posílejte nae-mail: info@yedoo.cz.
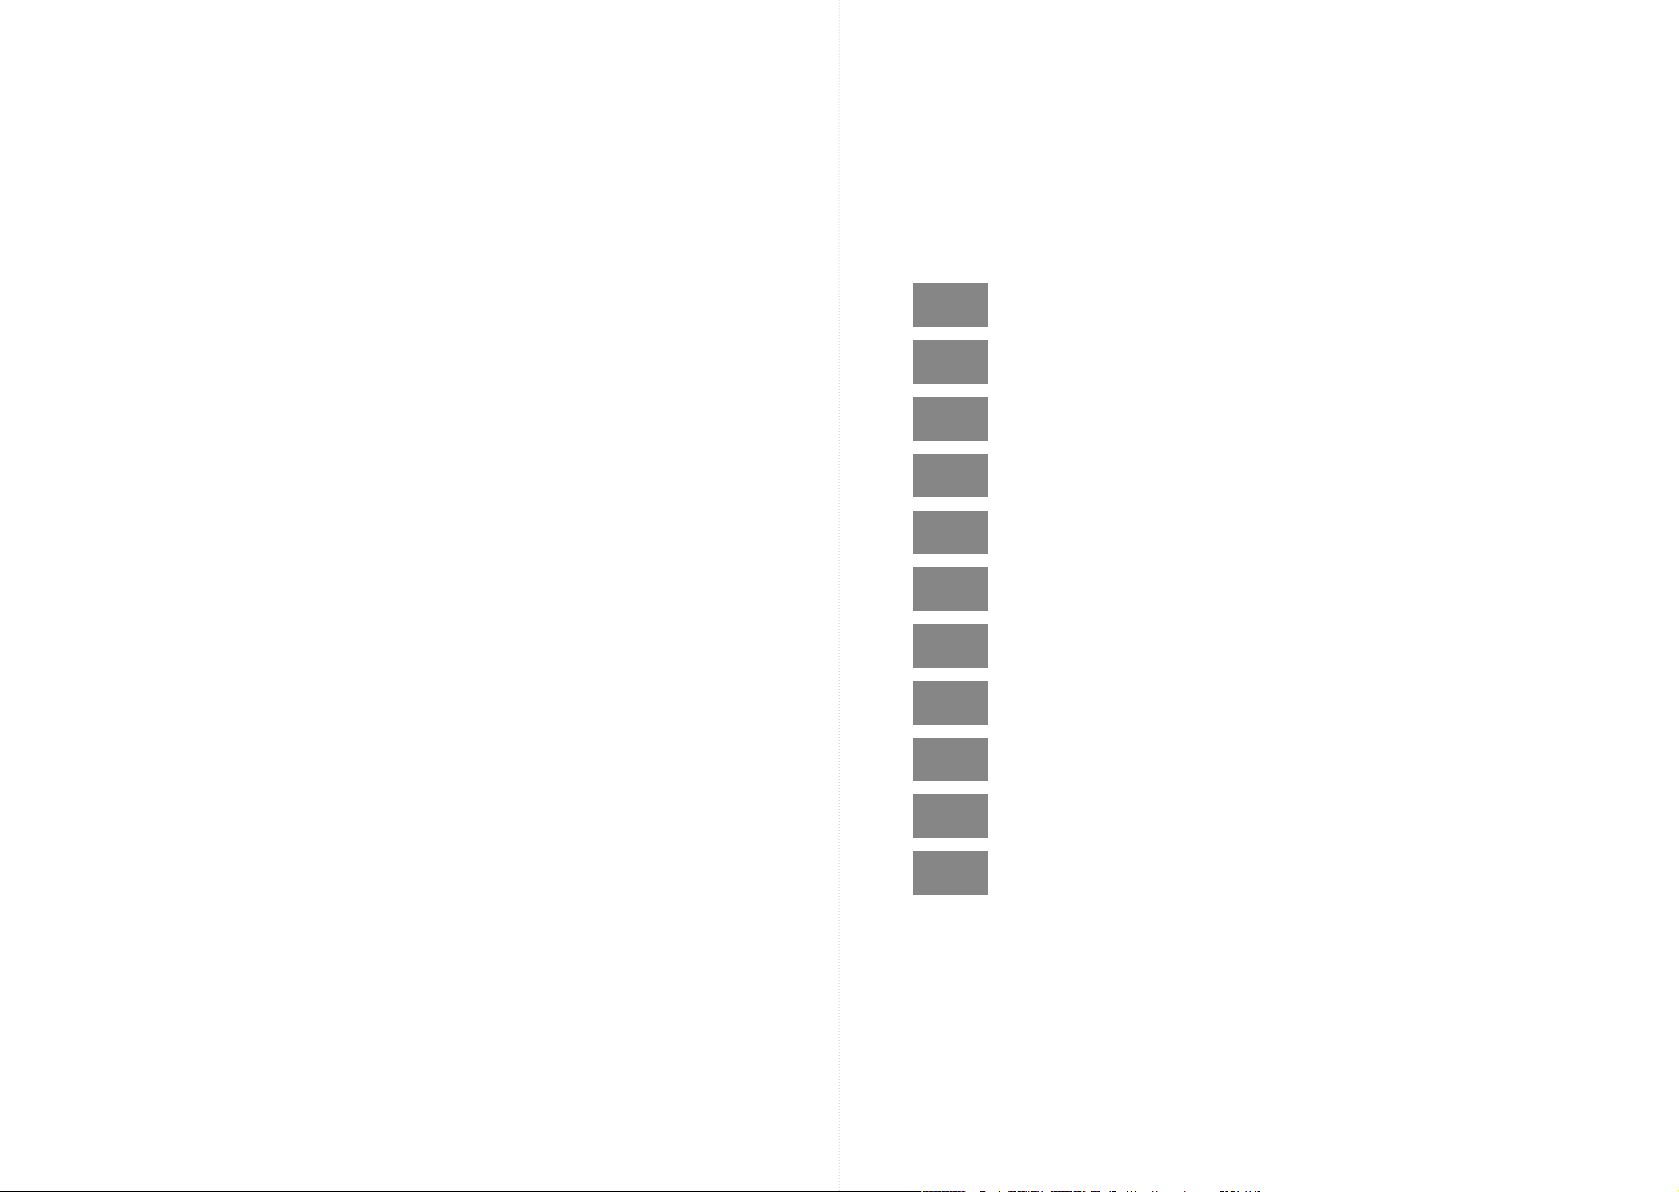
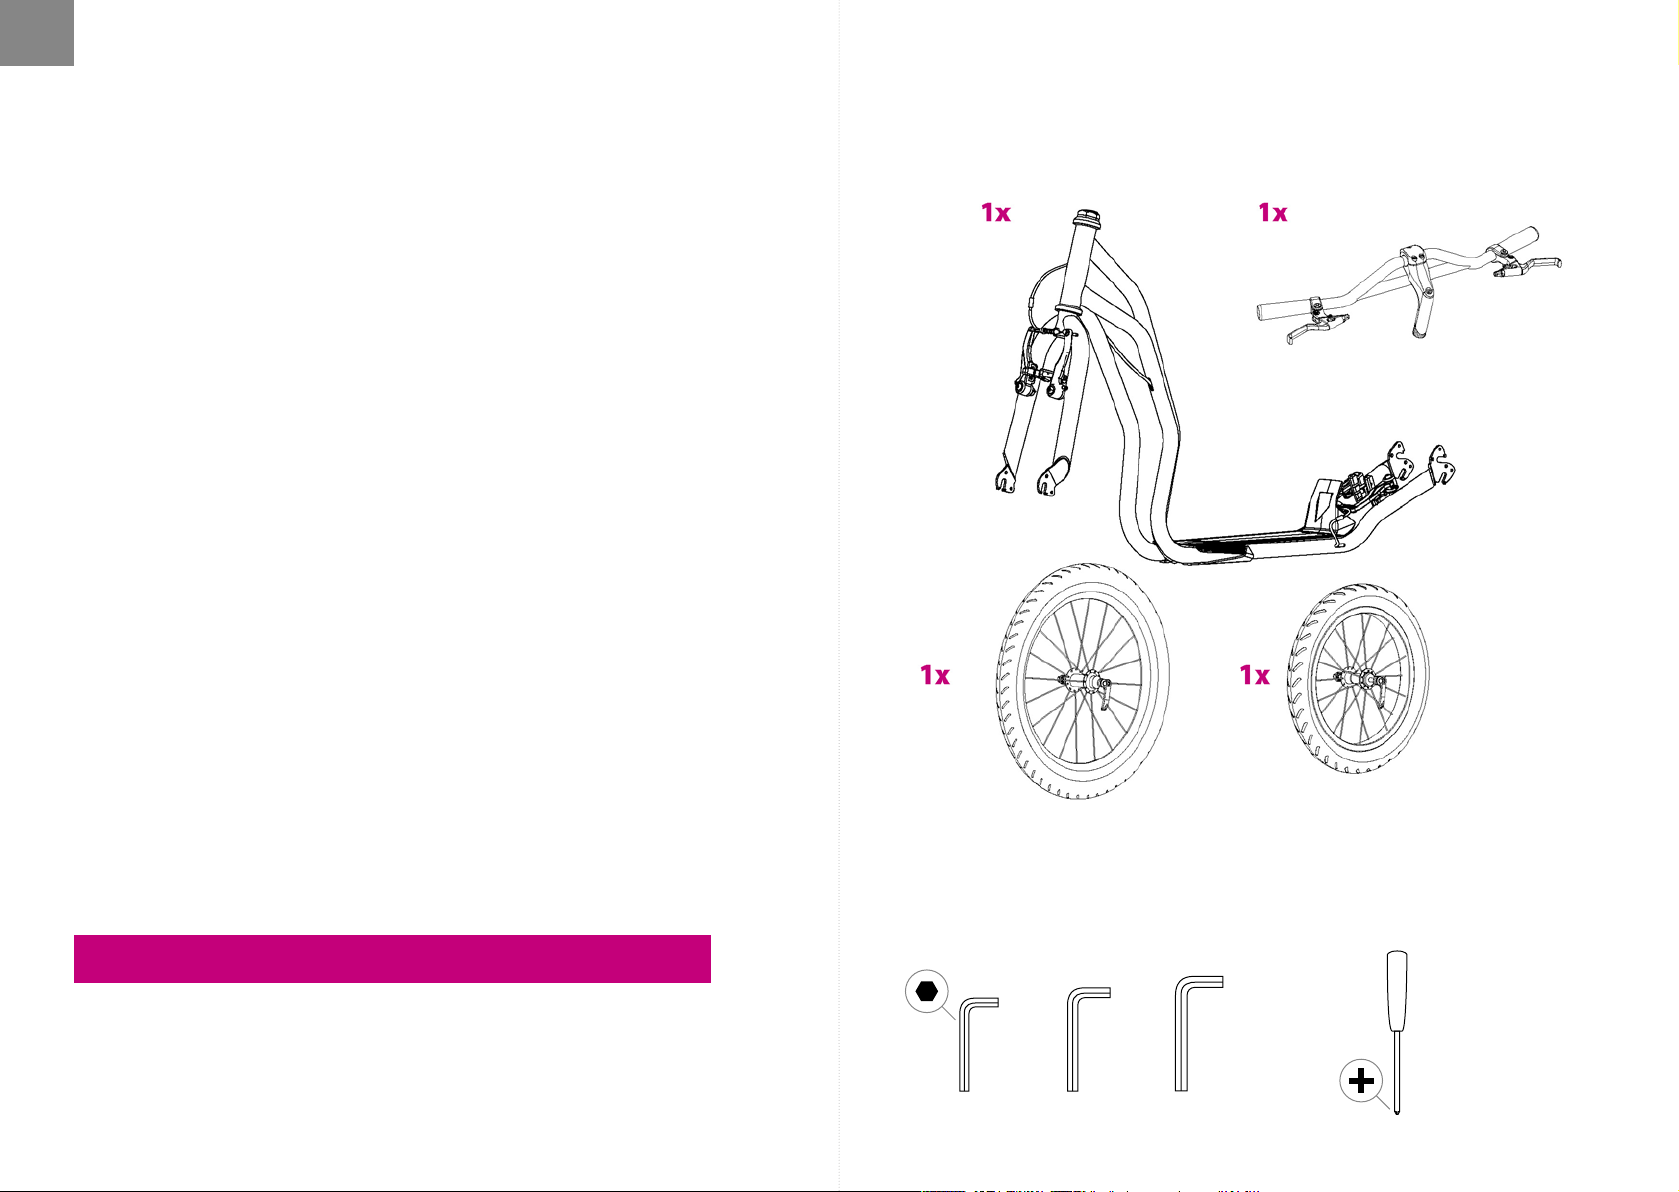
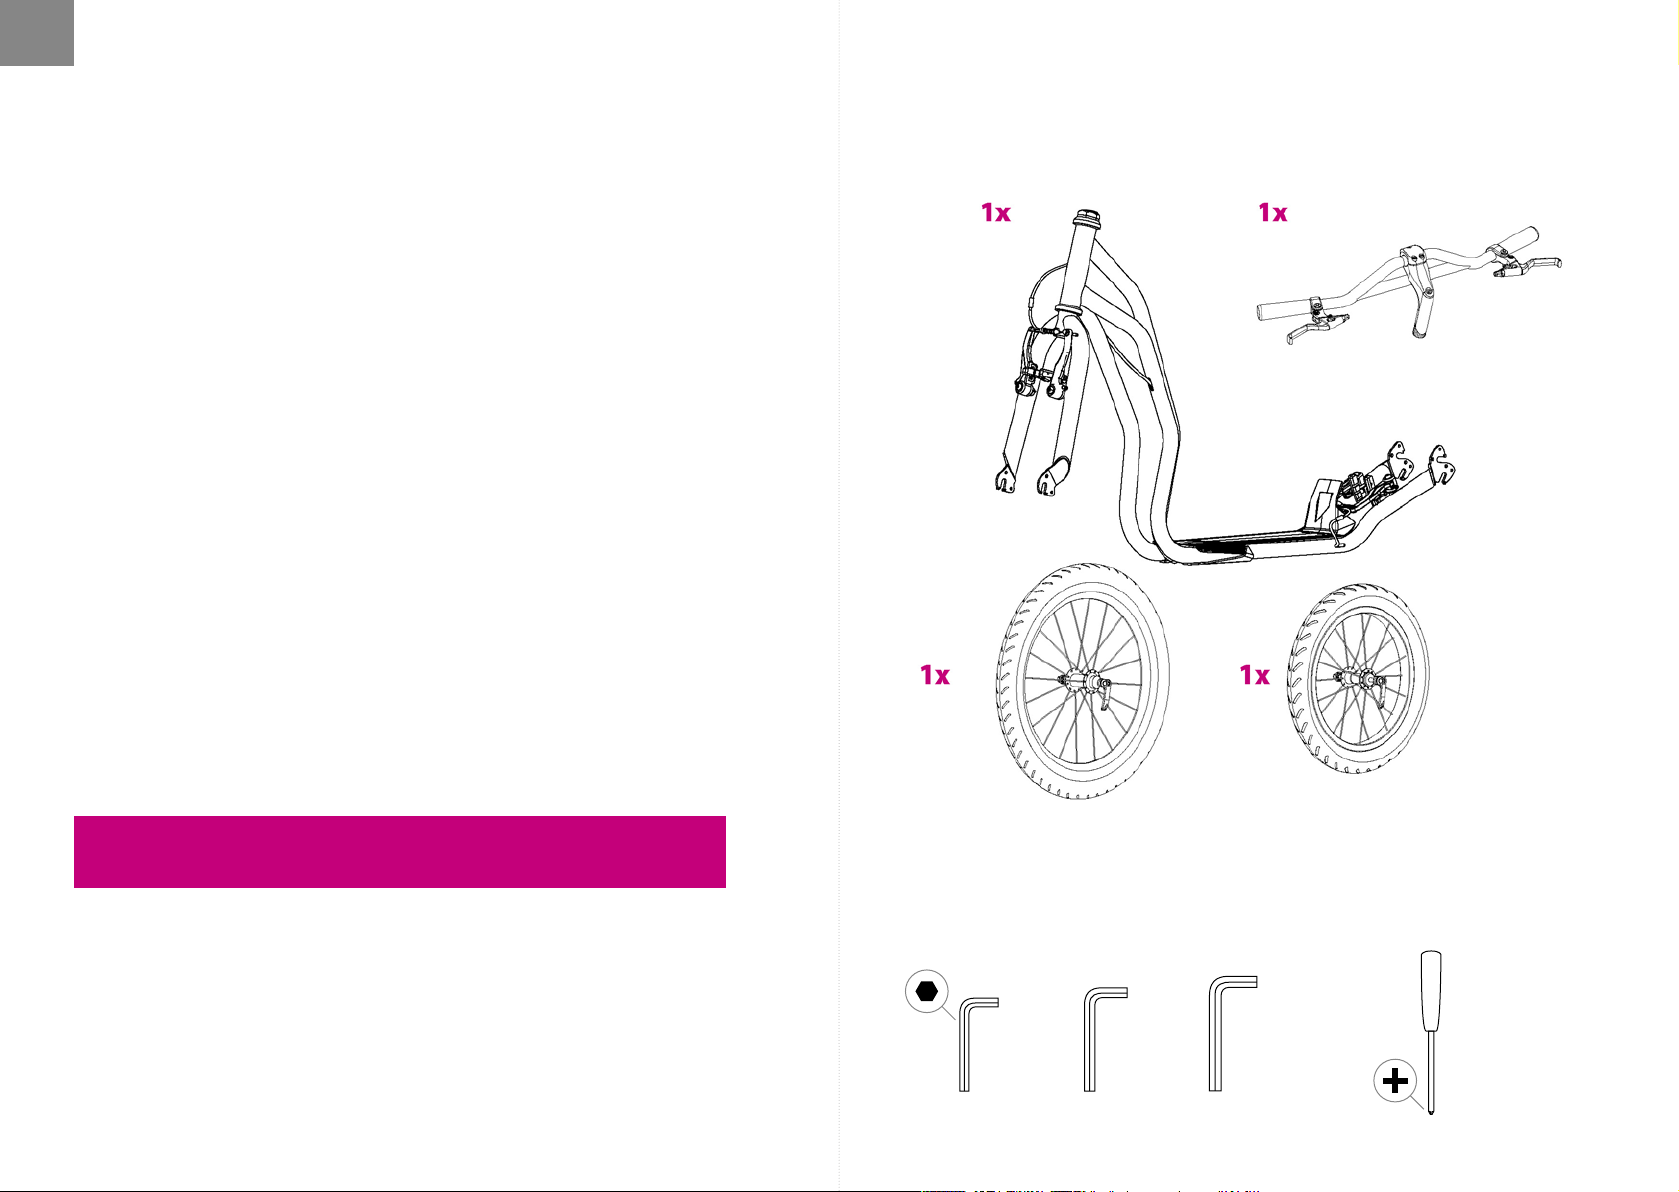
obsah baleníúVOD
Více informací ze světa koloběžek aseznam distributorů najdete na
www.yedoo.cz.
potřebné nářadí
6 mm5 mm4 mm
4 5
Page 4
CZ
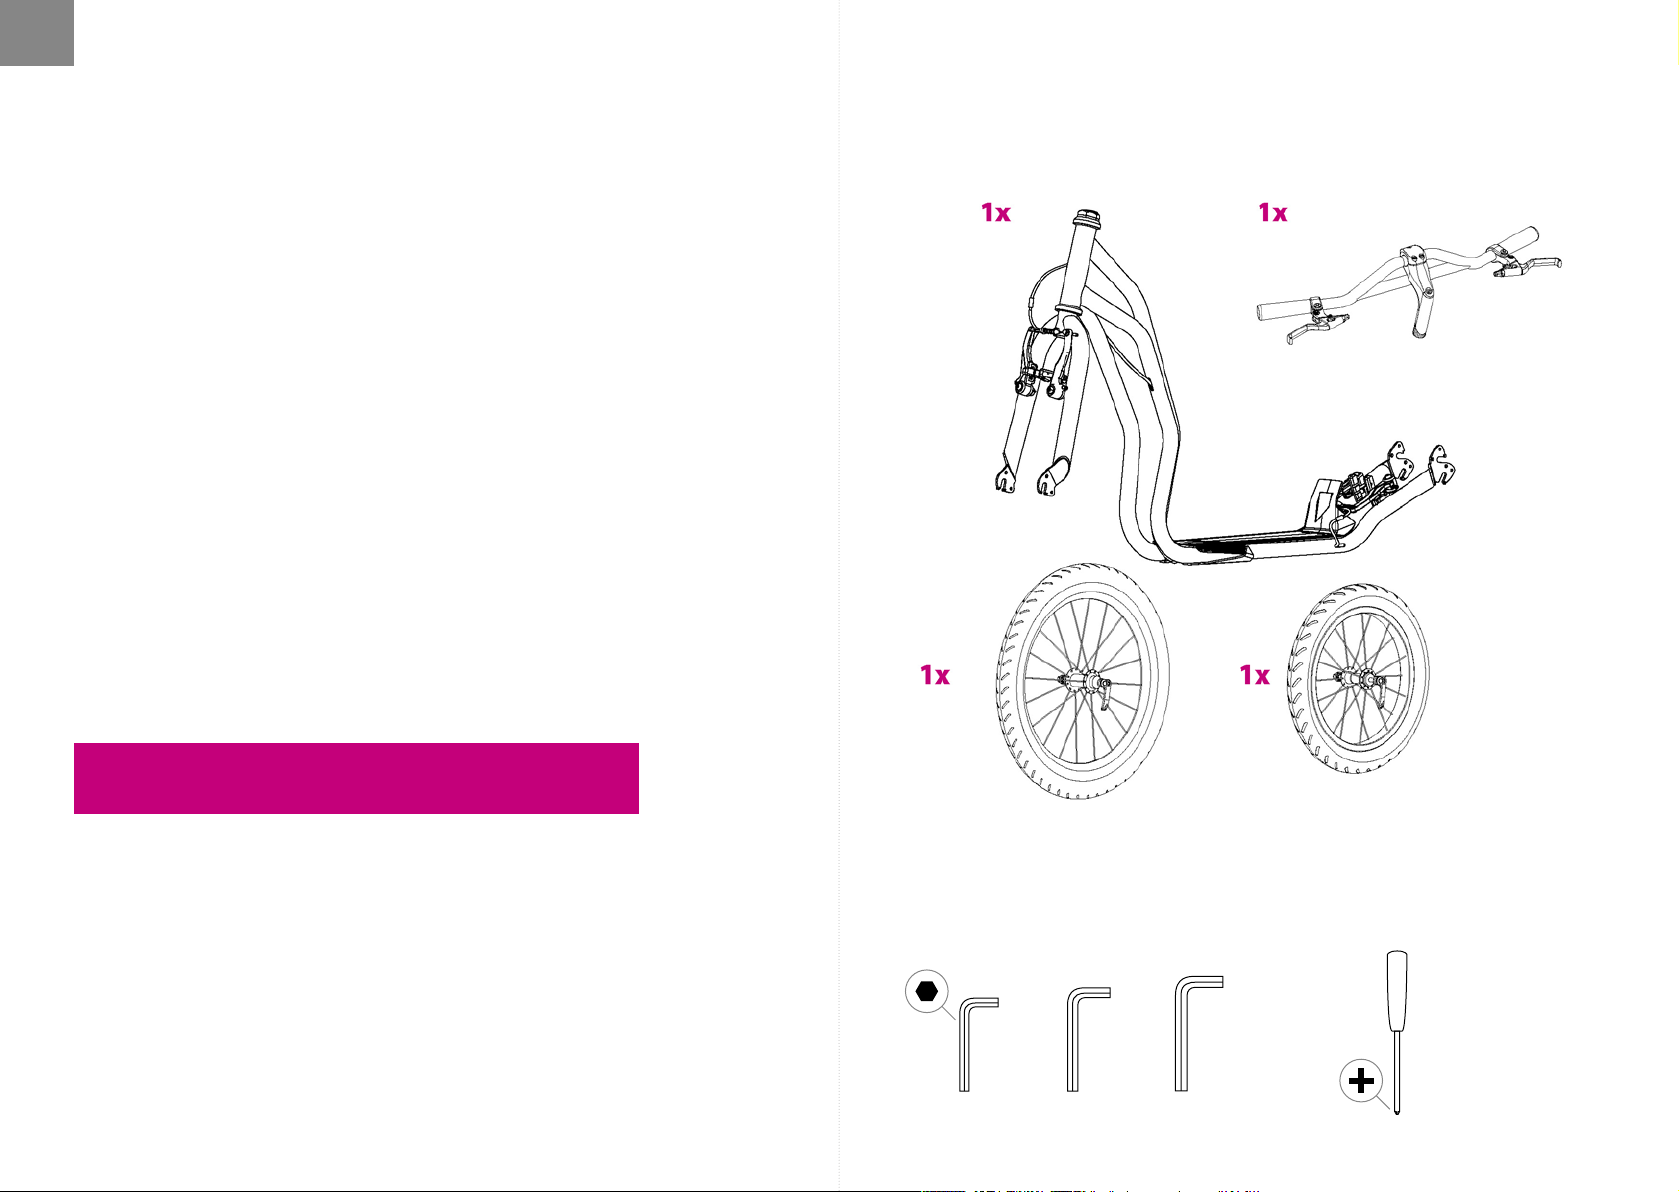
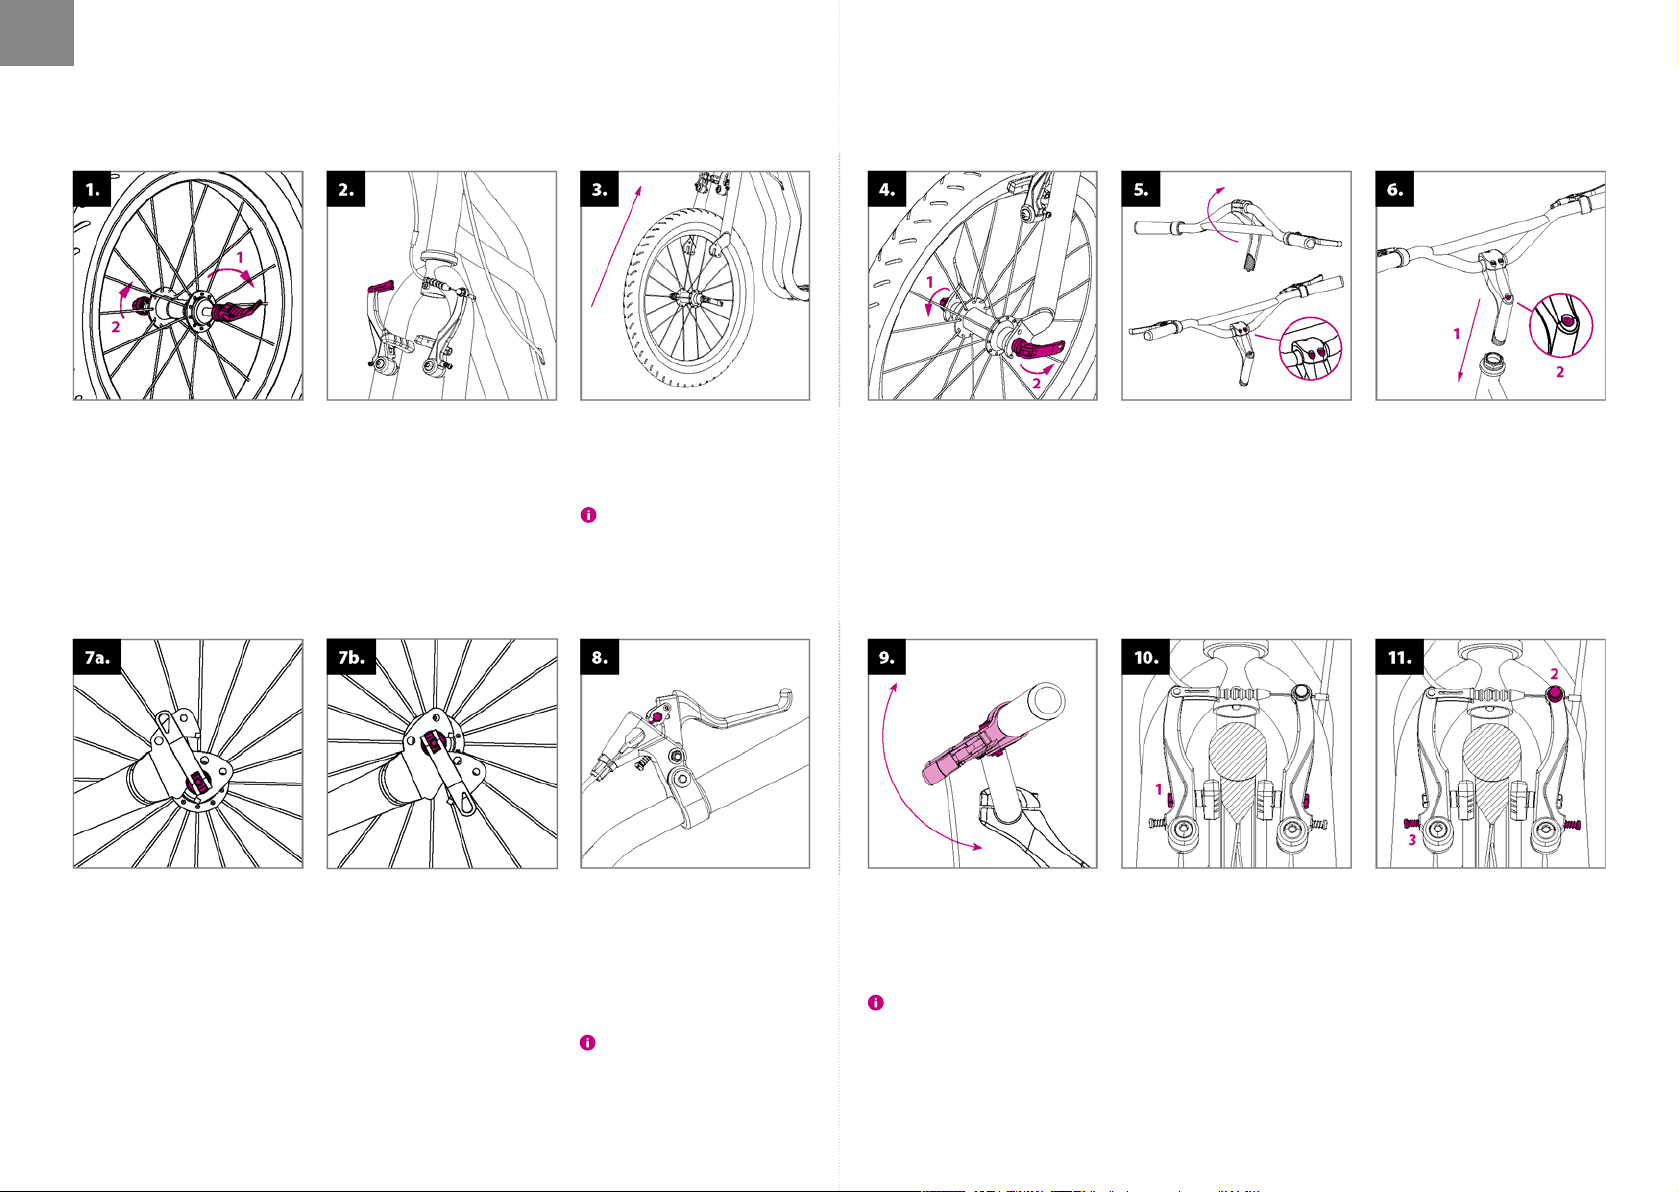
montážní návod
Montáž předního (většího)
kola: uvolněte rychloupínací
páčku apovolte matici.
Montáž zadního kola se
odmontáže předního liší pouze
dvojitou vidlicí. Ta umožňuje
měnit výšku stupátka vzávislosti
napovrchu. Spodní úchyt použijte pro jízdu terénem.
Zkontrolujte, zda je přední vidlice
koloběžky natočená vesprávném
směru (ramena V-brzdy směřují
dopředu). Uvolněte brzdové lanko zvodítka auvolněte brzdová
ramena.
Horní úchyt vidlice, který sníží
výšku stupátka azároveň odlehčí
stojné noze, je určen pro jízdu
nahladkém povrchu. Jízda bude
méně namáhavá.
Kolo vsaďte dopřední vidlice tak,
aby bylo přesně uprostřed.
Vzorek pneumat iky (rýhy vetvar u šípů)
by měl směřo vat dopředu posmě ru jízdy.
Instalace brzdových lanek:
zmáčkněte brzdovou páčku
namaximum adokulatého očka
vložte konec brzdového lanka.
Stejný postup zopakujte naobou
páčkách.
Zadní brzdové l anko se zpravidla
upevňuj e dopravé brzdové p áčky, přední
dolevé.
Dotáhněte matici (1) tak, abyste
před dovřením rychloupínací
páčky cítili odpor. Páčku zavřete
dopozice, při které bude směřovat kzadnímu kolu (2) (zbezpečnostních důvodů). Brzdové lanko
vraťte zpět dovodítka.
Seřízení brzdových páček:
nastavte správný sklon brzdových
páček pomocí upevňovacího
šroubu naobjímce.
Správný sklon brzdových páček: stoupněte si nast upátko, uchopte ří dítka anatáhněte prsty tak, aby prodlužovaly přímku
ruky. Doté to polohy nastav te páčky.
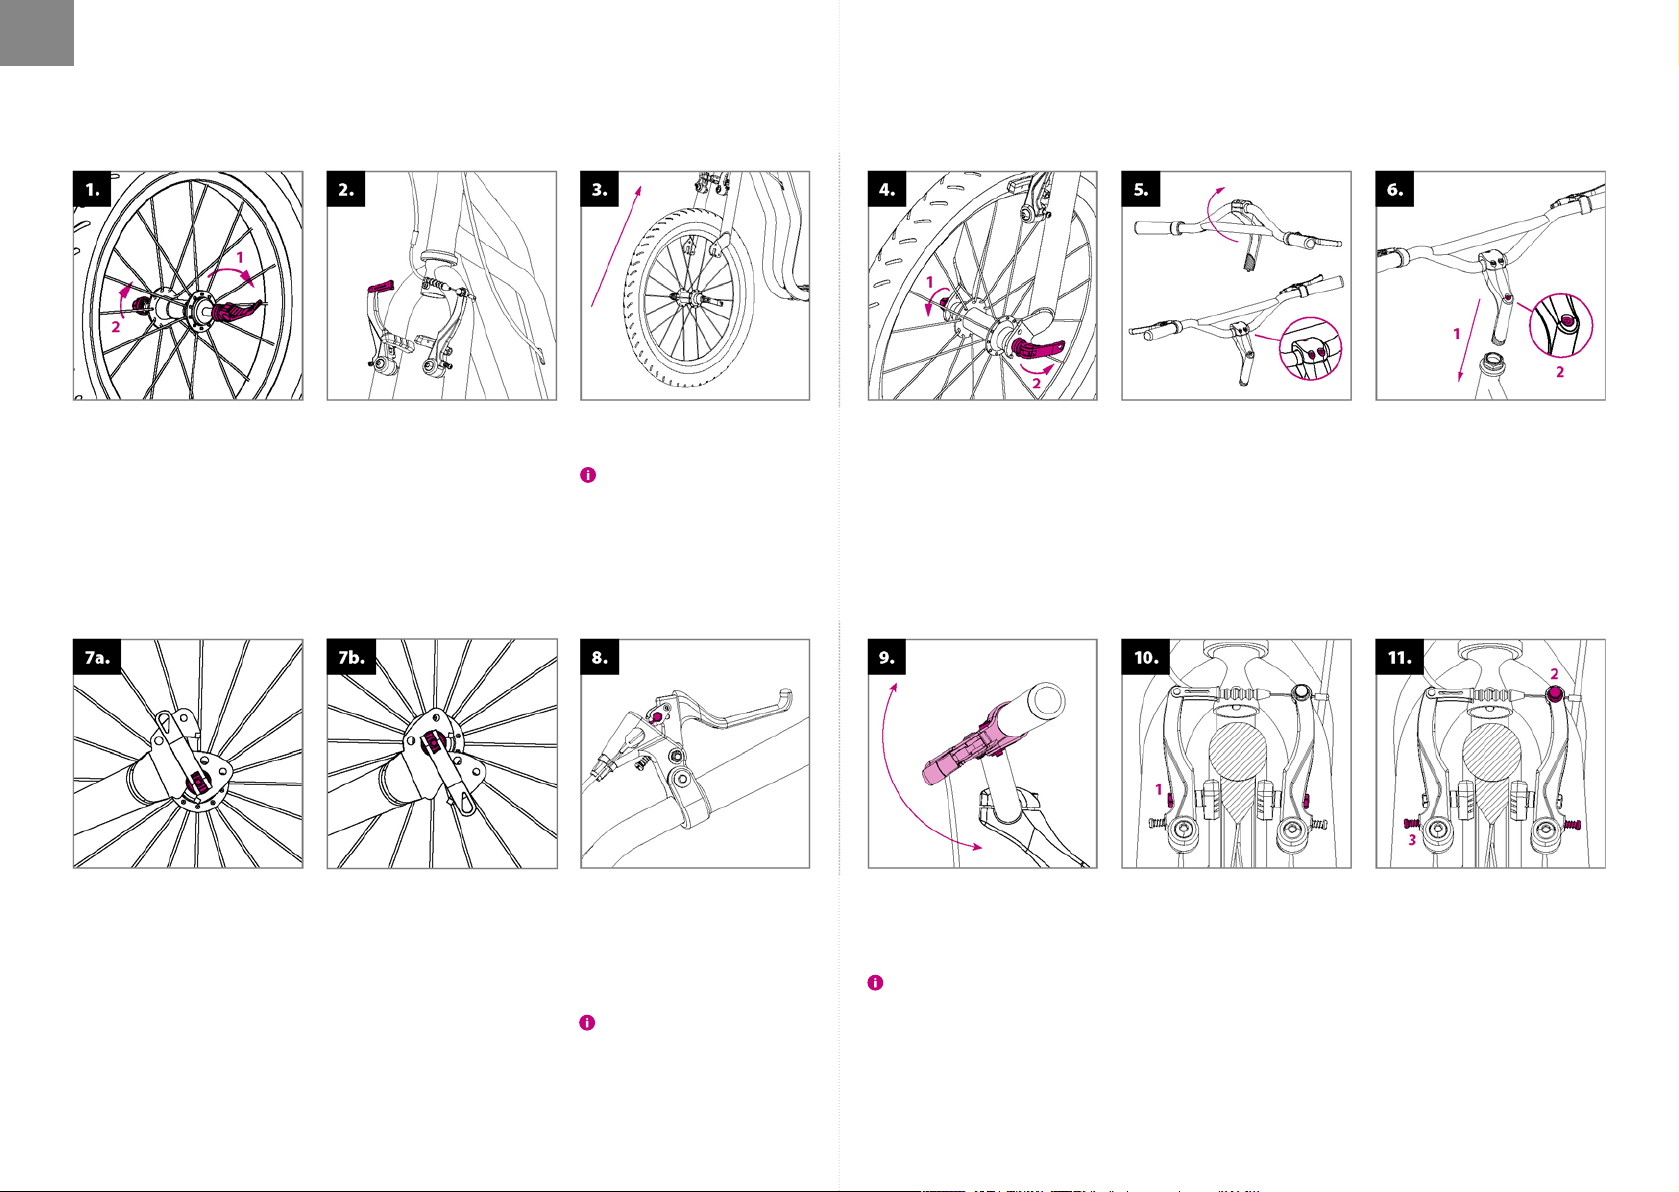
Instalace řídítek: řídítkovou tyč
umístěte dopolohy dle obrázku
autáhněte šrouby představce.
Seřízení brzd: naobou kolech
zkontrolujte, zda brzdové špalíky
při zabrzdění dosedají celou svou
plochou nabok ráfku. Pokud ne,
upravte jejich polohu pomocí
šroubku, kterým jsou špalíky přichyceny kramenům V-brzdy (1).
Špalíky se nesmí dotýkat pláště.
Zasuňte řídítkovou tyč dohlavové trubky rámu koloběžky (1)
anastavte požadovanou výšku
řídítek (max. povyznačenou
rysku). Zkontrolujte, zda jsou
řídítka rovně adotáhněte šroub
nařídítkové tyči (2).
Zkontrolujte, zda se špalíky při
uvolnění brzdové páčky dostatečně oddálí odráfku (1–2 mm).
Vzdálenost špalíků lze upravit přitažením či povolením brzdového
lanka vkotevním šroubu (2).
Pokud kolo při otáčení vněkterém místě škrtá obrzdový špalík,
symetricky upravte vzdálenost
brzdových ramen napínacími
šroubky (3).
6 7
Page 5
CZ
BEZPEČNOSTNÍ
DOPORUČENÍ
Koloběžka je vzákladní výbavě určena pro jízdu
zadenního světla vprostorách určených pro sport
arekreaci.
Pro jízdu napozemních komunikacích apro jízdu
zatmy ji musíte vybavit bezpečnostními prvky
(světla, odrazky atd.) vsouladu splatnými předpisy
vevaší zemi. Dodržujte pravidla silničního provozu, zásady bezpečné jízdy apoužívejte ochranné
pomůcky (přilbu, chrániče kolen aloktů, pevné
boty apod.).
Před každou jízdou zkontrolujte funkčnost brzd
acelkový technický stav koloběžky. Nepřekračujte
její max. zatížení (nosnost koloběžky je uvedená
naúvodní straně). Koloběžka je určena pouze pro
jednoho jezdce. Vyvarujte se nadměrného zatěžování koloběžky, koloběžka není určena pro skoky
ani akrobatickou jízdu .
Všechny mechanismy snižující rychlost (brzdové
destičky či kotouče, ráfky, pneumatiky apod.) se
při používání zahřívají, nedotýkejte se jich, dokud
nevychladnou!
Kzaparkování koloběžky používejte stojánek.
Pozor, jeho max. nosnost je cca 15 kg. Nazaparkovanou koloběžku nestoupejte!
jízdní pokyny
Při jízdě mějte vždy obě ruce nařídítkách. Zatímco
se jednou nohou odrážíte, druhou nohou stůjte
nastupátku koloběžky. Pravidelně střídejte odrazovou nohu. Pro zabrzdění stiskněte brzdové
páčky nařídítkách. Brzděte pomocí zadní brzdy, tu
zpravidla ovládá pravá páčka. Přední brzdu používejte jen při přibrzďování nebo vpřípadě nouze.
POZOR: prudké zabrzdění může způsobit pád.
údržba
Řádná údržba zvýší bezpečnost aprodlouží životnost vaší koloběžky. Proto pravidelně dotahujte
šroubové spoje, kontrolujte stav rychloupínáku,
tlak vpneumatikách apromazávejte pohyblivé
části (ložiska kol ařídítek, čepy brzdových páček,
čelisti brzd, brzdová lanka, atd.).
Dejte však pozor, aby se mazivo nedostalo naráfky, brzdové destičky nebo kotouče. Mastnota snižuje jejich účinek! Pokud se tak stane, odmastěte
znečištěné části např. technickým benzínem.
Pravidelně kontrolujte výšku vzorku napláštích
kol, vpřípadě potřeby vyměňte pláště zanové se
shodnými parametry.
Kontrolujte stav samojistných matic (pokud se
zajízdy samovolně uvolňují, vyměňte je zanové).
Pravidelně kontrolujte výplet kol, nestejnoměrné
napnutí drátů vevýpletu může způsobit jejich
praskání nebo rozcentrování kol.
Koloběžku udržujte včistotě, zašpinění otřete
vlhkým hadrem. Skladujte ji uvnitř nasuchém
astinném místě, dlouhodobě ji nevystavujte
zvýšené vlhkosti ani extrémním teplotám. Před
zazimováním ošetřete antikorozním přípravkem
apneumatiky nahustěte namaximální hodnotu
uvedenou naboku pláště. Výrobce neodpovídá
zaškody vzniklé výlučně zanedbanou údržbou,
neodborným zásahem, vlastními úpravami či
špatným zacházením.
Výrobek splňuje náležité normy EU (ČSN EN 14619)
azískal certikáty kvality abezpečnosti odpředního českého zkušebního ústavu (Strojírenský
zkušební ústav, s. p.) imezinárodně uznávaného
TÜV SÜD Czech s. r. o.
Výrobce: Intrea-Piko, s. r. o., Sasanková 2657/2
10600 Praha 10, Česká republika
Uplatnění práv z vadného plnění
Obecná ustanovení: Obsah, rozsah atrvání práv kupujícího zvadného plnění zboží se řídí platnými
právními předpisy České republiky, ato především příslušnými ustanoveními občanského zákoníku (z.
č. 89/2012 Sb.) azákona oochraně spotřebitele (z. č. 634/1992 Sb.). Práva kupujícího vesmyslu těchto
předpisů nejsou tímto dokladem, ani vněm uvedenými informacemi nijak dotčena.
Doba pro uplatnění práv zvadného plnění: Právo zvady unově zakoupené koloběžky Yedoo (dále jen
zboží) může kupující uplatnit vdobě 24 měsíců odjejího převzetí. Vytkne-li kupující vadu zboží oprávněně,
lhůta pro uplatnění práv zvadného plnění neběží podobu, pokterou kupující nemůže zboží užívat.
Způsob uplatnění práv zvadného plnění: Práva zvadného plnění se uplatňují uprodejce, ukterého
kupující zboží zakoupil (viz údaje níže). Při uplatnění vad zboží doporučujeme předložit tento doklad,
doklad okoupi akompletní nečistot zbavenou koloběžku. Ouplatnění práv zvadného plnění, případně
oprovedení opravy vystaví prodejce kupujícímu písemné potvrzení.
Podmínky trvání práv zvadného plnění: Při montáži koloběžky musí být dodrženy pokyny uvedené
vmontážním návodu. Koloběžka musí být používána výhradně kúčelu, kjakému byla vyrobena.
Koloběžka musí být skladována audržována podle výrobcem uvedených pokynů. Navady způsobené
výlučně nesprávnou montáží či používáním koloběžky vrozporu suživatelskou příručkou se
odpovědnost výrobce nevztahuje.
Model koloběžky:
Výrobní číslo rámu:
Datum prodeje:
Prodejce:
Razítko ap odpis:
8 9
Page 6
DE
Grundsätzlich empfehlen wir die Montage,
Einstellung und regelmäßige Wartung einem
spezialisierten Fahrradservice zu überlassen.
Beachten Sie bitte auch, dass unsachgemäßer
Einsatz oder Veränderungen am Kickroller
Materialschäden und schwere Unfälle zur Folge
haben kann.
Falls Sie technische Fertigkeiten besitzen
und sich nicht davor scheuen werden Sie
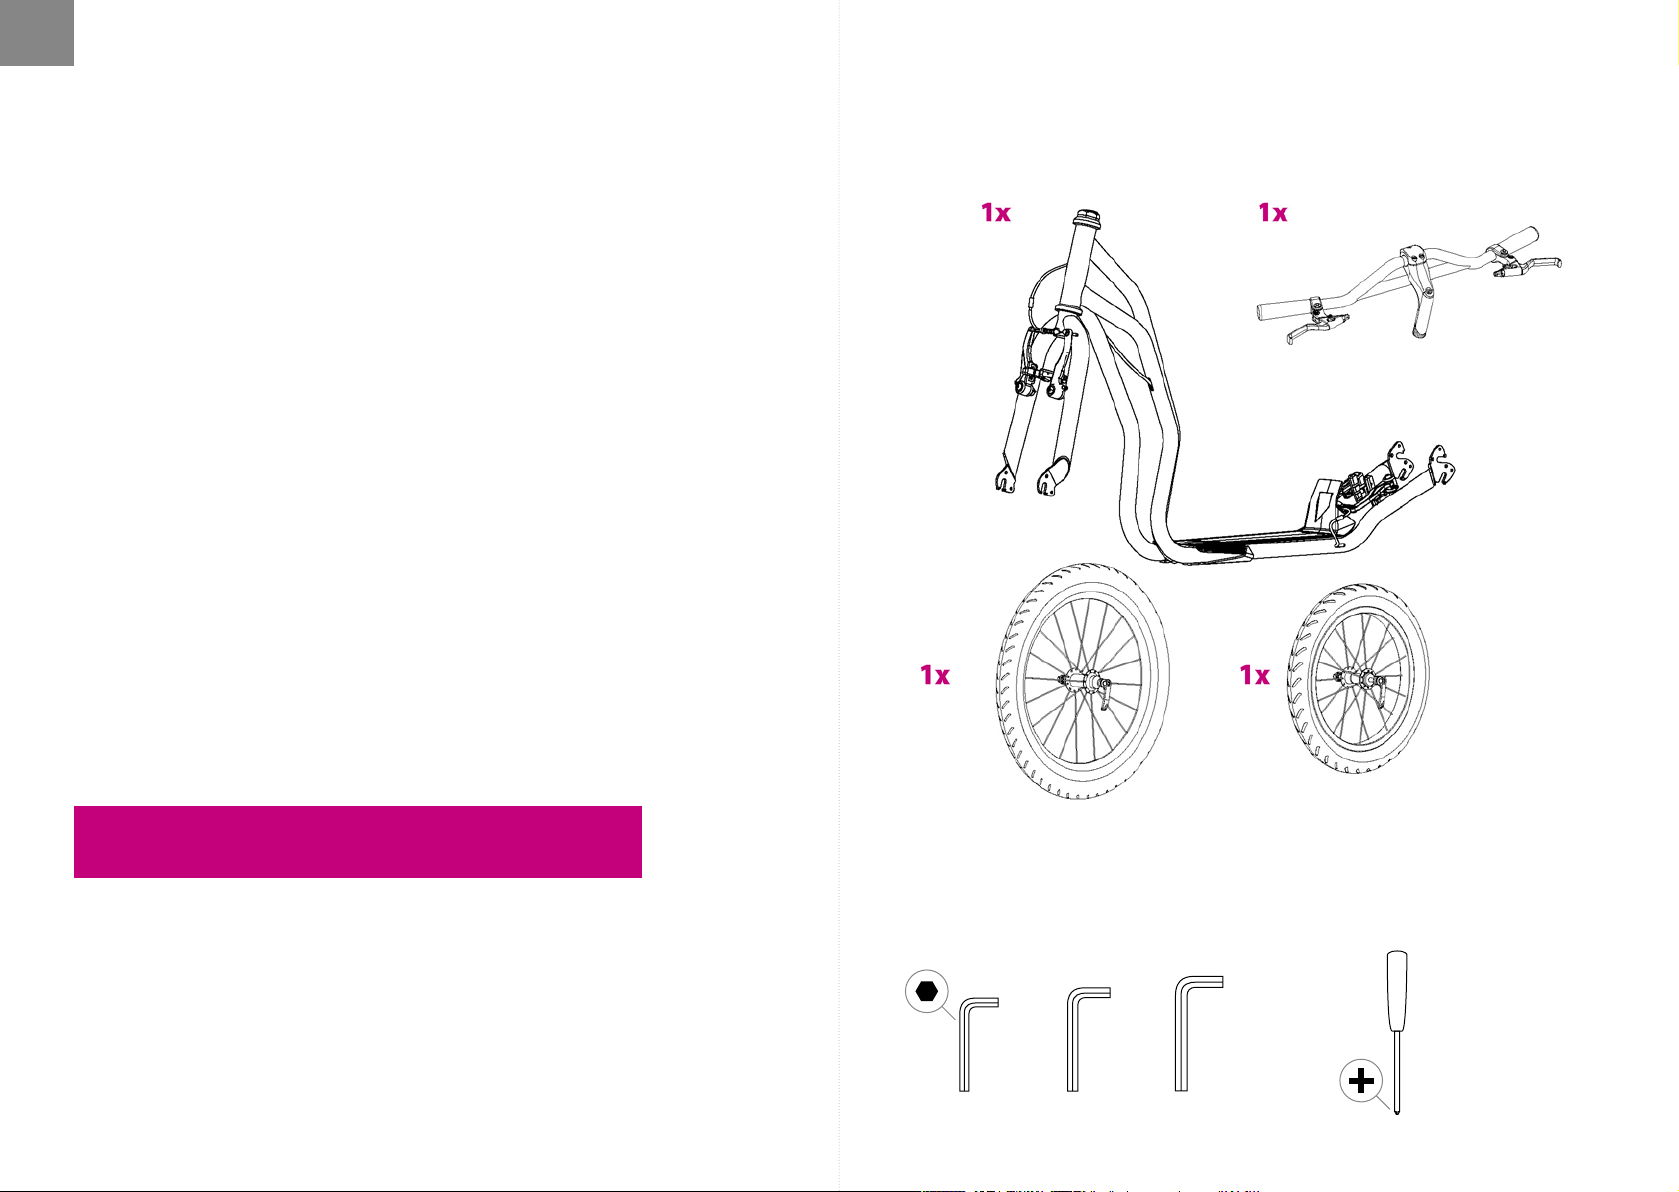
INHALT DER VERPACKUNG EINLEITUNG
allerdings sehen, dass die Montage ganz
leicht ist. Folgen Sie jedoch unbedingt
allen Schritten dieser Montageanleitung
und beachten Sie sämtliche Warnhinweise.
Fragen, Bemerkungen und Verbesserungsvorschläge zu unseren
Produkten schicken Sie uns bitte an unsere E-Mail Adresse:
info@yedoo.eu.
NOTWENDIGES WERKZEUG
Mehr Informationen aus der Tretroller-Welt ndet Sie www.yedoo.eu.
6 mm5 mm4 mm
10 11
Page 7
DE
MONTAGEANLEITUNG
Montage des vorderen,
größeren Rades: Önen Sie den
Schnellspannhebel und lockern
Sie die Gegenmutter etwas.
Die Montage des hinteren
Rades unterscheidet sich von der
Montage des vorderen Rades nur
durch eine Doppelgabel. Verwenden Sie die untere Halterung für
Geländefahrten.
Bringen Sie die Vordergabel des
Tretrollers so in Position, dass die
Arme der V-Bremse nach vorne
gerichtet sind. Hängen Sie das
Bremsseil aus der Gegenzugseite
aus und önen Sie die Bremsarme.
Die Position in der oberen Gabelhalterung, verringert die Höhe
des Trittbrettes und entlastet
zugleich das Standbein, ist für
Fahrten auf ebener Oberäche
bestimmt. Die Fahrt ist somit
weniger anstrengend.
Führen Sie die Radachse von unten
in die Schlitze der vorderen Gabel,
und positionieren Sie das Rad so,
dass es genau in der Mitte ist.
Das Lauächenprol des Reifens (Rillen
in Form von P feilen) muss nach vor ne in
Fahrrichtung zeigen.
Montage der Bremszüge:
ziehen Sie den Bremshebel auf
das Maximum an und schieben
das verdickte Ende des Bremsseils
in die Mitnehmerhalterung.
Wiederholen Sie den gleichen
Vorgang bei beiden Hebeln.
Der hintere Bremsbowdenzug wird
in der Reg el in den rechten Bre mshebel
befest igt, das Vordere in de n linken
Bremshebel.
Drehen Sie die Schraubenmutter
(1) nun so nach, dass sie vor dem
Schließen des Schnellspannhebels einen Widerstand fühlen.
Schließen Sie den Hebel so, dass
er nach hinten geklappt ist (2)
(aus Sicherheitsgründen). Hängen
Sie das Bremsseil wieder in den
Bremsenzug ein.
Einstellen der Bremshebel:
stellen Sie die richtige Lage der
Bremshebel am Lenker mit Hilfe
der Klemmschraube des Bremshebelhalters ein.
Richtiger Winke l der Bremshebe l: stellen
Sie sich auf d as Trittbr ett, greifen Si e die
Lenks tange so, damit Sie d ie Gerade der
Hände verlängert. Fixieren Sie die Bremshebel in diesem Winkel.
Anbringen der Lenkerstange:
Positionieren Sie die Lenkstange
gemäß der Abbildung und
ziehen Sie die Schrauben des
Lenkstangenvorbaus an.
Einstellung der Bremse: überprüfen Sie auf beiden Rädern, dass die
Bremsbeläge beim Bremsen mit ihrer
ganzen Fläche auf der Seitenwand
der Felge auiegen. Falls nicht,
lösen Sie die Feststellschraube der
Bremsklötze und positionieren diese.
Nach dem Festziehen der Schraube
sind die Bremsklötze zu den Armen
der VBremse (1) xiert. ACHTUNG!
Die Klöt ze dürfen nie den Mantel des
Reifens berühren.
Schieben Sie die Lenkerstange
in das Hauptrohr des Tretrollerrahmens (1) und stellen Sie
die gewünschte Höhe des Lenkers
ein (bis max. in Höhe des gekennzeichneten Striches). Überprüfen
Sie, ob der Lenker gerade ist und
ziehen Sie die Inbusschraube der
Lenkerstange fest (2).
Überprüfen Sie, dass der Abstand
der Bremsbeläge von der Felge bei
unbetätigtem Bremshebel etwa 1-2mm
beträgt . Dieser Abstand lässt sich durch
anziehen oder lockern des Bremsseils
in der Fixierschraube (2) regulieren.
Falls der Reifen beim drehen an
irgendeiner Stelle den Bremsbelag
streift, stellen Sie die Entfernung der
Bremsarme durch die Spannschrauben
(3) symmetrisch ein.
12 13
Page 8
DE
SICHERHEITSEMPFEHLUNGEN
Der Tretroller i st in seiner Grunda usstattung für e ine Fahrt bei
Tageslicht auf Sportplätzen und Geländen in mäßig strukturiertem Gelände bestimmt. Für die Fahrt auf Verkehrswegen
und für die Fahr t im Dunkeln müssen Si e mit Sicherheitse lementen im Einklang mit deren gültigen Straßenvorschriften
für Ihr Lan d ausgestattet s ein. (Lichter, Rückst rahler usw.)
Halten Sie die vorgeschriebenen Regeln des Straßenverkehrs,
sowie die Grundsätze des sicheren Fahrbetriebes ein und
benutzten Sie Schutz mittel (Schutzhelm, Ellbogen- und
Knieschü tzer, feste Schuhe u. ä .)
Überprüfen Sie vor jeder Fahrt die Funktionsfähigkeit der
Bremsen und den gesamten technischen Zustand des
Tretrollers.
Übersch reiten Sie auf keinen Fall di e max. Belastung d es
Tretrollers (die Traglast des Tretrollers ist auf der Einleitung
angegeben). Der Tretroller ist nur für einen Fahrer bestimmt.
Überbeanspruchen Sie den Tretroller nicht. Der Tretroller ist
nicht für Belastungen wie Akrobatik und Sprünge ausgelegt.
Alle Bauteile, welche die Geschwindigkeit regulieren (Bremsbeläge, Felgen, Reifen und Scheiben der Scheibenbremse)
erwär men sich bei der Nut zung, fassen Sie dies e nicht an,
solange sie nicht abgekühlt sind!
Benutzen Sie zum Abstellen des Tretrollers den Ständer.
Vorsicht, se ine max. Belastu ng beträgt ca. 15 kg. Steigen Sie
deshalb nie auf den abgestellten Tretroller!
FAHR-
ANWEISUNGEN
Halten Sie bei der Fahrt immer beide Hände auf der Lenkstange. Währ end Sie sich mit einem Fuß abs toßen, stehen Sie
mit dem Anderen auf dem Trittbrett des Tretrollers. Wechseln Sie reg elmäßig das Beim mit de m Sie sich abstoßen.
Ziehen Sie f ür das Bremsen die Brem shebel in Richtung
Lenkerstange. Bremsen Sie mit Hilfe der hinteren Bremse,
diese wird i n der Regel mit dem rec hten Hebel bedient .
Die vordere Bremse benutzt man beim leichten Anbremsen oder im N otfall gemeins am mit der Hinter Bremse b ei
gezielten Notbremsungen.
VORSICHT: ein scha rfes Bremsen kan n einen Sturz zur Folge
haben.
WARTUNG
Die richtige und regelmäßige Wartung erhöht die Sicherheit und verlängert die Lebensdauer Ihres Tretrollers.
Deswegen ziehen Sie bitte regelmäßig die Schraubenverbindungen nach, kontrollieren Sie den Sitz der
Schnellspannhebel, den Luftddruck in den Reifen und
schmieren Sie die beweglichen Teile (Lager der Räder
und Lenkerstange, Stifte der Bremshebel, Bremsbacken,
Bremsbowdenzüge, usw.).
Achten Sie aber darauf, dass das Schmiermittel nicht auf
die Felgen oder Bremsbeläge gelangt. Das Schmiermittel reduziert die Bremswirkung entscheidend! Falls es
trotzdem passiert, fetten Sie die verschmutzten Teile z. B.
mit technischem Benzin ab.
Überprüfen Sie regelmäßig die Tiefe des Lauächenprols der Reifen, falls notwendig, tauschen Sie die
Reifenmäntel für neue mit gleichen Dimensionen aus.
Überprüfen Sie den Stand der selbstsichernden
Schraubenmuttern (falls diese sich während der Fahrt
unbeabsichtigt lockern, tauschen sie diese gegen neue
aus). Überprüfen Sie regelmäßig die Spannung der
Speichen, eine ungleichmäßige Spannung der Drähte der
Speiche kann zu deren Reißen oder zu einer schlechten
Ausrichtung der Räder führen. Halten Sie den Tretroller
sauber, mögliche Verschmutzungen wischen Sie mit
einem feuchten Tuch ab. Am Besten bringen Sie den
Tretroller in einem Innenraum an einem trockenen und
schattigen Ort unter, setzen den Tretroller längere Zeit
weder erhöhter Feuchtigkeit noch extremen Temperaturen aus. Vor dem Winter sollten Sie den Tretroller mit
einem antikorrosiven Mittel behandeln und die Reifen
sollten auf maximalen Wert aufgepumpt werden, dieser
Wert ist seitlich auf dem Mantel angegeben.
Der Hersteller garantiert nicht für Schäden welche durch
mangelhafte Wartung, unautorisierte Umbauten oder
andere technische Veränderungen, zweckentfremdete
Benutzung sowie inadequate Lagerung hervorgerufen
werden.
Das Produkt erfüllt die erforderlichen ordnungsgemäßen
EU Normen (ČSN EN 14619) und erhielt ein Qualitäts- und
Sicherheitszertikat von den führenden tschechischen
Prüfanstalten (Maschinenbau Prüfanstalt, s. p.TZÚS
Praha, s. p.– Werk ZÚLP České Budějovice) und den international anerkannten TÜV SÜD Czech s. r. o.
Hersteller: Intrea-Piko, s. r. o., Sasanková 2657/2, 106 00
Praha 10, Tschechische Republik
GARANTIESCHEIN
Allgemeine Bedingungen: Der Inhalt, Umfang sowie die zeitliche Gültigkeit der Garantie entsprechen
den gesetzlichen Vorschriften des Landes in dem der Tretroller erworben wurde.
Garantie Zeitraum: Der Käufer des neuen Yedoo Tretrollers (Produkts) kann den Garantieanspruch
bis zum Ablauf von 24 Monaten nach dem Erwerb geltend machen. Der Garantieanspruch beginnt
mit dem Tag des Erwerbs und verlängert sich automatisch um jenen Zeitraum für den das Produkt zur
Garantiereparatur während des Garantieanspruch Zeitraumes eingesandt sein sollte.
Garantie Anspruch: Die Garantie Karte muss mit dem Händler vollständig ausgefüllt sein (siehe unten)
Wir empfehlen, die Rechnung, die ausgefüllte Garantiekarte sowie das vollständig gereinigte Produkt
zur Garantieabwicklung beim Händler vorzulegen. Der Händler wird dem Käufer im Gegenzug eine
Übergabebestätigung für die Übernahme zur Garantieabwicklung aushändigen.
Garantie Bedingungen: Das Produkt muss gemäß der Aufbauanleitung zusammengebaut sein, gemäß
der Bedienungsanleitung gelagert, montiert, eingestellt und Instand gehalten werden, und darf nicht
zweckentfremdet verwendet werden. Mängel die durch gewöhnliche Abnutzung entstehen können
nicht als Reklamationsursache betrachtet werden. Der Hersteller haftet auch nicht für Schäden, die durch
falsche Montage oder durch Nutzung in anderer als in diesem Bedienungshandbuch erläuterten Art und
Weise entstehen.
Produkt/Modell:
Produktionsnummer
des Rahmens:
Verkaufsdatum:
Verkäufer:
Stempel und Unterschrift:
14 15
Page 9
EN
We highly recommend having the scooter
assembled and regularly inspected by
aprofessional bicycle technician. Incorrect
or decient assembly can lead to damaging
the scooter and can cause serious injuries.
If you are askilled technician, you
may assemble the scooter without
professional assistance with our help.
If you have any ideas or comments, feedback or tips,
please donot hesitate to contact us at our email address:
info@yedoo.eu.
PACKAGING CONTENTS INTRODUCTION
More information from the world of scooters and the list of sellers can be found
herewww.yedoo.eu.
NECESSARY TOOLS
4 mm
(0,16 in)
16 17
5 mm
(0,2 in)
6 mm
(0,24 in)
Page 10

EN
ASSEMBLY INSTRUCTIONS
Assembly of the front (bigger)
wheel: open the quick-release
lever and loosen the nut.
Assembly of the rear wheel is
the same as the assembly of the
front wheel with the only exception of double dropout at the
rear fork. It allows positioning the
footboard according to the road
conditions. The lower dropout
enables o road riding.
Make sure the front fork of the
scooter is well positioned (brake
levers are facing forward). Release
the brake cable from its holder
and loosen the brake arms.
The upper dropout, which also
makes the footboard go lower
and thus reduces the load on the
standing leg, is intended for at
surface. Riding will be less tiring.
Place the wheel into the front fork
so that is well-centred.
The tread pattern (arrow-shaped lines
on the tire s) must be po inting to the front .
Installation of brake cables:
press the brake lever to the maximum and insert the ending of the
brake cable into the circular xing
point. Repeat the action with
both brakes.
The rear brake cab le is usually xed o n
the right , front brake cabl e on the left.
Tighten the nut (1) until you can
feel resistance before closing the
quick release. Close it in away
that the quick release lever (2)
points backwards (for safety
reasons). Return the brake cable
into the holder.
Adjustment of brake levers:
incline the brake levers correctly
by loosening the screw on the
sleeve.
The right i nclination: sta nd on the
footbo ard, hold the hand les and stretch
out your n gers in away that your ar m and
the nger s form asingle str aight line. This
should b e the position of th e brake levers.
Handlebar installation: place
the handlebar tube as shown
on the picture and tighten the
screws on the stem.
Adjustment of brakes: when
braking, check that the brake
pads of both wheels t tightly on
the rim sides. If not, you can adjust their position via ascrew that
connects them to the V-brake
arms (1). The pads shall not touch
the tires.
Insert the handlebar tube into the
front frame (1) and adjust the height
according to the rider’s needs
(not higher than indicated by the
line). Check that the handlebar is
upright and properly tighten the
screw on the handlebar tube (2).
Check that the pads make enough
space (1–2 mm) after releasing
the brake levers. The distance
can be adjusted by tightening or
loosening the brake cable at the
anchor screw (2).
In case the brake pad is touching
the wheel when turning, symmetrically adjust the distance of brake
arms by the tightening screws (3).
18 19
Page 11
EN
SAFETY MEASURES
The scooter in its basic equipment is designed for
riding during daylight in areas meant for sport and
recreation. For roads with car trac or for riding
in the dark, you need to provide your scooter with
safety features (lights, reectors, etc.) in accordance with the regulations valid in your country. Pay
attention to trac and general safety regulations and
use protective accessories (helmets, knee and elbow
pads, good shoes, etc.)
Before each ride, always check good function of
the brakes and the overall technical condition of
the scooter. Donot exceed the maximum loading
capacity of the scooter (as specied on the front side).
The scooter is designed for one rider only! Donot
overload the scooter, it is not intended for jumping
or acrobatic riding.
All the speed-limiting mechanisms (brake pads or
discs, rims, and tires etc.) can become warm when
used. For this reason, it is not recommendable to touch them before cooling o!
To park the scooter, use the kick-stand! Beware that its
loading capacity is approximately 15kg. Donot step on
the footboard when the scooter is parked.
RIDING
INSTRUCTIONS
When riding, always grip the handlebar with both
hands. While pushing o with one foot, place the
other foot on the footboard of the scooter. Regularly
exchange feet. In order to brake, press the brake
levers on the handlebars. Usually you would use the
right lever which controls the rear brake. The front
brake should only be used to supplement the stopping power of the rear brake. Never squeeze the front
brake without also squeezing the rear brake with
equal or greater force.
WARNING: sudden violent braking may cause injury.
MAINTENANCE
Correct and regular maintenance increases safety
and lengthens the life span of your scooter. Regularly
inspect screw connections, quick releases, pressure
in tires and lubricate the moveable parts (wheels,
bearings, handlebars bearings, cables, brake parts
etc.). Make sure that no lubricant gets on the rims or
brake pads. Grease reduces their eect!
If this situation occurs, it is necessary to remove the
grease from all the parts, using asolvent and/or
degreaser.
Inspect the tires for cuts, nicks and deformities. Replace tires that show excessive wear and damage with an
equivalent tire.
Inspect the self-locking nuts. If they get loose freely,
exchange them with new ones.
Check the spokes for defects. Irregular strain or looseness in spokes can cause their cracking or can make
the wheel wobble.
Keep your scooter clean, use soft cloth moistened
with water. It should be stored inside, on adry and
shaded place. Donot expose the scooter to high
humidity or extreme temperatures over along period
of time. Before the winter, prepare it against corrosion
and inate the tires to its maximal value as specied
on the side of the tire. The producer does not cover
damage caused solely by neglected maintenance,
non-adequate adaptation, or inappropriate treatment
and storage.
The product complies with the corresponding EU
standards (ČSN EN 14619) and received quality and
safely certications from aleading Czech testing
lab - Engineering Test Institute (Strojírenský zkušební
ústav, s.p.) as well as from the internationally recognized TÜV SÜD Czech s.r.o.
Producer: Intrea-Piko, s. r. o., Sasanková 2657/2, 10600
Prague 10, Czech Republic
WARRANTY LIST
General regulations: The content, extend and duration of the warranty conforms to the valid legal code in
the respective country of the purchase of the scooter.
Warranty period: The buyer of the new Yedoo scooter (product) can apply the warranty during the period
of 24 months from the purchase. The warranty commences on the day of the sale to the end user and is
automatically extended when the product is taken into repair during warranty period.
Warranty application: The warranty must be lled out with the retailer, where the product was purchased
(see bellow). When applying the warranty, we recommend presenting the lled out sheet bellow, the receipt and acomplete and cleaned product. The seller will give awritten conrmation to the buyer regarding
the acceptance of the product into the warranty process.
Warranty conditions: The product must be assembled following the instructions of the manual. The
products shall only be used for the purposes, which it was designed for. The product must be stored and
maintained in the ways in accordance with the Instruction manual. The warranty does not cover damage
caused by common wear and tear is not covered by this warranty. The producer does not cover damage
caused by incorrect assembly or by use in contradiction with the Instruction manual.
Product model:
Serial number
of the frame:
Date of purchase:
Retailer:
Signature and stamp:
20 21
Page 12
ES
Se recomienda tener el scooter montado
y revisado periódicamente por un servicio
profesional de la bicicleta. Intervenciones
inexpertas pueden causar daños en el
scooter oaccidentes graves.
Sin embargo, si usted se considera un
técnico especializado, usted mismo
puede montar el scooter por su cuenta
con nuestra ayuda.
CONTENIDO DE LA CAJA INTRODUCCION
Si usted tiene alguna idea ocomentarios, opiniones
osugerencias, por favor no dude en ponerse en contacto
con nosotros en nuestra dirección de correo electrónico:
info@yedoo.eu.
Más información del mundo de los scooters y la lista de vendedores la
puede encontrar aquí www.yedoo.eu.
HERRAMIENTAS NECESARIAS
6 mm5 mm4 mm
22 23
Page 13

ES
INSTRUCCIONES DE MONTAJE
Ensamble la rueda delantera (la
mayor): abra la palanca de cierre
rápido y aoje la tuerca.
El ensamblaje de la rueda trasera diere del montaje de la rueda
delantera sólo por el distinto
terminado de la horquilla trasera.
Permite posicionar el caballete
de acuerdo con las condiciones
del terreno. La posición más baja
permite la conducción campo
através.
Asegúrese de que la horquilla
delantera del scooter está bien
posicionada.
La posición superior, hace que el
caballete vaya más bajo y por lo
tanto reduce la carga en la pierna
de apoyo, está destinado para
supercies planas. Montar será
menos cansado.
Coloque la rueda en la horquilla
delantera, y asegúrese que queda
bien centrada.
El patrón de giro (lí neas en forma de
echa de l os neumáticos) debe a puntar ala
parte delantera.
La instalación de los cables de
freno: presione la palanca del
freno al máximo y coloque el nal
del cable de freno en el punto de
jación circular. Repita la acción
con los dos frenos.
El cable del fren o trasero se ja
normalm ente en la maneta de f reno
derecha, y el delantero en la izquierda.
Apriete la tuerca (1) hasta que
sienta resistencia antes de cerrar
el cierre rápido. Cierre de manera
que la palanca del cierre rápido
señala hacia arriba (2) (por razones de seguridad).
Ajuste de las palancas de
freno: incline las palancas de
freno correctamente aojando el
tornillo de la maneta.
La posición cor recta: de pie en p osición
parada , mantenga las asas y es tire los dedos
de maner a que el brazo y los de dos formen
una sola lí nea recta. Es ta debe ser la posi ción
de las pala ncas de freno.
Instalación del manillar:
coloque el manillar como se
muestra en la imagen y apriete
los tornillos en la tija.
Ajuste de frenos: Respecto
alas ruedas, compruebe que las
zapatas no tocan las llantas de la
rueda cuando esté girando. Si realmente tocan, aoje los tornillos
de ajuste (1). y regule la posición
de ambas pastillas de freno de
modo que sean paralelas al disco
en su longitud. Acontinuación,
apriete los tornillos de nuevo.
Inserte el manillar en el bastidor
delantero (1) ajuste la altura de
acuerdo con las necesidades del
ciclista (no superior ala indicada
por la línea). Compruebe que el
manillar está en posición vertical
y ajuste correctamente el tornillo
del tubo del manillar (2).
La distancia entre las zapatas
de freno y la llanta debe ser la
mínima. Puede ajustar con la tuerca de ajuste (2), que regula el la
tensión del cable de freno. Si este
no es suciente, apriete oincluso
aoje el cable del freno al anclar
el tornillo (3).
24 25
Page 14

ES
MEDIDAS DE
SEGURIDAD
El scooter bás icamente está diseña do para montar durante
el día en zonas d estinadas para el dep orte y el recreo. Para
carreter as con tráco de coches opara m ontar en la oscuridad, es ne cesario proveer asu scoo ter con característi cas
de segurid ad (luces, reecto res, etc) de acuerdo con la
normativa vigente en cada país. Preste atención al tráco
y las normas de s eguridad general es y use accesorios de
protección (cas cos, rodilleras y coder as, buenos zapatos, e tc)
Antes de cada uso, compruebe siempre el buen funcionamiento de los f renos y el estado técni co general del scooter.
No exceda la ca pacidad máxima de ca rga del scooter
(siguiendo las e specicaciones). El scoo ter está diseñado
para un sol o ciclista! No sobrec argue el scooter, que no está
diseñado para saltar orealizar acrobacias.
Todos los mecanismos de limitación de la velocidad
(pastillas d e freno odiscos, llantas , neumáticos, etc.) pued en
recalent arse cuando son utili zados y, por tanto, no es
recomend able tocarlos antes de qu e se enfríen!
Para aparcar e l scooter, utilice el sopor te! Tenga en cuent a
que su capaci dad de carga es de aproxima damente 15 kg.
No se apoye en e l estribo al estacio nar el scooter.
INSTRUCCIONES
DE CONDUCCIÓN
Al andar, siempre sostenga el manillar con las dos manos.
Mientras qu e para empujar utilice uno d e sus pies, colocando el otro pie la b ase del scooter. Regularm ente cambie de
pie. Con el n de f renar, presione las palanca s de freno del
manillar. Por lo general, se usaría la palanca derecha la cual
controla el f reno posterior. Elfreno de lantero es de uso en
frenadas co rtas y para uso sólo d e forma excepcional, co mo
emergencia.
ADVERTENCIA: un frenado violento puede causar lesiones.
MANTENIMIENTO
Un correcto y regular mantenimiento aumenta tanto la
segurida d, así como el período d e vida útil de su scooter.
Así que revis e periódicamente la s uniones atornilladas , la
presión en lo s neumáticos y lubrique las p artes móviles
(ruedas, rodamientos, cojinetes de manillares, cables, los
componente s de frenos, etc.) Ase gúrese de que ningún
lubricante e ntra en los bordes olas pas tillas de freno. La
grasa redu ce su efecto!
Si se produce es ta situación, es nece sario eliminar la gras a,
por ejemp lo, con un disolvente especí co.
También se debe comprobar la banda de rodadura de los
neumáticos . Y si es necesario, se debe n cambiar los neumáticos por unos nuevos.
Inspeccione las tuercas de seguridad. Si se observan aojados, substituyalos por otros nuevos.
Comprueb e también los radios. L a tensión irregular en l os
radios pue de causar su agrietam iento opueden hacer que
el giro de la rue da no sea el adecuado.
Mantenga su sco oter limpio, en caso de uso d e por tierra,
pase un paño h úmedo. Debe ser almace nado en el interior,
en un lugar se co y sombreado. No expo nga el scooter auna
humedad y temperaturas extremas durante un período
de tiempo prolongado. Antes de que llegue el invierno,
se recomien da prepararlo contra l a corrosión e inar los
neumáticos asu v alor máximo tal como se e specica en el
neumático.
El fabrica nte no cubre los daños causa dos por negligenci a
de mantenimie nto, la adaptación no ade cuada, oel tratamiento y almacenamiento inapropiado.
El producto cumple con la correspondiente Normativa de la
UE (ČSN EN 14619) y han sido certi cados por los sigui entes
laboratorios de pruebas: Instituto de Ingeniería de prueba
Checo - Instit uto de Prueba de Ingenie ría (Strojírenský zku šební úst av, S P), y la certic ación del reconocid o internacionalmente sro T ÜV SÜD Checa.
Producto r: Intrea-Piko, s. r. o., Sasa nková 2657/2 ,
10600 Praga 10, Repúbl ica Checa
CERTIFICADO DE GARANTÍA
Reglamento general: El contenido, extensión y la duración de la garantía se ajusta al ordenamiento jurídico vigente en el país respectivo de la compra del scooter.
Período de garantía: El comprador del nuevo scooter Yedoo (producto) ofrece la garantía durante el
período de 24 meses apartir de la compra. La garantía comienza el día de la venta al usuario nal y es
prorrogado automáticamente cuando el producto está en reparación durante el periodo de garantía.
Aplicación de la garantía: La garantía debe ser sellada por el minorista, en la que se adquirió el producto
(Consulte la siguiente tabla). Al aplicar la garantía, le recomendamos presentar el sello del vendedor, la
factura y el producto completo y limpio. El vendedor le dará una conrmación por escrito al comprador
con respecto ala aceptación del producto en el proceso de garantía.
Condiciones de la garantía: El producto debe montarse siguiendo las instrucciones del manual. Los
productos sólo podrán utilizarse para los nes que fueron diseñados. El producto debe ser almacenado
y mantenido, de acuerdo con el manual de instrucciones. La garantía no cubre los daños causados por el
desgaste común de las piezas. El fabricante no cubre los daños causados por un montaje incorrecto ouso
en contradicción con el manual de instrucciones.
Modelo del producto:
Número de serie
del chasis:
Fecha de compra:
Minorista:
Firma y sello:
26 27
Page 15

FR
Introduction
Nous vous recommandons vivement de faire
assembler et vérier votre trottinette par un
professionnel du cycle. Des interventions par
des non spécialistes peuvent endommager les
trottinettes ou causer de graves accidents.
Toutefois, si vous vous considérez
comme un technicien averti, vous pouvez
assembler la trottinette vous-même sans
l‘aide d‘un professionnel.
Si vous avez des idées, commentaires, retours, information,
n‘hésitez à nous contacter via notre email : info@yedoo.eu.
Contenu du colis
Vous trouverez plus d‘information sur le monde de la trottinette sur www.yedoo.eu.
Outils nécessaires
6 mm5 mm4 mm
28 29
Page 16

FR
Instructions d‘assemblage
Assemblage de la roue (grande)
avant : ouvrir le levier de serrage
rapide et desserrer l‘écrou.
Assemblage de la roue arrière:
il dière de l‘installation de ala
roue avant par le fait qu‘il y a2
positions possible pour la roue.
Cela permet de positionner le plateau en fonction des conditions
de circulation. La position basse
permet une circulation o road.
Assurez-vous que la fourche avant
est en bonne position (les leviers
de frein vers l‘avant). Sortez le
câble de frein de son support et
desserrer le bras du frein.
La position haute, qui fait que le
plateau soit en position basse et
réduit ainsi la charge sur la béquille, est destiné à la circulation
sur surface plate. Faire de la trottinette sera moins fatiguant.
Placez la roue dans la fourche
de manière à ce qu‘elle soit bien
centrée.
Le dessin en forme d e èche sur le pneu
doit poi nter vers l‘avant
Installation des câbles de
frein : appuyer sur le levier de
frein à fond. Et insérez la n du
câble dans le point de xation
circulaire. Répétez la même chose
avec les 2 câbles.
Le frein arrière e st habituelle ment à
droite et l e frein avant à gauche .
Resserrez l‘écrou (1) jusqu‘à ce
que vous sentiez une résistance
dans le levier de serrage rapide,
ensuite fermer le serrage rapide.
Fermez-le vers l‘arrière dans une
position de sécurité (2). Remettre
le câble de frein dans le support.
Ajustement des leviers de
frein: incliner le levier de frein
correctement en desserrant la vis
sur le manche.
L‘i nclinaison corr ecte : placez-vo us sur
le plateau , tenez les poign ées et tendez vos
doigts d e manière à former u ne ligne droite
avec vos bra s. Cette positio n doit être celle
des levie rs de frein.
Installation du guidon : placez
le tube du guidon comme sur la
photo et resserrez la vis sur la tige.
Ajustement des freins : quand
vous freinez, vériez que les pad
de frein des 2 roues viennent
serrer la jante des 2 cotés. Si ce
n‘est pas le cas, vous pouvez
ajuster leur position via une vis
qui les relier au bras du V-brake
(1). Le pad ne doit absolument
pas toucher le pneu.
6. Insérez le tube du guidon dans
la fourche avant (1) ajustez la
hauteur en fonction de l‘utilisateur (pas plus haut que le trait sur
le tube). Vériez que le guidon est
droit et serrez soigneusement la
vis en haut du tube (2).
Vériez que les pads laissent
un espace de 1-2mm quand les
freins sont relâchés. La distance
peut être ajustée en resserrant
ou desserrant le câble de frein au
niveau de la vis d‘ancrage (2).
Si le pad touche la roue quand
vous roulez, ajustement symétriquement la distance des
bras de freins en resserrant les
vis (3).
30 31
Page 17

FR
MESURES DE
SECURITE
La trottinette dans son équipement de base est faite
pour rouler sur des terrains appropriés au sport et aux
loisirs. Pour rouler sur les voies de circulation ou pour
rouler de nuit, vous devez apporter des équipements
de sécurité telle que lumières, catadioptre, etc. en
accord avec les lois dans votre pays. Faites attention
au trac routier et portez les équipements de sécurité
appropriés (casque, genouillères, coudières, bonnes
chaussures, etc.).
Avant chaque utilisation, vérier le bon fonctionnement des freins et tous les serrages de la trottinette. Ne pas dépasser le poids maxi autorisé de la
trottinette (spécié sur l‘avant de la trottinette). Cette
trottinette est conçue pour être utilisée par une seule
personne!
Ne pas surcharger la trottinette, celle-ci n‘est pas
conçue pour faire des sauts ou des acrobaties.
Tous les mécanismes de limitation de vitesse (pad
de frein, jante, pneus, disque de frein, etc.) peuvent
chauer quand ils sont utilisés, nous vous recommandons de ne pas les toucher avant qu‘ils aient refroidi!
Pour ranger la trottinette utilisez la béquille! Attention sa capacité est d‘environ 15kg. Ne pas se mettre
sur le plateau quand al trottinette repose sur la
béquille!
POUR ROULER
Quand vous roulez, tenez toujours le guidon avec les
2 mains. Lorsque vous poussez avec un pied, mettre
l‘autre pied sur le plateau. Changer régulièrement
de pied. Pour freiner, serrez le levier de frein vers le
guidon. Habituellement vous utiliserez le levier droit
pour actionner le frein arrière. Le frein avant est seulement utilisé pour des freinages courts et exceptionnels, en cas d‘urgence.
ATTENTION: un freinage violent peut causer un
accident.
MAINTENANCE
Une maintenance correcte et régulière améliore la
sécurité et la durée de vie de votre trottinette. Vériez
régulièrement les vis, les serrages rapide, la pression
des pneus et lubriez les partie amovible (roues,
roulements, roulement du guidon, câble, frein, etc.).
assurez vous qu‘il n‘y apas de lubriant sur les pads
de frein ou sur la jante. La graisse réduit le freinage!
Si cela devait arriver, il est nécessaire d‘ôter toute la
graisse de toutes les parties, avec de l‘essence par
exemple.
Vériez également les rainures des pneus, et si c‘est
nécessaire, remplacer le pneu par un pneu équivalent.
Vérier les écrous, si ils se desserrent il faut les remplacer immédiatement par des neufs.
Vérier les rayons, et les remplacer s‘ils sont tordus
ou rayés.
Gardez votre trottinette propre, utilisez un chion
doux pour nettoyer. Elle doit être rangée à l‘intérieur
dans un endroit sec. Ne pas exposer la trottinette à
un trop fort taux d‘humidité ou à des températures
extrêmes pour de longues périodes. Avant l‘hiver,
préparez la contre la corrosion, gonez les pneus au
maximum comme indiqué sur le an de ceux-ci.
Le fabricant ne couvre pas les dommages liés à la
négligence, le défaut de maintenance, l‘utilisation
inappropriée ou un rangement inadapté.
Ce produit répond aux standards européens (ČSN EN
14619) et aété certié conforme par un laboratoire
Tchèque: Engineering Test Institute (Strojírenský
zkušební ústav, s.p.), et également par le laboratoire
international TÜV SÜD Czech s.r.o.
Fabricant : Intrea-Piko, s. r. o., Sasanková 2657/2,
10600 Prague 10, République tchèque
LISTE de GARANTIE
Généralités: le contenu et la durée de la garantie sont conforme aux réglementations en vigueur dans le
pays d‘achat de la trottinette.
Période de garantie: les produits YEDOO sont garantis 24 mois pour le cadre et les composants. La garantie débute à la date d‘achat par le client nal et est automatiquement prolongée en cas de retour pour
réparation.
Application de la garantie: pour faire valoir la garantie, ce document doit être complété avec le revendeur où le produit aété acheté. Une liste complète de garantie (ci-dessous) doit être complétée et le
produit doit être remis complet et propre. Le revendeur doit vous remettre une conrmation de prise en
garantie du produit.
Condition de garantie: le produit doit être assemblé selon les instructions du manuel. Les produits ne
doivent être utilisés que ce pour quoi ils sont conçus. Le produit doit être rangé et entretenu selon les
instructions spéciées dans ce document. La garantie ne s‘applique pas aux cas de dommages ou de perte
d‘un accessoire provoqué par une chute, aux rayures, montage incorrect, modication inadéquate, sauts,
acrobaties, course dangereuse, course de compétition, utilisation imprudente, négligence de l‘entretien
courant ou utilisation d‘une trottinette complétée d‘un moteur quelconque.
Produit type/modèle:
N° de série du cadre:
Date d‘achat:
Revendeur:
Cachet et signature:
32 33
Page 18

HU
Aroller szerelését, beállítását és rendszeres
karbantartását ajánljuk kerékpárszakszervizre bízni. Anem szakszerű
beavatkozások aroller károsodásához, és/
vagy komoly egészségügyi következményű
balesethez vezethetnek.
Amennyiben ön gyakorlott szakember,
akkor önállóan, ami segítségünkkel is
összeszerelheti arollert.
KISZERELÉS TARTALMABEVEZETÉS
Kérdéseit, megjegyzéseit és termékeink javulására
vonatkozó észrevételeit kérjük küldje akövetkező e-mail
címre: info@yedoo.eu.
További információt arollerek világából, ill. aforgalmazók jegyzékét
akövetkező címen találja: www.yedoo.eu.
SZÜKSÉGES SZERSZÁMOK
6 mm5 mm4 mm
34 35
Page 19

HU
Instructions d‘assemblage
Az elülső (nagyobb) kerék szerelése: lazítsa fel agyorsszorító
kart és lazítsa fel az anyát.
Ellenőrizze, hogy aroller elülső
villája helyes irányba fordul-e
(V-fék karjai előre irányulnak).
Lazítsa fel azsinórvezetőből afékzsinórt és lazítsa fel afékkarokat.
Illessze be akereket az elülső
villába úgy, hogy pontosan középen legyen.
Agumiabroncs mintájának (nyíl alakú
bevágás ok) amenetirány ba kell előrefe lé
irányulni.
Húzza szorosra az anyát (1) úgy,
hogy agyorsszorító kar teljes
bezáródása előtt ellenállást
érezzen. Zárja be akart (2) olyan
helyzetbe, amelynél ahátsó kerék
felé fog irányulni (biztonsági
okokból). Afékzsinórt helyezze
vissza azsinórvezetőbe.
Akormány felszerelése:
helyezze akormányrudat akép
szerinti helyzetbe, és húzza meg
aszár csavarjait.
Akormányrudat tolja bele aroller
váz fejcsövébe (1) és állítsa be
akormány megfelelő magasságát
ahasználó szükségletei szerint
(max. aszintjel magasságában).
Ellenőrizze, hogy akormány
egyenesen van-e, majd húzza
szorosra akormányrúdon lévő
csavart (2).
Ahátsó kerék szerelése azonos
az első kerék szerelésével,
ahátsó villánál való kettős kiesés
kivételével. Ez segít atalpdeszka
útviszonyokhoz való hozzáigazításában.Az alsó kiesés az úton
kívüli közlekedést teszi lehetővé.
Afelső kiesés, amely egyúttal
alacsonyabb pozícióba helyezi
atalpdeszkát, és így csökkenti
arajta álló láb terhelését, sík
felszínen való közlekedéshez volt
tervezve. Így amenet kevésbé
lesz fáradalmas.
Fékzsinórok felszerelése:
nyomja le afékkart amaximumra,
és akerek szembe helyezze be
afékzsinór végét. Ugyanezt az
eljárást ismételje meg mindkét
fékkaron.
Ahátsó fékz sinórt általá ban ajobb
fékka rba rögzítik, a z elülsőt abal fék karba.
Afékkarok beállítása: állítsa
be afékkarok helyes hajlásszögét
afoglalaton lévő rögzítő csavar
segítségével.
Afékkarok hel yes hajlásszöge : álljon
rá atalpd eszkára, fog ja meg akormányt ,
és nyújts a ki az ujjait úgy, ho gy ezek meghossz abbítsák akie gyenesített ké zt. Ebbe
apozíció ba állítsa be afék karokat.
Fékek beállítása: fékezésnél
ellenőrizze mindkét keréken,
hogy aféktuskók szorosan ráfekszenek-e akeréktalp oldalára. Ha
nem, akkor módosítsa helyzetüket annak acsavarnak segítségével, amellyel aféktuskók aV-fék
karjaihoz (1) vannak rögzítve.
Aféktuskók nem kerülhetnek
érintkezésbe agumipalásttal.
Ellenőrizze, hogy afékkar fellazulása után afék tuskók elégségesen
eltávolodnak-e akeréktalptól (1-2
mm). Aféktuskók távolságát afékzsinór rögzítő csavarban (2) történő
meghúzásával vagy fellazításával
lehet módosítani.
Ha forgás közben akerék valamelyik helyen érintkezik aféktuskóval,
akkor afékkarok távolságát afeszítő csavarok segítségével (3) állítsa
be szimmetrikusan.
36 37
Page 20

HU
BIZTONSÁGI
JAVASLATOK
Aroller alap -kivitelezésében napközben, sport és
rekreáció céljára szolgáló területen való használatra
rendeltetett. Az úttesteken történő használat és sötétben történő használat érdekében, az adott országban
hatályos előírásoknak megfelelően, arollert biztonsági
elemekkel kell ellátni (lámpák, fényvisszaverők stb.).
Tartsa be aközúti közlekedés szabályait, abiztonságos
közlekedés elveit, és használjon védőeszközöket (sisakot, térd- és könyökvédőt, szilárd cipőt stb.).
Minden menet előtt ellenőrizze afékek működését
és aroller teljes műszaki állapotát. Ne lépje túl max.
megterhelését (aroller teherbírása abevezető oldalon
van feltüntetve). Aroller kizárólag egy személy számára
van tervezve. Ne terhelje túl arollert, nem alkalmas
ugrálásra, vagy akrobatikus vezetésre.
Az összes sebességcsökkentő mechanizmus (fékpofák,
tárcsafékek tárcsái, keréktalpak, gumiabroncsok, stb.)
felmelegedhet használat közben, ezert nem ajánlatos
ezeket megérinteni, amíg ki nem hűlnek!
Aroller par kolásához használja az á llványt. Figyelem , ennek
max. tehe rbírása kb. 15 kg. Aleparkolt ro llerre ne lépjen rá!
MENETRE
VONATKOZÓ
UTASÍTÁSOK
Menet közben tartsa mindkét kezét akormányon.
Miközben az egyik lábával ellöki magát, amásik lábával
álljon aroller talpdeszkájára. Rendszeresen cserélgesse
az ellökésre használt lábat. Fékezés céljából nyomja
meg akormányon lévő fékkarokat. Általában ahátsó
fék van használva, ezt ajobb kar vezérli. Az elülső féket
csak ahátsófék fékezőerejének növelése érdekében
ajánlatos használni. Sohasem használja az elülső féket
anélkül, hogy egyidejűleg ahátsó féket is legalább
azonos, vagy nagyobb erővel lenyomná.
FIGYELEM: ahir telen megfékezés esést okozhat.
KARBANTARTÁS
Ahelyes és rendszeres karbantartás növeli abiztonságot, és meghosszabbítja rollerének élettartamát.
Rendszeresen húzza szorosra acsavarcsatlakoztatásokat, ellenőrizze agyorsszorító állapotát, agumikban
lévő nyomást, és kenje be amozgó részeket (kerekek és
kormányok csapágyait, fékkarok csapjait, fékpofákat,
fékzsinórokat, stb.). Ügyeljen rá, hogy akenőanyag ne
kerüljön akeréktalpakra, vagy afékbetétekre. A kenőzsír ugyanis csökkenti hatékonyságukat!
Ha ez mégis előfordul, akkor zsírtalanítsa aszennyezett
részeket pl. műszaki benzinnel és/vagy z sírtalanítóval.
Ellenőrizze, hogy az abroncsokban nincsenek-e vágások, szögek, ill. deformációk. Cserélje le atúlhasznált,
vagy megkárosodott abroncsokat azonos típusú
abroncsokra.
Ellenőriz ze az önzáró anyákat. Ha önmaguktól meglazulnak, cserélje le őket.
Rendszeresen ellenőriz ze akerék küllőit, mivel aküllők
egyenetlen mértékű megfeszítése azok elpattanását
vagy akerék középhelyzetének az eltolódását okozhatja.
Tartsa aroller t tisztán, aszennyeződéseket nedves ronggyal törölje le. Fedett sz áraz és árnyékos helyen tárolja, ne tegye ki huzamosabb időre fokozott nedvesség,
ill. extrém hőmérsékleti hatásoknak. Telelésre helyezés
előtt ápolja korrózió gátló készítménnyel, és agumikat
fújja fel apalást oldalán feltüntetett maximális szintre.
Agyártó nem vállal felelősséget elhanyagolt karbantartásból, nem megfelelő alkalmazásból, kezelésből,
tárolásból fakadó megkárosodásokért.
Atermék teljesíti avonatkozó EU szabványok (ČSN EN
14619) követelményeit, illetve megkapta az élenjáró
cseh vizsgálóintézetek [Gépészeti Vizsgálóintézet s.
p.(állami vállalat)] és anemzetközileg is elismert TÜV
SÜD Czech s. r. o. (Kf t.) által kiállított minőségbiztosítási
és biztonsági tanúsítványokat.
Gyártó: Intrea-Piko, s. r. o., Sasanková 2657/2, 10600
Praha 10, Cseh Köztársaság
GARANCIALEVÉL
Általános szabványok: ajótállás tartalma, terjedelme, ill. időtartama alárendelkezik azon ország érvényben levő törvényszabályainak, amelyben aroller vásárolva volt.
Ajótállás időtartama: ajótállást az új Yedoo roller (termék) vásárlója amegvétel időpontjától kezdve 24
hónapon belül érvényesítheti. Ajótállás időtartama atermék végfelhasználója által történő megvétel napján kezdődik, és automatikusan meghosszabbítódik ajótállási időtartam belüli javításba helyezés esetén.
Ajótállás érvényesítése: agarancialapnak azon eladó által kell kitöltve lennie, ahol atermék vásárolva
volt. (lásd lent) Agarancia érvényesítésénél elő kell terjeszteni aszabályosan kitöltött garancialapot, nyugtát és akomplett kitisztított rollert. Az eladó irásban igazolja atermék jótállási folyamatba való átvételét.
Jótállási feltételek: Aterméket akézikönyvben feltüntetett lépések alapján kell összeszerelni. Aterméket
kizárólag csak arra arendeltetési célra használja, amelyre gyártották. Aterméket megfelelő módon kell
tárolni, és ahasználati útmutatóban feltüntetett utasítások alapján karbantartani. Aszokásos elhasználódással létrejött meghibásodások nem reklamálhatók. Agyártó nem felel ahelytelen összeszerelés, ill. az
útmutatóban kijelölt utasításokkal ellentétes használat által okozott hibákért.
Termék modell:
Váz gyártási száma:
Eladás dátuma:
Eladó:
Pecsét és aláírás:
38 39
Page 21

IT
Consigliamo di adare il montaggio,
l’assemblaggio dei vari componenti e la
manutenzione regolare del monopattino
aun meccanico di biciclette professionista.
Gli interventi eettuati da non professionisti
possono causare il danneggiamento
del monopattino oincidenti con serie
conseguenze per la salute.
Se pensate di avere una buona
CONTENUTO DELLA CONFEZIONEINTRODUZIONE
manualità, non abbiate paura e
procedete il montaggio insieme anoi.
Vi preghiamo di mandare questioni, commenti e
osservazioni volte al miglioramento del nostro prodotto
all’indirizzo mail: info@yedoo.eu.
Troverete maggiori informazioni sul mondo dei monopattini e elenco dei
distributori sul sito www.yedoo.eu.
40 41
ATTREZZI NECESSARI
6 mm5 mm4 mm
Page 22

IT
ISTRUZIONI PER IL MONTAGGIO
Montaggio della ruota anteriore (la più grande): allentare
la leva di bloccaggio rapido del
mozzo e allentare il dado.
Controllare che la forcella anteriore del monopattino sia girata
nel verso giusto (il ceppo del
freno aVdeve essere rivolto in
avanti). Staccare il cavo del freno
dal morsetto e allentare il pattino
del freno.
Incastrare la ruota nella forcella
anteriore di modo che ci passi nel
centro perfetto.
Isolchi su l copertone (sca nalature
aspina di pe sce) dovrebbero es sere rivolti in
avanti seguendo la direzione della corsa.
Avvitare il dado (1) nché non
si incontra una certa resistenza prima di ssare la leva del
bloccaggio rapido. Fissare la leva
di modo che sia rivolta verso la
ruota posteriore (2) (per motivi di
sicurezza). Riattaccare il cavo del
Inserimento del manubrio:
collocare l’asta del manubrio
nella posizione indicata dalla
gura e stringere le viti del blocco
manubrio.
Inserire l’asta del manubrio nel
relativo attacco (1) e regolare
l’altezza del manubrio desiderata
(senza andare oltre la tacca segnata). Controllare che il manubrio sia dritto e stringere la vite
sull’asse del manubrio (2)
freno al morsetto.
Il montaggio della ruota posteriore si distingue dal montaggio
di quella anteriore solamente per
la presenza della forcella aforma
biforcuta. Essa permette di
cambiare l’altezza della pedana in
relazione alle condizioni della supercie stradale. Posizionarla sul
dentello inferiore per pattinare su
terreni sconnessi.
Il dentello più alto della forcella,
che abbassa la posizione della
pedana alleviando così il peso
sulla gamba d’appoggio, serve
per pattinare su superci lisce.
La corsa risulterà meno faticosa.
Attaccamento dei cavi dei
freni: premere al massimo la leva
dei freni e inserire l’estremità del
cavo dei freni nel morsetto circolare. Ripetere lo stesso procedimento per entrambi ifreni.
Il cavo dei freni po steriori di norm a è
collegato alla leva destra del freno, quello
anteriore alla leva sinistra.
Montaggio delle leve dei freni:
regolare le leve dei freni con la
giusta inclinazione ssando una
vite sui relativi manicotti dei freni.
Inclinazione c orretta dell e leve dei freni:
salire sul la pedana, aer rare il manubrio e
allungar e le dita di modo che s iano in linea
retta co n il braccio.
Regolazione dei freni: controllare su entrambe le ruote se
ipattini dei freni durante la frenata aderiscono con tutta la loro
supercie sul lato del cerchione.
In caso contrario correggere la
loro posizione girando la vite che
connette ipattini al ceppo aVdel
freno (1). Ipattini non devono
toccare il copertone.
Controllare che dopo il rilascio dei
freni irelativi pattini si distanzino
asucienza dal cerchione (1-2
mm). La distanza dei pattini si
può regolare tendendo oallentando il cavo del freno sul perno
di ssaggio (2).
Se la ruota quando viene girata in
qualche direzione sfrega il pattino, regolare simmetricamente il
ceppo del freno per mezzo delle
viti atrazione (3).
42 43
Page 23

IT
MISURE DI
SICUREZZA
Il monopat tino con le sue attrez zature di base è stato
ideato per essere usato alla luce del giorno in spazi ric reativi adibiti allo sport e ricreazione.
Per andare sulle grandi vie di comunicazione oal buio
dovrete munirlo di determinati componenti di sicurezza
(lucette, c atarifrangenti, ecc .) in conformità alle pre scrizioni in vigore nel vostro p aese. Rispettate l e regole
della circola zione stradale, le no rme di sicurezza e us ate
le protezioni idonee (casco, ginocchiere e paragomiti,
scarpe solide ecc.).
Prima di ogni cor sa controllate il funzio namento dei freni
e le condizioni complessive del monopattino dal punto
di vista tec nico. Non superate il suo limite di carico (la sua
portata massima è indicata sulla pagina introdu ttiva). Può
usare il monopattino solo una persona per vo lta. Si cerchi
di evitare di s ovraccaricare monop attino, il quale non è
destinato ai s alti ocorsa acrobatica .
Tutti imeccanismi a dibiti alla riduzione d ella velocità
(pastigli e dei freni ofreni adisco circolari, cerchioni, pneumatici ecc), durante il loro uso si surriscaldano, perciò non
toccateli nché non si raredda no!
Per parcheggiare il monopattino utilizzate il portabiciclette. Attenzio ne, la sua portata massima è di circa 15 Kg . Una
volta parcheggiato non salite sul monopattino.
ISTRUZIONI PER
L’ U S O
Durante la cor sa tenete sempre entrambe le mani sul
manubrio. Me ntre vi date la spinta con una gamb a, tenete
l’altra sulla pedana. Alternate regolarmente la gamba di
spinta. Per fr enare premete le leve dei f reni sul manubrio.
Frenate con l’ausilio de l freno posteriore, solitamente è
collegato all a leva di destra. Usate il freno anteriore sola mente per rallentare oppure in c aso di emergenza.
ATTENZIONE: una frenata brusca può causare la vostr a
caduta.
MANUTENZIONE
La manutenzione corrett a e regolare del vostro mo nopatti no aumenta la sua sicurez za e ne prolunga la
durata. Per qu esto motivo stringete re golarmente le viti,
controllate lo stato della leva di bloccaggio rapido, la
pressione degli pneumatici e lubricate le parti mobili
(idischet ti delle ruote e del manubr io, idadi delle leve dei
freni, irelativi ceppi, il cavo dei f reni ecc.).
Fate però attenzione che il lubricante non raggiunga
icerchioni pas tiglie odischi dei freni . Il grasso ostacola la
loro funzi one! Se ciò accade, togliete il grasso dalle par ti
unte, ad esempio con solventi osgrass anti.
Controllate regolarmente lo spessore delle scanalature
sul coper tone della ruota, in cas o di bisogno cambiate il
copertone con uno nuovo dai parametri adeguati.
Controllate le condizioni dei dadi autobloccanti (se durante la corsa si all entano, cambiateli con dei n uovi).
Controllate regolarmente l’intelaiatura delle ruote, la tensione non uniforme dei raggi dell’intelaiatura può causare
la loro rottura ola deformaz ione delle ruote.
Mantenete il monopattino pulito stronando lo sporco
con un panno umi do. Tenetelo al cope rto in un posto
asciutto e ombreggiato, non tenetelo esposto per lungo
tempo in ambi enti con alto tasso di umidità oatemperature estrem e. In vista dell’inverno applicategli anticorrosivi e gonate g li pneumatici no al valore massimo
indicato sul lato del copertone.
Il produt tore non è responsabile per danni risultati d alla
manutenzione trascurata, intervento non specializzato,
propria mo dica otrattamento m ale.
Questo pro dotto è ai sensi delle direttive EU (ČSN EN
14619) e ha ottenuto diversi certicati di qualità e di
sicurezza dai principali laboratori di prova cechi (Strojírenský zkuš ební ústav, s. p.) e anche dal TÜV SÜD C zech s. r. o.,
riconosciuto alivello internazionale
Casa produttrice: Intrea-Piko, s. r. o., Sasanková
2657/2, 10600 Praha 10, Repubblica Ceca
GARANZIA
Regulazioni generali: Norme generali: Il contenuto, prolungazione e durata della garanzia ricade sotto al
codice giuridico valido al paese dell´acquisto del monopattino.
Periodo della garanzia: L´acquirente di monopattino Yedoo nuovo (prodotto) può applicare la garanzia
durante il periodo di 24 mesi apartire dal giorno in cui è avvenuta la vendita del prodotto al consumatore
nale e viene automaticamente prolungata del tempo in cui il monopattino subisce riparazioni coperte
dalla garanzia.
Applicazione della garanzia: La garanzia diventa eettiva solamente presso il rivenditore dal quale è
stato acquistato il prodotto (vedi sotto). Per avvalersi della garanzia devono essere presentati il certicato
di garanzia correttamente compilato e il monopattino ben pulito in tutte le sue componenti. Il venditore
darà una conferma scritta all‘acquirente per quanto riguardal‘accettazione del prodotto nel processo di
garanzia.
Condizioni della garanzia: Il prodotto deve essere costruito secondo le istruzioni nel manuale. Iprodotti
devono essere usati esclusivemente per lo scopo alo quale sono stati concepiti. Il prodotto deve essere
conservato in buono stato e mantenuto secondo le istruzioni indicate dal manuale. garanzia non si riferisce
aI guasti che avvengono per l’uso frequente del monopattino. Il produttore non copre il danneggiamento
causato di montaggio incorretto odell´usanza in contradizione con il manuale delle istruzioni.
Modello del prodotto:
Numero di produzione
del telaio:
Data di vendita:
Rivenditore:
Timbro e rma:
44 45
Page 24

NL
INTRODUCTIE INHOUD VAN DE VERPAKKING
Wij raden uaan deze step te laten monteren
en regelmatig te laten controleren door een
professionele etsenmaker. Ondeskundige
montage kan leiden tot schade aan de step
of ernstige ongevallen.
Als je zelf een ervaren technicus bent,
kun je de step zelf monterenmet behulp
van deze montagehandleiding.
Als unog ideeën of opmerkingen heeft, feedback of tips,
aarzel dan niet om met ons contact op te nemen via ons
e-mailadres: info@yedoo.eu.
Meer informatie over Yedoo steppen en verkoopadressen kunt uvinden
via www.yedoo.eu.
BENODIGD GEREEDSCHAP
6 mm5 mm4 mm
46 47
Page 25

NL
MONTAGEVOORSCHRIFT
Montage van het voorste
(grote) wiel: Draai de snelsluiter
iets los.
Montage van het achterwiel
wijkt af van de montage van het
voorwiel. Dit heeft te maken met
de twee verschillende hoogtemogelijkheden bij de achtervork.
De lage uitval maakt o-road
rijden mogelijk. Plaats het wiel in
de gewenste uitval en zorg dat
het goed is gecentreerd. Draai de
snelsluiter goed aan en breng de
remkabel terug in de houder.
Zorg ervoor dat de voorvork van
de step goed gepositioneerd
is (remhendels zijn naar voren
gericht). Maak de remkabel los uit
de houder (zodat het wiel er door
past) en zet de remarmen iets
naar buiten.
De bovenste uitval zorgt voor een
lage treeplank en vermindert zo
de belasting van het standbeen,
ideaal bij een lange tocht op een
vlakke ondergrond. Ook is deze
stand minder vermoeiend.
Plaats het wiel in de voorvork en
zorg dat het goed is gecentreerd.
Het patroon op de band (pijlvormige
lijnen op d e banden) moeten na ar voren
wijzen.
Installatie van remkabels:
Schuif het ronde uiteinde van de
remkabel in het grotere ronde
gat aan de onderkant van de
remhendel. Herhaal dit bij de
andere remkabel.
Voor de montage ge ldt meestal dat d e
rechter remhendel het achterwiel remt en
de linker he t voorwiel.
Draai de moer aan (1) tot uweer-
stand voelt voor het sluiten van
de snelspanner. Sluit het op een
manier zodat de snelspanner
(2) naar achteren wijst (om veili-
gheidsredenen) en breng dan de
remkabel terug in de houder.
Afstellen van remgrepen:
plaats de remgrepen in de juiste
hellinghoek door de bout aan de
onderkant van de remgreep iets
los te draaien. Najuiste plaatsing
kan de bout weer worden vastgedraaid.
De juiste hellin g: Ga staan op de tre eplank, ho ud de handgrepe n vast en strek je
vinger s op een manier dat je a rm en de vingers een r echte lijn vormen . Dit zou de juiste
positie v an de remhendels m oeten zijn.
Stuur montage: Draai bij het
stuur de stuurpen omlaag zoals
afgebeeld op de foto en draai
de 4 slotbouten van de stuurpen
gelijkmatig aan.
Afstellen van de remmen: Druk
de beide remarmen van de V-
-brake in de richting van de velg
van het wiel en stel met de juiste
sleutel de remblokjes zo af dat ze
bij het remmen met hun hele remoppervlak tegen de zijkant van
de velg wrijven (1). De remschoen
(remblok) hoort de band niet te
raken.
Schuif het s tuur respectievelijk de stuurstang in de balhoofdbuis (1) stel de
hoogte van het stuur in vanaf d e grond
volgens de behoefte van de gebruiker,
waarbij de maximale uitschuifmogelijkheid gemarkeerd is op de stuurpen.
Controleer of het stuur recht staat ten
opzichte van h et voorwiel en draai de
bout op de stuurpen goed aan (2).
Controleer of de afstand tussen de
velg en het remblokje ca 1- 2 mm is
nahet loslaten van de remgrepen. De
afstand kan worden aangepast door
het aandraaien of losdraaien van de
remkabel aan het ankerschroef (2).
Als het wiel niet vrij kan draaien en “afremt” aan een kant, kan dit bijgesteld
worden door het aandraaien van de
stelschroef op de arm van de V-brake
die het wiel “afremt” (3).
48 49
Page 26

NL
VEILIGHEIDSMAATREGELEN
De step is ont worpen voor het rijden bij daglicht op
verharde paden. Voor wegen met autoverkeer of voor
het rijden in het donker, moet uw step voorzien zijn van
veiligheidsvoorzieningen (verlichting, reectoren, enz.)
in overeenstemming met de voorschriften die geldig
zijn in uw land. Besteed aandacht aan de algemene veiligheidsvoorschriften en het gebruik van beschermende
accessoires (ukunt dan denken aan helm, knie-en
elleboogbeschermers, goede schoenen, enz.)
Controleer voor iedere rit altijd of de remmen goed
werken en de algemene technische staat van de step.
Overschrijd nooit het maximale laadvermogen van de
step (zoals vermeld op de voorzijde). De step is ontworpen voor sle chts één rijder! Overbelast de step niet, deze
step is niet gemaakt om mee te springen of te stunten.
Alle remonderdelen (remblokken, velgen, banden en
schijfremmen) kunnen warm worden bij gebruik en daarom is het niet aan te raden om ze aan te raken voordat
ze afgekoeld zijn. Om de step te parkeren, gebruik t ude
standaard! Pas op dat het laadvermogen van de standaard ongeveer 15kg is. Ga niet op de treeplank staan als
de step geparkeerd staat.
GEBRUIK
INSTRUCTIES
Tijdens het steppen altijd het stuur met beide handen
vasthouden. Regelmatig afwisselen van de voeten (om
de 15 keer). Je zet af met één voet, terwijl de andere voet
op de treeplank van de step staat. Om te remmen, knijp
je in de remgrepen op het stuur. Gebruik normaal alleen
de achterrem, de voorrem alleen extra bij een noodstop.
WAARSCHUWING: accuut remmen kan letsel veroorzaken.
ONDERHOUD
Correct en regelmatig onderhoud verhoogt zowel
de veiligheid als levensduur van uw step. Dus check
regelmatig de bouten en moeren, snelspanners, de druk
in de banden en smeer de bewegende delen (wielen,
lagers, stuur lagers, kab els, remdelen, etc.). Zorg dat er
geen smeermiddel komt op de velgen of remblokken.
Vet verminder t hun eect!
Wanneer deze situatie zich voordoet, is het noodzakelijk
om het vet te verwijderen, bijvoorbeeld met wasbenzine.
Controleer ook regelmatig het loopvlak van de banden.
En indien nod ig, vervang ze als ze versleten zijn door
dezelfde type banden.
Inspecteer de zelfborgende moeren. Als ze uitzichzelf los
gaan, vervang ze dan voor nieuwe.
Controleer de spaken ook. On regelmatige spanning en in
spaken kan k raken veroorzaken of kan het wiel wieb elend
maken.
Houd uw step schoon, bij viezigheid poetsen met
een vochtige doek. De step moet binnen worden
opgeslagen, op een droge en schaduwrijke plaats. Stel
de step niet bloot aan een hoge luchtvochtigheid of
extreme temperaturen gedurende een langere periode
van tijd. Vóór de winter, extra behandelen met vaseline
tegen corrosie en pomp de banden op zijn maximale
waarde zoals vermeld op de zijkant van de band. De
producent vergoed geen schade bij aanwijsbaar slecht
onderhoud, slechte montage of corrosie door vochtige
stalling.
Alle steppen, loopetsen en kinderetsen voldoen aan
de desbetreende EU-normen (ČSN EN 14619) en zijn gecerticeerd door de volgende testlaboratoria: Techniek
Test Instituut (Strojírenský zkušební ústav, sp), Technisch
en Test Instituut voor Techniek Praag (Tzus Praha, sp) –
collega instituut ZÚLP in Ceske Budejovice, en TÜV SÜD
Czech sro.
Producent: Intrea-Piko, s. r. o., Sasanková 2657/2, 10600
Praha 10, Tsjechische Republiek
GARANTIE LIJST
Algemene garantie: De inhoud van de garantieregeling kan per land verschillen. Informeer naar de
wettelijke regels in het land van aankoop.
Garantie periode: De producent van Yedoo steppen en etsen, biedt de garantie van 24 maanden voor het
frame en onderdelen. De garantie wordt gerekend vanaf de dag van de verkoop aan de eindverbruiker en
wordt automatisch verlengd wanneer het product in reparatie wordt genomen tijdens de garantieperiode.
Garantie verlening: Meldt een probleem altijd bij uw verkoper, hij neemt contact op met Yedoo om het
probleem op te lossen. Vul onderstaand formulier in, lever een digitale foto aan van het probleem en een
scan van de aankoopbon met datum.
Garantie condities: Het product moet gemonteerd zijn volgens de montagehandleiding. Het product
wordt alleen gebruikt waar het voor bedoeld is. Sla het op en onderhoudt het zoals aangegeven in de
instructie. Schade veroorzaakt door tegelijkertijd gebruik van meerdere personen op een step valt niet onder de garantie. De producent heeft geen betrekking op schade veroorzaakt door achterstallig onderhoud,
niet-adequate reparaties, extreem gebruik en overbelasting, of ongepaste behandeling en opslag.
Product model:
Serienummer
van het frame:
Datum van aankoop:
verkopende winkel:
Handtekening en stempel:
50 51
Page 27

RU
ВСТУПЛЕНИЕ
Мы настоятельно рекомендуем покупать
самокат в собранном виде и регулярно
проходить техническое обслуживание
в веломастерских. Неопытное
вмешательство может привести к
повреждению самоката или к серьезным
авариям.
Тем не менее, если вы считаете себя
квалифицированным специалистом,
вы можете собрать самокат
самостоятельно с помощью данного
СОДЕРЖИМОЕ УПАКОВКИ
руководства
Если у вас есть идеи или комментарии, отзывы или
советы, пожалуйста, не стесняйтесь обращаться к нам
на наш адрес электронной почты: info@yedoo.eu.
ИНСТРУМЕНТЫ НЕОБХОДИМЫЕ
Более подробную информацию о наших самокатах и список
продавцов можно найти здесь www.yedoo.eu.
52 53
ДЛЯ СБОРКИ
6 мм 5 мм 4 мм
Page 28

RU
ИНСТРУКЦИЯ ПО СБОРКЕ
Возьмите переднее колесо:
поверните рычаг эксцентрика
(1), как показано на рисунке и
ослабьте гайку (2).
Убедитесь, что передняя
вилка самоката расположена
правильно (тормозные рычаги
должны быть спереди).
Выньте тормозной трос
из держателя и ослабьте
тормозные рычаги.
Поместите колесо в вилку
так, чтобы оно располагалось
строго по центру.
Рисунок протектора (стреловидные
линии на покрышке) должен быть
направлен вперед.
Закручивайте гайку (1) до тех
пор, пока вы не почувствуете
сопротивление при закрытии
рычага эксцентрика (2). Закройте
эксцентрик таким образом,
чтобы рычаг эксцентрика был
направлен к заднему колесу (из
соображений безопасности).
Установка руля: Установите
вынос руля, как показано на
рисунке и затяните винты
выноса.
Вставьте вынос руля (1) в раму
и отрегулируйте высоту в
соответствии с ростом гонщика
(не выше, чем обозначено
линией). Убедитесь, что руль
находится в вертикальном
положении и затяните винт
выноса руля (2).
Поместите тормозной трос в
держатель тормозного рычага.
Установка заднего колеса
отличается от установки
переднего колеса только
тем, что оно может быть
установлено в двух положениях.
Это позволяет регулировать
положение ножной платформы,
в соответствии с дорожными
условиями. Если установить
колесо в нижнем положении, то
это будет оптимально для езды
по бездорожью.
Установка заднего колеса
вверхнем положении
позволяет установить
ножную платформу ниже.
В результате уменьшается
нагрузка на опорную ногу,
и езда становится менее
утомительной. Это идеально
для катания на ровных
поверхностях.
Установка тормозных
тросов: нажмите на рычаг
тормоза до максимума и
вставьте конец троса тормоза в
ручку тормоза, как показано на
рисунке. Повторите действия с
обоими тормозами.
Тормозная ру чка расположенн ая
справа на ру ле – как правило, дл я заднего
тормоза , тормозная ручка с лева – для
переднего тормоза.
Регулировка тормозных
ручек: повернуть тормозные
ручки, ослабив винт.
Как это сделать : поставьте самок ат на
подножк у, расположите са мокат между
ног – стой те на полу! Возьми тесь за
тормозны е ручки, вытяну в пальцы таким
образо м, чтобы ваши лад они и пальцы
образовывали единую прямую линию.
Таким должно б ыть положение тор мозных
ручек.
Регулировка тормоза:
Нажмите на рычаг тормоза
- тормозные колодки должны
плотно обхватывать обод
с обеих сторон. Если нет,
то вы можете настроить
их положение с помощью
регулировочного болта,
который соединяет их с V-
-образным тормозным рычагом
(1). Между колодкой и ободом
должен быть просвет 1-2 мм.
Отпустите рычаг тормоза.
Прокрутите колесо несколько раз.
Убедитесь, что оно не задевает
за тормозные колодки. Меж ду
колодками и ободом должен быть
просвет 1-2 мм. Расс тояние можно
регулировать путем затягивания
или ослабления винта на
тормозном тросе (2). В случае, когда
тормозные колодки касаются колеса
при повороте, отрегулируйте
расстояние между тормозными
рычагами и колесом с помощью
винта (3).
54 55
Page 29

RU
МЕРЫ
БЕЗОПАСНОСТИ
Самокат в заводской комплектации предназначен для
катания в дневное время по ровным дорогам; а также
в районах, предназначенных для спорта и отдыха. Для
дорог с автомобильным движением или для езды в
темное время суток, необходимо оборудовать ваш
самокат (фары, отражатели и т.д.) в соответствии с
нормами, действующими в Вашей стране. Обратите
внимание на общие правила техники безопасности
и используйте защитные аксесс уары (шлемы,
наколенники и налокотники, хорошая обувь и т.д.)
Перед каждой поездкой всегда проверяйте работу
тормозов и общее техническое состояние самоката.
Не превышайте максимальную нагрузку на самокат
(максимальная нагрузка указана на лицевой
стороне инструкции). Самокат предназначен для
катания только одного ребенка или взрослого! Не
перегружайте самокат, он не предназначен для
прыжков и акробатической езды!
Некоторые механизмы (тормозные колодки,
диски, покрышки, дисковые тормоза и т.п.) могу т
нагреваться при использовании и, следовательно, не
рекомендуется прикасаться к ним, так как могут быть
ожоги!
Для парковки самоката используйте подножку!
Помните, что его вес около 15 кг. Не наступайте на
подножк у, когда самокат на с тоянке.
ПРАВИЛА КАТАНИЯ
Во время катания всегда держите руль обеими
руками. При отталкивании одной ногой, поместите
другую ногу на подножку самоката. Регулярно
меняйте толчковую ногу. Для того чтобы тормозить,
нажмите на тормозные рычаги на руле. Чаще
используется правый рычаг, который управляет
задними тормозами. Передний тормоз слу жит
для редких торможений и торможений при
чрезвычайных ситуациях.
ПРЕДУПРЕЖДЕНИЕ: насильственное внешнее
торможение самоката может привести к травме.
ОБСЛУЖИВАНИЕ
САМОКАТА
Правильное и регулярное техническое обслуживание
повышает как безопасность, так и срок службы
вашего самоката. Необходимо регулярно проверять
затяну тость всех болтов, давление в шинах, а также
смазывать подвижные части (колеса, подшипники,
подшипники руля, кабели, комплектующие и т.д.).
Убедитесь, что смазка не попадает на диски или
тормозные колодки. Смазка снижает их эффект!
Если возникает такая ситуация, необходимо удалить
смазку, например, с помощью технического бензина.
Также регулярно проверяйте рисунок протектора на
покрышках. Если они стерты, замените покрышки.
Проверяйте натяжение спиц. Неравномерное
напряжение в спицах может вызвать их
растрескивание или колебание колеса.
Храните самокат в чистом виде. В случае загрязнения
используйте влажную ткань. Самокат должен
храниться в помещении, в сухом и затененном месте.
Не подвергайте самокат действию повышенной
влажности и высокой температуры в течение
длительного периода времени. Для хранения зимой,
смажьте подвижные части самоката для защиты от
коррозии и накачайте покрышки до максимального
значения, как указано на боковой стороне покрышки.
Гарантия производителя не распространяется на
ущерб, причиненный в результате неправильного
обращения и хранения, а так же при не адекватном
использовании и халатном обслуживании самоката.
Все самокаты и велосипеды, предназначенные
для катания детей отвечают требованиям
соответс твующих стандартов ЕС (ČSN EN 14619) и
были сертифицированы в следующих тестовых
лабораториях: Машиностроительный испытательный
инстит ут (Strojírenský zkušební ústav, SP), Технический
и испытательный строительный институт Прага (Praha
TZÚS, ИП) - филиал ZÚLP в Ческе-Будеевице, и TÜV SÜD
Чешская SRO
Производитель: Intrea-Piko s.r.o., Sasanková 2657/2,
10600 Praha 10, Чехия
ГАРАНТИЙНЫЙ ТАЛОН
Общие правила: Содержание и продолжительность гарантии соответствует действующему
законодательству, соответствующему стране покупки самоката.
Гарантийный срок: Покупателю нового самоката Yedoo (продукта) предоставляется гарантия
24 месяца со дня покупки. Гарантия начинается со дня продажи конечному потребителю и
автоматически продлевается, когда продукт принимается в ремонт в течение гарантийного срока.
Гарантийные правила: Гарантийный талон должен быть заполнен розничным продавцом магазина,
где был приобретен продукт, (см. ниже). При возникновении гарантийного случая, мы рекомендуем
предоставлять заполненный гарантийный талон, и чистый самокат или велосипед. Продавец обязан
выдать письменное подтверждение покупателю о принятии продукта на гарантийный ремонт.
Гарантийные условия: сборка самоката и оборудование должно быть установлено в соответствии
с инструкциями настоящего руководства. Самокаты должны использоваться только для целей,
для которых они предназначены. Самокат должен храниться и обслуживаться в соответствии с
руководством по эксплуатации. Гарантия не распространяется на повреждения, вызванные общим
износом самоката. Гарантия на детали подвергающиеся естественному износу не распространяется
(покрышки, камеры, тормозные колодки, тормозные тросики и т.п.). Производитель не дает
гарантию на повреждения, вызванные неправильной сборкой или использованием самоката не по
назначению.
Тип продукта / Модель:
Серийный номер
рамы:
Дата покупки:
Продавец:
Подпись и п ечать продавца:
56 57
Page 30

SE
Vi rekommenderar starkt att sparkcykeln
monteras och inspekteras regelbundet
av en professionell cykelservice. Felaktig
montering kan leda till skador på
sparkcykeln eller till allvarliga olyckor.
Anser du dig själv tekniskt kunnig kan
du montera sparkcykeln på egen hand
med vår hjälp.
Om du har några idéer eller synpunkter, feedback eller
tips, tveka inte att kontakta oss på vår e-postadress:
info@yedoo.eu.
FÖRPACKNINGENS INNEHÅLLINLEDNING
Mer information om våra sparkcyklar och återförsäljare hittar du på
www.yedoo.eu.
Nödvändiga verktyg
6 mm5 mm4 mm
58 59
Page 31

SE
MONTERINGSINSTRUKTIONER
Montering av framhjul(större):
öppna snabbkopplingsspaken
och lossa muttern.
Montera bakhjulet på liknande
sätt som framhjulet, här kan
du dock välja 2 placeringar för
bakdäcket iramen. Den lägre placeringen är lämpligt för körning
iterräng.
Kontrollera att framgaeln
på sparkcykeln är irätt position(bromshandtag är vända
framåt). Lossa bromsvajern från
hållaren på bromsarmarna.
Den övre placeringen som gör att
fotsteget kommer lägre ner vilket
passar bra vid användning på planare underlag. Belastningen på
det ben du använder på fotsteget
blir då mindre och det blir mindre
tröttsamt.
Placera hjulet iframgaeln så det
är centrerat.
De pilformade l injerna på däcken s ka
peka framåt.
Installation av bromsvajer:
Tryck bromshandtaget tills det
tar stopp och placera änden på
bromsvajern iden cirkulära fästpunkten, säkerställ att vajern placeras iskåran på bromshandtaget
och justermuttrar. Upprepa
åtgärden med båda bromsarna.
Den bakre broms vajern placer as oftast
till höge r, frambro msens kabel til l vänster.
Dra åt muttern (1) tills du känner
motstånd innan du stänger snabbkopplingen. Stäng den så att
snabbfrigöringsspaken (2) pekar
bakåt (av säkerhetsskäl). Sätt
tillbaka bromsvajern ihållaren.
Justering av bromshandtag:
För att få rätt lutning på handtaget, lossa skruven på bromsarmen.
För att justera r ätt lutning, st å på fotsteget. Hål l ihandtaget och s träck ut ngrarna ,
bromshandtaget ska vara justerat så arm
och ngra r bildar en rak linje .
Installation av styre: Placera
styrröret som visas på bilden och
dra åt skruvarna på ramen.
Justering av bromsar: Vid
inbromsning, kontrollera att
bromsbelägg på båda sidorna
pressas mot fälgen. Om inte,
kan du justera dess position via
en skruv som förbinder dem till
bromsarmarna (1). Bromsbeläggen ska inte vidröra däcket.
Sätt styrröret iramen (1) och
justera höjden beroende på användarens behov (ej högre än vad
som anges av linjen). Kontrollera
att styret är upprätt och ordentligt åtskruvat på styrröret (2).
Kontrollera att bromsbeläggen
inte vidrör fälgen när du släpper
bromshandtagen (distans på
1-2mm). Avståndet kan justeras
genom att dra åt eller lossa bromskabeln vid skruven (2).
Om bromsbelägget vidrör
hjulet när man svänger, justera
avståndet för bromsarmarna med
justeringsskruv (3).
60 61
Page 32

SE
Säkerhetsåtgärd er
Sparkcykeln är med sin grundutrustning konstruerad för att åka under dagsljus iområden avsedda
för sport och rekreation . För vägar med biltrak
eller för att åka imörker, måste du förse din sparkcykel med säkerhetsfunktioner (ljus, reektorer,
etc.) ienlighet med de regler som gäller iditt
land. Var uppmärksam på traken och allmänna
säkerhetsföreskrifter och använd skyddande
utrustning (hjälm, knä- och armbågsskydd, bra
skor, etc.)
Innan varje åktur kontrollera alltid att bromsarna
fungerar och sparkcykelns övriga tekniska funktion är ok. Överskrid inte den maximala vikten för
sparkcykeln som anges på framsidan av manualen. Sparkcykeln är konstruerad för en åkare!
Överbelasta ej sparkcykeln, den är ej anpassad för
att hoppa med.
Bromsmekanism delarna (bromsbelägg, fälgar,
däck och skivbromsar mm) kan bli varma när de
används, och därför rekommenderar vi att inte
röra dem innan de svalnat.
Använd stödet när du parkerar sparkcykeln, observera att dess lastkapacitet är cirka 15 kg. Trampa
inte på fotsteget när sparkcykeln är parkerad.
Underhåll
Korrekt och regelbundet underhåll ökar både säkerheten och livslängden på din sparkcykel. Kontrollera regelbundet skruvar, snabbfästen, tryck
idäcken och smörj rörliga delar (hjul, kullager,
styre lager, bromsdelar osv.). Se till att inget smörjmedel hamnar på fälgar och bromsbelägg. Fett
minskar deras eekt!
Om så sker är det nödvändigt att ta bort fett från
alla delar.
Kontrollera även mönster på däcken. Och om
det behövs, byt däck när mönstret börjar vara
bortnött.
Inspektera skruvar & muttrar.
Kontrollera ekrarna, eventuella defekter på ekrarna kan göra hjulet vingligt.
Håll din sparkcykel ren, använd en fuktig trasa
vid rengöring. Förvara sparkcykeln under tak på
skuggig plats.. Utsätt inte sparkcykeln för högre
luftfuktighet eller extrema temperaturer under en
längre tid. Inför vintern, förbered den mot korrosion och pumpa däcken till sitt maximala värde som
anges på sidan av däcket. .Producenten täcker inte
skador som orsakats enbart av eftersatt underhåll,
felaktig montering eller olämplig behandling och
lagring.
GARANTI
Allmänna bestämmelser: Innehållet och längden samt varaktighet på garantin överensstämmer med
den gällande lagstiftningen irespektive land för köp av sparkcykeln.
Garantitid: Köparen av den nya Yedoo sparkcykeln(produkt) kan tillämpa garantin under en period av 24
månader från köpet. Garantin börjar på dagen för försäljningen till slutanvändaren.
Garanti ansökan: Garantin måste fyllas iav den återförsäljare där produkten köptes (se nedan). Vid
tillämpning av garantin ska ifyllt dokument (nedan) , kvitto samt en komplett och rengjord produkt visas
upp. Säljaren kommer att ge en skriftlig bekräftelse till köparen om godkännande av produkten igarantiprocessen.
Garantivillkor: Produkten skall monteras enligt instruktionerna ihandboken. Produkterna får endast
användas för de ändamål som den var avsedd för. Produkten skall förvaras och underhållas på det sätt
ienlighet med bruksanvisningen. Garantin täcker inte skador som orsakas av vanligt slitage. Producenten
täcker inte skador som orsakats av felaktig montering eller användning istrid med bruksanvisningen.
Produkt typ/modell:
Serienummer på ramen:
Inköpsdatum:
Återförsäljare:
Produkten uppfyller EU-normerna (ČSN EN 14619)
KÖRANVISNIG
Håll alltid båda händerna på styret när ni åker med
sparkcykeln. För att sparka sig framåt placera ena
foten på fotsteget och sparka ifrån med den andra,
byt fot med jämna mellanrum. Vid inbromsning
använd iförsta hand bakbromsen (handtaget på
höger sida). Den främre bromsen används vid
behov av snabbare inbromsning.
VARNING: våldsam inbromsning kan orsaka skada.
62 63
och har kvalitets och säkerhets certieringar från
ett ledande tjeckisk testlabb - Engineering Test
Institute (Strojírenský zkušební ústav, sp) samt från
den internationellt erkända TÜV SÜD Czech s.r.o
Tillverkare: Intrea-Piko, s. r. o., Sasanková 2657/2,
10600 Praha 10, Tjeckien
Underskrift och stämpel:
Page 33

SK
Montáž, nastavenie apravidelnú údržbu
doporučujeme zveriť odbornému
cykloservisu. Neodborné zásahy môžu viesť
kpoškodeniu kolobežky alebo nehode
svážnymi zdravotnými následkami.
Pokiaľ sa cítite ako technický typ
aničoho sa nebojíte, schuťou sa
domontáže pustite snami.
Otázky, pripomienky anámety nazlepšenie našich
výrobkov nám prosím posielajte nae-mail:
info@yedoo.cz.
OBSAH BALENIAúVOD
Viac informácií zo sveta kolobežiek azoznam distribútorov nájdete
na www.yedoo.cz
POTREBNÉ NÁRADIE
6 mm5 mm4 mm
64 65
Page 34

SK
MONTÁŽNY NÁVOD
Montáž predného (väčšieho)
kolesa: uvoľnite rýchloupínaciu
páčku apovoľte maticu.
Montáž zadného kolesa sa od
montáže predného líši len dvojitou vidlicou. Tá umožňuje meniť
výšku v závislosti od povrchu.
Spodný úchyt použite na jazdu
vteréne.
66 67
Skontrolujte, či je predná vidlica
kolobežky natočená vsprávnom
smere (ramená V-brzdy smerujú
dopredu). Uvoľnite brzdové lanko
zvodítka auvoľnite brzdové
ramená.
Horný úchyt vidlice slúži na zníženie výšky stúpadla, čím sa odľahčí
stojná noha. Je určený na jazdu
na hladkom povrchu – jazda bude
menej namáhavá.
Koleso vsaďte doprednej vidlice
tak, aby bolo presne uprostred.
Vzor pneumatik y (ryhy vtvare ší pov) by
mal smerov ať dopredu vsmer e jazdy.
Inštalácia brzdových laniek:
stlačte brzdovú páčku na maximum a do okrúhleho očka vložte
koniec brzdového lanka. Rovnaký
postup zopakujte na oboch
páčkach.
Zadné brzdové l anko sa spravidla
upevňuje do pravej brzdovej páčky, predné
do ľavej.
Dotiahnite maticu (1) tak, aby ste
pred dotiahnutím (sklopením)
rýchloupínacej páčky cítili odpor.
Páčku dotiahnite (2) (sklopte)
dopolohy, vktorej bude smerovať kzadnému kolesu (zbezpečnostných dôvodov). Brzdové
lanko vráťte späť dovodítka.
Nastavenie brzdových páčiek:
nastavte správny sklon brzdových
páčiek pomocou upevňovacej
skrutky na objímke.
Správny sklon brzdových páčiek:
postav te sa na stúpadl o, uchopte riadidl á a
natiahnite prsty tak, aby predlžovali priamku
ruky. Do tej to polohy nastav te páčky.
Inštalácia riadidiel: tyč riadenia
umiestnite dopolohy podľa
obrázku adotiahnite skrutky
predstavca.
Nastavenie bŕzd: na obidvoch
kolesách skontrolujte, či brzdové
platničky pri zabrzdení dosadajú
celou svojou plochou na bok
ráka. Pokiaľ nie, upravte ich polohu pomocou skrutky, ktorou sú
platničky prichytené k ramenám
V brzdy (1). Platničky sa nesmú
dotýkať plášťa.
Zasuňte tyč riadenia dohlavovej rúrky rámu kolobežky (1)
anastavte požadovanú výšku
riadidiel (max. povyznačenú
rysku). Skontrolujte, či sú riadidlá
rovno adotiahnite skrutku natyči
riadenia (2).
Skontrolujte, či sa platničky pri
uvoľnení brzdovej páčky dostatočne vzdialia od ráka (1-2 mm).
Vzdialenosť platničiek možno
upraviť dotiahnutím alebo povolením brzdového lanka v kotevnej
skrutke (2).
Pokiaľ sa koleso pri otáčaní
v niektorom mieste dotýka brzdovej platničky, symetricky upravte
vzdialenosť brzdových ramien
napínacími skrutkami (3).
Page 35

SK
BEZPEČNOSTNÉ
DOPORUČENIA
Kolobežka je vzákladnej výbave určená pre jazdu zadenného svetla vpriestoroch určených našport arekreáciu.
Pre jazdu napozemných komunikáciách apre jazdu
vtme ju musíte v ybaviť bezpečnostnými prvkami (svetlá,
odrazk y atď.) vsúlade splatnými predpismi vo vašej
krajine. Dodržujte pravidlá cestnej premávky, zásady
bezpečnej jazdy apoužívajte ochranné pomôcky (prilbu,
chrániče kolien alakťov, pevnú obuv apod.).
Pred každou jazdou skontrolujte funkčnosť bŕzd acelkový technický stav kolobežky. Neprekračujte jej max .
zaťažiteľnosť (nosnosť kolobežky je uvedená naúvodnej
strane). Kolobežka je určená len pre jedného jazdca.
Vyvarujte sa nadmerného zaťažovania kolobežky, kolobežka nie je určená naskoky aakrobatickú jazdu.
Všetky mechanizmy znižujúce rýchlosť (brzdové platničky akotúče, ráky, pneumatik y apod.) sa pri používaní
zahrievajú, nedotýkajte sa ich, pok iaľ nevychladnú!
Kzaparkovaniu kolobežk y používajte stojan. Pozor, jeho
max. nosnosť je cca 15 kg. Nazaparkovanú kolobežku
nestúpajte!
POKYNY
K JAZDE
Pri jazde majte vždy obe ruky nariadidlách. Pokiaľ
sa jednou nohou odrážate, druhou nohou stojte
nastúpadle kolobežky. Pravidelne striedajte odrazovú nohu. Nazabrzdenie stlačte brzdové páčky
nariadidlách. Brzdite pomocou zadnej brzdy, tú
ovládate pravou páčkou. Prednú brzdu používajte
len pri pribrzďovaní, alebo vprípade núdze.
POZOR: prudké zabrzdenie môže spôsobiť pád.
ÚDRŽBA
Správna apravidelná údržba zvyšuje bezpečnosť
apredlžuje životnosť vašej kolobežky. Preto pravidelne
doťahujte sk rutkové spoje, kontrolujte stav rýchloupínacích páčok, tlak vpneumatikách apremazávajte
pohyblivé časti (ložiská kolies ariadidiel, čapy brzdových
páčok, čeľuste bŕzd, brzdové lanká, atď.).
Dajte pozor, aby sa mazivo nedostalo naráky, brzdové
platničk y alebo kotúče. Mastnota znižuje ich účinok!
Pokiaľ sa tak stane, odmastite znečistené časti napr.
technickým benzínom.
Pravidelne kontrolujte hĺbku vzoru naplášťoch kolies,
vprípade potreby vymeňte plášte zanové so zhodnými
parametrami.
Kontrolujte stav samoistných matíc (pokiaľ sa zajazdy
samovoľne uvoľňujú, vymeňte ich zanové).
Pravidelne kontrolujte výplet kolies, nerovnomerné
napnutie drôtov vo výplete môže spôsobiť ich praskanie
alebo rozcentrovanie kolies.
Kolobežku udržujte včistote, znečistenie otrite vlhkou
handričkou. Skladujte ju vnútri nasuchom atienistom
mieste, dlhodobo ju nevystavujte zv ýšenej vlhkosti
ani extrémnym teplotám. Pred zazimovaním ošetrite
antikoróznym prípravkom apneumatiky nahustite
namaximálnu hodnotu uvedenú naboku plášťa. Výrobca
nezodpovedá zaškody spôsobené zanedbaním údržby,
neodborným zásahom, vlastnými úpravami alebo zlým
zaobchádzaním.
Výrobok spĺňa zodpovedajúce normy EU (ČSN EN
14619:2005) azískal cer tikáty kvality abezpečnosti
odpopredného českého skúšobného ústavu (Strojírenský
zkušební ústav, s. p.,) imezinárodne uznávaného TÜV
SÜD Czech s. r. o.
Výrobca: Intrea-Piko, s. r. o., Sasanková 2657/2, 10600
Praha 10, Česká republika
UPLATNENIE PRÁV Z VADNÉHO PLNENIA
Všeobecné ustanovenia: Obsah, rozsah atrvanie práv kupujúceho zvadného plnenia tovaru sa riadi platnými predpismi Slovenskej republiky, predovšetkým príslušnými ustanoveniami Občianskeho zákonníka
asúvisiacich predpisov azákona č. 250/2007 Zb. oochrane spotrebiteľa. Práva kupujúceho vzmysle znenia
týchto predpisov nie sú týmto dokladom ani vňom uvedenými informáciami nijako dotknuté.
Čas pre uplatnenie práv zvadného plnenia: Právo zvady pri zakúpení kolobežky Yedoo (ďalej len tovaru) si môže kupujúci uplatniť douplynutia 24 mesiacov odjej zakúpenia aprevzatia. Ak kupujúci vytkne
vadu tovaru oprávnene, lehota pre uplatnenie práv zvadného plnenia sa nezapočítava počas doby, kedy
kupujúci nemôže tovar riadne užívať.
Spôsob uplatnenia práv zvadného plnenia: Práva zvadného plnenia sa uplatňujú upredajcu, uktorého
kupujúci tovar zakúpil (viď údaje nižšie). Pri uplatnení vady tovaru doporučujeme predložiť tento doklad,
doklad okúpe akompletnú, nečistôt zbavenú kolobežku. Vprípade uplatnenia práv zvadného plnenia,
alebo vykonania opravy dotknutého tovaru vystaví predajca kupujúcemu písomné potvrdenie.
Podmienky trvania práv zvadného plnenia: Pri montáži kolobežky musia byť dodržané pokyny uvedené
vmontážnom návode. Kolobežka musí byť využívaná výhradne naúčel, naaký bola vyrobená. Kolobežka
musí byť skladovaná audržiavaná podľa výrobcom uvedených pokynov. Nazávady spôsobené jednoznačne nesprávnou montážou, či používaním kolobežky vrozpore sužívateľskou príručkou sa zodpovednosť výrobcu nevzťahuje!
Model kolobežky:
Výrobné číslo rámu:
Dátum predaja:
Predajca:
Pečiatka ap odpis predajc u:
68 69
Page 36

This page intentionally left blank. This page intentionally left blank.
Page 37

www.yedoo.eu
 Loading...