

Page 1

yedoo
fifty
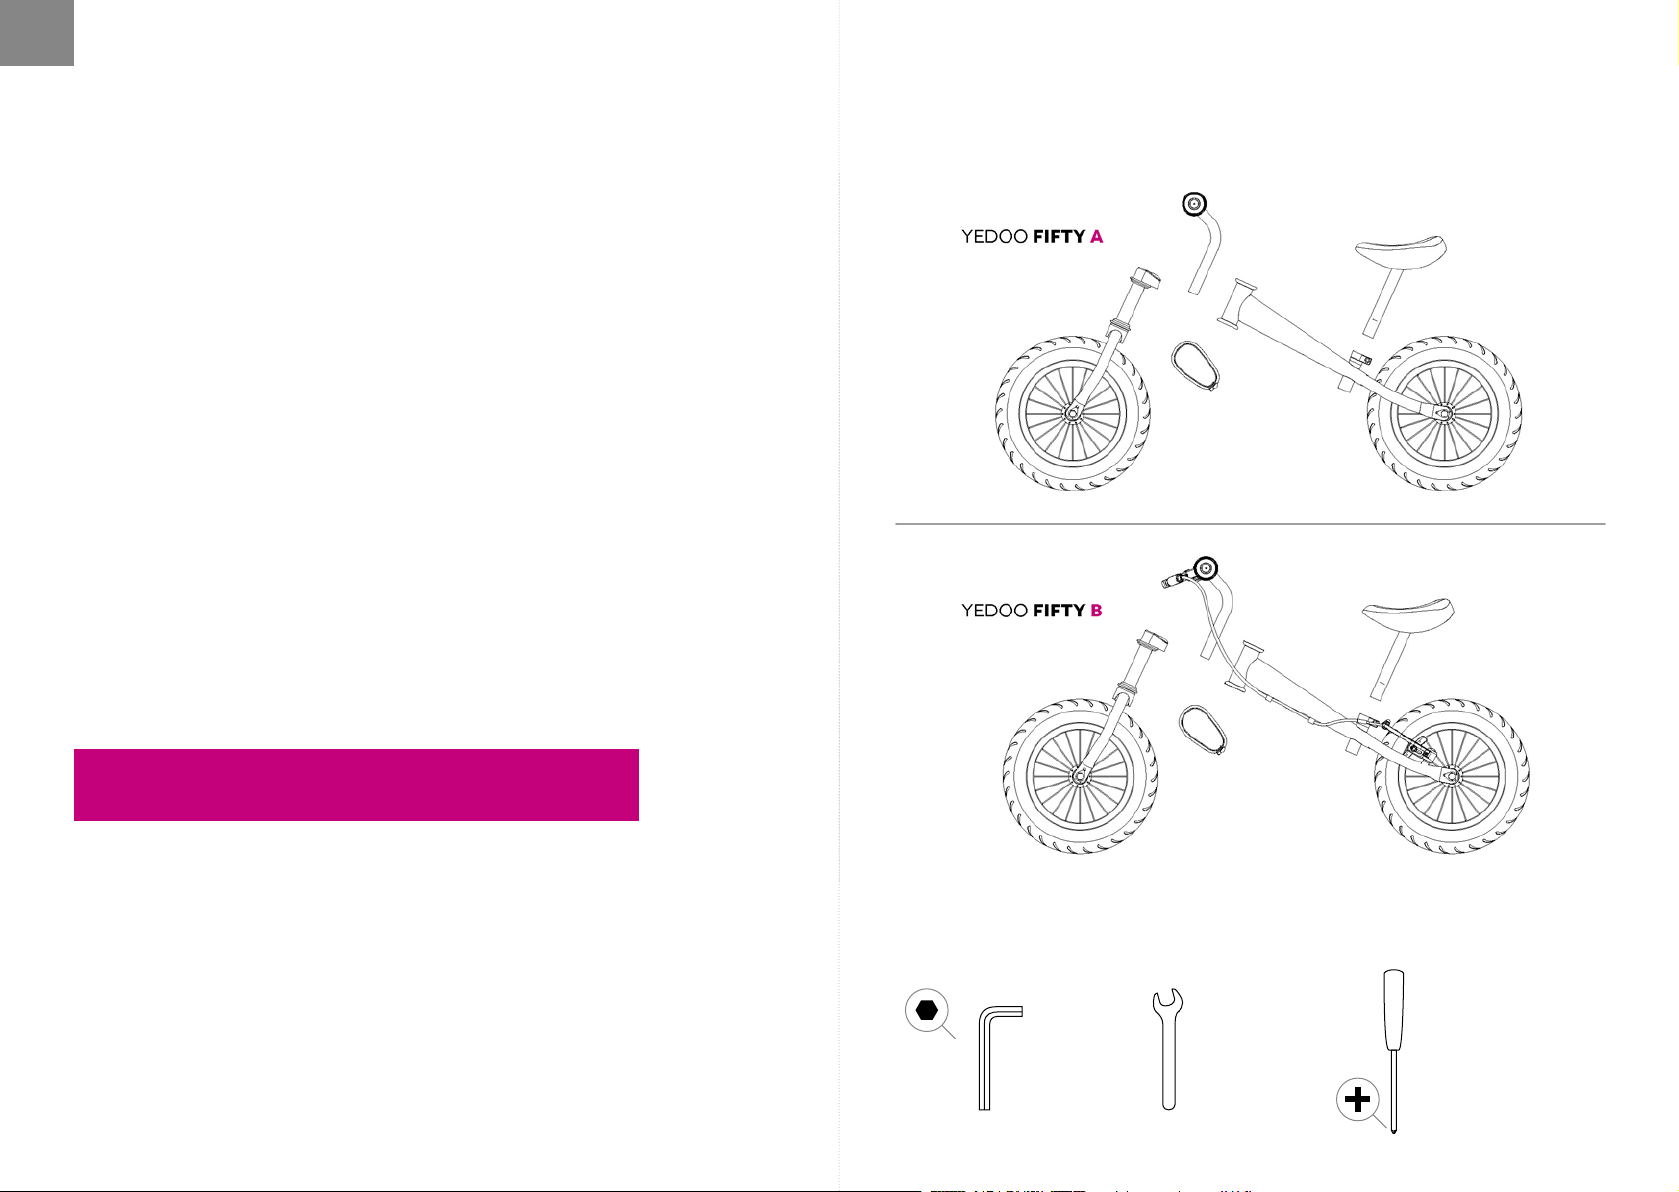
fifty B
max 60 kg | 132 lbs
min 85 cm | 33 i n
fifty a
user manual
Page 2
contents / obsah
. . . . . . . . . . . . . . . . . . . . . . . . . . . . . . . . . . . . 4
CZ
. . . . . . . . . . . . . . . . . . . . . . . . . . . . . . . . . . . 10
DE
. . . . . . . . . . . . . . . . . . . . . . . . . . . . . . . . . . . 16
EN
. . . . . . . . . . . . . . . . . . . . . . . . . . . . . . . . . . .22
ES
. . . . . . . . . . . . . . . . . . . . . . . . . . . . . . . . . . .28
FR
. . . . . . . . . . . . . . . . . . . . . . . . . . . . . . . . . . .34
HU
IT
. . . . . . . . . . . . . . . . . . . . . . . . . . . . . . . . . . .40
NL
. . . . . . . . . . . . . . . . . . . . . . . . . . . . . . . . . . .46
RU
. . . . . . . . . . . . . . . . . . . . . . . . . . . . . . . . . . . 52
SE
. . . . . . . . . . . . . . . . . . . . . . . . . . . . . . . . . . .58
SK
. . . . . . . . . . . . . . . . . . . . . . . . . . . . . . . . . . .64
Page 3
CZ
Montáž, seřízení apravidelnou údržbu
doporučujeme svěřit odbornému
cykloservisu. Neodborné zásahy mohou
vést kpoškození odrážedla či nehodě
svážnými zdravotními následky.
Pokud se cítíte jako technický
typ, ničeho se nebojte aschutí se
domontáže pusťte snámi.
Dotazy, připomínky anáměty nazlepšení našich výrobků
nám prosím posílejte nae-mail: info@yedoo.cz.
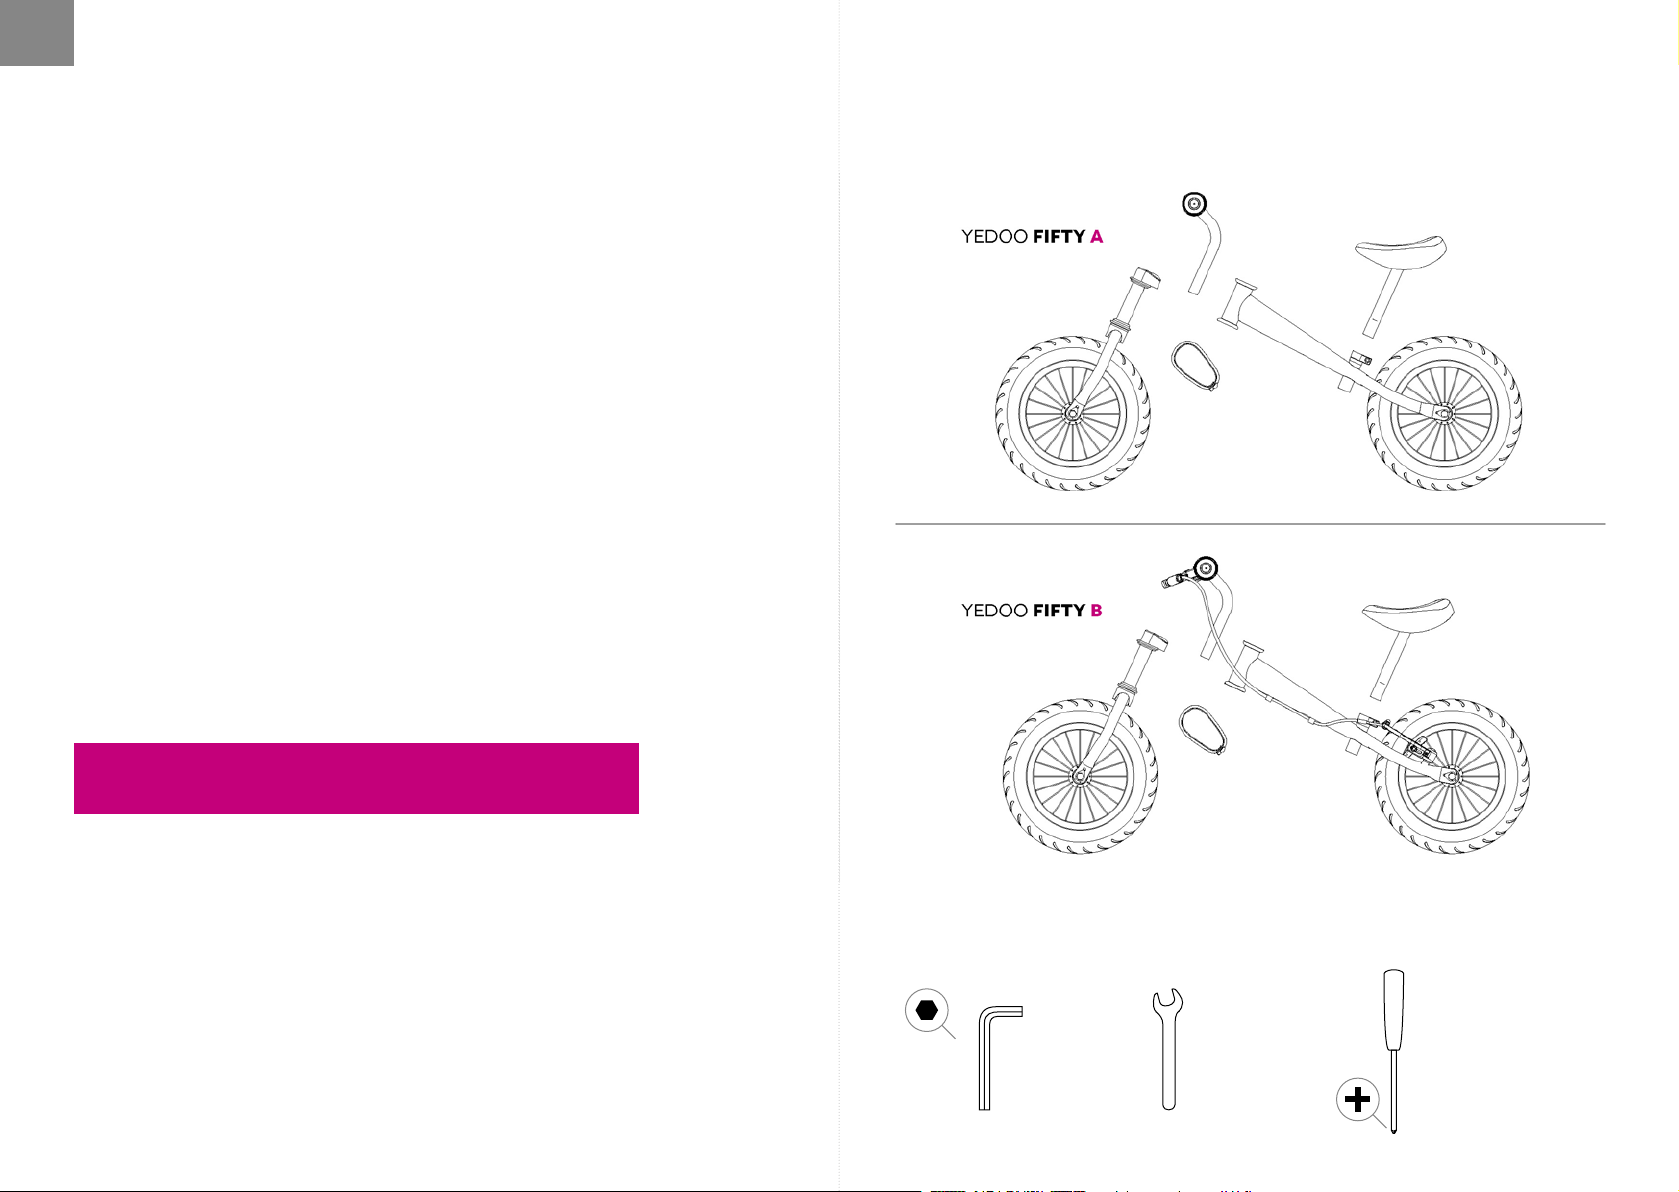
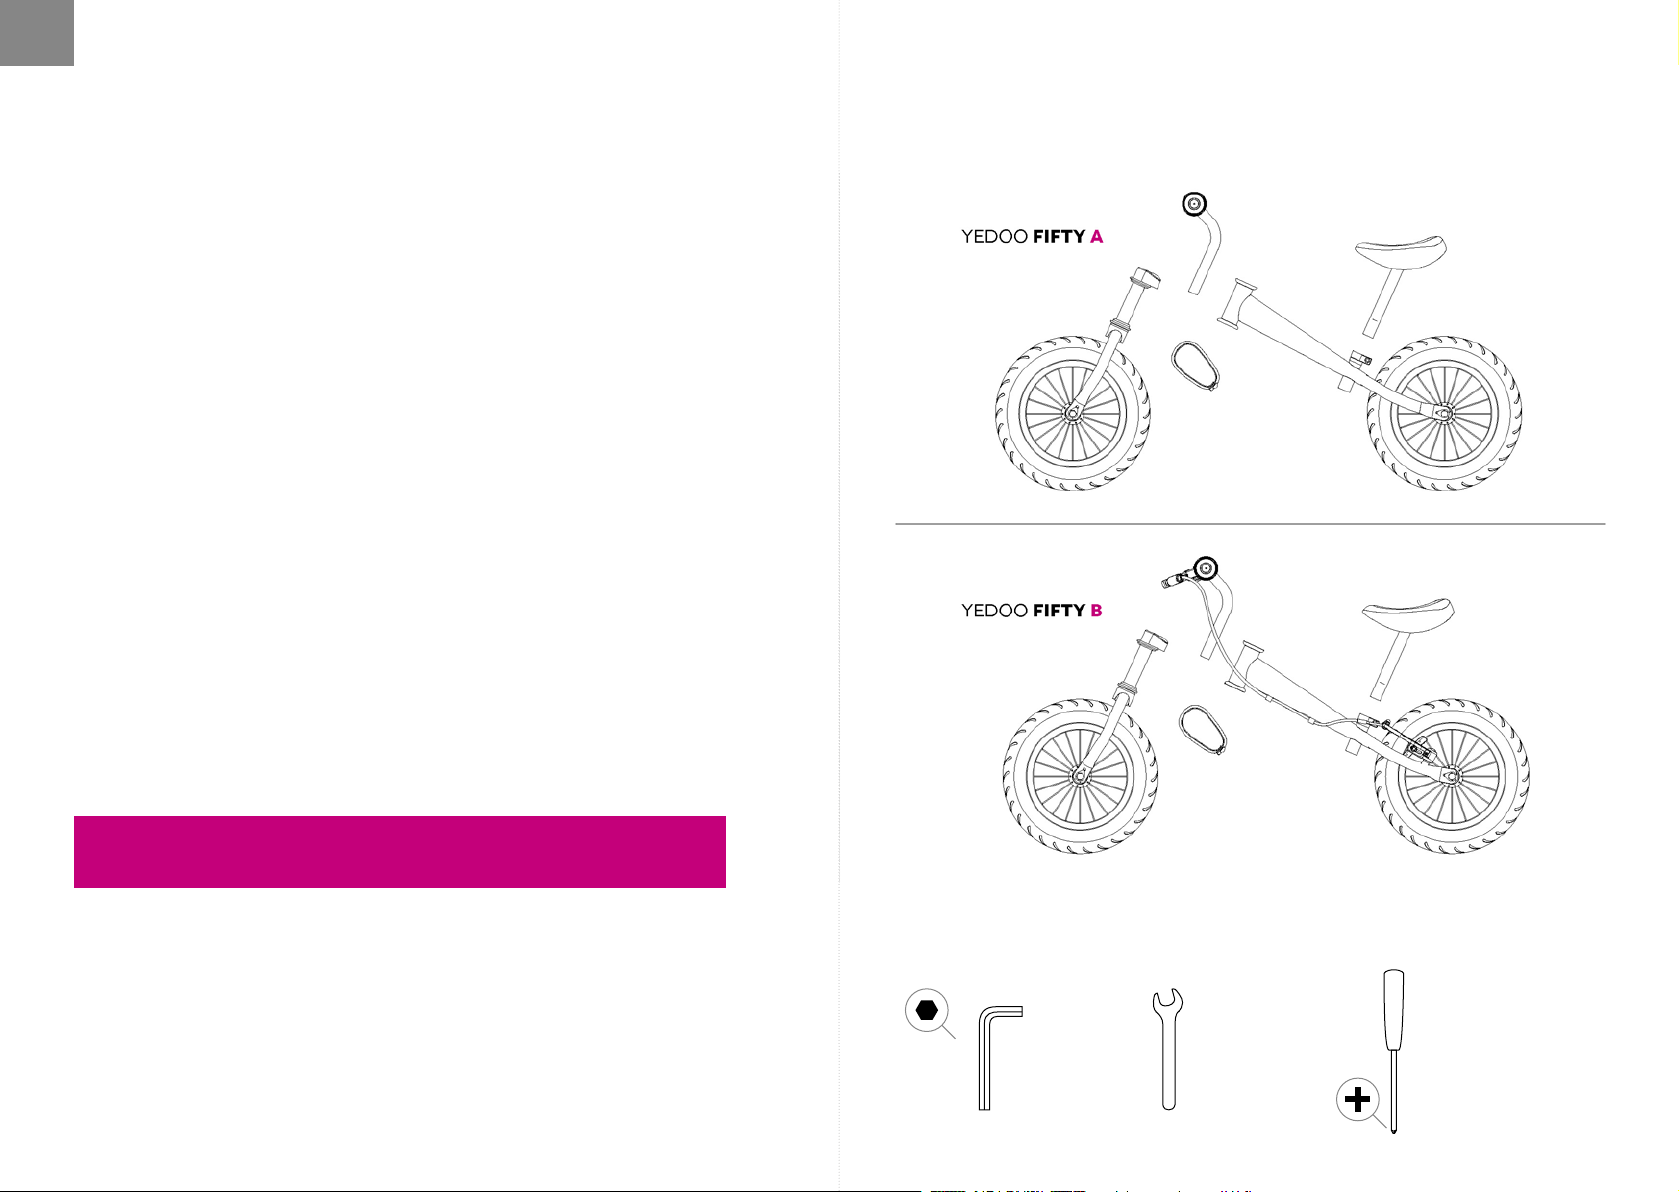
obsah baleníúVOD
Více informací ze světa odrážedel aseznam distributorů najdete na
www.yedoo.cz.
potřebné nářadí
5 mm
4 5
14 m m
Page 4
CZ
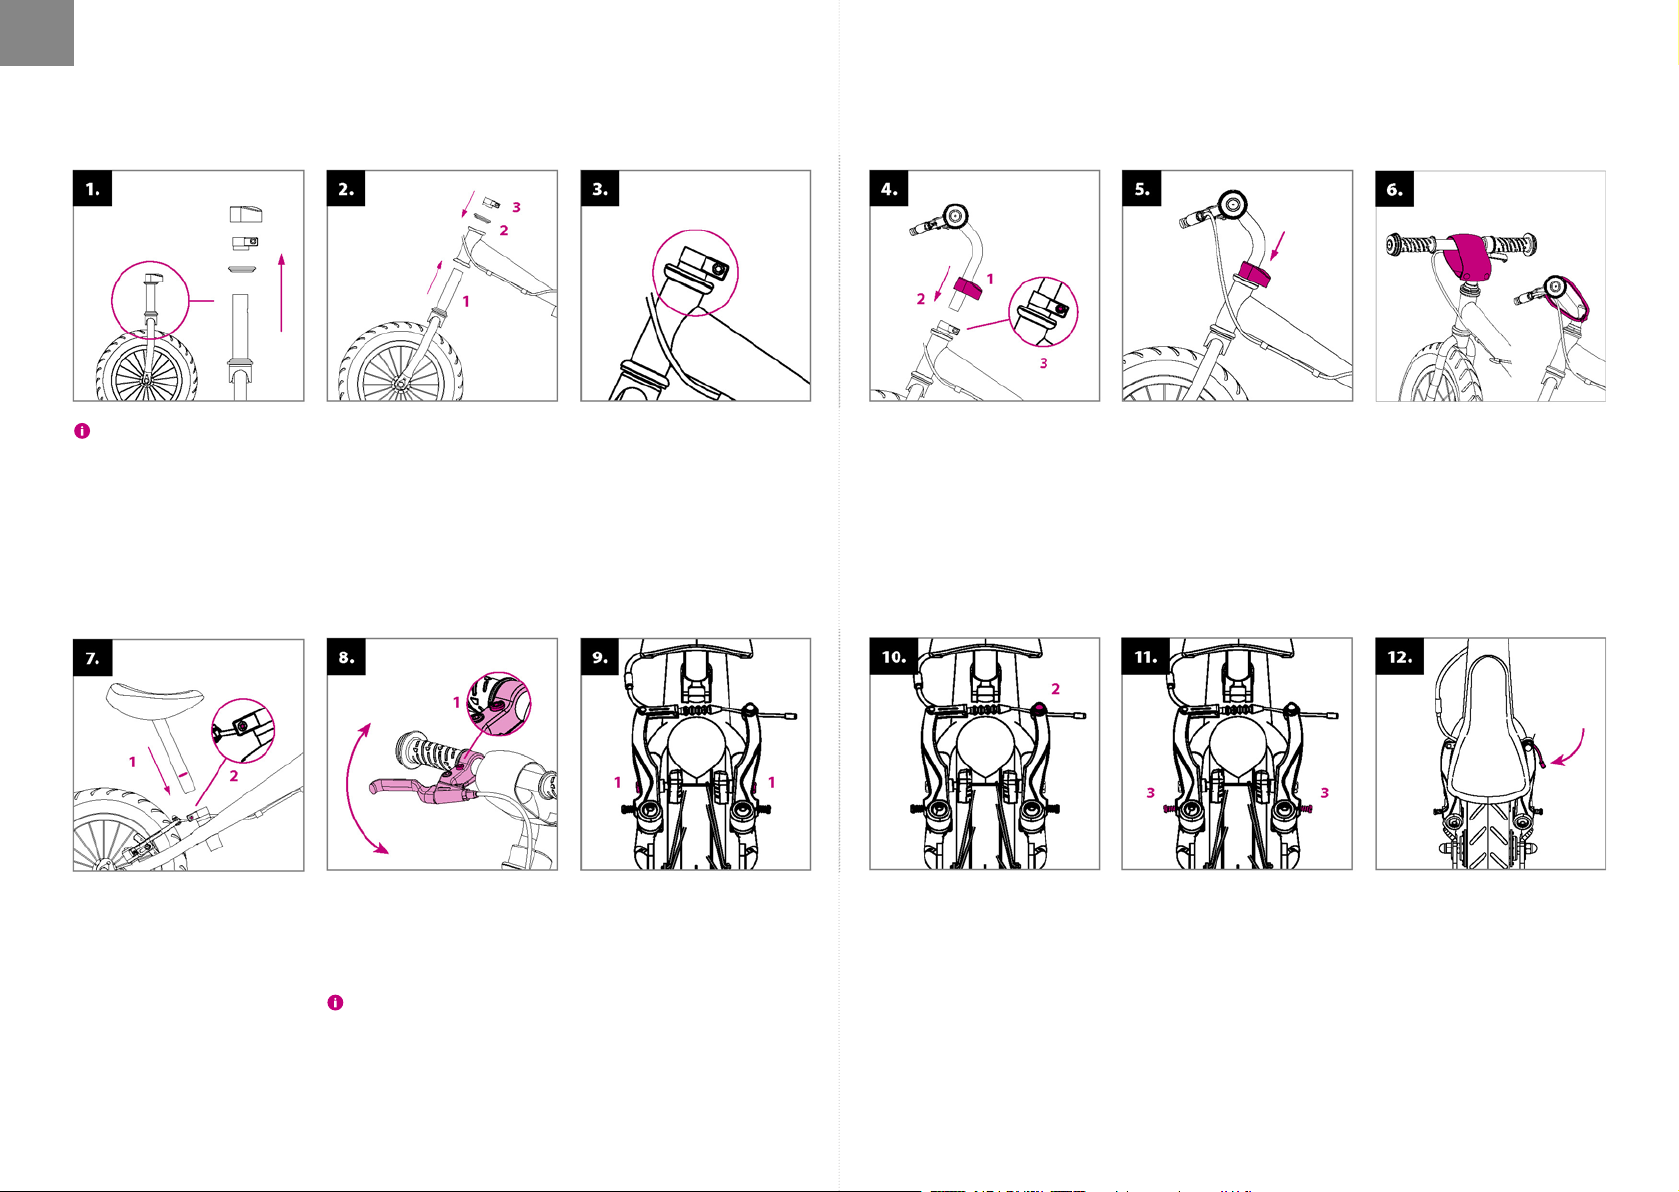
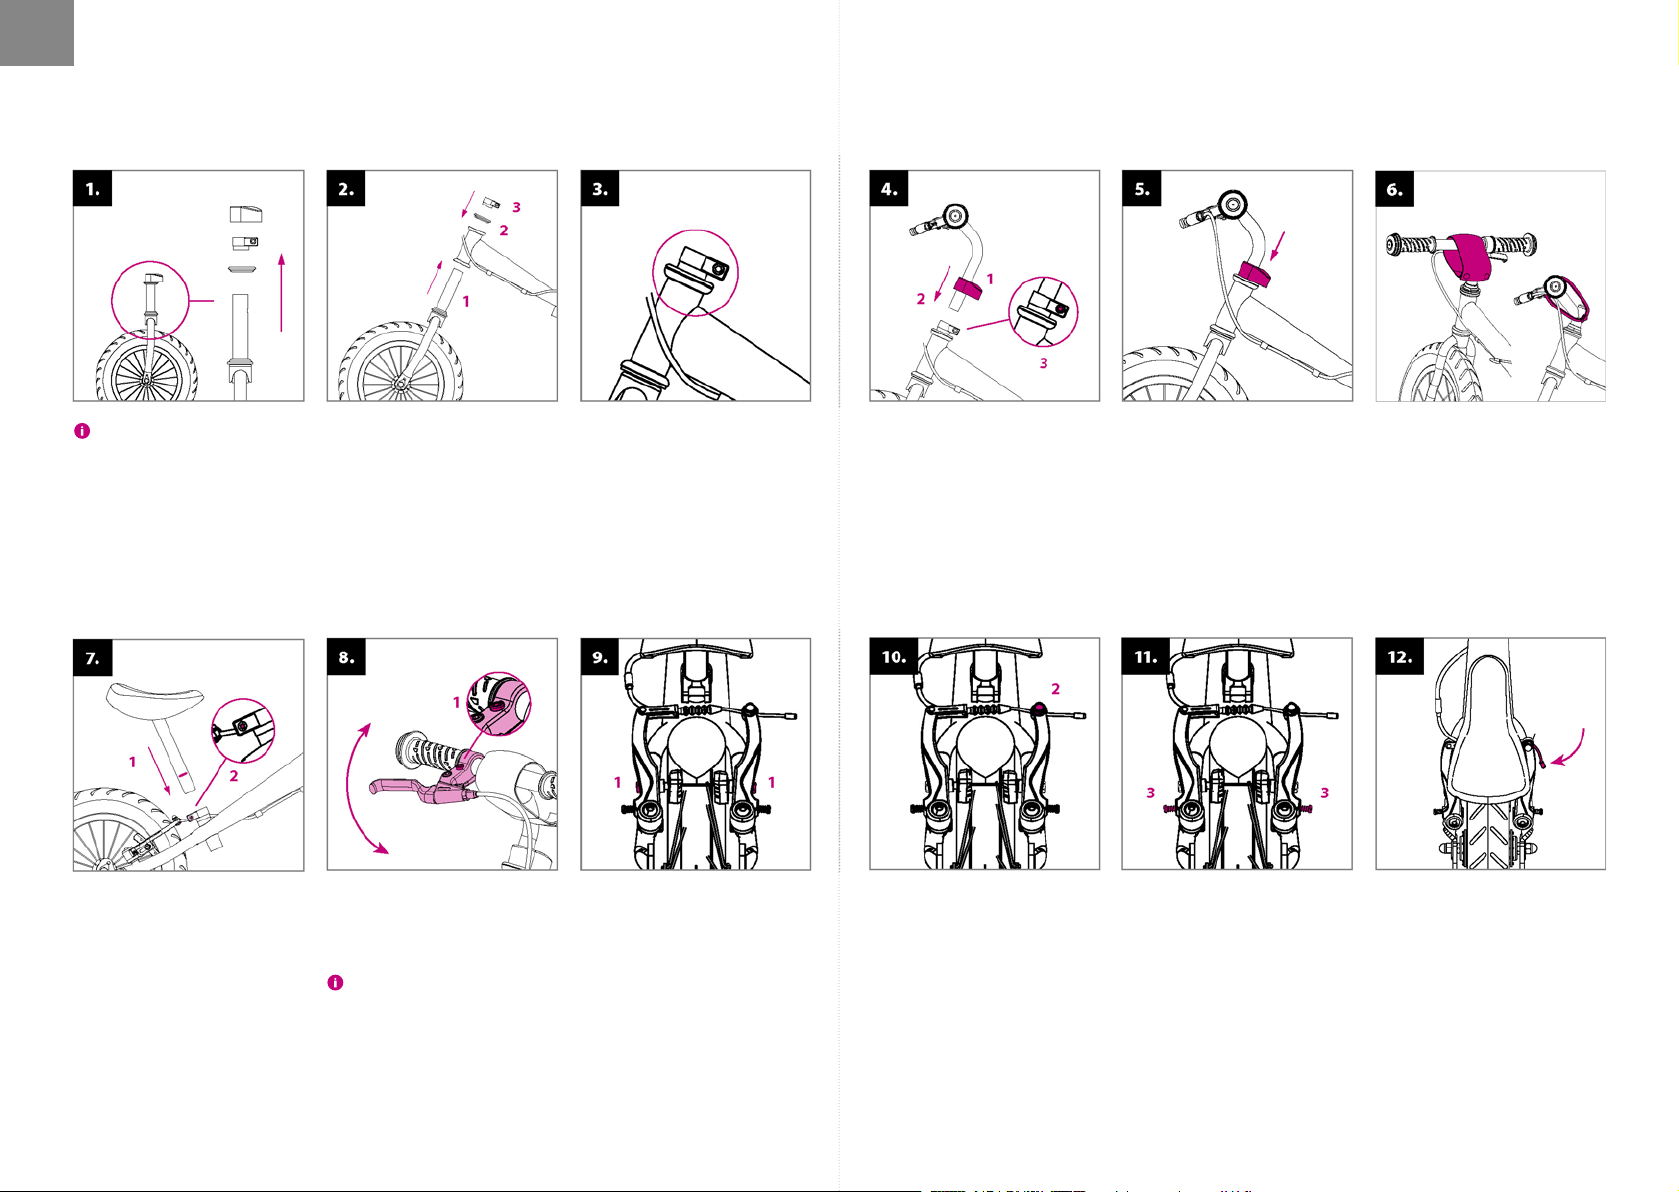
montážní návod
Před mont áží odstraňte pl astové kryt y
zosy před ního azadního k ola.
Instalace řídítek apřední
vidlice: zvidlice předního kola
sundejte kryt objímky, objímku
samotnou ahorní kroužek hlavového složení. Při instalaci musí
být dodržena skladba hlavového
složení viz obrázek.
Instalace sedla: zasuňte sedlovou trubku dorámu odrážedla
(1), nastavte požadovanou výšku
sedla (max. povyznačenou rysku)
adotáhněte šroub naobjímce (2).
Nakonec nahustěte pneumatiky
dle hodnot naboku pláště (ideálně mezi 1,3 – 1,8 bary).
Zasuňte přední vidlici dohlavové
trubky rámu (1) tak, aby mírné
prohnutí vidlice směřovalo dopředu. Navidlici navlečte zpátky
horní kroužek hlavového složení
(2) aobjímku (3).
Seřízení brzdových páček
(pouze pro odrážedlo FIFTY B):
nastavte správný sklon brzdových
páček pomocí upevňovacího
šroubu naobjímce (1).
Správný sklon brzdových páček: nechte
dítě sedn out naodrážedl o, ruce nechť polo ží
nařídítk a anatáhne prst y tak, aby prodlu žovaly př ímku jeho ruky. Dot éto polohy
nastavte brzdovou páčku.
Šroub objímky umístěte navýřez
vidlicové trubky přesně podle
obrázku.
Seřízení brzdy: zkontrolujte, zda
brzdové špalíky při zabrzdění dosedají celou svou plochou nabok
ráfku. Jejich polohu můžete upravit pomocí šroubků (1). Špalíky se
nesmí dotýkat pláště.
Nařídítkovou tyč navlečte kryt
objímky (1) azasuňte ji dovidlicové trubky (2). Nastavte požadovanou výšku řídítek (max. povyznačenou rysku) adotáhněte šroub
naobjímce (3).
Zkontrolujte, zda se špalíky při
uvolnění brzdové páčky dostatečně oddálí odráfku (1-2 mm).
Vzdálenost špalíků lze upravit přitažením či povolením brzdového
lanka vkotevním šroubu (2).
Nakonec naobjímku nasaďte
ochranný kryt.
Pokud kolo při otáčení vněkterém místě škrtá obrzdový špalík,
symetricky upravte vzdálenost
brzdových ramen napínacími
šroubky (3).
Instalace chrániče: napředstavec řídítek připněte měkký
ochranný kryt zomyvatelného
nylonu.
Konec brzdového lanka zahněte
tak, aby nepřekáželo dítěti vjízdě.
6 7
Page 5

CZ
BEZPEČNOSTNÍ
DOPORUČENÍ
Odrážedlo je vzákladní výbavě určeno pro jízdu
zadenního světla vprostorách určených pro sport
arekreaci.
Pro jízdu napozemních komunikacích apro jízdu
zatmy ho musíte vybavit bezpečnostními prvky
(světla, odrazky atd.) vsouladu splatnými předpisy
vevaší zemi. Dbejte, aby děti dodržovaly zásady
bezpečné jízdy či pravidla silničního provozu apoužívaly ochranné pomůcky (přilbu, chrániče kolen
aloktů, pevné boty apod.).
Před každou jízdou zkontrolujte funkčnost brzd
acelkový technický stav odrážedla. Dbejte, aby
nebylo překračováno jeho maximální zatížení
(nosnost odrážedla je uvedena naúvodní straně).
Všechny mechanismy snižující rychlost (brzdové
špalíky, ráfky, pneumatiky apod.) se při používání
zahřívají, nedotýkejte se jich, dokud nevychladnou!
jízdní pokyny
Děti mohou používat odrážedlo jen zadozoru
dospělé osoby. Je důležité, aby dítě mělo při jízdě
vždy obě ruce nařídítkách. Zatímco sedí audržuje
rovnováhu, odráží se střídavě oběma nohama
jako při běhu či rychlé chůzi. POZOR: dítě může
naodrážedle vyvinout značnou rychlost, proto by
ho rodiče případně odpovědná osoba měla před
první jízdou řádně poučit omožných nebezpečích
aozpůsobu brzdění. Pro zabrzdění nechť dítě
stiskne brzdovou páčku nařídítkách nebo zpomaluje třením podrážky bot ozem/brzdí nohama.
POZOR: prudké zabrzdění může způsobit pád.
údržba
Řádná údržba zvýší bezpečnost aprodlouží životnost zakoupeného odrážedla. Proto pravidelně
dotahujte šroubové spoje, kontrolujte tlak vpneumatikách apromazávejte pohyblivé části (ložiska
kol ařídítek, čepy brzdových páček, čelisti brzd,
brzdová lanka, atd.).
Dejte však pozor, aby se mazivo nedostalo naráfky
či brzdové destičky. Mastnota snižuje jejich účinek!
Pokud se tak stane, odmastěte znečištěné části
např. technickým benzínem.
Pravidelně kontrolujte výšku vzorku napláštích
kol, vpřípadě potřeby vyměňte pláště zanové se
shodnými parametry.
Kontrolujte stav samojistných matic (pokud se
zajízdy samovolně uvolňují, vyměňte je zanové).
Pravidelně kontrolujte výplet kol, nestejnoměrné
napnutí drátů vevýpletu může způsobit jejich
praskání nebo rozcentrování kol.
Odrážedlo udržujte včistotě, zašpinění otřete
vlhkým hadrem. Skladujte ho uvnitř nasuchém
astinném místě, dlouhodobě ho nevystavujte
zvýšené vlhkosti ani extrémním teplotám. Před
zazimováním ošetřete antikorozním přípravkem
apneumatiky nahustěte namaximální hodnotu
uvedenou naboku pláště. Výrobce neodpovídá
zaškody vzniklé výlučně zanedbanou údržbou,
neodborným zásahem, vlastními úpravami či
špatným zacházením.
Výrobek splňuje náležité normy EU (ČSN EN 71-1,
ČSN EN 71-3) azískal certikáty kvality abezpečnosti odpředního českého zkušebního ústavu
(Strojírenský zkušební ústav, s. p.) imezinárodně
uznávaného TÜV SÜD Czech s. r. o.
Uplatnění práv z vadného plnění
Obecná ustanovení: Obsah, rozsah atrvání práv kupujícího zvadného plnění zboží se řídí platnými
právními předpisy České republiky, ato především příslušnými ustanoveními občanského zákoníku (z.
č. 89/2012 Sb.) azákona oochraně spotřebitele (z. č. 634/1992 Sb.). Práva kupujícího vesmyslu těchto
předpisů nejsou tímto dokladem, ani vněm uvedenými informacemi nijak dotčena.
Doba pro uplatnění práv zvadného plnění: Právo zvady unově zakoupeného odrážedla Yedoo (dále
jen zboží) může kupující uplatnit vdobě 24 měsíců odjeho převzetí. Vy tkne-li kupující vadu zboží oprávněně,
lhůta pro uplatnění práv zvadného plnění neběží podobu, pokterou kupující nemůže zboží užívat.
Způsob uplatnění práv zvadného plnění: Práva zvadného plnění se uplatňují uprodejce, ukterého
kupující zboží zakoupil (viz údaje níže). Při uplatnění vad zboží doporučujeme předložit tento doklad,
doklad okoupi akompletní nečistot zbavené odrážedlo. Ouplatnění práv zvadného plnění, případně
oprovedení opravy vystaví prodejce kupujícímu písemné potvrzení.
Podmínky trvání práv zvadného plnění: Při montáži odrážedla musí být dodrženy pokyny
uvedené vmontážním návodu. Odrážedlo musí být používáno výhradně kúčelu, kjakému bylo
vyrobeno. Odrážedlo musí být skladováno audržováno podle výrobcem uvedených pokynů. Navady
způsobené výlučně nesprávnou montáží či používáním odrážedla vrozporu suživatelskou příručkou se
odpovědnost výrobce nevztahuje.
Model odrážedla:
Výrobní číslo rámu:
Datum prodeje:
Prodejce:
Razítko ap odpis:
Výrobce: Intrea-Piko, s. r. o., Sasanková 2657/2,
10600 Praha 10, Česká republika
8 9
Page 6
DE
Grundsätzlich empfehlen wir die Montage,
Einstellung und regelmäßige Wartung einem
spezialisierten Fahrradservice zu überlassen. Zudem
beachten Sie bitte, dass Veränderungen am Laufrad
sowie unsachgemäßer Gebrauch, Materialschäden
und schwere Unfälle zur Folge haben können.
Falls Sie über technische Kenntnisse verfügen
und von diesen Gebrauch machen möchten
werden Sie bemerken, dass die Montage einfach
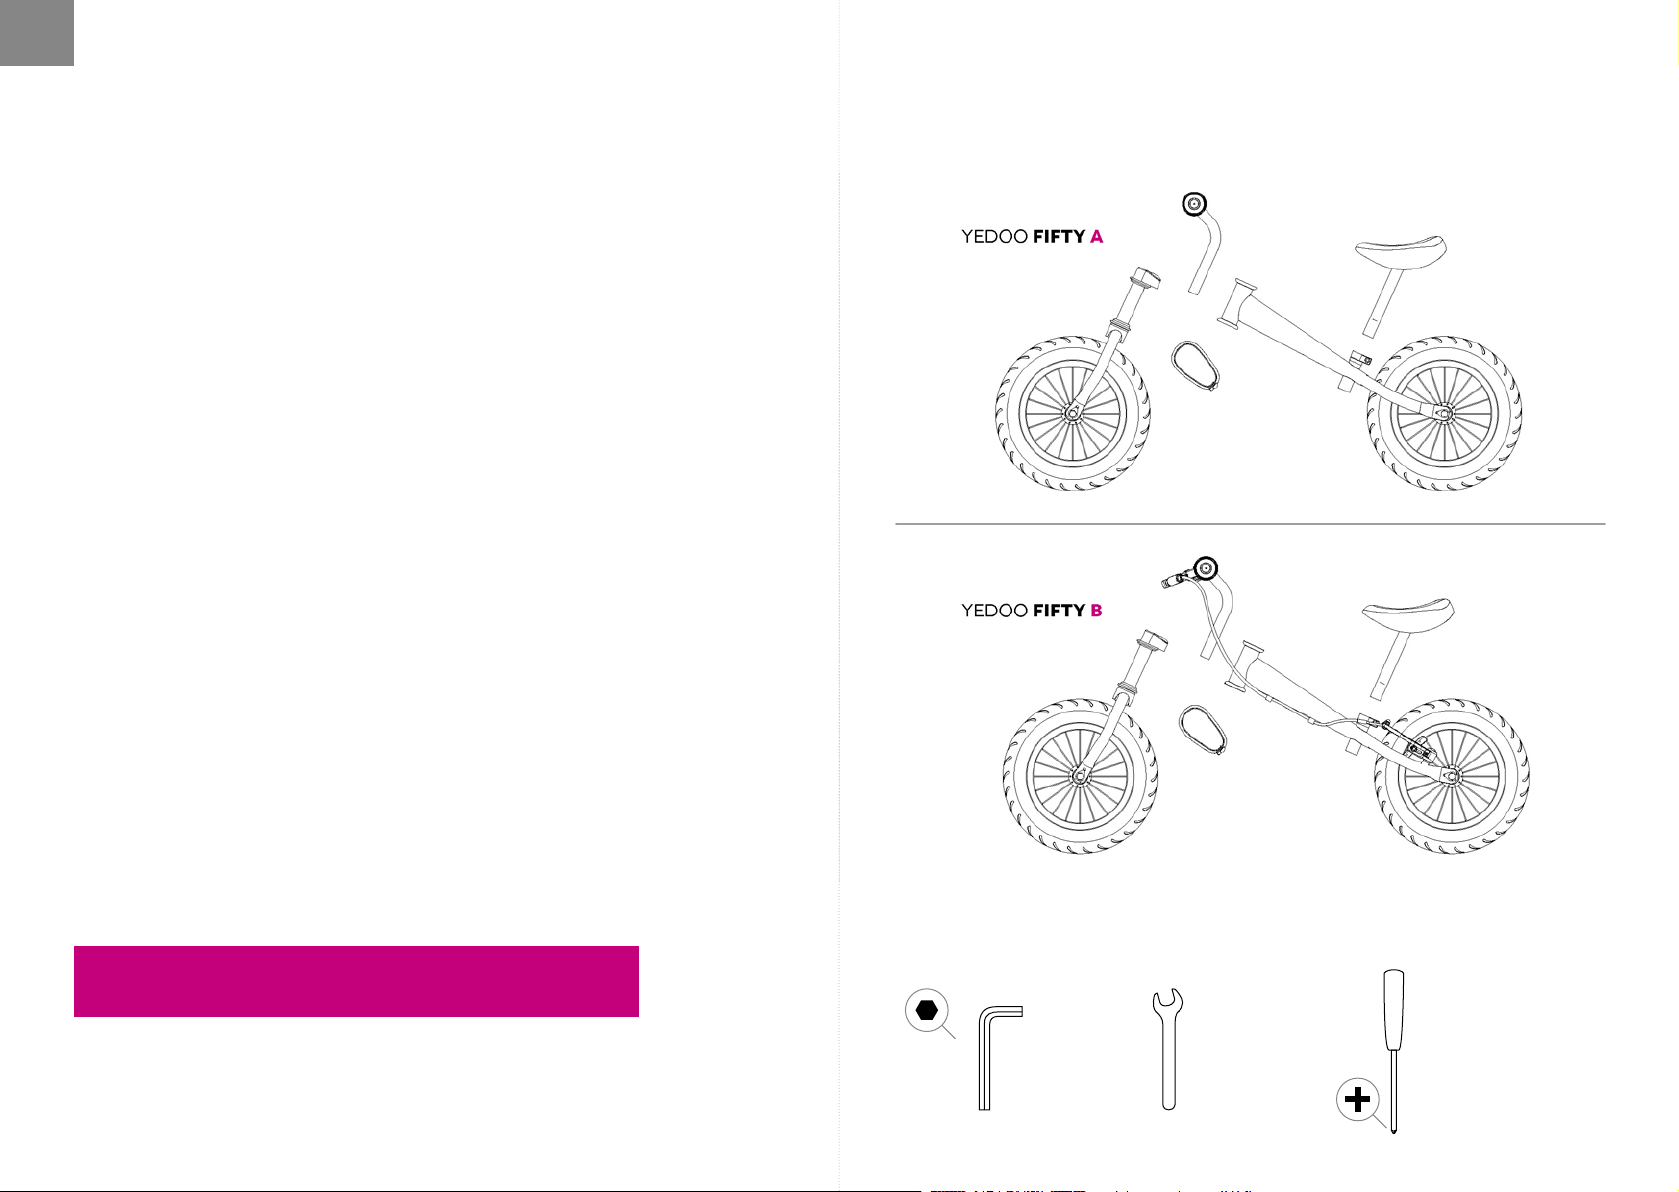
INHALT DER VERPACKUNG EINLEITUNG
ist. Folgen Sie den beschriebenen Schritten der
Montageanleitung und beachten Sie sämtliche
Warnhinweise.
Fragen, Bemerkungen und Verbesserungsvorschläge zu unseren
Produkten schicken Sie bitte an folgende E-Mail Adresse:
info@yedoo.eu.
NOTWENDIGES WERKZEUG
Mehr Informationen aus der Tretroller-Welt nden Sie unter
www.yedoo.eu.
5 mm
10 11
14 m m
Page 7

DE
MONTAGEANLEITUNG
Entfernen Sie vor dem Zusammenbau
die Plastikabdeckungen von den Vordersowie Hinterradachsen.
Lenker- und Vordergabelmontage: Entfernen Sie die Plastikabdec-
kung der Klemmschelle, Klemmschelle selbst sowie den oberen
Lagerungsring. Beim Zusammenbau
müssen die Teile wie abgebildet über
das Gabelrohr geschoben werden.
Sitzmontage: Schieben Sie die
Sitzstange in das Aufnahmerohr des
Laufradrahmens (1) und stellen Sie
die gewünschte Höhe des Lenkers
ein (bis max. in Höhe des gekennzeichneten Striches). Überprüfen Sie,
ob der Sitz gerade ist und ziehen Sie
die Fixierschraube der Sitzbefestigung fest (2).
Pumpen Sie nun die Reifen mit
dem vorgeschriebenen Luftdruck –
gemäß Aufdruck an der Reifenwand
– (Idealbereich: 1,3 bis 1,8 bar) auf.
Schieben Sie die Lenkerstange in
das Hauptrohr des Laufradrahmens
(1) so dass die die Biegung der
Gabel nach vorne zeigt. Schieben
Sie nun abschließend den oberen
Lagerring (2) und die Klemmschelle
(3) über das Vordergabelrohr.
Einstellen der Bremshebel (nur
FIFTY B): Stellen Sie die richtige
Lage der Bremshebel am Lenker
durch lockern der Klemmschraube
des Bremshebelhalters und drehen
am Lenker ein. Abschließend wie-
der gut festziehen (1).
Richtiger Winke l der Bremshebe l: Lassen
Sie das Kin d auf dem Laufrad s itzen, den
Lenker und die Bremshebeln umfassen. Die
Finger sollen nun eine verlängerte Linie mit
den Armen bilden.
Platzieren Sie die Klemmschellenschraube exakt über dem
Ausschnitt des Gabelrohres wie auf
der Abbildung gezeigt.
Einstellung der Bremse: Überprüfen Sie auf beiden Rädern, dass
die Bremsbeläge beim Bremsen mit
ihrer ganzen Fläche auf der Seitenwand der Felge auiegen. Falls
nicht, lösen Sie die Feststellschraube der Bremsklötze und positionieren diese. Nach dem Festziehen der
Schraube sind die Bremsklötze zu
den Armen der VBremse (1) xiert.
ACHTUNG! Die Klötze dürfen nie
den Mantel des Reifens berühren.
Schieben Sie die Plastikabdeckung der Klemmschelle (1) auf das
Lenkerrohr und stecken dieses in
das Gabelrohr (2). Stellen Sie die
gewünschte Höhe des Lenkers ein
(bis max. in Höhe des gekennzeichneten Striches). Überprüfen Sie, ob
der Lenker gerade ist und ziehen Sie
die Fixierschraube der Klemmschelle fest (3).
Überprüfen Sie, ob der Abstand
der Bremsbeläge von der Felge bei
unbetätigtem Bremshebel etwa
1-2mm beträgt. Dieser Abstand
lässt sich durch anziehen oder
lockern des Bremsseils in der Fixierschraube (2) regulieren.
Zuletzt schieben Sie die Plastikabdeckung über die Klemmschelle.
Falls der Reifen beim Drehen an
irgendeiner Stelle den Bremsbelag
streift, stellen Sie die Entfernung
der Bremsarme durch die Spannschrauben (3) symmetrisch ein.
Lenkerschutz montieren: Montieren Sie das weiche Schutzband
aus waschbarem Nylon mit Hilfe
der Klettverschlüsse mittig über die
Lenkeraufnahme
Biegen Sie das Ende des Bremsseiles so, dass es das Kind nicht stört
wenn es fährt.
12 13
Page 8
DE
SICHERHEITSEMPFEHLUNGEN
Das Laufrad ist in seiner Grundausstattung für Fahrten
bei Tageslicht und in Gebieten für Sport und Erholung
bestimmt. Für Fahrten im Dunkeln und auf Verkehrswegen müssen Sie mit den vorgeschriebenen
Sicherheitselementen der Straßenvorschriften für Ihr
Land ausgestattet sein. (Lichter, Rückstrahler usw.)
Veranlassen Sie das Kind die vorgeschriebenen Regeln
des Straßenverkehrs, sowie die Grundsätze des sicheren
Fahrbetriebes einzuhalten und die erforderlichen
Schutzmittel zu tragen. (Schut zhelm, Ellbogen- und
Knieschützer, feste Schuhe u. ä.)
Überprüfen Sie vor jeder Fahrt die Funktionsfähigkeit
der Bremsen und den gesamten technischen Zustand
des Laufrades.
Überschreiten Sie auf keinen Fall die max. Belastung
des Laufrades (die Traglast des Laufrades ist auf der
Vorderseite angegeben). Das Laufrad ist nur für einen
Fahrer bestimmt.
Überlasten Sie das Laufrad nicht. Das Laufrad ist nicht
für Belastungen wie Akrobatik und Sprünge ausgelegt.
Alle Bauteile welche die Geschwindigkeit regulieren
(Bremsbeläge, Felgen, Reifen und Scheiben der Scheibenbremse) erwärmen sich durch Nutzung. Fassen Sie
die Teile nicht an bevor sie abgekühlt sind.
FAHRANWEISUNGEN
Kinder dür fen das Laufrad nur unter Aufsicht eines
Erwachsenen benut zen. Es ist wichtig, dass das Kind
den Lenker immer fest mit beiden Händen umfasst. Das
Kind bewegt das Laufrad durch abwechselnde G eh-/
Laufbewegungen der Beine nach vorne.
ACHTUNG: Mit dem Laufrad kann eine hohe Geschwindigkeit erreicht werden. Deshalb sollten Kinder über die
Gefahren sowie Möglichkeiten des Bremsens aufgeklärt
werden. Um zu stoppen muss das Kind den Bremshebel
anziehen o der die Sohlen (robuste Schuhe!) auf den
Boden pressen.
ACHTUNG: Abruptes, hef tiges Bremsen kann zu Stürzen
und Verletzungen führen.
WARTUNG
Die richtige und regelmäßige Wartung erhöht die
Sicherheit und verlängert die Lebensdauer Ihres
Laufrades. Kontrollieren Sie bitte daher regelmäßig
Schraubenverbindungen, Sitz, Schnellspannhebel,
Luftdruck in den Reifen sowie schmieren die beweglichen Teile (Lager der Räder und Lenkerstange, Stifte der
Bremshebel, Bremsbacken, Bremsbowdenzüge, usw.).
Achten Sie darauf, dass das Schmiermittel nicht auf
die Felgen oder Bremsbeläge gelangt, da dies die
Bremswirkung erheblich reduziert! Sollte es dennoch
passieren, fetten Sie die verschmutzten Teile z. B. mit
Waschbenzin ab.
Überprüfen Sie regelmäßig die Tiefe des Lauächenprols der Reifen. Falls notwendig sind die alten
Reifenmäntel durch neue mit den gleichen Ausmaßen
auszutauschen.
Überprüfen Sie den Stand der selbstsichernden Schraubenmuttern. Tauschen Sie die Muttern aus, falls diese
sich während der Fahrt lockern.
Prüfen Sie regelmäßig die Speichen auf Defekte. Ungleichmäßige Span nungen der Drähte könne n zu deren Reißen oder einer schlechten Ausrichtung der Räder führen.
Halten Sie das L aufrad sauber. Verschmut zungen sind mit
einem feuc hten Tu ch zu beseitigen. Das L aufrad sollte an
einem schattigen sowie trockenen Ort untergebracht werden. Es sollte nicht erhöhter Feuchtigkeit oder extremen
Temperaturen über längere Zeit ausgesetzt werden.
Vor dem Winter so llte das Laufrad mit ein em Antikorrosionsmittel behandelt werden und die Reifen auf deren
maximale n Wert (seitlich am Mantel) au fgepumpt werden.
Für Schäden, welche durch mangelhafte Wartung,
unautorisierte Umbauten, andere technische Veränderungen, unsachgemäße Nutzung sowie unangemessene Lagerung hervorgerufen werden, übernimmt der
Hersteller keine Garantie.
Das Produkt erfüllt die erforderlichen ordnungsgemäßen EU Normen (ČSN EN 71-1, ČSN EN 71-3) und
erhielt ein Qualitäts- und Sicherheitszertikat von den
führenden tschechischen Prüfanstalten (Maschinenbau
Prüfanstalt, s. p.TZÚS Praha, s. p.– Werk ZÚLP České
Budějovice) sowie dem international anerkannten TÜV
SÜD Czech s. r. o.
Hersteller: Intrea -Piko, s. r. o. Sasanková 2657/2, 106 00
Prag 10, Tschechische Republik
GARANTIESCHEIN
Allgemeine Bedingungen: Der Inhalt, Umfang sowie die zeitliche Gültigkeit der Garantie entsprechen
den gesetzlichen Vorschriften des Landes in dem das Laufrad erworben wurde.
Garantiezeit: Der Garantieanspruch kann vom Käufer bis zum Ablauf von 24 Monaten nach Erwerb des
Laufrads geltend gemacht werden. Der Anspruch beginnt mit dem Tag des Erwerbs und verlängert sich
automatisch um den Zeitraum für den sich das Produkt in Garantiereparatur bendet.
Garantieanspruch: Die Garantiekarte (siehe unten) ist zusammen mit dem Händler vollständig
auszufüllen. Wir empfehlen das vollständig gereinigte Produkt zusammen mit der ausgefüllten
Garantiekarte und Rechnung beim Händler vorzulegen. Im Gegenzug wird der Händler eine
Übergabebestätigung für die Übernahme der Garantieabwicklung aushändigen.
Garantiebedingungen: Das Produkt muss gemäß der Aufbauanleitung zusammengebaut sein
sowie laut Bedienungsanleitung gelagert, montiert, eingestellt und gewartet werden. Es darf nicht
zweckentfremdet werden. Für Mängel welche durch die gewöhnliche Abnutzung entstehen besteht
kein Garantieanspruch.
Produkt/Modell:
Produktionsnummer
des Rahmens:
Verkaufsdatum:
Verkäufer:
Stempel und Unterschrift:
14 15
Page 9
EN
INTRODUCTION
We highly recommend having the running
bike assembled and regularly inspected by
aprofessional bicycle technician. Incorrect
or decient assembly can lead to damaging
the running bike and can cause serious
injuries.
If you are askilled technician, you may
assemble the running bike without
professional assistance with our help.
If you have any ideas or comments, feedback or tips,
please donot hesitate to contact us at our email address:
info@yedoo.eu.
PACKAGING CONTENTS
More information from the world of scooters and the list of sellers can be found
herewww.yedoo.eu.
NECESSARY TOOLS
5 mm 14 m m
16 17
Page 10
EN
ASSEMBLY INSTRUCTIONS
Before assemb ly, remove the plastic
covers fro m both front and rea r wheel axis.
Handlebar and front fork
installation: remove the sleeve
cover, the sleeve itself and upper
the headset ring from the front
fork. At installation, the headset
composition must be as on the
picture.
Seat installation: put the seat
tube into the frame (1) of the
running bike, adjust the desired
height (donot exceed the maximum mark) and tighten the
sleeve screw (2).
Then inate the tires according
to the values on their side (ideally
between 1,3 and 1,8 bars).
Insert the front fork into the
main frame tube (1) so that the
bending of the fork faces forward.
Place the upper headset ring (2)
and the sleeve (3) back on the
front fork.
Adjustment of brake levers
(only for FIFTY B): incline the
brake levers correctly by loosening the screw on the sleeve (1).
The right i nclination: let t he child sit
on the runn ing bike, hold the ha ndles and
stretch o ut your ngers in away t hat his/her
arm and the ngers form asing le straight
line. Thi s should be the posi tion of the
brake lever.
Place the sleeve screw exactly on
the cut-out of the fork tube as on
the picture.
Adjustment of brake: when
braking, check that the brake
pads t tightly on the rim sides.
Their position can be adjusted via
the screws (1). The pads shall not
touch the tires.
Put the sleeve cover (1) on the
handlebar tube and place it into
the fork tube (2). Adjust the heigh
as desired (donot exceed the
maximum mark) and tighten the
screw on the sleeve (3).
Check that the pads make enough space (1-2 mm) after releasing
the brake levers. The distance
can be adjusted by tightening or
loosening the brake cable at the
anchor screw (2).
In the end, place the protective
cover over the sleeve.
In case the brake pad is touching
the wheel when turning, symmetrically adjust the distance of brake
arms by the tightening screws (3).
Protective pad installation:
place the soft protective pad
from washable nylon over the
handlebar stem.
Bend the ending of the brake
cable so that it does not obstract
when the child is riding.
18 19
Page 11
EN
SAFETY MEASURES
The running bike in its basic equipment is designed
for riding during daylight in areas meant for sport and
recreation. For roads with car trac or for riding in
the dark, you need to provide your running bike with
safety features (lights, reectors, etc.) in accordance
with the regulations valid in your country. Make sure
the children obey general safety regulations or trac
rules and that they use use protective accessories
(helmets, knee and elbow pads, good shoes, etc.)
Before each ride, always check good function of the
brakes and the overall technical condition of the
running bike. Donot exceed the maximum loading
capacity of the running bike (as specied on the
front side). The scooter is designed for one rider only!
Donot overload the scooter, it is not intended for
jumping or acrobatic riding.
All the speed-limiting mechanisms (brake pads or
discs, rims, and tires etc.) can become warm when
used. For this reason, it is not recommendable to touch them before cooling o!
RIDING
INSTRUCTIONS
Children can use the running bike only under the
supervision of an adult. It is important that the child
always grips the handles with both hands at when riding. While seated and balancing, the child pushes o
alternating the feet as when running or walking fast.
WARNING: Children can develop a considerable speed, so they should be properly instructed about the
possible dangers and braking methods by the parent
or the responsible adult. For braking, the child should
squeeze the brake lever on the handlebar or should
use soles of his/her shoes to slow down by puting
them to the ground.
WARNING: sudden violent braking may cause injury.
MAINTENANCE
Correct and regular maintenance increases safety and
lengthens the life span of the running bike. Regularly
inspect screw connections, quick releases, pressure in
tires and lubricate the moveable parts (wheels, bearings, handlebars bearings, cables, brake parts etc.).
Make sure that no lubricant gets on the rims or brake
pads. Grease reduces their eect! If this situation
occurs, it is necessary to remove the grease from all
the parts, using asolvent and/or degreaser.
Inspect the tires for cuts, nicks and deformities. Replace tires that show excessive wear and damage with an
equivalent tire.
Inspect the self-locking nuts. If they get loose freely,
exchange them with new ones.
Check the spokes for defects. Irregular strain or looseness in spokes can cause their cracking or can make
the wheel wobble.
Keep the running bike clean, use soft cloth moistened
with water. It should be stored inside, on adry and
shaded place. Donot expose the running bike to high
humidity or extreme temperatures over along period
of time. Before the winter, prepare it against corrosion
and inate the tires to its maximal value as specied
on the side of the tire. The producer does not cover
damage caused solely by neglected maintenance,
non-adequate adaptation, or inappropriate treatment
and storage.
The product complies with the corresponding EU
standards (ČSN EN 71-1, ČSN EN 71-3) and received
quality and safely certications from aleading Czech
testing lab - Engineering Test Institute (Strojírenský
zkušební ústav, s.p.) as well as from the internationally
recognized TÜV SÜD Czech s.r.o.
Producer: Intrea-Piko, s. r. o., Sasanková 2657/2, 10600
Prague 10, Czech Republic
WARRANTY LIST
General regulations: The content, extend and duration of the warranty conforms to the valid legal code in
the respective country of the purchase of the running bike.
Warranty period: The buyer of the new Yedoo running bike (product) can apply the warranty during the
period of 24 months from the purchase. The warranty commences on the day of the sale to the end user
and is automatically extended when the product is taken into repair during warranty period.
Warranty application: The warranty must be lled out with the retailer, where the product was purchased
(see bellow). When applying the warranty, we recommend presenting the lled out sheet bellow, the receipt and acomplete and cleaned product. The seller will give awritten conrmation to the buyer regarding
the acceptance of the product into the warranty process.
Warranty conditions: The product must be assembled following the instructions of the manual. The
products shall only be used for the purposes, which it was designed for. The product must be stored and
maintained in the ways in accordance with the Instruction manual. The warranty does not cover damage
caused by common wear and tear is not covered by this warranty. The producer does not cover damage
caused by incorrect assembly or by use in contradiction with the Instruction manual.
Product model:
Serial number
of the frame:
Date of purchase:
Retailer:
Signature and stamp:
20 21
Page 12
ES
Recomendamos dejar el montaje, ajuste
y mantenimiento acargo de un servicio
especializado. Las manipulaciones realizadas
por personas no calicadas pueden resultar
en daños ala bicicleta oen accidentes con
consecuencias graves para la salud.
Si se siente como una persona con
habilidad técnica, no tenga miedo y
póngase aarmar la bicicleta con nosotros.
CONTENIDO DEL EMBALAJEINTRODUCCIÓN
Puede enviar preguntas, comentarios y sugerencias para
mejorar nuestros productos a: info@yedoo.eu.
Más información sobre el mundo de las bicicletas, y la lista de
distribuidores, véanse en www.yedoo.eu.
HERRAMIENTAS NECESARIAS
5 mm
22 23
14 m m
Page 13

ES
INSTRUCCIONES DE MONTAJE
Antes del montaj e, retire las cubier tas
de plásti co de los ejes de las ru edas trasera
y delantera.
Instalación del manillar y la
horquilla delantera: retire cubre-
-abrazadera de la horquilla delantera,
la abrazadera misma, y el anillo superior del telescopio. La composición del
telescopio debe mantenerse tal como
se veen la imagen.
Instalación del sillín: inserte el tubo
del sillín en el cuadro de la bicicleta
(1), ajuste la altura (hasta la línea
marcada) y ajuste el tornillo de la
abrazadera (2).
Para terminar, ine los neumáticos de
acuerdo con los valores en el lateral
de la cubier ta (idealmente, entre 1,3
y 1,8 bar).
Inserte la horquilla delantera en el
tubo del telescopio (1) con la parte
ligeramente curvada de la horquilla
apuntando hacia adelante. Inserte la
horquilla (2) y la abrazadera (3) através del anillo superior del telescopio.
Ajuste d e la palanca de freno (solo
para el mo delo FIFTY B): Ajuste
el ángulo correcto de la palanca de
freno con el tornillo de jación en el
casquillo (1).
Angulo correc to de la palanca de f reno:
deje que el n iño se siente en la bic icleta y
que ponga las manos en el manillar, estirando los ded os para alargar la lí nea de la mano.
Ajuste la p alanca de freno aes a posición.
Coloque el tornillo de la abrazadera
en la hendidura de los tubos de la
horquilla, tal como lo muestra la
imagen.
Ajuste d e los frenos: compruebe
que al frenar, toda la super cie de las
zapatas se apoye en el lado de la llanta. Su posición puede ajustarse con
los tornillos (1). Las z apatas no deben
tocar la cubierta.
Coloque el cubre-abrazadera en la
varilla del manillar (1) e insér telo en
el tubo de la horquilla (2). Ajuste el
manillar ala altura deseada (hasta la
línea marcada) y ajuste el tornillo en la
abrazadera (3).
Asegúrese que al soltar el freno, las
zapatas se separen lo suciente de la
llanta (1-2 mm). La distancia puede
ser corregida ajustando oaojando
el tornillo de anclaje de la palanca de
freno (2).
Para terminar, coloque el cubre-abrazadera sobre la abrazadera.
Si en algún momento al girar, la rueda
roza la zapata de freno, ajuste simétricamente la distancia del brazo del
freno con el tornillo de tensión (3).
Doble el extremo del cable del freno
para que no moleste al niño al andar.
24 25
Page 14

ES
RECOMENDACIONES DE
SEGURIDAD
En su versión básica, la bicicleta est á diseñada para andar
durante el día, en espacios destinados al depor te y la
recreación.
Para andar en carreteras y en la oscuridad se debe equipar con componentes de seguridad (luces, reectores,
etc.), de acuerdo con las leyes vigentes en su país. Asegú rese de que los niños sigan los principios de conducción
segura y las normas viales, y que usen equipo de protección (casco, rodilleras, coderas, calzado rme etc.).
Antes de cada uso, controle el funcionamiento de los frenos y de todo el estado técnico de la bicicleta. Asegúrese
que no se exceda la carga máxima (la capacidad de carga
de la bicicleta se encuentra en la página inicial).
Todos los mecanismos de reducción de velocidad (las
zapatas de freno, las llantas, los neumáticos, etc.) se
calientan durante el uso. No los toque hasta que no se
hayan enfriado.
INSTRUCCIONES
DE USO
Los niños pueden usar la bicicleta, únicamente bajo la
supervisión de un adulto. Es importante que al andar el
niño siempre mantenga ambas manos sobre el manillar.
Mientras está sentado y mantiene el equilibrio, debe
mover ambas piernas como si corriese ocaminase rápido.
PRESAUCIÓN: Los niños pueden alcanzar velocidades
bastante altas en la bicicleta, es por ello que antes del
primer uso, los padres, oalguna persona responsable,
deben explicarles debidamente los riesgos potenciales
ycómo frenar. Para frenar, el niño debe apretar la palanca
de freno o, apoyando las suelas de los zapatos en el suelo,
frenar con los pies.
PRESAUCIÓN: Frenar bruscamente puede resultar en
caídas.
MANTENIMIENTO
El mantenimiento apropiado aumenta la seguridad y
extiende la vida útil de la bicicleta. Por lo tanto, ajuste regularmente las juntas roscadas, controle la presión de los
neumáticos y lubrique las partes móviles (los cojinetes de
las ruedas, los pivotes de la palanca de f renos, las zapatas
de freno, los cables del freno, etc.)
Sin embargo, evite que el lubricante entre en contacto
con las llantas olas pastillas de freno. ¡La grasitud reduce
su efecto! Si esto sucediese, desengrase las zonas sucias
con, por ejemplo, bencina.
Controle regularmente la altura del dibujo de las cubiertas, en caso de desgaste, cámbielas p or unas nuevas con
los mismos parámetros
Controle el estado de las tuercas autob locantes (si al andar se aojan por sí mismas, cámbielas por unas nuevas).
Controle regularmente los radios de las ruedas. Si la
tensión de los rayos es irregular, pueden romp erse
odescentrar la rueda.
Mantenga la bicicleta limpia. Retire la suciedad con un
paño húmedo. Guárdela b ajo techo, en un lugar seco y
sombreado. No la exponga demasiado tiempo aalta humedad ni atemperaturas extremas. Antes de guardarla
durante el inverno, trátela con un agente anticorrosivo e
ine los neumáticos al máximo indicado en la cubier ta. El
fabricante no se hace responsable por daños derivados
de un mantenimiento inadecuado, manipulaciones no
profesionales, alteraciones propias ouso indebido.
El producto cumple con las normas pertinentes de la UE
(ČSN EN 71-1, ČSN EN 71-3) y ha obtenido certicados de
calidad y seguridad por parte del principal instituto de
pruebas de la República Checa (Strojírenský zkušební
ústav, s. p.), y del internacionalmente reconocido TÜV
SÜD Czech s. r.o.
Fabricante: Intrea-Piko, s.r.o., Sasanková 2657/2, 10600
Praga 10, República Checa
EJERCICIO DEL DERECHO A RECLAMO
Disposiciones generales: El contenido, alcance y duración del derecho areclamo del comprador se rigen
por las normas legales vigentes en la República Checa; en particular, las disposiciones pertinentes del
Código Civil (Ley nro. 89/2012) y la Ley de Protección al Consumidor (Ley nro. 634/1992). Los derechos del
comprador en el sentido de estas normas legales no son afectados por el presente documento, ni por la
información contenida en el mismo.
Plazo para ejercer el derecho areclamo: El comprador puede ejercer su derecho areclamo por defectos
en las bicicletas Yadoo (en adelante, producto) recientemente adquiridas por un periodo de 24 meses
apartir de su recepción. Cuando el comprador presenta un reclamo legítimo por defectos en el producto,
el periodo para ejercer el derecho areclamo dejará de correr por el tiempo durante el cual el comprador no
pueda utilizar el producto.
Cómo ejercer el derecho areclamo: El derecho areclamo puede ser ejercido para el producto que el
comprador ha comprado (ver detalles más abajo). Al presentar un reclamo, recomendamos adjuntar este
documento, la factura del producto y la bicicleta libre de suciedad. El vendedor entregará al comprador un
certicado por escrito de la recepción del reclamo ode los arreglos efectuados.
Términos de la validez del derecho areclamo: Al armar la bicicleta, deben seguirse los pasos de las instrucciones de montaje. La bicicleta debe ser utilizada únicamente para el propósito para el que fue producida.
La bicicleta debe ser guardada y mantenida de acuerdo con las instrucciones proporcionadas por el fabricante. El fabricante no se hará responsable por averías causadas como resultado de un montaje inadecuado,
opor el uso indebido de la bicicleta.
Modelo de bicicleta:
Número de serie del
marco:
Vendedor:
Vendedor:
Sello y rm a:
26 27
Page 15

FR
Nous vous recommandons de coner
le montage, le réglage et l’entretien
régulier du produit à un atelier spécialisé.
Toute intervention par une personne
non qualiée pourrait endommager la
draisienne ou occasionner un accident aux
conséquences graves pour la santé.
Si vous êtes un peu bricoleur, vous
n’aurez aucun probléme à monter la
CONTENU DU CARTONINTRODUCTION
draisienne en suivant nos instructions.
Merci de nous faire parvenir vos questions, remarques et
suggestions d'amélioration concernant nos produits par
e-mail à : info@yedoo.eu.
Pour davantage d’informations sur le monde des draisiennes et la liste
des distributeurs : www.yedoo.eu.
OUTILS NÉCESSAIRES
5 mm
28 29
14 m m
Page 16

FR
Instructions d‘assemblage
Avant le montage, ôt ez les caches en
plastiq ue des axes des roue s avant et arrière.
Installation du guidon et de
la fourc he avant : ôtez le cache
de la bague de la fourche de la
roue avant, la bague elle-même et
l’anneau supérieur du jeu de direction. Au montage, la structure du
jeu de direction doit être respectée
– voir image.
Installation de la selle : insérez
le tube de la selle dans le cadre de
la draisienne (1), réglez la selle à la
hauteur voulue (max. jusqu’au trait)
et vissez (2).
Pour nir, gonez les pneus conformément aux valeurs indiquées sur
le côté du pneu (idéalement entre
1,3 et 1,8 bars).
Insérer la fourche avant dans la
direction du cadre (1) de manière
à ce que la légère courbure de la
fourche soit orientée vers l’avant.
Repositionnez sur la fourche l’anneau supérieur du jeu de direction (2)
et la bague (3).
Réglage des leviers de frein
(uniquement draisienne FIFTYB) : réglez la bonne inclination
des leviers de frein à l’aide du
boulon sur la bague (1).
Bonne inclinati on des leviers de f rein
: faites ass eoir l’enfant sur la d raisienne,
mains sur le g uidon et doigts t endus dans le
prolongement de la main. Réglez les leviers
de frein da ns cette positio n.
Placez la vis de la bague dans
l’encoche du tube de la fourche
conformément à l’image.
Réglage des fre ins : vériez que,
lors du freinage, toute la surface
des tampons des freins touche bien
le côté de la jante. Vous pouvez
modier leur positionnement à
l’aide des boulons (1). Les tampons
ne doivent pas toucher le pneu.
Enlez le cache de la bague sur
la tige du guidon (1) et insérez
celle-ci dans le tube de la fourche
(2). Réglez le guidon à la hauteur
voulue (max. jusqu’au trait) et
vissez(3).
Vériez que, quand vous lâchez les
freins, les tampons soient susamment éloignés de la jante (1-2 mm).
Vous pouvez modier l’éloignement des tampons en resserrant
ou desserrant le câble de frein au
niveau du boulon du câble (2).
Pour nir, recouvrez la bague du
cache de protection.
Si, lorsque vous tournez, le vélo
eeure à un endroit les blocs de
frein, modiez symétriquement
l'éloignement des plongeurs à l’aide
des boulons-tenseurs (3).
Installation des protections:
attachez sur la potence du guidon
la protection souple en nylon
lavable.
Positionnez l’extrémité du câble de
frein de manière à ce qu’il ne gêne
pas l’enfant.
30 31
Page 17

FR
RECOMMANDATIONS DE
SÉCURITÉ
La draisienne que vous avez reçue est conçue pour
être utilisée de jour, dans des espaces destinés à la
pratique du sport et aux loisirs.
Pour une utilisation sur route ou de nuit, vous
devez l’équiper d’accessoires de sécurité (lumières,
catadioptres etc.) conformément aux prescriptions
en vigueur dans votre pays. Veillez à ce que les
enfants respectent le code de la route ainsi que les
autres principes de sécurité à suivre, et utilisent des
protections (casque, protections pour les genoux et
les coudes, chaussures fermes etc.).
Avant chaque utilisation, vériez le bon fonctionnement des freins et l’état général de la draisienne.
Vériez que le poids maximum autorisé ne soit pas
dépassé (le poids maximum autorisé est indiqué sur
la page de couverture).
Tous les dispositifs réduisant la vitesse (tampons de
frein, pneus etc.) chauent pendant l’utilisation; ne
les touchez pas tant qu’ils n’ont pas refroidi!
INSTRUCTIONS
D’UTILISATION
Un enfant devrait toujours être sous la surveillance
d'un adulte, lorsqu’il est sur sa draisienne. Il devrait
également toujours garder les deux mains sur le
guidon, lorsqu’il roule. Une fois qu’il s’est assis sur sa
machine et qu’il atrouvé son équilibre, il doit pousser
en alternance sur les pédales comme s'il courait ou
marchait rapidement. AT TENTION: l’enfant peut atteindre une vitesse importante sur sa draisienne; avant la
première utilisation, il faut donc que le parent, ou la
personne qui l’a en charge, lui explique les risques potentiels et lui apprenne à freiner. Pour freiner, l’enfant
doit serrer le levier de frein au niveau du guidon ou
ralentir en frottant les semelles de ses chaussures sur
le sol / en freinant avec les pieds. ATTENTION: freiner
brutalement peut entraîner une chute.
ENTRETIEN
Un entretien correct accroît la sécurité et prolonge la
durée de vie de la draisienne achetée. Resserrez donc
régulièrement les vis, vériez la pression des pneus
et graissez les parties mobiles (roulements des roues
et du guidon, pivots des leviers de frein, étriers des
freins, câbles des freins, etc.).
Faîtes attention toutefois à ce que du lubriant ne se
retrouve pas sur les pneus ou les plaquettes de frein,
cela réduirait leur per formance ! Si cela se produit,
nettoyez les parties touchées en appliquant par
exemple de la benzine.
Vériez régulièrement la hauteur des crampons des
pneus ; si nécessaire, changez les pneus, mais prenez
des pneus conformes.
Vériez l’état des vis autoserrantes (si elles se dévissent toutes seules en cours d’utilisation, changez-
-les).
Vériez régulièrement les rayons des roues ; une
tension inégale peut entraîner la rupture des rayons
ou le décentrage de la roue.
Conservez propre la draisienne et nettoyez-la à l’aide
d’un chion humidié. Rangez-la dans un endroit sec
et à l’abri de la lumière, ne la laissez pas durablement
exposée à une humidité élevée ou des températures extrêmes. Avant de la ranger pendant l’hiver,
protégez-la à l’aide d’un produit antirouille et gonez
les pneus à la valeur maximum indiquée sur le côté.
Le constructeur ne saurait être tenu responsable pour
des dommages qui ne seraient dûs qu’à un mauvais
entretien, à une intervention non qualiée, à des
modications apportées par le propriétaire, ou à une
mauvaise utilisation de la draisienne.
Le produit est conforme aux normes de l’UE (ČSN EN
71-1, ČSN EN 71-3) ; sa qualité et sa sécurité ont été
certiées par le principal laboratoire tchèque d’essai
(Strojírenský zkušební ústav, s. p.) et par un organisme
de certication de renommée internationale (TUV
SUD Czech s. r. o.).
Constructeur : Intrea-Piko, s. r. o., Sasanková 2657/2,
10600 Prague 10, République tchèque
VOS DROITS EN CAS DE VICE
DE FABRICATION
Dispositions générales : la teneur, l’étendue et la durée des droits de l’acheteur en cas de vice de fabrication relèvent du droit tchèque et en particulier des dispositions correspondantes du code civil (loi n°
89/2012 Sb.) et de la loi sur la protection des consommateurs (loi n° 634/1992 Sb.). Ni le présent document
ni les informations qu’il contient ne s’opposent d’une quelconque manière aux droits de l’acheteur au sens
desdites dispositions.
Délai de prescription des droits de l’acheteur en cas de vice de fabrication : l’acheteur peut exercer ses
droits en cas de vice de fabrication constatée sur une draisienne Yedoo venant d’être achetée (ci-après la
« marchandise ») dans les 24 mois suivant la réception de son achat. Lorsque la réclamation de l’acheteur
est légitime, la prescription est suspendue durant tout le temps où l’acheteur ne peut pas avoir usage de la
marchandise.
Mode d’exercice de ces droits : en cas de vice de fabrication, l’acheteur doit faire valoir ses droits auprès
du vendeur auquel il aacheté la marchandise (voir informations ci-après). Nous lui recommandons de
présenter au vendeur le présent document, l’acte d’achat et la draisienne intégralement nettoyée. Le
vendeur établit un document conrmant à l’acheteur l’acceptation de sa réclamation ou éventuellement
conrmant la réparation eectuée.
Conditions de validité de ces droits : lors du montage de la draisienne, les instructions du guide doivent
être respectées. La draisienne doit être utilisée exclusivement pour l’usage pour lequel elle aété fabriquée.
Elle doit être rangée et entretenue conformément aux instructions fournies par le constructeur. Les défauts
de la draisienne qui ne serait dûs qu’à un mauvais montage ou à une mauvaise utilisation, en contradiction
avec le manuel d’utilisation, ne relèvent pas de la responsabilité du constructeur.
Modèle de draisienne:
Numéro de fabrication du cadre:
Date de la vente:
Vendeur:
Cachet et signature:
32 33
Page 18

HU
Aszerelést, beállítást és arendszeres
karbantartást ajánlott kerékpár
szakszervizben elvégeztetni. Aszaksze
rűtlen beavatkozások afutókerékpár
meghibásodását okozhatják
vagybalesethez vezethenek, amelysúlyos
egészségkárosodással jáhat.
Ha van műszaki érzéke, ne ijedjen
meg afeladattól, fogjon hozzá bátran
A CSOMAG TARTALMABEVEZETŐ
aszereléshez velünk együtt.
Kérdéseit, észrevételeit és termékeinkkel kapcsolatos újító
javaslatait az alábbi e-mail címre szíveskedjék küldeni:
info@yedoo.eu.
Afutókerékpárok világáról bővebb információkat és aforgalmazók
névsorát itt találja www.yedoo.eu.
SZÜKSÉGES SZERSZÁMOK
5 mm
34 35
14 m m
Page 19

HU
SZERELÉSI ÚTMUTATÓ
Összeszerel és előtt távolít sa el az első
és ahátsó ke rék tengelyérő l aműanyag
burkolatot!
Akormány és a z első villa fe lszerelése: vegye le az első kerék
villájáról abilincs burkolatát, magát
abilincset és akormánycsapágy felső
gyűrűjét! Akormánycsapágy összeállítását szereléskor be kell tar tani,
lásd az ábrát.
Az ülés felszerelése: tolja be anyereg csövét afutókerékpár vázába
(1), állítsa be anyereg kívánt magas-
ságát (max. amegjelölt vonalig), és
húzza meg abilincs csavarját (2).
Végül fújja fel agumiabroncsokat,
aköpeny oldalán megjelölt értékeknek megfelelően (az ideális 1,3 és
1,8 bar között)!
Tolja be az első villát aváz homlokcsövébe (1) úgy, hogy avilla enyhe
hajlata előre nézzen! Helyezze
vissza /húzza rá/ avillára aakormánycsapágy felső gyűrűjét (2) és
abilincset (3).
Afékkarok beállítása (csak
aFIFTY B futókerékpárnál): Állít-
sa be afékkarok megfelelő szögét,
abilincsen található rögzítőcsavar
segítségével (1).
Afékkarok hel yes szöge: ültess e fel agyermeket af utókerékpár ra, tetesse akezét
akormányr a és nyújtassa ki a z ujjait, úgy,
hogy azo k akéz vonalát foly tassák! Állít sa
afékka rt ebbe ahelyz etbe!
Abilincs csavarját helyezze avilla
csövének kivágására, pontosan az
ábra szerint!
Afék beállítása: ellenőrizze, hogy
afékpofák fékezéskor teljes felületükkel rásimulnak-e afelni oldalára!
Helyzetük csavarok (1) segítségével
állítható. Afékpofák nem érintkezhetnek agumiköpennyel
Húzza rá akormányrúdra abilincs
burkolatát (1) és tolja be avilla
csövébe (2)! Állítsa be akormány kívánt magasságát (max. amegjelölt
vonalig), és húzza meg abilincs
csavarját (3).
Ellenőrizze, hogy afékpofák afékkar kiengedésekor megfelelő távolságba kerülnek-e afelnitől (1-2 mm)!
Afékpofák távolsága afékhuzal
meghúzásával vagy kiengedésével
állítható arögzítő csavarban (2)
Végül helyezze fel abilincsre
avédőburkolatot!
Ha akerék forgás közben valahol
éri afékpofákat, afékkengyelek
távolságát afeszítő csavarokkal (3)
állítsa be szimmetrikusan.
Avédőburkolat fe lszerelése:
helyezze fel amosható nylonból
készült puha védőburkolatot akormányszárra!
Afékhuzal végét hajtsa be, úgy,
hogy agyermeket ne akadályozza
aközlekedésben!
36 37
Page 20

HU
BIZTONSÁGI
AJÁNLÁSOK
Az alapfelszerelésű futókerékpár nappali fény melletti
használatra alkalmas, sport-és szabadidős tevékenységekre szolgáló terekben.
Közúton és sötétben történő használatra fel kell szerelni biztonsági berendezésekkel (lámpák, fényvisszaverők, stb.), az Ön országában alkalmazandó jogszabályoknak megfelelően. Ügyeljen arra, hogy agyermekek
betartsák abiztonságos vezetés és aközúti közlekedés
szabályait, valamint használjanak védőfelszerelést
(sisak, térd-és könyökvédő, erős cipő, stb.)!
Minden használat előt t ellenőrizze afékek működőképességét és afutókerékpár általános műszaki állapotát!
Ügyeljen, hogy ne lépjék túl amaximális terhelést
(afutókerékpár teherbírása anyitóoldalon szerepel)!
Használat közben asebességet csökkentő valamennyi
mechanizmus (fékpofák, felnik, gumiabroncsok, stb.)
melegszik. Ne fogja meg ezeket, amíg ki nem hűltek!
VEZETÉSI
ÚTMUTATÓ
Gyermekek csak felnőt t felügyelete mellett használhatják afutókerékpárt. Fontos, hogy menet közben
agyermek mindkét kezét mindig akormányon tartsa.
Miközben ül, és fenntartja az egyensúlyt, mindkét
lábával felváltva löki magát, mint futásnál vagy gyors
gyaloglásnál.
FIGYELEM: agyermek, afutókerékpárral jelentős
sebességet érhet el, ezért, az első használat előt t,
szüleinek, illetőleg afelelős személynek megfelelően
ki kell oktatnia őt alehetséges veszélyekről és afékezés
módjáról. Fékezéshez agyermek szorítsa meg afékkart
akormányon, vagy cipője talpának atalajhoz dörzsölésével lassítson/fékezzen lábbal!
FIGYELEM: Ahir telen fékezéstől eleshet.
KARBANTARTÁS
Amegfelelő karbantartás növeli abiztonságot, és
meghossz abbítja amegvásárolt futókerékpár élettartamát. Ezért rendszeresen húzza meg acsavarkötéseket, ellenőrizze az abroncsnyomást és kenje amozgó
alkatrészeket (kerékcsapágyak és kormánycsapágy,
fékkar-csapok, fékkengyelek, fékhuzal, stb.)!
Vigyáz zon azonban, hogy akenőanyag ne kerüljön
afelnire vagy afékpofákra! Azsír csökkenti afékhatást!
Ha ez megtörténik, zsírtalanítsa aszennyezett területeket, pl. benzinnel!
Rendszeresen ellenőrizze agumiabroncsok mintázatának magasságát, szükség esetén cserélje ki agumiabroncsokat azonos minőségű új abroncsokra!
Ellenőrizze az önzáró anyák állapotát (ha menet
közben maguktól kilazulnak, cserélje újakra azokat)!
Rendszeresen ellenőrizze aküllőket! Az egyenetlen feszítettségtől elpattanhatnak, vagy akerék „nyolcast kap”.
Tartsa tisztán afutókerékpárt, aszennyeződéseket
nedves ruhával törölje le! Tárolja zárt, száraz és árnyékos helyen, tartósan ne tegye ki magas páratartalomnak vagy szélsőséges hőmérsékletnek! Mielőtt
télre leállítja, kezelje korrózióvédő szerrel és fújja fel
agumiabroncsokat aköpeny oldalán megjelölt maximális értékre! Agyártó nem vállal felelősséget olyan
károkért, amelyek kizárólag akarbantartás hiánya,
szakszerűtlen beavatkozás, saját kezű módosítás vagy
rossz bánásmód miatt keletkeztek.
Atermék megfelel avonatkozó EU szabványoknak
(ČSN /Cseh Állami Szabvány/ EN 71-1, ČSN EN 71-3),
valamint avezető cseh vizsgálóintézettől (Strojírenský
zkušební ústav, s. p./Gépészeti Vizsgálóintézet Állami
Vállalat), de anemzetközileg elismert TÜV SÜD Czech
s. r. o. /Kft /-től is minőségi és biztonsági tanúsítványt
szerzett.
Gyártó: Intrea-Piko, s. r. o., Sasanková 2657/2,
10600 Praha 10, Cseh Köztársaság
VOS DROITS EN CAS DE VICE
DE FABRICATION
Általános rendelkezések: Avevő hibás teljesítésből adódó jogos igényeinek tartalmát, kiterjedését és
időtartamát aaCseh Köztársaságban érvényes törvények szabályozzák, különösen pedig aPolgári Törvénykönyv (89/2012 Sb. sz. törvény), valamint afogyasztóvédelmi törvény (634/1992 Sb. sz.) vonatkozó rendelkezései. Avevő jogait, e rendelkezések értelmében, e dokumentum, sem abenne szereplő információk
semmilyen módon nem érintik.
Hibás teljesítésből adódó jogos igények érvényesítésének időtartama: Újonnan vásárolt Yedoo futókerékpár (atovábbiakban áru) esetében, ahibából eredő jogos igényét avevő az áru átvételétől számított
24 hónapon belül érvényesítheti. Ha avevő jogosan kifogásolja az áru hibáját, ahibás teljesítésből származó jogos igények érvényesítésére megszabott idő futása addig szünetel, amíg avevő nem tudja használni
az árut.
Ahibás teljesítésből adódó jogos igények érvényesítésének módja: Ahibás teljesítésből adódó jogos
igényeket annál akereskedőnél kell érvényesíteni, akitől avásárló az árut vásárolta (az adatokat lásd
alább). Az áruhibák érvényesítésekor javasoljuk bemutatni e dokumentumot, avásárlást igazoló bizonylatot és aszennyeződésektől teljesen megtisztított futókerékpárt. Ahibás teljesítésből adódó jogos igények
érvényesítéséről, illetve ajavítás elvégzéséről akereskedő avevő számára írásos igazolást állít ki.
Hibás teljesítésből adódó jogos igények időtartamának feltételei: Afutókerékpár összeszerelésénél be
kell tartani aszerelési útmutató utasításait. Afutókerékpárt kizárólag rendeltetésszerűen szabad használni.
Afutókerékpárt agyártó utasításai szerint kell tárolni és karbantartani. Akizárólag helytelen szerelés vagy
afutókerékpár használati utasításával ellentétes használata miatt felmerülő hibákra agyártó felelőssége
nem vonatkozik.
Afutókerékpár:
Aváz gyártási száma:
Az értékesítés:
Kereskedő:
Bélyegző és aláírás:
38 39
Page 21

IT
Consigliamo di adare il montaggio,
l’assemblaggio dei vari componenti e la
manutenzione regolare della bicicletta senza
pedali aun meccanico di biciclette professionista.
Gli interventi eettuati da non professionisti
possono causare il danneggiamento della
bicicletta senza pedali oincidenti con serie
conseguenze per la salute.
Se pensate di avere una buona manualità,
CONTENUTO DELLA CONFEZIONEINTRODUZIONE
non abbiate paura e procedete con il
montaggio insieme anoi.
Vi preghiamo di mandare questioni, commenti e osservazioni volte
al miglioramento del nostro prodotto all’indirizzo mail:
info@yedoo.eu.
Troverete maggiori informazioni sul mondo dei monopattini e l’elenco
dei distributori sul sito www.yedoo.eu.
ATTREZZI NECESSARI
5 mm
40 41
14 m m
Page 22

IT
ISTRUZIONI PER IL MONTAGGIO
Prima del montaggio bisogna togliere
la coper tura protetti va di plastica dal l´a sse
della ruota anteriore e posteriore.
Installazione del manubrio e forcella anteriore: togliete la cop ertura
protettiva dal manicotto della forcella
anteriore, togliete il manicotto stesso
acerchiet to superiore dell o headset. Durante l´installazione bisogna rispettare
la composizione dello headset secondo
l´illustrazione.
Istallazione del sellino: inserite
il tubo del sellino nel telaio della
bicicletta senza pedali (1), impostate l'altezza desiderata del sellino
(al massimo della linea segnata)
eserrate la vite sul manicotto (2).
Gonate ipneumatici secondo
ivalori dati sul lato del copertone
(idealmente tra 1,3 – 1,8 bar).
Inserite la forcella anteriore nella
parte principale del tubo telaio (1)
in modo che ci sia un leggero incurvamento della forcella, questa deve
essere rivolta in avanti. Inlate il
cerchietto superiore dello heasdset
(2) e il manicotto (3) sulla forcella.
Regolazione delle leve dei freni
(solo per la bicicletta senz a
pedali FIFTY B): Impostate le
leve dei freni in pendenza corretta
utilizzando le levette di ssaggio sul
manicotto (1).
Pendenza corretta delle leve dei freni:
quando il b ambino è seduto sul la bicicletta
senza p edali, bisogna f argli mettere l e mani
sul manubr io e allungare le di ta in modo che
si allungh i la linea della sua ma no. Impostate
la leva del f reno in questa p osizione.
Impostate la vite del manicotto sul
taglio del tubo della forcella esattamente secondo l´ilustrazione.
Regolazione dei freni: Controllate
se iceppi dei freni in frenata coinvolgono tutta la supercie sul lato
del cerchio. La loro posizione può
essere regolata con le viti (1). Iceppi
non devono toccare il copertone.
Inlate la copertura dell manicotto (1) sull´asta del manubrio e
inseritela nell tubo della forcella (2).
Impostate l'altezza desiderata del
manubrio (al massimo della linea
segnata) e stringete e avvitate il
palo sul manubrio (3).
Si assicuri che iceppi si allontanino
dal cerchione sucientemente
quando si smettano di premere
(1-2 mm). La distanza dei ceppi può
essere regolata stringendo oallentando il cavo del freno nel bullone
di ancoraggio (2).
Alla ne mettete il coperto protettivo sul manicotto.
Se la ruota, quando si gira, sbarra
sul ceppo del freno in qualsiasi
posto, bisogna sistemare simmetricamante la distanza del braccio del
freno usando il tenditore avite (3).
Installazione di imbottitura:
ssate sullo stem del manubrio il
coperchio morbido protettivo dal
nylon lavabile.
Fine del cavo del freno piegate in
modo che non ostacoli la corsa del
bambino.
42 43
Page 23

IT
MISURE DI
SICUREZZA
La bicicletta senza pedali con le sue attrezzature di base
è stata ideata per essere usata alla luce del giorno in
spazi ricreativi adibiti allo sport e ricreazione.
Per andare sulle grandi vie di comunicazione oal buio
dovrete munirla di determinati componenti di sicurezza
(lucette, catarifrangenti, ecc.) in conformità alle prescrizioni in vigore nel vostro paese. State attenti che il vostro
bambino rispetti le regole principali della circolazione
stradale, le norme di sicurezza e usate le protezioni idonee (casco, ginocchiere e paragomiti, scarpe solide ecc.).
Prima di ogni cor sa controllate il funzionamento dei
freni e le condizioni complessive della bicicletta senza
pedali dal punto di vista tecnico. Non sup erate il suo
limite di carico (la sua por tata massima è indicata sulla
pagina introduttiva).
Tutti imeccanismi adibiti alla riduzione della velocità
(pastiglie dei freni ofreni adisco circolari, cerchioni,
pneumatici e cc), durante il loro uso si surriscaldano,
perciò non to ccateli nché non si rareddano!
ISTRUZIONI PER
LA CORSA
Ibambini possono usare la biciclet ta senza pedali soltanto sotto la supervisione di un adulto. E’ impor tante
che durante la guida il bambino aerri sempre le manig lie con entramb e le mani. Una volta seduto e bilanciato,
il bambino deve spingere ipiedi alternativamente come
quando si corre ocammina veloce.
ATTENZIONE: Ibambini possono sviluppare una velocità
considerevole, perciò dovrebbero essere correttamente
istruiti dalla persona reponsabile sui possibili pericoli
e metodi di frenamento. Dopo aver frenato il bambino
deve premere la leva del freno sul manubrio e non freni
nel modo che rallenti sfregando con le scarpe per terra.
MANUTENZIONE
La manutenzione corretta e regolare della vostra bicicletta senza pedali aumenta la sua sicurezza e ne prolunga
la durata. Per questo motivo s tringete regolarmente le
viti, controllate lo stato della leva di bloccaggio rapido,
la pressione dei pneumatici e lubricate le parti mobili
(idischetti delle ruote e del manubrio, idadi delle leve
dei freni, ire lativi ceppi, il cavo dei freni ecc.).
Fate però attenzione che il lubricante non raggiunga
icerchioni pas tiglie odischi dei freni. Il grasso ostacola la
loro funzione! Se ciò accade, togliete il grasso dalle parti
unte, ad esempio con solventi osgrassanti.
Controllate regolarmente lo spessore delle scanalature
sul copertone della ruota, in caso di bisogno cambiate il
copertone con uno nuovo dai parametri adeguati.
Controllate le condizioni dei dadi autobloccanti (se
durante la corsa si allentano, cambiateli con dei nuovi).
Controllate regolarmente l’intelaiatura delle ruote, la
tensione non uniforme dei raggi dell’intelaiatura può
causare la loro rottura ola deformazione delle ruote.
Mantenete la bicicletta senza pedali pulita stronando
lo sporco con un panno umido. Tenetela al coperto in
un posto asciutto e ombreggiato, non tenetela esposta
per lungo tempo in ambienti con alto tasso di umidità
oatemperature estreme. In vista dell’inverno applicategli anticorrosivi e gonate ipneumatici no al valore
massimo indicato sul lato del copertone. Il produt tore
non è responsabile per danni risultati dalla manutenzione trascurata, intervento non specializzato, propria
modica otrattamento male.
Questo prodotto è ai sensi delle direttive EU (ČSN EN 711, ČSN EN 71-3) e ha ottenuto diversi cer ticati di qualità
e di sicurezza dai principali laboratori di prova cechi
(Strojírenský zkušební ústav, s. p.) e anche dal TÜV SÜD
Czech s. r. o., riconosciuto alivello interna zionale
Casa produttrice: Intrea-Piko, s. r. o., Sasanková 2657/2,
10600 Praha 10, Repubblica Ceca
GARANZIA
Regulazioni generali: Norme generali: Il contenuto, prolungazione e durata della garanzia ricade sotto il
codice giuridico valido nel paese dell´acquisto dela bicicletta senza pedali.
Periodo della garanzia: L´acquirente di bicicletta senza pedali Yedoo nuova (prodotta) può applicare la
garanzia durante il periodo di 24 mesi apartire dal giorno in cui è avvenuta la vendita del prodotto al consumatore nale e viene automaticamente prolungata nel tempo in cui il monopattino subisce riparazioni
coperte dalla garanzia.
Applicazione della garanzia: La garanzia diventa eettiva solamente presso il rivenditore dal quale è
stato acquistato il prodotto (vedi sotto). Per avvalersi della garanzia devono essere presentati il certicato
di garanzia correttamente compilato e il monopattino ben pulito in tutte le sue componenti. Il venditore
darà una conferma scritta all'acquirente per quanto riguardal'accettazione del prodotto nel processo di
garanzia.
Condizioni della garanzia: Il prodotto deve essere costruito secondo le istruzioni nel manuale. Iprodotti
devono essere usati esclusivemente per lo scopo alo quale sono stati concepiti. Il prodotto deve essere
conservato in buono stato e mantenuto secondo le istruzioni indicate dal manuale. garanzia non si riferisce
aI guasti che avvengono per l’uso frequente del monopattino. Il produttore non copre il danneggiamento
causato di montaggio incorretto odell´usanza in contradizione con il manuale delle istruzioni.
Modello del prodotto:
Numero di produzione
del telaio:
Data di vendita:
Rivenditore:
Timbro e rma:
ATTENZIONE: una frenata violenta può causare caduta.
44 45
Page 24

NL
Wij raden uaan deze loopets te
laten monteren en regelmatig te laten
controleren door een professionele
etsenmaker. Ondeskundige montage
kan leiden tot schade aan de loopets of
ernstige ongevallen.
Als je zelf een ervaren technicus bent,
kun je de loopets zelf monterenmet
behulp van deze montagehandleiding.
INHOUD VAN DE VERPAKKINGINTRODUCTIE
Als unog ideeën of opmerkingen heeft, feedback of tips,
aarzel dan niet om met ons contact op te nemen via ons
e-mailadres: info@yedoo.eu.
Meer informatie over Yedoo steppen en verkoopadressen kunt
uvinden via www.yedoo.eu.
BENODIGD GEREEDSCHAP
5 mm
46 47
14 m m
Page 25

NL
MONTAGE INSTRUCTIE
Voor het monteren e erst de plastic
beschermkapjes van de wielassen afhalen.
Montage van voorvork: Verwijder
het verpakkingsmateriaal en haal het
‘headset ‘ van de bovenkant van de
vork af. Let op dat de volgorde van
de onderdelen hetzelfde is als op
illustratie 1.
Zadel montage: stop de zadelpen
in het frame (1) van de loopets,
stel de juiste hoogte af (let op, niet
de maximum hoogte overschrijden)
en draai de sluitbout goed aan (2).
Daarna de banden goed oppompen
(tussen 1,3 en 1,8 bar).
Plaats de vork in het balhoofd (1)
van de loopets. Let op dat de
voorvork naar voren gebogen is.
Plaats de bovenste ring (2) en klem
(3) op de vork.
Afstellen van remgrepen (alleen
FIFTY B): plaats de remgrepen in
de juiste hellinghoek door de bout
aan de onderkant van de remgreep
iets los te draaien (1). Najuiste
plaatsing kan de bout weer worden
vastgedraaid.
De juiste hellin g: Laat het kind zi tten
op de loopets. Houd de handgrepen vast
en strek j e vingers op een ma nier dat je
arm en de vin gers een rechte l ijn vormen.
Dit zou de ju iste positie van d e remhendels
moeten zijn.
Zorg dat de klem op dezelfde
manier is gemonteerd is als op
illustratie 3.
Afstellen van de remmen: Druk
de beide remarmen van de V-brake
in de richting van de velg van het
wiel en stel met de juiste sleutel de
remblokjes zo af dat ze bij het remmen met hun hele remoppervlak
tegen de zijkant van de velg wrijven
(1). De remschoen (remblok) hoort
de band niet te raken.
Schuif het stuur in het beschermkapje (1) en schuif het geheel in het
balhoofd (2). Stel de juiste hoogte
af en draai de bout goed aan (3).
Controleer of de afstand tussen de
velg en het remblokje ca 1-2 mm is
nahet loslaten van de remgrepen.
De afstand kan worden aangepast
door het aandraaien of losdraaien
van de remkabel aan het ankerschroef (2).
Als laatste, druk het kapje naar
beneden over de klem.
Als het wiel niet vrij kan draaien en
“afremt” aan een kant, kan dit bijge steld worden door het aandraaien
van de stelschroef op de arm van de
V-brake die het wiel “afremt” (3).
Beschermhoesje plaatsen: Plaats
het beschermhoesje over het stuur.
Buig het uiteinde van de remkabel
naar achteren zodat het kind er
geen last van heeft tijdens het
rijden.
48 49
Page 26

NL
VEILIGHEIDSMAATREGELEN
Deze loopets is ontworpen voor het rijden bij daglicht
op verharde paden. Voor wegen met autoverkeer of voor
het rijden in het donker, moet de loopets voorzien zijn
van veiligheidsvoorzieningen (verlichting, reectoren,
enz.) in overeenstemming met de voorschriften die geldig zijn in uw land. Besteed aandacht aan de algemene
veiligheidsvoorschriften en het gebruik van beschermende accessoires (ukunt dan denken aan helm, k nie-
-en elleboogbeschermers, goede schoenen, enz.)
Controleer voor iedere rit altijd of de remmen goed werken en de algemene technische staat van de loopets.
Overschrijd nooit het maximale laadvermogen van de
step (zoals vermeld op de vo orzijde). Deze loopets is
ontworpen voor het gebruik van maximaal één kind per
keer! Overbelast de loopets niet, deze loopets is niet
gemaakt om mee te springen of te stunten.
Alle remonderdelen (remblokken, velgen, banden en
schijfremmen) kunnen warm worden bij gebruik en da arom is het niet aan te raden om ze aan te raken voordat
ze afgekoeld zijn.
GEBRUIK
INSTRUCTIES
Kinderen kunnen het beste de loopets gebruiken onder
toezicht van volwassenen. Het is belangrijk tijdens
het gebruik dat het kind tijdens het rijden met beide
handen het stuur vast houdt. Terwijl het op de loopets
zit beweegt het kind 1 of beide benen om vooruit te
komen.
WAARSCHUWING: tijdens het rijden kan het kind e en
hoge snelheid bereiken. Het kind moet daarom vooraf
door een volwassenen geleerd worden hoe het moet re mmen. Remmen kan met de handrem of met de voeten
op de ondergrond.
WAARSCHUWING: accuut remmen kan letsel veroorzaken.
ONDERHOUD
Correct en regelmatig onderhoud verhoogt zowel de
veiligheid als levensduur van uw loopets. Dus check
regelmatig de bouten en moeren, snelspanners, de druk
in de banden en smeer de bewegende delen (wielen,
lagers, stuur lagers, kabels, remdelen, etc.). Zorg dat er
geen smeermiddel komt op de velgen of remblok ken.
Vet verminder t hun eect!
Wanneer deze situatie zich vo ordoet, is het noodzakelijk
om het vet te verwijderen, bijvoorbeeld met wasbenzine.
Controleer ook regelmatig het loopvlak van de banden.
En indien nodig, vervang ze als ze versleten zijn door
dezelfde type banden.
Inspecteer de zelfborgende moeren. Als ze uitzichzelf los
gaan, vervang ze dan voor nieuwe.
Controleer de spaken ook. Onregelmatige spanningen
in spaken kan k raken veroorzaken of k an het wiel wiebelend maken.
Houd uw loopets schoon, bij viezigheid poetsen met
een vochtige doek. De loopets moet binnen worden
opgeslagen, op een droge en schaduwrijke plaats. Stel
de loopets niet bloot aan een hoge luchtvochtigheid of
extreme temperaturen gedurende een langere periode
van tijd. Vóór de winter, extra behandelen met vaseline
tegen corrosie en pomp de banden op zijn maximale
waarde zoals vermeld op de zijkant van de band. De
producent vergoed geen schade bij aanwijsbaar slecht
onderhoud, slechte montage of corrosie door vochtige
stalling.
Alle steppen, loopetsen en kinderetsen voldoen aan
de desbetreende EU-normen (ČSN EN 71-1, ČSN EN
71-3) en zijn gecerticeerd door de volgende testlaboratoria: Techniek Test Instituut (Strojírenský zkušební ústav,
sp), Technisch en Test Instituut voor Techniek Praag (Tzus
Praha, sp) – collega instituut ZÚLP in Ceske Budejovice,
en TÜV SÜD Czech sro.
Producent: Intrea-Piko, s. r. o., Sasanková 2657/2, 10600
Praha 10, Tsjechische Republiek
GARANTIE LIJST
Algemene garantie: De inhoud van de garantieregeling kan per land verschillen. Informeer naar de
wettelijke regels in het land van aankoop.
Garantie periode: De producent van Yedoo steppen en loopetsen, biedt de garantie van 24 maanden
voor het frame en onderdelen. De garantie wordt gerekend vanaf de dag van de verkoop aan de eindverbruiker en wordt automatisch verlengd wanneer het product in reparatie wordt genomen tijdens de
garantieperiode.
Garantie verlening: Meldt een probleem altijd bij uw verkoper, hij neemt contact op met Yedoo om het
probleem op te lossen. Vul onderstaand formulier in, lever een digitale foto aan van het probleem en een
scan van de aankoopbon met datum.
Garantie condities: Het product moet gemonteerd zijn volgens de montagehandleiding. Het product
wordt alleen gebruikt waar het voor bedoeld is. Sla het op en onderhoudt het zoals aangegeven in de
instructie. Schade veroorzaakt door tegelijkertijd gebruik van meerdere personen op een step valt niet onder de garantie. De producent heeft geen betrekking op schade veroorzaakt door achterstallig onderhoud,
niet-adequate reparaties, extreem gebruik en overbelasting, of ongepaste behandeling en opslag.
Product model:
Serienummer
van het frame:
Datum van aankoop:
verkopende winkel:
Handtekening en stempel:
50 51
Page 27

RU
Мы настоятельно рекомендуем покупать
беговел в собранном виде и регулярно
проходить техническое обслуживание
в веломастерских. Неопытное
вмешательство может привести к
повреждению беговела или к серьезным
авариям.
Тем не менее, если вы считаете себя
квалифицированным специалистом,
СОДЕРЖИМОЕ УПАКОВКИВСТУПЛЕНИЕ
вы можете собрать беговел
самостоятельно с помощью данного
руководства.
Если у вас есть идеи или комментарии, отзывы или
советы, пожалуйста, не стесняйтесь обращаться к нам
на наш адрес электронной почты: info@yedoo.eu.
Более подробную информацию о беговелах и список
дистрибьюторов можно найти на www.yedoo.eu.
52 53
ИНСТРУМЕНТЫ НЕОБХОДИМЫЕ ДЛЯ СБОРКИ
5 mm 14 m m
Page 28

RU
ИНСТРУКЦИЯ ПО СБОРКЕ
Перед сборкой уд алить
пластмассовые колпачки с осей переднего
и заднего колеса.
Установка Руля и вилки:
Снимите с вилки кольца и
эксцентрик. При установке
порядок деталей должен быть
как на рисунке.
Установка седла: Поместите
подседельный штырь в
раму (1) беговела, выберите
нужную высоту (не превышая
максимальную отметку) и
затяните болт (2).
Затем накачайте покрышки, в
соответствии со значениями,
которые на них указаны (в
идеале от 1,3 и 1,8 бар).
Поместите переднюю вилку
в отверстие на раме (1) ,
разместите вилку правильно
– изгиб на вилке должен быть
обращен вперед. Поместите
кольца (2) и эксцентрик
(3) обратно на вилку, в
соответствии со схемой.
Регулировка тормозов
(только для модели FIFTY B):
Наклоните тормозные ручки,
ослабив болты (1).
Правильное положение тормозных
ручек: п осадите ребен ка на беговел,
попроси те его взяться з а руль и вытянуть
пальцы та ким образом, чт обы его / ее
ладонь и пальцы образовывали единую
прямую л инию. Таким должно быть
правильное положение тормозных ручек.
Поместите эксцентрик именно
так как указано на рисунке.
Регулировка тормоза:
Убедитесь, что при торможении
тормозные колодки плотно
прижаты к ободу. Их положение
можно регулировать
спомощью болтов (1).
Тормозные колодки не должны
касаться покрышек.
Поместите защитное кольцо
(1) на трубу руля и установите
руль в раму (2). Выберите
нужную высоту (не превышая
максимальную отметку) и
затяните болт (3).
Убедитесь, что между
колодками и ободом
достаточно места (1-2 мм),
если тормозные рычаги на
руле не нажаты. Расстояние
можно регулировать путем
затягивания или ослабления
болта (2).
В конце, расположите защитное
кольцо на эксцентрик.
В случае, если тормозные
колодки касаются колеса при
повороте, отрегулируйте их с
помощью затягивания болта (3).
Установка защитной
подушечки: установите
мягкую подушечку из
моющегося нейлона на руль
беговела.
Конец тормозного кабеля
согните так, чтобы он не мешал
ребенку во время катания.
54 55
Page 29

RU
БЕЗОПАСНОСТИ
Беговел в заводской комплектации предназначен для
катания в дневное время по ровным дорогам; а также
в районах, предназначенных для спорта и отдыха.
Для дорог с автомобильным движением или д ля
езды в темн ое время суток, необходи мо оборудовать
беговел (фары, о тражатели и т.д.) в соответствии с
нормами, действу ющими в Вашей стран е. Обратите
внимание своего ребенка на общие правила техники
безопасности, правила дорожного движения, а также
всегда использу йте защитные аксессуары (шлемы,
наколенники и налокотники, хорошая обувь и т.д.)
Перед каждой поездкой всегда проверяйте работу
тормозов и общее техниче ское состояние беговела.
Не превышайте максимальную нагрузку на беговел
(максимальная нагрузка указана на лицевой стороне
инструкции). Беговел предназначен для катания
только одного ребенка! Не перегружайте беговел,
он не предназначен для прыжков и акробатической
езды!
Беговелы оснащены рулевой колонкой со
встроенным блокиратором, который препятствуют
перекручиванию руля. Поэтому, не крутите
руль силой, чтобы избежать повреждения
блокиратора. Ремонтируйте рулевую колонку только
вспециализированных веломастерских.
Некоторые механизмы (тормозные колодки, диски,
покрышки, дисковые тормоза и т.п.) могут нагреваться
при использовании и, следовательно, не рекомендуется
прикасать ся к ним, так как мог ут быть ожоги !
ПРАВИЛА КАТАНИЯ
Дети могут использовать беговел только под
надзором взрослого. Важно, чтобы ребенок
всегда держался за руль обеими руками во время
езды. Сидя и балансируя, ребенок отталкивается,
чередуя ноги, как при начале движения или
быстрой ходьбе. ВНИМАНИЕ: Дети, при отсутствии
достаточного опыта, могут развивать высокую
скорость, поэтому со стороны родителей или
ответственного взрослого, они должны быть
надлежащим образом проинструктированы о
возможных опасностях и методах торможения.
Для торможения, ребенок должен нажать
рычаг тормоза на руле или поставив ноги на
землю замедлить движение. ПРЕДУПРЕЖДЕНИЕ:
внезапное или резкое насильственное
торможение беговела может привести к травме.
ОБСЛУЖИВАНИЕ
БЕГОВЕЛА
Правильное и регулярное техническое
обслуживание повышает как безопасность, так
и срок слу жбы вашего беговела. Необходимо
регулярно проверять затянутость всех болтов,
давление в шинах, а также смазывать подвижные
части (колеса, подшипники, подшипники руля,
кабели, комплектующие и т.д.). Убедитесь, что
смазка не попадает на диски или тормозные
колодки. Смазка снижает их эффект!
Если возникает такая ситуация, необходимо
удалить смазку, например, с помощью
технического бензина.
Также регулярно проверяйте рисунок протектора
на покрышках. Если они стерты, замените
покрышки.
Проверяйте натяжение спиц. Неравномерное
напряжение в спицах может вызвать их
растрескивание или колебание колеса.
Храните беговел в чистом виде. В случае
загрязнения используйте влажную ткань.
Беговел должен храниться в помещении, в
сухом и затененном месте. Не подвергайте
беговел действию повышенной влажности и
высокой температуры в течение длительного
периода времени. Для хранения зимой,
смажьте подвижные части беговела для
защиты от коррозии и накачайте покрышки до
максимального значения, как указано на боковой
стороне покрышки. Гарантия производителя
не распространяется на ущерб, причиненный в
результате неправильного обращения и хранения,
а также при не адекватном использовании и
халатном обслуживании беговела.
Изделие отвечает соответствующим стандартам ЕС
(ЧСН ЕН 71-1, ЧСН ЕН 71-3) и получило сертификат
качества и безопасности от ведущего чешского
испытательного института (Государственный
машиностроительный испытательный инстут) и
международно признанного TüV SüD Czech s. r. o.
Производитель: Intrea-Piko, s.r.o., Sasanková 2657/2,
106 00 Praha 10, Чехия
ГАРАНТИЙНЫЙ ТАЛОНМЕРЫ
Общие правила: Содержание и продолжительность гарантии соответствует действующему
законодательству, соответствующему стране покупки беговела.
Гарантийный срок: Покупателю нового беговела Yedoo (продукта) предоставляется гарантия
24 месяца со дня покупки. Гарантия начинается со дня продажи конечному потребителю и
автоматически продлевается, когда продукт принимается в ремонт в течение гарантийного срока.
Гарантийные правила: Гарантийный талон должен быть заполнен розничным продавцом
магазина, где был приобретен продукт, (см. ниже). При возникновении гарантийного случая, мы
рекомендуем предоставлять заполненный гарантийный талон, и чистый самокат или велосипед.
Продавец обязан выдать письменное подтверждение покупателю о принятии продукта на
гарантийный ремонт.
Гарантийные условия: сборка беговела и оборудование должно быть установлено в соответствии
с инструкциями настоящего руководства. Беговелы должны использоваться только для целей,
для которых они предназначены. Беговел должен храниться и обслуживаться в соответствии с
руководством по эксплуатации. Гарантия не распространяется на повреждения, вызванные общим
износом беговела. Гарантия на детали подвергающиеся естественному износу не распространяется
(покрышки, камеры, тормозные колодки, тормозные тросики и т.п.). Производитель не дает
гарантию на повреждения, вызванные неправильной сборкой или использованием беговела не по
назначению.
Тип продукта /
Модель:
Серийный номер
рамы:
Дата покупки:
Продавец:
Подпись и п ечать продавца:
56 57
Page 30

SE
Vi rekommenderar starkt att springcykeln
monteras och inspekteras regelbundet av en
professionell cykelservice. Felaktig och/eller
bristande montering kan leda till skador på
springcykeln och till allvarliga olyckor.
Anser du dig själv tekniskt kunnig kan
du montera springcykeln på egen hand
med vår hjälp.
Om du har några idéer eller synpunkter, feedback eller
tips, tveka inte att kontakta oss på vår e-postadress:
info@yedoo.eu.
FÖRPACKNINGENS INNEHÅLLINLEDNING
Mer information om våra produkter och våra återförsäljare hittar
dupå www.yedoo.eu.
Nödvändiga verktyg
5 mm
58 59
14 m m
Page 31

SE
MONTERINGSINSTRUKTIONER
Före montering, ta bort plastskydden
från båd e fram och bakhju lens axel.
Styrstång och framgaelmontering: Ta bort hylsskyddet,
hylsan samt den övre brickringen
från fram gaeln. Vid installationen se till att delarna placeras
enligt bilden.
Sadel montering: Placera sadel
röret iramen (1) på springcykeln,
justera höjden (justera inte över
max markeringen på sadelröret)
och skruva åt hylsskruven (2).
Pumpa sedan upp däcken enligt
info på däcksidorna (rekommenderas mellan 1,3 och 1,8 bar).
Trä in framgaeln iramens främre
rör (1) så att framgaelns böjning
pekar framåt. Placera övre brickringen (2) och hylsan (3) tillbaks
på framgaeln.
Justera bromshandtaget
(endast för FIFTY B): justera
lutningen av bromshandtaget
genom att lossa på skruven på
hylsan (1).
Rätt lutning: lå t barnet sätta s ig på
springc ykeln, hålla ihan dtagen och str äcka
ut ngrar na så att barnet s arm och ngrar
bildar en r ak linje. Då har man rät t läge på
bromsen.
Placera hylsskruven exakt på
utskurna delen på framgaelns
rör som på bilden.
Justering av bromsar: när
du bromsar, kontrollera att
bromsbeläggen trycks tätt mot
fälgsidorna. Positionen kan justeras med hjälp av skruvarna (1).
Beläggen ska inte vidröra däcket.
Placera hylsskyddet (1) på
styrstången och stick ner det iframgaelnsrör (2). Justera höjden
( justera inte över max markeringen på styrstången) och skruva åt
hylsskruven (3).
Kontrollera att det är tillräckligt
mellanrum mellan beläggen och
fälgsidorna (1-2mm) när du släppt
bromshandtaget. Avståndet kan
justeras genom att skruva åt eller
lossa på bromskabeln vid förankringsskruven (2).
Slutligen placera hylsskyddet
över hylsan.
Ifall att bromsbeläggen vidrör
hjulet när du svänger , justera
symmetriskt avståndet mellan
bromsarmarna genom att skruva
åt skruvarna (3).
Placera skyddet av tvättbar nylon
över styrstångsfästet.
Böj in bromskabelns ände så att
den inte är ivägen när barnet
använder springcykeln.
60 61
Page 32

SE
Säkerhetsåtg ärder
Springcykeln är med sin grundutrustning konstruerad för att åka under dagsljus iområden avsedda för
sport och rekreation. För vägar med biltrak eller för
att åka imörker, måste du förse din springcykel med
säkerhetsfunktioner (ljus, reektorer, etc.) ienlighet
med de regler som gäller iditt land. Var uppmärksam
på traken och allmänna säkerhetsföreskrifter. Se till
att barnen följer generella säkerhets föreskrifter och
trakregler och att dom använder skyddsutrustning
(hjälm, knäskydd & armbågsskydd) samt bra skor etc.
Innan varje åktur kontrollera alltid att bromsarna fungerar och spingcykelns övriga tekniska funktion är ok.
Överskrid inte den maximala vikten för springcykeln
som anges på framsidan av manualen. Springcykeln
är konstruerad för en åkare! Överbelasta ej springcykeln, den är ej anpassad för att hoppa med.
Bromsmekanism delarna (bromsbelägg, fälgar, däck
och skivbromsar mm) kan bli varma när de används,
och därför rekommenderar vi att inte röra dem innan
de svalnat.
KÖRANVISNIG
Barn ska bara använda en springcykelunder uppsikt
av en vuxen. Det är viktigt att barnet håller båda
händerna på styret när dom använder springcykeln.
När barnet sitter och balanserar, barnet sparkar sig
fram växelvis på liknande sätt som när man springer
eller går fort.
VARNING: Barn kan få upp en hög fart så det viktigt
att dom har blivit instruerade om risker som nns
samt hur man bromsar farten genom information från
föräldrar eller ansvarig vuxen. För att bromsa farten
ska barnet pressa broms handtaget på styrstången
eller använda sulan på skorna för att få ner farten
genom att hålla dom mot marken.
VARNING: Plötslig inbromsning kan orsaka skador.
Underhåll
Korrekt och regelbundet underhåll ökar både säkerheten och livslängden på din springcykel. Kontrollera regelbundet skruvar, snabbfästen, tr yck idäcken
och smörj rörliga delar (hjul, kullager, styre lager,
bromsdelar osv.). Se till att inget smörjmedel hamnar
på fälgar och bromsbelägg. Fett minskar deras eekt!
Om så sker är det nödvändigt att ta bort fett från alla
delar, använd avfettning- eller lösningsmedel.
Kontrollera däcken så att det inte nns jack, revor
mm. Byt ut däck som är skadade.
Inspektera låsmuttrar. Om dom lossar enkelt byt ut
dom mot nya.
Kontrollera ekrarna, eventuella defekter på ekrarna
kan göra hjulet vingligt.
Håll din springcykel ren, använd en fuktig trasa vid
rengöring. Förvara springcykeln under tak på skuggig
plats. Utsätt inte springcykeln för högre luftfuktighet
eller extrema temperaturer under en längre tid. Inför
vintern, förbered den mot korrosion och pumpa
däcken till sitt maximala värde som anges på sidan av
däcket. Producenten täcker inte skador som orsakats
enbart av eftersatt underhåll, felaktig montering eller
olämplig behandling och lagring.
Produkten uppfyller EU-normerna (ČSN EN 71-1, ČSN
EN 71-3) och har kvalitets och säkerhets certieringar
från ett ledande tjeckisk testlabb - Engineering Test
Institute (Strojírenský zkušební ústav, sp) samt från
den internationellt erkända TÜV SÜD Czech s.r.o
Tillverkare: Intrea-Piko, s. r. o., Sasanková 2657/2,
10600 Praha 10, Tjeckien
GARANTI
Allmänna bestämmelser: Innehållet och längden samt varaktighet på garantin överensstämmer med
den gällande lagstiftningen irespektive land för köp av springcykeln.
Garantitid: Köparen av den nya Yedoo springcykeln(produkt) kan tillämpa garantin under en period av
24 månader från köpet. Garantin börjar på dagen för försäljningen till slutanvändaren.
Garanti ansökan: Garantin måste fyllas iav den återförsäljare där produkten köptes (se nedan). Vid
tillämpning av garantin ska ifyllt dokument (nedan), kvitto samt en komplett och rengjord produkt
visas upp. Säljaren kommer att ge en skriftlig bekräftelse till köparen om godkännande av produkten
igarantiprocessen.
Garantivillkor: Produkten skall monteras enligt instruktionerna ihandboken. Produkterna får endast
användas för de ändamål som den var avsedd för. Produkten skall förvaras och underhållas på det sätt
ienlighet med bruksanvisningen. Garantin täcker inte skador som orsakas av vanligt slitage. Producenten
täcker inte skador som orsakats av felaktig montering eller användning istrid med bruksanvisningen.
Produkt typ/modell:
Serienummer på ramen:
Inköpsdatum:
Återförsäljare:
Underskrift och stämpel:
62 63
Page 33

SK
Montáž, nastavenie apravidelnú údržbu
doporučujeme zveriť odbornému
cykloservisu. Neodborné zásahy
môžu viesť kpoškodeniu odrážadla
alebo nehode svážnymi zdravotnými
následkami.
Pokiaľ sa cítite ako technický typ
aničoho sa nebojíte, schuťou sa
domontáže pustite snami.
OBSAH BALENIAúVOD
Otázky, pripomienky anámety nazlepšenie našich
výrobkov: info@yedoo.cz.
Viac informácií zo sveta odrážadiel azoznam distribútorov nájdete na
www.yedoo.cz.
POTREBNÉ NÁRADIE
5 mm
64 65
14 m m
Page 34

SK
MONTÁŽNY NÁVOD
Pred montážou o dstráňte plastov é kryty
zpredné ho izadného kole sa.
Montáž riadidiel apredného
kolesa: Zvidlice predného kolesa
odstráňte kryt objímky, samotnú
objímku ahorný krúžok uloženia
hlavy. Pri montáži musí byť
dodržaný postup skladania hlavy
riadenia – viď obrázok.
Montáž sedadla: vložte sedlovú
rúrku dorámu odrážadla (1), nastavte požadovanú výšku sedadla
(max. povyznačenú rysku) adotiahnite skrutku naobjímke (2).
Nahustite pneumatiky podľa hodnôt uvedených naboku plášťa
(ideálne medzi 1,3 – 1,8 baru)
Vložte prednú vidlicu dohlavovej
rúrky predného rámu (1) tak, aby
mierne prehnutie vidlice smerovalo dopredu. Navidlicu naložte
späť horný krúžok uloženia hlavy
(2) aobjímku (3).
Nastavenie brzdových páčiek
(len pre odrážadlo FIFTY B):
nastavte správny sklon brzdových
páčiek pomocou upevňovacej
skrutky naobjímke (1).
Správny sklon brzdových páčiek: posaďte dieťa nao drážadlo, ruk y nech položí na
riadidl á anatiahne prst y tak, aby predl žovali
priamku j eho ruky. Dotejto p olohy nastavte
brzdovú páčku.
Skrutku objímky umiestnite anasmerujte navýrez vidlicovej rúrky
podľa obrázku.
Nastavenie brzdy: skontrolujte,
či brzdové doštičky dosadajú
narák celou svojou plochou. Ich
polohu môžete upraviť pomocou
skrutiek (1). Brzdové doštičky sa
nesmú dotýkať plášťa!
Natyč riadenia navlečte kryt
objímky (1) atyč vložte dorúrky
prednej vidlice (2). Nastavte
požadovanú výšku riadidiel (max.
povyznačenú rysku) adotiahnite
skrutku naobjímke (3).
Skontrolujte, či sa brzdové doštičky pri uvoľnení brzdovej páčky
dostatočne vzdialia odráka
(1-2mm). Vzdialenosť brzdových doštičiek je možné upraviť
povolením alebo dotiahnutím
brzdového lanka vkotviacej
skrutke (2).
Naložte ochranný kryt
naobjímku.
Pokiaľ sa koleso pri otáčaní
vniektorom mieste dotýka brzdovej doštičky, upravte symetricky
vzdialenosť brzdových ramien
napínacími skrutkami (3).
Montáž chrániča: napredstavec
riadidiel pripnite mäkký ochranný
kryt zumývateľného plastu.
Koniec brzdového lanka zahnite
tak, aby neprekážal pri jazde.
66 67
Page 35

SK
BEZPEČNOSTNÉ
DOPORUČENIA
Odrážadlo je vzákladnej výbave určené pre jazdu
zadenného svetla vpriestoroch určených našport
arekreáciu.
Pre jazdu napozemných komunikáciách apre jazdu
vtme ho musíte vybaviť bezpečnostnými prvkami
(svetlá, odrazky atď.) vsúlade splatnými predpismi
vo vašej krajine. Dbajte, aby deti dodržiavali zásady
bezpečnej jazdy, či pravidlá cestnej premávky apoužívali ochranné pomôcky (prilbu, chrániče kolien
alakťov, pevnú obuv apod.).
Pred každou jazdou skontrolujte funkčnosť bŕzd
acelkový technický stav odrážadla. Dbajte, aby ne bola prekračovaná jeho max. zaťažiteľnosť (nosnosť
odrážadla je uvedená naúvodnej strane).
Všetky mechanizmy znižujúce rýchlosť (brzdové
doštičky akotúče, ráky, pneumatiky apod.) sa pri
používaní zahrievajú, nedotýkajte sa ich, pokiaľ
nevychladnú!
POKYNY
K JAZDE
Deti môžu odrážadlo používať len pod dozorom
dospelej osoby. Je dôležité, aby pri jazde malo dieťa vždy obe ruky nariadidlách. Pokiaľ sedí naodrážadle audržiava rovnováhu, nohami sa striedavo
odráža ako pri behu alebo chôdzi. POZOR, dieťa
môže naodrážadle vyvinúť značnú rýchlosť, preto
by ho rodič alebo iná zodpovedná osoba mala
pred prvou jazdou patrične poučiť omožných
rizikách aspôsobe brzdenia. Pri brzdení nech dieťa
stlačí brzdovú páčku nariadidlách, alebo spomaľuje trením podrážok obuvi ozem (brzdí nohami).
ÚDRŽBA
Správna apravidelná údržba zvyšuje bezpečnosť
apredlžuje životnosť vami zakúpeného odrážadla.
Preto pravidelne doťahujte skrutkové spoje, kontrolujte tlak vpneumatikách apremazávajte pohyblivé
časti (ložiská kolies ariadidiel, čapy brzdových páčok,
čeľuste bŕzd, brzdové lanká, atď.).
Dajte pozor, aby sa mazivo nedostalo naráky
abrzdové doštičky. Mastnota znižuje ich účinok!
Pokiaľ sa tak stane, odmastite znečistené časti napr.
technickým benzínom.
Pravidelne kontrolujte hĺbku vzoru naplášťoch
kolies, vprípade potreby v ymeňte plášte zanové so
zhodnými parametrami.
Kontrolujte stav samoistných matíc (pokiaľ sa
zajazdy samovoľne uvoľňujú, vymeňte ich zanové).
Pravidelne kontrolujte výplet kolies, nerovnomerné napnutie drôtov vo v ýplete môže spôsobiť ich
praskanie alebo rozcentrovanie kolies.
Odrážadlo udržujte včistote, znečistenie otrite vlhkou handričkou. Skladujte ho vnútri nasuchom atienistom mieste, dlhodobo ho nevystavujte zv ýšenej
vlhkosti ani extrémnym teplotám. Pred zazimovaním
ošetrite antikoróznym prípravkom apneumatiky
nahustite namaximálnu hodnotu uvedenú naboku
plášťa. Výrobca nezodpovedá zaškody spôsobené
zanedbaním údržby, neodborným zásahom, vlastnými úpravami alebo zlým zaobchádzaním.
Výrobok spĺňa zodpovedajúce normy EU (ČSN EN
71-1, ČSN EN 71-3) azískal certikáty kvality abezpečnosti odpopredného českého skúšobného ústavu
(Strojírenský zkušební ústav, s. p.,) imezinárodne
uznávaného TÜV SÜD Czech s. r. o.
Výrobca: Intrea-Piko, s. r. o., Sasanková 2657/2, 10600
Praha 10, Česká republika
uplatneni práv zo zodpovednosti za vady
Všeobecné ustanovenia: Obsah, rozsah a trvanie práv kupujúceho zo zodpovednosti za vady tovaru sa
riadi platnými predpismi Slovenskej republiky, predovšetkým príslušnými ustanoveniami Občianskeho zákonníka a súvisiacich predpisov a zákona č. 250/2007 Zb. o ochrane spotrebiteľa. Práva kupujúceho v zmysle znenia týchto predpisov nie sú týmto dokladom ani v ňom uvedenými informáciami nijako dotknuté.
Čas pre uplatnenie práv z vadného plnenia: Právo zo zodpovednosti za vady zakúpeného odrážadla
Yedoo (ďalej len tovaru) si môže kupujúci uplatniť do uplynutia 24 mesiacov od jeho zakúpenia a prevzatia.
Ak kupujúci vytkne vadu tovaru oprávnene, lehota pre uplatnenie práv z vadného plnenia sa nezapočítava
počas doby, kedy kupujúci nemôže tovar riadne užívať.
Spôsob uplatnenia práv zo zodpovednosti za vady: Práva zo zodpovednosti za vady sa uplatňujú
upredajcu, u ktorého kupujúci tovar zakúpil (viď údaje nižšie). Pri uplatnení vady tovaru doporučujeme
predložiť tento doklad, doklad o kúpe a kompletné, nečistôt zbavené odrážadlo. V prípade uplatnenia
práv zo zodpovednosti za vady, alebo vykonania opravy dotknutého tovaru vystaví predajca kupujúcemu
písomné potvrdenie.
Podmienky trvania práv zo zodpovednosti za vady: Pri montáži odrážadla musia byť dodržané pokyny
uvedené v montážnom návode. Odrážadlo musí byť využívané výhradne na účel, na aký bolo vyrobené.
Odrážadlo musí byť skladované a udržiavané podľa výrobcom uvedených pokynov. Na závady spôsobené
jednoznačne nesprávnou montážou, či používaním odrážadla v rozpore s užívateľskou príručkou sa zodpovednosť výrobcu nevzťahuje!
Model odrážadla:
Výrobné číslo rámu:
Dátum predaja:
Predajca:
Pečiatka ap odpis predajc u:
POZOR: prudké zabrzdenie môže spôsobiť pád.
68 69
Page 36

This page intentionally left blank. This page intentionally left blank.
Page 37

www.yedoo.eu
 Loading...