

Page 1
ALLOY
WOLFER
TREXX
User manual
Page 2
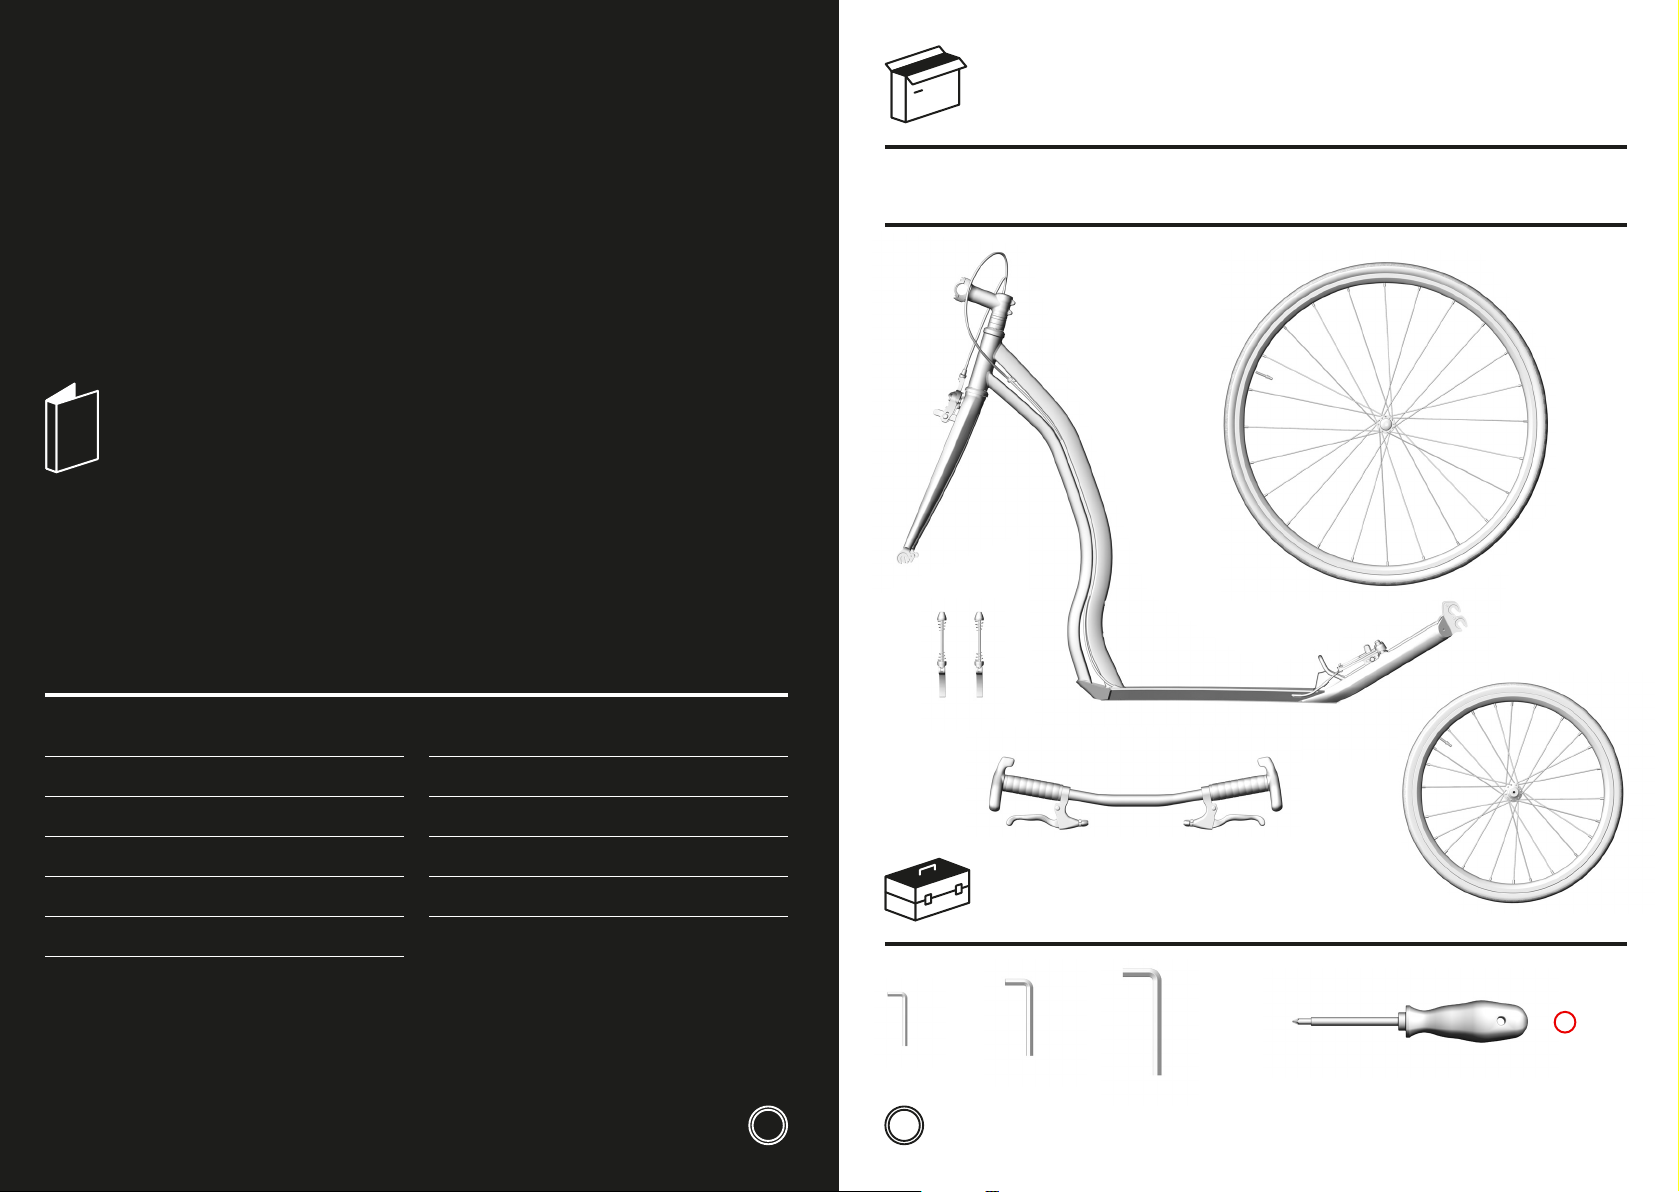
Yedoo
Wolfer 28"/ 20"
Maximum load:
120 kg / 265 lb
Trexx 26"/ 20"
Maximum load:
130 kg / 287 lb
i
Yedoo Wolfer
Contents
EN 5
CZ 12
DE 19
EE 26
ES 33
FR 40
Visit our website www.yedoo.eu
for more language versions.
IT 47
PL 54
RU 61
SE 68
SK 75
2
5 mm4 mm 6 mm
3
+
Page 3
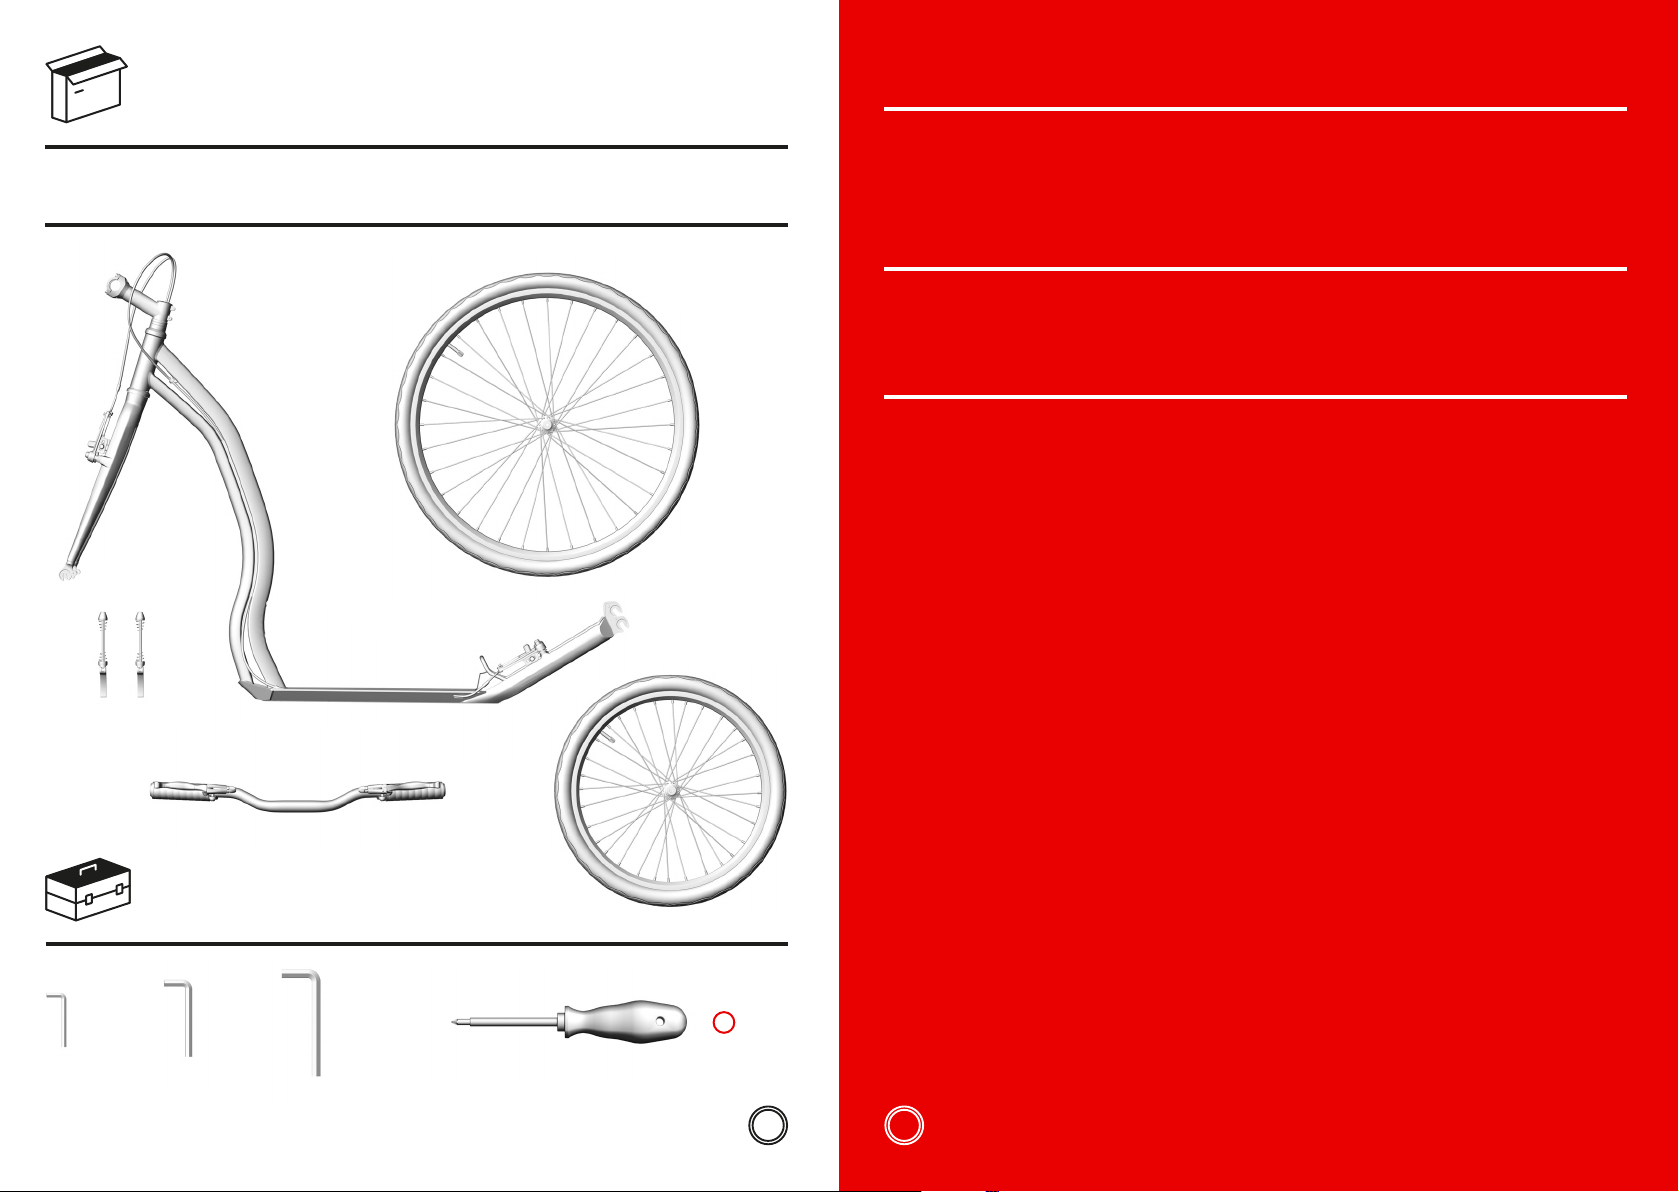
Yedoo Trexx
Introduction
We recommend that you entrust the installation, adjustment
and regular maintenance to a specialist bicycle shop. Improper
intervention can lead to damage of the scooter or to an accident
with serious health consequences.
If you are technically capable, do not worry, this manual
contains all the information you need to help you assemble your
new scooter.
Send your questions, comments and suggestions for
improvement of our products by e-mail to: info@yedoo.eu.
5 mm4 mm 6 mm
More information from the
+
4
world of scooters and the list
of distributors can be found at
www.yedoo.eu.
5
EN
Page 4
Installation manual
The installation is the same for both
models (Wolfer, Trexx), it diers only in
minor details (see additional pictures).
When tightening the connections do not
exceed the specified tightening torque.
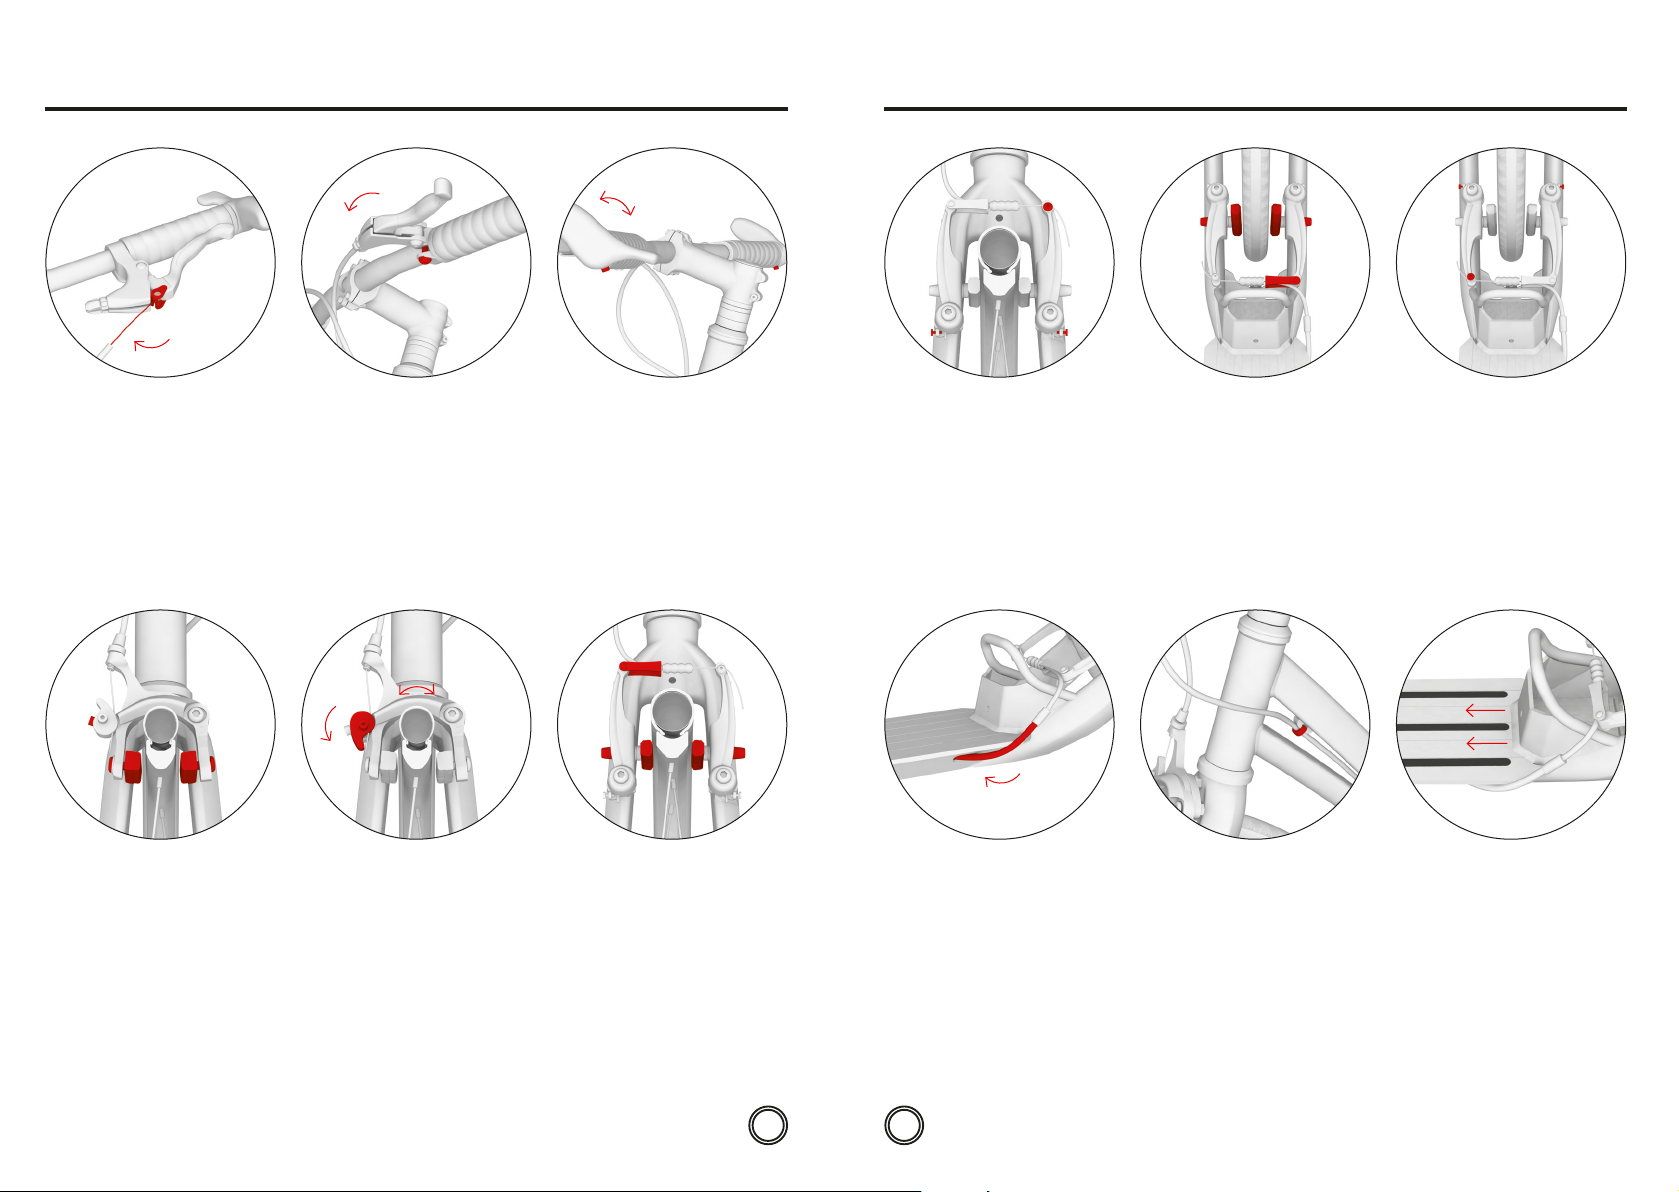
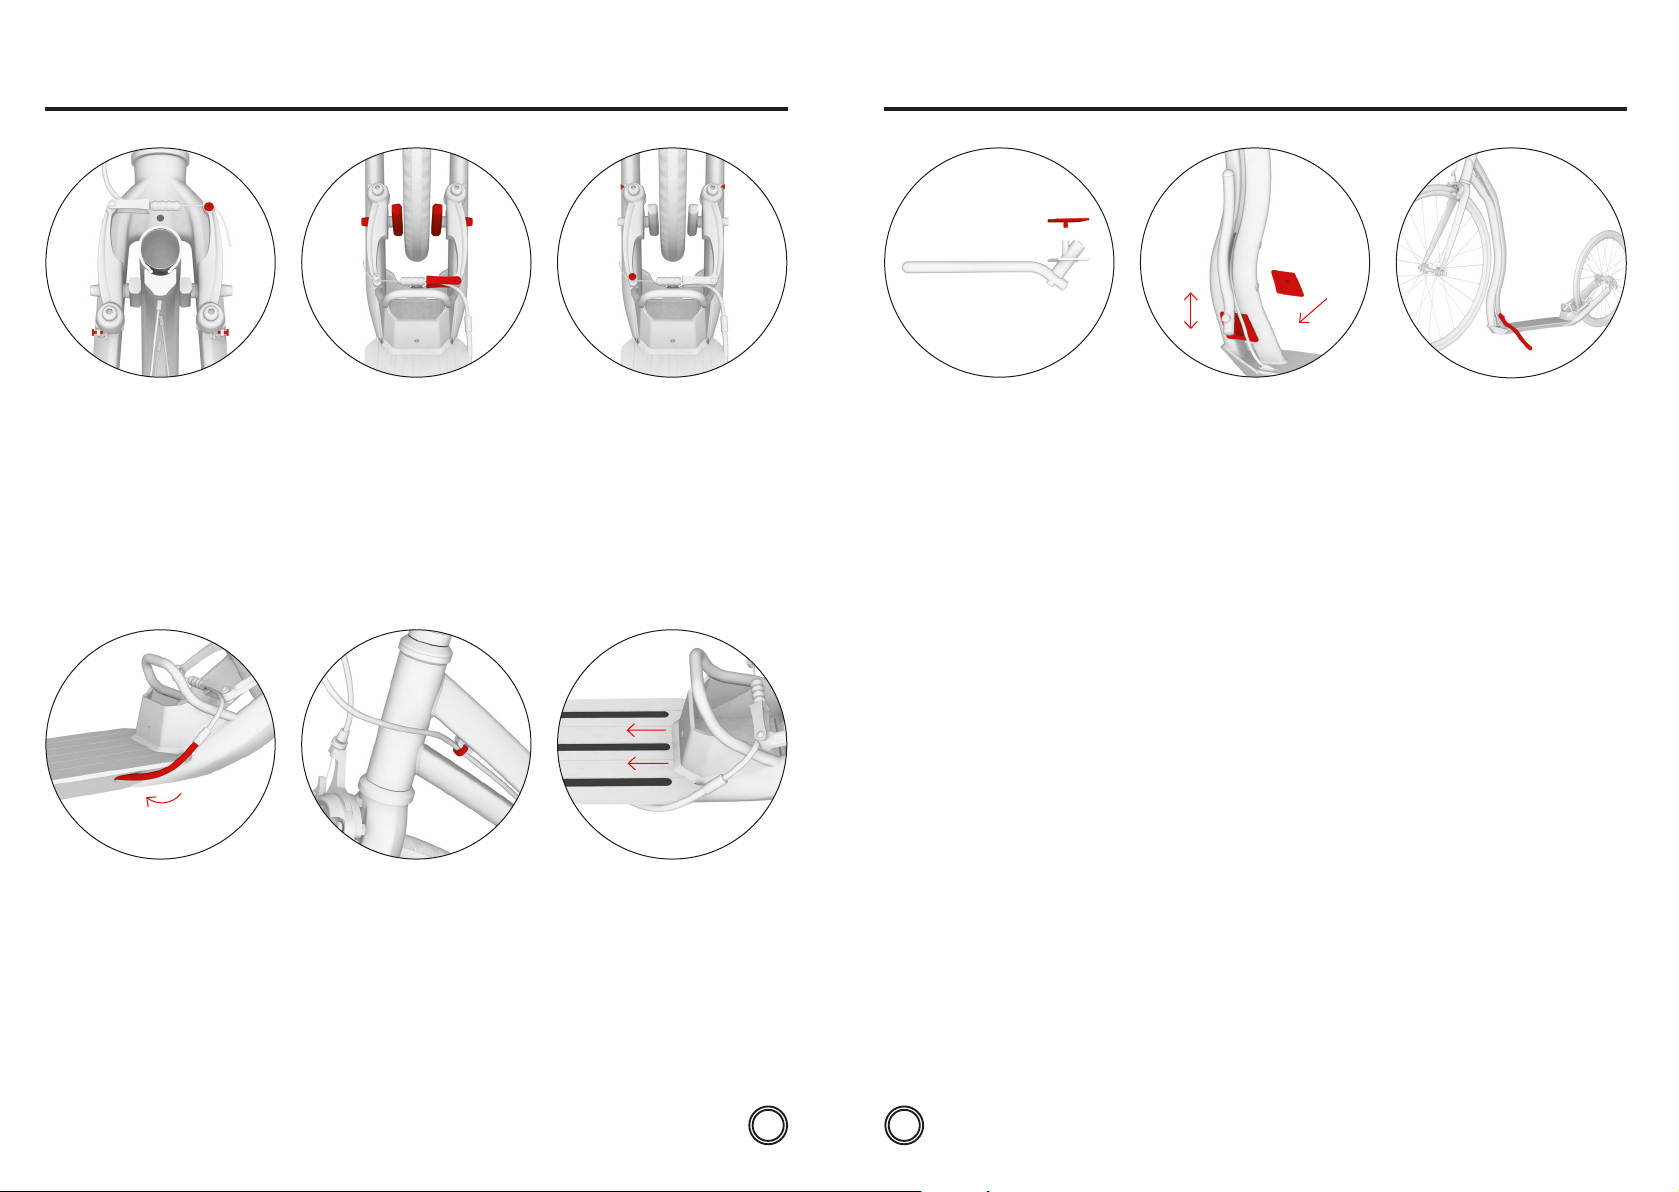
Installing the front wheel
Insert the quick release mechanism into
the wheel ensuring that on both sides of
the wheel the narrow ends of the springs
face the centre of the wheel.
4.
2.
First, check that the front fork of the
scooter is aligned correctly (the V-brake
shoulders should be pointing forwards
towards the front of the scooter), then
release the brake jaws by rotating
thelever.
5.
Wolfer
3.1.
Direction
of rotation
Insert the wheel into the front fork so it
is exactly in the middle. Caution: When
inserting the wheel, ensure that the
arrow on the tyre sidewall points in the
direction of rotation when the scooter
is rolling forwards.
Trexx
6.a 6.c
2
1
Installing the rear wheel
Release the brake cable from the guide
(1). Put the wheel in one of the two fork
dropouts (see 6.b, 6.c.) then centre the
wheel and tighten the quick release
mechanism (2).
6.b
Two-position rear fork enables you to
adjust the height of the footrest above
the ground. Use the lower position
for riding over a rough terrain. Close
the quick release lever. It should point
upwards.
The upper fork position, which reduces
the height of the footrest, is designed for
riding on a smooth, flat surface. Riding
will be less physically demanding. The
closed quick release lever should point
downwards.
7.a 7.b 7.d
6–8 Nm
1
Tighten the adjustment nut of the
quick release mechanism to the correct
position. When it is in the correct
position you will feel a noticeable
resistance just before you close the
mechanism completely. Close the quick
release lever in a position where it does
not touch the fork and simultaneously
it cannot be opened accidentally
while riding.
EN
5–6 Nm 5–6 Nm
Handlebars installation
Insert the handlebars on the stem
and tighten the screws of the sleeve.
The labels (not shown in a picture)
should be clearly visible from the
front view.
2
3
5–6 Nm
7.c
Adjusting the height of the handlebars
Loosen the screws on the stem and
adjust the handlebars to the desired
height using spacer rings. To set the
handlebars to the lowest position,
turn the stem so it points downwards,
see fig. 7.c. After adjusting the handlebar
height, first tighten the head-set screw
(1), then the side screws (2, 3).
6
7
EN
Page 5
Installation manual
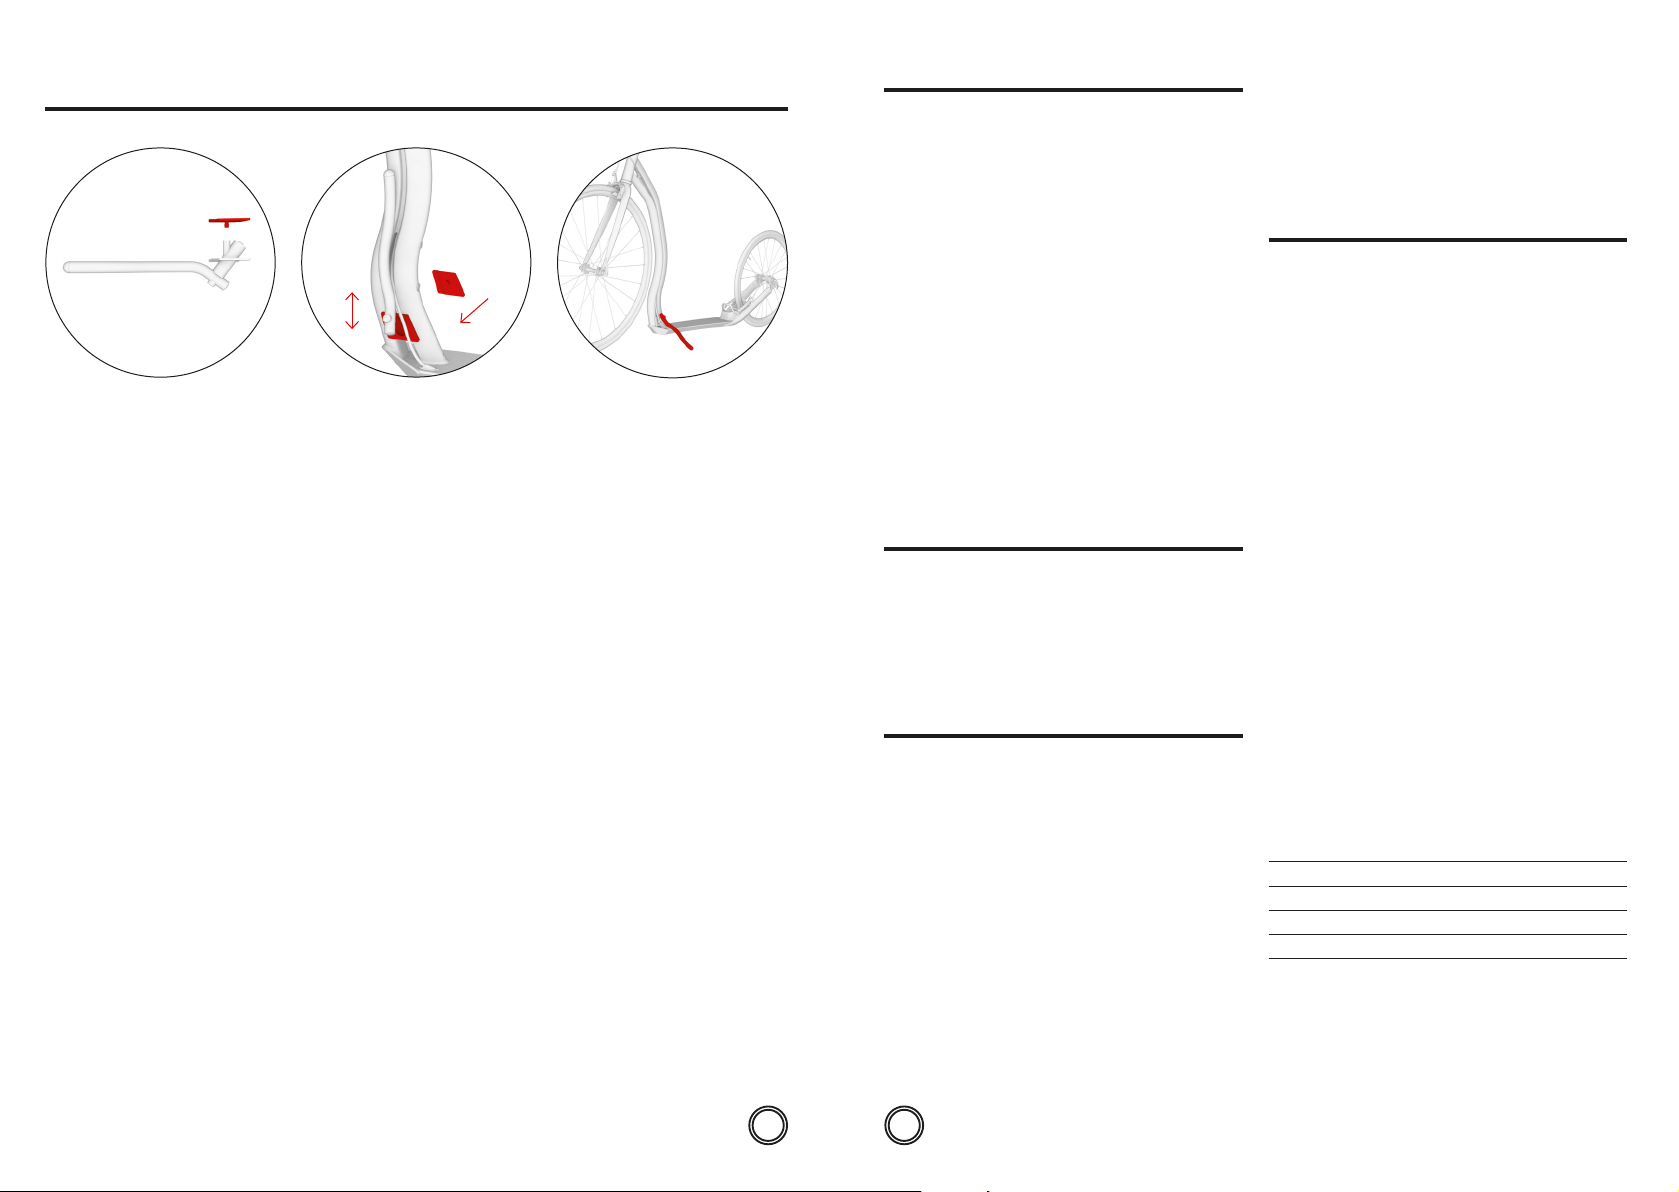
8.
3
2
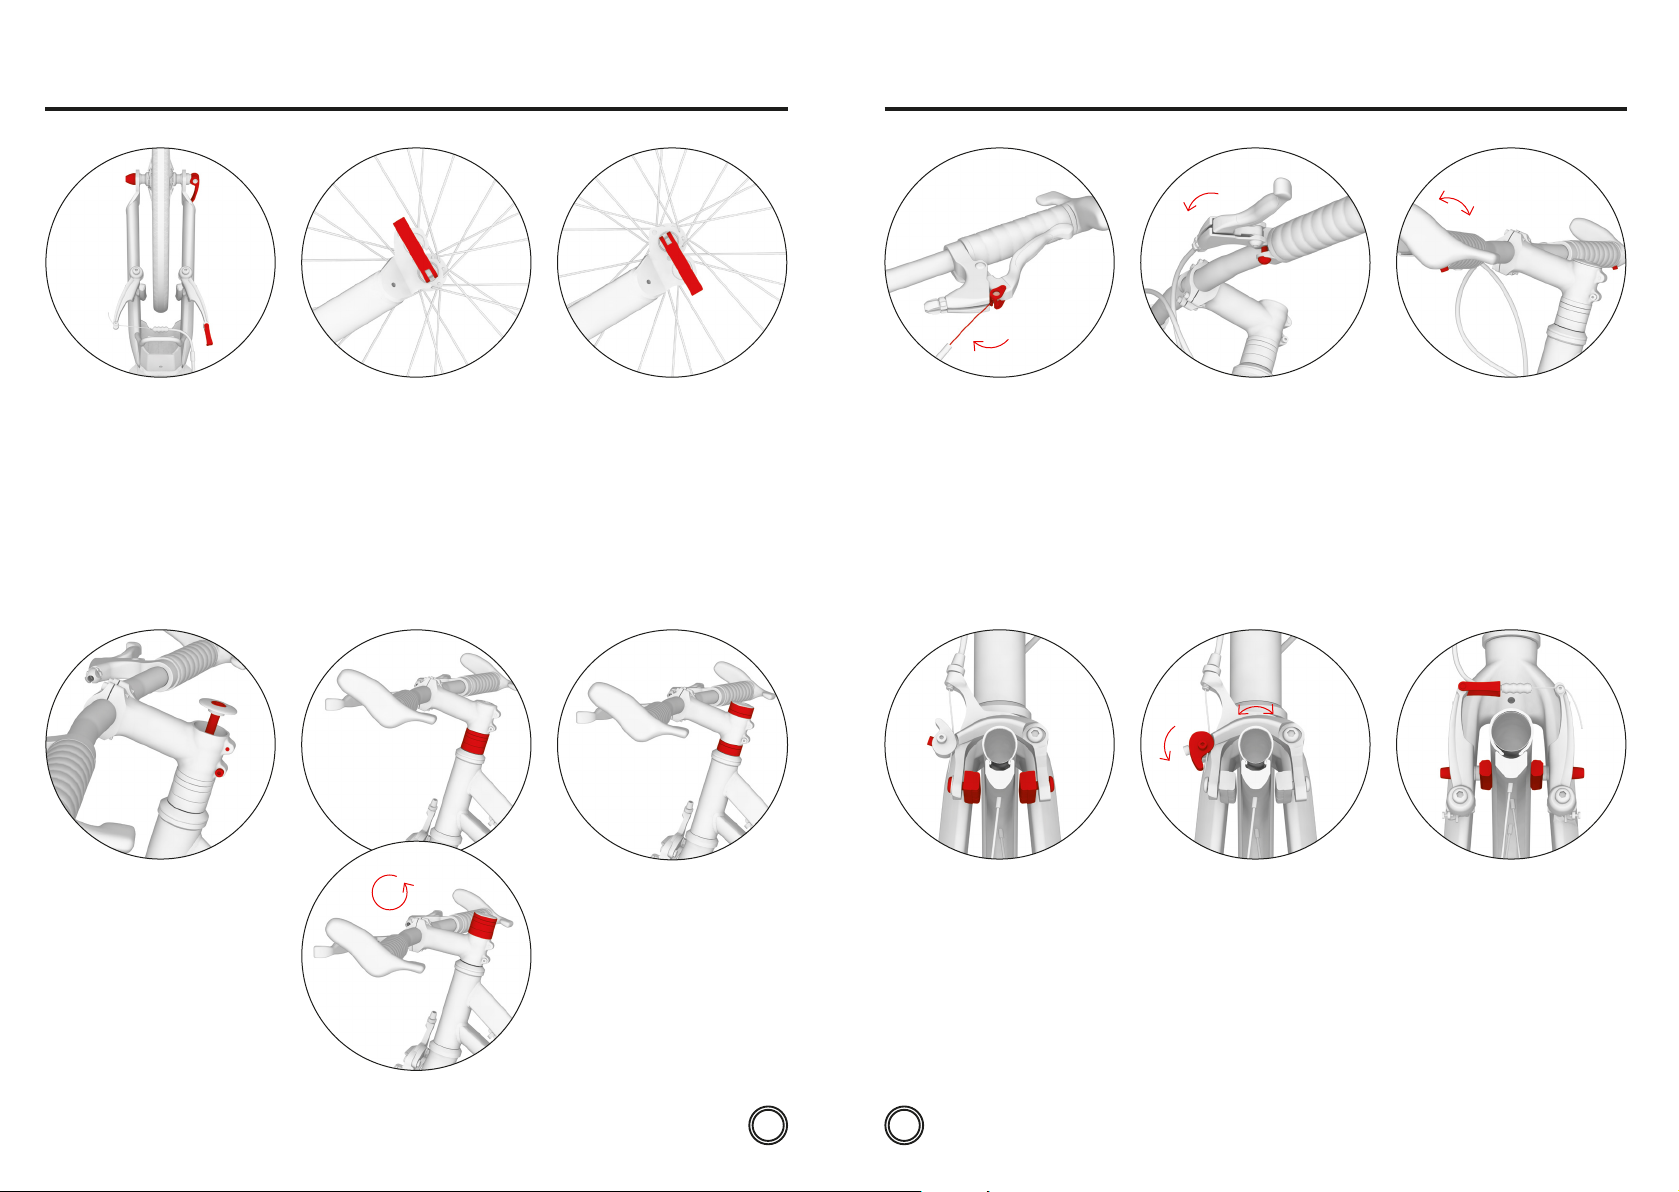
Installing the brake cables
Squeeze the brake lever to the maximum
and insert the end of the brake cable
into the round lug (1). Insert the cable
into the groove and tighten the set
screw (2) and the nut (3). Repeat the
process with the other brake. The rear
brake cable is usually mounted on the
right brake lever and the front brake
cable on the left.
1
10.a
2
6–7 Nm 6–7 Nm
Adjusting the angle of the brake levers
On both brake levers loosen the screw
on the sleeve. For the best results, stand
on the footrest, grab the handlebars and
stretch your fingers so they extend in
a straight line from your hands. Set the
brake levers in this position and tighten
the two mounting screws.
10.b
9.b9.a
You can adjust the position of the
handlebar ends on the Yedoo Wolfer
model using the mounting screws
shown on the picture.
Check that the brake pads move away
from the rim suiciently (1–2 mm) when
the brake lever is re-leased. The distance
of the brake pads can be adjusted by
tightening or loosening the brake cable
anchor bolt (1). If the brake pads come
into contact with the rim while the wheel
spins, adjust the spacing of the brake
arms symmetrically with the tensioning
bolts (2).
11.a 14.b14.a
1
1
2 2
12. 13.11.b
2 2
1
Adjusting the rear brake is the same for
both models.
Insert the brake cable back into the
guide (1). Check the brake pads during
braking, ensuring that their entire
surface fits tightly against the side of the
rim. If not, adjust the screw (2), which
attaches the brake pads to the shoulders
of the V- brakes. The brake pads must
not touch the tyre.
2 2
1
Check that the brake pads move away
from the rim suiciently (1–2 mm) when
the brake lever is re-leased. The distance
of the brake pads can be adjusted by
tightening or loosening the brake cable
anchor bolt (1). If the brake pads come
into contact with the rim while the wheel
spins, adjust the spacing of the brake
arms symmetrically with the tensioning
bolts (2).
15.
1 1
Adjusting the front brakes – Wolfer
The entire surface of the brake pads
should fit tightly against the side of
the rim while braking. If not, adjust the
position of the brake pads using the
screws which attach the brake pads
to the arms of the brakes (1). The pads
should not touch the tyre and when
the brake levers are released the pads
should be 1–2 mm away from the rim.
The distance of the brake pads can be
adjusted by tightening or releasing of
the brake cable in the anchor bolt (2).
EN
1
If the wheel touches the brake pad at
some point during the rotation, turn the
whole brake mechanism until the brake
arms are evenly spaced from the rim.
To lock the position of the arms, turn the
lever downwards (1).
2 2
Adjusting the front brakes – Trexx
Insert the brake cable back into the
guide (1) and check the brake pads
during braking, ensuring that their entire
surface fits tightly against the side of the
rim. If not, adjust the brake pads position
with the screw (2), which attaches the
brake pads to the shoulders of V-brakes.
The bake pads must not touch the tyre.
8
Adjusting the bowden cables
Adjust the position of the cables
and make sure they do not extend
outside the frame of the scooter
(especially in the rear fork area).
9
Attach them to the socket in front of
the frame.
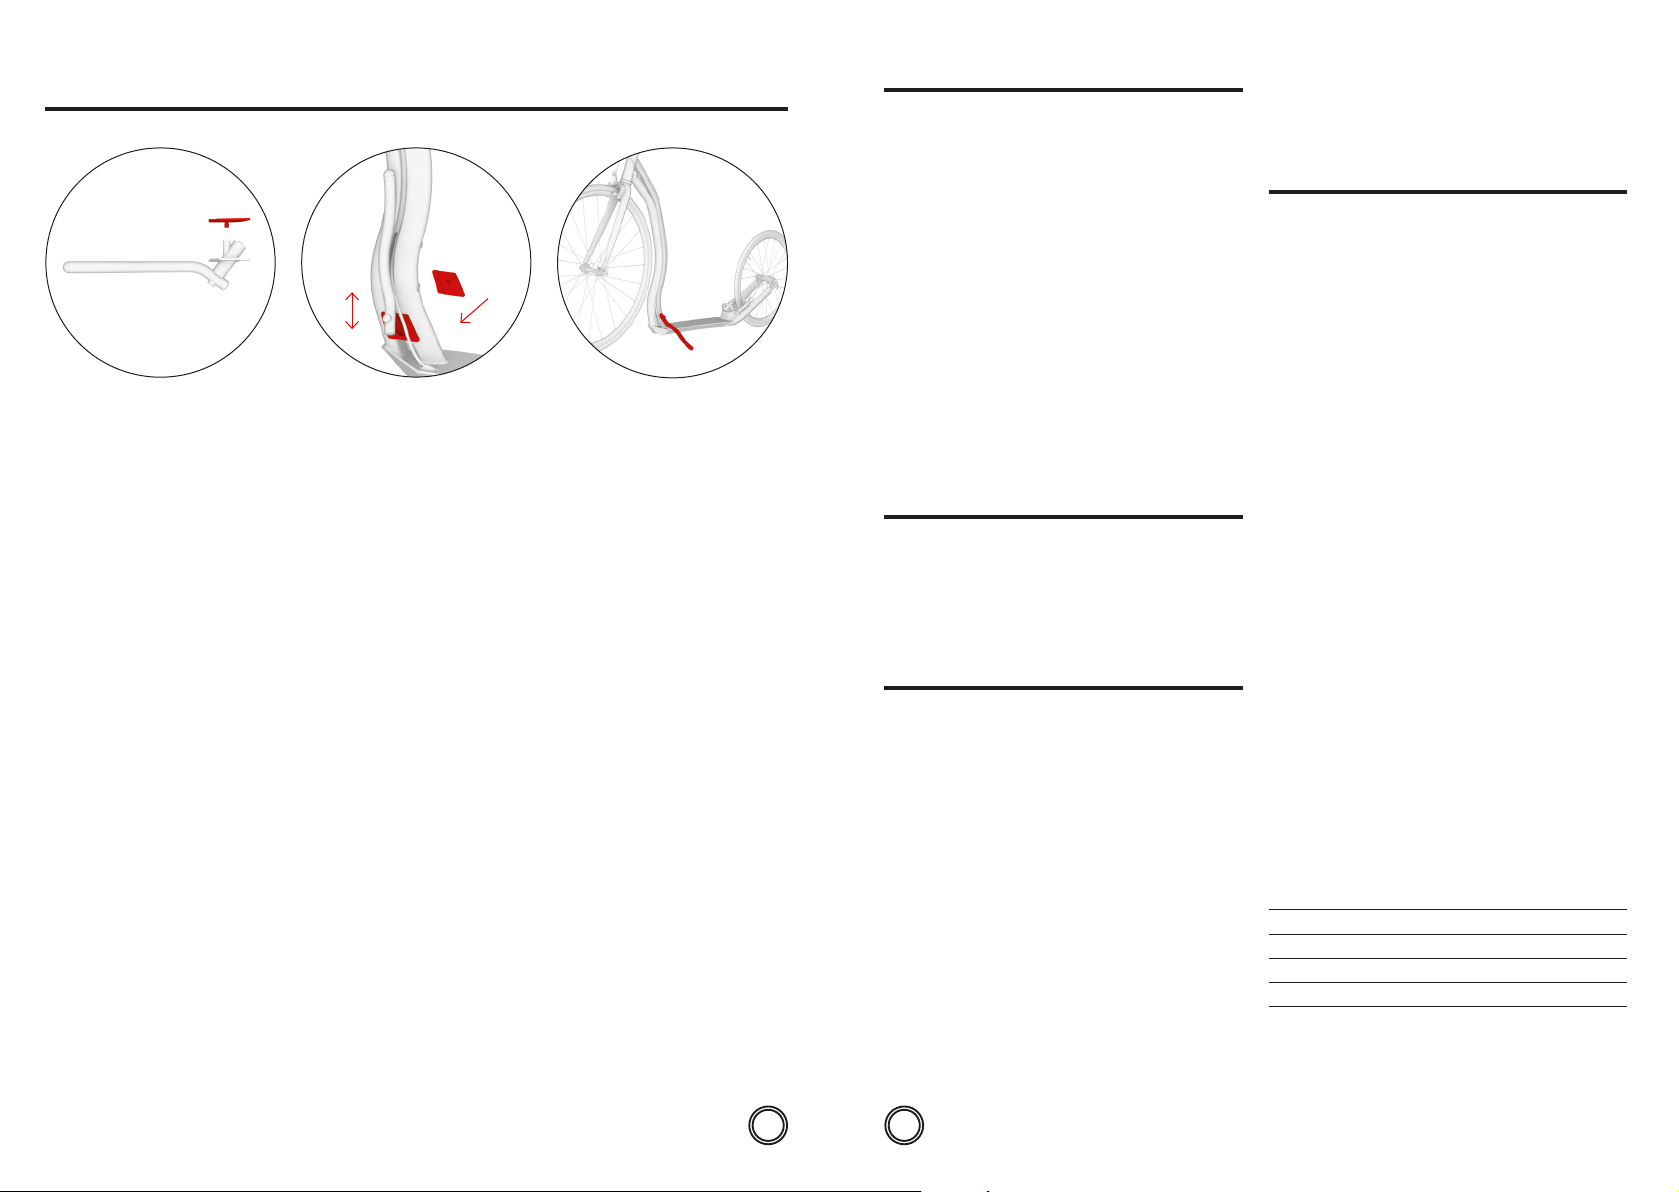
Anti-slip tapes
Use the spare anti-slip tapes to enhance
the anti-slip eect of the footrest. You
can easily stick them onto the empty
slots of the footrest. Caution: Clean and
degrease the footrest thoroughly before
installation.
EN
Page 6
Installation manual
Safety recommendations
The manufacturer and importer in the EU is INTREA – PIKO, s.r.o.,
Sasanková 2657/2, 106 00 Prague 10, Czech Republic,
www.yedoo.eu.
1. 2. 3.
Assembling the stand
The stand is not included. You can
purchase it together with other Yedoo
accessories at your local dealer.
See www.yedoo.eu.
Mount the stand in the area where the
front profile of the frame is spread out.
For the best stability for a given model
choose the right height for mounting
the stand. The stand should not extend
outside the frame of the scooter when in
the riding position.
The maximum capacity of the stand
is about 15 kg. Do not stand on the
parked scooter.
The scooter in its basic configuration is designed for riding in
daylight in areas designated for sport and rec-reation, ideally
on a smooth, dry surface.
For riding on roads and in the dark you must equip the
scooter with additional safety devices (lights, reflec-tors etc.)
in compliance with applicable regulations in your country.
Observe traic rules, principles of safe riding and wear
personal protective equipment (helmet, bike gloves, knee and
elbow pads, boots, etc.).
Before each ride check your brakes and the overall technical
condition of the scooter. Inflate the tyres to the recommended
maximum pressure (see the side of the tyre). Do not exceed its
capacity. The scooter is de-signed only for one rider. Do not
overload the scooter. The scooter is not intended for jumps or
acrobatic rid-ing.
All components designed to decrease the speed (brake pads,
rims, tyres, etc.) get hot while in use. Do not touch any of the
parts until they have cooled down!
Riding instructions
Keep both hands on handlebars while riding. While you use
one leg for taking o, use your second leg for standing on the
footrest. Alternate your legs regularly. Press the brake levers on
the handlebars to apply the brakes. Caution: Sudden braking
may cause a fall.
Maintenance
Proper maintenance will improve safety and extend the life of
your scooter. Therefore, tighten the screw connections, check
the condition of the quick release mechanisms, check the tyre
pressures and lubricate moving parts (bearings in the wheels
and handlebars, brake lever pins, brake mechanism pivot
points, brake cables, etc.) regularly.
Make sure that the applied lubricant does not get on the rims
and brake pads. Grease reduces their eect! If that happens,
degrease soiled areas with, for example, technical gasoline.
Check the tyre tread depth regu-larly and replace the tyres with
new ones with the same parameters if necessary. If the scooter
is not ready to be used, clearly mark it as such.
Check the condition of self-locking nuts regularly (if they
become loose spontaneously, replace them with new ones).
Regularly check the wheel spokes, uneven tension of the wires
can cause cracking or decentrali-zation of the wheels.
The product complies with the relevant EU standards (EN14619)
and it also received certificates of quality and safety by a leading
Czech testing institute (Strojírenský zkušební ústav,s.p.).
Exercise of rights arising
from defective performance
General provisions
Content, scope and duration of the purchaser's rights arising
from defective performance is governed by the applicable laws
of the Czech Republic, in particular the relevant regulations
of the Civil Code (Act No. 89/2012 Coll.) and the Consumer
Protection Act (Act No. 634/1992 Coll.). The rights of the
purchaser within these regulations are not aected by this
document or the information contained in it.
Period for exercising of rights arising from defective
performance
The purchaser can apply the right from defects in newly bought
Yedoo scooter (hereinafter goods) within a period of 24 months
from the day of receipt. If the buyer defines the defect of the
goods legitimately, the period for exercising rights arising from
defective performance is suspended for the time during which
the buyer cannot use the goods.
Specifications of application of rights arising from the
defective performance
Rights arising from the defective performance are applied to
the dealer where the goods were purchased (see details below).
We recommend to submit this document, proof of purchase
and a complete scooter free from any impurities when applying
the rights from defects.
The seller will issue a written confirmation of the exercise of
rights arising from defective performance or a confirmation
ofrepair.
Specification of rights of defective performance
When assembling the scooter the instructions given in the
installation manual must be followed. The scooter must be used
exclusively for the purpose for which it was made. The scooter
must be stored and maintained according to the provided
manufacturer's instructions. The manufacturer's liability does
not apply to defects caused exclusively by improper installation
or use of scooters in conflict with the user manual.
Model of the scooter:
Serial number of the frame:
Date of sale:
Vendor:
Stamp and signature:
EN
10
11
EN
Page 7
Úvod
Montážní návod
Montáž, seřízení a pravidelnou údržbu doporučujeme svěřit
odbornému cykloservisu. Neodborné zásahy mohou vést
k poškození koloběžky či nehodě s vážnými zdravotními následky.
Pokud jste ale technicky zdatní, ničeho se nebojte a s chutí
sedomontáže pusťte s námi.
Dotazy, připomínky a náměty na zlepšení našich výrobků
námprosím posílejte na e-mail: info@yedoo.cz.
1.
Postup montáže je pro oba
modely koloběžek (Wolfer, Trexx)
stejný, liší se jen v detailech,
viz doplňující obrázky.
Při utahování spojů nepřekračujte
uvedený moment utažení.
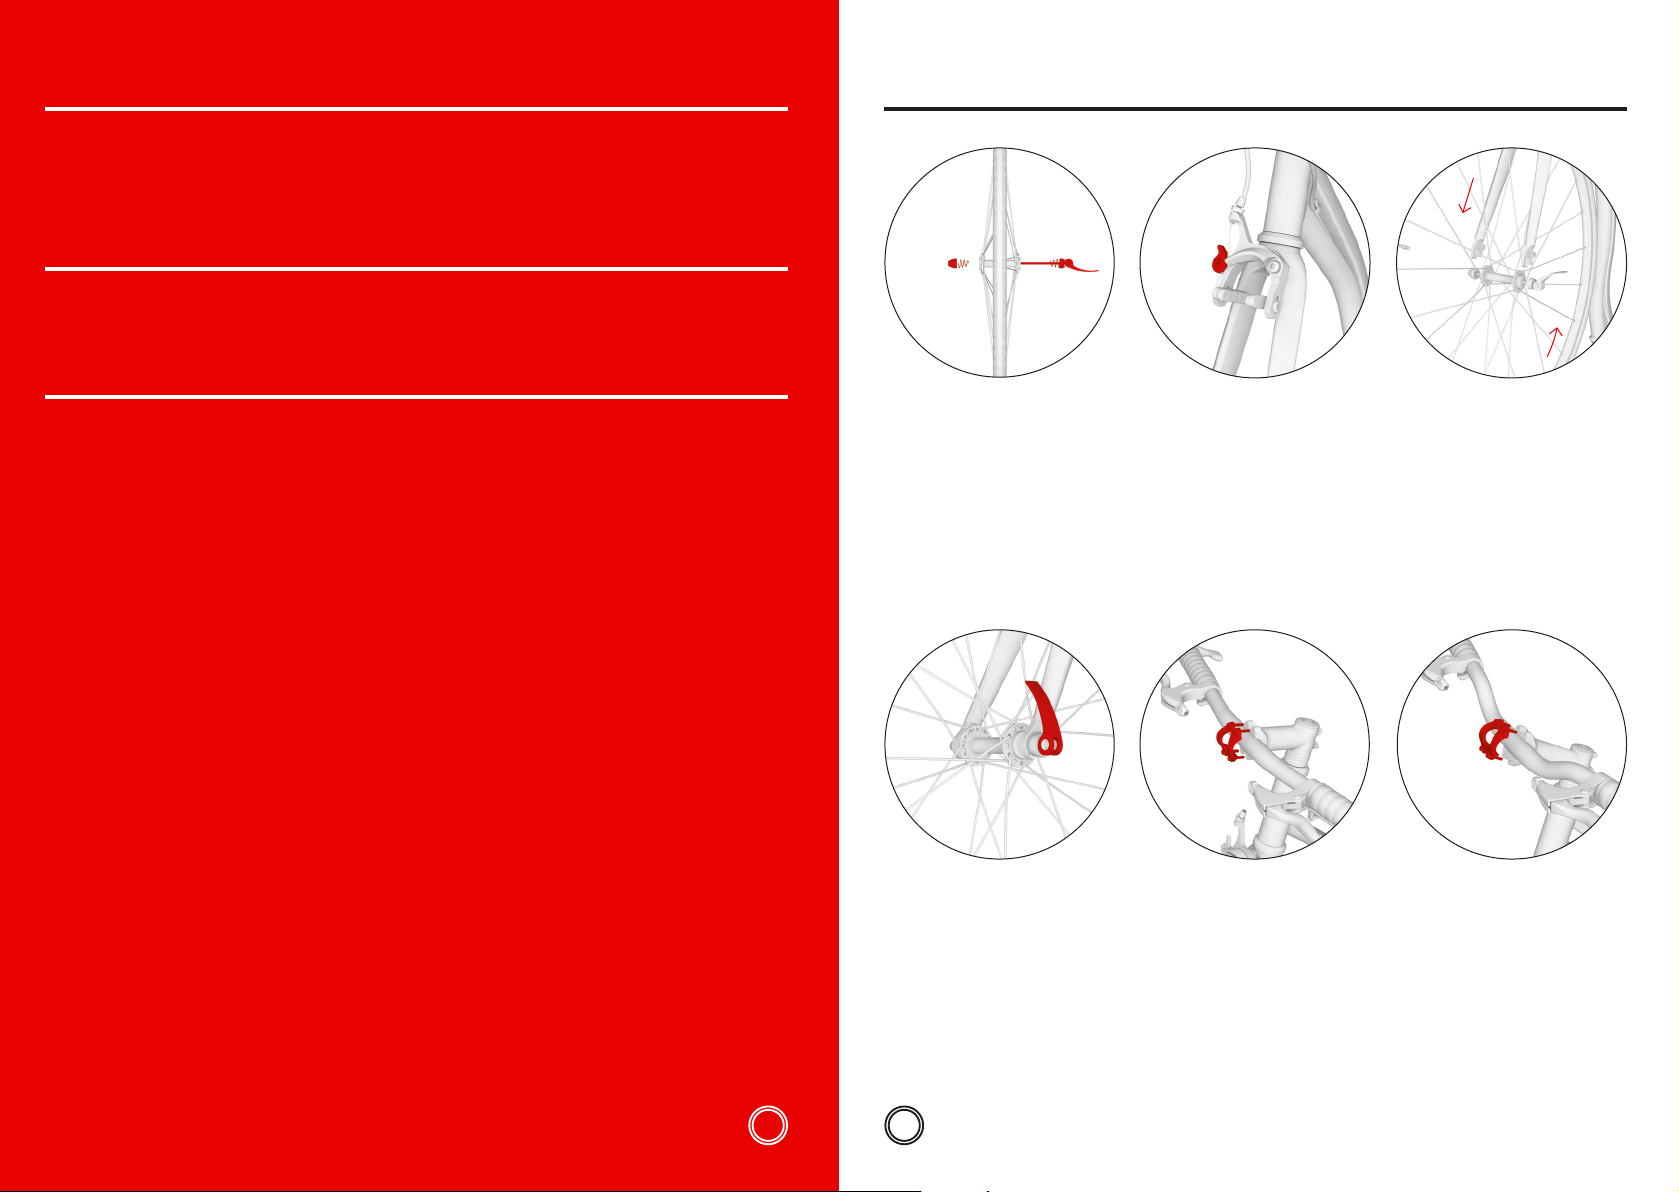
Montáž předního kola
Do kola vložte rychloupínák tak,
aby na každé straně byla jedna pružinka
se zúžením směřujícím ke středu kola.
4.
2.
Nejprve zkontrolujte, zda je přední
vidlice koloběžky natočená ve
správném směru (ramena V-brzdy
směřují dopředu), pak uvolněte
brzdové čelisti pootočením páčky.
5.
Wolfer
3.
Směr otáčení
Kolo vsaďte do přední vidlice tak,
aby bylo přesně uprostřed. Pozor:
Vzorek pneumatiky by měl směřovat
dopředu po směru jízdy, viz směrová
šipka na boku pláště.
Trexx
Více informací ze světa
koloběžek a seznam distributorů
najdete na www.yedoo.cz.
CZ
5–6 Nm 5–6 Nm
Dotáhněte seřizovací matici
rychloupínáku, těsně před dovřením
rychloupínací páčky byste měli cítit
znatelný odpor. Páčku zavřete v takové
pozici, aby se nedotýkala vidlice
a zároveň nemohlo dojít k jejímu
náhodnému otevření během jízdy.
12
13
Instalace řídítek
Řídítka nainstalujete na představec
a utáhněte šrouby objímky. Nápisy na
řídítkách (nejsou zobrazené na obrázku)
by měly být při čelním pohledu čitelné.
CZ
Page 8
Montážní návod
6.a 6.c
2
1
Montáž zadního kola
Uvolněte brzdové lanko z vodítka (1),
vložte kolo do jednoho ze dvou
úchytů vidlice, viz obr. 6.b, 6.c.,
kolo vycentrujte a dotáhněte
rychloupínák (2).
6.b
Dvoupolohová zadní vidlice
umožňuje uzpůsobit výšku stupátka.
Spodní úchyt použijte pro jízdu terénem.
Rychloupínací páčku dovřete tak,
aby směřovala nahoru.
Horní úchyt vidlice, který sníží výšku
stupátka a zároveň odlehčí stojné noze,
je určen pro jízdu na hladkém a rovném
povrchu. Jízda bude méně fyzicky
namáhavá. Rychloupínací páčku dovřete
směrem dolů.
7.a 7.b 7.d
6–8 Nm
1
2
3
5–6 Nm
8.
3
2
Instalace brzdových lanek
Zmáčkněte brzdovou páčku na
maximum a do kulatého očka (1) vložte
konec brzdového lanka. Lanko vložte
do drážky a utáhněte stavěcí šroub (2)
a matici (3). Stejný postup zopakujte
i na druhé brzdě. Zadní brzdové lanko
se zpravidla upevňuje do pravé brzdové
páčky, přední do levé.
1
10.a
2
1 1
9.a
6–7 Nm 6–7 Nm
Nastavení sklonu brzdových páček
U obou brzdových páček povolte
upevňovací šroubek na objímce. Správný
sklon brzdových páček nastavíte tak,
že si stoupnete na stupátko, uchopíte
řídítka a natáhnete prsty tak, aby
prodlužovaly přímku ruky. Do této polohy
nastavte páčky a u obou dotáhněte
upevňovací šroubek.
10.b
1
9.b
U modelu Yedoo Wolfer můžete
pomocí upevňovacích šroubků na
obrázku upravit také polohu rohů.
11.a
1
2 2
Nastavení výšky řídítek
Uvolněte šrouby na představci a nastavte
požadovanou výšku řídítek pomocí
vymezovacích kroužků. Pro nastavení
nejnižší polohy přetočte představec
tak, aby směřoval dolů, viz obr. 7.c.
Po nastavení výšky řídítek nejprve
dotáhněte šroub hlavového složení (1),
pak teprve boční šroubky (2, 3).
CZ
7.c
Seřízení přední brzdy – Wolfer
Brzdové špalíky by při zabrzdění měly
dosedat celou svou plochou na bok
ráfku. Pokud ne, upravte jejich polohu
pomocí šroubku, kterým jsou špalíky
přichyceny k ramenům brzdy (1). Špalíky
se nesmí dotýkat pláště a při uvolnění
brzdové páčky by se měly 1–2 mm
oddálit od ráfku. Vzdálenost špalíků
lze upravit přitažením nebo povolením
brzdového lana v kotevním šroubu (2).
14 15
Pokud kolo při otáčení škrtá o brzdový
špalík, pootočte celým brzdovým
mechanismem tak, aby byla brzdová
ramena stejnoměrně vzdálena od ráfku.
Polohu ramen uzamkněte otočením
páčky směrem dolů (1).
Seřízení přední brzdy – Trexx
Vložte brzdové lanko zpět do vodítka (1)
a zkontrolujte, zda brzdové špalíky při
zabrzdění dosedají celou svou plochou
na bok ráfku. Pokud ne, upravte jejich
polohu pomocí šroubku (2), kterým jsou
špalíky přichyceny k ramenům V-brzdy.
Špalíky se nesmí dotýkat pláště.
CZ
Page 9
Montážní návod
1
2 2
Zkontrolujte, zda se špalíky při uvolnění
brzdové páčky dostatečně oddálí
od ráfku (1–2 mm). Vzdálenost špalíků
lze upravit přitažením či povolením
brzdového lanka v kotevním šroubu
(1). Pokud kolo při otáčení v některém
místě škrtá o brzdový špalík, symetricky
upravte vzdálenost brzdových ramen
napínacími šroubky (2).
12. 13.11.b
2 2
1
Seřízení zadní brzdy je pro oba
modely stejné.
Vložte brzdové lanko zpět do vodítka
(1). Zkontrolujte, zda brzdové špalíky při
zabrzdění dosedají celou svou plochou
na bok ráfku. Pokud ne, upravte jejich
polohu pomocí šroubku (2), kterým jsou
špalíky přichyceny k ramenům V-brzdy.
Špalíky se nesmí dotýkat pláště.
14.b14.a
2 2
1
Zkontrolujte, zda se špalíky při uvolnění
brzdové páčky dostatečně oddálí
od ráfku (1–2 mm). Vzdálenost špalíků
lze upravit přitažením či povolením
brzdového lanka v kotevním šroubu
(1). Pokud kolo při otáčení v některém
místě škrtá o brzdový špalík, symetricky
upravte vzdálenost brzdových ramen
napínacími šroubky (2).
15.
1. 2. 3.
Montáž stojánku
Stojánek není součástí balení,
stejně jako ostatní doplňky Yedoo si jej
můžete dokoupit. Více na yedoo.cz.
Stojánek namontujte v místě,
kde je přední profil rámu rozevřen.
Výšku upevnění stojánku zvolte tak,
aby pro daný model poskytl největší
stabilitu. Stojánek by v záložní poloze
neměl přesahovat rám koloběžky.
Maximální nosnost stojánku je cca 15 kg.
Na zaparkovanou koloběžku nestoupejte.
Upravení bowdenů
Upravte polohu bowdenů tak,
aby nikde (obzvláště u zadní vidlice)
nepřesahovaly rám koloběžky.
CZ
Vpřední části rámu jej upevněte
do objímky.
Protiskluzové pásky
Pro zvýšení protiskluzového účinku
stupátka použijte náhradní protiskluzové
pásky, které jednoduše nalepíte do
prázdných drážek stupátka. Pozor:
Před aplikací stupátko řádně očistěte
a odmastěte.
16 17
CZ
Page 10
Bezpečnostní doporučení
Výrobce a dovozce do EU INTREA – PIKO, s.r.o.,
Sasanková 2657/2, 106 00 Praha 10, Česká republika,
www.yedoo.cz.
Einleitung
Koloběžka je v základní výbavě určena pro jízdu za denního
světla v prostorách vymezených pro sport a rekreaci,
ideálně nahladkém a suchém povrchu.
Pro jízdu na pozemních komunikacích a pro jízdu za tmy
jimusíte dovybavit bezpečnostními prvky (světla, odrazky atd.)
v souladu s platnými předpisy ve vaší zemi. Dodržujte pravidla
silničního provozu, zásady bezpečné jízdy a noste osobní
ochranné pomůcky (přilbu, cyklistické rukavice, chrániče kolen
a loktů, pevné boty apod.).
Před každou jízdou zkontrolujte funkčnost brzd a celkový
technický stav koloběžky. Pneumatiky hustěte na maximální
doporučenou hodnotu tlaku, viz boční strana pláště.
Nepřekračujte její nosnost. Koloběžka je určena pouze pro
jednoho jezdce. Vyvarujte se přetěžování koloběžky, koloběžka
není určena pro skoky ani akrobatickou jízdu.
Všechny komponenty snižující rychlost (brzdové špalíky, ráfky,
pneumatiky apod.) se při používání zahřívají, nedotýkejte se
jich, dokud nevychladnou!
Jízdní pokyny
Při jízdě mějte vždy obě ruce na řídítkách. Zatímco se jednou
nohou odrážíte, druhou nohou stůjte na stupátku koloběžky.
Pravidelně střídejte odrazovou nohu. Pro zabrzdění stiskněte
brzdové páčky na řídítkách. Pozor: Prudké zabrzdění může
způsobit pád.
Údržba
Řádná údržba zvýší bezpečnost a prodlouží životnost vaší
koloběžky. Proto pravidelně dotahujte šroubové spoje,
kontrolujte stav rychloupínáků, tlak v pneumatikách
apromazávejte pohyblivé části (ložiska kol a řídítek,
čepy brzdových páček, čelisti brzd, brzdová lanka atd.).
Dejte však pozor, aby se mazivo nedostalo na ráfky a brzdové
destičky. Mastnota snižuje jejich účinek! Pokud se tak stane,
odmastěte znečištěné části např. technickým benzínem.
Pravidelně kontrolujte výšku vzorku na pláštích kol, v případě
potřeby vyměňte pláště za nové se shodnými parametry.
Koloběžku, která není připravena pro použití, vhodně označte.
Kontrolujte stav samojistných matic (pokud se za jízdy
samovolně uvolňují, vyměňte je za nové). Pravidelně kontrolujte
výplet kol, nestejnoměrné napnutí drátů ve výpletu může
způsobit jejich praskání nebo rozcentrování kol.
Výrobek splňuje náležité normy EU (ČSN EN 14619 SPORTOVNÍ
POTŘEBA) a získal certifikáty kvality a bezpečnosti od předního
českého zkušebního ústavu (Strojírenský zkušební ústav, s. p.).
Uplatnění práv
z vadného plnění
Obecná ustanovení
Obsah, rozsah a trvání práv kupujícího z vadného plnění
zboží se řídí platnými právními předpisy České republiky,
ato především příslušnými ustanoveními občanského
zákoníku (z.č.89/2012 Sb.) a zákona o ochraně spotřebitele
(z.č.634/1992 Sb.). Práva kupujícího ve smyslu těchto předpisů
nejsou tímto dokladem ani v něm uvedenými informacemi nijak
dotčena.
Doba pro uplatnění práv z vadného plnění
Právo z vady u nově zakoupené koloběžky Yedoo (dále jen
zboží) může kupující uplatnit v době 24 měsíců od jejího
převzetí. Vytkne-li kupující vadu zboží oprávněně, lhůta pro
uplatnění práv z vadného plnění neběží po dobu, po kterou
kupující nemůže zboží užívat.
Způsob uplatnění práv z vadného plnění
Práva z vadného plnění se uplatňují u prodejce, u kterého
kupující zboží zakoupil (viz údaje níže). Při uplatnění vad
zboží doporučujeme předložit tento doklad, doklad o koupi
akompletní, nečistot zbavenou koloběžku. O uplatnění
práv zvadného plnění, případně o provedení opravy vystaví
prodejce kupujícímu písemné potvrzení.
Podmínky trvání práv z vadného plnění
Při montáži koloběžky musí být dodrženy pokyny uvedené
vmontážním návodu. Koloběžka musí být používána výhradně
kúčelu, k jakému byla vyrobena. Koloběžka musí být
skladována a udržována podle výrobcem uvedených pokynů.
Na vady způsobené výlučně nesprávnou montáží či používáním
koloběžky v rozporu s uživatelskou příručkou se odpovědnost
výrobce nevztahuje.
Model koloběžky:
Výrobní číslo rámu:
Datum prodeje:
Prodejce:
Razítko a podpis:
Grundsätzlich empfehlen wir die Montage, Einstellung und
regelmäßige Wartung einem spezialisierten Fahrradservice
zuüberlassen. Unsachgemäße Einsatz oder Veränderungenen
am Tretroller können Materialschäden und schwere Unfälle
zurFolge haben.
Falls Sie technische Fertigkeiten besitzen und sich nicht davor
scheuen, werden Sie allerdings sehen, dass die Montage ganz
leicht ist.
Fragen, Bemerkungen und Verbesserungsvorschläge zu unseren
Produkten schicken Sie uns bitte an unsere E-Mail Adresse:
info@yedoo.eu.
Mehr Informationen aus der
„Tretroller-Welt“ und eine Liste
der Vertreiber finden Sie unter
www.yedoo.eu.
CZ
18
19
DE
Page 11

Montageanleitung
1.
Die Vorgehensweise ist für beide
Modelle (Wolfer, Trexx) gleich,
sie unterscheidet sich nur in Details,
siehe ergänzende Bilder.
Beim Festziehen überschreiten Sie nicht
den angegebenen Festziehmoment.
Montage des vorderen Rades
Setzen Sie den Schnellspannhebel in
das Rad so ein, dass an jeder Seite eine
Feder mit Verengung zur Radmitte ist.
4.
2.
Bringen Sie die Vordergabel des
Tretrollers so in Position, dass die Arme
der V-Bremse nach vorne gerichtet sind,
dann önen Sie die Bremsarme durch
Drehen des Hebels.
5.
Wolfer
3.
Drehrichtung
Führen Sie die Radachse in die Schlitze
der vorderen Gabel so, dass es in der
Mitte ist. Achtung: Das Laulächenprofil
des Reifens (Rillen in Form von Pfeilen)
muss nach vorne in Fahrrichtung zeigen.
Trexx
6.a 6.c
2
1
Montage des hinteren Rades
Hängen Sie das Bremsseil aus (1),
setzen Sie das Rad in einen der
beiden Gabelhalter ein, siehe Abb.
6.b, 6.c., das Rad zentrieren und den
Schnellspannhebel (2) festziehen.
6.b
Die hintere Gabel mit zwei
Positionen ermöglicht die Einstellung
der Trittbretthöhe. Die untere
Gabelhalterung ist für Geländefahrten
bestimmt. Schließen Sie den
Schnellspannhebel so, dass er nach
oben zeigt.
Die obere Gabelhalterung, verringert
die Höhe des Trittbretts und entlastet
zugleich das Standbein, ist für Fahrten
auf ebener Oberfläche bestimmt.
DieFahrt ist somit weniger anstrengend.
Schließen Sie den Schnellspannhebel so,
dass er nach unten zeigt.
7.a 7.b 7.d
6–8 Nm
1
Drehen Sie die Schraubenmutter nur so
nach, dass Sie vor dem Schließen des
Schnellspannhebels einen Widerstand
fühlen. Schließen Sie den Hebel so,
dass er die Gabel nicht berührt und sich
während der Fahrt nicht önen kann.
DE
5–6 Nm 5–6 Nm
Anbringen der Lenkerstange
Installieren Sie die Lenkerstange an den
Anbau und ziehen Sie die Schrauben des
Lenkstangenvorbaus fest. Die Logos
(auf der Abbildung nicht dargestellt)
sollten bei Frontansicht lesbar sein.
Einstellung der Lenkerhöhe
Lockern Sie die Schrauben des
Lenkstangenvorbaus und stellen Sie
die gewünschte Höhe des Lenkers mit
Hilfe der Ringe ein. Um die niedrigste
Position einzustellen, drehen Sie den
Lenkstangenvorbau nach unten, siehe
Abb. 7.c. Nach der Einstellung ziehen Sie
zuerst die Kopfschraube (1) fest, dann
die Seitenschrauben (2, 3).
20 21
2
3
5–6 Nm
7.c
DE
Page 12

Montageanleitung
8.
3
2
Montage der Bremszüge
Ziehen Sie den Bremshebel auf das
Maximum an und schieben Sie das
verdickte Ende des Bremsseils in die
Halterung. (1). Schieben Sie das Seil in
die Nut und zeihen Sie die Stellschraube
(2) und Mutter (3) fest. Wiederholen
Sie den gleichen Vorgang bei beiden
Hebeln. Der hintere Bremsteil wird in der
Regel im rechten Bremshebel befestigt,
der vordere im linken.
1
10.a
2
9.a
6–7 Nm 6–7 Nm
Einstellen der Bremshebel
Lösen Sie bei beiden Bremshebeln
die Schrauben Bremshebelfassung.
Richtiger Winkel der Bremshebel: Stellen
Sie sich auf das Trittbrett, greifen Sie
die Lenkstange so, damit sie die Gerade
der Hände verlängert. Fixieren Sie die
Bremshebel in diesem Winkel mit Hilfe
der Schraube.
10.b
9.b
Beim Yedoo Wolfer-Modell können Sie
mit Hilfe von Schrauben siehe Abbildung
auch die Position der Hörner einstellen.
Überprüfen Sie, dass der Abstand
der Bremsbeläge von der Felge bei
unbetätigtem Bremshebel etwa 1–2mm
beträgt. Dieser Abstand lässt sich
durch das Anziehen oder Lockern des
Bremsseils in der Fixierschraube (1)
regulieren. Falls der Reifen beim Drehen
an irgendeiner Stelle den Bremsbelag
streift, stellen Sie die Entfernung der
Bremsarme durch die Spannschrauben
(2) symmetrisch ein.
11.a 14.b14.a
1
1
2 2
12. 13.11.b
2 2
1
Einstellung der hinteren Bremse
ist fürbeide Modelle gleich.
Bremsseil in den Bremsenzug einhängen
(1) und prüfen Sie, ob die Bremsbeläge
beim Bremsen mit ihrer ganzen Fläche
auf der Seitenwand der Felge aufliegen.
Falls nicht, korrigieren Sie die Position
mit Hilfe der Feststellschraube (2),
mitder die Bremsklötze am Armen der
V-Bremse fixiert sind. Die Klötze dürfen
den Mantel des Reifens nicht berühren.
2 2
1
Überprüfen Sie, dass der Abstand
der Bremsbeläge von der Felge bei
unbetätigtem Bremshebel etwa 1–2mm
beträgt. Dieser Abstand lässt sich
durch das Anziehen oder Lockern des
Bremsseils in der Fixierschraube (1)
regulieren. Falls der Reifen beim Drehen
an irgendeiner Stelle den Bremsbelag
streift, stellen Sie die Entfernung der
Bremsarme durch die Spannschrauben
(2) symmetrisch ein.
15.
1 1
Einstellung der vorderen Bremse –
Wolfer
Die Bremsbeläge sollten beim
Bremsen mit ihrer ganzen Fläche auf
der Seitenwand der Felge aufliegen.
Falls nicht, lösen Sie die Schraube
der Bremsklötze an den Armen der
V-Bremse (1) und positionieren diese.
Die Klötze dürfen nie den Mantel des
Reifens berühren und bei unbetätigtem
Bremshebel sollte deren Abstand von
der Felge etwa 1–2 mm betragen.
Dieser Abstand lässt sich durch
Anziehen oder Lockern des Bremsseils
in der Fixierschraube (2) regulieren.
1
Falls der Reifen beim Drehen an
irgendeiner Stelle den Bremsbelag
streift, drehen Sie das ganze
Bremssystem so, dass die Bremsarme
von der Felge gleichmäßig entfernt
sind. Durch das Drehen des Hebels nach
unten (1) stellen Sie die Position ein.
2 2
Einstellung der vorderen Bremse –
Trexx
Bremsseil in den Bremsenzug einhängen
(1) und prüfen Sie, ob die Bremsbeläge
beim Bremsen mit ihrer ganzen Fläche
auf der Seitenwand der Felge aufliegen.
Falls nicht, korrigieren Sie die Position
mit Hilfe der Feststellschraube (2),
mit der die Bremsklötze am Armen der
V-Bremse fixiert sind. Die Klötze dürfen
den Mantel des Reifens nicht berühren.
Bowden-Einstellung
Positionieren Sie die Bowdens so, damit
sie den Rahmen des Tretrollers nicht
überschreiten (insbesondere bei
hinterer Gabel).
2322
Im vorderen Teil des Rahmens in der
Fassung fixieren.
Antirutschstreifen
Für das Trittbrett verwenden Sie
diebeiliegenden Antirutschstreifen,
die einfach in die Rillen des Trittbretts
geklebt werden. Achtung: Das Trittbrett
vor der Anwendung säubern und
entfetten.
DE
Page 13
Montageanleitung
1. 2. 3.
Montage des Ständers
Der Ständer ist im Lieferumfang nicht
enthalten, sowie weiteres Zubehör,
dass Sie bestellen können.
Montieren Sie den Ständer an der Stelle,
wo das vordere Rahmenprofil geönet
ist. Wählen Sie bei gegebenem Modell
solche Befestigungshöhe, damit der
Ständer genügend Stabilität bieten
kann. Während der Fahrt sollte der
Stände nicht den Rahmen des Tretrollers
überschreiten.
Maximale Tragfähigkeit des Ständers
beträgt ca.15 kg. Bei ausgeklappten
Ständer nicht auf den Tretroller steigen.
Sicherheits -Empfehlungen
Der Tretroller ist in seiner Grundausstattung für eine Fahrt
bei Tageslicht auf Sportplätzen und Geländen in mäßig
strukturiertem Gelände bestimmt.
Für die Fahrten auf Verkehrswegen und für die Fahrt im
Dunkeln ist er mit Sicherheitselementen (Licht, Rückstrahler
usw.) gemäß den geltenden Straßenvorschriften in Ihrem Land
auszustatten. Halten Sie die Straßenverkehrsregeln sowie
die Grundsätze des sicheren Betriebes ein und benutzen Sie
Schutzmittel (Helm, Handschuhe, Ellbogen- und Knieschützer,
feste Schuhe usw.).
Überprüfen Sie vor jeder Fahrt die Funktionsfähigkeit
der Bremsen und den gesamten technischen Zustand
des Tretrollers. Überschreiten Sie auf keinen Fall den
max. Reifendruck, siehe an der Seite des Reifenmantels.
Überschreiten Sie nicht die max. Tragfähigkeit. Der Tretroller
ist nur für eine Person bestimmt. Der Tretroller ist nicht für
Belastungen wie Akrobatik und Sprünge ausgelegt.
Alle Bauteile, die die Geschwindigkeit regulieren (Bremsbeläge,
Felgen, Reifen usw.) erwärmen sich während der Nutzung,
fassen Sie diese nicht an, solange sie nicht abgekühlt sind!
Fahranweisungen
Halten Sie während der Fahrt immer beide Hände auf der
Lenkstange. Während Sie sich mit einem Fuß abstoßen, stehen
Sie mit dem anderen Fuß auf dem Trittbrett des Tretrollers.
Wechseln Sie regelmäßig das Bein, mit dem Sie sich abstoßen.
Zum Bremsen benutzen Sie die Bremshebel an der Lenkerstange.
Achtung: Ein scharfes Bremsen kann einen Sturz zur Folge haben.
Wartung
Richtige und regelmäßige Wartung erhöht die Sicherheit und
verlängert die Lebensdauer Ihres Tretrollers. Deshalb ziehen
Sie regelmäßig die Schraubenverbindungen nach, prüfen Sie
den Zustand der Schnellspannhebel, den Luftdruck in den
Reifen und schmieren Sie die beweglichen Teile (Lager der
Räder und Lenkerstange, Stifte der Bremshebel, Bremsbacken,
Bremsseileusw.)
Achten Sie aber darauf, dass das Schmiermittel nicht auf die
Felgen oder Bremsbeläge gelangt. Das Schmiermittel reduziert die
Bremswirkung entscheidend! Falls es trotzdem passiert, entfetten
Sie die verunreinigten Teile z.B. mit technischem Benzin. Prüfen
Sie regelmäßig die Profiltiefe an den Reifen, bei Bedarf gegen
neue mit gleichen Parametern tauschen. Fahruntüchtige Tretroller
sollten geeignet gekennzeichnet werden.
Prüfen Sie den Zustand der Sicherheitsmutter (werden sie
während der Fahrt locker, tauschen Sie sie gegen neue).
Prüfen Sie regelmäßig die Radbespannung, ungleichmäßige
Bespannung kann zum Bruch führen.
Das Produkt erfüllt die erforderlichen EU Normen
(ČSNEN14619 SPORTBEDARF) und erhielt ein Qualitätsund Sicherheitszertifikat von der führenden tschechischen
Prüfanstalt (Maschinenbau-Prüfanstalt, s. p.).
Hersteller und Einführer in EU INTREA – PIKO, s.r.o.,
Sasanková 2657/2, 106 00 Praha 10, Tschechische Republik,
www.yedoo.eu.
Garantieschein
Allgemeine Bestimmungen
Der Inhalt, Umfang, sowie die zeitliche Gültigkeit der Garantie
richten sich nach den gesetzlichen Rechtsvorschriften
der Tschechischen Republik, insbesondere nach den
Bestimmungen des Bürgerlichen Gesetzbuches (Nr. 89/2012
Slg.) und des Verbraucherschutzgesetzes (Nr. 634/1992 Slg.).
Die Käuferrechte bleiben im Sinne dieser Vorschriften durch
diese Informationen unberührt.
Garantiebedingungen
Das Produkt muss gemäß der Montageanleitung
zusammengebaut werden. Der Tretroller muss gemäß den
Herstelleranweisungen gelagert und gewartet werden und
darf nicht zweckentfremdet verwendet werden. Der Hersteller
haftet nicht für Schäden, die durch falsche Montage oder
durch Nutzung in anderer als in diesem Benutzerhandbuch
erläuterten Art und Weise entstehen.
Garantiedauer
Die Garantiedauer beträgt bei einem neu gekauften Tretroller
Yedoo (weiter nur Produkt) 24 Monate ab Abnahme. Ist der
Anspruch aufgrund tatsächlicher Produktmängel berechtigt,
soläuft ist bis zur Behebung der Mängel die Laufzeit der
Garantie ausgesetzt.
Garantieanspruch
Der Garantianspruch wird beim Händler geltend gemacht, bei
dem die Ware gekauft wurde (siehe unten). Wir empfehlen, die
Rechnung, die ausgefüllte Garantiekarte, sowie das vollständig
gereinigte Produkt beim Händler vorzulegen. Der Händler wird
dem Käufer im Gegenzug eine Übergabebestätigung für die
Übernahme zur Garantieabwicklung aushändigen.
Produkt/Modell:
Produktionsnummer des Rahmens:
Verkaufsdatum:
Verkäufer:
Stempel und Unterschrift:
DE
24 25
DE
Page 14
Sissejuhatus
Paigaldusjuhend
Soovitame, et usaldaksite paigaldamise, reguleerimise
ja regulaarse hoolduse jalgrattapoe spetsialistidele. Vale
sekkumine võib tõukeratast kahjustada või põhjustada tõsise
tervisekahjustusega õnnetuse.
Kui olete aga tehnilise taibuga, siis ärge muretsege – sellest
kasutusjuhendist leiate kogu vajaliku teabe, et oma uus
tõukeratas ise kokku panna.
Saatke oma küsimused, arvamused ja meie toodete
parandusettepanekud e-posti aadressil: info@yedoo.eu.
1.
Mõlema mudeli (Wolfer ja Trexx)
paigaldamine on sarnane ning erineb
vaid väikeste detailide osas (vt lisapilte).
Ühenduste pingutamisel on oluline,
et te ei ületaks kindlaksmääratud
pingutusmomenti.
Esiratta paigaldamine
Sisestage rattasse
kiirkinnitusmehhanism, tagamaks et
mõlemal ratta küljel on vedrude kitsad
otsad suunaga ratta keskele.
4.
2.
Kõigepealt kontrollige, et tõukeratta
esihark oleks õigesti joondatud (V-piduri
õlad peavad olema suunatud ettepoole,
tõukeratta esiosa suunas), seejärel
vabastage pidurihaaratsid hoova
pööramise teel.
5.
Wolfer
3.
Pöörlemissuund
Sisestage ratas esiharki nii, et see
jääks täpselt keskele. Tähelepanu!
Ratast paigaldades jälgige, et rehvi
siseküljel olev nool osutaks tõukeratta
edasiveeremisel pöörlemissuunda.
Trexx
Lisateavet tõukerattamaailma
kohta ja edasimüüjate nimekirja
leiate meie kodulehelt
www.yedoo.eu.
EE
26
Kinnitage kiirkinnitusmehhanism
kohandusmutri abil oma õigele kohale.
Kui see on õiges asendis, siis tunnete
vahetult enne mehhanismi täielikku
sulgemist märgatavat takistust. Sulgege
kiirkinniti hoob asendisse, kus see ei
puudutaks kahvlit ega avaneks sõitmise
ajal kogemata.
27
5–6 Nm 5–6 Nm
Juhtraua paigaldamine
Paigaldage juhtraud varre külge ja
keerake muhvi kruvid kinni. Sildid (pole
pildil näidatud) peaks olema eestvaates
selgelt nähtavad.
EE
Page 15

Paigaldusjuhend
6.a 6.c
2
1
Tagaratta paigaldamine
Vabastage piduritross juhikust (1),
asetage ratas ühele kahest kahvli
eemalduvast osast (vt 6.b ja 6.c), asetage
ratas keskele ja lõpuks pingutage
kiirkinnitusmehhanismi (2).
6.b
Kahe asendiga tagumise kahvli abil saab
reguleerida jalatoe kõrgust maapinnast.
Kasutage alumist asendit, kui soovite
sõita ebatasasel maapinnal. Sulgege
kiirkinnituse hoob. See peaks olema
suunaga ülespoole.
Ülemise kahvli asend, mis vähendab
jalatoe kõrgust ja mis on mõeldud
sõitmiseks siledal ning tasasel pinnal. Nii
on sõitmine füüsiliselt kergem. Suletud
kiirkinnituse hoob ei tohiks olla suunaga
allapoole.
7.a 7.b 7.d
6–8 Nm
1
2
3
5–6 Nm
8.
3
2
Piduritrosside paigaldamine
Pigistage pidurihooba maksimaalselt ja
sisestage piduritrossi ots ümmargusse
sanga (1). Sisestage tross soonde
ja keerake fikseerimiskruvi (2) ning
mutter kinni (3). Korrake protsessi
teise piduriga. Tagumine piduritross
paigaldatakse tavaliselt paremale
pidurihoovale ja eesmine piduritross
vasakule hoovale.
1
10.a
2
1 1
9.a
6–7 Nm 6–7 Nm
Pidurihoobade kaldenurga
reguleerimine
Keerake mõlema pidurihoova muhvil
olev kruvi lahti. Parima tulemuse
saavutamiseks seiske jalatoel, haarake
juhtrauast ja sirutage oma sõrmed sirgelt
välja. Seadke piduri hoovad sellesse
asendisse ja keerake kahe kinnituskruviga
kinni.
10.b
1
9.b
Yedoo Wolfer mudeli korral saate
juhtraua otsade asendit reguleerida
kinnituskruvide abil, nagu on ka pildil
näidatud.
11.a
1
2 2
Juhtraua kõrguse reguleerimine
Keerake varrel olevad kruvid lahti ja
reguleerige juhtraud lisarõngaste abil
soovitud kõrgusele. Et seada juhtrauda
madalaimasse asendisse, keerake vart
nii, et see jääks suunaga allapoole, vt
joonist 7.c. Pärast juhtraua kõrguse
reguleerimist, keerake kõigepealt kinni
peakruvi (1), ja seejärel külgmised kruvid
(2 ja 3).
EE
7.c
28
Esipidurite reguleerimine – Wolfer
Pidurdamise ajal peab piduriklotside
kogu pind sobituma tihedalt vastu
velge. Kui ei sobitu, siis reguleerige
piduriklotse kruvide abil, mis kinnitavad
piduriklotsid piduriõlgade külge (1).
Piduriklotsid ei tohi rehvide vastu
puutuda ja pidurihoova vabastamisel
peaks piduriklotsid jääma veljest 1-2
mm kaugusele. Piduriklotside kaugust
saab muuta ankrupoldiga piduritrossi
pingutamise või lõdvendamise teel (2).
29
Kui ratas puutub pöörlemise ajal
piduriklotsiga kokku, siis keerake tervet
pidurimehhanismi, kuni piduriõlad
jäävad veljest ühtlasele kaugusele.
Õlgade asendi lukustamiseks pöörake
hooba allapoole (1).
Tagumiste pidurite reguleerimine –
Wolfer
Sisestage piduritross tagasi juhikusse (1)
ja kontrollige piduriklotse pidurdamise
ajal, tagamaks et nende kogu pind
sobitub tihedalt vastu velge. Kui ei
sobitu, siis reguleerige piduriklotside
asendit kruviga (2), mis kinnitab
piduriklotsid V-pidurite õlgade külge.
Piduriklotsid ei tohi rehvide vastu
puutuda.
EE
Page 16

Paigaldusjuhend
1
2 2
Kontrollige, et piduriklotsid eemalduks
pidurihoova vabastamisel veljest
piisavalt (1-2 mm). Piduriklotside kaugust
saab muuta ankrupoldiga piduritrossi
pingutamise või lõdvendamise
teel (1). Kui piduriklotsid puutuvad
ratta pöörlemise ajal velje vastu,
siis reguleerige pidurivarte kaugust
pingutamispoltidega (2) sümmeetriliselt.
12. 13.11.b
2 2
1
Tagumiste pidurite reguleerimine
on mõlema mudeli korral sarnane.
Sisestage piduritross tagasi juhikusse
(1). Kontrollige piduriklotse pidurdamise
ajal, tagamaks et nende kogu pind
sobitub tihedalt vastu velge. Kui ei
sobitu, siis reguleerige kruvi (2), mis
kinnitab piduriklotsid V-pidurite õlgade
külge. Piduriklotsid ei tohi rehvide vastu
puutuda.
14.b14.a
2 2
1
Kontrollige, et piduriklotsid eemalduks
pidurihoova vabastamisel veljest
piisavalt (1-2 mm). Piduriklotside kaugust
saab muuta ankrupoldiga piduritrossi
pingutamise või lõdvendamise
teel (1). Kui piduriklotsid puutuvad
ratta pöörlemise ajal velje vastu,
siis reguleerige pidurivarte kaugust
pingutamispoltidega (2) sümmeetriliselt.
15.
1. 2. 3.
Statiivi ehk rattajala paigaldamine
Statiiv komplekti ei kuulu. Saate selle
osta koos teiste Yedoo tarvikutega
kohalikult edasimüüjalt.
Vaadake www.yedoo.eu.
Kinnitage statiiv kohale, kus raami
esiprofiil laieneb. Antud mudeli parima
stabiilsuse saavutamiseks, valige statiivi
paigaldamiseks sobilik kõrgus. Statiiv ei
peaks sõiduasendis ulatuma väljapoole
tõukeratta raami.
Statiivi maksimaalne võimsus on umbes
15kg. Ärge pargitud tõukerattal seiske.
Kõritrosside reguleerimine
Reguleerige trosside asendeid ja
veenduge, et need ei ulatuks väljaspoole
tõukeratta raami (eriti tagumises
kahvlialas).
EE
Kinnitage need eesmise raami
trossipessa.
Libisemisvastased lindid
Kasutage libisemisvastaseid linte, et
jalatoed oleks veelgi libisemiskindlad.
Neid saab lihtsalt kleepida jalatugedel
olevatesse tühikutesse. Tähelepanu!
Enne paigaldamist puhastage jalatugi
põhjalikult igasugusest mustusest ja
määrdest.
30
31
EE
Page 17

Ohutusjuhised
Tõukeratas on oma põhikonfiguratsioonilt mõeldud
kasutamiseks päevavalguses ning spordiks ja vaba aja
veetmiseks ettenähtud aladel, kus on ideaaljuhul sile ja
kuivpind.
Liiklemiseks teedel ja pimedas, peate paigaldama tõukerattale
täiendavad ohutusseadmed (tuled, helkurid jne), mis
oleks kooskõlas teie riigis kehtivate eeskirjadega. Jälgige
liikluseeskirju, ohutu liiklemise põhimõtteid ja kandke
isikukaitsevahendeid (kiivrit, jalgrattakindaid, põlve- ja
küünarnukikaitsmeid, sobilikke jalanõusid jne).
Enne igat sõitu kontrollige tõukeratta pidureid ja selle
üldist tehnilist seisukorda. Täitke rehvid ]huga, soovitatud
maksimaalse rehvirõhuni (vt rehvi küljel olevaid andmeid). Ärge
rehvi ületäitke. Tõukeratas on mõeldud ainult ühele sõitjale.
Ärge tõuketatast ülekoormake. Tõukeratas ei ole mõeldud
hüpeteks ega vigursõitmiseks.
Kõik osad, mille eesmärk on kiiruse vähendamine (piduriklotsid,
veljed, rehvid jne), muutuvad kasutamise ajal kuumaks. Ära
puudutage osi enne, kui need on maha jahtunud!
Sõitmisjuhised
Sõitmise ajal hoidke mõlema käega juhtrauast kinni. Sel ajal
kui kasutate ühte jalga hoo lükkamiseks, hoidke oma teist jalga
jalatoel. Vahetage oma jalgu regulaarselt. Pidurite kasutamiseks
vajutage juhtraual olevatele pidurihoobadele. Tähelepanu! Järsk
pidurdamine võib põhjustada kukkumist.
Hooldus
Õige hooldus parandab ohutust ja pikendab tõukeratta
kasutusiga. Seetõttu keerake kruvid korralikult kinni, kontrollige
kiirvabastusmehhanismi seisukorda, kontrollige rehvirõhku ja
määrige regulaarselt liikuvaid osi (rataste ja juhtraua laagreid,
pidurihoova kodaraid, pidurimehhanism pöördepunkte,
piduritrosse jne).
Veenduge, et kasutatud määrdeaine ei satuks pöidadele ega
piduriklotsidele. Määrdeaine vähendab nende mõju! Kui see
juhtub, siis eemaldage määre, näiteks tehnilise bensiiniga.
Kontrollige regulaarselt rehvide mustri sügavust ja vajadusel
vahetage rehvid uute, samade parameetritega rehvide vastu
välja. Kui tõukeratas ei ole kasutamisvalmis, siis tähistage see
selgelt.
Kontrollige iselukustuvaid mutreid regulaarselt (kui nad tulevad
iseenesest lahti, siis asendage need uutega). Kontrollige
korrapäraselt rattakodaraid, sest ebaühtlane pinge kodarates
võib põhjustada pragunemist või rataste detsentraliseerimist.
Toode vastab ELi nõuetele (EN 14619) ja on saanud kvaliteedi ja
ohutuse tunnistuse nii juhtivalt Tšehhi katsetamise instituudilt
(Strojírenský zkušební ústav,s.p.).
Tootja ja importija ELis on ettevõte INTREA – PIKO, s. r. o.,
Sasanková 2657/2, 106 00 Praha 10, Tšehhi Vabariik,
www.yedoo.eu.
Tootja vastutus toote
mittenõuetekohase
toimimise korral
Üldsätted
Ostjate õiguste sisu, ulatus ja kestus, mis on seotud
toote mittekohase toimimisega, on reguleeritud
Tšehhi Vabariigis kohaldatavate seadustega, eelkõige
tsiviilseadustiku asjakohaste määruste (seadus nr 89/2012)
ja tarbijakaitseseadusega (seadus nr 634/1992). Käesolev
dokument ja selles sisalduv teave ei mõjuta ostja õiguseid
seoses nimetatud määrustega.
Tootja vastutuse periood toote mittenõuetekohase
toimimise korral
Ostja saab rakendada oma õiguseid seoses äsja ostetud
defektse Yedoo tõukerattaga (edaspidi „kaubad“) 24 kuu jooksul
alates selle kättesaamise kuupäevast. Kui ostja määratleb
kaupade defekti õiguspäraselt, siis õiguste rakendamise
periood mittenõuetekohase toimimise korral algab ajast, mil
ostja ei saa kaupa kasutada.
Õiguste rakendamise erisused mittenõuetekohase
toimimise korral
Mittenõuetekohasest toimimisest tulenevate õiguste rikkumise
korral tuleb pöörduda edasimüüja poole, kelle juurest kaup
soetati (vt allpool). Defektse toote korral soovitame esitada
edasimüüjale käesoleva dokumendi, ostutšeki ja täieliku, ilma
igasuguste lisanditeta tõukeratta.
Müüja väljastab defektse toote osas kirjaliku kinnituse või
remonditööde teostamise kinnituse
Täpsustus seoses õiguste rikkumisega
Tõukeratta kokkupanemisel tuleb järgida paigaldusjuhendit.
Tõukeratast tohib kasutada ainult sel eesmärgil, milleks see
on valmistatud. Tõukeratast tuleb hoida ja hooldada vastavalt
tootja juhistele. Tootja vastutus ei kehti defektidele, mis on
põhjustatud valest paigaldusest, ega tõukeratta kasutamisest
viisil, mis on vastuolus kasutusjuhendiga.
Tõukeratta mudel:
Raami seerianumber:
Müügikuupäev:
Müüja:
Tempel ja allkiri:
32
Introducción
Le recomendamos que encargue la instalación, el ajuste
y elmantenimiento regular a una tienda de bicicletas
especializada. Una intervención inadecuada puede provocar
daños en el patinete o un accidente con graves consecuencias
para la salud.
Si usted posee capacidades técnicas, no se preocupe, este
manual contiene toda la información necesaria para ayudarle
amontar su nuevo patinete.
Envíenos sus preguntas, comentarios y sugerencias para
lamejora de nuestros productos al correo electrónico:
info@yedoo.eu.
Puede encontrar información
adicional del “mundo de
los patinetes” y una lista de
distribuidores en www.yedoo.eu.
33
ES
Page 18

Instrucciones de montaje
1.
El montaje es el mismo para ambos
modelos (Wolfer, Trexx) y difiere
solamente en pequeños detalles (véanse
las imágenes adicionales). Al apretar las
conexiones, no exceda el par de apriete
especificado.
Instalación de la rueda fronta
Inserte el mecanismo de cierre rápido en
la rueda, asegurándose que en ambos
lados de la rueda los extremos estrechos
de los muelles estén orientados al centro
de la rueda.
4.
2.
Primero verifique que la horquilla
delantera del patinete está
correctamente alineada (los brazos
del freno en V deben apuntar hacia
adelante, hacia la parte frontal del
patinete), luego suelte las levas
del freno girando la palanca.
5.
Wolfer
3.
dirección
de rotación
Inserte el eje de la rueda en la horquilla
delantera de tal manera que quede
exactamente en el medio. Precaución:
Cuando inserte la rueda, asegúrese que
la flecha en la banda de rodadura del
neumático apunte en la dirección de
rotación cuando el patinete se desplace
hacia delante.
Trexx
6.a 6.c
2
1
Instalación de la rueda trasera
Suelte el cable de freno de la guía (1),
sitúe la rueda en uno de los dos soportes
de la horquilla (véase 6.b, 6.c.) después
centre la rueda y apriete el mecanismo
de cierre rápido (2).
6.b
La horquilla trasera de dos posiciones
lepermite ajustar la altura sobre elsuelo
de la plataforma de apoyo. Utilice
laposición más baja para conducir
sobre un terreno difícil. Cierre la palanca
decierre rápido. Tiene que apuntar
hacia arriba.
La posición superior de la horquilla,
lacual reduce la altura de la plataforma
de apoyo, está diseñada para
conducir en superficies lisas y planas.
Laconducción así será físicamente
menos demandante. La palanca
decierre rápido tiene que apuntar hacia
arriba.
7.a 7.b 7.d
6–8 Nm
1
Apriete la tuerca de ajuste del
mecanismo de cierre rápido hasta
laposición correcta. Cuando alcance
laposición correcta, notará una
resistencia evidente justo antes de que
cierre el mecanismo por completo.
Cierre la palanca del cierre rápido a una
posición en la cual no toque la horquilla
y simultáneamente no pueda abrirse de
forma accidental al usar el patinete.
ES
5–6 Nm 5–6 Nm
Instalación del manillar
Inserte el manillar en el vástago y apriete
los tornillos del manguito. Las etiquetas
(no están representadas en la imagen)
deben ser claramente visibles desde
lavista frontal.
34
2
3
5–6 Nm
Ajustar la altura del manillar
Suelte los tornillos del vástago y ajuste
el manillar a la altura deseada usando los
anillos espaciadores. Para fijar el manillar
a la posición más baja, gire el vástago
de forma que apunte hacia abajo,
véase img.7.c. Tras ajustar la altura del
manillar, apriete primero el tornillo del
conjunto de la dirección (1), después
lostornillos laterales (2, 3).
35
7.c
ES
Page 19

Instrucciones de montaje
8.
3
2
Instalación de los cables de freno
Apriete la palanca del freno al máximo e
inserte el extremo del cable del freno en
la lengüeta redonda (1). Inserte el cable
en la ranura y apriete el tornillo de ajuste
(2) y la tuerca (3). Repita el proceso con
el otro freno. El cable del freno trasero
generalmente está instalado en la
palanca de freno derecha y el cable de
freno delantero en la izquierda.
1
10.a
2
6–7 Nm 6–7 Nm
Ajuste del ángulo de las palancas de
freno
Suelte los tornillos del manguito en
ambas palancas de freno. Para obtener
los mejores resultados, póngase de
pie en la plataforma de apoyo, agarre
elmanillar y estire los dedos de forma
que se extiendan en línea recta desde
sus manos. Fije las palancas de freno
enesa posición y apriete los dos
tornillos de montaje.
10.b
9.b9.a
Puede ajustar la posición de los
extremos del manillar en el modelo
Wolfer de Yedoo, usando los tornillos de
montaje que se muestran en la imagen.
11.a
1
1
2 2
Asegúrese que las pastillas de freno se
separan suficientemente de la llanta
(1–2mm) cuando se suelta las palancas
de freno. Ajuste la distancia de las
pastillas de freno, apretando o aflojando
el cable de freno en el perno de anclaje
(1). Si las pastillas de freno entran en
contacto con la llanta mientras gira
la rueda, ajuste el espaciado de los
brazos del freno simétricamente con los
tornillos tensores(2).
12. 13.11.b
2 2
1
El ajuste de los frenos traseros
eselmismo para ambos modelos.
Vuelva a insertar el cable de freno en
la guía (1). Verifique la pastilla de freno
durante el frenado, asegúrese de que su
superficie entera encaja a laperfección
contra el lado de la llanta. En caso
contrario, ajuste el tornillo (2), que
sujeta las pastillas de freno a los brazos
del freno en V. Las pastillas de freno no
tienen que tocar la rueda.
14.b14.a
2 2
1
Asegúrese que las pastillas de freno se
separan suficientemente de la llanta
(1–2mm) cuando se suelta las palancas
de freno. Ajuste la distancia de las
pastillas de freno, apretando o aflojando
el cable de freno en el perno de anclaje
(1). Si las pastillas de freno entran en
contacto con la llanta mientras gira
la rueda, ajuste el espaciado de los
brazos del freno simétricamente con los
tornillos tensores (2).
15.
1 1
Ajuste de los frenos delanteros – Wolfer
Toda la superficie de las pastillas de freno
tiene que encajar a la perfección contra
el lado de la llanta durante el frenado.
En caso contrario, ajuste la posición de
las pastillas de freno usando los tornillos
que sujetan las pastillas de freno a los
brazos de los frenos (1). Las pastillas no
tienen que tocar la rueda y cuando se
suelte las palancas de freno, las pastillas
tienen que estar a una distancia de 1-2
mm de lallanta. Ajuste la distancia de las
pastillas de freno, apretando o soltando el
cable de freno en el perno de anclaje (2).
1
Si la rueda toca las pastillas de freno
en algún momento durante la rotación,
gire el mecanismo de freno al completo
hasta que los brazos de freno estén
separados uniformemente de la llanta.
Para fijar la posición de los brazos, gire
la palanca hacia abajo (1).
2 2
Ajuste de los frenos delanteros – Trexx
Vuelva a insertar el cable del freno en
la guía (1) y verifique la pastilla de freno
durante el frenado, asegúrese de que su
superficie entera encaja a la perfección
contra el lado de la llanta. Encaso
contrario, ajuste la posición de las
pastillas de freno con el tornillo (2), que
sujeta las pastillas de freno a los brazos
del freno en V. Las pastillas de freno no
tienen que tocar la rueda.
36 37
Ajustar los cables bowden
Ajuste la posición de los cables
yasegúrese que no sobresalgan
por fuera del bastidor del patinete
(especialmente en el área de la horquilla
trasera).
Fíjelo en el portacables en la parte
delantera del bastidor.
Cintas antideslizantes
Use la cinta antideslizante de repuesto
para mejorar el efecto antideslizante
en la plataforma de apoyo. Las puede
pegar fácilmente en las ranuras
vacías de la plataforma de apoyo.
Precaución: Limpie y desengrase a
fondo la plataforma de apoyo antes de
la instalación.
ES
Page 20

Instrucciones de montaje
Recomendaciones
deseguridad
(Strojírenský zkušební ústav, s. p.).
El fabricante y el importador en la UE es INTREA – PIKO, s. r. o.,
Sasanková 2657/2, 106 00 Praga 10, República Checa,
www.yedoo.eu.
1. 2. 3.
Montaje del soporte
El soporte no se incluye en el suministro.
Puede comprarlo junto a otros
accesorios de Yedoo en su distribuidor
local. Véase www.yedoo.eu.
Instale el soporte en el área en la cual
elperfil frontal del bastidor se ensancha.
Elija la altura adecuada para instalar el
soporte para un modelo concreto para
conseguir la mejor estabilidad. En la
posición de circulación el soporte no
tiene que sobresalir del bastidor del
patinete.
La capacidad máxima del soporte es de
aproximadamente 15kg. No se ponga de
pie en el patinete cuando esté aparcado.
ES
38
El patinete en su configuración básica está diseñado para
conducir a la luz del día en áreas designadas para el deporte
yla animación, idealmente en superficies lisas y secas.
Para circular en carreteras y en la oscuridad debe equipar
alpatinete con dispositivos de seguridad adicionales (luces,
reflectores, etc.) de acuerdo con las regulaciones aplicables en
su país. Tenga en cuenta las normas de tráfico, los principios
de conducción segura y use equipos de protección personal
(casco, guantes de bicicleta, rodilleras y coderas, botas, etc.).
Antes de cada conducción revise los frenos y el estado técnico
general del patinete. Infle las ruedas hasta la presión máxima
recomendada (véase en el lateral de la rueda). No exceda su
capacidad. El patinete está diseñado solo para un conductor.
No sobrecargue el patinete. El patinete no debe usarse para
saltos o conducción acrobática.
Todos los componentes diseñados para reducir la velocidad
(pastillas de freno, llantas, ruedas, etc.) se calientan durante
eluso. ¡No toque éstas partes hasta que no se hayan enfriado!
Instrucciones de conducción
Mantenga las dos manos en el manillar mientras conduce.
Mientras usa una pierna para arrancar, mantenga la otra pierna
para mantenerse de pie en la plataforma de apoyo. Alterne las
piernas de forma regular. Para frenar presione las palancas de
freno en el manillar. Precaución: Un frenado brusco puede
causar una caída.
Mantenimiento
Un mantenimiento adecuado mejora la seguridad y aumenta
la vida de su patinete. Por ello y de forma regular, apriete
las conexiones de tornillo, compruebe el estado de los
mecanismos de cierre rápido, compruebe la presión de las
ruedas y lubrique las partes móviles (cojinetes en las ruedas
yel manillar, pasadores de la palanca de freno, puntos de
pivote del mecanismo de freno, cables de freno, etc.).
Asegúrese que el lubricante aplicado no acabe en las llantas
o las pastillas de freno. ¡La grasa reduce su efecto! Si esto
ocurriera, desengrase las áreas afectadas con, por ejemplo,
gasolina técnica. Compruebe de forma regular la profundidad
de la banda de rodadura y sustituya si fuera necesario las ruedas
por unas nuevas con los mismos parámetros. Si el patinete no
está listo para su uso, marquelo claramente como tal.
Compruebe de forma regular el estado de las tuercas
autoblocantes (si se sueltan espontáneamente, reemplácelas
por otras nuevas). Compruebe de forma regular los radios de
las ruedas, una tensión irregular de los cables puede causar
grietas o la descentralización de las ruedas.
El producto cumple con las normas de la UE pertinentes
(EN 14619) y también ha obtenido certificados de calidad
yseguridad por parte de un puntero instituto checo de pruebas
Ejercicio de los derechos
derivados de un cumplimiento
defectuoso
Provisiones generales
El contenido, el alcance y la duración de los derechos del
comprador derivados de un cumplimiento defectuoso se
rigen por las leyes aplicables de la República Checa, en
particular de las disposiciones pertinentes del Código Civil
(Ley Nº89/2012 Coll.) y la ley de protección del consumidor
(Ley Nº634/1992 Coll.). Los derechos del comprador dentro de
estas disposiciones, no se ven afectados por este documento
olainformación contenida en él.
Período para el ejercicio de los derechos derivados de un
cumplimiento defectuoso
El comprador puede aplicar el derecho de defectos en
elpatinete Yedoo recién comprado (en adelante, bienes) en
un plazo de 24 meses a partir de la fecha de recepción. Si
elcomprador define legítimamente el defecto de los bienes,
el período para el ejercicio de los derechos derivados de
un cumplimiento defectuoso quedará suspendido durante
eltiempo durante el cual el comprador no puede utilizar
losbienes.
Especificaciones para la aplicación de los derechos derivados
de un cumplimiento defectuoso
Los derechos derivados del cumplimiento defectuoso se
aplican al distribuidor en el que se adquirieron los bienes
(véanse los detalles más abajo). Recomendamos presentar este
documento, el comprobante de compra y el patinete completo
libre de cualquier impureza al aplicar los derechos de defectos.
El vendedor emitirá una confirmación por escrito de
laconfirmación del ejercicio de los derechos derivados de un
cumplimiento defectuoso la confirmación de la reparación.
Especificación de los derechos de un cumplimiento
defectuoso
Siga al montar el patinete las instrucciones proporcionadas
en el manual de instalación. Use el patinete exclusivamente
para el propósito para el cual fue fabricado. El patinete se tiene
que almacenar y ser mantenido de acuerdo a las instrucciones
suministradas por el fabricante. La responsabilidad del
fabricante no se aplica a defectos causados exclusivamente
por una instalación incorrecta o por el uso de los patinetes
enconflicto con el manual del usuario.
Modelo de patinete:
Número de serie del bastidor:
Fecha de venta:
Vendedor:
Sello y firma:
Page 21

Introduction
Notice de montage
Nous vous recommandons de confier le montage, le réglage et
l'entretien régulier à un spécialiste du vélo. Les interventions
incorrectes peuvent entraîner un endommagement de la
trottinette ou un accident avec des conséquences graves pour
la santé.
Cependant, si vous êtes doué pour la technique, ne craignez
rien et lancez-vous dans le montage avec nous.
Veuillez nous envoyer vos questions, commentaires et
suggestion pour améliorer nos produits à l'adresse e-mail :
info@yedoo.cz.
1.
Le procédé de montage est identique
pour les deux modèles de trottinettes
(Wolfer, Trexx), il ne dière que par des
détails – voir les dessins additionnels.
Lors du serrage des vis ne dépassez pas
le couple de serrage indiqué.
Montage de la roue avant
Insérez dans la roue l'attache rapide de
sorte que des deux côtés soit un ressort
se rétrécissant vers le centre de la roue.
4.
2.
Tout d'abord vérifiez si la fourche avant
de la trottinette est orientée dans
la bonne direction (les bras du frein
V-break sont orientés vers l'avant), puis
libérez les mâchoirs de frein en tournant
légèrement l'attache.
5.
Wolfer
3.
sens de
roulement
Insérez la roue dans la fourche avant de
sorte qu'elle soit exactement au milieu.
Attention : La sculpture de la bande
de roulement des pneus devrait être
orientée vers l'avant dans le sens de
roulement, voir la flèche de direction sur
le flanc du pneu.
Trexx
Pour plus d'informations du
monde des trottinettes et la
liste des distributeurs consultez
lesite www.yedoo.cz
FR
40
Resserrez l'écrou de réglage de l'attache
rapide de sorte que vous sentiez juste
avant de la fermeture de l'attache rapide
une résistance sensible. Fermez l'attache
dans une telle position qu'elle ne touche
pas la fourche et en même temps que
son ouverture accidentelle lors de
l'utilisation soit empêchée.
41
5–6 Nm 5–6 Nm
Installation des guidons
Positionnez les guidons sur la
potence et serrez les vis du manchon.
Lesinscriptions sur les guidons (qui ne
sont pas représentées sur le dessin)
devrainet être lisible en regardant de
face.
FR
Page 22

Notice de montage
6.a 6.c
2
1
Montage de la roue arrière
Libérez le câble de frein du guide
(1), insérer la roue dans une de deux
supports de la fourche, voir les dessins
6.b, 6.c., centrez la roue et resserrez
l'attache rapide (2).
6.b
La fourche arrière à deux positions
permet d'ajuster la hauteur du repose-
-pied au-dessus du sol. Utilisez le support
inférieur pour une conduite plus sportive.
Fermez l'attache rapide de sorte qu'elle
soit orientée vers le haut.
Le support supérieur de la fourche qui
diminue la hauteur du repose-pied et
en même temps fait soulager la jambe
d'appui est conçu pour l'utilisation sur
une surface plane. La conduite sera
moins diicile physiquement. Fermez
l'attache rapide de sorte qu'elle soit
orientée vers le bas.
7.a 7.b 7.d
6–8 Nm
1
2
3
5–6 Nm
8.
3
2
Appuyez la manette de frein au
maximum et insérez dans l'oeillet rond
(1) l'extrémité du câble de frein. Insérez
le câble dans la rainure et serrez la vis
sans tête (2) et l'écrou (3). Répétez la
même procédure aussi avec le second
frein. Le câble de frein arrière est
d'habitude fixé dans la manette de frein
droite, celui de l'avant dans la manette
de frein gauche.
1
10.a
2
1 1
9.a
6–7 Nm 6–7 Nm
Ajustement de l'inclinaison des
manettes de frein
Desserrez légèrement la vis de fixation
sur le manchon des deux manettes de
frein. Ajustez la bonne inclinaison des
manettes de frein en vous montant sur
le repose-pied , en saisissant les guidons
et en étendant les doigts de sorte qu'ils
prolongent la ligne de la main.Ajustez les
manettes dans cette position et reserrez
la vis de fixation des deux manettes.
10.b
1
9.b
Pour le modèle Yedoo Wolfer, vous
pouvez ajuster aussi la position des
cornes du cintre à l'aide des vis de
fixation.
11.a
1
2 2
Ajustement de la hauteur des guidons
Desserrez les vis sur la potence et
ajustez la hauteur désirée des guidons
A l'aide des bagues de centrage. Pour
ajuster la position la plus basse, tournez
la potence de sorte qu'elle soit orientée
vers le bas, voir le dessin 7.c. Pour
ajuster la hauteur des guidons resserez
d'abord la vis de plongeur (1), ensuite les
vis latérales (2, 3).
FR
7.c
42
Réglage du frein avant – Wolfer
Lors du freinage, les patins de frein
devraient s'appuient par toute leur
surface sur le flanc de la jante. Si ce
n'est pas le cas, ajustez leur position à
l'aide de la vis qui assure la fixation des
patins de frein aux bras du frein (1). Les
patins ne doivent pas toucher la bande
de roulement et lors de la libération de
la manette de frein ils devraient s'écarter
de la jante de 1-2 mm. La distance des
patins peut être ajustée en resserant ou
en desserrant le boulon d'ancrage du
câble de frein (2).
Si la roue en tournant entre en
contact avec le patin de frein, tournez
légèrement le mécanisme de frein de
sorte que les bras de frein soient écartés
de la jante d'une distance identique. Les
bras seront bloqués dans cette position
en tournant le levier vers le bas (1).
Réglage du frein avant – Trexx
Réinsérez le câble de frein dans le guide
(1) et vérifiez si lors du freinage les patins
de frein s'appuient par toute leur surface
sur le flanc de la jante. Si ce n'est pas le
cas, ajustez leur position à l'aide de la
vis (2), qui assure la fixation des patins
de frein aux bras du frein V-break. Les
patins ne doivent pas toucher la bande
de roulement.
FR
Page 23

Notice de montage
1
2 2
Vérifiez si les patins s'écartent
suisamment de la jante (1–2 mm) lors
de la libération de la manette de frein.
La distance des patins peut être ajustée
en resserant ou en desserrant le boulon
d'ancrage du câble de frein (1). Si la
roue en tournant entre en contact avec
le patin de frein, ajustez de manière
symétrique la distance des bras de frein
à l'aide des vis de tension (2).
12. 13.11.b
2 2
1
Régage du frein arière et identique pour
les deux modèles.
Régage du frein arière et identique
Réinsérez le câble de frein dans le guide
(1). Vérifiez si lors du freinage les patins
de frein s'appuient par toute leur surface
sur le flanc de la jante. Si ce n'est pas le
cas, ajustez leur position à l'aide de la
vis (2) qui assure la fixation des patins
de frein aux bras du frein V-break. Les
patins ne doivent pas toucher la bande
de roulement.
14.b14.a
2 2
1
Vérifiez si les patins s'écartent
suisamment de la jante (1–2 mm) lors
de la libération de la manette de frein.
La distance des patins peut être ajustée
en resserant ou en desserrant le boulon
d'ancrage du câble de frein (1). Si la
roue en tournant entre en contact avec
le patin de frein, ajustez de manière
symétrique la distance des bras de frein
à l'aide des vis de tension (2).
15.
1. 2. 3.
Montage de la béquille
La béquille ne fait pas partie du kit,
vous pouvez l'acheter, ainsi que d'autres
accessoires Yedoo. Plus d'informations
sur yedoo.cz.
Installez la béquille dans l'endroit,
où s'ouvre le profil avant du cadre.
Séléctionnez la hauteur de fixation de la
béquille de manière qu'elle fournisse au
modèle concret la plus grande stabilité.
Dans la position conçue pour l'utilisation,
la béquille ne devrait pas dépasser
lecadre de la trottinette.
La capacité de charge maximale de
la béquille est d'environ 15 kg. Ne pas
monter sur la trottinette garée.
Ajustement des bowdens
Ajustez la position des bowdens de
manière qu'ils ne dépassent nullepart
(en particulier pour la fourche arrière)
lecadre de la trottinette.
FR
Dans la partie avant du cadre fixez-le
dans le manchon.
Bandes antidérapantes
Pour augmenter l'eet antidérapant
du repose-pied, utilisez les bandes
antidérapantes en les collant
simplement dans les rainures vides
du repose-pied. Attention : Avant leur
application, nettoyez et dégraissez bien
le repose-pied.
44
45
FR
Page 24

Recommandations de sécurité
Fabricant et importateur à l'UE: INTREA – PIKO, s.r.o.,
Sasanková 2657/2, 106 00 Praha 10, République tchèque,
www.yedoo.cz.
Introduzione
Dans sa configuration de base la trottinette est conçue pour
une utilisation en plein jour, dans les espaces désignés pour
le sport et les loisirs, idéalement pour l'usage sur une surface
plane et sèche.
Pour la conduite sur les voies publiques et pour la conduite
la nuit vous devez l'équiper des éléments de sécurité (phares,
réflecteurs etc.) conformément à la législation en vigueur
de votre pays. Respectez le code de la route, les principes
de conduite en toute sécurité et portez les équipements de
protection (casque, gants de vélo, protections aux génoux et
aux coudes, chaussures solides etc.).
Avant toute utilisation, vérifiez le fonctionnement des freins
et l'état technique de la trottinette. Gonflez les pneus à la
valeur maximale recomandée de pression, voir le flanc de la
bande de roulement. Ne dépassez pas sa capacité de charge.
La trottinette est conçue seulement pour un utilisateur. Évitez
lasurcharge de la trottinette, la trottinette ne convient pas pour
les sauts ni pour un usage acrobatique.
Tous les composants diminuant la vitesse (patins de frein,
jantes, pneus, atc.) se réchauent lors de leur utilisation, ne
lestouchez pas avant qu'ils ne soient refroidis !
Instructions d'utilisation
Pendant la course tenez les poignées du guidon avec les deux
mains. Tandis qu'une jambe eectue la poussée, gardez l'autre
sur le repose-pied de la trottinette. Alternez régulièrement
la jambe de poussée. Pour freiner, appuyez sur les manettes
de frein sur les guidons. Attention : Le freinage brusque peut
entraîner la chute.
Entretien
Un entretien correct augmentera la sécurité et prolongera
ladurée de vie de votre trottinette. Pour cette raison, reserrez
régulièrement les vis, vérifiez l'état des attaches rapides, la
pression des pneus et graissez les pièces mobiles (roulements
des roues et des guidons, axes des manettes de frein, mâchoirs
de freins, câbles de frein etc.).
Faites attention à ce que la graisse n'atteinte par les jantes
et les patins de frein. La graisse réduit leur eet ! Si cela se
produit, dégraissez les zones encrassées par ex. à l'aide de
la benzine technique. Vérifiez régulièrement la hauteur de
sculpture de la bande de roulement, le cas échéant remplacer
les pneus pour de nouveaux pneus ayant les paramètres
identiques. Désignez la trottinette qui n'est pas convenable
àl'usage de manière appropriée.
Vérifiez l'état des écrous autobloquants (si elles se dégagent
spontanément lors de l'usage, remplacez-lez par de nouveaux
écrous). Vérifiez régulièrement le rayonnage des roues, la
tension inégale des fils du rayonnage peut provoquer leur
fissuration ou décentrer les roues.
Le produit est conforme aux normes pertinentes de l'UE (ČSN
EN 14619 ÉQUIPEMENT DE SPORT) et il a reçu des certificats de
qualité et de sécurité de la part du principal institut tchèque
d'essai (Strojírenský zkušební ústav, s. p. (Institut d'essais
mécaniques).
Exercice des droits découlant
de l'exécution défectueuse
d'une prestation
Dispositions générales
Le contenu, l'étendue et la durée des droits de l'achateur
qui découlent de l'exécution défectueuse d'une prestation
relative aux marchandises sont régis par les lois en vigueur
de la République tchèque, notamment par les dispositions
pertinentes du Code civil (loi n
de la loi sur la protection du consommateur (loi n
du Recueil des lois). Les droits de l'acheteur conformément à
ces dispositions législatives ne sont aucunement aectés par
leprésent document ni par les informations y figurant.
Délai pour faire valoir les droits découlant de l'exécution
défectueuse d'une prestation
Le droit associé à la nouvelletrottinette Yedoo présentant un
défaut (ci-après la marchandise) peut être exercé par l'acheteur
au cours des 24 mois à compter de sa reprise. Si l'acheteur
réclame le défaut de marchandise de manière justifiée, le délai
pour exercer les droits découlant de l'exécution défectueuse
cesse à courir pour la période pendant laquelle l'acheteur ne
peut pas utiliser la marchandise.
Modalité d'exercice des droits découlant de l'exécution
défectueuse d'une prestation
Les droits découlant de l'exécution défectueuse d'une
prestation doivent être exercés auprès du vendeur qui a vendé
à l'acheteur la marchandise (voir les données ci-dessous). Lors
de l'exercice des droits associés au défaut de marchandise,
nous recommandons de présenter le présent document,
lejustificatif d'achat et la trottinette complète, bien nettoyée.
Le vendeur établit une confirmation écrite pour l'acheteur sur
l'exercice des droits associés à l'exécution défectueuse d'une
prestation, éventuellement sur la réparation eectuée.
Conditions de la durée des droits découlant de l'exécution
défectueuse d'une prestation
Lors du montage de la trottinette les instructions figurant
dans la notice de montagedoivent être respectées.
Latrottinette doit être utilisée exclusivement dans le but,
pour lequel elle a été conçue. La trottinette doit être stockée
et entretenue conformément aux instructions du fabricant.
La responsabilité du fabricant ne s'applique pas aux défauts
causés exclusivement par un montage ou usage incorrect de
latrottinette, en conflit avec le mode d'emploi.
Modèle de la trottinette :
No de série du cadre :
Date de vente :
Vendeur :
Cachet et signature :
o
89/2012 du Recueil des lois) et
o
634/1992
Raccomandiamo di aidare il montaggio, la riparazione
elaregolare manutenzione ad una oicina professionale. Un
intervento inesperto potrebbe causare danni al monopattino
oppure un incidente con conseguenze significative sulla salute.
Se siete tecnicamente esperti, non vi preoccupate e provate ad
eseguire il montaggio insieme a noi.
Vi preghiamo di mandare le vostre domande, osservazioni
esuggerimenti per migliorare i nostri prodotti all‘indirizzo email
info@yedoo.eu.
Maggiori informazioni sul mondo
di monopattini e l'elenco dei
distributori trovate al sito web
www.yedoo.eu.
47
IT
Page 25

Istruzioni di montaggio
1.
Il montaggio di entrambi i modelli di
monopattino (Wolfer, Trexx) è lo stesso,
varia solo per alcuni dettagli (vedi le
immagini aggiuntive). Serrando i giunti
non oltrepassare la coppia di serraggio
indicata.
Montaggio della ruota anteriore
Inserire lo sgancio rapido nella ruota in
modo che su ogni lato ci sia una molla
e la sua parte più stretta punti al centro
della ruota.
4.
2.
Per prima cosa controllare che la
forcella anteriore del monopattino sia
girata nella direzione giusta (la pinza
del freno deve essere orientata in
avanti) dopodiché sbloccare la leva che
permette di allentare il freno.
5.
Wolfer
3.
senso di
marcia
Inserire la ruota nella forcella anteriore
e centrarla. Attenzione: il battistrada
dovrebbe essere orientato in avanti
seguendo il senso di marcia (vedi la
freccia del senso di rotazione sul lato
delopertone).
Trexx
6.a 6.c
2
1
Montaggio della ruota posteriore
Allentare il cavo del freno (1), inserire
la ruota in uno dei due dentelli della
forcella (vedi fig. 6.b, 6.c), centrare
laruota e serrare lo sgancio rapido (2).
6.b
La forcella posteriore ha due posizioni
possibili, il che permette variare
l'altezza della pedana. Usare il dentello
inferiore per uscite su terreni sconnessi
ofuoristrada. Chiudere lo sgancio rapido
in modo che punti verso l'alto.
Il dentello superiore, che abbassa
l'altezza della pedana ed allo stesso
tempo alleggerisce il peso sulla gamba
d'appoggio, serve per la corsa su
superfici lisce e piane, rendendo
l‘andatura meno faticosa. Chiudere
losgancio rapido verso il basso.
7.a 7.b 7.d
6–8 Nm
1
Stringere il dado dello sgancio rapido
fino a sentire una discreta resistenza
prima di chiudere completamente
lalevetta. Chiudere la levetta verso l'alto
in modo da non toccare la forcella ed
allo stesso tempo evitare una apertura
accidentale durante la corsa.
IT
5–6 Nm 5–6 Nm
Installazione del manubrio
Installare il manubrio sullo sterzo
eserrare le viti della boccola. Le diciture
sul manubrio (non visualizzate in questa
figura) dovrebbero essere leggibili dalla
parte frontale.
48
2
3
5–6 Nm
Regolazione dell'altezza del manubrio
Allentare le viti sullo sterzo e settare
il manubrio all'altezza desiderata
con l'aiuto degli anelli spaziatori. Per
laposizione più bassa ruotare lo sterzo
in modo che punti verso il basso, vedi
fig. 7c. Dopo la regolazione dell'altezza
del manubrio serrare prima la vite
centrale (1), e solo dopo le viti laterali
(2, 3).
49
7.c
IT
Page 26

Istruzioni di montaggio
8.
3
2
Installazione dei cavi del freno
Tirare la leva del freno al massimo
einserire l'estremità del cavo del freno
nell'occhiello circolare (1). Inserire il cavo
nella scanalatura e serrare il morsetto
(2) e il dado (3). Ripetere lo stesso
procedimento anche per il secondo
freno. Di norma il cavo del freno
posteriore viene collegato alla leva freno
destra, l‘anteriore a quella sinistra.
1
10.a
2
6–7 Nm 6–7 Nm
Regolazione dell'inclinazione delle leve
del freno
Allentare la vite di fissaggio sulla
boccola di entrambe le leve del freno.
Per trovare la giusta inclinazione delle
leve del freno, salire sulla pedana,
mettere le mani sul manubrio e allungare
le dita in modo che siano in linea con la
mano. Fissare le leve in questa posizione
e serrare tutte e due le viti di fissaggio,
10.b
9.b9.a
Nel modello Yedoo Wolfer è possibile
regolare anche la posizione delle
appendici del manubrio con l'aiuto delle
viti di fissaggio.
11.a
1
1
2 2
Controllare se quando si rilascia la
leva del freno i pattini si allontanino
suicientemente dal cerchione (1–2
mm). La distanza tra i pattini può essere
regolata tendendo oppure allentando il
cavo del freno sul bullone di ancoraggio
(1). Se girando, la ruota tocca i pattini
del freno, regolare simmetricamente
ladistanza dei due braccetti del freno
con l'aiuto delle viti di fissaggio(2).
12. 13.11.b
2 2
1
Regolazione del freno posteriore
èuguale per entrambi i modelli.
Inserire di nuovo il cavo del freno (1)
econtrollare se durante la frenata l‘intera
superficie delle pastiglie del freno sia
aderente al lato del cerchione. In caso
contrario, correggere la loro posizione
con l'aiuto delle viti (2), che collegano
ipattini alla pinza del freno. Le pastiglie
non devono toccare il copertone.
14.b14.a
2 2
1
Controllare se quando si rilascia
laleva del freno i pattini si allontanino
suicientemente dal cerchione
(1–2mm). La distanza tra i pattini può
essere regolata tendendo oppure
allentando il cavo del freno sul bullone
di ancoraggio (1). Se girando, la ruota
tocca i pattini del freno, regolare
simmetricamente la distanza dei due
braccetti del freno con l'aiuto delle viti
di fissaggio (2).
15.
1 1
Regolazione del freno anteriore – Wolfer
Durante la frenata l‘intera superficie delle
pastiglie del freno dovrebbe aderire sul
lato del cerchione. In caso contrario,
regolare la loro posizione con l'aiuto della
vite che collega il pattino alla pinza(1).
LE pastiglie non devono toccare il
copertone e quando si allenta la leva del
freno, i pattini dovrebbero allontanarsi
dal cerchione per 1–2 mm. La distanza tra
i pattini può essere regolata stringendo
oppure allentando il cavo del freno sul
bullone di ancoraggio (2).
1
Se girando, la ruota tocca i pattini del
freno, regolare la posizione dell'intero
archetto in modo che i due braccetti
del freno siano ugualmente distanti
dal cerchione. Fissare la posizione
dei braccetti con l'aiuto della leva
chiudendola verso il basso (1).
2 2
Regolazione del freno anteriore – Trexx
Inserire di nuovo il cavo del freno (1)
econtrollare se durante la frenata l‘intera
superficie delle pastiglie del freno sia
aderente al lato del cerchione. In caso
contrario, correggere la loro posizione
con l'aiuto delle viti (2), che collegano
ipattini alla pinza del freno. Le pastiglie
non devono toccare il copertone.
50 51
Regolazione delle guaine
Regolare la posizione delle guaine
in modo che in nessun punto
(soprattutto vicino alla forcella
posteriore) eccedano il telaio del
monopattino.
Nella parte anteriore del telaio fissare
icavi nella boccola.
Nastri antiscivolo
Per aumentare l'eetto antiscivolo della
pedana incollare i nastri antiscivolo
nelle scanalature libere della pedana.
Attenzione : Prima dell‘ applicazione
pulire e sgrassare per bene la pedana.
IT
Page 27

Istruzioni di montaggio
1. 2. 3.
Montaggio del cavalletto
Il cavalletto non è incluso. Potete
acquistarlo successivamente assieme
agli altri accessori Yedoo. Maggiori
informazioni su yedoo.eu.
Montare il cavalletto sul profilo
anteriore del telaio, in corrispondenza
dell‘apertura. Il punto dove fissare
ilcavalletto va scelto in base alla
posizione in cui il monopattino
raggiunge la sua massima stabilità.
Ilcavalletto chiuso non dovrebbe
spuntare oltre il telaio del monopattino.
La portata massima del cavalletto è di
circa 15 kg. Non salire sul monopattino
parcheggiato.
Misure su sicurezza
Il monopattino in equipaggiamento base è pensato per un
utilizzo alla luce del giorno su campi sportivi e ricreativi,
idealmente su superfici lisce e asciutte.
Per la corsa su strada o al buio dovete munire il monopattino
degli elementi di sicurezza (fanali, catadiottri, ecc.) secondo
il regolamento in vigore nel vostro paese. Rispettate le regole
del codice stradale e le norme di sicurezza ed utilizzate
leopportune protezioni (casco, guanti, ginocchiere, paragomiti,
scarpe solide ecc.)
Non superare la portata massima del monopattino.
Ilmonopattino è omologato per una persona sola. Non
sovraccaricarlo; il monopattino non è ideato né per salti né per
corse acrobatiche.
Tutti i componenti atti alla riduzione della velocità (pastiglie
dei freni, cerchioni, pneumatici ecc.) si surriscaldano durante
il loro utilizzo perciò evitate di toccarli finché non si saranno
rareddati.
Istruzioni per l'uso
Durante la corsa tenete sempre entrambe le mani sul manubrio.
Mentre spingete con una gamba, lasciate la seconda sulla
pedana del monopattino. Alternate regolarmente la gamba
di spinta. Per frenare tirate le leve dei freni sul manubrio.
Attenzione : Una frenata improvvisa può causare una caduta.
Manutenzione
Una manutenzione regolare del vostro monopattino aumenta
la sicurezza e prolunga la sua durata. Per questo motivo
raccomandiamo regolarmente di stringere le viti, controllare
lo stato degli sganci rapidi, la pressione degli pneumatici e
lubrificare le parti mobili (cuscinetti delle ruote e del manubrio,
perni della leva del freno, cavi del freno ecc.).
Prestate attenzione ainché il lubrificante non entri in contatto
con i cerchioni e le pastiglie del freno. Il grasso li rende meno
eicaci! Se dovesse accadere, sgrassare le parti unte con
l'aiuto di un solvente. Controllate regolarmente lo spessore
delle scanalature sui copertoni delle ruote; in caso di necessità
sostituite il copertone usurato con uno nuovo dai parametri
conformi.
Controllate lo stato dei dadi autobloccanti (se si allentano
durante la corsa sostituirli con dei nuovi). Controllate
regolarmente la raggiatura delle ruote, la tensione non
uniforme dei raggi può causare la loro rottura oppure una
deformazione delle ruote.
Il prodotto è ai sensi delle direttive UE (EN 14619) e ha ottenuto
le certificazioni di qualità e sicurezza sia da un eminente istituto
di prova ceco (Strojírenský zkušební ústav, s. p.).
Produttore e importatore UE: INTREA – PIKO, s.r.o., Sasanková
2657/2, 106 00 Praga 10,Repubblica Ceca, www.yedoo.eu.
Garanzia
Regolazioni generali
Contenuto, ampiezza e durata della garanzia sono regolati
dalle leggi in vigore in Repubblica Ceca, soprattutto dalle
disposizioni di legge corrispondenti del codice civile
(89/2012) e della tutela del consumatore (634/1992). I diritti
dell'acquirente in merito a queste disposizioni non sono
influenzati né da questo documento né dal suo contenuto.
Periodo della garanzia
L'acquirente di un monopattino Yedoo nuovo può avvalersi della
garanzia per un periodo di 24 mesi a partire dalla ricezione del
prodotto. Nel caso in cui venisse applicata la garanzia il periodo
di 24 mesi si prolunga del periodo in cui l'acquirente non può
utilizzare il monopattino.
Applicazione della garanzia
La garanzia deve essere applicata dal rivenditore da cui è stata
acquistata la merce (vedi sotto). Per avvalersi della garanzia
raccomandiamo di presentare questo documento, la ricevuta
e il monopattino ben pulito assieme a tutti i suoi componenti.
Il rivenditore deve emettere un documento scritto in cui
confermerà l'applicazione della garanzia ed una eventuale
riparazione.
Condizioni della garanzia
Il monopattino deve essere assemblato secondo le istruzioni
descritte nel manuale di montaggio. Il monopattino deve
essere usato esclusivamente per lo scopo per cui è stato
fabbricato edeve essere conservato e manutenuto secondo
le istruzioni del produttore. La garanzia non copre danni
causati dal montaggio errato oppure dall'uso non corretto
incontraddizione con il manuale delle istruzioni.
Modello del monopattino:
Numero di produzione del telaio:
Data di vendita:
Rivenditore:
Stampa e firma:
IT
52
53
IT
Page 28

Wprowadzenie
Instrukcja instalacji
Zaleca się powierzenie instalacji, regulacji oraz okresowych
przeglądów specjalistycznym sklepom rowerowym.
Niewłaściwe działanie może doprowadzić do uszkodzenia
hulajnogi lub wypadku z poważnymi konsekwencjami
zdrowotnymi.
Jeśli znasz podstawy techniki, nie martw się; Niniejsza instrukcja
zawiera wszystkie informacje potrzebne, aby pomóc Ci złożyć
Twoją nową hulajnogę.
Wyślij swoje pytania, uwagi i sugestie dotyczące poprawy
naszych produktów pod adres e-mail: info@yedoo.eu.
1.
Instalacja jest właściwie identyczna
dla obydwu modeli (Wolfer, Trexx),
różni się tylko drobnymi szczegółami
(patrz dodatkowe zdjęcia). Podczas
dokręcania połączeń nie przekraczaj
określonego momentu dokręcania.
Montaż przedniego koła
Wstawić szybki mechanizm zwalniający
do koła upewniając się, że po obu
stronach koła wąskie końce sprężyn są
skierowane w stronę środka koła.
4.
2.
Najpierw sprawdź, czy przedni widelec
skutera jest prawidłowo ustawiony
(ramiona V-brake powinny być
skierowane do przodu w kierunku
przedniej części skutera), a następnie
zwolnij hamulec poprzez obrócenie
dźwigni.
5.
Wolfer
3.
Kierunek
rotacji
Włóż koło do przedniego widelca tak,
aby znajdowało się dokładnie pośrodku.
Uwaga: Podczas zakładania koła upewnij
się, że strzałka na boku opony wskazuje
kierunek obrotu koła, gdy hulajnoga
toczy się do przodu.
Trexx
Więcej informacji ze
świata hulajnóg oraz listę
dystrybutorów można znaleźć
na www.yedoo.eu.
PL
54
Dokręć nakrętkę regulującą mechanizm
szybkiego uwalniania do właściwej
pozycji. Gdy znajdzie się w prawidłowej
pozycji poczujesz zauważalny opór
tuż przed całkowitym zamknięciem
mechanizmu. Zamknij dźwignię
zwalniającą w takiej pozycji, aby nie
dotykała widelca i aby jednocześnie nie
było możliwe przypadkowe otwarcie jej
podczas jazdy.
55
5–6 Nm 5–6 Nm
Instalacja kierownicy
Nałóż kierownicę na rdzeń i dokręć śruby
rękawa. Oznaczenia (nie pokazane na
obrazku) powinny być widoczne patrząc
od przodu hulajnogi.
PL
Page 29

Instrukcja instalacji
6.a 6.c
2
1
Montaż tylniego koła
Zwolnij linkę hamulca z przewodnika (1),
Włóż koło w jedno z ramion widelca (zob
6.b, 6.c.), a następnie wycentruj koło i
dokręć szybki mechanizm zwalniający
(2).
6.b
Dwupozycyjny widelec tylni pozwala
na regulację wysokości podnóżka nad
ziemią. Niższa pozycja jest przydatna
do jazdy w trudnym terenie. Zamknij
dźwignię zwalniającą. Powinna być
skierowana w górę.
Widełki w górnym położeniu oznaczają
niższą pozycję podnóżka. Ustawienie to
jest przeznaczone do jazdy na gładkiej,
płaskiej powierzchni. Taka jazda będzie
mniej wymagająca fizycznie. Zamknięta
dźwignia szybkiego zwalniania powinna
być skierowana w dół.
7.a 7.b 7.d
6–8 Nm
1
2
3
5–6 Nm
8.
3
2
Instalacja przewodów hamulcowych
Ściśnij dźwignię hamulca do maksimum
i łóż koniec przewodu hamulcowego do
okrągłego występu (1) i nakrętkę (2) et
l'écrou (3). Powtórz operację z drugim
hamulcem. Tylni przewód hamulcowy
jest zwykle montowany na prawej
dźwigni hamulca, a przewód przedniego
hamulca po lewej stronie.
1
10.a
2
1 1
9.a
6–7 Nm 6–7 Nm
Regulacja kąta dźwigni hamulcowych
Poluzuj śrubę na rękawie przy obu
hamulcach. Aby uzyskać najlepsze
rezultaty, stań na podnóżku, chwyć
kierownicę i rozłóż palce tak, by
rozszerzały się w linii prostej od twoich
rąk. Ustaw dźwignie hamulców w tym
położeniu i dokręć dwie śruby mocujące.
10.b
1
9.b
Możesz ustawić pozycję ramion
kierownicy w modelu Yedoo Wolfer
używając śrub montujących pokazanych
na obrazku.
11.a
1
2 2
Ustawianie wysokości kierownicy
Poluzuj śruby na rdzeniu i ustaw
kierownicę na żądanej wysokości
za pomocą pierścieni. Aby ustawić
kierownicę w najniższym położeniu,
obróć rdzeń tak, aby był zwrócony w dół,
zob. obr. 7 c. Po ustawieniu wysokości
kierownicy, najpierw dokręć śrubę
główną (1), a potem śruby boczne (2, 3).
PL
7.c
56
Ustawianie hamulców przednich –
Wolfer
Podczas hamowania cała powierzchnia
klocków hamulcowych powinna
przylegać ściśle do obręczy. Jeżeli tak
się nie dzieje, należy wyregulować
położenie klocków hamulcowych za
pomocą śrub, które mocują klocki
hamulcowe do ramion hamulców (1).
Klocki hamulcowe nie powinny dotykać
koła, a gdy dźwignie hamulcowe są
zwolnione, klocki powinny znajdować się
1-2 mm od obręczy. Odległość klocków
hamulcowych można regulować poprzez
dokręcenie lub poluzowanie śruby
mocującej linkę hamulca (2).
Jeżeli koło dotyka klocka hamulcowego
w jakimkolwiek momencie podczas
obracania, obróć cały mechanizm
hamulca, aż ramiona hamulcowe będą
równomiernie oddalone od obręczy.
Aby zablokować pozycję ramion, obróć
dźwignię w dół (1).
Ustawianie hamulców przednich –
Trexx
Włóż przewód hamulcowy z powrotem
do prowadnicy (1) i sprawdź klocki
hamulcowe podczas hamowania,
upewniając się, że całą powierzchnią
przylegają do obręczy. Jeśli nie,
wyreguluj śrubę (2), która mocuje
klocki hamulcowe do ramion hamulców
V-brake. Klocki hamulcowe nie mogą
dotykać opon.
PL
Page 30

Instrukcja instalacji
1
2 2
Sprawdź, czy klocki hamulcowe
odsuwają się od obręczy
wdostatecznym stopniu (1–2 mm), kiedy
dźwignia hamulca zostanie zwolniona.
Odległość klocków hamulcowych
można regulować poprzez dokręcenie
lub poluzowanie śruby mocującej linkę
hamulca (1). Jeśli klocki hamulcowe
wchodzą w kontakt z obręczą w czasie,
kiedy koło się obraca, ustaw odstępy
ramion hamulców symetrycznie za
pomocą śrub regulujących (2).
12. 13.11.b
2 2
1
Ustawianie tylnego hamulca jest takie
samo dla obu modeli.
Włóż przewód hamulcowy z powrotem
do prowadnicy (1). Sprawdź klocki
hamulcowe podczas hamowania,
upewniając się, że całą powierzchnią
przylegają do obręczy. Jeśli nie,
wyreguluj śrubę (2) która mocuje klocki
hamulcowe do ramion hamulców
V-brake. Klocki hamulcowe nie mogą
dotykać opon.
14.b14.a
2 2
1
Sprawdź, czy klocki hamulcowe
odsuwają się od obręczy w
dostatecznym stopniu (1–2 mm), kiedy
dźwignia hamulca zostanie zwolniona.
Odległość klocków hamulcowych
można regulować poprzez dokręcenie
lub poluzowanie śruby mocującej linkę
hamulca (1). Jeśli klocki hamulcowe
wchodzą w kontakt z obręczą w czasie,
kiedy koło się obraca, ustaw odstępy
ramion hamulców symetrycznie za
pomocą śrub regulujących (2).
15.
1. 2. 3.
Montaż podstawki
Podstawka nie jest wliczona w cenę.
Możesz ją kupić razem z innymi
akcesoriami Yedoo u lokalnego
sprzedawcy. Sprawdź na stronie www.
yedoo.eu.
Zamontuj podstawkę w miejscu, gdzie
rozszerza się przedni profil ramy.
Dlanajlepszej stabilności dla danego
modelu wybierz właściwą wysokość
do zamontowania podstawki. Brzegi
podstawki nie powinny wystawać poza
ramę hulajnogi w czasie jazdy.
Maksymalna wytrzymałość podstawki
wynosi ok 15kg. Nigdy nie stawaj
nazaparkowanej hulajnodze.
Regulacja cięgien Bowdena
Wyreguluj położenie cięgien
i upewnij się, że nie wykraczają poza
ramy hulajnogi (zwłaszcza w obrębie
tylnego widelca).
PL
Dołącz je do gniazda w przedniej
częściramy.
Taśmy antypoślizgowe
Użyj zapasowej taśmy antypoślizgowej,
aby wzmocnić efekt antypoślizgowy
na podnóżku. Możesz z łatwością
przykleić taśmę na puste szczeliny
podnóżka. Uwaga: Przed przyklejeniem
taśmy wyczyść i odtłuść powierzchnię
podnóżka.
58
59
PL
Page 31

Zalecenia dotyczące
bezpieczeństwa
W swojej podstawowej konfiguracji hulajnoga przeznaczona
jest do jazdy dziennej na obszarach przeznaczonych do użytku
sportowego i rekreacyjnego, najlepiej na gładkiej i suchej
powierzchni.
Do jazdy po drogach i w ciemności należy wyposażyć hulajnogę
w dodatkowe elementy zwiększające bezpieczeństwo (światła,
reflektory itd.), zgodnie z obowiązującymi w Twoim kraju
przepisami. Należy przestrzegać przepisów ruchu drogowego,
zasady bezpiecznej jazdy i nosić sprzęt ochrony osobistej (kask,
rękawiczki rowerowe, ochraniacze na kolana i łokcie, buty, itp.)
Przed każdą jazdą sprawdzić hamulce i ogólny stan techniczny
hulajnogi. Napompować opony do zalecanego maksymalnego
ciśnienia (patrz bok opony). Nie należy przekraczać granic
wytrzymałości hulajnogi. Hulajnoga jest przeznaczona dla
jednej osoby. Nie należy przeciążać hulajnogi. Hulajnoga nie
jest przeznaczona do skoków lub jazdy akrobatycznej.
Wszystkie komponenty służące do zmniejszania prędkości
(klocki hamulcowe, obręcze, opony itd.) stają się gorące
wtrakcie używania. Nie dotykaj żadnej z tych części, dopóki
niewystygną!
Instrukcje dotyczące jazdy
Podczas jazdy należy trzymać obie ręce na kierownicy. Podczas
uruchamiania hulajnogi jedną nogą, druga noga powinna stać
na podnóżku. Używaj obydwu nóg naprzemiennie i zmieniaj
je regularnie. Naciśnij dźwignie hamulców, aby zahamować.
Uwaga: Nagłe hamowanie może spowodować wypadek.
Pielęgnacja
Właściwa pielęgnacja poprawi bezpieczeństwo oraz przedłuży
czas użytkowania hulajnogi. Z tego powodu regularnie dokręcaj
śruby, sprawdzaj stan mechanizmu szybkiego zwalniania,
ciśnienie powietrza w oponach oraz nasmarowanie części
ruchomych (łożyska w kołach i hamulcach, dźwignie hamulców
i nakrętki przy nich, miejsca obrotu w mechanizmie hamowania,
linki hamulcowe itd.)
Upewnij się, że zastosowany środek smarujący nie znajduje
się na obręczy i klockach hamulcowych. Tłuszcz zmniejsza ich
efekt! Jeśli tak się zdarzy, możesz odtłuścić te powierzchnie
benzyną techniczną. Regularnie sprawdzaj stan bieżników opon
i wymieniaj opony na nowe o takich samych parametrach, jeśli
zajdzie taka potrzeba. Jeśli hulajnoga nie nadaje się do użytku,
należy ją odpowiednio oznaczyć.
Regularnie sprawdzaj stan nakrętek samozaciskowych (jeśli się
poluzują, należy je wymienić). Regularnie sprawdzaj szprychy
koła, nierównomierne napięcie przewodów może spowodować
pękanie lub decentralizację kół.
Produkt jest zgodny z normami UE (EN 14619), a także otrzymał
certyfikaty jakości i bezpieczeństwa wiodącego czeskiego
instytutu badawczego (Strojírenský Zkušební ÚSTAV, s. p).
Producentem i importerem w UE jest firma INTREA – PIKO, s. r. o.,
ul. Sasanková 2657/2, 106 00 Praga 10, Czechy,
www.yedoo.eu.
Dochodzenie praw
wynikających
znieprawidłowego wykonania.
Postanowienia ogólne
Treść, zakres i czas trwania praw nabywcy wynikających
zwadliwego wykonania są regulowane stosownymi przepisami
prawa czeskiego, w szczególności odpowiednimi przepisami
Kodeksu Cywilnego (ustawa nr 89/2012 Coll.) oraz ustawy
o ochronie konsumentów (ustawa nr 634/1992 Coll.). Ten
dokument i informacje w nim zawarte nie mają wpływu na
prawo do reklamacji, regulowane powyższymi przepisami.
Okres przysługujący na dochodzenie praw wynikających
znieprawidłowego wykonania
Nabywca może zareklamować nowo zakupioną hulajnogę
Yedoo (dalej: towar) w okresie 24 miesięcy od dnia jego
otrzymania. Jeśli nabywca zareklamuje towar, wtedy
okres przysługujący na dochodzenie swoich praw z uwagi
nanieprawidłowe wykonanie produktu ulega zawieszeniu
naczas, kiedy kupujący nie może używać produktu.
Określenie okresu przysługującego na dochodzenie praw
wynikających z nieprawidłowego wykonania
Roszczenia wynikające z nieprawidłowego wykonania należy
zgłaszać do sklepu, w którym towar został zakupiony (szczegóły
poniżej). Zalecamy dostarczenie niniejszego dokumentu wraz
z dowodem zakupu oraz kompletną hulajnogą, która powinna
być czysta. Sprzedawca wyda pisemne potwierdzenie przyjęcia
sprzętu do reklamacji lub naprawy.
Specyfikacja praw wynikających z nieprawidłowego
wykonania
Podczas montowania hulajnogi należy przestrzegać wskazówek
zawartych w instrukcji obsługi. Hulajnoga może być używana
jedynie w celu, w którym została skonstruowana. Należy
przechowywać i czyścić hulajnogę zgodnie z instrukcjami
producenta. Gwarancja producenta nie obejmuje uszkodzeń
spowodowanych niewłaściwym montażem lub użytkowaniem
niezgodnym z instrukcją użytkownika.
Model hulajnogi:
Numer seryjny ramy:
Data sprzedaży:
Sprzedawca:
Pieczątka i podpis:
Введение
Для монтажа, настройки и регулярного ухода рекомендуем
обратиться в профессиональный велосервис.
Непрофессиональные вмешательства могут привести
к повреждению самоката или аварии с серьёзными
последствиями для здоровья.
Однако если вы технически подкованы, ничего не бойтесь
и займитесь сборкой вместе с нами.
Вопросы, замечания и предложения по улучшению наших
изделий, пожалуйста, посылайте нам на e-mail:
info@yedoo.eu.
Дополнительную информацию
о свете самокатов и список
дистрибуторов найдете
на www.yedoo.eu.
PL
60
61
RU
Page 32

Инструкция по монтажу
Порядок монтажа обеих
моделей (Wolfer, Trexx) одинаков,
отличается только в деталях, см.
дополнительные рисунки. При
затяжке соединений не превышайте
указанного момента усилия.
Монтаж переднего колеса
В колесо вложите эксцентрик так,
чтобы на каждой стороне была одна
пружинка со суженным концом,
направленным к центру колеса.
2.1.
Сначала проверьте, повёрнута
ли передняя вилка в правильном
направлении (рычаги ободного тормоза
находятся впереди), затем ослабьте
плечи тормоза, повернув рычажок.
5.4.
Wolfer
3.
Направление
вращения
Колесо вставьте в переднюю вилку так,
чтобы оно было точно посередине.
Внимание: Рисунок покрышки должен
быть направлен в сторону движения,
см. стрелку направления на боку
покрышки.
Trexx
6.a 6.c
2
1
Монтаж заднего колеса
Ослабьте тормозной трос в хомуте (1),
вложите колесо в одну из скоб вилки,
см. рис. 6.b, 6.c., колесо отцентрируйте
и затяните эксцентрик (2).
6.b
Двухпозиционная задняя вилка
позволяет приспособить высоту деки.
Нижнюю скобу используйте для езды
по бездорожью. Эксцентрик закройте
так, чтобы его рычажок был направлен
наверх.
Верхняя скоба вилки, которая снизит
высоту деки и в то же время разгрузит
опорную ногу, предназначена для езды
по гладкой и ровной поверхности.
Езда будет физически легче. Рычаг
эксцентрика закройте в направлении
вниз.
7.a 7.b 7.d
6–8 Nm
1
Затяните настроечную гайку
эксцентрика так, чтобы перед
закрытием рычажка эксцентрика
вы почувствовали значительное
сопротивление. Рычажок закройте
в таком положении, чтобы он не
прикасался к вилке, и в то же время
чтобы исключить его случайное
открытие во время езды.
RU
5–6 Nm 5–6 Nm
Установка руля
Руль установите на вынос руля
и затяните болты хомута. Надписи
на руле (не изображены на рисунке)
должны быть видны при взгляде
спереди.
62
2
3
5–6 Nm
Настройка высоты руля
Ослабьте болты на выносе руля
и установите требуемую высоту руля
с помощью дистанционных колец.
Для получения минимальной высоты
поверните вынос руля так, чтобы
он был направлен вниз, см. рис. 7.c.
После настройки высоты руля сначала
затяните головной болт (1), только
после этого боковые винты (2, 3).
63
7.c
RU
Page 33

Инструкция по монтажу
8.
3
2
Установка тормозных тросов
Нажмите ручку тормоза до упора,
а в круглое гнездо (1) вложите конец
тормозного троса. Трос вложите
в канавку и затяните установочный
болт (2) и гайку (3). Монтаж второго
тормоза проводится аналогичным
способом. Задний тормозной трос,
как правило, крепится к правой ручке
тормоза, передний к левой.
1
10.a
2
9.a
6–7 Nm 6–7 Nm
Настройка наклона ручек тормоза
Ослабьте крепёжные винты на хомутах
обеих ручек тормоза. Правильный
наклон ручек тормоза настроите так:
встаньте на деку, возьмитесь за руль
и протяните пальцы так, чтобы они
продолжали прямую руку. В это
положение настройте ручки, и затяните
крепёжные винты у обеих ручек.
10.b
9.b
В модели Yedoo Wolfer можете
с помощью крепёжных болтиков
(на рисунке) также настроить
положение рогов.
11.a
1
1
2 2
Проверьте, чтобы при отпускании
ручки тормоза колодки достаточно
отдалились от обода (1–2 мм).
Расстояние между колодками и ободом
можно настроить, прижав или ослабив
тормозной трос в крепёжном болте
(1). Если колесо при вращении
в каком-либо месте трётся о тормозную
колодку, измените симметрично
расстояние до рычагов тормоза
с помощью натяжных болтиков (2).
12. 13.11.b
2 2
1
Настройка заднего тормоза для обеих
моделей одинакова
Вложите тормозной трос обратно
в хомут (1). Проверьте, чтобы тормозные
колодки при торможении прилегали
всей своей поверхностью на бок
обода. В противном случае настройте
их положение с помощью болтиков
(2), которым колодки прикреплены
к рычагам ободного тормоза. Колодки
не должны прикасаться к покрышке.
14.b14.a
2 2
1
Проверьте, чтобы при отпускании
ручки тормоза колодки достаточно
отдалились от обода (1–2 мм).
Расстояние между колодками
и ободом можно настроить, прижав
или ослабив тормозной трос
в крепёжном болте (1). Если колесо
при вращении в каком-либо месте
трётся о тормозную колодку, измените
симметрично расстояние до рычагов
тормоза с помощью натяжных
болтиков (2).
15.
1 1
Настройка переднего тормоза –
Wolfer
Тормозные колодки при торможении
должны прилегать всей своей
поверхностью на боковину обода.
В противном случае измените их
положение с помощью болтика,
которым эти колодки прикреплены
к плечам тормоза (1). Колодки не
должны прикасаться к покрышке и при
отпущенной ручке тормоза должны
быть на расстоянии 1–2 мм от обода.
Расстояние между колодками и ободом
можно настроить, прижав или ослабив
тормозной трос в крепёжном болте (2).
1
Если колесо при вращении задевает
тормозную колодку, поверните слегка
весь тормозной механизм так, чтобы
плечи тормоза были на одинаковом
расстоянии от обода. Положение плеч
зафиксируйте, повернув рычажок
вниз (1).
2 2
Настройка переднего тормоза – Trexx
Вставьте тормозной трос обратно
в хомут (1) и проверьте, чтобы
тормозные колодки при торможении
прилегали всей своей поверхностью
на боковину обода. В противном
случае настройте их положение
с помощью болтиков (2), которым
колодки прикреплены к рычагам
ободного тормоза. Колодки не должны
прикасаться к покрышке.
64 65
Настройка тросов Боудена
Настройте положение тросов Боудена
так, чтобы они нигде (особенно
в области задней вилки) не выходили
за пределы рамы самоката.
В передней части рамы закрепите его
в хомут.
Противоскользящие ленты
Для повышения противоскользящих
свойств деки применяйте запасные
противоскользящие ленты, которые
просто вклейте в свободные
канавки деки. Внимание: Перед
применением деку тщательно очистите
и обезжирьте её.
RU
Page 34

Инструкция по монтажу
1. 2. 3.
Монтаж подножки
Подножка не входит в комплект; её,
как и остальные принадлежности Yedoo
можете купить дополнительно.
Подробности на yedoo.cz.
RU
Подножку установите в месте, где
раскрывается передний профиль
рамы. Высоту крепления подножки
выберите так, чтобы для данной
модели обеспечить максимальную
стабильность. Подножка в сложенном
положении не должна выходить за
пределы рамы самоката.
Максимальная несущая способность
подножки – около 15 кг. Не вставайте
на запаркованный самокат.
66
Рекомендации
по безопасности
Самокат с базовым оснащением предназначен для езды при
дневном свете на площадках, предназначенных для спорта
и отдыха, препочтительно на гладкой и сухой поверхности.
Для езды по дорогам и в тёмное время суток его необходимо
дооснастить элементами безопасности (фонари, катафоты
и т.д.) в соответствии с предписаниями, действующими
в вашей стране. Соблюдайте правила дорожного движения,
принципы безопасной езды и носите индивидуальные
защитные средства (шлем, велосипедные перчатки,
защитные наколенники и налокотники, прочную обувь и т.д.)
Перед каждой ездой проверьте работоспособность тормозов
и общее техническое состояние самоката. Покрышки
накачивайте на максимальное рекомендуемое значение
давления, см. боковую сторону покрышки. Не превышайте
их несущую способность. Самокат предназначен только для
одного ездока. Избегайте перегрузки самоката, самокат не
предназначен для прыжков или акробатической езды.
Все компоненты, снижающие скорость (тормозные колодки,
обода, покрышки и т.д.) при использовании нагреваются, не
прикасайтесь к ним, пока они не остынут!
Советы по использованию
самоката
При езде всегда держитесь обеими руками за руль. При
отталкивании одной ногой, вторая нога должна находиться
на деке самоката. Регулярно чередуйте толчковую ногу. Для
торможения нажмите ручки тормоза на руле. Внимание:
Резкое торможение может быть причиной падения.
Уход
Надлежащий уход способствует повышению безопасности
и увеличивает срок службы вашего самоката. Поэтому
регулярно подтягивайте болтовые соединения, проверяйте
состояние эксцентриков, давление в колёсах и смазывайте
движущиеся части (подшипники колёс, оси ручек тормоза,
плечи тормозов, тормозные тросы и т.д.).
При этом следите за тем, чтобы смазка не попала на обод
и тормозные колодки. Наличие смазки на них снижает их
эффективность! Если это все же произойдет, обезжирьте
загрязнённые части, например, техническим бензином.
Регулярно проверяйте глубину рисунка на покрышках колёс,
при необходимости замените покрышки новыми с подобными
параметрами. Самокат, не готовый к использованию,
обозначьте подходящим способом.
Контролируйте состояние самостопорных гаек (если они
при езде самопроизвольно ослабляются, то замените их
новыми). Регулярно проверяйте спицовку колёс, в случае
неодинакового натяжения спиц они могут лопаться или
может произойти расцентровка колёс.
Изделие отвечает соответствующим нормам ЕС
(ČSN EN 14619 СПОРТИВНЫЕ СРЕДСТВА) и получило
сертификаты качества и безопасности от головного
чешского испытательного органа (ГУ «Машиностроительный
испытательный центр»).
Производитель и импортёр в ЕС INTREA – PIKO, s.r.o.,
ул. Сасанкова 2657/2, 106 00 Прага 10, Чешская Республика,
www.yedoo.eu.
Порядок предъявления
rекламаций
Общие положения
Содержание, диапазон и продолжительность гарантийного
периода руководствуются правовыми нормами Чешской
Республики, главным образом соответствующими
положениями Гражданского кодекса (закон № 89/2012 Св.),
и закона об охране потребителя (закон № 634/1992 Св.).
Права покупателя в соответствии с данными правовыми
нормами не затронуты ни настоящим документом,
ни содержащейся в нём информацией.
Гарантийный период
Гарантийный период на новый купленный самокат Yedoo
(далее только «товар») составляет 24 месяца от момента его
первого приобретения. В случае обоснованной рекламации
покупателя, гарантийный период продлевается на время,
в течение которого покупатель не мог товаром пользоваться.
Порядок подачи рекламации
Рекламация подаётся у продавца, у которого покупатель
товар купил (см. данные ниже). При подаче рекламации
рекомендуем предъявить настоящий документ, документ,
подтверждающий покупку, и комплектный, очищенный
от загрязнений самокат. О предъявлении рекламации
и о возможном проведении ремонта продавец оформит
письменное подтверждение для покупателя.
Гарантийные условия
При монтаже самоката должны соблюдаться указания,
приведённые в инструкции по монтажу. Самокат должен
применяться исключительно для целей, для которых он был
произведён. Самокат должен храниться и обслуживаться
в соответствии с указаниями, установленными
производителем. На дефекты, возникшие исключительно
в результате неправильного монтажа или использования
самоката в противоречии с инструкцией по применению,
не распространяется ответственность производителя.
Модель самоката:
Серийный номер рамы:
Дата продажи:
Продавец:
Печать и подпись:
RU
Page 35

Inledning
Installationsmanual
Vi rekommenderar att du överlåtar installation, injustering
och regelbundet underhåll till en specialiserad cykelhandlare.
Felaktig ingripande kan leda till skador på skotern eller en olycka
med allvarliga konsekvenser för hälsan.
Om du är teknisk duktig, oroa dig inte, denna handbok
innehåller all information du behöver för att hjälpa dig montera
ihop din nya skoter.
Skicka dina frågor, kommentarer och förslag till förbättringar
avvåra produkter via e-post till: info@yedoo.eu.
1.
Installationen är densamma för
båda modellerna (Wolfer, Trexx), det
skiljer sig endast i mindre detaljer
(se fler bilder). Vid åtdragning av
anslutningarna överstig inte angivet
åtdragningsmoment.
Montering av framhjulet
Sätt in snabbfrigöringsmekanismen
ihjulet för att säkerställa att de smala
ändarna av fjädrarna på båda sidor
avhjulet vetter mot mitten av hjulet.
4.
2.
Kontrollera först att framgaeln
på skotern är korrekt inriktad
(V-bromsaxlarna ska peka framåt
mot framsidan av skotern), släpp
bromsbackarna genom att vrida spaken.
5.
Wolfer
3.
Rotationsriktning
Sätt in hjulet i framgaeln så att det är
exakt i mitten. Varning: När du sätter
ihjulet, se till att pilen på däcksidan
pekar i rotationsriktningen när skotern
rullar framåt.
Trexx
Mer information från
skoter-världen och en lista
pådistributörer finns på
www.yedoo.eu.
SE
68
Dra åt inställningsmuttern av
snabbfrigöringsmekanismen till rätt
position. När det är i rätt läge kommer
du att känna ett märkbart motstånd
precis innan du stänger mekanismen
helt. Stäng snabbfrigöringsspaken i ett
läge där det inte kommer i kontakt med
gaeln och samtidigt inte kan öppnas av
misstag när du åker.
69
5–6 Nm 5–6 Nm
Styrets installation
Sätt styret på stammen och dra åt
skruvarna i hylsan. Etiketterna (ejvisade
ibild) ska vara klart synliga från
framifrån.
SE
Page 36

Installationsmanual
6.a 6.c
2
1
Installera bakhjulet
Släpp bromskabel från styrningen(1),
placera hjulet i en av de två
gaeländarna (se 6.b, 6.c) centrera
sedan hjulet och dra åt snabbkopplingen
(2).
6.b
Med bakgaelns två lägen kan du
justera höjden på fotstödet över marken.
Använd det nedre läget för färd i ojämn
terräng. Stäng snabbfrigöringsspaken.
Den ska peka uppåt.
Det övre gaelläget, som minskar höjden
på fotstödet, är utformad för färd på en
jämn, plan yta. Färden kommer att vara
mindre fysiskt krävande. Den slutna
snabbfrigöringsspaken ska peka nedåt.
7.a 7.b 7.d
6–8 Nm
1
2
3
5–6 Nm
8.
3
2
Installera bromskablarna
Tryck in bromshandtaget maximalt och
stick in änden av bromskabeln i den
runda tappen (1). För in kabeln i spåret
och dra åt ställskruven (2) och muttern
(3). Upprepa processen med den andra
bromsen. Den bakre bromskabeln
är vanligtvis monterad på den högra
bromsspaken och främre bromskabel
på vänster.
1
10.a
2
1 1
9.a
6–7 Nm 6–7 Nm
Justera vinkeln på bromshandtagen
Lossa fästskruven till styret på de båda
bromsspakarna. För bästa resultat,
stå på fotstödet, ta tag i styret och
sträck fingrarna så att de sträcker sig
i en rät linje från dina händer. Ställ in
bromshandtagen i detta läge och dra åt
de två skruvarna.
10.b
1
9.b
Du kan justera placeringen av styrets
ändar på Yedoo Wolfer modellen med
hjälp av monteringsskruvarna som visas
på bilden.
11.a
1
2 2
Justera höjden på styret
Lossa skruvarna på stammen och justera
styret till önskad höjd med hjälp av
distansringarna. För att ställa in styret
idet lägsta läget, vrid spindeln så att den
pekar nedåt, se fig. 7.c Efter justering
av styrets höjd, dra först åt skruven på
styrstolpen (1), sedan sidoskruvarna
(2, 3).
SE
7.c
70
Inställning av frambromsarna – Wolfer
Hela ytan av bromsbeläggen bör
passa tätt mot sidan av fälgen vid
bromsning. Om inte, justera läget för
bromsbeläggen med hjälp av skruvarna
som fäster bromsbeläggen till armarna
på bromsarna (1). Beläggen får inte röra
däcket och när bromsspakarna släpps
bör beläggen vara 1–2 mm från kanten.
Avståndet för bromsbeläggen kan
justeras genom att dra åt eller släppa
efter bromskabeln i ankarbulten (2).
71
Om hjulet rör bromsbelägget vid någon
punkt under rotationen, vrid hela
bromsmekanismen tills bromsarmarna
är jämnt åtskilda från fälgen. För att låsa
armarnas position, vrid spaken nedåt (1).
Inställning av frambromsarna – Trexx
Sätt in bromskabeln tillbaka
till styrningen (1). Kontrollera
bromsbeläggen vid bromsning och se
till att hela ytan passar tätt mot sidan
av fälgen. Om inte, justera skruven (2),
som fäster bromsbeläggen till axlarna
av V- bromsar. Bromsbeläggen får inte
vidröra fälgen.
SE
Page 37

Installationsmanual
1
2 2
Kontrollera att bromsbeläggen rörar sig
bort från kanten tillräckligt (1–2 mm)
när bromshandtaget släpps. Avståndet
för bromsbeläggen kan justeras genom
att dra åt eller lossa bromskabelns
ankarbulten (1). Om bromsbeläggen
kommer i kontakt med kanten medan
hjulet snurrar, justera avståndet mellan
bromsarmarna symmetriskt med
spännskruvarna (2).
12. 13.11.b
2 2
1
Justering av bakbromsen är densamma
för båda modellerna.
Sätt in bromskabeln tillbaka
till styrningen (1). Kontrollera
bromsbeläggen vid bromsning och se
till att hela ytan passar tätt mot sidan
av fälgen. Om inte, justera skruven (2),
som fäster bromsbeläggen till axlarna
av V- bromsar. Bromsbeläggen får inte
vidröra fälgen.
14.b14.a
2 2
1
Kontrollera att bromsbeläggen rörar sig
bort från kanten tillräckligt (1–2 mm)
när bromshandtaget släpps. Avståndet
för bromsbeläggen kan justeras genom
att dra åt eller lossa bromskabelns
ankarbulten (1). Om bromsbeläggen
kommer i kontakt med kanten medan
hjulet snurrar, justera avståndet mellan
bromsarmarna symmetriskt med
spännskruvarna (2).
15.
1. 2. 3.
Montering av stativet
Stativet är inte inkluderad. Du kan köpa
den tillsammans med andra Yedoo
tillbehör hos din lokala återförsäljare.
Sewww.yedoo.eu.
Montera stativet i det område där den
främre profilen av ramen är utspritt. För
bästa stabilitet för en viss modell välj rätt
höjd för montering av stativet. Stativet bör
inte sträcka sig utanför ramen för skotern
när i körställning.
Den maximala kapaciteten av stativet
är ca 15 kg. Stå inte på den parkerade
skoter.
Justering av bowdenkablarna
Justera positionen av kablarna och se
till att de inte sträcker sig utanför ramen
för skoter (Särskilt i den bakre gaelområde)
SE
Bifoga dem till uttaget framför ramen.
Halkskydd band
Använd reserv halkskydd band för att
öka anti-slip eekt på fotplattan. Du kan
enkelt hålla dem på de tomma luckorna
i fotstödet. Varning: Rengör och avfetta
fotstödet noggrant före installation.
72
73
SE
Page 38

Säkerhetsrekommendationer
Tillverkaren och importören i EU är INTREA - PIKO, Ltd.,
Sasanková 2657/2, 106 00 Prag 10, Tjeckien,
www.yedoo.eu.
Úvod
Skotern i sin grundkonfiguration är avsedd för ridning i dagsljus
i områden avsedda för idrott och rekreation, helst på en slät,
torr yta.
För att rida på vägar och i mörker måste du utrusta skoter med
extra säkerhetsanordningar (ljus, reflektorer etc.) i enlighet med
tillämpliga regler i ditt land. Följ trafikreglerna , principer för
säker ridning och bära personlig skyddsutrustning (hjälm, cykel
handskar, knä- och armbågsskydd, stövlar, etc.).
Före varje körning kontrollera dina bromsarna och det
totala tekniska tillståndet för skotern. Pumpa däcken till den
rekommenderade maximala tryck (se däcksidan). Inte överskrid
dens kapacitet. Skotern är endast avsedd för en ryttare. Inte
överbelasta skotern. Skotern är inte avsedd för hopp eller
acrobat-ridning.
Alla komponenter är utformade för att minska hastigheten
(bromsbelägg, fälgar, däck, etc.) blir varma under användning.
Rör inte någon av delarna tills de har svalnat!
Instruktioner för körning
Hålla båda händerna på styret medan du kör. Även om du
använder ett ben för att köra, använd din andra benet för
att stå på fotstödet. Att växla benen regelbundet. Tryck på
bromshandtag på styret för att bromsa. Varning: Plötslig
bromsning kan orsaka ett fall.
Underhåll
Korrekt underhåll kommer att förbättra säkerheten och förlänga
livslängden på din scooter. Därför dra åt skruvförbindningar,
kontrollera skick av anordningarna för snabb öppning,
kontrollera däcktrycket och smörj rörliga delar (lager i hjulen
och styret, bromshandtaget pinnar, bromsmekanismens
ledpunkter, bromskablar, etc.) regelbundet.
Se till att den tillförda smörjmedlet inte blir på fälgar och
bromsbelägg. Fett minskar deras eekt! Om det händer, avfetta
nedsmutsade områden med, till exempel, teknisk bensin.
Kontrollera mönsterdjup regelbundet och byta ut däcken mot
nya med samma parametrar om det behövs. Om skotern inte är
redo att användas, tydligt markera det som sådant.
Kontrollera tillstånd på de självlåsande muttrarna regelbundet
(om de lossnar spontant, ersätta dem med nya). Regelbundet
kontrollera hjul ekrar, ojämn spänning av trådarna kan orsaka
sprickor eller decentralisering av hjulen.
Produkten uppfyller relevanta EU-normer (EN 14619) och
det fick också intyg om kvalitet och säkerhet av en ledande
tjeckiska testinstitut (Strojírenský zkušební ústav, s. S.).
Utnyttjande av rättigheter som
följer från bristande fullgörelse
Allmänna bestämmelser
Innehåll, omfattning och varaktighet köparens rättigheter
som följer av bristande fullgörelse styrs av tillämpliga lagar
iTjeckien, särskilt relevanta bestämmelser i civillagen (lag nr
89/2012 Coll.) Och konsumentskyddslagen (lag nr 634/1992
Coll.). De köparens rättigheter inom dessa regler inte påverkas
av detta dokument eller uppgifterna i den.
Period för att utöva de rättigheter som följer av bristande
fullgörelse
Köparen kan tillämpa rätt från fel i nyinköpta Yedoo skoter
(nedan varor) inom en period av 24 månader från dagen för
mottagandet. Om köparen definierar felet av varorna legitimt,
är den period för att utöva rättigheter som följer av bristande
fullgörelse förlängas med den tid under vilken köparen inte kan
använda varan.
Specifikationer för tillämpning av rättigheter som följer av
bristande fullgörelse
Rättigheter som följer av bristande fullgörelse tillämpas
påden återförsäljare där varorna köptes (se detaljer nedan).
Virekommenderar att lämna det här dokumentet, inköpsbevis
och en komplett skoter fritt från föroreningar vid tillämpning av
rättigheter från defekter. Säljaren kommer att utfärda en skriftlig
bekräftelse på att utöva de rättigheter som följer av bristande
fullgörelse eller en bekräftelse av reparation.
Specifikation av rättigheter vid materialfel
Vid montering av skotern anvisningarna
iinstallationshandboken måste följas. Skotern får endast
användas för det ändamål som den gjordes för. Skotern ska
förvaras och underhållas i enlighet med den medföljande
tillverkarens instruktioner. Tillverkarens ansvar gäller inte fel
orsakade enbart av felaktig installation eller användning av
skotrar i konflikt med bruksanvisningen.
Modell av skoter:
Serienummer av ram:
Datum för försäljning:
Försäljare:
Stämpel och underskrift:
Montáž, nastavenie a pravidelnú údržbu odporúčame zveriť
odbornému cykloservisu. Neodborné zásahy môžu poškodiť
kolobežku alebo zapríčiniť nehodu s vážnymi zdravotnými
následkami.
Ak ste však technicky zdatní, ničoho sa nebojte a s chuťou sa
domontáže pusťte s nami.
Otázky, pripomienky a návrhy na zlepšenie našich výrobkov nám
prosím posielajte na e-mail: info@yedoo.eu.
Viac informácií zo sveta
kolobežiek a zoznam distribútorov
nájdete na www.yedoo.eu.
SE
74
75
SK
Page 39

Návod na montáž
1.
Postup je pre oba modely
(Wolfer, Trexx)
v detailoch, pozri doplňujúce obrázky.
Pri uťahovaní spojov neprekročte
uvedený moment utiahnutia.
Montáž predného kolesa
Do kolesa vložte rýchloupínač tak,
aby na každej strane bola jedna pružinka
so zúžením smerujúcim k stredu kolesa.
rovnaký, líši sa len
4.
2.
Najprv skontrolujte, či predná vidlica
kolobežky je natočená v správnom
smere (ramená V-brzdy smerujú
dopredu), potom uvoľnite brzdové
čeľuste pootočením páčky.
5.
Wolfer
3.
Smer
otáčania
Koleso vsaďte do prednej vidlice tak,
aby bolo presne uprostred. Pozor:
vzor pneumatiky by mal smerovať
dopredu v smere jazdy, pozri smerovú
šípku na boku plášťa.
Trexx
6.a 6.c
2
1
Montáž zadného kolesa
Uvoľnite brzdové lanko z vodidla (1),
koleso vložte do jedného z dvoch
úchytov vidlice, pozri obr. 6.b, 6.c.,
koleso vycentrujte a dotiahnite
rýchloupínač (2).
6.b
Dvojpolohová zadná vidlica umožňuje
prispôsobiť výšku stúpadla. Spodný
úchyt použite pri jazde po teréne.
Rýchloupínaciu páčku dovrite tak,
aby smerovala nahor.
Horný úchyt vidlice, ktorý zníži výšku
stúpadla a zároveň odľahčí stojacej nohe,
je určený pre jazdu na hladkom a rovnom
povrchu. Jazda bude fyzicky menej
namáhavá. Rýchloupínaciu páčku dovrite
tak, aby smerovala nadol.
7.a 7.b 7.d
6–8 Nm
1
Dotiahnite nastavovaciu maticu
rýchloupínača tak, aby ste tesne
pred dovretím rýchloupínacej páčky
cítili značný odpor. Páčku zavrite
v takej pozícii, aby sa nedotýkala
vidlice a zároveň nemohlo dôjsť k jej
náhodnému otvoreniu počas jazdy.
SK
5–6 Nm 5–6 Nm
Montáž riadidiel
Riadidlá inštalujete na predstavec
a utiahnite skrutky objímky. Logá
(nie sú zobrazené na obrázku) by mali
byť pri čelnom pohľade čitateľné.
76
2
3
5–6 Nm
Nastavenie výšky riadidiel
Uvoľnite skrutky na predstavci a nastavte
požadovanú výšku riadidiel pomocou
vymedzovacích krúžkov. Pre nastavenie
najnižšej polohy pretočte predstavec
tak, aby smeroval dolu, pozri obr. 7.c.
Po nastavení výšky riadidiel najprv
dotiahnite skrutku hlavového zloženia (1),
potom bočné skrutky (2, 3).
77
7.c
SK
Page 40

Návod na montáž
8.
3
2
Montáž brzdových laniek
Stlačte brzdovú páčku na maximum
a do guľatého očka vložte koniec
brzdového lanka (1). Lanko vložte do
drážky a utiahnite stavaciu skrutku (2)
a maticu (3). Rovnaký postup zopakujte
aj s druhou brzdou. Zadné brzdové lanko
sa spravidla upevňuje do pravej brzdovej
páčky, predné do ľavej.
1
10.a
2
6–7 Nm 6–7 Nm
Nastavenie sklonu brzdových páčok
U oboch brzdových páčok povoľte
upevňovaciu skrutku na objímke.
Správny sklon brzdových páčok
nastavíte tak, že si stúpnete na stúpadlo,
uchopíte riadidlá a natiahnete prsty tak,
aby predĺžili priamku ruky. V tejto polohe
nastavte páčky a u oboch dotiahnite
upevňovaciu skrutku.
10.b
9.b9.a
Pri modeli Yedoo Wolfer môžete
pomocou upevňovacích skrutiek
na obrázku upraviť aj polohu rohov.
11.a
1
1
2 2
Skontrolujte, či sa špalky pri uvoľnení
brzdovej páčky dostatočne oddialia
odráfika (1–2 mm). Vzdialenosť špalkov
možno upraviť pritiahnutím alebo
povolením brzdového lanka v kotevnej
skrutke (1). Ak sa koleso pri otáčaní
vniektorom mieste trie o brzdový
špalok, symetricky upravte vzdialenosť
brzdových ramien napínacími
skrutkami(2).
12. 13.11.b
2 2
1
Nastavenie zadnej brzdy je rovnaké pre
oba modely.
Vložte brzdové lanko naspäť do vodidla
(1) a skontrolujte, či brzdové špalky
pri zabrzdení dosadajú celou svojou
plochou na bok ráfika. Ak nie, upravte
ich polohu pomocou skrutiek (2),
ktorými sú špalky prichytené k ramenám
V-brzdy. Špalky sa nesmú dotýkať plášťa.
14.b14.a
2 2
1
Skontrolujte, či sa špalky pri uvoľnení
brzdovej páčky dostatočne oddialia
odráfika (1–2 mm). Vzdialenosť špalkov
možno upraviť pritiahnutím alebo
povolením brzdového lanka v kotevnej
skrutke (1). Ak sa koleso pri otáčaní
vniektorom mieste trie o brzdový
špalok, symetricky upravte vzdialenosť
brzdových ramien napínacími
skrutkami(2).
15.
1 1
Nastavenie prednej brzdy – Wolfer
Brzdové špalky by pri zabrzdení mali
dosadať celou svojou plochou na
bok ráfika. Ak nie, upravte ich polohu
pomocou skrutiek, ktorými sú špalky
prichytené k ramenám brzdy (1). Špalky
sa nesmú dotýkať plášťa a pri uvoľnení
brzdovej páčky by sa mali 1–2 mm oddialiť
od ráfika. Vzdialenosť špalkov možno
upraviť pritiahnutím alebo uvoľnením
brzdového lana v kotevnej skrutke (2).
SK
1
Ak sa koleso pri otáčaní trie o brzdový
špalok, pootočte celým brzdovým
mechanizmom tak, aby brzdové ramená
boli rovnomerne vzdialené od ráfika.
Polohu ramien uzamknite otočením
páčky smerom dolu (1).
2 2
Nastavenie prednej brzdy – Trexx
Vložte brzdové lanko naspäť do vodidla
(1) a skontrolujte, či brzdové špalky
pri zabrzdení dosadajú celou svojou
plochou na bok ráfika. Ak nie, upravte
ich polohu pomocou skrutiek (2), ktorými
sú špalky prichytené k ramenám V-brzdy.
Špalky sa nesmú dotýkať plášťa.
78
Upravenie bowdenov
Polohu bowdenov upravte tak, aby nikde
(najmä pri zadnej vidlici) nepresahovali
rám kolobežky.
79
V prednej časti rámu ich upevnite
doobjímky.
Protišmykové pásky
Na zvýšenie protišmykového účinku
stúpadla použite náhradné protišmykové
pásky, ktoré jednoducho nalepíte do
prázdnych drážok stúpadla. Pozor:
Pred aplikáciou stúpadlo dobre očistite
azbavte mastnoty.
SK
Page 41

Návod na montáž
Bezpečnostné odporúčania
Výrobca a dovozca v EÚ INTREA – PIKO, s.r.o., Sasanková 2657/2,
106 00 Praha 10, Česká republika, www.yedoo.eu.
1. 2. 3.
Montáž stojančeka
Stojanček nie je súčasťou balenie,
podobne ako ostatné doplnky Yedoo si
ho môžete dokúpiť. Viac na yedoo.cz.
Stojanček namontujte na mieste,
kde je predný profil rámu roztvorený.
Výšku upevnenia stojančeka zvoľte tak,
aby pre daný model poskytla najväčšiu
stabilitu. Stojanček by v záložnej polohe
nemal presahovať rám kolobežky.
Maximálna nosnosť stojančeka je
cca 15 kg. Na zaparkovanú kolobežku
nestúpajte.
Kolobežka je v základnej výbave určená pre jazdu za denného
svetla v priestoroch určených pre šport a rekreáciu, ideálne na
hladkom a suchom povrchu.
Pre jazdu na pozemných komunikáciách a pre jazdu za tmy ju
treba vybaviť bezpečnostnými prvkami (svetlami, odrazovými
svetlami atď.) v súlade s platnými predpismi v príslušnom štáte.
Dodržujte pravidlá cestnej premávky, zásady bezpečnej jazdy
a noste osobné ochranné pomôcky (prilbu, cyklistické rukavice,
chrániče kolien a lakťov, pevnú obuv a pod.).
Pred každou jazdou skontrolujte funkčnosť bŕzd a celkový
technický stav kolobežky. Pneumatiky hustite na maximálnu
odporúčanú hodnotu tlaku, pozri bočnú strana plášťa.
Neprekračujte jej nosnosť. Kolobežka je určená len pre jedného
jazdca. Vyvarujte sa preťažovania kolobežky, kolobežka nie je
určená pre skoky ani akrobatickú jazdu.
Všetky komponenty znižujúce rýchlosť (brzdové tyčky, ráfiky,
pneumatiky a pod.) sa pri používaní zahrievajú, nedotýkajte sa
ich, dokým nevychladnú!
Pokyny pre jazdu
Pri jazde majte vždy obe ruky na riadidlách. Zatiaľ čo sa jednou
nohou odrážate, druhou nohou stojte na stúpadle kolobežky.
Pravidelne striedajte odrazovú nohu. Na zabrzdenie stlačte
brzdové páčky na riadidlách. Pozor: Prudké zabrzdenie môže
spôsobiť pád.
Údržba
Dobrá údržba zvýši bezpečnosť a predĺži životnosť kolobežky.
Preto pravidelne doťahujte skrutkové spoje, kontrolujte stav
rýchloupínáčov, tlak v pneumatikách a mažte pohyblivé časti
(ložiská kolies a riadidiel, čapy brzdových páčok, čeľuste bŕzd,
brzdové lanká atď.).
Dajte však pozor, aby sa mazivo nedostalo na ráfiky a brzdové
doštičky. Mastnota znižuje ich účinky! Ak sa tak stane,
znečistené časti zbavte mastnoty napr. technickým benzínom.
Pravidelne kontrolujte výšku vzoru na plášťoch kolies a podľa
potreby vymeňte plášte za nové so zhodnými parametrami.
Kolobežku, ktorá nie je pripravená na použitie, vhodne označte.
Kontrolujte stav samoistiacich matíc (ak sa za jazdy samovoľne
uvoľňujú, vymeňte ich za nové). Pravidelne kontrolujte výplet
kolies, nerovnomerné napnutie drôtu vo výplete môže spôsobiť
ich praskanie alebo porušenie centrovania kolies.
Výrobok spĺňa príslušné normy EÚ (ČSN EN 14619 ŠPORTOVÁ
POTREBA) a získal certifikáty kvality a bezpečnosti od
popredného českého skúšobného ústavu (Strojárenský
skúšobný ústav, s. p.).
Uplatnenie práv pri
nedostatočnej kvalite
Všeobecné ustanovenia
Obsah, rozsah a trvanie práv kupujúceho pri nedostatočnej
kvalite tovaru sa riadia platnými právnymi predpismi
Českej republiky, predovšetkým príslušnými ustanoveniami
občianskeho zákonníka (z. č. 89/2012 Zb.) a zákona o ochrane
spotrebiteľa (z. č. 634/1992 Zb.). Práva kupujúceho podľa
týchto predpisov nie sú týmto dokladom, ani v ňom uvedenými
informáciami nijako porušené.
Lehota na uplatnenie práva pri nedostatočnej kvalite
Právo pri nedostatočnej kvalite u novo zakúpenej kolobežky
Yedoo (ďalej len tovar) môže kupujúci uplatniť v lehote
24mesiacov od jej prevzatia. Ak kupujúci oprávnene vytkne
nedostatočnú kvalitu, do lehoty na uplatnenie práva pri
nedostatočnej kvalite sa nepočíta čas, počas ktorého kupujúci
nemohol tovar používať.
Spôsob uplatnenia práva pri nedostatočnej kvalite
Právo pri nedostatočnej kvalite sa uplatňuje u predajcu,
u ktorého kupujúci tovar kúpil (pozri údaje nižšie). Pri uplatnení
práva pri nedostatočnej kvalite odporúčame predložiť
tento doklad, doklad o kúpe a kompletnú, nečistôt zbavenú
kolobežku. O uplatnenie práva pri nedostatočnej kvalite,
prípadne o vykonaní opravy vystaví predajca kupujúcemu
písomné potvrdenie.
Podmienky trvania práva z nedostatku kvality
Pri montáži kolobežky treba dodržať pokyny uvedené v návode
na montáž. Kolobežku možno používať iba na účel, na aký bola
vyrobená. Kolobežku treba skladovať a udržovať podľa pokynov
výrobcu. Na poruchy spôsobené výlučne nesprávnou montážou
alebo používaním kolobežky v rozpore s užívateľskou príručkou
sa zodpovednosť výrobcu nevzťahuje.
Model kolobežky:
Výrobné číslo rámu:
Dátum predaja:
Predajca:
Pečiatka a podpis:
SK
80
81
SK
Page 42

Yedoo Wolfer
Yedoo Trexx
Notes
www.yedoo.eu
Page 43

Page 44

 Loading...