

Page 1
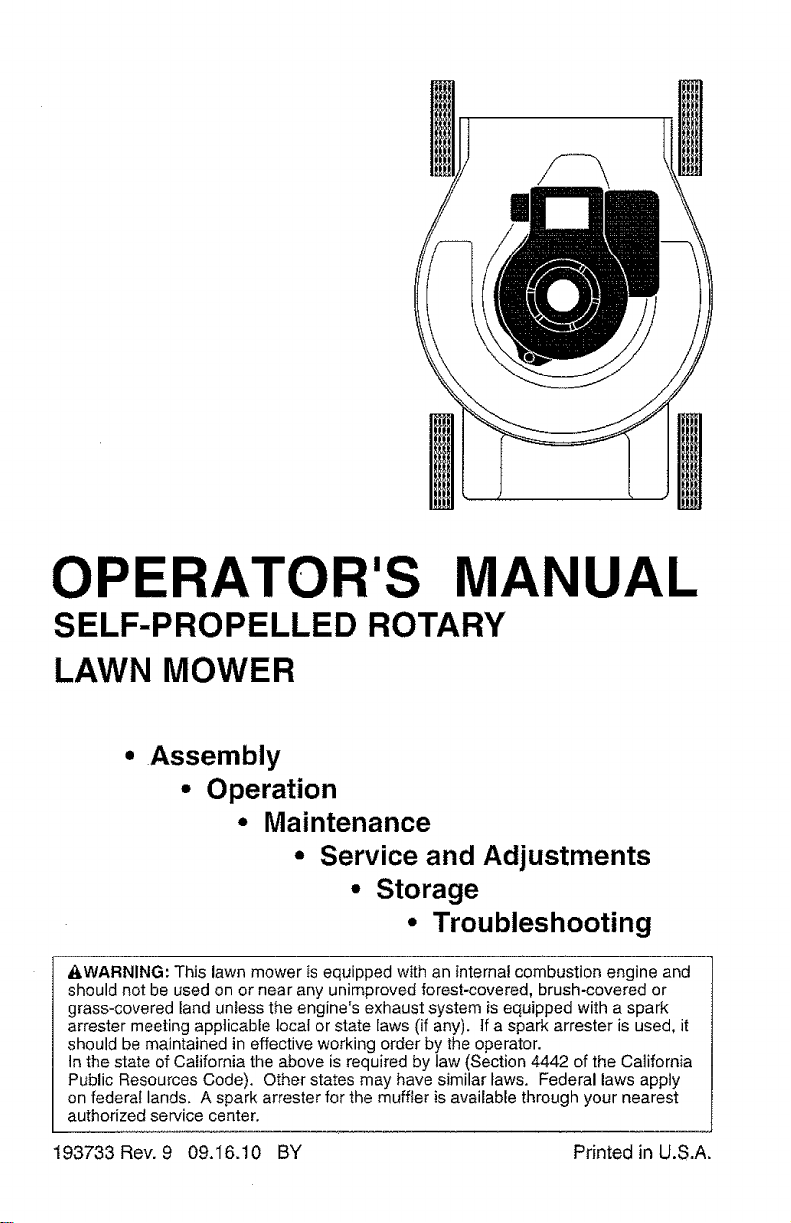
OPERATOR'S MANUAL
SELF-PROPELLED ROTARY
LAWN MOWER
Assembly
• Operation
• Maintenance
° Service and Adjustments
° Storage
• Troubleshooting
&WARNING: This lawn mower is equipped with an internal combustion engine and
should not be used on or near any unimproved forest-covered, brush-covered or
grass-covered land unless the engine's exhaust system is equipped with a spark
arrester meeting applicable local or state laws (if any). tf a spark arrester is used, it
should be maintained in effective working order by the operator.
In the state of California the above is required by law (Section 4442 of the California
Public Resources Code). Other states may have similar taws. Federal laws apply
on federaI lands. A spark arrester for the muffler is available through your nearest
authorized service center.
193733 Rev. 9 09.16.10 BY Printed in U.S.A.
Page 2
Safety Rules ................. 2-3 Maintenance ............. 22-26 Storage ..................... 33-34
Assembiy ...................... 5-8 Service and Troubleshooting ........ 35-36
Operation .................... 9-2t Adjustments .............. 27-32
IMPORTANT: This cutting machine is capable of amputating hands and feet andthrowingob-
jects. Failure to observe the following safety instructions could result in serious injury or death.
,&Look for this symbol to point out impor- • Do not pull mower backwards unless
tant safety precautions. It means
CAUTION!!! BECOME ALERT!t!
YOUR SAFETY IS INVOLVED.
&WARNING: Inordertopreventaccidental •
starting when setting up, transporting, ad-
lusting or making repairs, always disconnect
sparkplug wire and place wire where it cannot
come in contact with plug.
•,WARNING: Engine exhaust, some of its •
constituents, and certain vehicle compo-
nents contain or emit chemicals known to
the State of California to cause cancer and °
birth defects or other reproductive harm.
•(kWARNING: Battery pests, terminals and
related accessories contain lead and lead
compounds, chemicals known to the State •
of California to cause cancer and birth
defects or other reproductive harm. Wash •
hands after handling.
=6,CAUTION: Muffler and
other engine parts become •
extremely hot during
operation and remain hot
after engine has stopped. °
To avoid severe burns on °
contact, stay away from these areas.
!. GENERAL OPERATION
, Read, understand, and follow all
instructions on the machine and in the
manual(s) before starting. Be thoroughly
familiar with the controls and the proper
use of the machine before starting,
° Do not put hands or feet near or under
rotating parts. Keep clear of the dis-
charge opening at all times.
• Only allow responsible individuals, who
are familiar with the instructions, to oper-
ate the machine.
• Clear the area of objects such as rocks,
toys, wire, bones, sticks, etc., which
could be picked up and thrown by blade.
• Be sure the area is clear of other people
before mowing. Stop machine if anyone
enters the area.
° Do not operate the mower when bare-
foot or wearing open sandals. Always
wear substantial foot wear.
absolutely necessary'. Always look down
and behind before and while moving
backwards.
Never direct discharged material toward
anyone. Avoid discharging material against
a wail or obstruction. Material may richo-
chet back toward the operator. Stop the
blade when crossing gravel surfaces.
Do not operate the mower without
proper guards, plates, grass catcher or
other safety protective devices in place.
See manufacturer's instructions for
proper operation and installation of
accessories, Only use accessories ap-
proved by the manufacturer.
Stop the blade(s) when crossing gravel
drives, walks, or roads.
Stop the engine (motor) whenever you
leave the equipment, before cleaning the
mower or unclogging the chute.
Shut the engine (motor) off and walt until
the blade comes to complete stop before
removing grass catcher.
Mow only in daylight / good artificial light.
Do not operate the machine while under
the influence of alcohol or drugs.
° Never operate machine in wet grass.
Always be sure of your footing: keep a
firm hold on the handle; walk, never run.
• Disengage the self-propelled mech-
anism or drive clutch on mowers so
equipped before starting the engine.
• If the equipment should start to vibrate
abnormally, stop the engine (motor) and
check immediately for the cause. Vibra-
tion is generally a warning of trouble.
• Always wear safety goggles or safety glass-
es with side shields when operating mower.
tl, SLOPE OPERATION
Slopes are a major factor related to slip &
fall accidents which can result in severe in-
jury. Aft slopes require extra caution, if you
feel uneasy on a slope, do not mow it.
DO:
• Mow across the face of slopes: never
up and down, Exercise extreme caution
when changing direction on slopes.
Page 3

• Removeobstacles(rocks,treelimbs,etc.)
- Watchforholes,ruts,orbumps.Tall
grasscanhideobstacles.
DONOT:
• Donottrimneardrop-offs,ditchesor
embankments.Theoperatorcouldlose
footingorbalance.
• Donottrimexcessivelysteepslopes.
• Donotmowonwetgrass.Reducedfoot-
ingcouldcauseslipping.
I!!.CHILDREN
Tragicaccidentscanoccuriftheoperatoris
notalerttothepresenceofchildren.Children
areoftenattractedtothemachineandthe
mowingactivity.Never assume that children
will remain where you last saw them.
• Keep children out of the trimming area
and under the watchful care of another
responsible adult.
° Be alert and turn machine off if children
enter the area.
• Before and while walking backwards,
look behind and down for small children.
• Never allow chitdren to operate the mower.
• Use extra care when approaching blind
corners, shrubs, trees, or other objects
that may obscure vision.
IV, SAFE HANDLING OF GASOLINE
Use extreme care in handling gasoline.
Gasoline is extremely flammable and the
vapors are explosive.
• Extinguish all cigarettes, cigars, pipes
and other sources of ignition.
• Use only an approved container.
• Never remove gas cap or add fuel with
the engine running. Allow engine to cool
before refueling.
• Never refuel the machine indoors.
• Never store the machine or fuel contain-
er where there is an open flame, spark
or pilot light such as a water heater or on
other appliances.
• Never fill containers inside a vehicle, on
a truck or trailer bed with a plastic liner,
Always place containers on the ground
away from your vehicle before filling.
• Remove gas-powered equipment from the
truck or trailerand refuel it on the ground, if
this is not possible, then refuel such equip-
ment with a portable container, rather than
from a gasoline dispenser nozzle.
• Keep the nozzle in contact with the rim
of the fuel tank or container opening at
all times until fueling is complete. Do not
use a nozzle lock-open device.
• tf fuel is spilled on clothing, change
clothing immediately.
• Never overfill fuel tank. Replace gas cap
and tighten securely.
V, GENERAL SERVICE
• Never run machine inside a closed area.
• Never make adjustments or repairs with
the engine (motor) running. Disconnect the
spark plug wire, and keep the wire away
from the plug to preventaccidentaI starting.
• Keep nuts and bolts, especially blade
attachment bolts, tight and keep equip-
ment in good condition.
• Never tamper with safety devices. Check
their proper operation regularly.
• Keep machine free of grass, leaves, orother
debris build-up, Clean oil or fuel spillage.
Allow machine to cool before storing.
• Stop and inspect the equipment if you
strike an object. Repair, if necessary,
before restarting.
• Never attempt to make wheel height
adjustments while the engine is running.
• Grass catchercomponents are subject to
wear, damage, and deterioration, which
could expose moving parts or allow objects
to bethrown. Frequentlycheck components
and replace with manufacturer's recom-
mended parts, when necessary.
, Mower blades are sharp and can cut.
Wrap the blade(s) or wear gloves, and
use extra caution when servicing them.
• Do not change the engine governor set-
ting or overspeed the engine.
, Maintain or replace safety and instruc-
tion labels, as necessary.
CONGRATU LATIONS on your purchase of a new Lawn Mower. Ithas been designed, engi-
neered and manufactured to give you the best possible dependability and performance,
Should you experience any problems you cannot easily remedy, please contact your
nearest authorized service center. They have competent, well trained technicians and
the proper tools to service or repair this unit.
° Read the SAFETY RULES and this Operator's Manual in its entirety before you at-
tempt to assemble or operate your new lawn mower to insure proper operation and to
prevent injury to yourse]fand others. Save this manual for future reference,
• Your new lawn mower has been assembled at the factory with the exception of those
parts left unassembled for shipping purposes. To ensure safe and proper operation
of your lawn mower, all parts and hardware you assemble must be tightened securely.
Use the correct tools as necessary to ensure proper tightness.
° All parts such as nuts, washers, bolts, etc., necessary to complete the assembly have
been placed in the parts bag. 3
Page 4
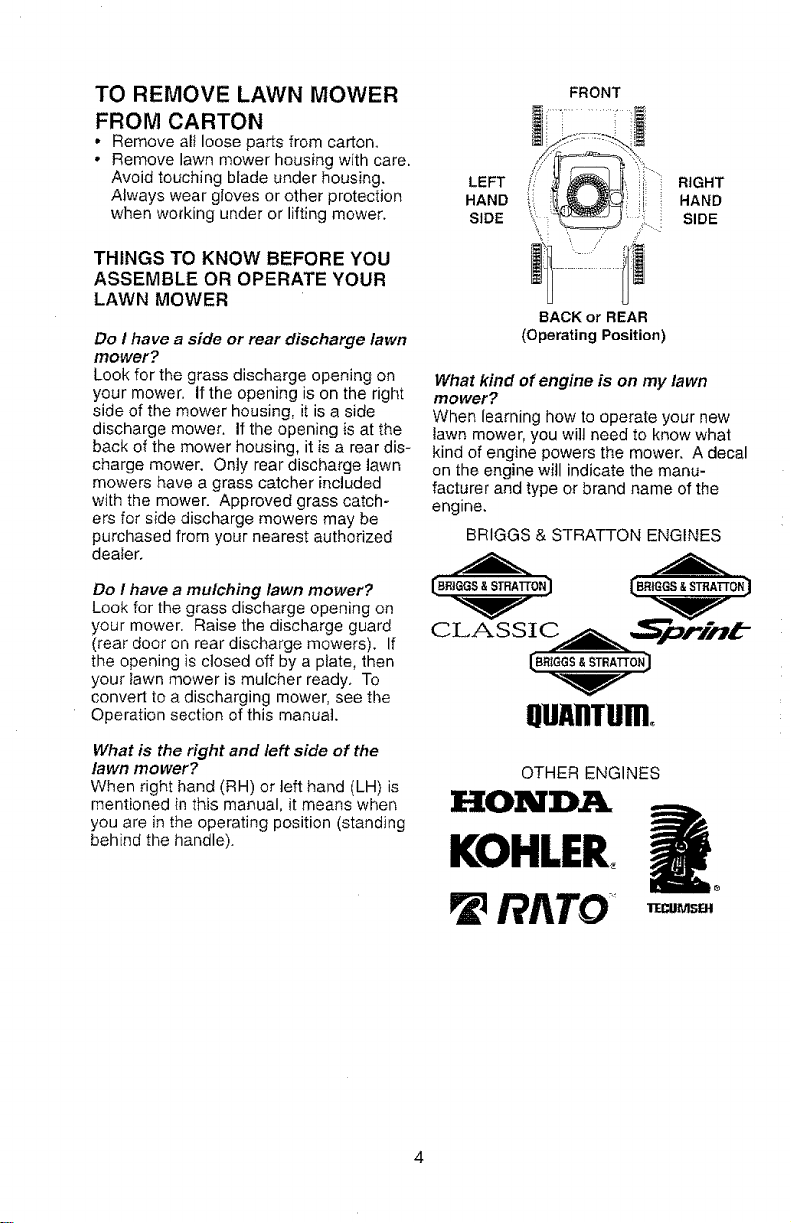
TO REMOVE LAWN MOWER
FROM CARTON
• Remove all loose parts from carton.
• Remove lawn mower housing with care.
Avoid touching blade under housing.
Always wear gloves or other protection
when working under or lifting mower.
THINGS TO KNOW BEFORE YOU
ASSEMBLE OR OPERATE YOUR
LAWN MOWER
Do I have a side or rear discharge lawn
mower?
Look for the grass discharge opening on
your mower, if the opening is on the right
side of the mower housing, it is a side
discharge mower. If the opening is at the
back of the mower housing, it is a rear dis-
charge mower. Only rear discharge lawn
mowers have a grass catcher included
with the mower. Approved grass catch-
ers for side discharge mowers may be
purchased from your nearest authorized
dealer.
Do I have a mulching lawn mower?
Look for the grass discharge opening on
your mower. Raise the discharge guard
(rear door on rear discharge mowers). If
the opening is closed off by a plate, then
your tawn mower is mulcher ready. To
convert to a discharging mower, see the
Operation section of this manual
What is the right and left side of the
lawn mower?
When right hand (RH) or left hand (LH) is
mentioned in this manual, it means when
you are in the operating position (standing
behind the handle).
FRONT
//
LEFT ii RIGHT
HAND HAND
SIDE SIDE
BACK or REAR
(Operating Position)
What kind of engine is on my lawn
mower?
When learning how to operate your new
tawn mower, you will need to know what
kind of engine powers the mower. A decal
on the engine will indicate the manu-
facturer and type or brand name of the
engine.
BRIGGS & STRA_ON ENGINES
[,BRIGGS & STRATTON)
QUAnTUm,
OTHER ENGINES
RitTO
4
Page 5

_I,CAUTION: Do not operate this lawn
mower without the discharge guard or an
entire approved grass catcher in place.
These guards are for your protection and
are required by the American National
Standards Institute and Consumer Prod-
ucts Safety Commission.
,Ii_CAUTION: Disconnect spark plug wire
from spark plug and place wire where it
cannot come in contact with plug,
HOW TO SET UP YOUR MOWER
UNFOLD HANDLE
IMPORTANT: Unfold handle carefully so
as not to pinch or damage control cables.
2 POSITION / "ADJUSTABLE" HANDLES
• Raise handles until lower handle section
locks into place in operating position.
"QUICK RELEASE" HANDLES
• Move height adjustment lever forward to
raise mower to highest position.
• Tighten handle bolts (on both sides).
Operator MOWING
presence
LIFT
UP
Upper
handle
Handle
lever
• Insert handle bolt through handle and
bracket and secure with knob.
° Repeat for opposite side of handle.
Knob
3 POSITION "QUICK" HANDLES
• Raise lower handle section to operating
position and squeeze the bottom ends
of lower handle towards each other
until the pin in handle can be inserted
into one of the three height adjustment
holes,
SQUEEZE
Handle
bracket
Belt
Handle pin
J
Handle
adj
bracket
handle
Handle
Height
adjuster
lever
LEVER
FORWARD
TO RAISE
MOWER
3 POSITION "EZ" HANDLES
• Raise lower handle section to operating
position and align hole in handle with
one of three height positioning holes.
ALL HANDLES
° Raise upper handle section into place on
bolt
lower handle, remove protective padding
and tighten both handle knobs.
° Remove handle padding holding opera-
tor presence control bar to upper handle.
° Your lawn mower handle can be ad-
justed for your mowing comforL Refer to
"ADJUST HANDLE" in the Service and
Adjustments section of this manual.
NOTE: For shipping purposes, the rear
wheels on your tawn mower may not be
adjusted to the same position as the front
wheels. Before operating mower adjust all
5 wheels to the same cutting height.
Page 6
INSTALL REAR WHEELS
("HIGH WHEEL" MOWERS ONLY)
Some high wheel models require washers
which will be provided in a parts bag. tf
provided, instali washers on the axle first
as shown.
* Install one (1) rear wheel on the axle of
rear wheel adjuster.
, Install 3/8-16 locknut and tighten se-
curely.
, Repeat procedure for other rear wheel.
O-Ring
Flanged
Iocknut assembly
Axle
ASSEMBLE GRASS CATCHER
(REAR DISCHARGE MOWERS ONLY)
IMPORTANT: If your model lawn mower
is mulcher ready, the mu]cher plate or plug
must be removed before using mower as
a bagger. To convert mower to bagging or
discharging, see the Operation section in
this manual.
Look at the different grass catcher illustra-
tions that follow. Determine which type
of grass catcher you have and folIow the
appropriate instructions.
"FABRIC TOP" GRASS CATCHERS
TO ASSEMBLE AND ATTACH GRASS
CATCHER
• Put grass catcher frame into grass bag
with rigid part of bag on the bottom.
• Slip vinyl bindings over frame.
NOTE: if vinyl bindings are too stiff, hold
them in warm water for a few minutes. If
bag gets wet, let it dry before using.
• Lift the rear door on the mower housing.
• For HINGE BRACKET mounted catcher,
place the grass catcher frame onto the
formed tabs on the rear door hinge
bracket.
"_--" Rear door
bracket
Grass
catcher
frame
---_..
Formed tabs
• For HANDLE BRACKET mounted
catcher, place frame side hooks into
slots in handle brackets.
Handle bracket hooks Rear
Grass
catcher
handle
Catcher frame side hook
Page 7
ForDOORPIVOTPINmounteclcatcher,
placethegrasscatcherframehooks
ontothedoorpivotpins.
Pivotpins Rear Grass
catcher
handle
Catcher frame hook
• For DOOR SLOT mounted catcher,
place the grass catcher frame hooks into
the slots of the rear door,
NOTE: The grass catcher is secured to the
lawn mower housing when the rear door is
lowered onto the grass catcher frame.
Rear door slots
Grass
catcher
handle
SPARK PLUG BOOT
On some models a spark plug boot is
)acked loose in the parts bag. If your
model has the boot, install on spark plug
wire and reconnect spark plug wire to
spark plug.
i Spark plug ........ j
Catcher frame hook
ALL GRASS CATCHERS
_CAUTION: Under normal usage, the
catcher material is subject to deterioration
and wear and should, therefore, be
checked frequently for replacement. Any
replacement catcher should be checked to
ensure compliance with original manufac-
turer's specifications,
_CAUTION: Do not run lawn mower
without the discharge guard (rear door),
approved grass catcher, clipping deflector
or mulcher plate in place. Never attempt
to operate mower with the discharge guard
(rear door) removed or propped open.
Page 8

TO PREPARE BATTERY
(ELECTRIC START MODELS ONLY)
NOTE: Your battery must be charged
before you can start your lawn mower,
• Open battery box (if equipped).
• Disconnect engine connector (male)
(if equipped) from battery connector
(female).
• Connect battery charger connector
(male) to harness connector (female).
• Plug battery charger into 1t0 volt A,C.
outlet.
• Leave battery charger connected for 24
hours before starting your engine for the
first time.
• Reconnect engine connector (male) (if
equipped) to batten/connector (female).
• Aftercharging, connect engine connector
(mate) (if equipped) to battery connector
(female).
Connect your battery charger to charge
battery after each use.
IMPORTANT: The engine will not recharge
your battery.
At the end of the mowing season the
battery should be charged for 48 hours to
protect the battery during winter storage,
&CAUTION: Always disconnect the
engine connector from the battery con-
nector to prevent accidental starting when
transporting or storing your lawn mower
after the season.
HANDLE-MOUNTED KEY SWITCH
Engine Harness
connector connector
\
connector (male)
22PLUS FRONT WHEEL DRIVE
Engine battery Battery
connector (male) er
Charger
connector
(male)
Battery connector (female)
Charger _
DECK-MOUNTED BATTERY
Battery
Charger
Harness
connector
(female)
Engine connector (male)
connector
(male)
Battery
box
22PLUS REAR WHEEL DRIVE
Batter
Harness
connector
(female)
Battery
box
Page 9

The operation of any lawn mower can result in foreign objects thrown into
the eyes, which can result in severe eye damage. Always wear safety
glasses or eye shields while operating your tawn mower or performing any
adjustments or repairs. We recommend standard safety glasses or a wide
vision safety mask worn over spectacles,
HOW TO USE YOUR LAWN MOWER
ENGINE SPEED CONTROL
MODELS WITH REMOTE THROTTLE
Engine speed is controlled by the throttle
control located on the upper handle.
• Move lever forward to FAST engine
speed for starting and better bagging.
• Move Sever backward for SLOW engine
speed.
• Some models have engines equipped
with a choke feature. Move the lever all
the way forward to the CHOKE position
when starting a cold engine.
NOTE: Be sure engine START!STOP
switch (if equipped) is in the ON position.
FAST .- ..
"_ slJ _J I,, tl
SLOW
//"-_ I I i -
,.//I ,'J i
_,, _v _
TO ADJUST CUTTING HEIGHT
ALL MODELS:
Adjust cutting height to suit your require-
ments. Medium position is best for most
lawns. Raise wheels for low cut and lower
wheels for high cut.
NOTE: For shipping purposes, the rear
wheels on your lawn mower may not be
adjusted to the same position as the front
wheels. Before operating mower adjust all
wheels to the same cutting height.
"MAN UAL" ADJUSTMENT
• Remove wheel, bolt, and hardware and
reassemble in desired adjustment hob.
• Reinstall wheel components in the same
order as they were before removai.
Tighten securely,
• Make sure all wheels are at same height.
Rat washer
Bolt
3/8-16
Spacer Locknut
,,___/" r / -""- Remote
MODELS WITH FIXED SPEED ENGINES
Engine speed was set at the factory for
optimum performance. Engine speed is
not adjustable.
_z control
throttle
"QUICK" ADJUSTMENT
• To change cutting height, squeeze adjuster
lever toward wheel. Move wheel up or
down to suit your requirements. Be sure
all wheels are in the same setting,
NOTE: Adjuster is properly positioned when
plate tab inserts into hole in lever. Also, 9-
position adjusters (if so equipped) allow lever
to be positioned between the plate tabs.
LEVER BACKWARD Plate tab
TO LOWER MOWER
LEVERFORWARDTORAISEMOWER Lever
9
Page 10
"QUICK-PIN" ADJUSTMENT
• To change cutting height, pull up on
adjuster lever, move wheel up or down
to suit your requirements and release
adjuster lever. Be sure all wheels are in
the same setting.
NOTE: Adjuster is properly positioned
when lever inserts into hole in plate.
TO LOWER MOWER
LEVER BACKWARD _
LEVER
FORWARD
TO RAISE MOWER
"SINGLE POINT" ADJUSTMENT
• Pult adiuster lever toward wheel. To
raise mower, move lever forward to
desired position. To lower mower, move
the lever toward the rear.
Height
adj
"DUAL POINT" ADJUSTMENT
Both front wheels are adjusted by a single
lever on the left front wheel. Likewise,
both rear wheels are adjusted by a single
lever on the left rear wheel.
• Putt adiuster lever toward wheel. To
raise mower, move Iever forward to
desired position. To lower mower, move
the lever toward the rear.
Be sure to adjust both front and rear
wheels to the same height.
Height uster lever
LEVER BACKWARD
TO LOWER MOWER
LEVER FORWARD
TO RAISE MOWER
LEVER
BACKWARD
TO LOWER
MOWER
LEVER
FORWARD
TO RAISE
MOWER
Page 11
"THREE POINT" ADJUSTMENT
(18" (45cm) Ht-VAC MODELS ONLY)
Both rear wheels are adjusted by a single
lever on the left rear wheel.
• Pull adjuster lever toward wheel. To
raise mower, move lever forward to
desired position. TO lower mower, move
the ]ever toward the rear.
NOTE: There are seven (7) height adjust-
ment positions for the rear wheels.
Both front wheels are adjusted as follows:
t. Remove wheel, bolt, and hardware and
reassemble in desired adjustment hole.
2. Reinstall wheel components in the
same order as they were before re-
moval. Tighten securely.
NOTE: There are seven (7) height adjust-
ment holes for the front wheels. Be sure
both front wheels are in the same hole.
IMPORTANT: Be sure to adjust both front
and rear wheels to the same height.
LEVER BACKWARD
TO LOWER REAR
OF MOWER
Lockbar
position)
Washel
usterlever
LEVER FORWARD
TO RAISE REAR
OF MOWER
Bolt
Lockbar
("freewheel"
Wing
position)
CASTER WHEEL OPERATION '
('q'HREE POINT" ADJUSTMENT ONLY)
The front wheels can be "locked" into
position or set to "freewheel" for better
maneuverability. Placing the lockbars in
the outer holes of the adjustment brackets
"locks" the front wheels. Likewise, placing
the tockbars in the inner holes of the ad-
justment brackets allows the front wheels
to spin freely ('_freewheel").
- Lift tockbar until the frontmost end clears
the adjustment bracket, then pivot lock-
bar to desired position.
IMPORTANT: Front wheels must be
"looked" into position when operating on
a slope. Mow across the face of slopes:
never up and down.
TO CONVERT MOWER:
Most mowers are shipped ready to be
used as a mutcher,
"REAR DISCHARGE ONLY" MOWERS
Some models have a seperate mulcher
plug, other models have the muicher plug
built into the rear door. To convert to bag-
ging or discharging, the plate or plug (if
so equipped) must be removed from the
discharge opening of the lawn mower,
• Open rear door and remove muicher
plate or plug (if so equipped). Store
mutcher plate or plug in a safe place.
• You can now install grass catcher or
optional clipping deflector accessory.
• To return to mulching operation, install
mutcher plate or plug into discharge
opening of mower.
• I,CAUTION: Do not run your fawn mower
without mulcher plate/plug in place or ap-
proved clipping deflector or grass catcher
in place. Never attempt to operate the
lawn mower with the rear door removed or
propped open.
MULCHER
"PLATE"
Mulcher
plate tabs
MULCHER
"PLUG"
Mufcher
plug
MULCHER PLUG BUILT INTO REAR DOOR
11
Page 12

"SIDE DISCHARGE ONLY" MOWERS
MULCHER PLATE
To convert to bagging or discharging,
mulcher plate must be removed from un-
derside of lawn mower.
• Remove the four (4) screws and lock nuts
securing the mulcher prate to the mower.
• Store mutcher plate and hardware in a
safe place.
° Mower can now be used for side
discharging or optional grass catcher
accessory can be attached,
• To return to mulching operation, simply
reinstall mulcher plate and tighten hard-
ware securely.
Screw and _ k._---.
lock nut _ x,.__
" _ 0 ML_cher
MULCHER PLUG TYPE "A"
To convert to mulching operation, mulcher
plug must be installed into discharge open-
ing of mower.
• Open discharge guard.
• Insert tab of mulch plug into housing
opening.
° Align hooks of mulch plug over hinge
rod of discharge guard, Push mulch plug
down unt;_ mulch plug is seated in hous-
ing opening.
_&CAUTION: Do not run your lawn mower
without discharge guard, approved grass
catcher or mutcher plug in place.
MULCHER PLUG TYPE "B"
To convert to bagging or discharging:
° Lift discharge guard and remove
mutcher plug.
• Mower can now be used for side dis-
charging or optional grass catcher can
be attached.
• To return to mulching operation, simply
reinstall mulcher plug as shown, making
sure tab is seated properly.
&CAUTION: Do not run your lawn mower
without discharge guard, approved grass
catcher or mulcher plug in place.
Lift
dischar(
guard
Install Tab
MOWER iS
NOW READY
FOR MULCH1NG
OPERATION
Discharge
Housing
ol
Mutcher plug 12
Page 13
"MULTI-CUT"MOWERS
"Your lawn mower was shipped ready to be
used as a mulcher, To convert to bagging
or discharging:
REAR BAGGING
• Open rear door and remove mulcher
plate or plug (if equipped). Store
mulcher plate or plug in a safe place,
o You can now install grass catcher,
• To convert to mulching or discharging
operation, instaU mu]cher plate or plug (if
equipped) into rear discharge opening of
mower, making sure all tabs are seated
properly. Close rear door,
bracket Grass
catcher
handle
catcher indicator
frame window (if
hook equipped)
"REAR DOOR PROP" (lF EQUIPPED)
(22PLUS MODELS ONLY)
NOTE: Rear door will remain open until
operator presence control bar is held down
to the handte.
,_,CAUTION: Do NOT force rear door to
close, Serious damage to your mower
could result.
Fu{l bag -
....._:_i!;,:,_:_':.........................:,:,:_i!i_?,_......
SIDE DISCHARGING
• Mulcher plate or plug (if equipped) must
be installed into rear discharge opening
of mower. Rear door must be closed.
• Open mulcher door and installdischarge
deflector under door as shown.
• Mower is now ready for discharging
operation.
° To convert to mulching or bagging
operation, discharge deflector must be
removed and mulcher door must be
closed and locked.
f
Unloc£
latch (if -_-'_
equipped)
Open mulcher door I
Discharge
deflector
J
/
13
Page 14
SIMPLE STEPS TO REMEMBER
WHEN CONVERTING YOUR
"MULTI-CUT" LAWN MOWER:
FOR MULCHING -
• Rear mutcher plate or plug (if equipped)
installed and rear door closed.
• Mulcher door closed.
FOR REAR BAGGING -
• Rear mulcher plate or plug (if equipped)
removed.
• Grass catcher installed.
• Mutcl_er door closed.
FOR SIDE DISCHARGING -
• Rear mulcher plate or plug (if equipped)
installed and rear door closed.
• Discharge deflector installed•
,_CAUTION: Do not run your lawn mower
without rear mulcher plate or plug in place
or approved grass catcher in place. Never
attempt to operate the lawn mower with
the rear door removed or propped open.
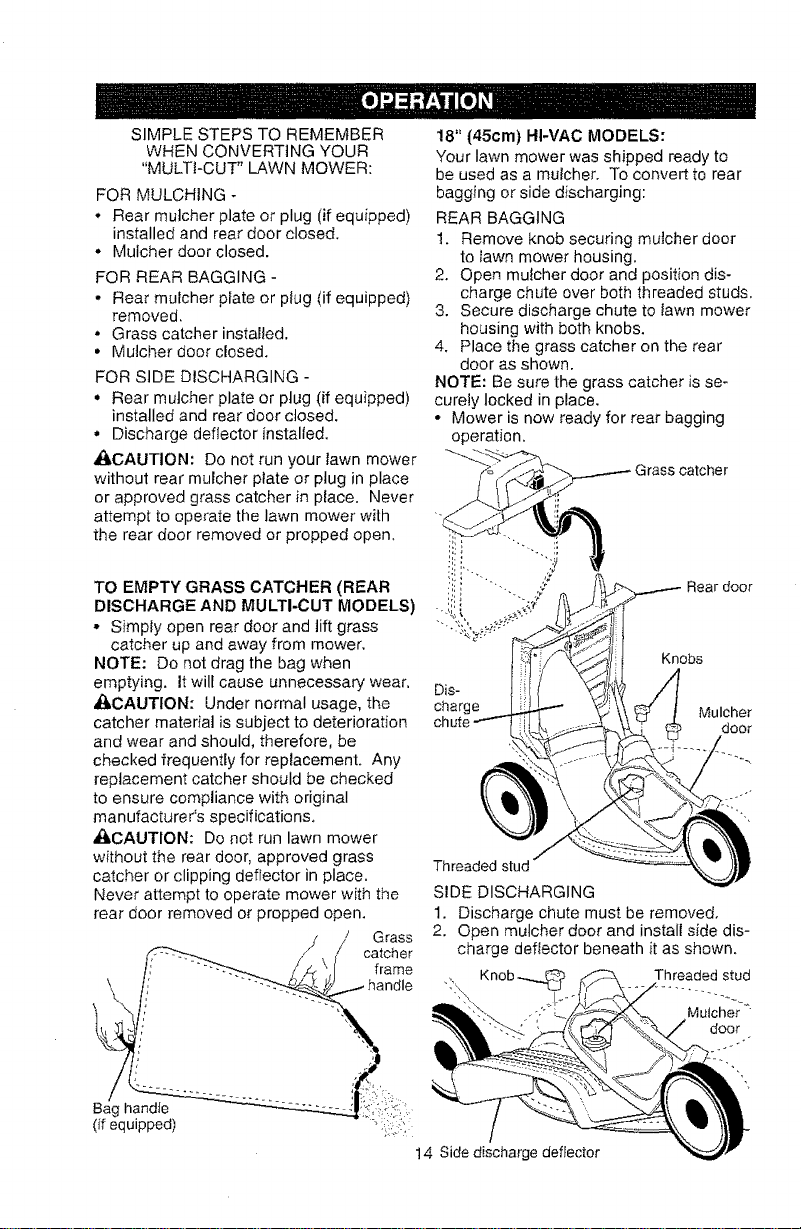
18" (45cm) HI-VAC MODELS:
Your lawn mower was shipped ready to
be used as a mulcher. To convert to rear
bagging or side discharging:
REAR BAGGING
!. Remove knob securing mutcher door
to lawn mower housing.
2, Open mufcher door and position dis-
charge chute over both threaded studs.
3, Secure discharge chute to lawn mower
housing with both knobs.
4, Place the grass catcher on the rear
door as shown.
NOTE: Be sure the grass catcher is se-
curely locked in place,
° Mower is now ready for rear bagging
operation.
TO EMPTY GRASS CATCHER (REAR
DISCHARGE AND MULTI-CUT MODELS)
- Simp{y open rear door and lift grass
catcher up and away from mower.
NOTE: Do not drag the bag when
emptying. It will cause unnecessary wear, Dis-
,_CAUTION: Under normal usage, the charge
catcher material is subject to deterioration
and wear and should, therefore, be
checked frequently for replacement. Any
replacement catcher should be checked
to ensure compliance with original
manufacturer's specifications.
_,CAUTION: Do not run lawn mower
without the rear door, approved grass
catcher or clipping deflector in place.
Never attempt to operate mower with the
rear door removed or propped open.
if / Grass
catcher
SIDE DISCHARGING
1. Discharge chute must be removed,
2. Open mulcher door and install side dis-
charge deflector beneath it as shown.
frame
(if equipped)
14 Side discharge deflector
door
Knobs
Mulcher
door
Knob _ Threaded stud
L,,,J
_ ' Mutcher
door
Page 15
3. Secure rear of side discharge deflector
to lawn mower housing with knob.
° Mower is now ready for side discharging
operation.
SIMPLE STEPS TO REMEMBER WHEN
CONVERTING YOUR 18" HI-VAC:
FOR MULCHING -
1. Grass catcher, discharge chute and
side discharge deflector removed.
2. Mulcher door secured to mower hous-
ing with knob.
FOR REAR BAGGING -
1. Side discharge deflector removed.
2. Grass catcher and discharge chute
installed with discharge chute secured
to lawn mower housing with knob.
FOR SIDE DISCHARGING -
1. Grass catcher and discharge chute
removed.
2. Side discharge deflector installed and
secured to mower housing with knob.
_,CAUTION: Do not run your lawn mower
without mulcher door closed; side dis-
charge deflector installed, or discharge
chute and approved grass catcher in
place. Never attempt to operate the lawn
mower with mulcher door removed or
propped open.
TO EMPTY GRASS CATCHER
t. Remove grass catcher with clippings
from lawn mower using both front and
center of handle as shown.
2. Empty clippings from grass catcher.
3. Reinstall grass catcher on rear door.
NOTE: Do not drag the bag when empty-
ing; it will cause unnecessary wear.
Handle
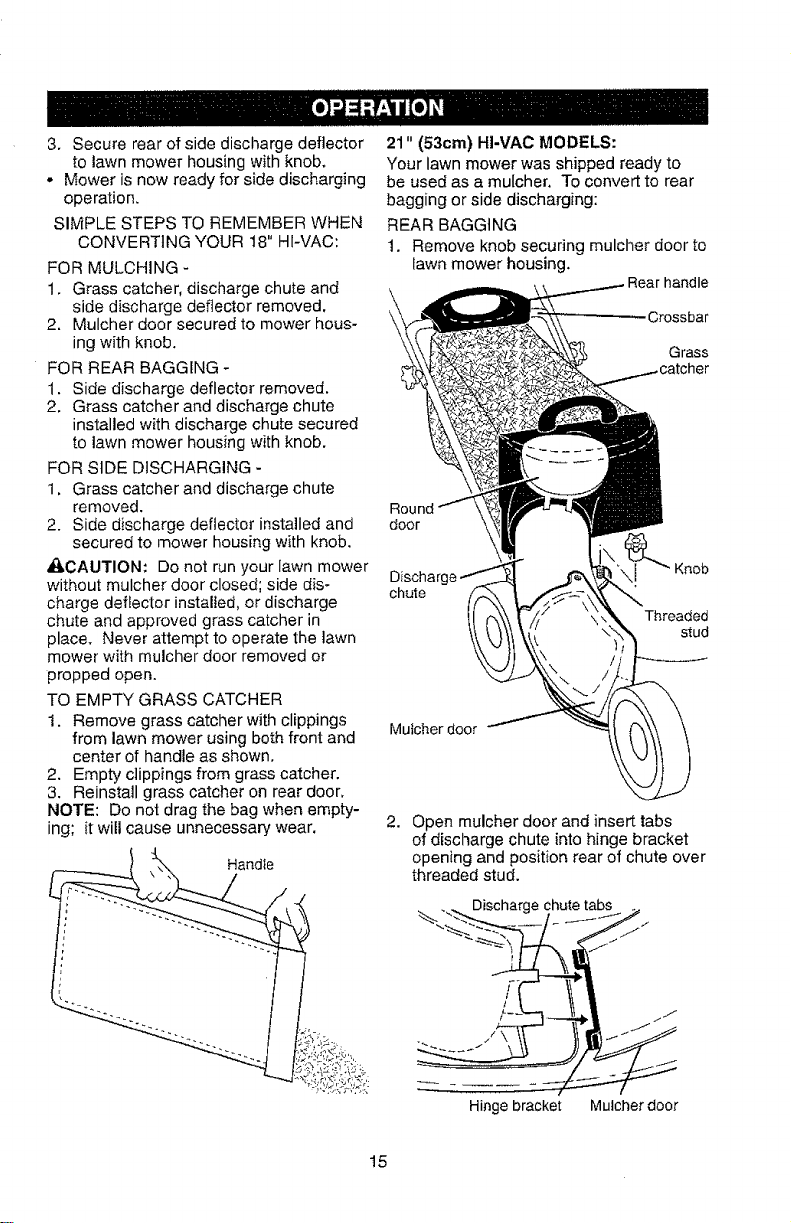
21" (53cm) HI-VAC MODELS:
Your lawn mower was shipped ready to
be used as a mulcher. To convert to rear
bagging or side discharging:
REAR BAGGING
1. Remove knob securing mulcher door to
fawn mower housing.
Round
door
chute
Muicher door
2,
Open mulcher door and insert tabs
_rhandle
Crossbar
Grass
Threaded
stud
of discharge chute into hinge bracket
opening and position rear of chute over
threaded stud.
Hinge bracket Mulcher door
t5
Page 16
3, Secure rear of discharge chute to lawn
mower housing with knob,
4, Place rear handle of grass catcher on
the crossbar of the lawn mower's lower
handle as shown.
5, Lift the round door of the discharge
chute and place the grass catcher into
place on the discharge chute.
NOTE: Be sure the grass catcher is se-
curely locked in place and the round door
of the discharge chute rests on the grass
catcher as shown,
• Mower is now ready for rear bagging
operation.
° To convert to mulching operation,
remove grass catcher and discharge
chute. Secure mulcher door to mower
housing with knob.
° To convert to side discharging operation,
remove grass catcher and discharge
chute. Install side discharge deflector
and secure it to lawn mower housing
with knob.
SIDE DISCHARGING
1, Grass catcher and discharge chute
must be removed.
2. Open mufcher door and install front of
side discharge deflector beneath it as
shown.
3. Secure rear of side discharge deflector
to lawn mower housing with knob.
° Mower is now ready for side discharging
operation.
° To convert to mulching operation, side
discharge deflector must be removed
and mulcher door secured to mower
housing with knob.
• To convert to rear bagging opera-
tion, side discharge deflector must be
removed; discharge chute and grass
catcher installed and discharge chute
secured to mower housing with knob.
Mulcher door _ Knob
Side
discharge
deflector
Y
stud
SIMPLE STEPS TO REMEMBER
WHEN CONVERTING YOUR 21" HI-VAC:
FOR MULCHING -
1. Grass catcher, discharge chute and
side discharge deflector removed.
2. Mutcher door secured to mower hous-
ing with knob,
FOR REAR BAGGING -
1, Side discharge deflector removed,
2. Grass catcher and discharge chute
installed with discharge chute secured
to lawn mower housing with knob.
3, Round door of discharge chute resting
on top of grass catcher.
FOR SIDE DISCHARGING -
1. Grass catcher and discharge chute
removed,
2. Side discharge deflector installed and
secured to mower housing with knob,
_CAUTtON: Do not run your lawn mower
without mulcher door dosed; side dis-
charge deflector installed, or discharge
chute and approved grass catcher in
place. Never attempt to operate the lawn
mower with mulcher door or round door
removed or propped open.
TO EMPTY GRASS CATCHER
1. Open round door of discharge chute to
move starter rope out and away from
grass catcher.
',\'_ Front
OPEN
Round Starter
door rope
2. Remove grass catcher with clippings
from lawn mower using both front and
rear handles,
3. Empty clippings from grass catcher
using rear handle. The weight of the
grass will open the door.
4, Snap door shut over frame before
installing grass catcher on mower.
NOTE: Do not drag the bag when empty-
!6 ing; it will cause unnecessary wear.
Page 17
OPERATOR PRESENCE CONTROL
BAR (ALL MODELS)
Your lawn mower is equipped with an op-
erator presence control bar which requires
the operator to be positioned behind the
lawn mower handle in order to start and
,_cerate the lawn mower.
AUTION: Federal regulations require
an engine control to be installed on this
lawn mower in order to minimize the risk
of blade contact injury. Do not under
any circumstances attempt to defeat the
function of the operator control. The blade
turns when the engine is running.
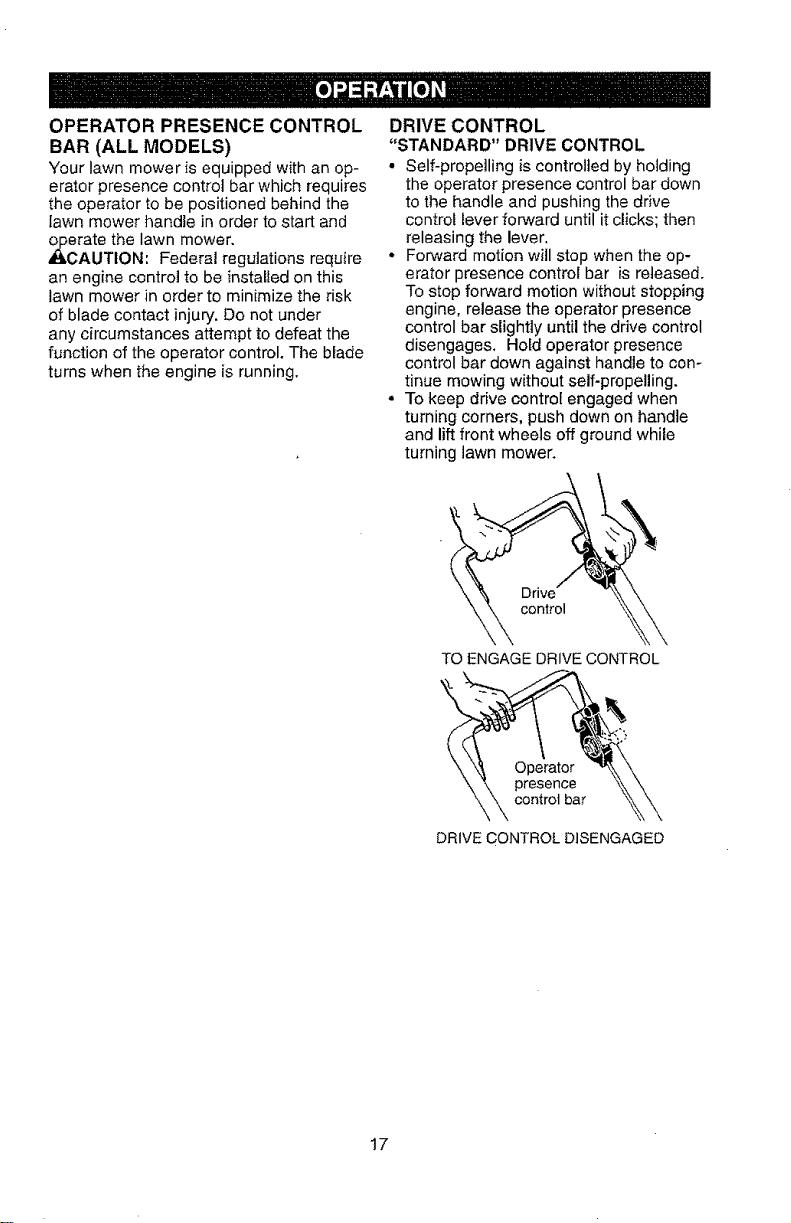
DRIVE CONTROL
"STANDARD" DRIVE CONTROL
• Self-propelling is controlled by holding
the operator presence control bar down
to the handle and pushing the drive
control lever forward until it clicks; then
releasing the lever,
• Forward motion will stop when the op-
erator presence control bar is released.
To stop forward motion without stopping
engine, release the operator presence
control bar slightly until the drive control
disengages, Hold operator presence
control bar down against handle to con-
tinue mowing without self-propelling.
• To keep drive control engaged when
turning corners, push down on handle
and lift front wheels off ground while
turning lawn mower.
Drive
control
TO ENGAGEDRIVECONTROL
\
17
Operator
presence
control bar
DRIVE CONTROL DISENGAGED
Page 18
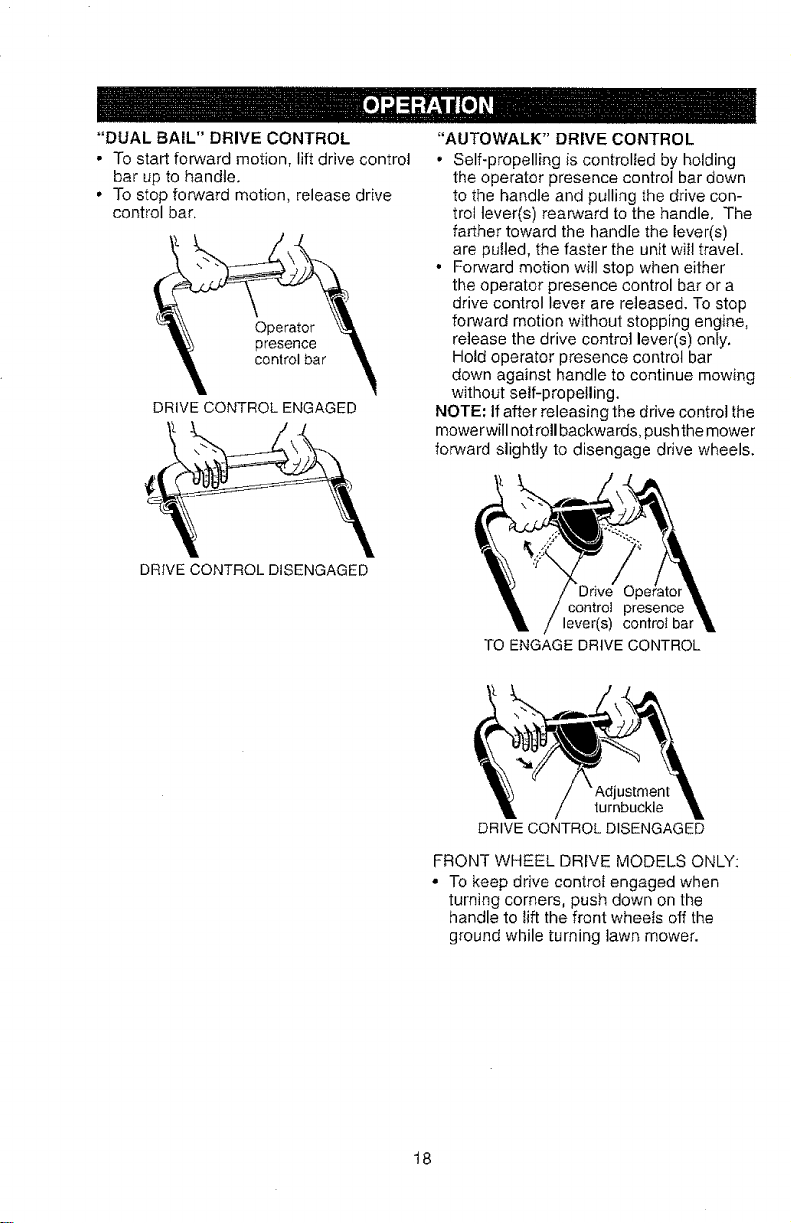
"DUAL BAIL" DRIVE CONTROL
• To start forward motion, lift drive control
bar up to handle.
• To stop forward motion, release drive
control bar.
DRIVE CONTROL ENGAGED
DRfVE CONTROL DISENGAGED
"AUTOWALK" DRIVE CONTROL
• Self-propelling is controlIed by holding
the operator presence control bar down
to the handle and pulling the drive con-
trol lever(s) rearward to the handle, The
farther toward the handle the lever(s)
are pulled, the faster the unit will travel,
• Forward motion will stop when either
the operator presence control bar or a
drive control lever are released. To stop
forward motion without stopping engine,
release the drive control lever(s) only.
Hold operator presence control bar
down against handle to continue mowing
without self-propelling.
NOTE: If after releasing the drive control the
mower wilI not roll backwards, push the mower
forward slightly to disengage drive wheels.
TO ENGAGE DRIVE CONTROL
lurnbuckle
DRIVE CONTROL DISENGAGED
FRONT WHEEL DRIVE MODELS ONLY:
° To keep drive control engaged when
turning corners, push down on the
handle to lift the front wheels off the
ground while turning lawn mower.
18
Page 19
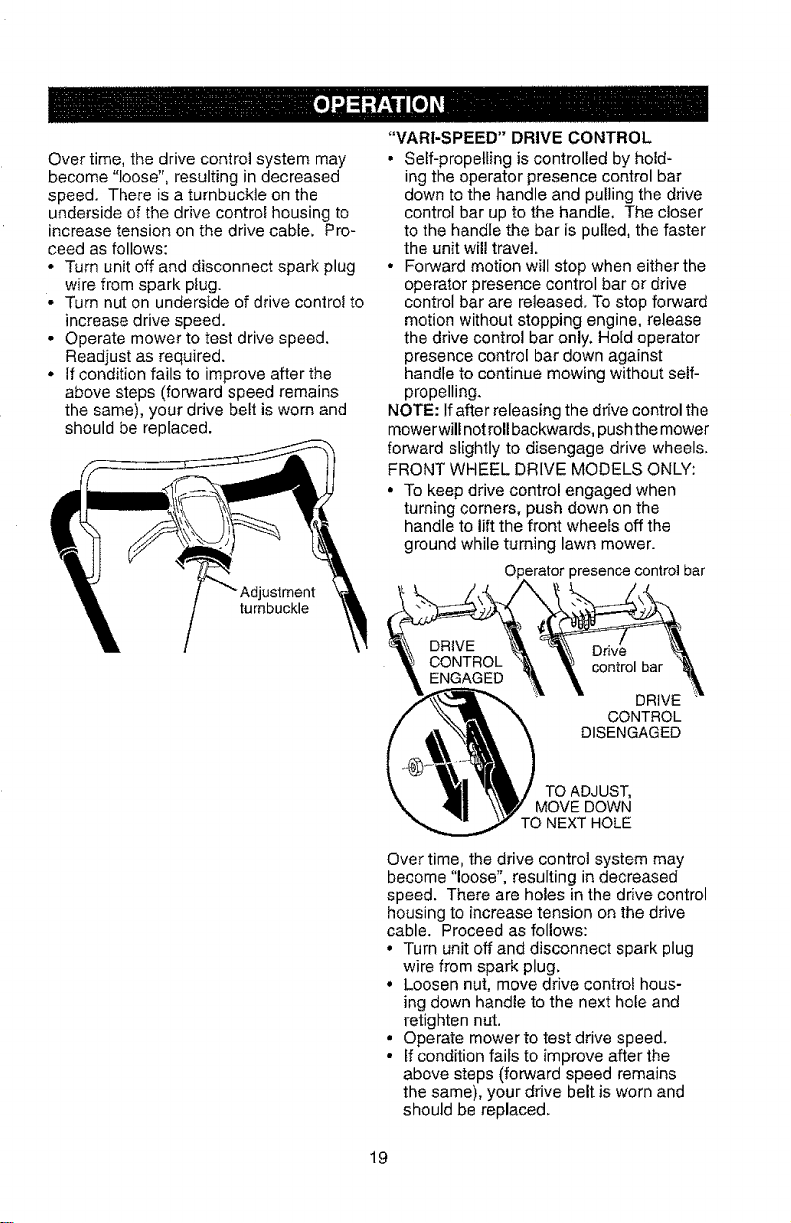
Over time, the drive control system may
become "loose", resulting in decreased
speed. There is a turnbuckle on the
underside of the drive control housing to
increase tension on the drive cable. Pro-
ceed as follows:
• Turn unit off and disconnect spark plug
wire from spark plug.
° Turn nut on underside of drive control to
increase drive speed.
• Operate mower to test drive speed.
Readjust as required.
• If condition fails to improve after the
above steps (forward speed remains
the same), your drive belt is worn and
should be replaced.
turnbuckle
"VARI-SPEED" DRIVE CONTROL
• Self-propelling is controlled by hold-
ing the operator presence control bar
down to the handle and pulling the drive
control bar up to the handle, The closer
to the handle the bar is pulled, the faster
the unit will travel.
• Forward motion will stop when either the
operator presence control bar or drive
control bar are released. To stop forward
motion without stopping engine, release
the drive control bar only, Hold operator
presence control bar down against
handle to continue mowing without self-
propelling.
NOTE: If after releasing the drive control the
mower will not roll backwards, push the mower
forward slightly to disengage drive wheels.
FRONT WHEEL DRIVE MODELS ONLY:
• To keep drive control engaged when
turning corners, push down on the
handle to lift the front wheels off the
ground while turning lawn mower.
presence control bar
control bar
DRIVE
CONTROL
DISENGAGED
TO ADJUST,
MOVE DOWN
TO NEXT HOLE
Over time, the drive control system may
become "loose", resulting in decreased
speed. There are holes in the drive control
housing to increase tension on the drive
cable. Proceed as follows:
° Turn unit off and disconnect spark plug
wire from spark plug.
• Loosen nut, move drive control hous-
ing down handle to the next hole and
retighten nut.
• Operate mower to test drive speed.
• If condition fails to improve after the
above steps (forward speed remains
the same), your drive belt is worn and
should be replaced.
19
Page 20

BEFORE STARTING ENGINE
Read the engine manual packed with your
mower.
FILL ENGINE WITH OIL
Your lawn mower is shipped without oil in
the engine.
- Be sure mower is level and area around
oi! fill is clean.
• Remove engine oil filler plug (oil fill cap/
dipstick on models so equipped).
• Slowly add oil. For type and grade of
oil to use, see "ENGINE" in the Mainte-
nance section of this manual.
• Fill to the top of slot in filler hole (to
"FULL" line on dipstick on models so
equipped). Do not overfill.
• Replace plug (oil fill cap/dipstick on
models so equipped) and tighten.
• Check oil level before each use. Add oil
as needed.
• To change oil, see Maintenance section
of this manual.
FILL GASOLINE TANK
• Fill gasoline tank with fresh, clean,
unleaded gasoline. DO NOT USE PRE-
MIUM GASOLINE. BE CAREFUL NOT
TO OVERFILL TANK.
WARNING: Alcohol blended fuels (called
gasohol or using ethanol or methanol) can
attract moisture which leads to separation
and formation of acids during storage. Acidic
gas can damage the fuel system of an engine
while in storage. To avoid engine problems,
the fuel system should be emptied before
storage of 30 days or longer. Drain the fuel
tank, start the engine and let it run until fuel
lines and carburetor are empty. Use fresh
fuel next season. See Storage Instructions
for additional information. Never use engine
or carburetor cleaner products in fuel tank or
permanent damage may occur.
TO START ENGINE
_CAUTION: The mower blade rotates
whenever the engine is running.
NOTE: Due to protective coatings on the
engine, a small amount of smoke may be
present during the initial use of the product
and should be considered normal.
• Place engine START/STOP switch (if
equipped) in the ON position.
° Move engine speed control to FAST
position (or to CHOKE/START position
on models equipped with choke feature).
• If your mower has a primer, to start a
cold engine, push primer as many times
as instructed in the engine manual
packed with your mower. Use a firm
push. This step is not usually necessary
when starting an engine which has
already run for a few minutes.
• Hold operator presence control bar
down against handle.
MODELS WITH RECOIL STARTER
• Pull starter handle quickly. Do not allow
starter rope to snap back.
Recoil
starter
handle
MODELS WITH ELECTRIC STARTER
• Push the engine start button (or turn the
key on models so equipped).
IMPORTANT: Do not crank engine more
than five continous seconds each time you
try to start. Wait 5 to 10 seconds between
each attempt.
ALL MODELS
° For engines equipped with choke, slowly
move engine speed control lever to
FAST after engine starts.
TO STOP ENGINE
° To stop engine, release operator pres-
ence control bar and/or place engine
START/STOP switch (if equipped) in the
OFF position.
NOTE: For engines with a primer, it may
be necessary to repeat priming steps
in cooler weather. In warmer weather,
overpdming may cause flooding and
engine wilt not start. If you do flood
engine, wait a few minules before
attempting to start and DO NOT repeat
priming steps,
2O
Page 21
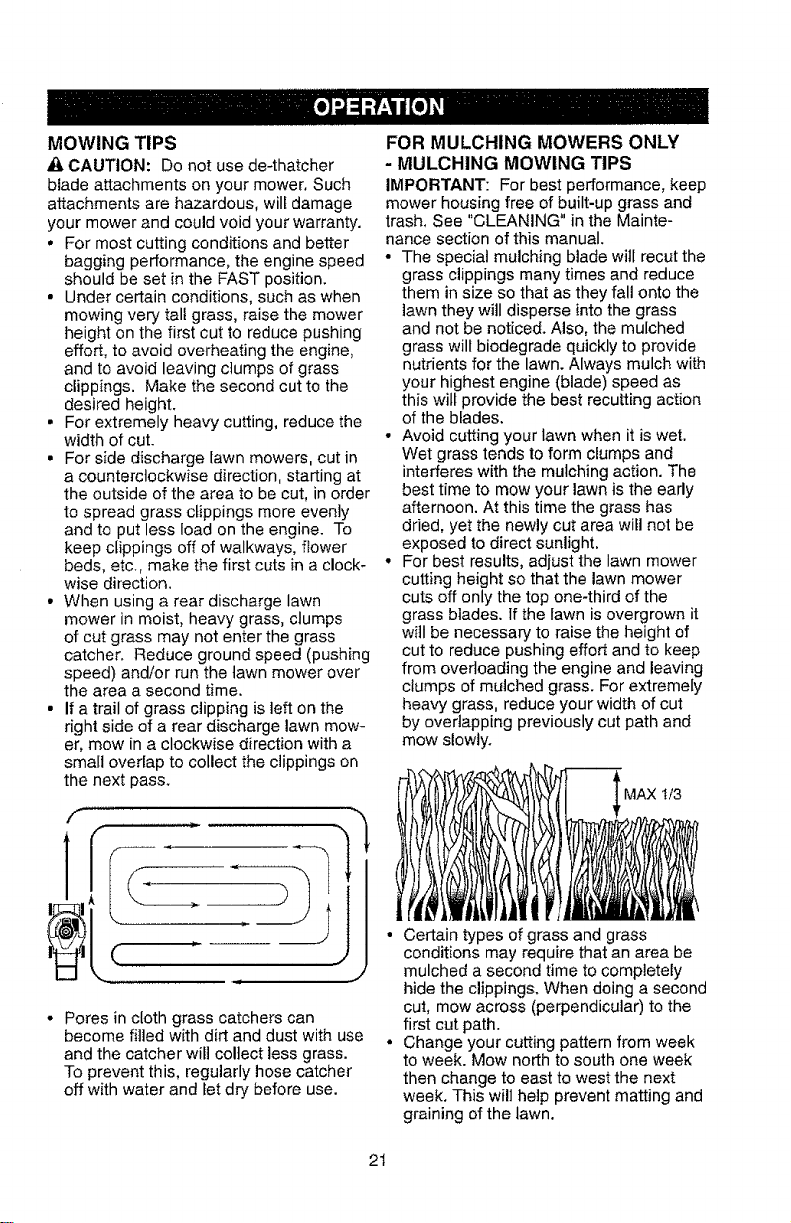
MOWING TIPS
CAUTION: Do not use de-thatcher
blade attachments on your mower. Such
attachments are hazardous, wilf damage
your mower and could void your warranty.
• For most cutting conditions and better
bagging performance, the engine speed
should be set in the FAST position.
• Under certain conditions, such as when
mowing very tall grass, raise the mower
height on the first cut to reduce pushing
effort, to avoid overheating the engine,
and to avoid leaving clumps of grass
clippings. Make the second cut to the
desired height.
• For extremely heavy cutting, reduce the
width of cut.
• For side discharge lawn mowers, cut in
a counterclockwise direction, starting at
the outside of the area to be cut, in order
to spread grass clippings more evenly
and to put less load on the engine. To
keep clippings off of walkways, flower
beds, etc., make the first cuts in a clock-
wise direction.
• When using a rear discharge lawn
mower in moist, heavy grass, clumps
of cut grass may not enter the grass
catcher. Reduce ground speed (pushing
speed) and/or run the lawn mower over
the area a second time.
• If a trail of grass clipping is left on the
right side of a rear discharge lawn mow-
er, mow in a clockwise direction with a
small overlap to collect the clippings on
the next pass.
f
FOR MULCHING MOWERS ONLY
- MULCHING MOWING TIPS
IMPORTANT: For best performance, keep
mower housing free of built-up grass and
trash, See "CLEANING" in the Mainte-
nance section of this manual.
• The special mulching blade will recur the
grass clippings many times and reduce
them in size so that as they fall onto the
lawnthey will disperse into the grass
and not be noticed. Also, the mulched
grass will biodegrade quickly to provide
nutrients for the lawn. Always mulch with
your highest engine (blade) speed as
this will provide the best recutting action
of the blades.
• Avoid cutting your lawn when it is wet.
Wet grass tends to form clumps and
interferes with the mulching action. The
best time to mow your lawn is the early
afternoon. At this time the grass has
dried, yet the newly cut area will not be
exposed to direct sunlight.
• For best results, adjust the lawn mower
cutting height so that the lawn mower
cuts off only the top one-third of the
grass blades. If the lawn is overgrown it
will be necessary to raise the height of
cut to reduce pushing effor_ and to keep
from overloading the engine and leaving
clumps of mulched grass. For extremely
heavy grass, reduce your width of cut
by overlapping previously cut path and
mow slowly.
•MAX t/3
1
_.,,,,,,,,,,,,._,, ir ,,,*"
Pores in cloth grass catchers can
become filled with dirt and dust with use
and the catcher will collect less grass.
To prevent this, regularly hose catcher
off with water and let dry before use.
!liU_llll//I ' _1
i lItllltl
Certain types of grass and grass
conditions may require that an area be
mulched a second time to completely
hide the clippings. When doing a second
cut, mow across (perpendicular) to the
first cut path.
Change your cutting pattern from week
to week. Mow north to south one week
then change to east to west the next
week. This will help prevent matting and
graining of the lawn.
21
Page 22
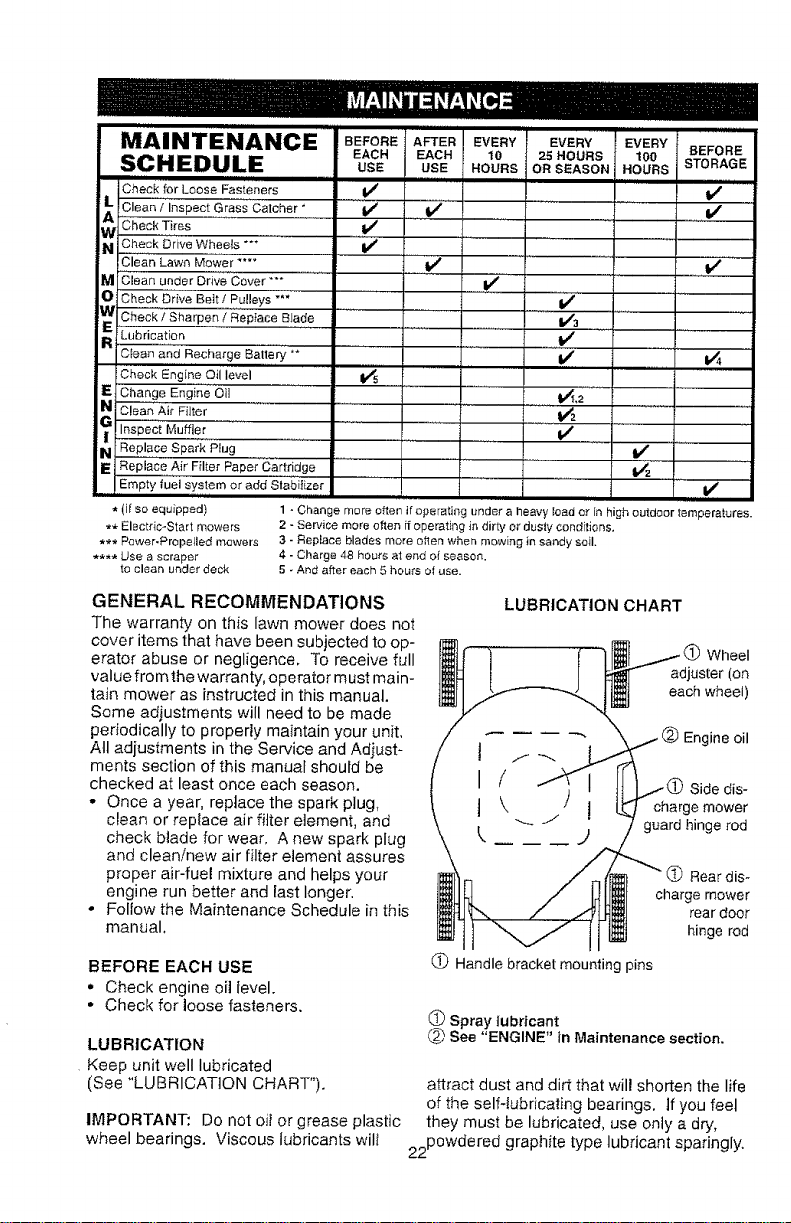
MAINTENANCE BEFOREAF-rEREVE.Yl" EWR_ EVERYI
SCHEDULE USE use ,ou.s O. SEAso. HOU.S STO.AGE
in iiH ..................
Chec"forLooseFas'_'ner_ j 1/
L Clean / Inspect Grass Catcher* iv/ _ If
Check Tires .......... 1/ .......
J ..... illll ,I,JlIIHI
EACH EAC. 10 2_.OURS 100 i BEFORE
WCheek5_iveW,heeI_"'* "1/
Clean Lawn Mower .... 1/ .......
M Glean under Drive Cover "** '....... ,...... i_
O Check Diive Belt/ ............Pulleys "*" If
Check / Sharpen / Rep}ace Blade I/3
Lubrication 1/ ............
Clean and Recharge Battery ** .........
Check Eng'iLe Oilievel '" _ ..........
E: Change Engine Oil ................. 11_,2 ....
N 8 can Air Filter .... _ .........
Gi nspect Muffler ....... .... ' ........
I! ................ 1/
N Replace Spark Plug ...... 11/
E Repiace Air Fflter Paper'Cartridge .....................
Empty fuel system or add Stabilizer 1/
* (il so equipped) 1 - Change more often if operating under a heavy load or in high outdoor _emperatures.
** Electric-Start mowers 2 - Service more orion if operating in dirty or dusty conditions,
*** Power-Propelled mowers 3 - Replace blades more o_ten wher_ mowing in seedy soil.
**** Use a scraper 4 - Charge 48 hours at end ot season.
to clean under deck 5 - And after each 5 hours o{ use.
GENERAL RECOMMENDATIONS
The warranty on this lawn mower does not
cover items that have been subjected to op-
erator abuse or negligence. To receive full
value from the warranty, operator must main-
tain mower as instructed in this manual.
Some adjustments will need to be made
periodically to properly maintain your unit.
All adjustments in the Service and Adiust-
meets section of this manual should be
checked at least once each season.
• Once a year, replace the spark plug,
clean or replace air filter element, and
check blade for wear. A new spark plug
and clean/new air filter element assures
proper air-fuel mixture and helps your
engine run better and last longer.
• Follow the Maintenance Schedule in this
manual,
BEFORE EACH USE
• Check engine oil level.
• Check for loose fasteners.
LUBRICATION
Keep unit well lubricated
(See "LUBRICATION CHART").
IMPORTANT: Do not oil or grease plastic
wheel bearings. Viscous lubricants will
,,,,u i HI
LUBRICATION CHART
t
I
t
L
(_) Handle bracket mounting pins
C) Spray lubricant
@ See "ENGINE" in Maintenance section.
attract dust and dirt that will shorten the life
of the self-lubricating bearings. ]f you feel
they must be lubricated, use only a dry,
22Powdered graphite type lubricant sparingly.
adjuster (on
each wheel)
charge mower
guard hinge rod
charge mower
Wheel
Engine oil
Side dis-
Rear dis-
rear door
hinge rod
Page 23

LAWN MOWER
Always observe safety rules when per-
forming any maintenance.
TIRES
• Keep tires free of gasoline, oil, or insect
control chemicals which can harm rub-
ber.
, Avoid stumps, stones, deep ruts, sharp
objects and other hazards that may
cause tire damage,
BLADE CARE
For best results, blade must be kept sharp.
Replace a bent or damaged blade.
,& CAUTION: Use only a replacement
blade approved by the manufacturer of
your mower. Using a blade not approved
by the manufacturer of your mower is
hazardous, could damage your mower and
void your warranty.
TO REMOVE BLADE
!. Disconnect spark plug wire from spark
plug and place wire where it cannot
come in contact with plug.
2. Turn lawn mower on its side. Make
sure air filter and carburetor are up.
3. Use a wood block between blade and
mower housing to prevent blade from
turning when removing blade bolt.
NOTE= Protect your hands with gloves
and/or wrap blade with heavy cloth.
4. Remove blade bolt by turning counter-
clockwise.
5. Remove blade and attaching hard-
ware (belt, lock washer and hardened
washer).
6. Remove debris shield (if equipped).
NOTE: Remove the blade adapter and
check the key inside hub of blade adapter.
The key must be in good condition to work
properly. Replace adapter if damaged.
Wingedge
Blade ada
De washer
(if equipped)
Blade Blade bolt
TO REPLACE BLADE
1. Position the blade adapter on the en-
gine crankshaft. Be sure key in adapter
and crankshaft keyway are aligned;
and that the drive belt is inside the tabs
of the belt retainer (if equipped).
2. Position blade on the blade adapter
aligning the two (2) holes in the blade
with the raised lugs on the adapter.
3. Be sure the trailing edge of blade (op-
posite sharp edge) is up toward the
engine.
4. Install the blade bolt with the lock
washer and hardened washer into
blade adapter and crankshaft.
5. Use block of wood between blade and
lawn mower housing and tighten the
blade bolt, turning clockwise.
• The recommended tightening torque is
35-40 ft. Ibs.
IMPORTANT: Blade bolt is heat treated.
tf bolt needs replacing, replace only with
approved bolt shown in the Repair Parts
section of this manual.
Hardened
TO SHARPEN BLADE
NOTE: We do not recommend sharpening
blade - but if you do, be sure the blade
is balanced. An unbalanced blade wilt
cause eventual damage to lawn mower or
engine.
° The blade can be sharpened with a file
or on a gdnding wheel. De not attempt
to sharpen while on the mower.
23
Page 24

BLADES WITH ROUND HOLE:
° To check blade balance, drive a nail into
a beam or wall. Leave about one inch of
the straight nail exposed. Place center
hole of blade over the head of the nail.
If blade is balanced, it should remain in
a horizontal position. If either end of the
blade moves downward, sharpen the
heavy end until the blade is balanced.
BLADES WITH "STAR" HOLE:
• To check blade balance, you will need
a 5/8" diameter steel bolt, pin, or a cone
balancer. (When using a cone balancer,
follow the instructions supplied with
balancer.)
NOTE: Do not use a nail for balancing
blade. The lobes of the center hole may
appear to be centered, but are not.
• Slide blade on to an unthreaded portion
of the steel bolt or pin and hold the bolt
or pin parallel with the ground. If blade
is balanced, it should remain in a hori-
zontal position, tf either end of the blade
moves downward, sharpen the heavy
end until the blade is balanced.
18" (45cm) HI-VAC MODELS ONLY:
t. Remove hubcaps (if equipped) and
Iocknuts.
2. Remove wheels from wheel adjuster
axles.
3. Remove any trash or grass cuttings
from inside the dust cover, pinion gear
and drive wheel gear teeth.
4. If you remove the pinion gears, wipe
clean with dry cloth. Reassemble
dry. Do not lubricate. Do not use oil or
grease.
IMPORTANT: The pinion gears (on both
sides of the mower) are the same, how-
ever, they must be installed correctly. If
installed incorrectly, the drive system will
not work.
5. There are arrows embossed on both
sides of the pinion gear. With the ar-
row at the top of the pinion, the arrow
must point towards the front of the
mower. If the arrow points to the rear
of the mower, turn the pinion around,
then assemble it to the mower.
6. Place wheels back on adjuster axles.
7. Replace ]ocknuts and hubcaps.
Center
5/8" bolt or pin
Btade
DRIVE WHEELS
Check drive wheels each time before you
mow to be sure they move freely.
The wheels not turning freely means trash,
grass cuttings, etc. are in the drive wheel
area and must be cleaned to free drive
wheels.
If necessary to clean the drive wheels,
check both drive wheels.
• If after cleaning, the drive wheels do not
turn freely, contact your nearest autho-
rized service center.
FRONT
OF
MOWER
CORRECT
INCORRECT
E-ring
Pinion
gear
Washer
Loeknut
° If after cleaning, the drive wheels do not
turn freely, contact your nearest autho-
rized service center.
24
Dust
cover
Page 25

GEAR CASE
• To keep your drive system working
properly, the gear case and area around
the drive should be kept clean and free
of trash build-up. Clean under the drive
cover twice a season.
• The gear case is filled with lubricant to
the proper level at the factory. The only
time the lubricant needs attention is if
service has been performed on the gear
case.
ENGINE
Read the maintenance section of your
engine manual.
LUBRICATION
Change the oil after the first two hours of
operation and every 25 hours thereafter or
at least once a year if the lawn mower is
not used for 25 hours in one year. Refer to
engine manual.
TO CHANGE ENGINE OIL
(SEE ENGINE MANUAL)
• Be sure lawn mower is on level surface.
, Oil will drain more freely when warm,
• Catch oil in a suitable container.
° For engines without dipstick, remove
bottom oil drain plug.
• For engines with oil fiI1 cap/dipstick,
remove bottom drain plug or remove en-
gine oil cap and turn mower on its side.
° After oil has drained completely, replace
oil drain plug and tighten securely.
• Refill engine with oil. Pour slowly. Do
not overfill.
° FilI to top of slot inside of filler hole or
to "FULL" line on dipstick on models so
equipped. Keep oil at proper level.
AIR FILTER
Your engine will not run properly and may
be damaged by using a dirty air filter.
Clean the element after every 25 hours
of operation or every season. Replace
the air filter every 100 hours of operation
or every season, whichever occurs first.
Service air cleaner more often under dusty
conditions, See the maintenance section
of your engine manual.
IN-LINE FUEL FILTER
(KOHLER ENGINES ONLY)
The fuel filter should be repiaced once
each season. If fuel filter becomes
clogged, obstructing fuel flow to carburetor,
replacement is required.
1. With engine cool, remove filter and plug
fuel line sections.
2. Place new fue! filter in position in fuel
line with arrow pointing towards carbu-
retor.
3. Be sure there are no fuel line leaks and
clamps are properly positioned.
4. Immediately wipe up any spilled gaso-
line.
MUFFLER
Inspect and replace corroded muffler as it
could create a fire hazard and/or damage.
SPARK PLUG
Replace spark plug at the beginning of
each mowing season or after ever,.7 100
hours of operation, whichever occurs first.
Set spark plug gap according to engine
manual specifications.
CLEANING
IMPORTANT: For best performance, keep
mower housing free of grass build-up and
trash. Clean the underside of your mower
after each use.
• Clean the underside of your lawn mower
by scraping to remove buildup of grass
and trash.
• Clean engine often to keep trash from
accumulating. A clogged engine runs
hotter and shortens engine life,
- Keep finished surfaces and wheels free
of all gasoline, oil, etc.
We do not recommend using a garden
hose to clean your lawn mower unless the
electrical system, muffler, air filter, and
carburetor are covered to keep water out.
Water in engine can shorten engine life.
CLEAN UNDER DRIVE COVER
Clean under the drive cover at least twice
aseason. Scrape underside of cover with
a putty knife or similar tool to remove any
buildup of trash or grass.
25
Page 26

WATER WASHOUT FEATURE
(IF EQUIPPED)
Your lawn mower may be equipped with a
fitting that allows quick and easy cleaning
of the underside of the housing. To use
this feature, proceed as follows:
1. Move lawn mower to an area of cut
grass or another hard surface,
NOTE: Water, grass and other debris will
drain from beneath the mower housing
during the washout process.
2, Remove grass catcher and d{scharge
chute assembly from lawn mower.
3. Close mulcher door (if equipped).
4. Connect a garden hose to the fitting
where shown.
IMPORTANT: Be sure the garden hose is
not routed under the lawn mower housing
or entangled in the wheels.
5. Turn on water supply and check for
leaks at the fitting.
If no leaks are present, start engine (as
described in the Operation section of this
manual) and let engine run until the under-
side of the lawn mower is clean,
• i, WARNING: Do not engage the drive
system during the washout process.
6. Shut off the engine.
7. Shut off water supply and remove hose
from fitting.
CAUTION: Do not remove hose from
fitting while engine is running. Water in
engine can result in shortened engine life.
8. Start engine (as described in the Op-
eration section of this manual) and let
engine run for a full minute to remove
excess water from mower.
Fitting
GRASS CATCHER (IF EQUIPPED)
Grass catcher may be hosed with water
but must be dry when used.
,I&CAUTION: Under normal usage, the
catcher material is subject to deterioration
and wear and should therefore be checked
to ensure compliance with original
manufacturer specifications.
26
Page 27

_kCAUTION; Before performing any ser-
vice or adjustments:
. Release operator presence control bar.
° Make sure the blade and all moving
parts have completely stopped.
° Disconnect spark plug wire from spark
plug and place wire where it cannot
come in contact with plug,
LAWN MOWER
TO ADJUST CUTTING HEIGHT
See "TO ADJUST CUTTING HEIGHT" in
the Operation section of this manual.
REAR DEFLECTOR
The rear deflector, attached between the
rear wheels of your mower, is provided to
minimize the possibility that objects will
be thrown out of the rear of the mower
into the operator's mowing position. If the
deflector becomes damaged, it should be
replaced.
DISCHARGE GUARD (IF EQUIPPED)
The discharge guard, attached to the side
discharge opening of your lawn mower, is
provided to prevent the possibility of iniury
resulting from objects being thrown out of
the discharge opening into the operator
mowing position. If the discharge guard
becomes damaged, it should be replaced.
TO ADJUST HANDLE
"2 POSIT_ON" HANDLES
The handle can be mounted in a high or
low position. The mounting holes in the
bottom of lower handle are off center for
raising or lowering the handle,
• Remove upper handle and all parts at-
tached to lower handle,
• Remove hairpin cotters from lower
handle bracket mounting pin.
• Squeeze lower handle in to remove it
from mounting pins.
• Turn lower handle over to raise or lower
handle.
• Squeeze lower handle in and position
holes onto mounting pins on handle
bracket.
• Reassemble hairpin cotters onto pins.
,, Reassemble upper handle and all parts
removed from lower handle.
TURN LOWER
HANDLE OVER
TO ADJUST HEIGHT
3 POSITION "EZ" HANDLES
The handle on your lawn mower has three
(3) height positions - adiust to height that
suits you.
• Remove knob and carriage bolt on one
side of the lower handle.
° While holding handle assembly, remove
knob and carriage belt from opposite
side, align hole in handle with desired
hole in handle bracket and reassemble
bolt and knob and tighten securely.
• Align opposite side of handle with same
positioning hole and secure with bolt and
knob.
High ._ Bolt
Knob
J
/"Handle
adjustment
cket
27
Page 28

3 POSITION "QUICK" HANDLES
The handle on your lawn mower has three
{3) height positions - adjust to height that
suits you.
• Squeeze the bottom ends of lower
handle towards each other until the pin
in handle can be inserted into one of the
three height adjustment holes.
High
Medium adjustment
Handle
bracket
SOL
Lc
"QUICK RELEASE" HANDLES
The upper handle may be adjusted to
three (3) different height positions.
1. Loosen both handle levers enough to
altow the upper handle to pivot to the
desired adjustment position.
2. Tighten both handle levers securely.
TO REMOVEIREPLACEDR|VEBELT
FRONT WHEEL DRIVE MODELS:
"STANDARD" OR "DUAL BAIL" MODELS:
• Remove drive cover. Remove belt from
gearcase pulley by pushing down on
pulley and rolling belt off it.
• Turn lawn mower on its side. See
engine manual for proper direction of
turning over the engine.
° Remove blade.
• Remove belt from engine pulley on
crankshaft.
• Install new belt by reversing above steps.
NOTE: Always use factory approved belt
to assure fit and long life.
Drive
cover
Pulle_
"AUTO WALK" or"VARI-SP EED" MODELS:
° Remove drive cover and belt keeper.
• Remove belt from gearcase pulley by push-
ing down on pulley and rolling belt off it.
• Turn lawn mower on its side. See
engine manual for proper direction of
turning over the engine.
• Remove blade and debris shield.
• Remove belt from engine pulley on
crankshaft,
• Instart new belt by reversing above
steps,
NOTE: Always use factory approved belt
to assure fit and long life.
PUSH
DOWN...,
Drive
cover
LEVERS
DOWN
TO ADJUST
HANDLE
Belt
\
\
\
PUSH
DOWN
Page 29

MODELS WITH GEARCASE-MOUNTED
BELT KEEPER:
* Remove drive cover and belt keeper.
, Remove belt from gearcase pulley.
• Turn lawn mower on its side. See
engine manual for proper direction of
turning over the engine.
, Remove blade and blade adapter.
o Remove belt from pulley of blade
adapter.
o Install new belt by reversing above
steps,
NOTE: Always use factor,] approved belt
to assure fit and tong life.
Blade adapte
Lockwasher
Blade
bolt Hardened Belt
washer edge retainer
REAR WHEEL DRIVE MODELS:
MODELS WITH IDLER ASSEMBLY:
• Disconnect spark plug wire from spark
plug and place wire where it cannot
come in contact with plug.
• Remove screws retaining drive cover
(not shown); and remove drive cover
from lawn mower housing.
Remove drive cable from anchor, then
detach it and return spring (if equipped)
from idler arm assembly.
Remove idler arm assembly from hous-
ing by removing hex nut; then remove
drive belt from drive pulley, belt keepers
and idler arm assembly.
Drive pulley "N_ /Drive cable anchor
_---\_® / Housing holes
kBee_pers.iHe-_xHexnu/__g _dsIseermab_y
• Turn lawn mower on its side. See engine
manual for proper direction of turning
over the engine,
, Use a wood block between blade and
mower housing to prevent blade from
turning when removing blade bolt.
NOTE: Protect your hands with gloves
and/or wrap blade with heavy cloth.
• Remove blade bolt,
• Remove blade, attaching hardware (bolt,
lock washer, hardened washer) and
blade adapter.
• Remove drive belt from engine pulley;
discard old belt.
, Install new belt by reversing above
steps.
NOTE: Always use factory approved belt
to assure fit and long life,
• The recommended tightening torque is
35-40 ft. ibs.
IMPORTANT: Blade bolt is grade 8 heat
treated.
Key Crankshaft
Lockwasher
Blade
bolt washer
Trailing edg,
Crankshaft retainer
Belt
29
Page 30

MODELS WITH GEARCASE-MOUNTED
BELT KEEPER:
• Remove drive cover.
• Remove spring and belt keeper.
° Remove belt from gearcase pulley.
i
Gearcase "Drive
cover
•Spring
Beit
\
° Route the other end of the new drive belt
through hole in housing,
• Return mower to upright position,
° Install new belt on gearcase pulley,
• Reinstall belt keeper and spring.
° Reinstall drive cover.
NOTE: Always use factory approved belt
to assure proper fit and long life,
° Turn lawn mower on its side with air filter
and carburetor down,
• Reinstall blade and blade adapter,
HI-VAC MODELS:
1. Disconnect spark plug wire from spark
plug and place wire where it cannot
come in contact with plug.
2, Remove screws retaining drive cover
and remove drive cover from lawn
mower housing,
3, Remove drive cable from anchor, then
detach it and return spring from idler
arm assembly,
18" (45cm) HI-VAC MODELS:
Drive cable anchor Return spring
Drive belt
* Turn lawn mower on its side, See
engine manual for proper direction of
turning over the engine,
, Remove blade and blade adapter,
- Remove belt from blade adapter.
- Position the blade adapter on the engine
crankshaft. Be sure key in adapter and
crankshaft keyway are aligned; and that
the drive belt is inside the tabs of the
belt retainer.
Crankshaft
bolt Hardene
washer
Trailin( edge retainer
r
puiley ,%'_'----ldler arm
Belt keeper PIVOT assembly
4, Pivot idler arm assembly to slacken
drive belt, then remove drive belt from
drive pulley, belt keepers and idler arm.
5. Turn lawn mower on its side, Make
sure air filter and carburetor are up,
//Housing hole
3O
Page 31

6. Removescrewsecuringdebrisshield.
Notethatthedebrisshieldhasatab
whichfitsintoagapinthehousing.
CrankshaftTab"-.'-'_'_'._
Housing ',_
hoJe Blade
Hardened
washer
Trailing edge Lock-washer
7. Use a wood block between blade and
mower housing to prevent blade from
turning when removing blade bolt.
NOTE: Protect your hands with gloves
and/or wrap blade with heavy cloth.
8. Remove blade bolt.
9. Remove blade, attaching hardware
(bolt, lock washer, hardened washer),
blade adapter and debris shield as one
assembly.
10, Remove drive belt from blade adapter
and debris shield; discard old belt.
TO REPLACE DRIVE BELT
1, Place new drive belt in the belt retainer
of the debris shield. Be sure to route
belt between belt keepers and through
slot as shown.
18" (45cm) HI-VAC MODELS:
Drive Debris
belt shield
Belt
_tainers
21" (53cm) HI-VAC MODELS:
Beit retainer, Tab
Belt
Drive
belt
\
Slot shield
2, Route the other end of the new drive
belt through hole in housing,
3, Reattach debris shield to housing with
screw previously removed. Be sure tab
of debris shield is in gap of housing.
4. Position blade on the blade adapter
aligning the two (2) holes in the blade
with the raised lugs on the adapter.
5. Be sure the trailing edge of blade (op-
posite sharp edge) is up toward the
engine as shown.
6. Install the blade bolt with the lock
washer and hardened washer into
blade adapter and crankshaft.
7. Use block of wood between blade and
lawn mower housing and tighten the
blade bolt, turning clockwise,
• The recommended tightening torque is
35-40 ft, Ibs.
IMPORTANT: Blade bolt is grade 8 heat
treated.
8. Return mower to upright position,
9. Install new drive belt into idler arm as-
sembly, then around the drive pulley.
Be sure belt is inside of belt keepers.
NOTE: Pulling on the drive belt (to install
it on the drive pulley) will cause the other
end of the belt to free itself from the debris
shield retainer and come into contact with
the pulley end of the blade adapter.
t0. Reattach drive cable and return spring
to the idler arm assembly, then reattach
drive cable to anchor.
11. Reattach drive cover with screws previ-
ously removed.
12.Connect spark plug wire to spark plug,
Debris
31
Page 32

22PLUS REAR WHEEL DRIVE MODELS:
1. Remove screws securing rear baffle,
2. Turn lawn mower on its side with air
filter and carburetor down,
3. Remove rear baffle from mower,
4. Remove blade bolt, ]ockwasher, hard-
ened washer and blade.
5. Remove debris shield.
6, Remove gearcase belt keeper.
7. Remove drive belt.
Gearcase
belt keeper
Rear
Debris
shield
Hardened
Blade
ENGINE
CARBURETOR
The carburetor has been preset at the fac-
tory and adjustment should not be neces-
sary, However, minor adjustment may be
required to compensate for differences in
fuel, temperature, altitude or load.
• The air filter must be assembled to the
carburetor when running engine.
• Best carburetor adjustment is obtained
when fuel tank is 1/4 full.
• In order for the engine to run, the opera-
tor presence control bar must be held
in the operating position. Therefore,
and assistant will be required to hold
Belt
bolt
the control bar in the operating position
when making final adjustment to the
carburetor.
See the ADJUSTMENT section of your
engine manual for further instructions.
ENGINE SPEED
The engine speed has been factory set.
Do not attempt to increase engine speed
as it may result in personal injury. If you
believe the engine is running too fast
or too slow, take your lawn mower to an
authorized engine service center for repair
and adjustment.
THROTTLE CONTROL
If it becomes necessary to adjust or re-
place the throttle control, see the ADJUST-
MENT section of your engine manual.
TO REPLACE DRIVE BELT
t, Place new drive belt on gearcase pul-
ley,
NOTE: Always use factory approved bett
to assure proper fit and tong life.
2. Reinstall gearcase belt keeper. Be
sure the new drive belt is inside the
tabs of the gearcase belt keeper.
3, Position the blade adapter on the en-
gine crankshaft. Be sure key in adapter
and crankshaft keyway are aligned;
and that the drive beIt is inside the tabs
of the belt retainer,
4. Place rear baffle in mower housing.
5, Reinstall debris shield.
6. Reinstall blade.
7, Return mower to upright position,
8, Reinstall rear baffle screws, 32
Page 33

Immediatelyprepareyourlawnmowerfor
storageattheendoftheseasonorifthe
unitwillnotbeusedfor30daysormore.
_LCAUTION:Neverstorethelawnmower
withgasolineinthetankinsideabuilding
wherefumesmayreachanopenflame
orspark.Allowtheenginetocoolbefore
storinginanyenclosure.
LAWN MOWER
When lawn mower is to be stored for a pe-
riod of time, clean it thoroughly, remove all
dirt, grease, leaves, etc. Store in a clean,
dry area.
• Clean entire lawn mower (See "CLEAN-
ING" in the Maintenance section of this
manual).
• Lubricate as shown in the Maintenance
section of this manual.
• Be sure that all nuts, bolts, screws, and
pins are securely fastened. Inspect
moving parts for damage, breakage and
wear. Replace if necessary.
• Touch up all rusted or chipped paint
surfaces; sand lightly before painting.
HANDLE
Your handle may be folded for storage as
shown.
• Squeeze the bottom ends of lower
handle towards each other until handle
clears the handle brackets and swing
handles forward over mower.
• Loosen upper handle mounting hard-
ware enough to allow upper handle to be
folded back.
IMPORTANT: When folding handles for
storage or transportation, be sure to fold
handles as shown or you may damage the
control cables.
Operator MOWtNG
controt bar
FOLD
FORWARE Upper
FOR handle
STORAGE
POSiTiON
Handle
knob
Lower handle
2 POSITION / "ADJUSTABLE" HANDLES
When setting you handles up from the
storage position, the lower handle will
automatically lock into mowing position.
3 POSITION HANDLES
When setting up your handle from the stor-
age position, the lower handle will require
manually locking into the mowing position.
3 POSITION "EZ"
Knob
"-" Bolt
Handle
ustment
bracket
33
3 POSITION "QUICK"
Handle pin
SQUEEZE
jf
Handle
bracket
Page 34

"QUICK-RELEASE" HANDLES
You can fold your lawn mower handle for
storage,
1. Loosen the two (2) handle levers on
sides of the upper handle and allow
handle to fold down to the rear.
2. Move height adjustment lever forward
to raise mower to highest position.
3. Loosen handle bolts (on both sides),
then pivot entire handle assembly
forward and allow it to rest on mower.
• When setting up your handle from the
storage position, the lower handle will
automatically lock into the mowing
position.
IMPORTANT: When folding the handle for
storage or transportation, be sure to fold
the handle as shown or you may damage
Acidic gas can damage the fuel system of
an engine while in storage.
• Drain the fuel tank.
• Starl the engine and let it run until the
fuel lines and carburetor are empty.
• Never use engine or carburetor cleaner
products in the fuel tank or permanent
damage may occur.
• Use fresh fuel next season.
NOTE: Fuel stabilizer is an acceptable al-
ternative in minimizing the formation of fuel
gum deposits during storage. Add stabilizer
to gasoline in fuel tank or storage container.
Always follow the mix ratio found on stabilizer
container. Run engine at least 10 minutes
after adding stabilizer to allow the stabilizer
to reach the carburetor. Do not drain the gas
tank and carburetor if using fuel stabilizer.
the control cables.
Operator MOWING
presence POSITION
ENGINE OIL
Drain oil (with engine warm) and replace
with clean oil. (See "ENGINE" in the Main-
tenance section of this manual).
CYLINDER
. Remove spark plug
FOLD / /
FORWARD ' /
FOR
STORAGE
handle
Handle
• Pour one ounce (29 ml) of oil through
spark plug hole into cylinder
• Pull starter handle slowly to distribute oil
• Replace with new spark plug
BATTERY (IF EQUIPPED)
lever
Disconnect the battery from the engine
connector and charge battery 48 hours.
handle
OTHER
• Do not store gasoline from one season
bolt
to another.
• Replace your gasoline can if your can
starts to rust. Rust and/or dirt in your
gasoline will cause problems.
• If possible, store your unit indoors and
cover it to protect it from dust and dirt.
• Cover your unit with a suitable protective
cover that does not retain moisture, Do
Height
adjuster
lever
LEVER
FORWARD
TO RAISE
MOWER
Handle
not use plastic, Plastic cannot breathe,
ENGINE
FUEL SYSTEM
IMPORTANT: It is important to prevent gum
deposits from forming in essentia! fuel system
parts such as carburetor, fuel filter, fuei hose,
ortank during storage. Alcohol blended fuels
(called gasohol or using ethanol or methanol)
can attract moisture which teads to separa-
which allows condensation to form and
will cause your unit to rust.
IMPORTANT: Never cover mower while
engine and exhaust areas are still warm.
_I,CAUTION: Never store the lawn mower
with gasoline in the tank inside a building
where fumes may reach an open flame
or spark. Allow the engine to cool before
tion and formation of acids during storage.34storing in any enclosure.
Page 35

See appropriate section in manual unless directed to an authorized
Service Center.
PROBLEM
Does not start 1.
Loss of power
Poor cut-
uneven
Excessive
vibration
CAUSE
Dirty air filter,
2.
Out of fuel.
3,
State fuel.
4,
Water in fuel.
5.
Spark plug wire is
disconnected.
6.
Bad spark plug.
7.
Loose blade or broken
blade adapter.
8.
Control bar in released
position.
9. Control bar defective.
10. Fuel valve lever (if so
equipped) in OFF position.
11. Weak battery (if equipped).
12. Disconnected battery
connector (if equipped).
13. Blown fuse (if equipped).
1. Rear of lawn mower
housing or cutting blade
dragging in heavy grass.
2. Cutting too much grass.
3. Dirty air filter.
4. Buildup of grass, leaves,
and trash under mower.
5. Too much oil in engine.
6. Walking speed too fast.
1. Worn, bent or loose blade.
2. Wheel heights uneven.
3. Buildup of grass, leaves
and trash under mower,
1. Worn. bent or loose blade.
2. Bent engine crankshaft.
CORRECTION
1. Clean/replace air filter.
2. Fill fuel tank.
3. Drain fuel tank and refill tank
with fresh, clean gasoline.
4. Drain fuel tank and refill tank
with fresh, clean gasoline.
5. Connect wire to plug.
6. Replace spark plug.
7. Tighten blade bolt or
replace blade adapter.
8. Depress control bar to
handle.
9. Replace control bar.
10.Turn fuel valve lever
to the ON position.
1t. Charge battery.
12.Connect battery to engine.
13. Replace fuse.
t. Raise cutting height.
2. Raise cutting height.
3. Clean/replace air filter.
4. Clean underside of mower
housing.
5. Check oil level.
6. Cut at slower walking speed.
t. Replace blade. Tighten
blade bolt.
2. Set all wheels at same
height.
3. Clean underside of
mower housing.
1. Replace blade. Tighten
blade bolt.
2. Contact a qualified service
center.
Starter rope
hard to pull
1. Engine flywheel brake is on
when control bar is released.
2. Bent engine crankshaft.
3. Blade adapter broken.
4. Blade dragging in grass.
35
I. Depress control bar to
upper handle before
pulling starter rope.
2. Contact a qualified service
center.
3. Replace blade adapter.
4. Move lawn mower to cut
grass or to hard surface.
Page 36

See appropriate section in manual unless directed to an authorized
Service Center.
PROBLEM CAUSE CORRECTION
Grass catcher !. Cutting height too low. 1, Raise cutting height.
not filling 2. Lift on blade worn off. 2. Replace blade.
(If so equipped) 3. Catcher not venting air. 3. Clean grass catcher.
Hard to push 1, Raise cutting height.1. Grass is too high or wheel
Loss of drive 1. Belt wear. 1. ChecWreplace drive belt.
or slowing of 2. Belt off of pulley, 2. Check/reinstall drive belt.
drive speed 3. Drive cable worn or broken. 3. Replace drive cable.
height is too low,
2. Rear of lawn mower
housing or cutting blade
dragging in grass.
3, Grass catcher too full,
4. Handle height position not
right for you.
4. "Loose" drive control system, 4. Adjust drive control,
2. Raise rear of tawn mower
housing one (I) setting
higher.
3. Empty grass catcher,
4. Adjust handle height to suit.
Page 37

i
f
MANUEl DE L'OPERATEUR
TONDEUSE A GAZON ROTATIVE
DE PLUSIEURS COUPES
Montage
• Utilisation
• Entretien
• Rdvision et Reglages
• Entreposage
= Guide de D_pannage
_I,AVERTISSEMENT: Ce tondeuse & gazon est equipe d'un moteur & combustion interne et
iIne doit pas _tre utilise sur ou pres d'un terrain couvert d'arbres, d'a_brisseaux, ou d'herbe si
le systeme d'echappement n'est pas muni d'un pare-6tince_Ies qui rencontre les exigences des
lois locales applicables. Quand un pare-6tincelles est utilis_, il doit 6tre maintenu en bon _tat de
fonctionnement par rop6rateur.
Un pare-etincefles pour Ie si_encieux est disponible au centre d'entretien autorise Ieplus proche.
193736 Rev. 9 09.16.10 BY Imprimeaux E.-U
Page 38

Regles de Securit6 ........................................ 2-3
Montage ......................................................... 5*8
Utilisation ..................................................... 9-21
Entretien .................................................... 22_26
Revision et Reglages ................................. 27-32
Entreposage .............................................. 33-35
Guide de Depannage ................................ 35-36
iMPORTANT: Cette machine peut amputer tes mains, tes pieds etprojeter des objets. L'inobservation
des regles de securite suivantes peut entrainer des blessures serieuses et mortelles.
41_ Ce symbole signale Ies points importants en
matiere de securite. II signifie- AI-TENTIQN!!!,
SOYEZ PRUDENT!!! VOTRE SECURITI:t EST
EN JEU.
ATTENTION: D_branchez toujours ie fiI de
bougie d'atlumage et pour prevenir ies demar=
rages accidentels, posezqe de telle faqon qu'it
ne puisse pas entrer en contact avecla bougie
d'allumage Iors de rinstaltation, du transport,
,_s ajustements ou des reparations.
ATTENTION: Le silencieux
et d'autres pieces de moteur
deviennent extr#mement
chaudes Iors du fonction-
nement et restent chaudes
apres que Ie moteur est arrete.
Pour eviter des br0Iures graves,
ne vous approchez pas de ces pieces.
I. UTILIZATION GC:NI_RALE
• II est imp_ratif, avant de demarrer la ma r
chine, de life et de comprendre toutes les
instructions presentes darts leis manueiis
d'utilisation el sur la machine. Bien connaitra
les commandes at l'utilisation de la machine
avant la demarrer.
- Ne mettez pas les mains ou les pieds pros ou
au-dessous des parties rotatives. Restez loin
de I'ouverture de Ia decharge en tout temps.
- Seuls des adultes fiablesconnaissant les instruc-
tions doivent etre autorisSs &utiliser la machine.
• D_barrassez raire de tonte des obiets tels
que les pierres, les jouets, tes ills metalliques,
Ies os, les b&tons, etc. Ces obiets peuvent
etre souleves et projetes par la lame.
° Assurez-vous qu'il n'y a pas d'enfants ni ani-
maux domestiques, dans I'aire de tonte avant
de commencer & tondre. Arretez Ia machine
si quelqu'un s'introduit dans I'aire de rotate.
° N'utitisez pas la machine les pieds nus ou
en portant des sandales ouvertes. Porlez
toujours des chaussures adequates,
• Ne faites pas reculer la machine D,moins d'y
6tre contraint. Regardez toujours par terre et
derriere vous avant de reculer.
• Ne dirigez jamais r_vacuation du materiau vers
les personnes. Evitez de diriger revacuation .
du mat_riau vers un mur ou un obstacle. Le A
materiau evacu6 risque de rebondir en arriere •
vers l'operateur. Arretez tes lames Iorsque vous
passez sur du gravilton.
° N'utilisez jamais la machine si les pro- •
tecteurs, les plateaux ettes autres dispositifs •
de securite ne sont pas en place. 2
• Consultez les instructions du fabricant pour
eonnaitre le mode de fonctionnement et
d'in-stallation des accessoires. N'utilisez PAS
d'accessoires non recommandes par le fabri-
cant de votre tondeuse, comme par exemple
ies accessoires amovibtes pour decoupeuses
de chaumes, car ils peuvent Ctredangereux
et abi'mer votre tondeuse.
• Arr_tez les lames Iorsque vous traversez des
allees gravillonnees, des trottoirs ou des rues.
• Arr_tez ie moteur si vous devez Iaisser la
machine, avant de la nettoyer, de la reparer
ou de l'inspecter.
- ArrCtez Ie moteur el attendez que ies lames
s'arr_tent completement avant d'enlever le
bac de ramassage.
• Tondez uniquement sous ta Iumiere du jour
ou une bonne lumiere artificielle.
• N'utitisez pas la machine si vous _tes sous
l'influence de i'alcooI ou des drogues.
- N'utilisez jarnais lamachine sur de i'herbe hu-
mide. Marchez d'un pas son saisissez bien la
poignee el marehez; ne courrez jamais.
• Desengagez le mecanisme automoteur ou
I'embrayage de Iatransmission des tondeuses
quien possedent unavantdedemarrer lemoteur.
• Si ta machine commence ,_vibrer de fa?on
anormale, arretez le moteur et cherchez
imm_diatement la cause. Les vibrations deno-
tent en g_neral un probleme.
° Portez toujours des ]unettes de protection avec
des d_flecteurs torsquevous utilisez la machine.
II. FONCTIONNEMENTDANS LES PENTES
Les pentes sont souvent _ l'origine de glis-
sades ou de chutes pouvant causer de graves
blessures. Faites Ires attention dans les pentes.
Si vous ne vous sentez pas en s_curite sur les
pentes, ne tondez pas.
• Tondez Ie long de la pente, jamais en montee
ou en descente. Faites tr,_sattention Iorsque
vous changez de direction.
. Enlevez les obstacles tels que Ies pierres, Ies
branches, etc.
Faites attention aux trous, aux ornieres et aux
irregularites du terrain. Uherbe haute peut
cacher des obstacles.
EVITER:
Ne tondez pas pros des douves> des fos-
ses ou des remblais. Vous pourriez perdre
i'equilibre ou trebueher.
Ne tondez pas de pentes trop raides.
Ne tondez pas t'herbe humide. Vous pourriez
gtisser.
Page 39

III. ENFANTS
Des accidents dramatiques peuvent survenir si
I'utilisateur ne porte pas attention &ta presence
des enfants. Les enfants sont fr6quemment atti-
res par Ia machine et par la tonte de la pelouse.
Ne presumez jamais que les enfants restent &
I'endroit oQvous les avez vus en dernier.
• Tenez les enfants en dehors de t'aire de
tonte, sous la surveillance d'un adutte digne
de confiance.
, Soyez vigilant et arr6tez Iamachine si un
enfant penetre darts ]'aire de tonte.
• Avant de recuter et Iorsque vous reculez,
regardez toujours vers le baset derriere s'iI y
a des enfants en bas &ge.
o N'autorisez jamais les enfants & utiliser la
machine.
° Soyez particulierement prudents lorsque vous
approchez des virages, des buissons, des
arbres ou de tout objet pouvant boucher Ia
vision normaleo
IV.MANIPULATIONS0REDUCARBURANT
Maniputez le carburant avec beaucoup de
precaution, car il est tres inflammable et ses
vapeurs sort explosives,
• Eteignez les cigarettes, cigares, pipes et
autre sources d'incendie,
• N'utilisez qu'un bidon hemologu_.
• N'enlevez jamais Ie bouchon et n'ajoutez
jamais de carburant Iorsque le moteur est en
marche, Laissez te moteur refroidir avant de
le remplir.
° Ne remplissez jamais le reservoir & l'int_rieur.
• Ne rangez jamais ni I'appareiI ni Ie bidon
dens un endroit ou se trouve une flamme
hue, des _tincettes ou une flamme pilote
(chauffe-eau ou autres appareils).
° Ne remplissez jamais les bidons dans une
voiture, un camion ou une remorque rev6tue
de plastique. Placez toujours les bidons sur
te sot et & 1'6cart de votre vehicute avant le
remplissage.
° Sortez t'appareil a essence du camion ou de
la remorque et remplissez-le au sol. Si cela
n'est pas possible, remplissez-Ie avec un bidon
portable plut6t qu'avec un distributeur &pistolet.
• Laissez Ia buse au contact du bord de l'orifice
du reservoir d'essence ou du bidon pendant
route Ia duree du remplissage, N'utilisez pas
de dispositif dent le pistolet se verrouilleen
ouverture.
• Si vous versez du carburant sur vos
v#tements, changez+vous imm_diatement.
• Ne remplissez iamais trop le r6servoir.
Remettez le bouchon en place et serrez bien.
V. ENTRETIEN Gi_NI_RALE
• Ne faites jamais marcher la tondeuse &
i'interieur d'un espace c]os.
• Ne faites ni r_glage ni r6paration lorsque le
moteur est en marche. D6branchez le fil de
la bougie et eloignezqe de la bougie pour
eviter tes demarrages accidentels.
• Les boulons et les _crous, surtout les bou]ons
qui servent & fixer Ia lame, doivent toujours
¢tre correctement serres et en bon etat.
° N'a]terez jamais te fonctionnement normal
des dispositifs de secudte. Veriflez reguli6re-
ment teur bon fonctionnement.
• Evitez que de l'herbe, des feuiltes, ou des de-
bris de tout genre ne s'accumutent sur votre
machine. Nettoyez Ies 6ctaboussures d'huile
ou d'essence+ Laissez refroidir la machine
avant de I'entreposer.
° Si vous heurtez un objet, arr6tez ta machine
et v6rifiez s'il y a des deg&ts. Avant de rede-
marrer, r_parez si n6cessaire tes deg&ts.
• N'essayezjamais de r6gier ia hauteur de la
roue Iorsque fe moteur est en marche.
° Les _l_ments du bac de ramassage s'usent
et peuvent s'abimer et se d_teriorer, risquant
ainsi de projeter des pieces ou des objets.
Verifiez frequemment ces _l_ments et rem-
placez-tes, en cas de besoin, par des pii_ces
de rechange conseifI_es par Iefabricant,
• Les lames de la tondeuse sont aff0tees et
peuvent couper. Envetoppez les lames ou
portez des gants et faites tras attention ]ors
des operations d'entretien des lames.
• Ne changez pas Ie raglage du limiteur de
regime et de la vitesse maximate du moteur.
• Nettoyez ou remplaeez au besoin fes
etiquettes d'information.
FELICITATIONS pour votre achat d'une nouveIIe tondeuse a. gazon, Elle a et6 con_ue, perfection-
nee, et fabriquee pour vous assurer un maximum de fiabitit6 et de rendement.
En cas d'un probleme que vous ne pouvez pas resoudre, contactez le centre d'entretien autoris_
le plus proche. Vous y trouverez Ies techniciens competents qui disposent des outils n6cessaires
pour t'entretien et la reparatign de cette machine.
• Lisez les "REGLES DE SECURITE" et ce Manuel de I'operateur compt_temen avant que vous
essayez de monter ou d'utiliser votre nouvelte tondeuse a gazon pour assurer I'utilisation cor-
recte et pour emp6cher les blessures a vous-m6me et aux autres personnes. Conservez ce
manuel pour la r_ference d'avenir.
° Votre nouvelle tondeuse a gazon a ere montee _ rusine sauf les pi_ces qui ne sont pas montees
cause de I'expedition. Pour assurer t'utilisation correcte et s0re de votre tondeuse a.gazon,
toutes tes pieces et la visserie que vous montez doivent ¢tre serr_-es &fond. Utilisez Ies outils
corrects comme necessaire pour assurer la s_curite. Un jeu de cle fera facilitera le montage.
Dependant de votre mod_te de tondeuse a gazon, quelques ou routes des dimensions de cle
suivantes sont exig6es pour le montage: pouce de 5/16, 7/!6, 9/16 et 3/4. Un tournevis cruci-
forme intermedaire et un tournevisa Nameplate peuvent _tre aussi exiges.
• Toutes les pieces comme Ies ecrous, les ronde]les, les boulons, etc. qui sent necessaires & com-
pleter te montage, ont ete mis dans le sac des pi_ces.
3
Page 40

POURENLEVER LA TONDEUSE A GAZON DU CARTON
• Enlevez Ies pieces detachees du carton.
• Enlevez le boftier de la tondeuse &gazon avec soin. E_vitezde toucher talame sous le boTtier.
Portez toujours des gents ou d'autres _lements de protection Iorsque vous travaillez sous la
tondeuse ou torsque vous Ia soulevez.
QUELQUES CHOSES A SAVOIR AVANT DE MONTER VOTRE TONDEUSE A GAZON
Est-ee que la tot}dense h gazon a uric
deeharge arriere ou une d6cherge lat_rale ?
Cherchez I'ouverture de d#charge d'herbe sur
votre tondeuse & gazon, Si rouverture est sur
le c6te droit du be?tier de tondeuse, c'est une
tondeuse & gazon de decharge lat6rale. Si
t'ouverture est & t'arriere du be?tier, e'est une
tondeuse & gazon de d6charge arriere, Les
tondeuses & gazon de d6charge arriere sont les
seuls qui ont un ramasse-herbe indu avec Ia
tondeuse. Les ramasseoherbes approuves pour
Ies tondeuses & gazon de decharge laterale
peuvent 6tre achetees chez votre concession-
naire autorise le plus proche.
Ou 'est.ee qua c 'eat le cO)re dtoit et le c6td
gauche de la tondeuse?
Quand te cSte droit (C.D.) ou le cSte gauche
(C.G.) est mentionn_ dans ce manuel il signifie
qua vous etes dans la position d'operation (der-
ri#re du guidon).
DEVANT
Est_ee qua la tondeuse & gazon est,elle une
tondeuse de broyeuse ?
Cherchez roverture de decharge d'herbe sur
votre tondeuse & gazon. Soulvez le defiecteur
de decharge (la porte arri6re sur une pIaque, tes
tondeuses de deeharge arri6re). Si roverture est
fermee par une plaque, ensuite votre tondeuse
a gazon est prate pour broyer. Pour convertir &
Ia tondeuse de d6chargement, referez-vous a la
section d'utilisation de ce manuel.
Quel type de rnoteur eat sur rna tondeuse ?
Quand vous montez et apprenez comment
utiliser votre nouvetle tondeuse & gazon, iI
faut que vous sachiez le type de moteur qui
mecanise la tondeuse. Une decalcomanie sur
Ie moteur fndiquera te fabricant et le type ou ta
marque de fabrique du moteur,
MOTEURS DE BRIGGS & STRATTON
[BB!66S &STRA_ON) [BRiGGS& _RATTON)
COTE
GAUCHt5
QUAnTUm.
D'AUTRES MOTEURS
]BI:O ' DA.
KOHLER
ARRIERE
(Position d'operatJon)
Page 41

,_ATTENTION: N'utilisez pas cette tondeuse
sans le d6flecteur de d_charge ou un ramasse-
herbe approuve en place. Ces protections
sont pour votre s_curite et sont requises par
l'Amedcan National Standards Institute et
Consumer Products Safety Commission.
,_ATTENTION; D6branchez le fil de bougie
d'allumage et posez-le de telle fa_on qu'it ne
puisse pas entrer en contact avecla bougie,
COMMENT MONTER VOTRE TONDEUSE
A GAZON
DE2PLIEZ LE GUIDON
IMPORTANT: Depliez soigneusement les
guidons pour ne pas pincer ou avarier les c&bles
de commande.
GUIDONS DE 2 POSITIONS /"AJUSTE"
. Soulevez les guidons jusqu'& ce que te
guidon inf6rieur se b!oque dans la position de
tonte,
GUIDONS DE "DEGAGEMENT RAPIDE"
. Fakes avancer le manchon de r_g}age de
taille & Ia faucheuse d'augmenter &la position
la plus _lev6e.
° Serrez les boulons de guidon (des deux
c6tes).
Barte de POSITION
commande D"UTIUSA-
de _ TiON
d'op_rateur
• Inserez le bouton de guidon par le guidon et
le support et fixez4e avec le bouton.
• R6p6tez pour l'autre c8t6 du guidon.
Support
deguidon
Boulon
"RAPIDE" DE 3 POSITIONS
• Soulevez la section du guidon inf_rieur & la
position d'utitisation et serrez les extremit_s
du guidon inferieur !'une vers I'autre jusqu'& ce
queta pince duguidon puisse ¢tre ins6r6e dans
I'un des trois trous de reglage de hauteur.
Pincedu
PRE_
Support de
reglage de
guidon
guidon
Guidon
sup_rieur
Manchon de
Guidon
inferieur
Boulon de
Guidon
Manchon
de r_
SOULEVEZ
LES ROUES
POUR UNE
COUPE BASSE
"EZ" DE 3 POSITIONS
. Soulevez Ia section du guidon inferieur & Ia
position de tonte et alignez le trou du guidon
avec un (1) des trois (3) trous de posi-
tionnement de hauteur.
TOUS LES GUIDONS
• Soulevez le guidon supedeur & ia position de
tonte, enlevez le rembourrage protecteur et
serrez & fond les deux boutons de guidon.
• Entevez les mati_res de rembourrage qui
maintient Ia barre de commande de presence
d'op_rateur contre le guidon sup_rieur.
• Le guidon de votre tondeuse & gazon peut
6tre r.egf_,pour votre confort. R_f6rez-vous
"FtEGLER LE GUIDON" darts ta section de
Revision et R_glages de ce manuel,
REMARQUE; Pendant l'exp_,dition les roues
arri_res de votre tondeuse a gazon ne sont pas
regl6es a la m_me position que tes roues de
devant. Avant d'op6rer votre tondeuse r6gtez
toutes ]us roues a Ia mSme position de hauteur
de coupe.
Page 42

INSTALLEZ LES ROUES ARRI,e--.RE
(SEULEMENT POUR LES TONDEUSES A.
GRANDES ROUES)
Quefques mod6tes & grandes roues exigent les
rondeiles qui seront fournies dans un sac des
pieces. Si fournies, insiallez premi6rement Jes
rondetles sur ressieu.
* Instattez une (1) roue ardere sur I'essieu du
dispositif de relevage des roues.
o lnstallez 1'6crou frein 3/8-t6 et serrez & fond.
o Repetez Ie proc6d6 ci-dessus pour rautre
roue arriere.
Ess,eu _'_1
Rondelle "--.
_orou
frein &
cellet
de la roue
MONTEZ LE RAMASSE-HERBE
(SEU LEMENT POUR LES TON DEUSES
GAZON DE DECHARGE ARRIERE)
IMPORTANT: Si votre modete de tondeuse
gazon est pr_t pour broyer, la plaque ou
bouchon de broyeuse doit _tre enlev6e avant
d'utiiiser la tondeuse &gazon comme un
ramasse=herbe, Pour convertir a la tondeuse
&gazon au ramassage ou au d6chargement,
voyez ia section d'utilisation dans ce manuel.
Cherchez aux illustrations du ramasse-herbe
diff6rent qui suivent. D6terminez te type du
ramasse-herbe que vous avez et suivez les
instructions appropriees,
C6te du
cadre du
• ramass6-
herbe
RAMASSE-HERBE AVEC UN SOMMET DE
TISSU
POUR MONTER ET ATTACHER LE RA-
MASSE-HERBE
• Mettez le cadre de ramasse-herbe dans te
sac de d_charge avec ta pattie rigide du sac
au fond.
• Glissez Ies etriers de pression de vinyle par-
dessus du cadre.
REMARQUE: Si les _triers sent trop dgides,
mettez-les dans !'eau chaude pendant quelques
minutes. Site sac de decharge devient mouil_e,
Iaissez-te secSer avant d'utiliser,
• Souievez ta porte arriere sur Ie boitier de
tondeuse,
• Pour un ramasse-herbe .qui est mont_ du
SUPPORT DE CHARNIERE, posez te cadre
de ramasse-herbe sur les pattes sur le sup-
port de charniere de la porte arriere.
/ Perle d'arfi_re
_ori & chamiere
Patte.s
Cadre du
• Pour un ramasse-herbe qui est monte du
SUPPORT DE GUIDON, posez Ies crochets
lateraux du cadre dans les fentes dans Ies
supped de guidon.
Crochet du support Poite
Poign_e du
ramasse-herbe
Etders c
pression
de vinyle
Crochets
Ouverlure
du cadre
Page 43

• Pour un ramasse-herbe mont4 avec une
goupille de PIVOTEMENT de PORTE, ptacez
les crochets de cadre du ramasse-herbe sur
les goupil_es de pivotement de porte.
Ports
"%_,,..
Croc
Poigneedu
ramasse-herbe
* Pour un ramasse-herbe mont_ avec une
fente de PORTE, piacez ies crochets de
cadre du ramasse-herbe dans les fentes de
la porte arri6re.
REMARQUE: Le ramasse-herbe est fixe au
boitier detondeuse & gazon quand la porte arriere
est baissee sur Ie cadre de ramasse-herbe.
Fentes de la porte arrie Porte
Poignee du
ramasse-hetbe
MANCHON DE LA BOUGIE D*ALLUMAGE
Sur quelques modeles, un manchon de la bou-
gie d'alIumage a 6t_ embalI6 dans Iesac des
pieces, Si votre modeIe ate manchon, installez
sur le fil de bougie d'atlumage et rebranchez
encore le fiI de bougie d'atlumage & ta bougie
d'altumage,
Manchon
TOUSLES RAMASSE_HERBES
_I_ATTENTION: Sous I'usage normal, le
materiau de ramasse-herbe est soumis & la
d#_t6riorationet &I'usure et donc, devrait etre
v6rifie souvent pour le remplacement. Tout
ramasse-herbe de rechange devrait 6tre v6rifie
pour assurer conformement aux sp6cifications
du fabricant originet.
• I,ATTENTION: N'utitisez pas la tondeuse&
gazon sans te d6flecteur de decharge (porte
arriere), un ramasse*herbe approuv_, un
d_flecteur de rherbe couple ou un plaque de
broyeuse en place. N'essayezjamaisd'utiliser
la tondeuse & gazon avec le d6flecteur de
decharge (porte arriere) enfeve ou ouvert.
Page 44

PRI_PAREZLA BATTERIE (POUR LES
MOD!ELES DU DEMARREUR ELECTRIQUE)
REMARQUE: Votre batterie doit _tre chargee
avant de demarrer Iatondeuse.
* Ouverlee te bac de batterie (si 6quipes),
• Branchez te connecteur du moteur (m&Ie) (si
_quipes) a ta connexion de batterie (femeiie).
° Branchez ie connecteur de chargeur de
batterie (m&ie) & ta connexion de batterie
(femelle).
• Branchez Ie chargeur de batterie dans une
prise de courant C,A, 110 volts.
- Laissez branch6 ie chargeur de batterie pen-
dant 24 heures avant de demarrer te moteur
pour la premiere fois.
, Rebranchez le connecteur du moteur (m&fe)
(si 6quip_s) & la connexion de batterie
(femelle),
- Apres avoir chargee Ia batterie, connectez la
connexion de moteur (m&le) (si equip_s) au
connecteur de batterie (femetle).
8ranchez votre chargeur de batterie pour char_
ger la batlerie apres chaque utilisation.
IMPORTANT: La moteur ne chargera pas une
batterie.
,_.ta fin de la saison de tonte, ta batterie doit 6tre
chargee pendant 48 heures pour Ia prot6ger
pendant I'entreposage d'hiver.
,I_ATTENTION: Debranchez touiours la
connexion du moteur de la connexion de la
batterie pour emp6cher Ie demarrage de la
tondeuse par accident pendan! le transport ou
de I'entreposage de votre tondeuse & gazon
apres ta saison de tonte.
CLFI MONTf_E LA GUIDION
Connecteur Cennecteur
du moteur de hamais
(m_le) (femeife)
,f
batierie (m&_e)
22PLUS MOD!ELES ENTRA[NEMENT ,_ DE
ROUE AVANT SEULEMENT:
Connecteur du Chargeur
moteur (m&le) de batterie
i I
...... _._ Connec{eur du
i chargeur de
Connecteur de batterie (femeife)
batterie (m&le)
eur de
BA_ERIE MONT!_E SUR LE CARTER
Chargeur de ba_ierie
Connecteur
du chargeur de
batterie (m&le)
Connecteur
de hernais
(feme]te)
Connecteur du moteur (m&le)
Bac de
, batterie
22PLUS MODi_LES ENTRA/NEMENT A DE
ROUE ARRiI_RE SEULEMENT:
Chargeur de batterie
Connecteur
de harnais
(iemei[e)
£ac de
batterie
Page 45

L'utilieation d'une tondeuse &
gazon pr_sente un risque de
projection de particules dans
Ies yeux, pouvant causer des
blessures serieuses, Portez
ou une visiere avant d'utiliser votre tondeuse
toujours des lunettes de s6curit{_
&gazon, ou de faire toute reparation et tout
reglage. Nous recommandons des lunettes de
securite ou un masque large de s6curit6 porte
au-dessus des lunettes.
COMMENT UTILISER VOTRE
TONDEUSE A GAZON
COMMANDE DE LA VITESSE DE MOTEUR
MODELES AVEC LA COMMANDE DES GAZ ,&,
DISTANCE
La vitesse de moteur est command6e par
ta commande des gaz situee sur le guidon
superieur,
° D6placez en avant Ietevier pour une vitesse
de moteur RAPIDE, pour le d_marrage, et
pour un meilleur ramassage de I'herbe cou-
pee dans Ie sac,
• Deplacez en arri6re le Ievier pour une vitesse
de moteur LENTE,
° Quelques modeles ont des moteurs _quipes
d'un starter. D6placez en avant le levier
jusqu'& la position de STARTER pour d6mar-
rerun moteur froid.
REMARQUE'. Soyez sQr que interrupteur de
ON/OFF de moteur (si equip6) est dans la posi-
tion de ON.
STARTER LENTE
(DEMARRER) RAPtDE
POUR RI_GLER LA HAUTEUR DE
COUPE
TOUS LES MOD!_LES:
R_glez la hauteur de coupe pour convenir & vos
besoins. La position moyenne est la meilleure
pour ta plupart des petouses. Soulevez les
roues pour une coupe rase et baissez-les pour
une coupe superficielte.
REMARQUE: Pendant l'expedition les roues
arrieres de votre tondeuse & gazon ne sont pas
reglees a la m6me position que Ies roues de
devant. Avant d'operer votre tondeuse reglez
routes tes roues a la m6me position de hauteur
de coupe,
MODELES AVEC LES ROUES
BOULONNEES ,&,MAIN
• Enlevez la roue, le boulon, et la visserie et
remontez clans te trou de r6gtage desire,
• Reinstallez Ies composants de roue dans le
m6me ordre comme elles _taient avant que
I'enl_vement. Serrez & fond,
• Assurez-vous que lee roues soient & la m6me
hauteur.
Ensemble
de ta _eue
des gaz &
distance
MOD#-LES AVEC LES MOTEURS ,EVtTESSE
FIXEE
La vitesse de moteur a 6t6 regtee & t'usine pour
un rendement maximum, La vitesse n'est pas
reglabte.
MODELES AVEC DISPOSITtF DE RELEVAGE
DE ROUES DE "RAPtDE RI_GLAGE '
• Pour changer Ia hauteur de coupe, pressez le
levier de dispositif de relevage des roues vers
Ia roue. Soulevez ou baissez Ia roue pour
convenir & vos besoins. Assurez-vous que
toutes les roues soient & la m_me hauteur.
REMARQUE; Le dispositif est en position
quand tes pattes de la ptaque sont dans ie trou
du Ievier, Aussi, ies dispositifs de 9 position (st
6quip6s) permettent que Ie levier soit raise entre
les paites de la plaque.
BAISSEZ LES ROUES Manchon
POUR UNE COUPE HAUTE de re
de la
plaque
SOULEVEZ LES ROUES POUR UNE COUPE BASSE
Page 46

MODt_LESAVECDISPOSITIFDERELEVAGE
DEROUESDE"PINCERAPIDE'*
• Pourchangerlatai!Iededecoupage,tirez
MODELES AVEC DISPOSITIF DE RELEVAGE
DE ROUES DE "POINT UNIQUE"
• Tirez te ]evier de reglage darts ladirection
versIehautsurielevierderegleur,deplacez
laroueversIehautouversIehaspoursatis-
faire&vosexigencesetpourlibererlelevier
der_gieur.SoyezsQrquerouteslesroues
sontdanslem_mearrangement,
REMARQUE:Leregleurest correctement
place quand des insertions de levier dans le
trou dans le plat.
BAtSSEZ LES ROUES
POUR UNE COUPE HAUTE
Plat
ROUES POUR
COUPE BASSE
Manchon
de r_glage
BAISSEZLES
ROUES POUR
UNECOUPE
HAUTE
SOULEVEZ
LES ROUES
POUR UNE
COUPE BASSE
MODELES AVEC DISPOSITIF DE RELEVAGE
DE ROUES DE "POINT DUAL"
Les deux roues de I'avant s'ajustent #. I'aide
d'un levier simple situ_ sur la roue avant
gauche. Pareillement, les deux roues de
t'arri&,re s'ajustent &}'aide d'un levier simple
situe sur la roue arriere gauche.
. Tirez te levier de reglage darts la direction
Assurez-vous de bien ajuster ies roues avant et
arriere & Ia meme hauteur.
BAISSEZ LES Manchon
ROUES POUR UNE de
COUPE HAUTE reglage
de la roue. Pour lever Ia tondeuse, placez le
ievier & la position desiree. Pour baisser ia
tondeuse, deplacez le levier vers i'arriere.
de la roue. Pour lever Ia tondeuse, placez le
levier & la position desiree. Pour baisser Ia
tondeuse, deptacez le levier vers i'arri_re.
SOULEVEZ LES ROUES
POUR UNE COUPE BASSE
t0
Page 47

MODI_LES AVEC DISPOSITIF DE RELEVAGE
DE ROUES DE"POINT TROIS"
(I8" (45CM) HI*VAC SEULEMENT)
Les deux roues de !'ardere s'ajustent & I'aide
d'un levier simple situe sur la roue arnere
gauche.
* Tirez le levier de reglage clans Ia direction
de la roue. Pour lever la tondeuse, placez le
levier & la position desir6e. Pour baisser Ia
tondeuse, d_,placez le levier vers I'arriere.
REMARQUE: IIy a sept (7) trous d'ajustement
de hauteur pour les roues arri_re.
Les deux roues de l'avant s'ajustent comme
montre:
1. Enlevez la roue, le boulon, et la visserie
et assemblez-les dans le trou de regtage
desir6,
2. Reinstallez tes composantes dans
I'ordre dans lequel elfes 6talent avant
I'enlevement. Serrez a fond.
REMARQLIE: 11y a sept (7) trous d'ajustement
de hauteur pour tes roues avant. Assurez-vous
que Ies deux roues avant soient positionnees
dans le m6me trou de part et d'autre.
IMPORTANT: Assurez-vous de bien a]uster les
roues avant et arriere & la m6me hauteur.
BAISSEZLES ROUES Manchonde _glage
POUR UNE COUPE
HAUTE SOULEVEZLES
Tige
(position
"wrouill_") Rondetle
[_crou "roue libre")
&e torique
ROUESPOURUNE
COUPE BASSE
Boulon
Tige frein (position
FONCTtONNEMENT DES ROUES PIVOT-
ANTES ("POINT TROIS" SEULEMENT}
Les roues avant peuvent Ctre mises en position
"verrouillee" ou en position "roue libre" pour
permettre une meifteure manceuvrabilit6. Pour
"verrouilt6e" les roues avant, il suffit de placer les
Ieviersde verrouillage dans tes trous des supports
de r_glage. Pareillement, il suffit de placer les
leviers de verrouillage dans les trous int_rieurs
des supports de reglage pour permettre aux roues
de tourner Iibrement ("roue tibre").
° Lever le levier de verrouillage jusqu'& ce que
la pattie la plus & I'avant passe librement
au-deI,_du support de reglage, ensuite faites
pivoter le tevier de verrouiltage a Ia position
d_siree.
IMPORTANT: Les roues avant dofvent _tre
"rouillees" en place tots du fonctionnement sur
une pente. Couper Ie gazon d'un c6t_ _, I'autre
de la face des pentes, jamais de haut en bas. 11
POUR CONVERTIR LA TONDEUSE
La plupart des tondeuses sent exp6-di6es
prates a Ctre utilisees comme broyeuses.
TONDEUSE DE "DECHARGE ARRI#RE"
SEULEMENT
Pour convertir au ramassage ou au d6charge-
ment, la plaque de broyeuse ou fe bouchon (st
muni d'un) doivent _tre enteves de I'orifice de
d_charge de la londeuse & gazon.
° Ouvrez la porte arri6re et enlevez Iaplaque
de broyeuse ou Ie bouohon (si muni d'un).
Convervez la plaque de broyeuse dans un
endroit s,3r.
° Vous pouvez maintenant installer le ramasse-
herbe ou le d6flecteur de d_charge facultatif.
- Pour retoumer & I'utilisation de brayer, in-
stallez la plaque de broyeuse darts l'orifice de
decharge de la tondeuse. Assurez-vous que
_; routes les pattes soient correctement posees.
ATTENTION: N'utilisez pas votre tondeuse
gazon sans un d6flecteur de d_charge ou
un ramasse-herbe approuve ou une plaque de
broyeuse en place. N'essayez iamais d'utiliser
la tondeuse a gazon quand la porte arriere est
enlevee ou ouverte.
"PLAQUE"DE
BROYEUSE
Fentes Fenles de
"--. plaque de
broyeuse
"BOUCHON"DE
BROYEUSE
Bouchon
BOUCHON DE BROYEUSECONSTRUtT
DANSLAPORTEARRIERE
Page 48

TONDEUSE DE "DECHARGE LATIeRALE"
SEULEMENT
TYPE PLAQUE DE BROYEUSE
Pour convertir au ramassage ou au decharge-
ment, ta plaque de broyeuse doit _tre enlevee
du dessous de la tondeuse & gazon,
* Enlevez les quatre (4) vis et les ecrous freins
qui fixent Ja plaque de broyeuse au boitier,
- Convervez Ia plaque et la visserie dans un
endroit sot.
- La tondeuse & gazon peut maintenant 6tre
utilise pour le dechargement }aterat ou un
ramasse-herbe facultatif peut _tre attach&
* Pour retourner & l'utilisation de broyer, rein-
stallez simplement ta plaque de broyeuse et
serrez & fon la visserie.
vis et e<rou frein
-,,
TYPE "B" BOUCHON DE BROYEUSE
Votre tondeuse & gazon a 6t6 exp_diee prate &
utiIiser comme une tondeuse broyeuse, Pour ta
convertir au ramassage ou au dechargement:
• Soulevez te d_flecteur de decharge et en-
tevez la bouchon de broyeuse.
• La tondeuse & gazon peut maintenant 6tre
utilisee pour le dechargement Jat@raiou un
ramasse-herbe peut 6tre utilise,
• Pour retoumer au broyage, r_instaHez
simptement ta bouchon de broyeuse comme
montr& Assurez-vous que te patte sont
completement poses.
ATTENTION: N'utilisez pas Ia tondeuse & ga-
zon sans un dMlecteur de decharge, un ramasse-
herbe approuve ou une bouchon de broyeuse.
ONvr6,z Ie
deflecteur
d6chargement
TYPE "A" BOUCHON DE BRQYEUSE
Votre tondeuse a. gazon a e,te exp_diee prate &
utiiiser comme une tondeuse broyeuse. Pour
convertir au ramassage ou au dechargement:
• Soulevez le deflecteur de decharge et en-
levez ta p;aque de broyeuse.
- La tondeuse & gazon peut maintenant 6tre
utilise pour le dechargement iateral ou un
ramasse-herbe facultatif peut ¢tre attache.
• Pour retoumer & t'utilisation de broyer,
simplement reinstailez la plaque de broyeuse
comme montr&
,I_ATTENTION N'utilisez pas la tondeuse
gazon sans un deflecteur de d{_charge ou un
ramasse-herbe approuve ou une plaque de
broyeuse en place.
Tige de chami_re
Deflecteur de
Bouchon 12
Instaf[ezle
bouchon de
broyeuse
LA TONDEUSE EST
MAINTENANT PRC:TE POUR
L'UTILISATION DE BROYEUSE
Patte
Page 49

TONDEUSE "MULTI-CUT"
Votre tondeuse & gazon a 6te exp_di6e prate &
utiliser comme une tondeuse broyeuse. Pour
convertir au ramassage ou au d_chargement:
RAMASSAGE ARRIERE
• Ouvrez la porte arriere et enlevez la plaque
(o bouchon> si equip6s) de broyeuse. Con-
vervez Ia plaque de broyeuse dans un endroit
s0r.
• Vous pouvez maintenant installer Ie ramasse-
herbe.
• Pour convertir & I'utilisation de broyage ou
de d6chargement, instalIez la plaque (o
bouchon, si equipes) de broyeuse dans
l'orifice de decharge arriere de ia tondeuse.
Suppod du
ramasse-herbe
Poign_e du
ramasse-
herbe
Pleine fen_tre d'indicateur"
de sac (si equipes)
MODELES AVEC PORTE ARRI12RE "PROP"
(22PLUS MODtELES SEULEMENT}
REMARQUE: La porte arri_re restera ouverte
jusqu'& ce que ta barre de commande de
presence d'op6rateur soit maintenue & la
ignee.
ATTENTION: Ne forcez pas la porte arriere
pour se fermer. Le sSrieux dommage & votre
tondeuse a pu resuiter.
DISCHARGEMENT LATI_RAL
• La plaque (o bouchon, si equip_s) de
broyeuse doit _tre instatt_e dans I'orffice de
d_charge arriere de la tondeuse (referez-
vous aux instructions ci-dessus).
• Ouvrez te porte de broyeuse et installez le
deflecteur de decharge au-dessous comme
montr&
• La tondeuse est maintenant prCte pour
I'utilisation de dechargement.
° Pour convertir & t'utilisation de broyage ou de
ramassage, le d_flecteur de decharge doit
_tre enleve et ta porte de broyeuse dolt 8tre
ferm6e.
Ouvrez le porle
de la broyeuse
D#flecteur de
decharge
\
/
::_:::
t3
Page 50

I_TAPES SIMPLES ,A SE RAPPELER
QUAND VOUS CONVERTIR VOTRE
PQUR LE BROYAGE -
• Plaque (o bouchon, si 6quipes) de broyeuse
• Porte de broyeuse ferrule.
POUR LE RAMASSAGE ARRtI_RE -
° Pfaque (o bouchon, si _quipes) de broyeuse
* Le ramasse-herbe eat install&
° Porte de broyeuse fermee.
POUR LE DECHARGEMENT LATI_RAL -
, Ptaque de broyeuse arriere et ia porte arfiere
• Le d_flecteur de dechargement install6.
,_ATTENTION: N'utilisez pas votre tondeuse
& gazon sans bouchon de broyeuse arri_re
ou bouchon en piace ou ramasse*herbe
approuve en place. Ne tentez ]amais & utiliser
{a tondeuse & gazon quand Ia porte arriere est
enlev6e ou ouverte.
TONDEUSE ,_,"MULTi-CUT'
arrJ_re et la porte arriere ferm_e,
arriere retire.
fermee.
VIDER LE RAMASSE-HERBE
(MODELES D'ENSACHEMENT ARRi#RE
OU "MULTI-CUT")
• Ouvrez simptement la porte arriere et sou°
levez en haut Ie ramasse*herbe et eloign_ de
la tondeuse & gazon.
REMARQUE: Ne trai'nez pas {e sac quand vous
le videz. Ceci I'userait inutilement.
,I_I_ATTENTION: Sous un usage normal, le
materiet de ramasse-herbe est soumis &la
deterioration et I'usure, donc, iI devrait _tre
verifie souvent pour Ie remptacement. S'iI est
n6cessaire de remplacer le ramasse-herbe,
utitisez uniquement un ramasse-herbe de
rechange approuve par le fabricant de votre
tondeuse & gazon.
_I_ATTENTION: N'utilisez pas la tondeuse
&gazon sans Ie d6flecteur de deeharge (Ia
porte arriere), le ramasse-herbe approuv¢
ou le deflecteur de I'herbe coupee en place,
N'essayez jamais d'utiliser la tondeuse a gazon
avec Ie deflecteur de d6charge (fa porte ardere)
enleve ou ouverte.
18" (45cm) HI-VAC MODELES:
Votre tondeuse & gazon a 6re expediee pr6te &
utiliser comme une tondeuse broyeuse. Pour la
convertir au ramassage arri&,re ou au decharge-
ment laterak
RAMASSAGE ARRI#RE
1. Retirer la poignee qui retient la porte de la
dechiqueteuse au ch&ssis de [e tondeuse &
gazon,
2. Ouvrir la porte de Ia dechiqueteuse et
insurer le goulotte d'_vacuation dans sur les
goujons filet&
3, Fixer le goulotte d'evacuation au ch&ssis
de Ia tondeuse & gazon & I'aide des lea bou-
tons.
4, Place le ramasse-herbe sur le porte arriere
celle-ci,
REMARQUE: Assurez-vous que ia ramasse-
herbe est solidement ferm_ & ctef en ptace.
• La Iondeuse est maintenant prate & fonction*
net avec I'ensachage arriere.
Ramasse-herbe
Porte arri6re
Le goulotte
Gouion fi{ete
DECHARGEMENT LAT#:RAL
I, Le goulotie d'evacuation doivent etre en-
leves.
Po_e
d_ch-
queleuse
14 Le goulotte d'evacualion doivenl
Page 51

2, Ouvrir la porte de la dechiqueteuse el
installer ie pattie avant de la goulotte
d'6vacuation doivent en dessous tel
qu'illuslre.
3. Fixer I'arriSre du d6flecteur lateral de la
goutotte au ch&ssis de la tondeuse & gazon
&t'aide des tes boutons.
• La tondeuse est maintenant prate & fonction-
ner avec Ie dechargement lateral,
E:TAPES FACtLES _. SE RAPPELER EN
CONVERTISSANT LA 18" (45cm) HI-VAC:
POUR LE BROYAGE -
t. Le ramasse-herbe, la goulotte d'6vacuation
ainsi que Ie d_flecteur lateral de la goutotte
enleves.
2. La porte de la d_chiqueteuse fixee au ch&s-
sis de ta tondeuse a I'aide des les boutons,
POUR LE RAMASSAGE ARRI#RE
1. Le deflecteur lateral de la goulotte enleve.
2, Le ramasse-herbe et la gouloite
d'6vacuation installae, et celle-ci fix_e sur le
ch&ssis de la tondeuse & gazon & l'aide des
les boutOnSr
POUR LE DISCHARGEMENT LATISRAL
1, Le ramasse+herbe et la gou!otte
d'evacuation enlev_s.
2. Le d6flecteur Iat_rat de Ia goulotte instafle et
fixe au chassis de ta tondeuse a I'aide des
Ies boutons.
ATTENTION: N'utitisez pas votre tondeuse
b,gazon sans que Ie porte de la broyeuse;
d6flecteur de decharge lateral install6, ou
descendeur de decharge at te ramasse-herbe
soient en place. Ne tentez jamais d'utiliser Ia
tondeuse b, gazon Iorsque la porte d_chique-
reuse est enlevee ou ouverte.
POUR VIDER LE RAMASSE-HERBE
1. Soulevez le ramasse-herbe en utilisant la
poignee du cadre.
2. Enlevez le ramasse*herbe avec I'herbe
coupee du dessous du guidon de tondeuse
& gazon.
3. Vider coupures avec Ie ramasse-herbe.
REMARQUE: Ne trafnez pas le sac quand
vous te videz, Ceci t'userait inutilement.
Polgn_e
2t" (53cm) HI-VAC MODELES:
Votre tondeuse & gazon a 6t_ expedite pr,_te,_
utiliser comme une tondeuse broyeuse. Pour Ia
convedir au ramassage arriere ou au d6charge-
ment lateral:
RAMASSAGE ARRIE_RE
t. Retirer Ia poign6e qui retient la porte de ta
d6chiqueteuse au chassis de ia tondeuse &
gazon.
du guidon
inf_rieur
ronde
Goulotte
Bouton
Goujon filete
Porte de la
broyeuse
2,
Ouvrir la porte de Ia dechiqueteuse et
insurer Ies languettes de la goulotte
d'evacuation dans l'ouverture de la ferrure
d'articulation et positionner I'arriere de Ia
goulotte sur le goujen fitete.
Languettes detagoulo_te d'_vacuation
Barre
herbe
Ferrure d'artk
3, Fixer I'arri6re de la goulotte d'_vacuation au
chassis de la tondeuse & gazon & l'aide de
15 la poignee,
royeuse
Page 52

4. Placer la poignee arriere du ramasse-herbe
sur Ia barre transversale de Ia poignee du
bas de ta tondeuse & gazon, tel qu'illuslre.
5. Lever la porte ronde de la goulotte
d'evacuation et mettre en place le ramasse-
herbe sur ceile-ci.
REMARQUE: Assurez-vous que la ramasse-
herbe est solidement ferm6 & clef en ptace et la
porte ronde de la gouEotte d'evacuation est bien
en place sur le ramasse-herbe, tet qu'ilIustre.
° La tondeuse est maintenant prete & foncfion-
her avec rensachage arriere.
° Pour convertir la tondeuse au fonctionnement
de dechiquetage, retirer le ramasse_herbe et
la goulotte d'_vacuafion. Fixer la porte de ta
dechiqueteuse au chassis de la tondeuse
gazon a i'aide de la poignee,
• Pour convertir Ia tondeuse au fonctionnement
de dechargement lateral, retirer le ramasse-
herbe et ia goulotte d'6vacuatfon, Installer le
deflecteur lateral de la goulotte et Ie fixer au
ch&ssis de Ia tondeuse a gazon & I'aide de la
poignee,
DECHARGEMENT LATERAL
1. Le ramasse-herbe et }a goulotte
d'e.vacuation doivent 6tre enleves,
2, Ouvrir la porte de Ia d_chiqueteuse el in-
statler le deflecteur lateral de la goulotte en
dessous tel qu'ilJustre.
3, Fixer I'arriere du deflecteur lat,@al de la
goulotte au ch&ssis de Ia londeuse a gazon
& I'aide de la poignee.
• La tondeuse est maintenant pr#te a fonction-
ner avec Ie dechargement lateral
° Pour convertir la tondeuse au fonclionnement
de dechiquetage, te deflecteur lat6ral de la
goulotte dolt 61re enleve et la porte de Ia
dechiqueteuse dolt 6tre bien en place sur le
ch&ssis de Ia tondeuse & i'aide de ta poignee.
,, Pour convertir Ja tondeuse au fonctionnement
d'ensachage arriere, le deflecteur tat6ral
de ta goulotte dolt 6tre enleve ; la goulolte
d'evacuation et le ramasse-herbe doivent 6tre
instaIles, et la goulotte d'evacuation doit &tre
bien en place sur te ch&ssis de Ia tondeuse
t'aide de _apoignee.
€:TAPES FACILES ,_,SE RAPPELER EN
CONVERTISSANT LA 21" (53cm) HkVAC:
POUR LE BROYAGE -
1. Le ramasse-herbe, la goulotte d'6vacuation
ainsi que ie d6flecteur Iateral de la goulotte
enleves.
2, La porte de la dechiqueteuse fix_.e au ch&s*
sis de Ia tondeuse & I'aide de Ia poignee.
POUR LE RAMASSAGE ARRI_ERE -
1. Le deflecteur tat_raI de la goulotte enleve.
2. Le ramasse-herbe et la goutotte
d'evacuation installee, et cetle-ci fix_e sur le
chassis de ia tondeuse a gazon & raide de
la poignee.
3. La porte ronde de la goulolle d'_vacuation
sur Ie dessus du ramasse-herbe.
POUR LE DECHARGEMENT LATC:RAL -
1. Le ramasse-herbe et la goulotte
d'evacuation enleves.
2. Le deflecteur lat6ral de la goulotte installe et
fixe au ch&ssis de ia tondeuse a I'aide de Ia
poignee.
ATTENTION: N'utilisez pas votre tondeuse
gazon sans que le porte de ta broyeuse; de-
flecteur de decharge lateral instalie, ou descen-
deur de decharge et te ramasse_herbe soient en
place. Ne tentez jamais d'utfliser la tondeuse ,_
gazon Iorsque la porte ardere ou ia porte ronde
est enievee ou ouverle.
POUR VIDER LE RAMASSE-HERBE
1. Ouvert la porte ronde de ta goulotte d'evac-
uation pour eloigner la corde de demarreur
dehors et du gant de ramasse- herbe.
' \\ Poignee
OUVERT
Porte de
Deflecteur
tateraf
"Beutor_
Goujon filet_
Porte Corde de
ronde demarrage
2. Enlevez le ramasse-herbe avec I'herbe
coup6e du tondeuse a gazon en utilisanl Ies
poignees anterieur et artiste,
3, Utilisez les poignee anterieur pour vider le
ramasse-herbe. Le poids de I'herbe ouvrira
Ia porte.
4. Fermer la porte avec un bruit sec sur le
ch&ssis avant d'instalier tesac a herbes sur
la tondeuse.
REMARQUE: Ne trainez pas le sac quand
vous Ie videz. Ceci t'userait inutilernent.
16
Page 53

BARRE DE COMMANDE DE MOTEUR
DE PRE_SENCE D'OPI_RATEUR
(TOUS LES MODELES)
Votre tondeuse & gazon est munie d'une
barre de commande de moteur de presence
d'operateur qui requiert que I'op6rateur soit
positionne derriere du guidon de Ia tondeuse &
gazon pour demarrer et utiliser la tondeuse
!ENTION: Les r_glements f6deraux
requierer_tqu'une commande de moteur
sol! instalI_e sur la tondeuse & gazon afin
de minimiser le risque de blessure & cause
du contacl avecla Iame. N'essayez jamais
de renverser {a fonction de la commande
d'operateur. La lame toume ]orsque le moteur
fonctionne.
COMMANDE D'ENTRAiNEMENT
COMMANDE D'ENTRA[NEMENT
"STANDARD"
• Pour commander i'autopropulsion, posez et
tenez la barre de cemmande de pr6sence
d'op_.rateur eontrete guidon et poussez en
avant le levier de commande d'entrafnement
jusqu'& ce qu'ii produise un clic; ensuite
rel&chez le tevier.
• Pour arr6ter le mouvement de devant,
reI&chez ta barre de commande de presence
d'operateur, Pour arr6ter Ie mouvement de
devant sans arreter te moteur, reI&chez le-
g_rement ta barre de commande de presence
d'op6rateur jusqu'& ce que la commande
d'entralnement degage. Ensuite, tenez
en bas la barre de commande de presence
d'operateur. Maintenez-ta contrete guidon
pour continuer tondre sans autopropulsion.
• Pour garder lacommande d'entra_'nement
engagee quand vous prenez un virage, ap-
puyez sur le guidon et soutevez les roues
anterieures de ta terre et toumez Ia tondeuse
& gazon.
d'entrainement
COMMANDE D'ENTRA_NEMENT EMBRAYEE
\
Barre de
commande
de pr_,sence
d'op_rateur
COMMANDE D'ENTRAiNEMENT DC:BRAYEE
!7
Page 54

COMMANDE D'ENTRA/NEMENT
"DEUX BARRE"
* Pour activer ta march vers I'avant, tirer ia
barre de commande vers le guidon.
° Pour arr_ter le mouvement de devant, rel&-
chez completement la barre de commande
d'entra'fnement.
Barre de
commande
de presence
d'operateur
COMMANDE D'ENTRAJNEMENT EMBRAYEE
COMMANDE D'ENTRAINEMENT DE_BRAYEE
COMMANDE D'ENTRAINEMENT
"AUTO-WALK"
, Pour commander Ie deplacement automa-
tique vous devez pousser vers te bas et vers
ia polgnee la barre de commande indiquant la
presence de I'operateur el tirer Ie(s) Ievier(s)
de commande vers la poignee. Plus le(s)
levier(s) est tire vers la poignee plus I'appareit
circute rapidemenL
° La marche avant s'arr_te en t&chant la barre de
commande indiquant la presence de t'operateur
ou le(s) levier(s) de commande. Pour arreter
la marche avant sans arreter le moteur> t&-
chez uniquement le tevier de commande de
i'entrafnement. Malntenez vers le bas, contre
la poignee, la barre de commande indiquant ta
presence de l'operateur pour continuer &tondre
sans deptacement automatique.
REMARQUE: Si apr_s d'avoir reI&chez la barre
de commande, Ia tondeuse & gazon ne route pas
vers t'arriere, poussez 16gerement Ia tondeuse ver
l'avant pour desengager fes roues motrices.
Levier(s) de
commande
d'entrainement
COMMANDE D'ENTRA_NEMENT EMBRAYEE
COMMANDE D'ENTRAiNEMENT DI_BRAYEE
MODELES ENTRAiNEMENT D, DE ROUE
AVANT SEULEMENT:
* Pour que la commande d'entrainement reste
engagee Iorsque vous negociez Ies virages,
poussez vers le bas la poignee pour soutever
les roues avant et faites pivoter la tondeuse.
18
Page 55

Avec le temps, _esysteme de commande de
I'entra;nement se "relb,che" ce qui diminue la
vitesse. Une touritlon, & l'arriere du carter de
la commande de I'entra_nement, permet de
resserrer le c_ble. Procedez de la sorte:
• Eteignez la tondeuse et d6branchez la bougie
de son c&ble.
* Toumez ta tourillon & t'arriere de la corno
mande de d'entra_nement pour I'epreuve Ia
vitesse d'entra_nement.
° Mettez en marche la tondeuse pour mettre
I'epreuve ta vitesse d'entrainement. Regler
au besoin.
° Si Ia situation ne s'amMiore pas apr_s cette
operation (Ia marche avant ne change pas),
vous devez remplacer la courroie
d'entrainement de votre appareil.
reglage
COMMANDE D'ENTRA/N EMENT
"VARI-SPEED"
* Pour commander le deplacement automa-
tique vous devez pousser vers le bas et vers
ta poignee la barre de commande indiquant
la presence de I'operateur et tirer le barre
de commande d'entrafnement jusqu'& la
poignee. Plus pros de le barre est tir6 vers la
poignee plus i'appareil circule rapidement.
° La marche avant s'arrCte en I&chant la
barre de commande indiquant la presence
de I'op6rateur ou Ie barre de commande
d'entrafnement. Pour arr6ter la marche avant
sans arrSter le moteur, t&chez uniquement
le barre de commande de rentra_nement,
Maintenez vers le bas, contre la poignee, Ia
barre de commande indiquant la presence
de I'operateur pour continuer a tondre sans
d_placement automatique.
REMARQUE: Si apres d'avoir rel&chez Ia barre
de commande, la tondeuse &gazon ne roule pas
vers t'arriere, poussez leg_rement {atondeuse vet
I'avant pour desengager Ies roues motrices.
MODELES ENTRMNEMENT _.DE ROUE
AVANT SEULEMENT:
. Pour que Ia commande d'entra_nement reste
engag6e Iorsque vous n_gociez les virages,
poussez vers le bas la poignee pour soulever
les roues avant et faites pivoter la tondeuse.
Barredecommandedepresence d'op_rateur
Barre de
commande
d'entrainement
COMMANDE
D'ENTRMNEMENT
DEBRAYEE
POUR S'AJUSTER,
DEPLACEZVERS
LETROUSUIVANT
Avec le temps, Ie syst_me de commande de
t'entrafnement se "rel&che" ce qui diminue la vi-
tesse. Les trous dans te carter de la commande
de I'entrainement, permet tent de resserrer le
c6bie. Procedez de Ia sorte:
• Eteignez latondeuse et d6branchez la
bougie de son c&ble,
° Desserrez i'_crou, d_,ptacez la poign6e
inf6rieure du carter de la commande de
I'entrafnement vers Ie trou suivant et
resserrez I'6crou.
° Mettez en marche ta tondeuse pour mettre
I°epreuve la vitesse d'entrainement.
° Si la situation ne s'am61iore pas apres cette
operation (ta marche avant ne change
pas), vous devez remplacer la courroie
d'entrafnement de votre appareil,
t9
Page 56

AVANT DE D#MARRER LE MOTEUR
Lisez le manuel do moteur qui est embaile avec
votre tondeuse a gazon.
REMPLtR LE MOTE.UR AVEC L'HUILE
Votre tondeuse & gazon est expedi6e sans huile
dans le moteur.
* Assurez-vous que la tondeuse suit sur un
terrain plat et que la superficie autour du
remplissage d'huile suit propre.
* Enlevez te bouchon de remplissage d'huile
de moteur (bouchon de remplissage d'huilei
jauge d'huile sur tes mod_les si 6quip6).
, Versez lentement I'huile. Pour le genre et ta
cat_gorie d'huile, r6ferez-vous & la section de
"MOTEUR" darts ta section d'entretien de ce
manuel.
o Remplissez jusqu'au haut de la fente dans le
trou de remptissage (b. Ia iigne pleine (FULL)
sur la jauge d'huile sur les modeles si taunts).
Ne remplissez pas trop.
, Replacer le bouchon de remplissage d'huile
de moteur (bouchon de remplissage d'huitei
jauge d'huite sur tes mod_tes si 6quipe),
• V6dliez te niveau correct avant chaque utili-
sation, Ajoutez I'huile comme necessaire.
- Pour changer rhuite, r6ferez-vous & ta section
d'entretien de ee manuef,
REMPLIR LE RESERVOIR D'ESSENCE
- RempIissez Ie reservoir d'essence avec de
!'essence sans plumb, fraiche et propre>
N'UTILISEZ PAS D'ESSENCE DE QUALIT[_
SUPERtEURE. PRENEZ SOIN DE NE PAS
REMPLIR LE RESERVOIR A L'EXCES.
AVERTISSEMENT: Les m61anges
d'essence et d'alcool (appeles gasohol ou
utilisant d'6thanol ou de methanol) peuvent
attirer I'humidite qui cause ta separation et
ta formation d'acide pendant I'entreposage.
Le gaz acide peut avarier ie systeme de
combustible d'un moteur pendant l'entreposage,
Pour eviter les problemes avec le moteur, le
systeme d'essence doit {_tre vidange avant
l'entreposage de 30 jeurs ou plus. Vidangez
le reservoir d'essence, demarrez le moteur
et taissez-Ie fenctionner jusqu'a ce que
les conduites d'essence et te carburateur
soient vides. Utflisez du combustible frais
la saison suivante. Voyez les instructions
sur l'entreposage pour les informations
supplementaires. N'utilisez jamais de produits
de nettoyage pour le moteur ou le carburateur
darts le r6ser_,oir d'essence ou des dommages
permanents pourraient etre causes.
DI_MARRER LE MOTEUR
_, ATTENTION: La tame de tondeuse tourne
Iorsque {e moteur fonctionne.
REMARQUE: En raison du rev_tement de protec-
tion du moteur, une petite quantit6 de fum6e est
normale la premiere fois qu'on utitise le produit.
• Placez le interrupteur de ON/OFF de moteur
(st equip6) est dans la position de ON.
• Deplacez la commande de vitesse de moteur
& Iaposition RAPIDE ou & ta position de
STARTERiDEMARRAGE sur les mod_les qui
sont muni d'un starter,
• Si votre tondeuse & gazon a un disposifif
d'amor?age (pompe manuelle) pour demar-
rerun moteur froid, poussez le dispositif
d'amor?age te numero de fois comme instruit
dans Ie manuel du moteur embail6 avec votre
tondeuse & gazon. Poussez solidement.
Cette etape n'est pas d'habitude necessaire
quand vous d6marrez un moteur qui a deja
fonctionn6 pendant quelque minutes.
• Tenez Ia barre de commande de presence
d'operateur contre Ie guidon,
MOD#LES AVEC LE DI_MARREUR DE RECUL
• Tirez rapidement sur la poignee de dSmar-
reur. Ne laissez pas Ie c&ble de d6marreur
revenir brusquement &sa position originaire.
Poign6e de
demarreur
MOD#LES AVEC LE Dg;MARREUR
[_LECTRIQUE
° Poussez le bouton de demarreur du moteur (ou
tournez ta c16 sur des modeles ainsi 6quipee),
IMPORTANT: Ne faites pas partir &la manivetle le
moteur pendant plus de cinq (5) secondes & ta fois.
Attendez 5 & 10 secondes entre chaque essai.
TOUS LES MODI_LES
• Pour les moteurs qui aunt muni d'un starter,
deplacez lentement te Ievier de commande
de vitesse de moteur & Ia position rapide
apr_s que le moteur demarre.
POUR ARRI_TER LE MOTEUR
* PourARRi_TER Ie moteur, reI&chez la barre de
commande de pr6sence d'operateur du moteur
etio placez te interrupteur de ON/OFF de mo-
teur (si 6quipe) est dans Ia position de OFR
REMARQUE: Sous des temp6ratures plus
froides, iI peut 6tre n6cessaire de r6p_ter les
etapes d'amor(;age. Sous des temp6ratures
plus chaudes, trop d'amor(_age peut noyer te
moteur et il refusera de demarrer. Si vous
noyez Ie moteur, attendez quetques minutes
avant d'essayer de te d6marrer et ne repStez
20Pas les 6tapes d'amorgage.
Page 57

CONSEILSDE TONDRE
,I_ A]-IENTION: N'utilisez pas d'accessoires
amovibles pour decoupeuses de chaumes sur
votre tondeuse. IIs sont dangereux, et risquent
d'ab]'mer votre tondeuse et annulet votre
garantie,
• Pour la plupart des conditions de coupe et
pour Ie meilteur ramassage, tavitesse de
moteur devrait regimea la position RAPIDE,
• Sous certaines conditions tetles que Ie gazon
tr¢s haut, elevez Ia hauteur de coupe pen-
dant la premiere coupe pour reduire I'effort
de pousser et pour _viter te surchauffage du
moteur et pour ne pas Iaisser des paquets
d'herbe coupee. Fakes la deuxiCme coupe
la hauteur desir_e.
° Pour une coupe extr6mement 6paisse, r6dui-
sez la Iargeur de coupe en imbriquant l'atl_e
auparavant coup6e et tondez tentement,
° Quand vous utitisez une tondeuse &gazon
de decharge laterale, tondez darts un seas
contralto des aiguilies d'une montre en com-
mengant a I'e×terieur de la superficie a 6tre
tondue pour etaler I'herbe couple plus regu-
Iierement eta reduire l'effort sur Ie moteur.
Pour garder t'herbe coup6e hors des allees,
des parterres, etc., tondez Ia p6riphSrie de
ta zone a 6tre coup6e dans le seas des
aiguilles d'une montre,
• Quand vous utilisez une tondeuse & gazon
de d6charge arfiere et quand le gazon est
mouille et iourd, los mottos du gazon coup_
ne peuvent pas entrer le ramasse-herbe,
Reduisez la vitesse de course (la vitesse de
pousser) etiou marchez Ia tondeuse a gazon
par-dessus la zone une deuxieme fois.
• Si la tondeuse a taiss_ une trace d'herbe
coupee sur Ie c6t6 droit d'une tondeuse
gazon de decharge arri6re, tondez darts Ie
sons des aiguilles d'une montre en dL_bordant
tegerement o_ vous avez d6j& tondu afin de
ramasser rherbe coup6e au prochain tour.
r
f
CONSEILS DE BROYER / TONDRE
(SEULEMENT POUR LES TONDEUSES
DE BROYEUSE)
IMPORTANT," Pour temeilleur rendement,
maintenez te boitier de tondeuse propre. Net-
toyez le dessous du bottler de tondeuse apres
chaque utilisation. Voir la section de "NETTOY-
AGE" dans la section d'entretien de ce manuel.
• La lame de broyage speciale recoupera
i'herbe coupee de multiples fois pour ]a faire
plus petite. L'herbe coupee sera distribuee
partout sur Ie gazon. L'herbe couple qui a
6t_' recoupee est biodegradable, ce qui pro-
curera au gazon substances nutritives. Pour
temeilleur rendement des lames, la vitesse
de moteur (tame) dolt ¢tre maintenue & la
position RAPI DE.
• Ne tondez pas la pelouse quand l>herbe est
mouiilee. L'herbe mouillee forme des touffes
qui g6nent t'action de la broyeuse. Le debut
de I>apr_s-midiest le meilleur temps pour
tondre, iorsque te gazon est sec et qu'il n'est
pas expose directement au soleit.
• Pour les meilleurs rSsultats, ajustez la
hauteur de coupe de fa tondeuse afin que Ia
tondeuse coupe seulement le tiers du haut
de rherbe. Si I'herbe est tres haute, i! sera
necessaire d'_lever la hauteur de coupe pour
r_duire los efforts de propulsion, eviter de
surchauffer le moteur et eviter I'agglutination
et rabandon de touffes d'herbe coupee. Dans
des conditions ires difficiles, reduisez ta lar-
geur de coupe en imbriquant I'allee aupara-
rant couple et tondez lentement,
MAXI_
- Los pores dans te lingo du ramasse-herbe
peuvent se remplir de la salet_ et la pous-
siere et iI ramassera moins de gazon coupe.
Pour prevenir cot obstruction, arrosez
r6gulierement le ramasse-herbe et laissezqe
secher avant de I'utiliser encore.
- Cerlains types d'herbe et certaines condi-
tions necessitent une deuxi_me coupe.
Quand vous faites fa deuxieme coupe, tondez
perpendiculaire & (ou en travers) Ia premiere
coupe.
• Changez votre parcours de coupe de
semaine & semaine, Tondez du nord au sud
une semaine et de I'est b, i'ouest ]a semaine
suivante, aria d'eviter le paillasson et la gran-
ulation de ta petouse.
2t
Page 58

AVANT APRES TOUTES TOUTES LES TOUTES AVANT
D'ENTRETIEN CHAQUE CHAQUE LESIO 25HEURES LESIO0 L'ENTRE-
lu i.in i wuu, uum u imlumu i
V_rJ_iez I'int#,grite des sys_emes de fixation ....... V' If
UTIL,SATION UT1L[SATION; HEURES OU SAISON HEURES POSAGE
T "_.oy_,lw,ifie,do"_._m_,.o-,o_" V' V' .... j
U Verilier _es Ro.eS d'entra?nement-* _..
D ._.oyo_loTo_.... "-" j ..............
Ei'.'J,'ioy_;.oo.,oc......_o_'o._"o_..... "'" '............. ¢'
U iw,i,o=I_cc_oieI!!_ po_li_"- '..... V' .................
S .Venliez / Aiguisez / Rempt&cez ta Lame ............. _3
E Tab[eau de tubrff[catiun ..............................
Netloyez / Rechargec _a Balleie "" if _ .....
OMv_ri_iez!_,_ivt_ d'_uiledemo_e_,_ _ ............................Remptacez rhuiie de moleu_ ................ _,2 ..............
t Nettoyez le Filtre a Air .................
Inspectez le Siter_cieta× if .................
. Ramp, .... ,a Boug,, d'a,lumage ........... t_
tqemplacez lc Cartouche du fillre _ air ................... t_2
Vider Ie sys_me de oafburaD ou a._ot_tet du €tabil san1
! - Changez p_us frequemmen[ quand _e maleur esl soumis a des efforts impertan_s ou quan# la _emperatttre ambianle est &levee.
2 - Augmentez J_.freq_ence des erc{etiens en cas d'utiJisa_o d_ns un erlvironnement poussiereu× et sale. (s[._quip_) *
3" Remplacez _cs lames pt_Js souvent en c_s d_util[sation sur un terrain sablonneux. Tondeuse & Demarreur Etetr_ue **
4 - Ch_,rgez per_d_nt 48 ;qeures _ ia fir_ de lasaiso_. Toe, clause _ Force Propulsive €,**
5 _ Ai_si qu'apres cha_ue _rat'_che _e 5 heures de _oncIio.qneme_t. UHIiser ua gra_oir pou[ neRoye_" fe dessous _lt ch&ssis de la _ondeuse ****
,,,,,,,,,,,,,,, ,, ,, ................
.... , ,,,,, ,,,,,, J
RECOMMANDATIONS GleNI_RALES
LBgarantie pour cet_etondeuse ,_gazon ne
couvre pas les elements qui ont eta sujets &
un abus ou & des negligences de Ia part de
I'operateur. Pour conserver une garantie com-
p_te, rutilisateur dolt maintenir Ia tondeuse tel
qua precise dans ce manuel
Quetques ajustements sont nCcessaires peri-
odiquement pour maintenir correctement votre
machine. Tous les r,_glages dans la section de
R_,vision et R_glages de ce manuei devraient
_tre verifies au moins une fois par saison,
• Une fois par an, remplacez la bougie
d'allumage, nettoyez ou remplacez te filtre &
air, et v_rifiez Ia lame pour Ies signes d'usure.
Une nouvelfe bougie d'allumage et un nou-
veau filtre & air propre assure la presence
d'un m_lange air/essence correct et ainsi
permet votre moteur de marcher mieux et de
durer plus Iongtemps.
• Respectez fes indications du Guide
d'entretien de ce manuel
AVANT CHAQUE UTILISATION
• Vedfiez le niveau d'huile de moteur,
• V_dfiez I'int_grite des systemes de tixatJon.
LUBRIFICATtON
Conservez votre machine bien tubrifiCe
(Voir le "TABLEAU DE LUBRIFICATION").
IMPORTANT: Ne mettez ni d'huile ni de graisse
sur Ies paiiers antifriction de plastique des
roues. Les lubrifiants qui attirent ta poussiere et
TABLEAU DE LUBRIFICATION
0_) Disposilif de
te_evage des
chaque roue)
@ Huite de
1
I / 'Chami_re
£ ..j seulement)
Goupilte de reel du support de guidon
Lubrifiant & vaporiser
@ Referez-vous & "MoteuP darts la section d'entretien
tes salet6s diminuent l'esp_rance de durabilite
de ces paliers a lubrification automatique. Si
vous pensez qu'fls doivcent 6tre lubrifi_s, utilisez
seuiemenl et avec moderation un lubrifiant sec,
en poudre de type graphite.
22
de la d_llecleur
d_charge taterale
(_) Charniere de
Ia porte arri&re
(modeles
d_charge arriCre
seutement)
roues (8ur
moteur
Page 59

TONDEUSE _. GAZON Loge-
Observez toujours les regles de securite quand mentde
vous faites l'entretien, clavettedu
PNEUS
• Assurez-vous que vos pneus ne soient pas
en contact avec de I'essence, de I'huile ou
des produits de chimique insecticide qui pour-
raient d_truire Iecaoutchouc,
vitebrequi_
Cl_
• I_vitez les souehes, Ies pierres, les orni_res
profondes, Ies objets tranchants et les autres
hasards qui pourraient causer des deg&ts les
pneus.
ENTRETIEN DE LA LAME
Pour les meilleurs resultats, ie lame de ton-
deuse dolt 6tre bien aiguisee, Remplacez les
lames tordues ou abTmees.
,i_ AVERTISSEMENT: N'utitisez que les lames
de rechange autorisee par ie fabricant de votre
tondeuse. L'usage d'une lame n'ayant pas ete
autoris6e par le fabricant de votre tondeuse
est dangereux et risque d'endommager votre
tondeuse et d'annuler sa garantie.
ENLEVER LA LAME
1. Debranchez le fil de bougie d'allumage et
posez-te de telle fa?on qu'if ne puisse pas
entrer en contact avec ta bougie d'allumage.
2. Mettez Ia tondeuse sur Ie c6t& Assurez-
vous que le filtre & air et le carburateur sont
vers le haul.
3. Utilisez un bloc de bois entre Ia lame et le
boitier de tondeuse pour emp6cher Ia lame
de toumer quand vous enlevez te boulon de
lame.
REMARQUE: Protegez vos mains avec des
gants et/ou enveloppez la lame dans un tinge
epais,
4. Enlevez le boulon de lame en te tournant
dans te sens contraire des aiguitles d'une
montre.
5. Enlevez la lame etla visserie (le boulon, la
rondelle ffein et Ia rondelle en acier trempe).
6, Enlevez le deftecteur de debris (si equip@.
REMARQUE: Enlevez l'adaptateur de lame
et v_rifiez la cle dans te moyeu de I'adaptateur
de tame. La cl6 dolt etre en bonne condition
pour fonctionner correctement. Remplacez
t'adaptateur s'iI est endommag&
Adaplateur de tame
D_flecleur de _e
(si equipe)
Lame
REMPLACER LA LAME
1. Posez t'adaptateur de lame sur te vilebre-
quin de moteur. Assurez-vous que Jacl6
dans radaptateur et Ie iogement de clavette
dans le vilebrequin sont alignes: et que ta
courroie d'entrainement est & I'interieur des
etiquettes de guide de courroie (si equipe).
2, Posez ia Iame sur l'adaptateur de tame en
alignant tes deux (2) trous darts la lame
avec ]es pattes dans I'adaptateur.
3, Assurez-vous que le bord arg_re de [atame
(oppose au bord) est vers le haut du moteur,
4. lnstallez le boulon de tame avec la rondetle
frein etla rondelle en acier trempe dens
I'adaptateur de tame et le vitebrequin.
5. Utilisez un bloc de bois entre Ia lame et
Ie boitier de tondeuse et serrez le boulon
de tame, en le toumant dans le sens des
aiguilles d'une montre.
• Le couple de serrage recommand_ est de
35-40 Ib-pL (47 & 54 N/m).
IMPORTANT; Le boulon de tame est trait6 &
la chateur. Si le bouton a besoin remptacer,
remplacez seulement par le boulon approuve
montre dans ta section de Pieces de Rechange
de ce manuel.
AFFILER LA LAME
REMARQUE: Nous ne recommandons pas la
lame - mais si vous Ie faites d'affiler, assurez-
vous que ia lame est 6quilibree. Une lame qui
n'est pas equilibree endommagera eventuelie-
ment la tondeuse & gazon ou le moteur.
• La lame peut #tre affil6e avec une time eu
une meuI& N'essayez pas d'affiier la lame
sans I'enlever de la tondeuseo
de
oourfoie
Bord arriere
RondelJe en
n de tame
23
Page 60

LAMES AVEC LE TROU ReND
• Pour veritier requitibre de la lame, enfoncez
un clou dans une poutre ou un mur. Laissez
environ un (t) pouce du clou dro{t expose.
Posez le trou centrat de la lame sur Ia t_te
du clou. Si la lame est #quitibree, eile devrait
rester dans une position horizon,ale. Si un
bout ou I'autre de la Iame descend, la lame
n'est pas equilibree. Affilez le bout lourd
jusqu'& ce que ia lame soit 6quilibree.
LAMES AVEC LE TROU "STAR"
• Pour verifier i'equilibre de fa_ame, vous aurez
besoin d'un boulon de dia, 5/8 pc. ou d'une
cheville en acier de din. 5/8 pc. ou d'une
equitibreuse conique (Si vous utilisez une
equilibreuse conique, suivez tes instructions
fournies avec requilibreuse).
REMARQUE: N'utitisez pas un clou pour @quili-
brer la lame, Les parties de !'orifice central peu-
vent avoir l'apparence qu'elles sent eentr6es,
mats elles ne sent pas.
• Giissez la lame sur la par_ie sans filetage du
boulon ou _acheville en acier et gardez le
boulonila oheville dans une position paral-
lele avec la terre. Si la lame est equilibree,
elle doit rester horizonlale. Si une extremil6
de Ia lame se deplace vers Ie has, aiguisez
I'extremite qui est trop Iourde jusqu'& ce que
ta lame soil bier, equilibree,
18" (45cm) HI-VAC MODELES SEULEMENT:
1, Entevez les chapeaux de moyeu et les
ecrous freins.
2. Enlevez les roues des essieux des disposi-
tifs de reglage des roues.
3. Entevez tes debris ou t'herbe coupee
de l'inl@ieur des cache-poussiere, des
pignons, effou des dents d'engrenage des
roues motrices.
4. Si vous retirez tes pignons d'entrafnement,
essuyezqes avec un tissu sec. Rassemblez-
les. Ne lubrifiez pas.
REMARQUE: Les pignons sur les deux c6tes
de la tondeuse son, identiques mats doivent ¢lre
instalI_s correctement, Une installation er-ronee
peut nuire au systeme d'entrainement.
5. Des fleches sont imprim_es sur les deux
c6tes du p[gnon. Si la ft_che est sur la
pattie superieur du pignon, elte dolt indiquer
I'av&nt de Ia tondeuse. Si la troche est
tournee vers t'arriere, tournez Ie pignon
et assembtez-ie sur la tondeuse. En
eas d'installation incorrecte, lesyst#me
d'entrafnement ne marche pas.
6. Posez ies roues sur les essieux des disposi-
tifs de r6glage des roues.
7. Repiacez les ecrous freins et Ies chapeaux
de moyeu.
FAQADE
DE LA
TONDEUSE
CORRECT
INCORRECT
ROUES MOTRICES
Verif[ez toujours Ies roues motrices avant de
tondre pour assurer qu'eltes toument Iibrement.
Si les roues ne toument pas iibrement, il y a des
d6bris, de rherbe coupee, etc. & I'_nterieur des
roues el ces dernieres doivent #tre nettoyees,
S'il est necessaire & nettoyer les roues me,rices,
verifiez les deux roues.
• Si Ies roues ne toument pas librement apr@s
qu'eltes on, @t@nettoyees, contactez votre
centre d'entretien aulorise le plus proche.
Bague en E
RondeIfe
Pignon
- Si Ies roues ne toument pas Iibrement apres
qu'elles ont 6re nettoyCes, contactez votre
centre d'entretien autorise le plus proche.
24
Cache-
poussiere
Page 61

BO[TE DE VITESSES
, Pour votre systeme d'entrafnement & fonc-
tionner correctement, la bofte de vitesses et
Ia superficie autour l'entrainement devraient
_tre consewes propres et ]ibres des debris°
Nettoyez deux fois par une saison sous te
couvercle d'entrainement.
• La boite de vitesses est remptie avec le Iubdfi-
antjusqu'au niveau correct & t'usine, Le tubdfi-
ant peut demander de l'attention sit'entretien a
ete execute sur la bolte de vitesses.
MOTEUR
Lisez la section d'entretien de votre manuel de
moteur.
LUBRIFICATION
Changez I'huile apres de chaque 25 heures
d'op6ration ou au moins une lois par arts si la
tondeuse est utilis_e moths que 25 heures par ans.
CHANGER L'HUILE DE MOTEUR
(VOIR LA MANUEL DE MOTEUR)
- Assurez-vous que Ia tondeuse & gazon soit
surun terrain plat.
• L'huile vidangera plus librement quand etIe
est chaude,
° Recueillez rhuile dans une cuvette appropriee.
° Pour les moteurs sans jauge d'huile, enlevez
le bouchon de vidange d'huile en bas.
• Pour les moteurs avec une jauge d'huile,
enlevez le bouchon de vidange d'huile en bas
ou enlevez Ie bouchon d'huite de moteur et
toumez les moteur sur le c6t&
° Apres I'huile a compl&,tement vidang6,
remptacez te bouchon de vidange d'huile et
serrez & fond,
° Remplissez ie moteur avec I'huile. Versez
lentement, N'en mettez pas trop.
° Remplissez au haut de la fente & i'interieur
du troude remplissage ou &Ia Iigne p}eine
(FULL) sur Iajauge d'huile sur les modeles
si munies. Assurez-vous que le bouchon de
ta jauge d'huile soit serree & fond pour une
lecture correcte, Maintenez I'huile au niveau
correct.
F]LTRE A AIR
Votre moteur ne marche pas correctement
avec un filtre & air sale, Nettoyez I'element de
filtre apres toutes Ies 25 heures d'utilisation ou
chaque saison. Remplacez le filtre & air chaque
annee les 100 heures d>utilisation, plus souvent
si vous tondez te gazon sous des conditions
tr_s poussiL_reuses et sales. Voir la section
d'entretien de votre manuel de moteur.
FILTRE D'ESSENCE INSTALLE EN LIGNE
(MOTEUR KOHLER SEULEMENT):
Lefiltre d'essence devrait _tre remplace au
moins chaque saison. Si le filtre d'essence est
bouche et obstrue 1'6coulement d'essence au
carburateur, il faut le remplaeer.
1. Quand le moteur est froid, enlevez Ie
flltre et bouchez les tron(2ons de conduite
d'essenee.
2. Posez le nouveau fiftre dans la conduite
d'essence avecla fl_che fointant vers le
carburateur.
3, Assurez-vous qu'il n'y ait pas de fuites de
Iaconduite d'essence et que les brides de
serrage soient bin placee&
4, Nettoyez imm_diatement I'essence renver-
see.
SILENC|EUX
Inspectez et remplacez le silencieux corrode
pour 6viter les risques d'ineendie et!ou les
d6g_fits,
BOUGIE D'ALLUMAGE
Remplacez le bougie d'allumage au debut de
chaque saison de tonte ou apres routes les
100 heures d'utilisation ce qui se pr_,sente er_
premier. Ajustez l'ecartement de la bougie
d'allumage selon Ies specifications du manuel
du moteur.
NETTOYAGE
IMPORTANT: Pour te meilleur rendement,
maintenez leboi'tier de tondeuse exempt de
t'accumulation de l'herbe et les debris, nettoyez
Ie dessous du boftier de tondeuse apr_s chaque
utilisation.
• Nettoyez le dessous de la tondeuse en grat-
tant pour enlever I'accumu]ation d>herbe et de
debris.
• Nettoyez frequemment te moteur pour eviter
l'accumulation de debris. Un moteur sale
marche & une temperature plus _Iev6e at
par consequent & une esperance de vie plus
courte que normale,
• Essuyez les surfaces finies et les roues de
routes les traces d'essence, d'huile etc.
Nous ne recommandons pas l'emploi d'un
tuyaud'arrosage pour nettoyer votre tondeuse
&gazon & moths que le syst6me electrique, le
silencieux, le filtre & air et le carburateur soient
couverts pour les mettre &l'abri de reau. La
pr6sence d'eau dans un moteur peut en reduire
l'esperance de vie.
COUVERCLE D'ENTRAiNEMENT
Nettoyez sous ie couvercle d'entrainement
au moins deux fois chaque saison. Grattez le
dessous du couvercte avec le couteau & maso
tiquer ou un outil semblabie pour enlever toute
I'accumu]ation des debds ou de l>herbe.
25
Page 62

LE DISPOSITIF DE LAVAGE DE L'EAU
(s_4QU_PES)
Votre tondeuse & gazon est {_quip_ d'un
ajustage qui permet ie nettoyage rapide et facile
du dessous du Iogement. Pour empIoyer ce
dispositif, operez comme suit:
1. D6placez Ia tondeuse & gazon & un secteur
d'une herbe coupee ou d'une surface dure
differente,
REMARQUE: L'eau, I'herbe et d'autres d{_bris
s'ecouleront sous _e Iogement de boiter de
tondeuse pendant le processus de iavage,
2, Enievez Ie ramasse_herbe et deflecteur de
decharge de la tondeuse & gazon.
3. Fermez Ia porte de broyeuse (si 6quip6e).
4, Reliez un tuyau de iardin a l'ajustage oQ
montr&
IMPORTANT: Soyez sOr que le tuyau de jardin
rFest pas conduft sous }e bofter de tondeuse &
gazon ou n'est pas emp_tr_ dans tes roues.
5. Al_umez I'approvisionnement et le contr61e
en eau pour des fuites a t'ajustage.
Si aucune fuite n'est presente, mettez en
marche le moteur (comme d6crit dans la section
d'operat[on de ce manuel) et laissez le moteur
courir jusqu'& ce que le dessous de [a tondeuse
,_Aazon soit propre.
TFENTION: N'engagez pas Ie systeme
d'entrainement pendant Ie processus de lavage.
6. Coupez le moteur.
7. Coupez Fapprovisionnement en eau et
enlevez le tuyau de I'ajustage.
_I_ AVERTISSEMENT: N'enlevez pas Ie tuyau
de Fajustage de precision tandis que le moteur
tourne. L'eau dans le moteur peut avoir comme
consequence ta vie raccourcie de moteur.
8. Mettez en marche le moteur (comme decril
dans la section d'op_ration de ce manuel)
et laissez le moteur courir pendant une
pleine minute pour enlever I'exes d'eau de
tondeuse & gazon.
RAMASSE*HERBE (Sl €QUIPt_S)
• Le ramasse*herbe peut _tre arrose, mais il
doit 8tre sec avant d'utiliser.
_ATTENTION: Sous l'utiiisation normale.
Ie materiau de ramasse-herbe est soumis &
t'usure et la deterioration; doric, il devrait ¢tre
v6rifi6 pour assurer qu'il est en accord avec tes
sp6cifications de fabricant.
Tuyau /
Ajus_age
26
Page 63

,AATTENTION: Avant d'effectuer tous Ies
revision et reglages
• Ret&chez la barre de commande et arr6tez le
moteur.
- Assurez-vous que la lame et toutes les
pi6ces mobiles soient arr&t6s completement.
• Debranchez le fil de bougie d'allumage et
posez-le de telle fa£on qu'il ne puisse pas
entrer en contact avec la bougie d'ailumage.
TONDEUSE ._ GAZON
RI_GLER LA HAUTEUR DE COUPE
Voir "REGLER LA HAUTEUR DE COUPE" dans
Ia section d'utitisation de ce manuel
DEFLECTEUR ARRI#RE
Le deflecteur arriere, fixe entre les roues ar-
riere de votre tondeuse &gazon, est utilis6
pour reduire le risque de projection d'objets &
l'arri6re de la tondeuse dans I'espace occupe
par I'operateur lots de la tonte. Si le d6flecteur
arriere est endommage, il devrait 6ire remplace.
DI_FLECTEUR DE D#CHARGE (SI F.QUIPES)
Le d6flecteur de decharge fix_ & rouverture de
decharge de votre tondeuse & gazon est utilise
pour r6duire te risque de projection d'objets &
travers I'ouverture de decharge dans respace
occupe par I'operateur Iors de Ia tonte. Si le de-
ftecteur de decharge est endommage, il devrait
etre remplace.
POUR Rg'GLER LE GUIDON
"2 POSITIONS"
Le guidon de Ia tondeuse & gazon peut 6tre
monte dans une position haute ou basse. Les
trous de montage dans Ie fond du guidon
inf6rieur ne sont pas align6s poursoulever ou
baisser du guidon.
° Enlevez ie guidon superieur et toutes les
pieces qui sont attachees au guidon inferieuro
• Enlevez ies goupiltes en epingle &cheveux
de la goupiIle de montage du support de
guidon inferieur.
° Pressez le guidon inf_rieur pour t'enfever des
goupilles de montage.
,, Renversez le guidon inf6rieur pour soutever
ou baisser du guidon.
• Pressez le guidon inf6rieur et mettez les trous
sur Ies goupiltes de montage sur le support
de guidon.
• Remontez les goupilles en 6pingle & cheveux
sur Ies goupil_es de montage.
• Remontez te guidon sup_.rieur et routes les
pieces auparavant enlevees du guidon Jnf6ri*
eur.
Position _<'_
d'utilisation
Position r_.3
d'utiUsation _
/
, /
, /
//
Goul:
en 6pingle
Goupille de
montage
POSmON 8ASSE
RENVERSEZLEGUtDON \_\
IN.FERIEURPOUR \_
REGLERLA HAUTEUR
"EZ" DE 3 POSITIONS
Le guidon de la tondeuse & gazon ales trois (3)
positions de hauteur _reglez & une hauteur qui
est confortable.
• Entevez le bouton et le bouton de chariot sur
un (1) c6t6 du guidon inferieur.
° Lorsque vous teniez I'ensemble du guidon,
enlevez Ie bouton et le boulon de chariot de
t'autre c616,alignez Ie trou dans le guidon
avec ie trou desir6 clans le support de guidon
et remontez Ie boulon et Ie bouton et serrez &
fond.
• Alignez l'autre c6t_ du guidon avec le m6me
trou de position et fixez aveo le boulon et le
bouton.
Ire ._ Do,Ion
Basse
POSITION HAUTE
/
Support de
rSgtagede
idon
Bouton
27
Page 64

"RAPJDE" DE 3 POSIT_ONS
Le guidon de Ia tondeuse & gazon a Ies trois (3)
positions de hauteur - rSglez & une hauteur qui
est confortable.
• Serrez Ies extremitees du guidon infedeur
I'une vers rautre jusqu'a ce que la pince du
guidon peut §Ire insertee dans t'interieur d'un
des trois trous de reglage d'auteur.
Haute Pince du guidon
Moyenne reglage de
PRESSEZ
B_gse
Support de
guidon
POUR ENLEVER/REMPLACER LA
COURROIE D'ENTRA|NEMENT
MOD#LES ENTRA{NEMENT ,_ ROUE AVANT:
"STANDARD" ou "DUEX BARRE" MODELES:
• Demontez Ie couvercle d'entrafnement.
Poussez en bas sur la poulie de bo_tede
vitesse pour entever Ia courroie,
• Mettez la tondeuse surson c6t& Referez-vous
de manuel du moteur pour le filtre & aft etle car-
burateur soient vers le fond ou vers Iehaut.
• Entevez IaIame.
• Enlevez la courroie de la poulie de moteur
sur le vilebrequin,
o Installez la nouve!le courroie en renversant
les directives ci-dessus,
REMARQUE: Utitisez toujours une courroie
approuvee par le fabricant pour assurer une
adaptation parfaite et une Iongue durabitite.
POUSSEZ
Couvercte
d'entra;nement
PouKie
"Dt2GAGEMENT RAPIDE"
Le guidon supedeur peut 6tre ajuste ,_trois (3)
positions differentes.
I. D_sserrez les deux boutons du guidon assez
pour que ie guidon sup6rieur puisse 6tre
place & Ia position desir_e.
2. Serrez tes deux boutons du guidon sotide-
menL
LEVtERS
VERS LE BAS "':'},
POUR REGLER
LE GUIDON
SUPERIEUR
• ..,\.. ',
Boutons ,, ,
du guidon \\ _\
"AUTO-WALK" ou "VARI-SPEED" MODELES:
• Retirez Ie couvercle et {e guide-courroie.
• Appuyez sur ta poulie en poussant vers le
bas afin de retirer la courroie,
• Mettez la tondeuse sur son c6t& R6ferez-vous
de manuel du moteur pour le filtre &air el le car-
burateur soient vers Iefond ou vers le haut.
• Enlevez la lame et te protecteur de debris,
• Enlevez la courroie de la poulie de moteur du
vilebrequin.
• ]nstattez la nouvelle courroie en renversant
tes directives ci-dessus.
Couvercte
d'entraiaement
POUSSEZ
VERSLEBAS
28
Page 65

MODI_LESAVECLEGUIDEDECOURROIE
MONTAGEDEBOITEDEVITESSE:
• Retirezlecouvercleetteguide-courroie,
- Retireziacourroiesurleguide+courroiemorn
ragedeboitedevitesse.
• Mettezlatondeusesursonc6t&Referez-vous
demanueldumoteurpourlefiltre&airetIeear-
burateursoientverslefondouversiehaut,
• Enlevezlalameetleadaptateurdelame,
• Enlevezlacourroiedelapoulied'adaptateur
delame.
retenue (si #.quipS)du mecanisme du Ievier
interm_diaire de direction.
• Retirer Ie m6canisme du levier interm6diaire
de direction duo h&ssis en commengant par
retirer r6crou hexagonal. Ensuite, retirez ia
courroie du systeme d'entrainement de ia
poulie, les gardes courroies et le m6canisme
du levier interm6diaire de direction,
Poulie Point d'ancrage de
d'entraTnement "X. _c_ble d'entra_nement
• lnstallezIanouvetlecourroieenrenversant
Iesdirectivesci-dessus,
REMARQUE:Utiliseztoujoursunecourroie
approuveeparlefabricantpourassurerune
adaptationparfaiteetuneIonguedurabilit&
Couvercle
d'entra_nemenl
° Mettezlatondeusesursoncat6. R6ferez-vous
de manuel du moteur pourle filtre &air et le car-
burateur soient vers le fond ou vers le haut.
- Utilisez un bloc de boisentre la Iame etleboft{er
de tondeuse pour emp_cher la lame de tourner
quand vous entevez le boulon de lame.
REMARQUE: Protegezvos mains avec des gants
etiou enveloppez la lame dans un tinge epais.
• Enlevez teboulon de lame en Ie tournant dans
le sens contraire des aiguilles d'une montre.
• Retirez la lame, Ies pieces de montage y
_tant apposees (boulon, rondelte de btocage,
ronde{le durcie), radaptateur de lame et le
Adaptateur Cle Logement de ctavet[e du
de tame _...._ _ _-,_,_ v}lebrequin
Rondell / t .--.
frein \_ '.&'qfl_- /_ 1 _C_
de onacier Bord._.._'-"__ r,, _...-_.
tame trempe artiste Vilebrec#in Guidedecourroie
MODI_LES ENTRA[NEMENT A ROUE AR-
RI#RE:
MOD#LES AVEC MI_CANISME DU LEVIER
INTERMF-DIAIRE DE DIRECTION:
• D_branchez le fil de bougie d'aIlumage et
posezqe de telle fagon qu'il ne puisse pas
entrer en contact avec la bougie d'allumage.
° Retirer les vis qui maintiennent en place le
couvercle du mecanisme d'entrafnement, et
retirer le couvercle du ch&ssis de la tondeuse
&gazon.
* Retirer le c&ble d'entra_nement du point
d'ancrage, ensuite detachez il st le ressort de29 tame trempe arri#re Vilebrec
pare-d_,bris. Veui{lez noter que le pare-d_bris
poss_de un onglet qui s'ajuste darts un trou
sur le ch&ssis.
• Retirez la courroie du systeme
d'entra'fnement de la poulie du moteur; debar-
rassez-vous de Iavieille courroie.
• Instatlez Ianouvelte courroie en renversant
les directives ci-dessus.
REMARQUE: Utilisez toujours une courroie
approuv6e par le fabdcant pour assurer une
adaptation parfaite et une Iongue durabilit&
• Le couple de serrage recommand_ est de
35-40 tb-pi.
IMPORTANT: Le boulon de lame est traite & la
chaleur (Cat. 8),
Adaptateur CI_ Logementdeclavettedu
delame._.....,.__ _ _--_._.. vilebrequin
uin Guidede courroie
Page 66

MODI_LES AVEC GUIDE DE COURROIE
MONTAGE DE BO'{TE DE VITESSE:
• Retirez Ie couvercle.
• Retirez le ressort et Ie guide-courroie,
• Retirez ta courroie sur ia poulie de ta boite de
vitesses.
Poulie de t
la boTtede !
vilesses
\
Guide de
Courroie
\
• Incfinez Ia tondeuse a gazon sur le c6t6 avec
le filtre & air et le carburateur vers le haut,
• Enlevez ia lame et Ie adaptateur de lame.
• Enlevez la courroie de ta adaptateur de lame,
- Posez I'adaptateur de lame sur te vitebrequin
de moteur_ Assurez-vous que la ci_ dans
t'adaptateur et le togement de clavette darts
Ie vilebrequin sont alignes; et cette courroie
d'entra_'nement est Ies etiquettes interieures
de Ie guide de courroie.
Adaptateur Cle Logement de clavette du
de Jame \ ,'ilebrequin
Rondelle
frein
° Reinstatlez te protecteur de debris.
° Remeltez la tondeuse & gazon en position
droite.
• lnstatlez la nouvel/e ceinture sur la poulie de
la boite de vitesses.
• Reinstattez te guide-courroie et le ressort.
o R6installezta couvercle.
REMARQUE: Utilisez toujours une courroie
approuvee par le fabricant pour assurer une
adaptation parfaite et une Iongue durabilite,
* inclinez Ia tondeuse a gazon sur le c6t_ avec
Ie fiitre & air et te carburateur vers le haut.
° R6installez le lame et Ie adaptateur de lame.
HI-VAC MODt_LES:
I. D6branchez le fiI de bougie d'allumage et
posez-le de telle fagon qu'iI ne puisse pas
entrer en contact avec la bougie d'allumage.
2. Retirer tes vis qui maintiennent en place Ie
couvercte du mecanisme d'entrainement,
et retirer le couvercle du eh_fissis de la ton-
deuse & gazon.
3. Retirer le c&ble d'entrafnement du point
d'ancrage, ensuite detachez i! et le ressort
de retenue du mecanisme du Ievier interme-
diaire de direction.
18" (45cm) Hi-VAC MODE:LES:
Point d'ancrage de
c&ble
I
d'entrain- / Trou du ch&ssis
ement ,/_ M#canisme
Bassin de " du Eevier
retenue de courroie intermediaire de direction
21" (53cm) HIoVAC MODI_LES:
[ "_-_,_ Point d'ancrage de TroLtdu
i _,,._z_...._c&bie d'entrainement ch_fissis
Ressort de _etenue
Cou[roie
d'entrainement
;t
:L,i: ! !.
Beulon Re
de en acier
lame trempe arriere Vifebrequin Guide de courroie
• Acheminez i'autre bout de la nouvelte cour-
roie du syst_me d'entrainement a travers le
trou du ch&ssis,
PO
d'en-
Courroie Ressort _ i_--_--€"_ du levier
train-
d'entra]n- de ',:----;?' PIVOTER inter-
ement emend:
4,
Faites pivoter le mecanisme du levier inter*
retenue m_diaire de direction
mediaire de direction afin de desserrer la
courroie du systeme d'entrafnement. Retirez
ensuite cetle-ci de la poulie, des gardes
courroies ainsi que du m6canisme du levier
intermediaire de direction,
3O
Page 67

5, Metteztatondeusesurlec6t&Assurez-
vousquelefiltre&airetiecarburateursent
versIehaut.
6. Retirezlavisquimaintienlepare-d6brisen
place.Veuilleznoterquetepare-d6brispos-
sedeunongletquis'ajustedansuntrousur
lech&ssis.
Vilebrequit_ P&tte
Trou
Vis Bord arrlefe Rondeile frein
7. Utilisez un bloc de bois entre Ia lame et le
bottler de tondeuse pour emp6cher la lame de
toumer quand vous enlevez Iebouton de lame.
REMAROUE: Protegez vos mains avec des gants
etiou enve!oppez Ia lame dans un Iinge epais.
8, Enlevez Ie boulon de tame en le toumant dans
Ie sens contraire des aiguilles d'une montre,
9, Retirez Ia tame, Ies pi_ces de montage
y 6tant apposees (boulon, rondelle de
blocage, rondelle durcie), radaptateur de
lame et le pare*debris d'un seuI bloc.
t0. Retirez la courroie du syst_me
d'entrafnement de l'adaptateur de lame
et du pare-d6bris; d_barrassez-vous de la
vieitle courroie,
POUR REMPLACER LA COURROtE
D'ENTRAiNEMENT
I, Inserez la nouvetle courroie du systeme
d'entraTnement darts le dispositif de retenue
de la courroie du pare-debris, Assurez-vous
de bien acheminer la cot_rroie entre lee
gardes courroies et & travers la fente tel que
demontr&
Courroie D_flec_eur
d'er_trainement d_debds
\
de debris
18" (45cm) H6VAC MOD#LES:
enacier
retenue de
courroie
21" (53cm) HPVAC MODI_LES:
Dispositif de tetenue,,,
de ia courroie
Bassir_de
courroie
Courroie
Fente d_bris
2. Acheminez t'autre bout de la nouvelle cour-
role du systeme d'entra;nement & travers Is
trou du ch&ssis.
3. Fixez & nouveau le pare-d6bds au ch&ssis
en utilisant ia vis retiree ant_rieurement. As-
surez-vous que t'onglet du pare_d6bris est
bienen place darts ]a fente du ch&ssis.
4. Poeez la lame sur I'adaptateur de lame en
alignant les deux (2) trous dane Ia lame
avec les pattes darts t'adaptateur.
5. Assurez-vous que te bord ardere de ta lame
(oppose au herd) est vers le haut du moteur.
6. lnstallez le bouton de lame avec Ia rondelle
frein et Ia rondelle en acier trempe dans
I'adaptateur de lame et Ie vilebrequin.
7. Utilisez un bloc de bole entre Ia lame et
Is heftier de tondeuse et serrez ]e bouton
de lame, en le tournant dane le sens des
aiguilles d'une montre.
- Le couple de serrage recommand6 est de
35-40 ]b-pL
IMPORTANT: Le boulon de lame est trait_ &Ia
chaleur (Cat. 8).
8. Redressez la tondeuse debout.
9. Installez la nouvelle courroie du syst_me
d'entrainement dane le m_canisme du levier
intermediaire de direction, ensuite faites
passer celte-ci autour de la poulie, Assurez-
vous que la courroie est &l'interieur des
gardes courroies.
REMARQUE- Le fair de tirer sur ia courroie
du syst_me d'entra_nement (pour rinstaller sur
ia poulie) causera des probI_mes, car rautre
bout de la courroie se degagera du dispositif
de retenue dans le pare-debriS, et viendra en
contact avec le bout de I'adaptateur de tame oQ
la poulie est situee.
10. Fixez & nouveau te ressort de retenue et
le c&ble d'entrainement au m6canisme du
tevier interm_diaire de direction et ensuite
au point d'ancrage.
11. Fixez & nouveau le cot_vercle du mecanisme
d'entraTnement &I'aide des vis retir6es
ant_rieurement.
12. Raccorder Is c&ble de bougie d'allumage
la bougie,
31
D_flecteur de
Parle
Page 68

22PLUS MODi_LES
(ENTRA_NEMENT _, ROUE ARRIt_RE):
1, Enlevez les vis fixant la chicane arriere.
2. Inclinez Ia tondeuse & gazon sur te c6te
avec Ie filtre & air et te carburateur vers ie
haut.
3. Retirez la chicane arriere.
4. Retirez ie boulon & lame, rondeile frein,
rondetle en acier trempe et la tame,
5. Retirez la deflecteur de debris,
6. Retirez la guide de courroie de la bo[te de
vitesses,
7, Retirez ia courroie.
Guide de
courroie de
Ct;icane
d_,bris
RondeIfe
Lam_ I Boulo#
Ronl
POUR REMPLACER LA COURROIE
D'ENTRAJNEMENT
t. tnserez la nouvelle courroie du poulie de la
bo_te de vitesses,
REMARQUE: Utilisez toujours une courroie
approuvee par le fabdcant pour assurer une
adaptation parfaite et une Iongue durabilite.
la bo_te de vitesses
Guid_ de
courraie
& lame
2. Reinstallez Ie guide-courroie de la boite
de vitesses. Assurez-vous que ta nouvelle
courroie d'entrafnement est les 6tiquettes
int_rieures de la guide de courroie.
3. Posez I'adaptateur de lame sur le vilebre-
quin de moteur. Assurez-vous que la cle
dans I'adaptateur et le Iogement de cEavette
dans le vi_ebrequin sont alignes; et cette
courroie d'entratnement est les etiquettes
interieures de Ie guide de courroie.
4. Reinstaflez Ia chicane arriiare.
5, Reinstatlez le protecteur de ddbris,
6. Reinstallezle lame.
7. Remettez Ia tondeuse & gazon en position
droite.
8. Reinstallez [es vis de la chicane arriere.
MOTEUR
CARBURATEUR
La carburateur a ere prereg_6 & !'usine et te
reglage ne devrait pas etre necessaire. Cepen-
dant, les reglages mineurs pourraient 6tre
necessaires pour compenser pour tes differenc-
es d'altitude, de temperature, de carburant et de
charge.
• Le fiItre & air dolt etre monte au carburateur
quand Ie moteur fonctionne_
• Le meilleur reglage de carburateur est obtenu
quand Ie reservoir d'essence est 1/4 ptein.
• Pour utiliser le moteur, ta barre de commande
de pre_sence de i'operateur doit 6Ire tenue
dans ia position d'utitisation. Donc, un assis-
tant sera exige a tenir ta barre de commande
dans le position d'utilisation quand vous faites
te reglage definitif au carburateur.
Referez-vous & ta section de RI_GLAGE de
votre manuel du moteur pour les instructions
supplementaires.
VITESSE DE MOTEUR
La vitesse de moteur a et6 regI6 & I'usine.
N'essayez pas d'augmenter la vitesse du
moteur; ceci pourrait causer des btessures per-
sonneltes. Si vous pensez que Jemoteur tourne
trop rite ou trop lentement, apportez votre
tondeuse & gazon au centre d'entretien autorise
pour faire les reparations et Ies reglages.
COMMANDE DES GAZ
Si c'est necessaire pour rempIacer ou reg_erla
commande des gaz, referez-vous a la section
de RE_GLAGEde votre manuet du moteur.
32
Page 69

Pr_parez votre tondeuse #,gazon pour
I'entreposage & tafin de Ia saison ou si taton-
deuse ne sera pas utilis6e pour une periode de
_ ours ou plus.
ATTENTION: N'entreposez jamais &
t'int_rieur d'un b&timent une tondeuse avec
de I'essence dans le reservoir. Les vapeurs
d'essence en provenance du reservoir
peuvent s'enflammer au contact d'une flamme
decouve4e ou des 6tincetles. Laissez refroidir
le moteur avant de pincer Ia tondeuse darts un
espace clos.
TONDEUSE .& GAZON
Quand la tondeuse a gazon dolt _tre entreposee
pour une certaine periode, nettoyez4a soigneu-
sement, enlevez toutes les saletes, la graisse,
Ies d_bris de feuilte. Entreposez dans un endroit
propre et sec.
• Nettoyez la tondeuse darts sa totalite (Voyez
"NETTOYAGE" darts Ia section d'entrentien
de ce manuel).
o Lubrifiez tel qu'il est precis_ darts la section
d'entrentien de ce manuel
• Assurez-vous que tous Ies ecrous, tes bou-
Ions, les vis et les goupilles soient correcte-
merit fixes. Inspectez Ies parties mobiles
pour des signes de dommage, de casse,
d'usure. Remplacez si n6cessaire.
• Peignez Ies surfaces rouillees et les surfaces
00 la peinture est abim6e; poncez 16g6re-
merit avant de peindre.
GUIDON
Le guidon de votre tondeuse peut 6tre repli6
pour t'entreposage comme montr&
• Poussez t'une vers rautre des extr6mites
inf6rieures du guidon jusqu'& ce qu'il se libere
de son support, &ce moment poussez en
avant Ie guidon par*dessus de la tondeuse.
- Desserrez Ia visserie de montage du guidon
sup6rieur jusqu'& ce que vous puissiez replier
Jeguidon superieur.
IMPORTANT: Quand vous rep]Jezie guidon
pour !'entreposage ou Ie transport, assurez-vous
de Ie replier comme montre ou vous pouvez
avarier te(s) c&ble(s) de contr6{e.
Barre de
de presence
d'op6rateur
REPUEZ
EN AVANT
POUR
ENTRE-
POSAGE
POSITION
D'UTIUSA-
//
Guidon
supedeur
Bouton de
TtON
guidon
\
Guidoninfedeur
GUIDONS DE 2 POSITION OU "AJUSTI_"
Lots du montage du guidon de Ia position
d'entreposage, le guidon infBrieur btoquera
automatiquement en position de tonte.
GUIDONS DE 3 POSITIONS
Lots du montage du guidon de Ia position
d'entreposage, le guidon inf6deur dolt etre blo-
que &la main dans la position de tonte.
"EZ" DE 3 POSITIONS
/
Supportde
regSagede
guidon
"RAPIDE" DE 3 POSITIONS
PRESSEZ
Support de 1//
regtage de
guidon
33
guidon
Page 70

"Dt_GAGEMENT RAPIDE"
Vous pouvez replier votre guidon de tondeuse &
gazon pour l'entreposage.
1. Desserrez les deux (2) leviers de guidon
sur les c6t6s du guidon superieur et pliez te
guidon vers J'arri6re.
2. Faites avencer le tevier d'ajustement de
faille & la tondeuse d'augmenter & la posi-
tion la plus 61evee.
3. Desserrez les deux (2) boutons de guidon
sur des deux c6tes du guidon inf6rieur et
faites pivoter vers I'avant Ie guidon en entier
jusqu'& ce qu'it repose sur ta tondeuse.
• Lorsque vous d6pIiez le guidon apres
I'entreposage, te guidon inf6deur doit 6tre
bloqu6 a la main darts la position d'utilisation.
IMPORTANT: Quand vous repliez le guidon
pour _'entreposage ou le transport, assurez-
vous que vous pJiez Ie guidon comme montre,
ou vous pourriez endommager les c&bles de
commande.
Barre de
de pr_,sence
d'operateur
REPLIEZ
EN AVANT
POUR
ENTRE-
POSAGE
LevJer
d'ajus[emeni
de
SOULEVEZLES
ROUESPOUR
UNECOUPE
BASSE
POSITION
D'UTILISA-
TION
Guidon
supedeur
Levier de
guidon
Jnferieur
Bou_on de
guidon
MOTEUR
SYST'_ME D'ESSENCE
IMPORTANT: li est important de pr6venir,
pendant I'entreposage, Ies d6p6ts de comme
dans ies parties essentielles du syst_me
d'essence teltesque le carburateur, le filtre
&essence, les conduites d'essence, ou le
reservoir d'essence, Les essences contenant
de I'alcoot (ethanol ou m6thanoJ el parfois
appelees gasohoI) peiuvent absorber de
l'humidit6. Ceci conduit & Ia separation des
616mentsdu m6tange et & la formating d'acide
en cas de conservation prolong6e, Uessence
devenue acide peut avarier le syst_me
d'essence pendant la dur6e de t'entreposage.
o Vidangez le reservoir d'essence.
• Demarrez le moteur et laissez-te fonctionner
jusqu'a ee que les conduites d'essence et te
carburateur soient vides.
• N'utilisez jamais de produits speciaux pour
nettoyer Iemoteur ou le carburateur dans le
reservoir d'essence. L'emploi de ces produits
pourrait causer des d6g_,ts permanents,
. Utilisez de ressence frafche I'annee suivanle,
REMARQUE: Les stabilisateurs d'essence
sont une alternative acceptable pour minimfser
Ia formation des dep6ts de gomme pendant Ies
periodes d'entreposage. Ajoutez Ie stabilisateur
dans t'essence darts le reservoir d'essence
ou le bidon d'essence. Respectez le quotient
d'essence/stabilisateur indiqu6 sur Ie flacon
de stabilisateur, Marchez le moteur pendant
au moins 10 minutes apres avoir ajoute Ie
stabitisateur pour permettre le stabiiisateur
d'atteindre le carburateur. Ne vidangez pas le
r6servoir d'essence ou te carburateur si vous
utilisez un stabilisateur d'essence.
HUILE DE MOTEUR
Vidangez I'huile (avec un moteur chaud) et
remplacez avec de i'huile de moteur frafche
(Voir "MOTEUR" clans la section d'entrentien de
ce manuel).
CYLINDRE
• Enlevez la bougie d'allumage,
• Versez 29 mt (une once) d'hui[e par l'orifice
de bougie d'aIlumage dans te cylindre,
• Tirez lentement la poignee de d6marreur
pendant quelques secondes pour repartir
t'huite.
• instatlezune nouvelle bougie d'aIlumage,
BATTER|E (Sl ]_QUIPE)
Debranchez la batterie de _aconnexion de me_
teur et chargez la batterie pendant 48 heures.
34
Page 71

AUTRES
• Ne conservez pas d'essence d'une saison &
rautre.
• Changez votre bidon d'essence s'il com-
mence &rouitter, La rouitle ou les satetes
dans t'essence sont & t'origine de problemes.
° Si possible, entreposez votre tondeuse
I'int6rieur d'un b&timent et couvrez-Ia pour la
proteger des salet6s et de ta poussiere.
• Couvrez votre tondeuse avec une housse
adequate qui ne retient pas rhumidit&
N'utitisez pas de plastique. Le plastique ne
peut pas respirer ce qui permet la conden-
sation et Iaformation de rouille sur votre
tondeuse.
IMPORTANT: Ne couvrezjamais votre
tondeuse quand le moteur et Iesilencieux sont
encore chauds.
_ATrENTION: N>entreposez jamais &
l'int6rieur d'un b&timent une tondeuse avec
de ressence dans Ie r_servoir. Les vapeurs
d'essence en provenance du reservoir
peuvent s'enflammer au contact d'une flamme
decouverte ou des etincettes, Laissez refroidir
le moteur avant de placer la tondeuse dans un
espace clos.
PROBLEME
Le moteur
refuse
de demarrer
Le moteur
manque de
Juissance
Coupe
irr_gull_re
CAUSE
1.
Filtre & air sale
2.
Sans essence.
3.
Essence trop vieilte.
4.
Eau darts ressence,
5.
Fil de bougie d'allumage
debranch&
6,
Mauvaise bougie d'allumage.
7.
Lame desserree ou adaptateur
de tame cass&
8.
Barre de commande rel&ch6e.
9.
Barre de commande
d_fectueuse,
10.
La valve d'essence (si _quipe) est
dans la position de marche OFR
'11.
Batterie faible (si 6quip6).
12.
Connexion de batterie
d6branchee (si _quip_).
!3.
Fusible casse.
1.
L'arri#re du bottler de tondeuse &
gazon ou tame entrafnee dans
rherbe haute,
2.
Trop d'herbe.
3.
Filtre &air sale.
4.
Accumulation d'herbe, de feuilles,
et de debris sous la tondeuse.
5,
Trop d'huile dans le moteur.
6,
Vitesse trop rapide.
1.
Lame usee, tordue ou desserree.
2.
Hauteur des roues inegaIe.
3.
Accumulation d'herbe, de fuilles,
et de debris sous ta tondeuse,
SOLUTION
1, Netloyeziremplacez le filtre & air,
2, Remp]issez reservoir d'essence,
3. Vidangez le r_servoir et remplissez-te
avec de ressence fra;che et propre.
4. Vidangez le reservoir et remplissez-le
avec de Pessence fra;che et propre.
5, Branchez le fil de bougie
d'altumage & la bougie d'a]iumage,
6, Changezta bougie d'ailumage.
7. Serrez le bouton de lame ou
remplacez I'adaptateur de lame.
8. Tenez Ia barre de commande
contre le guidon.
9. Remplacezla barre de
commande.
10, Turnez le valve d'essence
dans Ia position de marche ON.
11. Chargez fa batterie.
12. Branchezla batterie au moteur.
13. Remplacez la fusible.
1. R6gtez la tondeuse &la position haute.
2. Reglez la tondeuse &Ia position haute.
3. Nettoyez ou remplacez te filtre & air,
4. Nettoyez Ie dessous du boi'tier
de la tondeuse & gazon.
5. V_rifiez le niveau d'huile.
6. Baissez la vitesse de marche.
1. Remplacezlatame. Serrez le
boulon de lame,
2, R6gtez fes 4 roues b, la m_me
hauteur.
3, Nettoyez le dessous du bottler
de la tondeuse & gazon.
35
Page 72

PROBL#ME CAUSE
Vibrations t. Lame us_e, tordue ou desserree.
exoessives
2. Vitebrequin tordu.
C_ble de
demarreur
difficite
tirer
Le ramasse-
herbe ne se
remplit pas
(si equip6e)
Diffictte ,_
_ousser
Perle de
commande
ou ralentis
sement de la
vitesse d'en-
trafnement
I. Le frein du volant est serr_ quand
Ia barre de de commande est
re[&chee.
2, Vilebrequin tordu.
3. Adaptateur de lame cass&
4. La _ameentrainee dans rherbe.
1. Hauteur de coupe trop basse,
2. La section de lame qui
soul,re I'herbe est usee.
3. Le ramasse-herbe ne permet
plus Jeassage d'air.
1. L'herbe est trop haute ou la
hauteur des roues est trop basse.
2, Arri_re du boitier de tondeuse
& gazon ou lame entra_nee dans
rherbe haute.
3. Ramasse-herbe trop plein.
4. La hauteur du guidon ne vous
convient pas.
1. Usure de ta courroie.
2. Tirez Ia courroie de fa poutie.
3, Ressort de tension de ia
courroie enlev&
4. Le systeme de commande
d'entrainement "dessert6",
SOLUTION
1. Remplacezla lame. Serrez
le boulon de lame.
2. Contactez un centre de service quatifi&
1. Tenez la barre de commande
eontre te guidon superieur avant
de tirer le c&ble de demarreur.
2, Contactez un centre de service qualifi&
j 3, Changez I'adaptateur de lame,
4. Pour demarrer Iatondeuse
gazon, poussez-la sur une zone
ou _'herbe est d6j& coupee ou
sur un terrain dur et plat.
1. Elevez la hauteur de coupe,
2, Changez la iame,
3. Nettoyez Ie sac de d6charge.
1, l_ievez la hauteur de coupe.
2. E_levezla partie arriere du
boitier de la tondeuse a gazon
(un reglage plus haul),
3. Videzie ramasse-herbe.
4. Reglez le guidon a une hauteur
qui vous convient.
1. Verifieziremplacez ia courroie
d'entrafnement.
2, V_rifiezir_instalIez la courroie
d'entra_'nement.
3. Remptacez le ressort de
tension de la courroie.
4, Ajustez ia commande
d'entra_nement.
i
 Loading...