


Save This Manual for Future Reference
Tame the Great Outdoors
TM
Two-Stage Snow Blower
Operator’s Manual
FOR YOUR SAFETY
READ AND UNDERSTAND THE ENTIRE MANUAL BEFORE OPERATING MACHINE
MODEL NUMBER
YB6270
SERIAL NUMBER
PURCHASE DATE
Both model number and serial
number may be found on the
main label. You should record
both of them in a safe place for
future use.
30255JUS25M100.indd 1 2016/9/2 14:49:13

Introduction 1
Specications 3
Symbols 4
Safety 5
Unpacking the Container 7
Contents Supplied 8
Assembly 9
Know Your Machine 12
Adjustment 15
Operation 17
Maintenance 19
Service 20
Storage 23
Troubleshooting 24
Parts Diagram 26
Parts List 29
TABLE OF CONTENTS
Your new YARDMAX™ snow blower offers quality
construction, and is easy and safe to operate. With
proper use and care, it is designed to give you many years
of dependable service.
Prepare to experience the durability to take on any job
with the ease, portability, and convenience of your new
snow blower!
Discover the YARDMAX Advantage
At YARDMAX, we understand that land ownership
definitely has its privileges, but it also comes with a
great deal of responsibility. When duty calls and you
need to respond, will you have what it takes to tame the
great outdoors?
When looking for outdoor power equipment (OPE) to get
the job done right, at the right price, YARDMAX delivers
the perfect combination of performance and practicality.
YARDMAX has a solution that’s right for you.
MAX Performance, MAX Value, MAX Support —
that’s YARDMAX
Backed by decades of proven manufacturing expertise
Enhanced design features come standard
Engineered for the best user experience
Quality metal parts are used instead of plastic
A robust warranty supports all products
Budget-friendly prices make it practical
Up for the job? YARDMAX is.
√
√
√
√
√
√
1
|
Introduction
30255JUS25M100.indd 1 2016/9/2 14:49:14

This unit is a gasoline engine driven snow blower. It is
perfect for tackling heavy snowfall — easily able to cut
through snow in excess of a foot or more. It is easy and
safe to operate. With proper use and care, it should give
you many years of dependable service.
Carefully read through this entire operator's manual
before using your new unit. Pay attention to all
cautions and warnings.
MODEL AND SERIAL NUMBERS
Record the model and serial number as well as date
and place of purchase for future reference. Have this
information available when ordering parts, optional
accessories and when making technical or warranty
inquiries.
ENGINE MANUAL
The
Engine Manufacturer
is responsible for all enginerelated issues with regards to performance, power rating,
specifications, warranty and service. Please refer to
the
Engine Manufacturer’s
owner/operator’s manual,
packed separately with your unit, for more information.
EMISSION CONTROL SYSTEM
This equipment or its engine may include exhaust and
evaporative emission control system components
required to meet U.S. Environmental Protection Agency
(EPA) and/or California Air Resources Board (CARB)
regulations. Tampering with emission controls and
components by unauthorized personnel may result
in severe fines or penalties. Emission controls and
components can only be adjusted by an authorized
engine manufacturer's service center.
DISCLAIMER
YARDMAX reserves the right to discontinue, change,
and improve its products at any time without notice
or obligation to the purchaser. The descriptions and
specications contained in this manual were in effect at
printing. Equipment described within this manual may be
optional. Some illustrations may not be applicable to your
unit.
ENVIRONMENTAL
Recycle unwanted materials instead of disposing of
them as waste. All tools, hoses, and packaging should
be taken to the local recycling center and disposed of
in an environmentally safe way.
CALIFORNIA PROPOSITION 65 WARNING
Engine exhaust, some of its constituents and certain
product components contain or emit chemicals known to
the state of California to cause cancer and birth defects
or other reproductive harm.
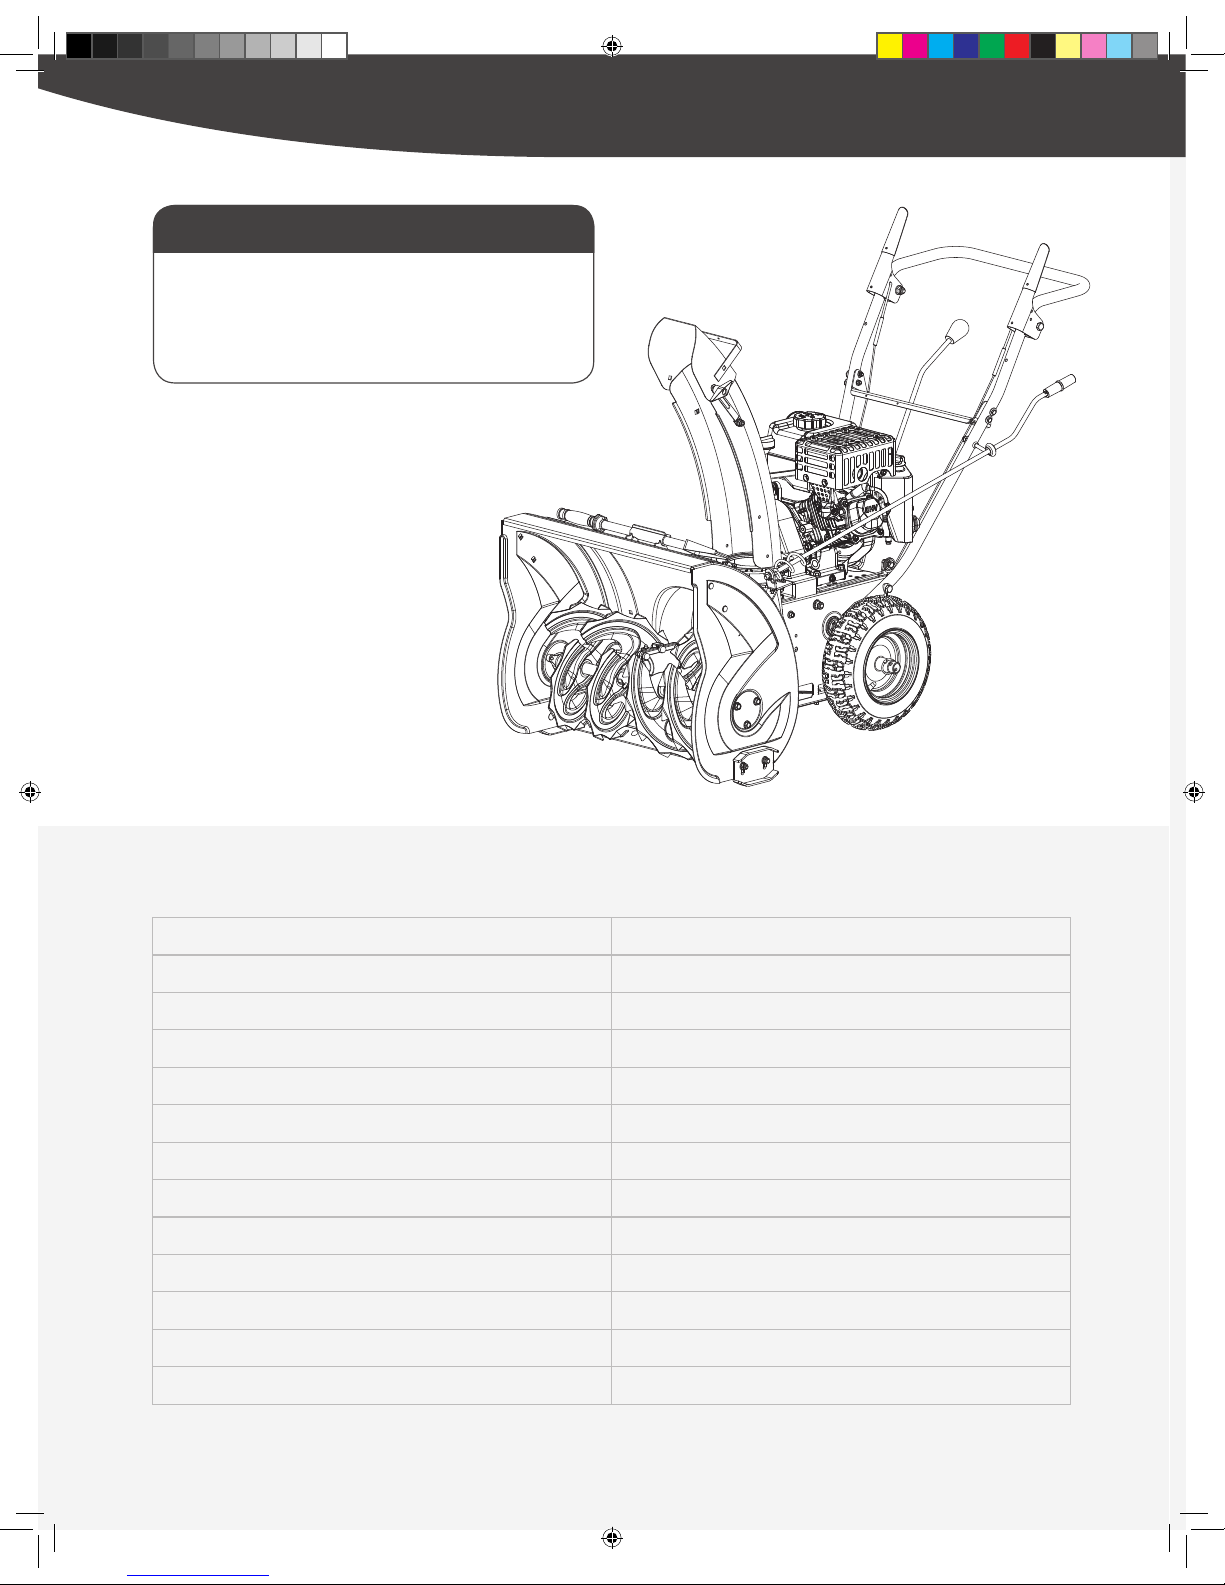
100010616
Serial Number
Model Number
YB6270
Engine Displacement:
Clearing Width:
Intake Height:
Auger Diameter:
Impeller Diameter:
Speed:
Weight:
Made in P.R.C
208 cc
24”
21”
12”
12”
6F+2R
154 lbs
2-stage Snow Thrower
Serial No.:
11~201~10
2015 2016 2017
1 2 3 4 5 6
7 8 9 10 11 12
21~30
Manufacture Date:
05001 3315
2
Two-Stage Snow Blower
»
Operator’s Manual
Introduction
|
30255JUS25M100.indd 2 2016/9/2 14:49:15
SPECIFICATIONS
Model Number YB6270
Clearing Width 24"
Engine LCT
Displacement 208cc
Start Type Electric
Auger Diameter 12"
Impeller Diameter 12"
Chute Control Crank
Chute Type Steel
Intake Depth 21"
Speed 13" x 4"
Forward Speeds
6
Reverse Speeds
2
SUPPORT
Have questions about your YARDMAX equipment?
Call us at 844-YARDMAX, email us at
support@yardmax.com, or contact us via your
favorite social media site.
3
|
Introduction & Specications
30255JUS25M100.indd 3 2016/9/2 14:49:17

SYMBOLS
The rating plate on your machine may show symbols. These represent important information about the product or instructions on its use.
Read these instructions carefully.
Wear eye protection.
Wear hearing protection.
Wear safety footwear.
Keep children and bystanders off and
aw ay.
Stop engine and remove ignition key
prior to leaving the operator’s position.
Only use clean-out tool to clear blockage.
Never use your hands.
Do not remove or tamper with the
protection and safety devices.
No smoking, sparks, or ames.
Do not touch parts that are hot from
operation. Serious burns may result.
Stop engine, remove key, read manual
before making any repairs or adjustments.
Keep hands out of the inlet and discharge
openings while machine is running.
Stay away from rotating augers.
Never direct discharge towards persons
or property.
4
Two-Stage Snow Blower
»
Operator’s Manual
Symbols
|
30255JUS25M100.indd 4 2016/9/2 14:49:18

SAFETY
GENERAL SAFETY RULES
UNDERSTAND YOUR MACHINE
Read this manual and labels afxed to the machine to understand
its limitations and potential hazards.
Be thoroughly familiar with the controls and their proper
operation. Know how to stop the machine and disengage the
controls quickly.
Make sure to read and understand all the instructions and safety
precautions as outlined in the
Engine Manufacturer’s
manual
packed separately with your unit. Do not attempt to operate the
machine until you fully understand how to properly operate and
maintain the engine and how to avoid accidental injuries and/or
property damage.
If the unit is to be used by someone other than original purchaser
or loaned, rented, or sold, always provide this manual and any
needed safety training before operation. The user can prevent
and is responsible for accidents or injuries that may occur to
themselves, other people, and property.
Do not force the machine. Use the correct machine for your
application. The correct machine will do the job more efciently
and safer at the rate it was designed.
PERSONAL SAFETY
Do not permit children to operate this machine at any time.
Keep children, pets, and other people not using the unit away
from the work area. Be alert and shut off unit if anyone enters
work area. Keep children under the watchful care of a responsible
adult.
Do not operate the machine while under the inuence of drugs,
alcohol, or any medication that could affect your ability to use it
properly.
Dress properly. Wear heavy long pants, boots, and gloves. Do not
wear loose clothing, short pants, or jewelry of any kind. Secure
long hair so it is above shoulder level. Keep your hair, clothing,
and gloves away from moving parts. Loose clothes, jewelry, or
long hair can be caught in moving parts.
Protect eyes, face, and head from objects that may be thrown
from the unit. Always wear safety goggles or safety glasses with
side shields when operating.
Wear appropriate hearing protection.
Always keep hands and feet away from all moving parts during
operation. Moving parts can cut or crush body parts.
Always keep hands and feet away from all pinch points.
Do not touch parts that might be hot from operation. Allow parts to
cool before attempting to maintain, adjust, or service.
Stay alert, watch what you are doing, and use common sense
when operating the machine.
Do not overreach. Do not operate the machine while barefoot
or when wearing sandals or similar lightweight footwear. Wear
protective footwear that will protect your feet and improve
your footing on slippery surfaces. Keep proper footing and
balance at all times. This enables better control of the machine in
unexpected situations.
INSPECT YOUR MACHINE
Check your machine before starting it. Keep guards in place and
in working order. Make sure all nuts, bolts, etc., are securely
tightened.
Never operate the machine when it is in need of repair or is in
poor mechanical condition. Replace damaged, missing, or failed
parts before using it. Check for fuel leaks. Keep the machine in
safe working condition.
Do not use the machine if the engine’s switch does not turn it on
or off. Any gasoline powered machine that can’t be controlled
with the engine switch is dangerous and must be replaced.
Regularly check to see that keys and adjusting wrenches are
removed from the machine area before starting it. A wrench or
a key that is left attached to a rotating part of the machine may
result in personal injury.
Avoid accidental starting. Be sure the engine’s switch is off before
transporting the machine or performing any maintenance or
service on the unit. Transporting or performing maintenance or
service on a machine with its switch on invites accidents.
If the machine should start to vibrate abnormally, stop the
engine (motor) and check immediately for the cause. Vibration is
generally a warning sign of trouble.
5
|
Safety
30255JUS25M100.indd 5 2016/9/2 14:49:18

ENGINE SAFETY
This machine is equipped with an internal combustion engine.
Do not use on or near any unimproved, forest covered, or brush
covered land unless the exhaust system is equipped with a spark
arrester meeting applicable local, state, or federal laws.
In the state of California, a spark arrester is required by law.
Other states have similar laws. A spark arrester, if used, must be
maintained in effective working order by the operator.
Never start or run the engine inside a closed area. The exhaust
fumes are dangerous, containing carbon monoxide, an odorless
and deadly gas. Operate this unit only in a well-ventilated
outdoor area.
Do not tamper with the engine to run it at excessive speeds. The
maximum engine speed is preset by the manufacturer and is
within safety limits. See engine manual.
Keep a Class B fire extinguisher on hand when operating this
snow blower in dry areas as a precautionary measure.
FUEL SAFETY
Fuel is highly flammable, and its vapors can explode if ignited.
Take precautions when using to reduce the chance of serious
personal injury.
When refilling or draining the fuel tank, use an approved fuel
storage container while in a clean, well-ventilated outdoor area.
Do not smoke, or allow sparks, open ames, or other sources of
ignition near the area while adding fuel or operating the unit.
Never ll the fuel tank indoors.
Keep grounded conductive objects, such as tools, away from
exposed, live electrical parts and connections to avoid sparking or
arcing. These events could ignite fumes or vapors.
Always stop the engine and allow it to cool before lling the fuel
tank. Never remove the cap of the fuel tank or add fuel while the
engine is running or when the engine is hot. Do not operate the
machine with known leaks in the fuel system.
Loosen the fuel tank cap slowly to relieve any pressure in the tank.
Never overfill the fuel tank. Fill the tank to no more than 1/2”
below the bottom of the ller neck to provide space for expansion
as the heat of the engine can cause fuel to expand.
Replace all fuel tank and container caps securely and wipe up spilled
fuel. Never operate the unit without the fuel cap securely in place.
Avoid creating a source of ignition for spilled fuel. If fuel is spilled,
do not attempt to start the engine but move the machine away
from the area of spillage and avoid creating any source of ignition
until fuel vapors have dissipated.
When fuel is spilled on yourself or your clothes, wash your skin
and change clothes immediately.
Store fuel in containers specifically designed and approved for
this purpose.
Store fuel in a cool, well-ventilated area, safely away from sparks,
open ames, or other sources of ignition.
Never store fuel or a machine with fuel in the tank inside a
building where fumes may reach a spark, open ame, or any other
source of ignition, such as a water heater, furnace, or clothes
dryer. Allow the engine to cool before storing in any enclosure.
Do not operate without wearing adequate winter outer garments.
Do not use the machine on a roof.
Do not run the engine indoors, except when starting the engine
and for transporting the snow thrower in or out of the building.
Open the outside doors; exhaust fumes are dangerous.
Always check overhead and side clearances carefully before
operation. Always be aware of traffic when operating along
streets or curbs.
Thoroughly inspect the area to be worked. Keep the working area
clean and free of toys, doormats, newspapers, sleds, boards, wires
and other foreign objects, which could be tripped over or thrown
by the auger/impeller. Check for weak spots on docks, ramps or
oors.
Plan your snow-throwing pattern to avoid discharge toward
people or areas where property damage can occur.
Do not operate near drop-offs, ditches, or embankments.
Machine can suddenly turn over if a wheel is over the edge of a
cliff or ditch, or if an edge caves in.
Keep all bystanders, children, and pets at least 75 feet (23m)
away. If you are approached, stop the unit immediately.
Use a grounded three-wire extension cord and receptacle for all
machines with electric start engines.
SPECIFIC SAFETY RULES
6
Two-Stage Snow Blower
»
Operator’s Manual
Safety
|
30255JUS25M100.indd 6 2016/9/2 14:49:18
Do not operate on steep slopes. Do not clear snow across the
face of slopes. Keep all movement on slopes slow and gradual. Do
not make sudden changes in speed or direction. Use a slow speed
to avoid stops or shifts on slopes. Avoid starting or stopping
on a slope. Do not park machine on a slope unless absolutely
necessary. When parking on a slope, always block the wheels.
Disengage power to the auger/impeller when transporting or not
in use.
Disengage all control levers and stop engine before you leave the
operating position (behind the handles). Wait until the auger/
impeller comes to a complete stop before unclogging the chute
assembly, making any adjustments, or inspections.
Hand contact with the rotating impeller inside the discharge
chute is the most common cause of injury associated with snow
throwers. Do not unclog chute assembly while engine is running.
Shut off engine and remain behind handles until all moving parts
have stopped before unclogging. Never put your hand in the
discharge or collector openings. Always use the clean-out tool
provided to unclog the discharge opening.
Check clutch and brake operation frequently. Adjust and service
as required. All motion of drive wheels and auger/impeller must
stop quickly when control levers are released.
Let engine and machine adjust to outdoor temperature before
starting to clear snow.
Stay alert for hidden hazards or trafc.
Do not overload machine capacity by attempting to clear snow at
too fast of a rate.
Do not throw snow any higher than necessary.
Adjust auger housing height to clear gravel or crushed rock
surfaces. Exercise extreme caution when operating.
Exercise caution to avoid slipping or falling, especially when
operating in reverse. Never operate machine at high transport
speeds on slippery surfaces. Always look down and behind before
and while backing.
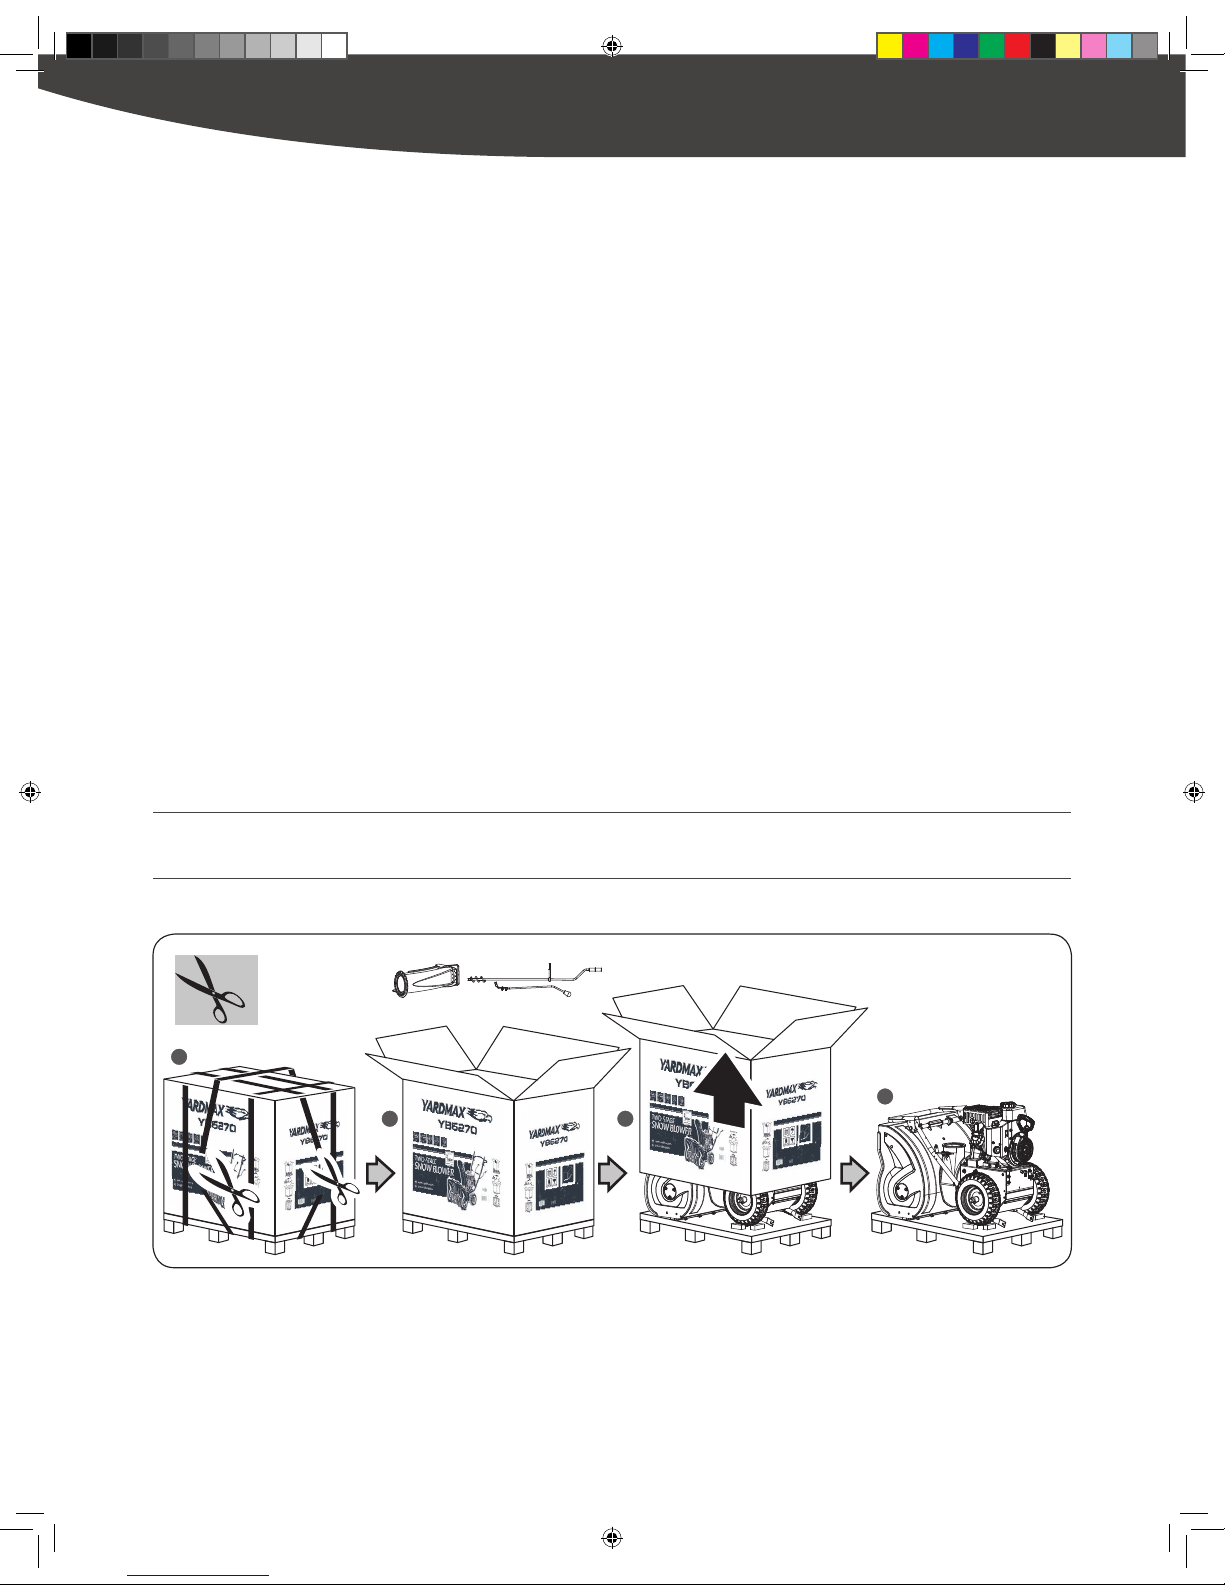
Open the top of box and remove all the loosen parts. Lift off the carton and dispose of properly. (See
Figure 1
)
UNPACKING THE CONTAINER
Figure 1
1
2 3
4
7
|
Safety & Unpacking The Container
30255JUS25M100.indd 7 2016/9/2 14:49:19

1. Main Machine
2. Discharge Chute
3. Chute Crank Flange
4. Handlebars
5. Control Panel
6. Skid Shoes
7. Shift Rod
8. Directional Chute Control
9. Operator’s Manual & Engine Manual
10. Tools for Spark Plug Assembly
11. Plastic Skid Shoes (Optional)
12. Drift Cutters (Optional)
13. Hardware Kit, Including:
CONTENTS SUPPLIED
Your YARDMAX snow blower comes partially assembled and contains the following:
REPLACEMENT PARTS
M10 X 40 X 2
1
M6 X 40 X 4
2
M6 X 30 X 1
3
M6 X 30 X 6
4
X 3
M8 X 1
5
X 1
M8x25 X 2
6
M8x20 X 2
X 2
7
X 2
6 X 37 X 2
8
Handware Kit
13
OPTIONAL
11
10
OPTIONAL
12
7
8
6
5
2
4
3
1
9
TOUCH-UP PAINT
Orange X 1
9
Light Gray X 1
8
Two-Stage Snow Blower
»
Operator’s Manual
Contents Supplied
|
30255JUS25M100.indd 8 2016/9/2 14:49:21
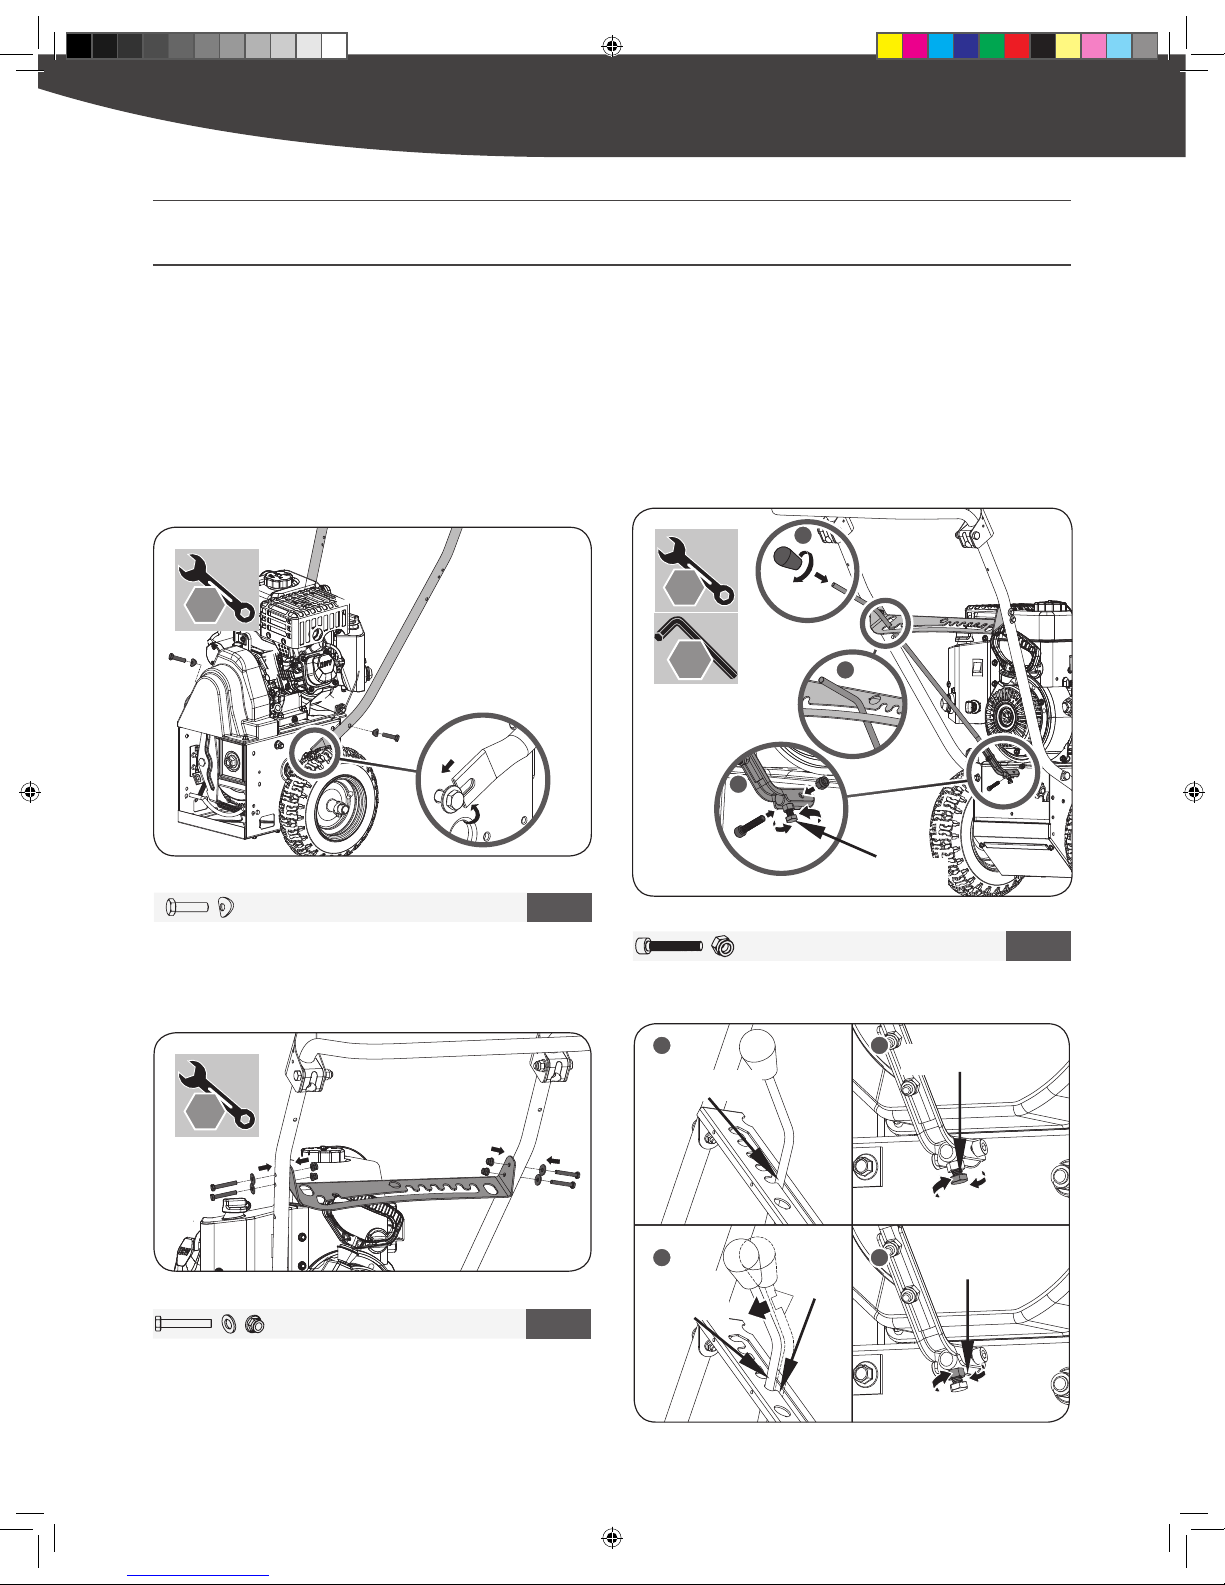
ASSEMBLY
1.
1.
2.
3.
2.
Loosen the two bolts on the sides of the transmission housing.
Slide the handle slots in-between the transmission and the
washer. Finger tighten the bolts to hold the handle in place.
Align the holes in the handle with the upper holes on both
sides of the transmission housing. Insert the bolts and curved
washers and nger tighten to hold in place. (See
Figure 2
)
1.
2.
3.
This snow blower was partially assembled at the factory. To assemble your machine follow the below instructions.
Figure 2
M10 X 40 X 2
1
M6 X 40 X 4
2
M6 X 30 X 1
3
Secure control panel to the handlebars with screws, washers
and nuts until they are nger tight.
Remove the knob to slide the shift lever through the slot in
the control panel.
The adjusting bolt will need to be loosen to install shift arm (See
Figure 4a
#2). Secure shift lever to the shift arm with screw and nut.
Reattach the knob.
Once control panel is installed. Securely tighten lower handle
and control panel bolts.
Figure 3
HANDLEBARS
CONTROL PANEL
SPEED SHIFT LINKAGE
Figure 4a
Figure 4b
10
mm
18
mm
16
mm
30
mm
5
mm
16
mm
30
mm
21
43
Jam Nut
Adjusting Bolt
Neutral Position
Drive Gear
Position
Neutral
Position
4. Slowly tighten the adjusting bolt until the shift lever has tension with
a spring action when shifting from Neutral to a Drive Gear position.
10
mm
18
mm
16
mm
30
mm
X 2
Adjusting Bolt
1
2
3
9
|
Assembly
30255JUS25M100.indd 9 2016/9/2 14:49:23
 Loading...