

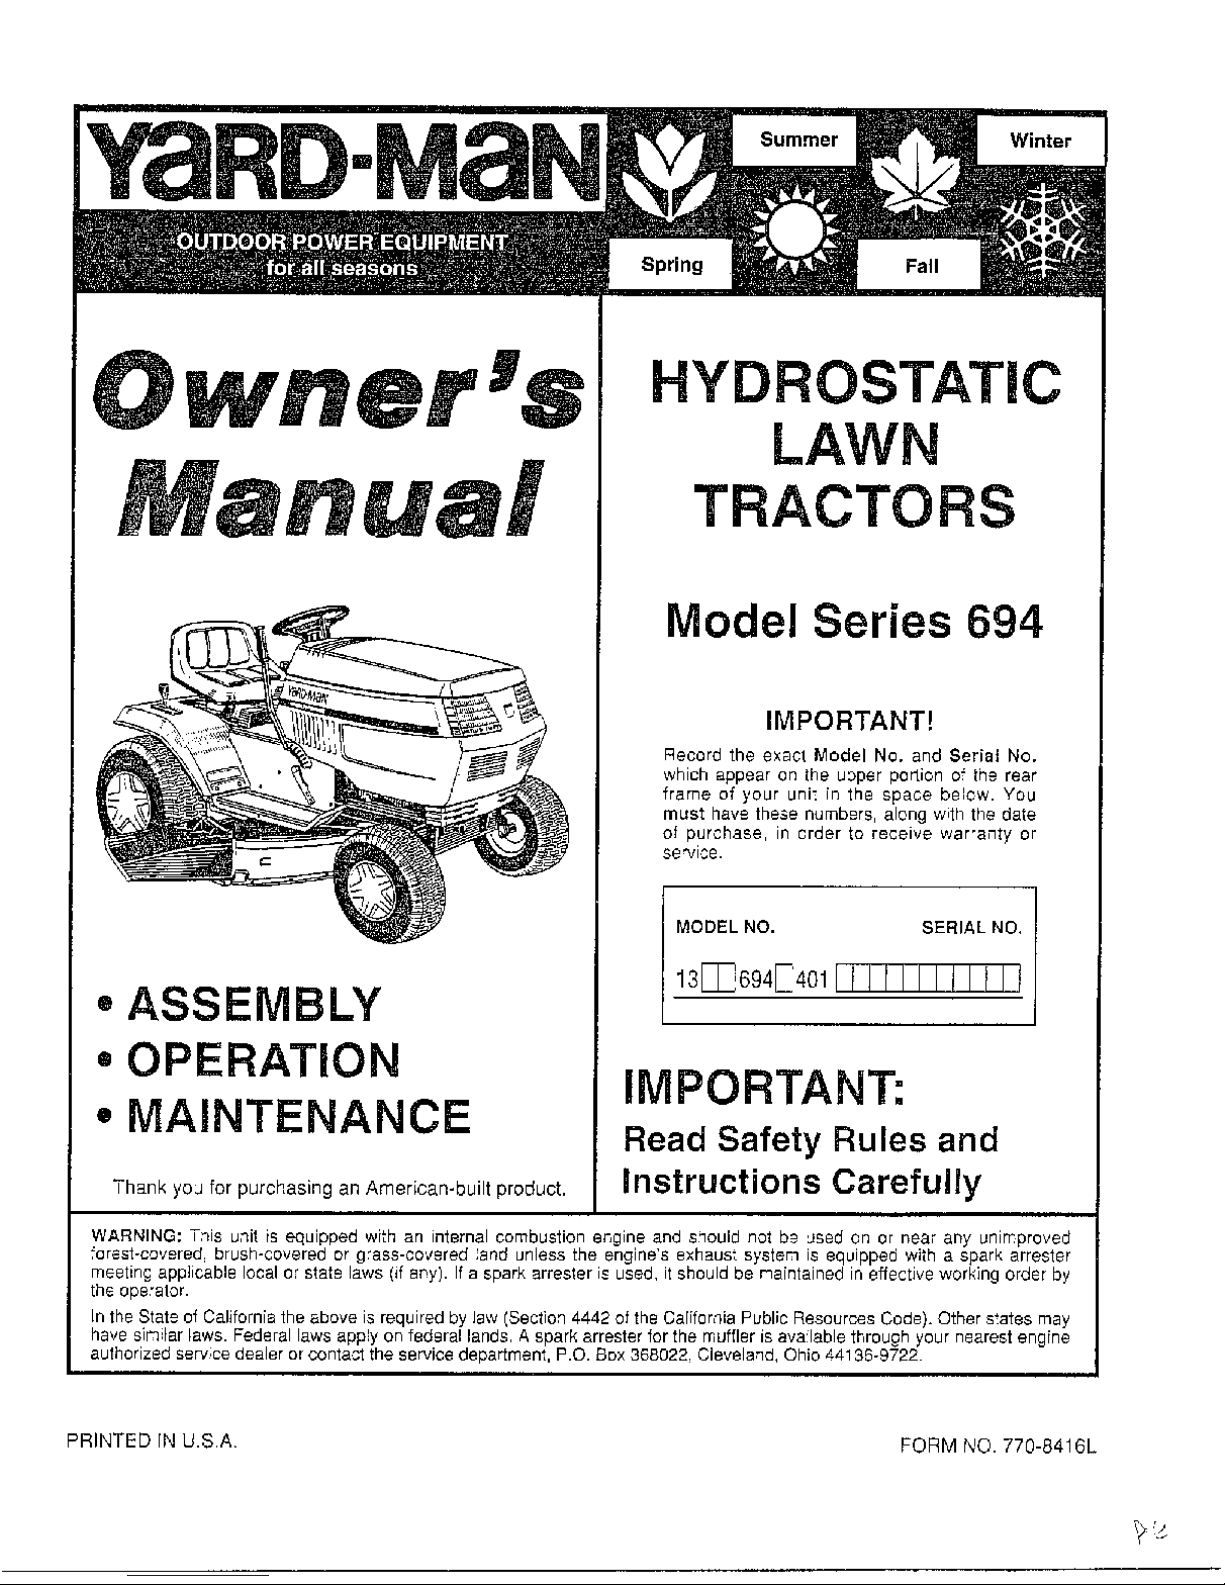
Yard-Man 136X694G401, 1363694H401, 1362694H401 Owner's Manual
Summer
• ASSEMBLY
• OPERATION
• MAINTENANCE
-hank yoJ for purchas=ng an Amer_c&n-bu_lt proSuct.
HYDROSTATIC
LAWN
TRACTORS
Model Series 694
IMPORTANT!
Record the exact Model No. and $eriaJ No.
which appear on the upper portion of the rear
frame of your uni_ in the space below. YOU
must have these nurnb£rs, along wi_h the date
of purchase, in crder to receive war'anty or
3e'vlce.
MODEL NO. SERIAL NO,
13[_694E4011r I t I I I I I I I F
IMPORTANT:
Read Safety Rules and
Instructions Carefully
WARNING: T_is unil is equipped with an internal combustion engine and should not be used on or near any unreproved
_or_s_-cov_red brush-covered or g:ass-co_'_red ;arid unless the engine's exhaust system is equipped with a spark arres_er
meetin§ eqpIicable local or state laws (if a_y). If a spark arrester i_ used, it should be maintained in effective working ord6r by
the operator.
In the Stat_ ot Calgornla the above is required by Jaw (Section 4442 of the CaIifo mia Public Resources Code). Other states may
have sgqilar laws. Federal laws eqply on fedgral lands¸ A spark attester lor the muffler is ava!lable through your neareM engine
authorized s_rvice dealer or con_a_ the ssrvice departmenh I=.O. Box 368022 Cievela'qd, Ohio z-41gs-gT22
PRINTED [N U.SA FORM NO. 770-8416L
llVlPORTANT SAFEOPE...,O.P..CT,C S
_ T'41SSYMBOLPOINTSOUT IMPORTANTSAFETYINSTRUCTIONSWHICH, IFNOTFOLLOWED,COULDENDANGERTHF PERSON-
AL SAFETYAND/OR PROPERTYOF YOURSELFAND OTHERS READ AND FOLLOWALL INSTRUCTIONS IN THIS MANUAL
BEFOREATI EMPTINGTO OPERATEYOURUNIT.WHEN YOU SEETHIS SYMBOL-- _ HED I'r8 WARNING.
Your I_wn mower was bail! to be operated a¢cordingto the rolesfor safe operation in this manua. As
This lawn mower is capable el amputetl_R handsand feet and throwing objects. FoflureIo observe the
DANGER: wtta anytype of pDwer equipment, carelessness or error Ollthe part of the operatorcan result III Inlary.
IoRowingsafety inslruclions_ould result M seriousinjuryor dealh.
_Lf 6_LEOAL_EP_EBAIJ_[
•RBad, understand, and follow all iTlstructien_ ir_the manu_l and
O_ the machine before starting Keep this manual in a safe
i_lae_for tutura _nd regular reference and for ordering replace_
m_M pa_s,
2. Only allow responsible individuals famigar with the instructions
fo op_=ratethe machin_ KnowcnntrDIs and how to stop the
machine quickly.
3. Do not hJr hands o[ teal u_der cuffing deck or n_ar rotstin D
parts¸
d. E ea: h_ area ct objac s such as rocks, eye, wry, e c,which
CObIb be picked ep and _hrov/n bE th_= blade. A small object
may haw been overlooked and could Pe accident;gly thrown by
the n:awer in any direcbon and cause iniury to you or a
bysla_dsr. TO help avoid a thrown ohjecfs in)ury, ke_p
chbbf_e, bystanders and helpers al least 75 Feet f:om the
mower while it !s in operation Always wear safety glasses or
s_taty goggles during operation or while performing an
the operator may be struck or paged from the unit, which
could result in serious injury.
20. Disengage all attachment _lofches, thoroughly depress the
brake pedal¸ end shift into neutral before attempting to start
engine¸
21 Your mowaT is designed to out normal resid_ofial grass of a
height no more than tg '¸. Do not aftempt to mow through
unusually tag, dry grass (eg. pasture) or piles of dry leaves
DebNs may build up on the mowal deck or contact the engine
exhaust presengnga potentia:fire hazard
_]1. __LDPEOPERATI_
Slopes are a major factor related to loss of control and tip-over
acaidems which san result in severe injury or death All s!opes
require extra caution liege cannel back up thesiope or if you feel
ungasy on "Cdo not mow it
Foryuur safety, use the slopegaug_includedaspartofthis manu_l
to measure slopes before operating this uni_ an a sloped or fii[ly
5 Be sJre the area is c ear of other people before mowing Stop
6 Never carry p_ssengers
7 Cisengage blade(s) before shining into reverseand hacking up
8 Be aware ol the mower andattacnment discbergedireation and
do not point it at anyon9 De not one,ate the mower witl_out
g Slow down befo'eturning Operate the machine smoothly
lg Never leave a ru_qing machine unattenaed Always turn off
in neutral, set dark brake stop
12 Stop engna and wait until blade(s) comes to a ;tinplate stop
before (_) removin0 grass catcher or unclogging chute, or (h)
13 Mow o_ly in daylight or good arti ieial light
14 DO not oporafe the machine while under the influence of
16 Use 9xtra care when loading or un coding the machine into a
trailer or truck¸ This unit should nol de driven up or down a
ramp or_o a trailer or truck urldor FOWeT, bee,-use the uoi_
17 Never make a cutting height adjustment while engine is
18 W_ar sturdy, rough-soled work shoes and close-fitting slacks
ann s_irts. Do not w_ar legs.= titl!ng clothes Or jewelry. They
can b=_caught in moving darts Ne_,er operafE a unit !n bare
feat. sandals, or sneaker&
rines, wires, bridges or low hanging tree branches, before
entering or leering bugPiogs or in a'_y other £gualion where
DO:
Mow up and down slopeS, not across
Removeobstacles such as rocks, limbs, eta.
Watch for holes, ruts or barrps Uneventerrain could overturqtba
machine. Ta]l grassca_ hideobstacles.
Use slow speed Choose _ Jowenough gear so :hat you wiLl pot
have to stop or shi_ while on the slope Alwzys k==epmachine in
gent when gol!g down sropes to take advantage of engine braking
actia_
Follow [he manufacturer's reconbme_,daPonsfor wheel weights or
Useextracarewth grasscatchersor utherat_achmen!sThesecar
Keep all mov_mect on the slopes slo_] and hradaah Do not make
sudd-=n changes in sp_ad or direction, R_pid engagement or brak-
:no could cause the lrenl of the maeMna to lift and rapidly fgg OVer
Mad starting or stopping on a slope. If tires lose traction, disen-
gagethe blade(s) _,ndproceed slowly Mraight down the slope.
NONOT:
Do nat turn on slopes unless neca£s_ry; ibel turn slowly end
Do not mow near grog-oNe, ddebos or emhankmentsThe mower
could suddenly _urn eVel if a wheel is over the edge Of a Cliff or
De nol mow on wet grass•ReducedtracCal could causesliding
DOnot fry to stabiliz_ the machine by puftirg your foot on the
ground.
Da col t)s8 grass ca[c_e£ on _aeg eJopaa,
Tragie ae_id_n_so_n eeeur if _heoberaie_
enu_ OF_hilb_an_Chbd_ee,tie often a_ac_ad io _hem,tcbine and
_h_m_w_ngaatM_y_Never assuma _hatabildren wig remain where
gou las_sa_ _b_ll_
\
1. Keep children out of the mowing area and in watchte[ care of
anadult otherthanthe operator.
2, Be alert and turn machJneoff it children enter the _.rca.
3, Before and when backing, teok behind at_dgown fo_small chg-
dren.
4. Never carrychildren, They may fall off and be seriously injured
or interfere with the safe machine operation
5. Never allow childrenunder 14 years old to operate the machine.
Children 14 years and over should only operate machine under
closep_rentelsupervisionandproper instruoUon.
6, Use extra care when approaching blind corners, shrubs, frees
or other objects that may obscureyour vision of a child or
otherhazard
7. Remove key when machine is unattended to prevent
unauthorized operation
' Use extreme care in handling gasoline and alger fuels They
are extremelyflammable and the vapors are explosi_,e.
a. Useonlyanagproqedcoetein_r.
b. Never remove fuel cad or add fuel with the engine runrkng
Allow engin_ to cool at leasttwo minutes before refueling
c. Replace fuel cap securely and wipe off any spilled fuel
before starting _he engine as it may cause a fire or
d Extinguish _.11cigarettes, cigars, pipes and other sources of
igstficn
e. Never /ellJel the r£asglne indoors because feel vapors will
aceurnulsta in the area¸
t, Never store the fuel conteiner or r£achlr)e in_id_ w_ere there
space g_=ster or furrlac8
2 Never run a machine inside _ closed area
3 To rMeca fire hazard keep the machinefr@e of grass, leaves or
other debris guild-up. Clean up oil or fuel spillage. Allow
rr ach[r e tc cool at least 5 _nigetes bete'e etorstg
and ag moving parts have stopped, Disconnect the spark plu#
wire, and kee_ the wire away from the spark plug to prevent
aceidentarstarting.
OWNER'S
SAFETYLABEL
5. Check the blade and engine mounting bolts at lreq,Jent
intervals for proper tightness. Also, v)suagy inspect blade for
(;amage (e.g,, excessive wear, bend cracked), Replace with
blade which rncets Driginal equipment specifications.
6, Keep all nuts, bolts and screws tight to he gur_ the equipment
I_ in saf_ working condition.
7. Never tamper with safety devices. Obeck their proper ogerahon
regulatty Use ag guards as Instructed In this manual.
& ANer striking _ foreign object, stop the engine remove the wire
from the spark plug and thoroughly inspect tee mower for any
d_rnape, R_paN the damag_ before restarNng a_d operating the
mower,
g Gr_es ceteger components are subject to wear, d_mage and
deterioraPon, which courd expose moving parts or _l!ow
objects to be thrown¸ For your safety protection, frequently
cbcck components and replace with marlufa¢_urer's
recommended parts when necessary.
10 Mower glades eresberpandean cut Wrap the hlabeJsjor
w_ar gloves and us=_extra caLgion whee servicing blade(s),
11. Check brake operation frequsntly, Agiust and service as
required.
12. M_ffJer, engine and belt guards b_cor_e hot budng operation
13 DOnot change the engine governor settings or overspeeb the
14 Observe proper disposal laws and regulst[ons Improper dis-
posalofflJids and materials can harm the envi/onm_st and the
ecology
e Prior to disposal¸ dst_rmlne the groper method to disdose
Reeye;ing centers are established to prop_=r]ydispose of
materials in an enviro£mentJly safe lashion.
b Use proper containers when draining R_ids Bc not use
food or be,/erage containers thai may mislead som£one
c DONOT pour oil or other fluids into the ground, down a
drain or rdo a stream, pond lake or other body el water
Obse"ve Environmental Protection Agency regu;afions
when disposing of oil, fuel, coolant, brake fluid, filters,
hot'aries,tires and other harrltel wzste.
WARNING- rouNRE$PON$1 ILITY
R_strist the use of this per,or maehige to persons who read,
unKerstaud and feltow the warnings and inst uetiona in this
UNPACKING
6,
TO REMOVE UNIT FROM CRATE
1. Remove arl screws from the top of the crate using
a 1/4" hex need socket or a fiat blade screwdriver,
2. To remove ends, grasp !op board on the end, and
pull towards you in a downward motion
3. Set panel aside to avoid tire punctures.
4. Repeat procedure for each side of the crate.
5. Remove and discard plaslic bag which covers
unit
7,
8.
Loose parts (tray include the owner's guide,
steering wheel steering wheel insert, battery
fluid, chute deflector optonal mulching kit, etc.)
are on the seat £nd wrapped in p]£stic, Carefully
cut and remove the plastic wrap. Remove rouse
parts from the seat.
Make certain brake is released. Raise the deck,
use the rellef valve and push the unit off the skid,
If your unit has a two-piece steering shaft the
upper steering shaft is tied to the steering wheel
for shipping. Cut and remove the cable tie,
ASSEMBLY INSTRUCTIONS
This owner's manual covers several models of
lawn tractors. Follow only those instructions
which pertain to your model lawn tractor.
BATTERY INFORMATION
_ WARNING
A. Battery acid must be handled with great care as
contact with it can burn and blister the skin. It is also
advisable to wear protective clothiog (goggles, rub-
ber gloves and apron) when working with it.*
B. Should battery acid accidentally ap]atter into the
eyes or onto the face, rinse the affected area
immediately wfth dean cold water, If there is any
further discomtod, seek prompt medical attenlion.
C. If acid spills on clothing, first dilute it with clean
water, then neutralize with a solution of ammonia/
water or baking sod&/water.
D, Since battery acid is corrosive do net pour it into
any sink or drain. Before d!scarding empty elec-
trolyte containers, rinse them wlth a neutralizing
solution,
E, NEVER connect or disconnect charger clips _obat-
tery while charger is turned on as it can cause
sparks.
F. Keep all lighted materials (clgarettes, matches,
lighters) away from the battery as the hydrogen
gas generated during charging can be com-
bustible.
G. AS a further precaution on]y charge the batIery in
a wellwentilated area.
*Always sbfe]d eyes, protect skin and clothing
when working near batteries.
DANGER
Battery contains sulfuric acid. Refer to warning
above. Antidote: EXTERNALmFlush with wafer.
INTERNALmDrink large quantities of water or
milk¸ Follow with milk of magnesia, be£ten eggs or
vegetable oil. Call physician immediately, EYES:
Flush with coo! water for at least 15 minutes, then
get prompt medlcal attanbon.
Since batteries produce explosive gases, keep
all lighted materials (cigarettes, lighters,
matches, etc.) away, Be sure to charge battery
only in welhventiIated areas. Make oedain venting
path of battery (drain tube) is always open,
KEEP BATTERIES
OUT OF THE REACH OF CHILDREN!
iMPORTANT: After assembly, service engine
with gasoline, and check oil level as instructed
in the separate engine manual packed with
your unit.
NOTE; Reference to right or left hand side of the
unit is observed from the driver's seat, facing for-
ward.
TGOLS REQUIRED FOR ASSEMBLY
(1) "U4"socket wrench or flat blade screwdriver
(1) 112"wrench or socket wrench
(1) 9tt 6" wrench or socket wrench
(2) 7/16" wrenches or socket wrenches
ACTIVATINGANDCHARGINGTHEBATTERY
Do not activate battery (fill with battery acid) until
battery is actually placed in service. Be certain to
read previous warnings before actrvating the
battery.
t. Pivot _he seat forward. Unhook Ihe strap which
secures the battery (hook is on rear flame, under
fender). Disconnect the positive cable from the
positive terminal. Save the hardware for
reassembly.
2 Remove the battery from the lawn tractor, payiog
a_ention to how the battery is placed in the unit,
and how the drain tube (attached 1othe battery) is
routed.
3 Activate the battery as instructed in the "Quick
Start" brochure incl,,dad with the battery fluid.
Read instructions carefully.
NOTE; You can continue assembling the lawn tractor
white battery is standing for 30 raPTures (after tilting
with acid), and later whJleyou are charging the batte'y.
IMPORTANT: To obtain the maximum life from
your battery, It MUST BE CHARGED prior to initial
use,
HARGE THE B ERY after the 30 minute stand
log period Use a 12-voff automotive type battery
charger to charge the battery at 6 AMPS for one hour
before installation.
NOTE', tf yoL_charge the battery at a lower AMP rat_,
use a hydrometer to make sure the battery is
completely charged, The hydrometer should read
1.260 minimum. DO NOT CHARGE A T MORE THAN
6AMPS
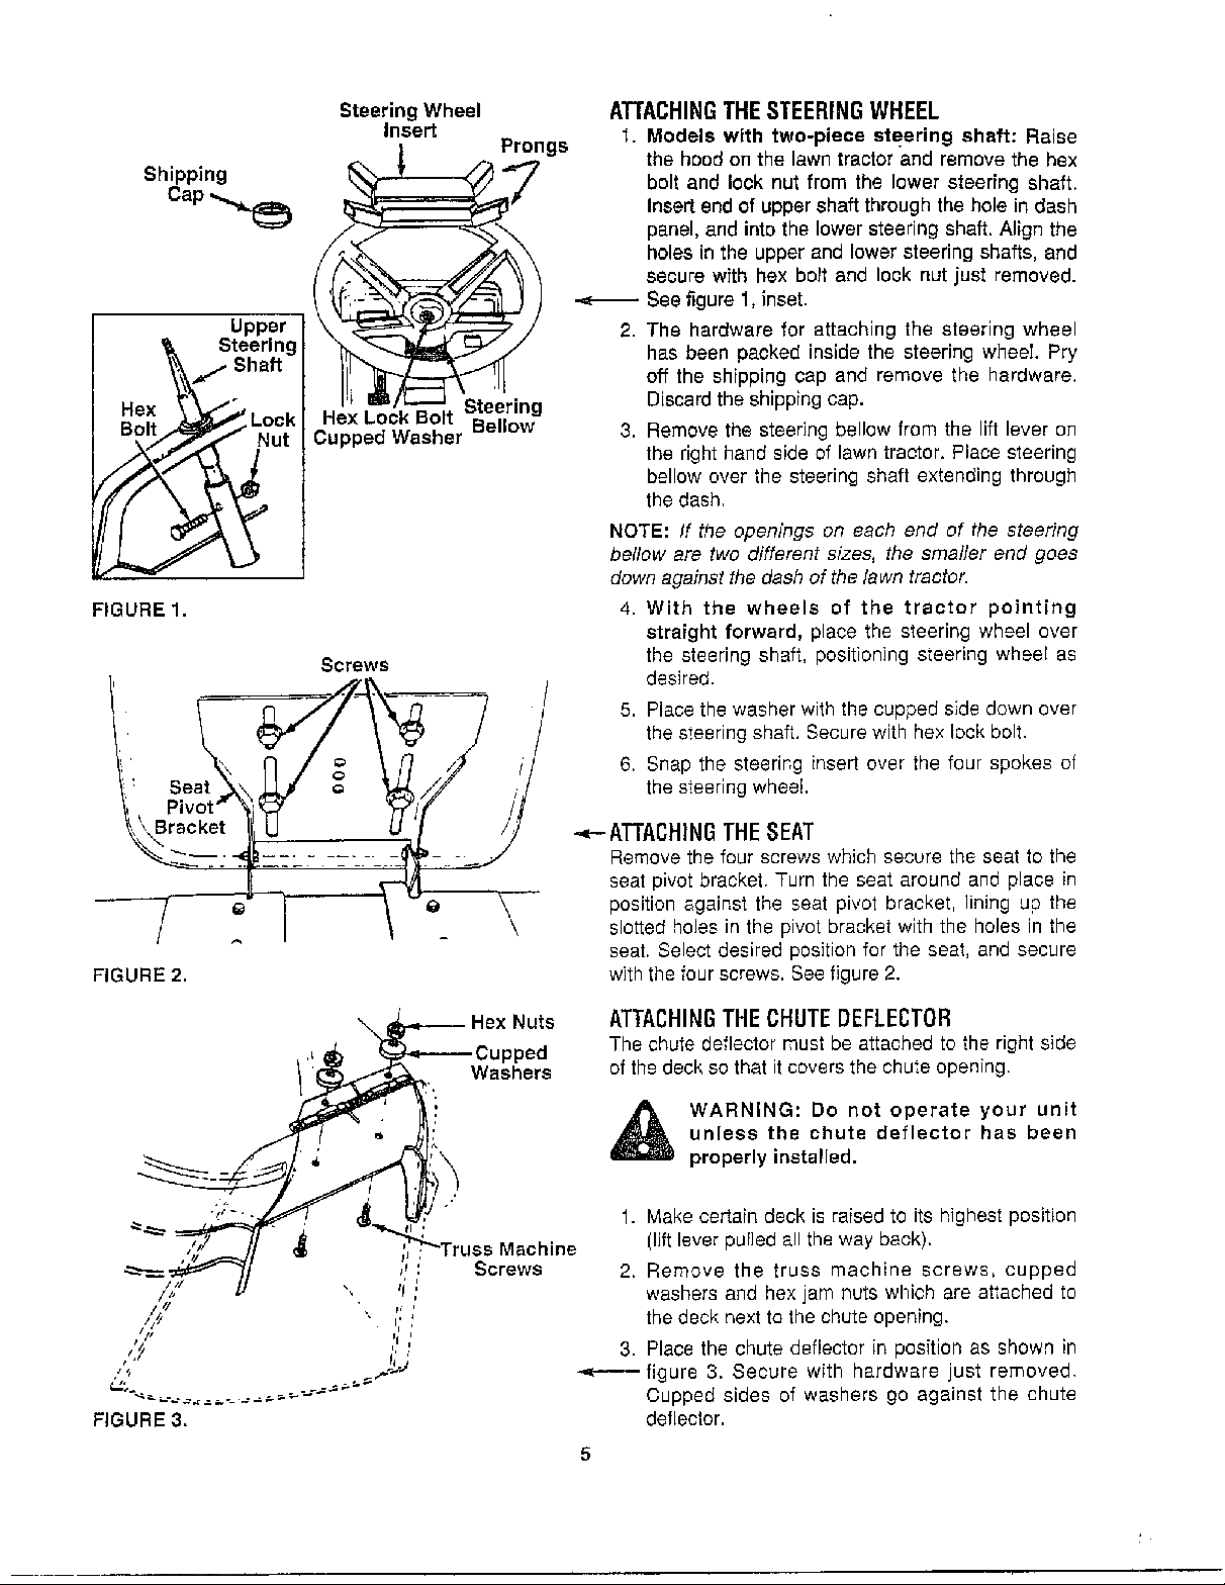
Shipping
Steering Wheel
Insert
Prongs
Upper
Re;(
Steering
Hex Lock Bolt Bellow
Cupped Washer
FIGURE 1.
Screws
_vot _ /
FIGURE 2.
ATTACHING THE STEERING WHEEL
t. Models with two-piece steering shaft: Raise
the hood on the lawn tractor and remove the hex
bolt and lock nut from the lower steering shaft.
Insert end of upper shaft through the hole in dash
psnel, and into the lower steering shaft. Align the
holes in the upper and lower steering shafts, and
secure with hex bolt and lock nut just removed.
See _gure 1, inset•
2. The hardware for attaching the steering wheel
has been packed inside the steering wheek Pry
off the shipping cap and remove the hardware,
Discard the shipping cap.
3. Remove the steering bellow from the lift lever on
the right hand side of lawn tractor. Place s_eering
bellow over the steering shaft extending through
the dash
NOTE: If the openings on each end of the steering
bellow are two different sizes, the smaller end goes
down against the dash of the lawn tractor•
4. With the wheels of the tractor pointing
straight forward, place the steering wheel over
the steering shaft, positioning s_eedng wheel as
desired.
5. Place the washer with the cup#ed side down over
the steering shaft, Secure with hex lock belt.
6. Snap the steering inseri over the four spokes of
the s_eering wheel
-..--ATTACHING THE SEAT
Remove the four screws which secure the seat to the
seat pivot bracket Turn the seat around and place in
position sgainst the seat pivot bracket, lining up the
slotted holes in the pivot bracket with the holes in the
seat. Select desired position for the seat, and secure
with the four screws. See figure 2.
3upped
Washers
ATTACHING THE CHUTE DEFLECTOR
The chute deflector must be attached to the right side
of th£ deck so that it covers the chute opening
WARNING: Do not operate your unit
unless the chute deflector has been
properly installed.
_chine
_F: Screws
FIGURE 3,
1. Make certain deck is raised to its highest position
(lift lever pul]ed all the way back).
2. Remove the truss machine screws, cupped
washers and hex jam nuts which are attached to
the deck next t{3 the chute opening,
3. Place the chute deflector in position as shown in
figure 3. Secure with hardware just removed
Cupped sides of washers go against the chute
deflector.
 Loading...