

Page 1

Operator’s Manual
Electric Trimmer
Model
MTDA13P
English
IMPORTANT: READ SAFETY RULES
AND INSTRUCTIONS CAREFULLY
P/N 6096-202A09 © 2005
PRINTED IN CHINA
Page 2

TABLE OF CONTENTS
Warranty Statement Page 1
Rules for Safe Operation Pages 2-6
Assembly Instructions Page 7
Adjustment Instructions Pages 8-9
Operating Instructions Page 9-10
Maintenance Instructions Pages 11-13
Specifications Page 13
Parts List Page 14
Notes Page 15
Manufacturer’s Limited Warranty Page 16
WARRANTY STATEMENT
TWO YEAR LIMITED WARRANTY ON YARD MACHINES GRASS TRIMMER
For two years from the date of purchase, when this grass trimmer is used and maintained according
to the operator’s manual, Yard Machines will repair any defect in material for workmanship free of
charge.
If this grass trimmer is used for commercial or rental purposes, this warranty applies for only 90 days
from the date of purchase.
WARRANTY SERVICE IS AVAILABLE BY RETURNING THIS GRASS TRIMMER TO THE NEAREST
MTD REPAIR DEALER.
This warraanty gives you specific legal rights, and you may also have other rights which vary from
state to state.
Page 3
RULES FOR SAFE OPERATION
The purpose of safety symbols is to attract your atten
tion to possible dangers. The safety symbols, and their
explanations, deserve your careful attention and understanding. The safety warnings do not by themselves
eliminate any danger
give are not substitutes for proper accident prevention
measures.
SYMBOL MEANING
SAFETY ALERT:
caution. Attention is required in order to
avoid serious personal injury. May be used
in conjunction with other symbols or pictographs.
NOTE: Advises you of information or instructions vital to
the operation or maintenance of the equipment.
Read the Operator’s Manual(s) and follow all warnings
and safety instructions.
Failure to do so can result in serious injury to the
operator and/or bystanders.
. The instructions or warnings they
Indicates
danger,
warning or
-
FOR QUESTIONS, CALL 1-800-668-1238
SYMBOL MEANING
DANGER:
result in serious injury to yourself or to others. Always follow the safety precautions to
reduce the risk of fire, electric shock and
personal injury.
WARNING:
result in injury to yourself and others.
Always follow the safety precautions to
reduce the risk of fire, electric shock and
personal injury.
CAUTION:
result in property damage or personal injury
to yourself or to others. Always follow the
safety precautions to reduce the risk of fire,
electric shock and personal injury.
Failure to obey a
safety warning will
Failure to obey a
safety warning can
Failure to obey a
safety war
ning may
• IMPORTANT SAFETY INSTRUCTIONS •
READ ALL INSTRUCTIONS
BEFORE OPERATING
When using the
WARNING:
Please read these instructions before operating the unit in or
of the operator and any bystanders. Please
keep these instructions for later use.
• Read the instructions carefully. Be familiar with the
controls and proper use of the unit.
• Do not operate this unit when tired, ill or under the
influence of alcohol, drugs or medication.
• Children must not operate the unit. Teens must be
accompanied and guided by an adult.
• All guards and safety attachments must be installed
properly before operating the unit.
Inspect the unit befor
•
Make sur
Replace par
any way
aged par
e all fasteners ar
ts that are cracked, chipped or damaged in
. Do not operate the unit with loose or dam
ts.
e use. Replace damaged par
e in place and secur
unit, safety r
der to ensur
e the safety
ules.
e.
• Carefully inspect the area before starting the unit.
Remove all debris and hard or sharp objects such as
glass, wire, etc.
• Clear the area of children, bystanders, and pets. At a
minimum, keep all children, bystanders, and pets outside a 50 feet (15m.) radius; there still may be a risk to
bystanders from thrown objects. Bystanders should be
encouraged to wear eye protection. If you are
approached, stop the unit immediately.
ts.
-
21
Page 4

RULES FOR SAFE OPERATION
MINIMUM WIRE GAUGE RECOMMENDATIONS
V
OLTS
EXTENSION CORD
LENGTH
WIRE SIZE
REQUIRED
120
25 feet / 7.5m 18 A.W.G.*
50 feet / 15m 16 A.W.G.*
100 feet / 30m 16 A.W.G.*
*American Wire Gauge
PLEASE READ - SAVE THESE
INSTRUCTIONS
When using an electrical appliance, basic pr
should always be followed to assure maximum safety and
optimum performance. Read this manual before assembling and operating this appliance. Failure to comply with
instructions may result in electrical shock, burns, fire, or
personal injury.
WARNING
TO REDUCE THE RISK OF ELECTRIC
SHOCK, BURNS, FIRE OR PERSONAL
INJURY:
1. FOLLOW ALL SAFETY INSTRUCTIONS listed in
this manual before/during operation of this trimmer.
2. TO REDUCE THE RISK OF ELECTRIC SHOCK this
equipment has a polarized plug (one blade is wider
than the other). This plug will fit in a polarized extension cord only one way. If the plug does not fit fully in
the extension cord, reverse the plug. Do not change
the plug in any way.
3. INSPECT UNIT FOR DAMAGE to the housing or
plug. Keep all fasteners tight. Do not use if the trigger
does not turn the unit off properly. Never use unit if
cord or plug has been damaged, the motor or unit
itself is not working as it should or has been dropped,
damaged, left outdoors or dropped in water. Never
operate with any air opening blocked. Keep air openings free of debris that may reduce air flow. Replace
damaged parts that are chipped, cracked or damaged in any way. Keep cutter knife sharp.
4. DOUBLE INSULATED to help protect against
electric shock. Double insulation construction
consists of 2 separate “layers” of electric insulation.
Appliances built with this insulation system ar
intended to be gr
cord used with your unit can be plugged into any
conventional 120 volt electrical outlet. Nor
ecautions must be obser
pr
electrical appliance. The double insulation system is
only for added pr
a possible inter
5.
EXTENSION CORD - Use only with an extension
cord intended for outdoor use. Match wire gauge to
the cor
out a ground connection may be used since this
appliance is double insulated. If in doubt of pr
wir
that the smaller the gauge number
cor
d length. See table below
e size, use the next heavier gauge. Please note
d.
ounded. As a r
otection against injur
nal electrical insulation failur
esult, the extension
ved when operating an
esulting from
y r
. A 2-wir
, the heavier the
ecautions
e not
mal safety
e.
d with
e cor
oper
Table 1
(1). When using the appliance, an extension cord of ade-
quate size must be used for safety and to prevent
loss of power and overheating.
(2). The extension cord must be specifically intended for
outdoor use and marked “SJ” or “SJT” and with the
suffix “WA”. In Canada, the extension cord must be
marked “SFTW”.
(3). Inspect extension power cord for loose or exposed
wires and damaged insulation. If damaged, replace
before using appliance.
DO NOT ABUSE CORD - Never carry appliance by
cord or pull cord to disconnect from outlet. Keep cord
clear of operator and obstacles at all times. Do not
expose cord to heated surfaces, oil or water. Do not
pull cord around sharp edges, corners or close door
on cord.
6. NO SERVICEABLE PARTS INSIDE - Your dou-
ble insulated appliance has no serviceable parts
inside. Do not attempt to repair it yourself. For service information, contact the Yard Machines Product
Service Department listed on the back cover of this
User Manual.
RISK OF EYE INJURY - Always wear goggles or
7.
other suitable eye protection when operating your
trimmer. Edging increases the risk of injury caused by
flying debris. Always keep bystanders at a safe dis
tance.
KEEP HANDS AND FEET AWAY from rotating line.
8.
Do not operate without debris shield attached.
9. DRESS PROPERLY - Always wear long pants, shoes
and gloves. Do not wear loose clothing, jewelry, short
pants, sandals or go barefoot.
10. KEEP AREA CLEAR - Keep everyone, especially
children and pets away from the area of operation 50
feet (15m). Turn off unit immediately if you are
-
approached. Never allow children to operate the
appliance to be used as a toy or to run unattended at
any time.
11. AVOID A DANGEROUS ENVIRONMENT - Do not
use in the presence of flammable liquids or gases,
smoking or burning materials to avoid creating a fire
or explosion. Never operate the trimmer in wet or
damp conditions or around swimming pools, hot tub,
etc. Do not use in rain. Do not handle plug, cord or
appliance with wet hands.
-
Page 5

RULES FOR SAFE OPERATION
12. USE APPLIANCE CORRECTLY - Use this appliance
only for its intended use as described in this manual.
DO NOT SWEEP WITH TRIMMER - Sweeping refers
to tilting stringhead to sweep away debris from walkways, etc. Y
stones or other such debris may be hurled 50 feet or
more, causing injury or damage to nearby property
such as automobiles, homes and windows. Inspect
area before starting the appliance to remove debris
and other objects that can cause damage during
operation.
DO NOT USE ACCESSORIES or attachments
13.
except as recommended and provided by Yard
Machines. Do not use any type of wire or metal cutting line.
DO NOT OVERREACH - Keep firm footing and bal-
14.
ance at all times.
15.
AVOID UNINTENTIONAL STARTING - Do not carry
plugged in trimmer with your finger on the switch.
DISCONNECT trimmer from power supply when not
16.
in use and before servicing stringhead.
17. STORE idle trimmer indoors. Appliance should be
stored in a dry, high or locked up place - out of the
reach of children.
18. Don’t grasp the exposed cutting blades or cutting
edges when picking up or holding the appliance.
Don’t force appliance - it will do the job better and
19.
witth less likelihood of a risk of injury at the rate for
which it was designed.
our trimmer is a powerful tool and small
EXPLANATION OF NOTE, WARNING, and
WARRANTY SYMBOL
1. A NOTE is used to convey additional information, or
highlight a particular explanation, or to expand a step
instruction.
2. A WARNING identifies a procedure which, if not
undertaken or if improperly done, can result in a serious personal injury or damage to the unit and/or
both.
3. (
4.
WARRANTY SYMBOL) serves notice that
unless instructions or procedures are followed, any
damage will void the warranty and repairs will be at
owner’s expense. Service other than user maintenance should be performed by a Yard Machines
Authorized Service Center. Damage or conditions
caused by improper maintenance practices which
render this product inoperable will void the manufacturer’s warranty.
FOR WARRANTY OR SERVICE contact the nearest
Yard Machines Authorized Service Center by calling
800# on back cover.
SAVE THESE INSTRUCTIONS
43
Page 6
RULES FOR SAFE OPERATION
SAFETY AND INTERNATIONAL SYMBOLS
This operator's manual describes safety and inter
Read the operator's manual for complete safety, assembly, operating and maintenance and repair information.
national symbols and pictographs that may appear on this product.
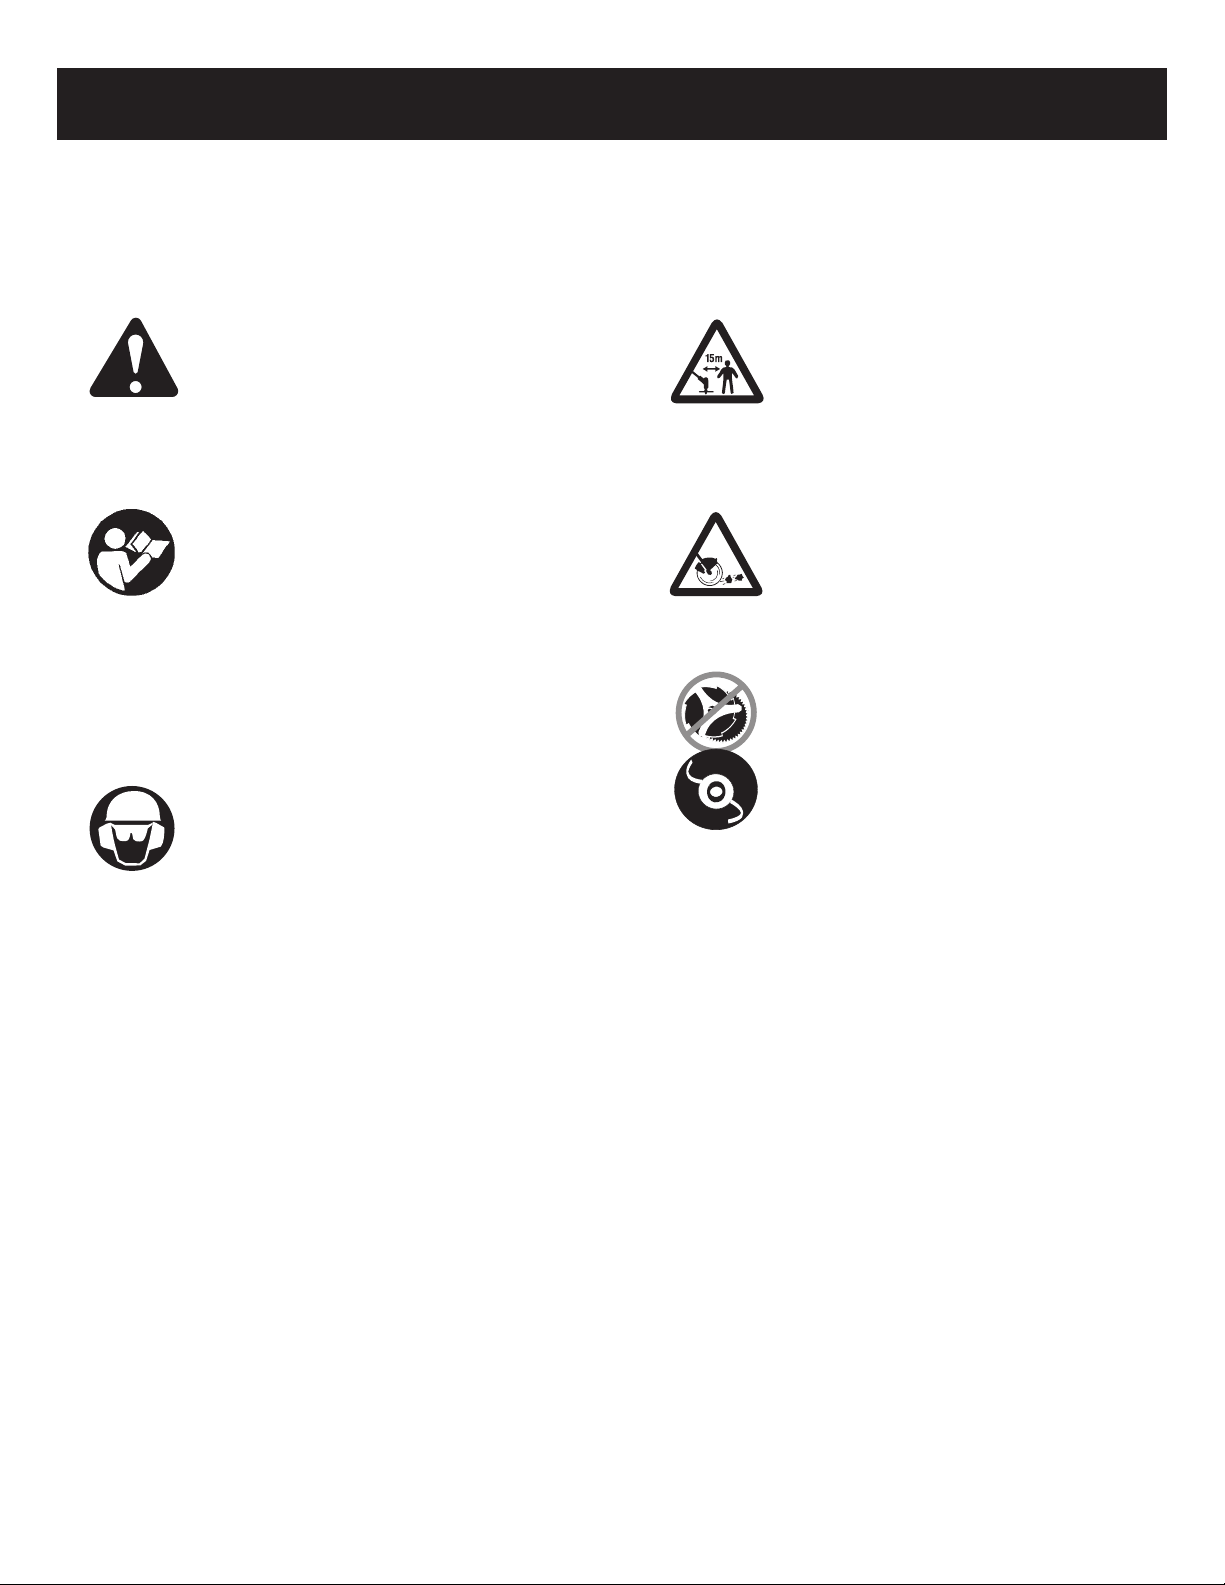
SYMBOL MEANING
• SAFETY ALERT SYMBOL
Indicates danger, warning, or caution.
May be used in conjunction with
other symbols or pictographs.
• WARNING - READ OPERATOR'S
MANUAL
Read the Operator’s Manual(s) and
follow all warnings and safety
instructions. Failure to do so can
result in serious injury to the operator
and/or bystanders.
• WEAR HEAD, EYE AND HEARING
PROTECTION
WARNING: Thrown objects and loud
noise can cause severe eye injury
and hearing loss. Wear eye protection meeting ANSI Z87.1-1989 standards and ear protection when operating this unit. Falling objects can
cause severe head injury. Wear head
protection when operating this unit.
Use a full face shield when needed.
SYMBOL MEANING
• MINIMUM OPERATING DISTANCE
WARNING: Keep children,
bystanders, and animals 50 feet
(15meters) away. If approached stop
unit immediately.
DANGER: Objects thrown up by
machine.
• DO NOT USE BLADES
WARNING: To prevent serious
personal injury, do not attach or
operate the unit with any type
of blade.
Page 7
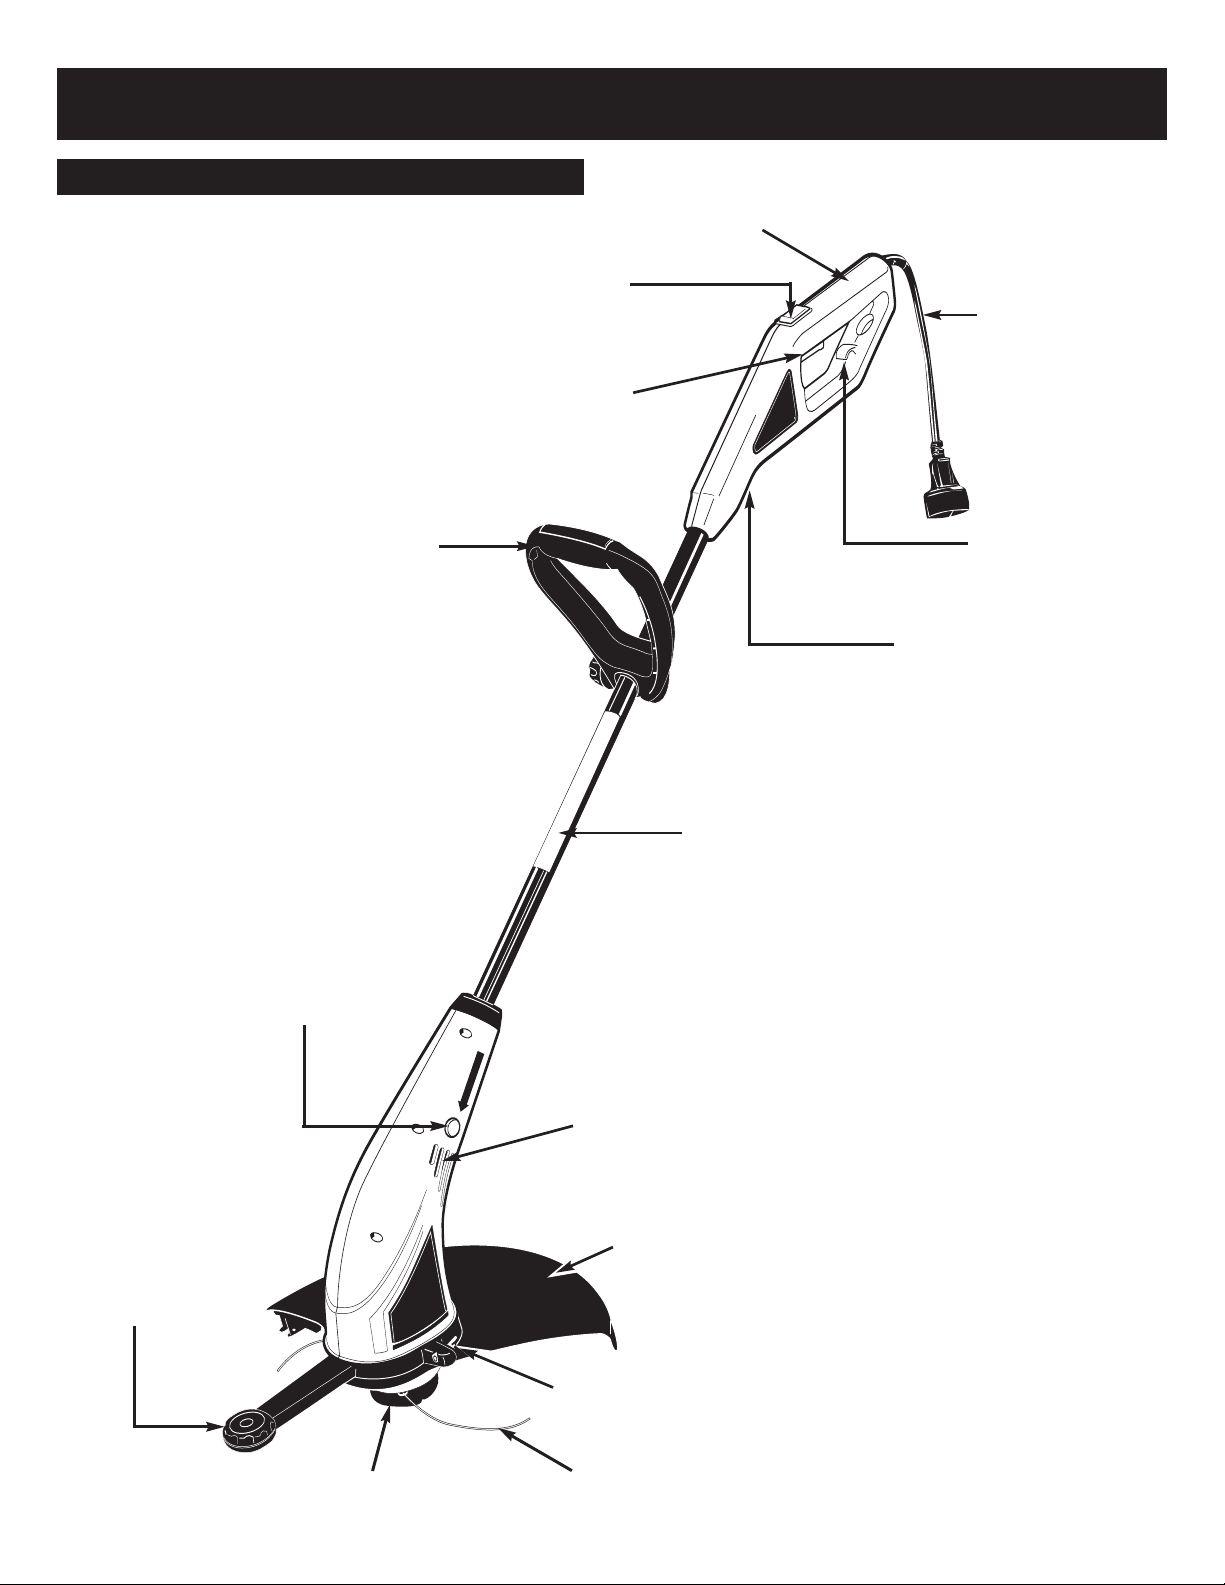
KNOW YOUR UNIT
RULES FOR SAFE OPERATION
REAR HANDLE
SAFETY SWITCH
POWER CORD
ON/OFF TRIGGER
ASSIST HANDLE
SHAFT ADJUSTMENT
BUTTON
ADJUSTABLE SHAFT
CORD RET
EDGER CONVERSION
BUTTON
AINER
EDGE GUIDE
WHEEL
STRING HEAD
AIR OPENINGS
DEBRIS SHIELD
EDGE GUIDE WING NUT
NYLON LINE
65
Page 8
ASSEMBLY INSTRUCTIONS
NOTE: The only assembly required for your trimmer is to
install the edge guide wheel, debris shield and adjust the
assist handle.
EDGE GUIDE WHEEL INSTALLATION
1. Position the edge guide wheel (A) to the front of the
motor housing as shown in Fig. 1.
2. Tighten the wing nut (B) firmly. (Fig. 2)
A
Fig. 1
Fig. 3
C
C
Fig. 2
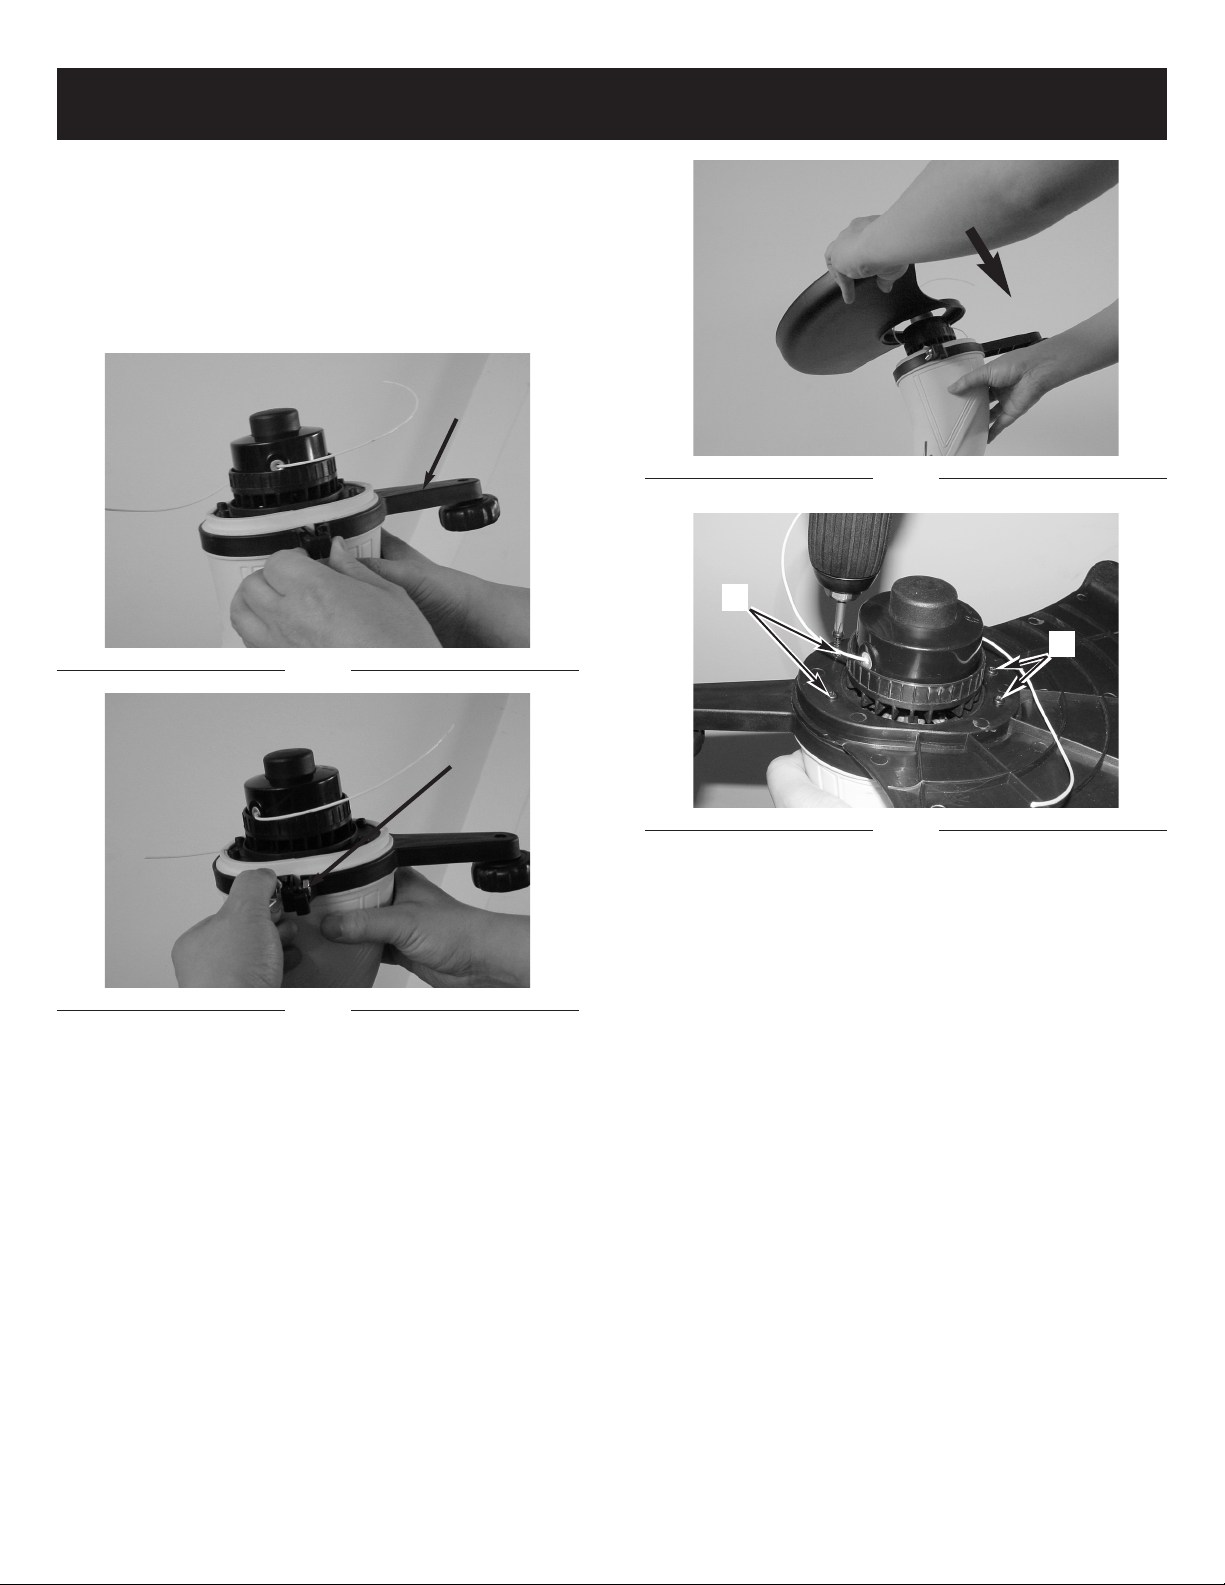
DEBRIS SHIELD INSTALLATION
1.
Position the motor housing with string head car
facing up. (Fig. 3)
2. Slide debris shield over motor housing.
3.
Secur
e it with 4 screws (C). (Fig. 4)
B
Fig. 4
rier
7
Page 9
ADJUSTMENT INSTRUCTIONS
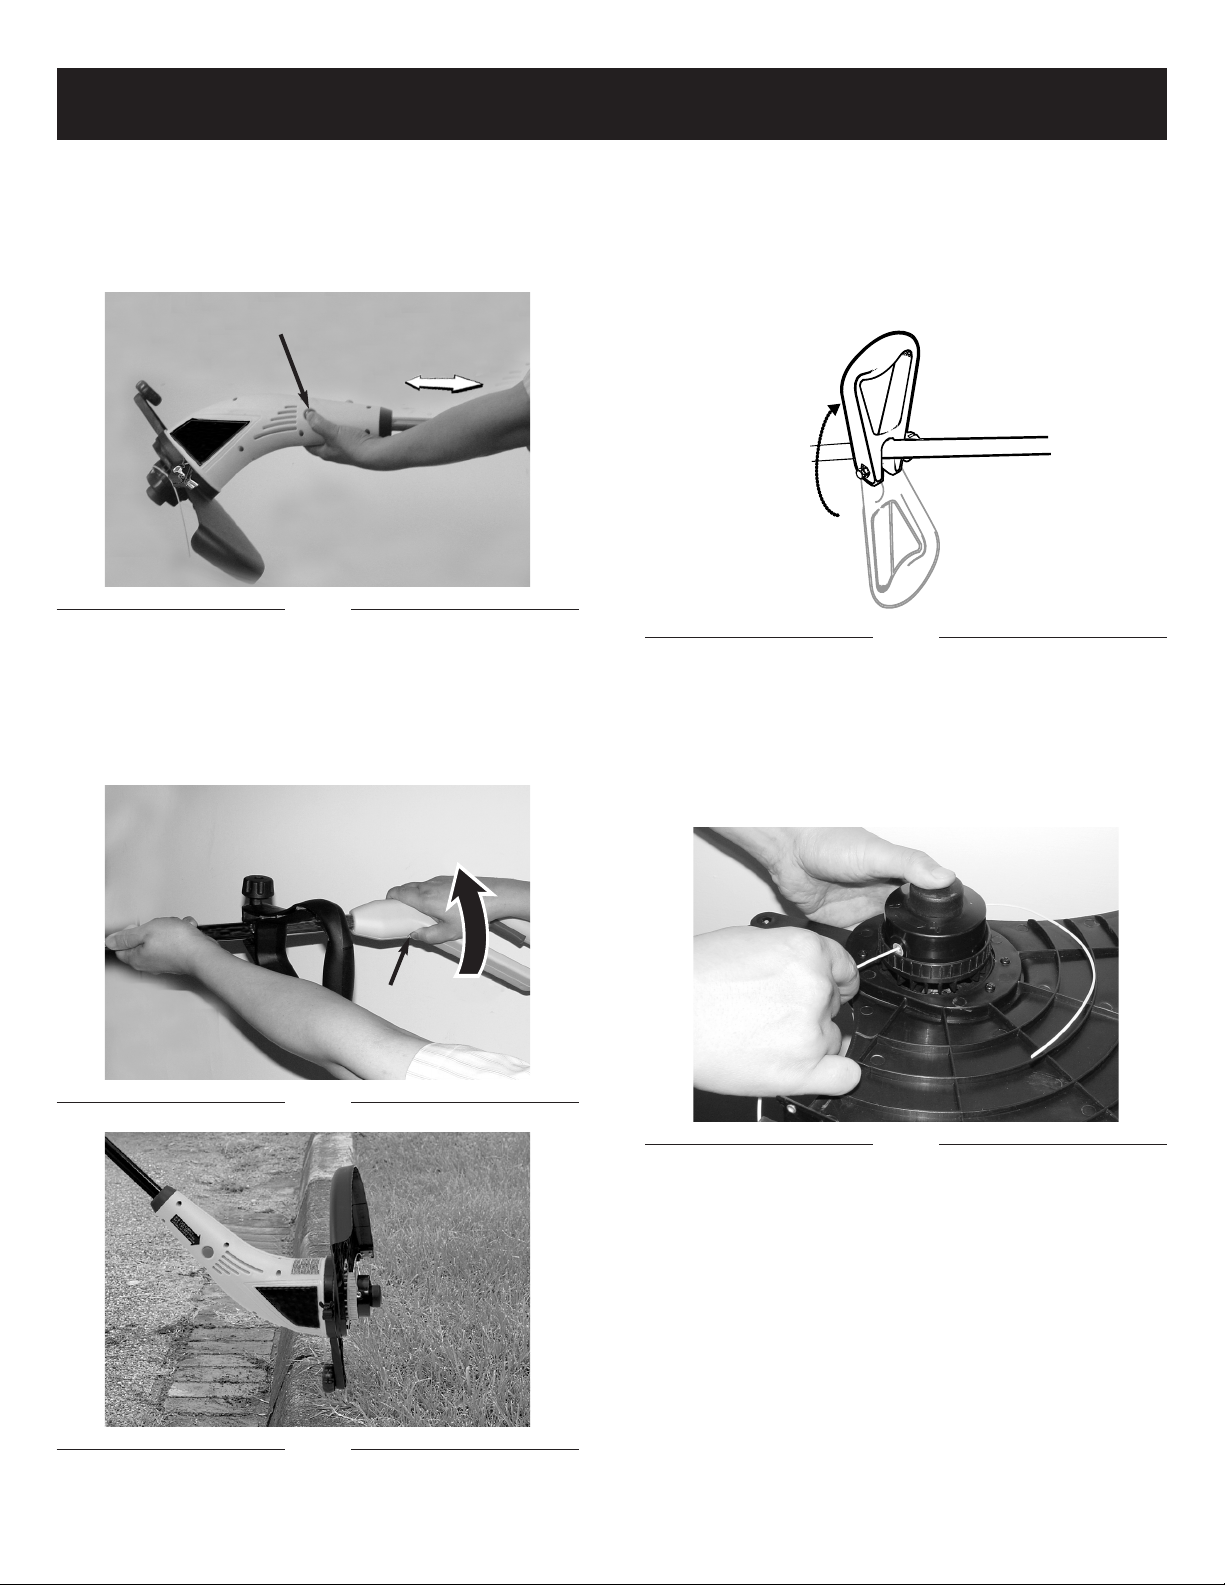
ADJUST SHAFT LENGTH
1. Grip shaft firmly.
2. Push shaft release button (A) and move motor hous-
orward or backward to desired length. (Fig. 5)
ing f
NOTE: Shaft may be adjusted in trimming or edging mode.
A
Fig. 5
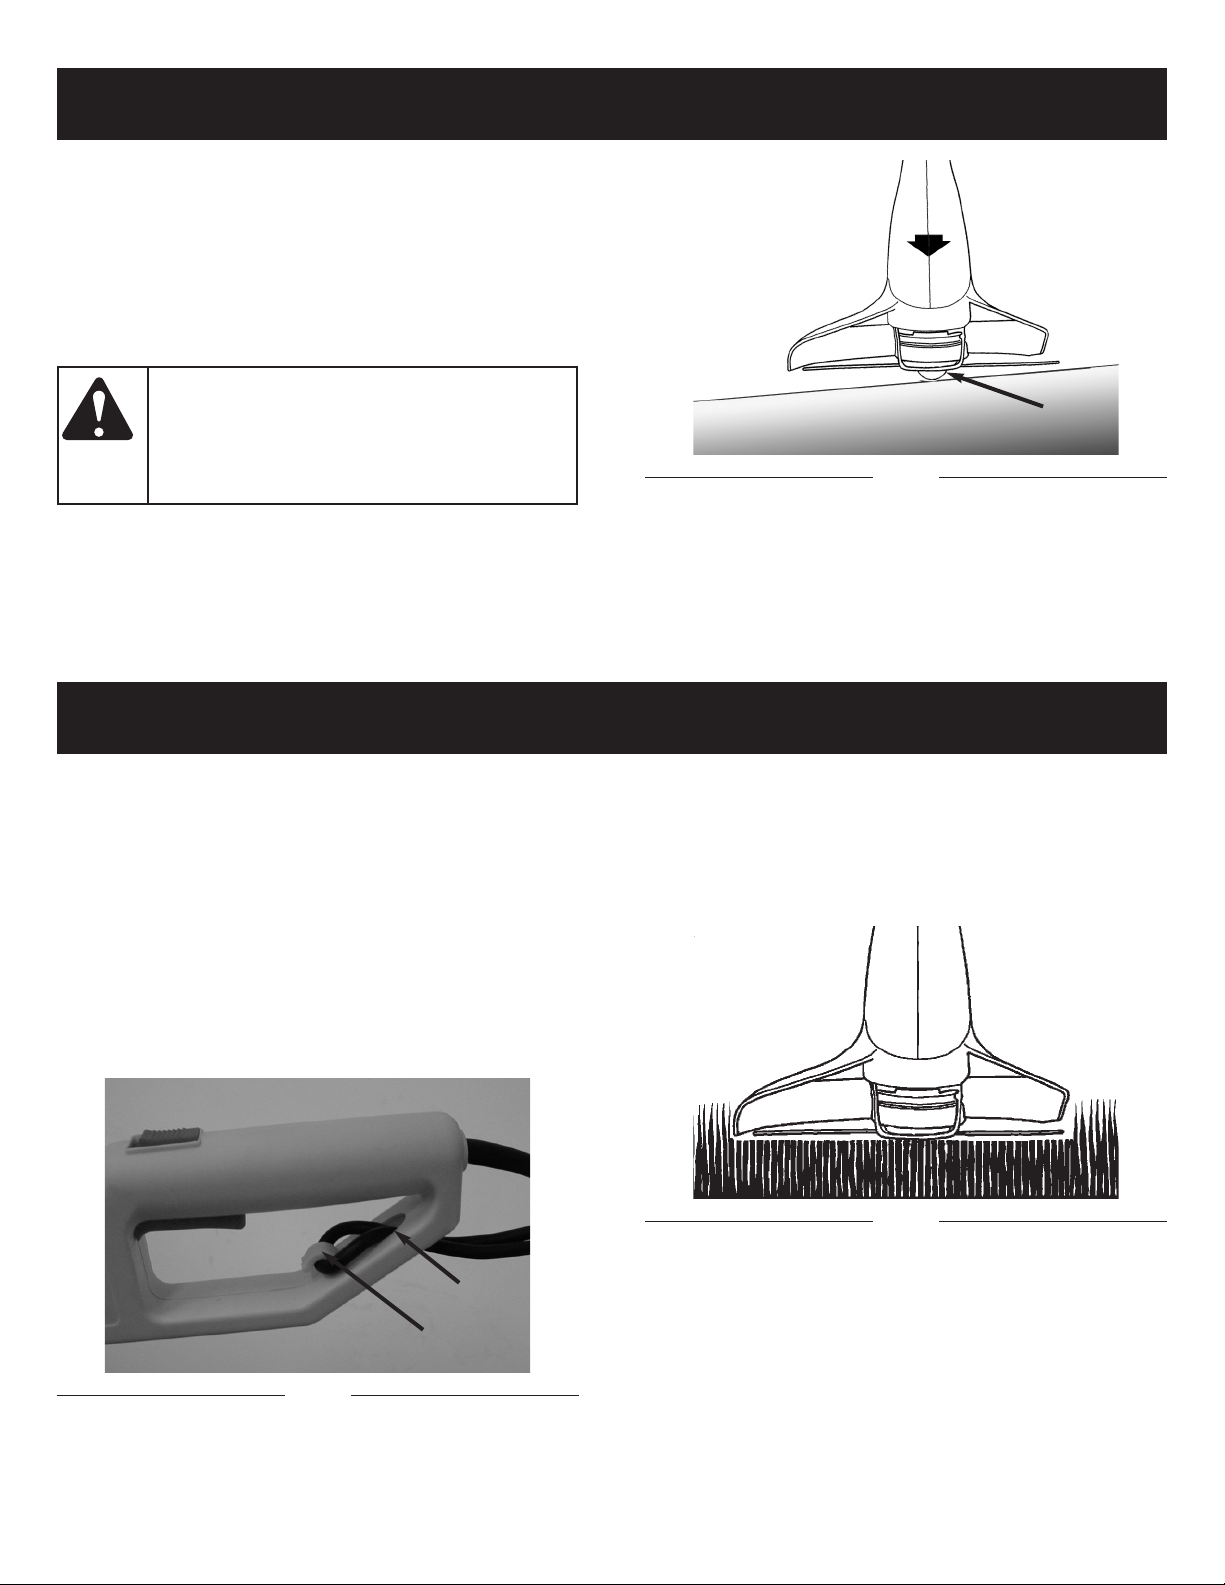
EDGING CONVERSION
1. Grip shaft firmly.
2. Push edge button (B) and rotate handle assembly
until an audible click is heard. (Fig. 6 & Fig. 7)
3. Adjust assist handle as required.
ADJUST THE ASSIST HANDLE
NOTE: The assist handle is attached to the shaft but has
been turned under for packing
Loosen adjustment knob and rotate handle to the top
1.
of shaft (Fig. 8).
Tighten adjustment knob securely.
2.
Fig. 8
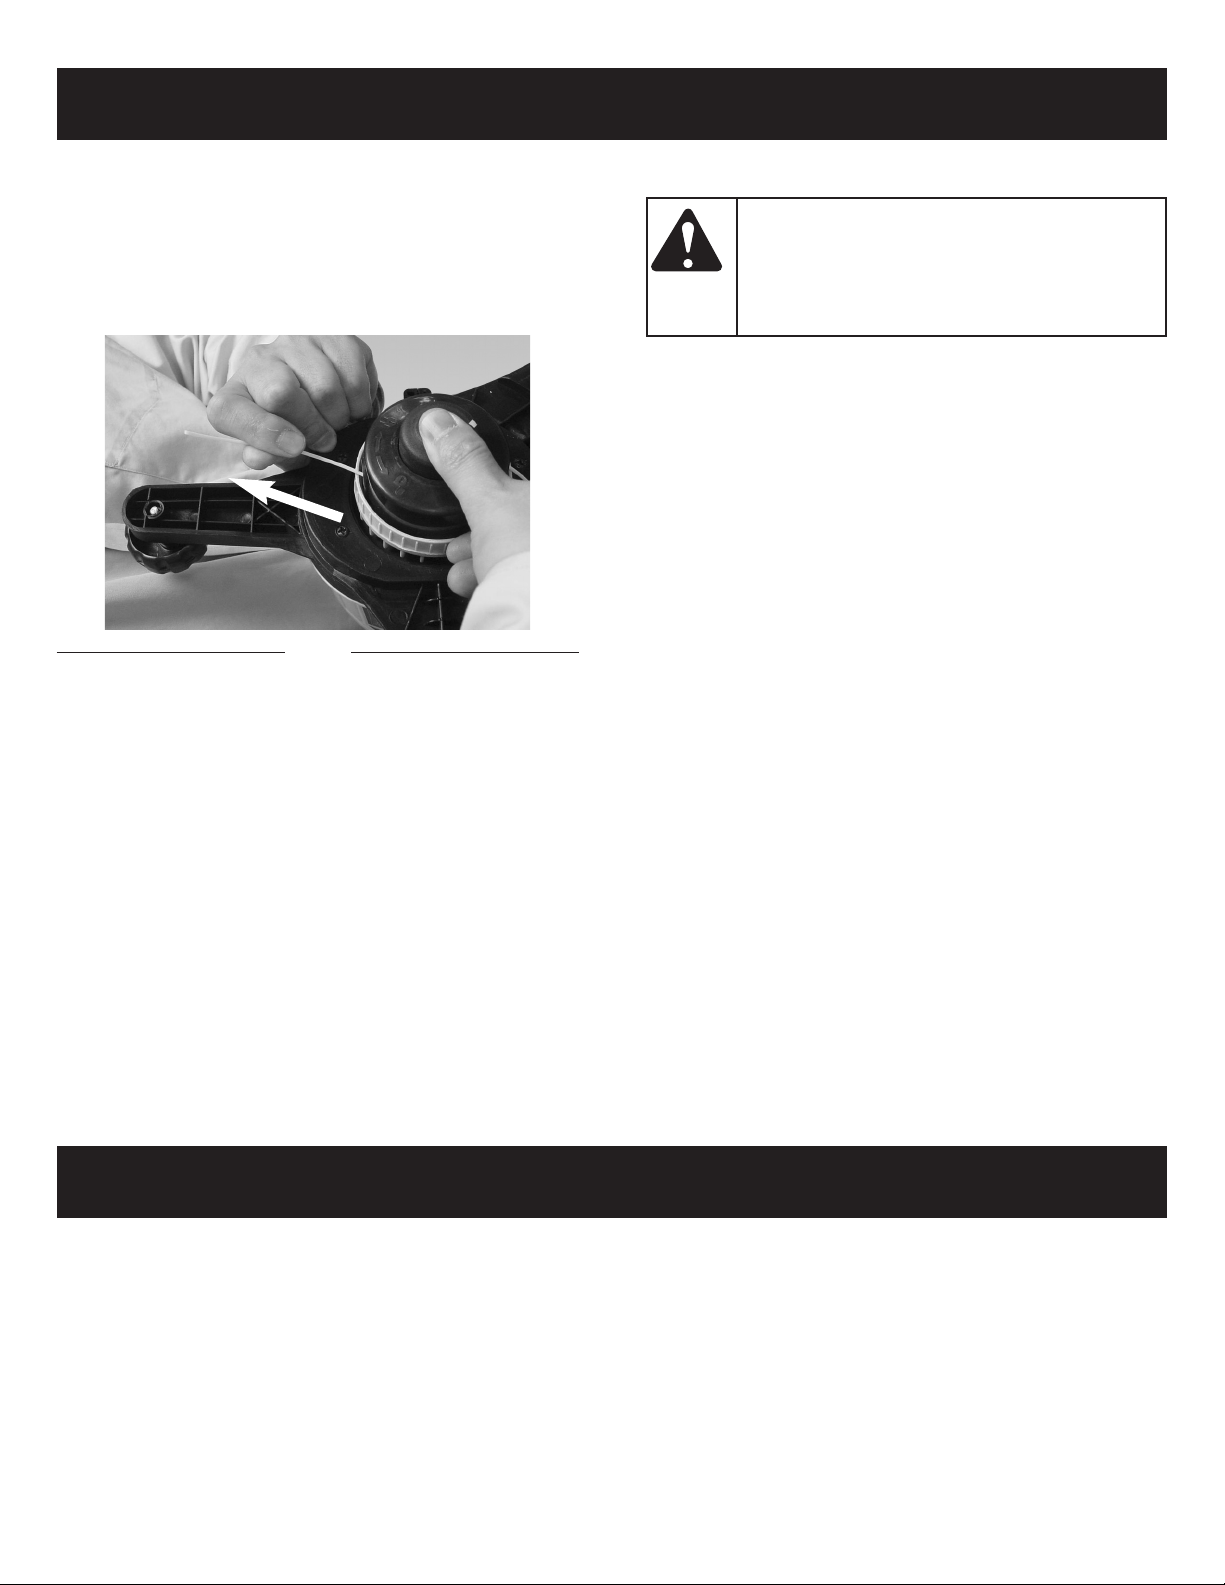
STARTING
1. Before starting the grass-trimmer for the first time,
check that the nylon line touch or pass over the linecutting blade. If they are not long enough, press the
bump knob and, at the same time, pull the nylon line.
(Fig. 9).
Fig. 6
Fig. 7
B
Fig. 9
2. Connect the correct extension cord to the string trimmer power cord per the instructions in Section 5-1
Connect the cord.
immer and position of
ass tr
e sure the length of g
Mak
3.
assist handle is most applicable before use, adjust the
ass trimmer by pressing the shaft adjust-
length of g
ment b
loosening the adjustment knob.
8
r
utton, adjust the height of assist handle b
r
y
Page 10
ADJUSTMENT INSTRUCTIONS
4. Take a secure hold of the grass trimmer and, without
letting it touch the g
switch, then press the trigger on the upper handgrip.
Let the grass trimmer run for a few seconds and
“bump” the stringhead against the lawn. Nylon line will
automatically release. The cut-off blade in the debris
shield will trim off excess line.
5. To switch off the string trimmer let go of the switch.
CAUTION:
so, to improve its operation on subsequent
occasions, bump the stringhead lightly on the
ground while the trimmer is running.(Fig 10)
These operations should be repeated a few times before
starting work to make sure that everything is functioning
properly and to familiarize yourself with the grass trimmer.
Start off slowly, when you have gained experience, you will
be able to use the grass trimmer to its full potential.
rass to be cut, push up the safety
A short or worn line
cuts less efficiently
B
Fig. 10
OPERATING INSTRUCTIONS
CONNECT THE CORD
1. Ensure the cord is NOT plugged into a receptacle
before this procedure.
2. Make a loop with 8″ - 10″ (20 - 25cm) of the end of the
extension cord.
3. Place the loop into the slot (A) under the rear handle
and lock into place on the cord retainer (B) as shown
in Figure 11.
Connect the e
4.
cord.
Plug the extension cord into a receptacle ONLY when
5.
ou are ready to oper
y
xtension cord to the tr
ate the tr
immer
immer power
.
A
TRIMMER OPERATION
1. TRIMMING / MOWING (Fig.12). Swing trimmer with a
sickle-like motion from side to side. Do not tilt the
stringhead during the procedure. Test area to be
trimmed for proper cutting height. Keep stringhead at
same level for even depth of cut.
Fig. 12
Fig. 11
B
9 10
Page 11

OPERATING INSTRUCTIONS
2. CLOSER TRIMMING (Fig. 13). Position trimmer
aight ahead with a slight tilt so bottom of stringhead
str
is above ground level and string contact occurs at
proper cutting point. Always cut away from operator.
Do not pull trimmer in toward operator.
FENCE/FOUNDATION TRIMMING. Approach trim-
3.
ming around chain link fences, picket fences, rock
walls and foundations slowly to cut close without whipping string against the barrier. If the string comes in
contact with rock, brick walls, or foundations, it will
break or fray. If string snags fencing, it will snap off.
TRIMMING AROUND TREES. Trim around tree
4.
trunks with a slow approach so string does not contact
k. Walk around the tree trimming from left to right.
bar
Approach grass or weeds with the tip of the string and
tilt stringhead slightly forward.
5. SCALPING (Fig. 14). Scalping refers to removal of all
vegetation down to the ground. To do this, tilt the
stringhead to about a 30 degree angle to the left. By
adjusting the handle you will have better control during this operation. Always keep a distance of 50 feet
(15 meters) from other people and animals when
scalping. Do not attempt this procedure if there is any
chance flying debris could injure operator, other people or cause damage to property.
OPERATING AS AN EDGER (Fig. 15). With the unit
6.
configured as an edger, hold it so the motor is to your
left side so that debris is thrown to the rear. Always
use eye protection.
7. SWEEPING - DO NOT SWEEP WITH TRIMMER (Fig.
16)
8. DO NOT BUMP TRIMMER ON CONCRETE. This can
damage the stringhead (Fig. 17).
Fig. 14
Fig. 15
Fig. 13
Fig. 16
Fig. 17
Page 12
MAINTENANCE INSTRUCTIONS
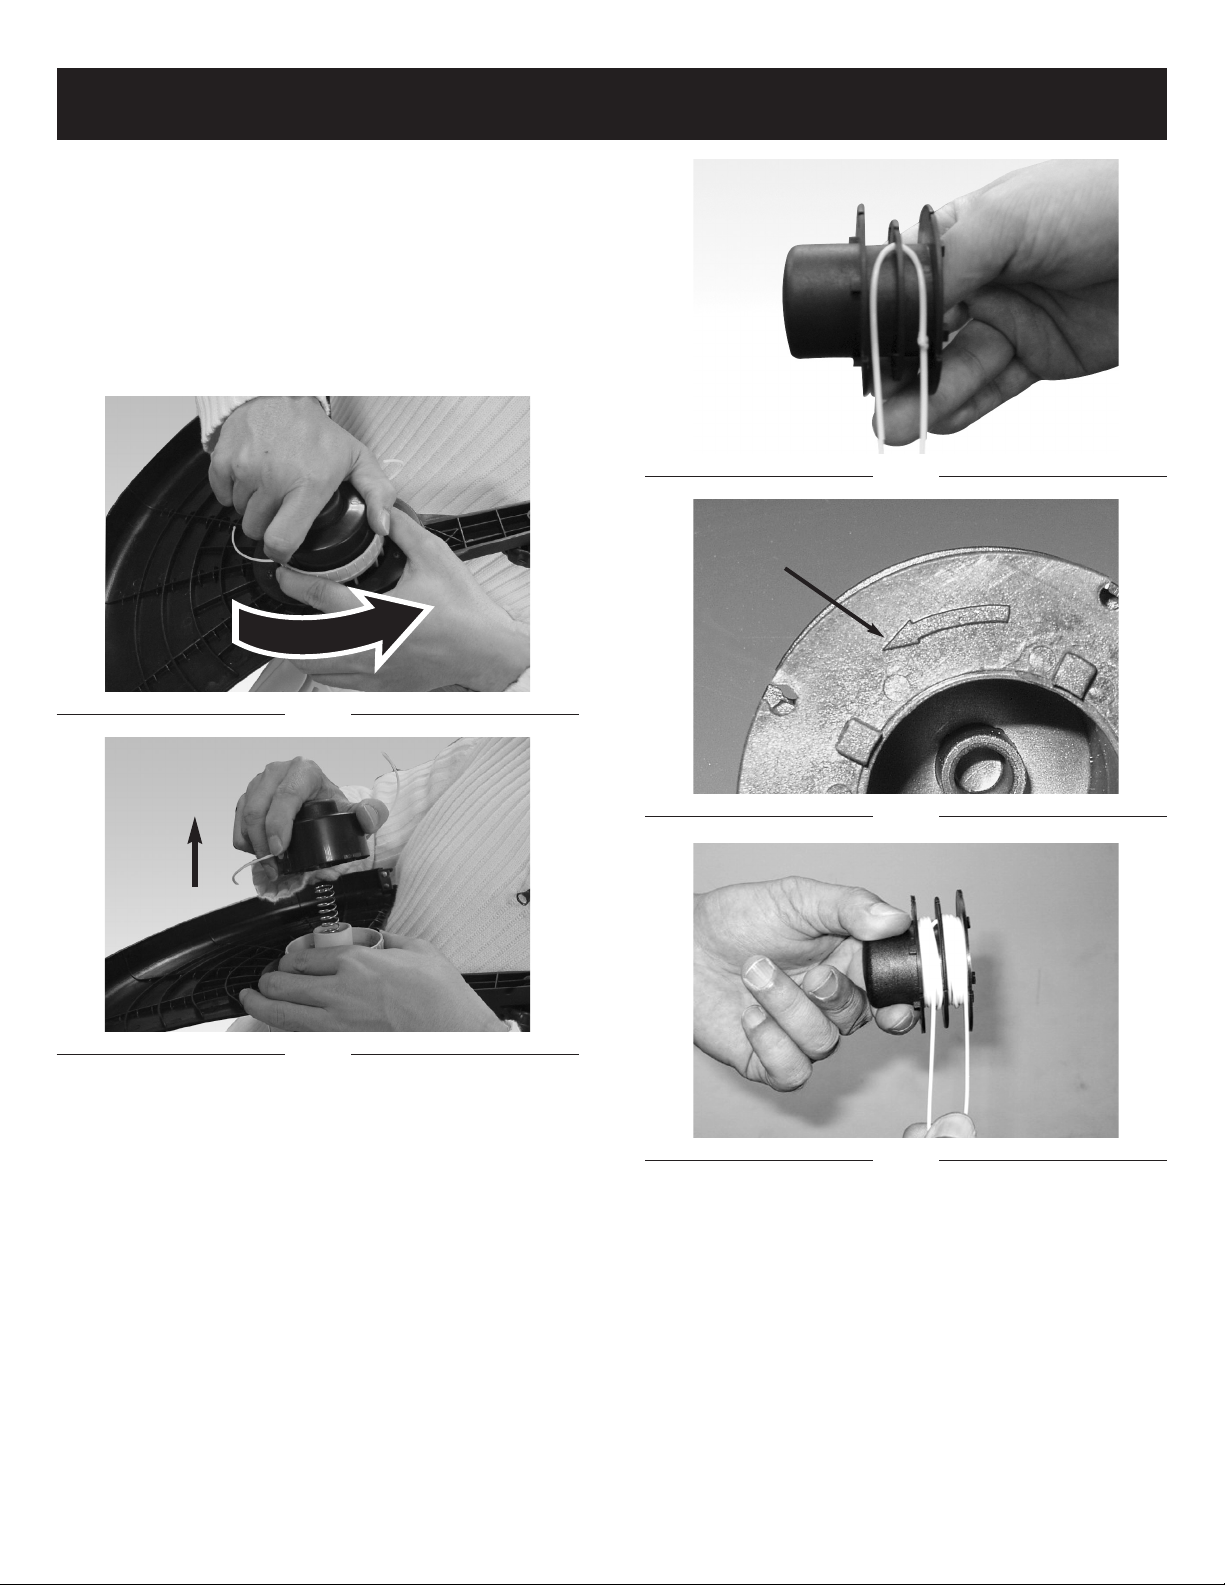
REPLACE THE SPOOL OF NYLON LINE
1. Unplug the trimmer.
2. Remove the spool assembly from the trimmer. To do
so, hold the outer ribbed part of the assembly with one
hand, while pushing down and turning the spool head
with the other to unlock it. (Fig. 18 & Fig. 19) The spool
carrier and spool will now disassemble easily.
NOTE: There is a spring inside the spool head that
could easily be lost. Ensure that it is put in a safe
place.
Fig. 20
A
Fig. 18
Fig. 19
3. Remove the clear plastic line retaining ring. Remove
any existing line from the spool.
Using 0.065" replacement line measure off appro
4.
mately 14' of line
equal lengths and place loop in slot of the spool
divider (Fig.
Wind the line onto the spool by turning the spool. The
5.
line should go on in the direction of the arrow (A) on
the spool (Fig.
around the spool. The line is wound with each half
separated by the divider. Tightly wind it until there is
about 6" of line left (Fig. 22).
. Double over the cutter line into two
20).
Line should be wrapped tightly
21).
xi
Fig. 21
-
Fig. 22
Page 13
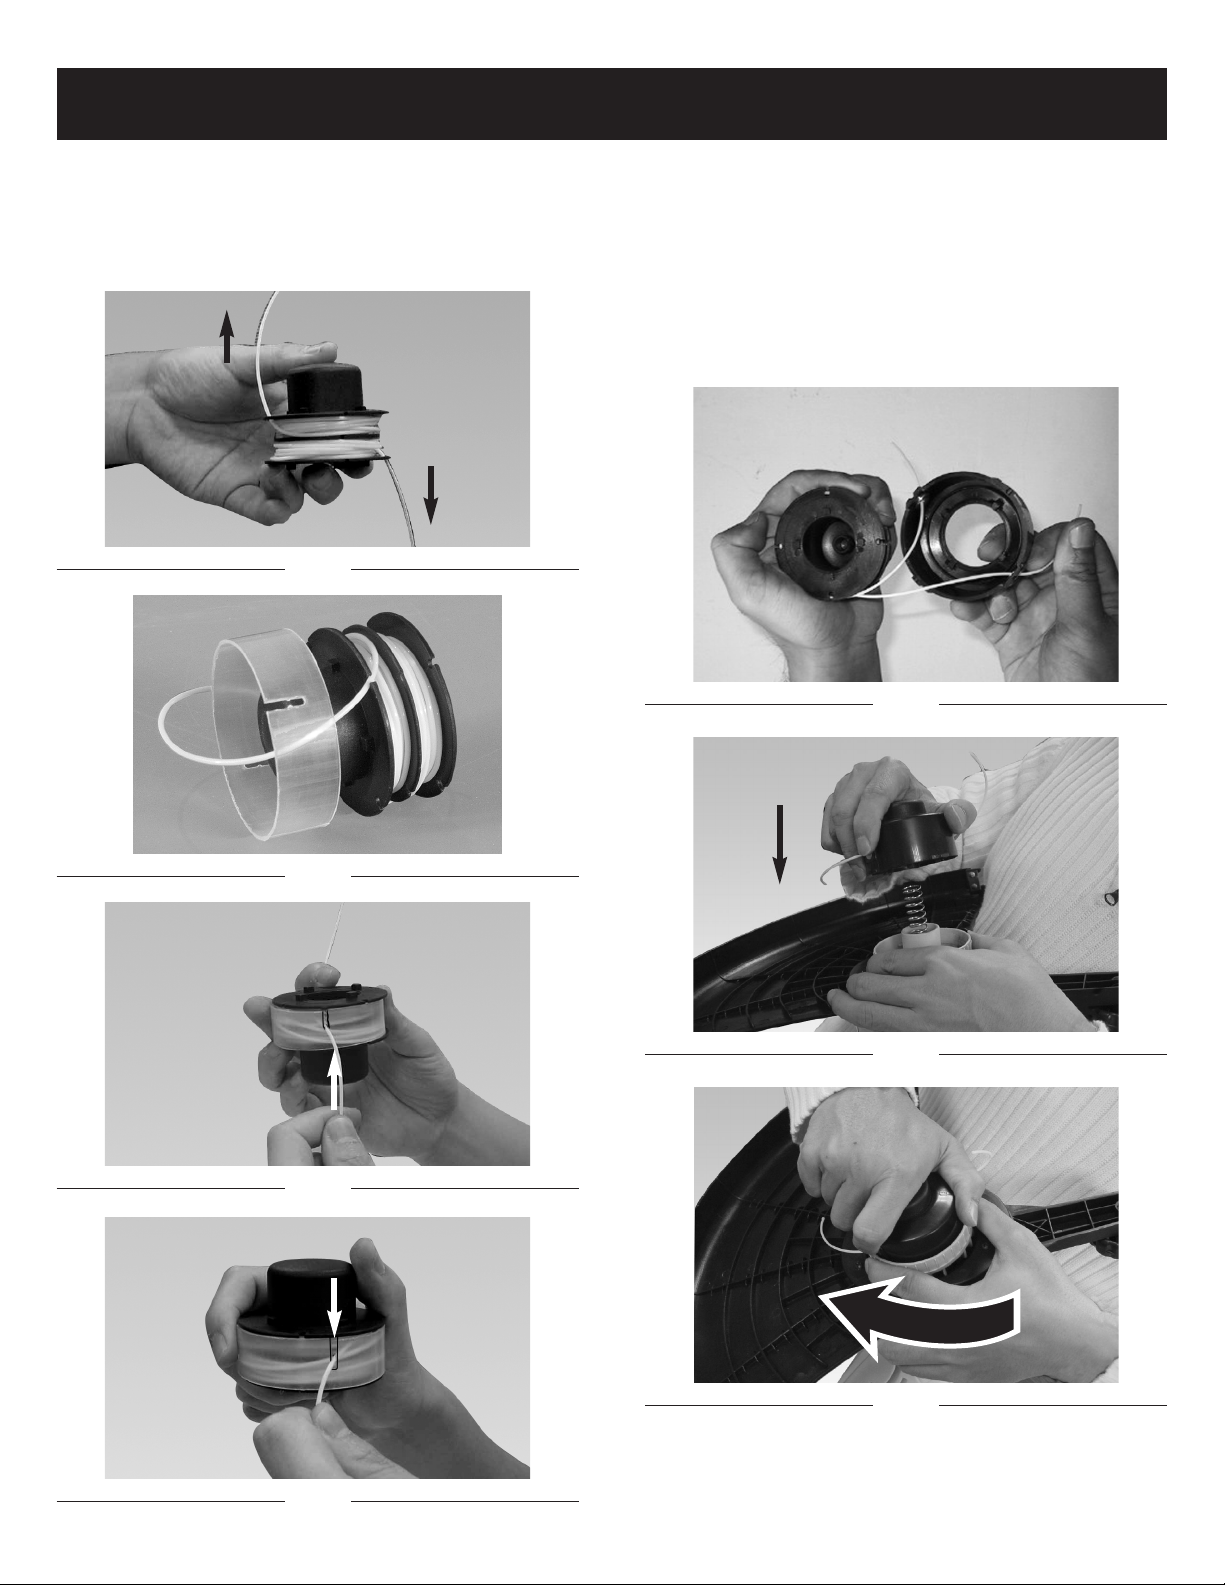
MAINTENANCE INSTRUCTIONS
6. Lock the ends of the line in opposite slots on the spool
(Fig. 23).Place the clear plastic line retainer back over
the line and spool (Fig.
wer slot in the clear plastic line retainer (Fig. 25).
the lo
24). Pull the lower line up into
Pull the upper line down into the upper slot (Fig. 26).
Fig. 23
7. Insert the line through each eyelet in the spool carrier
and slide the spool into the carrier. (Fig. 27)
NOTE: Ensure that the line is within the clear plastic
line retainer. If it's outside of the clear plastic line
retainer, the line will not feed.
8. Make sure to insert the spring, assemble the spool
and spool carrier back onto the trimmer. To do so,
push the head on and turn it clockwise until it locks.
(Fig. 28 and Fig. 29)
Fig. 27
Fig. 24
Fig. 25
Fig. 28
Fig. 29
Fig. 26
1211
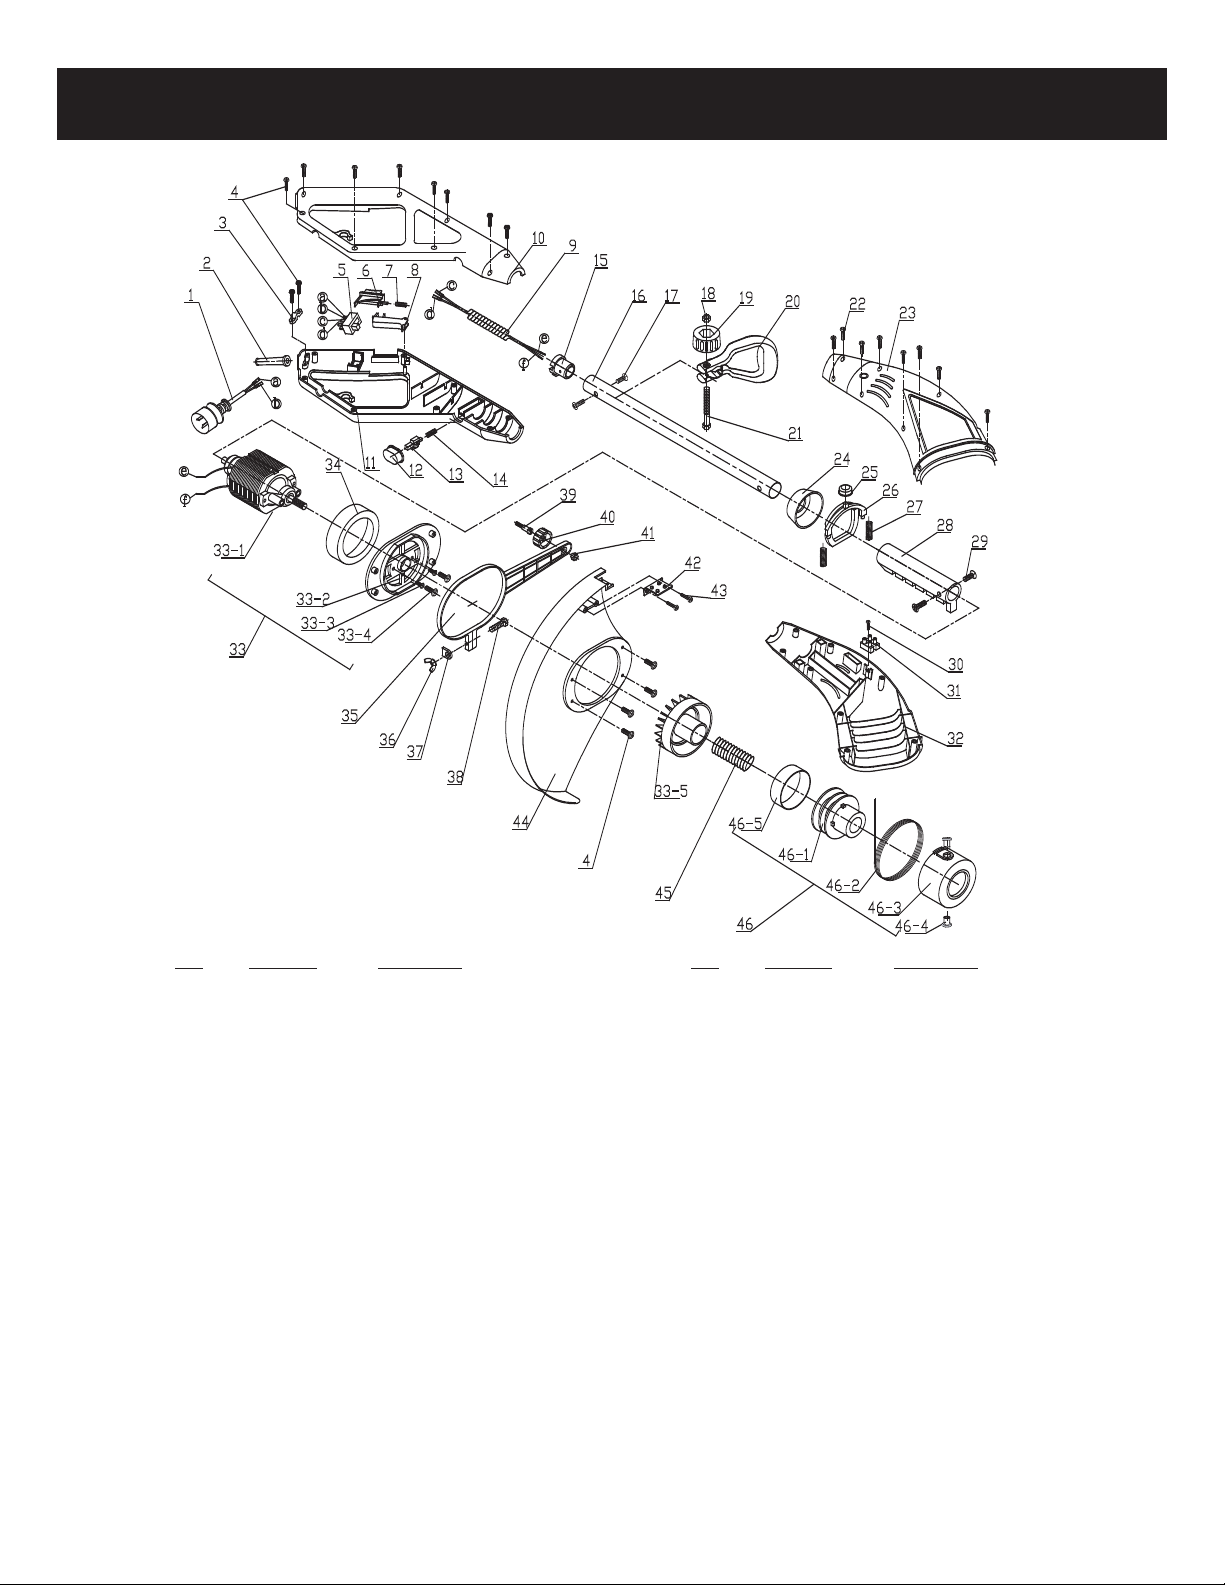
Page 14
MAINTENANCE INSTRUCTIONS
No. Parts No. Description
1 6011-202A02 POWER CORD 29 6SVABB04-10 SCREW
2 6199-202A01 CORD GUARD 30 6SDABA03-16 SCREW
3 6043-815501 PLATE (PRESSING CORD) 31 6041-840001 TERMINAL BLOCK
4 6SDABB04-14 SCREW 32 6038-202A06 HOUSING (L)
5 6022-202A01 SWITCH 33 6228-202A15 MOTOR ASS'Y
6 6134-202A04 TRIGGER 33-1 6099-202A03 MOTOR
7 6024-202A01 SPRING 33-2 6187-202A01 FIXED PLATE
8 6134-202A05 TRIGGER 33-3 6SDAB-03-12 SCREW
9 6010-202A01 WIRE 33-4 6SDAB-04-12 SCREW
10 6068-202A06 UPPER HANDGRIP (R) 33-5 6270-202003 CUTTER ASS'Y
11 6068-202A05 UPPER HANDGRIP (L) 34 6131-202A04 CUSHION RING
12 6056-202A03 BUTTON 35 6114-202A02 EGDER GUIDE
13 6021-202A01 LEVER 36 6NBB-06 NUT
14 6024-202A02 SPRING 37 6043-202A01 GASKET
15 6131-202A01 JOINT PIPE 38 6SXDB-06-20 SCREW
16 6129-202A01 CENTRAL TUBE 39 6115-202A01 SHAFT PIN
17 6SDABB04-06 SCREW 40 6137-202A01 WHEEL
18 6NAB-06 NUT 41 6NAB-05 NUT
19 6056-230302 BUTTON 42
6SDABB04-08 SCREW
20 6068-230301 CENTRAL HANDGRIP 43
6250-202503 WIRE CUTTING BLADE
21 6SXDB-06-65 SCREW 44 6262-202A02 SHIELD
22 6SDABB04-18 SCREW 45 6024-202A04 SPRING
23 6038-202A05 HOUSING (R) 46 6228-202004A SPOOL CARRIER ASS'Y
24 6059-202A01 JACKET 46-1
6059-202004 BLISTER PACK
25 6056-202A04 BUTTON 46-2
6008-202001A SPOOL CARRIER
26 6239-202A01 FIXED RING 46-3
6194-202001 WIRE-CUTTING
27 6024-202A03 SPRING 46-4
6059-202005A SPOOL COVER
28 6131-202A02 EXPANDING RING 46-5
6140-B23101 PILOT
No. Parts No. Description
9. To test if the line is advancing properly, push the button with your thumb while pulling the line with your fin-
. The line should advance freely. (Fig. 30).
gers
10. In the event of the line breaking inside the spool,
repeat the replacement operation.
11. Start the grass trimmer following the instructions in
the “STARTING” section.
Fig. 30
MAINTENANCE
ore carrying out
Bef
CAUTION:
operations, cut off the electric power supply by
disconnecting the plug from the extension
cord.
1. Regular cleaning and maintenance of your string trimmer will ensure efficiency and prolong the life of your
machine.
2. After each cutting operation, take apart and clean out
the grass and soil from: the spool and its slot and in
particular the debris shield.
3. During operation, keep the air slots clean and free of
grass.
4. Only use a cloth soaked with hot water and a soft
ush to clean the string trimmer.
br
5. Do not spray or wet the appliance with water.
6. Do not use detergents or solvents as these could ruin
the trimmer. The parts made of plastic can easily be
damaged by chemical agents.
7. If the line cutting blade no longer cuts or breaks, have
this replaced by contacting an authorized service
center.
any maintenance
. . . . . . . . . . . . . . . . . . . . . . . . . . . . . . . . . . . . . . . . . . . . . . . . . . . . . . . . . . . . . . . . . . . . . . . . . . . . . .
Input
No Load Speed . . . . . . . . . . . . . . . . . . . . . . . . . . . . . . . . . . . . . . . . . . . . . . . . . . . . . . . . . . . . . . . . . . . . . . . . . . . . . .7,500/min.
Cutting
Line Diameter . . . . . . . . . . . . . . . . . . . . . . . . . . . . . . . . . . . . . . . . . . . . . . . . . . . . . . . . . . . . . . . . . . . . . . . . .ø0.065” (1.65mm)
Net
eight
W
. . . . . . . . . . . . . . . . . . . . . . . . . . . . . . . . . . . . . . . . . . . . . . . . . . . . . . . . . . . . . . . . . . . . . . . . . . . . . .
Width
. . . . . . . . . . . . . . . . . . . . . . . . . . . . . . . . . . . . . . . . . . . . . . . . . . . . . . . . . . . . . . . . . . . . . . . . . . . . .
SPECIFICATION
120V~, 60Hz, 4 Amp
(330mm)
13”
6.4 Lbs (2.9 Kg)
Page 15
PARTS LIST
No. Parts No. Description
1 6011-202A02 POWER CORD 29 6SVABB04-10 SCREW
2 6199-202A01 CORD GUARD 30 6SDABA03-16 SCREW
3 6043-815501 PLATE (PRESSING CORD) 31 6041-840001 TERMINAL BLOCK
4 6SDABB04-14 SCREW 32 6038-202A06 HOUSING (L)
5 6022-202A01 SWITCH 33 6228-202A15 MOTOR ASS'Y
6 6134-202A04 TRIGGER 33-1 6099-202A03 MOTOR
7 6024-202A01 SPRING 33-2 6187-202A01 FIXED PLATE
8 6134-202A05 TRIGGER 33-3 6SDAB-03-12 SCREW
9 6010-202A01 WIRE 33-4 6SDAB-04-12 SCREW
10 6068-202A06 UPPER HANDGRIP (R) 33-5 6270-202003 CUTTER ASS'Y
11 6068-202A05 UPPER HANDGRIP (L) 34 6131-202A04 CUSHION RING
12 6056-202A03 BUTTON 35 6114-202A02 EGDER GUIDE
13 6021-202A01 LEVER 36 6NBB-06 NUT
14 6024-202A02 SPRING 37 6043-202A01 GASKET
15 6131-202A01 JOINT PIPE 38 6SXDB-06-20 SCREW
16 6129-202A01 CENTRAL TUBE 39 6115-202A01 SHAFT PIN
17 6SDABB04-06 SCREW 40 6137-202A01 WHEEL
18 6NAB-06 NUT 41 6NAB-05 NUT
19 6056-230302 BUTTON 42
6SDABB04-08 SCREW
20 6068-230301 CENTRAL HANDGRIP 43
6250-202503 WIRE CUTTING BLADE
21 6SXDB-06-65 SCREW 44 6262-202A02 SHIELD
22 6SDABB04-18 SCREW 45 6024-202A04 SPRING
23 6038-202A05 HOUSING (R) 46 6228-202004A SPOOL CARRIER ASS'Y
24 6059-202A01 JACKET 46-1
6059-202004 BLISTER PACK
25 6056-202A04 BUTTON 46-2
6008-202001A SPOOL CARRIER
26 6239-202A01 FIXED RING 46-3
6194-202001 WIRE-CUTTING
27 6024-202A03 SPRING 46-4
6059-202005A SPOOL COVER
28 6131-202A02 EXPANDING RING 46-5
6140-B23101 PILOT
No. Parts No. Description
1413
Page 16

NOTES
15 16
Page 17

MANUFACTURER’S LIMITED WARRANTY FOR:
The limited warranty set forth below is given by MTD
LLC (“MTD”) with respect to new merchandise purchased and
used in the United States and Canada, its possessions and
territories.
MTD warrants this product against defects in material and
workmanship for a period of two (2) years commencing on the
date of original purchase and will, at its option, repair or replace,
free of charge, any part found to be defective in material or
workmanship. This limited warranty shall only apply if this
product has been operated and maintained in accordance with
the Operator
been subject to misuse, abuse,
commercial use, neglect, accident, improper maintenance,
alteration, vandalism, theft, fire, water or damage because of
other peril or natural disaster. Damage resulting from the
installation or use of any accessory or attachment not approved
by MTD for use with the product(s) covered by this manual will
void your warranty as to any resulting damage. This warranty is
limited to ninety (90) days from the date of original retail
purchase for any MTD product that is used for rental or
commercial purposes, or any other income-producing purpose.
HOW TO OBTAIN SERVICE: Warranty service is available,
WITH PROOF OF PURCHASE THROUGH YOUR LOCAL
AUTHORIZED SERVICE DEALER. To locate the dealer in your
area, please check for a listing in the Yellow Pages or contact
the Customer Service Department of MTD LLC by calling
1-866-747-9816 or writing to P.O. Box 361131, Cleveland OH
44136-0019 or if in Canada call 1-800-668-1238. No product
returned directly to the factory will be accepted unless prior
written permission has been extended by the Customer Service
Department of MTD LLC.
This limited warranty does not provide coverage in the
following cases:
Trimmer line.
A.
B.
MTD does not extend any warranty for products sold or
exported outside of the United States of America and
Canada, its possessions and territories, except those
sold through MTD’s authorized channels of export
distribution.
’s Manual furnished with the product, and has not
No implied warranty, including any implied warranty of
merchantability or fitness for a particular purpose, applies
after the applicable period of express written warranty
above as to the parts as identified. No other express
warranty or guaranty, whether written or oral, except as
mentioned above, given by any person or entity, including
a dealer or retailer, with respect to any product shall bind
MTD. During the period of the Warranty, the exclusive
remedy is repair or replacement of the product as set
forth above.
long an implied war
not apply to you.)
The provisions as set forth in this Warranty provide the
sole and exclusive remedy arising from the sales. MTD
shall not be liable for incidental or consequential loss or
damages including, without limitation, expenses incurred
for substitute or replacement lawn care services, for
transportation or for related expenses, or for rental
expenses to temporarily replace a warranted product.
(Some states do not allow limitations on how long an implied
warranty lasts, so the above limitation may not apply to you.)
In no event shall recovery of any kind be greater than the
amount of the purchase price of the product sold. Alteration
of the safety features of the product shall void this Warranty.
You assume the risk and liability for loss, damage, or injury to
you and your property and/or to others and their property
arising out of the use or misuse or inability to use the product.
This limited warranty shall not extend to anyone other than
the original purchaser, original lessee or the person for whom
it was purchased as a gift.
How State Law Relates to this W
gives you specific legal rights, and you may also have other
rights which vary from state to state.
To locate your nearest service dealer dial 1-866-747-9816 in
the United States or 1-800-668-1238 in Canada.
(Some states do not allow limitations on how
ranty lasts, so the above limitation may
arranty:
This war
ranty
ves the right to change or impr
eser
MTD r
any MTD Product without assuming any obligation to modify
any product previously manufactured.
ove the design of
MTD LLC
P.O. Box 361131
Cleveland, OH 44136-0019
Page 18

Manuel de Utilisation
Désherbeuse Électrique
Modèle
MTDA13P
Français
IMPORTANT: LISEZ LES RÈGLES ET
CONSIGNES DE SÉCURITÉ SOIGNEUSEMENT
P/N 6096-202A09 © 2005
ABRIQUÉ Á CHINA
F
Page 19

TABLE DES MATIÈRES
Declaration de Garantie Page 18
Consignes de Sécurité Pages 19-23
Instructions Pour Montage Page 24
Instructions de Reglage Pages 25-26
Instructions D’utilisation Pages 26-27
Instructions de Mantenimiento Pages 28-30
Caractéristiques Page 30
Liste des Pièces Page 31
Notes Page 32
Garantie Limitee du Fabricant Page 33
DECLARATION DE GARANTIE
GARANTIE LIMITEE DE DEUX ANS SUR LE COUPE - HERBE DE YARD MACHINES
Pendant deux années à partir de la date d'achat, quand ce coupe-herbe est utilisé et maintenu selon
le manuel de l'opérateur, Yard Machines réparera n'importe quel vice de matériau pour la main-d'œuvre gratuitement.
Si ce coupe-herbe est utilisé pour des buts commerciaux ou de location, cette garantie ne s'applique
que pendant 90 jours à partir de la date d'achat.
LE SERVICE DE GARANTIE EST DISPONIBLE EN RENVOYANT CE COUPE-HERBE AU SERVICE
DE REPARATION DU REVENDEUR MTD LE PLUS PROCHE.
Cette garantie vous donne des droits légaux spécifiques, et vous pouvez également avoir d'autres
droits qui varient d'un état à l'autre.
18
Page 20

CONSIGNES DE SÉCURITÉ
RECOMMANDATIONS DE CALIBRE DE FIL MINIMUM
TENSION
LONGUEUR DU
CORDON
CALIBRE DE FIL
REQUIS
120
25 pieds / 7,5m 18 A.W.G.*
50 pieds / 15m 16 A.W.G.*
100 pieds / 30m 16 A.W.G.*
*American Wire Gauge (CALIBRE AMERICAIN)
Les symboles de sécurité attir
des dangers potentiels. Ces symboles et leurs détails
explicatifs méritent que vous les lisiez et compreniez
bien. Les avertissements de sécurité ne peuvent éviter
les dangers de par eux-mêmes. Les consignes ou
mises en garde qu'ils donnent ne remplacent pas des
mesures préventives appropriées contre les accidents.
SYMBOLE SIGNIFICATION
ent votre attention sur
ALERTE DE SÉCURITÉ:
indique un danger, un avertissement ou une
mise en garde. Soyez vigilant afin d'éviter toute
blessure grave. Ce symbole peut être combiné
à d'autres symboles ou pictogrammes.
REMARQUE: donne des informations ou des instructions
vitales pour le fonctionnement ou l'entretien de
l'équipement.
Lisez le(s) manuel(s) de l'utilisateur et suivez tous
les avertissements et consignes de sécurité.
Vous pourriez à défaut entraîner des blessures
graves pour vous ou d'autres personnes.
SYMBOLE SIGNIFICATION
DANGER:
causer dommages matériels ou blessures
graves pour tous. Respectez les consignes
de sécurité afin de réduire les risques
d'incendie, d'électrocution et de blessures.
AVERTISSEMENT:
respect d’un avertissement peut causer
dommages matériels ou blessures graves
pour tous. Respectez les consignes de
sécurité afin de réduire les risques d'incendie,
d'électrocution et de blessures.
MISE EN GARDE:
d’un avertissement peut causer dommages
matériels ou blessures graves pour tous.
Respectez toujours les consignes de sécurité
afin de réduire les risques d'incendie,
d'électrocution et de blessures.
le non-respect d’un
avertissement peut
le
non-
le nonrespect
SI VOUS AVEZ DES QUESTIONS, APPELEZ LE
1-800-668-1238
• IMPORTANTES CONSIGNES DE SÉCURITÉ •
LIRE TOUTES LES INSTRUCTIONS
AVANT UTILISATION
AVERTISSEMENT:
soig-neusement les consignes de sécurité
lorsque vous utilisez cet appareil. Dans l'intérêt de votre sécurité et de celle des personnes à proximité, prenez soin de lire ces
instructions avant de faire fonctionner la
machine. Veuillez garder les instructions en
lieu sûr pour usage ultérieur.
euillez lire les instructions avec soin. Familiarisez-vous
V
•
avec les commandes et l'utilisation correcte de cet
appareil.
• N'utilisez pas l'appareil si vous êtes fatigué, malade ou
sous l'ef
Les enfants et adolescents de moins de 15 ans ne
•
doivent pas utiliser l'appareil exceptés les adolescents
assistés d'un adulte.
•
Inspectez l'appar
endommagées. Regardez s'il y a des fuites de carburant.
Assurez-vous que les fixations sont solidement en place.
fet de l'alcool, de dr
eil avant utilisation. Remplacez les pièces
ogues ou de médicaments.
suivez
19
Remplacez les pièces de l'accessoire de coupe qui sont
fendillées, ébréchées ou endommagées. Assurez-vous
que l'accessoire de coupe est correctement installé et
solidement fixé. Assurez-vous que le protecteur d'acces-
e de coupe est correctement fixé et positionné comme
soir
recommandé. Vous risquez sinon de causer des blessures
à l'opérateur et aux spectateurs, et d'endommager l'ap-
eil.
par
N'utilisez que du fil de r
•
can. N'utilisez jamais de fil ou de cordon à renfort
métallique car ils peuvent se briser et se transformer en
ojectile danger
pr
Dégagez la zone de coupe avant chaque usage. Enlevez
•
tous les objets pouvant être projetés ou happés par l'accessoire de coupe : cailloux, verre brisé, clous, fil ou
ficelle. Éloignez enfants, spectateurs et animaux de la
zone de coupe. Tenez-les à au moins 15 m (50 pi) de là
mais sachez que les spectateurs risquent quand même
e atteints par des objets pr
d'êtr
ter des pr
por
le moteur et l'accessoire de coupe si quelqu'un s'ap-
oche de vous.
pr
eux.
otecteurs oculair
emplacement d’origine du fabri-
ojetés. Conseillez-leur de
rêtez immédiatement
es. Ar
Page 21

CONSIGNES DE SÉCURITÉ
RECOMMANDATIONS DE CALIBRE DE FIL MINIMUM
TENSION
LONGUEUR DU
CORDON
CALIBRE DE FIL
REQUIS
120
25 pieds / 7,5m 18 A.W.G.*
50 pieds / 15m 16 A.W.G.*
100 pieds / 30m 16 A.W.G.*
*American Wire Gauge (CALIBRE AMERICAIN)
LIRE ET CONSERVER CES
INSTRUCTIONS
Lorsqu'un appareil électr
élémentaires doivent toujours être prises pour assurer une
sécurité maximum et une performance optimale. Lire cette
Notice avant d'assembler et d'utiliser cet appareil. Ne pas
se conformer aux instructions peut causer des secousses
électriques, des brûlures, un incendie ou des blessures
corporelles.
ique est utilisé, des précautions
AVERTISSEMENT
POUR RÉDUIRE LES RISQUES DE
BRÛLURES, D'INCENDIE, DE SECOUSSES
ÉLECTRIQUES OU DE BLESSURES :
1. RESPECTER TOUTES LES MESURES DE
SÉCURITÉ figur
l'utilisation du coupe-herbe.
2. POUR RÉDUIRE LES RISQUES DE SECOUSSES
ÉLECTRIQUES, cet équipement est muni d'une fiche
polarisée (une broche est plus large que l'autre).
Cette fiche ne peut être branchée que dans un sens
et que dans une prise de courant polarisée. Si la fiche
ne peut pas être enfoncée à fond dans la prise de
courant, inverser le sens de la fiche. Ne jamais modifier la fiche de l'appareil.
3. INSPECTER L'APPAREIL À LA RECHERCHE DE
DOMMAGES qu'auraient pu subir le carter, le cordon
électrique ou à la fiche. Toutes les fixations doivent
être bien serrées. Ne pas utiliser l'appareil si la
gâchette ne permet pas de l'arrêter adéquatement.
Ne jamais utiliser l'appareil si le cordon électrique ou
la fiche est endommagé, si le moteur ou le coupeherbe lui-même ne fonctionne pas correctement ou
s'il est tombé, s'il a été endommagé, laissé à l'ex-
ieur ou plongé dans l'eau.
tér
si les trous de ventilation sont bouchés. Toujours
er les débris qui risqueraient de limiter la circula-
v
enle
tion de l'air par les trous de v
pièces endommagées qui sont ébréchées, cassées
ou qui ont été endommagées d'une manière ou d'une
autre et qui r
graves blessures. Garden le couteau de coupeur
aigu.
4.
DOUBLE ISOLA
des risques de secousses électriques. La double
isolation consiste en deux «couches» d'isolant élec
Les appareils constr
.
ique
tr
tion ne sont pas conçus pour être mis à la terre. Par
conséquent, le cordon prolongateur utilisé a
coupe-herbe peut être br
prise de courant de 120 volts. Des mesures de sécu-
ité élémentaires doivent toujours être prises
r
lorsqu'un appareil électr
lation constitue seulement une protection supplémen-
ant dans cette Notice avant et durant
Ne pas utiliser l'appareil
entilation.
aient d'être projetées et causer de
isquer
TION
pour protéger l'utilisateur
uits a
anché dans n'impor
ique est utilisé.
Remplacer les
vec ce type d'isola-
La doub
vec le
te quelle
le iso
taire en cas de défaillance de l'isolant interne.
5.
CORDON PR
appareil que dans un cordon prolongateur conçu pour
usage extérieur et d'un calibre adéquat en fonction de
sa longueur. Voir le tableau ci-dessous. Un cordon
prolongateur à 2 conducteurs ne possédant pas de
connexion à la terre peut être utilisé étant donné que
cet appareil est à double isolation. Si l'on n'est pas sûr
du calibre du cordon prolongateur à utiliser, utiliser un
cordon prolongateur de calibre immédiatement
supérieur. Il est à noter que plus le numéro du calibre
est petit plus le cordon prolongateur est gros.
(1). Un cordon prolongateur de diamètre approprié doit
être utilisé pour éviter les pertes de puissance et la
surchauffe de l'appareil.
(2). Le cordon prolongateur doit être spécialement conçu
pour usage extérieur et porter la mention «SJ» ou
«SJT» et le suffixe «WA». Au Canada, le cordon prolongateur doit porter la mention «SFTW».
(3). S'assurer que le cordon prolongateur ne comporte
pas de fils dénudés ni desserrés et que l'isolant n'est
pas endommagé. En cas de dommages, remplacer le
cordon prolongateur avant d'utiliser l'appareil.
NE PAS MALTRAITER LE CORDON - Ne jamais
transporter l'appareil par le cordon électrique ni tirer
sur le cordon électrique pour débrancher l'appareil. Le
cordon électrique doit toujours être tenu à l'écart de
l'opérateur et des obstacles. Ne pas exposer le cordon
électrique à des surfaces chaudes, de l'huile ou de
l'eau. Ne pas tirer le cordon électrique autour d'angles
vifs, de coins et veiller à ne pas le coincer dans une
porte en la fermant.
6. AUCUNE PIÈCE INTERNE N'EST RÉPARABLE
PAR L'UTILISATEUR - Cet appareil à double
isolation ne comporte aucune pièce interne réparable
par l'utilisateur. Ne pas essayer de le réparer soi-
-
-
20
même. Pour tout renseignement concernant l'entretien, s'adresser à un Centre de réparation Yard
Machines dont le numéro figure sur la couverture
arrière de cette Notice d'utilisation.
7. DANGER POUR LES YEUX - Toujours porter des
lunettes de sécur
tion des y
Lorsque l'on taille des bordures, les débris projetés
augmentent le r
s'approcher de la z
OLONGATEUR
Tableau 1
ité ou tout autre dispositif de protec
eux lorsqu'on utilise le coupe-herbe
isque de b
one de tr
- Ne br
lessures. Personne ne doit
ail.
v
a
ancher cet
.
Page 22

CONSIGNES DE SÉCURITÉ
8. TENIR LES PIEDS ET LES MAINS À L'ÉCART du fil
de coupe en rotation.
debris n'est pas en place.
BIEN S'HABILLER - Toujours porter des pantalons
9.
longs, des chaussures et des gants. Ne jamais porter
de vêtements amples, de bijoux, de shorts ou de sandales. Ne jamais utiliser l'appareil si on est pieds nus.
10. LA ZONE DE TRAVAIL DOIT TOUJOURS ÊTRE
DÉGAGÉE - Ne laissez personne, en particulier les
enfants et les animaux de compagnie, s’approcher de
la zone dans laquelle vous travaillez à moins de 50
pieds (15 mètres). Arrêter l'appareil dès que
quelqu'un s'en approche. Ne jamais laisser les
enfants utiliser cet appareil en tant que jouet et ne
jamais les laisser utiliser l'appareil sans surveillance.
ÉVITER LES MILIEUX D
11.
isques d'incendie ou d'explosion, ne pas utiliser
les r
l'appareil à proximité de liquides ou de gaz inflammables ou de matériaux en combustion ou dégageant de
la fumée. Ne pas utiliser le coupe-herbe dans les
endroits humides ou mouillés, autour des piscines, de
cuves à remous, etc. ou lorsqu'il pleut. Ne pas toucher à la fiche, au cordon électrique ou à l'appareil si on
a les mains mouillées.
UTILISER ADÉQUATEMENT L'APPAREIL - Utiliser
12.
l'appareil exclusivement pour les applications prévues
dans cette Notice. NE PAS UTILISER LE COUPEHERBE POUR BALAYER - c'est-à-dire déplacer la
tête de coupe de gauche à droite pour nettoyer les
débris des trottoirs, des allées, etc. Ce coupe-herbe
est un outil puissant qui peut projeter des débris à
plus de 50 pieds et blesser quelqu'un ou endommager
les voitures, les fenêtres ou les habitations proches.
Inspecter la zone de travail avant de mettre l'appareil
en marche et la débarrasser des débris et des autres
objets qui pourraient éventuellement causer des dommages.
NE JAMAIS UTILISER D'ACCESSOIRES autres que
13.
ecommandés et four
ceux r
pas utiliser de fils de coupe métalliques.
14. NE PAS TENIR L'APPAREIL À BOUT DE BRAS.
Toujours garder bon pied et un bon équilibre.
15. ÉVITER LES DÉMARRA
pas por
qu'on a le doigt sur la gâchette.
16.
DÉBRANCHER l'appareil de la prise de courant
quand il n'est pas utilisé ou a
de coupe
17.
REMISER le coupe-herbe à l'intérieur - Lorsqu'il n'est
pas utilisé, l'appareil doit être remisé dans un endroit
sec, verrouillé ou inaccessible aux enfants.
18. Ne pas saisir les lames de coupe ou les bords de
coupe exposés lorsque ous prenez ou tenez l’appareil.
ter l'appareil pendant qu'il est br
.
Ne pas utiliser si le bouclier à
ANGEREUX
nis par Yard Machines. Ne
GES A
CCIDENTELS
ant d'entretenir la tête
v
our éviter
- P
- Ne
anché et alors
19.
Ne pas forcer avec l’appareil - il fonctionnera mieux
et il y aur
à la vitesse pour laquelle il a été prévu.
a moins de risques d’accident s’il fonctionne
EXPLICATION DES NOTA, AVERTISSEMENTS
ET SYMBOLES DE LA GARANTIE
1. Un NOTA est destiné à fournir des informations com-
plémentaires, à éclaircir un point particulier ou à expliquer plus en détail une étape.
2. Un
3. Le (SYMBOLE DE GARANTIE) indique que si les
4.
AVERTISSEMENT identifie une procédure qui
risque de causer de graves blessures corporelles ou
de graves dommages à l'appareil et/ou les deux si elle
n'est pas respectée ou si elle est mal effectuée.
procédures ou instructions n'ont pas été respectées,
les dommages causés annuleront la garantie et que
les réparations seront à la charge du propriétaire.
Pour des services autres que ceux d'entretien à
effectuer par l'utilisateur, s'adresser à un Centre de
réparation agréé Yard Machines. La garantie du fabricant sera nulle et non avenue si des dommages ou
des conditions causés par de mauvaises pratiques
d'entretien rendent le produit inutilisable.
POUR TOUT ENTRETIEN OU SERVICE AU TITRE
DE LA GARANTIE prenez contact avec le Centre de
maintenance agréé MTD le plus proche en appelant
le numérogrtuit 800# mentionné sur le capot arrière.
CONSERVER CES
INSTRUCTIONS
21 22
Page 23

CONSIGNES DE SÉCURITÉ
SYMBOLES DE SÉCURITÉ ET INTERNATIONAUX
Ce manuel de l'utilisateur décrit les symboles et pictogrammes de sécurité et internationaux pouvant apparaître sur ce
produit. Consultez le manuel de l'utilisateur pour les informations concernant la sécurité, le montage, le fonctionnement,
etien et les réparations.
l'entr
SYMBOLE SIGNIFICATION
• SYMBOLE ALERTE DE
SÉCURITÉ
Indique un danger, un avertissement
ou une mise en garde. Ce symbole
peut être combiné à d'autres symboles ou pictogrammes.
• AVERTISSEMENT - LISEZ LE
MANUEL DE L'UTILISATEUR
Lisez le manuel de l'utilisateur et suivez tous les avertissements et consignes de sécurité. Vous pourriez à
défaut entraîner des blessures graves
pour vous ou d'autres personnes
• PORTEZ DES PROTECTIONS
(TÊTE, YEUX ET OREILLES)
SYMBOLE SIGNIFICATION
• ÉLOIGNEZ LES SPECTATEURS
AVERTISSEMENT : éloignez les
spectateurs, les enfants et les animaux domestiques en particulier,
d'au moins 15 m (50 pi) de la zone
de coupe.
DANGER: Objects thrown up by
machine.
• N'UTILISEZ PAS LES LAMES
AVERTISSEMENT : Pour empêcher
des blessures sérieuses aux personnes, ne pas attachez pas et utilisez
l'unité avec n'importe quel type de
lames.
AVERTISSEMENT: les objets projetés et les bruits forts peuvent
endommager la vue et l’ouïe. Portez
une visière de norme ANSI Z87.11989 et des protège-oreilles pendant
l'utilisation. la chute d’objets peut
causer des blessures graves à la
tête. Pr
l'utilisation de l'appareil.
otégez-vous la tête pendant
Page 24

CONSIGNES DE SÉCURITÉ
FAMILIARISEZ-VOUS AVEC VOTRE APPAREIL
INTERRUPTEUR DE
SÉCURITÉ
MANETTE
MARCHE/ARRET
POIGNEE ARRIERE
CORDON DE
SECTUR
POIGNEE DE MAINTIEN
BOUTON DE
’AXE
L
RÉGLAGE
DE
RETENUE DU
CORDON
BOUTON DE
CONVERSION DE
TAILLE-HAIE
ARBRE DE TRANSMISSION
AJUSTABLE
DE
ROUE
GUIDAGE DE
BORD
TETE DE COUPE
TROUS DE
VENTILATION
ARE-DEBRIS
P
BOULON À OREILLES DU
GUIDE DE BORD
FIL DE NYLON
23
Page 25

INSTRUCTIONS POUR MONTAGE
REMARQUE : Les seules opérations de montage que
nécessite v
guidage de bord, le bouclier à débris, et a regler la poignee
d'aide.
INSTALLATION DE LA ROUE DE GUIDAGE
DE BORD
1. Placez la roue du guide de bordure (A) sur l'avant du
2. Serrez fermement l'écrou à oreilles (B). (Fig. 2)
otre taille-haies consistent à monter la roue de
logement moteur ainsi qu'illustré dans la Fig. 1.
Fig. 1
B
A
Fig. 3
C
Fig. 4
Fig. 2
INSTALLATION DU BOUCLIER A DEBRIS
1. Placez le logement du moteur de façon à avoir le suppor
t de tête de fil tourné vers le haut. (Fig. 3)
2. Faites glisser le bouclier à débris au-dessus du logement du moteur.
3. Fixez avec 4 vis (C). (Fig. 4)
24
Page 26

INSTRUCTIONS DE REGLAGE
RÉGLAGE DE LA LONGUEUR DU MANCHE
1. Saisir fermement le manche.
Pousser lSaisir fermement le manche.e bouton de
2.
dégagement rouge du manche vers l’avant et déplacer le manche vers l’avant ou vers l’arrière à la
longueur désirée (Fig. 5)
NOTA: Le manche peut être réglé dans le mode coupeherbe ou taille-bordure.
A
Fig. 5
TRANSFORMATION EN TAILLE-BORDURE
1. Saisir fermement le manche.
2. Appuyez sur le bouton de bordure (B) et faites pivoter
l'ensemble de poignée jusqu'à ce vous entendiez un
déclic. (Fig. 6 & Fig. 7)
3. Ajustez la poignée d'aide selon vos besoins.
ADJUSTER LA POIGNEE DE MAINTEIN
N\REMARQUE: La poignée de maintien est attachée au
manche mais a été tournée vers le bas pour le transport.
Desserrer le bouton de réglage et faire toutner la
1.
poignée vers le haut du manche. (Fig. 8)
Resserrer fermement le bouton de réglage.
2.
Fig. 8
DEMARRAGE
1. A la première utilisation du coupe herbe à fil, vérifier
que les fils de Nylon touchent ou sont au-dessus de la
lame coupe-fil; s’ils ne sont pas assez longs, appuyer
sur le bouton et tirer les fils de Nylon simultanément.
(Fig. 9)
Fig. 6
Fig. 7
B
Fig. 9
2. Connectez le cordon d'alimentation du taille-bordures
à la rallonge selon les instructions de Section 5-1
Conne
xion du cordon.
3. Assurez-vous que la longueur du coupe-herbe et la
position de la poignée d'aide sont bien correctes
ajustez la longueur du coupe-herbe
.
25
ant utilisation ;
v
a
en appuyant sur le bouton de réglage de l'axe ;
ajustez la hauteur de la poignée d'aide en desserrant
la molette de réglage
Page 27

INSTRUCTIONS DE REGLAGE
4. Attrapez fermement l'extremité du taille-herbe et, sans
le laisser entrer en contact a
enfoncez l'interrupteur de sécurité, puis appuyez sur
la gâchette sur la poignée supérieure. Laissez le
coupe-herbe à fil tourner pendant quelques secondes, et "cognez" la tête de fil contre le sol. Le fil de
nylon sera automatiquement relâché. La lame de
coupe se trouvant dans le bouclier à débris coupera
l'excédant de fil.
5. Pour arrêter le coupe herbe, relâcher la gâchette.
AVERTISSEMENT:
abîmé ou trop court ne coupe pas de manière
efficace ; afin d’améliorer sa performance,
tapoter légèrement le bouton de la bobine
contre le sol pendant que le coupe herbe est
en marche. (Fig 10)
vec l'herbe à couper,
Un
fil
INSTRUCTIONS D’UTILISATION
Répéter plusieurs fois avant de commencer le travail pour
ous assurer que tout fonctionne correctement et pour
v
vous familiariser avec le coupe herbe.
Commencer doucement, et avec un peu d’expérience,
vous pourrez utiliser le coupe herbe dans tout son potentiel.
Fig. 10
BRANCHEMENT DU CORDON PROLONGATEUR
1. S'assurer que le cordon prolongateur n'est PAS
branché dans une prise de courant avant de procéder
à l'opération suivante.
2. Former une boucle de 20 à 25 cm (8 à 10 pouces)
avec l'extrémité du cordon prolongateur.
3. Placez la boucle dans la fente (A) sous la poignée
e et ver
rièr
ar
retenue de cordon (B) comme illustré dans la Figure
11.
ancher le cordon prolongateur sur le du coupe-
Br
4.
herbe.
Ne brancher le cordon prolongateur dans une prise de
5.
ant secteur Q
cour
l'appareil.
rouillez la en place avec la pièce de
UE lorsque l'on est prêt à utiliser
FONCTIONNEMENT DU COUPE-HERBE
1. COUPE ET TONTE (Fig. 12). Utiliser un mouvement
de balancement latéral semblable à celui d’une faux.
Ne pas incliner la tête pendant cette opération. Faire
un essai sur la partie à tondre pour vérifier la hauteur
de coupe. Garder la téte de coupe à une hauteur constante pour obtenir une tonte uniforme.
Fig. 12
Fig. 11
A
B
26
Page 28

INSTRUCTIONS D’UTILISATION
2. POUR TONDRE DE PLUS PRÉS (Fig. 13). Tenir le
coupe-herbe droit de
de manière que le fil de coupe se trouve à l’angle
voulu sans que le dessous de la tête de coupe ne
touche le sol. Toujours tondre loin de soi, ne jamais
amener le coupe-herbe à soi.
POUR COUPER L’HERBE AUTOUR DES
3.
CLÔTURES ET DES FONDATIONS. Pour couper
l’herbe autour des clôtures grillagées, des palissades,
des murs et des fondations, avancer lentement de
manière à couper l’herbe au ras de l’obstacle sans
que le fil de coupe vienne le fouetter, ce qui risquerait
de casser le fil ou l’effilocher. Si le fil vient en contact
avec une clôture grillagée, il cassera.
POUR COUPER L’HERBE AUTOUR DES ARBRES.
4.
Approacher lentement de arbres, de manière que le fil
de coupe ne fouette pas l’écorce. Faire le tour des
arbres dans le sens des aiguilles d’une montre.
Couper avec la pointe du fil de coupe en inclinant
légèrement le coupe-herbe vers l’avant.
RASAGE (Fig. 14). Le rasage consiste à couper la
5.
végétation au ras du sol. Pour ce faire, incliner la tête
de coupe à gauche à un angle d’environ 30 degrés.Le
réglage de la poignée permettra de mieux contrôler le
coupe-herbe pendant cette opération. S’assurer
qu’aucune personne ou qu’aucun animal ne soit
présent dans un rayon de 15 mètres. Ne jamais
essayer de raser une zone où des débris risquent
d’être projetés et causer des dommages corporels ou
matériels.
UTILISATION EN TANT QUE TAILLE-
6.
BORDURE(Fig. 15). L’appareil étant réglé en tant que
taille-bordure, le maintenir de façon que le moteur soit
à gauche pour que les débris soient projetés vers l’arrière. Toujours porter des lunettes de sécurité.
YAGE - NE PAS UTILISER LE COUPE-HERBE
ALA
B
7.
POUR BALAYER
8. NE PAS HEURTER LE BETON AVEC LE COUPEHERBE. Cela risquerait d'endommager la tête de fil.
17).
(Fig.
vant soi et l’inclner légèrement
(Fig. 16)
Fig. 14
Fig. 15
Fig. 16
Fig. 13
Fig. 17
27
Page 29

INSTRUCTIONS DE MANTENIMIENTO
REMPLACEMENT DE LA BOBINE DE FIL DE
NYLON
1. Débranchez le coupe-herbe.
2. Demontez l'ensemble bobine du coupe-herbe. Pour
ce faire, tenez la partie exterieure cannelée de
l'ensemb
faites tourner la tête de bobine de l'autre main pour la
déverrouiller. (Fig. 18 & Fig. 19) Le support de bobine
et la bobine devraient maintenant se demonter facilement.
REMARQUE : Il y a un ressort dans la tête de fil ;
faites attention de ne pas le perdre.Veillez à le placer
en lieu sûr.
le d'une main, puis poussez vers le bas et
Fig. 20
A
Fig. 18
Fig. 19
3. Enlevez le support transparent. Sortez tout le fil
4. Utilisez un fil de remplacement de 0,065'', d'une
longueur d'en
boucle ainsi obtenue dans l’orifice du diviseur de
bobine. (Fig. 20)
5. Enroulez le fil de façon serrée et propre sur la bobine.
Le fil devrait s’enrouler dans le sens de la flèche (A)
imprimée sur le bobine, chaque moitié étant séparée
par le diviseur (Fig. 21). Continuez à enrouler et serrer jusqu’à ce que le fil reste environ 6” de longueur.
(Fig. 22).
viron 14'.
Pliez le fil en deux et placez la
Fig. 21
Fig. 22
28
Page 30

INSTRUCTIONS DE MANTENIMIENTO
6. Installez le bout du fil dans l’orifice opposé (Fig. 23).
Replacez le support transparent (Fig. 24). Tirez le fil
de dessous et le fix
suppor
t transparent (Fig. 25). Tirez le fil de dessus et
ez dans l’orifice en dessous du
le fixez dans l’orifice en dessus du support transparent. (Fig. 26)
Fig. 23
7. Insérez le fil dans chaque orifice du support de
bobine, et faites glisser la bobine dans ce support.
27)
(Fig.
REMARQUE : Assurez-vous que le fil se trouve bien
dans le diviseur ; s'il est en-dehors, le fil ne sera pas
alimenté.
8. En veillant à bien insérer le ressort, remontez
l'ensemble support de bobine et bobine dans le
coupe-herbe. Pour ce faire, poussez sur la tête et
tournez l'ensemble dans le sens des aiguilles d'une
montre jusqu'à ce qu'il se fixe en position. (Fig. 28 and
Fig. 29)
Fig. 24
Fig. 25
Fig. 27
Fig. 28
Fig. 26
Fig. 29
29
Page 31

INSTRUCTIONS DE MANTENIMIENTO
9. Pour vérifier que le fil avance bien correctement,
poussezle bouton avec votre pouce tout en tirant le fil
vec vos doigts. Le fil doit pouvoir avancer librement.
a
30).
(Fig.
10. Si le fil se casse dans la bobine, répétez l'opération de
remplacement.
11. Démarrez le coupe-herbe en suivant les instructions
données dans la section "MISE EN MARCHE".
Fig. 30
MANTENIMIENTO
AVERTISSEMENT:
Avant de commencer toute maintenance,
débrancher la prise du prolongateur.
1. Un entretien et nettoyage réguliers du coupe herbe en
assurera son efficacité et sa longévité.
2. Après chaque opération, défaire et enlever la terre et
l’herbe des éléments suivants : la bobine et ses
encoches, particulièrement le pare débris.
3. Pendant l’utilisation, garder les ouvertures propres et
sans herbe.
4. Pour nettoyer le coupe herbe, utiliser exclusivement
un chiffon trempé dans de l’eau chaude et une
brosse à poils doux.
Ne pas asperger ou mouiller l’appareil.
5.
6. Ne pas utiliser de détergeants ou dissolvants car ils
risquent d’endommager le coupe herbe. Les pièces
en plastique sont facilement endommagées par les
produits chimiques.
7. Si le fil de coupe ne coupe plus ou se casse, faitesle remplacer pour cela, prenez contact avec un centre de maintenance agrée.
CARACTÉRISTIQUES
ouissance
P
Vitesse à vide . . . . . . . . . . . . . . . . . . . . . . . . . . . . . . . . . . . . . . . . . . . . . . . . . . . . . . . . . . . . . . . . . . . . . . . . . . . . . . . .7,500/min
Diamètre du cercle de coupe
Taille de ligne . . . . . . . . . . . . . . . . . . . . . . . . . . . . . . . . . . . . . . . . . . . . . . . . . . . . . . . . . . . . . . . . . . . . . . . . . .ø0.065” (1.65mm)
oids Net
P
. . . . . . . . . . . . . . . . . . . . . . . . . . . . . . . . . . . . . . . . . . . . . . . . . . . . . . . . . . . . . . . . . . . . . . . .
. . . . . . . . . . . . . . . . . . . . . . . . . . . . . . . . . . . . . . . . . . . . . . . . . . . . . . . . . . . . . . . . . .
. . . . . . . . . . . . . . . . . . . . . . . . . . . . . . . . . . . . . . . . . . . . . . . . . . . . . . . . . . . . . . . . . . . . . . . . . . . . . .
30
120V~, 60Hz, 4,0Amp
(330mm)
13”
6,4 Lbs (2,9 Kg)
Page 32

LISTE DES PIÈCES
1 6011-202A02 CORDON DE SECTUR 29 6SVABB04-10 VIS
2 6199-202A01 RETENUE DU CORDON 30 6SDABA03-16 VIS
3 6043-815501 PLAT (PRESSION DE LA CORD) 31 6041-840001 PLAQUE A BORNES
4 6SDABB04-14 VIS 32 6038-202A06 BOITIER (L)
5 6022-202A01 INTERRUPTEUR 33 6228-202A15 ASSEMBLAGE DU MOTEUR
6 6134-202A04 GÂCHETTE 33-1 6099-202A03 MOTEUR
7 6024-202A01 RESSORT 33-2 6187-202A01 PLAT FIXE
8 6134-202A05 GÂCHETTE 33-3 6SDAB-03-12 VIS
9 6010-202A01 FIL 33-4 6SDAB-04-12 VIS
10 6068-202A06 POIGNÉE SUPERIEURE (R) 33-5 6270-202003 ASSEMBLAGE DU COUTEAU
11 6068-202A05 POIGNÉE SUPERIEURE (L) 34 6131-202A04 ANNEAU DE COUSSIN
12 6056-202A03 BOUTON 35 6114-202A02 GUIDE D'EGDER
13 6021-202A01 LEVIER 36 6NBB-06 ECROU
14 6024-202A02 RESSORT 37 6043-202A01 GARNITURE
15 6131-202A01 PIPE COMMUNE 38 6SXDB-06-20 VIS
16 6129-202A01 TUBE CENTRAL 39 6115-202A01 GOUPILLE D'AXE
17 6SDABB04-06 VIS 40 6137-202A01 ROUE
18 6NAB-06 ECROU 41 6NAB-05 ECROU
19 6056-230302 BOUTON 42
6SDABB04-08 VIS
20 6068-230301 POIGNÉE CENTRALE 43
6250-202503 LAME DE DECOUPE PAR FIL
21 6SXDB-06-65 VIS 44 6262-202A02 BOUCLIER
22 6SDABB04-18 VIS 45 6024-202A04 RESSORT
23 6038-202A05 BOITIER (R) 46 6228-202004A ASSEMBLAGE DU PORTE-BOBINE
24 6059-202A01 CHEMISE 46-1
6059-202004 HABILLAGE TRANSPARENT
25 6056-202A04 BOUTON 46-2
6008-202001A PORTE-BONIINE
26 6239-202A01 ANNEAU FIXE 46-3
6194-202001 DECOUPE PAR FIL
27 6024-202A03 RESSORT 46-4
6059-202005A COUVRE-BOBINE
28 6131-202A02 ANNEAU D'EXTENSION 46-5
6140-B23101 PILOTE
No. Référence Description No. Référence Description
31
Page 33

NOTES
32
Page 34

GARANTIE LIMITÉE DU FABRICANT POUR:
La garantie limitée énoncée ci-après est accordée par MTD
LLC (« MTD ») et concerne les marchandises neuves achetées
et utilisées aux États-Unis, ainsi que dans leurs possessions et
territoires.
MTD garantit ce produit contre tout vice de matière ou de façon
pendant une période de deux (2) ans à compter de la date
d’achat initiale et elle se réserve le choix de réparer ou de
remplacer, à titre gratuit, toute pièce présentant un vice de
matière ou de façon. Cette garantie limitée nes’ appliquera que
dans la mesure où le produit aura été utilisé et entretenu
mément au Guide de l’utilisateur fourni avec le produit et
confor
n’aura pas fait l’objet d’un usage inadéquat, abusif, commercial
ou négligent, d’un accident, d’un entretien inadéquat, d’une
modification, de vandalisme, d’un vol, d’un incendie, de dégâts
d’eau ou d’un endommagement résultant d’un autre péril ou
d’un désastre naturel. Les dommages résultats de l’installation
ou de l’utilisation de tout accessoire ou équipement non
approuvé par MTD pour une utilisation avec le(s) produit(s)
couvert(s) par le présent guide annuleront la garantie et ce qui
concerne les dommages qui en résulteraient éventuellement.La
présente garantie est limitée à quatre-vingt-dix (90) jours à
compter de la date d’achat au détail initiale pour tout produit
MTD utilisé à des fins locatives ou commerciales, ou toute
utilisation produisant des revenus.
POUR L’ENTRETIEN-DÉPANNAGE : l’Entretien-dépannage
au titre de la garantie est disponible, SUR PRÉSENTATION DE
PREUVE D’ACHAT, AUPRÈS DU DISTRIBUTEUR AGRÉÉ
LOCAL. Pour obtenir le nom du distributeur agréé local,
consulter les Pages Jaunes ou se mettre en rapport avec le
Service après-vente de MTD LLC. en appelant le 1-866-7479816 ou en écrivant au P.O. Box 361131, Cleveland OH
44136-0019 ou en appelant le 1-800-668-1238 au Canada.
Aucun pr
préalable du ser
accepté.
La garantie limitée n’offre aucune couverture dans les cas
suivants :
A. Ligne plus mince.
B. MTD n’accorde aucune garantie pour les produits vendus
MTD se réserve la droit de modifier ou d’améliorer la
conception de tout produit MTD sans assumer l’obligation de
modifier tout produit d’une fabrication plus ancienne.
oduit r
ou exportés des États-Unis, de leurs possessions et
ter
vendus par l’inter
distribution à l’exportation.
es, exception faite en ce qui concer
ritoir
né à l’usine sans per
etour
vice après-vente de MTD LLC ne sera
médiaire de ses canaux agréés de
mission écrite
ne les pr
oduits
Aucune garantie implicite, y compris toute garantie de
valeur marchande ou d’adaptation à une fin particulière, ne
s’applique après la période applicable de garantie expresse
écrite ci-dessus concernant les pièces qui sont identifiées.
Aucune autre garantie ou caution expresse, écrite ou orale,
à l’exception de celle mentionnée ci-dessus, accordée par
toute personne ou entité, y compris tout distributeur ou
détaillant, concernant tout produit n’engagera la
responsabilité de MTD. Pendant la période destates
garantie, le remède exclusif est la réparation ou le
emplacement du produit dans les conditions énoncées ci-
r
dessus.
garantie implicite, il est donc possible que la limitation ci-dessus
ne s’applique pas à vous.)
Les clauses énoncées dans la présente Garantie
constituent le recours unique et exclusif inhérent aux
ventes. MTD ne sera en aucun cas tenue pour
responsable de tout dommage indirect ou consécutif ou
de dommages comprenant, entre autres mais pas
seulement, les dépenses encourues du fait du recours à
des services de remplacement ou de substitution pour
l’entretien des pelouses, le transport ou des frais
connexes, ou les frais entraînés par une location destinée
à remplacer provisoirement un produit sous garantie.
(Certains états ne permettent pas la limitation de la garantie
implicite, il est donc possible que la limitation ci-dessus ne
s’applique pas à vous.)
Aucun recouvrement, quel qu’il soit, ne sera d’un montant
supérieur au prix du produit vendu. Toute modification des
dispositifs de sécurité du produit annulera la présente
Garantie. Vous assumez tout risque et toute responsabilité
résultant de la perte, de l’endommagement ou du préjudice
que vous et votr
pr
la mauvaise utilisation ou de l’empêchement d’utiliser le
produit.
La présente garantie limitée n’est accordée qu’à l’acheteur
initial, au preneur initial ou à la personne à laquelle le produit
a été offert.
Le Dr
présente garantie vous confère certains droits juridiques, et
vous pouvez bénéficier d’autres droits, lesquels varient d’une
juridiction à l’autr
Pour obtenir l’adr
composer le : 1-800-345-8746 aux États-Unis ou le
1-800-668-1238 au Canada.
(Certains états ne permettent pas la limitation de la
opriété et/ou d’autr
opriété pourront encourir du fait de l’utilisation normale, de
oit des États vis à vis de la présente garantie :
e pr
e.
esse du distributeur agréé le plus pr
es et leur
oche,
la
33
MTD LLC
P.O. Box 361131
Cleveland, OH 44136-0019
Page 35

Manuel del Dueño/Operador
Podadora Eléctrica
Modelo
MTDA13P
Español
IMPORTANTE: LEA LAS REGLAS DE SEGURIDAD Y
INSTRUCCIONES DETENIDAMENTE
P/N 6096-202A09 © 2005
HECHO EN CHINA
Page 36

ÍNDICE
Declaración de Garantía Página 35
Reglas de Funcionamiento Seguro
Instrucciones de Ensamble Página 41
Instrucciones de Ajuste Página 42-43
Instrucciones de Operación Página 43-44
Página 36-40
Instrucciones de Mantenimiento
Especificaciones Página 47
Lista de piezas Página 48
Notas Página 49
Garantía Limitada del Fabricante Página 50
Página 45-47
DECLARACIÓN DE GARANTÍA
GARANTÍA LIMITADA DE DOS AÑOS EN LA BORDEADORA DE CÉSPED YARD MACHINE
Yard Machine reparará cualquier defecto material o de fabricación de forma gratuita durante un plazo
de dos años desde la fecha de compra, siempre y cuando la bordeadora haya sido usada y mantenida de acuerdo con el manual de usuario.
Si esta Bordeadora de césped se usa comercialmente o para alquiler, esta garantía estará en vigor
durante sólo 90 días desde la fecha de compra.
SE ACCEDE AL SERVICIO DE GARANTÍA DEVOLVIENDO LA BORDEADORA DE CÉSPED AL
SERVICIO TÉCNICO MTD MÁS CERCANO.
Esta garantía le da derechos legales específicos. Puede tener otros derechos, que varían de estado a
estado.
35
Page 37

REGLAS DE FUNCIONAMIENTO SEGURO
opósito de los símbolos de seguridad es atraer su
El pr
atención sobre posibles peligros. Los símbolos de
seguridad y su explicación merecen su atención y
comprensión. Las advertencias de seguridad no eliminan el peligr
advertencias que ofrecen no son sustitutas de ninguna
medida de prevención de accidentes.
SÍMBOLO SIGNIFICADO
o por sí mismas. Las instrucciones o
ALERTA DE SEGURIDAD:
Indica peligro, advertencia o precaución. Se
equiere atención para evitar daños person-
r
ales. Puede utilizarse con otros símbolos o
pictogramas.
NOTA: Le avisa de información o instrucciones vitales para
el funcionamiento del equipo.
Lea el Manual del Usuario y siga todas las advertencias e instrucciones de seguridad.
Si no lo hace pueden producirse daños en el operador y los que le rodean.
SÍMBOLO SIGNIFICADO
PELIGRO:
producirse daños personajes a usted o a terceros. Siga siempre las precauciones de
seguridad para reducir el riesgo de incendio o
daños personales.
ADVERTENCIA:
advertencia pueden producirse daños en
usted o en otros. Siga siempre las instrucciones de seguridad para reducir el riesgo de
incendio y daños personales.
PRECAUCIÓN:
resultar dañada su propiedad o usted mismo.
Siga siempre las precauciones para reducir el
riesgo de incendio y daños personales.
Si no se obedece una
advertencia pueden
Si no se obedece una
Si no obedece
viso puede
un a
SI TIENE PREGUNTAS, LLAME AL
1-800-668-1238
• INSTRUCCIONES IMPORTANTES DE SEGURIDAD •
LEA TODAS LAS INSTRUCCIONES DE
ANTEMANO
Al utilizar la
ADVERTENCIA:
seguir las normas de seguridad. Lea estas
instrucciones antes de manipular la unidad para
asegurar la seguridad del operador y de aquellos que lo rodean. Conserve estas instrucciones
para uso futuro.
• Lea las instrucciones detenidamente. Familiarícese
con los controles y el uso adecuado de la unidad.
No opere esta unidad si está cansado
•
la influencia del alcohol, drogas o medicamentos.
• Los niños no debe operar la unidad. Los adolescentes
deben encontrarse acompañados por un adulto.
odos los dispositiv
T
•
instalados y en b
de manipular la unidad.
Inspeccione la unidad antes de utilizarla. Reemplace
•
todos los componentes dañados antes de comenzar a
usarla. Asegúrese de que la unidad funciona correcta-
os de seguridad deben encontrarse
uen estado de funcionamiento antes
unidad, debe
mo o bajo
er
, enf
mente antes de arrancarla. Reemplace los componentes que estén rotos o dañados de cualquier forma.
No manipule la unidad se tiene componentes sueltos o
dañados
• Inspeccione la zona detenidamente antes de arrancar
la unidad. Retire cualquier deshecho u objetos duros o
blandos como puedan ser cristales, cables, etc.
Mantenga alejados de la zona a niños, personas o
•
mascotas
y mascotas a una distancia de 50 pies (15 m.); aún así
puede e
por objetos lanzados por la máquina.
los observadores que utilicen gafas protectoras. Si
alguien se le aproxima, detenga la unidad inmediatamente
.
Como mínimo
.
xistir riesgo para los observadores causados
.
, mantenga a todos los niños
Se recomienda a
36
Page 38

REGLAS DE FUNCIONAMIENTO SEGURO REGLAS DE FUNCIONAMIENTO SEGURO
RECOMENDACIONES PARA EL CALIBRE
MINIMO DEL ALAMBRE
VOLTIOS
LONGITUD DE
CABLE DE
EXTENSION
T
AMAÑO
REQUERIDO DEL
ALAMBRE
120
25 pies / 7.5m 18 A.W.G.*
50 pies / 15m 16 A.W.G.*
100 pies / 30m 16 A.W.G.*
*Calibre para Alambre de los E.U.A.
FAVOR DE LEER - CONSERVE
ESTAS INSTRUCCIONES
Al utilizar un apar
precauciones básicas para asegurar una protección máxima y un rendimiento óptimo. Lea este manual antes de
ensamblar y operar este aparato. Si no sigue las instrucciones podría provocar el riesgo de incendio, choque eléctrico o heridas personales.
ato eléctrico siempre debe seguir ciertas
ADVERTENCIA
PARA REDUCIR EL RIESGO DE CHOQUEN
ELECTRICO, INCENDIO O HERIDAS PERSONALES:
1. SIGA TODAS LAS INSTRUCCIONES DE SEGURIDAD enlistadas en este manual antes y durante la
operación de esta recortadora.
PARA REDUCIR EL RIESGO DE CHOQUE ELEC-
2.
TRICO, este equipo cuenta con un enchufe polarizado (una clavija es más ancha que la otra). Este
enchufe embonará en una toma de corriente polarizada de una sola manera. Si el enchufe no embona por
completo, inviértalo. De ninguna manera intente cambiar el enchufe.
3. REVISE LA UNIDAD POR SI HAY DAÑOS en el
bastidor, el cable o el enchufe. Mantenga todos los
sujetadores apretados. No la use si el interruptor no
apaga su unidad adecuadamente. Nunca la opere si
el cable o el enchufe han sido dañados, si el motor no
funciona como debería, o si la unidad ha sido golpeada, dañada o dejada caer en agua. Nunca la haga
funcionar con alguna apertura de aire bloqueada.
Conserve todas las aperturas libres de desechos que
puedan reducir el flujo de aire. Reemplace las partes
dañadas que estén astilladas, cuarteadas o en mal
estado, de manera que puedan volar y causar alguna
herida seria. Mantenga cuchillo de cortador agudo.
4. DOBLE AISLAMIENTO para ayudar a prote-
.
lo contr
ger
ción de doble aislamiento consiste en 2 “capas” separadas de aislamiento eléctrico. Los aparatos construidos con este sistema de aislamiento no están diseña
dos para conectarse a tierra. Como resultado de esto,
el cable de extensión utilizado con este aparato
puede conectarse en cualquier toma eléctrica convencional de 120 voltios. Deben observarse las precauciones nor
to eléctr
para aumentar la protección contra heridas que
pudieran resultar por una posible falla de aislamiento
eléctr
5.
CABLE DE EXTENSION - Uselo e
un cable de extensión diseñado para exteriores. Vea
la tabla de abajo. Puede usar un cable de dos alambres sin una cone
ico
ico interno.
a los choques eléctr
males de segur
El sistema de dob
.
xión a tierr
icos
idad al operar un apara-
le aislamiento sólo es
xclusiv
a que este apar
a y
La constr
amente con
uc-
ato
está doblemente aislado. En caso existir duda sobre
la medida adecuada del alambre
sigue para un mayor grosor. Observe que entre más
pequeño es el número de calibre, más grueso es el
cable.
Tabla 1
(1). Al utilizar este aparato, debe usar un cable de exten-
sión del tamaño adecuado por seguridad y para evitar
una pérdida de potencia o sobrecalentamiento.
(2). El cable de extensión debe estar diseñado específica-
mente para uso en exteriores y marcado con “SJ” o
“SJT” y con el sufijo “WA”. En Canadá, el cable de
extensión debe estar marcado con “SFTW”.
(3). Revise la extensión del cable de energía por si hay
alambres sueltos o expuestos, o por si el aislamiento
está dañado. En caso de que sea así, reemplácelo
antes de utilizar el aparato.
NO MALTRATE EL CABLE – Nunca jale el cable
para transportar el aparato o para desonectarlo de la
toma de corriente. Mantenga el cable a distancia del
operador y de cualquier obstáculo en todo momento.
No explonga el cable a superficies caliente, aceite o
agua. No jale el cable alrededor de borde u orillas
filosas ni cierre puertas sobre éste.
6.
-
7. RIESGO DE HERIDAS EN LOS OJOS – Siempre
8. CONSERVE LAS MANOS Y LOS PIES ALEJADOS
9. VISTA ADECUADAMENTE – Use siempre pan-
NO INCLUYE PARTES DE REPUESTO – Su
aparato doblemente aislado no cuenta con
partes de repuesto en su interior. No intente hacer
reparaciones usted mismo. Para información sobre el
servicio, consulte al Departamento de Servicios para
Productos Yard Machines enlistado en el reverso de
Manual del Usuario.
use lentes protectores cuando opere su recortadora.
El desorillar aumenta el riesgo de heridas causadas
por desechos que vuelan. Mantenga siempre a los
espectaroes a una distancia segura.
de la línea giratoria. No opere sin la protección instalada.
talones largos, zapatos y guantes. No opere sin el
protector para residuos instalado.
, use el calibre que le
Page 39

10. MANTENGA EL ÁREA LIBRE DE OBSTÁCULOS -
Mantenga a todo el mundo, especialmente niños y
mascotas, alejados de la zona de operación unos 50
pies (15 m). Apague el aparato inmediatamente si
alguien le acerca. Nunca permita a los niños usar el
aparato, usarlo como un juguete o usarlo sin super
visión.
11. EVITE UN AMBIENTE PELIGROSO – No lo use en
presencia de líquidos o gases inflamables, materiales
humeantes o ardientes, para evitar que produzca un
incendio o alguna explosión. Nunca opere su recortadora en condiciones húmedas o mojadas, alrededor
de albercas, etc. No lo use bajo la lluvia. No agarre el
enchufe, el cable o el aparato con las manos
mojadas.
12. USE EL APARATO CORRECTO – Use este aparato
exclusivamente para lo que fue hecho y como se
describe en este manual. NO BARRA CON LA
RECORTADORA - El barrer significa ladear la cabeza
de hilo con el fin de quitar desechos de las banquetas, etc. Su recortadora es una potente herramienta y
pequeñas piedras u otros escombros similares peuden ser lanzados 50 pies o más, causando heridas o
daños a propiedades cercanas tales como
automóviles, casas y ventanas. Inspeccione el área
antes de encender el aparato para remover desechos
y otros objetos que pueden causar daños durante la
operación.
NO USE ACCESORIOS o aditamentos con excep-
13.
ción de los recomendados y suministrados por Yard
Machines, No use ningún tipo de línea cortadora
metálica o alámbrica.
14. NO SE EXTRALIMITE – Conserve una posición y
equilibrio fir
15. EVITE UN ENCENDIDO INVOLUNT
transporte la recortadora conectada con el dedo en
el interruptor.
16. DESCONECTE la recortadora de la corriente eléctrica cuando no la use o antes de realizar el servicio de
la cabeza de hilo.
17. ALMACENE la recortadora inactiva en el interior.
Este aparato debe ser almacenado en lugares secos,
altos y seguros - fuera del alcance de los niños.
No toque las cuchillas de cor
18.
des de corte cuando tome o levente el aparato.
19.
No fuerce el aparato - realizará mejor el trabajo y
con menos probabiliada de un riesgo de lesión a la
velocidad para la cual se diseñó.
me en todo momento.
te expustas ni los bor
ARIO
– No
EXPLICACION DE NOTA, ADVERTENCIA Y
SIMBOLO DE GARANTIA
1. Una NOTA usada para comunicar información adi-
cional, para destacar una explicación particular, o
para expander una instrucción específica.
-
2. Una ADVERTENCIA identifica un procedimiento que,
si no se acomete o se realiza inadecuadamente,
puede provocar heridas personales y/o daños a la
unidad.
3. EL (
ficar que por los menos las instrucciones o
procedimientos deben llevarse al cabo, cualiquier
daño invalidará la garantía y los gastos de la reparaciones serán asumidos por el dueño. Cualquier otro
servicio, con excepción del mantenimiento del
usuario, deberá ser realizado por un Centro de
Servicio Autorizado Yard Machines. Los daños o
condiciones causadas por practicas de mantenimiento inadecuadas, las cuales hagan que el producto sea inoperable invalidarán la garantía del fabricante.
4.
PARA LA GARANTIA O EL SERVICIO póngase en
contacto con el Centro de Servicio Autorizado de
Yard Machines llamando al número 800# de la
cubierta posterior.
SIMBOLO DE GARANTIA) sirve para noti-
CONSERVE ESTAS
INSTRUCCIONES
-
3837
Page 40

REGLAS DE FUNCIONAMIENTO SEGURO
SEGURIDAD Y SÍMBOLOS INTERNACIONALES
Este manual del usuario describe los símbolos de seguridad internacionales que pueden aparecer en este producto. Lea el
manual del usuario para obtener información sobre seguridad, ensamblaje, funcionamiento y mantenimiento.
SÍMBOLO SINGIFICADO
• SÍMBOLO ALERTA DE SEGURIDAD
Indica peligro, advertencia o precaución. Puede utilizarse en conjunto
con otros símbolos o pictogramas.
• LEA EL MANUAL DEL USUARIO
ADVERTENCIA: Lea
el Manual del Usuario y siga las
advertencias e instrucciones. Si no lo
hace puede provocar serios daños al
operador o los que lo rodean.
• UTILICE PROTECCIÓN PARA
OJOS, OÍDOS Y CABEZA
ADVERTENCIA: Los
objetos lanzados y los ruidos
potentes pueden dañar los ojos y el
oído. Utilice protección ocular según
la norma ANSI Z87.1-1989 y protección auditiva al utilizar esta unidad.
Utilice casco. Utilice una mascara si
es necesario
SÍMBOLO SINGIFICADO
• DISTANCIA MÍNIMA OPERATIVA
ADVERTENCIA:
Mantenga a niños, observadores y
animales a 50 pies (15 m.). Si se
aproxima alguien, detenga la unidad
inmediatamente.
PELIGRO: La máquina
puede lanzar objetos.
• NO UTILICE LAS CUCHILLAS
ADVERTENCIA: Para prevenir daños
personales graves, no acople ni use
ningún tipo de cuchilla a la unidad.
Page 41

REGLAS DE FUNCIONAMIENTO SEGURO
CONOZCA SU BORDEADORA DE CÉSPED
MANUBRIO TRASERO
MANUBRIO
AUXILIAR
INTERRUPTOR
SEGURIDAD
GATILLO DE
ENCENDIDO/APAGADO
DE
CABLE ELÉCTRICO
RETENEDOR DEL
CABLE
BOTÓN DE
CONVERIÓN DE EJES
FLECHA AJUSTABLE
RUEDA DE GUÍA
DE EXTREMO
BOTÓN DE AJUSTE
CUCHILLA
DE
CABEZA DE HILO
APERTURAS DE
AIRE
PROTECTOR
DESECHOS
TUERCA DE MARIPOSA
DEGUÍA DE EXTREMO
HILO NYLON
4039
Page 42

INSTRUCCIONES DE ENSAMBLE
NOTA: El único montaje necesario para la recortadora es
instalar la rueda de guía del extremo, la protección contra
residuos y el mango de asistencia.
INSTALACIÓN DE LA RUEDA DE GUÍA DEL
EXTREMO
1. Coloque la rueda guía de reborde (A) al frente de la
carcasa del motor como e muestra en la Fig. 1.
2. Apriete la tuerca de mariposa (B) firmemente. (Fig. 2)
A
Fig. 3
C
C
Fig. 1
B
Fig. 2
INSTALACIÓN DE LA PROTECCIÓN CONTRA
RESIDUOS
1. Coloque el compartimento del motor con el portador
del cabezal de cuerda mirando hacia arriba. (Fig. 3)
2. Deslice la protección contra residuos sobre el compartimento del motor.
3. Apriétela con 4 tornillos (C). (Fig. 4)
Fig. 4
41
Page 43

INSTRUCCIONES DE AJUSTE
Ajuste la longitud del eje
1. Agarre el eje firmemente.
2. Presione el botón rojo para liberar el eje hacia adelante y m
deseada (Figura 5).
NOTA: El eje puede ser ajustado ya sea en modo de recortadora o de desorilladora.
ueva el manubrio hacia atrás a la longitud
A
Fig. 5
Transformacion a desorilladora
1. Agarre el eje firmemente.
2. Pulse el botón de extremo (B) y gire el montaje del
mango hasta que se oiga un clic. (Fig 6 y Fig. 7)
3. Ajuste el mango de asistencia según lo necesite.
AJUSTE DE EL MENUBRIO AUXILIAR
NOTA: La manija de ayuda está atada al mango pero ha
sido girada hacia abajo para empacarse.
1. Afloje la perilla de ajuste y gire la manija hacia arriba
del mango (Figura 8).
2. Reapriete la perilla de ajuste seguramente.
Fig. 8
ENCENDIDO
1. Antes de encender la bordeadora de césped por
primera vez, asegúrese de que las líneas de nylon
toquen o pasen por encima de la cuchilla de cortar las
líneas. Si no son lo suficientemente largas, pulse la
perilla de choque y, a la vez, tire de las líneas de
nylon. (Fig. 9).
Fig. 6
Fig. 7
B
Fig. 9
Conecte el alargador correcto al cab
2.
mentación de la recortadora según las instrucciones
de la sección Conectar el cable.
3. Asegúrese de que la longitud de la recortadora de
hierba y la posición del mango de asistencia es la
conveniente antes de su utilización, ajuste la longitud
del recortador de hierba pulsando el botón de ajuste
del eje
soltando el botón de ajuste.
42
, ajuste la altura del mango de asistencia
le de ali
-
Page 44

INSTRUCCIONES DE AJUSTE
4. Sostenga firmemente la cortadora de césped y, sin
la tocar el césped que va a cortar, hale el inter-
dejar
ruptor de seguridad, luego presione el gatillo del
mango superior. Deje que la cortadora de cordel
opere por unos pocos segundos y "choque" el
cabezote de cordel contra el césped. El cordel de
Nylon se liberará automáticamente. La cuchilla de
corte en la guarda escombros cortará el exceso de
cordel.
5. Para apagar la unidad simplemente deje de presionar
el interruptor de encendido.
Una línea
PRECAUCIÓN :
gastada realiza un corte menos eficiente. Para
mejorar su rendimiento en futuros usos, golpee
el botón de la bobina (A) con sua
suelo mientr
do.(Fig. 10)
as la bordeadora esté funcionan-
corta o
vidad en el
INSTRUCCIONES DE OPERACION
Esta operación debe repetirse algunas veces antes de iniciar el tr
cionando correctamente y para que usted se familiarice
con el orillador de pasto. Inicie lentamente , cuando
obtenga experiencia podrá usar su orillador de pasto a su
máxima capacidad.
abajo con el fin de asegurarse que todo esta fun-
B
Fig. 10
CONECTE EL CABLE
1. Asegúrese de que el cable NO esté conectado en el
receptáculo antes de este procedimiento.
2. Haga una lazada con 20-25cm (8-10″) del extremo
del cable extensión.
Coloque la anilla en la ranura (A) bajo el mango
3.
posterior y asegúrela en el dispositivo de sujeción de
la cuerda (B), tal y como se muestra en la Figura 11.
xtensión al de la recortadora.
Conecte el cab
4.
5. Enchufe el cable de extensión en el receptáculo
SOLO cuando esté preparado para hacer funcionar la
recortadora.
le de e
A
OPERACIÓN DEL CORTADOR ORILLADOR
1. CORTADOR DE PASTO (Fig. 12). Columpie la unidad
de lado a lado. No incline el cabezal en este
movimiento. Haga una prueba para definir la altura de
corte. Mantenga el cabezal a una misma altura para
un corte parejo.
Fig. 12
Fig. 11
B
43 44
Page 45

INSTRUCCIONES DE OPERACION
2. CORTE MAS CERCANO (Fig. 13). Posicione el
cabezal un poco inclinado , siempre corte alejado de
personas y del oper
3. CORTE EN ORILLAS. Acerque el cabezal a las oril-
las que desea cor
cando poco a poco a el objeto conde quiere cortar las
orillas de pasto , corte pero no acerque tanto que
toque el objeto ya que el hilo se romperá.
4.
ORILLAR ALREDEDOR DE ARBOLES. Corte
alrededor de arboles sin tocar la corteza del árbol,
utilice la guÌa de corte para que por ningún motivo
toque el árbol, puede dañar al árbol si le llega a cortar la corteza del mismo.
REMOVER VEGETACIÓN (Fig. 14). Gire la unidad 30
5.
grados hacia la izquierda. Ajustando el maneral tendrá mejor control de esta oper
ga una distancia de 50 pies (15 metros) de cualquier
persona o animal . No intente hacer esta operación si
existe la posibilidad de que alguna partÌcula pudiera
dañar al operador, a otras personas o pueda dañar
objetos .
OPERACIÓN COMO ORILLADOR (Fig. 15. Con la
6.
unidad configurada como orillador, sujétela con el
motor a la izquierda, de tal forma que las partÌculas
sean lanzadas hacia atrás. Siempre utilice protector
para los ojos.
BARREDOR - Nunca utilice su unidad para este
7.
trabajo (Fig. 16)
8. NO HAGA FUNCIONAR EL RECORTADOR SOBRE
HORMIGÓN.
das (Figura 17).
ador.
tar, inicie el proceso de corte acer-
ación. Siempre manten-
Esto podría dañar el cabezal de cuer-
Fig. 14
Fig. 15
Fig. 13
Fig. 16
Fig. 17
Page 46

INSTRUCCIONES DE MAINTENIMIENTO
SUSTITUCIÓN DEL CARRETE DEL CABLE DE
NYLON
1. Desconecte la recortadora.
2. Retire el conjunto del rotor de la podadora. Para hac-
erlo, sostenga la parte acanalada exterior del conjunto con una mano, mientras empuja hacia abajo y gira
la cabeza del rotor con la otra mano para separarla
(Fig. 18 & Fig. 19). El portador del rotor y el rotor
ahora se separarán fácilmente.
NOTA: Hay un resorte dentro de la cabeza del rotor
que se podría perder fácilmente. Asegúrese de colocarlo en un lugar seguro.
Fig. 20
A
Fig. 18
Fig. 19
Retire el anillo de retencion de plastico tr
3.
Retire cualquier linea existente del rotor.
4. Usando la linea de reemplazo 0.065”, mida aproxi-
madamente 14’ de línea. Doble sobre la línea del cortador en dos longitudes iguales y coloque el rotor en
a del divisor del rotor (Fig. 20)
ur
an
la r
5. Enrolle la línea en el rotor girando el mismo. La línea
debe ir en la dirección de la flecha (A) en el rotor (Fig.
21) La línea se debe enrollar fuertemente alrededor
del rotor. La línea se enrolla con cada mitad separada
por el divisor. Enrolle fuertemente hasta que queden
aproximadamente 6” de línea (Fig. 22)
ansparente
Fig. 21
Fig. 22
.
Page 47

INSTRUCCIONES DE MAINTENIMIENTO
6. Ajuste los extremos de la línea en las ranuras opues-
tas en el rotor (Fig. 23) Coloque el retenedor de línea
de plástico tr
ansparente de nuevo sobre la línea y el
rotor (Fig. 24) Jale la linea hasta la ranura inferior en
el retenedor de la línea de plástico transparente (Fig.
ala la línea superior hacia la ranura superior (Fig.
25) J
26).
Fig. 23
7. Inserte la línea a través de cara ojal en el portador del
rotor y deslice el rotor en el portador. (Fig. 27)
TA:
NO
Asegúrese que la línea está dentro del retene
dor de plástico transparente. Si está fuera del retenedor de plástico transparente, la línea no avanzara.
8. Asegúrese de insertar el resorte, ensamblar el rotor y
el portador de rotor de nuevo en la podadora. Para
hacerlo, empuje la cabeza y gírela hacia la derecha
hasta que embone. (Fig. 28 y Fig. 29)
Fig. 27
-
Fig. 24
Fig. 25
Fig. 26
Fig. 28
Fig. 29
4645
Page 48

INSTRUCCIONES DE MAINTENIMIENTO
1 6011-202A02 CABLE ALIMENTACIÓN 29 6SVABB04-10 TORNILLO
2 6199-202A01 PROTECCIÓN DE CABLE 30 6SDABA03-16 TORNILLO
3 6043-815501 CUBIERTA (PRESIONA CABLE) 31 6041-840001 ABRAZADERA DE TORNILLO
4 6SDABB04-14 TORNILLO 32 6038-202A06 CARCASA (L)
5 6022-202A01 INTERRUPTOR 33 6228-202A15 MOTOR ASAMBLEA
6 6134-202A04 GATILLO 33-1 6099-202A03 MOTOR
7 6024-202A01 MUELLE 33-2 6187-202A01 PLACA DE FIJACIÓN
8 6134-202A05 GATILLO 33-3 6SDAB-03-12 TORNILLO
9 6010-202A01 ALAMBRE 33-4 6SDAB-04-12 TORNILLO
10 6068-202A06 MANILLAR SUPERIOR (R) 33-5 6270-202003 CUTTER ASS'Y
11 6068-202A05 MANILLAR SUPERIOR (L) 34 6131-202A04 ANILLO AMORTIGUADOR
12 6056-202A03 BOTÓN 35 6114-202A02 GUÍA DE LA CUCHILLA
13 6021-202A01 PALANCA 36 6NBB-06 TUERCA
14 6024-202A02 MUELLE 37 6043-202A01 JUNTA DE CULATA
15 6131-202A01 TUBO DE UNIÓN 38 6SXDB-06-20 TORNILLO
16 6129-202A01 TUBO CENTRAL 39 6115-202A01 CLAVIJA DEL EJE
17 6SDABB04-06 TORNILLO 40 6137-202A01 PUEDA
18 6NAB-06 TUERCA 41 6NAB-05 TUERCA
19 6056-230302 BOTÓN 42
6SDABB04-08 TORNILLO
20 6068-230301 EMPUÑADURA CENTRAL 43
6250-202503 ALAMBRE CORTANDO HOJA
21 6SXDB-06-65 TORNILLO 44 6262-202A02 ALINDAJE
22 6SDABB04-18 TORNILLO 45 6024-202A04 MUELLE
23 6038-202A05 CARCASA (R) 46 6228-202004A PORTADOR DE CARRETE
24 6059-202A01 JACKET 46-1
6059-202004 BAÍSTER
25 6056-202A04 BOTÓN 46-2
6008-202001A PORTABOBINAS
26 6239-202A01 ANILLO FIJO 46-3
6194-202001 ALAMBRA-CORTANDO
27 6024-202A03 MUELLE 46-4
6059-202005A TAPA DE LA BOBINA
28 6131-202A02 ANILLO DE XPANSIÓN 46-5
6140-B23101 PILOTO
No. Pieza No. Descripción No. Pieza No. Descripción
9. Para probar si la línea está avanzando adecuadamente, presione el botón con su pulgar mientras jala
la línea con sus dedos
. La línea deberá avanzar libre-
mente. (Fig. 30)
10. En caso de que la línea se rompa dentro del rotor,
repita la oper
ación de reemplazo.
11. Encienda el podador de pasto siguiente las instrucciónes en la seccion de “ARRANQUE”.
Fig. 30
MAINTENIMIENTO
Antes de
PRECAUCION :
cualquier procedimiento de mantenimiento de
su unidad, corte completamente el suministro
de corriente eléctrica de la unidad
desconectando la clavija de la extensión eléctrica.
1. Un regular mantenimiento y aseo de su maquina asegurara un funcionamiento mas eficiente y prolongara
la vida de su unidad.
2. Después de cada operación de corte, limpie y quite la
tierra y pasto de el cabezal y particularmente de la
guarda.
3. Mientras opera la unidad asegúrese de que las
ranuras d ventilación están limpias y libres de tierra y
pasto.
4. Unicamente utilice un trapo húmedo con agua
caliente y un cepillo delgado para limpiar su maquina.
5. No rocÌe o moje su unidad con agua.
6. No utilice detergentes o solventes ya que esto pudiera
arruinar su unidad.
7. Si la línea de corte ya no corta o se rompe, reemplácela contactando un centro de servicio autorizado.
practicar
otencia
P
Velocidad no Instalada . . . . . . . . . . . . . . . . . . . . . . . . . . . . . . . . . . . . . . . . . . . . . . . . . . . . . . . . . . . . . . . . . . . .7,500 min
Diámetro del Círculo de Corte . . . . . . . . . . . . . . . . . . . . . . . . . . . . . . . . . . . . . . . . . . . . . . . . . . . . . . . . . . . . . . . . .13” (330mm)
Reserva del la línea . . . . . . . . . . . . . . . . . . . . . . . . . . . . . . . . . . . . . . . . . . . . . . . . . . . . . . . . . . . . . . . . . . . . .ø .065” (1.65mm)
eso neto
P
. . . . . . . . . . . . . . . . . . . . . . . . . . . . . . . . . . . . . . . . . . . . . . . . . . . . . . . . . . . . . . . . . . . . . . . . . . . . .
. . . . . . . . . . . . . . . . . . . . . . . . . . . . . . . . . . . . . . . . . . . . . . . . . . . . . . . . . . . . . . . . . . . . . . . . . . . . .6,4 Lbs (2,9 Kg )
ESPECIFICACIONES
120V~, 60Hz, 4,0A
-1
/RPM
Page 49

LISTA DE PIEZAS
1 6011-202A02 CABLE ALIMENTACIÓN 29 6SVABB04-10 TORNILLO
2 6199-202A01 PROTECCIÓN DE CABLE 30 6SDABA03-16 TORNILLO
3 6043-815501 CUBIERTA (PRESIONA CABLE) 31 6041-840001 ABRAZADERA DE TORNILLO
4 6SDABB04-14 TORNILLO 32 6038-202A06 CARCASA (L)
5 6022-202A01 INTERRUPTOR 33 6228-202A15 MOTOR ASAMBLEA
6 6134-202A04 GATILLO 33-1 6099-202A03 MOTOR
7 6024-202A01 MUELLE 33-2 6187-202A01 PLACA DE FIJACIÓN
8 6134-202A05 GATILLO 33-3 6SDAB-03-12 TORNILLO
9 6010-202A01 ALAMBRE 33-4 6SDAB-04-12 TORNILLO
10 6068-202A06 MANILLAR SUPERIOR (R) 33-5 6270-202003 CUTTER ASS'Y
11 6068-202A05 MANILLAR SUPERIOR (L) 34 6131-202A04 ANILLO AMORTIGUADOR
12 6056-202A03 BOTÓN 35 6114-202A02 GUÍA DE LA CUCHILLA
13 6021-202A01 PALANCA 36 6NBB-06 TUERCA
14 6024-202A02 MUELLE 37 6043-202A01 JUNTA DE CULATA
15 6131-202A01 TUBO DE UNIÓN 38 6SXDB-06-20 TORNILLO
16 6129-202A01 TUBO CENTRAL 39 6115-202A01 CLAVIJA DEL EJE
17 6SDABB04-06 TORNILLO 40 6137-202A01 PUEDA
18 6NAB-06 TUERCA 41 6NAB-05 TUERCA
19 6056-230302 BOTÓN 42
6SDABB04-08 TORNILLO
20 6068-230301 EMPUÑADURA CENTRAL 43
6250-202503 ALAMBRE CORTANDO HOJA
21 6SXDB-06-65 TORNILLO 44 6262-202A02 ALINDAJE
22 6SDABB04-18 TORNILLO 45 6024-202A04 MUELLE
23 6038-202A05 CARCASA (R) 46 6228-202004A PORTADOR DE CARRETE
24 6059-202A01 JACKET 46-1
6059-202004 BAÍSTER
25 6056-202A04 BOTÓN 46-2
6008-202001A PORTABOBINAS
26 6239-202A01 ANILLO FIJO 46-3
6194-202001 ALAMBRA-CORTANDO
27 6024-202A03 MUELLE 46-4
6059-202005A TAPA DE LA BOBINA
28 6131-202A02 ANILLO DE XPANSIÓN 46-5
6140-B23101 PILOTO
No. Pieza No. Descripción No. Pieza No. Descripción
4847
Page 50

NOTAS
Page 51

GARANTÍA LIMITADA DEL FABRICANTE PARA:
MTD LLC concede la garantía limitada establecida debajo
para mercancías nuevas que sean compradas y usadas en
los Estados Unidos, sus posesiones y territorios.
MTD LLC garantiza este producto contra defectos en el
material y la mano de obra durante un período de dos (2)
años, a partir de la fecha de compra original y a su entera
discreción, arreglará o substituirá sin costo alguno cualquier
pieza cuyo material o mano de obra se considere defectuoso. Esta garantía limitada se deberá aplicar únicamente si
este producto ha sido manejado y mantenido de acuerdo al
Manual del Operario incluido con el producto y, si no ha sido
sometido a mal uso, abuso, uso comercial, negligencia,
accidente, mantenimiento inapropiado, alteración, vandalismo, hurto, fuego, agua o daños debidos a otros riesgos o
desastre natural. Los daños ocasionados por la instalación o
el uso de cualquier accesorio o aditamento que no esté
aprobado por MTD y que sea usado con el (los) producto(s)
contemplados en este manual, anularán la garantía con
respecto a cualquier daño resultante. Esta garantía está limitada a noventa (90) días a partir de la fecha de compra original al detalle de cualquier producto MTD que se use para
alquiler, para propósitos comerciales o cualquier otro
propósito que genere ingresos.
CÓMO OBTENER SERVICIO: El servicio de garantía se
encuentra disponible A TRAVÉS DE SU DISTRIBUIDOR LOCAL
AUTORIZADO, AL PRESENTAR UN COMPROBANTE DE
COMPRA. Para ubicar al distribuidor de su área, por favor
consulte las Páginas Amarillas o contacte al Departamento de
Servicio al Consumidor de MTD LLC llame al 1-866-747-9816
o, escriba a P.O. Box 361131, Cleveland OH 44136-0019. Si
está en Canadá, llame al 1-800-668-1238. No se aceptará
ningún producto que sea enviado directamente a la fábrica, a
menos que haya recibido autorización previa por escrito por
parte del Departamento de Servicio al Consumidor de MTD
LLC.
Esta garantía limitada no ofrece cobertura en los siguientes casos:
A.
Lína de corte
B. MTD no le ofrece ninguna garantía a los productos que
sean vendidos o exportados fuera de los Estados
Unidos de América, sus posesiones y ter
to aquellos que se vendan a través de los canales de distribución para exportación autorizados por MTD.
MTD se reserva el derecho a cambiar o mejorar el diseño de
cualquier producto MTD, sin adoptar ninguna obligación
para modificar cualquier pr
dad.
oducto fabricado con anteriori
ritorios, excep
Ninguna garantía implícita es aplicable después del
período de aplicabilidad de la garantía expresa escrita
con anterioridad, incluyendo cualquier garantía
implícita de comerciabilidad o idoneidad para un
propósito particular con respecto a las piezas identificadas. Exceptuando lo mencionado anteriormente,
ninguna otra garantía expresa bien sea escrita o verbal
con respecto a cualquier producto que sea concedida
por cualquier persona o entidad, incluyendo al distribuidor o minorista, deberá compr
durante el período de la Garantía, el remedio exclusivo
es el arreglo o la sustitución del producto según lo
establecido anteriormente. (Algunos estados no permiten
limitaciones en cuanto al período de duración de una garantía implícita, de manera que puede que la limitación anterior
no sea aplicable en su caso.)
Las estipulaciones establecidas en esta Garantía ofrecen la solución única y exclusiva que resulte de las
ventas. MTD no deberá ser responsable de pérdidas o
daños incidentales o consecuentes que incluyan, sin
limitación, gastos incurridos debido a la sustitución de
servicios de mantenimiento de prados, transporte o
gastos relacionados, o gastos de alquiler para reemplazar temporalmente un producto bajo garantía.
(Algunos estados no permiten limitaciones en cuanto al
período de duración de una garantía implícita, de manera
que puede que la limitación anterior no sea aplicable en su
caso.)
Ningún tipo de recuperación deberá ser superior al precio de
compra del producto vendido, en ningún caso. La alteración
de las características de seguridad del pr
lar esta Garantía. Usted adopta el riesgo y la obligación de la
pérdida, daño o lesión en su persona o a su propiedad y/o la
de otras personas y sus pr
del uso o mal uso, o la incompetencia para usar el producto.
Esta garantía limitada no deberá cubrir a ninguna otra persona distinta al comprador original, arrendatario original, o la
persona para la cual se compró en calidad de r
-
-
Relación de las leyes estatales con esta Garantía: Esta
garantía le confier
que usted también tenga otros derechos, los cuales varían
en cada estado.
Para ubicar a su distribuidor de servicio más cercano, llame
al 1-866-747-9816 en los Estados Unidos a al
1-800-668-1238 en Canadá.
e der
opiedades, que se origine a raíz
echos legales específicos, y puede
ometer a MTD LLC
oducto deberá anu
egalo.
-
MTD LLC
PO Box 361131
Cleveland, OH 44136-0019
5049
Page 52

U.S.A. Imported by:
MTD LLC
P.O. Box 361131
Cleveland, OH 44136-0019
Canada Imported by / Importé par:
MTD PRODUCTS LIMITED
97 Kent Avenue
Kitchener, ON
CANADA N2G 4J1
Made in China / Fabriquè à China / Hecho en China
STOP
ARRÊT
ALTO
For problems or questions, DO NOT return
this product to the store. Contact your
Customer Service Agent .
En cas de problèmes ou pour des questions,
NE PAS retourner ce produit au point de vente. S'adresser
au préposé du Service à la clientèle en composant.
Para problemas o preguntas, NO devolver este producto a la tienda
Contacte a su Agente de Servicio al Cliente.
U.S.A. 1-866-747-9816
CANADA 1-800-668-1238
For Consumer Assistance Please Call
L'Aide Du Consommateur Necessitez S'il Vous Plait
Para La Ayuda Del Consumidor Llame Por Favor
 Loading...