

Yard King 50562X89 Owner’s Manual
f
P RRf,4 /LZE
_SA_E This Instruction Book Contains Information
For Several Models. Read And Keep Thin Book For
ture Reference. This Book Contains Important Information On:
ASSEMBLY, OPERATION AND MAINTENANCE.
PRODUCT INFORMATION
The owner must be certain that all the product Information is Included with this unit.
This information includes the INSTRUCTION BOOKS, the REPLACEMENT PARTS J
and the WARRANTIES. This information must be included to make
sure state laws and other laws are followed.
F M_odel
50562x89
Record The Following Information About Your Unit. This Information
is Necessary When Ordering Parts Or In Case Of Loss Or Theft.
WHERE PURCHASED:
DATE PURCHASED: Month Day. .Year
MODEL NO.: DATE OF MANUFACTURE:
_,710933B •
BUILT iN THE
LISA

TABLE OF CONTENTS
WARRANTY ......................................... 2
RESPONSIBILITY OF THE OWNER .................... 3
SAFETY RULES ..................................... 3
ASSEMBLY .......................................... 9
PARTS BAG - CONTENTS ............................... 9
CHECK THE TIRES ...................................... 9
CHECK THE LEVEL OF THE MOWER HOUSING ............ 9
HOW TO INSTALL THE SEAT ............................. 10
HOW TO ASSEMBLE THE STEERING WHEEL .............. lS
HOW TO ASSEMBLE THE GAUGE WHEELS ............... 10
HOW TO INSTALL THE MOWER HOUSING ................. 11
MAINTENANCE FREE BA'rrERY .......................... 12
HOW TO PREPARE THE ENGINE ......................... 12
IMPORTANTI BEFORE YOU START MOWING .............. 12
OPERATION ......................................... 13
LOCATION OF CONTROLS ............................... 13
AI"rACHMENTS ......................................... 14
HOW TO USE THE THROTn.E CONTROL .................. 14
HOW TO USE THE BLADE ROTATION CONTROL ........... 14
HOW TO USE THE SPEED CONTROL PEDAL .............. 15
HOW TO DISCONNECT THE TRANSMISSION .............. 15
HOW TO SET THE PARKING BRAKE ...................... 16
HOW TO CHANGE THE DuI"rlNG HEIGHT ................. 16
HOW TO STOP THE UNIT ................................ 16
HOW TO TRANSPORT THE UNIT .......................... 16
HOW TO OPERATE WITH THE MOWER HOUSING .......... 17
HOW TO OPERATE THE UNIT ON HILLS ................... 17
BEFORE STARTING THE ENGINE ......................... 18
HOW TO START THE ENGINE ............................ 18
OPERATING TIPS .................................... 19
MOWING AND SAGGING TIPS ............................ 19
MAINTENANCE ...................................... 2O
MAINTENANCE CHART .................................. 20
HOW TO CHECK THE MUFFLER .......................... 20
HOW TO REMOVE AND INSTALL THE BLADE .............. 21
HOW TO SHARPEN THE BLADE ....................... ... 21
HOW TO ADJUST THE BLADE ROTATION CONTROL ....... 22
HOW TO CHECK AND ADJUST THE DRNE BRAKE ......... 23
HOW TO CHECK AND ADJUST THE MOTION DRIVE BELT .. 23
HOW TO ADJUST THE SPEED CONTROL PEDAL ........... 24
MAINTENANCE FREE BAI"rERY .......................... 24
HOW TO CHARGE THE BAI-[ERY ......................... 24
WHERE TO LUBRICATE .................................. 25
HOW TO CHECK THE FUEL FILTER ....................... 25
CHECK THE TIRES ...................................... 25
HOW TO REMOVE THE MOWER HOUSING ................ 26
HOW TO INSTALL THE MOWER HOUSING ................. 26
HOW TO ADJUST THE GAUGE WHEELS .................. 27
HOW TO LEVEL THE MOWER HOUSING ................... 28
HOW TO REPLACE THE MOTION DRIVE BELT ............. 29
HOW TO REPLACE THE MOWER DRIVE BELTS ............ 3O
HOW TO REPLACE THE FUSE ............................ 31
HOW TO REPLACE THE LIGHT BULB ..................... 31
HOW TO CLEAN THE MOWER HOUSING .................. 31
STORAGE (OVER 30 DAYS) .............................. 31
TROUBLE SHOOTING CHART ........................ 32
SLOPE GUIDE ....................................... 33
REPAIR PARTS ...................................... 34
LAWN TRACTOR ACCESSORIES ...................... 58
YARDKING PERFORMANCE Two Year Limited Warranty
Yardking Performance warrants to the original purchaser that this unit shall be free from defects in material and workmanship
under normal use and service for a period of Two (2) Years from the date of purchase; however, this warranty does not cover
engines, accessories (such as snow blowers, snow blades, grass baggers and plows), transmissions, batteries and Normal
Wear Parts (except as noted below) or transaxles as the companies that manufacture these items furnishtheir own warranties
and provideservice through their authorized field service facilities. For additional information,see the warranties covering these
padiculerparts. If you are uncertain whether your unitcontainsor isequipped with one ormore ofthese pads, consultyourdealer
priorto purchase. Subject to the terms and conditions noted inthis LimitedWarranty, we shall, at our option, repair or replace
at no cost to the original purchaser any part covered by this Umited Warranty during the applicable warranty period.
In the event the battery proves defective within ninety (90) days from the date of purchase, we will replace it without charge. If
the battery proves defective after (90) days butwithin one hundred twenty (120) days from the date of purchase, we willreplace
itfor a charge of one half (1/2) ofthe retail price of the battery in effect at the time of return.
Normal Wear Parts are defined as belts, blades, blade adapters, pneumatic tires, headlights and seat covers. These partsare
warranted to be free from defects in material and workmanship as delivered with the product. Any claim for repair orreplacement
of Normal Wear Parts must be made withinthirty (30) days of the date of purchase. No claims involvingdamage caused from
material use, abuse or misuse will be honored.
This Yardking Performance Two (2) Year Limited Warranty is your exclusive remedy; however, thiswarranty is voidor does
not apply to any unit that has been tampered with, altered, misused, abused or used for rental or other commercial and/or
professional (non-homeowner) uses. Your warranty does notcover minor mechanical adjustments which are not due to any
defect in material or workmanship. For assistance in making such adjustments, consult your InstructionBook.
Tomake a claim under thisYardking Performance Two (2) Year Limited Warranty, return the unit (orif authorized in advance,
the defective part) along with your proof of purchase to an Authorized Service Center near you. To locate the nearestAuthorized
Service Center, callthe Central Parts Distributor for your area shown inthe list provided with your unit orcheck the Yellow Page
listings in your local telephone directory. If you return the entire unit, we will repair the unit. If we authorize the return of the
defective partonly, we willeither replace or repair the part. In thecase ofa defect in a transmission ordifferential(as distinguished
from a transaxle), the entire transmission or differential must be returned since they do not include user serviceable pads.
ThisYardklng Performance Two (2) Year Limited Warranty gives you specific legal rights, and you may alsohave other rights
which vary from state to state. This Limited Warranty Is given In lieu of all other expressed and implied warranties
Including the Implied warranty of merchantability and warranty of fitness for a particular purpose. If you need additional
information on this written warranty or assistance in obtaining service, write or call: Yardking Performance, Outdoor Power
Equipment, Customer Service Department, P.O. Box 268, Brentwood, Tennessee 37027. (1-800-289-8995)
710933 2
OWNER'S INFORMATION
Thisinstructionbook is forseveral differentmodels.The instructions
are written fora person withsome mechanical ability,Uke most ser-
vicebooks, notallthe steps are described. Steps on howto loosenor
tightenfasteners are steps anyone canfollowwithsome mechanical
ability.Read and follow these instructionsbeforeyou use the unit.
Knowyour product: Ifyou understandthe unitand howtheunitoper-
ates, youwill get thebest performance. Asyou readthismanual, com-
pare the illustrations tothe unit. Learn the location and the function of
thecontrols.To help prevent aneccident, followthe operating instruc-
tions end the safety rules. Keep this manual for future reference.
IMPORTANT: Many units are not assembled and are sold in car-
tons. It is the responsibility of the owner to make sure the assembly
instructions in this manual ere exactly followed. Other units are pur-
RESPONSIBILITY OF THE OWNER
The responsibility of the owner Is to follow the instructions below.
1. Carefully read and follow the rules for safe operation.
2+ Follow ell the assembly instructions.
3. Inspect the unit.
4. Make sure that the operator of the unit knows how to correctly
use all standard and accessory equipment.
5, Operate the unit only with guards, shields, and other safety
items in place end working correctly.
6+ Correctly adjust the unit.
7. Service the unitonly with authorized or approved replacement
parts.
8. Complete aft maintenance on the unit.
chased in an assembled condition,On assembled units, it isthe re-
spensibility of the owner to make sure the unit is correctly
assembled, The owner must carefully check the unit according to
the instructionsin this manual before it is first used.
Environmental Awareness
• Do not fillthe engine's fuel tank completely full.
• Drain fuel for off-season storage.
• Use only unleaded gasoline.
• Service the air cleaner regularly.
• Change oil regularly. Use 30W oil insummer.
• Tune-up the engine regularly.
• Keep equipment in efficient operating condition.
• Dispose of used engine oil properly.
SAFETY RULES
As Recommended by American National Standards Institute
,&
WARNING: This cutting machine is capable of amputating hands and feet and throwing objects. Failure to observe the
following safety Instructions could result in serious injury or death to the operator or bystanders.
GENERAL OPERATION:
1. Read, understancland followallinstructions inthe InstructionBook, on the machine, theengine and with anyattachments before starting.
2. Only allow responsible adults familiar with the instructions to operate the machine.
3. Clear the area of objects such as rocks, toys, wire, etc. which could be picked up and thrown by the blade.
4. Be sure the area is clear of other people before mowing. Stop the machine if anyone enters the area.
5. Never carry passengers.
6. Disengage power to the mower or any attachments before backing up. Do not mow in reverse unless absolutely necessary. Always
look down and behind before and while backing.
7. Be aware of the direction the mower discharges. Do not point discharge from the mower at anyone or at places where people may be.
Do not operate the mower without either the entire grass bagger or the mower guard in place.
8. Slow down before turning.
9. Never leave a machine unattended with the engine running. Always disengage the blade(s), set the parking brake, stop the engine and
remove the key before dismounting.
10. Disengage power toattachment(s) when transporting or notin use. Disengage the blade(s) when not mowing.
11. Stop the engine before removing the grass bagger or unclogging the chute.
12. Mow only in daylight or good artificial light.
13. Do not operate the machine while under the influence of alcohol or drugs or when very tired.
14. Watch for trafficwhen operating near or crossing roadways.
15. Use extra caution when loading or unloading the machine when using a trailer or truck for transporting.
16. Disengage all attachment clutches before attempting to start the engine
17. Always wear safety glasses or an eye shield when you operate the unit to protect your eyes from foreign objects that can be thrown
from the unit. Always wear eye protection when you make an adjustment or repair to the machine.
18. Use care when pulling loads or using heavy equipment.
e. Use only approved drewbar hitch points.
b. Limit loads to those you can safely control.
c, Do not turn sharply. Use care when backing.
d. Use counterweights or wheel weights when suggested in the Instruction Book.
710933 3
Safe Operation Practices for Riding Vehicles
OWNER'S INFORMATION
19. Do not operate this machine if you are taking drugs or other medication which can cause drowsiness or affect your ability to operate
this machine.
20. Do not use this machine if you are mentally or physically unable to operate this machine safely.
SLOPE OPERATION:
Slopes and rough terrain are major factors related to loss of control and tip over accidents which can result In severe injury or
death. ALL ==lopes require extra caution. If you cannot back up the slope or if you feel uneasy on the slope, do not mow it. See the
"Slope Guide" In the back of this book to cheek for safe operation.
DO
1. Mow up end down slopes, not across.
2. Remove obstacles such as rocks, limbs, etc...
3. Watch for holes, ruts or bumps. Uneven terrain could ovedurn the machine. =Tallgrass can hide obstacles."
4, Use slow speed on slopes. Do not make sudden speed changes.
5. Follow the manufacturer's recommendations for wheel weights or counterweights to improve stabitity
6. Use extra care with grass baggers or other attachments, they can change the stabilityof the machine,
7. Keep all movement on the slopes slow and gradual. [30 not make sudden changes in speed or direction.
8. Avoid starting or stopping on a slope, If tires lose traction, disengage the blades and proceed slowly straight down the slope.
DO NOT
1. Do not turn on slopes unless absolutely necessary, then only turn slowly and gradually downhill, if possible.
2. Do not mow near drop-offs, ditches or embankments. A wheel over the edge or an edge caving incould cause a sudden overturn and
an injury or death.
3. Do not mow on wet grass. Reduced traction could cause sliding.
4. Do not try to stabilize the machine by putting your foot on the ground.
5. Do not use a grass bagger or other rear mounted accessories on steep slopes (greater than 10 degrees).
CHILDREN:
Tragic accidents can occur ifthe operator Is not alert to the presence of children. Children are often attracted to the machine and
the mowing activity. NEVER assume that children will remain where you last saw them.
1. Keep children out ofthe mowing area and inthe watchful care of an adult other than the operator.
2. Be alert and tLKnthe engine off if children enter the area.
3. Before and when backing, look behind and down for small children.
4. Never carry children or any passengers. They may fall off and be seriously injuredor interfere with the safe operationof the machine.
5. Never allow children to operate the machine. Instructchildren in the dangers of the machine.
6. Use extra care when approaching blind corners, shrubs, trees or other objects that may obscure vision.
SERVICE:
1, Use extra care when handling gasoline and other fuels. Fuels ere flammable and the vapors are explosive.
a. Use only an approved container.
b. Never remove the gas cap or add fuel with the engine running. AIlow the engine to cool for several minutes before refueling, Do
not smoke.
c. Never refuel Ihe machine indoors
d. Never store the machine with fuel in the tank or fuel container inside where there is an open flame, such as a water heater.
2. Never star or run the engine inside a closed area.
3. Keep all nuts and.bolts, especially the blade attachment nuts tight. Frequently check the blade(s) for wear or damage such as cracks
and nicks. A blade that is bent or damaged must be immediately replaced with an original equipment blade from an autheri;_ed service
dealer. For safety, replace the blade every two years. Keep the equipment in good condition.
4. Never tamper with the safety devices. Check their proper operation regularly.
5. To reduce fire hazards keep the machine free of grass, leaves or other debris build-up, Clean up oil or fuel spills. Mow the machine
to cool before storing.
6, Stop and inspect the equipment if you strike an object. Repair, if necessary, before restarting.
7. Never make adjustments or repairs with the engine running. The carburetor can be adjusted with the engine running. Do not change
the engine governor settings or over-speed the engine.
8, Grass bagger components are subiect to wear, damage and deterioration, which could expose moving parts or allow objects to be
thrown. For storage, always make sure the grass bag is empty. Frequently check components and replace with manufacturer's recom-
mended pads when necessary.
9. Mower blade(s) ere sharp and can cut. Wrap the blade(s) or wear gloves and use extra caution when servicing them or the blade housing
area.
10. Check the brake operation frequently. Adjust and service as required.
11. Wait for all movement to stop before servicing any par ofthe unit.
710933
,_ Look for this symbol to indicate Important safety
precautions, This symbol indicates: "Attention!
Become Alert! Your Safety Is At Risk."
4
SAFE MOWING GUIDE
Each person that operates power
equipment must learn to use correct and
safe mowing procedures. To help you
learn, carefully read the following
pages. Most of the time the operator was
notcorrectly shown or did not read the
instructionson the unitor in the instruction
Book before using the'unit. Also, some
operators do not have enough experience.
The result is unsafe use, endangering the
operator, bystanders and the equipmenL
Another result can be a poor appearance
of the area mewed.
Read this book. Read the instructions on
the unit. Operate the mower according to
the Safe Mowing Guide. Follow all safety
rules, cautions orwarnings in this book
and on the unit. Make sure anyone that
uses the unit reads the instructionsand is
told how to safely operate the mower.
controlsand how they work. In an
emergency, how fast you can stop the
blade is important. Learn how to control
the mower at all times.
Many engines are started by hand. When
you use a pullstart or rope start, place
your feet apart and away from the blade(s).
Hold the rope handle tight. Never wrap the
rope around your arm or fingers for a
"petter grip'. Tostart the engine, follow the
instructionson the mower, inthis book and
in the engine operating instructions.
For electric start engines, sit in the seat to
start the engine. The battery can be
dangerous. Followthe instructions on the
battery, the acid container, and in this book
when working withthe battery. Even smell
batteries have enough voltage to cause an
injury.Always be careful.
The mower is designed to be operated by
one person. Never let another person ride
with you on the unit or on any accessories.
A passenger will make the unitharder to
control, blockthe visibilityor distract the
operatorand is dangerous to the operator,
the passenger and the equipment. Without
a passenger seat, the passenger can fall
from the mower or contact dangerous
pads. A mower is not a toy for showing off
or for giving rides.
The blade of a power mower rotates very
fast. Itcan discharge rocks and other
objects over a long distance which can be
dangerous. The force of the objects can
break windows, cause injuriesor even put
an eye out. Most of the time the injury is to
a person, like a child. Keep every person
completely away from the area to be
mowed. Make sure the grass isnot
discharged toward anyone. Planning your
mowing pattern has a double advantage, it
can decrease the possibilityof an injury
and make the clean up after mowing
easier.
The mower will give you good service and
durability,if operated in normal conditions.
Ifthe mower is not correctly serviced or is
used where the terrain is rough or
unsuitable, product performance and
safety will be decreased.
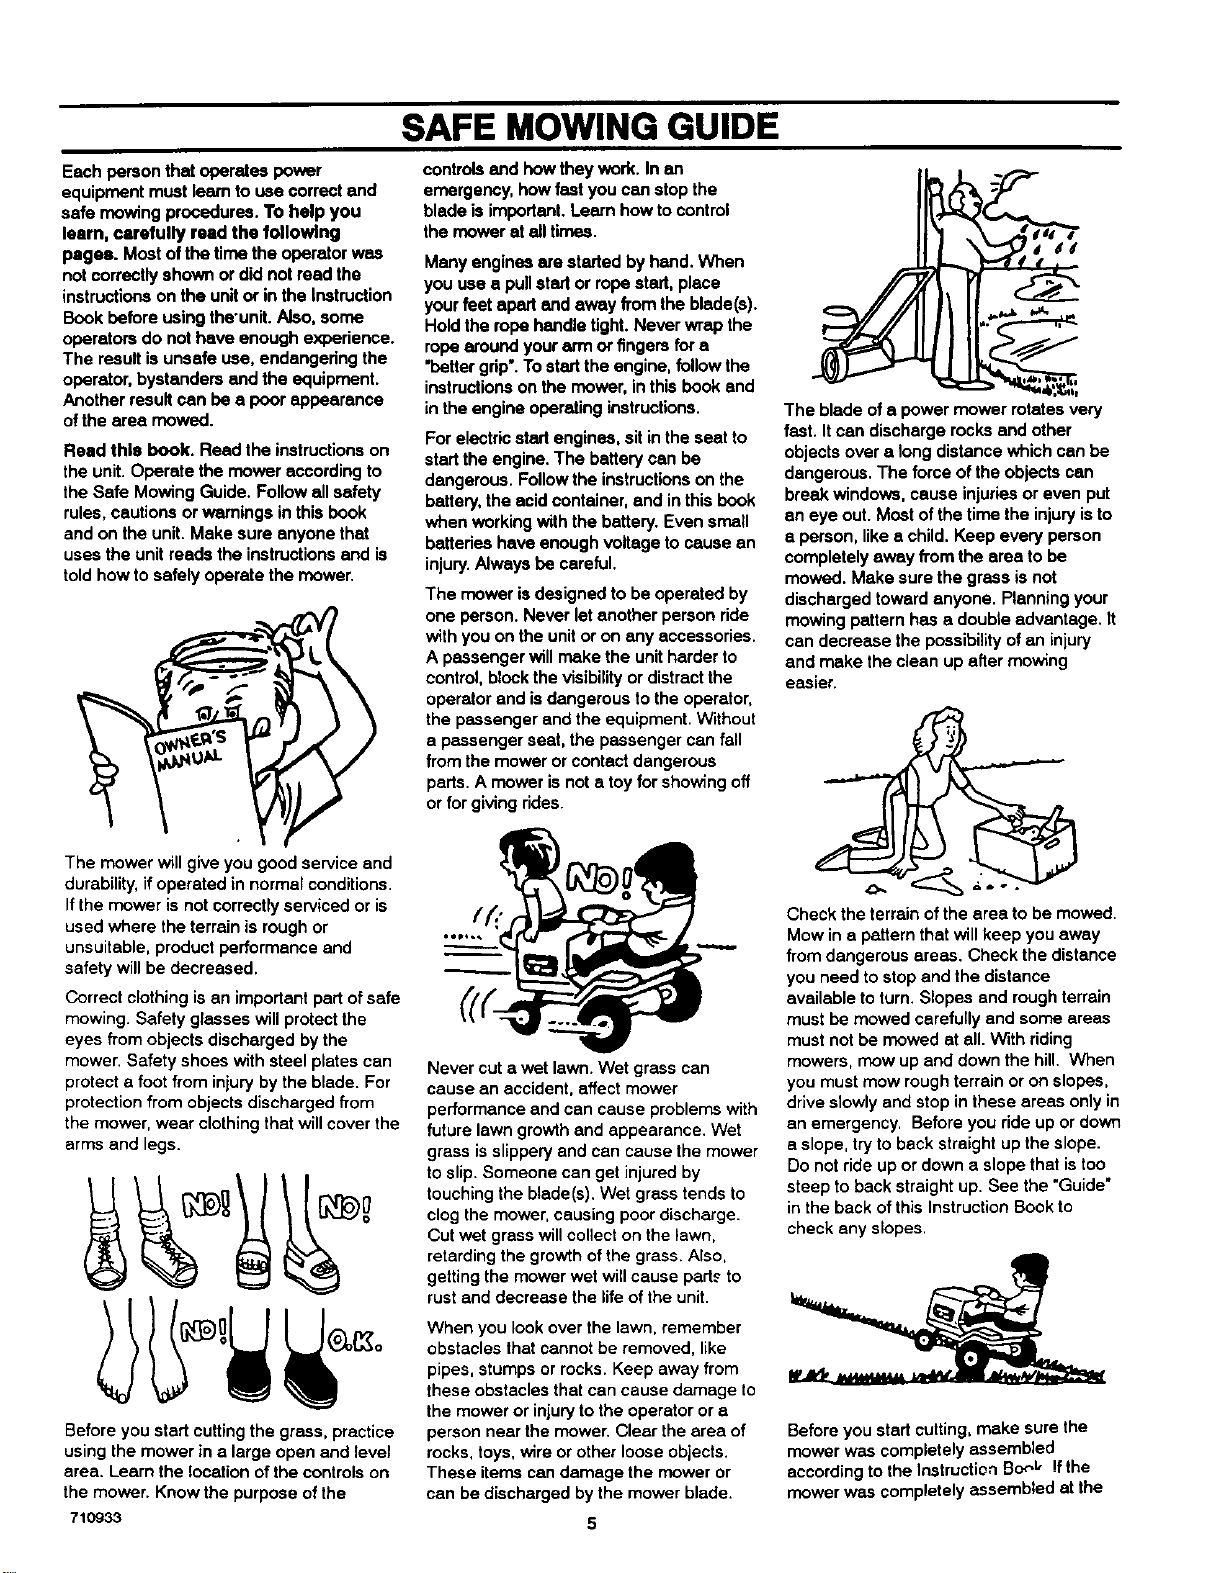
Correct clothing is an important part of safe
mowing. Safety glasses will protect the
eyes from objects discharged by the
mower. Safety shoes with steel plates can
protect a foot from iniuryby the blade. For
protection from objects discharged from
the mower, wear clothing that willcover the
arms and legs.
Before you start cutting the grass, practice
using the mower in a large open and level
area. Learn the location ofthe controls on
the mower. Know the purpose ofthe
71C_33
Never cut a wet lawn. Wet grass can
cause an accident, affect mower
performance and can cause problemswith
future lawn growth and appearance. Wet
grass is slippery and can cause the mower
to slip. Someone can get injured by
touching the blade(s), Wet grass tends to
clog the mower, causing poor discharge.
Cut wet grass will collect on the lawn,
retarding the growth of the grass. Also,
gettingthe mower wet will cause pads to
rust and decrease the lifeof the unit.
When you look over the lawn, remember
obstacles that cannot be removed, like
pipes, stumps or rocks. Keep away from
these obstacles that can cause damage to
the mower or injuryto the operator or a
person near the mower. Clear the area of
rocks, toys,wire or other loose objects.
These items can damage the mower or
can be discharged by the mower blade.
5
°
Check the terrain of the area to be mowed.
Mow in a pattern that will keep you away
from dangerous ames. Check the distance
you need to stop and the distance
available to turn. Slopes and rough terrain
must be mowed cerefully and some areas
must not be mowed at all. With riding
mowers, mow up and down the hill. When
you must mow rough terrain or on slopes,
drive slowly and stop in these areas onlyin
an emergency, Before you ride up or down
a slope, try to back straight up the slope.
Do not ride up or down a slope that is too
steep toback straight up. See the "Guide"
in the back of this InstructionBook to
check any slopes.
Before you start cutting, make sure the
mower was completely assembled
according to the Instruction Bo_L" !fthe
mower was completely assembled at the
SAFE MOWING GUIDE
store,youmuststillcheckthemower
according to the assembly instructions.
Make sure the mower is correctly
assembled and thai ell fasteners are tight•
Make sure the engine has the correct
amount of oil. Check these items often
during the life of the mower.
Your mower has • gasoline engine.
Gasoline is a dangerous fuel. Keep
gasoline only in an approved safety
gasoline container. Do not keep large
amounts of gasoline. When you add
gasoline to the fuel tank, do not smoke.
Store the gasoline container and the
mower in an area that has good ventilation,
Also, keep the gasoline away from any
flames like the pilot light of a furnace or
any other source of ignition. Ifthe mower is
to be stored for more than a few weeks,
remove the gasoline from the fuel tank.
When inside an enclosure, do not add
, gasoline to the fuel tank. Before you add
gasoline, move the mower outside and add
gasoline carefully. Before you start the
engine, remove any gasoline from the
outside of the fuel tank or from the mower.
Warm gasoline willexpand. Leave some
space in the fuel tank for the gasoline to
expand. Also, the fuel cap has a vent hole
forfuel vapors. Always use the correct fuel
cap. Failure to follow safety rules about
gasoline will cause fires and explosions,
injuryto you and da_&ge to the equipment
and other property.
engine and transmission cool before
servicing the mower. Remember, exhaust
fumes ere dangerous. Never operate the
engine inside e building.
When you get a new mower, it can be a
new experience for the family. Tell each
person how a mower can be dangerous.
Remember, a mower is not a toy. A mower
is not to be used by children or anyone not
old enough, strong enough or that does not
have experience.
If the mower is not correctly assembled,
not operated correctly,or notregularly
serviced, the mower can be dangerous,
The most importantrule to follow is always
use good judgement and common sense.
Mow safely and carefutly.
Your mower will easily cutthick grass.
Fingers, feet and other parts can also be
cut by the blade. Injuries occur when the
operator does not think and reaches into
the chute opening. Always operate the
mower as ifthe blade is rotating. Do not
service or make an adjustment, except to
the carburetor, while the engine is running.
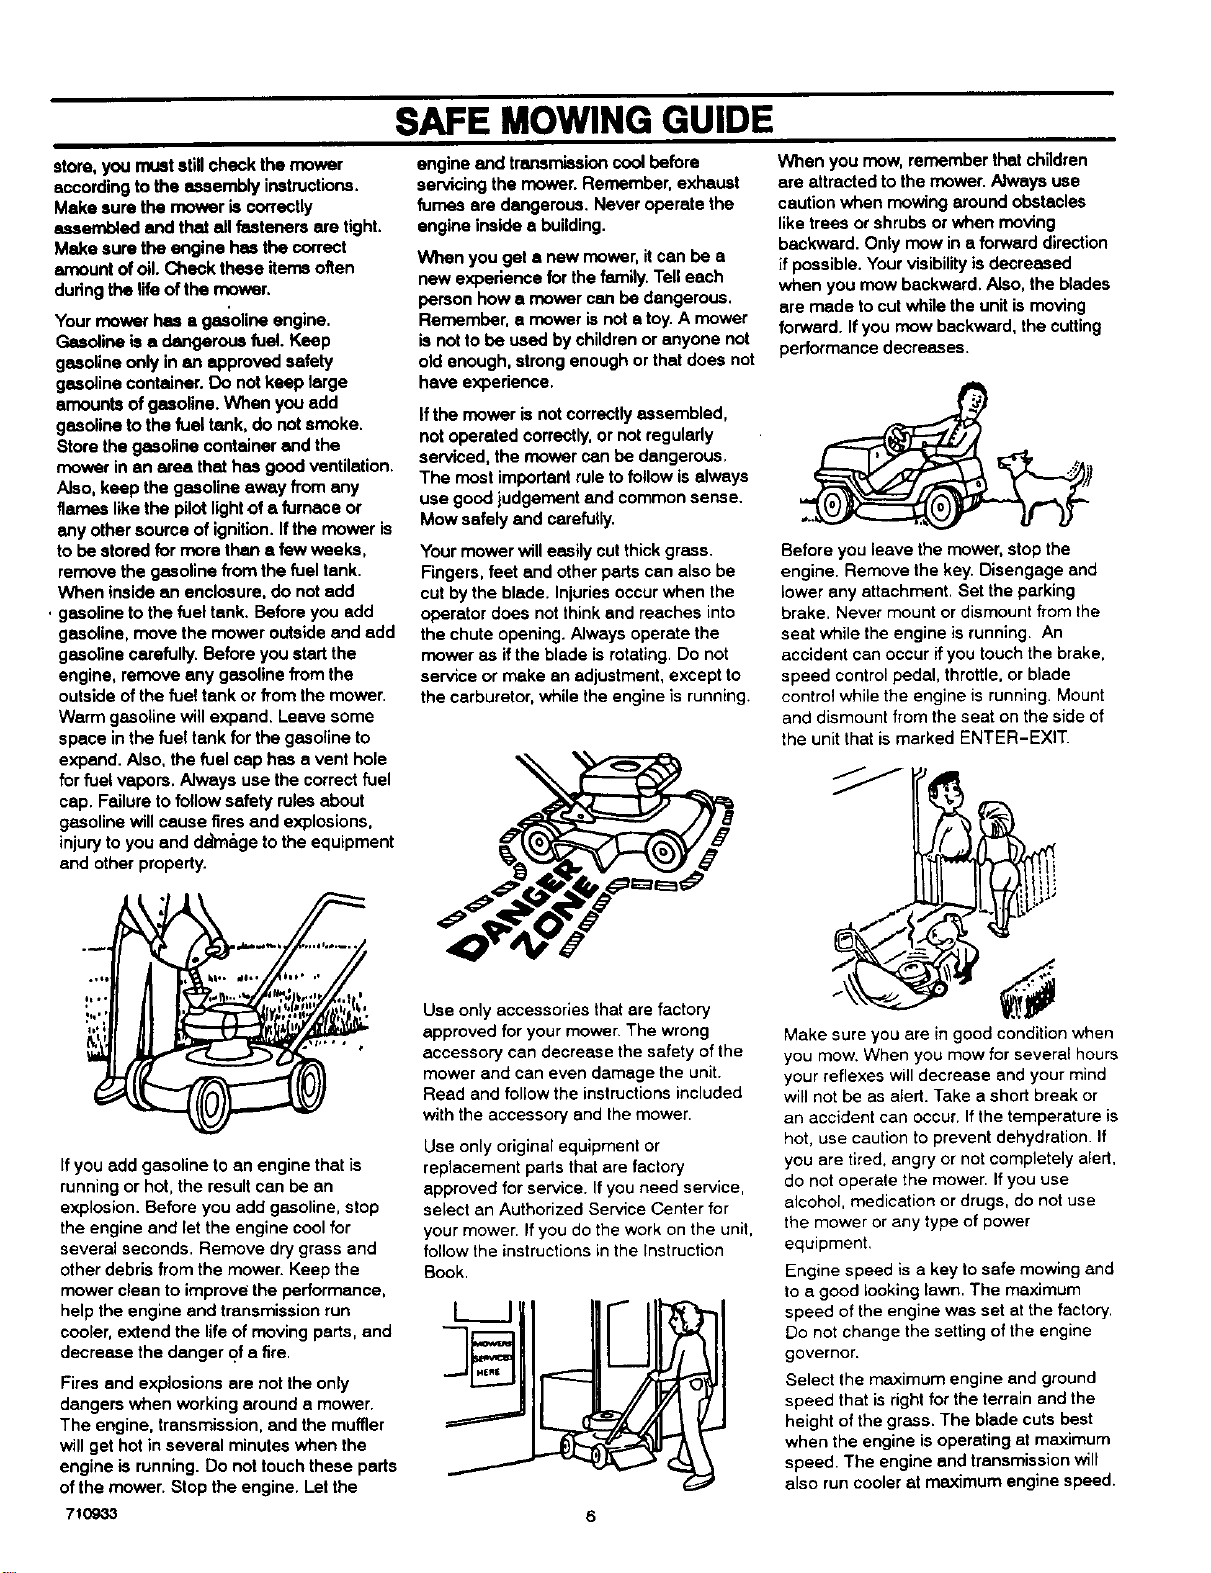
When you mow, remember that children
are attracted to the mower. Always use
caution when mowing around obstacles
like trees or shrubs or when moving
backward. Only mow in a forward direction
if possible. Your visibility is decreased
when you mow backward, Also, the blades
are made to cut while the unit is moving
forward. If you mow backward, the cutting
performance decreases.
Before you leave the mower, stop the
engine. Remove the key. Disengage and
lower any attachment, Set the parking
brake. Never mount or dismount from the
seat while the engine is running. An
accident can occur if you touch the brake,
speed control pedal, throttle, or blade
control while the engine is running. Mount
and dismount from the seat on the side of
the unitthat is marked ENTER-EXIT.
=li
If you add gasoline to an engine that is
running or hot, the result can be an
explosion. Before you add gasoline, stop
the engine and let the engine cool for
several seconds. Remove dry grass end
other debris from the mower. Keep the
mower clean to improve the performance,
help the engine end transmission run
cooler, extend the life of moving parts, and
decrease the danger of a fire.
Fires and explosions are not the only
dangers when working around a mower.
The engine, transmission, and the muffler
will get hotin several minutes when the
engine is running. Do not touch these parts
of the mower. Stop the engine. Let the
71O933
Use only accessories thatare factory
approved for your mower. The wrong
accessory can decrease the safety of the
mower and can even damage the unit.
Read and followthe instructionsincluded
with the accessory end the mower.
Use only original equipment or
replacement parts that are factory
approved for service. If you need service,
select an Authorized Service Center for
your mower. Ifyou do the work on the unit,
follow the instructionsinthe Instruction
Book.
I I
6
Make sure you are in good condition when
you mow. When you mow for several hours
your reflexes will decrease and your mind
will not be as alert. Take a short break or
an accident can occur. If the temperature is
hot, use caution to prevent dehydration. If
you ere tired, angry or not completely alert.
do not operate the mower. If you use
alcohol, medication or drugs, do not use
the mower or any type of power
equipment,
Engine speed is a key to safe mowing and
to a good looking lawn. The maximum
speed of the engine was set at the factory.
Do not change the setting of the engine
governor.
Select the maximum engine end ground
speed that is right for the terrain and the
height of the grass. The blade cuts best
when the engine is operating at maximum
speed. The engine and transmission will
also run cooler at maximum engine speed.
SAFE MOWING GUIDE
Also, the grass begger will function better
when the engine is operating at mmdmum
speed. On slopes, decrease the ground
speed and use care making sure the
mower feels safe to operate.
Ifthe weather conditionsare bed, do not
mow. Ifweather conditions become bad,
stop cutting end finish later. It is dangerous
tocut grass in the rain. Always find
protection in an aiectdcat storm. If the
weather conditions are extra,dry, protect
your eyes with safety glasses from the dust
and from the objects discharged by the
mower. Also, a dust or a pollen mask can
help.
Your mower is equipped with a number of
safety devices which are important to the
safety of the operator and bystanders and
must never be changed or removed from
the mower. If a safety device is lost,
damaged or no longerfunctions, repair or
replace the device before you operate the
mower.
it is best to mow during the day. If you
must mow at night, make sure there is
enough light for safe operation.
Your mower will require regular
maintenance and service. The
maintenance schedule depends on the
hours of use. Also, mowing conditions can
change the schedule. Check the
instruction Book for more information.
Correct maintenance will help the mower
function safely.
Do not service the
mower (except for the
carburetor adjustment)
while the engine is ' ,...
service the unit, even I_1_j'_-
with the engine stopped,||t _
always disconnect the
running. Before you _ !
wire from the spark plug
to prevent the engine
from starting.
Ifyou hit a large object during operation,
stopthe engine. Remove the wire from the
spark plug. Carefully inspect the mower for
damage. Before you start the engine
again, make the necessary repairs. Ifyou
feel new or excessive vibration,
immediately stopthe engine and check for
the problem. Vibration can be a warning of
a problem. Keep all nuts, bolts and screws
tight.
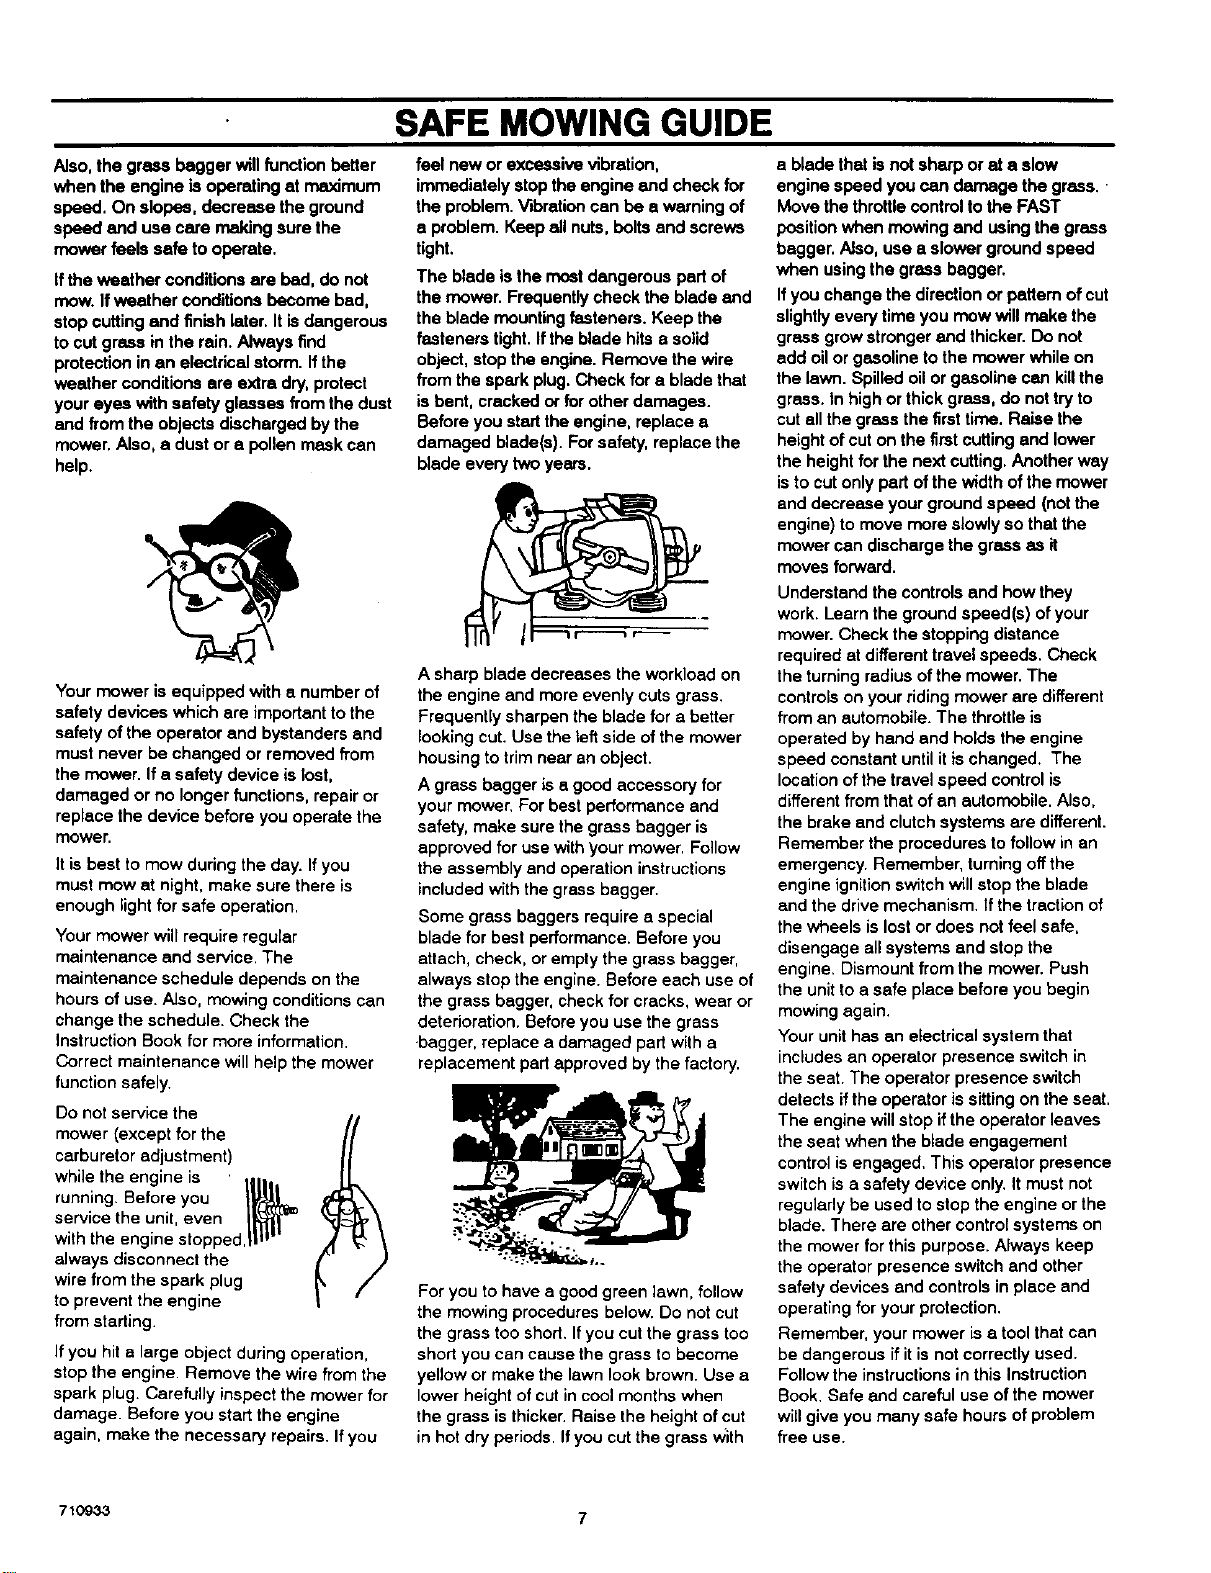
The blade is the most dangerous pad of
the mower. Frequently check the blade and
the blade mounting fasteners. Keep the
fasteners tight. Ifthe blade hits a solid
object, stop the engine. Remove the wire
fromthe spark plug. Check for a blade that
is bent, cracked or for other damages.
Before you start the engine, replace a
damaged blade(s). Forsafety, replace the
blade every two years.
A sharp blade decreases the workload on
the engine and more evenly cuts grass.
Frequently sharpen the blade for a better
lookingcut. Use the left side ofthe mower
housing to trim near an object.
A grass bagger is a good accessory for
your mower, For best performance and
safety, make sure the grass bagger is
approved for use with your mower. Follow
the assembly and operationinstructions
included with the grass bagger.
Some grass baggers require a special
blade for best performance. Before you
attach, check, or empty the grass bagger,
always stop the engine. Before each use of
the grass bagger, checkfor cracks, wear or
deterioration. Before you use the grass
bagger, replace a damaged part with a
replacement part approved by the factory.
For you to have a good green lawn, follow
the mowing procedures below. Do not cut
the grass too shod. Ifyou cut the grass too
short you can cause the grassto become
yellow or make the lawn lookbrown. Use a
lower height of cut in cool months when
the grass isthicker. Raise the height of cut
in hot dry periods. Ifyou cut the grass With
a blade thatis not sharp or at a slow
engine speed you can damage the grass.
Move the throttlecontrolto the FAST
positionwhen mowing and using the grass
bagger. Also, use a slower ground speed
when using the grass bagger.
Ifyou change the direction or pattem of cut
slightlyevery time you mow will make the
grass grow stronger and thicker. Do not
add oil or gasoline to the mower while on
the lawn. Spilled oil or gasoline can killthe
grass. In high or thick grass, do not try to
cut all the grass the first time. Raise the
height of cut on the first cutting and lower
the height for the next cutting. Another way
isto cut only part of the width of the mower
and decrease your ground speed (not the
engine) to move more slowly so that the
mower can discharge the grass as it
moves forward.
Understand the controlsand how they
work. Learn the ground speed(s) of your
mower. Check the stopping distance
required at differenttravel speeds. Check
the turning radius ofthe mower. The
controlson your riding mower are different
from an automobile. The throttle is
operated by hand and holds the engine
speed constant until it is changed. The
location of the travel speed control is
differentfrom that of an automobile. Also,
the brake and clutch systems are different.
Remember the procedures to follow in an
emergency. Remember, turning offthe
engine ignition switch will stop the blade
and the drive mechanism. If the tractionof
the wheels is lost or does not feel safe,
disengage all systems and stop the
engine. Dismount from the mower. Push
the unit to a safe place before you begin
mowing again.
Your unit has an electrical system that
includesan operator presence switch in
the seat. The operator presence switch
detects if the operator is sittingon the seat.
The engine will stop ifthe operator leaves
the seat when the blade engagement
control is engaged, This operator presence
switch is a safety device only. It must not
regularlybe used to stop the engine or the
blade. There are other control systems on
the mower for this purpose. Always keep
the operator presence switch and other
safety devices and controls in place and
operating foryour protection.
Remember, your mower is a tool that can
be dangerous if it is not correctly used.
Follow the instructionsin this Instruction
Book, Safe and careful use of the mower
willgive you many safe hours of problem
free use.
710933 7
STEPS TO FOLLOW
BEFORE MOWING
• Be sure to dress correctly.Wear hard shoes, not sandals or tennis shoes.
• Examine the blade. A blade that is bent, cracked, or damaged must he replaced with e factory replacement blade.
• Fill the fuel tank outside. Clean offspilled fuel.
• Read end folk)w the Owner's Manual, the instructions with the engine, and the instructions with any attachments, Owner's Manual
instructionsare for your safety and the safety of others.
• Exhaust fumes ere dangerous. Start the engine outside,
• Make sure all safety devices ere in place end working correctly.
• Operation ofthe mower is only for e person that has experience.
• Wet grass can be dangerous, Let the grass dry.
• instructchildren and others to keep away from the work area.
• Never cutthe grass without good light,
• Pick up loose objects. Remove them from the mowing area,
WHILE MOWING
• Watch for fixed objects and avoid them. They can damage the mower or cause injury.
• A hot engine, muffler, and transmission willcause e burn. Do not touch.
• Inclines and slopes must be carefully mowed. See the "Guide" in the back of this book to check a slope,
• Lack of daylight or good adificial light is cause to stop mowing.
• Examinethem_wer'theb__de_andotherpadsf_rdamageafterhittingaf_reign_bject_riftheunitvibratesexcessively`
• Do not make adjustments or repairs without stoppingthe engine. Disconnect the spark plug wire.
• On or near roads, watch out for traffic. Direct discharge away from roads.
• When mewing, avoid areas where traction is unsure. Look back before changing direction of travel.
• In heavy grass, raise the cutting height. Cut slower. Stop the engine to remove clogged grass from the mower,
• Never remove any safety related pads.
• Do not pour gasoline intoa engine that is hot or running.
AFTER MOWING
• Always let the mower cool before storing in an enclosed area,
• Foreign material on the mower is dangerous. Clean off grass, reaves, grease and oil before storing.
• Tighten all loose nuts, belts and screws before you use the unit.
• Empty and clean any grass catcher or other accessory.
• Remove the key or disconnect the spark plug wire to prevent unauthorized use.
• Make sure the mower is not kept near a source of ignition. Gas fumes can cause an explosion.
• Only original pads or factory approved substitutes can be used to service the mower.
• When storing the mower for an extended period, remove the fuel from the fuel tank,
• Instruct children to leave the mower alone. It is not a toy,
• Never keep gasoline near a source of ignition. Always use an approved container, Keep gasoline away from children.
• Lubricate according to the Instruction Book. See "Lubrication'.
IMPORTANT--Road the Instruction Book. Keep this book for future use and reference.
safety precautions. It means: "Attention! Become Alert!
WARNING: Look for this symbol to point out Important
Your Safety Is Involved,"
710933 8
ASSEMBLY
ASSEMBLY
This instructionbook is for several models. Some parts or ecossso-
rias are not included on all models. Read and follow the assembly
and adjustment instructionsfor your mower. Allfasteners are in the
parts bag. Do not discard any parts or material until the unit is
assembled.
_IL WARNING: Before doing any assembly or mainte-
NOTE: in this Instruction book, left and dght describe the loca-
tion of a part with the operator on the seat.
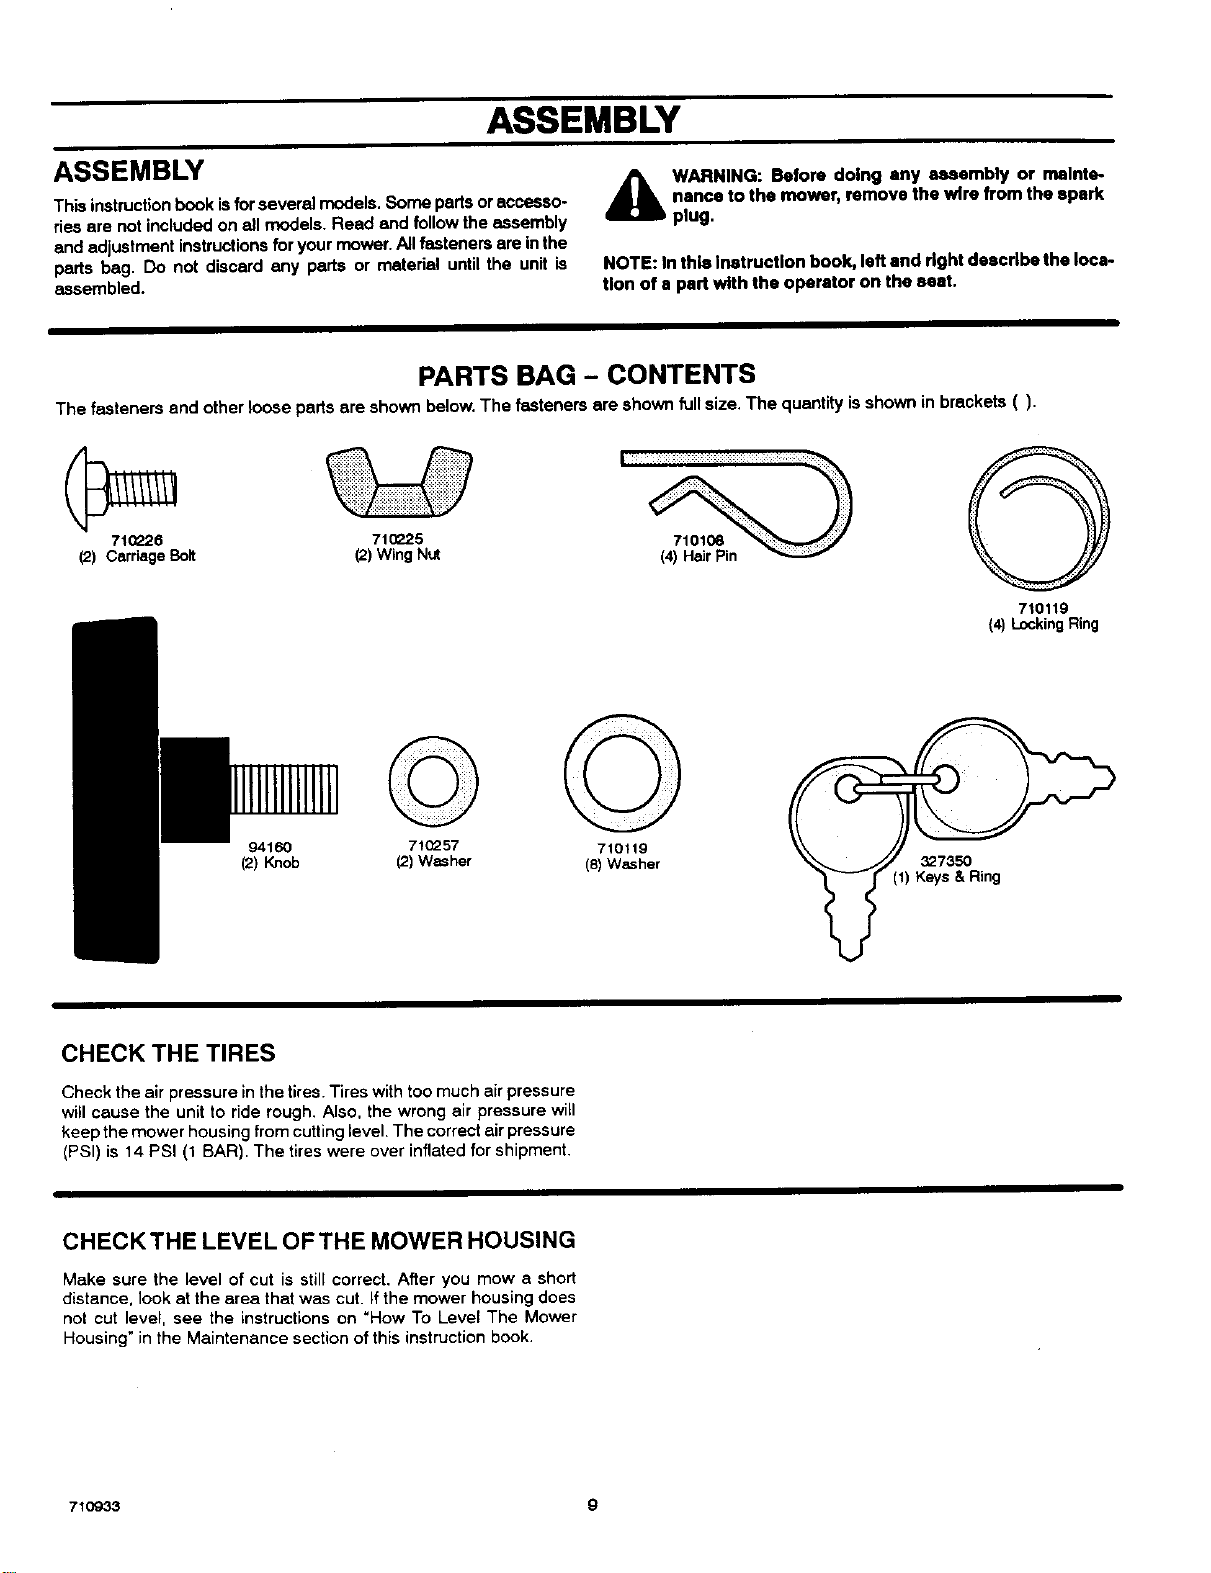
PARTS BAG - CONTENTS
The fasteners and other loose parts are shown below.The fasteners are shown full size. The quantity isshown in brackets ().
nance to the mower, remove the wire from the spark
plug.
710226 71_P-25
(2) CarriageBolt (2)WingNut
94160
(2) Knob
CHECK THE TIRES
Check the air pressure in the tires.Tires with too much air pressure
will cause the unit to ride rough. Also, the wrong air pressure will
keep the mower housing from cutting level, The correct air pressure
(PSI) is 14 PSI (1 BAR). The tires were over inflated for shipment.
71(_57
(2) Washer
710119
(8) W_her
O
710119
(4) LockingRing
_7350
(1) Keys & Ring
CHECKTHE LEVEL OFTHE MOWER HOUSING
Make sure the level of cut is stillcorrect, After you mow a short
distance, look at the area that was cut. If the mower housing does
not cut level, see the instructions on "How To Level The Mower
Housing" in the Maintenance section of this instruction book,
710933 9
ASSEMBLY
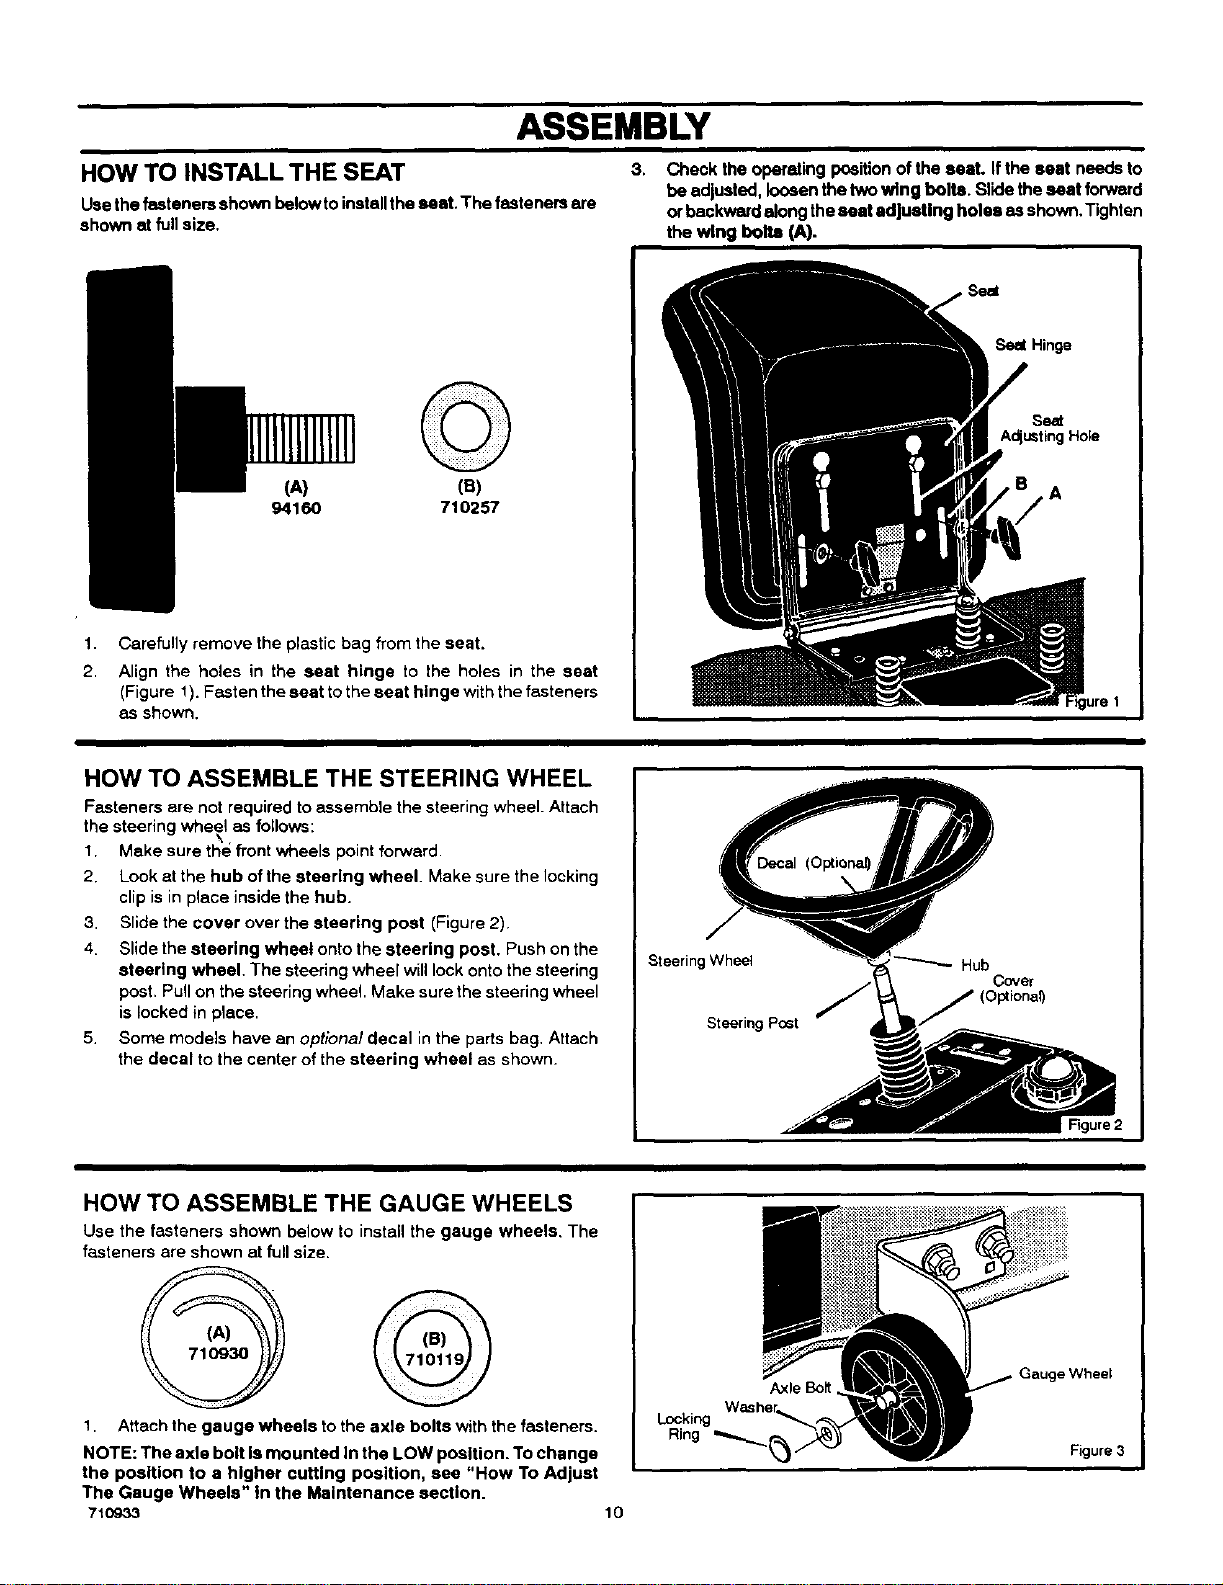
HOW TO INSTALL THE SEAT
Use the fasteners shown belowto installthe seat. The fasteners ere
shown at full size,
3.
Check the operating positionof the seat. If the seat needs to
be adjusted, loosenthe two wing bolts. Slide the seat forward
orbackward along theseat adjusting holes as shown. Tighten
the wing bolt_ (A).
Seat
Seal Hinge
(A) (B)
94160 710257
1.
Carefully remove the plastic bag from the seat.
2.
Align the holes in the seat hinge to the holes in the seat
(Figure 1). Fasten the seat to the seat hinge withthe fasteners
as shown.
HOW TO ASSEMBLE THE STEERING WHEEL
Fasteners are not required to assemble the steering wheel. Attach
the steering wheel as follows:
1. Make sure the front wheels point forward.
2. Look at the hub of the steering wheel. Make sure the locking
clip is in piece inside the hub.
3. Slide the cover over the steering post (Figure 2).
4. Slide the steering wheel onto the steering poet. Push on the
steorlng wheel. The steering wheel will lock onto the steering
post. Pull on the steering wheel. Make sure the steering wheel
is locked in place.
5. Some models have an optional decal in the parts bag. Attach
the decal to the center of the steering wheel as shown.
Steering Wheel
Steering Post
A
Hub
Cover
(Optional)
HOW TO ASSEMBLE THE GAUGE WHEELS
Use the fasteners shown below to install the gauge wheels, The
fasteners are shown at full size.
1. Attach the gauge wheels to the axle bolts with the fasteners.
NOTE: The axle bolt Is mounted In the LOW position. To change
the position to a higher cutting position, see "How To Adjust
The Gauge Wheels" in the Maintenance section.
710933
10
Locking
Ring
Axle Bolt
.=Wheel
Figure 3
ASSEMBLY
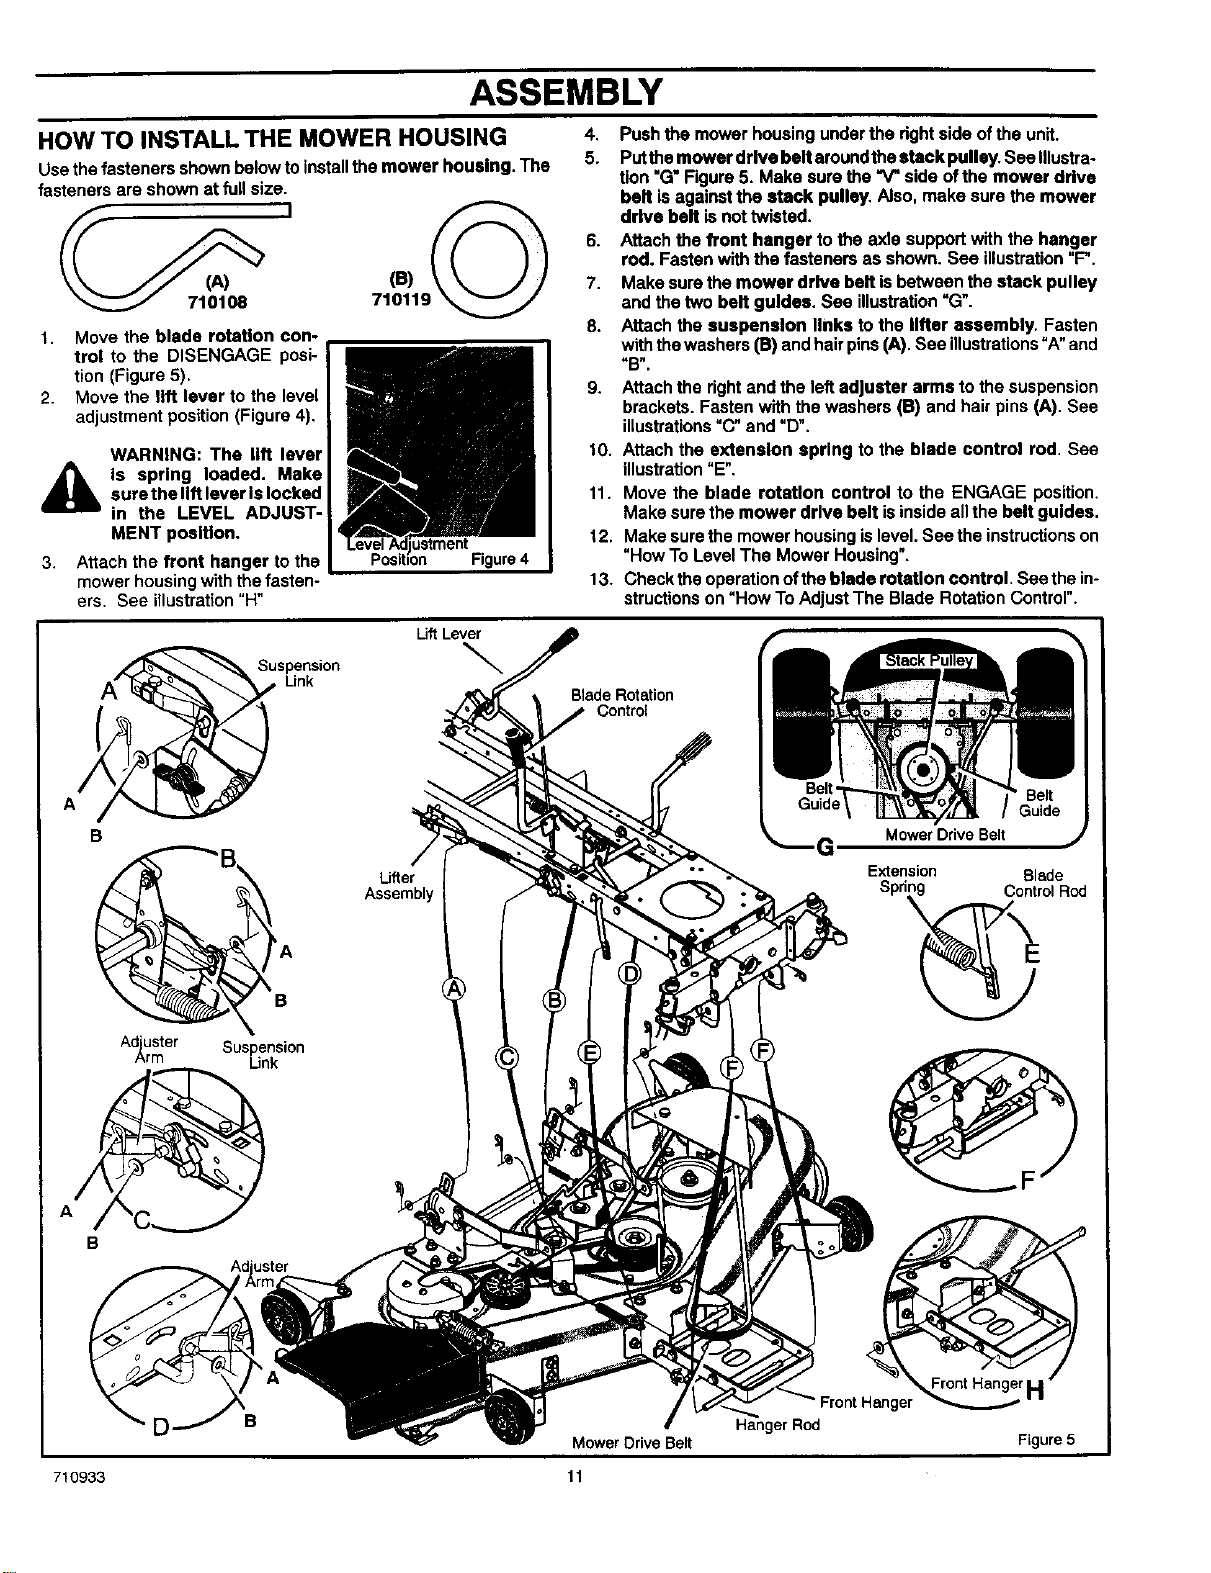
HOW TO INSTALL THE MOWER HOUSING
Use the fasteners shown below to Install the mower housing. The
fasteners are shown at full size.
I
1. Move the blade rotation con-
trol to the DISENGAGE posi-
tion (Figure 5).
2. Move the lift lever to the level
adjustment position (Figure 4).
WARNING: The lift lever
sure the lift lever Is locked
iS spring loaded. Make
in the LEVEL ADJUST-
MENT position.
3. Attach the front hanger to the
mower housing with the fasten-
ers. See illustration"H"
Suspension
Link
Figure 4
Lift Lever
\
4. Push the mower housing under the dght side ofthe unit.
5. Putthe mower drive belt aroundthe stack pulley. See Illustra-
tion "G" Figure 5. Make sure the "V" side of the mower drive
belt is against the ldack pulley. Also, make sure the mower
drive belt is not twisted.
6. Attach the front hanger to the axle support with the hanger
rod. Fasten with the fasteners as shown. See illustration"F".
7. Make sure the mower drive beR is between the stack pulley
and the two belt guides. Sea illustration "G".
8. Attach the suspension links to the lifter assembly. Fasten
withthe washers (B) and hair pins (A). See illustrations"A"and
"B".
9. Attach the right end the left adjuster arms to the suspension
brackets. Fasten with the washers (13)and hair pins (A). See
illustrations"C" and "D".
10. Attach the extension spring to the blade control rod. See
illustration"E".
11. Move the blade rotstlon control to the ENGAGE position.
Make sure the mower drive belt is inside allthe belt guides.
12. Make surethe mower housingis level. See the instructionson
"How To Level The Mower Housing".
13. Check the operation ofthe blade rotstlon control. See the in-
structions on "How To Adjust The Blade Rotation Control".
Blade Rotation
Control
B
Ad'uster
_rm
P'A
B
Suspension
Link
uster
Lifter
Assernbl
Mower Drive Belt
Extension Blade
Spd_rol Rod
Front_
D B
710933 11
Mower Drive Belt
Hanger Rod
Figure 5
ASSEMBLY
MAINTENANCE FREE BATTERY HOWTO CHARGETHE MAINTENANCEFREEBATTERY
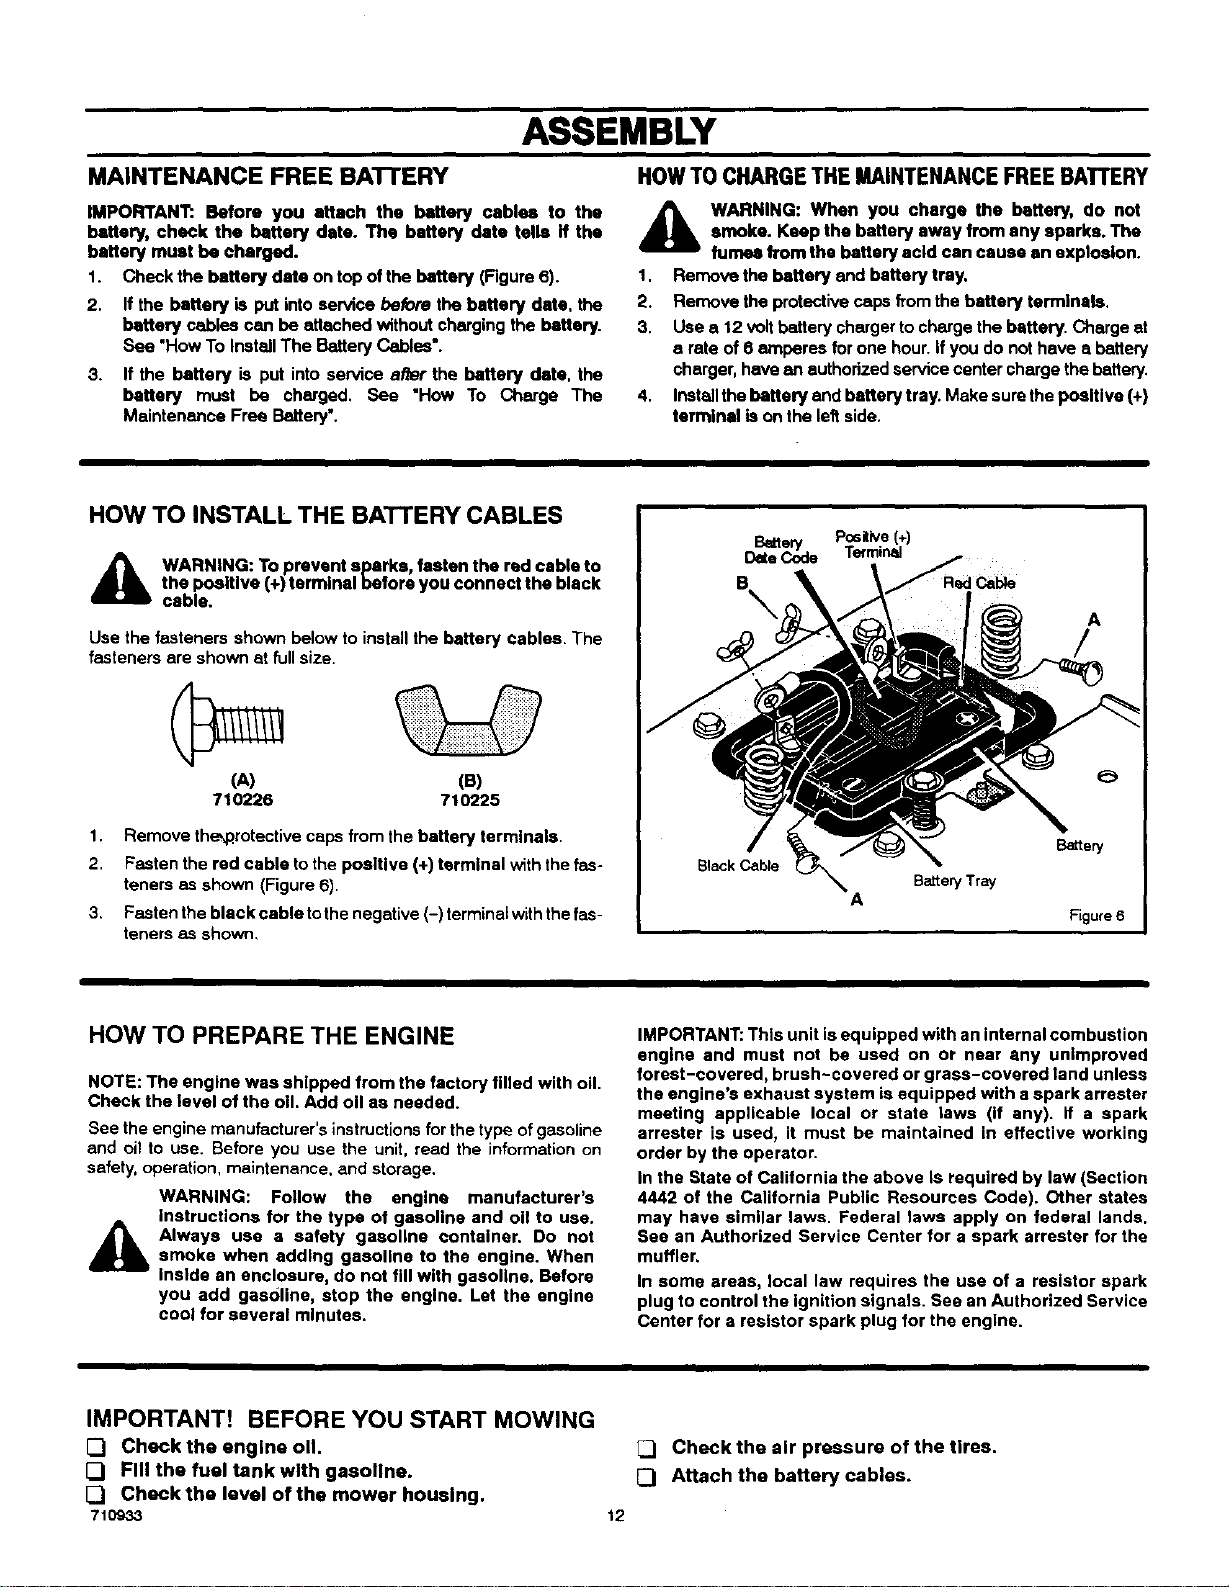
IMPORTANT:. Before you attach the battery cables to the
battery, check the battery date. The battery date tells if the
battery must be charged.
1. Check the battery date on top of the battery (Figure 6).
2. If the battery is put into service before the battery date. the
battery cables can be attached without charging the battery.
See "How To Install The Battery Cables*.
3. If the battery is put into service alter the battery date, the
battery must be charged. See "How To Charge The
Maintenance Free Battery'.
HOW TO INSTALL THE BATTERY CABLES
_k WARNING: To prevent sparks, fasten the red cable to
Use the fasteners shown below to install the battery cables. The
fasteners are shown st fullsize.
the positive (+) terminal before you connect the black
cable.
(A) (B)
710226 710225
WARNING: When you charge the battery, do not
A
1.
2.
3.
4,
I positive(+) I
smoke. Keep the battery away from any sparks. The
fumes from the battery acid can cause an explosion.
Remove the battery and battery tray.
Remove the protective caps from the battery terminals.
Use a 12 volt battery charger to charge the battery. Charge at
s rate of 6 amperes for one hour. if you do not have a battery
charger, have an authorized service center charge the battery.
Installthe battery and battery tray. Make sure the pesltlve (+)
terminal is on the leftside.
_Ek_te___ Terminal
e A
/
1. Remove the_rotective caps from the battery terminals.
2. Fasten the red cable to the positive (+) terminal with the fas-
teners as shown (Figure 6).
3. Fasten the black cable to the negative (-) terminalwith the fas-
teners as shown,
HOW TO PREPARE THE ENGINE
NOTE: The engine was shipped from the factory filled with oil.
Cheek the level of the oil. Add oil aa needed.
Bee the engine manufacturer's instructions for the type of gasoline
and oil to use. Before you use the unit, read the information on
safety, operation, maintenance, and storage,
WARNING: Follow the engine manufacturer's
instructions for the type of gasoline and oil to use.
Always use a safety gasoline container. Do not
smoke when addthg gasoline to the engine. When
inside an enclosure, do not fill with gasoline. Before
you add gasoline, stop the engine. Let the engine
cool for several minutes.
IMPORTANT: This unit is equipped with an internal combustion
engine and must not be used on or near any unimproved
forest-covered, brush-covered or grass-covered land unless
the engine's exhaust system is equipped with a spark arrester
meeting applicable local or state laws (if any). If a spark
arrester is used, it must be maintained in effective working
order by the operator.
In the State of California the above Is required by law (Section
4442 of the California Public Resources Code). Other states
may have similar laws. Federal laws apply on federal lands.
See an Authorized Service Center for a spark arrester for the
muffler,
In some areas, local law requires the use of a resistor spark
plug to control the ignition signals. See an Authorized Service
Center for a resistor spark plug for the engine.
IMPORTANT! BEFORE YOU START MOWING
[3 Check the engine oil.
[_ Fill the fuel tank with gasoline.
[_ Check the level of the mower housing.
710933
_1 Check the air pressure of the tires.
[3 Attach the battery cables.
12

ThrottleControl
Lever
Brake Pedal
OPERATION
Blade Rotation
Control
Speed
Control
P_ial
LOCATION OF CONTROLS
BLADE ROTATION CONTROL: Use the blade rotation
control to start and stop the rotation of the blade.
BRAKE PEDAL: Use the brake pedal to quickly stop.
HEADLIGHT SWITCH: The headlight switch isthefirst part
of the ignitionswitch. To use the lights with the engine running, turn
the key to the position for the lights.
IGNITION SWITCH: usetheignitionswitchtostartandstop
the engine,
BATTERY LIGHT: Indicates whether battery is being re-
charged when engine is running. When the engine is running and
the light is on this means the battery IS charging. If indicator is not
on, have a battery and/or engine charging system checked by an
authorized service dealer.
710933
Figure 7
OK LIGHT: Ifthisindicatorlightison,theenginewillnotstart.
1. Your clutch-brake pedal may not be fully depressed.
2. The blade rotationcontrol may not be in the DISENGAGE posi-
tion.
AUTOMATIC DRIVE DISCONNECT: Usetheauto-
matic drive di,_connect,located under the seat, to disengage the
transmission.
LIFT LEVER: Use the lift lever to change the height of cut.
PARKING BRAKE LEVER: usetheparkingbrake lever
toengage the brake when you leave the unit.
SPEED CONTROL PEDAL: Usethe speedcontrolpedal
to change the speed and the direction of the unit.
THROTTLE CO NTROL LEVER: usethe throttle control
lever to increase or decrease the speed of the engine,
13

OPERATION
ATTACHMENTS HOWTO USETHE BLADEROTATIONCONTROL
This unitcan use many ditfemnt attachments. See the attachment
page in this book. This unit can pull attachments like a lawn
sweeper, a lawn aerator, or a hopper spreader. This unitcan notuse
attachments that engage the ground like a plow, a disk harrow,or
a cultivator.
HOW TO USE THE THROTTLE CONTROL
Use the throttle €_)ntrol to increase or decrease the speed of the
engine.
CAUTION: Always operate the engine with the throttle control
In the FAST posiflon. If the engine mrle for several minutes st
slower than the FAST position, the engine end transmission
will overheat end ran be damaged.
1. The FAST praition is marked with a detent. For normal opera-
tionand when using a grass bagger, move the throttle control
tothe FAST position. For maximum charging ofthe battery end
for a cooler running engine end transmission, operate the en-
gine inthe FAST position.
2.
For transport end to tow pull behind attachments, control the
ground speed with the speed control pedal.
3,
The engine governoris set at the factoryfor maximum perform-
ance. Do not edjt._t the governor to increase the speed of the
engine.
The blade rotation control is next to tho steering wheel (Figure 8).
Use the blade rotation control to engage the blade(s) orto operate
• snow thrower attachment.
1. Before you start the engine, make sure the blade rotation con-
trol is in the DISENGAGE poattlon•
2. Move the blade rotation control tothe ENGAGE position to
rotate the blade(s).
Nots: If the engine stops when you engage the blade(s),
the seat switch Is not activated. Make sure you sit In the
middle of the seat. Also, make sure the wire Is connected
to the seat switch.
3. Move the blade rotation control to the DISENGAGE position
to stop the blade(s). Before you leave the operator's position,
make sure the blade(s) has stopped rotating,
4. Before you ride the unitacross a sidewalk ora road, move the
blade rotation control to the DISENGAGE position.
_1 WARNING: Always keep your hands and feet away
from the blade, deflector opening, and the mower
housing when the engine runs.
Disengage
Position
B_adeR_=ionCo_rol
Engage Pc_s_ion
Figure 8
7109,33 14
OPERATION
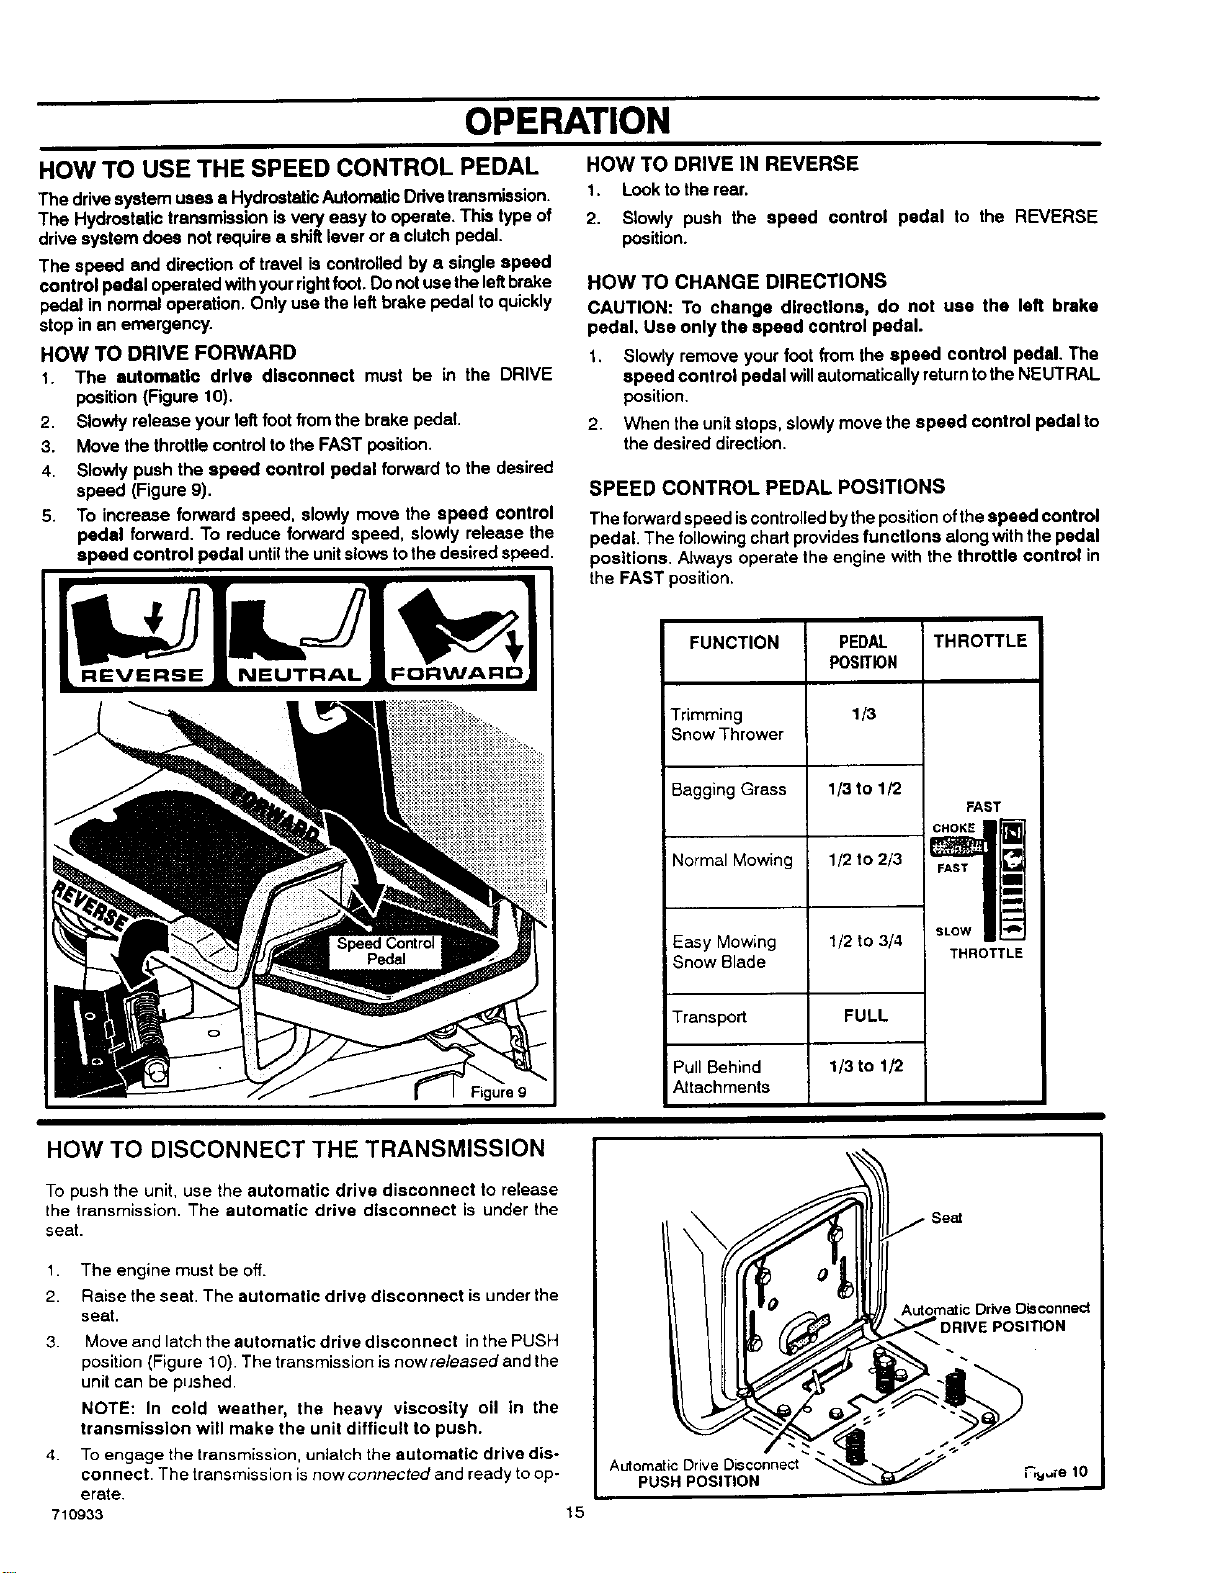
HOW TO USE THE SPEED CONTROL PEDAL
The drive system uses a HydrostaticAutomatic Drive transmission.
The Hydrostatic transmission is very easy to operate. This type of
drive system does not require e shiRlever or a clutch pedal.
The speed end direction of travel is controlled by a single speed
control pedal operated withyour rightfoot. Donot usethe leftbrake
pedal in normal operation. Only use the left brake pedal to quickly
stop in an emergency.
HOW TO DRIVE FORWARD
1. The automatic drive dlaconnest must be in the DRIVE
position (Figure 10).
2. Slowly release your left footfrom the brake pedal.
3. Move the throttle control to the FAST position.
4. Slowly push the speed control pedal forward to the desired
speed (Figure 9).
5+ To increase forward speed, slowly move the speed control
pedal forward. To reduce forward speed, slowly release the
speed control pedal until the unit slows to the desired speed.
HOW TO DRIVE IN REVERSE
1. Look to the rear.
2. Slowly push the speed control pedal to the REVERSE
position.
HOW TO CHANGE DIRECTIONS
CAUTION: To change diracttons, do not use the left brake
pedal, Use only the speed control pedal.
1. Slowly remove your foot from the speed control pedal. The
speed control pedal willautomatically returntothe NEUTRAL
position.
2. When the unitstops, slowly move the speed control pedal to
the desired direction.
SPEED CONTROL PEDAL POSITIONS
The forward speed is controlledby the positionofthe speed control
pedal. The following chad providesfunctions along with the pedal
positions. Always operate the engine with the throttle control in
the FAST position.
FUNCTION THROTTLE
Trimming
Snow Thrower
PEDAL
POSITION
1/3
HOW TO DISCONNECT THE TRANSMISSION
To push the unit, use the automatic drive disconnect to release
the transmission. The automatic drive disconnect is under the
seat.
1. The engine must be off.
2. Raise the seat. The automatic drive disconnect is under the
seat.
3. Move and latch the automatic drive disconnect in the PUSH
position {Figure 10). The transmission is nowreleasedand the
unit can be pushed
NOTE: In cold weather, the heavy viscosity oil in the
transmission will make the unit difficult to push.
4. To engage the transmission, unlatch the automatic drive dis-
connect. The transmission is now connected and ready to op-
erate.
710933
Bagging Grass
Normal Mowing
Easy Mowing
Snow Blade
Transport
Pull Behind
Attachments
Automatic Drive Disconnect
PUSH POSITION
15
1/3 to 1/2
1/2 to 2/3
1/2 to 3/4
FULL
1/3 to 1/2
FAST
CHOKE __
FAST
SLOW
Automatic Drive Disconnect
THROTTLE
POSITION
_l
m
m
m
u
m
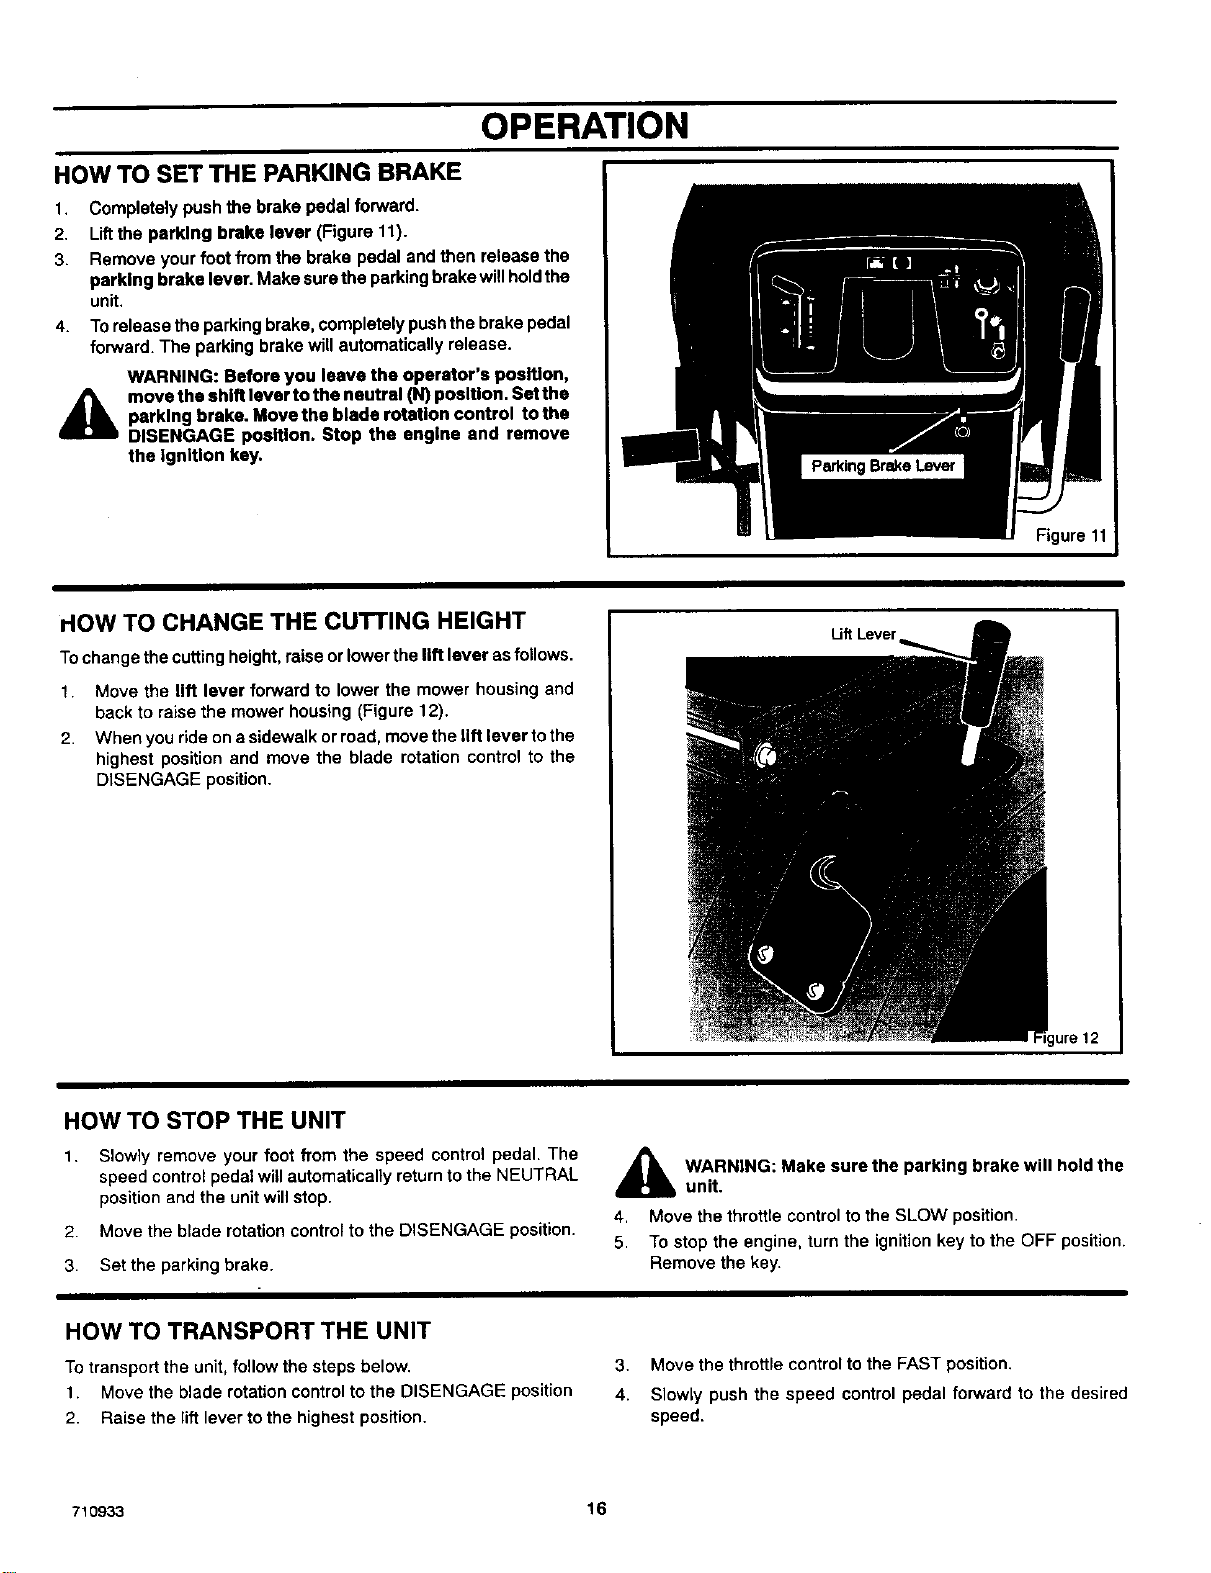
HOW TO SET THE PARKING BRAKE
1.
Completely push the brake pedal forward.
2.
Liftthe parking brake lever (Figure 11).
3.
Remove your foot from the brake pedal and then release the
parking brake lever. Make sure the parking brake will holdthe
unit,
4.
Torelease the parking brake, completely pushthe brake pedal
forward. The parking brake will automatically release.
WARNING: Before you leave the operator's position,
move the shift lever to the neutral (N) poslUon. Set the
A
parking brake. Move the blade rotation control tothe
DISENGAGE position. Stop the engine and remove
the Ignition key.
OPERATION
Figure 11
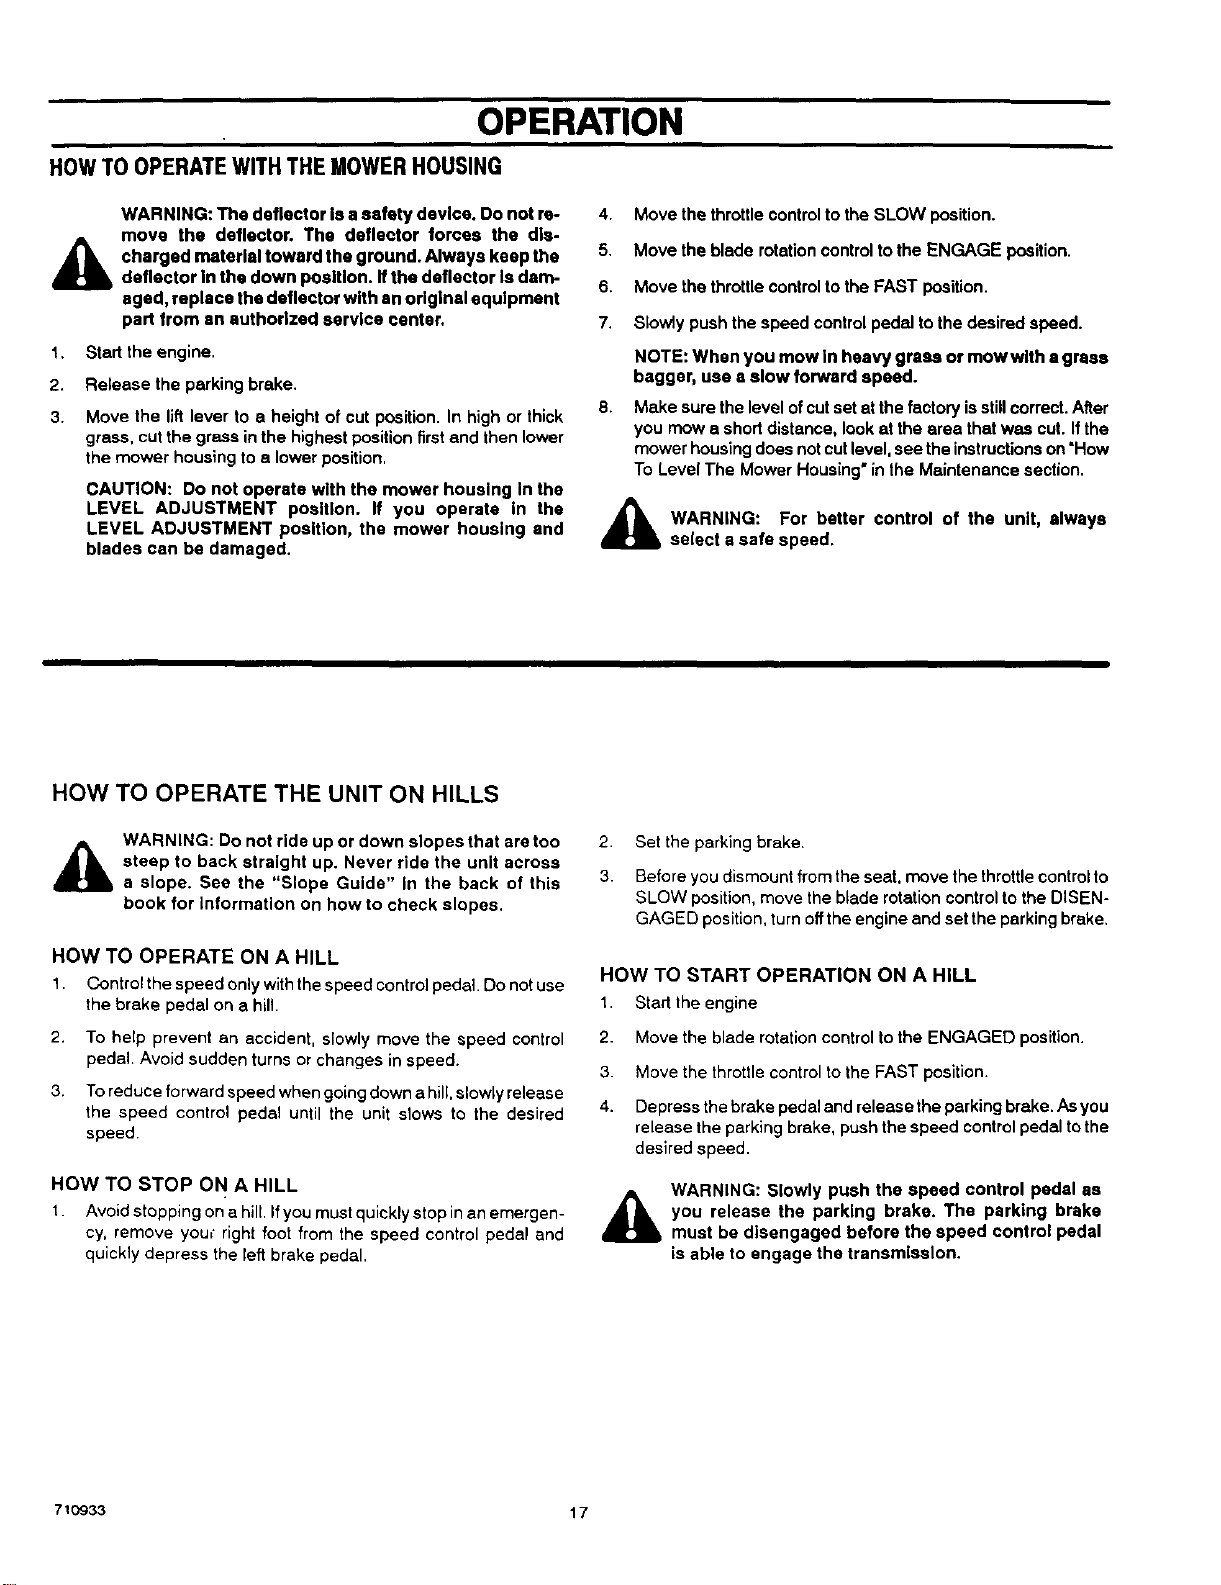
HOW TO CHANGE THE CUTTING HEIGHT
To change the cuttingheight, raise or lower the lift lever asfollows.
1. Move the lift lever forward to lower the mower housing and
back to raise the mower housing (Figure 12).
2. When you ride on a sidewalk or road, move the lift lever to the
highest position and move the blade rotation control to the
DISENGAGE position.
HOW TO STOP THE UNIT
1.
Slowly remove your foot from the speed control pedal. The
speed control pedal will automatically return tothe NEUTRAL
position and the unit will stop.
2. Move the blade rotation control to the DISENGAGE position.
3. Set the parking brake.
Uff Lever
_bb ARNING: Make sure the parking brake will hold the
4, Move the throttle control to the SLOW position
5, To stop the engine, turn the ignition key to the OFF position.
unit.
Remove the key.
HOW TO TRANSPORT THE UNIT
To transport the unit, follow the steps below.
1. Move the blade rotation control to the DISENGAGE position
2. Raise the lift lever to the highest position.
710933 16
3. Move the throttle control to the FAST position.
4. Slowly push the speed control pedal forward to the desired
speed.
OPERATION
ROWTO OPERATEWITH THE MOWERHOUSING
WARNING: The deflector is a safety device. Do not re-
move the deflector. The deflector forces the dis-
charged material toward the ground. Always keep the
deflector In the down position. Ifthe deflector Is darn-
aged, replace the deflector with an original equipment
part from an authorized service center.
1.
Start the engine.
2.
Release the parking brake.
3.
Move the lift lever to e height of cut position. In high or thick
grass, cut the grass inthe highest positionfirst and then lower
the mower housing to a lower position.
CAUTION: Do not operate with the mower housing In the
LEVEL ADJUSTMENT position, ff you operate In the
LEVEL ADJUSTMENT position, the mower housing end
blades can be damaged.
HOW TO OPERATE THE UNIT ON HILLS
4. Move the throttlecontrolto the SLOW position.
5, Move the blade rotationcontrol to the ENGAGE position.
6. Move the throttlecontrolto the FAST position.
7. Slowly push the speed controlpedal to the desired speed.
NOTE: When you mow in heavy grass or mow with • grass
bagger, use s slow forward speed.
8,
Make sure the level of cut set at the factory is stillcorrect. After
you mow a shortdistance, look at the area that was cut. Ifthe
mower housing doesnot cutlevel, see the instructionson"How
To Level The Mower Housing"in the Maintenance section.
_lb ARNING: For better control of the unit, always
select a safe speed.
WARNING: Do not ride up or down slopes that are too 2
steep to back straight up. Never ride the unit across
a slope. See the "Slope Guide" in the back of this 3
book for information on how to check slopes,
HOW TO OPERATE ON A HILL
1. Control the speed only withthe speed control pedal Do not use
the brake pedal on a hill.
2. To help prevent an accident, slowly move the speed control
pedal. Avoid sudden turns or changes in speed.
3. To reduce forward speed when going downa hill, slowlyrelease
the speed control pedal until the unit slows to the desired
speed
HOW TO STOP ON A HILL
I. Avoid stopping on a hill, Ifyou must quickly stop in an emergen-
cy, remove your" right foot from the speed control pedal and
quickly depress the left brake pedal.
Set the parking brake.
Before you dismount from the seat, move the throttlecontrolto
SLOW position, move the blade rotation controlto the DISEN-
GAGED position, turn off the engine and set the parking brake,
HOW TO START OPERATION ON A HILL
1. Start the engine
2. Move the blade rotationcontrolto the ENGAGED position.
3. Move the throttle controlto the FAST position.
4. Depress the brake pedal and release the parking brake.As you
release the parking brake, push the speed controlpedal to the
desired speed.
WARNING: Slowly push the speed control pedal as
you release the parking brake. The parking brake
must be disengaged before the speed control pedal
is able to engage the transmission.
710933 17
OPERATION
BEFORE STARTING THE ENGINE
CHECK THE OIL
NOTE: The engine was shipped from the factory filled with o11.
Check the level of the oil Add oll amneeded, See the engine
manufacturer's Instructions for the type of gasoline end oll to
use.
I. Make sure the unit is level.
NOTE: Do not check the level of the oll while the engine
rune.
2, Check the oil. Follow the procedure in the engine manufectur- 3. After storage, make sure you use fresh fuel. See the storage
ar's instructions, instructionsfor additional information.
3. If necessary, add oil until the oil reaches the FULL mark on the
dipstick.The quantity ofoil needed from ADD to FULL is shown 4. Never use engine cleaner or carburetor cleaner inthe fuel tank
on the dipstick. Do not add too much oil. or permanent damage can occur.
ADD GASOLINE
WARNING: Always use a safety gasoline container.
Do not smoke when adding gasoline to the fuel tank.
A
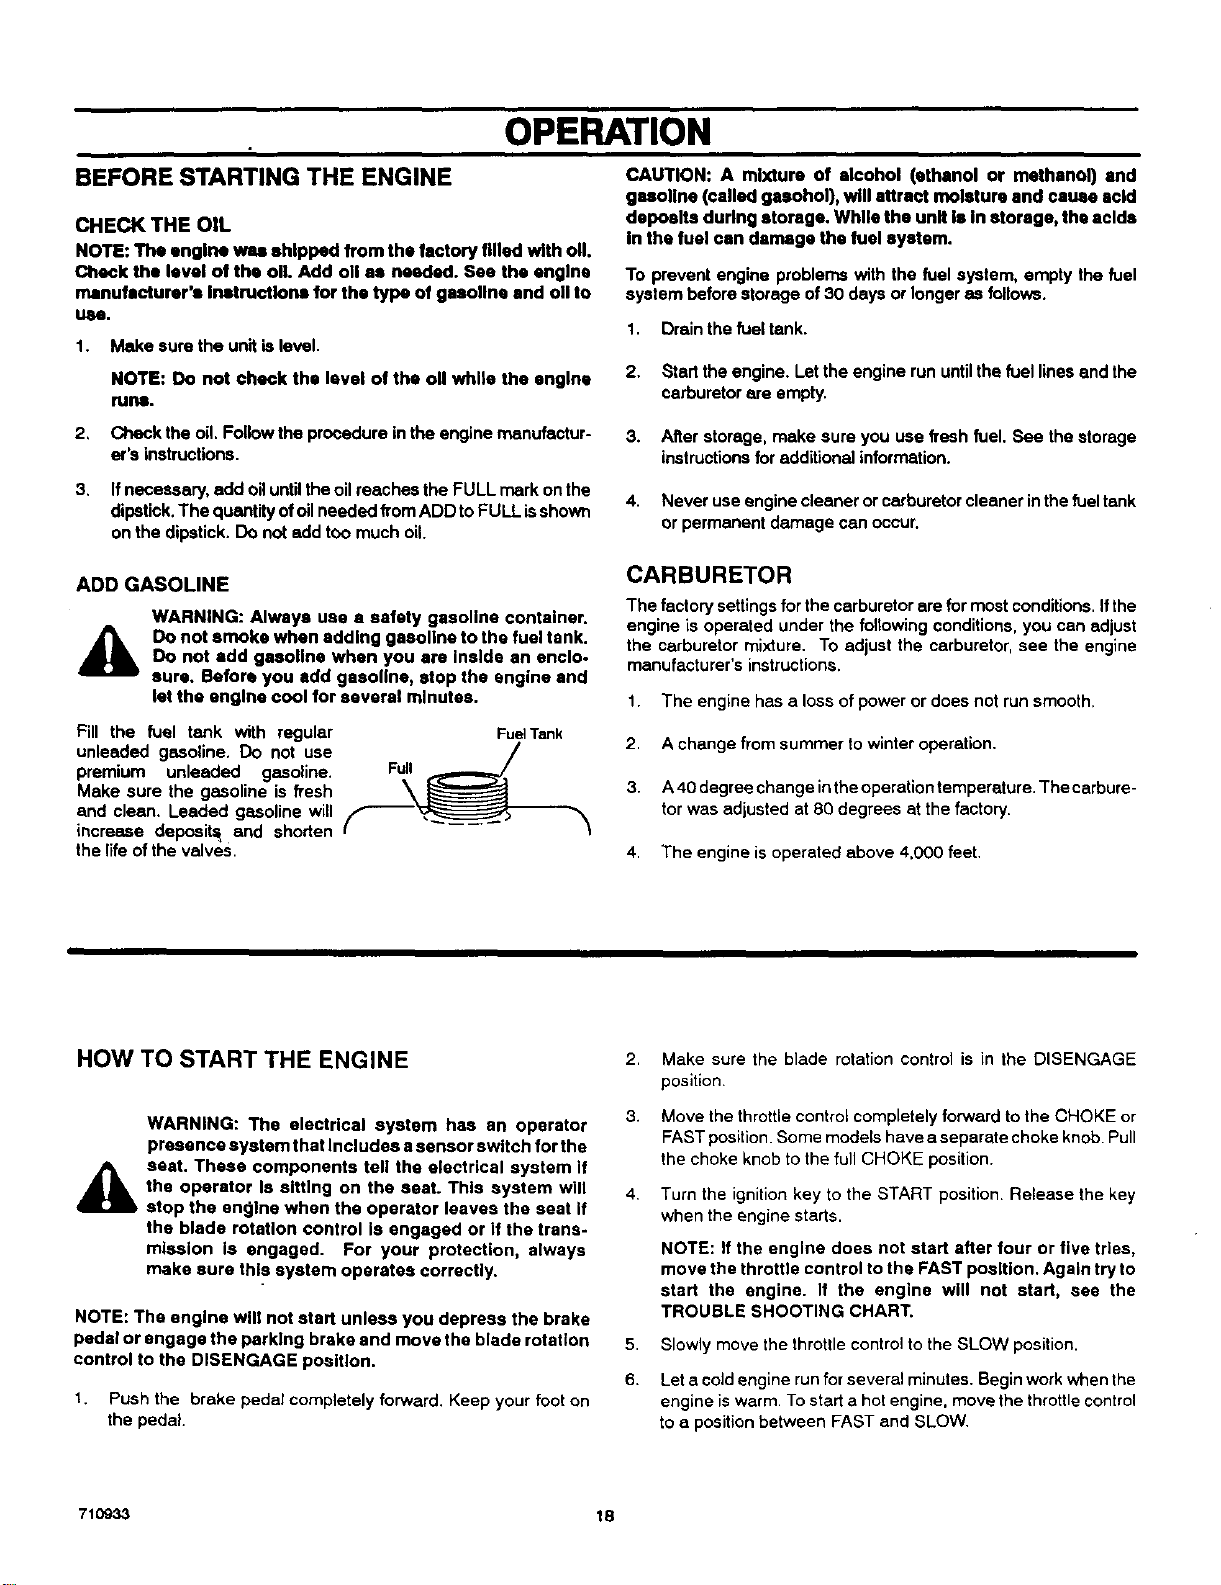
Pill the fuel tank with regular
unleaded gasoline. Do not use
premium unleaded gasoline.
Make sure the gasoline is fresh
and clean. Leaded gasoline will
increase deposits; and shorten
the life of the valves.
Do not add gasoline when you ere Inside an enclo-
sure, Before you add gasoline, stop the engine and
let the engine cool for several minutes.
Fue] Tank
Full
\
CAUTION: A mlxfure of alcohol (ethanol or methanol) and
gasoline (called gasohol), will attract moisture and cause acid
deposits during storage, While the unit Is In storage, the sold==
In the fuel can damage the fuel system.
To prevent engine problems with the fuel system, empty the fuel
system before storage of 30 days or longer as follows.
1. Drainthe fuel tank.
2. Start the engine. Let the engine run untilthe fuel lines end the
carburetor are empty.
CARBURETOR
The factory settings for the carburetor ere for most conditions. Ifthe
engine is operated under the following conditions, you can adjust
the carburetor mixture. To adjust the carburetor, see the engine
manufacturer's instructions.
1. The engine has a loss of power or does not run smooth,
2. A change from summer towinter operation.
3. A40 degree change intheoperation temperature. The carbure-
torwas adjusted at 80 degrees at the factory.
4. The engine is operated above 4,000 feet.
HOW TO START THE ENGINE
WARNING: The electrical system has an operator
presence system that Includes a sensor switch for the
seat. These components tell the electrical system if
&,
NOTE: The engine will not start unless you depress the brake
pedal or engage the parking brake and move the blade rotation
control to the DISENGAGE position.
1. Push the brake pedal completely forward. Keep your foot on
710933 18
the operator Is sitting on the seat. This system will
stop the en01ne when the operator leaves the seat if
the blade rotaUon control is engaged or if the trans-
mission Is engaged. For your protection, always
make sure this system operates correctly.
the pedal.
2.
Make sure the blade rotation control is in the DISENGAGE
position.
3.
Move the throttle controlcompletely forward to the CHOKE or
FAST position. Some models have a separate choke knob. Pull
the choke knob to the full CHOKE position.
4,
Turn the ignition key to the START position. Release the key
when the engine starts.
NOTE: If the engine does not start after four or five tries,
move the throttle control to the FAST position. Again try to
start the engine. If the engine will not start, see the
TROUBLE SHOOTING CHART.
5.
Slowly move the throttle control to the SLOW position.
6.
Let a cold engine runfor several minutes. Begin work when the
engine iswarm. To start a hot engine, move the throttlecontrol
toa positionbetween FAST and SLOW.
 Loading...