

The expert for robots in your home
With one click to the online shop
myRobotcenter.eu myRobotcenter.co.uk
myRobotcenter
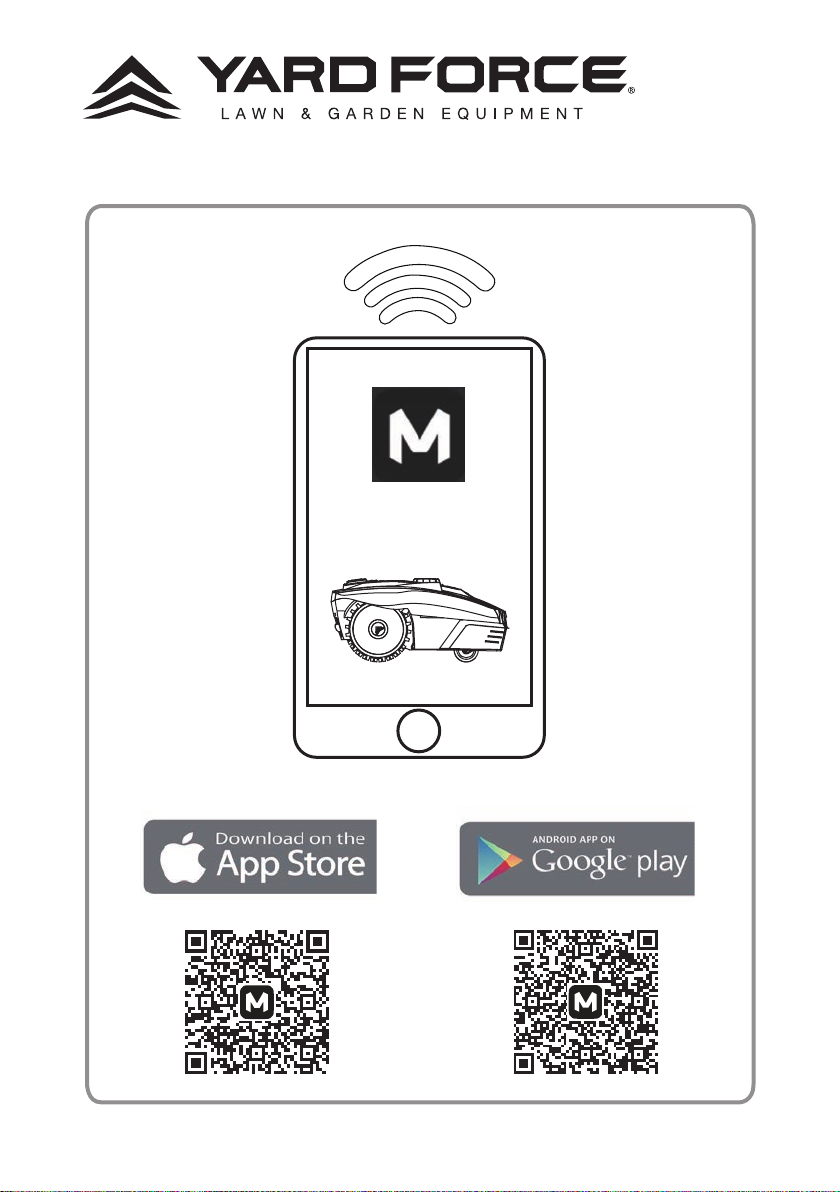
MOWAP
MOWAP
GB
DE
FR
NL
PL
Read this manual carefully prior to operating the
robotic mower. Keep this manual in a safe place
and have it ready for future reference.
Bitte lesen Sie vor der Montage und
Inbetriebnahme des Rasenroboters die
Betriebsanweisung sorgfältig durch.Bewahren Sie
diese Anleitung an einem sicheren Platz auf, um
sie bei Bedarf stets zur Hand zu haben.
Lisez attentivement ce manuel avant d’utiliser la
tondeuse robotique. Conservez ce manuel dans
un endroit sûr et conservez-le pour pouvoir le
consulter ultérieurement.
Lees deze handleiding aandachtig door voordat de
robotmaaier wordt gebruikt.
Bewaar deze handleiding op een veilige plaats
voor toekomstige raadpleging.
Przed użyciem robokosiarki prosimy uważnie
przeczytać niniejszą instrukcję.
Instrukcję należy zachować w bezpiecznym
miejscu na wypadek, gdyby była potrzebna w
przyszłości.
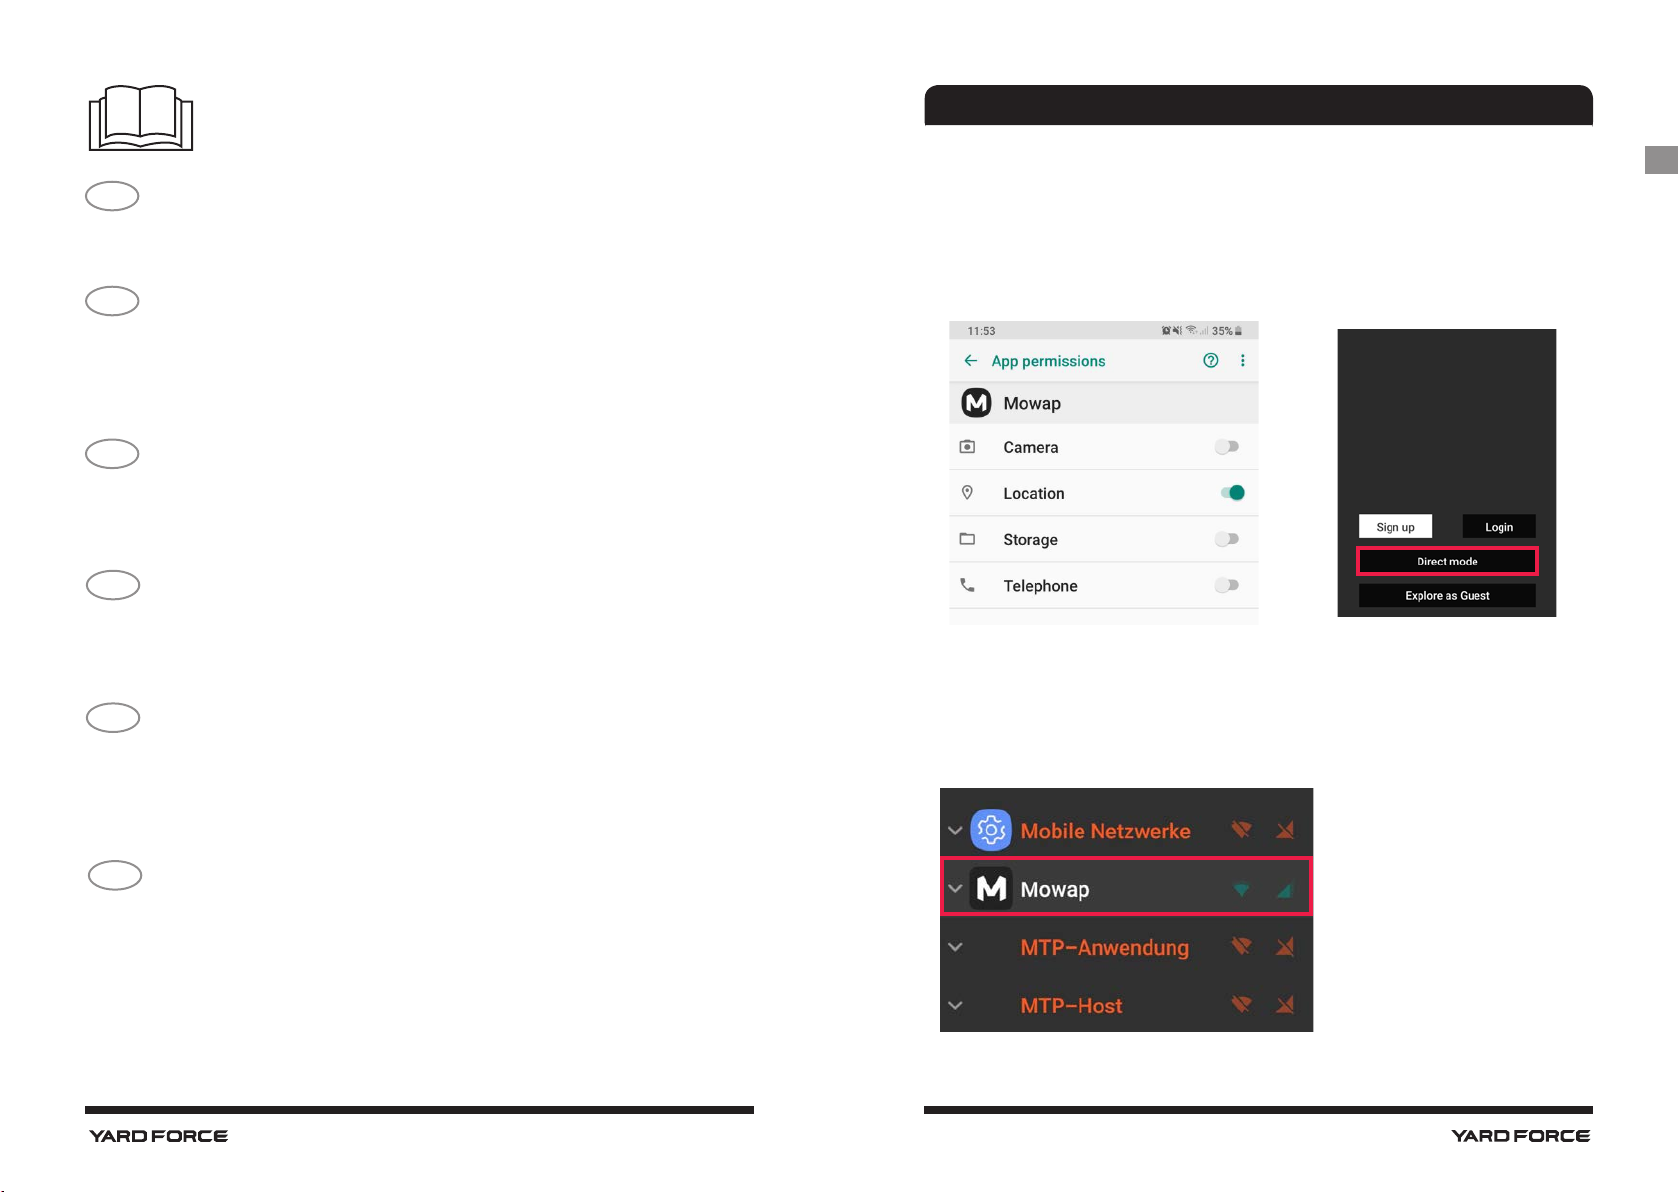
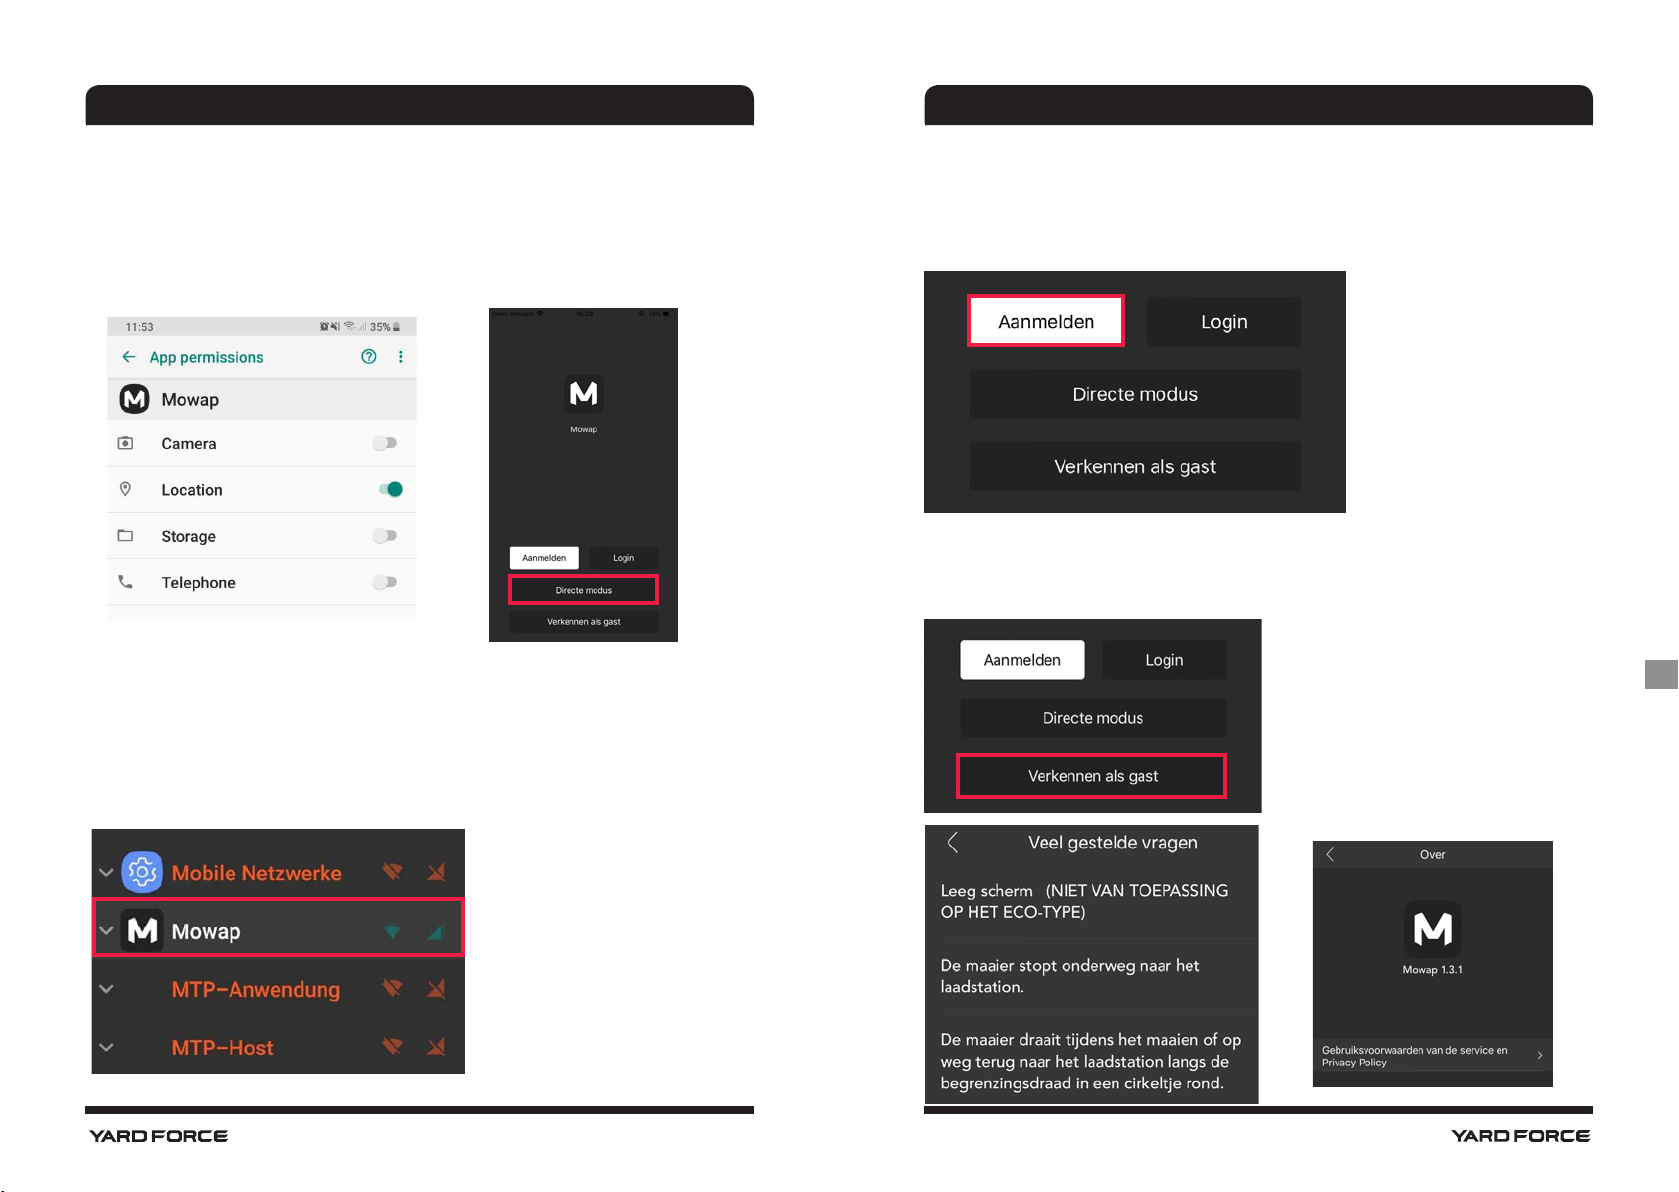
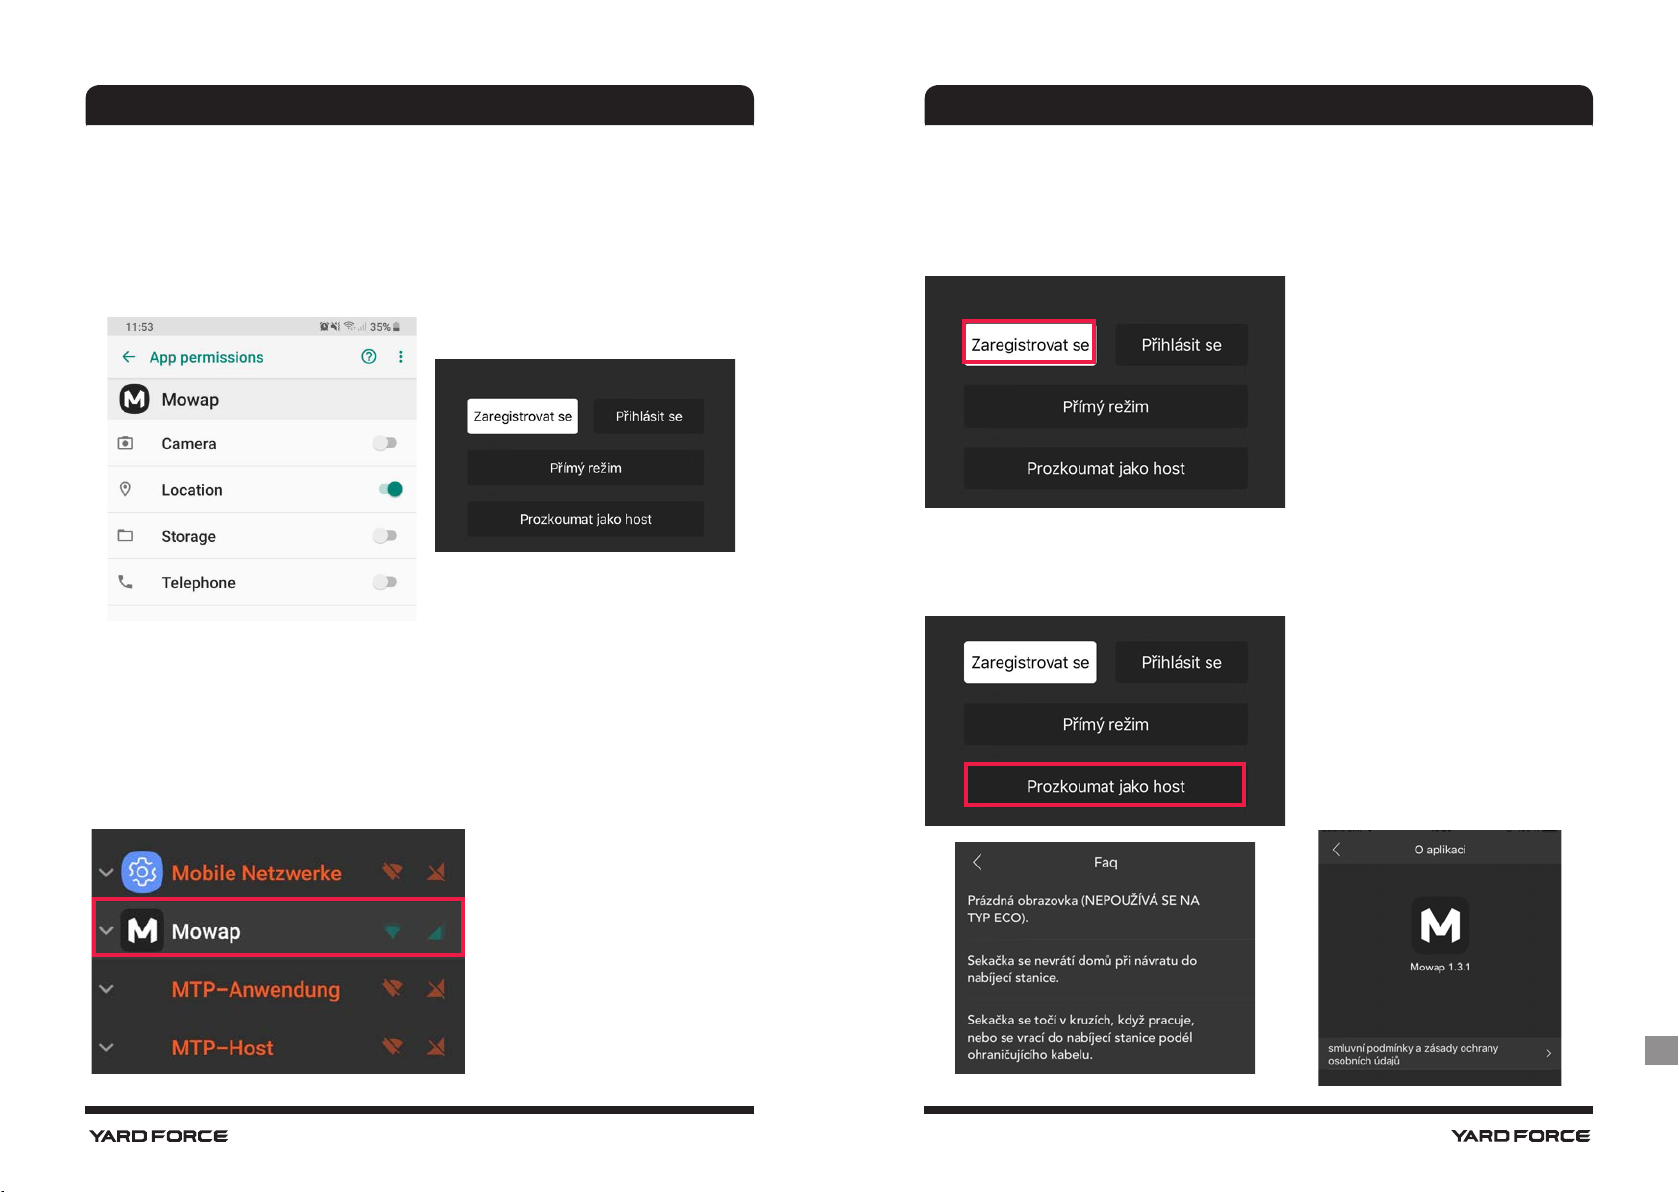
Required permissions
Location
MOWAP wants to have some permissions, but for"Direct mode"
only "Location/ GPS" is necessary. (could be turned off after
successful login)
Firewall / Anti Virus software
It is necessary in the firewall or anti-virus software to allow"MOWAP"
the appropriate permissions. As an example on the left the firewall
app "Net guard"
GB
CZ
Před obsluhou robotické sekačky si pečlivě
přečtěte tuto příručku.
Uschovejte tento návod na bezpečném místě a
mějte ho k dispozici pro budoucí použití.
2 3
MOWAP MOWAP
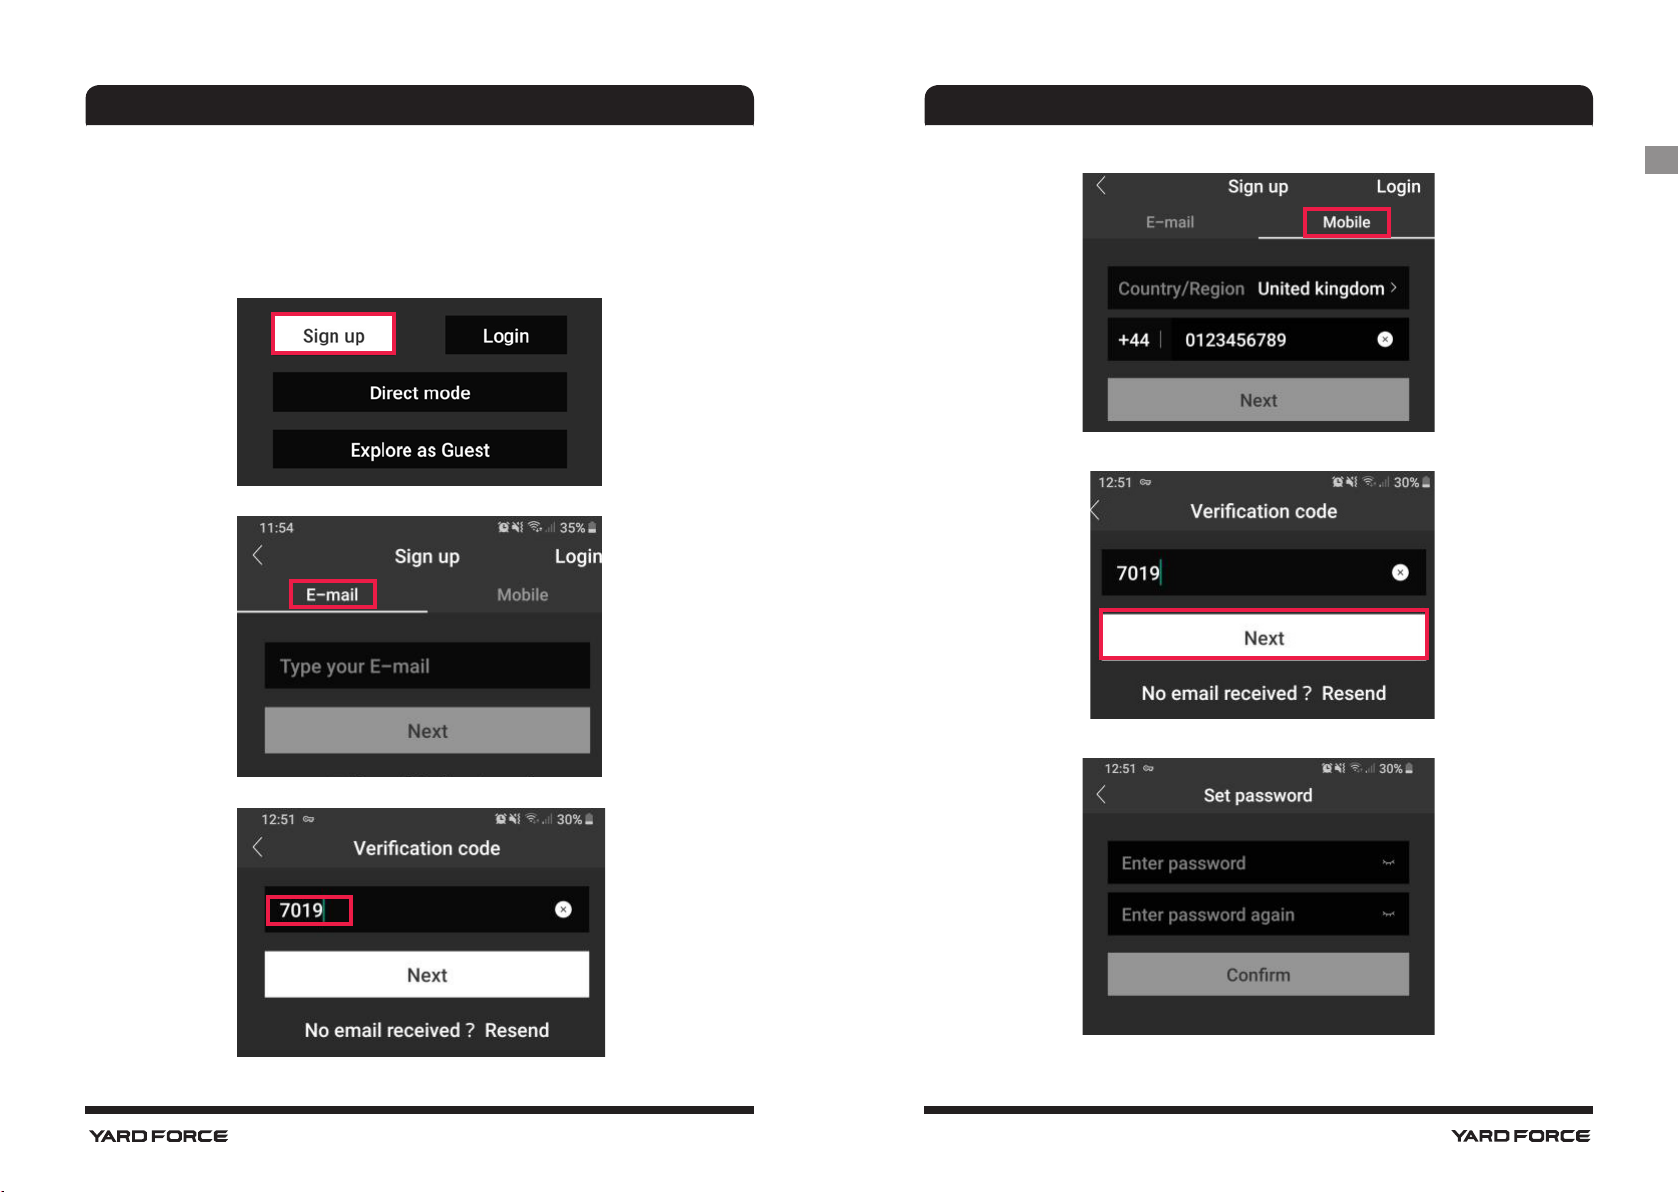
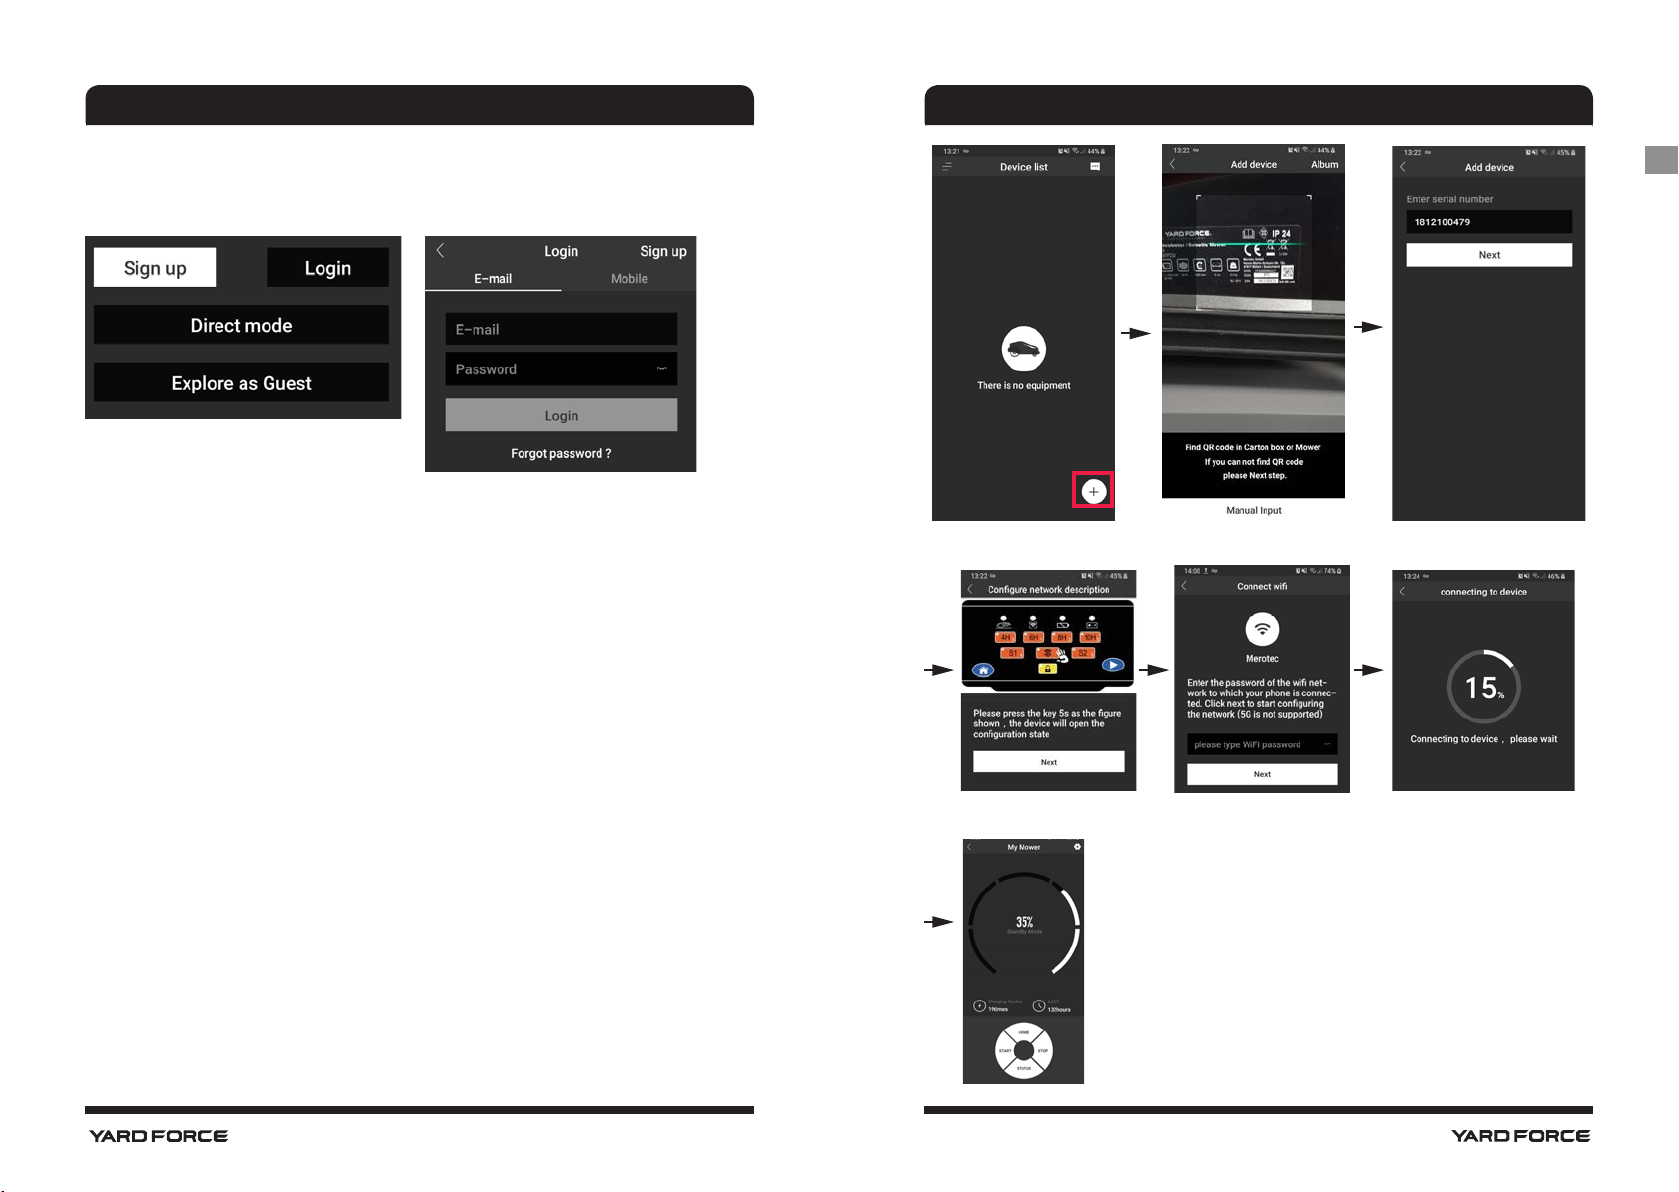
Main page
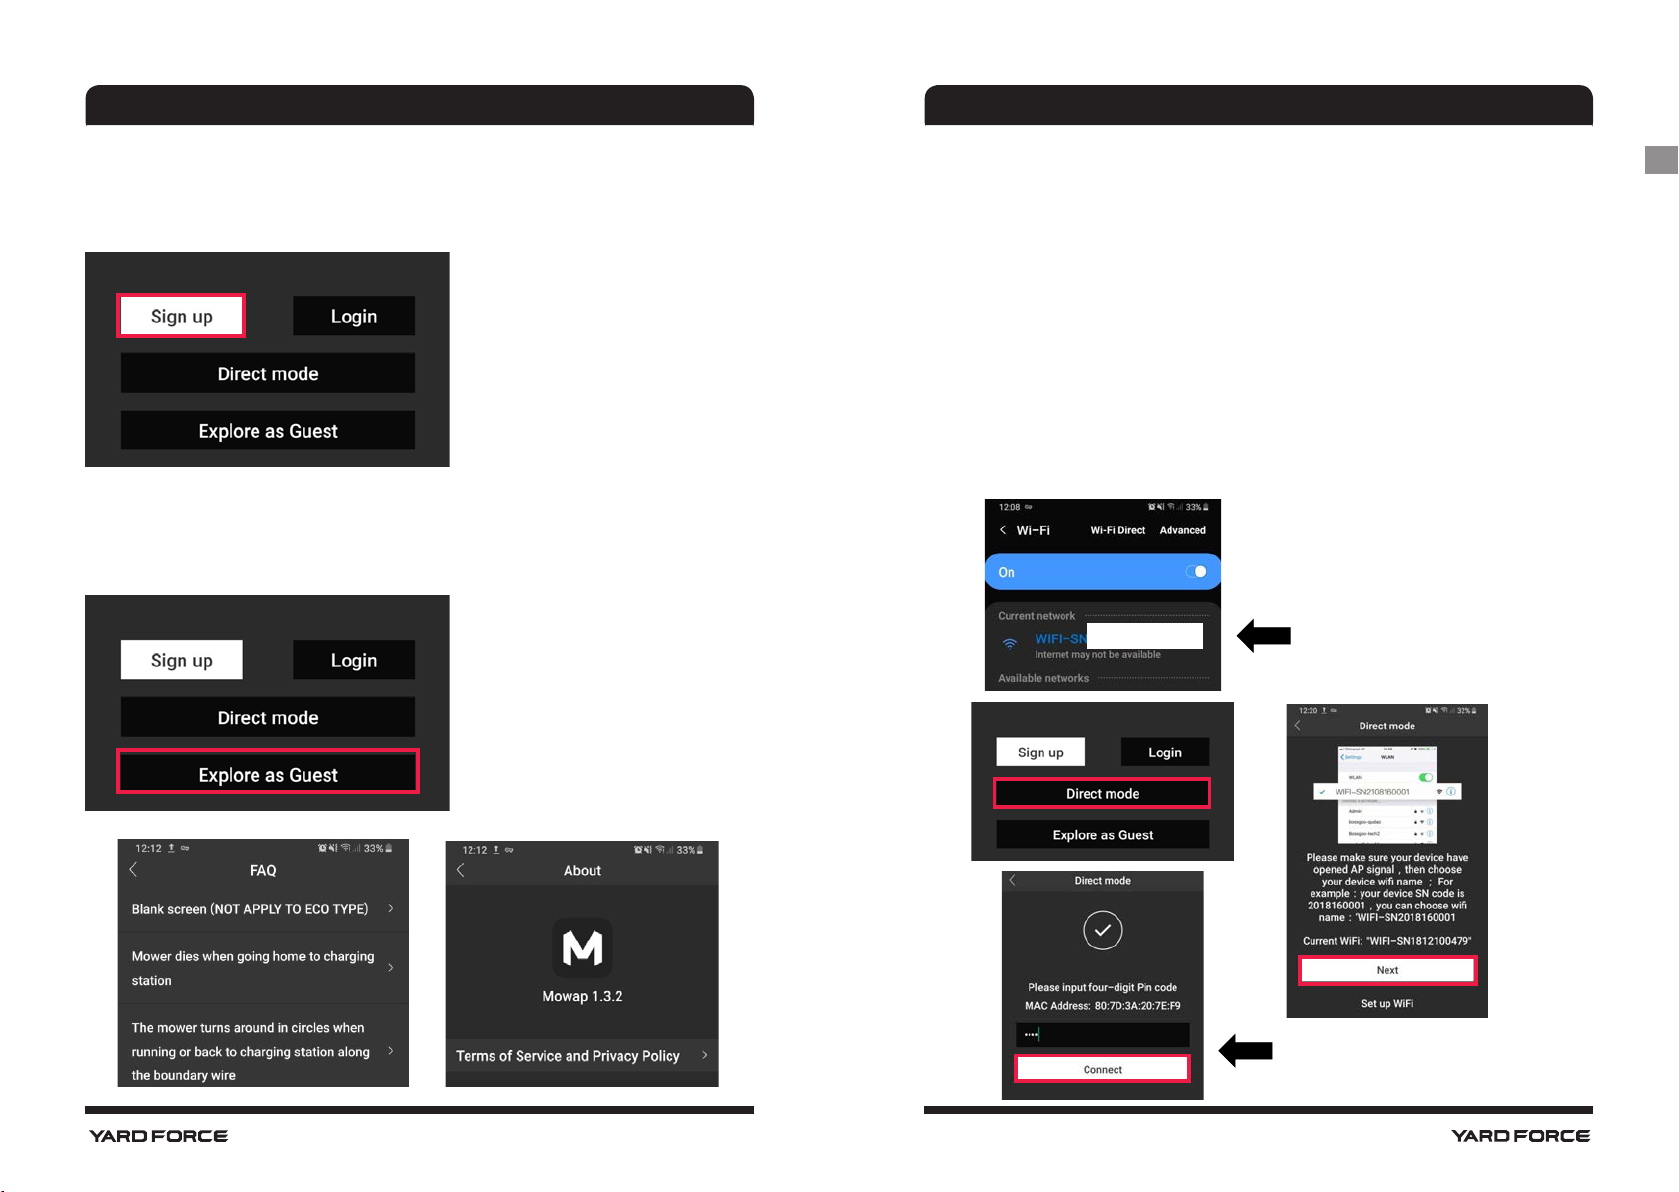
Sign up/ Login
This section can be made by e-mail or mobile phone number
Explore as Guest
Here is information available when clicking on the submenu items.
There are FAQ and MOWAP info available
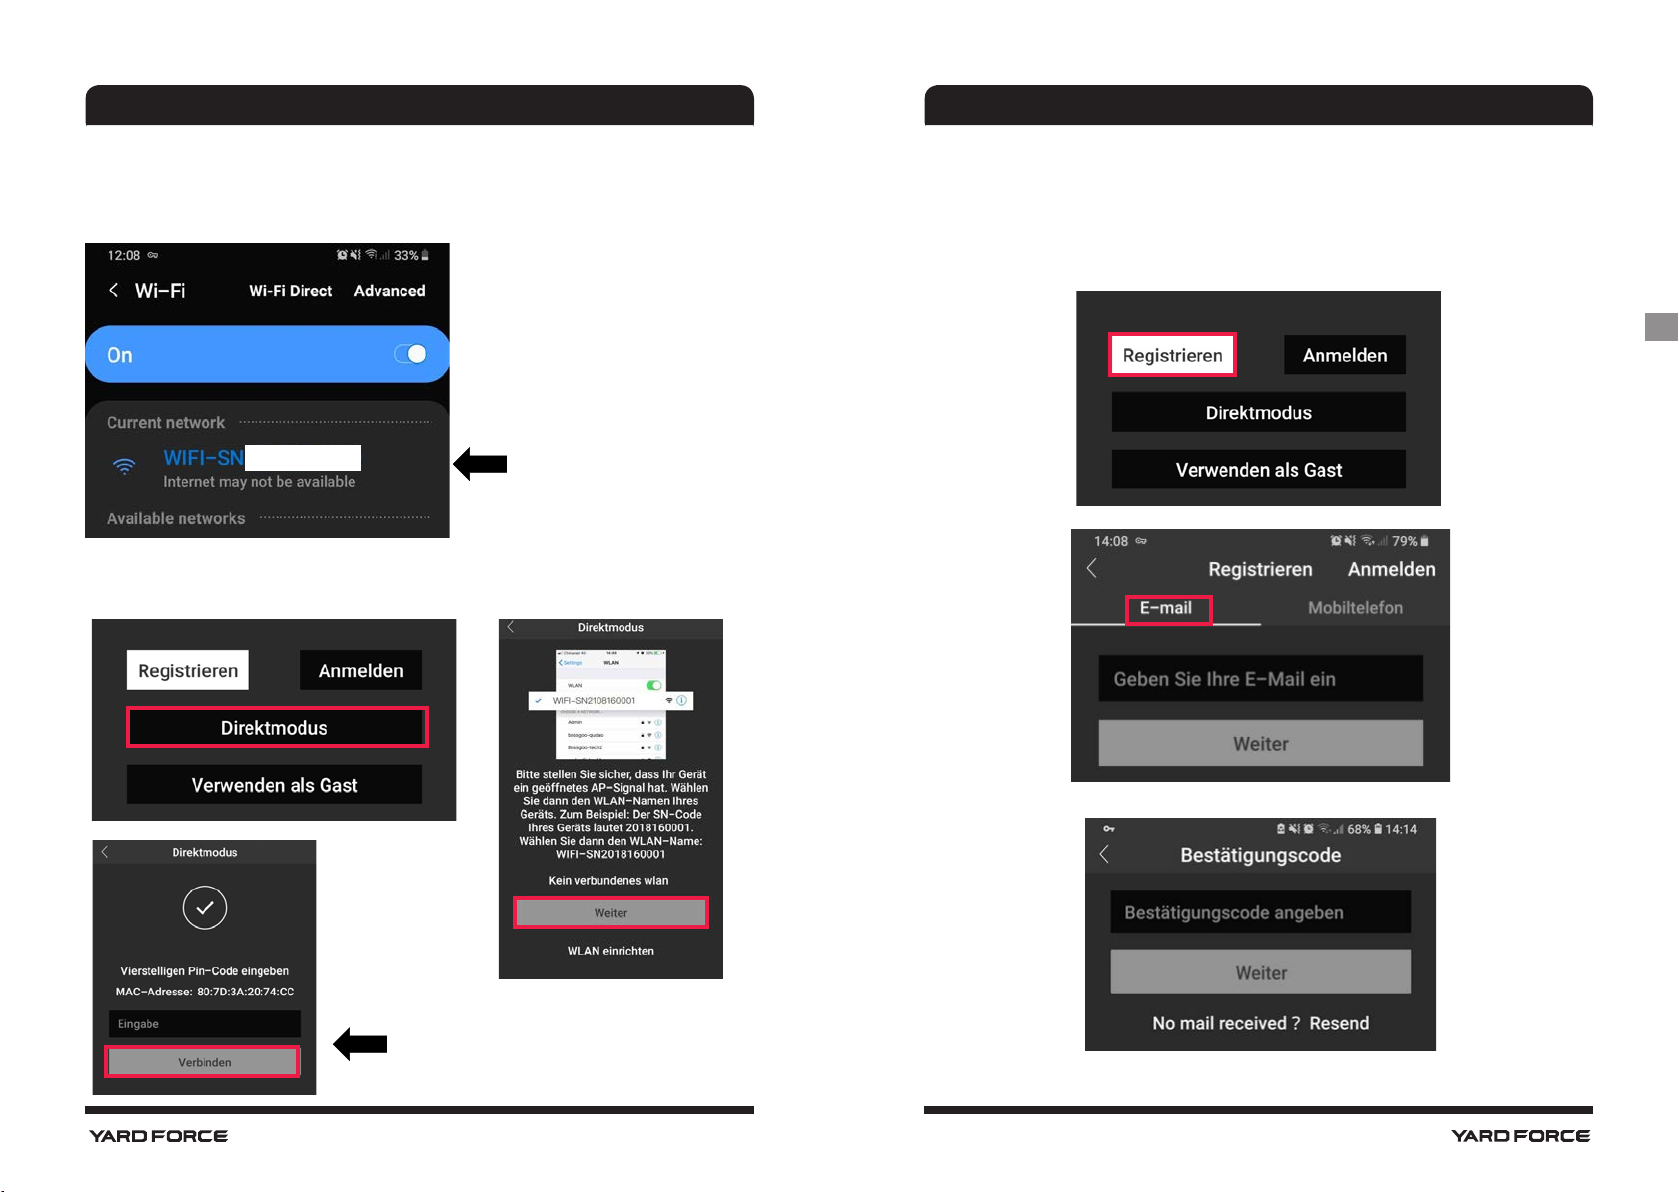
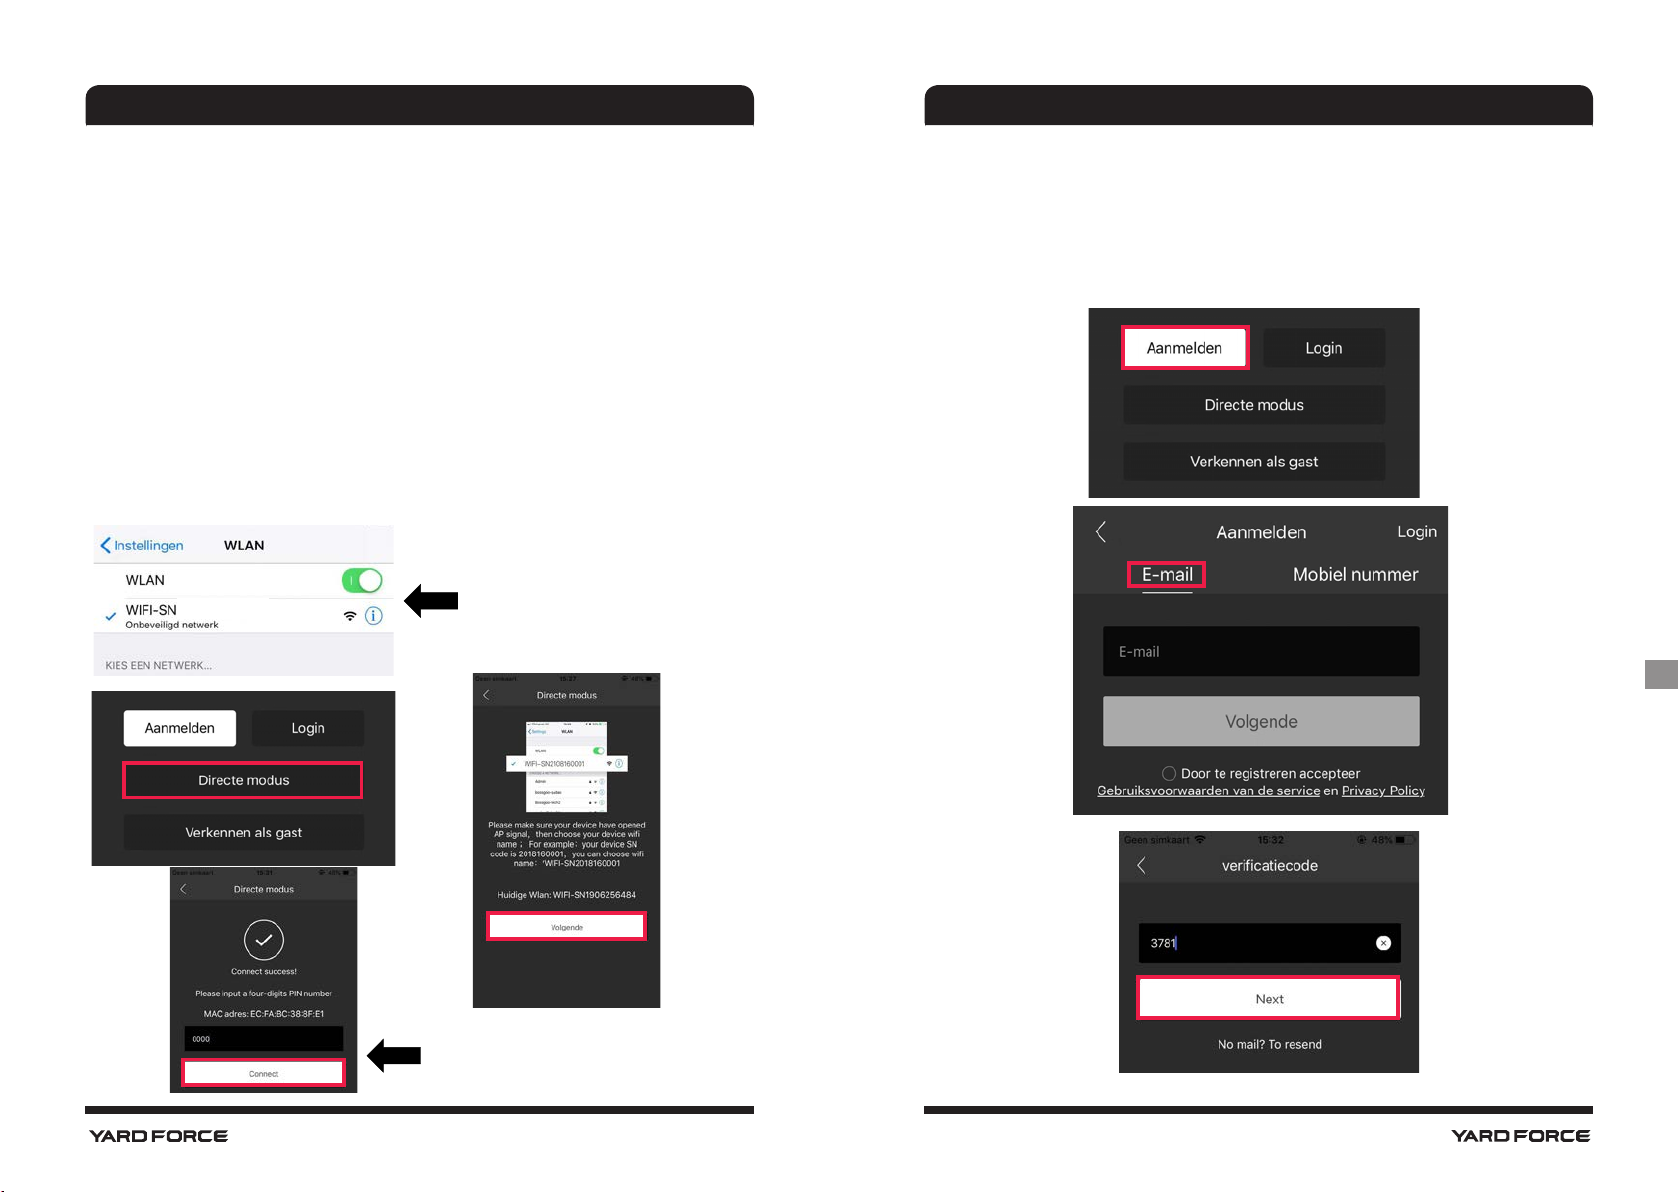
Direct mode
For direct mode use, add mower to your Wi-Fi setting and turn on
"Location / GPS"
1. Press and hold the Wi-Fi button and then turn on the main
power switch.
NOTE: For the touch screen model (e.g. X150i), turn on the machine
and enter into “settings” option and then select “Wi-Fi” to configure
the network.
2. Open your Wi-Fi setting on your phone, select the SN +
Serial number accordingly.
NOTE:Direct mode works on Android 5.0 to 10.0 and IOS 9.0 to 13
XXXXXXXX
Unique Serial number
GB
4 5
Enter 4-digit Pin(default 0000)
MOWAP MOWAP
Registration
NOTE: If your robotic mower is only used in "Direct mode", this
chapter is irrelevant.
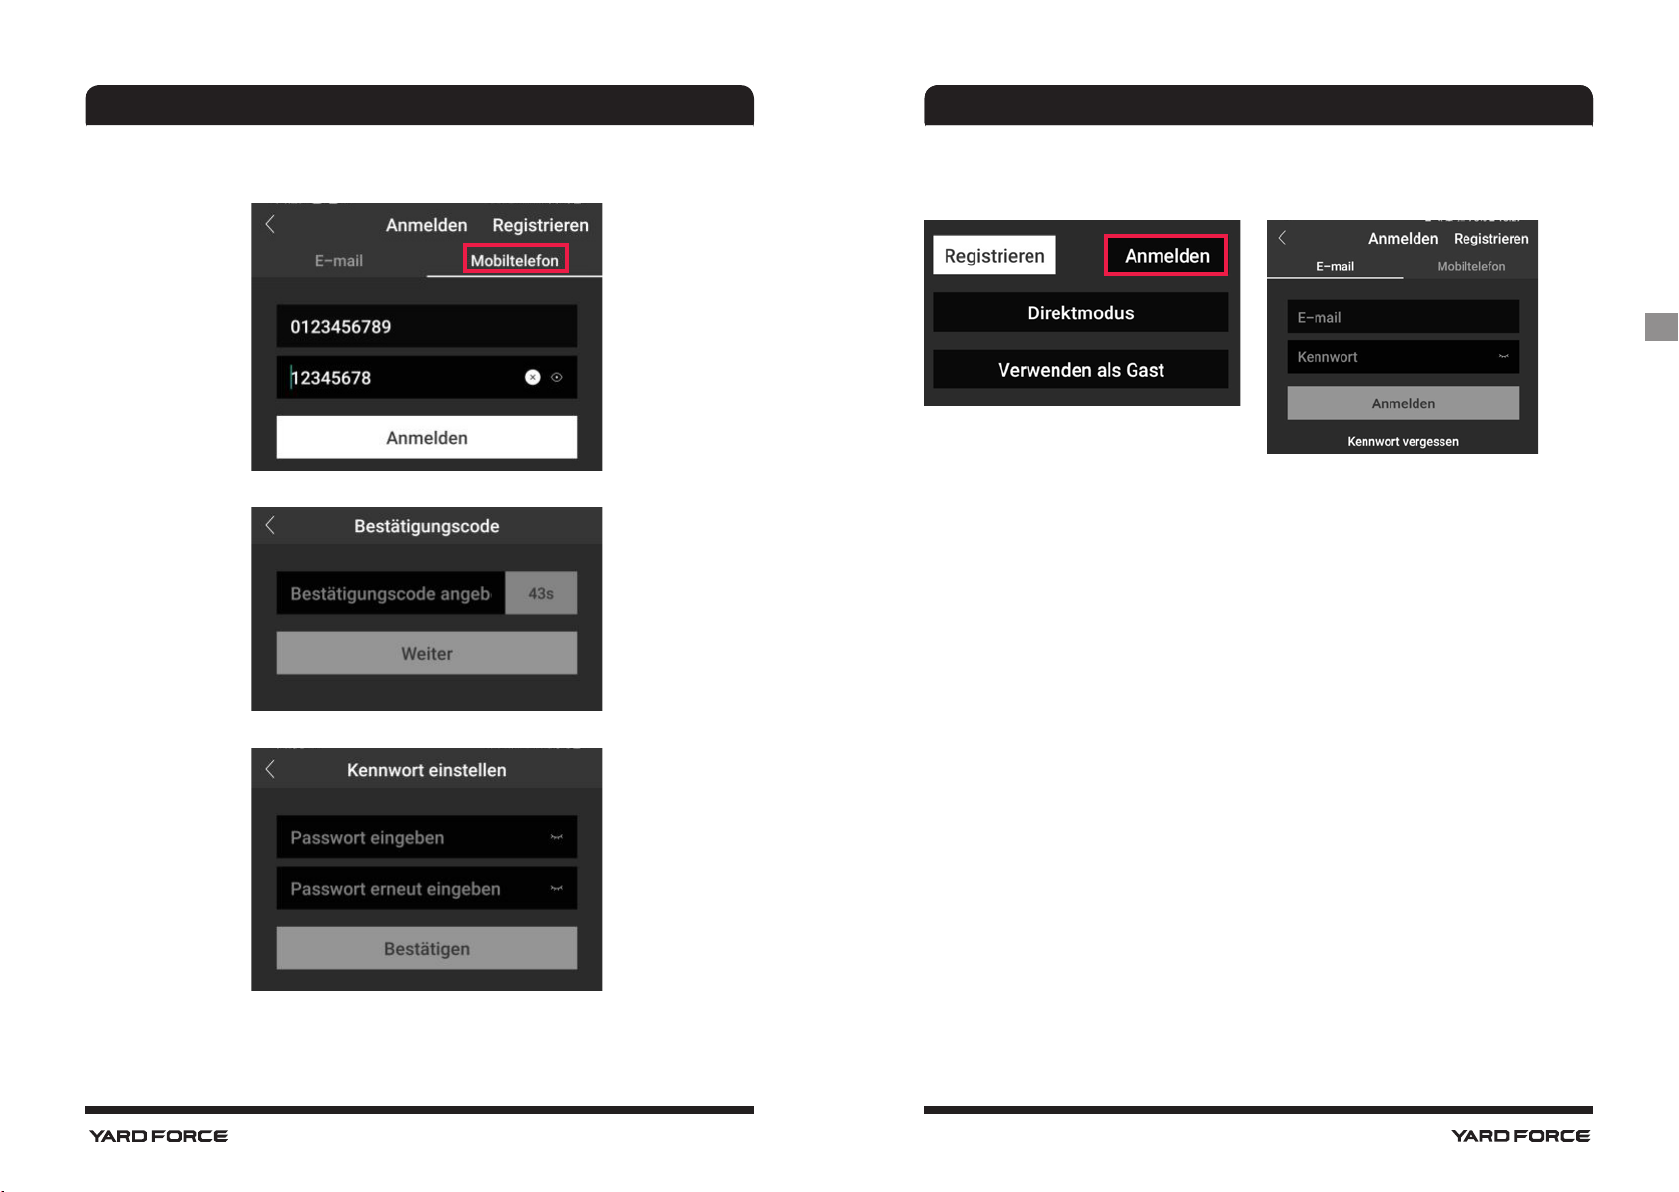
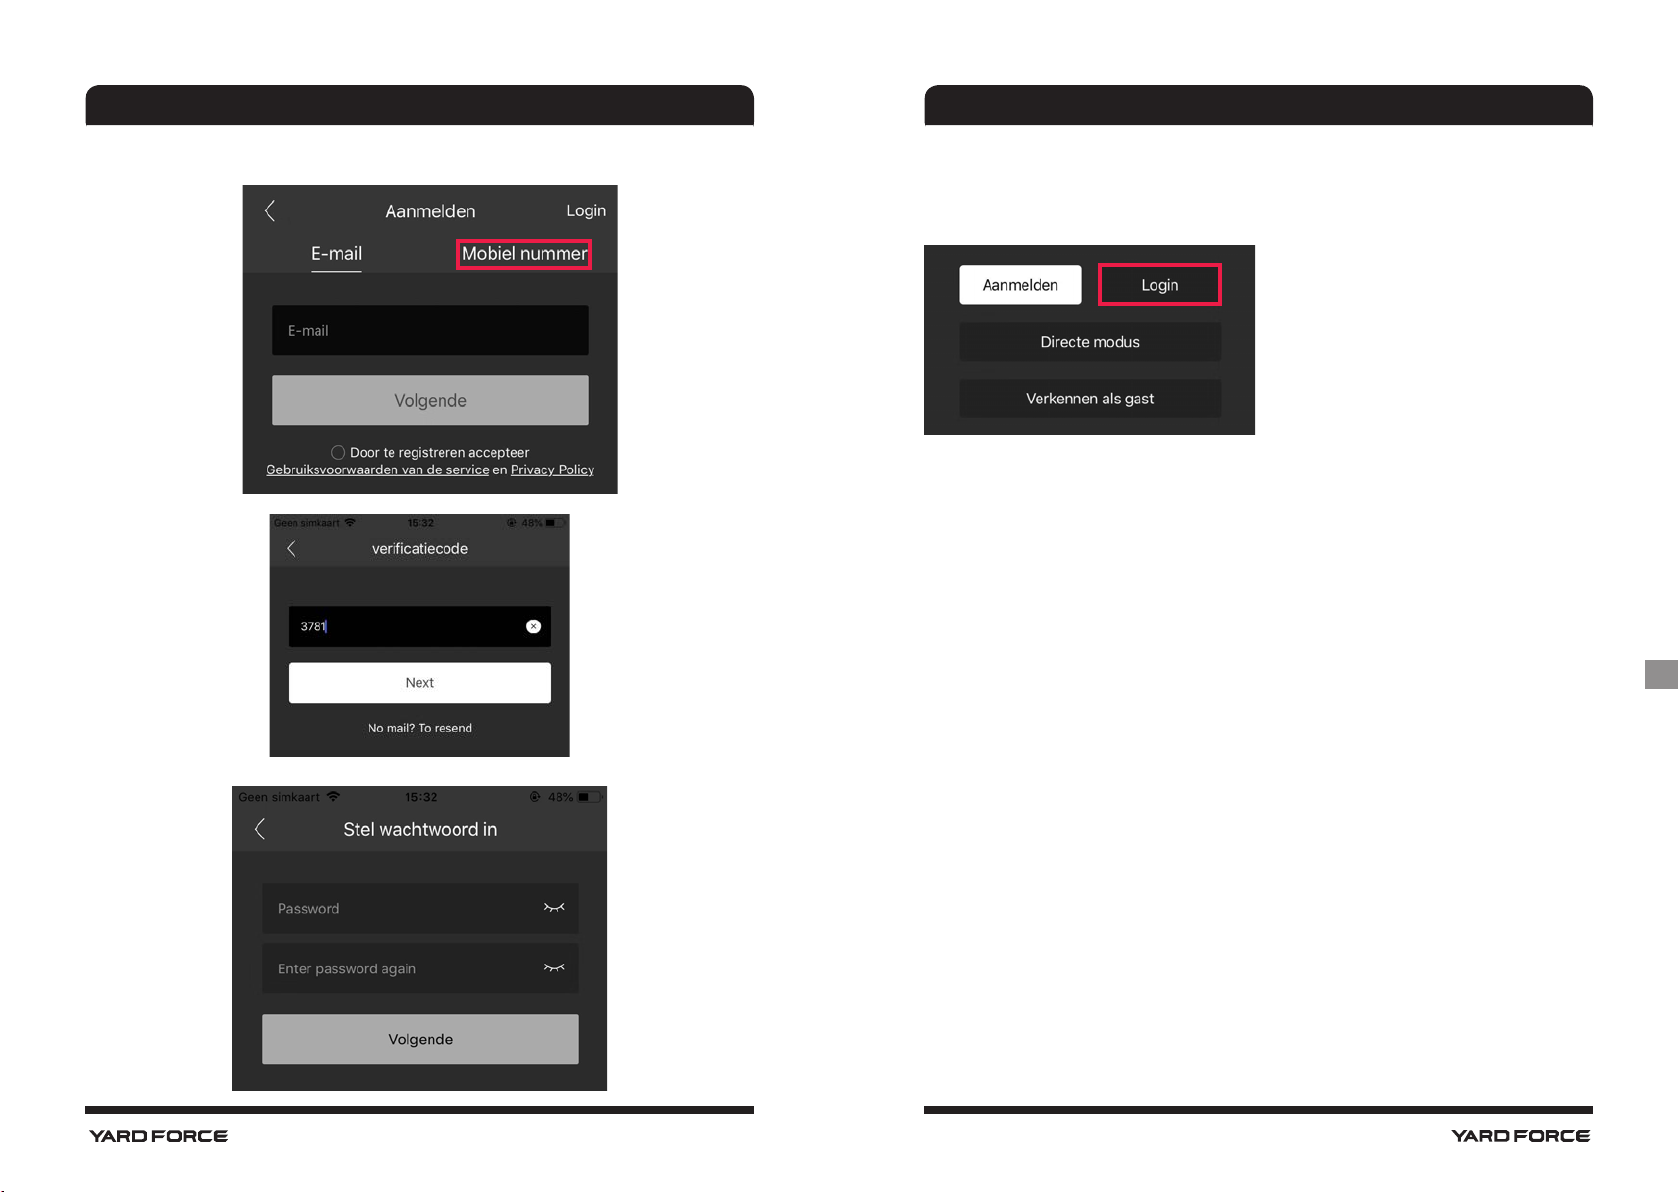
Registration by E-mail
Registration by Mobile phone
GB
6 7
MOWAP MOWAP
Login
E-mail or mobile phone number with password can register MOWAP.
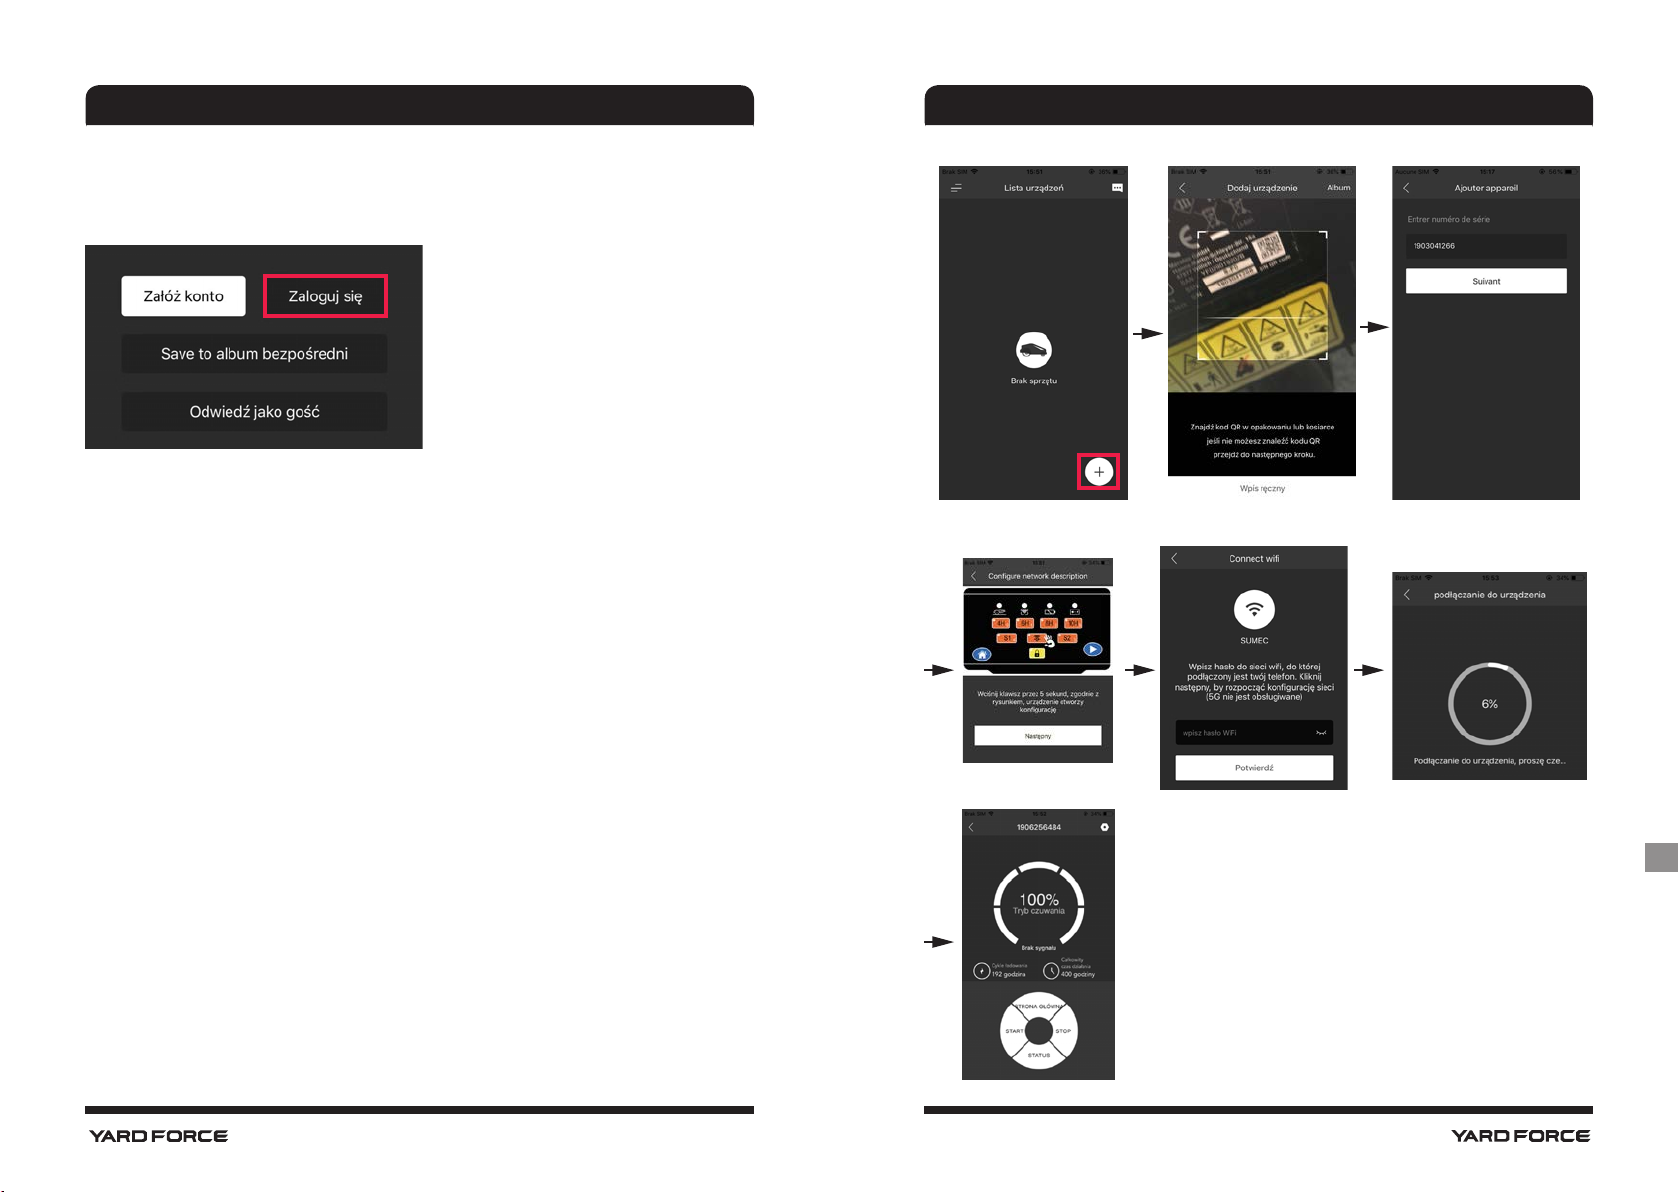
Device list
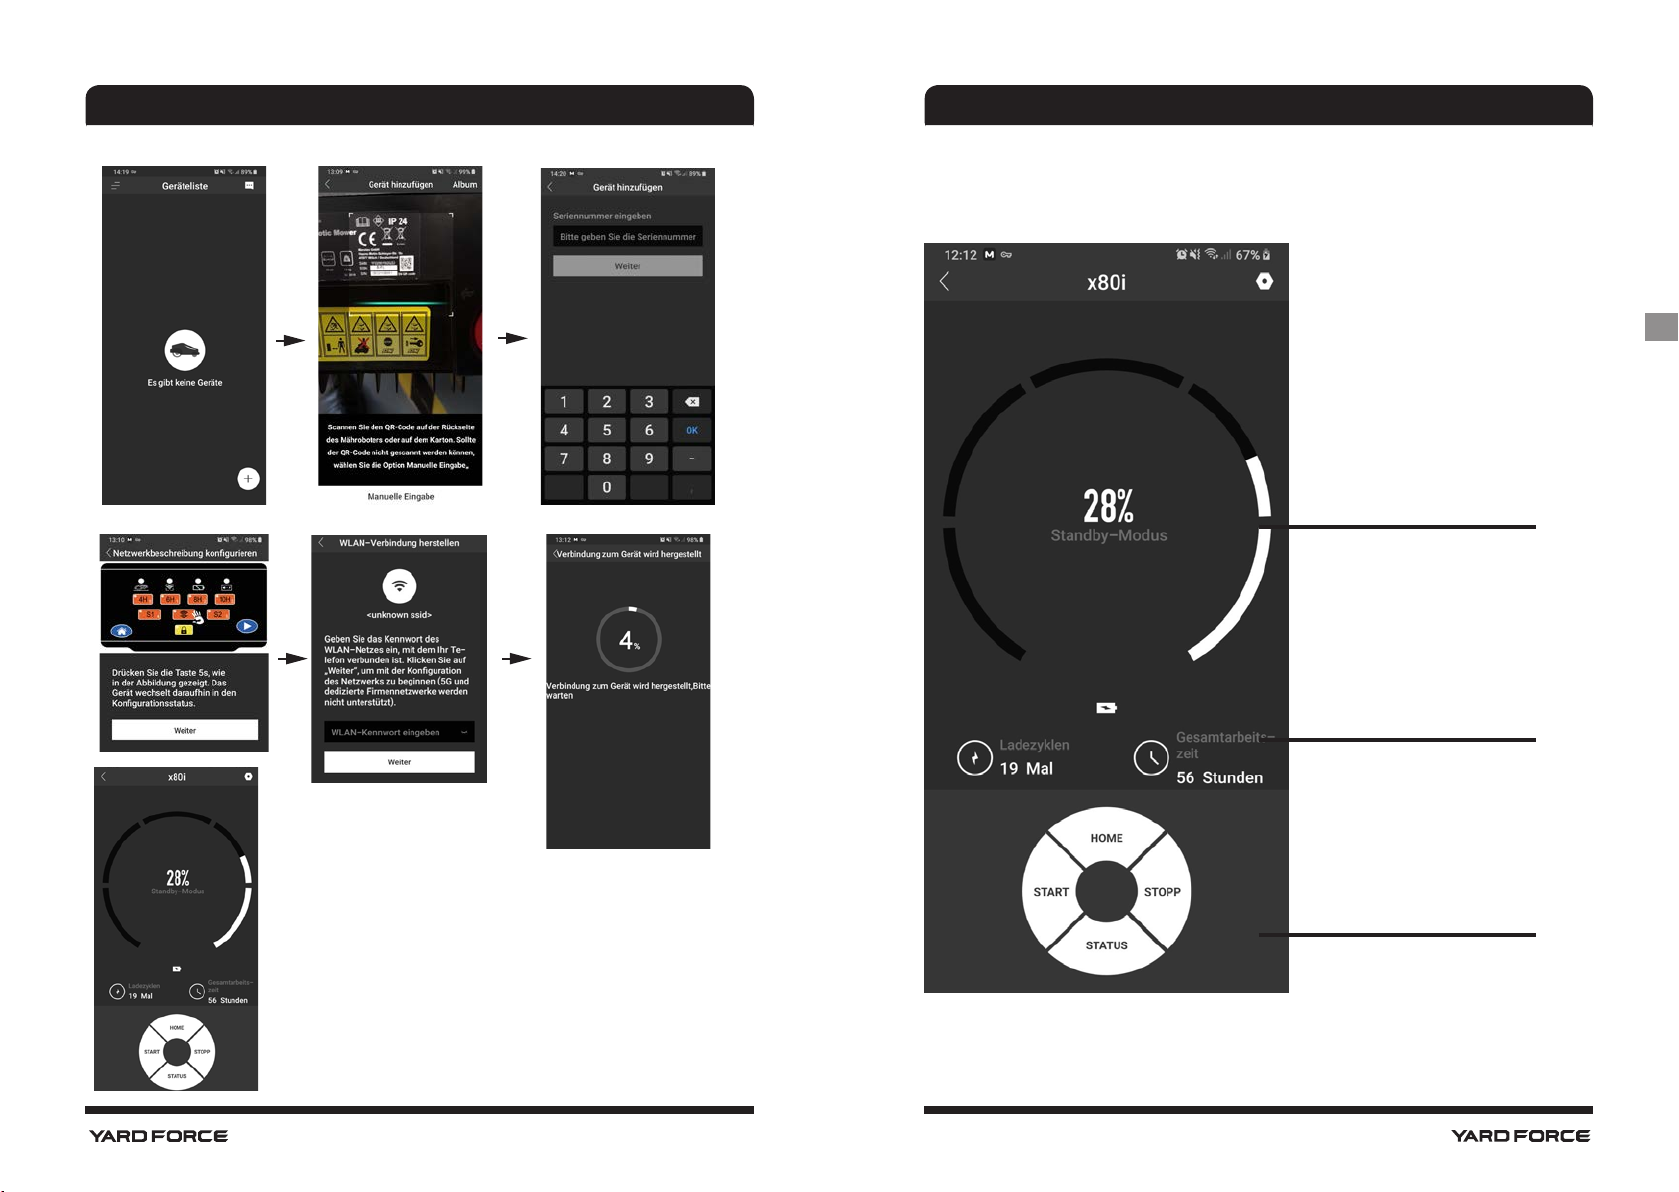
1. Add a mower by tapping on the symbol "+"
2. Scan the QR code or manually enter the serial number, if the
serial number is correct, tap "Next".
- In order to control your robotic mower from anywhere, the mower
has to be integrated into your home WLAN network
- When the "Configure network description" page appears, press
the WLAN button on the mower until the LED Stops flashing. Then
tap "Next". (This may take a while)
NOTE: For X150i touch screen, enter into “settings” option and then
select “Wi-Fi” to configure the network.
3. Connection is in processing (this may take a while).
4. If the connection fails, check the wireless settings on your phone.
5. After successful connection, the main working page shown like
below.
GB
8 9
MOWAP MOWAP
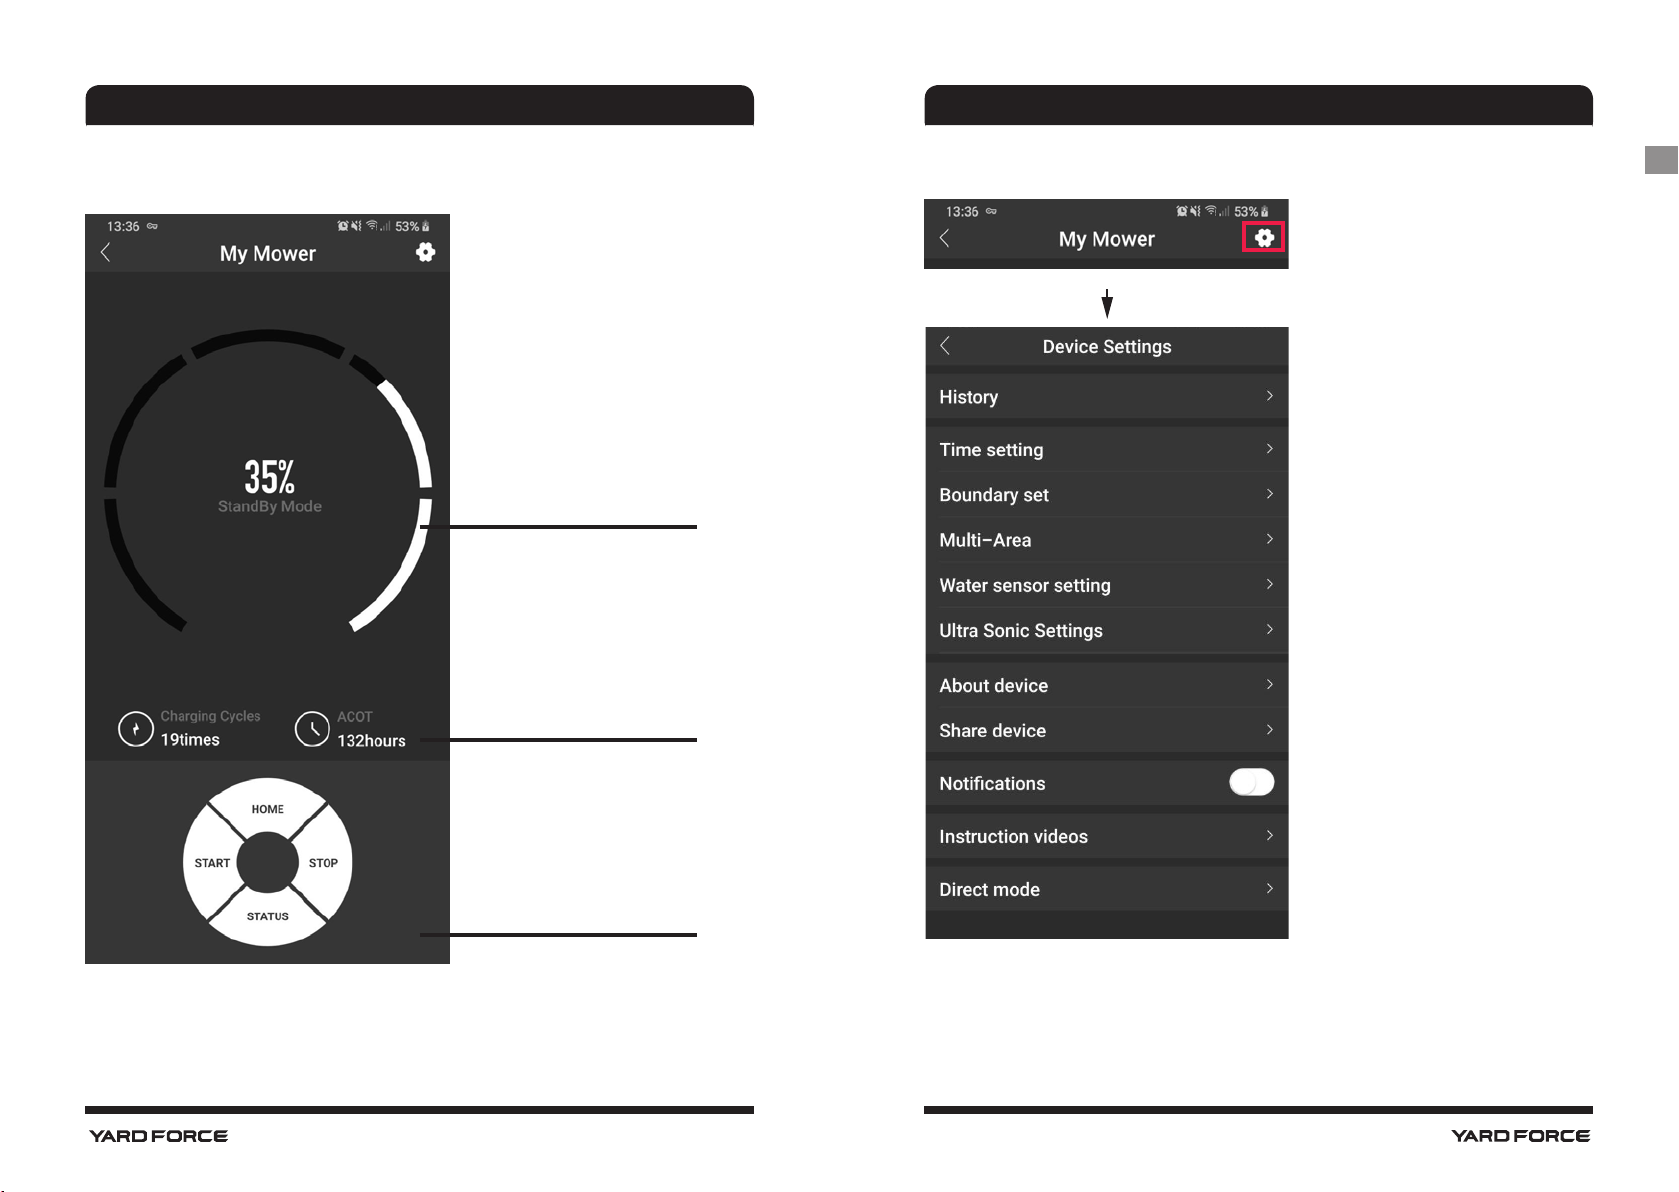
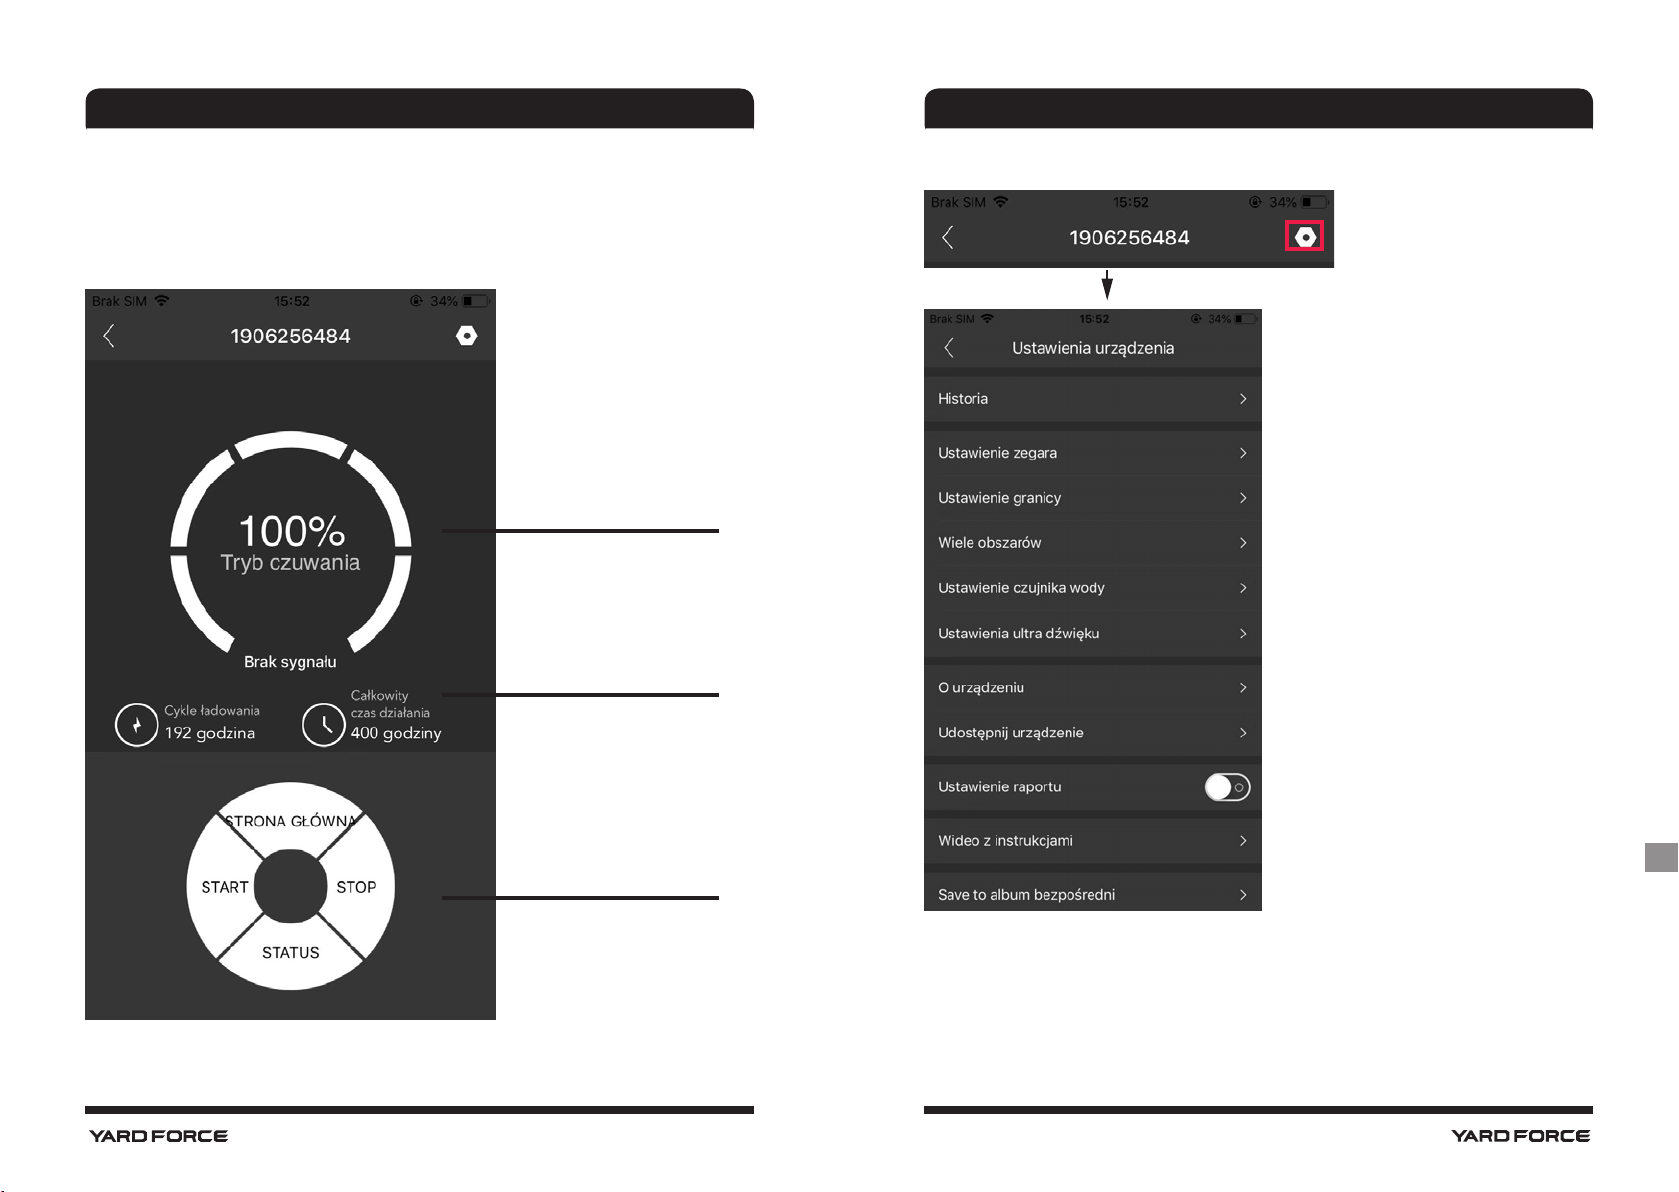
Main working page
Battery charge status
Charging cycles and total
working time
Device settings
GB
Home, Start and Stop
buttons have the same
function as the buttons on
the mower.
History
Here you can see
- Error history
- Cutting history
- Charging historyHealth / Total working history
10 11
MOWAP MOWAP
Time settings
Here you can set three different working times and select the day
when the mower should work. Also set Mower date and time
Boundary settings
- Trimming: edge cutting function on/ off
- Width: Set how far the mower is allowed to go beyond the
perimeter wire.
series)
- Signal: Change from S1 to S2
(Function only for the Yardforce LUV and X
Multi-Area
Here you can define up to 4 different mowing areas.
(Function only for the Yardforce X80i, X100i, X150i, LUV1000Ri )
Rain sensor setting
Setting a delay when the mower should resume work after the rain
GB
12 13
MOWAP MOWAP
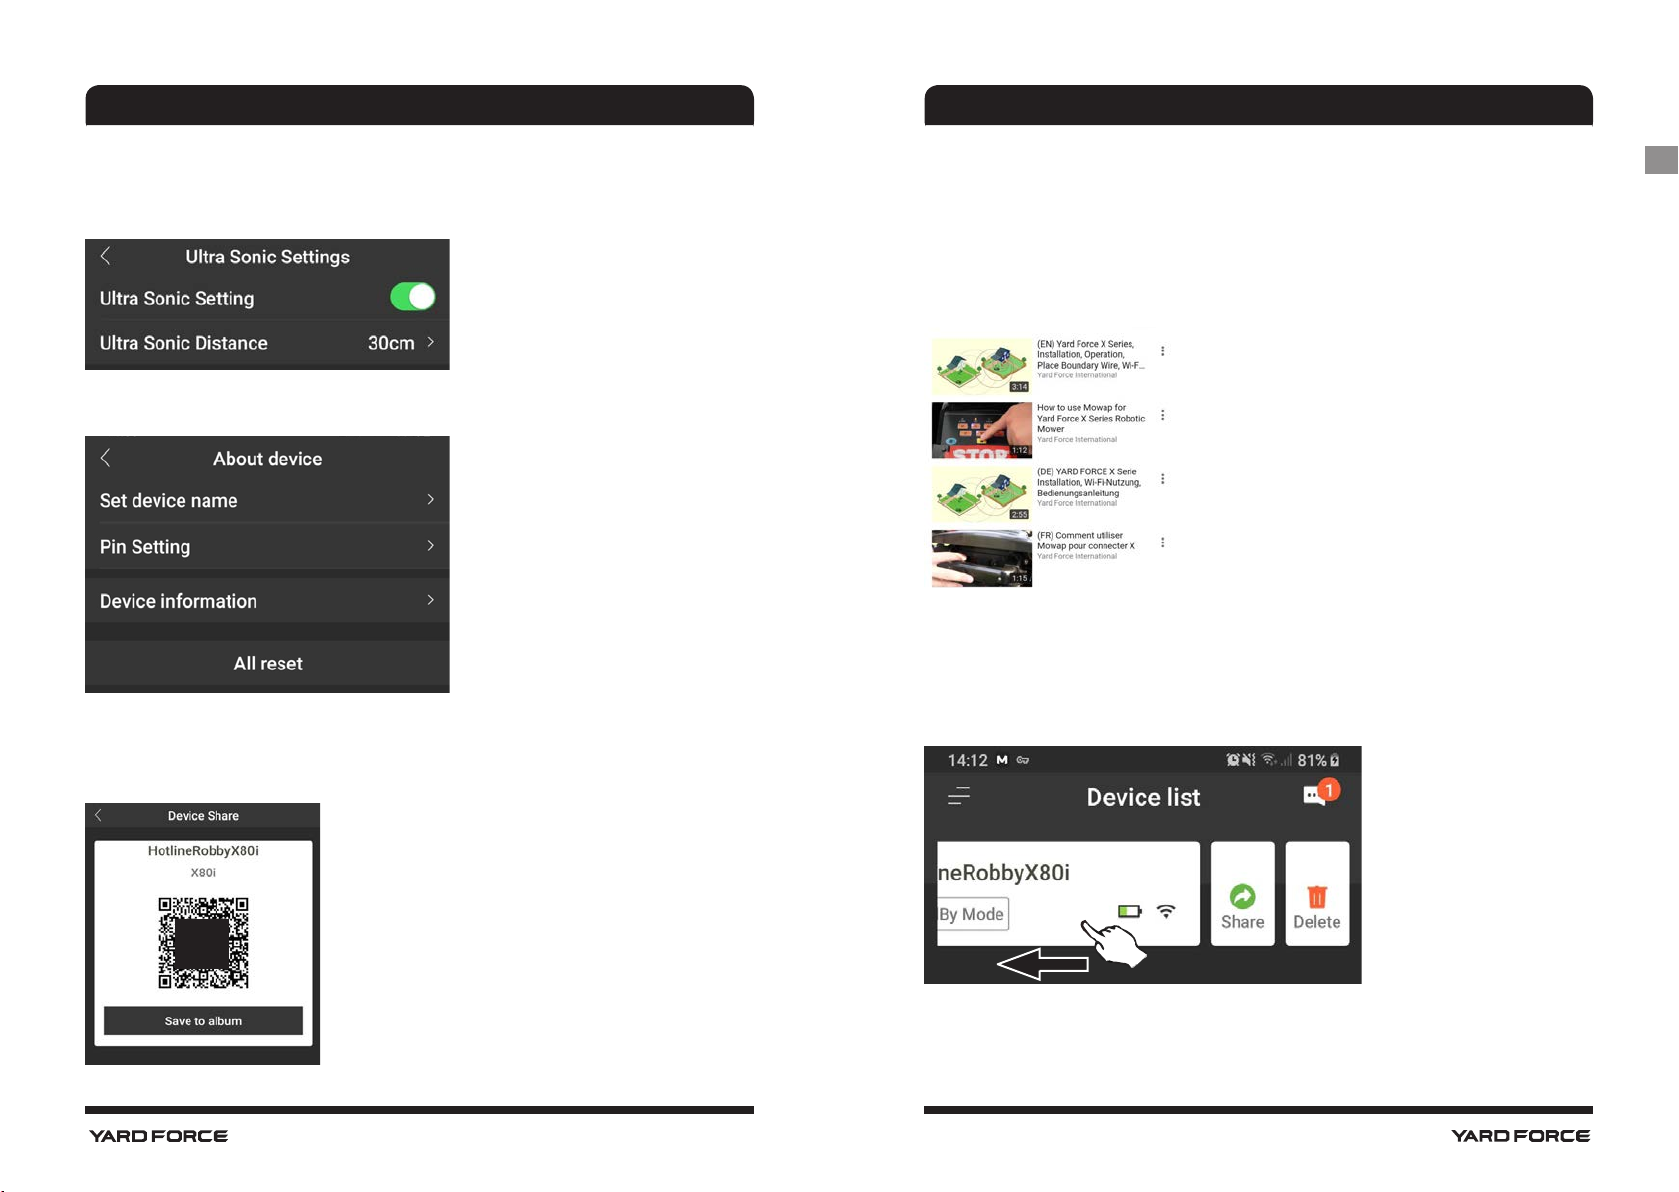
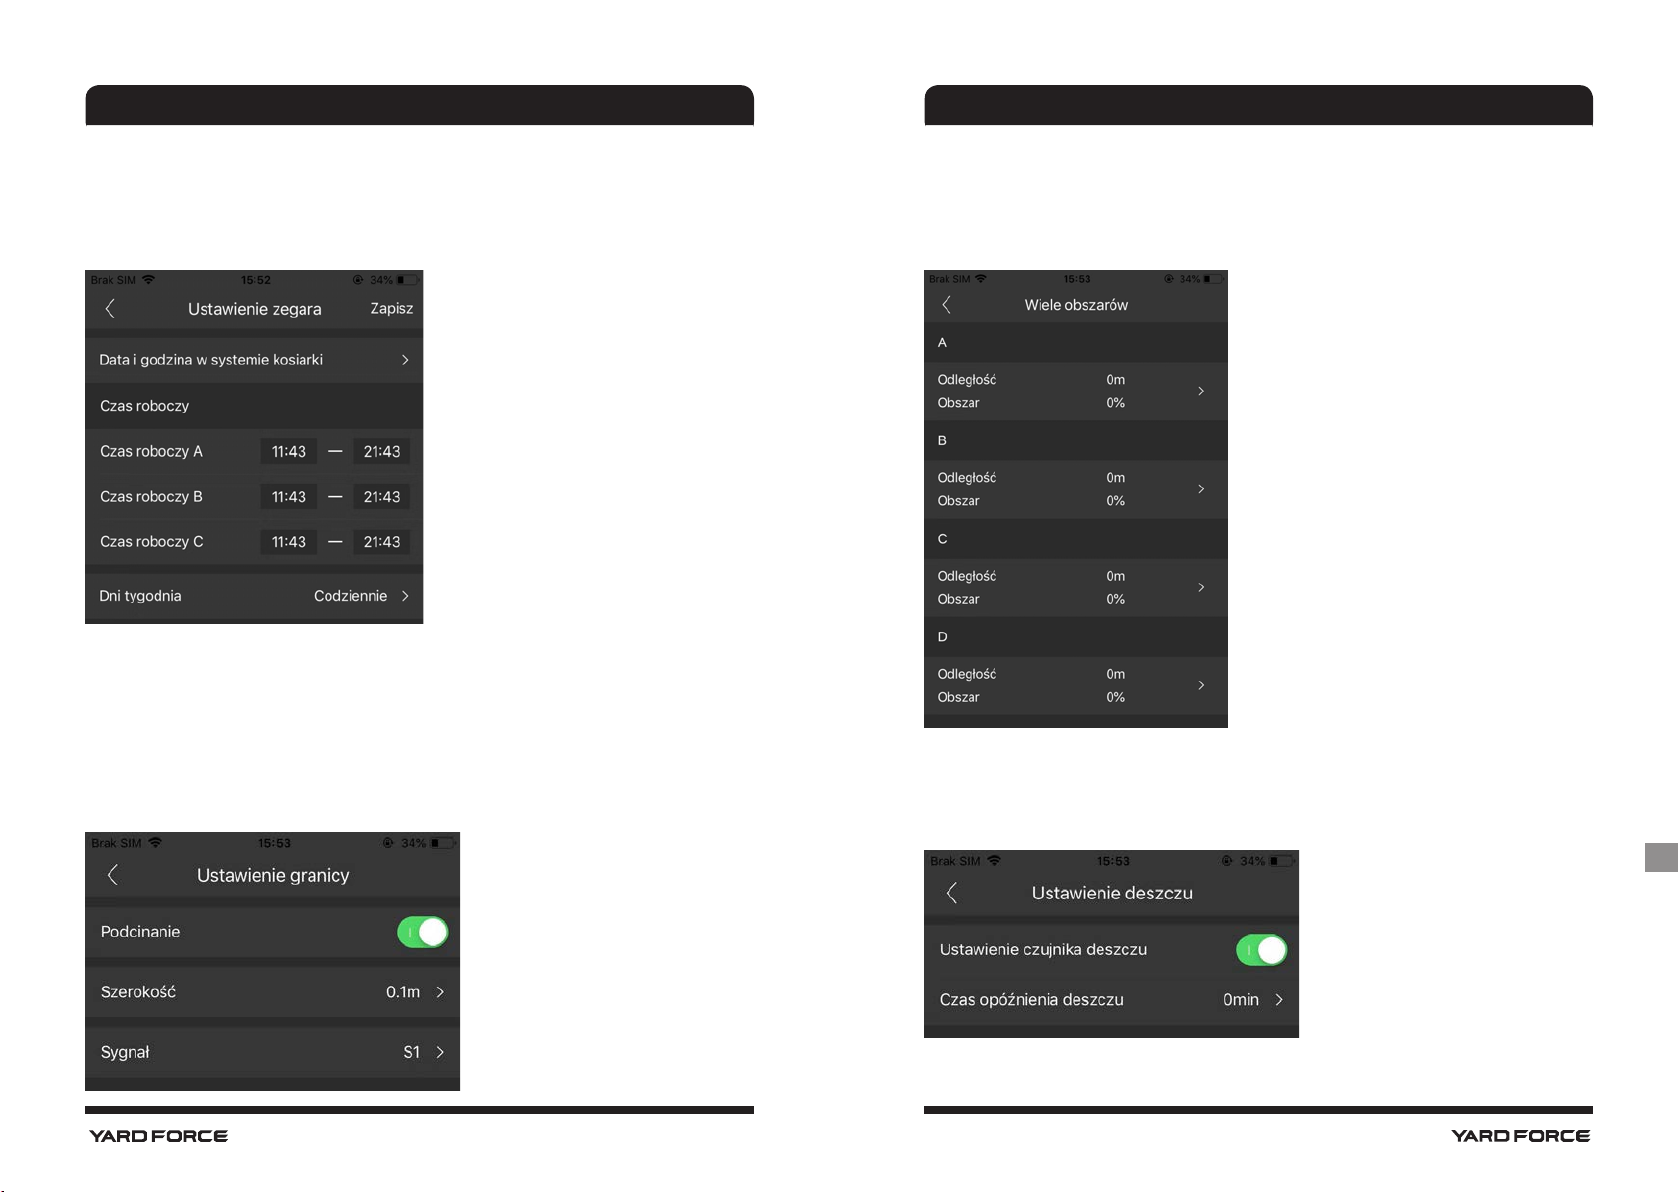
Ultrasonic settings
Set at which distance the mower should stop and turn in another
direction.
About device
- Set device name
- Pin setting, change pin code
- Device information, Model,
WLAN version
- All reset, default values
Share device
Share your device with a QR code
Scan the QR code or save the QR code and share it
Notifications
When active, if the app crashes all app errors, are automatically
forwarded to the manufacturer for optimization purposes.
Instruction videos
Some instructional videos about installation, operation, etc.
Delete mower from device
Tap on mower and swipe to the left, then tap on delete. This is
necessary for example, if the Wi-Fi password from your router has
been changed.
GB
14 15

MOWAP
MOWAP
Benötigte Berechtigungen
Standort
Die App möchte viele Berechtigungen haben, es ist aber für den
Direktmodus nur die Berechtigung Standort / GPS nötig. (Kann nach
erfolgreiche Anmeldung wieder ausgeschaltet werden)
Wenn eine Firewall bzw. AV Software eingesetzt wird
Es ist erforderlich, in der Firewall oder Anti Viren Software die
MOWAP-App die entsprechende Berechtigungen zu erteilen, Als
Beispiel links im Bild die Firewall App „Netguard“
Die Startseite der App
„Registrierung / Anmeldung“ Hier kann die Registrierung oder
Anmeldung mit E-Mail oder mit Handynummer gemacht werden
DE
„Verwenden als Gast“ Hier sind Informationen abrufbar wenn man
die Untermenüpunkte anklickt. Es stehen FAQ‘s und App-Infos zur
Verfügung
16 17
MOWAP MOWAP
Direktmodus
Mäher hinzufügen bei WLAN Einstellungen
XXXXXXXX
Der Direktmodus funktioniert ab Android 5.0 bis 9.0
Die Seriennummer ist
einmalig
Die Registrierung
Wird die App nur im „Direktmodus“ benutzt, ist dieses Kapitel nicht
von Belang
Registrierung per E-Mail
DE
Hier den 4-stelligen Pin (Standard
0000) eingeben, dann Tap auf
„Verbinden“
18 19
MOWAP MOWAP
MOWAP
Registrierung per Handy
Die Anmeldung
Die Anmeldung erfolgt per E-Mail oder Handy und Kennwort.
Die Anmeldung ins Netzwerk
Gerät hinzufügen
1. Über das plus (+) Symbol wird der Mäher hinzugefügt
2. Den QR Code scannen oder die Seriennummer manuell eingeben.
Wenn die Seriennummer korrekt ist, auf „Weiter“ tappen.
Um den Mäher von überall aus steuern zu können, muss der Mäher in
-
das heimische WLAN Netzwerk eingebunden werden
- Wenn die Seite „Netzwerkbeschreibung konfigurieren“ erscheint,
soll die WLAN Taste auf dem Mäher solange gedrückt werden, bis die
LED nicht mehr blinkt. Dann einen Tap auf „Weiter“. Der WLAN Router
wird aufgelistet. Dann das WLAN Kennwort eingeben und einen Tap auf
„Weiter“. Die Verbindung wird hergestellt (kann etwas dauern).
3. Verbindung wird hergestellt (kann schon mal etwas dauern).
4. Wenn die Verbindung fehlschlägt, die WLAN Einstellungen im
Handy / Tablett kontrollieren.
5. Nach erfolgreicher Verbindung, wird der Hauptmodus angezeigt.
DE
20 21
MOWAP MOWAP
Der Hauptmodus
DE
Hier ist der Akkuladezustand
abzulesen
Hier sind die Ladezyklen
und die Gesamtarbeitszeit
abzulesen
Home, Start und Stopptasten
haben die gleiche Funktion
wie die Tasten am Mäher
22 23

MOWAP
MOWAP
Einstellungen
Zeitplan
hier können drei verschiedene Urzeiten und alle Tage eingestellt
werden wann der Mäher arbeiten soll.
DE
Signalkabel
- Schneiden: Kantenschnittfunktion an oder aus.
- Abstand: Einstellen wie weit der Mäher über den Begrenzungsdraht
hinaus fahren darf. (Funktion nur für die Yardforce X, LUV Reihe)
- Signal Umstellung von S1 auf S2 oder umgekehrt.
Verlauf
hier findet man:
- Fehlerprotokolle
- Mähprotokolle
- Aufladeprotokolle
- Betriebszustand Mähstatistikprotokolle
24 25

MOWAP
MOWAP
Multi-Bereich
Hier können bis zu 4 verschiedene Mähbereiche definiert werden.
(Nicht für die Amiro Reihe)
Regensensor-Einstellung
Einstellung der Wartezeit, wann der Mäher, nach einem
Regenschauer, wieder seine Arbeit aufnehmen soll.
Ultraschall-Einstellung
Entfernung einstellen, in welcher Entfernung vor einem Hindernis
der Mäher anhalten und eine andere Richtung einschlagen soll.
DE
Über das Gerät
- Gerätenamen vergeben
- Pin-Einstellung, Änderung
der Pin code
- Geräteinformationen, z. B.
Modell, WLAN-Version
- Alle zurücksetzen,
Standardwerte werden gesetzt
Gerät teilen
Gerät mit anderen teilen, die Freigabe erfolgt über den QR-Code,
mit einem Handy / Tablett QR-Code scannen oder den QR-Code
speichern und z. B. per E-Mail verschicken.
26 27

MOWAP MOWAP
Berichteinstellung
Wenn aktiv, werden App Abstürze, Fehler usw. automatisch zum
Hersteller zwecks App Optimierung weitergeleitet.
Anleitungsvideos
Hier gibt es Lernvideos zu Installation, Bedienung usw.
Mäher aus der Geräteliste löschen
Auf Mäher tappen und nach links wischen, dann Tap auf löschen. Ist
nötig wenn z. B. das WLAN Passwort geändert wurde.
Autorisations requises
Emplacement
MOWAP souhaite disposer de certaines autorisations, mais pour le
« Mode direct », seul « Emplacement / GPS » est nécessaire (peut
être désactivé après une connexion réussie).
FR
Logiciel pare-feu / anti-virus
Dans le pare-feu ou le logiciel anti-virus, il est nécessaire d'autoriser
« MOWAP » pour obtenir les autorisations appropriées. Par
exemple, à gauche, l'application de pare-feu « Net Guard ».
28 29

MOWAP MOWAP
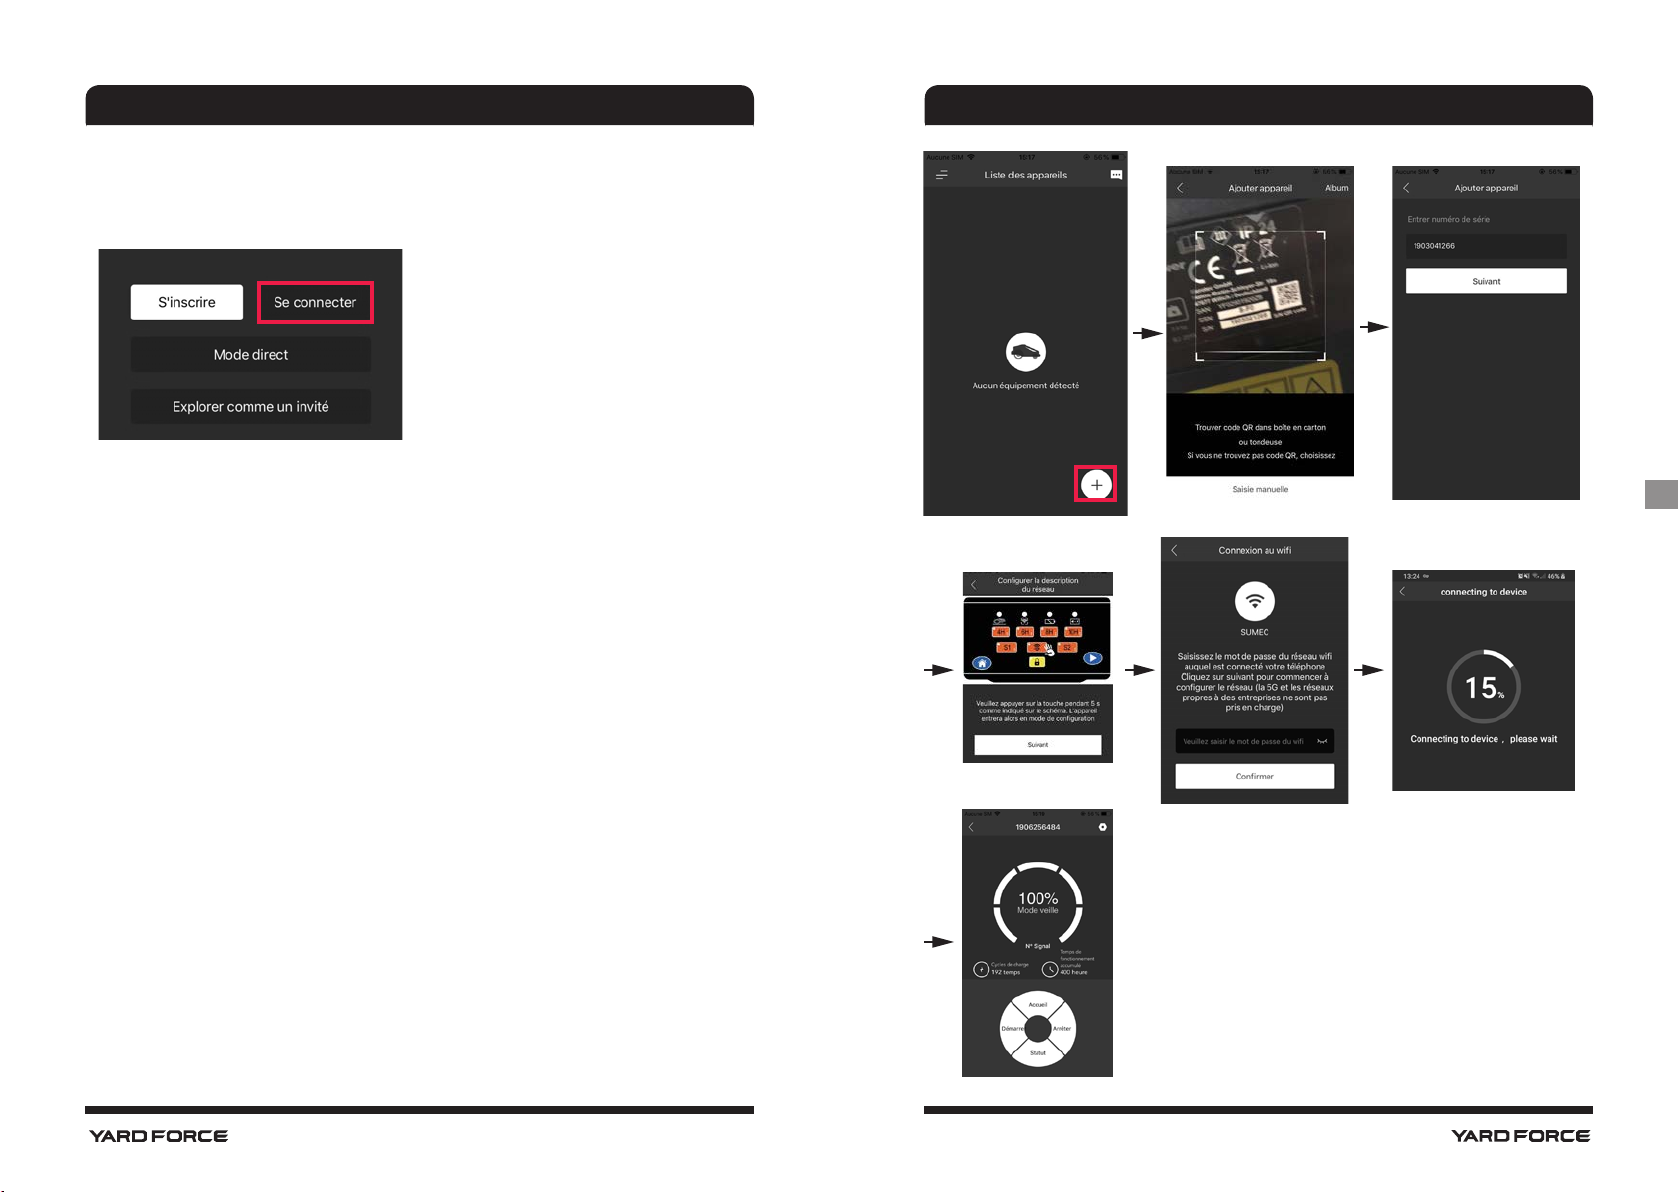
Page d’accueil
S'inscrire / Se connecter
Vous pouvez vous inscrire par e-mail ou par téléphone portable.
Explorer comme un invité
Voici les informations disponibles accessibles en cliquant sur
les éléments du sous-menu. Une foire aux questions et des
informations MOWAP sont disponibles
Mode direct
Pour une utilisation en mode direct, ajoutez la tondeuse à votre
configuration Wi-Fi et activez « Localisation / GPS ».
1. Appuyez et maintenez le Wi-Fi bouton enfoncé, puis activez
l’interrupteur principal. REMARQUE : Pour les modèles à écran
tactile (comme X150i), mettez l'appareil en marche, accédez à
l'option « Paramètres », puis sélectionnez « Wi-Fi » pour configurer
le réseau.
2. Ouvrez les paramètres Wi-Fi de votre téléphone, sélectionnez
le SN + numéro de série en conséquence.
REMARQUE :
IOS 9.0 à 13.
Le mode direct fonctionne sur Android 5.0 à 10.0 et
XXXXXXXX
Numéro de série unique
FR
30 31
Entrez le code PIN à 4 chiffres
(0000 par défaut)

MOWAP MOWAP
S’inscrire
REMARQUE :
Mode direct », ce chapitre n'a pas d'importance.
Inscription par e-mail
Si votre tondeuse robotique n'est utilisée qu'en «
Inscription par téléphone portable
FR
32 33
MOWAP MOWAP
Se connecter
La connexion peut être réalisée par e-mail ou téléphone portable,
avec le mot de passe.
Liste des appareils
1. Ajoutez une tondeuse en appuyant sur le symbole « + ».
2. Scannez le code QR ou entrez manuellement le numéro de série.
Si le numéro de série est correct, tapez sur « Suivant ».
- Afin de contrôler votre tondeuse robotique de n'importe quel
endroit, la tondeuse doit être intégrée à votre réseau domestique
WLAN.
- Lorsque la page « Configurer la description du réseau » apparaît,
appuyez sur le bouton WLAN de la tondeuse jusqu'à ce que le
voyant LED cesse de clignoter. Puis appuyez sur « Suivant » (cela
peut prendre un certain temps).
REMARQUE : Pour l’écran tactile X150i, entrez dans l’option «
Paramètres », puis sélectionnez « Wi-Fi » pour configurer le réseau.
3. La connexion est en cours de traitement (cela peut prendre un
certain temps).
4. Si la connexion échoue, vérifiez les paramètres sans fil de votre
téléphone.
5. Une fois la connexion établie, la page principale de
fonctionnement s’affiche comme ci-dessous.
FR
34 35
MOWAP MOWAP
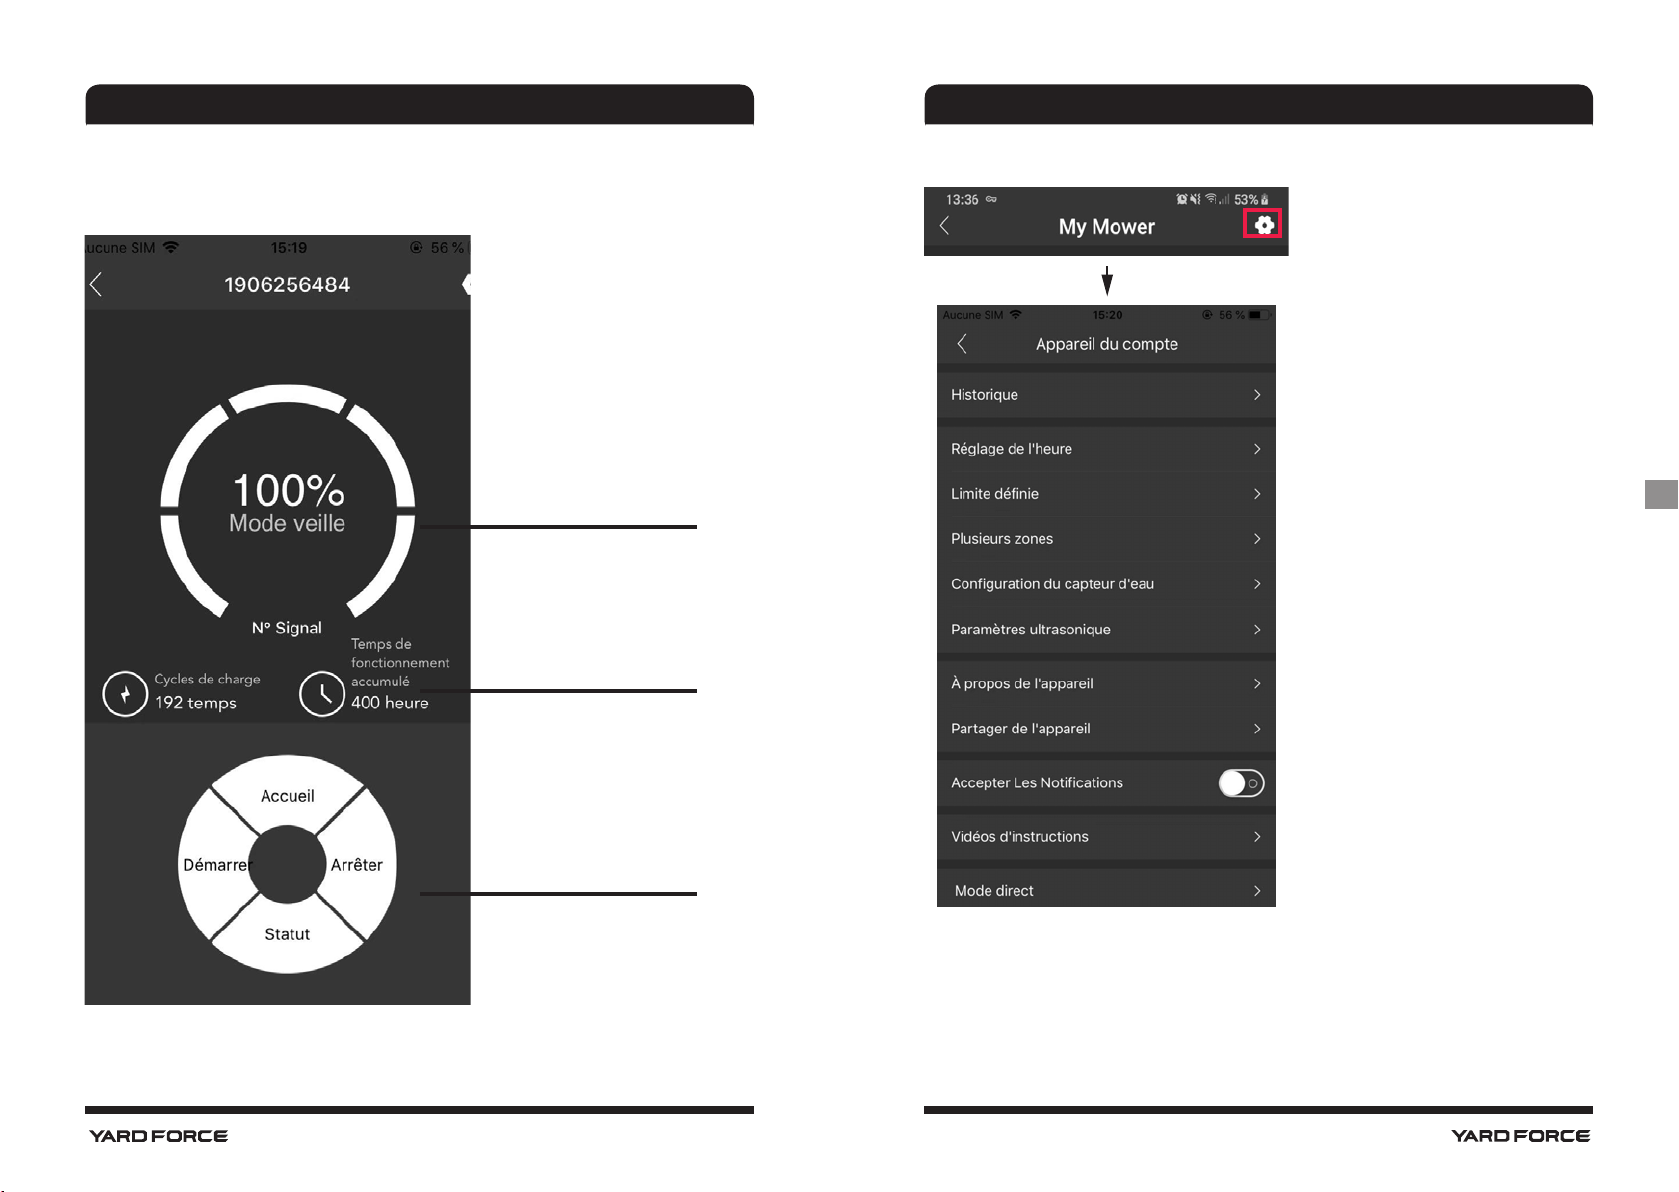
Page principale de fonctionnemen
Statut de charge de la
batterie
Cycles de charge et durée
totale de fonctionnement
Appareil du compte
FR
Les boutons Accueil,
Marche et Arrêt ont la
même fonction que les
boutons de la tondeuse.
Historique
Içi vous pouvez voir
- L’historique des erreurs
- L’historique de coupe
- L’historique de charge / Santé / Historique de fonctionnement
total
36 37
MOWAP MOWAP
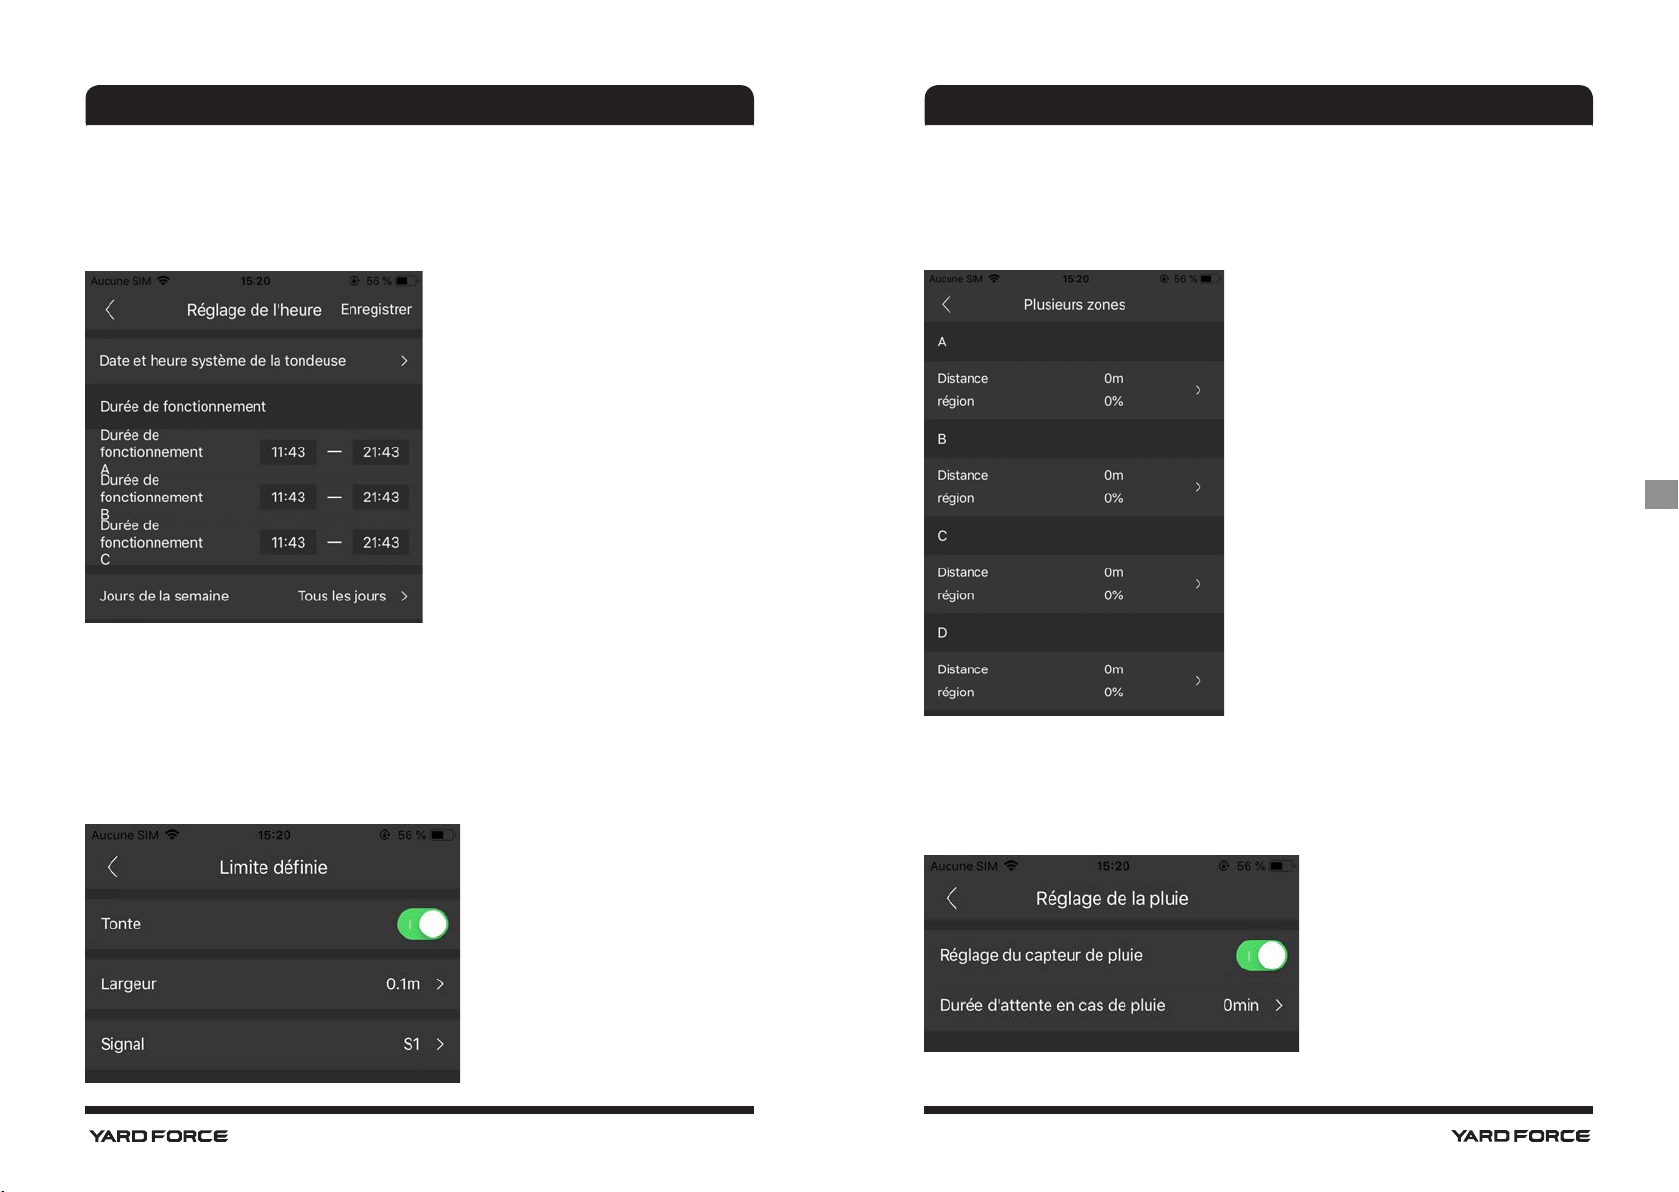
Réglage de l’heure
Ici, vous pouvez définir trois heures différentes de fonctionnement
et sélectionner le jour où la tondeuse doit fonctionner. Définissez
également la date et l'heure de la tondeuse
Limite définie
- Tonte : fonction de coupe des bords activée / désactivée
- Largeur : définissez la distance autorisée par la tondeuse audelà du câble périphérique. (Fonction uniquement pour les séries
Yardforce LUV et X).
- Signal : Changement de S1 à S2
Plusieurs zones
Ici, vous pouvez définir jusqu'à 4 zones de tonte différentes.
(Fonction uniquement pour les Yardforce X80i, X100i, X150i,
LUV1000Ri)
FR
Configuration du capteur d’eau
Réglez un délai lorsque la tondeuse doit reprendre le travail après la
pluie.
38 39
MOWAP MOWAP
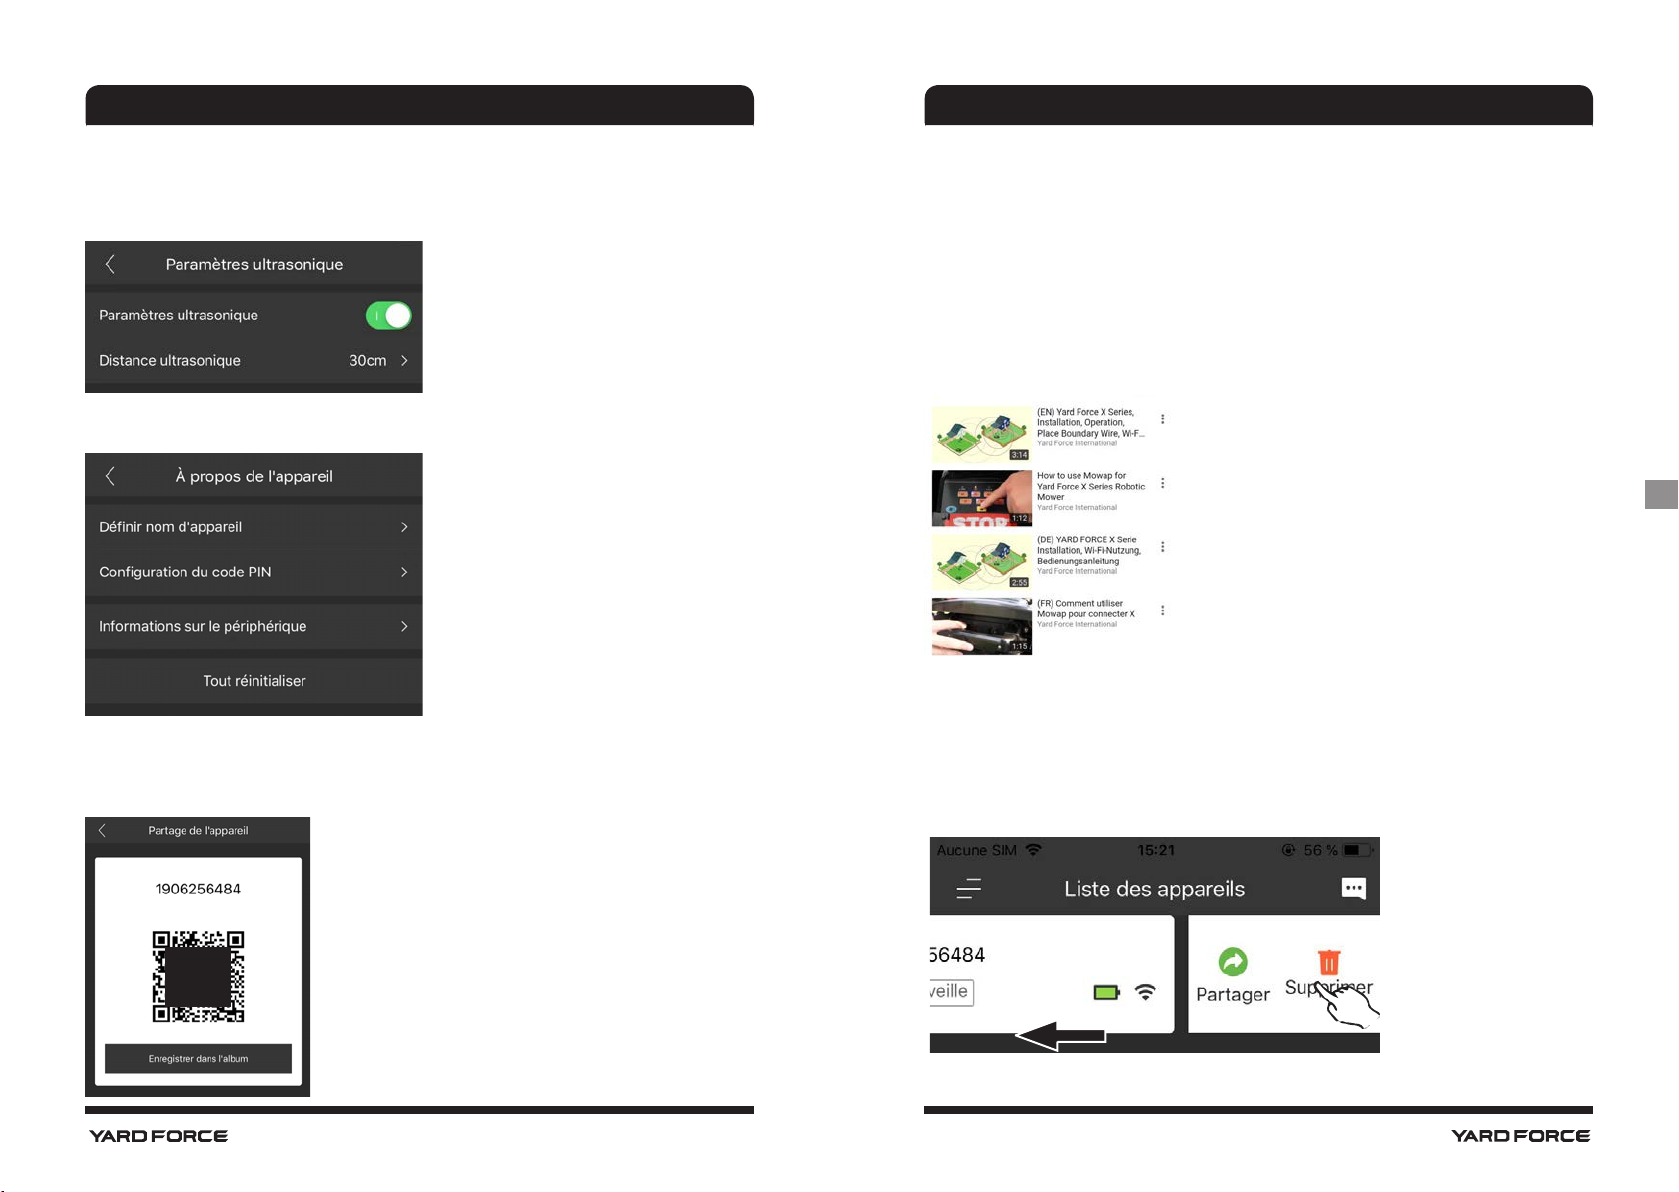
Paramètres ultrasonique
Réglez à quelle distance la tondeuse doit s'arrêter et tourner dans
une autre direction.
À propos de l’appareil
- Définir nom d’appareil
- Configuration du code PIN,
changement du code PIN
- Informations sur le
périphérique, Modèle, version
WLAN
- Tout réinitialiser, valeurs par
défaut
Partager l’appareil
Partagez votre appareil avec un code QR
Scannez le code QR ou sauvegardez le code QR et partagez-le.
Notifications
Lorsqu'elle est active, si l'application se bloque, toutes les erreurs
de l'application sont automatiquement transmises au fabricant à
des fins d'optimisation.
Vidéos d’instructions
Quelques vidéos d'instruction sur l'installation, le fonctionnement,
etc.
FR
Supprimer la tondeuse
Tapez sur la tondeuse et balayez vers la gauche, puis tapez sur
supprimer. Cela est nécessaire par exemple si le mot de passe WiFi de votre routeur a été modifié.
40 41
MOWAP
MOWAP
Vereiste machtigingen
Locatie
MOWAP heeft enkele machtigingen nodig. Voor de “Directe modus”
is echter alleen "Locatie/ GPS" nodig. (Kan worden uitgeschakeld
na een succesvolle login)
Firewall / Antivirussoftware
Zorg ervoor dat “MOWAP” in de firewall- of antivirussoftware over
de juiste machtigingen beschikt. Als voorbeeld, aan de linkerkant de
firewall-app “Net guard”.
Hoofdpagina
Aanmelden/ Login
De MOWAP kan worden geregistreerd met gebruik van een
e-mailadres of mobiel telefoonnummer.
Verkennen als gast
Klik op de submenu-items voor extra informatie. Er zijn FAQ en
informatie over de MOWAP te vinden.
NL
42 43
MOWAP
MOWAP
Directe modus
Om de directe modus te gebruiken, voeg de robotmaaier toe aan
uw Wi-Fi instelling en schakel “Locatie / GPS” in.
1. Druk en houd de Wi-Fi knop ingedrukt en schakel de
hoofdschakelaar in.
OPMERKING: Voor een model met een aanraakscherm (bijv. X150i),
schakel de machine in, open de optie "instellingen” en selecteer
vervolgens “Wi-Fi” om het netwerk te configureren
2. Open uw Wi-Fi instelling op uw telefoon en selecteer het SN +
Serienummer.
OPMERKING:
IOS 9.0 tot 13
Directe modus werkt met Android 5.0 tot 10.0 en
XXXXXXXX
Unieke serienummer
Aanmelden
OPMERKING:
wordt gebruikt, is dit hoofdstuk niet van toepassing.
Registratie via e-mail
Als uw robotmaaier alleen in de "Directe modus”
NL
Voer pincode van 4 cijfers in
(standaard 0000)
44 45
MOWAP
MOWAP
Registratie via mobiele telefoon
Login
Login kan via e-mail of mobiele telefoon, met invoer van een
wachtwoord, worden uitgevoerd.
Apparatenlijst
1. Voeg een robotmaaier toe door op het symbool "+” te tikken
2. Scan de QR-code of voer het serienummer handmatig in.
Wanneer het serienummer juist is, tik op “Volgende”.
- Om uw robotmaaier vanuit gelijk welke plaats te bedienen, zorg
dat het in uw home WLAN-netwerk geïntegreerd is.
- Wanneer de pagina "Configureer netwerkbeschrijving” verschijnt,
druk op de WLAN knop op de robotmaaier totdat de led stopt met
knipperen. Tik dan op “Volgende”. (Dit kan enige tijd duren)
OPMERKING:
“instellingen” en selecteer dan “Wi-Fi” om het netwerk te
configureren.
3. De verbinding wordt gemaakt (dit kan enige tijd duren).
4. Als de verbinding mislukt, controleer de draadloze instellingen op
uw telefoon.
5. Na een succesvolle verbinding, wordt de onderstaande
voornaamste werkingspagina weergegeven.
Voor het X150i aanraakscherm, open de optie
NL
46 47

MOWAP
MOWAP
Voornaamste werkingspagina
Laadstatus van accu
Laadcycli en totale
werkingstijd
NL
48 49
Home, Start en Stopknoppen hebben
dezelfde werking als
de knoppen op de
robotmaaier.

MOWAP
MOWAP
Apparaat instellingen
Tijdsinstelling
U kunt hier drie verschillende werkingstijden instellen en de dag
wanneer de robotmaaier moet werken selecteren. U kunt tevens de
datum en tijd voor de robotmaaier instellen.
Grens instellen
- Trimmen: rand maaien-functie aan/ uit
- Breedte: U kunt hier instellen hoe ver de grasmaaier over de
afbakeningsdraad kan gaan. (Functie alleen beschikbaar voor de
Yardforce LUV en x-serie)
- Signal: Wijzigen tussen S1 en S2
NL
History
U kunt hier het volgende bekijken:
- Foutgeschiedenis
- Maaigeschiedenis
- Laadgeschiedenis / Gezondheid/ Totale werkingsgeschiedenis
50 51

MOWAP
MOWAP
Meerdere gebieden
U kunt hier tot 4 verschillende maaigebieden instellen
(Functie alleen beschikbaar voor de Yardforce X80i, X100i, X150i,
LUV1000Ri )
Ultrasone ilnstellen
U kunt hier instellen op welke afstand de robotmaaier moet stoppen
en in een andere richting moet draaien.
Over het apparaat
- De naam van het apparaat
instellen
- Pincode instellen, pincode
wijzigen
- Apparaat informatie, Model,
WLAN-versie
- Reset alles, standaard
waarden
NL
Instellen watersensor
U kunt hier een uitsteltijd instellen wanneer de bosmaaier na een
regenbui het werk kan hervatten.
52 53
Delen het apparaat
Deel uw apparaat met een QR-code
Scan de QR-code of sla de QR-code op en deel het

MOWAP
MOWAP
Verslag instelling
Wanneer actief; als de app crasht, worden alle fouten automatisch
naar de fabrikant doorgestuurd voor optimalisatiedoeleinden.
Instructie video’s
Enkele instructievideo’s over de installatie, werking, etc.
Robotmaaier van apparaat verwijderen
Tik op robotmaaier, veeg naar links en tik vervolgens op verwijderen.
Dit is bijvoorbeeld nodig wanneer het Wi-Fi wachtwoord van uw
router is gewijzigd.
Wymagane zezwolenia
AplikaLokalizacja
Aplikacja MOWAP wymaga pewnych zezwoleń, ale w „trybie
bezpośrednim” konieczna jest tylko „Lokalizacja/GPS”. (Po
pomyślnym zalogowaniu istnieje możliwość wyłączenia)
Firewall/Oprogramowanie antywirusowe
W firewallu lub w oprogramowaniu antywirusowym trzeba
przydzielić aplikacji „MOWAP” odpowiednie zezwolenia. Jako
przykład, po lewej aplikacja firewall „Net guard”.
54 55
PL

MOWAP MOWAP
Strona główna
Załóż konto/Zaloguj się
Aplikację można zarejestrować poprzez e-mail lub komórkę.
Odwiedź jako gość
Tutaj podane są informacje dostępne po kliknięciu w elementy
podmenu. Dostępne są FAQ (najczęściej zadawane pytania) oraz
informacje o MOWAP.
Tryb bezpośredni
W trybie bezpośredniego użycia należy dodać kosiarkę do swoich
ustawień Wi-Fi i włączyć opcję „Lokalizacja/GPS”.
1.
Naciśnij i przytrzymaj przycisk Wi-Fi i włącz zasilanie
przełącznikiem głównym.
UWAGA: W modelach z ekranem dotykowym (np. X150i) należy
włączyć maszynę, przejść do opcji „Ustawienia” i wybrać „Wi-Fi”,
aby skonfigurować sieć.
2. Otwórz ustawienia Wi-Fi w swoim telefonie i wybierz SN + numer
seryjny.
UWAGA: Tryb bezpośredni działa w systemach Android od 5.0 do
10.0 oraz IOS od 9.0 do 13.
XXXXXXXX
Niepowtarzalny
numer seryjny
56 57
PL
Wprowadź 4-cyfrowy
kod Pin (domyślnie
0000).

MOWAP MOWAP
Rejestracja
UWAGA: Jeśli robokosiarka jest używana wyłącznie w „trybie
bezpośrednim”, fragment ten można pominąć.
Rejestracja za pomocą adresu e-mail
Rejestracja za pomocą telefonu komórkowego
PL
58 59
MOWAP MOWAP
Logowanie się
Użytkownik może się zalogować za pomocą adresu e-mail lub
telefonu komórkowego oraz hasła.
Lista urządzeń
1. Dodaj kosiarkę, dotykając symbolu „+”.
2. Zeskanuj kod QR lub ręcznie wprowadź numer seryjny, jeśli
numer seryjny jest prawidłowy, dotknij przycisku „Dalej”.
- Aby można było sterować robokosiarką z dowolnego miejsca,
kosiarka musi być połączona z domową siecią WLAN.
- Gdy pojawi się strona „Skonfiguruj opis sieci”, naciśnij przycisk
WLAN w kosiarce i przytrzymaj aż dioda LED przestanie migać.
Następnie dotknij przycisku „Dalej”. (Może to trochę potrwać)
UWAGA: W modelu z ekranem dotykowym X150i, aby
skonfigurować sieć, należy wejść do „Ustawień” i wybrać opcję
„Wi-Fi”.
3. Trwa łączenie (może to trochę potrwać).
4. Jeśli połączenie nie powiedzie się, sprawdź ustawienia łączności
bezprzewodowej w swoim telefonie.
5. Po pomyślnym nawiązaniu połączenia pojawi się główna strona
robocza pokazana poniżej.
PL
60 61
MOWAP MOWAP
Główna strona robocza
Ustawienia urządzenia
Stan naładowania baterii
Cykle ładowania i
całkowity czas pracy
Przyciski Home, Start
i Stop mają taką samą
funkcję jak przyciski w
kosiarce
Historia
W tym miejscu widoczne są
- Historia błędów
- Historia koszenia
- Historia ładowania / Stan urządzenia / Cała historia pracy
62 63
PL
MOWAP MOWAP
Ustawianie zegara
W tym miejscu można ustawić trzy różne czasy pracy i wybrać
dzień, w którym ma pracować kosiarka. Można też ustawić datę i
godzinę kosiarki.
Ustawienia granicy
- Podcinanie: wł./wył. funkcję przycinania krawędzi
- Szerokość: Ustawienie jak daleko wolno kosiarce oddalić się
poza przewód ograniczający. (Funkcja dostępna tylko w modelach
Yardforce serii LUV i X)
- Sygnał: Zmiana sygnału z S1 na S2.
Wiele obszarów
W tym miejscu można zdefiniować do 4 różnych obszarów koszenia.
(Funkcja dostępna tylko w modelach Yardforce X80i, X100i,
X150i, LUV1000Ri)
Ustawienie czujnika deszczu
Ustawianie opóźnienia wznawiania pracy po deszczu.
64 65
PL
MOWAP MOWAP
Ustawienia ultradźwięków
Ustawianie w jakiej odległości kosiarka ma zatrzymywać się i
skręcać w inną stronę.
O urządzeniu
- Ustaw nazwę urządzenia
- Ustawienie PIN, zmiana PIN
- Informacje o urządzeniu,
model, wersja WLAN
- Zresetuj wszystko, wartości
domyślne
Udostępnij urządzenie
Udostępnianie urządzenia za pomocą kodu QR.
Skanowanie kodu QR lub zapisywanie kodu QR i udostępnianie.
Ustawienie raportu
Gdy opcja ta jest włączona, jeżeli aplikacja zawiesi się, wówczas
wszystkie błędy aplikacji zostają automatycznie przesłane do
producenta w celu optymalizacji.
Wideo z instrukcjami
Filmy instruktażowe na temat instalacji, obsługi
itp.
Usuwanie kosiarki z urządzenia
Dotknij kosiarkę i przeciągnij ją w lewo, a następnie dotknij przycisku
Usuń. Jest to konieczne np wtedy, gdy zostanie zmienione hasło
Wi-Fi routera.
66 67
PL
MOWAP
MOWAP
Požadovaná oprávnění
Umístění
MOWAP vyžaduje určitá oprávnění, ale pro „Přímý režim“ je nutná
pouze „Poloha / GPS“. (Může být vypnuto po úspěšném přihlášení)
Firewall / antivirový software
V bráně firewall nebo antivirovém softwaru je nutné povolit příslušná
oprávnění pro „MOWAP“. Příkladem vlevo je aplikace brány firewall
„Net guard“
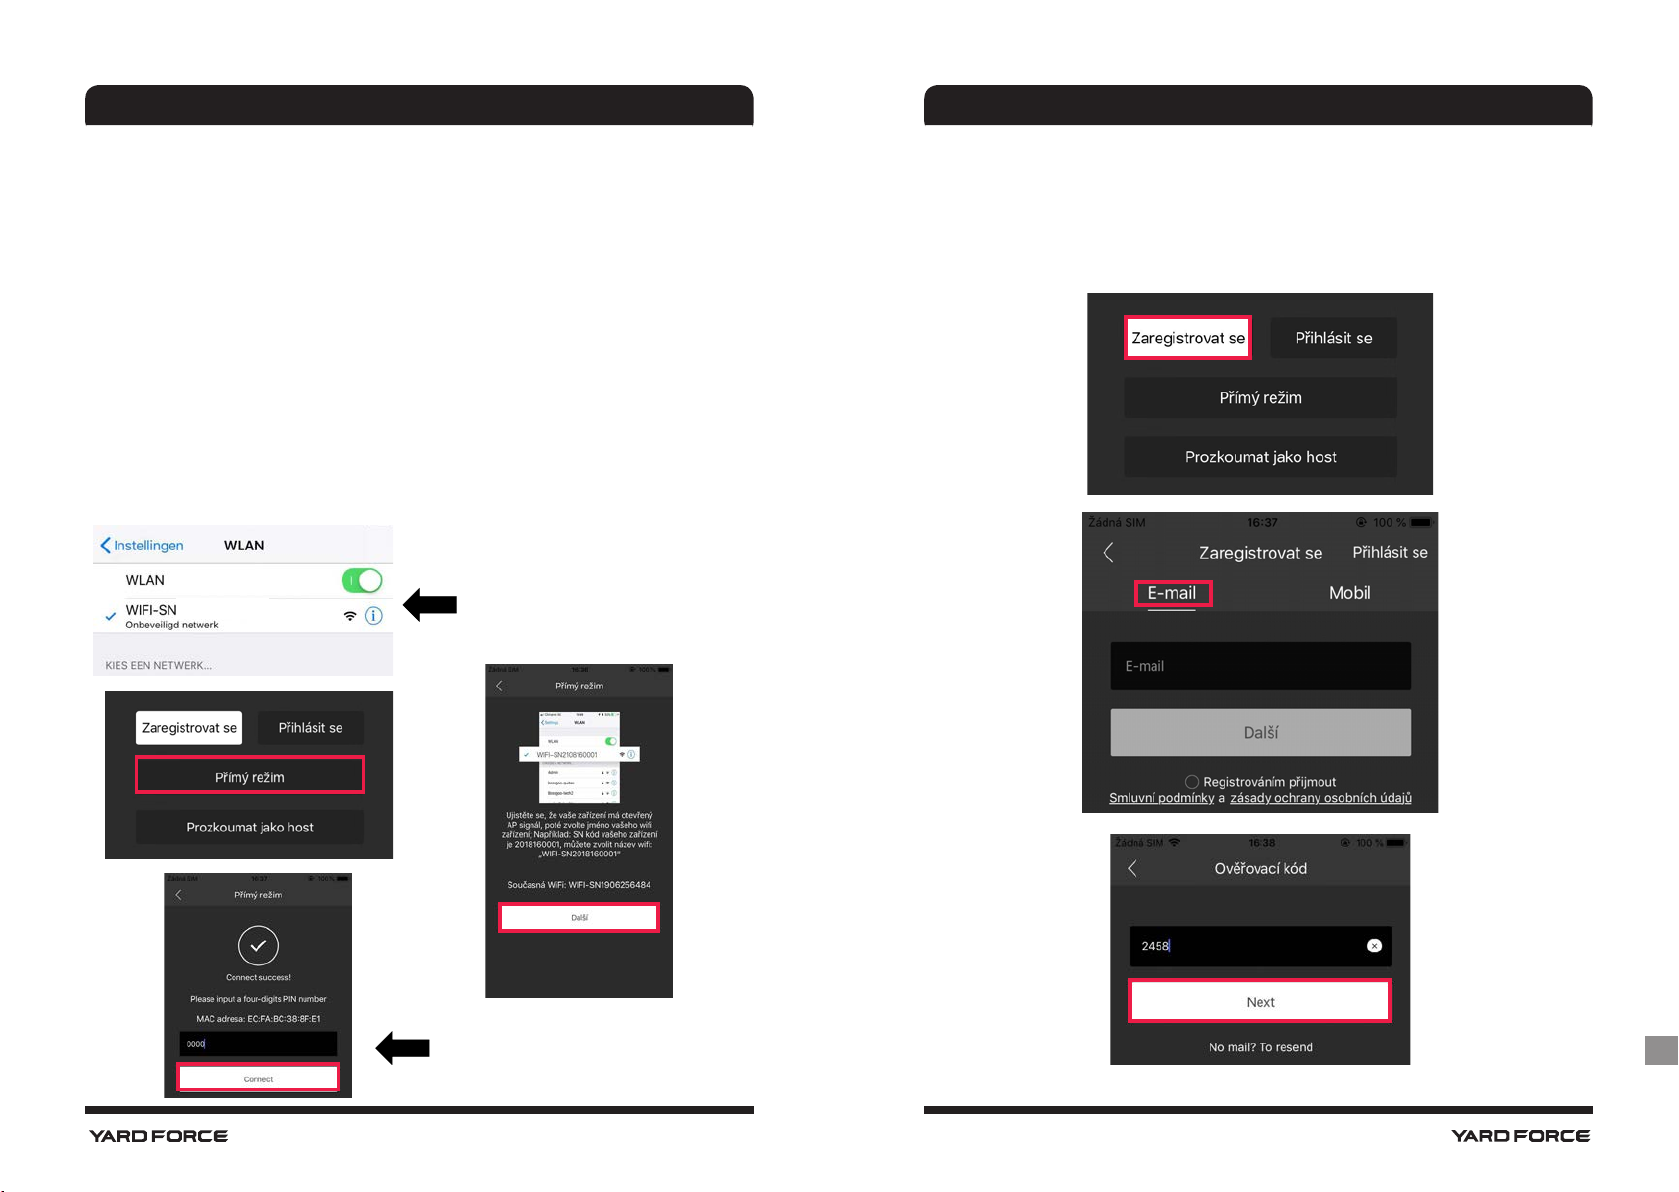
Hlavní stránka
Zaregistrovat se / Přihlásit se
Tato sekce může obsahovat e-mail nebo číslo mobilního telefonu
pro registraci.
Prozkoumat jako host
Zde jsou informace dostupné po kliknutí na položky podnabídky. K
dispozici jsou FAQ a MOWAP informace
68 69
CZ
MOWAP
MOWAP
Přímý režim
Pro použití v přímém režimu přidejte sekačku do nastavení Wi-Fi a
zapněte „Poloha / GPS“
1. Stiskněte a podržte tlačítko Wi-Fi a poté zapněte hlavní vypínač.
POZNÁMKA: U modelu s dotykovou obrazovkou (např. X150i)
zapněte zařízení a zadejte možnost „nastavení“ a poté vyberte „WiFi“ pro konfiguraci sítě.
2. Otevřete v telefonu nastavení Wi-Fi a podle toho vyberte sériové
číslo.
POZNÁMKA: Přímý režim funguje na Android 5.0 až 10.0 a IOS 9.0
až 13
XXXXXXXX
Jedinečné sériové číslo
Registrace
POZNÁMKA: Pokud je vaše robotická sekačka používána pouze v
„Přímém režimu“, není tato kapitola relevantní.
Registrace e-mailem
Zadejte čtyřmístný kód PIN
(výchozí 0000)
70 71
CZ
MOWAP
MOWAP
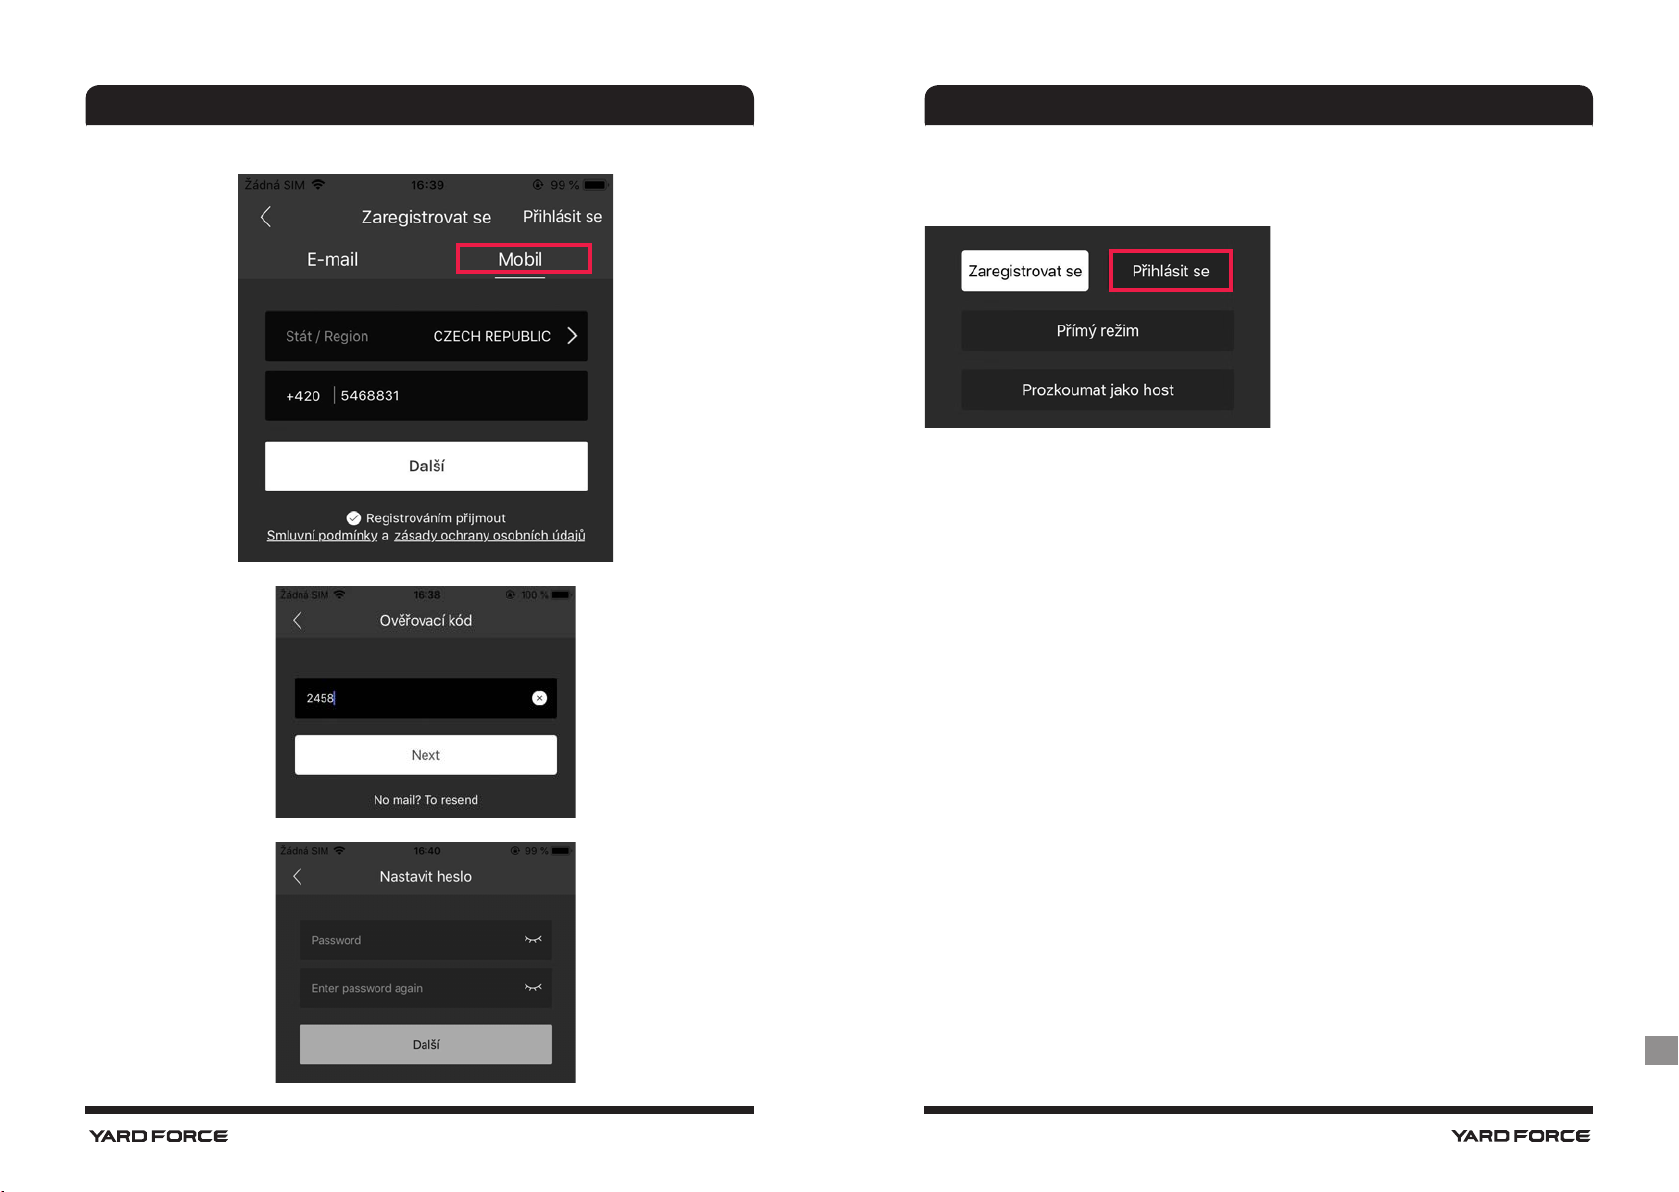
Registrace pomocí mobilního telefonu
Přihlásit se
Přihlášení lze provést e-mailem nebo mobilním telefonem s heslem.
Seznam zařízení
1. Přidejte sekačku klepnutím na symbol „+“
2. Naskenujte QR kód nebo zadejte sériové číslo ručně, pokud je
sériové číslo správné, klepněte na „Další“.
- Aby bylo možné ovládat robotickou sekačku odkudkoli, musí být
sekačka integrována do vaší domácí sítě WLAN
- Jakmile se zobrazí stránka „Konfigurace popisu sítě“, stiskněte
tlačítko WLAN na sekačce, dokud kontrolka LED nepřestane blikat.
Poté klepněte na „Další“. (Může to chvíli trvat)
POZNÁMKA: U dotykové obrazovky X150i zadejte možnost
„nastavení“ a poté vyberte „Wi-Fi“ pro konfiguraci sítě.
3. Připojení se zpracovává (může to chvíli trvat).
4. Pokud se připojení nezdaří, zkontrolujte nastavení bezdrátového
připojení v telefonu.
5. Po úspěšném připojení se zobrazí níže uvedená hlavní pracovní
stránka.
72 73
CZ

MOWAP
MOWAP
Hlavní pracovní stránka
Stav nabití baterie
Nabíjecí cykly a
celková pracovní
doba
74 75
Tlačítka Domů, Start
a Stop mají stejnou
funkci jako tlačítka na
sekačce.
CZ
MOWAP
MOWAP
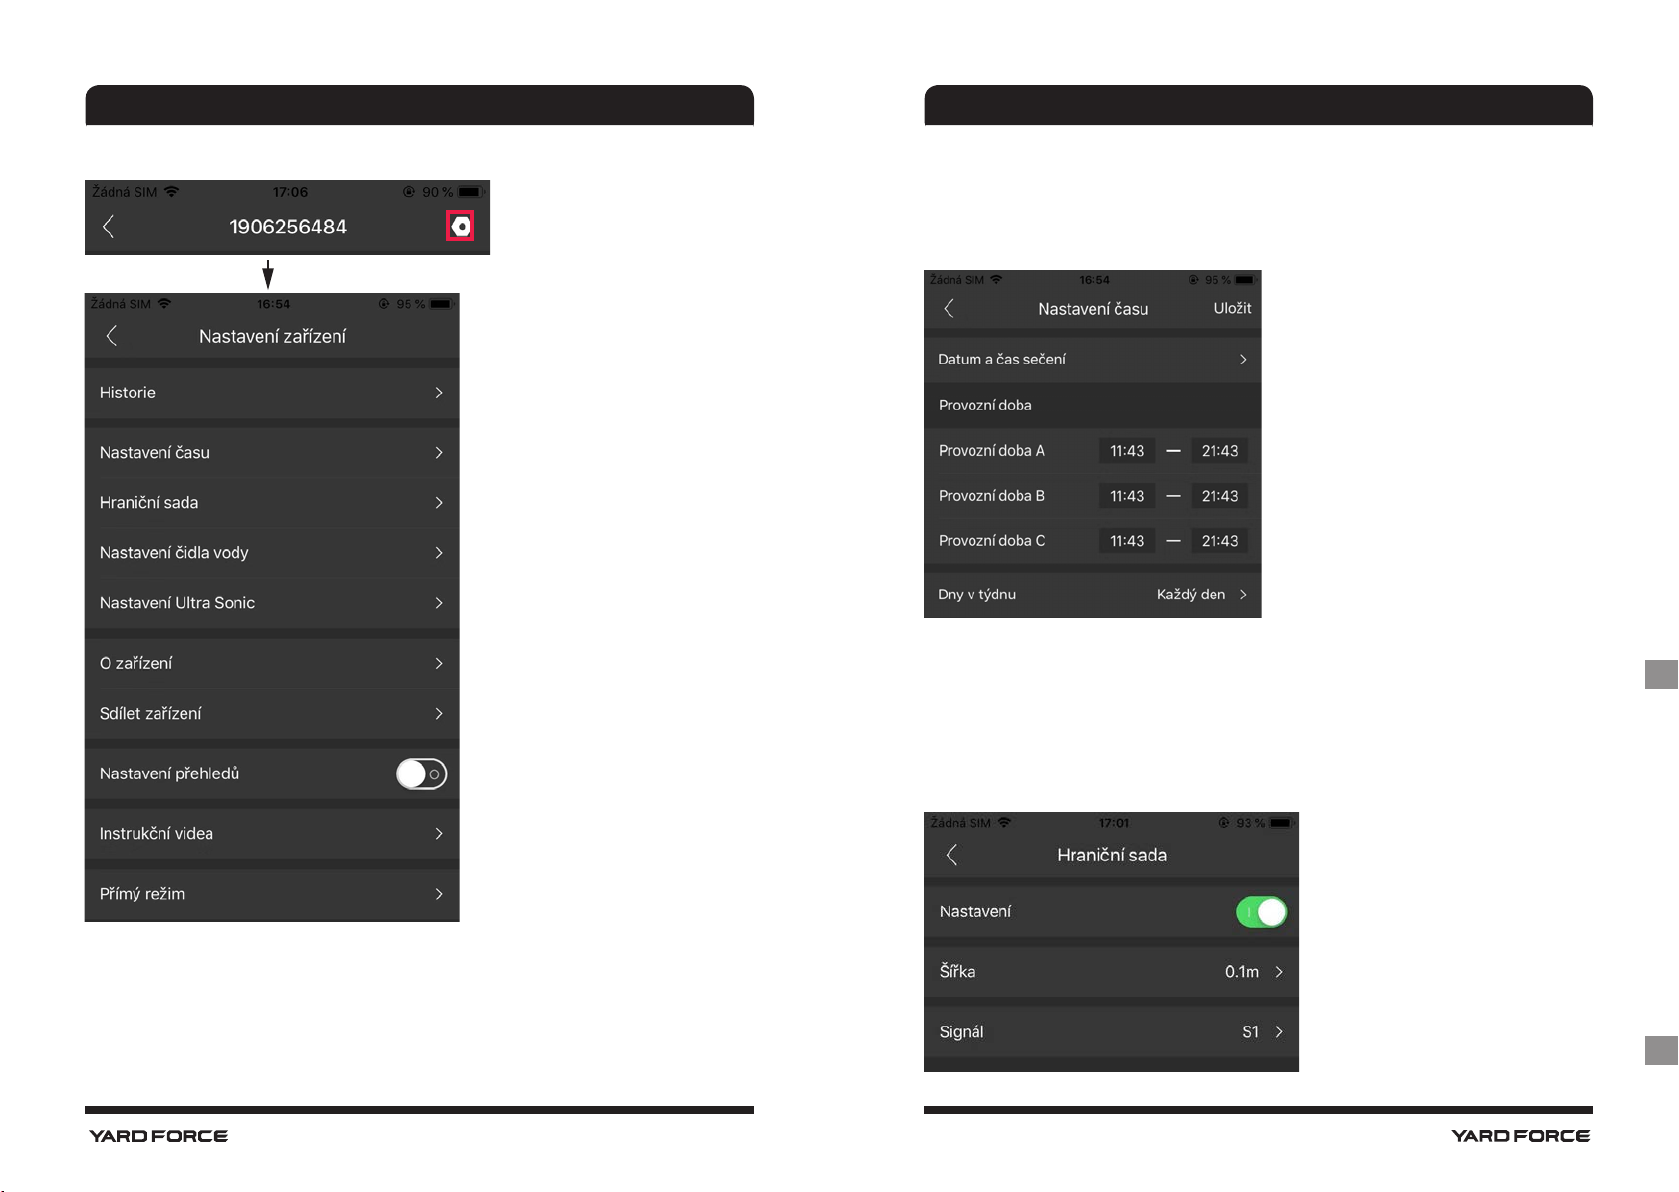
Nastavení zařízení
Nastavení času
Zde můžete nastavit tři různé pracovní doby a vybrat den, kdy má
sekačka pracovat. Nastavujete zde také datum a čas sečení
Hraniční sada
- Nastavení: funkce ořezání okrajů zapnuta / vypnuta
- Šířka: Nastavení, jak daleko může sekačka přesáhnout obvodový
drát. (Funguje pouze pro řadu Yardforce LUV a X)
- Signál: Změna z S1 na S2
NL
Historie
Zde můžete vidět
- Historie chyb
- Historie sečení
- Historie nabíjení / Zdraví / Celková provozní historie
76 77
CZ
MOWAP
MOWAP
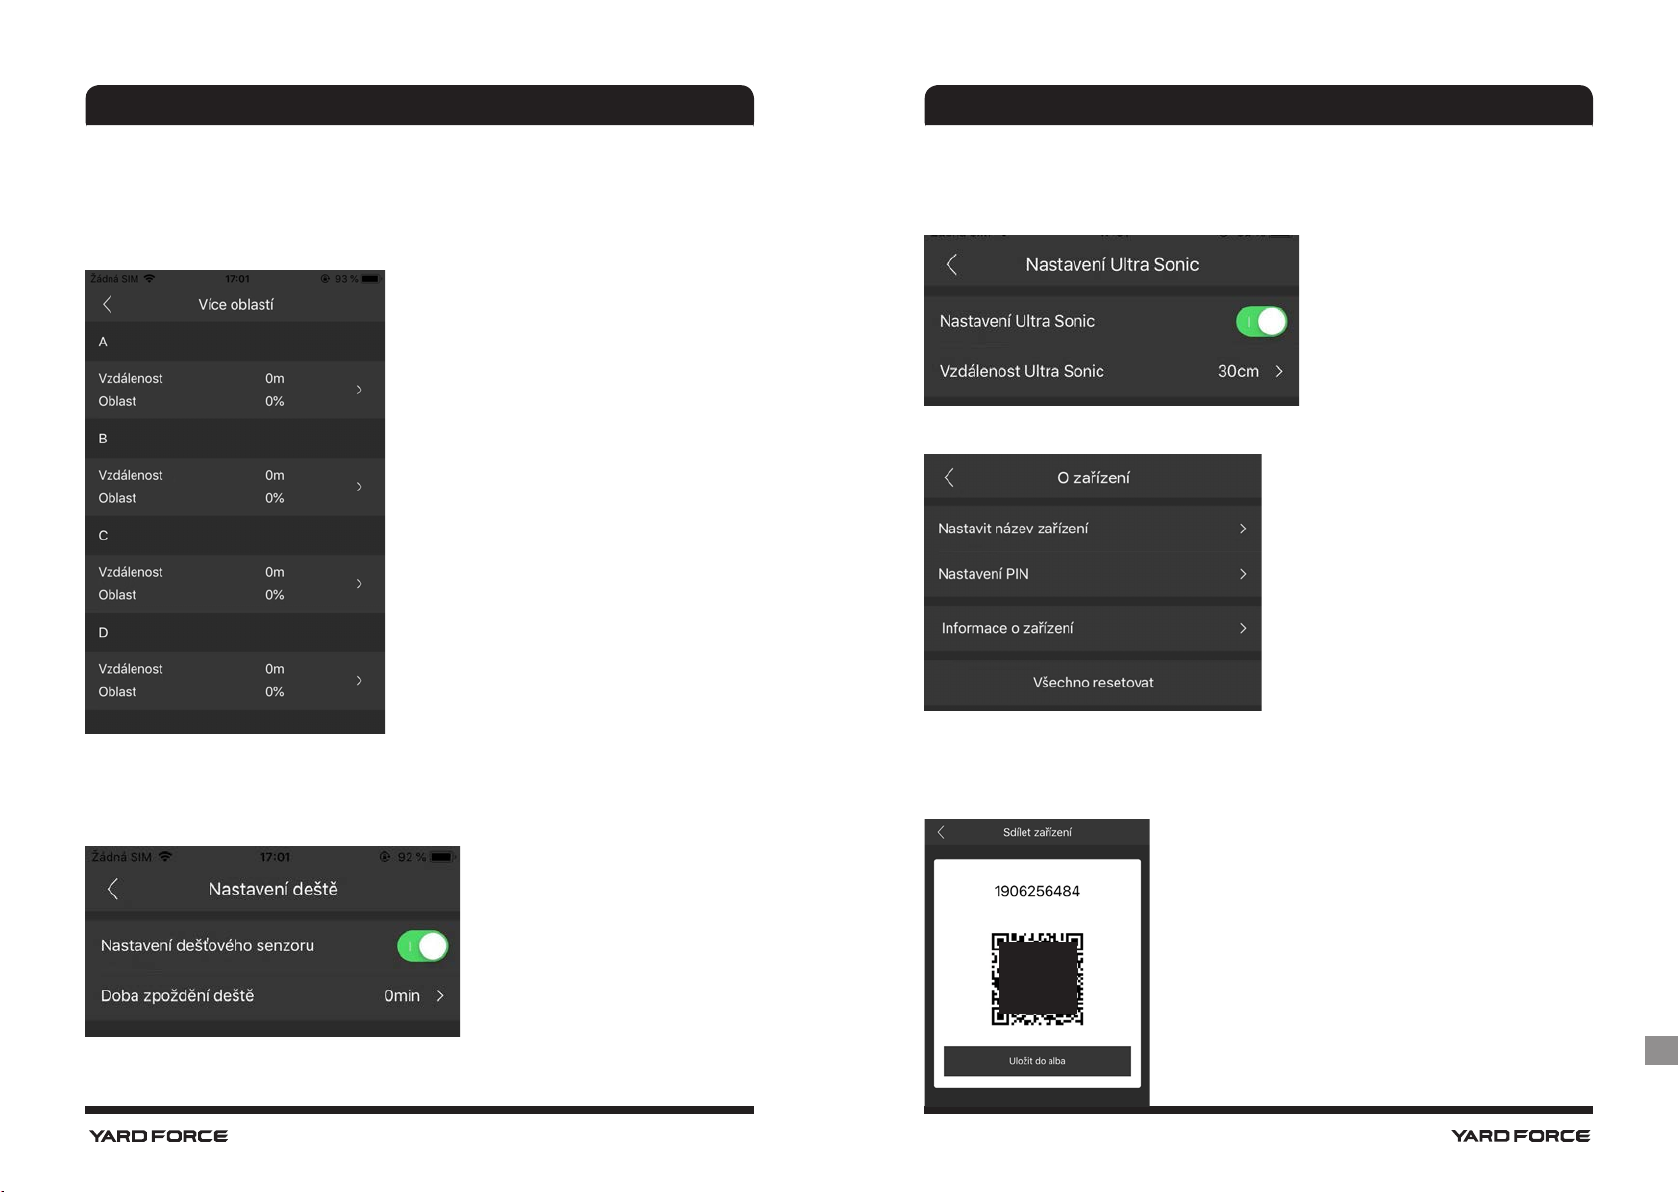
Více oblastí
Zde můžete definovat až 4 různé oblasti sečení.
(Funkce pouze pro modely Yardforce X80i, X100i, X150i, LUV1000Ri)
Nastavení Ultra Sonic
Nastavení vzdálenosti, ve které se má sekačka zastavit a otočit do
jiného směru.
O zařízení
- Nastavit název zařízení
- Nastavení PIN, změna kódu
PIN
- Informace o zařízení, model,
verze WLAN
- Všechno resetovat, výchozí
hodnoty
Nastavení čidla vody
Nastavení zpoždění, kdy má sekačka pokračovat v práci po dešti
78 79
Sdílet zařízení
Sdílejte zařízení pomocí QR kódu
Naskenujte QR kód nebo jej uložte a sdílejte
CZCZ

MOWAP
Oznámení
Když je aktivní a pokud se aplikace zhroutí, pak všechny
chyby aplikace jsou automaticky předávány výrobci za účelem
optimalizace.
Instrukční videa
Některá instruktážní videa o instalaci, provozu atd.
Odstranit sekačku ze zařízení
Klepněte na sekačku, přejeďte prstem doleva a potom klepněte na
Odstranit. To je nutné například v případě, že bylo změněno Wi-Fi
heslo z vašeho routeru.
80 81
CZ
 Loading...