

Page 1
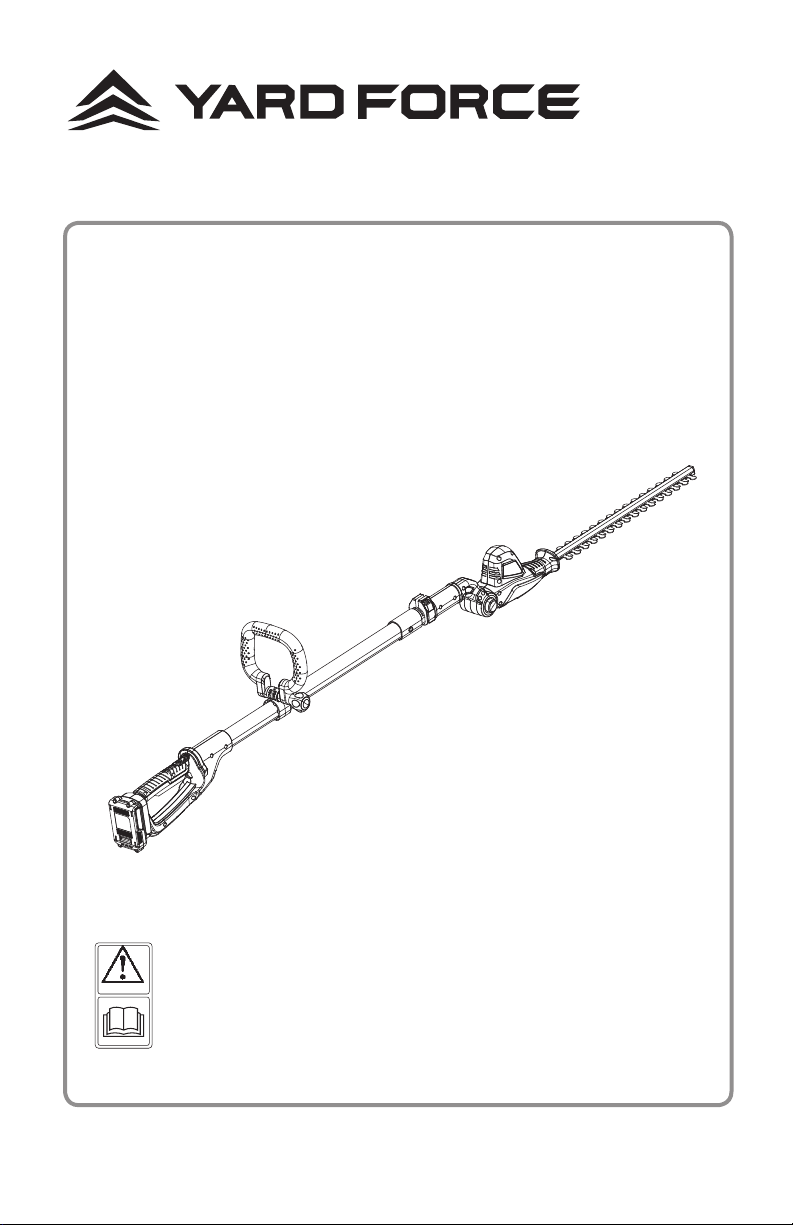
Model M0E-16ET-410
20V CORDLESS POLE HEDGE TRIMMER
Original Instructions
READ & UNDERSTAND
INSTRUCTION MANUAL
Save all warnings and instructions for future reference.
1
Page 2

M0E-16ET-410 Original Instruction
TABLE OF CONTENTS
Description of Product Parts 2
Technical Specications 4
Intended Use 5
Safety Information 6
Assembly 16
Operation 19
Maintenance and Storing 22
Troubleshooting 23
EC Declaration of Conformity 24
Read this manual carefully prior to assembling and
operating the pole hedge trimmer. It is dangerous to
operate this product without being familiar with these
instructions. Keep this manual in a safe place and have
it ready for future reference.
2 1
Page 3

DESCRIPTION OF PRODUCT PARTS
DESCRIPTION OF PRODUCT PARTS
Fig. 1
6
8
9
4
7
10
Parts List
As shown in Fig. 1
1. Blade
2. Working head
3. Pivot knob
4. Quick release for telescopic
handle
5. Pole tube
6. Front handle
2
3
5
11
7. Front handle adjusting knob
8. Safety lock-off button
9. Main switch
10. Charger
11. Battery pack
12. Blade sheath
12
Check the delivery parts
As shown in Fig. 2
Carefully remove the machine from its packaging and check as the following parts are
1
complete:
Fig. 2
A. 20 V cordless pole hedge trimmer 1pc
B. Charger 1pc
C. Battery pack 1pc
D. Front handle 1pc
E. Manual 1pc
WARNING: If any parts are damaged or missing, do not operate this tool until
the missing parts are replaced. Failure to heed this warning could result in
serious personal injury.
NOTE! Always recycle the packaging in accordance with local recycling
schemes.
2 3
Page 4

TECHNICAL SPECIFICATIONS
TECHNICAL SPECIFICATIONS
Model Number M0E-16ET-410
Voltage 20 V
Battery type Lithium-Ion
No load speed 1400 min
Cutting length/Capacity 410 mm / 14 mm
Tooth gap 16 mm
Measured sound pressure level(LpA ) 75dB(A) K=3.0 dB(A)
Measured sound power level(L wA) 87.9dB(A) K=3.0 dB(A)
Guaranteed sound power level(LwA) 90 dB(A)
Weight 3.4 kg
Vibrations 2.0 m/s² K=1.5 m/s²
-1
Battery pack
Battery pack B0P-SP07-18-C(5INR 19/65)
Battery type Lithium-Ion
Battery capacity 40Wh
Battery voltage 20 V
Charger
Charger Type B0Q-SP03-20
Rated Voltage 220-240V~/50~60Hz
Nominal Consumption 75W
Output Voltage of Charge 20V d.c.
Output Current of Charge 2A
Charging time Approx.60min
Protection Class Class II
Protection Category IPX0
WARNING!
Depending on the actual use of the product the vibration values can differ from the
declared total! Adopt proper measures to protect yourself against vibration exposures!
Take the whole work process including times the product is running under no load or
switched off into consideration!
Proper measures include among others regular maintenance and care of the product and
cutting attachments, keeping hands warm, periodical breaks and proper planning of work
processes!
INTENDED USE
This Li-ion pole hedge trimmer M0E-16ET-460 is intended for trimming hedges, bushes
and shrubs. Observe the technical data for the maximum cutting capacity. Do not cut non
plant material or branches exceeding the stated maximum capacity. For safety reasons it
is essential to read the entire instruction manual before rst operation and to observe all
the instructions there in. This product is intended for private domestic use only, not for any
commercial trade use. It must not be used for any purposes other than those described.
The sound values have been determined according to noise test code given in EN 607452-15, using the basic standards EN ISO 11094 and EN ISO 3744.
The noise gures quoted are emission levels and are not necessarily safe working levels.
Factors that inuence the actual level of exposure of work-force include the characteristics
of the work room, the other sources of noise, etc. i.e. the number of machines and other
adjacent processes, and the length of time for which an operator is exposed to the noise.
Also the permissible exposure level can vary from country. This information, however, will
enable the user of the machine to make a better evaluation of the hazard and risk.
Wear hearing protection! The sound intensity level for the operator may exceed 80 dB (A)
and ear protection measures are necessary!
The declared vibration value has been measured in accordance with a standard test
method (according to EN 12096) and may be used for comparing one product with
another. The declared vibration value may also be used in a preliminary assessment of
exposure.
This tool may cause hand-arm vibration syndrome if its use is not adequately managed.
4 5
Page 5

SAFETY INFORMATION
SAFETY INFORMATION
GENERAL POWER TOOL SAFETY WARNINGS
Read all instructions. Failure to follow all instructions
listed below may result in electric shock, re and/or
serious injury. The term “power tool” in all warnings
listed below refers to your mains operated power tool.
1. Read the instruction carefully. Be familiar with
the controls and the correct use of the appliance.
Read and understand the operator’s manual and
observe the warnings and instruction labels afxed
to the appliance.
2. Users. Never allow children or people unfamiliar
with these instructions to use the appliance. Local
regulations may restrict the age of operator. Never
operate the tool under the inuence of alcohol,
medication or drugs.
3. Use appropriate tool. This device is only intended
for trimming hedge outdoors and only designated
for use on private property. Do not force small
tools or attachments to do the job of a heavy duty
tool.
4. Keep work areas clean. Cluttered areas can
cause accidents.
5. Consider work area environment. Do not expose
the tool to high humidity or rain. Do not use the
tool in damp and wet conditions. Keep the work
area well lit. Do not use the tool where there is
a risk of causing re or explosion, e.g. in the
presence of ammable liquids and gases.
6. Keep all bystanders, children, and pets away.
The operator or user is responsible for accidents or
hazards occurring to other people or the property.
7. Dress appropriately. Do not wear loose clothing,
hair or jewelry, as these can be caught in moving
parts. Preferably wear non-slip footwear when
working outdoors. Wear protective hair covering to
keep long hair out of the way.
8. Head protection. Always use safety glasses and
gloves. Use a face or dust mask whenever the
operations may produce dust or ying particles.
Wear ear protection whenever the sound level
seems uncomfortable.
9. Do not overreach. Keep proper footing and
balance at all times.
10. Stay alert, watch what you are doing. Use
common sense when operating the appliance. Do
not operate the tool when you are tired.
11. Grip the tool securely. Operator should have one
hand on the main handle, the other on the front
handle. Keep nger off trigger until ready to use.
12. Remove adjusting keys and wrenches. Always
check that adjusting keys and wrenches are
removed from the tool before operating the tool.
13. Risk of cut. Do not try to grasp or remove
trimmings when the product is running. Only
remove trimmings when the product is switched
off and disconnected from the power supply.
14. Disconnect the battery. Disconnect battery from
the tool when not in use or when servicing or
cleaning.
15. Check for damaged parts. Before further use,
carefully check the tool for damage. Check for
alignment of moving parts, binding of moving
parts, breakage of parts, mounting and any other
condition that may affect its operation. Do not use
the tool if any parts are damaged or defective.
Have any damaged or defective parts repaired or
replaced by an authorized service agent. Never
attempt any repairs yourself.
16. Store idle tools. When not in use, tools should
be stored in a dry, locked-up place out of reach of
children.
17. Maintain tools with care. Keep tools clean and in
6 7
Page 6

SAFETY INFORMATION
SAFETY INFORMATION
good condition for better and safer performance.
Follow the instructions for maintenance and
changing accessories. Keep handles and switches
dry, clean and free from oil and grease.
18. Have your tool repaired by an authorized
service agent. This tool is manufactured in
accordance with the relevant safety regulations. To
avoid danger, electrical appliances must only be
repaired by qualied technicians.
WARNING! The use of attachments or
accessories not recommended by the
manufacturer of this tool, can result in serious
personal injury.
ADDITIONAL SAFETY INSTRUCTIONS FOR
BATTERIES AND CHARGERS
Batteries
1. Never attempt to open for any reason.
2. Do not expose to water.
3. Do not incinerate the battery pack even if it is
severely damaged or is completely worn out.
The battery pack can explode in a re.
4. Do not store in locations where the temperature
may exceed 40oC.
5. Do not leave the battery pack in the charger
when the charging is nished, otherwise
battery leakage may occur.
6. Charge only at room temperature.
7. Charge only by using the charger provided with
the tool (see technical data).
8. Before charging, make sure that the battery is
dry and clean.
9. Use only the correct type of battery for the tool
(see technical data).
10. Do not dispose of battery packs/batteries
into household waste, re or water. Battery
packs/ batteries should be collected, recycled
or disposed of in an environmental-friendly
manner.
11. Under extreme conditions, battery leakage may
occur. When you notice liquid on the battery,
proceed as follows:
• Carefully wipe the liquid off using a cloth.
• Avoid skin contact.
• Dispose of the battery in an environmental
friendly manner
12. In case of skin or eye contact, follow the
instructions below.
• The battery uid, a 25-30% solution of
potassium hydroxide, can be harmful. In case
of skin contact, immediately rinse with water.
Neutralize with a mild acid such as lemon
juice or vinegar. In case of eye contact, rinse
abundantly with clean water for at least 10
minutes. Consult a physician.
13. Don’t let any metal objects contact the
electrode plate on battery pack.
NOTE: The batteries in your battery pack are the
Lithium-Ion type. Do not dispose of battery packs/
batteries into household waste, re or water. Battery
packs/batteries should be collected, recycled or
disposed of in an environmental-friendly manner.
Charger
1. The charger’s plug must match the outlet.
8 9
Page 7

SAFETY INFORMATION
SAFETY INFORMATION
Never modify the plug in any way. Unmodied
plug sand matching outlets will reduce risk of
electric shock.
2. Use your charger only to charge batteries
of the type supplied with your tool. Other
batteries could burst, causing personal injury
and damage.
3. Only 2 battery packs are allowed to be charged
continuously in order to prevent over heating of
charger, necessary rest time is required to let
the charger cool down before further charging.
4. When charging is nished, takeaway the
battery pack from the charger, do not leave the
battery pack in the charger.
5. Never carry the charger by its cord or pull it
to disconnect from the socket. Keep the cord
away from heat, oil and sharp edges.
6. Never attempt to charge non-rechargeable
batteries.
7. The cord of the charger is not changeable, do
not continue to use if the cord is damaged.
8. Do not expose to water or rain, do not use in
wet condition.
9. Do not open the charger.
10. Do not probe the charger.
11. Intended for indoor use only.
ADDITIONAL SAFETY INSTRUCTIONS FOR
HEDGE TRIMMERS
1. THIS TOOL CAN CAUSE SERIOUS INJURIES.
Read instructions carefully for the correct
handling, preparation, maintenance, starting
and stopping of the tool. Be familiar with all
controls and proper use of the tool.
2. Only use the tool in daylight or good articial
light.
3. Never allow children to use the tool.
4. Beware of overhead power lines.
5. Avoid operating while people, especially
children are nearby.
6. Dress properly! Do not wear loose clothing or
jewellery which can be caught in moving parts.
Use of sturdy gloves, non-skid footwear, and
safety glasses is recommended.
7. If the tool stalls, immediately switch it off.
Remove the battery before attempting to
remove any obstructions.
8. Remove the battery before checking,
maintenance or working on the tool.
9. While operating the tool always be sure of a
safe and secure operating position especially
when using steps or a ladder.
10. Do not attempt to repair the tool.
11. Do not operate the tool with a damaged or
excessively worn cutting device.
12. Always wear ear protection, goggles and a
helmet during operating.
13. Always ensure that all guards are tted when
using the tool. Never attempt to use an
incomplete tool or a tool with unauthorized
modications.
14. Always use two hands to operate the tool.
15. When transporting or storing the tool, always t
the blade sheath.
16. Always be aware of your surroundings and stay
alert for possible hazards that you may not
10 11
Page 8

SAFETY INFORMATION
SAFETY INFORMATION
hear due to the noise of the tool.
17. Do not carry the tool with your hands on the
switch unless the battery has been removed.
18. If you have not used a hedge trimmer before,
preferably seek practical instruction by an
experienced user in addition to studying this
manual.
19. Never touch the blades while the tool is
running.
20. Never attempt to force the blades to come to a
standstill.
21. Do not put the tool down until the blade has
come to a complete standstill.
22. Regularly check the blades for damage and
wear. Do not use the machine when the blades
are damaged.
23. Take care to avoid hard objects (e.g. metal
wire, railings) when trimming. Should you
accidentally hit any such object, immediately
switch the tool off and check for any damage.
24. Should the tool start to vibrate abnormally,
immediately switch it off and check for any
damage.
25. Always be aware of falling debris when cutting
the higher sides of a hedge.
26. Be aware of the cutting blade; always wear
gloves to protect your hands from cut.
EMERGENCY
Familiarise yourself with the use of this product by
means of this instruction manual. Memorise the
safety directions and follow them to the letter. This
will help to prevent risks and hazards.
1. Always be alert when using this product, so
that you can recognise and handle risks early.
Fast intervention can prevent serious injury and
damage to property.
2. Switch off and disconnect from the power
supply if there is any malfunction. Have the
product checked by a qualied specialist and
repaired, if necessary, before you put it into
operation again.
RESIDUAL RISKS
Even if you are operating this product in accordance
with all the safety requirements, potential risks of
injury and damage remain. The following dangers
can arise in connection with the structure and
design of this product:
1. Health defects resulting from vibration emission
if the product is being used over long periods
of time or not adequately managed and
properly maintained.
2. Injuries and damage to property due to broken
application tools or the sudden impact of
hidden objects during use.
3. Danger of injury and property damage caused
by ying objects.
WARNING! This product produces an
electromagnetic eld during operation! This
eld may under some circumstances interfere
with active or passive medical implants! To
reduce the risk of serious or fatal injury, we
recommend persons with medical implants to
consult their doctor and the medical implant
manufacturer before operating this product.
12 13
Page 9
SAFETY INFORMATION
SAFETY INFORMATION
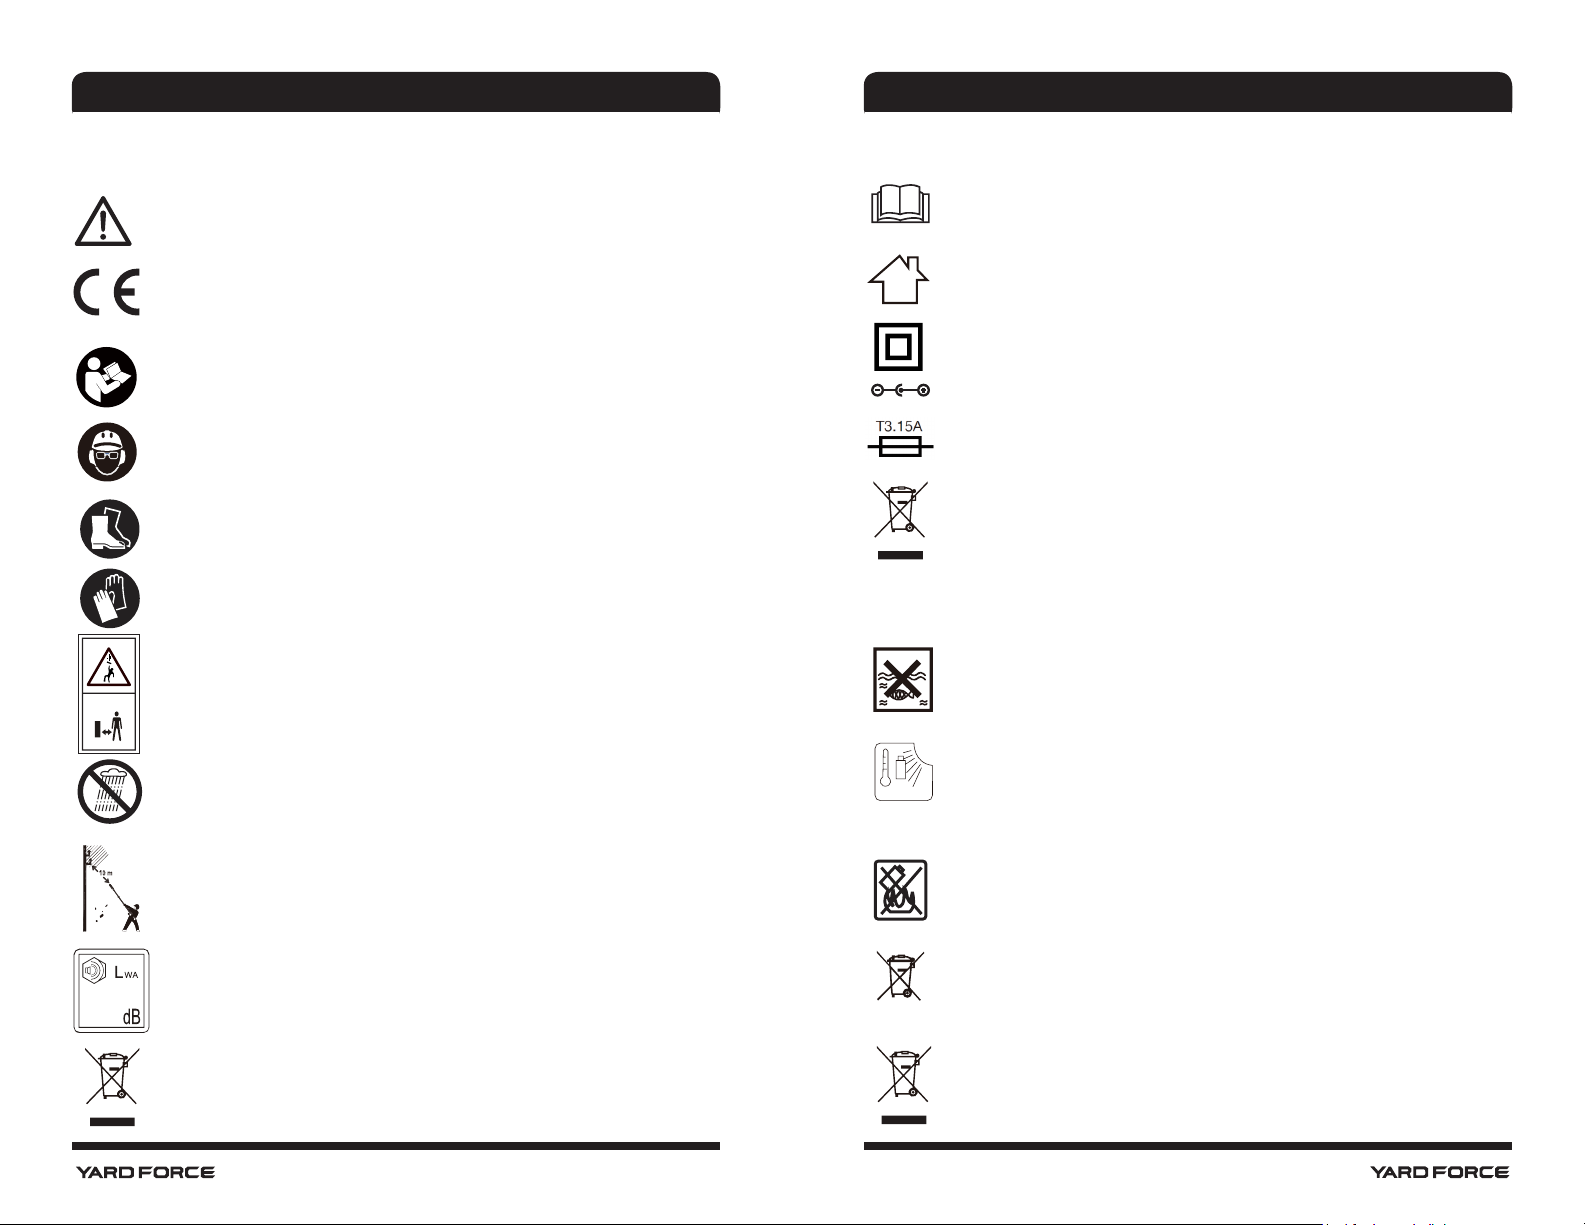
DESCRIPTION OF SYMBOLS
Warning symbols
Warning!
The product complies with the applicable
European directives and an evaluation method of
conformity for these directives was done.
Read the instruction manual before use.
Wear eye protection.
Wear ear protection.
Wear protective boots
Wear protective gloves
Keep bystanders away. Thrown objects can
cause serious injury.
Warning symbols on the charger
Before use, carefully read through the user
manual.
The charger is for indoor use only.
Protection class II.
Pole orientation.
Protective 3.15A limited.
Waste electrical products should not be disposed
of with household waste. Please recycle where
facilities exist. Check with your Local Authority
or retailer for recycling advice.
Warning Symbols on the Battery
Do not dispose of batteries in rivers or immerse
in water.
90
Do not expose to rain.
WARNING! The device is not protected against
electric shocks when it touches high-voltage
lines! Maintain a safe distance of 10m from live
electrical lines.
Guaranteed Sound power level data.
Waste electrical products should not be disposed
of with household waste. Please recycle where
facilities exist. Check with your Local Authority
or retailer for recycling advice.
14 15
max. 45
Li-Ion
Do not subject the battery to strong sunlight
o
over long periods and do not leave it on a heater
C
(max.45oC).
Do not dispose of batteries in a re. They will
explode and cause injury.
Contain Li-ion battery. Battery must be recycles
or disposed of properly.
Waste electrical products should not be disposed
of with household waste. Please recycle where
facilities exist. Check with your Local Authority
or retailer for recycling advice.
Page 10
ASSEMBLY
ASSEMBLY
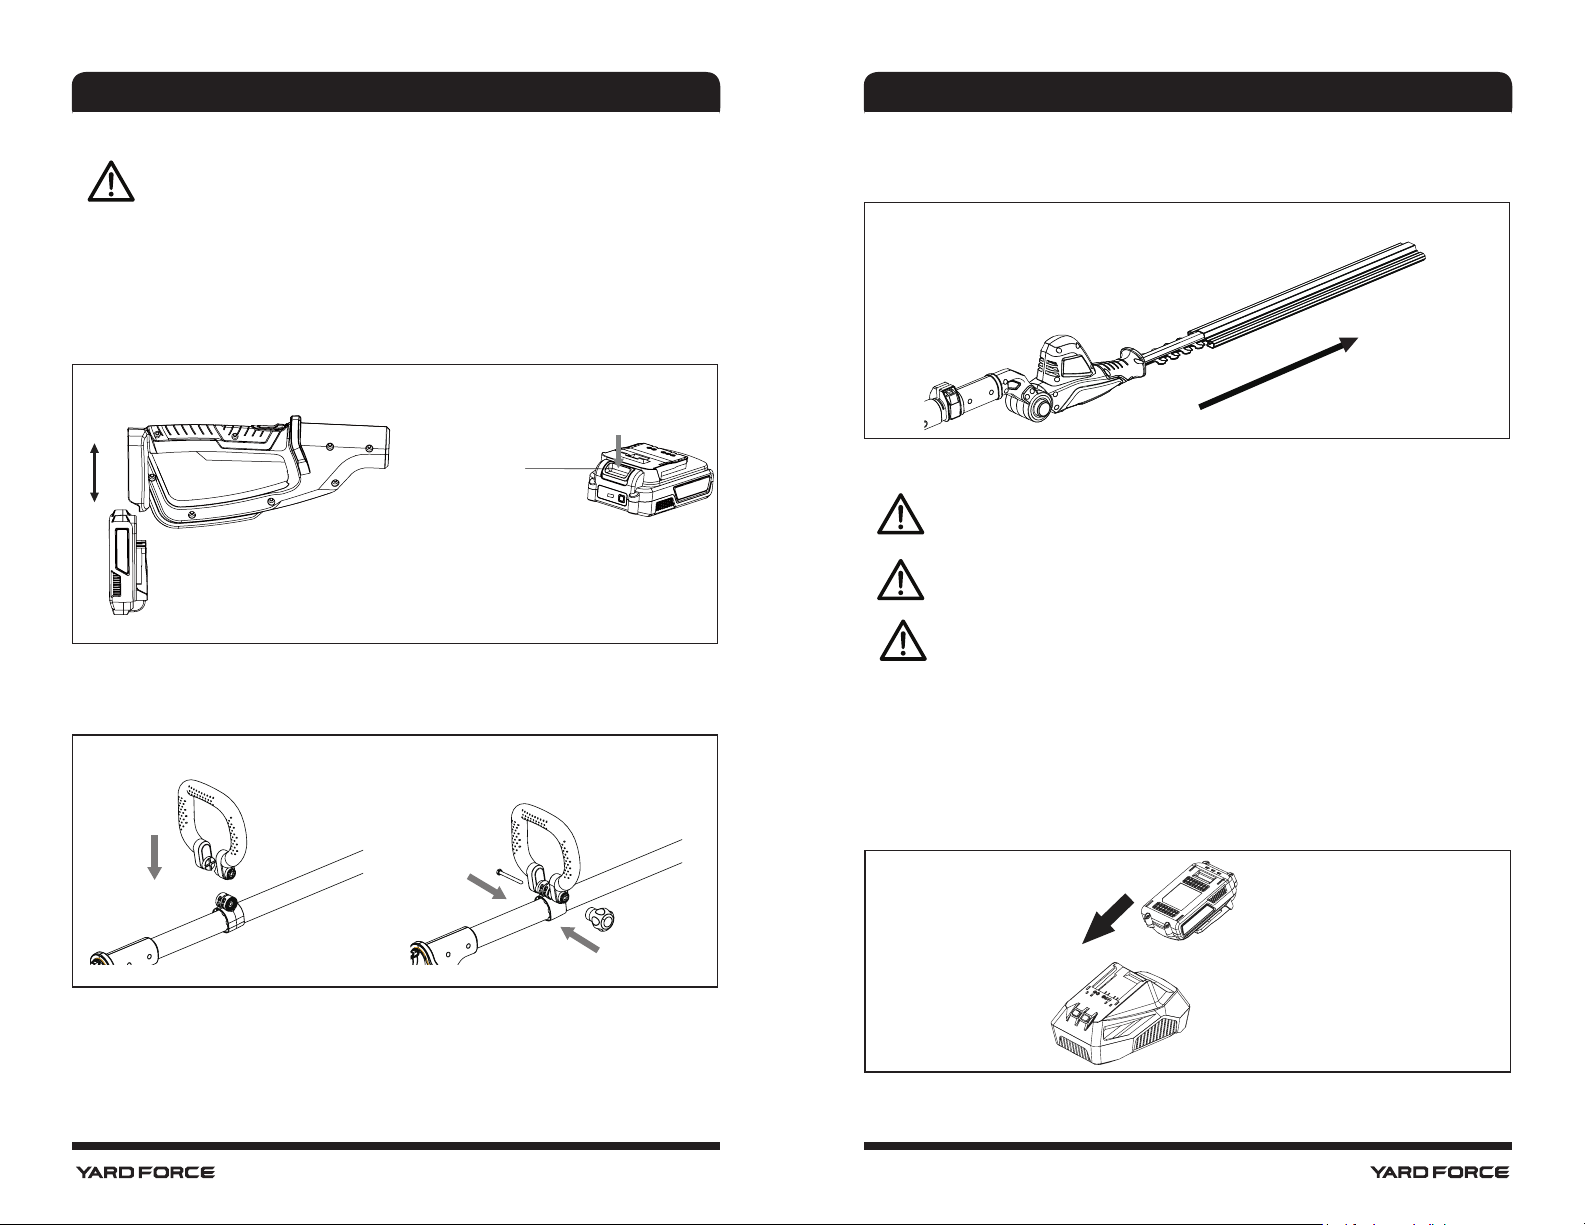
Inserting the battery pack
WARNING! Always release the On/Off switch before insert in or removal of the
battery pack. Remove the battery pack. Depress the button (A) on end of the
battery pack, and then remove the pack from the tool.
Install the battery pack. Align the ribs on both side of the battery pack with the slots in
the housing and slip it into place. Always insert it all the way until it locks in place with a
click sound. If not, it may accidentally fall out of the tool, causing injury to you or someone
around you. To release the battery from the product, push the button (A) on the battery
pack and pull away from the product.
Fig. 3
A
Assemble the front handle
Attach the front handle to the block on the lower handle, and insert the bolt. Tighten the
knob to the bolt.
Fig. 4
Take off the blade sheath
Slide the blade sheath off before you start the machine.
Fig. 5
Charging the battery pack
As shown in Fig. 6
NOTE: The battery pack will be fully charged after 1H. Remove it from the
charger after it has been fully charged.
NOTE: This battery pack has been shipped in a low charge condition. It should
be fully charged before rst use.
NOTE: Make sure the main voltage is the same as rating label which located on
the adaptor.
1. Plug the charger into an appropriate power supply. When connected, a green LED
light will ash.
2. To insert the battery pack into the charger, align the battery pack with the correspond-
ing receptacle on the charger, push the battery pack downward until it has been
locked in place.
3. Battery pack fully charges in 90mins, when charged a green LED light will show.
Fig. 6
16 17
Page 11
ASSEMBLY
OPERATION
The power indicator on the battery pack
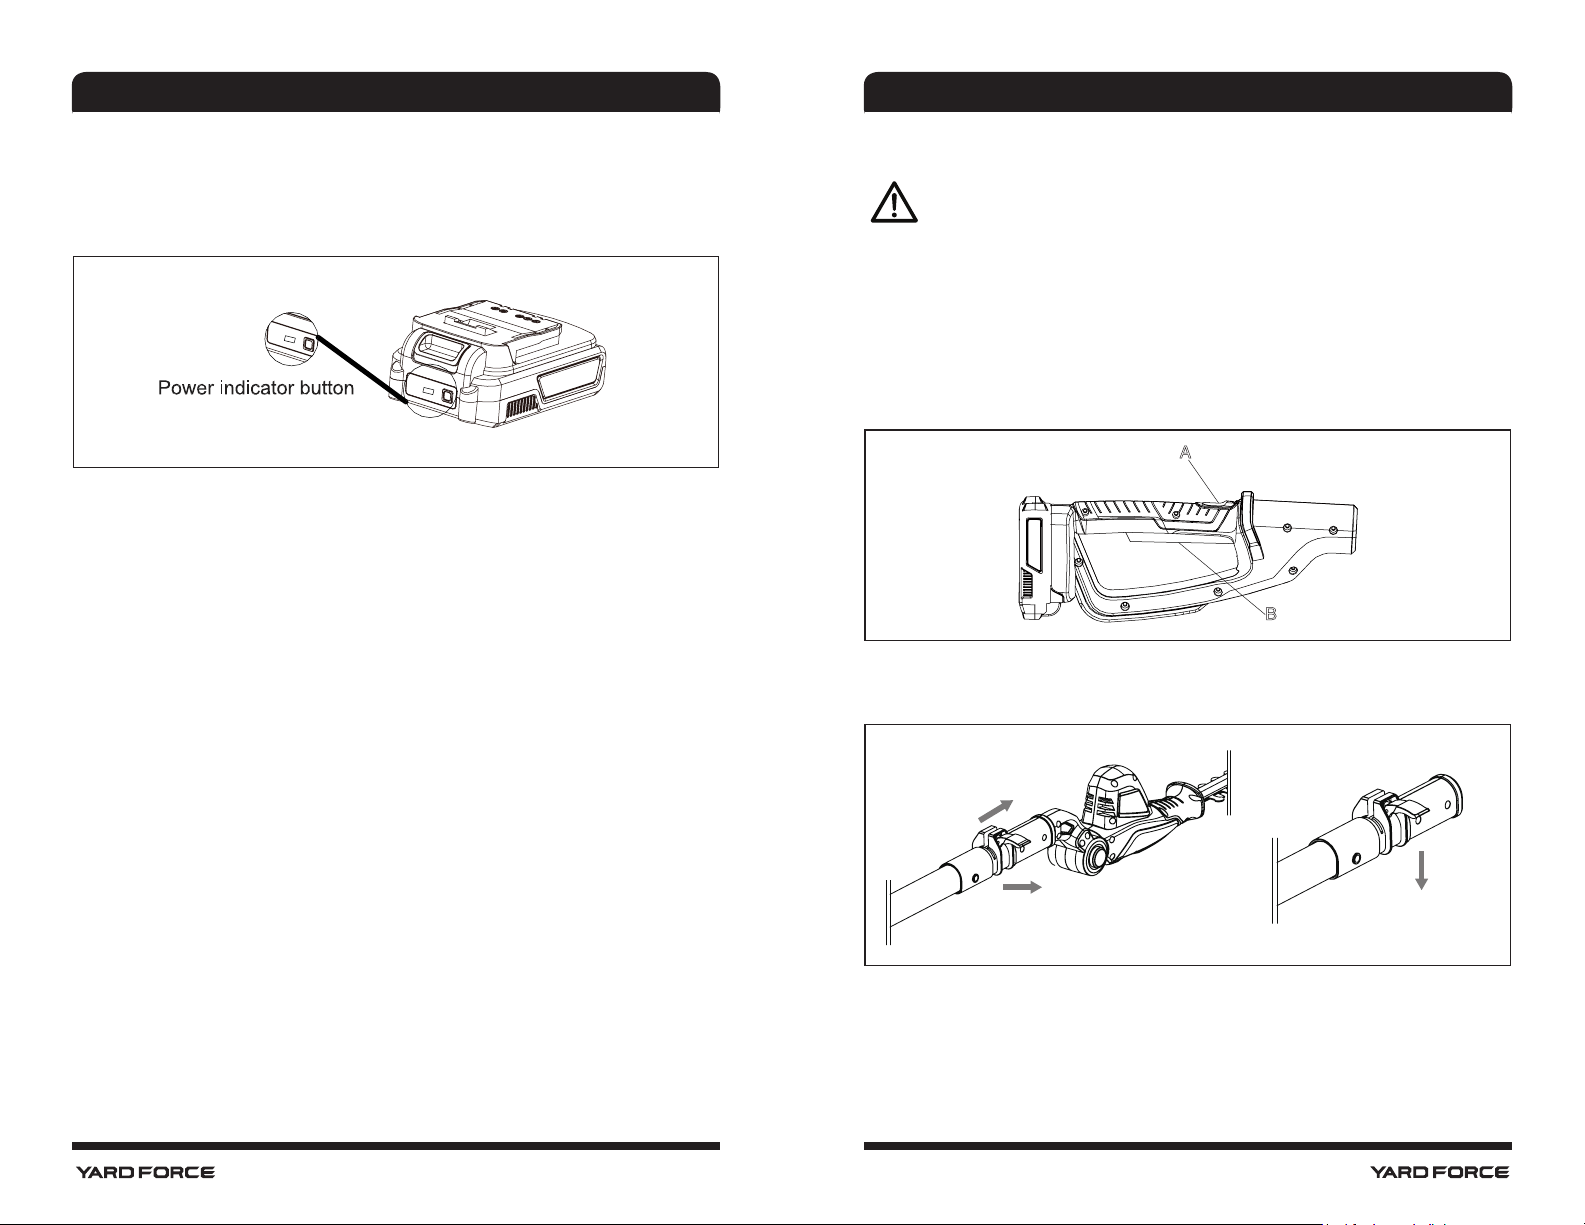
As shown in Fig. 7
Press the power indicator button, the remaining power will be shown on the screen.
We recommend that when it shows less than 30%, it is time to recharge the battery pack.
Fig. 7
To obtain the best life from the battery
Never allow the battery to completely discharge before recharging. The battery pack
should be placed on the charger whenever the battery pack is noticeably running down or
the tool no longer performs a task it previously performed.
Avoid conducting short charges. Make sure that the battery is fully charged every time by
allowing the charger to complete its full charging cycle.
Avoid allowing lose items like screws or nails etc. to be stored with battery packs as these
or similar items can short battery packs and cause a re or explosion
Always unplug the charger when not in use and store in a dry secure place.
Switch ON/OFF
WARNING! If any parts are missing, damaged or broken, do not operate your
hedge trimmer until all damaged parts have been replaced or repaired. Failure to
do so could result in serious personal injury.
Switching the trimmer on:
1. Push forward the safety lock-off button (A) and then press the start button (B) on the
handle.
2. Release the safety lock-off button (A) .
Switching the trimmer off:
1. Release the start button (B) on the handle.
Fig. 8
A
B
Telescopic handle
Open the clamping lever and extend upper part of handle to desired handle length. Then
click the clamping lever to x the tube tight.
Fig. 9
Avoid charging or storing your battery in temperatures below 0°C (32°F) and above 40°C
(104°F).
Cool down hot battery pack from a just-operated tool for approximately 30 minutes before
attempting to recharge.
18 19
Page 12
OPERATION
OPERATION
Function of swivel head
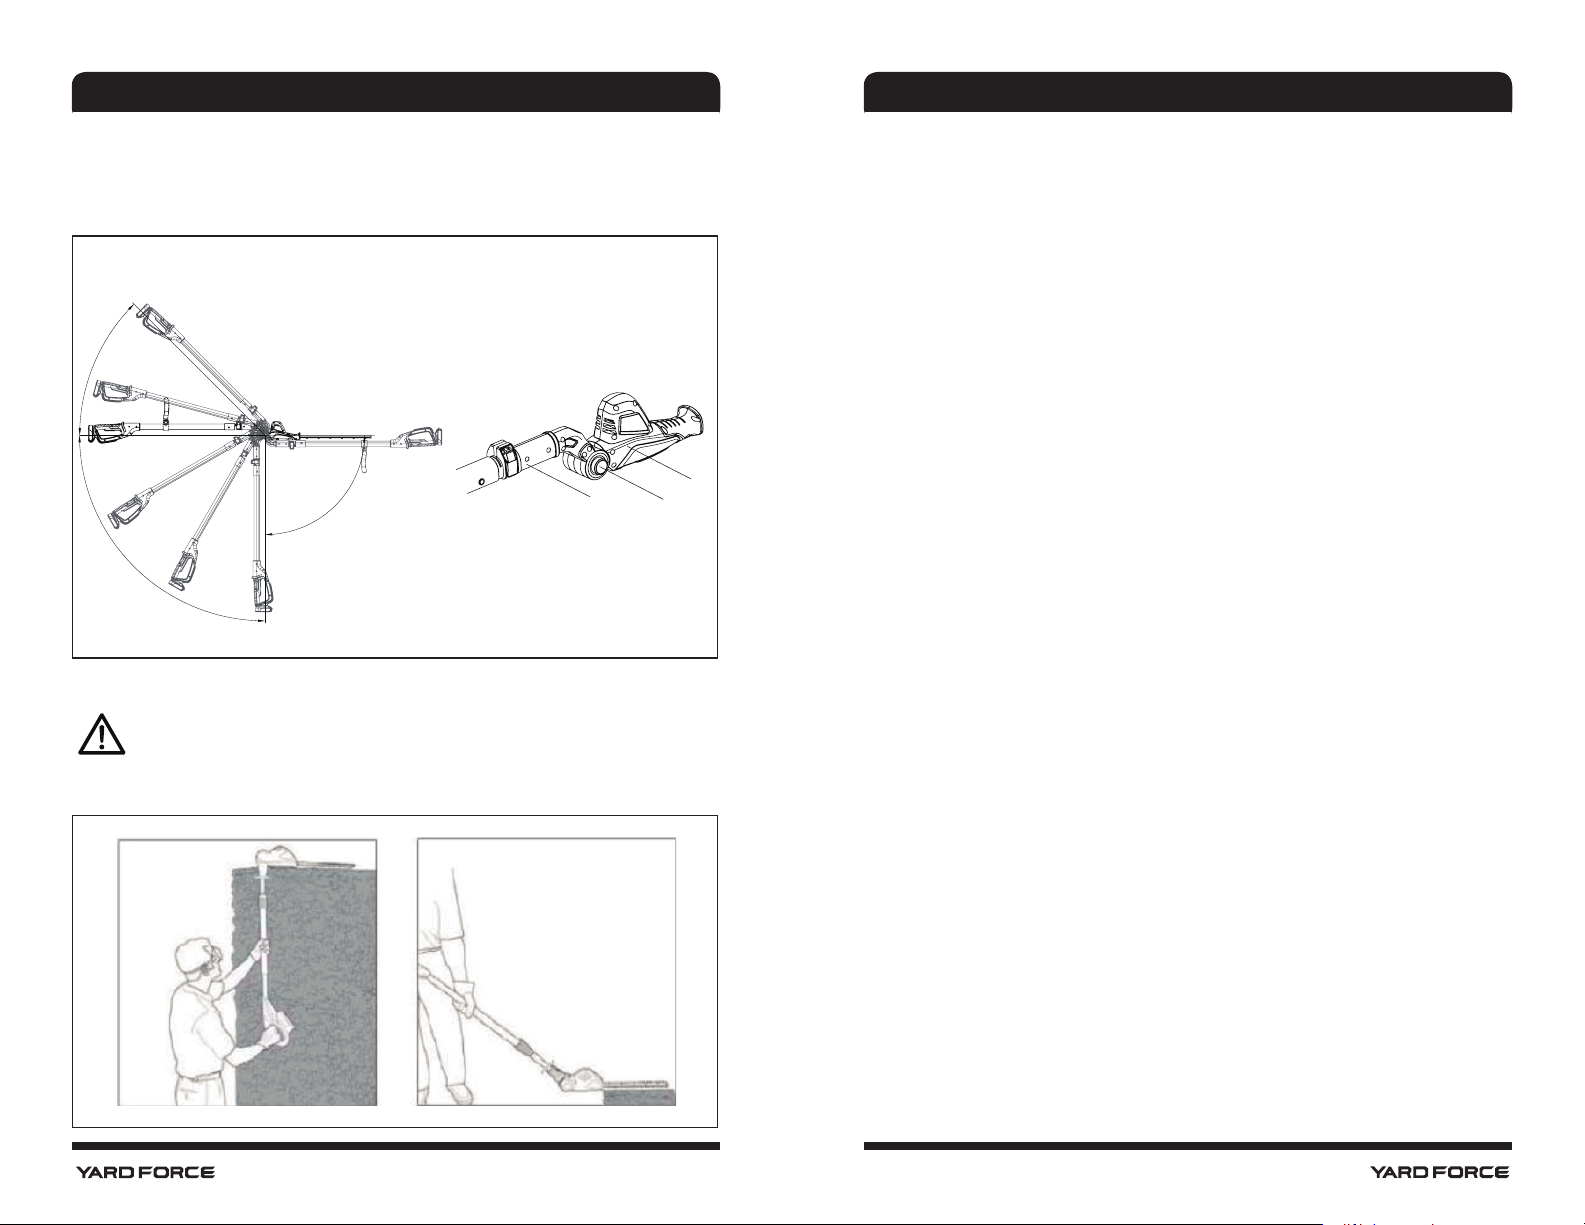
Note: The cutter head can be locked in 9 positions (-45°~90°). Hold the handle (D) tightly.
Push the lock button (E) and then turn the cutter head (F) to the desired position. Release
the lock button (E) again and check whether the cutter head is locked in place.
Fig. 10
C
o
45
F
D
-90
o
C
Using the hedge trimmer
WARNING! Remove the cut branches. DO NOT exceed the cutting capacity of this
product.
With its unique design the pole trimmer can be used to trim and shape hard to reach areas
of hedges and bushes such as those show in below Abb.ure.
E
Cutting guide
Seasonal hedges and shrubs that lose their leaves in the winter should be trimmed in June
and October. Evergreen hedges and shrubs that retain their leaves in the winter should be
trimmed in April and August. Conifers and other fast growing shrubs can be trimmed every
six weeks from May onwards, throughout the growing season.
Fig. 11
20 21
Page 13
MAINTENANCE AND STORING TROUBLESHOOTING
Maintenance
WARNING: Before any maintenance, always take off the battery pack and wear
protection gloves.
Lubrication of the blade
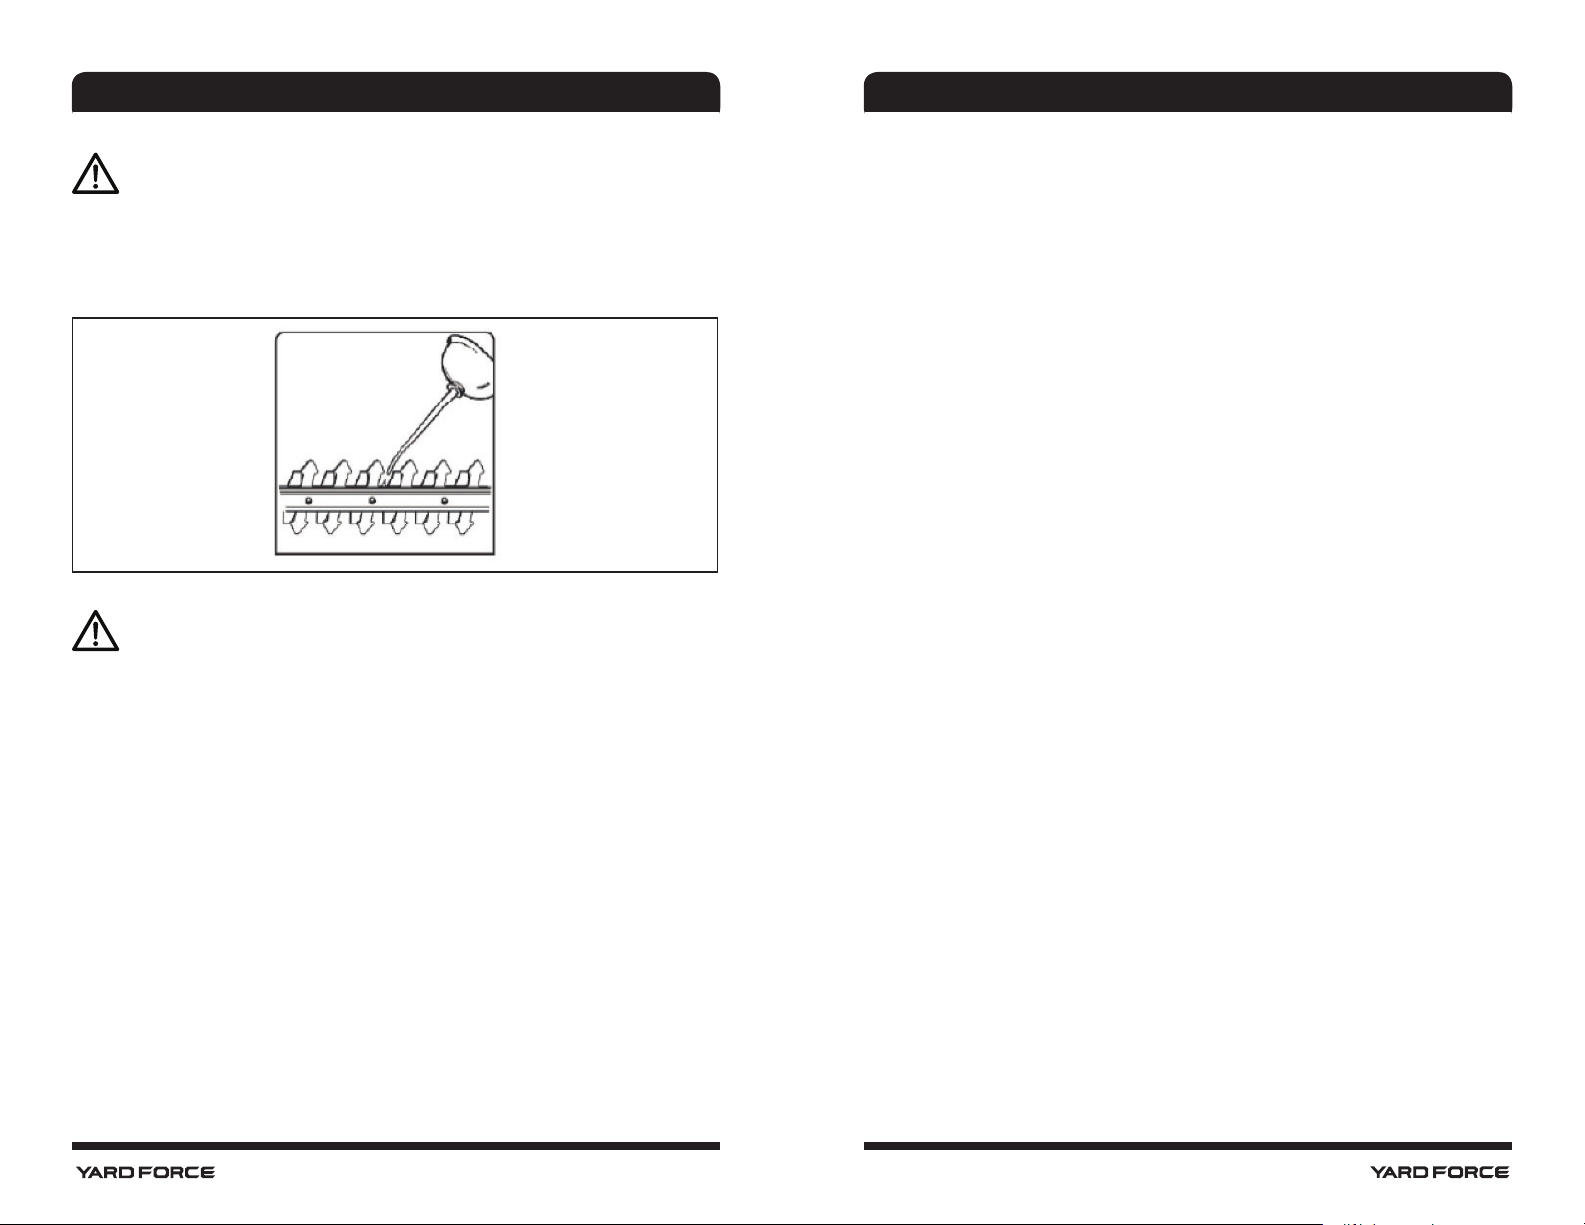
For easier operation and longer life, lubricate the cutting blades before and after each use.
Before lubricating, make sure your hedge trimmer is disconnected from the battery. Apply
the oil (any kind of lubrication oil) so that it runs between the two blades.
Fig. 12
Clean
WARNING! Before commencing these cleaning procedures or when clearing a
blockage, make sure that the hedge trimmer is switched off and disconnected
from the battery.
To ensure the best performance from the hedge trimmer, it must be kept clean.
Always clean the hedge trimmer immediately after use.
Although your new cordless hedge trimmer is really easy to operate, if you do experience
problems, check the following:
Check battery pack assembly;
If trimmer will not operate
Charge the battery: operation of the hedge trimmer is dependent upon sufcient charge in
the battery pack.
If the battery will not charge
Check to see if the battery is properly inserted into the charging station, and make sure the
indicator light is on. If not, check the power supply to the socket.
If the trimmer is not cutting properly
Check the condition of the blades; if the blade is blunt or damaged have them repaired by
a qualied service agent.
If a fault is suspected return the trimmer to an authorized dealer to repair.
Never use water for cleaning your hedge trimmer, but use a soft damp cloth.
Do not clean with chemicals, including petrol, or solvents as this can damage your hedge
trimmer. Do not allow cuttings and other debris to become dry and hard on any of the
hedge trimmer surfaces. This will directly affect the cutting performance.
Make sure that the blade is kept clean of all cuttings and other debris.
Take extra care to clean the cooling vents.
Storage
Make sure that the hedge trimmer has been thoroughly cleaned before storing it in a clean
dry place out of the reach of children. Always t the transportation blade sheath when
storing the hedge trimmer.
22 23
Page 14
DECLARATION OF CONFORMITY
To the provisions of Council Directives
SUMEC UK
Unit A&B, Escrick Business Park
Escrick, York, YO19 6FD
Declare that the product:
Description: 20V CORDLESS POLE HEDGE TRIMMER
Model No: M0E-16ET-410
Charger Model: B0Q-SP03-20
Function: Trimming hedges, bushes and shrubs
Complies with essential health and safety requirements of
the following directives:
Machinery Directive 2006/42/EC
Electromagnetic Compatibility Directive 2014/30/EU
Low Voltage Directive 2014/35/EU
RoHS Directive 2011/65/EU
Noise irective
2000/14/EC amended by 2005/88/EC
Conformity Assessment Procedure as Per Annex V
Measured Sound Power Level: 87.9dB (A)
Declared Guaranteed Sound Power Level: 90 dB (A)
Standards and technical specication referred to:
Cordless hedge trimmer Charger
EN 60745-2-15:2009+A1:10
EN 60745-1:2009+A11:10
EN ISO 10157:2009+A1:2013
EN 55014-1:2006/+A1:2009/+A2:2011
EN 55014-2:2015
EN50581:2012
Authorized Signatory
Date: 06/12/2018
Signature:________________________
Name: Mariana Hall
SUMEC UK
UNIT A&B, ESCRICK BUSINESS PARK
ESCRICK, YORK, YO19 6FD
EN60335-1:2012+A11:14
EN60335-2-29: 2004+A2:10
EN 62233:2008
EN 55014-1:2017
EN 55014-2:2015
EN 61000-3-2:2014
EN 61000-3-3:2013
EN50581:2012
24 25
 Loading...