

Page 1
1
READ & UNDERSTAND
INSTRUCTION MANUAL
Save all warnings and instructions for future reference.
LM G32
Y0J-SP01-3236
Service centre: +44(0)1904727513
Mail: [email protected]
Web: www.yardforce.co.uk
SUMEC UK
UNIT A&B ESCRICK BUSINESS PARK
ESCRICK, YORK
YO19 6FD
40V CORDLESS LAWNMOWER
Original Instructions
GB
Page 2
2 3
Read this manual carefully prior to assembling and
operating the lawnmower. It is dangerous to operate this
product without being familiar with these instructions.
Keep this manual in a safe place and have it ready for
future reference.
A
1
2
3
4
5
6
7
8
9
10
B
a
b
c
d
e
f
h
g
i
Page 3
4 5
C
D
G
H
I
J
E
F
K
L
O
M
N
1
2
Page 4

6 7
LM G34/LM G37 Original Instructions
CONTENT
Intended use 07
General safety warnings 07
Product safety warnings 09
Symbols 15
Technical data 19
Description of product 20
Installation 21
Operation 22
Maintenance and storage 26
Troubleshooting 28
CE declaration 29
INTENDED USE
This lawnmower has been designed for cutting grass. The machine is to be used only for its
prescribed purpose, any other use is deemed to be a case of misuse.
Please note that our equipment has not been designed for use in commercial, trade or
industrial applications. Our warranty will be voided if the machine is used in commercial,
trade or industrial businesses or for equivalent purposes.
GENERAL SAFETY WARNINGS
WARNING: Read all safety warnings and
instructions. Failure to follow the warnings and
instructions may result in electric shock, re and/or
serious personal injury.
Carefully read the instructions for the safe operation
of this machine.
Save all warnings and instructions for future
reference.
• This appliance can be used by children aged
8 years and above and persons with reduced
physical, sensory or mental capabilities or lack
of experience and knowledge if they have been
given supervision or instruction concerning
the use of the appliance in a safe way and
understand the hazards involved.
• Children should be supervised to ensure that they
do not play with the product.
IMPORTANT
READ CAREFULLY BEFORE USE
KEEP FOR FUTURE REFERENCE
Page 5

8 9
GENERAL SAFETY WARNINGS
Training
1. Read the instructions carefully and make sure you fully
understand them. Make sure you are familiar with the
controls and the correct use of the product.
2. Never allow small children or people unfamiliar
with these instructions to use the product. Local
regulations can restrict the age of the operator.
3. Never operate the product while people, especially
children or pets, are nearby.
4. Keep in mind that the operator or user is responsible
for any accidents or hazards occurring to other people
or their property.
Preparation
1. While operating the product always wear substantial
footwear and long trousers. Do not operate this
product when barefoot or wearing open sandals.
Avoid wearing clothing that is loose tting or has
hanging cords or ties.
2. Thoroughly inspect the area where the product is to
be used and remove all objects which could be thrown
by the product.
3. Before use, always visually inspect to see that the
blade, blade bolt and the blade assembly are not worn
or damaged. Replace worn or damaged components
in sets to preserve balance. Replace any damaged or
unreadable labels.
4. Ensure the switch is in the off position before inserting
the battery pack. Inserting the battery pack into a
machine that is switched on can result in injury.
General Operation
1. Use the tool only with specically designated battery
packs. Use of any other battery packs will increase
the risk of injury and re.
2. Only operate the product in daylight or in good
articial light.
3. Do not expose tool and charger to rain or wet
conditions. If a tool or charger is exposed to moisture
it will increase the risk of electric shock.
4. Avoid operating the product on wet grass.
5. Always be sure of your footing on slopes.
6. Walk, never run.
7. Mow across the face of slopes, never up and down.
8. Exercise extreme caution when changing direction on
slopes.
9. Do not mow excessively steep slopes.
10. Use extreme caution when reversing or pulling the
product towards you.
11. Stop the blades if the product has to be tilted for
transportation, when crossing surfaces other than
grass and when transporting the product to and from
the area to be mowed.
12. Never operate the product with defective guards or
shields or without safety devices in place such as
deectors or grass collector.
13. When switching on motor keep feet well away from
blades.
14. Do not tilt the product when switching on the motor,
except if the product has to be tilted for starting. In
PRODUCT SAFETY WARNINGS
Page 6

10 11
this case, do not tilt it more than absolutely necessary
and lift only the part furthest away from the operator.
15. Do not start the product when standing in front of the
discharge opening.
16. Do not put hands or feet near or under rotating parts.
17. Keep clear of the discharge opening at all times.
18. Do not transport the product while the cutting blade
is running.
19. Stop the product and remove the key/battery pack
from the machine and make sure that all moving parts
have come to a complete stop:
• Whenever you leave the product unattended.
• Before clearing blockages or unclogging chute.
• Before checking, cleaning or working on the
product.
• After striking a foreign object. Make sure to inspect
the product for damage and make repairs before
restarting and operating the product.
20. If the product starts to vibrate abnormally:
• Inspect for any damages.
• Replace or repair any damaged parts.
• Check for and tighten any loose parts.
Charger
1. Recharge only with the charger specied by the
manufacturer. Do not use the original charger on
other li-ion batteries or on any other type of battery
as this can increase the risk of re or explosion.
PRODUCT SAFETY WARNINGS PRODUCT SAFETY WARNINGS
2. Check the battery charger, cable and plug before
each use. Do not use the battery charger if damaged.
Do not open the battery charger yourself; charger
must be repaired by qualied personnel using original
spare parts.
3. The charger is designed to use a standard household
230-240 V~ 50Hz power source, ensure that the plug
matches the outlet.
4. Never modify the plug in any way, this will reduce the
risk of electric shock.
5. Do not abuse the cord of charger. Never use the cord
for carrying, pulling or unplugging the charger. Keep
cord away from heat, oil, sharp edges or moving
parts. Damaged or entangled cords increase the risk
of electric shock.
6. Make sure the charger cord is situated so that it will
not be stepped on, tripped over or get damaged.
7. Keep the battery charger clean. Contamination can
increase the risk of electric shock.
8. Protect the battery charger from rain and moisture.
If water accesses the battery charger there is an
increased risk of electric shock.
9. Battery will heat up whilst charging. To reduce the risk
of re, do not operate battery charger on ammable
surfaces such as paper or textiles.
10. The temperature range over which the battery
pack can be charged is typically between 5ºC45 ºC. Attempts to charge outwith the prescribed
temperature range may automatically be blocked by
Page 7

12 13
PRODUCT SAFETY WARNINGS
the protection circuitry of the battery pack. Longest
life and best performance can be obtained if the
battery pack is charged at room temperature.
11. Disconnect charger from the power supply when not
in use. This will reduce the risk of electric shock or
damage to the charger.
Battery pack
1. Fully charge battery pack before rst use.
2. Recharge battery pack immediately when the power
output starts to slow. DO NOT CONTINUE TO USE
PRODUCT WHEN BATTERY LEVEL IS LOW.
3. To prevent serious damage to the battery, charge in
temperatures above 5ºC or below 45ºC. Longest life
and best performance can be achieved when battery
is charged at room temperature.
4. If the battery temperature is above 45ºC it must be
allowed to cool before putting it into the charging
station.
5. To reduce the risk of explosion, ensure the battery
pack is not left in the sun for extended periods of
time and that it is kept away from re.
6. Do not carry individual battery packs in your pockets
or bag as they could short-circuit against other metal
items.
7. Should a li-ion battery catch re, ensure to use the
correct re extinguisher to combat the re. DO NOT
THROW WATER ON A BURNING LI-ION BATTERY.
8. If the battery pack becomes too hot during charging,
disconnect and switch off immediately. Contact the
service centre directly.
9. Do not attempt to open the battery yourself.
10. When battery pack is not in use keep it away from
other metal objects such as paperclips, coins, keys,
nails, screws or other small metal objects that can
make a connection from one terminal to another.
Maintenance and storage
1. Keep all nuts, bolts and screws tight to be sure the
product is in a safe working condition.
2. Check the grass collector frequently for wear or
deterioration.
3. Be careful when adjusting the product to prevent
trapping ngers between moving blades or other
xed parts of the product.
4. Always allow the product to cool down before storing.
5. When servicing the blades be aware that even though
the power source is switched off, the blades can still
move.
6. Replace worn or damaged parts for safety. Use only
genuine replacement parts and accessories.
7. DO NOT attempt to open the charger and battery
pack. There are no customer serviceable parts inside.
Return to any authorised service centre.
8. Store the appliance with battery pack fully charged at
room temperature (around 20ºC).
PRODUCT SAFETY WARNINGS
Page 8
14 15
9. Every deep discharge cycle decreases the capacity
of battery pack. To prolong battery life, it is
recommended that you charge the battery every six
months within extended periods of time when the
product is not in use.
Servicing
1. Have your tool repaired by an authorised service
agent. This tool is manufactured in accordance with
the relevant safety regulations. To avoid danger,
equipment must only be repaired by qualied
technicians.
2. Only use parts and accessories made for this
machine by the manufacturer. Failure to do so can
result in personal injury.
PRODUCT SAFETY WARNINGS
Safety symbols
The purpose of safety symbols is to attract your
attention to any possible dangers. The safety symbols
and their explanations deserve your careful attention
and full understanding. The symbol warnings do not, by
themselves, eliminate any danger. The instructions and
warnings they give are no substitute for proper accident
prevention measures.
WARNING: Be sure to read and understand
all safety instructions within this operator’s
manual, including all safety alert symbols such as
“DANGER”, “WARNING”, and “CAUTION” before
using this tool. Failure to follow all instructions
listed below may result in electric shock, re and/or
serious personal injury.
SAFETY ALERT SYMBOLS: Indicate DANGER,
WARNING, or CAUTION. May be used in conjunction
with other symbols or pictographs.
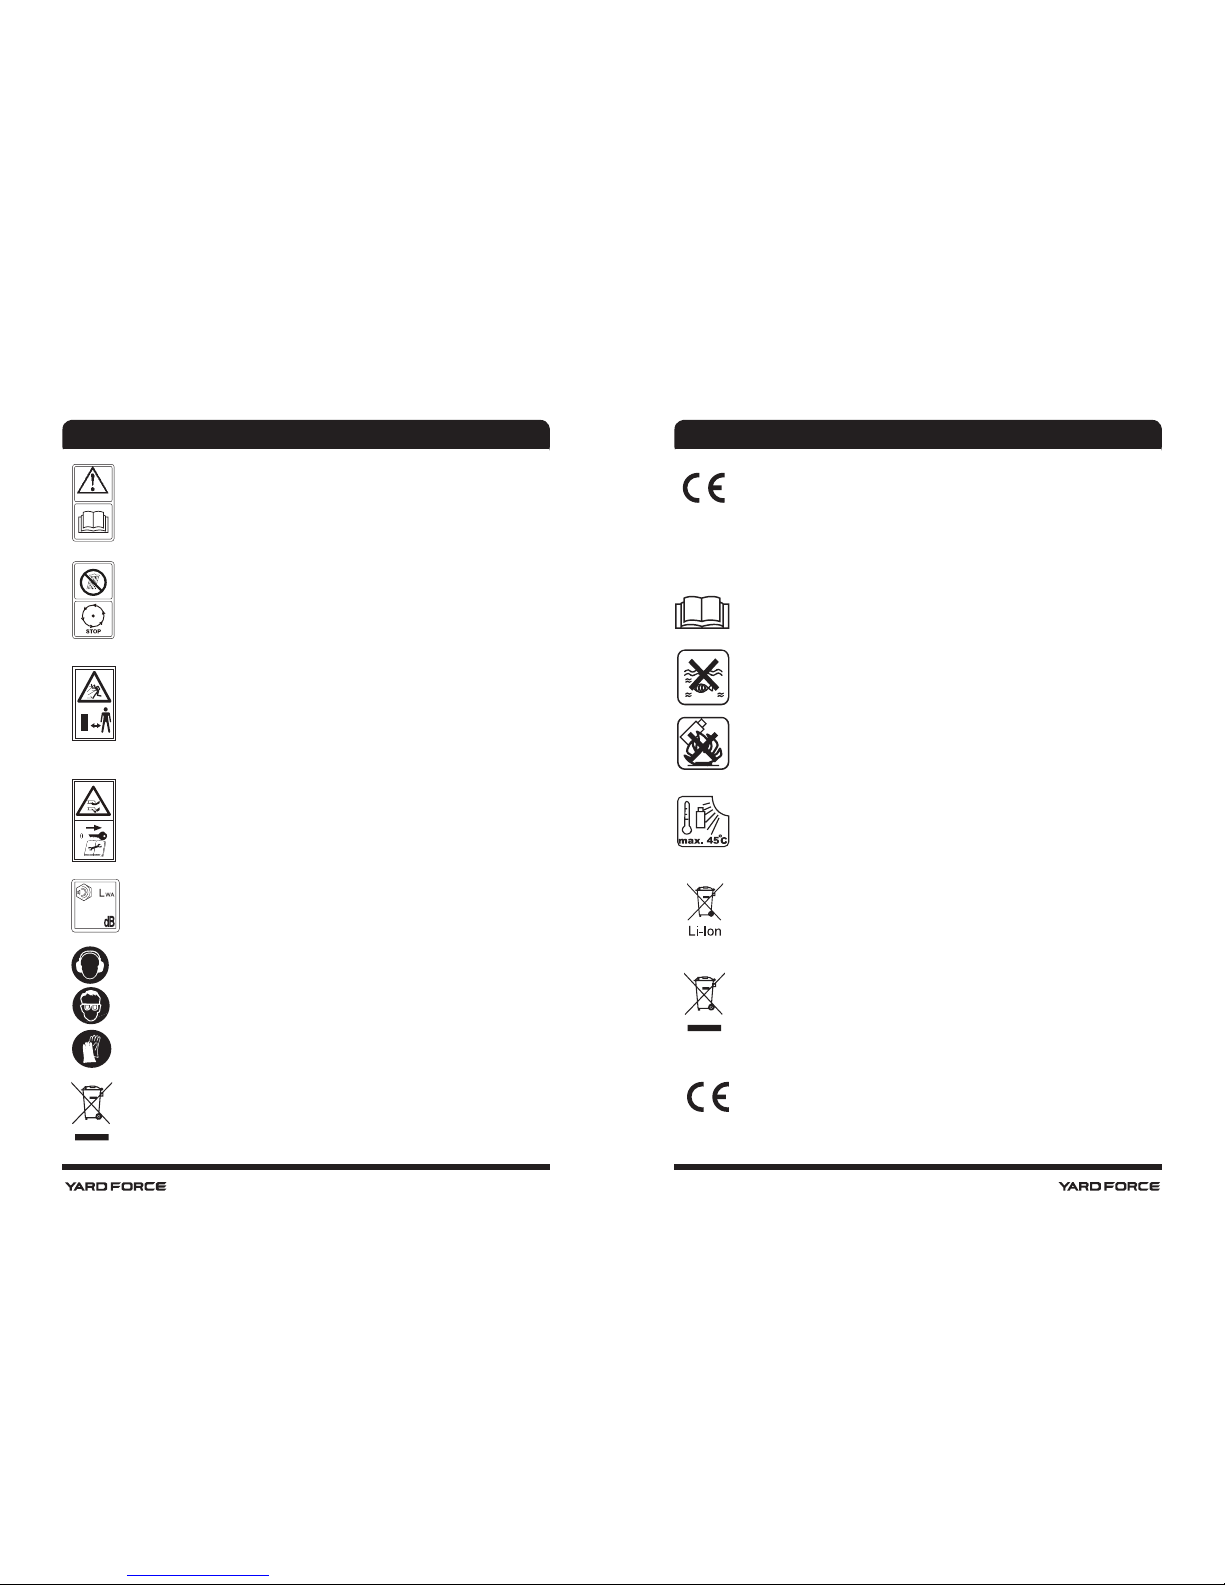
Symbol meanings
This page depicts and describes safety symbols that
may appear on this product. Read, fully understand and
follow all instructions on the machine before attempting
to assemble and operate.
SYMBOLS
Page 9
16 17
To reduce the risk of injury, user must read
instruction manual carefully.
Avoid using tool in the rain.
Wait until all machine components have
completely stopped before touching them.
Keep bystanders away. Objects thrown by the
product could hit the user or other bystanders.
Always ensure that other people and pets remain
at a safe distance from the product when it is in
operation.
Beware of sharp blades. Blades continue to rotate
after the motor is switched off. Remove disabling
device before performing any maintenance tasks.
Guaranteed sound power level value is 96 dB
Wear ear protection, eye protection and gloves
when using the product.
WEEE symbol. Waste electrical products should
not be disposed of with household waste. Please
recycle where facilities exist. Check with your local
authority or local store for recycling guidelines.
SYMBOLS
96
The product complies with the applicable
European directives and an evaluation method of
conformity for these directives was done.
Warning symbols on the battery pack
To reduce the risk of injury, user must read
instruction manual carefully.
Do not throw into water.
Do not throw on re.
Do not subject the battery to strong sunlight over
long periods of time. Do not leave on a heater
(max.45°C).
Batteries contain Li-ion. Do not dispose of
waste batteries in domestic waste. Contact local
authority to nd out how to dispose of batteries.
WEEE symbol. Waste electrical products should
not be disposed of with household waste. Please
recycle where facilities exist. Check with your local
authority or local store for recycling guidelines.
The product complies with the applicable
European directives and an evaluation method of
conformity for these directives was done.
SYMBOLS
Page 10
18 19
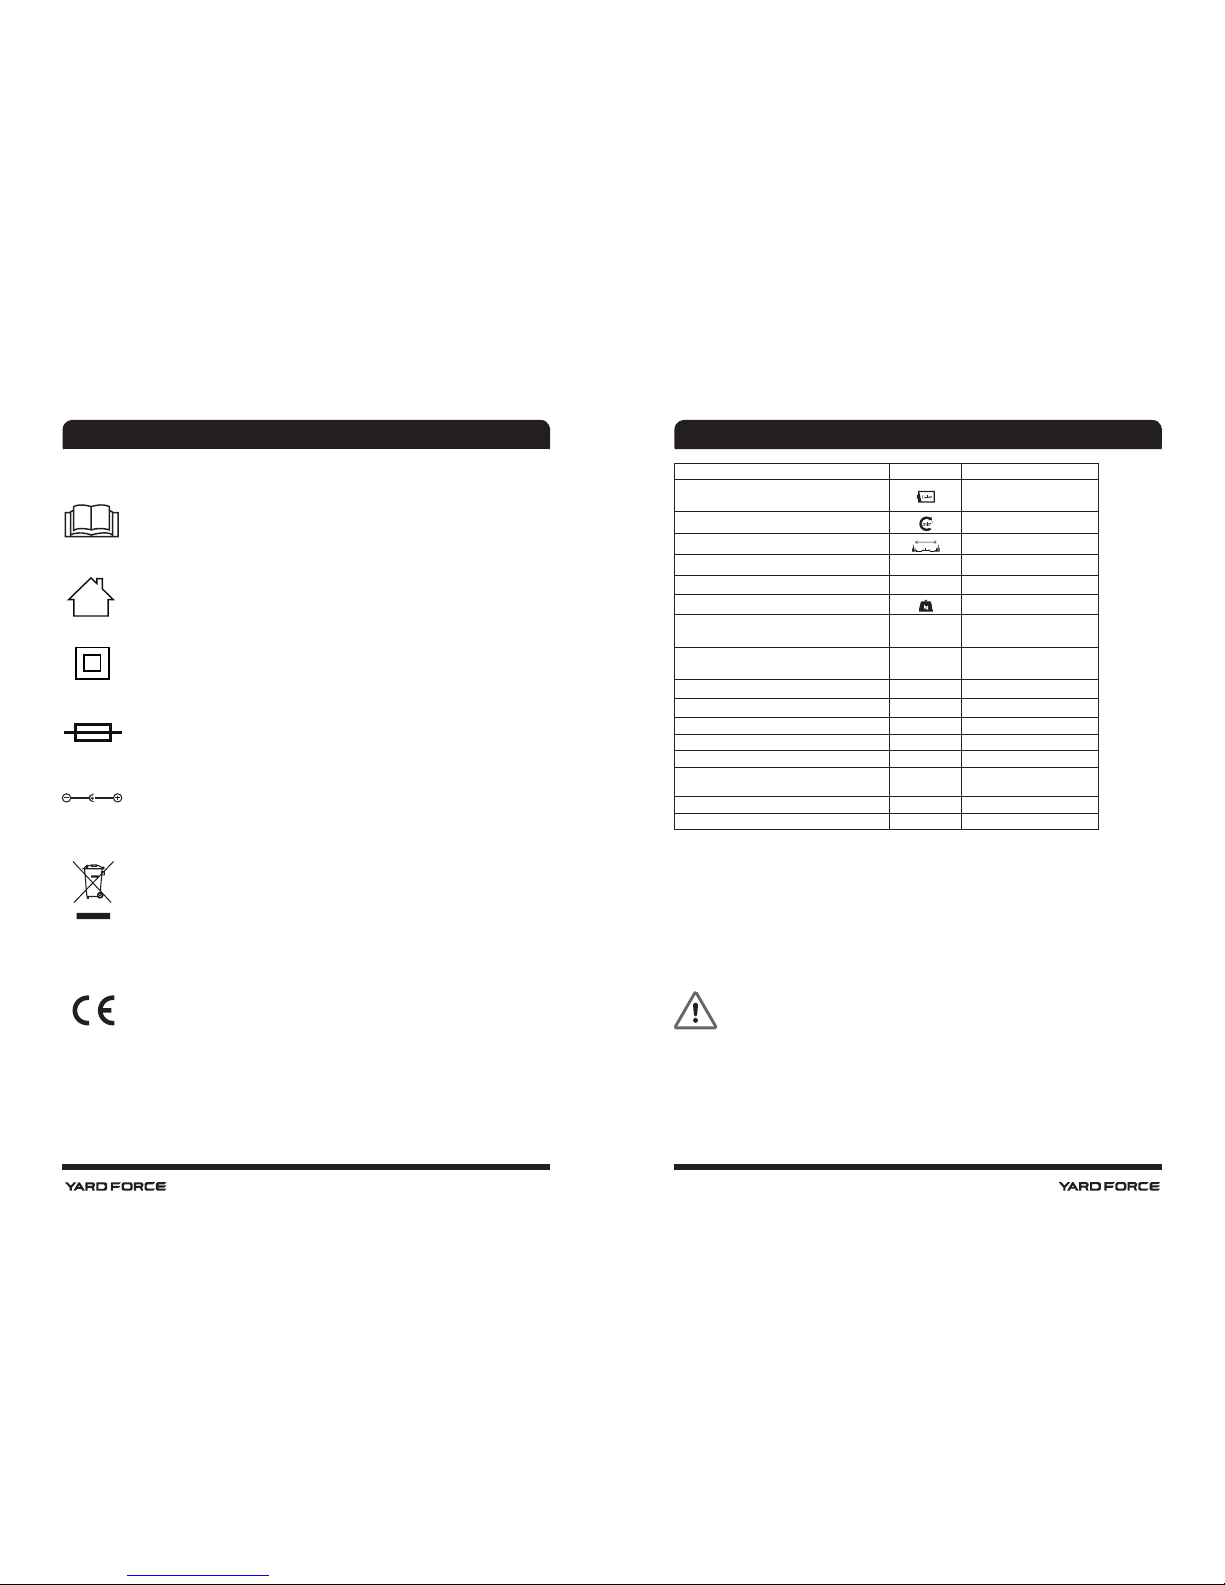
Warning symbols on the charger
To reduce the risk of injury, user must read
instruction manual carefully.
The charger is for indoor use only.
Double insulation
Protective 3.15A limited
Pole orientation.
WEEE symbol. Waste electrical products should
not be disposed of with household waste. Please
recycle where facilities exist. Check with your
Local Authority or local store for recycling advice.
The product complies with the applicable
European directives and an evaluation method of
conformity for these directives was done.
SYMBOLS
T3.15A
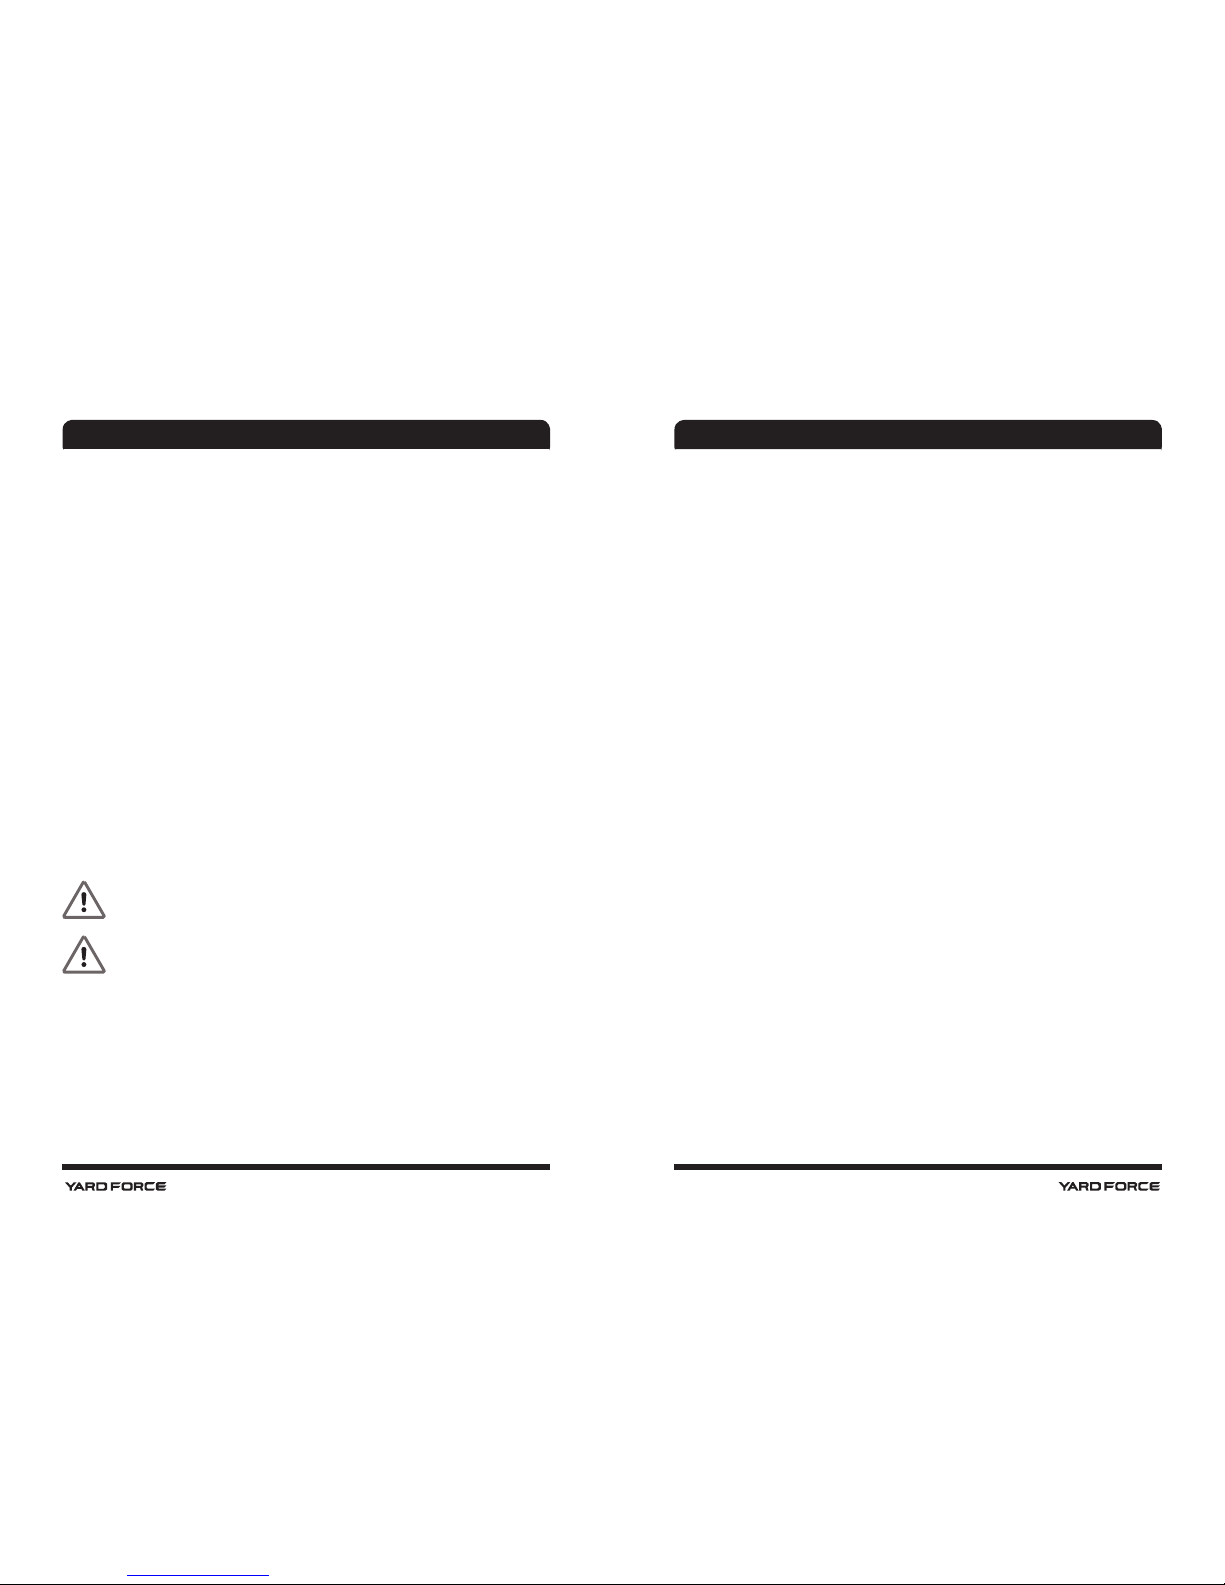
Mower Type LM G32
Nominal voltage of product with battery
40V d.c. /2.5Ah Li-ion
No-load cutting speed
3500 min
-1
Cutting width 32 cm
Cutting height 25-75mm, 7 positions
Capacity of grass bag 30 l
Weight
9.5 kg
Measured sound pressure level(L
pA
) 75.6dB(A), K=3 dB(A)
Guaranteed sound power level 96 dB(A)
Vibrations 1.68 m/s² K=1.5 m/s² *
Battery pack Model B0P-SP02-36
Battery capacity 2.5Ah
Battery charging time Max. 1.5hr
Battery charger Model B0Q-SP02-36
Input
220-240V AC,
50/60Hz 100W
Output DC 40V, 2.0A
Protection class II
The sound values have been determined according to noise test code given in EN 60335-277, using the basic standards EN ISO 11201 and EN ISO 3744.
The sound intensity level for the operator may exceed 80 dB(A) and ear protection measures
are necessary.
The declared vibration value has been measured in accordance with a standard test method
(according to EN 60335-2-77) and may be used for comparing one product with another. The
declared vibration value may also be used in a preliminary assessment of exposure.
WARNING: Depending on the actual use of the product the vibration values can
differ from the declared total!
Adopt proper measures to protect yourself against vibration exposure! Take the
whole work process including times the product is running under no load or
switched off into consideration!
TECHNICAL DATA
Page 11
20 21
DESCRIPTION OF PRODUCT
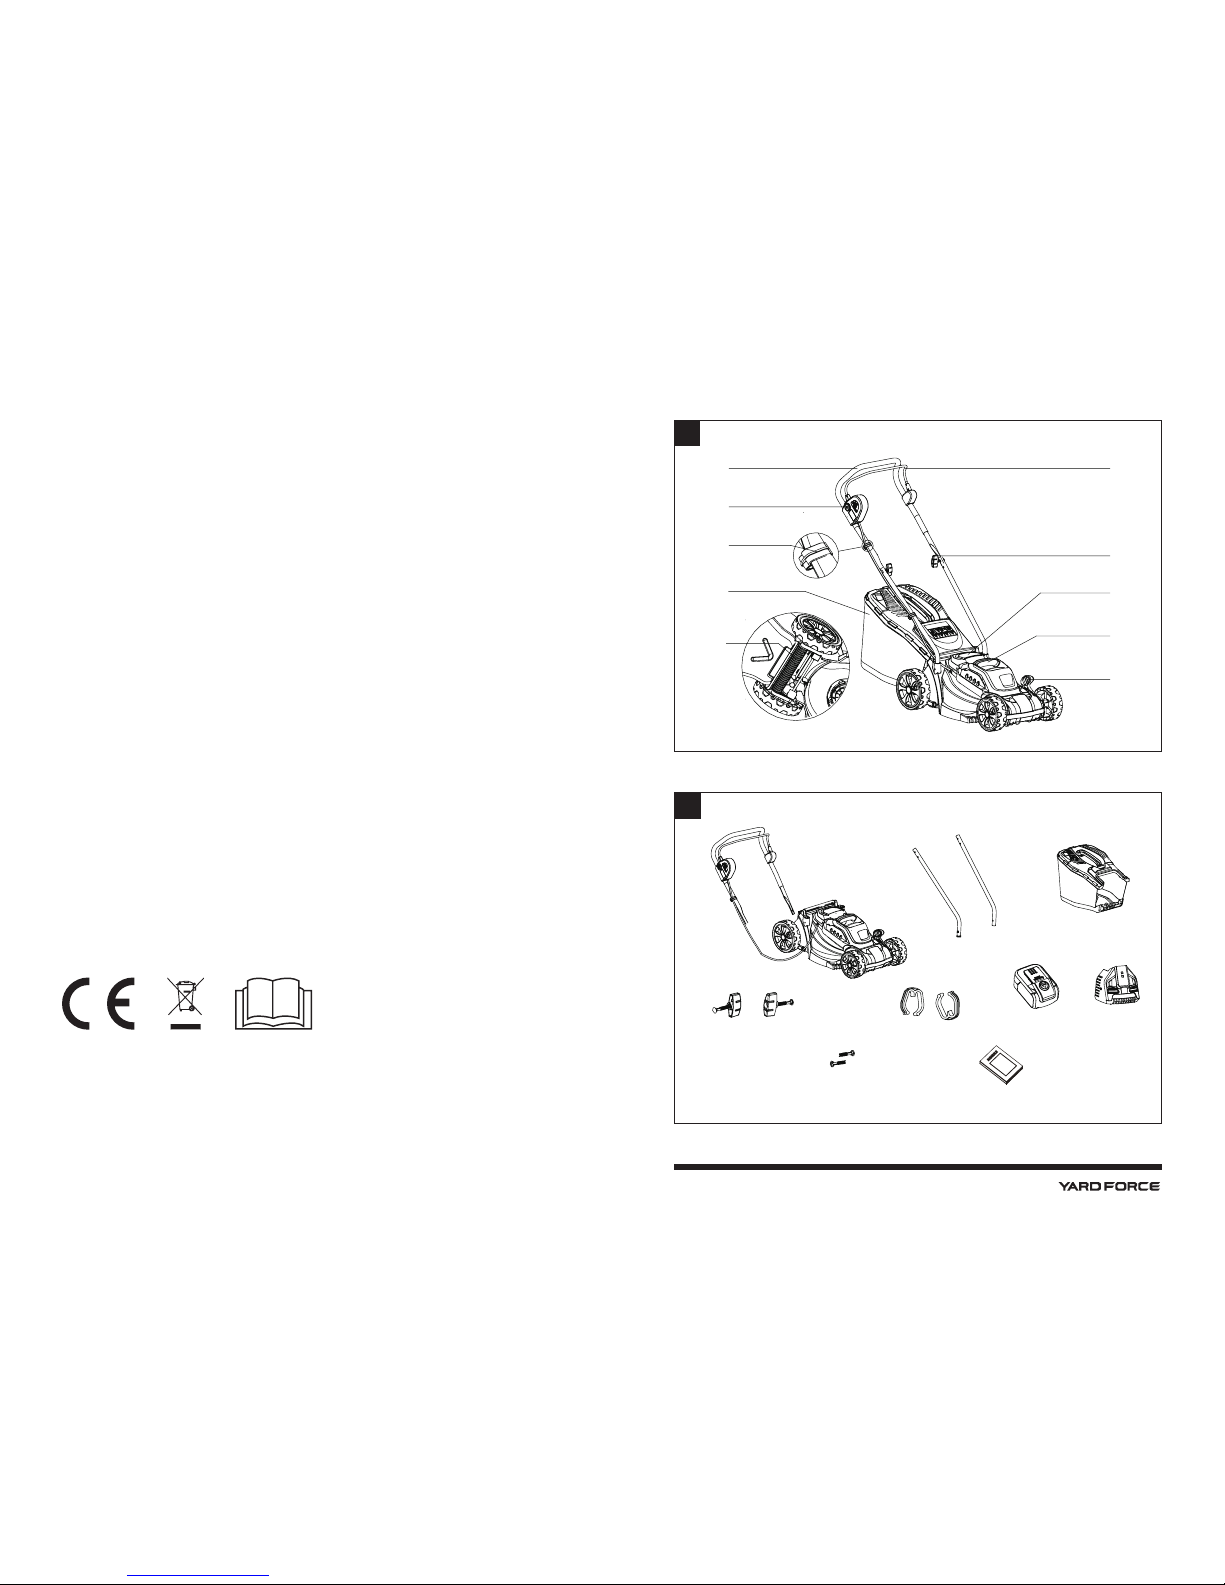
Parts description (Fig. A)
1. Upper handle
2. Switch box
3. Cable clip
4. Grass bag
5. Roller
6. Cutting height adjustment lever
7. Carry handle
8. Battery pack locating tank
9. Rotating knob
10. Switch lever
Check the delivery parts (Fig. B)
Remove the machine from its packaging carefully and make sure that all of the following parts
are present:
A. Lawnmower with upper handle
B. Lower brace
C. Grass bag
D. Rotating knob x2
E. Installation screw x2
F. Cable clip x2
G. Manual
H. Battery pack
I. Charger
WARNING: If any parts are damaged or missing, do not operate this tool until these
parts have been replaced. Failure to heed this warning could result in serious
personal injury.
NOTE: Always recycle the packaging in accordance with local recycling guidelines.
INSTALLATION
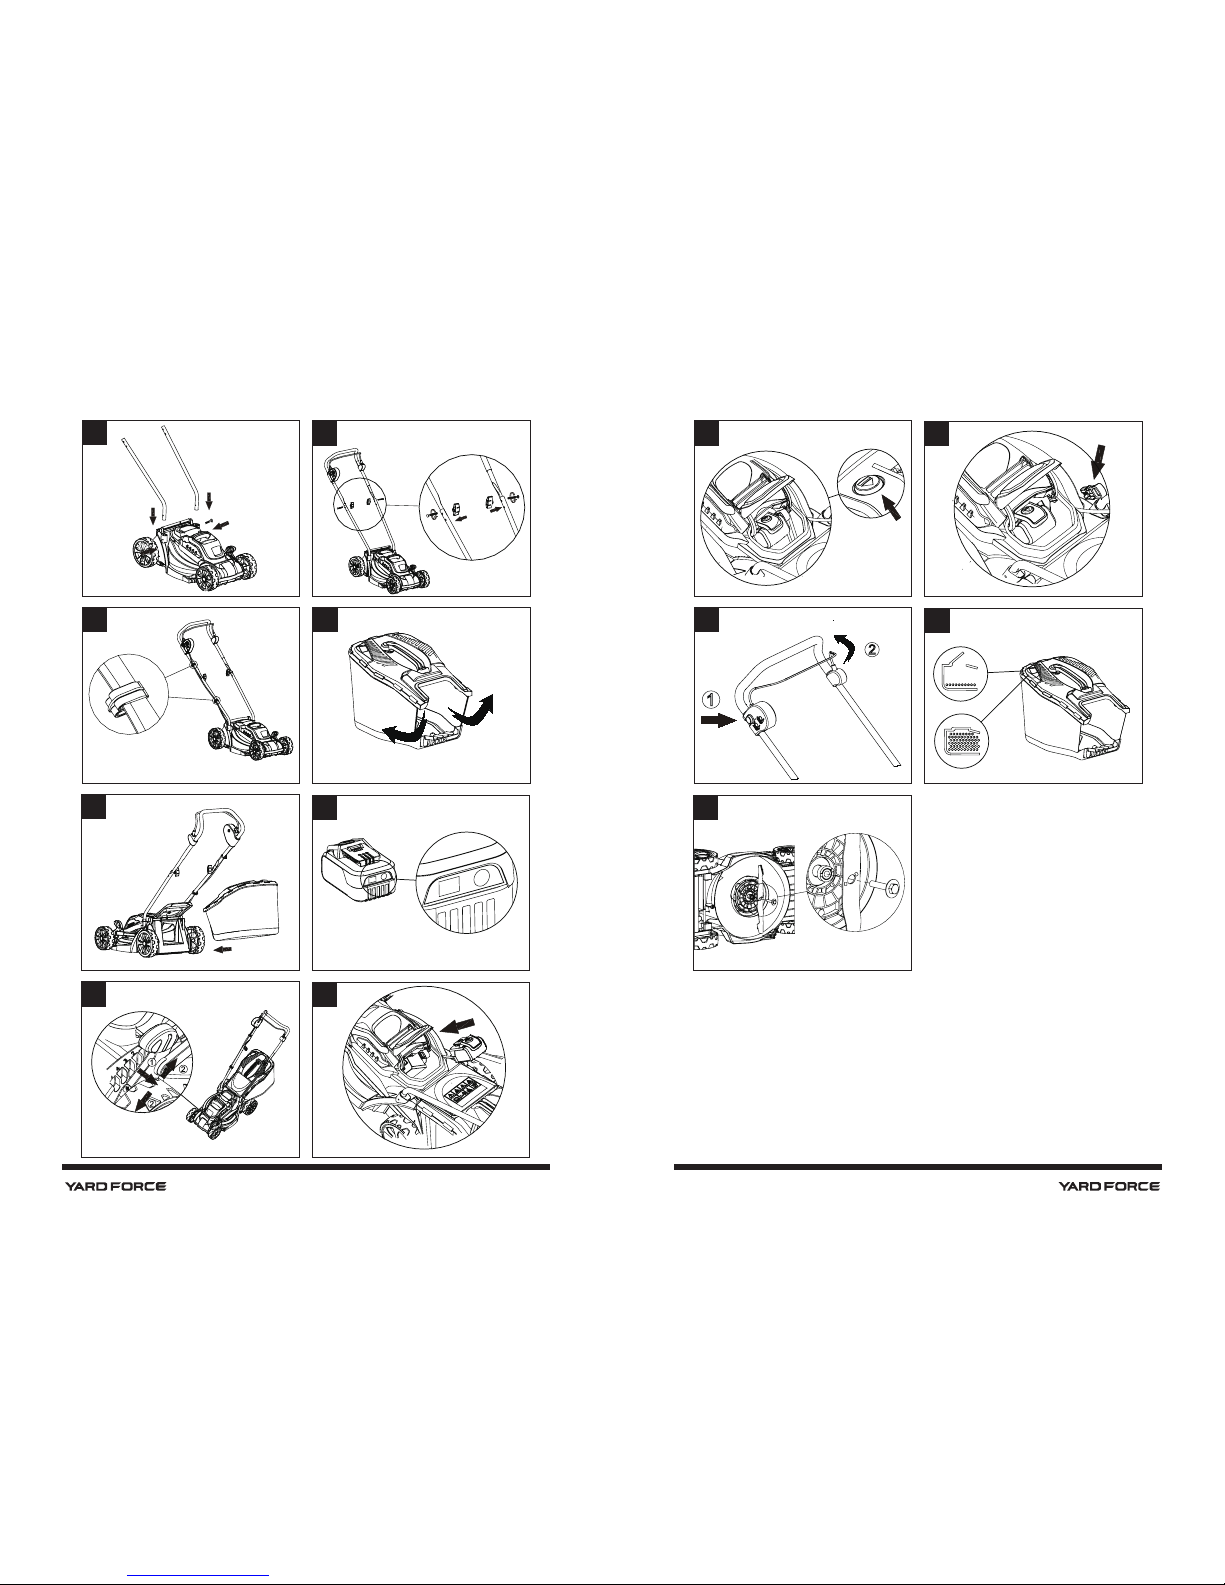
Assemble the lower brace (Fig. C)
1. Attach the lower brace to the deck.
2. Use two installation screws to x the lower brace.
Attach the top handle to lower brace (Fig. D)
Mount the top handle to the lower brace by using the two rotating knobs.
Fitting the cable clip (Fig. E)
Ensure that the cable clips supplied are used to x the cable to the lower brace.
Attach the grass bag
Attach the grass bag to the frame by xing the plastic hooks onto the side (Fig. F)
Lift the safety ap with one hand and hook in the grass bag. Release the ejector ap to
secure the grass bag in position. (Fig. G)
Page 12
22 23
OPERATION
NOTE: This battery pack has been shipped in a low charge condition. It should be
fully charged before rst use. Make sure the mains voltage is the same as rating label
which is located on the charger.
WARNING: The charger and battery pack are specically designed to work together
so do not attempt to use any other devices. Never insert or allow metallic objects into
your charger or battery pack connections because an electrical failure and hazard will
occur. The battery needs to be fully charged before rst use and whenever it fails to
produce sufcient power on jobs that were easily done before.
This product comes with a lithium-ion battery pack.The lithium-ion battery will not lose charge
when not in use and will not lose charging capacity over time, however to maintain optimum
battery life it is recommended to charge the battery when empty or running low.
Connecting the charger to mains
1. Plug the charger into an appropriate power supply. The LED lights green to tell you that
the charger is ready for use.
2. To insert the battery pack into the charger, align the battery pack with the corresponding
receptacle on the charger, push the battery pack downward until it has been locked in
place.
3. The battery pack will be fully charged 90 minutes and the green LED will light up to let
you know that the battery is fully charged.
Important charging notes
Longest life and best performance can be obtained if the battery pack is charged when the
air temperature is between 18-24°C. Do not charge the battery pack in a very low or very high
air temperature. This is important and will prevent serious damage to the battery pack.
- When using your tool continuously, the batteries in your battery pack will become
hot. You should let a hot battery pack cool down for approximately 30 minutes before
attempting to recharge.
- The charger and battery pack may become warm to touch while charging. This is
normal, and does not indicate a problem.
- Use the charger in normal room temperature whenever possible. To prevent overheating,
do not cover the charger and do not charge battery packs in direct sunlight or near heat
sources.
- If the battery pack does not charge properly:
1. Check the main socket by plugging in a lamp or other appliance.
2. Move the charger and battery pack to a location where the surrounding air
temperature is approximately 18-24°C.
3. If charging problems persist, contact your local service center.
- The battery pack should be recharged when it fails to produce sufcient power on jobs
which were easily done previously. DO NOT CONTINUE to use under these conditions.
- Follow the charging procedure. You may also charge a partially used pack whenever you
desire with no adverse effect on the battery pack.
- Under certain conditions, with the charger plugged in to the power supply, the exposed
charging contacts inside the charger can be shorted by foreign material. Foreign
materials of a conductive nature such as, but no limited to, steel wool, aluminum foil,
or any buildup of metallic particles should be kept away from charger cavities. Always
OPERATION
unplug the charger from the power supply when there is no battery pack in the cavity.
Unplug charger before attempting to clean.
- Do not immerse charger in water or any other liquid.
WARNING: Do not allow any liquid to get inside charger. This will increase the risk
of electric shock. To facilitate the cooling of the battery pack after use, avoid placing
the charger or battery pack in a warm environment such as in a metal shed or an uninsulated trailer.
CAUTION: Never attempt to open the battery pack for any reason. If the plastic
housing of the battery pack breaks or cracks, return to a service center to be
recycled; do not continue to use.
Checking the battery capacity (Fig. H)
Push the power indicator button, the remaining percentage of battery capacity will show on
screen.
Setting cutting height (Fig. I)
If you wish to change the cutting height, push the adjusting lever rst to make it out of the
tooth and then push the lever to the desired position.
WARNING:
Never operate the adjusting handle roughly.
Removing and inserting the battery pack
Insert the battery pack. (Fig. J)
Align the battery pack with its compartment of the tool. Push the battery pack into the tank
until you hear a click. This means the battery pack has been locked in position, then close the
battery pack tank cover.
Removing the battery pack from the tool (Fig. K)
Open the battery pack tank cover. Pull the battery pack release button, the battery pack will
come out automatically.
NOTE: Safety-Key (Fig. L)
This lawnmower is tted with a safety key; this prevents the accidental start up of your
cordless lawnmower.
The safety key has been designed to totally disable the lawnmower when it is removed.
Page 13
24 25
Switching on and off (Fig. M)
Switch on:
1. Press and hold the safety button on the side of the switch box with one hand.
2. Pull the switch bar towards the handle and hold it with the other hand.
Switch off:
Release the switch bar.
NOTE: Do not continue to press the start button after an automatic shut-off of the
machine, this will lead to battery damage.
WARNING: When the motor has been switched off, the blade will continue to run for
several seconds. Do not touch the underside of the mower until the cutter has come
to a complete standstill!
Operating the lawnmower
Operating on a slope:
Slopes increase the risk of slip-and-fall accidents, which can result in severe injury. Always be
sure of your footing on slopes. Operation on slopes requires extra caution. If you feel uneasy
on a slope, do not mow it.
Do:
- Mow across the face of slopes, never mow up and down. Exercise extreme caution
when changing direction on slopes.
- Watch for holes, ruts, rocks, hidden objects or bumps which could cause you to slip or
trip. Tall grass can hide obstacles.
Do not:
- Do not mow near drop-offs, ditches or embankments; you could lose your footing or
balance.
- Do not mow slopes greater than 15 degrees.
- Do not mow on wet grass. Unstable footing could cause you to slip.
Mower overload protection
To prevent overload conditions, do not try to cut too much grass at one time. Slow down your
cutting pace or raise the cut height. Your mower has built-in overload circuit protection. When
the mower is overloaded, the motor will stop. Switch the mower off and check to see if grass
has collected beneath the deck and clear it if necessary, then restart the mower.
Function of full indicator (Fig. N)
If the grass bag is empty or it is not lled with grass, the grass full indicator will be open.
If the grass bag is lled with grass the grass full indicator will be closed.
OPERATION
Emptying the grass bag
As soon as the grass bag indicator closes while you are mowing this means that it is time to
empty the grass bag.
NOTE: Before taking off the grass bag, switch off the engine and wait until the blade
has come to a complete stop.
To take off the grass bag, use one hand to lift up safety ap and the other to grab onto the
carry handle. The safety ap automatically falls down after removing the grass bag and closes
off the rear chute opening.
Empty out the grass bag then ret to machine.
NOTE: If any grass residue is caught in the discharge chute, clean it using a brush.
Do not remove grass debris in the mower casing or on the blade by hand or with
your feet. Instead use suitable tools such as a brush or broom. To ensure that the cut
grass can be collected into grass bag, the discharge opening and inside the mower
casing must be cleared of any blockages.
OPERATION
Page 14
26 27
MAINTENANCE AND STORAGE
WARNING: Before performing any maintenance or cleaning work, always ensure
that the battery pack/safety key has been removed. Wait until the blade has stopped
completely and the machine has cooled down.
Cleaning
Cleaning the product
– Use a soft brush to remove accumulated dust and debris. Wear safety glasses to protect
your eyes whilst cleaning.
– Wipe down the product enclosure with a slightly damp cloth. Do not spray the unit with
water. Water may destroy the switch unit and the electric motor.
Maintenance
NOTE: Always wear gardening gloves when handling or working near sharp blades.
1. Keep all nuts, bolts and screws tight to ensure that the machine is in a safe working
condition.
2. Check the grass bag frequently for wear or deterioration.
3. Examine the machine and replace worn or damaged parts for safety.
Removing/Installing the blade (Fig. O)
1. Use the correct size wrench to uninstall the blade bolt nut.
2. Wearing heavy gloves hold the blade still and turn the wrench anti-clockwise to remove
the bolt.
3. Fit the replacement blade correctly with marking facing up and align pegs, ret the bolt
and retighten securely to torque 20N.m.
WARNING: Replace or re-sharpen the mowing blade at the end of the mowing
season. Always have the mowing blade re-sharpened or replaced by a
recommended Yard Force service centre.
Unbalanced blades will cause the lawn mower to vibrate violently which can
increase the risk of accidents occurring.
Battery maintenance:
Use the following procedures to achieve the best battery life:
1. Protect the battery against moisture and water.
2. Store the battery only within temperature range of 5 oC to 45 oC. Do not leave the battery
in direct sunlight for extended periods of time.
3. Clean the battery regularly with a soft, clean and dry brush.
4. If you do not use the product for a long time, remember to charge and discharge the
battery pack once every 6 months.
Storage and transport
Storage
After cleaning the unit thoroughly, store mower in a dry room and allow the motor to cool
down.
NOTE: Remove the safety key and battery packs. Ensure cables are not trapped when
folding/unfolding the handle. If stored vertically make sure the mower is positioned in a corner
so that the blade is facing inwards against a wall and the machine is secure to prevent it
falling over.
Transport
Use the original packaging to ship whenever possible.
MAINTENANCE AND STORAGE
Page 15
28 29
TROUBLESHOOTING CE DECLARATION
Declaration of Conformity
We
Sumec UK
Unit A&B Escrick Business Park Escrick,York YO19 6FD
Declare that the product:
Description: 40V CORDLESS LAWNMOWER
Y0J-SP01-3236
LM G32
Function: Cutting grass
Complies with the essential health and safety requirements of the following directives:
Machinery Directive 2006/42/EC
Electromagnetic Compatibility Directive 2004/108/EC
RoHS Directive 2011/65/EU
Noise Emission in the Environment by Equipment for Use Outdoors Directive
2000/14/EC amended by 2005/88/EC
Conformity Assessment Procedure as Per Annex VI
Measured Sound Power Level: 89.58 dB (A)
Declared Guaranteed Sound Power Level: 96 dB (A)
Standards and technical specification referred to :
EN 55014-1:2006+A1+A2
EN 55014-2:1997+A1+A2
EN 55014-2:2015
EN 61000-3-2:2014
EN 61000-3-3:2013
EN 60335-1:2012+A11
EN 60335-2-77:2010
EN 60335-2-29:2004+A2
EN62233:2008
EN 50581:2012
Authorized Signatory
Date: 11.10.2017
Signature:________________________
Place: York
Name: Mariana Hall
General Manager
SUMEC UK Co.,Ltd.
Unit A&B Escrick Business Park
Escrick,York YO19 6FD
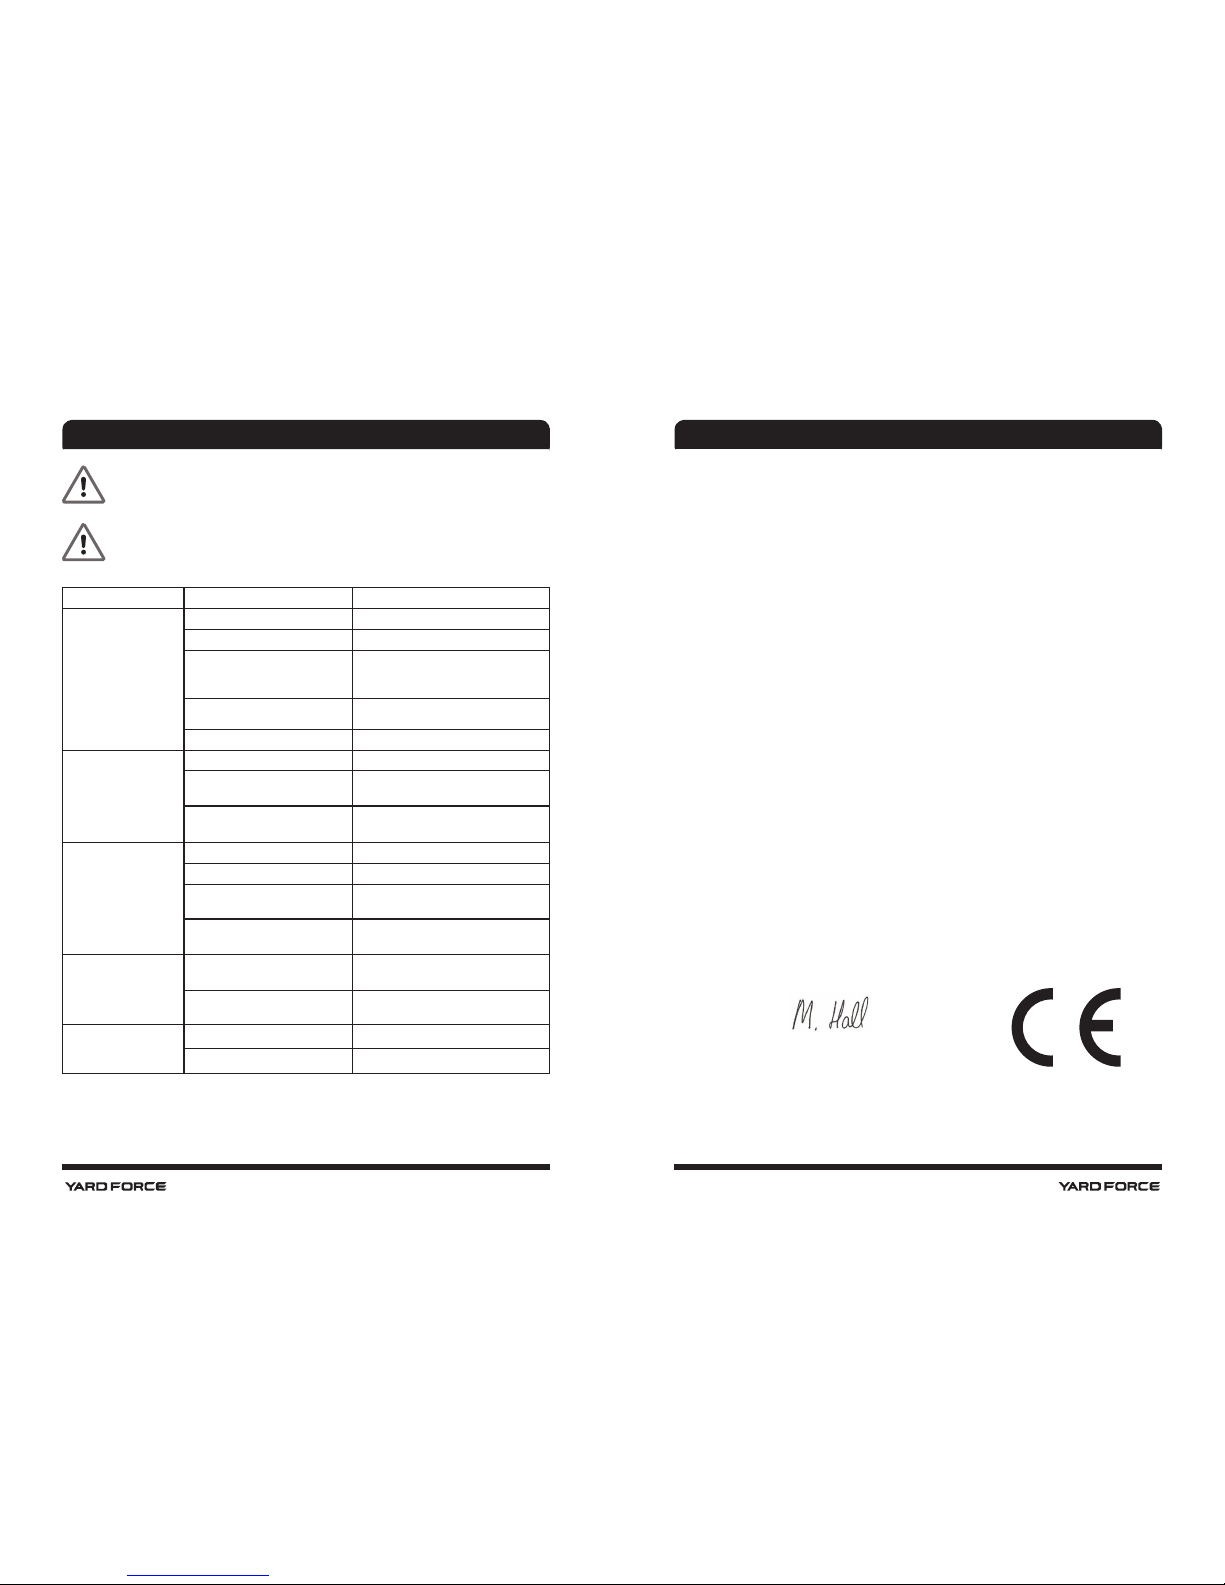
WARNING: Before performing any repair work, always ensure that the battery pack
has been removed.
WARNING: Always wear heavy duty gloves when adjusting or cleaning, especially
when handling sharp objects.
Fault/malfunction Cause Remedy
Mower fails to start
Safety key is not inserted Insert safety key
Battery is not correctly inserted Remove the battery and reinsert
Mower standing in high grass
Start motor on shorter grass or
already mowed area, change cutting
height if necessary
The mower housing is clogged
Clean housing so that the blade can
move freely
Battery has no power Check and recharge battery
Mower stops working
/loses power
Cutting height is incorrect Adjust the cutting height
Cutting blade is worn or
damaged
Replace with new blade from dealer
service centre
Battery performance
decreasing
Check the battery performance and
charge it if necessary
Grass bag is not lled
sufciently
Cutting height is too low
Adjust and increase cutting height
The lawn / grass is wet
Allow the lawn to dry
Underside of the mower deck
is clogged.
Clean the underside of the mower
deck
Cutting blade is worn or damaged.
Replace it by contacting the customer service centre
Mower vibrating at
higher speed
Cutting blade is unbalanced
Balance the blade by grinding each
cutting edge until equal
Blade is loosened /incorrectly
tted
Tighten the blade bolt
Mower cuts unevenly
The blade is damaged.
Sharpen the blade or replace.
Blade is assembled incorrectly.
Re-assemble blade correctly.
 Loading...