

Page 1

No. CP-UM-1703E
DIGITRONIK
Digital Indicating
Controller
SDC10
User’s Manual
Index
Chapter 1 NAMES & FUNCTIONS OF PARTS ..... 1
Chapter 2 STRUCTURE ........................................2
Chapter 3 MOUNTING...........................................3
Chapter 4 WIRING ................................................. 6
Chapter 5 INITIAL SETTINGS ............................... 9
5-1 Overall Operation Flow ............................... 10
5-2 Setup Items ................................................ 11
5-3 Parameter Settings ..................................... 18
5-4 Event Settings ............................................ 21
5-5 SP Setting .................................................. 21
Chapter 6 TUNING............................................... 24
6-1 Selecting the Control Method ..................... 24
6-2 Self-tuning .................................................. 24
6-3 Cautions During Self-tuning ........................ 25
6-4 Auto-tuning ................................................ 26
6-5 Control Troubleshooting ............................. 27
Chapter 7 SPECIFICATIONS .............................. 28
Chapter 8 ALARM CODES ..................................30
Chapter 9 MAINTENANCE ..................................31
SDC10 Setup Worksheet ......................................... 32
Thank you for purchasing the DIGITRONIK Digital Indicating Controller SDC10.
This manual contains information for ensuring correct use of the DIGITRONIK
Digital Indicating Controller SDC10. It also provides necessary information
for installation, maintenance and troubleshooting. This manual should be read
by those who design and maintain devices and operator control panels that
use the DIGITRONIK Digital Indicating Controller SDC10. Be sure to keep
this manual nearby for handy reference.
Page 2
Note that incorrect wiring of the SDC10 can damage the SDC10 and lead
to other hazards. Check that the SDC10 has been correctly wired before
turning the power ON.
Before wiring, or removing/mounting the SDC10, be sure to turn the power
OFF. Failure to do so might cause electric shock.
Do not touch electrically charged parts such as the power terminals. Doing
so might cause electric shock.
Do not disassemble the SDC10. Doing so might cause electric shock or
faulty operation.
This product has been designed, developed and manufactured for general-purpose
application in machinery and equipment.
Accordingly, when used in applications outlined below, special care should be taken to
implement a fail-safe and/or redundant design concept as well as a periodic maintenance
program.
•Safety devices for plant worker protection
•Start/stop control devices for transportation and material handling machines
•Aeronautical/aerospace machines
•Control devices for nuclear reactors
Never use this product in applications where human safety may be put at risk.
This manual uses the following symbols to ensure safe operation of this controller:
i
RESTRICTIONS ON USE
REQUEST
Ensure that this User's Manual is handed over to the user before the
product is used.
Copying or duplicating this User's Manual in part or in whole is forbidden. The information and specifications in this User's Manual are subject to change without notice.
Considerable effort has been made to ensure that this User's Manual is
free from inaccuracies and omissions.
If you should find any inaccuracies or omissions, please contact
Yamatake Corporation.
In no event is Yamatake Corporation liable to anyone for any indirect,
special or consequential damages as a result of using this product.
©1995 Yamatake Corporation ALL RIGHTS RESERVED
WARNING
CAUTION
Warnings are indicated when mishandling the SDC10
might result in death or serious injury to the user.
Cautions are indicated when mishandling the SDC10 might
result in minor injury to the user, or only physical damage
to the SDC10.
WARNING
Page 3
ii
CAUTION
Do not operate the keys with a propelling pencil or sharp-tipped object.
Doing so might cause faulty operation.
In addition to the standard ON/OFF and PID controls, the SDC10 is also
equipped with self-tuning control which does not require setting control constants. Self-tuning control ensures stable control even during changes in
SP values or during disturbances. This is achieved by monitoring and learning the characteristics of the control target to automatically output control
constants.
This function should be used according to the instructions given in the
manual.
Use the SDC10 within the operating ranges recommended in the specifications (temperature, humidity, voltage, vibration, shock, mounting direction,
atmosphere, etc.). Failure to do so might cause fire or faulty operation.
Do not block ventilation holes. Doing so might cause fire or faulty operation.
Wire the SDC10 properly according to predetermined standards. Also wire
the SDC10 using specified power leads according to recognized installation methods.
Failure to do so might cause electric shock, fire or faulty operation.
Do not allow lead clippings, chips or water to enter the controller case.
Doing so might cause fire or faulty operation.
Firmly tighten the terminal screws at the torque listed in the specifications.
Insufficient tightening of terminal screws might cause electric shock or fire.
Do not use unused terminals on the SDC10 as relay terminals.
Doing so might cause electric shock, fire or faulty operation.
We recommend attaching the terminal cover (sold separately) after wiring
the SDC10.
Failure to do so might cause electric shock, fire or faulty operation.
Use the relays on the SDC10 within the service life listed in the specifica-
tions.
Continued use of the relays after the recommended service life has expired
might cause fire or faulty operation.
Use Yamatake Corporation's SurgeNon if there is the risk of power surges
caused by lightning.
Failure to do so might cause fire or faulty operation.
Page 4

iii
SAFETY REQUIREMENTS
To reduce risk of electrical shock which could cause personal injury, follow all safety notices
in this document.
This symbol warns the user of a potential shock hazard where hazardous live voltages may be
accessible.
* If the controller is used in a manner not specified by Yamatake Corporation, the protection provided
by the controller must be impaired.
* Do not replace any component (or part) not explicitly specified as replaceable by your supplier.
* All wiring must be in accordance with local norms and carried out by authorized and experienced
personnel.
* A switch in the main power supply is required near the equipment.
* Provide delayed type (T) fuses having a rated power supply of 200mA and voltage of 250V for the
mains power supply wiring of this AC power supply controller. (IEC 127)
EQUIPMENT RATINGS
Supply voltage 100 to 240Vac (operating power voltage 85 to 264Vac)
Frequency 50/60Hz
Power consumption 7VA max.
EQUIPMENT CONDITIONS
Do not operate the instrument in the presence of flammable liquids or vapors. Operation of any electrical
instrument in such an environment constitutes a safety hazard.
Temperature: 0 to 50°C
Humidity: 10 to 90%RH (condensation not allowed)
Vibration: 2m/s2 (10 to 60Hz)
Over-voltage category: Category II (IEC60364-4-443, IEC60664-1)
Pollution degree: 2
EQUIPMENT INSTALLATION
The controller must be mounted into a panel to limit operator access to the rear terminals.
Make sure that the I/O common voltage and the grounding voltage excluding the power voltage are
33Vrms max., 46.7V (peak) max. and 70Vdc max.
APPLICABLE STANDARDS
EN61010-1, EN50081-2, EN50082-2, EN61326
The CE supported model is the C10T type (panel type) only.
H
Page 5
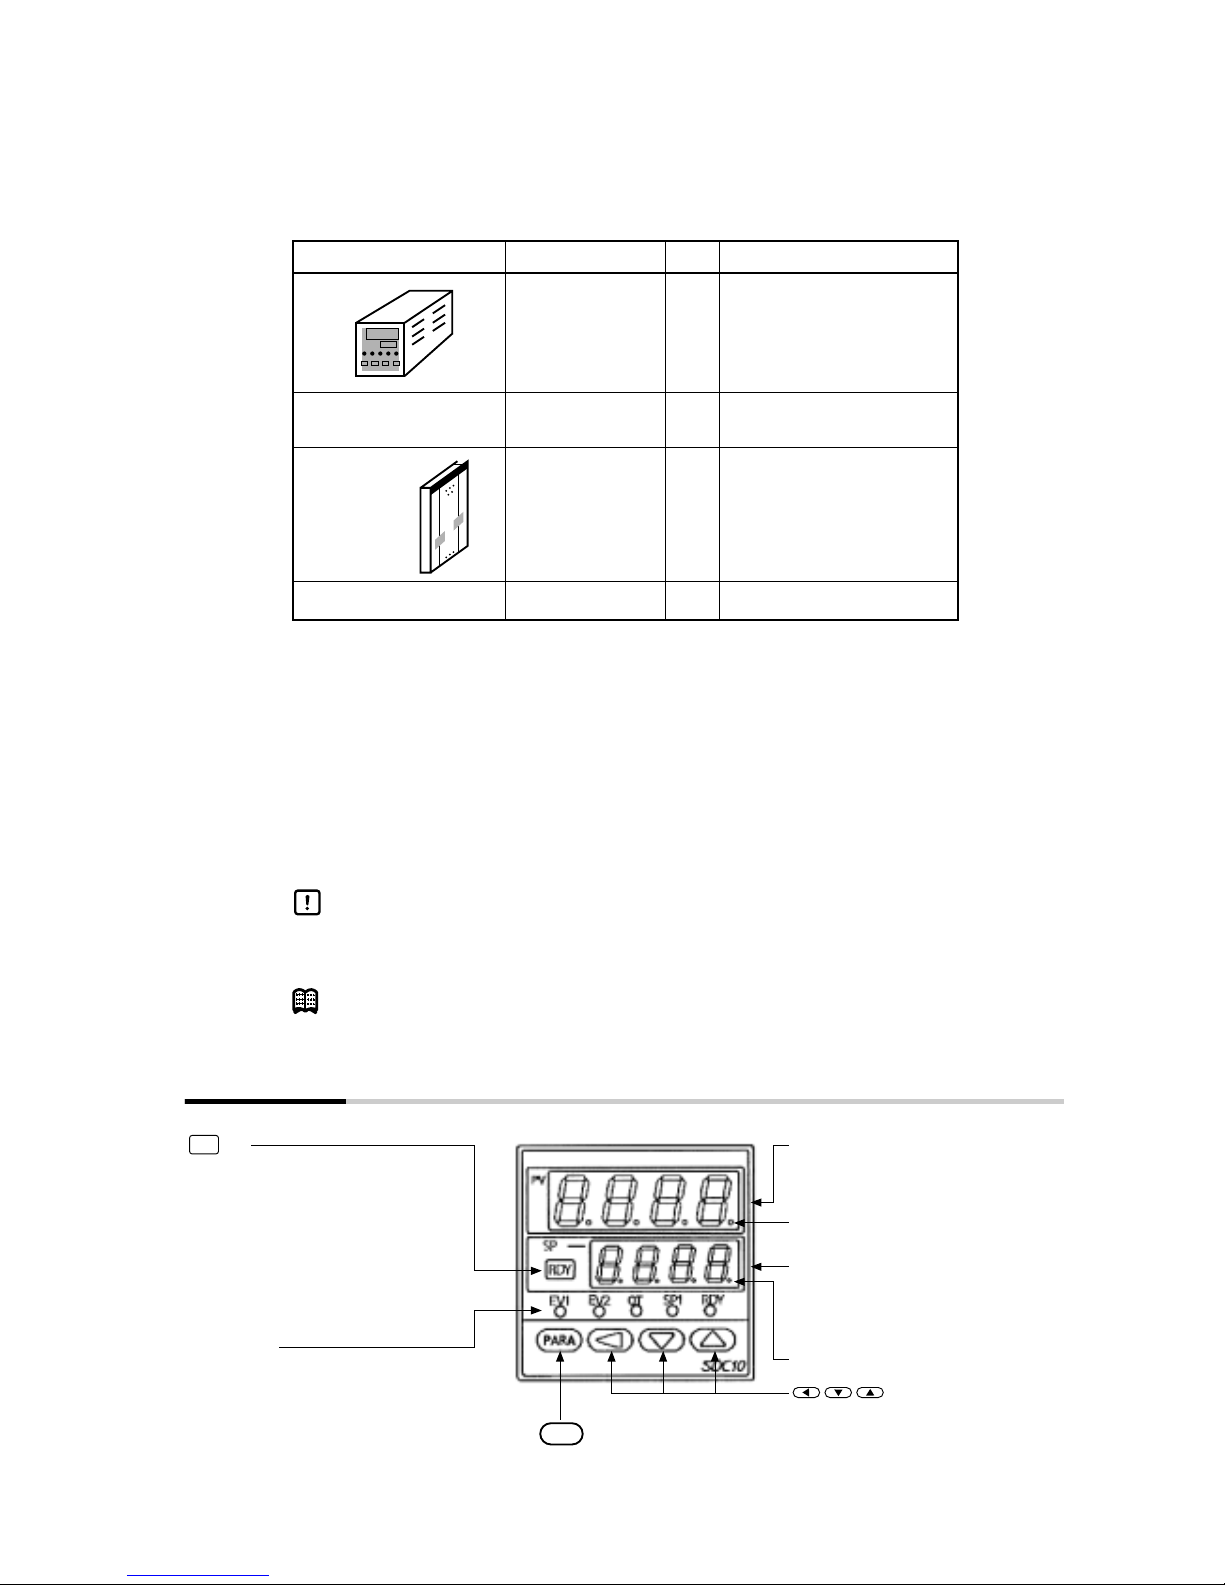
1
Hold this key down for at least 1
second to enable either of the
following operations.
•
•
•
•
Factory setting is key lock state.
Run (RUN)/ (READY)
Cancelation of event latch state
Auto-tuning start/stop
SP No. switching
key
EV1:
EV2:
OT:
SP1:
RDY:
Lights when event 1 is ON.
Lights when event 2 is ON.
Lights when the control output is ON.
Lights (or, blinks) when No.1 to No.3
SP is switched.
Lights when READY (control stop)
Mode LEDs
Displays PV values (current
temperature, etc.) or setup items
This LED blinks in the self-tuning mode.
Displays SP values (set
temperature, etc.) and other
parameter values.
This LED blinks in the auto-tuning mode.
Upper display
Lower display
keys:
Switches the display. Hold
down for at least 3 seconds
to switch modes.
key
PARA
RDY
Used for incrementing numeric
values and performing arithmetic
shift operations.
Unpacking
When unpacking the product, check that you have received all the items that you ordered.
The C10S type socket is optional.
After unpacking, handle the SDC10 and its accessories taking care to prevent damage or loss of parts.
Those using the communications function, should read the DIGITRONIK digital indicating controller
User's Manual SDC10 “Communications Function Manual”.
If an inconsistency is found or the package contents are not in order, immediately contact your dealer.
Conventions Used in This Manual
The following conventions are used in this manual.
Handling Precautions
: Handling Precautions indicate items that the user should pay attention to when
handling the SDC10.
Note : Notes indicate useful information that the user might benefit by knowing.
Name Catalog No. Q’ty Remarks
Body 1
Installation tool 81446403-001 1
(C10T type only)
User’s Manual CP-UM-1703E 1
Engineering Unit seal 1
See ■ Model Selection
Guide on page 2.
This manual
Chapter 1 NAMES & FUNCTIONS OF PARTS
Page 6
2
C10
T
(Note 1) S
0D
6D
T
R
L
A
D
00
01
(Note 2) 02
(Note 2) 03
(Note 2) 05
00
D0
Chapter 2 STRUCTURE
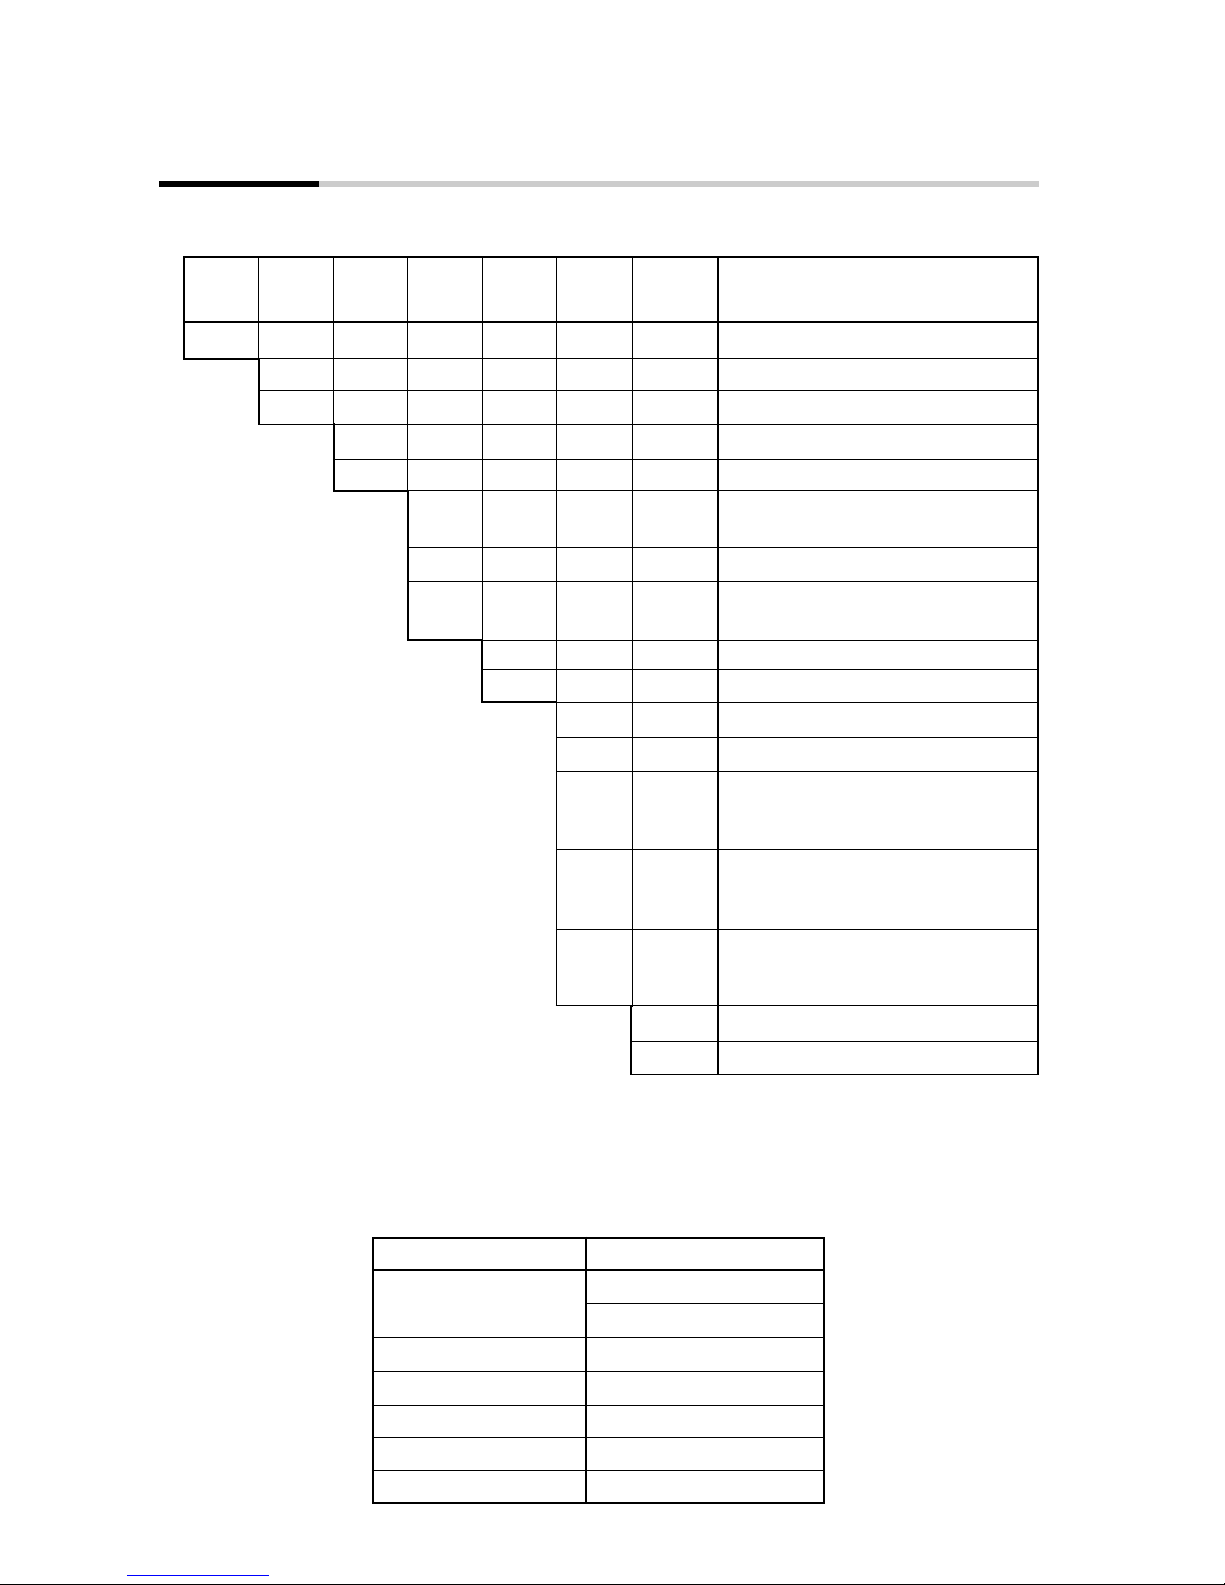
■ Model Selection Guide
●
Options
Basic
Model
No.
Mounting
Control
Output
Power
Voltage
Option
Additional
Process-
ing
PV
Input
Specifications
Panel mounting
Socket mounting
Relay output
Voltage pulse output (for SSR drive)
Thermocouple input (K, J, E, T, R, DIN
U, DIN L)
RTD (Pt100/JPt100)
DC voltage input
(0 to 1Vdc, 0 to 5Vdc, 1 to 5Vdc)
100 to 240Vac, 50/60Hz
24Vdc (no polarity)
None
2 event outputs
2 event outputs
2 non-insulated external switch inputs
1 current transformer input
2 event outputs
2 insulated external switch inputs
1 current transformer input
2 event outputs
RS-485 communications (CPL)
1 current transformer input
No additional processing
Provision of Inspection Sheet
(Note 1) A socket mounted model cannot be combined with 02, 03, 05 (option). The
socket is sold as an option.
CE is not covered on socket mounted models.
(Note 2) The current transformer is sold as an option.
Name Model No.
Current transformer QN206A (5.8mm hole dia.)
QN212A (12mm hole dia.)
Socket (C10S) 81446391-001
Mounting bracket 81446403-001
Hard cover 81446442-001
Soft cover 81446443-001
Terminal cover 81446464-001
Page 7
3
Chapter 3 MOUNTING
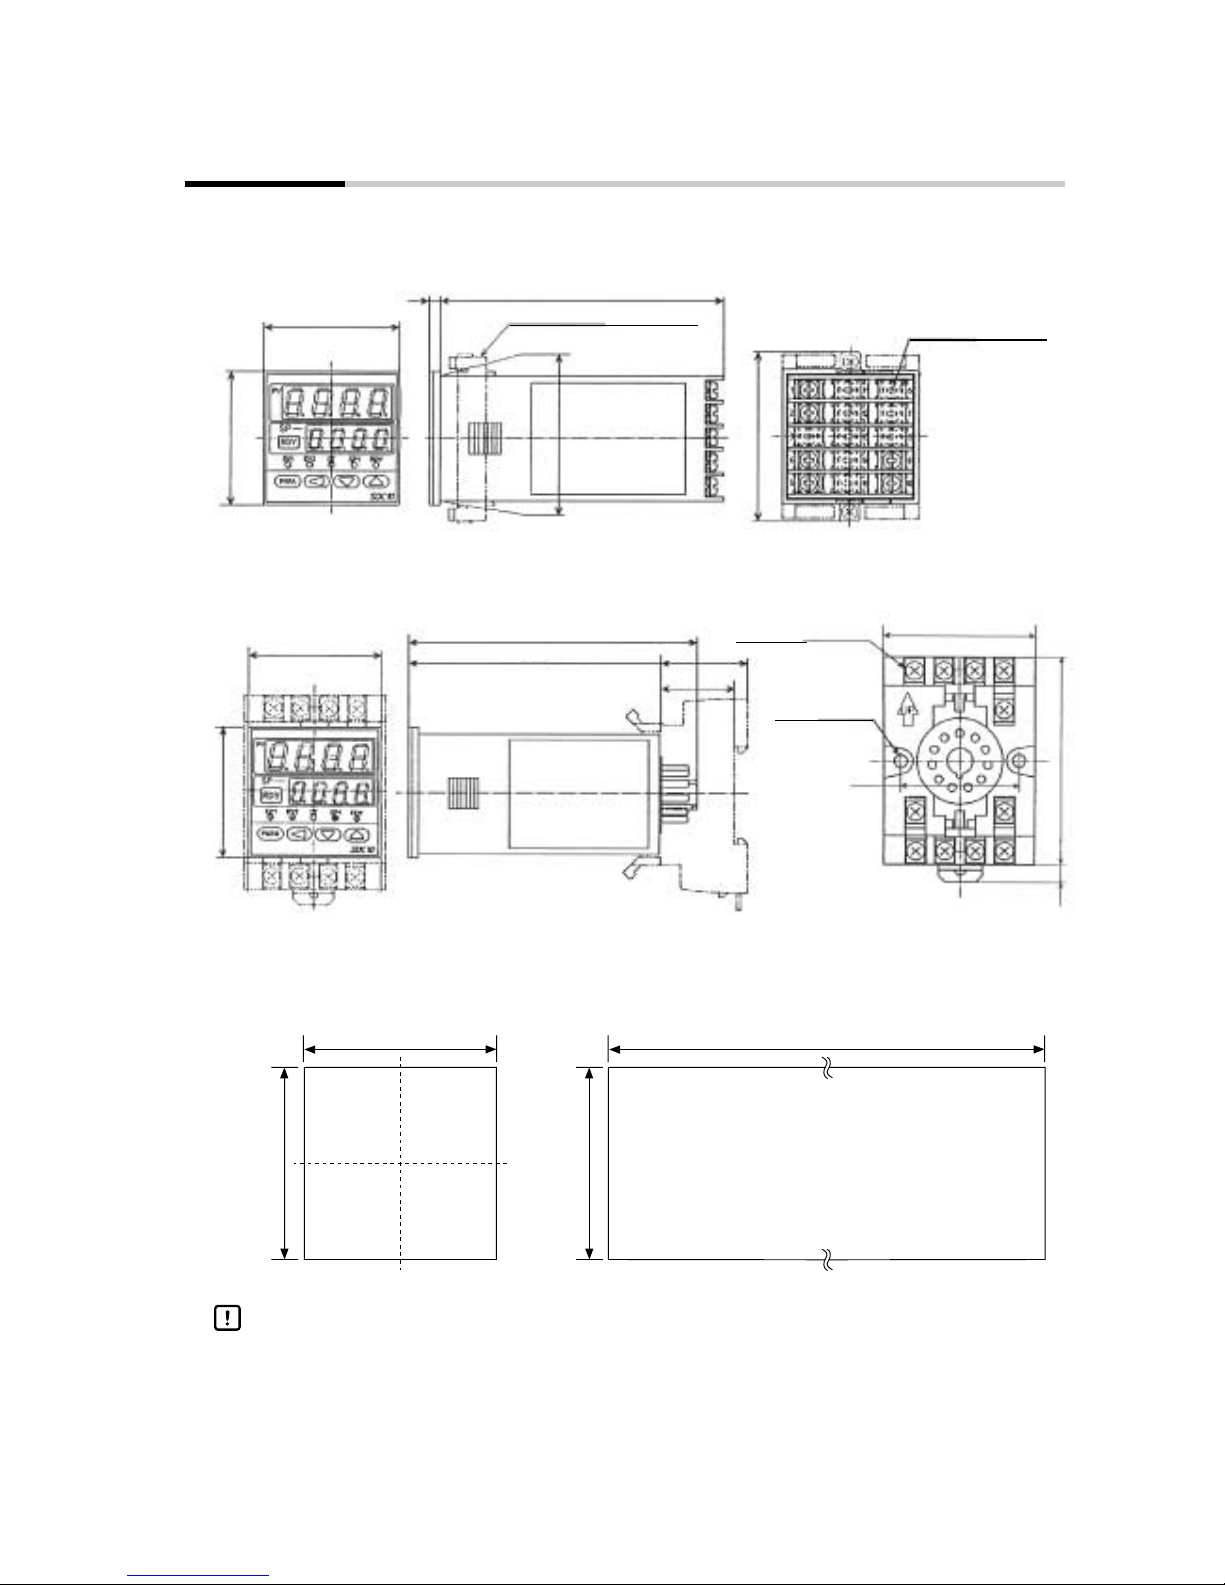
■ External Dimensions
●
C10T (panel mounted)
Mounting bracket (included)
M3.5 terminal screw
Unit: mm
48
48
1014
□45
61
●
C10S (with socket)
48
48
104
90.5 31
26.5
51
87 65
4
3
21
11
10
9
40
716.5
M3.5 terminal screw
Mounting hole
for 2-M4 screw
Socket (sold separately)
Model No.: 81446391-001
■ Panel Cut-out Dimensions
45
-0
+0.6
45
-0
+0.6
(Nx48-2.5)
-0
+1
45
-0
+0.6
N is the number of mounted units
Handling Precautions
When three or more units are gang-mounted horizontally, the maximum allowable ambient temperature is 45°C.
Page 8
4
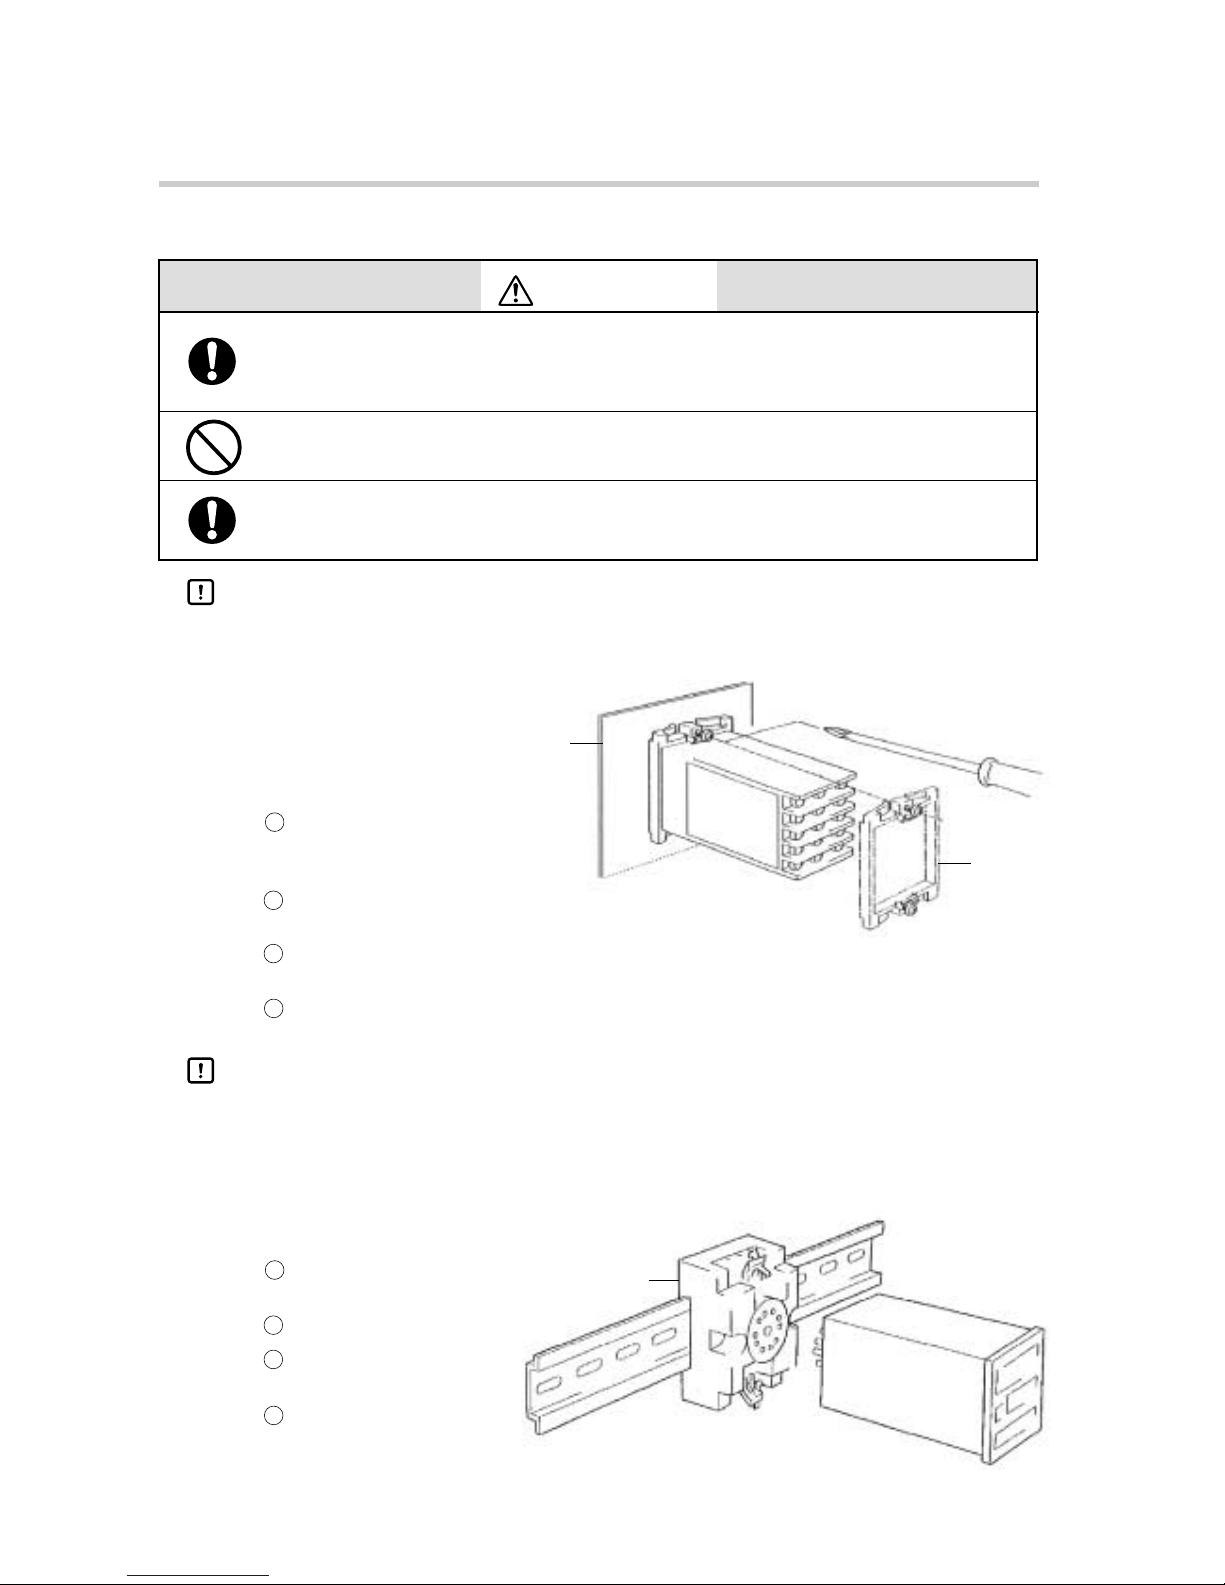
CAUTION
Press the controller against the mounting bracket to make sure that the bracket claws enter the
grooves of the controller.
Tighten the top and bottom screws. (When the screws touch the panel, turn the screws another half
turn.)
● C10T
●
Required tools
Phillips screwdriver
Insert the controller into the
opening on the front side of the
panel.
Attach the mounting bracket at
the rear side of the panel.
■ Mounting Procedure
Use the SDC10 within the operating ranges recommended in the specifications (temperature, humidity, voltage, shock, mounting direction, atmosphere, etc.). Failure to do so might cause fire or faulty operation.
Do not block ventilation holes. Doing so might cause fire or faulty operation.
Be sure to attach the terminal cover (sold separately) after wiring the SDC10.
Failure to do so might cause electric shock, fire or faulty operation.
Handling Precautions
When three or more units are gang-mounted horizontally, the maximum allowable ambient
temperature is 45°C.
Panel
Mounting
Bracket
Socket
Handling Precautions
●
Do not operate the keys with a propelling pencil or sharp tipped object. Be sure to mount this
controller on a panel. Cover terminals to prevent electric shock.
An optional terminal cover is provided. (model No.: 81446464-001)
●
Do not overtighten the screws to prevent deformation of the front panel.
● C10S
Mount the socket in the panel
using a DIN rail or screws.
Wire the socket.
Insert the body of the control-
ler into the socket.
Insert the clasps at the top and
bottom of the socket into the
holes of the controller body to
firmly secure it to the socket.
Chapter 3 MOUNTING
1
2
3
4
1
2
3
4
Page 9
5
■ Location
Do not install the controller in locations where it is:
• subject to extreme temperature and humidity
• subject to sulfuric or corrosive gases
• subject to dust or oil smoke
• subject to direct sunlight, or splashing by rain or water
• subject to mechanical vibrations and shock
• subject to high-voltage lines, welding machines and sources of electric noise
• less than 15 m from high-voltage ignition devices
• subject to electromagnetic fields
• subject to flammable liquids or vapor
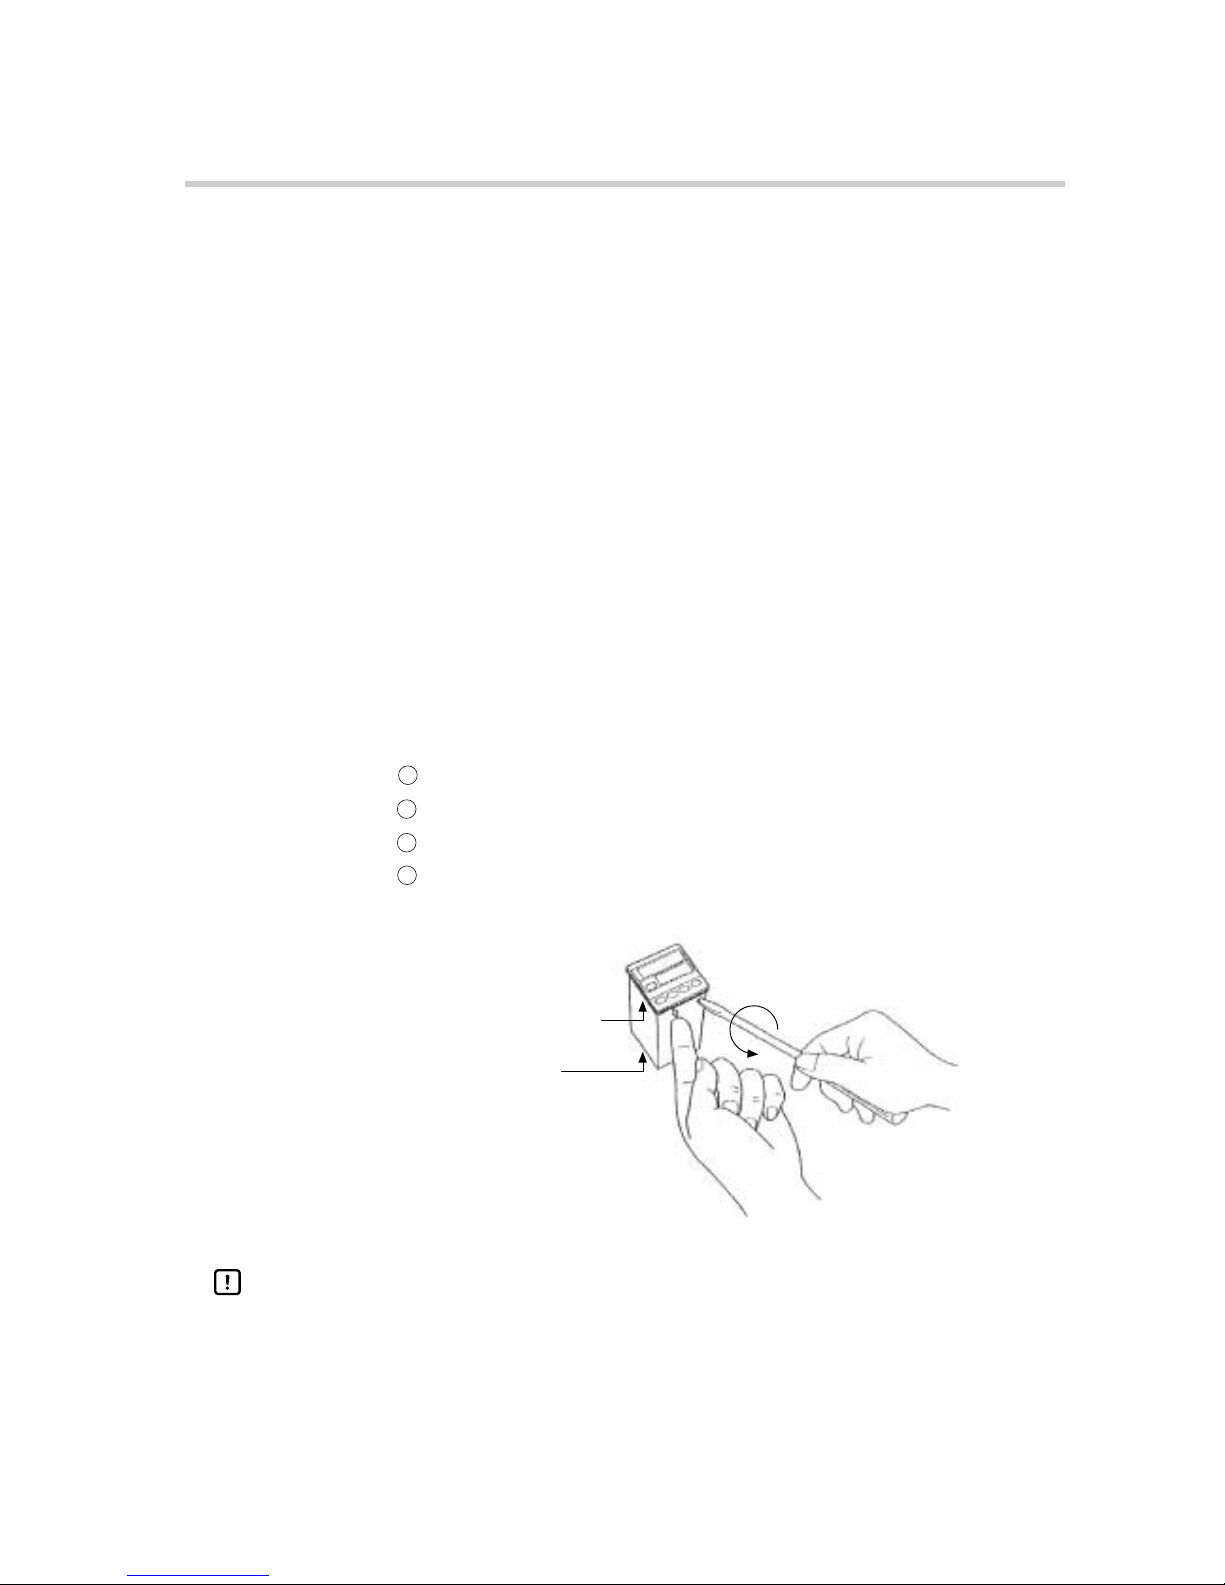
■ Removing the SDC10T Case
The following instructions show how to remove the SDC10T body from the case. This
has to be carried out only when the controller is to be replaced:
●
Required tools
Small standard screwdriver
Press the claw on the lower left side of the mask bezel with your finger.
Insert the screwdriver into the groove between the mask bezel and the controller body.
Press the claw while turning the screwdriver.
Take hold of the front end of the body as it is forced out of the case and pull it out.
Mask bezel
Case
Handling Precautions
●
Turn the power OFF before carrying out the above procedure.
●
In the case of the socket model (C10S), internal components cannot be drawn
out.
Chapter 3 MOUNTING
1
2
3
4
Page 10
6
CAUTION
Wire the SDC10 properly according to predetermined standards. Also wire
the SDC10 using specified power leads according to recognized installation methods. Failure to do so might cause electric shock, fire or faulty
operation.
Do not allow lead clippings, chips or water to enter the controller case.
Doing so might cause fire or faulty operation.
Firmly tighten the terminal screws at the torque listed in the specifications.
Insufficient tightening of terminal screws might cause electric shock or fire.
Do not use unused terminals on the SDC10 as relay terminals.
Doing so might cause electric shock, fire or faulty operation.
We recommend attaching the terminal cover (sold separately) after wiring
the SDC10. Failure to do so might cause electric shock, fire or faulty operation.
Use the relays on the SDC10 within the service life listed in the specifications.
Continued use of the relays after the recommended service life might cause
fire or faulty operation.
Use Yamatake Corporation’s SurgeNon if there is the risk of power surges
caused by lightning.
Failure to do might cause fire or faulty operation.
Make sure all wiring is correct. Incorrect wiring may damage connected
equipment.
The controller does not operate until six seconds after the power has been
turned ON. Special arrangements must be made when the relay output
from the controller is to be used as an interlock signal.
When a ground type thermocouple must be used and an external switch
input is required, PV readout error caused by sneak path current may occur. Select the insulated external switch input model (option code 03).
Chapter 4 WIRING
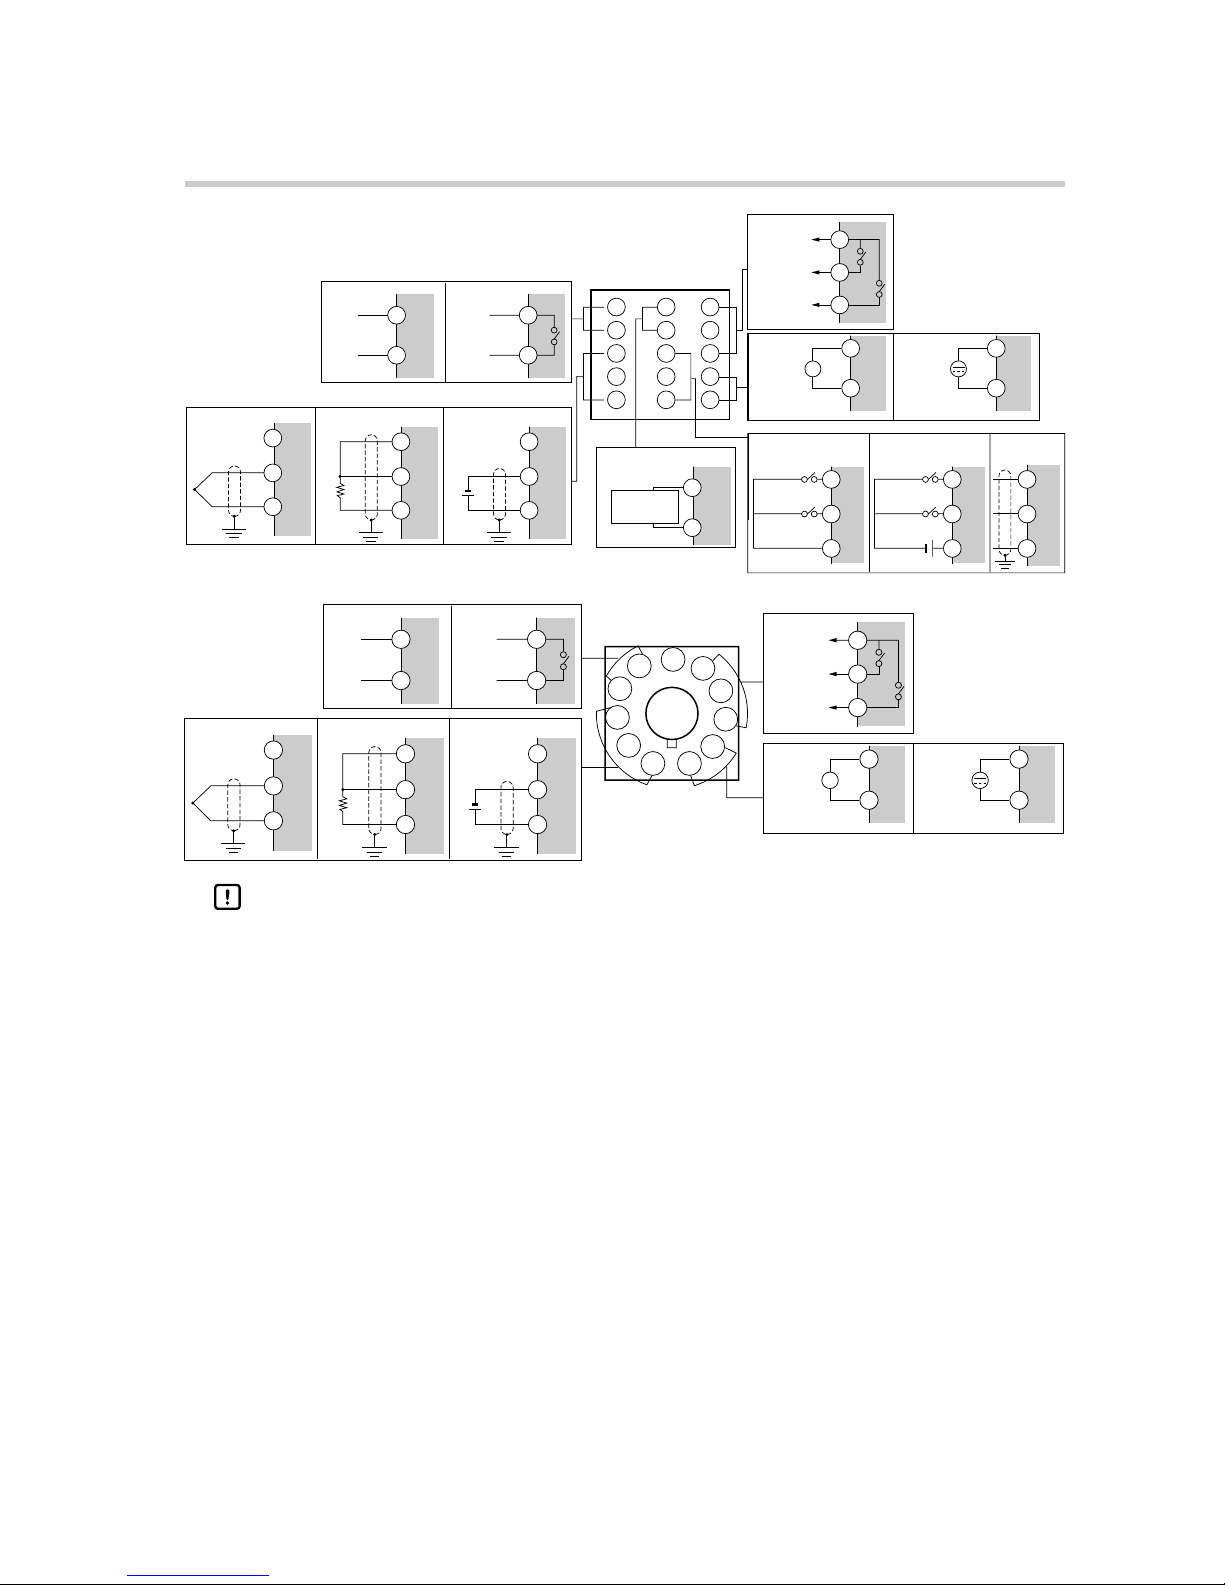
■ Terminal Array and Wiring
Before wiring, or removing/mounting the SDC10, be sure to turn the power
OFF. Failure to do so might cause electric shock.
Do not touch electrically charged parts such as the power terminals. Doing
so might cause electric shock.
WARNING
Page 11
7
● C10T
● C10S
Chapter 4 WIRING
1
2
1
2
6
7
8
4
3
5
4
3
5
C
B
A
4
3
5
1
2
3
4
5
11
12
13
14
15
6
7
8
9
10
11
12
9
10
~
13
15
14
9
10
13
15
14
13
15
14
SG
Voltage output Relay output
+
—
Thermocouple RTD DC voltage input
Current transformer
input
Current
transformer
+
—
+
—
Event output
AC power supply
Non-insulated
external switch input
RSW2
RSW1
Insulated
external switch input
RSW2
RSW1
12/24Vdc
100 to 240Vac
50/60Hz
DC power supply
24Vdc
No polarity
Event 1
Event 2
CPL communications
+
—
Voltage output
Relay output
RTDThermocouple DC voltage input
5
+
4
—
5
4
7
8
9
2
3
1
2
3
1
C
B
A
2
3
1
10
11
~
10
11
1 11
2
3
4
5
6
7
8
9
10
+
—
+
—
Event output
AC power supply
100 to 240Vac
50/60Hz
DC power supply
24Vdc
No polarity
Event 1
Event 2
Handling Precautions
●
Check the model number of the controller and terminal numbers on the label on the side of the
controller to prevent any wiring errors.
●
Use crimped solderless wire connectors for M3.5 screws.
●
I/O signal lines should be routed at least 50cm away from power lines. Also, do not route I/O
leads through the same distribution box or ducts.
●
Crimped solderless wire connectors must not contact other connectors.
●
Do not use unused terminals as relay terminals.
●
Two or more SDC10 series controllers can be connected in parallel by external switch input.
●
The controller can be connected with the Yamatake Corporation SDC20/30/40 series in parallel by non-insulated external switch inputs.
●
Before connecting in parallel to other equipment, first check the conditions of the other equipment.
●
Non-insulated external switch inputs are non-voltage contact inputs. So, use external switch for
small current.
●
Pass a lead wire for carrying the heater current through a current transformer.
Use the controller with the heater current within the specification range (allowable current).
Otherwise, the controller may be damaged.
●
The controller is designed not to function for six seconds after it is turned ON. This is to allow it
to stabilize. The controller then enters the operation mode. However, warm up the controller to
satisfy standard accuracy requirements. Warming up takes about 30 minutes.
Page 12
8
●
Current transformer input cannot be used for 3-phase motors and phase control.
●
Devices and systems to be connected to this unit must have the basic insulation sufficient to
withstand the maximum operating voltage levels of the power supply and input/output parts.
●
Use power supply with reinforced insulation for DC model.
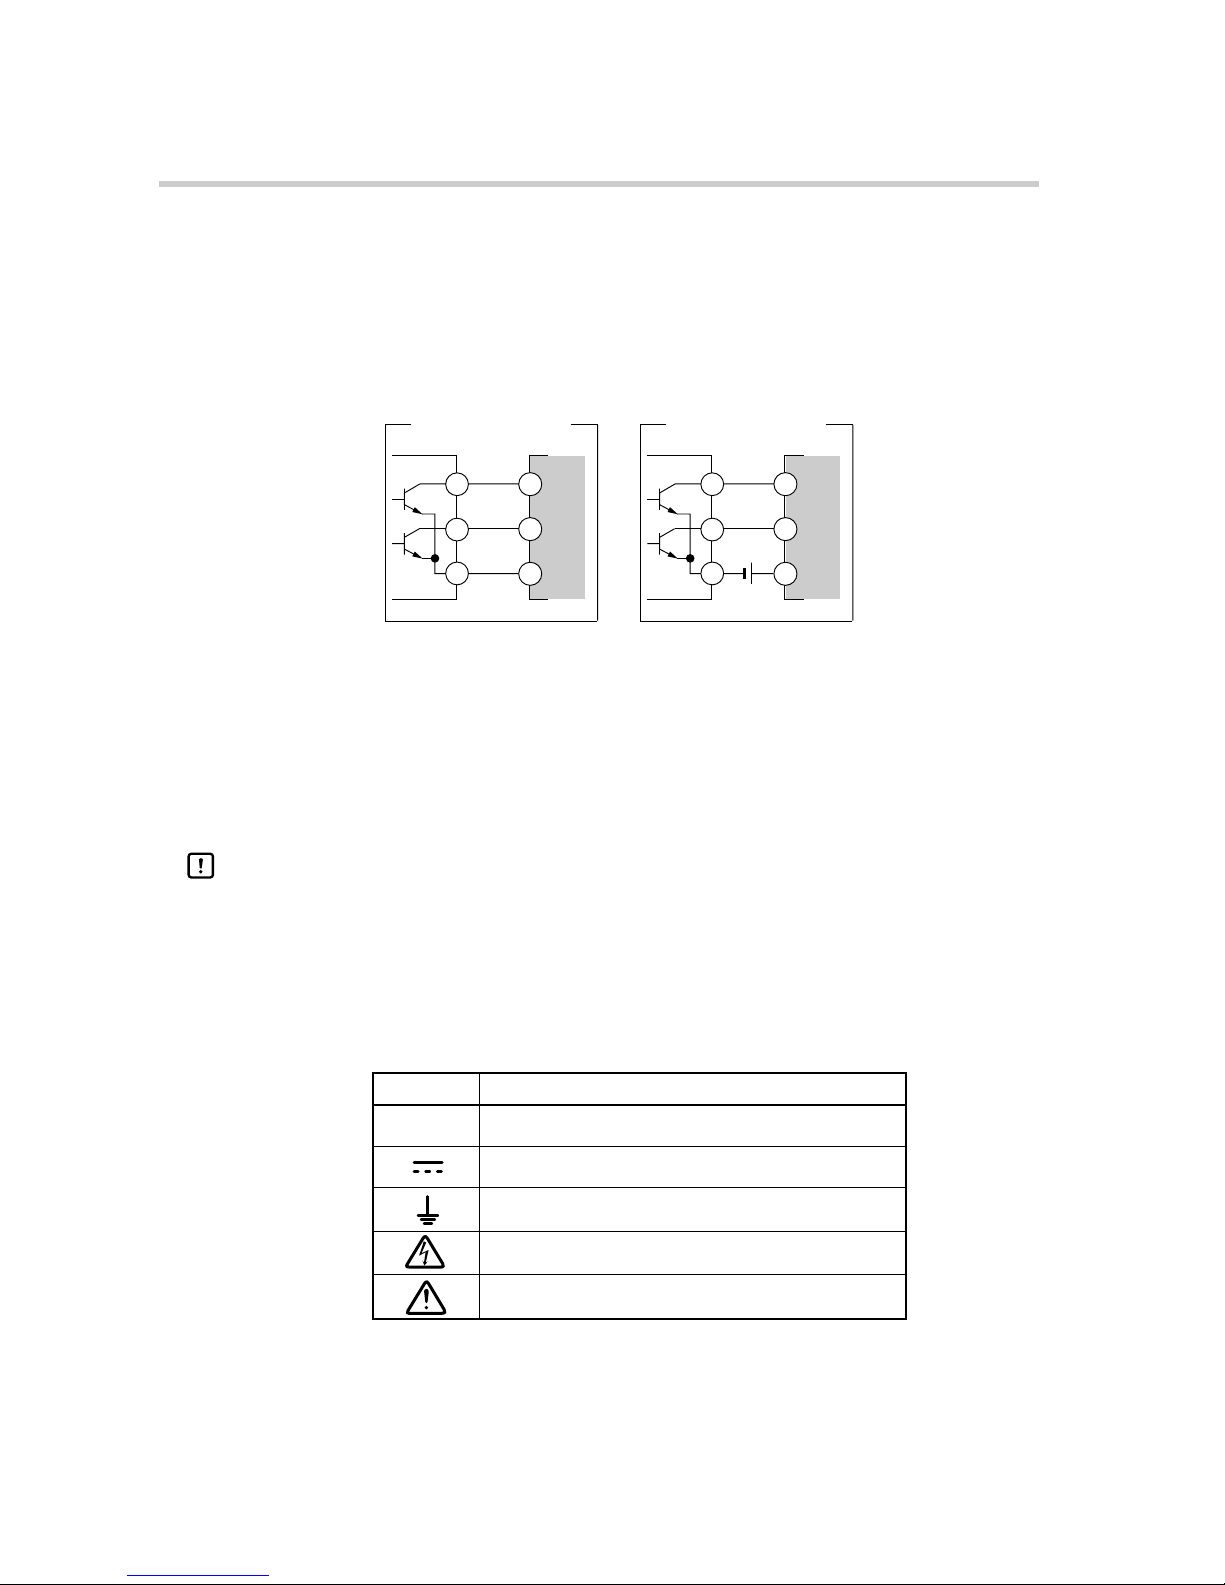
■ How to connect open collector output to external switch inputs
Chapter 4 WIRING
Symbol Description
~
Alternating current
Direct current
Earth (ground) terminal
CAUTION, risk of electric shock
CAUTION
■ Noise Countermeasures
●
Use power from a single-phase control power supply to reduce noise.
●
Install an insulating transformer when power line noise is excessive and use a line
filter.
(model number of Yamatake Corporation line filter: 81446364-001)
●
Use a CR filter to counteract fast-rising noise.
(model number of Yamatake Corporation filter: 81446365-001)
Handling Precautions
●
When noise countermeasures have been taken, do not bundle primary and
secondary cables together or route them through the same distribution box or
ducts.
■ Meanings of Symbols in the Terminal Wiring Label
The following table shows the meanings of symbols in the terminal wiring label on the
instrument top.
15
In the case of a non-insulated type
external switch input
SDC10
14
13
15
In the case of an insulated type
external switch input
SDC10
12/24Vdc
14
13
Page 13

9
RDY
PV
SP
PARA
C
0
3
0
RDY
PV
SP
C
0
3
RDY
PV
SP
C
0
3
1
Procedure
1
How to Set up Data
Numeric values blink for about
2 seconds. During blinking,
the key cannot be
used.
Blinking stops to indicate that
the data has been set.
Enter numeric values with
the keys.
PARA
1
2
3
(Note)
“L O c” is displayed in the lower
display for about 2 seconds to indicate that an incorrect key or data
entry was made. Such entries are ignored.
Chapter 5 INITIAL SETTINGS
Set up the SDC10 according to the following procedure:
See Page
10
11
18
21
21
Step
1
Step
2
Step
3
Step
4
Step
5
Enter the customer settings in the Setup Worksheet
referring to the setup items and the parameter items list.
Set up item settings (in setup mode)
Parameter settings (in parameter mode)
Event value settings (in operation mode)
SP values and start operation (in operation mode)
Carry out initial setup for basic controller operations.
Carry out control constant setup.
Set up SP values and start operation.
RDY
PV
SP
C
0
4
L O c
Page 14

10
Setup Mode Settings and Display Order
• C 0 1 : Key lock
• C 0 2 : Temperature unit
• C 0 3 : Direct/reverse operation
• C 0 4 : Input range
• C 0 5 : Decimal point position
• C 0 6 : PV range lower limit
• C 0 7 : PV range upper limit
• C 0 9 : Lower SP limit
• C 1 0 : Upper SP limit
• C 1 1 : Preset output value
• C 1 2 : Operation mode display
• C 1 3 : Number of SPs used
• C 1 4 : Event 1 type
• C 1 5 : Event 2 type
• C 1 6 : Event operation when
READY
• C 1 7 : External switch input 1
type
• C 1 8 : External switch input 2
type
• C 2 1 : READY key settings
• C 2 2 : Communications address
• C 2 3 : Communications condi-
tions
• C 2 4 : Cold junction compensa-
tion
• C 2 5 : Selection of time-propor-
tional control operation
Parameter Mode Settings and Display Order
• C T R L : Control method
• A T : Auto-tuning
• S P 0 : No. 0 SP value
• S P 1 : No. 1 SP value
• S P 2 : No. 2 SP value
• S P 3 : No. 3 SP value
• P : Proportional band
• I : Reset time
• D : Rate time
• O L : Output limit low
• O H : Output limit high
• R E : Manual reset value
• S B : Self-tuning startup width
• D I F F : Differential gap
• C Y C L : Time-proportional cycle
• P B I A : PV bias value
• H Y S I : Event 1 hysteresis
• D L Y I : Event 1 ON delay time
• H Y S 2 : Event 2 hysteresis
• D L Y 2 : Event 2 ON delay time
• F I L T : PV filter
Operation Mode Display Order
•:Basic display state
• S P
-
0 : No. 0 SP value
• S P
-
1 : No. 1 SP value
• S P
-
2 : No. 2 SP value
• S P
-
3 : No. 3 SP value
• O v T : Manipulated variable
• C T : Current value (CT)
• T 1 : Remaining timer 1 time
• T 2 : Remaining timer 2 time
• e 1 L O : Event 1
(E 1) Lower limit
• E 1 H I : Event 1
Upper limit
• E 2 L O : Event 2
(E 2) Lower limit
• E 2 H I : Event 2
Upper limit
5-1 Overall Operation Flow
The controller enters the Operation mode when power is
turned ON.
Hold down the
PARA
key for three seconds to change modes,
and use this key to move setup items between modes.
Items that are shaded are not displayed depending on the setup or installed options.
Chapter 5 INITIAL SETTINGS
RDY
PV
SP
2 0
0
0
RDY
PV
SP
e
1 l
O
0
e 2 h 1
RDY
PV
SP
PARA
PARA
PARA
RDY
PV
SP
C T R L
RDY
PV
SP
1 0
S d C
C Y C L
d
L Y
1
S
P
1
0
5
RDY
PV
SP
0
RDY
PV
SP
PARA
PARA
PARA
RDY
PV
SP
0
PARA
0
RDY
PV
SP
0
RDY
PV
SP
PARA
PARA
PARA
RDY
PV
SP
0
C 0 1
C
0 2
C
2 1
Power ON
This value is displayed
for 6 seconds.
No key operation for
1 minute or more.
No key operation for
1 minute or more.
PARA
Hold down the
key for
3 seconds.
PARA
Hold down the
key for
3 seconds.
PARA
Hold down the
key for
1 second.
Operation mode Setup modeParameter mode
PV/SP value normal display mode
key
key
key
key
key
key
key
key
key
key
Page 15

11
5-2 Setup Items
This section describes how to set the controller to the Operation mode after it is first
mounted in instruments. Before this controller is first used, the input range, event operation type and other operating conditions matched to the desired instrument application
must be set. This is referred to as “setup.”
If this controller is already mounted in instruments and the setup is already completed,
proceed to the next chapter.
The following shows the initial settings in basic controller operation:
Handling Precautions
The alarm code and blinking to indicate self-tuning or auto-tuning in progress are
not displayed while moving to the setup mode.
C
0
1
RDY
PV
SP
1 0
S d
C
RDY
PV
SP
S d
C
RDY
PV
SP
1 0
2
0
RDY
PV
SP
1 0
2
0
RDY
PV
SP
0
C t
R L
RDY
PV
SP
0
C
0
4
C
0
4
RDY
PV
SP
3
RDY
PV
SP
5
Entering the setup mode
Procedure
Operation mode
Parameter mode
Setup mode
Operation mode
Power ON
The initial screen is displayed
for about 6 seconds.
The operation mode is
displayed.
Hold down the key for
3 seconds to advance to the
parameter mode.
The setup mode is displayed.
PARA
PARA
Hold down the key for
3 seconds to advance to the
setup mode.
PARA
Press the key to scroll
the selection.
PARA
Hold down the key for
3 seconds or wait 1 minute.
Press the , and
keys to set the numeric value.
To return to the operation mode
Example:
Current PV value
Current SP value
C 0 4
(input range)
Current PV value
(in the operation mode)
Change the input range from
"K 0 to 400°C" to "J 0 to 800°C".
Item setting value
(default
3
: K 0 to 400°C)
Change to
5
. The value blinks for
2 seconds before it is fixed.
(
5
: J 0 to 800°C)
Current SP value
1
2
3
4
5
6
7
Chapter 5 INITIAL SETTINGS
Page 16

12
Function
Prompt
C 0 1 Key lock
C 0 2 Temperature
unit
C 0 3 Control output
direction
C 0 4 Input type and
range
C 0 5 Decimal point
position
C 0 6 PV range
lower limit
C 0 7 PV range
upper limit
C 0 9
SP lower limit
C 1 0
SP upper limit
C 1 1
Manipulated
variable when
READY mode
or Alarm occur
0: Key lock not engaged
1: Key lock engaged for items other than SP
value, SP set selection, event value,
RDY
key
and AT
2: Key lock engaged for items other than SP
value, SP set selection and
RDY
key
3: Key lock engaged for all items
0: °C
1: °F
0: Reverse operation (heat control)
1: Direct operation (cooling control)
Thermocouple input range
1: K 0 to 1200°C 0 to 2200°F
2: K 0 to 600°C 0 to 1100°F
3: K 0 to 400°C 0 to 700°F
4: K -200 to +400°C -300 to +700°F
5: J 0 to 800°C 0 to 1500°F
6: J -200 to +400°C -300 to +700°F
7: E 0 to 600°C 0 to 1100°F
8: T -200 to +400°C -300 to +700°F
9: DIN U -200 to +400°C -300 to +700°F
10: DIN L 0 to 800°C 0 to 1500°F
11: R 0 to 1600 °C 0 to 3000°F
12: S 0 to 1600°C 0 to 3000°F
RTD input range
21: Pt100 -200 to +500°C -300 to +700°F
22: Pt100 0 to 200°C 0 to 300°F
23: Pt100 0.0 to 200.0°C 0.0 to 300.0°F
24:JPt100 -200 to +500°C -300 to +700°F
25:JPt100 0 to 200°C 0 to 300°F
26:JPt100 0.0 to 200.0°C 0.0 to 300.0 °F
27: Pt100 -50 to +100°C -50 to +150°F
28: Pt100 -50.0 to+100.0°C -50.0 to+150.0°F
29:JPt100 -50 to +100 °C -50 to +150°F
30:JPt100 -50.0 to+100.0°C -50.0 to+150.0°F
DC voltage input range
42: 1 to 5Vdc
43: 0 to 5Vdc
44: 0 to 1Vdc
0: Decimal point not displayed (XXXX)
1: Decimal point No.1 display (XXX.X)
2: Decimal point No.2 display (XX.XX)
3: Decimal point No.3 display (X.XXX)
-1999 to +9999
-1999 to +9999
Setting range : PV range lower limit to SP upper
limit
Setting range : SP lower limit to PV range upper
limit
Setting range : 0 to 100% (no decimal point)
0
0
0
3
22
43
0
0
1000
Range
Min.
Range
Max.
0
Key lock can be
canceled anytime
Factory
Setting
Function Selections and Setting Range
Remarks
Displayed on DC voltage
input models only
Displayed on DC voltage
input models only
Displayed on DC voltage
input models only
(Applied alarm code
A L 0 1, 0 2 , 0 3 , 7 0,
9 8)
Chapter 5 INITIAL SETTINGS
● List of setup items
Page 17

13
C 1 2 Operation
mode
C 1 3
Number of SPs
used and
display
method
C 1 4 Event 1
operation type
C 1 5 Event 2
operation type
C 1 6 Event opera-
tion in READY
mode
C 1 7 External switch
input 1 operation type
C 1 8 External switch
input 2 operation type
C 2 1
RDY
key
setting
Displayed on event
output model
Displayed on event
output model
Displayed on event
output model
Displayed on external
switch input model.
All operation types are
alternated.
Do not set the same
operation type No. to
external inputs 1 and 2.
(excluding 1: SP
switching)
When “1” (SP switching) is set for both C17
and C18, the four SP
values can be
switched.
RDY
key cannot be
operated when same
functions as external
switch input have been
set.
Function
Prompt
Function
Remarks
Factory
Setting
Selections and Setting Range
1st digit 0: Displays both SP and PV values
1: Displays SP value only
2: Displays PV value only
2nd digit 0: Does not display manipulated variable
1: Displays manipulated variable
3rd digit 0: Displays event settings or heater current value
1: Does not display event settings or heater current value
2: Does not display heater current only
4th digit 0: Displays time remaining of event timers/ Displays heater current and
event setting with a resolution of 1A
1: Does not display time remaining of event timers/ Displays heater current
and event setting with a resolution of 1A
2: Displays time remaining of event timers/ Displays heater current and
event setting with a resolution of 0.1A
3: Does not display time remaining of event timers/ Displays heater current
and event setting with a resolution of 0.1A
See page 14.
See page 15.
See page 15.
0: Operation continued in READY mode
1: Event output OFF in READY mode
0000
0000
0
0
0
0
Chapter 5 INITIAL SETTINGS
0000
0: Disabled
1: Switches between RUN and READY
2: Event latch canceled
3: Auto-tuning start/stop
4: SP value switching (two to four SP values)
Valid when the 1st digit of the number of SP
sets C13 is “1” or more.
Description
0:No operation
1:Switches between
No.0 SP and No.1
SP
2:Switches between
RUN and READY
3:Event 1 timer
operation
4:Event 2 timer
operation
5:Event 1 latch
canceled
6:Event 2 latch
canceled
7:Auto-tuning starts/
stops
Operation
when ON
No.1 SP
READY
Timer
activated
Timer
activated
Latch
canceled
Latch
canceled
Started
Operation
when OFF
No.0 SP
RUN
Timer reset
Timer reset
Latch
enabled
Latch
enabled
Stopped
C12
0000
1st digit
2nd digit
3rd digit
4th digit
Page 18

14
Function
Prompt
C 2 2 Communica-
tions address
C 2 3 Communica-
tions conditions
C 2 4 Cold junction
compensation
C 2 5 Selection of
time-proportional control
operation
0 to 127
0: 9600bps, 8bits, even parity, 1 stop bit
1: 9600bps, 8bits, no parity, 2 stop bit
2: 4800bps, 8bits, even parity, 1 stop bits
3: 4800bps, 8bits, no parity, 2 stop bits
0: Yes
1: No
0: Priority given to controllability
1: Priority given to life of control target (only
1 ON/OFF operation within the timeproportional cycle)
0
0
0
0
Displayed on communications
model only
Communications disabled
when set to “0”
Displayed on communications
model only
Thermocouple input model
only
If a large fluctuation of the
manipulated variable occurs
during the time-proportional
cycle when this item is set to
“0”, control follows this
fluctuation. For this reason,
control may be turned ON and
OFF several times within the
cycle.
Factory
Setting
Function Selections and Setting Range
Remarks
Display of Front Panel LED (SP1)
*See SP1 Lighting Pattern Table.
SP No. Display in
Operation Mode
Change of SP Value during
Selection (in Operation mode)
Chapter 5 INITIAL SETTINGS
C13 (number of SPs used and display method) Setting
1st digit: Number of SPs used
This digit sets the number of SP values that are used.
Setting Number of SPs Used
01
12
23
34
2nd digit: Display/change method
Setting
0 OFF Disabled Pattern 1
1 ON Disabled Pattern 1
2 OFF Enabled Pattern 1
3 ON Enabled Pattern 1
4 OFF Disabled Pattern 2
5 ON Disabled Pattern 2
6 OFF Enabled Pattern 2
7 ON Enabled Pattern 2
• SP No. display in Operation mode
This setting selects whether or not to display the SP No. (SP0 to SP3) in the Operation mode.
• Change of SP value during selection
This setting selects whether or not to enable changing of the currently selected VP value.
• Display of front panel LED (SP1)
This setting is for distinguishing which SP value is currently selected by the lit/blinking state of
the front panel LED (SP1).
C13
0000
1st digit
2nd digit
3rd digit
4th digit
Page 19

15
ON
delay
—
x
Event Settings
Enable/Disable
Related Settings
Hyster-
esis
—
x
E1 or E1 Low
(E2) (E2 High)
E1 High
(E2 High)
C14 and C15 Settings
4th digit 3rd digit 2nd digit 1st digit
—
—
—
E1 Low to 9999
(E2 Low)
—
—
0 to 9999
E1 Low to 9999 (A)
(E2 Low)
—
—
—
-1999 to +9999
-1999 to +9999
-1999 to +9999
(E2 High)
-1999 to +9999
-1999 to +9999
0 to 9999
-1999 to E1 High (A)
(E2 High)
-1999 to +9999 (A)
1 to 9999 (s.)
0:No
1:PV upper limit
alarm
2:PV lower limit
alarm
3:PV upper and
lower limit alarms
4:Deviation upper
limit alarm
5:Deviation lower
limit alarm
6:Deviation upper
and lower limit
alarms
7:Heater line break/
overcurrent alarm
8:Control device
short-circuit alarm
9:Timer
0:No
1:Standby
2:Latch
3:Standby
and latch
4:Non
5:Standby
at chang-
ing SP
0:Direct
1:Reverse
Controller
alarm
0:No
1:Yes
(See note)
Chapter 5 INITIAL SETTINGS
Front Panel LED (SP1) Lighting Pattern
Pattern 1 Pattern 2
No.0 SP Selected Out Out
No.1 SP Selected Lit Lit
No.2 SP Selected Blinks twice Lit
No.3 SP Selected Blinks 3 times Lit
C14 and C15 settings
Digit settings: Enable/Disable
(Note) • When the event operation type is set to timer, set digits 2, 3 and 4 to “0”.
• When the controller fault alarm (4th digit) is set, the controller fault alarm
operates directly at all times.
Page 20

16
2nd Digit 1st Digit Event Description Remarks
00No
0 1 PV upper limit
alarm
0 2 PV lower limit
alarm
0 3 PV upper and
lower limit alarms
0 4 Deviation upper
limit alarm
0 5 Deviation lower
limit alarm
0 6 Deviation upper
and lower limit
alarms
0 7 Heater line break/
overcurrent alarm
0 8 Control device
short-circuit alarm
0 9 Timer
See
note 1
See
note 2
See
note 2
HyS
E1
PV
ON
OFF
HyS
E1Hl
PV
HyS
E1Lo
ON
OFF
PV
HyS
SP+E1
ON
OFF
HyS
SP+E1
PV
ON
OFF
Note 1 Set a negative value as the lower deviation limit (E1). If a positive value is set, a temperature
higher than the SP value will be used as the operating point.
Example: Enter “-10” to set an operating point of SP-10°C
Note 2 Heater line break/overcurrent and control device short-circuit alarm.
Models with a current transformer input detect heater line breaks, overcurrent conditions
and control device short-circuit alarms by input from the current transformer.
• Heater line break/overcurrent alarm (operation type: 7)
Heater line break: This alarm is activated when the current at control output ON is
lower than the event setting (Ex Low). Set Ex High to “9999” to
disable the overcurrent alarm.
Overcurrent: This alarm is activated when the current is higher than the event
setting (Ex High) when the control output is ON. Set Ex Low to
“1999” to disable the heater line break alarm.
• Control device short-circuit alarm (operation type: 8)
This alarm is activated when the current is higher than the event setting (Ex) when control
output is OFF.
Note ● The current display ( C t ) in the operation mode indicates the current value when the
control output is ON. This displayed current value is not updated when control output
is OFF and for 300ms after control output changes to ON.
Detection of the current value is not updated for 300ms after the current output state
changes.
1
Event operation type setting, direct/reverse operation
Chapter 5 INITIAL SETTINGS
HyS
E1
PV
ON
OFF
PV
HyS
E1Hl
HyS
E1Lo
ON SP
OFF
HyS
E1Hl
Current
HyS
E1Lo
ON
OFF
HyS
E1
Current
ON
OFF
RSW
Time
Time
ON
External contact input
OFF
ON
Event operation
OFF
E1
Page 21

17
● The following shows an example of how to set the event setting during detection of a
line break.
Calculate the event setting using the heater current value at control output ON (monitor the displayed CT value) and heater current value at control output OFF (cannot be
measured on the product) according to the following equation:
Event setting = {(heater current value at control output ON) + (heater current value at
control output OFF)}/2
2
Direct/reverse setting (C14 and C15 2nd digit setting)
The direct/reverse setting is used to reverse (invert an ON/OFF relationship) the operation of the event set
on the 1st digit. (0: Direct, 1: Reverse)
Handling Precautions
● Direct operation of the PV upper limit alarm and deviation upper limit alarm is the
same as the reverse limit of PV lower limit alarm and deviation lower limit alarm operation.
Example: Event operation type setting (1st digit): 3 (PV upper and lower limits)
Direct/reverse operation setting (2nd digit): 1 (reverse)
● When using the heater line break/overcurrent and control short-circuit alarm, set
the area to 3A or more.
3
Additional function settings (C14 and C15 3rd digit setting)
Standby and latch operations can be added as additional functions to an event operation type set on the 1st
digit.
Settings 0: No
1: Standby
2: Latch
3: Standby and Latch
4: Non
5: Standby at changing SP
Note ● Standby
The standby function prevents an event from turning ON, even when the ON condition of that event is satisfied at controller power ON or when the READY mode changes
to the RUN mode.
Event output is activated when an ON condition is satisfied after an OFF condition
has been satisfied. The standby state occurs at power ON when the PV value is the
shaded area.
● Latch
Once event output is ON, the latch function holds an event in the ON state even when
an OFF condition is satisfied. Follow the procedure below to reset the latch state.
Chapter 5 INITIAL SETTINGS
● When using the PV, deviation upper/lower limit and heater line break/overcurrent and
control device short-circuit alarm, set HYS so that the OFF point is not lost.
ExLo
ExHI
PV
ON
OFF
HyS
HyS
(bad example) (correct setting)
HyS HyS
ExLo ExHI
PV
ON
OFF
ExHI
HySHyS
ExLo
ON
OFF
PV
Page 22

18
RDY
PV
SP
1 0
S d
C
RDY
PV
SP
S d
C
RDY
PV
SP
1 0
2
0
RDY
PV
SP
0
C t
R L
RDY
PV
SP
1 0
2
0
RDY
PV
SP
1
C t
R L
Operation mode
Operation mode
Parameter mode
PARA
PARA
PARA
Procedure
Power ON
This initial screen is displayed
for about 6 seconds.
The operation mode is
displayed.
Hold down the key for
3 seconds to advance to the
parameter mode.
The parameter mode is
displayed.
Use the , and
keys to enter numeric values.
To set other items, press the
key to display the item
and enter numeric values as
described in Step 4 above.
Hold down the key for 3
seconds twice or wait 1 minute.
Example:
Change the control method
from "ON/OFF control" to "selftuning".
Current PV value
Current SP value
C T R L
is displayed
0
is displayed
(default: ON/OFF operation)
Change to
1
( 1: self-tuning)
The digit that is changed blinks for
about 2 seconds. Blinking stops
when the value is fixed.
Current PV value
(in the operation mode)
Current SP value
1
2
3
4
5
6
Chapter 5 INITIAL SETTINGS
1.Set “Latch Cancel” to the external switch input to turn the external switch ON.
2.Reset the additional event setting function (by setting the 3rd digit on C14 and C15 to “0”).
3.Turn the power OFF and back ON again.
4.Set “Latch Cancel” to the
RDY
key, and hold down the
RDY
key for at least one second.
Handling Precautions
Latch Cancel by the
RDY
key is enabled for both events 1 and 2. External switch input is
valid individually for events 1 and 2.
4
Controller alarm setting (C14 and C15 4th digit setting)
This function turns ON an event when a controller alarm code (AL01, AL02, AL03, AL70, AL97 and
AL98) is generated regardless of the direct/reverse setting of the operation mode. OR logic can be set on
the 1st digit of the event operation type.
Setting: 0: Disable
1: Enable
5-3 Parameter Settings
Control parameter settings are shown below.
Page 23

19
C T R L Control method
A T Auto-tuning
S P 0 No.0 SP value
S P 1 No.1 SP value
S P 2 No.2 SP value
S P 3 No.3 SP value
P Proportional band
I Reset time
D Rate time
O L Output limit low
O H Output limit high
R E Manual reset value
S B Self-tuning startup
width/correction
width setting
D I F F Differential gap
C Y C L Time-proportional
cycle
P B I A PV bias value
H Y S 1 Event 1 hysteresis
D L Y 1 Event 1 ON delay
time
H Y S 2 Event 2 hysteresis
D L Y 2 Event 2 ON delay
time
F I L T PV filter
0
0
0 (0.0)
0 (0.0)
0 (0.0)
0 (0.0)
5.0
120
30
0
100
50
2
(or 2.0)
°C/°F
0.5%
(%F.S.)
5 (0.5)
10
0 (0.0)
5
(0.5)
0
5
(0.5)
0
0.0
Function
Prompt
0: ON/OFF control
1: Self-tuning
2: Control by PID fixed values
0: Stop
1: Start
Same as normal SP value or SP limit value
range
0.1 to 999.9%
0 to 3600 s
0 to 1200 s
0% to Output limit high
Output limit low to 100%
0 to 100%
Thermocouple/RTD input:
0 to 5 (or 0.0 to 5.0) °C/°F
DC voltage input
0.0 to 3.0% (%F.S.)
1 to 250 ( or 0.1 to 25.0)
5 to 120 s (relay output)
1 to 120 s (voltage output)
-1999 to +9999 (or -199.9 to +999.9)
0 to 9999 (or 0.0 to 999.9)
0 to 9999 s
0 to 9999 (or 0.0 to 999.9)
0 to 9999 s
0.0 to 20.0 s
Function
Remarks
Factory
Setting
Selections and Setting Range
Displayed when
C T R L
(control method) is set
to
1 or 2 .
Normally, setting is not
required when C T R L
(control method) is set
to
1 (self-tuning).
Displayed when 1st digit
of
C 1 3 is "1" to "3"
Displayed when 1st digit
of
C 1 3 is "2" or "3"
Displayed when 1st
digit of
C 1 3 is "3"
Displayed when
C T R L
= 1 or 2
C T R L = 0
Displayed when
C T R L
= 1 or 2
Displayed on event
output model and when
value of 1st digit of event
type setting (
C 1 4 or
C 1 5) is 1 to 8
Chapter 5 INITIAL SETTINGS
● List of parameters
Page 24

20
Chapter 5 INITIAL SETTINGS
PV
PV
Time
ON
OFF
ON delay time
Event setting
Event output
● Self-tuning Startup Width Setting
Any deviation width (S b) for startup can be set as a startup condition of self-tuning.
Startup width (S b) is set in the parameter settings. Setting the startup width to “0” disables (self-tuning is started only when the SP value changes) self-tuning by deviation.
The startup width (S b) is set to “0” in the following applications:
- In the case of interference control targets (e.g. instruments that are easily influenced by
changes in the temperature of adjacent (up, down, left, right) zones
- In the case of control targets where disturbance is generated intermittently (e.g. packaging equipment)
SP value
PV value
Startup width (sb)
Self-tuning startup
Note Event ON delay
An event operation whose condition (exceeding an upper temperature limit, for
example) has been satisfied is not activated until a set time has elapsed.
Page 25

21
Example:
Set
E 1
in operation mode.
RDY
PV
SP
1 0
RDY
PV
SP
S d
C
RDY
PV
SP
1 0
5
0
2
0
RDY
PV
SP
0
E
1
RDY
PV
SP
5 0
RDY
PV
SP
1 0
2
0
RDY
PV
SP
RDY
PV
SP
E
1
Operation mode
PARA
PARA
Procedure
Power ON
The initial screen is displayed
for about 6 seconds.
The operation mode is
displayed.
Press the key several
times to scroll the selection.
Use the , and
keys to enter numeric values.
Hold down the key
until the PV and SP values are
displayed.
Current PV value
Current SP value
E 1
(event 1 setting) is displayed.
The digits that are changed blink
for about 2 seconds. Blinking stops
when the value is stored.
Current PV value
Current SP value
Set event 2 by the same procedure.
1
2
3
4
5
RDY
PV
SP
1 0
RDY
PV
SP
S d C
2 0
RDY
PV
SP
1 0
2
0
0
2 0
RDY
PV
SP
2 0 0
2 0
RDY
PV
SP
Operation mode
Example:
Change the SP value in the
basic display state in the
operation mode.
PARA
Procedure
Power ON
The operation mode is
displayed.
Use the , and
keys to enter numeric values.
Hold down the key
until the PV and SP values are
displayed.
Current PV value
Current SP value
Change the SP value.
The digits that are changed blink
for about 2 seconds. Blinking
stops when the value is stored.
Current PV value
Current SP value
1
2
3
4
The initial screen is displayed
for about 6 seconds.
Chapter 5 INITIAL SETTINGS
5-4 Event Settings (only with option installed)
5-5 SP Setting
The following shows how to set an SP value.
Page 26

22
Upper
display:
PV
Lower
display:
SP
S P - 0
S P - 1
S P - 2
S P - 3
O V T
C T
T 1
T 2
E 1
(E 1 L O)
E 1 H I
E 2
(E 2 L O)
E 2 H I
Normal display
mode
SP No. and SP
value displayed
Manipulated variable
displayed
Current (Ct) displayed
Timer event 1
remaining time
displayed
Timer event 2
remaining time
displayed
Event 1 (lower limit)
setting
Event 1 (upper limit)
setting
Event 2 (lower limit)
setting
Event 2 (upper limit)
setting
Function
Prompt
SP: upper and lower SP limit
Settings can be made in the
C 0 9 to C 1 0 range
Not settable
Not settable
Not settable
Not settable
Depends on event 1 operation
type
See pages 10 to 12 for details
Depends on event 2 operation
type
See pages 10 to 12 for details
Function
Remarks
Selections and Setting Range
0 Upper display (PV):
Displays
C 1 2 = XXX0, XXX2
Lower display (SP):
Displays
C 1 2 = XXX0 , XXX 1
SP No. switched by
keys.
(See note 1)
— Displays
C 1 2 = XX 1X
ON/OFF control:
“0.0” is displayed at OFF
“100.0” is displayed at ON
PID control:
Values in 0.0 to 100.0 (%)
range displayed
—
C 1 2 = X0XX is displayed on CT
model
Measurement range: 0 to 55 A
Event operable range: 3 to 50 A
Lights when control output is
300ms or more (See note 2).
— Displays
C 1 2 = 0XXX
(See note 3)
— Displays C 1 2 = 0XXX
(See note 3)
0 Displays
C 1 2 = X0XX
Displays settings
C 1 2 = 1 to 9
0 E 1 : Sets either upper or lower
limit. Displayed at event
0
E 1 L O, E 1 H I:
Displayed at events requiring upper/lower limit setting
Factory
Setting
0
Chapter 5 INITIAL SETTINGS
■ List of Operation modes
(Note 1) This value cannot be changed when SP switching by external switch input is
selected.
(Note 2) This value blinks when control output is OFF or ON at 300ms or less. During
blinking, the displayed CT value cannot be changed.
(Note 3) This value is displayed by timer events set in the event and by the operation
type of the external switch input set to the timer start setting. As long as timer
operation continues, the time elapsed after the occurrence of the event is
displayed within the range 0 to -1999 seconds.
Page 27

23
● How to Switch the SP Value
Up to four SP values can be switched by the following three methods:
1
By SP No.
2
By the
RDY
key
3
By external switch input
1
By SP No.
If the value of the 2nd digit of setup item C 1 3 is set to an odd-number (1, 3, 5, 7),
pressing the
PARA
key in the operation mode displays the SP Nos. “S P - 0” through
to “S P - 3” on the upper display.
Pressing the , keys in this state changes the SP No. in the upper display, and
switches the SP value.
The SP No. is not displayed if the value of the 2nd digit of setup item C 1 3 is set to an
even-number (0, 2, 4, 6).
2
By the
RDY
key
If the value of setup item C 2 1 is set to “4”, the SP value can be switched by the
RDY
key. Holding down the
RDY
key for at least two seconds switches the SP No.
S P 0 → S P 1 → S P 2 → S P 3 → S P 0 and so forth.
3
By external switch input (optional function)
If the values of both setup items C 1 7 and C 1 8 are set to “1” (SP switching), the four
SP values can be switched according to the ON/OFF states of the two external switch
inputs.
External External Selected SP
Switch Input 1 Switch Input 2
Set 1 OFF OFF → No.0 SP
Set 2 ON OFF → No.1 SP
Set 3 OFF ON → No.2 SP
Set 4 ON ON → No.3 SP
Chapter 5 INITIAL SETTINGS
Upper display: SP No.
Lower display: SP value
RDY
PV
SP
1 0 0
S p
_
1
RDY
PV
SP
Page 28

24
Chapter 6 TUNING
6-1 Selecting the Control Method
The SDC10 is provided with three types of control method. Select the desired method
according to the C t R l (control method) setup in parameter items.
0. ON/OFF control
1. Self-tuning : This control method automatically changes control constants when SP is changed, or disturbance
occurs.
2. Control by PID fixed values : Control follows fixed PID values set by auto-tuning or manual operation.
6-2 Self-tuning
The controller can be self-tuned by setting the control method to self-tuning ( C t R l =
1).
Tuning is automatically started and control constants are changed by the following op-
eration or when a change in state occurs in this state.
1
Start by SP change
Start conditions:
• Initial start (*1) SP change of ±10%FS (*2) or more
• 2nd start onwards SP change of ±5%FS or more
*1 “Initial start” refers to initial tuning after the C t R l setting is set to 1.
*2 “FS (full-scale)” refers to the width between the upper and lower temperatures set
by range code (setup item C04).
Example: ±10%FS when the range is -200 to +400°C becomes:
600 (°C) x 10 (%) = 60 (°C)
2
Start by generation of deviation
Startup conditions:
• When the difference between SP and PV is sb or more
* sb: Self-tuning startup width. This is set in the parameter items.
3
Start by power ON or mode change from READY to RUN
Start conditions:
• When the power is turned ON with the difference between SP and PV at ±sb or
more, or the mode is changed from READY to RUN
Self-tuning display
The lower right LED after the 1st digit in the upper display blinks when the self-tuning
function is ON. The LED goes out when learning ends and control constants are stored.
2 5 0
1 2
0
RDY
PV
SP
LED
Page 29

25
● Startup method
● Stop method
Change C t R l from 1 to 2. This fixes the PID values. PID values can also be changed
by key entry.
6-3 Cautions During Self-tuning
Observe the following when using the self-tuning function:
• Turn heaters or other control devices ON before turning the controller ON.
• To turn a control device OFF, set the controller to the READY mode. When turning a
control device back ON again, set the controller to the RUN mode.
• When the power is turned OFF during self-tuning while the LED blinks, the control
constants used during tuning are not stored in controller memory.
If any of the above mistakes have been made, unsuitable control constants are stored to
memory, which may result in unexpected control. If this happens, follow the procedure
below to reset the controller.
RDY
PV
SP
0
C t
R L
RDY
PV
SP
0
2
0
RDY
PV
SP
2 0 0
5
0
RDY
PV
SP
1
C t
R L
Parameter mode
Operation mode
PARA
PARA
Check that the control device
(heater, etc.) is ON and in an
operating state.
Hold down the key for
3 seconds to advance to the
parameter mode.
The parameter mode is
displayed.
Use the , and
keys to enter numeric values.
Hold down the key for
3 seconds twice to advance to
the operation mode.
Use the , and
key to set the SP value to the
desired temperature.
Self-tuning is automatically started for PV value
disturbances and SP changes whenever necessary.
Procedure
C T R L
is displayed.
0
is displayed.
(default: ON/OFF operation)
The
C T R L
value changes from
0
to 1.
Self-tuning starts (LED starts
blinking) simultaneously with SP
value input.
When SP reaches the PV value,
tuning stops and the LED goes out
to indicate that self-tuning has
stopped.
1
2
3
4
5
6
Chapter 6 TUNING
Page 30

26
Chapter 6 TUNING
• Use auto-tuning.
For details on how to use auto-tuning, see “6-4 Auto-tuning.”
• Reset the PID values, and resume self-tuning.
Set parameter item C t R l (control method) to “2”.
Reset the PID values to the factory settings (P = 5.0, I = 120, d = 30).
Set C t R l to “1”, and resume self-tuning.
Handling Precautions
● In the Case of Interference Control Targets
Control targets may be located to the left or right (above or below), and response may slow down as a result of mutual tuning being adversely affected by
respective changes in temperature.
If this happens, either use control by fixed PID values (C t R l = 2), or set
parameter item (S b) to “0”.
● In the Case of Control Targets Where Disturbance Is Generated Intermittently
Tuning results are sometimes adversely influenced when tuning control targets
where intermittent temperature drops occur (e.g. during sealing on packaging
machines).
If this happens, either use control by fixed PID values (C t R l = 2), or set
parameter item (S b) to “0”.
6-4 Auto-tuning
Use the auto-tuning function in the following instances:
• To automatically calculate PID constants by control by fixed PID value (C t R l = 2)
• When startup is slow in self-tuning control
• When response startup is slow in self-tuning control
The auto-tuning function can be used in either of self-tuning control (C t R l = 1) or
control by fixed PID values (C t R l = 2).
● Procedure
Hold the
PARA
key down for at least 3 seconds in the RUN mode and with the SP
value set to enter the parameter setup mode.
Press the
PARA
key with C t R l set to “1” or “2”.
A t (auto-tuning) is displayed. Set “1”.
If “1” is already set, set to “0” then back to “1”.
Auto-tuning can also be stopped by using the external switch input function. To forcibly
cancel auto-tuning midway, either set A t to “0”, or set the controller to the READY
mode.
Auto-tuning indication
The lower right LED after the 1st digit in the lower
display blinks when the auto-tuning function is ON.
The LED goes out when tuning ends.
2 5 0
1 2 0
RDY
PV
SP
LED
1
2
3
1
2
3
Page 31

27
Phenomenon Remedy
Slow startup time
Slow response
PV value fluctuates
Tuning does not end. PV value
fluctuates with a 2°C or more
error between SP and PV value.
Tuning does not end. PV value is
stable but PV does not end.
Large overshoot
Control signals repeatedly turn
ON and OFF more than necessary.
Handling Precautions
● Auto-tuning does not function normally unless the control target is connected.
● The auto-tuning time from start to finish varies according to the control target.
● When auto-tuning is executed, control is suspended, and 0 to 100% output is
repeated several times. If this hinders operation, manually set the PID values.
● Sometimes suitable PID values cannot be obtained according to the control
target. If this happens, manually set the PID values.
The following describes auto-tuning operation:
Operation when the difference between SP and PV values is 10% FS or more and
SP>PV
At startup, operation stabilizes at a temperature of about (SP - PV)/2
↓
The temperature rises again and reaches SP.
↓
Auto-tuning ends when stability is achieved.
Operation when the difference between SP and PV values is 10% FS or less and
SP<PV
Cycling is repeated around the SP value.
↓
Auto-tuning ends when stability is achieved.
Chapter 6 TUNING
TimeSP
Temperature
Execute auto-tuning.
Set
C T R L to “2”, reset PID
values to factory settings,
and set
C T R L to “1” to
execute self-tuning.
Reduce the value of time-
proportional cycle (
C y C L ).
Set the value of PV filter (parameter item) to “1.0” to “2.0”.
Operation ends though it takes
a long time. The slower the
response of the control target,
the longer tuning takes.
Temperature
Time
SP
2
SP-PV
6-5 Control Troubleshooting
1
2
1
2
5
1
2
1
2
3 4
1
2
4
3 4
1
2
3
4
1
2
5
Page 32

28
Input type
Sampling cycle
PV bias
Set points
Setting indication range
Indication accuracy
Temperature unit switching
Model number
Output
Control action
Output rating
Differential gap
Output direct/reverse switching
Chapter 7 SPECIFICATIONS
Category Item Specifications
PV Inputs
Indicators
and Settings
Control
Outputs
Additional
Functions
Thermocouple: K, J, E, T, R, DIN U, DIN L
RTD: Pt100, JPt100
DC voltage: 1 to 5 V, 0 to 5 V, 0 to 1 V
500ms
-1999 to +9999 or -199.9 to +999.9
1 or 2 to 4
Input range display: See page 12 for details
±0.5%FS ±1 digit
Negative thermocouple area: ±1%FS ±1 digit
°C/°F switchable
0D
Relay contacts
ON/OFF, time-proportional
Contact type: SPST
Contact rating: 250Vac, 3A,
30Vdc, 3A
Life: Min. 100,000 operations
(resistive load)
Min. switching specification:
5V, 100mA
6D
Voltage pulse (for SSR drive)
ON/OFF, time-proportional
Voltage (open):
22.5Vdc ±15%
Internal resistance:
1100Ω ±5%
Leakage current (OFF):
100µA max.
1 to 9999 or 0.1 to 999.9
Switchable
2 , SPST contacts, common shared
Contact rating: 250Vac 1A, 30Vdc 1A (resistive load)
PV upper limit alarm, PV lower limit alarm, PV upper/lower limit alarms,
deviation upper limit alarm, deviation lower limit alarm, deviation upper/
lower limit alarms, heater line break/overcurrent, control device shortcircuit, timer
Standby, latch, ON delay, controller alarm
0 to 9999 or 0.0 to 999.9
Min. 100,000 operations (resistive load)
5V, 10mA
1
AC 0 to 55A
AC 3 to 50A
±3A
2
SP switching, RUN/READY switching, event latch state cancel, timer
event start/stop, auto-tuning start/stop
Dry contact or open-collector
• Allowable ON contact resistance: Max. 250Ω
• Allowable OFF contact resistance: Min. 100kΩ
• Allowable ON residual voltage: Max. 1.0V
• Terminal current voltage (open): 5Vdc
• Terminal current (ON): Approx. 4mA
Event
Current
transformer
input
External
switch
input
No. of points
Type
Additional functions
Differential gap
Life
Min. switching
specifications
No. of points
Display range
Guaranteed
operating range
Accuracy
Recommended
operating conditions
No. of points
Function
Non-insulated type
No. Current
Thru Lines
Measuring
Current
CT Value
Display (ave.)
Allowable Input
Current
AC 3 to 15A 3 9 to 45A Max. AC 33A
AC 5 to 23A 2 10 to 46A Max. AC 50A
AC 9 to 50A 1 9 to 50A Max. AC 100A
Page 33

29
Wet contact or open-collector
• Input voltage range: 10 to 26.4Vdc
• Allowable ON voltage: 10V min.
• Allowable OFF voltage: 3.0V max.
• Input impedance: Approx. 2200Ω
• Terminal current (ON): Approx. 5mA (when 12Vdc is applied)
Approx. 10mA (when 24Vdc is applied)
Non-volatile semiconductor memory
AC model: 100 to 240Vac, 50/60Hz
DC model: 24Vdc (no polarity)
AC model: 7VA Max. (under operating conditions)
DC model: 7W Max. (under operating conditions)
Across power terminal and secondary terminals:
500Vdc, 20MΩ or more
AC model: Across power terminal and case: 1500Vac for 1 minute
(See note)
DC model: Across power terminal and case: 500Vac for 1 minute
AC model: Max. 30A
DC model: Max. 20A
ABS plastic/dark gray (equivalent to Munsell 5Y3.5/1)
PC plastic/light gray (equivalent to Munsell 2.5Y7.5/1)
Ambient temperature: 23 ±2°C
Ambient humidity: 60±5%RH
Power voltage: AC model: 105Vac±1%, 50/60Hz±1Hz
DC model: 24Vdc±5%
Vibration resistance: 0m/s
2
Shock resistance: 0m/s
2
Mounting angle: Reference plane ±3°
Ambient temperature: 0 to 50 °C (0 to 45 °C when 3 or more units are
gang-mounted horizontally)
Ambient humidity: 10 to 90%RH (no condensation allowed)
Power voltage: AC model: 85 to 264Vac, 50/60Hz±2Hz
DC model: 21.6 to 26.4Vdc
Vibration resistance: 0 to 2m/s2 (10 to 60Hz, 2 hours in each X, Y,
Z direction)
Shock resistance: 0 to 10m/s
2
Mounting angle: Reference plane ±10°
Altitude: Max. 2000 mm
Ambient temperature: -20 to +70°C
Ambient humidity: 10 to 95%RH (no condensation allowed)
200g max. (including installation bracket on panel mounted type)
300g max. (including socket on socket type)
0.78 to 0.98N•m
External
switch
input
Insulated type
Category Item Specifications
Additional
Functions
General
Specifications
Memory backup
Rated power supply voltage
Power consumption
Insulation resistance
Dielectric strength
Rush current (power ON)
Mask material/color
Case material/color
Standard conditions
Operating conditions
Shipping and storage
conditions
Mass
Terminal screw tightening
torque
Chapter 7 SPECIFICATIONS
(Note) The primary side and secondary side capacities are joined inside the controller. For
this reason, when performing the withstand voltage test for the panel and controller’s
power supply, disconnect the wiring of grounded secondary side terminals and PV
input terminals from those terminals. In some cases, the grounding / non-grounding
type thermocouples and resistance bulb sensors are not guaranteed for the withstand
voltage between the protecting tube and the inner sensor. Because of this, there will
be a possible cause of failure if such a withstand voltage test is performed as it is.
● I/O isolation The following table shows mutual isolation between I/O items. Items surrounded by
solid lines are insulated from other signals. Items in dashed lines are not insulated:
Power supply Digital circuit
PV input
External switch input 1
External switch input 2 *1
Current transformer input
Control output
Event output 1
Event output 2
*1 Insulated external switch inputs (option code 3) are insulated from other signals.
Page 34

30
Chapter 8 ALARM CODES
When an error occurs, the following alarm codes are displayed in the upper display:
Alarm code Error Cause Countermeasure
A L 0 1
A L 0 2
A L 0 3
A L 7 0
A L 9 7
A L 9 8
Sensor line break, incorrect wiring,
incorrect range code setting
Sensor line break, incorrect wiring,
incorrect range code setting
Terminal temperature compensation
unit failure (thermocouple)
Sensor line break, incorrect wiring
(RTD)
Defective A/D converter
• Power turned OFF during fixing of
data
• Data corrupted due to noise
Data corrupted due to noise
Check wiring or reset range
code.
Check wiring or reset range
code.
Replace unit.
Check wiring.
Replace unit.
Reset data.
Replace unit.
Abnormal PV input
(see Note)
Abnormal PV input
(see Note)
CJ failure
Abnormal PV input
(see Note)
Abnormal A/D
conversion
Abnormal parameter
Abnormal adjustment
data
An alarm code other than A L 9 7 causes the manipulated variable (control output value)
to be set to 0% (OFF). Instrument operations other than manipulated variable are unaffected.
The A L 9 7 alarm code does not affect instrument operation.
(Note) • Display and operation when thermocouple input line break occurs
Abnormal State Indication Alarm Code
Sensor line break Upscaled
A L 0 1
• Display and operation when break occurs in resistance temperature detector input
Abnormal State Indication Alarm Code
Resistor line break
Upscaled or downscaled
A L 0 1
Break in line A or A L 0 2, A L 0 3
Break in line B Downscaled A L 0 2, A L 0 3
Break in line C
Upscaled or downscaled
A L 0 1, A L 0 3
Break in 2 lines or more or A L 0 2, A L 0 3
B short-circuited Downscaled A L 0 2
C short-circuited Downscaled A L 0 2
• Display and operation when break occurs in DC voltage input
Abnormal State Indication Alarm Code
Line break Upscaled A L 0 1
Page 35

31
Chapter 9 MAINTENANCE
● Cleaning
Wipe off dirt on the controller using a soft, dry cloth.
● Parts Replacement
Only authorized personnel are allowed to replace parts.
● Fuse Replacement (AC model only)
Use only specified standard fuses when replacing fuses on the AC power supply wiring.
Standard IEC127
Cutoff Speed Delayed operation type
Rated Voltage 250V
Rated Current 200mA
Page 36

Model No. C10
Person in charge Drawn Up
SDC10 Setup Work Sheet
● Operation mode settings
● Parameter mode settings
Display Item Default Customer settings Memo
C T R L Control method 0
A T Auto-tuning 0
S P 0 No.0 SP value 0
S P 1 No.1 SP value 0
S P 2 No.2 SP value 0
S P 3 No.3 SP value 0
P Proportional band 5.0 %
I Reset time 120 s
d Rate time 30 s
O
L Output limit low 0 %
O
H Output limit high 100 %
R
E Manual reset 50 %
S
B Self-tuning startup width %
Thermocouple, RTD 2 °C/°F
DC voltage 0.5 %FS
D I F F Differential gap 5 (0.5)
C Y C L Time-proportional cycle 10 s
P B I A PV bias 0 (0.0)
H Y S 1 Event 1 hysteresis 5 (0.5)
D L Y 1 Event 1 ON delay time 0 s
H Y S 2 Event 2 hysteresis 5 (0.5)
D L Y 2 Event 2 ON delay time 0 s
F I L T PV filter 0.0 s
See page 19 for information on parameter settings.
Display Item Default Customer settings Memo
S P SP value 0
S P - SP set selection 0
E 1 (E 1 L O) Event 1 (lower limit) setting 0
E 1 H I Event 1 upper limit setting 0
E 2 (E 2 L O) Event 2 (lower limit) setting 0
E 2 H I Event 2 upper limit setting 0
See page 22 for information on operation settings.
32
Page 37

Display Item Default Customer settings Memo
C 0 1 Key lock 0
C 0 2 Temperature unit 0
C 0 3 Control output direction 0
C 0 4 Input range : thermocouple input 3
: RTD input 22
: DC voltage input 43
C 0 5 Decimal point position 0
C 0 6 PV range lower limit (DC voltage input) 0
C 0 7 PV range upper limit (DC voltage input) 1000
C 0 9 SP lower limit Range Min.
C 1 0 SP upper limit Range Max.
C 1 1 Manipulated variable when READY mode 0
or Alarm occur
C 1 2 Operation mode 0000
C 1 3 Number of SPs used 0
C 1 4 Event 1 operation type 0000
C 1 5 Event 2 operation type 0000
C 1 6 Event operation in READY mode 0
C 1 7 External switch input 1 operation type 0
C 1 8 External switch input 2 operation type 0
C 2 1 RDY key setting 0
C 2 2 Communications address 0
C 2 3 Communications conditions 0
C 2 4 Cold junction compensation 0
C 2 5 Selection of time-proportional control 0
operation
See pages 12 to 14 for information on setup items.
● Setup mode items
33
Page 38

Specifications are subject to change without notice.
Advanced Automation Company
Totate International Building
2-12-19 Shibuya Shibuya-ku
Tokyo 150-8316 Japan
URL: http://www.yamatake.com
Printed in Japan.
1st Edition: Issued in Nov., 1995
12th Edition: Issued in July, 2004(B)
This has been printed on recycled paper. (02)
 Loading...