

Yamata FY750, FY760 Instruction Manual

• Antes de retirar as coberturas e efectuar a lubrificação ou quaisquer outras intervenções de servi
ço indicadas nestas instruções de utilização, desconecte sempre a máquina de costura da corrente.
CONSERVE CUIDADOSAMENTE ESTAS INSTRUÇÕES!
Esta máquina de COSTURA SÓ SE DESTINA A UTILIZAÇÃO NO LAR.
INSTRUÇÕES IMPORTANTES DE SEGURANÇA
Antes de utilizar a máquina de costura, leia todas as instruções e ao trabalhar respeite sempre as
medidas básicas de segurança.
PERIGO
– protecção contra lesão provocada pela corrente eléctrica:
• Se a máquina de costura estiver conectada à corrente, não deve ser deixada sem controlo. Imedia
tamente após a conclusão do trabalho ou antes de limpá-la, desconecte a máquina da corrente.
• Também deve desconectar sempre a máquina antes de substituir a lâmpada.
ADVERTÊNCIA
– Para reduzir o risco de queimaduras, incêndio, acidentes provocados pela
corrente eléctrica ou lesões de pessoas:
• Não permita que esta máquina de costura seja usada como brinquedo. Se, enquanto trabalha com
a máquina, houver crianças nas proximidades, deve ter muito cuidado.
• Use esta máquina de costura apenas de acordo com o seu objectivo, descrito nestas instruções. Use
apenas os acessórios recomendados pelo fabricante e indicados nestas instruções.
• Nunca trabalhe com a máquina de costura se o cabo eléctrico ou a ficha estiverem danificados, se
a máquina não trabalhar correctamente, se caiu ao chão, se foi danificada ou esteve em contacto
com a água. Nestes casos, devolva a máquina de costura ao vendedor autorizado mais próximo ou
entregue-a a um centro de assistência técnica para que seja revista, reparada ou mecanicamente
ajustada.
• Nunca trabalhe com a máquina se os seus orifícios de ar estiverem tapados. Os orifícios de ventila
ção e o pedal de comando devem-se conservar sempre limpos, sem restos de têxteis, pó ou peda
ços de tecido soltos.
• Não introduza objectos em nenhum orifício.
• Não use esta máquina de costura sob a acção de intempéries.
• Não use esta máquina de costura em ambientes de aplicação de produtos de aerossol (sprays) ou
de oxigénio.
• Se quiser desconectar a máquina de costura da corrente, comute primeiramente o conector princi
pal para a posição "O", isto é, desconectada, e só depois retire a ficha da tomada.
• Ao desconectar a ficha, não puxe pelo cabo. Para desconectar a máquina da corrente, agarre bem
a ficha e puxe-a, e não pelo cabo.
• Não aproxime os dedos de nenhuma parte móvel. É necessária uma atenção especial à proximida
de da agulha da máquina de costura.
• Use sempre a placa de pontos apropriada. Usando placa incorrecta, a agulha poderá quebrar-se.
• Não use agulhas tortas.
• Ao coser, não puxe o tecido nem o empurre. Poderia desviar a agulha e esta quebrar-se.
• Antes de efectuar várias acções nas proximidades da agulha como, por exemplo, introduzir o fio,
comute a máquina para a posição de desconectada.
1
Bedien. PORTO/ENGL.713/723 16.04.2004 14:31 Uhr Seite 3

IMPORTANT SAFETY INSTRUCTIONS
When using the sewing machine, basic safety precautions should always be followed, including
the following:
" Read all instruction before using."
! DANGER
- To reduce the risk of electric shock:
The sewing machine should never be left unattended when plugged in. Always unplug this
sewing machine from the electrical outlet immediately after using and before cleaning.
Always unplug before changing the light bulb. Replace bulb with same type rated 15 watts.
! WARNING
- To reduce the risk of burns, fire, electric shock, or injury to persons:
• Do not allow this machine to be used as a toy. Close attention is necessary when the sewing
machine is used by or near children.
• Use this sewing machine only for its intended use as described in this manual.
Use only aceessories recommended by the manufacturer as contained in this manual.
• Never operate this sewing machine if it has a damaged cord or plug, if it is not working properly,
if it has been dropped or damaged, or dropped into water, Return the sewing machine to the
nearest authorized dealer or service center for examination, repair, electrical or mechanical
adjustment.
• Never operate the sewing machine with any of the air openings blocked. Keep the ventilation
openings of the sewing machine and foot controller free from the accumulation of lint, dust
and loose cloth.
• Never drop or insert any object into any openings.
• Do not use this machine outdoors.
• Do not operate this machine where areosol (spray) products are being usecl or where oxygen
is being administered.
• To disconnect, turn the main switch to the symbol" O " position which represents off, then
remove plug from outlet.
• Do not unplug by pulling on the cord. To unplug, grasp the plug and pull, not the cord.
• Keep fingers away from all moving parts. Special care is requirecl around the sewing machine
needle.
• Always use the proper needle plate. The wrong plate can cause the needle to break.
• Do not use a bent needle.
• Do not pull or push the fabric while stitching. It may deflect the needle causing it to break.
• Cut off the power position when making and adjustments in the needle area. such as threading
the needle, changing the needle, threading the bobbin, or changing the presser foot.
• Always unplug the sewing rnachine from the electrical outlet when removing covers, lubricating,
or when making any other user service adjustments mentioned in this instruction manual.
" SAVE THESE INSTRUCTIONS "
" This sewing machinc is intended for household use.”
2
Bedien. PORTO/ENGL.713/723 16.04.2004 14:31 Uhr Seite 4

ÍNDICE INTRODUÇÃO BREVE
Capítulo I
Funções importantes
Principais componentes
Capítulo II
Preparação antes da costura
Painel móvel para o tecido 6
Acessórios
Alimentação 8
Pedal de comando 8
Iluminação da máquina de costura 9
Substituição da patilha 10
Substituição da agulha 11
Tabela de agulhas e fios 12
Como usar os passadores de bobinas 13
Remoção e fixação da canela da bobina 14
Enchimento da bobina 15
Introdução do fio na canela da bobina 16
Passagem do fio inferior para cima 18
Ajustamento da tensão do fio superior 19
Selector rotativo do desenho 20
Selecção do ponto duplo 20
Selector rotativo de comprimento do ponto 21
Selector rotativo de largura do ponto 21
Botão de marcha-atrás 22
Alimentador inferior 22
Selector rotativo de pressão da patilha 23
Capítulo III
Início da costura
Ponto recto 24
Mudança do sentido da costura 25
Utilização do guia-fios na placa de pontos 26
Ponto em ângulo recto 26
Ponto em ziguezague 27
Capítulo IV
Costura de tecidos
Ponto em ziguezague de debruns 28
Ponto em ziguezague de três pontos 29
Debruado 30
Ponto elástico recto de três pontos
(Modelo 723) 31
Costura de botões 32
Costura de casas de botões 34
Casas de botões com pontos de adorno 36
Costura de cremalheira 37
Ponto cego 38
Capítulo V
Ponto de adorno
Ponto concoida 39
Ponto duplo (Modelo 723) 40
Ponto reticular (Modelo 723) 41
Ponto elástico diagonal (Modelo 723) 42
Costura de aplicações 43
Costura de orlas (Modelo 723) 44
Capítulo VI
Manutenção da máquina de costura
Remoção do alimentador e de seus acessórios 45
Limpeza do alimentador 46
Lubrificação da máquina 47
Eliminação de falhas 49
3
Bedien. PORTO/ENGL.713/723 16.04.2004 14:31 Uhr Seite 5

A Brief Introduction
Chapter I
Straight sewing……………………………….24
Imporatant Functions Change sewing direction……………………25
Name of parts:……………………………5 Use leg wire on the needle plate………….26
Chapter II
Right-angle drive……………………………..26
Preparation before sewing Zigzag sewing………………………………..77
Extendable………………………………..6
Chapter IV
Accessory…………………………………7 Join fabric
Power supply……………………………..8 Zigzag over-lock……………………………..28
Foot controller…………………………….8 Triple zigzag stitching……………………….29
Sewinglamp……………………………….9 Triple stretch straight stitching
Remove and attach presser foot………..l0 (Model 723)…………………………………..30
Change the needle………………………11 Button sewing………………………………..31
Thread and needle chart………………..12 Make a buttonhole…………………………..33
How to use spool holder………………...13 Buttonhole with decorative stitching……….35
Remove and attach the bobbin case…..14 Zipper insertion………………………………36
Wind the bobbin………………………….15 Blind hem……………………………………..37
Attach bobbin into bobbin case………...16
Chapter V
Machine threading……………………….17 Decorative stitching
Draw up lower threading………………..18 Shell stitchin………………………………….38
Upper threading tension………………...19 Double Action stitching (Model 723)………39
Pattern selection dial…………………….20 Net stitching (Model 723)…………………...40
Select double action stitch………………20 Box-shaped elastic stitching (Model 723)…43
Stitch length selection dial………………21 Pad stitching………………………………….42
Stitch width selection dial………………..21 Edge joining (Model 723)…………………...43
Reverse sewing button…………………..22
Chapter VI
Lower feed dog…………………………...22 Remove the shuttle and its accessories
Presser foot pressure selection dia…….23 Clean feed dog……………………………… 45
Chapter III
Oil the machine………………………………46
Start sewing Obstacle avoidance………………………….48
4
Contents
Bedien. PORTO/ENGL.713/723 16.04.2004 14:31 Uhr Seite 6
5
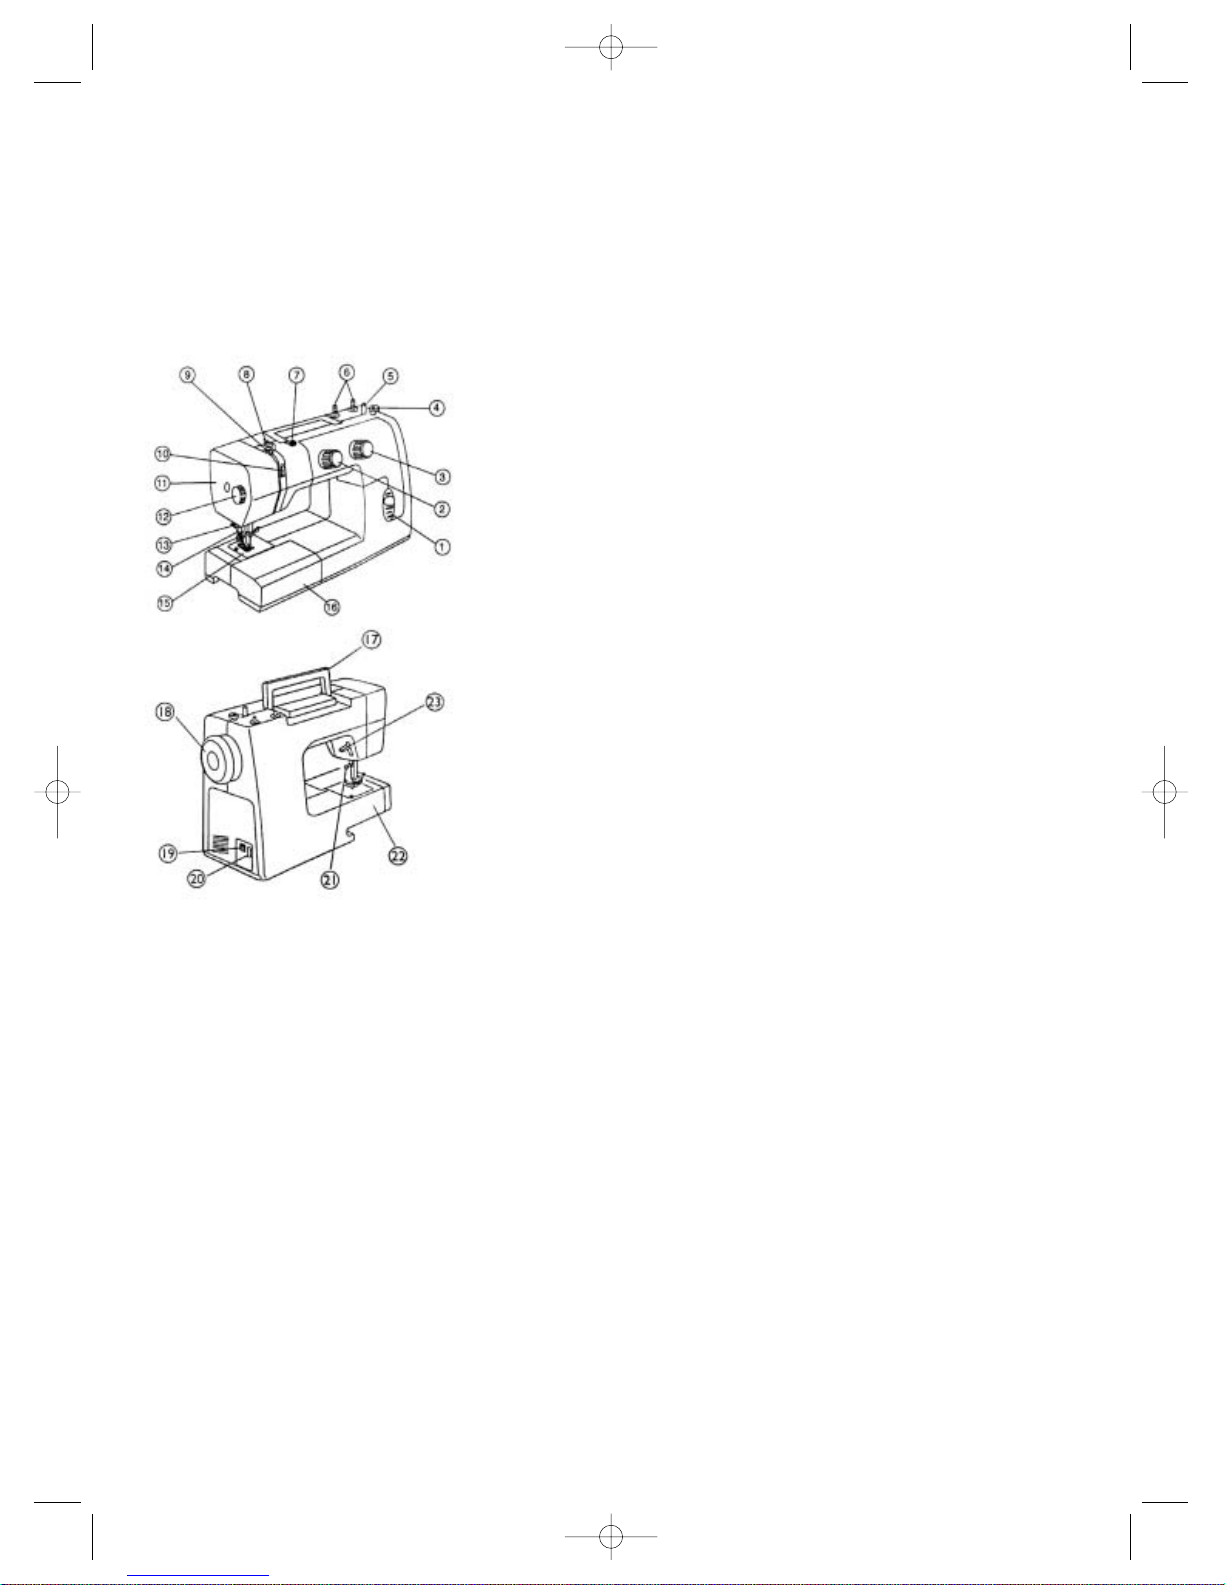
Capítulo 1 Name of parts:
Funções importantes
Principais componentes: 1 Reverse button
2 Pattern selection dial
1 Botão de marcha-atrás 3 Stitch length selection diall
2 Selector rotativo do desenho 4 Bobbin winding regulator
3 Selector rotativo do 5 Bobbin winding shaft
comprimento do ponto
4 Topo de enchimento da bobina 6 Spool holder
5 Bobina de costura 7 Wind thread tension disc
6 Suporte da bobina 8 Thread retainer
7 Cobertura superior 9 Thread take-up lever
8 Guia-fios IO Uppercover thread tension
9 Alavanca dos fios disc
10 Tensão do fio 11 Top cover
11 Cobertura da lâmpada 12 Presser foot pressure
12 Patilha regulation selection dial
13 Elevador da patilha 13 Ripper
14 Dispositivo para descoser 14 Presser foot lever
15 Placa de pontos 15 Needleplate
16 Painel móvel do tecido
(gaveta dos acessórios) 16 Extendakle cloth plate
17 Asa (accessory' case)
18 Volante manual l7 Lifter
19 Tomada do pedal de comando 18 Balance wheel
20 Conexão/Desconexão 19 Switch button
21 Parafuso de braçadeira 20 Power
de agulha 2I Needle clamp screw
22 Suporte independente do 22 Free-arm cloth plate
painel para tecido 23 Presser foot elevator lever
23 Alavanca de elevação
da patilha
Bedien. PORTO/ENGL.713/723 16.04.2004 14:31 Uhr Seite 7
Capítulo II: Preparação Chapter lI
antes da costura Preparation before Sewing
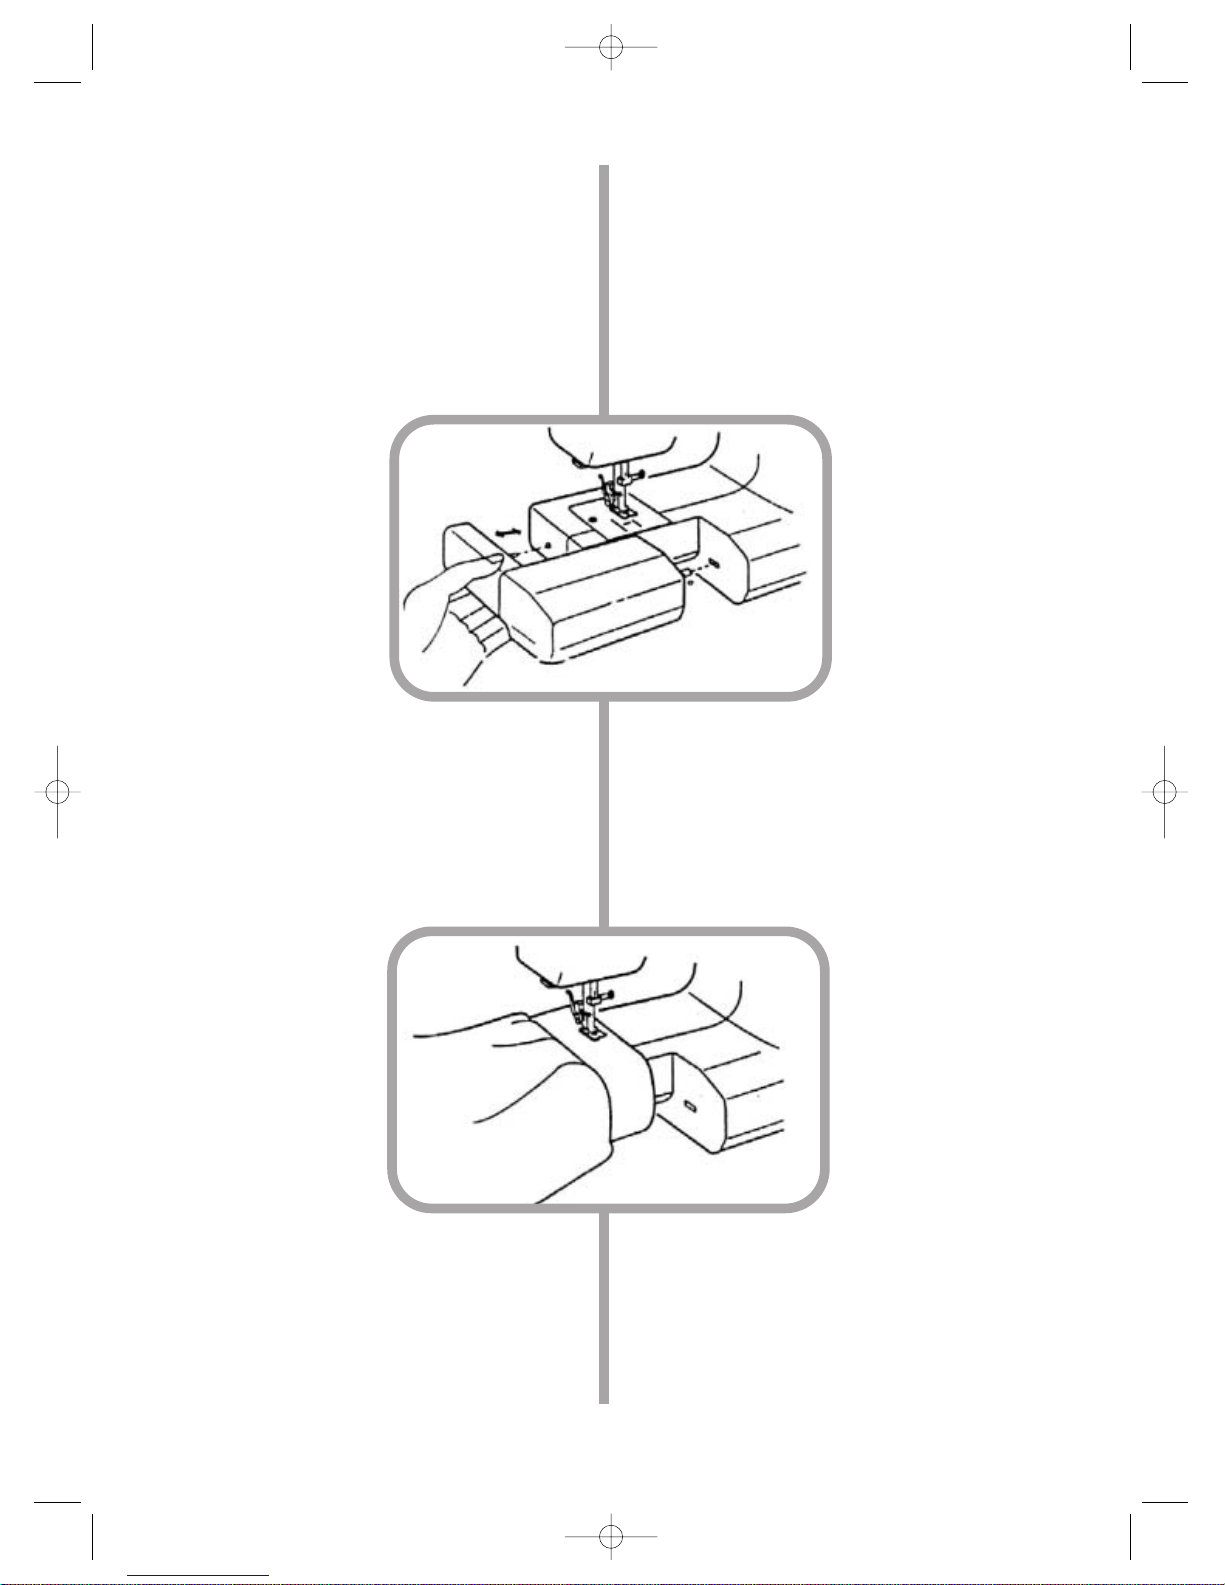
Externdable cloth plate
6
The extendable cloth plate can not nolyenlarge
working. Space while sewing but also can be easily
disassembled. The free-arm cloth plate can also be
used.
Disassembe the extendable cloth plate:
Disassembe the cloth plate as shown in the
illustration.
Fit over the cloth plate:
Join the extendable cloth plate(namely,platform
stiching)
Merits and application of free-arm cloth
plate stitching
Avoid cloth piled up in front of needle while sewing
pockets, tucks and waist edges. Sew sleeves, waist
edges, trouser legs or other roundshaped costumes.
Darn knees, elbows and children clothes.
Painel de alongamento do tecido
O painel móvel do tecido pode aumentar o
posto de trabalho e é fácil de desmontar.
Também se pode usar o suporte independente
do tecido para coser em zonas de acesso difícil.
Desmontagem
do painel móvel
do tecido:
Desmonte o painel para tecido da forma
indicada no desenho.
Instalação do painel para tecido:
Instale o painel para tecido (sobretudo para
coser na plataforma pequena).
Vantagens e uso
do ponto no
suporte independente do painel
para tecido
Impede a acumulação do tecido à frente do fio
ao coser bolsos, pregas e orlas de fitas.
Para coser mangas, orlas de fitas, perneiras ou
outros tipos de roupa de forma redonda.
Cerzir joelheiras, cotoveleiras e roupa infantil.
Bedien. PORTO/ENGL.713/723 16.04.2004 14:31 Uhr Seite 8
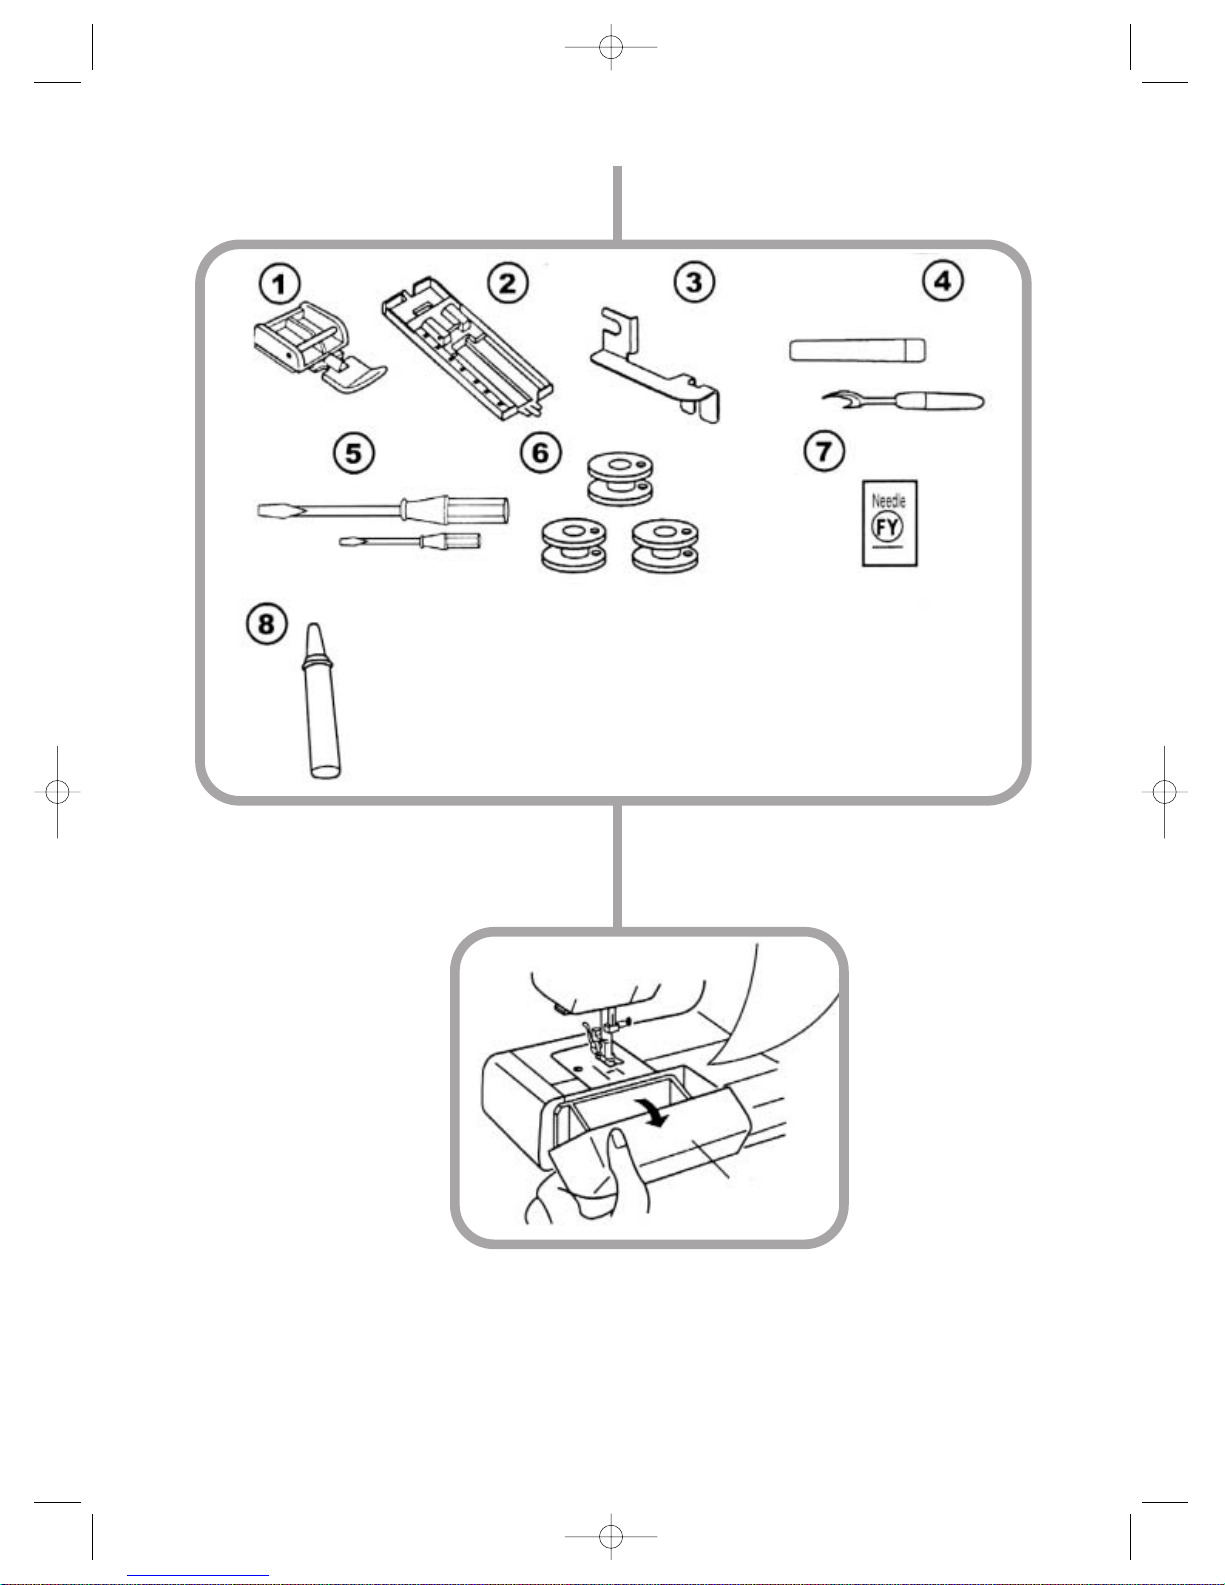
Acessórios
Acessórios
Accessories
Accessories
7
1) Patilha para cremalheiras
2) Patilha para casas de botões
3) Alça de desvio
4) Dispositivo para corte de
casas de botões
5) Chaves de parafusos
6) Bobinas
7) Jogo de agulhas
8) Óleo
1) Zipper foot
2) Buttonhole foot
3) Deflector gate
4) Buttonhole cutter
5) Screw driver
6) Shuttle
7) Needle
8) Oil
Bedien. PORTO/ENGL.713/723 16.04.2004 14:31 Uhr Seite 9
Alimentação
Alimentação
Power Supply
Power Supply
8
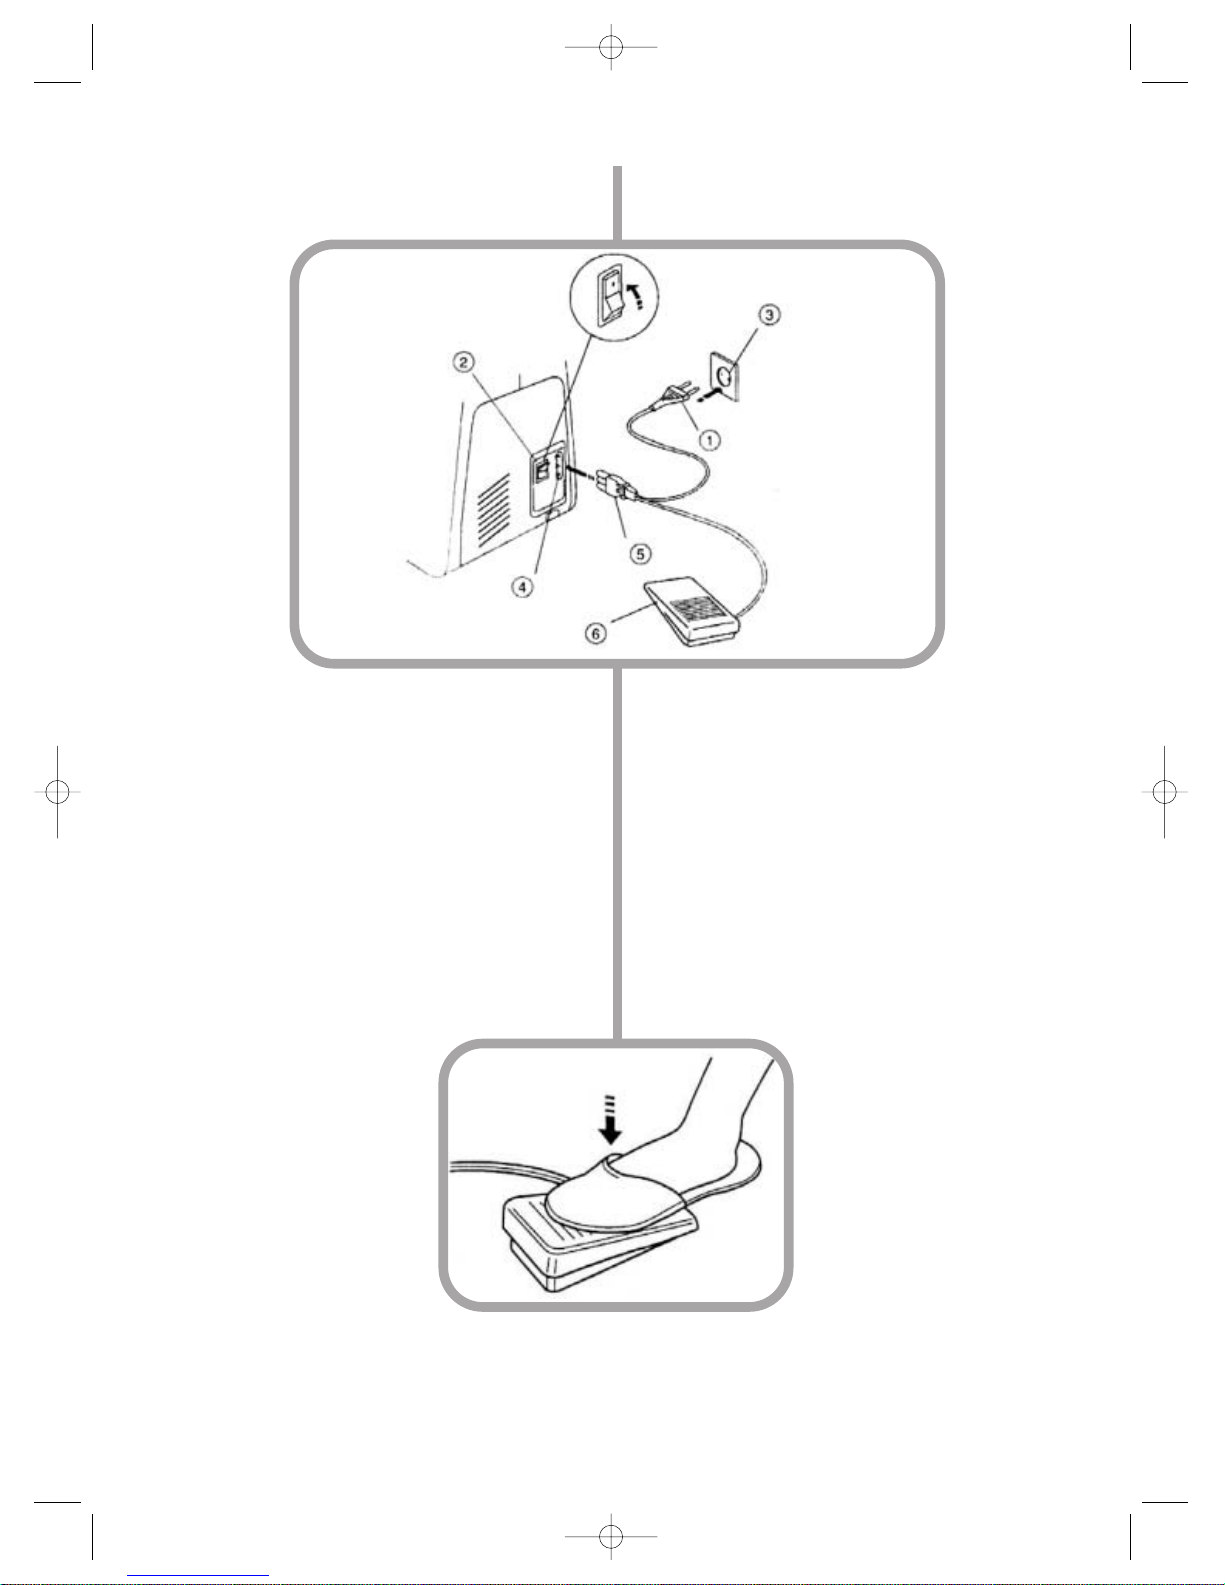
Antes de conectar a máquina à corrente, é
necessário verificar se a tensão e frequência indicadas na máquina estão de acordo
com as características da alimentação.
1. Conecte o cabo de adução do pedal de comando
(5) – de forma que o cabo passe entre o pedal de
comando e a tomada – à respectiva fêmea (4) na
máquina de costura.
2. Conecte a ficha (1) à tomada (3).
3. Com o botão de conexão, conecte a luz (2).
(1) Ficha de conexão (2) Botão do conector
(3) Tomada eléctrica (4) Fêmea da máquina de costura
(5) Ficha do cabo do pedal de comando
(6) Pedal de comando
Pedal de comando
Pedal de comando
Com a ajuda do pedal de
comando, pode determinar a
velocidade da costura. Quanto
mais carregar no pedal de
comando, maior será a
velocidade da costura.
It is to be determined that the voltage
and frequency indicated on the machine
should be identical to the supply prior to
connected to the power.
1.Connect machine plug (5) to, machine interface (4)
2.Connect attaching plug (1) to receptacle (3).
3.Switch on sewing lamp with switch button (2).
(1) Attachplug (2) Switchbutton
(3) Reccptacle (4) Machine interface
(5) Machine plug (6) Foot controller
Foot controller
Foot controller
Foot controller
may change speed of
sewing. The tighter the
switch is pressed, the fas-
ter stitching goes.
Bedien. PORTO/ENGL.713/723 16.04.2004 14:31 Uhr Seite 10
Iluminação da máquina de costura
Iluminação da máquina de costura
Sewing lamp
Sewing lamp
9
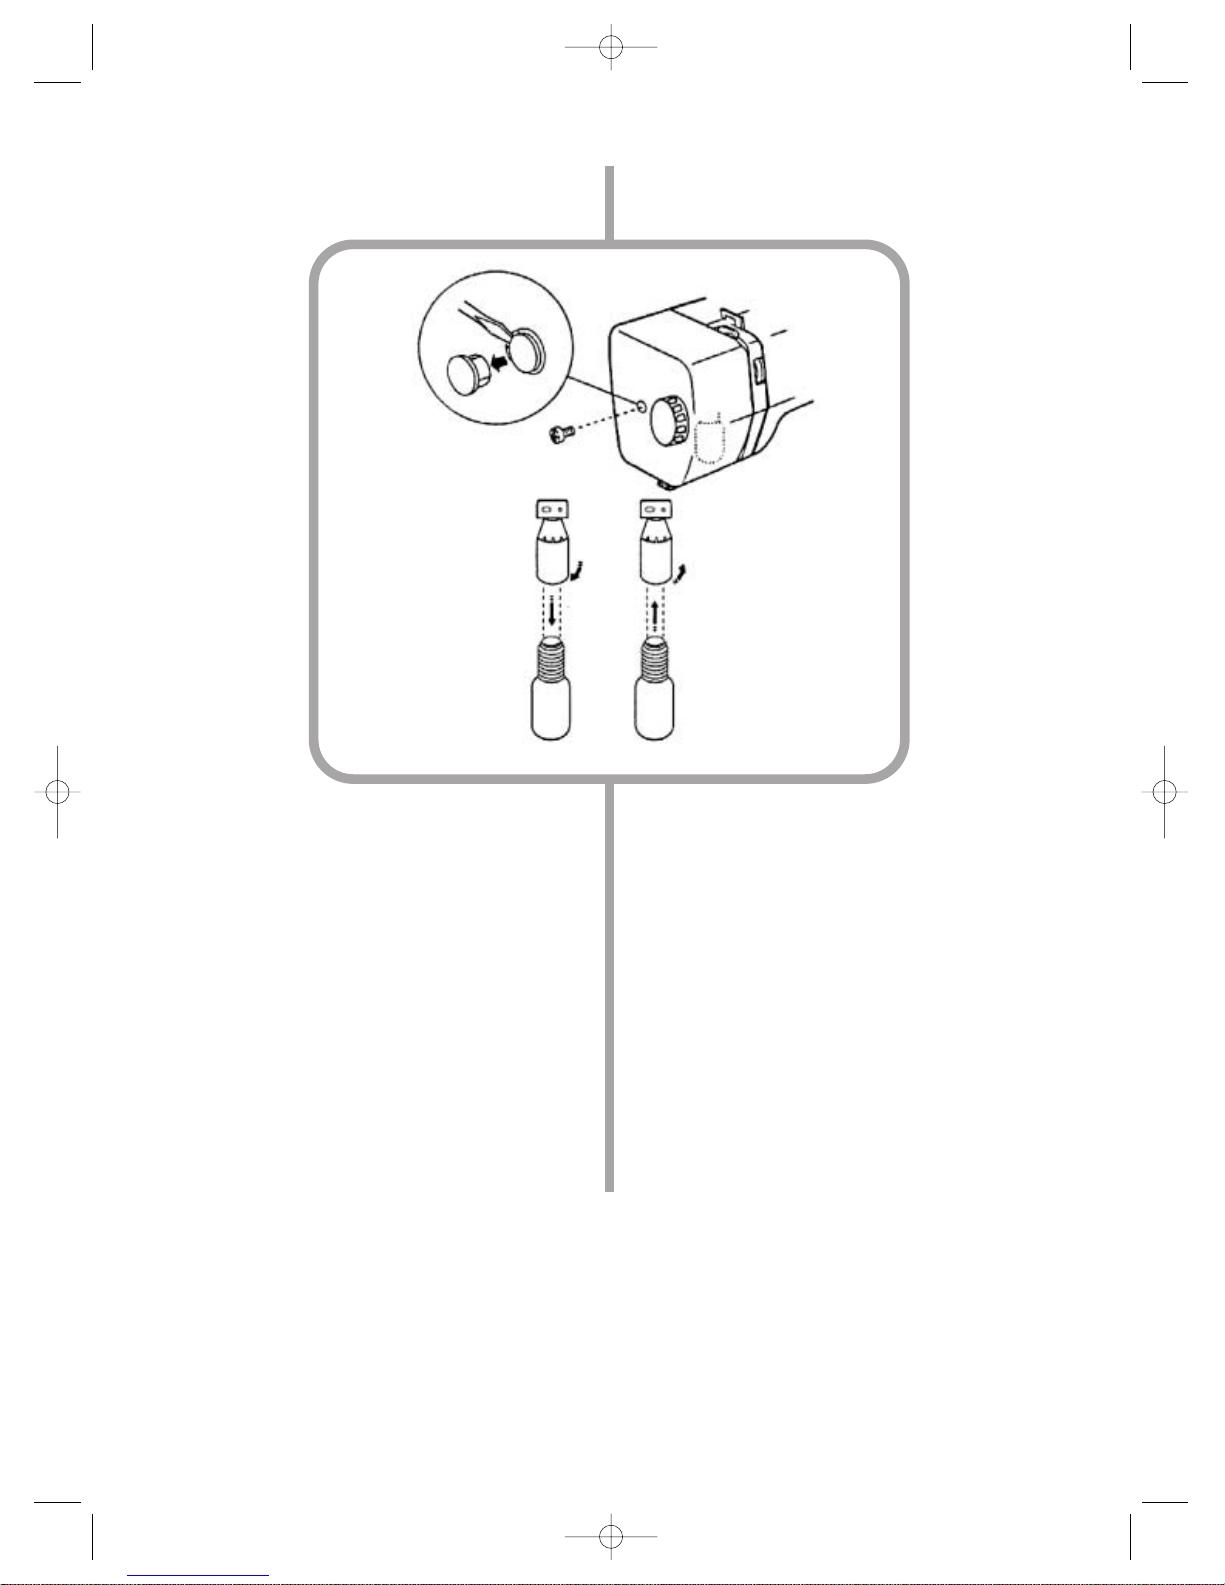
Iluminação da máquina de costura
A lâmpada de iluminação encontra-se por detrás da
cobertura superior. Para substituir a lâmpada, é
necessário retirar a cobertura superior
(parafuso na parte frontal).
Nota
Antes de substituir a lâmpada, desconecte a
alimentação.
Retirar a lâmpada:
Pegue na lâmpada e desenrosque-a rodando para
a esquerda.
Colocar uma lâmpada nova:
Pegue na lâmpada e enrosque-a rodando para a
direita.
Sewing lamp
Sewing lamp hulb stands at the back of top
cover.Take -the top cover when changing the bulb
(fronl screw).
! Note
Switch off the power before replacing a bulb.
Take out a bulb:
-Hold it and screw off to the left.
Fit over a bulb:
-Hold it and screw on to the right.
Bedien. PORTO/ENGL.713/723 16.04.2004 14:31 Uhr Seite 11
Substituição da patilha
Substituição da patilha
Remote and
Remote and
Attach
Attach
Presser Foot
Presser Foot
10
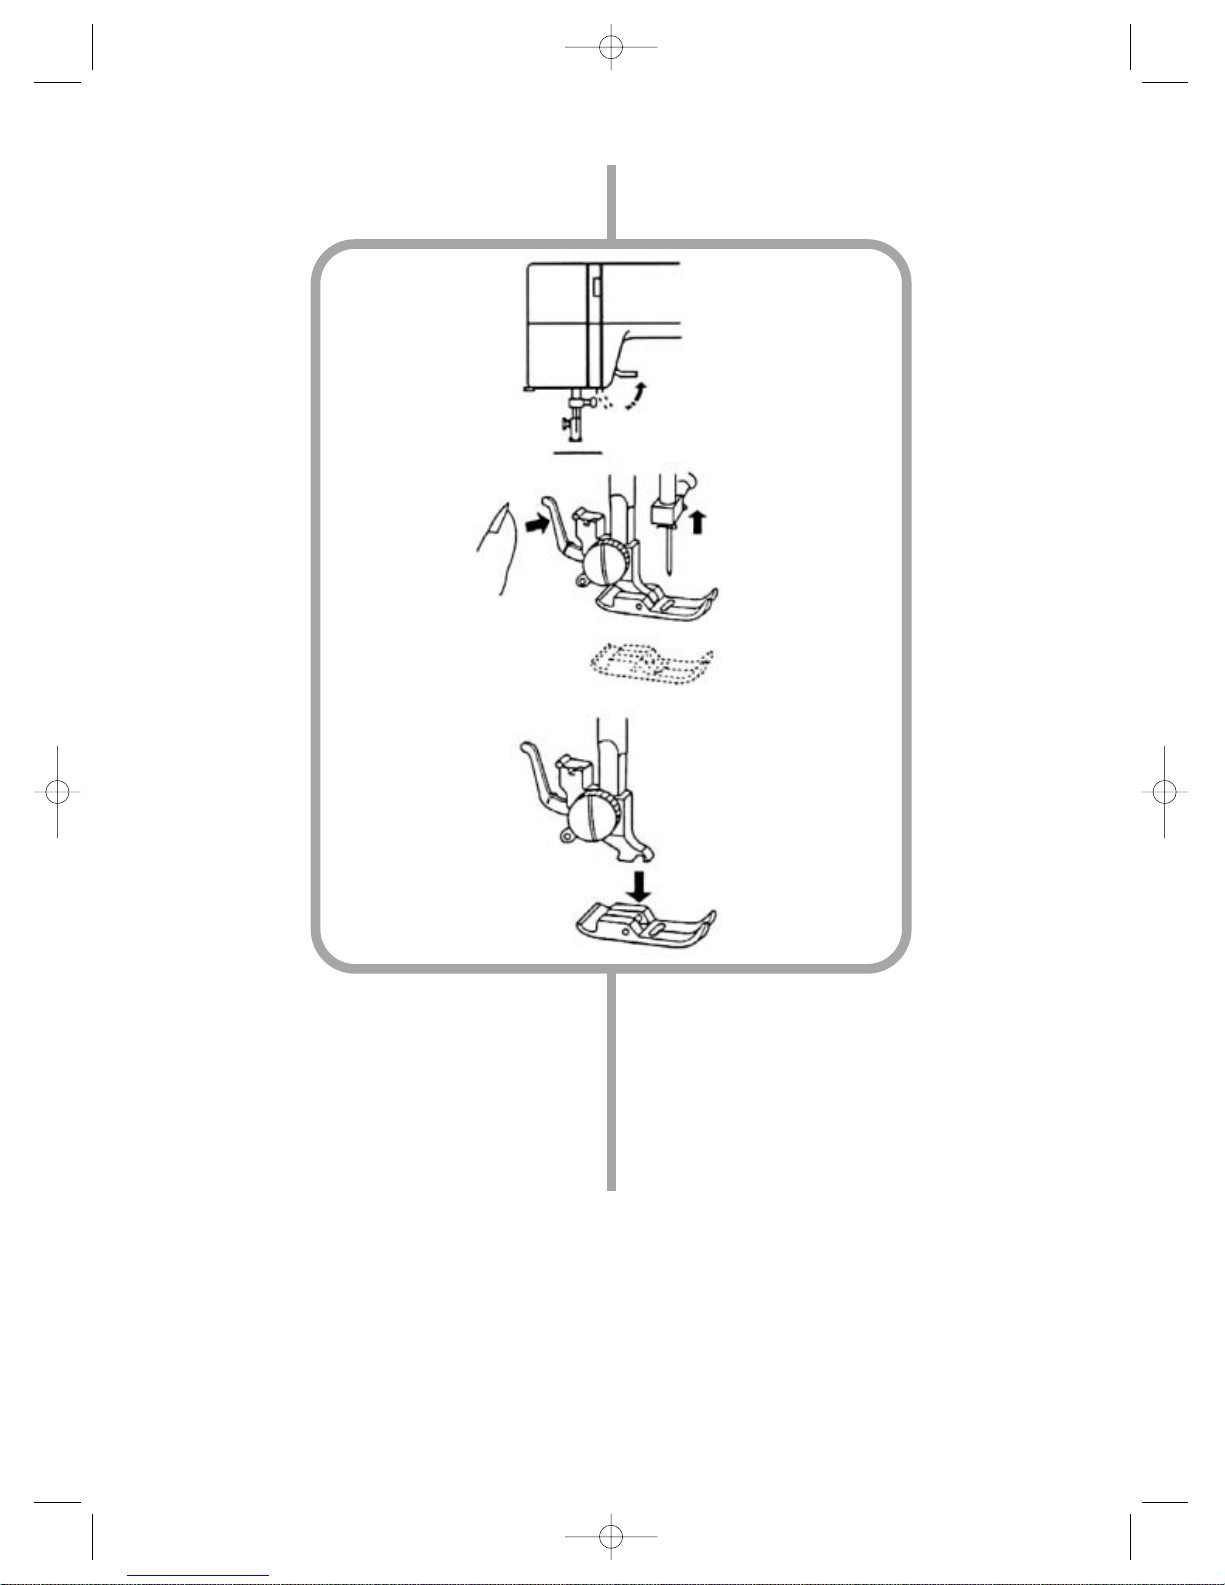
Retirar:
Rode o volante manual até que a agulha se levante para a posição superior. Equilibre a patilha.
Aperte a alavanca no suporte da patilha, afrouxando simultaneamente a patilha.
Colocar:
Coloque a patilha de forma que a sua cavilha
plana fique directamente frente à ranhura. Baixe a
alavanca da patilha para que esta fique fixa no
seu lugar.
Removing:
Turn forward the balance wheel while raising
the needle to the highest position. Leveling up
the presser foot. Hold back the lever on the
foot bearer while releasing the presser foot.
Installing:
Fit over the presser foot so that its plate dowel
is just opposite to the groove. Lower the presser foot lever and its presser foot will be fixed
to the place.
Bedien. PORTO/ENGL.713/723 16.04.2004 14:31 Uhr Seite 12
Substituição da agulha
Substituição da agulha
Changing the needle
Changing the needle
11
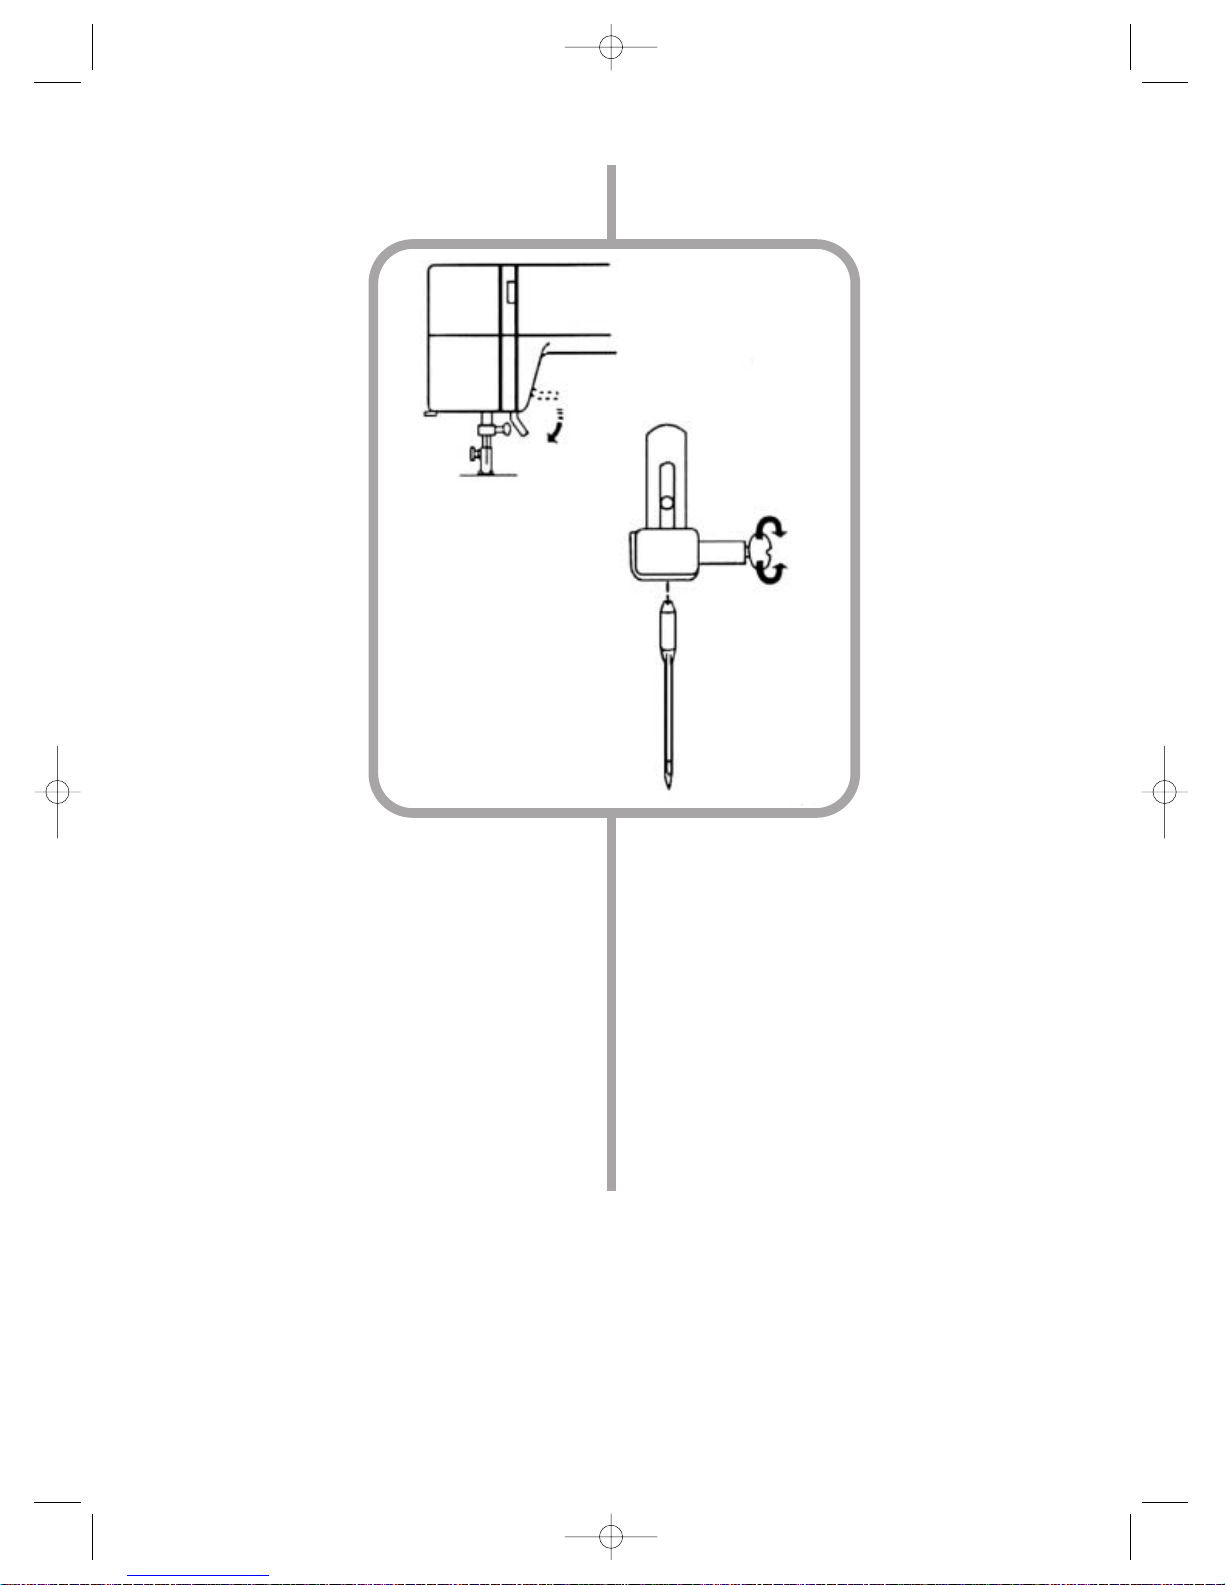
Rode o volante manual até a agulha se levante e a
patilha baixe. Rodando contra o sentido dos ponteiros do relógio, afrouxe o parafuso da braçadeira da
agulha. Retire a agulha usada e introduza uma
nova, de forma que o seu lado plano fique virado
para trás.
Ao introduzir a agulha, empurre-a o máximo possível para cima na braçadeira da agulha e aperte o
parafuso com a chave de parafusos.
Nota
Examine regularmente a agulha para verificar se
está torta ou tem a ponta partida.
Em tecidos de ponto, seda fina e tecidos de seda,
aparecem frequentemente nozinhos e falhas de
costura, provocados por agulhas danificadas.
Turn forward the balance wheel while raising
the needle to the high level and lower the presser foot. Loosen the needle clamp bolt by turning it anti-clockwise.Remove the used needle
and insert the new one with its flat side facing
the back. While inserting the needle, the needle
should be pressed as firmly as possible up into
the needle clamp, which should he tightened
with a screwdriver.
! Note
Regular checking should be done to ensure that
the needle is never twisted or blunt.Knitting
materıals, lıne silk or silk fabrıcs may frequently
encounter knots and skipping stitches, which
are often caused by the damaged needles.
Bedien. PORTO/ENGL.713/723 16.04.2004 14:31 Uhr Seite 13
TTabela de agulhas e fios
abela de agulhas e fios
Tamanho da agulha Material Parâmetros do fio de Parâmetros do
algodão fio de seda
No. 60 (No. 7) Seda fina Crespão 70-80 100-140
No. 70 (No. 10)
No. 80 (No. 12) Popelina Seda pura 50-60 80-100
No. 80-90 (No. 12-14) Tecido de lã Algodão 40-50 60-70
No. 90-100 (No. 14-16) Lã 30-40 50-60
No. 90-100 (No. 14-18) Materiais de tecidos de 30 45-50
mescla
Ponto elástico
C. 70 (c. 10) Materiais tecidos a 70-80 100-140
ponto
Thead and needle char
Thead and needle chartt
Needle size Material Cotton thread Silk thread
Specification Specification
No.60(#7) Fine silk 70-80 1 00- 1 40
No.70(#10) Crepe
No.80(#12) Poplin 50-6U 8O-100
Pure Silk
No.8U-90(#12-14) woolen cloth 40-50 60-70
Cotton
No.90-100(#14-16) Wool 30-40 50-60
No.90-100(#14-18) Jeans Materials 30 45-50
Elastic stitching
No.70(#10) Knitting Materials 70-80 100-140
12
Bedien. PORTO/ENGL.713/723 16.04.2004 14:31 Uhr Seite 14

Como usar os passadores de
Como usar os passadores de
How to use spool holder
How to use spool holder
bobinas
bobinas
13
Os passadores de bobinas são usados para
suportar as bobinas. Antes de coser, retire o passador de bobina da cobertura da máquina de costura.
Antes de guardar a máquina, recoloque o passador de bobina na cobertura da máquina.
(1) fio superior (2) orifício (3) nozinho
Nota:
Se o fio usado se enredar facilmente ou se ficar
travado no passador de bobinas, pode passar o
fio pelo orifício desta forma (ver o desenho).
Neste caso, deve-se orientar o orifício para a
bobina.
Spool holder is used lo hold spools.Pulling up the
spool holder when sewing.
Pressdown the machine when it is packed.
(1) upper tread (2) hole (3) knot
Instruction:
In case that the thread in use is easily
tangled with spool holder or knotted, you can
pull the thread through the hole as shown in the
ill ustration. While keeping the hole facing the
spool.
Bedien. PORTO/ENGL.713/723 16.04.2004 14:31 Uhr Seite 15
14
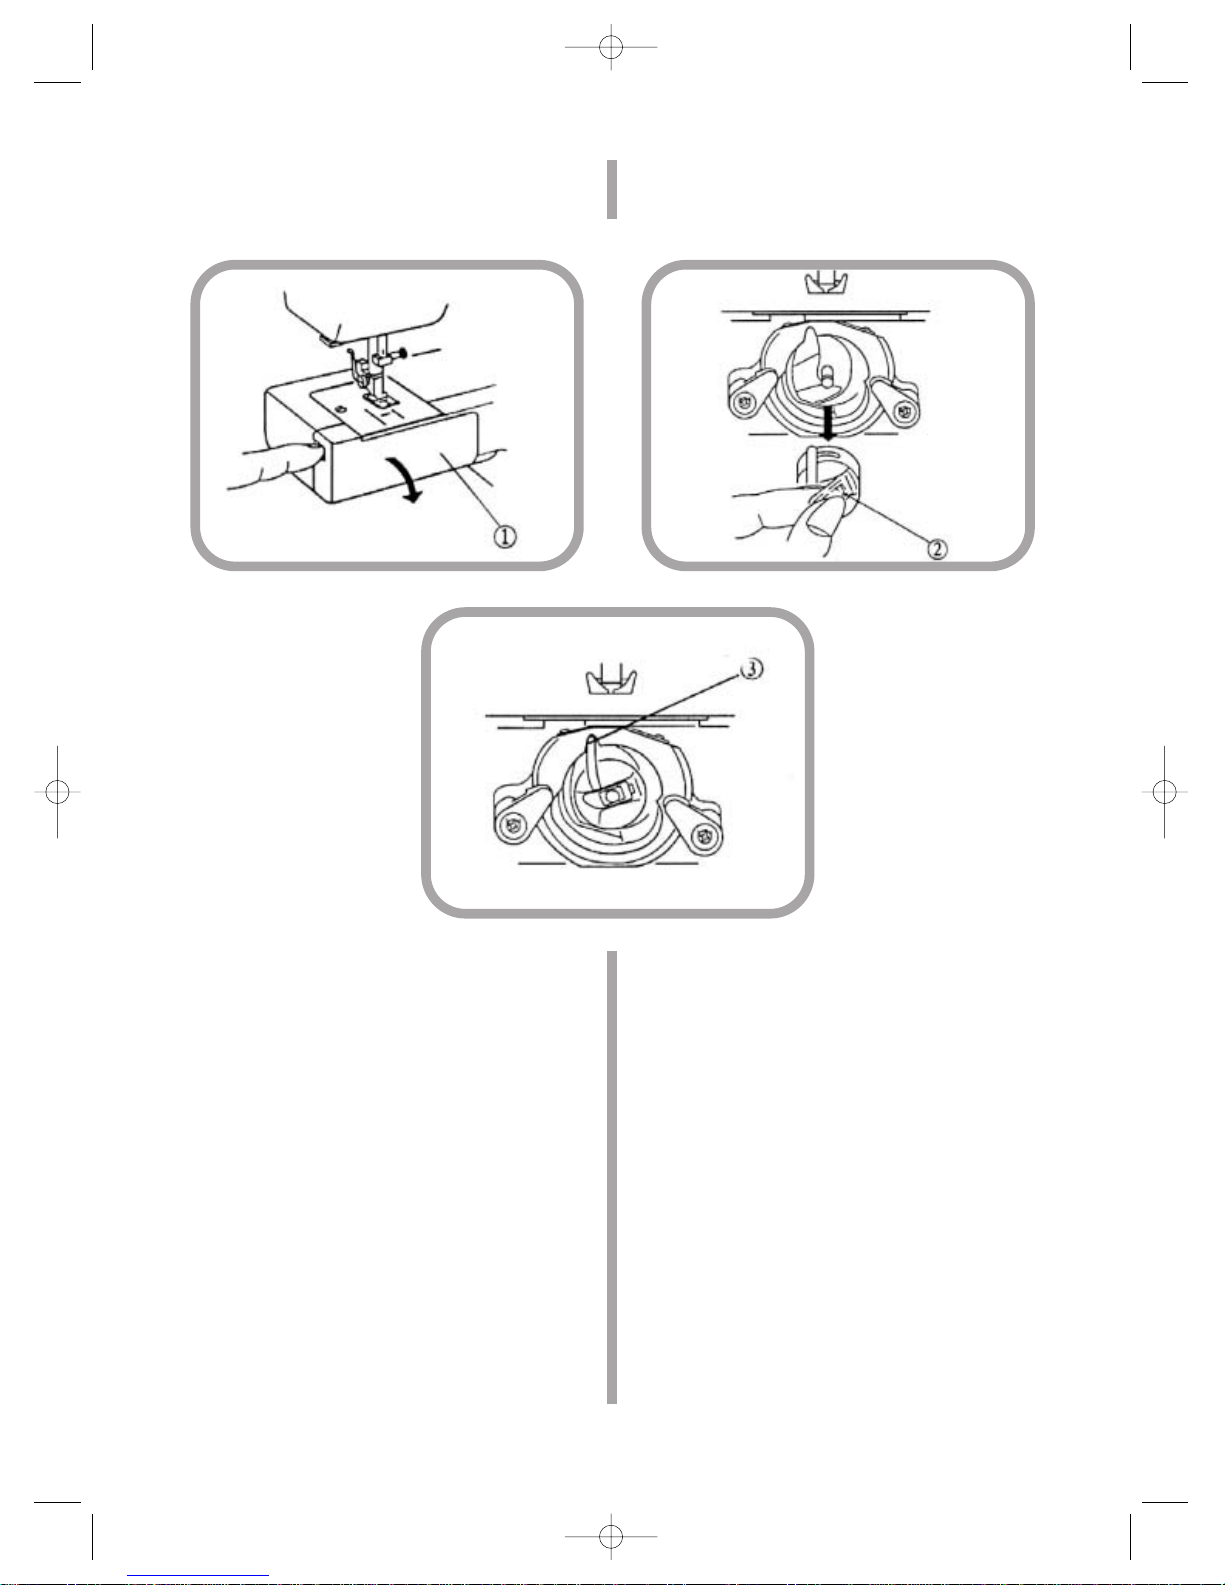
Levantar a cobertura do braço
(1) Cobertura do braço
Rode o volante manual até que a agulha se
levante o máximo possível. Pegue na lingueta de remoção da bobina e retire a canela da
bobina da cobertura.
(2) Lingueta de remoção da bobina
Introduzindo a bobina na canela, empurre a
alavanca da canela o máximo possível para
dentro, tendo em vista garantir a sua fixação
correcta.
(3) Alavanca da canela da bobina
Live the Cover
(1) Cover
Turn forward the balance wheel to raise the
needle. Hold on to the bobbin exit and pull out the
bobbin case.
(2) Bobbin exit
Press the bobbin case handle to the innermost to
ensure jcining when loading it into the bobbin
case.
(3) Bobbin case handle
Remoção e fixação da canela
Remoção e fixação da canela
Remove and load the
Remove and load the
da bobina
da bobina
bobbin case
bobbin case
Bedien. PORTO/ENGL.713/723 16.04.2004 14:31 Uhr Seite 16
15
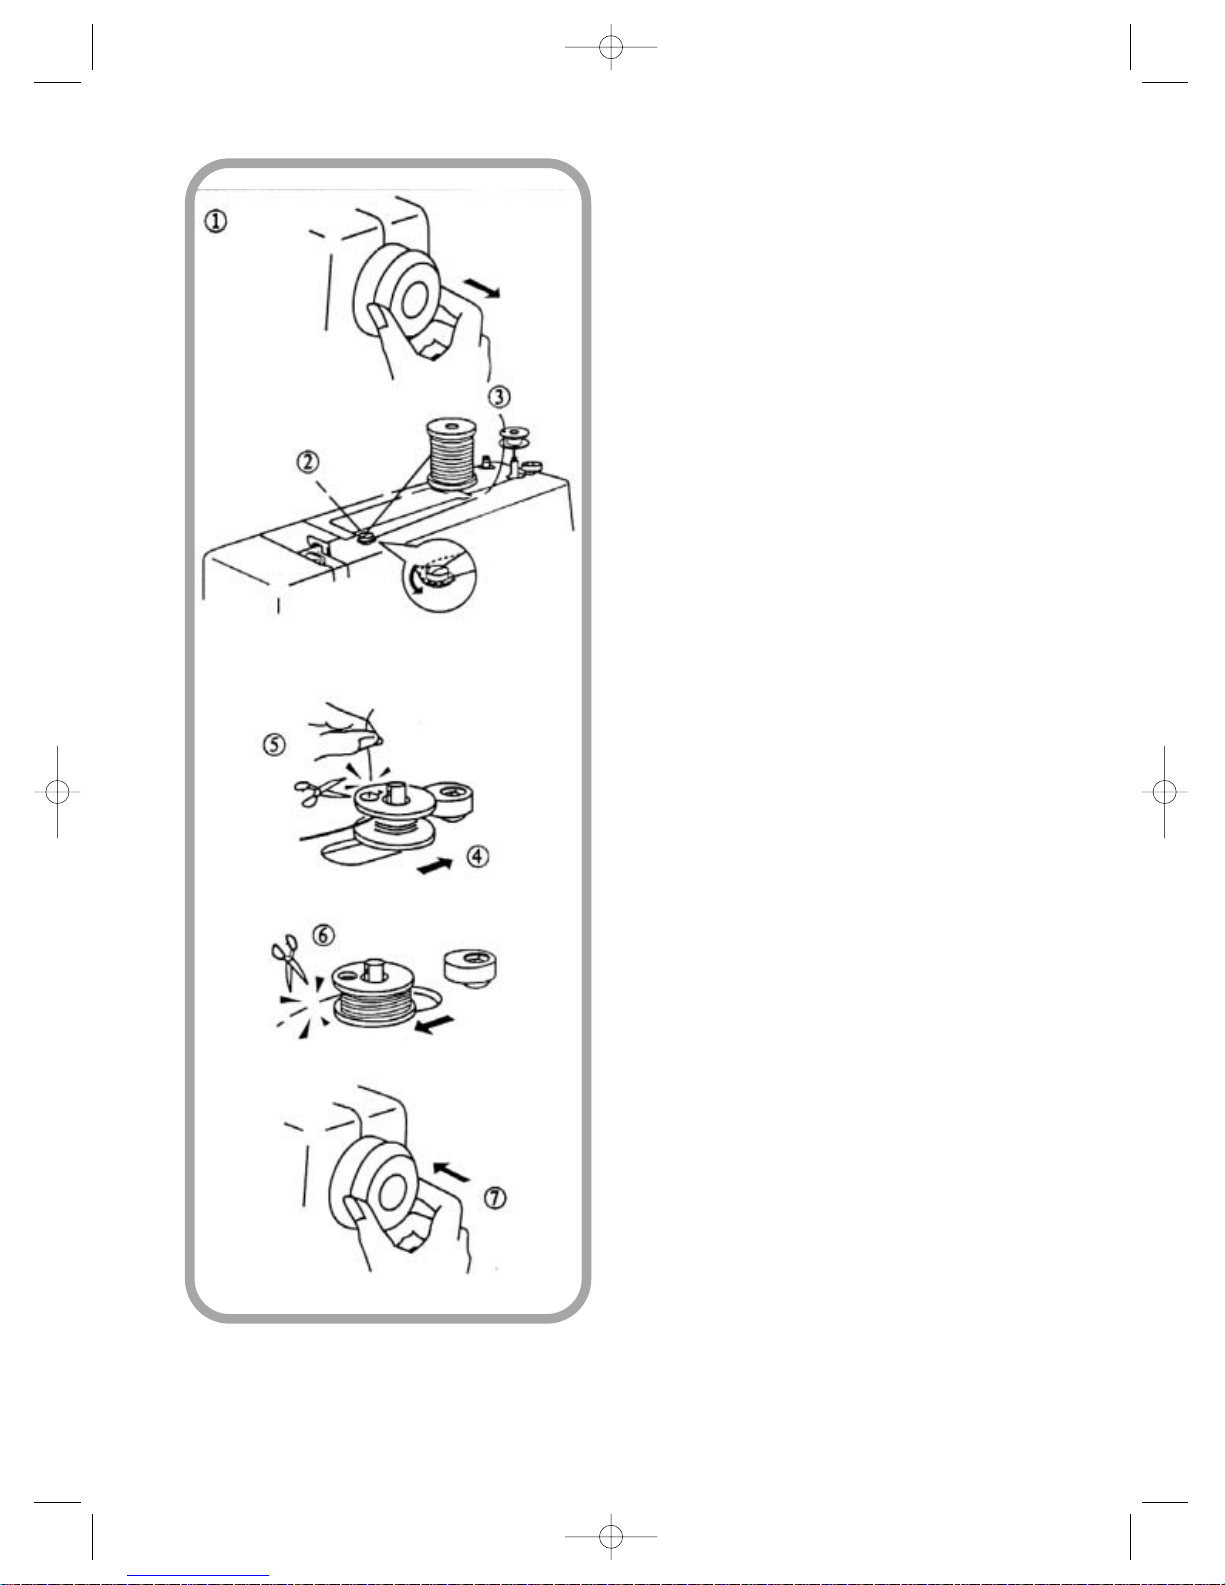
Enchimento da bobina
Enchimento da bobina
(1) Retire o volante manual para a direita, para que fique
separado da máquina.
(2) Passe o fio da bobina através do travão de disco de
enchimento do fio.
(3) Passe o fio através do orifício da bobina e introduza a
bobina no passador da bobina.
(4) Rode a bobina para cima.
(5) Segure a extremidade do fio e carregue várias vezes no
pedal de comando. Pare depois de várias voltas. Corte o fio
que sobeja junto à bobina.
(6) Volte a carregar no pedal de comando. Vá enrolando o
fio até que a bobina fique cheia e depois pare a máquina.
Empurre o passador para a esquerda e corte o fio.
(7) Empurre o volante manual para a esquerda, para ficar
acoplado à máquina (posição original).
Nota: Concluído o enchimento, é necessário empurrar o
passador da bobina para a esquerda.
WWinding
inding
(1) Pull out the balance wheel to the right so as to break
contact with machine
(2) Draw thread from the spool through the bobbin
winder tension disc.
(3) Pull thread through the hole in the bobbin and insert the
bobbin into the bobbin shaft.
(4) Turn the bobbin to the right.
(5)Hold the end of the thread and keep stepping down
the foot controller. Stop the after several turns.Cut the
excess thread close to the bobbin.
(6) Stcp down again the foot controller. Wind thread
until the bobbin is full and stop the machine. Push the
shaft to the left and cut the thread.
(7) Push the balance wheel to the left to close contact
(to the original position).
Instruction:
The bobbin shaft is to be pushed to
the left when the winding finished.
Bedien. PORTO/ENGL.713/723 16.04.2004 14:31 Uhr Seite 17
 Loading...