


家庭用美容器
27
GR16-1-001E
Instruction Manual
Keep this Instruction Manual for future reference.
Refer to the Safety Precautions section for
important information.
Before using this product, please read these
instructions carefully.
GR-16
Tornado EMS Roller
Safety Precautions . . . . . . . . . . . . . . . . . . . . . . . . . . . . 1
Product Description . . . . . . . . . . . . . . . . . . . . . . . . . . . 8
Before Use . . . . . . . . . . . . . . . . . . . . . . . . . . . . . . . . . . 9
Treatment . . . . . . . . . . . . . . . . . . . . . . . . . . . . . . . . . . . 14
After Treatment . . . . . . . . . . . . . . . . . . . . . . . . . . . . . . 21
Troubleshooting . . . . . . . . . . . . . . . . . . . . . . . . . . . . . . 22
Use in Foreign Countries . . . . . . . . . . . . . . . . . . . . . . . 7
Table of Contents

21
Safety Precautions
Safety Precautions
WARNING
Never use thi s devic e i n a
sauna or bedrock bath.
The dev ic e ma y overh ea t
and co uld cause burn s o r
injury.
Do not appl y fo r a long
perio d on area s with th in
skin or ove r bones as this
may pote ntia lly harm you r
skin or body.
Do n ot p la ce n ear or in a
fire. Do not use, c harge, or
store in a high temperature
e n v i r o n m e nt . T hi s u ni t
con ta i n s a r e c har ge a b le
battery that may cause fire or
explosion if exposed to heat.
Do not leave in a bathroom
or in wet or humid areas as
this may cau se a n el ectric
shock, short circuit, or fire
hazard.
Improper use of this device poses a severe and
likely risk of death or serious injury.
DANGER
Improper use of this device may pose a risk of
death or serious injury.
WARNING
Improper use of this device may result in fire,
injury, or property damage.
CAUTION
Safety Precautions
Please read all instructions carefully for safe and proper use.
Use only as directed.
Immediately discontinue use if any malfunction or unusual reaction to
treatment occurs.
Use of a malfunctioning device on your body may result in undesired
effects.
Precautions listed in the instruction manual are very important.
For your safety, please follow them carefully.
Precautions are classified as DANGER, WARNING, or CAUTION in order to
clearly specify the level of danger and possible injury or damage that may
occur if the device is misused.
DANGER
Do not use under any of the following conditions as this may
cause malfunction of medical devices.
Do not use in conjunction with any medical electronic equipment
such as a pacemaker, oxygenator, electrocardiograph, etc.
This symbol shows you what you must be careful with.
This symbol shows you what you must do.
This symbol shows you what you must NOT do.
To avoid accident or injury to your skin or body, do not use under the
following conditions:
· If you are under a doctor's care
· While growing or during adolescence
· If you suffer from an acute disorder
· If you suffer from tuberculosis
· If you have a fever
· If you have abnormal blood pressure or a contagious disease
· If you have a malignancy
· If you have allergic diathesis
· If you suffer from a blood disease or visceral disease
· If you have skin disease or suffer from atopic dermatitis
· If you have sensitive or weak skin
· If you are extremely tired
· If you are feeling unwell
· If you have consumed alcohol
· If you have consumed medication that causes drowsiness
· If you are pregnant or nursing or during menstruation
· If you have viral warts or melanoderma
· If you are undergoing dental treatment
· If you have capillary dilatation due to long term use of steroid hormonal
drugs or a disorder of liver function
To avoid accident or injury, do not use on the following body areas:
If you are not sure, consult with a doctor before use.
Do not allow use by persons who cannot express their intentions.
Do not allow unattended use by disabled persons.
· Over cuts or damaged skin or where you have had plastic surgery
· Inside the mouth or around the pubic area or mucous membranes
· Areas with skin irritation or redness caused by sunburn
· Acne or over itchy or swelling areas
· Skin with suppuration and irritation
· Unusual warts or viral warts
· Over the Adam's apple, on eyelids or eyeballs, or around the eyes
· Over the head or nose bone

43
Safety Precautions
Safety Precautions
D o n ot d i s as s e m bl e ,
attempt to repair, or modify
this de vice in an y way a s
t h i s m ay c au se a f ir e,
electrical shock hazard, or
in jur y. Co ns u lt yo ur lo ca l
agent if repair is needed.
*Warranty applies only to use
wit hi n c ountr y of purch ase .
Warrant y re pair fo r fo re ign
customers is not available.
Use a t AC100-240V only to
av oid a pot e nt ial fi re o r
electrical shock hazard.
D o n o t us e i f t h e AC
adap ter is d amag ed o r th e
wall socket is loose.
Th is may c a us e e lec tr i ca l
shock hazard, short circuit, or
fire.
Hol d the head of t he pl ug
in stead of th e co rd w he n
un plug g ing th e ad a pte r
f r om t h e w a l l s oc k et .
Dam age to t he co rd m ay
cause electrical shock, short
circuit, or fire hazard. Do not
touch with wet hands.
Do not use on chi ldr en or
al lo w ch il dr en to use the
dev ice . Keep out of rea ch
of children.
D o n ot a ll ow d is ab le d
persons to use th e d evice
unattended.
Avoid use on persons with
sensiti ve skin or on those
who cann ot ex pre ss th eir
i n t e ntions as th is m a y
cause injury.
Do n ot us e or s tore ne ar
fire , un der dire ct s unli ght,
or in dusty areas.
Do not place nea r h eat ing
equi pm e n t a s th is m a y
ca use a fir e or e xp lo si on
hazard.
I f a n y p r ob l em oc c ur s
d u r in g us e , i nc lu di ng
abnormal odor , s moke, or
ex ce ss he at , tu rn of f th e
pow er an d unp lug the AC
adapter immediately.
Di sc on ti nu e use if th er e is
any smoke, unusual noise, or
odor.
Use only the sup plied AC
adapter and plug it directly
into the wall socket.
Do n ot us e an ex te n si on
cord as this may cause an
el ect ric al sh o ck ha zar d,
short circuit, or fire.
Do n ot a pp ly t o pe ts o r
anima ls as this may cause
injury.
Do not drop or hit the main
uni t. Dr oppin g the de vi ce
may cau se malfunc tion or
injury.
Use only as directed in this
instruction manual.
Im pr op er us e ma y ca use
injury or malfunction.
Befor e ch argin g the uni t,
ch eck th at t he p lu g a nd
soc ket are not w et as thi s
m a y c au se an e le c tr ic
shock, short circuit, or fire
hazard.
If you are having any dental
treatment, or are under the
ca re of a den ti st, d o n ot
us e o r a voi d u s e i n t ha t
area.
Yo u ma y fe el a s tr on g or
un pl ea sa nt s en sa tion on
yo ur ch eek o r j aw if y o u
have any dental work in the
area being treated. This will
no t a d ve rse ly a ff e ct th e
tr ea tm en t, b ut if you feel
di sco mf ort c o ns ult y our
doctor.
D o no t da m a g e, br ea k ,
modify, bend by force, pull,
twist , or bundl e the c ord .
Do not place heavy objects
on t he c or d or allow it to
ge t pi nche d in bet wee n
oth er ob jects as t his may
damage the cord and cause
a f ir e or e lec tr i c s ho c k
hazard.
B e sure t o t u r n off th e
pow er wh en no t i n use or
whe n cle aning the uni t to
av oid a p ot en ti al e le ctric
shock, short circuit, or fire
hazard.
When a p p l y i ng t o y o u r
fac e, use on ly in the Fa ce
Mod e to avoid pote nti al ly
damaging your skin.
Do not place t he unit near
fire or flame, leave it under
di re ct su nli gh t, or o n a n
elect ri c bla nket or carp et
as th is co uld c ause ov er-
heating, fire , o r explosio n
hazard.
WARNINGWARNING

5
6
Safety Precautions
Safety Precautions
CAUTIONCAUTION
A f t e r u s e, r em o v e a n y
wa ter on th e un it . Do n ot
store t he main unit w et as
this may cause damage or
a malfunction.
Avoid exposure to very hot
water or hot air fr om a hair
dryer a s this ma y mel t or
deform the device.
Do not use if there is crack
on th e m ai n u ni t, if th e
outer coating is peeling, or
if th e rol le r i s d ef ec t iv e.
Use o f a damag ed devi ce
may harm your skin.
Do not wi pe the ma in uni t
w i t h al co ho l, t h in ne r,
b e n ez en e , n ai l po l i sh
re mo ver o r any s ol v en ts
wh ic h c ou ld da ma ge th e
device.
Do not use the device in a
sauna, bedrock bath, or hot
sp rin g. D o no t us e wi t h
bath agents or salts as this
may cause a malfunction.
Do not a llo w c ontac t w ith
other b eauty o r elect ronic
devices while the power is
on . T o p r ev e nt po s si b le
ma lfunction o r in ju ry , do
not place nea r a ppl iances
that produce he at s uch as
heaters , electric blanke ts,
etc.
Do not apply the roller over
a b utton , b uckle , o r oth er
ha rd o bj ec ts a s th is may
damage the roller or cause
a malfunction.
When using EMS in the bath but not under water, set the intensity
to a lower level.
While using under water, the EMS stimulation will feel weaker than
when applying it outside of the bath water. If you set the intensity
to a comfortable level while under water, you may feel stonger EMS
stimulation when used outside of the water.
Du ri ng u se, a pp ly g en tl y
an d be c ar ef ul n ot t o ge t
yo ur s kin caug h t i n th e
rollers.
T h e r ol le r s p in ch a nd
release while rotatin g and
y o u s ho ul d a dj us t t he
angl e o f app li c a tion t o
avoid pinching the skin too
tightly.
Even if yo u don ´t fe el th e
EMS s t i mul at i o n, ma k e
only sm all adjust men ts to
the intensity level to gauge
your reaction.
Don´t increase the level too
quickly at one time.
If y ou f ee l an unpleasant
t i n g li ng o n yo ur s ki n,
reduce the intens ity lev el,
mo ve t o an ot he r ar ea , or
app ly wa te r t o the s kin
su rf ac e. D o no t continue
use in such cond iti ons as
this may damage your skin.
If y ou f e e l ti re d o r you
encount er s ki n probl em s
d urin g t r e a t m e n t, st op
using i mmedi ately . If an y
probl em s per sist af ter 2 4
hours, consult a physician.
Av oid exten de d us e ov er
one area and apply only for
the reco mme nde d tim e. If
you w i s h t o r e tre at t he
same area using EMS, wait
at least 4 hours.
D o n´ t p r e ss t oo h a rd
against you r skin to a void
pot en t i al sk i n da ma g e.
Exercise special care when
ap pl yi ng on a re as w he re
th e s kin can ge t c aug ht
bet we en the r oller s, such
as yo u r n e ck an d up p er
arm.
Af ter usi ng i n th e ba t h ,
h o l d t h e m a i n u n i t
ve rt ic al ly and shake it to
remove excess water, then
dry the rollers with a cloth.
After use, thor oughl y dry
the main unit and store in a
clean dry place. Storing the
unit while wet may damage
t h e d ev ic e o r c au se a
malfunction.

7
8
Use in Foreign Countries
Product Description
WARNING
Be sure to check the plug shape and the voltage before using.
Us in g th is d ev ic e wi th a n im pr op er p lu g or a t th e in co rr ec t
voltage may cause overheating, fire, or malfunction.
NOTE: This product can be operated with 100-240V. If the plug of the
supplied AC adapter does not match the plug of your location, use a
plug adapter (not provided).
Main plug configurations and countries of use
US, Canada, Hawaii, Spain, Guam,
Saipan, Thailand, Korea, Taiwan, China,
Philippines, Vietnam, Brazil, Turkey, etc.
UK, Switzerland, China, Hong Kong,
India, Singapore, Philippines, Egypt,
South Africa, etc.
Canada, UK, Switzerland, Thailand,
Korea, Singapore, China, Hong Kong,
Egypt, South Africa, etc.
The plug configu ration and voltage varies depending on the region and
the type of accommodat ion. Always be sure to che ck for comp atibili ty
before using the device.
Fo r in fo rm at ion a bo ut p lu g ad apters, c on su lt a t ravel a ge nc y or a
consumer electronics retailer.
Type Plug Configuration Countries of Use
Use at A C100- 240 V onl y to avo id a poten tia l fir e or ele ctric al
shock hazard.
Italy, Holland, Switzerland, Spain,
Germany, France, India, Thailand, Korea,
China, Hong Kong, Malaysia, Turkey, etc.
UK, France, Australia, New Zealand,
Korea, Taiwan, China, Philippines,
Argentina, etc.
Use in Foreign Countries Product Description
●
Accessories
●
Main Unit
Battery Power Lamp
Oscillating Rollers
Cable
Socket
USB
Socket
Charging
Terminal
Flat
Surfaces
Large
Roller
Small
Roller
Charging Terminal
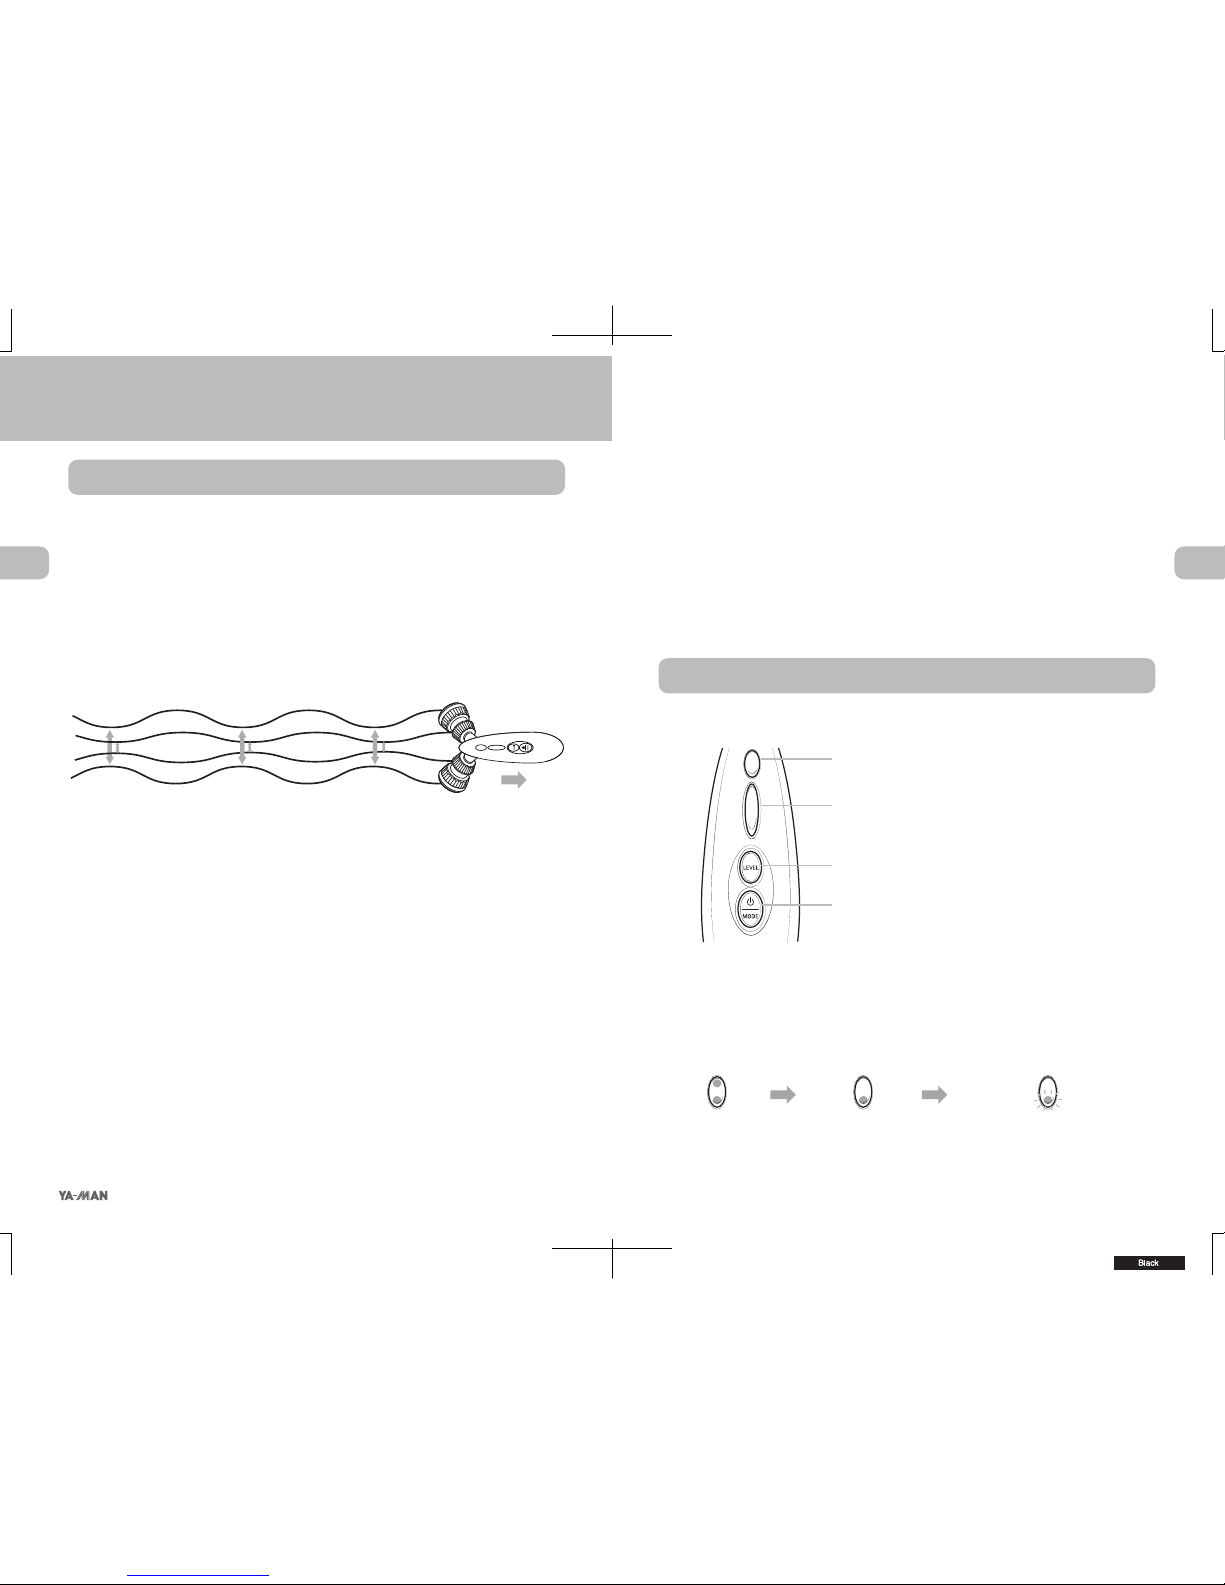
EMS Mode / Level Indicator
Level Button
Power / Mode Button
Grip
[Back Side]
[Front Side]
Charging Stand
AC AdapterUSB Cable
* Design and specifications of the main unit and accessories
are subject to change for improvements without prior notice.
9
10
Features
Indicator Lamps
Before Use
Before Use
Before Use
The Tornado EMS Roller is an at-home treatment device that is designed
with V-shaped rollers and provides an EMS (plus micro-current) function.
Choose your desired treatment including Roller care, EMS care, or Roller +
EMS care . Ple ase s elect eith er th e Face or Body mod e for EMS care
depending upon the treatment area.
The double-ring on the rollers swirls like a tornado. These large and small
rings on the rollers cr eat e a double spiral mo tion which act s t o “Grip”,
“Pinch” and “Release”, replicating the touch of a professional aesthetician’s
hand technique .
●
Double-Ring Rollers
Micro-current treatment can be performed by just applying the flat surface
of the roller ont o the ey e a rea (Face m ode level 1 ). Micro-cu rre nt is a
tec hnology that transmit s weak c urrent w hich is said to help maintain
beautiful skin.
●
Eye Care Mode (Micro-current)
●
Double EMS Wavelengths
EMS (Electrical Muscle Stimulation) is a technology that transmits electrical
current through the skin surface to underlying muscles, causing them to
contract.
Tornado EMS R oller’s E MS uses a double wa velength of both lo w and
mid-frequency that allows it to stimulate deep facial expression muscles
and core muscles. The Tornado EMS Roller is designed for use on either
the face or body by employing separate EMS modes. Each mode has 5
adjustable levels.
* Be sure to start at Level 1 (lowest intensity) when first using the device.
* Always select either the face or body mode when using EMS on the
face or body respectively.
This product can be used in the shower or bath.
* The main unit is equivalent to IPX7 (JIS standard) waterproof.
* The charger stand and AC adapter are not waterproof.
●
Waterproof
This product is equipped with an automatic power OFF function.
The power will turn OFF in 10 minutes after the power is turned on. Press
and hold the POWER / MODE button for more than 1 second to turn the
power back ON if you wish to continue.
* Pr es s and h ol d the P OW ER / MO DE b utton f or 3 se co nd s to st op
treatment early.
●
Auto Power OFF
The lamps will flash or glow solid to indicate charging status or operation.
Battery Power lamp
EMS Mode / Level indicator (p.13)
Level Button
Power / Mode Button
Fully
Charged
1 Solid white lamp2 Solid white lamps White lamp flashing
Insufficient battery.
Please charge before use.
(See p.11 for instructions)
This indicator will show the remaining battery charge.
The number of solid lamps will indicate a full charge or low battery.
Battery is
getting low
●
Battery Power Lamp

11
12
警告
注意
Before Use
Before Use
How to Charge
WARNING
CAUTION
* May cause electric shock, short circuit, or fire hazard.
* May cause electric shock, short circuit, or fire hazard.
●Always use the supplied AC adapter with this device and always
plug the a dapte r cord directly into the wall s ocket (do not use
extension cords).
●Always c heck that the charging terminal is clean and not wet
before charging.
Charging Time
Approx. 3 hours Approx. 3.5 hours
Operating Time
* The time indicated at left is when the device
is charged at an ambient temperature of
around 25°C.
* Operating time shown is immediately after
being fully charged.
* Actual charging time will differ depending
upon the remaining battery and the charging
environment.
* The 2 white lamps indicating a full charge
may remain on for only a few minutes if it is
the first time the device has been charged, or
if the battery has not been charged for an
extended period of time.
Charging the battery is necessary before first using the device, or if the
battery charge is running low.
Do not use the device until fully charged the first time you charge the battery.
●
Charging Time
●
Charging from a Wall Socket
1
2
3
Plug USB cable into the AC adapter.
(NOTE: Skip this step if your AC adapter
has a wired-in cable.) Charging will not
start if the cable is not firmly plugged in.
Plug the other end of the cable firmly
into the charger stand and then plug
the AC adapter into a wall socket.
Set the m a in u n it o n the c har g e r
stand and be sure to press down until
the EMS Mo de / Level lamps on th e
main unit turn red.
* Please wipe off any water or dirt on the
charging terminal.
* The EMS Mode / Level indicator lamps
wi l l s equ ent i all y f las h re d w h il e th e
battery is charging.
* The indicator lamps will turn off when
the charging is complete.
●
Be sure to press down where pictured above (just beneath the
Ya-Man logo) to firmly set the main unit on the charger stand.
4
When charging is co mplete, unplug the AC adapter from
the wall socket and then remove the adapter plug from the
charging stand.
●
Charging from your Computer
4
2~3
1
Follow the same steps as charging from a wall socket
(refer to p.11).
Plu g your U SB cable in to your
computer.
* M a k e su r e you r comp u t er i s
turned on.
* Be su re to p lu g the U SB cable
in to a pro pe r U SB po rt on yo ur
computer.
When c harging is comple te, unplug the USB c abl e from your
computer and then remove the adapter plug from the charging
stand.
●A ny loss o f pr og ra m or d at a, or pot en ti al d am ag e to your
computer due to USB connection is not covered by warranty.
●Charging may take longer if there are other USB connections to
the computer or the USB port cannot supply enough power.

13
14
Before Use
Precautions
EMS Mode and Level Indicator
Selecting EMS Modes
Press and hold the Power / Mode button for over 1 second to turn
on the power. Press the Power / Mode button again for 1 second to
select the desired EMS mode.
The EMS mode will change each time you press the Power / Mode
button in the order shown below.
●
Face mode: Blue Lamp
Select this mode for treating the face. Level 1 is for eye treatment
(Micro-current).
●
Body1 Mode (Tight mode): Red Lamp
Select this mode to treat body muscles with a type of kneading
stimulation.
●
Body2 Mode (Beat mode): Purple Lamp
Select this mode to treat body muscles with a type of tapping
stimulation.
Level 1 Level 2 Level 3 Level 4 Level 5
Adjusting the EMS Intensity Level
Press the Level button to adjust the EMS intensity level.
The EMS level will change in the order shown below each time you
press the Level button. Select an EMS level that feels comfortable.
This symbol indicates a flashing lamp
* Always start with Level 1
* Micro-current will only work when using Face Mode Level 1.
* Micro-current cannot be felt.
Precautions for Use
How to Hold the Device
●
Remove any jewelry or accessories (necklaces,
pier ci ng s, e tc .) before sta rt in g tr ea tment to
avoid getting them tangled in the device.
●
To avoid getting your hair tangled in the device,
be sure to tie your hair up or use a hair band.
This is especially important near the hairline.
●
If your hair does become tangled in the device,
turn it off and carefully untangle your hair.
●
Ro l lin g th e dev i ce o ver you r cl o the s ma y
damage the fabric. Use directly on the skin or
over clothes that you are not concerned about
damaging.
Read this section carefully before use and use only as directed.
Impr oper operation may occur if you
pr e ss a b ut t on ac c id e nt all y w hil e
gripping the main unit. Hold the device
carefully in order to avoid unin tended
operation during use.
●
Hold the device as shown at right.
Treatment

15
16
使用中は皮膚の挟み込みに注意する。強く挟み込んだ状態で使用
しない。
ローラーは「つまむ」「離す」を繰り返しながら回転します。ローラーが
「つまむ」タイミングのときに、皮膚を挟み込みすぎないように、本体と
肌の角度を調節しながら使用してください。
力を入れて肌にこすりつけない。特に、首筋や二の腕などローラー
の間に肌が挟まりやすい部位に使用する場合は力を入れすぎない。
肌を傷める原因となります。
注意注意注意
Treatment
Treatment
The force of “pinchi ng” b etwee n the roll ers c an be adju sted by
changing the angle of the device and direction of rolling.
Choose an angle that gives you the most comfortable treatment by
referring to the diagram below.
How to use on your skin
Skin
Rolling Direction Rolling Direction
Skin
Strong
Weak
Strong
Weak
Rollers
You will fee l the
muscle stimulation
only while applying
the t wo r oller s on
y o u r s k in w he n
using EMS mode.
* It may be difficult for the rollers to pinch the skin when it
is w et or with co smet ics applied. In t his case, press the
rollers against your skin to adjust the force of pinching.
Treatment with the Rollers
Gently apply the rollers to your skin and then roll.
●
Turning on the power is not necessary if you wish
only to use the rollers.
●
Do not press too hard against your skin.
●
Alw ays start r olling f rom down to up and fro m
center to outside when treating the face.
●
Always start rolling from down to
up and from outside towards the
center of your body when treating
the body.
Mo ve the gr ip a wa y fr om y ou r skin,
adjust the angle, and then roll gently.
CAUTION
●
Be careful to not pinch your skin too hard when using the
devi ce. Discontinue use if treatment is u ncom fort able or
your skin gets pinched too tightly.
The roll ers are designed to repeat a pinch-and-release actio n
whe n t hey ar e r oll ed. Avoid pressing too ha rd and ca ref ull y
maintain the angle when the rollers are in the “pinch” phase.
●
Do not press too hard on the skin, particularly over areas
where t he sk in is e asily p inche d such as the neck an d
upper arms. Pressing too hard may harm your skin.
●
EMS Treatment
●
Eye Treatment (Micro-current)
Lamp changes to
solid Blue, Red, or
Purple to indicate
the EMS mode
Power / Mode
Button
Adjust to
Level 1-5
Level
Button
3
2
1
Pr e ss P owe r / Mod e bu tto n fo r
more than 1 second to turn on the
power.
The Battery Power Lamp will turn on
and the EMS Mode / Level lamp will
turn to solid blue.
(Initially Face Mode Level 1.)
Press Powe r / Mode button again
for 1 second to select desired EMS
mode.
The EMS mode will change each time
you press the Power / Mode button.
For more information on the modes,
ref e r to “ S e l ecti n g EMS M o d es”
(p.13)
Press Level button to adjust the EMS
intensity level.
The EMS intensity will change each time
you press the Level button.
Ref er to “Adjust ing the EMS I ntensity
Level” on p.13 for details.
You may not feel the EMS stimulation if you have dry skin. Apply a
moisturizer or water to your skin if you feel the EMS is too weak.
* Do no t use tre at ment oi ls as they ma y block E MS stimul at ion.
2
1
Pres s Po we r / Mode button f or m or e
than 1 second to turn on the power.
●
Ey e t rea tm e nt mo de wil l s ta rt whe n
power is turned on.
●
The Battery Level lamp will turn on and
the EMS Mode/Level lamp turns solid blue.
Place your thumb on on e s ide of one
roller and apply the flat surface on the
tip of the other roller to your skin (see
p.18 for details).
●
Do not press too hard against your skin.
●
Start rolling from down to up, from the
center of your face outward.
Power / Mode
Button
Solid Blue
(Face Mode
Level 1)
Battery Level
(Solid White)

17
18
Treatment
Treatment
CAUTION
WARNING
●
Use only the Face Mode when treating your face.
Using the Body Modes on the face may harm your skin.
●
Discontinue use if you start to feel fatigued or you see any
skin reaction during use.
If symptoms continue, consult a physician.
●
Wh en u si ng i n th e ba th , be s ur e to d ec re as e th e EM S
in te ns it y l ev el w hi le ap pl yi ng over a re as t hat a re n ot
submerged in water.
T he EMS stimula tion ma y fe el weak wh en used under wate r
compared to wh en it is appli ed outside of the w ater. You may
also feel stronger EMS stimulation if you set a comfortable level
while using under water and then apply outside of the water.
●
Do not apply treatment over the same area longer than the
time recommended in this manual.
If you wish to repeat EMS treatment over the same area, always
wait at least 4 hours or more before treating again.
* EMS may stimulate the nerves of your teeth. In such a case, do not
press too hard and move to another treatment area. Individuals under
dental treatment should be especially careful when using this device.
Lamp
turns off
Power / Mode
Button
Auto Power OFF Feature
Power will automatically turn off
after 10 minutes of use.
4
Gently roll ove r the skin to l ocate EMS
points. Stop and hold where you feel the
EMS stimulation and press lightly.
Do not press too hard.
Select Face Mode when using on the face,
and sele ct Body1 or B ody2 mode whe n
using on the body (see p.13).
5
Wh en yo u fin ish t rea tm ent , pre ss th e
Po wer / Mod e b utt on for mo re tha n 3
seconds to turn OFF the power.
The lamp will turn off.
How to use EMS / Micro-Current
Eye Area Around Lips Forehead
Eye Area
Touch the
roller with
your thumb
Side of Stomach Calves Upper Arms
Side of
Stomach
Upper
Arms
●
Skincare with Micro-current
●
EMS Treatment while Gripping the Skin
* Micro-Current will not be produced unless your thumb is also touching
one side of the roller as pictured above.
Select Face Mode level 1, and put your thumb on the side of one free
roller and apply the flat surface of the other roller onto your skin.
[Recommended Areas]
Select EMS mode, grip the skin with the rollers and hold. Gripping the
soft part of the skin will allow EMS to firmly stimulate the muscles.
[Recommended Areas]
Treat the eye area as if you are
gen t l y sta m p i n g t h e d evic e
roller onto your face.
Start from the inner side of the
eye area and move outward.
Pre s s an d p inc h t he r o ller s
against the side of the stomach
to al lo w the E MS to sti mu late
near and around the muscles.
S t op th e r o l le r s ha l fw a y
bet w e e n el b o w and a r mpit .
Apply the rollers where you feel
the most EMS sensation.

19
20
Treatment
Treatment
Face Line
Arms
Legs
Bust LineThighs Lower Stomach Hips
Lift and Hold
Shoulders / Décolletage Back Waist
Press the flat surface firmly against treatment areas and lift upwards
as shown for stimulating broad areas of muscles firmly and deeply.
[Recommended Areas]
●
EMS Treatment using the Flat Surface
Select EMS mode and roll over the skin. The rollers will cycle through
“grip”, “pinch”, “release” with “EMS” at the same time.
Suggested Treatment: Apply 10 times back and forth over the area, taking
one second for each pass.
[Recommended Areas]
●
EMS Treatment while Rolling
Hips
Legs
Face Line
Li ft fr o m the ba ck sid e o f t he
thigh towards the hip using the
flat roller surface.
Relax your muscles during the
treatment.
Select face mode.
Roll from down to up by gently
pressing the rollers against the
skin. Select an EMS level that
feels comfortable.
Start from th e Achill es’ tendon
and roll to the back of the knee.
Ad j u st t he a n gle o f t h e g r i p
which feels most comfortable.
[EMS Treatment] Select Body Mode 1 or Body Mode 2 and apply to the
skin.
●
Legs
Treating Areas of Concern
Back of the Knee
Apply the rollers on the back of
the knee.
Hold the rollers where EMS can
be felt to the toes. Treatment in
the bat h is also recommended
for foot care.
Corners of Mouth
Pr e ss rol l ers fi r ml y
on t o t he cor ner s o f
the mouth.
Under Chin
Lift sagging skin with
the rollers toward the
chin and set the tip of
the grip to fit the chin
as shown.
Cheeks
Tr ai n wo r r y ar e a s
su ch as th e c he eks
and mouth.
Nose Line
Stimulate muscles on
the side of the no se.
Adjust EMS to a level
you find comfortable.
Position of rollers
Position of rollers
Position of rollers Position of rollers
* Do not apply
over Adam’s Apple
[EMS Treatment] Select Face Modes (Level over 2) and apply to the
skin.
●
Chin / Face Line
[EMS Treatment] Select Face Modes (Level over 2) and apply to the
skin.
●
Cheeks

21
22
→ →
→ →
→ →
→ →
→
→
→
→ →
→
Troubleshooting
Checklist
Symptom Possible Cause
If you encounter anything abnormal during use, check below.
Solution
Power does not
turn on
Battery Power Lamp
is flashing
You have not
pressed the Power
button to turn on
Press and hold
Power / Mode to turn
on the power
Fully charge the
battery (p.11)
Battery not charged
Battery is not
sufficiently charged
Device only
operates for a few
minutes even after
charging
Contact your local
distributor.
* Do not attempt to
replace the battery
yourself as this may
cause a malfunction
Battery life is ended
Unit does not start
charging (EMS
Mode / Level lamps
do not flash red)
Connect AC Adapter
or USB cable to main
unit correctly (p.11)
AC Adapter or USB
cable is not properly
connected
Place main unit on
charger stand and
push down until the
Mode / Level lamps
are red (p.11)
Main unit is not
firmly set onto the
charging stand
You are pressing the
Power/Mode button
for over 3 seconds
Power turns off
Troubleshooting
After Treatment
After Treatment
Wipe the surface of the device with a dry towel.
3
After use in the shower or bath, shake the device up and down to
remove any excess water on the unit.
2
Dry thoroughly and store in a well-ventilated place.
4
* Make sure no wa ter r ema in s i ns ide t he ro lle rs or ar ou nd th e
charging terminal.
* Do not use any detergents or solvents.
* Wipe off with dry towel or tissue any lubricant that oozes from the
base of the rollers.
* Never leave the device wet as this may cause damage, malfunction,
or leave an unusual odor.
1
WARNING
Cleaning
Clean the device after each use.
●
Turn the power OFF when cleaning the device.
Cleaning without turning off the power may cause an electrical
shock hazard, short circuit, or fire hazard.
Make sure the power is turned off.
Storing
●
Always remove excess water and dry thoroughly after each use before storing.
Leaving the device wet may cause a malfunction or corrosion.
●
If you will not be using the device for an extended period, clean the device before
storing.
●
When not in use, turn off the power, unplug the AC adapter from the wall socket,
remove any moisture from the device and dry well before storing.
●
Do not lea ve the dev ice near f ire or fla me, under dir ect sun lig ht, or in humid
places such as the bathroom. Store only in a clean, well-ventilated place.
●
Keep this device out of the reach of children or pets.
Maintenance and Inspection
●
If you have not u sed the device fo r an extended period, i nspect it careful ly and
check that the device works properly and safely.
●
If there is any evidence of a malfunction, refer to the “Trouble shooting” section
(p.22) before calling for service.
●
If the device malfunctions, app ears damaged, or needs se rvice, please contact
your local distributor.

23
24
→ →
→ →
→ →
→ →
→
→
→
→ →
→ →
→ →
→
→ →
→ →
FAQ
FAQ (Frequently Asked Questions)
Q A
How many minutes
should I use it per
day?
Rollers (without EMS & Micro-Current):
1 minute per area, up to 3 times per day.
EMS: 10 minutes per area. Up to 30 minutes for
the entire body per day, 2-3 times per week.
(10 minute s total for both right and left uppe r
arm s , bot h t high s , or b o t h ca l v e s). * U s e
depending upon your particular skin condition.
Can I use it in
saunas or bedrock
baths?
No, never use this device in saunas or bedrock
baths as this will cause bu rns du e t o i t b ein g
heated in a high temperature environment.
Can I use EMS
outside of the bath
or shower?
Ye s, b ut if y ou r ski n is dr y th ere a re c ases
where you might not feel the EMS stimulation. If
you feel the EMS is weak, wet your skin with
water or us e a skincare produ ct to moisturize
the skin before use.
Should I press hard
when using the
rollers?
●
Pressing too hard ma y dam age y our s kin.
Ge nt ly gl ide o ve r t he skin e spe ci ally wh en
rolling over the face.
●
Gli de the r oll ers with a press ure that fe els
comfortable to you.
Can I use it in the
bath?
●
Yes, this d evice is wa terproo f and can b e
used in the shower or bath, but do not leave it
submerged under water.
●
In some c ases, t he pinching a ction o f the
rolle rs will b e weak if the sk in is w et . In th is
cas e , pre s s the r o l ler s a s ne e d e d to g e t
sufficient treatment.
●
Avoid use in hot springs or baths having bath
sa l t s as this may c ause a ma l func t ion o r
corrosion due to added minerals in the water.
I have sensitive skin.
Is it OK for me to
use it?
●
Test your sensitivity first by applying over a
discreet area such as the upper arm and see if
your skin condition changes.
●
If you experience any adverse skin reaction,
discontinue use.
Troubleshooting
Symptom Possible Cause Solution
EMS is too strong
EMS is too weak
Cannot feel EMS
Cannot feel
Micro-Current
Your skin is dry
You are using Body
Mode on your face
You are using Face
Mode on your body
Be sure both rollers
are in skin contact
Both rollers are not
in contact with skin
You are using the
device under water
You have pressed
the Power / Mode
button during use
Make sure you have
selected the correct
Mode setting (p.16)
Moisturize your skin
with water or
skincare products
Do not press the
Power / Mode button
during use
The battery is not
charged
Charge the battery
(p.11)
Both rollers are not
in contact with skin
Micro-Current
normally cannot be
felt
Be sure both rollers
are in skin contact
EMS level too high
Lower EMS level
EMS level too low Increase EMS level
Use the device
outside of the water
(EMS is weaker
under water) or set
the level higher
when using in water
 Loading...