

Page 1
Page 2

SPECIAL MESSAGE SECTION
This product utilizes batteries or an external power supply (adapter). DO NOT
connect this product to any power supply or adapter other than one described
in the manual, on the name plate, or specifically recommended by Yamaha.
WARNING: Do not place this product in a position where anyone could walk on,
trip over ,or roll anything over power or connecting cords of any kind. The use of
an extension cord is not recommended! IF you must use an extension cord, the
minimum wire size for a 25' cord (or less ) is 18 AWG. NOTE: The smaller the AWG
number ,the larger the current handling capacity. For longer extension cords,
consult a local electrician.
This product should be used only with the components supplied or; a cart, rack,
or stand that is recommended by Yamaha. If a cart, etc., is used, please observe
all safety markings and instructions that accompany the accessory product.
SPECIFICATIONS SUBJECT TO CHANGE:
The information contained in this manual is believed to be correct at the time of
printing. However, Yamaha reserves the right to change or modify any of the
specifications without notice or obligation to update existing units.
This product, either alone or in combination with an amplifier and headphones
or speaker/s, may be capable of producing sound levels that could cause
permanent hearing loss. DO NOT operate for long periods of time at a high
volume level or at a level that is uncomfortable. If you experience any hearing
loss or ringing in the ears, you should consult an audiologist.
IMPORTANT: The louder the sound, the shorter the time period before damage
occurs.
Some Yamaha products may have benches and / or accessory mounting fixtures
that are either supplied with the product or as optional accessories. Some of these
items are designed to be dealer assembled or installed. Please make sure that
benches are stable and any optional fixtures (where applicable) are well secured
BEFORE using.
Benches supplied by Yamaha are designed for seating only. No other uses are
recommended.
NOTICE:
Service charges incurred due to a lack of knowledge relating to how a function
or effect works (when the unit is operating as designed) are not covered by the
manufacturer’s warranty, and are therefore the owners responsibility. Please
study this manual carefully and consult your dealer before requesting service.
ENVIRONMENTAL ISSUES:
Yamaha strives to produce products that are both user safe and environmentally
friendly. We sincerely believe that our products and the production methods
used to produce them, meet these goals. In keeping with both the letter and
the spirit of the law, we want you to be aware of the following:
Battery Notice:
This product MAY contain a small non-rechargeable battery which (if applicable)
is soldered in place. The average life span of this type of battery is approximately
five years. When replacement becomes necessary, contact a qualified service
representative to perform the replacement.
This product may also use “household” type batteries. Some of these may be
rechargeable. Make sure that the battery being charged is a rechargeable type
and that the charger is intended for the battery being charged.
When installing batteries, do not mix batteries with new, or with batteries of a
different type. Batteries MUST be installed correctly. Mismatches or incorrect
installation may result in overheating and battery case rupture.
Warning:
Do not attempt to disassemble, or incinerate any battery. Keep all batteries
away from children. Dispose of used batteries promptly and as regulated by
the laws in your area. Note: Check with any retailer of household type batteries
in your area for battery disposal information.
Disposal Notice:
Should this product become damaged beyond repair, or for some reason its
useful life is considered to be at an end, please observe all local, state, and
federal regulations that relate to the disposal of products that contain lead,
batteries, plastics, etc. If your dealer is unable to assist you, please contact
Yamaha directly.
NAME PLATE LOCATION:
The name plate is located on the instrument body inside the battery cover. The
name plate lists the product’s model number, power requirements, and other
information. The serial number is located on the instrument body inside the
battery cover. Please record the model number, serial number, and date of
purchase in the spaces provided below, and keep this manual as a permanent
record of your purchase.
Model
Serial No.
Purchase Date
92-BP
PLEASE KEEP THIS MANUAL
FCC INFORMATION (U.S.A.)
1. IMPORTANT NOTICE: DO NOT MODIFY THIS UNIT!
This product, when installed as indicated in the instructions contained
in this manual, meets FCC requirements. Modifications not expressly
approved by Yamaha may void your authority, granted by the FCC, to
use the product.
2. IMPORTANT: When connecting this product to accessories and/or
another product use only high quality shielded cables. Cable/s supplied with this product MUST be used. Follow all installation instructions. Failure to follow instructions could void your FCC authorization
to use this product in the USA.
3. NOTE: This product has been tested and found to comply with the
requirements listed in FCC Regulations, Part 15 for Class “B” digital
devices. Compliance with these requirements provides a reasonable
level of assurance that your use of this product in a residential environment will not result in harmful interference with other electronic
devices. This equipment generates/uses radio frequencies and, if not
installed and used according to the instructions found in the users
manual, may cause interference harmful to the operation of other electronic
devices. Compliance with FCC regulations does not guarantee that
interference will not occur in all installations. If this product is found to
be the source of interference, which can be determined by turning the
unit “OFF” and “ON”, please try to eliminate the problem by using one
of the following measures:
* This applies only to products distributed by YAMAHA CORPORATION OF AMERICA.
CANADA
This Class B digital apparatus meets all requirements of the Canadian Interference-Causing Equipment Regulations.
Cet appareil numérique de la classe B respecte toutes les exigences du Règlement sur le matériel brouilleur du Canada.
• This applies only to products distributed by Yamaha Canada Music Ltd.
• Ceci ne s’applique qu’aux produits distribués par Yamaha Canada Musique Ltée.
Relocate either this product or the device that is being affected by the
interference.
Utilize power outlets that are on different branch (circuit breaker or
fuse) circuits or install AC line filter/s.
In the case of radio or TV interference, relocate/reorient the antenna.
If the antenna lead-in is 300 ohm ribbon lead, change the lead-in to
co-axial type cable.
If these corrective measures do not produce satisfactory results, please
contact the local retailer authorized to distribute this type of product. If
you can not locate the appropriate retailer, please contact Yamaha
Corporation of America, Electronic Service Division, 6600 Orangethorpe
Ave, Buena Park, CA90620
The above statements apply ONLY to those products distributed by
Yamaha Corporation of America or its subsidiaries.
This device complies with Part 15 of the FCC Rules. Operation is subject
to the following two conditions:
(1) This device may not cause harmful interference, and (2) this device
must accept any interference received, including interference that may
cause undesired operation.
2
Page 3

PRECAUTIONS
PLEASE READ CAREFULLY BEFORE PROCEEDING
* Please keep these precautions in a safe place for future reference.
WARNING
Always follow the basic precautions listed below to avoid the possibility of serious injury or even death from electrical shock, shortcircuiting, damages, fire or other hazards. These precautions include, but are not limited to, the following:
• Do not open the instrument or attempt to disassemble the internal parts or modify
them in any way. The instrument contains no user-serviceable parts. If it should
appear to be malfunctioning, discontinue use immediately and have it inspected
by qualified Yamaha service personnel.
• Do not expose the instrument to rain, use it near water or in damp or wet conditions, or place containers on it containing liquids which might spill into any openings.
• If the AC adaptor cord or plug becomes frayed or damaged, or if there is a sudden
loss of sound during use of the instrument, or if any unusual smells or smoke
should appear to be caused by it, immediately turn off the power switch, disconnect the adaptor plug from the outlet, and have the instrument inspected by qualified Yamaha service personnel.
• Use the specified adaptor (PA-3B or an equivalent recommended by Yamaha) only.
Using the wrong adaptor can result in damage to the instrument or overheating.
• Before cleaning the instrument, always remove the electric plug from the outlet.
Never insert or remove an electric plug with wet hands.
• Check the electric plug periodically and remove any dirt or dust which may have
accumulated on it.
CAUTION
Always follow the basic precautions listed below to avoid the possibility of physical injury to you or others, or damage to the instrument
or other property. These precautions include, but are not limited to, the following:
• Do not place the AC adaptor cord near heat sources such as heaters or radiators,
and do not excessively bend or otherwise damage the cord, place heavy objects on
it, or place it in a position where anyone could walk on, trip over, or roll anything
over it.
• When removing the electric plug from the instrument or an outlet, always hold the
plug itself and not the cord.
• Do not connect the instrument to an electrical outlet using a multiple-connector.
Doing so can result in lower sound quality, or possibly cause overheating in the
outlet.
• Unplug the AC power adaptor when not using the instrument, or during electrical
storms.
• Always make sure all batteries are inserted in conformity with the +/- polarity markings. Failure to do so might result in overheating, fire, or battery fluid leakage.
• Always replace all batteries at the same time. Do not use new batteries together
with old ones. Also, do not mix battery types, such as alkaline batteries with manganese batteries, or batteries from different makers, or different types of batteries
from the same maker, since this can cause overheating, fire, or battery fluid leakage.
• Do not dispose of batteries in fire.
• Do not attempt to recharge batteries that are not intended to be charged.
• If the instrument is not to be in use for a long time, remove the batteries from it, in
order to prevent possible fluid leakage from the battery.
• Keep batteries away from children.
• Before connecting the instrument to other electronic components, turn off the power
for all components. Before turning the power on or off for all components, set all
volume levels to minimum.
• Do not expose the instrument to excessive dust or vibrations, or extreme cold or
heat (such as in direct sunlight, near a heater, or in a car during the day) to prevent
the possibility of panel disfiguration or damage to the internal components.
• Do not use the instrument near other electrical products such as televisions, radios, or speakers, since this might cause interference which can affect proper operation of the other products.
• Do not place the instrument in an unstable position where it might accidentally fall
over.
• Before moving the instrument, remove all connected adaptor and other cables.
• When cleaning the instrument, use a soft, dry cloth. Do not use paint thinners,
solvents, cleaning fluids, or chemical-impregnated wiping cloths. Also, do not
place vinyl or plastic objects on the instrument, since this might discolor the panel
or keyboard.
• Do not rest your weight on, or place heavy objects on the instrument, and do not
use excessive force on the buttons, switches or connectors.
• Do not operate the instrument for a long period of time at a high or uncomfortable
volume level, since this can cause permanent hearing loss. If you experience any
hearing loss or ringing in the ears, consult a physician.
Yamaha cannot be held responsible for damage caused by improper use or modifications
to the instrument, or data that is lost or destroyed.
Always turn the power off when the instrument is not in use.
Make sure to discard used batteries according to local regulations.
(4)
3
Page 4

Congratulations!
Your Yamaha WX5 is a state-of-the-art Wind MIDI Controller which takes wind MIDI control to
new levels of performance and playability. With precise, responsive wind and lip sensors, a choice of
single-reed or recorder type mouthpieces, and a range of fingering modes, the WX5 makes expressive
wind control more accessible than ever before. While it gives experienced wind players a new medium
and vastly expanded sonic possibilities in a familiar format, it is playable enough that beginners can
become proficient in a relatively short time. The WX5 also provides expressive control and nuances that
are simply not available with keyboards or other MIDI controllers. Although it is ideal for use with just
about any MIDI tone generator or synthesizer, combined with a state-of-the-art tone generator such as
the Yamaha VL70-m V irtual Acoustic Tone Generator, the WX5 is capable of expressive depth and tonal
subtlety that rival the finest acoustic instruments.
Refer to this owner’s manual while becoming familiar with the many functions and features provided by the WX5, and keep it in a safe place for later reference.
Contents
The WX5 Controls & Connectors ...................................... 6
Setting Up ............................................................................... 8
Power Suppl y...................................................................... 8
AC Adaptor ..................................................................... 8
Batteries.......................................................................... 8
Connecting to a Tone Generator ................................... 9
Connecting to a Tone Generator with a WX Connector .. 9
Connecting to a Standard MIDI Tone Generator............. 9
Preparing to Play ................................................................ 10
Turning the Power On ................................................... 10
Selecting a Mouthpiece ................................................ 10
Selecting a Lip Mode: Tight Lip or Loose Lip ................ 10
About the Wind and Lip Sensors .................................. 11
Basic Playing Techniques................................................. 12
Fingering Modes ........................................................... 12
Octave Shift .................................................................. 13
Pitch Bend Wheel ......................................................... 13
Key Hold ....................................................................... 14
Using the Setup Button ..................................................... 20
Sensitivity (Software Wind Gain) .................................. 20
Octave Transpose ......................................................... 21
Audition Function On/Off .............................................. 21
Setup Switch Settings ....................................................... 22
Wind and Lip Sensor Adjustment ................................... 25
Wind Zero & Wind Gain Ajustment ............................... 25
Lip Zero & Lip Gain Adjustment.................................... 26
Tuning .................................................................................... 27
● Tone Generator Setting ........................................................ 27
Maintenance ........................................................................ 28
MIDI System Setup Examples........................................... 29
Foot Control .................................................................. 29
Sequencer Recording & Playback ................................ 29
Troubleshooting .................................................................. 30
Program Change Control .................................................. 16
Changing V oices ........................................................... 16
Bank Number Transmission .......................................... 17
Changing the MIDI Transmit Channel ........................... 18
Parameter Reset........................................................... 18
Mono/Poly & Portamento Switching.............................. 19
4
Index ....................................................................................... 31
WX5 Fingering .......................................................................... 32
MIDI Data Format ...................................................................... 38
WX5 Specifications.................................................................. 40
Key Operation Chart / MIDI Message Assignments ................. 41
Page 5
Main WX5 Features
Realistic wind-instrument type response and playability
offers unprecedented expressive control.
A 16-key layout similar to the standard saxophone layout, and a choice of four fingering modes, make the WX5
easily accessible to most wind players. Beginners can
select the fingering mode that they find easiest to play.
With a WX5, a tone generator , and a pair of headphones,
you can play anytime , anywhere, without worrying about
disturbing neighbors.
Dedicated connector and cable provides direct connection to Yamaha WX-series tone generators such as the
VL70-m Virtual Acoustic Tone Generator.
Built-in MIDI output connector means the WX5 can be
directly connected to any standard MIDI tone generator
or synthesizer without the need for an external MIDI interface.
High-resolution wind sensor achieves precise breath response for smooth, natural v elocity/volume control. 5 sensitivity settings provide optimum response for all pla y ers.
Responsive lip sensor allows lip control of pitch and other
parameters when used with the reed (saxophone type)
mouthpiece.
Thumb-controlled pitch-bend wheel allows convenient
pitch bend control when either the reed (saxophone type)
or recorder type mouthpiece is used.
Octave keys allow pitch to be shifted over a ±3-octave
range.
MIDI program change transmission means that voices
can be switched directly from the WX5.
Four ke y-hold button modes - normal, follow , portamento,
and sustain - provide a range of expressive control options.
Built-in LED display facilitates lip-zero adjustment.
Stable, precise response eliminates false triggering and
transient tones.
The illustrations in this owner’s manual are for instructional purposes only, and may be different from the ones on your instrument.
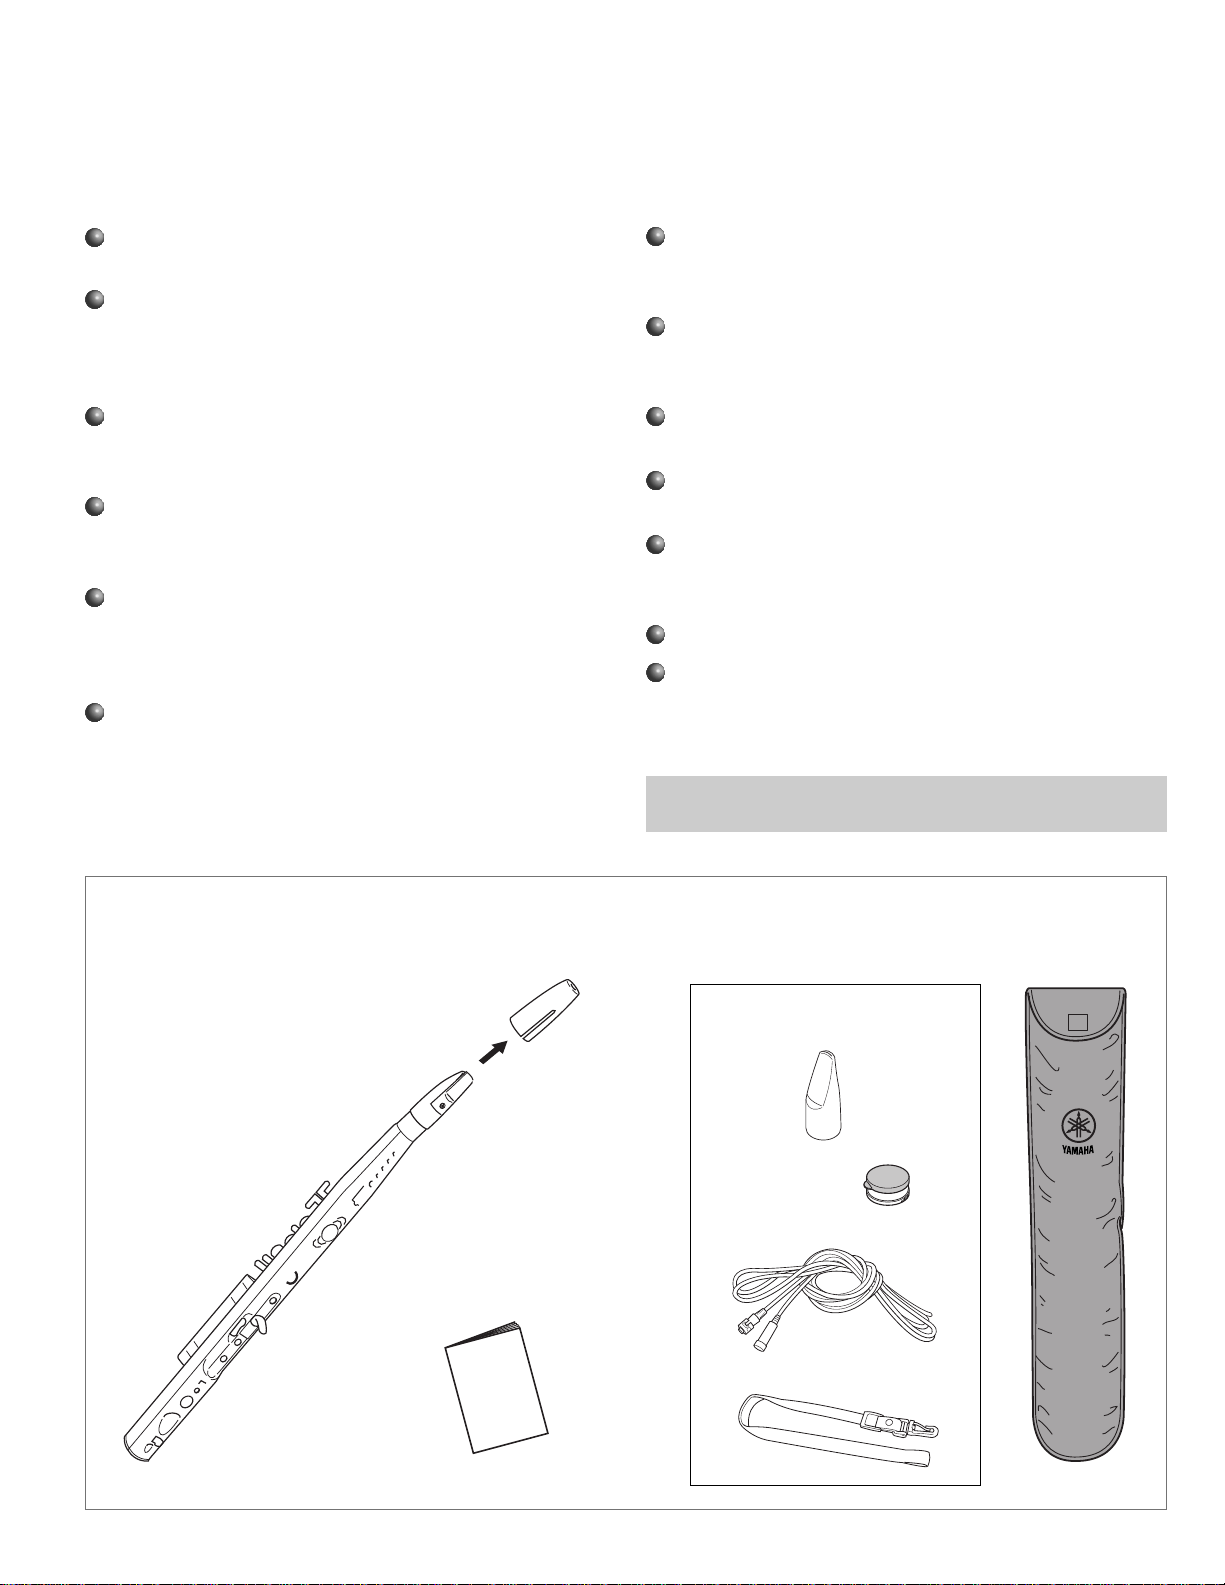
❖ Packing List
After opening the WX5 package, make sure that it includes all of the items listed below.
Mouthpiece Cap (attached)
* Remove the mouthpiece cap before
playing the WX5.
Mouthpiece (attached)
Reed (saxophone) type.
WX5
Owner’s Manual
Mouthpiece
No reed (recorder) type.
Recorder Cream
WX Cable
Strap
Soft Case
5
Page 6
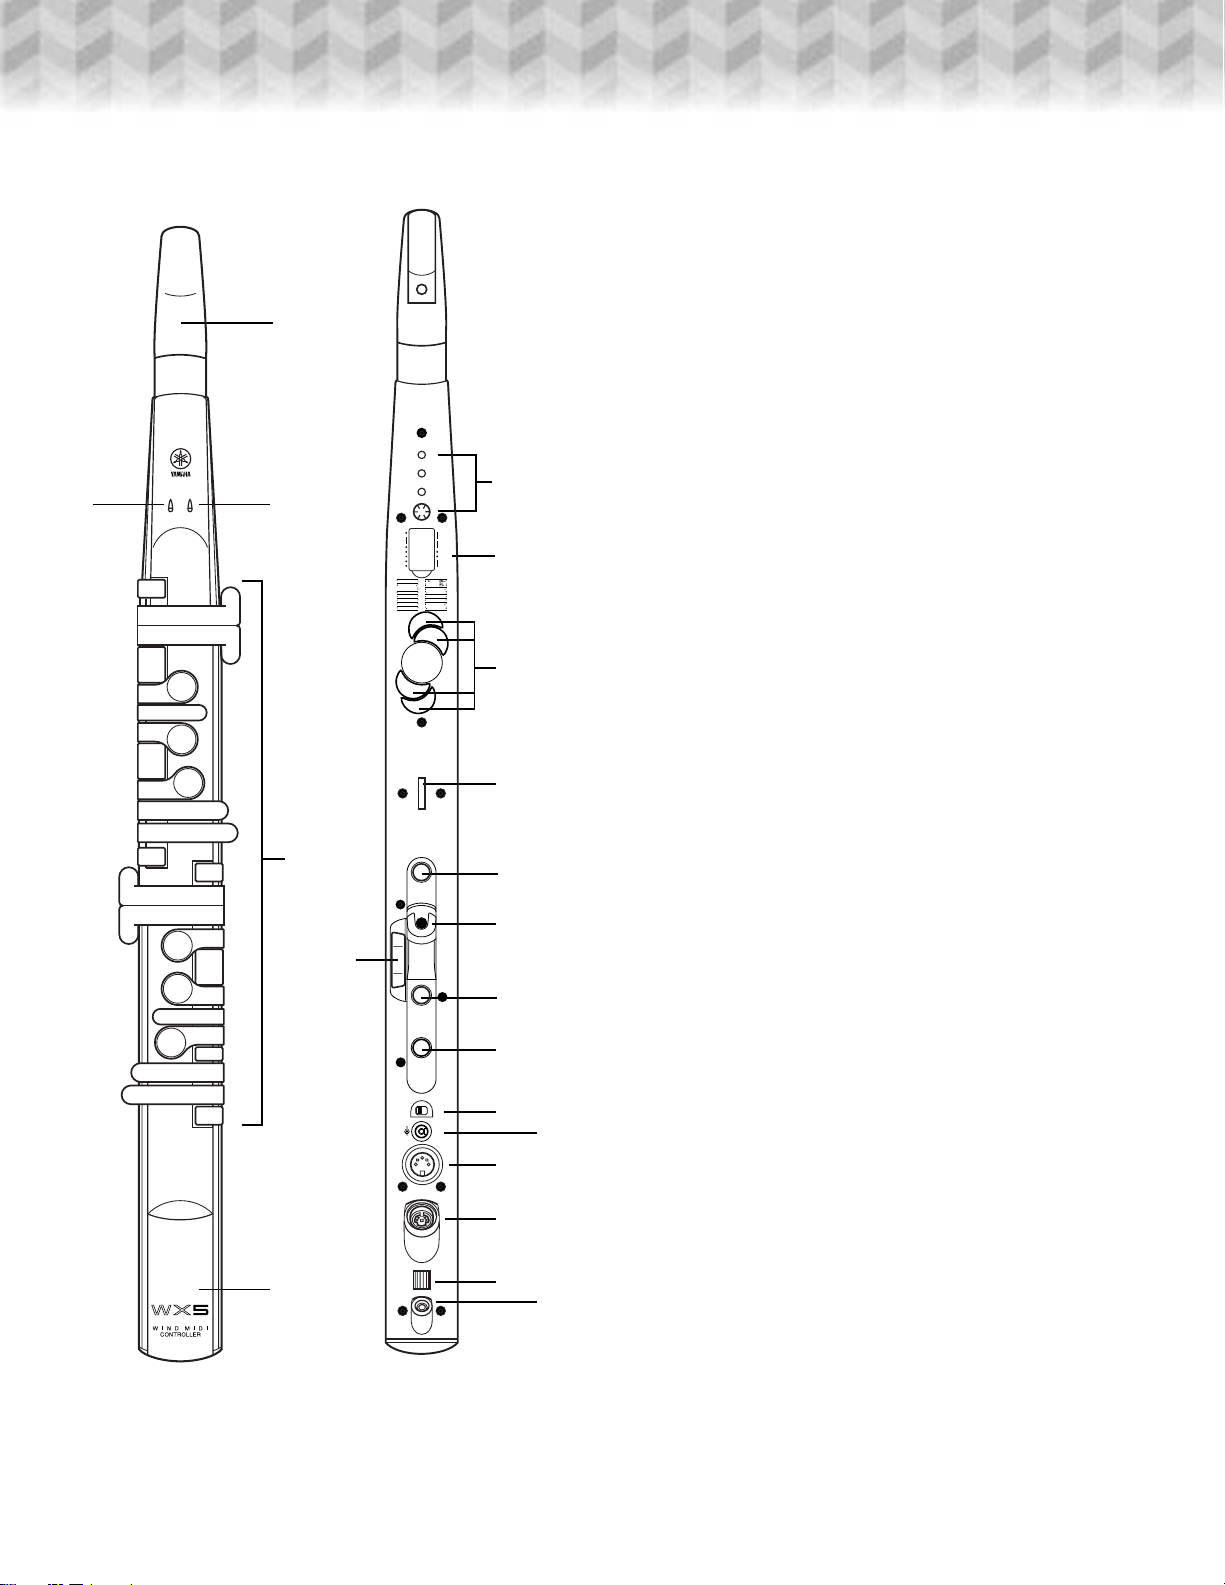
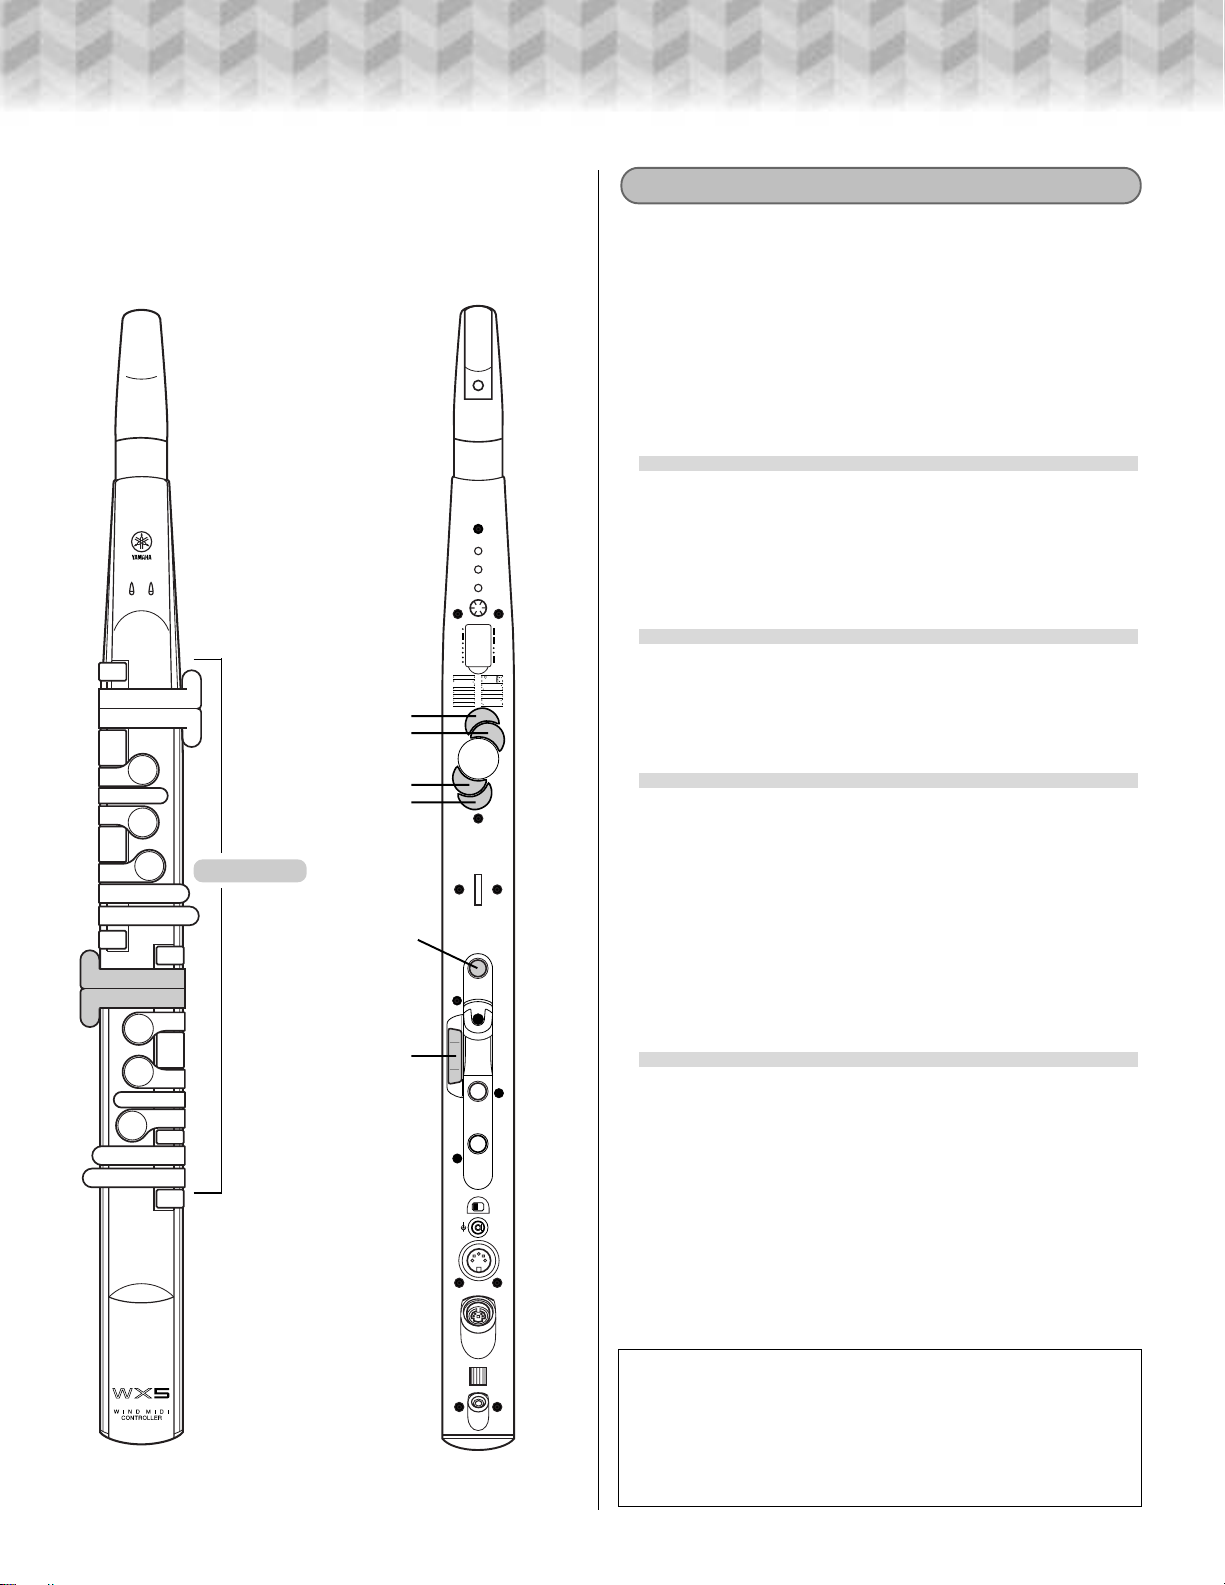
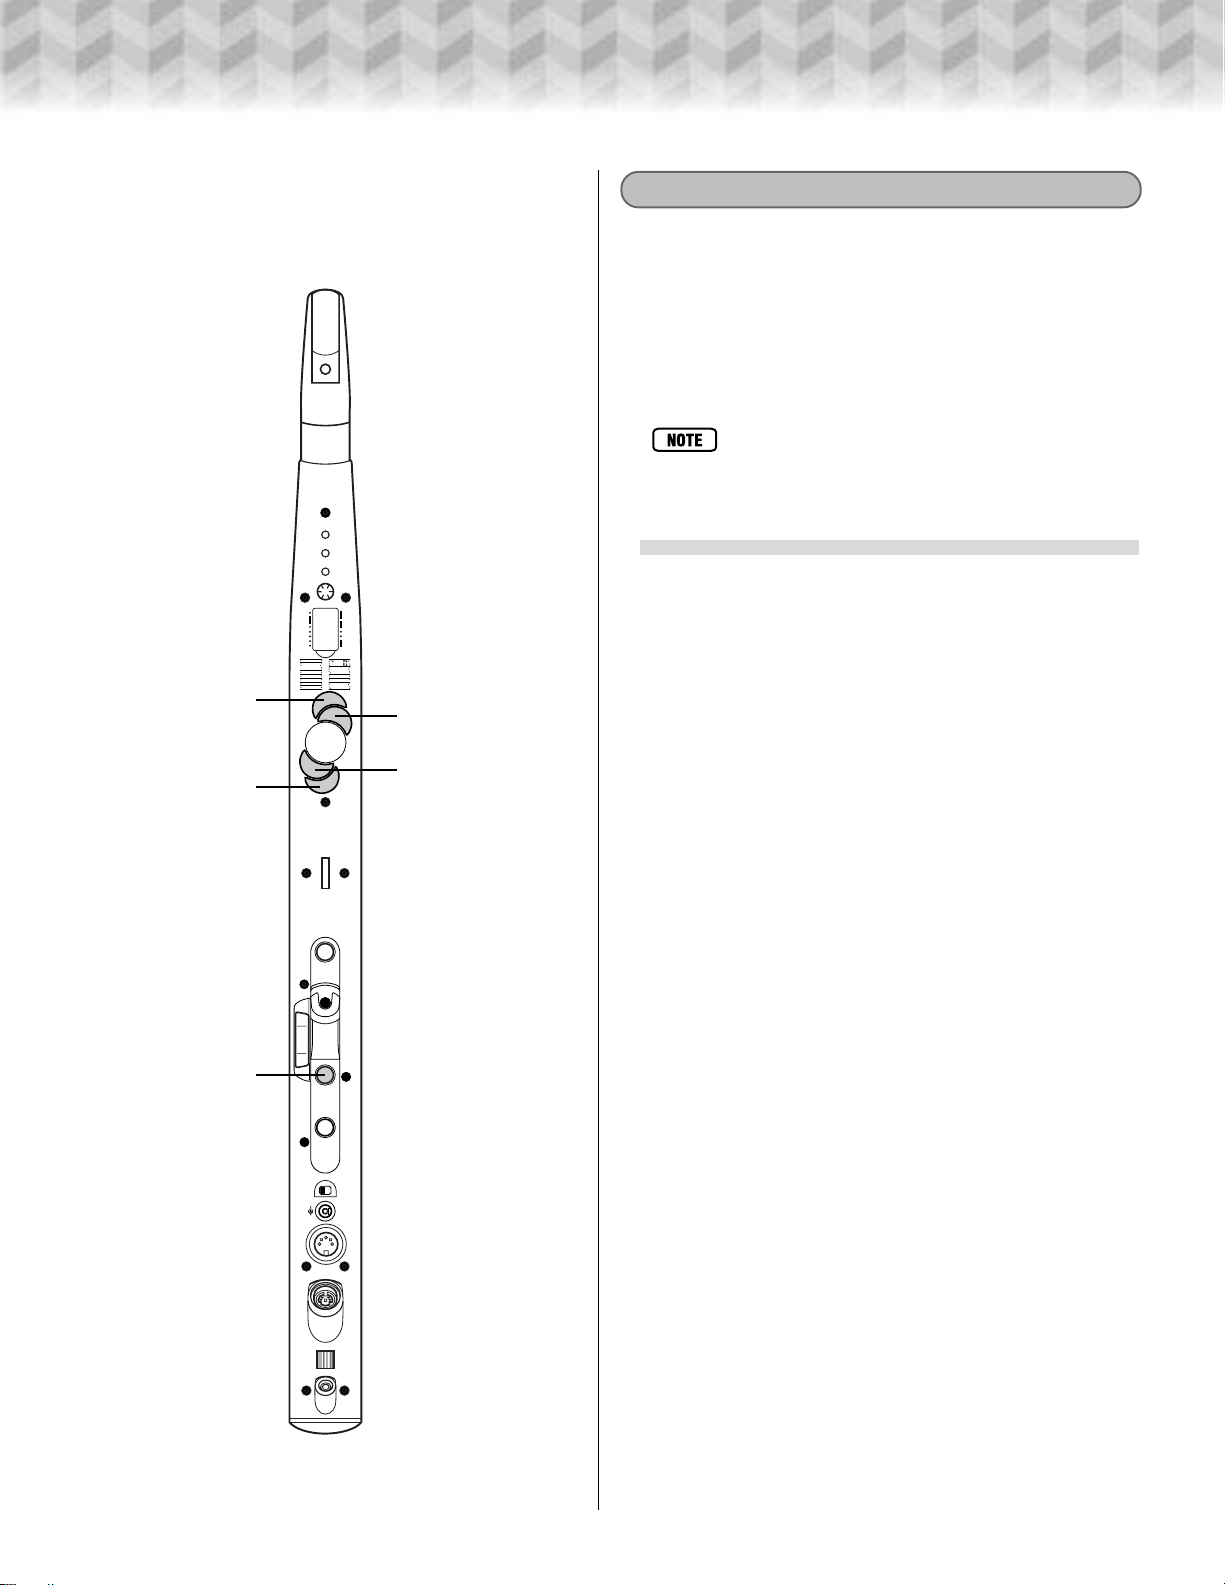
The WX5 Controls & Connectors
1 Mouthpiece
The WX5 is supplied with two mouthpieces: a saxophone-type
mouthpiece with a reed, and a recorder-type mouthpiece with no
reed. The WX5 is initially shipped with the saxophone-type mouthpiece attached. To remove and replace the mouthpiece see the
“Maintenance” section on page 28.
1
2 LED 1 Indicators
3 LED 2 Indicators
Viewed from the key side of the instrument (as in the illustration), the LED indicator on the right shows lip sensor status, and
the LED indicator on the left shows wind sensor status. Details on
page 11.
4 Keys
These are the keys used to play the WX5. The actual fingering
used will depend on the fingering type selected via the setup
switches (page 12, 30).
33
3
33
2
WIND GAIN
WIND ZERO
Vel
Win
Win
LIP
LIP
LIP
LIP+
nrm fix
B/C EXP
nrm hrd
tht loos
nrm wide
P/B M/W
off on
LIP GAIN
LIP ZERO
VOL
A C
B Fl
off on
off on
PB gen
MW filt
6
Trns
Fing
Fast
Hi ct
7
Whl
5
4
@
OFF
+ –
MIDI OUT
WX OUT
POWER
ON DC IN 12V
8
9
0
!
#
$
%
&
*
(
^
)
5 Battery Cover
Batteries can be installed or removed after removing this cover
(page 8).
6 Sensor Gain Controls
These four controls adjust the gain and zero point of the wind
and lip sensors. The upper three controls can be adjusted using a
small “minus” screwdriver, while the LIP ZERO control can be
adjusted using a finger. Adjustment details on page 25.
7 Setup Switches
The DIP switches below the switch cover determine many of
the WX5’ s basic functions - e.g. fingering, breath and lip response,
the instrument’s base key, and more. Details on page 22.
8 Octave Keys
These keys allow you to shift the pitch of the instrument up or
down by one, two, or three octaves while playing. Details on page
13.
9 Strap Ring
The supplied neck strap attaches to this ring. See “Attaching
the Strap”, below .
0 Setup Button
Used in conjunction with other WX5 control buttons, the Setup
Button allows software wind gain, octave transpose, and other settings to be changed while playing. Details on page 20.
6
! Thumb Hook
This hook allows the instrument to be supported by the righthand thumb while playing. See “Positioning the Thumb Hook”,
below.
Page 7
The WX5 Controls & Connectors
@ Pitch Bend Wheel
Like the pitch bend wheel on keyboard synthesizers, the WX5
pitch bend wheel can be used to produce smooth upward or downward pitch bends. Details on page 13.
# Key Hold Button
The Key Hold button controls any of four assignable key hold
functions including sustain. Details on page 14.
$ Program Change Button
Used in conjunction with the instrument’s keys, the Program
Change button can be used to transmit MIDI program change numbers to the connected tone generator in order to change voices directly from the WX5. Details on page 16.
% Power Switch
Turns the WX5 power on or of f.
^ DC IN 12V Connector
When using a Yamaha PA-3B AC Adaptor to power the WX5,
the adaptor’s output cable should be connected here. Details on
page 8.
& MIDI OUT Connector
When not using the WX cable (below), use this connector to
connect the WX5 to a MIDI tone generator or synthesizer via a
standard MIDI cable. Details on page 9.
* WX OUT Connector
This connector allows the WX5 to be directly connected to
compatible Yamaha tone generators (such as the VL70-m) which
have a WX IN connector via the supplied WX cable. Details on
page 9.
❖ Attaching the Strap
When using the supplied neck strap with the
WX5, attack the strap hook to the strap ring as shown
in the illustration.
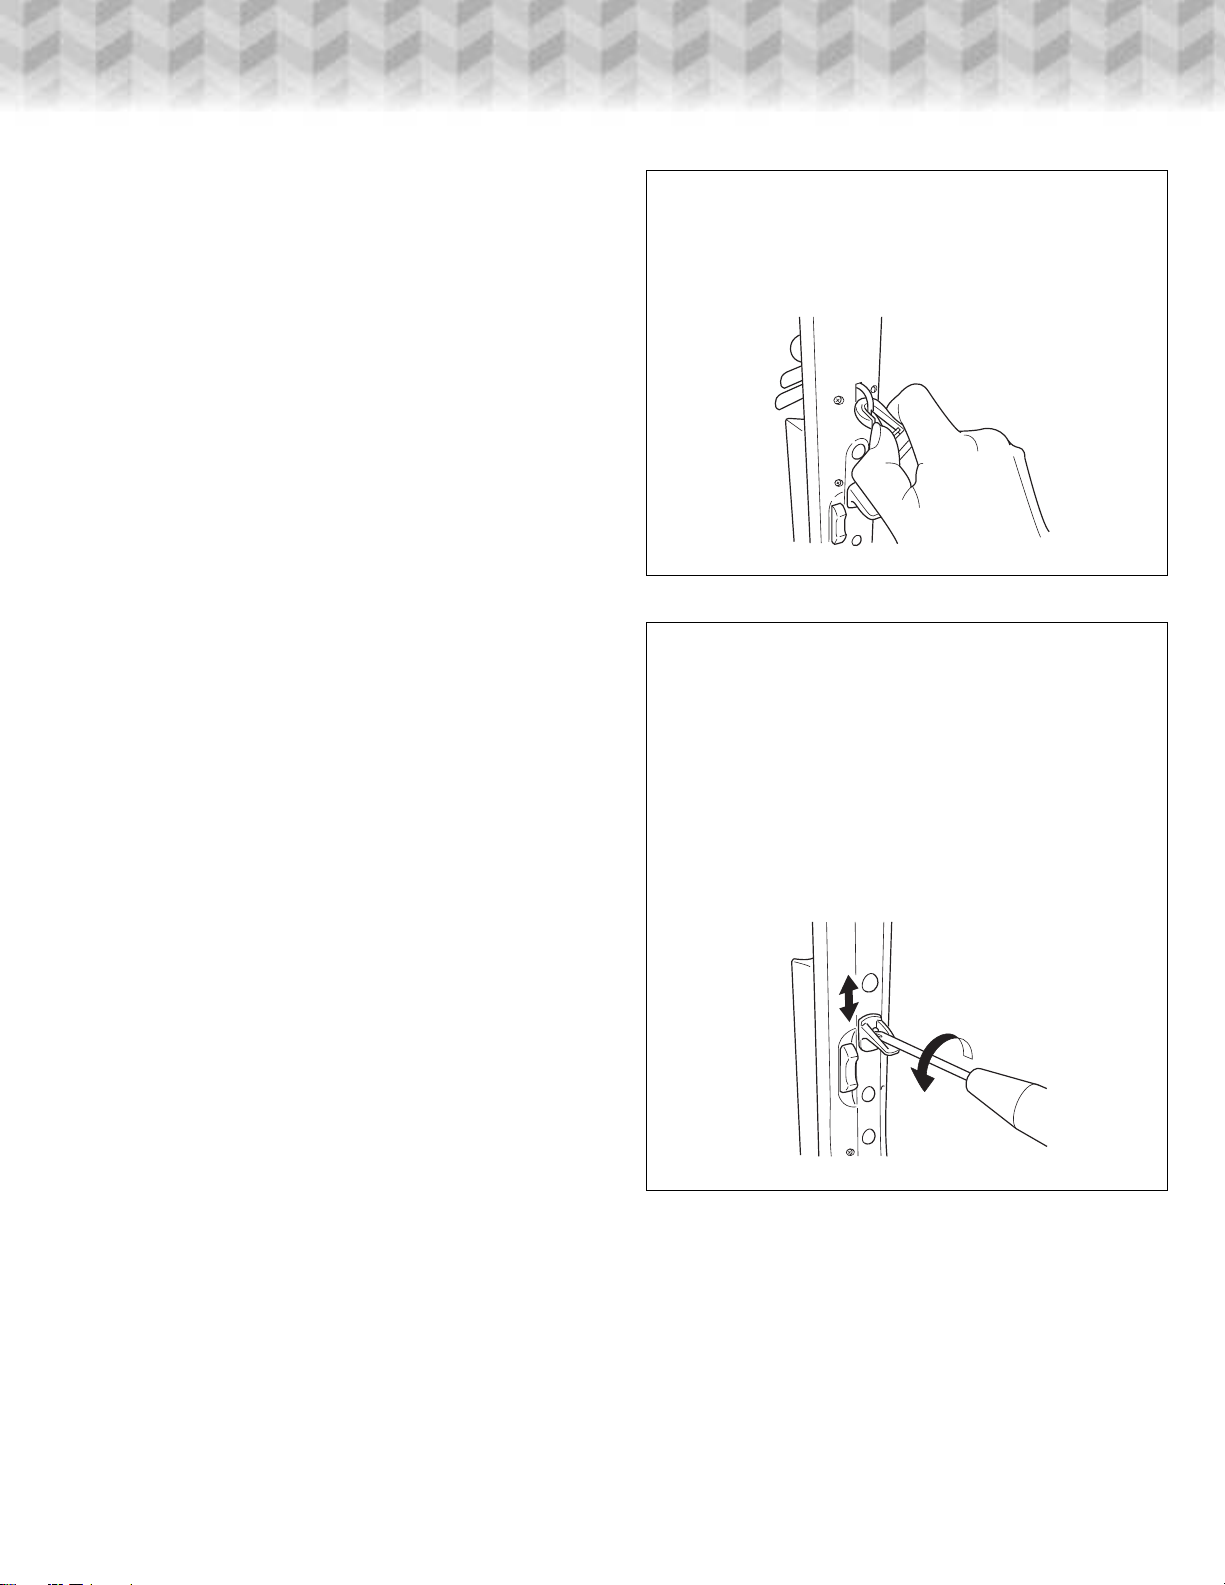
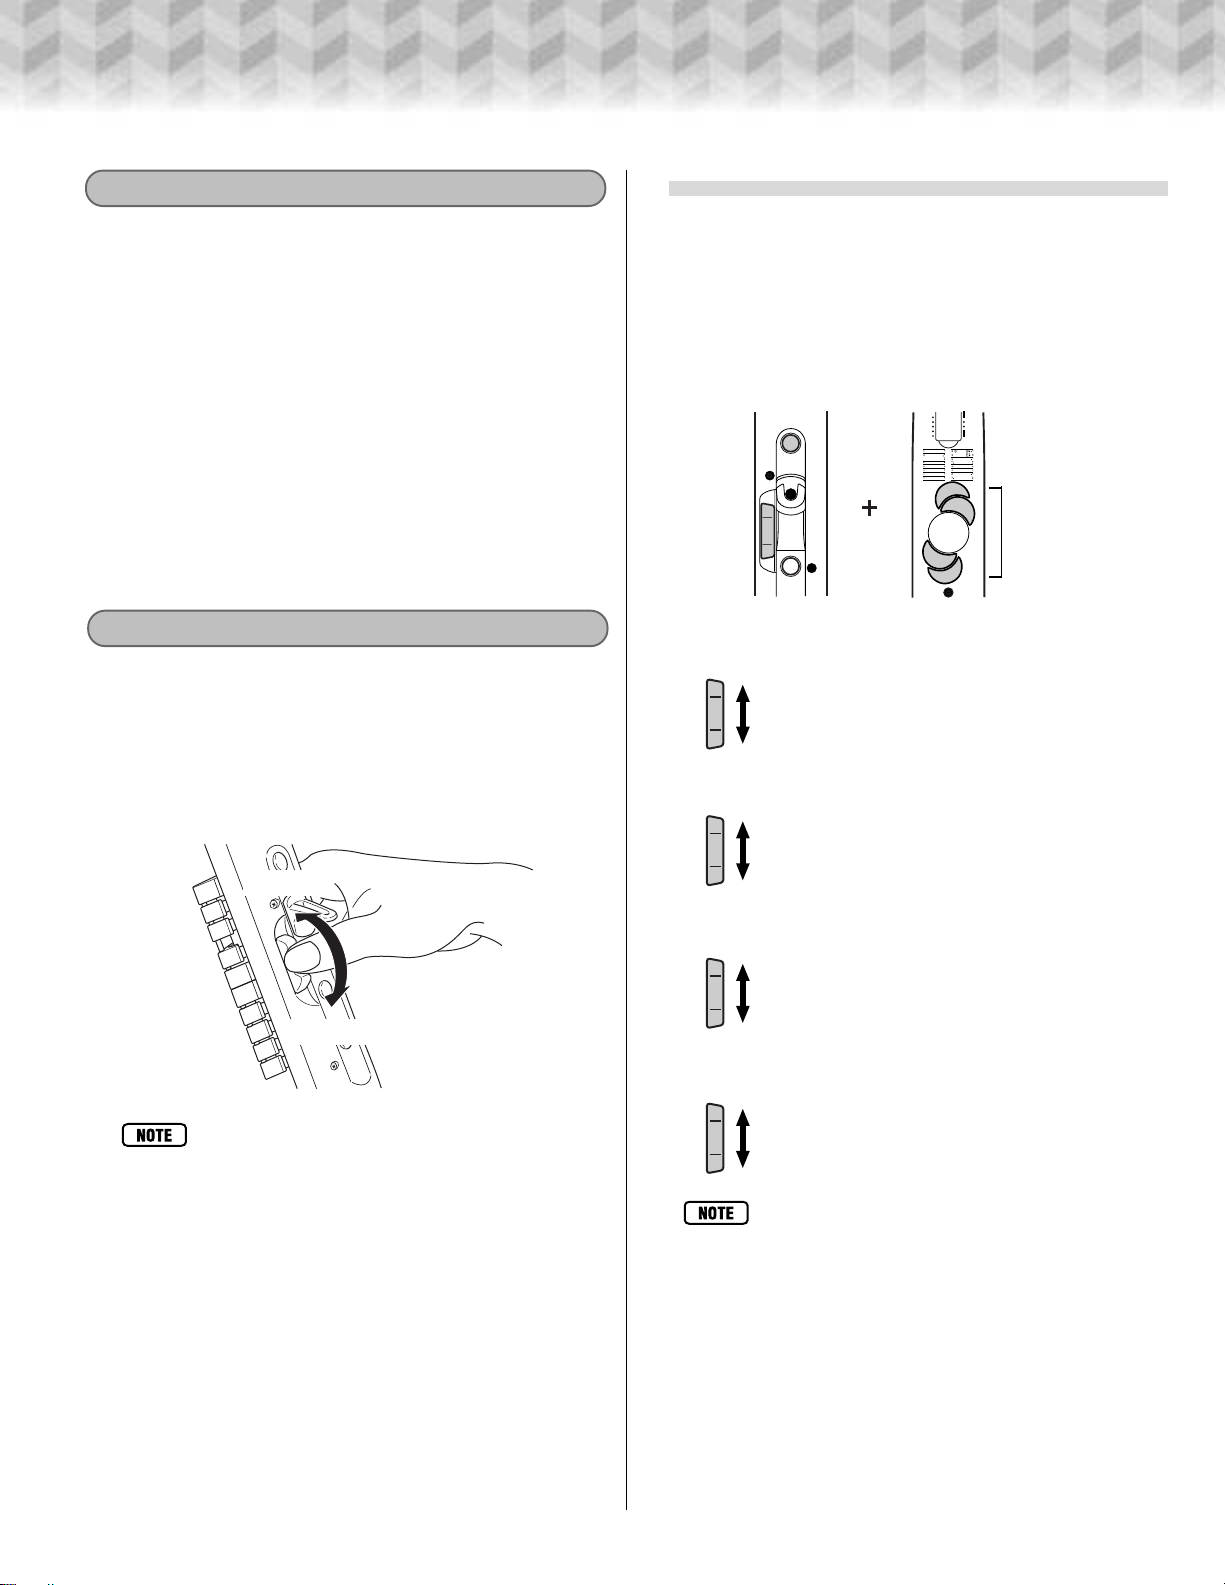
❖ Positioning the Thumb Hook
The thumb hook rests on the right-hand thumb
while playing, supporting and steadying the instrument. For maximum comfort and playability, the
thumb hook can be positioned as required by loosening the screw using a small “plus” screwdriver, as
shown in the illustration, positioning the thumb hook
as required, and then tightening the screw. Do not
use excessive force when tightening the thumb-hook
screw .
( Cable Holder
Supports the AC adaptor output cable and the MIDI or WX
cable connected to the WX5, preventing accidental disconnection.
) Water Drain
Breath and built-up water escape from this aperture - do not
block this aperture.
7
Page 8
Setting Up
Since the WX5 is a MIDI controller, it must be used with a MIDI tone generator to produce sound. Yamaha recommends the
VL70-m or an MU-series XG tone generator, but just about any MIDI tone generator can be used.
WX-Compatible T one Generators
When the WX5 is connected to a WX-compatible tone generator such as the VL70-m via the supplied WX cable (the tone
generator must have a WX IN connector) po wer is supplied to the WX5 via the WX cable and no other pow er supply is required.
This means that you don’t have an extra cable connected to the instrument, or the extra weight of batteries inside the instrument.
Standard MIDI Tone Generators
When using the WX5 with a standard MIDI tone generator or synthesizer, connection must be made via an optional MIDI cable
(see your music instrument dealer). In this case pow er must be supplied to the WX5 either from an optional Yamaha PA-3B AC
Adaptor, or a set of six SUM-4 batteries installed in the instrument. See “Power Supply”, below.
Power Supply
The power supply connection or battery installation described in this section is only necessary if you will be
connecting the WX5 to a standard MIDI tone generator via a MIDI cable.
AC Adaptor
Use only a Yamaha PA-3B AC Adaptor to power the
WX5 from a household AC outlet.
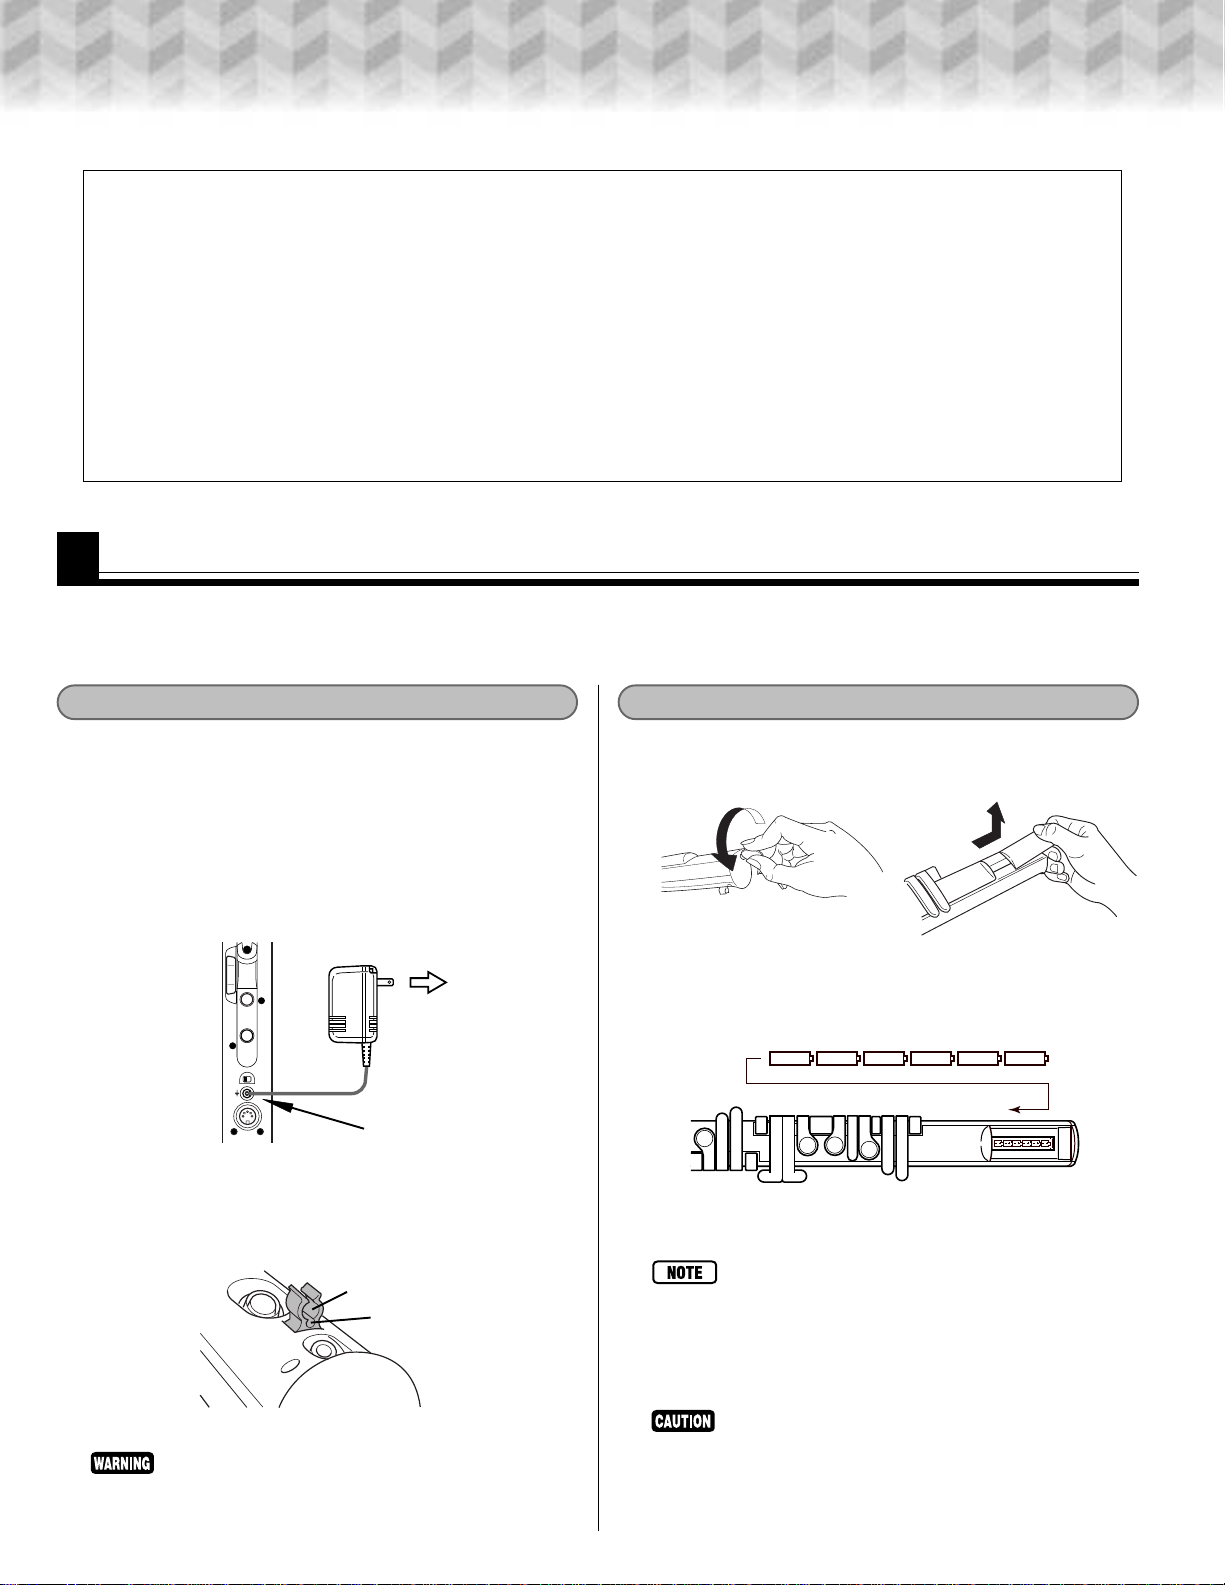
1
Connect the DC output cable from the PA-3B to the
DC IN 12V connector on the WX5.
2
Plug the PA-3B into a convenient AC wall outlet.
POWER
OFF
ON DC IN 12V
+ –
MIDI OUT
WX OUT
3
Clip the AC adaptor’ s output cable into the cable holder
on the WX5 before clipping a MIDI cable in to the
cable holder.
DC IN 12V
MIDI cable
AC adaptor’s cable
Batteries
1
Use a coin to unlock the battery cover, then remove
the cover as shown in the illustration.
2
Install a complete set of six new SUM-4 batteries, being sure to orient the polarity of the batteries properly
as in the illustration.
3
Replace and lock the battery cover.
• When the batteries are almost depleted the LED indicators will flash and the sound may become distorted
or reduced in volume. Be sure to replace the batteries
early to minimize sound quality degradation.
• When an AC adaptor is plugged into the WX5 the internal batteries are automatically disconnected.
• Use only a Yamaha PA-3B AC Adaptor to power the
WX5 from a household AC outlet. The use of other A C
adaptors will void the warranty, and possibly damage
the WX5.
8
• Always replace all six batteries with new ones at the
same time. Ne ver mix new batteries with old ones, and
don’t mix different types of batteries (i.e. standard and
alkaline), or different brands of batteries.
Page 9
Connecting to a Tone Generator
Setting Up
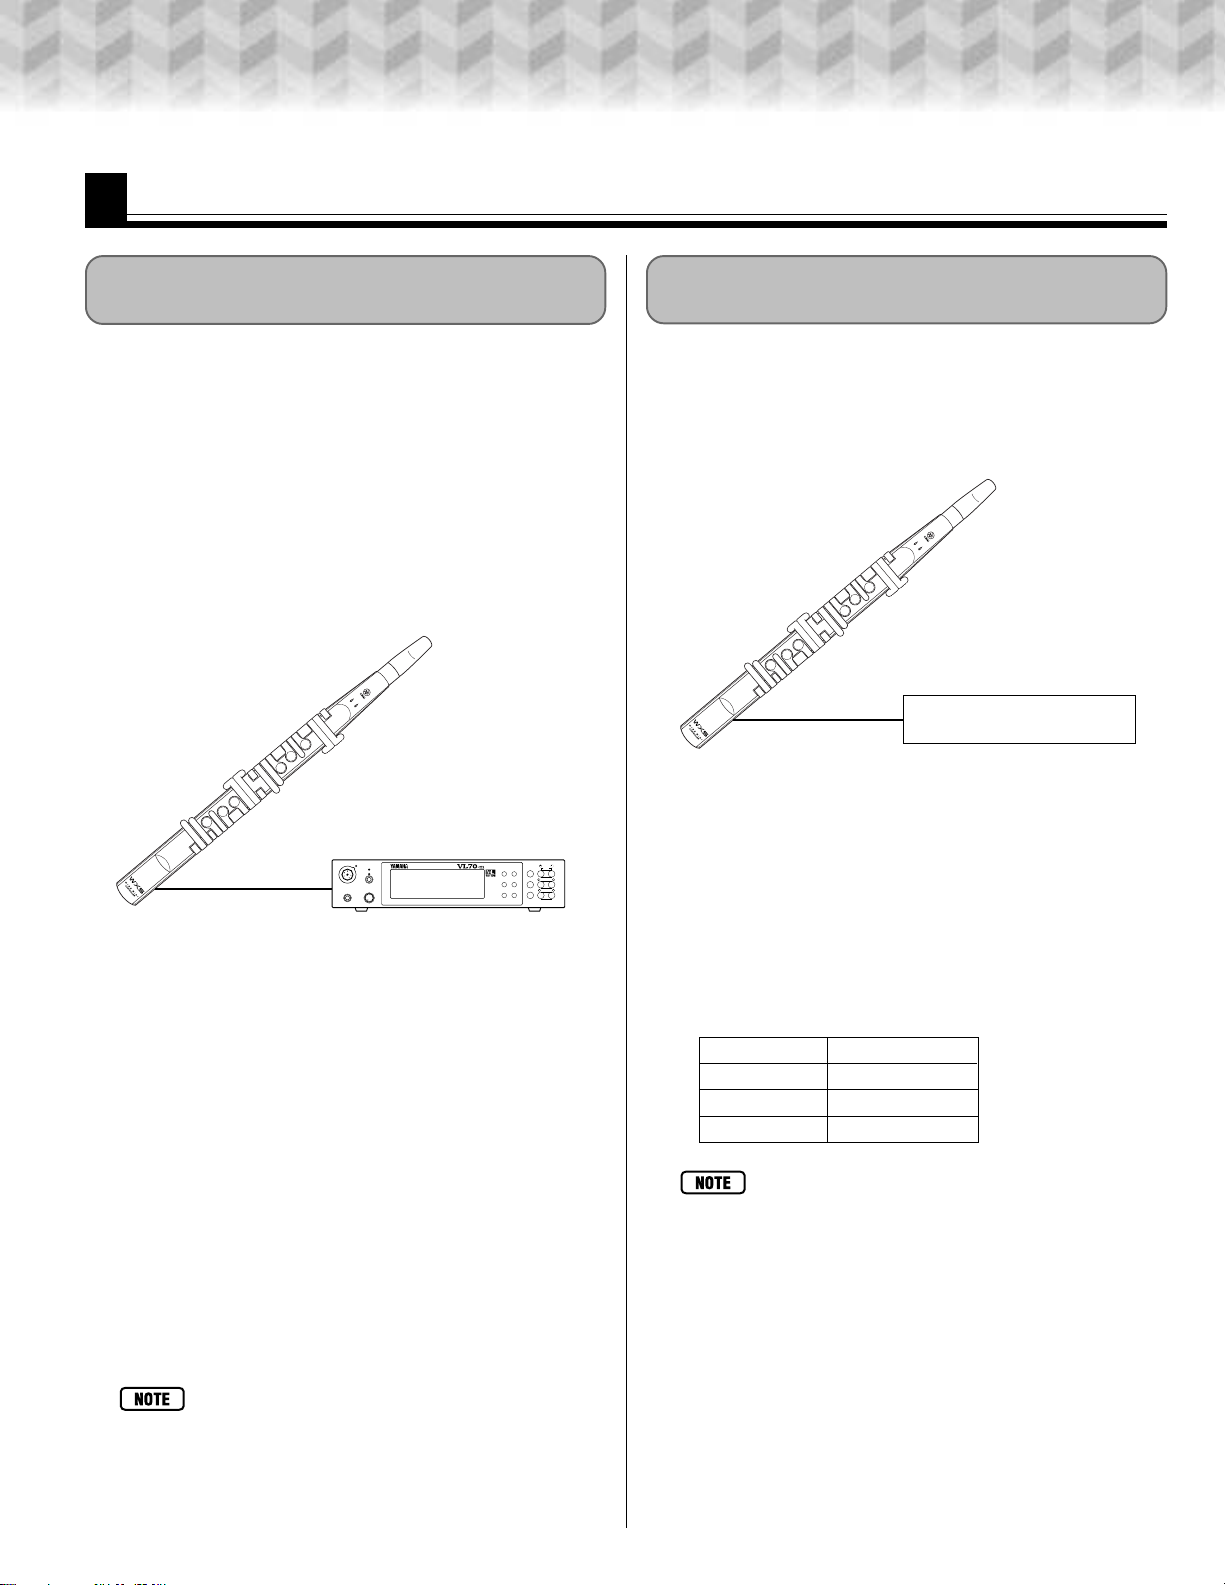
Connecting to a Tone Generator with a WX Connector
The Yamaha VL70-m Virtual Acoustic T one Generator was designed for optimum matching with Yamaha
WX-series Wind MIDI Controllers, and is recommended
for use with the WX5 to make the most of the WX5’s
expressive capabilities.
To connect the WX5 to the VL70-m, simply connect
the supplied WX cable to the WX5’s WX OUT connector, and to the WX IN connector on the VL70-m. No other
connections are required (the VL70-m supplies power to
the WX5 via the WX cable).
WX5
VL70-m WX IN connector
WX OUT
WX cable
WX IN BREATH
PHONES
VIRTUAL ACOUSTIC TONE GENERATOR
POWER/VOL
PART MIDI BANK/PGM# VOL EXP PAN REV CHO VAR KEY
PUSH ON/OFF
HOST SLECT switch “MIDI”
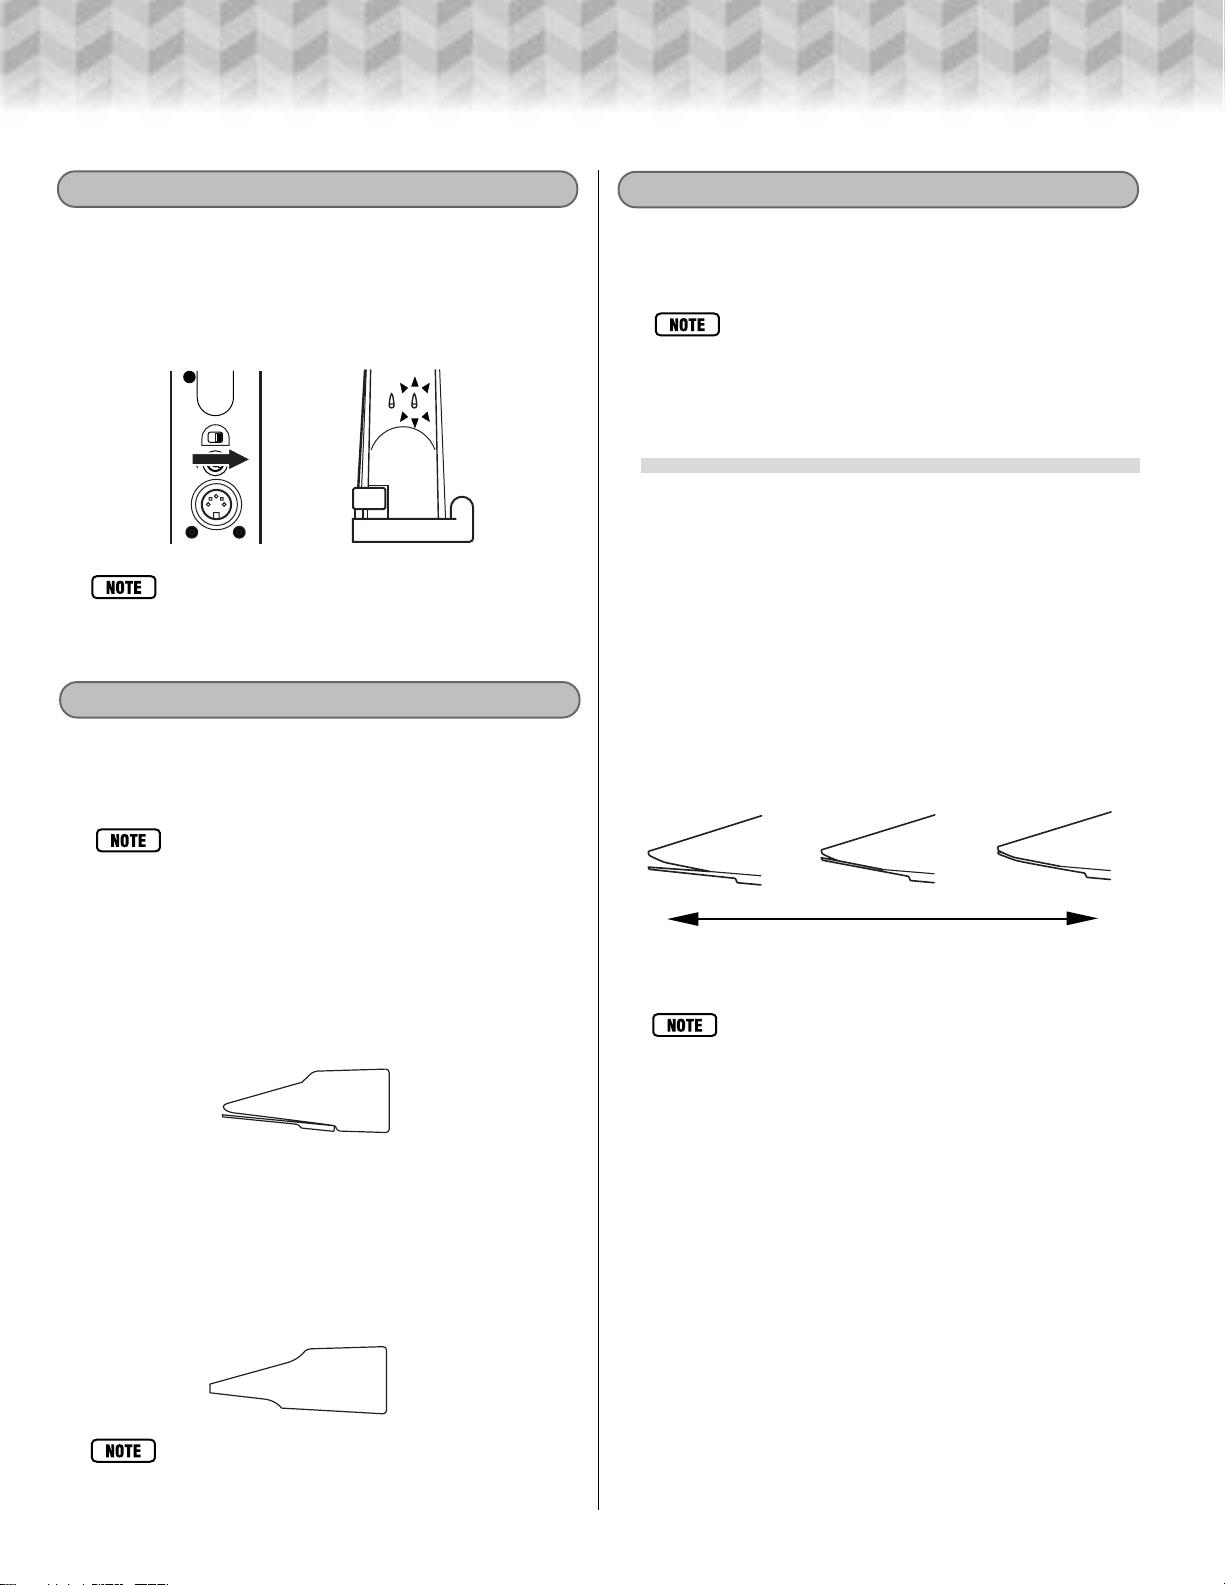
WX5 Connection
Connect the end of the WX cable with the screw
ring to the WX5. Insert the connector with the arrow on
the cable connector facing upward, then tighten the screw
ring to ensure a solid connection. Finally, clip the cable
into the cable holder for extra security .
MIDI/
PART
PLAY EDIT
ALL
WX
UTIL
EFFECT
ENTER
SELECT
BC/WX
VELOCITY
TOUCH EG
BREATH
MODE
EXIT
VALUE
VOICE
VL-XG
Connecting to a Standard MIDI Tone Generator
In addition to connecting an AC adaptor or installing
batteries as described on page 8, connect the MIDI OUT
connector of the WX5 to the MIDI IN connector of the
tone generator or synthesizer to be used via a standard
MIDI cable (sold separately).
WX5
MIDI cable
MIDI OUT
Before using the WX5 to control a standard MIDI tone
generator, it may be necessary to make several settings
on the tone generator side. Refer to your tone generator’s
owner’s manual for details, as well as the “Tone Generator Settings” section of this manual (page 27).
Also be sure to set the SW1-1(V el), SW1-2(W in), and
SW1-3(Win) DIP switches (page 22) as shown below to
ensure smooth breath volume and timbre control.
Switch Setting
SW1-1(Vel) ON
SW1-2(Win) ON
SW1-3(Win) OFF
MIDI tone generator
VL70-m Connection
Align the protrusion on the VL70-m end of the cable
with the groove in the VL70-m WX IN connector, and
plug in firmly. Also be sure to set the HOST SELECT
switch on the VL70-m rear panel to “MIDI”, and set the
VL70-m breath mode to BC/WX (refer to the VL70-m
owner’s manual for details).
• The WX5 can also be directly connected to the Yamaha
WT11 Wind Tone Generator via the WX cable.
• In order to make the most of the WX5’s expressive
capabilities, it is recommended that you use a tone
generator which is capable of receiving MIDI Breath
Controller control change data (control change number 2). Breath control is ideally suited to controlling
volume and timbre via breath pressure, as well as applying a range of other effects.
• When using an XG tone generator, the tone generator’ s
Assignable Controller parameter is set to allow reception of breath controller data, but setting the WX5’s
“Wind Controller to MIDI Data” setup switches to “Expression” (page 22) can produce better results f or volume control in some cases.
• The WX5 can also be connected to a MIDI tone generator via the WX cable and an optional Yamaha BT7
Power Box.
9
Page 10
Preparing to Play
Turning the Power On
Whether you are powering the WX5 via the WX cable
connected to a VL70-m tone generator, or via an AC adaptor or batteries, the WX5 power is switched on by sliding
the POWER switch to the “ON” position. Turn the power
off by sliding the POWER switch to the “OFF” position.
POWER
OFF
ON DC IN 12V
+ –
MIDI OUT
WX OUT
• Depending on the setup switch settings (page 10) and
sensor adjustment (page 25), the LED indicators may
not light when the power is turned on.
Selecting a Mouthpiece
The WX5 is supplied with two different mouthpieces. Select the type that best suits your playing style
and/or the type of music you intend to play.
Selecting a Lip Mode: Tight Lip or Loose Lip
The WX5 has two basic playing modes: Tight Lip
and Loose Lip, described below. Select the mode which
best suits your playing style.
• The Tight Lip or Loose Lip mode is set via the setup
switches, as described on page 22.
• The WX5 is initially shipped with the Tight Lip mode
selected.
■ Tight Lip
The tight lip mode, which is the way most acoustic singlereed instruments are played, simply means that a certain
amount of bite (lip pressure) is applied to the reed when
playing at normal pitch. Increased pressure on the reed
raises pitch, and decreased pressure on the reed (and/or
moving the bite towards the tip of the mouthpiece) lowers pitch. The Tight Lip mode means that accurate pitch
must be determined by the player’s ear, but is probably
the best choice for players who have experience with
single-reed instruments.
Bend Down Normal Pitch Bend Up
• When changing mouthpieces, be careful not to bend
or otherwise damage the cantilever inside the mouthpiece cavity.
Reed Mouthpiece (Saxophone Type)
This mouthpiece features a reed which can be used to
control pitch according to your “bite”. This mouthpiece
provides playability and expressive control essentially
equivalent to a saxophone or clarinet.
Reedless Mouthpiece (Recorder Type)
This mouthpiece has no reed and thus does not allow lip
control. Playing the reedless mouthpiece is similar to playing a recorder.
When using the reedless mouthpiece, set the lip mode to
“Loose Lip” via the setup switches, as described on page 22.
Downward Pitch Bend
• The lip range (the amount of variation caused by a
given change in lip- pressure), and the type of effect
produced by lip pressure (pitch or modulation) can be
adjusted via the Lip Range and Lip Data setup
switches, as described on page 22, 23.
Upward Pitch Bend
• The WX5 is initially shipped with the Reed Mouthpiece
attached.
10
Page 11
Preparing to Play
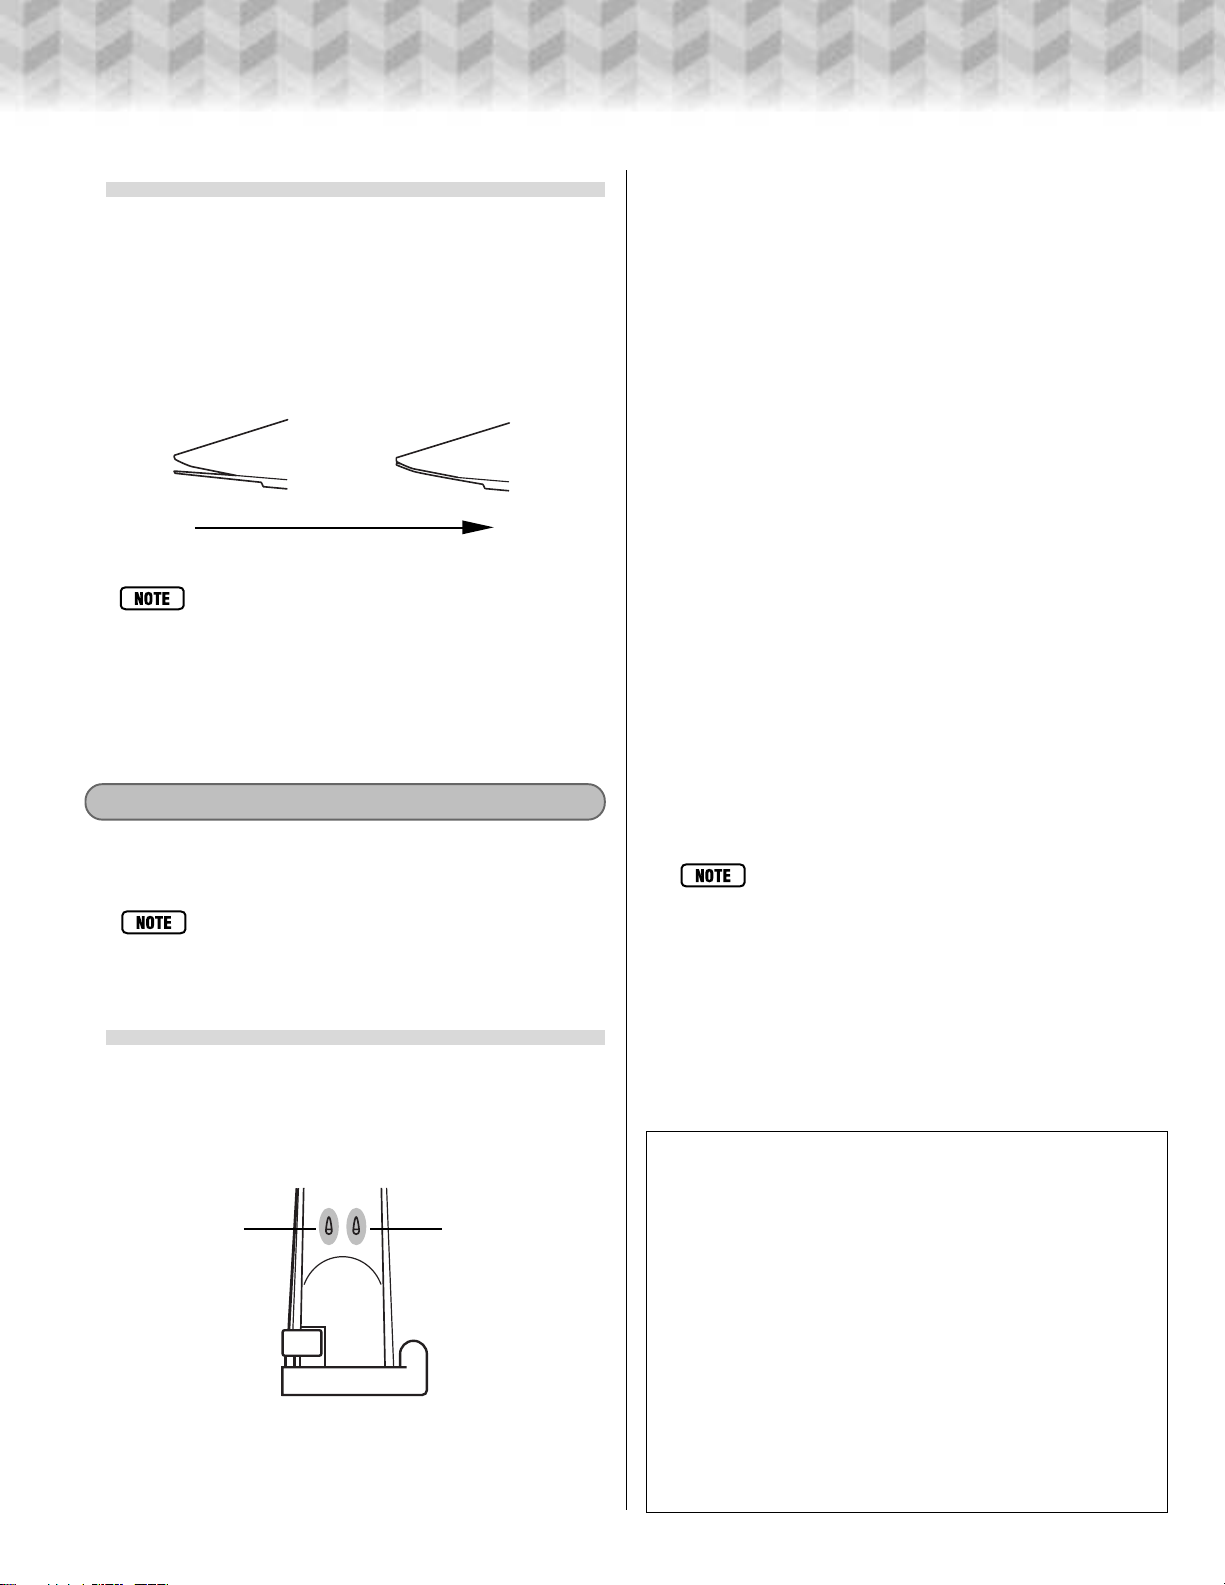
■ Loose Lip
In the loose lip mode no pressure (or very slight pressure)
is applied to the reed when playing normally. Pressure
applied to the reed causes an increase in pitch. Thus, in
the loose lip mode only upward pitch bend can be applied, but the amount of upward pitch bend that can be
applied is greater than that available in the tight lip mode.
Normal Pitch
• Always select the Loose Lip mode when using the
reedless mouthpiece.
• The lip range (the amount of variation caused by a
given change in lip- pressure), and the type of effect
produced by lip pressure (pitch or modulation) can be
adjusted via the Lip Range and Lip Data setup
switches, as described on page 22,23.
Bend Up
Upward Pitch Bend
About the Wind and Lip Sensors
The WX5 has two sensors - wind and lip - which may
have to be adjusted for optimum playability (page 25).
• When the WX5 is initially shipped, the Tight Lip mode
is selected, and both sensors are adjusted for “average” playing conditions.
● LED1 (Lip Sensor Data)
LED 1 responds as follows in the Tight Lip mode, and
with the initially factory settings:
LED On : Reed open (bend down).
LED Off : Reed at center (no bend).
LED On : Reed closed (bend up).
In the Loose Lip mode LED 1 responds as follows:
LED Off :
LED On : Reed closed (bend up).
Reed completely open (pitch bend data “0”).
When flute fingering is selected (page 12), LED 1 responds as follows (in this mode the Tight/Loose Lip setting is ignored):
LED Off : Reed completely open (pitch as fingered).
LED On : Reed closed (pitch one octave above fingered
pitch).
● LED 2 (Wind Sensor Data)
LED On : Breath applied (sound will be produced if the
WX5 is connected to a tone generator).
LED Off : No breath pressure (no sound will be produced
by the tone generator connected to the WX5)
• Both LED indicators will flash when the batteries (if
used) are almost depleted. If this happens, replace all
six batteries with new ones as soon as possible.
■ The LED Indicators
The WX5 has two LED indicators which indicate the status of the wind and lip sensors. Viewing the instrument
from the front (the key side) the indicator on the right is
“LED 1”, and the indicator on the left is “LED 2”.
LED 2 LED 1
❖ About Tonguing
“Tonguing” is a technique which is used to add attack to
notes, and to rapidly repeat notes. Rather than simply blowing into the mouthpiece, the tip of the tongue is used as if
saying “tu” at the beginning of a note. A little practice is
required, but the extra expressive capability is well worth
the effort. Refer to a recorder or flute or saxophone method
book for details on tonguing technique.
All other playing techniques which can be used with the
WX5 -breath and lip control - are essentially the same as
those used with acoustic wind instruments, so referring to
appropriate wind instrument method books can be of great
value.
11
Page 12
Basic Playing Techniques
WIND GAIN
WIND ZERO
LIP GAIN
LIP ZERO
Vel
Trns
Win
Fing
Win
LIP
Fast
LIP
Hi ct
LIP
Whl
LIP+
nrm fix
B/C EXP
VOL
A C
B Fl
nrm hrd
off on
tht loos
off on
nrm wide
PB gen
High D# Key
High D Key
[Up 2] Octave key
[Up 1] Octave key
P/B M/W
MW filt
off on
Fingering Modes
The WX5 offers a choice of four fingering modes. Refer to the explanations of each mode, below , and the fingering charts on page 32, to determine which fingering
mode is best for you.
* The fingering mode is set via the setup switches, as de-
scribed on page 23.
* The WX5 is initially shipped with the Saxophone(a) finger-
ing mode selected.
■ Saxophone(a)
Basically the same as saxophone fingering, except that
the fingering remains the same in all octaves (you only
need to use the octave keys to change octaves), and thus
is easy to learn.
■ Saxophone(b)
This mode is similar to Saxophone(a), but with additional
trill key functions to facilitate rapid passages. This mode
is ideal for players who are experienced with the WX11.
B
A#
A
G
G#
LOW B
Whole-tone T rill
Semitone T rill
F
E
F#
D
D#
C
[Down 1] Octave key
[Down 2] Octave key
Playing Keys
Pitch Bend Wheel
Setup Button
OFF
+ –
MIDI OUT
WX OUT
POWER
ON DC IN 12V
■ Saxophone(c)
A variation of the Saxophone(a) fingering mode, this
mode allows saxophone-type alternate fingerings. Although alternate fingerings produce the same note, they
produce slight variations in pitch and timbre which can
be used for musical effect. The Saxophone(c) fingering
mode simulates these effects.
* When using the Saxophone(c) mode, set the tone genera-
tor pitch bend range to “2” (±200 cents).
■ Flute
Similar to flute fingering, this mode is ideal for players
who are familiar with flute fingering. Rather than continuous pitch bend in response to lip pressure, the pitch
jumps up one octave when lip pressure is applied. The
Lip Mode setting (page 11) is ignored when Flute fingering is selected.
12
❖ The Whole-tone and Semitone Trill Keys
Pressing the whole-tone trill key raises the pitch a whole
tone above the current fingering.
Pressing the semitone trill key raises the pitch a semitone
above the current fingering.
Page 13
Octave Shift
The octave keys can be used to shift the pitch up or
down by one, two, or three octaves while playing, as follows:
[Up 2] Octave Key 3 octaves up
[Up 1] + [Up 2] Octave Keys 2 octaves up
[Up 1] Octave Key 1 octave up
[Down 1] Octave Key 1 octave down
[Down 1] + [Down 2] Octave Keys 2 octaves down
[Down 2] Octave Key 3 octaves down
Pitch Bend Wheel
The WX5 pitch bend wheel makes it possible to produce smooth upward and downward bends over a greater
range than is possible via lip control. Rolling the wheel
upward (towards the mouthpiece end of the instrument)
produces an upward pitch bend, and rolling the wheel
downward produces a downward pitch bend.
Basic Playing Techniques
■
Changing the Pitch Bend Wheel Function
The function of the pitch bend in the upward and downward directions (i.e. the MIDI data it generates when
rolled upward or downward) can be changed by using
the Setup and Octave buttons while the pitch bend wheel
is rolled all the way up or down, as listed below:
Pitch bend wheel + Setup Button + Octave Key
Fing
Win
Fast
LIP
LIP
Hi ct
LIP
Whl
LIP+
nrm fix
B/C EXP
VOL
A C
B Fl
nrm hrd
off on
tht loos
off on
nrm wide
PB gen
P/B M/W
MW filt
off on
Octave key
[Up 2], [Up 1],
[Down 1], [Down 2]
Pitch Bend Wheel + Setup Button + [Up 2] Octa ve Key
Pitch bend up data
Pitch bend down data
Pitch Bend Wheel + Setup Button + [Up 1] Octa ve Key
Modulation wheel data
Bend Up
Bend Down
• Using the neck strap and thumb hook provides maximum instrument stability, making it easier to produce
accurate pitch bends using the pitch bend wheel.
• Set the required pitch bend range via the corresponding parameter on your tone generator.
• Don’t turn the WX5 power on while moving the pitch
bend wheel. Doing so will cause the center wheel position to shift, thereby causing the instrument to play
out of tune.
• Be careful not to accidentally press the Key Hold b utton while operating the Pitch Bend Wheel.
Pitch bend down data
Pitch Bend Wheel + Setup Button + [Down 1] Octave Ke y
Control change #16 (0 … 127) data
Control change #17 (0 … 127) data
Pitch Bend Wheel + Setup Button + [Down 2] Octave Ke y
Brightness up (control change #74) data
Brightness down (control change #74) data
• When brightness control is selected, the wheel transmits control change #74 value 64 at its center position, value 127 in the maximum upward position, and
value 0 in the maximum downward position.
• According to GM (General MIDI) specifications, control change numbers #16 and #17 are non-reserved
and available for general use. If your tone generator
allows parameters to be assigned to MIDI control numbers, you can use the pitch bend wheel to control any
available parameter. With the VL70-m, for example,
you might want to assign the scream, growl, or other
expressive parameters to control change n umbers #16
and #17, so that they can be controlled via the WX5
pitch control wheel.
13
Page 14
Basic Playing Techniques
WIND GAIN
WIND ZERO
LIP GAIN
LIP ZERO
Vel
Trns
Win
Fing
Win
LIP
Fast
LIP
Hi ct
LIP
Whl
LIP+
nrm fix
B/C EXP
VOL
A C
B Fl
nrm hrd
off on
tht loos
off on
nrm wide
PB gen
P/B M/W
MW filt
[Up 2] Octave key
[Down 2] Octave key
off on
[Up 1] Octave key
[Down 1] Octave key
Key Hold
The Key Hold function can be used to hold a specified note while playing other notes, thus allowing more
than one note to be played at the same time. You actually
have a choice of four different Key Hold functions - Normal Hold, Follow Hold, Sustain, and Portamento - selected by holding the Key Hold button and pressing one
of the Octave keys.
• When using a monophonic tone generator such as the
VL70-m, the Normal Hold and Follow Hold functions
cannot be used.
■ Normal Hold
Select the Normal Hold mode by pressing the [Down 1]
Octave key while holding the Key Hold button.
Normal Hold allows a specified note to be held while other
notes are played.
Applying Normal Hold
1
Play a note on the WX5.
Key Hold button
OFF + –
POWER
MIDI OUT
WX OUT
ON DC IN 12V
2
While playing the note, rapidly press and release the
Key Hold button. The note will be held.
3
Any subsequently played notes will sound simultaneously with the held note.
Changing the Held Note
1
Play a different note than the held note.
2
While playing the new note, rapidly press and release
the Key Hold button. The note will be held in place of
the previous held note.
3
Any subsequently played notes will sound simultaneously with the held note.
14
Page 15

Basic Playing Techniques
Press the Key Hold button while no note is being
played to disengage the Key Hold function.
In the Normal Hold mode, no key off message is transmitted to the tone generator when breath pressure is
stopped. Rather, the sound is stopped because the wind
sensor produces a volume value of “0”. Depending on
the settings of your tone generator, the held note may
continue to sound even when breath pressure to the WX5
is stopped. This will depend on whether or not your tone
generator is receiving the MIDI data generated by the
WX5 wind sensor. For example, if the WX5 is transmitting wind sensor data as MIDI breath controller data (control change #02, the factory preset default) and your tone
generator is not set up to receive this type of data, the
sound will continue even when breath pressure is stopped.
In such a case setting the WX5 to transmit wind sensor
data as system expression or volume data may solve the
problem (page 22).
• The Nor mal Hold mode is automatically selected
whenever the WX5 power switch is turned on.
■ Follow Hold
Select the Follow Hold mode by pressing the [Down 2]
Octave key while holding the Key Hold button.
In the Follow Hold mode whenever a note is played a
second note will sound at a specified interval from the
fingered note. Volume, timbre, pitch bend and other variations will apply to both notes simultaneously.
Applying Follow Hold
1
Play a note on the WX5.
2
While playing the note, rapidly press and release the
Key Hold button.
3
The next note played will determine the interval to be
maintained by the Follow Hold function. Both the second note and the note played during steps 1 and 2,
above, will sound simultaneously. Any subsequently
played notes will sound simultaneously with a second
note at the specified interval.
Changing the Held Interval
1
Play a note (a second note will sound at the specified
interval).
2
Rapidly press and release the Key Hold button. The
second note will stop playing and only the fingered
note will sound.
3
Play a different note to determine the interval to be
maintained. Both the second note and the note played
during steps 1 and 2, above, will sound simultaneously.
Any subsequently played notes will sound simultaneously with a second note at the specified interval.
Press the Key Hold button while no note is being
played to disengage the Key Hold function.
■ Sustain
Select the Sustain mode by pressing the [Up 2] Octave
key while holding the Key Hold button.
In this mode pressing the Key Hold button will cause a
MIDI sustain message (control change #64) to be transmitted, alternately turning sustain on and off (“sustain
on” will be transmitted the first time the Key Hold button
is pressed after this mode is engaged).
■ Portamento
Select the Portamento mode by pressing the [Up 1] Octave key while holding the Key Hold button.
In this mode pressing the Key Hold button will cause a
MIDI portamento message (control change #65) to be
transmitted, alternately turning portamento on and off
(“portamento on” will be transmitted the first time the
Key Hold button is pressed after this mode is engaged).
Portamento produces a “glide” effect between notes
played.
• When using the WX5 to transmit portamento data,
make sure your tone generator is set up to receive
MIDI portamento data. Refer to your tone gener ator’s
owner’s manual for details.
15
Page 16

Program Change Control
By using the playing keys and octave keys in conjunction with the Program Change button, it is possible to
change voices and other MIDI functions on your tone generator directly from the WX5.
• Refer to your tone generator’s owner’s manual for details on the pertinent MIDI settings and functions.
Changing Voices
Program Change Increment & Decrement
■
The voice number currently selected on your tone generator can be increment or decremented by using the WX5
high keys while pressing the Program Change button.
Program Change Button + High D Key
Increments the current voice number by one. Hold the
1
2
3
4
5
6
High D# Key
High D Key
B
A#
A
G
G#
LOW B
High Keys
Increment/
Decrement MIDI
Program Change
Number
Playing Keys
Direct Program Change
Number Entry
WIND GAIN
WIND ZERO
Vel
Win
Win
LIP
LIP
LIP
LIP+
nrm fix
B/C EXP
nrm hrd
tht loos
nrm wide
P/B M/W
off on
LIP GAIN
LIP ZERO
VOL
A C
B Fl
off on
off on
PB gen
MW filt
Trns
Fing
Fast
Hi ct
Whl
key to increment continuously .
Program Change Button + High D
##
# Key
##
Decrements the current voice number by one. Hold the
key to decrement continuously.
7
Whole-tone T rill
Semitone T rill
8
9
0
F
E
F#
D
D#
Program
Change Button
C
16
OFF
+ –
MIDI OUT
WX OUT
POWER
• This method cannot be used to change the bank select number. To change the bank number see page
17.
ON DC IN 12V
Page 17

Program Change Control
■ Direct Program Change Entry
Specific program change numbers can be directly transmitted from the WX5 by using the playing keys (numbers 1 through 0 are assigned to the keys - see illustration
above) while pressing the Program Change button.
1-digit Example: Program Change Number 003
Press the A key (number 3) while holding the Program
Change button. Program change number 003 will actually be transmitted when the Program Change key is released.
B
A#
A
An alternative method is to enter all three digits of the
number in sequence - [0][0][3]. In this case the program
change number will actually be transmitted as soon as
the last digit is entered.
2-digit Example: Program Change Number 012
Press the B key (number 1) and then the A# key (number
2) while holding the Program Change button. Program
change number 012 will actually be transmitted when the
Program Change key is released.
3
B
A#
A
G
• This method cannot be used to change the bank select number. The specified voice number within the
current bank will be selected. T o change the bank n umber see “Bank Number Transmission”, below.
1
2
4
Bank Number Transmission
By specifying bank MSB (Most Significant Bits) and
LSB (Least Significant Bits) numbers before transmitting a program change number, it is possible to change
banks and voices at the same time.
Enter the 3-digit bank select MSB number while holding the Program Change button and the D# key , then enter the 3-digit bank select LSB number while holding the
Program Change button and the C key.
Bank Select MSB
B
A#
A
An alternative method is to enter all three digits of the
number in sequence - [0][1][2]. In this case the program
change number will actually be transmitted as soon as
the last digit is entered.
3-digit Example: Program Change Number 124
Press the B key (number 1), the A# key (number 2), and
then the G key (number 4) while holding the Program
Change button. Program change number 124 will actually be transmitted as soon as the last digit is entered.
D#
1
2
C
Playing Key
Bank Select LSB
D#
C
Playing Key
The specified bank select MSB and LSB numbers will
not be transmitted until the next program change number is transmitted, as described in the preceding section.
17
Page 18

Program Change Control
MIDI Channel
Number
Assignments
Playing Keys
High D# Key
1
2
High D Key
Up 2 Octave Key
Up 1 Octave Key
WIND GAIN
WIND ZERO
Vel
Win
Win
LIP
LIP
LIP
LIP+
nrm fix
B/C EXP
nrm hrd
tht loos
nrm wide
P/B M/W
off on
LIP GAIN
LIP ZERO
VOL
A C
B Fl
off on
off on
PB gen
MW filt
Changing the MIDI Transmit Channel
The WX5 MIDI transmit channel can be changed by
pressing the appropriately numbered playing key (see the
channel number assignment illustration to the left) while
holding the Program Change button and the Key Hold
button.
Playing Keys
• The default MIDI transmit channel is channel 1.
Trns
Fing
Fast
Hi ct
Whl
• Make sure that your tone generator is set to receive
on the same MIDI channel as the WX5 is set to transmit on.
3
4
5
6
7
8
9
10
11
12
13
14
15
16
B
A#
A
G
G#
LOW B
Whole-tone T rill
Semitone T rill
F
E
F#
D
D#
C
Down 1 Octave Key
Down 2 Octave Key
Playing Keys
Setup Button
Key Hold Button
Program Change
Button
OFF
+ –
MIDI OUT
POWER
WX OUT
Parameter Reset
All WX5 parameters can be reset to their initial poweron default values by pressing the Setup button while holding the Program Change button and Key Hold button.
The following parameters are reset:
• Octave Transpose
• Wind Gain
• MIDI Transmit Channel
• Key Hold
• High Control Key Toggle
• Pitch Bend Wheel Function
ON DC IN 12V
18
Page 19

Program Change Control
Mono/Poly & Portamento Switching
By using the Octave Keys while holding the Program
Change button, it is possible to transmit MIDI Mono,
Poly, and Portamento mode messages to your tone generator.
* See your tone generator’s owner’s manual for details on how
it responds to MIDI Mono, Poly, and Portamento mode
messages.
Program Change Button + Up 2 Octave Key
MIDI “Poly ON” message transmitted.
LIP
Whl
LIP+
nrm fix
B/C EXP
VOL
A C
B Fl
nrm hrd
off on
tht loos
off on
nrm wide
PB gen
P/B M/W
MW filt
off on
POWER
OFF + –
ON DC IN
Program Change Button + Down 2 Octave Key
MIDI “Portamento OFF” message transmitted.
LIP
Whl
LIP+
nrm fix
B/C EXP
VOL
A C
B Fl
nrm hrd
off on
tht loos
off on
nrm wide
PB gen
P/B M/W
MW filt
off on
POWER
OFF
ON DC IN
+ –
• If a “Poly ON” or “Mono ON” message is transmitted
while the Key Hold button is being used to transmit
“Sustain ON” or “Portamento ON”, the held note, sustain, and portamento will automatically be turned off.
Program Change Button + Up 1 Octave Key
MIDI “Mono ON” message transmitted.
LIP
Whl
LIP+
nrm fix
B/C EXP
VOL
A C
B Fl
nrm hrd
off on
tht loos
off on
nrm wide
PB gen
P/B M/W
MW filt
off on
POWER
OFF
ON DC IN
+ –
Program Change Button + Down 1 Octave Key
MIDI “Portamento ON” message transmitted.
LIP
Whl
LIP+
nrm fix
B/C EXP
VOL
A C
B Fl
nrm hrd
off on
tht loos
off on
nrm wide
PB gen
P/B M/W
MW filt
off on
POWER
OFF
ON DC IN
+ –
19
Page 20

Using the Setup Button
A number of important WX5 parameters can be changed as required by using the Setup button in conjunction with the Octave keys or Pitch Bend wheel.
Sensitivity (Software Wind Gain)
The WX5’ s software sensitivity setting (software wind
gain) can be adjusted in five stages by using the Octave
keys while holding the Setup button. The software wind
gain settings are: Soft, Medium Soft, Medium, Medium
Hard, and Hard. The power-on default setting is “Medium”.
Up 2 Octave Key
Down 2 Octave Key
Setup Button
Pitch Bend Wheel
WIND GAIN
WIND ZERO
Vel
Win
Win
LIP
LIP
LIP
LIP+
nrm fix
B/C EXP
nrm hrd
tht loos
nrm wide
P/B M/W
off on
LIP GAIN
LIP ZERO
VOL
A C
B Fl
off on
off on
PB gen
MW filt
Trns
Fing
Fast
Hi ct
Whl
Up 1 Octave Key
Down 1 Octave Key
Soft
Medium
Soft
Medium
Medium
Hard
Hard
5 Stages
Setup Button + Up 2 Octave Key
The software wind gain setting shifts one stage toward
“Hard” each time the Up 2 Octave key is pressed.
B Fl
nrm hrd
off on
tht loos
off on
nrm wide
PB gen
P/B M/W
MW filt
off on
Setup Button + Down 2 Octave Key
The software wind gain setting shifts one stage toward
“Soft” each time the Down 2 Octave key is pressed.
B Fl
nrm hrd
off on
tht loos
off on
nrm wide
PB gen
P/B M/W
MW filt
off on
POWER
OFF
ON DC IN 12V
+ –
MIDI OUT
WX OUT
20
Setup Button + Up 2 and Down 2 Octave Keys
Resets software wind gain to “Medium”.
B Fl
nrm hrd
off on
tht loos
off on
nrm wide
PB gen
P/B M/W
MW filt
off on
Page 21

Using the Setup Button
• The WX5 hardware wind gain for the wind sensor is
set as described on page 25. Set both the hardware
and software wind gain for optimum playability.
Octave Transpose
The MIDI note numbers transmitted by the WX5 can
be shifted up or down by one or two octaves by using the
Octave keys in conjunction with the Setup button.
B Fl
off on
off on
PB gen
MW filt
+ 2
– 2
– 1
0
+ 1
5 Stages
Setup Button + Up 1 Octave Key
MIDI note numbers shifted up one octave each time the
Up 1 Octave key is pressed.
nrm hrd
tht loos
nrm wide
P/B M/W
off on
Setup Button + Up 1 and Down 1 Octave Keys
Resets the octave to “0”.
B Fl
nrm hrd
off on
tht loos
off on
nrm wide
PB gen
P/B M/W
MW filt
off on
Audition Function On/Off
When the Audition function is on, the tone generator
will produce sound even when breath pressure is not applied to the WX5. This can be handy when selecting voices
or checking system operation.
Rotate the Pitch Bend wheel while holding the Setup
button to turn the Audition function on. The connected
tone generator will then produce sound whenever the Pitch
Bend wheel is rotated.
Setup Button + Down 1 Octave Key
MIDI note numbers shifted down one octave each time
the Down 1 Octave key is pressed.
B Fl
nrm hrd
off on
tht loos
off on
nrm wide
PB gen
P/B M/W
MW filt
off on
Press the Setup button again to turn the Audition function off.
21
Page 22

Setup Switch Settings
The WX5 has 16 DIP s witches which can be used to set up
a range of important basic parameters. These s witches are
not intended for frequent use, b ut rather to set up the WX5
to match your individual playing requirements. Read the
descriptions below carefully before changing the setup
switch settings.
● Remove the rubber switch cover , and use a small screwdriver or similar implement to change the switch settings as required.
● The switches are OFF when flipped to the left, and ON when flipped to the
right. All switches are OFF when the WX5 is initially shipped.
1-1
1-2
1-3
1-4
1-5
1-6
1-7
1-8
Vel
Win
Win
LIP
LIP
LIP
LIP+
nrm fix
B/C EXP
nrm hrd
tht loos
nrm wide
P/B M/W
off on
VOL
Trns
Fing
Fast
Hi ct
Whl
A C
B Fl
off on
off on
PB gen
MW filt
2-1
2-2
2-3
2-4
2-5
2-6
2-7
2-8
● Switch 1-1 (Vel) - Velocity
Determines whether the key-on velocity will be fixed or
controlled by wind pressure.
SW 1-1 Setting
OFF Variable (fixed time delay)
ON Fixed (velocity - 100)
● Switch 1-2 & 3 (Win) - Wind Sensor to MIDI Data
Specifies the type of MIDI data via which the WX5 wind
data will be transmitted.
SW 1-2 SW 1-3 Setting
OFF – Breath Controller
(control change #2)
ON OFF Expression
(control change #11)
ON ON Volume (control change #7)
•
When using the WX5 with a tone generator which does
not have a WX IN connector, be sure to set the SW11(V el) s witch ON so that a fix ed v elocity v alue is tr ansmitted, and set the SW1-2(Win) and SW1-3(Win) switches
so that MIDI expression control (SW1-2 ON, SW1-3 OFF)
or volume control (SW1-2 ON, SW1-3 ON) is tr ansmitted.
● Switch 1-4 (Win) - Wind Curve
Determines the relationship between breath pressure and
the output MIDI volume data.
SW 1-4 Setting
OFF Normal
ON Hard (requires considerable breath pressure to
produce maximum volume)
● Switch 1-5 (Lip) - Tight Lip/Loose Lip Mode
Selects the Tight Lip or Loose Lip playing mode. In the
Tight Lip mode pitch can be bent up and down via lip
pressure, but in the Loose Lip mode pitch can only be
bent upward via lip pressure (page 11).
● Switch 1-6 (Lip) - Lip Data Range
Determines the range of data which can be produced via
lip control, depending also on the setting of Switch 1-7
(Lip Data), below .
SW 1-6 Setting
OFF Normal
ON Wide (greater range)
When Lip Data is set to “Pitch Bend”
Tight Lip Mode
Normal Wide
Reed Open -16 -64
Center 0 0
Maximum +32 +63
Loose Lip Mode
Normal Wide
Reed Open 0 0
Maximum +32 +63
When Lip Data is set to “Modulation Wheel”
Tight Lip Mode
Normal Wide
Reed Open 48 0
Center 64 64
Maximum 96 127
Loose Lip Mode
Normal Wide
Reed Open 0 0
Maximum 64 127
SW 1-5 Setting
OFF Tight Lip
ON Loose Lip
22
Page 23

Setup Switch Settings
● Switch 1-7 (Lip) - Lip Data
Specifies the type of MIDI data via which the WX5 lip
data will be transmitted.
SW 1-7 Setting
OFF Pitch Bend
ON Modulation Wheel
● Switch 1-8 (Lip+) - Lip + Control Change Data
Determines whether or not MIDI control change number
#18 (GEN3: general control 3) will be added to the lip
data transmitted by the WX5.
SW 1-8 Setting
OFF No control change data added
ON Control change data added
The control range of this data is not affected by the settings of Switch 1-6 or 1-7. The overall range is always 0
… 127, as listed below for the Tight Lip and Loose Lip
modes.
• Tight Lip Mode
Reed Open = 0, Center = 64, Maximum = 127
• Loose Lip Mode
Reed Open = 0, Maximum = 127
• According to the GM standard, control change #18 is
for “general control” and is not assigned to any specific control function. By using the VL70-m Control Edit
function it is possible to assign Scream, Growl, or other
parameters to this control change number, thus making it possible to create a range of expressive effects.
● Switch 2-1 & 2 (Trns) - Transpose
Sets the “key” of the WX5: i.e. the actual pitch played
when all keys are closed.
SW 2-1 SW 2-2 Setting
OFF – C2
ON OFF Bb1
ON ON Eb2
● Switch 2-3 & 4 (Fing) - Fingering
Specifies the WX5 fingering mode (page 12).
SW 2-3 SW 2-4 Setting
OFF OFF Saxophone(a)
OFF ON Saxophone(b)
ON OFF Saxophone(c)
ON ON Flute
● Switch 2-5 (Fast) - Fast Response
Sets the speed at which the WX5 will respond when a
note is played.
When OFF incidental tones are less likely to occur between notes, but notes may sometimes not be properly
recognized when playing very fast passages. Beginning
players should set this switch OFF , while advanced players who are capable of playing very fast passages may
achieve better response with this switch set ON.
SW 2-5 Setting
OFF Slow response (less incidental tones)
ON Fast response (incidental tones may occur)
● Switch 2-6 (Hi ct) - High D/D
##
# Key Assign
##
Determines whether the high D and D# keys will be used
normally as playing keys, or to transmit control change
data.
SW 2-6 Setting
OFF Normal playing key operation
ON Control change data transmission
When used to transmit control change data, the D and D#
keys transmit the following control change numbers and
values:
• High D
Press to transmit control change #81 (GEN6) with value 127,
and release for value 0.
• High D
##
#
##
Press to alternately transmit control change #80 (GEN5)
with values 0 and 127.
• According to the GM standard, control change #80 and
#81 are for “general control” and are not assigned to
any specific control functions. By using the VL70-m
Control Edit function it is possible to assign Scream,
Growl, or other parameters to these control change
numbers, thus making it possible to create a range of
expressive effects.
23
Page 24

Setup Switch Settings
● Switch 2-7 & 8 (Whl) - Pitch Bend to MIDI Data
Determines the initial power-on Pitch Bend Wheel control mode (page 13).
SW 2-7 SW 2-8 Setting
OFF OFF Mode 1
OFF ON Mode 2
ON OFF Mode 3
ON ON Mode 4
Mode 1
Pitch bend up data
Pitch bend down data
Mode 2
Modulation wheel data
Mode 3
Mode 4
Pitch bend down data
Control change #16 (0 … 127) data
Control change #17 (0 … 127) data
Brightness up (control change #74) data
Brightness down (control change #74) data
• After the power has been turned on, these setting can
be changed by using the Setup button and octav e keys
as described on page 13.
24
Page 25

Wind & Lip Sensor Adjustment
Perform the sensor adjustments after selecting the required playing mode (page 10).
2
Wind Zero & Wind Gain Adjustment
Adjust both Wind Zero and W ind Gain to set the ideal
relationship between wind pressure input and MIDI data
output for your playing style.
• Wind Gain
Sets the sensitivity to breath pressure.
• Wind Zero
Sets the minimum amount of breath pressure which must
be applied before sound is produced.
Volume
Wind Gain
Trn s
Fing
Fast
Hi ct
Whl
Wind Zero
Breath Pressure
WIND GAIN
WIND ZERO
WIND GAIN
WIND ZERO
LIP GAIN
LIP ZERO
Vel
Win
Win
LIP
LIP
LIP
LIP+
Using a small screwdriver, rotate the WIND ZERO
control clockwise until LED 2 lights and the note begins to sound (page 11).
• If no sound is produced, check your connections and
MIDI channel settings.
3
When the note begins to sound, rotate the WIND
ZERO control counterclockwise just until LED 2 goes
out and the sound stops.
Before adjusting the wind gain and wind zero, be sure
to check the type of MIDI data which is being transmitted by the WX5 in response to breath input, and make
sure that your tone generator is set up to receive that type
of data (page 22). For example, if the WX5 is set to transmit Breath Controller data (control change #02) but the
tone generator is not set up to receive Breath Controller
data, the wind sensor cannot be adjusted. Adjusting the
wind gain and wind zero parameter is equivalent to selecting the ideal mouthpiece and reed for an acoustic wind
instrument, so be sure to make these adjustments carefully.
Adjustment Procedure
1
Select a voice which is responsive to breath control,
and apply breath pressure to the WX5. For this adjustment it is better to select a sustained (non-decaying)
type of voice such as organ, rather than a decaying
voice like piano.
4
Applying only the minimum amount of breath pressure you want to produce sound output, repeat steps 2
and 3, above, until set as required.
5
Using a small screwdriver, adjust the WIND GAIN
control for optimum sensitivity while applying breath
pressure to the WX5. Rotating the control clockwise
increases sensitivity.
6
The WIND ZERO setting may change slightly when
WING GAIN is adjusted, so you may have to repeat
the WIND ZERO and WIND GAIN adjustments a few
times to get everything exactly right.
25
Page 26

Wind & Lip Sensor Adjustment
Lip Zero & Lip Gain Adjustment
The WX5 lip sensor translates lip pressure applied to
the WX5 reed to MIDI pitch bend data. Greater lip pressure raises the pitch. In the Tight Lip mode, however , the
range of pitch variation which can be produced via lip
pressure is much smaller than that which can be produced
via the Pitch Bend Wheel. The adjustment procedures
for the Tight Lip and Loose Lip modes are different, so
use the adjustment procedure which is appropriate for
the playing mode you have chosen.
When Flute fingering is selected use the Loose Lip
adjustment procedure (the Tight/Loose Lip settings have
no effect on playability when Flute fingering is selected).
Tight Lip Mode Adjustment Procedure
1
Select a voice on your tone generator.
2
Play a note while applying normal lip pressure to the
WX5 reed.
3
Watch the LED1 indicator and, if it is lit, adjust the
LIP ZERO control so that it just goes out.
Loose Lip Mode Adjustment Procedure
1
Play a note while applying no lip pressure to the WX5
reed and confirm that the LED 1 indicator is not lit. If
it is lit, adjust the LIP ZERO control so that it just
goes out.
2
Select a voice on your tone generator .
3
Beginning with no pressure applied to the reed, play a
note and gradually increase your lip pressure.
4
Adjust the LIP ZERO control so that the pitch begins
to change at the desired point as lip pressure is increased.
4
Using a small screwdriver, adjust the LIP GAIN control for optimum lip sensitivity. Rotating the control
clockwise increases sensitivity .
5
Repeat steps 2 through 4 as many times as necessary
until the lip zero and lip gain are set satisfactorily .
• Lip sensor adjustments can only be made with the reed
(saxophone type) mouthpiece.
26
5
Using a small screwdriver, adjust the LIP GAIN control for optimum lip sensitivity. Rotating the control
clockwise increases sensitivity .
* When the Flute fingering is selected (page 12), adjust LIP GAIN
so that normal pitch is produced when the reed is completely
open, and so that the pitch shifts up one octave when appropriate lip pressure is applied.
• Please note that sensitivity is greater when the loose
lip mode is selected.
6
Repeat steps 3 through 5 as many times as necessary
until the lip zero and lip gain are set satisfactorily.
• For some players it might be better to adjust for lip
zero when a slight amount of pressure is applied to
the reed. Adjust f or the playing f eel that best suits your
style.
Page 27

Tuning
Two tuning methods are possible with the WX5: Tone Generator Tuning, and Lip Sensor Tuning.
■ T one Generator T uning
Most tone generators have a master tuning parameter
that can be used to tune the tone generator’s sound. When
using a Yamaha VL70-m or MU-series tone generator,
• It may be convenient to use the A udition function (page
21) to produce output while tuning.
• The VL70-m also has special “WX Lip” and “WX Lip
Lock” parameters which can be used f or optimum tuning and playability.
use the Master Tune parameter in the System Setup display in the UTILITY mode to set overall system tuning.
Refer to your tone generator’s owner’s manual for tuning
details.
VL70-m Display Setting
■ WX5 Tuning (Lip Sensor Tuning)
See page 26.
Tone Generator Settings
The WX5 transmits a r ange of MIDI messages which can be used to control tone generator parameters .
Familiarity with your tone gener ator and how it responds to the MIDI data transmitted b y the WX5 is vital
for realizing the maximum musical potential of y our WX5 system. Refer to the tips below, and your tone
generator’s owner’s manual for details.
■ Pitch Bend
The WX5 Lip Sensor and Pitch Bend Wheel data are transmitted in the form of MIDI pitch bend data. Be sure to set an
appropriate pitch bend range on your tone generator. For subtle
control a pitch bend range setting of between about 2 and 4
should be ideal. For broader control try a range setting between
about 5 and 7. For really sweeping pitch bends, try a setting of
8 or more.
■ Velocity
The WX5 transmits breath attack information in the form
of MIDI velocity data. Y amaha recommends, however , that you
set your tone generator’s velocity to a fixed value in order to
facilitate breath control of volume. However, if velocity is the
only means you have of controlling volume and timbre, then it
might be a good idea to allow some velocity sensitivity particularly when playing voices such as bass, drums, and piano,
which depend on the characteristics of the attack for their sound.
■ Breath Control
Breath strength information is transmitted by the WX5 in
the form of MIDI breath control data which is primarily used
to control volume and timbre. Initially set the breath control
response of your tone generator so that the full breath control
range can be used, then readjust for the optimum range while
actually playing the WX5.
When using a Yamaha VL70-m be sure to set the Breath
Mode parameter to “BC/WX.”
■ Program Change
The WX5 is capable of transmitting MIDI program change
data in order to switch voices on your tone generator. Make
sure your tone generator is set up to receive program change
data, unless you only intend to play one voice and don’t want
that voice to be accidentally changed.
A Yamaha MFC10 MIDI Foot Controller can be set up for
convenient foot selection of a specified range of voices.
27
Page 28

Maintenance
Although the WX5 does not require the constant maintenance that acoustic wind instruments do , the simple
maintenance steps described below will ensure that your WX5 will deliv er optimum perf ormance at all times.
● When the mouthpiece and/or reed become dirty, re-
move and wash the mouthpiece with plain water or a
dilute neutral detergent solution, as required. W ipe the
instrument itself with a soft, dry cloth.
Be careful not to bend or otherwise damage the lip
sensor cantilever inside the mouthpiece cavity when
removing or replacing the mouthpiece. The mouthpiece can be rotated slightly to facilitate removal.
Top view of mouthpiece
Cantilever
Mouthpiece can be rotated
over approximately this range
● When replacing the mouthpiece, a little “Recorder
Cream” (supplied with the WX5) applied to the rubber seal on the instrument can make insertion smoother.
● Clean the cantilever and seal rubber by wiping with a
soft, dry cloth. Be careful not to bend or otherwise
damage the cantilever .
• Maintenance procedures commonly used on acoustic
wind instruments (e.g. key oil, pad replacement, etc.)
can damage the WX5 and should be avoided.
Cantilever
Rubber seal
The reed can be removed for cleaning by using a screwdriver, as shown in the illustration.
28
Page 29

MIDI System Setup Examples
The WX5 can be used with MIDI devices other than just tone generators for expanded capabilities.
Foot Control
Data from a Yamaha MFC10 MIDI Foot Controller
can be added to the MIDI output from the WX5 for extra
control capability.
WX5
MFC10
WX Cable
Tone generators
• Up to 128 MIDI program change numbers can be
memorized and transmitted to the tone generator via
convenient foot control.
• Up to 100 types of MIDI control change data can be
memorized and transmitted to the tone generator as
required.
• The MFC10 foot controller can be used to transmit
just about any type of continuous MIDI control change
data.
Extra foot controllers
MIDI Cable
Sequencer Recording & Playback
The WX5 can be connected to an integrated sequencer/
tone generator unit such as the Yamaha QY70 or QY700
to allow convenient recording and playback of MIDI data.
WX5
QY70/QY700
Multi-timbre tone generators
MIDI Cable
• Since the QY70 and QY700 feature built-in multi-tim-
bre tone generators, no extra equipment is required
for high-quality sequence recording and playback.
• The WX5 could also be connected to a computer
equipped with music sequencing software for ad-
vanced sequencing and editing capabilities.
• Two extra foot controllers can be connected to the
MFC10 and used in addition to the MFC10’s o wn f oot
controller.
29
Page 30

Troubleshooting
PROBLEM POSSIBLE CAUSE/SOLUTION
The LED indicators don’t light when the power is
turned on.
No sound is produced when breath pressure is
applied to the WX5.
V olume too low, or it is too difficult to produce sufficient volume.
• The Loose Lip mode is selected. When the Loose Lip mode is selected
the LED indicators may not light. This is normal.
• If the Tight Lip mode is selected, the lip sensor may not be adjusted
properly. Follow the adjustment procedure outlined on page 26.
• The wind sensor may not be properly adjusted. Follow the adjustment
procedure outlined on page 25.
• The Audition function may be turned on. Try tur ning the Audition function off as described on page 21.
• The tone generator power may be off , or its MIDI settings may be not be
set up properly for use with the WX5. Check your tone generator.
• The wind sensor may not be properly adjusted. Follow the adjustment
procedure outlined on page 25.
• The sensitivity (software wind gain) setting may be too low. Refer to
page 20.
• Also check the voice you are using as well as relevant tone generator
settings.
Sound is produced even when no breath pressure
is applied to the WX5.
The pitch doesn’t change as expected when lip
pressure is applied to the reed.
The volume doesn’t change as expected when
breath pressure is varied.
• If the LED2 indicator is lit when no breath pressure is applied, this may
mean that the wind sensor is not adjusted properly. Follow the adjustment procedure outlined on page 25.
• The Key Hold function ma y be engaged. Try pressing the Key Hold b utton to disengage Key Hold.
• The Audition function may be turned on. Try turning the Audition function off as described on page 21.
• No lip pressure can be applied if you are using the reedless (recorder
type) mouthpiece. Use the reed (saxophone type) mouthpiece if you
want to use lip control.
• The setup switches related to lip sensor operation may not be set properly. Refer to the instructions for switches 1-6 and 1-7 on page 22, 23.
• The voice you have selected may not allow pitch control. Use a voice
that is set up to allow pitch control.
The volume control settings of the WX5 and tone generator may not be
matched properly . If the WX5 wind sensor is set to transmit breath data as
MIDI breath control data (control change #02), then the tone generator
must be set up to allow volume control via the same type of data. Either
change the WX5 wind sensor data type to match that of the tone generator (page 22), or set the tone generator to allow breath control.
30
Page 31

Index
A
AC Adaptor....................................... 8
Audition Function ........................... 21
B
Bank Select MSB ........................... 17
Bank Select LSB ............................ 17
Batteries ........................................... 8
Battery Cover ................................... 8
Breath Control ................................ 27
Breath Controller ............................ 22
Brightness ................................ 13, 24
C
Cable Holder .................................... 8
Cantilever ....................................... 28
Control change #16........................ 13
Control change #17........................ 13
Control change #80........................ 23
Control change #81........................ 23
D
DC IN 12V Connector ...................... 8
DIP switch ...................................... 22
E
Expression ..................................... 22
F
Fast Response ............................... 23
Fingering ........................................ 32
Fingering Modes ............................ 12
Flute ......................................... 12, 37
Follow Hold (Key Hold)................... 15
Foot Control ................................... 29
G
GM ................................................. 13
Growl.............................................. 13
H
High D Key ..................................... 23
High D# Key ................................... 23
High Keys....................................... 23
K
Key Assign ..................................... 23
Key Hold......................................... 14
Key Hold Button ............................. 14
Keys ......................................... 12, 32
L
LED Indicators................................ 11
LED 1 ............................................. 11
LED 2 ............................................. 11
Lip Data.......................................... 23
Lip Data Range .............................. 22
Lip Sensors .............................. 11, 26
LIP GAIN ........................................ 26
LIP ZERO....................................... 26
Loose Lip........................................ 11
M
Maintenance................................... 28
MIDI cable........................................ 9
MIDI Data Format........................... 38
MIDI Foot Controller....................... 29
MIDI OUT Connector ....................... 9
MIDI Implementation Chart ............ 39
MIDI System Setup ........................ 29
MIDI Transmit Channel................... 18
Modulation Wheel .......................... 13
Mono .............................................. 19
monophonic tone generator ........... 14
Mouthpiece..................................... 10
Mouthpiece Cap ............................... 5
N
Normal Hold (Key Hold) ................. 14
O
Octave Key..................................... 13
Octave Shift.................................... 13
Octave Transpose........................... 21
P
Parameter Reset ............................ 18
Pitch Bend................................ 13, 27
Pitch Bend Range .......................... 13
Pitch Bend Wheel........................... 13
Playing Keys............................. 12, 32
Poly ................................................ 19
Portamento..................................... 19
Portamento (Key Hold)................... 15
Power Switch.................................. 10
Program Change............................ 16
Program Change Button ................ 16
R
Recorder ........................................ 10
Recorder Cream............................. 28
Reed............................................... 10
Reed Mouthpiece
(Saxophone T ype)..................... 10
Reedless Mouthpiece
(Recorder T ype) ........................ 10
S
Saxophone ..................................... 12
Scream........................................... 13
Semitone Trill Key........................... 12
Sensitivity ....................................... 20
Sensor............................................ 11
Sensor Gain Controls..................... 25
Setup Button .................................. 20
Setup Switch .................................. 22
Sequencer...................................... 29
Soft Case ......................................... 5
Software Wind Gain ....................... 20
Specifications ................................. 40
Standard MIDI Tone Generator ........ 9
Strap................................................. 5
Strap Ring ........................................ 7
Sustain (Key Hold) ......................... 15
T
Thumb Hook..................................... 7
Tight Lip ......................................... 10
Tone Generator .............................. 27
Tonguing......................................... 11
Transpose....................................... 23
Troubleshooting .............................. 30
Tuning............................................. 27
V
Velocity........................................... 27
Volume ........................................... 22
W
Water Drain ...................................... 7
Whole-tone Trill Key........................ 12
Wind Curve .................................... 22
WIND GAIN.................................... 25
Wind Sensor............................. 11, 25
WIND ZERO................................... 25
WX Cable ......................................... 9
WX OUT Connector ......................... 9
X
XG .................................................... 9
31
Page 32

WX5 Fingering
Refer to page 12 for more information about the WX5 fingerings.
Saxophone(a)
● The whole-tone trill key (side E) and semitone trill key (side
A#) raise the pitch of all notes a whole tone or semitone, respectively.
● The cross-hatched keys raise the pitch of notes in the range
shown above a semitone in the same w ay as the semitone trill
key.
32
Page 33

Saxophone(a)
Octave up
8va
WX5 Fingering
8va 8va
8va
33
Page 34

WX5 Fingering
Saxophone(b)
● The whole-tone trill key and semitone trill key raise the pitch of
all notes a whole tone or semitone, respectively.
● The High D# key and High D key raise the pitch of all notes a
whole tone or semitone, respectively.
● The G# key raises the pitch of notes outside the G … C# (Db)
range a semitone.
● The B key and C ke y lower the pitch of all notes a semitone or
whole tone, respectively.
● The D# key raises the pitch of all notes a semitone.
34
Page 35

Saxophone(b)
Octave up
8va
WX5 Fingering
8va
8va
35
Page 36

WX5 Fingering
Saxophone(c)
A A A A A A A
B
B B B B
A
B
E
C
D
E
A
A
B
C
D
A
B
A
A
B
A
A
B
C
B B
B
C
A
B
This chart shows only the alternate fingerings provided in addition to the
Saxophone(a) fingerings.
● Alternate fingering variations are shown in A through E.
● When more that one key is shown in A through E, press all ke ys shown simultaneously.
A
B
D
C
A
B
D
C
36
Page 37

Flute
OCT UP2
OCT UP1
WX5 Fingering
OCT UP2
OCT UP1
OCT UP2
OCT UP1
37
Page 38

MIDI Data Format
1. TRANSMIT DA T A
1-1. CHANNEL VOICE MESSAGES
1-1-1. NOTE ON/OFF
STATUS 1001nnnn ($9n)
NOTE No. 0kkkkkkk
k = 10 (Bb-2) - 104 (G#6)
k = 0 (C-2) - 127 (G8)
when Follow Hold is ON.
VELOCITY 0vvvvvvv v = 0 Note Off
1-1-2 CONTROL CHANGE
STATUS 1011nnnn ($Bn)
CONTROL No. 0ccccccc
DATA 0vvvvvvv
* Transmit CONTROL NUMBER
c = 0 BANK SELECT MSB
c = 1 MODULATION
c = 2 BREATH CONTROLLER
c = 7 VOLUME
c = 11 EXPRESSION
c = 16 GENERAL CONTROL 1
c = 17 GENERAL CONTROL 2
c = 18 GENERAL CONTROL 3
c = 32 BANK SELECT LSB
c = 64 SUSTAIN
c = 65 PORTAMENTO
c = 74 BRIGHTNESS
c = 80 GENERAL CONTROL 5
c = 81 GENERAL CONTROL 6
2. CHANNEL MODE MESSAGES
2-1. MONO
ST ATUS 1011nnnn ($Bn)
MONO 01111110 ($7E)
DATA 00000001 m = 1
2-2. POLY
STATUS 1011nnnn ($Bn)
POLY 01111111 ($7F)
DATA 00000000
3. SYSTEM EXCLUSIVE MESSAGE
Not transmitted.
4. REALTIME MESSAGE
4-1. ACTIVE SENSING
STATUS 11111110 ($FE)
Active sensing is transmitted approximately once every
150 msec.
1-1-3. PROGRAM CHANGE
STATUS 1100nnnn ($Cn)
PROGRAM No. 0ppppppp p = 0 - 127
1-1-4. PITCH BEND
STA TUS 1110nnnn ($En)
LSB 0vvvvvvv
MSB 0vvvvvvv
9-bit transmit resolution.
38
Page 39

YAMAHA [ Wind MIDI Controller ] Date:17-Nov-1997
Model WX5 MIDI Implementation Chart Version : 1.0
+------------------------------------------------------------------------+
: : Transmitted : Remarks :
: Function ... : : :
:---------------------+---------------------------------+----------------:
:Basic Default : 1 : :
:Channel Changed : 1 - 16 : :
:---------------------+---------------------------------+----------------:
: Default : x : :
:Mode Messages : x : :
: Altered : ************** : :
:---------------------+---------------------------------+----------------:
:Note : 10 - 104 : :
:Number : True voice : ************** : :
:---------------------+---------------------------------+----------------:
:Velocity Note ON : o 9nH,v=1-127 : :
: Note OFF : x 9nH,v=0 : :
:---------------------+---------------------------------+----------------:
:After Key's : x : :
:Touch Ch's : x : :
:---------------------+---------------------------------+----------------:
:Pitch Bender : o *1 :7 bit resolution:
:---------------------+---------------------------------+----------------:
:Control 0,1,2,7,11 : : :
:Change 16,17,18,32 : : :
: 64,65,74,80,81 : o *1 : :
: : : :
: : : :
: : : :
: : : :
: : : :
: : : :
: : : :
: : : :
: : : :
: : : :
:---------------------+---------------------------------+----------------:
:Prog : o 0 - 127 : :
:Change : True # : *********** : :
:---------------------+---------------------------------+----------------:
:System Exclusive : x : :
:---------------------+---------------------------------+----------------:
:System : Song Pos. : x : :
: : Song Sel. : x : :
:common : Tune : x : :
:---------------------+---------------------------------+----------------:
:System :Clock : x : :
:Real Time :Commands : x : :
:---------------------+---------------------------------+----------------:
:Aux :Local ON/OFF : x : :
: :All Notes OFF : x : :
:Mes- :Active Sense : o : :
:sages:Reset : x : :
:---------------------+---------------------------------+----------------:
:Notes: *1 ; assignable :
: :
+------------------------------------------------------------------------+
Mode 1 : OMNI ON, POLY Mode 2 : OMNI ON, MONO o : Yes
Mode 3 : OMNI OFF, POLY Mode 4 : OMNI OFF, MONO x : No
39
Page 40

WX5 Specifications
Sensors Wind Sensor, Lip Sensor
Keys/Buttons/Switches 16 keys, Octave keys (Up2, Up1, Down1, Down2), Setup But-
Trim Controls WIND GAIN, WIND ZERO, LIP GAIN, LIP ZERO
Terminals DC IN 12V Connector, MIDI OUT Connector,
MIDI T ransmit Channels Channel 1-16
Power Supply P ow er supplied by a WX-compatib le tone generator when con-
ton, Pitch Bend Wheel, Key Hold Button, Program Change
Button, Power Switch, Setup Switches(16 DIP Switches)
WX OUT Connector
nected via the WX cable.
6 SUM-4(1.5V) batteries
PA-3B AC Power Adaptor
Power Consumption 450 mW (when using the PA-3B power adaptor)
Dimensions 611(L) x 62(W) x 70(H) mm (24-1/6” x 2-1/2” x 2-3/4”)
Weight 520g (1 lbs. 2 oz) , excluding batteries
Supplied Accessories Mouthpieces: Saxophone Type (attached), Recorder Type
Mouthpiece Cap (attached)
WX Cable
Strap
Recorder Cream
Soft Case
Owner’s Manual
* Specifications subject to change without notice.
40
Page 41

Key Operation Chart / MIDI Message Assignments
• Key Operation Chart ... This chart lists key operations other than fingering.
Setup Button Audition Function Off
Setup Button + Pitch Bend Wheel Audition Function On
Setup Button + Octave Key [Up1], [Down1] Octave Transpose
Setup Button + Octave Key [Up2], [Down2] Sensitivity (Software Wind Gain)
Pitch Bend Wheel + Setup Button + Octave Key [Up2] Pitch Bend Wheel Function : Pitch Bend Up, Pitch Bend Down
Pitch Bend Wheel + Setup Button + Octave Key [Up1] Pitch Bend Wheel Function : Modulation Wheel, Pitch Bend Down
Pitch Bend Wheel + Setup Button + Octave Key [Down1] Pitch Bend Wheel Function : Control Change #16, 17
Pitch Bend Wheel + Setup Button + Octave Key [Down2] Pitch Bend Wheel Function : Brightness Up, Brightness Down
Program Change Button + Octave Key [Up2] Poly On
Program Change Button + Octave Key [Up1] Mono On
Program Change Button + Octave Key [Down1] Portamento On
Program Change Button + Octave Key [Down2] Portamento Off
Program Change Button + Playing Keys Program Change
Program Change Button + High D, D# Keys Program Change Increment/Decrement
Program Change Button + D# Key + Playing Keys Bank Select MSB
Program Change Button + C Key + Playing Keys Bank Select LSB
Program Change Button + Key Hold Button + Playing Keys MIDI Transmit Channel
Program Change Button + Key Hold Button + Setup Button Parameter Reset
Key Hold Button + Octave Key [Up2] Sustain
Key Hold Button + Octave Key [Up1] Portamento
Key Hold Button + Octave Key [Down1] Normal Hold
Key Hold Button + Octave Key [Down2] Follow Hold
• MIDI Message Assignments ... The MIDI messages which can be transmitted by sensor, pitch bend wheel, and key
operation are listed below .
PB MW BC VOL EXP GEN1 GEN2 GEN3 BR GC5 GC6
Lip ❍ ❍
Lip ❍❍
Wind ❍
Wind ❍
Wind ❍
PB ❍
PB ❍❍
PB ❍❍
PB ❍
High Keys ❍❍
When Saxophone(c)
fingering selected
PB = Pitch Bend
MW = Modulation Wheel
BC = Breath Controller
VOL = Volume
EXP = Expression
GEN = General Control
BR = Brightness
❍ ❍
41
Page 42

For details of products, please contact your nearest Yamaha or the
authorized distributor listed below.
Pour plus de détails sur les produits, veuillez-vous adresser à Yamaha
ou au distributeur le plus proche de vous figurant dans la liste suivante.
Die Einzelheiten zu Produkten sind bei Ihrer unten aufgeführten Niederlassung und bei Yamaha Vertragshändlern in den jeweiligen
Bestimmungsländern erhältlich.
Para detalles sobre productos, contacte su tienda Yamaha más cercana
o el distribuidor autorizado que se lista debajo.
NORTH AMERICA
CANADA
Yamaha Canada Music Ltd.
135 Milner Avenue, Scarborough, Ontario,
M1S 3R1, Canada
Tel: 416-298-1311
U.S.A.
Yamaha Corporation of America
6600 Orangethorpe Ave., Buena Park, Calif. 90620,
U.S.A.
Tel: 714-522-9011
CENTRAL & SOUTH AMERICA
MEXICO
Yamaha de Mexico S.A. De C.V.,
Departamento de ventas
Javier Rojo Gomez No.1149, Col. Gpe Del
Moral, Deleg. Iztapalapa, 09300 Mexico, D.F.
Tel: 686-00-33
BRASIL
Yamaha Musical do Brasil LTDA.
Ave. Reboucas 2636, São Paulo, Brasil
Tel: 011-853-1377
ARGENTINA
Yamaha Music Argentina S.A.
Viamonte 1145 Piso2-B 1053,
Buenos Aires, Argentina
Tel: 1-371-7021
PANAMA AND OTHER LATIN
AMERICAN COUNTRIES/
CARIBBEAN COUNTRIES
Yamaha de Panama S.A.
Torre Banco General, Piso 7, Urbanización Marbella,
Calle 47 y Aquilino de la Guardia,
Ciudad de Panamá, Panamá
Tel: 507-269-5311
EUROPE
THE UNITED KINGDOM
Yamaha-Kemble Music (U.K.) Ltd.
Sherbourne Drive, Tilbrook, Milton Keynes,
MK7 8BL, England
Tel: 01908-366700
IRELAND
Danfay Ltd.
61D, Sallynoggin Road, Dun Laoghaire, Co. Dublin
Tel: 01-2859177
GERMANY/SWITZERLAND
Yamaha Europa GmbH.
Siemensstraße 22-34, 25462 Rellingen,
F.R. of Germany
Tel: 04101-3030
AUSTRIA
Yamaha Music Austria
Schleiergasse 20, A-1100 Wien Austria
Tel: 01-60203900
ITALY
Yamaha Musica Italia S.P.A.,
Combo Division
Viale Italia 88, 20020 Lainate (Milano), Italy
Tel: 02-935-771
SPAIN
Yamaha-Hazen Electronica Musical, S.A.
Jorge Juan 30, 28001, Madrid, Spain
Tel: 91-577-7270
PORTUGAL
Valentim de Carvalho CI SA
Estrada de Porto Salvo, Paço de Arcos 2780 Oeiras,
Portugal
Tel: 01-443-3398/4030/1823
GREECE
Philippe Nakas S.A.
Navarinou Street 13, P.Code 10680, Athens, Greece
Tel: 01-364-7111
SWEDEN
Yamaha Scandinavia AB
J. A. Wettergrens Gata 1
Box 30053
S-400 43 Göteborg, Sweden
Tel: 031 89 34 00
DENMARK
YS Copenhagen Liaison Office
Generatorvej 8B
DK-2730 Herlev, Denmark
Tel: 44 92 49 00
FINLAND
Warner Music Finland OY/Fazer Music
Aleksanterinkatu 11, P.O. Box 260
SF-00101 Helsinki, Finland
Tel: 0435 011
NORWAY
Norsk filial av Yamaha Scandinavia AB
Grini Næringspark 1
N-1345 Østerås, Norway
Tel: 67 16 77 70
ICELAND
Skifan HF
Skeifan 17 P.O. Box 8120
IS-128 Reykjavik, Iceland
Tel: 525 5000
OTHER EUROPEAN COUNTRIES
Yamaha Europa GmbH.
Siemensstraße 22-34, 25462 Rellingen, F.R. of
Germany
Tel: 04101-3030
Yamaha Corporation,
International Marketing Division
Nakazawa-cho 10-1, Hamamatsu, Japan 430-8650
Tel: 053-460-2312
THE NETHERLANDS
Yamaha Music Nederland
Kanaalweg 18G, 3526KL, Utrecht, The Netherlands
Tel: 030-2828411
BELGIUM
Yamaha Music Belgium
Keiberg Imperiastraat 8, 1930 Zaventem, Belgium
Tel: 02-7258220
FRANCE
Yamaha Musique France,
Division Professionnelle
BP 70-77312 Marne-la-Vallée Cedex 2, France
Tel: 01-64-61-4000
SY14
TURKEY/CYPRUS
Yamaha Europa GmbH.
Siemensstraße 22-34, 25462 Rellingen,
F.R. of Germany
Tel: 04101-3030
OTHER COUNTRIES
Yamaha Corporation,
International Marketing Division
Nakazawa-cho 10-1, Hamamatsu, Japan 430-8650
Tel: 053-460-2312
4242
ASIA
HONG KONG
Tom Lee Music Co., Ltd.
11/F., Silvercord Tower 1, 30 Canton Road,
Tsimshatsui, Kowloon, Hong Kong
Tel: 730-1098
INDONESIA
PT. Yamaha Music Indonesia (Distributor)
PT. Nusantik
Gedung Yamaha Music Center, Jalan Jend. Gatot
Subroto Kav. 4, Jakarta 12930, Indonesia
Tel: 21-520-2577
KOREA
Cosmos Corporation
#131-31, Neung-Dong, Sungdong-Ku, Seoul
Korea
Tel: 02-466-0021~5
MALAYSIA
Yamaha Music Malaysia, Sdn., Bhd.
16-28, Jalan SS 2/72, Petaling Jaya, Selangor,
Malaysia
Tel: 3-717-8977
PHILIPPINES
Yupangco Music Corporation
339 Gil J. Puyat Avenue, P.O. Box 885 MCPO,
Makati, Metro Manila, Philippines
Tel: 819-7551
SINGAPORE
Yamaha Music Asia Pte., Ltd.
Blk 202 Hougang, Street 21 #02-01,
Singapore 530202
Tel: 382-1922
TAIWAN
Yamaha KHS Music Co., Ltd.
10F, 150, Tun-Hwa Northroad,
Taipei, Taiwan, R.O.C.
Tel: 02-717-3812
THAILAND
Siam Music Yamaha Co., Ltd.
121/60-61 RS Tower 17th Floor,
Ratchadaphisek RD., Dindaeng,
Bangkok 10320, Thailand
Tel: 02-641-2951
THE PEOPLE’S REPUBLIC OF CHINA
AND OTHER ASIAN COUNTRIES
Yamaha Corporation,
International Marketing Division
Nakazawa-cho 10-1, Hamamatsu, Japan 430-8650
Tel: 053-460-2317
AFRICA
AUSTRALIA
Yamaha Music Australia Pty. Ltd.
17-33 Market Street, South Melbourne, Vic. 3205,
Australia
Tel: 3-699-2388
MIDDLE EAST
HEAD OFFICE Yamaha Corporation, Electronic Musical Instrument Division
Nakazawa-cho 10-1, Hamamatsu, Japan 430-8650
Tel: 053-460-2445
NEW ZEALAND
Music Houses of N.Z. Ltd.
146/148 Captain Springs Road, Te Papapa,
Auckland, New Zealand
Tel: 9-634-0099
COUNTRIES AND TRUST
TERRITORIES IN PACIFIC OCEAN
Yamaha Corporation,
International Marketing Division
Nakazawa-cho 10-1, Hamamatsu, Japan 430-8650
Tel: 053-460-2317
OCEANIA
Page 43

Page 44

M.D.G., EMI Division © Yamaha Corporation 1998
V201440 802POCP12.2-01A0 Printed in Japan
Page 45

documentation manual, user maintenance, brochure, user reference, pdf manual
This file has been downloaded from:
User Manual and User Guide for many equipments like mobile phones, photo cameras, monther board, monitors, software, tv, dvd, and othes..
Manual users, user manuals, user guide manual, owners manual, instruction manual, manual owner, manual owner's, manual guide,
manual operation, operating manual, user's manual, operating instructions, manual operators, manual operator, manual product,
 Loading...