

Yamaha Audio W7, W5 User Manual


SPECIAL MESSAGE SECTION
PRODUCT SAFETY MARKINGS: Yamaha electronic p rod -
ucts m ay have either labels sim ilar to the grap hics shown
below or molded / stam p ed fac sim iles of thes e g ra p hics on
the enclosure. The explanation of these graphics appears on
this page.
Please observe all cautions indicated on this page and those
indicated in the safety instruction section.
CAUTION
RISK OF ELECTRIC SHOCK.
DO NOT OPEN
CAUTION: TO REDUCE THE RISK OF
ELECTRIC SHOCK, DO NOT REMOVE
COVER (OR BACK). NO USER-SERVICEABLE
PARTS INSIDE. REFER SERVICING TO
QUALIFIED SERVICE PERSONNEL.
See the name plate for graphic symbol markings.
The exclamation point within the
equilateral triangle is intended to alert
the user to the p resent of import ant
operating and maintenance
(servicing) instructions in the
literature accompanying the product.
The lightning flash with arrowhead
symbo l within the eq uilateral triang le
is intend ed to alert the user to the
presen ce of uninsulated "dangerous
voltage" within the product's
enclosure that may b e of sufficient
magnitude to c onstitute a risk of
electrical shock.
ENVIRONMENTAL ISSUES: Yamaha strives to produc e
prod ucts that are both user safe and environmentally
friendl y.
We sincerely b elieve that our p rod uc ts and the pro duc tion
methods used to prod uce them, meet these g oals. In
keeping with both the letter and the spirit of the law, we want
you to be aware of the following:
BATTERY NOTICE: This product MAY contain a small
nonrechargeable battery which (if applicable) is soldered in
plac e. The average life span of this type of battery is
app roximately five years. When replac ement becomes
necessary, contact a q ualified servic e representative to
perform the replacement.
WARNING: Do not attemp t to recharg e, disassemb le, or
incine rate this type of battery. Keep all batteries away from
child ren. Dispose of used batteries promptly and as
regulated b y applicab le laws. Note: In some areas, the
servicer is required b y law to return the de fective parts.
However, you d o have the option of having the servicer
dispose of these parts for you.
DISPOSAL NOTICE: Should this product become
damaged beyond repair, or for some reason its useful life is
considered t o b e at an end , p lease ob serv e all local, state,
and federal reg ulations that relate to the disposal of
products that contain lead, batteries, plastics, etc.
NOTICE: Service charges incurred due to lack of knowledge
relating to how a func tion o r effec t works (whe n the unit is
operating as designed) are not covered by the
manufacture's warranty, and are therefore the owner's
respon sibility.
Please study this manu al c are fully and c onsult your dealer
before requesting service.
NAME PLATE LOCATION: The graphic below indicates the
location of the name plate. The model numb er, serial
number, power requirements, etc., are located on this plate.
You should rec ord the mod el numb er, serial number, a nd
the date of purc hase in the spaces p rovided below and
retain this manual as a permanent record of your purchase.
IMPORTANT NOTICE: All Yamaha electronic p rod uc ts are
tested and ap proved by an ind epend ent safety testing
laboratory in order that you may b e sure that when it is
prop erly installed and used in its normal and customary
manner, all foreseeable risks have been eliminated. DO NOT
modify this unit or commission others to d o so unless
specifically authorized by Yamaha.
Product performance and /or safety standard s may be
dimini shed . C laims filed und er th e exp r essed w arranty ma y
be denied if the unit is/has been modified. Implied warranties
may also be affected.
SPECIFICATIONS SUBJECT TO CHANGE: The information
contained in this manual is believed to be correct at the time
of printing. However, Yamaha reserves the right to change or
modify any of the spec ific a tions without n otic e or oblig ation
to update existing units.
92-469-➀
Model
Serial No.
Purchase Date
CAUTION
RISK OF ELECTRIC SHOCK
DO NOT OPEN
ATTENTION:RISQUE DE CHOC ELECTRIQUE NE PAS OUVRIR.
WARNIING TO REDUCE THE RISK OF FIRE OR ELECTRIC
SHOCK. DO NOT EXPOSE THIS PRODUCT TO RAIN OR MOISTURE.
THIS DEVICE COMPLIES WITH PART 15 OF THE FCC RULES. OPERATION IS
SUBJECT TO THE FOLLOWING TWO CONDITIONS:
(1)THIS DEVICE MAY NOT CAUSE HARMFUL INTERFERENCE, AND (2)THIS DEVICE
MUST ACCEPT ANY INTERFERENCE RECEIVED, INCLUDING INTERFERENCE THAT
MAY CAUSE UNDESIRED OPERATION.
MODEL
SER.NO.
POWER
ON/ OFF
AC INLET

IMPORTANT SAFETY INSTRUCTIONS
INFORMATION RELATING TO PERSONAL INJURY, ELECTRICAL SHOCK,
AND FIRE HAZARD POSSIBILITIES HAS BEEN INCLUDED IN THIS LIST.
WARNING- When using any electrical or electronic product,
basic precautions should always be followed. These
precautions include, but are not limited to, the following:
1. Read all Safety Instructio ns, Installation Instructions,
Special Message Section items, and any Assembly
Instructions found in this manual BEFORE making any
connections, including connection to the main supply.
2. Do not attemp t to service this p roduc t beyond that
desc ribed in the user-maintenanc e instructions. All other
servicing should be referred to qualified service personnel.
3. Main Power Sup ply Verific ation: Yamaha prod uc ts are
manufac tured sp ec if ic ally fo r the supp ly voltage in the area
where they are to be sold. If you should move, or if any doubt
exists ab ou t the supp l y volt age in your area, please contac t
your dealer for supply voltage verification and (if applicable)
instruc tions.The requir ed supp ly voltage is p rinted on th e
name p late. For name plate location, please refer to the
graphic found in the Special Message Section of this manual.
4. DANGER-Grounding Instructions: This product must be
grounded and therefore has been equipped with a three pin
attachment plug . If this prod uct should malfunction, the
ground p in provid es a path o f low resistance for electric al
curren t, reducing the risk of elec trical shoc k. If your wall
socket will not accommod ate this type p lug, c ontact an
electr ician to have the outlet rep laced in acc ordanc e with
local electrical codes. Do NOT modify the plug or change the
plug to a different type!
5. WARNING: Do not p lace this produc t or any other
objec ts on the p ower cord or place it in a position where
anyone c ould walk on, trip over, or roll an ything over p owe r
or con necting c ords of a ny kind. The use of an extension
cord is not recomm ended! If you must use an extension
cord , the minimum wire size for a 25' cord (or less) is 18
AWG. NOTE: The smaller the AWG numb er, the larg er the
current handling capacity. For longer extension c ords,
consult a local el ectrician.
6. Ventilation: Electronic p roduc ts, unless specifically
desig ned for enc losed installations, should b e plac ed in
locations that do not interfere with p roper ventilation. If
instructions for enclosed installation are not provided, it must
be assumed that unobstructed ventilation is required.
7. Temperature considerations: Electronic produc ts
should be installed in loc ations that do not seriously
contri bu te to their op erating tem pe rature. Placement of this
prod uct close to heat sourc es such as; rad iators, heat
registers etc., should be avoided.
8. This prod uct was NOT desi gned for use in wet/d amp
locatio ns and sh ould not b e used near water o r exp osed to
rain. Examples of wet /damp locations are; near a swimming
pool, spa, tub, sink, or wet basement.
9. This prod uct should b e u sed only with the components
supp lied or; a c art ,ra ck, o r stand that is rec ommend ed b y
the manufac turer . If a c art, rack, or stand is used , p lease
observe all safety markings and instructions that
accompany the accessory product.
10. The power supply cord (plug) should be
disconnected from the outlet when electronic products are to
be left unused for ext ended period s of time. Cord s should
also b e disconne cted when t here is a high p robabil ity of
lightning and/or electrical storm activity.
11. Care should be taken that objects d o not fall on and
liquid s are not spilled into the enc losure through any
openings that may exist.
12. Electric al/e lectronic pr oduc ts should be servic ed by
a qualified service person when:
a. The power supply cord has been damaged; or
b. Objects have fallen, been inserted, or liquids have
been spilled into the enclosure through openings; or
c. The product has been exposed to rain; or
d. The product does not operate, exhibits a marked
change in performance; or
e. The product has been dropped, or the enclosure of
the product has been damaged.
13. This prod uc t, either alone or in c omb ination with a n
amplifier and headphones or speaker/s, may be capable of
producing sound levels that could cause permanent hearing
loss. Do NOT operate f or a long p eriod of time at a hig h
volume level or at a level that is uncomfortable. If you
experience any hearing loss or ringing in the ears, you
should consult an audiologist.
IMPORTANT: The louder the sound , the shorter the time
period before damage occurs.
14. Some Yamaha products may hav e benches and / or
accessory mounting fixtures that are either supplied as a part
of the p roduc t or as optional ac cesso ries. Some of these
items are d esigned to be d ealer assembled or installed.
Please make sure that b enches are stable and any optional
fixtures (where app l icable) are well secured BEFORE using.
Benches supplied by Yamaha are designed for seating only.
No other uses are recommended.
PLEASE KEEP THIS MANUAL

C ONTENT S
BEFORE YOU BEGI N .................................................... 7
FRONT PANEL .......................................................10
REAR PANEL .........................................................15
SYSTEM LOGIC ......................................................17
GE TTING STAR TE D ................................................... 43
SETUP & PLAY ......................................................44
LOADING & PLAYING THE DEMO ...........................52
PROGRAMMING ....................................................56
SAVING & LOADING .............................................64
INTEGRATING INTO A MIDI SYSTEM ......................67
■ FEATURE REFEREN CE................71
SON G MOD E .. .. .. .. .. ... .. .. .. .. .. ... .. .. .. .. .. .. ... .. .. .. .. .. ... .. .. .. .. .. .72
SONG PLAY ...........................................................73
SONG MULTI .........................................................74
SYSTEM EFFECTS ...................................................79
SONG SEQ UENCE PLAY ...........................................80
SONG SETUP ......................................................... 82
SONG RECORD ......................................................85
REALTIME RECORDING ........................................... 87
STEP REC ORDING ..................................................89
SONG EDIT ...........................................................91
SEQ UENC E TRACK GRAPH ......................................91
SEQ UENC E/TEMPO TRACK DATA C HANGE................ 92
SEQ UENC E/TEMPO TRACK DATA INSERT ..................93
SONG JOB .............................................................95
SONG JOB 1 ...........................................................96
SONG JOB 2 ...........................................................98
SONG JOB 3 .........................................................100
AWM TONE GENERATI ON ................................... 104
VOICE MODE . .. .. ... .. .. .. .. .. ... .. .. .. .. .. .. ... .. .. .. .. .. .. ... .. .. .. .. .. 1 0 6
VOICE PLAY ........................................................ 107
VOICE EDIT .........................................................108
NO RMAL VOICE EDIT MODE.................................. 109
DRUM VOICE EDIT MODE ...................................... 124
2

STORE MOD E . .. .. . .. . .. . .. .. . .. . .. . .. .. . .. . .. . .. .. . .. . .. . .. .. . .. . .. . .. .. . 1 29
STORE MULTI ......................................................129
STORE VOICE ......................................................130
DIS K MODE . .. .. .. .. .. ... .. .. .. .. .. .. ... .. .. .. .. .. ... .. .. .. .. .. .. ... .. .. .. .131
DISK STATUS .......................................................133
SAVE TO DISK .....................................................134
LOAD FROM DISK ................................................136
RENAME FILE ......................................................139
DELETE FILE .......................................................140
FORMAT DISK .....................................................141
UTILITY MODE. .. .. .. ... .. .. .. .. .. ... .. .. .. .. .. .. ... .. .. .. .. .. .. ... .. .. .1 42
SONG VOICE MEMORY .........................................143
INITIALIZE ..........................................................144
VOICE BULK DUMP ..............................................144
SYNTHESIZER SETUP ...........................................145
CONTROLLERS ....................................................147
MIDI SETUP .........................................................148
OTHER SETUP .....................................................149
GREETING MESSAGE ...........................................149
BEFORE YOU BEGIN
GE TTING STAR TE D
SON G MODE
AWM TONE GENERATION
VOICE MODE
■ APPENDIX .............................151
ERROR MESSAGES ...............................................152
TROUBLESHOOTING ............................................153
MOUNTING THE EXPANSION BOARD ....................155
SPECIFICATIONS .................................................156
INDEX ........................................................................... 158
STORE MOD E
DISK MODE
UTILITY MODE
APPEN DIX
3

THA NK Y OU FOR PURCHA SING THE YA M A HA W5/W7 M USIC SYNTHE SIZ E R
The Yamaha W5 (76-key) / W7 (61-key) Music Synthesizer is a full-featured, professional
level music production and performance keyboard complete with 32-note synthesizer and
sequencer, extensive voice and song editing capabilities, digital effects, GM compatibility
and much more.
Featuring Yamaha s unique AWM2 (second generation Advanced Wave Memory) tone
generation system, where sounds are generated from high quality digital recordings of actual
instruments, the W5/W7 is a
multitimbral
keyboard that can function as several synthesizers
at once and play up to 16 different instrument sounds simultaneously via the internal song
sequencer or an external MIDI source.
The W5/W7 is specifically designed with the music composer and performer in mind to
give serious musicians all the tools they need to make great sounding music, in one compact,
easy-to-use, yet powerful, package.
To take full advantage of the W5/W7 s many in-depth features and music production
capabilities, and to enjoy many years of long and trouble-free use, please read this manual
carefully.
HOW TO USE THIS MA NUAL
This manual is divided into three distinct sections, as follows:
● INTRODUCTORY SECTION: BEFORE YO U BEGIN
A big picture overview of the W 5/W 7, c omplete with
explanation o f the instrument s m ain features and c ap ab ili-
ties, front and rear panel diagrams with detailed descrip-
tions o f controls and o ther features, p lus an explanation o f
system lo gic and o ther technical co nsiderations everything
you need to know b efore you begin using the W 5/W 7 in
order to p ut its numerous features and c ap ab ilities into
pro per co ntext.
● TUTORIAL SECTION: GETTING STARTED
A simple yet co mprehensive guided tour of the basic
operation of all main features o f the W 5/W 7, includ ing
setting up and connecting to a monitor system, exploring
the prepro grammed voices and realtime c ontrol features,
basic vo ice editing, song creation and sound mixing, saving
and lo ading data, p lus integrating the W 5/W 7 into a larger
MIDI system everything you need to get started right away
familiarizing yo urself with the W 5/W 7 through hands on
experienc e.
● RE FE RE NCE SEC TION: FEA TURE RE FE RE NCE
A virtual encyc lopedia of all features o f the W 5/W7,
includ ing detailed info rmation abo ut voice, song, utility,
disk and storage mo des, as well as an extensive feature
index everything you need for quick and easy access to
any subject you want to lo cate.
IMPORTANT NOTE: Keep this manual in a safe place for future
reference.
4

PR EC AUTIONS
IMPORTANT! PLEASE READ BEFORE PROCEEDING.
The W5/W7 is a powerful electronic musical instrument featuring sensitive high technology. To ensure many years of trouble-free use, please take the important precautions below
seriously.
L OCATION
● In order to avoid c ausing serious damage to the W 5/W 7, do
not expo se the instrument to d irect sunlight, high temp era-
tures, exc essive humid ity, excessive dust or strong vib ration.
● Place the W 5/W 7 o n a solid surface such as a keyboard
stand or a sturdy tab le o r desk.
POWER SUPPLY
● Turn the pow er switch o ff when the instrument is not in
use.
● The power supp ly cord should be unplugged from the AC
outlet if the instrument is not to be used fo r an extended
period o f time. (NOTE: When AC po wer is reconnected,
song sequencer data, including Song vo ice data, will have
been erased.)
● Unplug the instrument during electrical sto rms.
● Avoid plugging the instrument into the same AC outlet as
appliances with high po wer co nsumption such as electric
heaters or o vens. Also avoid using multiple-p lug adapters
since these can result in reduced so und quality and possibly
even damage to the W 5/W 7.
UN PLUG ALL INSTRUMENTS WHEN MAKIN G
CONN ECTIONS
● To avoid causing damage to the instrument and o ther
devices to which it is connected (such as a sound system o r
MIDI instruments), turn o ff power and unplug all related
devices prior to connecting o r disconnecting audio and
MIDI cables. W hen co nnecting AC po wer be sure the W 5/
W 7 is properly grounded.
ELECTRICAL IN TERFERENCE
● Avoid using the W 5/W 7 near televisions, radios or other
devices which generate electromagnetic fields, since this
may cause the W 5/W 7 to malfunction, and po ssibly
generate interference no ise in the other devic es.
BAC K-UP BATT ER Y
● The W 5/W 7 co ntains a special long-life b attery that retains
the co ntents of its internal voice and multi memory when
the po wer is turned off. The back-up b attery should last for
several years. W hen it needs to be replaced , the message
Change internal battery! will appear on the display when
the po wer is turned on. W hen this happens, have the
backup battery replaced by qualified Yamaha service
personnel. Do not attemp t to replace the backup battery
yourself.
HANDLING AND TRANS PORT
● Handle with care. Physical shoc ks caused by d ropping,
bum ping the instrument, o r placing heavy o bjects upo n it,
can result in serious damage to the W 5/W 7.
● Never apply excessive force to the co ntro ls, co nnectors o r
other parts of the instrument.
● Disco nnect all cables before mo ving the instrument. Always
unplug cables by gripping the plug firmly, and not by
pulling o n the cable itself.
CL EA NING
● Never use chemical solvents o r thinners to clean the W5/
W 7, since these will damage the finish or dull the keys.
W ipe the instrument clean with a soft, dry cloth. If necessary, use a soft, clean cloth slightly mo istened with a
diluted, mild detergent. Then wipe the instrument thoroughly with a dry clo th.
● Avoid placing vinyl o bjects on top of the instrument, since
vinyl can stick to and d isc olor the surfac e.
DATA BACKU P AND STORAGE
● Be sure to save all song sequence and Song vo ice data to
flop py disk b efore turning off the p ower. At power o ff, these
types of data are not retained in the W 5/W 7 s internal
memory.
● Since it is possible for d ata in internal m emory to be lost as
a result of impro per op eration, handling, or o ther reasons,
always keep flop py disk b ackups of impo rtant voice, song
sequence and multi data, and store them in a co ol, dry
place. Since it is also possible fo r the data in a floppy disk to
be lo st as a result of static electricity, magnetic fields, o r
other causes, it is always a goo d idea to make at least two
backup copies o f the flopp y disks and store them in
different loc ations, just to be safe.
● To prevent accidental erasure o f imp ortant data you have
saved to flo ppy d isk, be sure to slide the d isk s write-protect
tab to the write protect p osition (the tab windo w should
be o pen). W hen this is done the data o n the disk canno t be
accidentally overwritten.
5

● Make regular backup copies o f impo rtant data to a separate
flop py disk, and keep your backup d isks in a separate, safe
place.
● To ensure the safety of your data (and of the disk drive
itself) always use floppy disks from a well-know n, reliab le
manufacturer. No-name brand disks may cause trouble.
IMPORTANT NOTE: Yamaha recommends that you regularly save
your data onto floppy disks and store the disks in a safe place! Yamaha
cannot be held responsible for the accidental loss of important music
data.
HANDLE FL OPPY DISK S AND TR EAT THE DISK DRIVE
WITH CARE
● Use only 3.5 2DD type flop py disks.
● The actual recording med ium inside a flop py disk has a fine
co ating o f magnetic particles in which the data is stored. To
protect this coating as well as the disk d rive s delicate read -
write head, always keep flopp y disks in their protective
cases when they are not in use.
● Do no t place heavy objects on a disk o r bend or app ly
pressure to the disk in any way. Do not o pen the sliding
shutter and touch the expo sed surfac e of the flo ppy d isk
inside. Do not expo se the disk to d irect sunlight, extremely
high o r lo w temperatures, or excessive humid ity, dust o r
liquids. Do not expose the disk to magnetic fields, such as
those prod uced b y televisions, speakers, mo tors, etc., since
magnetic fields can partially or co mpletely erase d ata on the
disk, rend ering it unreadable.
● Never use a flop py disk with a deformed shutter or ho using.
● Do not attach anything other than the provided labels to a
flop py disk. Also make sure that labels are attac hed in the
pro per locatio n.
● To insert a flop py disk into the W 5/W 7 s disk drive, ho ld
the disk so that the label of the disk is facing upward and
the sliding shutter is facing forward, tow ards the d isk
insertio n slot. Carefully insert the disk shutter first into
the slot, slowly pushing it all the way in until it clicks into
place and the eject button pop s o ut.
millimeters. If this happens, do not attempt to pull out the
partially ejected disk, since using fo rce in this situation can
damage the disk drive mechanism o r the flo ppy d isk. To
remove a partially ejected disk, try pressing the eject b utton
once again, or push the d isk back into the slot and then
repeat the eject proc edure.
● Never insert anything but flo ppy d isks into the disk drive.
Other objects may cause damage to the disk drive or flopp y
disks.
● Be sure to remo ve the floppy disk from the disk drive before
turning off the po wer. A flop py disk left in the drive for
extended perio ds can easily pic k up d ust and dirt that can
cause data read and write errors.
CL EANING THE DISK DRIVE READ/WRITE HE AD
● Clean the read/ write head regularly. This instrument
employs a precision m agnetic read/write head whic h, after
an extended period o f use, will pick up a layer o f magnetic
particles from the disks used that will eventually cause read
and write errors. To maintain the disk d rive in o ptimum
wo rking o rder Yamaha recommends that yo u use a com mercially-available dry-type head cleaning d isk to clean the
head abo ut once a month. Ask your Yamaha dealer about
the availability of proper head-cleaning disks.
SERVICE AND MOD IFICATION
● The W 5/W 7 co ntains no user serviceable parts, so never
open the case or tamper with the internal circuitry in any
way. Do ing so m ay result in electrical shock o r damage to
the instrument. Refer all servicing to qualified Yamaha
service personnel.
THIR D PAR TY SOFTWAR E
● Yamaha canno t take responsibility for software pro duced fo r
this prod uct by third-party manufac turers. Please direct any
questions or comments abo ut such software to the manufac turer o r their official agents.
IMPORTANT NOTE: Yamaha cannot be held responsible for
damage to the W5/W7 resulting from improper handling or operation.
● W hen writing and reading data to and from disk, the red
LED on the floppy disk d rive will light up. Never attempt to
remove the disk o r turn the po wer off while this LED is lit.
Doing so co uld d amage the disk and possibly the d isk drive.
● To eject a floppy disk, press the eject butto n slowly as far as
it will go; the disk will automatically pop out. W hen the
disk is fully ejected, c arefully remo ve it by hand. If the eject
button is pressed too quickly, o r if it is not pressed in as far
as it will go , the disk may no t eject prop erly. The eject
button may bec ome stuck in a half-pressed position with
the disk extending from the drive slot by o nly a few
6

BEFORE YOU BEGIN
Co ngratulatio ns! You are now the p roud owner o f the Yamaha W5/W 7 Music Synthe-
sizer. The W 5/W 7 is a self contained , full-featured, easy-to -operate multitimbral music
pro ductio n and perfo rmance
16 -track sequencer, full vo ice and song editing capabilities, studio quality digital effects,
po werful stereo sound m ixing features, large memo ry capacity, on-b oard flopp y disk drive,
GM c omp atibility, friendly user-interface and mo re. Main features includ e:
●
A WM2 TONE GENER A TION
Second generation Ad vanc ed W ave Memory tone generation system, where
instrument sounds are generated from high-q uality digital samples o f ac tual
instruments and o ther sounds.
●
L AR GE-CAPA CITY WAV EF OR M ROM
8Mb ytes o f 16-b it linear waveforms sampled at maximum 48kHz sampling
frequency, p lus exp and ab ility.
●
EA SY CONTROL AND FR IENDLY USER INTE RFA CE
Multiple assignable co ntrollers, large LCD screen, multi-p urpo se function keys,
data entry pad, jo g/shuttle and other data input features, p lus individual se-
quencer trac k buttons and mo re give yo u instant access to any mo de o r parameter. Accessing func tio ns rarely takes mo re than two o r three presses of a button.
wo rkstatio n
, c omp lete with 32- note po lypho nic synthesizer,
BEFORE YOU BEGIN
●
SON G MULTI
The basic Song Play o peration mode o f the W5/ W7, a multi lets yo u design a
co mplete music production from start to finish and store it as a song in any of
the 16 internal song mem ories. A multi is the co nfiguration o f all p erformance
and vo ice settings and other data which combine to create a stereo song mix .
W ithin a multi, yo u can assign up to 16 on-b oard
track sequencer, p lus determine all effects and mixer settings as well as MIDI
co ntrol status and many other parameters.
●
16-TRA CK , 16-SONG M USIC SE QUENCE R
Large capacity memo ry (appro ximately 100,000 notes) song sequenc er with real-
time, step and p unch- in recording, and extensive song editing jo bs. The 16
sequences in song memo ry can be spec ified to p lay back o ne after another.
Instrument
voices to the 16-
7

●
GENERAL MIDI
Global stand ard co nfiguration o f 128 instrument vo ices and specified MIDI
channel assignments and o ther parameters. General MIDI lets yo u load and play
music data created by ano ther sequencer and saved to d isk in the Standard MIDI
File format.
BEFORE YOU BEGIN
ABOUT THE GM SYSTEM LEVEL 1
The General MIDI ( GM ) w orld standard p rotoc ol was develo ped b y a co nsortium o f musical
instrument hardware and so ftware makers in o rder to minim ize con fusion and the n eed for repro gram ming w hen playing music so ftware created by o ne devic e on ano th er devic e. The W 5/W 7 sup ports the
GM System Level 1 , which is the cu rrent m inimum MIDI co nfiguration standard rec ognized by the
International MIDI Assoc iation.
GM p ermits performanc e and o ther data to b e transferred between different instruments, even
instruments made b y different manufacturers. For examp le, sequence d ata originally c reated to co ntrol
a specific to ne generator c an be used to con trol a different tone gen erato r from ano ther manufacturer
withou t reco nfiguring MIDI channel and o ther assignments. Program change and o ther data transmitted from the sequencer will select the c orrect voices and settings on the d estinatio n tone g enerator.
GM d efines a stan dard vo ice allocation c hart in whic h the sam e or similar voices are accessed b y the
same program c hange num bers ( 001 ~ 128) and MIDI channels (1 ~ 16 ), and the same type o f drum
sound s are assigned to specific keys, an d co ntrollers such as p itch bend range, o ctave registration ,
expression, mod ulatio n, etc., are designated with spec ific co ntroller num bers. (For m ore information
about GM sounds and mapping, see the
●
384 INSTR UM ENT V OICES AND 10 DRUM K ITS
W 5/W 7 Tec hnical Information
384 preset no rm al voices plus 10 drum vo ices (o r kits), inc luding the 128
General MIDI vo ices and 8 kits, c onstructed from the hundreds of preset AWM
elements and the m any on-b oard synthesizer parameters.
bo oklet, sup plied separately. )
●
VOICE EDITING
Extensive synthesizer voice ed iting features give yo u unlimited sound c reatio n
po tential. A vo ice, which can be constructed from between 1 and 4 AW M ele-
ments, has hundreds of editable parameters.
●
L AR GE INTER NAL V OICE AND SONG V OICE R AM
128 Internal o r user no rmal voice memories and 2 Internal d rum voice
memories, fo r storing yo ur own instrument sounds and drum kits. There are also
16 banks of 1 28 Song vo ice memories and 16 banks of 2 Song drum voice
memories one Song vo ice bank per each song memo ry which are handy for
organizing vo ices and drums for specific songs or live performance setups and
storing them together with song multi data on flo ppy d isks for q uick and easy
access.
8

●
75 DIGITAL EF FECT S
Two independent, studio quality DSP effects systems Insertion Effects and
System Effects each with three different types o f effects generators. An Inser-
tion Effect can be assigned to each voice in Voice Edit Mode, and switched on and
off via the mixer. As many as three Insertion Effects can be used in a multi. The
three System Effects can be app lied to the o verall sound mix. Preset stereo effects
¤
includ e reverb , delay, chorus, auto panning, 3-band EQ, Aural Exciter
, pitch
change, distortion and many more. There are a total of 3 5 preprogrammed
Insertion Effects and 40 System Effects, which can be ed ited and c onfigured in a
variety of w ays in the multi for a song o r performance setup.
* Aural Exciter¤ is a registered trademark of and is manufactured under license from Aphex Systems Ltd.
●
STEREO S OU ND MIXING
Extensive stereo sound m ixing c ap ab ilities, via the on-b oard tone generator sound
mixer, the d igital effects and o thers. In c onjunction with the sequencer yo u can
even achieve an automated mixd own fo r yo ur final playback o utput.
●
PERF OR MA NCE FEA TURE S
76 -key (W 5) or 61-key (W 7) po lyphonic keybo ard with key velocity sensitivity
and aftertouch, p lus keyboard splitting, layering and 4-Zone capabilities. The
W 5/W 7 c an play a maximum of 32 notes simultaneo usly. In Song Multi Mode, it
can play a maximum o f 16 timbres, or voices, simultaneously; in Voice Mode, it
can play one timbre at a time. There are also many performance controllers,
includ ing pitch b end and mo dulatio n wheels, fo ot controller, and a multi-
function c ontinuo us slider.
BEFORE YOU BEGIN
●
FL OPPY DISK DRIV E
For storing yo ur song and voice data o n 3.5 2DD type flop py disks.
●
E XPA NSION POTE NTIA L
The factory p repro grammed sound m emory c an be expanded with an optional
Yamaha 4Mb yte Expansion W ave/Voic e Bo ard.
9
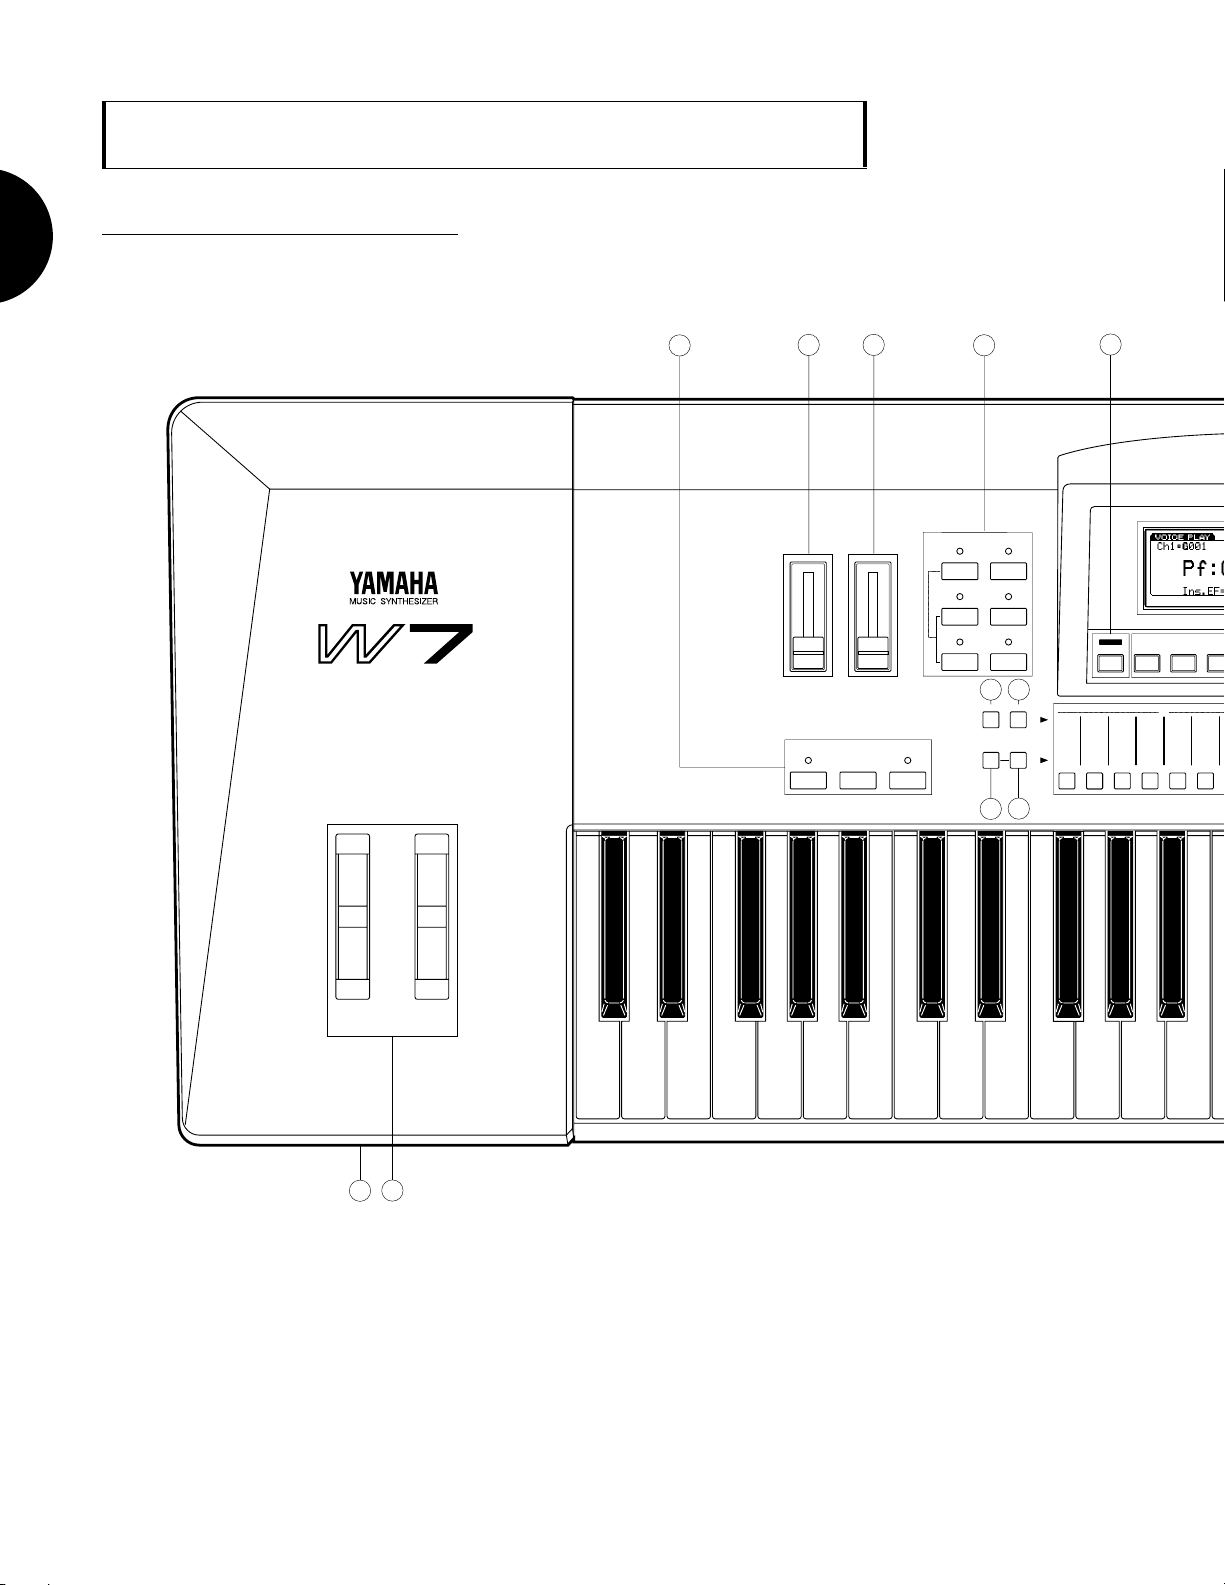
BEFORE YOU BEGIN
F
F
FR ONT PANEL
D IAGRAM & FEATURES
7
4
5
6
14
PITCH MODULATION
SEQUENCER
STOP/TOPRECORD
CSVOLUME
RUN
SONG
EDIT
JOB
MODE
VOICE
UTILITY
DISK
8
STORE VOICE EDIT
TRACK
SELECT SOLO
10
SHIFT
F1 F2
9
ELEMENT SELECT
1
1
223344516
ON/O
2
11
2
3
NOTE: The above diagram is the 61-key W7 Music Synthesizer. The 76-key W5 has precisely the same on-board controls
and internal operating system only the number of keys on the keyboard is different.
10
13
3F4F5F6F7F8
F
73849 10
ELEMENT
COMMON FILTERAMP EFFECTPITCH CONTROLLFO
VOICE EDIT
11 12 13 14 15 16
12
BEFORE YOU BEGIN
ENTER
18
CANCEL
9
6
3
DATA/CURSOR
INCDEC
16
15
EXIT
17
8
7
5
4
2
1
REST TIE UTILITY
–
0
19
20
21
1
11

BEFORE YOU BEGIN
K EYBOAR D
76 -key (W 5) or 61-key (W -7 ) keyboard with key-on velocity sensitivity and channel
aftertouch sensitivity gives you full c ontrol o ver expression and nuance as you play.
PITCH AND MODU LATION W HEELS
The pitch wheel lets you bend the pitch up or down as yo u play. It is spring-loaded
to return to center po sition when you let go o f it. The m odulation wheel lets you
apply o r set a designated amo unt o f vibrato o r tremolo. You can also assign it to affect
EG b ias, filter cutoff, amplitude mo dulation, p itch m odulation, frequenc y modulation
and various o ther co ntro llab le parameters.
FL OPPY DISK DRIV E
The 3.5 2DD flop py disk drive can store large amo unts of vo ice, multi and so ng
sequence data. The red d isk drive indicator LED will light when the disk is being
written o r read. (NO TE: Never attempt to remo ve the disk while this LED is let.
Do ing so could damage the disk and the disk drive. Always insert the disk with the
label facing up, from the end with the shutter facing forward. To remo ve the disk,
press the eject butto n at the lower right of the drive.)
VOLUME SL IDER
Regulates the output vo lume from the stereo output jacks o n the rear p anel.
CONTINUOUS SLIDER (CS)
This is a multiple function c ontroller that can control the parameter you assign to it,
includ ing pan, fo ot co ntrol functions, expression, data entry and others.
MODE SECTION
For choosing the six main operation mod es of the W 5/W 7 Song, Edit, Jo b, Vo ice,
Utility and Disk.
SEQUENCER S ECTION
For starting and stop ping the reco rding and p layback func tio ns of the internal
sequenc er, and returning the song to the top, o r first measure. Pressing RECO RD
engages the Song Record Mo de; p ressing STOP/TOP o nce stop s a song w hich is
playing back, while pressing STO P/TOP twice returns the song to the top, o r measure
one; p ressing RUN starts the song playback fro m the currently designated measure.
STORE BUTTON
For entering Sto re Mode in o rder to store multis into the song memory bank and
voices into the Internal voice bank. In Sto re Mod e the STORE button w ill light green.
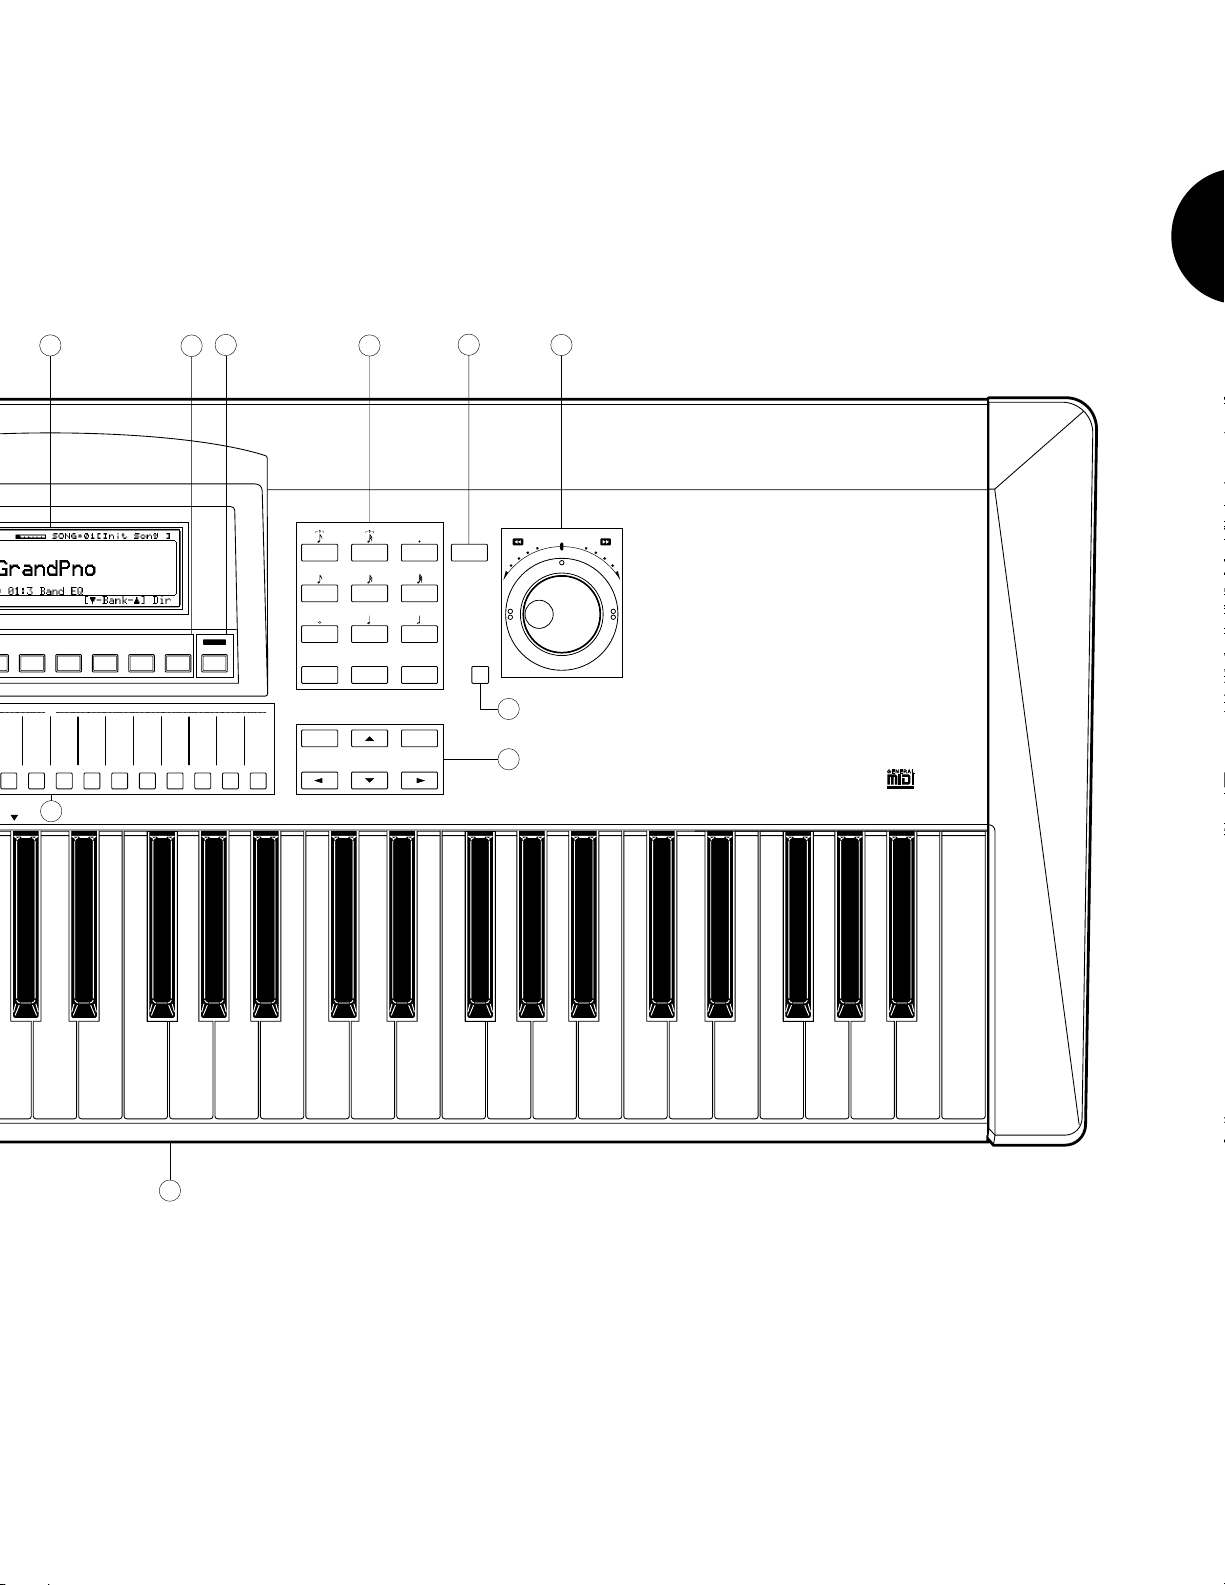
12

VOIC E EDIT BUTTON
For switching directly into Voice Edit Mo de, regardless of whatever mode you re in at
the time, to access the voice editing functions and parameters. During the ed iting
operation, p ressing VO IC E EDIT lets you c omp are the sound o f the vo ice you re
editing to the sound of the original voic e you started from. In Voice Edit Mode the
VOICE EDIT button lights in o range (as do various TRACK buttons, which in Voice
Edit Mo de double as voice ed iting function and element selectors).
TR ACK SE LE CT BUTTON
In the normal op erating mo des the TRACK SELECT button will be lit with a green
light, indicating that you can select tracks 1 ~ 16 o f the song multi. In Voic e Edit and
Solo Mo des, the light on the TRACK SELECT button will go out, indicating that yo u
canno t select tracks.
TR A CK SOLO BUTTON
W hen a song sequence is playing back, pressing the SOLO button will allow yo u to
solo and mute the various trac ks with music data in them. Soloed tracks will light in
red and muted tracks will light in green.
BEFORE YOU BEGIN
TR ACK BUTTONS 1 ~ 16
In Song Play, Voice Play and Song Record Mo des, the TRACK buttons let yo u select
any track in the multi the selected track button will be indicated with a red light. In
Song Sequenc e Play Mod e, the TRACK buttons co rrespo nding with tracks which
have music data in them will be ind icated with a green light. In Vo ice Edit Mod e,
various TRACK buttons double as edit function select, element select and element on/
off switches as indicated on the panel directly abo ve eac h button. In Voice Edit
Mode, the selected buttons will be ind icated with orange lights.
L C D SCRE EN
The 240 x 64 do t Liquid Crystal Display with adjustable c ontrast provides graphic ,
numeric and much o ther visual information.
SHIFT K EY
SHIFT is used in conjunc tio n with the func tio n keys to acc ess seco ndary func tio ns
and parameters, as well as to jump directly to main menus and o ther functions.
FUNCTION KE Y S 1 ~ 8
The func tio ns of these keys [F1 ~ F8] depend on the selected mo de. They are used to
engage a func tio n indic ated on the display imm ediately abo ve the key.
EX IT K EY
EXIT is for exiting from any function o r submode. In many c ases pressing EXIT mo re
than o nce will let yo u retrace your previous few steps .
13

DATA E NTRY K EY PA D
For precise, specific entry o f data, b y punching in a number, then pressing ENTER.
The [ —] button lets yo u enter a negative value. In Song Record Mo de yo u can enter
music no tation values acco rding to the co rresponding musical symbols and indic a-
tions printed above the butto ns. ENTER is used to execute many different op erations.
BEFORE YOU BEGIN
CANCEL BUTTON
If you change a parameter and then decide yo u want to retrieve the previous data
value, pressing CANCEL before proceed ing to another func tio n will cancel o ut the
data entry, reverting to the p revious value status.
J OG/SHUTTL E DIAL
Two -function co ncentric (inner and o uter) d ial. The JOG ( inner dial) lets you enter
data or scroll through functions. The SHUTTLE ( outer dial) lets you fast forward o r
rewind through measures in a song sequence.
DATA /CURSOR BUTTON
Determines the function o f the JOG d ial. W hen switched o ff (no light), the JO G will
be used primarily for entering data. W hen switched o n (red light indicato r), spin-
ning the JO G will mo ve the cursor.
CURSOR CONTROL & INC/DEC BUTTONS
The arrow C URSO R-UP, -DO WN, - LEFT and -RIGHT butto ns let you mo ve the
cursor in these respec tive d irec tio ns one step at a time. INC lets you enter data one
increment with each press of the butto n, while DEC lets you enter data one decre-
ment with each press of the button. The INC/DEC b uttons are also used to confirm
execution o f or abort an operation after pressing ENTER.
14

R EAR PANEL
D IAGRAM & FEATURES
THRU OUT
CAUTION
RISK OF ELECTRIC SHOCK
ATTENTION:RISQUE DE CHOC ELECTRIQUE NE PAS OUVRIR.
WARNIING TO REDUCE THE RISK OF FIRE OR ELECTRIC
SHOCK. DO NOT EXPOSE THIS PRODUCT TO RAIN OR MOISTURE.
THIS DEVICE COMPLIES WITH PART 15 OF THE FCC RULES. OPERATION IS
SUBJECT TO THE FOLLOWING TWO CONDITIONS:
(1)THIS DEVICE MAY NOT CAUSE HARMFUL INTERFERENCE, AND (2)THIS DEVICE
MUST ACCEPT ANY INTERFERENCE RECEIVED, INCLUDING INTERFERENCE THAT
MAY CAUSE UNDESIRED OPERATION.
DO NOT OPEN
POWER
ON/ OFF
MODEL
SER.NO.
PATENTS US4584921 US4967635
US4738179 US4731835
US4763553 US4731835
YAMAHA CORPORATION
MADE IN JAPAN
VS25750
12
MIDI
34
IN
SUSTAIN FOOT
FOOT
VOLUME
CONTROLLER
5
6
OUTPUT
R L/MONO
7
BEFORE YOU BEGIN
AC INLET
PHONES
8
POWER SWITCH
Press to turn the po wer on o r off.
POWER CONNECTOR
Attach the po wer supply cord and plug into the AC po wer outlet.
MIDI CONN ECTORS
For connecting other MIDI devices. The MIDI IN c onnec to r receives MIDI data from
an external sequencer or o ther MIDI device which will control o r transmit data to the
W 5/W 7. The MIDI THRU co nnector simply p asses along the data received at the
MIDI IN co nnector, allowing co nvenient chaining o f MIDI devices. The MIDI OUT
co nnector transmits data co rresponding to all W 5/W 7 perfo rm anc e op erations, o r
bulk data when one o f the MIDI data transmission func tio ns are activated.
SUSTA IN J ACK
An o ptional Yamaha FC4 o r FC5 fo ot switch c onnec ted here will permit press-o n/
release-off sustain control by fo ot. You can also determine the expression level limit.
15

FOOT CONTROL L E R JACK
An o ptional Yamaha FC7 o r FC9 fo ot co ntroller connected here can be used fo r
amplitude m odulatio n, pitch mo dulation, frequency mo dulatio n, envelope generato r
bias, and filter cutoff frequency co ntrol.
BEFORE YOU BEGIN
FOOT VOL UM E J A CK
An o ptional FC7 o r FC9 fo ot co ntroller connected here can be used to regulate
overall volume.
OUTPUT J A CKS
Audio outputs for monitoring the W 5/W 7 by external amplification in either stereo o r
mo no. If a plug is inserted into o nly the L/MONO jac k, the left and right channel
signals are co mbined and delivered via this single jack.
PHONES J A CK
Accepts a standard pair o f stereo headp hones (1/ 4 stereo p hone plug) fo r private
mo nitoring of the W 5/W 7.
16

S YS TEM LOGIC
MUSICIAN S WORKSTATION
The W 5/W 7 Music Synthesizer is a true music workstatio n designed with the com-
po ser as well as performer in mind. In one streamlined, easy-to-use package is bundled all
the too ls a musician needs to c oncentrate o n making music
ing, recording, p erfo rming or practicing rather than being d istracted by lots of machines
and cables.
The W 5/W 7 comes equipped with 32-no te po lypho nic keyboard , 16 -track, 1 6-so ng
sequenc er, full vo ice and so ng editing capabilities, studio quality digital effects, p owerful
stereo sound m ixing features, large memo ry capacity, on-b oard flopp y disk drive, GM
co mpatibility, and mo re everything a musician needs for any modern music situatio n. Its
AW M2 tone generatio n, which includ es hund reds o f high quality digital samples that form
the co re wave o f sound elements from w hich the synthesizer voices are co nstructed,
pro vides rich, d ynamic and p ow erful,
W ith the W 5/W 7, there is no single prescribed method o f working the way you use
it will be dictated by the needs o f your particular music session. All op eratio ns are performed w ithin a song multi , or co nfiguration o f all p arameter settings and o ther data
which make up a song , that can be stored in one o f the 16 internal song m emo ries and
saved to flo ppy disk.
pro fessional
quality sound.
naturally
whether compos-
BEFORE YOU BEGIN
One key to the W 5/W 7 s ease of operatio n is its intuitive, friendly user interface.
Through a balance o f easy reac h, multi-purpo se butto ns, sliders and controllers, plus a
large LCD screen, the W 5/W 7 allow s you to go directly to any func tion, whether it s vo ice
editing, reco rding, so ng editing, o r o thers, in usually the touch of a single button, and
rarely more than two or three.
Another key to the W 5/ W7 s ease of operation is the flexible nature of the so ng multis.
A song multi is a specific co nfiguration o f all settings you make fo r a particular music
sessio n whether composing, reco rding, performing or practicing which you store in the
16 song memo ries, and can save to flo ppy disk in a variety of ways.
Finally, with the W 5/W 7 you c an literally perform any o peration on the fly , mo ving
around within func tio ns and jump ing from mo de to mo de intuitively switching back and
forth between the various mo des freely as you work. You can even switch into Voice Edit
Mode while the sequencer is running, in o rder to make spec ific voice ed iting param eter
adjustments during song mixdo wn.
17
BEFORE YOU BEGIN
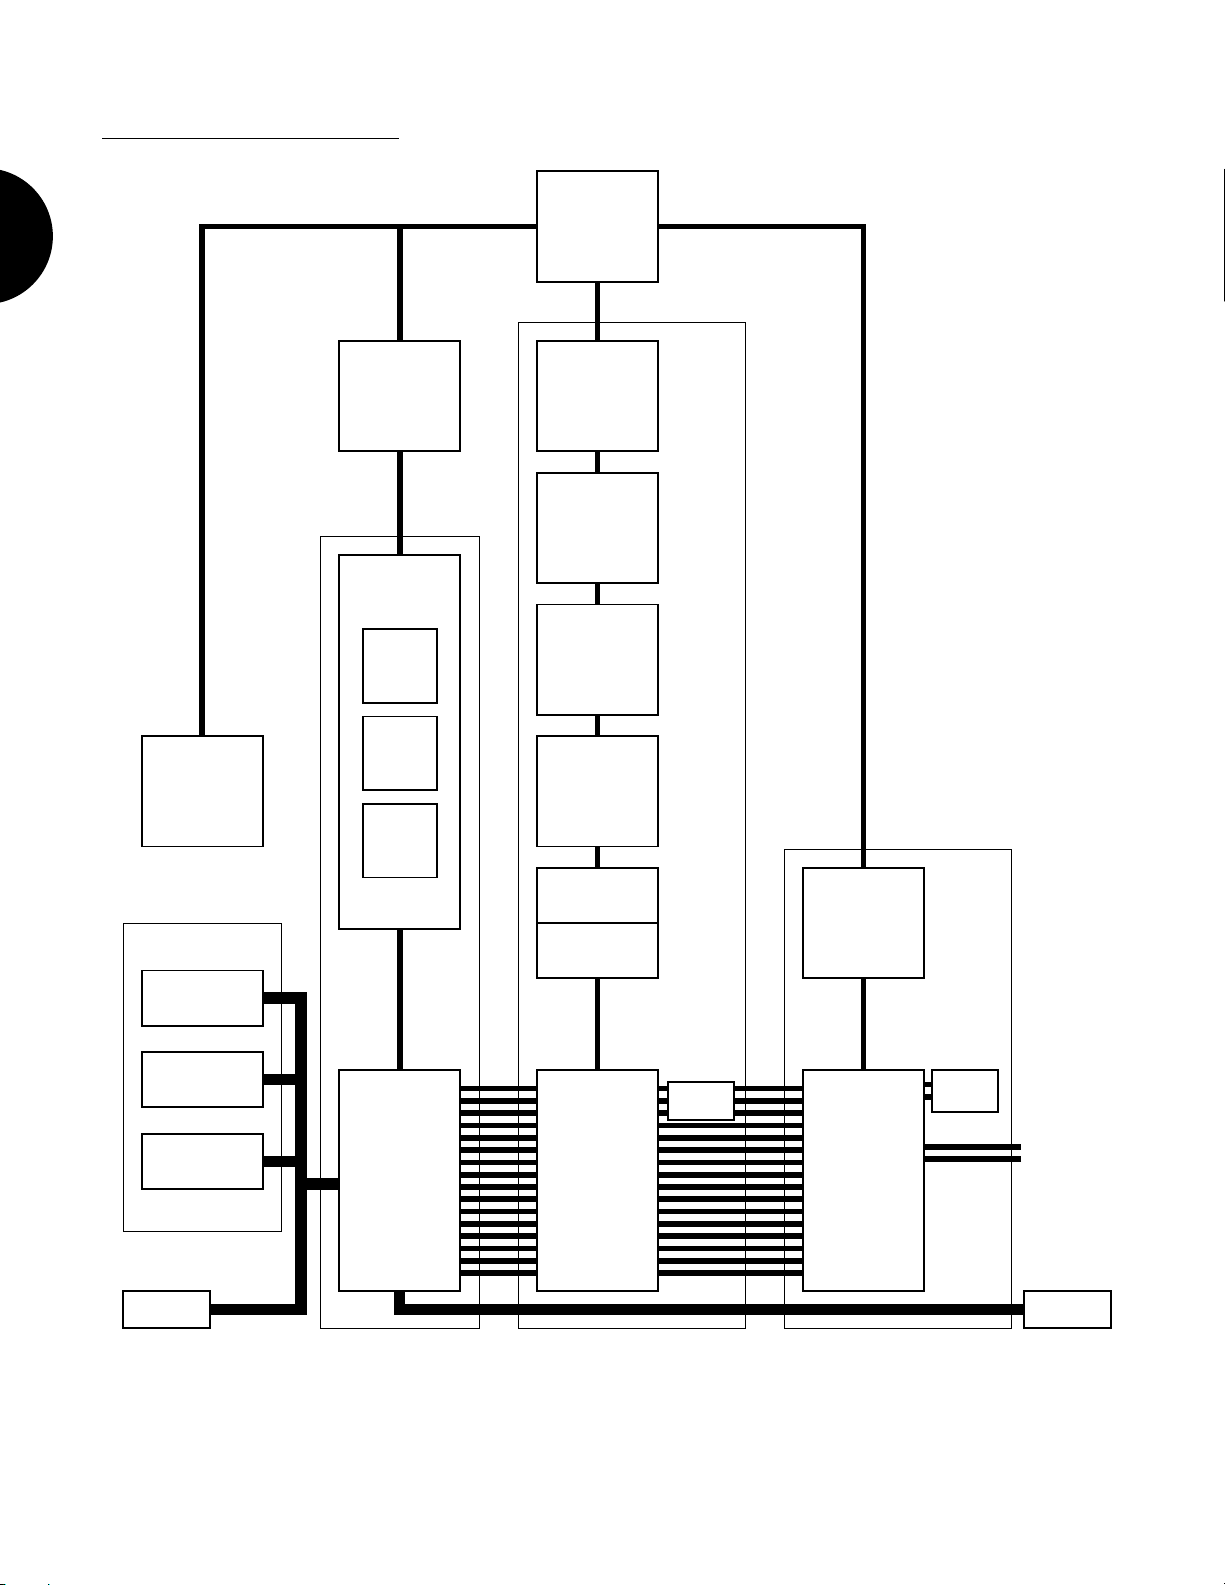
SYSTEM OVE RV IE W
128 normal
+ 2 drum
Song voice
memory
(Volatile RAM)
Disk Drive
16-song
sequencer
memory
(Volatile RAM)
Song Sequencer
Record
Edit
Job
“External”
normal and drum
voice memory
(Optional)
128 normal
+ 2 drum
Internal voice
memory
(RAM)
128 normal
+ 2 drum
Preset voice
memory
(ROM)
128 normal
+ 8 drum
GM voice
memory
(ROM)
Voice Edit Buffer
Tone Generator
16-song
multi memory
(RAM)
Controller
Keyboard
Data entry
MIDI IN
16 Tracks
On/Off
SEQUENCER VOICE MULTI OUTPUTINPUT
18
16 Instruments
Assign
Insertion
Effect
16 Channels
Stereo Mixer
System
Effect
L
R
MIDI OUT

OPERATING MODES
The basic o perating mo des of the W 5/W 7 are as follow s:
●SON G MOD E
For performing Song Play, Song Reco rd, Song Edit and Song Job mo de opera-
tions. ( For mo re informatio n, see Song Mode, page 72.)
SONG PLAY - Lets you choose between Song Multi, Song Sequence Play and
Song Setup func tio ns, in o rder to
voice to eac h of the 16 trac ks and d etermining sound mixer and other settings
for each track ( including volume, panning, effects, tuning, no te shift and pitch
bend ), c hoo se any of the 16 songs in internal song memo ry, assign various
MIDI settings including transmit channel, set the keyb oard mo de to No rmal,
Split, Layer or 4-Zo ne, set the sequencer c lock to internal or MIDI sync, and
determine o ther settings which affect the currently selected song multi. ( Fo r
mo re info rm ation, see Song Play Mode, page 73.)
define
BEFORE YOU BEGIN
a multi by assigning an Instrument
SONG RECORD - Lets you reco rd a sequence in the currently selected song
memory, either in real- time (including replace, overdub and p unch- in reco rd-
ing) or step- time, as well as determine record p arameters like quantize, tempo,
click vo lume and o thers. (Fo r mo re info rmation, see So ng Reco rd Mode, page
85 .)
SONG EDIT - Lets you view and edit individual no te, controller and other
MIDI events in the song sequence, through three separate functions Data
Change, w hich lets you mo dify the data, Data Insert, whic h lets you insert new
data, and Grap h, whic h lets you view no tes as black squares on a keybo ard
diagram plus a horizontal line which displays black do ts that indicate the
po sition of note data in a measure. ( Fo r more information, see Song Edit
Mode, page 91.)
19

BEFORE YOU BEGIN
SONG JOB - Lets yo u make changes to the sequence that apply to all the data
in o ne or more entire measures. Song Job operatio ns include song copy,
append and clear, track copy, clear and mix, measure co py, erase, create,
delete and insert, data thin out, extrac t and cho rd sort, plus quantize, mo ve
clo ck, mo dify gate time, mod ify velocity, transpose, shift no te, and crescend o.
(For mo re info rmation, see Song Job Mode, page 95.)
● VOICE M ODE
For performing single Voice Play and Vo ice Editing o perations. (For mo re info r-
mation, see Voice Mo de, p age 1 06.)
VOICE PLAY - Lets you play the individual voices (from the Preset, GM,
Internal, Song o r o ptional External voice b anks) without multi settings ap-
plied. (For more information, see Voice Play, p age 107.)
VOICE EDIT - Lets you edit any and all parameters which make up a voice,
includ ing Insertion Effect and controller settings. You can go directly to Voic e
Edit Mo de from either Voice Play o r Song Play and start editing the currently
selected vo ice at any time, even while the sequencer is running. (For mo re
informatio n, see Voice Edit Mo de, page 108.)
20
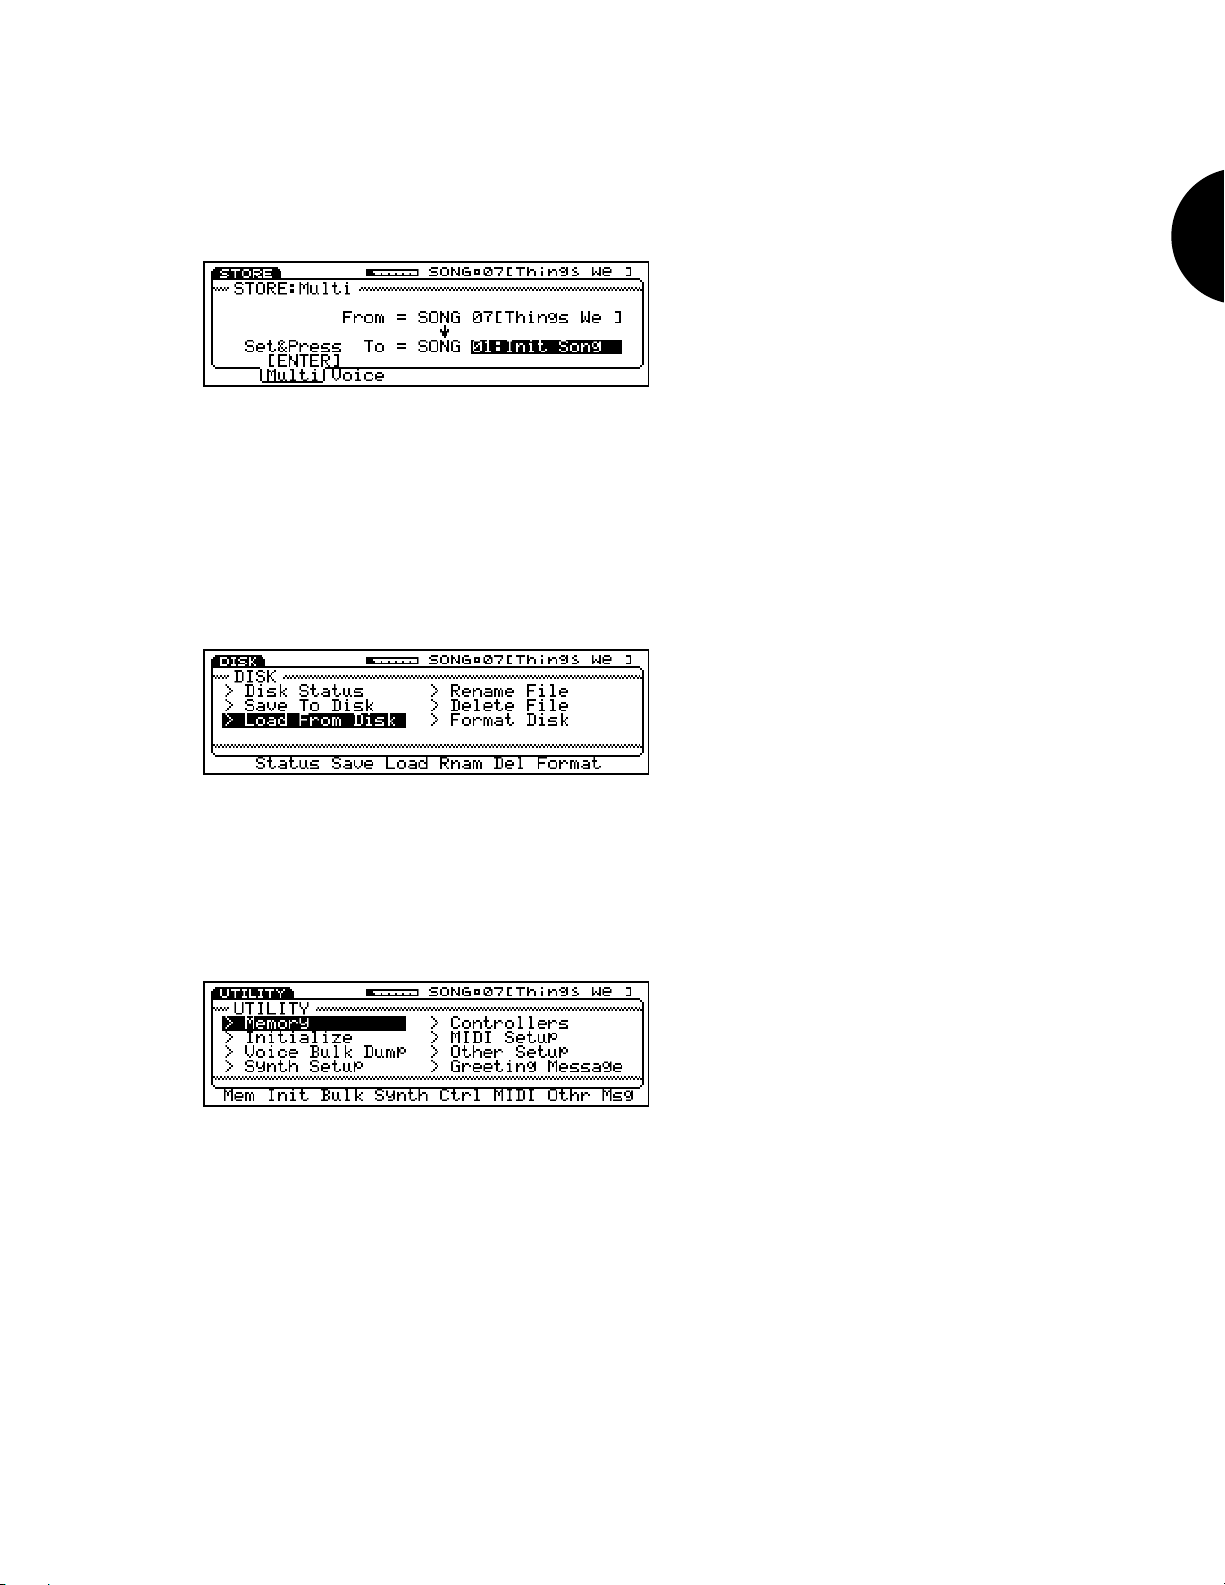
● STOR E MODE
Lets yo u store multis in an internal song multi memory (01 ~ 16 ) as well as store
original and preset voices in the Internal voice bank. Store Mode is handy for
organizing yo ur voic es and multis before saving them to disk. (For details, see
Sto re Mod e, p age 129.)
● D ISK MODE
Lets yo u save yo ur original voices, song multis and sequence data in various
co mbinations into disk files o n a flopp y disk (3 .5 2DD type), as well as load the
files back into Internal/Song vo ice and song memory. It also lets you perfo rm
various disk file management functions like renaming and deleting files and
formatting a disk fo r the W 5/W 7 o perating system. (For details, see Disk Mod e,
page 131.)
BEFORE YOU BEGIN
●UTILITY MODE
Lets yo u manage Song vo ices, initialize the Internal vo ice bank, d etermine various
MIDI settings and transmit bulk MIDI data, set master tuning and keybo ard
velocity parameters, and access o ther functions whic h affect the W 5/W 7 s o verall
system . (For details, see Utility Mode, page 14 2.)
21

BEFORE YOU BEGIN
SYSTEM ARCHITECTURE
The W 5/W 7 s o verall system is co mprised o f three distinct sections: the Co ntro ller
section, the Sequencer section and the To ne Generator section. The MIDI signal, o riginated
externally o r from the keybo ard and co ntro llers, flows through the sequencer before
reaching the tone generator.
Controller
MIDI IN
Keyboard
Controllers
Sequencer Tone Generaor
Song
Sequencer
Tracks
1 ~ 16
Song Memory Voice Memory
Track
Transmit
Channels
1 ~ 16
Mixer
Tracks
1 ~ 16
System
Effects
Insertion
Effects
L
R
MIDI
OUT
●CONTROLLER SECTION
Co ntrols the source o f the MIDI data, whether from an external source, o r via the
W 5/W 7 s keybo ard and co ntrollers, o r from b oth.
●SEQUENCER S ECTION
Receives 16 channels o f MIDI data from a source and ro utes each channel to the
co rresponding 16 tracks in the sequencer. The sequencer lets you reco rd, edit and
play back song sequenc es, and assign MIDI transmit channel fo r each track.
●TONE GENE RA TOR SECT ION (MIX E R )
Can play up to 16 different Instrument vo ices simultaneo usly, as assigned to the
sequenc er tracks. The tone generato r s mixer lets you determine song multi
param eters including voice select, vo lume, pan, Insertion Effect on/ off, System
Effect (1 ~ 3) send levels, tuning, note shift and pitch bend range for each trac k,
as well as overall settings which affect all tracks equally.
22

SONG MULTIS
The Song Multi function lets you assign an Instrument vo ice to each of the 16 TRACK
buttons on the panel, p lus designate all sound mixer and o ther settings for each track as
well as for the o verall mix inc luding volume, panning and digital effects settings, as well
as tuning, note shift and pitch bend param eters.
A so ng multi is the complete configuratio n of all MIDI, vo ice, mixer and other
assignments and settings w hich determine the o perating status of the W 5/W 7.
Depending on yo ur particular needs for a setup, i.e., w hether you are co mpo sing,
practicing, recording, or p erfo rming live o r are using the W 5/W 7 as a master keyb oard
co ntroller o r as a slave tone generator a song multi may be comprised of the following:
● m ulti settings (i.e., all parameter settings), so ng
sequenc e data, and acco mpanying Song vo ice bank;
● m ulti settings with acc ompanying Song voice b ank;
● m ulti settings only.
A song multi can be stored in any o f the 16 song memories in the W 5/W 7 and saved to
flop py disk and loaded back in via the disk drive. And since each so ng memo ry also
co ntains a Song vo ice bank into w hich yo u can store up to 12 8 no rmal voices and 2 drum
voices c opied from the Internal, Preset or GM voice bank (or the External voice bank if
the optional Expansion W ave/Voice Board is installed), you can organize an entire bank of
Song vo ices specifically fo r a single multi. This lets yo u keep all data for a multi in one
place, i.e., inside a single song memo ry.
BEFORE YOU BEGIN
Song m ultis are an integral part o f the W 5/ W7 s flexibility and user friendliness.
Basically, you define the multis naturally as you work, whether you re co mpo sing, or
recording, or preparing setups for live p erformance by selecting a track and assigning an
Instrument voice to it, setting a pan position here, an effect send level there, and so o n.
Every multi will take on the unique character o f the work session. Then you save your
multis to flo ppy disk, so that whenever you need any particular multi, yo u can load it back
into o ne of the 16 so ng memo ries and be assured that all settings and o ther data are always
exactly as they should be and instantly accessible.
There are literally hundreds of parameters whic h make up a song m ulti, but only four
basic steps involved in the pro cess o f creating and defining the multi: ( 1) select a song
memory loc ation; ( 2) assign Instrument voices to tracks and d etermine multi parameter
settings as you work, whether yo u re reco rd ing or structuring a performance setup; ( 3)
store the multi in song memo ry as you wo rk; and (4) save the multi to flopp y disk. (For
mo re info rmation abo ut song multis, see Song Mo de, page 74.)
NOTE: Song multis can be saved to
floppy disk and loaded back into the
W5/W7 in various ways, including
all 16 songs with accompanying
Song voice banks, one song only,
one song with accompanying Song
voice bank, and in the Standard
MIDI File format. For more
information on saving to and
loading from disk, see Disk Mode,
page 131.
23
LR
BEFORE YOU BEGIN
MIXER CHANNEL
1~9/11~16
Pitch Bend Range
Note Shift
Tune
System Effect
Send 1 Level
System Effect
Send 2 Level
System Effect
Send 3 Level
Insertion Effect
On/Off
Pan Position
MIXER CHANNEL
10
System Effect
Send 1 Level
System Effect
Send 2 Level
System Effect
Send 3 Level
Insertion Effect
On/Off
Pan Position
Volume Level
INSTRUMENT
Assign
Volume Level
INSTRUMENT
Assign
Voice Edit
STEREO VOICE
Voice Name
Volume Level
Insertion Effect Type/Parameter
Element Edit
Element
Element
1
2
Element
3
Element
4
Insertion Effect Type/Parameter
Voice Edit
STEREO VOICE
Voice Name
Volume Level
Key (Element) Edit
Pan
Volume
System Effect Send Levels
NORMAL VOICE DRUM VOICE
24

INS TRU MEN T VOICES AN D P OLYPHONY
Instrument vo ices are those Preset, GM, Internal, Song and ( optional) External voices
assigned to trac ks in the tone generator mixer. The number o f notes yo u can play simulta-
neously with an Instrument vo ice either from the keyboard o r from the sequencer is a
maximum o f 32, but is determined p ractically by the numb er of elements used in a voice,
as well as the numb er of vo ices used in a sequence. The more elements that make up a
voice, the fewer number o f keys that can be p layed o n the keybo ard, o r generated b y the
tone generator from the sequencer.
V OICE BA NK S
BEFORE YOU BEGIN
The W 5/W 7 has a total of 10 separate
standard features, w hile two of them are available as optional ROM memo ries that yo u can
purchase separately and plug into the W 5/ W7 s lo gic bo ard via a special access located o n
the bo ttom o f the instrument.
The various vo ice banks are organized acc ording to the type of instrument sounds that
are in them i.e., by no rmal voices (voices with pitched sounds) or d rum voices (voices
with assorted percussion sounds). W hether the voic e bank is a normal or a drum voice
bank is indicated by a one- or two -letter abbreviatio n co de, respec tively, whic h app ears
immed iately to the left o f the vo ice number. Fo llowing is a list o f the various vo ice banks,
alo ng with abbreviatio n co des and d escriptions:
vo ice banks
. Eight of these are provid ed as
NORMAL VOICES
●(G) GM VOIC E
12 8 ROM sound s preset acco rding to the General MIDI standard, which canno t
be overwritten.
●(P) PR ESET VOIC E
12 8 ROM sound s preset at the facto ry, which canno t be o verwritten.
●(I) INTER NAL V OICE
128 RAM user memo ry locations which have voic es stored in them when shipped
from the factory, b ut can be o verwritten when storing your own original normal
voices, and will be retained in m emory even when the po wer is turned off.
●(S) SONG VOICE
128 RAM user memo ry locations for storing GM, Preset o r Internal vo ices used in
a particular song o r multi. Song vo ice banks each holding 128 normal voices for
each song can be saved to and loaded from flo ppy disks via the disk drive. Song
voices will not be retained in memory when the po wer is turned off.
● (E) EX TERNAL VOICE
Additional ROM vo ices available as an o ption. (NOTE: The E will not display
unless the op tio nal Expansion W ave/Voice Board mem ory upgrade package is
installed. )
25

DRUM VOICES
● (GD) GM DRUM V OICE
8 ROM d rum sets, each with do zens of so unds arrayed on the keyboard, preset
acco rding to the General MIDI stand ard, which canno t be o verwritten.
BEFORE YOU BEGIN
● (PD) PRE SE T DRUM V OICE
2 ROM d rum sets, each with do zens of so unds arrayed on the keyboard, preset at
the facto ry, which canno t be overwritten.
●(ID) INTE R NAL DRUM VOICE
2 RAM user memory locations for storing your own original drum voices, w hich
will be retained in m emo ry even when the po wer is turned off.
●(SD) SONG DRUM V OICE
2 RAM user memory locations for storing GM, Preset or Internal drum vo ices
used in a particular song o r multi. Up to 16 Song drum vo ice banks each
holding 2 drum voices c an be saved to and lo aded from floppy disks via the
disk drive. Song drum voices will not be retained in memory when the po wer is
turned o ff.
●(ED) EX TE RNA L DR UM V OICE
Additional ROM d rum sets available as an option. ( NOTE: The ED w ill no t
display unless the optional Expansion W ave/Voice Board memo ry upgrade
package is installed.)
(Fo r more info rmation abo ut voic es and elements, p lease refer to the
Tech nical Info rmation
boo klet, supp lied separately.)
W 5/W 7
26

VOICE CATEGORIES
The ind ividual vo ices are organized into 2 1 classes of instrument gro ups, called Vo ice
Categories, for easier access, as follows:
—
No Assign
Pf
Piano
Cp
Chromatic Percussion
Or
Organ
Gt
Guitar
Ba
Bass
St
Strings/Orchestral
En
Ensemble
Br
Brass
Rd
Reed
Pi
Pipe
Ld
Synth Lead
Pd
Synth Pad
Fx
Synth Sound Effects
Et
Ethnic
Pc
Percussive
Se
Sound Effect
Dr
Drums
Sc
Synth Comping
Vo
Voice
Co
Co mbination
The Vo ice Category for each vo ice is identified b y a two-c haracter prefix, which in
Voice Mo de will app ear to the left of the voic e name, and in Song Mo de will app ear just
belo w the track vo lume section in the mixer screen.
NOTE: When the voice bank is set to
off , no Voice Category code will
display.
BEFORE YOU BEGIN
NOTE: You can assign a voice
category code to your own voices, in
Voice Edit Mode.
27

BEFORE YOU BEGIN
INS ERTION EFFECTS & S YS TEM EFFECTS
The W 5/W 7 has 75 digital effects inside two indep endent, studio quality DSP stereo
effects processors with editable p arameters called Insertion Effects and System Effects ,
whic h provides fo r eno rm ous sound processing flexibility and co ntro l. Effects include
¤
reverb, delay, c horus, auto panning, 3-band EQ , Aural Exciter
and many more.
, pitch c hange, distortion
Stereo
Voice
Element 1
Pan
Element 2
Pan
Element 3
Pan
Element 4
Pan
Fader
Insertion Effect Assign
Insertion
Effect Switch
on
off
1: Stereo In/Out
2: Mono In/Mono Out
3: Mono In/Stereo Out
Pan
Pan
System Effect
Send Levels
System Effects
Effect 1 : Rev Module
Effect 2 : Chorus Module
Effect 3 : Dly/Rev Module
System
Return 1
Return 2
Return 3
L
Mixer
R
* Aural Exciter¤ is a registered trademark of and is manufactured under license from Aphex Systems Ltd.
28
 Loading...