

Page 1

UCA
V S -1 0
VS-10
Home Theater Sound System
Systèm audio home cinéma
POWER
OPEN
NATURAL SOUND HOME THEATER SYSTEM VS-10
MANUAL DE INSTRUCCIONES
STANDBY
DIGITAL
DOLBY
DIGITAL
SURROUND
OWNER’S MANUAL
MODE D’EMPLOI
Page 2
IMPORTANT SAFETY INSTRUCTIONS
CAUTION
RISK OF ELECTRIC SHOCK
DO N OT OPEN
CAUTION: TO REDUCE THE RISK OF
ELECTRIC SHOCK, DO NOT REMOVE
COVER (OR BACK). NO USER-SERVICEABLE
PARTS INSIDE. REFER SERVICING TO
QUALIFIED SERVICE PERSONNEL.
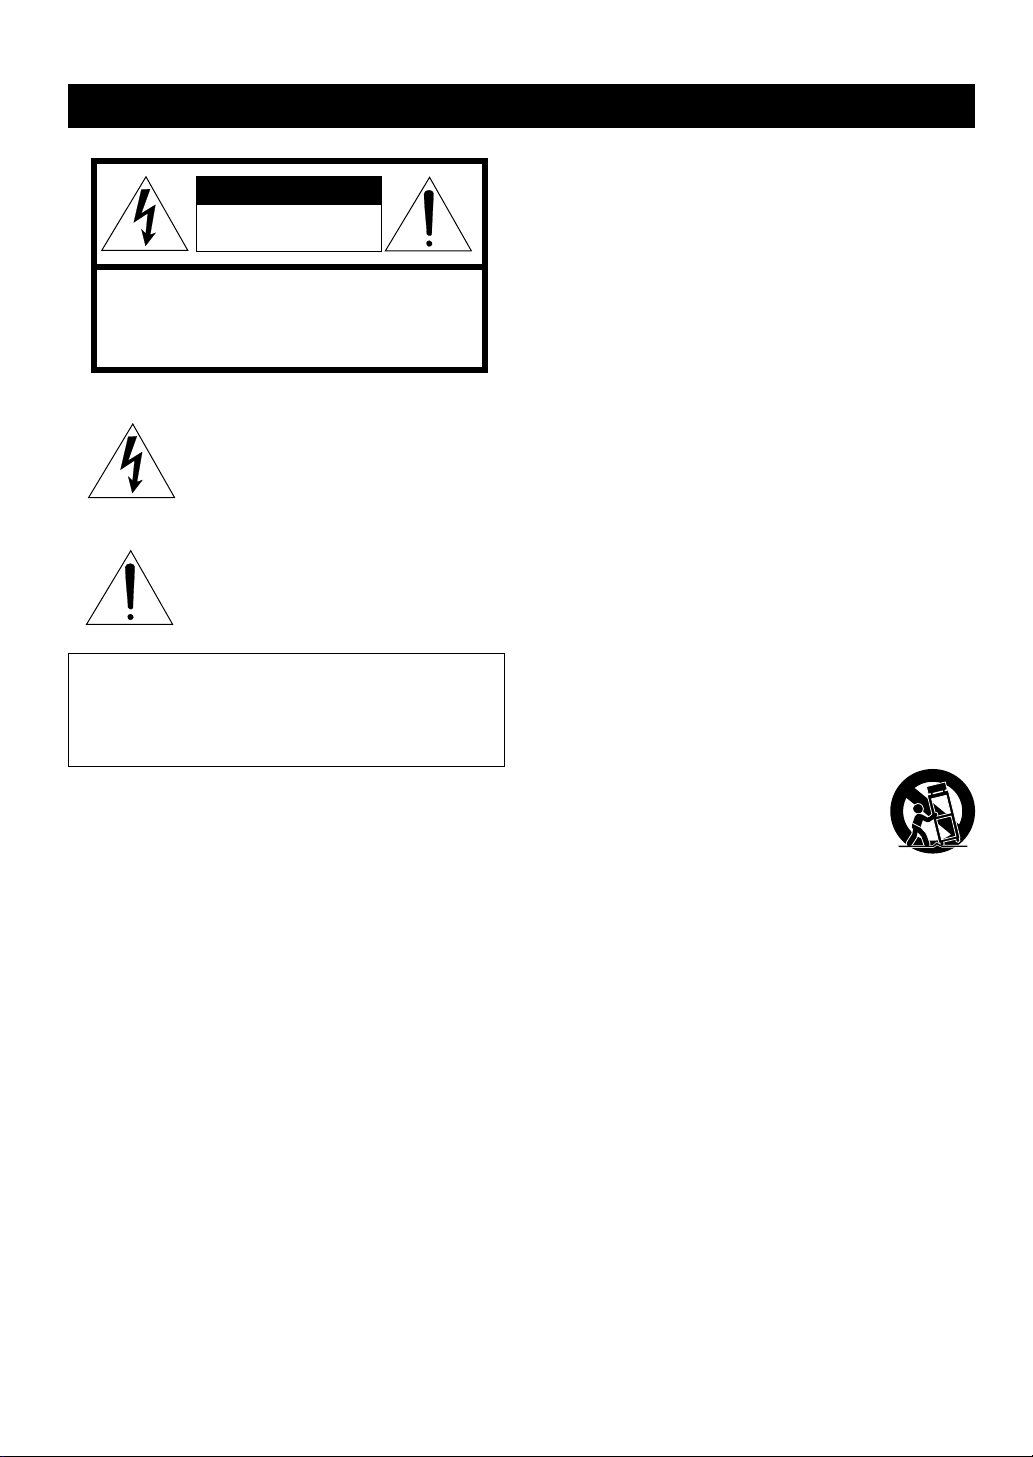
• Explanation of Graphical Symbols
The lightning flash with arrowhead symbol,
within an equilateral triangle, is intended to
alert you to the presence of uninsulated
“dangerous voltage” within the product’s
enclosure that may be of sufficient magnitude
to constitute a risk of electric shock to persons.
The exclamation point within an equilateral
triangle is intended to alert you to the presence
of important operating and maintenance
(servicing) instructions in the literature
accompanying the appliance.
WARNING
TO REDUCE THE RISK OF FIRE OR ELECTRIC
SHOCK, DO NOT EXPOSE THIS UNIT TO RAIN OR
MOISTURE.
1 Read these instructions.
2 Keep these instructions.
3 Heed all warnings.
4 Follow all instructions.
5 Do not use this apparatus near water.
6 Clean only with dry cloth.
7 Do not block any ventilation openings. Install in accor-
dance with the manufacturer’s instructions.
8 Do not install near any heat sources such as radiators,
heat registers, stoves, or other apparatus (including
amplifiers) that produce heat.
9 Do not defeat the safety purpose of the polarized or
grounding-type plug. A polarized plug has two blades with
one wider than the other. A grounding type plug has two
blades and a third grounding prong. The wide blade or
the third prong are provided for your safety. If the
provided plug does not fit into your outlet, consult an
electrician for replacement of the obsolete outlet.
10 Protect the power cord from being walked on or pinched
particularly at plugs, convenience receptacles, and the
point where they exit from the apparatus.
11 Only use attachments/accessories specified by the
manufacturer.
12 Use only with the cart, stand, tripod,
bracket, or table specified by the manufacturer, or sold with the apparatus. When a
cart is used, use caution when moving the
cart/apparatus combination to avoid injury
from tip-over.
13 Unplug this apparatus during lightning storms or when
unused for long periods of time.
14 Refer all servicing to qualified service personnel.
Servicing is required when the apparatus has been
damaged in any way, such as power-supply cord or plug
is damaged, liquid has been spilled or objects have fallen
into the apparatus, the apparatus has been exposed to
rain or moisture, does not operate normally, or has been
dropped.
CAUTION
Page 3
IMPORTANT SAFETY INSTRUCTIONS
FCC INFORMATION (for US customers only)
1. IMPORTANT NOTICE : DO NOT MODIFY THIS UNIT!
This product, when installed as indicated in the
instructions contained in this manual, meets FCC
requirements. Modifications not expressly approved by
Yamaha may void your authority, granted by the FCC,
to use the product.
2. IMPORTANT : When connecting this product to
accessories and/or another product use only high
quality shielded cables. Cable/s supplied with this
product MUST be used. Follow all installation instructions. Failure to follow instructions could void your FCC
authorization to use this product in the USA.
3. NOTE : This product has been tested and found to
comply with the requirements listed in FCC Regulations, Part 15 for Class “B” digital devices. Compliance
with these requirements provides a reasonable level of
assurance that your use of this product in a residential
environment will not result in harmful interference with
other electronic devices.
This equipment generates/uses radio frequencies and,
if not installed and used according to the instructions
found in the users manual, may cause interference
harmful to the operation of other electronic devices.
Compliance with FCC regulations does not guarantee
that interference will not occur in all installations. If
this product is found to be the source of interference,
which can be determined by turning the unit “OFF”
and “ON”, please try to eliminate the problem by using
one of the following measures:
Relocate either this product or the device that is being
affected by the interference.
Utilize power outlets that are on different branch
(circuit breaker or fuse) circuits or install AC line filter/
s.
In the case of radio or TV interference, relocate/
reorient the antenna. If the antenna lead-in is 300
ohm ribbon lead, change the lead-in to coaxial type
cable.
If these corrective measures do not produce satisfactory results, please contact the local retailer authorized to distribute this type of product. If you can not
locate the appropriate retailer, please contact Yamaha
Electronics Corp., U.S.A. 6660 Orangethor pe Ave,
Buena Park, CA 90620.
The above statements apply ONLY to those products
distributed by Yamaha Corporation of America or its
subsidiaries.
INTRODUCTIOIN
PREPARATIONS
PLAYBACK
We Want You Listening For A Lifetime
YAMAHA and the Electronic Industries Association’s
Consumer Electronics Group want you to get the most out of
your equipment by playing it at a safe level. One that lets the
sound come through loud and clear without annoying blaring
or distortion – and, most importantly, without affecting your
sensitive hearing.
IMPORTANT
Please record the serial number of this unit in the space
below.
MODEL:
Serial No.:
The serial number is located on the rear of the unit.
Retain this Owner’s Manual in a safe place for future
reference.
WARNING
TO REDUCE THE RISK OF FIRE OR ELECTRIC
SHOCK, DO NOT EXPOSE THIS UNIT TO RAIN OR
MOISTURE.
Since hearing damage from loud sounds is often
undetectable until it is too late, YAMAHA and the
Electronic Industries Association’s Consumer
Electronics Group recommend you to avoid
prolonged exposure from excessive volume
levels.
SETUP MENU APPENDIX
English
CAUTION
Page 4

CAUTION: READ THIS BEFORE OPERATING YOUR UNIT.
1 To assure the finest performance, please read this
manual carefully. Keep it in a safe place for future
reference.
2 Install this unit in a well ventilated, cool, dry, and
clean place with at least 10 cm above, behind and on
the both sides of this unit - away from direct sunlight,
heat sources, vibration, dust, moisture, and/or cold.
3 Position this unit away from other electrical
appliances, motors and transformers to avoid
humming sounds, do not place this unit where it may
get exposed to rain or any kind of liquid to prevent
fire or electrical shock.
4 Avoid extreme temperature swings or excessive use
of humidifier in the room where this unit is installed
to prevent condensation inside this unit, which may
cause an electrical shock, fire damage to this unit,
and/or personal injury.
5 Do not cover this unit with a newspaper, a tablecloth,
a curtain, etc. in or der not to obstruct heat radiation.
If the temperature inside this unit rises, it may cause
fire, damage to this unit and/or personal injury.
6 Avoid installing this unit in a place where foreign
objects and liquid might fall. It might cause a fire,
damage to this unit and/or personal injury. Do not
place the following objects on this unit:
• Other components, as they may cause damage
and/or discoloration on the surface of this unit.
• Burning objects (i.e., candles), as they may cause
fire, damage to this unit and/or personal injury.
• Containers with liquid in them, as they may cause
an electrical shock to the user and/or damage to
this unit.
7 Do not operate this unit upside-down. It may
overheat, possibly causing damage.
8 When moving this unit, be sure to first disconnect the
power cord from the AC outlet and disconnect all
cords connecting this unit to other equipment.
9 Do not use force on switches, controls or connection
cables. Never pull the cables when disconnecting
them.
10 Only voltage specified on this unit must be used.
Using this unit with a higher voltage than specified is
dangerous and may result in fire or other accidents.
YAMAHA will not be held responsible for any damage
resulting from the use of this unit with a voltage other
than that specified.
11 Do not attempt to clean this unit with chemical
solvents; this might damage the finish. Use a clean,
dry cloth.
12 Disconnect the power cord from the wall outlet when
not planning to use this unit for a long period of time,
or during an electrical storm, as they may cause
damage by lightning.
13 Do not attempt to modify or fix this unit. Contact the
qualified YAMAHA service personnel when any
service is needed. Cabinet should never be opened
for any reasons.
14 Be sure to read ‘TROUBLESHOOTING’ section
regarding common operating errors before
concluding that this unit is faulty.
■ For U.K. customers
If the socket outlets in the home are not suitable for the plug
supplied with this appliance, it should be cut off and an
appropriate 3 pin plug fitted. For details, refer to the
instructions described below.
Note
• The plug severed from the mains lead must be destroyed, as a
plug with bared flexible cord is hazardous if engaged in a live
socket outlet.
■ Special Instructions for U.K. Model
IMPORTANT
THE WIRES IN MAINS LEAD ARE COLOURED IN
ACCORDANCE WITH THE FOLLOWING CODE:
Blue: NEUTRAL
Brown: LIVE
As the colours of the wires in the mains lead of this
apparatus may not correspond with the coloured
markings identifying the terminals in your plug, proceed
as follows:
The wire which is coloured BLUE must be connected to
the terminal which is marked with the letter N or
coloured BLACK. The wire which is coloured BROWN
must be connected to the terminal which is marked with
the letter L or coloured RED.
Making sure that neither core is connected to the earth
terminal of the three pin plug.
FOR CANADIAN CUSTOMERS
To prevent electric shock, match wide blade of plug to
wide slot and fully insert.
This Class B digital apparatus complies with Canadian
ICES-003.
CAUTION
Page 5

PREPARATION
FEATURES
● Home Theater Sound
This system delivers a realistic and powerful sound
experience like that found in a movie theater just by
connecting the VS-10 to the TV. You can also enjoy
stronger bass and surround effects by adding the
separately available YAMAHA NX-SW10, consisting
of a subwoofer, a center speaker and two rear
speakers.
● Includes Dolby Digital, Dolby Pro
Logic and DTS Decoders
This system can reproduce the sound field of the
software with the g, s or
logo mark.
● Virtual Surround (available for Virtual
Dolby Digital)
The VS-10 can produce a virtual surround sound field
when playing software with the g,
s or logo mark so that you can
enjoy surround effects that give a motion to sound and
make you feel like you are in action.
CONTENTS
PREPARATION
FEATURES .................................................................. 1
GETTING STARTED ................................................. 2
NAMES OF ALL PARTS ............................................ 4
SPEAKER PLACEMENT .......................................... 6
INSTALLATION ......................................................... 7
CONNECTIONS.......................................................... 9
ADJUSTING THE SPEAKER
OUTPUT LEVELS ................................................. 15
OPERATION
OPERATING THE UNIT ......................................... 17
USING CONVENIENT FUNCTIONS .................... 19
DSP PROGRAM (DIGITAL SOUND FIELD
PROCESSOR EFFECT)........................................ 21
MENU FUNCTIONS................................................. 24
PREPARATION
PREPARATION
OPERATION
● Eight DSP programs including
YAMAHA CINEMA DSP
Connecting the YAMAHA NX-SW10 (sold
separately) allows eight different DSP programs to be
used to enhance the power and realism of various
sources, from movies to concerts, sporting events and
games. Moreover, the SILENT CINEMA program
allows you to enjoy Virtual Surround by connecting
the headphones.
● Preset Remote Control
The remote control can be used to control not only the
control center, but component from other
manufacturers merely by setting the proper
manufacturer code.
Manufactured under license from Dolby
Laboratories. “Dolby”, “Pro Logic” and the
double-D symbol are trademarks of Dolby
Laboratories. Confidential Unpublished Works.
©1992 – 1997 Dolby Laboratories, Inc. All rights
reserved.
Manufactured under license from Digital Theater
Systems, Inc. US Pat. No. 5,451,942 and other worldwide patents issued and pending. “DTS”, “DTS Digital
Surround”, are trademarks of Digital Theater Systems,
Inc. Copyright 1996 Digital Theater Systems, Inc. All
Rights Reserved.
REMOTE CONTROL
OPERATING OTHER COMPONENTS USING
THE REMOTE CONTROL .................................. 27
APPENDIX
GLOSSARY................................................................ 31
TROUBLESHOOTING ............................................ 32
SPECIFICATIONS.................................................... 33
INDEX ........................................................................ 34
y indicates a tip for your operation.
REMOTE CONTROL
APPENDIX
English
1
Page 6
GETTING STARTED
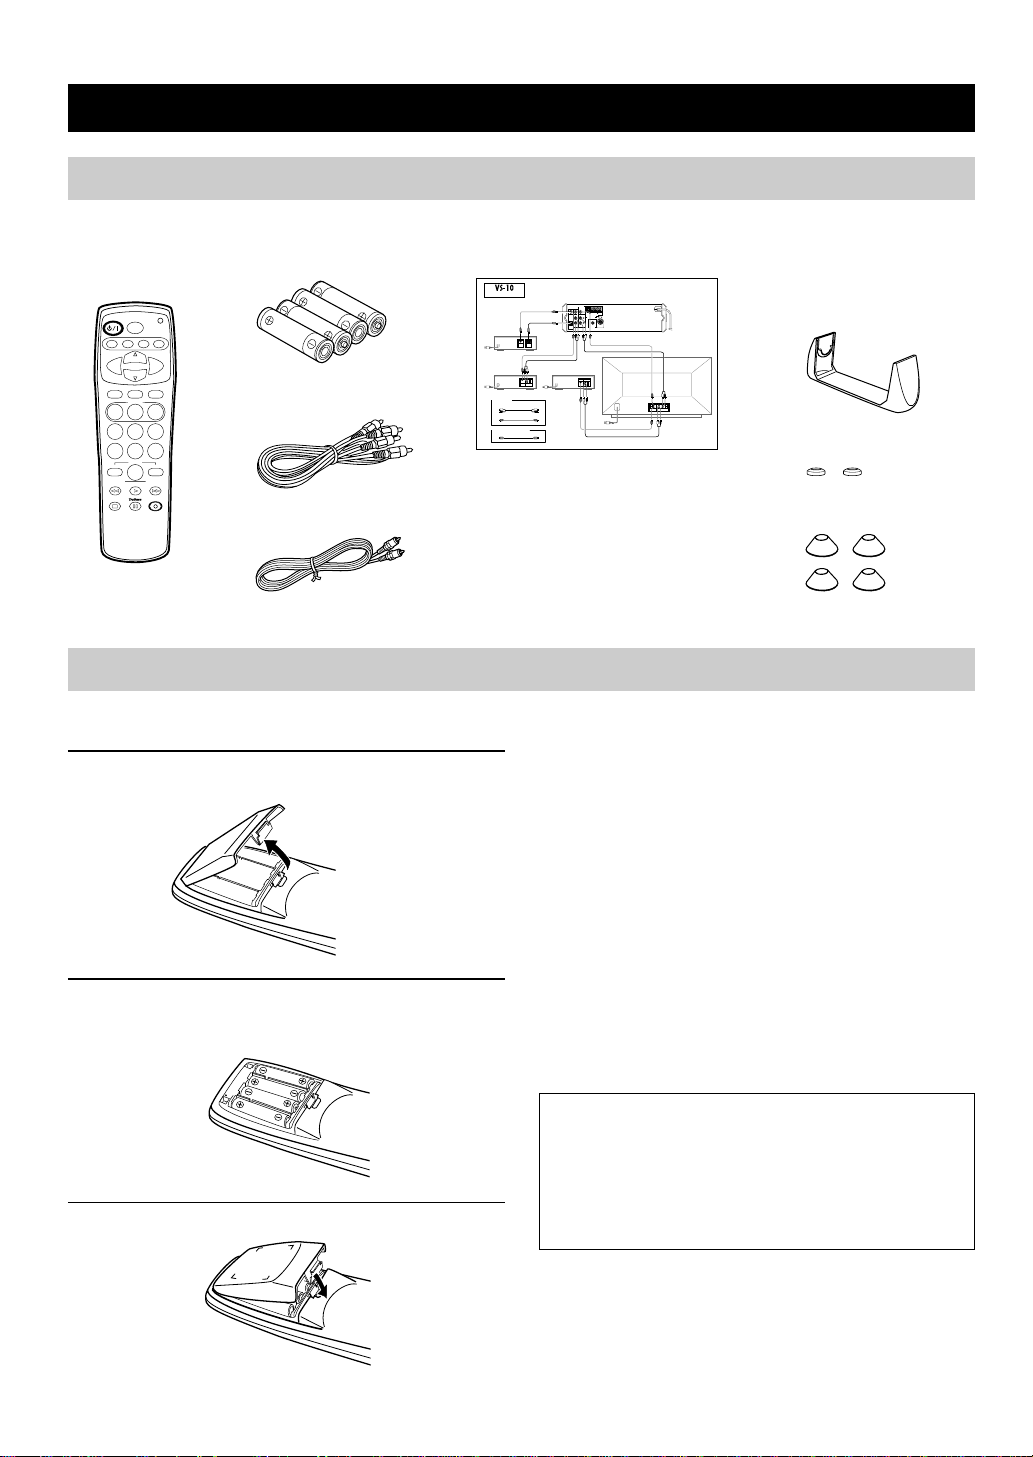
Checking the Package Contents
Check that the following accessories are included in the package.
Connection guide
ON/OFF
EFFECT
VS10 TV VCR CBL
CH
–
VOL VOL
CH
SET
DSP
MEMORY
231
564
8
MENU
LAST
0
SUBWOOFER
TEST
–
NIGHT MODE
ENTER
SUBWOOFER
Batteries (AAA, R03, UM-4 type)Remote control
+
AVMUTE
97
+–
+
Audio connection cord
(2 pin, 1.5 m)
Video connection cord (1.5 m)
Readying the Remote Control
■ Inserting the batteries
1 Remove the battery compartment cover.
2 Insert the four batteries (AAA, R03, UM-4 type)
with + and – oriented properly.
Installation attachments
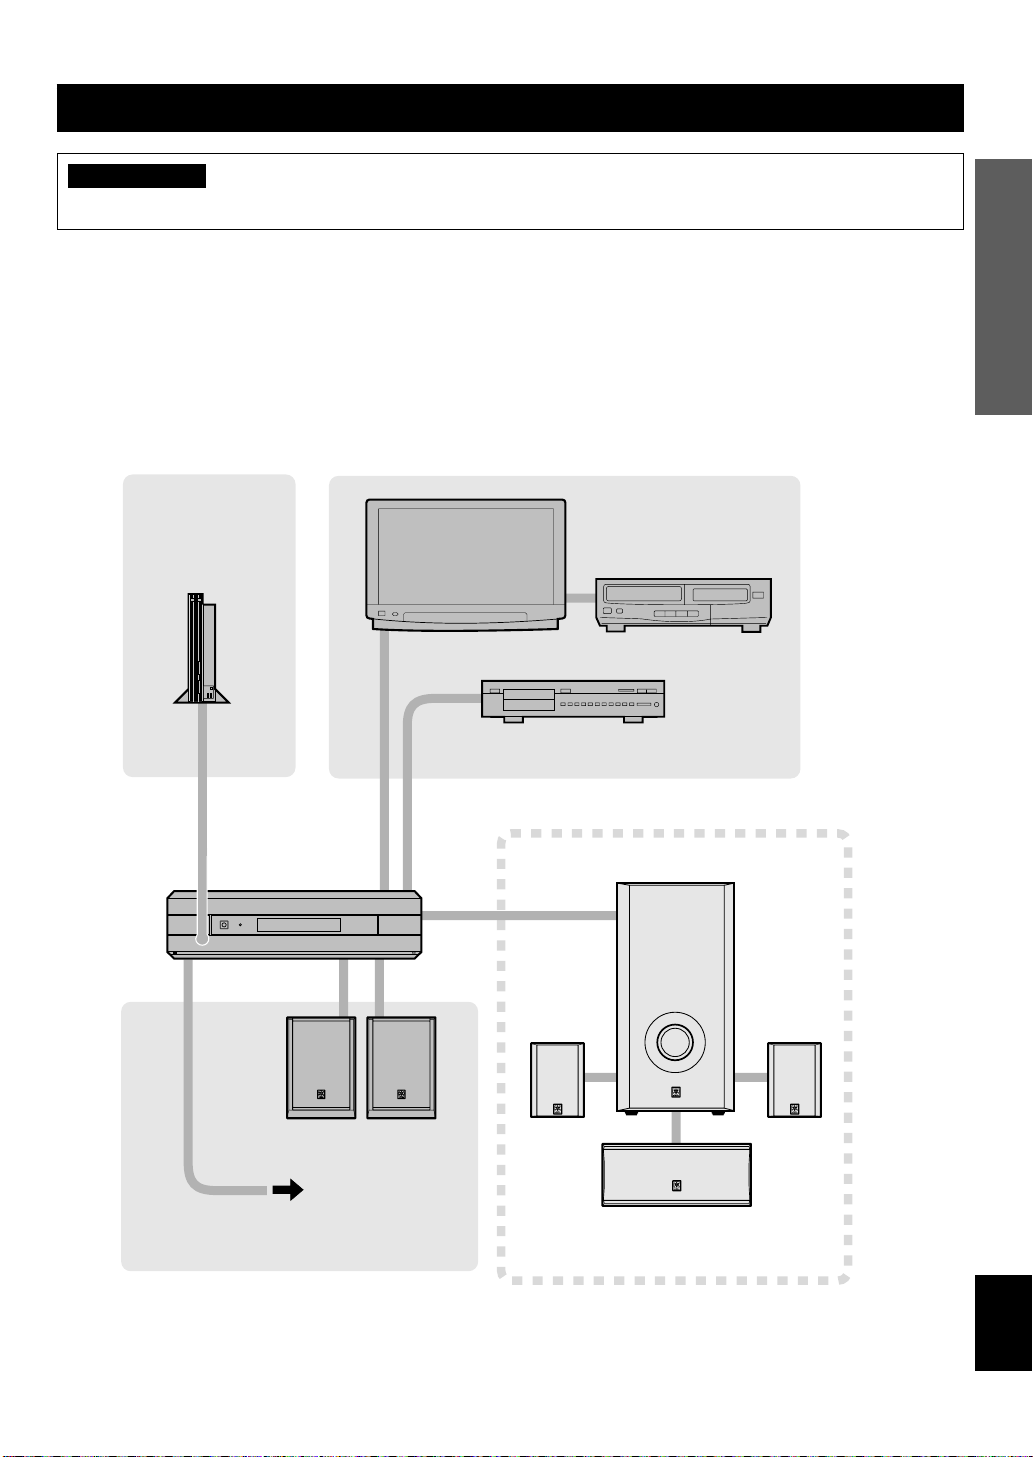
Connecting to a TV ( monitor), DVD pla yer, Sa telli te tuner and V CR
Connection Guide
DVD player
Satellite tuner
Supplied cords
Audio connection cord (2 pin) (x 1)
L
R
Video connection cord (x 1)
V
Commercially available cable
Optical fiber cable
Control center VS-10 (rear panel)
VIDEO SIGNAL
MONITOR
OUT
V
+ +
DO NOT CONNECT THIS UNIT TO
SPEAKERS OTHER THAN NX-VS10M
MAIN SPEAKERS
OUT
DIGITAL 1
VIDEO 1 TV
SUBWOOFER
(V/PCM)
INPUT
V
VIDEO
OPTICAL DIGITAL
OUT
OUTPUT
V
RL
VIDEO
AUDIO
OUT
OUT
VV RL
R L
VCR
VIDEO
AUDIO
L
OUT
OUT
R
L
R
V RL
L
R
V
–
MARK
SYSTEM
CONNECTOR
V RL
L
R12
VIDEOINAUDIO
AUDIO
IN
OUT
V RL
for the control center
Supporting stand
TV (monitor)
Side pads (x 2)
Bottom pads (x 4)
■ Precautions regarding batteries
Misuse of dry cell batteries may result in leakage or
bursting. Be sure to follow the precautions given below.
• Insert batteries with (+) and (–) oriented according to the
marking in the battery compartment.
• Do not mix old and new batteries.
• Do not mix different types of batteries as they may offer
different voltage and performance even though they have
the same shape.
• Remove all batteries when they can no longer be used or
when the remote control will not be used for an extended
period.
• Do not use rechargeable batteries.
• If leakage occurs, wipe away all battery fluid inside the
compartment.
3 Close the battery compartment cover.
2
Preserving the manufacturer code
Replace batteries early before they become unusable.
The manufacturer code set by the user will be preserved
for about two minutes when batteries run out or when
they are removed. Note that the manufacturer code
setting may be lost if more than two minutes elapses.
Page 7
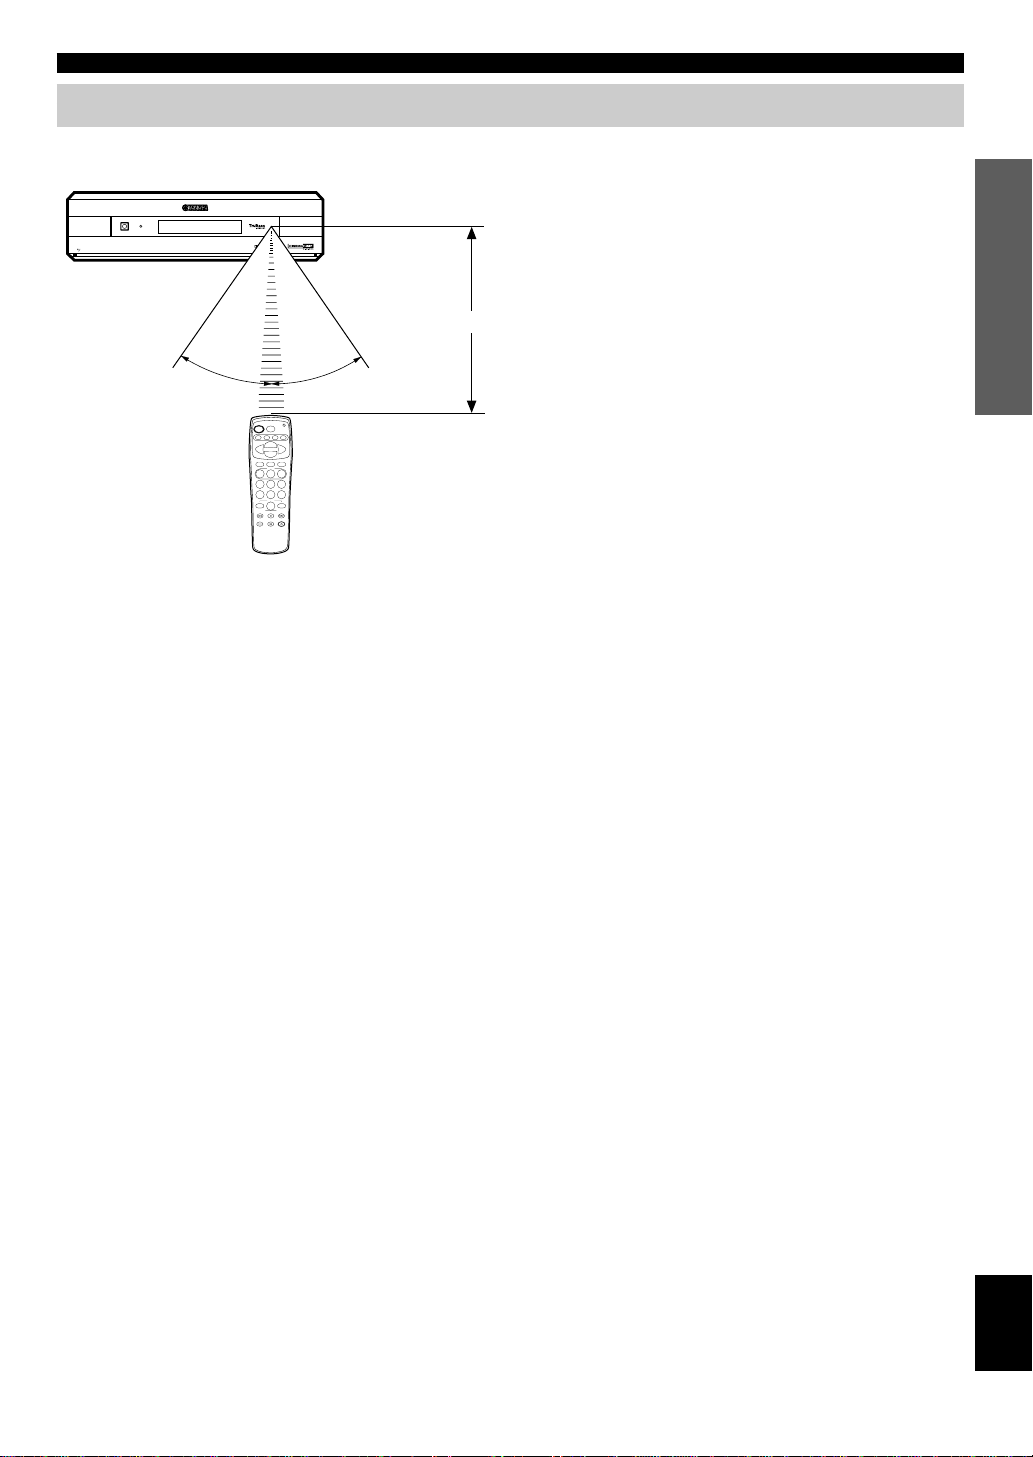
Operational Area of the Remote Control
Control center
POWER
OPEN
NATURAL SOUND HOME THEATER SYSTEM VS-10
STANDBY
DIGITAL
DOLBY
DIGITAL
SURROUND
Approx. 20 cm– 6 m
30°30°
GETTING STARTED
■ Battery replacement cycle
Replace all four batteries when the operational range of the
remote control starts to become shorter.
■ Precautions on handling the
remote control
• The remote control may not be able to operate the
control center when an object blocks the remote control
sensor on the unit.
• Do not subject the remote control to impact. Do not
allow it to get wet or place it in a location subject to high
humidity.
• The remote control operations become difficult when
direct sunlight or other strong light (such as from an
inverter fluorescent lamp) strikes the sensor. Adjust the
relative positions of the light and the control center if
this happens.
• Remote control operations may not be possible if another
remote control is being operated at the same time.
PREPARATION
English
3
Page 8
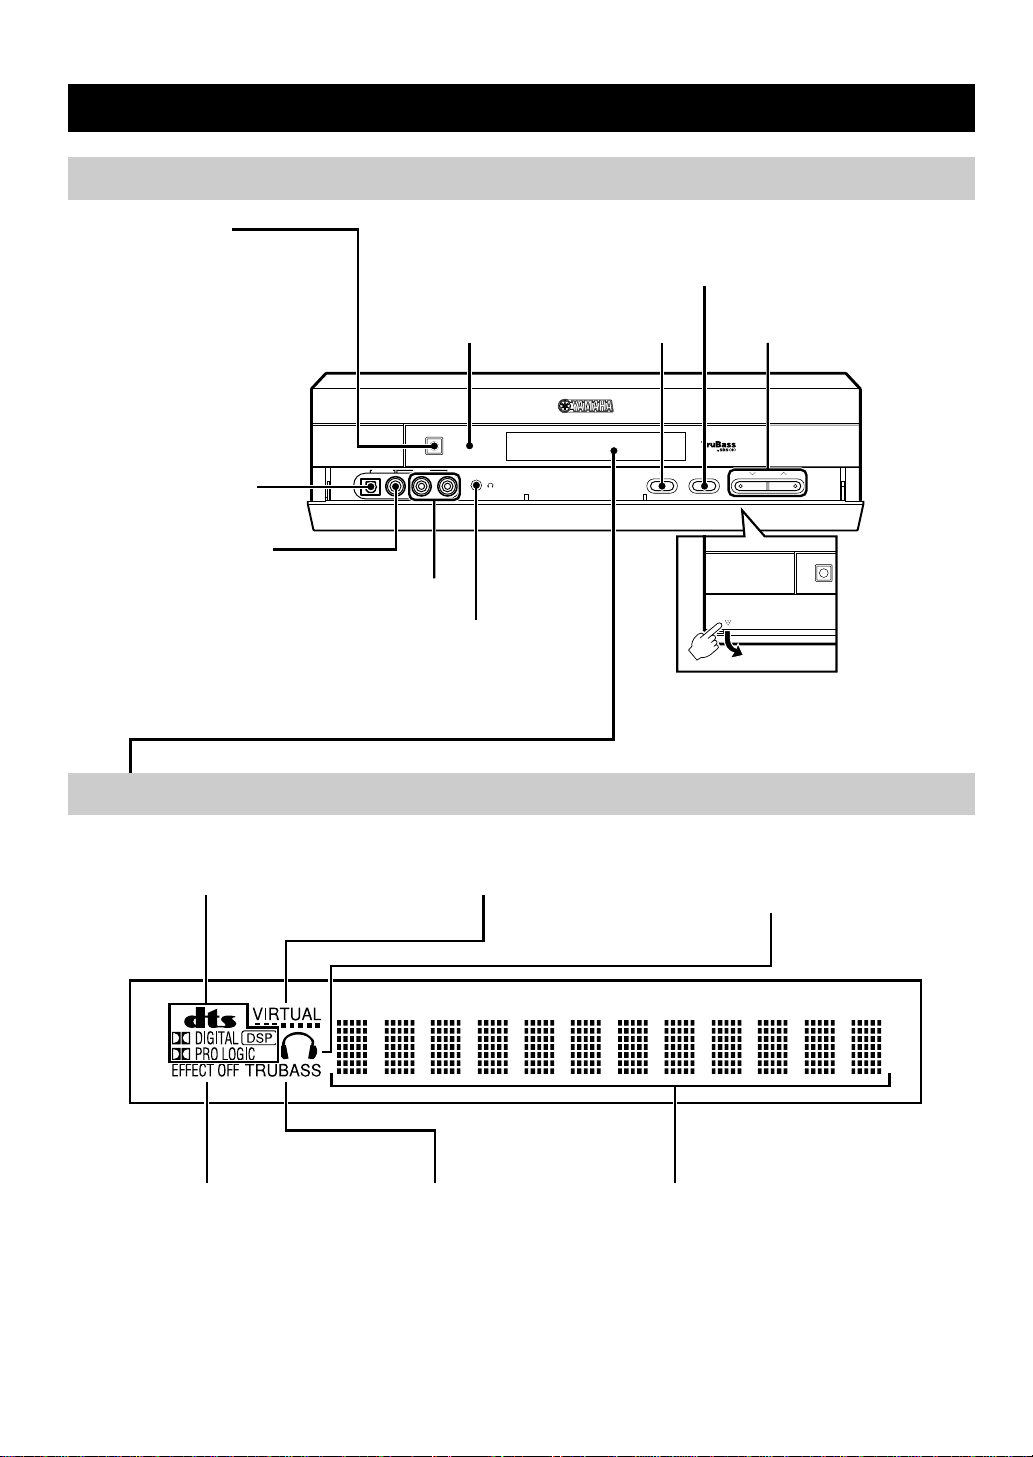
NAMES OF ALL PARTS
E
Control Center (Front Panel)
POWER (page 17)
Turns the power of the control
center on and off. This button
also turns off the subwoofer’s
power when the YAMAHA NXSW10 (sold separately) is
connected. The STANDBY
indicator lights when power is
turned off using p on the
remote control.
DIGITAL 2 optical
digital input terminal
DIGITAL 2 / VIDEO 2
video input terminal
Display
STANDBY indicator
When this indicator lights up,
this unit consumes a very
small quantity of power to
receive infrared-signals from
the remote control.
POWER
DIGITAL2 VIDEO2
VIDEO 2 audio input
terminals
PHONES jack
Used to connect the headphones.
No sound can be heard from the
speakers when the headphones are
connected.
PHONES
STANDBY
SILENT
DSP selector button (page 22)
INPUT selector
button (page 17)
INPUT
VOLUME N/B (page 17)
DSP VOLUME
OPEN
To open the front door
Press downward “OPEN” on the left
bottom of the front door. When the
parts inside the front door are not used,
put the front door back.
POWER
NATURAL SOUND HOME TH
As the display becomes brighter for a few seconds each time this unit is operated, you can check the current operation clearly.
Processing indicators (page 23) VIRTUAL indicator Phones indicator
EFFECT OFF indicator
TRUBASS indicator (page 19)
Lights when the sound field
effects is not turned on.
4
Lights when the headphones are connected.
Shows the various information such as DSP
program name, level or operational status
Page 9
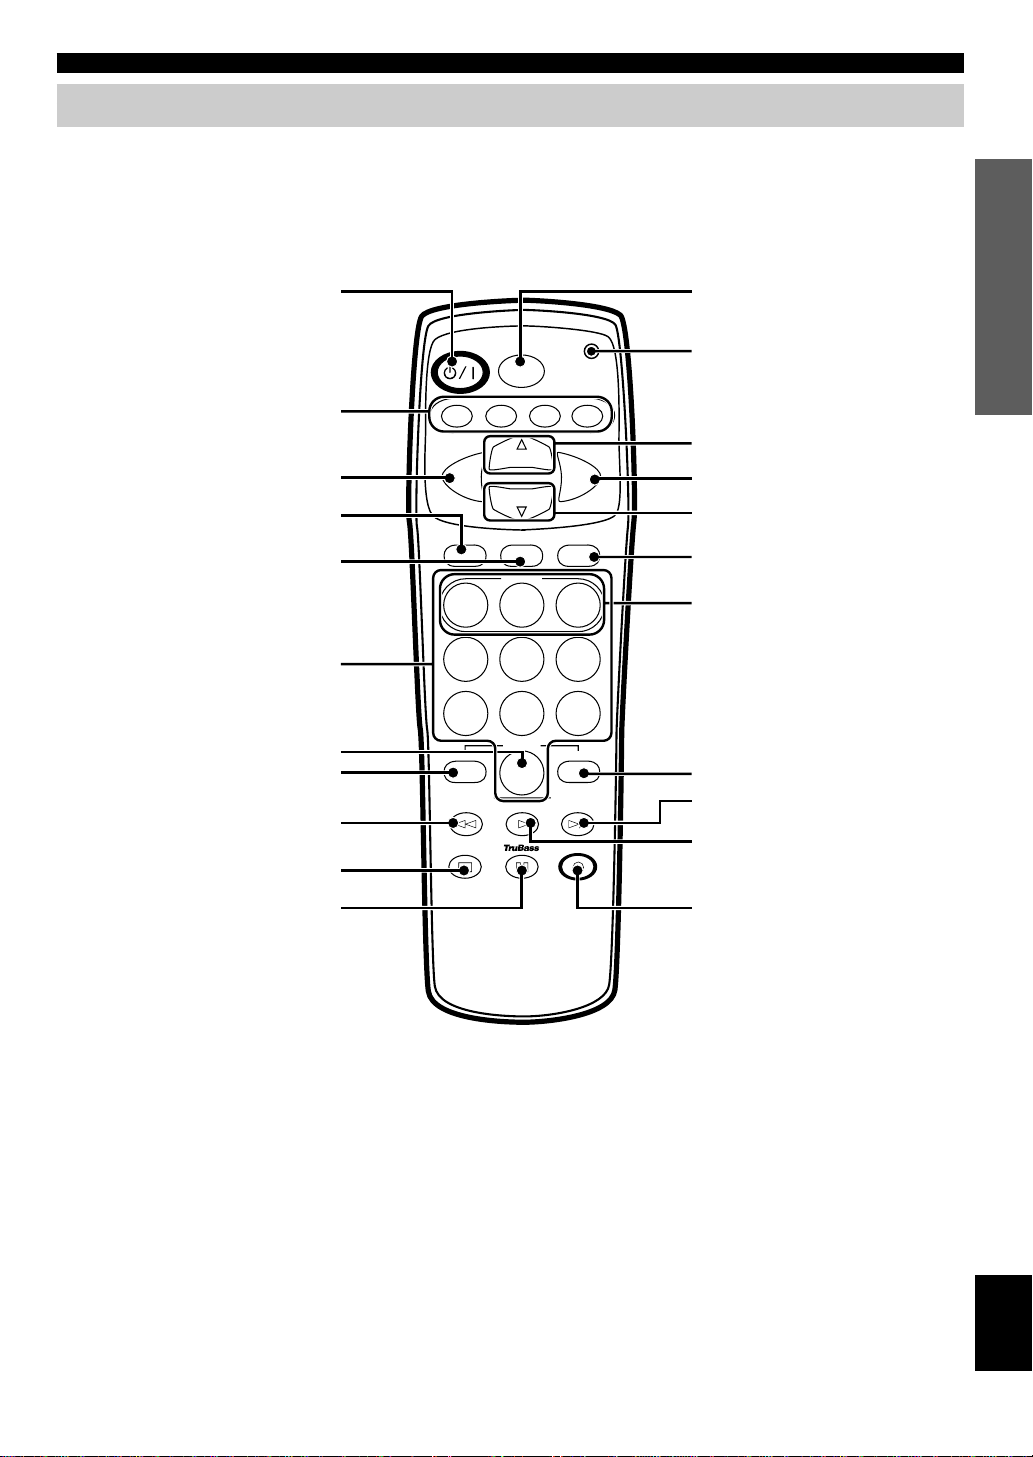
Remote Control
NAMES OF ALL PARTS
PREPARATION
(power) (page 17)
p
Remote control selector buttons
(page 27)
VOL – (page 17)
MUTE (page 19)
SET/DSP (pages 22 and 27)
Numeric buttons (page 27)
MENU (page 24)
MENU – (page 24)
SUBWOOFER – (page 19)
NIGHT MODE (page 19)
ON/OFF
EFFECT
VS10 TV VCR CBL
–
CH
VOL VOL
CH
SET
DSP
MEMORY
231
564
8
MENU
LAST
SUBWOOFER
–
NIGHT MODE
0
TEST
ENTER
SUBWOOFER
EFFECT ON/OFF (page 23)
Transmission indicator
Not used with this unit.
(pages 29 and 30)
+
VOL + (page 17)
CHg (page 27)
AVMUTE
AV selector button (page 17)
MEMORY (page 20)
97
+–
+
MENU + (page 24)
SUBWOOFER + (page 19)
TEST (page 15)
t (page 19)
Not used with this unit. (page 30)
English
5
Page 10
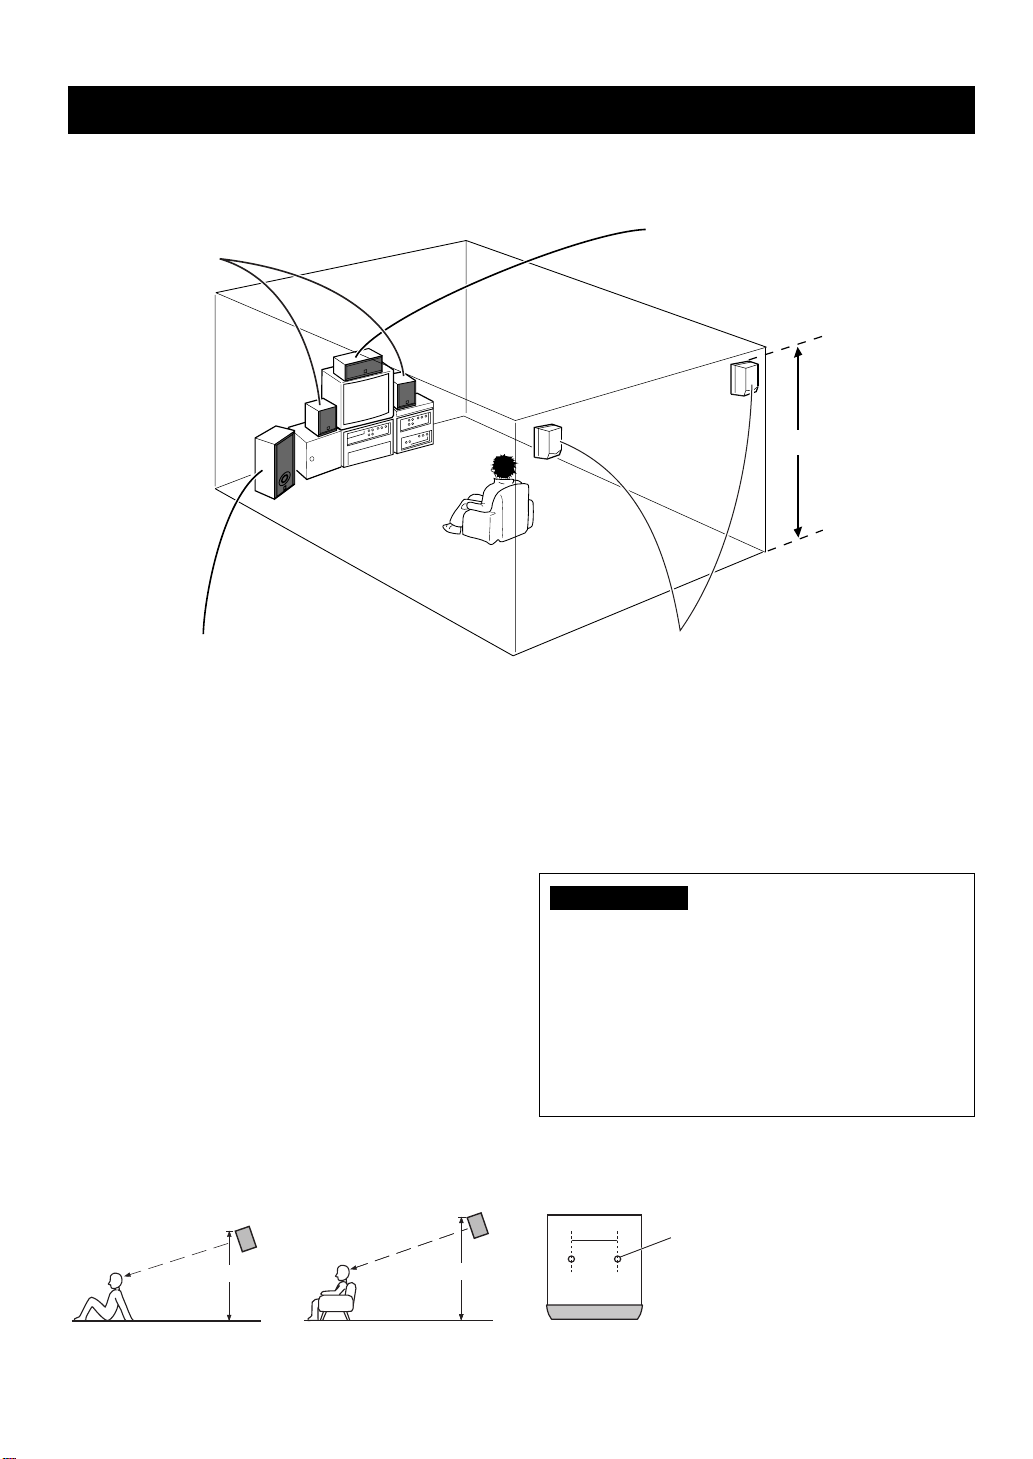
SPEAKER PLACEMENT
Although speakers should ideally be placed as shown below, satisfactory effects may be obtained even if you do not strictly
follow these guidelines.
Main speakers
Place in each side of the TV monitor.
Subwoofer (sold separately)
Place near the right or left main speaker.
■ Main speakers NX-VS10M
Place the main speakers an equal distance from each side of
the TV monitor.
Placing the main speakers at almost the same height as your
listening position is more effective.
■ YAMAHA center speaker
NX-VS10C (sold separately)
Place the center speaker on top of the television and align
the front surface of the speaker with the front surface of the
television monitor. If the speaker cannot be placed on top of
the television, place it on a rack beneath the television as
close to the television monitor as possible.
■ YAMAHA rear speakers NX-VS10E
(sold separately)
Depending on room conditions, it is possible to place
YAMAHA rear speakers NX-VS10E on shelves or hang
them on the wall. Speakers should be placed about 1.5 m
above the floor when you sit on the floor, or about 1.8 m
above the floor when you sit on the chair.
Center speaker (sold separately)
Place above the TV monitor in the center.
Right rear
speaker
1.5 - 1.8 m
Left rear
speaker
Rear speakers (sold separately)
Place behind or to the sides of the listening position.
■ YAMAHA subwoofer SW-VS10
(sold separately)
Place the subwoofer at the outside of the either right or left
main speaker and turn it slightly toward the center of the
room to reduce the wall reflections. Try altering the position
of the subwoofer versus the listening position as the relative
position will affect the way the bass sounds.
CAUTION
Although these main speakers are magnetically shielded,
they may still affect the color on the television monitor
when using the speakers near the television. Adjust the
relative positions of the speakers and the television if this
happen. Perform the following steps if you are using a
magnetically shielded television.
1 Turn off the television.
2 Wait awhile and turn the television back on.
You can also use the screw holes on the bottom of the main
speakers for installing the speakers on commercially
available speaker stands.
About 1.8 mAbout 1.5 m
When sitting on the floor. When sitting on the chair.
6
60 mm
A screw with a diameter of 4 mm can be used.
(Hole depth: 8 mm)
Page 11

INSTALLATION
Depending on room conditions, the control center can be installed vertically or horizontally.
Precautions before installation
• Do not touch the adhesive surface after peeling off the pad as this will weaken its adhesive strength.
• Thoroughly wipe clean the surface where the pad is to be applied. Note that adhesive strength is weakened if the surface is
dusty, oily or wet.
Installing the Control Center Horizontally
Apply the four supplied bottom pads to the bottom of the control center.
Peel off the seals of the bottom pads and apply to the four indented parts (screwed parts) on the bottom
of the control center.
Apply to the indented part.
Peel off the seal.
Bottom pad
Bottom panel
PREPARATION
CAUTIONS
• Be sure to use the bottom pads when installing the control center horizontally. Otherwise, the front door of the control
center cannot open.
• Be sure to apply the bottom pads to the indented parts (screwed parts) on the bottom panel. Do not apply them to the
indented parts on the top of the control center.
English
7
Page 12
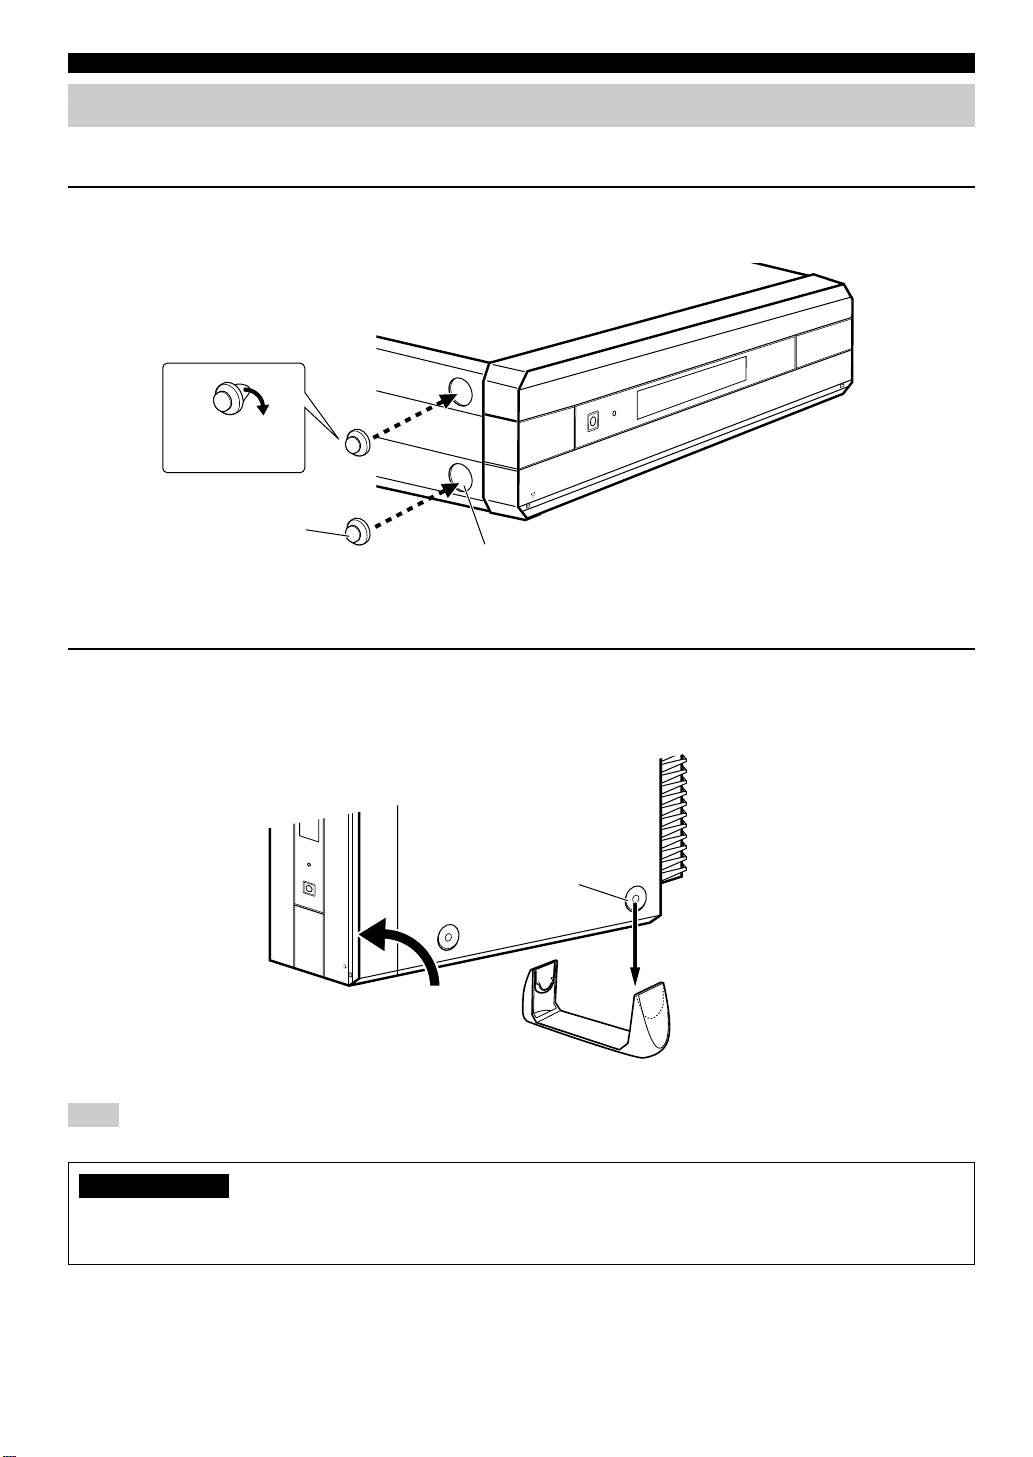
INSTALLATION
Installing the Control Center Vertically
Apply the two supplied side pads to the side of the control center and attach to the supplied supporting stand.
1 Peel off the seals of the side pads and apply to the two indented parts (near to the front panel) on the
left side of the control center.
Peel off the seal.
Front panel
Side pad
Apply to the indented part.
2 Attach the control center with the pads applied side facing down to the supporting stand as shown in
the illustration below.
Bottom panel
Rear panel
Front panel
Lift in this direction.
Note
• Using only the supporting stand makes the control center unstable and the front door cannot open. Be sure to use the side pads as well.
CAUTIONS
• Be sure to place the control center with the left side down.
• When installing the control center vertically on a high place such as on a shelf, do not place close to the edge.
Apply to the indented part.
A supporting stand
8
Page 13
CONNECTIONS
CAUTION
Always be sure to turn off the power of the control center and any component to be connected when making connections.
To ensure proper connections
• Connect the white plug of the connection cord to the left “L” (white) audio signal terminal and connect the red plug to the
right “R” (red) terminal.
• Insert the plug securely. If the plug is not inserted securely, noise may result or sound may not be output.
• Since the method of connection and terminal names differ depending on the component being used, be sure to refer to the
instruction manuals for all components being connected.
• After connections have been made, check one more time that wiring has been made properly.
PREPARATION
Page 12
Video game player ,
DVD player ,
Camcorder, etc.
Control center
NATURAL SOUND HOME THEATER SYSTEM VS-10
Pages 10 and 11
TV (monitor)
DVD player, etc.
VCR, etc.
Page 14
DIGITAL
DOLBY
DIGITAL
SURROUND
Main speakers
To AC outlet
Pages 13 and 14
YAMAHA subwoofer, center speaker
and rear speakers NX-SW10
(sold separately)
English
9
Page 14
CONNECTIONS
Connecting a TV or VCR
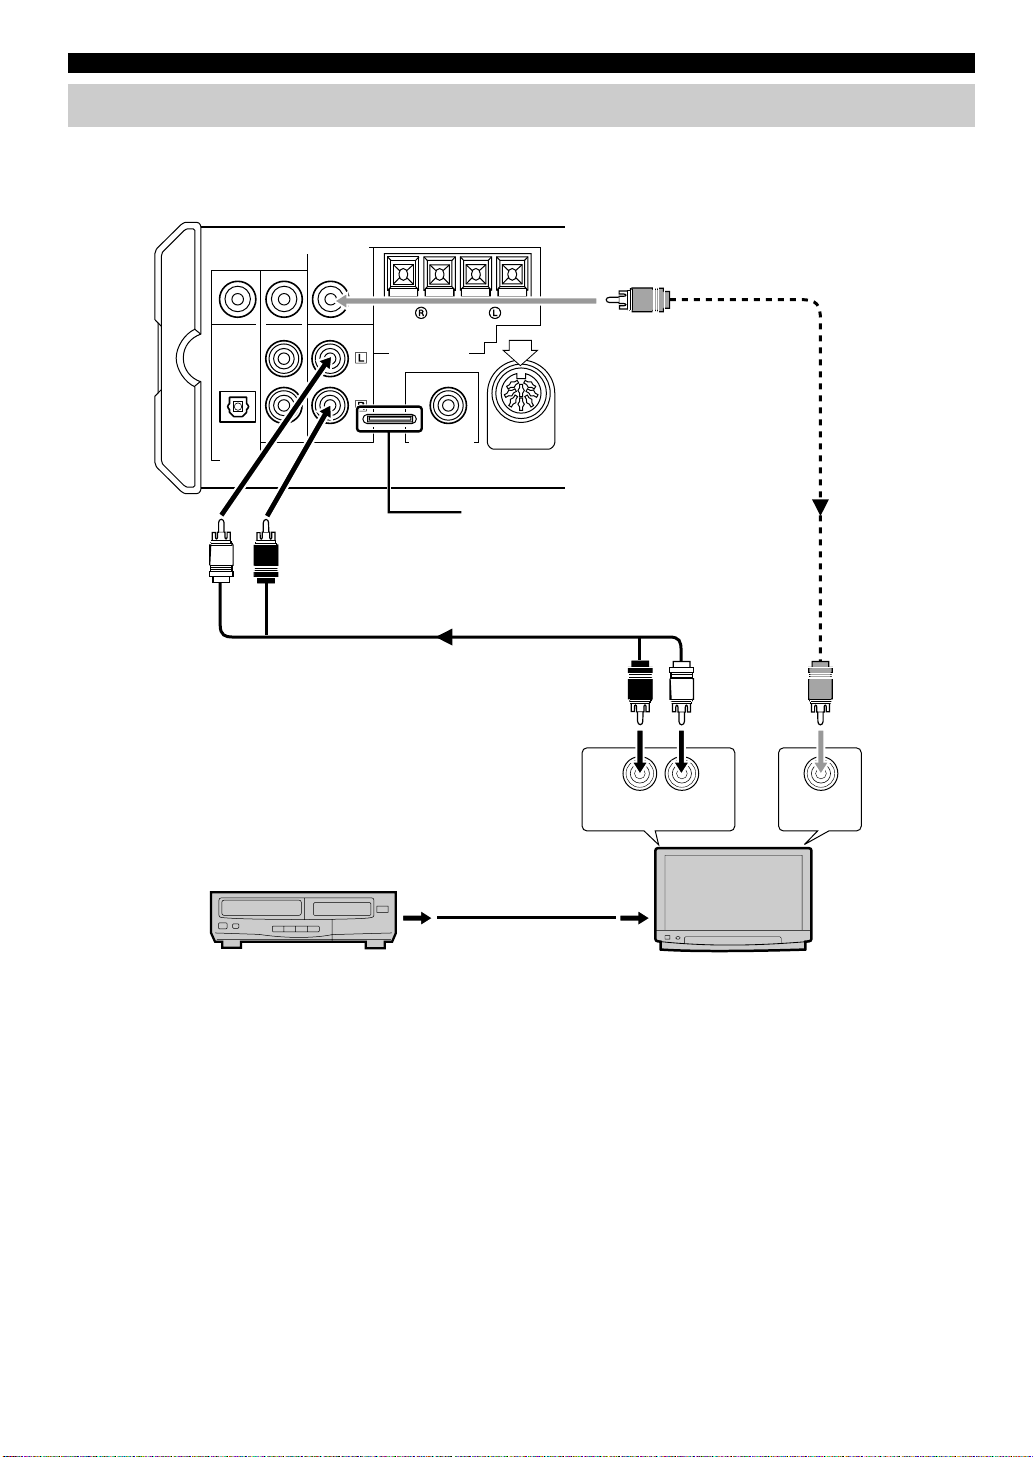
■ Connecting a TV (monitor)
Control center (rear panel)
VIDEO SIGNAL
MONITOR
OUT
DO NOT CONNECT THIS UNIT TO
SPEAKERS OTHER THAN NX-VS10M
+
–+–
MAIN SPEAKERS
MARK
VIDEO OUT
Video connection cord
(supplied)
AUDIO
IN L
DIGITAL 1
(V/PCM)
INPUT
L
VIDEO 1 TV
R
AUDIO
IN R
OUT
SUBWOOFER
SYSTEM
CONNECTOR
As this terminal is used for an
examination in the factory, do not
connect any equipment to this terminal.
Audio connection cord (supplied)
AUDIO/VIDEO
OUT
R L
AUDIO
OUT R
RL
OUTPUT INPUT
AUDIO/VIDEO
IN
AUDIO
OUT L
TV (monitor)VCR, etc.
VIDEO IN
Connect the audio output terminals on the TV (monitor) to the TV audio input terminals on the control center using the
supplied audio connection cord and the video input terminal on the TV (monitor) to the MONITOR OUT terminal on the
control center using the supplied video connector cord.
y
• The sound from the TV can be heard using the speakers connected to the control center. (Although you can also hear the sound from the TV
speakers, we recommend you to reduce the TV volume so that you may enjoy the full benefit of the VS-10.)
• To monitor the picture output from the component such as a DVD player, cable TV tuner, camcorder, video game player, etc. of which the
video output terminal is connected to the video input terminal on the control center (as described on pages 11 and 12), switch the video
input of the TV (monitor) connected to the MONITOR OUT terminal on the control center.
• The TV (monitor) without the audio output terminals cannot be connected to the control center.
10
Page 15

■ Connecting a DVD player, cable TV tuner, etc.
Control center (rear panel)
CONNECTIONS
Anti-dust cap
Anti-dust cap
Remove the cap covering the
DIGITAL 1 terminal (optical)
when connecting an optical
fiber cable. Safely store the
cap and always re-insert it in
the terminal when the terminal
is not in use. (This cap
prevents the entrance of dust.)
VIDEO SIGNAL
MONITOR
VIDEO IN VIDEO IN
OUT
+
––
DO NOT CONNECT THIS UNIT TO
SPEAKERS OTHER THAN NX-VS10M
MAIN SPEAKERS
Video
connection cord
DIGITAL 1
(V/PCM)
INPUT
VIDEO 1 TV
OUT
SUBWOOFER
(commercially
available)
Video connection
cord (commercially
available)
R L
AUDIO IN LAUDIO IN R
Audio connection cord
(commercially available)
Optical fiber cable
(EIA standard)
(commercially available)
VIDEO OUT
AUDIO
OUT R
R L
AUDIO
OUT L
VIDEO
OUT
PREPARATION
OPTICAL DIGITAL
OUTPUT
OUTPUT
DVD player, etc.
RL
OUTPUT OUTPUT
Cable TV tuner, etc.
Connect the optical digital output terminal on the DVD player, etc. to the DIGITAL 1 (optical) digital input terminal on the
control center using a commercially available optical fiber cable. This connection brings you digital sound.
When connecting the cable TV tuner, etc. without a digital output terminal, connect the audio output terminals to the VIDEO
1 audio input terminals on the control center using a commercially available audio connection cord (2 pin).
Also, connect the video output terminal on the DVD player to the DIGITAL 1 video input terminal on the control center
using a commercially available video connection cord and the video output terminal on the cable TV tuner to the VIDEO 1
video input terminal on the control center using a commercially available video connection cord. However, when the DVD
player, cable TV tuner, etc. has an S video output terminal, connect to the S video input terminal on the TV (monitor) directly
so that you can obtain the high quality picture.
y
• The sound from a DVD player, cable TV tuner, etc. can be heard using the speakers connected to the control center. The sound cannot be
heard from the TV’s speakers. The sound from a DVD player, cable TV tuner, etc. cannot be heard when the power of the control center is
turned off.
• The VS-10 cannot record any audio or video source.
English
11
Page 16

T
CONNECTIONS
■ Connecting a camcorder, video game player, etc.
Anti-dust cap
Remove the cap covering the DIGITAL 2 terminal
(optical) when connecting an optical fiber cable.
Safely store the cap and always re-insert it in the
terminal when the terminal is not in use. (This cap
Anti-dust cap
prevents the entrance of dust.)
Optical fiber cable
Less than 14 mm
Use the optical fiber cable of which the plug
dimensions are less than 14 mm.
(EIA standard)
(commercially
available)
VIDEO IN
Video connection
cord
(commercially
available)
VIDEO OUT
Control center (Front panel)
VIDEO IN AUDIO
Connect either.
VIDEO OUT
POWER
DIGITAL2 VIDEO2
L
AUDIO
IN L
Video
connection cord
(commercially
available)
R
AUDIO
OUT R
STANDBY
PHONES
SILEN
IN R
Audio connection
cord (commercially
available)Optical fiber cable
R L
AUDIO
OUT L
OPTICAL DIGITAL
OUTPUT
Video game player or DVD
player, etc. which has an optical
digital output terminal
OUTPUTOUTPUT
Camcorder or video game
player, etc. which has no
optical digital output terminal
RL
OUTPUT
When connecting the video game player, DVD player, etc. with a optical digital output terminal, connect the optical digital
output terminal to the DIGITAL 2 (optical) digital input terminal on the control center using a commercially available optical
fiber cable. This allows you to enjoy a digital sound.
When connecting the camcorder, video game player, etc. without a digital output terminal, connect the audio output terminals
to the VIDEO 2 audio input terminals on the front panel of the control center using a commercially available audio
connection cord (2 pin).
Also, connect the video output terminal on the camcorder, video game player, etc. to the DIGITAL 2 (VIDEO 2) video input
terminal on the control center using a commercially available video connection cord. However, when the camcorder, video
game player, etc. has an S video output terminal, connect to the S video input terminal on the TV (monitor) directly so that
you can obtain the high quality picture.
y
• The sound from camcorder, video game player, etc. can be heard using the speakers connected to the control center. The sound cannot be
heard from the TV’s speakers. The sound from a camcorder, video game, etc. cannot be heard when the power of the control center is
turned off.
• The VS-10 cannot record any audio or video source.
12
Page 17

CONNECTIONS
Connecting the M ain Speakers
Connect the main speakers to the control center.
Note
• Do not connect any speakers to the speaker terminals on the control center except for the supplied main speakers (NX-VS10M). Damage
may result if a different speaker is connected.
Right main speaker (Rear panel) Left main speaker (Rear panel)
PREPARATION
Bare wire
2
3
1 Open the tab.
2 Insert the bare wire of the speaker cord into
the hole.
3 Return the tab until it clicks.
1
+
–+–
Tab
DO NOT CONNECT THIS UNIT TO
SPEAKERS OTHER THAN NX-VS10M
MAIN SPEAKERS
Control center (Rear panel)
VIDEO SIGNAL
MONITOR
OUT
+
–+–
DIGITAL 1
(V/PCM)
INPUT
VIDEO 1 TV
DO NOT CONNECT THIS UNIT TO
SPEAKERS OTHER THAN NX-VS10M
MAIN SPEAKERS
OUT
SUBWOOFER
MARK
SYSTEM
CONNECTOR
CAUTIONS
• Do not let the bare speaker wire touch each other and do not let them touch any metal part of the speakers. This could
damage the speakers.
• Do not mistakenly connect positive (+) to negative (–) or vice versa when connecting speaker cords.
• Insert the speaker cords securely so that positive (+) and negative (–) do not short. The speaker may not output any
sound or may output noise, causing damage to the speakers, if speaker cords are not inserted securely.
• Only insert the bare wire portion of the speaker cords into the holes. Sound will not be output if you insert as far as the
plastic insulation part of the cord.
• Secure the speaker cords so that they will not catch on hands or feet.
• Connect the white cord to the + terminal (red), and the
black cord to the – terminal (black).
• Once connected, pull gently on the speaker cords to
check that they are connected securely.
UNSWITCED
0.8A MAX. 120V
60Hz 100W MAX.
AC OUTLET
English
13
Page 18

CONNECTIONS
Connecting the Control Center to the Subwoofer
Although the VS-10 alone can be used to reproduce rich and natural sounding audio, the additional use of a subwoofer allows
you to enjoy powerful bass tones.
Connecting the YAMAHA subwoofer, center speaker and rear speakers NX-SW10 (sold separately) can not only increase
bass sensitivity but improve the surround effect.
Control center
YAMAHA subwoofer, center speaker and
rear speakers NX-SW10 (sold separately)
DIGITAL 1
(V/PCM)
INPUT
VIDEO SIGNAL
VIDEO 1 TV
MONITOR
OUT
+
–+–
DO NOT CONNECT THIS UNIT TO
SPEAKERS OTHER THAN NX-VS10M
MAIN SPEAKERS
OUT
SUBWOOFER
MARK
SYSTEM
CONNECTOR
System connector cable
supplied with the
YAMAHA NX-SW10
To SYSTEM
CONNECTOR terminal
Match the mark on the
plug with the
To SYSTEM
CONNECTOR
terminal
mark on
the terminal and insert.
When connecting your subwoofer, connect
the input terminal on the subwoofer to the
SUBWOOFER OUT terminal on the control
center using a commercially available audio
connection cord (1 pin).
Note
• When the power of the control center is turned off, that of the YAMAHA subwoofer SW-VS10 is also turned off accordingly.
y
• For details regarding connections, please refer to the instruction manuals for your subwoofer or the owner’s manual for the YAMAHA
subwoofer, center speaker and rear speakers NX-SW10 (sold separately).
Connecting the AC Power Supply Cord
Control center
UNSWITCHED
0.8A MAX. 120V
60Hz 100W MAX.
AC OUTLET
To AC outlet
AC OUTLET (UNSWITCHED)
14
Once all connections have been made, check them one more
time. Finally, insert the plug of the power supply cord for
the control center into an AC outlet. Disconnect the power
supply cord if you will not use the unit for an extended
period.
■ AC OUTLET (UNSWITCHED)
(Except for Australia model)
Use this outlet to connect the power cord of your
component to this unit. This outlet will supply power to any
connected component regardless of the operation of the
POWER switch on the control center (or p on the remote
control). The maximum power that can be connected to the
AC OUTLET is 100 W.
Page 19

ADJUSTING THE SPEAKER OUTPUT LEVELS
When reproducing the source encoded with a Dolby Digital, Dolby Surround or DTS, it is important to adjust the sound
output level heard at the listening position to the same from each speaker. Therefore, the best performance of these digital
sound fields can be obtained. Even when the other sound field is selected, you can enjoy the characteristics of each sound
field.
Speaker output levels may be adjusted using the remote control before playback by following the steps.
PREPARATION
1
2
ON/OFF
EFFECT
VS10 TV VCR CBL
CH
–
VOL VOL
CH
SET
DSP
MEMORY
231
564
8
MENU
TEST
ENTER
0
SUBWOOFER
LAST
SUBWOOFER
–
NIGHT MODE
2 Press TEST .
A test tone (like pink noise) will be output in the
following order.
+
● When only the VS-10 is connected or the
AVMUTE
97
+–
+
VIRTUAL SURROUND is selected:
Main
speaker
LEFT
SURROUND
RIGHT
SURROUND
(Virtual)(Virtual)
● When the NX-SW10 is connected:
Main
speaker
Main
speaker
RIGHTLEFT
Main
speaker
RIGHTCENTERLEFT
1 Press p to turn on the power.
If the STANDBY indicator is lit, turn on the power
using p on the remote control. If the main power is
off (when the STANDBY indicator is not lit), turn on
the power by pressing POWER on the control center.
CAUTION
When the NX-SW10 (sold separately) is connected to the
control center, insert the plug of the AC power supply
cord of the subwoofer SW-VS10 into an AC outlet
beforehand and turn on the power of the control center.
LEFT
SURROUND
RIGHT
SURROUND
Rear speakers
English
15
Page 20

ADJUSTING THE SPEAKER OUTPUT LEVELS
ON/OFF
EFFECT
VS10 TV VCR CBL
CH
4
–
VOL VOL
DSP
MEMORY
MENU
LAST
SUBWOOFER
TEST
–
NIGHT MODE
+
CH
SET
AVMUTE
231
564
8
97
+–
ENTER
0
SUBWOOFER
+
3
5
y
• When only the VS-10 is connected:
Adjust the sound output levels of the rear virtual speakers and the
main speakers so that they become almost the same.
• When the NX-SW10 is connected:
Adjust the sound output levels of the center speaker and the rear
speakers so that they become almost the same as that of the main
speakers.
Notes
• When the sound output levels of the main speakers are adjusted,
adjust the sound output levels of the center speaker, rear speakers
and rear virtual speakers again.
• The sound output levels of right and left virtual speakers cannot
be adjusted separately. While one level is adjusted, the other is
also adjusted similarly.
• When the headphones are connected, the order of each speaker
from which a test tone is heard is the same as that of VS-10 only.
However, the sound output level of main speakers cannot be
adjusted. Only the sound output level of rear speakers can be
adjusted, however, that level cannot be adjusted for each right or
left rear speaker separately. (Adjustable range: –3 to +3 dB)
5 When the adjustment is complete, press TEST.
A test tone stops.
3 Adjust the level of the test tone using VOL +/–.
(Adjust to your listening level.)
Pressing VOL + increases the level, while pressing
VOL – decreases the level.
4 Adjust the sound output level of each speaker
while listening to the test tone.
Pressing f increases the level, while pressing w
decreases the level.
y
The sound output level can be adjusted in the following range.
• When only the VS-10 is connected or the VIRTUAL
SURROUND is selected:
– Right and left main speakers: –10 to ±0 dB
– Rear virtual speakers: –3 to +3 dB
– The minimum level for the main speakers is –10 dB, while that
for the rear virtual speakers is –3 dB.
• When the NX-SW10 is connected:
– Right and left main speakers: –10 to ±0 dB
– Center speaker: –20 to +6 dB
– Right and left rear speakers: –20 to +6 dB
– The minimum level for the main speakers is –10 dB, while that
for the center speaker and the rear speakers is –20 dB.
16
Page 21

OPERATION
OPERATING THE UNIT
Enjoying the Home Theater Sound System
This section describes how to select the input source to enjoy the sound from a TV, VCR, DVD player, satellite tuner or video
game player with the VS-10 and to adjust the volume.
First turn on the power of the playback component and the TV, and then follow the steps described below.
1
DIGITAL2 VIDEO2
POWER
STANDBY
PHONES
SILENT
2
INPUT
DSP VOLUME
1 Press POWER on the control center and press
p on the remote control to turn on the power.
When the
STANDBY indicator
Front panel
lights or flashes.
Remote control
• When the STANDBY indicator lights or flashes, the
power can be turned on using p on the remote
control. The power also can be turned on by pressing
the INPUT selector button on the control center.
• The VS-10 memorizes the last state when the power
is turned off. If you turn off the power using
POWER on the control center in standby mode
(when the STANDBY indicator lights), the unit
enters standby mode when you press POWER on the
control center next time.
If you turn off the power using POWER on the
control center when the power is turned on (when the
STANDBY indicator does not light), the power is
turned on when you press POWER on the control
center next time.
2 Press the INPUT or AV selector button.
Each time the button is pressed, the input is switched in
the order: VIDEO 1 → TV → VIDEO 2 → DIGITAL 1
→ DIGITAL 2.
3
1
3
ON/OFF
EFFECT
VS10 TV VCR CBL
CH
–
VOL VOL
CH
SET
DSP
MEMORY
231
+
AVMUTE
2
3 Adjust the level using VOLUME B/N (or VOL
+/– on the remote control).
Pressing VOLUME B (or VOL + on the remote
control) increases the level, while pressing VOLUME
N (or VOL – on the remote control) decreases the
level.
or
Front panel
CAUTION
When the “TV”, “VCR” or “CBL” button on the remote
control is pressed to control another unit, the remote
control can not control the VS-10. In this case, press the
“VS10” button on the remote control and operate the
VS-10.
Remote control
OPERATION
or
Front panel
AV
Remote control
English
17
Page 22

OPERATING THE UNIT
Switching the input mode
This function allows you to switch the input mode of the
component connected to the DIGITAL 1 or DIGITAL 2
terminal to “Auto Mode” or “dts Fix”.
Auto Mode : This recognizes the PCM signal such as a CD,
Dolby digital signal or DTS signal
automatically.
dts Fix : This fixes to a DTS signal.
Normally, the playback can be performed with the “Auto
Mode”. If you play a CD encoded with DTS in the “Auto
Mode” setting, there will be a short noise at first while the
unit recognizes the DTS signal and turns on the DTS
decoder. This is not a malfunction and can be avoided by
setting the input mode to “dts Fix” beforehand. When you
play and stop a CD encoded with DTS in the “Auto Mode”
setting, the sound is muted even if you play the PCM signal
such as a normal CD and the
30 seconds. However, this condition is released after about
30 seconds.
indicator flashes for about
1 Press the INPUT or AV selector button to
select DIGITAL 1 or DIGITAL 2.
or
AV
CAUTION
The variable sound intensity range is large when playing
back a CD or MD. So, if the source that includes the
sudden change from a small sound level to large one is
played back at a maximum volume for a long time, the
speakers may be damaged.
Front panel
Remote control
2 Press the INPUT or AV selector button again
for about 3 seconds to switch the input mode.
Each time the button is pressed for about 3 seconds, the
input mode is switched between “Auto Mode” and “dts
Fix”, and displayed as follows.
“D1$ dts Fix” “D1$Auto Mode”
•“D1” or “D2” is displayed before the selected input
mode when DIGITAL 1 or DIGITAL 2 is selected
respectively.
Notes
• The indicator lights when “dts Fix” is selected, and goes off
when a digital signal encoded with DTS is not input in the “Auto
Mode” setting.
• The setting of the input mode returns to “Auto mode” when the
power of the control center is turned off.
• When playing a source encoded with DTS, be sure to connect the
player to the DIGITAL 1 or DIGITAL 2 input terminal of the
control center with an optical fiber cable.
• If the digital output data of the player has been processed in any
way, you may not be able to perform DTS decoding even if you
make a digital connection between this unit and the player.
18
Page 23

USING CONVENIENT FUNCTIONS
You can use convenient functions with the remote control
during a playback.
ON/OFF
EFFECT
VS10 TV VCR CBL
CH
D
–
VOL VOL
MEMORY
DSP
+
CH
SET
AVMUTE
231
E
564
97
8
MENU
+–
(When the subwoofer
C
is connected.)
LAST
SUBWOOFER
–
NIGHT MODE
TEST
ENTER
0
SUBWOOFER
+
B
A
ı Listening to sound clearly at low
levels
Press NIGHT MODE.
• Sounds become clear.
• Use this function when it is difficult to output high
volumes such as late at night.
To cancel NIGHT MODE, press NIGHT MODE again.
Notes
• The NIGHT MODE does not function when the headphones are
connected.
• Volume cannot be decreased using this button. To decrease the
volume, press VOLUME N (or VOL – on the remote control).
Ç Adjusting the subwoofer level
Subwoofer level can be adjusted when a subwoofer is
connected.
Pressing SUBWOOFER + increases the level,
while pressing SUBWOOFER – decreases the
level.
OPERATION
Å Enhancing the bass tones
Press t.
• The TRUBASS* indicator lights in the display.
• This function enhances the bass tones by increasing
the level of the low-range frequencies. When the
SW-VS10 is connected, the bass tones of the
subwoofer are also enhanced.
To cancel TRUBASS mode, press t again.
Notes
• The TRUBASS mode does not function when the headphones are
connected.
• If a thudding noise is heard from the subwoofer when this
function is turned on, lower the subwoofer level. Otherwise, the
subwoofer may be damaged due to an excessive input level of
low-bass signal.
*
TruBass and the symbol are trademarks of SRS Labs, Inc. in
the United States and selected foreign countries. TruBass
technology is incorporated under license from SRS Labs, Inc.
y
• The level can be adjusted within the range –20 dB to +10 dB.
Note
• If a thudding noise is heard from the subwoofer when the
TRUBASS function is turned on or when you play a bassenhanced source such as 5.1 channel Dolby Digital or DTS which
contains Low Frequency Effect, lower the subwoofer level.
Otherwise, the subwoofer may be damaged due to an excessive
input level of low-bass signal.
Î Muting the sound temporarily
Press MUTE.
MUTE
y
•“Mute ON” is displayed when the sound is muted.
To return to the original volume level, press MUTE again.
Pressing VOL+/– also cancels the muting mode and adjusts
the volume level.
English
19
Page 24

USING CONVENIENT FUNCTIONS
‰ Calling Up Your Favorite Settings
Each MEMORY 1, 2 or 3 button can memorize the
current input and the settings of DSP mode,
SUBWOOFER level, TRUBASS and NIGHT MODE.
Once the settings are preset, you can call up each
MEMORY 1, 2 or 3 button anytime by simply pressing
one of the MEMORY buttons.
Memorizing the settings to each MEMORY 1, 2
or 3 button
Press and hold the MEMORY 1, 2 or 3 button to be
memorized for about 3 seconds.
231
The number of button you pressed is displayed after
“Memory” and the current settings are memorized.
Ex. : When the MEMORY 1 button is pressed,
“Memory 1” is displayed.
Calling up the favorite button’s memory
Press the MEMORY 1, 2 or 3 button to select the
desired settings.
The number of button you pressed is displayed after
“Memory” and the favorite settings are selected.
• If you keep pressing the button for more than 3
seconds, the previously memorized setting will be
replaced with the current settings.
Clearing the button’s memory
Press and hold the MEMORY 1, 2 or 3 button to be
cleared for about 10 seconds. The number of the button
you pressed is displayed after “MemoryClear” and the
memorized settings are cleared. (When pressing the
button, “Memory 1 (2 or 3)” is displayed after about 3
seconds, but keep pressing the button.)
• If you release the button before the display changes
from “Memory” to “MemoryClear”, the button
memorizes the current setting.
20
Page 25

DSP PROGRAM (DIGITAL SOUND FIELD PROCESSOR EFFECT)
You can recreate the sound and feel of a movie theater, concert hall or other location by selecting from any of eight DSP
programs best suited to the source being reproduced. This allows you to enjoy the full experience of digital systems such as
DOLBY DIGITAL, DOLBY PRO LOGIC, DTS, or YAMAHA CINEMA DSP (Digital Sound field Processor).
Description of DSP Programs
■ When the VS-10 is connected without the YAMAHA NX-SW10:
No. Program name Features and applicable sources
1 VIRTUAL SURROUND
(input source: Dolby Digital, Dolby Surround or DTS)
This program creates the virtual surround field that gives an
experience as if you are enjoying with a Dolby Digital, Dolby
Pro Logic or DTS only using the main speakers.
4 GAME
5 HALL
6 CONCERT/SPORTS
7 MONO MOVIE
This program directs games to be more realistic and powerful
adding a depth and surround feeling to the sounds.
This program reproduces the rich and full sound. This sound
field brings a surround experience like that found in the center
of the large amphitheater.
This program is suitable for many types of sound reproduction.
Resonant sounds are retained so that it does not give the feeling
unnatural even when this sound field is used for an extended
period of time.
This program is designed specially to enhance monaural source
such as an old monaural movie.
■ When the VS-10 and the YAMAHA NX-SW10 are connected:
No. Program name Features and applicable sources
1 VIRTUAL SURROUND
(input source: Dolby Digital, Dolby Surround or DTS)
2 DOLBY DIGITAL (input source: Dolby Digital)
DOLBY PRO LOGIC (input source: Dolby Surround)
DTS (input source: DTS)
3 DIGITAL MOVIE THEATER
(input source: Dolby Digital)
70mm MOVIE THEATER
(input source: Dolby Surround)
DTS MOVIE THEATER
(input source: DTS)
4 GAME This program directs games to be more realistic and powerful
This program creates the virtual surround field that gives an
experience as if you are enjoying with a Dolby Digital, Dolby
Pro Logic or DTS only using the main speakers.
This program straightforwardly reproduces the movie sound
that is accurately processed using a Dolby Digital, Dolby Pro
Logic or DTS decoder.
This program reproduces the rich and full sound found in a
movie theater using the latest movie sound design in which
dialog and sound effects are handled separately.
adding a depth and surround feeling to the sounds.
OPERATION
5 HALL
6 CONCERT/SPORTS
This program reproduces the huge image of the amphitheater,
which has all range reflected, rich and full sound, and strong
surround feeling.
This program is suitable for many types of sound reproduction
such as a variety show, live broadcast program, etc. Resonant
sounds are retained so that it does not give the feeling unnatural
even when this sound field is used for an extended period of
time.
21
English
Page 26

DSP PROGRAM (DIGITAL SOUND FIELD PROCESSOR EFFECT)
No. Program name Features and applicable sources
7 MONO MOVIE
This program is designed specially to enhance monaural source
such as an old monaural movie. Sound field effects and
moderate resonance processing are used to bring fuller life to
the monaural audio.
Note
• When “GAME” or “HALL” is selected for a 2 -channel source, no sound is heard from the center speaker even if the YAMAHA NX-SW10
is connected.
■ When the headphones are connected:
No. Program name Features and applicable sources
8 SILENT CINEMA
This program is for enjoying the three-dimensional virtual
surround through the headphones. This sound field is suited for
multi-channel movie software such as a DVD.
Enjoying DSP Programs
DSP selector button
ON/OFF
DIGITAL2 VIDEO2
POWER
EFFECT
VS10 TV VCR CBL
CH
–
STANDBY
INPUT
PHONES
SILENT
DSP VOLUME
VOL VOL
CH
SET
DSP
MEMORY
231
+
AVMUTE
EFFECT ON/OFF
DSP
Press the DSP selector button (on the control
center) or DSP (on the remote control).
or
Front panel
Remote control
Each time this button is pressed, the DSP program is
selected in the following order and the currently
selected DSP program name is displayed.
● When the VS-10 is connected without the
YAMAHA NX-SW10:
VIRTUAL SURROUND
EFFECT OFF *
MONO MOVIE
GAME
HALL
CONCERT/SPORTS
22
● When the VS-10 and the YAMAHA NX-SW10 are
connected:
VIRTUAL SURROUND
EFFECT OFF *
MONO MOVIE
CONCERT/SPORTS
HALL GAME
* The “EFFECT OFF” appears only when using the DSP selector
button on the control center.
DOLBY DIGITAL/
DOLBY PRO LOGIC/DTS
DIGITAL MOVIE THEATER/
70 mm MOVIE THEATER/
DTS MOVIE THEATER
● When the headphones are connected:
SILENT CINEMA EFFECT OFF
Page 27

Notes
• Be sure to select the DSP program best suited for the atmosphere
of the source being listened to.
• The last selected DSP program for each input source (VIDEO 1,
TV, VIDEO 2, DIGITAL 1 and DIGITAL 2) is stored in memory.
So, when the input source is changed, the DSP program is
automatically changed to the last selected one correspondingly.
■ To cancel sound field effects
(using the remote control)
Press EFFECT ON/OFF.
The normal stereo playback is performed and
“EFFECT OFF” is displayed when the sound field
effect is canceled. Pressing this button again turns the
sound field effect back on.
■ Processing indicators
A processing indicator displays the type of input signal
when reproducing a source using a DSP program.
q DIGITAL: Lights when reproducing a source
encoded with Dolby Digital.
q PRO LOGIC: Lights when reproducing a source
encoded with Dolby Digital in 2channel, PCM audio or an analog source
using DSP program No. 2.
: Lights when reproducing a source
encoded with DTS.
DSP: Lights when reproducing a source using
DSP program No. 3 through 7.
Notes
• The VIRTUAL SURROUND, DOLBY DIGITAL/DOLBY PRO
LOGIC/DTS, DIGITAL MOVIE THEATER/70 mm MOVIE
THEATER/DTS MOVIE THEATER are the optimum programs
for reproducing visual software encoded with Dolby or DTS that
displays the g, s or
• The volume level of the right and left main speakers may differ
depending on the input source being used because, except in the
case of Dolby Digital and DTS, sound field data as actually
measured are used.
• Select the DSP program that you feel sounds best for a source
regardless of its name. Besides, the sound field effect of the DSP
program is affected by the resonance of the listening room. To
enjoy the full performance of the DSP program, arrange the
furnishings so that your listening room has less resonance.
logo marks.
y
• Be sure to minimize the volume level of the TV to maximize the
virtual surround effect when reproducing a source with the
VIRTUAL SURROUND program.
• Refer to the glossary on page 31.
DSP PROGRAM (DIGITAL SOUND FIELD PROCESSOR EFFECT)
OPERATION
English
23
Page 28

MENU FUNCTIONS
The menu functions include: “Auto Power” for setting
automatic power on/off, “Dimmer” for adjusting display
brightness, “Input Name” for naming inputs, “Center
Delay” for adjusting the delay time used for the sound from
the center speaker and “Delay Time” for adjusting the delay
time used for the surround sound.
Adjustments on the menu functions should be performed
with the remote control.
Each time MENU on the remote control is pressed, the
function changes in the following order: “Auto Power”,
“Dimmer”, “Input Name”, “Center Delay”, “Delay Time” ,
and input display.
ON/OFF
EFFECT
VS10 TV VCR CBL
CH
AV
selector button
MENU +/–
–
VOL VOL
MEMORY
MENU
LAST
SUBWOOFER
–
NIGHT MODE
DSP
TEST
+
CH
SET
AVMUTE
231
564
8
97
+–
ENTER
0
SUBWOOFER
+
MENU
Setting Auto Power On/Off
The Auto Power function works as described below.
No signal is input and no button is operated for about 30
minutes.
@
The unit enters the Auto Power Off mode.
(The STANDBY indicator flashes slowly.)
@
The unit enters the Auto Power On mode and the power
is turned on automatically when the signal is input*.
(or the power is turned on with p on the remote control
or INPUT selector button on the control center.)
* If the power is turned off and on using POWER on the control
center and the signal is input in STANDBY mode, the power is
turned on after about 5 seconds.
(When a power failure is restored and the signal is input, the
power is also turned on after about 5 seconds.)
You can set the sensitivity for the Auto Power function or
turn the Auto Power function off.
1 Press MENU to display “Auto Power”.
MENU
0
2 To set Auto Power On, select the “Auto Power
2” using MENU +/–. To set Auto Power Off,
select the “OFF” using MENU –.
LAST
The Auto Power function may not work properly depending
on the signal output level of the connected component. In
this case, you can refer to the table described below to
change the sensitivity of the Auto Power function.
Pressing + will change the display from top to bottom,
while pressing – will change the display from bottom to top.
Display Setting/Symptom
OFF The Auto power function is turned off.
1 [Weak signal] Select this position when the unit does
not enter the Auto Power On mode even when the
signal is input, or the unit enters the Auto Power Off
mode even when the signal is being input.
2 [Normal signal] Normally select this position to turn
the Auto Power function on.
3 [Strong signal] Select this position when the unit
enters the Auto Power On mode even when no signal
is input, or the unit does not enter the Auto Power
Off mode even when no signal is input.
After adjusting the menu functions, press MENU. The input
display returns.
+–
ENTER
24
Page 29

MENU FUNCTIONS
Adjusting Display Brightness
The display brightness of the control center can be adjusted
as follows.
1 Press MENU to display “Dimmer”.
The current brightness level (such as “Dimmer: ±0”) is
displayed.
MENU
0
2 Press MENU + or – to adjust the brightness.
Pressing + brightens the display, while pressing – dims
the display. Brightness can be adjusted from –3
(dimmest) to +3 (brightest). The brightness of +3
(brightest) is as same as that of the display right after
the VS-10 is operated.
+–
LAST
After adjusting the menu functions, press MENU. The input
display returns.
ENTER
3 Press MENU + or – to select the name.
+–
LAST
If you select VIDEO 2 in step 2 above, names are
displayed in the following order when you press +.
VIDEO 2
VIDEO 2: GAME
VIDEO 2: MD
VIDEO 2: CABLE
If you select DIGITAL 1 or 2 in step 2 above, names
are displayed in the following order when you press +.
DIGITAL 1
D1: GAME
Notes
•“D1:” is displayed before the name when DIGITAL 1 is selected,
while “D2:” is displayed before the name when DIGITAL 2 is
selected.
• Pressing – displays the names in reverse order.
ENTER
D1: DVD
D1: CDD1: MD
VIDEO 2: SAT
VIDEO 2: DVD
VIDEO 2: LDVIDEO 2: CD
D1: LD
D1: SAT
OPERATION
Naming the Input Terminals
It is possible to give names to the VIDEO 2, DIGITAL 1
and DIGITAL 2 input terminals. (It is not possible to change
the input names for the TV or VIDEO 1 input terminals.)
Once you select a name so that you can easily find out
which component is connected to the terminal, it is
convenient when you select an input source. For example, if
a video game player is connected to the VIDEO 2, you can
name that source “GAME”, or if a DVD player is connected
to the DIGITAL 1 terminal, you can name that source
“DVD”.
1 Press MENU to display “Input Name”.
MENU
0
2 Press the AV selector button to select the
input you want to name (VIDEO 2, DIGITAL 1 or
DIGITAL 2).
AV
4 Repeat steps 1 through 3 to give names to
VIDEO 2, DIGITAL 1 and DIGITAL 2 input
terminals.
After adjusting the menu functions, press MENU. The input
display returns.
English
25
Page 30

MENU FUNCTIONS
Adjusting the Center Delay Time
The center delay time is the time difference between the
beginning of the sound from the main speakers and the
beginning of the sound from the center speaker. When the
other DSP program except for SILENT CINEMA is
selected, it is possible to adjust the center delay time. This
adjusts the delay between the main sound (on the main
speakers) and dialog, etc. (on the center speaker).
This makes sounds from the left main, center and right main
speakers reach your listening position at the same time. This
is achieved by delaying the sound from the center speaker if
the distance from the center speaker to your listening
position is shorter than the distance from the right and left
main speakers to your listening position. Each time the
value of the center delay time is added by 1 ms, the center
speaker is positioned farther from your listening position by
about 30 cm virtually.
1 Press MENU to display “Cntr Delay”.
MENU
0
2 Press MENU + or – to adjust the center delay
time.
+–
LAST
y
• Adjustable range
0 to 5 ms
After adjusting the menu functions, press MENU. The input
display returns.
ENTER
Adjusting the Delay Time
When the selected DSP program is VIRTUAL
SURROUND, DOLBY DIGITAL/DOLBY PRO LOGIC/
DTS or SILENT CINEMA, it is possible to adjust the delay
time. The delay time is that time difference between when
the sound from the main speakers can be heard and the
surround sound can be heard.
The larger the value, the later the sound field effect is
generated.
1 Press MENU to display “Delay Time”.
MENU
0
2 Press MENU + or – to adjust the delay time.
+–
LAST
y
• Adjustable range
– For Dolby Digital (except for 2 ch)/DTS input: 0 to 15 ms
– For the other inputs: 15 to 30 ms
If the delay time level of a signal input is adjusted, that of
other signal inputs will be changed. For example, when the
delay time of the Dolby Digital (except for 2 ch)/DTS
inputs is adjusted from 0 ms (minimum) to 5 ms, that of the
other signal inputs is adjusted from 15 ms (minimum) to 20
ms automatically.
After adjusting the menu functions, press MENU. The input
display returns.
ENTER
26
Page 31

REMOTE CONTROL
OPERATING OTHER COMPONENTS USING THE REMOTE CONTROL
Setting the manufacturer code for your TV, VCR or cable TV tuner/satellite tuner on the remote control allows you to operate
not only the VS-10 but also your TV, VCR or cable TV tuner/satellite tuner using the remote control.
Notes
• Remote control of some component may not be possible depending on the model and the year of make even though its manufacturer is
listed on page i (at the end of this manual).
• Depending on the model, some components from other manufacturers cannot be controlled, or only limited functions can be controlled,
even though the proper manufacturer code has been set. If you encounter this problem, please use the remote control supplied with the
component.
• Setting the manufacture code can not be performed if your component to be controlled does not support remote control operation.
Setting the M anufacturer Code
4
ON/OFF
EFFECT
VS10 TV VCR CBL
CH
–
VOL VOL
CH
SET
DSP
AVMUTE
MEMORY
231
564
+
Transmission
indicator
1
2
3
97
8
MENU
+–
TEST
ENTER
0
SUBWOOFER
+
LAST
SUBWOOFER
–
NIGHT MODE
1 Press the remote control selector button (TV,
VCR or CBL) for which the manufacturer code
is to be set.
The signals for controlling the control center have
already been set for the VS10 button so that only the
manufacturer code for the TV, VCR or CBL needs to be
set. A manufacturer code of the TV, VCR or cable TV
tuner/satellite tuner can be set for the TV, VCR or CBL
button respectively.
2 Hold down SET and press CH
until the
g
transmission indicator lights.
The indicator will light.
CH
3 While the transmission indicator is lit, enter
the 4-digit manufacturer code for the
component to be controlled using the numeric
buttons.
231
564
897
0
The indicator will go out.
Enter the code surely. The transmission indicator goes
out when the code is set properly. (The code has not
been set properly if the indicator flashes and then goes
out.)
Refer to the list of manufacturer codes on page i (at the
end of this manual).
4 Press p and check that the component to be
controlled turns on and off.
REMOTE CONTROL
English
TV VCR CBL
27
Page 32

OPERATING OTHER COMPONENTS USING THE REMOTE CONTROL
■ Precautions when performing
preset
The transmission indicator goes out once the manufacturer
code is set properly.
If the transmission indicator does not go out, or if it flashes
and then goes out, repeat the procedure from step 1.
Pay attention to the following points when you repeat the
preset procedure.
• Check the manufacturer code number.
• Check that the correct remote control selector button has
been selected when setting the manufacturer code.
• If more than one code is given for a manufacturer, try
entering each code in the order given.
• Remove and replace the remote control’s batteries
(complete this step within 2 minutes) and then repeat the
procedure.
■ When the remote control does not
work correctly
When the remote control does not work correctly, try to
enter the other manufacturer codes.
■ To clear a manufacturer code
Perform the procedure “Setting the Manufacturer Code”
described on page 27 and enter the following codes when
you reach step 3.
• To clear the “TV” button: 0000
• To clear the “VCR” button: 0000
• To clear the “CBL” button: 0000
• To clear all buttons: 9990
28
Page 33

OPERATING OTHER COMPONENTS USING THE REMOTE CONTROL
Controlling a TV
You can control your TV by setting the corresponding manufacturer code for the remote control selector button “TV”.
Press TV .
ON/OFF
TV power ON/OFF
EFFECT
Decreases TV volume
Selects the next lower channel
Mutes the TV
Returns to the last channel
Rewinds the VCR*
Stops the VCR*
Pauses the VCR*
VS10 TV VCR CBL
–
CH
VOL VOL
CH
SET
DSP
MEMORY
231
564
8
MENU
TEST
0
ENTER
SUBWOOFER
LAST
SUBWOOFER
–
NIGHT MODE
Selects the next higher channel
+
AVMUTE
Increases TV volume
Selects TV input
Select the channel
REMOTE CONTROL
Enters the channel
97
+–
+
Fast forwards the VCR*
Plays the VCR*
Records on the VCR*
y
• A VCR can be controlled using * marked buttons once the
manufacturer code for that VCR has been set for the remote
control selector button “VCR”.
English
29
Page 34

OPERATING OTHER COMPONENTS USING THE REMOTE CONTROL
Controlling a VCR
You can control your VCR by setting the corresponding manufacturer code for the remote control selector button “VCR”.
Press VCR.
ON/OFF
VCR power ON/OFF
EFFECT
Decreases TV volume*
Selects the next lower channel
Mutes the TV*
Rewinds
Stops
Pauses
VS10 TV VCR CBL
–
CH
VOL VOL
CH
SET
DSP
MEMORY
231
564
8
MENU
TEST
ENTER
0
SUBWOOFER
LAST
SUBWOOFER
–
NIGHT MODE
Selects the next higher channel
+
AVMUTE
Increases TV volume*
Selects TV input*
Select the channel
97
+–
+
Fast forwards
Plays
Records
This button needs to be pressed twice in the
case of some models for the VCR to begin a
recording.
30
y
• A TV can be controlled using * marked buttons once the
manufacturer code for that TV has been set for the remote control
select button “TV”.
Page 35

APPENDIX
GLOSSARY
■ Encode/Decode
When a signal or other information is processed,
compressed and digitized, this is called encoding. Encoding
can be used to record an extremely large amount of
information on a single CD or DVD.
An encoded signal cannot be listened to directly. It must be
returned to its original state (i.e. audible sound) and this is
called decoding.
■ Sound field
Not all sound travels from the sound source directly into the
human ear, but instead reflects off of walls, ceilings and
other objects to arrive at the ear slightly delayed (early
reflection). It may also reflect repeatedly in a complicated
manner before reaching the ear (subsequent reverberation).
A human is able to perceive the size and shape of a location
based on the various sounds heard in this way. The specific
acoustic space of a particular building is called a sound
field.
■ Dolby Surround
In movie theaters and in live theaters, the spectators are
surrounded by many speakers and sound effects geared to
each scene are used to make sound move from front to back
and right to left. This gives the sound a three dimensional
feel that surrounds the entire body. Dolby Surround is used
to implement this realistic effect. Originally, the Dolby
Surround system consisted of a total of four channels: two
front channels (right and left), one center channel, and one
rear channel. Later, two-channel stereo compatibility was
added to for broadcast and video media used in the home.
The ability to easily set up a home AV system capable of
stereo reproduction is one of the biggest features of Dolby
Surround.
■ Dolby Digital
Dolby Digital consists of a total of five channels: three front
channels (left, center and right) and two rear channels (right
and left), plus a distinct LFE channel for low frequency
effect. It is therefore commonly referred to as a 5.1 channel
system. Using digital compression technology for all 5.1
channels, Dolby Digital can be used for completely
independent audio reproduction. Dolby Digital offers
superior sound separation between each channels and a
more three dimensional surround effect in comparison to the
older Dolby Surround, which mixes four channels (three
front and one rear) into two-channel stereo and separates
them using a matrix circuit.
■ DTS (Digital Theater Systems)
Digital Surround
DTS was developed to replace the analog soundtracks of
movies with six discrete channels of digital soundtracks,
and it is now installed in many theaters around the world.
The DTS digital playback system changed the way we
experienced movies in theaters with six discrete channels of
superb digital audio.
DTS technology, through intense research and development
has made it possible to deliver similar encode/decode
discrete technology to home audio surround-sound
entertainment.
DTS Digital Surround is an encode/decode system which
delivers six channels of master-quality, 20-bit audio;
technically, it is 5.1 channels, which means 5 full-range
(left, center, right and two surround) channels, plus a
subwoofer (LFE) channel (as “0.1”). It is compatible with
the 5.1 speaker configurations that are currently available
for home theater systems.
■ Virtual surround
We basically perceive the direction from which sounds
come to us based on the difference in time they reach the
right and left ears and differences in sound level. Virtual
technology is based on this property of the human ear. A
DSP (digital sound field processor — a form of digital
signal processing) and right and left main speakers are used
so that the listener feels like he or she is hearing sounds that
come from virtual speakers located in directions other than
just the two physical speakers. This allows the listener to
experience surround effects as if rear speakers were present
as in a five-speaker system.
■ YAMAHA DSP (Digital Sound Field
Processor)
YAMAHA technicians traveled to world famous concert
halls, opera houses and other locations just to measure
acoustical information such as the direction, intensity, band
characteristics, and delay time of reflected sounds. This
wealth of information was then put on a ROM.
Using a built-in YAMAHA DSP (digital sound field
processor) to create sound fields, this unit allows you to
freely select various sound field programs created from this
actual acoustical data so that you can reproduce the sound
field of concert halls and live houses right in your listening
room.
Movie makers design sounds for a movie so that the sound
and screen become one. Dialog is positioned right on the
screen, sound effects behind the screen, music behind that,
and surround effects wrap around the audience.
CINEMA DSP is a program for use in AV reproduction that
has evolved from YAMAHA DSP. Fusing the movie sound
decoders, Dolby Pro Logic, Dolby Digital and DTS, with
YAMAHA DSP, allows you to reproduce the type of
surround sound field of the quality found on a dubbing stage
designed to optimize movie surround conditions. (A
dubbing stage is the final mix used to complete the final
sound design for a movie.)
By adding YAMAHA DSP processing to both the right and
left front channels and the center channel, the CINEMA
DSP program wraps the audience in a surround sound field
that not only makes dialog real, but penetrates and
surrounds the screen to give depth to sound effects and
music as well as a smooth sense of movement to sound
sources.
APPENDIX
English
31
Page 36

TROUBLESHOOTING
Be sure to investigate thoroughly before requesting repairs or after service. If it cannot be corrected, or if the problem is not
listed in the SYMPTOM column, disconnect the power cord and contact your authorized YAMAHA dealer or service center.
Notes
• Sometimes the unit may cease to recognize operations due to a mistaken operation or as a result of strong external noise (such as irregular
voltage due to shock of impact, excessive static electricity, or lightning strike). If this happens, first disconnect the power cord, wait about
30 seconds, re-connect the power cord, and try the desired operation again.
• When requesting repairs or after service of the YAMAHA subwoofer, center speaker and rear speakers NX-SW10 (sold separately), be sure
to bring along with this unit.
■ General
SYMPTOM CHECK Refer to page
No sound output at all.
A “humming” noise is present.
The STANDBY indicator
flashes slowly.
There is noise in the tuner or
TV and the video image is
unstable.
• Is the AC power supply cord connected?
• Is the TV or VCR connected correctly?
• Are the main speakers connected correctly?
• Is the input source selected correctly?
• Is the sound muted temporarily?
• Are the headphones connected?
• Hum caused by external electromagnetic waves may be generated.
Try inverting the right-left polarity of the power cord and re-insert into
the AC outlet.
• The unit is in Auto Power Off mode.
Turn off the main power if the unit is not to be used for an extended
period of time.
• Is a tuner or TV that uses an indoor antenna located near the unit?
Use of an outdoor antenna is recommended.
14
10
13
17
19
4
14
24
—
■ When using a DSP program
SYMPTOM CHECK Refer to page
Movie dialog and other audio
is difficult to hear.
• Is HALL, CONCERT/SPORTS or GAME selected? Select the other DSP
program.
■ When using the remote control
SYMPTOM CHECK Refer to page
The remote control does not
function properly.
Cannot control other
component.
• Are the batteries used up?
• Is the remote control pointed at the sensor?
• Is the remote control too far from or too close to the sensor?
• Is direct sunlight or other intense light (such as an inverter fluorescent
lamp) striking the sensor?
• Is another remote control being used at the same time?
• Are the batteries inserted in the correct direction?
• Is the remote control selector button “VS10” pressed? Press “VS10” when
you want to control this unit after controlling another component.
• Is the manufacturer code set correctly?
• Is the remote control selector button corresponding to the component to
be controlled pressed?
21-22
3
3
3
3
3
2
—
27
29-30
32
Page 37

SPECIFICATIONS
Control Center
■ Amplifier Section
Minimum RMS Output Power
Main .......................... 25 W + 25 W (1 kHz, 10% THD, 6 ohms)
Signal-to-Noise Ratio ............................... 90 dB (VIDEO 1, IHF-A)
Total Harmonic Distortion
....................... 0.07% (Input: VIDEO 1, 1 kHz, 10 W/6 ohms)
Input Sensitivity/Impedance ..............VIDEO 1, 200 mV/50 k-ohms
■ Video Section
Video Signal Level .................................................. 1 Vp-p/75 ohms
Main Speakers
Type .................................................................... 2 way Bass-Reflex
Speakers..................................... 10-cm cone, magnetically shielded
2 cm Super Tweeter
Maximum Input Power............................................................. 25 W
Impedance ............................................................................. 6 ohms
General
Power Supply
[Europe and U.K. models] ................................AC 230 V, 50 Hz
[U.S.A. and Canada models] ............................AC 120 V, 60 Hz
[Australia model] ..............................................AC 240 V, 50 Hz
Power Consumption ................................................................. 60 W
Power Consumption (standby mode) ...................................... 5.5 W
Dimensions (W x H x D)
Control center ............................................... 302 x 82 x 300 mm
When installing vertically (including the supporting stand and
side pads) .............................................. 124 x 302.5 x 300 mm
When installing horizontally (including the bottom pads)
................................................................ 302 x 88.5 x 300 mm
Main speaker............................................... 125 x 185 x 145 mm
Weight
Control center .................................................................... 4.7 kg
Main speaker...................................................................... 1.4 kg
Accessories ............................................................... Remote control
UM-4 batteries (x 4)
Audio connection cord (2 pin, 1.5 m)
Video connection cord (1.5 m)
Supporting stand (x 1)
Bottom pads (x 4)
Side pads (x 2)
Connection guide
Specifications are subject to change without notice.
APPENDIX
English
33
Page 38

INDEX
A
Adjusting display brightness ............................................. 25
Adjusting the bass (subwoofer level) ................................ 19
Adjusting the center delay time ......................................... 26
Adjusting the delay time.................................................... 26
Adjusting the volume level................................................ 17
Auto Power on/off ............................................................. 24
C
Center Delay → Adjusting the center delay time.............. 26
CINEMA DSP → DSP program................................... 21-23
Connecting a camcorder .................................................... 12
Connecting a DVD player ................................................. 11
Connecting a subwoofer .................................................... 14
Connecting a TV................................................................ 10
Connecting a VCR............................................................. 10
Connecting the main speakers ........................................... 13
Connecting the AC power supply cord.............................. 14
Connecting the YAMAHA NX-SW10 .............................. 14
Controlling a TV with the remote control ......................... 29
Controlling a VCR with the remote control ...................... 30
D
Delay time → Adjusting the delay time ............................ 26
DIGITAL input terminal.............................................. 11, 12
Dimmer → Adjusting display brightness .......................... 25
Display................................................................................. 4
DOLBY DIGITAL, DOLBY PRO LOGIC,
DTS ..................................................................21-23, 31
DSP programs...............................................................21-23
M
Manufacturer codes ................... i (at the end of this manual)
Memory ............................................................................. 20
Menu functions .................................................................. 24
Muting the audio ............................................................... 19
N
Naming the input terminals ............................................... 25
NIGHT MODE .................................................................. 19
S
Selecting a sound field....................................................... 22
Selecting the input ............................................................. 17
Selecting the input mode ................................................... 18
Setting a manufacturer code .............................................. 27
Speaker placement............................................................... 6
T
Test tone............................................................................. 15
TRUBASS mode ............................................................... 19
V
VIRTUAL SURROUND ..............................................21-23
34
Page 39

LIST OF MANUFACTURER’S CODES
LISTES DES CODES FABRICANT
LISTA DE CÓDIGOS DE FABRICANTES
TV
A-MARK 1161
A TANDY 0941
ABEX 1151
ADMIRA 1141
ADVENTURA 1131
AIKO 1121
AIWA 1451
AKAI 0331, 1101, 1111
ALBA 0431
ALLERON 1091
AMBASSADOR 1081
AMSTRAD 0481, 1081
ANAM 0251, 1041, 1051,
1061, 1071
ANAM NATIONAL 1041
AOC 0361, 1021, 1031
1111, 1161
ARCHER 1161
AUDIOSONIC 1001
AUDIOVOX 1051,1161
BAUER 0441
BAUR 1001
BEIJING 1511, 1551,1561
BELCOR 1031
BELL & HOWELL 0981,0991
BEON 1001
BRADFORD 1051
BROCKWOOD 1031
BROKSONIC 1161
BUSH 1001
CANDLE 0351, 0361, 0961,
0971, 1111, 1131
CAPEHART 1021
CARVER 0101
CA THAY 1001
CELEBRITY 0951
CENTURION 0411
CHANGHONG 1541, 1551,
1561,1621
CITIZEN 0351, 0361,0921,
0931, 0941, 0961,
0971, 1111, 1121,
1131
CLAIRTONE 1011
CLARIVOX 1001
CONCERTO 0351,0971
CONROW A 1751
CONTEC 0901, 0911,1011,
1051
CORANDO 0941
CRAIG 0251, 1051
CROWN 0941,1051
CURTIS MATHES 0161,0361,
0931,0941,
0981,1111
CXC 1051
DAEWOO 0291, 0301, 0331,
0721, 0941, 1001,
1031, 1121, 1191,
1531, 1581, 1591,
1601
DANSAI 1001
DAYTRON 0941, 1031
DECCA 0271, 1001
DIXI 0331, 1001, 1071
DUMONT 0891, 1031
DYNATECH 0881
ELECTROBAND 0951, 1011
ELECTROHOME 0941
ELECTRON 0941
ELIN 1001
ELTA 0331
ENERSON 0001, 0021, 0061,
0071, 0081, 0091,
0111, 0811, 0821,
0831, 0841, 0851,
0861, 0871, 0901,
0921, 0941, 0981,
1011, 1031, 1051,
1081, 1091
ENVISION 0361,1111
ERRES 1001
ETRON 0331
FERGUSON 1001
FINLUX 1001
FISHER 0171,0801, 0981
FORMENTI 0441
FORMONTI 1001
FORTRESS 1141
FUJITSU 1091
FUNAI 1051, 1091, 1501,
1521
FUTURETECH 1051
GE 0131, 0161, 0201,
0751, 0761, 0771,
0781, 0791, 0811,
0861, 1041
GEC 0271, 1001
GEMINI 0391
GENEXXA 0431
GIBRALTER 0891,1031, 1111
GOLDSTAR 0031, 0121, 0351
0411, 0731, 0741,
0861, 0941, 0971,
1001, 1031, 1111,
1151
GOODMANS/TASHIKO
0271, 0661, 1001
GRANADA 1001
GRUNDIG 1781, 1791, 1801,
1811, 1821, 1831,
1841, 1851, 1861,
1871, 1881
GUNPY 1051,1091
H/K 0721
HALLMARK 0861
HANSEATIC 1001
HARVARD 1051,1061
HINARI 1001,1091
HITACHI 0181,0351, 0671,
0681, 0691, 0701,
0711, 0871, 0941,
0971, 1351
HYPSON 1001
IMA 1051
INDIANA 1001
INFINITY REFERENCE 0101
INTERFUNK 1001
ITT 0611
JANEIL 1131
JBL 0101
JCB 0951
JENSEN 0311
JINXING 1531,1541, 1551,
1561,1571, 1621,
1631,1641, 1651,
1691,1731
JVC 0261,0281, 0641,
0651,0661, 0841
KAWASHO 0901
KAYPANI 1021
KENWOOD 0361, 1031,1111
KLOSS 0631,0721, 1131
KTV 0921, 0941,1011,
1051,1111
LEYCO 1001
LIESENK & TTER 1001
LLOYTRON 0941
LOEWE 1001
LOGIK 0991, 1771
LUXMAN 0351, 0971
LXI 0101, 0621,0761,
0861,0981
MAGNAVOX 0101,0341, 0391,
0401,0411, 0421,
0581,0591, 0601,
0611,0631, 0661,
0961,1111
MAJESTIC 0991
MARANTZ 0101, 0221, 0361,
1001,1111
MARK 1001
MATSUI 0271, 0331, 1001
MEDIATOR 1001
MEGATRON 0691,0861, 1161
MEI 1011
M-ELECTRONIC 1001
MEMOREX 0331,0571, 0861,
0971,0981, 0991,
1771
METZ 1791,1831, 1891,
1901,1911, 1921,
1931,1941
MGA 0361, 0561, 0571,
0861,1031, 1111
MIDLAND 0751,0761, 0891,
0941,1151
MITSUBISHI 0221, 0321, 0561,
0571,0661, 0861,
1031,1101, 1381
MONTGOMERY 1091
MOTOROLA 1041,1141
MTC 0351, 0361,0931,
0971,1011, 1031,
1111
MUL TITECH 0881, 1051
NAD 0551, 0621,0861
NEC 0241, 0351, 0361,
0661,0971, 1031,
1111, 1321, 1711
NECKERMANN 1001
NEI 1001
NIKKAI 0271,0431, 1001,
1151
NIKKO 0861,1111, 1121
NOVABEAM 0721
NTC 1121
ONWA 1051
OPTIMUS 0551
OPTONICA 0541, 1141
ORION 0831,1001
OSAKI 0271, 1151
OTTO VERSAND 1001
PANASONIC 0101, 0191,0251,
0751, 1041, 1311,
1371, 1431
PANDA 1541, 1721
PENNY 0161, 0361,0521,
0531, 0621, 0731,
0751, 0761, 0781,
0791, 0861, 0931,
0941, 1031, 1041,
1111, 1151, 1161
PEONY 1561, 1621
PHILCO 0361, 0581,0591,
0601, 0611, 0631,
0961, 1031, 111 1
PHILIPS 0101,0401, 1001
PHONOLA 1001
PILOT 0941, 1031, 111 1
PIONEER 0511, 0551,0871
PORTLAND 0941, 1031, 1121
PRICECLUB 0931
PRISM 0751
PROSCAN 0761
PROTECH 1001
PROTON 0501, 0861,0941,
1021, 1161
PULSAR 0891
PULSER 1031
QUASAR 0251,0751,1041
QUELLE 1001
RADIO SHACK0541, 0941,1031,
1051, 1151
RADIOLA 1001
RCA 0051, 0141,0151,
0181, 0411, 0491,
0531, 0761, 0771,
0871, 1031
REALISTIC 0541, 0861,0941,
0971, 0981, 1031,
1051, 1111, 1151
RHAPSODY 1011
R-LINE 1001
RUNCO 0891, 1111
SAISHO 0331, 1081
SAMPO 0361, 0941, 1021,
1111, 1151
SAMSUNG 0331, 0341,0351,
0361, 0861, 0931,
0941, 0971, 1001,
1031, 1111, 1151
SAMSUX 0941
SANYO 0171, 0231, 0271,
0661, 0801, 0911,
0981, 1231, 1251,
1261
SBR 1001
SCHEIDER 1001
SCIMITSU 1031
SCOTCH 0861
SCOTT 0831,0861, 0941,
1031, 1051, 1091
i
Page 40

SEARS 0101, 0161,0171,
0351, 0451, 0521,
0621, 0761, 0801,
0861, 0971, 0981,
1091
SHANGHAI 1561,1681
SHARP 0461, 0471,0541,
0661, 0911, 0941,
1141
SHOGUN 1031
SIGNATURE 0991,1771
SIMPSON 0581,0961
SOLAVOX 1151
SONOKO 1001
SONTEC 1001
SONY 0371, 0451, 0661,
0841, 0951, 1281,
1441
SOUNDESIGN 0861, 0961,1051,
1091
SOUNDWAVE 1001
SPECTRICON 1161
SQUAREVIEW 0481
SSS 1031, 1051
STAR-LITE 1051
SUPREX 0951
SUPRE-MACY 1131
SURPA 0351, 0971
SYLVANIA 0101, 0361,0441,
0581, 0591, 0601,
0611, 0631, 0961,
1111
SYMPHONIC 0481
SYSLINE 1001
TANDY 0271, 0431,1141
TATUNG 0271, 0881,1001,
1041, 1161
TCL 1561,1631, 1701
TECHNICS 0751
TECHWOOD 0351,0751,0971
TEKNIKA 0101, 0351, 0571,
0931, 0941, 0961,
0971, 0991, 1031,
1051, 1091, 1121,
1131, 1771
TELETECH 0331
TERA 0501
THAKRAL 1671
THORM 1001
TMK 0351, 0861, 0971,
1081
TOSHIBA 0381,0521,0621,
0661, 0931, 0981,
1301
TOSONIC 1011
TOTEVISION 0941
TRICAL 0911
UNIVERSAL 0781, 0791
UNIVERSUM 1001
VECTOR RESEARCH
0361, 1111
VESTEL 1001
VICTOR 0651
VIDEO CONCEPT 1101
VIDIKRON 0101, 0211
VIDTECH 0861, 1031
VIKING 1131
WARDS 0101, 0361,0451,
0541, 0581, 0591,
0601, 0611, 0771,
0781, 0791, 0861,
0971, 0991, 1031,
1091, 1111, 1771
WATSON 1001
XOGEGO 1611, 1621,1661,
1741, 1761
YAMAHA 0361, 1031,1111
YOKO 1001
ZENITH 0011, 0041,0891,
0991, 1771
ZONDA 1161
VCR
A T ANDY 0902
ADVENTURA 0992
AIKO 0982
AIW A 0992, 1422, 1432,
1442, 1452, 1462
AKAI 0262, 0942, 0952,
0962, 0972
AMERICAN HIGH 0932
AMSTRAD 0992
ASA 0002, 0912
ASHA 0922
AUDIO DYNAMICS 0202
AUDIOVOX 0912
BEAUMARK 0922
BELL & HOWELL 0902
BLAUPUNKT 0412
BROKSONIC 0872, 0882, 0892
BUSH 0852
CALIX 0912
CANON 0862,0932
CCE 0852, 0982
CITIZEN 0912, 0982
COL T 0852
CRAIG 0832, 0842,0852,
0912, 0922
CURTIS MATHES 0662, 0822,
0932
CYBERNEX 0922
DAEWOO 0802, 0812, 0982
DBX 0202
DYNATECH 0472,0992
ELECTROHOME 0912
ELECTROPHONIC 0912
EMEREX 0792
EMERSON 0072, 0132,0142,
0152, 0162, 0172,
0182, 0192, 0212,
0702, 0712, 0722,
0732, 0742, 0752,
0762, 0772, 0782,
0872, 0882, 0892,
0912, 0952, 0992,
1072
FINLUX 0002,0992
FISHER 0682, 0692, 0842,
0902
FUJI 0672, 0932
FUNAI 0992
GARRARD 0992
GE 0662, 0822, 0932
GO VIDEO 0642, 0652
GOLDSTAR 0082, 0632, 0912
GOODMANS 0402
GRADIENTE 0992
GRANDA 0612,0902
GRUNDIG 0002
H/K 1082
HARLEY DAVIDSON 0992
HARMAN/KARDON 0632, 1082
HARWOOD 0752,0852
HEADQUARTER 0612
HI-Q 0842
HINARI 0852
HITACHI 0102, 0562,0572,
0582,0592, 0602,
0992,1212, 1262
ITT 0942
JVC 0202, 0522,0532,
0542,0552
KENWOOD 0202, 0542,0612,
0632,0902
KLH 0852
KODAK 0912, 0932
LLOYD 0992
LOGIK 0852
LUXOR 0942
LXI 0022, 0912
MAGNAVOX 0002,0482, 0492,
0502,0512, 0932
MAGNIU 0922
MARANTZ 0002, 0202, 0402,
0632,0932
MARTA 0912
MATSUSHITA 0932
MATSUI 0722
MEI 0222,0932
MEMOREX 0232,0242, 0472,
0512,0612, 0842,
0902,0912, 0922,
0932,0992
MGA 0762, 0952
MGA TECHNOLOGY 0922
MINOLTA 0592, 0602
MITSUBISHI 0452, 0462, 0542,
0762,0952, 1082,
1272,1342
MOTOROLA 0472,0932
MTC 0922, 0992
MUL TITECH 0852, 0992
NAD 0442
NEC 0122, 0202, 0292,
0422,0432, 0542,
0632,1232, 1242
NIKKO 0912
NOBLEX 0922
OL YMPUS 0412, 0932
OPTIMUS 0442, 0472,0912
OPTONICA 0402
ORION 0212,0722, 0742,
0772
OSAKI 0912
PANASONIC 0012,0052,0092,
0222,0372, 0382,
0392,0412, 0932,
1292,1312, 1322,
1332,1402
PENNY 0202, 0432, 0602,
0632,0692, 0912,
0922,0932
PENTAX 0592,0602
PERDIO 0992
PHILCO 0002, 0932
PHILIPS 0002,0282, 0402,
0492,0932
PILOT 0912
PIONEER 0442, 0542
PROSCAN 1002, 1012, 1022,
1032,1042, 1052,
1062
PULSAR 0512
QUARTER 0612
QUARTZ 0272,0612
QUASAR 0382, 0392,0932
RADIO SHACK 0912, 0992
RADIX 0912
RANDEX 0912
RCA 0112, 0382,0392,
0482, 0592, 0602,
0662, 0822, 0942
REALISTIC 0402, 0472, 0612,
0662, 0842, 0902,
0912, 0922, 0932,
0992
RICOH 0352, 0362
SAISHO 0212, 0582,0722,
0732, 0742, 0772
SALORA 0612, 0762
SAMSUNG 0212, 0312,0922,
0962
SANKY 0472, 0512
SANSUI 0292, 0542,0832
SANYO 0242, 0612, 0842,
0902, 0922, 1122,
1132, 1142, 1152
SBR 0002,0282
SCHEIDER 0852
SCOTT 0342,0712, 0762,
0872, 0882, 0892
SEARS 0302, 0592,0602,
0612, 0682, 0692,
0842, 0902, 0912,
0932
SHARP 0402, 0472
SHINTON 0852
SHOGUN 0922
SINGER 0852
SONY 0032,0332, 0352,
0362, 0672, 0792,
0932, 1102, 1112,
1192
STS 0602
SUNPAK 0352
SYLVANIA 0002, 0492,0502,
0762, 0932, 0992
SYMPHONIC 0992
TANDY 0992
TASHIKO 0712,0992
TEAC 0992
TECHNICS 0932
TEKNIKA 0322, 0912, 0932,
0992
TELEFUNKEN 0252
TMK 0212, 0732, 0772,
0922
TOSHIBA 0062,0302,0342,
0622, 0682, 0712,
0762, 1202, 1222
TOTEVISION 0912,0922
UNITECH 0922
VECTOR RESEARCH
0202, 0432, 0632
VICTOR 0542, 0552
VIDEO CONCEPTS 0202, 0432,
0632, 0952
WARDS 0322, 0402,0472,
0482, 0602, 0712,
0842, 0852, 0922,
0932, 0992
YAMAHA 0202, 0632
ZENITH 0042, 0362,0512,
0672
Cable TV
ABC 0254, 0374
ANTRONIX 0134
ARCHER 0134, 0284
BBT 0074
CABLETIME 0164
CABLEVISION 0194
COLOUR VOICE 0304,0344
ii
Page 41

COMTRONICS 0214, 0274
EAGLE COMTRONICS 0274
EASTERN 0064
ELECTRICORD 0204
ELECTUS 0264
GE 0114, 0124
GEC CABLE SYSTEM 0194
HAMLIN H5 0674
HAMLIN H6 0664
HAMLIN H6S 0654
HAMLIN H8 0644
HAMLIN H9 0634
JERROLD 0254
JERROLD 400L 0624
JERROLD 450L 0614
JERROLD 550 0604
JERROLD OSD CATV 0594
JERROLD SPRUCER 0434
MAGNAVOX/PHILIPS
0414, 0424
MAMM 0294
MEMOREX 0384
MOVIE TIME 0144,0204
NORTHCOAST0014
NSC 0144
OAK 0104
OAK SIGMA 450 0544
OAK SIGMA 550 0534
PANASONIC TZ 120/130 0474
PANASONIC TZ 170/180 0444
PANASONIC TZ140 0464
PANASONIC TZ150/160 0454
PARAGON 0384
PHILIPS 0034, 0214, 0304,
0314, 0324, 0334,
0344
PIONEER 0004, 0084
PIONEER BR50 0844
PIONEER BR60/70/80/81/82
0694
PIONEER BR90 0554
PULSAR 0384
RCA DIGITAL SATELLITE
SYSTEM 0394, 0404
REALISTIC 0134
REGENCY/EASTERN 0684
RUNCO 0384
SAMSUNG 0274
SCIENTIFIC A TLANT A 175/475
0574
SCIENTIFIC A TLANT A 75
0364, 0584
SCIENTIFIC A TLANT A 8650
0564
SIGNAL 0274
SL MARX 0274
SPECTAVISION 0234
STANDARD COMPONENTS
0184
STARCOM V 0254
STARGATE 0274
SYLVANIA/TEXSCAN
0374, 0494
TEKNIKA 0174
TELESERVICE 0054
TELEVIEW 0274
TEXSCAN 0184,0374
TFC 0024
TOCOM 0224, 0354
TOCOM 5503A 0524
TOCOM 5503VIP/5507 0514
TOCOM TC56 0504
TOSHIBA 0384
TUDI 0044
UNIKA 0134
UNIVERSAL 0134,0154, 0204,
0284
VIDEOW AY 0094
VIEWSTAR 0214
ZENITH 0244, 0384,0484
Satellite T uner
ALPHA STAR 0824
CHAPARRAL 0754
ECHOSTAR 0834
GENERAL INSTRUMENT 0774,
0874
HTS 0834
HUGHES NETWORK SYSTEMS
0814
JERROLD 0774, 0784
PANASONIC 0804
PRIMESTAR 0774, 0784
RCA 0764
SONY 0794
iii
Page 42

Page 43

YAMAHA ELECTRONICS CORPORATION, USA 6660 ORANGETHORPE AVE., BUENA PARK, CALIF. 90620, U.S.A.
YAMAHA CANADA MUSIC LTD. 135 MILNER AVE., SCARBOROUGH, ONTARIO M1S 3R1, CANADA
YAMAHA ELECTRONIK EUROPA G.m.b.H. SIEMENSSTR. 22-34, 25462 RELLINGEN BEI HAMBURG, F.R. OF GERMANY
YAMAHA ELECTRONIQUE FRANCE S.A. RUE AMBROISE CROIZAT BP70 CROISSY-BEAUBOURG 77312 MARNE-LA-VALLEE CEDEX02, FRANCE
YAMAHA ELECTRONICS (UK) LTD. YAMAHA HOUSE, 200 RICKMANSWORTH ROAD WATFORD, HERTS WD1 7JS, ENGLAND
YAMAHA SCANDINAVIA A.B. J A WETTERGRENS GATA 1, BOX 30053, 400 43 VÄSTRA FRÖLUNDA, SWEDEN
YAMAHA MUSIC AUSTRALIA PTY, LTD. 17-33 MARKET ST., SOUTH MELBOURNE, 3205 VIC., AUSTRALIA
Printed in Malaysia V672800-1
Page 44

Connection Guide
Connecting to a TV (monitor), DVD player, Satellite tuner and VCR
Control center VS-10 (rear panel)
VIDEO SIGNAL
MONITOR
OUT
DVD player
V
VIDEO
OUT
OPTICAL DIGITAL
OUTPUT
V
DIGITAL 1
(V/PCM)
INPUT
VIDEO 1 TV
+
DO NOT CONNECT THIS UNIT TO
SPEAKERS OTHER THAN NX-VS10M
MAIN SPEAKERS
R L
OUT
SUBWOOFER
VV R L
+
–
MARK
SYSTEM
CONNECTOR
TV (monitor)
Satellite tuner
VIDEO
OUT
Supplied cords
Audio connection cord (2 pin) (x 1)
L
R
Video connection cord (x 1)
V
V
R L
VCR
VIDEO
OUT
V RL
AUDIO
OUT
L
R
V RL
AUDIO
OUT
L
R
1
2
VIDEOINAUDIO
IN
V RL
AUDIO
OUT
L
R
L
R
V
Commercially available cable
Optical fiber cable
Page 45

Connecting to a camcorder
+
DO NOT CONNECT THIS UNIT TO
SPEAKERS OTHER THAN NX-VS10M
–
+
–
MAIN SPEAKERS
+
––
+
REAR, CENTER SPEAKERS
DO NOT CONNECT THIS UNIT TO
SPEAKERS OTHER THAN NX-VS10E,
NX-VS10C
Connecting the main speakers (supplied) and YAMAHA subwoofer/
Connection Guide
DIGITAL2 VIDEO2
and video game player
POWER
STANDBY
PHONES
SILENT
center speaker/rear speakers NX-SW10 (sold separately)
Main speaker
NX-VS10M
Right
Main speaker
NX-VS10M
Left
Connect either.
V
V
RL
VIDEO SIGNAL
MONITOR
OUT
+
–+–
DO NOT CONNECT THIS UNIT TO
SPEAKERS OTHER THAN NX-VS10M
Camcorder
DIGITAL 1
(V/PCM)
INPUT
VIDEO 1 TV
L
R
VIDEO
OUT
AUDIO
OUT
Control center VS-10
V
L
R
MAIN SPEAKERS
OUT
SUBWOOFER
MARK
SYSTEM
CONNECTOR
SYSTEM
CONNECTOR
MARK
REAR, CENTER SPEAKERS
+
–
DO NOT CONNECT THIS UNIT TO
SPEAKERS OTHER THAN NX-VS10E,
NX-VS10C
REAR R
CENTER
+
–
REAR L
Subwoofer
SW-VS10
(rear panel)
Supplied cable
V
VIDEO
OUT
OPTICAL DIGITAL
OUTPUT
Video game player
V647640
System connector cable (x 1)
Commercially available cords and cable
Video connection cord
V
Audio connection cord (2 pin)
L
R
Optical fiber cable
V
L
R
+– –
Rear speaker
NX-VS10E
Right
MAINS
+
–
Center speaker NX-VS10C
+
Rear speaker
NX-VS10E
Left
Page 46

documentation manual, user maintenance, brochure, user reference, pdf manual
This file has been downloaded from:
User Manual and User Guide for many equipments like mobile phones, photo cameras, monther board, monitors, software, tv, dvd, and othes..
Manual users, user manuals, user guide manual, owners manual, instruction manual, manual owner, manual owner's, manual guide,
manual operation, operating manual, user's manual, operating instructions, manual operators, manual operator, manual product,
 Loading...