

Page 1

VL Visual Editor
Manual
Important Notices
The VL Visual Editor (the Visual Editor) provides an easy, intuitive way to create, edit,
and save basic voices for Yamaha VL Plug-in Board.
Do not operate the “mother” synthesizer/ tone generator while editing voices using the
Visual Editor since you may inadvertently change the voice edit parameters by operating the hardware.
Copyright Notices
• The software and this owner’s manual are the exclusive copyrights of Yamaha Corporation.
• Copying of the software or reproduction of this manual in whole or in part by any means is
expressly forbidden without the written consent of the manufacturer.
• Copying of the commercially available music sequence data and/or digital audio files is
strictly prohibited except for your personal use.
Trade Marks and Registered Trade Marks
• OMS® and are trademarks of Opcode Systems, Inc.
• The company names and product names in this Owner’s Manual are the trademarks or registered trademarks of their respective companies.
Notices
• Yamaha makes no representations or warranties with regard to the use of the software and
documentation and cannot be held responsible for the results of the use of this manual and
the software.
• The windows and illustrations in this manual are for instructional purposes only, and may
slightly different from the ones shown on your software.
About this manual
The screens shown in this manual are almost all on Windows systems. Although some screens may diff er f or
Macintosh systems, the basic operations are the same.
For Windows users
When you use the VL Visual Editor, set “Font Size” to “Small Fonts” at the “Control Panel | Display | (Settings |)
Advanced” page. If “Large Fonts” is selected, messages in some dialog boxes may not be displayed properly.
For Macintosh users
When you use the VL Visual Editor on MacOS 8.5 or later, set “Large System Font” to “Charcoal” at the “Control
Panels | Appearance | Font” page. Also, uncheck the “Smooth all fonts on screen” check box.
Copyright (c) 2001 Yamaha Corporation. All rights reserved.
Version 1.0, 2001
YAMAHA CORPORATION
Page 2
Editing Procedure
The Visual Editor mainly consists of two windows: the Synthesis Window and Edit Window.
Synthesis
Edit
z Select the combination of the Driver, Pipe/Strings and Variation
to synthesize in the Synthesis Window.
x Switch to the Edit Window after the selection. This process auto-
matically creates a voice (a set of new voice parameters).
c Make detailed changes on the parameters in the Edit Window to
complete the new voice.
2
Page 3
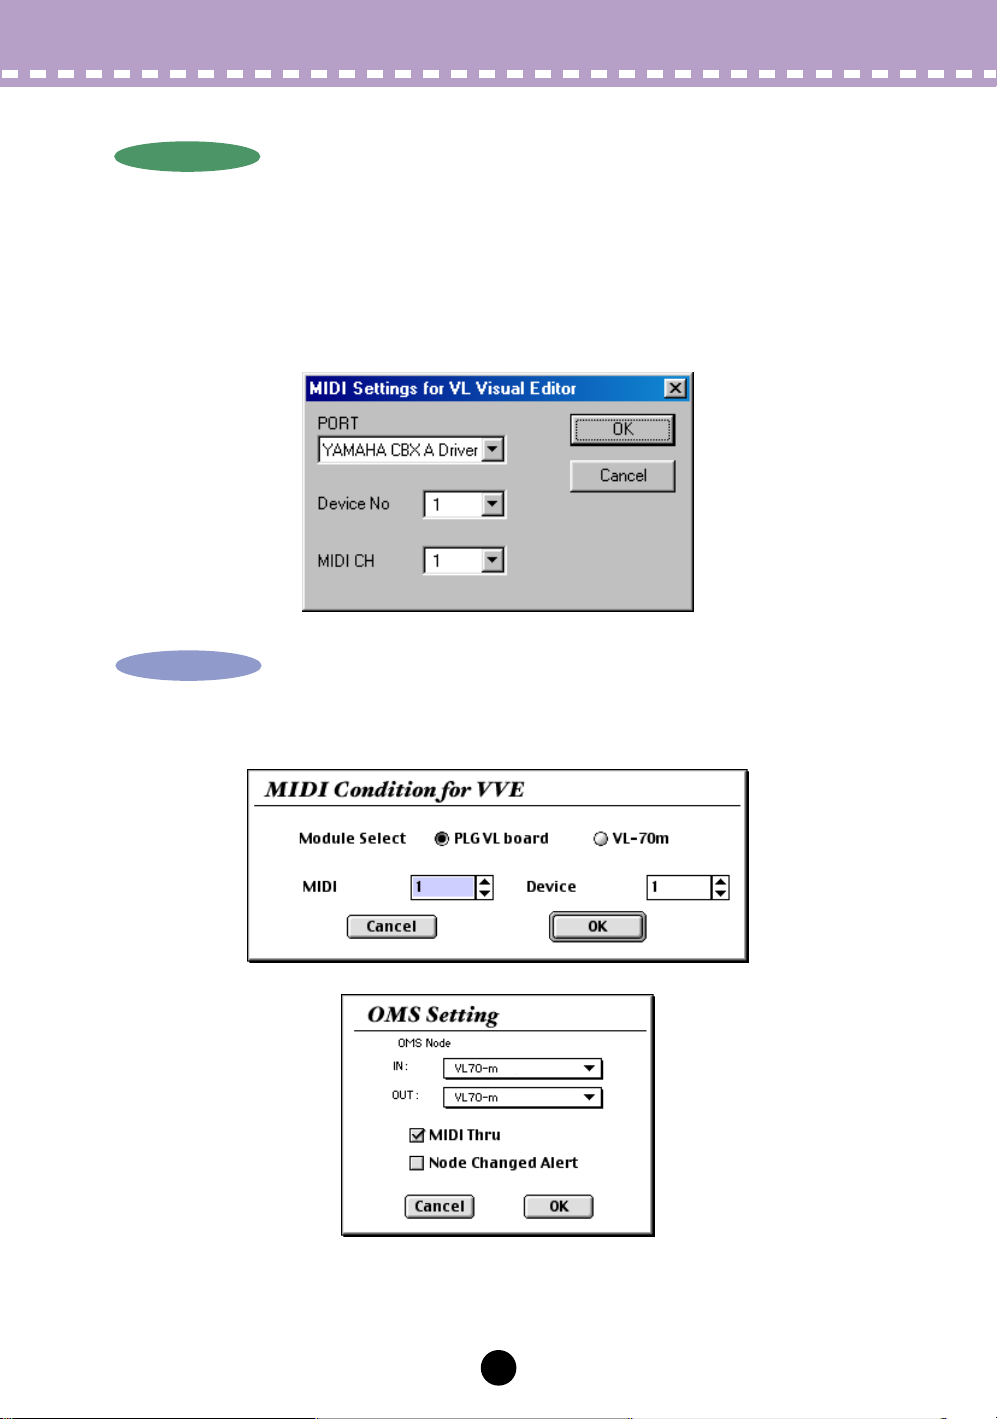
MIDI Settings
Windows
Windows
Select [VL Visual Editor MIDI...] from the [Setup] Menu to open the dialog box, which
lets you select the MIDI Por t, Device Number and Transmit Channel to send. Set the
same MIDI Port, Device Number and Transmit Channel as the ones you set for the tone
generator.
The Visual Editor is valid for the VL voice assigned to Part 1. Set the VL voice to Part 1
by operating the “mother” synthesizer/ tone generator.
Macintosh
Macintosh
Select [MIDI…] or [Choose Input/Output…] from the [Window] Menu to open the following dialog boxes.
3
Page 4
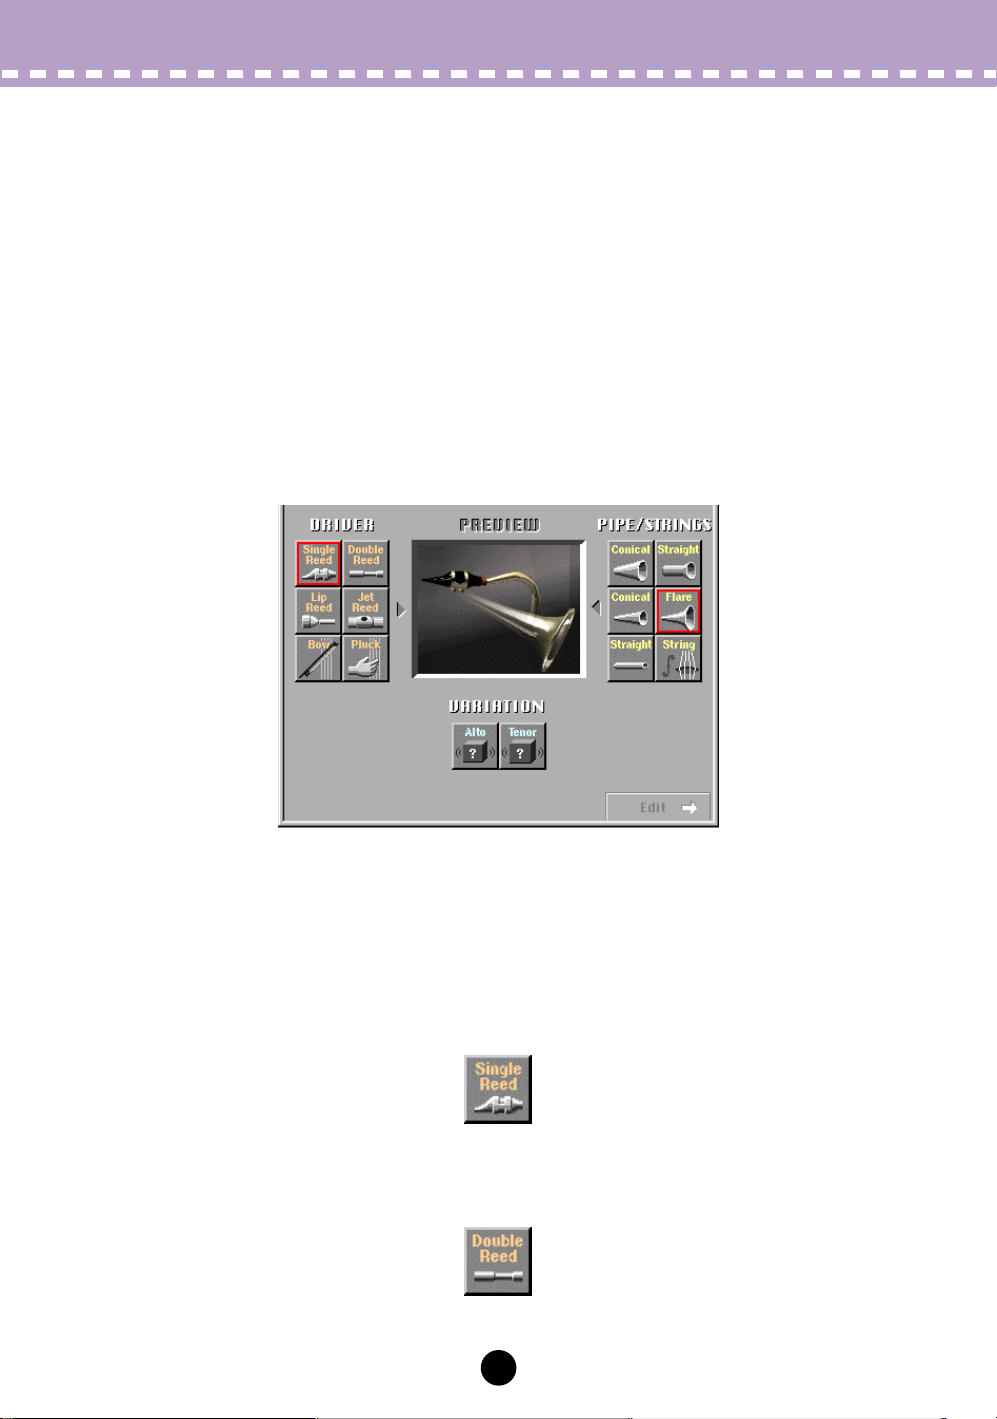
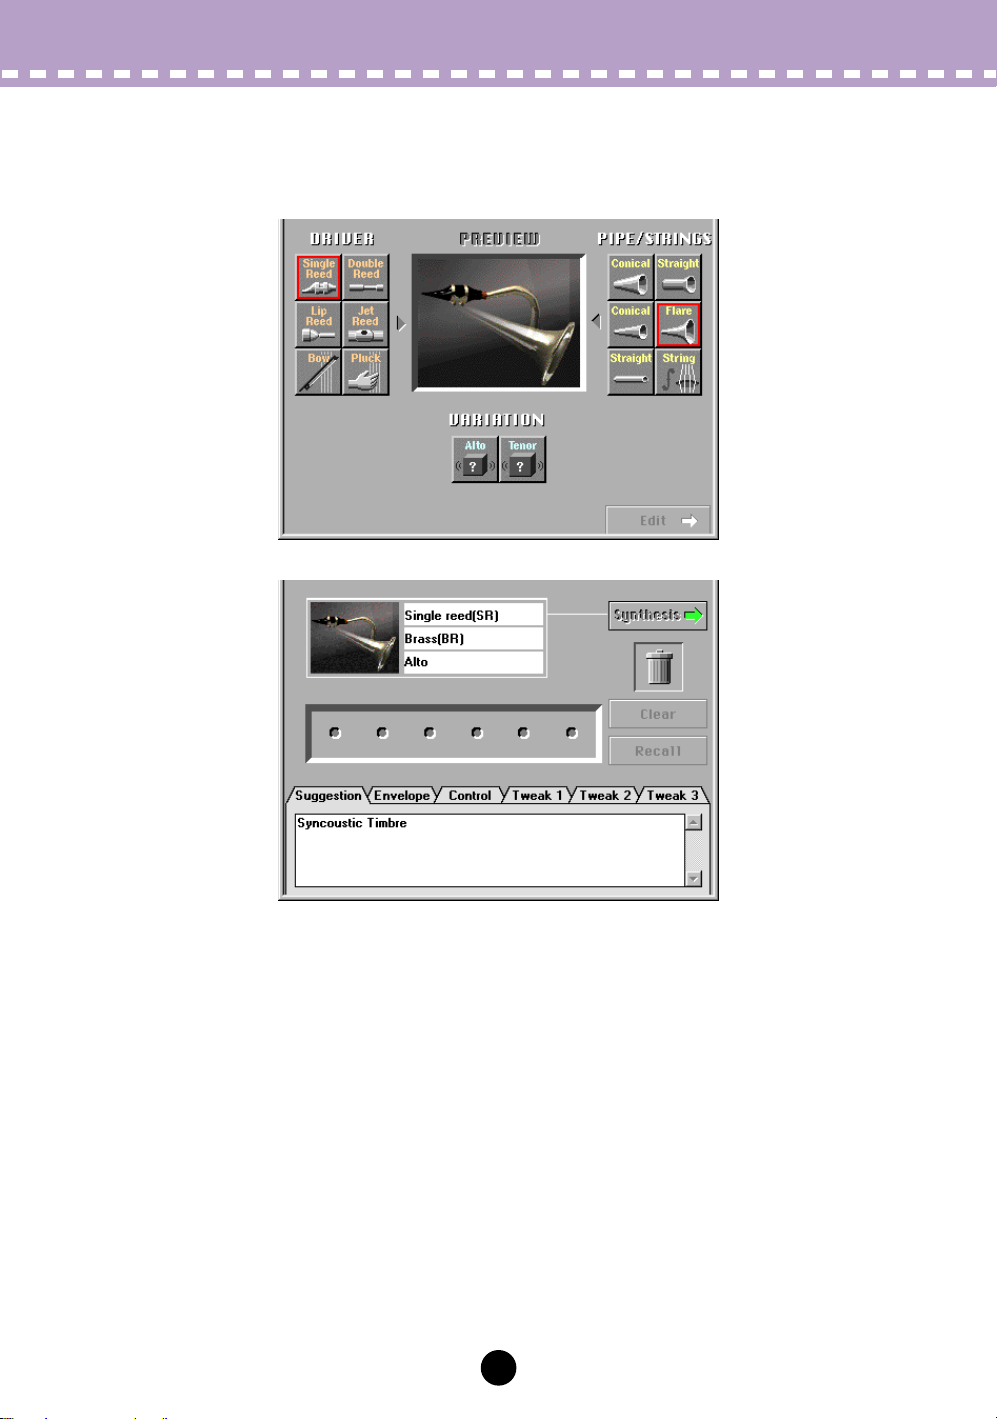
Synthesis Window
Click on any of the “DRIVER” options to the left of the window to select it (the selected
driver will be outlined in red). Next click on one of the PIPE/STRINGS options to the
right of the window — the selected PIPE/STRINGS option will be outlined in red. A composite image representing the selected DRIVER and PIPE/STRINGS options will
appear in the “PREVIEW” window. The “VARIATION” buttons will also appear and be
selectable. If one of the “VARIATION” buttons in the lower part of the window is now
clicked, the corresponding voice data will be transmitted to, and can be played via, the
connected tone generator. The transmitted voice will sound briefly when the data has
been successfully transmitted.
When the transmission process is completed, the Visual Editor informs you of it by playing a broken chord using the transmitted voice. You can audition the edited voice as a
broken chord by clicking the composite image.
The DRIVER Options
The Visual Editor provides 6 DRIVER options. This is the part of the instrument which
generates the energy which will be converted into sound and subsequently “shaped” by
the PIPE/STRINGS section.
• Single Reed
A single-reed woodwind mouthpiece like the type used on a saxophone or clarinet.
• Double Reed
A double-reed woodwind mouthpiece like the type used on an oboe or bassoon. The
“grass flute” also works on this principle.
4
Page 5
Synthesis Window
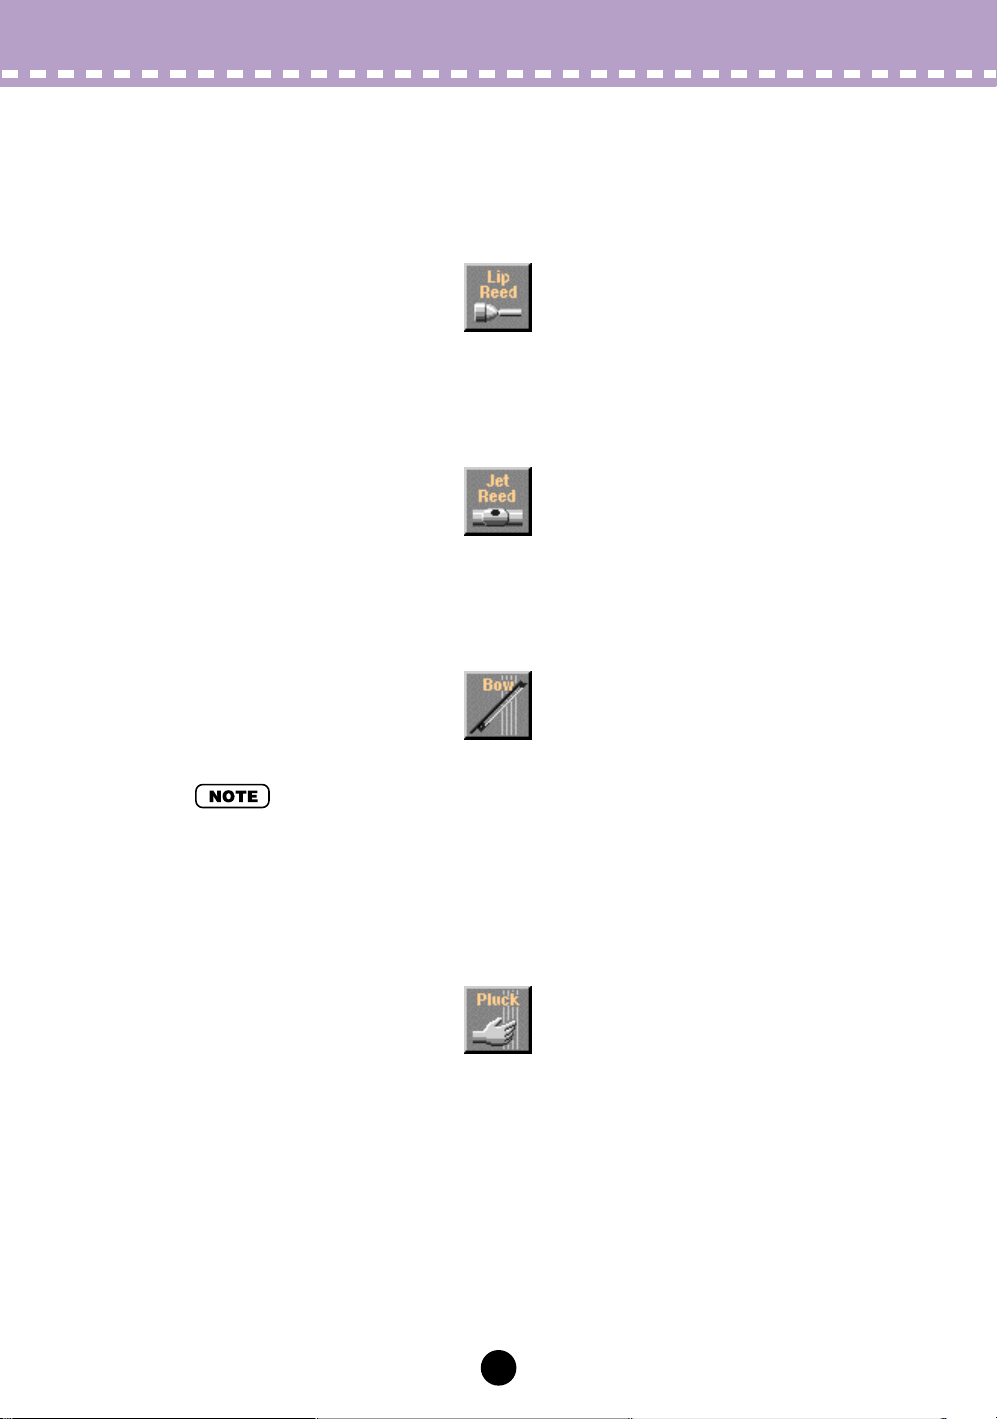
• Lip Reed
In a trumpet, the player’s lips are pressed against a specially-shaped mouthpiece and
forced to vibrate in response to the player’s breath pressure. The trombone, horn, tuba,
and most other brass instruments work on this principle.
• Jet Reed
The flute, pan pipes and shakuhachi all work on the “jet reed” principle: i.e. sound is generated by the air turbulence produced by blowing across a solid edge.
•Bow
A bow drawn across a string causes the string to vibrate, thereby generating rubbedstring instrument sound: violin, cello, contrabass, etc.
• Selecting the Bow (DRIVER) and String (PIPE/STRINGS) combination allows you to select
Analog synthesizer waves in VARIATION.
• Pluck
Guitar, mandolin, and harp are all plucked string instruments. “Pizzicato” is pluc k ed violin,
viola, etc. This driver corresponds to plucking a string to produce sound.
5
Page 6
Synthesis Window
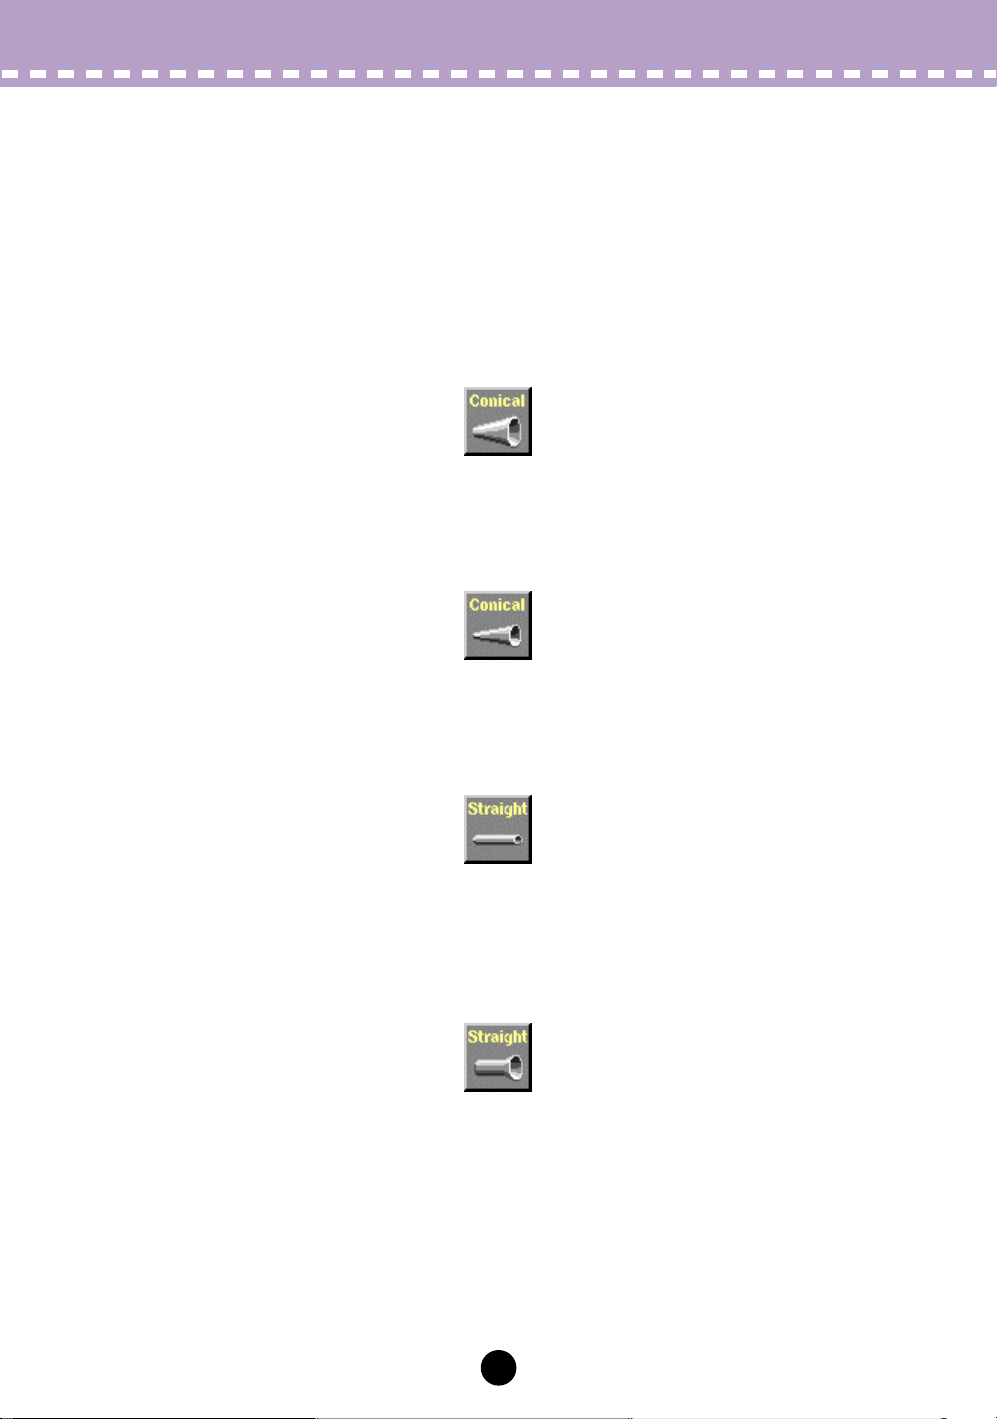
The PIPE/STRINGS Options
The Visual Editor provides 6 PIPE/STRINGS options. The pipe or string is the section of
the instrument that amplifies and adds distinctive tonal characteristics to the sound
energy generated by the driver.
• Conical (large)
This option simulates the type of conical horn used in instruments like the saxophone —
a small entrance aperture, gradually expanding to a relatively large bell.
• Conical (small)
This conical pipe has a much smaller taper than the above, more like the type of pipe
used in an oboe.
• Straight (double-ended)
A flute pipe, for example, is essentially straight along its length, but is driven at a point
somewhere between its two ends. This type of pipe is “double-ended”.
• Straight (single-ended)
Similar to a clarinet pipe — driven from one end and essentially straight right up to the
flare at the other end. In physical modelling terminology, this type of pipe is considered to
be “single-ended”.
6
Page 7

Synthesis Window
• Flare
This is the type of pipe found on the trumpet and other brass instruments. Although it
depends on the type of DRIVER selected, this type of pipe generally produces a relatively bright sound.
• If the Pluck driver is combined with the Flare pipe, the resultant pitch can be unpredictable.
This is because the Flare pipe is inherently ambiguous — e.g. a trumpet player can vary the
pitch of his instrument over a wide range simply by adjusting his embouchure (the way he
uses his lips).
• String
A drawn string, like the type used on a violin or guitar. The final result depends on the
DRIVER selected, but the string generally has a relatively long decay.
The V ARIA TION Options
Depending on the DRIVER and PIPE/STRINGS combination selected, two or more
VARIATIONs corresponding to different instrument sizes and characteristics may be
available. If the DRIVER and PIPE/STRINGS combination is a standard one (e.g. Lip
Reed with Flare), the corresponding instrument names will appear in the VARIATION
buttons (e.g. Trumpet, T rombone, etc.).
You can also select V ARIATION by double-clicking, and it tak es y ou to Edit window automatically.
7
Page 8
Edit Window
Press the [Edit ->] button in the lower right corner of the “Synthesis” window to go to the
“Edit” window. This window allows further editing of the basic voice created in the “Synthesis” window.
The labelled “menu tabs” in the lo w er section of the “Edit” window provide access to corresponding edit pages. By clicking each menu tab you can display various editing
“pages”.
You can audition the edited voice as a broken chord by clicking the composite image.
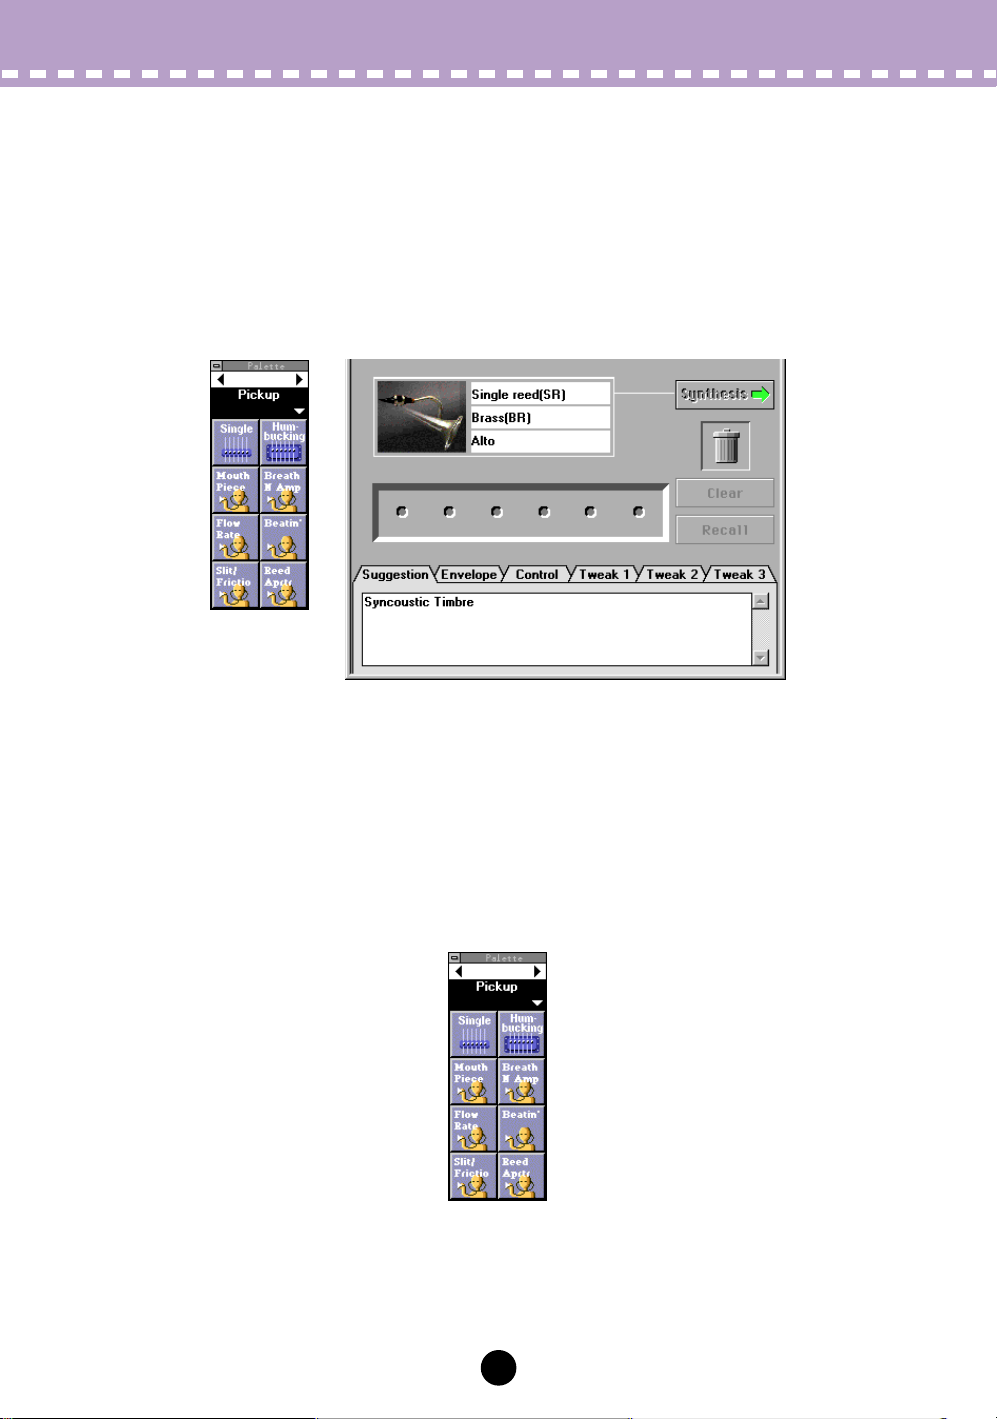
The Patch Palette
When the “Edit” window is selected, a smaller floating window labelled “Pickup” will
appear to its left. This is the “Patch Palette” containing 8 men u pages for editing
Filter, Resonator, Combination-1, Combination-2, Variation, Chorus, Reverberation.
Click on the left and right facing arrows at the top of the window to switch menus as
required. You can also select a menu by clicking on the solid section showing the menu
name to open the pop-up menu and directly choosing a menu from it.
Pickup,
8
Page 9

Edit Window
A menu contains several icons (patches), each of which is assigned with specific effects.
Editing will be executed by selecting the icons from various menu pages and arranging
them in the patch holder row in the center of the Edit Window (above the labelled “menu
tabs”).
Double-clicking on any of the icons in the “Patch Palette” causes that icon to appear in
the patch holder, and the corresponding effect will be applied to the current voice. The
items in the “Patch Palette” menu icons can also be moved to the patch holder by clicking
and dragging. The icons can be selected, or moved to the patch holder according to the
following rules:
• Only one item can be selected from the same type menu. If one of these icons is selected
while a previous icon of the same type exists in the patch holder, the new selection will
replace the previous selection.
• The selected icons lines up from left to right in the predetermined order: Pickup (left most),
Filter, Resonator, Combination, Variation, Chorus, Reverberation (right most).
• Selecting the Combination item while the Variation, Chorus and/or Reverberation items are
selected resets, or deletes the Variation, Chorus and/or Reverberation items. On the contrary,
simultaneously selecting all three items (the Variation, Chorus and Reverberation) while the
Combination item is selected deletes the Combination item.
• When you are using the synthesizer/ tone generator compatible with Modular Synthesis Plugin System, the Combination, Variation, Chorus and Reverberation items have no effects.
To remove an item from the patch holder chain, simply click and drag it to the trash can
icon.
If you want to remove all patch icons and start from scratch, click on the [Clear] button.
Clicking [Recall] button restores the items deleted.
• Please note that when “Clear” is executed the other “Edit” parameters — “Envelope”, “Control” and “Tweak”, to be described later — are also cleared.
• The “Patch Palette” will always appear in front of any other open windows, but, like any other
window, it can be closed by clicking on its close button. Once closed it can be re-opened by
selecting [VL Show Patch Palette] from the [Window] Menu.
9
Page 10

Edit Window
The various patches are described briefly below.
<1> Pickup
Changing pickups is like changing pickups on a guitar or changing the position of
a pickup on a brass or woodwind instrument. The Visual Editor provides 8 pickup
types.
• Single
A simulation of a “single-coil” electric guitar pickup.
• Humbucking
A simulation of a “double-coil” humbucking electric guitar pickup.
• Mouthpiece
The effect produced by attaching a pickup to the mouthpiece of a wind instrument.
• BreathNoiseAmp
This pickup picks up the amplitude of the noise components of the breath noise.
• FlowRate
The saturation component of the air-flow within the instrument’s mouthpiece is converted to sound and amplified.
• Beatin’
The beating or “buzzing” of the mouthpiece reed is selectively amplified.
10
Page 11

Edit Window
• Slit/Friction
The variation in the gap between the reed and mouthpiece is converted to sound and
amplified. When the “Bow” driver is selected this pickup amplifies the friction of the
bow.
• Reed Aperture
The flexing of the reed is converted to sound and amplified.
<2> Filter
The sound can be shaped with basic low-pass filters usually found on analog synthesizers. The frequency and resonance of the filter can be adjusted via the
“Tweak” edit page, described later.
11
Page 12

Edit Window
<3> Resonator
These patches add, for example, the resonance of a violin or guitar body to the
sound.
<4> Combination 1, 2
A range of effect combinations are provided for use with different types of music.
12
Page 13

Edit Window
<5> Variation
Mainly delay type effects based on the Variation Effect of the “mother” synthesizer/ tone generator.
<6> Chorus
Chorus type effects based on the Chorus Effect of the “mother” synthesizer/ tone
generator.
13
Page 14

Edit Window
<7> Reverberation
Reverb type effects based on the Reverb Effect of the “mother” synthesizer/ tone
generator.
Suggestion
Clicking on the “Suggestion” tab in the lower part of the “Edit” window will bring the Suggestion page to the front. The Suggestion page provides notes on the current voice and
the selected patches.
Envelope
Click on the “Envelope” tab to access the Attack Rate, Delay, and Release envelope
parameters. The Decay parameter is only available when the Pluck driver is selected.
Each of these parameters can be adjusted from -16 to +16 (33 steps). The higher the
value the faster the rate. A value other than “0” must be selected to produce any effect.
With some DRIVER and PIPE/STRINGS combinations, however, only positive or negative values may be effective. Also, some en velope settings will produce no audible effect
with some DRIVER and PIPE/STRINGS combinations.
14
Page 15

Edit Window
Control
Click on the “Control” tab to access parameters that allows adjustment of Breath Controller operation. The “Control depth” parameter can be adjusted from 0 (no control) to
127 (maximum depth), and the “Control curve” parameter can be adjusted from -16 to
+16 (33 steps). Positive values produce a softer curve while negative values produce a
harder curve. The “Breath/No Breath” parameter selects the controller: “BC/WX” for the
Breath Controller. “Velocity” for the keyboard velocity. “TouchEG” for touch EG control
(i.e. keyboard velocity and aftertouch response) .
Be aware that the “Breath/No Breath” setting here affects all voices equally. Independent setting for each voice cannot be applied.
Tweak 1, 2, 3
The “Tweak 1”, “Tweak 2” and “Tweak 3” tabs access a range of parameters that can be
adjusted from -16 through +16 (33 steps). Additional parameters may also appear
according to the selected patches.
• When you use the synthesizer/ tone generator compatible with Modular Synthesis Plug-in
System, some items on the Tweak pages have no effects.
Recall
Clicking the [Clear] button resets the “Patch Palette”, “Envelope”, “Control” and “Tweak”
parameters. Clicking [Recall] button restores the parameters which have been deleted.
In some cases you might want to change the DRIVER, PIPE/STRINGS and/or VARIATION settings without affecting the “Edit” page settings. If you switch from the “Edit” window to the “Synthesis” window (the “Patch Palette”, “Envelope”, “Control” and “Tweak”
parameters will be reset to the defaults) and then return to the “Edit” window, you can
restore the original parameter settings.
The “Clear” and “Recall” functions will be effective to the values of the “Envelope”, “Control” and “Tweak” parameters even though the patch holder have not been assigned
with the patch palette menu.
15
Page 16

Voice List
A Voice List window is automatically created the first time the “Edit” window is selected,
and it can also be opened by selecting [VL Voice List] from the [Window] Menu.
A newly created voice is automatically added to the Voice List each time the [Edit ->]
button in the “Synthesis” window is clicked.
Audition
When a voice name in the Voice List is clicked, the data for that voice is transmitted to
the connected tone generator, and the selected voice can be played via the tone generator.
• This function will be inactive when you select a voice using the arrow keys on your computer
keyboard.
Edit
Commands in the [Edit] Menu from the Menu Bar can be used to edit Voice List items as
in the conventional Edit commands. For example, copied voices by using [VL Voice
Copy] command can be pasted to a new location by using [VL Voice Paste], or selected
voices can be deleted by using [VL Voice Delete].
File Management
The Voice List can be saved in the same way as any other file on the computer. Its file
extension is .LIB.
Select [VL Voice Save] from the [File] menu to save the current Voice List. Select [VL
Voice Save as …] to specify a different save file name. The “Save As” dialog box will
also appear the first time the “Save” option is selected for a Voice List. Subsequent uses
of the “Save” option simply overwrite the previous file of the same name … be careful
not to accidentally overwrite a file you want to keep.
Select [VL Voice Open] from the [File] menu in order to open a previously saved Voice
List. Use the “Open” dialog box to select the folder and file you want to open.
Select [VL Voice New] from the [File] Menu to create a new Voice List.
16
Page 17

Voice List
• When a new or existing file is opened and a new v oice is created (specifically, when the [Edit >] button in the “Synthesis” window is clicked), the new voice will be added to the Voice List.
If you want to add the new voice to the specific voice list, you must open it beforehand.
• Multiple Voice Lists cannot be opened at the same time. Voice copied from one list using the
[Edit] Menu [VL Voice Copy] command can be pasted to a different Voice List to allow voice
management between multiple Voice Lists.
• A new Voice List contains 128 blank voice locations, none of which contain data which can be
transmitted to the tone generator. As voices are created they are placed in the Voice List in
the order of creation, and are automatically saved up to the last existing voice location when
the Voice List is saved.
• When a new voice is synthesized after performing edit operations, the existing voice in the
Voice List may be overwritten.
Voice Names & Comments
The Voice Name window can be selected by double-clicking on the desired voice in the
Voice List while holding the <Ctrl> key. A voice name of up to 8 characters can be
entered as required.
Macintosh
Macintosh
For Macintosh, it can be selected by double-clicking while holding the
< >key.
The Comment window can be selected by double-clicking on a voice in the Voice List
while holding the <Ctrl> and <Alt> keys. The total number of characters that can be
entered in the Comment window is shown next to “Capacity” in the lower left corner of
the window.
Macintosh
Macintosh
For Macintosh, it can be selected by double-clicking while holding the
< > and <control> keys.
17
Page 18

Voice List
SMF (Standard MIDI File)
The Standard MIDI File is a universally accepted file type format which enables MIDI
song data to be transferred easily among diff erent music sequencing softw are and hardware made by different manufacturers. The Visual Editor can save the voice data in the
SMF format, which can be adopted to song sequence data.
zz
zz
After selecting the desired voice from the Voice List, select [VL
Voice Export...] from the [File] Menu. The following dialog box
appears:
The voice number in the Voice List is shown in the “voice”. Two SMF format types
are available: format 0 and format 1 (only format 0 for Macintosh).
xx
xx
Designate the file name and the folder to which you want to sa ve
the voice.
• Selecting [VL Voice Expor t...] when the voice is not specified in the Voice List allows you to
save the currently editing voice. In this case, the voice number is not available.
Loading the Voice Data to Custom Voice Bank
The currently edited voice can be transferred and loaded to the VL Plug-in Board as the
Custom Voice in the Custom Voice Bank. Refer to the VL Plug-in Board’s manual for
information on the Custom Voice.
zz
zz
Select [VL Load Voice...] from the [File] Menu.
The following dialog box appears:
18
Page 19

xx
xx
Enter the Custom Voice number (1 - 6) you want, and click [OK].
Number of Voices in the Voice List
The number of voices in the Voice List can be predetermined.
zz
zz
Click the Voice List to be top, or active.
xx
xx
Select [VL Voice Number...] from the [Setup] Menu.
The following dialog box appears:
cc
cc
Enter the number (1 - 256) you want to have in the V oice List, and
click [OK].
Voice List
Inserting the Voice Data in Songs
The voice data created by the VL Visual Editor can be inserted in the specified position
in the track of a song.
• This function is enabled when you use the Visual Editor as Plug-in Editor on Windows systems.
zz
zz
After selecting the desired voice from the Voice List, select
[Insert VL Voice Parameters...] from the [Setup] Menu.
The following dialog box appears:
xx
xx
Select the track number and specify the position you want to
have the data inserted, and then click [OK].
• Executing the operation above when the voice is not specified in the Voice List allows you to
insert the currently editing voice.
19
Page 20

Quitting the Application
Click on the Close button at the top of the “Synthesis” or “Edit” Window to quit the VL
Visual Editor application. If the currently synthesized or edited voice is not saved, a dialog box asking you to confirm whether you want to save the current Voice List will
appear. Select the appropriate response to quit the program.
20
Page 21

Menu Bar
[File] Menu
• VL V oice New
Opens a new Voice List.
• VL V oice Open
Displays the “Open” dialog box and you can select the desired Voice List file (extension
.LIB).
• VL V oice Close
Closes the Voice List currently displayed.
• VL V oice Save
Saves the Voice List currently displayed.
• VL Voice Save As
Displays the “Save As” dialog box. You can name the file and save it as Voice List file
(extension .LIB).
VL V oice Export
•
Saves the voice data in the SMF format.
• VL Load Voice
Loads the currently edited voice to the VL tone generator as the Custom Voice.
• Exit
Closes the window and shuts down the application.
If you use the VL Visual Editor as Plug-in Editor, the menu item is disabled. Click the Close
button of the “Synthesis” or “Edit” window to quit the application.
Though the menu names differ slightly for Macintosh systems, the basic functions are the
same.
21
Page 22

[Edit] Menu
• Undo
Undoes the most recent edit operation.
• Redo
You can redo operations that you have undone.
• VL V oice Copy
Copies the voice selected in the Voice List to the clipboard.
Menu Bar
• VL V oice Paste
The voice data on the clipboard will be pasted to the specified place in the Voice List.
• VL V oice Delete
The voice selected in the Voice List will be deleted.
• VL Voice Select All
All voices in the Voice List will be selected.
• Sort VL V oice List
The voices selected in the Voice List will be sorted.
Though the menu names differ slightly for Macintosh systems, the basic functions are the
same.
22
Page 23

[Setup] Menu
VL Visual Editor MIDI
•
You can make the MIDI settings for the VL Visual Editor.
Menu Bar
Macintosh
Macintosh
• OMS Studio Setup
This starts OMS Setup and opens the currently valid setup file. For more details on setting up
OMS, see the OMS manual in PDF format.
• OMS MIDI Setup
This opens the OMS MIDI setup dialog. Put a checkmark for the port you will be using, and
click [OK] to apply the setting. For more details, see the OMS manual in PDF format.
• Insert VL V oice Parameters
The voice data created by the VL Visual Editor can be inserted in the specified position in
the track of a song.
This function is enabled when you use the Visual Editor as Plug-in Editor on Windows systems.
• VL V oice Number
The number of voices in the Voice List can be predetermined.
[Window] Menu
For Macintosh, the follo wing men u items can be selected from the [Win
dow] Menu.
-
• VL Synthesis
Opens the Synthesis Window.
• VL Edit
Opens the Edit Window.
• VL V oice List
Opens the Voice List.
• VL Show/Hide Patch Palette
Switches between displaying and not displaying the Patch Palette.
Though the menu names differ slightly for Macintosh systems, the basic functions are the
same.
23
Page 24

documentation manual, user maintenance, brochure, user reference, pdf manual
This file has been downloaded from:
User Manual and User Guide for many equipments like mobile phones, photo cameras, monther board, monitors, software, tv, dvd, and othes..
Manual users, user manuals, user guide manual, owners manual, instruction manual, manual owner, manual owner's, manual guide,
manual operation, operating manual, user's manual, operating instructions, manual operators, manual operator, manual product,
 Loading...