

Page 1
Getting Started
Owner’s Manual 1
Page 2

Getting Started
Contents
Precautions . . . . . . . . . . . . . . . . . . . . . . . . . . . . . . . . . . . . . . . . . . . . . . . . 4
About the Manuals . . . . . . . . . . . . . . . . . . . . . . . 6
■ The Getting Started Manual (this manual) . . . . . . . . . . . . . . . . . . . . . . . . 6
■ The Feature Reference Manual . . . . . . . . . . . . . . . . . . . . . . . . . . . . . . . . . 7
■ Conventions . . . . . . . . . . . . . . . . . . . . . . . . . . . . . . . . . . . . . . . . . . . . . . . . . 7
VL7 Basics . . . . . . . . . . . . . . . . . . . . . . . . . . . . . . 8
Essential Concepts for the VL7 User
■ What Are the Advantages? . . . . . . . . . . . . . . . . . . . . . . . . . . . . . . . . . . . . . 9
■ The VL7 Model . . . . . . . . . . . . . . . . . . . . . . . . . . . . . . . . . . . . . . . . . . . . 10
The Instrument . . . . . . . . . . . . . . . . . . . . . . . . . . . . . . . . . . . . . . . . 10
The Controllers . . . . . . . . . . . . . . . . . . . . . . . . . . . . . . . . . . . . . . . . 12
The Modifiers . . . . . . . . . . . . . . . . . . . . . . . . . . . . . . . . . . . . . . . . . 13
■ There’s More … . . . . . . . . . . . . . . . . . . . . . . . . . . . . . . . . . . . . . . . . . . . . 15
The Controls & Connectors . . . . . . . . . . . . . . . 16
A Brief Introduction To the VL7 Interface
■ Front Panel . . . . . . . . . . . . . . . . . . . . . . . . . . . . . . . . . . . . . . . . . . . . . . . . 17
■ Rear Panel . . . . . . . . . . . . . . . . . . . . . . . . . . . . . . . . . . . . . . . . . . . . . . . . . 20
Setting Up . . . . . . . . . . . . . . . . . . . . . . . . . . . . . 22
System Connections & Preparation
■ Power Supply . . . . . . . . . . . . . . . . . . . . . . . . . . . . . . . . . . . . . . . . . . . . . . 22
■ Controllers . . . . . . . . . . . . . . . . . . . . . . . . . . . . . . . . . . . . . . . . . . . . . . . . . 23
Breath Controller . . . . . . . . . . . . . . . . . . . . . . . . . . . . . . . . . . . . . . 23
Foot Controllers . . . . . . . . . . . . . . . . . . . . . . . . . . . . . . . . . . . . . . . 23
Foot Switches . . . . . . . . . . . . . . . . . . . . . . . . . . . . . . . . . . . . . . . . . 23
■ Audio Connections . . . . . . . . . . . . . . . . . . . . . . . . . . . . . . . . . . . . . . . . . . 23
Headphones . . . . . . . . . . . . . . . . . . . . . . . . . . . . . . . . . . . . . . . . . . . 23
Stereo Sound System . . . . . . . . . . . . . . . . . . . . . . . . . . . . . . . . . . . 24
■ MIDI Connections . . . . . . . . . . . . . . . . . . . . . . . . . . . . . . . . . . . . . . . . . . . 24
■ Power-on Procedure . . . . . . . . . . . . . . . . . . . . . . . . . . . . . . . . . . . . . . . . . 25
■ Play the Demo . . . . . . . . . . . . . . . . . . . . . . . . . . . . . . . . . . . . . . . . . . . . . . 26
■ Breath Controller Calibration . . . . . . . . . . . . . . . . . . . . . . . . . . . . . . . . . . 28
■ Load the Pre-programmed Voice Data . . . . . . . . . . . . . . . . . . . . . . . . . . 30
Loading the “FULLCNT1:All” Voice File . . . . . . . . . . . . . . . . . . 31
2
Page 3
Getting Started
Voice Selection . . . . . . . . . . . . . . . . . . . . . . . . . 34
Selecting & Playing the VL7’s 64 Voices
■ Using the Voice Directory . . . . . . . . . . . . . . . . . . . . . . . . . . . . . . . . . . . . 36
The Controllers . . . . . . . . . . . . . . . . . . . . . . . . .38
Natural Musical Nuance and Expressive Control
■ Physical Controllers . . . . . . . . . . . . . . . . . . . . . . . . . . . . . . . . . . . . . . . . . 39
■ VL7 Controller Parameters . . . . . . . . . . . . . . . . . . . . . . . . . . . . . . . . . . . . 40
■ Controller Views . . . . . . . . . . . . . . . . . . . . . . . . . . . . . . . . . . . . . . . . . . . . 41
■ Some Exercises With the Alto Sax Controllers . . . . . . . . . . . . . . . . . . . . 42
■ Controller Envelopes . . . . . . . . . . . . . . . . . . . . . . . . . . . . . . . . . . . . . . . . 46
■ Other Controller Views . . . . . . . . . . . . . . . . . . . . . . . . . . . . . . . . . . . . . . . 47
Mixing & The Modifiers . . . . . . . . . . . . . . . . . . 48
Creating New Timbres and Original Voices
Mixing . . . . . . . . . . . . . . . . . . . . . . . . . . . . . . . . . . . . . . . . . . . . . . . . . . . 48
■ An Exercise: Remix the Pan Pipes Voice . . . . . . . . . . . . . . . . . . . . . . . . 49
The Modifiers . . . . . . . . . . . . . . . . . . . . . . . . . . . . . . . . . . . . . . . . . . . . . 51
■ Harmonic Enhancer . . . . . . . . . . . . . . . . . . . . . . . . . . . . . . . . . . . . . . . . . . 51
■ Dynamic Filter . . . . . . . . . . . . . . . . . . . . . . . . . . . . . . . . . . . . . . . . . . . . . 54
■ Frequency Equalizer . . . . . . . . . . . . . . . . . . . . . . . . . . . . . . . . . . . . . . . . . 55
■ Impulse Expander . . . . . . . . . . . . . . . . . . . . . . . . . . . . . . . . . . . . . . . . . . . 56
■ Resonator . . . . . . . . . . . . . . . . . . . . . . . . . . . . . . . . . . . . . . . . . . . . . . . . . . 57
Effects . . . . . . . . . . . . . . . . . . . . . . . . . . . . . . . .58
Creating the Right Ambience
■ Modulation Effects . . . . . . . . . . . . . . . . . . . . . . . . . . . . . . . . . . . . . . . . . . 59
■ Feedback Delay Effects . . . . . . . . . . . . . . . . . . . . . . . . . . . . . . . . . . . . . . 59
■ Reverb Effects . . . . . . . . . . . . . . . . . . . . . . . . . . . . . . . . . . . . . . . . . . . . . . 60
Index . . . . . . . . . . . . . . . . . . . . . . . . . . . . . . . . . 62
3
Page 4

Getting Started
Precautions
!! PLEASE READ THIS BEFORE PROCEEDING !!
■ Location
Do not expose the instrument to the following
conditions to avoid deformation, discoloration, or more
serious damage.
• Direct sunlight (e.g. near a window).
High temperatures (e.g. near a heat source, outside,
•
or in a car during the daytime).
• Excessive humidity.
• Excessive dust.
• Strong vibration.
■ Power Supply
• Turn the power switch OFF when the instrument is
not in use.
• The power supply cord should be unplugged from
the AC outlet if the instrument is not to be used
for an extended period of time.
• Unplug the instrument during electric storms.
• Avoid plugging the instrument into the same AC
outlet as appliances with high power consumption,
such as electric heaters or ovens. Also avoid using
multi-plug adaptors since these can result in
reduced sound quality and possibly damage.
■ Turn Power OFF When Making Connections
• To avoid damage to the instrument and other devices
to which it is connected (a sound system, for
example), turn the power switches of all related
devices OFF prior to connecting or disconnecting
audio and MIDI cables.
● DANGER
Improper connection of the equipment-grounding
conductor can result in a risk of electric shock.
Do not modify the plug provided with the product
— if it will not fit the outlet, have a proper outlet
installed by a qualified electrician. Do not use an
adaptor which defeats the function of the equipment-grounding conductor. If you are in doubt as
to whether the product is properly grounded,
check with a qualified serviceman or electrician.
■ MIDI Connections
• When connecting the VL7 to MIDI equipment, be
sure to use high-quality cables made especially for
MIDI data transmission.
• Avoid MIDI cables longer than about 15 meters.
Longer cables can pick up electrical noise that can
causes data errors.
■ Handling and Transport
• Never apply excessive force to the controls,
connectors or other parts of the instrument.
• Always unplug cables by gripping the plug firmly,
not by pulling on the cable.
• Disconnect all cables before moving the instrument.
• Physical shocks caused by dropping, bumping, or
placing heavy objects on the instrument can result in
scratches and more serious damage.
■ Cleaning
• Clean the cabinet and panel with a dry soft cloth.
• A slightly damp cloth may be used to remove
stubborn grime and dirt.
• Never use cleaners such as alcohol or thinner.
• Avoid placing vinyl objects on top of the instrument
(vinyl can stick to and discolor the surface).
■ Electrical Interference
• This instrument contains digital circuitry and may
cause interference if placed too close to radio or
television receivers. If this occurs, move the
instrument further away from the affected
equipment.
4
Page 5

Getting Started
■ Data Backup
• The VL7 contains a special long-life battery that
retains the contents of its internal memory even
when the power is turned OFF. The backup battery
should last for several years. When the backup
battery needs to be replaced “Change battery!” will
appear on the display when the power is turned on.
When this happens, have the backup battery replaced
by qualified Yamaha service personnel. DO NOT
ATTEMPT TO REPLACE THE BACKUP
BATTERY YOURSELF!
■ Handle Floppy Disks and the Disk Drive With
Care
• Use only 3.5” 2HD or 2DD type floppy disks.
• Do not bend or apply pressure to the floppy disk.
Do not open the shutter and touch the surface of
the floppy disk inside.
• Do not expose the disk to high temperatures. (e.g.
direct sunlight, a car interior, etc.)
• Do not expose the disk to magnetic fields.
Magnetic fields can partially or totally erase data
on the disk, rendering the disk unreadable.
• To eject a floppy disk, press the eject button
slowly as far as it will go then, when the disk is
fully ejected, remove it by hand.
The disk may not be ejected properly if the eject
button is pressed too quickly, or it is not pressed
in as far as it will go (the eject button may
become stuck in a half-pressed position and the
disk extends from the drive slot by only a few
millimeters). If this happens, do not attempt to
pull out the partially ejected disk. Using force in
this situation can damage the disk-drive mechanism or the floppy disk. To remove a partially
ejected disk, try pressing the eject button once
again, or push the disk back into the slot and then
repeat the eject procedure carefully.
• Do not insert anything but floppy disks into the
disk drive. Other objects may cause damage to the
disk drive or the floppy disk.
■ Service and Modification
• The VL7 contains no user serviceable parts. Opening
it or tampering with it in any way can lead to
irreparable damage and possibly electric shock.
Refer all servicing to qualified YAMAHA personnel.
■ Third-party Software
• Yamaha can not take any responsibility for
software produced for this product by third-party
manufacturers. Please direct any questions or
comments about such software to the manufacturer or their agents.
YAMAHA is not responsible for damage caused by improper handling or operation.
5
Page 6
Getting Started
About the Manuals
The VL7 comes with two manuals — Getting Started and Feature
Reference.
The Getting Started Manual (this manual)
The Getting Started manual contains seven chapters that take you through
essential information and procedures you will need to know to become familiar
with your VL7:
1. VL7 Basics [≥ Page 8]
Basic concepts you’ll need to understand in order to get the
most out of the VL7.
2. The Controls & Connectors [≥ Page 16]
Brief descriptions of the VL7 controls and connectors, and their
functions.
3. Setting Up [≥ Page 22]
System connections, powering up, playing the demo, calibrating
the Breath Controller, and loading the pre-programmed voices.
4. Voice Selection [≥ Page 34]
Several ways to select and play the VL7’s 64 voices.
5. The Controllers [≥ Page 38]
The VL7 controllers and how they can be assigned and edited
for optimum control.
6. Mixing & The Modifiers [≥ Page 48]
Customizing the sound to suit your own personal needs.
7. Effects [≥ Page 58]
An overview of the built-in digital effects that you can use to
add depth and ambience to the VL7 sound.
We recommend that you go through the chapters in sequence and actually
try out the various operations described. Once you’ve gone through the entire
Getting Started manual in this way, you should be familiar enough with the VL7
to need only the VL7 Feature Reference manual in future.
6
Page 7
Getting Started
The Feature Reference Manual
The Feature Reference manual is the “nuts and bolts” reference for
the VL7, individually describing its many functions in detail. The Feature
Reference manual is divided into 5 main sections, each describing the
various functions within a particular VL7 edit or utility mode.
1. General Operation [≥ Page 7]
2. Play Mode [≥ Page 13]
3. Edit Mode [≥ Page 21]
4. Utility Mode [≥ Page 149]
5. Appendix [≥ Page 177]
Once you have become familiar with the way the VL7 works by
going through the Getting Started manual, you should only need to refer to
the Feature Reference manual from time to time to get details on functions
you’ve never used before, or refresh your memory about functions that
you don’t use very often.
Each section of the Feature Reference manual has its own table of
contents, so you should be able to locate any particular function quickly
and easily. Functions and references can also be located by referring to the
index at the back of the manual.
The following conventions are used through the VL7 manuals to avoid
confusion and make the text easier to read.
Buttons & Controls
Button and control names used on the VL7 panel appear in the text
in capital letters within square brackets: “the [ button”, for
example.
Parameter Names
Parameter names and other labels which appear on the VL7 display
are printed in the courier typeface for easier identification: for
example, “adjust the “Balance” parameter as required”.
Parameter Ranges
An ellipsis is used to indicate a range of parameter values: e.g. “0
… 127”. This minimizes the confusion sometimes caused by the use
of a hyphen or dash for this purpose.
Conventions
7
Page 8
Getting Started
VL7 Basics
Essential Concepts for the VL7 User
ike its predecessor, the VL1, the Yamaha VL7 Virtual Acoustic
Synthesizer produces sound in an entirely new way. It has no
L
In fact, it uses none of the sound generation concepts employed in
conventional synthesizers. The VL7 represents an advanced application of
computer-based “physical modeling” in musical sound synthesis.
systems or the flight characteristics of aircraft in the design stage, the VL7
simulates the very complex vibrations, resonances, reflections and other
acoustic phenomena that occur in a real wind or string instrument. This
requires a tremendous amount of computer processing power (weather and
aerodynamic modeling require room-filling super computers), and radical
advances in microprocessor speed and capability plus some very
sophisticated Yamaha technology were necessary to achieve the real-time
sound generation capabilities exhibited by the VL7 Virtual Acoustic
Synthesizer.
oscillators or function generators, no preset waveforms or samples.
In the same way that computer models are used to simulate weather
8
Page 9

Getting Started
What Are the Advantages?
he VL7 offers many advantages in terms of musical performance.
Not just in terms of sound, but also in terms of the “behavior” that
T
because someone has programmed a certain sound or pattern of behavior
into it. The physical model can be programmed to have certain attributes
— the length of a pipe or the stiffness of a reed, for example — but the
actual sound produced by any configuration can only be accurately
determined by playing it. Of course, the same applies to the design of
acoustic instruments. Because of its natural acoustic behavior the VL7 is
undoubtedly a little harder to play than conventional synthesizers, but
when mastered this is the very characteristic that is its greatest strength.
The Yamaha VL7 is the most musical synthesizer ever made. A soloist’s
dream!
makes acoustic instruments so … well, musical! But this is not
• The VL7 sounds better, has more depth, and is more realistic in
the musical sense than any other synthesizer system.
• Simply pressing a key in the same way does not always produce
precisely the same sound. The instrument is responsive and
“alive”.
• Simply pressing a key in the same way does not always produce
precisely the same sound. The instrument is responsive and
“alive”.
• It has extraordinary expressive capability. Rather than simply
controlling parameters like volume or pitch, you can control
characteristics such as breath and reed pressure with appropriate
complex effects on the timbre of the sound.
9
Page 10
T
Getting Started
The VL7 Model
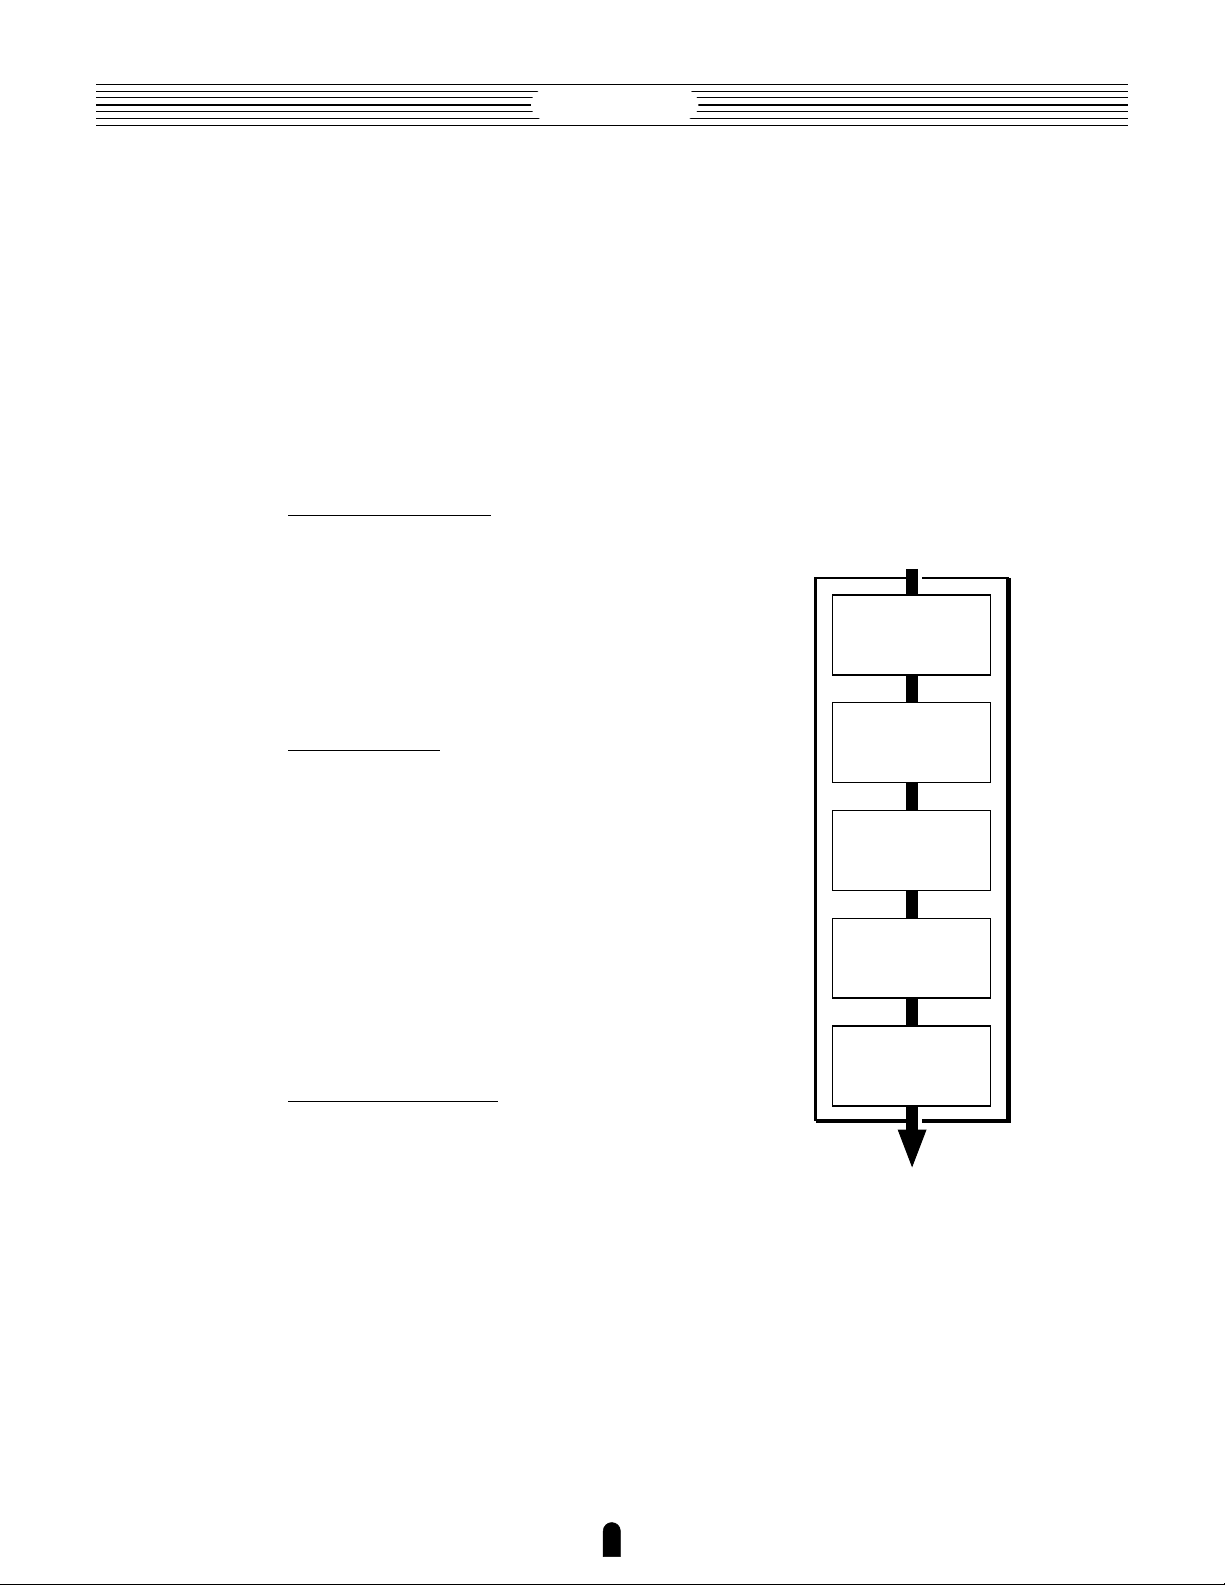
he overall VL7 model or “algorithm” consists of three main blocks:
the instrument, controllers, and modifiers. In schematic form these
blocks are arranged as follows:
The VL7 Voice "Element"
Controllers (also envelopes)
Instrument
●
The Instrument
The key block in this algorithm is the instrument, since it is here that
the fundamental tone or “timbre” of the sound is defined. The extreme
complexity of this portion of the model makes it unsuitable for user
programming, so various instruments for the VL7 are provided in the form
of pre-programmed voices. These are primarily woodwind, brass, and
string voices, since the VL7’s physical model is capable of most
accurately simulating the sound-generating mechanism of all three
instrument categories.
The instrument model consists primarily of a driver — the reed/
mouthpiece, lip/mouthpiece, or bow/string system — and a resonant
system corresponding to the tube and air column or string.
Modifiers
Sound
out.
10
Page 11
Getting Started
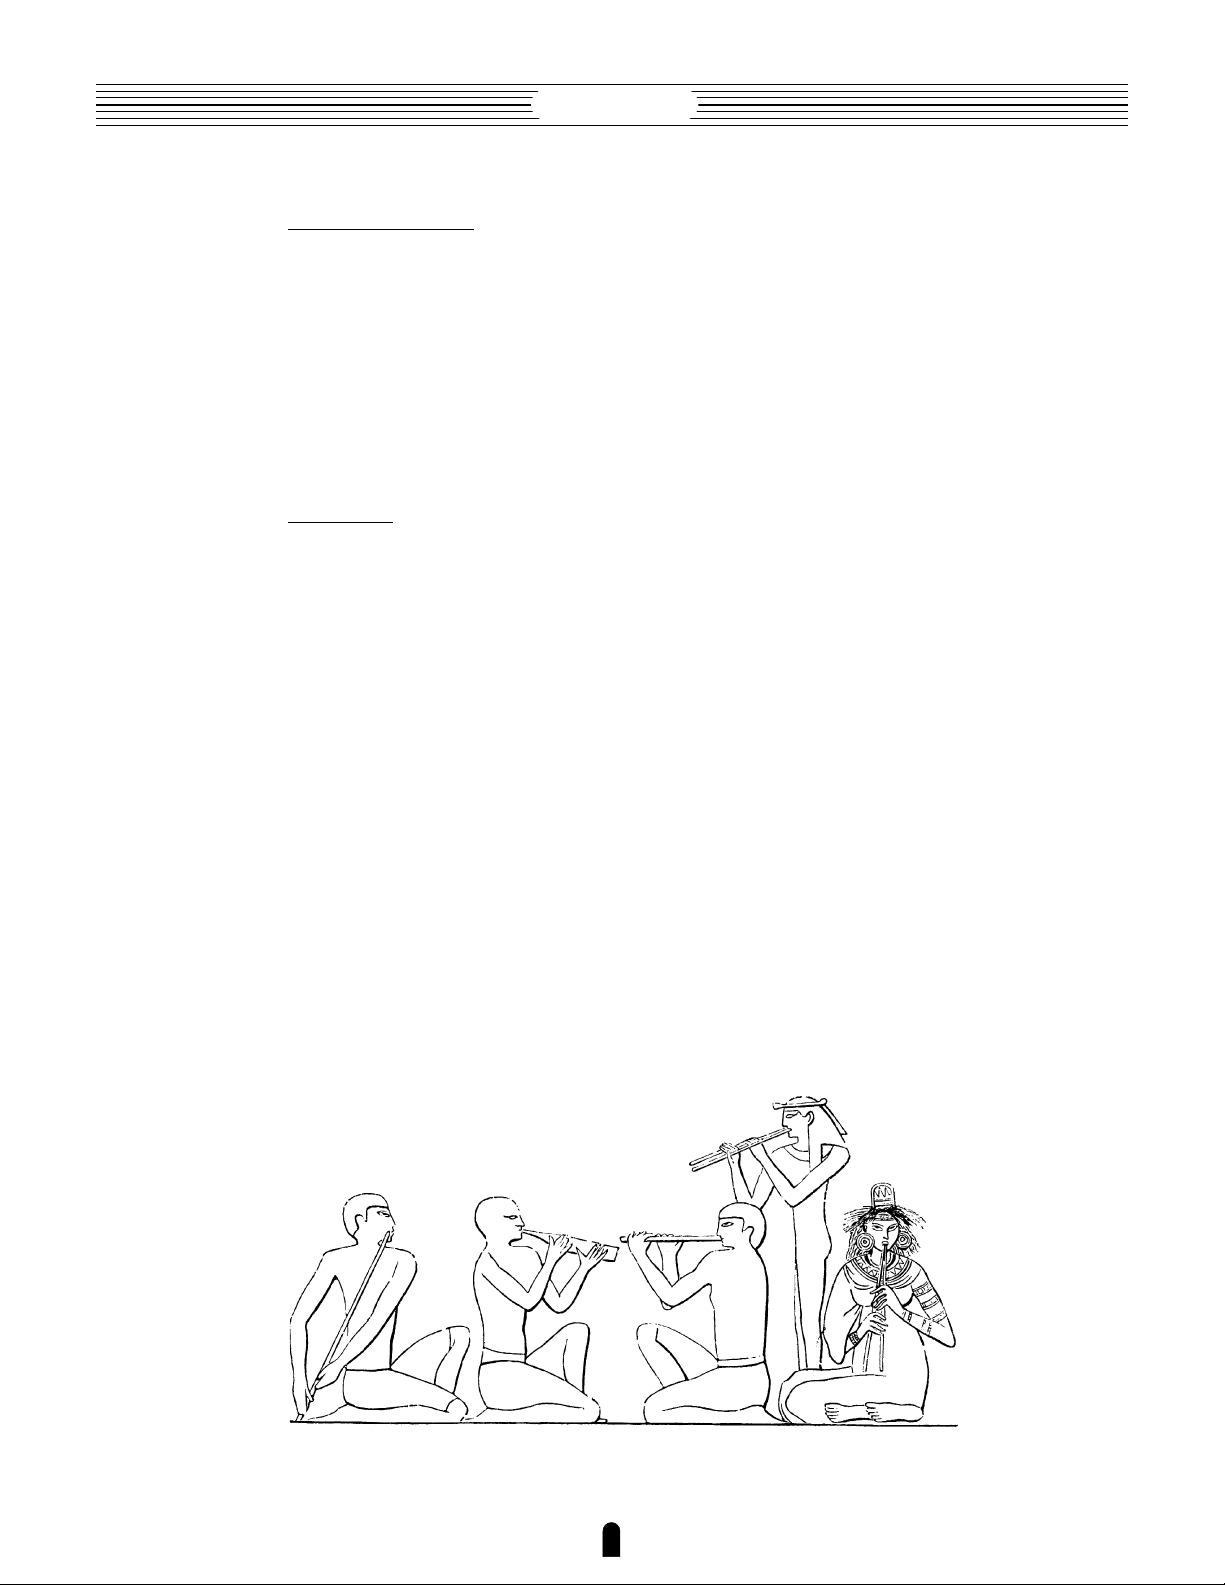
In all these
instruments
pressure
applied here
(the driving
point) causes
vibration which
results in
sound.
The sound thus
produced is amplified
and sustained
by the body of
the instrument.
Reed vibration.
Lip vibration.
Air vibration.
String vibration.
The pitch of the sound is determined
by the length of the air column or
string, and the timbre is a complex
product of the driving source (reed,
lip, air, string), the shape of the
resonant cavity, the materials from
which the instrument is made, etc.
One of the remarkable features of the VL7’s Virtual Acoustic Synthesis
system is that just about any driver can be used with any type of pipe or string.
Drivers Pipes/String
11
Page 12
Getting Started
●
The Controllers
The input to an acoustic wind instrument comes from the player’s lungs, trachea,
oral cavity, and lips. In a string instrument it comes from the players arm movement,
transmitted to the string via a bow. These elements actually form an important part of the
sound generating system and, in the VL7 model, are included in the controllers block.
The player also influences the sound of the instrument by playing the keys, tone holes, or
frets, and this aspect of control constitutes another part of the controllers block. These
and other control parameters provided by the VL7 are listed in the illustration below.
In essence, the controller parameters determine how the instrument “plays”. All of
these parameters can be assigned to any of the external controllers that can be used with
the VL7: breath controller, foot controller, modulation wheels, etc. The pressure
parameter, for example, will normally be assigned to a breath controller so the player can
control the dynamics of the instrument by varying the breath pressure applied to the
controller — a natural, instinctive way to play wind-instrument voices. At the same time
the growl and throat parameters might also be assigned to the breath controller in order
to achieve life-like response and effects.
Controls the characteristics
of the "player's" throat or bowing arm.
Pressure
The amount of breath pressure
applied to the reed or mouthpiece,
or bow velocity applied to the string".
Embouchure
The tightness of the lips against
the reed or against each other, or
the force of the bow against the
string.
Pitch
Changes the length of the
air column or string, and thereby
the pitch of the sound.
Throat
Growl
A periodic pressure (bow
velocity) modulation which
produces the "growl" effect
often heard in wind instruments.
Tonguing
Simulates the half-tonguing
technique used by saxophone
players by changing the "slit"
of the reed.
Scream
Drives the entire system into
chaotic oscillation, creating
effects that can only be
achieved with physical
modelling technology.
Damping & Absorption
Simulate the effects of air friction
in the pipe or on the string,
and of high-frequency losses
at the end of the pipe or string.
12
Page 13
Getting Started
●
The Modifiers
Although you don’t have direct programming access to the VL7
instrument block, the modifiers allow a significant degree of control over the
final timbre of the voice. The modifiers block consists of 5 sections as shown in
the diagram. Although these may appear to be simple effects, they are actually
intimately related to the VL7’s sound-producing model and have a significant
effect on the sound (the VL7 has a separate effects stage with reverb, delay, and
modulations effects — see page 58).
Harmonic Enhancer
The Harmonic Enhancer allows you to
manipulate the harmonic structure of the
In
sound to the extent that you can create
radical timbral variations within the current
instrument “family” (e.g. saxes).
Harmonic
Enhancer
[Page 51]
Dynamic Filter
This section is similar to the dynamic filters
found in many conventional synthesizers. It
has selectable high-pass, bandpass, band
elimination, and low-pass modes, and a
“wet/dry” balance parameter which allows
delicate variations in the degree of filtration
applied. Another important feature is
keyboard cutoff tracking which varies the
cutoff frequency according to the key
played. [Page 54]
Frequency Equalizer
This is a 5-band parametric equalizer with
frequency, Q (bandwidth), and level
control. The equalizer also has pre-EQ
high- and low-pass filters as well as key
scaling capability for precise response
control throughout the instrument’s range.
[Page 55]
Dynamic
Filter
Frequency
Equalizer
Impulse
Expander
Resonator
Out
13
Page 14
Getting Started
Impulse Expander
The Impulse Expander works in conjunction with the Resonator, described
below, to simulate the effect of an instrument’s resonant cavity or sound
box. It can also be used to simulate the acoustic environment in which the
instrument is played. In contrast to the Resonator, the Impulse Expander is
more suited to the simulation of metallic resonances and is thus invaluable
for refining the sound of brass and metal-bodied woodwinds. Other
important effects are the ability to diffuse sharp attack sounds and to give
depth and realism to vibrato. [Page 56]
Resonator
While the Impulse Expander and even the Harmonic Enhancer tend to give
the sound a metallic quality, the Resonator produces a more woody
resonance effect. Careful adjustment of the resonator’s parameters can
often bring a not-quite-right voice to life. [Page 57]
14
Page 15

Getting Started
There’s More …
n this brief introduction to VL7 basics we’ve only looked at the
central physical model which is the key the VL7’s unprecedented
I
sound and musical performance. There’s also an extensive range of
other functions and features that are similar to those you may be familiar
with from conventional synthesizers. There are, for example, a range of
programmable envelopes that can be applied to most of the controllers in
addition to real-time player control. And, of course, there’s a
comprehensive selection of MIDI, disk, and other utility functions that
give the VL7 maximum versatility and convenience.
Now that you understand the basics, dive in and find out what the
VL7 can really do.
15
Page 16
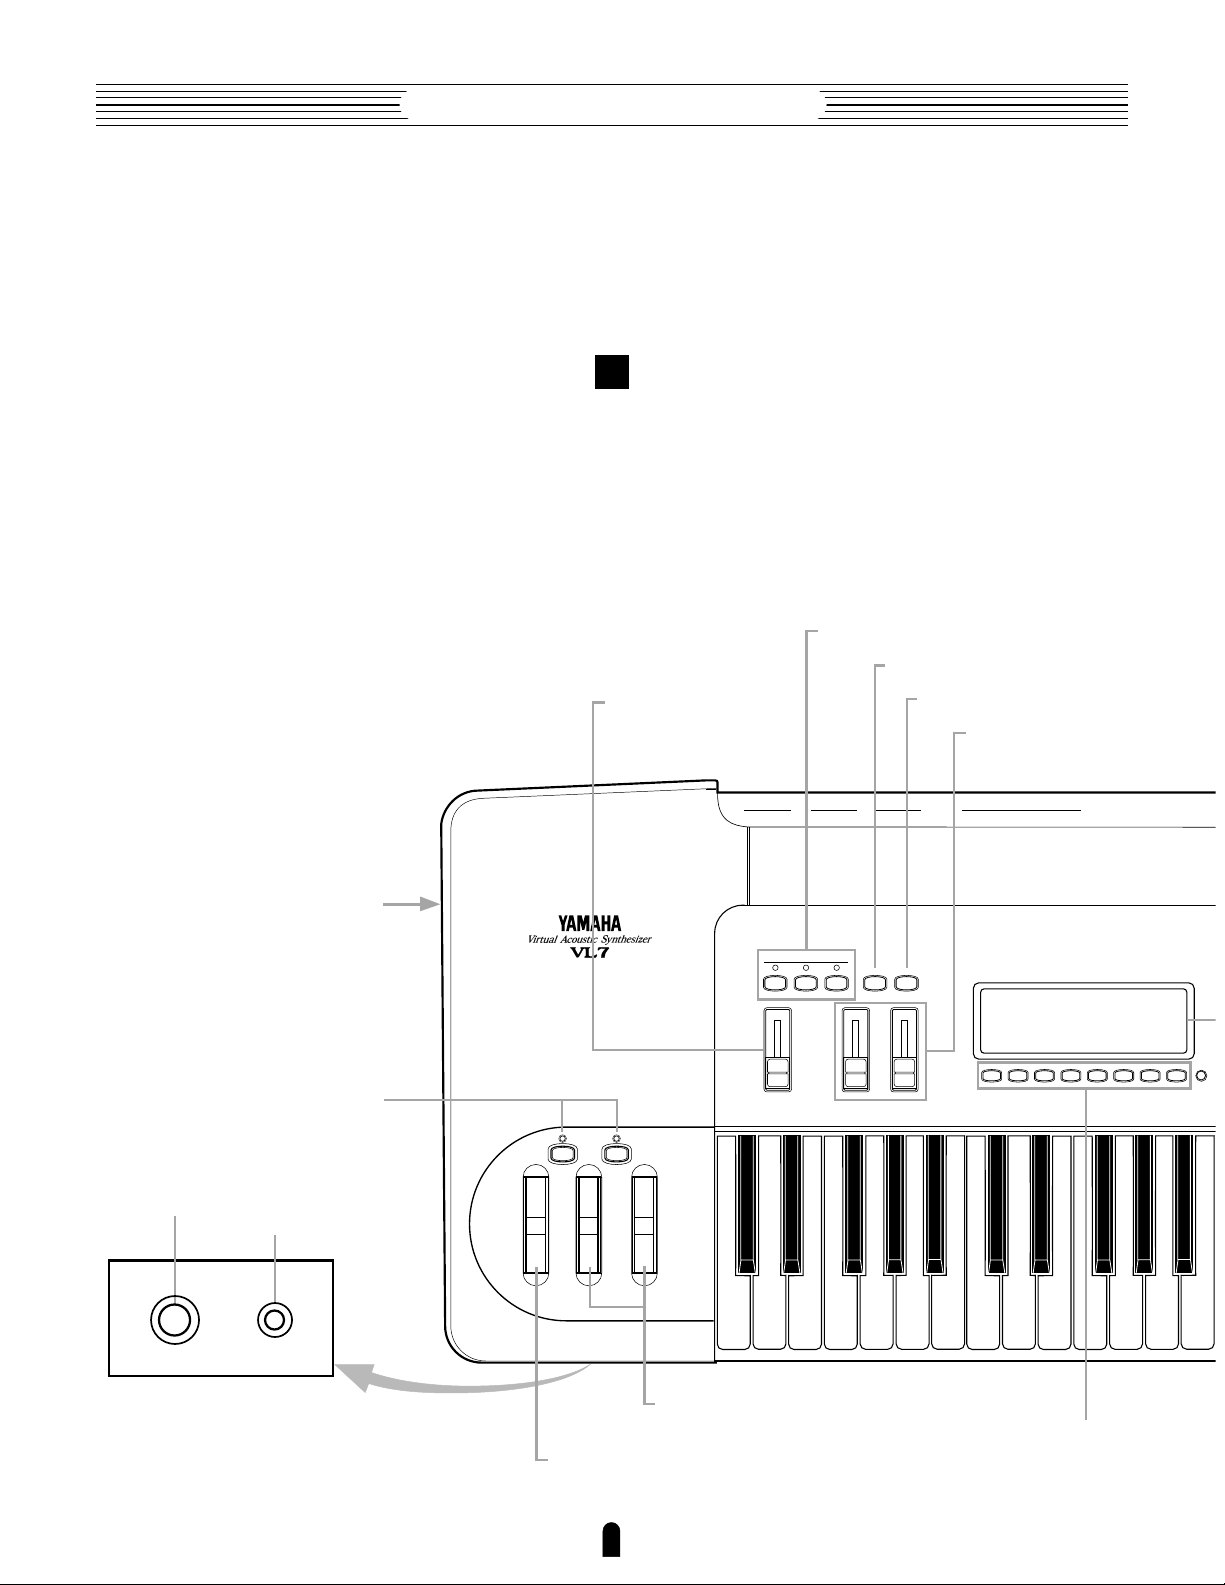
Getting Started●The Controls & Connectors
The Controls & Connectors
A Brief Introduction To the VL7 Interface
The following brief descriptions of the VL7 controls and connectors
should help you to understand the overall logic of the interface.
q MODE Buttons
w
C Button
@0
!8
PHONES Jack
Floppy Disk Drive
!5
OCTAVE _
and + Buttons
!9
Breath Controller Jack
r
DOWN UP
OCTAVE
VOLUME Control
LR
12
OUTPUT
FOOT CONTROLLER
MODE
EDIT UTILITY COPY STORE
PLAY
COMPARE
VOLUME CS1 CS2
1
FOOT SWITCH
e
S Button
t
Continuous Sliders
2
IN THRU
– and ≠
OUT
MIDI
F1 F2 F3 F4 F5 F6 F7 F8 CONT
PHONES
BREATH
PITCH MODULATION 1 MODULATION 2
!6
π Wheel
16
!7
“ and
‘ Wheels
u
¡ through •
Function Buttons
Page 17
Getting Started●The Controls & Connectors
Front Panel
y LCD Display & ÷ Control
i Data Dial
!0 = and - Buttons
The Controls & Connectors
q MODE Buttons
The P, E, and U buttons select the corresponding VL7 modes. The
PLAY mode lets you select and play voices, the EDIT mode gives you programming
access to the VL7’s voice and controller parameters, and the UTILITY mode includes
MIDI, disk, system and other functions that are essential for general operation.
☛ Feature Reference page 8.
w C Button
This button is used to copy voice parameters for fast, efficient editing.
☛ Feature Reference page 24.
e S Button
Used to store edited data to an internal memory location.
☛ Feature Reference page 27.
POWER
ON / OFF
A
B
C
D
1
2
3
4
5
6
7
INCDEC
9
ENTEREXIT
10
ALL
HE
DF
MODIFIER ON / OFF
ALL
MOD
11
12
EQ
EFFECT ON / OFF
13
14
IE
RSN
8
FBD
REV
15
16
!2 Bank a through
d Buttons
!3 Voice Number 1
through ^ Buttons
!1 ] and [ Buttons
o Cursor Buttons
!4 Keyboard
17
Page 18
Getting Started●The Controls & Connectors
r VOLUME Control
Adjusts the volume of the sound delivered via the rear-panel OUTPUT L and R
jacks as well as the PHONES jack.
☛ Getting Started page 25.
t – and ≠ Continuous Sliders
These controls can be assigned to a range of controller parameters for real-time
expressive control.
☛ Getting Started page 47. Feature Reference page 19.
y LCD Display & ÷ Control
This large multi-function liquid crystal display panel shows all parameters and
prompts you need to operate the VL7 with optimum ease and efficiency.
Use the ÷ (contrast) control located near the lower right-hand corner of the
display to achieve the best display visibility (LCD visibility varies greatly with viewing
angle and lighting).
☛ Getting Started page 34. Feature Reference page 14.
u ¡ through • Function Buttons
The functions of these buttons depend on the selected mode. They are used to
engage a function indicated on the display immediately above the button, select a page of
parameters, scroll through a list of parameters, and more.
☛ Feature Reference page 9.
i Data Dial
The data dial provides a fast, efficient way to cover a broad range of voice numbers
when, for example, you’re looking for a voice but don’t know the voice number. It’s also
handy for making large value changes in any of the edit modes.
☛ Getting Started page 35. Feature Reference page 16.
o Cursor Buttons
These 4 buttons move the “cursor” around the display screen, highlighting the various
items that are available for selection or parameters that are available for editing (the VL7
cursor appears as a dark block with inverse characters).
☛ Getting Started page 32. Feature Reference page 10.
!0 = and - Buttons
Used to select voices and edit parameter values in any of the VL7 edit modes.
Either button can be pressed briefly for single stepping in the specified direction, or held
for continuous scrolling. These buttons are also used to respond “Yes” or “No” to the
“Are You Sure?” confirmation prompt when required.
☛ Getting Started page 35. Feature Reference page 16.
!1 ] and [ Buttons
The ] button can generally be used to exit from any sub-mode or function,
while the [ button is used to engage a variety of modes and functions.
☛ Getting Started page 26. Feature Reference page 10.
!2 Bank a through d Buttons
The VL7 has 64 internal voice memory locations arranged in 4 banks of 16 voices
each. These buttons select the voice bank from which an individual voice will be selected.
☛ Getting Started page 35. Feature Reference page 15.
18
Page 19

Getting Started●The Controls & Connectors
!3 Voice Number 1 through ^ Buttons
The voice number buttons are used in conjunction with the bank buttons to select
any of the VL7’s 64 internal voice memory locations. When editing voice parameters
they are also used to turn effects and modifiers on or off.
☛ Getting Started page 35. Feature Reference page 15.
!4 Keyboard
The VL7 has a 49-key keyboard that is both velocity and after-touch sensitive for
broad, intimate expressive control.
!5 OCTAVE _ and + Buttons
Shift the pitch of the keyboard up or down one octave. A utility “Octave Hold”
function provides two modes: shift only while the button is held, or press once to shift
and again to release. MIDI note output data is also shifted.
☛ Feature Reference page 151.
!6 π Wheel
This self-centering pitch wheel allows realistic upward and downward pitch bends.
The pitch wheel can also be assigned to any of the VL7’s extensive range of controller
parameters for sophisticated expressive control.
☛ Getting Started page 39.
!7 “ and ‘ Wheels
Can be assigned to any of the VL7’s extensive range of controller parameters for
extraordinary expressive control. The ‘ wheel features a center-click position.
☛ Getting Started page 39. Feature Reference page 154.
The Controls & Connectors
!8 PHONES Jack
Accepts a standard pair of stereo headphones (1/4" stereo phone plug) for
headphone monitoring of the VL7 sound without the need for external amplification
equipment.
☛ Getting Started page 23.
!9 Breath Controller Jack
Plug the Yamaha BC2 Breath Controller supplied with the VL7 in here (an optional
BC1 Breath Controller may also be used).
☛ Getting Started page 23.
@0 Floppy Disk Drive
The VL7’s built-in floppy disk drive allows easy, economical, high-volume storage of
voice data. The disk-in-use indicator below the drive slot lights while any disk operation is in
progress (
progress). The eject button, also below the disk slot, is used to remove disks from the drive.
☛ Getting Started page 5, 31. Feature Reference page 162.
NEVER attempt to remove a disk or turn the power off while a disk operation is in
19
Page 20
Getting Started●The Controls & Connectors
YAMAHA
MODEL VL7
AC INLET
@1
AC Power Cord
Socket
POWER
ON / OFF
@2 POWER Switch
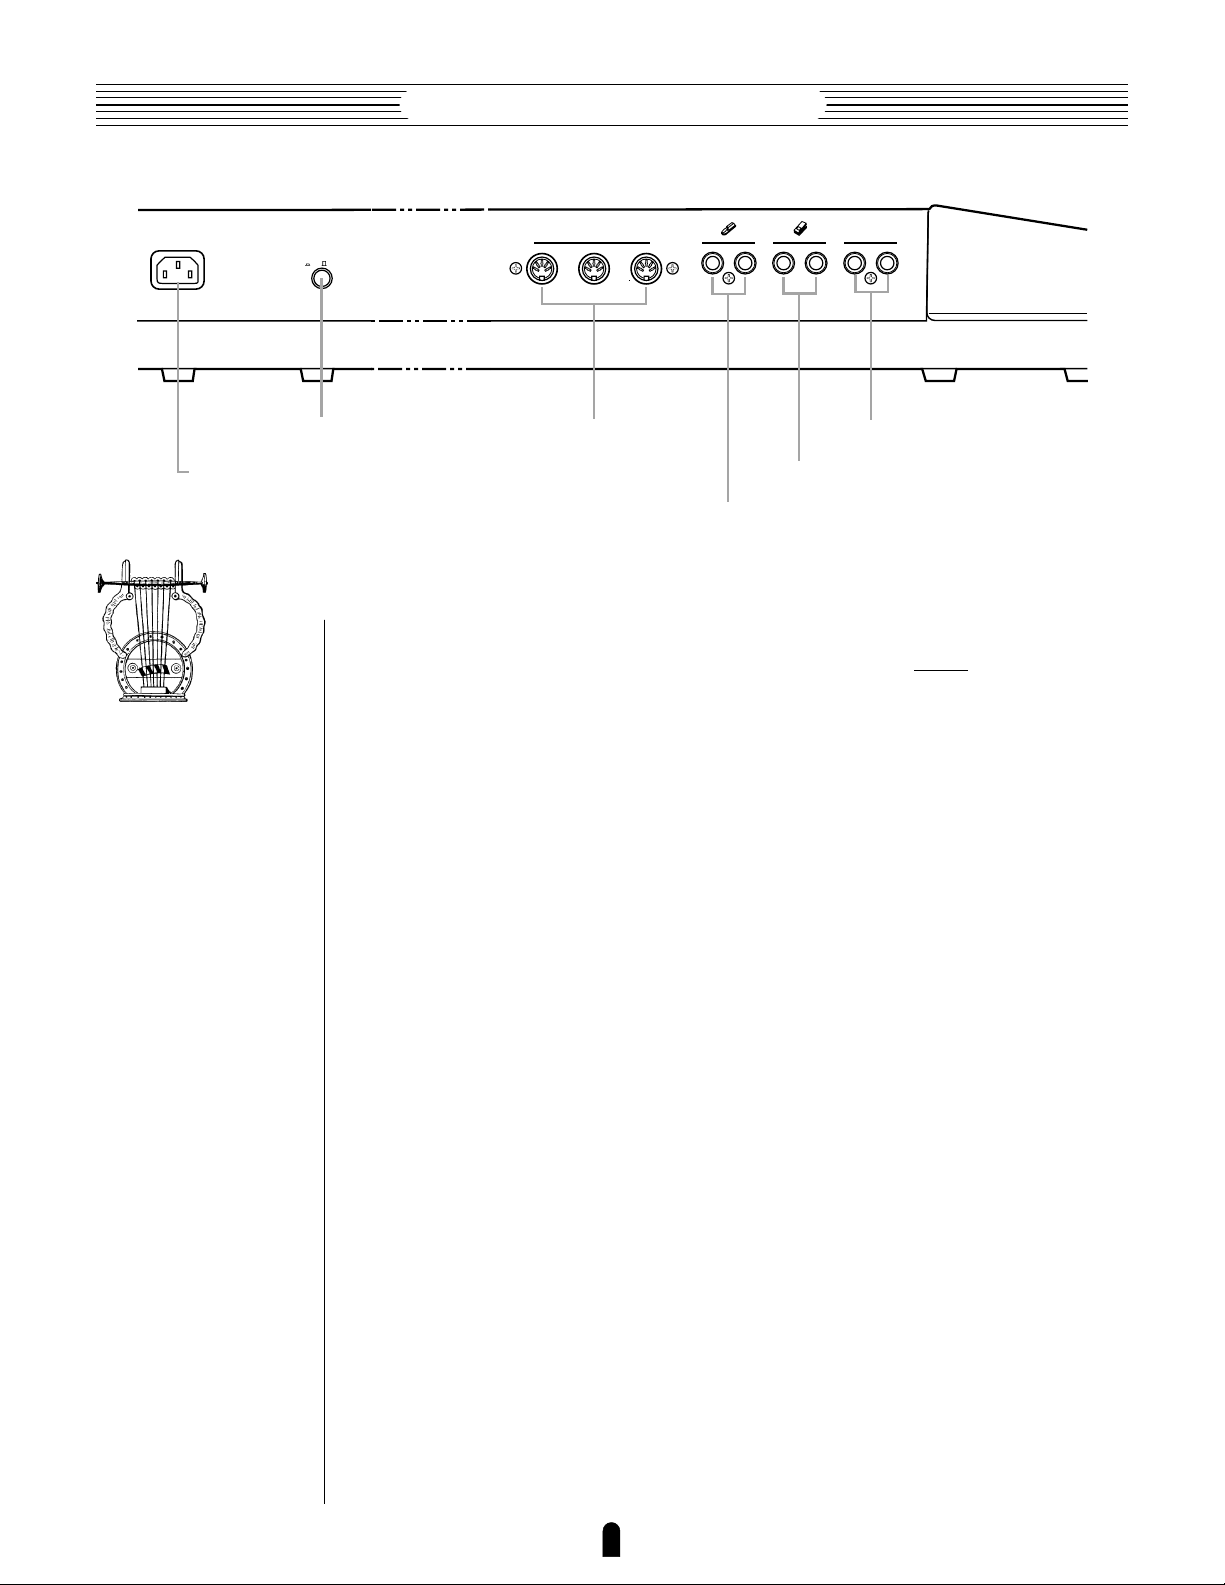
Rear Panel
@1 AC Power Cord Socket
Be sure the plug the VL7’s AC power cord into this socket
power cord into an AC outlet.
☛ Getting Started page 22.
@2 POWER Switch
Press to turn power ON or OFF.
MIDI
THRU OUT
@6
MIDI IN, OUT and
IN
THRU Connectors
FOOT SWITCH
21
FOOT CONTROLLER
21
OUTPUT
R
@3
@4
FOOT CONTROLLER 1 and 2 Jacks
@5
FOOT SWITCH 1 and 2 Jacks
L
OUTPUT L and R Jacks
before plugging the
@3 OUTPUT L and R Jacks
These are the main stereo outputs from the VL7. Be sure to connect both outputs to the
appropriate channels of a stereo sound system in order to appreciate the full quality of the
VL7 sound and effects.
☛ Getting Started page 24.
@4 FOOT CONTROLLER 1 and 2 Jacks
These jacks accept Yamaha FC7 Foot Controllers which can be used to control any of
the VL7’s controller parameters. One FC7 Foot Controller is supplied with the VL7, and this
should normally be plugged into the FOOT CONTROLLER 2 jack. The second FC7 foot
controller is optional.
☛ Getting Started page 23.
@5 FOOT SWITCH 1 and 2 Jacks
An optional Yamaha FC4 or FC5 footswitch can be connected to one or both of
these jacks for sustain, portamento, and other control functions.
☛ Getting Started page 23.
@6 MIDI IN, OUT and THRU Connectors
The MIDI IN connector receives the data from an external sequencer or other MIDI
device which is to control or transmit data to the VL7. The MIDI THRU connector
simply re-transmits the data received at the MIDI IN connector, allowing convenient
chaining of MIDI devices. The MIDI OUT connector transmits data corresponding to all
VL7 performance operations, or bulk data when one of the MIDI data transmission
functions are activated.
☛ Getting Started page 24.
20
Page 21

Getting Started●The Controls & Connectors
The Controls & Connectors
21
Page 22

Getting Started●Setting Up
Setting Up
System Connections & Preparation
Audio
Foot
Controller
DOWN UP
OCTAVE
PITCH MODULATION 1 MODULATION 2
LR
OUTPUT12FOOT CONTROLLER
MODE
PLAY
EDIT UTILITY COPY STORE
COMPARE
VOLUME CS1 CS2
2
1
FOOT SWITCH
OUT
IN THRU
MIDI
F1 F2 F3 F4 F5 F6 F7 F8 CONT
Foot
Switch
A
1
INCDEC
9
ENTEREXIT
ALL
MIDI
POWER
ON / OFF
B
C
D
2
3
4
5
6
7
8
ALL
MOD
FBD
REV
EFFECT ON / OFF
10
11
12
13
14
15
16
HE
DF
EQ
IE
RSN
MODIFIER ON / OFF
Power Supply
Breath ControllerHeadphones
Power Supply
Before making any other connections the “female” end of the AC power cord
supplied with the VL7 should be firmly plugged into the rear-panel AC cord socket.
Ideally the power cord should then be plugged into a convenient AC outlet after you’ve
made all other necessary connections and placed the VL7 in the position in which it will
be used. Always make sure that the POWER switch is in the OFF (extended) position
before plugging the power cord in an AC outlet.
CAUTION! ■ Make sure your VL7 is rate d f or t he AC volt age supplied in t h e
area in w h ich it is t o be used (as listed on t he rear panel). Connecting t he VL7 to
the wrong AC supply can cause serious dam age to t he int ernal circuit ry and m ay
CAUTION!
even pose a shock hazard!
22
Page 23

Controllers
Breath Controller
●
The Breath Controller is an essential expressive tool — both for realistic expression
with wind-instrument voices and unprecedented expressive control with string voices.
Plug the BC2 Breath Controller supplied with the VL7 (or an optional BC1 breath
controller) into the front-panel breath controller jack. The Breath Controller is ideal for
controlling parameters that would normally be affected by a wind player's breath:
dynamics, timbre, pitch, and others.
Once you've set up your system and begin playing, refer to “Breath Controller
Calibration” on page 28 for instructions on calibrating your Breath Controller for optimum control precision and ease.
NOTES ■ For m ore inf orm at ion on Bre ath Contro ller set up and operatio n, see
the inst ruct ions p acked w it h t h e supplied BC2 Breath Controll er.
Getting Started●Setting Up
Setting Up
Foot Controllers
●
Although the VL7 has jacks for two foot controllers, it is not necessary to use both.
To begin with plug the supplied FC7 Foot Controller into the rear-panel FOOT
CONTROLLER 2 jack.
If you purchase a second FC7 Foot Controller for extra control capability, plug it
into the FOOT CONTROLLER 1 jack.
NOTES ■ For mo re inf orm ation on Foot Cont roller se t up and operation,
see t he inst ruc t ions packed wit h t he supplied FC7 Foot Controller .
Foot Switches
●
The use of one or two footswitches allows sustain portamento switching. We
recommend that you purchase at least one Yamaha FC4 or FC5 Footswitch for this
purpose. A single footswitch can be plugged into either the rear-panel FOOTSWITCH 1
or 2 jack.
Audio Connections
●
Headphones
For private listening and practice headphones are ideal. You don’t have to hook up
and complete sound system, and you won’t disturb the neighbors no matter how loud or
late you play. Recommended Yamaha headphones for VL7 monitoring are the HPE-170,
HPE-160, or HPE-150 Stereo Headphones. Any standard pair of stereo headphones with a
1/4” stereo phone plug and an impedance of between about 8 and 150 ohms can be used.
23
Page 24

Getting Started●Setting Up
●
Stereo Sound System
The VL7 voices and effects are designed to sound their best in stereo, so you should
always use a stereo sound system to appreciate the full impact of the VL7 voices and
expressive features. The VL7 OUTPUT L and R jacks can be connected directly to musical
instrument amplifiers designed for keyboard use, or to the line inputs of a mixing console. It
is also possible to connect the VL7 outputs directly to the inputs of a multitrack or stereo tape
recorder.
The normal output level and impedance of the VL7 outputs are 2.5 ± 2 dBm and
10 kΩ.
NOTES ■ If you ne ed t o drive a m ono am p or ot her d evice t he VL7 out put can
be swit ched t o m onaural — the same signal appears at t he L and R outpu ts —
by using t he O ut put paramet er describ ed on page 152 of t he Feature Reference
manual.
■ Make sure t hat bot h t he VL7 and your sound syst em are t urned OFF w hen
making conne ct ions.
MIDI Connections
Like any other MIDI instrument the VL7 can be used with MIDI tone generators,
sequencers, computer software, and controllers for virtually unlimited system expansion
and control capability. You might, for example, like to control it from a Yamaha wind
controller such as the WX11 rather than the keyboard for even more realistic windinstrument feel and expression.
To ensure reliable error-free transmission of MIDI data always use high-quality
MIDI cables obtained from your Yamaha dealer or music equipment store. Also avoid
MIDI cables that are longer than about 15 meters, since cables longer than this can pick
up noise which can cause data errors.
The VL7 MIDI transmit channel, receive channel, local on/off, and device number
parameters are available in the utility mode “MIDI Setting” page described on page 153
of the Feature Reference manual. Make sure these parameters are set to match the corresponding settings of the external MIDI device(s) used with the VL7.
● The VL7 transmits and receives the following MIDI data:
Note
Control Change
Program Change
Aftertouch
Pitch Bend
Bulk
The played key(s) and velocity value.
Modulation wheel, foot controller, breath controller, and other controller
data.
Voice numbers from 1 to 64.
Keyboard aftertouch pressure.
Pitch bend wheel position.
Voice and system parameters transmitted in the form of “bulk dumps.”
24
Page 25

Getting Started●Setting Up
NOTES ■ For det ailed M ID I specif icati ons ref er t o t h e “ MIDI D ata Format” .
■ W hen using t he VL7 w it h ot her MIDI equipm ent , i t is a good idea to ref e r t o
the MIDI spec if ications (im plem ent atio n chart, MIDI data form at) of t he
equipm ent use d t o ensure com patibilit y .
Power-on Procedure
Always follow proper procedure when powering-up a sound system to minimize the
possibility of damage to the equipment (and your ears!).
1. Make sure your sound system’s main level/volume control(s) and the VL7 volume
control are turned all the way down prior to turning power on.
2. Turn on the VL7.
3. Turn on the sound system.
4. Raise the sound system volume to a reasonable level.
Setting Up
5. Gradually raise the VL7 VOLUME control while playing the keyboard to set the
desired listening level.
NOTES ■ The VL7 autom atically transm it s MID I cont rol ch ange data correspond-
ing t o it s cont rol st atus when it s power swit ch is t urn ed ON. This data can be
received and used by c om patible MIDI equipm ent conne ct ed t o t he VL7 MIDI
OUT connect or if t he rece iving equip m ent is t urned on
befo re t he VL7.
25
Page 26

Getting Started●Setting Up
Play the Demo
Once you’ve set up your VL7 system, you might like to play the pre-programmed demo
sequence to hear how some of the voices sound. This process will also help to familiarize you
with some of the VL7’s selection and editing procedures.
1. Select the Utility Mode System Page
Press the U button to select the utility mode.
2. Select the Demo Page
Press the ∞ button to select the “Demo” page.
3. Press [ and Confirm
Press the [ button if it’s OK to go ahead with the demo. The VL7 will ask
you to confirm again: press - to continue or = to abort.
NOTES ■ If t he curr ent ly select ed voice has been edit e d but not st ore d, t he edit
data w ill be los t when t he d em o m ode is engaged. Make sure t he curre nt voice
has been stor ed bef ore e nt ering t he de m o m ode.
■ If t he UTILITY mo de “
Reference m anual, page 156), the “
Confirm
” parame t er is t urned “
Are You Sure?
” prom pt will n ot appear.
off
” (Feature
26
Page 27

Getting Started●Setting Up
4. Select a Song
Use the data dial or = and - buttons to select the song number you want to
start with.
• 16 demo pieces are provided. The last of these can be used with full accompaniment if the VL7 is connected to a GM (General MIDI) tone generator such
as the Yamaha TG300. Connect the VL7 MIDI OUT connector to the MIDI
IN connector of the GM tone generator.
5. Run the Demo
Press the • button to run the demo. Playback will start with the selected song,
then all other songs will be played in sequence. The cycle will repeat until stopped.
Setting Up
6. Stop the Demo
Press the ¶ button to stop demo playback.
7. Return To the Play Mode When Done
Press the MODE P button to return the PLAY mode.
27
Page 28

Getting Started●Setting Up
Breath Controller Calibration
Proper operation of the breath controller is vital to achieving the best possible sound
from the VL7. Although the controller is factory-calibrated to match most requirements,
we recommend that you carefully calibrate the breath controller for optimum performance
with your own playing style.
1. Make Sure the Breath Controller Is Connected
Make sure the breath controller is properly connected: turn the power OFF, plug in
the breath controller, then turn the power ON.
2. Select the Utility Mode System Page
Press the U button to select the utility mode. Then, if it is not already selected when the utility mode display appears, press the ¡ button to select the “Sys-
tem” function page.
3. Go To the Utility Mode Curve Page and Select “Brth”
Use the cursor keys to move the cursor to “5:Curve”, then press [ to call
the “Curve” function page. When the curve display appears press the • function
button (“Brth”) to call the breath controller curve page.
4. Adjust the Breath Controller Offset
The following adjustment must be performed while
controller mouthpiece. Do not hold the breath controller in your mouth.
Rotate the breath controller OFFSET trimmer slowly clockwise, using the supplied
screwdriver, until the vertical cursors above and below the curve graph move slightly to
the right and the number below the graph is greater than “0”. Then slowly rotate the
trimmer carefully counter-clockwise until the number below the graph just reaches “0”
(the cursors will be lined up with the left end of the graph), then stop. This completes the
offset adjustment.
not blowing into the breath
28
Page 29

Getting Started●Setting Up
5. Adjust the Breath Controller Gain
Place the breath controller mouthpiece in your mouth and blow — notice that the
cursors move to right and the number below the graph increases according to how hard
you blow. Rotate the breath controller GAIN trimmer counter-clockwise as far as it will
go (don’t force it!) then, while blowing into the mouthpiece using the
you intend to use while playing, rotate the trimmer slowly clockwise until the number
below the graph just reaches “127” (the cursors should just line up with the right end of
the graph) and then stop. This completes the gain adjustment. Since changing the gain
can sometimes affect the offset setting, it is a good idea to repeat steps 4 and 5 until both
the offset and gain are set precisely as required.
NOTES ■ In addition t o calibrating t he bre ath cont rolle r, t he UTILITY mode
“ Curve” page described here also allow s yo u t o select a range of 4 dif f erent
response cur ves — t hese are discussed in m o re det ail on page 155 of t he
Feature Ref erence manual.
maximum pressure
6. Return to the Play Mode
Press the P button to return to the PLAY mode.
Setting Up
29
Page 30

Getting Started●Setting Up
Load the Pre-programmed Voice Data
When initially shipped, the VL7 internal memory contains a set of voices programmed
to be used without the breath controller (the “NOBREATH:All” file, described below). Since
the breath controller is such an important expressive tool, and since some of the examples
given in this manual use the breath controller, we recommend that you load the
“FULLCNT1:All or FULLCNT2:All” file provided on the VL7 data disk. The voices in this
file are pre-programmed for use with the breath controller.
NOTES ■ Loading the pre-programm ed voices ove rwrit es any ot her data t hat is
in th e VL7 inte rnal mem or y, so if you h ave any import ant vo ices in m emory m ake
sure it is safely saved to d isk bef ore l oading the data — Feature Reference
manual, page 156.
About the VL7 Data Disk
The floppy disk supplied with the VL7 contains the following files:
● 001:NOBREATH:All
A complete set of 64 voices and system data in which the voices are
programmed to be played without a breath controller. This is the voice set
which is in the VL7 memory when the unit is initially shipped. The voices
can be controlled via keyboard initial and after-touch, and via the
modulation wheels.
● 002:FULLCNT1:All
A complete set of 64 voices and system data in which the voices are
programmed to allow maximum controller variation. The breath controller,
foot controller, and modulation wheels are required for voice control.
● 003:FULLCNT2:All
A second set of 64 voices and system data in which the voices are
programmed to allow maximum controller variation. The breath controller,
foot controller, and modulation wheels are required for voice control.
● 004:EXAMPLE:All
Some example voices which have been programmed so that some
major tone generator and controller characteristics are easy to understand.
30
Page 31

Getting Started●Setting Up
●
Loading the “FULLCNT1:All” Voice File
1. Insert the Voice Disk
Insert the VL7 voice disk into the disk drive. The sliding disk shutter should go in first,
and the label side of the disk should face upward.
2. Select the Utility Mode System Page
Press the U button to select the utility mode. Then, if it is not already selected when the utility mode display appears, press the ¡ button to select the “Sys-
tem” function page.
NOTES ■ If t he Memory Prote ct f unct ion has been t urn ed on (the def ault
sett in g is “ of f ” ), it m ust be t urne d of f bef ore lo ading the data.
Use t he cursor but t ons t o m o ve t he curso r t o “
[
press
butt o ns t o select t h e “
memory prot e ct “
to c all the “
Miscellaneous
Memory Protect
off
” .
” fu nct ion page. Use t he c ursor
” parame t er, t hen pres s
6:Miscellaneous
=
to t u rn
” , th en
Setting Up
3. Select the Disk Function Directory
Press the £ function button (“Disk”) to select the utility mode disk function
directory.
4. Select “Load From Disk”
Use the cursor buttons to move the cursor to “2:Load From Disk” and then
press [.
31
Page 32

Getting Started●Setting Up
5. Select “All” and Select the “002:FULLCNT1:All” File
Make sure the cursor is positioned at “1:All” and press [.
When the list of files appears use the cursor > and < buttons to select the
“002:FULLCNT1:All” file, then press [ again.
6. Load the File
Loading will begin when you press the - button in response to the “Are You
Sure?” prompt. A bar graph on the display will indicate the progress of the load opera-
tion, and when all the data has been loaded “Completed!” will appear.
7. Return to the Play Mode, Eject the Disk, & Select a Voice
When the “Completed!” display appears, press the P button to return to the
play mode, then press the eject button below the disk drive slot to eject the disk. Store
the disk in a safe place. You must now select a voice in order for the loaded data to be
properly activated — see the following section.
32
Page 33

Getting Started●Setting Up
Setting Up
33
Page 34

Getting Started●Voice Selection
Voice Selection
Selecting & Playing the VL7’s 64 Voices
One of the first things you’ll want to do with your VL7 is select and
play some of its voices … this section will show you how to do just that.
1. Select the Play Mode
Press the P button so that its indicator lights and the word “PLAY” appears in
the upper left corner of the LCD panel.
A considerable amount of information appears on the play-mode display in addition
to the name of the currently selected voice. Many of the functions relating to this
information will be covered later in the manual. For now, here are the basics:
Voice name: Alto Sax 1 (A14: [FULLCNT1:All]).
Reverb is ON.
Play mode.
Element name: Alto Sax 1.
Assign Mode: Last Note
The abbreviations in the section separated by a line at the bottom of the display
(“Cnt1”, “Cnt2”, etc) indicate the functions of the corresponding function buttons
below the display: ¡ through •. These will be discussed later in this section.
Effects in use: Pitch Change,
Feedback Delay off and
Studio type reverb.
Stereo output mode.
34
Page 35

Getting Started●Voice Selection
2. Select a Voice
The VL7’s 64 voices are organized into 4 banks of 16 voices each (4 x 16 = 64).
Any voice can be selected by specifying its bank using the bank buttons (a through
d), and its number using the voice number buttons (1 through ^).
To select voice “D7”, for example, first press the bank d button and then the
voice number 7 button. The bank d button indicator will flash until the voice number
7 button is pressed and the D7 voice is actually engaged.
Note that when you select a different bank (or even press the current bank button)
the voice directory for the selected bank will appear on the display, showing the names of
all voices in that bank with the cursor located at the currently selected voice number. The
VL7 returns to the normal voice display as soon as you specify the voice number. You
can also press the [ button if you want to stay with the same voice number.
Voice Selection
To select a different voice within the same bank it is only necessary to press the
appropriate voice number button. To select a different bank, however, you’ll always have
to press both a bank button and a voice number button (or the [ button). This
prevents unwanted voices from being selected until you’ve actually specified both the
bank and number of the voice you want to use.
Alternate Voice Selection Methods
● The - and = Buttons are best used for small, step-wise changes
— e.g. selecting adjacent voice numbers, or numbers that are only a few
steps away.
Press the = or - button briefly to
decrement or increment the voice number by
DEC INC
● The Data Dial provides a fast, efficient way to cover a broad range of
one, or hold either button for continuous
decrementing or incrementing in the corresponding direction. Extra-fast increment or
decrement operation can be achieved by
pressing the opposite button while holding
either the - or = button. The bank will
switch automatically if you cross a bank voicenumber boundary.
voice numbers when, for example, you’re
looking for a voice but don’t know the voice
number. Simply rotate the data dial clockwise
for higher voice numbers or counter-clockwise
for lower voice numbers while watching the
display.
The banks are automatically switched when neces-
sary as the voice numbers are changed.
35
Page 36

Getting Started●Voice Selection
3. Play
Try playing the selected voice on the keyboard. Select a number of different voices
and try them out. Assuming that you have loaded either of the “FULLCNT1:All” or
“FULLCNT2:All” files as directed in the preceding section,
pressure to the breath controller and/or press the foot controller forward to produce sound
with many of the voices. A complete list of the pre-programmed voices and their controller assignments is provided in the Voice List & MIDI Data Format. The VL7 also provides “controller views”, described in the next chapter, that let you check the current
controller assignments via the VL7 display.
NOTES ■ If you don ’ t get any sound at t his p oint : Make sure your sound
syst em is t urned ON and th e volum e is t urned up t o a reasonable level, m ake
sure t hat t he VL7 VOLUM E cont rol is t urned up t o a reasonable level, and check
all connection s carefully.
you will have to apply breath
Using the Voice Directory
Although the voice directory appears automatically any time you select a different
bank, you can have the directory displayed continuously if you find it more convenient
than the normal voice display. To switch to the voice directory display, press the •
button — located directly below “Dir” on the display. Voices are selected using the
same methods described in the preceding section, and the cursor or data dial will move to
the selected voice.
To return to the normal voice display press the ] button.
36
Page 37

Getting Started●Voice Selection
Voice Selection
37
Page 38

Getting Started●The Controllers
The Controllers
Natural Musical Nuance and Expressive Control
If you’ve read the “VL7 Basics” section (if you haven’t, please do so
— page 8) you should understand the concept of “controllers” as applied
to the VL7. The “controller parameters” correspond to simulated
characteristics of the instrument model — e.g. breath pressure,
embouchure or tonguing. Any of these can be controlled by you via
“physical controllers” — e.g. the breath controller or modulation wheel —
assigned to the required controller parameter. Even if you never go as far
as editing the actual sound of the voices, you’ll no doubt want to be able
to change these controller assignments and modify the way the controllers
affect the sound.
In this section we’ll introduce you to the basics of controller
assignment and operation.
Physical Controllers
• Breath Controller
• Foot Controller
• Etc.
"Physical controllers" such as
the Breath or Foot Controller
can be assigned to "controller
parameters" such as Pressure
or Embouchure.
VL Controller Parameters
• Pressure
• Embouchure
• Etc.
The effectiveness of the VL7 as a musical instrument depends to a
great deal on how well you learn to use these controllers. Since the VL7
sound is produced by a computer-based physical model rather than a
oscillator-based tone generator, there are no hard-and-fast rules as to how
any controller will actually affect the sound. There are guidelines, based
on the role of the corresponding controller parameter within the physical
model, but proficiency with the VL7 depends more on experience and
practice — just as it does in any acoustic instrument.
38
Page 39

Getting Started●The Controllers
Physical Controllers
First, here’s a list of the physical controllers available for use with the VL7:
Breath Controller
Breath Attack
Pitch Wheel
Modulation 1 Wheel
Modulation 2 Wheel
Foot Controller 1
Foot Controller 2
Foot Switches 1 & 2
Aftertouch
Velocity
MIDI
A natural candidate for controlling pressure, tonguing, throat, growl,
and other parameters.
This unique "controller" can be applied only through the Breath
Controller. When it is selected control is applied by
pressure, rather than the absolute breath pressure itself. A constant
pressure — whether zero or maximum — produces no change. The
faster the change in pressure, the higher the control value.
The self-centering VL7 pitch wheel can be assigned to a range of
parameters, but it’s “standard” function is pitch control. A controller
parameter such as Embouchure can also be assigned to the pitch
wheel for more realistic pitch variations.
This wheel produces minimum effect in its lowest position and
maximum effect in the highest position. This modulation wheel is
permanently assigned to the standard MIDI modulation wheel control
change number — 001.
The VL7’s second modulation wheel is not self-centering, but it has a
center click-stop which makes it ideal for assignment to parameters
that have a “normal” central setting with variations above and below.
It can also be assigned to any MIDI control change number, function
in the same way as the breath controller, foot controller, etc.
Foot controller 1 has the standard MIDI foot controller control change
number — 004 — and can be assigned to any VL7 controller
parameter.
Like the modulation 2 wheel, foot controller 2 is assignable to any
MIDI control change number, and is frequently assigned to function in
the same way as the breath controller. It can also be assigned to any
VL7 controller parameter.
In addition to their obvious sustain and portamento functions, the foot
switches are independently assignable to any MIDI controller function
as well as a voice number increment function. Of course, they are
only really useful with on/off type parameters — not with parameters
that allow continuous control.
Keyboard aftertouch allows you to control any controller parameter by
the pressure you apply to a key after it is initially pressed. This is
perhaps the most “intimate” type of keyboard expression control.
Although normally assigned to pressure (particularly in plucked string
voices), keyboard velocity can also be assigned to any other
controller parameter.
The MIDI protocol provides 120 control change numbers, some of
which are pre-assigned to specific controllers — “001” is “Modulation
Wheel”, for example. All of these are available for assignments to the
VL7 controller parameters, so external MIDI control devices can be
used to full advantage.
changes
in breath
The Controllers
39
Page 40

Getting Started●The Controllers
VL7 Controller Parameters
Any of the physical controllers listed above can be assigned to control any of the VL7’s
controller parameters:
Pressure
Embouchure
Pitch
Vibrato
Tonguing
Amplitude
Scream
Breath Noise
Growl
Throat Formant
Dynamic Filter
Harmonic Enhancer
Damping
Absorption
The amount of breath pressure applied to a reed or mouthpiece, or
the speed of the bow applied to a string. Pressure variations affect
both volume and timbre.
The tightness of the lips against the reed or against each other. In a
string instrument voice Embouchure corresponds to how strongly the
bow is pressed against the string. Affects both pitch and timbre.
Changes the length of the air column or string, and thereby the pitch
of the sound. The PITCH wheel is usually assigned to this parameter.
A standard vibrato (pitch modulation) effect. An extensive range of
parameters makes it possible to achieve extremely natural vibrato
effects. The amounts of vibrato applied via pitch and embouchure, for
example, are independently programmable.
Simulates the half-tonguing technique used by saxophone players by
changing the "slit" of the reed. The slit is the space between the tip of
the reed and the mouthpiece.
Unlike Pressure, this parameter simply controls the volume of the
sound without varying timbre.
Drives the entire system into chaotic oscillation, creating effects that
can only be achieved with physical modeling technology.
Adds breath noise. The sound of the breath noise itself can be varied
over a wide range using the EDIT mode “Breath Noise” parameters
— Feature Reference manual page 71.
A periodic pressure modulation which produces the “growl” effect
often heard in wind instruments. Like vibrato, an extensive range of
parameters allow remarkably realistic effects.
Controls the characteristics of the simulated player’s lungs, trachea,
and oral cavity. Can add a realistic “roughness” to the sound.
Similar to the dynamic filters found in many conventional
synthesizers. The VL7 filter has selectable high-pass, bandpass, band
elimination, and low-pass modes.
The Harmonic Enhancer can vary the harmonic structure of the sound
over a wide range. The Harmonic Enhancer also includes parameters
that affect breath noise and several reed characteristics.
Simulates the effect of damping due to losses within the body of a
wind instrument or in a string due to air friction. Affects both pitch and
timbre.
Simulates the effect of high-frequency loss at the end of the air
column or string. In the case of a wind instrument, the Damping and
Absorption parameters control the diameter and shape of the bell.
40
Page 41

Getting Started●The Controllers
Controller Views
In the PLAY mode, function buttons ¡ through § are used to select “controller
view” displays that list all controller assignments for the currently selected voice. In
particular, ¡ through ¢ display the assignments for the controller parameters listed in
the preceding chart (you can press the ] button at any time to return to the normal
play-mode display).
¡ Voice A14 — Alto Sax 1
™ Voice A14 — Alto Sax 1
The Controllers
£ Voice A14 — Alto Sax 1
¢ Voice A14 — Alto Sax 1
The controller parameters are listed in the left column of the controller view display, and the controllers assigned to them are listed in the right column.
In this example we can see that the breath controller is assigned to control “Pres-
sure” and “D.Filter” (the Dynamic Filter). The pitch wheel controls both “Pitch”
and “Embouchure”, and the modulation wheel (MODULATION 1) controls “Vi-
brato”. Keyboard aftertouch controls the “Throat Formant” parameter. Keyboard
velocity controls both “Breath Noise” and “H.Enhancer” (the Harmonic Enhancer). MIDI control change number 013 controls “Tonguing”. The remaining parameters are currently “off” and therefore have no effect on the sound.
NOTES ■ The
views t hat deal wit h dif f ere nt t ypes of co nt rollers. These will b e sum m arized in
the “ Ot her Cont roller View s sect ion on page 47 of t his m anual.
∞
(“
Cnt5
” ) and § (“CS” ) funct ion but t o ns access cont roller
41
Page 42

Getting Started●The Controllers
Some Exercises With the Alto Sax 1 Controllers
Now that you know which physical controllers are assigned to which controller parameters in the Alto Sax 1 voice (A14), play the voice using the assigned controllers to get a feel
for their effect before changing the assignments.
1. Engage the EDIT Mode
The controller assignments are accessed via the EDIT mode Controller page. To get
to this page first press the E button to engage the edit mode. This is the initial EDIT
mode display:
If the initial EDIT mode display shown above does not appear when the E
button is pressed, try pressing the ] button one or more times.
NOTES ■ When t he edit m ode is select ed, t he VL7 w ill aut om atically go st raight
to t he last edit page t hat was select ed f or m aximum program m ing spee d and
eff ici ency. You m ay have to
display hierarchy to ret ur n t o t he init ial display.
]
thro ugh one o r t wo layers of t he EDIT mode
2. Select the Element Controller Parameters
Press the ™ function button (immediately below “EL” on the display) to select the
element parameters.
If the display doesn’t look like this press the ¡ function button (below “Ctrl” on
the display) to call the “Controller” page.
3. Select the Controller Parameter You Want To Edit
Use the cursor buttons to select the controller parameter you want to assign a
controller to (you can also use the = and - buttons or data dial for this), then
press the [ button.
For example, let’s try adding scream control to the MODULATION 1 wheel (it
currently controls vibrato). Move the cursor to “07:Scream” and press [.
42
Page 43

Getting Started●The Controllers
4. Edit the Scream Controller Parameter
The cursor should be located at the “Controller” parameter, as shown in the
example display. In the Alto Sax 1 voice the scream control parameter is not used so it is
currently turned “off”. Press the - button or rotate the data entry dial to the right
slightly to select “Modulation Wheel”, the first controller on the list.
Notice that as soon as you edit the parameter, and inverse letter “E”(´) appears to
the left of the voice number near the upper left corner of the display. This tells you that
the voice has been edited and, later, that you’ll need to store the voice in memory before
selecting a different voice if you want to keep the edited data.
NOTES ■ The Controller parameter has 125 set t ings — 00 1 t hrough 1 20
correspondin g t o t he cont ro ller num ber s provided by MIDI pr ot ocol and 5
sett in gs(Aft er Touch, Pitch Bend, Velocit y, Breat h At t ack and Touch EG). Som e of
thes e are pre-assigned: Modu lation W hee l is num ber 001, Breat h Controlle r is
num ber 002, e t c. W hen you select a pre-assigned controlle r t he corres ponding
cont roller nam e is shown on t he disp lay; non-assigned cont rolle rs are displayed
as M IDI cont rol change num bers.
■ The “
w hee l. The M OD ULATION 2 wheel can be assigned to
num ber — Feature Refe rence m anual, page 154.
Modulation Wheel
” set t ing ref ers t o t he VL7’s MODULATION 1
any M IDI cont ro l change
The Controllers
5. Try Out the Edited Voice & Cancel the Vibrato Effect
Try operating the “ wheel while playing the Alto Sax 1 voice. You
should hear the scream effect increase as the wheel is rolled upward. Vibrato is still
assigned to the “ wheel, so the vibrato effect will come in simultaneously.
To cancel the vibrato effect and leave only the scream effect, simply go to the
Controller “Vibrato” page and turn the Controller parameter “off”. To get to the
vibrato page you can either ] to the controller directory introduced in step 2 and
select the vibrato page from there, or step backward through the controller pages by using
the § function button (“Bpag” stands for “Back page”). In the same way, the ¶
function button can be used to step forward through the controller pages (“Fpag”).
NOTES ■ When “
the vibrato and several ot her cont rol ler pages, t he
another page of paramet ers pert aining t o t he con t roller.
Para
” appears above th e • fun ct ion but t on, as it does in
•
fun ct ion but t on accesses
43
Page 44

Getting Started●The Controllers
6. Go to the Pressure Controller Page
From the Vibrato page use the § button to step back to the Pressure controller
page. Quite logically, the Breath Controller is assigned to control the “Pressure”
parameter, and we will leave it set that way while we experiment with the “Depth” and
“Curve” parameters.
7. Vary the Depth Parameter
Move the cursor to the “Depth” parameter and, while trying out the effect of the
changes on how the “Pressure” parameter is affected by the Breath Controller, use the
data dial to vary to depth setting.
As you decrease the setting, notice that the graph to the right of the display changes
accordingly. The horizontal axis corresponds to breath pressure (or the control value in
any other controller screen), and the vertical axis represents the depth of the parameter.
With “Depth” set to the maximum value of “127” no breath pressure produces no
sound and maximum breath pressure produces maximum output.
Maximum
output.
Minimum
output.
Minimum
breath
pressure.
Maximum
breath
pressure.
As the value of the “Depth” parameter approaches zero, however, the depth of the
output range is reduced and a corresponding amount of output is produced even at minimum breath pressure. In other words, at a setting lower than 127 simply playing a key
will produce sound even without breath pressure, and the Breath Controller will vary
output between the initial level and maximum output.
44
Page 45

Getting Started●The Controllers
Once you pass zero, you enter a range of “negative” Depth values that produce
reverse controller operation: i.e. the output level
Breath Controller. Like the normal positive range, the negative Depth range is from “0”
to “-127”.
decreases as you blow harder into the
8. Vary the Curve Parameter
You may have noticed in the previous step that the relationship between breath
pressure and output is not linear (the line in the graph is slightly curved). That is, a
change in breath pressure does not necessarily produce a corresponding change in sound.
The “Curve” parameter makes it possible to change that relationship.
As you increase the curve value (the maximum value is 16), the line on the graph
which represents breath pressure versus output will curve downward, as shown in the
display below (setting “12”). The result is that the lower end of the breath pressure range
has relatively little effect on the sound, while higher breath pressures produce more
dramatic changes.
The Controllers
Negative curve values (o … -16) have the opposite effect: Output increases rapidly
at low breath pressures while higher pressures produce relatively little effect.
45
Page 46

Getting Started●The Controllers
9. Experiment!
Now that you’ve got the idea, flip through the all the available controller pages and
experiment with alternative assignments and settings until you feel comfortable with the
system. You should also try this with different voices later, since the controllers can have
different effects with different voices.
NOTES ■ There are several variations o n t he basic cont roller d isplay and param-
eter s. W hen yo u’ re ready to st udy t he paramet ers i n m ore det ail ref er t o t he
“ Element Cont rollers” se ct ion beginn ing on page 62 of t he Feature Reference
manual.
10.Return to the Play Mode When Done
When you’re finished experimenting with the controllers, press the P button to
return to the play mode.
Note that the inverse letter “E”(´) still appears to the left of the voice number,
indicating that the voice has been edited.
If you want to keep the edited voice, it must be saved to an internal memory location and then to floppy disk if necessary, as described on pages 27 and 166 of the Feature
Reference manual, respectively. This must be done
the same voice again) or your edits will be lost. To confirm this, try selecting a different
voice and then return to the Alto Sax 1 voice … the inverse “E”(´) will be gone and the
voice will be as it was before you edited it.
NOTES ■ The VL7 has a M em or y Voice Recall fu nct ion t hat can be used t o
recall the last version of a voice if yo u accidentally m ake unwanted changes or
lose your edit e d data as described above — Feature Reference manual, page 173.
Controller Envelopes
Since acoustic instruments virtually never respond instantaneously to “controller”
changes, the VL7 includes a range of controller envelopes that can be used to simulate
this type of response. For example, sudden application of maximum breath pressure to a
wind instrument or bow speed to a string instrument normally doesn’t produce instantaneous sound. The instrument requires a few milliseconds to reach the full resonance demanded by the breath pressure or bowing. The VL7 provides programmable envelopes for
the “Pressure”, “Embouchure & Pitch”, “Vibrato”, “Growl”, and
“Amplitude & Filter” parameters, and these are described in detail on pages 126
through 148 of the feature reference manual.
before you select a different voice (or
46
Page 47

Getting Started●The Controllers
Other Controller Views
If you press the ∞ function button from the play mode you’ll see the following
controller view:
The controller parameters listed in this screen are not in the same category as those
discussed in the preceding section, and therefore need to be introduced separately. All of
the related parameters will be discussed in detail in the Feature Reference manual (pages
listed below).
The Controllers
Sustain
Portamento
Time MIDI
Ctrl
Effect Ctrl
Controller
Indicates whether sustain control is on or off.
(≥ Feature Reference manual, page 33)
This line indicates the current portamento status: “Full Time” or “Fingered”.
(≥ Feature Reference manual, page 38)
A MIDI controller can be assigned to control portamento time. This line
indicates whether Time MIDI Control is turned “on” or “off”.
(≥ Feature Reference manual, page 38)
Any physical controller can be assigned to control certain of the VL7’s effects in
certain ways: the wet/dry balance of the pitch change effect, the feedback delay
send level, or the reverb send level. This line indicates which effect parameter
is assigned for control.
(≥ Feature Reference manual, page 43)
This line indicates which controller is assigned to control the effect parameter
shown in the “Effect Ctrl” line, above.
(≥ Feature Reference manual, page 43)
The § function button calls the Continuous Slider (“CS”) controller view, which
will look something like this:
The continuous sliders can not be assigned to the instrument controller parameters
listed above, but can be independently assigned to several other parameters that you can
control in real time while playing. The parameters available for editing via the continuous
sliders are individually preset for each voice. You can select from the available range by
using the “Continuous Slider” assignment function described on page 40 of the Feature
Reference manual.
The continuous slider view shows you which parameters are assigned to which
controller as well as the current positions of the controllers and parameter values.
47
Page 48

Getting Started●Mixing & The Modifiers
Mixing & The Modifiers
Creating New Timbres and Original Voices
The VL7 provides two ways to change the timber of a voice to
create original variations: 1) by mixing the output signals from various
parts of the physical model, and 2) by using the VL7’s “Modifiers” to
shape the overall harmonic structure. You should always start with the
mixing parameters when attempting to create a new voice, so we’ll
describe mixing first.
Mixing
The VL7’s physical instrument model produces three output signals
that can be mixed to produce a surprising range of timbral variation.
● Driver
The “Driver” signal is the direct output from
the mouthpiece (or bow/string interface)
without the resonance of the instrument’s
body. In acoustic instruments there is
a certain amount of driver sound —
particularly when the instrument is heard at
close range. Judicious adjustment of the
amount of driver signal added to the sound
can significantly enhance the simulation.
Tap
Driver Pipe/String
Mix
Out
(to modifiers)
● Pipe/String
This is the main output from the instrument’s
pipe or string.
● Tap
By “tapping” the output from a specific point
along the instrument’s pipe or string and
mixing that signal with the Driver and Pipe/
String signals, a range of variations can be
produced. The Tap signal alone sounds
almost the same as the Pipe/String signal,
but since it has a different phase the tone
can change drastically when the two signals
are mixed due to phase cancellation and
reinforcement.
always
48
Page 49

Getting Started●Mixing & The Modifiers
An Exercise: Remix the Pan Pipes Voice
Before going to the EDIT mode, select and play the Pan Pipes (B03) voice for a
few minutes to get a feel for how it sounds.
1. Engage the EDIT Mode
The mixing parameters are accessed via the EDIT mode “Mixing” page. To get to
this page first press the E button to engage the edit mode. You may have to press the
] button one or more times to get the initial edit display.
2. Select the Element Miscellaneous Parameters
Press the ™ function button to select the element parameters, then press the ™
function button again (below “Misc” on the display) to call the “Miscellaneous”
page.
Mixing & The Modifiers
3. Select & Edit the Mixing Parameters
Move the cursor to “4:Mixing” and press [.
Here you have all the parameters you need to mix the physical model output signals: Driver Output, Pipe/String Output, and Tap Output. These three
parameters can be set from “0” (no output) to “127” (maximum output). Try changing
their values to see how the sound is affected.
Note that in the example display there are more Tap parameters. There is actually
one more: move the cursor to the “Tap Setting” parameter and press the =
button (or use the data dial) to set it to “Variable” (the previous setting, “Driving
Point”, fixes the position of the tap output at the instrument’s driving point). Now the
location of the tap can be set at any point via the “Tap Location” parameter. Try
changing the “Tap Location” setting and notice how the tone changes.
49
Page 50

Getting Started●Mixing & The Modifiers
Tap Location
0%
99%
50%
The remaining tap parameter — “Tap Sign” — inverts the phase of the tap
signal. It has two settings: “+” and “-”. Try it.
4. Return To the PLAY Mode When Done
Press the P button to return to the PLAY mode when you’ve finished experi-
menting with the mixing parameters.
After experimenting with the Mixing parameters for a while you’ll discover that
they define the basic sound of the instrument. Once you’ve created the basic sound you
want by using the Mixing parameters, then you can move on the Modifiers to refine the
sound.
50
Page 51

Getting Started●Mixing & The Modifiers
The Modifiers
As described in the “VL7 Basics” section (page 8), the VL7 has five
“Modifier” stages that shape the overall timbre of the sound. Although the
modifiers can vary the sound over a considerable range, the fundamental
timbre of each voice is determined by its physical instrument model. If
you start with a trumpet voice, for example, the modifiers will let you
create an broad range of timbres, but the final sound will always be more
or less trumpet-like. It is therefore important to choose a voice that provides the right foundation for the sound you are trying to achieve when
attempting to create an original sound.
The five modifier stages are:
Mixing & The Modifiers
In
(from physical
model)
Harmonic
Enhancer
Dynamic
Filter
Impulse
Expander
Harmonic Enhancer
Of the five modifier stages, the Harmonic Enhancer has the most pronounced effect
on the actual harmonic structure of the sound. It allows you to create radical timbral
variations within the current instrument “family”.
Modulator
Source.
Carrier
Source.
Frequency
Equalizer
Resonator
Modulator
Carrier
Out
(to effects stage)
Driver,
pipe/string,
and tap sound.
51
Wet/Dry
Balance
Out
(to Dynamic Filter.)
Page 52

Getting Started●Mixing & The Modifiers
Referring to the block diagram of the harmonic enhancer, above, we can see that it
employs a modulation approach to building new harmonic structures. The carrier and
modulator blocks have independent display pages and some independent parameters.
The Modulator Parameter Page
■
■
The Carrier Parameter Page
NOTES ■ If you want t o e xperim ent with t he Harm onic Enhancer paramet ers
w hile reading th is sect ion, t h ey can be accessed by select in g t he EDIT mode
]
and, from t he in it ial EDIT mode d isplay (try pressing
™
display doesn’ t appear), pressing
then pressing
the cursor t o “
Harmonic Enhancer display is select ed t he carrier and m odif ier pages are
select ed via
£
(“
Modi
” ) to select t he Modif ier paramet ers, and f inally m oving
1:Harmonic Enhancer
¡
(“
Crr
” ) and ™ (“
(“EL” ) to select t h e Element p arameters ,
” and pressing
Mod
” ), respective ly.
if t he init ial EDIT
[
. Once t he
The “Signal Select” parameters in these pages allow independent selection of
the six different signal sources listed below.
Normal
Breath Noise
Amplitude
Flow Rate
Saturation
Beat
Slit/Friction
Reed
This is the total output of the instrument model: a mix of the driver,
pipe/string, and tap signals.
This signal represents the instantaneous amplitude of the breath noise
produced at the driver. It is basically a highly distortion version of the
Slit/Friction signal described below.
When the pressures on either side of an aperture (e.g. a mounthpiece/
reed assembly) differ, a corresponding flow of air is produced. There is,
however, a limit to the speed of the airflow which can be produced
(saturation). The relationship between the pressure difference and
resulting airflow is derived as the Flow Rate Saturation signal.
The beat signal represents contact between the vibrating reed and the
mouthpiece.
As the reed vibrates, the area of gap (slit) between it and the
mouthpiece varies accordingly. The Slit/Friction signal corresponds to
the varying are of the reed/mouthpiece slit.
This signal is derived directly from the flexing of the reed.
52
Page 53

Getting Started●Mixing & The Modifiers
Although any modulator source signal can be applied to any carrier source signal,
two approaches are recommended when attempting to create an acoustic instrument
simulation.
The first is to set the carrier signal to “Normal” and the modulator signal to any
other than normal, set the dry/wet “Balance” to 63 (all wet), and set a relatively high
modulator “Index” value. In this case the total output of the instrument model (“Nor-
mal” signal) will by modulated by one of the component signals, so the dry/wet “Balance” can be set to fully wet (modulated carrier output only) since the carrier source and
dry signals are essentially the same. The “Index” parameter determines how much
modulation is applied, so a higher value is generally required to create sufficient variation.
The second approach is to set the carrier signal to any other than normal and the
modulator signal to any of the six possibilities, set the dry/wet “Balance” to a more
central value, and set a relatively low modulator “Index” value. In this situation it is
necessary to set the “Balance” more toward the “Dry” side since the carrier source
signal is
not the normal signal and at least some of the dry signal is necessary to provide
the basic sound of the instrument model. In other words, the sound produced by the
Harmonic Enhancer is simply added to the basic sound of the instrument, in contrast with
the first approach in which the basic sound of the instrument is modulated directly.
Please note that these are only guidelines, and are by no means the only way to
work with the Harmonic Enhancer. Since the Harmonic Enhancer tends to respond
differently with different instrument models, experimentation and experience are your
most valuable tools.
Mixing & The Modifiers
While the “Balance” and “Index” parameters apply to the overall harmonic
enhancer sound, the following independent parameters are provided for the modulator and
carrier blocks.
Both the modulator and carrier blocks have high-pass filters that can be
HPF Cutoff
Overdrive
Phase
used to roll off the low frequencies of the corresponding signal. The
cutoff frequency can be varied from 17.7 Hz to 11.2 kHz. The filter can
also be bypassed.
This parameter boosts the corresponding modulator or carrier signal,
forcing it into distortion and thereby drastically changing its harmonic
structure.
This parameter is provided for the modulator block only. It allows a
degree of timbral variation by varying the phase of the modulator signal
through 360 degrees in 2- or 3-degree increments.
Look at the Harmonic Enhancer display pages again. Parameters with an inverse
“K”(˚) next to them can also be controlled by key scaling — i.e. the value of the parameter changes according to the pitch of the key played. This makes it possible to achieve
both natural and unprecedented timbral variations across the range of the keyboard.
NOTES ■ Refer to page 105 of t he Feature Referen ce m anual for f ull det ails on
the Harmonic Enhancer paramet ers.
53
Page 54

Getting Started●Mixing & The Modifiers
Dynamic Filter
The Dynamic Filter stage is similar to the dynamic filters found in many conventional synthesizers. It allows both fixed and dynamic filtering in high-pass, low-pass,
bandpass, and band elimination modes, and is effective for broad tonal control.
In
(from Harmonic
Enhancer)
■
The Dynamic Filter Parameter Page
Dynamic
Filter
Wet/Dry
Balance
Out
(to Frequency
Equalizer)
The dry/wet “Balance” parameter allows delicate variations in the degree of
filtration applied. The “Cutoff Tracking” parameter selects either the “Fixed”
mode in which the cutoff frequency of the filter is fixed at the specified cutoff frequency
in Hz (“Cutoff Freq.” parameter), or the “KeyTrack” mode in which the cutoff
frequency varies according to the key played. When “KeyTrack” is selected the cutoff
frequency is specified in octaves. Another important feature is “Resonance” — a
parameter that produces a variable resonant peak at the specified cutoff frequency in any
of the filter’s modes.
NOTES ■ Refer t o page 113 of t he Feature Refer ence m anual for f ull de t ails on
the Dynamic Filt er paramet ers.
54
Page 55

Getting Started●Mixing & The Modifiers
Frequency Equalizer
The Frequency Equalizer stage consists of two blocks — Auxiliary and Band —
each with its own display page.
In
(from Dynamic
Filter)
The Equalizer Auxiliary Parameter Page
■
■
The Equalizer Band Parameter Page
Equalizer
(Auxiliary)
Equalizer
(Bands)
Out
(to Impulse
Expander)
Mixing & The Modifiers
The Auxiliary block includes programmable low-pass and high-pass filters that can
be used independently or together to create a bandpass response. Both the low-pass and
high-pass filters have independent key-scaling parameters that can be used to vary the
gain of the filters across the range of the keyboard. The “Input Gain” parameter
adjusts the level of the signal applied to the input of the Equalizer Auxiliary stage.
The Equalizer Band block is a 5-band parametric equalizer with frequency, Q
(bandwidth), and level control. The Band block functions in the same way as any standard parametric equalizer, allowing flexible response control over a wide range.
NOTES ■ Refer t o page 117, 120 of t he Feature Reference manual for f ull
details on t he Frequency Equalizer paramet ers.
55
Page 56

Getting Started●Mixing & The Modifiers
Impulse Expander
The Impulse Expander works in conjunction with the Resonator, described below, to
simulate the effect of an instrument’s resonant cavity or sound box. It can also be used to
simulate the acoustic environment in which the instrument is played.
In
(from Frequency
Equalizer)
■
The Impulse Expander Parameter Page
Frequency-dependent Delay
Mix
Out
(to Resonator)
In contrast to the Resonator, the Impulse Expander is more suited to the simulation
of metallic resonances and is thus invaluable for refining the sound of brass and metalbodied woodwinds. Other important effects are the ability to diffuse sharp attack sounds
and to give depth and realism to vibrato. In fact, the Impulse Expander should only be
used with voices which have a degree of vibrato or other cyclic variation, since its effect
is less noticeable on uniformly sustained sounds.
Since the Impulse Expander is not essential for all voices, it can be turned completely off when not needed. It also has “Wet Level”, “Dry Level”, and stereo
“Level Balance” parameters that allow its effect to be blended into the main sound
as required.
NOTES ■ Refer to page 123 of t he Feature Referen ce m anual for f ull det ails on
the Im pulse Expander paramet e rs.
56
Page 57

Resonator
While the Impulse Expander tends to give the sound a metallic quality, the Resonator produces a more woody resonance effect. Careful adjustment of the resonator’s
parameters can often bring a not-quite-right voice to life.
Getting Started●Mixing & The Modifiers
Delay
Delay
In
(from Impulse
Expander)
■
The Resonator Parameter Page
Delay
Delay
Delay
Right Channel
Out (to Effects)
Left Channel
The Resonator basically consists of five parallel delay lines with independently
programmable delay times (DL1 through DL5, variable from 0.29 to 41.54 milliseconds).
Other parameters include variable “Decay Time”, “LPF Cutoff Freq.” (low-pass
filtercutoff frequency), “Diffusion”, and “Phase”.
Like the Impulse Expander, the Resonator is not essential for all voices and can be
turned completely off when not needed. It also has “Input Gain”, “Wet Level”,
and stereo “Level Balance” parameters that allow its effect to be blended into the
main sound as required (the cursor is moved around the block diagram in the “IE & RSN
SETTING” page, shown below, to select the parameters associated with the various
blocks).
Mixing & The Modifiers
■
The Impulse Expander & Resonator Setting Page
(IE = Impulse Expander. RSN = Resonator)
NOTES ■ Refer to page 124 of t he Feature Referen ce m anual for f ull det ails on
the Resonator paramete rs.
57
Page 58

Getting Started●Effects
Effects
Creating the Right Ambience
Effects are the essential finishing touches for any voice. Once you’ve
created a sound you like, use one or more of the VL7’s three highperformance digital effect stages to polish and refine it as required. Each
stage includes a number of effects. The Modulation, Feedback Delay, and
Reverb stages can be used simultaneously, but only one of the effects
available in each stage can be used at a time.
R
Modulation
L
Feedback
Delay
Reverb
R
L
All effects can be accessed from the initial EDIT mode display by
press the ¡ button (“COM”) to select the common voice parameters, and
then the ™ button (“Efct”) to call the effect directory. Then move the
cursor to the name of the desire effect stage and press [ button.
58
Page 59

Getting Started●Effects
Modulation Effects
Although “modulation” usually implies some sort of cyclical variation, the VL7
Modulation stage allows selection of Flanger, Pitch Change, and Distortion effects (only
Flanger fits the traditional definition of a modulation effect). Since most of these effects
produce a marked change in the sound, you’ll probably only want to use them on certain
voices, and maybe not all the time.
This type of effect is created by slightly delaying the sound and
Flanger
Pitch Change
Distortion
periodically varying the delay time. The delayed signal is then added to
the direct signal causing a variable comb-filter effect which results in
the familiar “swishing” flanger sound.
A dual pitch change effect which can be used in the Mono mode, in
which both pitch-shifted notes appear on both channels, or the Stereo
mode in which one pitch-shifted note appears on the left channel and
the other on the right. The pitch of the two pitch-shifted notes can be
set over a two-octave range — from one octave below to one octave
above the input note.
An extremely versatile distortion effect which offers transistor, vintage
tube, fuzz and other distortion types, a variety of speaker types, and a
comprehensive range of other parameters that can be used to refine
the distortion sound.
Effects
NOTES ■ Refer t o page 44 of t he Feature Refere nce m anual for f ull det ails on
the Modulation ef f ect s and parameters .
Feedback Delay Effects
All three effects available in the Feedback Delay stage are basically designed to
produce distinct repeat delays or echoes. You have extensive control over the number of
repeats produced and the way they decay.
Mono
L, R
L, C, R
Since the goal in producing a delay effect is often to match the delay time to a
musical time value, the VL7 includes a “time calculation” function that makes it easy to
convert standard note values to their corresponding delay times in milliseconds.
The Mono delay effect produces a single delay sound which appears in
the center of the stereo sound field.
This variation provides independently programmable delays for the left
and right stereo channels.
Independent delays are provided for the left and right channels, plus a
center delay.
59
Page 60

■ The Time Calculation Pop-up Page
NOTES ■ Refer t o page 51 of t he Feature Refere nce m anual for f ull det ails on
the Feedback Delay effe ct s and paramet ers .
Reverb Effects
You’ll probably want to apply the effects in this stage to some degree to all your
voices. These are the effects that will give your sound ambience and a sense of dimension, adding warmth and depth to an otherwise dry sound.
Getting Started●Effects
Hall 1
Hall 2
Room 1
Room 2
Studio
Plate
Space
Reverse
A simulation of the reverbation characteristics of a fairly standard
concert hall.
This hall simulation produces a richer low-frequency reverb sound than
the Hall 1 program.
The ambience of a small room rather than a large hall. This effect is
ideal when you just want a subtle touch of ambience.
A larger room than the Room 1 simulation, with a correspondingly
“bigger” reverb sound.
In recording studios it is generally desirable to suppress low-frequency
reverbeation without entirely losing the "live" sound of the room. The
Studio program simulates this type of environment.
The plate reverb unit is a classic tool of the recording trade — it was
the first mechanical method of creating artificial reverberation that
capable of producing satisfactory results in the studio. This is a very
realistic simulation.
A diffuse reverberation of the type you might experience in an
extremely large space.
In this effect the reverb sound plays in reverse, building up to
maximum level rather than decaying as normal.
For even more versatility all of the reverb effects have a “Feel” parameter with
four settings which produce significant changes in the basic sound of the effect. In
essence you have 32 distinct reverb programs (8 effects x 4 Feel settings). Another
innovative feature of the reverb effects is a Reverb Time Boost parameter which can be
used to extend the tail end of the reverb sound in fine increments.
NOTES ■ Refer t o page 58 of t he Feature Refere nce m anual for f ull det ails on
the Reverb eff e ct s and paramet ers .
60
Page 61

Getting Started●Effects
Effects
61
Page 62

Getting Started●Index
Index
This index covers both the VL7 Getting Started and Feature Reference manuals for
easy cross-referencing. Page numbers in the Getting Started manual are preceded by
©”, and page numbers in the Feature Reference manual are preceded by “ƒ”.
“
A
Absorption . . . . . . . . . . . . . . . . . . . . . . . . . . . . . . . ƒ79
Aftertouch curve . . . . . . . . . . . . . . . . . . . . . . . . . ƒ155
Amplitude & filter envelope . . . . . . . . . . . . . . . ƒ141
Amplitude & filter key scaling . . . . . . . . . ƒ144-148
Amplitude (Element Controller) . . . . . . . . . . . . . ƒ69
Amplitude level . . . . . . . . . . . . . . . . . . . . . . . . . . ƒ102
Assign mode . . . . . . . . . . . . . . . . . . . . . . . . . . . . . ƒ33
B
Backup battery . . . . . . . . . . . . . . . . . . . . . . . . . . . . ©4
Bank buttons . . . . . . . . . . . . . . . . . . . ©19, 34. ƒ15
Breath attack gain . . . . . . . . . . . . . . . . . . . . . . . . . ƒ34
Breath attack time . . . . . . . . . . . . . . . . . . . . . . . . . ƒ34
Breath control curve . . . . . . . . . . . . . . . . . . . . . . ƒ155
Breath controller calibration . . . . . . . . . . . . . . . . . ©28
Breath controller . . . . . . . . . . . . . . . . . . . . . . . . . . ©23
Breath controller jack . . . . . . . . . . . . . . . . . . . . . . ©19
Breath noise . . . . . . . . . . . . . . . . . . . . . . . . . . ƒ71, 84
Breath noise key scaling . . . . . . . . . . . . . . . . . ƒ86-88
Bulk dump, MIDI . . . . . . . . . . . . . . . . . . . . . . . . ƒ158
Controllers . . . . . . . . . . . . . . . . . . . . . . . . . . . . ©12, 38
Conventions . . . . . . . . . . . . . . . . . . . . . . . . . . . . . . . ©7
Copy button . . . . . . . . . . . . . . . . . . . . . . . . . . . . . . ©17
Copy function . . . . . . . . . . . . . . . . . . . . . . . . . . . . ƒ24
Cursor buttons . . . . . . . . . . . . . . . . . . . . . . . . . . . . ©18
D
Damping . . . . . . . . . . . . . . . . . . . . . . . . . . . . . . . . ƒ78
Data dial . . . . . . . . . . . . . . . . . . . . . . ©18, 35. ƒ16
Decrement & increment buttons . . . ©18, 35. ƒ16
Demo playback . . . . . . . . . . . . . . . . . . . ©26. ƒ174
Device number . . . . . . . . . . . . . . . . . . . . . . . . . . ƒ153
Disk format . . . . . . . . . . . . . . . . . . . . . . . . . . . . . ƒ171
Disk status . . . . . . . . . . . . . . . . . . . . . . . . . . . . . . ƒ163
Disk, delete file . . . . . . . . . . . . . . . . . . . . . . . . . . ƒ170
Disk, load from . . . . . . . . . . . . . . . . . . . . . . . . . . ƒ164
Disk, rename file . . . . . . . . . . . . . . . . . . . . . . . . . ƒ168
Disk, save to . . . . . . . . . . . . . . . . . . . . . . . . . . . . ƒ166
Display mode . . . . . . . . . . . . . . . . . . . . . . . . . . . ƒ156
Distortion . . . . . . . . . . . . . . . . . . . . . . . . . . . . . . . . ƒ49
Dynamic filter . . . . . . . . . . . . . . . . . ©54. ƒ75, 113
Dynamic filter key scaling . . . . . . . . . . . . . ƒ115-116
C
Common miscellaneous . . . . . . . . . . . . . . . . . . . . ƒ32
Confirm mode . . . . . . . . . . . . . . . . . . . . . . . . . . . ƒ156
Continuous slider assignment . . . . . . . . . . . . . . . . ƒ40
Continuous sliders . . . . . . . . . . . . . . . ©18, 47. ƒ19
Controller envelopes . . . . . . . . . . . . . . . . . . . . . . . ©46
Controller search & replace . . . . . . . . . . . . . . . . . ƒ80
Controller parameters . . . . . . . . . . . . . . . . . . . . . . ©40
Controller views . . . . . . . . . . . . . . . . ©41, 47. ƒ17
E
Edit compare function . . . . . . . . . . . . . . . . . . . . . ƒ23
Edit recall . . . . . . . . . . . . . . . . . . . . . . . . . . . . . . ƒ172
Effect control . . . . . . . . . . . . . . . . . . . . . . . . . . . . ƒ43
Effect on/off . . . . . . . . . . . . . . . . . . . . . . . . . . . . . ƒ22
Effects . . . . . . . . . . . . . . . . . . . . . . . . . . . . . . . . . . ©58
Element level . . . . . . . . . . . . . . . . . . . . . . . . . . . . ƒ36
Element names . . . . . . . . . . . . . . . . . . . . . . . . . . . ƒ31
62
Page 63

Getting Started●Index
Element note shift . . . . . . . . . . . . . . . . . . . . . . . . . ƒ35
Element pan . . . . . . . . . . . . . . . . . . . . . . . . . . . . . ƒ36
Element pitch . . . . . . . . . . . . . . . . . . . . . . . . . . . . ƒ35
Element random pitch . . . . . . . . . . . . . . . . . . . . . . ƒ35
Element tune . . . . . . . . . . . . . . . . . . . . . . . . . . . . . ƒ35
Embouchure & pitch envelope . . . . . . . . . . . . . . ƒ128
Embouchure & pitch envelope key scaling ƒ130-132
Embouchure . . . . . . . . . . . . . . . . . . . . . . . . . . . . .
Enter button . . . . . . . . . . . . . . . . . . . . . . . . . . . . . . ©18
Equalizer auxiliary . . . . . . . . . . . . . . . . . . . . . . . ƒ117
Equalizer auxiliary key scaling . . . . . . . . . ƒ118-119
Equalizer band . . . . . . . . . . . . . . . . . . . . . . . . . . ƒ120
Equalizer . . . . . . . . . . . . . . . . . . . . . . . . . . . . . . . . ©55
Error messages . . . . . . . . . . . . . . . . . . . . . . . . . .
Exit button . . . . . . . . . . . . . . . . . . . . . . . . . . . . . . . ©18
ƒ64
ƒ182
F
Feedback delay effects . . . . . . . . . . . . . . . . . . . . . ©59
Feedback delay . . . . . . . . . . . . . . . . . . . . . . . . . . . ƒ51
Feedback delay/reverb mode . . . . . . . . . . . . . . . . ƒ43
Flanger . . . . . . . . . . . . . . . . . . . . . . . . . . . . . . . . . . ƒ45
Floppy disk drive . . . . . . . . . . . . . . . . . . . . . . . . . ©19
Floppy disks & drive, handling . . . . . . . . . . . . . . . ©5
Foot controller 2 assign . . . . . . . . . . . . . . . . . . . ƒ154
Foot controller jacks . . . . . . . . . . . . . . . . . . . . . . . ©20
Foot controllers . . . . . . . . . . . . . . . . . . . . . . . . . . . ©23
Foot switches . . . . . . . . . . . . . . . . . . . . . . . . . . . . ©23
Foot switch assign . . . . . . . . . . . . . . . . . . . . . . . ƒ154
Foot switch jacks . . . . . . . . . . . . . . . . . . . . . . . . . ©20
Function buttons . . . . . . . . . . . . . . . . . . . . . . . . . . ©18
Functions & parameters, finding . . . . . . . . . . . . . . ƒ9
G
Greeting message . . . . . . . . . . . . . . . . . . . . . . . . ƒ157
Growl envelope . . . . . . . . . . . . . . . . . . . . . . . . . . ƒ139
Growl . . . . . . . . . . . . . . . . . . . . . . . . . . . . . . . . . . . ƒ72
Growl speed key scaling . . . . . . . . . . . . . . . . . . ƒ140
I
Impulse expander & resonator setting . . . . . . . . ƒ121
Impulse expander . . . . . . . . . . . . . . . . . ©56. ƒ123
Initial edit page . . . . . . . . . . . . . . . . . . . . . . . . . . . ƒ30
Interpolate speed . . . . . . . . . . . . . . . . . . . . . . . . . . ƒ83
K
Keyboard . . . . . . . . . . . . . . . . . . . . . . . . . . . . . . . . ©19
Keyboard transpose . . . . . . . . . . . . . . . . . . . . . . . ƒ151
L
L,C,R delay . . . . . . . . . . . . . . . . . . . . . . . . . . . . . . ƒ55
L,R delay . . . . . . . . . . . . . . . . . . . . . . . . . . . . . . . . ƒ53
LCD display . . . . . . . . . . . . . . . . . . . . . . . . . . . . . ©18
Local on/off . . . . . . . . . . . . . . . . . . . . . . . . . . . . . ƒ153
M
Manuals, about the . . . . . . . . . . . . . . . . . . . ©6. ƒ4
Master tuning . . . . . . . . . . . . . . . . . . . . . . . . . . . ƒ152
Memory protect . . . . . . . . . . . . . . . . . . . . . . . . . . ƒ156
Micro tuning . . . . . . . . . . . . . . . . . . . . . . . . . . . . . ƒ39
MIDI connections . . . . . . . . . . . . . . . . . . . . . . . . . ©24
MIDI connectors . . . . . . . . . . . . . . . . . . . . . . . . . . ©20
MIDI settings . . . . . . . . . . . . . . . . . . . . . . . . . . . ƒ153
Mixing . . . . . . . . . . . . . . . . . . . . . . . . . . . ©48. ƒ96
Mixing key scaling . . . . . . . . . . . . . . . . . . . . ƒ98-101
Mode buttons . . . . . . . . . . . . . . . . . . . . . . . . . . . . ©17
Modes, the 3 main . . . . . . . . . . . . . . . . . . . . . . . . . ƒ8
Modifier on/off . . . . . . . . . . . . . . . . . . . . . . . . . . . ƒ22
Modifiers . . . . . . . . . . . . . . . . . . . . . . . . . . . . . . . . ©51
Modulation effect type . . . . . . . . . . . . . . . . . . . . ƒ44
Modulation effects . . . . . . . . . . . . . . . . . . . . . . . . ©59
Modulation wheel 2 assign . . . . . . . . . . . . . . . . . ƒ154
Modulation wheels . . . . . . . . . . . . . . . . . . . . . . . . ©19
Mono delay . . . . . . . . . . . . . . . . . . . . . . . . . . . . . . ƒ51
Index
H
Harmonic enhancer . . . . . . . . . . . . . ©51. ƒ76, 105
Harmonic enhancer key scaling . . . . . . . . . ƒ108-112
Headphones . . . . . . . . . . . . . . . . . . . . . . . . . . . . . . ©23
N
Navigation aids . . . . . . . . . . . . . . . . . . . . . . . . . . . ƒ11
O
Octave buttons . . . . . . . . . . . . . . . . . . . . . . . . . . . ©19
Octave switch hold . . . . . . . . . . . . . . . . . . . . . . . ƒ151
Output jacks . . . . . . . . . . . . . . . . . . . . . . . . . . . . . ©20
63
Page 64

Getting Started●Effects
Getting Started●Index
P
Phones jack . . . . . . . . . . . . . . . . . . . . . . . . . . . . . . ©19
Pitch change . . . . . . . . . . . . . . . . . . . . . . . . . . . . . ƒ47
Pitch . . . . . . . . . . . . . . . . . . . . . . . . . . . . . . . . . . . . ƒ65
Pitch wheel . . . . . . . . . . . . . . . . . . . . . . . . . . . . . . ©19
Play-mode display . . . . . . . . . . . . . . . . . . ©34. ƒ14
Portamento . . . . . . . . . . . . . . . . . . . . . . . . . . . . . . ƒ38
Power cord socket . . . . . . . . . . . . . . . . . . . . . . . . . ©20
Power supply . . . . . . . . . . . . . . . . . . . . . . . . . . . . . ©22
Power switch . . . . . . . . . . . . . . . . . . . . . . . . . . . . . ©20
Power-on procedure . . . . . . . . . . . . . . . . . . . . . . . ©25
Pre-programmed voices, loading . . . . . . . . . . . . . ©31
Pressure envelope . . . . . . . . . . . . . . . . . . . . . . . . ƒ127
Pressure . . . . . . . . . . . . . . . . . . . . . . . . . . . . . . . . . ƒ63
Q
Quick editing . . . . . . . . . . . . . . . . . . . . . . . . . . . . . ƒ19
R
Receive channel . . . . . . . . . . . . . . . . . . . . . . . . . ƒ153
Resonator . . . . . . . . . . . . . . . . . . . . . . . . ©57. ƒ124
Reverb effects . . . . . . . . . . . . . . . . . . . . . . . . . . . . ©60
Reverb . . . . . . . . . . . . . . . . . . . . . . . . . . . . . . ƒ58, 152
V
Velocity curve . . . . . . . . . . . . . . . . . . . . . . . . . . . ƒ155
Vibrato envelope . . . . . . . . . . . . . . . . . . . . . . . . . ƒ133
Vibrato envelope key scaling . . . . . . . . . . . ƒ135-138
Vibrato . . . . . . . . . . . . . . . . . . . . . . . . . . . . . . . . . . ƒ67
Voice directory . . . . . . . . . . . . . . . . . . . . . . . . . . . ©36
Voice name . . . . . . . . . . . . . . . . . . . . . . . . . . . . . . ƒ31
Voice number buttons . . . . . . . . . ©19, 35. ƒ15, 22
Voice selection . . . . . . . . . . . . . . . . . . . . ©34. ƒ15
Volume control . . . . . . . . . . . . . . . . . . . . . . . . . . . ©18
X
Xfade speed . . . . . . . . . . . . . . . . . . . . . . . . . . . . . . ƒ83
S
Scream . . . . . . . . . . . . . . . . . . . . . . . . . . . . . . . . . . ƒ70
Selecting & editing parameters . . . . . . . . . . . . . . ƒ12
Sound system . . . . . . . . . . . . . . . . . . . . . . . . . . . . ©24
Specifications . . . . . . . . . . . . . . . . . . . . . . . . . . . ƒ184
Store button . . . . . . . . . . . . . . . . . . . . . . . . . . . . . . ©17
Store function . . . . . . . . . . . . . . . . . . . . . . . . . . . . ƒ27
Sustain . . . . . . . . . . . . . . . . . . . . . . . . . . . . . . . . . . ƒ33
T
Throat formant . . . . . . . . . . . . . . . . . . . . . . . . ƒ73, 89
Throat formant key scaling . . . . . . . . . . . . . . ƒ91-95
Time calculation, musical . . . . . . . . . . . . . . . . . . . ƒ57
Tonguing . . . . . . . . . . . . . . . . . . . . . . . . . . . . . . . . ƒ68
Touch EG time . . . . . . . . . . . . . . . . . . . . . . . . . . . ƒ34
Transmit channel . . . . . . . . . . . . . . . . . . . . . . . . . ƒ153
Trigger mode . . . . . . . . . . . . . . . . . . . . . . . . . . . . . ƒ83
Troubleshooting . . . . . . . . . . . . . . . . . . . . . . . . . ƒ178
64
64
Page 65

documentation manual, user maintenance, brochure, user reference, pdf manual
This file has been downloaded from:
User Manual and User Guide for many equipments like mobile phones, photo cameras, monther board, monitors, software, tv, dvd, and othes..
Manual users, user manuals, user guide manual, owners manual, instruction manual, manual owner, manual owner's, manual guide,
manual operation, operating manual, user's manual, operating instructions, manual operators, manual operator, manual product,
 Loading...