

Page 1

USB-MIDI INTERFACE
Owner's Manual
Bedienungsanleitung
Mode d'emploi
EnglishDeutschFrançais
Page 2
SPECIAL MESSAGE SECTION
This product utilizes an external power supply
(adapter). DO NOT connect this product to any
power supply or adapter other than one
described in the manual, on the name plate, or
specifically recommended by Yamaha.
WARNING: Do not place this product in a
position where anyone could walk on, trip over,
or roll anything over power or connecting cords
of any kind. The use of an extension cord is not
recommended! If you must use an extension
cord, the minimum wire size for a 25' cord (or
less) is 18 AWG. NOTE: The smaller the AWG
number, the larger the current handling capacity.
For longer extension cords, consult a local
electrician.
This product should be used only with the
components supplied or; a cart, rack, or stand
that is recommended by Yamaha. If a cart, etc.,
is used, please observe all safety markings and
instructions that accompany the accessory
product.
SPECIFICATIONS SUBJECT TO
CHANGE:
The information contained in this manual is
believed to be correct at the time of printing.
However, Yamaha reserves the right to change
or modify any of the specifications without notice
or obligation to update existing units.
Do not attempt to service this product beyond
that described in the user-maintenance
instructions. All other servicing should be
referred to qualified service personnel.
This product, either alone or in combination with
an amplifier and headphones or speaker/s, may
be capable of producing sound levels that could
cause permanent hearing loss. DO NOT operate
for long periods of time at a high volume level or
at a level that is uncomfortable. If you experience
any hearing loss or ringing in the ears, you
should consult an audiologist. IMPORTANT: The
louder the sound, the shorter the time period
before damage occurs.
Some Yamaha products may have benches and/
or accessory mounting fixtures that are either
supplied with the product or as optional
accessories. Some of these items are designed
to be dealer assembled or installed. Please
make sure that benches are stable and any
optional fixtures (where applicable) are well
secured BEFORE using. Benches supplied by
Yamaha are designed for seating only. No other
uses are recommended.
NOTICE:
Service charges incurred due to a lack of
knowledge relating to how a function or effect
works (when the unit is operating as designed)
are not covered by the manufacturer's warranty,
and are therefore the owners responsibility.
Please study this manual carefully and consult
your dealer before requesting service.
ENVIRONMENTAL ISSUES:
Yamaha strives to produce products that are
both user safe and environmentally friendly. We
sincerely believe that our products and the
production methods used to produce them, meet
these goals. In keeping with both the letter and
the spirit of the law, we want you to be aware of
the following:
Disposal Notice:
Should this product become damaged beyond
repair, or for some reason its useful life is
considered to be at an end, please observe all
local, state, and federal regulations that relate to
the disposal of products that contain lead,
batteries, plastics, etc. If your dealer is unable to
assist you, please contact Yamaha directly.
NAME PLATE LOCATION:
The graphic below indicates the location of the
name plate for this model. The model number,
serial number, power requirements, etc., are
located on this plate. You should record the
model number, serial number, and the date of
purchase in the spaces provided below and
retain this manual as a permanent record of your
purchase.
Model
Serial No.
Purchase Date
93-DC
PLEASE KEEP THIS MANUAL
Page 3
PRECAUTIONS
PLEASE READ CAREFULLY BEFORE PROCEEDING
* Please keep these precautions in a safe place for future reference.
WARNING
Always follow the basic precautions listed below to avoid the possibility of serious injury or even death
from electrical shock, short-circuiting, damages, fire or other hazards. These precautions include, but are
not limited to, the following:
• Do not open the instrument or attempt to disassemble the internal parts or modify them in any
way. The instrument contains no user-serviceable parts. If it should appear to be malfunctioning, discontinue use immediately and have it
inspected by qualified Yamaha service personnel.
• Do not expose the instrument to rain, use it near
water or in damp or wet conditions, or place
containers on it containing liquids which might
spill into any openings.
CAUTION
Always follow the basic precautions listed below to avoid the possibility of physical injury to you or others, or
damage to the instrument or other property. These precautions include, but are not limited to, the following:
• Do not place the USB cable near heat sources
such as heaters or radiators, and do not excessively bend or otherwise damage the cable,
place heavy objects on it, or place it in a position
where anyone could walk on, trip over, or roll
anything over it.
• Unplug the USB cable when not using the
instrument, or during electrical storms.
• Before connecting the instrument to other electronic components, turn off the power for all
components. Before turning the power on or off
for all components, set all volume levels to minimum. Also, be sure to set the volumes of all
components at their minimum levels and gradually raise the volume controls while playing the
instrument to set the desired listening level.
• Do not expose the instrument to excessive dust
or vibrations, or extreme cold or heat (such as in
direct sunlight, near a heater, or in a car during
the day) to prevent the possibility of panel disfiguration or damage to the internal components.
• Do not use the instrument near other electrical
products such as televisions, radios, or speakers, since this might cause interference which
can affect proper operation of the other products.
• If the USB cable becomes frayed or damaged,
or if there is a sudden loss of sound during use
of the instrument, or if any unusual smells or
smoke should appear to be caused by it, immediately disconnect the USB cable, and have the
instrument inspected by qualified Yamaha service personnel.
• Before cleaning the instrument, always remove
the USB cable. Never insert or remove a USB
cable with wet hands.
• Do not place the instrument in an unstable position where it might accidentally fall over.
• Before moving the instrument, remove all connected cables.
• When cleaning the instrument, use a soft, dry
cloth. Do not use paint thinners, solvents, cleaning fluids, or chemical-impregnated wiping
cloths. Also, do not place vinyl, plastic or rubber
objects on the instrument, since this might discolor the panel or keyboard.
• Do not rest your weight on, or place heavy
objects on the instrument, and do not use
excessive force on the connectors.
Yamaha cannot be held responsible for damage caused by improper use or modifications to the instrument, or data that is lost or
destroyed.
(3)-6
Page 4
Welcome to the UX96
Thank you for choosing the Yamaha UX96 USB-MIDI interface.
The UX96 is a MIDI interface that features fast data transfer via USB connection
and simultaneous playback of up to 96 channels. Connect the UX96 to a computer
that has a USB terminal and enjoy the advantages of digital music.
Please read this owner’s manual thoroughly to make the best use of the UX96.
After you read this manual, please keep it in a safe place for future reference.
Table of Contents
UX96 Features.................................................................................. 5
Package Contents............................................................................. 6
System Requirements .......................................................................7
Specifications ................................................................................... 7
Parts and Functions ..........................................................................8
Connection ......................................................................................9
Installing the Driver ........................................................................ 10
Changing the driver setting (MIDI Patch Screen)............................ 20
Troubleshooting (FAQ)................................................................... 25
• The screen displays in this Owner’s Manual are intended for instructional pur-
poses, and may appear somewhat different from the screens that appear on
your computer.
®
• OMS
• The company names and product names in this Owner’s Manual are the trade-
and are trademarks of Opcode Systems, Inc.
marks or registered trademarks of their respective companies.
4
Page 5

UX96 Features
● 96-channel Simultaneous Playback
You can use both MIDI IN/OUT terminals and the TO TG/INST terminal
(equivalent to a serial port on a computer) simultaneously. In this way, you can
build a powerful music production environment with 6 MIDI OUT ports (96
channels) and 2 MIDI IN ports (32 channels).
● Easy Hot Swap Connection
With a USB connection, you can connect and disconnect the USB cable while the
power to the computer is on. The UX96 operates on USB bus power and does not
require a power adaptor.
● USB Fast Data Transfer
USB connection enables a very quick response during multiport simultaneous
performance.
● Supports Windows and Macintosh
The UX96 supports Windows 98/Me/2000 and Mac OS 8.5 or higher (including
OS 9.1).
Notes on USB
Never connect or disconnect a USB cable under any of the following conditions.
Otherwise, the computer may lock up or UX96 functions may be disabled:
• The computer is checking the device or loading the driver.
• The computer is starting or quitting the OS.
• The computer is in or canceling Save Energy (Sleep) mode.
• A MIDI application program is running.
Also, do not perform any of the following operations. Otherwise, the computer
may lock up or the UX96 functions may be disabled:
• Do not frequently connect or disconnect the cables.
• Do not place the computer in or cancel Save Energy (Sleep) mode during MIDI
data transfer.
• Do not connect or disconnect cables, restart the computer, or install the driver
while a large amount of data is being transferred.
If you are using Windows 2000, Save Energy mode may be disabled depending on
NOTE
your environment (USB Host Controller etc.) Even in this case, if you disconnect and
connect the USB cable, UX96 functions will be enabled again.
5
Page 6

Package Contents
The UX96 package contains the following items. Check the contents for missing
items.
• USB-MIDI interface (UX96 main unit)
• CD-ROM (Windows/Macintosh hybrid CD)
• USB cable
• Owner’s manual (this book)
About the included software
The included CD-ROM contains the following software (driver).
[Windows]
• USB-MIDI driver (YAMAHA USB-MIDI Driver)
You need this driver to operate the UX96. See page 11 for information on
installing the driver.
[Macintosh]
• OMS
This is a MIDI driver for Macintosh provided by Opcode Systems.
See page 15 and the included “OMS_2.3_Mac.pdf” OMS manual for
information on installing and using the driver.
• USB-MIDI driver (YAMAHA USB-MIDI Driver)
You need this driver to operate the UX96.
Be sure to install the OMS driver first, then install this driver. See page 15 for
information on installing the driver.
6
Page 7
System Requirements
[Windows]
OS: Windows98/Me/2000
Computer: USB-supported IBM-PC or compatible computer
CPU: Pentium 166MHz or higher
Memory: 32 MB or higher (64 MB or higher is recommended)
Hard Disk: 2 MB or more of free space
[Macintosh]
OS: MacOS 8.5 through OS 9.1
Computer: Macintosh computer with built-in USB port
With some iMac models, you need to install “iMac Update 1.1,” provided by Apple
NOTE
Computer. This program improves the USB software. For more information, visit the
Apple Computer web site (www.apple.com).
Memory: 64 MB or higher (128 MB or higher is recommended)
Turn off virtual memory.
NOTE
Hard Disk: 2 MB or more of free space
Other: OMS 2.3.6 or later (included in the CD-ROM in the
package)
Specifications
Terminals: MIDI IN terminal, MIDI OUT terminal, TO TG/INST
terminal, USB terminal
Power Supply: USB bus power supply
Dimensions: 77(W) × 77(D) × 33(H) [mm]
Weight: 80g
Option: 8-pin peripheral cable for Apple Macintosh
Specifications and descriptions in this Owner’s Manual are for information
purposes only. Yamaha Corp. reserves the right to change or modify products or
specifications at any time without prior notice. Since specifications, equipment or
options may not be the same in every locale, please check with your Yamaha
dealer.
7
Page 8
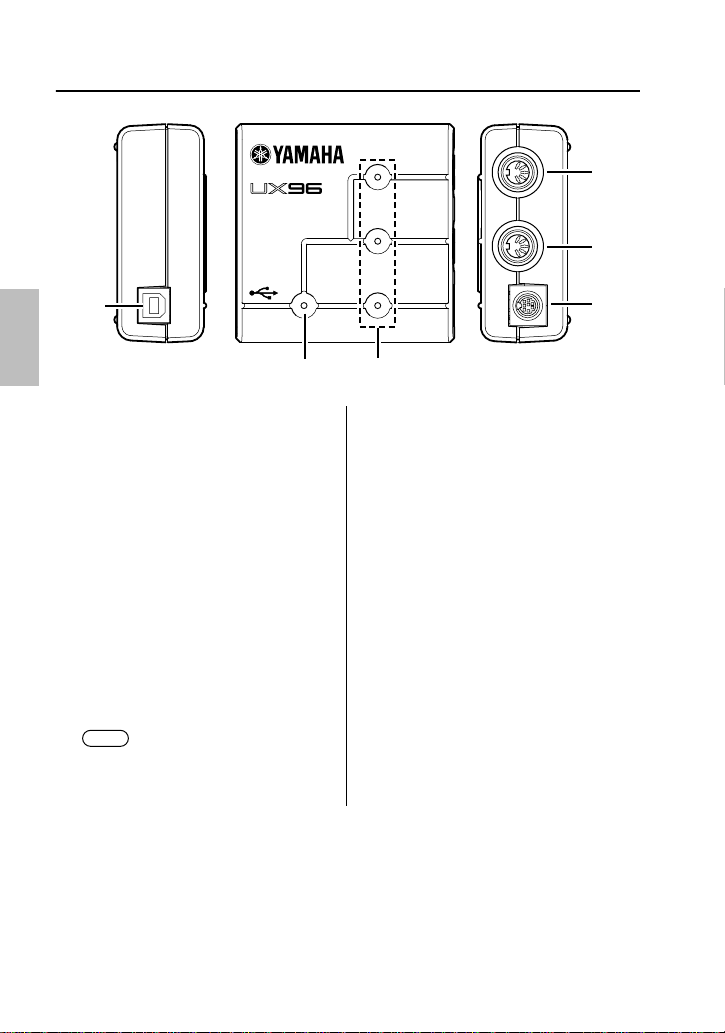
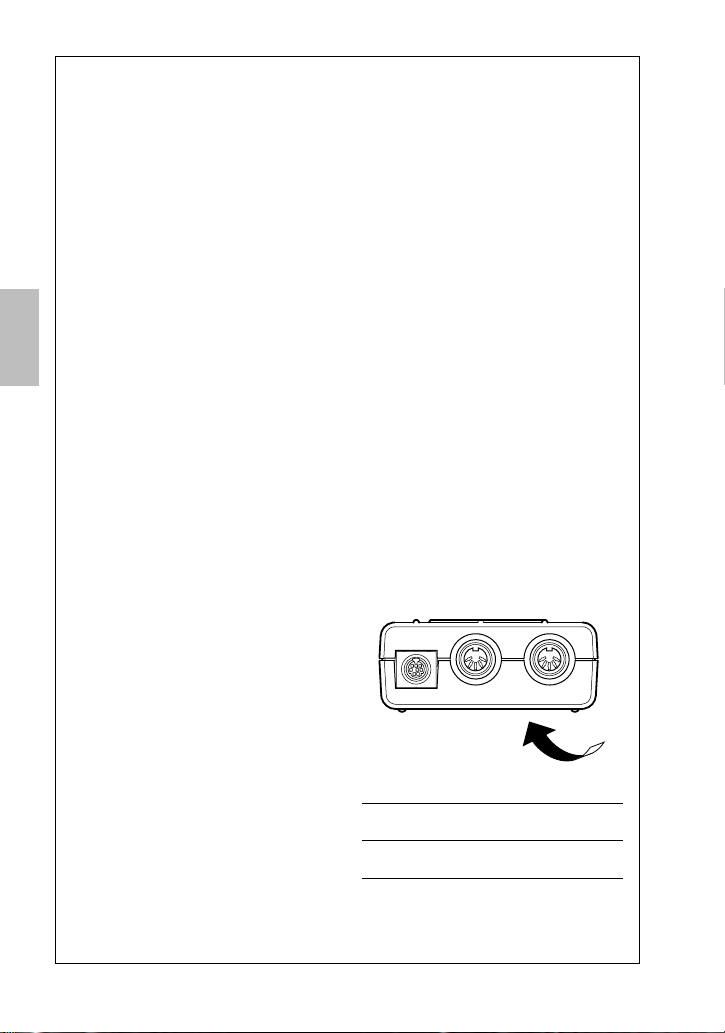
Parts and Functions
USB-MIDI INTERFACE
6
1 Power LED
This LED lights up when the USB
terminal is connected and the
power is being supplied to the
UX96.
2 Terminal LEDs
These LEDs light up when MIDI
signal passes through the
corresponding terminals.
3 TO TG/INST terminal
Connect this terminal to the TO
HOST terminal on the MIDI device.
Use an optional 8-pin system
peripheral cable for Apple
Macintosh for connection.
Set the HOST SELECT switch of
NOTE
the connected MIDI device to
“PC-1” or “Mac,” regardless of
the computer you are using.
MIDI IN
MIDI OUT
TO TG/INST
12
4 MIDI OUT terminal
This terminal transmits MIDI signals
to connected MIDI devices. Use an
optional MIDI cable for connection.
5 MIDI IN terminal
This terminal receives MIDI signals
from connected MIDI devices. Use
an optional MIDI cable for
connection.
6 USB terminal
Connect this terminal to a
computer or a USB hub using a
USB cable.
5
4
3
8
Page 9
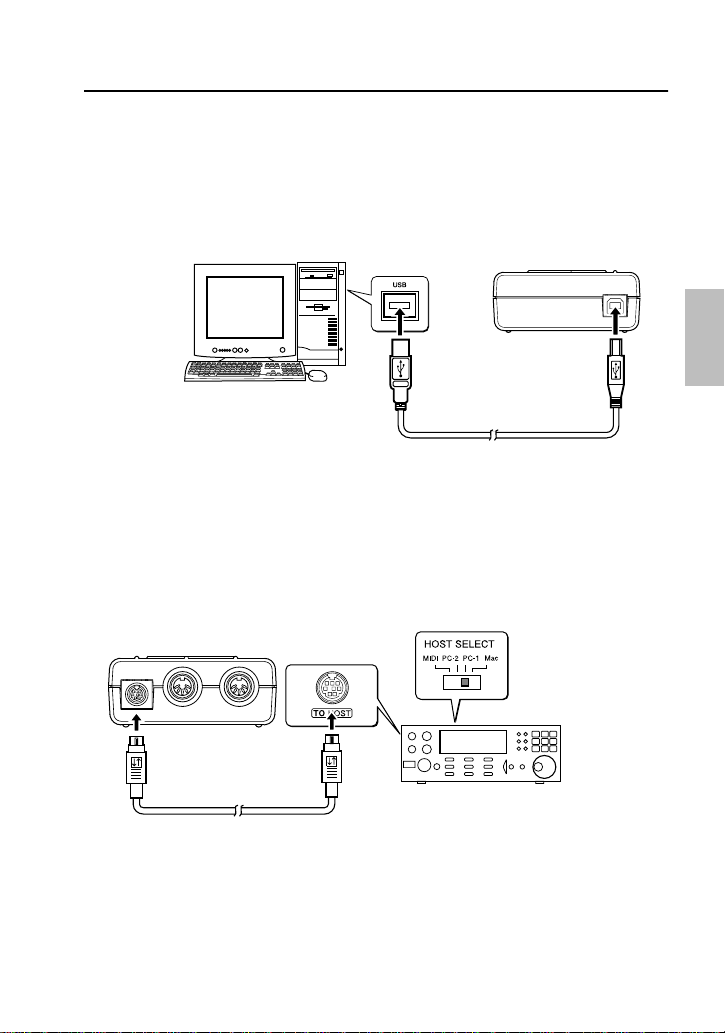
Connection
This chapter explains how to connect MIDI devices, such as a tone generator and
a MIDI keyboard, to the UX96.
1. Connecting a computer
Connect the USB terminal of a computer to the USB terminal of the UX96
using a USB cable. At this time, you do not have to turn off the power to the
computer.
Computer
See page 10 for information
on installing the driver.
2. Connecting the TO TG/INST terminal to a MIDI device
Connect the TO HOST terminal of a MIDI device to the TO TG/INST terminal
of the UX96 using an optional serial cable (8-pin Macintosh peripheral cable).
At this time, set the HOST SELECT switch of the MIDI device to “PC-1” or
“Mac,” regardless of the computer you are using.
When you are using the TO TG/INST terminal, you can use five MIDI OUT
ports and one MIDI IN port to control the connected MIDI device.
UX96
Serial cable
USB cable
Set the HOST SELECT
switch of the MIDI
device to “PC-1” or
“Mac.”
MIDI device
UX96
3. Connecting the MIDI terminals to a MIDI device
Use optional MIDI cables to connect the MIDI IN terminal of the MIDI device
to the MIDI OUT terminal of the UX96. Also, connect the MIDI OUT terminal
of the MIDI device to the MIDI IN terminal of the UX96. At this time, set the
HOST SELECT switch of the MIDI device to “MIDI.”
9
Page 10

UX96
Set the HOST SELECT
switch of the MIDI
device to “MIDI.”
MIDI cables
MIDI device
Installing the Driver
To operate the UX96, you need to install the driver on the computer correctly.
The USB-MIDI driver is software that transmits MIDI signals back and forth
between sequence software and the UX96 via a USB cable.
If you are using a Macintosh computer, you also need to install the OMS driver
(page 15) as well as the USB-MIDI driver.
Windows
Macintosh
OMS
Computer
Sequence
software
Driver
Computer
Sequence
software
Driver
USB cable
USB cable
USB-MIDI INTERFACE
UX96
USB-MIDI INTERFACE
UX96
MIDI IN
MIDI OUT
TO TG/INST
MIDI IN
MIDI OUT
TO TG/INST
Windows 98/Me users →See page 11.
Windows 2000 users →See page 13.
Macintosh users →See page 15.
10
Page 11

Windows users:
● Installing the driver on a Windows98/Me system
1. Start the computer.
2. Insert the included CD-ROM into the CD-ROM drive.
3. Use the included USB cable to connect the USB terminal of the computer (or
the USB hub) to the USB terminal of the UX96.
The UX96 is powered on and the system automatically displays the “Add New
Hardware Wizard.”
For Windows Me users, check the radio button to the left of “Automatic search for a
NOTE
better driver (Recommended)” and click [Next]. The system automatically starts
searching and installing the driver. Proceed to Step 8. If the system does not detect
the driver, select “Specify the location of the driver (Advanced)” and specify the CDROM drive’s root directory (e.g., D:\) to install the driver.
Windows 98
4. Click [Next].
The system displays a screen that enables you to select the search method.
Windows Me
11
Page 12

5. Check the radio button to the left of “Search for the best driver for your device.
(Recommended).” Click [Next].
The system displays a screen that enables you to select a location in which to
install the driver.
6. Check the “CD-ROM drive” box and uncheck all other items. Click [Next].
The system may ask you to insert a Windows CD-ROM while it checks for the driver.
NOTE
Specify the root folder of the CD-ROM drive (such as D:\) and continue the installation.
7. When the system detects the driver on the CD-ROM and is ready for installation, it displays the following screen.
Make sure that the “YAMAHA USB MIDI Driver” is listed, and click [Next]. The
system starts the installation.
12
Page 13

8. When the installation is complete, the following screen appears.
Click [Finish].
Some computers may take about ten seconds to show this screen after the installation
NOTE
is complete.
Windows 98
Windows Me
The driver has been installed.
● Installing the driver on a Windows 2000 system
1. Start the computer and use the “Administrator” account to log into Windows
2000.
2. Select [My Computer | Control Panel | System | Hardware | Driver Signing | File
Signature verification], and check the radio button on the left of “Ignore Install all files, regardless of file signature” and click [OK].
3. Insert the included CD-ROM into the CD-ROM drive.
4. Use the included USB cable to connect the USB terminal of the computer (or
the USB hub) to the USB terminal of the UX96.
The UX96 is powered on and the system automatically displays the “Found
New Hardware Wizard.” Click [Next].
5. Check the radio button to the left of “Search for a suitable driver for my device.
(Recommended).” Click [Next].
The system displays a screen that enables you to select a location in which to
install the driver.
6. Check the “CD-ROM drives” box and uncheck all other items. Click [Next].
The system may ask you to insert a Windows CD-ROM while it checks for the driver.
NOTE
Specify the root folder of the CD-ROM drive (such as D:\) and continue the installation.
7. When the installation is complete, the system displays “Completing the Found
New Hardware Wizard.”
Click [Finish].
Some computers may take about ten seconds to show this screen after the installation
NOTE
is complete.
13
Page 14

8. Restart the computer.
The driver has been installed.
● Selecting the destination for the MIDI signal output
This section explains how to set up the UX96 for use with Windows Media Player
(included in Windows) or an equivalent program. For information on setting up
your sequence software, refer to the owner’s manual for the software.
Windows Me
Windows 98
1. Select [My Computer | Control Panel] and double-click to open “Sounds and
Multimedia (Multimedia).”
For Windows Me users, if you do not see “Sounds and Multimedia” in the “Control
NOTE
Panel,” click “View all Control Panel options.”
2. Click the “Audio (MIDI)” tab.
3. Click “Preferred device” in “MIDI Music Playback” to view “YAMAHA USB OUT
xx-yy.” Select a driver according to the port number of the connected MIDI
device. For Windows Me users, check the “Use only preferred devices” checkbox.
The variable “xx” represents the device number (page 21) and “yy” represents the port
NOTE
number (page 20). If only one UX96 is connected, the device number is “0.”
For Windows 98 users, select the driver while “Single instrument” is selected.
NOTE
If “YAMAHA USB OUT xx-yy” is not displayed, the drive has not been installed
NOTE
correctly. Delete the driver (page 26) and re-install the driver.
4. Click [OK].
14
Page 15

● Using two or more UX96s
Follow the steps below to connect two or more UX96s. You do not need to reinstall the driver.
1. Start the computer.
2. Use the included USB cable to connect the USB terminal of the computer (or
the USB hub) to the USB terminal of the UX96.
When you turn on the power to connected multiple UX96s, the device number is
NOTE
assigned, starting with 0, to the units in the order in which you turn on the power. If
you turn on the power to all units simultaneously, the device number is assigned
based on the order of the port numbers of the USB hub. However, this order may
change depending on the hub.
Macintosh users:
First install OMS before you install the USB-MIDI driver. Also, after installing the
driver, you will need to set up OMS (page 17).
● Installing OMS
1. Start the computer.
2. Insert the included CD-ROM into the CD-ROM drive. The system displays the
CD-ROM icon on the desktop.
3. Double-click to open the CD-ROM icon and double-click the “Install OMS
2.3.6” icon in the “OMS 2.3.6” folder inside “OMS E.”
Follow the instructions on the screen to install OMS. For more information on
installing and using OMS, refer to the included “OMS_2.3_Mac.pdf” manual.
● Installing the USB-MIDI driver
1. Start the computer.
2. Insert the included CD-ROM into the CD-ROM drive. The system displays the
CD-ROM icon on the desktop.
15
Page 16

3. Double-click the CD-ROM icon and double-click the “Install USB Driver” icon to
display the following installation screen.
4. The “Install Location” box displays the destination of the installation. If you
wish to change the destination disk or folder, use the [Switch Disk] button and
the pop-up menu to specify the desired destination.
This box usually displays the start-up disk as the destination.
NOTE
5. Click the [Install] button. The system displays the following message: “This
installation requires your computer to restart after installing this software. Click
Continue to automatically quit all other running applications.” Click [Continue].
To cancel the installation, click [Cancel].
NOTE
6. The installation starts. If the driver has already been installed, you will receive
the following message. To return to step 3, press [Continue]. To complete the
installation, click [Quit].
16
Page 17

7. When the installation is complete, the system displays the following message:
“Installation was successful. You have installed software which requires you to
restart your computer.” Click [Restart]. The computer automatically restarts.
You can locate the installed files in the following locations:
• System Folder | Control Panels | YAMAHA USB MIDI Patch
• System Folder | Extensions | USB YAMAHA MIDI Driver
• System Folder | OMS Folder | YAMAHA USB MIDI OMS Driver
● Setting up OMS
1. Start the computer.
2. Use the included USB cable to connect the USB terminal of the computer (or
the USB hub) to the USB terminal of the UX96.
Make sure that the UX96 is powered on and the power LED lights up.
3. Open the “OMS Applications” folder in the “Opcode” folder installed on the
hard disk, and double-click the “OMS Setup” icon to start the setup program.
4. If the AppleTalk dialog appears, click [Turn It Off], then click [OK] in the subsequent dialog box.
5. The system displays the “Create a New Studio Setup” dialog box. If this dialog
box does not appear, select “New Studio Setup” from the “File” menu.
6. Click [OK]. The system displays the “OMS Driver Search” dialog box. Remove
the check from the “Modem” and “Printer” check boxes, and click [Search].
17
Page 18

7. After the search operation is complete, make sure that “USB-MIDI 1” is listed in
the “OMS Driver Setup” dialog, then click [OK].
If the UX96 is not detected correctly, “USB-MIDI 1” does not appear. Check the cable
NOTE
connection and repeat the procedure from the beginning.
If your iMac does not detect the UX96, “iMac Update 1.1” may not have been installed.
NOTE
See page 7 for more information.
The system displays one “USB-MIDI x” message for each connected UX96.
NOTE
8. Make sure that “USB-MIDI 1” and multiple Port numbers are listed in the “OMS
MIDI Device Setup” dialog. Check all Ports 1–6 check boxes.
Click [OK].
9. The system displays a dialog box that enables you to save the setup file. Enter
the file name and click [Save].
18
Page 19

10. After you save the file, the system displays the following window.
The setting is complete if a “” mark appears before the file name.
You can also improve the setup view by changing the name and icon for each
port. For more information, refer to the included “OMS_2.3_Mac.pdf.”
The driver installation and OMS setup is now complete.
● Using two or more UX96s
First connect multiple UX96s, then proceed to the OMS setup procedure
(page 17).
19
Page 20

Changing the driver setting (MIDI Patch Screen)
You can change the assignment of I/O ports on the UX96 and port numbers
selected from your computer.
Sequence software transmits and receives MIDI signals to and from the UX96 via
the driver (page 10). The UX96 features MIDI IN/OUT terminals and a TO TG/
INST terminal. Select the I/O ports on the UX96 from your computer (sequence
software). You specify the I/O ports of the UX96 using the computer’s sequence
software. Changing the driver setting enables you to change I/O assignments
without re-patching cables.
For example, you can transmit an identical MIDI signal to multiple ports, or
transmit layered MIDI signals from multiple ports to a single port. Also, you can
directly route MIDI signals from MIDI IN to MIDI OUT.
The following table shows the assignment of the port numbers and I/O ports.
With the default settings, the port number matches the computer’s port number.
port number MIDI output port MIDI input port
Port 1 MIDI OUT MIDI IN
Port 2 TO TG/INST -A TO TG/INST
Port 3 TO TG/INST -B —
Port 4 TO TG/INST -C —
Port 5 TO TG/INST -D —
Port 6 TO TG/INST -E —
If a tone generator connected to the TO TG/INST terminal does not support multiport
NOTE
specifications, the selection of ports B–E will be ignored.
20
Page 21

● Starting the MIDI Patch screen
The start-up method and the MIDI Patch screen differ slightly for Windows and
Macintosh systems. However, the basic operation of the screen is the same. The
following section explains how to operate the MIDI Patch screen on a Windows
system.
[Windows]
1. Double-click “Control Panel” in the “My Computer” folder.
2. Double-click “MIDI-USB Driver” to display the screen.
[Macintosh]
Select “Control Panels” from the Apple menu, then select “YAMAHA USB MIDI
Patch” to display the screen.
● Changing the device number
If you are using multiple UX96s, you can change the device number.
Click “Device Name.” The System displays the drop-down list. Select the device
for which you wish to change the setting.
If you are using a Macintosh computer, the device number is assigned sequentially,
NOTE
such as “USB1,” “USB2,” etc., as the Device Name.
21
Page 22

● Checking the signal path
To see if the MIDI device is connected correctly, you can try transmitting MIDI
signals.
• Note Off Message
When you click [Send All Note OFF], a MIDI All Note Off message will be sent
to all ports on the UX96.
• Note On Message
When you click [Send All Note On], a MIDI All Note On message will be sent
to all ports on the UX96.
● Changing connections during playback (PC OUT → MIDI OUT)
You can change the I/O assignment of the computer’s output port and the
UX96’s output port. The left column shows the computer’s output ports (OUT 1–
6), and the top column shows the UX96’s output ports (1–6). With the default
settings, ports with the same number are connected to each other. However, you
can change these settings by checking the check boxes.
If you check multiple check boxes vertically, MIDI signals from multiple output
ports on the computer are merged and transmitted to one output port on the
UX96. If you check multiple check boxes horizontally, a MIDI signal from one
output port on the computer is distributed to multiple output ports on the UX96.
See page 20 for more information on the relationship between the UX96’s I/O ports
NOTE
and the port numbers.
22
Page 23

● Changing connections during recording (MIDI IN → PC IN)
You can change the I/O assignment of the computer’s input port and the UX96’s
input port. The left column shows the computer’s input ports (IN 1–2), and the
top column shows the UX96’s input ports (1–2). With the default settings, ports
with the same number are connected to each other. However, you can change
these settings by checking the check boxes.
If you check multiple check boxes vertically, a MIDI signal from one input port on
the UX96 is distributed to multiple input ports on the computer. If you check
multiple check boxes horizontally, MIDI signals from multiple input ports on the
UX96 are merged and transmitted to one input port on the computer.
See page 20 for more information on the relationship between the UX96’s I/O ports
NOTE
and the port numbers.
23
Page 24

● THRU output of MIDI signals (MIDI IN → MIDI OUT)
You can route MIDI signals received at the input port(s) of the UX96 directly to
the output port(s) of the UX96 (this is called THRU output). This routing is useful
when you wish to route MIDI signals from a MIDI keyboard directly to a tone
generator. The left column shows the UX96’s output ports (1–6), and the top
column shows the UX96’s input ports (1–2). To enable this function, check the
“Thru ON/OFF” check box in the lower right corner of the screen.
If you check multiple check boxes vertically, a MIDI signal from one input port on
the UX96 is distributed to multiple output ports on the UX96. If you check
multiple check boxes horizontally, MIDI signals from multiple input ports on the
UX96 are merged and transmitted to one output port on the UX96.
See page 20 for more information on the relationship between the UX96’s I/O ports
NOTE
and the port numbers.
For Macintosh, this function is valid only when the MIDI Patch screen or sequence
NOTE
software is running.
24
Page 25

Troubleshooting (FAQ)
● The driver cannot be installed.
• Is the USB cable connected correctly?
→ Check the USB cable connection. (page 9)
→ Disconnect the USB cable, then connect it again.
• [Windows] Is the USB function enabled on your computer?
→ When you connect the UX96 to the computer for the first time, if the “Add New
Hardware Wizard” (pages 11 and 13) does not appear, the USB function on the
computer may be disabled. Perform the following steps.
1. Double-click “System” in the Control Panel to open the System Properties
window.
2. Double-click the “Device Manager” tab and make sure that no “!” or “x”
marks appear at “Universal serial bus controller” or “USB Root Hub.”
If you see the “!” or “x” mark, the USB controller is disabled. For more
information, refer to the owner’s manual of your computer.
• [Windows] Is any unknown device registered?
→ If driver installation fails, the UX96 will be evaluated as an “Unknown device,”
and you will not be able to install the driver. Delete the “Unknown device” by following the steps below.
1. Double-click “System” in the Control Panel to open the System Properties
window.
2. Double-click the “Device Manager” tab. With the “View devices by type”
check box checked, look for “Other devices.”
3. If you find “Other devices,” double-click it to extend the tree to look for
“Unknown device.” If one appears, select it and click the [Remove] button.
4. Remove the USB cable from the UX96, and make the connection again.
5. Install the driver by following the steps (starting from Step 3) described on
page 11.
25
Page 26

● The UX96 does not operate correctly, or no sound is heard.
• Did you install the driver? (page 10)
• Are the USB cable, MIDI cables, serial cables, and audio cables connected
correctly? (page 9)
• Is the volume setting of the tone generator, playback device, and applica-
tion program set to the appropriate level?
• Is the HOST SELECT switch on the tone generator set correctly?
→ If the tone generator is connected to the MIDI IN/OUT terminals, set the switch
to “MIDI.” If the tone generator is connected to the TO TG/INST terminal, set the
switch to “PC-1” or “Mac,” regardless of the computer you are using.
• Have you selected an appropriate port in the sequence software?
● Playback response is delayed.
• Does your computer satisfy the system requirements? (page 7)
• Is any other application or device driver running?
[Macintosh]
→ Turn off virtual memory.
→ Disable AppleTalk.
● Cannot suspend or resume the computer correctly.
• Do not suspend the computer while the MIDI application is running.
• If you are using Windows 2000, Save Energy mode may be disabled
depending on your environment (USB Host Controller etc.) Even in this
case, if you disconnect and connect the USB cable, UX96 functions will be
enabled again.
26
Page 27

● How can I delete or re-install the driver?
[Windows Me/98]
1. When the UX96 is recognized correctly, double-click “System” in the Control Panel to open the System window.
2. Double-click the “Device Manager” tab, select “YAMAHA USB MIDI Driver”
and delete it.
3. Use MS-DOS prompt or Internet Explorer to delete the following three files.
To delete these files using Explorer, select “Folder Options” from the Tool (View)
NOTE
menu, and select “Show all files (and folders).”
• \WINDOWS\INF\OTHER\YAMAHAUX96.INF
• \WINDOWS\SYSTEM\Xgusb.drv
• \WINDOWS\SYSTEM\Ymidusb.sys
4. Disconnect the USB cable.
5. Restart the computer.
6. Re-install the driver according to the instructions on page 11.
[Macintosh]
1. Delete the files in the following locations:
• System Folder | Control Panels | YAMAHA USB MIDI Patch
• System Folder | Extensions | USB YAMAHA MIDI Driver
• System Folder | OMS Folder | YAMAHA USB MIDI OMS Driver
2. Restart the computer.
3. Install the driver (page 15) and set up OMS (page 17).
27
Page 28

FCC INFORMATION (U.S.A.)
1. IMPORTANT NOTICE: DO NOT
MODIFY THIS UNIT!
This product, when installed as indicated in the instructions contained in
this manual, meets FCC requirements. Modifications not expressly
approved by Yamaha may void your
authority, granted by the FCC, to use
the product.
2. IMPORTANT: When connecting this
product to accessories and/or another
product use only high quality shielded
cables. Cable/s supplied with this
product MUST be used. Follow all
installation instructions. Failure to
follow instructions could void your
FCC authorization to use this product
in the USA.
3. NOTE: This product has been tested
and found to comply with the
requirements listed in FCC
Regulations, Part 15 for Class “B”
digital devices. Compliance with these
requirements provides a reasonable
level of assurance that your use of this
product in a residential environment
will not result in harmful interference
with other electronic devices. This
equipment generates/uses radio
frequencies and, if not installed and
used according to the instructions
found in the users manual, may cause
interference harmful to the operation
of other electronic devices.
Compliance with FCC regulations
does not guarantee that interference
will not occur in all installations. If this
product is found to be the source of
interference, which can be determined
by turning the unit “OFF” and “ON”,
please try to eliminate the problem by
using one of the following measures:
Relocate either this product or the
device that is being affected by the
interference.
Utilize power outlets that are on different branch (circuit breaker or fuse)
circuits or install AC line filter/s.
In the case of radio or TV interference, relocate/reorient the antenna. If
the antenna lead-in is 300 ohm ribbon
lead, change the lead-in to co-axial
type cable.
If these corrective measures do not
produce satisfactory results, please
contact the local retailer authorized to
distribute this type of product. If you
can not locate the appropriate retailer,
please contact Yamaha Corporation of
America, Electronic Service Division,
6600 Orangethorpe Ave, Buena Park,
CA90620
The above statements apply ONLY to
those products distributed by Yamaha
Corporation of America or its
subsidiaries.
* This applies only to products distributed by YAMAHA CORPORATION OF AMERICA. (class B)
CANADA
This Class B digital apparatus complies with Canadian ICES-003.
Cet appareil numérique de la classe B est conforme à la norme NMB-003 du Canada.
• This applies only to products distributed by Yamaha Canada Music Ltd.
• Ceci ne s’applique qu’aux produits distribués par Yamaha Canada Musique Ltée.
(class B)
Page 29

For details of products, please contact your nearest
Yamaha or the authorized distributor listed below.
Pour plus de détails sur les produits, veuillez-vous
adresser à Yamaha ou au distributeur le plus proche de
vous figurant dans la liste suivante.
NORTH AMERICA
CANADA
Yamaha Canada Music Ltd.
135 Milner Avenue, Scarborough, Ontario,
M1S 3R1, Canada
Tel: 416-298-1311
U.S.A.
Yamaha Corporation of America
6600 Orangethorpe Ave., Buena Park,
Calif. 90620, U.S.A.
Tel: 714-522-9011
CENTRAL & SOUTH AMERICA
MEXICO
Yamaha de Mexico S.A. De C.V.,
Departamento de ventas
Javier Rojo Gomez No.1149, Col. Gpe Del
Moral, Deleg. Iztapalapa, 09300 Mexico,
D.F.
Tel: 686-00-33
BRAZIL
Yamaha Musical do Brasil LTDA.
Av. Rebouças 2636, São Paulo, Brasil
Tel: 011-853-1377
ARGENTINA
Yamaha Music Argentina S.A.
Viamonte 1145 Piso2-B 1053,
Buenos Aires, Argentina
Tel: 1-4371-7021
PANAMA AND OTHER LATIN
AMERICAN COUNTRIES/
CARIBBEAN COUNTRIES
Yamaha de Panama S.A.
Torre Banco General, Piso 7, Urbanización
Marbella, Calle 47 y Aquilino de la
Guardia, Ciudad de Panamá, Panamá
Tel: 507-269-5311
EUROPE
THE UNITED KINGDOM
Yamaha-Kemble Music (U.K.) Ltd.
Sherbourne Drive, Tilbrook,
Milton Keynes, MK7 8BL, England
Tel: 01908-366700
IRELAND
Danfay Ltd.
61D, Sallynoggin Road, Dun Laoghaire,
Co. Dublin
Tel: 01-2859177
GERMANY/SWITZERLAND
Yamaha Europa GmbH.
Siemensstraße 22-34, 25462 Rellingen,
F.R. of Germany
Tel: 04101-3030
AUSTRIA
Yamaha Music Austria
Schleiergasse 20, A-1100 Wien Austria
Tel: 01-60203900
THE NETHERLANDS
Yamaha Music Nederland
Kanaalweg 18G, 3526KL, Utrecht,
The Netherlands
Tel: 030-2828411
BELGIUM
Yamaha Music Belgium
Keiberg Imperiastraat 8, 1930 Zaventem,
Belgium
Tel: 02-7258220
FRANCE
Yamaha Musique France,
Division Professionnelle
BP 70-77312 Marne-la-Vallée Cedex 2,
France
Tel: 01-64-61-4000
ITALY
Yamaha Musica Italia S.P.A.,
Combo Division
Viale Italia 88, 20020 Lainate (Milano),
Italy
Tel: 02-935-771
SPAIN/PORTUGAL
Yamaha-Hazen Electronica Musical, S.A.
Ctra. de la Coruna km. 17, 200, 28230
Las Rozas (Madrid) Spain
Tel: 91-201-0700
GREECE
Philippe Nakas S.A.
Navarinou Street 13, P.Code 10680,
Athens, Greece
Tel: 01-364-7111
SWEDEN
Yamaha Scandinavia AB
J. A. Wettergrens Gata 1 Box 30053
S-400 43 Göteborg, Sweden
Tel: 031 89 34 00
DENMARK
YS Copenhagen Liaison Office
Generatorvej 8B DK-2730 Herlev, Denmark
Tel: 44 92 49 00
FINLAND
F-Musiikki Oy
Kluuvikatu 6, P.O. Box 260,
SF-00101 Helsinki, Finland
Tel: 09 618511
NORWAY
Norsk filial av Yamaha Scandinavia AB
Grini Næringspark 1
N-1345 Østerås, Norway
Tel: 67 16 77 70
ICELAND
Skifan HF
Skeifan 17 P.O. Box 8120
IS-128 Reykjavik, Iceland
Tel: 525 5000
OTHER EUROPEAN COUNTRIES
Yamaha Europa GmbH.
Siemensstraße 22-34, 25462 Rellingen,
F.R. of Germany
Tel: 04101-3030
Yamaha Corporation,
Asia-Pacific Music Marketing Group
Nakazawa-cho 10-1, Hamamatsu,
Japan 430-8650
Tel: 053-460-2312
TURKEY/CYPRUS
Yamaha Europa GmbH.
Siemensstraße 22-34, 25462 Rellingen,
F.R. of Germany
Tel: 04101-3030
OTHER COUNTRIES
Yamaha Music Gulf FZE
LB21-128 Jebel Ali Freezone
P.O.Box 17328, Dubai, U.A.E.
Tel: 971-4-881-5868
HEAD OFFICE Yamaha Corporation, Pro Audio & Digital Musical Instrument Division
SY22
Die Einzelheiten zu Produkten sind bei Ihrer unten aufgeführten Niederlassung und bei Yamaha Vertragshändlern
in den jeweiligen Bestimmungsländern erhältlich.
Para detalles sobre productos, contacte su tienda Yamaha
más cercana o el distribuidor autorizado que se lista debajo.
AFRICA
MIDDLE EAST
Nakazawa-cho 10-1, Hamamatsu, Japan 430-8650
Tel: 053-460-2445
HONG KONG
Tom Lee Music Co., Ltd.
11/F., Silvercord Tower 1, 30 Canton Road,
Tsimshatsui, Kowloon, Hong Kong
Tel: 2737-7688
INDONESIA
PT. Yamaha Music Indonesia (Distributor) PT. Nusantik
Gedung Yamaha Music Center, Jalan Jend.
Gatot Subroto Kav. 4, Jakarta 12930, Indonesia
Tel: 21-520-2577
KOREA
Cosmos Corporation
1461-9, Seocho Dong, Seocho Gu, Seoul, Korea
Tel: 02-3486-0011
MALAYSIA
Yamaha Music Malaysia, Sdn., Bhd.
Lot 8, Jalan Perbandaran, 47301 Kelana
Jaya, Petaling Jaya, Selangor, Malaysia
Tel: 3-703-0900
PHILIPPINES
Yupangco Music Corporation
339 Gil J. Puyat Avenue, P.O. Box 885
MCPO, Makati, Metro Manila, Philippines
Tel: 819-7551
SINGAPORE
Yamaha Music Asia Pte., Ltd.
11 Ubi Road #06-00,
Meiban Industrial Building, Singapore
Tel: 65-747-4374
TAIWAN
Yamaha KHS Music Co., Ltd.
10F, 150, Tun-Hwa Northroad, Taipei,
Taiwan, R.O.C.
Tel: 02-2713-8999
THAILAND
Siam Music Yamaha Co., Ltd.
121/60-61 RS Tower 17th Floor,
Ratchadaphisek RD., Dindaeng,
Bangkok 10320, Thailand
Tel: 02-641-2951
THE PEOPLE’S REPUBLIC OF
CHINA AND OTHER ASIAN
COUNTRIES
Yamaha Corporation,
Asia-Pacific Music Marketing Group
Nakazawa-cho 10-1, Hamamatsu,
Japan 430-8650
Tel: 053-460-2317
ASIA
OCEANIA
AUSTRALIA
Yamaha Music Australia Pty. Ltd.
Level 1, 99 Queensbridge Street,
Southbank, Victoria 3006, Australia
Tel: 3-9693-5111
NEW ZEALAND
Music Houses of N.Z. Ltd.
146/148 Captain Springs Road, Te Papapa,
Auckland, New Zealand
Tel: 9-634-0099
COUNTRIES AND TRUST TERRITORIES IN PACIFIC OCEAN
Yamaha Corporation,
Asia-Pacific Music Marketing Group
Nakazawa-cho 10-1, Hamamatsu,
Japan 430-8650
Tel: 053-460-2312
Page 30

Yamaha Web Site (English only)
www.yamahasynth.com
Yamaha Manual Library (English versions only)
http://www2.yamaha.co.jp/manual/english/
This document is printed on recycled chlorine free (ECF) paper with soy ink.
Auf Recycling-Umweltpapier gedruckt.
Ce document a été imprimé sur du papier recyclé non blanchi au chlore.
M.D.G., PA•DMI Division, Yamaha Corporation
© 2001 Yamaha Corporation
V754770 104APAP7.2-01A0 Printed in Japan
Page 31

documentation manual, user maintenance, brochure, user reference, pdf manual
This file has been downloaded from:
User Manual and User Guide for many equipments like mobile phones, photo cameras, monther board, monitors, software, tv, dvd, and othes..
Manual users, user manuals, user guide manual, owners manual, instruction manual, manual owner, manual owner's, manual guide,
manual operation, operating manual, user's manual, operating instructions, manual operators, manual operator, manual product,
 Loading...