

Page 1
SP-PDM1
Speakers for Wide Plasma Display
Operating Instructions
Before attempting to assemble these accessories, please read
these instructions completely.
Please retain this book for future reference.
Lautsprecher für Plasmadisplay
Bedienungsanleitung
Bitte lesen Sie vor dem Zusammenbau dieses Zubehörs die
Anleitung vollständig durch.
Bitte bewahren Sie diese Anleitung zum späteren
Nachschlagen auf.
Altoparlanti per lo Schermo al
Plasma-16:9
Instruzioni per I’uso
Prima di cominciare a montare queste parti componenti,
leggere completamente queste istruzioni. Conservare questo
libretto per consultazioni future.
Enceintes pour écran Plasma
16/9ème
Mode d’emploi
Lisez attentivement ce document avant d’assembler les pièces.
Conservez ce document pour référence.
Altavoces para Pantalla
Panorámica de Plasma
Instrucciones de funcionamiento
Antes del montaje de este accesorio, lea completamente estas
instrucciones. Y guárdelas para utilizarlas como referencia en
el futuro.
TQZW301
Page 2
Sponges
For right
For left
Speaker (right) Speaker (Ieft)
Mounting brackets
(right)
Mounting brackets
(left)
Bracket mounting screws Bracket mounting screws
Safety Precautions
CAUTION
Do not suspend the speakers.
• Personal injury may result if the speakers fall. Take particular care to install the speakers in
such a manner that they cannot fall and injure children.
These speakers are for use with the Wide Plasma Display only.
• If connecting the speakers to any other amplifier, ensure that the rated output level of the
amplifier is 8W or less. Fire may result if the output exceeds this level.
Make sure that all screws are tightened securely during installation.
• If the speakers are not installed securely, they may fall, causing injury to you or others.
Accessories
Mounting bracket
(right).......................2
Mounting bracket
(left) .........................2
Bracket mounting
screw.....................12
Installation
Installing to the Wide Plasma Display
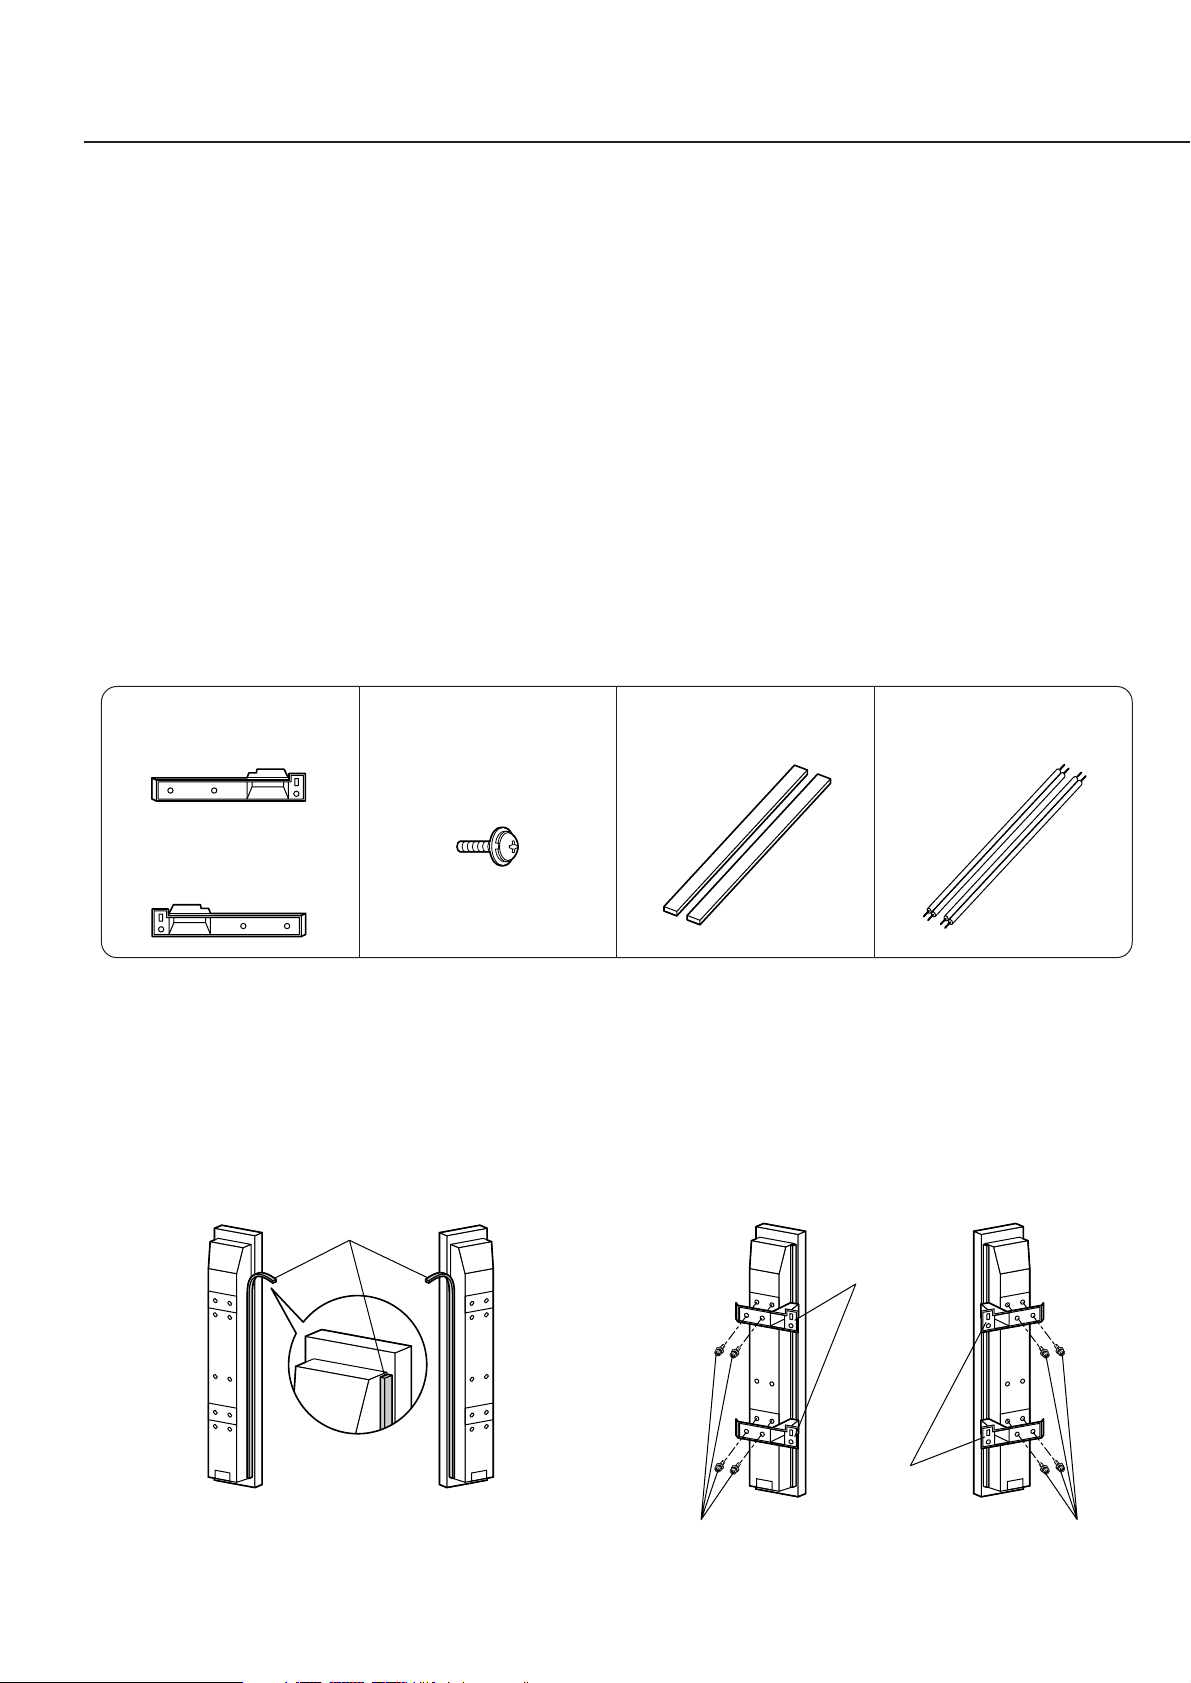
1. Attach the sponges to the
speakers.
Sponge....................2 Speaker cable 7 7/8”
(20 cm) ....................2
2. Attach the mounting
brackets to the speakers.
• Clean the surfaces of the speakers before
attaching the sponges.
• Attach the sponges to the surfaces which are in
contact with the Display.
2
Page 3

3. Attach the speakers to the
Bracket mounting
screw
Rear of Wide Plasma Display
Hook
Rear of Wide Plasma Display
Hooking hole
Hooking hole
1. Push down the lever.
2. Insert
the cable.
3. Return the lever to
its normal position.
1. Push down the lever.
3. Return the lever to its
normal position.
2. Insert
the cable.
Preparing the ends of the
speaker cables
While twisting
4. Secure the speakers in
Wide Plasma Display.
• Clip the hooks on the top and bottom mounting
brackets into the corresponding holes at the rear
of the Wide Plasma Display simultaneously, and
than lower the speaker into place.
• Attach the other speaker in the same manner.
5. Connect the speaker cables.
place.
• Adjust the position of the speakers so that there is
a uniform clearance between the Wide Plasma
Display and the speakers, then securely tighten
the bracket mounting screws.
• Secure the top and bottom mounting brackets by
tightening the bracket mounting screws.
• Attach the other speaker in the same manner.
• After preparing the ends of the speaker cables as shown, attach the red cable to the (+) terminal and the black
cable to the (-) terminal. Do not reverse these connections.
When these speakers are attached to the plasma display they will not lie flat but be angled slightly inwards.
This is normal and is done to project an accurate sound.
Notes on use
1. Take care that the volume output from the Wide Plasma
Display does not exceed the rated limits of the speakers,
as excess volume can cause damage to these
components.
2. Do not place the speakers in the following places:
• Places which are exposed to direct sunlight
• Near heaters or other heat sources
• Places with high humidity
3. This set is equipped with magnetic resistant speakers but
be careful not to place them near CRT Televisions as it
may cause color patches.
4. If they are extremely soiled, wipe them with a soft cloth that
has been soaked in a small amount of household
detergent, and then dry with a dry cloth.
• Do not use solvents such as alcohol or thinner.
• If using chemically-treated cloths, follow the instructions
on the cloth packaging.
5. Remove the dust on the speaker net using a duster or a
vacuum cleaner at low power. The net is simply cloth, so to
avoid damaging it be careful not to push excessively.
3
Page 4

YAMAHA ELECTRONICS CORPORATION, USA 6660 ORANGETHORPE AVE., BUENA PARK, CALIF. 90620, U.S.A.
YAMAHA CANADA MUSIC LTD. 135 MILNER AVE., SCARBOROUGH, ONTARIO M1S 3R1, CANADA
YAMAHA ELECTRONIK EUROPA G.m.b.H. SIEMENSSTR. 22-34, 25462 RELLINGEN BEI HAMBURG, F.R. OF GERMANY
YAMAHA ELECTRONIQUE FRANCE S.A. RUE AMBROISE CROIZAT BP70 CROISSY-BEAUBOURG 77312 MARNE-LA-VALLEE CEDEX02, FRANCE
YAMAHA ELECTRONICS (UK) LTD. YAMAHA HOUSE, 200 RICKMANSWORTH ROAD WATFORD, HERTS WD1 7JS, ENGLAND
YAMAHA SCANDINAVIA A.B. J A WETTERGRENS GATA 1, BOX 30053, 400 43 VÄSTRA FRÖLUNDA, SWEDEN
YAMAHA MUSIC AUSTRALIA PTY, LTD. 17-33 MARKET ST., SOUTH MELBOURNE, 3205 VIC., AUSTRALIA
Printed in Japan MBS1002-0
Specifications
Speaker unit Woofer
Tweeter
Rated impedance 6 Ω
Rated input 8 W
Dimensions (W x H x D) 3.9” x 28.5” x 3.5”
(100 mm x 724 mm x 89 mm)
39/64” (8 cm dia. x 2)
63
/64” (2.5 cm dia.)
Technische Daten
Lautsprecher Tiefton 8 cm dia. x 2
Hochton 2.5 cm dia.
Nennimpedanz 6 Ω
Nennbelastung 8 W
Abmessungen (B x H x T) 100 mm x 724 mm x 89 mm
Specifiche tecniche
Altoparlante Bassi 8 cm dia. x 2
Alti 2.5 cm dia.
Impedenza 6 Ω
Livello ingresso 8 W
Dimensioni (L x A x P) 100 mm x 724 mm x 89 mm
Spécifications
Enceinte Woofer 8 cm de dia. x 2
Tweeter 2.5 cm de dia.
Impédance nominale 6 Ω
Entrée nominale 8 W
Dimensions (L x H x P) 100 mm x 724 mm x 89 mm
Weight 5.1 lbs (2.3 kg) (per speaker)
Cabinet material Styrene plastic
Gewicht 2.3 kg (ein Lautsprecher)
Gehäusematerial Styrol
Peso 2.3 kg (per altoparlante)
Composizione involucro Stirene
Poids 2.3 kg (par enceinte)
Matériau du coffret Plastique styrène
Espeificaciones
Unidad de altavoz
Impedancia de régimen 6 Ω
Entrada de régimen 8 W
Dimensiones (An. x Al. x Prof.)
Altavoz para graves
Altavoz para agudos
100 mm x 724 mm x 89 mm
8 cm de diá. x 2
2.5 cm de diá.
Peso 2.3 kg (por altavoz)
Material del mueble plástico de estireno
Page 5

documentation manual, user maintenance, brochure, user reference, pdf manual
This file has been downloaded from:
User Manual and User Guide for many equipments like mobile phones, photo cameras, monther board, monitors, software, tv, dvd, and othes..
Manual users, user manuals, user guide manual, owners manual, instruction manual, manual owner, manual owner's, manual guide,
manual operation, operating manual, user's manual, operating instructions, manual operators, manual operator, manual product,
 Loading...