

Page 1
F
Electronic Drum Rack System
RS-80
Assembly Instructions
Thank you for purchasing the Yamaha Electronic Drum Rack System RS-80.
Before using, thoroughly read this assembly manual, and use this product safely and correctly.
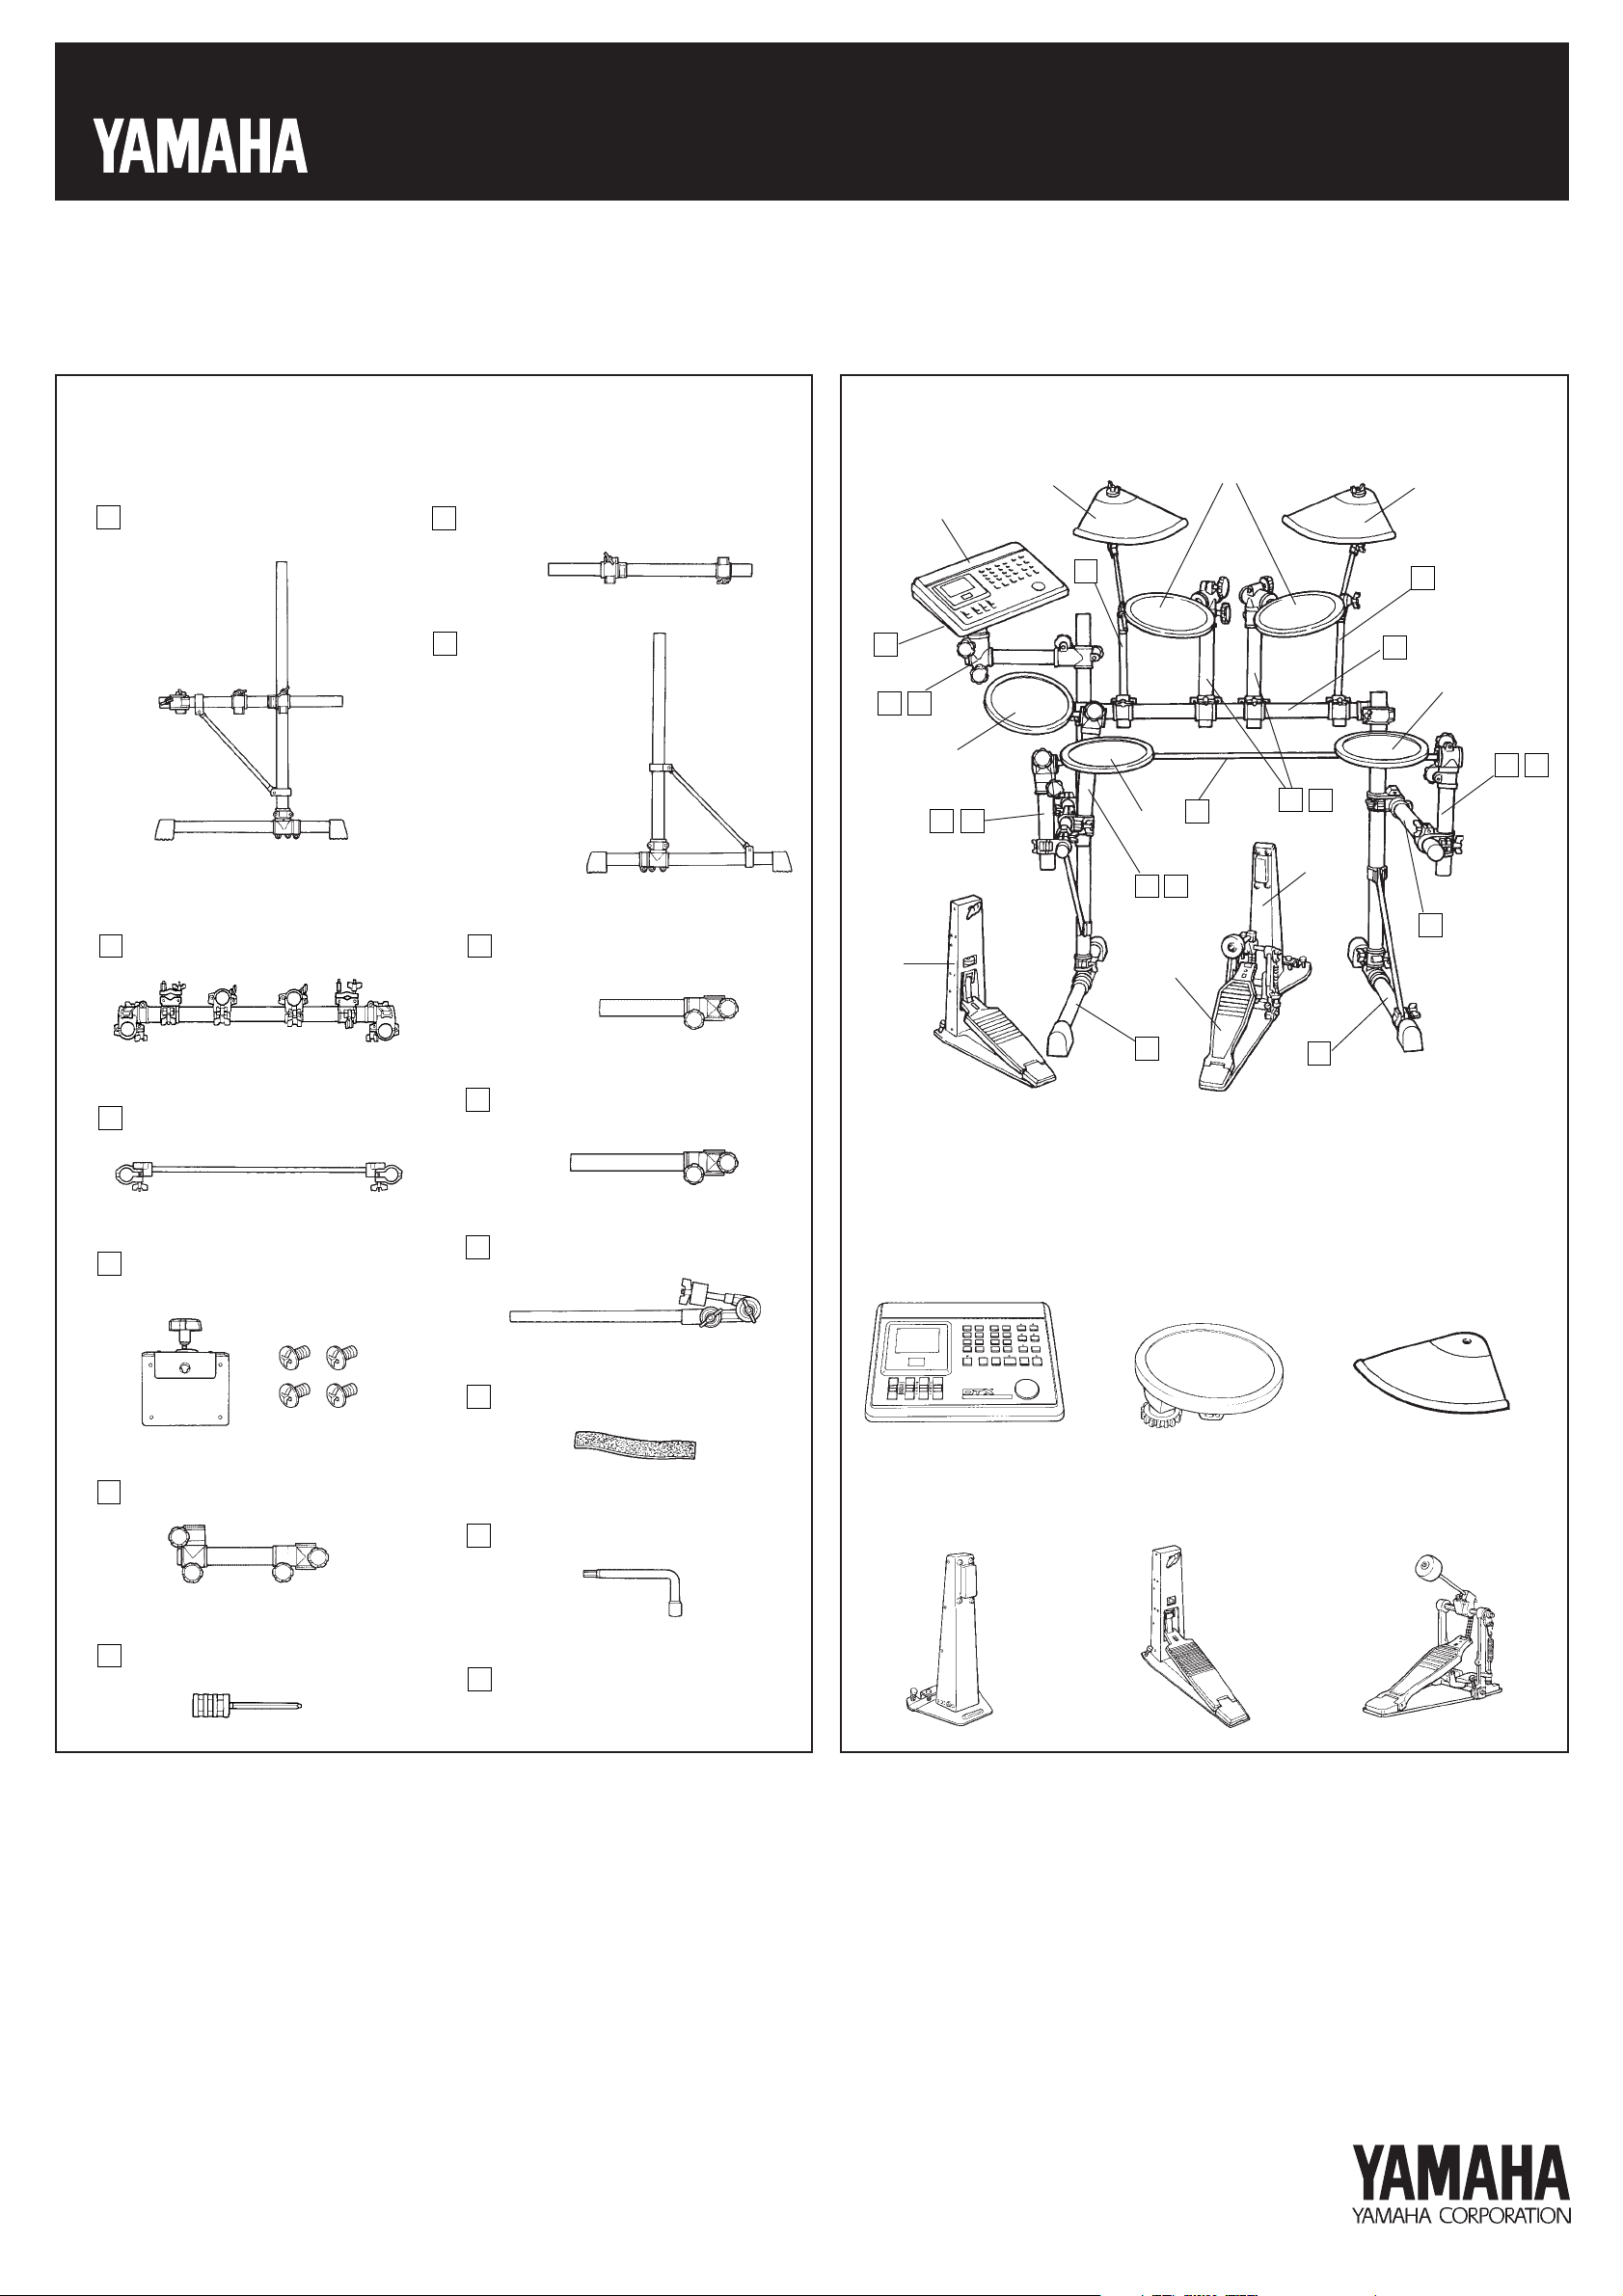
■ RS-80 Rack Stand Parts ■ RS-80+Pad grouping : Set up example
* Before assembling the rack stand, make sure all of the parts shown below
are included.
A
Left Side Assembly (x1)
B
Right Side Arm (x1)
C
Right Side Assembly (x1)
e
q
K
H
G
w
e
K
D
w
D
Center Pipe Assembly (x1)
E
Center Bar (x1)
F
Module Holder (x1)
(4 screws included)
I
Drum Pad Clamp (Short) (x2)
J
Drum Pad Clamp (Long) (x3)
Cymbal Holder (x2)
K
w
E
H
I
t
● Pad and Drum Trigger Grouping (option)
q DTX
Drum Trigger Module
w
H
J
y
A
w TP80S/TP80
Drum Pad
J
H
r
C
e PCY80S/PCY80
Cymbal Pad
H
I
B
G
Module Holder Clamp (x1)
H
Hex Rod Cylinder (x6)
Cable Band (x10)
L
M
Tuning Key (x1)
N
Assembly Instructions
(this sheet)
r KP80
Kick Pad
t HH80
Hi-hat Control Pedal
* Specifications are subject to change without notice.
y Foot Pedal
* FP-820 etc.
PrintedinTaiwan
Page 2
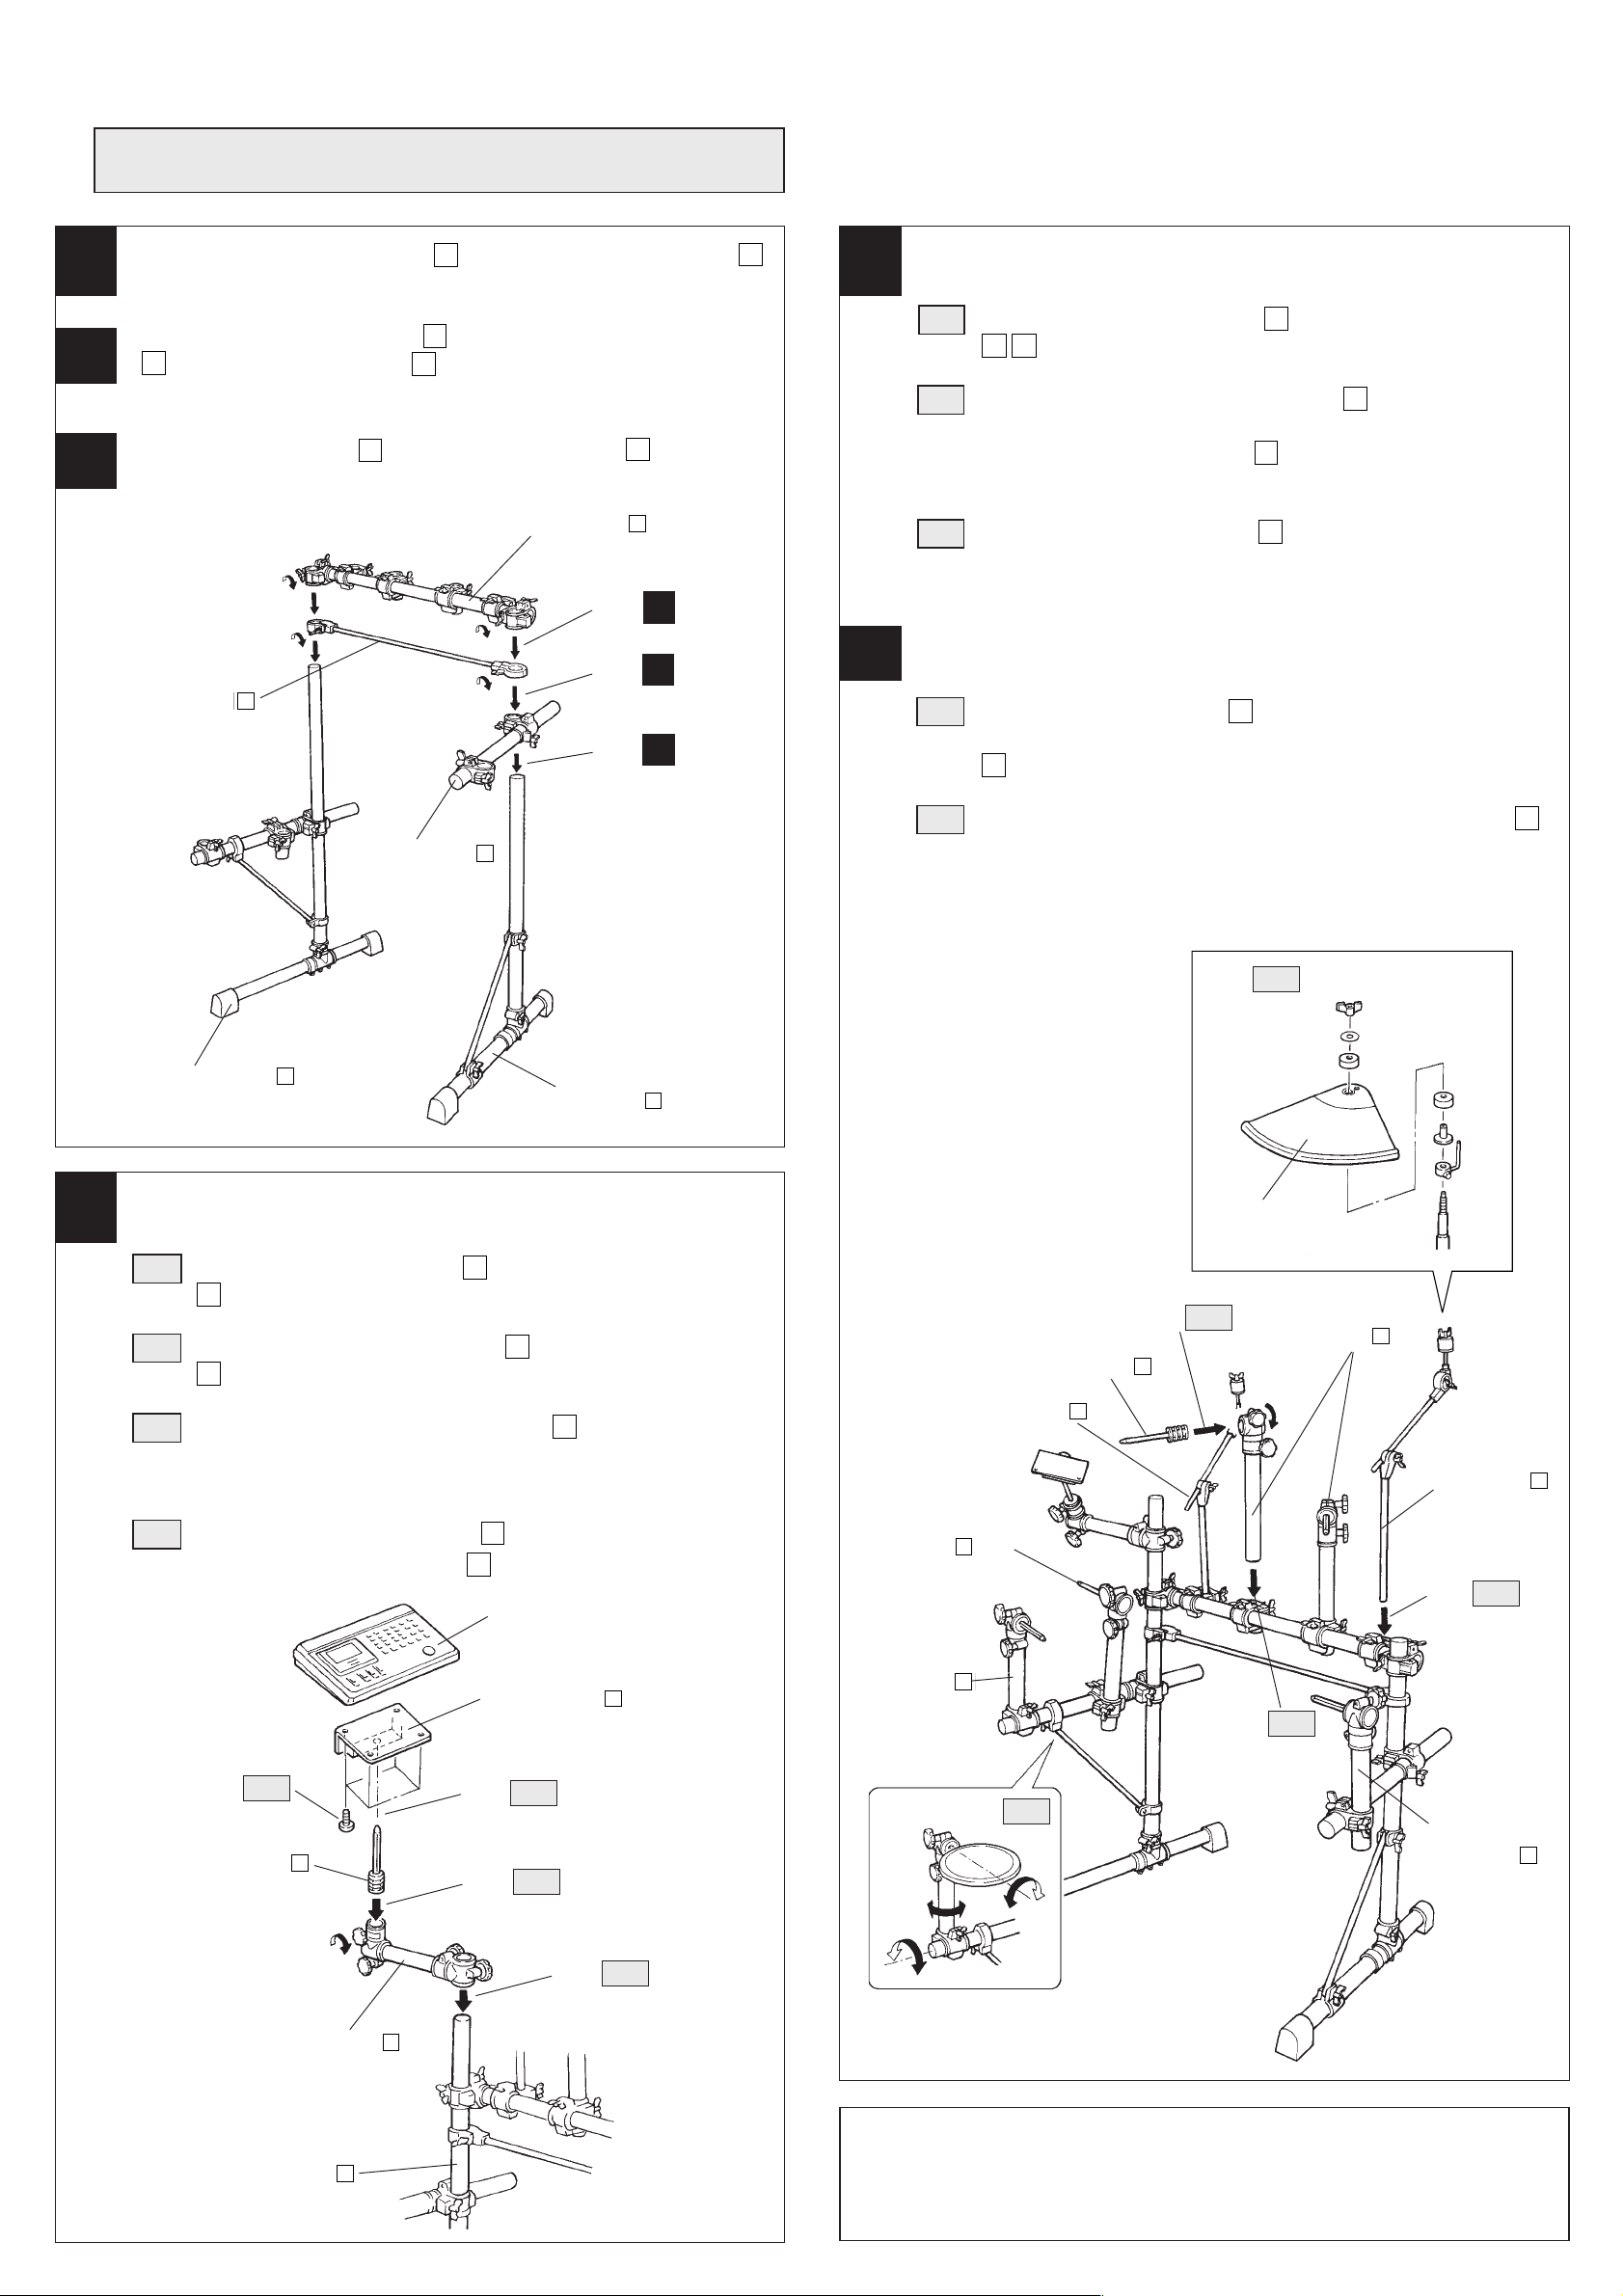
■ RS-80 Assembly
* A screw driver (+ or -) is necessary to complete the assembly.
Over-tightening of the fixing bolts may result in damage.
Take care when tightening fixing bolts and screws.
1
2
3
Insert the Right Side Assembly C pipe into the Right Side Arm B,
and tighten the fixing bolts.
Insert the Left Side Assembly A pipe and the Right Side Assembly
C
pipe into the Center Bar E, and tighten the fixing bolts.
Make sure that the Left and Right Side Assemblies are not reversed.
Above the Center Bar E, attach the Center Pipe D, and tighten
the fixing bolts.
D
Step 3
Step 2
Step 1
Tighten
Center Bar
Tighten
E
Attach the Center Pipe
Tighten
Tighten
5
6
Attach the Drum Pad Clamps
5-1 Insert the Hex Rod Cylinders
IJ
, and tighten the fixing bolts.
5-2 Attach the Drum Pad Clamps (Short)
and floor tom positions.
The Drum Pad Clams (Long)
hat and tom tom positions.
5-3 Insert the Hex Rod Cylinders
tion of the pad and tighten the fixing bolts.
H
into the Drum Pad Clamps
I
to the snare drum
J
should be attached to the hi-
H
in the pads, adjust the posi-
Attach the Cymbal Holders
6-1 Insert the Cymbal Holders
that are attach to the left and right sides of the Center Pipe
D
, and tighten all fixing bolts.
K
into the Cymbal Holder Clamps
4
B
Right Side Assembly
Left Side Assembly
Right Side Arm
A
Attach the Module Holder
4-1 Insert the Hex Rod Cylinder
G
, and tighten the fixing bolts.
4-2 Attach the Module Holder Clamp
A
pipe.
4-3 Attach the DTX to the Module Holder
use the screws included with the Module Holder to attach the
holder to the bottom of the DTX.
H
into the Module Holder Clamp
C
G
to the Left Side Assembly
F
. With a screwdriver,
6-2 Attach the Cymbal Pad to the Cymbal Holders
adjust the position and tighten the fixing bolts. (Refer to the
Cymbal Pad’s Owner’s Manual for instructions on attaching
the cymbal pad to the cymbal holder.)
Step 6-2
Cymbal Pad
Drum Pad Clamp
(Long)
Tighten
J
Cymbal Holder
Hex Rod Cylinder
Cymbal Holder
Step 5-1
H
K
K
,
K
4-4 Attach the Module Holder
to the Module Holder Clamp
Step 4-3
Hex Rod Cylinder
Attach the Module Holder
H
Tighten
G
F
(with the DTX attached)
.
G
DTX
Module Holder
Step 4-4
Step 4-1
F
Step 4-2
Drum Pad Clamp
(Long)
Drum Pad
Clamp(short)
J
I
Step 5-3
Step 5-2
Step 6-1
Drum Pad
Clamp(short)
I
Left Side Assembly
A
After the above assembly is complete, set the Kick Pad, Hi-Hat Control Pedal, etc. into position and connect the necessary cables. To
keep cable out of the way while playing, use the supplied Cable Bands
to hold the cables to the rack systems’s pipes.
Page 3

documentation manual, user maintenance, brochure, user reference, pdf manual
This file has been downloaded from:
User Manual and User Guide for many equipments like mobile phones, photo cameras, monther board, monitors, software, tv, dvd, and othes..
Manual users, user manuals, user guide manual, owners manual, instruction manual, manual owner, manual owner's, manual guide,
manual operation, operating manual, user's manual, operating instructions, manual operators, manual operator, manual product,
 Loading...