

Page 1
S
J
RACK MOUNT KIT RK1
Owner’s Manual
Thank you for purchasing the RK1 Rack Mount Kit.
For details on installation, please refer to the owner’s manual of
the product to which you are attaching the RK1.
■
Included items
• Rack mount hardware (2 pcs.)
• Screws (10 pcs.)
• Owner’s manual
■
Products compatible with the RK1
Products using three screws on each side: 01V96, 01V, 03D,
EMX5000-12, MX12/4, MX12/6
Products using five screws on each side: DM1000
(as of February 2003)
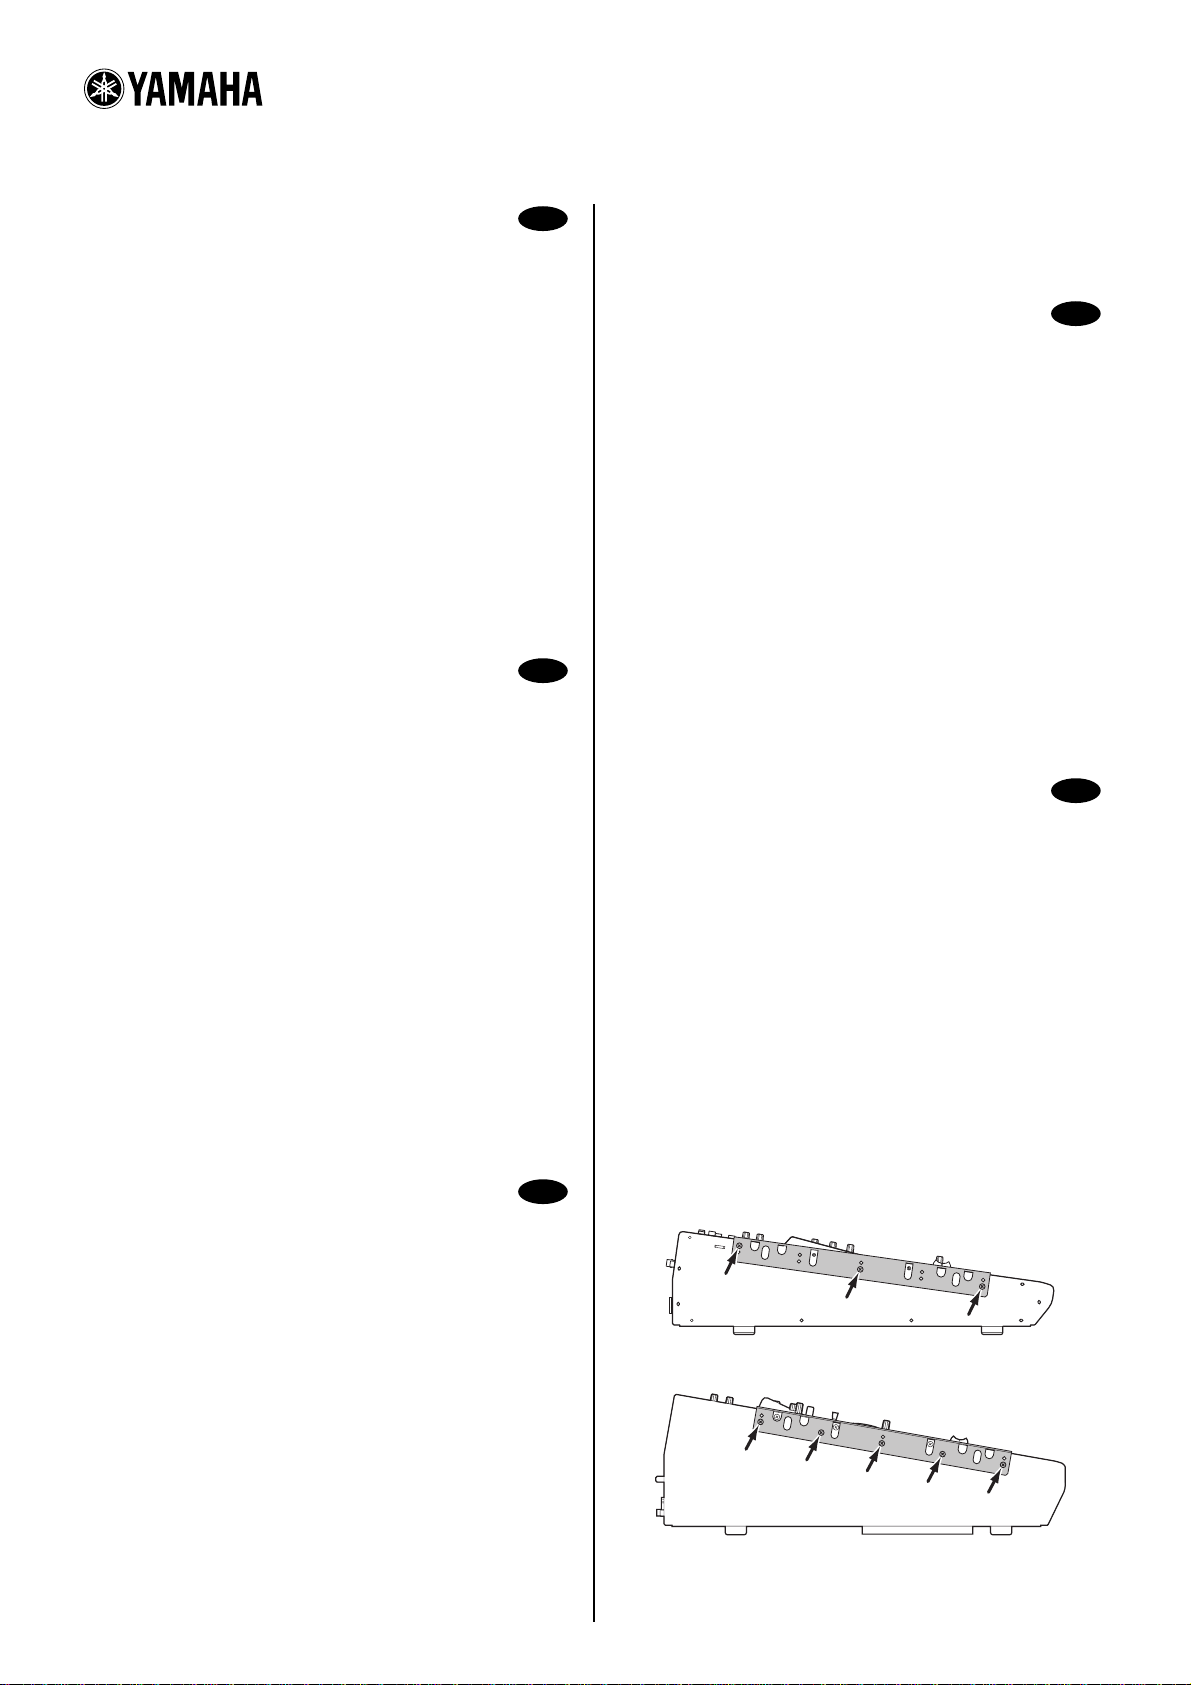
When attaching the RK1 to a product that uses three screws on
each side, install screws in the center hole and in the holes at
each end, as shown below. You will have four screws left over.
Bedienungsanleitung
Vielen Dank, dass Sie sich für einen Rack-Einbausatz RK1 entschieden haben.
We itere Hinweise zum Einbauverfahren entnehmen Sie bitte der
Bedienungsanleitung des Gerätes, für welches Sie den RK1
gekauft haben.
■
Lieferumfang
• Hardware für den Rackeinbau (2 Stück)
• Schrauben (10 Stück)
• Bedienungsanleitung
■
Geräte, für die sich der RK1 eignet
Geräte, für die drei Schrauben pro Seite benötigt werden:
01V, 03D, EMX5000-12, MX12/4, MX12/6
Geräte, für die fünf Schrauben pro Seite benötigt werden: DM1000
(Stand: Februar 2003)
Beim Anbringen des RK1 an einem Gerät, das drei Schrauben
pro Seite voraussetzt, müssen Sie die Schrauben in der Mitte
sowie der Ober- und Unterseite anbringen (siehe Abbildung). Es
bleiben dann also vier Schrauben übrig.
Mode d’emploi
Nous vous remercions d’avoir opté pour le kit de montage en
rack RK1.
Pour en savoir plus sur l’installation, veuillez consulter le mode
d’emploi de l’appareil auquel vous fixez le RK1.
E
G
01V96,
F
Lorsque vous fixez le RK1 à un appareil se servant de trois vis de
chaque côté, insérez les vis dans l’orifice central et aux deux
extrémités. Il vous restera quatre vis superflues.
Manual de instrucciones
Gracias por adquirir el kit de montaje en rack RK1.
Para información sobre su instalación, consulte el manual de
instrucciones del producto en el que instalará el RK1.
■
Elementos incluidos
• Hardware de montaje en rack (2 piezas)
• Tornillos (10 piezas)
• Manual de instrucciones
■
Productos compatibles con el RK1
Productos que utilizan tres tornillos en cada lado: 01V96, 01V,
03D, EMX5000-12, MX12/4, MX12/6
Productos que utilizan cinco tornillos en cada lado: DM1000
(a partir de febrero de 2003)
Al instalar el RK1 en un producto que utiliza tres tornillos en
cada lado, instale los tornillos en el orificio central y en los orificios de cada extremo, tal como se muestra a continuación. Le
sobrarán cuatro tornillos.
取扱説明書
このたびは、ラックマウントキット R K 1 をお買い上げいただ
きまして、まことにありがとうございます。
取付方法については、取り付ける機器の取扱説明書をご参照
ください。
■
同梱品
・ラックマウント金具 2 個
・ネジ 10 本
・取扱説明書 1 部
■ R K 1 対応機器
片側ネジ 3 本の機器 01V 96、01V 、03D 、EM X 5000-12、
片側ネジ 5 本の機器 D M 1000
片側にネジ 3 本の機器に取り付ける場合は、下図のように中
央と両端のネジ穴にネジ止めします。ネジは 4 本余ります。
01V96
:
M X 12/4、M X 12/6
:
(2003 年 2 月現在)
■
Articles fournis
• Equerres de montage en rack (2 pcs.)
• Vis (10 pcs.)
• Mode d’emploi
■
Produits compatibles avec le RK1
Produits utilisant trois vis de chaque côté: 01V96, 01V, 03D,
EMX5000-12, MX12/4, MX12/6
Produits utilisant cinq vis de chaque côté: DM1000
(en février 2003)
This document is pr
WB45670 302IPCP1.3-01A0
Printed in Japan
inted on chlorine free (ECF) paper with so
y ink.
DM1000
M.D.G., Pro Audio & Digital Musical Instrument Division, Yamaha Corporation
© 2003 Yamaha Corporation
Page 2

documentation manual, user maintenance, brochure, user reference, pdf manual
This file has been downloaded from:
User Manual and User Guide for many equipments like mobile phones, photo cameras, monther board, monitors, software, tv, dvd, and othes..
Manual users, user manuals, user guide manual, owners manual, instruction manual, manual owner, manual owner's, manual guide,
manual operation, operating manual, user's manual, operating instructions, manual operators, manual operator, manual product,
 Loading...