

Yamaha Audio mLAN Driver User Manual
Table of Contents
mLAN Control Panel’s Manual ...................2
What is mLAN Control Panel? ........................................... 2
Starting mLAN Control Panel............................................ 2
mLAN Control Panel menu................................................ 3
mLAN Control Panel window............................................ 4
ASIO mLAN Driver’s Manual.....................12
What is the ASIO mLAN driver? ...................................... 12
Installing the driver ......................................................... 12
Starting the ASIO mLAN Control Panel .......................... 12
ASIO mLAN Control Panel............................................... 13
mLAN OMS Driver’s Manual .....................15
What is the mLAN OMS Driver?...................................... 15
Installing the driver ......................................................... 15
mLAN OMS Device Info dialog box ................................ 16
• The software and this owner’s manual are exclusive copyrights of Yamaha Corporation.
• Copying of the software or reproduction of this manual in whole or in part by any means is
expressly forbidden without the written consent of the manufacturer.
• Yamaha makes no representations or warranties with regard to the use of the software and documentation and cannot be held responsible for the results of the use of this manual and the software.
• Copying of the commercially available music sequence data and/or digital audio files is strictly
prohibited except for your personal use.
• The company names and product names in this owner’s manual are the trademarks or registered
trademarks of their respective companies.
• The screen displays as illustrated in this owner’s manual are for instructional purposes, and may
appear somewhat different from the screens which appear on your computer.
This owner’s manual assumes that you are already familiar with basic Macintosh operation. If you are not, please refer to the owner’s manual which came with your Mac OS
software before using mLAN Driver.
For information about hardware requirements, the interconnection of devices and the
installation of the mLAN Driver software, refer to the separate “Installation Guide” as
well as the owner’s manual for the respective mLAN device.
©2000 Y amaha Corporation
1

mLAN Control Panel’s Manual
What is mLAN Control Panel?
“mLAN Control Panel” software enables you to set various parameters when you are using
mLAN with a Macintosh computer. For example, it lets you specify the number of sequences
and the sampling frequency of audio and MIDI data received or transmitted via mLAN, and
specify where to receive or transmit such data. The settings made using the mLAN Control
Panel apply globally to all application programs used with mLAN.
The settings are stored as the “mLAN Control Panel Prefs” file in the “System
→
folder”
checked (selected) the “Send” parameter in the mLAN Control Panel window,
when you start the computer next time the stored settings will automatically be
read and data will be output to mLAN according to the settings.
“Preferences”
→
“mLAN Prefs” folder. For example, if you have
Starting mLAN Control Panel
Select Apple menu
folder” of the start-up disk and double-click “mLAN Control Panel” in the “Control Panels”
folder.
If any mLAN-related application programs are open, you may not be able to
change the mLAN Control Panel settings. In this case, select “Show Clients...”
from the File menu. The system displays the title of the currently-open application(s). Quit the application, then adjust the mLAN Control Panel settings.
Control Panels
→
mLAN Control Panel. Alternatively, open the “System
→
2

mLAN Control Panel menu
Apple menu
About mLAN Control Panel...
Displays the version information of mLAN Control Panel.
File menu
Close
Closes mLAN Control Panel. Same as “Quit” in the File menu.
Set
Same as the [Set] button in the mLAN Control Panel window.
Revert
Same as the [Revert] button in the mLAN Control Panel window.
Show Clients...
Displays the title of the currently-open application that uses mLAN.
Reset FireWire Bus
Issues Bus Reset to the FireWire bus that is selected by “FireWire Card ID” in the mLAN
Control Panel window. Note that sound may be interrupted if you are currently using an
mLAN device.
Quit
Quits mLAN Control Panel. Same as “Close” in the File menu.
3
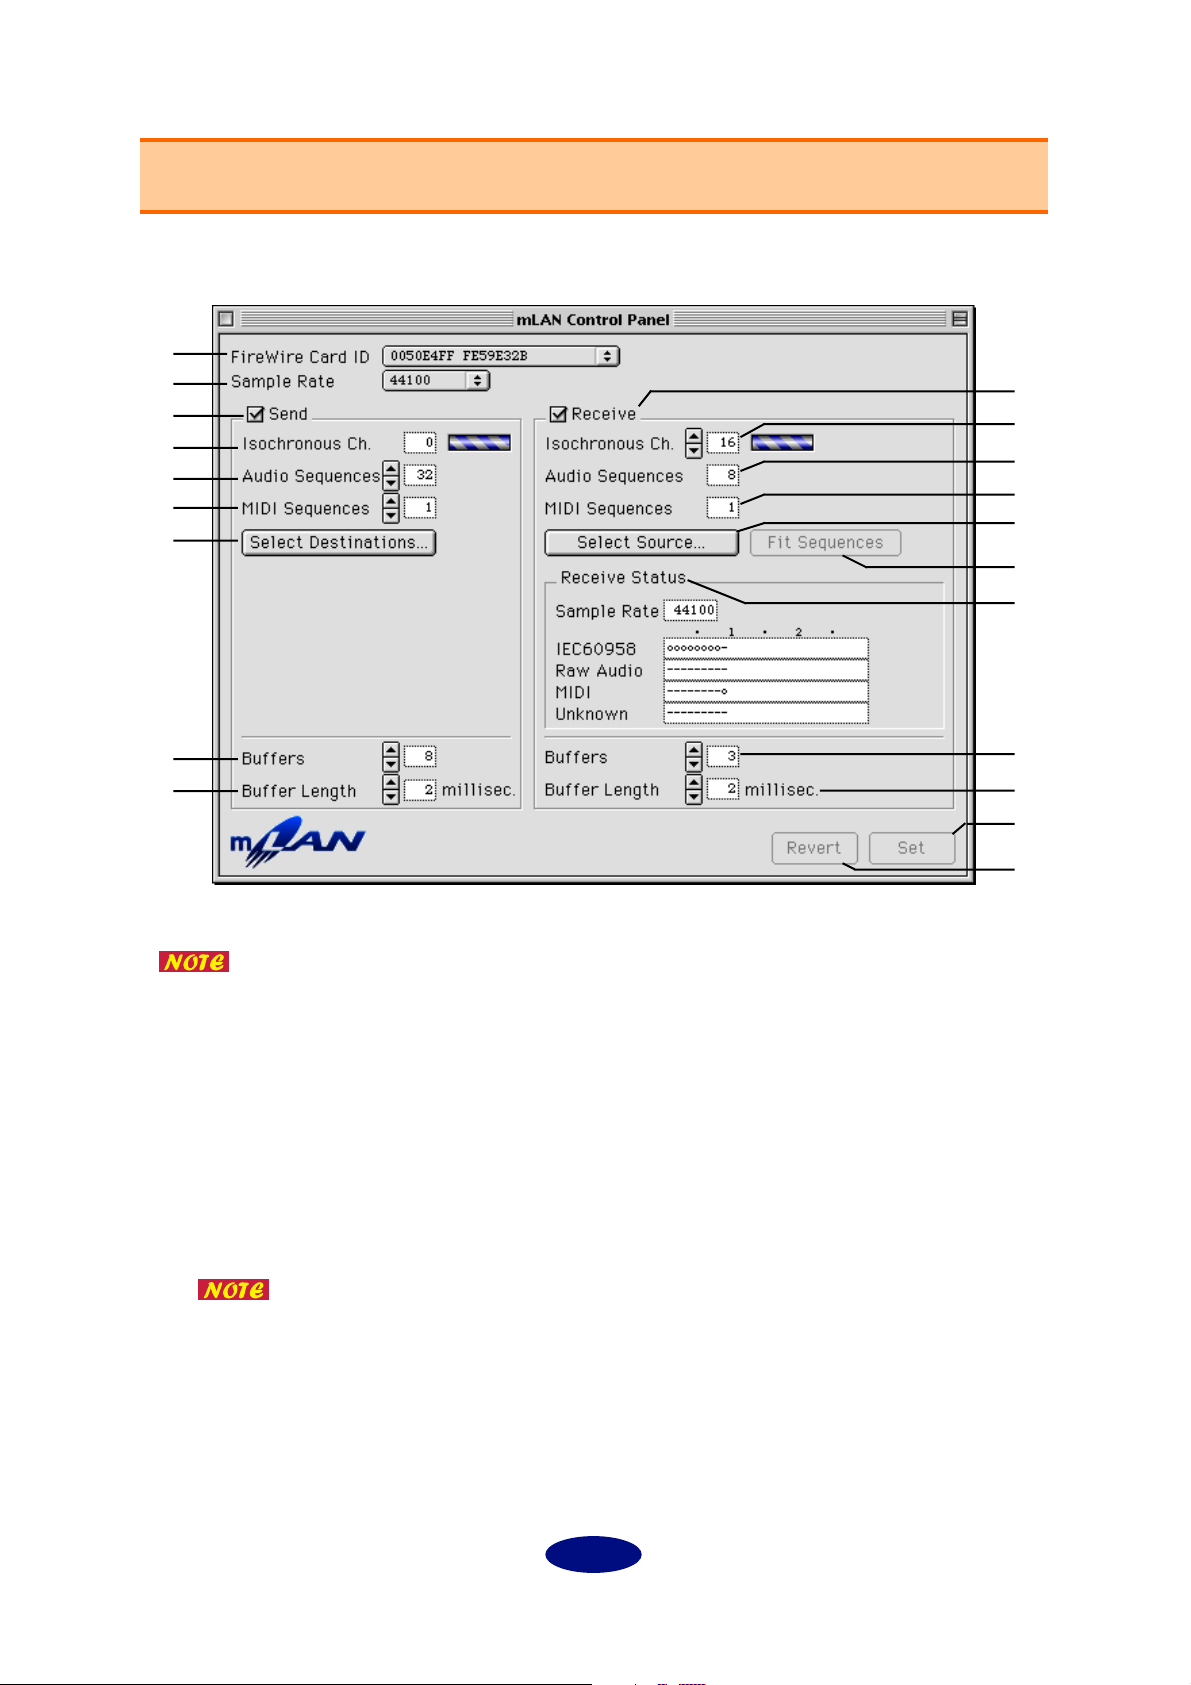
mLAN Control Panel window
When you start mLAN Control Panel, the system displays the following window.
A
B
C
D
E
F
G
J
K
L
M
N
O
H
I
All changes to the parameters in this window become valid when you click the
[Set] button.
A
FireWire Card ID
This parameter displays the serial number of the FireWire (IEEE1394) interface card. If multiple interface cards are installed on the computer, select the desired card here.
B
Sample Rate
P
Q
R
S
T
This parameter enables you to specify the sampling frequency of audio data used via
mLAN. This rate is applied to all reception and transmission of audio data via mLAN.
Options currently supported are “44.1kHz” and “48kHz.”
mLAN supports a sample bit resolution of up to 24-bit for received and transmitted audio data, although this bit resolution may not be available depending on the application program being used.
4

C
Send
This column enables you to set parameters for mLAN data transmission.
Checking the “Send” checkbox enables data transmission to the mLAN bus, and lets you
make the necessary settings for transmission. If you do not perform mLAN transmission,
remove the check from the checkbox.
If you check the “Send” checkbox, mLAN data is always transmitted from the
current computer even if you are not using mLAN. This applies a load to the
entire system, including non-mLAN-related application programs. Remove
the check from this checkbox when you are not using mLAN.
D
Isochronous Ch.
This parameter displays the Isochronous Channel number of the FireWire channel being
used for mLAN data transmission. The channel number ranges from 0 through 63, and
unused number is automatically assigned. The bar graph on the right displays the
progress of transmission. The bar graph scrolls when data is being transmitted, and it
stops when no data is transmitted.
Audio Sequences
E
This parameter enables you to specify the number of sequences of mLAN audio data
transmitted from the computer. One sequence corresponds to one channel. The value is
an even number ranging from 0 through 32. The specified number of monaural audio
sequences is always output to FireWire, regardless of whether the current application uses
mLAN. (If the application program does not use mLAN, mLAN audio data indicating
“silence (flat waveform with a level of 0)” will be output.)
F
MIDI Sequences
This parameter enables you to specify the number of sequences of MIDI data transmitted
from the computer via mLAN. One sequence corresponds to one MIDI cable. The value
ranges from 0 through 8. The specified number of MIDI sequences is always output to
FireWire, regardless of whether the current application uses mLAN. (If the application program does not use mLAN, mLAN MIDI data indicating “No data” will be output.)
The higher the number of sequences, the greater the load applied to the
computer. Set the minimum value possible. The actual number of sequences
that can be correctly transmitted depends on the performance of your computer and the type of application program.
G
Select Destinations...
Click here to open a dialog box that enables you to select an mLAN device to receive
mLAN data from the computer. The dialog box (page 6) opens after the system scans and
recognizes the connected mLAN devices.
5
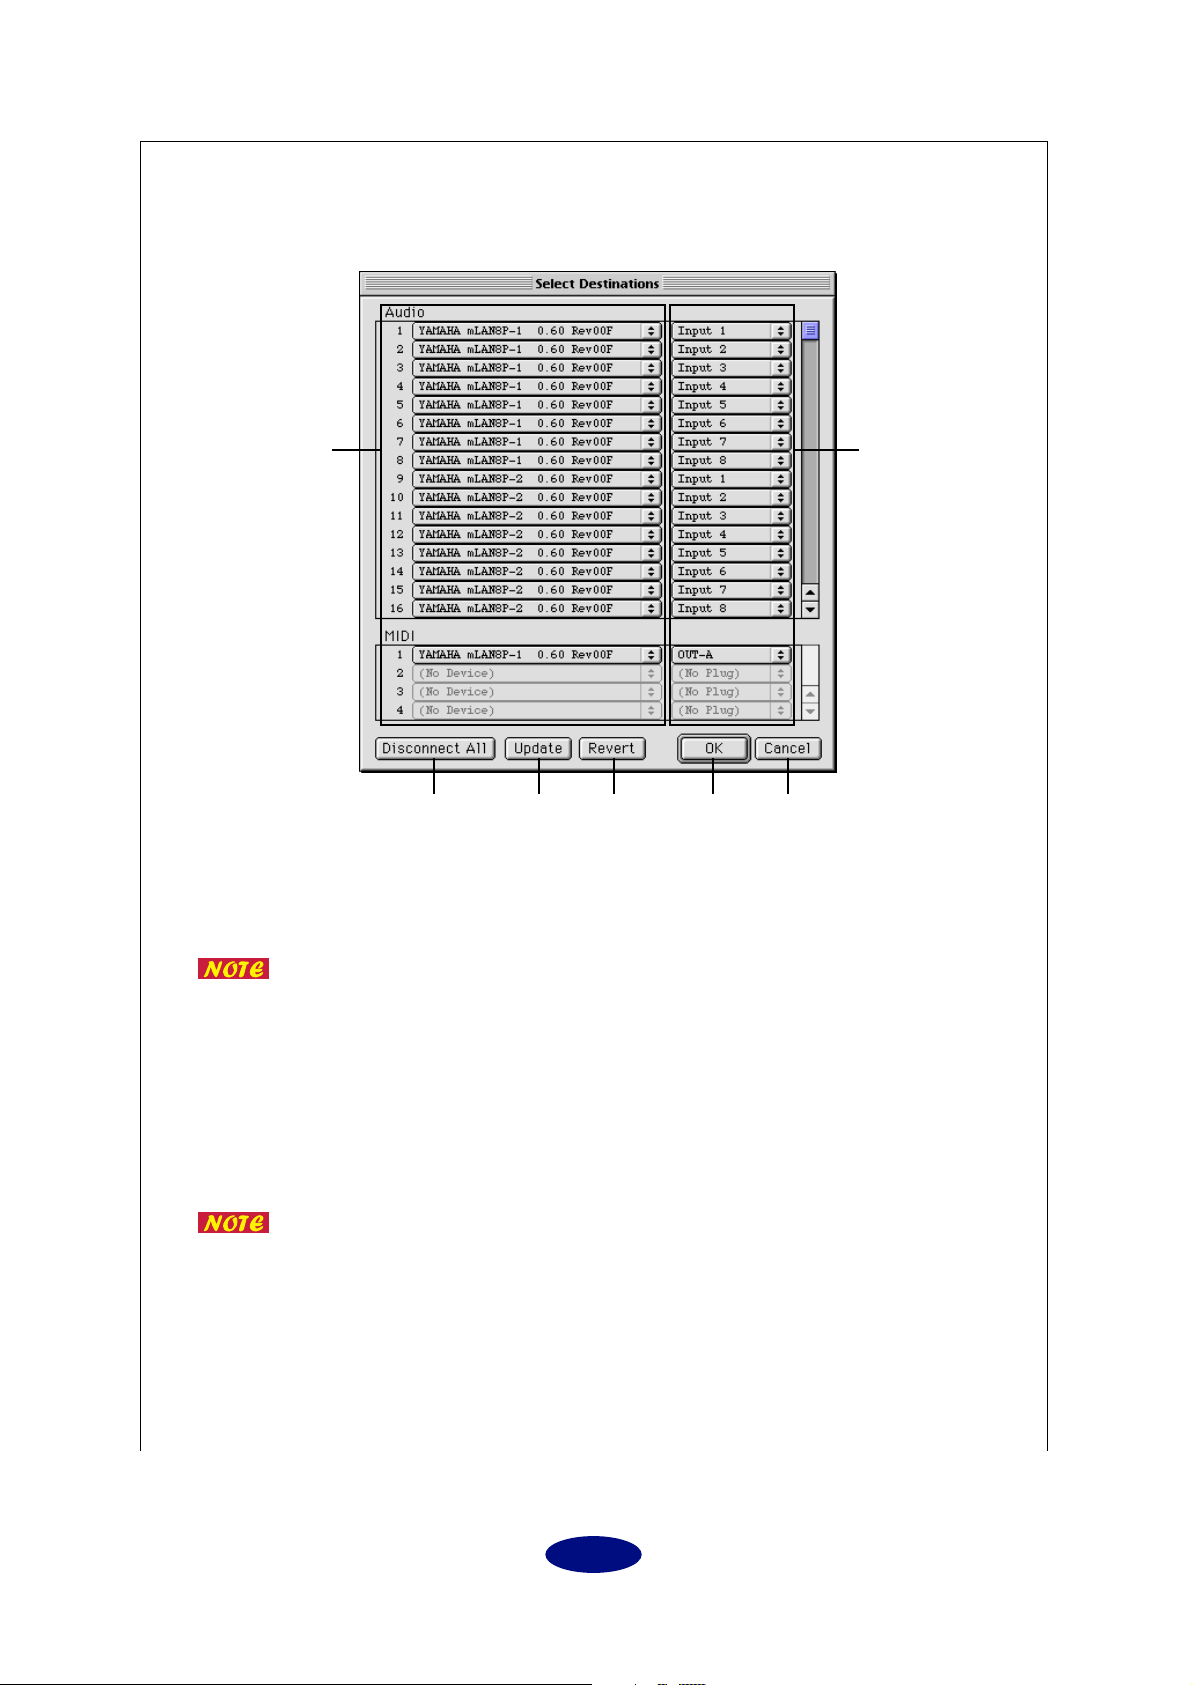
“Select Destinations” dialog box
This dialog box enables you to specify the mLAN devices and mLAN plugs that receive
mLAN data from the computer.
A
B
CDEFG
1
Device pop-up menus
These pop-up menus enable you to select mLAN devices to which data is transmitted. The numbers on the left show the sequence numbers for audio and MIDI data.
When you select the destination mLAN device in one of the Device pop-up
menu while holding down the Option key, the same mLAN device will be
automatically selected in the subsequent Device pop-up menus. The number of the Device pop-up menus that have the same mLAN device selection
corresponds to the number of destination mLAN input plugs.
2
mLAN plug pop-up menus
These pop-up menus enable you to select the destination mLAN plugs for the mLAN
devices selected by the Device pop-up menus (
Select the destination mLAN device while holding down the Option key to
assign multiple plugs simultaneously.
3
Disconnect All
Click this button to change all pop-up menus on the right to “(No Plug).” Click [OK]
while “(No Plug)” is selected for all these pop-up menus to disconnect all virtual
transmission (mLAN connections) from the computer to the mLAN devices.
6
1
).
 Loading...