

MDX-9
MDX-9
MINIDISC RECORDER
MINIDISC RECORDER
LECTEUR ENREGISTREUR DE MINIDISC
LECTEUR ENREGISTREUR DE MINIDISC
B G
s
NATURAL SOUND M INIDISC RECORDER MDX-9
TIMER
OFF
PLAYREC
POWER
0
¡1
SEARCH
DISPLAY TITLE CHARA. DELETE EDIT SET
CANCEL ENTER
O WN ER’S MANUAL
O WN ER’S MANUAL
MO DE D ’ EMPLO I
MO DE D ’ EMPLO I
BEDIEN UNGSAN LEITUNG
BEDIEN UNGSAN LEITUNG
BRUKSA NVISNING
BRUKSA NVISNING
MANUALE DELL’UTENTE
MANUALE DELL’UTENTE
MANUAL D E INSTRUCCIO NES
MANUAL D E INSTRUCCIO NES
INPUT
+
¢4
REC LEVEL
010
REC
3
PLAY/
STOP
8
PAUSE
7
GEBRUIKSAANW I JZING
GEBRUIKSAANW I JZING
CAUTION: READ THIS BEFORE OPERATING YOUR UNIT.
1. This unit is a sophisticated mini disc re corder. To ensure
proper operation for the best possible performance, please
read this man ual carefully.
2. Choo se th e in stall ation location of your unit c ar efull y. Av oid
placing it in direct sunligh t or close to source of he at. Also
avoid locations subject to vibration and excessive dust, heat,
cold or moisture. Keep it awa y fro m so urces of hum such a s
transformers or motors.
3. Do no t place another component on top of this unit, to do s o
may discolor or damage the surface of the uni t.
4. Do no t open the cabinet of this unit, to do s o m ay re sult in
damage to the unit or elec trical shock. If any f oreign object or
substance gets into the u nit, contact your dealer for
assistanc e.
5. When removing the power plug from the wall outlet, alw ays
pull directly on the plug; never pull the cord its elf.
6. Do no t apply excessive force when operating switches and
knobs.
7. When moving the unit, be sure to first disconnect the power
cord from the AC outlet and disconnect all cord s connecting
the unit to other equipment.
8. Do no t att empt to clean this un it w ith chemical solvents as this
may dam age the finish. Use a c le an, dry cloth.
9. Be su re to rea d the “TROUBLESHOOTING” section for a dvice
on comm on o perating errors before concluding th at yo ur u nit
is faulty.
For U.K. customers
If the soc k et o utlet s in t he h ome are not suita ble for the
plug supplied with this appliance, it should be cut off and
an appropriate 3 pin plug fitted. For details, refe r to t he
instruc tion s described below.
Note: The plug seve red from the mains lead must be
destro yed, as a plug with bared flexible cord is hazardous
if enga ged in a live so cket outlet.
IMPORTANT
THE WIRES IN MAINS LEAD ARE COLOURED IN
ACCORDANCE WITH THE FOLLOWING CODE:
Blue: NEUTRAL
Brown: LIVE
As the c ol ours of th e w ires in th e ma ins lead of this
apparatus may not c o rres pond with the coloured
marking s i dentifying the te rmin als in yo ur plug,
proceed as follow s: The wire which is coloured BLUE
must b e connected to the terminal which is marked
with the letter N or coloured BLAC K. The wire which is
colour ed BROWN must be connected to the terminal
which is m arke d with the letter L or coloured RED.
Making su re th at ne ithe r core is conne cted to the
earth terminal of the th ree pin plug.
10. Keep this manual in a safe place for future reference.
Note
Please chec k the copyright laws in your country to record from
records, compact discs, radio, etc. Recor ding of copyright
material may infringe cop yright laws.
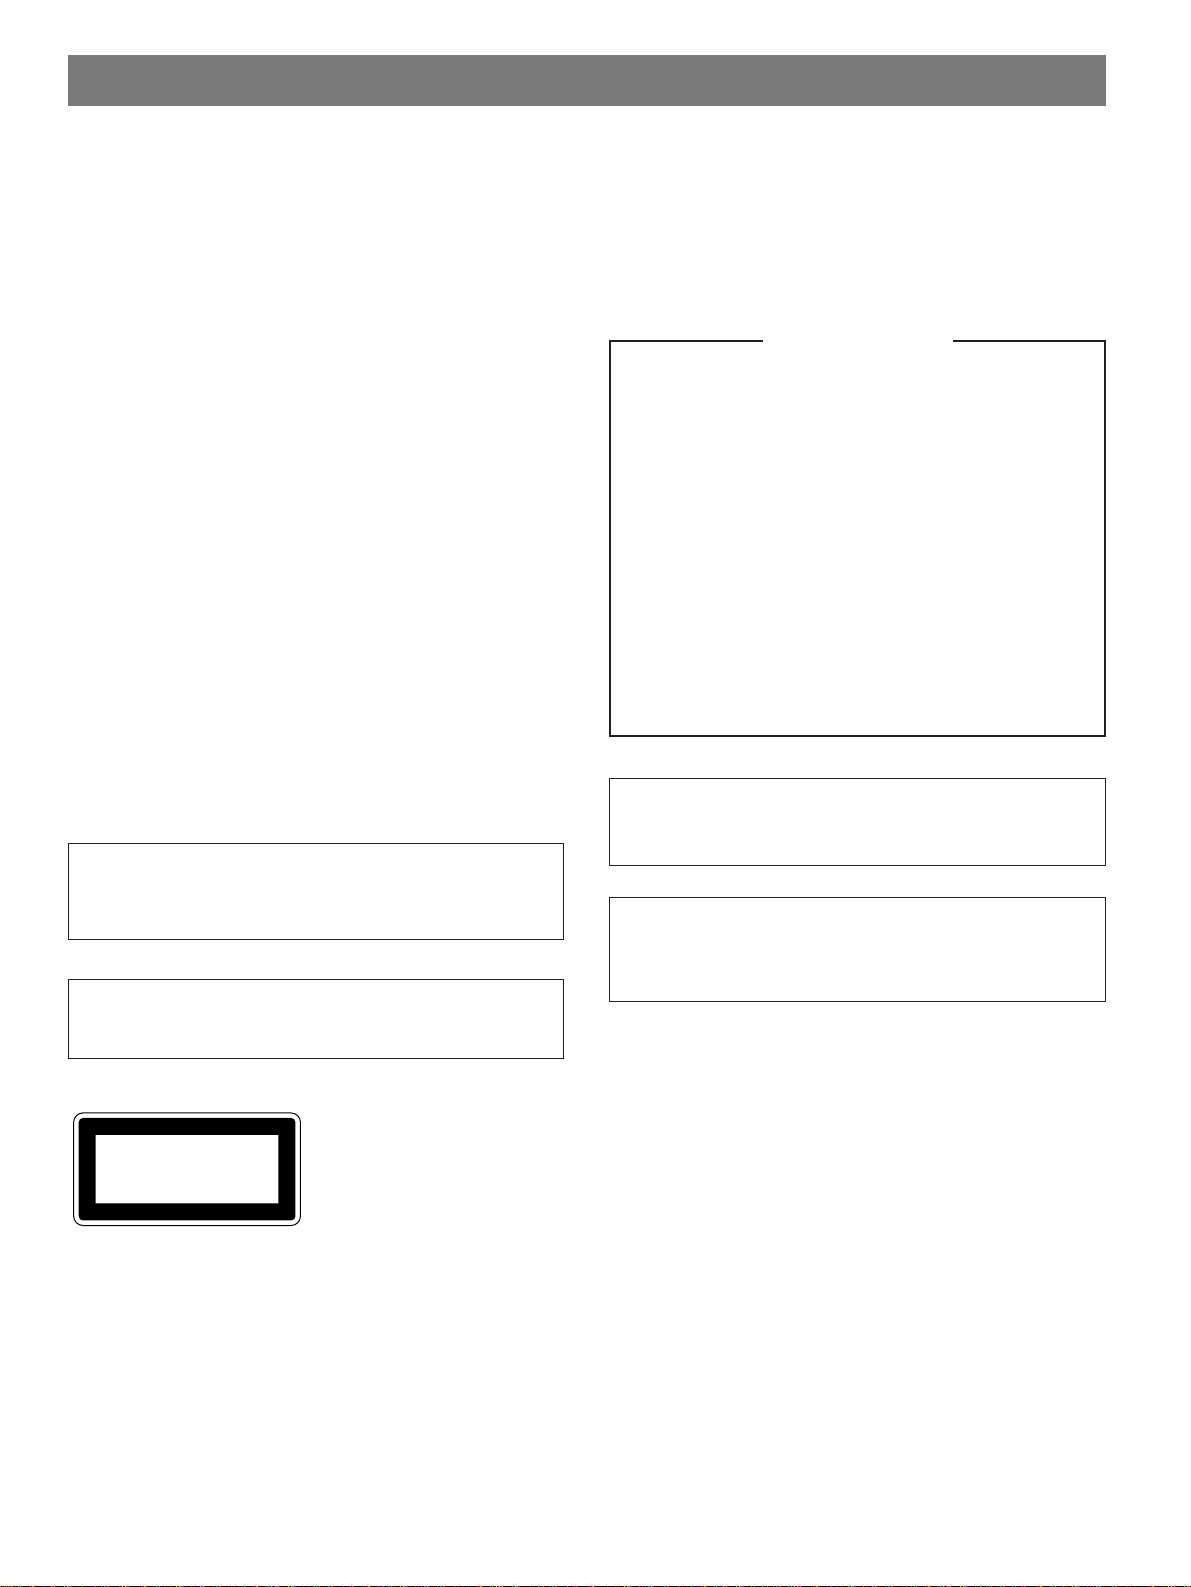
WARNING
TO REDUCE TH E RISK OF FIRE OR ELECTRIC SHOCK, DO
NOT EXPOSE TH IS APPLIANCE TO RAIN OR MOISTURE.
This mini disc recorder is
classified as a CLASS 1 LASER
CLASS 1 LASER PRODUCT
product.
The CLASS 1 LASER PRODUCT
label is lo cated on the rear
exterior.
DANGER
Invisible lase r radiation when open and interlock failed or
defeated. Avoid direct exp osu re to beam.
CAUTION
Use of co ntro ls o r adjustments or perf orma nce of procedures
other than those specified her ein may resu lt in haz ardous
radiation exposure.
2

Thank you for selecting this YAMAHA mini disc recorder.
CONTENTSFEATURES
¶ A samp l ing rate co nver ter t hat l ets y ou m ake
digital reco rdings from 32 kHz (DA T, etc .) , 44. 1
kHz (CD, DAT, MD, etc .) and 48 kHz (DAT, etc.)
program sources.
¶ Editing featu res (MO VE, ERASE, DIVIDE,
COMBINE, TITLE, and U NDO ) th at le t you tak e
full ad va ntage of the MD recording system.
¶ Multip le digital INPUT terminals (2 op ti cal inputs
and 1 coaxial inp ut ) let you connect u p to three
diffe rent digital program s ources.
¶ The digital optical OUTPUT terminal lets you
outp ut digital a udio from an MD.*
¶ In ad dition to the standard disc and track repeat
mod es, this unit also has a part (A-B) repeat
mod e th at le ts yo u re peat a spe cific part of a
trac k.
¶ Synchro Record lets you make synchronized
reco rdings from an y type of source component.
¶ Time Resc ue Rec o rd monitors the sound being
inpu t an d allows you to recover sound input from
a po int a pproximate ly fo ur s econds before you
start the recording operation. (So you will not
miss the beginning of a song whe n recording
dire ctly from the radio, etc.)
¶ The Monaural Record m ode lets you record up to
148 minutes of audio onto one MD.
¶ Timer playback and recording modes that let you
start p la yback or re cording at a pres et ti me u sing
an op tio nal a udio timer.
* This is not pos sible if MD is a direct copy of another digital
signal (se e page 24 for details regarding SCMS copy
protection).
US and foreign patents licensed from Dolby Laboratorie s
Licens ing Corporation .
PART DESCRIPTIONS ........................................................ 4
FRONT PANEL ..................................................................... 5
REMOTE CONTROL.................................... . . . . . . . . . . . . . . . . . . . . . . . . . 6
CONNECTIONS ................................................................... 7
ANALOG CONNECTIONS ................................................... 7
DIGITAL CONNECTIONS .................................................... 7
PLAYBACK.......................................................................... 8
Skippi ng Tracks ................................................................ 8
Searching ........... ............................................................... 9
Switching the D isplay ....................................................... 9
RANDOM PLAY.................................................................. 10
REPEA T PLAY .................................................................... 10
Single Track Repeat ....................................................... 10
Full Disc Repeat............................. ................................. 10
Part (A-B) Repeat............................................................11
PROGRAM PLAY.............................................. . . . . . . . . . . . . ......11
RECORDING...................................................................... 13
Record ing Level.............................................................. 14
Auto Marking ............................. . .. . .. . .. . . .. . .. . .. . .. . .. . . .. . .. . .. . .. 14
TIME RESCUE RECORDING ............................................. 15
SYNCHRO RECORDING....................................................15
MONAURAL REC ORDING................................................. 16
MONITOR OUT...................................................................16
EDITING ............................................................................. 17
MOVE ..................................................................................17
ERASE................................................................................. 18
Disc Erase ....................................................................... 18
Track Erase ..................................................................... 18
Part Erase........................................................................ 19
COMBINE ........................................................................... 19
DIVIDE................................................................................20
TITLING.............................................................................. 21
TIMER OPERATIONS ....................................................... 22
Timer recording .............................................................. 22
Timer playback ............................................................... 22
MD SYSTEM LIMITATIONS.............................................. 23
COPY PROTECTION (SCMS) .......................................... 24
NOTES REGARDING THE REMOTE CONTROL............ 24
Remote control operation range .................................... 24
Battery installation ..... ..................................................... 24
TROUBLESHOOTING....................................................... 25
DISPLAY MESSAGES ...................................................... 26
SPECIFICATIONS ............................................................. 27
ENGLISH
3
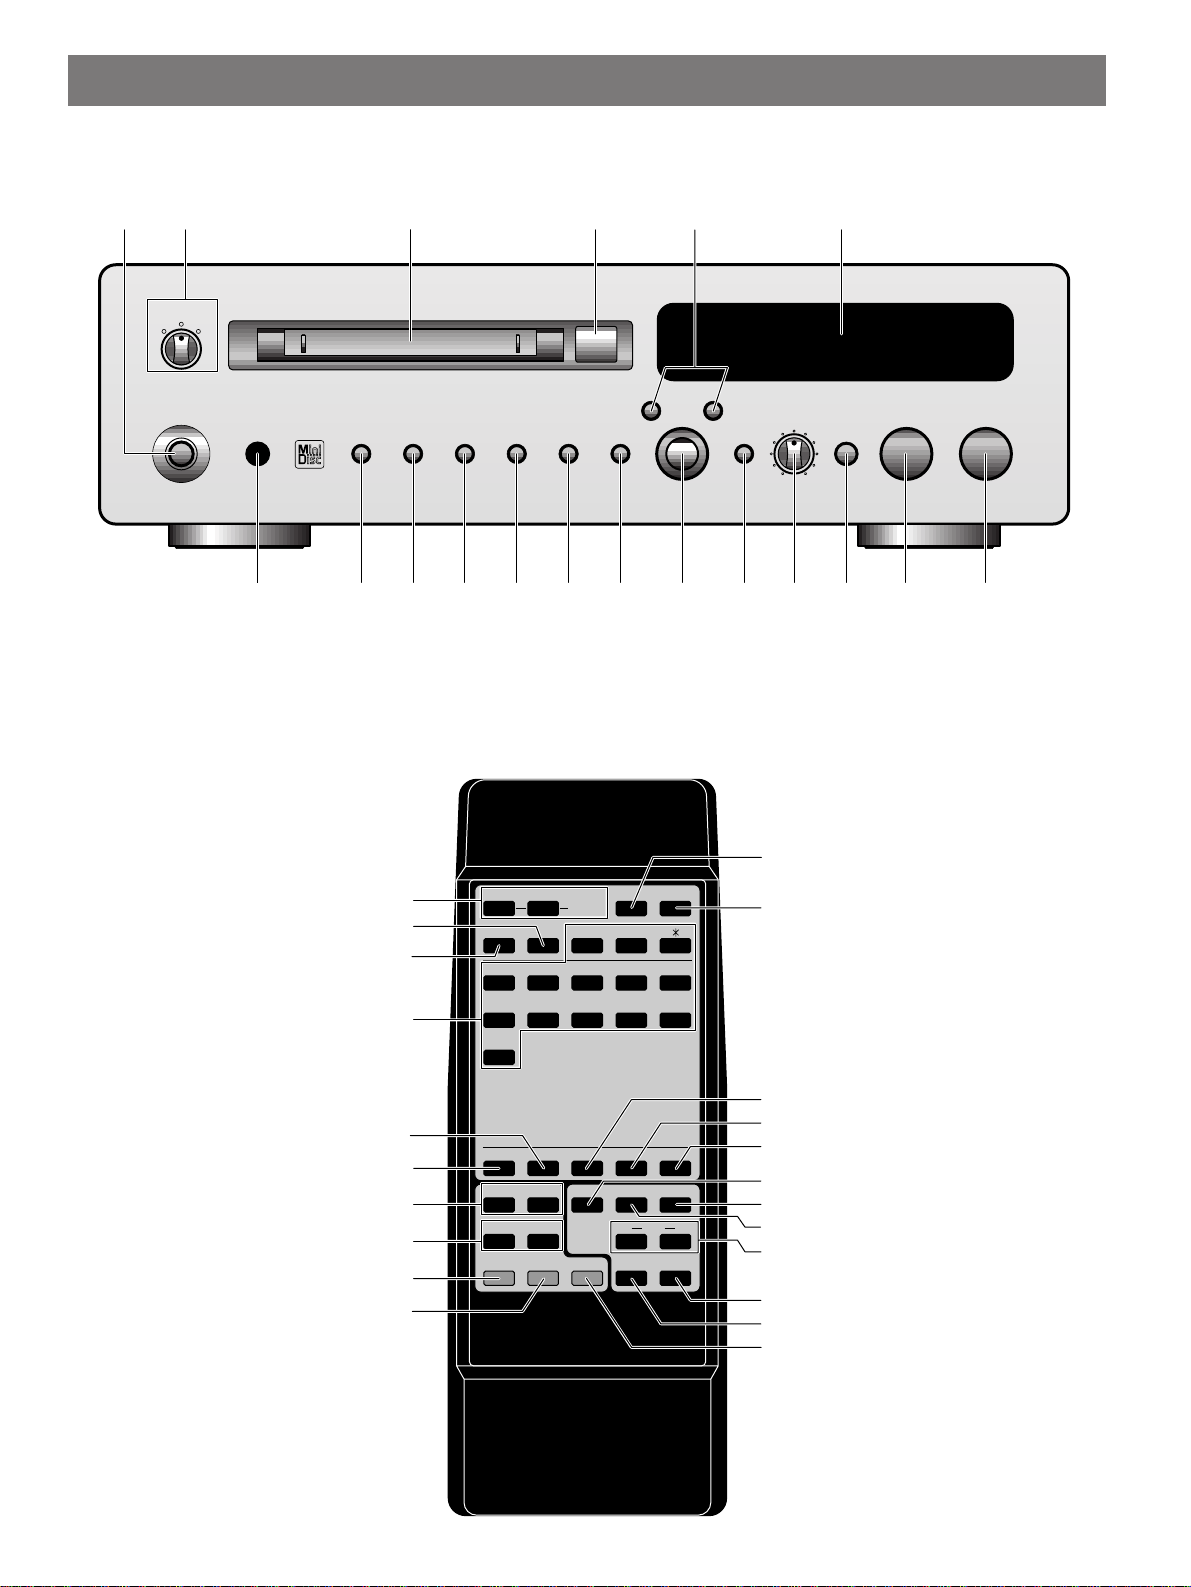
PART DESCRIPTIONS
Front Panel
Ÿ ! ⁄ ¤@~
s
TIMER
OFF
POWER
NATURAL SOUND M INIDISC RECORDER M DX-9
PLAYREC
0
¡1
SEARCH
7
STOP
DISPLAY TITLE CHARA. DELETE EDIT SET
CANCEL ENTER
REC LEVEL
INPUT
—
+
¢4
REC
010
# ‹$›%fi^ fl &‡* ° (
Remote Control
%
?
~
Ÿ
!
⁄
!
S/ F
&
RNDM
A B C
1
P Q R
6
SPACE
+10
A—B
PROG
D E F
S T U
REPEAT
—
G H I
2
3
V W X
7
8
J K L
Y Z
SCROLLDISPLAY
fi
)(
M N O
5
4
/
0
9
3
8
PLAY/
PAUSE
@
¤
#
‹
$
›
4
SEARCH
1
SKIP
4
PLAY
£
s
CHAR.TITLE SETDELETENUMBER
M-MARK M ONO/ ST
¡
¢
PAUSE
STOP
8
7
REC
REC
¶
M DX
INPUT
SYNCTIME
CD—P
^
fl
&
‡
*
°
(
·
)
‚

FRONT PANEL
See the pages in parenthesis for details rega rding operation.
~ POWER (8)
Press to turn the unit on or off.
Ÿ TIMER (22)
Use to set the unit to play or recor d when activat ed by
an external timer.
! Disc insertion slot
Insert the disc into this slot.
⁄ Eject )
Press to remove the dis c.
If the TOC* data has no t ye t been written, it is written
automatically before the disc is ejected.
@ SEARCH ! ⁄ (9, 21)
Press and hold to search quickly during p la y or pause.
Use to move the cursor when inpu tting a disc (track)
title.
¤ Display panel (9)
Displa ys v ariou s in form ation .
# Remote control sensor (24)
Receives the signals emitted from the rem ote control.
‹ DISPLAY (9)
Press repeatedly to switch between the title and t ime
displays.
$ TITLE (21)
Press to activate or deactivate the title mo de.
› CHARA. (21)
Press repeatedly to select different types of characters
when titling a disc (tr ack).
% DELETE/CANCEL (17, 21)
Press to cancel an edit function or to delete the
select ed character when titling a disc (track).
fi EDIT (17)
Press repeatedly to accesses the different edit modes.
^ SET/ENTER (17, 21)
Press to confirm the current opera tion or s elect an edit
mode (etc.).
fl Jog dial [– / +] [$ ›] (8, 21)
Use to skip to the beginning of the previous or next
tracks .
Use to select characters when inputting a disc (track)
title.
& INPUT (13)
Press repeatedly to select the input jacks you wa nt to
record from: ANALOG or DIGITAL (OPTICAL 1,
OPTICAL 2, or COAXIAL).
‡ REC LEVEL (14)
Use to ad j ust t he re cording level when recording from
the analog inputs.
* REC (14)
Press during stop or pause to activate the record
pause mo de.
Press while recording to manually add a track division.
° & STOP (8, 13, 17, 21)
Press to stop recording or playback.
Press to cancel an edit or title input operation .
( ‹ PLAY/* PAUSE (8, 13)
Press during stop (or pause) to start playback. Press
while p layi ng to pause.
Press during record pause to start recording . Press
while rec o rding to pause.
ENGLISH
* TOC (Table of Contents) : This is the non-audio data
conta ined on all mini d iscs (track nu mbers, playback
time, title data, etc.).
UTOC (User’s Table of Contents): This is non-audio data
that you can edit (like track numbers, playback time, and
title da ta) .
5

REMOTE CONTROL
See the pages in parenthesis for details rega rding operation.
~ REPEAT (10~11)
S/F (!)
Press to select single track (S) or full disc (F) repeat.
Press to select “!” wh en creating a disc (track) title.
A-B (?)
Press to specify the A and B points for A-B rep ea t.
Press to select “?” wh en creating a disc (track) title.
Ÿ PROG (–) (11)
Press to activate or deactivate the program play mode.
Press to select “–” wh en creating a disc (track) title.
! RNDM (&) (10)
Press to activate or deactivate the ran dom play mode.
Press to select “&” when creating a disc (track) title.
⁄ Numbers/Characters (8, 21)
Use to sp e cify a track.
Press repeatedly to select a character when creating a
disc (track) title.
@ CHAR. (21)
Press repeatedly to select uppercase or lowercase
letters d ur ing title mode.
¤ TITLE (21)
Press to activate or deactivate the title mo de.
# SEARCH ! ⁄ (9, 21)
Press and hold to search quickly during p la y or pause.
Use to move the cursor when inpu tting a disc (track)
title.
‹ SKIP $ › (8, 21)
Press to skip to the beginning of the previous or n ext
tracks during play, pause or stop.
Use to select characters when inputting a disc (track)
title.
$ ‹ PLAY (8, 14)
Press during stop (or pause) to start playback.
Press during record pause to start recording .
› * PAUSE (8, 14)
Press to pause playback or recording.
% DISPLAY (9)
Press repeatedly to switch between the title and t ime
displays.
fi SCROLL (9)
Press to scroll the disc (track) title across the display.
Press while scrolling to pause the scroll.
^ NUMBER (21)
Press before pressing a number button to input a
numbe r during title m ode.
fl DELETE (21)
Press to delete the sele cted character when titlin g a
disc (track).
& SET (21)
Press to confirm selected character when tit ling a disc
(track ).
‡ M-MARK (14)
Press to select automa tic or manual marking of tracks
during recording.
* INPUT (13)
Press repeatedly to select the input jacks you wa nt to
record from: ANALOG or DIGITAL (OPTICAL 1,
OPTICAL 2, or COAXIAL).
° MONO/ST (16)
Press during stop or pause to select either m onau ral o r
stereo recording.
( Special Record buttons
TIME (15)
Press during record pause mode to a ctivate Time
Rescue Recording and set the unit to the rec ord pause
mode.
SYNC (15)
Press during stop to activate Sync hro nize d Recording
and se t the uni t to t he r ecord pause mode.
· CD-P (15)
Press to start playback from a YAMAHA CD player.
) ? REC (14)
Press during stop or pause to activate the record
pause mo de.
Press while recording to manually add a track mark.
‚ & STOP (8, 14, 17, 21)
Press to stop recording or playback.
Press to cancel an edit or title input operation .
6
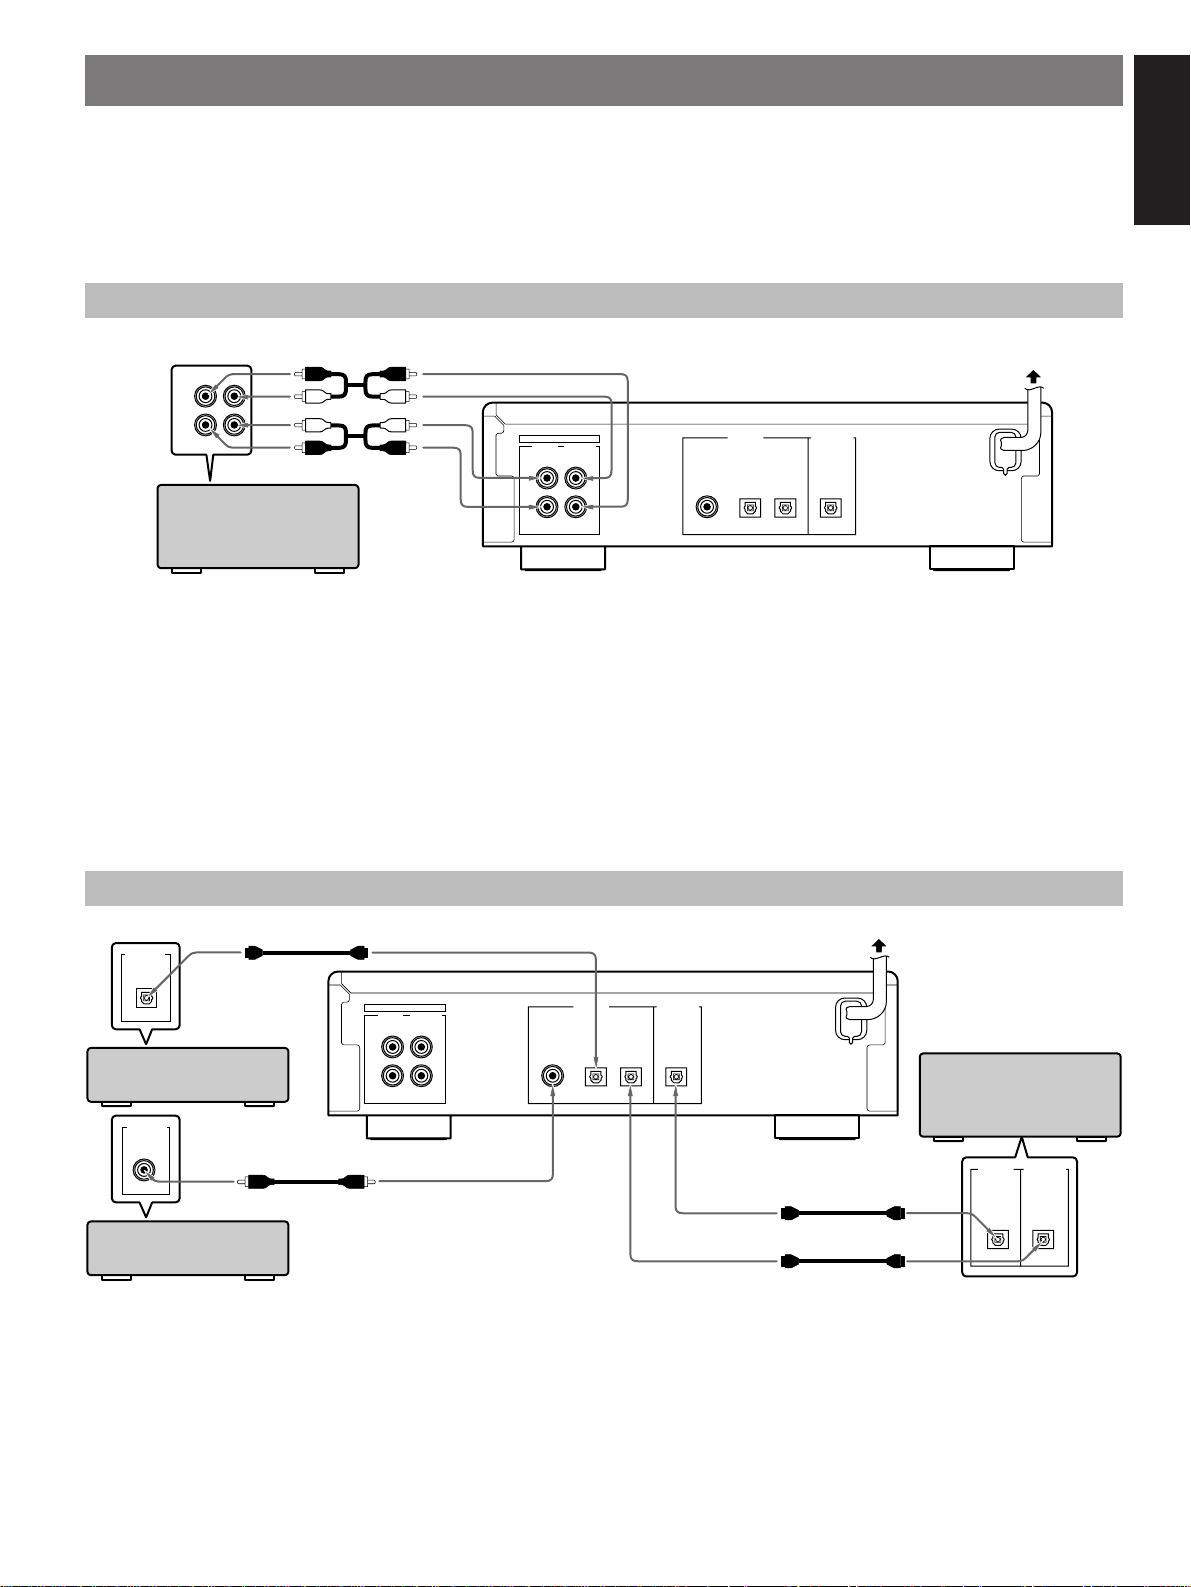
CONNECTIONS
Do not plug in this unit (or other components) until all other connections are complete.
• Connections should be made to the correct input/output terminals on the other component.
• Also refer to the owner’s manual supplied with the component you are conn ecting.
• If the plac em ent o f th is un it causes noise in other equipment, such as a tuner, move them farthe r apart.
ANALOG CONNECTIONS
Connecting cords (included)
3
PLAY
4
REC
LR
Amplifier/Receiver
ANALOG
LINE IN LINE OUT
L
R
DIGITAL IN DIGITAL OUT
34
PLAYREC
OPTICAL OPTICALCOAXIAL
12
Notes for analog connections
• The white plug on the connecting cables corresponds to the L (left) channel an d the red plug corre sponds to the R (righ t) channel. Be
sure to c onne ct L (left) to L and R (right) to R. Also make sure that th e plugs are fully inse rted and that the connection is firm.
• The LINE OUT jacks on the MD recorder should be c on nected to the MD PLAY jacks on your amplifier.
The LINE IN jacks on the MD recorder should be connected to the MD REC jacks on your amplifier.
• The LINE OUT terminals on this unit are numbered 3 and the LIN E IN jac k s ar e nu mbered 4. When con necting this unit to a YAMAHA
amplifier or re ceiver whose terminals are numbered 1, 2, 3, 4 ... (et c.), connect this unit’s LINE OUT terminals to the input terminals
numbere d 3 and c o nne ct this unit’s LINE IN terminals to the outp u t ter min als n umbered 4 on the rear panel of the ampl ifier or re ceiver.
To AC outlet
ENGLISH
DIGITAL CONNECTIONS
DIGITAL OUT
OPTICAL
CD player (etc.) with
optical OUT
DIGITAL OUT
COAXIAL
ANALOG
LINE IN LINE OUT
L
R
34
PLAYREC
DIGITAL IN DIGITAL OUT
OPTICAL OPTICALCOAXIAL
12
Coaxial cable (not included)
Optical fiber cable (not included)
Optical fiber cable (not included)
Satellite tuner (etc.)
with coaxial OUT
Optical fiber cable (not included)
Notes for digital connections
• The DIGITAL IN terminals can be c onn ected to any component with an optical or coaxial output so you can make direct digit al
recordings.
• The DIGITAL OUT terminal ca n be connected to a any component with an optical inp ut so y ou can output digital audio from an MD.
• Before making O PTICAL connections, remove the terminal cover(s).
• In order to protect the termin als f rom dust, be sure to atta ch the terminal cove rs wh en the o ptical terminals are n ot being used.
To AC outlet
Amplifier/Receiver
(or MD/DAT recorder)
with optical IN/OUT
DIGITAL IN DIGITAL OUT
OPTICAL OPTICAL
7

PLAYBACK
Preparations
• Be sure to set the TIMER switch to O FF, then press
POWER to turn this unit on.
• Set your amplifier or rec eive r to MD.
CANCEL ENTER
A–B!S/ F
&
PROG
RNDM
D E F2A B C
1
S T U7P Q R
6
SPACE
+10
CHAR.TITLE SETDELETENUMBER
SEARCH
⁄
!
SKIP
›
$
PAUSE*PLAY
‹
s
)
SEARCH ! ⁄
)
⁄!
SEARCH
REC LEVEL
INPUT
–
+
›$
jog dial & STOP
?
–
REPEAT
3
8
M-MARK MONO/ ST
&
SCROLLDISPLAY
)(
M N O5J K L4G H I
/0Y Z9V W X
INPUT
REC
SYNCTIME
REC?STOP
CD-P
M DX
010
&
STOP
REC
Numbers
& STOP
#
PLAY/
*
PAUSE
NATURAL SOUND M INIDISC RECORDER MDX-9
s
TIMER
OFF
PLAYREC
POWER
SEARCH
! ⁄
SKIP
$ ›
2
* PAUSE
1
DISPLAY TITLE CHARA. DELETE EDIT SET
To stop
Press & STOP.
To pause
Press # PLAY/* PAUSE (or * PAUSE on the remote).
Press again to resume playback (or press # PLAY on t he
2
remote).
To eject the MD
Press ).
Note
The MONO indicator lights when playing monaural MDs.
Skipping Tracks
To skip to the next track
Turn the jog dial to the right (or press SKIP › on the
remote).
To skip to a previous track
Turn the jog dial to the left (or pres s SKIP $ o n th e
remote).
Turn one click to skip to the beginning of the current tra ck.
Turn an additional click to skip to the beginning of each
previo us tr ack.
To skip to a specific track number
Press the number buttons on the remote corresponding to
the trac k y ou desire.
Example:
To select track 3, press 3.
To select track 13, press +10, then press 3.
To select track 23, press +10 twic e , the n press 3.
1 Insert an M D.
Label facing up
NATURAL SOUND MINIDISC RECORDER MDX-9
s
0
Arrow pointed toward
disc insertion slot
2 Press # PLAY/* PAUSE (or # PLAY on the
remote) to start playback.
3 Adjust the volume using the volume con trol o n
your amplifier or receiver.
8
To skip to the last track on the disc
Turn the jog dial to the left when the d i splay is showing the
total trac k s an d total playing time.
Searching
DISC TRACK
TOTAL
REMAIN
DISC TRACK
TOTAL
REMAIN
DISC TRACK
TOTAL
REMAIN
#
DISC TRACK
TOTAL
REMAIN
#
DISC TRACK
TOTAL
REMAIN
#
To search forward during play or pause
Press and hold SEARCH ⁄.
2 Time remaining on the MD (only for recordable MDs)
REMAIN indicator
Time remaining on the MD
To search in reverse during play or pause
Press and hold SEARCH !.
Notes
• Sound can be heard when searching in play mode to help you
locate th e desired position within the track. No sou nd is heard
when searc h ing in pause mode, but the search is conducted
at a high er speed.
• When searching in play mode, playbac k s tops when you
reach the end of the last track .
• Search may not func t ion correctly when th ere are seve ral
consecutive tracks consisting of only a fe w se conds apiece.
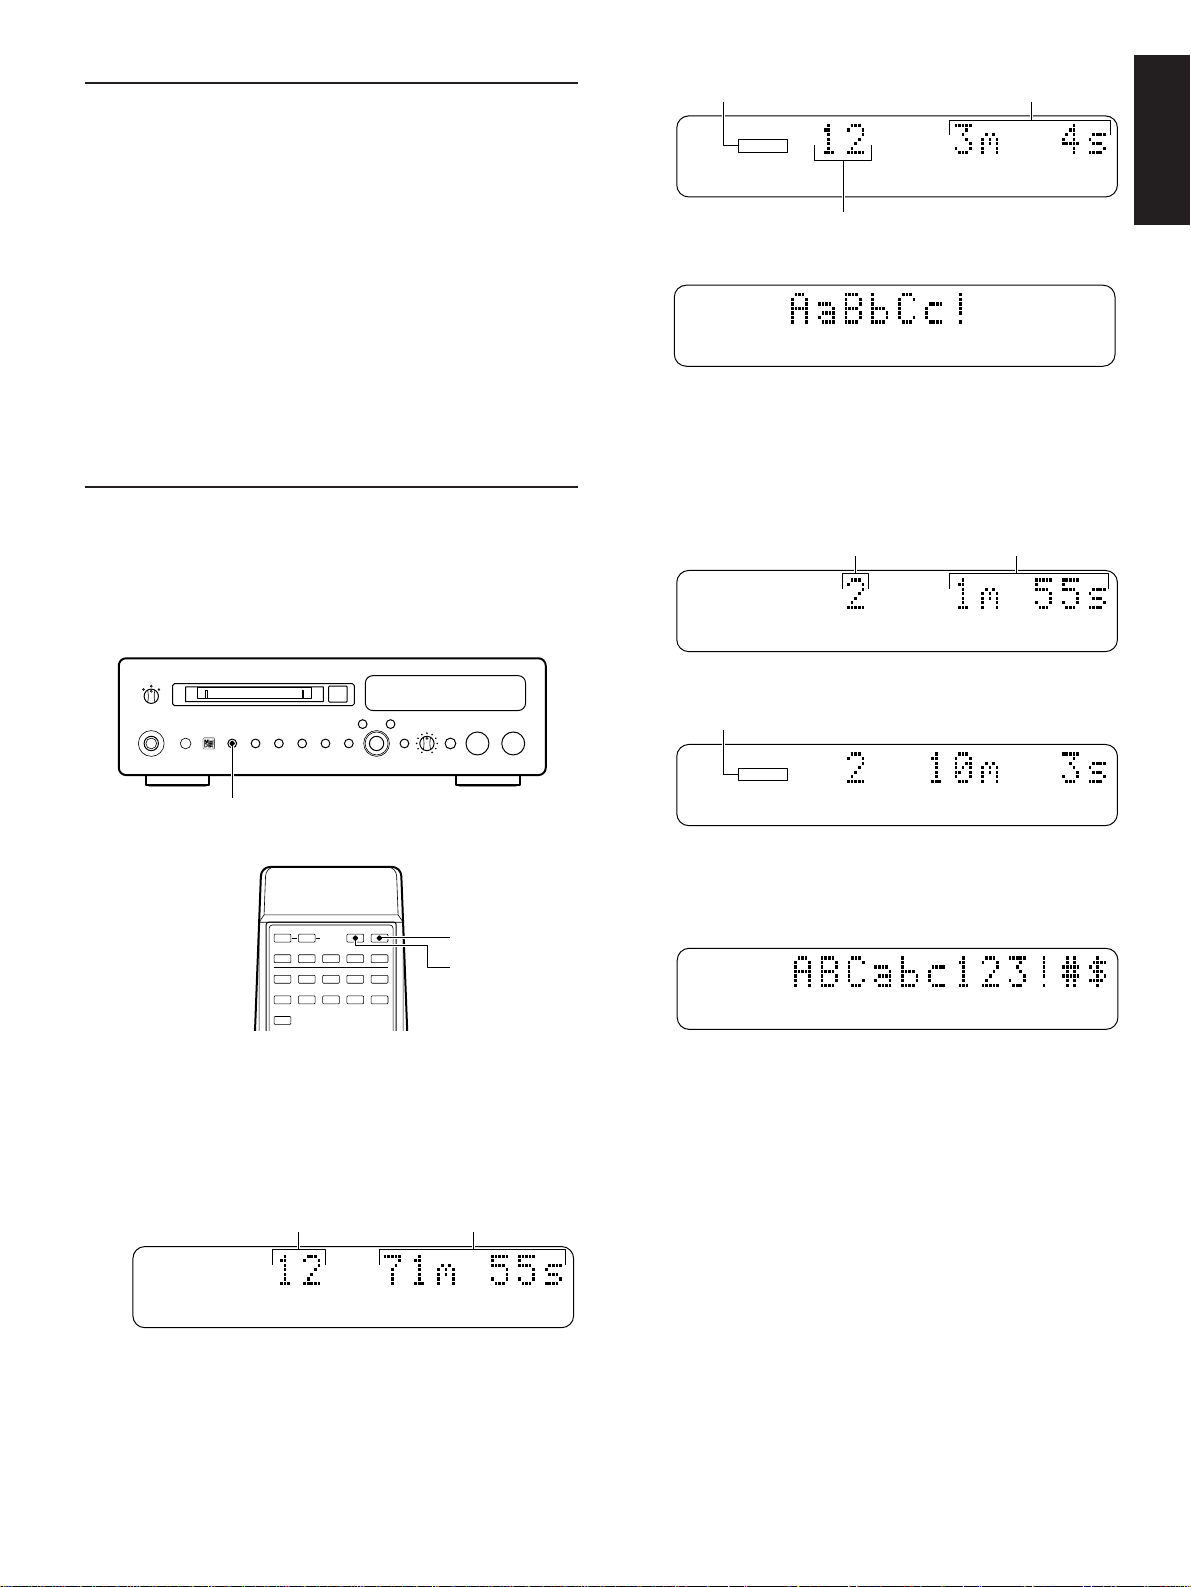
Switching the Display
When you insert an MD the disc title is displayed
automatically (“No Title” appears if there is n o disc title).
Pressing DISPLAY d u ring stop or playback lets you
display other information, such as the remaining time and
track titles .
NATURAL SOUND M INIDISC RECORDER MDX-9
s
TIMER
OFF
POWER
PLAYREC
DISPLAY TITLE CHARA. DELETE EDIT SET
)
CANCEL ENTER
⁄!
SEARCH
REC LEVEL
INPUT
010
—
+
›$
#
PLAY/
*
&
STOP
REC
PAUSE
ENGLISH
Total tracks
3 Disc title
During playback
Press DISPLAY to repeatedly to display the following
information.
1 Current track number and elapsed time
Track number Elapsed time
2 Time remaining on the current track
REMAIN indicator
DISPLAY
SPACE
?
A–B!S/ F
–
PROG&RNDM
D E F2A B C
1
S T U7P Q R
6
+10
REPEAT
SCROLLDISPLAY
#)(
M N O5J K L4G H I
3
/0Y Z9V W X
8
SCROLL
DISPLAY
During stop
Press DISPLAY to repeatedly to display the following
information.
1 Number of tracks and total playing time
Total tracks Total playing time
DISC TRACK
TOTAL
REMAIN
3 Track title
If the trac k ha s no t been given a name , “No Title” is
displayed and the display swi tches back to the elapsed time
(1).
To view the entire disc (track) title
If the d isc (track) title is to o lo ng to fit in the d isplay, press
SCROLL. Press SCROLL while the title is scrolling to stop
the sc rollin g. Press again to continue scrolling through the
title.
9
 Loading...