

Page 1

M D X -5 9 5
NATURAL SOUND MINIDISC RECORDER
LECTEUR ENREGISTREUR MINIDISC
U
OWNER’S MANUAL
MODE D’EMPLOI
Page 2
SAFETY INSTRUCTIONS
CAUTION
RISK OF ELECTRIC SHOCK
DO NOT OPEN
CAUTION: TO REDUCE THE RISK OF ELECTRIC
SHOCK, DO NOT REMOVE COVER (OR BACK).
NO USER-SERVICEABLE PARTS INSIDE. REFER
SERVICING TO QUALIFIED SERVICE PERSONNEL.
9 Heat — The unit should be situated away from heat
sources such as radiators, stoves, or other units that produce
heat.
10 Power Sources — The unit should be connected to a
power supply only of the type described in the operating
instructions or as marked on the unit.
11 Power-Cord Protection — Power-supply cords should be
routed so that they are not likely to be walked on or pinched
by items placed upon or against them, paying attention to
receptacles, and the point where they exit from the unit.
÷ Explanation of Graphical Symbols
The lightning flash with arrowhead symbol,
within an equilateral triangle, is intended to alert
you to the presence of uninsulated “dangerous
voltage” within the product's enclosure that may
be of sufficient magnitude to constitute a risk of
electric shock to persons.
The exclamation point within an equilateral
triangle is intended to alert you to the presence
of important operating and maintenance
(servicing) instructions in the literature
accompanying the appliance.
WARNING
TO REDUCE THE RISK OF FIRE OR ELECTRIC SHOCK, DO NOT
EXPOSE THIS APPLIANCE TO RAIN OR MOISTURE.
1 Read Instructions — All the safety and operating
instructions should be read before the unit is operated.
2 Retain Instructions — The safety and operating
instructions should be retained for future reference.
3 Heed Warnings — All warnings on the unit and in the
operating instructions should be adhered to.
4 Follow Instructions — All operating and other instructions
should be followed.
5 Water and Moisture — The unit should not be used near
water — for example, near a bathtub, washbowl, kitchen sink,
laundry tub, in a wet basement, or near swimming pool, etc.
6 Carts and Stands — The unit should be used only with a
cart or stand that is recommended by the manufacturer.
12 Cleaning — The unit should be cleaned only as
recommended by the manufacturer.
13 No Use Periods — The power cord of the unit should be
unplugged from the outlet when left unused for a long period
of time.
14 Object and Liquid Entry — Care should be taken so that
objects do not fall into and liquids not spilled into the inside of
the unit.
15 Damage Requiring Service — The unit should be
serviced by qualified service personnel when:
A. The power-supply cord or the plug has been damaged; or
B. Objects have fallen, or liquid has been spilled into the unit;
or
C. The unit has been exposed to rain; or
D. The unit does not appear to operate normally or exhibits a
marked change in performance; or
E. The unit has been dropped, or the cabinet damaged.
16 Servicing — The user should not attempt to service the
unit beyond those means described in the operating
instructions. All other servicing should be referred to qualified
service personnel.
17 Grounding or Polarization — Precautions should be taken
so that the grounding or polarization is not defeated.
18 Power Lines — An outdoor antenna should be located
away from power lines.
IMPORTANT!
Please record the serial number of this unit in the space
below.
6A An applicance and cart
combination should be moved with
care. Quick stops, excessive force, and
uneven surfaces may cause the unit
and cart combination to overturn.
7 Wall or Ceiling Mounting — The unit should be mounted to
a wall or ceiling only as recommended by the manufacturer.
8 Ventilation — The unit should be situated so that its
location or position does not interfere with its proper
ventilation. For example, the unit should not be situated on a
bed, sofa, rug or similar surfaces that may block the
ventilation openings: or placed in a built-in installation, such
as a bookcase or cabinet that may impede the flow of air
through the ventilation openings.
Model :
Serial No. :
The serial number is located on the rear of the unit.
Retain this owners manual in a safe place for future
reference.
Page 3

FCC INFORMATION (for U.S. customers only)
1.IMPORTANT NOTICE: DO NOT MODIFY THIS UNIT!
This product, when installed as indicated in the instructions
contained in this manual, meets FCC requirements.
Modifications not expressly approved by Yamaha may void
your authority, granted by the FCC, to use the product.
2.IMPORTANT: When connecting this product to accessories
and/or another product use only high quality shielded
cables. Cables supplied with this product MUST be used.
Follow all installation instructions. Failure to follow
instructions could void your FCC authorization to use this
product in the USA.
3.NOTE: This product has been tested and found to comply
with the requirements listed in FCC Regulations, Part 15 for
Class “B” digital devices. Compliance with these
requirements provides a reasonable level of assurance that
your use of this product in a residential environment will not
result in harmful interference with other electronic devices.
This equipment generates/uses radio frequencies and, if not
installed and used according to the instructions found in the
users manual, may cause interference harmful to the
operation of other electronic devices.
We Want You Listening For A Lifetime
YAMAHA and the Electronic Industries Association’s
Consumer Electronics Group want you to get the most out of
your equipment by playing it at a safe level. One that lets the
sound come through loud and clear without annoying blaring
or distortion – and, most importantly, without affecting your
sensitive hearing.
Compliance with FCC regulations does not guarantee that
interference will not occur in all installations. If this product
is found to be the source of interference, which can be
determined by turning the product “OFF” and “ON”, please
try to eliminate the problem using one of the following
measures:
Relocate this product or the device that is being affected by
the interference.
Utilize power outlets that are on different branch (circuit
breaker or fuse) circuits or install AC line filter/s.
In the case of radio or TV interference, relocate/reorient the
antenna. If the antenna lead-in is 300 ohm ribbon lead,
change the lead-in to coaxial type cable.
If these corrective measures do not produce satisfactory
results, please contact your local retailer that is authorized to
distribute this type of product. If you cannot locate the
appropriate retailer, please contact Yamaha Electronics
Corp., U.S.A. 6660 Orangethorpe Ave, Buena Park, CA
90620.
The above statements apply ONLY to those products
distributed by Yamaha Corporation of America or its
subsidiaries.
Since hearing damage from loud sounds is
often undetectable until it is too late,
YAMAHA and the Electronic Industries
Association’s Consumer Electronics Group
recommend you avoid prolonged exposure
to excessive volume levels.
We
Want You
LISTENING
For A Lifetime
For Canadian Customers
To prevent electric shock, match wide blade of plug to
wide slot and fully insert.
This Class B digital apparatus complies with Canadian
ICES-003.
1
Page 4

CAUTION: READ THIS BEFORE OPERATING YOUR UNIT.
1. This unit is a sophisticated mini disc re corder. To ensure
proper operation for the best possib l e performance, please
read this man ual carefully.
2. Install your unit in a cool, dry, c le an place with good
ventilation. Avoid p lacing it in direct sunl ight, near sour ces of
heat, or in locations subject to vibration, ex cessive dust, heat,
cold, or moisture. To avoid humming sounds, po sition the uni t
away from other electrical ap pliances, motors, and
transformers.
3. Do not op era te th e un it upside-d o wn. It ma y ov erhe at,
possibly causing dam age.
4. Do not pl ace another component on top of this unit, t o do so
may discolor or damage the surface of the unit.
5. Do not op en the cabinet of this unit, t o do so may re sult in
damage to the unit or e lectrical shock. If any foreign object or
substance gets into the unit, contact your dealer for
assistanc e.
6. When removing the power plug fr om t he w all o utle t, alw ays
pull directly on the plug ; ne ver pull the cord itself.
7. Do not ap ply excessive force when operating switches and
knobs.
8. When moving the unit, be sure to fir st disconnect the p ow er
cord from the AC o utle t and disc on nect all cords co nne cting
the unit to other equip m ent.
For U.K. customers
If the soc k et o utlet s in t he h ome are not suita ble for the
plug supplied w ith this a ppliance, it should be c ut off a nd
an appropriate 3 pin plug fitted. For details, refer to t he
instruc tion s described below.
Note: The plug seve red from th e m ains lead must be
destro yed, as a plug with bared flexible cord is haz ardous
if enga ged in a live socket outle t.
IMPORTANT
THE WIRES IN MAINS LEAD ARE COLOURED IN
ACCORDANCE WITH THE FOLLOWING CODE:
Blue: NEUTRAL
Brown: LIVE
As the c ol ours of th e w ires in th e ma ins lead of this
apparatus ma y no t correspond with the coloured
marking s i dentifying the term inals in y our plug, proc ee d
as follows: The wire whic h is coloured BLUE must be
conne cted to the termin al wh ich is mark ed with the
letter N or coloured BLACK. The wire which is coloured
BROWN must be connec t ed to the te rmin al w hich is
marked wi th th e let ter L or coloure d RED.
Making su re th at ne ithe r core is connected to the earth
terminal of the three pin plug.
9. To prevent d a mage by lightning , disconnect the p ow er cord
from the wall outlet during an electrica l sto rm.
10. Do not attem pt to clean this unit with chemical solvents as th is
may dam age the finish. Use a clean, dry cloth.
11. Be sure to re ad the “TROUBLESHOOTING” sectio n for advice
on comm on o perating errors before conc luding that your unit
is faulty.
12. Keep this manual in a safe place for future referen ce.
13. The voltage to be used must be the same as th at s pecified on
this unit. Using this unit with a higher voltage than that w hich is
specified is d angerous and may resu lt in a fir e or othe r type of
accid e nt causing damag e. YAMAHA will not be held
responsible for any damage resulting from use of this unit with
a voltage oth er th an th at w hich is specified .
Note
Please chec k the copyrig ht la ws in yo ur country to record from
records, comp a ct discs , radio, etc. Recording of c opyright
material may infringe copyright laws.
This mini disc reco rder is
classified as a CLA SS 1 LASER
CLASS 1 LASER PRODUCT
product.
The CLASS 1 LASER PRODUCT
label is lo cated on the rear
exterior.
(U.K. and Europ e models only)
CAUTION FOR CARRYING THE UNIT
Before c arryi ng the unit, firs t rem ove a disc from the unit,
press POWER to turn the unit off, then disconnect the AC
power plug from the wall outl et.
WARNING
To reduc e th e ris k of fire o r ele ctric shoc k , do not expose this
appliance to rain or moisture .
To avoid electrical sho ck, do not open the cabine t.
Refer servicing to q uali fied personnel only.
DANGER
Invisible lase r radiation whe n open and interlock failed or
defeated. Avoid direct exposure to beam.
CAUTION
Use of co ntro ls o r adjustments or performance of procedu res
other than those spec if ied herein may res ult in haz ardous
radiation exposure.
2
Page 5

English
CONTENTSFEATURES
¶ A samp l ing rate conv erter that lets you ma ke
digital re cordings from 32 kHz (DAT, etc.) , 44.1
kHz (CD, DAT, MD, etc .) and 48 k Hz (DAT, etc.)
program sou rces.
¶ Editing f eatu res ( MOVE, ERASE, DIVIDE,
COMBINE, TITLE, and UNDO) that let y ou ta ke
full ad va ntage of the MD r ecording system.
¶ Multip le digital input termin als (2 optical inputs)
let you connect two different digital program
sourc es .
¶ The dig i tal o ptical output termi nal l ets y ou o utput
digital au dio from an M D.*
¶ In ad dition to the stan dard disc and track repeat
mod es, this unit also has a part (A -B) r epeat
mod e th at le ts yo u re peat a specific part of a
trac k.
¶ Synchro Record lets you mak e sy nchroniz ed
reco rdings from a ny t ype of so urce component.
¶ Time Resc ue Rec or d monito rs th e so und being
inpu t an d allows you to re cover so und input from
a po int a pproximately six seconds before y ou
start the recording operation. (So you will not
miss the beginning of a song when recording
dire ctly from the radio, etc.)
¶ The Monaural Record m ode lets y ou r ecord up to
148 minutes of audio onto one MD .
¶ Timer playback and recording modes th at le t you
start p la yback or recording at a preset t ime using
an op tio nal a udio time r.
* This is not possible if M D is a direct c o py of another digital
signal (se e page 26 for details regard ing SCMS cop y
protection).
US and foreign p a tent s licensed from Do lby Laboratories
Licens ing Corporation.
PART DESCRIPTIONS ........................................................ 4
FRONT PANEL ..................................................................... 5
REMOTE CONTROL ........ . . . . . . . . . . . . ...................................... . . . 6
CONNECTIONS ................................................................... 7
ANALOG CONNECTIONS ................................................... 7
DIGITAL CONNECTIONS .................................................... 7
PLAYBACK.......................................................................... 8
Skippi ng Tracks ............ .................................................... 8
Searching .............. ............................................................ 9
Switching the D isplay ....................................................... 9
RANDOM PLAY.................................................................. 10
REPEAT PLAY .................................................................... 10
Single Track Repeat ....................................................... 10
Full Disc Repeat................................... ........................... 10
Part (A-B) Repeat............................................................ 11
PROGRAM PLAY............... . . . . . . . . . . . . . . . .................................. 11
RECORDING...................................................................... 13
Adjust ing Recording Levels ........................................... 14
Auto Marking ................................ . . . . . . ............................. 15
TIME RESCUE RECORDING ............................................. 15
SYNCHRO RECORDING................................................. ... 16
MONAURAL RECORDING................................................. 16
MONITOR OUT................................................................... 17
EDITING ............................................................................. 18
MOVE .................................................................................. 18
ERASE................................................................................. 19
Disc Erase ....................................................................... 19
Track Erase ..................................................................... 19
Part Erase........................................................................ 20
Disc o r Trac k Title Erase ................................................ 20
COMBINE ........................................................................... 21
DIVIDE ................................................................................ 21
Disc M aint enan ce .................................. ............................ 22
TOC WRITE ..................................................................... 22
FRA CHECK .................................................................... 22
TITLING.............................................................................. 23
TIMER OPERATIONS ....................................................... 24
Timer Rec o rding ............................................................. 24
Timer Playback ............................................................... 24
MD SYSTEM LIMITATIONS.............................................. 25
COPY PROTECTION (SCMS) .......................................... 26
NOTES REGARDING THE REMOTE CONTROL............ 26
Remote Control Opera tion Rang e.................................. 26
Battery Installation ...................................... .................... 26
TROUBLESHOOTING....................................................... 27
DISPLAY MESSAGES ...................................................... 28
SPECIFICATIONS ............................................................. 29
3
Page 6
N A T U R A L S O U N D M IN ID IS C R E C O R D E R M D X –5 9 5
P O W E R
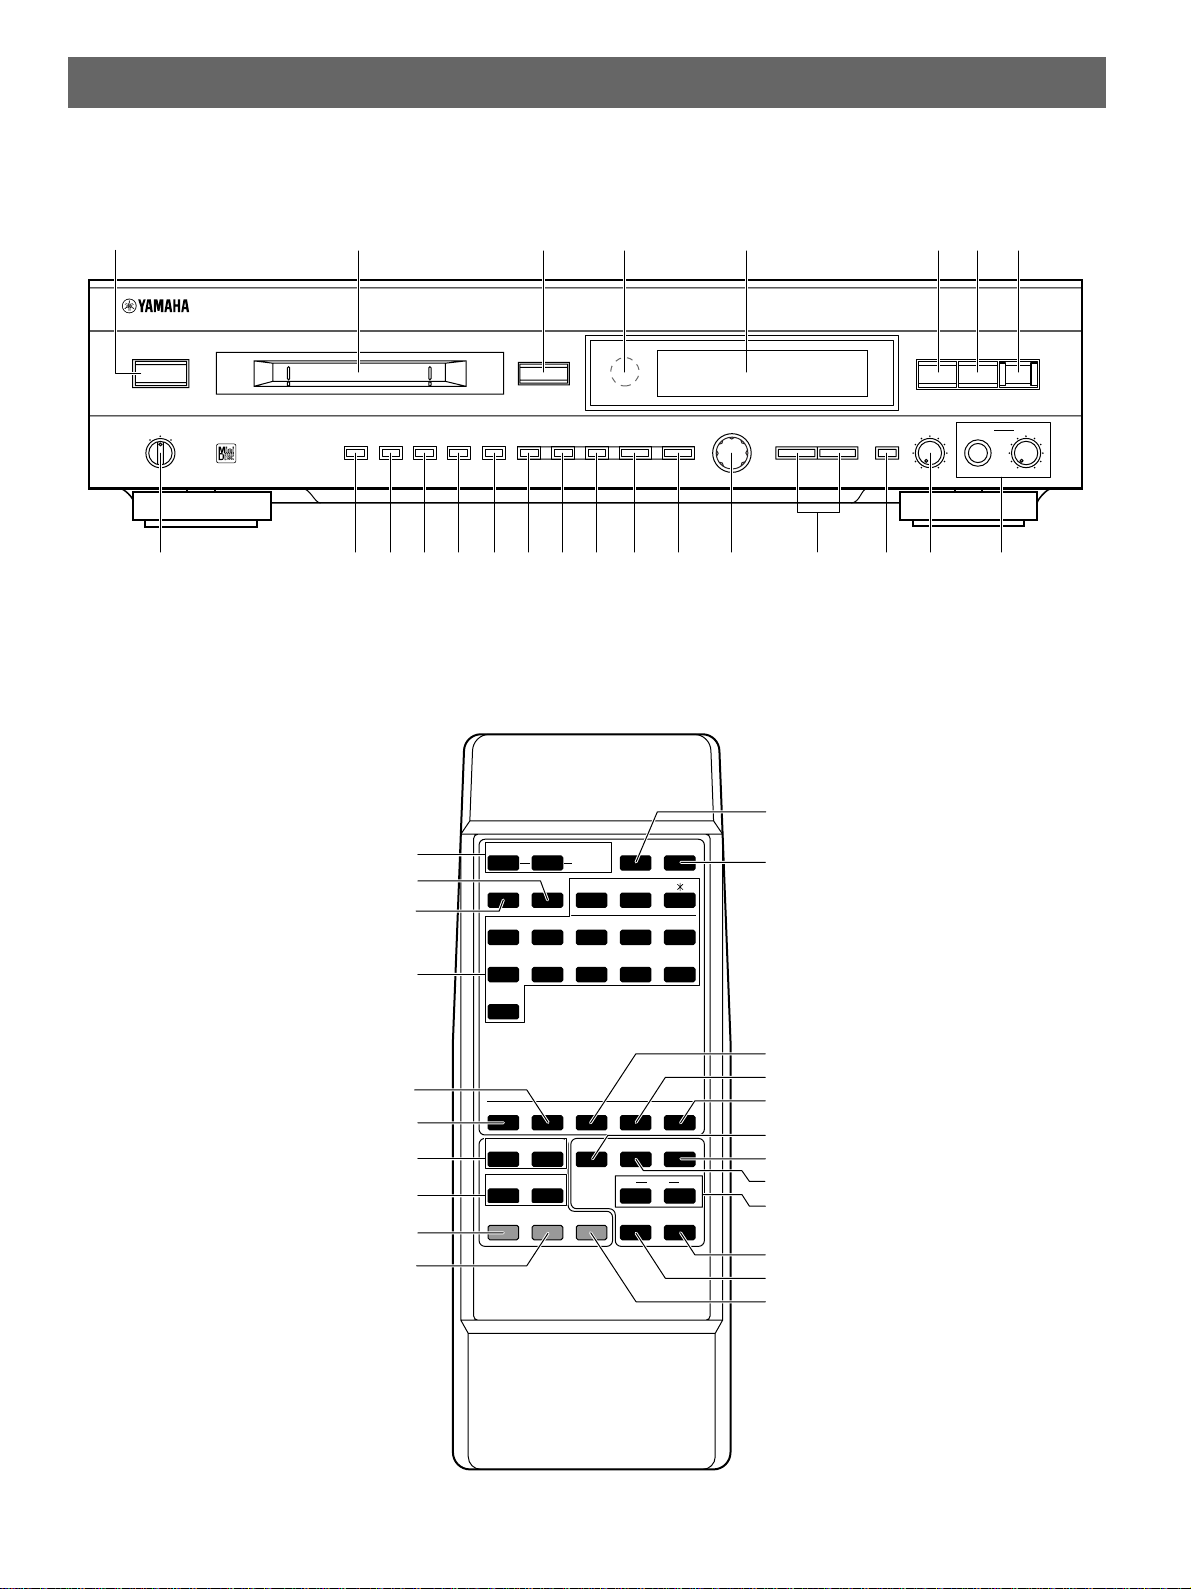
PART DESCRIPTIONS
Front Panel
Ÿ ! ⁄ @ ¤ # ‹~
)
EJ E C T
#˜* &
R E C
TIMER
DIGITAL
REC LEVEL
+
OFF
PLAYREC
RANDOM S/ F REPEAT A–B DISPLAY SCROLL TITLE CHARA. DELETE EDIT SET
CANCEL ENTER
$
–
›
!
SEARCH
⁄
ANALOG
REC LEVEL PH ONES LEVEL
INPUT
10
0
$ › % fi ^ fl & ‡ * ° ( · ‚) _ —
Remote Control
%
?
~
Ÿ
!
⁄
!
S/ F
&
RNDM
A B C
1
P Q R
6
SPACE
+10
A–B
–
PROG
D E F
2
S T U
7
REPEAT
G H I
3
V W X
8
J K L
Y Z
SCROLLDISPLAY
fi
)(
M N O
5
4
/
0
9
10
0
@
¤
#
‹
$
›
4
CHAR.TITLE SETDELETENUMBER
SEARCH
1
SKIP
4
PAUSE
PLAY
£
s
¡
¢
8
M-MARK M ONO/ ST
REC
STOP
¶
7
INPUT
REC
SYNCTIME
CD-P
M DX
^
fl
&
‡
*
°
(
·
)
‚
Page 7

FRONT PANEL
See the pages in parenthesis for details regarding operation.
English
~ POWER (8)
Press to turn the unit on or off.
Ÿ Disc insertion slot
Insert the disc int o thi s slo t.
! ) EJECT
Press to remove the dis c.
If the TOC* data has no t ye t been writt en, i t is w ritte n
automatically b ef ore the disc is ejected.
⁄ Remote control sensor (26)
Receives the signals emitted from th e rem ote control.
@ Display panel (9)
Displa ys v ario us s yste m in form atio n.
¤ #/* (8, 14)
Press during stop (or p au se) to st art playback. Press
while p layi ng to pause.
Press during rec o rd pause to start r ecording. Press
while rec o rding to pause.
# & (8, 13, 18, 23)
Press to stop recording or playback.
Press to cancel an edit or title input operation.
‹ REC (14)
Press during stop or p au se to activate th e re cord
pause mo de.
$ TIMER (24)
Use to set the unit to play or re cord when activated by
an external timer.
› RANDOM (10)
Press to activate or deactivate the ra ndom play mode.
% REPEAT S/F (10)
Press to select single track (S) or full d isc (F) rep eat .
fi REPEAT A-B (11)
Press to specify the A and B points for A-B r epeat.
^ DISPLAY (9)
Press repeatedly to switch between the title and time
displays.
fl SCROLL (9)
Press to scroll the disc (track) title across the display.
Press while scrolling to pause the scroll. Press and
hold to scroll rapidly.
& TITLE (23)
Press to activate or deactivate the tit le m ode.
‡ CHARA. (23)
Press repeatedly to select different types of characters
when c rea ting a disc (track) title.
* DELETE/CANCEL (23, 18)
Press to cancel an edit function or to delete the
select ed character when titling a disc (track).
° EDIT (18)
Press repeatedly to acc e ss t he different edit modes.
( SET/ENTER (23, 18)
Press to confirm an edit operation or ente r a character
in the title mode.
· Jog dial ($ ›)/
Use to ad j ust t he digital recording leve l wh en
recording dig it al a udio sources.
Use to skip to the beg inn ing of previous tra cks or
advan ce to later t racks.
Use to select c ha racters wh en creating a disc (track)
title.
DIGITAL REC LEVEL (8, 14, 18, 23)
) SEARCH ! ⁄ (9, 23)
Press and hold to search quic k ly during play or pause.
Use to move the cursor when creating a disc (track)
title.
‚ INPUT (13)
Press repeatedly to select the input jacks you want to
record from: ANA LOG or DIGI TAL (OPTICAL 1 or
OPTICAL 2).
_ ANALOG REC LEVEL (14)
Use to ad j ust t he re cording level when recording from
the analog inp uts .
— PHONES (12)
PHONES jack
For connecting s tereo he adphones.
PHONES LEVEL knob
Turn to adjust the volum e o f the hea dphones
conne cted to the PHONES jac k .
* TOC (Table of Co nten ts): This is the non-audio data
conta ined on all m ini discs (track numbers, playbac k
time, title data, etc.).
UTOC (User’s Table of Contents): This is non-audio data
that you can ed it (like track numbers, playback time, and
title da ta) .
5
Page 8

REMOTE CONTROL
See the pages in parenthesis for details regarding operation.
~ REPEAT (10)
S/F [ ! ]
Press to select single track (S) or full d isc (F) rep eat .
Press to select “!” w hen creating a disc (track) title.
A-B [ ? ]
Press to specify the A and B points for A-B r epeat.
Press to select “?” when creating a disc (track) title.
Ÿ PROG [ – ] (11)
Press to activate or deactivate the program play mode.
Press to select “–” when creating a disc (track) title.
! RNDM [ & ] (10)
Press to activate or deactivate the ra ndom play mode.
Press to select “&” when creating a d i sc (track) title.
⁄ Numbers [Characters] (8, 23)
Use to sp e cify a track.
Press repeatedly to select a character when creating a
disc (track) title.
@ CHAR. (23)
Press repeatedly to select upp e rcase or lo wer case
letters d ur ing title mo de.
¤ TITLE (23)
Press to activate or deactivate the tit le m ode.
# SEARCH ! ⁄ (9, 23)
Press and hold to search quic k ly during play or pause.
Use to move the cursor when creating a disc (track)
title.
‹ SKIP $ › (8, 23)
Press to skip back to the beg inn ing of previous tra cks
or adv ance to late r tra cks during play, p a use or st op.
Use to select c ha racters wh en creating a disc (track)
title.
$ PLAY # (8, 14)
Press during stop (or p au se) to st art playback.
Press during rec o rd pause to start r ecording.
› PAUSE * (8, 14)
Press to pause playbac k or r ecording.
% DISPLAY (9)
Press repeatedly to switch between the title and time
displays.
fi SCROLL (9)
Press to scroll the disc (track) title across the display.
Press while scrolling to pause the scroll. Press and
hold to scroll rapidly.
^ NUMBER (23)
Press before pressing a number button to input a
numbe r during title mode.
fl DELETE (23)
Press to delete the sele cted character when creating a
disc (track) title.
& SET (23)
Press to confirm selected character when creating a
disc (track) title.
‡ M-MARK (15)
Press to select automa tic or manu al m arki ng of tracks
during recording.
* INPUT (13)
Press repeatedly to select the input jacks you want to
record from: ANA LOG or DIGI TAL (OPTICAL 1 or
OPTICAL 2).
° MONO/ST (16)
Press during stop or p au se to sel ect either m ona ural or
stereo record ing.
( Special Record buttons
TIME (15)
Press during rec o rd pause mode to activate Time
Rescue Recording.
SYNC (16)
Press during stop to ac ti vate Sync hro nize d Recording.
· CD-P (16)
Press to start playback from a YAMAHA CD player.
) REC ? (14)
Press during stop or p au se to activate th e re cord
pause mo de.
‚ STOP & (8, 13, 18, 23)
Press to stop recording or playback.
Press to cancel an edit or title input operation.
6
Page 9
CONNECTIONS
Do not plug in this unit (or other components) until all connections are complete.
• Connections sho uld be made to the correct input/output terminals on the o ther component.
• Also refer to the owner’s manual s upplied with the component you are connecting.
• If the placement of this unit causes noi se in oth er equipment, such as a t uner , mo ve t hem farth er a part.
ANALOG CONNECTIONS
Audio connecting cords (included)
3
PLAY
4
REC
LR
ANALOG
IN OUT
34
L
L
R
Amplifier/Receiver
R
(PLAY)(REC)
Notes for analog connections
• The white plug on the audio c o nnecting c o rds corresponds to th e L ( left) channel and the red plug corresponds to the R (right) channel.
Be sure to c o nne ct L (left) to L and R (right) to R. Also make sure t hat t he plugs are fully inserte d and that the connection is firm.
• The LINE OUT jacks o n th e M D re corder should be connected to th e MD PLAY jacks on your am plifier.
The LINE IN jacks on the MD record er s hou ld be co nne cted to the MD REC jacks on your amplifier.
• The LINE OUT terminals on this unit ar e nu mbered 3 and the LINE IN jacks a re n umbered 4. When conne cting this unit to a YAMAHA
amplifier or re ceiver whose term inal s are num bered 1, 2, 3, 4 ... (etc.), connect this unit’s LINE OUT terminals to the input terminals
numbere d 3 and connec t th is un it’s L INE IN terminals to th e ou tput terminals num bered 4 on the rear panel of the amplifier or receiver.
DIGITAL
OPTICAL
IN
OUT
2
1
To AC outlet
English
DIGITAL CONNECTIONS
Optical fiber cable (included)
DIGITAL OUT
OPTICAL
ANALOG
IN OUT
34
L
CD player (etc.) with
optical OUT
L
R
R
(PLAY)(REC)
* One optical fiber cable is included with
the MDX-595. Additional OPTICAL
connections should be made using
commercially available optical fiber cables.
Notes for digital connections
• The DIGITAL IN terminals can b e connected to any compo nen t with an optical output so you can make direc t digital recordings.
• The DIGITAL OUT terminal can be connec ted to a any component with an optical inp u t so y ou can output dig ital audio from an MD.
• Befor e ma king OPTICAL connections, remove the term inal cover(s).
• In order to protect the terminals fro m dust, be sure to attach the termi nal covers wh en th e optical terminals are n ot being used .
DIGITAL
OPTICAL
IN
OUT
2
1
Amplifier/Receiver
(or MD/DAT recorder)
with optical IN/OUT
To AC outlet
*Optical fiber cable
*Optical fiber cable
DIGITAL IN DIGITAL OUT
OPTICAL OPTICAL
7
Page 10
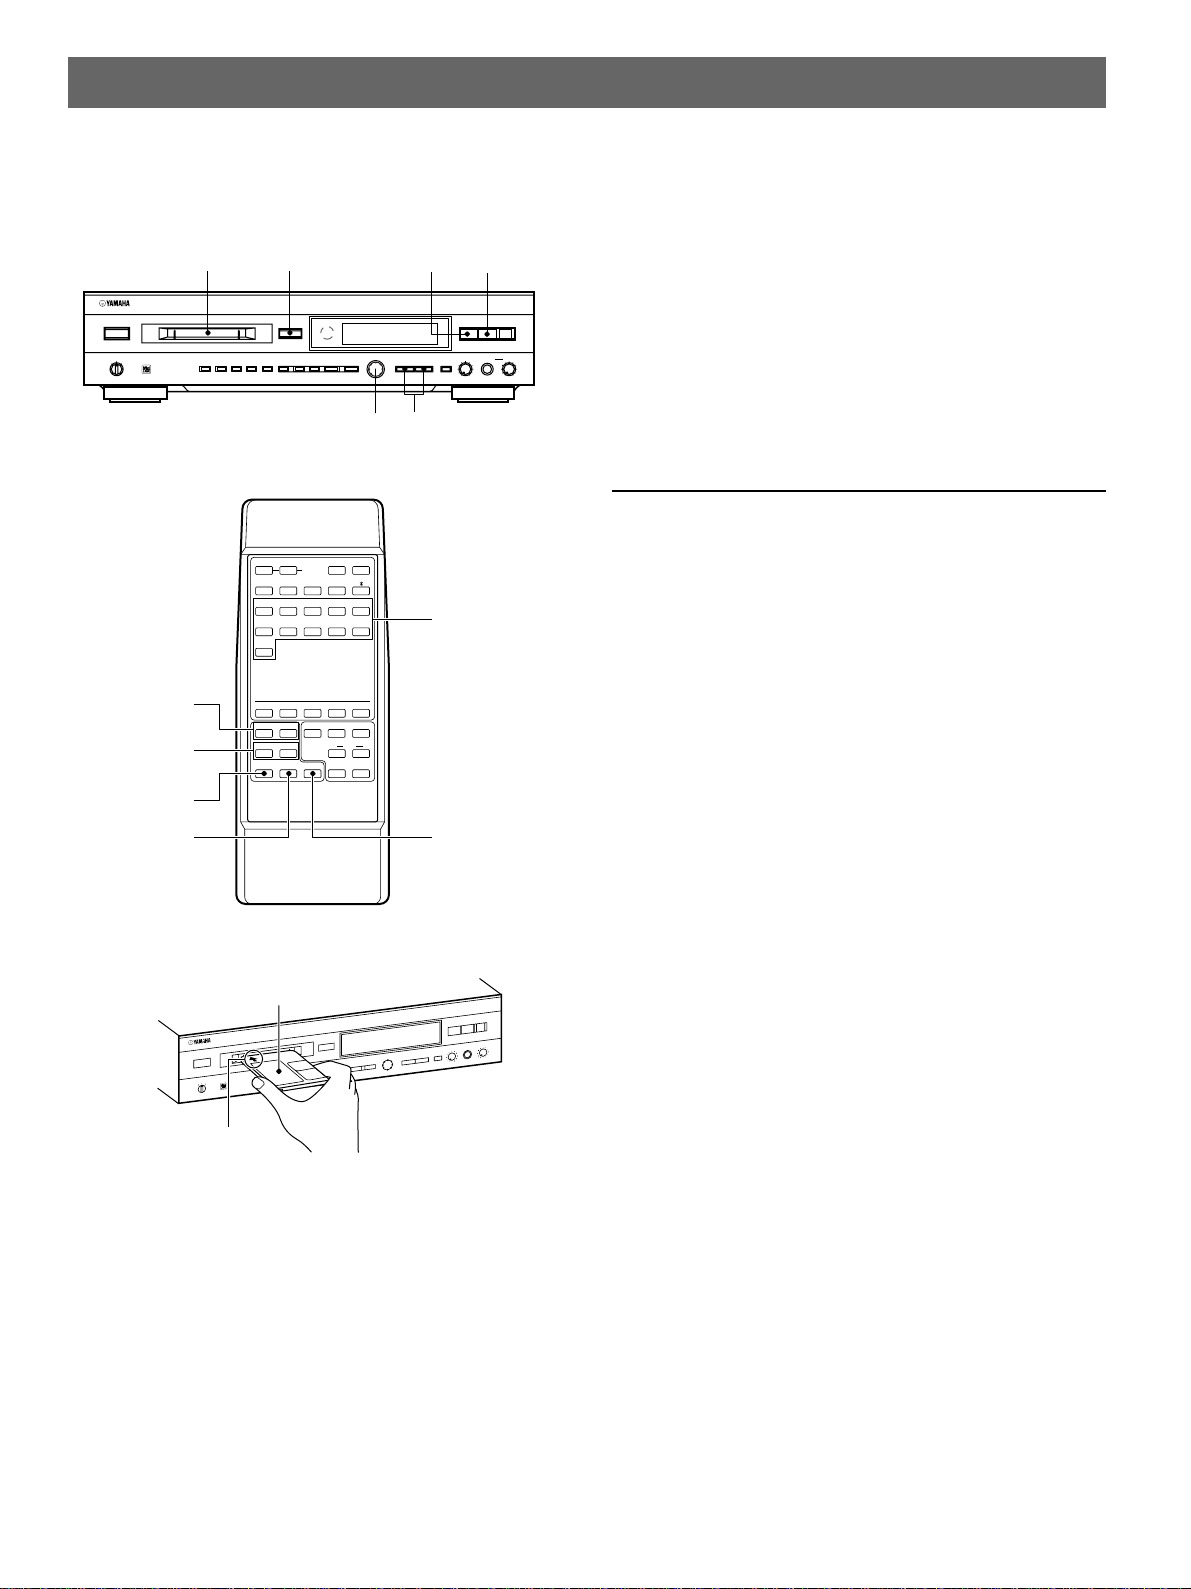
PLAYBACK
Preparations
• Be sure to set the TIMER switc h to O FF, then press
POWER to turn this unit on.
• Set your amplifier or receiver to MD.
NA TU R AL S OU N D M IN ID IS C RE CO RD ER M DX –5 9 5
PO W ER
TIMER
OFF
PLAYREC
SEARCH
! ⁄
SKIP
$ ›
2
PAUSE *
1
RANDOM S/ F REPEAT A–B DISPLAY SCROLL TITLE CHARA. DELETE EDIT SET
) EJECT
)
EJ EC T
A–B!S/ F
PROG&RNDM
D E F2A B C
1
S T U7P Q R
6
SPACE
+10
CHAR.TITLE SETDELETENUMBER
SEARCH
⁄
!
SKIP
›
$
PAUSE*PLAY
‹
s
?
–
CANCEL ENTER
REPEAT
3
8
M-MARK MONO/ ST
&
)(
REC?STOP
$
SCROLLDISPLAY
M N O5J K L4G H I
/0Y Z9V W X
INPUT
REC
SYNCTIME
CD-P
M DX
DIGITAL
–
REC LEVEL
2
&
&#˜*
SEARCH
⁄
ANALOG
REC LEVEL PHONES LEVEL
INPUT
0
10
+
›
!
SEARCH ! ⁄jog dial
Numbers
STOP &
To stop
Press & (STOP & on the remote).
To pause
Press #/* (PAUSE * on the remote).
Press again to resume playback (or press PLAY # on the
remote).
To eject the MD
REC
10
0
Press ) EJECT.
Note
The MONO indicator lights when playing m onau ral MDs .
Skipping Tracks
To skip to the next track
Turn the jog dial to the right (or press SKIP › o n the
remote).
To skip to a previous track
Turn the jog dial to the left (or press SKIP $ on th e
remote).
Turn one click to skip to the beginning of the current track.
Turn an additional clic k to sk ip back to the beg in ning of
each previous tra ck.
To skip to a specific track number
Press the number buttons on t he r emo te corresponding to
the trac k y ou desire.
Example:
To select track 3, p re ss 3.
To select track 13, p res s +10, then press 3.
To select track 23, p re ss +10 tw ice, then press 3.
1 Insert an MD.
Label facing up
NA TUR AL SO UN D MI NID ISC REC OR DER M D X–7 93
0
Arrow pointed toward
disc insertion slot
2 Press #/* (PLAY # on the remote) t o sta rt
play back.
3 Ad jus t the volu me usin g the volu me control o n
your amplifier or receiver.
To skip to the last track on the disc
Turn the jog dial to the left wh en th e display is showi ng the
total trac k s an d total playing time.
8
Page 11

Searching
DISC TRACK
TOTAL
REMAIN
DISC TRACK
TOTAL
REMAIN
#
DISC TRACK
TOTAL
REMAIN
#
English
2 Time remaining on the MD (only for recordable MDs)
To search forward during play or pause
Press and hold SEARCH ⁄.
To search in reverse during play or pause
Press and hold SEARCH !.
Notes
• Sound c an be heard when searching in p la y mo de to help you
locate th e desired p o sitio n wi thin the t rack. No soun d is heard
when searc h ing in pause mode, b u t the sea rch is conducted
at a high er speed.
• When searching in p l ay m ode, playb a ck stops when you
reach the end of the las t tra ck.
• Search may not function correctly when there are sev eral
consecutive tracks consisting of only a few seconds each.
Switching the Display
When you insert an MD, the disc t itle i s displayed
automatically (“ N o Title” a ppears if there is no disc title).
Pressing DISPLAY d u ring stop or playback to d i splay other
information, such as the rema ining time a nd track titles.
NA TU R AL S OU N D M IN ID IS C RE CO RD ER M DX –5 9 5
)
PO W ER
TIMER
OFF
PLAYREC
RANDOM S/ F REPEAT A–B DISPLAY SCROLL TITLE CHARA. DELETE EDIT SET
EJ EC T
CANCEL ENTER
REC
&#˜*
DIGITAL
+
–
REC LEVEL
›
$
!
SEARCH
⁄
ANALOG
REC LEVEL PHONES LEVEL
INPUT
0
10
10
0
REMAIN indicator
DISC TRACK
TOTAL
REMAIN
Time remaining on the MD
Total tracks
3 Disc title
During playback
Press DISPLAY repeatedly to display the following
information.
1 Current track number and elapsed time
Track number Elapsed time
DISC TRACK
TOTAL
REMAIN
#
2 Time remaining on the current track
REMAIN indicator
DISPLAY SCROLL
SPACE
?
A–B!S/ F
–
PROG&RNDM
D E F2A B C
1
S T U7P Q R
6
+10
REPEAT
SCROLLDISPLAY
)(
M N O5J K L4G H I
3
/0Y Z9V W X
8
SCROLL
DISPLAY
During stop
Press DISPLAY repeatedly to disp l ay th e fo llow ing
information.
1 Number of tracks and total playing time
Total tracks Total playing time
DISC TRACK
TOTAL
REMAIN
3 Track title
If the trac k ha s no t been given a name, “No Title” is
displayed and th e display switches b a ck to the elapsed time
(1).
To view the entire disc (track) title
If the d isc (track) title is too l ong to fit in the display, press
SCROLL to move the title sequentially across the display.
While the title is being displayed, p ress SCROLL to pause
the dis play, and again to continue presentatio n of the title.
Press and hold SCROLL for rapid p res enta tion of th e titl e.
9
Page 12

RANDOM PLAY
&#˜*
REC
)
EJ EC T
PO W ER
0
10
0
10
RANDOM S/ F REPEAT A–B DISPLAY SCROLL TITLE CHARA. DELETE EDIT SET
CANCEL ENTER
REC LEVEL PHONES LEVEL
INPUT
!
SEARCH
⁄
+
›
–
$
TIMER
OFF
PLAYREC
NA TU R AL S OU N D M IN ID IS C RE CO RD ER M DX –5 9 5
ANALOG
DIGITAL
REC LEVEL
REPEAT
A-BSF
REPEAT
A-BSF
?
A–B!S/ F
SCROLLDISPLAY
REPEAT
–
PROG&RNDM
)(
D E F2A B C
1
M N O5J K L4G H I
3
S T U7P Q R
6
/0Y Z9V W X
8
SPACE
+10
REPEAT PLAY
You can have the unit play all the t racks on a disc in
random order.
NA TU R AL S OU N D M IN ID IS C RE CO RD ER M DX –5 9 5
)
PO W ER
TIMER
OFF
PLAYREC
RANDOM S/ F REPEAT A–B DISPLAY SCROLL TITLE CHARA. D ELETE EDIT SET
EJ EC T
CANCEL ENTER
&#˜*
DIGITAL
+
–
REC LEVEL
›
$
!
SEARCH
⁄
ANALOG
REC LEVEL PHONES LEVEL
INPUT
0
10
RANDOM
RNDM
RNDM
SPACE
?
A–B!S/ F
–
&
PROG
D E F2A B C
1
S T U7P Q R
6
+10
REPEAT
SCROLLDISPLAY
)(
M N O5J K L4G H I
3
/0Y Z9V W X
8
To start random playback
Press RANDOM (RNDM on the remote).
The RANDOM indicator lights up and “Random Searc h”
appears in th e display while the unit sele cts a track.
Playbac k s tarts autom atically.
You can have the unit r epeat a sin gle track, a full disc, or
just pa rt of a tra ck.
REC
10
0
A-B – REPEATS/F – REPEAT
S/F – REPEAT
A-B – REPEAT
Single Track Repeat
1 Select the track you wan t to repeat.
2 Press S/F – REPEAT repeatedly to light the
REPEAT S indicators.
To cancel
Press RANDOM (RNDM on the remote) again to tu rn of f the
RANDOM indicator.
Notes
• Pressing SKIP › durin g random play skip s t o ano ther track
at random . Pressing SKIP $ returns to the beg i nning of the
current tr ack (you cannot return t o previously played tracks).
• If you turn the unit off during rand om playbac k, it will be ready
for rando m play the nex t tim e you turn the power bac k on.
To cancel
Press S/F – REPEAT repeatedly to turn off the REPEAT S
indicators.
Note
Single trac k r epeat is not av aila ble during ra ndom or program
playback.
Full Disc Repeat
Press S/F – REPEAT repeatedly to light the REPEAT
F indic a tors .
To cancel
Press S/F – REPEAT repeatedly to turn off the REPEAT F
indicators.
Notes
• In program play mode, the entire program is played
repeatedly.
• In rand om play mode, the unit r eshu ffles the tracks and plays
them aga in a fter e ach track plays onc e .
10
Page 13

TOTAL
PROGRAM
?
A–B!S/ F
SCROLLDISPLAY
REPEAT
–
PROG&RNDM
)(
D E F2A B C
1
M N O5J K L4G H I
3
S T U7P Q R
6
/0Y Z9V W X
8
CHAR.TITLE SETDELETENUMBER
⁄
SEARCH
!
INPUT
›
SKIP
$
PAUSE*PLAY
‹
REC?STOP
&
SPACE
+10
s
M DX
CD-P
REC
SYNCTIME
M-MARK MONO/ ST
PROGRAM
Part (A-B) Repeat
This function lets you r epeat a specific p a rt of a tra ck. It’s a
conve nien t wa y to study a lan guage, or to learn the l yrics to
your favorite song (etc.).
1 Press A-B – REPEAT during playback to specify
the b eginning (A point) of t he part y ou w ant to
repe at.
The REPEAT A indic ato rs li ght up.
REPEAT
A-BSF
English
PROGRAM PLAY
This function lets you e njoy liste ning to you r fav orite tra cks
in any ord e r yo u desire.
2
3
2 Press A-B – REPEAT again to specify the en d (B
poin t) of the part you wan t to r epeat.
The REPEAT A-B indic a tors light up and the part you
specified starts to re peat.
REPEAT
A-BSF
To cancel
Press & or A-B – REPEAT.
SEARCH
DELETE
! ⁄
SKIP
$ ›
1
4
1 Press STOP & to stop playback.
2 Press PROG to light up the PROGRAM indic a tor.
3 Program the desire d track by pressing the
corr esponding numer ic buttons.
Example:
To select track 3, p ress 3.
To select track 13, p res s +10, then press 3.
To select track 23, p re ss +10 tw ice, then press 3.
The following display appears momenta rily to
show the step information :
Step number
Track number
The display then switches to t he program s tatus :
Total steps
Repeat this operation to program up to 30 steps.
Total playing time
4 Press PLAY # to start p ro gram playback.
Continued on next page
11
Page 14

To check the programmed data
1 Stop or pause program playbac k .
2 Press SKIP $ or › to skip through the step
information (or use the jog dial on the fron t panel).
To delete a specific step
1 Stop program playbac k.
2 Press SKIP $ or › to skip through the step
information (or use the jog dial on the fron t panel).
3 Press DELETE (or DELETE/CANCEL on the front
panel) to delete th e ste p. The high er st eps are
renumb ere d automati cally.
To change a step
1 Stop program playbac k.
2 Press SKIP $ or › to skip through the step
information (or use the jog dial on the fron t panel).
3 Use the n ume ric buttons to program a new track
numbe r for that step. The orig in al tra ck is cleared from
memory and the new track is programmed.
To cancel
Press PROG to turn off the PROGRAM indicator, eject the
disc, or press POWER to turn this un it off .
To use headphones for private listening
Set the PHONES LEVEL knob on the front panel to “0”
(minimum) and insert the headphones plug of your stereo
headphones into t he PHONES jack.
To adjust the volume level of the headphones
Use the PHONES LEVEL knob.
Turn toward “10” (max imu m) to increase th e vo lume .
Turn toward “0” ( minim um ) to decrease the v olum e.
Notes
• If the total time exceed s 2 55 m inute s “255mOver” is displayed
instead o f the total time .
• SKIP $ or › ca n be used during playbac k to skip
between programmed trac ks.
• SEARCH ⁄ can be used d u ring playb ack to search through
all tracks in th e current program.
• SEARCH ! can be used d u ring playb ack to return to t he
beginning of the current track.
12
Page 15

RECORDING
ANALOG
DIGITAL
OPT. 1
2
COAX.
32 4 4.1 48
kHz
REPEAT
DISC TRACK
TOTAL
REMAIN
RANDOM
PROGRAM
A-BSF
English
This unit allows you to make recording s f rom a wi de variety
of program so urces (both analo g and dig ital ).
When recording a n an alog source (such as an LP or
casse tte) this u nit conver ts th e an alog signals to a
44.1 kHz digi tal s ignal before recording them onto the M D.
When recording a digital source, this unit convert s the
digital signals to 44. 1 kH z for recording onto the MD.
However, if you are recording a 44.1 kHz so urce signal
(such as a CD ) the re is no conversion . This unit can record
32, 44.1 and 48 kHz dig i tal s ignals.
Preparations
• Be sure to set the TIMER switc h to O FF, then press
POWER to turn this unit on.
• Set your amplifier or receiver to the program source to be
recorded.
6
DIGITAL
+
–
REC LEVEL
›
!
SEARCH
⁄
&
&#˜*
ANALOG
REC LEVEL PHONES LEVEL
INPUT
10
0
REC LEVEL
2
REC
10
0
NA TU R AL S OU N D M IN ID IS C REC O RD ER M DX –5 9 5
PO W ER
TIMER
OFF
PLAYREC
1
RANDOM S/ F REPEAT A–B DISPLAY SCROLL TITLE CHARA. DELETE EDIT SET
) EJECT
)
EJ EC T
CANCEL ENTER
$
1 Insert an MD.
Label facing up
NA TUR AL SO UN D MI NID ISC REC OR DER M D X–7 93
0
Arrow pointed toward
disc insertion slot
2 Press INPUT repeatedly to sele ct the input
con nected to the sou nd source yo u wa nt to
reco rd.
For Select
LINE IN 4 ANALOG
DIGITAL IN OPTICAL 1 DIGITAL OPT. 1
DIGITAL IN OPTICAL 2 DIGITAL OPT. 2
4
Input indicator
(Source) sampling frequency indicators*
* App ea rs w hen digital sig na l is i nput.
PAUSE *
STOP &
3 Locate the point where you wan t to s tart
CHAR.TITLE SETDELETENUMBER
M-MARK MONO/ ST
SEARCH
⁄
!
SKIP
›
$
PAUSE*PLAY
6
‹
s
INPUT
REC
SYNCTIME
REC?STOP
&
CD-P
M DX
M-MARK
2
4
reco rding.
• When recording on a blank MD
Skip this step.
• To start recording from the end of a previous recording
Press & to set this unit to stop mode.
• To record over a previous recording
Turn the jog dial (or p re ss SKIP $ or › on the remote)
to select a tra ck (record i ng starts from the beginning o f the
deleted track), or press ^ (PAUSE * on the remote)
during playb ack to pause at the point where yo u w ant t o
start reco rding.
Continued on next page
13
Page 16

4 Press REC (REC ‡ on the remote) to set this unit
to rec ord pause m ode.
The REC * indicators light up .
“REC Standby” and the amount of tim e av ailable for recording
flash alternately in the display.
If you selected a track number or paused playback (in step
3) to record over a previous recording
“OverWrite OK?” app ea rs in the display.
To confirm, press ENTER. This operation will era se th e
selected track number (or point) and all sub se quent material .
To canc el, press CANCEL (or &).
Adjust the recording level corresponding to the audio
input you selected in step 2. Refer to "Adjusting
Recording Levels" on this page for more details.
Note
When recording fro m a digital source that has a dig ital o utput
(volume) c on trol, s et th e ou tput level (volu me) to “MAX”.
Recordin g may not be possib le at lo w ou tput levels (wh en t he
digital volume is tu rned down).
5 Start playing the program source to be recorded.
Adjusting Recording Levels
Setting the digital volume level
The volume level of digital audio sou rces is often sim ilar,
however, level differences may be quite obvious between
differe nt digital audio formats an d even between o ne
recording and another. To maintain a consistent vo lum e
level in MD recording s, i t is possible to change the volum e
of the inp u t digital signal.
To select the dig i tal si gnal to be recorded or m onito red,
press INPUT repeatedly until the a ppropriate d i gital input
indicator (DIG ITAL OPT. 1 or DIGITAL OPT. 2) appea rs in
the dis play. Durin g record or record pause m ode, turning
DIGITAL REC LEVEL adjusts the vo lume of t he digital
signal . The d igital volu me can be adjusted up to +12 dB
and down to a min imu m (M IN) l evel from the default volu me
of 0 dB , the lev el of the i nput digital signal. To set the
volume level, play the digital source to be record ed and
adjust DIGITAL REC LEVEL so that highest peak causes
the 0 d B le vel in dicators to flicker. The OVER indicators
should not light.
6 Press #/* (PLAY # on the remote) to start
reco rding.
The TOC indicat or lights up.
When the TOC indicator i s lit, this m ean s th at the TOC
information has not yet been written to th e disc. After
recording is c om plete, the TOC d at a is a utom atically writte n to
the disc.
To stop
Press & (STOP & on the remote).
To pause
Press #/* (PAUSE * on the remote).
Press again to resume recording.
To eject the MD
Press ) EJECT.
If the p owe r to t his u nit is turn ed off while mak ing a
recording, the TOC d ata cannot be correctly written to
the dis c and the recorded da ta w ill be erased.
TOC writing may be impossible (or track number
marking m ay no t perform a s ex pected) when recording
a dam aged CD or a broadcast source with
interference.
L
–
––– –––
dB
60 3 0 10 6 4 2 1 0 OVER00
R
Should not light
If reco rding is stopped , the digital recording lev el is
restored to the default volu me o f 0 dB.
Notes
• When DIGITAL REC LEVEL is turned, the digita l volu me l evel
is adjuste d in 0.5 dB steps b etw een +12 dB and –20 dB, 1 dB
steps fro m –20 d B to –30 d B , 2 dB steps from –30 dB to –40
dB, follow ed by –44 dB, –48 dB, –54 d B , –62 d B and MIN.
• Althoug h so me s ources can be rec orded with lower peak
levels, setting the p eak leve ls too low may degrad e the quality
of the rec ording.
• The dig ital v olum e cannot be adjusted while a track title is
being entered.
Setting the analog recording level
Press INPUT repeatedly until the ANAL OG i ndicator
appears in th e display, and press REC (REC ‡ on the
remote) to put this unit in the r ecord pause or monitor o ut
mode. For b est resu lts, play the loudest passage of the
sourc e to be recorded and watc h the recording level meter
in the d isplay. Adjust ANALOG REC LEVEL so that the
highes t peak causes the 0 dB level i ndicators to flicker.
The OVER indica tors sho uld not light.
14
Page 17

CHAR.TITLE SETDELETENUMBER
⁄
SEARCH
!
INPUT
›
SKIP
$
PAUSE*PLAY
‹
REC?STOP
&
s
M DX
CD-P
REC
SYNCTIME
M-MARK MONO/ ST
Auto Marking
English
TIME RESCUE RECORDING
When making a recording, you can c h oos e eit her
automatic or manual marking. This feature operates
somewhat differently for analo g and dig ital signals. See
below for details.
Press M-MARK on the remote repeatedly to select
automatic (MANUAL indicator out ) or m anu al
(MANUAL indicator lit) markin g.
MANUAL
When recording analog signals
Auto : Track numbers are written in syn chronizatio n wit h
the inp ut le vel of th e signal being recorded . D uring
recording, if no soun d is detected for more than 1.5
secon ds, the recorder interprets this to be a gap b e twe en
two trac ks . When the source signal is detected ag ain , a
track num ber is autom atically wr itten .
Manual : One trac k n umber is wr itten aut oma tically when
you start record in g, but none are wr itten during recording .
To mark a track number, press M-MARK at the desired
positio n wh ile r ecording.
Note
When using manual mark ing, the marks mus t be set at lea st 4
seconds apart.
When recording digital signals
Track numbers are written in the s ame positions a s th e ori ginal
sourc e (C D, et c.) with eith er a utom atic or ma nual mar king.
To add additional track numbers, set M-MARK to MAN UA L
and press M-MARK at the desired position while recording.
Notes
• When recording is paused, the portion record ed up to the
pause is counted as an individual trac k. When recordi ng is
resumed , a n ew t rack number is created. On the other hand, if
one track is r ecorded in continuous repetition, th at tra ck is
recorded as one continuous track with a single track number.
• During synchronized record i ng, manual tra ck marking is not
possible.
The Time Rescue (TIME) recording function allows you to
start rec or ding six seconds b e fore you press record.
During record pause mode, the MD re corder monitors th e
input s ignal and continuously m aint ains a six second
memory “ cache”. Therefore, you can rec o rd a song that
just started without cutting off the beg i nnin g. You may find
this func tio n us eful whe n re cording live broad casts, o r
when you want to start recording from the beginning of a
song w itho ut re cording lots of commercials (etc.).
4
1
3
1 Press INPUT repeatedly to sele ct the input
con nected to the sou nd source yo u wa nt to
reco rd.
2 Locate the point where you wan t to s tart
reco rding.
3 Press REC ‡ to set this unit to record pause
mod e.
The REC * indicators light up .
“REC Standby” and the amount of tim e a vaila ble for recording
flash alternately in the display.
To adjust the record ing level of digital or analog input
sources, see “Adjusting Rec ording Levels” on p age 14.
4 Press TIME to start rec or ding when yo u he ar th e
beginnin g of a so ng you w ant t o re cord.
Recordin g starts from t he m emo ry cache, allowing you to
record from a point app rox ima tely six s econds b ef ore y ou
pressed TIME.
15
Page 18

CHAR.TITLE SETDELETENUMBER
⁄
SEARCH
!
INPUT
›
SKIP
$
PAUSE*PLAY
‹
REC?STOP
&
s
M DX
CD-P
REC
SYNCTIME
M-MARK MONO/ ST
SYNCHRO RECORDING
MONAURAL RECORDING
The synchronized recording fun ction lets y ou s et thi s un it
to start record ing automa tically whe n a s ound signal is
input. When operating this unit in combination with a
remote c on troll able Yamaha CD player, you can use the
CD-P button on this uni t’s re mot e control to start playback
from the CD player.
CHAR.TITLE SETDELETENUMBER
SEARCH
⁄
!
SKIP
›
$
PAUSE*PLAY
‹
M-MARK MONO/ ST
&
INPUT
REC
SYNCTIME
REC?STOP
CD-P
2
4
5
s
M DX
1 Load t he so und sou rce into th e so urce
com ponent.
If nec essa ry, program, or sel ect the track you w ant to
start rec or ding from before proceed in g to the nex t
step. ( Refer to the operation manu al su pplied with the
sourc e component for in structions r egarding its use.)
2 Press INPUT repeatedly to select the in put
con nected to the soun d source you wan t to
reco rd.
3 Loc ate the point wh ere y ou w ant t o sta rt
reco rding.
4 Press SYNC to set this unit to record p au se
mod e.
The REC * indicators light up .
“Synchro REC” and the amount of time a vail able for recording
flash alternately in the display.
During sy nchronized record ing, analog input sources are
recorded at the current ANALOG REC LEVEL setting, digital
sources are r ecorded at t he 0 dB level.
Record ing in mon aura l (mo no) allow s yo u to record up to
148 minutes of sound on one 74 m inute MD . (When
recording in stereo y ou can record up to 74 minutes of
sound .) This may be useful when r ecording an interview,
debate, or wh ene ver y ou w ant t o record for a long time o n
one di sc.
3
1
4
5
1 Press INPUT repeatedly to sele ct the in put
con nected to the soun d source you wan t to
reco rd.
2 Locate the point where y ou w ant to st art
reco rding.
3 Press MONO/ST to light the MONO indicator.
4 Press REC ‡.
The REC * indicators light up .
“REC Standby” and the amount of tim e av ailable for recording
flash alternately in the display.
To adjust the record ing level of digital or analog input
sources, see “Adjusting Rec o rding Levels” on p age 14.
5 Press PLAY # to start rec ording.
5 Start playing the sound sour ce. (Press CD-P if
reco rding from a Yamaha CD player.)
The MD starts recording automatically when a sound signal is
input. When the sound signal stops, the unit switches back to
record pause mode and “Synchro REC” blinks in the disp lay.
6 To continue recording, repeat step 5.
When you have finished r ecording, press & on
this unit to cancel the record pause mode.
Note
When the signals at the beginning of a track are at a lower level
than the level required to st art s ynchronized record in g, they are
not recor ded. Should this occ u r, perform ma nual recording .
16
Page 19

MONITOR OUT
When a disc is not loaded, you can use the monito r ou t
functio n to mo nitor the soun d of the input sou rce. This
allows you to enjoy better sou nd from you r oth er digital
sourc e components, such as C D, by using this u nit a s a
digital to ana log converter.
English
NA TU R AL S OU N D M IN ID IS C RE CO RD ER M DX –5 9 5
PO W ER
TIMER
OFF
PLAYREC
1
)
EJ EC T
RANDOM S/ F REPEAT A–B DISPLAY SCROLL TITLE CHARA. DELETE EDIT SET
CANCEL ENTER
DIGITAL
+
–
REC LEVEL
›
$
!
SEARCH
⁄
ANALOG
REC LEVEL PHONES LEVEL
INPUT
0
3
REC
&#˜*
10
10
0
2
1 Press ) EJECT to remove the disc.
2 Press INPUT repeatedly to sele ct the input
con nected to the sou nd source yo u wa nt to
monitor.
3 Press REC.
“MONITOR OUT” appears in the display.
Sound from the selected inpu t wil l be output from this unit ’s
analog a nd digit al ou tput terminals .
4 Start playing the so und sour ce selected in ste p 2.
The sound is output from the MD re corder’s analog and digital
output te rmina ls.
To cancel
Press REC again, press &, or inse rt a disc.
Note
The digit al vo lume can be adjusted whe n u sing the monito r ou t
function. How eve r, please note that the digital volume setting is
restored to th e default (0 dB) the next time a r ecording is made.
17
Page 20

EDITING
&#˜*
REC
)
EJ EC T
PO W ER
0
10
0
10
RANDOM S/ F REPEAT A–B DISPLAY SCROLL TITLE CHARA. DELETE EDIT SET
CANCEL ENTER
REC LEVEL PHONES LEVEL
INPUT
!
SEARCH
⁄
+
›
–
$
TIMER
OFF
PLAYREC
NA TU R AL S OU N D M IN ID IS C RE CO RD ER M DX –5 9 5
ANALOG
DIGITAL
REC LEVEL
One of the main advantages of MD is its editing
capabilities. You ca n rem ove the commercials from a r adio
broadcast, reorder songs into the order you w ant, rem ove
songs , combine songs, and even remo ve part of a son g.
Edit functions
This unit offers the following ed itin g operations.
(Please note that track num bers are updated automatically
when you perform a MOVE, ERASE, COMBINE or DIVIDE
operat ion.)
¶ MOVE
Lets you move a track to a different t rack number.
¶ ERASE
Lets you erase a track, the en tire disc, or part of a
track. You c an also era se th e tit le of a disc, or the title s
of trac ks o n a disc.
¶ COMBINE
Lets you comb ine two adjacent tracks.
¶ DIVIDE
Lets you split a single track into two different tracks.
¶ TOC WRITE
Lets you write TOC information to the disc so that
changes are save d.
¶ FRA CHECK
Lets you recover disc space that may hav e been lost
after multiple ed it operations .
¶ UNDO
Lets you undo the previous edit operation if you ma ke
a mistake (you cannot, howev er, u ndo the UNDO
functio n).
Note
After per form ing an edit operation, the TOC ind icator lights to
show that the TOC information has not yet been written t o the
disc. Undo is p o ssible only wh en th e TOC indica tor is lit.
However, if you perform a recording operation (by pressing
REC, TIME, or SYNC), UNDO is not possib le ev en i f the TOC
indicator is lit.
MOVE
This function lets you change the position o f any track.
First, select the track you wan t to move , the n specify the
track number you wan t to m ove it to . Afte r the mo ve, th e
tracks located between the old and new positions ar e
renumb ere d automati cally. You c an perform this operation
repeat edly to completely reorder the disc.
CANCEL
2
1,32,4
&
1 Turn the jog dial to select the track yo u wa nt to
move.
2 Press EDIT repeatedly to display “Move ?” , the n
pres s ENTER.
“Move (tr ack number)=(track number)” appears in the
display.
3 Turn the jog dial to sele ct the tra ck’s destinat ion.
Destination
ANALOG
DIGITAL
OPT. 1 2
COAX.
DISC TRACK
TOTAL
REMAIN
Selected track
4 Press ENTER.
“Complete” ap pears mom enta rily i n the display.
To cancel before moving the track
Press CANCEL (or &).
To undo MOVE
1 Press & to put this unit in sto p mode.
2 Press EDIT repeatedly to d i splay “Undo Move”, then
press ENTER.
“Undo OK ?” appears in the disp lay.
3 Press ENTER ag a in to undo.
To canc el, press CANCEL (or &).
18
Page 21

ERASE
&#˜*
REC
)
EJ EC T
PO W ER
0
10
0
10
RANDOM S/ F REPEAT A–B DISPLAY SCROLL TITLE CHARA. DELETE EDIT SET
CANCEL ENTER
REC LEVEL PHONES LEVEL
INPUT
!
SEARCH
⁄
+
›
–
$
TIMER
OFF
PLAYREC
NA TU R AL S OU N D M IN ID IS C REC O RD ER M DX –5 9 5
ANALOG
DIGITAL
REC LEVEL
Track Erase
English
The ability to erase sou nd without havi ng to re-record is
another c o nve nien t fun ction. You c an eras e the ent ire disc,
a sing le tra ck, or just part of a tra ck.
Disc Erase
This operation lets you eras e al l audio and title (character)
data to create a blank M D. Please note that o nce erased,
this da ta can be recovered using the UNDO f unction.
1
NA TU R AL S OU N D M IN ID IS C RE CO RD ER M DX –5 9 5
)
PO W ER
TIMER
OFF
PLAYREC
RANDOM S/ F REPEAT A–B DISPLAY SCROLL TITLE CHARA. DELETE EDIT SET
CANCEL
EJ EC T
CANCEL ENTER
2 2,3
REC
&#˜*
DIGITAL
+
–
REC LEVEL
›
$
!
SEARCH
⁄
ANALOG
REC LEVEL PHONES LEVEL
INPUT
0
10
10
0
1 Press & to set this unit to stop mode.
2 Press EDIT repeate dly to display “Disc Erase?”,
then p re ss ENTER.
“Disc Erase OK?” ap pears in the display.
3 Press ENTER again.
When all audio, name a nd title data has been er ased
“Com plete” app ea rs m ome ntar ily.
To cancel before erasing the entire disc
Press CANCEL (or &).
To undo ERASE
1 Press & to set this unit to s top mode.
2 Press EDIT rep ea tedly to display “Undo Erase”, then
press ENTER.
“Undo OK ?” appears in the disp lay.
3 Press ENTER ag a in to undo.
To canc el, press CANCEL (or &).
This operation lets you eras e a single track as we ll as
corres ponding title data. After you eras e th e tra ck, the tota l
numbe r of tracks decreases by one and all tracks follow ing
that trac k are r enu mbered.
CANCEL
2 2,3 1
If you plan to erase two or more tracks
To avoid c on fusio n yo u sh ould always e rase from higher track
numbers to lo wer track numbers. This pre ven ts accid enta l
renumbe ring of tracks you plan to erase.
1 Turn the jog dial to sele ct the tra ck you w ant to
erase.
2 Press EDIT repeate dly to display “Erase ?”, then
pres s ENTER.
“(track number) Erase OK?” ap pears in the display.
3 Press ENTER again.
The track is erased and “Com plete” ap pears mom enta rily.
To cancel before erasing the track
Press CANCEL (or &).
To undo ERASE
1 Press & to set this unit to s top mode.
2 Press EDIT rep ea tedly to display “Undo Erase”, then
press ENTER.
“Undo OK ?” appears in the disp lay.
3 Press ENTER aga in to undo.
To canc el, press CANCEL (or &).
19
Page 22

Part Erase
Disc or Track Title Erase
This operation lets you eras e part of a t rack.
1,2,42,4
NA TU R AL S OU N D M IN ID IS C RE CO RD ER M DX –5 9 5
)
PO W ER
TIMER
OFF
PLAYREC
RANDOM S/ F REPEAT A–B DISPLAY SCROLL TITLE CHARA. DELETE EDIT SET
CANCEL
EJ EC T
DIGITAL
+
–
REC LEVEL
›
$
CANCEL ENTER
!
3,5 3,5,6 5
SEARCH
⁄
ANALOG
REC LEVEL PHONES LEVEL
INPUT
0
REC
&#˜*
10
10
0
1 Press #/* to play t he tr ack containin g the part
you want to erase.
2 Use SEARCH ! or ⁄ to locate the beginning
of the p a rt yo u wa nt to eras e (point A ), th en press
#/* to pause at that point.
3 Press EDIT repeatedly to display “A–B Erase?”,
then p re ss ENTER.
Point A (from step 2) is registered and “ Erase A–_” appears in
the display.
4 Use #/* and SEARCH ⁄ to locate the e nd of
the p art you w ant to er ase (point B).
This operation lets you eras e the title of th e disc or the title
of trac ks o n a disc. The title of the disc can onl y be erased
during the sto p mode, however, the title o f the track can be
erased during play or stop mode. In the stop mode, use
the jog dial to sele ct the track.
To erase a disc title
1
NA TU R AL S OU N D M IN ID IS C RE CO RD ER M DX –5 9 5
)
PO W ER
TIMER
OFF
PLAYREC
RANDOM S/ F REPEAT A–B DISPLAY SCROLL TITLE CHARA. DELETE EDIT SET
CANCEL
EJ EC T
CANCEL ENTER
2 2,3
REC
&#˜*
DIGITAL
+
–
REC LEVEL
›
$
ANALOG
REC LEVEL PHONES LEVEL
INPUT
!
SEARCH
⁄
10
10
0
0
1 Press & to set this unit to stop mode.
2 Press EDIT repeate dly to display “Title Erase?”,
then p re ss ENTER.
“Disc Title” and “Erase OK?” appear alternativel y in the
display.
3 Press ENTER again.
The disc title is er ase d and “ Com plete” ap pears mome ntar ily.
To erase a track title
5 Press ENTER to register point B.
“Check” ap pears moment arily in th e display, and two second
segment s of t he tr ack immediately before point A and after
point B play repeatedly. “ Erase A–B?” appears in the display.
To adjust points A and B
Pressing EDIT rep eate dly disp lays “A point” an d “B po int”
alternately. Adjust the selected point by turning the jog d ial in
the direction you w ant t o mo ve th e point.
Each poi nt can be adjusted up to 2 seconds (176 steps) in
either dir ection.
6 Press ENTER again.
The part is erased and “Complete” appears momentarily.
To cancel before erasing the part
Press CANCEL (or &).
To undo ERASE
1 Press & to set this unit to sto p mode.
2 Press EDIT repe atedly to display “Undo Erase”, then
press ENTER.
“Undo OK ?” appears in the disp lay.
3 Press ENTER again t o un do.
To canc el, press CANCEL (or &).
To erase parts spanning more than one track
Use the COMBINE func tion described ne xt to combine the
tracks into one track before performing this operation.
NA TU R AL S OU N D M IN ID IS C RE CO RD ER M DX –5 9 5
)
PO W ER
TIMER
OFF
PLAYREC
RANDOM S/ F REPEAT A–B DISPLAY SCROLL TITLE CHARA. DELETE EDIT SET
CANCEL
EJ EC T
DIGITAL
+
–
REC LEVEL
›
$
CANCEL ENTER
2 2,3 1
REC
&#˜*
ANALOG
REC LEVEL PHONES LEVEL
INPUT
!
SEARCH
⁄
10
10
0
0
1 Turn the jog dial to sele ct the tr ack with the t itle
you want to erase.
2 Press EDIT repeate dly to display “Title Erase?”,
then p re ss ENTER.
“Track Title” and “Erase OK?” appear alter nativ ely in th e
display.
3 Press ENTER again.
The track title is erased and “ Com plete” ap pears mom enta rily.
To cancel before erasing the disc or track title
Press CANCEL (or &).
To undo ERASE
1 Press & to set this uni t to s top mode.
2 Press EDIT repeatedly to d i splay “Undo Erase”, then
press ENTER.
“Undo OK ?” appears in the disp lay.
3 Press ENTER ag a in to undo.
To canc el, press CANCEL (or &).
Notes
• After part er ase, a ne w tra ck number is automatically
assigned to the section starti ng after point B.
• Point B cannot be pos ition ed before p o int A .
20
Notes
• Note that the DISC and TRACK indicators appea r in the
display when “Title Erase” is d isplayed to disting ui sh between
the two op era tion s.
• To avoid mistakes when era sing the disc or trac k nam es,
press DISPLAY repeatedly unt il the titl e display screen
appears so that title s can be confirmed beforehan d.
Page 23

COMBINE
&#˜*
REC
)
EJ EC T
PO W ER
0
10
0
10
RANDOM S/ F REPEAT A–B DISPLAY SCROLL TITLE CHARA. DELETE EDIT SET
CANCEL ENTER
REC LEVEL PHONES LEVEL
INPUT
!
SEARCH
⁄
+
›
–
$
TIMER
OFF
PLAYREC
NA TU R AL S OU N D M IN ID IS C RE CO RD ER M DX –5 9 5
ANALOG
DIGITAL
REC LEVEL
English
DIVIDE
This function lets you combine two consecutive tra cks into
one. After you combine the tracks, the total num ber of
tracks decreases by one and the tracks follo wing the
combined tracks are renum bered.
NA TU R AL S OU N D M IN ID IS C RE CO RD ER M DX –5 9 5
)
PO W ER
TIMER
OFF
PLAYREC
RANDOM S/ F REPEAT A–B DISPLAY SCROLL TITLE CHARA. D ELETE EDIT SET
CANCEL
EJ EC T
DIGITAL
+
–
REC LEVEL
›
$
!
SEARCH
CANCEL ENTER
3
3,4
⁄
2
ANALOG
REC LEVEL PHONES LEVEL
INPUT
0
REC
&#˜*
10
10
0
1
1 Press & to stop playback.
2 Turn the jog dial to sele ct the se cond track of the
two you want to combine.
3 Press EDIT repeate dly to display “Combine ?”,
then p re ss ENTER.
“Check” ap pears moment arily , the n the un it plays the 4
seconds before and after the point where the tracks will be
connected. “ (tra ck number) + (track number) OK?” appe ars in
the display.
4 Press ENTER again.
The tracks are comb in ed and “ Com plete” ap pears
momentarily.
To cancel before combining the tracks
Press CANCEL (or &).
To undo COMBINE
1 Press & to set this unit to s top mode.
2 Press EDIT rep ea tedly to display “Undo Combine” ,
then p ress ENTER.
“Undo OK ?” appears in the disp lay.
3 Press ENTER ag a in to undo.
To canc el, press CANCEL (or &).
This function lets you divide one track into t wo s eparate
tracks by adding a new track num ber to a certain point in
the trac k. If yo u add a track number at the beginning of a
sectio n yo u wa nt to hea r, y ou can access it quickly by
using the s kip function during playb a ck. After yo u divide a
track, the total num ber of tracks increases by one and the
tracks follo win g the divided trac ks are renu mbered.
&
CANCEL
1,2
2
3
3,5 4
1 Press #/* to pla y th e tra ck you w ant to divide.
2 Use SEARCH ! or ⁄ to locate t he point
where you want to divide the t rack, the n press
#/* to pause at that position.
3 Press EDIT repeate dly to display “Divide ?”, the n
pres s ENTER.
“Check” ap pears moment arily , the n “Divide OK ?” app e ars
and the u nit s tarts repeating the point where the track will be
divided.
4 If necessary, use th e jo g dial to adjust the
pos ition of th e point w here the track wi ll be
divided.
The divid e position can be ad ju sted up to 2 second s (25 5
steps) in eithe r direction.
5 Press ENTER.
The track is divided and “Complete” appe ars
momentarily.
Notes
• This operation is not possible when track 1 is selected.
• You can also divid e th e tr ack later using the DIVIDE function.
• If “Can ’t Ed it” appe ars in th e display, the tracks cannot b e
combined. This sometimes hap pens when you have edited
the same track many times. This is d ue to th e te chnical
limitations of the MD syste m a nd is neither a mechanical error
nor a malfunction.
To cancel before dividing the track
Press CANCEL (or &).
To undo DIVIDE
1 Press & to set this uni t to s top mode.
2 Press EDIT rep ea tedly to display “Undo Divide” , th en
press ENTER.
“Undo OK ?” appears in the disp lay.
3 Press ENTER aga in to undo.
To canc el, press CANCEL (or &).
Note
You can also comb ine the t racks later usi ng the COMBI NE
function.
21
Page 24

Disc Maintenance
This unit features two d isc mainten ance functions wh ich
optimi ze performa nce of your MD discs. The TOC WRITE
functio n al lows you to w rite a ny e dits to the TOC without
having to e ject the disc. The FRA CHECK function recovers
recordable space on a disc that m ay have been lost
because of m ultiple edit operations. The d ia gram below
applies to the procedures for both TOC WRITE and FRA
CHECK functions.
1
NA TU R AL S OU N D M IN ID IS C RE CO RD ER M DX –5 9 5
)
PO W ER
TIMER
OFF
PLAYREC
RANDOM S/ F REPEAT A–B DISPLAY SCROLL TITLE CHARA. DELETE EDIT SET
EJ EC T
CANCEL ENTER
REC
&#˜*
DIGITAL
+
–
REC LEVEL
›
$
!
SEARCH
⁄
ANALOG
REC LEVEL PHONES LEVEL
INPUT
0
10
10
0
FRA CHECK
When edit functions such as “MOVE” and “DIVIDE” are
perfor med, spaces of recordab le space may be lost and
“TOC Full” may appear in the display to indicate that no
more rec o rding can b e performed. When this occ urs, it
may b e possible to recover the FRA (Freely Recordable
Area) on the disc that was lost during edit functions so that
more rec o rding is possible.
1 Press & to stop playback.
2 Press EDIT repeatedly to display “FRA Check ?”,
then p re ss ENTER.
“FRA Check OK ?” appears.
3 Press ENTER.
“Com plete” app ear s mo men tarily .
CANCEL
2
2,3
TOC WRITE
When making a recording, the TOC (Table Of Contents) of
the MD is written as so on a s recording is finished. When
making disc edits, however, the TOC isn't a utom atically
written unless the disc is ejected. If the unit is accidentally
turned off before w ritin g edits to the TOC, it is possible that
these c han ges will not be saved. By usin g this function,
you ca n en sure that you r edits are s aved on the disc.
1 Press & to stop playback.
2 Press EDIT repeatedly to display “TOC Write ?”,
then p re ss ENTER.
“TOC Write OK ?” appears.
3 Press ENTER.
“TOC Writing” b li nks i n the display momentar ily.
To cancel before writing to the TOC
Press CANCEL (or &).
Notes
• You cannot und o an edit once it has been written to the TOC.
• The TOC Write function can only be selected when the TOC
indicator is lit in the display.
To cancel before checking the FRA
Press CANCEL (or &).
22
Page 25

TITLING
English
This function lets you t itle r ecorded MDs and the individual
tracks . Titles may consist of uppercase and lowercase
letters, numbers, and symbols for a maximu m of up to 250
chara cters for ea ch title.
NA TU R AL S OU N D M IN ID IS C RE CO RD ER M DX –5 9 5
PO W ER
TIMER
OFF
PLAYREC
)
EJ EC T
RANDOM S/ F REPEAT A–B DISPLAY SCROLL TITLE CHARA. DELETE EDIT SET
CANCEL ENTER
SEARCH
! ⁄DELETE
DIGITAL
+
–
REC LEVEL
›
$
!
SEARCH
⁄
ANALOG
REC LEVEL PHONES LEVEL
INPUT
0
&
REC
&#˜*
10
10
0
5432,7
2,7
SEARCH
! ⁄
?
A–B!S/ F
–
PROG&RNDM
D E F2A B C
1
S T U7P Q R
6
SPACE
+10
3
CHAR.TITLE SETDELETENUMBER
SEARCH
⁄
!
SKIP
›
$
PAUSE
PLAY
*
‹
REPEAT
3
8
M-MARK MONO/ ST
&
SCROLLDISPLAY
)(
M N O5J K L4G H I
/0Y Z9V W X
4
DELETE
INPUT
REC
SYNCTIME
REC?STOP
CD-P
5
4
s
M DX
STOP &
3 Using the front panel
Press CHARA. repeatedly to select between
uppercase letters (A ), lo wercase le tters (a), and
numbe rs ( 0).
Note : To access the sym bols, press CHARA. repeated l y to
select “A”, then turn the jog dial to the left.
Using the remote
Press CHAR. repeatedly to select between upperc ase
letters (A) and lowercase letters (a).
4 Use the jog dial (the character button s or SKIP
$ or › on the remo te) t o se lect a character,
numb er , or sym bol.
Example (using the remote):
To select “ A”, press 1 [ABC] once.
To select “ B”, press 1 [ABC] twice.
To select “ C”, press 1 [ABC] three times.
To select “ 1”, press NUMBER, then press 1 [ABC].
5 Press SET to move the c ur sor i nto positi on fo r the
next c ha racter.
6 Repeat steps 3 thro ugh 5 to complete you r titl e.
To delete a character (AB
1 Use SEARCH ! or ⁄ to mo ve th e cursor to the position
of the ch aracter you wa nt t o delete.
2 Press DELETE.
To insert a character (AB
1 Use SEARCH ! or ⁄ to mov e th e cursor to the position
where you want to insert t he character.
2 Use CHARA. and the jog d ial (or CHAR. and the character
buttons o n th e re mot e) to sel ect the new character.
3 Press SET to set the charac ter . The c ha racter previously in
that posit ion auto mat ically moves t o th e right.
CD = ABD)
CD = ABTCD)
1 To title a disc
Press & (STOP & on the remote) to stop playb a ck.
To title a track
• During stop mode
Use the jog dial (SKIP $ or › on the remote) to sele ct the
track you wa nt to title .
• During playback or pause
Use the jog dial (SKIP $ or › on the remote) to sele ct the
track you wa nt to title , or go directly to step 2 to title the
current tr ack.
During playbac k , the unit aut oma tically repeats the selected
track wh ile yo u ar e en terin g the title.
• During recording
Go directly to step 2 to title th e current track.
Recordin g continues normally wh ile y ou a re e nter ing the title
for the selec t ed track.
2 Press TITLE to activa te th e tit le m ode.
The cursor appear s in t he display.
To insert a space (AB
CD = AB CD)
1 Use SEARCH ! or ⁄ to mo ve th e cursor to the position
where you want to insert t he s pace.
2 Press +10 [SPACE] on the remote.
7 Press TITLE to exit the title mode.
If a title c ons ists o f mo re t han 12 characters, it will scroll
across th e display once and th en be disp l ayed in abb r evia ted
form (first 12 charac ter s on ly).
To undo TITLE
1 Press & (STOP & on the rem ote ) to display the tota l
tracks and total playing time on the disc.
2 Press EDIT rep ea tedly to display “Undo Title”, then
press ENTER.
“Undo OK ?” appears in the disp lay.
3 Press ENTER aga in to undo.
To cance l, press CANCEL (or &).
23
Page 26

TIMER OPERATIONS
With a commercially available audio timer, i t is possible to mak e re cordings and initiate playb a ck automat ically at any time .
Make sure that all power cord connections b e twee n th e tim er an d amplifier/receiver are properly made.
For details, refer to the instr uctions of y our a udio timer. No change in any of th e oth er connections between the r ecorder and
amplif ier/re ceiver, etc., is necessary .
NA TU R AL S OU N D M IN ID IS C RE CO RD ER M DX –5 9 5
)
EJ EC T
CANCEL ENTER
REC
&#˜*
DIGITAL
+
–
REC LEVEL
›
$
!
SEARCH
⁄
ANALOG
REC LEVEL PHONES LEVEL
INPUT
0
10
10
0
To AC outlet
TIMER
PO W ER
TIMER
OFF
PLAYREC
RANDOM S/ F REPEAT A–B DISPLAY SCROLL TITLE CHARA. DELETE EDIT SET
Tuner
Timer Recording
1 Turn on the power of ea ch component, th en s et
your tuner to the stat ion y ou w ant t o record.
2 Set this unit’s reco rding options.
Select d igital or an alog inputs, auto o r ma nua l mar king,
and st ereo or m ono recording. When recording analog
signal s, be sure to set the r ecording level. When
recording dig ita l signals, th e re cording level is set at
0 dB. (See p ages 13 to 16 f or details re garding these
operat ions .)
3 Turn down the volu me on yo ur a mplifier/re ceiver.
This has no effect on th e re cording level.
4 Set the timer to the times at which you w ant to
start and stop record in g.
We recommend setting the timer to start a few min utes before
and stop a few min utes after the actual broadcast to le ave
some room for later editing.
5 Set TIMER to REC.
TIMER
OFF
PLAYREC
When the preset time a rrive s, th e tim er tu rns o n th e
components (am plifier/receiver, tun er a nd MD
recorder) and the M D recorder starts t o record. When
the stop tim e ar rives , the time r sto ps the recording b y
turning off t he components.
Amplifier
Audio timer
Timer Playback
1 Turn on the amp lifie r/receive r and adjust th e
volume and tone controls.
2 Set the input m ode selector o f you r am plifier/
rece iver to M D.
3 Set the timer to the times at which yo u wa nt to
start and stop p lay back.
4 Set TIMER to PLAY.
TIMER
OFF
PLAYREC
When the preset time a rrive s, th e tim er tu rns o n th e
components (amplifier/re ceiver and MD recorder) and
the MD record er s tarts to play. When the stop time
arrives, the timer stops the playback b y turn ing off the
components.
Notes
• Playbac k al ways star ts fro m th e beginning of the MD.
• Set TIMER to OFF when not using the ti mer play function. If
the powe r is t urne d on (by p res sing POWER, plugging in the
power cord, etc . ) whe n TIMER is set to PLAY, the MD
recorder will start t o play and may cause a sudd en output at
high volu me.
Notes
• When record ing to a blank MD, recording st arts from the
beginning. When recording to a p rev iousl y recorded M D,
recording starts from the end of the las t track.
• Set TIMER to OFF when not using the ti mer recording
function. If the power is turn ed on (by p re ssin g POWER,
plugg in g in the power cord , e tc.) when TIMER is set to REC,
the MD rec or der will start re cording au toma tically.
24
Page 27

MD SYSTEM LIMITATIONS
English
The recording sy stem in y our MD recorder is radically
differe nt fr om t hose use d in cassette and DAT d ecks and is
chara cterized by the limitations described below. N ote,
however, that these lim itatio ns a re i nher ent t o the MD
recording system an d are not a resu lt of me chanical
trouble .
“Can’t REC” is displayed before the maximum
recording time (60 or 74 minutes) has been reached
Once 255 tracks hav e been recorded on one MD, “Can’t
REC” is displayed regard les s of the total recorded time.
More than 255 tracks cannot be recorded on one MD . To
contin ue r ecording, erase unnecessary tra cks, combine
tracks to r educe the total nu mber of tracks, or use anot her
recordable MD.
“Disc Full” is displayed before the maximum number of
tracks (255) have been recorded
During aut oma tic track marking, fluctuations in em phasis
within songs may be interpreted as song intervals,
increa sing the tot al nu mber of tra cks and causing “ D isc
Full” to b e displayed.
The remaining recording time does not increase even
after erasing numerous short tracks
Tracks under 12 seconds in length are not counted and so
erasing the m m ay n ot le ad to an in crease in t he re cording
time.
“TOC Reading” is displayed continuously
The “TOC Reading” display lasts longer than norm al w hen
a bran d new (blank) disc is inserted.
The total recorded time and the remaining time on the
MD do not total to the maximum recording time
• Rec or ding is done in minimum units of 2 seconds each,
no matter how short the ma teria l. The c o nte nts r ecorded
may thus be shorter than the m axi mum recording
capacity. Disc spac e ma y als o be furthe r reduced b y
scratches.
Tracks created through editing may exhibit sound
dropout during search operations.
Track numbers are not recorded correctly
Incorr ect assignment or recording of track numbers may
result when CD tracks are divided into several sma ller
tracks during dig ita l recording.
It is not possible to erase part of a track using the A-B
ERASE function
This unit organizes the audio data in soun d groups and
cluste rs. The minimum size of t hese uni ts va ries according
to the number of channels being rec or ded. For a 2 chan nel
(stereo) record ing, a sin gle unit may not consist of less
than 10 second s of so und. For one channel (mono)
recording, a single unit ma y no t consist of less than 20
secon ds of soun d.
Limitations when recording over an existing track
• The correc t rema inin g recording t ime may not be
displayed.
• You may find it impossible to record over a track if that
track has been recorded over several time s alr eady. If
this hap pens, era se th e tra ck using the ERASE function.
• The remaining recording tim e m ay be shortene d out of
proportion to the total recorded time.
• Rec or ding over a track to elimi nate nois e is not
recom men ded since this may short en th e duration of th e
track.
• You may find it impossible to label a track while
recording over anot her t rack.
The correct recorded/playing time may not be displayed
during playback of MDs recorded in monaural.
• This unit displays the length of the largest continuous
blank area as t he r ema ining time. Therefore, if there are
several separate blank spac es, the rem ainin g time will
only d isplay a tim e equivalen t to the l argest continuous
blank space.
If there is a 1 minute blank space and a 2 minute blank
space, the re main ing time display will be “2” minutes. If
you then record 1 min ute and 30 seconds of the 2 minu te
blank, the rema inin g time display will become “1” mi nute .
25
Page 28

COPY PROTECTION (SCMS)
NOTES REGARDING THE
As a d igital audio component, this MD recorder conforms
with the Serial Copy Ma nagement System (SCMS)
standa rds. The Serial Copy Management System restricts
copies made by recording digital signals to first-generatio n
copies only. Therefore, an MD recorded through a dig ital
input cannot be used as a source for m akin g another
digital recording.
However, subsequent record ings can be made from the
first-ge nera tion copy by using the analog input/output
jacks.
There are three genera l rule s th at apply to this unit .
Rule 1
You can record fr om digital program sources (CDs, DATs
or pre -mas tered MDs) onto a D AT tap e o r recordable MD
via the d igital input jack on a DA T or MD recorder. You
canno t, ho weve r, re cord from this recorded DAT tape or
MD to another DAT tap e or recordable MD via a digital
input j ack.
Rule 2
You can record a digital signal input from a digital satellite
broadcast onto a DA T tap e o r recordable MD via the digital
input j ack on the DAT or MD recorder. (This unit is
equipped with a sampling rate converter that allo ws you t o
make d igital recordings from 32 kHz, 4 4.1 k Hz, or 48 kHz
digital program sources).
If the b roadcast does not contain a copyright protec tio n
code, you can then record the contents of th is recorded
DAT tape or MD (first-generat ion) onto anot her D AT tap e or
recordable MD via a digital input jack on the DAT or MD
recorder to create a second generation digital cop y (t hese
copies may a lso be copied d igitally). No te, h owev er, t hat if
the bro adcast contains a copy p r otection code, secondgenera tion digital cop y ing will not be possible.
REMOTE CONTROL
Remote Control Operation Range
6 m
30°
30°
Notes
• There should be no large ob sta cles between the remote
control a nd the remote sens or on the mai n uni t.
• Strong lig ht (especially from an inver ter t ype fluorescent lamp)
shining directly on the remot e sen sor may prevent proper
operation . In s uch cases, reposition the main un it to avoi d
direct light.
Battery Installation
Rule 3
You can record a DAT tap e or M D r ecorded via the DAT or
MD rec order’s an alog input jack onto anoth er D AT tap e o r
MD via the DAT or MD rec o rder’s digital output jack. You
canno t, ho weve r, m ake a second-generation DAT tap e or
MD co py via the D AT or MD recorder’s dig ital o utput jack.
26
Battery replacement
When you notice a decrease in the o perating range of the
remote c on trol, replace both batteries with new ones .
Notes
• Use only AA, R6, UM-3 b atte ries for r eplacement.
• Be sure to insert the batteries with correct p ol arity (as
illustrated on t he battery compartment).
• Remove the batteries if the r emo te control will n ot be used for
an extend ed period o f tim e.
• If batte ries l eak, dispose of them immediately. Avo id touching
the leaking m ateri al or lettin g it come into contact with
clothing, etc. Clean the battery compartment thoroughly
before in stallin g new batteries.
Page 29

TROUBLESHOOTING
If your MD recorder fails to operate normally , check the follow ing table. It lists common operating errors a nd simple
measures which you can take to correct the problem. If it cannot be corrected , or th e sy mptom is n ot lis ted, disconnect the
recorder’s power cord and contac t you r aut horiz ed YAMAHA d e aler or s ervi ce center for help.
English
Symptom
The unit does not respond to
operations.
It happens that this unit does not work
normally.
Playback is not possible.
Recording is not possible.
Cause
• MD is dirty o r damaged.
• MD is dama ged (“U TOC ERR appears
in the dis play).
• There is an influence of stro ng external
noise (lig htnin g, excessive static
electricity, etc.) or a misoperation was
performe d while using this unit.
• Moisture is on the laser pickup.
• The power is OFF.
• The disc ha s been loaded inc orre ctly.
• An unrecor ded (bla nk) MD was loaded
(“Blank D isc” ap pears in the display) .
• The d isc is record pro tected
(“Protect ed” appears in th e display).
• A pre-maste red MD is loa ded
(“Playback MD” appe ars i n th e display).
• The source is not connected correctly.
• The input setting is inc orre ct.
• The recordi ng level is too low.
• The digital o utput level of the digital
source is too low .
• There is not enough blank spac e lef t on
the MD.
• If the power cord was unplug ged or
there was a power outage du ring
recording, that record ing may be lost.
Remedy
• Replace the current disc with a new
one.
• Turn the power off and d is connect the
AC powe r fro m th e AC ou tlet. After
about 30 seconds have passed,
connect the power and try again.
• Leave the unit switched O N an d wait 20
to 30 minutes for the mois ture to
evaporat e before trying to play a disc .
• Press POWER to turn the p ow er o n.
• Reload the d isc with the la bel side
facing up, and th e ar row pointing
toward th e disc insertion slot.
• Insert a rec orded MD.
• Slide the rec ord-protect tab t o th e
closed position.
• Load a recordab le MD.
• Check all connections again.
• Press INPUT repeatedly to select the
correct input jacks.
• Turn REC LEVEL to adjust the record in g
level.
• Set the digit al ou tput level of th e digital
source to “MAX”.
• Load a recordab le MD with fewe r
recorded trac ks , or e rase un necessary
tracks fro m t he current MD .
• If recording was interrupted , try
recording ag ain start ing from the
beginning.
The MD cannot be removed when
partially inserted.
Excessive noise.
The remote control does not operate.
• The c arria ge lock function has activated.
• The unit is too close to the te levi sion or
other com ponent.
• The batteries are exhausted.
• The remote control transmitt er is
operated from an in correct d is tance or
angle.
• The remote control sensor is located in
strong direct lig h t.
To clean the cabinet
Use a soft cloth slightly moistened with mild detergent solution.
Care of MDs
• Do not expose th e M D to direct sunlight or heat so urces such as hot air ducts, nor leave it in a car parked in direct sunlight
as there can b e a considerable rise in tem perature ins ide the car.
• Periodica lly r emo ve dust and debris from the cartridge surface by wip in g it with a dry cloth.
• Because the MD itse lf is hous ed in a cartridge, you can handle it normally w itho ut being concerned ab out dirt or
fingerprints. H owe ver , ma lfunctioning may re sult if th e cartridge itself is dirty or warped.
Do not open the shutter on the MD cartridge
Trying to force the shutter open will damage the sh utte r.
• Insert the MD comple tely, then press
) EJECT to ejec t it.
• Place the unit farther away fr om the
television or other component.
• Replace the batteries.
• Operate the rem ote from less tha n 6
meters (ab ou t 20 feet ) and within 30 ° on
either sid e of the sens or.
• Place the unit away from the stro ng
light.
27
Page 30

DISPLAY MESSAGES
Can’t Copy
Digital recording c a nno t be performed. (See “COPY
PROTECTION (SCMS)” on page 26.)
Can’t Edit
Edit op erat ions are n ot possible.
Can’t Play!
Timer playbac k is not possible. The load ed disc may be
blank, damaged, or an incompatible format.
Can’t REC!
Timer recording is not possible. The load ed disc may be
protected or there m ay n ot be enough blank space
remaining on th e disc.
Can’t REC
Record ing is not possible because there is no t en ough
blank space remaining on the disc.
DIGin Unlock
No digital signal is being input to the sele cted digi tal in put
jack.
Disc Full
Record ing is not possible because there is no blank space
remaining on th e disc.
TMP Over!!
The temperature of the unit has exceeded the normal
operat ing temperature. Turn off the unit a nd let it cool
down. If th e uni t is in stal led in a place with little ve ntilat ion
(such as a built in bookcase), move the u nit t o an other
locatio n w ith better ve ntila tion .
TOC Writing
The TOC d a ta is being written to the disc. Do not mov e the
unit or p ull out t he m ains lead. If you do, recorded material
may not b e sav ed normally .
TOC Reading
The unit is reading the TOC d ata.
Protected
The record p rotection on the inse rted MD is s et to
“protect”.
Playback MD
The inserted MD is a designed for playbac k o nly ( you
canno t record on this disc).
MONITOR OUT
The monitor out functio n is active. The audio sig na l input to
the selec te d input terminals i s out put from thi s uni t’s ou tput
terminals.
Program Full
Additional ste ps cannot be prog r amm ed because the
maximum number of steps (30) has a lrea dy been
programmed.
Title Full
Additional characters cannot be input for the current ti tle
because the max imum num ber of characters for a s ingle
title (250) has already been input.
UTOC WError
Error occ u rred when writin g to the UTOC.
Not Audio
The inserted disc is not an audio MD.
Tr Protected
The selected track c ann ot be edited bec aus e it is
protected.
TOC Full
The disc a rea a llotte d for TOC d ata has become full and
further ed i ting is not possible.
UTOC ERR L...
Problem involving UTOC data .
28
Page 31

SPECIFICATIONS
English
Digital audio system
System
MiniDisc digital audio system
Disc
Mini Disc
Recording method
Magne tic field variation over writ e
Reading method
Non-c onta ct optical pick up (using semiconductor
laser)
Laser
Semiconduct or la ser
Laser Diode Properties
Material: GaAIAs
Wavelength: 780 nm
Pulse time:
Read mode
Write mode
Record/playback time
Max. 74 minutes (using MDW-74 disc )
74 minutes (stereo)
148 minutes (mono)
Revolutions
Approx. 400 – 900 rp m (C LV)
Error Correction
ACIRC (Advanced Cross Interleave Reed-solomon
Code)
Sampling frequency
44.1 kHz (32 kHz and 48 kHz signals converted to
44.1 kHz for recording )
Coding
ATRAC (Ad a ptive TRansform Acoustic Coding)
Modulation system
EFM (Eight-to-Fourteen Mod u latio n)
Number of channels
2 (stereo) or 1 (monaur al, f or ex tended recording )
Frequency Response
5 – 20,000 Hz ±0 .5 dB
Signal-to-Noise Ratio
More than 99 dB during playback
Wow and Flutter
Below measurable limit
...
0.8 mW Continuous
...
max 10 mW 0.5S
min cy cle 1.5S
Repetition
Inputs
LINE IN (REC)
Type: p in j ack
Standard i nput level ( 56 k -ohm s): 300 mV
DIGITAL IN (OPTICAL) (2)
Type: sq ua re o ptical connector jack
Outputs
LINE OUT (REC)
Type: p in j ack
Standard o utput level (1 kH z, 0 dB): 2.0 ± 0.5 Vrms
DIGITAL OUT (OPTICAL)
Type: sq ua re o ptical connector jack
PHONES
Standard o utput level
(Input 150 ohm s sh orte d, –20 dB): 300 ± 60 mV
GENERAL
Power Supplies
230 V, 50 Hz (U.K. and Europ e models)
120 V, 60 Hz (U.S.A. model)
Power Consumption
20 W
Dimensions (W x H x D)
435 x 96 x 288 mm (17 -1/8 " x 3-3/4" x 11-5/16")
Weight
4.1 kg (9 lbs. 1 oz .)
Accessories
Remote Control
1
Audio connecting cord
2
Optical fiber cable
1
Batteries (size AA, R6, UM-3)
2
Specif ications su bject to change without notice.
29
Page 32

YAMAHA ELECTRONICS CORPORATION, USA 6660 ORANGETHORPE AVE., BUENA P ARK, CALIF. 90620, U.S.A.
YAMAHA CANADA MUSIC LTD. 135 MILNER AVE., SCARBOROUGH, ONTARIO M1S 3R1, CANADA
YAMAHA ELECTRONIK EUROPA G.m.b.H. SIEMENSSTR. 22-34, 25462 RELLINGEN BEI HAMBURG, F.R. OF GERMANY
YAMAHA ELECTRONIQUE FRANCE S.A. RUE AMBROISE CROIZAT BP70 CROISSY-BEAUBOURG 77312 MARNE-LA-VALLEE CEDEX02, FRANCE
YAMAHA ELECTRONICS (UK) LTD. YAMAHA HOUSE, 200 RICKMANSWORTH ROAD WATFORD, HERTS WD1 7JS, ENGLAND
YAMAHA SCANDINAVIA A.B. J A WETTERGRENS GATA 1, BOX 30053, 400 43 VÄSTRA FRÖLUNDA, SWEDEN
YAMAHA MUSIC AUSTRALIA PTY, LTD. 17-33 MARKET ST., SOUTH MELBOURNE, 3205 VIC., AUSTRALIA
60
Printed in Malaysia
V354880
Page 33

documentation manual, user maintenance, brochure, user reference, pdf manual
This file has been downloaded from:
User Manual and User Guide for many equipments like mobile phones, photo cameras, monther board, monitors, software, tv, dvd, and othes..
Manual users, user manuals, user guide manual, owners manual, instruction manual, manual owner, manual owner's, manual guide,
manual operation, operating manual, user's manual, operating instructions, manual operators, manual operator, manual product,
 Loading...