

Page 1
LP-3 Assembly Instructions
Do not hold the LP-3 in the
shaded areas, to avoid
getting your fingers
caught.
Hand
Danger
Bottom of the
keyboard
Hand
HandHand
Danger
Slide the keyboard from
rear to front as your place
it on the stand to align
the bolt holes.
CAUTION
• Be careful not to confuse parts, and be sure to install all parts
in the correct direction. Please assemble in accordance with
the sequence given below.
• Assembly should be carried out by at least two persons.
• Be sure to use the correct screw size, as indicated below. Use
of incorrect screws can cause damage.
• Be sure to tighten up all screws upon completing assembly of
each unit.
• To disassemble, reverse the assembly sequence given below.
• If the main unit creaks or is otherwise unsteady when you play
on the keyboard, refer to the assembly diagrams and retighten
all screws.
Assembly procedure
1 You will need a Phillips screwdriver to assemble the
stand.
2 Open the box and remove all parts. Make sure that all
of the parts are included.
Screw set (VS64540)
(A) Long screws
(6 x 30 mm)
(6 x 16 mm)
(C) Small screws
(4 x 8 mm)
(D) Caps(B) Short screws
(E) Knob bolts
(6 x 40 mm)
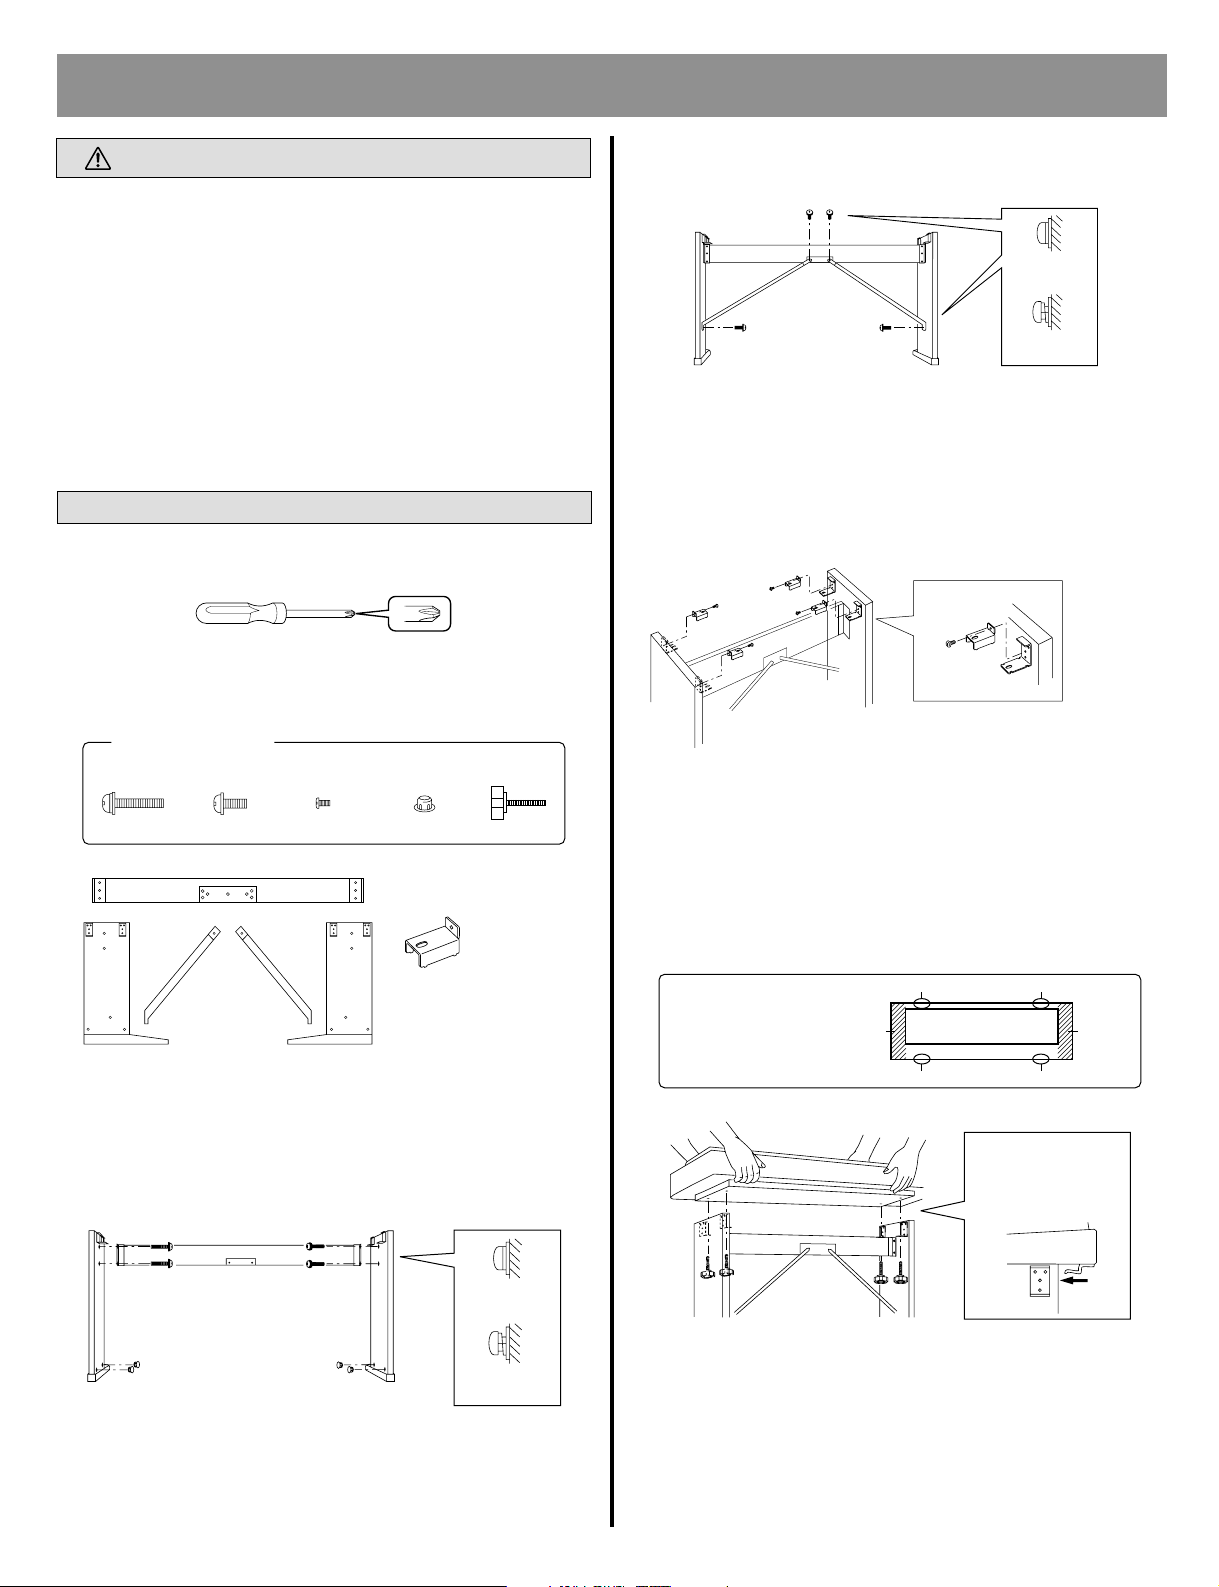
4 Attach the braces.
1 Attach the braces to the center of the upper beam using
the short screws (B). Do not tighten the screws yet.
(B)
Correct
tightenning
(A) (A)
Insufficient
tightenning
2 Attach the stays to the side panels using the remaining
long screws (A). Again, do not tighten the screws yet.
3 Tighten the screws when all four are in place.
5 Set the attachments.
Note: Fix them using small screws (C).
Attachments
Small screws
(C)
6 pcs. 2 pcs. 4 pcs. 4 pcs. 4 pcs.
Attachments
4 pcs.
Right
side
panel
Upper beam
Braces 2 pcs.
(identical)
Left
side
panel
3 Attach the upper beam and cap (D).
Notes: Tighten four long screws (A) loosely at first, then do
them hardly to set each screw in place correctly.
When inserting the screws, turn them in loosely at
first, then tighten them after making sure the upper
beam is positioned correctly.
1 Secure the upper beam
with long screws (A).
2 Attach the caps (D).
Correct
tightenning
Insufficient
tightenning
6 Attach the keyboard to the stand.
1 After making sure that the keyboard and the stand are
both facing in the same direction, place the keyboard on
the stand so that the holes of the stand are aligned with
the holes in the bottom of the keyboard.
Note: Be careful not to let your finger get caught between the
stand and the keyboard.
2 Secure the keyboard using the knob bolts (E).
Note: Do not tighten the bolts until all four bolts are in place.
M.D.G., Pro Audio & Digital Musical Instrument Division, Yamaha Corporation
©1994, 2003 Yamaha Corporation
Page 2

documentation manual, user maintenance, brochure, user reference, pdf manual
This file has been downloaded from:
User Manual and User Guide for many equipments like mobile phones, photo cameras, monther board, monitors, software, tv, dvd, and othes..
Manual users, user manuals, user guide manual, owners manual, instruction manual, manual owner, manual owner's, manual guide,
manual operation, operating manual, user's manual, operating instructions, manual operators, manual operator, manual product,
 Loading...