

Page 1
Page 2

Playing the ELS-01/01C — Tutorial
2
Page 3

About This Manual
(Read this first!)
This manual is made up of four chapters, each focusing on a single song
for you to practice. By playing and working on each song, you’ll build up
your knowledge and experience of using the ELS-01/01C, and increase
your familiarity with the functions of the instrument naturally. If you’re
already familiar with the Electone or have experience playing one, feel free
to start somewhere in the middle of the book, rather than the beginning.
The point is to learn things about the Electone that you may not have
known before, and to use them effectively in your performance.
When you need more specific instructions or want to explore a feature or
function in greater detail, refer to the separate Owner’s Manual.
In addition, the Owner’s Manual contains basic information about the
ELS-01/01C, such as the Panel Layout and Basic Operations (pages 8 –
21), helpful sections you should read before working through this
booklet.
Now, go to the next page and take a look at the brief overviews of each
chapter.
Playing the ELS-01/01C — Tutorial
3
Page 4
ACT 1
Page 6
Playing with the Registration Menus
Song: “Grandfather’s Clock”
Simply select the Registration from the Registration Menu and play the song. It’s not a
difficult piece to play, but if y ou’re unfamiliar with the score, try slowing down the rh ythm
and playing it at a more relaxed pace . Enjoy perf orming with the clear oboe melody and
the beautiful strings harmony.
ACT 2
Page 12
Editing a Registration and Storing it to Registration Memory
Song: “Dancing Queen”
Here, you’ll select a Registration from the Registration Menu, then slightly edit it and
save to Registration Memory. Three Registration Memories (M1, M2, and M3) are used
in this song. You’ll also save these Registrations to a SmartMedia card. Finally, play the
song and use the right footswitch to change the Registration Memory. The Lower
keyboard and Pedalboard parts are very simple, letting you master this piece quickly.
M 1
M 2
M 3
Creating a Simple Intro Sound based on the Registration Menu
Slightly Editing the Intro Sound
Enjoying the Original Sound of the Registration Menu
Playing the ELS-01/01C — Tutorial
4
Page 5
ACT 3
Page 24
Selecting and Editing Voices
Working with Rhythm Sequence and Registration Sequence
Song: “Change the World”
In this chapter, we’ll work on creating each Registration from scratch, instead of using
the Registration Menu. First, select the Voices for each Voice section and apply some
controls and effects. Then, program a Rhythm Sequence and Registration Sequence.
These allow you to play the song with all the necessary changes made automatically —
without your having to use the footswitch, switch Registrations or select different
rhythms. Finally, record the settings and your performance to a SmartMedia card.
Intro with Acoustic Guitar and Electric Piano
Classic Rock Organ
Sweet Harmonica Melody
Soft Harmony with Pad Sound on the Lower Keyboard
Mysterious Arpeggio with Delay
Electric Guitar Solo
Ending with Acoustic Guitar and Electric Piano
ACT 4
M 1
M 2
M 3
M 4
M 5
M 6
M 7
Page 60
Creating Various Organ Sounds (ELS-01C only)
Song: “Moldau”
The Organ Flutes function (not available on the ELS-01) lets you create various organ
sounds — such as those of a traditional pipe organ, gorgeous jazz organ, and more.
“Moldau” is a short song, yet it includes a very colorful organ sound. Enjoy all of the
sounds from your head down to your feet.
M 1
M 2
M 3
M 4
M 5
M 6
Classical Sound
Soft Jazz Sound
Tasty Jazz Sound
Colorful Jazz Sound
Percussive Rock Sound
Classical Sound (same as M1)
Playing the ELS-01/01C — Tutorial
5
Page 6
ACT
ACT
the Registration Menus
1
1
Playing with
Song:
“Grandfather’s Clock”
Playing the ELS-01/01C — Tutorial
6
Page 7
One of the most exciting aspects of the Electone is its abundance of realistic Voices and dynamic
rhythms. For details on exactly what Voices and rhythms are available, check the Voice List and
Rhythm List in the Owner’s Manual (pages 30 and 59). With all the hundreds of choices available, you
may have a difficult time finding which is best for a particular song. That’s where the Registration
Menu comes in handy.
Registration Menu contains 48 Registrations (60 on the ELS-01C) in five main categories: (1) Kids, (2)
Pops & Rock, (3) Dance & Ballad, (4) Jazz & Latin, and (5) Symphony & World. Registration settings in
the Registration Menu include not only the Voices for each ke yboar d — Upper, Lo wer and Pedal — but
also the rhythm and Auto Bass Chord settings. This means you can enjoy playing the Electone with
appropriate settings for any style of music or song simply by selecting the desired Registration from
the Registration Menu.
About “Grandfather’s Clock”
This plaintive and poignant folk song was written by Henry Clay Work back in 1876, and was one of
the two most popular songs that year in the United States — the other being “I’ll Take You Home,
Kathleen.” Standing clocks like the one mentioned in the lyrics were a common fixture in homes across
the country, and the image of the clock, as well as the parallel lives of the clock and the old man,
captured the hearts of listeners as much as did the beautiful melody. The song has endured, renewing
its popularity every generation, and has even left us with the word “grandfather clock” — meaning a
standing, tallcase clock.
ACT 1ACT 2ACT 4 ACT 3
Playing the ELS-01/01C — Tutorial
7
Page 8
ACT 1 ACT 2 ACT 3 ACT 4
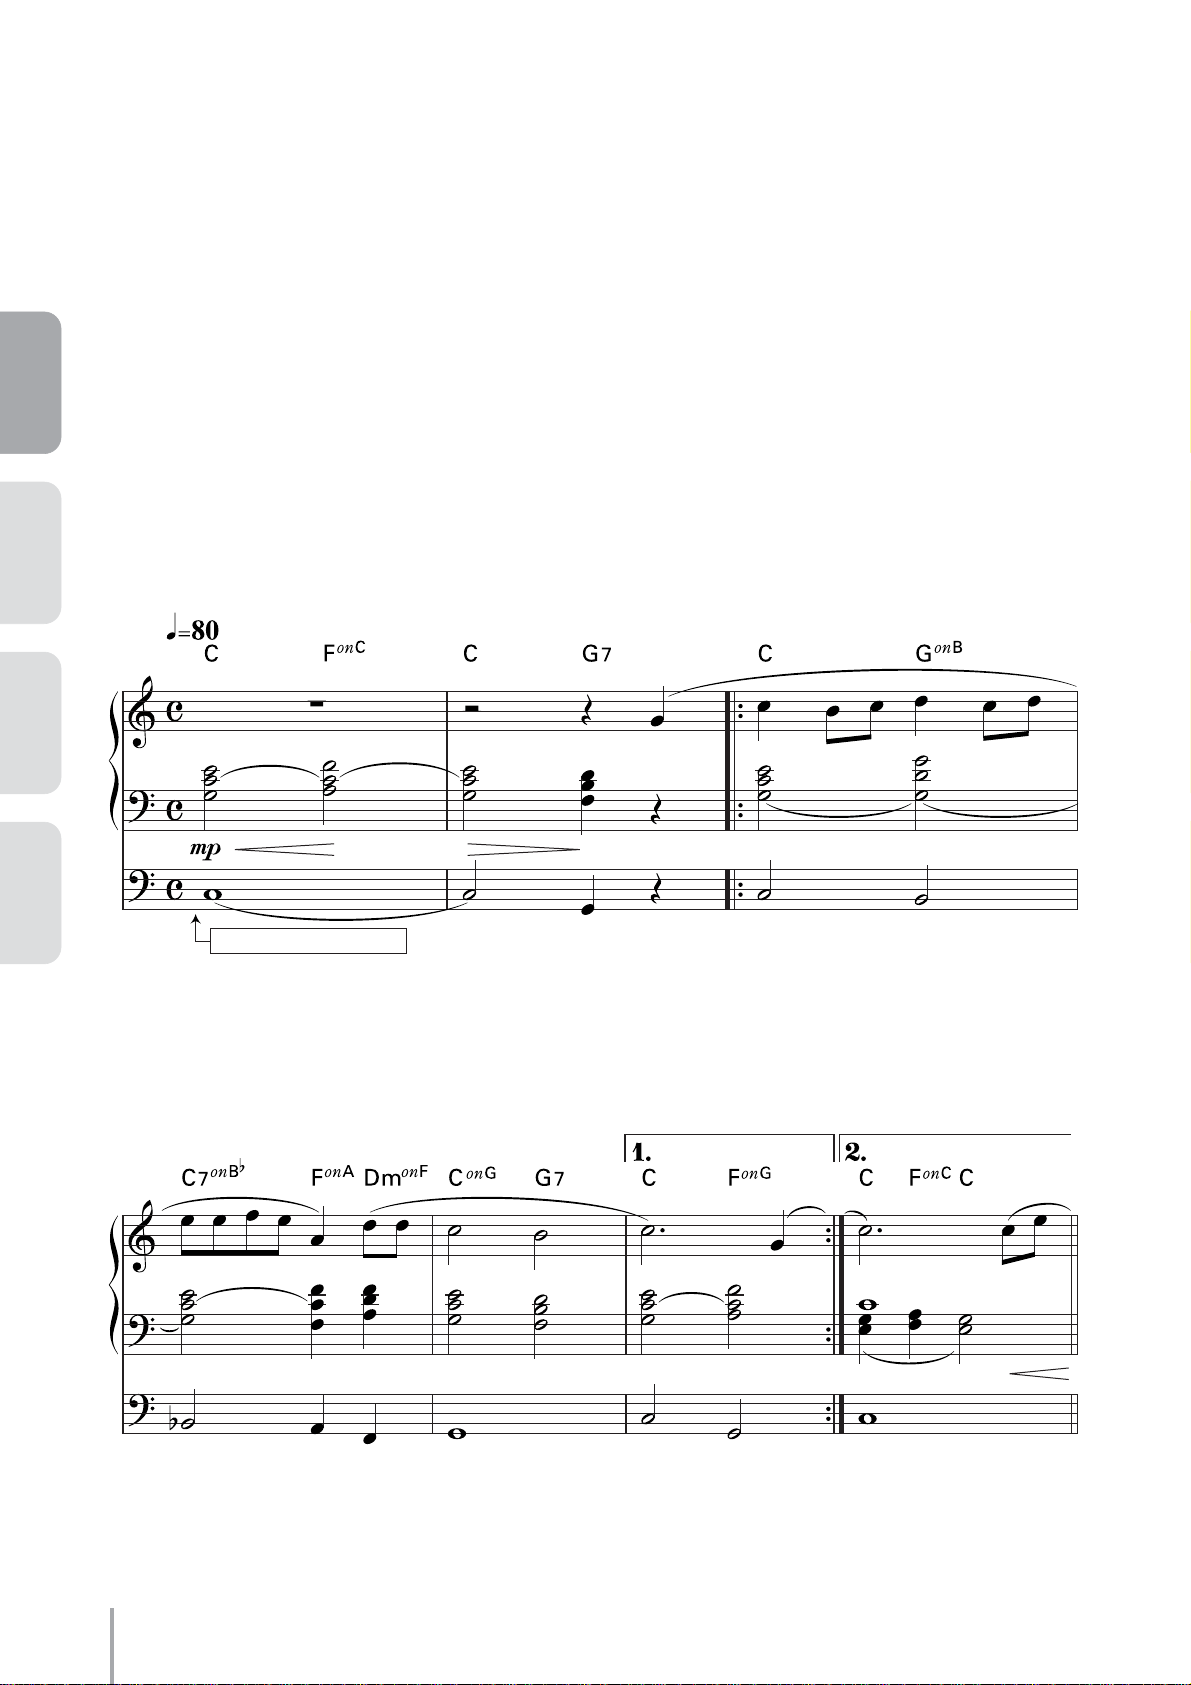
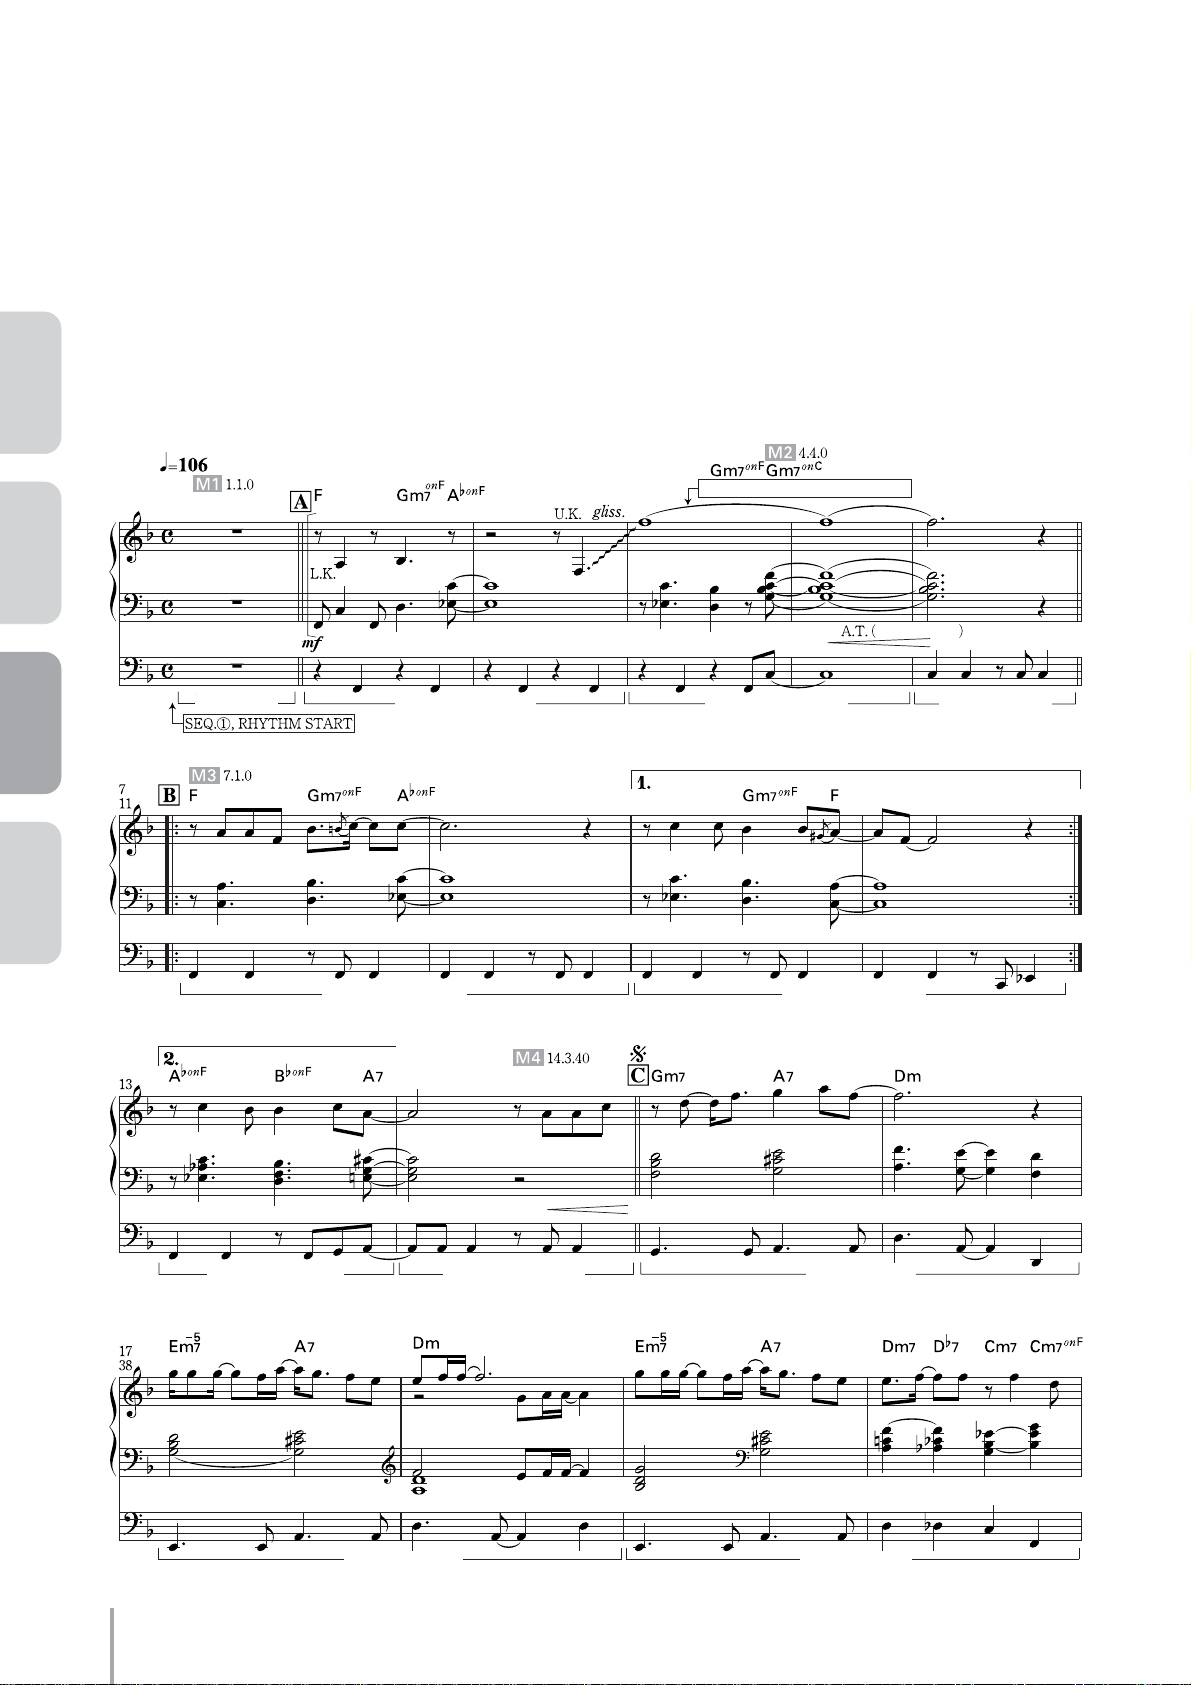
Grandfather’s Clock
Composed by Henry Clay Work
Arranged by Riko Morino
* Notes in parentheses can be ignored.
RHYTHM SYNCHRO START
( )
( )
Playing the ELS-01/01C — Tutorial
8
Page 9

( )
( )
( )
( )
( )
( )
( ) ( )
ACT 1ACT 2ACT 4 ACT 3
RHYTHM STOP (with right hand)
Playing the ELS-01/01C — Tutorial
9
Page 10

ACT 1 ACT 2 ACT 3 ACT 4
Selecting the Registration for “Grandfather’s Clock”
from the Registration Menu
The simple, warm sounds of the oboe and soft strings perfectly match this melodic song, with the rhythm gently
echoing the tick-tock sound of the clock.
Press the REGISTRATION MENU [1] button.
1
The Kids Menu appears.
REGISTRATION MENU
12345
Select [Simple 8Beat 2] in the Kids Menu.
2
Playing the ELS-01/01C — Tutorial
10
Page 11
Playing “Grandfather’ s Clock”
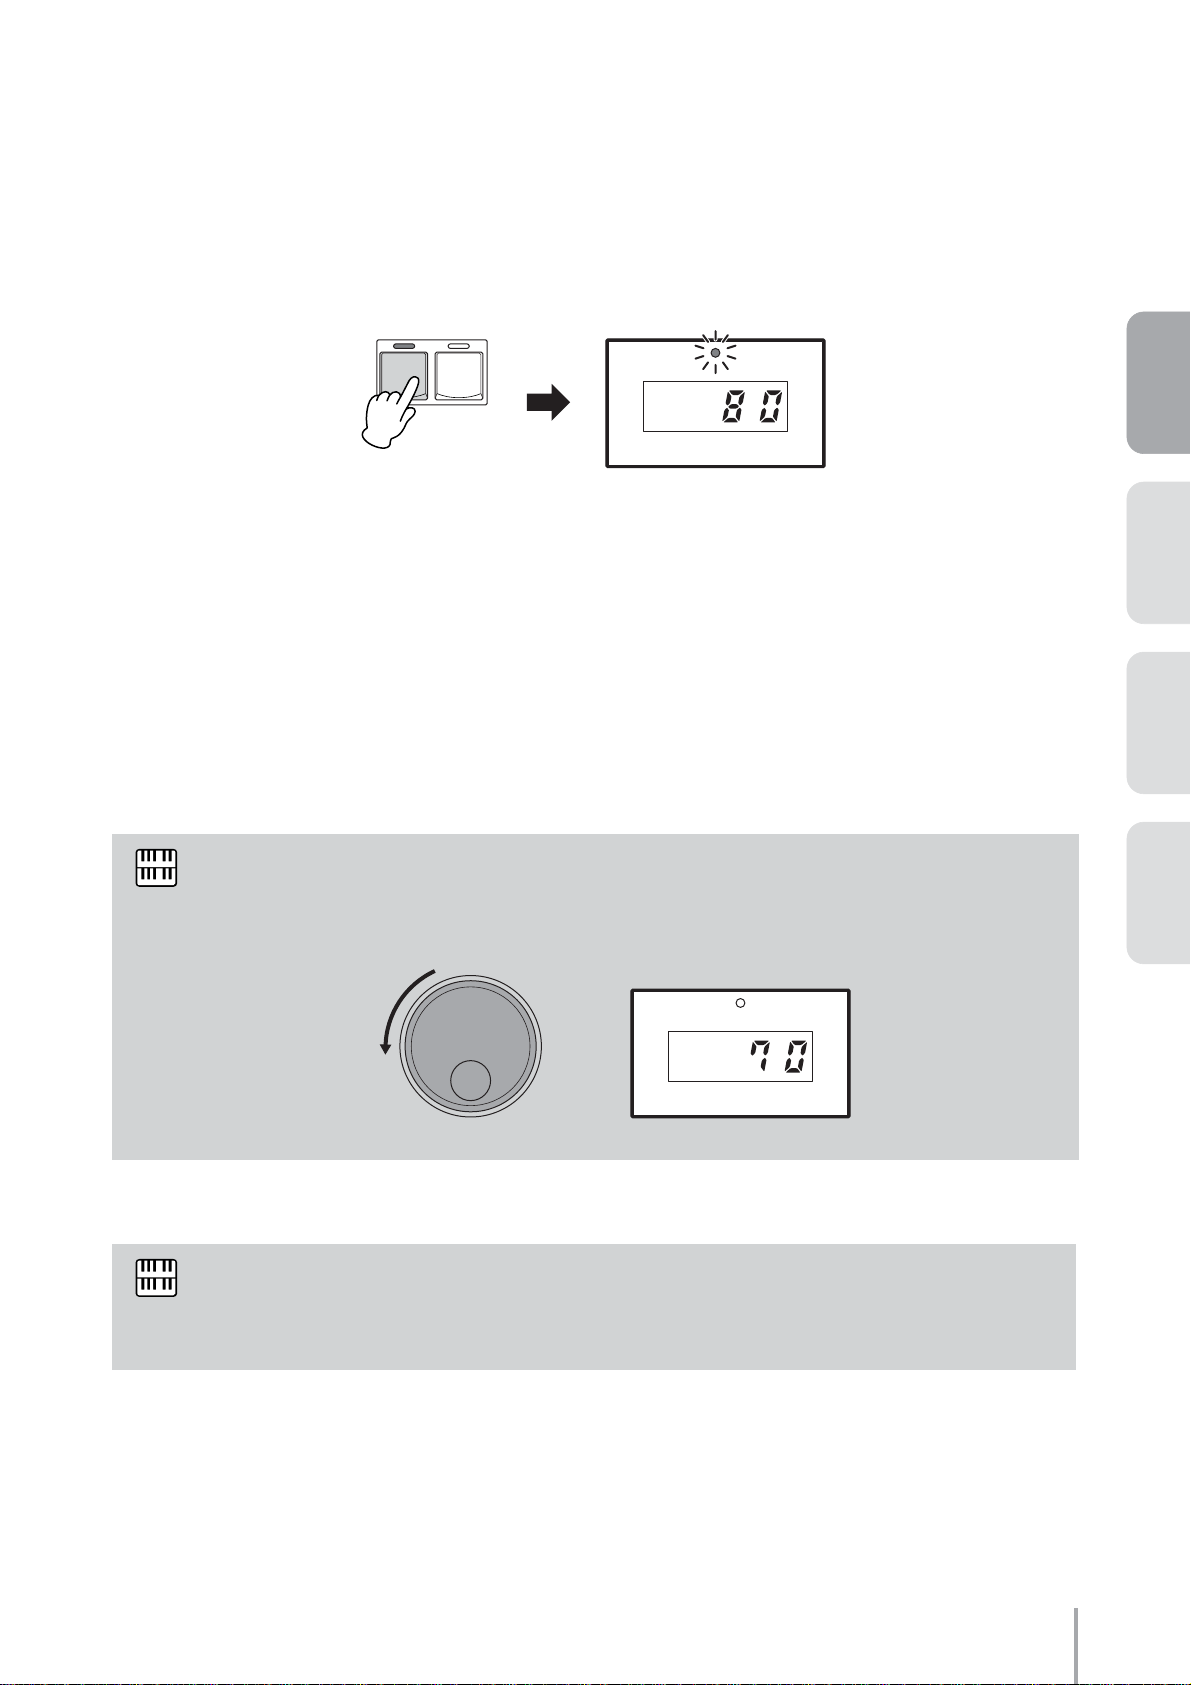
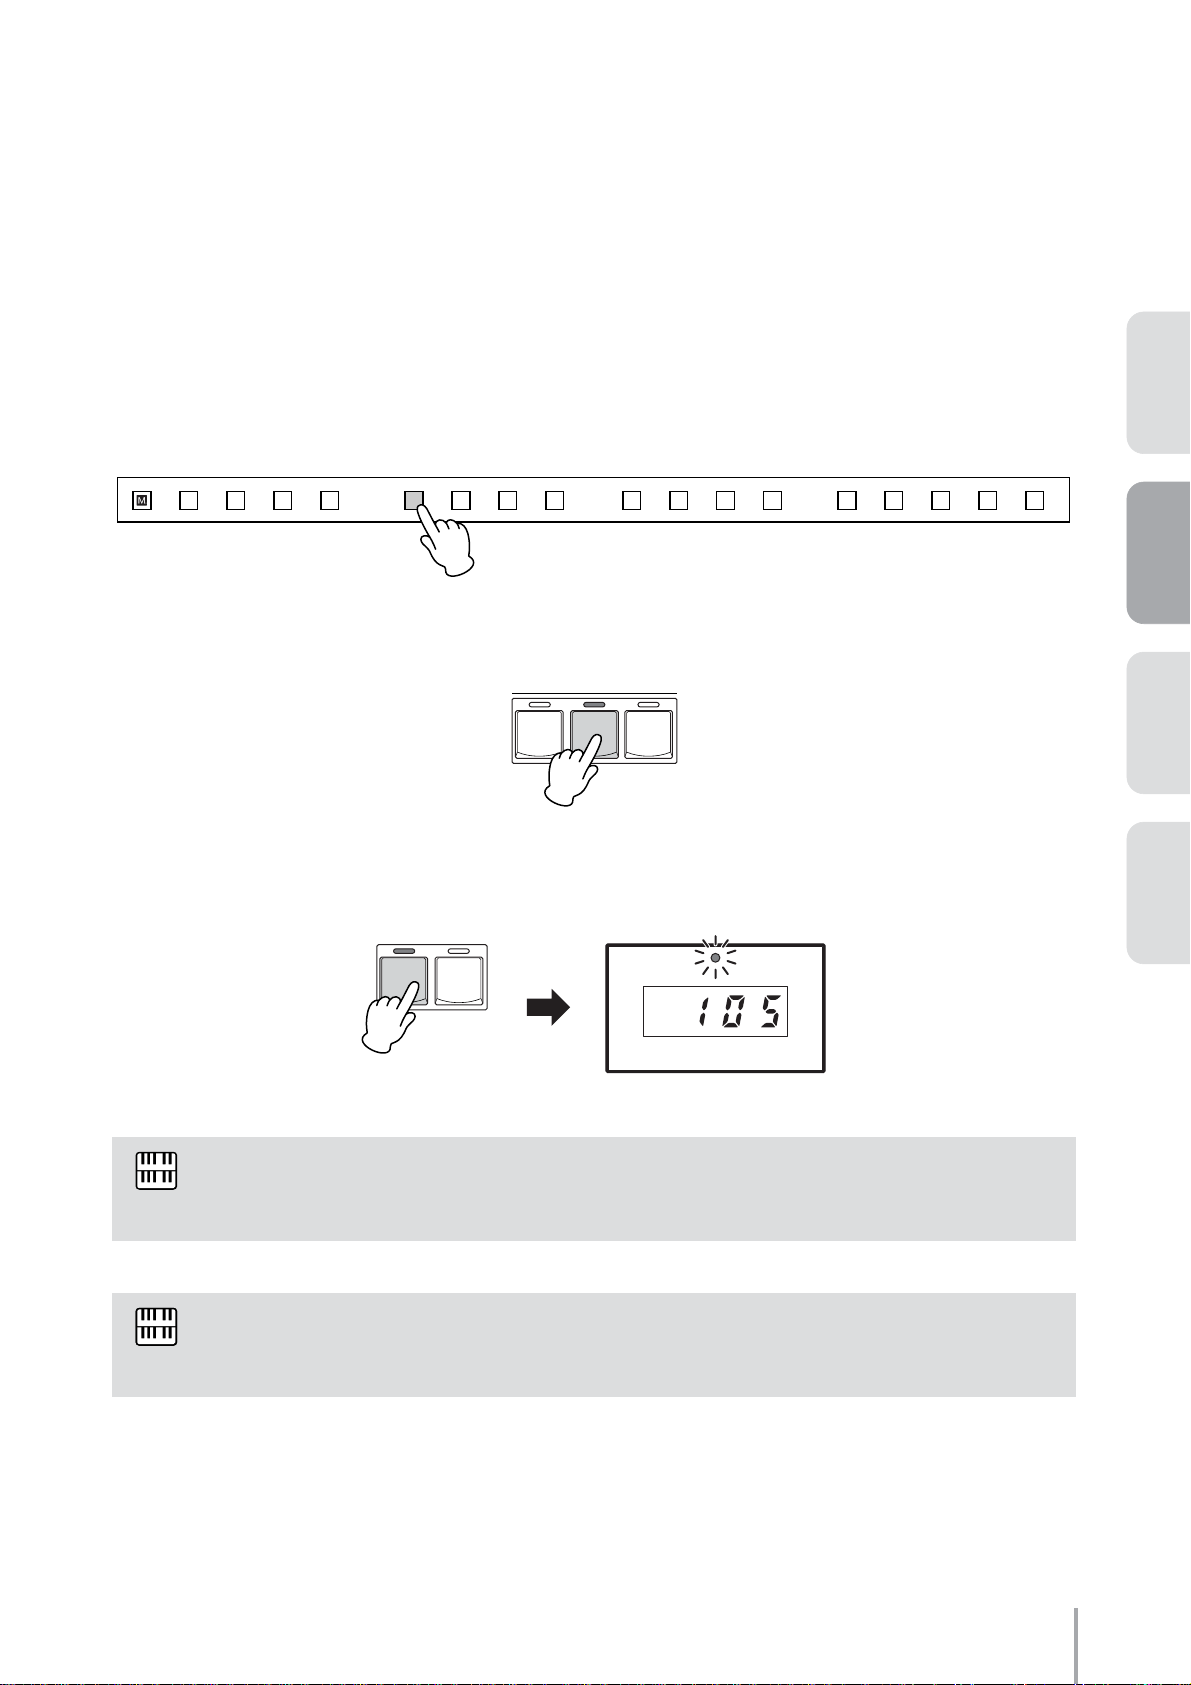
Press the [SYNCHRO START] button.
1
The lamp above the BAR/BEAT display flashes, indicating the rhythm is set to standby.
START
SYNCHRO
START
Play the song.
2
As soon as you play the first note, the rhythm starts. Try putting some expression into your playing by using
after touch (see page 39 of the Owner’s Manual).
When you come to the last measure, press the [SYNCHRO START] button with your
3
right hand to stop the rhythm.
BAR / BEAT
TEMPO
ACT 1ACT 2ACT 4 ACT 3
NOTE
NOTE
If you want to play the song at a slower tempo, turn the TEMPO dial counter-clockwise and decrease
the tempo to around 70 or so.
TEMPO
Decreasing
the tempo
BAR / BEAT
TEMPO
Notice the tied notes in the left hand. When changing chords, be careful not to break up the
continuous sound between the chords. The notes in parentheses are optional and can be left out,
especially if you have difficulty playing them.
Playing the ELS-01/01C — Tutorial
11
Page 12
ACT
ACT
Editing a Registration
Registration Memory
2
2
and Storing it to
Song:
Dancing Queen
M1
M2
M3
Creating a Simple Intro Sound
based on the Registration Menu
Slightly Editing the Intro Sound
Enjoying the Original Sound
of the Registration Menu
Playing the ELS-01/01C — Tutorial
Playing the ELS-01/01C — Tutorial
12
12
Page 13
In this chapter, first select one of the Registration Menu buttons (as you did in ACT 1), then create
three new Registrations by changing the selected Registration. You can save the created
Registrations to the Registration Memory buttons first, then save them to a SmartMedia card.
Here is a brief rundown of the three Registrations you’ll be using in “Dancing Queen.” Registration M1
features a clear piano intertwined with warm strings and a distinctive wah guitar in the Lower
keyboard. In M2, the Synth Lead performs the melody. The last Registration, M3, is the gorgeous
sound of the original Registration Menu itself.
About “Dancing Queen”
The Disco craze of the mid 1970’s swept the entire world, resulting in a huge amount of hit songs and
many popular artists, such as Earth, Wind & Fire, KC & the Sunshine Band, and the Bee Gees. One of
the most successful Disco-flavored acts was ABBA, the Swedish male/female team of songwriters/
singers — and “Dancing Queen” was one of their most popular songs. As you’ll discover, the Electone
has a wide variety of highly danceable rhythms that are ideal for recreating the Disco sound.
ACT 1ACT 2ACT 4 ACT 3
Playing the ELS-01/01C — Tutorial
13
Page 14

ACT 1 ACT 2 ACT 3 ACT 4
Dancing Queen
Composed by Benny Andersson/Bjorn Ulvaeus/Stig Anderson
Arranged by Riko Morino
DANCING QUEEN
Words & Music by Benny Andersson/Björn Ulvaeus/Stig Anderson
© 1976 by UNIVERSAL MUSIC PUBLISHING A.B./UNION SONGS A.B.
All Rights Reserved. International Copyright Secured.
Prin rights for Japan controlled K.K. Music SALES
Softly
INTRO , RHYTHM SYNCHRO START
Playing the ELS-01/01C — Tutorial
14
Page 15

a
ACT 1ACT 2ACT 4 ACT 3
ENDING 1 (with left footswitch)
Playing the ELS-01/01C — Tutorial
15
Page 16
M1
Creating a Simple Intro Sound
based on the Registration Menu
The original Registration Menu we’ll use for “Dancing Queen” is full and rich — perfect for this song’s main
melody. However, it’s a bit too extravagant to use in the intro. So, we’ll make it a little more simple and sparse, by
canceling the Melody On Chord feature and muting the Lead Voice.
ACT 1 ACT 2 ACT 3 ACT 4
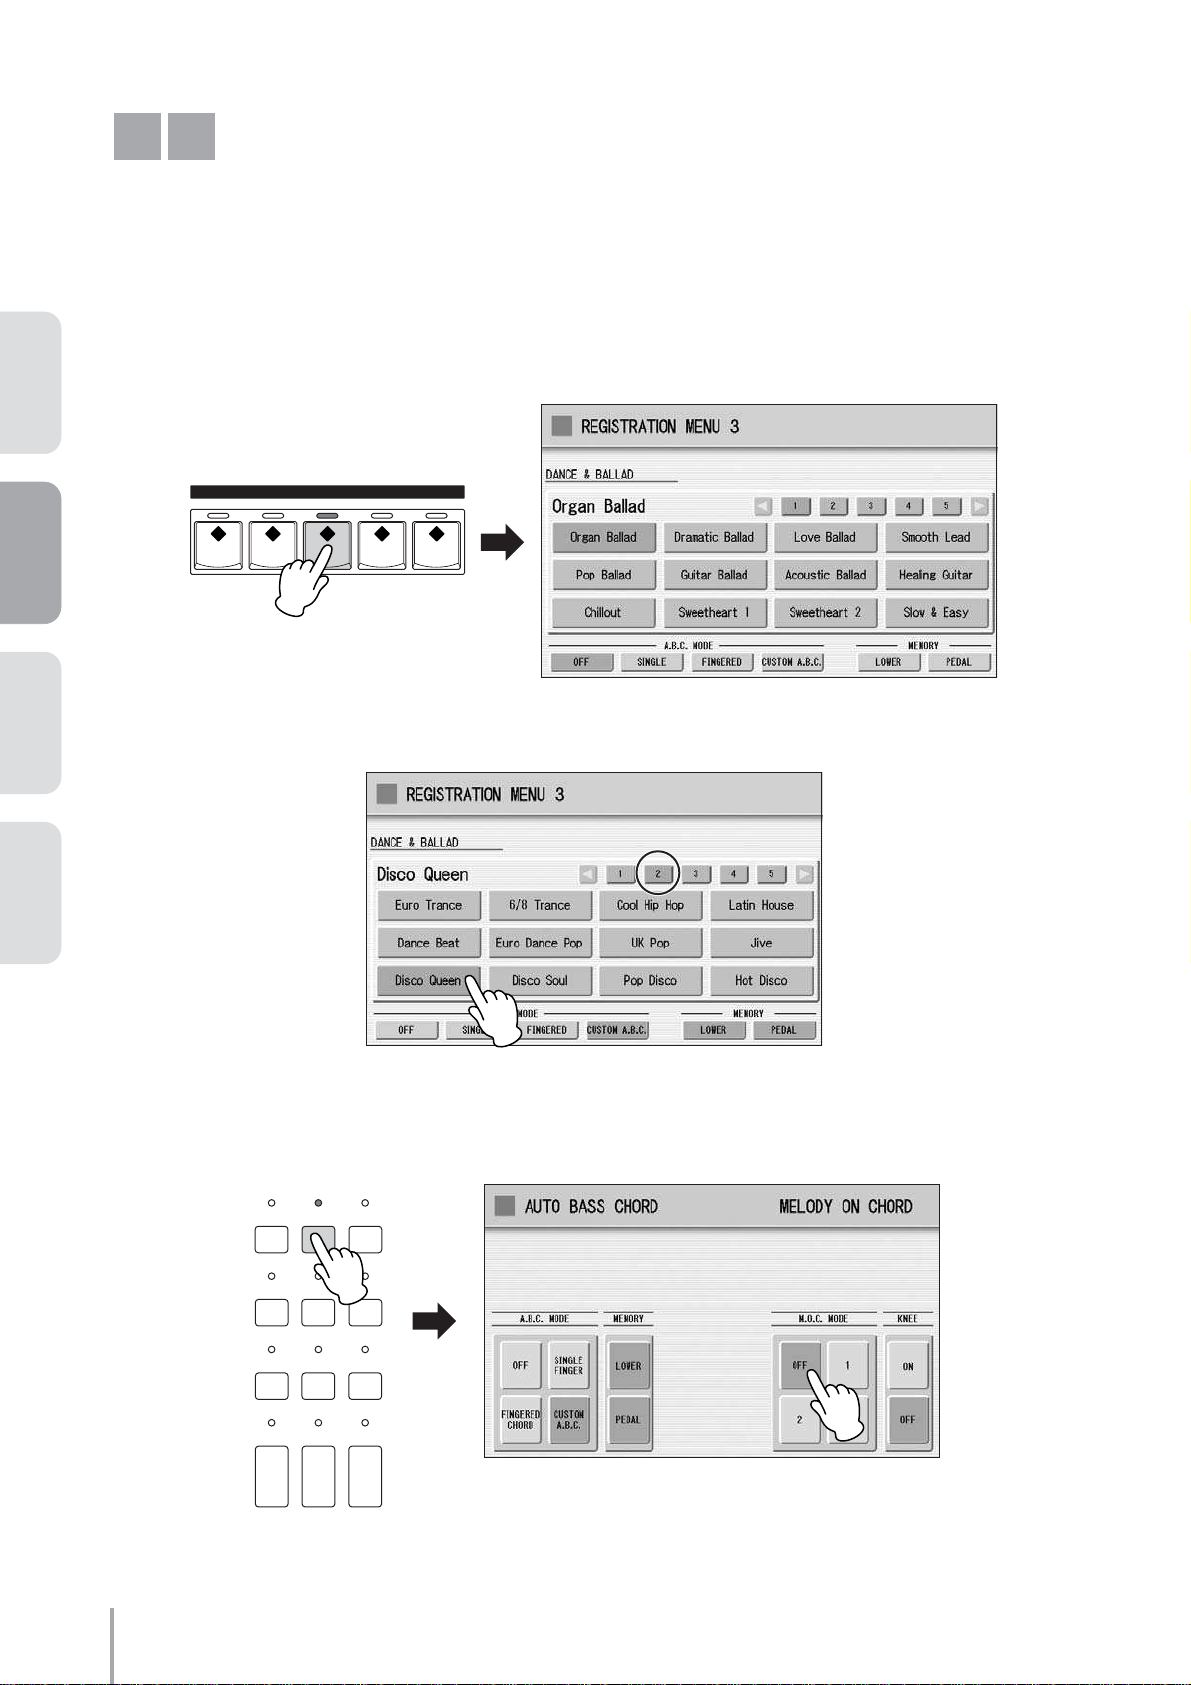
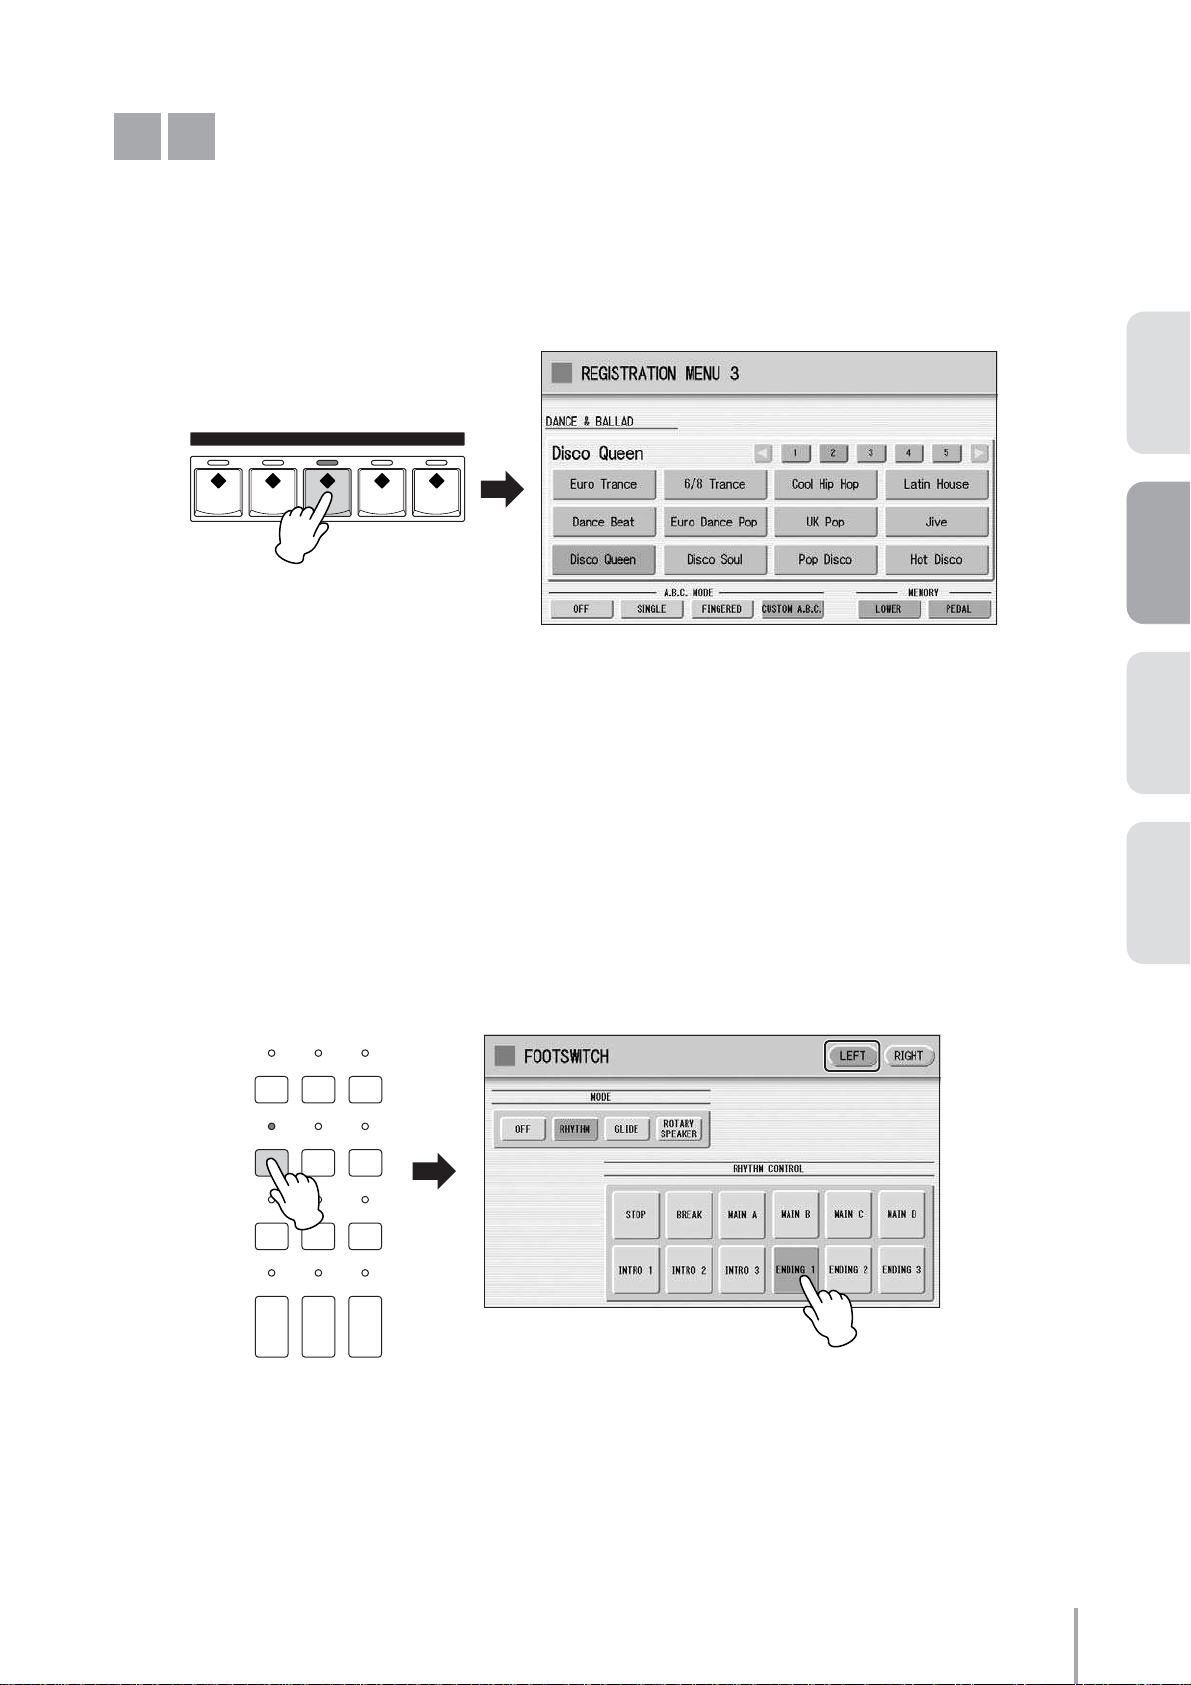
Press the REGISTRATION MENU [3] button.
1
REGISTRATION MENU
12345
Press the [2] button in the display to change the displayed menu page, then select
2
[Disco Queen].
Press the [A.B.C./M.O.C.] button to call up the Auto Bass Chord/Melody On Chord
3
display, then set Melody On Chord (M.O.C. MODE) to OFF.
DISPLAY SELECT
A.B.C.
VOICE
DISPLAY
FOOT
SWITCH
VOICE EDIT PATTERN SEQUENCE
U.ORGAN
FLUTES
Playing the ELS-01/01C — Tutorial
16
MDR
M.O.C.
UTILITY INTERNET
RHYTHM
PROGRAM
ROTARY SP
L.ORGAN
SPEED
FLUTES
Page 17
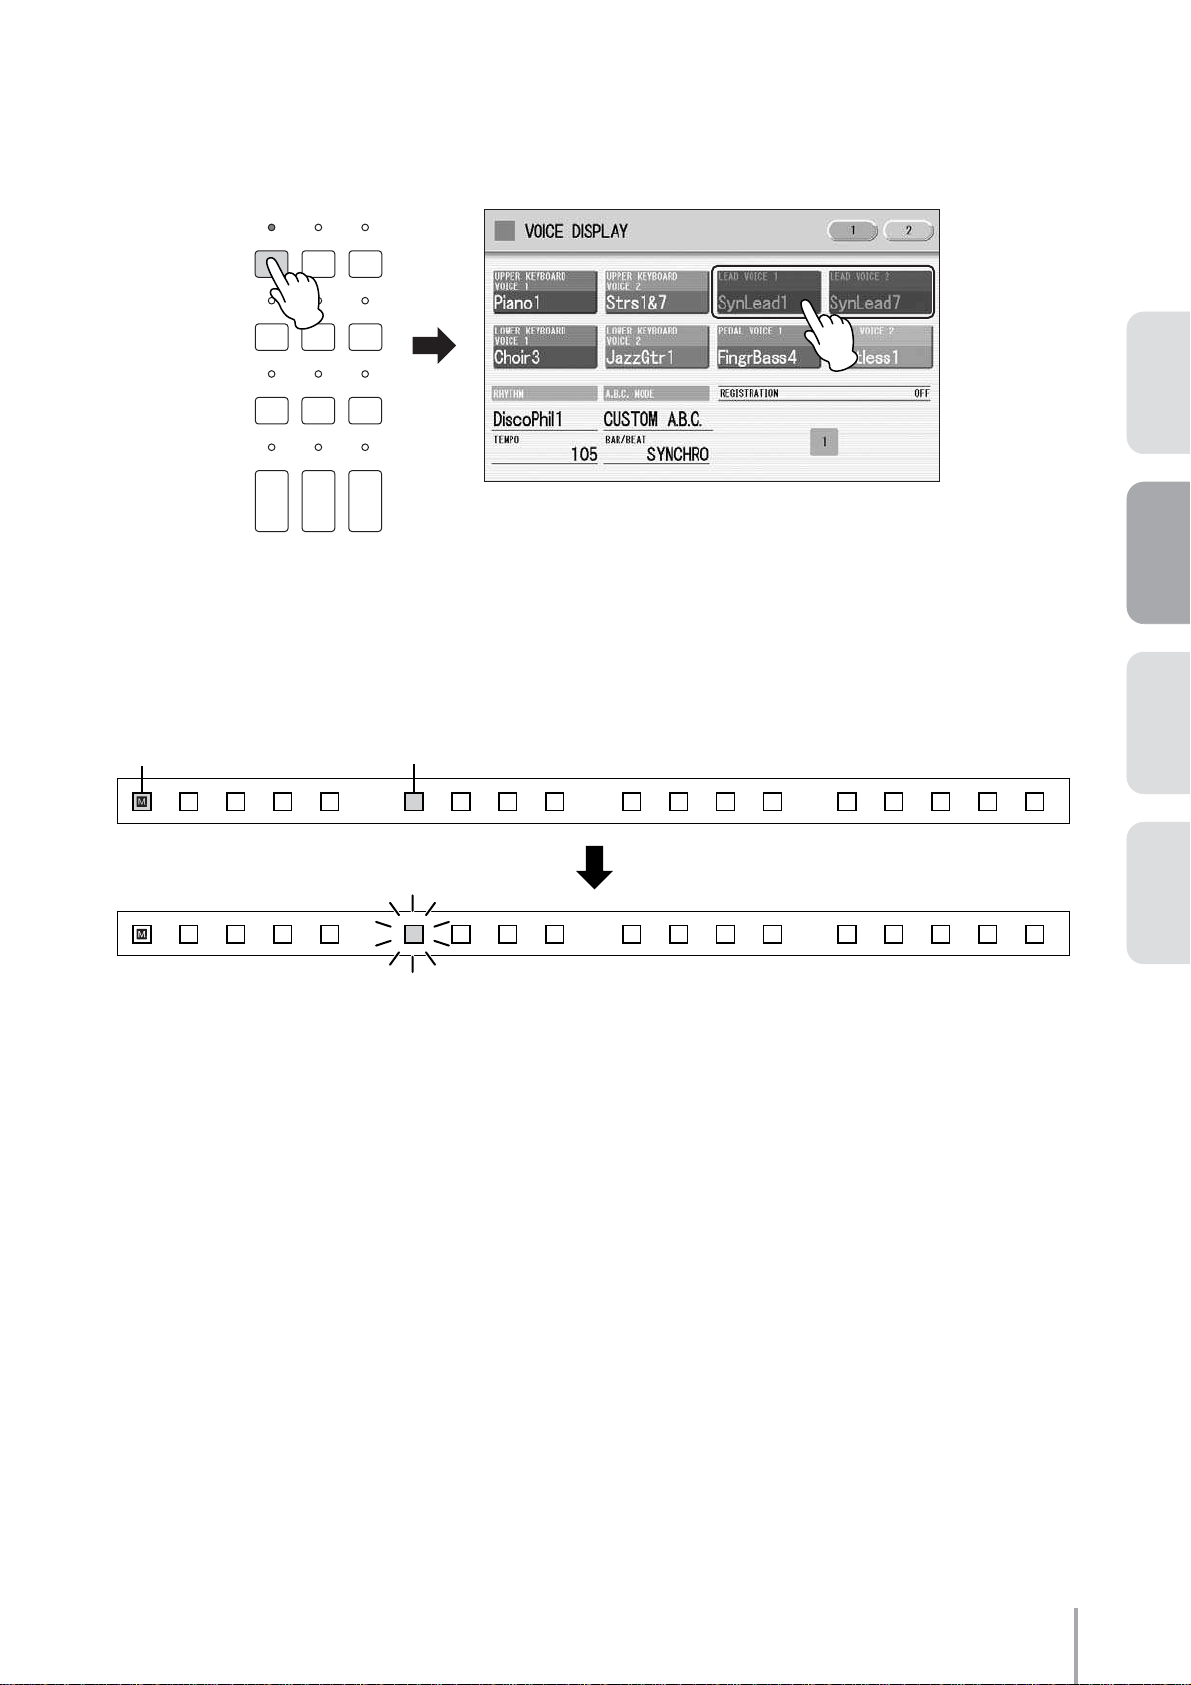
Press the [VOICE DISPLAY] button, to call up the Voice Display, then mute both Lead
4
Voice 1 and Lead Voice 2. (Press the buttons so they are grayed-out or “ghosted.”)
DISPLAY SELECT
A.B.C.
VOICE
DISPLAY
FOOT
SWITCH
VOICE EDIT PATTERN SEQUENCE
MDR
M.O.C.
UTILITY INTERNET
RHYTHM
PROGRAM
ACT 1ACT 2ACT 4 ACT 3
U.ORGAN
FLUTES
L.ORGAN
FLUTES
ROTARY SP
SPEED
This completes the settings for Registration Memory 1, so record these settings to the [1] button in the
Registration Memory section.
While holding down the [M.] (Memory) button in the Registration Memory section, press the [1] button.
1. While holding down [M.] button…
13 14 15 16 1 2 3 4 5 6 7 8 9 10 11 12 D.
13 14 15 16 1 2 3 4 5 6 7 8 9 10 11 12 D.
2. Press the numbered button.
When the Registration is being stored, the [1] button flashes momentarily.
Playing the ELS-01/01C — Tutorial
17
Page 18
ACT 1 ACT 2 ACT 3 ACT 4
M2
Slightly Editing the Intro Sound
Here, we’ll slightly change the Registration used in the intro (M1), by turning on the Lead Voice — to better
bring out the melody played on the Upper keyboard.
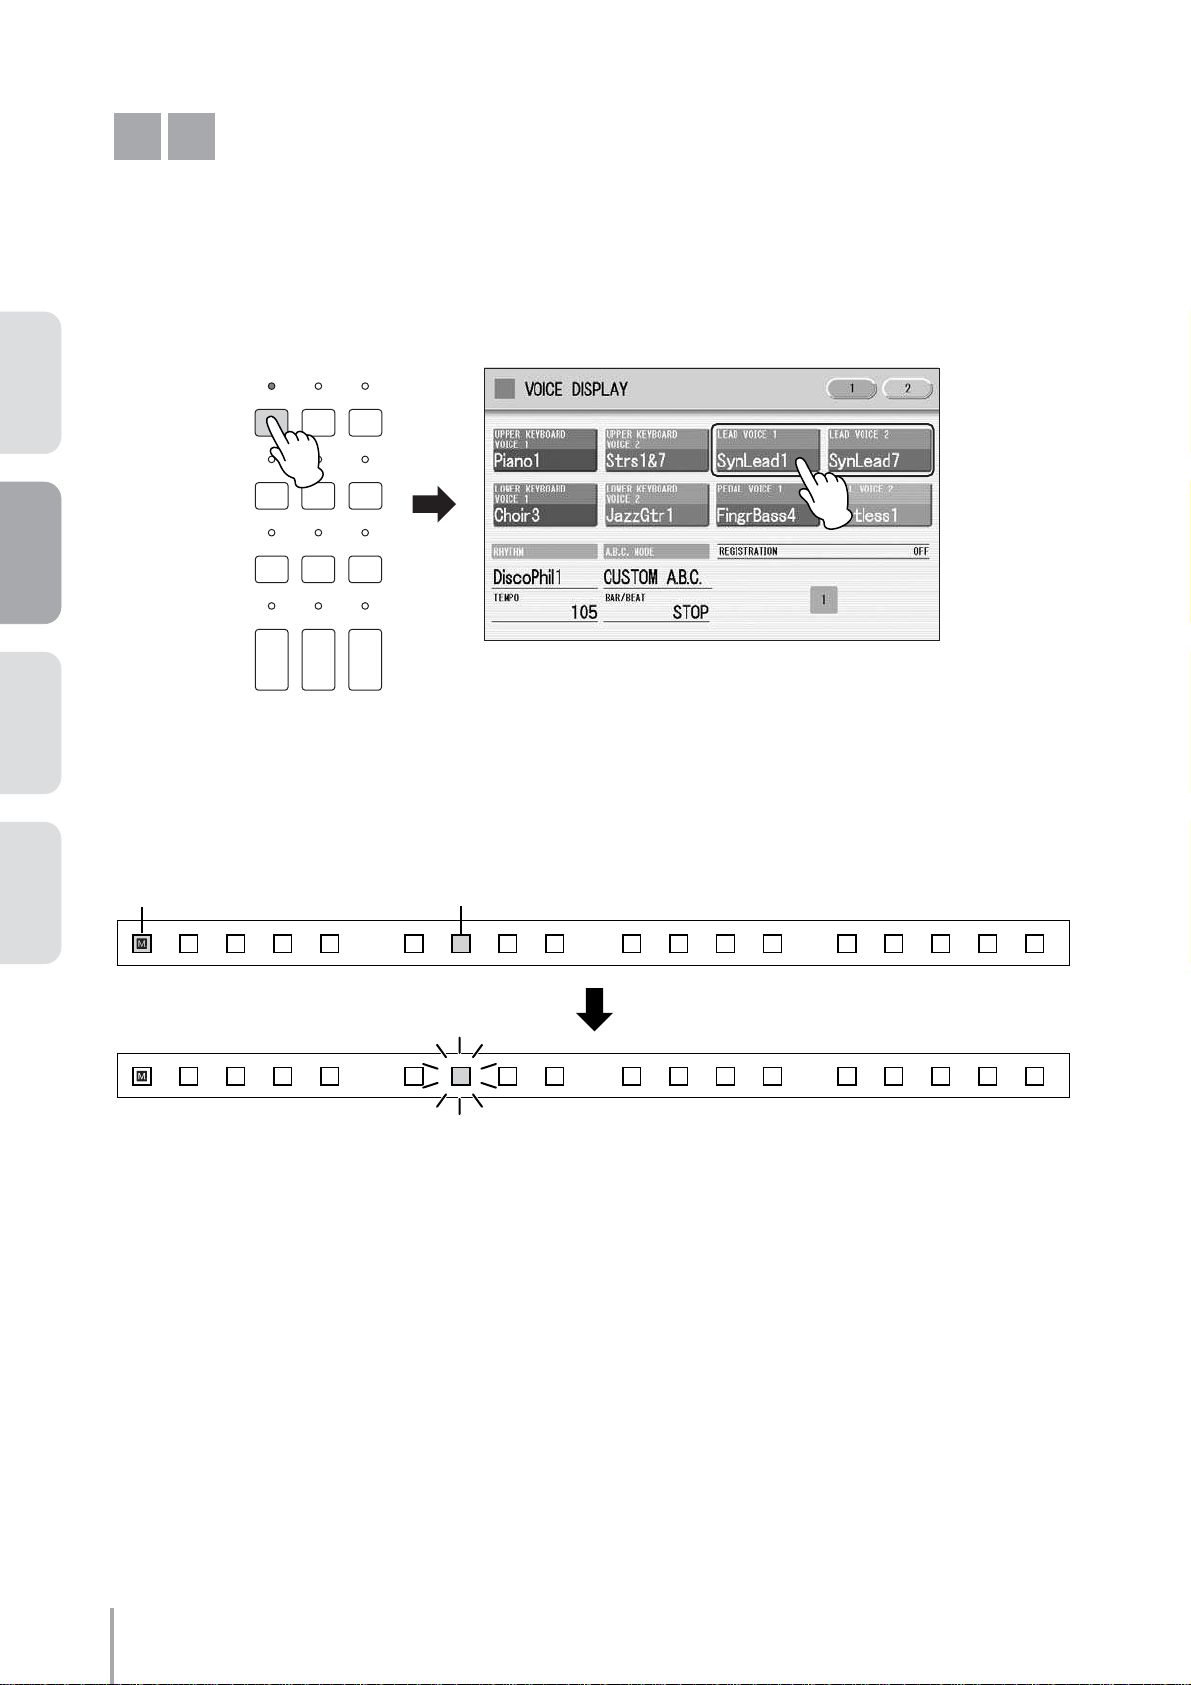
Press the (muted) Lead Voice 1 and Lead Voice 2 buttons in the Voice Display to turn them
back on.
DISPLAY SELECT
A.B.C.
VOICE
DISPLAY
FOOT
SWITCH
VOICE EDIT PATTERN SEQUENCE
MDR
M.O.C.
UTILITY INTERNET
RHYTHM
PROGRAM
U.ORGAN
FLUTES
L.ORGAN
FLUTES
ROTARY SP
SPEED
This completes the settings for Registration Memory 2, so record these settings to the [2] button in the
Registration Memory section.
While holding down the [M.] (Memory) button in the Registration Memory section, press the [2] button.
1. While holding down [M.] button…
13 14 15 16 1 2 3 4 5 6 7 8 9 10 11 12 D.
13 14 15 16 1 2 3 4 5 6 7 8 9 10 11 12 D.
2. Press the numbered button.
When the Registration is being stored, the [2] button flashes momentarily.
Playing the ELS-01/01C — Tutorial
18
Page 19
M3
Enjoying the Original Sound
of the Registration Menu
For the main melody, we’ll use original Registration Menu, with no editing. Melody On Chord is set to on for the
Registration Menu by default, automatically adding harmony notes to your performance.
Press the REGISTRATION MENU [3] button, then select the “Disco Queen” Registration.
REGISTRATION MENU
12345
ACT 1ACT 2ACT 4 ACT 3
Footswitch Settings
●●●●●●●●●●●●●●●●●●●●●●●●●●●●●●●●●●●●●●●●●●●●●●●●●●
You can use the footswitches on the Electone to control different performance functions — without ever having to
take your hands from the keyboards! First, we’ll set the Left Footswitch function so that you can play the Ending 1
pattern with the left footswitch.
Press the [FOOT SWITCH] button to call up the Footswitch display, then press the [LEFT]
button at the top right of the display.
Set the Mode to [RHYTHM], then select [ENDING 1] in the RHYTHM CONTROL section in the display.
DISPLAY SELECT
A.B.C.
VOICE
DISPLAY
FOOT
SWITCH
VOICE EDIT PATTERN SEQUENCE
U.ORGAN
FLUTES
MDR
M.O.C.
UTILITY INTERNET
RHYTHM
PROGRAM
ROTARY SP
L.ORGAN
SPEED
FLUTES
Playing the ELS-01/01C — Tutorial
19
Page 20
ACT 1 ACT 2 ACT 3 ACT 4
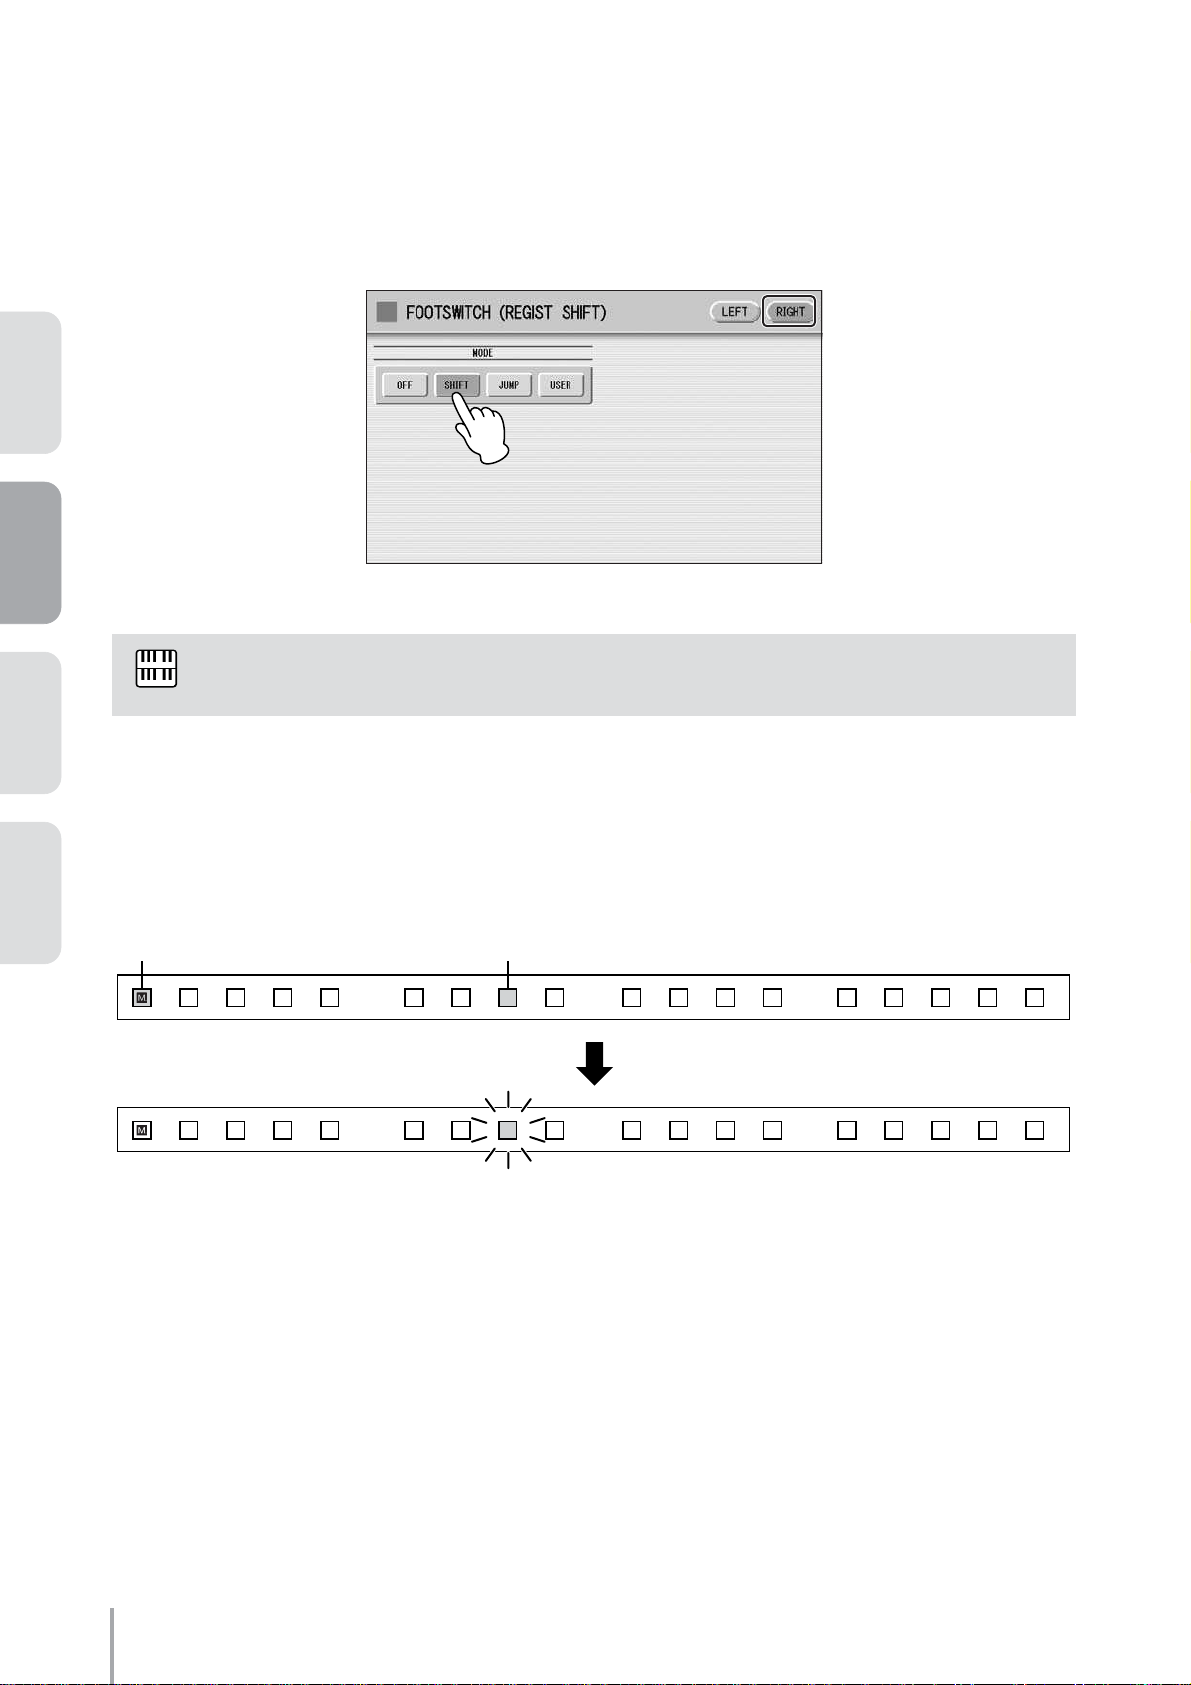
Next, set the Right Footswitch function so that you can change the Registration with the right footswitch.
Press the [RIGHT] button at the top right of the display.
Select the [SHIFT] mode as shown below.
NOTE
This setting, Registration Shift, cannot be saved to the Registration Memory buttons.
This completes the settings for Registration Memory 3, so record these settings to the [3] button in the
Registration Memory section.
While holding down the [M.] (Memory) button in the Registration Memory section, press the [3] button.
1. While holding down [M.] button…
13 14 15 16 1 2 3 4 5 6 7 8 9 10 11 12 D.
13 14 15 16 1 2 3 4 5 6 7 8 9 10 11 12 D.
2. Press the numbered button.
When the Registration is being stored, the [3] button flashes momentarily.
Playing the ELS-01/01C — Tutorial
20
Page 21
Using the Music Data Recorder
In these instructions, you’ll learn how to save your new Registration Memory settings to a SmartMedia card.
Saving Registration Data to SmartMedia
●●●●●●●●●●●●●●●●●●●●●●●●●●●●●●●●●●●●●●●●●●●●●●●●●●
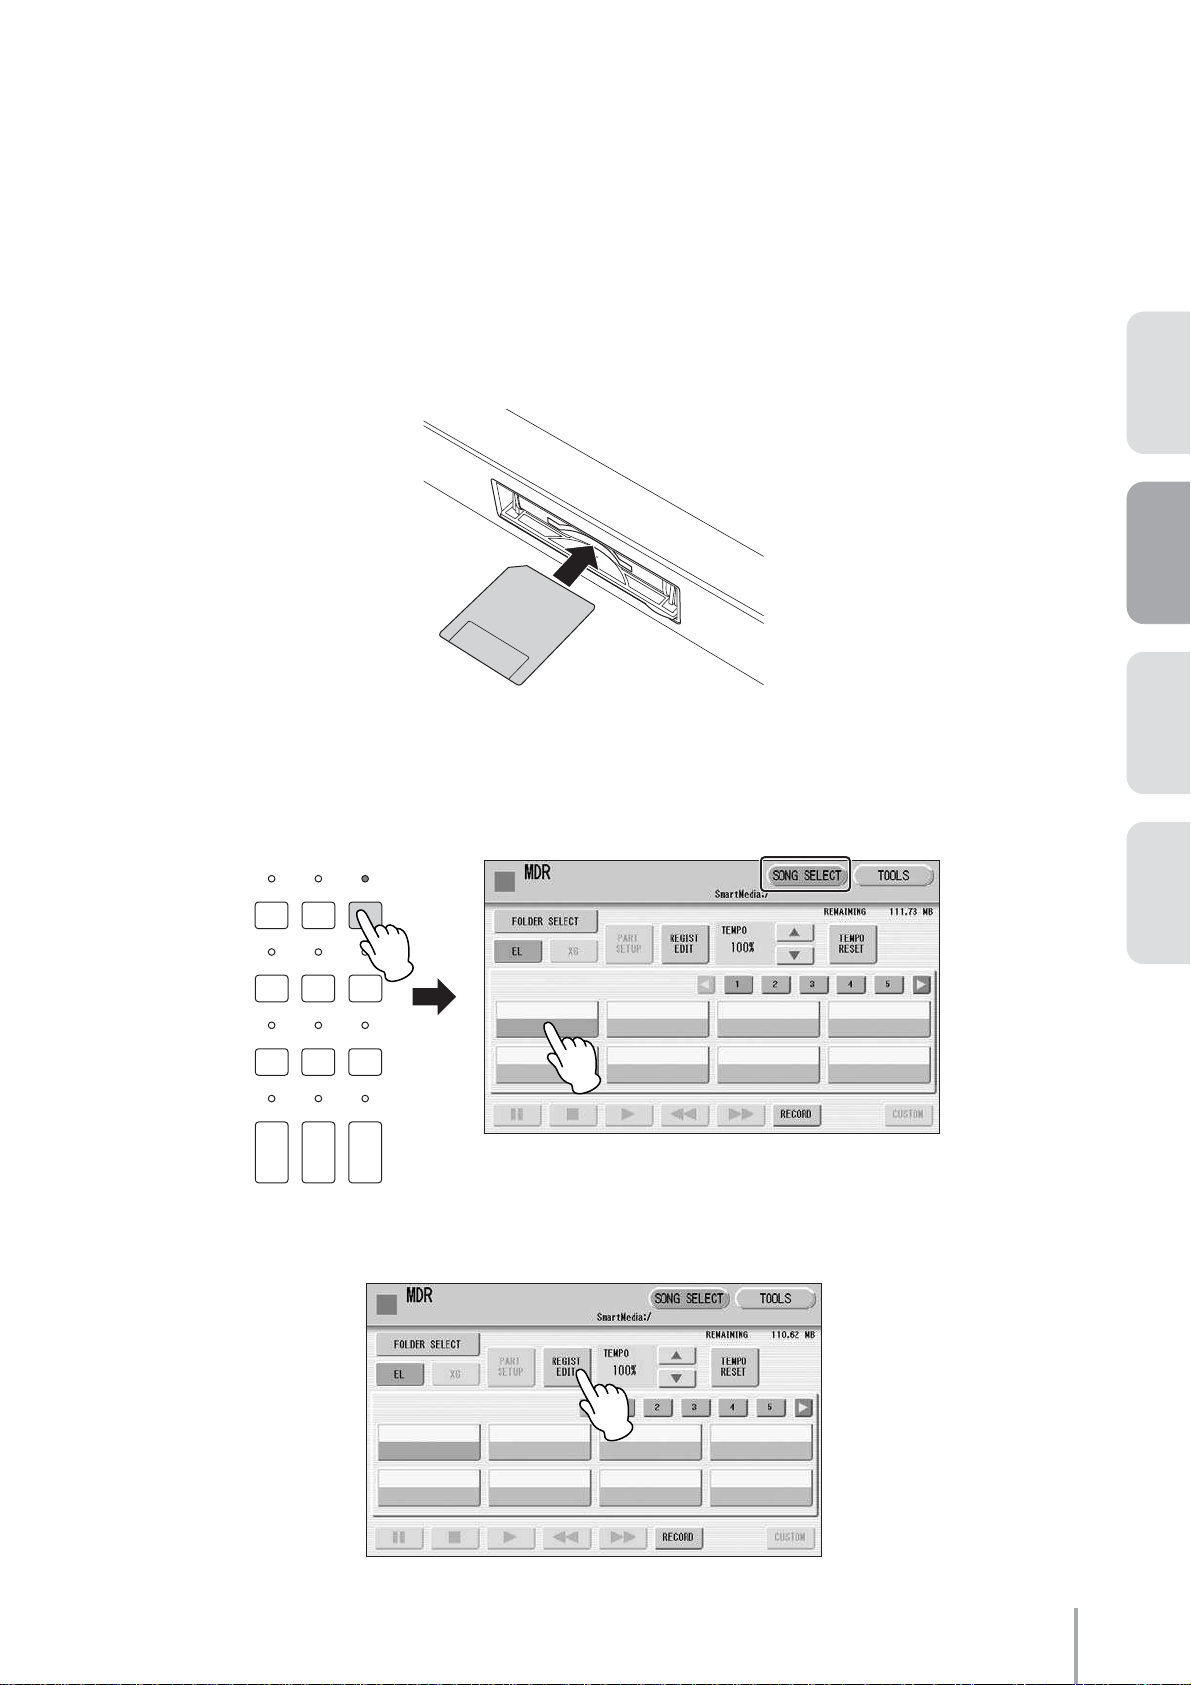
Insert the SmartMedia card with the terminal (gold-plated) side face down into the card
1
slot, until it clicks into place.
ACT 1ACT 2ACT 4 ACT 3
Press the [MDR] button in the panel to call up the M.D.R. display, then select a
2
destination Song.
In the SONG SELECT Page of the display, select a blank Song to which the Registration data will be saved.
DISPLAY SELECT
A.B.C.
VOICE
DISPLAY
FOOT
SWITCH
VOICE EDIT PATTERN SEQUENCE
U.ORGAN
FLUTES
Press the [REGIST EDIT] button in the display.
3
MDR
M.O.C.
UTILITY INTERNET
RHYTHM
PROGRAM
ROTARY SP
L.ORGAN
SPEED
FLUTES
Playing the ELS-01/01C — Tutorial
21
Page 22
ACT 1 ACT 2 ACT 3 ACT 4
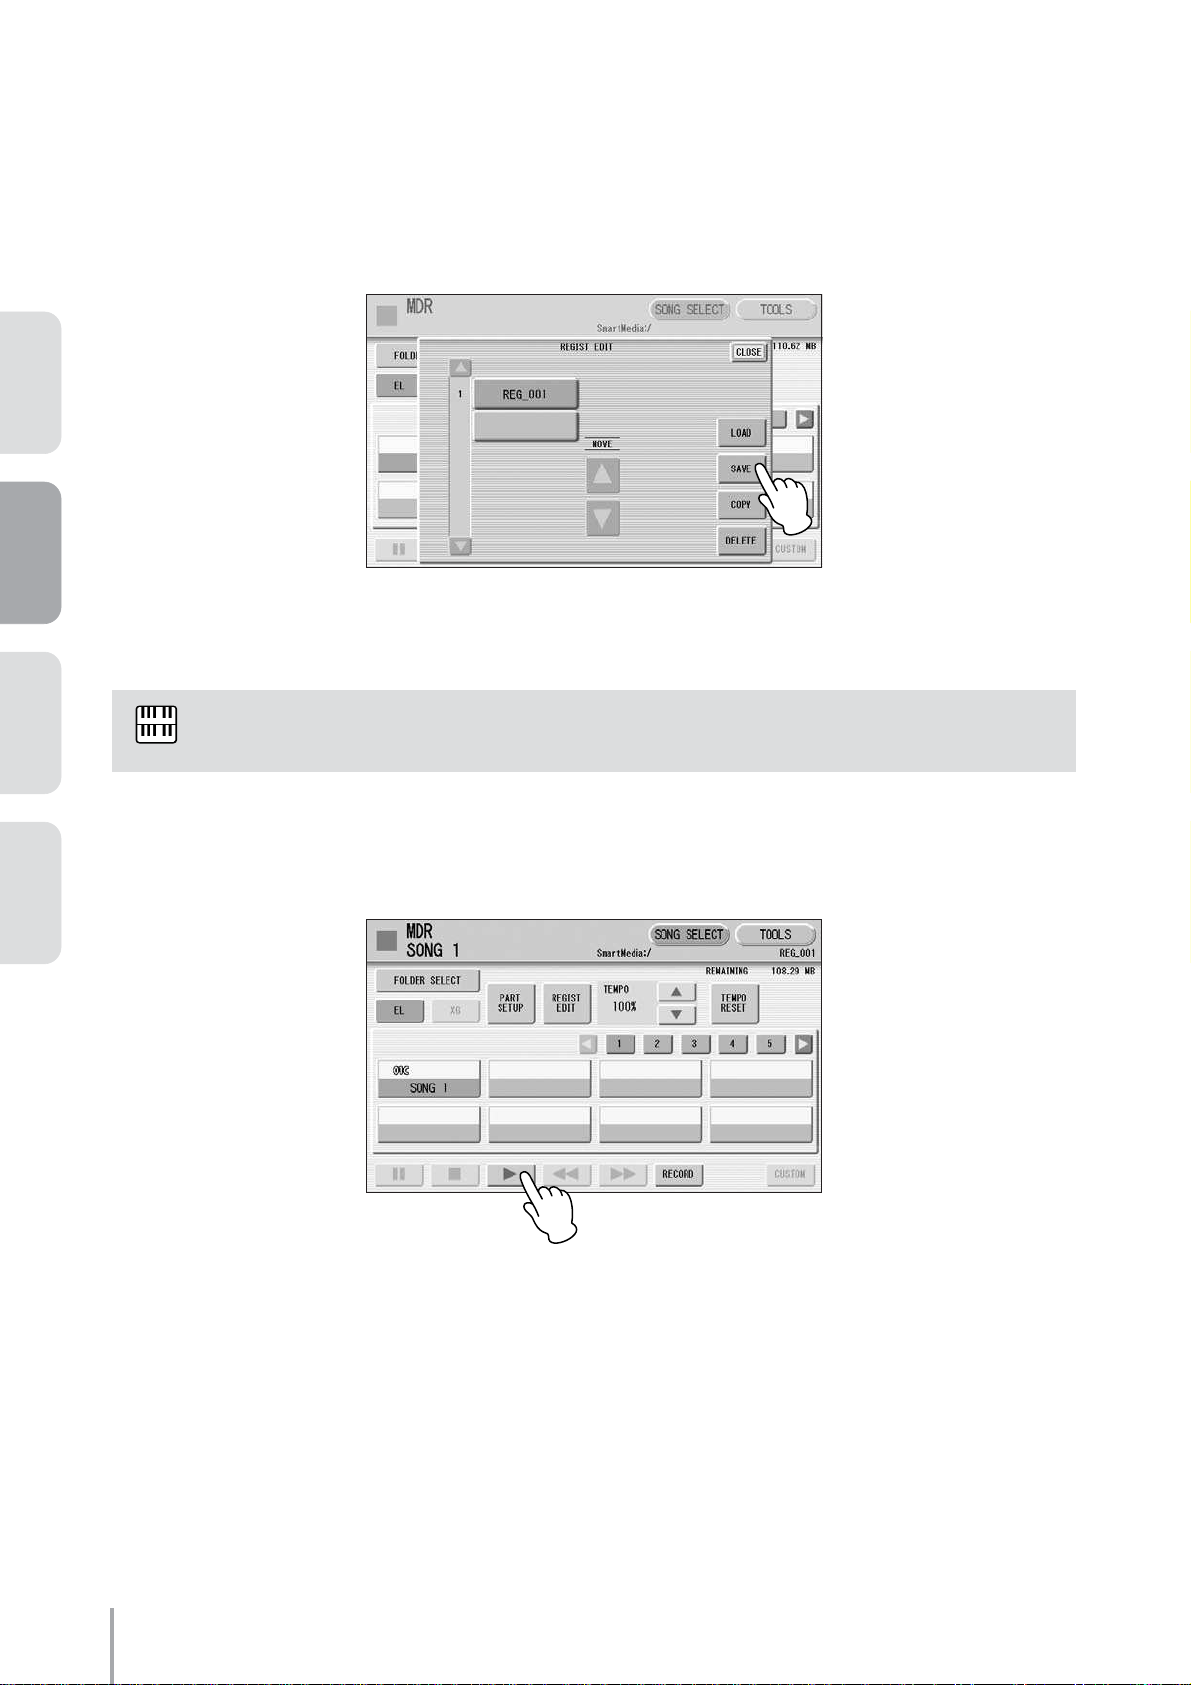
Press the [SAVE] button in the display to save the Registration data. A message
4
appears indicating the data is being saved.
After the message disappears, press the [CLOSE] button to close the Regist Edit
display.
Now, your Registration settings in Registration Memory buttons 1 – 3 have been saved to a SmartMedia card.
NOTE
To call up the saved Registration data, select the song in the SONG SELECT Page of the M.D.R. display then
press the [F] (Play) button.
You can change the Song name as desired (see page 104 in the Owner’s Manual).
Playing the ELS-01/01C — Tutorial
22
Page 23
Playing “Dancing Queen”
Using your three new Registrations (M1 – M3), try playing “Dancing Queen” now.
See the notation on pages 14 – 15. At the points in the score where M2 and M3 are indicated, press the right
footswitch to change the Registration Memory. At the second to the last measure, press the left footswitch to
switch to the Ending pattern and stop the rhythm. Using your foot to control these features may take some
practice, but mastering this technique will make your performance much more dynamic and professional.
Press the Registration Memory [1] button.
1
13 14 15 16 1 2 3 4 5 6 7 8 9 10 11 12 D.
Press the INTRO [2] button on the panel.
2
INTRO
123
Press the rhythm [SYNCHRO START] button. The lamp above the BAR/BEAT display
3
flashes, indicating the rhythm is set to standby.
START
SYNCHRO
START
BAR / BEAT
ACT 1ACT 2ACT 4 ACT 3
NOTE
NOTENOTE
Now, start playing — in rhythm!
In the intro section, play the right hand performance with a soft touch, as if you were adding
embellishments to the auto accompaniment. (If this part is difficult for you to play, feel free to ignore it.)
To better feel the disco rh ythm with your whole body, play the pedalboard with four quarter notes every
measure.
TEMPO
Playing the ELS-01/01C — Tutorial
23
Page 24
ACT
ACT
3
3
Selecting and Editing Voices
Working with Rhythm Sequence
and Registration Sequence
Song:
Change the World
M1
M2
M3
M4
M5
M6
M7
Intro with Acoustic Guitar
and Electric Piano
Classic Rock Organ
Sweet Harmonica Melody
Soft Harmony with Pad Sound
on the Lower Keyboard
Mysterious Arpeggio with Delay
Electric Guitar Solo
Ending with Acoustic Guitar
and Electric Piano
Playing the ELS-01/01C — Tutorial
24
Page 25

In Acts 1 and 2, you were able to enjoy playing the songs quickly using just the Registration Menu.
However, you may want to spice up your performance with more detailed Voice settings.
In this chapter, we’ll create custom song settings from the default settings. First, we’ll select the
necessary Voices and edit them with Voice controls and effects, then we’ll program a Rhythm
Sequence and Registration Sequence especially for the song.
After creating the song settings, try recording y our perf ormance to a SmartMedia card with the M.D.R.
function. The recorded song can be played back easily.
Since going through this chapter in v olves many diff erent operations, take y our time, master eac h step
in turn while you familiarize yourself with the convenient, sophisticated functions of the Electone.
Here is a brief rundown of the seven Registrations you’ ll be using in “Change the W orld.” The acoustic
guitar and electric piano accompaniment form the main part for M1, a rock organ for M2, a sweet
harmonica melody and pad harmony for M3 – M4, a mysterious arpeggio for M5, and an electric guitar
solo for M6. The final, ending Registration, M7, has the same settings as the intro.
About “Change the W orld”
This huge hit spent 13 weeks at #1 on both the Billboard and R&R charts in 1996 and captured three
major Grammy awards in 1997: Song of the Year, Record of the Year and Best Male Pop Vocal
Performance.
Though “Change the World” is closely identified with both Eric Clapton and Babyface, neither of those
artists wrote the song. Moreover, the three acclaimed songwriters who actually composed the tune,
wrote parts of it in turn and were not even in the same room together! The song was recorded first by
country superstar Wynonna, and eventually found its way to Eric Clapton and Babyface, who
performed and produced it for the soundtrack of the movie “Phenomenon.”
ACT 1ACT 2ACT 4 ACT 3
Playing the ELS-01/01C — Tutorial
25
Page 26
ACT 1 ACT 2 ACT 3 ACT 4
Change the World
Composed by Tommy Sims, Gordon Kennedy, Wayne Kirkpatrick
Arranged by Riko Morino
CHANGE THE WORLD
Words & Music by Tommy Sims/Gordon Kennedy/Wayne Kirkpatrick
© Copyright 1996 by UNIVERSAL-POLYGRAM INT'L PUBL. INC.,
UNIVERSAL-MCA MUSIC PUBLISHING, A DIVISION OF UNIVERSAL STUDIOS, INC.,
CAREERS-BMG MUSIC PUBLISHING, INC., and BASES LOADED MUSIC
All Rights Reserved. International Copyright Secured.
Print rights for Japan controlled K.K. MUSIC SALES
CHANGE THE WORLD
Gordon Kennedy / Wayne Kirkpatrick / Tommy Sims
© CAREERS-BMG MUSIC PUBLISHING, INC. / BASES LOADED MUSIC
Assigned for Japan to BMG Funhouse Music Publishing, Inc.
ROTARY SP On (with right hand)
with left hand
60’s 8Beat
Intro1
8Beat Light1 MainB
8Beat Light1 MainA
8Beat Light1 MainA
8Beat Light1 FillInB 16Beat 1 MainC
8Beat Light1 MainB
8Beat Light1 MainB
60’s 8Beat Break
16Beat 1 MainC 16Beat 1 MainD
Playing the ELS-01/01C — Tutorial
26
Page 27

a
16Beat 1 MainD
ROTARY SP On (with right hand)
Country Rock 2 MainB
Hard Rock 2 MainD
16Beat 1 FillInD
Country Rock 2 FillInC
*
16Beat 1 Break
8Beat Light1 MainA
(2nd time)
Hard Rock 2 MainD
Hard Rock 2 MainD
Country Rock 2 MainB
ACT 1ACT 2ACT 4 ACT 3
*
*
Hard Rock 2 MainD
For details on “H.Vib” and the asterisk mark (*), refer to page 57.
Hard Rock 2 FillInD
8Beat Light1 MainA
8Beat Light1 MainA
8Beat Light1 MainB
Folk Rock 1 Ending2
Playing the ELS-01/01C — Tutorial
27
Page 28

Initializing the Registration Memory
Before starting to create new song data, initialize the Registration Memory settings with the following procedure.
This will erase the settings you made in the last chapter, but if you don’t reset the Registrations, you won’t get the
intended results from the instructions that follow in this chapter.
ACT 1 ACT 2 ACT 3 ACT 4
Press the [UTILITY] button on the panel.
1
Press the INITIALIZE [EXECUTE] button in the Utility display, GLOBAL Page.
2
DISPLAY SELECT
A.B.C.
VOICE
DISPLAY
FOOT
SWITCH
VOICE EDIT PATTERN SEQUENCE
U.ORGAN
FLUTES
MDR
M.O.C.
UTILITY INTERNET
RHYTHM
PROGRAM
ROTARY SP
L.ORGAN
SPEED
FLUTES
A message prompting you to initialize the Registration data appears. Press [INITIALIZE] to go ahead and
initialize the data.
The display turns dark briefly, then starts up again automatically, indicating the initialization operation is
complete.
Creating the Registration Settings
How do go about creating the Registration? Where do you start? — the Voice settings for playing the melody, or
the rhythm settings that determine the groove? Actually, either is fine. In these instructions, we’ll first select the
Voices for each keyboard, Upper, Lower and Pedal, then make the rhythm settings.
Playing the ELS-01/01C — Tutorial
28
Page 29

M1
The main part of the Intro is the Acoustic Guitar and Electric Piano in the Lower Keyboard. In fact, the Electric
Piano for Lower Keyboard Voice 2 is used throughout the song, contained in Registrations M1 – M7.
Intro with Acoustic Guitar and Electric Piano
Adjusting the Reverb Settings
●●●●●●●●●●●●●●●●●●●●●●●●●●●●●●●●●●●●●●●●●●●●●●●●●●
Press one of the REVERB buttons on the panel to call up the Reverb Display, and set
1
the Depth to 20.
REVERB
MAX
MIN
Press the [2] button at the top right of the display, then set the Type to [STAGE 1].
2
Pressing the TYPE button calls up the Effect Type list. Select [STAGE 1] from the list, then press the
[CLOSE] button to close the list.
ACT 1ACT 2ACT 4 ACT 3
This setting reproduces the intimate atmosphere of hearing a live performance on a small stage, instead of a
large hall.
NOTE
The sliders in Page 3 of the Reverb display are the same as the Reverb slider in the Voice Condition
display of each Voice section. In these instructions, we’ll adjust the reverb for each Voice section by
using the Reverb Slider in the Voice Condition display, not the Reverb display.
Playing the ELS-01/01C — Tutorial
29
Page 30

ACT 1 ACT 2 ACT 3 ACT 4
Press the [4] button at the top right of the display, then set the Type to [STAGE 1] and
3
the Accompaniment to 20, as shown below.
Helpful Hint
The reverb for this song should be relatively short and minimal, especially since a “dry” percussion
sound better suits the intimate nature of the song. If you want to play a brass sound, a short, tight
reverb is better, too. On the other hand, when playing strings, or an expressive solo instrument, make
the reverb settings deeper and longer to reproduce a larger hall atmosphere and bring out the subtle
nuances of the instrument.
Selecting and Editing the Upper Keyboard Voices
●●●●●●●●●●●●●●●●●●●●●●●●●●●●●●●●●●●●●●●●●●●●●●●●●●
Press the [ORGAN] button in the UPPER KEYBOARD VOICE 1 section.
1
VOLUME
UPPER KEYBOARD VOICE 1
STRINGS BRASS TUTTI PAD SYNTH
PIANO ORGAN GUITAR CHOIR WORLD
Select [Rock Organ 1] in the displayed Voice Menu, on display Page 4.
2
WOOD-
WIND
PERCUS-
SION
BRILLIANCE
BRILLIANT
1
2
MELLOW
MAX
MIN
Playing the ELS-01/01C — Tutorial
30
Page 31

Set the BRILLIANCE button (at the right of the Voice buttons), to the third position from
3
the top.
VOLUME
UPPER KEYBOARD VOICE 1
STRINGS BRASS TUTTI PAD SYNTH
WOOD-
WIND
BRILLIANCE
BRILLIANT
1
MAX
PIANO ORGAN GUITAR CHOIR WORLD
PERCUS-
SION
2
MELLOW
MIN
Make the appropriate Voice Condition settings for Rock Organ 1.
4
Pressing the [ORGAN] button on the panel again calls up the Voice Condition display. On Page 1 of the
display, set After Touch in Touch Tone to 0, and Reverb to 16.
On Page 2 of the display, set Tune to +4. (Use the Data Control dial, if necessary.) This detunes the sound
slightly and gives it a bit of tension.
ACT 1ACT 2ACT 4 ACT 3
NOTE
There are two ways to call up the Voice Condition display: pressing the same Voice button on the
panel again, or pressing the selected Voice button in the Voice Menu in the display. In these
instructions, we’ve used the first method.
NOTE
The VOLUME buttons on the panel let you make broad settings to the volume, while the VOLUME
slider in the Voice Condition display lets you make fine adjustments.
Playing the ELS-01/01C — Tutorial
31
Page 32

ACT 1 ACT 2 ACT 3 ACT 4
On Page 3 of the display, select the Effect Category and Type.
5
Pressing the EFFECT1 button calls up the Effect Category list. Select [ROTARY SPEAKER] from the list,
then press [CLOSE] button to close the list.
Pressing the TYPE1 button calls up the Effect Category list. Select [ROTARY SP 5] from the list, then press
[CLOSE] button to close the list.
NOTE
Set the EQ High Gain to +7dB.
After you’ve changed the Effect Type, the effect parameters at the bottom half of the display
automatically change as well to reflect the switch. Feel free to adjust these effect parameters as you
want to get the desired sound.
Playing the ELS-01/01C — Tutorial
32
Page 33

Helpful Hint
Press the [ROTARY SP SPEED] button on the panel to turn the Rotary Speaker on/off at the respective
points indicated in the notation ( Aand D).
You can do this with your right hand, while you play. At the end of the glissando (the note F), keep
holding the note with your finger and replace it with your thumb. While you continue to hold the key,
press the [ROTARY SP SPEED] button with forefinger or middle finger.
On Page 4 of the display, change EFFECT 2 to THRU.
6
The Effect Type (TYPE 2) also changes to THRU automatically.
This completes the settings for UPPER KEYBOARD VOICE 1.
For the M1 Registration, UPPER KEYBOARD VOICE 2, LEAD VOICE 1 and LEAD VOICE 2 are not used.
Turn all their volume settings to 0.
ACT 1ACT 2ACT 4 ACT 3
Selecting and Editing the Lower Keyboard Voices
●●●●●●●●●●●●●●●●●●●●●●●●●●●●●●●●●●●●●●●●●●●●●●●●●●
Press the [GUITAR] button in the LOWER KEYBOARD VOICE 1 section.
1
Select [Steel Guitar 1] in the displayed Voice Menu, on display Page 1.
2
Check that the BRILLIANCE button (at the right of the Voice buttons), is set to the
3
fourth position from the top.
Make the appropriate Voice Condition settings for Steel Guitar 1.
4
On Page 1 of the Voice Condition display, set After Touch in Touch Tone to 0, and Volume to 22.
You don’t need to make any changes in Pages 2 and 3 of the Voice Condition display.
Playing the ELS-01/01C — Tutorial
33
Page 34

ACT 1 ACT 2 ACT 3 ACT 4
On Page 4 of the display, change EFFECT 2 to THRU.
5
This completes the settings for LOWER KEYBOARD VOICE 1. Next, we’ll edit the LOWER KEYBOARD
VOICE 2 settings.
Press the [PIANO] button in the LOWER KEYBOARD VOICE 2 section.
6
Select [Stage E.Piano 1] in the displayed Voice Menu, on display Page 2.
7
Set the BRILLIANCE button (at the right of the Voice buttons), to the third position from
8
the top.
Make the appropriate Voice Condition settings for Stage E.Piano 1.
9
On Page 1 of the Voice Condition display, set Initial Touch in Touch Tone to 5, and After Touch to 0. Also,
set Volume to 22, and Pan to L1 (one step left of center).
This Pan setting places the Electric Piano on the left side of the stage.
You don’t need to make any changes in Page 2 of the Voice Condition display.
10
On Page 3 of the display, change EFFECT 1 to CHORUS and TYPE 1 to CELESTE 4.
You don’t need to make any changes in Page 4 of the Voice Condition display.
This completes the settings for the Lower Keyboard Voices.
Playing the ELS-01/01C — Tutorial
34
Page 35

Selecting and Editing the Pedal Voices
●●●●●●●●●●●●●●●●●●●●●●●●●●●●●●●●●●●●●●●●●●●●●●●●●●
Press the [ELEC. BASS] button in the PEDAL VOICE 1 section.
1
Select [Fingered Bass 1] in the displayed Voice Menu, on display Page 1.
2
Set the BRILLIANCE button (at the right of the Voice buttons), to the second position
3
from the top.
1
LOWER
BRILLIANCE VOLUME
BRILLIANT
MELLOW
MAX
MIN
PEDAL VOICE 1
CONTRA
Make the appropriate Voice Condition settings for Fingered Bass 1.
4
On Page 1 of the Voice Condition display, set Initial Touch in Touch Tone to 4, and After Touch to 0.
(After Touch for the Pedal Voice is available only on the ELS-01C). Also, set the Volume to 17.
ELEC.
BASS
BASS
TIMPANI TO
SYNTH
BASS
ACT 1ACT 2ACT 4 ACT 3
You don’t need to make any changes in Pages 2, 3 and 4 of the Voice Condition display.
This completes the settings for PEDAL VOICE 1. Next, we’ll edit the PEDAL VOICE 2 settings.
Press the [ELEC. BASS] button in the PEDAL VOICE 2 section.
5
Select [Fretless Bass 1] in the displayed Voice Menu, on display Page 2.
6
Set the BRILLIANCE button (at the right of the Voice buttons), to the third position from
7
the top. Also, set the VOLUME button to the third position from the bottom.
Playing the ELS-01/01C — Tutorial
35
Page 36

ACT 1 ACT 2 ACT 3 ACT 4
Make the appropriate Voice Condition settings for Fretless Bass 1.
8
On Page 1 of the Voice Condition display, set Initial Touch in Touch Tone to 5, and After Touch to 0.
(After Touch for the Pedal Voice is available only on the ELS-01C).
You don’t need to make any changes in Page 2 of the Voice Condition display.
On Page 3 of the display, change the EFFECT 1 to [CHORUS] and TYPE 1 to [XG
9
CHORUS 1].
You don’t need to make any changes in Page 4 of the Voice Condition display.
This completes the settings for the Pedal Voice settings.
Editing the Rhythm Condition
●●●●●●●●●●●●●●●●●●●●●●●●●●●●●●●●●●●●●●●●●●●●●●●●●●
Press the [POPS] button on the panel.
1
RHYTHM
WALT Z POPS R & B
SEQ.2SEQ.
1
SEQ.4SEQ.
3
Select the [60’s 8Beat] in the displayed Rhythm Menu, on display Page 1.
2
MARCH
LATIN
WORLD
MUSIC
SWING&
JAZZ
BALLAD ROCK
DANCE
VOLUME
MAX
1
2
MIN
Playing the ELS-01/01C — Tutorial
36
Page 37

Set the VOLUME button, (at the right of the Rhythm buttons), to the second position
3
from the top.
RHYTHM
WALT Z POPS R & B
SEQ.2SEQ.
1
SEQ.4SEQ.
3
MARCH
LATIN
WORLD
MUSIC
SWING&
JAZZ
BALLAD ROCK
Turn the TEMPO dial and set the Tempo to 106.
TEMPO
Increases
the tempo
NOTE
Decreases
the tempo
In this song, the rhythm patterns will automatically be changed with the Rhythm Sequence, so you
don’t need to save your rhythm pattern selections to Registration Memory. However, the Tempo and
Rhythm Condition settings must be saved to Registration Memory.
DANCE
BAR / BEAT
TEMPO
VOLUME
MAX
1
2
MIN
ACT 1ACT 2ACT 4 ACT 3
This completes the Rhythm Condition settings.
Now that the Registration Memory 1 settings are complete, record them to the [1] button in Registration
Memory section.
While holding down the [M.] (Memory) button in the Registration Memory section, press the
[1] button.
When the Registration is being stored, the [1] button flashes momentarily.
Working through the instructions above, you’ve probably become quite familiar with making settings for Voice
Condition and Rhythm Condition. Now try making settings on your own for the other Registration Memories
(M2 – M7), referring to the list of Voice Condition settings below.
Playing the ELS-01/01C — Tutorial
37
Page 38

M2
Using the M1 Registration as a basis, make M2 by changing the Lower Keyboard Voice setting.
The “Resonance Pad 5” Voice we’ll set here for Lower Keyboard Voice 1 is a unique sound that includes an
interval of a fifth, making chords played on the Lower Keyboard sound rich and mysterious.
Classic Rock Organ
ACT 1 ACT 2 ACT 3 ACT 4
Changing Lower Keyboard Voice 1
●●●●●●●●●●●●●●●●●●●●●●●●●●●●●●●●●●●●●●●●●●●●●●●●●●
Select the [Resonance Pad 5] Voice for the Lower Keyboard Voice 1.
1
This Voice is included in the [PAD] button, display Page 2.
Make the appropriate Voice Condition settings for Resonance Pad 5.
2
Change the Voice Condition settings in display Pages 1 – 4 and the Brilliance setting according to the
following chart. Settings/values that should be changed are highlighted in color.
Voice Condition Settings
Page 1 Pan Center
Touch Tone
Pitch Horizontal: 0 After: 0
Feet Preset (8')
Reverb 20
Volume 20
Page 2 Vibrato Preset
Touch Vibrato OFF
Transpose 0
Tune 0
Page 3 Effect 1 Chorus
Type 1 Celeste 2
Page 4 Effect 2 Thru
Type 2 Thru
BRILLIANCE 3rd from bottom
Initial: 3 After: 12
The After Touch setting allows you to change the volume and timbre of the sound, depending on how
strongly you press down on the keys after playing them.
After you’ve made all the necessary Voice Condition settings, press the [ROTARY SP SPEED] button to turn it
on.
Now that the Registration Memory 2 settings are complete, record these settings to the [2] button in Registration
Memory section.
Playing the ELS-01/01C — Tutorial
38
Page 39

M3
Sweet Harmonica Melody
Using the M1 Registration as the basis, set Harmonica for Lead Voice 1.
First, call up the M1 Registration by pressing the [1] button on the Registration Memory section, then set the
volume of the Upper Keyboard Voice 1 to 0.
Creating the Lead Voice 1 settings
●●●●●●●●●●●●●●●●●●●●●●●●●●●●●●●●●●●●●●●●●●●●●●●●●●
Press User button [1] of Lead Voice 1, then select [Harmonica 2] from the Organ
1
category.
ACT 1ACT 2ACT 4 ACT 3
1
LOWER
BRILLIANCE VOLUME
BRILLIANT
MELLOW
MAX
MIN
LEAD VOICE 1
VIOLIN
SYNTH
FLUTE TO
TRUMPET
Make the appropriate Voice Condition settings for Harmonica 2.
2
Change the Voice Condition settings in display Pages 1 – 4 and the Brilliance setting according to the
following chart. Settings/values that should be changed are highlighted in color.
Voice Condition Settings
Page 1 Pan Center
Touch Tone Initial: 8 After: 8
Pitch Horizontal: 0 After: 0
Feet Preset (8')
Reverb
Volume 22
Page 2 Vibrato User Delay: 4, Depth: 2,
Touch Vibrato OFF
Slide OFF Time: 0
Transpose 0
Tune
Page 3 Effect 1 Delay
Type 1 Echo
Page 4 Effect 2 Preset
Type 2 Thru
BRILLIANCE 4th from bottom
18
Speed: 3
+10
Playing the ELS-01/01C — Tutorial
39
Page 40

The “User” setting of Vibrato allows you to create your original vibrato by changing the vibrato delay,
depth and speed. The Tune setting, set higher than other Voices, makes the Harmonica stand out. The
Delay effect lends an echo to the sound as if the instrument is being played in a hall.
ACT 1 ACT 2 ACT 3 ACT 4
This completes the LEAD VOICE 1 settings.
LEAD VOICE 2 is not going to be used in this Registration, so check that its volume is set to 0.
Now that the Registration Memory 3 settings are complete, record these settings to the [3] button in Registration
Memory section.
Playing the ELS-01/01C — Tutorial
40
Page 41

M4
Soft Harmony with Pad Sound
on the Lower Keyboard
Using the M3 Registration as the basis, set Pop Lead for Lead Voice 2 and change the Lower Keyboard Voice 1 to
an ethereal pad sound like an angel singing. We’ll also change the Rhythm Condition here, setting some
accompaniment parts – including guitar backing – to on.
First call up the M3 Registration by pressing the [3] button on the Registration Memory section.
Helpful Hint
If you don’t want to program all of the Registration settings in one session, it is a good idea to save the
Registration settings you’ve created to a SmartMedia card, using the M.D.R. function. Saving your
settings periodically will also help prevent loss of data should you make any mistakes while
programming.
When you want to create a new Registration based on the previously created Registration, first call up
the created Registration (M3, in this case) then record it to the Registration memory number to be reprogrammed (M4, in this case). This helps your programming and editing go more smoothly.
ACT 1ACT 2ACT 4 ACT 3
Creating the Lead Voice 2 settings
●●●●●●●●●●●●●●●●●●●●●●●●●●●●●●●●●●●●●●●●●●●●●●●●●●
Press User button [1] of Lead Voice 2, then select [Pop Lead 6] from the Synth category,
1
display Page 2.
1
SOLO
(KNEE)
BRILLIANCE VOLUME
BRILLIANT
MELLOW
MAX
MIN
LEAD VOICE 2
VA VA
ACOUS-
TIC
VA VA
ELEC-
TRONIC
VIRTUAL
CUSTOM
Playing the ELS-01/01C — Tutorial
41
Page 42

ACT 1 ACT 2 ACT 3 ACT 4
Make the appropriate Voice Condition settings for Pop Lead 6.
Change the Voice Condition settings in display Pages 1 – 4 and the Brilliance setting according to the
2
following chart. Settings/values that should be changed are highlighted in color.
Voice Condition Settings
Page 1 Pan Center
Touch Tone Initial: 8 After: 8
Pitch Horizontal: 0 After: 0
Feet Preset (8')
Reverb
Volume 12
Priority
Page 2 Vibrato Preset
Touch Vibrato OFF
Slide OFF Time: 0
Transpose 0
Tune +10
Page 3 Effect 1 Delay
Type 1 Delay LR
Page 4 Effect 2 Thru
Type 2 Thru
BRILLIANCE 3rd from top
22
Last
NOTE
The “Last” setting of the Priority parameter allows y ou to pla y the phrase with the Lead Voice while one
note is being held down — for example, in the fourth and seventh bars in C in the notation.
This completes the LEAD VOICE 2 settings.
Playing the ELS-01/01C — Tutorial
42
Page 43

Changing the Lower Keyboard settings
●●●●●●●●●●●●●●●●●●●●●●●●●●●●●●●●●●●●●●●●●●●●●●●●●●
Select [Smooth Pad 1] for Lower Keyboard Voice 1.
1
This Voice is included in the [PAD] button, display Page 1.
Make the appropriate Voice Condition settings for Smooth Pad 1.
2
Change the Voice Condition settings in display Pages 1 – 4 and the Brilliance setting according to the
following chart. Settings/values that should be changed are highlighted in color.
Voice Condition Settings
Page 1 Pan Center
Touch Tone Initial: 8 After: 0
Pitch Horizontal: 0 After: 0
Feet Preset (8')
Reverb 20
Volume
Page 2 Vibrato Preset
Touch Vibrato OFF
Transpose 0
Tune 0
Page 3 Effect 1 EQ/Enhancer
Type 1 ST 2Band EQ
Page 4 Effect 2 Thru
Type 2 Thru
BRILLIANCE 4th from bottom
12
ACT 1ACT 2ACT 4 ACT 3
Press the SUSTAIN [LOWER] button to call up the Sustain Length display. Set the
3
sustain length of the Lower keyboard to 3.
SUSTAIN
UPPER
(KNEE)
LOWER
PEDAL
(KNEE)
NOTE
The Smooth Pad 1 Voice sounds long after you release your finger from the key.
Reducing the sustain length makes this decay shorter.
Playing the ELS-01/01C — Tutorial
43
Page 44

ACT 1 ACT 2 ACT 3 ACT 4
Changing the Rhythm Condition settings
●●●●●●●●●●●●●●●●●●●●●●●●●●●●●●●●●●●●●●●●●●●●●●●●●●
Press the [POPS] button and select [16Beat 1] from display Page 3.
1
Turn on two of accompaniment parts, Chord 1 and Pad by pressing the [CHORD1] and
2
[PAD] buttons shown at the bottom of the display.
Accompaniment Parts
Press the [POPS] button on the panel again to call up the Rhythm Condition display,
3
then increase the Accompaniment Volume to 18.
This completes the Rhythm Condition settings.
Now that the Registration Memory 4 settings are complete, record these settings to the [4] button in Registration
Memory section.
Playing the ELS-01/01C — Tutorial
44
Page 45

M5
Using the M2 Registration as the basis, we’ll change the Upper Keyboard Voices 1 and 2. Also, for playing the
arpeggio, we’ll use the Delay effect.
First call up the M2 Registration by pressing the [2] button on the Registration Memory section, then press the
[ROTARY SP SPEED] button to turn it off.
Mysterious Arpeggio with Delay
Changing the Upper Keyboard Voice Settings
●●●●●●●●●●●●●●●●●●●●●●●●●●●●●●●●●●●●●●●●●●●●●●●●●●
Select [DX E.Piano 2] for Upper Keyboard Voice 1.
1
This Voice is included in the [PIANO] button, display Page 2.
Make the appropriate Voice Condition settings for DX E.Piano 2.
2
Change the Voice Condition settings in display Pages 1 – 4 and the Brilliance setting according to the
following chart. Settings/values that should be changed are highlighted in color.
Voice Condition Settings
Page 1 Pan
Touch Tone Initial: 4 After: 0
Pitch Horizontal: 0 After: 0
Feet Preset (8’)
Reverb 22
Volume 20
Page 2 Vibrato Preset
Touch Vibrato OFF
Transpose 0
Tune 0
Page 3 Effect 1 Chorus
Type 1 Celeste 4
Page 4 Effect 2 Thru
Type 2 Thru
BRILLIANCE 4th from bottom
L1
ACT 1ACT 2ACT 4 ACT 3
This completes the UPPER KEYBOARD VOICE 1 settings. Next, we’ll edit the UPPER KEYBOARD VOICE 2
settings.
Select [DX E.Piano 2] for Upper Keyboard Voice 2.
3
This Voice is included in the [PIANO] button, display Page 2.
Playing the ELS-01/01C — Tutorial
45
Page 46

ACT 1 ACT 2 ACT 3 ACT 4
Make the appropriate Voice Condition settings for DX E.Piano 2.
4
Change the Voice Condition settings in display Pages 1 – 4 and the Brilliance setting according to the
following chart. Settings/values that should be changed are highlighted in color.
Voice Condition Settings
Page 1 Pan Center
Touch Tone
Pitch Horizontal: 0 After: 0
Feet 4'
Reverb 24
Volume 22
Page 2 Vibrato Preset
Touch Vibrato OFF
Transpose 0
Tune 0
Page 3 Effect 1
Type 1 Celeste 4
Page 4 Effect 2 Delay
Type 2 Tempo Delay Delay Time: 4th/3,
BRILLIANCE 3rd from top
Initial: 4 After: 0
Chorus
Feedback Level: +16,
Dry/Wet: D<W63
NOTE
Tempo Delay creates delayed notes to embellish a phrase. In this song, once you play the notes G,
B, D and F, other notes you have not played will follow — thanks to the delay.
Press the SUSTAIN [UPPER] button to call up the Sustain Length display. Set the
5
sustain length of the Upper keyboard to 8.
SUSTAIN
UPPER
(KNEE)
LOWER
PEDAL
(KNEE)
Now that the Registration Memory 5 settings are complete, record these settings to the [5] button in Registration
Memory section.
Playing the ELS-01/01C — Tutorial
46
Page 47

M6
Using the M5 Registration as the basis, change the Upper Keyboard Voice 2 and Lower Keyboard Voice 1. The
main Voice in this Registration is Electric Guitar. Here, we’ll create an exciting distorted electric guitar sound.
First, turn the Upper Keyboard Voice 1 volume to 0, then press the SUSTAIN [UPPER] button to turn Sustain
off.
Electric Guitar Solo
Changing the Upper Keyboard Voice settings
●●●●●●●●●●●●●●●●●●●●●●●●●●●●●●●●●●●●●●●●●●●●●●●●●●
Select [Elec Guitar 2] for Upper Keyboard Voice 2.
1
This Voice is included in the [GUITAR] button, display Page 2.
Make the appropriate Voice Condition settings for Elec Guitar 2.
2
Change the Voice Condition settings in display Pages 1 – 4 and the Brilliance setting according to the
following chart. Settings/values that should be changed are highlighted in color.
Voice Condition Settings
Page 1 Pan Center
Touch Tone
Pitch Horizontal: 6 After: -9
Feet 8'
Reverb 22
Volume 24
Page 2 Vibrato User Delay: 3, Depth: 3,
Touch Vibrato OFF
Transpose 0
Tune +8
Page 3 Effect 1 Distortion+
Type 1 Dist.+Delay
Page 4 Effect 2 Thru
Type 2 Thru
BRILLIANCE 4th from bottom
Initial: 8 After: 8
Speed: 1
ACT 1ACT 2ACT 4 ACT 3
The adjusted Tune setting gives the sound a certain amount of tension.
Horizontal and After Touch lets you change the volume and timbre of the sound by your performance
technique on the Upper keyboard.
NOTE
This completes the UPPER KEYBOARD VOICE 2 settings.
Horizontal Touch is available only on the ELS-01C.
Playing the ELS-01/01C — Tutorial
47
Page 48

Changing the Lower Keyboard Voice settings
●●●●●●●●●●●●●●●●●●●●●●●●●●●●●●●●●●●●●●●●●●●●●●●●●●
Select [Pop Organ 4] for Lower Keyboard Voice 1.
1
This Voice is included in the [ORGAN] button, display Page 4.
ACT 1 ACT 2 ACT 3 ACT 4
Make the appropriate Voice Condition settings for Pop Organ 4.
2
Change the Voice Condition settings in display Pages 1 – 4 and the Brilliance setting according to the
following chart. Settings/values that should be changed are highlighted in color.
Voice Condition Settings
Page 1 Pan Center
Touch Tone
Pitch Horizontal: 0 After: 0
Feet Preset (8')
Reverb 16
Volume 12
Page 2 Vibrato Preset
Touch Vibrato OFF
Transpose 0
Tune 0
Page 3 Effect 1 Preset
Type 1 ST 2Band EQ
Page 4 Effect 2 Thru
Type 2 Thru
BRILLIANCE 4th from bottom
Initial: 8 After: 0
Now that the Registration Memory 6 settings are complete, record these settings to the [6] button in Registration
Memory section.
Playing the ELS-01/01C — Tutorial
48
Page 49

M7
Using the M1 Registration as the basis, create the Registration for the ending. This will let you finish the song
with a sparse, calm arrangement of guitar and piano.
First, call up the M1 Registration by pressing the [1] button in the Registration Memory section.
Ending with Acoustic Guitar and Electric Piano
Changing the Upper Keyboard Voice settings
●●●●●●●●●●●●●●●●●●●●●●●●●●●●●●●●●●●●●●●●●●●●●●●●●●
Select [Steel Guitar 1] for Upper Keyboard Voice 1.
1
This Voice is included in the [GUITAR] button, display Page 1.
Make the appropriate Voice Condition settings for Steel Guitar 1.
2
Change the Voice Condition settings in display Pages 1 – 4 and the Brilliance setting according to the
following chart. Settings/values that should be changed are highlighted in color.
Voice Condition Settings
Page 1 Pan Center
Touch Tone Initial: 8 After: 0
Pitch Horizontal: 0 After: 0
Feet Preset (16')
Reverb
Volume 22
Page 2 Vibrato Preset
Touch Vibrato OFF
Transpose 0
Tune 0
Page 3 Effect 1 Preset
Type 1 ST2Band EQ
Page 4 Effect 2 Thru
Type 2 Thru
BRILLIANCE 4th from bottom
20
ACT 1ACT 2ACT 4 ACT 3
This completes the UPPER KEYBOARD VOICE 1 settings. Next, we’ll edit the UPPER KEYBOARD VOICE 2
settings.
Select [Stage E.Piano 1] for Upper Keyboard Voice 2.
3
This Voice is included in the [PIANO] button, display Page 2.
Playing the ELS-01/01C — Tutorial
49
Page 50

Make the appropriate Voice Condition settings for Stage E.Piano 1.
4
Change the Voice Condition settings in display Pages 1 – 4 and the Brilliance setting according to the
following chart. Settings/values that should be changed are highlighted in color.
Voice Condition Settings
ACT 1 ACT 2 ACT 3 ACT 4
Page 1 Pan
Touch Tone Initial: 5 After: 0
Pitch Horizontal: 0 After: 0
Feet 16'
Reverb 20
Volume 15
Page 2 Vibrato Preset
Touch Vibrato OFF
Transpose 0
Tune 0
Page 3 Effect 1
Type 1 Celeste 4
Page 4 Effect 2 Preset
Type 2 Thru
BRILLIANCE 4th from bottom
This completes the Upper Keyboard settings.
L1
Chorus
NOTE
The only difference between the Upper Keyboard Voices and Lower Keyboard Voices is the Feet
(octave) setting.
Now that the Registration Memory 7 settings are complete, record these settings to the [7] button in Registration
Memory section.
Playing the ELS-01/01C — Tutorial
50
Page 51

Recording a Rhythm Sequence Program
Using the powerful Rhythm Sequence Program feature, you can string together any of the Electone’s rhythms to
make complete rhythm compositions. In this section, we’ll connect some preset rhythms to make the rhythm
composition for “Change the World.” The rhythms used in this song are shown in the notation on pages 26 – 27.
Selecting a Sequence
●●●●●●●●●●●●●●●●●●●●●●●●●●●●●●●●●●●●●●●●●●●●●●●●●●
Press the [SEQUENCE] button in the DISPLAY SELECT section.
1
DISPLAY SELECT
A.B.C.
VOICE
DISPLAY
FOOT
SWITCH
VOICE EDIT PATTERN SEQUENCE
U.ORGAN
FLUTES
MDR
M.O.C.
UTILITY INTERNET
RHYTHM
PROGRAM
ROTARY SP
L.ORGAN
SPEED
FLUTES
The Sequence display appears and the destination, [SEQ.1] (Sequence 1), is selected.
Press the [RHYTHM] button at the top right of the display to call up the RHYTHM Page.
2
ACT 1ACT 2ACT 4 ACT 3
Playing the ELS-01/01C — Tutorial
51
Page 52

ACT 1 ACT 2 ACT 3 ACT 4
Programming the Rhythm Sequence
●●●●●●●●●●●●●●●●●●●●●●●●●●●●●●●●●●●●●●●●●●●●●●●●●●
First, we’ll set the Intro 1 section of the 60’s 8Beat rhythm for the first measure.
Press the [POPS] button in the RHYTHM section on the panel.
1
VOLUME
MAX
1
SEQ.2SEQ.
1
RHYTHM
WALT Z POPS R & B
MARCH
SWING&
JAZZ
SEQ.4SEQ.
3
LATIN
WORLD
MUSIC
BALLAD ROCK
DANCE
2
MIN
Select [60’s 8Beat] from the displayed rhythm menu. The selected rhythm is shown at
2
the top of the display.
Press the INTRO [1] button to turn Intro 1 on.
3
NOTE
When the Intro, Ending, or Break section is selected, the MAIN/FILL IN button flashes.
INTRO
123
Playing the ELS-01/01C — Tutorial
52
Page 53

Enter the selected rhythm “60’s 8Beat, Intro 1” to the first bar by pressing the [SET]
4
button in the display.
ACT 1ACT 2ACT 4 ACT 3
NOTE
Next, set the Main A section of the 8Beat Light 1 rhythm, for the second bar.
Press the [POPS] button on the panel and select [8Beat Light 1] from the displayed
5
rhythm menu.
Once the [Set] button is pressed, one measure of the selected rhythm will be entered. The exception
to this rule is the ending patterns, which enter more than one measure when you press the [SET]
button. Keep in mind that entering an ending pattern automatically ends the song; no other rhythms
can be entered after an ending pattern.
Press the MAIN/FILL IN [A] button twice so that the [A] button lights (not flashes).
6
NOTE
When you press the [A] button once, the button flashes and Fill In A is selected. Pressing it again
lights the [A] button and Main A is selected.
MAIN / FILL IN
ABCD
Playing the ELS-01/01C — Tutorial
53
Page 54

ACT 1 ACT 2 ACT 3 ACT 4
Enter the selected rhythm “8Beat Light 1, Main A” to the second bar by pressing the
7
[SET] button in the display.
Repeat steps #5 through #7 above to enter the rest of the rhythm and create the rh ythm
8
composition indicated in the notation on pages 26 – 27.
The following rhythms are used in this song:
Rhythm Selection
60’s 8Beat [POPS] button menu, Page 1
8Beat Light 1 [POPS] button menu, Page 1
16Beat 1 [POPS] button menu, Page 3
Country Rock 2 [ROCK] button menu, Page 2
Hard Rock 2 [ROCK] button menu, Page 1
Folk Rock 1 [POPS] button menu, Page 1
NOTE
If you make a mistake in entering a rhythm, move the cursor to the rhythm you want to delete and
press the [DELETE] button in the display, then reenter the correct rhythm.
Playing the ELS-01/01C — Tutorial
54
Page 55

Creating a Registration Sequence Program
The Registration Sequence feature lets you program the Registrations you want to be automatically called up in
sequence, when playing a Rhythm Sequence. This convenient feature frees you from having to work the
footswitch, so you can concentrate completely on your keyboard performance.
Programming the Registration Sequence
●●●●●●●●●●●●●●●●●●●●●●●●●●●●●●●●●●●●●●●●●●●●●●●●●●
Press the [REGIST] button at the top right of the display to call up the REGIST Page.
1
Press the Registration Memory [1] button to enter the setting to the Registration
2
Sequence.
Set the timing location at which you want the Registration to change.
3
Check the timing indication in the notation for the M1 event. You’ll see it’s written as “1.1.0” — meaning,
Bar 1, Beat 1, Clock 0.
After setting the appropriate timing, press the [SET] button in the display to actually
4
enter M1 at that timing.
ACT 1ACT 2ACT 4 ACT 3
Playing the ELS-01/01C — Tutorial
55
Page 56

ACT 1 ACT 2 ACT 3 ACT 4
Repeat steps #2 through #4 above to finish creating the Registration Sequence
5
indicated in the notation on pages 26 – 27.
Helpful Hint
Take a look at bar 14 in the notation. Registration M4 appears at the halfway point of the third beat in
bar 14. Since one quarter-note beat equals 96 clocks and half of that is 48 clocks, you would think that
the timing should be “14.3.48.” However, the indication is slightly before that, at “14.3.40.” Similarly,
M5 is indicated as “22.4.90,” not “23.1.0.” The reason behind these anticipated settings is that the
Registration may not have enough time to change all the sounds and settings in time for the
performance, if the change is programmed exactly at the precise point of the intended change.
NOTE
Up to 140 bars of events can be entered to one sequence button (for example, SEQ.1). The rhythm
composition for “Change the World,” consisting of 52 bars, falls well within that one-button limit.
Howev er, you may want to start the song from the middle, or ev en mix up the arr angement diff erently
than what is indicated here. To do that, you can divide the song into its component sections (verse,
chorus, solos, etc.) and then assign each part to a separate SEQ button). For example, you could
assign a single sequence only for the guitar solo (bars 28 – 35). This would mean assigning the
Registration sequence for bars 1 – 27 to the [SEQ.1] button, the sequence for bars 28 – 35 to the
[SEQ.2] button, and that for bars 36 – 52 to the [SEQ.3] button.
In this case, you’ll also need to divide the Registration Sequence into three sequence numbers. Also,
keep in mind when programming that the first measure in each sequence is numbered “1,” no matter
what number measure it actually is in the song.
Quit the Rhythm Sequence by pressing the [SEQUENCE] button in the DISPLAY
6
SELECT section.
DISPLAY SELECT
A.B.C.
VOICE
DISPLAY
FOOT
SWITCH
VOICE EDIT PATTERN SEQUENCE
MDR
M.O.C.
UTILITY INTERNET
RHYTHM
PROGRAM
Playing the ELS-01/01C — Tutorial
56
U.ORGAN
FLUTES
L.ORGAN
FLUTES
ROTARY SP
SPEED
Page 57

Playing “Change the W orld”
Now that you’ve done all the necessary programming, you’re ready to play the song.
Press the [SEQ.1] button, then press the RHYTHM [START] button. The Rhythm Sequence composition starts
from the first bar.
No need to use the footswitches. Just start playing and let the Electone do the hard work!
NOTE
At the notes indicated with a “*” mark, press the key and apply both Horizontal Touch (wiggling the
key from side to side) and After Touch. This allows y ou to change the sound of the guitar much as an
actual guitarist would, and makes both the sound and the overall performance sound much more
realistic and expressive.
At the notes marked with “H.Vib,” apply Horizontal Touch to add the vibrato effect. (Horizontal Touch
is available only on the ELS-01C.)
Using the Music Data Recorder
In ACT 2, you used the M.D.R. to record your new Registration settings to a SmartMedia card. Now, in this
chapter, try recording your performance. After recording is finished, listen back to your newly recorded song.
Recording the Performance
●●●●●●●●●●●●●●●●●●●●●●●●●●●●●●●●●●●●●●●●●●●●●●●●●●
ACT 1ACT 2ACT 4 ACT 3
Here, we’ll show you how to set up and start recording.
Insert a SmartMedia card into the card slot.
1
Playing the ELS-01/01C — Tutorial
57
Page 58

ACT 1 ACT 2 ACT 3 ACT 4
Press the [MDR] button to call up the M.D.R. display, then select the destination Song
2
to which you want to record your performance (page 21).
DISPLAY SELECT
A.B.C.
VOICE
DISPLAY
FOOT
SWITCH
VOICE EDIT PATTERN SEQUENCE
MDR
M.O.C.
UTILITY INTERNET
RHYTHM
PROGRAM
U.ORGAN
FLUTES
Press the [RECORD] button in the display. The Rec Standby display appears.
3
L.ORGAN
FLUTES
ROTARY SP
SPEED
Press the [F] (Play) button in the display. The hourglass icon appears, indicating the
4
Registration data is being read. After the hourglass disappears, start playing. First,
press the [SEQ.1] button, then the RHYTHM [START] button, then begin playing the
song.
NOTE
If you make a mistake during recording, press the [RETR Y] b utton in the displa y. The recording stops
and the M.D.R. returns to the starting point of the song. Then press the [F] (Play) button or
[CUSTOM] button to begin re-recording.
Helpful Hint
If you press the [J] (Stop) button when you make a mistake, the recording stops and your aborted
performance is automatically saved. If this happens and you don’t need the recording, you can delete
the song with the [SONG DELETE] button in the TOOLS Page of the M.D.R. display (see page 120 in
the Owner’s Manual).
Playing the ELS-01/01C — Tutorial
58
Page 59

When you finish playing, press the [J] (Stop) button.
The recording is finished and the display returns to the SONG SELECT Page. The song to which your
5
performance is recorded is automatically named “SONG 2.” If you want to change the song name, see page
104 in the Owner’s Manual.
NOTE
After recording is finished, you can play back the recorded performance by pressing the [
in the M.D.R. display.
NOTE
During recording, if you press any of the buttons on the panel, such as [ROTARY SP SPEED], the
M.D.R. display is replaced by the button-selected display (for example, Rotary Speaker). If this
happens, press the [MDR] button again to recall the M.D.R. display.
During playback of a song, you can fast forward, rewind, or pause the song as desired. You can also
select the part to be played (see page 113 in the Owner’s Manual).
ACT 1ACT 2ACT 4 ACT 3
F] (Play) button
Playing the ELS-01/01C — Tutorial
59
Page 60

ACT
ACT
4
4
Creating Various Organ Sounds
(ELS-01C only)
Song:
Moldau
M1
M2
M3
M4
M5
M6
Classical Sound
Soft Jazz Sound
Tasty Jazz Sound
Colorful Jazz Sound
Percussive Rock Sound
Classical Sound (same as M1)
Playing the ELS-01/01C — Tutorial
Playing the ELS-01/01C — Tutorial
60
60
Page 61

In the last section of this tutorial, you’ll explore the Organ Flutes feature of the ELS-01C and enjoy its
wide variety of wonderful organ sounds.
Depending on the flute footage settings in the display, you can create a solemn pipe organ sound,
tasty jazz organ sound, heavy rock organ sound, and much more.
The footage levers are similar to those on a conventional organ, letting you easily and realistically
recreate traditional, famous organ songs.
Five Registrations are used in “Moldau.” M1 is a solemn classical organ. M2 is a jazz organ for the
section with the jazz waltz arrangement, while M3 and M4 are for the jazz swing part, and M5 is a
powerful rock organ.
About “Moldau”
The 19th century composer Bedrich Smetana is considered the founder of Czech national music. One
of his greatest works, a set of symphonic poems called “My Fatherland,” took him five years to
complete. It is comprised of six parts, the most famous of which is “Moldau” — which is arranged here
for the Electone.
The great river Moldau stretches for 430 kilometers, with its two sources starting in southern Bohemia,
merging and running through the capital Prague — and represents the very heart and soul of the
Czech people. Smetana’s musical portrait of the Moldau provides a dynamic, highly melodic tour
down the river, with a peasant wedding on one side and stately castles on the other. The beginning of
this score brings to life the atmosphere of the original piece, expressing the majestic body of water,
flowing and rushing through the countryside. Times have changed, however, and the old hunting
trumpets and peasant dances have been replaced by jazz groups and rock bands — a complex
image you can use as inspiration when you play this arrangement…
ACT 1ACT 2ACT 4 ACT 3
Playing the ELS-01/01C — Tutorial
61
Page 62

ACT 1 ACT 2 ACT 3 ACT 4
Moldau
Composed by Bedrich Smetana
Arranged by Riko Morino
right foot
left foot
Playing the ELS-01/01C — Tutorial
62
ROTARY SP On (with right hand)
Page 63

ACT 1ACT 2ACT 4 ACT 3
with left footswitch
Playing the ELS-01/01C — Tutorial
63
Page 64

ACT 1 ACT 2 ACT 3 ACT 4
Before Starting
In this chapter, we’ll create the settings we want from the default settings of the instrument. Before starting,
initialize the Registration Memory by following the steps on page 28. After initialization is complete, set the
volume of each Voice section to 0.
M1
The setting here is one of the most recognizable and representative settings of classical pipe organs, which have a
wide and rich sonic range.
Imagine that you are in a large concert hall or a stone cathedral — one that has both a majestic pipe organ high
above the floor and a small organ near the audience.
Adjusting the Reverb Settings
●●●●●●●●●●●●●●●●●●●●●●●●●●●●●●●●●●●●●●●●●●●●●●●●●●
Classical Sound
Press the top of the REVERB button on the panel to set the depth to 24.
1
REVERB
MAX
MIN
Playing the ELS-01/01C — Tutorial
64
Page 65

Press the [2] button at the top of the display, then check that the Type is set to
2
[XG HALL 1].
This reverb type recreates the lush ambience and reverberation of playing a majestic organ in a large hall.
ACT 1ACT 2ACT 4 ACT 3
NOTE
The sliders in Page 2 of the Reverb display are the same as the Reverb slider in the Upper or Lower
Organ Flute display. In these instructions, we’ll adjust the reverb for the Organ Flute Voices by using
the Reverb slider in the Organ Flute display, not the Reverb display.
Creating the Upper Organ Flute Voice
●●●●●●●●●●●●●●●●●●●●●●●●●●●●●●●●●●●●●●●●●●●●●●●●●●
Press the [U. ORGAN FLUTES] button.
1
The lamp of the [U. ORGAN FLUTES] button lights and the Upper Organ Flute display is called up.
DISPLAY SELECT
A.B.C.
VOICE
DISPLAY
FOOT
SWITCH
VOICE EDIT PATTERN SEQUENCE
MDR
M.O.C.
UTILITY INTERNET
RHYTHM
PROGRAM
U.ORGAN
FLUTES
L.ORGAN
FLUTES
ROTARY SP
SPEED
Playing the ELS-01/01C — Tutorial
65
Page 66

ACT 1 ACT 2 ACT 3 ACT 4
Change the sound type to [SINE], and change the flute footage settings as indicated below.
Press the [ATTACK/VOLUME] button at the top right of the display to call up the
2
ATTACK/VOLUME Page, then change the display settings as indicated below.
NOTE
Set the Effect Type to [OFF].
3
This completes the Upper Organ Flutes settings.
The response setting is one of the most important points in producing this classical sound. This
delays the response of the notes when playing the keys, resembling the short, natural delay in an
actual pipe organ.
Playing the ELS-01/01C — Tutorial
66
Page 67

Creating the Lower Organ Flute Voice
●●●●●●●●●●●●●●●●●●●●●●●●●●●●●●●●●●●●●●●●●●●●●●●●●●
Press the [L. ORGAN FLUTES] button.
1
The lamp of the [L. ORGAN FLUTES] button lights and the Lower Organ Flute display is called up.
Call up the FOOTAGE Page, then change the sound type to [SINE].
DISPLAY SELECT
A.B.C.
VOICE
DISPLAY
FOOT
SWITCH
VOICE EDIT PATTERN SEQUENCE
MDR
M.O.C.
UTILITY INTERNET
RHYTHM
PROGRAM
ACT 1ACT 2ACT 4 ACT 3
U.ORGAN
FLUTES
L.ORGAN
FLUTES
ROTARY SP
SPEED
Press the [ATTACK/VOLUME] button at the top right of the display to call up the
2
ATTACK/VOLUME Page, then change the display settings as indicated below.
Set the Effect Type to [OFF].
3
This completes the Lower Organ Flutes settings.
Playing the ELS-01/01C — Tutorial
67
Page 68

Selecting and Editing the Pedal Voice
●●●●●●●●●●●●●●●●●●●●●●●●●●●●●●●●●●●●●●●●●●●●●●●●●●
ACT 1 ACT 2 ACT 3 ACT 4
NOTE
Since the Pedal Voice does not have the Organ Flute function, select the Pedal Voice by using the
Voice buttons.
Press the User button [1] of PEDAL VOICE 1.
1
1
LOWER
BRILLIANCE VOLUME
BRILLIANT
MELLOW
MAX
MIN
PEDAL VOICE 1
CONTRA
TIMPANI TO
Select the [Organ Bass 2] Voice from the Organ category, display Page 5.
2
BASS
ELEC.
BASS
SYNTH
BASS
Helpful Hint
Choose your favorite Voice for the Pedal Voice, then change its Feet (octave) setting to best suit the
Registration. Try that with Organ Bass or Pipe Organ, whichever you prefer.
Playing the ELS-01/01C — Tutorial
68
Page 69

Make the appropriate Voice Condition settings for Organ Bass 2.
3
Pressing the User button [1] on the panel again calls up the Voice Condition display. On Page 1 of the
display, set Reverb to 24, Volume to 18, and Poly to ON. On Page 2 of the display, set Tune to -2.
ACT 1ACT 2ACT 4 ACT 3
NOTE
Confirm that the Effect is set to [PRESET] or [THRU] in display Pages 3 and 4.
4
This completes the PEDAL VOICE 1 settings.
For the M1 Registration, PEDAL VOICE 2 is not used. Turn its volume setting to 0.
Now that the Registration Memory 1 settings are complete, record them to the [1] button in Registration
Memory section. Before recording, confirm that the lamps of the [U. ORGAN FLUTES] and [L. ORGAN
FLUTES] buttons are lit.
While holding down the [M.] (Memory) button in the Registration Memory section, press the
[1] button.
When the Registration is being stored, the [1] button flashes momentarily.
The pedal polyphonic mode makes it possible to play legato on the pedalboard, letting you play
notes on the pedalboard with both your left and right foot, at bar 9 in section A.
Playing the ELS-01/01C — Tutorial
69
Page 70

M2
Soft Jazz Sound
The setting here is a popular Jazz Organ sound. Since this sound has a strong 16’ footage element, the setting is
suited for a crisp and clear performance rather than chord performance.
Now, we’ll create the M2 Registration, based on M1.
ACT 1 ACT 2 ACT 3 ACT 4
Creating the Upper Organ Flute Voice
●●●●●●●●●●●●●●●●●●●●●●●●●●●●●●●●●●●●●●●●●●●●●●●●●●
Press the [U. ORGAN FLUTES] button twice to call up the Upper Organ Flutes display.
1
In the FOOTAGE Page, change the flute footage settings as indicated below.
DISPLAY SELECT
A.B.C.
VOICE
DISPLAY
FOOT
SWITCH
VOICE EDIT PATTERN SEQUENCE
U.ORGAN
FLUTES
MDR
M.O.C.
UTILITY INTERNET
RHYTHM
PROGRAM
ROTARY SP
L.ORGAN
SPEED
FLUTES
Press the [ATTACK/VOLUME] button at the top right of the display to call up the
2
ATTACK/VOLUME Page, then change Attac k 2 2/3' to 4, Response to 0, and Re verb to 8,
as indicated here.
NOTE
The Response lever was pulled down to the bottom to create a pipe organ-like sound in the M1
Registration. Here in the M2 Registr ation, however, the Response lever should be set to 0, to create
a clear sound with quick attack. In addition, the lower setting of the rev erb sim ulates a more intimate
performance environment, with the organ placed near the audience.
Playing the ELS-01/01C — Tutorial
70
Page 71

Press the Effect Type button to call up the Effect Type list in the display. Select [2WAY
3
ROT SP] from the list, then close the list by pressing the [CLOSE] button.
Press the [ROTARY SP SPEED] button to call up the Rotary Speaker display.
4
DISPLAY SELECT
A.B.C.
VOICE
DISPLAY
FOOT
SWITCH
MDR
M.O.C.
UTILITY INTERNET
ACT 1ACT 2ACT 4 ACT 3
VOICE EDIT PATTERN SEQUENCE
U.ORGAN
L.ORGAN
FLUTES
FLUTES
Set the SPEED to 6.06 Hz.
5
RHYTHM
PROGRAM
ROTARY SP
SPEED
Turn the Rotary Speaker off by pressing the [ROTARY SP SPEED] button again.
6
This completes the Upper Organ Flutes settings.
Playing the ELS-01/01C — Tutorial
71
Page 72

ACT 1 ACT 2 ACT 3 ACT 4
Creating the Lower Organ Flute Voice
●●●●●●●●●●●●●●●●●●●●●●●●●●●●●●●●●●●●●●●●●●●●●●●●●●
Press the [L. ORGAN FLUTES] button twice to call up the Lower Organ Flutes display.
1
The settings on the FOOTAGE Page do not need to be changed.
On the ATTACK/VOLUME Page, change the Response to 0, Reverb to 8, and Volume to
2
15, as indicated below.
Press the Effect Type button to call up the Effect Type list in the display. Select [2WAY
3
ROT SP] from the list, then close the list by pressing the [CLOSE] button.
This completes the Lower Organ Flutes settings.
Selecting and Editing the Pedal Voice
●●●●●●●●●●●●●●●●●●●●●●●●●●●●●●●●●●●●●●●●●●●●●●●●●●
Press User button [1] of PEDAL VOICE 1.
1
1
LOWER
BRILLIANCE VOLUME
BRILLIANT
MELLOW
MAX
MIN
PEDAL VOICE 1
CONTRA
TIMPANI TO
BASS
ELEC.
BASS
SYNTH
BASS
Playing the ELS-01/01C — Tutorial
72
Page 73

Select the [Organ Bass 1] Voice from the Organ category, display Page 5.
2
Make the appropriate Voice Condition settings for Organ Bass 1.
3
Pressing the User button [1] on the panel again calls up the Voice Condition display. On Page 1 of the
display, set Reverb to 8, and Poly to OFF.
ACT 1ACT 2ACT 4 ACT 3
You don’t need to make any changes in display Pages 2, 3 and 4.
This completes the PEDAL VOICE 1 settings.
For the M2 Registration, PEDAL VOICE 2 is not used. Check that its volume is set to 0.
Now that the Registration Memory 2 settings are complete, record them to the [2] button in Registration
Memory section. Before recording, confirm that the lamps of the [U. ORGAN FLUTES] and [L. ORGAN
FLUTES] buttons are lit, and the lamp of the [ROTARY SP SPEED] button is off.
While holding down the [M.] (Memory) button in the Registration Memory section, press the
[2] button.
When the Registration is being stored, the [2] button flashes momentarily.
Playing the ELS-01/01C — Tutorial
73
Page 74

ACT 1 ACT 2 ACT 3 ACT 4
M3
Tasty Jazz Sound
The 1' footage setting is crucial in recreating this characteristic jazz organ sound. In the phrase using the M3
Registration, you’ll have to trigger Melody On Chord operation with the knee lever. The point and duration in the
song that this is to be performed is indicated by “KNEE (M.O.C.) ON” in the notation.
Now, we’ll create the M3 Registration, based on M2.
Creating the Upper Organ Flute Voice
●●●●●●●●●●●●●●●●●●●●●●●●●●●●●●●●●●●●●●●●●●●●●●●●●●
Press the [U. ORGAN FLUTES] button twice to call up the Upper Organ Flutes display.
1
In the FOOTAGE Page, change the flute footage settings as indicated below.
DISPLAY SELECT
A.B.C.
VOICE
DISPLAY
FOOT
SWITCH
VOICE EDIT PATTERN SEQUENCE
MDR
M.O.C.
UTILITY INTERNET
RHYTHM
PROGRAM
U.ORGAN
FLUTES
L.ORGAN
FLUTES
ROTARY SP
SPEED
Helpful Hint
You can set the amount of 1' footage as desired. When set low, the sound is warm and slightly
subdued. You would think that adding more of this high tone would make the sound too brilliant.
However, the footage gives the sound its “cool” jazzy character.
Press the [ATTACK/VOLUME] button at the top right of the display to call up the
2
ATTACK/VOLUME Page, then set Attack 2 2/3' to 0.
Playing the ELS-01/01C — Tutorial
74
Page 75

Press the [A.B.C./M.O.C.] button on the panel to call up the A.B.C./M.O.C. display, then
3
set the M.O.C. Mode to [1] and KNEE to [ON]. Also, fold down the Knee Lever to be able
to use it during your performance.
DISPLAY SELECT
A.B.C.
VOICE
DISPLAY
FOOT
SWITCH
VOICE EDIT PATTERN SEQUENCE
MDR
M.O.C.
UTILITY INTERNET
RHYTHM
PROGRAM
ACT 1ACT 2ACT 4 ACT 3
NOTE
U.ORGAN
FLUTES
In this song, you’ll be switching Melody On Chord on or off with the Knee Lever. There are other ways
L.ORGAN
FLUTES
ROTARY SP
SPEED
Fold down
of turning M.O.C. on/off — for example, by creating two Registrations. In one Registration, set the
M.O.C. on, and in the other Registration, set it off. Using the Knee Lever has two advantages,
however: It allows you to switch the M.O.C. on/off momentarily as you need (or don’t need) it, and
allows you to save Registration Memory settings for other changes.
This completes the Upper Organ Flutes settings.
You don’t need to change the Lower Organ Flutes Voice and Pedal Voices.
Helpful Hint
Following section D, you might want to try playing the keyboards with a rhythm such as Combo Jazz
or Cool Combo in the SWING & JAZZ category. Have fun finding a favorite rhythm to match with this
song.
Now that the Registration Memory 3 settings are complete, record them to the [3] button in Registration
Memory section. Before recording, confirm that the lamps of the [U. ORGAN FLUTES] and [L. ORGAN
FLUTES] buttons are lit.
While holding down the [M.] (Memory) button in the Registration Memory section, press the
[3] button.
When the Registration is being stored, the [3] button flashes momentarily.
Playing the ELS-01/01C — Tutorial
75
Page 76

ACT 1 ACT 2 ACT 3 ACT 4
M4
Colorful Jazz Sound
The footage lever settings are powerful and highly intuitive ways to shape richly textured organ sounds.
Now, we’ll create the M4 Registration, based on M3.
Creating the Upper Organ Flute Voice
●●●●●●●●●●●●●●●●●●●●●●●●●●●●●●●●●●●●●●●●●●●●●●●●●●
Press the [U. ORGAN FLUTES] button twice to call up the Upper Organ Flutes display.
1
In the FOOTAGE Page, change the flute footage settings as indicated below.
DISPLAY SELECT
A.B.C.
VOICE
DISPLAY
FOOT
SWITCH
VOICE EDIT PATTERN SEQUENCE
MDR
M.O.C.
UTILITY INTERNET
RHYTHM
PROGRAM
U.ORGAN
FLUTES
L.ORGAN
FLUTES
ROTARY SP
SPEED
You don’t need to make any changes in the ATTACK/VOLUME Page.
Press the [ROTARY SP SPEED] button to turn it on.
2
DISPLAY SELECT
A.B.C.
VOICE
DISPLAY
FOOT
SWITCH
VOICE EDIT PATTERN SEQUENCE
U.ORGAN
FLUTES
MDR
M.O.C.
UTILITY INTERNET
RHYTHM
PROGRAM
ROTARY SP
L.ORGAN
SPEED
FLUTES
Playing the ELS-01/01C — Tutorial
76
Page 77

Helpful Hint
The Melody On Chord you set for Registration M3 can be easily turned off by calling up the A.B.C./
M.O.C. display and setting the Mode to OFF. Keep in mind, however, that even if you do not cancel
M.O.C., the M.O.C. will have no effect unless you press the Knee Lever.
This completes the Upper Organ Flutes settings.
You don’t need to change the Lower Organ Flutes Voice and Pedal Voices.
Now that the Registration Memory 4 settings are complete, record them to the [4] button in Registration
Memory section. Before recording, confirm that the lamps of the [U. ORGAN FLUTES], [L. ORGAN FLUTES]
and [ROTARY SP SPEED] buttons are all lit.
While holding down the [M.] (Memory) button in the Registration Memory section, press the
[4] button.
When the Registration is being stored, the [4] button flashes momentarily.
ACT 1ACT 2ACT 4 ACT 3
Playing the ELS-01/01C — Tutorial
77
Page 78

ACT 1 ACT 2 ACT 3 ACT 4
M5
Percussive Rock Sound
With the addition of the 2 2/3' footage, the sound is more vivid and brilliant. The vintage wave setting also makes
the sound more powerful. Finally, the setting of the Lower Organ Flute is ideal for playing bass phrases on the
Lower keyboard.
Now, we’ll create the M5 Registration, based on M4.
Creating the Upper Organ Flute Voice
●●●●●●●●●●●●●●●●●●●●●●●●●●●●●●●●●●●●●●●●●●●●●●●●●●
Press the [U. ORGAN FLUTES] button twice to call up the Upper Organ Flutes display.
1
Change the sound type to VINTAGE, and c hange the flute f oota ge settings as indicated
below.
DISPLAY SELECT
A.B.C.
VOICE
DISPLAY
FOOT
SWITCH
VOICE EDIT PATTERN SEQUENCE
MDR
M.O.C.
UTILITY INTERNET
RHYTHM
PROGRAM
NOTE
U.ORGAN
FLUTES
The M5 Registration is characterized by its vintage tone generation and distorted sound.
Add the 1 3/5' footage if you like.
L.ORGAN
FLUTES
ROTARY SP
SPEED
Press the [ATTACK/VOLUME] button at the top right of the display to call up the
2
ATTACK/VOLUME Page, then set Attack 4' to 4.
This completes the Upper Organ Flutes settings.
Playing the ELS-01/01C — Tutorial
78
Page 79

Creating the Lower Organ Flute Voice
●●●●●●●●●●●●●●●●●●●●●●●●●●●●●●●●●●●●●●●●●●●●●●●●●●
Press the [L. ORGAN FLUTES] button twice to call up the Lower Organ Flutes display.
1
On the FOOTAGE Page, change the sound type to VINTAGE, and change the flute
footage settings as indicated below.
DISPLAY SELECT
A.B.C.
VOICE
DISPLAY
M.O.C.
MDR
FOOT
UTILITY INTERNET
SWITCH
RHYTHM
PROGRAM
ROTARY SP
L.ORGAN
SPEED
FLUTES
The setting of the Lower Organ Flute is ideal for playing bass parts on the Lower keyboard. Enjoy the
NOTE
VOICE EDIT PATTERN SEQUENCE
U.ORGAN
FLUTES
deep, full sound.
Press the [ATTACK/VOLUME] button at the top right of the display to call up the
2
ATTACK/VOLUME Page, then change the Volume to 20.
ACT 1ACT 2ACT 4 ACT 3
This completes the Lower Organ Flutes settings.
Playing the ELS-01/01C — Tutorial
79
Page 80

Press the [FOOT SWITCH] button to call up the Footswitch display. On the LEFT Page,
3
set the mode to [ROTARY SPEAKER].
DISPLAY SELECT
A.B.C.
VOICE
DISPLAY
FOOT
SWITCH
MDR
M.O.C.
UTILITY INTERNET
ACT 1 ACT 2 ACT 3 ACT 4
RHYTHM
PROGRAM
ROTARY SP
L.ORGAN
SPEED
FLUTES
Other than by using the left foots witch, the Rotary Speaker can also be turned on/off by the [R OTARY
NOTE
VOICE EDIT PATTERN SEQUENCE
U.ORGAN
FLUTES
SP SPEED] button on the panel, or by using two Registration Memories.
You don’t need to change the Pedal Voices.
Now that the Registration Memory 5 settings are complete, record them to the [5] button in Registration
Memory section. Before recording, confirm that the lamps of the [U. ORGAN FLUTES], [L. ORGAN FLUTES]
and [ROTARY SP SPEED] buttons are all lit.
While holding down the [M.] (Memory) button in the Registration Memory section, press the
[5] button.
When the Registration is being stored, the [5] button flashes momentarily.
Playing the ELS-01/01C — Tutorial
80
Page 81

M6
Classical Sound (same as M1)
The M6 Registration is completely the same as M1.
Press the Registration memory [1] button to call up Registration M1. No changes are
needed.
Since the Registration Memory 6 settings are complete, record these settings to the [6] button in Registration
Memory section.
While holding down the [M.] (Memory) button in the Registration Memory section, press the
[6] button.
When the Registration is being stored, the [6] button flashes momentarily.
Before Playing
During the performance, change the Registration memory by using the right footswitch. Before you start playing,
make sure to set the Registration Shift function.
Press the [FOOT SWITCH] button to call up the Footswitch display. In the RIGHT Page, set
the Registration Shift mode to [SHIFT].
DISPLAY SELECT
A.B.C.
VOICE
DISPLAY
FOOT
SWITCH
MDR
M.O.C.
UTILITY INTERNET
ACT 1ACT 2ACT 4 ACT 3
RHYTHM
VOICE EDIT PATTERN SEQUENCE
U.ORGAN
FLUTES
PROGRAM
L.ORGAN
FLUTES
ROTARY SP
SPEED
Playing the ELS-01/01C — Tutorial
81
Page 82

ACT 1 ACT 2 ACT 3 ACT 4
Playing “Moldau”
Press the [1] button in the Registration Memory section to call up Registration M1.
1
Check that the Knee Lever is folded down.
2
The notation indicates the various points in the song where you’ll need to make changes to the instrument —
shifting the Registration Memory, turning the Rotary Speaker on with your right hand, turning the Rotary
Speaker off with the left footswitch, turning Melody On Chord on with the Knee Lever, and so on. Be careful to
follow these indications as you play the Electone.
Helpful Hint
The tempo written in the notation is only a rough indication of how the song should be performed. A lot
of the performance depends on “feel.” When you start at section B, play in a relaxed way, and put in
a little pause. In the jazzy arrangement (from Bto E), ride the rhythm and play evenly. At the last bar
of F, after turning off the Rotary Speaker, listen closely for the speed change of the Rotary Speaker
effect. When you feel the rotation stop, shift the Registration to M6. At section G, decrease the tempo.
Finish the song with a loud flourish or bring down the volume and end calmly, as you like. Either
approach will work fine.
This arrangement showcases a variety of different organ sounds and features various dynamic stylistic changes.
Play it with enthusiasm, and above all — enjoy it. You’re now an Electone master!
Playing the ELS-01/01C — Tutorial
82
Page 83

Playing the ELS-01/01C — Tutorial
83
Page 84

Yamaha Manual Library
http://www2.yamaha.co.jp/manual/english/
This document is printed on chlorine free (ECF) paper with soy ink.
U.R.G., Pro Audio & Digital Musical Instrument Division, Yamaha Corporation
© 2004 Yamaha Corporation
WB86420 401MWCP35.2-01A0
Page 85

documentation manual, user maintenance, brochure, user reference, pdf manual
This file has been downloaded from:
User Manual and User Guide for many equipments like mobile phones, photo cameras, monther board, monitors, software, tv, dvd, and othes..
Manual users, user manuals, user guide manual, owners manual, instruction manual, manual owner, manual owner's, manual guide,
manual operation, operating manual, user's manual, operating instructions, manual operators, manual operator, manual product,
 Loading...