

Yamaha Audio EL-87 User Manual

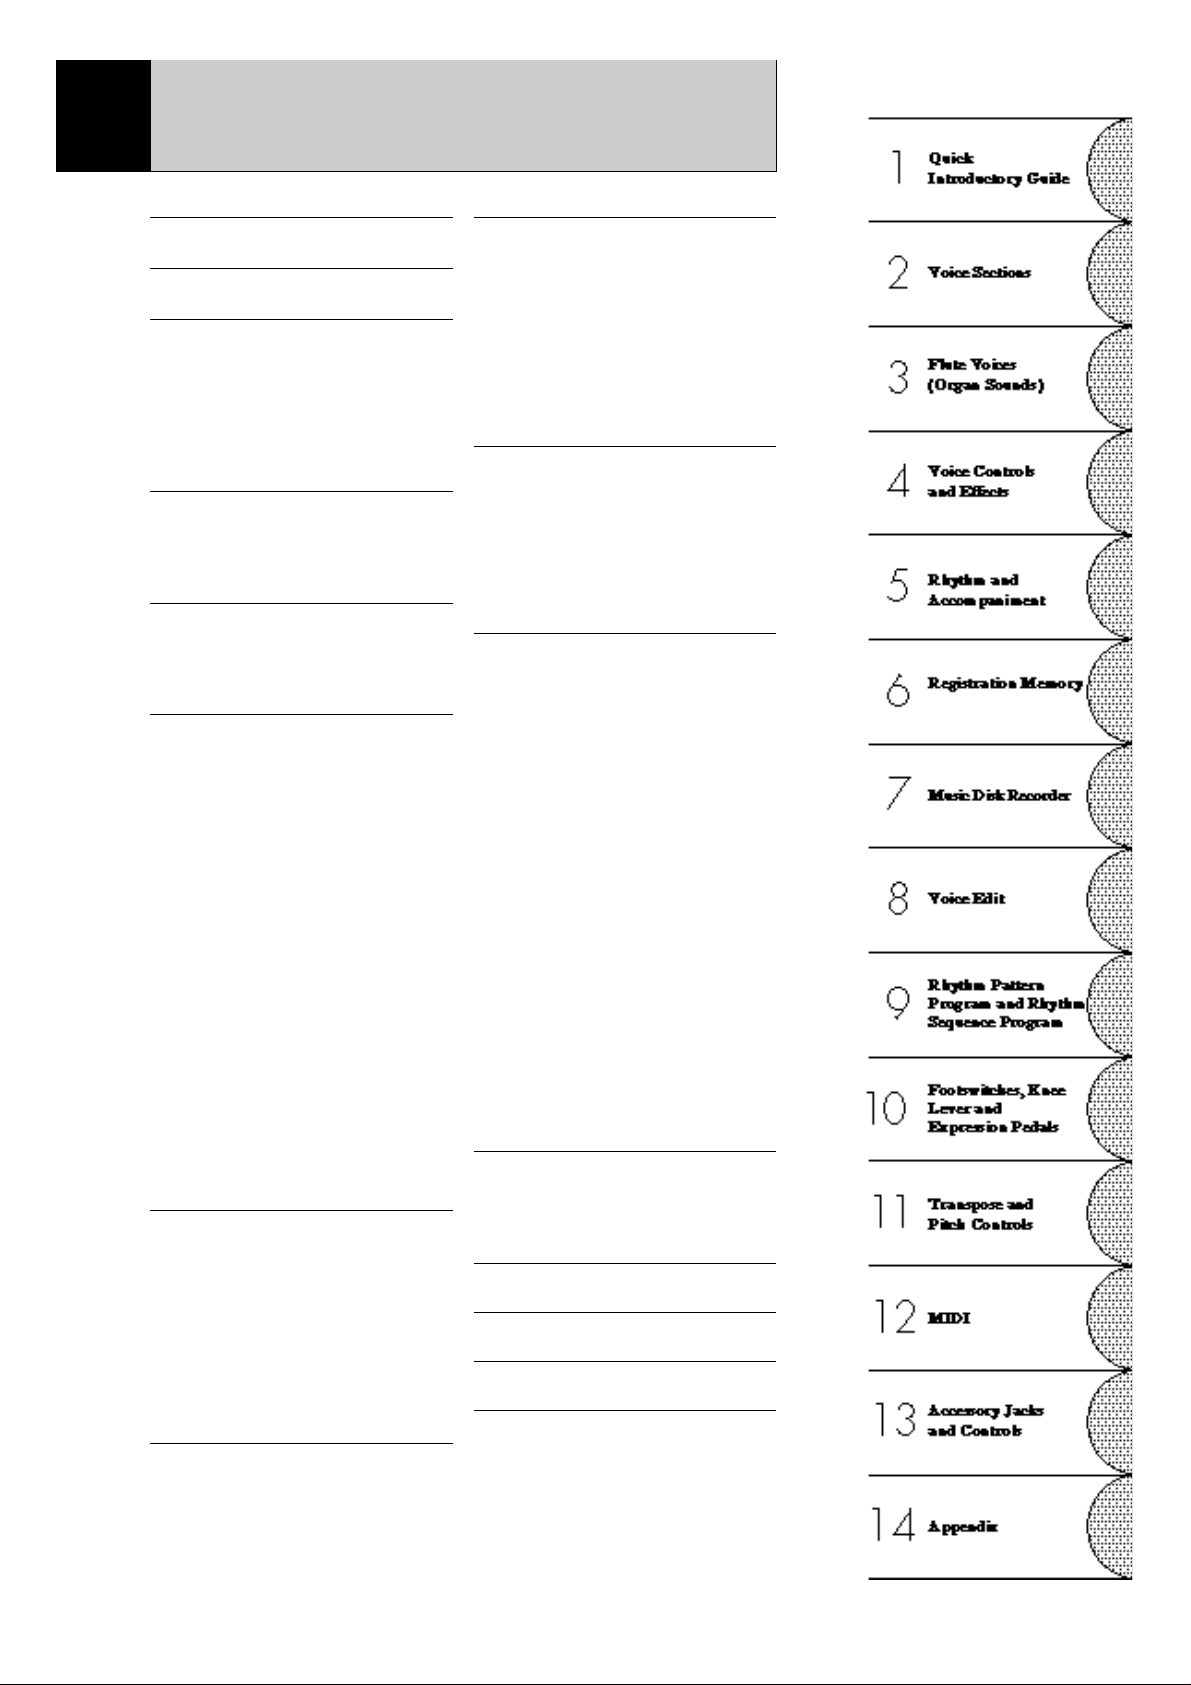
Table of Contents
Panel Layout........................................2
Main Features......................................5
1 Quick Introductory Guide...............6
1 Getting Started.............................................. 6
2 Basic Registrations ....................................... 7
3 Registration Menu Disk................................ 8
4 Basic Operation.......................................... 15
5 Using the LCD Display .............................. 16
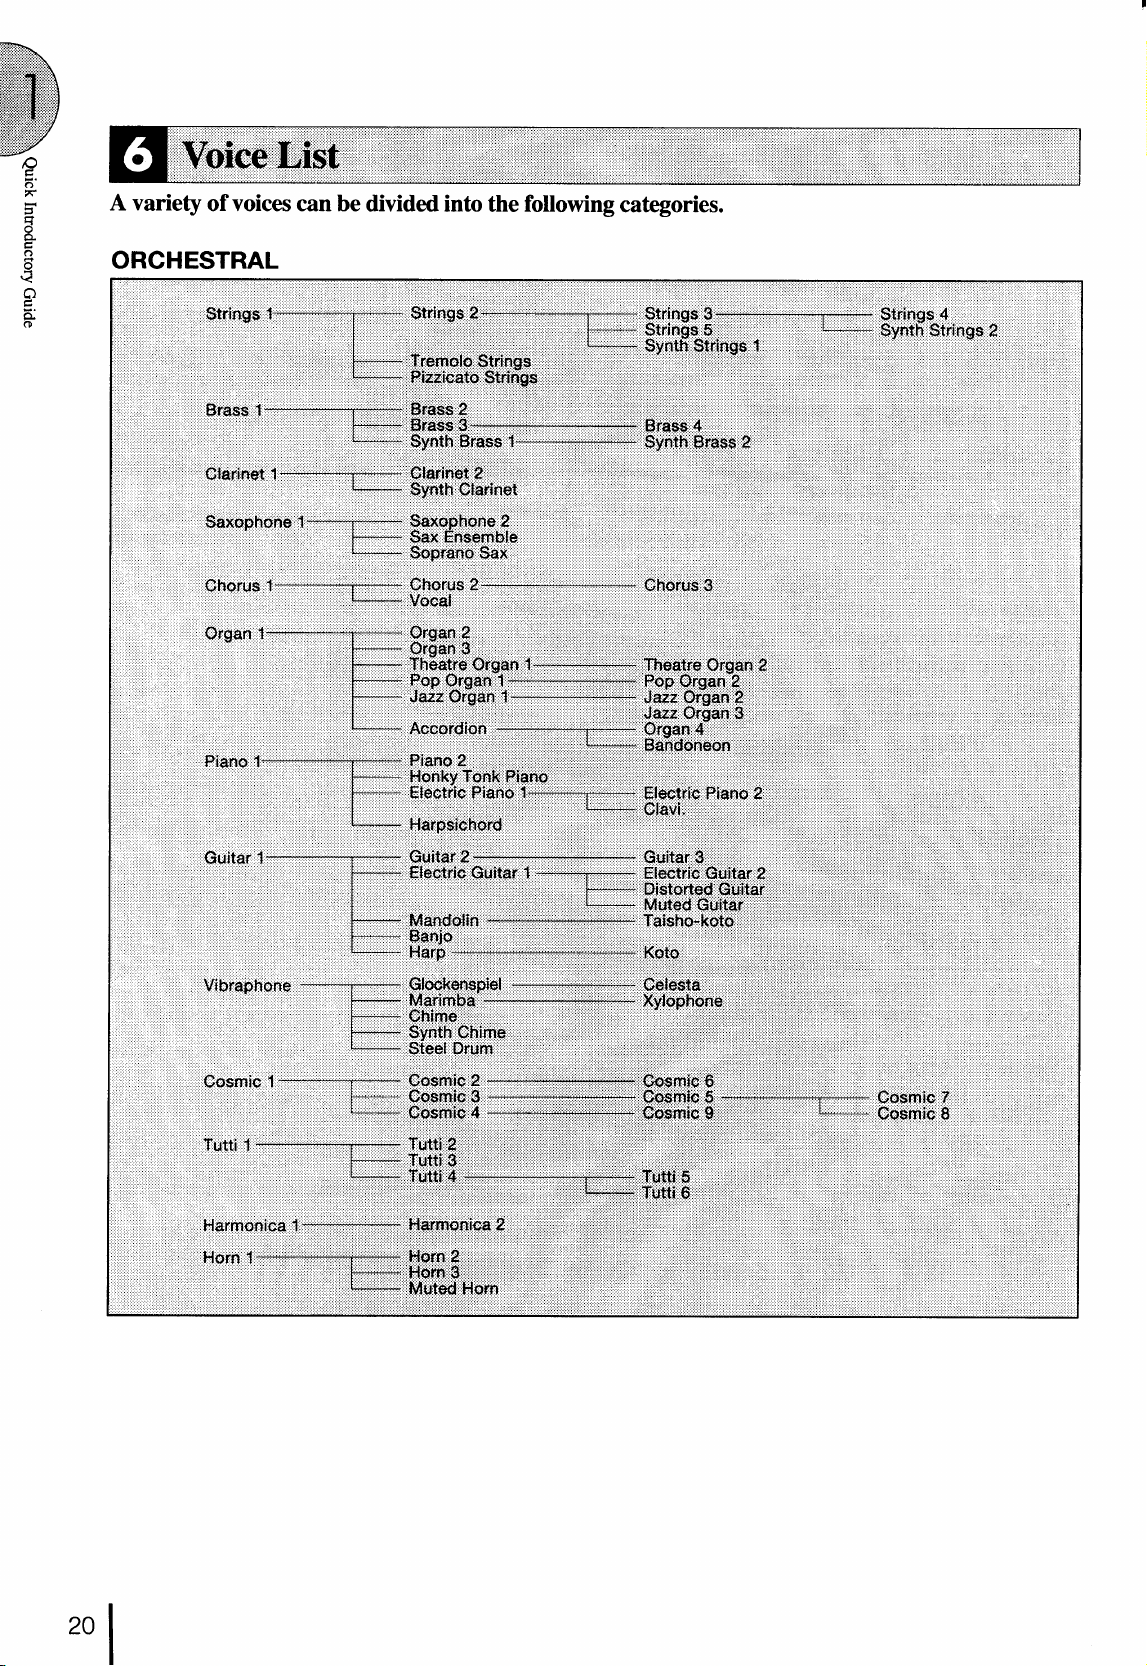
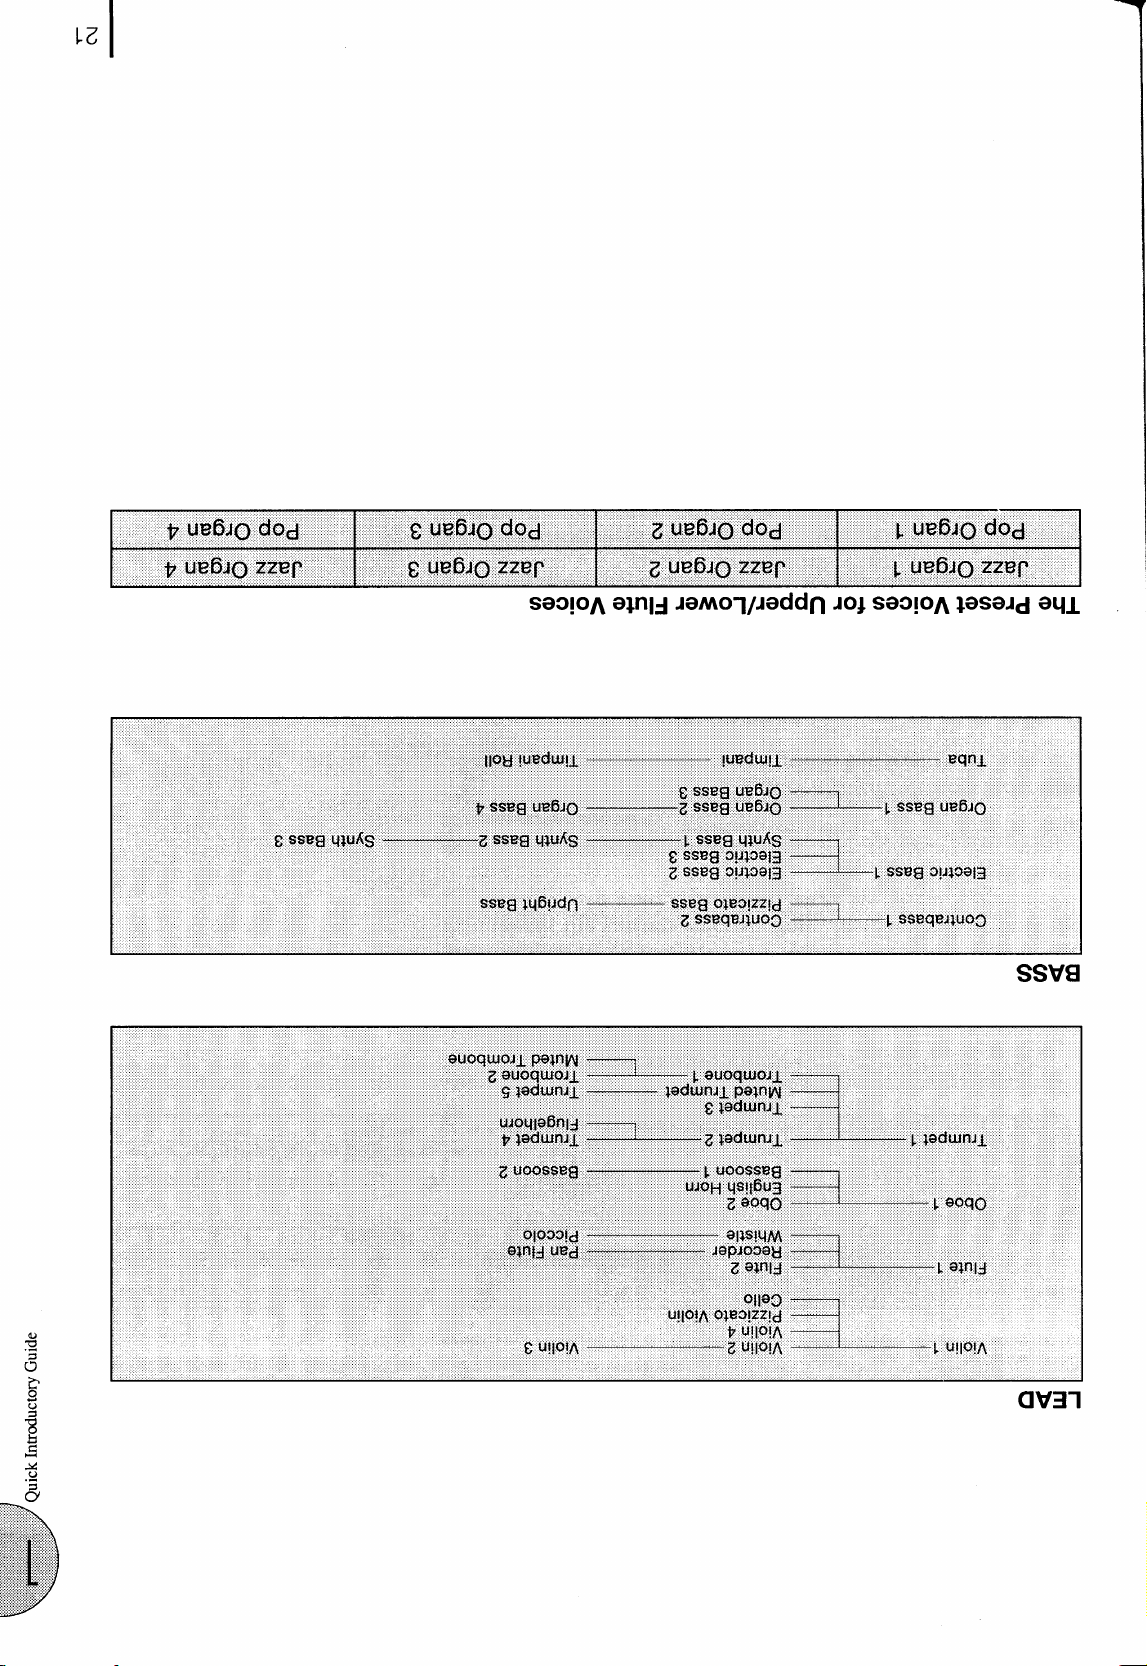
6 Voice List................................................... 20
2 Voice Sections ................................22
1 Selecting Voices from the Panel ................. 22
2 Selecting Voices from the Dotted Buttons.. 25
3 Voice Menus .............................................. 27
3 Flute Voices (Organ Sounds).........32
1 Creating Flute Voices ................................. 32
2 Save to User Flute Voice ............................ 34
3 Using Preset and User Voices..................... 35
4 Voice Controls and Effects ............36
1 Selecting from Voice Condition Pages ....... 37
[PAGE 1] .................................................... 37
(1) Touch Tone.......................................... 37
(2) Feet ...................................................... 38
(3) Effect (On/Off)..................................... 38
(4) Pan ....................................................... 38
(5) Brilliance.............................................. 38
(6) Volume ................................................ 38
[PAGE 2] .................................................... 39
(1) Vibrato ................................................. 39
(2) Touch Vibrato ...................................... 39
(3) Slide (Lead Voice Only)....................... 39
(4) Tune (Lead Voice Only)....................... 39
2 Selecting from Effect Set Pages.................. 40
(1) Tremolo/Chorus................................... 40
(2) Symphonic/Celeste............................... 40
(3) Delay.................................................... 41
(4) Flanger................................................. 41
3 Selecting from the Panel............................. 42
(1) Reverb.................................................. 42
(2) Sustain.................................................. 45
(3) Tremolo/Chorus................................... 46
5 Rhythm and Accompaniment .......49
1 Selecting Rhythms from the Panel.............. 49
2 Rhythm Condition Page.............................. 52
3 Dotted Buttons and User Rhythms.............. 53
4 Rhythm Menus........................................... 54
5 Automatic Accompaniment-Auto Bass Chord
(A.B.C.)...................................................... 56
6 Accompaniment Controls........................... 58
7 Keyboard Percussion .................................. 59
8 Melody On Chord (M.O.C.) ....................... 61
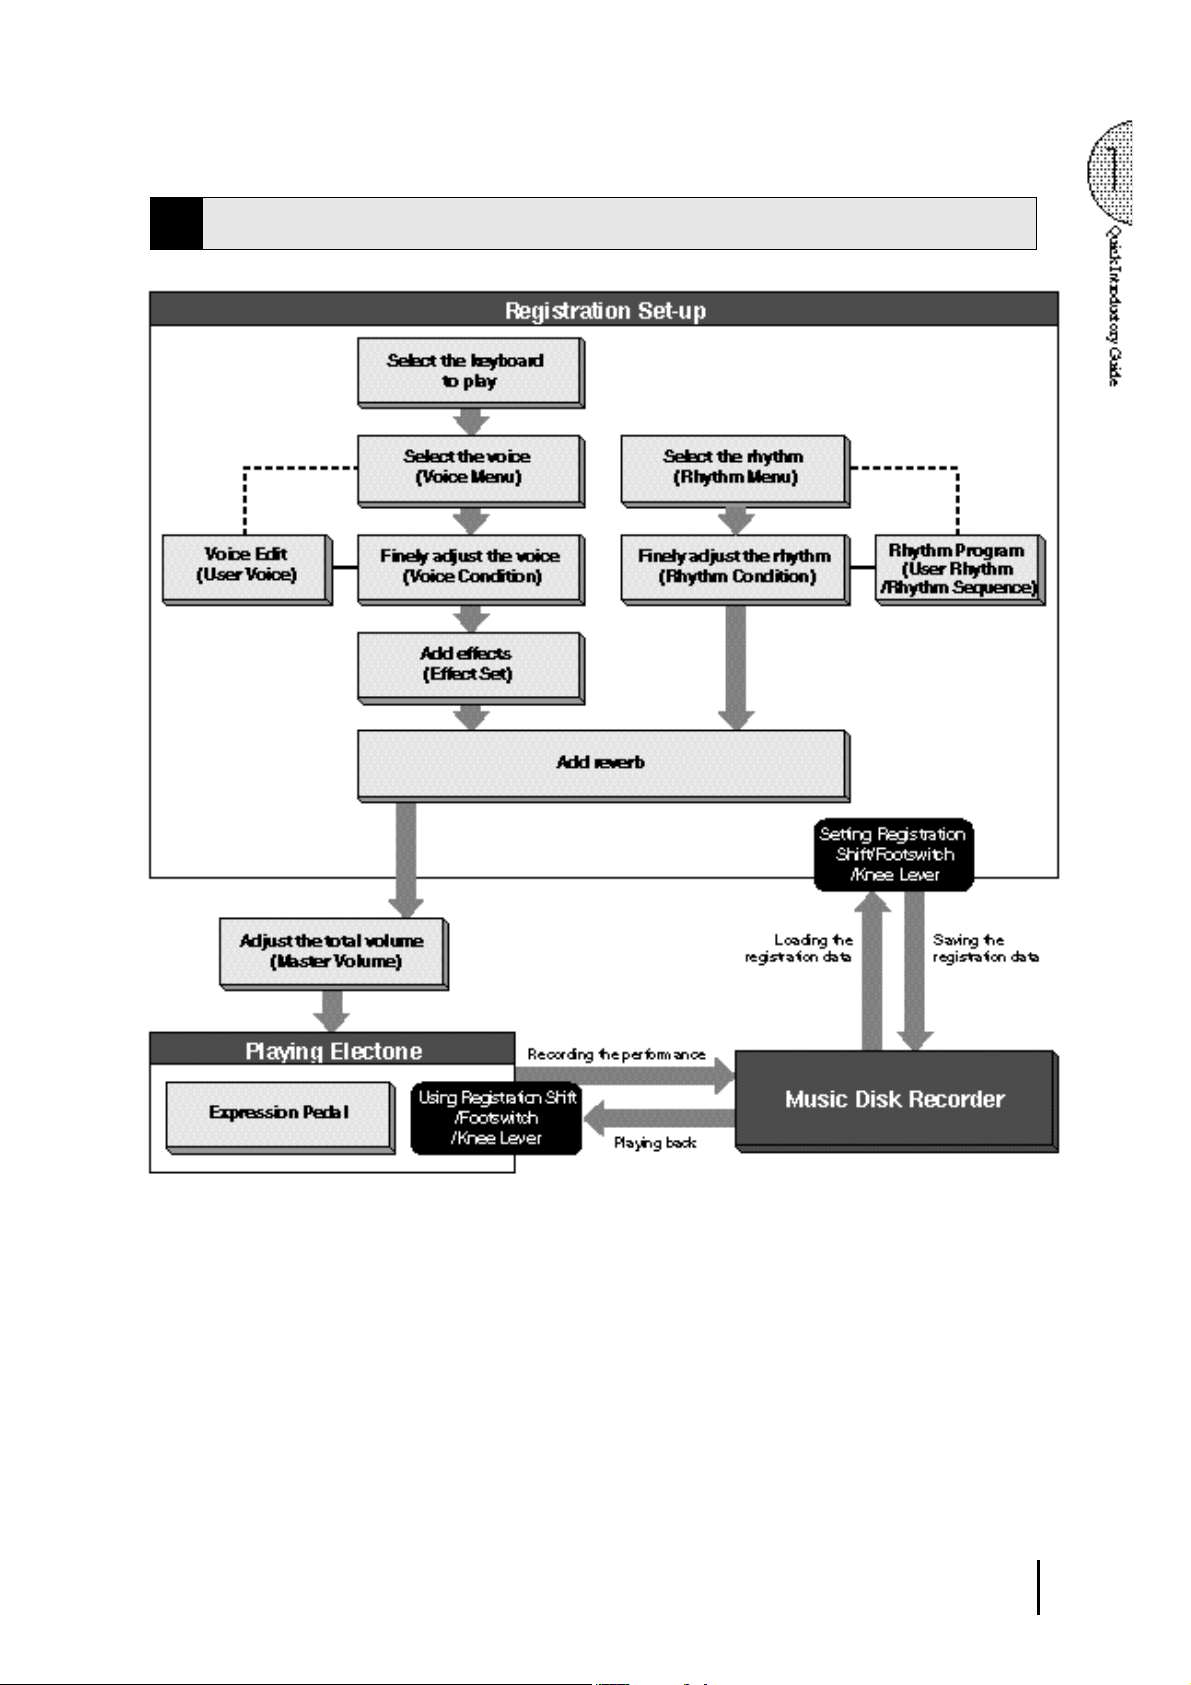
6 Registration Memory.....................62
1 Storing Registrations .................................. 62
2 Selecting Registrations ............................... 62
3 Saving the Registration Data to Disk .......... 63
4 Registration Shift........................................ 64
7 Music Disk Recorder .....................68
1 Precautions ................................................. 68
2 Formatting a Disk....................................... 70
3 Recording ................................................... 71
4 Recording Registrations (and Bulk Data) ... 77
5 Recalling Recorded Registrations
(and BulkData)........................................... 78
6 Replacing Registrations.............................. 78
7 Playback..................................................... 79
8 Other Functions.......................................... 81
8 Voice Edit.......................................88
1 Editing a Voice........................................... 88
2 Saving Your New Voice............................. 93
3 Quitting Voice Edit..................................... 94
4 Recalling an Edited Voice .......................... 94
5
Selecting Voices from a Voice Disk (Optional)..
95
6 Voice Editing Basics .................................. 96
9 Rhythm Pattern Program
and Rhythm Sequence Program .108
Outline of the Rhythm Programming Operation ...
108
1 Rhythm Pattern Program .......................... 109
(1) Entering Rhythm Pattern Program...... 109
(2) Percussion Sounds Used for
Rhythm Pattern Program.................... 111
(3) Step Write and Real Time Write ........ 112
(4) Selecting Step Write or
Real Time Write Operation ................ 112
(5) Setting the Beat/Quantize Values....... 112
(6) Entering Percussion Sounds
to a Rhythm Pattern............................ 113
(7) Editing with Step Write...................... 114
(8) Editing with Real Time Write ............ 118
(9) Selecting Accompaniment Patterns.... 119
(10) Saving Rhythm Patterns..................... 120
(11) Quitting Rhythm Pattern Program...... 121
(12) Recalling User Rhythm Patterns......... 122
2 Rhythm Sequence Program ...................... 123
(1) Selecting a Sequence.......................... 123
(2) Programming a Sequence................... 124
(3) Quitting Rhythm Sequence Program.. 127
(4) Playing Rhythm Sequences................ 127
(5) Playing All Sequences in Order.......... 128
10 Footswitches, Knee Lever
and Expression Pedals................130
1 Footswitch................................................ 130
2 Knee Lever............................................... 132
3 Expression Pedals..................................... 134
11 Transpose And Pitch Controls ..136
12 MIDI...........................................137
13 Accessory Jacks and Controls ...139
14 Appendix ....................................140
MIDI............................................................. 140
MIDI Data Format ........................................ 141
MIDI Implementation Chart ......................... 145
Troubleshooting............................................ 146
Specifications................................................ 149
Index............................................................. 150
1
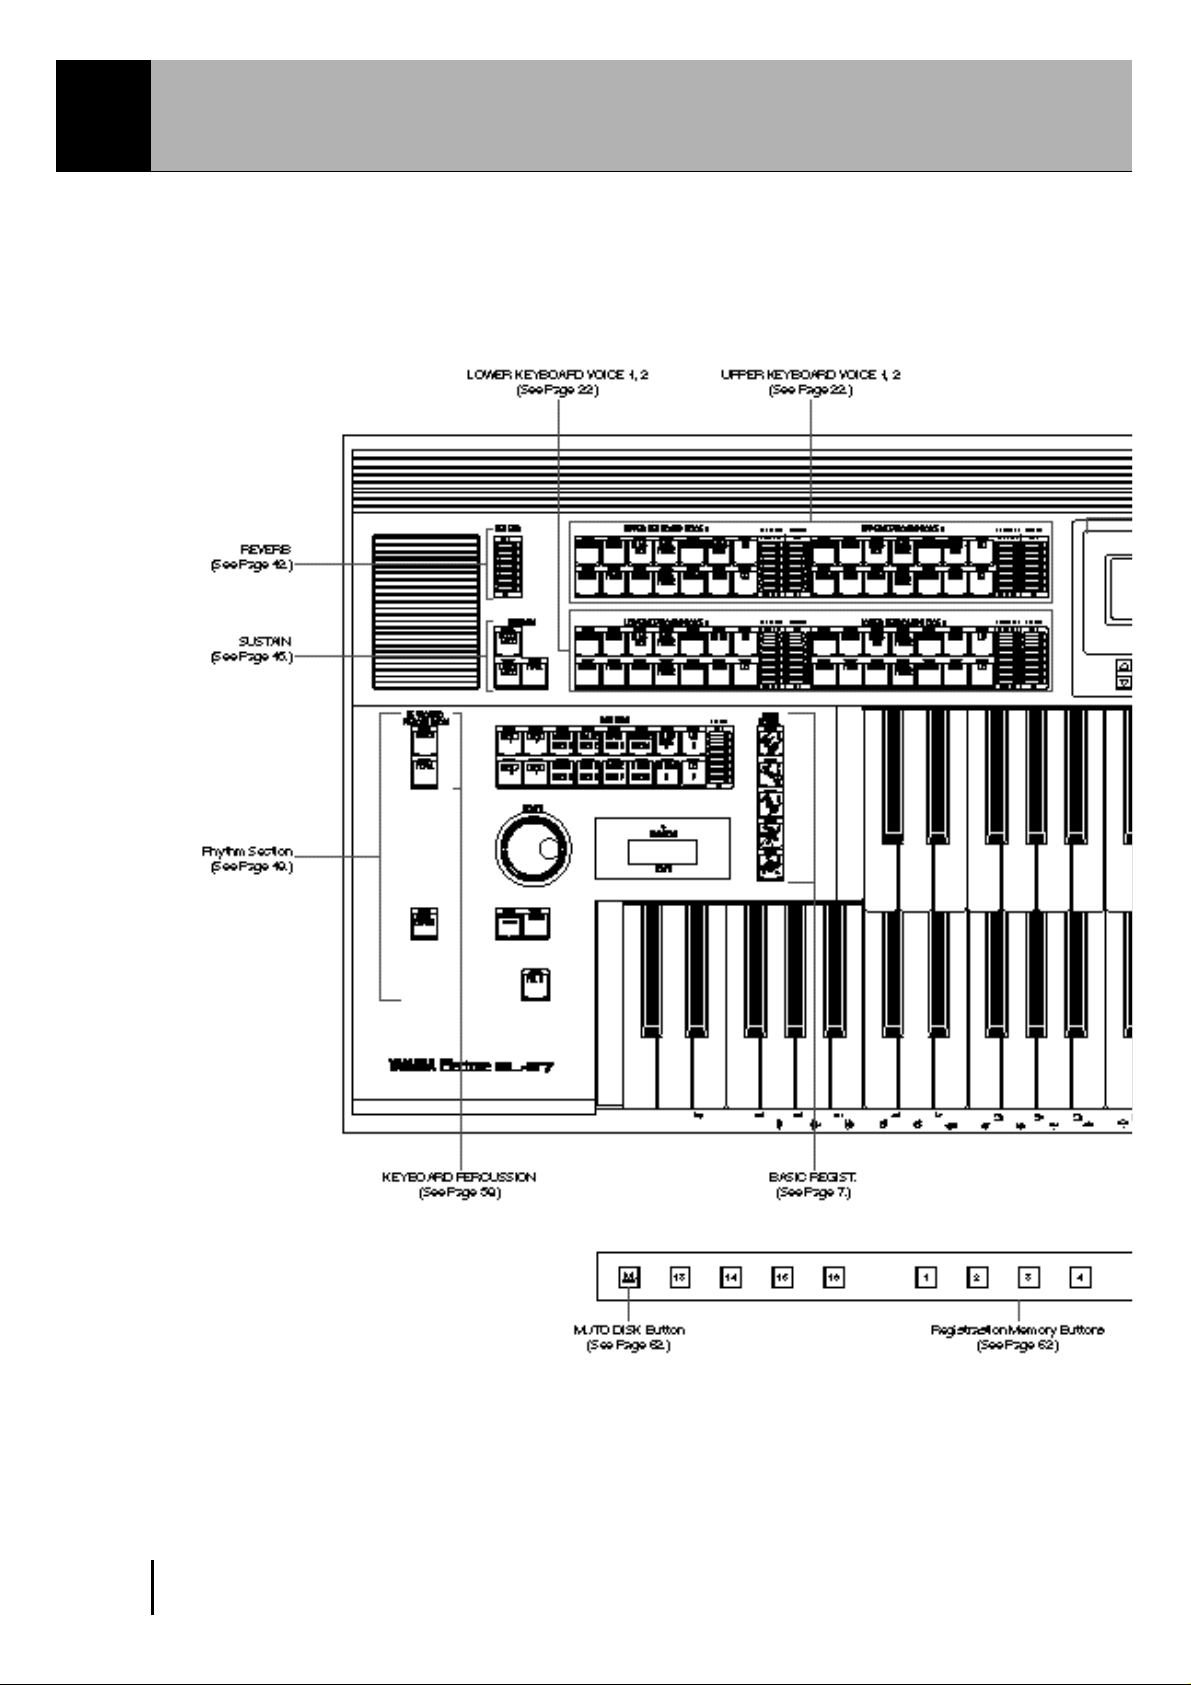
Panel Layout
Front Panel
2
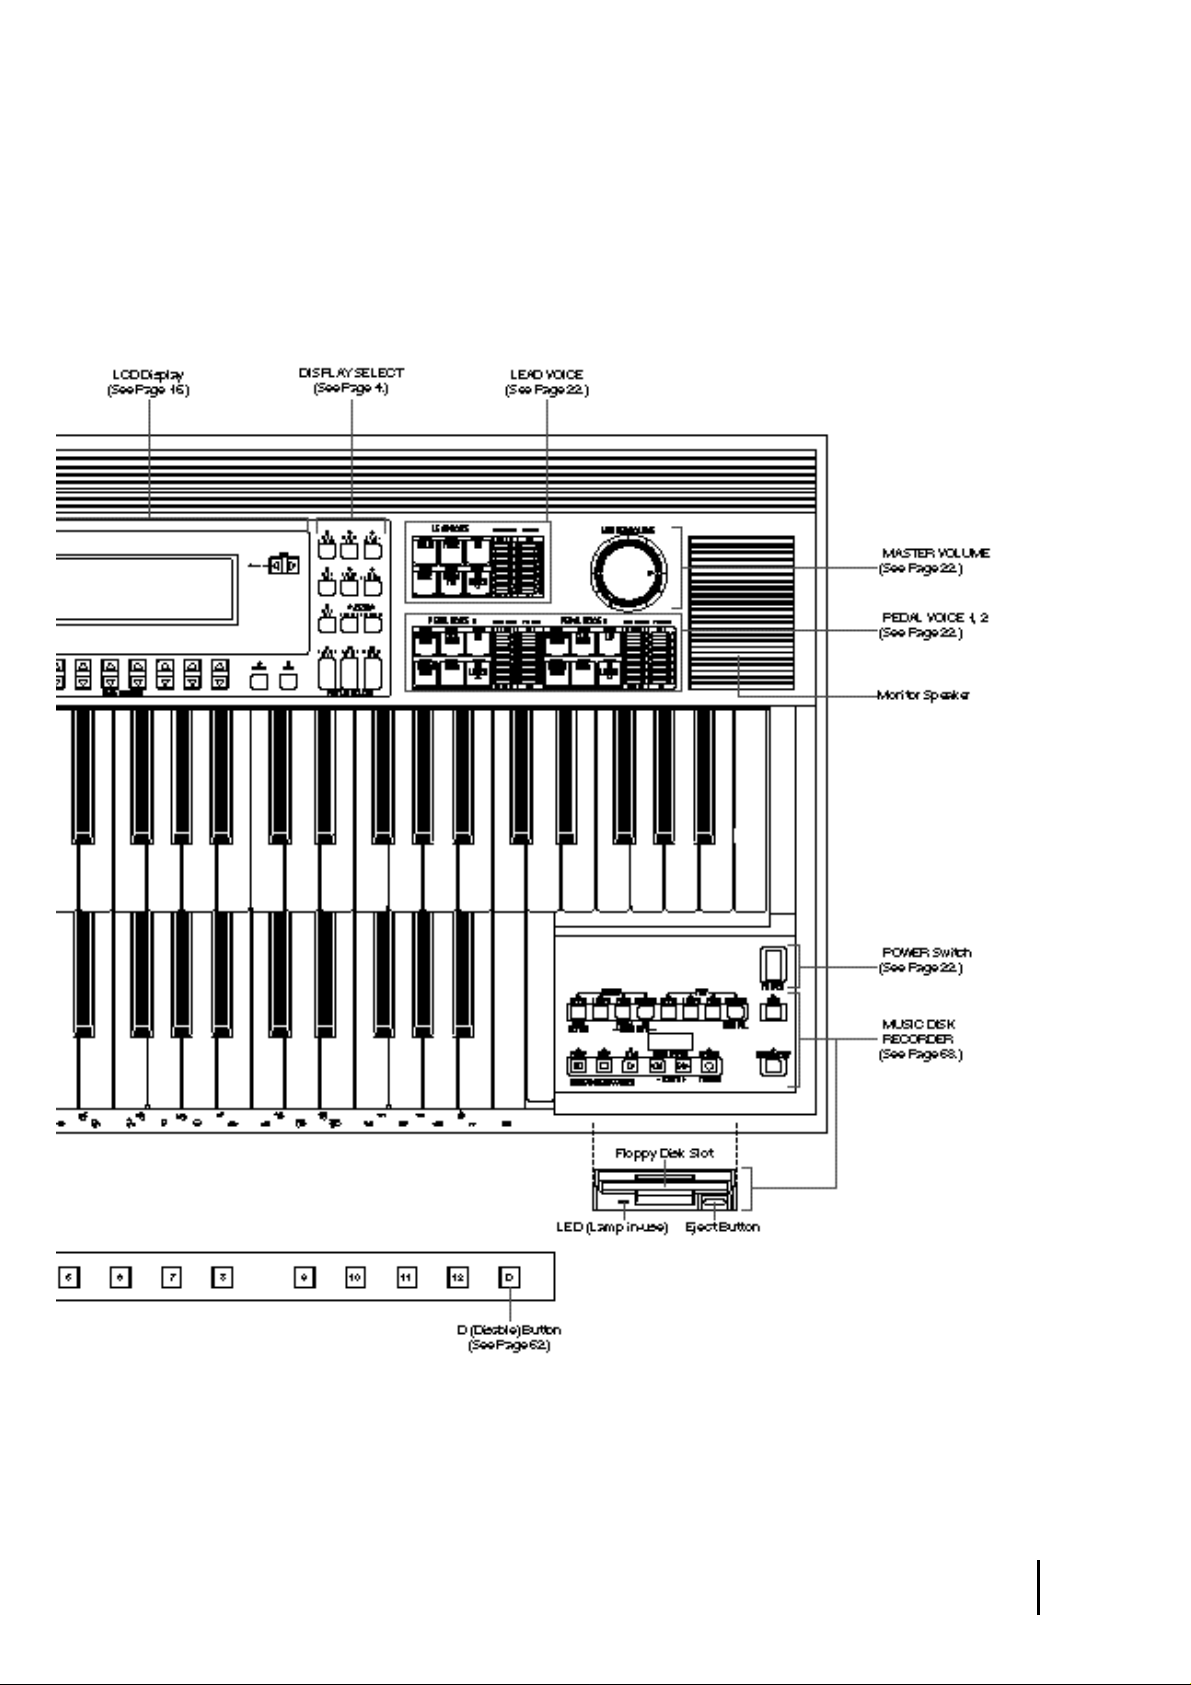
3
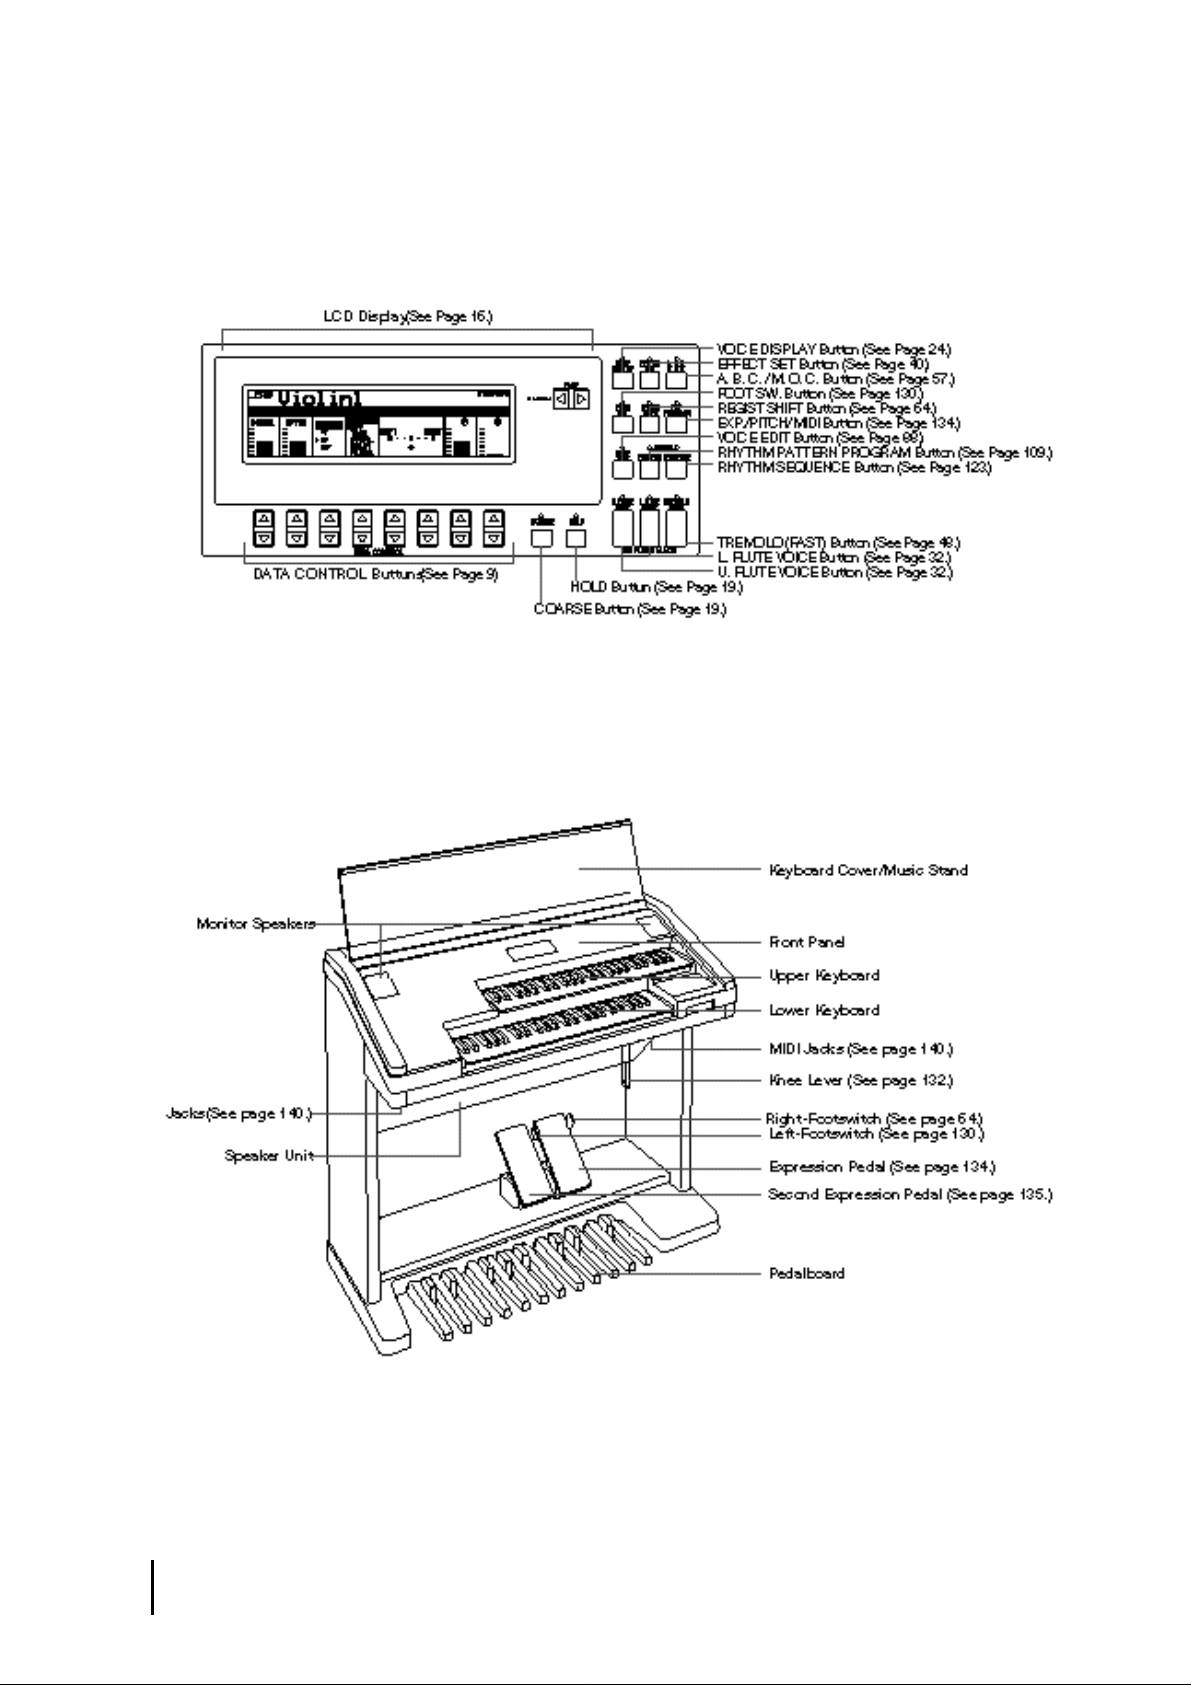
LCD/Display Select
Others
4

Main Features
Your Yamaha Electone is packed with many sophisticated functions. Yet is amazingly
easy to use. The main features are briefly described here so that you can quickly
understand the capabilities of your Electone.
Included among the main features are:
1 Astoundingly True-to-life Sounds
The new AWM (Advanced Wave Memory) and FM (Frequency Modulation) tone generation
technologies combined with authentic touch response for individual instrument voices, make
this Electone a truly expressive musical instrument. (See page 22.)
2 Limitless Variety of Organ Sounds
The Electone also has separate voice sections that feature classic organ sounds-from jazz
and pop to church and theater-and lets you easily create your own organ sounds by adjusting
the volumes of the various flute footages. (See page 32.)
3 Original Voice Creation
The Electone also provides easy-to-use voice editing tools for manipulating the sophisticated
AWM and FM tone generation technologies, allowing you to create your own original
Electone voices. (See page 88.)
4 Dynamic and Programmable Rhythm Patterns
The Rhythm section of the Electone features authentic drum and percussion sounds, used
by expert rhythm programmers in creating a total of 66 rhythm patterns, ranging across all
styles of music. (See page 49.)
Along with the Keyboard Percussion function, which lets you play percussion sounds from
the keyboard, the Rhythm Pattern Programmer and Rhythm Sequence Programmer let you
record your own rhythm patterns and connect them to make songs. (See page 108.)
5 Wide Variety of Effects
Electone voices can also be enhanced with a full range of high-quality effects, ranging from
Tremolo (for reproducing the sound of a rotating speaker) and Reverb to Flanger and Delay.
(See page 36.)
6 Recording of Performances with the Music Disk Recorder
The Electone also features a Music Disk Recorder for recording your registrations and
performances. The recording is completely digital and is stored to disk, which means that
no matter how many times you play back the recording, it will always sound exactly the
same as the original performance. (See page 68.)
7 Large LCD for Systematic, Intuitive Operation
The large LCD display provides comprehensive and easy-to-understand control over virtually
all of the operations of the Electone. (See page 16.)
5
1 Quick Introductory Guide
Whether you are an advanced Electone performer or have never touched an electronic keyboard in
your life, we recommend that you take the time to go through this basic section. It shows you in the
simplest possible manner how to start playing your Electone. The basic operations and functions
that you learn in this section will also be important when you later use the Electone's more advanced
features.
2
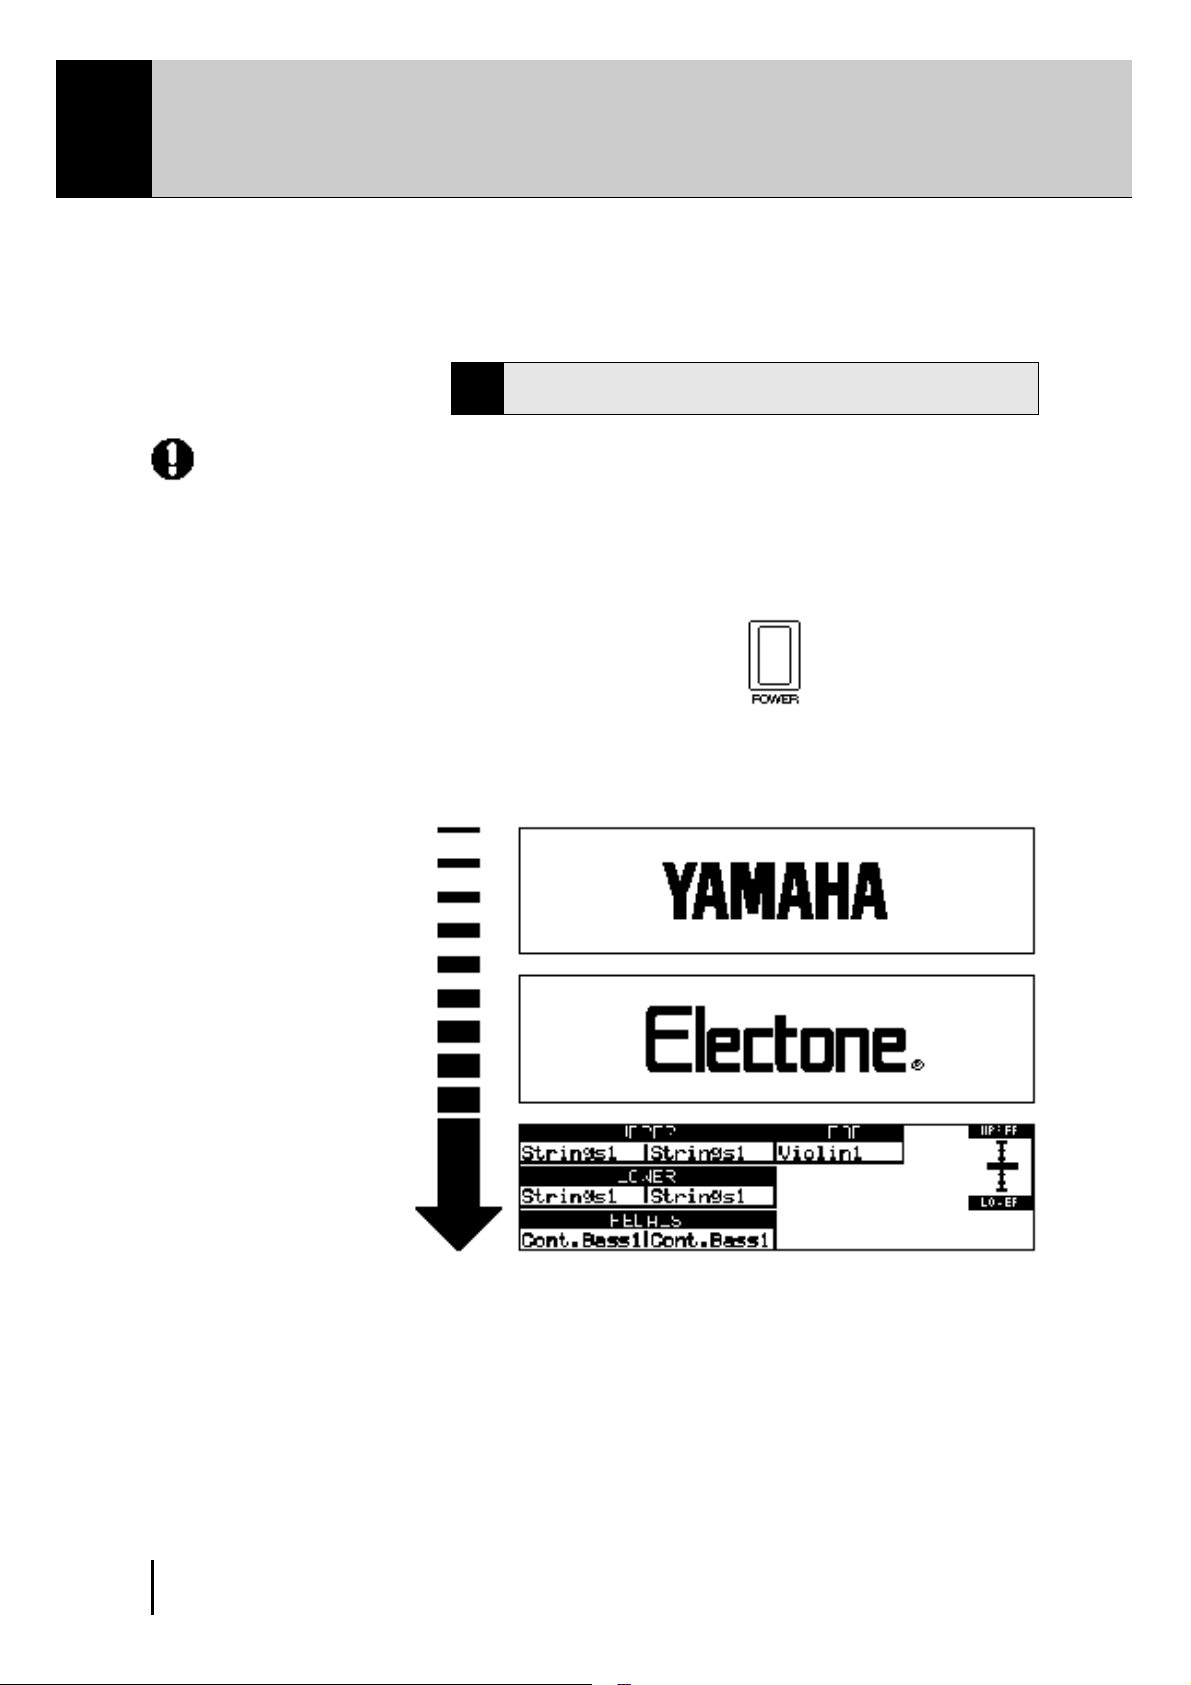
Turn on the Electone by pressing the POWER switch.
Yamaha products are manufactured
specifically for the supply voltage in the
area where they are to be sold. If you
should move, or if any doubt exists about
the supply voltage, please consult with a
qualified technician.
1
Getting Started
1
Plug the power cord in to an appropriate electrical outlet.
When you turn on the Electone, the following displays will
appear one after the other in the LCD display:
6
This last display shows the currently assigned voice settings for
each voice section, as well as the overall balance between the
Upper and Lower voices.
When the Electone is turned on, Basic Registration 1 is
automatically selected.

3
4
Set the MASTER VOLUME control.
The MASTER VOLUME control is an overall control which
affects the volume of the entire instrument.
Press the Expression pedal down with your foot.
Once you have set the MASTER VOLUME control to a suitable
level, you can use the Expression pedal to change the volume
with your foot as you play.
Basic Registrations
2
The Basic Registration section has five factory preset registrations,
each with a different set of voices for the Upper/Lower keyboards
and Pedalboard and each specially suited for playing in a different
music style.
To select Basic Registrations:
When you turn the power on, the Electone automatically selects Basic
Registration 1. Press the BASIC REGIST. buttons to select each Basic
Registration.
The chart below lists the voices that have been set for the Upper/Lower
keyboards and Pedalboard in each of the five Basic Registrations.
If you have made panel settings you wish to keep, save them to
Registration Memory (see p. 62) before turning the Electone off.
You can, however, restore the panel settings that were made before
the Electone was last turned off. See page 67 for more information.
Turning the Electone off erases all panel
settings you have made. When the
Electone is turned on, Basic Registration
1 is automatically selected.
7
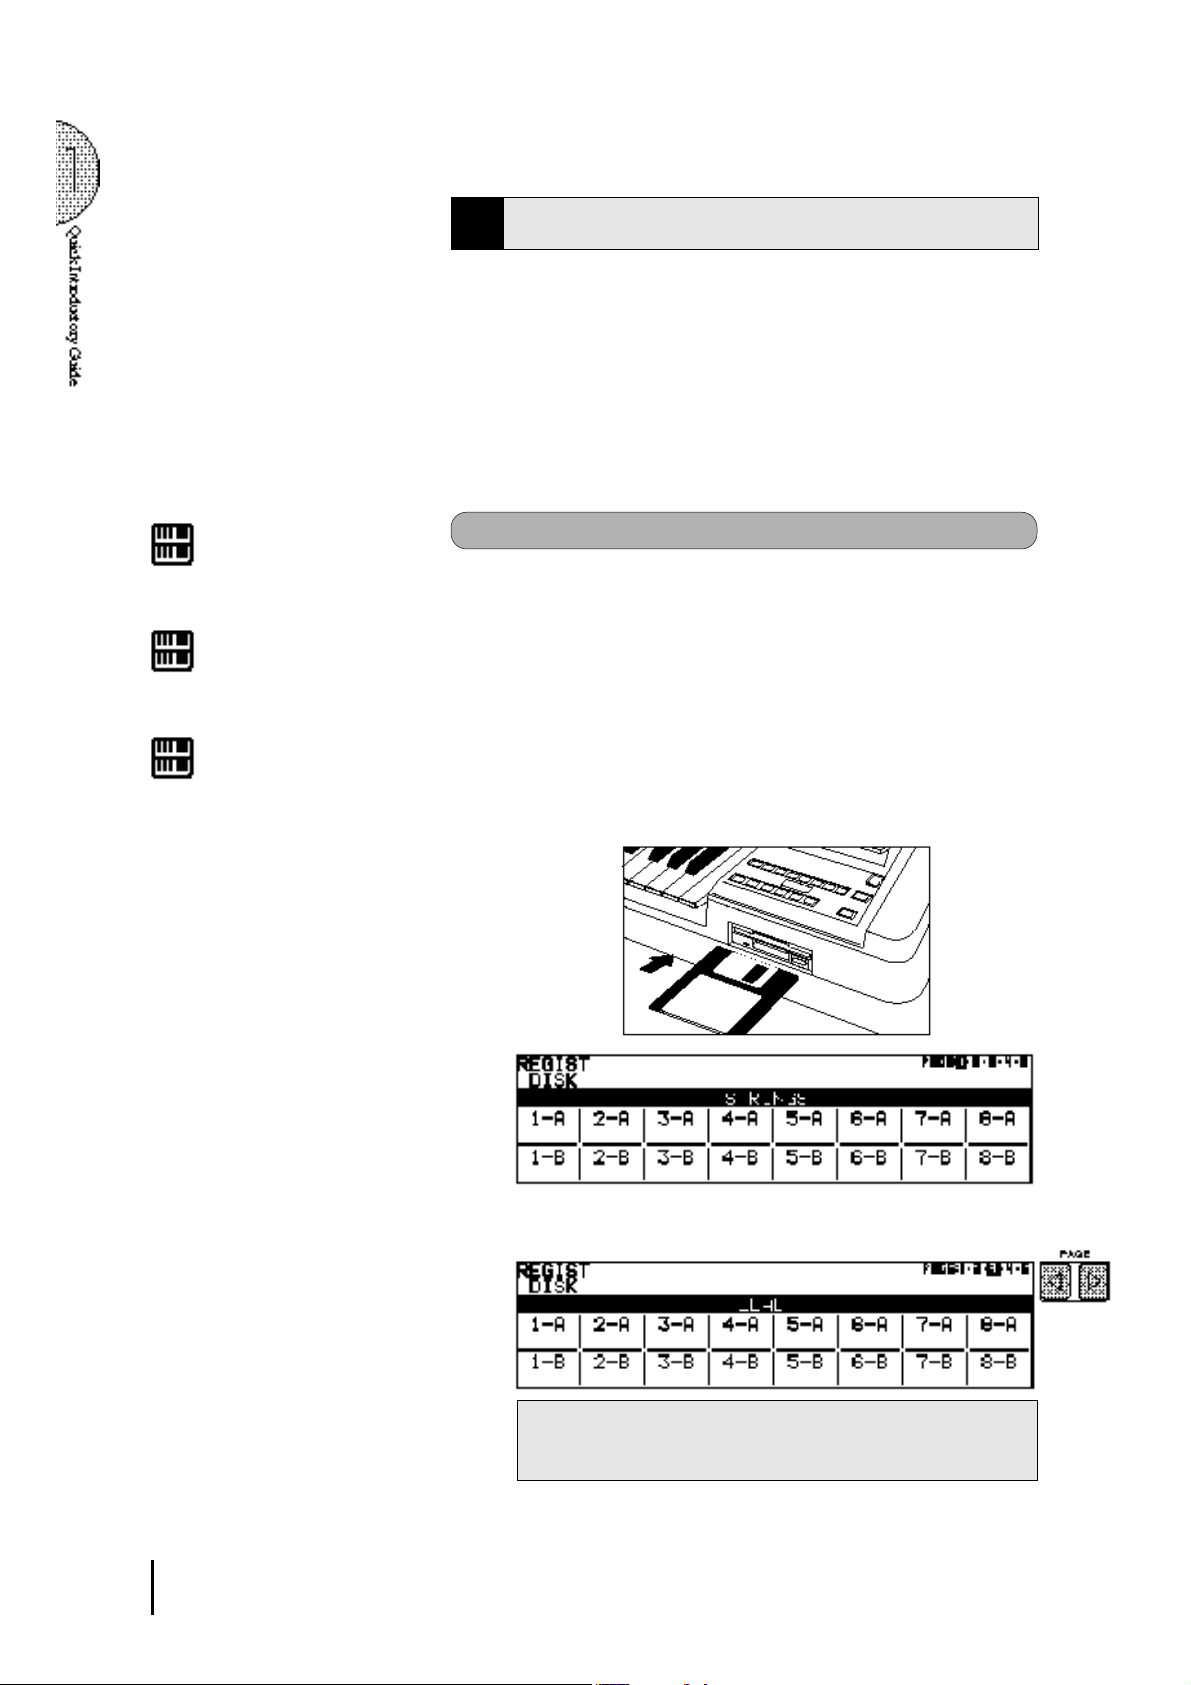
Registration Menu Disk
3
The Electone includes convenient Registrations that let you
completely and instantly change the voices and other settings for
all of the keyboards, even as you play. Each registration is preprogrammed to be used for a specific music style or instrumental
combination.
Included with your Electone is a Registration Menu Disk. The
disk is packed with 80 different types of registrations, including
voice and rhythm selections. Each registration is pre-programmed
to be used for a specific music style or instrumental combination.
NOTE:
See page 68 for more information on the
Music Disk Recorder.
NOTE:
See page 10 for the complete list of the
Registration Menus.
NOTE:
While you are in the Voice Edit mode or
Rhythm Pattern/Sequence Program
mode, the Registration Menus cannot be
displayed on the LCD.
To select registrations from the Registration Menu Disk:
Put the included Registration Menu Disk (with the label of the
1
disk facing upward and the sliding shutter facing forward) into
the Disk slot, located just under the Music Disk Recorder at the
right side of the Electone.
Once you've securely inserted the disk into the slot, the LCD
Display on the panel will automatically change to show the
available Registration Menus.
There are dozens of registrations on a disk, but up to 16 can
only be shown in the LCD Display at a time.
The page numbers 1 through 5 shown at the top right corner of
the LCD indicate this Registration Menu Disk contains five
pages.
8
Downloaded from:
2
Press the Page button to select the various menu "pages" of
registrations available on the disk.
When the page numbers are displayed at the top right corner,
you can select the pages by pressing the Page buttons, [>] to
select next page and [<] to select previous page.
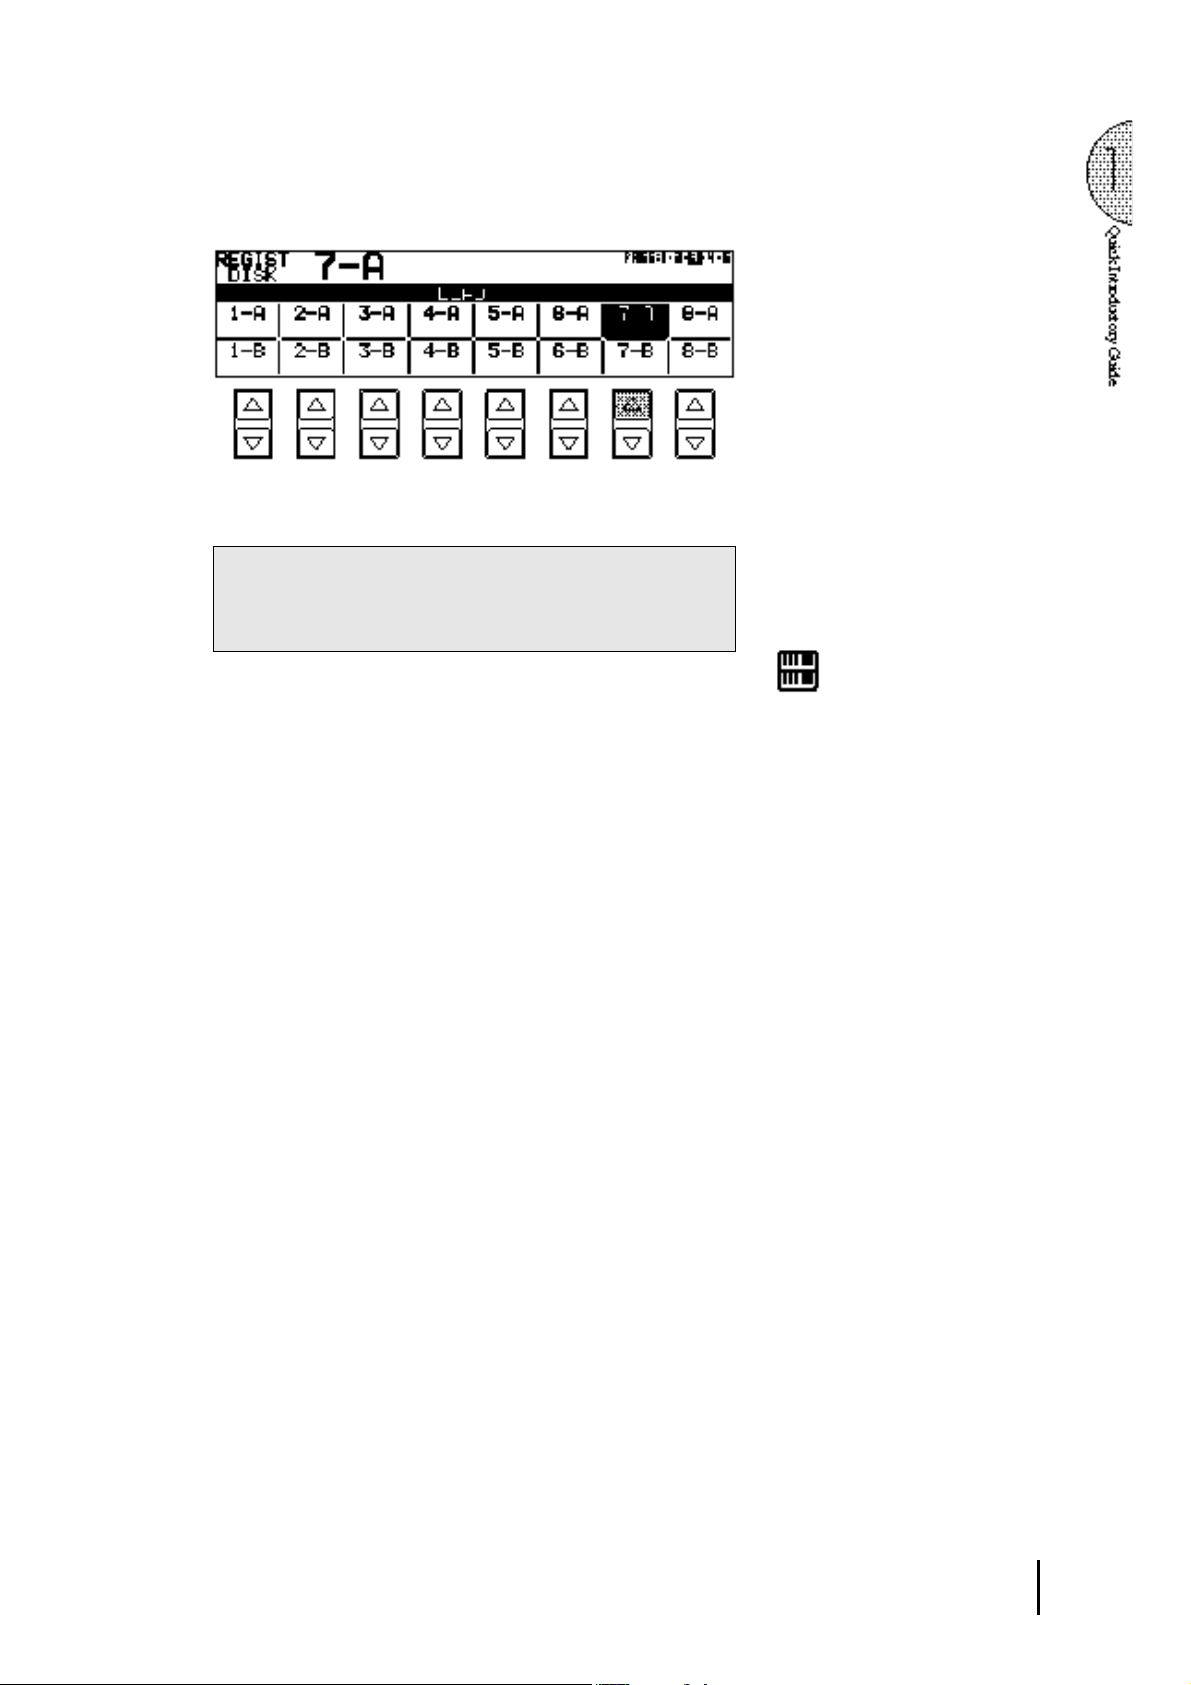
3
Select one of the registrations shown on the LCD by pressing
the appropriate Data Control button.
Up to 16 registration selections are shown on the LCD, and the
16 Data Control buttons correspond to those selections.
The Data Control buttons are used to select voices, rhythms
and various functions. They are also used to raise or lower
volumes and levels, as well as move the cursor up and down,
right and left.
NOTE:
Inadvertently pressing another button on
the panel may change the content of the
LCD during the Registration Menu
operation. In this case press PLAY button
on the Music Disk Recorder section, to
retrieve the Registration Menu display.
Downloaded from:
9
Registration Menu List
Page 1: Strings
1-A String Orchestra 1 Strings 1 2 Strings 2 3 Strings 4 4
5 Horn 3 6 Strings 1 7 Cotrabass1 8
2-A Mellow Orchestra 1 1 Strings 2 2 Chorus 2 3 Whistle 4 Slow Rock2
5 Strings 2 6 Chorus 2 7 Upright Bass 8
3-A Small Strings 1 Strings 3 2 Strings 2 3 Violin 4 4
5 Strings 3 6 Strings 2 7 Cotrabass1 8
4-A Fidle 1 Strings 4 2 3 Violin 1 4
5 Strings 2 6 7 Cotrabass1 8
5-A Mellow Classic 1 1 Strings 2 2 Synth. Strings1 3 4
5 Strings 2 6 7 Cotrabass1 8
6-A Pizzicato Strings 1
7-A Tremolo Strings 1 Horn 3 2 Horn 1 3 4
8-A Mellow Classic 1 Strings 1 2 Strings 2 3 Strings 5 4
1-B Strings Quartet 1 Violin 1 2 3 4
2-B Mellow Orchestra 2 1 Cosmic 1 2 Celesta 3 4 Slow Rock 1
3-B Pops Classic 1 Strings 2 2 Harpsichord 3 Violin 4 4 8Beat1
4-B Unison Strings 1 Strings 2 2 Strings 2(16') 3 4
5-B Mellow Classic 2 1 2 3 English Horn 4
6-B Pizzicato Unison 1
7-B Dynamic Musical 1 Tutti 1 2 Strings 2 3 Piccolo 4 Polka1
8-B Dynamic Orchestra 1 Strings 1 2 Brass 1 3 Piccolo 4
The numbers in the parentheses indicate that the "feet" settings for the assigned voice are different from the default.
Pizzicato Strings
5
Pizzicato Strings
5 Tremolo Strings 6 Strings 2 7 Cotrabass 1 8
5 Strings 1 6 7 Cotrabass 1 8
5 Violin 3 6 7 Cello 8
5 Strings 2 6 Chorus 2 7 Upright Bass 8
5 Strings 1 6 Horn 3 7
5 Strings 2 6 7 Cotrabass1 8
5 Strings 2 6 7 8 Cotrabass1
Pizzicato Strings
5
Pizzicato Strings
5 Horn 1 6 Strings 1 7 Cotrabass1 8
5 Strings 1 6 Brass 2 7 Timpani 8
1
: UPPER KEYBOARD VOICE 12: UPPER KEYBOARD VOICE 23: LEAD VOI CE
5
: LOWER KEYBOARD VOI CE 16: LOWER KEYBOARD VOI CE 27: PEDAL VOI CE 1
2 3 4
6
2
6
Pizzicato Strings
Pizzicato Strings
Pizzicato Strings
7
Pizzicato Strings
Elec. Bass 1
(16')
3 4
7
Pizzicato Strings
8
8
8
4
: RHYTHM
8
: PEDAL VOI CE 2
1 0
Page 2: Brass
1-A Marching Band 1 1 Brass 1(16') 2 Brass 1(8') 3 4 March 1
5 Brass 1 6 7 Tuba 8
2-A Fanfare 1 Brass 2 2 3 Trumpet 1 4
5 Brass 4 6 7 Tuba 8
3-A Big Band 1 1 Tutti 3 2 3 Trumpet 1 4 Swing 3
(Dynamic)
4-A Big Band 3 1 Trombone 2 2 3 Trombone 2 4 Swing 3
(Trombone Ensemble)
5-A Big Band 5 1 Saxphone 2 2 3 Saxphone 2 4 Swing 1
(Super Saxophones)
6-A Jazz Trumpet 1 1 2 3 Trumpet 3 4 Swing 6
7-A Dixieland 1 1 Clarinet 2 2 3 4 Dixieland 2
8-A Sax Fusion 1 1 2 3 Saxphone 2 4 16 Beat 3
1-B Marching Band 2 1 Glockenspiel 2 3 Piccolo 4 March 2
2-B Classic Horn 1 Horn 3 2 3 4
3-B Big Band 2 1 Tutti 3 2 3 Trumpet 3 4 Swing 2
(Mellow)
4-B Big Band 4 1
(Mute)
5-B Big Band 6 1 Sax Ensemble 2 3 Sax Ensemble 4 Swing 1
(Mellow Sax)
6-B Jazz Trumpet 2 1 2 3 Flugelhorn 4 Jazz Ballad
(Flugelhorn)
7-B Dixieland 2 1 2 3 Trombone 1 4 Dixieland 1
8-B Sax Fusion 2 1 2 3 Saxphone 2(8') 4 Bounce 3
5 Trombone 2 6 7 Upright Bass 8
5 Sax Ensemble 6 7 Upright Bass 8
1 Brass 4 6 7 Upright Bass 8
5 Piano 2 6 7 Upright Bass 8
5 Banjo 6 7 Upright Bass 8
5
Electric Piano 2
5 Brass 1 6 7 Tuba 8
5 Trombone 1 6 7 Tuba 8
5 Guitar 2 6 7 Upright Bass 8
Muted Trombone
5 Piano 1 6 7 Upright Bass 8
Muted Trombone
5
5 Piano 1 6 7 Upright Bass 8
5 Honky Tonk Piano 6 7 Upright Bass 8
5 Synth. Strings 2 6
6 7
2 3
6 7 Upright Bass 8
Elec. Piano 1
7
Elec. Bass 1
Muted Trombone
Elec. Bass 2
8
4 Swing 2
8
1
: UPPER KEYBOARD VOICE 12: UPPER KEYBOARD VOICE 23: LEAD VOI CE
5
: LOWER KEYBOARD VOI CE 16: LOWER KEYBOARD VOI CE 28: PEDAL VOI CE 1
4
: RHYTHM
8
: PEDAL VOI CE 2
1 1

Page 3: Lead
1-A Woodwind Ensemble 1 1 Clarinet 1 2 3 Flute 1 4
5 Bassoon 2 6 7 Contrabass 1 8
2-A Classical Flute 1 2 3 Flute 1 4
5 Harp 6 7 Contrabass 1 8
3-A Classic Oboe 1 2 3 Oboe 1 4
5 Tremolo Strings 6 7 Contrabass 2 8
4-A Classic Clarinet 1 2 3 Clarinet 1 4 Polka 1
5 Horn 3 6 7 Pizzicato Bass 8
5-A Folklore Kena 1 2 3 Pan Flute 4 Country 2
5 Guitar 1 6 7 Pizzicato Bass 8
6-A Western Harmonica 1 2 3 Harmonica 1 4
5 Strings 2 6 7 Contrabass 1 8
7-A Continental Tango 1 Harmonica 2 2 Bandoneon (4') 3 Violin 1 4 Tango 2
5 Piano 1 6 Strings 2 7 Pizzicato Bass 8
8-A Jazz Organ 1 1 Jazz Organ 2 2 Jazz Organ 2(4') 3 4 Bossanova 2
5 Pop Organ 1 6 7 Organ Bass 1 8
1-B Piccolo Cute 1 2 Glockenspiel 3 Piccolo 4 Polka 1
5 English Horn 6 7 Pizzicato Bass 8
2-B Mellow Flute 1 2 3 Flute 2 4 Slow Rock 1
5
Elec. Piano 1
3-B Mellow Oboe 1 2 3 Oboe 2 4 8 Beat 5
5 Pizzicato Strings 6 7 Pizzicato Bass 8
4-B Jazz Clarinet 1 2 3 Clarinet 2 4 Jazz Ballad
5 Strings 2 6 7 Upright Bass 8
5-B Mellow Whistle 1 2 3 Whistle 4 8 Beat 1
5
Elec. Piano 1
6-B Jazz Harmonica 1 2 3 Harmonica 2 4 Slow Rock 3
5 Guitar 2 6 7 Upright Bass 8
7-B Chanson Accordion 1 Accordion 2 3 Harmonica 2 4 Waltz 1
5 Accordion 6 7 Pizzicato Bass 8
8-B Jazz Organ 2 1 Pop Organ 2 2 Jazz Organ 1 3 Jazz Organ 3 4 Swing 2
5 Pop Organ 1 6 7 Organ Bass 1 8
6 7
6 7
Elec. Bass 3
Elec. Bass 1
8
8
1
: UPPER KEYBOARD VOICE 12: UPPER KEYBOARD VOICE 23: LEAD VOI CE
5
: LOWER KEYBOARD VOI CE 16: LOWER KEYBOARD VOI CE 27: PEDAL VOI CE 1
1 2
4
: RHYTHM
8
: PEDAL VOI CE 2

Page 4: Decay
1-A Classic Piano 1 Piano 1 2 3 4
5 Piano 1 6 7 Pizzicato Bass 8
2-A Electric Piano 1 1
3-A Honky Tonk 1
4-A Jazz Guitar 1 2 3 Guitar 2 4 Bossanova 1
5-A Latin Mrimba 1 Marimba 2 3 4 Samba1
6-A Romantic Music Box 1 Celesta 2 3 Whisle 4 Slow Rock 1
7-A Guitar, Oldies 1
8-A Steel Drum 1 Steel Drum 2 3 4 Reggae 2
1-B European Mellow Piano 1 Piano 2 2 3 4 8 Beat 5
2-B Electric Piano 2 1
3-B Western Guitar 1 2 3 Whistle 4 Country 1
4-B Classic Guitar 1 Guitar 3 2 3 4 Samba 2
5-B Canzone Mandolin 1 Mandolin 2 Chorus 3 3 Violin 3 4 Tango 1
6-B Xmas Chime 1 Synth. Chime 2 Chime 3 Glockenspiel 4 Polka 1
7-B Heavy Metal 1
8-B Japanese Tradition 1 Koto 2 3 4 Beguine
Elec. Piano 1
5
Elec. Piano 1
Honky Tonk Piano
5
Honky Tonk Piano
5
Elec. PIano 1
5 Piano 1 6 7 Upright Bass 8
5 Chorus 2 6 Strings 2 7 Pizzicato Bass 8
Elec. Guitar 2
5
Elec. Guitar 1
5 Pop Organ 1 6 7
5 Piano 2 6 Strings 2 7
Elec. Piano 2
5
Elec. Piano 2
5 Guitar 1 6 7 Upright Bass 8
5 Guitar 1 6 7 Upright Bass 8
5 Strings 4 6 7 Pizzicato Bass 8
5 Theatre Organ 1 6 Chorus 2 7 Organ Bass 2 8
Distorted Guitar
5
Elec. Guitar 1
5 Strings 3 6 7 Contrabass1 8
2 3 4 16 Beat 3
6 7
2 3 4 Dixieland 1
6 7 Upright Bass 8
6 Strings 2 7 Upright Bass 8
2 3 4 8 Beat 3
6 7
2 3 4 8 Beat 1
2 7
2 3
6 7
Elec. Bass 3
Elec. Bass 3
Elec. Bass 1
Elec. Bass 1
Elec. Bass 3
Distorted Guitar
Elec. Bass 2
8
8
8
8
8
4 Bounce 3
8
1
: UPPER KEYBOARD VOICE 12: UPPER KEYBOARD VOICE 23: LEAD VOI CE
5
: LOWER KEYBOARD VOI CE 16: LOWER KEYBOARD VOI CE 27: PEDAL VOI CE 1
4
: RHYTHM
8
: PEDAL VOI CE 2
1 3

Page 5: Synth
1-A Contemporary 1 1 2 3 Soprano Sax 4 8 Beat 4
(Fusion 1)
2-A Contemporary 3 1 Synth. Brass 2 2 3 Synth. Brass 2 4 Dance Pop 2
(Dance Beat 1)
3-A Contemporary 5 1 Synth. Brass 1 2 Glockenspiel 3 Recorder 4 8 Beat 4
(Japanese New Music 1)
4-A Contemporary 7 1 Brass 3 2 Brass 3 (16') 3 Trumpet 4 4 Dance Pop 4
(Dance Beat 3)
5-A Contemporary 9 1
(Fusion 3)
6-A Synth Classic 1 1 Cosmic 7 2 Cosmic 1 3 Whistle (4') 4
7-A Contemporary 11 1 Cosmic 3 2 3 Cosmic 4 4 8 Beat 2
(Dance Beat 4)
8-A Synth Brass Orchestra 1 1 Tutti 4 2 Brass 2 3 Synth. Brass 2 4 Bounce 3
1-B Contemporary 2 1 2 3 Saxphone 2 4 8 Beat 5
(Fusion 2)
2-B Contemporary 4 1 Synth. Brass 1 2 Synth. Brass 2 3 Synth. Brass 1 4 Dance Pop 3
(Dance Beat 2)
3-B Contemporary 6 1 2 3 Whistle 4 8 Beat 5
(Japanese New Music 2)
4-B Contemporary 8 1 2 3 Flugelhorn 4 Jazz Waltz 2
(Waltz)
5-B Contemporary 10 1 2 Brass 2 3 Trumpet 3 4 16 Beat 4
(Fusion 4)
6-B Synth Classic 2 1 Cosmic 6 2 Cosmic 3(4') 3 Marimba 4
7-B Contemporary 12 1 Glockenspiel 2
(Dance Beat 5)
8-B Synth Brass Orchestra 2 1 Brass 3 2 Synth. Brass 1 3 Trumpet 4 4 16 Beat 3
5
Elec. Guitar 2
5
Elec. Guitar 1
Elec. Piano
5
5
5
5 Cosmic 5 6 Cosmic 1 7 Contrabass 2 8
5
5 Clavi (8') 6 Synth. Clarinet 7 Synth. Bass 3 8
5 Piano 2 6 7
5 Cosmic 3 6
5 PIano 2 6 7
5
5
5 Cosmic 9 6 Chorus 2 7 Contrabass 2 8
5 Piano 2 6 Synth. Strings 1 7
5
1 6 Synth. Strings 2 7
Elec. Guitar 1
Elec. Guitar 1
Elec. Piano 1
Elec. Guitar 1
Elec. Piano 1
Elec. Guitar
1 6 7
Elec. Piano
1 6 Cosmic 3 7
6 7
6 7
6 7
2 3
6 Strings 2 7
6 Synth. Strings 1 7
Elec. Guitar 1
6 Cosmic 4 7
Synth. Brass 1(16')
Elec. Bass 3
Elec. Bass 2
Elec. Bass 1
Elec. Bass 2
Elec. Guitar 2
Elec. Bass 2
Elec. Bass 3
Elec. Bass 1
7
Elec. Bass 2
Elec. Bass 1
Elec. Bass 1
Elec. Bass 2
3 Synth. Bass 3 4 Dance Pop 1
Elec. Bass 2
Elec. Bass 3
8
8
8
8
4 16 Beat Funk 1
8
8
8
8
8
8
8
8
8
1
: UPPER KEYBOARD VOICE 12: UPPER KEYBOARD VOICE 23: LEAD VOI CE
5
: LOWER KEYBOARD VOI CE 16: LOWER KEYBOARD VOI CE 27: PEDAL VOI CE 1
1 4
4
: RHYTHM
8
: PEDAL VOI CE 2
Basic Operation
4
1 5
5 Using the LCD Display
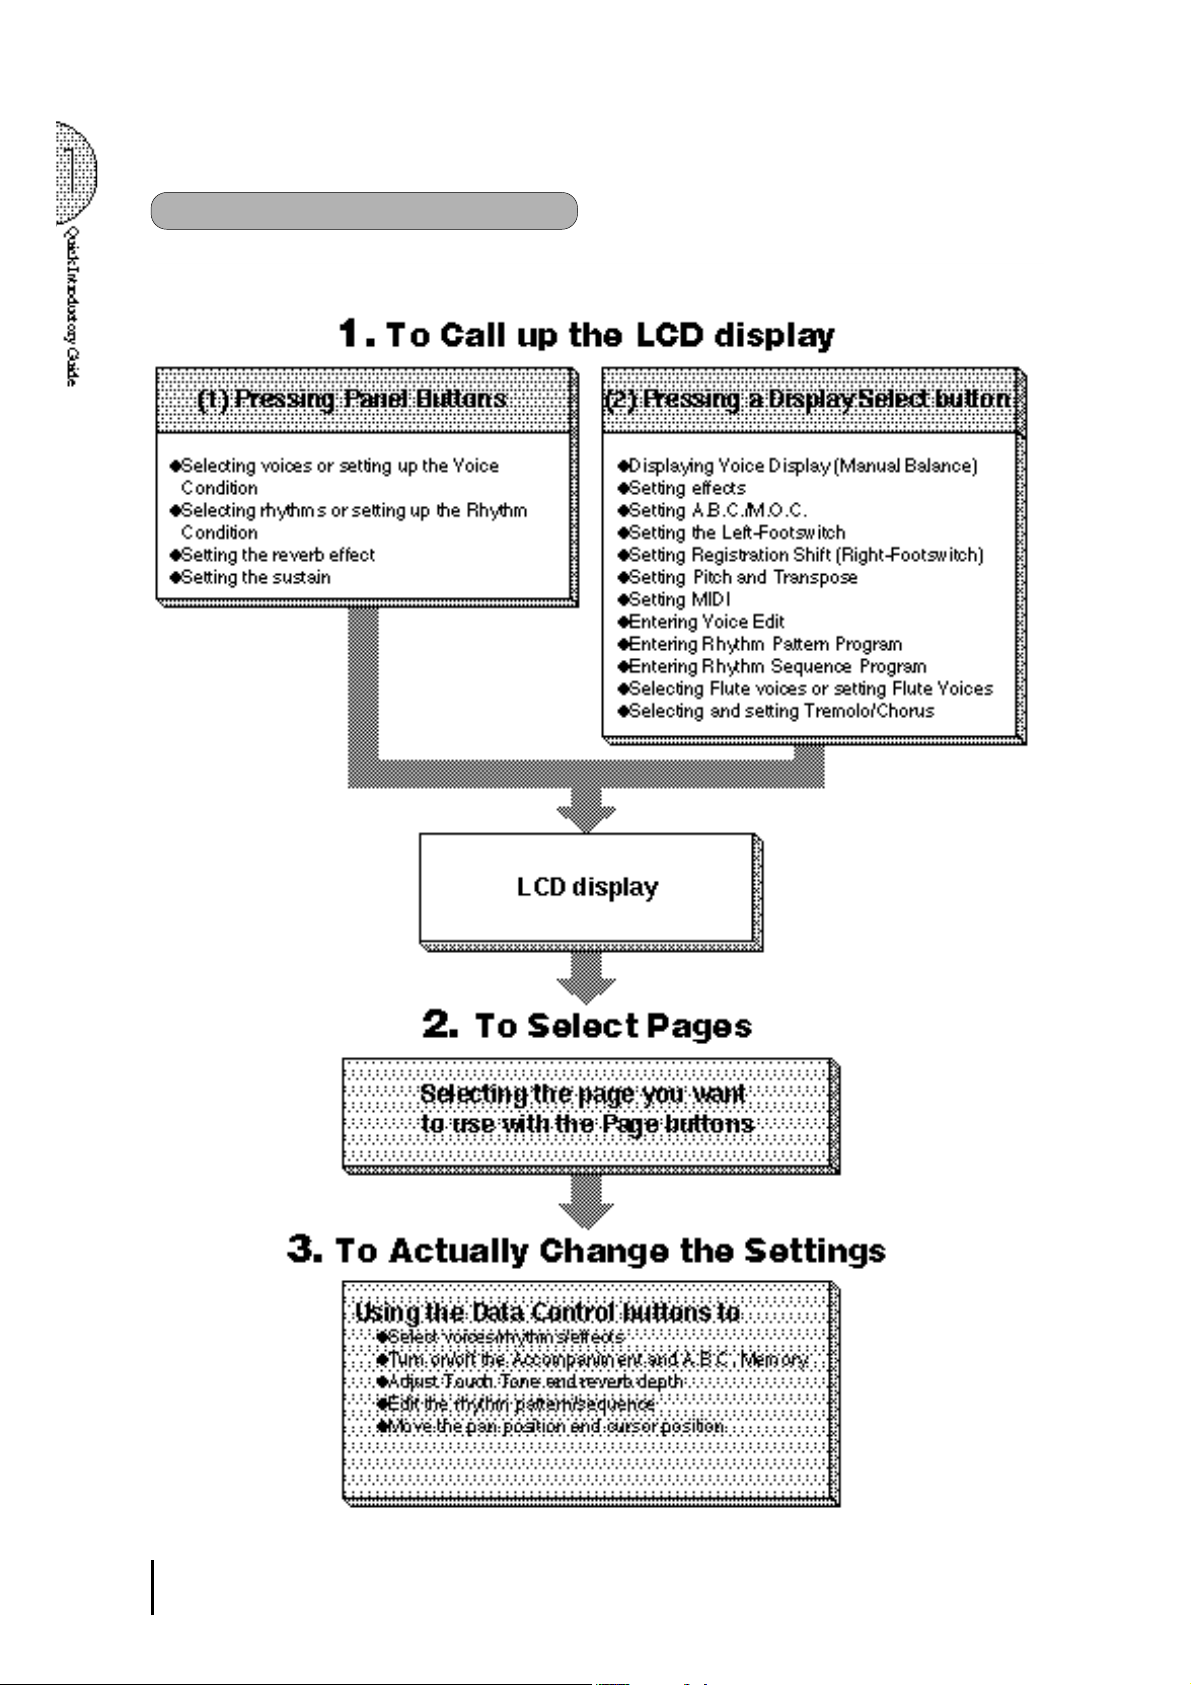
This section introduces you the convenient control functions of the
LCD display. The LCD display lets you see at a glance the current
settings and provides easy-to-understand graphic representation
of all parameters.
Selecting a voice/rhythm
Press the panel voice/rhythm button which you want to use (For
1
example, press the STRINGS button in the Upper Keyboard
Voice 1 section).
The following display will appear, showing all the available
voices/rhythms in the category (Strings Category in this case).
2
.
Press the Data Control button corresponding to the voice you
want to play (Strings 3 in this case).
The selected voice/rhythm will be shown in the reversed box.
1 6
Data Control Buttons
The Data Control buttons are used to select 1 a voice/rhythm
or function shown on the display.
Press the STRINGS button in the Upper Keyboard Voice 1
section once again.
This LCD changes to show some of the other ways in which
the Data Control buttons are used to control Electone functions.
Each pair of buttons corresponding to the section of the display
directly above it increases/decreases 2 the value or chooses 3
a setting/function. When you are setting the Pan position, each
of them moves the curosr 4 to the right/left.
Page Buttons
These buttons are used to select (when available) the various
"pages" of the display, the names of which appear at the top
right of the LCD. Use Page [>] to select the next page, and
Page[<] to select the previous page.
1 7
The Summary of the LCD Operation
1 8
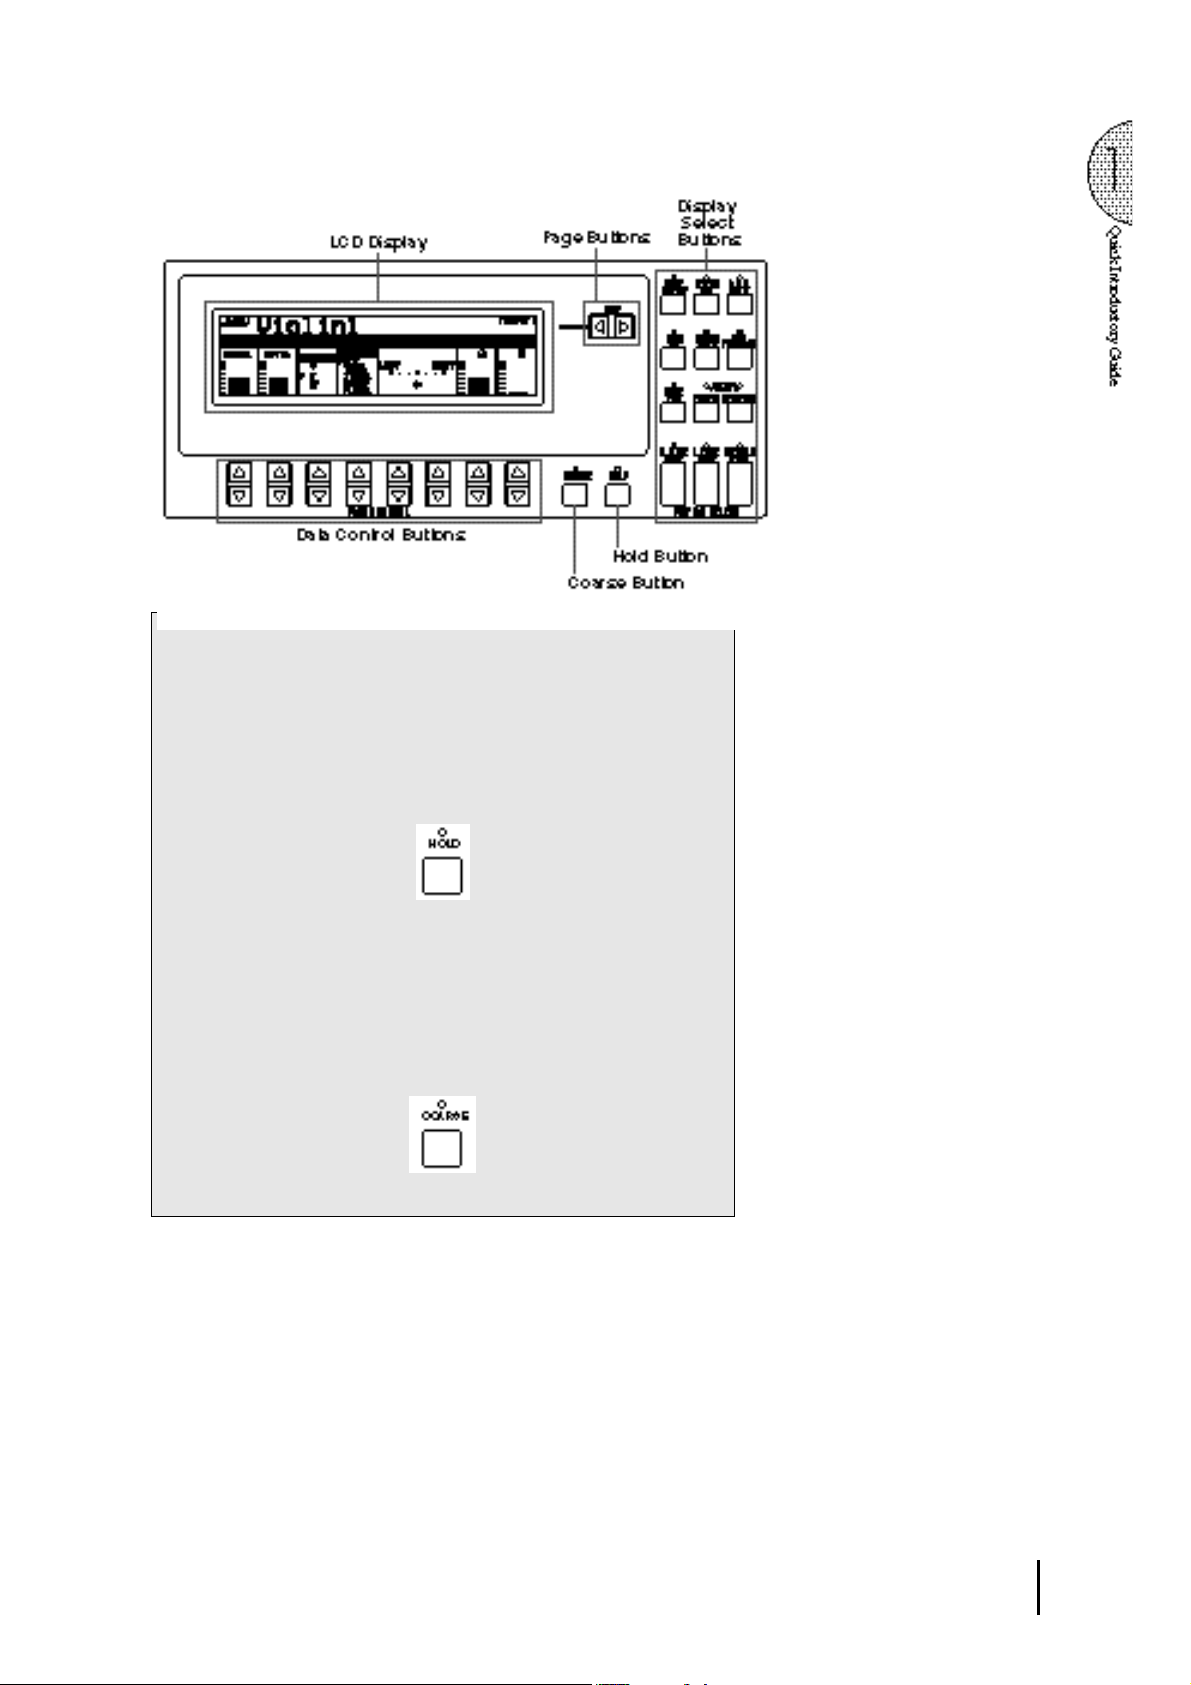
Hold
This button allows you to keep the LCD display at the current
function. Normally, if the buttons of other functions are pressed,
the LCD will switch to those functions. To keep this from
happening, press the Hold button; the button's LED will remain lit
as long as Hold is in effect. Press the button again to cancel Hold.
Coarse Button
This button allows you to make quick "jumps" when changing values
(of the parameters with bar indications). While holding the Coarse
button down, press the Data Control button corresponding to the
value you wish to change; the values will change rapidly toward
the maximum or minimum.
1 9
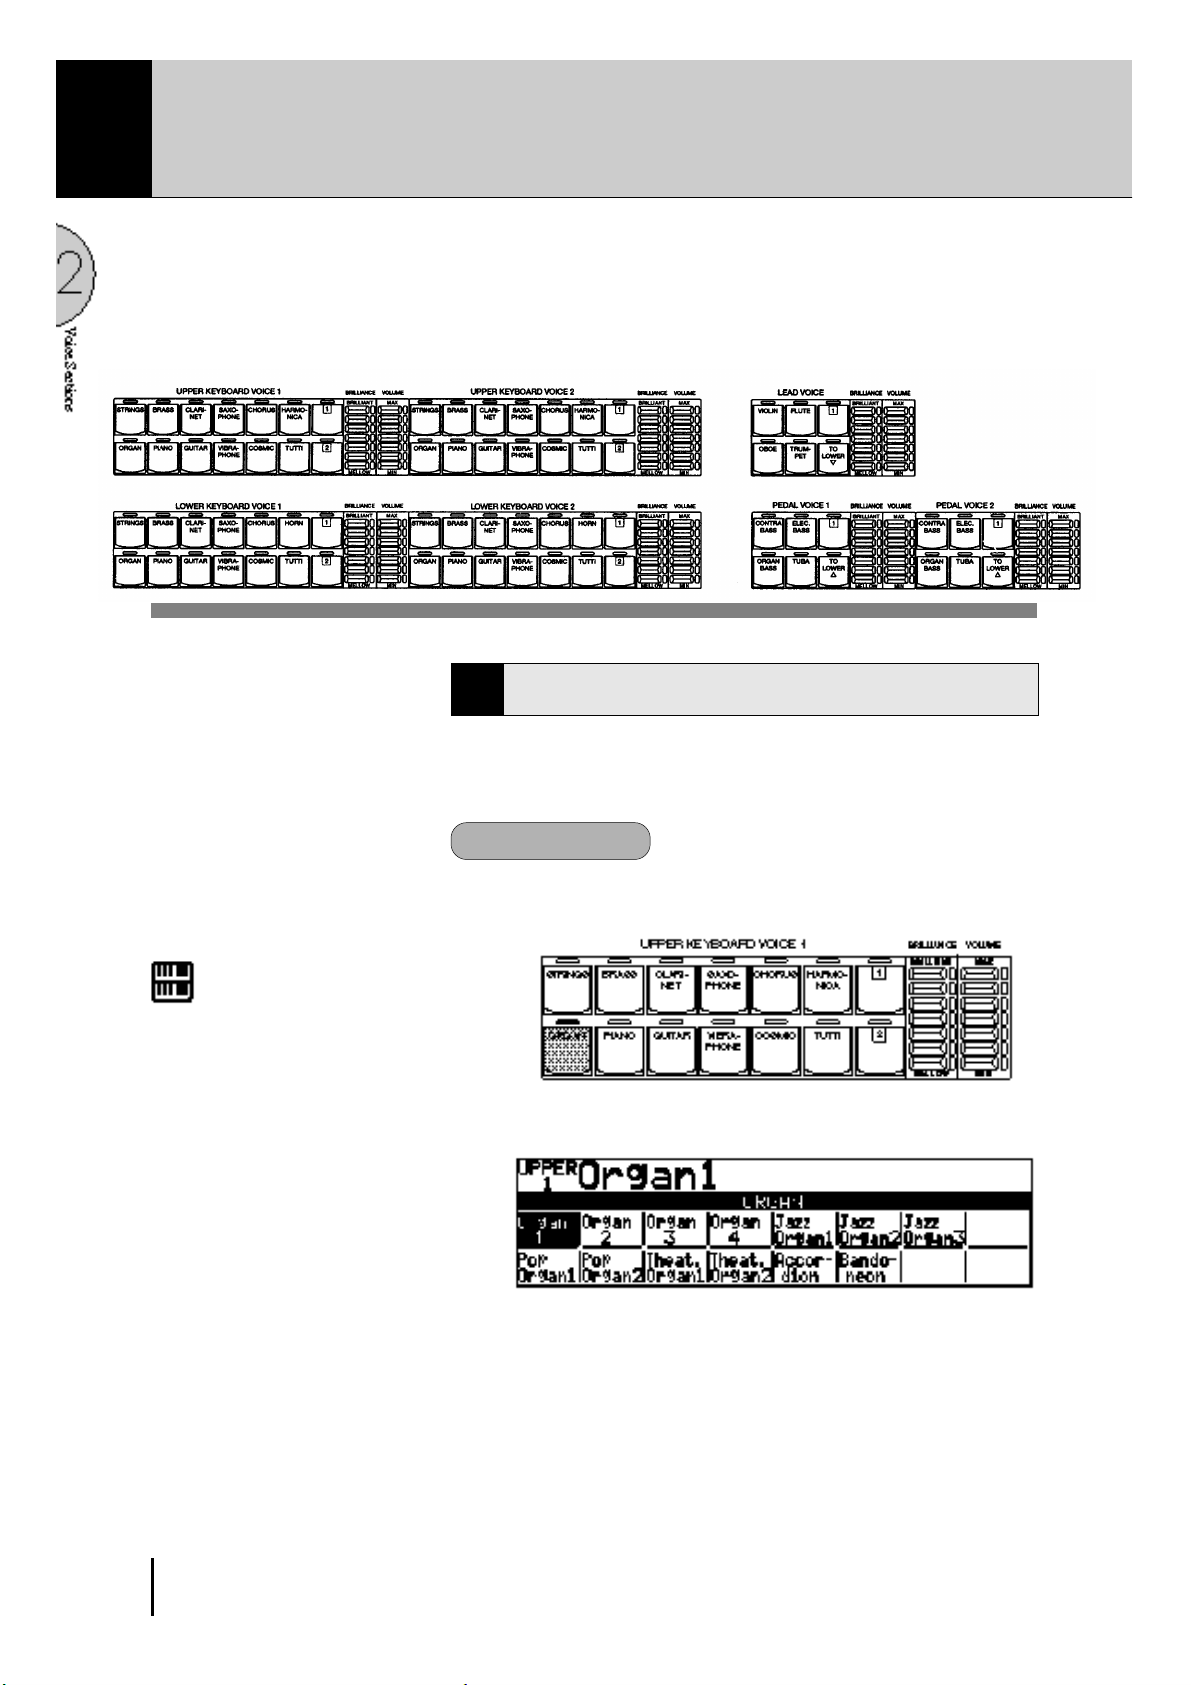
2 Voice Sections
The EL-87 features 131 different high quality AWM voices, each of them can be used on the Upper
keyboard, Lower keyboard and Pedalboard.
There are four voice sections for the Upper keyboard (including the Upper Flute Voice section),
three voice sections for the Lower keyboard (including the Lower Flute Voice section), and two voice
sections for the Pedalboard. Each voice section can, of course, have its own Voice Condition page(s),
which allow you to finely set up voice and volume settings.
Since selection of panel voices follows the same procedure
throughout the various voice sections, instructions for only the
Upper Keyboard Voice 1 are given here.
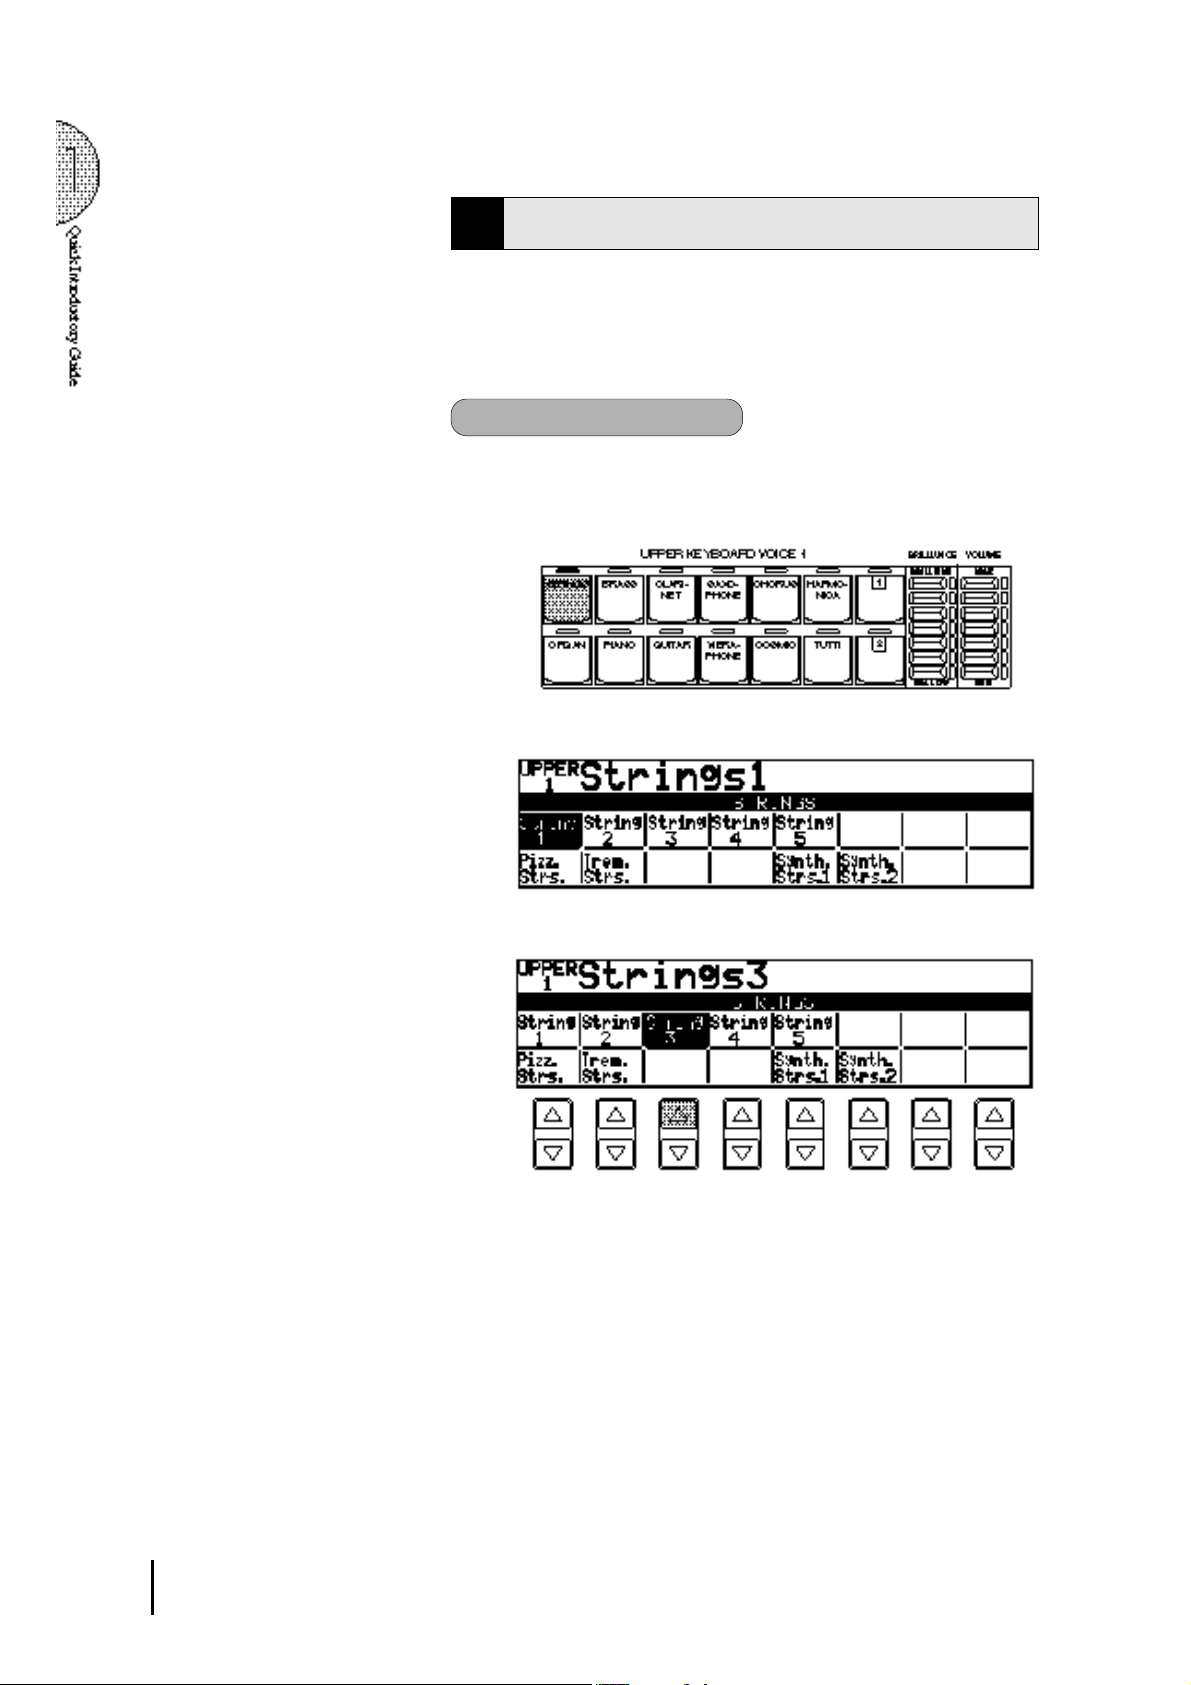
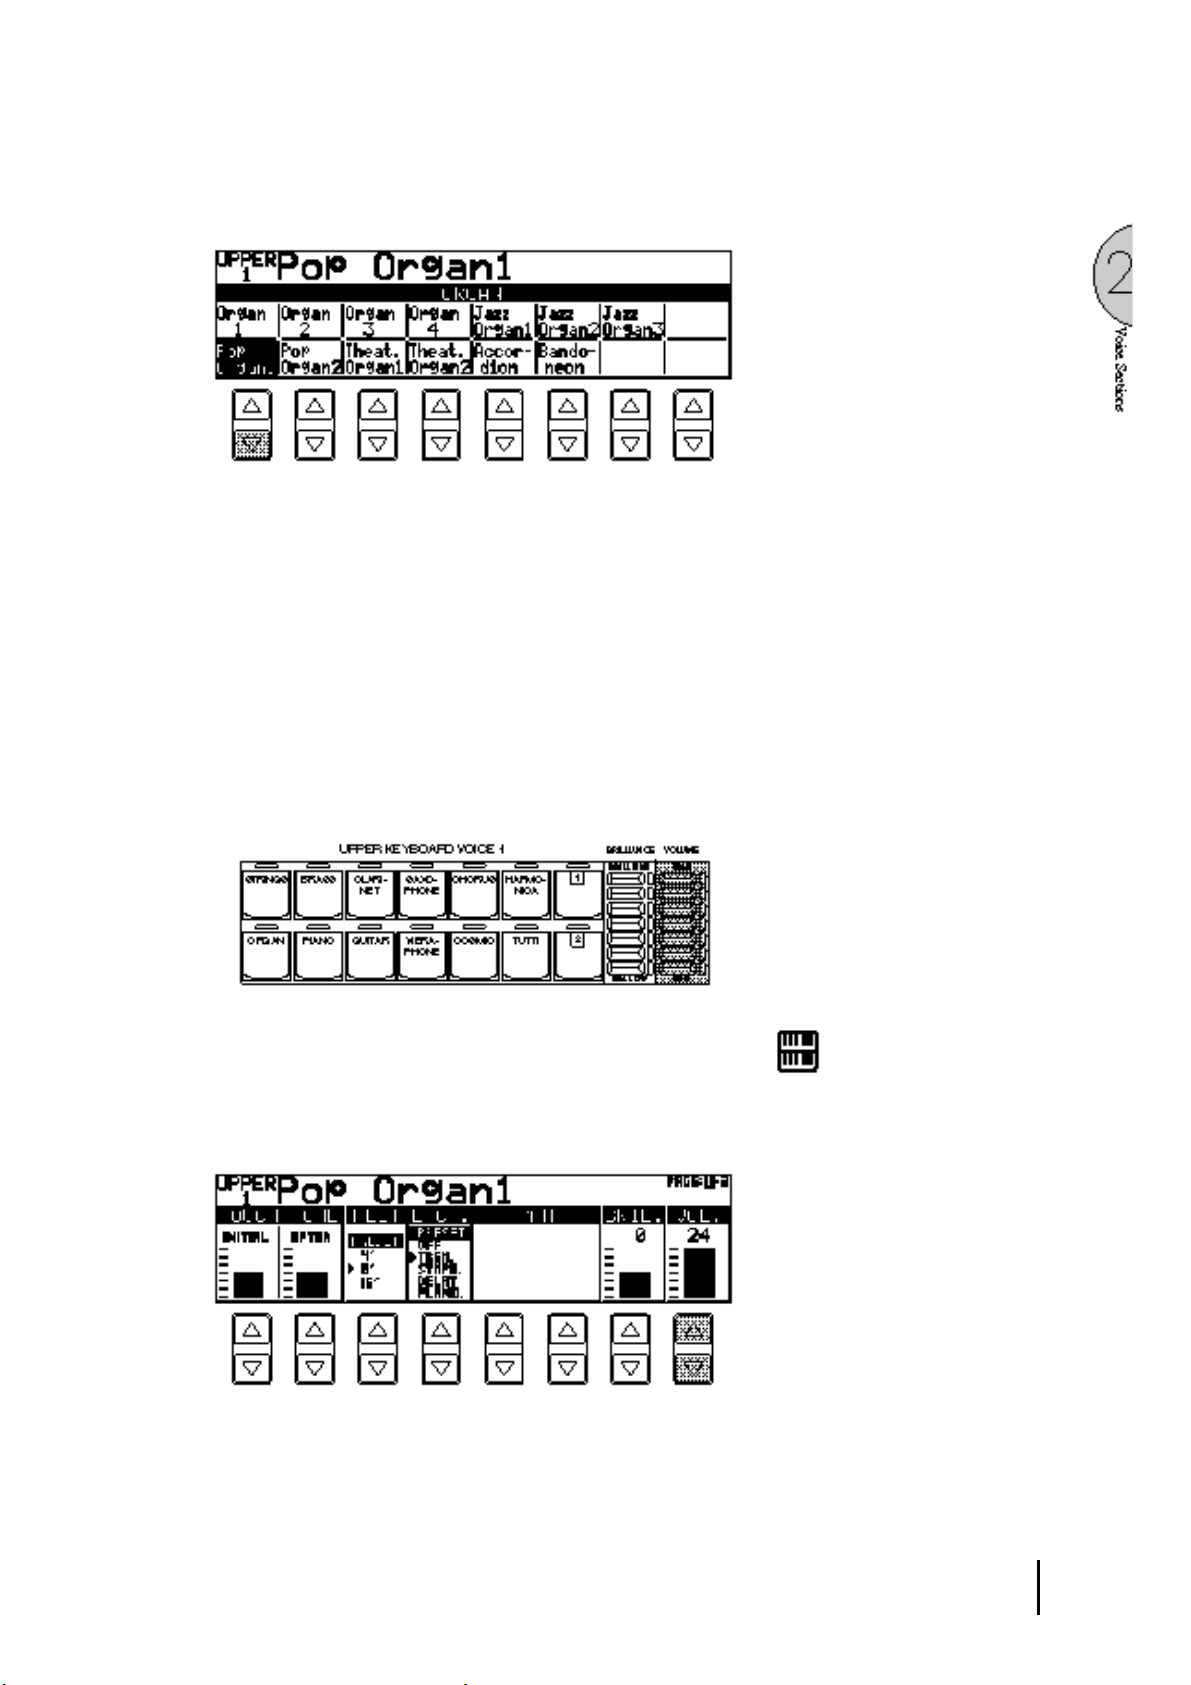
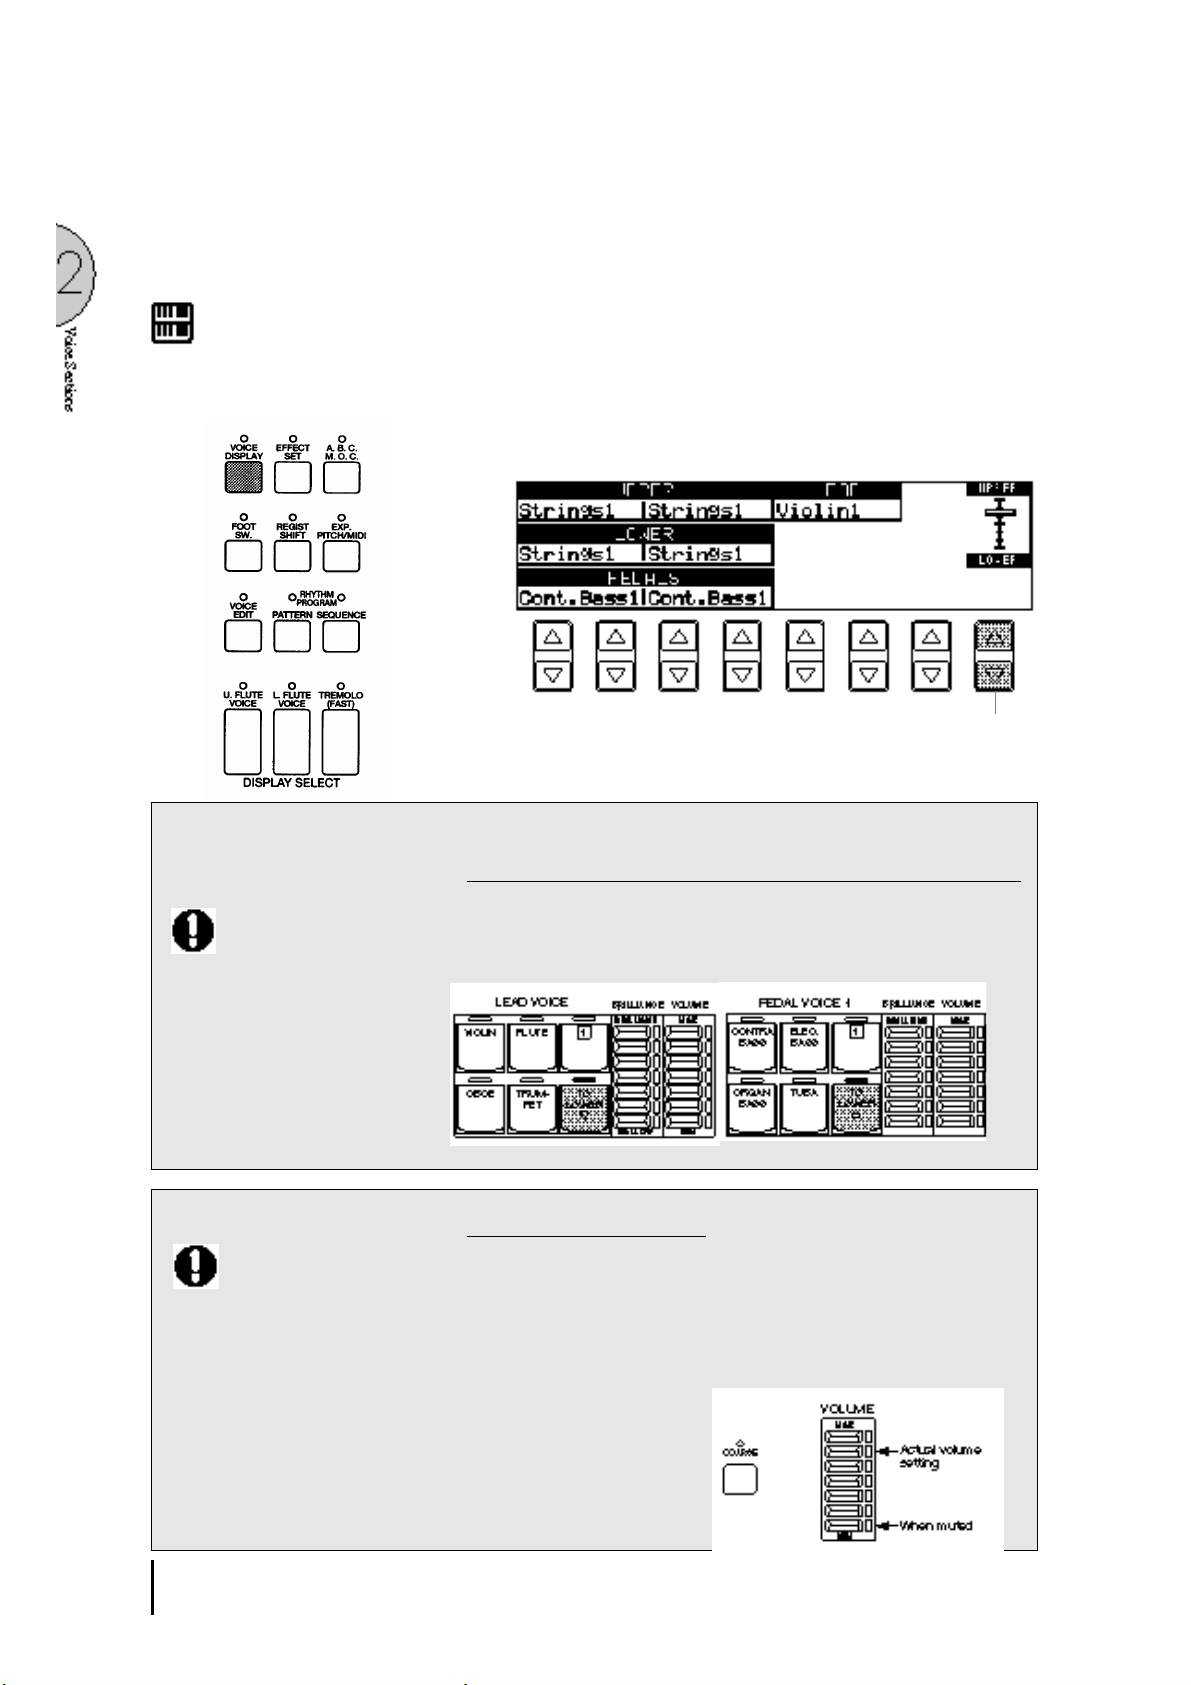
Selecting Voices from the Panel
1
NOTE:
Voices of the Upper and Lower Flute
Voice sections are selected by a different
procedure. Refer to the section Flute
Voices on page 32 for details.
To select voices:
Select a voice from the Upper Keyboard Voice 1 section by
1
pressing one of the Voice buttons in that section.
If, for example, you have selected the ORGAN voice, the
following display (Voice Menu) will appear:
Notice that several different voice names are shown on this
display. These are variations of the basic organ voice category.
2 2
2
3
4
Press one of the Data Control buttons that corresponds to voice
you wish to select.
The selected voice will be shown at the upper row of the LCD.
In this case, Pop Organ 1 appears.
If you wish to, you can select voices from the other Upper
Keyboard Voice sections (Upper Voices 2 and Lead Voices),
following steps #1 and #2 above.
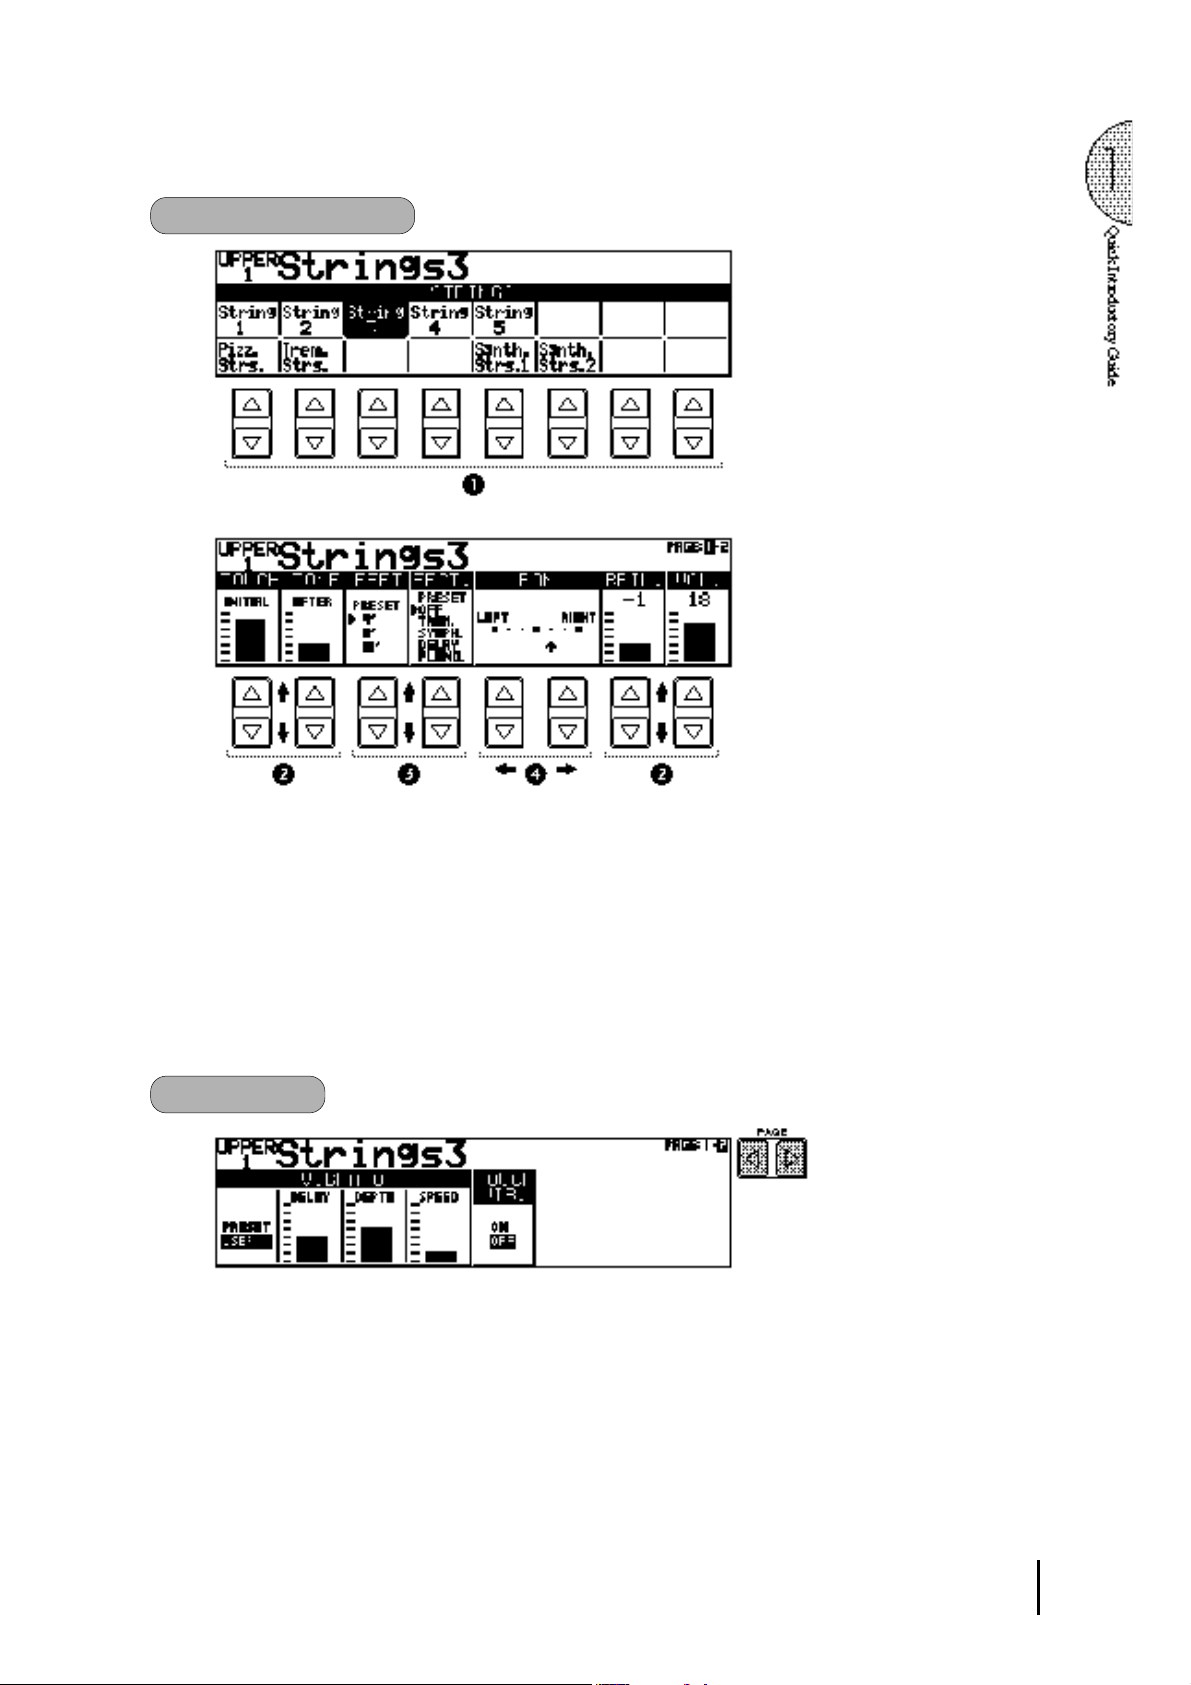
Set the volume for each voice section. There are two volume
controls: Coarse and Fine.
Coarse: Use the VOLUME controls of each voice section on
the panel to set the desired level for each voice. The controls
have seven volume settings, from a minimum of 0, or no sound,
to a maximum of full volume.
Fine: Pressing the same panel voice button again (or the same
Data Control button corresponding to the selected voice) calls
up the Voice Condition display. Use the Data Control buttons
directly under the display to change the level of the desired
voice. The relative level is indicated by the bar under each
voice in the display as well as by a numeric value (from 0-24).
NOTE:
Pressing a voice button once calls up that
voice's Voice Menu display. Pressing it
a second time calls up the Voice Condition
display. Successive presses alternate
between the two displays.
2 3
5
Now select voices for the Lower keyboard and Pedalboard as
you did for the Upper keyboard above. Also set the volumes of
the voices.
NOTE:
The Lead and Pedal Voices sound one
note at a time; when you simultaneously
press two or more keys, only the highest
note will sound.
Adjust the volume balance between the Upper and Lower Voices
6
with the Balance Control provided on the Voice Display.
1. Return to the Voice Display by pressing the VOICE DISPLAY
button in the DISPLAY SELECT section.
2. Adjust the balance with the corresponding Data Control buttons.
Pressing this pair of Data
Control buttons at the same
time restores the balance to
the center position.
About TO LOWER - Playing Lead and Pedal voices
from the Lower keyboard:
When the TO LOWER button is turned
on, the Lead voices and Pedal voices
cannot be played on the Upper keyboard
and Pedalboard, respectively.
Turning the Electone off erases all panel
settings you have made. When the
Electone is turned on, Basic Registration
1 is automatically selected.
If you have made panel settings you wish
to keep, save them to Registration
Memory (see page 62) before turning the
Electone off.
You can, however, restore the panel
settings that were made before the
Electone was last turned off. See page 67
for more information.
The Electone has a special "To Lower" function that lets you assign
Lead or Bass voices to the Lower keyboard. Simply press the TO
LOWER button on the voice section you wish to assign, and that
voice will be playable from the Lower keyboard.
About Mute function:
The voices of the three voice sections of the Upper keyboard (two
in the Lower and Pedal) sound together in a layer, and the balance
of the voices in the layer is determined by these VOLUME controls.
You can easily mute the voice of a voice section by holding down
the COARSE button and pressing the panel volume control of the
voice section you wish to mute. Repeating the procedure restores
the original volume setting.
2 4
Selecting Voices from the Dotted Buttons
2
—Dotted Buttons and User Voices—
The EL-87 has a wide variety of voices from which you can choosefar greater than what is immediately apparent from the front panel
controls. You've already learned in the section above how to select
the different voices that are available in the Voice Menu display of
each panel voice. The Electone also has dotted buttons in each
voice section, giving you access to even more voices by including
space for storing and recalling voices you've created yourself (User
voices) by using Voice Edit function(See page 88.). Optional Voice
Disk voices containing many new voices are also being made
available for the EL-87(See page 95.).
Each voice section has one or two dotted buttons, found on the
right side of each voice section. These dotted buttons function as
"wild card" Voice Menu selectors; any internal or User voices can
be selected from these buttons.
The dotted buttons have three basic uses:
● For playing any voice of the Voice Menus from any of the
keyboards or Pedalboard. You can play on the Upper keyboard,
for example, voices from the twenty-two Voice Menu pages
(including User), and not be limited to only the twelve buttons
(equivalent to twelve Voice Menu pages) that make up the Upper
Voice section. Another advantage to this feature is that when
the normally monophonic (one note) Lead and Pedal voices are
assigned to the Upper or Lower keyboard Voice sections, they
can be played polyphonically.
● For having three different voices from the same Voice Menu
page available for selection in the same song. For example,
you can assign one of the voices to a dotted button in the Upper
Keyboard Voice 1 section, the second voice to the other dotted
button in the same section, and the third one on the Voice Menu.
● For playing the User voices of your own creation or those from
a Voice Disk. (See page 88.)
Downloaded from:
2 5
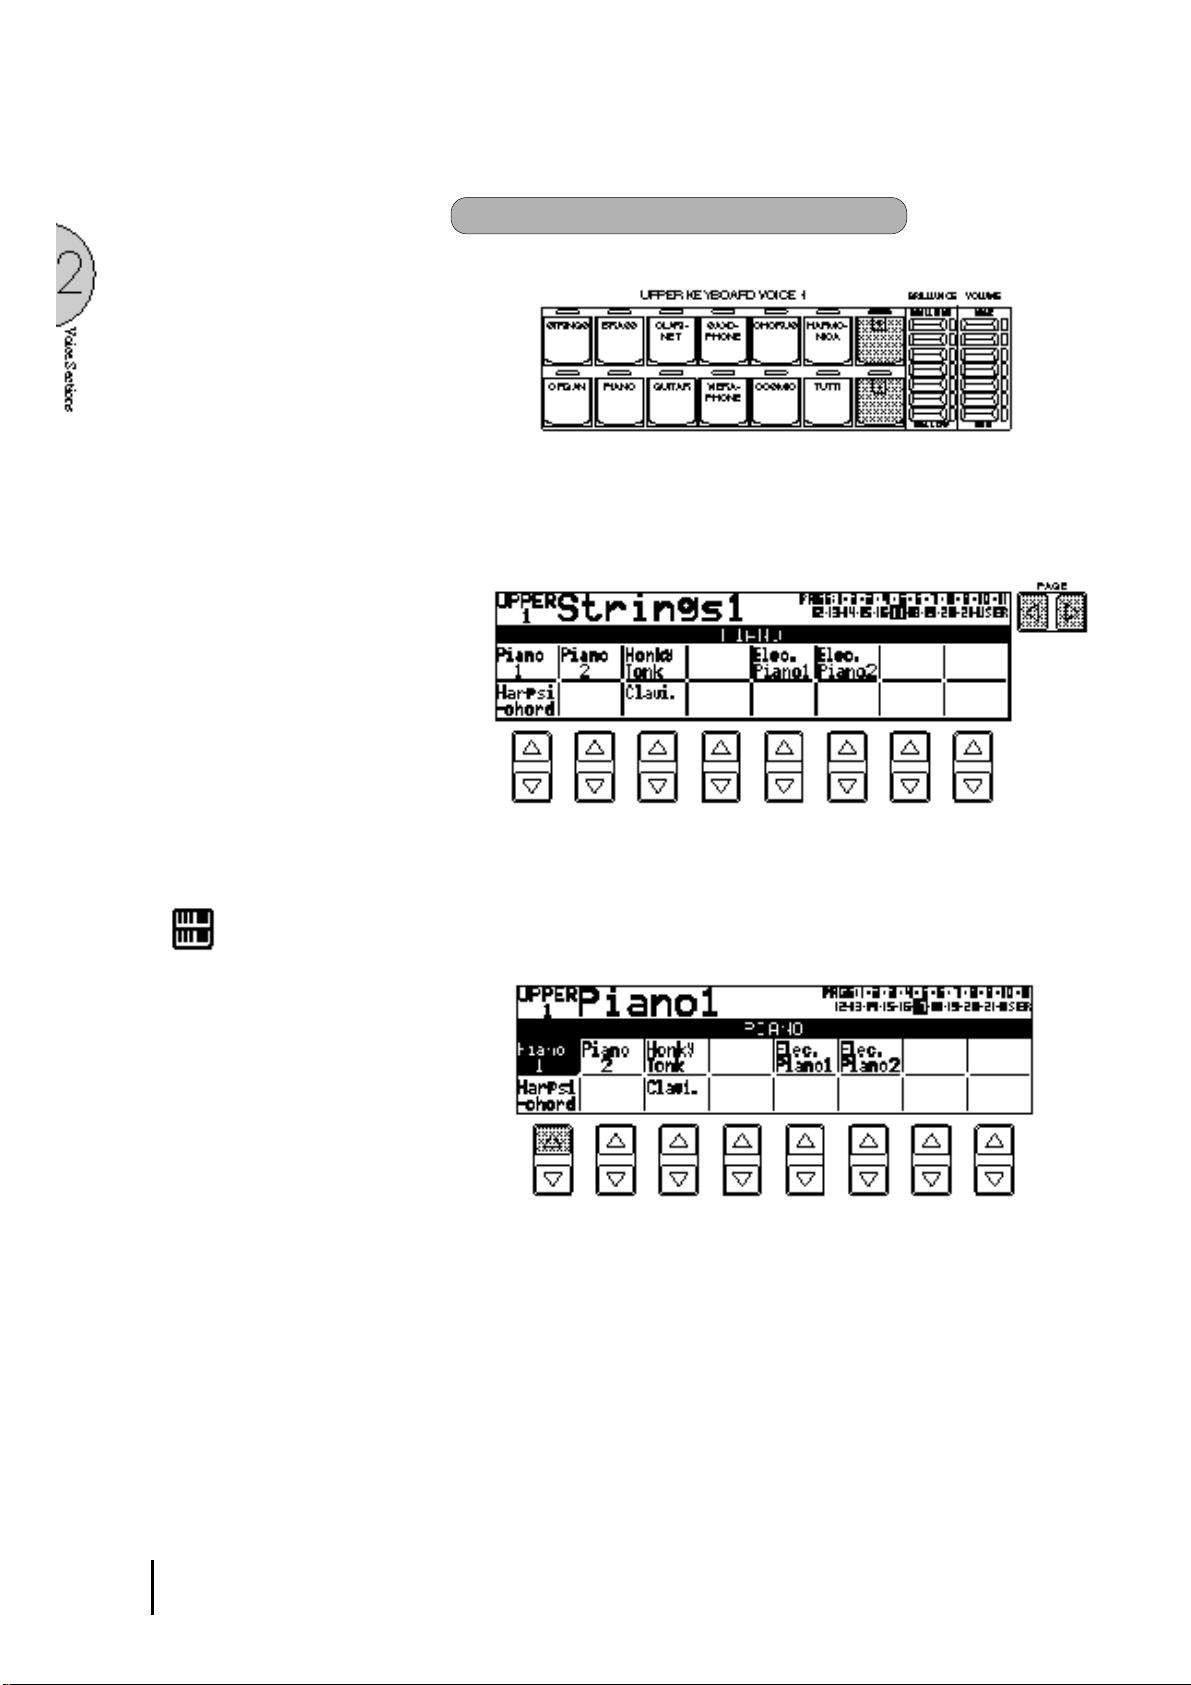
To select voices from the dotted buttons:
Press one of the dotted buttons in any of the voice sections.
1
Select one of the pages with the Page buttons, and choose a
2
Voice Menu (PIANO, for example).
Each page represents a general voice category and the title of
the category appears in the dark bar in the middle of the display
when the page has been selected.
NOTE:
You can directly view and select Voice
Menu pages by holding down one of the
Dotted buttons and simultaneously
pressing the desired voice buttons in
succession.
3
The voice name shown at the top of the LCD is that of the
currently assigned voice and is irrelevant to the Voice Menu
below.
Select a voice from the display (PIANO 1, for example) PIANO
1 will be shown at the top of LCD indicating that it has been
selected.
2 6
 Loading...