

Page 1

Page 2

Page 3

Page 4

Panel Controls
M. 1234
UPPER
(KNEE)
LOWER
(KNEE)
PEDAL
SUSTAIN
MAX
MIN
REVERB
MARCH WALTZ SWING BOUNCE SLOW
ROCK
MAX
MIN
TANGO LATIN1LATIN28 BEAT 16 BEAT
RHYTHM
LOWER
PEDAL
KEYBOARD
PERCUSSION
SYNCHRO
START
START
RHYTHM
FILL IN
INTRO.
ENDING
BAR/BEAT
BAR
BEAT
BASIC
REGIST.
DATA CONTROL
TEMPO
CONTRA
BASS
ELEC.
BASS
MAX
MIN
ORGAN
BASS
TUBA TO
LOWER
LOWER KEYBOARD VOICE PEDAL VOICE
STRINGS BRASS CLARI-
NET
SAXOPHONE
CHORUS HARMO-
NICA
MAX
MIN
ORGAN PIANO GUITAR VIBRA-
PHONE
COSMIC TUTTI
VIOLIN FLUTE
MAX
MIN
OBOE TRUM-
PETTOLOWER
UPPER KEYBOARD VOICE LEAD VOICE
1
2
1
STRINGS BRASS CLARI-
NET
SAXOPHONE
CHORUS HORN
MAX
MIN
ORGAN PIANO GUITAR VIBRA-
PHONE
COSMIC TUTTI
1
2
1
1
2
SEQ.
SEQ.
1
3
SEQ.
SEQ.
2
4
1
2
3
4
5
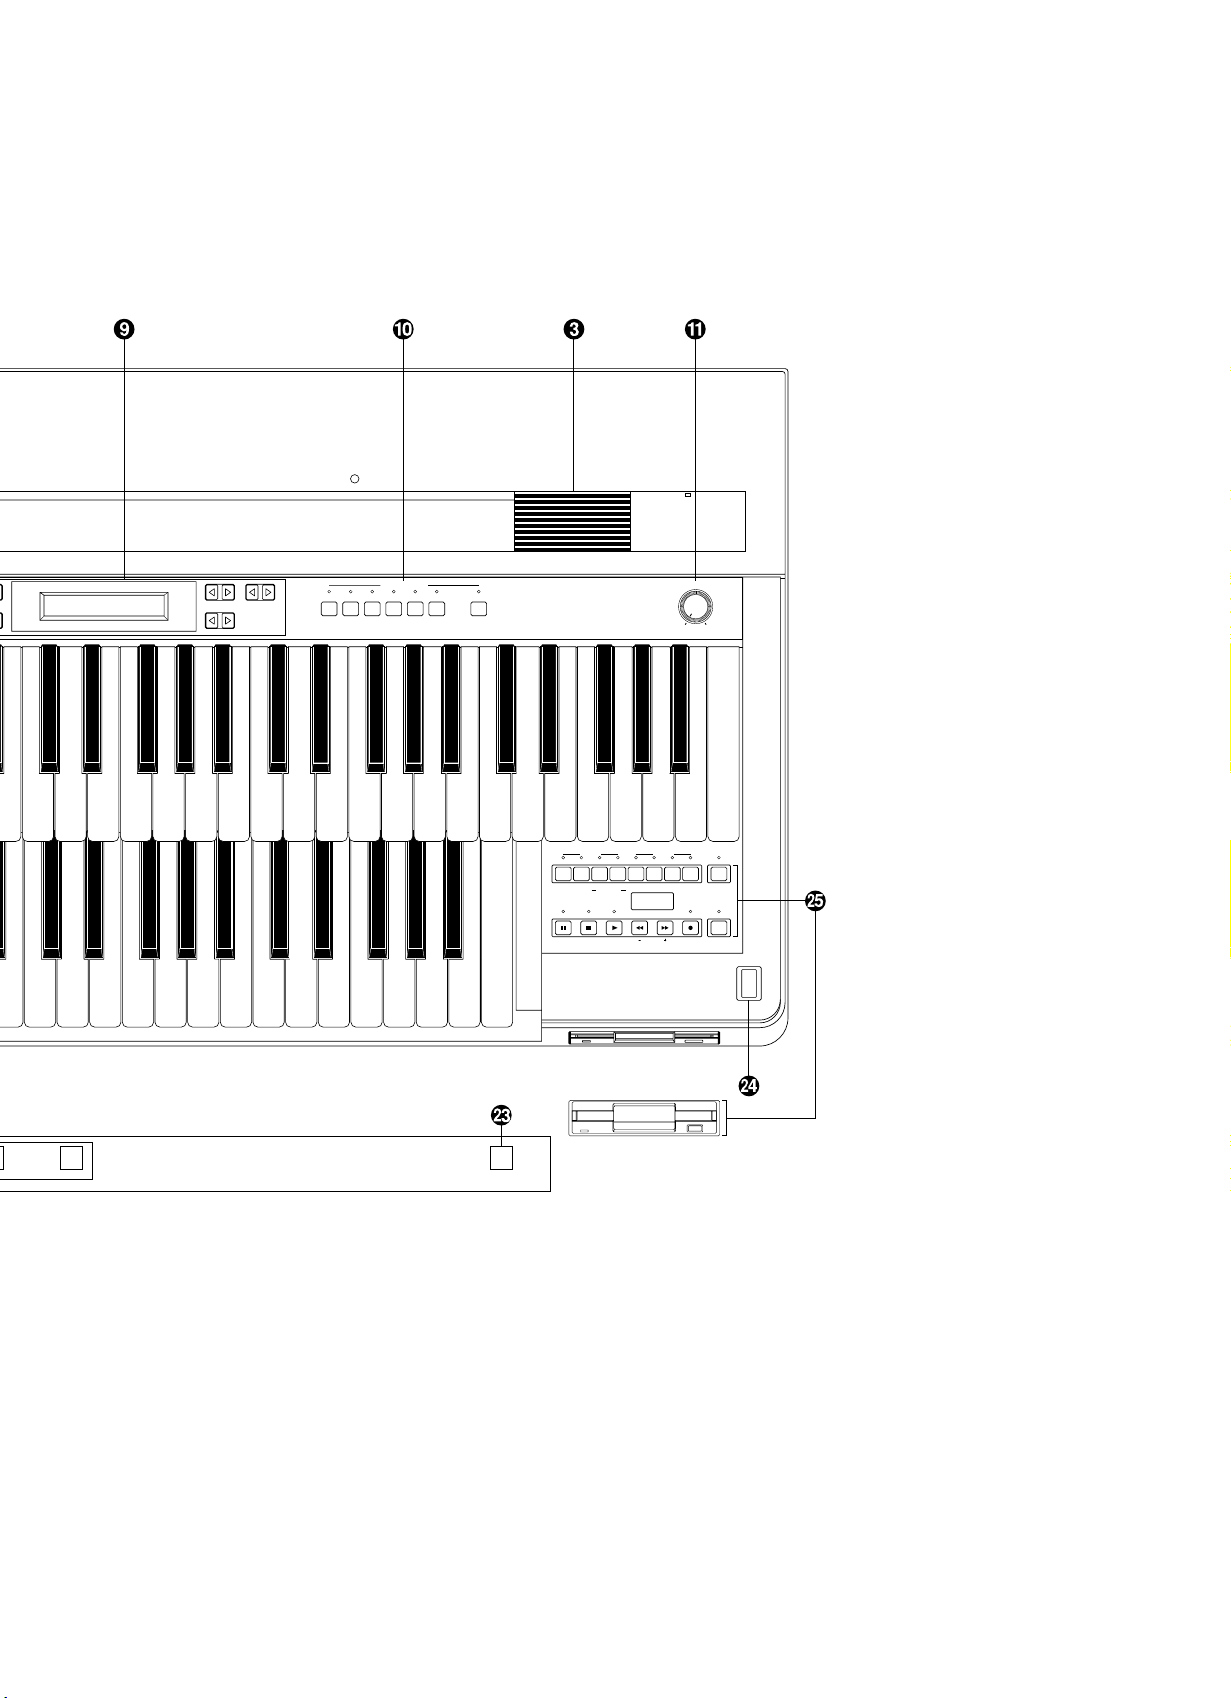
Front Panel
! REVERB (See page 30.)
" SUSTAIN Buttons (See page 30.)
# Monitor Speakers
Adjusts the Reverb effect for the entire sound.
Adds the Sustain effects each to Upper/Lower Keyboard and
Pedalboard.
Built-in speakers for your monitoring.
$ UPPER KEYBOARD VOICE (See page 18.)
Selects the Upper Keyboard voices and adjusts the volume.
% LOWER KEYBOARD V OICE (See page 18.)
Selects the Lower Keyboard voices and adjusts the volume.
& LEAD VOICE (See page 18.)
Selects the voices and adjusts the volume.
' PEDAL VOICE (See page 18.)
Selects the voices and adjusts the volume.
2
( BASIC REGIST. (Basic Registration) Buttons
(See page 8.)
Selects the Basic Registrations.
) LCD DISPLAY & D ATA CONTROL Buttons
(See page 4.)
* DISPLAY SELECT Section (See page 4.)
Selects the various functions.
+ MASTER VOLUME (See page 8.)
Adjusts the entire volume.
, RHYTHM Section (See page 31.)
Selects the rhythm patterns and adjusts the volume.
- BAR/BEAT TEMPO Display (See page 32.)
Displays the rhythm tempo or bar/beat.
Page 5
5 D.
FOOT
SW.
REGIST.
MENU
VOICE
DISPLAY
A. B. C.
M. O. C.
REGIST.
SHIFT
PITCH
MIDI
POWER
DISPLAY SELECT
MASTER VOLUME
DATA CONTROL PAGE
SYMPHO-
NIC
UPPER LOWER PEDAL
CONTROL
UPPER LOWER PEDAL
CONTROL SHIFT
SONG
REPEAT
FROM
SONG DEL.
TO
PAUSE RECORD CUSTOM PLAY
FORMAT
STOP PLAY SONG SELECT
RECORD
PLAY
SONG COPY
TEMPO
MUSIC DISK RECORDER
. KEYBOARD PERCUSSION Buttons
(See page 43.)
Used to play the percussion sounds on the Lower Keyboard or
Pedalboard.
/ TEMPO Dial (See page 33.)
Adjusts the rhythm tempo.
0 BAR /BEAT Indicator (See page 33.)
Flashes to the first beat of every measure (or every beat).
1 INTRO. ENDING Button (See page 32.)
Used to add a short introduction before starting actual rhythm
pattern or an ending pattern before stopping the rhythm.
2 SYNCHRO START Button (See page 32.)
Puts the rhythm pattern in "stand-by" and enables the Lower
keyboard or Pedalboard to start the rhythm.
3 FILL IN Button (See page 34.)
Used to add a FIll-In pattern in the middle of rhythm playback.
4 START Button (See page 32.)
Used to start or stop the rhythm pattern.
5 M. (Memory) Button (See page 47.)
Used to store a Registration to the Registration Memory buttons.
6 Registration Memory Buttons (See page 47.)
Used to store a Registration to or call up the stored Registration
from.
7 D. (Disable) Button (See page 47.)
Used to keep the same rhythm and accompaniment patterns
throughout the registration changes.
8 POWER Switch (See page 7.)
Turns the EL-27 on/off.
9 Music Disk Recorder (M.D.R.) (See page 55.)
Used to record/play back your performance and save/load the
registration data.
3
Page 6

LCD Display/DISPLAY SELECT Section
DATA CONTROL DATA CONTROL PAGE
FOOT
SW.
REGIST.
MENU
VOICE
DISPLAY
A. B. C.
M. O. C.
REGIST.
SHIFT
PITCH
MIDI
DISPLAY SELECT
SYMPHO-
NIC
: LCD Display
Displays various information for you to play EL-27.
; DAT A CONTROL Buttons (See page 11.)
Selects the functions or sets the values.
< PAGE Buttons (See page 10.)
Changes pages when a function has more than two pages.
= VOICE DISPLAY Button (See page 18.)
Displays the currently assigned voices to each keyboard.
> SYMPHONIC Button (See page 27.)
DIsplays the Symphonic page.
? A.B.C./M.O.C. Button (See pages 40, 45.)
Selects the Auto Bass Chord page or Melody On Chord page.
@ FOOT SW. (Footswitch) Button (See page 51.)
Selects the (Left) Footswitch page.
A REGIST. SHIFT (Registration Shift) Button
(See page 48.)
Selects the Registration Shift function.
B PITCH/MIDI Button (See pages 54, 75.)
Displays Transport/Pitch page or MIDI page.
C REGIST. MENU Button (See page 10.)
Selects the Registration Menu pages.
Other Parts, Controls and Terminals
D Accessory Jacks and Controls (See page 77.)
E Keyboard Cover/Music Stand
F Upper Keyboard
G Lower Keyboard
H MIDI Jacks (See page 75.)
I Knee Lever (See page 52.)
Turns on and off the Sustain or M.O.C. effect with your right knee
even while you are playing.
J Left Footswitch (See page 51.)
Allows you to control the rhythm in the middle of performance.
K Right Footswitch (See page 48.)
Allows you to control the Registration Shift function.
L Expression Pedal (See page 8.)
Used to adjust the entire volume level in the middle of
performance.
M Pedalboard
4
Page 7

Table of Contents
1 Quick Introductory Guide
2 Voice Sections
3 Voice Controls and
Effects
4 Rhythm, Accompaniment
and Percussion
5 Registration Memory
6 Footswitches and
Knee Lever
7 Pitch Controls
8 Music Disk Recorder
9 MIDI Controls
10 Accessory Jacks and
Controls
Main Features . . . . . . . . . . . . . . . . . . . . . . . . . . . . . . . . . . . . . . 6
1 Quick Introductory Guide . . . . . . . . . . . . . . . . . . . . . . . . . . 7
1. Getting Started . . . . . . . . . . . . . . . . . . . . . . . . . . . . . . . . . . . . . . . . . . . . . . 7
2. Playing Your Electone . . . . . . . . . . . . . . . . . . . . . . . . . . . . . . . . . . . . . . . . . 8
3. Registration Menu . . . . . . . . . . . . . . . . . . . . . . . . . . . . . . . . . . . . . . . . . . . 10
4. Registration Menu List . . . . . . . . . . . . . . . . . . . . . . . . . . . . . . . . . . . . . . .15
2 Voice Sections . . . . . . . . . . . . . . . . . . . . . . . . . . . . . . . . . . 18
1. Voice Display . . . . . . . . . . . . . . . . . . . . . . . . . . . . . . . . . . . . . . . . . . . . . . 18
2. Selecting Voices from the Panel . . . . . . . . . . . . . . . . . . . . . . . . . . . . . . . . 19
3. Selecting Additional Voices – Dotted Buttons and User Voices . . . . . . . . 21
4. Voice Menus . . . . . . . . . . . . . . . . . . . . . . . . . . . . . . . . . . . . . . . . . . . . . . .23
3 Voice Controls and Effects . . . . . . . . . . . . . . . . . . . . . . . 24
1. Selecting from the Voice Condition Pages . . . . . . . . . . . . . . . . . . . . . . . .24
Touch Tone . . . . . . . . . . . . . . . . . . . . . . . . . . . . . . . . . . . . . . . . . . . . . . 26
Feet . . . . . . . . . . . . . . . . . . . . . . . . . . . . . . . . . . . . . . . . . . . . . . . . . . . .26
Symphonic/Celeste . . . . . . . . . . . . . . . . . . . . . . . . . . . . . . . . . . . . . . . .27
Vibrato . . . . . . . . . . . . . . . . . . . . . . . . . . . . . . . . . . . . . . . . . . . . . . . . . . 28
2. Selecting from the Panel Buttons . . . . . . . . . . . . . . . . . . . . . . . . . . . . . . . 30
Reverb . . . . . . . . . . . . . . . . . . . . . . . . . . . . . . . . . . . . . . . . . . . . . . . . . .30
Sustain . . . . . . . . . . . . . . . . . . . . . . . . . . . . . . . . . . . . . . . . . . . . . . . . . 30
4 Rhythm, Accompaniment and Percussion . . . . . . . . . . . 31
1. Selecting Rhythm Patterns from the Panel . . . . . . . . . . . . . . . . . . . . . . . . 31
2. Auto Variation and Rhythm Volume . . . . . . . . . . . . . . . . . . . . . . . . . . . . . 35
3. Selecting Rhythms from the Dotted Buttons . . . . . . . . . . . . . . . . . . . . . . . 36
4. Rhythm Menus . . . . . . . . . . . . . . . . . . . . . . . . . . . . . . . . . . . . . . . . . . . . . 38
5. Accompaniment Controls . . . . . . . . . . . . . . . . . . . . . . . . . . . . . . . . . . . . . 39
6. Automatic Accompaniment – Auto Bass Chord . . . . . . . . . . . . . . . . . . . . 40
7. Keyboard Percussion . . . . . . . . . . . . . . . . . . . . . . . . . . . . . . . . . . . . . . . . 43
8. Melody On Chord . . . . . . . . . . . . . . . . . . . . . . . . . . . . . . . . . . . . . . . . . . . 45
5 Registration Memory . . . . . . . . . . . . . . . . . . . . . . . . . . . . 47
1. Storing Registrations . . . . . . . . . . . . . . . . . . . . . . . . . . . . . . . . . . . . . . . . . 47
2. Registration Shift . . . . . . . . . . . . . . . . . . . . . . . . . . . . . . . . . . . . . . . . . . . . 48
6 Footswitches and Knee Lever . . . . . . . . . . . . . . . . . . . . . 51
1. Footswitch Control . . . . . . . . . . . . . . . . . . . . . . . . . . . . . . . . . . . . . . . . . . 51
2. Knee Lever . . . . . . . . . . . . . . . . . . . . . . . . . . . . . . . . . . . . . . . . . . . . . . . . 52
7 Pitch Controls . . . . . . . . . . . . . . . . . . . . . . . . . . . . . . . . . . 54
8 Music Disk Recorder . . . . . . . . . . . . . . . . . . . . . . . . . . . . . 55
Precautions . . . . . . . . . . . . . . . . . . . . . . . . . . . . . . . . . . . . . . . . . . . . . . . . . . 55
Formatting a Disk . . . . . . . . . . . . . . . . . . . . . . . . . . . . . . . . . . . . . . . . . . . . . 57
Recording . . . . . . . . . . . . . . . . . . . . . . . . . . . . . . . . . . . . . . . . . . . . . . . . . . .58
Recording Registrations (and Bulk Data) . . . . . . . . . . . . . . . . . . . . . . . . . . . 63
Recalling Recorded Registrations (and Bulk Data) . . . . . . . . . . . . . . . . . . . 64
Replacing Registrations . . . . . . . . . . . . . . . . . . . . . . . . . . . . . . . . . . . . . . . . 64
Playback . . . . . . . . . . . . . . . . . . . . . . . . . . . . . . . . . . . . . . . . . . . . . . . . . . . . 65
Other Functoins . . . . . . . . . . . . . . . . . . . . . . . . . . . . . . . . . . . . . . . . . . . . . . . 68
9 MIDI Controls . . . . . . . . . . . . . . . . . . . . . . . . . . . . . . . . . . . 75
10 Accessory Jacks and Controls . . . . . . . . . . . . . . . . . . . . 77
Troubleshooting . . . . . . . . . . . . . . . . . . . . . . . . . . . . . . . . . . . 78
Specifications . . . . . . . . . . . . . . . . . . . . . . . . . . . . . . . . . . . . . 80
MIDI Messages . . . . . . . . . . . . . . . . . . . . . . . . . . . . . . . . . . . . 81
MIDI Implementation Chart . . . . . . . . . . . . . . . . . . . . . . . . . . 84
Index . . . . . . . . . . . . . . . . . . . . . . . . . . . . . . . . . . . . . . . . . . . . 85
5
Page 8

Main Features
Your Yamaha Electone is pac ked with many sophisticated functions. Yet it is amazingly easy to
use. The main features are described here so that you can quickly understand the capabilities of
your Electone.
Included among the main features are:
Astoundingly True-to-life Sounds
The new AWM (Advanced Wave Memory) and FM (Frequency Modulation)
tone generation technologies, combined with authentic tone function, make
the EL-27 a truly expressive musical instrument.
Wide Range of Voice Controls and Effects
Electone voices can also be enhanced with a variety of v oice controls and
effects, including octa ve settings, Touch Tone, Symphonic/Celesta, Vibrato,
Reverb, and Sustain. (See page 24.)
Dynamic Rhythm Patterns
The Rhythm section of the EL-27 f eatures authentic drum and percussion
sounds, accompanied with conv enient Accompaniment functions. (See
page 31.)
A Keyboard Percussion function is also provided for playing the realistic
percussion sounds from the Lower keyboard and Pedalboard. (See page
43.)
Wide Variety of Registration Menus
Your Electone also has convenient Registration Men us that allow you to
instantly change all settings for the entire instrument in real time, as you
play. (See page 10.)
Recording of Performances with the Music Disk Recorder
The Electone also features a Music Disk Recorder f or recording your
performances. The recording is completely digital and is stored to disk,
which means that no matter how many times you play back the recording, it
will always sound exactly the same as the original performance. (See page
55.)
6
Page 9

1 Quick Introductory Guide
£Strings ¢™Violin
¢Strings ¡ContBass
YAMAHA Electone
POWER
1 Quick Introductory Guide
POWER
No matter what your level of pla ying experience, we recommend that you take the time to go
through this basic section. It shows y ou in the simplest possible manner how to start playing your
Electone. The basic operations and functions that you learn in this section will also be important
when you later use the Electone's more adv anced features.
1. Getting Started
Once you've set up y our Electone and plugged the power cord into an
electrical outlet, you're ready to get started and play.
1. Turn on the Electone by pressing the POWER switch.
When you turn on the Electone, the following displays will appear in
succession on the LCD:
Yamaha products are
manufactured specifically
for the supply voltage in the
area where they are to be sold. If
you should move, or if any doubt
exists about the supply voltage,
please consult with a qualified
technician.
This last display (Voice Display) shows the currently assigned voice settings
for each voice section of the instrument, with the abbreviation for each v oice
section beside the voice name: Upper (£), Lower (¢), Lead (¢™), and
Pedalboard (¡).
Turning the Electone off erases all panel settings you have made. When the Electone is turned on, Basic
Registration 1 is automatically selected. If you have made panel settings you wish to keep, save them to
Registration Memory (see page 47.) before turning the Electone off. You can, however, restore the panel
settings that were made before the Electone was last turned off. In doing this, first be careful NOT to press
any panel buttons (excepting those in Basic Registration) after you turn the Electone back on. Then, to
restore the previous settings, hold down the M. (Memory) button and press the D. (Disable) button.
7
Page 10

1 Quick Introductory Guide
2. Set the MASTER VOLUME control.
Maximum volume Minimum volume
MASTER VOLUME
1
2
3
4
5
BASIC
REGIST.
The MASTER VOLUME control is an overall control which affects the
volume of the entire instrument.
3. Press the Expression pedal down with your foot.
The Expression pedal also controls the entire volume of the Electone. Once
you hav e set the MASTER VOLUME control to a suitable level, you can use
the Expression pedal to change the volume with your foot as you play.
For now, press the pedal down slightly beyond the halfwa y point.
2. Playing Your Electone
The Electone includes convenient Registrations that let you completely and instantly change the voices
and other settings for all of the keyboards, ev en as you play. Each registration is pre-programmed to be
used for a specific music style or instrumental combination.
●Basic Registrations
The Basic Registration section has five factory preset registrations, each
with a different set of voices for the Upper/Lower keyboards and Pedalboard
and each specially suited for pla ying in a different music style.
When you turn the Electone on, the Electone automatically selects Basic
Registration 1. If another registration has been selected (the lamp on the
button will be lit), press the button for Basic Registration 1.
8
Page 11

1 Quick Introductory Guide
Now, try out the five Basic Registrations with the following music examples. Press the appr opriate
Page 3 [13: Waltz-A]
Tempo=105
Page 4 [1: Swing-B]
Tempo=160
Page 5 [11: 16 Beat-A]
Tempo=74
Page 5 [7: 8Beat-A]
Tempo=100
Page 3 [9: March-A]
Tempo=120
E
G
A A
F
A
B B
A
B
G
F
E
C
G
F
E
C
G
G
E
C
F
E
C
G
D
E
C
D
C
A
B
G
D
G
E
A
C
B
A
D
E
G
F
D
F
E
G G
A A
CC
G
F F
E E
D D
C
D
E
F
G
A
B
C
C
D
E
F
DDD
F
E
A
GGG
D
E
F
D
C
Basic Registration 1
Basic Registration 2
Basic Registration 3
Basic Registration 4
Basic Registration 5
Skaters Waltzes E. Waldteuful
When the Saints Go Marchin' in American Traditional Folk Song
Ave Maria Gnauld
Twinkle, Twinkle Little Star French Traditional Folk Song
Overture "Orphee aux enfers" J. Offenbach
C
C CC
C
CG7
G7
G7
G7
GDm Am D7
C C
G7C G7C
G7C
C C
G7F
C
C
CDm C G C
CFC C C
CC C
Am
G
7
G7
G7
G7 G7 G7
G7
D7
G7
C
buttons to select the registrations. Each music example has been chosen to best suit its
companion registration.
9
Page 12

1 Quick Introductory Guide
The chart below lists the voices that have been set for the Upper/Lower keyboards and Pedalboard in
DATA CONTROLDATA CONTROL PAGE
DATA CONTROLDATA CONTROL
FOOT
SW.
REGIST.
MENU
VOICE
DISPLAY
A. B. C.
M. O. C.
REGIST.
SHIFT
PITCH
MIDI
DISPLAY SELECT
SYMPHO-
NIC
Basic Registration 1 Basic Registration 2 Basic Registration 3 Basic Registration 4
Strings
Upper Keyboard
voice
Lower Keyboard
voice
Pedal voice
Strings
Contrabass
Brass
Horn
Tuba Contrabass
Piano
Flute Cosmic 1
Cosmic 2
Cosmic 2
Basic Registration 5
Synth. Brass
Cosmic 3
Synth. Bass
each of the five Basic Registrations.
3. Registration Menu
In addition to the Basic Registrations, many more registrations are available on y our Electone. Some of
the registrations include voice and rhythm/accompaniment selections. With the variety of registrations
availab le, you're certain to find the right registration that perfectly suits any style of music you play.
The EL-27 is equipped with a total of 80 specially programmed registrations, selected with the built-in
Registration Menu button on the panel, as well as the 40 registr ations selected from the included
Registration Menu disk. Refer to the Registr ation Menu List on page 15.
To select a registration from the built-in Registration Menu:
For e xample, let's select an appropriate registration (Waltz-A) f or the "Skaters Waltzes" (Basic
Regisatrtion 1).
1. Press the REGIST. MENU button in the DISPLAY SELECT
section.
2. From the display that appears, select the desired
page.
The top right PAGE buttons select the next or previous page.
(In this case, select page 3.)
10
Some of the functions have more than two pages. Each press of the PAGE buttons (1q) increases the page
number found in the top right in the display.
Page 13

3. Press the bottom left DATA CONTROL buttons to select
SYNCHRO
START
START
RHYTHM
FILL IN
INTRO.
ENDING
<REGIST DISK> ¡3
13:Waltz-A [SET]
Any button can be
used to actually select
the setting.
Selects next number.
Selects previous number.
Jumps ahead ten numbers.
Jumps back ten numbers.
1 Quick Introductory Guide
the registration you want to use. (In this case, select
Waltz-A [No.13].)
The bottom left DAT A CONTROL buttons step through the various
selections, while the top left DATA CONTROL buttons are used to jump
ahead or back by ten selections.
4. Finally, call up the selected registration by pressing
the right DATA CONTROL buttons, selecting SET (Waltz-A
[No.13] here, for example.).
The message "Completed...!!" will be instantly indicated in the display,
meaning that the registration menu indicated in the display has been set.
The DATA CONTROL buttons are generally used to select voice and rhythms, and are also used as
described above. The left button of a DATA CONTROL button pair is usually used in a "negative" fashion –
for instance, to decrease a value, or select a previous setting or position. The right button is used in a
"positive" fashion – to increase a value, or select the next setting or position.
To Start the Rhythm:
5. Once you've selected a registration, press the START
button in the RHYTHM section.
This step starts up a rhythm pattern appropriate to the music style you have
selected. (To turn the pattern off, press the START button again.)
Some of the registrations in
the Registration Menu section
may not have assigned rhythm and
automatic accompaniment patterns.
See a chart included with this manual
that provides a list of all the available
music styles, along with the rhythm
patterns used. (See page 15.)
11
Page 14

1 Quick Introductory Guide
You can also adjust the tempo of the rhythm to your liking by turning the
BAR/BEAT
BAR
BEAT
TEMPO
Slower Faster
C
G
7
TEMPO dial, as indicated in the illustration below. T urning the dial clockwise
makes the tempo faster and counterclockwise makes slower.
To use Auto Bass Chord function:
The A.B.C. (Auto Bass Chord) automatic accompaniment feature of the Electone also plays an important
role and is used in conjunction with the registrations and rhythm patterns. Like the rhythm patterns, A.B.C.
patterns have been programmed to best match the selected registration in pages 3, 4 and 5 of the
Registration Menu. They allow you to add sophisticated bass and chord accompaniment patterns that suit
the music, simply by playing chords on the Lower keyboard.
6. Press the chord "C"on the Lower keyboard. (Try the
chord shown in the illustration on the right.)
This function provides automatic accompaniment specially tailored for the
music style in which you pla y. Notice that ev en after you release your fingers
from the keyboard, the chord and accompaniment patterns continue to
sound. For more details on A.B.C., see page 41.
Now return to the first five written music examples in the Basic Registrations
section above (see page 9). Select the registration indicated at the top right
of the score (for e xample, "13: Waltz-A" in the first song). Refer back to the
steps on selecting registrations above (see page 10.) if necessary.
7. Play the melody line as you did before with your
right hand on the Upper keyboard. This time, however,
use the A.B.C. automatic accompaniment by pressing the
chords with your left hand. The keys you should press
are indicated by the small diagrams just below the
melody in the score.
Now that you'v e heard what A.B.C. can do, try selecting other registrations
from the Registration Menu. Use the A.B.C. function with these newly
selected registrations as well, to get a better idea of the wide stylistic range
of your Electone.
See how easy it is? And remember, you don't have to hold the key down to
use the automatic accompaniment. Just press the ke y once and the
automatic accompaniment will continue until you press the ne xt key.
If you have unintentionally
changed the display by
pressing a button on the panel, return
to Step #1 above (pressing the
REGIST. MENU button) to return to the
Registration Menu.
12
Page 15

To cancel the A.B.C. Automatic Accompaniment:
<ABC> <MEMORY> ¡1
OFF ŒL ŒP
Turns the Lower keyboard Memory (L)
on and off.
Turns the Pedalboard
Memory (P) on and off.
These buttons correspond to the bottom left
of the LCD and let you step through the various
A.B.C. modes.
<ABC> <MEMORY> ¡1
Fingered „L „P
FOOT
SW.
REGIST.
MENU
VOICE
DISPLAY
A. B. C.
M. O. C.
REGIST.
SHIFT
PITCH
MIDI
DISPLAY SELECT
SYMPHO-
NIC
1 Quick Introductory Guide
You can, of course, cancel the automatic accompaniment patterns (Fingered mode) if you want to play
the accompaniment by yourself on the Lower keyboard and Pedalboard.
8. Press the A.B.C./M.O.C. button in the DISPLAY SELECT
section, to the right of the LCD Display.
9. Press one of the bottom left DATA CONTROL buttons
repeatedly until "OFF" appears below ABC on the LCD.
10 . Turn the Memory function off as well by using the
bottom right DATA CONTROL buttons.
A solid or dark box on the LCD indicates that the function is on; an empty or
outlined box indicates that the function is off. Make sure the boxes next to L
(Lower) and P (Pedal) are both off, as shown in the example LCD above.
This short introductory section has shown you just a small portion of the
vast potential of your Electone . Now that you know how to select among the
Registrations and use the A.B.C . Automatic Accompaniment, take some
time to explore the other registrations and their rhythm patterns. There's a
great wealth of realistic voices , authentic orchestration and stylistically
varied rhythms – all instantly available from the Registration Menus feature.
Before going on to explore the
remaining sections of this manual, we
suggest that you turn the A.B.C.
automatic accompaniment and
memory functions off. Otherwise,
single notes played on the Lower
keyboard will sound as full chords,
and the Pedal voices will not sound
when playing the Pedalboard. To
keep this from happening, select the
OFF setting in A.B.C. and press the
buttons that correspond to LOWER
and PEDAL in the display to turn
memory off.
As in the operation described
above, the DATA CONTROL
buttons are also used simply to turn
functions on and off.
Press the Registration Menu
buttons in the DISPLAY
SELECT section to display the
registration menu on the LCD.
13
Page 16

1 Quick Introductory Guide
To select the Registrations from the Registration Menu disk:
Any button can be used to
actually select the setting.
Selects the next number.
Selects the previous number.
PAGE
Included with your Electone is a Registration Menu Disk, containing 40 different menus.
1. Put the included Registration Menu Disk,
facing the label up, into the Disk slot, located just
under the Music Disk Recorder at the right side of
the Electone.
Once you've securely inserted the disk into the slot, the LCD
Display on the panel will automatically change to show the
availab le registration menu.
2. Press the PAGE buttons in the right of the LCD
to select the various menu "pages" of registrations
available on the disk.
3. Select one of the registrations shown on the LCD by
pressing the DATA CONTROL button in the left bottom of
the display.
4. Press the DATA CONTROL buttons in the right of the
LCD to call up the Registration you have selected.
The message "Completed...!!" momentarily appears, indicating that the
menu has been selected.
Up to 10 registration
selections are shown on the
LCD; no data is stored in the
registration numbers from 11 through
16.
14
Page 17

1 Quick Introductory Guide
4. Registration Menu List
Page1
No. LCD Display Sound Image Upper Keyboard Voice Lead Voice Lower Keyboard Voice Pedal Voice
1 STRINGS1 Orchestra Strings Violin Horn Contrabass
2 STRINGS2 Pop Strings Strings Flute (4') Strings Pizzicato Bass
3 STRINGS3 Chamber Strings Strings Violin Strings Pizzicato Bass
4 STRINGS4 Solo Violin - Violin Strings Contrabass
5 STRINGS5 Pops Orchestra 1 Strings Harpsichord Strings Elec. Bass
6 STRINGS6 Pizzicato Strings Pizzicato Bass Pizzicato Bass (4') Pizzicato Bass Pizzicato Bass
7 STRINGS7 Pops Orchestra 2 Strings Trumpet Brass Pizzicato Bass
8 STRINGS8 Strings Ensemble Strings Strings (16') Strings Contrabass
9 BRASS1 Marching Band Brass Trombone Brass Tuba
10 BRASS2 Solo Trumpet - Trumpet Horn Tuba
11 BRASS3 Big Band 1 Brass Saxophone Trombone Pizzicato Bass
12 BRASS4 Solo Trombone - Trombone Saxophone Pizzicato Bass
13 BRASS5 Big Band 2 (Saxophone Ensemble) Saxophone Saxophone (8') Piano Pizzicato Bass
14 BRASS6 Jazz Combo 1 (Trumpet) - Trumpet Elec. Bass Pizzicato Bass
15 BRASS7 Dixie Jazz - Clarinet Piano Pizzicato Bass
16 BRASS8 Fusion (Saxophone) Saxophone Elec. Piano Elec. Bass
Page 2
No. LCD Display Sound Image Upper Keyboard Voice Lead Voice Lower Keyboard Voice Pedal Voice
1 LEAD1 Woodwind Ensemble Oboe Flute Clarinet Bassoon (8')
2 LEAD2 Solo Flute - Flute Strings Contrabass
3 LEAD3 Solo Oboe - Oboe Strings Contrabass
4 LEAD4 Polka - Clarinet Harmonica Pizzicato Bass
5 LEAD5 Fantasy 1 Cosmic 1 Flute (4') Elec. Piano Elec. Bass
6 LEAD6 Harmonica - Harmonica Strings Contrabass
7 LEAD7 Tango Band Harmonica Harmonica (16') Piano Pizzicato Bass
8 LEAD8 Jazz Organ Jazz Organ Jazz Organ (4') Jazz Organ (8') Organ Bass
9 DECAY1 Piano Piano - Piano Piano
10 DECAY2 Jazz Combo 2 (Vibraphone) Vibraphone - Piano Pizzicato Bass
11 DECAY3 Honky-tonk Piano Piano - Piano Piano
12 DECAY4 Jazz Guitar Elec. Bass Elec. Bass (16') Strings Elec. Bass
13 DECAY5 Marimba Marimba - Piano Pizzicato Bass
14 DECAY6 Fantasy 2 Vibraphone (4') Flute (4') Strings Elec. Bass
15 DECAY7 Guitar Guitar Elec. Bass (16') Strings Contrabass
16 DECAY8 Oriental 1 Harpsichord Harpsichord (16') Strings Elec. Bass
● The numbers in the parentheses indicate that the "feet" settings for the assigned voice are different from the default.
Built-in Registration Menu (80 Menus)
15
Page 18

1 Quick Introductory Guide
Page 3
No. LCD Display Sound Image Upper Keyboard Voice Lead Voice Lower Keyboard Voice Pedal Voice
1 CONTEMP.1 Wind Synth. 1 - Cosmic 3 Elec. Piano Elec. Bass (16')
2 CONTEMP.2 Synth. Brass Synth. Brass Synth. Bass (8') Harpsichord Elec. Bass (16')
3 CONTEMP.3 Wind Synth. 2 Oboe Saxophone (8') Piano Elec. Bass (16')
4 CONTEMP.4 Synth. Horn Tuba (8') Guitar Elec. Bass
5 CONTEMP.5 Fantasy 3 Cosmic 1 (8 ') Organ Bass (4') Cosmic 1 (8 ') Contrabass
6 CONTEMP.6 Fantasy 4 Cosmic 2 Cosmic 1 Chorus Organ
7 CONTEMP.7 Piano + Synth. Piano Cosmic 1 (8') Clarinet Synth. Bass
8 CONTEMP.8 Oriental 2 Cosmic 2(16') Marimba Contrabass Horn (16')
No. LCD Display Rhythm (Tempo) Accompaniment Type Upper Keyboard Voice Lead Voice Pedal Voice
9 March-A 120 4 Brass Trumpet Tuba
10 March-B 11 0 1 Bassoon Flute (4') Pizzicato Bass (16')
11 Country 112 1 - Harmonica Pizzicato Bass (16')
12 Broadway 135 4 Trombone (8') Trumpet Pizzicato Bass
13 Waltz-A 10 5 4 Strings Strings (16') Pizzicato Bass (16')
14 Waltz-B 17 0 1 Strings Violin Pizzicato Bass
15 Jazz Waltz 140 4 Elec. Bass (16') Flute (4') Pizzicato Bass (16')
16 Swing-A 16 5 2 Saxophone Saxophone (8') Pizzicato Bass
Page 4
No. LCD Display Rhythm (Tempo) Accompaniment Type Upper Keyboard Voice Lead Voice Pedal Voice
1 Swing-B 16 0 3 Brass Trumpet Pizzicato Bass
2 Swing-C 138 1 - Clarinet Pizzicato Bass
3 Jazz Ballad 60 3 - Trombone Pizzicato Bass
4 Dixieland 108 4 - Trumpet Tuba
5 Bounce-A 1 2 3 2 Guitar Elec. Bass (16') Elec. Bass (16')
6 Bounce-B 1 3 0 4 - Clarinet Pizzicato Bass (16')
7 Reggae-A 132 4 Marimba - Elec. Bass (16')
8 Reggae-B 120 3 Elec. Piano Synth. Bass Elec. Bass (16')
9 Slow Rock-A 80 3 Guitar Elec. Bass (16') Elec. Bass (16')
10 Slow Rock-B 74 1 - Trumpet Elec. Bass (16')
11 Slow Rock-C 80 3 - Saxophone Elec. Bass (16')
12 Tango-A 12 0 1 Harmonica Harmonica (16') Pizzicato Bass (16')
13 Tango-B 120 1 Strings Violin Pizzicato Bass (16')
14 Tango-C 1 20 4 - Violin Pizzicato Bass (16')
15 ChaCha 126 4 Piano (16') Piano (4') Elec. Bass (16')
16 Rhumba 115 1 - Trombone (8') Elec. Bass (16')
Page 5
No. LCD Display Rhythm (Tempo) Accompaniment Type Upper Keyboard Voice Lead Voice Pedal Voice
1 Beguine 118 4 Strings Flute (4') Elec. Bass (16')
2 Mambo 100 4 Brass Saxophone Elec. Bass (16')
3 Samba-A 120 1 Saxophone Trumpet Elec. Bass (16')
4 Samba-B 120 4 Elec. Bass (16') Flute Elec. Bass (16')
5 Bossanova-A 1 03 1 - Flute Elec. Bass (16')
6 Bossanova-B 1 2 4 1 - Saxophone Elec. Bass (16')
7 8 Beat-A 100 3 Cosmic 2 Vibraphone (4') Elec. Bass (16')
8 8 Beat-B 117 1 Elec. Piano - Elec. Bass (16')
9 8 Beat-C 152 1 Jazz Organ - Elec. Bass (16')
10 DancePop 130 4 Vibraphone (4') Elec. Piano Elec. Bass (16')
11 16 Beat-A 85 4 - Flute Elec. Bass (16')
12 16 Beat-B 124 1 Synth. Brass Synth. Brass (16') Elec. Bass (16')
13 16 Beat-C 112 1 Brass Trumpet Elec. Bass (16')
14 16 Beat Funk 118 4 Synth. Bass Cosmic 3 Elec. Bass (16')
No. LCD Display Sound Image Upper Keyboard Voice Lead Voice Lower Keyboard Voice Pedal Voice
15 Wedding Wedding Organ Organ (4') Organ Organ (16')
16 X'mas X'mas Vibraphone (4') Cosmic 2 Strings Contrabass
● For No.9 through 16 of Page 3, and Pages 4 and 5 above, settings are as follows: A.B.C.: "Fingered", Memory: "ON" to both Lower keyboard and Pedalboard.
● The numbers in the parentheses indicate that the "feet" settings for the assigned voice are different from the default.
16
Page 19

Registration Menu Disk (40 Menus)
1 Quick Introductory Guide
Page1
No. LCD Display Sound Image Upper Keyboard Voice Lead Voice Lower Keyboard Voice Pedal Voice
1 STRINGS1 Solo Violin - Violin Strings Contrabass
2 STRINGS2 Strings Ensemble Strings Strings Horn Pizzicato Bass
3 STRINGS3 Pop Strings 1 Strings Vibraphone Horn Contrabass
4 STRINGS4 Pop Strings 2 Strings Clarinet Strings Pizzicato Bass
5 STRINGS5 Symphonic Orchestra Tutti 1 Tutti 2 Strings Contrabass
6 BRASS1 Trumpet Ensemble Brass Trumpet Brass Tuba
7 BRASS2 Solo Trumpet - Trumpet Trombone Tuba
8 BRASS3 Solo Trombone - Trombone Trombone Tuba
9 BRASS4 Brass Ensemble Trumpet Trombone Horn Tuba
10 BRASS5 Big Band Brass Trombone Saxophone Pizzicato Bass
Page 2
No. LCD Display Sound Image Upper Keyboard Voice Lead Voice Lower Keyboard Voice Pedal Voice
1 LEAD1 Solo Flute 1 - Flute Strings Contrabass
2 LEAD2 Solo Flute 2 - Flute Clarinet Pizzicato Bass
3 LEAD3 Whistle - Flute Pizzicato Bass Pizzicato Bass
4 LEAD4 Flute Ensemble Flute Flute Bassoon Pizzicato Bass
5 LEAD5 Pop Flute Vibraphone Flute Strings Contrabass
6 LEAD6 Woodwind Ensemble 1 Bassoon Flute Clarinet Pizzicato Bass
7 LEAD7 Solo Oboe - Oboe Bassoon Pizzicato Bass
8 LEAD8 Woodwind Ensemble 2 - Clarinet Bassoon Clarinet
9 LEAD9 Solo Clarinet Clarinet - Horn Pizzicato Bass
10 LEAD10 Solo Saxophone - Saxophone Strings Contrabass
Page 3
No. LCD Display Sound Image Upper Keyboard Voice Lead Voice Lower Keyboard Voice Pedal Voice
1 DECAY1 Piano Piano - Piano Piano
2 DECAY2 Harpsichord Harpsichord - Strings Contrabass
3 DECAY3 Marimba Marimba - Clarinet Pizzicato Bass
4 DECAY4 Music Box Vibraphone - Vibraphone Vibraphone
5 DECAY5 Classical Guitar Guitar - Strings Pizzicato Bass
6 ORGAN1 Organ Organ - Organ Organ Bass
7 ORGAN2 Jazz Organ Jazz Organ - Jazz Organ Organ Bass
8 BANDONEON Bandoneon Harmonica Harmonica Strings Pizzicato Bass
9 SYNTH1 Cosmic Sound 1 Cosmic 2 Cosmic 1 Chorus Contrabass
10 SYNTH2 Cosmic Sound 2 Cosmic 3 Synth. Bass Cosmic 3 Synth. Bass
Page4
No. LCD Display Rhythm (Tempo) Accompaniment Type Upper Keyboard Voice Lead Voice Pedal Voice
1 March 120 4 Brass Trumpet Tuba
2 Broadway 135 4 Trombone Saxophone Pizzicato Bass
3 Waltz 105 4 Strings Strings Pizzicato Bass
4 Swing 160 3 Brass Trumpet Pizzicato Bass
5 SlowRock 80 3 Guitar Elec. Bass Elec. Bass
6 Tango 127 3 Harmonica Harmonica Pizzicato Bass
7 Cha Cha 126 4 Piano Piano Elec. Bass
8 Samba 120 1 Saxophone Trumpet Elec. Bass
9 8 Beat 100 3 Cosmic 2 Vibraphone Elec. Bass
10 16 Beat 74 4 Harmonica Harmonica Elec. Bass
● For Page 4 above, settings are as follows: A.B.C.: "Fingered", Memory: "ON" to both Lower keyboard and Pedalboard.
17
Page 20

2 Voice Sections
£Strings ¢™Violin
¢Strings ¡ContBass
FOOT
SW.
REGIST.
MENU
VOICE
DISPLAY
A. B. C.
M. O. C.
REGIST.
SHIFT
PITCH
MIDI
DISPLAY SELECT
SYMPHO-
NIC
CONTRA
BASS
ELEC.
BASS
MAX
MIN
ORGAN
BASS
TUBA TO
LOWER
LOWER KEYBOARD VOICE PEDAL VOICE
STRINGS BRASS CLARI-
NET
SAXO-
PHONE
CHORUS HARMO-
NICA
MAX
MIN
ORGAN PIANO GUITAR VIBRA-
PHONE
COSMIC TUTTI
VIOLIN FLUTE
MAX
MIN
OBOE TRUM-
PETTOLOWER
UPPER KEYBOARD VOICE LEAD VOICE
1
2
1
STRINGS BRASS CLARI-
NET
SAXO-
PHONE
CHORUS HORN
MAX
MIN
ORGAN PIANO GUITAR VIBRA-
PHONE
COSMIC TUTTI
1
2
1
2 Voice Sections
The following illustration shows the various available voice sections.
The Electone has four voice sections: Upper Keyboard Voice, Lead Voice, Lower Keyboard Voice,
and Pedal Voice. All voices are playable from the Upper or Lower keyboards or Pedalboard,
allowing you to create richly textured voice layers on a single keyboard.
1. Voice Display
You can see at-a-glance which voices are currently selected for each of the voice sections by calling up
the Voice Display.
Press the VOICE DISPLAY button in the DISPLAY SELECT
section.
The Voice Display is indicated on the LCD.
The Voice Display is automatically shown when the Electone is turned on.
18
Page 21

2 Voice Sections
2. Selecting Voices from the Panel
Harpsi.
Piano E.Piano
The first character flashes to
indicate the selected voice.
Harpsi.
Piano E.Piano
STRINGS BRASS CLARI-
NET
SAXOPHONE
CHORUS HARMO-
NICA
MAX
MIN
ORGAN PIANO GUITAR VIBRA-
PHONE
COSMIC TUTTI
UPPER KEYBOARD VOICE
1
2
Since selection of panel voices follows the same procedure throughout the various voice sections,
instructions for only the Upper Keyboard Voice section are given here.
1. Select a voice from the UPPER KEYBOARD VOICE
section by pressing one of the Voice buttons in that
section.
If, for example, you have selected the PIANO voice, the following display will
appear:
Notice that several different voice names are sho wn on this display.
These are variations of the basic Piano voice category.
2. Press one of the DATA CONTROL buttons that
corresponds to the voice you wish to select.
Some voice buttons have
only one voice.
19
Page 22

2 Voice Sections
3. Set the volume for each voice section.
TOUCH=4 VOL.=24
<UPPER> ¡1
Pressing this button decreases the value.
Pressing this button increases the value.
STRINGS BRASS CLARI-
NET
SAXO-
PHONE
CHORUS HARMO-
NICA
MAX
MIN
ORGAN PIANO GUITAR VIBRA-
PHONE
COSMIC TUTTI
UPPER KEYBOARD VOICE
1
2
Maximum
Minimum
CONTRA
BASS
ELEC.
BASS
MAX
MIN
ORGAN
BASS
TUBA TO
LOWER
PEDAL VOICE
VIOLIN FLUTE
MAX
MIN
OBOE TRUM-
PETTOLOWER
LEAD VOICE
1
1
There are two volume controls: Coarse and Fine.
Coarse:
Use the VOLUME controls of each voice section on the panel to set the
desired level for each voice.
The controls have seven volume settings , from a minimum of 0, or no sound,
to a maximum of full volume.
Fine:
Pressing the same panel voice button again calls up the Voice Condition
display.
Use the DAT A CONTROL buttons, in the bottom right of the LCD, that
correspond to the Volume setting to change the lev el of the desired voice.
The relative level is indicated by a numeric value (from 0 – 24).
Pressing a voice button once
calls up that voice's Voice
Menu display. Pressing it a second
time calls up the Voice Condition
display (as shown in the illustration).
Successive presses alternate between
the two displays.
4. Now select voices for the Lower keyboard and
Pedalboard as you did for the Upper keyboard above.
Also set the volumes of the voices.
PLAYING LEAD AND PEDAL VOICES FROM THE LOWER KEYBOARD:
The Electone has a special "To Lower" function that lets you assign Lead
or Pedal voices to the Lower ke yboard. Simply press the TO LOWER
20
button on the voice section you wish to assign, and that voice will be
playable from the Lower keyboard.
●If the effect (vibrato, etc.) is set to the original Pedal Voices, the voices
assigned to the Lower ke yboards are playable with the effects as well.
●The Lead/Pedal Voice cannot be played on the Upper keyboard/
Pedalboard, if the Lead/Pedal Voice is assigned to the Low er keyboard.
The Lead Voice and Pedal
time; when you simultaneously press
two or more keys, only the highest
note will sound.
Voice sounds one note at a
Page 23

2 Voice Sections
3. Selecting Additional Voices – Dotted Buttons
and User Voices
The EL-27 Electone has a variety of voices from which you can choose – far greater than what is
immediately apparent from the front panel controls. You've already learned in the section above how to
select the different voices that are available in the Voice Menu display of each panel voice . The Electone
also has dotted buttons in each voice section, giving you convenient access to any voice.
Selecting Voices From the Dotted Buttons
Each voice section has one or two dotted buttons, found on the right side of
each voice section. These dotted buttons function as "wild card" Voice Menu
selectors; any internal voices can be selected from these buttons.
The dotted buttons have the following basic uses:
! For playing any voice of the Voice Menus from any of the keyboards
or Pedalboard.
You can play on the Upper ke yboard, for example, voices from the twentytwo Voice Menu pages (including User), and not be limited to only the twelve
buttons (equivalent to twelve Voice Menu pages) that make up the Upper
Voice section. Another advantage to this f eature is that when the normally
monophonic (one note) Lead and Pedal voices are assigned to the Upper or
Lower ke yboard voice sections, they can be played polyphonically. The
opposite is also the case: Upper or Lower voices assigned to the Lead or
Pedal sections will be monophonic.
" For having three different voices from the same Voice Menu page
available f or selection in the same song.
For e xample, you can assign one of the voices to a dotted b utton in the
Upper Keyboard Voice section, the second voice to the other dotted button
in the same section, and the third one on the Voice Menu.
# For storing voices from a Voice Disk.
21
Page 24

To select a voice from a dotted button:
USER 3 USER 4
USER 1 USER 2 ¡US
Harpsi.
Piano E.Piano ¡17
Piano E.Piano ¡17
Harpsi.
PAGE
Strings ¡1
STRINGS BRASS CLARI-
NET
SAXOPHONE
CHORUS HARMO-
NICA
MAX
MIN
ORGAN PIANO GUITAR VIBRA-
PHONE
COSMIC TUTTI
UPPER KEYBOARD VOICE
1
2
Dotted buttons
2 Voice Sections
1. Press one of the dotted buttons in any of the voice
sections.
For e xample, let's select the E. Piano (Page 17: Piano) using the dotted
button.
Page 1 (Strings) is displayed on the LCD.
2. Select one of the pages with the PAGE buttons found
in the right to the LCD display (Page 17: Piano).
Each voice group appears on the LCD display when the page has been
selected.
3. Select a voice from the display (E. Piano).
Select the USER page in the same manner as above when y ou wish to use
a voice from a Voice Disk. (See page 72.)
You can directly view and
select Voice Menu pages by
holding down one of the dotted
buttons and simultaneously pressing
the desired voice buttons in
succession.
The first character of the
selected voice's name
flashes to indicate that the voice has
been selected. As long as you do not
select a voice, this indication will not
appear.
22
When you turn off and turn
on the Electone again, the
voice is set to the Basic
Registration 1. Be sure to store the
selected voices (registration
setting) to the Registration Memory
before you turn off the Electone
(see page 47).
Page 25

4.Voice Menus
2 Voice Sections
Strings ¡1
STRINGS (Upper/Lower)
Tutti1 Tutti2 ¡12
TUTTI (Upper/Lower)
Violin ¡2
VIOLIN (Lead)
Chorus ¡13
CHORUS (Upper/Lower)
ContBass PizzBass ¡3
CONTRABASS (Pedal)
Harmonic ¡14
HARMONICA (Upper)
Brass SynBrass ¡4
BRASS (Upper/Lower)
Organ JazzOrgn¡15
ORGAN (Upper/Lower)
Horn ¡5
HORN (Lower)
OrgBass ¡16
ORGAN BASS (Pedal)
Trombone
Trumpet ¡6
TRUMPET (Lead)
Harpsi.
Piano E.Piano ¡17
PIANO (Upper/Lower)
Tuba ¡7
TUBA (Pedal)
Guitar ¡18
GUITAR (Upper/Lower)
Flute ¡8
FLUTE (Lead)
Marimba
Vibrphon ¡19
VIBRAPHONE (Upper/Lower)
Oboe Bassoon ¡9
OBOE (Lead)
SynBass
E.Bass ¡20
ELACTRIC BASS (Pedal)
Clarinet ¡10
CLARINET (Upper/Lower)
Cosmic3
Cosmic1 Cosmic2 ¡21
COSMIC (Upper/Lower)
Saxophon ¡11
SAXOPHONE (Upper/Lower)
USER 3 USER 4
USER 1 USER 2 ¡US
The following chart lists the voices available and their button/page
assignment. The numbers shown in the list correspond to the page numbers
shown in the display and are displayed only when pressing the dotted
buttons.
Some of the voice names are abbreviated: e.g., ContBass for Contrabass .
23
Page 26

3 Voice Controls and Effects
3 Voice Controls and Effects
<LEAD> ¡1
TOUCH=4 VOL.=24
PAGE
!"
VIOLIN FLUTE
MAX
MIN
OBOE TRUM-
PETTOLOWER
LEAD VOICE
1
The Electone is equipped with two general kinds of functions that can be used to change the
sound of the voices: Voice Controls and Effects.
These are used to change various aspects of the voices, suc h as the volume or octave (footage)
settings, or enhance the sound of the voices, such as with Reverb or Tremolo. They are divided
into two groups: 1) The contr ols/effects selected on the Voice Condition pages. 2) The effects set
by the panel buttons.
Each voice has been given certain factory-preset settings to best enhance its sound. However,
you can also change the settings to suit your pref erences by using the controls described in this
section.
1. Selecting from the Voice Condition Pages
To select the Voice Condition pages for changing the settings:
Choose a voice on the panel, then press that v oice's panel button
twice; If the voice you want to select is already displayed on the LCD
display, press once.
For the Lead Voice example shown below, press the VIOLIN button in the
LEAD VOICE section twice.
Page 1 of the Voice Condition pages is displayed on the LCD display. Each
of the Voice Conditions has page 1 through 4.
Voice Condition – Page 1
Lead Voice
! TOUCH (TOUCH TONE)
See page 24.
" VOL. (VOLUME)
Fine adjustment of the voice volume. See page 20.
24
The Pedal Condition display
Pedal voices do not have the Vibrato
function.
has only two pages: The
Page 27

3 Voice Controls and Effects
Voice Condition – Page 2
<UPPER>VIB. ¡4
DEPTH=0
PAGE
"
<LEAD>VIB. DELAY=0¡4
DEPTH=0 SPEED=0
PAGE
"#
!
<LEAD> ¡3
„USER VIB.
PAGE
<LEAD> ¡2
FEET=PRE. SYM.=PRE.
PAGE
!"
Press the PAGE buttons to select P age 2.
! FEET
See page 26.
" SYM. (SYMPHONIC)
See page 27.
Voice Condition – Page 3
Press the PAGE buttons to select P age 3.
USER VIB. (User Vibrato)
See page 28.
Voice Condition – Page 4
Press the PAGE buttons to select P age 4.
Lead Voice
Upper Keyboard Voice
(When USER VIB. is ON.)
! DELAY (Lead Voice only)
See page 29.
" DEPTH
See page 29.
# SPEED (Lead Voice only)
See page 29.
The Vibrato function in Page 4
of the Lead Voice is different
from the Upper/Lower Keyboard
Voice.
25
Page 28

3 Voice Controls and Effects
Press the PAGE button to return to the Page 1.
<LEAD> ¡2
FEET=PRE. SYM.=PRE.
PAGE
PRE.
4'
8'
16'
Selects next setting.
Selects previous setting.
<PEDAL> ¡1
VOL.=10
<LEAD> ¡1
TOUCH=4 VOL.=24
PAGE
1
4
Voice Condition - Page 1
●Touch Tone
The Touch Tone function gives you expressive control o ver the volume and timbre of a voice.
TOUCH (Touch T one)
The depth of Touch Tone is switchable alternately to 1 (Shallow) or 4 (Deep)
by pressing the D ATA CONTROL button found in the bottom left to the LCD
display. 4 is the factory setting.
The Touch Tone cannot be applied to the pedal voices.
response over the voices, controlling
volume and timbre according to the
velocity at/after which you strike the
keys.
in the upper models, respectively.
after touch does not function to the
percussive voices (Piano, etc.).
The Touch Tone function
provides initial/after touch
The set values 1 and 4 are
the same as the ones found
The Touch Tone does not
function to Organ Voice. The
Press the PAGE buttons to select the P age 2.
Voice Condition - Page 2
●Feet
FEET
Determines the octave setting of the voice . PRE. (Preset) is the original
(factory) setting; 4' is the highest and 16' is the lowest.
Settings: PRE., 4', 8', 16'
By using different Feet
settings in the Lower and
Upper keyboards, you can duplicate
the wide octave range of many
instruments. For example, with both
the Lower and Upper keyboards set to
the Piano voice and Feet set to
appropriate values, you can play the
voice nearly over the full range of a
grand piano.
26
Page 29

●Symphonic/Celeste
<SYMPHONIC>
„Symphonic ŒCeleste
Use these buttons to select Symphonic or Celeste.
FOOT
SW.
REGIST.
MENU
VOICE
DISPLAY
A. B. C.
M. O. C.
REGIST.
SHIFT
PITCH
MIDI
DISPLAY SELECT
SYMPHO-
NIC
<LEAD> ¡2
FEET=PRE. SYM.=PRE.
PAGE
PRE.
OFF
ON
Selects next setting.
Selects previous setting.
3 Voice Controls and Effects
Symphonic simulates the effect of a large ensemb le, while Celeste creates
the effect of a gradually expanding sound.
Symphonic/Celeste function can be set separately to each of the voices.
1. Press the bottom right DATA CONTROL buttons to turn
the SYM. (Symphonic) ON in the Voice Condition – Page 2.
2. Press the SYMPHONIC button in the DISPLAY SELECT
section to select either Symphonic or Celeste.
The Symphonic menu is display ed on the LCD display. Press the bottom
DAT A CONTROL buttons to switch betw een Symphonic and Celeste.
Symphonic/Celeste can be
selected by each voice,
however, both of them cannot be
applied at a time.
27
Page 30

●Vibrato
<LEAD>VIB. DELAY=0¡4
DEPTH=0 SPEED=0
PAGE
"#
!
<LEAD> ¡3
„USER VIB.
Press either of these buttons to turn on User Vibrato.
<LEAD> ¡3
ŒUSER VIB.
PAGE
3 Voice Controls and Effects
Vibrato is an effect that periodically, or regularly, varies the pitch of a voice
for a quavering sound. Used properly, it can make a voice sound richer and
more natural.
Press the PAGE buttons to select page 3.
Voice Condition – Page 3
1. Turn on USER VIB. (User Vibrato) in the Voice
Condition – Page 3.
When this is turned on, you can adjust the vibrato settings: Delay, Depth
and Speed for Lead voices, and Depth for Upper/Lower voices.
The Delay, Depth and Speed settings are set in the next page, Voice
Condition – Page 4. The Delay, Depth and Speed settings are not displayed
and cannot be adjusted unless USER VIB. has been turned on in this
setting.
2. Call up the Voice Condition – Page 4 by pressing the
PAGE buttons.
Voice Condition - Page 4
Lead Voice
28
Page 31

Upper Keyboard Voice
<LEAD>VIB ¡4
PRESET VIBRATO
Delay
Vibrato Controls
Speed
Depth
Key On
<LEAD>VIB ¡4
DEPTH=0
PAGE
"
3 Voice Controls and Effects
! Delay (Lead Voice only)
Determines the amount of time that elapses between the playing of a ke y
and the start of the vibrato effect (see diagram). Higher settings increase the
delay of the vibrato onset. Range: 0 – 7
" Depth
Determines the intensity of the vibrato effect (see diagram). Higher settings
result in a more pronounced vibrato. Range: 0 – 7
# Speed (Lead Voice only)
Determines the speed of the vibrato effect (see diagram). Range: 0 – 7
The following diagr am graphically shows the vibrato effect and its related
controls.
Vibrato Controls
3. Select the setting of USER.VIB by using either of the
PAGE buttons, as indicated in the illustration of Step #2.
If User Vibrato has not been turned on, the following display appears when Page 4 is selected.
29
Page 32

3 Voice Controls and Effects
2. Selecting from the Panel Buttons
<SUSTAIN> UPPER=10
LOWER=10 PEDAL=6
UPPER
(KNEE)
LOWER
(KNEE)
PEDAL
SUSTAIN
MAX
MIN
REVERB
●Reverb
Reverb adds an echo-like effect to the sound, giving the impression of a
performance in a large room or concert hall. The effect is applied equally
and simultaneously to all voice sections.
To adjust the reverb effect:
Press one of the REVERB buttons, located at the far left of the panel.
These controls determine the depth of the reverb eff ect. There are seven
settings, from a minimum of 0, or no reverb, to the maximum.
●Sustain
Sustain is selectable for the Upper, Lower and Pedal voices and makes the
sound gradually fade out when the keys are released. The sustain on/off
and sustain length settings are independent for each keyboard, providing
maximum expressiv e control.
To add sustain to the voices and call up the
Sustain Length page:
1. Press either of the buttons in the SUSTAIN section.
The lamp of the button pressed lights up to indicate that sustain is on.
Press the button again to turn sustain off.
The Sustain display appears on the LCD displa y.
Sustain cannot be applied to
the Lead voices.
If knee lever control of the
Upper or Lower sustain has
been turned on, pressing the Upper or
Lower buttons here will not add
sustain unless the knee lever is
pushed. (See page 52.)
Remember that the SUSTAIN
buttons are on/off switches. If
you use them to simply check the
sustain length values, you may
unintentionally change the on/off
status of the effect. Remember to
check whether the sustain button
lamps are on or off before you start to
play.
When you turn off and turn
on the Electone again, the
voice is set to the Basic
Registration 1. Be sure to store the
selected voices (registration
setting) to the Registration
Memory before you turn off the
Electone (see page 47.).
2. Determines the length of sustain applied to each
voice section by using each of the DATA CONTROL
buttons.
The display shows the current sustain length values for each voice section.
Increasing valuesmakes sustain more effectively. Range:0 –12.
30
Page 33

4 Rhythm, Accompaniment and Percussion
4 Rhythm, Accompaniment and Percussion
March
Country Broadway
Press either of these
DATA CONTROL buttons
that correspond to
Broadway on the
display.
Country Broadway
March
MARCH WALTZ SWING BOUNCE SLOW
ROCK
MAX
MIN
TANGO LATIN1LATIN28 BEAT 16 BEAT
RHYTHM
1
2
SEQ.
SEQ.
1
3
SEQ.
SEQ.
2
4
The Rhythm features of the Electone use actual drum and percussion sampled sounds to
automatically play various rhythm patterns. Automatic Accompaniment functions are used with
the rhythm patterns, pro viding appropriate and completely automatic accompaniment to match
the style of the rhythm pattern selected. Moreover, the Electone has a Keyboard Percussion
feature that allows you to play drum and percussion sounds from the Lower keyboard and
Pedalboard.
1. Selecting Rhythm Patterns from the Panel
Ten different rhythm menus in various styles can be instantly selected from the front panel. The Electone
has additional "hidden" rhythm patterns, however. A total of 24 rhythm patterns are available, and can be
selected by using combination of the RHYTHM buttons and the LCD display.
To select and play a rhythm pattern:
1. Choose a rhythm pattern by pressing one of the
RHYTHM buttons on the panel.
The first character of the selected rhythm pattern's name flashes on the
LCD display. (Refer to the Rhythm Menu list on page 38 for selecting a
rhythm pattern.)
2. Press the DATA CONTROL buttons to select a rhythm
pattern from the Rhythm menu.
From the example display shown belo w, select Broadway.
31
Page 34

4 Rhythm, Accompaniment and Percussion
3. Set the volume.
BAR/BEAT
BAR
BEAT
TEMPO
SYNCHRO
START
START
RHYTHM
FILL IN
INTRO.
ENDING
Press the VOLUME controls to the right of the RHYTHM buttons to set the
desired level of the rhythm.
The controls have seven volume settings , from a minimum of 0, or no
sound, to a maximum of full volume.
Fine adjustments in the volume of the rhythm pattern can also be made
from the Rhythm Condition page (see page 35.).
4. Turn the rhythm on. You can use one of three buttons
to turn on the rhythm:
When the Electone is turned
on, the rhythm volume is
automatically set to 0.
! START
This button does as its name indicates; the rhythm begins as soon as the
button is pressed. To stop the rhythm, press this button again.
" SYNCHRO START
This button puts the rhythm pattern in "stand-by"; the rhythm will start when
you press a note on the Lower keyboard or Pedalboard. To stop the rhythm,
press this button again.
# INTRO. ENDING
INTRO .
Pressing this button automatically plays a short introduction (of up to eight
measures) before starting the actual rhythm pattern. First, press the INTRO .
ENDING button, then the START or SYNCHRO START buttons.
While the introduction is playing, the TEMPO displa y shows the countdown
to the first measure of the pattern.
The left footswitch can also be
used to turn the rhythm off and
on in the middle of a song. (To assign
the footswitch for rhythm control, see
page 51.)
ABOUT SYNCHRO START:
The Synchro Start feature
functions quite differently when Auto
Bass Chord is turned on and
Accompaniment Memory is turned off.
The rhythm pattern starts when a key
on the Lower keyboard is played, but
then immediately stops when the key
is released. To keep this from
happening, turn the Memory function
on. (Refer to the A.B.C. section, page
40, for details on Auto Bass Chord
and Memory.)
The EL-27 does not sound by
playing the Lower Keyboard
while the introduction is played back.
ENDING
Pressing the INTRO . ENDING button again while the pattern is being played
will automatically add an ending phrase before stopping the rhythm.
32
LEAD IN
Pressing the START button while holding down the INTRO. ENDING button automatically plays a special
one-measure Lead In, with a click on each beat, to cue you in to the beginning of the song.
Page 35

4 Rhythm, Accompaniment and Percussion
5. Set the tempo by turning the TEMPO dial below the
BAR/BEAT
TEMPO
The number on the left indicates
the current bar or measure
and the one on the right indicates
the number of the beat in each bar.
BAR/BEAT
BAR
BEAT
TEMPO
Slower Faster
RHYTHM section.
! TEMPO Dial
For adjusting the speed of the rh ythm. Turn the dial clockwise to increase
the tempo, and counter-cloc kwise to decrease it.
" TEMPO Display
/ BAR/BEAT Display
Shows the current tempo. (Displayed values are given in beats per minute,
just as on a conventional metronome .) The tempo range is 40 to 240 beats
per minute.
When the rhythm pattern begins playing, the TEMPO display changes
function to a BAR/BEAT display.
# BAR/BEAT Indicator
The BAR/BEAT indicator flashes to the first beat of every measure.
33
Page 36

4 Rhythm, Accompaniment and Percussion
Fill In Patterns
SYNCHRO
START
START
RHYTHM
FILL IN
INTRO.
ENDING
Fill In patterns are designed to be used as temporary and regular rhythmic breaks to spice up a repeating
rhythm pattern.
To use the Fill In patterns:
USING A FILL IN FOR THE
1. Select and play a rhythm pattern.
START OF A SONG:
Fill In patterns can also be used as
introductions; simply press the FILL
IN button before starting the rhythm
with the START or SYNCHRO START
buttons.
2. As you play the Electone along with the rhythm
pattern, occasionally press the FILL IN button.
For best results, press the FILL IN button just at the beginning or the first
beat of a measure.
PLAYING PARTIAL FILL IN
PATTERNS:
You can also start Fill In patterns
within a bar, in order to play only the
final one or two beats of the Fill In
pattern and create additional
rhythmic interest. Since the Fill In
feature is very sensitive to bar/beat
boundaries, you should be very
careful to "play" the FILL IN button
precisely on (or just slightly before)
the beat that you want the Fill In
pattern to begin.
The left footswitch can also
be used to apply the Fill In
or Ending. (See page 52.)
34
Page 37

4 Rhythm, Accompaniment and Percussion
2. Auto Variation and Rhythm Volume
<RHYTHM> ¡1
ŒAUTO VARI. VOL.=0
Decreases the volume.
These buttons turn the Auto Variation function on and off.
Increases the volume.
!"
MARCH WALTZ SWING BOUNCE SLOW
ROCK
MAX
MIN
TANGO LATIN1LATIN28 BEAT 16 BEAT
RHYTHM
1
2
SEQ.
SEQ.
1
3
SEQ.
SEQ.
2
4
These two settings are controlled from each rhythm's Rhythm Condition pages. There are three Rhythm
Condition pages.
To select the Rhythm Condition pages:
Choose a rhythm pattern, and press that pattern's panel button again.
(The button should be pressed only once if the Rhythm display has
already been called up; otherwise press the button twice.)
Rhythm Condition Page appears on the LCD as below.
Rhythm Condition – Page 1
! AUTO VARI. (Auto Variation)
The Auto Variation function lets you set pattern variations to be played
automatically. When set to on, Auto Variation automatically substitutes
additional pattern variations to make the rhythm more interesting and
complex.
" VOL. (Volume)
Fine adjustment of the overall volume of the rhythm patterns and Keyboard
Percussion (see page 43 on the Keyboard Percussion.). Range: 0 – 24
The Auto Variation function is
not applied to some of the
rhythm patterns.
Rhythm Condition Pages 2
and 3 are described later in
this section. (See pages 39 and 40.)
35
Page 38

3. Selecting Rhythms from the Dotted Buttons
Swing ¡3
J.Ballad Dixie
Swing ¡3
J.Ballad Dixie
PAGE
Country Broadway
March ¡1
MARCH WALTZ SWING BOUNCE SLOW
ROCK
MAX
MIN
TANGO LATIN1LATIN28 BEAT 16 BEAT
RHYTHM
1
2
SEQ.
SEQ.
1
3
SEQ.
SEQ.
2
4
Dotted buttons
4 Rhythm, Accompaniment and Percussion
The Rhythm section also has, like the voice sections, dotted buttons from which rhythm patterns can be
selected. These dotted buttons function as "wild card" rhythm pattern selectors; any of the rhythm
patterns available from the panel b uttons or from the pattern displa ys can be selected from these buttons.
As with the Voice sections' dotted buttons, y ou can set two or three rhythm patterns from the same page
to be selected from different buttons (one from the original Rhythm button, and the others from the dotted
buttons).
To select a rhythm pattern from a dotted button:
1. Press one of the dotted buttons on the right side of
the RHYTHM section.
Select the Dixie in the Swing Page for example.
Page 1 of the RHYTHM menu appears on the display.
2. Select one of the pages with the PAGE buttons.
3. Select one of the rhythms by pressing one of the
appropriate (bottom right) DATA CONTROL buttons.
You can directly go to the
Rhythm page by pressing the
appropriate RHYTHM button while
holding down the dotted buttons.
36
Page 39

User Rhythm Pages:
USER1-A USER1-B ¡U1
USER1-C USER1-D
4 Rhythm, Accompaniment and Percussion
You will find the User Rhythm P ages (8 in total) in the Rhythm Menu. You can call up and use the User
Rhythm Patterns created with other Electones such as EL-37.
1. First, create a user rhythm with the EL-37, register it
in one of the user rhythm number, and record it as a part
of the registration to a floppy disk.
2. Insert the floppy disk into the EL-27's M.D.R. slot. Call
up the registration, to load the user rhythm to the
corresponding user rhythm number.
3. Select the user rhythm by using the dotted button.
When you turn off and turn
on the Electone again, the
voice is set to the Basic
Registration 1. Be sure to store the
selected voices (registration
setting) to the Registration Memory
before you turn off the Electone
(see page 47.).
37
Page 40

4 Rhythm, Accompaniment and Percussion
4. Rhythm Menus
Country Broadway
March ¡1
Beguine Mambo
Cha-cha Rhumba ¡7
J.Waltz
Waltz ¡2
Bossa.
Samba ¡8
J.Ballad Dixie
Swing ¡3
D.Pop
8Beat ¡9
Reggae
Bounce ¡4
Funk
16Beat ¡10
S.Rock1 S.Rock2 ¡5
USER1-C USER1-D
USER1-A USER1-B ¡U1
Tango1 Tango2 ¡6
USER8-C USER8-D
USER8-A USER8-B ¡U8
This chart lists all 24 rhythm patterns available on the Electone. The n umbers in the chart correspond to
the page numbers shown in the display.
Some of the rhythm names are abbreviated (e.g., J. Waltz for Jazz Waltz).
38
Page 41

4 Rhythm, Accompaniment and Percussion
5. Accompaniment Controls
<ACCOMPANIMENT> ¡2
TYPE=1 VOL.=0
PAGE
Increases volume.
Decreases volume.
Sets volume to maximum value.
Sets volume to minimum value.
Select the Accompaniment type.
"!
<RHYTHM> ¡1
ŒAUTO VARI. VOL.=0
MARCH WALTZ SWING BOUNCE SLOW
ROCK
MAX
MIN
TANGO LATIN1LATIN28 BEAT 16 BEAT
RHYTHM
1
2
SEQ.
SEQ.
1
3
SEQ.
SEQ.
2
4
The Accompaniment function here is independent of the A.B.C. accompaniment and works with the
Rhythm section to automatically add arpeggiated chords and other instrumental embellishments. The
Accompaniment controls include the setting of the Accompaniment type and its volume.
To select the Accompaniment controls in the Rhythm Condition
pages:
1. Press any one of the RHYTHM buttons on the panel
twice.
2. Once the Rhythm Condition Page 1 display has been
called up, use the PAGE buttons to select Page 2.
Rhythm Condition – Page 2
! TYPE=1, 2, 3, 4
These settings provide four different types of rhythmic and melodic
accompaniment, and become more complex according to the type number
(Type 1 is the simplest, Type 4 the most complex).
" VOL. (Volume)
Determines the volume of the Accompaniment. The Accompaniment can be
turned off by setting this parameter to the minimum value. Range: 0 – 24
3. Turn on the rhythm by pressing the START button and
play on the Lower Keyboard.
The rhythmic or arpeggiated chords will be automatically added to the
original chords you play on the Low er keyboard.
Even if the Accompaniment
Type is changed, the
Intro/Ending pattern remains the
same.
When turning the Electone on,
the Accompaniment volume is
automatically set to 0. Be sure to set
the Accompaniment volume to the
appropriate value when using the
Accompaniment function.
39
Page 42

4 Rhythm, Accompaniment and Percussion
6. Automatic Accompaniment – Auto Bass Chord
<ABC> <MEMORY> ¡1
Fingered „L ŒP
OFF
Single
Fingered
Custom
Turns the Pedalboard
Memory (P) on and off.
Turns the Lower keyboard
Memory (L) on and off.
"
!
These buttons correspond to the bottom left of the LCD
and let you step through the various A.B.C. modes.
FOOT
SW.
REGIST.
MENU
VOICE
DISPLAY
A. B. C.
M. O. C.
REGIST.
SHIFT
PITCH
MIDI
DISPLAY SELECT
SYMPHO-
NIC
The Auto Bass Chord (A.B.C.) function works with the Rhythm section of the Electone to automatically
produce chord and bass accompaniment as you play. Depending on the feature or mode selected, y ou
can play anything from a single note to a full chord on the Lo wer keyboard and hear complete, rhythmical
bass and chord accompaniment.
There are three Auto Bass Chord modes – Single Finger, Fingered Chord
and Custom A.B.C.– and they are selected from either Rhythm Condition
Page 3 or the A.B .C./M.O.C. button (page) in the DISPLAY SELECT section.
To select the A.B.C. function:
1. Press the A.B.C./M.O.C. button. (Or press any of the
RHYTHM buttons twice to call up the Rhythm Condition
pages, then use the PAGE buttons to select Page 3, the
A.B.C./MEMORY page.)
A.B.C. function for the Pedal
voice does not work when the
To Lower in the Pedal voice section is
turned on.
A.B.C./MEMORY Page
40
Page 43

4 Rhythm, Accompaniment and Percussion
Auto Bass Chord
! Mode: Off, Single, Fingered, Custom
Off
Cancels the Auto Bass Chord function.
Single (Single Finger mode)
The Single Finger mode provides the fastest and easiest means to obtain
many different chord/bass combinations , by simply using one, or at most,
two or three fingers to play the chords.
Refer to the chart in page 42, "Chords Recognized in the Single Finger
Mode," for details on playing chords in this mode.
Fingered (Fingered Chord mode)
The Fingered Chord mode automatically produces bass and chord
accompaniment for chords pla yed in the Lower ke yboard. It allows you to
use a wider range of chord types than in the Single Finger mode. In the
Fingered Chord mode, you play all the notes of the chord while the Auto
Bass Chord function automatically selects the appropriate bass pattern and
rhythmic accents.
Refer to the chart in page 42, "Chords Recognized in the Fingered Chord
Mode," for details on playing chords in this mode.
Custom (Custom A.B.C. mode)
The Custom A.B.C. mode is a slight variation on the Fingered Chord mode.
It allows you to determine what bass notes will be play ed in the
accompaniment by playing a note on the Pedalboard along with the chords
you play in the Lower keyboard. In this way, you have greater control over
the actual notes of the accompaniment and the freedom to use a wider
variety of chords and voicings, yet are still able to take adv antage of the
automatic accompaniment capabilities of the Auto Bass Chord feature.
MEMORY
" Memory
The Memory function allows you to have the bass and chord
accompaniment continue even after you release your fingers from the
keyboard. Independent Memory settings are available for the Lower
keyboard and Pedalboard, making it possible, for example, to have the bass
continue with the rhythm while the chord accompaniment "rests." The
Memory function can also be used independently from the A.B.C. feature.
The bottom right DATA CONTROL button pair is used to control the Memory
function. The left button corresponds to the Lower keyboard, and the right
button corresponds to the Pedalboard.
L (Lower)
When Lower is set to on (solid box), the chord accompaniment of the Lower
Keyboard voices continues to play even after you release your fingers from
the Lower ke yboard.
P (Pedal)
When Pedal is set to on (solid box), the bass accompaniment of the
Pedalboard voices continues to play even after you release your fingers
from the Lower ke yboard.
Pedalboard does not sound in
the Single Finger or Fingered
mode.
When you start playing the
rhythm using the SYNCRO
START button with Auto Bass Chord
ON and Memory OFF and release
your fingers from the keyboard, the
rhythm pattern also stops.
The Pedal Voice remains
sounding even if you release
your fingers from the keyboard in the
Single Finger or Fingered Chord
mode.
41
Page 44

4 Rhythm, Accompaniment and Percussion
Chords Recognized in the Single Finger Mode (Key of C)
C Cm C7 Cm7 Cmaj7
Cm maj7 C+5 C7+5
Cdim C7sus4
C-5Cm7-5 C7-5 C6 Cm6
Cm7
C7
Cm
C
FGABCDE
GAB DE
Major, minor, 7th and minor 7th chords can all be played in the Single Finger
mode.
Major chords:
Press the root of the chord (the note that corresponds to the chord's name).
Minor chords:
Simultaneously press the root and any one black key to the left of it.
7th chords:
Simultaneously press the root and any one white key to the left of it.
Minor 7th chords:
Simultaneously press the root as well as any black key and any white key to
the left of it.
Minor, 7th and minor 7th
chords with black key roots
(such as B♭or G♭) are played in the
same way as those with white key
roots.
With Single Finger, the chord
produced will sound in the
same octave regardless of where it is
played on the Lower keyboard.
Chords Recognized in the Fingered Chord Mode (Key of C)
PLAYING SINGLE FINGER CHORDS WITHOUT RHYTHM:
Auto Bass Chord is generally used with rhythm patterns to create full
rhythmic accompaniment, but it can also be used in the Single Finger mode
to add full continuous chords to your perf ormance without the use of the
rhythm. Simply leave the rhythm off in Single Finger mode, and play Single
Finger chords from the Lower keyboard.
42
If you forget to cancel the
Single Finger or Fingered
Chord accompaniment functions,
single notes that you play will be
sounded as continuous chords.
Page 45

7. Keyboard Percussion
MARCH WALTZ SWING BOUNCE SLOW
ROCK
MAX
MIN
TANGO LATIN1LATIN28 BEAT 16 BEAT
RHYTHM
1
2
SEQ.
SEQ.
1
3
SEQ.
SEQ.
2
4
LOWER
PEDAL
KEYBOARD
PERCUSSION
4 Rhythm, Accompaniment and Percussion
The various drum and percussion sounds (a total of 43 available) have been
assigned to the Lower keyboard and pedalboard for you to play.
To play the Keyboard Percussion sounds :
1. Turn on the Keyboard Percussion function by
pressing either or both the LOWER and PEDAL buttons in
the KEYBOARD PERCUSSION section.
2. Set the volume.
The volume of the percussion sounds is set together with that of the rh ythm
by using the V OLUME controls in the Rhythm section. Set the volume to the
desired level.
3. Turn off all the Lower and Pedal voices by setting
each voice's volume to MIN.
4. Play some notes on the Lower keyboard and
Pedalboard. The various percussion sounds have been
assigned to the keyboards as shown in the charts on
page 44.
43
Page 46

4 Rhythm, Accompaniment and Percussion
Hand Clap
Agogo High
Agogo Low
Wood Block High
Wood Block Low
Cowbell
Triangle Open
Triangle Closed
Snare Drum Roll
Orchestra Snare Drum
Tom 1
Tom 2
Tom 3
Snare Brush Shot
Snare Brush Roll
Synth. Tom 1
Synth. Tom 2
Synth. Tom 3
Claves
Shaker
Cuica High
Cuica Low
Bongo High
Bongo Low
Conga High
Conga Low
Timbale High
Timbale Low
Castanet
Tambourine
Orchestra Cymbal 2
Orchestra Cymbal 1
Crash Cymbal
Ride Cymbal
Hi-hat Open
Hi-hat Closed
Snare Drum Rim
Snare Drum Light
Snare Drum Reverb
Snare Drum Heavy
Snare Drum Heavy
Bass Drum Light
Bass Drum Heavy
Concert Bass Drum
Synth. Tom 1
Synth. Tom 2
Synth. Tom 3
Tom 1
Tom 2
Tom 3
Snare Brush Shot
Snare Brush Roll
Orchestra Cymbal 1
Crash Cymbal
Ride Cymbal
Hi-hat Open
Hi-hat Closed
Snare Drum Rim
Snare Drum Light
Snare Drum Reverb
Snare Drum Heavy
Bass Drum Heavy
Percussion Assignments for the Lower Keyboard
Percussion Assignments for the Pedalboard
44
Page 47

8. Melody On Chord
<MOC> ¡2
OFF „KNEE
OFF
MOC TYPE1
MOC TYPE2
MOC TYPE3
"
!
KNEE lever function on/off
PAGE
FOOT
SW.
REGIST.
MENU
VOICE
DISPLAY
A. B. C.
M. O. C.
REGIST.
SHIFT
PITCH
MIDI
DISPLAY SELECT
SYMPHO-
NIC
4 Rhythm, Accompaniment and Percussion
The Melody On Chord (M.O.C.) feature automatically adds a harmony part
to the melodies you play on the Upper keyboard. The harmony is derived
from the chords you play on the Lower keyboard – or from the chords that
are played for you, if you use the A.B .C. Automatic Accompaniment.
Melody On Chord has three different types, each pro viding a different set of
harmonies to accompany the melody played. The Melody On Chord feature
is selected from the A.B.C./M.O.C. page.
To select the M.O.C. function:
Press the A.B.C./M.O.C. button in the DISPLAY SELECT section and PAGE
buttons to call up P age 2.
! Type
OFF
Cancels the Melody On Chord function.
M.O.C. Type 1
Produces harmonies of up to two notes in a range close to the melody
played.
M.O.C. Type 2
Produces harmonies of up to three notes in a range close to the melody
played.
M.O.C. Type 3
Produces harmonies of up to four notes in a range relatively distant from the
melody played.
" KNEE
On/off switch f or knee lever control over Melody On Chord operation. When
this is on, pressing the knee lever to the right activates the Melody On
Chord function. (Refer to Knee Le ver Control, page 53.)
M.O.C. function does not work
effectively when the Upper
keyboard voice volume is too small;
increase it.
M.O.C. function still works
even when you release fingers
from the Lower keyboard, if the rhythm
is playing while the Lower Memory
function is set to on.
45
Page 48

4 Rhythm, Accompaniment and Percussion
About the User Rhythm Sequence:
SYNCHRO
START
START
RHYTHM
FILL IN
INTRO.
ENDING
MARCH WALTZ SWING BOUNCE SLOW
ROCK
MAX
MIN
TANGO LATIN1LATIN28 BEAT 16 BEAT
RHYTHM
1
2
SEQ.
SEQ.
1
3
SEQ.
SEQ.
2
4
MARCH WALTZ SWING BOUNCE SLOW
ROCK
MAX
MIN
TANGO LATIN1LATIN28 BEAT 16 BEAT
RHYTHM
1
2
SEQ.
SEQ.
1
3
SEQ.
SEQ.
2
4
The EL-27 can read the user rhythm sequence data created by the
other Electones such as EL-37 and play back the sequence data.
To read and play back the rh ythm sequence data:
1. Create the rhythm sequence data with the EL-37
and save them to a floppy disk as a part of the
registration data.
2. Insert the floppy disk into the M.D.R. slot of the
EL-27. Call up the registration, to load the data onto
the SEQ.1-4 buttons of the EL-27.
If you have loaded the rhythm
sequence data to all four SEQ.
buttons and the SEQ. buttons are all
turned on, the EL-27 will play back the
sequences automatically from the
lowest numbered button in the
numerical order to the highest
numbered button.
3. Press the appropriate SEQ. button.
4. Press the START button to start playing back the
rhythm sequences.
About the SEQ.1-4 buttons:
Each SEQ. button is assigned with the following rhythm patterns as the
default.
46
SEQ.1 Metronome SEQ.2 2/4 pattern
SEQ.3 3/4 pattern SEQ.4 4/4 pattern
If you once read the external rhythm sequence data, the above settings
for each SEQ. button will be overwritten and lost. If you want to return
to the default setting, perform the Power On Reset operation described
on page 49.
When you turn off and turn
on the Electone again, the
voice is set to the Basic
Registration 1. Be sure to store the
selected voices (registration
setting) to the Registration Memory
before you turn off the Electone
(see page 47.).
Page 49

5 Registration Memory
5 Registration Memory
M. 1234 5 D.
M. 1234 5 D.
While holding down M. button...
...press desired numbered button.
Registration Memory allows you to store virtually all the settings you make on the panel and with
the LCD, providing a convenient way to instantly change all voice settings and rhythms while
you're playing, with the simple touch of a single button on the Registration Memory panel.
Virtually all of the front panel settings and the functions and settings accessible from display pages, such
as effects and accompaniment, can be memorized to Registration Memory.
1. Storing Registrations
Newly created registrations you make can be stored to the Registration Memory panel buttons. All
registrations in Registration Memory can also be saved to disk for future recall.
To store registrations to the Registration Memory:
1. After creating your original registration, decide
which numbered button (1–5) you wish to store.
2. While holding down the M. (Memory) button in the
Registration Memory section, press the numbered button
to which you wish to store your registration.
When the registration is stored, the numbered button flashes momentarily.
The following functions and
settings cannot be memorized:
●Pitch/Transpose settings
●Registration Shift settings
●MIDI settings
●D. (Disable) button condition
●Rhythm playback condition
●SEQ. (Sequence) button condition
To select registrations from Registration Memory:
Simply press the numbered button that corresponds to the registration you
wish to select.
USING THE D. (DISABLE) BUTTON:
Rhythm and automatic accompaniment patterns also change when you select
different Registration Memory buttons. Pressing the D. (Disable) button allows
you to keep the same rhythm and accompaniment patterns throughout all your
registration changes.
The following settings are
disabled, or fixed by the D.
(Disable) button:
●Rhythm pattern
●Rhythm condition (including the
Rhythm Volume and
Accompaniment)
●Tempo
●Accompaniment features
(A.B.C./M.O.C.)
When the Electone is turned
on, the Basic Registration 1 is
automatically selected, as well as the
Disable function is canceled.
47
Page 50

Right
footswitch
2. Registration Shift
<REGIST SHIFT>
ŒOFF „SHIFT ŒUSER
FOOT
SW.
REGIST.
MENU
VOICE
DISPLAY
A. B. C.
M. O. C.
REGIST.
SHIFT
PITCH
MIDI
DISPLAY SELECT
SYMPHO-
NIC
5 Registration Memory
The Registration Shift function allows you to change registrations, all the settings you make on the panel
and LCD, without taking your hands from the keyboards. By using the right footswitch on the expression
pedal, you can step through the panel registrations in sequence.
To select the Registration Shift functions:
1. Press the REGIST. SHIFT button in the DISPLAY SELECT
section.
The REGIST SHIFT Page appears on the LCD.
2. Select SHIFT on the display by pressing any one of
the bottom DATA CONTROL buttons.
! OFF
Turns off the Registration function.
" SHIFT
Selects the SHIFT mode. Each press of the right foots witch selects the
Registration Memory buttons in their numerical order. After the last
preset is reached, the function "wraps around" to select the first button
again.
3. Press the right footswitch.
Each press of the right footswitch selects the Registration Memory buttons
in their numerical order.
# USER
Selects the User Registration
Shift mode. Description in details of
this function follows in page 49.
48
Page 51

About the User Registration shift:
<REGIST SHIFT> ¡DISP
T12314545454541 •••E
Moves the cursor.
one step to the left.
Cursor
Moves the cursor to E (End).
Moves the cursor to T (Top).
Moves the cursor.
one step to the right.
Moves the cursor to E (End).
Moves the cursor to T (Top).
5 Registration Memory
POWER
The USER mode lets you use the User Registration Shift settings created by the other types of Electones,
such as EL-37.
1. Create the User Registration Shift data with the EL-37
and save it to a floppy disk as a part of the registration
data.
2. Insert the floppy disk into the M.D.R. slot of the EL-27.
Call up the registration, to load the data to the USER.
3. Select USER in the Registration Shift Page.
In the USER mode, each press of the right foots witch selects registrations
according to the predetermined order. The current position is indicated by
the cursor, which can be moved along the registration row.
The registration numbers
higher than 6, set by the other
Electones, will be displayed by "X" to
indicate the numbers are ineffective.
Resetting the Registration Memory Buttons (Power On Reset):
All current data including the registrations can be deleted at once by using the Power On Reset function.
To do this:
1. Turn off the Electone.
2. While holding down the top left DATA CONTROL
button, turn the power back on.
Be careful when using this operation, since it erases all your existing data.
Always sa ve your important data toa floppy disk using M.D .R. (See page58.)
49
Page 52

Restoring the Panel Settings:
M. 12 34 5 D.
POWER
5 Registration Memory
Turning the Electone off erases all panel settings you have made. When the Electone is turned on, Basic
Registration 1 is automatically selected. If you have made panel settings you wish to keep, save them to
Registration Memory before turning the Electone off. You can, however, restore the panel settings that
were made before the Electone was last turned off .
To do this:
1. Turn the Electone back on.
2. While being careful NOT to press any panel buttons
(excepting those in Basic Registration), hold down the M.
(Memory) button and press the D. (Disable) button.
50
Page 53

6 Footswitches and Knee Lever
6 Footswitches and Knee Lever
<FOOT SW>MODE:OFF
Use any of these top DATA CONTROL buttons to select the footswitch mode.
OFF
RHYTHM
FOOT
SW.
REGIST.
MENU
VOICE
DISPLAY
A. B. C.
M. O. C.
REGIST.
SHIFT
PITCH
MIDI
DISPLAY SELECT
SYMPHO-
NIC
Right
footswitch
Left
footswitch
These leg- and foot-operated controls allow you to turn on and execute various performance
functions without taking your hands from the ke yboards.
Footswitch Control
The Electone has two footswitches on the expression pedal that can be used to control various functions.
The right footswitch is used for the Registration Shift functions (see page 48). The left footswitch can be
set to control one of the following functions: Rhythm stop, rhythm ending, and rhythm Fill In. Assignments
of the functions are made in the Foots witch pages.
To select the Footswitch pages:
Press the FOOT SW. button in the DISPLAY SELECT section.
51
Page 54

6 Footswitches and Knee Lever
Two modes are available: OFF and RHYTHM. Select the desired mode
UPPER
(KNEE)
LOWER
(KNEE)
PEDAL
SUSTAIN
<FOOT SW>MODE:RHYTHM
„STOP ŒENDING ŒFILL
Use any of these bottom DATA CONTROL buttons
to select three settings, STOP, ENDING or FILL.
with the top right or top left DATA CONTROL buttons.
Off
Cancels left foots witch control.
Rhythm Mode
Selection of left foots witch control over rhythm functions. When this is
chosen, the following display appears:
Select one of the three Rhythm Control functions from this displa y.
Pressing the left foots witch executes the corresponding function.
! STOP
Functions as an off/on switch f or the rhythm pattern in the middle of rhythm
playback.
" ENDING
Switches the rhythm to the Ending pattern, after which the rhythm is
stopped.
# FILL (Fill In)
Switches the rhythm to the Fill In pattern.
Knee Lever
The knee lever, located on the underside of the keyboard panel, can be used to turn one of the following
functions on and off: The Sustain effect or Melody On Chord.
●Sustain
To select knee lever control over Sustain:
1. Make sure that the Upper and/or Lower Sustain
effect panel controls have been turned on; otherwise, the
Knee Lever function will have no effect.
52
Page 55

6 Footswitches and Knee Lever
2. Fold the knee lever down.
<MOC> ¡2
MOC TYPE1 „KNEE
PAGE
Set KNEE control to ON by pressing
these DATA CONTROL buttons.
FOOT
SW.
REGIST.
MENU
VOICE
DISPLAY
A. B. C.
M. O. C.
REGIST.
SHIFT
PITCH
MIDI
DISPLAY SELECT
SYMPHO-
NIC
ON
ON
OFF
3. Press the knee lever to the right with your knee
when you want to have sustain.
When the knee lever is folded up:
The sustain effect is applied constantly, as long as the front panel sustain
buttons are on.
When the knee lever is vertical:
The sustain effect is cancelled.
When the knee lever is continuously pressed to the right:
The sustain effect is on.
●Melody On Chord
To select knee lever control over Melody On Chord:
1. Press the A.B.C./M.O.C button in the DISPLAY SELECT
section.
2. Select Page 2 (M.O.C.) by pressing the PAGE buttons,
and select one of the modes, then set KNEE control to ON
by pressing the bottom right DATA CONTROL buttons.
3. Press the knee lever to the right when you want to
add the Melody On Chord feature.
If the KNEE is set to ON, the
Melody On Chord cannot be
applied without using the Knee Lever.
53
Page 56

7 Pitch Controls
7 Pitch Controls
<TRANS.> <PITCH> ¡1
0 A=440.0Hz
Increases the Transpose value.
Decreases the Transpose value.
Increases the Pitch value.
Decreases the Pitch value.
!"
FOOT
SW.
REGIST.
MENU
VOICE
DISPLAY
A. B. C.
M. O. C.
REGIST.
SHIFT
PITCH
MIDI
DISPLAY SELECT
SYMPHO-
NIC
There are two pitch-related controls on the Electone: Transpose and Pitch. Transpose allows you
to change the key of the instrument and Pitch lets you finely adjust the tuning. These features
make it easy to change the key of a song to accommodate a vocalist's range or to precisely match
the tuning of another instrument. The Pitch controls are located on the TRANS. PITCH page.
To select the TRANS. PITCH page (Page 1):
Press the PITCH/MIDI button in the DISPLAY SELECT section.
The display below appears on the LCD.
! TRANS. (Transpose)
Determines the coarse pitch setting of all the voices, and is adjustable in
half-steps (semitones). Range: -6 – +6 (one octave)
" PITCH
Determines the fine pitch setting of all the voices.Range:438.8Hz–444.5Hz
When you change the Pitch
and turn the Electone off then
on again, the Transpose/Pitch isreset to
the factory setting value of 0/440.0 Hz.
54
Page 57

8 Music Disk Recorder
8 Music Disk Recorder
Floppy disk insertion slot
LED (Lamp in-use) Eject button
The Music Disk Recorder (M.D.R.) is a sophisticated recording device built into the Electone that
lets you record your performances and registration settings. The Music Disk Recorder not only
records the notes you play; it also remembers the voices and rhythms you select, the front panel
controls you change, as well as all expression pedal, footswitch and knee lever positions, to
reproduce your performance exactly as you pla y it. Moreover , you can separately record different
parts of your performance, building up a song part by part.
Precautions
Be sure to handle floppy disks and treat the disk drive with care . Follow the important precautions below.
Compatible Disk Type
3.5" 2DD and 2HD type floppy disks can be
used. A blank 2DD floppy disk has been included
with your Electone for you to record your
performances.
Inserting/Ejecting Floppy
Disks
To insert a floppy disk into the disk drive:
Hold the disk so that the label of the disk is facing
upward and the sliding shutter is facing forward,
towards the disk insertion slot. Carefully insert the
disk – shutter first – into the slot, slowly pushing it
all the way in until it clicks into place and the eject
button pops out.
■ To eject a floppy disk:
Before ejecting the disk, be sure to confirm
that the M.D.R. is stopped (check if the LED
above the STOP button in the M.D.R.
section is lit and the LED below the disk slot
is off).
Press the eject button slowly as far as it will
go; the disk will automatically pop out.
When the disk is fully ejected, carefully
remove it by hand.
Never attempt to remove the disk or turn the
power off during recording, reading and
playing back. Doing so can damage the disk
and possibly the disk drive.
If the eject button is pressed too quickly, or if
it is not pressed in as far as it will go, the
disk may not eject properly. The eject button
may become stuck in a half-pressed
position with the disk extending from the
drive slot by only a f ew millimeters. If this
happens, do not attempt to pull out the
partially ejected disk, since using force in
this situation can damage the disk drive
mechanism or the floppy disk. To remove a
partially ejected disk, try pressing the eject
button once again, or push the disk back
into the slot and then repeat the eject
procedure.
Be sure to remove the floppy disk from the
disk drive before turning off the power. A
floppy disk left in the drive for extended
periods can easily pick up dust and dirt that
can cause data read and write errors.
55
Page 58

Cleaning the Disk Drive
Protect Off
(tab closed: unlocked)
Protect On
(tab open: locked)
Rear side
Shutter
Write-protect tab
8 Music Disk Recorder
Read/Write Head
● Clean the read/write head regularly. This
instrument employs a precision magnetic
read/write head which, after an extended period of
use, will pick up a la yer of magnetic particles from
the disks used that will eventually cause read and
write errors.
● To maintain the disk drive in optimum working
order Yamaha recommends that you use a
commercially-available dry-type head cleaning
disk to clean the head about once a month. Ask
your Yamaha dealer about the availability of
proper head-cleaning disks.
Never insert anything but floppy disks into
the disk drive. Other objects may cause
damage to the disk drive or floppy disks.
About the Floppy Disks
■ To protect your data (Write-protect Tab):
To prevent accidental erasure of important data,
slide the disk's write-protect tab to the "protect"
position (tab open). If you attempt to modify the
disk when the write-protect tab is set to "on"
position, "Prot (Protected)" will appear on the LED
display in the M.D.R. section indicating that the
operation is not possible.
■ To handle floppy disks with care:
Do not place heavy objects on a disk or
bend or apply pressure to the disk in any
way. Always k eep floppy disks in their
protective cases when they are not in use .
Do not expose the disk to direct sunlight,
extremely high or low temperatures, or
excessive humidity, dust or liquids.
Do not open the sliding shutter and touch
the exposed surf ace of the floppy disk
inside.
Do not expose the disk to magnetic fields,
such as those produced by televisions,
speakers, motors, etc., since magnetic fields
can partially or completely erase data on the
disk, rendering it unreadable.
Never use a floppy disk with a deformed
shutter or housing.
Do not attach anything other than the
provided labels to a floppy disk. Also make
sure that labels are attached in the proper
location.
56
Be aware that the M.D.R. and the EL-27 are connected via
MIDI In/Out jacks on the right underside of the Electone
keyboard.
If you disconnect the cables from the MIDI In/Out jacks, the M.D.R.
function will be disabled.
Page 59

8 Music Disk Recorder
Formatting a Disk
UPPER LOWER PEDAL
CONTROL
UPPER LOWER PEDAL
CONTROL SHIFT
SONG
REPEAT
FROM
SONG DEL.
TO
PAUSE RECORD CUSTOM PLAY
FORMAT
STOP PLAY SONG SELECT
RECORD
PLAY
SONG COPY
TEMPO
MUSIC DISK RECORDER
UPPER LOWER PEDAL
CONTROL
UPPER LOWER PEDAL
CONTROL SHIFT
SONG
REPEAT
FROM
SONG DEL.
TO
PAUSE RECORD CUSTOM PLAY
FORMAT
STOP PLAY SONG SELECT
RECORD
PLAY
SONG COPY
TEMPO
MUSIC DISK RECORDER
----
UPPER LOWER PEDAL
CONTROL
UPPER LOWER PEDAL
CONTROL SHIFT
SONG
REPEAT
FROM
SONG DEL.
TO
PAUSE RECORD CUSTOM PLAY
FORMAT
STOP PLAY SONG SELECT
RECORD
PLAY
SONG COPY
TEMPO
MUSIC DISK RECORDER
160
UPPER LOWER PEDAL
CONTROL
UPPER LOWER PEDAL
CONTROL SHIFT
SONG
REPEAT
FROM
SONG DEL.
TO
PAUSE RECORD CUSTOM PLAY
FORMAT
STOP PLAY SONG SELECT
RECORD
PLAY
SONG COPY
TEMPO
MUSIC DISK RECORDER
01
Before recording a perf ormance to your blank disk, the disk must first be formatted.
To format a disk:
1. Put the disk, label facing up, into the
disk drive (insertion slot).
"Fort" will appear on the LED display indicating that the
inserted disk reguires to be formatted.
2. While holding down the SHIFT button,
press the FORMAT button.
This step puts the format operation on stand-by, indicated
by the dashes on the LED display and the flashing LED
above the FORMAT button.
If you format a disk that contains previously
recorded data, all data on the disk will be
erased. To avoid inadvertently formatting a
disk after this step, press the STOP button.
3. Press the FORMAT button again to
begin formatting.
The LED above the FORMAT button stays lit. The number
"160" appears on the LED display and counts down to
"001" as the disk is being formatted. When formatting is
completed, operation returns to the original STOP status.
About SHIFT button:
You will find the SHIFT button (printed in green) at the top right side of the M.D.R. section. Some buttons in
the M.D.R. section have dual functions: the first function is printed in white above each button; the second
function is printed in green below each button. The SHIFT button is used to select the second functions by
pressing each function button while holding down the SHIFT.
57
Page 60

Recording
UPPER LOWER PEDAL
CONTROL
UPPER LOWER PEDAL
CONTROL SHIFT
SONG
REPEAT
FROM
SONG DEL.
TO
PAUSE RECORD CUSTOM PLAY
FORMAT
STOP PLAY SONG SELECT
RECORD
PLAY
SONG COPY
TEMPO
MUSIC DISK RECORDER
01
UPPER LOWER PEDAL
CONTROL
UPPER LOWER PEDAL
CONTROL SHIFT
SONG
REPEAT
FROM
SONG DEL.
TO
PAUSE RECORD CUSTOM PLAY
FORMAT
STOP PLAY SONG SELECT
RECORD
PLAY
SONG COPY
TEMPO
MUSIC DISK RECORDER
--
UPPER LOWER PEDAL
CONTROL
UPPER LOWER PEDAL
CONTROL SHIFT
SONG
REPEAT
FROM
SONG DEL.
TO
PAUSE RECORD CUSTOM PLAY
FORMAT
STOP PLAY SONG SELECT
RECORD
PLAY
SONG COPY
TEMPO
MUSIC DISK RECORDER
01
8 Music Disk Recorder
(1) To record a song:
1. Set the desired registrations on the
Electone.
Make all the Electone settings necessary for the song you
will record. This means entering the all registrations you
will need for the entire perf ormance in the Registration
Memory. Make sure also to select the registration that you
will use at the beginning of the song.
2. Put a formatted disk into the disk slot.
3. Use the SONG SELECT (F,G) buttons to
select the song number for recording.
4. Press the RECORD button.
The RECORD lamp lights up and the PLAY and CUSTOM
PLAY lamps begins blinking, indicating that the Music Disk
Recorder is ready to record.
When a disk is first inserted, song number 01 is
automatically selected. The song numbers 01 through 40 are
available and up to 40 songs can be stored on a disk.
However, available song numbers may be reduced
depending on the amount of the song data you have
recorded.
5. Press the PLAY button.
58
The PLAY lamp lights up and small bars flash across the
LED display from left to right, indicating that the M.D.R. is
reading the registrations and other settings.
If the selected song number already contains
recorded data, small bars ("--") appear at the left part
of LED display and flash along with the song number, warning
you that the selected song number already contains recorded
data. If you want to execute recording operation over the
song number, press the RECORD button again. If you don't
want, select another song number for recording or press the
STOP button to cancel recording.
Page 61

8 Music Disk Recorder
6. After numbers appear on the LED
UPPER LOWER PEDAL
CONTROL
UPPER LOWER PEDAL
CONTROL SHIFT
SONG
REPEAT
FROM
SONG DEL.
TO
PAUSE RECORD CUSTOM PLAY
FORMAT
STOP PLAY SONG SELECT
RECORD
PLAY
SONG COPY
TEMPO
MUSIC DISK RECORDER
622
UPPER LOWER PEDAL
CONTROL
UPPER LOWER PEDAL
CONTROL SHIFT
SONG
REPEAT
FROM
SONG DEL.
TO
PAUSE RECORD CUSTOM PLAY
FORMAT
STOP PLAY SONG SELECT
RECORD
PLAY
SONG COPY
TEMPO
MUSIC DISK RECORDER
rE01
UPPER LOWER PEDAL
CONTROL
UPPER LOWER PEDAL
CONTROL SHIFT
SONG
REPEAT
FROM
SONG DEL.
TO
PAUSE RECORD CUSTOM PLAY
FORMAT
STOP PLAY SONG SELECT
RECORD
PLAY
SONG COPY
TEMPO
MUSIC DISK RECORDER
01
display of the M.D.R., begin playing.
Once the setup operation in step #5 is complete, a
number will appear on the LED display indicating that y ou
can begin recording your performance. The number also
indicates the amount of memory left on the disk.
If you make a mistake during recording:
1.Press the PLAY button while the M.D.R. is still
running.
This stops the recording and returns you to the starting
point of the song.
The letters "rE" (retry) appear on the left side of the LED
display and the PLAY and CUSTOM PLAY LEDs start
flashing, indicating that you can re-record the song.
2. Press PLAY again to begin re-recording the song.
Re-recording starts from the beginning of the song and
replaces the previously recorded perf ormance with the
newly recorded performance.
The short time it takes to set up for recording is
recorded as well, causing a short pause before
playback of the song.
7. When you finish playing, press the
STOP button.
After the small bars flash to draw a square on the LED
display to indicate the processing f or stop, both the
RECORD and PLAY lamps go out, and recording is
stopped.
8. To hear your newly recorded
performance, press the PLAY button.
Playback will begin after a couple of seconds. For more
information on playback and other playback-related
functions, see page 65.
When the available memory reaches "008" or
less, the numbers begin flashing to warn you.
If this happens, stop recording before the display
reaches "000."
Be sure to remove the floppy disk from the
disk drive after the STOP lamp lights up.
Never attempt to press the eject button or
turn the power off during recording, reading
and playing back. Doing so can damage
the disk and possibly the disk drive. Be sure to
remove the floppy disk from the disk drive before
turning off the power.
59
Page 62

Outline of M.D.R. Operation
8 Music Disk Recorder
Though the M.D.R. is as easy to operate as a cassette tape recorder, it is far move versatile. Since it records
all Electone settings and control movements as well as the notes you play as digital data, it allows you much
more flexibility and control than even the most sophisticated tape recorder. Basically, the M.D.R.
independently records the following three types of data:
1)Registration data (including Bulk data)
All registrations stored to the Registration Memory numbered buttons as well as the registration currently set
to the panel, are recorded at the beginning of a song, before the actual recording of your performance. Bulk
data is also saved to the song with the Registration data. Bulk data includes: Registration Shift settings,
Rhythm Pattern (User rhythms), Rhythm Sequence data and User voices.
2)Performance data
The M.D.R. records your performance on the keyboards and pedalboard of the Electone exactly as you play
it, even recording the strength at which you play the keys and how hard you press them down while playing.
The various types of performance data-Upper, Lower, Pedal and Lead-are recorded to independent "tracks,"
so that you can change any one of them without affecting the others.
3)Control data
All changes you make on the Electone during your performance are recorded in real time. These include
registration changes, the use of the expression pedals, footswitches and knee lever.
(2) To record each part separately:
You can also record the parts of your performance
independently; for e xample, first recording the chords and
bass to the song (using the Lower and Pedalboard), and
after that recording the melody. This function also lets you
record keyboard percussion and performance control
data, such as registration changes and expression pedal
operation, separately from the other parts of the song.
1. Set up the M.D.R. for recording, as you
did in the section above.
The first steps in recording parts separately are the same
as for normal recording on page 58:
1)Memorize all the registrations needed for your
performance to the Registration Memory numbered
buttons, and set the registration that will be used at
the beginning of the song.
2)Insert a formatted disk.
3)Select the song number to which you will record
your performance.
4)Press the RECORD button to make the Music Disk
Recorder ready to record.
60
Page 63

8 Music Disk Recorder
UPPER LOWER PEDAL
CONTROL
UPPER LOWER PEDAL
CONTROL SHIFT
SONG
REPEAT
FROM
SONG DEL.
TO
PAUSE RECORD CUSTOM PLAY
FORMAT
STOP PLAY SONG SELECT
RECORD
PLAY
SONG COPY
TEMPO
MUSIC DISK RECORDER
01
SHIFT
RECORD
PLAY
01
(K.PERC.) (K.PERC.)
PAUSE
REM.MEM.
2. Select the parts for recording.
Pressing the RECORD in the procedure 1) – 4) above
turns on the all parts' LEDs in the upper left row
indicating that each part is ready to record.
Press the RECORD buttons for each part in the upper
left row to turn off the parts you don't want to record.
For this e xample, press RECORD/UPPER. The
PLAY/UPPER lamp in the upper right row lights up.
RECORD/UPPER – Records the performance data of
the Upper keyboard when turned on.
RECORD/LOWER – Records the performance data
of the Lower ke yboard when turned on.
RECORD/PEDAL – Records the performance data of
the Pedalboard when turned on.
RECORD/CONTROL – Records the Control data (see
Outline of M.D.R. Operation above)when turned on.
The LED lamps above the b uttons indicate the record status of the parts.
This example operation disab les recording of the Upper part.
Separate recording for Keyboard Percussion part:
Hold down the SHIFT button and simultaneously press the
RECORD/PEDAL button in the top row in the procedure #2.
above. The shaded button (indicated in the illustration at
right) functions as Keyboard Percussion selector in the
record mode.
RECORD/K.PERC. – Records the performance data of
Keyboard Percussion when turned on. (Keyboard
Percussion can be recorded and played independent of the
Rhythm patterns.)
Holding down the SHIFT button in the record condition lets
you select these "hidden" functions. The lamps above each
button will also change to indicate the status of SHIFTselected parts.
3. Press the PLAY button, and start
playing after numbers appear in the
display.
For this e xample, play the Lower keyboard and
Pedalboard.
If you don't record the Keyboard Percussion part
separately, the Keyboard Percussion part will be
recorded as the Lower/Pedal data.
4. Press the STOP button when you are
finished with your performance to stop
recording. Now that you've recorded the
first parts of your performance.
61
Page 64

5. Press the RECORD button to set up
UPPER LOWER PEDAL
CONTROL
UPPER LOWER PEDAL
CONTROL SHIFT
SONG
REPEAT
FROM
SONG DEL.
TO
PAUSE RECORD CUSTOM PLAY
FORMAT
STOP PLAY SONG SELECT
RECORD
PLAY
SONG COPY
TEMPO
MUSIC DISK RECORDER
--01
UPPER LOWER PEDAL
CONTROL
UPPER LOWER PEDAL
CONTROL SHIFT
SONG
REPEAT
FROM
SONG DEL.
TO
PAUSE RECORD CUSTOM PLAY
FORMAT
STOP PLAY SONG SELECT
RECORD
PLAY
SONG COPY
TEMPO
MUSIC DISK RECORDER
01
UPPER LOWER PEDAL
CONTROL
UPPER LOWER PEDAL
CONTROL SHIFT
SONG
REPEAT
FROM
SONG DEL.
TO
PAUSE RECORD CUSTOM PLAY
FORMAT
STOP PLAY SONG SELECT
RECORD
PLAY
SONG COPY
TEMPO
MUSIC DISK RECORDER
01
UPPER LOWER PEDAL
CONTROL
UPPER LOWER PEDAL
CONTROL SHIFT
SONG
REPEAT
FROM
SONG DEL.
TO
PAUSE RECORD CUSTOM PLAY
FORMAT
STOP PLAY SONG SELECT
RECORD
PLAY
SONG COPY
TEMPO
MUSIC DISK RECORDER
610
8 Music Disk Recorder
recording of the next part.
In this case, the song (number) contains the performance
data of the Lower and Pedal in addition to the registration
and setup data. The small bars ("––") appear at the left
part of LED display and flash along with the song number,
warning you that the selected song number already
contains recorded data.
6. Press the RECORD button again to
record another part. (Upper part.)
The RECORD lamp lights up and the PLAY and CUSTOM
PLAY lamps begin blinking, indicating that the Music Disk
Recorder is ready to record.
7. Press the RECORD buttons for each part
in the upper left row to turn off the parts
you have already recorded.
In this case, press RECORD/LOWER, RECORD/PEDAL
and RECORD/CONTROL to turn off.
8. Press the CUSTOM PLAY button to start
recording of the new part or parts. (Upper
part.)
Playback of the previously recorded parts starts
immediately.
The CUSTOM PLAY button is used here to record only the
parts that have been selected for recording, and play back
only those parts that have been selected for playback.
Since registration data has already been recorded with the
first parts of the song, recording begins immediately .
While you listen to the parts being played back, start
playing the melody on the Upper keyboard.
When the end of the recorded performance is reached,
playback is automatically stopped and the STOP status is
resumed.
The CUSTOM PLAY button is used to play
back the specified track(s).
The length of a subsequently recorded part
cannot exceed the length of the previously
recorded parts. If you want to change the song
length, first delete the existing song (see Song Delete
on page 71.) and record again.
62
Page 65

Recording Registrations (and Bulk Data)
8 Music Disk Recorder
UPPER LOWER PEDAL
CONTROL
UPPER LOWER PEDAL
CONTROL SHIFT
SONG
REPEAT
FROM
SONG DEL.
TO
PAUSE RECORD CUSTOM PLAY
FORMAT
STOP PLAY SONG SELECT
RECORD
PLAY
SONG COPY
TEMPO
MUSIC DISK RECORDER
01
UPPER LOWER PEDAL
CONTROL
UPPER LOWER PEDAL
CONTROL SHIFT
SONG
REPEAT
FROM
SONG DEL.
TO
PAUSE RECORD CUSTOM PLAY
FORMAT
STOP PLAY SONG SELECT
RECORD
PLAY
SONG COPY
TEMPO
MUSIC DISK RECORDER
--
UPPER LOWER PEDAL
CONTROL
UPPER LOWER PEDAL
CONTROL SHIFT
SONG
REPEAT
FROM
SONG DEL.
TO
PAUSE RECORD CUSTOM PLAY
FORMAT
STOP PLAY SONG SELECT
RECORD
PLAY
SONG COPY
TEMPO
MUSIC DISK RECORDER
01
You can also record registrations by themselves, without recording a performance. Bulk data, including
Registration Memory and Registration Shift settings, Rhythm Pattern (User rhythms) and Rhythm
Sequence data, and User voices, is also sa ved in the operation.
To record only the registrations and bulk data:
1. On the Electone, set the registrations
and all other data you wish to record.
2. Select the song number to which you
wish to record the registrations.
3. Press the RECORD button.
4. Press the PLAY button to record the
registrations, then press the STOP button as
soon as you see the small bars flash across
the LED display from left to right.
The small bars that flash across the display indicate that
the M.D.R. is recording the registrations and being set up
for normal recording; pressing the STOP button interrupts
this process.
63
Page 66

Recalling Recorded Registrations (and Bulk Data)
8 Music Disk Recorder
The registrations (and bulk data) recorded to song numbers in the above operation can be loaded back to
the Electone by simply selecting the appropriate song number and pressing the PLAY button. When the
operation has been completed, the M.D.R. returns to STOP status.
The M.D.R. also makes it possible to use more than the 5 Registration Memory registrations in a
performance – without having to alter the current panel settings. This would come in handy when
performing sev er al songs in succession that use more than 5 registrations.
To do this:
1. First record the registrations you need
into several song numbers on the M.D.R.
before the performance. (You should also
try to record them in the order that you'll
use them, if possible.)
2. During the performance, after all 5
registrations from a certain song number
have been used, select the next song
number and press the PLAY button on the
M.D.R. This replaces all 5 registrations in
Registration Memory with the new ones
from the selected song number.
3. By repeating the above steps, you can
run through an entire performance without
having to change the panel settings.
Replacing Registrations
The M.D.R. also lets you change the registrations of an existing song without changing the performance
data.
The procedure is the same as that of Recording Registrations mentioned in the previous page .
64
Page 67

8 Music Disk Recorder
Playback
UPPER LOWER PEDAL
CONTROL
UPPER LOWER PEDAL
CONTROL SHIFT
SONG
REPEAT
FROM
SONG DEL.
TO
PAUSE RECORD CUSTOM PLAY
FORMAT
STOP PLAY SONG SELECT
RECORD
PLAY
SONG COPY
TEMPO
MUSIC DISK RECORDER
01
UPPER LOWER PEDAL
CONTROL
UPPER LOWER PEDAL
CONTROL SHIFT
SONG
REPEAT
FROM
SONG DEL.
TO
PAUSE RECORD CUSTOM PLAY
FORMAT
STOP PLAY SONG SELECT
RECORD
PLAY
SONG COPY
TEMPO
MUSIC DISK RECORDER
---
UPPER LOWER PEDAL
CONTROL
UPPER LOWER PEDAL
CONTROL SHIFT
SONG
REPEAT
FROM
SONG DEL.
TO
PAUSE RECORD CUSTOM PLAY
FORMAT
STOP PLAY SONG SELECT
RECORD
PLAY
SONG COPY
TEMPO
MUSIC DISK RECORDER
00:05
You can play back y our recorded performance by simply pressing the PLAY button. Registrations and
other data will be recalled to the Electone.
(1) To play back a song:
1. Select the number of the song you wish
to play back by using the SONG SELECT
buttons.
2. Press the PLAY button.
The PLAY lamp lights up and small bars move across the
display, indicating that the M.D.R. is resetting registrations
on the Electone.
3. Playback of the song begins after the
Electone data is reset and the song time is
shown on the M.D.R.'s display.
Playback automatically stops at the end of a song. You
can, however, stop playback in the middle of a song by
pressing the STOP b utton.
Never turn off the power switch when a floppy disk
is still engaged in the M.D.R. disk drive slot. Also
do not press the Eject button during recording or
playback.
65
Page 68

(2) To play back the selected part(s):
UPPER LOWER PEDAL
CONTROL
UPPER LOWER PEDAL
CONTROL SHIFT
SONG
REPEAT
FROM
SONG DEL.
TO
PAUSE RECORD CUSTOM PLAY
FORMAT
STOP PLAY SONG SELECT
RECORD
PLAY
SONG COPY
TEMPO
MUSIC DISK RECORDER
01
UPPER LOWER PEDAL
CONTROL
UPPER LOWER PEDAL
CONTROL SHIFT
SONG
REPEAT
FROM
SONG DEL.
TO
PAUSE RECORD CUSTOM PLAY
FORMAT
STOP PLAY SONG SELECT
RECORD
PLAY
SONG COPY
TEMPO
MUSIC DISK RECORDER
01
UPPER LOWER PEDAL
CONTROL
UPPER LOWER PEDAL
CONTROL SHIFT
SONG
REPEAT
FROM
SONG DEL.
TO
PAUSE RECORD CUSTOM PLAY
FORMAT
STOP PLAY SONG SELECT
RECORD
PLAY
SONG COPY
TEMPO
MUSIC DISK RECORDER
---
8 Music Disk Recorder
You can also play back the selected parts of your recorded
performance, while other parts are temporarily turned off.
This function is especially useful for pla ying a single part,
such as the melody, over previously recorded
accompaniment parts.
To select specific parts for playback:
1. Select the number of the song to be
played back.
2. Set the parts you wish to mute to OFF,
by pressing the appropriate PLAY button.
The LED of the selected part should be off.
Make sure to turn on the parts you wish to play back.
3. Press the PLAY button.
First the registration and other data are read, then
playback of the performance starts (excepting the parts
that were turned off in step #2).
4. Now perform your new part or parts
over the playback parts.
When the end of the recorded performance is reached,
playback is automatically stopped and the STOP status is
resumed.
66
Page 69

8 Music Disk Recorder
(3) To repeat playback of a song or songs:
UPPER LOWER PEDAL
CONTROL
UPPER LOWER PEDAL
CONTROL SHIFT
SONG
REPEAT
FROM
SONG DEL.
TO
PAUSE RECORD CUSTOM PLAY
FORMAT
STOP PLAY SONG SELECT
RECORD
PLAY
SONG COPY
TEMPO
MUSIC DISK RECORDER
01
UPPER LOWER PEDAL
CONTROL
UPPER LOWER PEDAL
CONTROL SHIFT
SONG
REPEAT
FROM
SONG DEL.
TO
PAUSE RECORD CUSTOM PLAY
FORMAT
STOP PLAY SONG SELECT
RECORD
PLAY
SONG COPY
TEMPO
MUSIC DISK RECORDER
UPPER LOWER PEDAL
CONTROL
UPPER LOWER PEDAL
CONTROL SHIFT
SONG
REPEAT
FROM
SONG DEL.
TO
PAUSE RECORD CUSTOM PLAY
FORMAT
STOP PLAY SONG SELECT
RECORD
PLAY
SONG COPY
TEMPO
MUSIC DISK RECORDER
00:01
UPPER LOWER PEDAL
CONTROL
UPPER LOWER PEDAL
CONTROL SHIFT
SONG
REPEAT
FROM
SONG DEL.
TO
PAUSE RECORD CUSTOM PLAY
FORMAT
STOP PLAY SONG SELECT
RECORD
PLAY
SONG COPY
TEMPO
MUSIC DISK RECORDER
00:01
UPPER LOWER PEDAL
CONTROL
UPPER LOWER PEDAL
CONTROL SHIFT
SONG
REPEAT
FROM
SONG DEL.
TO
PAUSE RECORD CUSTOM PLAY
FORMAT
STOP PLAY SONG SELECT
RECORD
PLAY
SONG COPY
TEMPO
MUSIC DISK RECORDER
This feature allows you to repeatedly play back either all
songs on a disk or only one specific song.
1. Select the song number you wish to
play back.
If you wish to play back all songs on a disk, select the first
song that will be played back. The others will follow in
order.
2. Hold down the SHIFT button and
simultaneously press the SONG REPEAT
button.
The lamps above SHIFT and SONG REPEAT light up, and
"ALL" appears on the LED display.
3. To repeatedly playback all songs
starting with the selected song:
Press the PLAY button.
Playback will begin from the song selected and repeat
indefinitely. To stop playback, press the STOP button.
3. To repeatedly playback only the
selected song:
3.-1 Again hold down the SHIFT button and
simultaneously press the SONG REPEAT
button.
"SinG" appears on the LED display to indicate that a
single song will be repeatedly played back.
3.-2 Press the PLAY button to begin
playback of the song.
Playback will begin from the song selected and repeat
indefinitely. To stop playback, press the STOP button.
67
Page 70

Other Functions
UPPER LOWER PEDAL
CONTROL
UPPER LOWER PEDAL
CONTROL SHIFT
SONG
REPEAT
FROM
SONG DEL.
TO
PAUSE RECORD CUSTOM PLAY
FORMAT
STOP PLAY SONG SELECT
RECORD
PLAY
SONG COPY
TEMPO
MUSIC DISK RECORDER
00:00
UPPER LOWER PEDAL
CONTROL
UPPER LOWER PEDAL
CONTROL SHIFT
SONG
REPEAT
FROM
SONG DEL.
TO
PAUSE RECORD CUSTOM PLAY
FORMAT
STOP PLAY SONG SELECT
RECORD
PLAY
SONG COPY
TEMPO
MUSIC DISK RECORDER
110
UPPER LOWER PEDAL
CONTROL
UPPER LOWER PEDAL
CONTROL SHIFT
SONG
REPEAT
FROM
SONG DEL.
TO
PAUSE RECORD CUSTOM PLAY
FORMAT
STOP PLAY SONG SELECT
RECORD
PLAY
SONG COPY
TEMPO
MUSIC DISK RECORDER
00:01
8 Music Disk Recorder
(1) Custom Play
If you want to pla y back the song without resetting the
registrations and other data, press the CUSTOM PLAY
button. This displays the song time and starts playbac k
immediately.
(2) Pause
If you want to temporarily stop pla yback of the song or
songs, press the PAUSE button. To resume playback from
the point at which the song was paused, press the PAUSE
button again.
If you hold down the SHIFT and press CUSTOM PLAY,
all data, except for that of Rhythm Pattern Program
and Rhythm Sequence, will be loaded and played back.
(3) Fast Forward and Fast Reverse
During playback, these buttons function as fast forward
and fast re verse buttons, much like those of a tape
recorder. Press [G] to advance to a later point in the
song or press [F] to return to an earlier position. While
either of these buttons is held down, playback stops and
the song time is advanced or reversed accordingly. Hold
down the button until the desired song time is shown.
When the button is released, playback is paused. To
resume playback from the point you've advanced or
reversed to, press the PLAY button.
Fast Forward and Fast Reverse operate at five times
the normal playback speed.
68
Page 71

8 Music Disk Recorder
(4) Changing the Tempo
UPPER LOWER PEDAL
CONTROL
UPPER LOWER PEDAL
CONTROL SHIFT
SONG
REPEAT
FROM
SONG DEL.
TO
PAUSE RECORD CUSTOM PLAY
FORMAT
STOP PLAY SONG SELECT
RECORD
PLAY
SONG COPY
TEMPO
MUSIC DISK RECORDER
UPPER LOWER PEDAL
CONTROL
UPPER LOWER PEDAL
CONTROL SHIFT
SONG
REPEAT
FROM
SONG DEL.
TO
PAUSE RECORD CUSTOM PLAY
FORMAT
STOP PLAY SONG SELECT
RECORD
PLAY
SONG COPY
TEMPO
MUSIC DISK RECORDER
Indicates faster tempo
Indicates original tempo
Indicates slower tempo
You can change the tempo of the song as the song
is playing on the M.D.R. by holding down the
SHIFT button and pressing the TEMPO + or
TEMPO - button. (The Tempo dial on the Electone
panel cannot be used to change the tempo on the
Music Disk Recorder.)
Each press of the button slows down or speeds up
the tempo by a small amount. Changing the
tempo does not change the pitch of the music.
To restore the original recording tempo of a song,
hold down the SHIFT button and simultaneously
press both TEMPO buttons.
When tempo is changed, the LED display indicates
the change as a percentage of the original recording
tempo (100). Values less than 100 indicate a slower tempo;
values greater than 100 indicate a faster tempo.
Tempo changes remain in effect even through
changes in song number. If you have changed the
tempo in one song, you should perform the above step to
restore the original tempo before playing another song.
Turning the power switch off and on again also restores the
original tempo.
69
Page 72

(5) Song Copy
UPPER LOWER PEDAL
CONTROL
UPPER LOWER PEDAL
CONTROL SHIFT
SONG
REPEAT
FROM
SONG DEL.
TO
PAUSE RECORD CUSTOM PLAY
FORMAT
STOP PLAY SONG SELECT
RECORD
PLAY
SONG COPY
TEMPO
MUSIC DISK RECORDER
01
UPPER LOWER PEDAL
CONTROL
UPPER LOWER PEDAL
CONTROL SHIFT
SONG
REPEAT
FROM
SONG DEL.
TO
PAUSE RECORD CUSTOM PLAY
FORMAT
STOP PLAY SONG SELECT
RECORD
PLAY
SONG COPY
TEMPO
MUSIC DISK RECORDER
UPPER LOWER PEDAL
CONTROL
UPPER LOWER PEDAL
CONTROL SHIFT
SONG
REPEAT
FROM
SONG DEL.
TO
PAUSE RECORD CUSTOM PLAY
FORMAT
STOP PLAY SONG SELECT
RECORD
PLAY
SONG COPY
TEMPO
MUSIC DISK RECORDER
UPPER LOWER PEDAL
CONTROL
UPPER LOWER PEDAL
CONTROL SHIFT
SONG
REPEAT
FROM
SONG DEL.
TO
PAUSE RECORD CUSTOM PLAY
FORMAT
STOP PLAY SONG SELECT
RECORD
PLAY
SONG COPY
TEMPO
MUSIC DISK RECORDER
016
8 Music Disk Recorder
This function lets you copy the data recorded at one song
number to another song number.
To use the Song Copy function:
1. Select the song number to be copied
with the SONG SELECT buttons.
2. While holding down the SHIFT button,
press the SONG COPY FROM button.
The song number to be copied from appears at the left of
the LED display.
If the specified song number has no recorded data,
the M.D.R. automatically searches for and selects the
next song that contains recorded data.
3. While holding down the SHIFT button,
press the SONG COPY TO button.
The M.D.R. automatically searches for an empty song
number to copy the data to, and displays that number at
the right side of the display. The RECORD lamp will start
flashing indicating that the M.D.R. is ready to copy. If all
songs numbers contain recorded data, "FULL" appears on
the LED display. In this case, you should erase one of the
songs on the disk by using the Song Delete function (see
page 71.).
4. Use the SONG SELECT buttons to select a
destination song number for copying.
Follow this step if y ou wish to select a different destination
song number than the one display ed. The M.D.R. will
display only those song numbers that ha ve no data.
5. Press the RECORD button to execute the
70
Song Copy function.
The RECORD lamp stops flashing and remains lit,
indicating that the Song Copy function is in process.
The LED display shows the "siz e" of the song in numbers,
and counts down as the data is being copied. When the
display shows "000", the song has been completely
copied.
The message "FULL" may appear when the available
memory is short.
If you want to abort the operation, press STOP button.
Page 73

8 Music Disk Recorder
(6) Song Delete
UPPER LOWER PEDAL
CONTROL
UPPER LOWER PEDAL
CONTROL SHIFT
SONG
REPEAT
FROM
SONG DEL.
TO
PAUSE RECORD CUSTOM PLAY
FORMAT
STOP PLAY SONG SELECT
RECORD
PLAY
SONG COPY
TEMPO
MUSIC DISK RECORDER
dL04
SHIFT
PAUSE
RECORD
PLAY
540
(K.PERC.) (K.PERC.)
REM.MEM.
You can delete a song on disk by performing this function.
To use Song Delete:
1. Use the SONG SELECT buttons to select
the number of the song you wish to delete.
2. While holding down the SHIFT button,
press the SONG DEL. button.
The letters "dL" appear on the left side of the LED display,
next to the selected song number. RECORD lamp flashes
to indicate that the M.D.R. is ready to delete the song. If
you wish to , you can still select a different song number in
this step by using the SONG SELECT buttons.
3. Press the RECORD button to execute the
Song Delete function.
The RECORD lamp stops flashing and remains lit,
indicating that the Song Delete function has begun.
When the Song Delete function is completed, the STOP
status is automatically resumed.
(7) Checking the Remaining Memory
While playback is stopped, you can check the amount of
memory available for additional recording. To do this,
simultaneously hold down the SHIFT button and the
PAUSE button (indicated in the illustration at right as REM.
MEM.: Remaining Memory). The maximum amount of
memory is 620 for 2DD disks and 1240 for 2HD disks.
(8) Registration Menus and Voice Disks
The M.D.R. also allows you to select registrations and
voices from disks. For more information about
Registration Menus, see page 10; for more on Voice
Disks, see page 72.
If you want to abort the operation, press STOP button.
71
Page 74

Voice Disk (Optional)
<VOICE DISK>
: [SAVE]
Selects next number.
Use these to save
the voice (see next step).
Selects previous number.
Voice number Voice name
Jumps ahead ten numbers.
Jumps back ten numbers.
<VOICE DISK>
Select a Group...!!
8 Music Disk Recorder
You can play these voices and save them to User memory
for future recall.
To select voices from the disk and save them to User
memory:
1. Insert the optional Voice Disk into the
Disk slot under the Music Disk Recorder.
The following display appears, prompting you to select the
voice group (Upper, Lower, Lead or P edal).
2. Press one of the panel voice buttons in
the voice section in which you wish to use
the new voice.
After you've pressed a panel voice button, the Voice Disk's
voice name will appear on the LCD.
3. Select the desired voice by using the left
DATA CONTROL buttons.
Pressing the bottom left buttons steps through the voice
numbers; pressing the top left buttons jumps ten numbers
back or forw ard. The name of each voice appears on the
display with the number.
Refer to the list included with your Voice Disk for voice
names and numbers. You can audition the voices as you
select them by playing them on the appropriate keyboard.
72
Page 75

8 Music Disk Recorder
4. To save the selected voice, press one of
Save To USER 3
[ OK ] [Cancel]
These select "Cancel"These select "OK"
To USER 1 USER 2
USER 3 USER 4
the right DATA CONTROL buttons
corresponding to SAVE in the display.
The following display showing User voices 1–4 appears.
5. Select the User number to which you
wish to save the voice, and press the
corresponding DATA CONTROL button.
6. The following display appears,
prompting you for confirmation of the
operation. Select "OK" to actually assign the
voice to the specific User number, or
"CANCEL" to abort the operation.
When the voice has been assigned, a "Completed...!!"
message appears.
(9) Copy Protect
Some of the Disks available for the Electone are purposely
protected from being copied or erased. You cannot save
the data to another floppy disk. If you try to load data from
such a "copy-protected" disk to the Electone, a "Protected
Disk" (Prxx) message will appear on the LED display. The
data cannot be saved to the disk.
If you eject the Voice Disk from the M.D.R., the voice
you assigned will be lost from the User number.
73
Page 76

Messages on the M.D.R. LED Display
No disk is installed. Install a disk.
1)The installed disk is write-protected, so the Record, Song Copy, and
Song Delete jobs cannot be performed. Set the disk's Write-protect tab to
OFF. (See page 56.)
2)If you are using a copy-protected playback-only disk, this message may
appear when you attempt the Record, Song Copy, or Song Delete
operations.
The installed disk is not formatted. Format the disk. (See page 57.)
1)The disk's memory capacity is full, so the Record or Song Copy
operation cannot be performed. Use another formatted disk.
2)Data is already recorded at all song numbers, so the Song Copy
operation cannot be performed. Press the STOP button, then delete any
unnecessary songs.
None of the song numbers contain recorded data, so the Song Copy
operation cannot be performed. Press the STOP button.
An error occurred because the disk was removed during recording or
playback. Press the STOP button, and replace the disk, then start the
operation over again.
The installed disk cannot be played back on the M.D.R.. Press the STOP
button, then insert a compatible disk.
Recording cannot be performed because too much data was received at
once. Press the STOP button.
The disk is defective and cannot be formatted. Press the STOP button,
then insert another disk.
An error occurred during the transmission or reception of data. Press the
STOP button.
You are trying to record to the song number which already contains
recorded data. Select the other blank song number by pressing the
SONG SELECT buttons. * "XX" indicates a song number (01 through 40).
When you insert the "copy-protected" disk to the Electone, this message
will appear on the LED display. You cannot overwrite or save the
changes. * "XX" indicates a song number (01 through 40).
In the case of Voice Disk operation, an incompatible Voice Disk has been
inserted. Check if the MIDI cables are properly connected.
Display
Description of the Messages
XX *
XX *
8 Music Disk Recorder
74
Page 77

9 MIDI Controls
9 MIDI Controls
<MIDI OUT> ¡2
UPPER=CH1 LOWER=CH2
PAGE
CH1
CH4
These select the MIDI
transmit channel for
Upper keyboard.
CH2
CH5
These select the MIDI
transmit channel for
Lower keyboard.
IN
MIDI
OUT
INOUT
IN OUT
EL-27
Synthesizer
or
Rhythm Machine
MIDI is an acronym that stands f or Musical Instrument Digital Interface, whic h allows electronic
musical instruments to communicate with each other, by sending and receiving MIDI messages.
On the right underside of the Electone keyboard you will find the MIDI IN/OUT jacks. If your
Electone is connected with external devices via these MIDI jacks and appropriate MIDI settings are
done, you can play an external MIDI device such as synthesizer from your Electone keyboard or
your Electone can be played by an external device such as sequencer.
Setting Examples
1. Using MIDI OUT jack
If a MIDI keyboard or tone generator is properl y connected:
Playing your Electone can cause the MIDI keyboard (or tone generator) to
be played using its own voices, accomplishing thick sound layers. (The MIDI
receive channel of the MIDI keyboard must match the transmit channel of
your Electone.)
Various messages including the values how far the expression pedal is
pressed down and how hard you play the Electone keyboard can be
transmitted as digital data. However , whether and how the external device
responds or not depends on the external device you have connected.
See page 81 for more detailed
information on the MIDI
messages.
MIDI IN/OUT jacks are
occupied and connected to
the built-in M.D.R.. You have to
disconnect the MIDI cables extended
from the M.D.R., when you use the
MIDI IN/OUT jacks for an external
device.
2. Using MIDI IN jack
Playing the e xternal MIDI keyboard can cause your Electone to be play ed
using Electone's voices. (The MIDI transmit channel of the MIDI keyboard
must match the receive channel of your Electone. The channels1,2 and 3
for the Upper, Lower and Pedalvoices, respectively.)
To select the MIDI pages:
Press the PITCH/MIDI button in the DISPLAY SELECT section, and select
Page 2 and Page 3 with the PAGE buttons.
Page 2 – Output Channels
75
Page 78

9 MIDI Controls
This determines the channels over which MIDI information will be
<MIDI IN>LEAD=INT.¡3
SYNC=INT.EXP.=AUTO
PAGE
These select the Lead setting.
These select the Expression Pedal setting.These select the Sync setting.
INT.
EXT.
AUTO
INT.
EXT.
INT.
EXT.
transmitted. The Upper keyboard can be set to send over channels 1 or 4,
while the Lower ke yboard can send over 2 or 5. The Pedalboard
automatically sends over channel 3. The MIDI receive channel of each
connected MIDI device should match the numbers set here.
Page 3 – Internal/External Control
When using another MIDI
device to play the Electone's
voices, you must set the MIDI transmit
channel(s) of the connected device to
match the receive channel(s) of the
Electone. The MIDI receive channels
of the Electone are automatically set
to the following values:
Upper:1
Lower: 2
Pedal: 3
Keyboard Percussion: 15 (receive
channel only)
When the power is turned on,
INT. is set to Lead and Sync
as well as AUTO to EXP. These
settings cannot be saved to the
Registration Memory buttons.
! LEAD
Determines Internal or External control of the Lead Voices. When set to
Internal, Lead Voices are played from the Electone and the sounds from a
connected MIDI instrument can be played via MIDI channel 1 (or channel 2,
when the To Lower function is on). When set to External, the Lead Voices
can only be played from the connected instrument via MIDI channel 4.
" SYNC
Determines the source of the timing control, for rhythm synchronization
purposes. Setting this to Internal gives the Electone timing control over the
connected rhythm machine. This also allo ws you to start and stop the
rhythm patterns of the connected rhythm machine from the Electone's panel
controls. Setting this to External gives timing control to the connected
rhythm machine.
# EXP. (Expression)
Determines the control of the expression functions. Ordinarily, this control is
set to AUTO. Howev er, when it is set to INT., you can manually control the
expression pedal during M.D.R. playback. When set to EXT., another
(external) Electone can be used to control the expression pedal functions.
When set to EXT., the transmit
channel of the MIDI device
connected to MIDI IN jack of EL-27
should be set to 16.
76
Page 79

10 Accessory Jacks and Controls
RL
RHYTHM
IN
RL
AUX.
OUT
HEADPHONES
10 Accessory Jacks and Controls
On the left underside of the Electone keyboard is a separate panel equipped with several
input/output terminals, the functions of which are described below.
! HEADPHONES
For connection of a stereo or monaural headphone set. When headphones
are connected to this jack, sound to the Electone's built-in speak er system is
automatically cut off, allowing you to play without disturbing others.
" AUX. OUT (Left and Right)
This set of stereo outputs (RCA pin jacks) is for connection to external
amplification/speaker systems. Typically, they are for direct connection to a
home audio system or cassette deck.
# RHYTHM IN (Left and Right)
This pair of phone jacks are for connection to an external rhythm machine.
The sound of the connected device is mix ed with the sound of the Electone
and played through the speaker system. The volume of the rhythm machine
can be controlled by the Expression pedal of the Electone.
77
Page 80

Problem
A cracking noise is sometimes heard.
Interference from radio, TV, or other sources
occurs.
The sound of the Electone causes
surrounding objects to resonate.
The Electone panel does not function
normally or the content of the memorized
data has changed.
When too many keys are pressed, not all of
the notes sound.
The sound is too soft, despite the volume
being set to the maximum.
Switching voices causes the volume to
change, despite their having identical
volume settings.
When keys on the Lower keyboard or
Pedalboard are pressed, the sounds of
percussion instruments are also heard.
Only one sound is heard when two notes of
the Lead or Pedal voices are simultaneously
played.
Possible Cause and Solution
Noise may be produced when either an electrical appliance is
turned on or off, or an electric power tool (such as drill) is used in
the proximity of the Electone. If this occurs, plug the Electone into
an electrical outlet located as far as possible from the device that
seems to be the source of the problem.
This is caused by the proximity of a high-power broadcasting station
or amateur ham radio setup.
Because the Electone is capable of producing powerful bass
sounds, resonance may be caused in surrounding objects, such as
cabinets or glass windows. To avoid this, relocate the objects or
lower the Electone's volume.
This happens very rarely. Occasionally, power surges and spikes
due to electrical storms or other reasons may cause the Electone to
malfunction and/or alter the contents of memorized data. If this
happens, perform the Power On Reset operation to reset the
Electone. (See page 49.)
Total polyphonic capacity (notes sounding for both Upper and
Lower Keyboards) is 11 notes.
Check all of the volume controls, making sure that they are set to
suitable levels: the panel Volume controls for each voice section,
the Master Volume dial, and the Expression Pedal.
The volume of certain voices may seem lower than that of others.
Adjust the balance of the sound with the Volume control within the
appropriate Voice Condition display.
The Keyboard Percussion function has been turned on. When not
using the function, be sure to turn it off. (See page 43.)
For practical performance reasons, the Electone has been
designed so that one note of the Lead or Pedal voices can be
played at a time. If several keys are pressed at once, only the
highest note will be sounded (high-note priority).
Troubleshooting
Please note that the appearance of any of following phenomena does not indicate a mechanical
failure of the Electone.
78
Page 81

Problem
The Pedal voices do not sound, even though
the volume is properly set.
The pitch in the Single Finger mode does
not change, even when pressing different
keys of the keyboard.
The harmony notes of the Melody On Chord
function cannot be heard.
Certain functions have not been memorized
to Registration Memory.
Rhythm does not start.
Recording or playback cannot be performed.
A total of 40 songs cannot be recorded.
Recording is stopped before the
performance is finished, or the Song Copy
function cannot ber executed.
The rhythm does not start at the beginning
of a recording, or stops in the middle of the
performance.
The notes of the recording are "stuck" and
sound contiousously.
Possible Cause and Solution
The Single Finger or Fingered Chord mode of Auto Bass Chord is
on. Turn off the mode in the display. (See page 41.)
Single Finger mode will only produce notes when played within a
fixed octave interval on the Lower keyboard. If notes with the same
letter name are pressed outside of that range, the chords that are
sounded will share the same pitch.
The Upper keyboard has been set to sound only lead voices.
Increase the volume of the Upper voices.
The following functions cannot be memomorized: Rhythm START,
SYNCRO START, FIll in, all switches of Intro./ENDING, User Voice,
User Rhythm, and REGIST. Shift.
● Check the volume level of the RYHTHM section.
● Any data may not be loaded into the SEQ. buttons. Load the
data created with the other upper models such as the EL-37
into the SEQ. buttons.
The PLAY or RECORD section buttons for selecting parts may be
turned off. Turn on the appropriate PLAY or RECORD buttons.
If some song numbers contain large amount of recorded data, the
disk may not have enogugh available memory left to record the
normal maximum of 40 songs.
The amount of recorded data on the disk is close to the maximum
limit. Either use another disk or delete the data of any unnecesary
song number. (See page71.)
The M.D.R. is designed so that the rhytm canonot be started at the
very begining of a recording. If you wish to use the rhythm, start it
after the available memory display appears on the M.D.R. display.
During playback, you removerd the disk by pressing the EJECT
button. Whenever you wish to stop playback, always press the
STOP button.
79
Page 82

Specifications
KEYBOARD Keyboards
Touch Tone
VOICE Tone Generation
Upper Keyboard Voice
Lower Keyboard Voice
Lead Voice
Pedalboard Voice
Voice Display
MELODY ON CHORD
EFFECT/CONDITION Digital Reverb
Sustain
Symphonic/Celeste
Vibrato
Feet
RHYTHM Rhythms
Variations
Rhythm Sequence
Others
KEYBOARD PERCUSSION
ACCOMPANIMENT Auto Bass Chord
Accompaniments
REGISTRATION MEMORY
BASIC REGISTRATION
REGISTRATION MENU
MUSIC DISK RECORDER
FOOTSWITCH
KNEE LEVER
OTHER CONTROLS
OTHER FITTINGS
OPTIONAL ACCESSORIES
SOUND SYSTEM Power Amplifiers
Speakers
DIMENSIONS
WEIGHT
Specifications and desciptions in this Owner's Manual are for information purposes only.
Yamaha Corp. reserves the right to change or modify products or specifications at any time without prior notice.
As specifications, equipment or options may not be the same in every locale, please check with your Yamaha dealer.
Upper: 49 keys (C–C), Lower: 49 keys (C–C), Pedal: 20 keys (C–G)
Upper, Lead, Lower: Touch Setting 1, 4
New AWM & FM
Strings; Organ, Jazz Organ; Brass, Synth. Brass; Piano, Elec. Piano, Harpsichord; Clarinet; Guitar;
Saxophone; Vibraphone, Marimba; Chorus; Cosmic 1, 2, 3; Tutti 1, 2;
[Upper] Harmonica; [Lower] Horn; User 1-4; (2 Dotted Buttons/21 Voices) ;Volume Fine
Violin; Oboe, Bassoon; Flute; Trumpet, Trombone; User 1-4; (1Dotted Button/6 Voices)
To Lower; Volume Fine
Contrabass, Pizz. Bass; Organ Bass; Elec. Bass,
Synth. Bass; Tuba; User 1-4; (1 Dotted Button/6 Voices)
To Lower; Volume Fine
Upper, Lower, Lead, Pedal
Mode: Off, 1, 2, 3; Knee: On/Off
Depth
Upper (Knee), Lower (Knee), Pedal: On/Off
Upper, Lead, Lower, Pedal; Mode: Symphonic/Celeste
Upper/Lower (Depth), Lead (Delay, Depth, Speed)
Upper, Lead, Lower, Pedal: Preset/4'/8'/16'
March, Country, Broadway; Waltz, Jazz Waltz; Swing, Jazz Ballad, Dixieland; Bounce,
Reggae; Slow Rock 1, 2; Cha-cha, Rhumba, Beguine, Mambo; Samba, Bossanova;
8Beat, Dance Pop; Tango 1, 2; 16Beat, 16Beat Funk; User 1-8 (A-D, Fill-In);
(2 Dotted Buttons; 24 Rhythms); Volume Fine
Fill-In; Intro. /Ending; Lead In; Auto Variation: On/Off
On/Off; Sequence 1-4 (playback only)
Start; Synchro Start; Tempo Dial; Tempo; Bar/Beat LED
On/Off: Lower, Pedal; 43 Sounds
Mode: Off; Single Finger; Fingered Chord; Custom ABC; Memory: Lower, Pedal
Type 1, 2, 3, 4, Off
M. (Memory), 1-5; D. (Disable) Button; Mode: Off; Shift; User (Playback only)
1 5
120 (Built-in: 80, Included disk: 40)
Play/Record: Upper, Lower, Pedal, Keyboard Percussion, Control; Pause; Stop; Song Select; Song
Repeat; Song Delete; Song Copy: From/To; Tempo; Shift; Format; Custom Play;
Remaining Memory; LED Display; Eject
[Left] Mode: Off; Rhythm (Stop, Ending, Fill-In); [Right] Regist. Shift Mode: Off, Shift, User
On/Off: Sustain (Upper, Lower); MOC
Power On/Off; Exp. Pedal (Depth); Pitch Control; Transpose; Master Volume; Display Select;
Data Controls; Page; MIDI (Output; Upper/Lower, Int./Ext.: Lead, Sync., Exp.)
Registration Menu Disk; 3.5Floppy Disk; Matching Bench; Keyboard Cover/Music Stand;
MIDI IN/OUT jacks; Headphones Jack; Rhythm In jacks (Phone; R/L); Aux Out (RCA; R/L)
Voice Disk; HPE-170 Headphones
30W
(2-way System) Woofer 20 cm 1; Tweeter 5 cm 1; Monitor 2
106.5 cm 46.0 cm 94.7 cm (WidthDepthHeight) (With Keyboard Cover Closed)
53.0 kg
80
Page 83

Code Function Transmit Receive Remarks
8n, nn*, 00-7F Note OFF CH 1 UK
CH 2 LK
CH 3 PK
(CH 4)** LEAD
CH 15 Keyboard Percussion
9n, nn*, 00 Note OFF CH 1 CH 1 UK
9n, nn*, 01-7F ON CH 2 CH 2 LK
LK
CH 3 CH 3 PK
(CH 4)** (CH 4)** Transmit:UK,
Receive: LEAD
(CH 5)**
CH 15 Keyboard Percussion
BF, 0B, 00-7F Expression Pedal CH 16 CH 16 CONTROL
Cn, nn*** Program Change CH 1 UK
CH 2 LK
CH 3 PK
CH 16 CH 16 CONTROL
Dn, 00-07 After Touch CH 1 CH 1 UK
CH 2 CH 2 LK
CH 3 CH 3 PK
(CH 4)** (CH 4)** Transmit:UK
Receive: LEAD
* Note No.
** Can be replaced by MIDI CONTROL function.
*** Regist No.
Code Function Transmit Receive Remarks
F8 Clock *
FA Start
FC Stop
FE Active Sensing
* Received only when in the Ext. mode
■ Channel Messages
■ System Realtime Messages
MIDI Messages
System Exclusive Messages
1. Electone Common Messages
■ Bulk Dump Related Messages
Code Messages Transmit Receive
F0, 43, 70, 70, 00, ...(Data)*..., F7 Bulk Dump Data
01 Request-to-Send Voice Parameter Data
02 Request-to-Receive Voice Parameter Data
F0, 43, 70, 70, 10, F7 Request-to-Send All RAM
11 Request-to-Send Resistoration Data
12 Request-to-Send R.S.P. Data
14 Request-to-Send User Pattern Data
15 Request-to-Send User Pattern Data
F0, 43, 70, 70, 20, F7 Request-to-Receive All RAM
F0, 43, 70, 70, 30, F7 Request-to-Send Model ID Data
F0, 43, 70, 70, 38, 7F, F7 Bulk Dump Acknowledge
(Data)* = Exclusive data
16 Request-to-Send User Voice Data
21 Request-to-Receive Resistoration Data
22 Request-to-Receive R.S.P. Data
24 Request-to-Receive User Pattern Data
25 Request-to-Receive User Pattern Data
26 Request-to-Receive User Voice Data
00 Bulk Dump Unacknowledge
81
Page 84

■ Control Change
2. EL Series Common Messages
Code Messages Transmit Receive
F0, 43, 70, 78, 00, ...(Data)*... , F7 Bulk Dump Data
01 Request-to-Send Voice Parameter Data
02 Request-to-Receive Voice Parameter Data
F0, 43, 70, 78, 10, F7 Request-to-Send all RAM
11 Request-to-Send Registration Data
12 Request-to-Send R.S.P. Data
14 Request-to-Send User Pattern Data
15 Request-to-Send User Pattern Data
16 Request-to-Send User Voice Data
F0, 43, 70, 78, 20, F7 Request-to-Receive All RAM
21 Request-to-Receive Registration Data
22 Request-to-Receive R.S.P. Data
24 Request-to-Receive User Pattern Data
25 Request-to-Receive User Pattern Data
26 Request-to-Receive User Voice Data
F0, 43, 70, 78, 41, ...(Data)*... ,F7 Panel Switch Event Data**
F0, 43, 70, 78, 42, ...(Data)*... ,F7 Current Registration Data
(Data)* = Exclusive data
** Refer to the Switch Cord
Code Messages Transmit Receive
F0, 43, 70, 70, 40, 45, 7F, F7 Left FT. SW. On
00 Off
F0, 43, 70, 70, 40, 47, 7F, F7 Knee Lever On
00 Off
F0, 43, 70, 70, 40, 48, 7F, F7 Fill-In On
00 Off
F0, 43, 70, 70, 40, 4B, 7F, F7 Intro./ENDING On
00 Off
F0, 43, 70, 70, 40, 50, Tl*, Th**, F7 Tempo
*l = low byte, ** = high byte
■ MDR - Related Messages
Code Messages Transmit Receive
F0, 43, 70, 70, 70, 01, F7 PLAY Start
02 Stop
03 RECORD Start
04 Stop
05 FF Start
06 Stop
09 Rhythm Pointer Reset*
20 Disk Eject
23 Insert Regist. Menu Disk
24 Respond to Regist. Menu Disk
25 Insert Voice Menu Disk
26 Respond to Voice Menu Disk
27,nn(Data No.),F7 Request-to-Send Menu Data
28,nn(DataAmount),F7 Voice Menu Data Amount
2F,...(Data)...,F7 Regist. Menu Display Data
In fast-reverse, the Rhythm Pointer Reset and fast-forward signals are transmitted.
■ Others
Code Messages Transmit Receive
F0, 43, 70, 70, 78, SC, NC, F7 Bar Signal
82
Page 85

3. Model-Specific Messages
4. Electone/Single Keybord Common Messages
"nn" =43 is the ID code of EL-20.
Code Messages Transmit Receive
Code Messages Transmit Receive
F0, 43, 70, nn*, 00, F7
00, ...(Data)... , F7
01
02
F0, 43, 70, nn*, 10, F7
11
12
14
15
16
F0, 43, 70, nn*, 20, F7
21
22
24
25
26
Model ID Data
Bulk Dump Data
Request-to-Send Voice Parameter Data
Request-to-Receive Voice Parameter Data
Request-to-Send All RAM
Request-to-Send Registration Data
Request-to-Send R.S.P. Data
Request-to-Send User Pattern Data
Request-to-Send User Pattern Data
Request-to-Send User Voice Data
Request-to-Receive All RAM Data
Request-to-Receive Registration Data
Request-to-Receive R.S.P. Data
Request-to-Receive User Pattern Data
Request-to-Receive User Pattern Data
Request-to-Receive User Voice Data
F0, 43, 73, 01, 02, F7
03
Request for Internal Synchronous Mode
Request for External Synchronous Mode
Functions Switches Code Data Remarks
Selector UK Voices
LK Voices
LEAD
PK Voice
Rhythm
02
03
06
07
0B
00-0D
00-0D
00-04
00-04
00-0B
SW No.
SW No.
SW No.
SW No.
SW No.
Volume UK Voices
LK Voices
LEAD
PK Voice
Rhythm
Reverb
12
13
16
17
1A
1B
00-7F
00-7F
00-7F
00-7F
00-7F
00-7F
Volume data
Volume data
Volume data
Volume data
Volume data
Depth data
Sustain UK
LK
PK
50
51
52
00-01
00-01
00-01
00=OFF 01=ON
00=OFF 01=ON
00=OFF 01=ON
To Lower LEAD
PK Voice
36
37
00-01
00-01
00=OFF 01=ON
00=OFF 01=ON
Keybord Percussion LK
PK
5B
5C
00-01
00-01
00=OFF 01=ON
00=OFF 01=ON
Disable –– 5F 00-01 00=OFF 01=ON
Rhythm Sequence Program 61
62
63
64
1
2
3
4
00-01
00-01
00-01
00-01
00=OFF 01=ON
00=OFF 01=ON
00=OFF 01=ON
00=OFF 01=ON
● Switch Code
83
Page 86

TransmitFunction Receive Remarks
Basic Channel
Note Number
Velocity
After Touch
Pitch Bend
Control Change
Program Change
System Exclusive
System
Common
System
Real Time
Aux
Messages
Notes
Mode
Default
Changed
Note ON
Note OFF
Key's
Ch's
1
4
11
64
True Voice
Clock
Commands
Local ON/OFF
All Notes OFF
Active Sense
Rese t
Song Position
Song Select
Tune
1, 2, 3, 16
4, 5
9nH, v=1–127
9nH, v=0
0 – 4, 112–116
************ * * * * *** * * * **
CH 1: 48–96, CH2: 36–84, CH3: 36–55
CH15: 36–127, Others: 36–96
CH1: UK, CH2: LK, CH3: PK, CH4: UK (Transmit), LEAD (Receive), CH5: LK,
CH15: KEYBOARD PERCUSSION, CH16: CONTROL
Mode 3
36 – 96
Mode 1: OMNI ON,POLY
Mode 3: OMNI OFF, POLY
1, 2, 3, 15, 16
4
9nH, v=1–127
9nH, v=0, 8nH
Received only in External mode)
0 – 4, 112–116
************ * * * * *** * * * **
Received only in External mode)
Mode 3
36 – 96
Modulation Wheel
2nd Expression Pedal
Expression Pedal
Sustain
Refer to MIDI Messages
( FAH, FCH)
: YES
: NO
Date:10. JUL.1993
Version: 1.0
EL-27 MIDI Implementation Chart
Range
Mode 2: OMNI ON, MONO
Mode 4: OMNI OFF, MONO
Default
Messages
Altered
84
Page 87

Index
A
A.B.C. (Auto Bass Chord) . . . . . . . . . 40
A.B.C./M.O.C . . . . . . . . . . . . . . . . 40, 45
Accompaniment . . . . . . . . . . . . . . . . . 39
After Touch . . . . . . . . . . . . . . . . . . . . 26
Auto Variation . . . . . . . . . . . . . . . . . . 39
Automatic Accompaniment . . . . . . . . 40
AUX. OUT . . . . . . . . . . . . . . . . . . . . . 77
B
Bar/Beat Indicator . . . . . . . . . . . . . . . 33
Basic Registrations . . . . . . . . . . . . . . . 8
C
Celeste . . . . . . . . . . . . . . . . . . . . . . . . 27
Chord . . . . . . . . . . . . . . . . . . . . . . . . . 12
Custom (Custom A.B.C.) . . . . . . . . . . 41
Custom Play (M.D.R.) . . . . . . . . . . . . 68
D
Data Control Buttons . . . . . . . . . . . . . 11
Delay (Vibrato) . . . . . . . . . . . . . . . . . . 29
Depth (Vibrato) . . . . . . . . . . . . . . . . . . 29
Disable (D.) Button . . . . . . . . . . . . . . . 47
Display Select . . . . . . . . . . . . . . . . . . . 4
Dotted Button (Rhythm) . . . . . . . . . . . 36
Dotted Button (Voice) . . . . . . . . . . . . 21
E
Effects . . . . . . . . . . . . . . . . . . . . . . . . 26
Eject (Disk) (M.D.R.) . . . . . . . . . . . . . 55
Ending (Intro. Ending) . . . . . . . . . . . . 32
Expression (MIDI Control) . . . . . . . . . 76
Expression Pedal . . . . . . . . . . . . . . . . . 8
F
Feet (Octave) . . . . . . . . . . . . . . . . . . . 26
Fill In . . . . . . . . . . . . . . . . . . . . . . . . . . 34
Fingered (Fingered Chord) . . . . . . . . 41
Footswitch (Left) . . . . . . . . . . . . . . . . 51
Footswitch (Rhythm) . . . . . . . . . . . . . 52
Footswitch (Right) . . . . . . . . . . . . . . . 48
Format (M.D.R.) . . . . . . . . . . . . . . . . . 57
H
Headphones . . . . . . . . . . . . . . . . . . . . 77
I
Initial Touch . . . . . . . . . . . . . . . . . . . . 26
Intro. Ending . . . . . . . . . . . . . . . . . . . . 32
K
Keyboard Percussion . . . . . . . . . . . . . 43
Knee (M.O.C.) . . . . . . . . . . . . . . . . . . 45
Knee (Sustain) . . . . . . . . . . . . . . . . . . 52
Knee Lever . . . . . . . . . . . . . . . . . . . . . 52
L
LCD Display . . . . . . . . . . . . . . . . . . . . . 4
Lead (MIDI Control) . . . . . . . . . . . . . . 76
Lead In . . . . . . . . . . . . . . . . . . . . . . . . 32
Lead Voice . . . . . . . . . . . . . . . . . . . . . 18
Lower Keyboard Voices . . . . . . . . . . . 18
M
M.D.R. (Music Disk Recorder) . . . . . . 55
M.O.C. (Melody On Chord) . . . . . . . . 45
Master Volume . . . . . . . . . . . . . . . . . . . 8
Memory (Lower/Pedal) . . . . . . . . . . . 41
Memory (M.) Button (Registration
Memory) . . . . . . . . . . . . . . . . . . . . . . . 47
Metronome . . . . . . . . . . . . . . . . . . . . . 46
MIDI . . . . . . . . . . . . . . . . . . . . . . . . . . 75
MIDI IN/OUT . . . . . . . . . . . . . . . . . . . 75
Music Disk Recorder . . . . . . . . . . . . . 55
O
Output Channel (MIDI) . . . . . . . . . . . . 75
P
Page Buttons . . . . . . . . . . . . . . . . . . . 10
Pause (M.D.R.) . . . . . . . . . . . . . . . . . 68
Pedal Voices . . . . . . . . . . . . . . . . . . . 18
Percussion . . . . . . . . . . . . . . . . . . . . . 43
Percussion Volume . . . . . . . . . . . . . . 43
Pitch . . . . . . . . . . . . . . . . . . . . . . . . . . 54
Playback (M.D.R.) . . . . . . . . . . . . . . . 65
Power On Reset . . . . . . . . . . . . . . . . 49
Power Switch . . . . . . . . . . . . . . . . . . . . 7
R
Record (M.D.R) . . . . . . . . . . . . . . . . . 58
Registration (Shift/User) . . . . . . . . . . 48
Registration Memory . . . . . . . . . . . . . 47
Registration Menu . . . . . . . . . . . . . . . 10
Registration Menu Disk . . . . . . . . . . . 14
Remaining Memory (M.D.R.) . . . . . . . 71
Retry (M.D.R.) . . . . . . . . . . . . . . . . . . 59
Reverb . . . . . . . . . . . . . . . . . . . . . . . . 30
Rhythm . . . . . . . . . . . . . . . . . . . . . . . . 31
Rhythm Condition Page . . . . . . . . . . . 35
Rhythm In . . . . . . . . . . . . . . . . . . . . . . 77
Rhythm Menu . . . . . . . . . . . . . . . . . . . 38
S
SEQ. . . . . . . . . . . . . . . . . . . . . . . . . . 46
Set (Registration) . . . . . . . . . . . . . . . . 11
Shift (M.D.R.) . . . . . . . . . . . . . . . . . . . 57
Shift (Registration) . . . . . . . . . . . . . . . 48
Single (Single Finger) . . . . . . . . . . . . 41
Song Copy (M.D.R.) . . . . . . . . . . . . . 70
Song Delete (M.D.R.) . . . . . . . . . . . . 71
Speed (Vibrato) . . . . . . . . . . . . . . . . . 29
Start Button . . . . . . . . . . . . . . . . . . . . 32
Stop Button (M.D.R.) . . . . . . . . . . . . . 58
Sustain . . . . . . . . . . . . . . . . . . . . . . . . 30
Symphonic . . . . . . . . . . . . . . . . . . . . . 27
Sync (MIDI Control) . . . . . . . . . . . . . . 76
Synchro. Start . . . . . . . . . . . . . . . . . . 32
T
Tempo (M.D.R.) . . . . . . . . . . . . . . . . .69
Tempo (Rhythm) . . . . . . . . . . . . . . . . 33
Tempo Dial . . . . . . . . . . . . . . . . . . 12, 33
Tempo Display . . . . . . . . . . . . . . . 12, 33
To Lower . . . . . . . . . . . . . . . . . . . . . . 20
Touch Tone . . . . . . . . . . . . . . . . . . . . 26
Transpose . . . . . . . . . . . . . . . . . . . . . 54
Type (Accompaniment) . . . . . . . . . . . 39
U
Upper Keyboard Voice . . . . . . . . . . . . 18
User (Registration) . . . . . . . . . . . . . . . 48
User Rhythm . . . . . . . . . . . . . . . . . . . 37
USER VIB. . . . . . . . . . . . . . . . . . . . . . 28
User Voice . . . . . . . . . . . . . . . . . . . . . 22
V
Vibrato . . . . . . . . . . . . . . . . . . . . . . . . 28
Voice Condition Pages . . . . . . . . . . . 24
Voice Disk . . . . . . . . . . . . . . . . . . . . . 72
Voice Display . . . . . . . . . . . . . . . . . . . 18
Voice Menu . . . . . . . . . . . . . . . . . . . . 23
Volume Coarse . . . . . . . . . . . . . . . . . 20
Volume Fine . . . . . . . . . . . . . . . . . . . . 20
W
Write Protect (M.D.R) . . . . . . . . . . . . 56
85
Page 88

Page 89

documentation manual, user maintenance, brochure, user reference, pdf manual
This file has been downloaded from:
User Manual and User Guide for many equipments like mobile phones, photo cameras, monther board, monitors, software, tv, dvd, and othes..
Manual users, user manuals, user guide manual, owners manual, instruction manual, manual owner, manual owner's, manual guide,
manual operation, operating manual, user's manual, operating instructions, manual operators, manual operator, manual product,
 Loading...