

Page 1

Owner's Manual
Page 2

SPECIAL MESSAGE SECTION
This product utilizes batteries or an external power supply (adapter). DO
NOT connect this product to any power supply or adapter other than
one described in the manual, on the name plate, or specifically recommended by Yamaha.
This product should be used only with the components supplied or; a
cart, rack, or stand that is recommended by Yamaha. If a cart, etc., is
used, please observe all safety markings and instructions that accompany the accessory product.
SPECIFICATIONS SUBJECT TO CHANGE:
The information contained in this manual is believed to be correct at the
time of printing. However, Yamaha reserves the right to change or
modify any of the specifications without notice or obligation to update
existing units.
This product, either alone or in combination with an amplifier and
headphones or speaker/s, may be capable of producing sound levels
that could cause permanent hearing loss. DO NOT operate for long
periods of time at a high volume level or at a level that is uncomfortable.
If you experience any hearing loss or ringing in the ears, you should
consult an audiologist.
IMPORTANT: The louder the sound, the shorter the time period before
damage occurs.
NOTICE:
Service charges incurred due to a lack of knowledge relating to how a
function or effect works (when the unit is operating as designed) are not
covered by the manufacturer’s warranty, and are therefore the owners
responsibility. Please study this manual carefully and consult your
dealer before requesting service.
ENVIRONMENTAL ISSUES:
Yamaha strives to produce products that are both user safe and environmentally friendly. We sincerely believe that our products and the
production methods used to produce them, meet these goals. In keeping with both the letter and the spirit of the law, we want you to be aware
of the following:
Battery Notice:
This product MAY contain a small non-rechargeable battery which (if
applicable) is soldered in place. The average life span of this type of
battery is approximately five years. When replacement becomes necessary, contact a qualified service representative to perform the replacement.
This product may also use “household” type batteries. Some of these
may be rechargeable. Make sure that the battery being charged is a
rechargeable type and that the charger is intended for the battery being
charged.
When installing batteries, do not mix batteries with new, or with batteries
of a different type. Batteries MUST be installed correctly. Mismatches or
incorrect installation may result in overheating and battery case rupture.
Warning:
Do not attempt to disassemble, or incinerate any battery. Keep all
batteries away from children. Dispose of used batteries promptly and as
regulated by the laws in your area. Note: Check with any retailer of
household type batteries in your area for battery disposal information.
Disposal Notice:
Should this product become damaged beyond repair, or for some
reason its useful life is considered to be at an end, please observe all
local, state, and federal regulations that relate to the disposal of products that contain lead, batteries, plastics, etc. If your dealer is unable to
assist you, please contact Yamaha directly.
NAME PLATE LOCATION:
The name plate is located on the bottom of the product. The model
number, serial number, power requirements, etc., are located on this
plate. You should record the model number, serial number, and the date
of purchase in the spaces provided below and retain this manual as a
permanent record of your purchase.
Model DD-20
DD-20/DD-20S
Serial No.
Purchase Date
92-BP (bottom)
PLEASE KEEP THIS MANUAL
FCC INFORMATION (U.S.A.)
1. IMPORTANT NOTICE: DO NOT MODIFY THIS UNIT!
This product, when installed as indicated in the instructions
contained in this manual, meets FCC requirements. Modifications not expressly approved by Yamaha may void your authority, granted by the FCC, to use the product.
2. IMPORTANT: When connecting this product to accessories
and/or another product use only high quality shielded cables.
Cable/s supplied with this product MUST be used. Follow all
installation instructions. Failure to follow instructions could void
your FCC authorization to use this product in the USA.
3. NOTE: This product has been tested and found to comply with
the requirements listed in FCC Regulations, Part 15 for Class “B”
digital devices. Compliance with these requirements provides a
reasonable level of assurance that your use of this product in a
residential environment will not result in harmful interference
with other electronic devices. This equipment generates/uses
radio frequencies and, if not installed and used according to the
instructions found in the users manual, may cause interference
harmful to the operation of other electronic devices. Compliance
* This applies only to products distributed by YAMAHA CORPORATION OF AMERICA.
This Class B digital apparatus
complies with Canadian ICES-003.
Cet appareil numérique de la classe B
est conforme à la norme NMB-003
du Canada.
2
with FCC regulations does not guarantee that interference will
not occur in all installations. If this product is found to be the
source of interference, which can be determined by turning the
unit “OFF” and “ON”, please try to eliminate the problem by
using one of the following measures:
Relocate either this product or the device that is being affected
by the interference.
Utilize power outlets that are on different branch (circuit breaker
or fuse) circuits or install AC line filter/s.
In the case of radio or TV interference, relocate/reorient the
antenna. If the antenna lead-in is 300 ohm ribbon lead, change
the lead-in to co-axial type cable.
If these corrective measures do not produce satisfactory results,
please contact the local retailer authorized to distribute this type
of product. If you can not locate the appropriate retailer, please
contact Yamaha Corporation of America, Electronic Service
Division, 6600 Orangethorpe Ave, Buena Park, CA90620
The above statements apply ONLY to those products distributed
by Yamaha Corporation of America or its subsidiaries.
(class B)
OBSERVERA!
Apparaten kopplas inte ur växelströmskällan (nätet) sá länge
som den ar ansluten till vägguttaget, även om själva apparaten
har stängts av.
ADVARSEL: Netspæendingen til dette apparat er IKKE
afbrudt, sálæenge netledningen siddr i en stikkontakt, som er t
endt — ogsá selvom der or slukket pá apparatets afbryder.
VAROITUS: Laitteen toisiopiiriin kytketty käyttökytkin ei irroita
koko laitetta verkosta.
(standby)
Page 3

PRECAUTIONS
PLEASE READ CAREFULLY BEFORE PROCEEDING
* Please keep these precautions in a safe place for future reference.
WARNING
Always follow the basic precautions listed below to avoid the possibility of serious injury or even death from electrical shock,
short-circuiting, damages, fire or other hazards. These precautions include, but are not limited to, the following:
• Do not open the instrument or attempt to disassemble the internal parts or modify them in any
way. The instrument contains no user-serviceable parts. If it should appear to be malfunctioning,
discontinue use immediately and have it inspected by qualified Yamaha service personnel.
• Do not expose the instrument to rain, use it near water or in damp or wet conditions, or place
containers on it containing liquids which might spill into any openings.
• If the AC adaptor cord or plug becomes frayed or damaged, or if there is a sudden loss of sound
during use of the instrument, or if any unusual smells or smoke should appear to be caused by
it, immediately turn off the power switch, disconnect the adaptor plug from the outlet, and have
the instrument inspected by qualified Yamaha service personnel.
CAUTION
Always follow the basic precautions listed below to avoid the possibility of physical injury to you or others, or damage to the
instrument or other property. These precautions include, but are not limited to, the following:
• Do not place the AC adaptor cord near heat sources such as heaters or radiators, and do not
excessively bend or otherwise damage the cord, place heavy objects on it, or place it in a position where anyone could walk on, trip over, or roll anything over it.
• When removing the electric plug from the instrument or an outlet, always hold the plug itself and
not the cord.
• Do not connect the instrument to an electrical outlet using a multiple-connector. Doing so can
result in lower sound quality, or possibly cause overheating in the outlet.
• Unplug the AC power adaptor when not using the instrument, or during electrical storms.
• Always make sure all batteries are inserted in conformity with the +/- polarity markings. Failure
to do so might result in overheating, fire, or battery fluid leakage.
• Always replace all batteries at the same time. Do not use new batteries together with old ones.
Also, do not mix battery types, such as alkaline batteries with manganese batteries, or batteries
from different makers, or different types of batteries from the same maker, since this can cause
overheating, fire, or battery fluid leakage.
• Do not dispose of batteries in fire.
• Do not attempt to recharge batteries that are not intended to be charged.
• When the batteries run out, or if the instrument is not to be used for a long time, remove the
batteries from the instrument to prevent possible leakage of the battery fluid.
• Keep batteries away from children.
• If the batteries do leak, avoid contact with the leaked fluid. If the battery fluid should come in
contact with your eyes, mouth, or skin, wash immediately with water and consult a doctor. Battery fluid is corrosive and may possibly cause loss of sight or chemical burns.
• Before connecting the instrument to other electronic components, turn off the power for all components. Before turning the power on or off for all components, set all volume levels to minimum. Also, be sure to set the volumes of all components at their minimum levels and gradually
raise the volume controls while playing the instrument to set the desired listening level.
• Do not expose the instrument to excessive dust or vibrations, or extreme cold or heat (such as in
direct sunlight, near a heater, or in a car during the day) to prevent the possibility of panel
disfiguration or damage to the internal components.
• Do not use the instrument near other electrical products such as televisions, radios, or speakers,
since this might cause interference which can affect proper operation of the other products.
• Do not place the instrument in an unstable position where it might accidentally fall over.
• Before moving the instrument, remove all connected adaptor and other cables.
• Use the specified adaptor (PA-3B, PA-3C or an equivalent recommended by Yamaha) only.
Using the wrong adaptor can result in damage to the instrument or overheating.
• Before cleaning the instrument, always remove the electric plug from the outlet. Never insert or
remove an electric plug with wet hands.
• Check the electric plug periodically and remove any dirt or dust which may have accumulated on
it.
• Do not put burning items, such as candles, on the unit.
A burning item may fall over and cause a fire.
• When cleaning the instrument, use a soft, dry cloth. Do not use paint thinners, solvents, cleaning
fluids, or chemical-impregnated wiping cloths. Also, do not place vinyl, plastic or rubber objects
on the instrument, since this might discolor the panel or keyboard.
• Do not rest your weight on, or place heavy objects on the instrument, and do not use excessive
force on the buttons, switches or connectors.
• Do not operate the instrument for a long period of time at a high or uncomfortable volume level,
since this can cause permanent hearing loss. If you experience any hearing loss or ringing in the
ears, consult a physician.
Yamaha cannot be held responsible for damage caused by improper use or modifications
to the instrument, or data that is lost or destroyed.
Always turn the power off when the instrument is not in use.
Make sure to discard used batteries according to local regulations.
The illustrations as shown in this owner’s manual are for instructional purposes only, and
may be different from the ones on your instrument.
Any mention or reference to the DD-20 in this manual also applies to the model DD-20S.
Entsorgung leerer Batterien (nur innerhalb Deutschlands)
Leisten Sie einen Beitrag zum Umweltschutz. Verbrauchte
Batterien oder Akkumulatoren dürfen nicht in den Hausmüll. Sie
können bei einer Sammelstelle für Altbatterien bzw. Sondermüll
abgegeben werden. Informieren Sie sich bei Ihrer Kommune.
(battery)
(4)-7
3
Page 4

Welcome
Congratulations! You are now the proud owner of a powerful new musical instrument capable of inspiring and fueling
your musical creativity. This is not just another digital percussion instrument. The DD-20 is the result of passion,
vision, and commitment from people who want you to enjoy
yourself every time you play it. We’re sure you’ll agree as you
discover the limitless possibilities of your new digital percussion instrument! Keep this manual in a safe place for future
reference.
Contents
The DD-20 At a Glance.................................................. 6
Setting Up ...................................................................... 7
Playing the Demo ..........................................................8
Percussion Set .............................................................. 8
Pad Assign..................................................................... 9
Style................................................................................ 9
Tempo .......................................................................... 10
Tap Start....................................................................... 10
Auto Roll ...................................................................... 11
Sound Effect ................................................................ 11
Troubleshooting.......................................................... 12
Specifications.............................................................. 12
Percussion Set List..................................................... 13
Voice List ..................................................................... 13
4
Page 5

Taking Care of the DD-20
Avoid Heat
Avoid placing the DD-20 near windows, heaters or other areas subject to
excessive heat or in a car exposed to direct sunlight.
Avoid Dust and Moisture
Avoid locations where the DD-20 is likely to be exposed to excessive dust or
moisture.
Avoid Physical Shocks
Do not subject the DD-20 to strong physical shocks and avoid placing heavy
objects on it.
Avoid Television and Radio Interference
The DD-20 contains digital circuitry and may cause interference if it is
placed too close to radio or television receivers. If interference occurs, move
the DD-20 farther away from the affected receiver(s).
Cleaning the DD-20
Use only a soft, dry or slightly damp cloth to clean the DD-20. Never use
solvents or thinners to clean the instrument.
Avoid Power Cord Damage
Do not place the DD-20 where somebody is liable to step on, trip over or
crush the power cord or any other connecting cables.
Making Connections
Before making any connections, turn off the power of the DD-20 and any
other equipment. Lower the volume on all audio equipment to the minimum
level when turning the power on.
5
Page 6

HEADPHONES/
AUX. OUT
DC IN 10-12V
+
_
HEADPHONES/
AUX
. O
UT
DC
IN
10-12V
+
_
The DD-20 At a Glance
Front View
LED display
LED display shows, the
selected Style, Volume,
Percussion Set, Tempo,
Sound Effect, Auto Roll,
and other settings.
STYLE list
The Style list is
on the front
panel for easy
reference.
VOLUME buttons
The volume of the DD20 is controlled by the
two VOLUME buttons.
The maximum volume
is automatically set
when you turn on the
power. Holding down
either the
or
button decreases
or increases
the volume
rapidly.
-15dB
-18dB
-21dB
-24dB
L1 L2 L3 L4 L5 L6 L7 L8 L9
-6dB
-9dB
-12dB
STYLE LIST
00-05 DANCE
06-09 HOUSE
10-13 HIP HOP
14-16 RAP
17-19 DISCO
20-23 POP ROCK
24-26 HARD ROCK
27-28 HEAVY METAL
29-31 CONTEMPO. ROCK
VOLUME
STANDBY ON
STANDBY/ON
switch
To turn on the
DD-20, move the
STANDBY/ON
switch to the right;
to turn it off move
the STANDBY/ON
switch to the left.
MAX
-3dB
32-35 8 BEAT
36-39 16 BEAT
40-43 ROCK SHUFFLE
44 PROGRE. ROCK
45 PUNK ROCK
46 TECHNO ROCK
47 LATIN ROCK
48-50 ROCK' N' ROLL
51-53 RHYTHM & BLUES
54-56 SOUL
SELECTOR
BEAT
STYLE / PERC.SET / TEMPO
STYLE PERC.SET TEMPO DEMO
PAD ASSIGNTAP
START
AUTO
START/
OFF
ROLL
STOP
ECHO
FLAM
ROLL
SELECTOR dial
The SELECTOR dial can
be an extremely quick
way to adjust the
Percussion Set, Pad
Assignment, Auto
Rhythm Style, Tempo
and Sound Effect sets.
Refer to each section
appropriately, for details.
Side View
SE
SELECT
1
2
3
4
57-60 FUNK
61-65 SWING
66-67 JAZZ BALLAD
68-71 FUSION
72-73 BOSSA NOVA
74-76 SAMBA
77-79 SALSA
80-81 REGGAE
82 CALYPSO
83 MERENGUE
84 BEGUINE
85 RHUMBA
86 MAMBO
87 CHA-CHA
88 TANGO
89-90 AFRICAN
91 COUNTRY
92-93 MARCH
94-96 WALTZ
97-99 METRONOME
SOUND EFFECT PADS
SOUND EFFECT pads
The DD-20 has four
Sound Effect pads
featuring a total of 16
realistic sound effects.
Operating buttons
STYLE (See page 9.)
PERC. SET (See page 8.)
TEMPO (See page 10.)
DEMO (See page 8.)
TAP START (See page 10.)
PAD ASSIGN (See page 9.)
SE SELECT (See page 11.)
START/ STOP
(See pages 8, 9 and 10.)
AUTO ROLL (See page 11.)
Supplied Accessories
• Percussion Sticks
6
Page 7
Percussion Pads
Striking two percussion pads
at the same time produces
simultaneous sounds according to the voices assigned to
the respective pads.
Sensitivity
The DD-20’s main percussion pads feature touch
sensors so that they respond
just like acoustic percussion
instruments. Striking the
percussion pads with different force results in relatively
loud or soft sounds accordingly. Be careful not to strike
the pads with excessive force
as this may seriously damage
the percussion pad sensors.
Setting Up
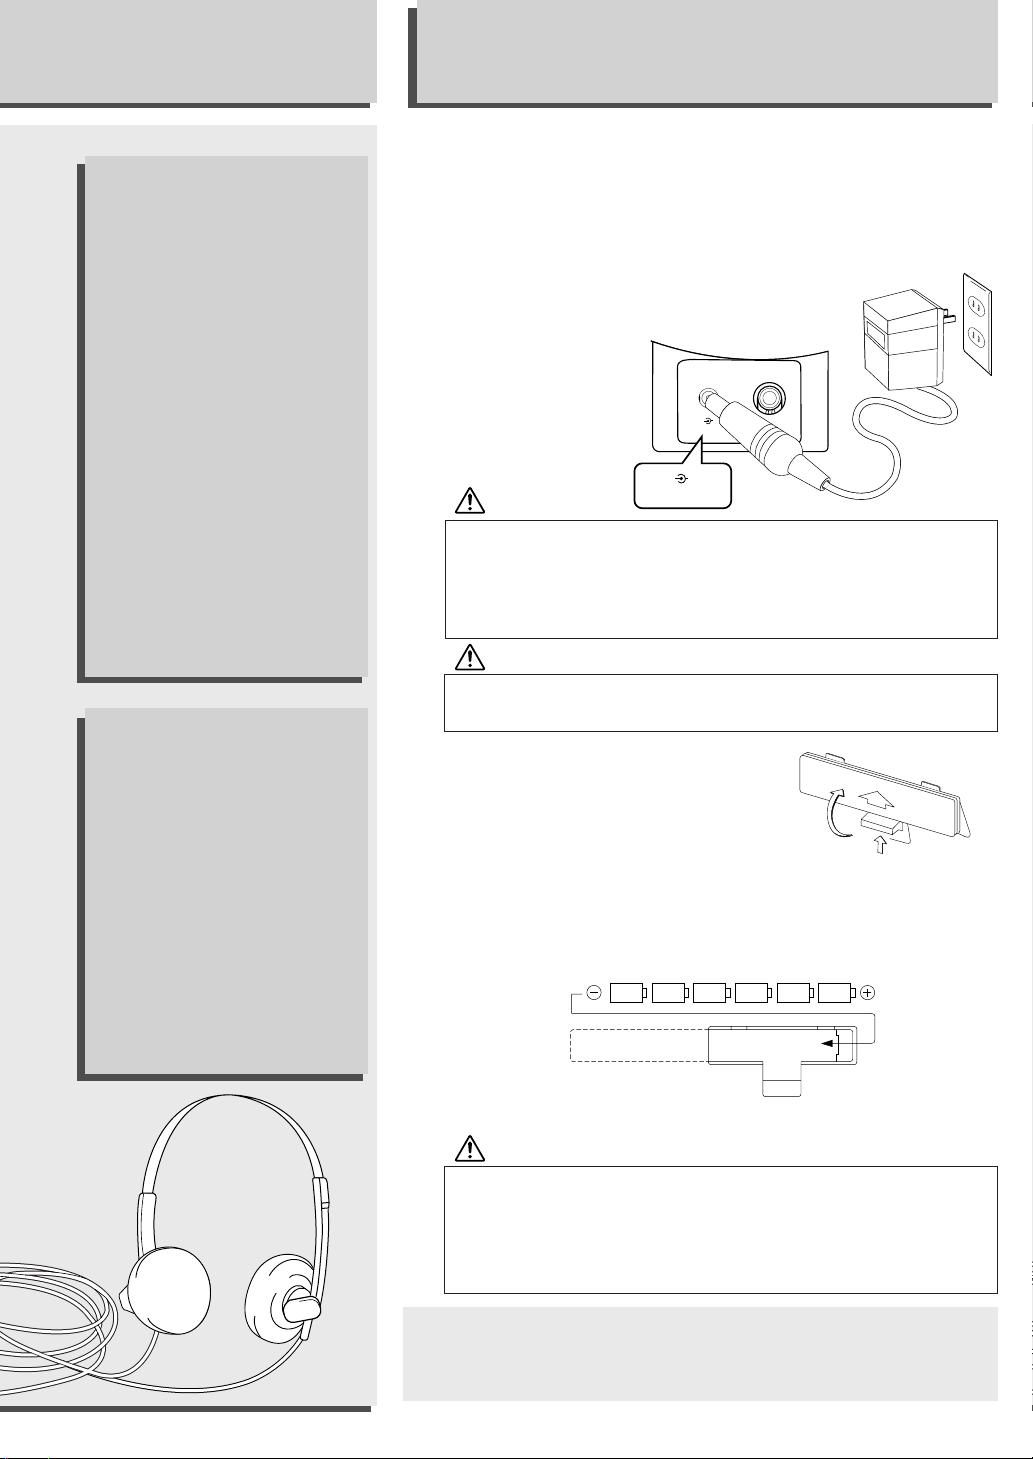
Supplying Power
The DD-20 will operate on either an optional power adaptor or
optional batteries.
▼ To connect a power adaptor:
1. Connect only the Yamaha PA-3B or PA3C power adaptor to the DC IN jack of
the DD-20.
2. Plug the power
adaptor into an AC
power outlet.
_
+
HEADPHONES/
DC IN 10-12V
_
+
WARNING
Use ONLY the Yamaha PA-3B, PA-3C AC Power Adaptor
(or other adaptor specifically recommended by Yamaha)
to power your instrument from the AC mains. The use of
other adaptors may result in irreparable damage to both
the adaptor and the DD-20.
CAUTION
Unplug the AC Power Adaptor when not using the DD20, or during electrical storms.
DC IN 10-12V
AUX. OUT
Headphones
You can use a standard pair
of stereo headphones, such as
Yamaha’s HPE-3 or HPE150, with the DD-20 for
private practice.
To connect headphones insert
the headphone plug into the
HEADPHONES/AUX. OUT
jack. The DD-20’s internal
speakers will switch off
automatically when you plug
in a pair of headphones.
▼ To insert batteries:
1. Remove the battery compartment
cover located on the bottom of the
DD-20.
2. Insert six (6) 1.5 V “AA” (R-6, SUM-3) or equivalent
batteries into the battery compartment.
Make sure the polarities are lined up as indicated in the battery
compartment.
3. Replace the battery compartment cover securely.
CAUTION
Never mix old and new batteries or different types of
batteries (e.g., alkaline and manganese).
To prevent possible damage from battery leakage,
remove the batteries from the instrument if it is not to
be used for a long time.
❏
When the batteries are low, replace with a complete set of six new
batteries. Never mix old and new batteries or different types of batteries. The batteries are low when the DD-20’s voices become noticeably
distorted or the DD-20 resets to default settings unexpectedly.
OPEN
7
Page 8

Playing the Demo
P ercussion Set
To give you an idea of the DD-20’s sophisticated capabilities, it comes with a demonstration
song.
▼ To play back the demonstration
song:
1. Press the DEMO button.
DEMO
2. To stop playback, press either the DEMO
button again or the START/STOP button.
START/
DEMO
OR
You can begin playing the DD-20’s percussion
pads as soon as you turn the STANDBY/ON
switch on and adjust the volume to an appropriate level.
STOP
The DD-20 allows you to choose from ten
different Percussion Sets quickly and easily.
Nine Percussion Sets have preset voice combinations. (See Percussion Set List on page 13.).
The DD-20 has one Custom Percussion Set
allowing you to combine any four of the DD20’s voices into a set. (See “Pad Assign” on
page 9.)
▼ To select a Percussion Set:
1. Press the PERC. SET button to enter the
Percussion Set mode.
PERC.SET
The current Percussion Set number appears in
the LED display.
You have approximately three seconds after
the PERC. SET button is released to start
selecting a Percussion Set before the DD-20
returns to the Auto Rhythm Style mode.
2. Press the PERC. SET button repeatedly or
turn the SELECTOR dial until the desired
Percussion Set number appears in the
LED display.
PERC.SET
OR
SELECTOR
STYLE LIST
STANDBY ON
VOLUME
00-05 DANCE
06-09 HOUSE
10-13 HIP HOP
14-16 RAP
17-19 DISCO
20-23 POP ROCK
24-26 HARD ROCK
27-28 HEAVY METAL
29-31 CONTEMPO. ROCK
SELECTOR
32-35 8 BEAT
36-39 16 BEAT
40-43 ROCK SHUFFLE
44 PROGRE. ROCK
45 PUNK ROCK
46 TECHNO ROCK
47 LATIN ROCK
48-50 ROCK' N' ROLL
51-53 RHYTHM & BLUES
54-56 SOUL
BEAT
STYLE / PERC.SET / TEMPO
STYLE PERC.SETTEMPODEMO
PAD ASSIGNTAP
START
AUTO
START/
OFF
ROLL
STOP
ECHO
FLAM
ROLL
57-60 FUNK
84 BEGUINE
61-65 SWING
85 RHUMBA
66-67 JAZZ BALLAD
86 MAMBO
87 CHA-CHA
68-71 FUSION
72-73 BOSSA NOVA
88 TANGO
74-76 SAMBA
89-90 AFRICAN
91 COUNTRY
77-79 SALSA
92-93 MARCH
80-81 REGGAE
94-96 WALTZ
82 CALYPSO
83 MERENGUE
97-99 METRONOME
SOUND EFFECT PADS
SE
SELECT
1
2
3
4
8
The Percussion Set numbers only cycle
forward when you press the PERC. SET
button.
The SELECTOR dial turns either clockwise
or counterclockwise and the Percussion Set
numbers cycle up or down accordingly.
❏
Percussion Sets appear in the LED display as P0P9. P0 is the Custom Percussion Set and P1-P9
represent different combinations of four voices.
❏
Percussion Set P1 is automatically selected when
the power is turned on.
Page 9

StylePad Assign
The DD-20 contains a total of 55 high quality
voices that can be assigned to each of the four
percussion pads. The Custom Set pad assignment allows any combinations of the 55 voices.
▼
To assign a voice to a percussion pad:
1. Strike the percussion pad to which you want
to assign a voice.
STYLE LIST
32-35 8 BEAT
57-60 FUNK
84 BEGUINE
36-39 16 BEAT
61-65 SWING
00-05 DANCE
06-09 HOUSE
10-13 HIP HOP
14-16 RAP
17-19 DISCO
20-23 POP ROCK
24-26 HARD ROCK
27-28 HEAVY METAL
29-31 CONTEMPO. ROCK
VOLUME
STANDBYON
2. Press and hold either the
85 RHUMBA
40-43 ROCK SHUFFLE
66-67 JAZZ BALLAD
86 MAMBO
44 PROGRE. ROCK
68-71 FUSION
87 CHA-CHA
BEAT
72-73 BOSSA NOVA
45 PUNK ROCK
88 TANGO
46 TECHNO ROCK
74-76 SAMBA
89-90 AFRICAN
91 COUNTRY
47 LATIN ROCK
77-79 SALSA
48-50 ROCK' N' ROLL
92-93 MARCH
80-81 REGGAE
51-53 RHYTHM & BLUES
82 CALYPSO
94-96 WALTZ
54-56 SOUL
83 MERENGUE
97-99 METRONOME
STYLE / PERC.SET / TEMPO
SELECTOR
SOUND EFFECT PADS
STYLEPERC.SETTEMPO DEMO
SE
PAD ASSIGNTAP
SELECT
START
1
AUTO
2
START/
OFF
ROLL
3
STOP
ECHO
4
FLAM
ROLL
or W PAD
Q
ASSIGN button.
PAD ASSIGN
The currently assigned voice number is
shown in the LED display.
3. While holding either PAD ASSIGN button,
strike the same percussion pad repeatedly
or turn the SELECTOR dial until the
desired voice number appears in the LED
display. (See the Voice List on page 13.)
SELECTOR
OR
The DD-20 features a large variety of Auto
Rhythm Styles including variations of basic 8
and 16 beat patterns as well as more exotic
styles such as Son Afro and Calypso. You can
play along with any of the DD-20 Auto Rhythm
Styles. (See the front panel for the Style list.)
▼ To select and play back an Auto
Rhythm Style:
1. Press the STYLE button repeatedly or
turn the SELECTOR dial until the desired
Auto Rhythm Style number appears in the
LED display.
STYLE
OR
The Auto Rhythm Style numbers only cycle
forward when you press the STYLE button.
The SELECTOR dial turns either clockwise
or counterclockwise and the Auto Rhythm
Style numbers cycle up or down accordingly.
2. Press the START/STOP button.
START/
STOP
SELECTOR
Voice numbers cycle from 00 to 54 to 00
when striking the percussion pad.
The
voice number and the
PAD ASSIGN button decreases the
Q
PAD ASSIGN
W
button increases the voice number.
4. Release the
or W PAD ASSIGN button.
Q
A new voice is now assigned to the designated percussion pad.
5. Repeat steps 1 to 4 for any or all of the
other DD-20 percussion pads to set the
four percussion pads to the desired
voice(s).
❏
The DD-20 always returns to Custom Set P0 when
assigning voices to a percussion pad.
❏
All pad assignment changes are memorized in
Custom Set P0 until the power is turned off.
The currently selected Auto Rhythm Style
plays back.
To stop playback, press the START/STOP
button again.
❏
You can select another Auto Rhythm Style or
enter the Tempo, Percussion Set or Sound Effect
Set mode while any Auto Rhythm Style is playing.
❏
Auto Rhythm Style “Dance 1” is automatically
selected and “00” appears in the LED
display when the power is turned on.
❏
Auto Rhythm Style “00” is selected and appears
automatically in the LED display when the
demonstration song is stopped.
9
Page 10
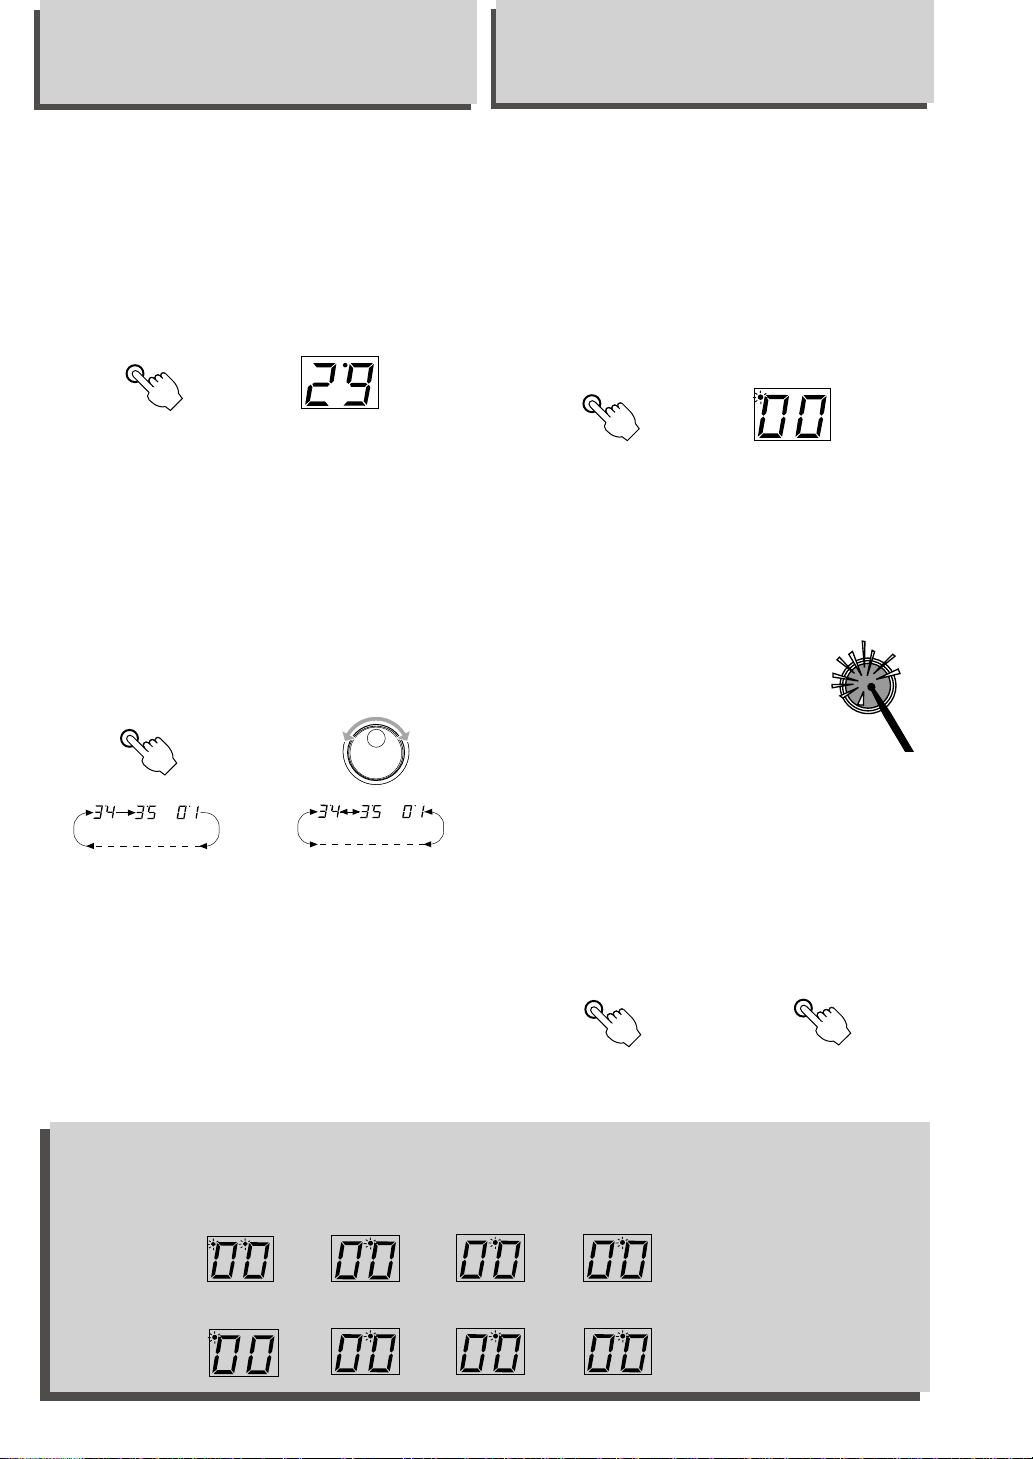
Tempo
Tap Start
The tempo can be adjusted in 35 steps, from 40
to 280 beats per minute (bpm). The steps are
shown in the LED display as values from 01 to
35. The default tempo varies according to Auto
Rhythm Style.
▼ To adjust the tempo:
1. Press the TEMPO button to enter the
Tempo mode.
TEMPO
The currently selected Tempo value appears
in the LED display and the right Tempo dot
lights.
You have approximately three seconds after
releasing the TEMPO button to start adjusting the tempo setting before the DD-20
returns to Auto Rhythm Style mode.
2. Press the TEMPO button repeatedly or
turn the SELECTOR dial until the desired
tempo value appears in the LED display.
TEMPO
OR
SELECTOR
The DD-20 features a Tap Start function that
sets the overall tempo depending on how fast
you strike the percussion pads. This is an
advanced feature that is very useful for coordinating your playing tempo with the selected
Auto Rhythm Style tempo.
▼ To set the tempo with Tap Start:
1. Press the TAP START button to enter the
Tap Start mode.
TAP
START
The left Tempo dot flashes at the current
tempo indicating that you are in Tap Start
standby mode.
To cancel the Tap Start mode, press the TAP
START button again.
2. Strike any percussion pad
three or four times depending
on the time signature of the
selected Auto Rhythm Style.
3. Playback of the currently
selected Auto Rhythm Style will start at
the desired tempo right after the third or
fourth strike on the percussion pad.
The tempo values only cycle forward when
you press the TEMPO button.
The SELECTOR dial turns either clockwise
or counterclockwise and the tempo values
cycle up or down accordingly.
The range of available tempos is from 40 to
280 bpm. You can change the current tempo
while any Auto Rhythm Style is playing.
LED display Tempo Dots
The DD-20 has two tempo lights in the top of the LED display. During Auto Rhythm Style playback, the two
lights flash in a specific pattern so you can keep the beat easily.
The tempo lights flash as follows:
1st measure
1st Beat
2nd measure
10
2nd Beat
3rd Beat 4th Beat
4. To stop playback, press the START/STOP
button.
To stop playback and enter Tap Start standby
mode, press the TAP START button.
START/
STOP
OR
TAP
START
Page 11

Auto Roll
O
Sound Effect
The DD-20 is equipped with three Auto Roll
effects that help enhance your playing. The
effects include ECHO, FLAM and ROLL. Each
of these effects varies according to the selected
tempo so that the initial strike starts the effect
and the DD-20 keeps the beat throughout the
effect’s duration. Auto Roll effects work only
with the percussion pads.
▼ To select an Auto Roll effect:
1. Press the AUTO ROLL button once to
enter the Auto Roll mode.
AUTO
ROLL
The current Auto Roll setting will appear in the
LED display for approximately 3 seconds.
2. Select an effect from the list next to the
AUTO ROLL button and press the AUTO
ROLL button in succession until the
desired effect setting appears in the LED
display.
The Auto Roll OFF setting is automatically
selected when the power is turned on.
The Auto Roll function may produce unexpected
❏
effects or not produce any effect at all, depending
on the voice selected and the tempo setting.
OFF
ECH
FLAM
ROLL
The DD-20 has four sound effect pads that
feature 16 realistic and versatile sound effects. A
set of four different sound effects, represented
by the symbols printed on the DD-20’s front
panel, is available for each sound effect pad.
▼ To select different sound effects:
1. Press the SE SELECT button to enter the
Sound Effect mode.
SE
SELECT
1
2
3
4
The current sound effect set number will
appear in the LED display.
You have approximately three seconds, after
releasing of the SE SELECT button to start
selecting the sound effect setting before the
DD-20 returns to the Auto Rhythm Style mode.
2. Press the SE SELECT button repeatedly
or turn the SELECTOR dial until the
desired sound effect set number appears in
the LED display.
SE
SELECT
1
2
3
4
OR
SELECTOR
Effect Setting
(OFF)
(ECHO)
(FLAM)
(ROLL)
Description
No Auto Roll effects
are assigned.
The DD-20 will produce a
fading echo sound automatically.
The DD-20 will produce
a double note (called a
flam) for every single
note you play.
The DD-20 will produce a
drum roll synchronized
with the tempo setting.
Each time you strike a
percussion pad a roll will
follow.
The sound effect set numbers only cycle
forward from E1 to E4 when you press the
SE SELECT button.
The SELECTOR dial turns either clockwise
or counterclockwise and the sound effect set
numbers cycle up or down accordingly.
11
Page 12

Troubleshooting
Specifications
In many cases, seemingly big problems or
malfunctions can be remedied easily. Please
check the following list before deciding that
your DD-20 is broken.
If the problem is not listed here or the suggested
remedy is ineffective, take the DD-20 to an
authorized Yamaha dealer for proper diagnosis
and repairs. Do not attempt to repair this digital
percussion instrument as serious damage may
occur.
A buzz or click occurs momentarily when the DD20 is turned ON or OFF.
❏ This is a normal power surge noise that occurs
when the STANDBY/ON switch is operated.
The LED display is completely dark.
❏ The batteries are low and should be replaced
immediately.
No sound comes from the speakers.
❏ The volume is turned down too low and should be
adjusted up appropriately.
❏ A plug is inserted into the HEADPHONES/AUX.
OUT jack and should be taken out immediately.
The wrong voice plays when you strike a percussion pad.
❏ The desired voice has not been assigned to the
percussion pad. Use the PAD ASSIGN function to
program the desired voice to the appropriate
percussion pad.
The custom pad voice assignments have disappeared or defaulted.
❏ The batteries are low and should be replaced
immediately.
❏ The STANDBY/ON switch has been turned
STANDBY and ON and the default voices have
replaced the desired voices. Use the PAD
ASSIGN function to program the desired voices
again.
When the percussion pads are struck, the LED
display goes dark momentarily and then changes
to the default reading “00”.
❏ The batteries are low and should be replaced
immediately.
Percussion pads
SE pads
Percussion sets
Auto Rhythm Styles
Instrument and Sound Effect Voices
Auxiliary Functions
Panel Controls
LED Display
Connectors
Main amplifier
Speaker
Power Supply
AC power adaptor
Batteries
Dimensions (W x D x H)
Weight
Supplied accessories
4 (touch sensitive)
4
9 preset + 1 custom
100
55
Tap Start, Auto Roll, Auto
Rhythm Style, Demonstration
Song
STANDBY/ON switch, SELECTOR dial, VOLUME buttons,
STYLE button, PERC. SET
button, TEMPO button, TAP
START button, PAD ASSIGN
buttons, START/STOP button,
AUTO/ROLL button, SE
SELECT button, DEMO button
STYLE/PERCUSSION SET/
TEMPO and other settings
DC IN 10-12V
Headphones/AUX.OUT
3.8W (EIAJ)
10.0cm
YAMAHA PA-3B or PA-3C
(sold separately)
Six “AA” size, R-6, or equivalent
batteries
(sold separately)
435mm x 236mm x 160mm
(17 1/8” x 9 1/4” x 6 1/3”)
1.4 Kg (3 lbs., 1oz.)
Percussion Sticks
12
* Specifications and descriptions in this owner’s
manual are for information purposes only. Yamaha
Corp. reserves the right to change or modify
products or specifications at any time without prior
notice. Since specifications, equipment or options
may not be the same in every locale, please check
with your Yamaha dealer.
Page 13

For details of products, please contact your nearest Yamaha
representative or the authorized distributor listed below.
Pour plus de détails sur les produits, veuillez-vous adresser à Yamaha ou
au distributeur le plus proche de vous figurant dans la liste suivante.
Die Einzelheiten zu Produkten sind bei Ihrer unten aufgeführten
Niederlassung und bei Yamaha Vertragshändlern in den jeweiligen
Bestimmungsländern erhältlich.
Para detalles sobre productos, contacte su tienda Yamaha más cercana
o el distribuidor autorizado que se lista debajo.
CANADA
Yamaha Canada Music Ltd.
135 Milner Avenue, Scarborough, Ontario,
M1S 3R1, Canada
Tel: 416-298-1311
U.S.A.
Yamaha Corporation of America
6600 Orangethorpe Ave., Buena Park, Calif. 90620,
U.S.A.
Tel: 714-522-9011
CENTRAL & SOUTH AMERICA
NORTH AMERICA
MEXICO
Yamaha de Mexico S.A. De C.V.,
Departamento de ventas
Javier Rojo Gomez No.1149, Col. Gpe Del
Moral, Deleg. Iztapalapa, 09300 Mexico, D.F.
Tel: 686-00-33
BRAZIL
Yamaha Musical do Brasil LTDA.
Av. Rebouças 2636, São Paulo, Brasil
Tel: 011-853-1377
ARGENTINA
Yamaha de Panamá S.A. Sucursal de Argentina
Viamonte 1145 Piso2-B 1053,
Buenos Aires, Argentina
Tel: 1-4371-7021
PANAMA AND OTHER LATIN
AMERICAN COUNTRIES/
CARIBBEAN COUNTRIES
Yamaha de Panamá S.A.
Torre Banco General, Piso 7, Urbanización Marbella,
Calle 47 y Aquilino de la Guardia,
Ciudad de Panamá, Panamá
Tel: +507-269-5311
EUROPE
THE UNITED KINGDOM
Yamaha-Kemble Music (U.K.) Ltd.
Sherbourne Drive, Tilbrook, Milton Keynes,
MK7 8BL, England
Tel: 01908-366700
IRELAND
Danfay Ltd.
61D, Sallynoggin Road, Dun Laoghaire, Co. Dublin
Tel: 01-2859177
GERMANY
Yamaha Music Central Europe GmbH
Siemensstraße 22-34, 25462 Rellingen, Germany
Tel: 04101-3030
SWITZERLAND/LIECHTENSTEIN
Yamaha Music Central Europe GmbH,
Branch Switzerland
Seefeldstrasse 94, 8008 Zürich, Switzerland
Tel: 01-383 3990
AUSTRIA
Yamaha Music Central Europe GmbH,
Branch Austria
Schleiergasse 20, A-1100 Wien, Austria
Tel: 01-60203900
THE NETHERLANDS
Yamaha Music Central Europe,
Branch Nederland
Clarissenhof 5-b, 4133 AB Vianen, The Netherlands
Tel: 0347-358 040
BELGIUM/LUXEMBOURG
Yamaha Music Central Europe GmbH,
Branch Belgium
Rue de Geneve (Genevastraat) 10, 1140 - Brussels,
Belgium
Tel: 02-726 6032
FRANCE
Yamaha Musique France, S.A.
Division Professionnelle
BP 70-77312 Marne-la-Vallée Cedex 2, France
Tel: 01-64-61-4000
ITALY
Yamaha Musica Italia S.P.A.
Combo Division
Viale Italia 88, 20020 Lainate (Milano), Italy
Tel: 02-935-771
SPAIN/PORTUGAL
Yamaha-Hazen Música, S.A.
Ctra. de la Coruna km. 17, 200, 28230
Las Rozas (Madrid), Spain
Tel: 91-639-8888
GREECE
Philippos Nakas S.A. The Music House
147 Skiathou Street, 112-55 Athens, Greece
Tel: 01-228 2160
SWEDEN
Yamaha Scandinavia AB
J. A. Wettergrens Gata 1
Box 30053
S-400 43 Göteborg, Sweden
Tel: 031 89 34 00
DENMARK
YS Copenhagen Liaison Office
Generatorvej 8B
DK-2730 Herlev, Denmark
Tel: 44 92 49 00
FINLAND
F-Musiikki Oy
Kluuvikatu 6, P.O. Box 260,
SF-00101 Helsinki, Finland
Tel: 09 618511
NORWAY
Norsk filial av Yamaha Scandinavia AB
Grini Næringspark 1
N-1345 Østerås, Norway
Tel: 67 16 77 70
ICELAND
Skifan HF
Skeifan 17 P.O. Box 8120
IS-128 Reykjavik, Iceland
Tel: 525 5000
OTHER EUROPEAN COUNTRIES
Yamaha Music Central Europe GmbH
Siemensstraße 22-34, 25462 Rellingen, Germany
Tel: +49-4101-3030
AFRICA
Yamaha Corporation,
Asia-Pacific Music Marketing Group
Nakazawa-cho 10-1, Hamamatsu, Japan 430-8650
Tel: +81-53-460-2312
MIDDLE EAST
TURKEY/CYPRUS
Yamaha Music Central Europe GmbH
Siemensstraße 22-34, 25462 Rellingen, Germany
Tel: 04101-3030
OTHER COUNTRIES
Yamaha Music Gulf FZE
LB21-128 Jebel Ali Freezone
P.O.Box 17328, Dubai, U.A.E.
Tel: +971-4-881-5868
HONG KONG
Tom Lee Music Co., Ltd.
11/F., Silvercord Tower 1, 30 Canton Road,
Tsimshatsui, Kowloon, Hong Kong
Tel: 2737-7688
INDONESIA
PT. Yamaha Music Indonesia (Distributor)
PT. Nusantik
Gedung Yamaha Music Center, Jalan Jend. Gatot
Subroto Kav. 4, Jakarta 12930, Indonesia
Tel: 21-520-2577
KOREA
Yamaha Music Korea Ltd.
Tong-Yang Securities Bldg. 16F 23-8 Yoido-dong,
Youngdungpo-ku, Seoul, Korea
Tel: 02-3770-0661
MALAYSIA
Yamaha Music Malaysia, Sdn., Bhd.
Lot 8, Jalan Perbandaran, 47301 Kelana Jaya,
Petaling Jaya, Selangor, Malaysia
Tel: 3-703-0900
PHILIPPINES
Yupangco Music Corporation
339 Gil J. Puyat Avenue, P.O. Box 885 MCPO,
Makati, Metro Manila, Philippines
Tel: 819-7551
SINGAPORE
Yamaha Music Asia Pte., Ltd.
11 Ubi Road #06-00, Meiban Industrial Building,
Singapore
Tel: 65-747-4374
TAI WAN
Yamaha KHS Music Co., Ltd.
3F, #6, Sec.2, Nan Jing E. Rd. Taipei.
Taiwan 104, R.O.C.
Tel: 02-2511-8688
THAILAND
Siam Music Yamaha Co., Ltd.
121/60-61 RS Tower 17th Floor,
Ratchadaphisek RD., Dindaeng,
Bangkok 10320, Thailand
Tel: 02-641-2951
THE PEOPLE’S REPUBLIC OF CHINA
AND OTHER ASIAN COUNTRIES
Yamaha Corporation,
Asia-Pacific Music Marketing Group
Nakazawa-cho 10-1, Hamamatsu, Japan 430-8650
Tel: +81-53-460-2317
OCEANIA
AUSTRALIA
Yamaha Music Australia Pty. Ltd.
Level 1, 99 Queensbridge Street, Southbank,
Victoria 3006, Australia
Tel: 3-9693-5111
NEW ZEALAND
Music Houses of N.Z. Ltd.
146/148 Captain Springs Road, Te Papapa,
Auckland, New Zealand
Tel: 9-634-0099
COUNTRIES AND TRUST
TERRITORIES IN PACIFIC OCEAN
Yamaha Corporation,
Asia-Pacific Music Marketing Group
Nakazawa-cho 10-1, Hamamatsu, Japan 430-8650
Tel: +81-53-460-2312
ASIA
HEAD OFFICE
[PK] 27
Yamaha Corporation, Pro Audio & Digital Musical Instrument Division
Nakazawa-cho 10-1, Hamamatsu, Japan 430-8650
Tel: +81-53-460-3273
Page 14

Yamaha PK CLUB (Portable Keyboard Home Page, English only)
http://www.yamahaPKclub.com/
Yamaha Manual Library
http://www2.yamaha.co.jp/manual/english/
M.D.G., Pro Audio & Digital Musical Instrument Division, Yamaha Corporation
© 2003 Yamaha Corporation
WB43360 304PO???.?-01A0 Printed in Malaysia
Page 15

documentation manual, user maintenance, brochure, user reference, pdf manual
This file has been downloaded from:
User Manual and User Guide for many equipments like mobile phones, photo cameras, monther board, monitors, software, tv, dvd, and othes..
Manual users, user manuals, user guide manual, owners manual, instruction manual, manual owner, manual owner's, manual guide,
manual operation, operating manual, user's manual, operating instructions, manual operators, manual operator, manual product,
 Loading...