


PRECAUTIONS
IMPORTANT! PLEASE READ
BEFORE PROCEEDING.
Following the important precautions below will help ensure you
many years of trouble free use from your CS1x.
LOCATION
• In order to avoid causing serious damage to
the CS1x, do not expose it to direct sunlight,
high temperatures, excessive humidity,
excessive dust or strong vibration.
• Always place the CS1x on a solid surface such
as a keyboard stand or a sturdy table or desk.
POWER SUPPLY
• Turn the power switch off when the CS1x is
not in use.
• Use only the supplied PA-3B or an equivalent
AC power adaptor. Use of an incompatible
adaptor may result in irreparable damage to
the CS1x, and could even pose a serious
shock hazard.
• The power adaptor should be unplugged
from the AC outlet if the CS1x is not to be
used for an extended period of time.
• Unplug the CS1x during electrical storms.
• Avoid plugging the CS1x into the same AC
outlet as appliances with high power
consumption such as electric heaters or
ovens. Also avoid using multiple-plug
adapters since these can result in reduced
sound quality and possibly even damage to
the instrument.
UNPLUG ALL INSTRUMENTS
WHEN MAKING CONNECTIONS
• To avoid causing damage to the CS1x and
other devices to which it is connected, such
as a sound system or MIDI instruments, turn
off the power and unplug all related devices
prior to connecting or disconnecting audio
and MIDI cables.
ELECTRICAL INTERFERENCE
• Avoid using the CS1x near televisions, radios
or other devices which generate
electromagnetic fields, since this may cause
the CS1x to malfunction, and possibly
generate interference noise in the other
devices.
BACK-UP BATTERY
• The CS1x contains a special long-life battery
that retains the contents of its User memory
when the power is turned off. The back-up
battery should last for several years. When it
needs to be replaced, the message "Battery
Low" will appear in the display when the
power is turned on. When this happens, have
the backup battery replaced by qualified
Yamaha service personnel.
to replace the backup battery yourself.
Do not attempt
HANDLING AND TRANSPORT
• Always handle the CS1x with care. Physical
shocks caused by dropping, bumping, or
placing heavy objects on it can result in
serious damage to the CS1x.
• Never apply excessive force to the controls,
connectors or other parts.
• Disconnect all cables before moving the
CS1x. Always unplug cables by gripping the
plug firmly, and not by pulling on the cable.
CLEANING
• Never use chemical solvents or thinners to
clean the CS1x, since these will damage the
finish or dull the keys. Wipe the instrument
clean with a soft, dry cloth. If necessary, use
a soft, clean cloth slightly moistened with a
diluted, mild detergent. Then wipe the
instrument thoroughly with a dry cloth.
• Avoid placing vinyl objects on top of the
instrument, since vinyl can stick to and
discolor the surface.
DATA BACKUP
• Yamaha recommends that you regularly save
your music data using an external MIDI data
storage device such as the Yamaha MDF2
MIDI Data Filer. Yamaha cannot be held
responsible for the accidental loss of CS1x
data.
SERVICE AND MODIFICATION
• The CS1x contains no user serviceable parts,
so never open the case or tamper with the
internal circuitry in any way. Doing so may
result in electrical shock or damage to the
instrument. Refer all servicing to qualified
Yamaha service personnel.
IMPORTANT NOTE
Yamaha cannot be held responsible for damage
to the CS1x resulting from improper handling
or operation, or for the accidental loss of CS1x
data.
NOTICES
• The company names and product names in
this owner's manual are the trademarks or
registered trademarks of their respective
companies.
• The LCD screens as illustrated in this owner's
manual are for instructional purposes, and may
appear somewhat different from the screens
which appear on your instrument.
1

Introduction
In the beginning, there was the knob…
And the knob was good. Great, in fact.
You could just reach out and grab it. Turn it left. And turn it right.
Interact with it in realtime.
And there were knobs of all kinds. Knobs for changing the attack
and release times of a sound. Knobs for setting the cutoff filter and
resonance. And knobs for controlling many other aspects of analog
synthesizer sounds.
By twisting a knob one way and another, a vast, practically endless
variety of electronic sounds could be called forth. Fat sounds. Strange
sounds. Beautiful sounds. Magical sounds.
It was the 1960s, and such was the power of the knob that music
was changed forever.
And the term synthesizer became a household word.
But the knob was not perfect…
From the start the knob was brilliant and easy to grasp. It put the
musician in complete control of the sound. And opened up a whole
new world of sonic exploration.
It was the 1970s, and some of the greatest recordings in music history
were being made. Analog "synths" were finding their way into the stages,
studios and professional composing suites of the world.
But as simple, straightforward and powerful as analog synths were,
they were also for the most part priced out of reach of the struggling
musician. Plus they tended to be sensitive to slight fluctuations in electric
current which frequently wreaked havoc with pitch, thus making tuning
inherently unstable.
And there was no reliable way to save panel settings and original
sounds except for tediously scrawling lists and notes with pencil and
paper.
Surely there must be a better way.
Engineers the world over went to work searching for a better way,
and great strides were made in the development of more stable, lower
cost, and more convenient technologies.
A breakthrough in electronic sound synthesis was imminent.
Then came the miracle of digital…
The beginning of the 1980s saw breakthroughs in digital synthesizer
technology which was to once again revolutionize modern music.
Musicians everywhere embraced affordable new technologies like
FM, which could accurately reproduce the sound characteristics of
acoustic and other instruments, and AWM (PCM), which relied on
"samples" of actual instrument sounds to produce an amazing wealth
of musical textures and sonic options.
The new spate of digital synthesizers were—on the outside—much
more streamlined than analog synths, sporting a minimal array of buttons
and a display screen which provided information about each feature.
Overnight the knob was rendered virtually obsolete.
Unstable tunings were a thing of the past. Memory was the future.
Digital synths were—on the inside—more loaded than ever, as
hundreds of amazing acoustic and electronic sounds, or voices, could
be stored and recalled at the touch of a button. Scores of new and exciting
features were available. Entire panel settings and configurations could
also be stored for instant recall.
It was the digital revolution that made MIDI, GM, XG, sequencing,
sampling, looping, multitimbral play, DSP effects and many other
breakthroughs in electronic music technology possible.
Developments that have changed forever the way we teach, compose,
2
2

perform and listen to music.
Global design standards ensured that music hardware and software
products made by different manufacturers could work together
seamlessly.
But alas, digital did not create a perfect world.
Chaos reigned over the land…
As convenient, dynamic and accessible as digital synthesis was, still
it was not perfect. It had certain limitations, though different ones than
analog synthesis.
Streamlined panel layouts and the demise of the knob meant that
all those hundreds of great new features had to be organized and stacked
in pages and subpages of hidden menus—which might mean several
presses of one or more buttons just to find a feature, and several more
to actually manipulate it.
And the steep learning curve of many digital synthesizers became a
legend unto itself. Alarmingly, the synth was on its way to becoming a
thing of science, rather than an intuitive musical instrument.
It was, therefore, inevitable that many would come to mourn
nostalgically for the days of simplicity—for the knob. For those warm,
fat, wonderful analog sounds. For fewer hidden features.
And for a simpler, easier to use electronic instrument.
There was a definite need for an analog-style digital synthesizer
that would have intuitive knobs plus all the benefits of digital memories
and other convenient—especially interactive—features.
One that could satisfy even the most die-hard advocate of analog or
digital synthesis.
A perfectly versatile synthesizer as attractive to first-time synth
owners as to desktop music hobbyists, serious amateurs, and even
seasoned professionals.
A powerful stand-alone performance instrument with hot dance
music and other versatile voices, as suited for the cutting edge as for the
classics.
An ideal multitimbral MIDI component which could fit right into
even the most sophisticated expanded system.
One with extremely modest pricing for such powerful utility.
It was only a matter of time before the thunder of analog would
unite with the lightning of digital to once again challenge convention
and ultimately change the landscape of music possibilities yet once more.
And Yamaha heard their cries…
Fortunately Yamaha recognized that something new and significant
must be created to bring together the best of both analog and digital
worlds.
The result was the Yamaha Control Synthesizer CS1x.
The CS1x takes the best of analog—simplicity of use, natural
interactivity, thick sound, and, of course, the knob—and unites it with
the best of digital—reliable pitch, plenty of memory, one-touch setting
reconfigurations, hundreds of voices, MIDI, and much, much more—
to begat a truly unique "control" synthesizer.
One with all the familiar concepts loved by both analog and digital
afficianados. One destined to satisfy even the most meticulous purist in
each camp.
Nothing to hide…
Perhaps the most striking—certainly refreshing—aspect of the CS1x
Control Synthesizer is the way it wears its heart on its sleeve.
What you see is what you get: all features are self-evidently displayed
on the panel.
A collection of six rotary Sound Control Knobs are irresistible to the
touch—and provide instant sonic results when turned.
Between the Sound Control Knobs, the clearly labeled panel switches,
and the back lit LCD, the current status of the CS1x is always crystal
clear.
The numeric keypad and other buttons—including Scenes, or
"snapshots" of knob positions—give you quick and easy access to any
parameter or setup you need, the moment you need it.
As such, the CS1x is an unprecedented realtime performance
instrument.
The hundreds of great sounding AWM2 (Advanced Wave Memory
2) instrument voices (created from high quality recordings of actual
instrument and other sounds), three digital effects units (with 11 Reverb,
11 Chorus and 43 Variation type effects) and scores of other parameters
can be configured in an almost unlimited variety of ways and stored in
memory for instant recall.
Performances, or complete configurations of up to four Layers
(voices) playing simultaneously, plus effect and other parameters, and
Multis, or a configuration of up to 16 Parts and other parameters for
multitimbral play (using an external sequencer or computer), provide a
unique array of options which make the CS1x a handy synth for literally
any type of music situation.
Thirty-two notes of polyphony ensure that you always have enough
available notes to play even the most demanding arrangement.
The on-board arpeggiator which can generate various types of
automatic arpeggios or be controlled by an external MIDI clock provides
an extremely useful tool for spicing up your masterpieces—or setting
the dance floor on fire.
Go forth and multiply…
As simple—yet powerful—as the CS1x is on its own, it has also
been specially engineered to easily fit right into any type of expanded
music system you wish to create.
General MIDI (GM) compatibility makes the CS1x an ideal
multitimbral tone generator for accurately playing any of the many
Standard MIDI File or other commercially available GM music data using
an external sequencer.
XG compatibility makes the CS1x completely state of the art—
conveniently able to take advantage of the expanded sound and
expressive capabilities that this exciting new format will offer in the
coming months and years.
A TO HOST terminal and HOST SELECT switch provides for direct
interface with either PC and Macintosh computers, thus enabling you
to easily jump right into the "desktop music" revolution without the
need for any additional peripheral interfacing equipment.
If you're a first-time synthesizer owner, the CS1x lets you expand
your music system at your own pace.
First you might want to add an affordable Yamaha QY series
sequencer and take advantage of the CS1x's powerful multitimbral
capabilities. With a QY sequencer you can record and play back up to
16 music "parts", each on an independent MIDI channel—just like a
multitrack recorder, but with virtually unlimited editing capabilities.
Next you might want to add the compact, low-cost Yamaha SU10
sampler which lets you capture music phrases and other sounds to add
an entirely unique dimension to your music.
Finally you might want to add a computer which will let you take
advantage of the many different types of music software products now
available plus those yet to come.
With the CS1x at the heart of your system, you're ready to grow
your own unique music system and take your musical capabilities as far
as you want—naturally.
3
3

CS1x MAIN
FEATURES
The CS1x is specially designed with an intuitive, interactive user interface
through lots of dedicated panel controls and sound editing features which
can easily be manipulated in realtime during performance. Main features
include:
• 6 Sound Control Knobs for direct access to key parameters of the currently
selected voice as you play, and 2 Scene memories for instant recall of
specified Sound Control Knob positions. You can use the Modulation
Wheel or a connected Foot Controller for continuous changes between
Scene 1 and Scene 2 parameter values.
• 480 GM- and XG-compatible AWM2 instrument voices and 11 drum
voices, or kits, in Multi Play mode. Additional voices are available in
Performance mode which can be assigned to the Performances.
• Performance mode with complete configurations of Layers (4 voices either
stacked or in sophisticated keyboard and velocity splits), digital effects
and other parameters. There are a total of 128 Preset Performances and
128 User Performances.
• Multi Play mode for multitimbral play of up to 16 different Parts (across
16 MIDI channels; when using an external sequencer), with 32-note
polyphony. TO HOST terminal and HOST SELECT switch allow direct
interface with IBM PC/AT or Apple Macintosh computers.
• 3 independent DSP digital effect units which can be used simultaneously—
Reverb (11 types), Chorus (11 types) and Variation (43 types).
• Arpeggiator with 30 types of arpeggiated chords and 10 timing subdivisions.
The Arpeggiator's tempo can also be controlled by an external MIDI
clock.
4

CONTENTS
The CS1x At A Glance .....................................6
Getting Started ............................................9
How The CS1x Generates Sound ................... 12
CS1x Main Operating Modes ........................ 14
Feature Reference ............ 20
Performance Mode .....................................20
Common Edit 1........................................ 22
Common Edit 2 ....................................... 25
Layer Edit 1 ............................................. 27
Layer Edit 2 ............................................. 30
Layer Edit 3 ............................................. 31
Layer Edit 4............................................. 33
Multi Play Mode.......................................... 36
Utility Mode ...............................................40
Store Mode .................................................44
Factory Settings .........................................46
Appendix ............................. 47
Digital Effects ............................................ 47
About MIDI ................................................. 53
Specifications ............................................. 57
Troubleshooting .........................................58
Error Messages ........................................... 59
Index..........................................................60
5
THE CS1x AT A
GLANCE
PHONES L/MONO
SCENE
PITCH MODULATION
R DC IN POWER
OUTPUT
AMP EG
2
MW/FC
1
ATTACK
FILTER
CUTOFF
VOLUME
RELEASE ASSIGN 1/DATAVOLUME
RESONANCE ASSIGN 2
FOOT
FOOT
FOOT
CONTROLLER
SWITCH
ARPEGGIO
PART/LAYER/
PRESET USER
TO HOSTINPUT HOST SELECT IN OUT
PERFORMANCE STORE
HOLD SHIFT
+
OCTAVE
PRESET USER ARPEGGIATOR
+
PROGRAM
THRU
MIDI
YZ'8&
VWX
*
7
MULTI
UTILITY
9
PQR5STU
MNO
4
6
GHI2JKL
DEF
1
3
PERFORMANCE MULTI
SPACE
ABC
ENTER
0
NO/
QUICK PC
STORE UTILITY
YES
ARPEGGIATOR PERFORM
REV
TYPE
TEMPO
P BEND
RANGE
PMOD
TUNE
NOTE
DETUNE
SFT
AEG
ATK
DCY
TIME
TIME
FEG
ATK
DCY
TIME
TIME
BANK
PROGRAM
DEMO
SYSTEM MIDI ASSIGN
MASTER
KBD
TUNE
TRANS
CHO
SUB
LEVEL
TYPE
TYPE
DIVIDE
FC PORTA
MW
FMOD
CUTOFF
FMOD
CUTOFF
NOTE
LIMIT
LIMIT
LIMIT
LIMIT
HIGH
LOW
HIGH
LOW
REL
AMOD
PMOD
SUS
TIME
LEVEL
REL
INIT
ATK
SUS
TIME
LEVEL
TIME
LEVEL
EFFECT
PAN
REV
CHO
VOLUME
SEND
SEND
VEL
TRANS
RCV
VEL
FIX
CH
CH
CURVE
EFECT
VARI
VARI
VARI
TYPE
PARAM
DATA
VARI
SWITCH
TIME
EF
VEL ASSIGN2
DEPTH
OFFSET
PARAM
LFO
WAVE
FMOD
SPEED
PEG
DCY
ATK
REL
TIME
LEVEL
TIME
FILTER
VARI
CUTOFF
REZ
SEND
LOCAL
DEVICE
BULK
NO
DUMP
PERFORM
NAME
ASSIGN1
PARAM
DATA
PHASE
REL
LEVEL
POLY/
MONO
CTRL
COMMON
INIT
LAYER
UTILITY
NO
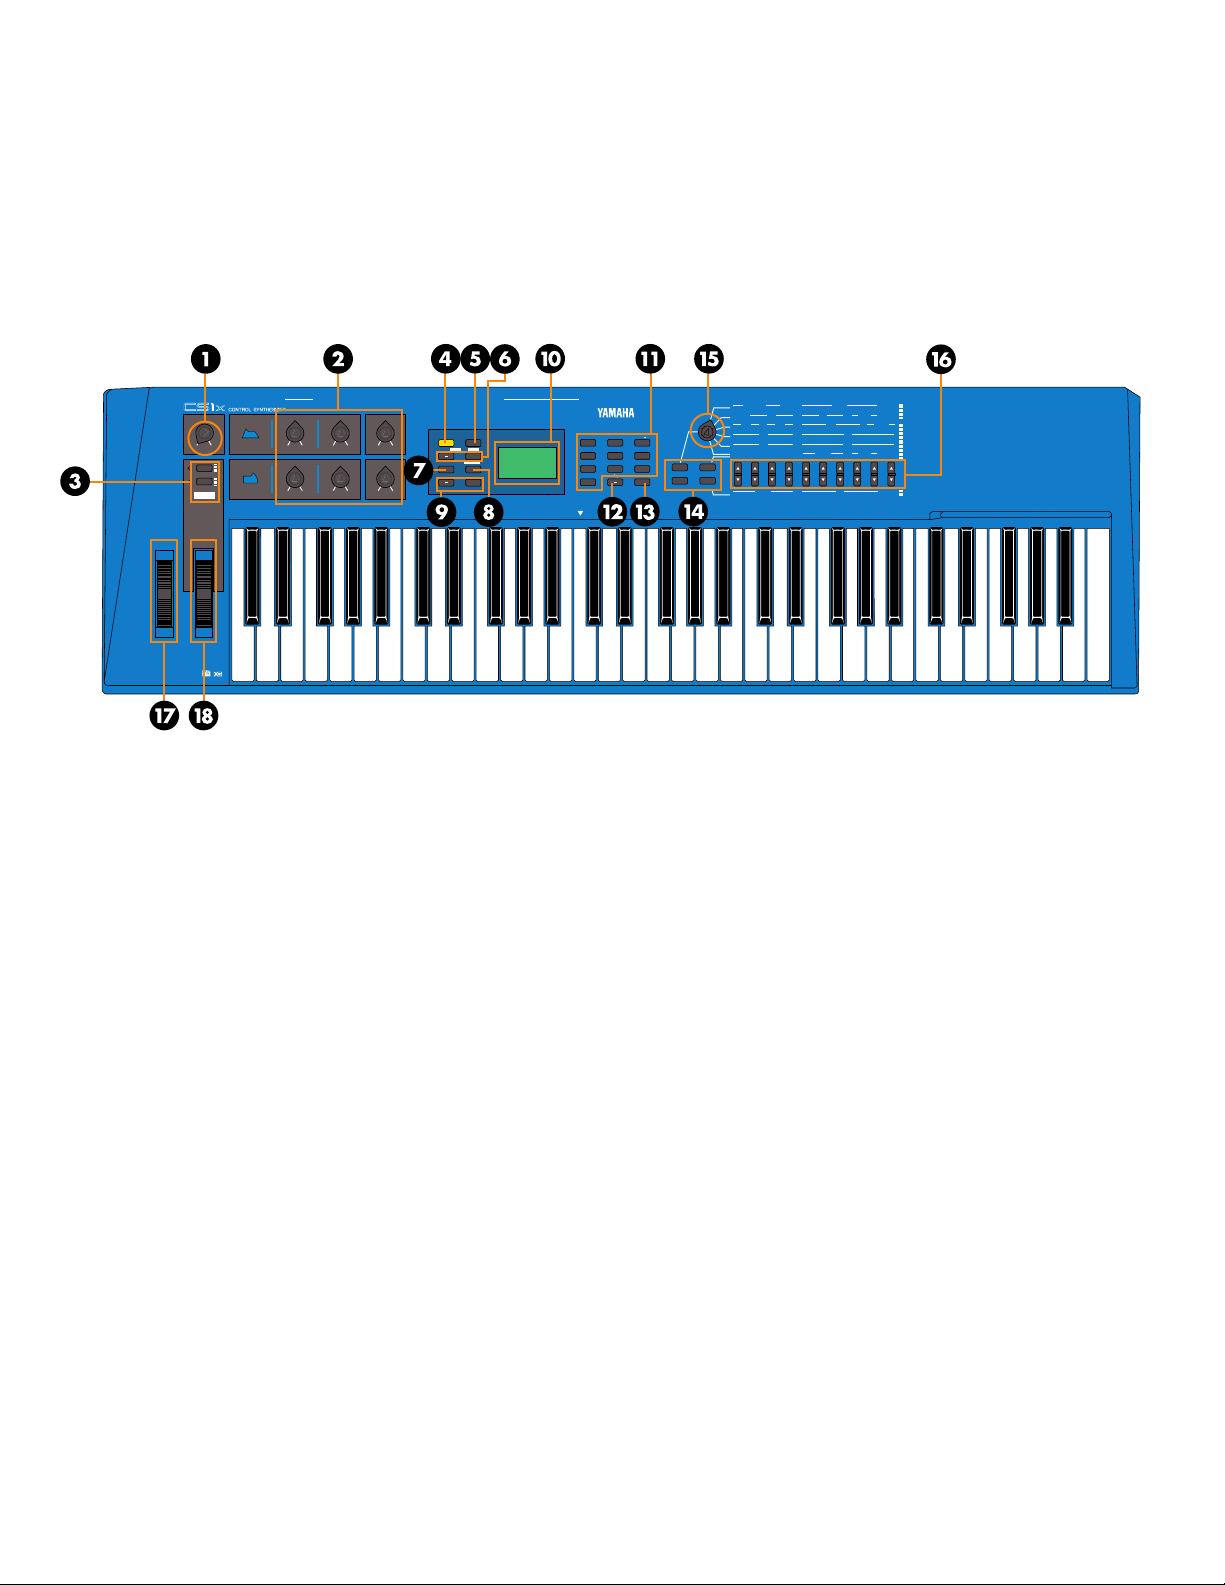
Front
Panel
! VOLUME
Turn this knob to set the proper
listening level whether using
headphones or amplified speakers.
" SOUND CONTROL
KNOBS
The six Sound Control Knobs give
you direct access to key parameters
of the currently selected
Performance/voice. Turning any
Sound Control Knob to the left or
right will offset the parameter values
accordingly (left for negative values,
right for positive values) and
produce an immediate result; a letter
"E" will appear next to the
Performance number in the LCD to
indicate the original voice has been
edited. Each knob has a center
detent which represents the original
value of the parameter.
• ATTACK (Knob 1) - This knob
controls the initial attack time of the
voice. Turn it left for a faster attack
time; turn it right for a slower attack
time. (See page 30)
• RELEASE (Knob 2) - This knob
controls the release time of the voice.
Turn it left for a shorter release time;
turn it right for a longer release time.
(See page 32.)
• ASSIGN 1/DATA (Knob 3) - This
knob has two functions. As an
ASSIGN 1 knob, you can assign one
of 28 parameters—including
Performance Volume, Arpeggiator
Tempo or Type, Portamento Time,
and others—to control by turning it
(see page 26). As a DATA entry knob,
you can use it to quickly change the
edit value of the currently selected
edit parameter.
• CUTOFF (Knob 4) - This knob
determines the cutoff frequency of
the filter, or the frequency point
above which other frequencies are
filtered out. Turn it left for a deeper,
more rounded tone; turn it right for
a thinner, brighter tone. (See page
25.)
• RESONANCE (Knob 5) - This knob
determines the amount of filter
resonance or emphasis of the cutoff
frequency. Turn it left to produce a
relatively flat response; turn it right
to add overtones and make the
sound more resonant. (See page 34.)
• ASSIGN 2 (Knob 6) - This knob can
be used to control any one of 28
parameters which you can assign to
it—including Volume, Note Shift,
Pan, Chorus Send, and others. (See
page 29.)
# SCENE 1 & 2
Each Performance has two Scene
memories which remember specific
positions of the six Sound Control
Knobs. (See page 16.)
• Simply press SCENE 1 or SCENE 2
to instantly recall the specified
settings. An LED beside each SCENE
button will light to indicate which
Scene is currently active. You can
store your own Scenes in advance
using Store mode. (See page 44.)
• By holding one SCENE button and
then pressing the other SCENE
button, both LED's will light,
indicating that you can use the
Modulation Wheel or a connected
Foot Controller for realtime
continuous parameter changes
between one Scene and the other.
(See page 45.)
6
$ ARPEGGIATOR
Press this button to activate the onboard Arpeggiator, which lets you
create automatic arpeggios simply
by playing a chord. An indicator will
appear in the lower right area of the
LCD when the Arpeggiator is on.
(See page 22.)
• There are various Arpeggiator Types
and Arpeggiator Timing
Subdivisions. These, plus the
Arpeggiator Tempo, can be specified
with the Common Edit 1 menu
parameters. (See page 23.)
• Pressing this button while holding
SHIFT will "hold" the arpeggiated
chord, or make it continue playing
even when you release the keys.
Pressing this button again stops the
Arpeggiator. (See page 23.)
• An Arpeggiator Split function lets you
split the keyboard at C3; the chords
you play to the left of the split point
will create arpeggiated chords, and
the notes and chords you play to the
right of the split point will play as
normal. (See page 23.)

% SHIFT
This button lets you transpose the
octave up or down as well as
activate the Arpeggiator Hold and
Split functions. (See page 23.)
• To transpose the octave, hold the
SHIFT button and press [–] (octave
down) or [+] (octave up)—located
directly beneath the SHIFT button.
(See page 15.)
& PART/LAYER [–]/[+]
These buttons let you select one of
the four Layers in Performance
mode (see page 14), or one of the
16 Parts in Multi Play mode (see
page 17). Which Layer or Part is
currently selected will be indicated
in the lower right area of the LCD.
' PRESET
In Performance mode, press this
button to activate the bank of 128
Preset Performances. (See page 20.)
( USER
In Performance mode, press this
button to activate the bank of 128
User Performances. (See page 20.)
) PROGRAM [–]/[+]
Press one of these to step up ([+]) or
down ([–]) through each
Performance (in Performance mode)
or voice (in Multi Play mode), one
at a time. (See page 20.)
* BACK LIT LCD
The LCD provides various types of
information which clearly indicates
the current operating status of the
CS1x, depending on which mode
or other button on the front panel
that you press.
+ NUMERIC KEYPAD
The numeric keypad has several
functions, depending on the
currently selected mode.
• In Performance mode or Multi Play
mode, you can use it to select a
specific Performance number or
voice number—by punching in the
desired number (1~128), then
pressing the ENTER button. (See page
20.)
• In Quick Program Change mode,
you can use it to select a specific
Performance (Performance mode)
or voice (Multi Play mode) within
the currently designated group of
10—by simply punching in the last
digit (0~9) of the desired
Performance or voice number. (See
page 21.)
• When editing parameters, you can
use it to quickly select a specific
value—by punching in the desired
number, then pressing ENTER. (See
page 20.)
• When naming a User Performance,
you can use it to select the letters of
the name, as indicated above each
button. (See page 24.)
, [–]/NO/QUICK PC
This button has three functions.
• As a [–] button, you can use it to
enter negative values when editing
parameters using the numeric
keypad. Press it before entering the
number, followed by ENTER.
• In Performance mode or Multi Play
mode, press it once to engage the
Quick Program Change function.
The hundredth and tenth digits of
the Performance or voice number
will be shown as bold characters
to indicate they are fixed when
Quick Program Change is active.
Press the button again to turn off
Quick Program Change. (See page
21.)
• In Store mode, this button lets you
decline (NO) the store operation if
you change your mind.
- ENTER/YES
This button has three functions.
• When selecting a Performance
number (Performance mode) or
voice number (Multi Play mode)
using the numeric keypad, you
must press ENTER to activate the
change. (See page 20.)
• When designating edit parameter
values using the numeric keypad,
you must press ENTER to activate
the change. (See page 22.)
• In Store mode, this button lets you
confirm (YES) the store operation.
(See page 44.)
. MODE SELECT
SWITCHES
Press one of these to select the
current operating mode.
• PERFORMANCE - In Performance
mode you can choose any of the
Preset or User Performances, plus
perform editing operations using the
Edit Parameter Rotary Switch and
Parameter Value UP/DOWN
buttons. Press PERFORMANCE to
enter Performance mode from
another mode, or to reselect the
Performance select screen in the
LCD after performing an edit
operation in Performance mode.
(See page 20.)
• MULTI - Press this button to enter
Multi Play mode, which lets you
designate up to 16 Parts for
multitimbral play when using an
external sequencer. Parameters
which can be edited in Multi Play
mode are printed in a row directly
above the Parameter Value UP/
DOWN buttons. (See page 36.)
• STORE - This button lets you store
User Performances. as well as
Scenes. (See page 44.)
• UTILITY - Press this button to access
those "system" parameters which
affect the CS1x as a whole—such as
Master Tune, MIDI Transmit and
Receive Channel numbers, Local
On/Off, etc.—as printed directly
below each Parameter Value UP/
DOWN button. (See page 40.)
/ EDIT PARAMETER
ROTARY SWITCH
Turn this knob to select one of the
six menus of edit parameters in
Performance mode.
• COMMON - The Common
parameters (Common Edit 1, 2
menus) are those parameters which
apply to the entire currently selected
Performance; i.e., it doesn't matter
which Layer is currently selected,
since common parameters (except
for Portamento) apply to all layers
equally. (See page 14.)
• LAYER - The Layer parameters (Layer
Edit 1, 2, 3, 4 menus) are those
parameters which affect only the
currently selected Layer (1~4, as
designated by the PART/LAYER
buttons) in a Performance. (See page
14.)
0 PARAMETER VALUE
UP/DOWN BUTTONS
These ten buttons are used to access
specific parameters in Performance,
Multi and Utility modes, as well as
change the values of the currently
selected edit parameter.
• PERFORMANCE MODE - After
selecting an Edit menu row with the
Edit Parameter Rotary Switch, press
the Parameter Value UP/DOWN
button located beneath the desired
parameter once to access the
parameter. The parameter name and
current value will appear in the LCD.
Then press [UP] or [DOWN] to
increase or decrease the current
parameter value as desired. (See
page 14.)
• MULTI PLAY MODE - Simply press
the Parameter Value UP/DOWN
button located beneath the desired
parameter as printed on the panel,
directly above each button. The
parameter name and current value
will appear in the LCD. Then press
[UP] or [DOWN] to increase or
decrease the current parameter value
as desired. (See page 17.)
• UTILITY MODE - Simply press the
Parameter Value UP/DOWN button
located above the desired parameter
as printed on the panel, directly
below each button. The parameter
name and current value will appear
in the LCD. Then press [UP] or
[DOWN] to increase or decrease the
current parameter value as desired.
(See page 40.)
1 PITCH
The Pitch Wheel lets you bend the
pitch up or down as you play. It is
spring-loaded to automatically
return to center position when you
let go of it. In Performance mode
you can designate the Pitch Bend
Range in the Common Edit 2 menu.
(See page 25.)
2 MODULATION
The Modulation Wheel lets you
apply or set a designated amount of
vibrato or tremolo. You can set it to
affect filter cutoff, filter modulation,
pitch modulation (Common Edit 2
menu, see page 25), as well as other
controllable parameters. (see page
43.)
7
THE CS1x AT A GLANCE
MIDI
OUTTHRU IN MIDI Mac TO HOST INPUT SWITCH CONTROLLER
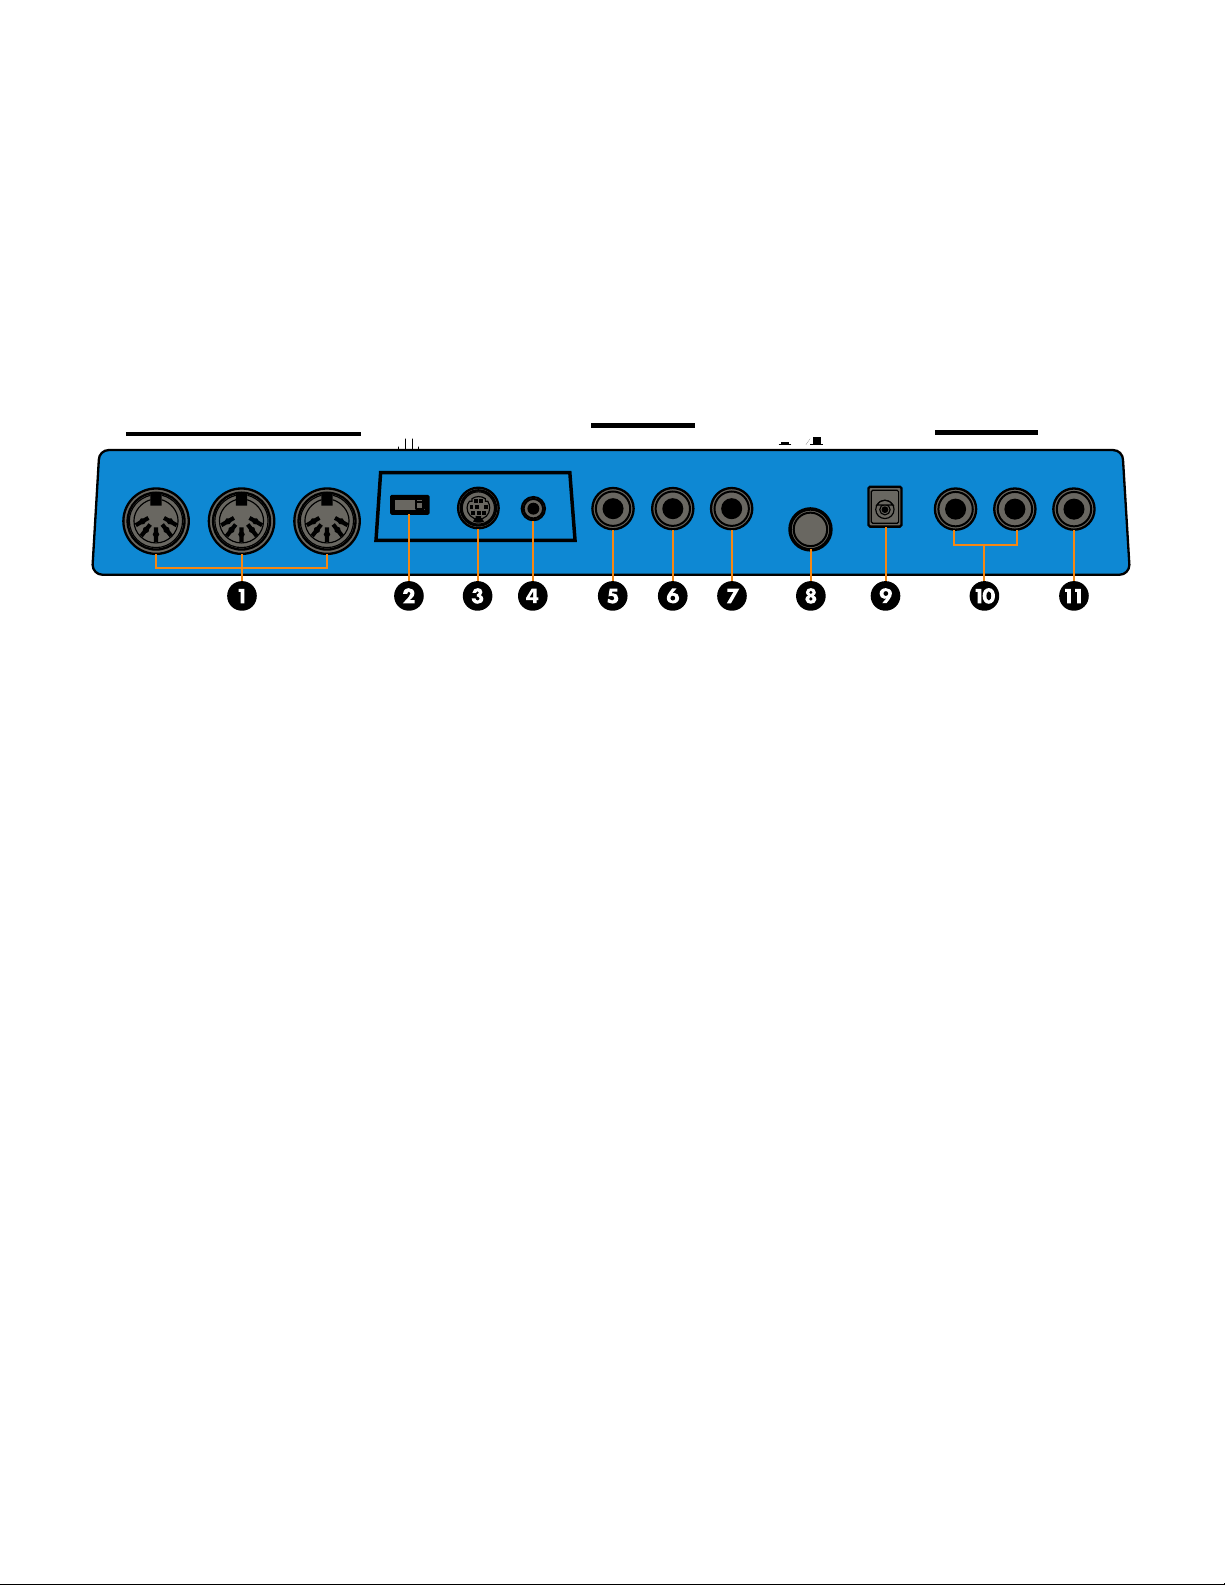
Rear
Panel
! MIDI
MIDI IN, OUT and THRU terminals
let you connect other MIDI devices
such as a MIDI keyboard, tone
generator, sequencer, or computer
with a MIDI cable. (Set the HOST
SELECT switch to MIDI when using
the MIDI terminals.) MIDI IN is for
input of MIDI data. MIDI OUT is
for output of MIDI data and for data
dumps to another CS1x or MIDI data
storage device. MIDI THRU is for
"daisy-chain" connection of
additional MIDI instruments, as the
MIDI data received at the CS1x's
MIDI IN terminal is passed along
unchanged to the CS1x's MIDI
THRU terminal. (See page 9.)
" HOST SELECT
The HOST SELECT switch lets you
designate the type of host computer.
(See page 10.) Set it to MIDI for
normal MIDI transmission and
reception when a host computer is
not connected.
HOST SELECT
PC-2 PC-1
# TO HOST
The TO HOST terminal lets you
connect the CS1x directly to a host
computer which does not have a
MIDI interface. (See page 10.)
$ INPUT
Connect an external audio source
(such as a keyboard, or CD player)
here using either a stereo or mono
mini plug, in order to mix its audio
signals with the CS1x's voices, for
output from the CS1x without the
need for an external mixer.
% FOOTSWITCH
An optional Yamaha FC4 or FC5
footswitch connected to this jack
can be used to control hold on/off,
portamento on/off and others,
determined by the Assign Control
Change Number setting in Utility
mode. (see page 43.)
& FOOT CONTROLLER
An optional Yamaha FC7 or FC9
foot controller connected to this jack
can be used for control of filter
modulation, filter cutoff, and the
ASSIGNABLE
FOOT FOOT
Variation effect (Common Edit 2
menu, see page 26), as well as the
Control Change Number. (see page
43.)
FOOT
VOLUME
POWER
ON OFF
' FOOT VOLUME
An optional Yamaha FC7 or FC9
foot controller connected to this jack
can be used to regulate overall
volume.
( POWER
Press this switch to turn the CS1x
on and off.
) DC IN
Connect the supplied Yamaha PA3B Power Adaptor here.
(CAUTION: Do not attempt to use
an AC adaptor other than the
Yamaha PA-3B or equivalent, since
the use of an incompatible adaptor
may cause irreparable damage to
the CS1x, and may even pose a
serious shock hazard.)
8
DC IN R L/MONO
OUTPUT PHONES
* OUTPUT
The stereo OUTPUT jacks let you
connect the CS1x to an external
stereo amplifier/speaker system.
When using a mono system,
connect it to the L/MONO jack.
+ PHONES
The PHONES jack lets you connect
a set of stereo headphones for
private listening.
GETTING STARTED
Setting Up Your CS1x
The Control Synthesizer CS1x literally comes ready to play right out of
the box.
Connect the supplied PA-3B DC power adaptor to the CS1x's DC IN
connector on the rear panel. Then connect the adaptor to the nearest
electrical outlet.
Before
switching on the power, connect any peripheral devices such as
amplified speakers or MIDI instruments.
There are many ways to incorporate the CS1x into a simple or expanded
music system. Below are a few examples to get you started.
CAUTION
• Do not attempt to use an AC adaptor other than the PA-3B. Use of an
incompatible adaptor may result in irreparable damage to the CS1x, and
could even pose a serious shock hazard.
• Be sure to disconnect the power adaptor from the electrical outlet when
the CS1x is not in use.
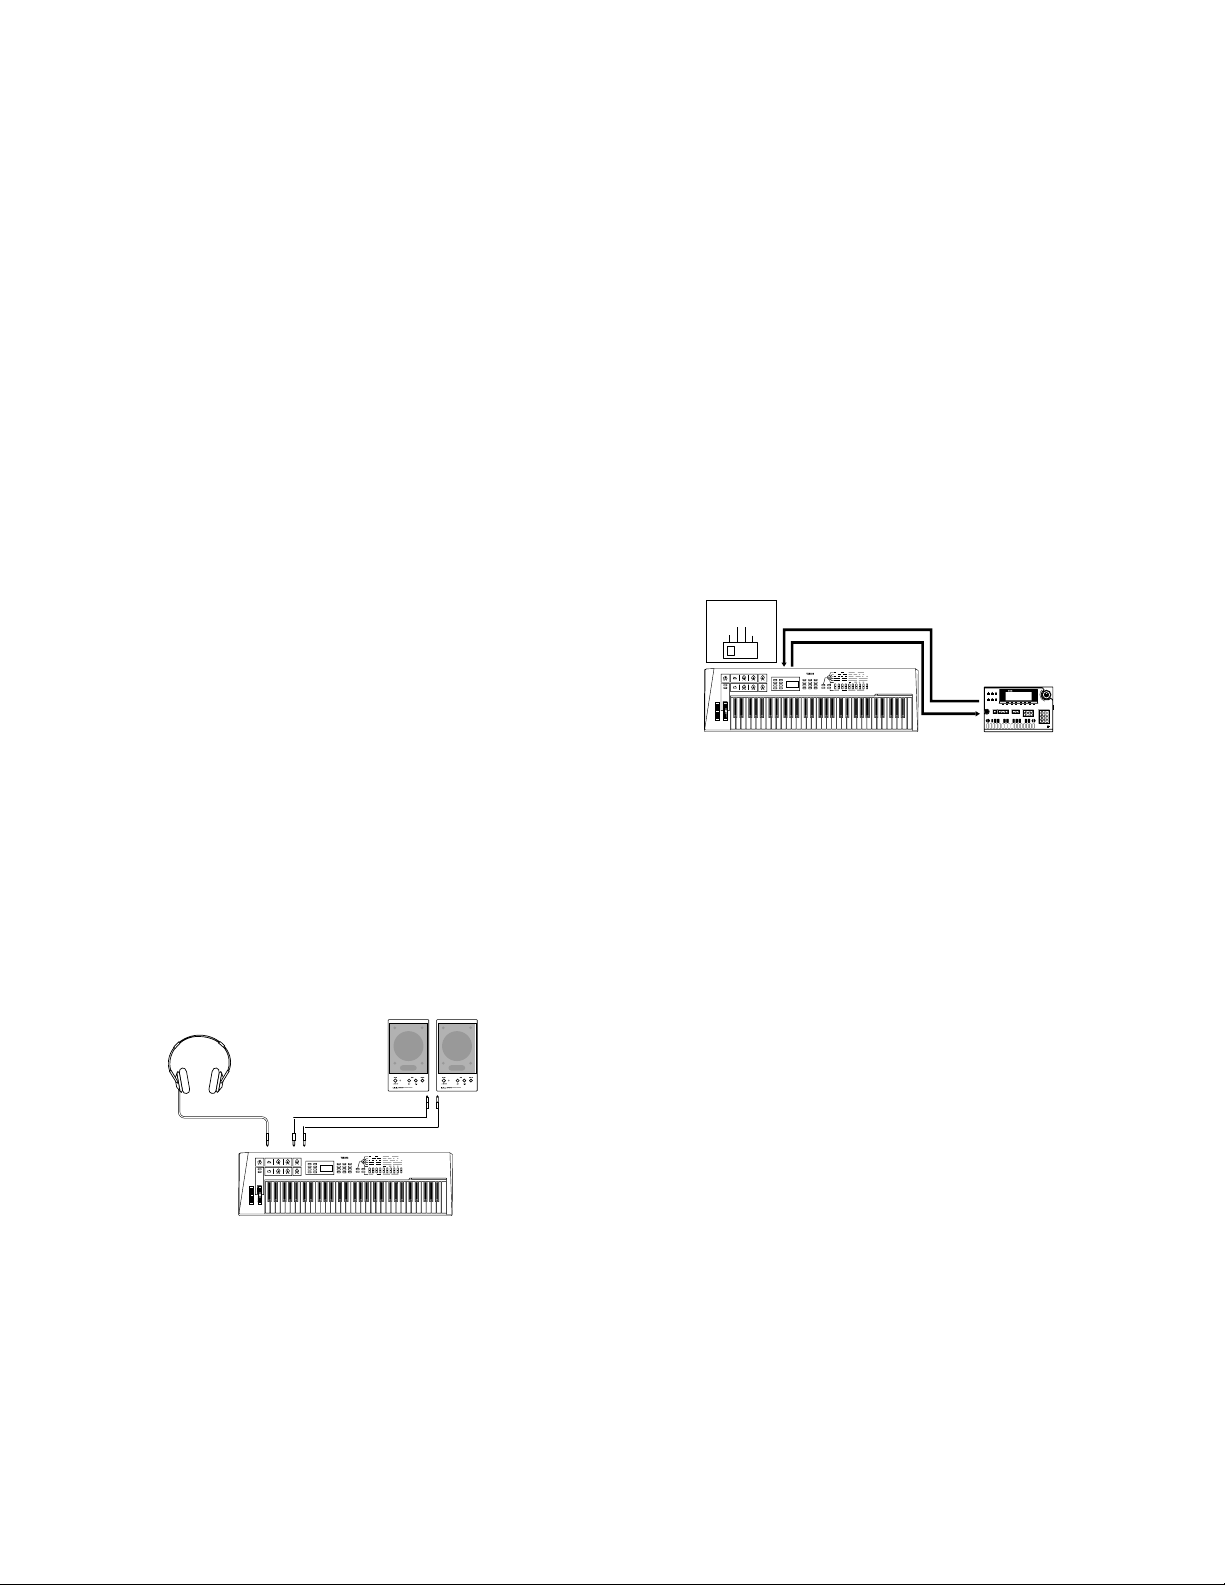
The CS1x By Itself
At the simplest level, all you need to do is connect stereo headphones to
the PHONES jack located on the rear panel.
As a stand-alone performance instrument, simply connect the CS1x to
amplified speakers, as follows:
For stereo use, connect one end of a pair of audio cables to the CS1x's
OUTPUT (L/MONO, R) jacks, and the other end to each amplified
speaker's input, as shown in the illustration below. (For mono use, connect
one end of a single audio cable to the CS1x's L/MONO jack, and the
other end to the amplified speaker's input.)
AMPLIFIED
SPEAKERS
R INPUTL
R OUTPUTPHONES
L
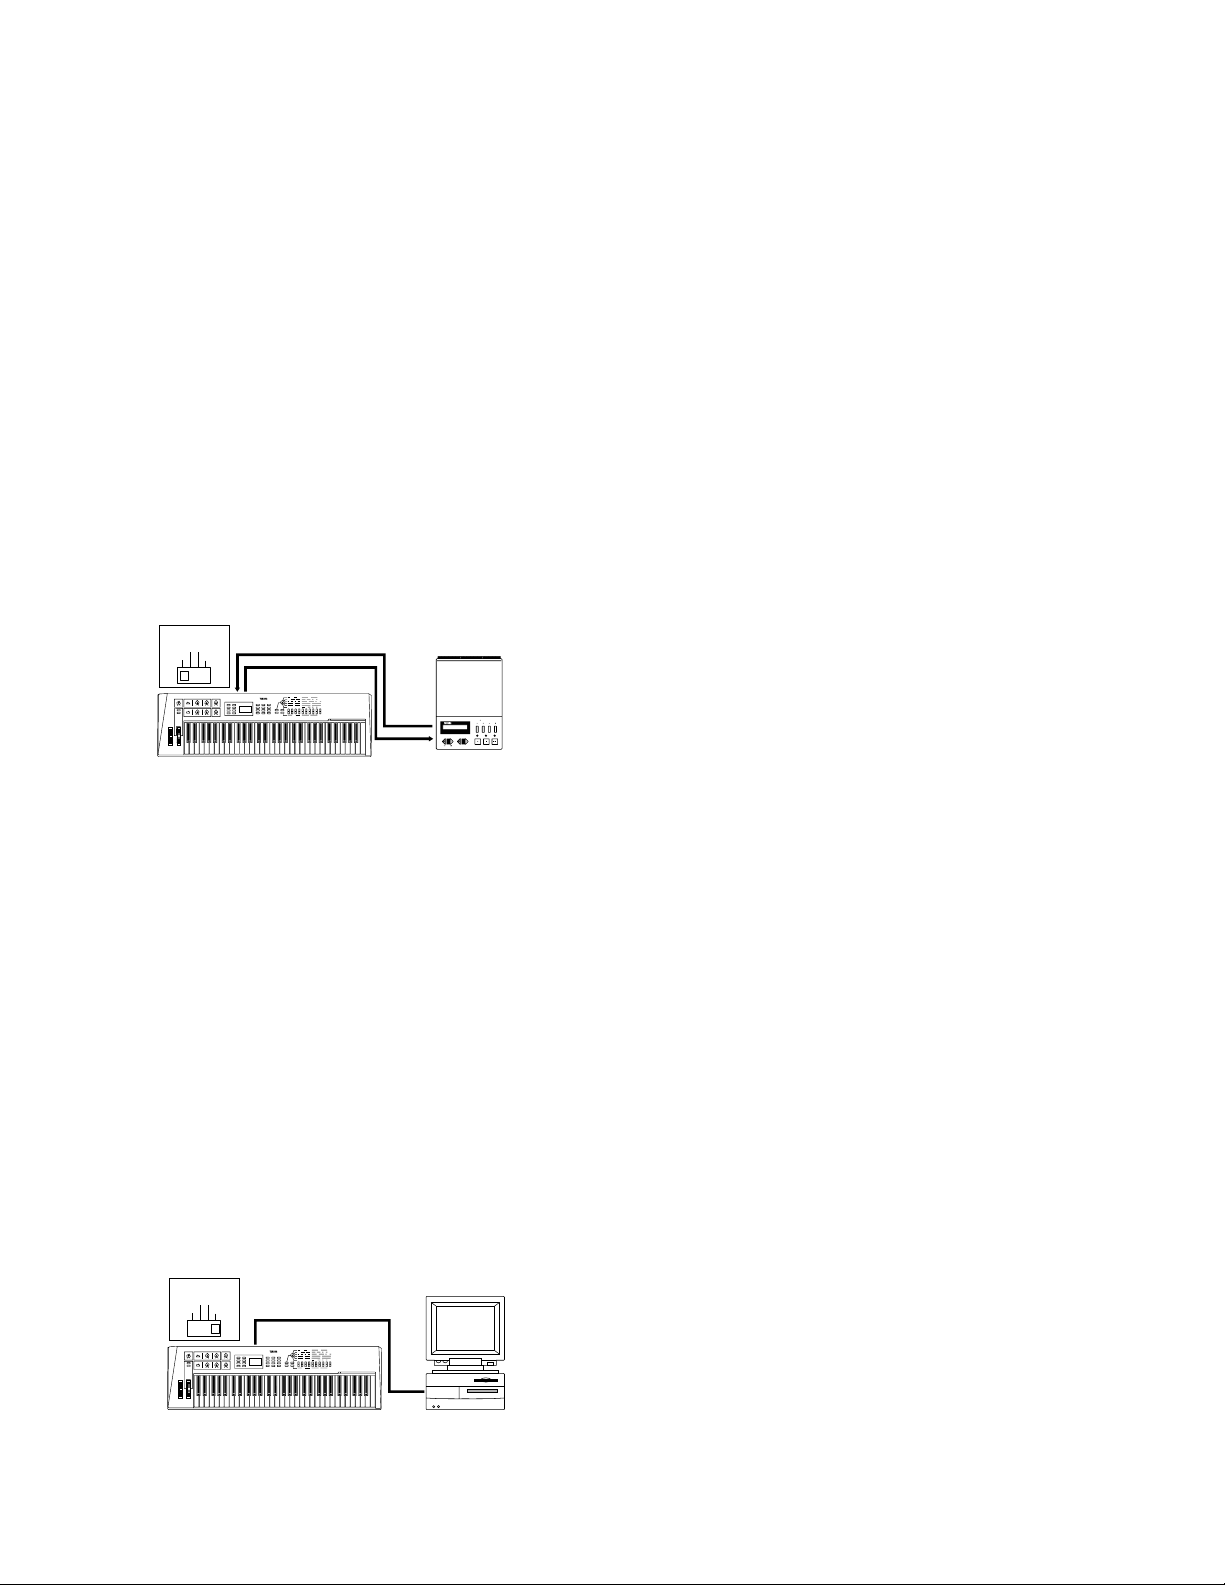
The CS1x With An External
Sequencer
The illustration below shows how to use the CS1x with a Yamaha QY
series sequencer, which lets you take full advantage of the CS1x's
multitimbral capability to play up to 16 different musical instrument Parts
at once.
You will need MIDI cables to make the proper connections.
1. Connect a MIDI cable from the CS1x's MIDI OUT terminal to the
sequencer's MIDI In terminal, and connect another MIDI cable from
the CS1x's MIDI IN terminal to the sequencer's MIDI Out terminal.
2. Set the HOST SELECT switch to MIDI.
HOST SELECT
PC-2 PC-1
MIDI Mac
In this case, the notes you play on the keyboard will be sent as MIDI note
event data to a specified MIDI channel of the sequencer. By selecting
different channels, you can record each Part independently, while listening
to those Parts you've already recorded.
When recording Parts to an external sequencer, you need to turn the
keyboard Local setting to OFF (see page 42). When keyboard Local is
turned off, the notes you play on the keyboard will not sound the CS1x's
internal tone generator, but note and other performance event data will
still be sent from the MIDI OUT terminal.
Since the CS1x's internal tone generator will respond to note and other
data it receives at the MIDI IN terminal, the notes you play on the keyboard
will be sent to the sequencer, then "echoed back" to the CS1x to play one
of the 16 Parts (depending on the current MIDI channel assignment).
For details about assigning CS1x MIDI channels, see page 41. For details
about assigning MIDI channels and other settings for the external devices
such as a sequencer, consult the owner's manual of each.
MIDI IN
MIDI OUT
CS1x
MIDI
OUT
MIDI IN
QY300 etc...
QY300
MUSIC SEQUENCER
CS1x
CAUTION
In order to avoid possible damage to the speakers or other connected
electronic equipment, before switching on the power of any component,
make sure the CS1x's volume level and the volume levels of the connected
equipment are set to minimum.
9
Connecting The CS1x To A
MIDI Data Storage Device
You can also connect the CS1x with a MIDI data storage device, such as
the Yamaha MDF2 MIDI Data Filer in order to "bulk dump", or save a
User Performance ("1 Perf" setting) or all the User Performances and Utility
parameters ("All" setting) to floppy disks.
This lets you build up complete libraries of Performance and other data,
which you can easily load back into the CS1x. (The MDF2 also lets you
play compatible song data on the CS1x directly from the MDF2 itself,
without the need for a sequencer.)
For information about how to perform Bulk Dump operations with the
CS1x, see page 42. Refer to the owner's manual of the MIDI data storage
device for operating instructions about sending and receiving data.
HOST SELECT
PC-2 PC-1
MIDI Mac
MIDI IN
MIDI OUT
CS1x
MIDI
OUT
MIDI IN
MDF2 etc...
MIDI
MDF2
MDR SEO JOB UTIL
MIDI DATA FILTER
- FILE DATA +
CURSOR
REC PAUSE START/STOP
TEMPO
Macintosh
If you have an Apple Macintosh not equipped with an external MIDI
interface, perform the following operation:
1. Set the HOST SELECT switch to Mac.
2. Connect the TO HOST terminal on the CS1x to the Modem or
Printer port on the Macintosh.
3. Turn on the host computer, then turn on the CS1x.
4. Start up your music software, and set up the appropriate options
in the software for operation with the CS1x.
The options you may have to set for the Apple MIDI Driver settings:
MIDI Interface Type (Clock) ➛ 1 MHz
Other options and settings may have to be made as well. Refer to the
owner's manual of your particular music software for more information.
IBM PC and Clones
If you have an IBM PC/AT or compatible computer not equipped
with an external MIDI interface, perform the following operation:
The CS1x In A Desktop Music
System
With its built-in host computer interface the CS1x is designed for direct
connection to an Apple Macintosh, IBM PC/AT or NEC PC-9800 Series
computer—without the need for a special MIDI interface between the
computer and the CS1x.
Using the CS1x in a computer music system lets you receive the full
benefits of the instrument's true capabilities, as well as take advantage of
the ever-expanding world of available music sequencer and other software
products which provide you with unlimited potential to achieve your
personal music goals.
If your computer already has a MIDI interface installed, you may want to
use it rather than using the host computer interface on the CS1x. Otherwise,
depending on the computer or interface used, set the HOST SELECT
switch to the appropriate setting: MIDI, PC-1 (NEC PC-9800 Series), PC2 (IBM and clones), or Mac (Macintosh). For information on the types of
cables that can be used for connection, see the section
Connecting Cables
HOST SELECT
PC-2 PC-1
MIDI Mac
, at right.
Connecting Cables
TO HOST
CS1x
MIDI/Computer
Computer
1. Set the HOST SELECT switch to PC-2.
2. Connect the TO HOST terminal on the CS1x to one of the
computer's serial ports, COM 1 or COM 2.
3. Turn on the host computer, then turn on the CS1x.
4. Start up your music software, and set up the appropriate options
in the software for operation with the CS1x.
Refer to the owner's manual of your particular music software for
more information.
MIDI/Computer Connecting
Cables
MIDI
Standard MIDI cable, maximum length 15 meters.
Mac
Apple Macintosh Peripheral cable (M0197), maximum length 2 meters.
PC-1
8-pin MINI DIN to D-SUB 25-pin cable, maximum length 1.8 meters.
(If your PC-1 type computer has a 9-pin serial port, use the PC-2 type
cable.)
PC-2
8-pin MINI DIN to D-SUB 9-pin cable, maximum length 1.8 meters.
10

Switching On
Playing
The Power And
Producing
Sound
Once all connections have been properly made, you're ready to switch
on the power and start having fun with the CS1x.
1. Turn the volume of the CS1x to its minimum position.
2. Press the POWER switch, located on the rear panel.
3. After a brief greeting message, the CS1x will power up.
4. Gradually turn the VOLUME knob to the right while playing the
keyboard until you achieve a comfortable listening level.
Playing The
Demo Songs
Before you dive in and start exploring the many Performances and other
versatile features of the CS1x, you may want to listen to the preprogrammed
demonstration song.
The Demo provides a dynamic example of just how powerful the CS1x
really is. To play the Demo, perform the following operation:
1. In Performance mode, hold the PERFORMANCE button and press
the MULTI button.
2. The word "DEMO" will appear in the LCD, and after a brief moment
the Demo song will begin, and continue playing.
3. To stop the Demo, simply press a mode button, such as
PERFORMANCE.
Arpeggiated
Chords
Take a moment and try out the Arpeggiator function, which creates
automatic arpeggios based on the chords you play. First select a
Performance with a fast attack, such as a percussive type sound. (Note:
The Arpeggiator function only works in Performance mode.)
1. Press ARPEGGIATOR. An indicator will appear in the lower right
area of the LCD.
2. Play a chord. The arpeggiated chord will begin playing, based on the
Arpeggiator Type, Tempo and Subdivide parameter settings.
3. Change the Arpeggiator Type, Tempo and Subdivide parameters using
the Common Edit 1 menu. (See page 22.)
HOLD SHIFT
ARPEGGIO
PART/LAYER/
PRESET USER
Arpeggiator Hold
The handy Arpeggiator Hold function lets you play a chord to start the
automatic arpeggio, then take your hand off the keyboard—the arpeggiated
chord will play continuously in a loop. Play another chord and the
automatic arpeggios will change accordingly.
1. Hold SHIFT and press ARPEGGIATOR. The Arpeggiator indicator in
the LCD will start blinking.
2. Play a series of chords.
3. To stop the arpeggiated chords, press ARPEGGIATOR again.
PROGRAM
+
OCTAVE
+
DEMO
PERFORMANCE MULTI
STORE UTILITY
When the Demo mode is engaged, you can select a Demo song from the
various Demo songs using the numeric keypad.
Arpeggiator Split
The Arpeggiator Split function greatly increases the performance capability
of the CS1x. When Arpeggiator Split is engaged, any chord you play to
the left of the split point (B2 and below) will produce an arpeggiated
chord, while chords you play to the right of the split point will play
normally.
1. Press ARPEGGIATOR to activate the Arpeggiator function.
2. Set the Edit Parameter Rotary Switch to the Common Edit 1 menu.
3. Hold SHIFT and press the left-most Parameter Value UP/DOWN
button (Arpeggiator Type parameter).
4. Pressing [UP] will turn on the Arpeggiator Split feature (the letter "S"
will display in the LCD); pressing [DOWN] will turn it off.
11
How The CS1x
Generates Sound
In order to better understand what's actually happening to the sound as
you turn the Sound Control Knobs or modify other parameters, it is helpful
to first take a look at the key components which make up the physical
nature of sound.
The Nature
Of Sound
What is sound? If we could see sounds they would look like waves rippling
through the air at a constant speed with high frequencies bunched close
together and lower frequencies spread far apart.
Our ears are naturally designed to take these physical vibrations—or
sound waves—moving through the air around us at high, mid and low
frequencies, and interpret them as a dog barking across the street, someone
practicing a violin next door, a jet airplane screaming overhead, or rock
music on the stereo in front of you.
Generating
Electronic
Sounds
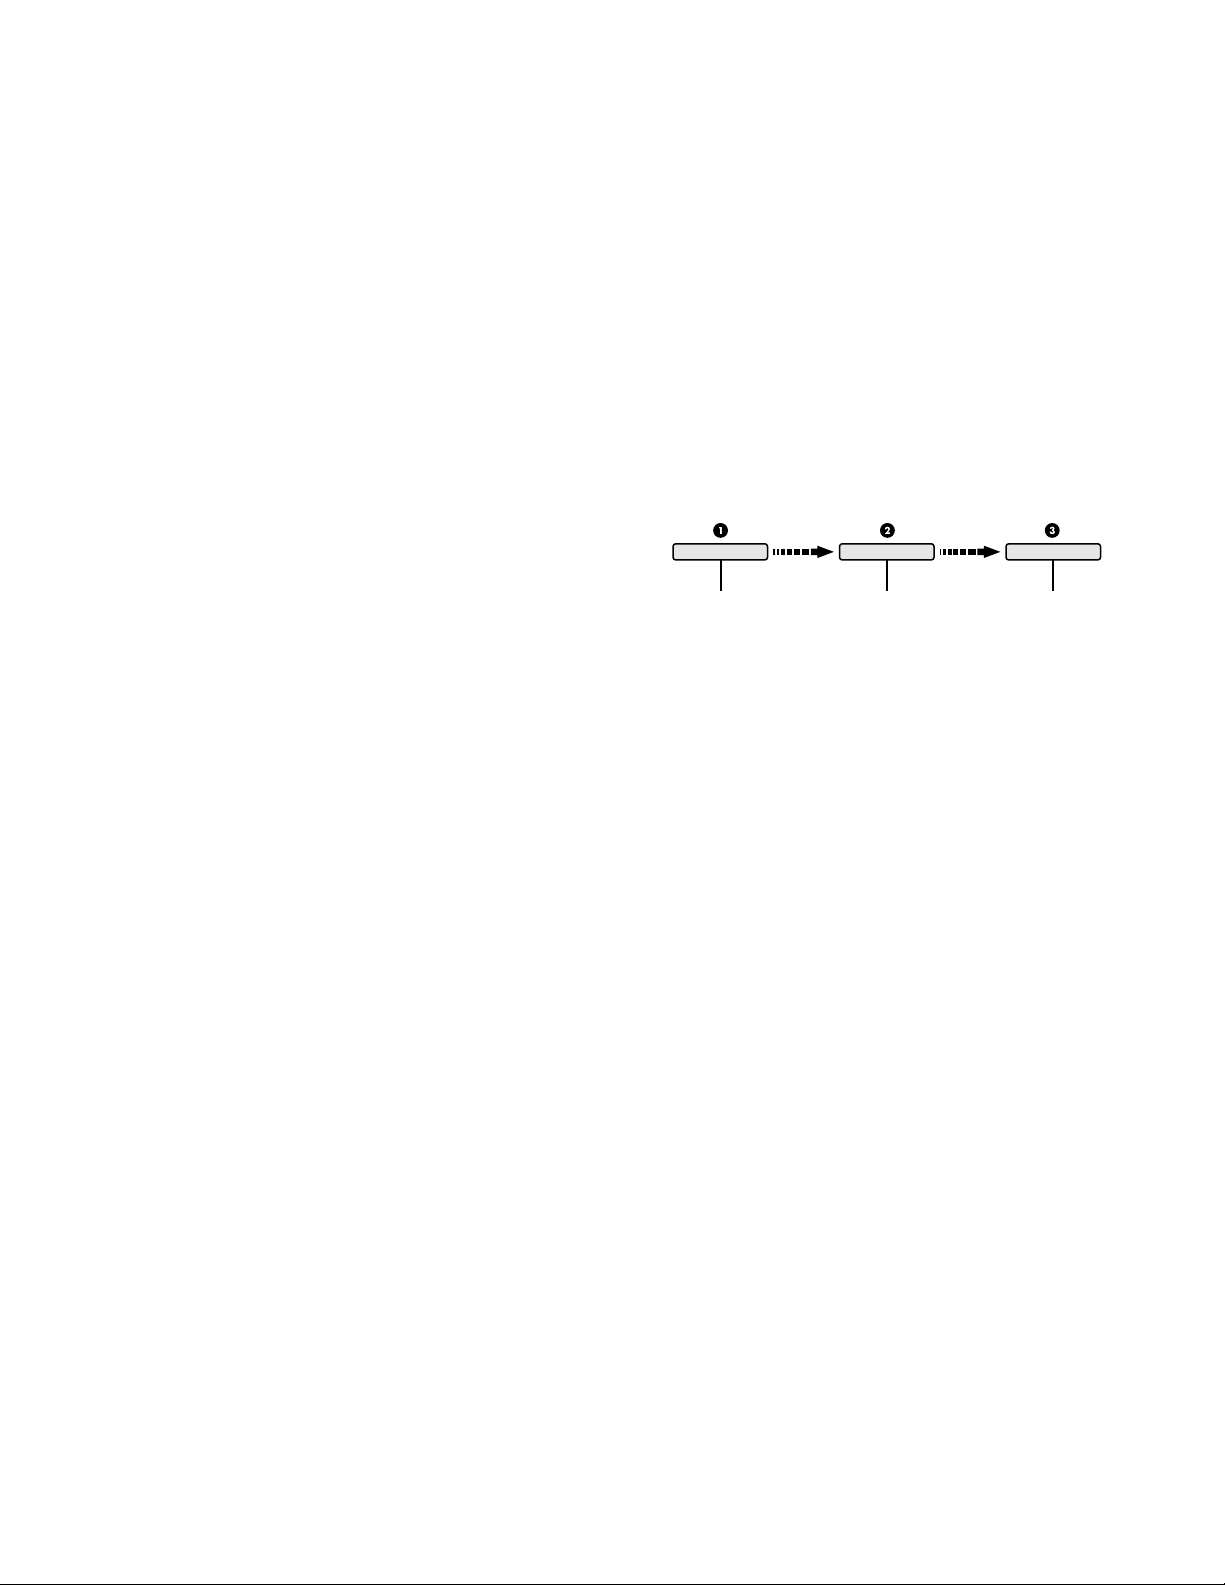
There are three basic elements which make up a sound:
•
pitch
, or how low or high it is
•
tone
, or what its overall quality is like
•
amplitude
, or how loud its volume level is
Oscillators, Filters And
Amplifiers
Synthesizers rely on three key electronic components to imitate the
soundwaves of musical instrument voices, as well as create entirely new
sounds.
In traditional analog synthesis the source sound pitch is generated by an
oscillator
an
! The oscillator generates sound wave vibrations at controllable speeds,
" Musical instrument sounds are made up of the basic tone that we
, its tone is created by a
amplifier
or frequencies, to create pitch. Synthesizer oscillators usually offer a
range of frequencies between 20 Hz and 20kHz, which is the range
of the audio spectrum that most human beings can hear. They also
usually offer various types of sound waveforms, such as sine, sawtooth,
and others.
clearly distinguish, plus additional harmonics, or overtones which
exist at each octave above the basic tone, but that we cannot distinctly
hear. The filter provides control over these harmonics. By manipulating
the filter's cutoff frequency, which decides where to delete—or cut
off—the overtones, and resonance settings, you can thus determine
the tone.
.
GENERATES
PITCH
filter
, and its volume is determined by
AMPLIFIERSFILTERSOSCILLATORS
CREATES
TONE
DETERMINES
VOLUME
Before we take a look at how the CS1x generates and manipulates pitch,
tone and amplitude, lets first take a look at how these elements apply
naturally to acoustic musical instruments.
Acoustic musical instruments are specifically designed and carefully built
to produce precise sound characteristics when played—which is why a
violin always sounds like a violin, a piano always sounds like a piano,
and a flute always sounds like a flute.
A musician playing a finely crafted violin will scrape the bow across the
string at a certain intensity to generate violin sound waves at a certain
volume level (
fingering positions (
well as the playing style and technique of the musician, will determine
the overall quality of the violin's sound (
amplitude
pitch
), and produce low or high notes based on
). The vibrating strings and resonating wood, as
tone
).
# An amplifier controls the volume of the tone. An envelope generator
(EG) determines the tone's volume over time, through attack, decay,
sustain and release settings.
AWM2 Waveforms
The CS1x takes the familiar concepts and functions of analog synthesis
and combines them with the state of the art in digital synthesis technology.
As such, it has hundreds of AWM2 waveforms, or digital recordings
("samples"), of all types of musical instrument and other sounds
programmed right inside—including everything from a violin bow
scraping a string, to a mallet striking a marimba, to a breath blowing
across a flute mouthpiece.
An AWM2 waveform forms the fundamental tone source of a CS1x voice;
the rest of the sound is contoured by the oscillator, filter and amplifier
settings. CS1x synthesis gives you enormous realtime and other control
over detailed aspects of all parameter settings.
12
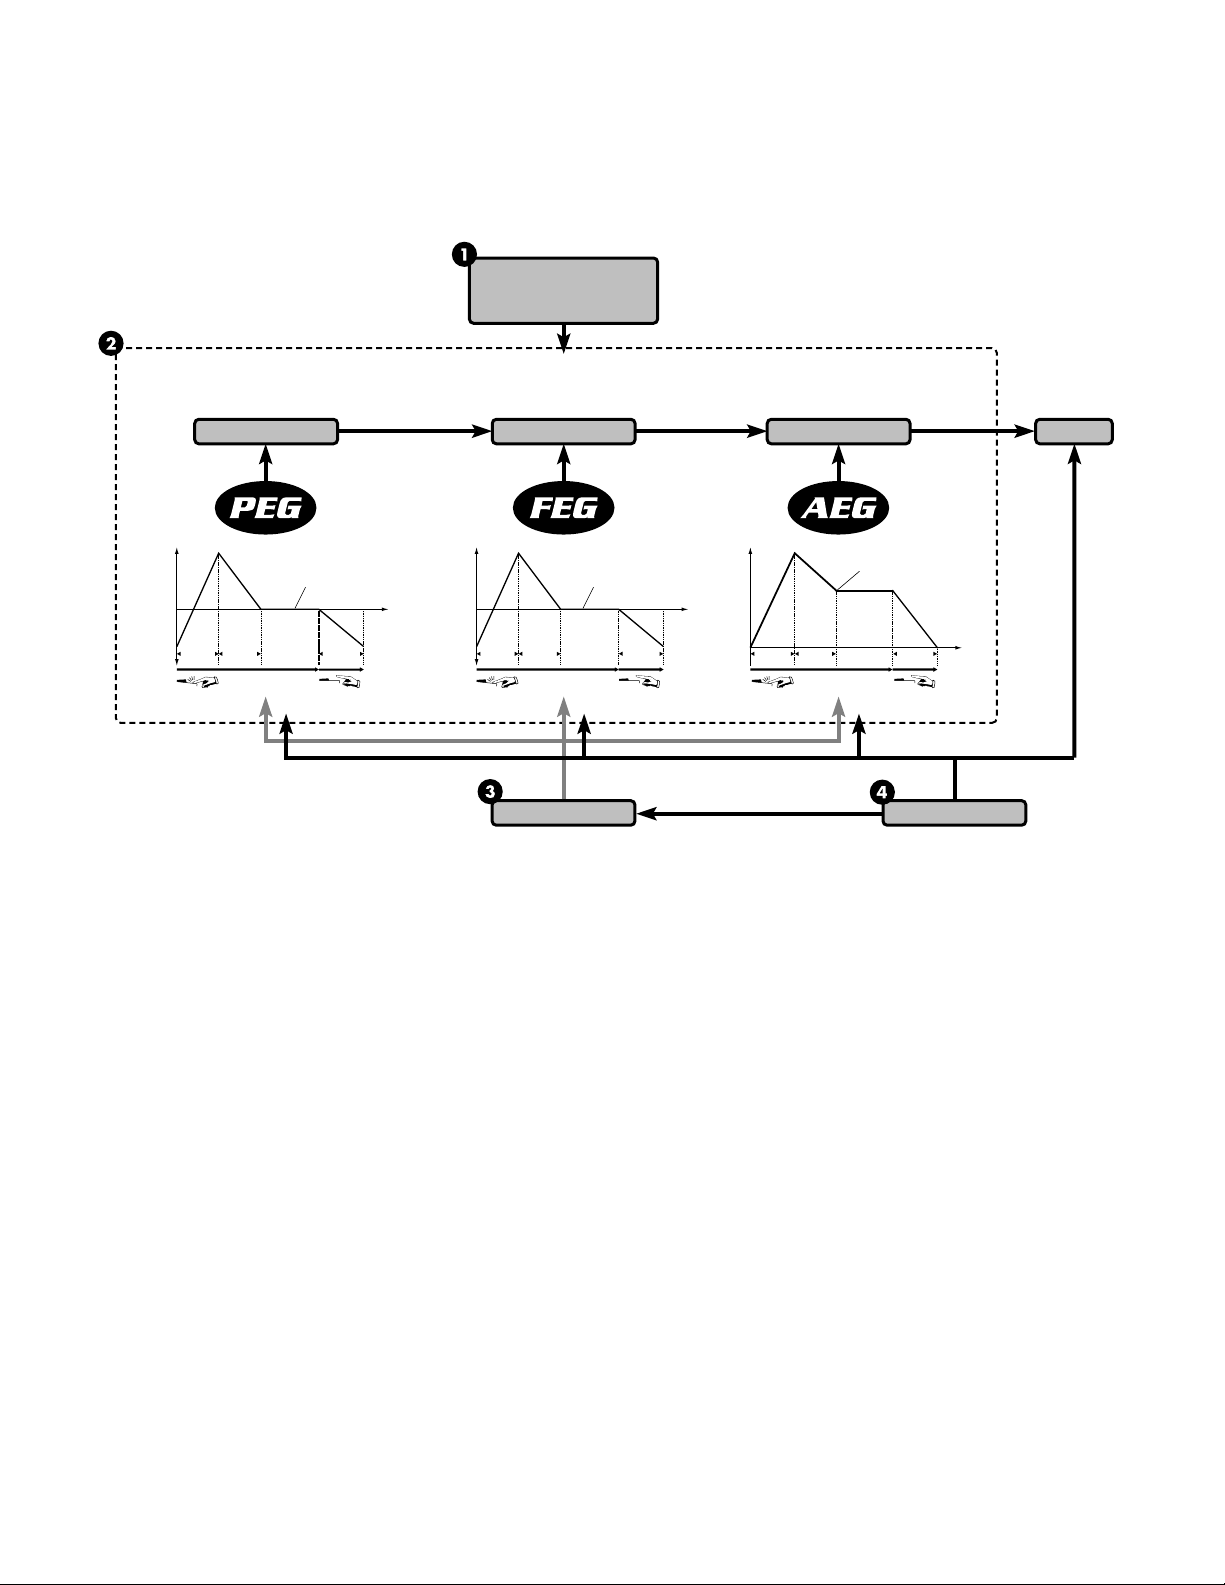
CS1x Synthesis
The secret behind the CS1x's exceptional quality sound is its ability to create rich and complex sonic textures in Performances, which are made up of
Layers of up to four AWM2 voices—either sounding simultaneously or mapped to various note and velocity zones across the keyboard.
AWM2 WAVEFORM
BANK
PROGRAM NUMBER
AWM2 VOICE
OSCILLATORS
ATTACK LEVEL
( ATK LEVEL )
LEVEL
BASIC KEY
PITCH VOLUME
INITIAL LEVEL
ATTACK TIME
( ATK TIME )
KEY ON
DECAY TIME
( DCY TIME )
( INIT LEVEL )
PLAYED
RELEASE TIME
( REL TIME )
KEY OFF
RELEASE LEVEL
( REL LEVEL )
TIME
LEVEL LEVEL
SUSTAIN LEVEL
CUT OFF
FREQUENCY
ATTACK TIME
( ATK TIME )
KEY ON
DECAY TIME
( DCY TIME )
(SUS LEVEL)
RELEASE TIME
( REL TIME )
KEY OFF
LFO
TIME
ATTACK TIME
( ATK TIME )
KEY ON
AMPLIFIERS EFFECTSFILTERS
DECAY TIME
( DCY TIME )
SUSTAIN LEVEL
( SUS LEVEL )
RELEASE TIME
( REl TIME )
KEY OFF
CONTROLLER
TIME
! AWM2 WAVEFORM - The fundamental source
of the CS1x's sound is the sampled AWM2
waveform. There are hundreds preprogrammed in
ROM which are used by the Performances.
Available waveforms are organized in Banks. Each
AWM2 waveform has its own Program Number.
" AWM2 VOICE - The AWM2 waveform combines
with the oscillator, filter and amplifier to make up
a CS1x voice.
• PEG - The Pitch Envelope Generator controls how
the pitch changes over time.
INIT LEVEL (Initial Level) sets the initial pitch level
when a key is played.
ATK TIME (Attack Time) determines the time
required for a sound to reach its Attack Level after
a note is played.
ATK LEVEL (Attack Level) sets the initially targeted
level after a note is played.
DCY TIME (Decay Time) determines the time
required for a sound to reach its basic pitch from
the Attack Level while the key is held.
REL TIME (Release Time) determines the time it
takes for the basic pitch to reach the Release Level
after the key has been released.
REL LEVEL (Release Level) sets the final targeted
level after the key is released.
• FEG - The Filter Envelope Generator controls how
the timbre changes over time.
ATK TIME (Attack Time) determines the time
required for a sound to reach its maximum cutoff
frequency level when a note is played.
DCY TIME (Decay Time) determines the time
required for a sound to reach its Sustain Level from
the maximum level while the key is held.
SUS LEVEL (Sustain Level) sets the Sustain Level;
the cutoff frequency will be maintained at this level
for as long as the key is held.
REL TIME (Release Time) determines the time it
takes for the cutoff frequency to reach the level
preset for each voice after the key has been released.
• AEG - The Amplitude Envelope Generator controls
how the volume changes over time.
ATK TIME (Attack Time) determines the time
required for a sound to reach its maximum volume
level when a note is played.
DCY TIME (Decay Time) determines the time
required for a sound to reach its Sustain Level from
the maximum volume level while the key is held.
SUS LEVEL (Sustain Level) sets the Sustain Level;
the volume will be maintained at this level for as
long as the key is held.
REL TIME (Release Time) determines the time it
13
takes for a sound to sustain after the key has been
released.
# LFO - The Low Frequency Oscillator generates low
frequency signals which can be used to modulate
the PEG, FEG and AEG.
• PMOD - The LFO can apply Pitch Modulation to
the PEG to create vibrato effects.
• FMOD - The LFO can apply Filter Modulation to
the FEG to create wah-wah types of effects.
• AMOD - The LFO can apply Amplitude
Modulation to the AEG to create tremolo effects.
$ CONTROLLER - You can use several types of
controllers to manipulate various parameters in
realtime.
• MW - Use the Modulation Wheel to control
PMOD, FMOD, and Filter Cutoff.
• FC - Use the Foot Controller to control FMOD,
Filter Cutoff, and Variation Effect.
• Use the Sound Control Knobs to control AEG Attack
Time, Release Time, Filter Cutoff, and Resonance.
The ASSIGN 1/2 knobs can be specified to control
one of any number of parameters. (See the lists on
pages 27 and 29.)
CS1x MAIN
OPERATING
MODES
The CS1x has two main operating modes: Performance mode and Multi
Play mode. The chief distinction between each mode is as follows:
• Performance mode is primarily for realtime performance of
has six menus of Edit parameters.
• Multi Play mode is primarily for multitimbral playback of up to 16
Parts
when external MIDI devices are connected. It has one menu of
Edit parameters. You can also use the CS1x as a MIDI data input
device for an external sequencer.
Utility mode lets you modify System and MIDI parameters which affect
both Performance and Multi Play mode. (For more information about
Utility mode, see page 40.)
Store mode lets you store your own User Performances and Scenes. (For
more information about Store mode, see page 44.)
Layers
. It
2
1
SCENE
AMP EG
MW/FC
FILTER
ATTACK
CUTOFF
RELEASE ASSIGN 1/DATAVOLUME
RESONANCE ASSIGN 2
Turning the Sound Control Knobs will give you direct access to the AMP
EG and FILTER parameters, thus providing analog-style realtime control
over key characteristics of the sound. You can also save up to two
"snapshots" of knob positions in Scenes, which can be instantly recalled
at the touch of a SCENE button.
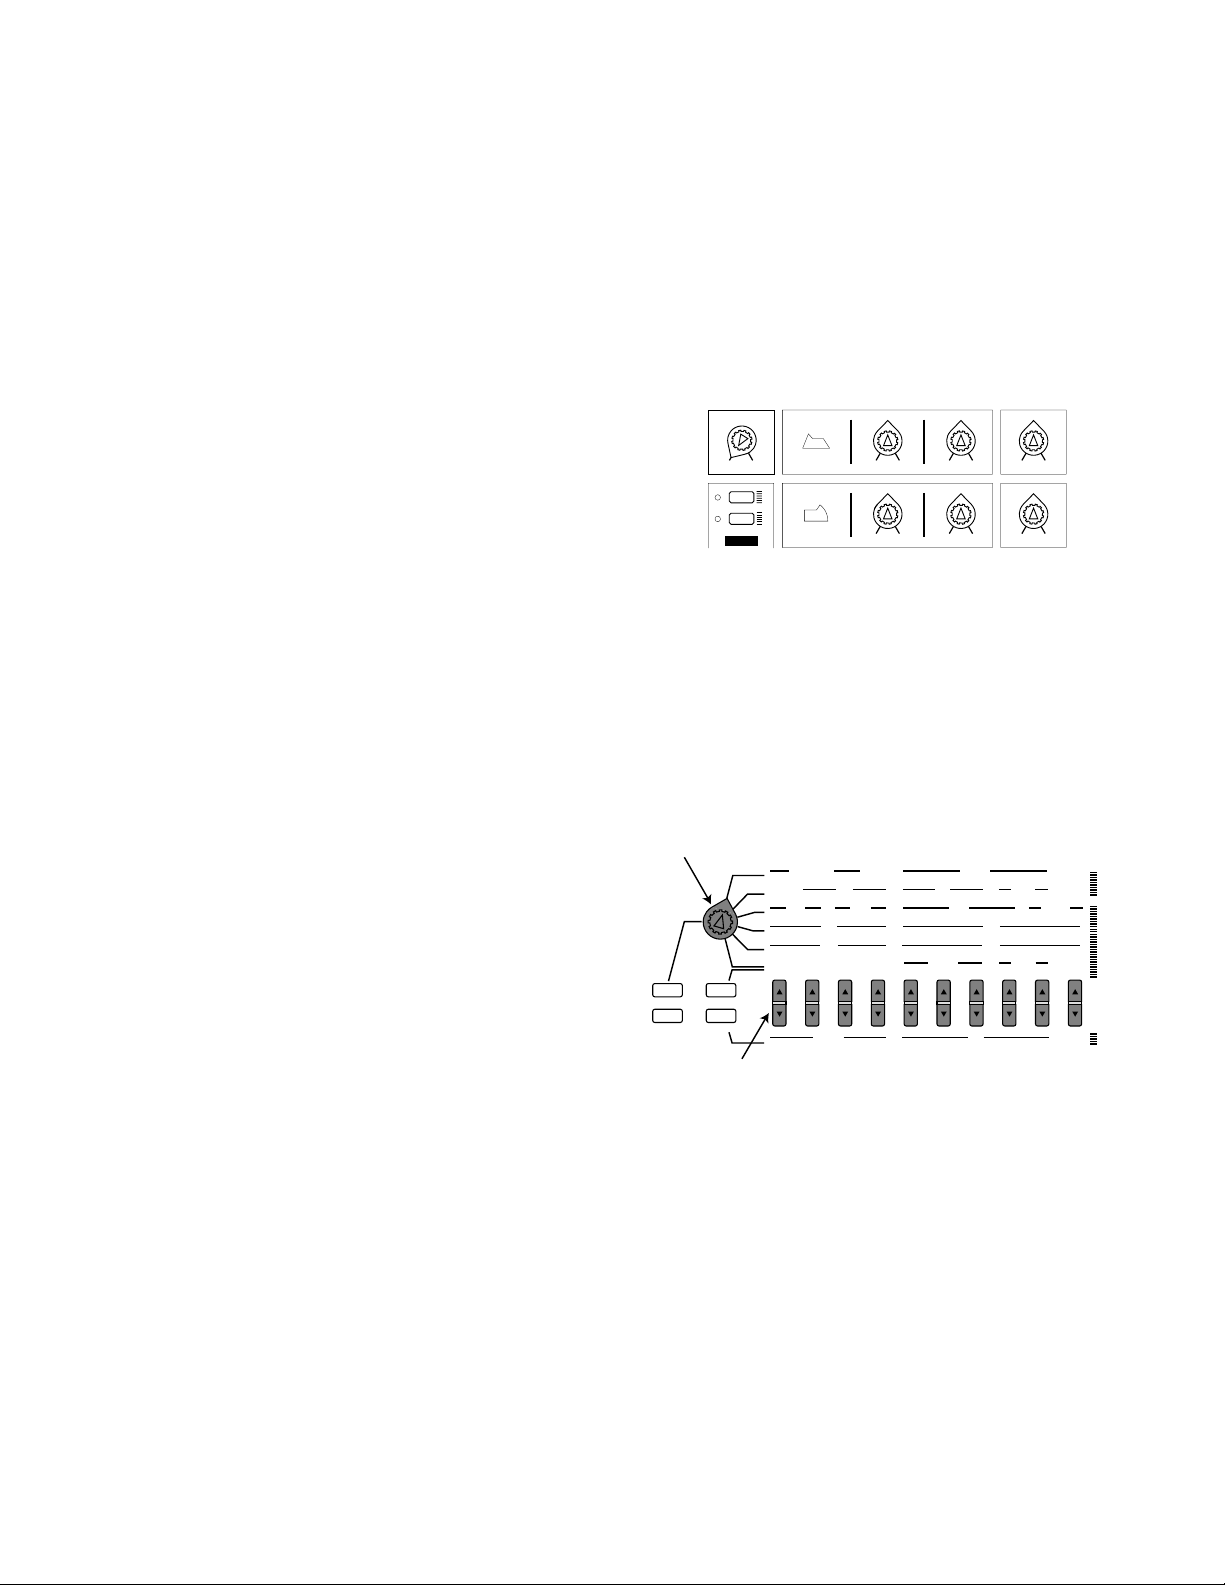
Another way to edit a Performance is with the Edit Parameter Rotary
Switch and Parameter Value UP/DOWN buttons. These give you control
over both "Common" parameters which affect all Layer voices equally,
and "Layer" parameters which affect individual Layers, or AWM2 voices.
Performance
Mode
If you're in a different mode, press the PERFORMANCE button to enter
Performance mode.
In Performance Play mode you can select a Performance from 128 Preset
Performances and 128 User Performances and begin playing.
A
Performance
sounding at once—either playing simultaneously across the length of the
keyboard, or playing independently according to specified key and
velocity ranges.
There are many Performance parameters which you can edit by
parameter values—i.e., adding to or subtracting from the values which
are preset for each voice. There are basically two ways to go about offsetting
the parameters—by turning the Sound Control Knobs, or using the Edit
Parameter Rotary Switch and Parameter Value UP/DOWN buttons.
Changing any parameter will automatically engage Performance Edit
mode. (You can easily switch back Performance Play mode by pressing
the PERFORMANCE button or PROGRAM [–]/[+] button.)
is comprised of up to four "Layers", or AWM2 voices
offsetting
Edit Parameter Rotary Switch
DEMO
PERFORMANCE MULTI
STORE UTILITY
Parameter Value UP/DOWN Buttons
ARPEGGIATOR PERFORM
TYPE
TEMPO
SUB
P BEND
RANGE
NOTE
TIME
TIME
BANK
MASTER
TUNE
SFT
ATK
ATK
DIVIDE
MW
FMOD
PMOD
TUNE
LIMIT
DETUNE
LOW
AEG
SUS
DCY
LEVEL
TIME
FEG
SUS
DCY
LEVEL
TIME
PROGRAM
VOLUME
SYSTEM MIDI ASSIGN
VEL
KBD
CURVE
TRANS
REV
LEVEL
TYPE
CUTOFF
FMOD
NOTE
LIMIT
LIMIT
HIGH
LOW
REL
AMOD
TIME
REL
INIT
TIME
LEVEL
PAN
REV
SEND
VEL
TRANS
FIX
CHO
TYPE
FC PORTA
CUTOFF
VEL ASSIGN2
LIMIT
HIGH
PMOD
ATK
TIME
EFFECT
CHO
SEND
RCV
CH
CH
EFECT
OFFSET
FMOD
DEVICE
VARI
TYPE
VARI
LEVEL
VARI
SEND
PARAM
SWITCH
EF
DEPTH
LFO
PEG
ATK
CUTOFF
NO
VARI
WAVE
TIME
LOCAL
PERFORM
NAME
VARI
DATA
TIME
PARAM
SPEED
DCY
REL
TIME
FILTER
REZ
BULK
DUMP
ASSIGN1
PARAM
DATA
PHASE
INIT
REL
LEVEL
POLY/
MONO
CTRL
NO
COMMON
LAYER
UTILITY
In Performance mode there are six Edit menus of Common and Layer
parameters which can be accessed via the Edit Parameter Rotary Switch
and modified with the Parameter Value UP/DOWN buttons.
Try changing the voice assignments to each Layer. This is a quick and
effective way to create an entirely new Performance, which you can
easily store as a User Performance.
Assigning voices to the Layers is simple. Choose the Layer (1~4) with the
PART/LAYER [–]/[+] buttons, and select from a variety of AWM2
instrument voices and drum voices using the Bank and Program
Parameters (Layer Edit 4, sixth row from the top).
14
Basic
Basic
Operations In
Operations In
Performance
Performance
Mode
Mode
PERFORMANCE
PLAY
Performance Play mode lets you select a
Preset or User Performance for realtime play.
• Press the PERFORMANCE button to enter
Performance mode (if you're in a different
mode).
• Press either the PRESET or USER button to
select the Preset or User Performance bank.
• Choose a Performance with the PROGRAM
[–]/[+] buttons.
• Use realtime control features as you play,
including the Pitch Bend and Modulation
Wheels.
• Transpose the octave up or down by holding
SHIFT and pressing PART/LAYER [–]/[+]. You
can transpose the pitch up ([+]) or down ([–])
by as many as three octaves, depending on
the Performance. (The transpose value will
also be reflected in the Utility mode's
Keyboard Transpose function. NOTE:
Maximum is ±3 octaves; however, when you
raise or lower the pitch in semitones, for
example, three octaves cannot be achieved
using the SHIFT button.)
next to the Performance number, to indicate
that the edited sound has not been stored.
• Offset AMP EG and FILTER parameters to
change the shape and tone of the sound as
you play by turning the Sound Control Knobs.
• Replace the Layer voice assignment, or edit
other Performance Common and Layer
parameters, with the Edit Parameter Rotary
Switch and Parameter Value UP/DOWN
buttons.
• Press ARPEGGIATOR to turn it ON, and play
a chord to start the arpeggiated chords. Select
Arpeggiator Type, Tempo and other
parameters from the Common Edit 1 menu.
STORE
Store mode lets you store Scenes as well as
User Performances for later recall.
• Store your favorite Scenes, or "snapshots" of
Sound Control Knob positions, in the currently
selected Performance. (See page 44.)
• Store your own Performances in the 128 User
Performance memories. (See page 44.)
PERFORMANCE EDIT
Making any adjustment—either intentionally
or inadvertently—to any parameter will
engage Performance Edit mode. When
exiting from the Performance Edit mode (by
pressing PERFORMANCE or PROGRAM
[–]/[+]), an "E" will be displayed in the LCD
15
15
Performance Structure
Preset Bank User Bank
128 Performance
007
006
005
004
003
002
001
001
DEMO
PERFORMANCE MULTI
STORE UTILITY
COMMON EDIT
ARPEGGIATOR PERFORM
LEVEL
REV
TYPE
TEMPO
SUB
TYPE
DIVIDE
P BEND
MW
FMOD
PMOD
RANGE
CUTOFF
FMOD
TUNE
NOTE
DETUNE
NOTE
LIMIT
LIMIT
LIMIT
SFT
LOW
HIGH
LOW
AEG
SUS
DCY
ATK
REL
AMOD
TIME
LEVEL
TIME
TIME
FEG
DCY
ATK
SUS
REL
INIT
TIME
TIME
LEVEL
TIME
LEVEL
BANK
PROGRAM
VOLUME
PAN
REV
SEND
LAYER EDIT
SYSTEM MIDI ASSIGN
VEL
MASTER
KBD
VEL
TRANS
TRANS
CURVE
TUNE
FIX
CH
EFECT
VARI
CHO
TYPE
TYPE
FC PORTA
CUTOFF
VARI
EF
VEL ASSIGN2
LIMIT
OFFSET
HIGH
PMOD
FMOD
ATK
ATK
LEVEL
TIME
EFFECT
CHO
VARI
SEND
SEND
RCV
DEVICE
CH
NO
LFO
PEG
VARI
PARAM
SWITCH
DEPTH
WAVE
DCY
TIME
FILTER
CUTOFF
LOCAL
PERFORM
NAME
VARI
DATA
ASSIGN1
PARAM
TIME
DATA
PARAM
PHASE
SPEED
INIT
REL
REL
LEVEL
TIME
POLY/
MONO
REZ
CTRL
BULK
NO
DUMP
Performance
COMMON
LAYER
UTILITY
SAVE AS SCENE 1 or 2
Layer 4
Layer 3
Layer 2
Layer 1
VOICE
VOICE
AMP EG
2
MW/FC
1
FILTER
SCENE
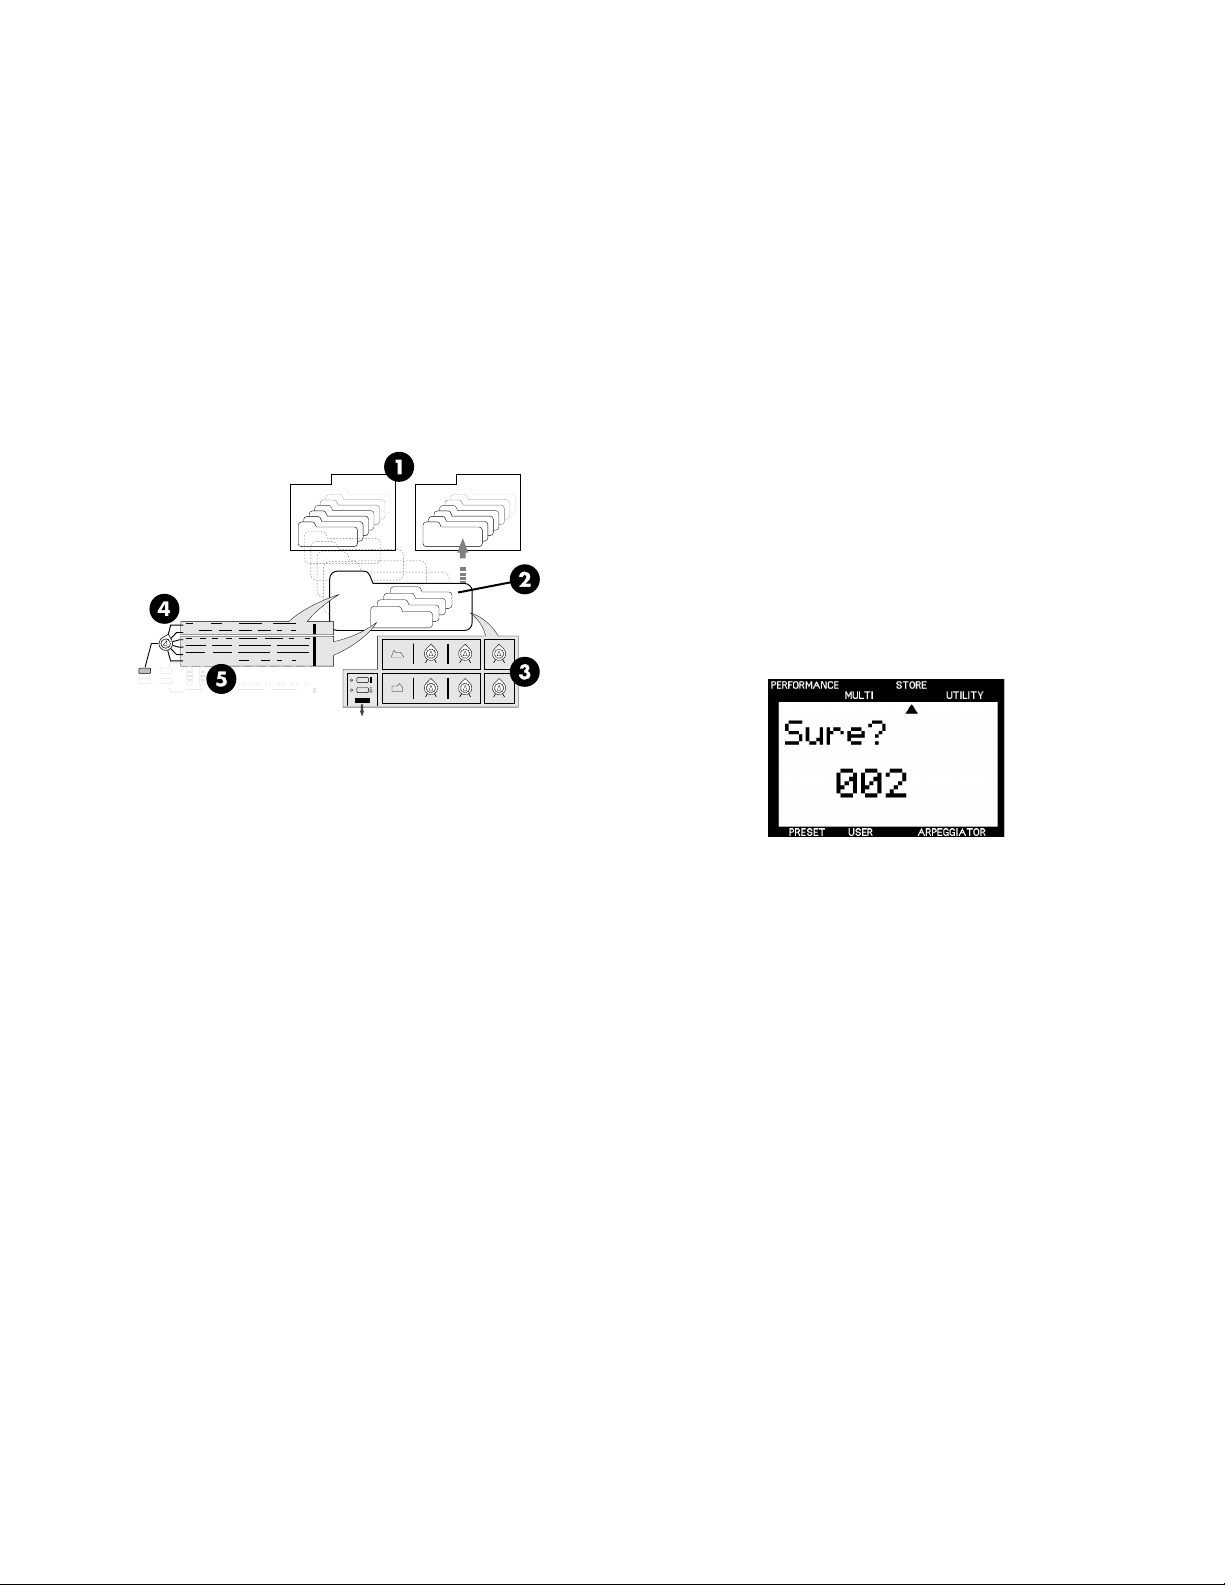
! PERFORMANCE BANKS - The CS1x comes preprogrammed with
128 Preset Performances and 128 User Performances. You can edit
the Layers of the currently selected Performance and store it in a User
Performance.
128 Performance
007
006
005
004
003
002
001
STORE IN USER BANK
VOICE
VOICE
ATTACK
RELEASE ASSIGN 1/DATA
CUTOFF
RESONANCE ASSIGN 2
REAL TIME EDIT with
THE SOUND CONTROL KNOBS
Storing User Performances
Storing your own User Performance is a quick and simple operation.
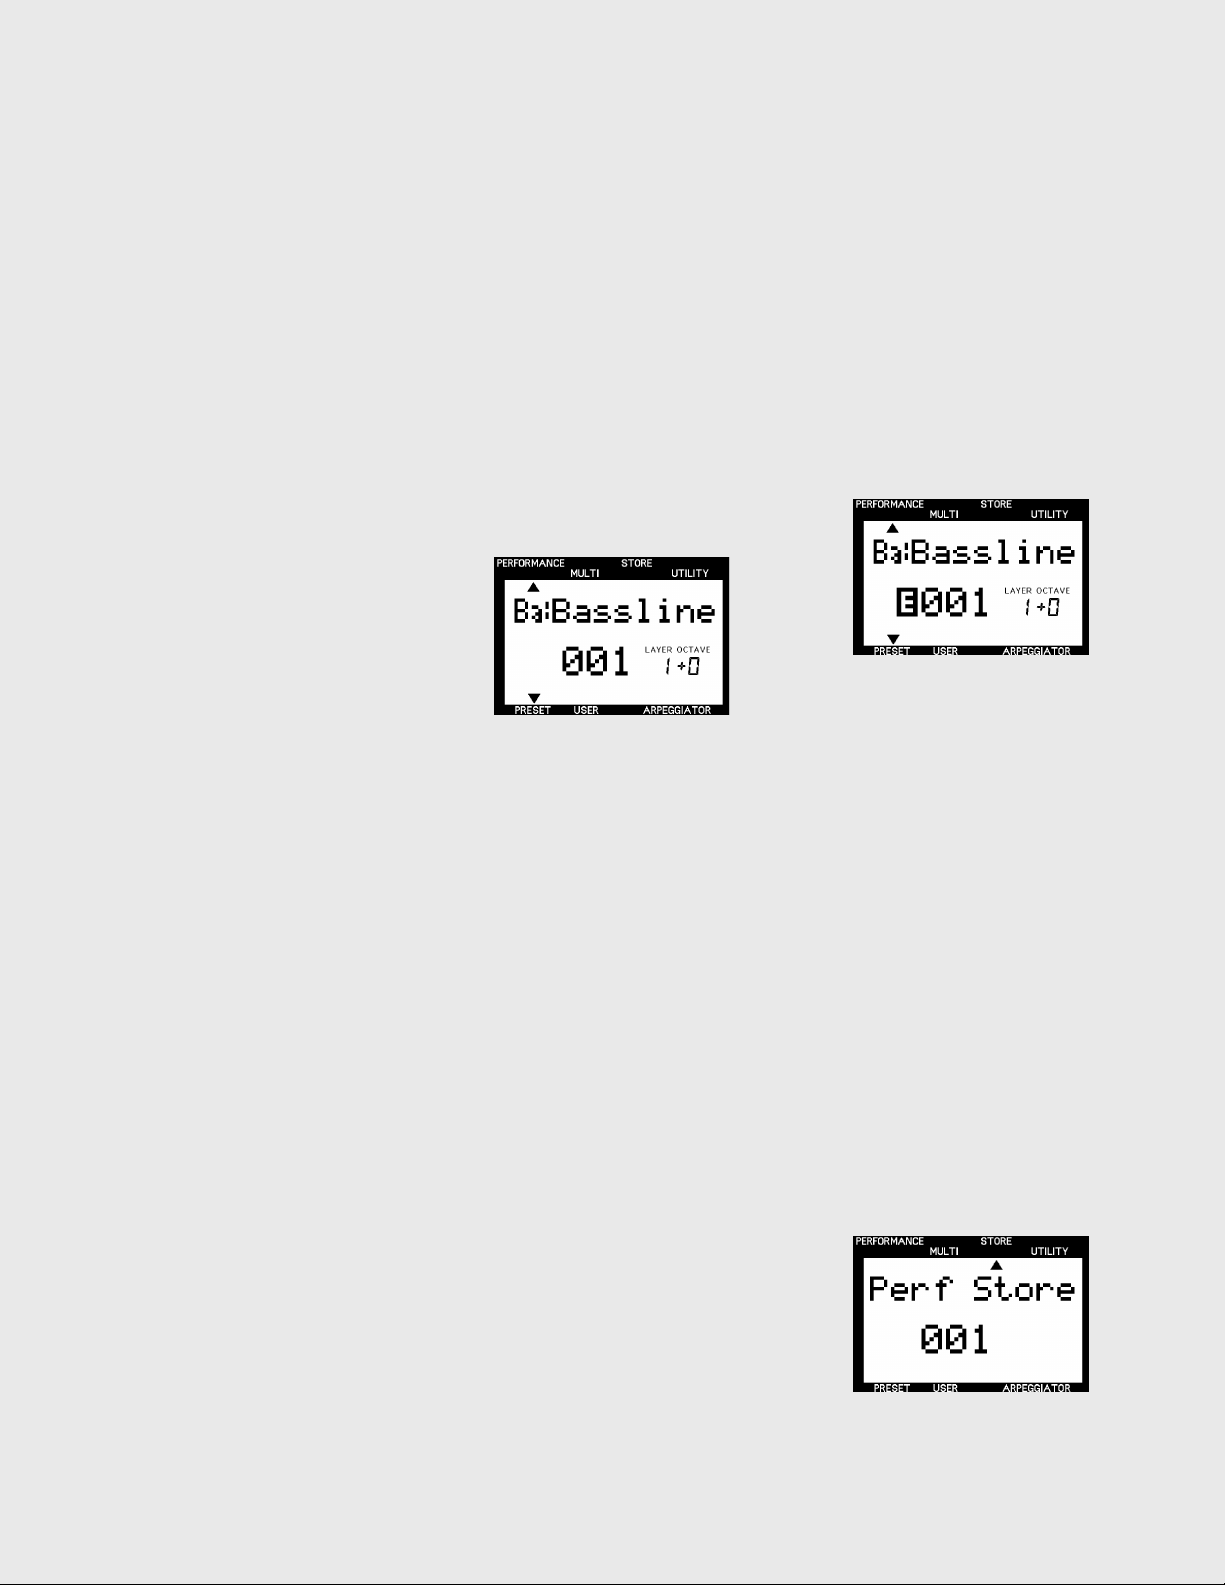
1. To store the current Performance, press the STORE button once.
2. Choose a User Performance number (1~128) using the numeric
keypad.
3. Press ENTER.
A "Sure?" prompt will appear in the LCD. Press YES to store the
Performance. Press NO to abort the operation.
" LAYERS - A Performance consists of up to four Layers—each Layer
can be assigned its own AWM2 voice. There are many Layer and
Common Performance parameters which can be edited.
# AMP EG/FILTER - Turning the Sound Control Knobs will affect all
Layers equally by offsetting AMP EG parameters to control the shape
of the volume of the sound over time, and FILTER parameters to control
the quality of the tone. In Edit mode you can assign which parameters
the ASSIGN 1 and ASSIGN 2 knobs will control.
$ COMMON EDIT 1~2 - These are "Common" parameters which affect
all Layers in the Performance equally.
% LAYER EDIT 1~4 - These are "Layer" parameters which let you modify
the characteristics of each individual Layer. Select the Layer you want
to edit using the PART/LAYER [–]/[+] buttons.
Scenes
There are two "Scene" memories dedicated to each Performance. Scenes
are simply "snapshots" of specific positions of the Sound Control Knobs—
instantly accessible via the SCENE buttons.
You can select one of the Scenes by pressing the SCENE 1 or SCENE
2 button. Or you can hold one SCENE button and press the other,
then use the Modulation Wheel or Foot Controller for realtime
continuous parameter changes between one Scene and the other.
The default controller is Modulation Wheel. The minimum position
of the controller is Scene1, and the maximum position is Scene 2.
Storing Scenes
You can easily store your own Scenes in a Performance—either
temporarily or permanently.
To store a Scene temporarily in the currently selected Performance, hold
a SCENE button and press STORE.
This will store the Scene in the edit buffer as long as the current Performance
is selected, so that the original Scenes are protected. If you select another
Performance, any new Scenes will be lost.
To store a Scene permanently in a Performance, simply perform the Store
operation for User Performances. (See
Storing User Performances
, above.)
16

Multi Play
Mode
In Multi Play mode you can select a voice from the GM bank of 128
AWM2 voices (accessible via the PROGRAM [–]/[+] buttons) and start
playing in realtime.
Multi Play mode lets you use the CS1x as a master keyboard controller or
MIDI note data input device, as well as a multitimbral tone generator.
A
Multi
is a configuration of up to 16 instrument "Parts" (each Part is
assigned to a MIDI channel) which can be played simultaneously when
an external sequencer or computer is connected to the CS1x.
Choose the Part with the PART/LAYER [–]/[+] buttons, and assign a voice
to it by selecting from the 480 GM- and XG-compatible AWM2 normal
(instrument) voices and 11 drum voices (kits), using the Edit menu Bank
and Program Parameter Value UP/DOWN button.
In Multi Play mode there is one menu of Edit parameters which can be
accessed via the Parameter Value UP/DOWN button.
Turning the Sound Control Knobs will affect only a single AWM2 voice,
i.e., the currently selected Part.
Multi Structure
BANK
PROGRAM
Part 1~16
7
6
5
4
3
2
1
PART SELECT
PART SELECT - In Multi Play mode each "Part" is made up of an AWM2
voice. You can select and play any of the 16 Parts by pressing the PART/
LAYER [–]/[+] buttons. Since the notes you play on the keyboard and the
buttons you press on the panel are sending MIDI messages, the CS1x is
ideal as a MIDI input device.
EDITING PARTS - Select the Part you want to edit using the PART/LAYER
[–]/[+] buttons. Each of the Multi parameters are printed above the
Parameter Value UP/DOWN button. To set up your own 16 Parts, assign
a voice to the Part using the Bank and Program parameters accessible by
the first two Parameter Value UP/DOWN buttons. (Note that these settings
will not be retained when the power is turned off, since the XG default
parameters are always reinstated when the power is turned on. If you
VOLUME
PAN
EFFECT
FILTER
POLY/MONO
insert voice Program Change messages at the head of your sequences,
however, the right Part voices will always be selected automatically when
you start your sequencer from the beginning of the song.)
MULTITIMBRAL PLAY - As a GM- and XG-compatible multitimbral
MIDI tone generator, the CS1x can receive note and other data on each
of the 16 MIDI channels, sent from an external sequencer or computer,
thus playing the corresponding 16 Parts.
XG Operation
The CS1x is a fully equipped, stand-alone XG-MIDI tone generator,
featuring a total of 480 normal voices and 11 drum voices.
The XG format maintains the universality and compatibility of the MIDI
and General MIDI System Level 1 standards, while significantly increasing
the range of expressiveness through much greater control over voice
modifications and effects.
In addition to supporting the 128 GM voices, the XG format provides for
Bank Select messages that significantly expand the number of voices
available for use.
Many of the new XG voices are variations of basic GM voices which are
stored in additional banks. Each bank is associated with a specific type of
variation, so that voices are easy to locate. When using an external
sequencer to control the CS1x, additional banks are selected by the
appropriate Bank-Select LSB values.
The XG format also supports a full SFX bank of extension effects, which
are selected by a Bank-Select MSB value of 40H. Bank-Select MSB 7H,
in contrast, can be used to set any channel to rhythm-part play.
The XG format allows creation of extremely expressive control data which
can change a voice's Harmonic Contents, Brightness, and many more
critical Control Change and other parameters.
The XG format also offers high level effects support, enabling control of
effects types, circuit operation, plus internal parameter settings for both
basic and elaborate effects. This means you can freely control the
parameters of the CS1x's 11 Reverb, 11 Chorus and 43 Variation types of
effects independently.
(For more information about MIDI related parameters, see the
page 53.)
The CS1x also features another play mode —TG300B mode— which
lets you play back commercially available MIDI files in this format.
17
Appendix
,

18

 Loading...