

Page 1
IMPORTANT
Check your power supply
Make sure that your local AC mains voltage matches the
voltage specified on the name plate on the bottom panel. In
some areas a voltage selector may be provided on the bottom
panel of the main keyboard unit near the power cord. Make
sure that the voltage selector is set for the voltage in your area.
The voltage selector is set at 240V when the unit is initially
shipped. To change the setting use a “minus” screwdriver to
rotate the selector dial so that the correct voltage appears next
to the pointer on the panel.
WICHTIG
Überprüfung der Stromversorgung
Vergewissern Sie sich vor dem Anschließen an das Stromnetz,
daß die örtliche Netzspannung den Betriebsspannungswerten
auf dem Typenschild an der Unterseite des Instruments
entspricht. In bestimmten Verkaufsgebieten ist das Instrument
mit einem Spannungswähler an der Unterseite neben der
Netzkabeldurchführung ausgestattet. Falls vorhanden, muß der
Spannungswähler auf die örtliche Netzspannung eingestellt
werden. Der Spannungswähler wurde werkseitig auf 240 V
voreingestellt. Zum Verstellen drehen Sie den Spannungsregler
mit einem Schlitzschraubendreher, bis der Zeiger auf den
korrekten Spannungswert weist
IMPORTANT
Contrôler la source d’alimentation
Vérifiez que la tension spécifiée sur le panneau arrière
correspond à la tension du secteur. Dans certaines régions,
l’instrument peut être équipé d’un sélecteur de tension situé sur
le panneau inférieur du clavier à proximité du cordon d’alimentation. Vérifiez que ce sélecteur est bien réglé en fonction de
la tension secteur de votre région. Le sélecteur de tension est
réglé sur 240 V au départ d’usine. Pour modifier ce réglage,
utilisez un tournevis à lame plate pour tourner le sélecteur afin
de mettre l’indication correspondant à la tension de votre
région vis à vis du repère triangulaire situé sur le panneau.
IMPORTANTE
Verifique la alimentación de corriente
Asegúrese de que tensión de alimentación de CA de su área
corresponde con la tensión especificada en la placa de
características del panel inferior de la unidad del teclado
principal, cerca del cable de alimentación. Asegúrese de que
el selector de tensión esté ajustado a la tensión de su área. El
selector de tensión se ajusta a 240V cuando la unidad sale de
fábrica. Para cambiar el ajuste, emplee un destornillador de
cabeza “recta” para girar el selector de modo que aparezca la
tensión correcta al lado del indicador del panel.
Page 2
SPECIAL MESSAGE SECTION
PRODUCT SAFETY MARKINGS: Yamaha electronic
products may have either labels similar to the graphics
shown below or molded/stamped facsimiles of these
graphics on the enclosure. The explanation of these graphics appears on this page. Please observe all cautions indicated on this page and those indicated in the safety instruction section.
CAUTION
RISK OF ELECTRIC SHOCK
DO NOT OPEN
CAUTION: TO REDUCE THE RISK OF ELECTRIC SHOCK.
DO NOT REMOVE COVER (OR BACK).
NO USER-SERVICEABLE PARTS INSIDE.
REFER SERVICING TO QUALIFIED SERVICE PERSONNEL.
See bottom of Keyboard enclosure for graphic symbol markings
The exclamation point within the equilateral triangle is intended to alert the
user to the presence of important operating and maintenance (servicing) instructions in the literature accompanying the product.
ENVIRONMENTAL ISSUES: Yamaha strives to produce products that are both user safe and environmentally
friendly. We sincerely believe that our products and the
production methods used to produce them, meet these
goals. In keeping with both the letter and the spirit of the
law, we want you to be aware of the following:
Battery Notice: This product MAY contain a small nonrechargable battery which (if applicable) is soldered in
place. The average life span of this type of battery is approximately five years. When replacement becomes necessary, contact a qualified service representative to perform the replacement.
Warning: Do not attempt to recharge, disassemble, or
incinerate this type of battery. Keep all batteries away
from children. Dispose of used batteries promptly and as
regulated by applicable laws. Note: In some areas, the
servicer is required by law to return the defective parts.
However, you do have the option of having the servicer
dispose of these parts for you.
Disposal Notice: Should this product become damaged
beyond repair, or for some reason its useful life is considered to be at an end, please observe all local, state, and
federal regulations that relate to the disposal of products
that contain lead, batteries, plastics, etc.
The lightning flash with arrowhead
symbol, within the equilateral triangle,
is intended to alert the user to the presence of uninsulated “dangerous voltage” within the product’s enclosure that
may be of sufficient magnitude to constitute a risk of electrical shock.
IMPORTANT NOTICE: All Yamaha electronic products are tested and approved by an independent safety
testing laboratory in order that you may be sure that when
it is properly installed and used in its normal and customary manner, all foreseeable risks have been eliminated.
DO NOT modify this unit or commission others to do so
unless specifically authorized by Yamaha. Product performance and/or safety standards may be diminished.
Claims filed under the expressed warranty may be denied
if the unit is/has been modified. Implied warranties may
also be affected.
SPECIFICATIONS SUBJECT TO CHANGE: The
information contained in this manual is believed to be
correct at the time of printing. However, Yamaha reserves
the right to change or modify any of the specifications
without notice or obligation to update existing units.
NOTICE: Service charges incurred due to lack of knowledge relating to how a function or effect works (when the
unit is operating as designed) are not covered by the
manufacturer’s warranty, and are therefore the owners
responsibility. Please study this manual carefully and consult your dealer before requesting service.
NAME PLATE LOCATION: The graphic below indicates the location of the name plate. The model number,
serial number, power requirements, etc., are located on
this plate. You should record the model number, serial
number, and the date of purchase in the spaces provided
below and retain this manual as a permanent record of
your purchase.
CLP-611 CLP-811
92-469 1
Model _____________________________________
Serial No. __________________________________
Purchase Date ______________________________
Page 3
○○○○○○○○○○○○○○○○○○○○○○○○○○○○○○○○○○○○○○○○○○○○○○○○○○○○○○○○○○○○○
CLP-811
CLP-611
Owner’s Manual English
Bedienungsanleitung Deutsch
Mode d’emploi Français
Manual de instrucciones Español
Page 4

Introduction
Thank you for choosing a Yamaha CLP-811/611 Clavinova. Your Clavinova is a fine musical instrument
employing advanced Yamaha music technology. With proper care, your Clavinova will provide you with
many years of musical pleasure.
● Yamaha’s AWM (Advanced Wave Memory) sound
generation provides extremely rich, realistic voices.
Piano voices are especially true and powerful.
● The damper pedal produces natural piano
resonances, obtained from direct sampling of string
and soundboard resonance characteristics.
● Piano-like touch response offers great control and
playability. Responsiveness can be set to any of four
levels.
● Dual mode lets you play any two voices in unison.
● Split mode divides the keyboard into two zones, so
that you can play a different voice with each hand.
● Special Organ Combination voice can be freely
edited.
● Unique Clavinova T one voice provides a new and
versatile sound.
To ensure that you can take full advantage of your Clavinova’s many outstanding features, please read
through this manual carefully, and store in a safe place for future reference.
● Built-in metronome function facilitates effective
practice.
● Digital recording function can record and replay your
keyboard input (up to about 4,200 notes).
● With MIDI compatibility and a solid range of MIDI
functions, the Clavinova can serve well within a wide
variety of advanced MIDI setups.
● Built-in computer interface allows for direct connection to personal computers running advanced music
software.
● Large LCD provides an effective and friendly interface. Well-designed displays make setup and control
operations extremely easy.
Taking Care Of Your Clavinova
Your Clavinova is a fine musical instrument, and deserves the most careful treatment. Observe the following
points and your Clavinova will sound and look great for many years.
1 Never open the case and touch or tamper with
the internal circuitry.
2 Always turn the POWER switch OFF after use,
and close the key cover to protect the keyboard.
3 Clean the cabinet and keys of your Clavinova
only with a clean, slightly damp cloth. A neutral
cleanser may be used if desired. Never use
abrasive cleansers, waxes, solvents, or chemical
dust cloths as these can dull or damage the
finish.
4 Never place any vinyl products on your
Clavinova. Contact with vinyl can cause irreversible damage to the finish.
5 Install your Clavinova in a place that is away
from direct sunlight, excessive humidity and
heat.
6 Never apply excessive force to the controls,
connectors or other parts of your Clavinova, and
avoid scratching or bumping it with hard objects.
7 Make sure that your local AC voltage matches
the voltage specified on the Clavinova’s nameplate (located on the bottom panel, under the
keyboard). Note that some Clavino vas are
equipped with a voltage selector dial located
next to the power-cord inlet. If your unit includes a selector, turn it as necessary (with a
screwdriver) to select the correct voltage.
● Nameplate Location
The CLP-811/611 nameplate is located on the
bottom panel.
Page 5

Contents
Getting Ready ........................................................2
Music Stand .....................................................2
Key Cover.........................................................2
Powering Up ....................................................3
Adjusting the Volume ..................................... 3
Using Headphones......................................... 3
Panel Controls and Connectors............................... 4
Basic Controls and Functions .................................. 6
Controlling the Clavinova .............................. 6
Frequently Used Buttons............................... 6
Playing the Demos and Piano Songs ...................... 8
Playing the Demos ......................................... 9
Playing the Piano Songs.............................. 10
One-Hand Practice with Piano Songs ........ 11
Repetition Practice with Piano Songs ........ 12
Selecting and Playing Voices................................ 13
Selecting a Voice .......................................... 13
Using the Pedals .......................................... 14
Changing the Sound [VARIATION],
[BRILLIANCE], [REVERB], [EFFECT].......... 14
TOUCH............................................................16
TRANSPOSE ..................................................17
DUAL Mode (Mixing two voices together) .. 17
SPLIT Mode (Dividing the keyboard) .......... 18
Using the METRONOME .............................. 19
F6. OrganEdit (ORGAN
COMBINATION settings)................... 30
F7. Metronome (Metronome settings) ..... 32
F8. Display (Display mode) ..................... 32
F9. L.Pedal (Function of left pedal) ......... 33
F10. DamperDpt (Damper-pedal depth).... 33
F11. Damper (Number of
damper-pedal levels)......................... 34
F12. CancelVol (Volume of muted
piano-song track) .............................. 34
F13. MIDIFunc. (MIDI settings) ................. 34
CLP-811
F14. MicRevDpt (Microphone reverb
depth).................................................36
F15. Backup (Backup ON/OFF
settings) .............................................36
CLP-611
F14. Backup (Backup ON/OFF
settings) .............................................36
The Clavinova’s Device Connectors ...................... 38
Connecting to a Personal Computer .......... 40
Troubleshooting ....................................................42
Options ................................................................43
Index....................................................................44
Using the Recorder ...............................................20
Recording.......................................................20
Playback.........................................................22
Configuration Functions (FUNCTION mode) .......... 24
Basic Procedure ............................................26
Function descriptions.................................. 27
F1. Tune (Keyboard fine tuning) .............. 27
F2. KTune (Key-by-key fine tuning).......... 27
F3. Scale (Temperament selection)......... 28
F4. DualFunc. (Settings for
DUAL mode.)..................................... 29
F5. SplitFunc. (Settings for SPLIT
mode.)................................................29
• Within this manual, a white arrow ( ) indicates how the Clavinova responds to an action that you
have taken.
• All front panel illustrations are from the CLP-811.
• Screen illustrations show examples only. Actual screen content will vary according to operational
settings.
Demo and Piano Songs Lists ................................ 46
Factory Defaults ...................................................47
MIDI Data Format ................................................48
Specifications........................................................53
CLP-811 Assembly Procedure .............................. 54
CLP-611 Assembly Procedure .............................. 60
MIDI Implementation Chart ................................. 66
1
Page 6
Getting Ready
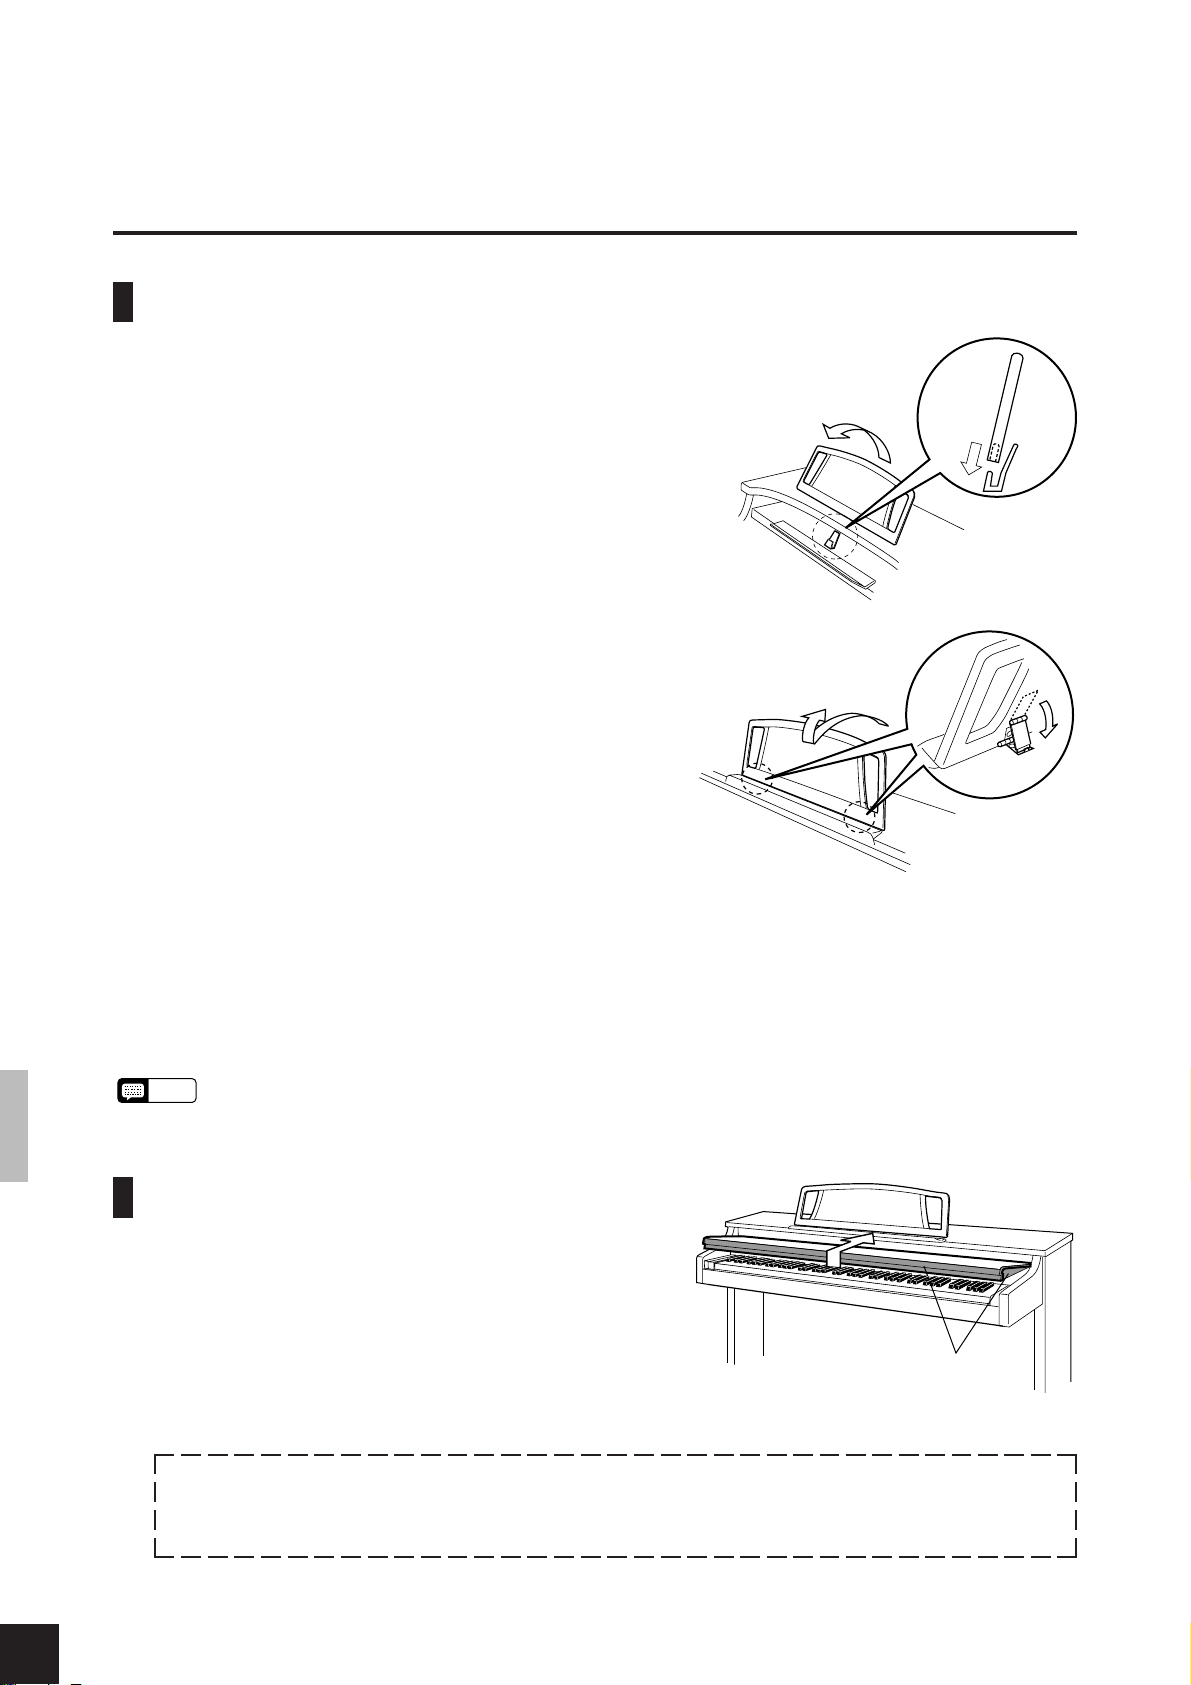
Music Stand
CLP-811
To raise the stand:
1. Using two hands, take hold of the left and right sides
of the music stand. Lift the stand upwards while at
the same time rotating the top of the stand toward
you.
2. Push the stand down into place so that the opening
on the base of the stand fits onto the small notch on
the plastic hook.
To retract the stand:
Lift the stand straight up off the notch, then rotate it
backwards and return it to its original position.
CLP-611
To raise the stand:
1. Lift the stand forward as far as it will go.
2. Flip down the two metal supports at the bottom rear
of the stand.
3. Lower the stand downward slightly so that it comes
to rest on the metal supports.
3
1
1
2
2
To lower the stand:
1. Lean the stand forward as far as it will go.
2. Raise the two metal supports (at the back of the
stand) so that they are flush with the stand.
3. Gently lower the stand backward until it is all the
way down.
Please do not try to use the stand in half-raised
NOTE
position. When raising or lowering the stand, always
hold on to it until it is securely in place.
Key Cover
To open the cover:
1. Lift the cover slightly (not too much).
2. Gently slide the cover open.
To close the cover:
1. Slide the cover all the way forward, holding it firmly
so that it can’t drop down.
2. Gently lower the cover over the keys.
Hold the cover with both hands when moving it, and do not release it until it is fully opened
or closed. Be careful to avoid catching fingers (your and others’,) between the cover and the
main unit.
Be careful of fingers when opening or closing.
CLP-811/611 Getting Ready
2
Page 7
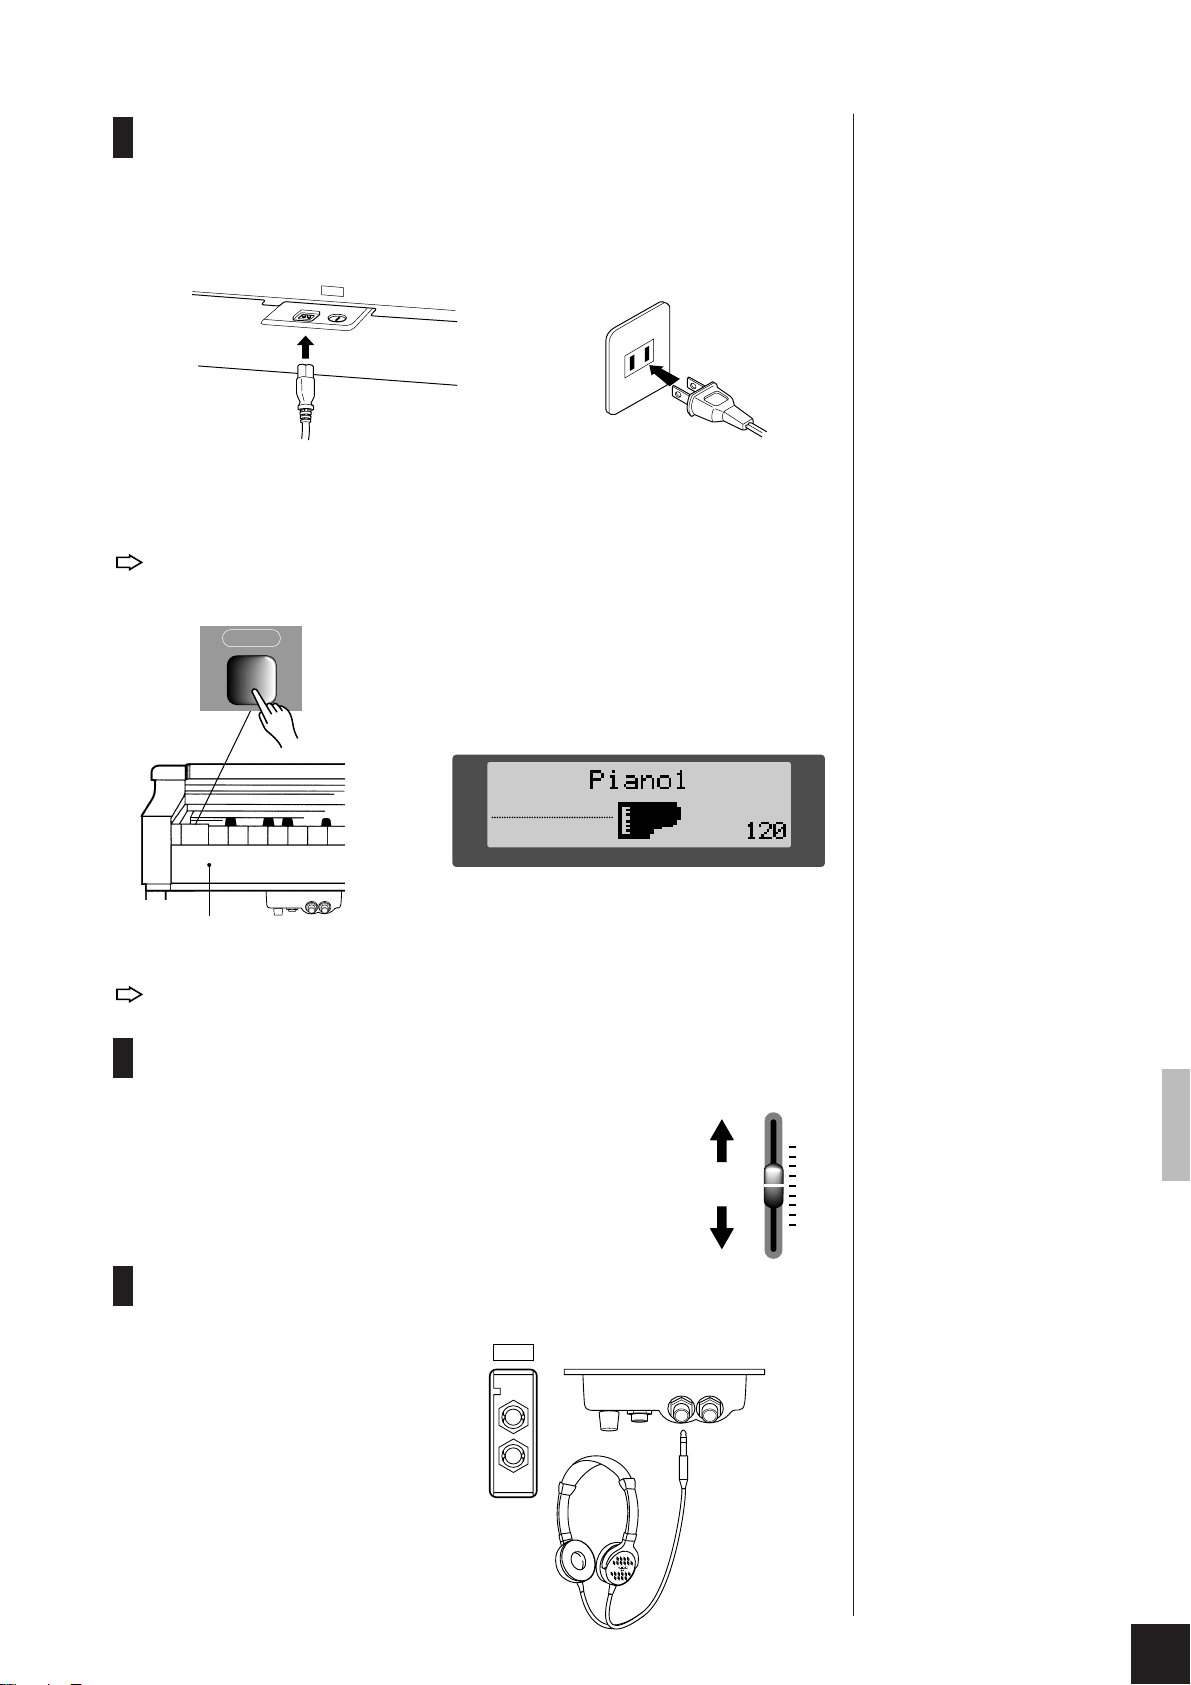
Powering Up
1. Connect the power cord.
Insert one end of the power cord into the power connector on the Clavinova, and
the other end into a standard wall outlet. (If your unit comes with a plug adaptor
and its use is required, please connect it to the end of the cord before plugging in.)
AC
IN
LE
T
The power inlet is located at
rear of Clavinova, on the
underside of the main unit
(directly above the backboard.)
2. Switch on the power.
The [POWER] button is located to the left of the keyboard. Press it once to
switch the power on.
The display comes on, and the power indicator on the front left of the
instrument lights up. One or more panel indicators also light up.
POWER
The power indicator is located on
the front side, so that you can tell
if power is on even with the key
cover closed.
ROOM
Power indicator
NORMAL
BRILLIANCE
REVERB EFFECT TOUCH
PHONESMIC.MIC. VOL.
MIN MAX
CLP-811
MEDIUM
To switch the power off, press [POWER] once again.
The display and indicators all go off.
Adjusting the Volume
You adjust the volume by moving the [MASTER
VOLUME] slider up or back. Adjust as necessary while
playing on the keyboard.
Using Headphones
You can connect headphones to either
or both of the PHONES jacks. The
connection automatically cuts off
output from the Clavinova’s speakers.
Two jacks are provided so that two
people can listen at the same time.
(Headphones must be purchased
separately.)
CLP-611
PHONES
MIN MAX
Louder
Softer
CLP-811
TEMPO
MASTER VOLUME
PHONESMIC.MIC. VOL.
Standard jack
for stereo headphones
MAX
MIN
The [MASTER VOLUME] slider
also controls the output level to
the PHONES and AUX OUT
jacks.
Recommended headphones:
Yamaha HPE-160
CLP-811/611 Getting Ready
3
Page 8

Panel Controls and Connectors
Front Panel
SPLIT
ROOM
CHORUS
HALL 1
SYMPHONIC
HALL 2
TREMOLO
STAGE
ECHO
REVERB EFFECT TOUCH
B
SONG
HARD
MEDIUM
SOFT
FIXED
MEASURE
TEMPO
2
MASTER VOLUME
345 0 A C E
TRANSPOSE SPLIT VARIATION
FUNCTION
MAX
BRILLIANCE REVERB EFFECT TOUCH
MIN
6
789 D F
PIANO2 CLAVI.TONE E.PIANO 1 E.PIANO 2
PIANO1
VIBES STRINGS CHOIR
HARPSICHORD
PIPE
ORGAN
BASS
ORGAN
COMBINATION
TRANSPOSE
MELLOW
NORMAL
BRIGHT
BRILLIANCE
This button exists on the CLP-811 but not on the CLP-611.
All other panel buttons are common to both models.
1
POWER
A-1 B-1
C0 D0 E0 F0 G0 A0 B0 C1 D1E1 F1 G1A1 B1 F2 G2A2 B2 C3D3 E3 F3 G3 A3 B3C4 D4 E4 F4 G4 A4 B4 C5 D5E5 F5 G5 A5 B5 C6 D6E6 F6 G6 A6 B6 C7C2 E2D2
MASTER VOLUME
FUNCTION
TRANSPOSE SPLIT VARIATION
MAX
BRILLIANCEREVERB EFFECT TOUCH
MIN
PIANO1
VIBES STRINGS CHOIR
PIANO2 CLAVI.TONEE.PIANO 1 E.PIANO2
PIPE
ORGAN
HARPSICHORD
TRANSPOSE
MELLOW
NORMAL
ORGAN
BRIGHT
COMBINATION
BASS
BRILLIANCE
CHORUS
ROOM
SYMPHONIC
HALL 1
TREMOLO
HALL 2
STAGE
REVERB EFFECT TOUCH
SONG
SPLIT
MEASURE
HARD
MEDIUM
TEMPO
SOFT
ECHO
FIXED
PIANO SONG
METRONOME
TEMPO
–
/ NO+ / YES
G
RECORDER
DEMO
/
METRONOME
–
/
TEMPO
NO + / YES
PIANO SONG
12
SONG
START
/
REC
STOP
SELECT
HI
RECORDER
DEMO
/
12
SONG
START
/
REC
STOP
SELECT
STEREO SAMPLING
CLP-
811
PHONES
O
CLP-611
MIN MAX
M
PHONESMIC.MIC. VOL.
NO
CLP-811
1 [POWER] ................................ page 3
2 [MASTER VOLUME]..................... 3
3 [FUNCTION] ................................. 24
4 [TRANSPOSE] / [
5 [SPLIT] / [
ss
s] .................................. 18
ss
tt
t]..................... 17
tt
6 [BRILLIANCE] .............................. 15
7 [REVERB] ....................................... 15
8 [EFFECT]......................................... 15
9 [TOUCH] ........................................ 16
0 Voice selectors ............................... 13
Middle C
(CLP-811)
J
K
L
A [VARIATION] ............................... 14
B Display (LCD) ................................. 6
C [METRONOME] ........................... 19
D Tempo [▲] [▼] [-/NO] [+/YES]
.................................................. 6,19,26
E [DEMO/PIANO SONG] ................8
F Song select [▲] [▼] ....................... 26
G RECORDER [1] [2] ........................ 20
CLP-811/611 Panel Controls and Connectors
4
Page 9
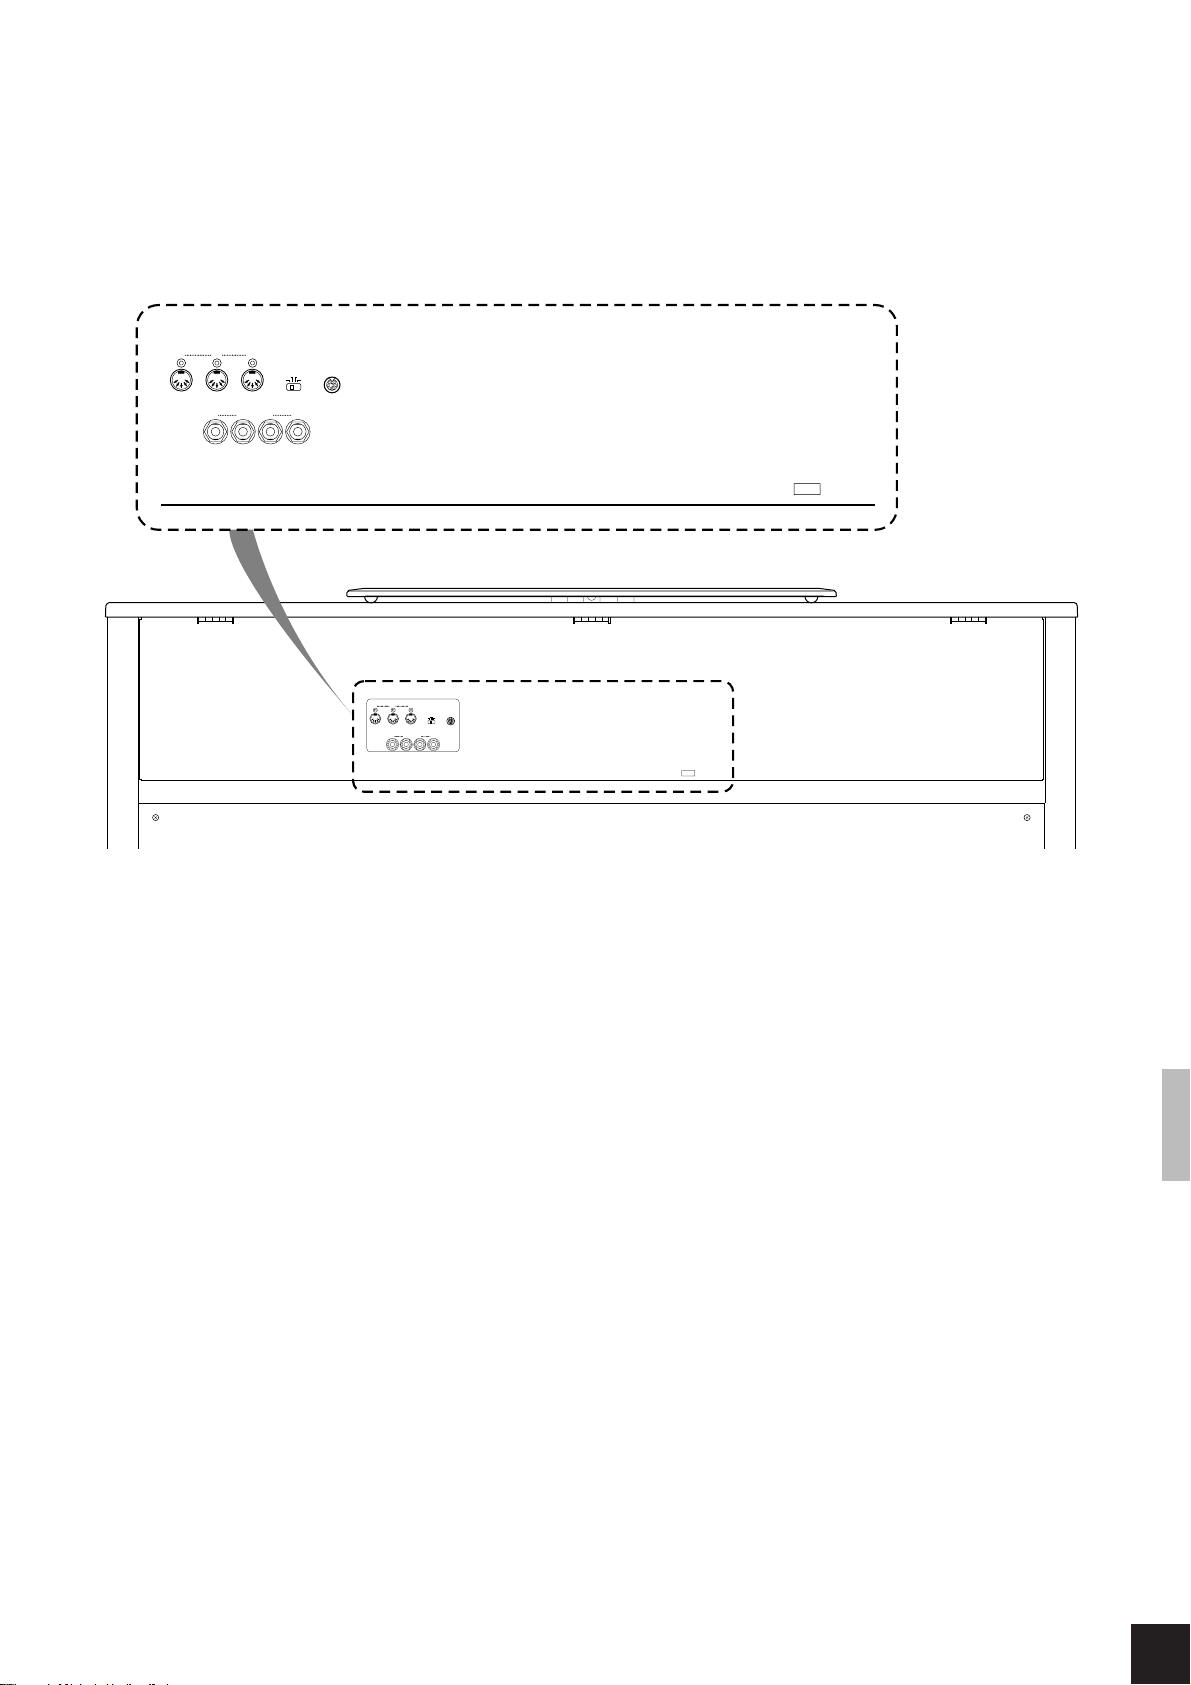
Rear Panel
P
MIDI
IN OUT
AUX IN
RL
/
THRU
L+R
Q
HOST SELECT TO HOST
PC-2 PC-1
MIDI
Mac
AUX OUT
RL/L+R
R
ST
IN OUT
MIDI
AUX IN
RL
U
AC INLET
THRU
HOST SELECT TO HOST
PC-2 PC-1
MIDI
Mac
AUX OUT
RL
/
L+R
/
L+R
AC INLET
(CLP-811)
H [START/STOP] ............. pages 10,21
I [REC] ............................................... 21
J Soft pedal ....................................... 14
K Sostenuto pedal ............................. 14
L Damper pedal ................................ 14
M [MIC.VOL] (CLP-811 only) .......... 38
N [MIC.] (CLP-811 only)................... 38
O [PHONES] ................................... 3,38
P MIDI [IN] [OUT] [THRU] ...... 39,48
Q HOST SELECT [MIDI] [PC-2]
[PC-1] [MAC] ............................39,40
R [TO HOST] ................................ 39,40
S AUX IN [R] [L/L+R] ...................... 39
T AUX OUT [R] [L/L+R].................. 39
U [AC INLET] ............................ 3,58,64
CLP-811/611 Panel Controls and Connectors
5
Page 10
Basic Controls and Functions
This section describes the basic controls and operational features of your Clavinova.
Please read through this information carefully.
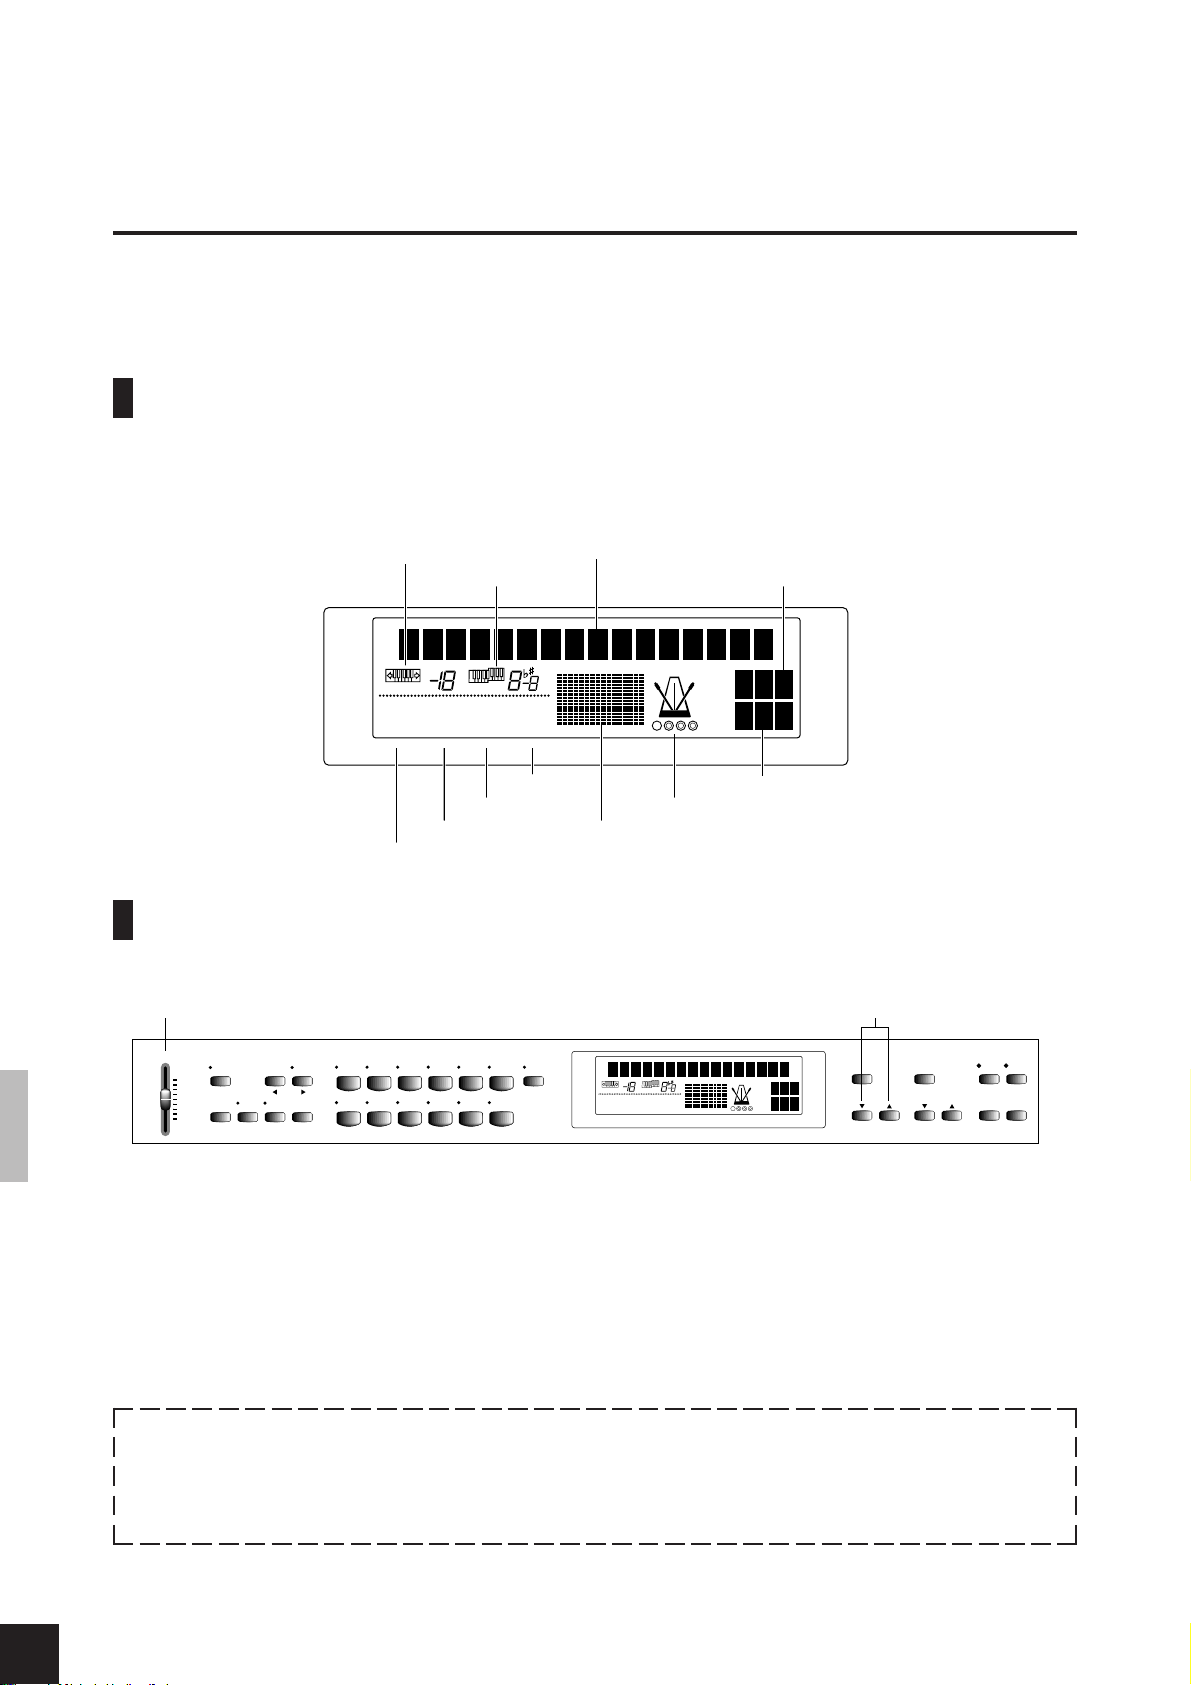
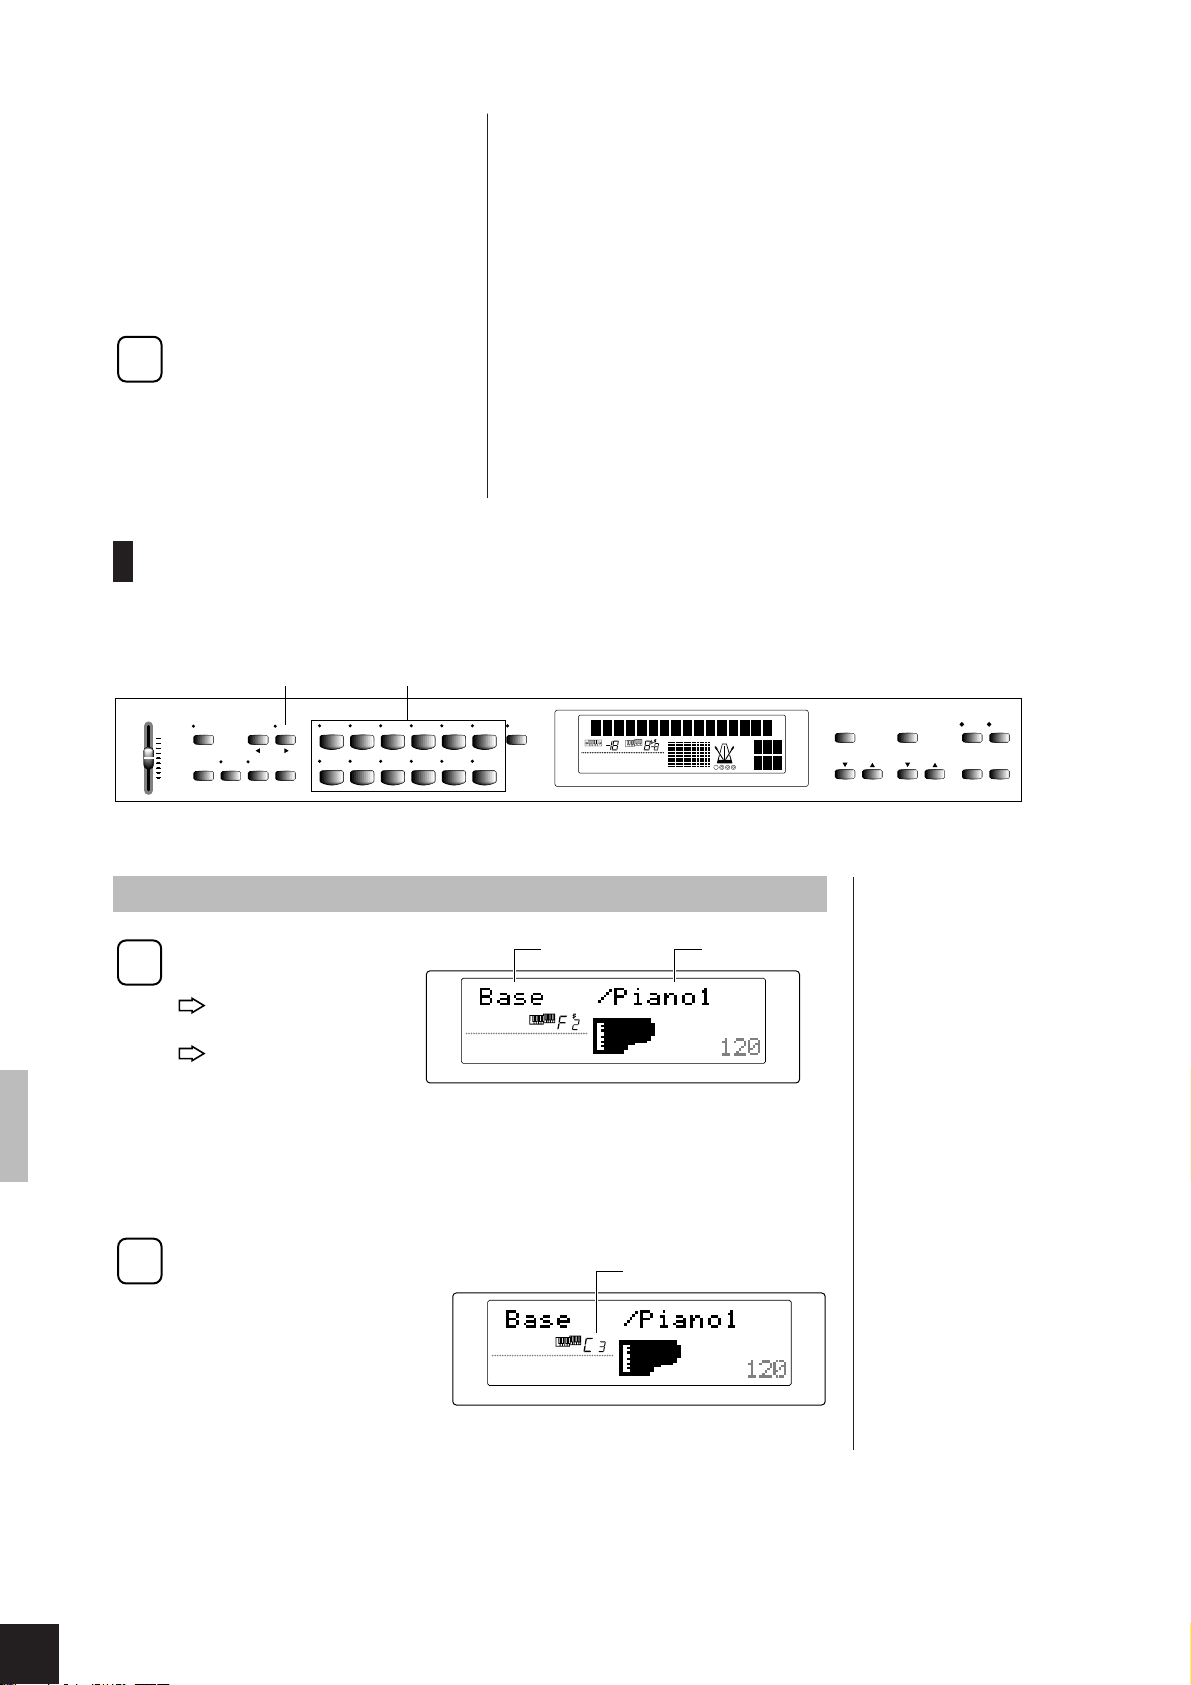
Controlling the Clavinova
You control the Clavinova functions by pressing the buttons on the panel. The display indicates the
results of each operation and keeps you informed of the current status.
Transpose
Name of voice, piano song, or function
Split
TRANSPOSE
MELLOW
NORMAL
BRIGHT
BRILLIANCE
SPLIT
ROOM
CHORUS
SYMPHONIC
TREMOLO
ECHO
HARD
MEDIUM
SOFT
FIXED
HALL 1
HALL 2
STAGE
REVERB EFFECT TOUCH
Touch
Effect Metronome
Reverb Graphic
Brilliance
Frequently Used Buttons
[MASTER VOLUME]
MASTER VOLUME
FUNCTION
MAX
BRILLIANCE REVERB EFFECT TOUCH
MIN
TRANSPOSE SPLIT
VIBES STRINGS CHOIR BASS
ORGAN
HARPSI-
CHORD
VARIATIONPIANO 1 PIANO 2 CLAVI.TONE E.PIANO1 E.PIANO2
PIPE
ORGAN
COMBINATION
TRANSPOSE
MELLOW
NORMAL
BRIGHT
BRILLIANCE
Piano song No., Measure count
SONG
MEASURE
TEMPO
Tempo
TEMPO [▲] [▼] / [–/NO] [+/YES]
SPLIT
ROOM
CHORUS
HALL 1
SYMPHONIC
HALL 2
TREMOLO
STAGE
ECHO
REVERB EFFECT TOUCH
MEDIUM
SONG
HARD
SOFT
FIXED
MEASURE
TEMPO
METRONOME
TEMPO
–
/ NO+ / YES
DEMO
PIANO SONG
/
SONG
SELECT
RECORDER
12
START
/
REC
STOP
[MASTER VOLUME]
Adjusts the output level to the speakers, headphones, and AUX OUT jacks.
TEMPO [▼] [▲]
Adjust the playback tempo for demo songs and piano songs. Also adjust the metronome tempo.
You can set the tempo to any value between 32 and 280. Pressing [▼] and [▲] at the same time resets the
value to its standard setting (either 120 or else as set within the currently selected song).
• Holding down the appropriate increment/decrement button (TEMPO [▼][▲]/[-/NO][+/YES] or
SONG SELECT[▼][▲]) causes the corresponding value to change continuously. In most cases the
setting will stop upon reaching the maximum or minimum limit. In some cases, however, the setting
will continue to loop through the available values.
• You can return any value to its factory default by pressing [-/NO] and [-/YES] at the same time.
CLP-811/611 Basic Controls and Functions
6
Page 11

Memory Backup
The Clavinova includes a memory-backup feature than can retain settings
while power is off and restore them when you resume play. Although all
backup is set to OFF at time of shipping, you can use the FUNCTION
mode’s Backup setting (F15 on the CLP-811, F14 on the CLP-611) to
selectivety set backup on or off for different groups of settings.
If backup for a group is set OFF, all settings within that group return to
their factory defaults each time power comes on. (A listing of factory
defaults appears on page 47.) Note that the Clavinova unconditionally
backs up and restores the Backup settings themselves, as well as any
keyboard input that you have recorded.
Memory backup remains effective for about a week, after which all
settings will return to their factory defaults. If you wish to retain your
settings for a long period of time, please be sure to switch the Clavinova
on for at least a few minutes each week.
CLP-811/611 function groups
CLP-811/611 functions can be broadly divided into three groups, as
follows.
Voice and performance functions (p.13-p.19)
Recording and playback functions (p.20-p.23)
FUNCTION-mode settings (p.24-p.37)
FUNCTION mode...
You can use FUNCTION mode to
set a wide variety of system and
utility parameters. All parameters
are originally set to standard
default values (factory defaults),
but you are free to change them
to suit your particular needs.
Memory...
The Clavinova stores the various
settings you have made within its
internal memory.
Backup...
Use the memory backup feature
to retain memory settings while
power is off, so that they will be
restored when you switch the
power back on.
CLP-811/611 Basic Controls and Functions
7
Page 12
Playing the Demos and Piano Songs
Your CLP-811/611 includes thirty built-in piano songs, together with demo songs for
each of the different voices (one demo per voice). Let’s try playing some of these songs
now. When playing piano songs you are free to turn off the left-hand or right-hand part
so that you can practice along. You can also pick out a specific phrase for repetition-type
practice.
2
MASTER VOLUME
FUNCTION
MAX
BRILLIANCE REVERB EFFECT TOUCH
MIN
TRANSPOSE SPLIT
VIBES STRINGS CHOIR BASS
ORGAN
HARPSICHORD
VARIATIONPIANO 1 PIANO 2 CLAVI.TONE E.PIANO1 E.PIANO2
PIPE
ORGAN
COMBINATION
TRANSPOSE
MELLOW
NORMAL
BRIGHT
BRILLIANCE
SPLIT
ROOM
CHORUS
HALL 1
SYMPHONIC
HALL 2
TREMOLO
STAGE
ECHO
REVERB EFFECT TOUCH
MEDIUM
HARD
SOFT
FIXED
Procedure
Switch on the power.
1
(If power is not yet on)
Press the [POWER] button.
The power comes on.
We’ll adjust the output volume while playing the songs. For now, please
set the [MASTER VOLUME] slider to approximately middle position.
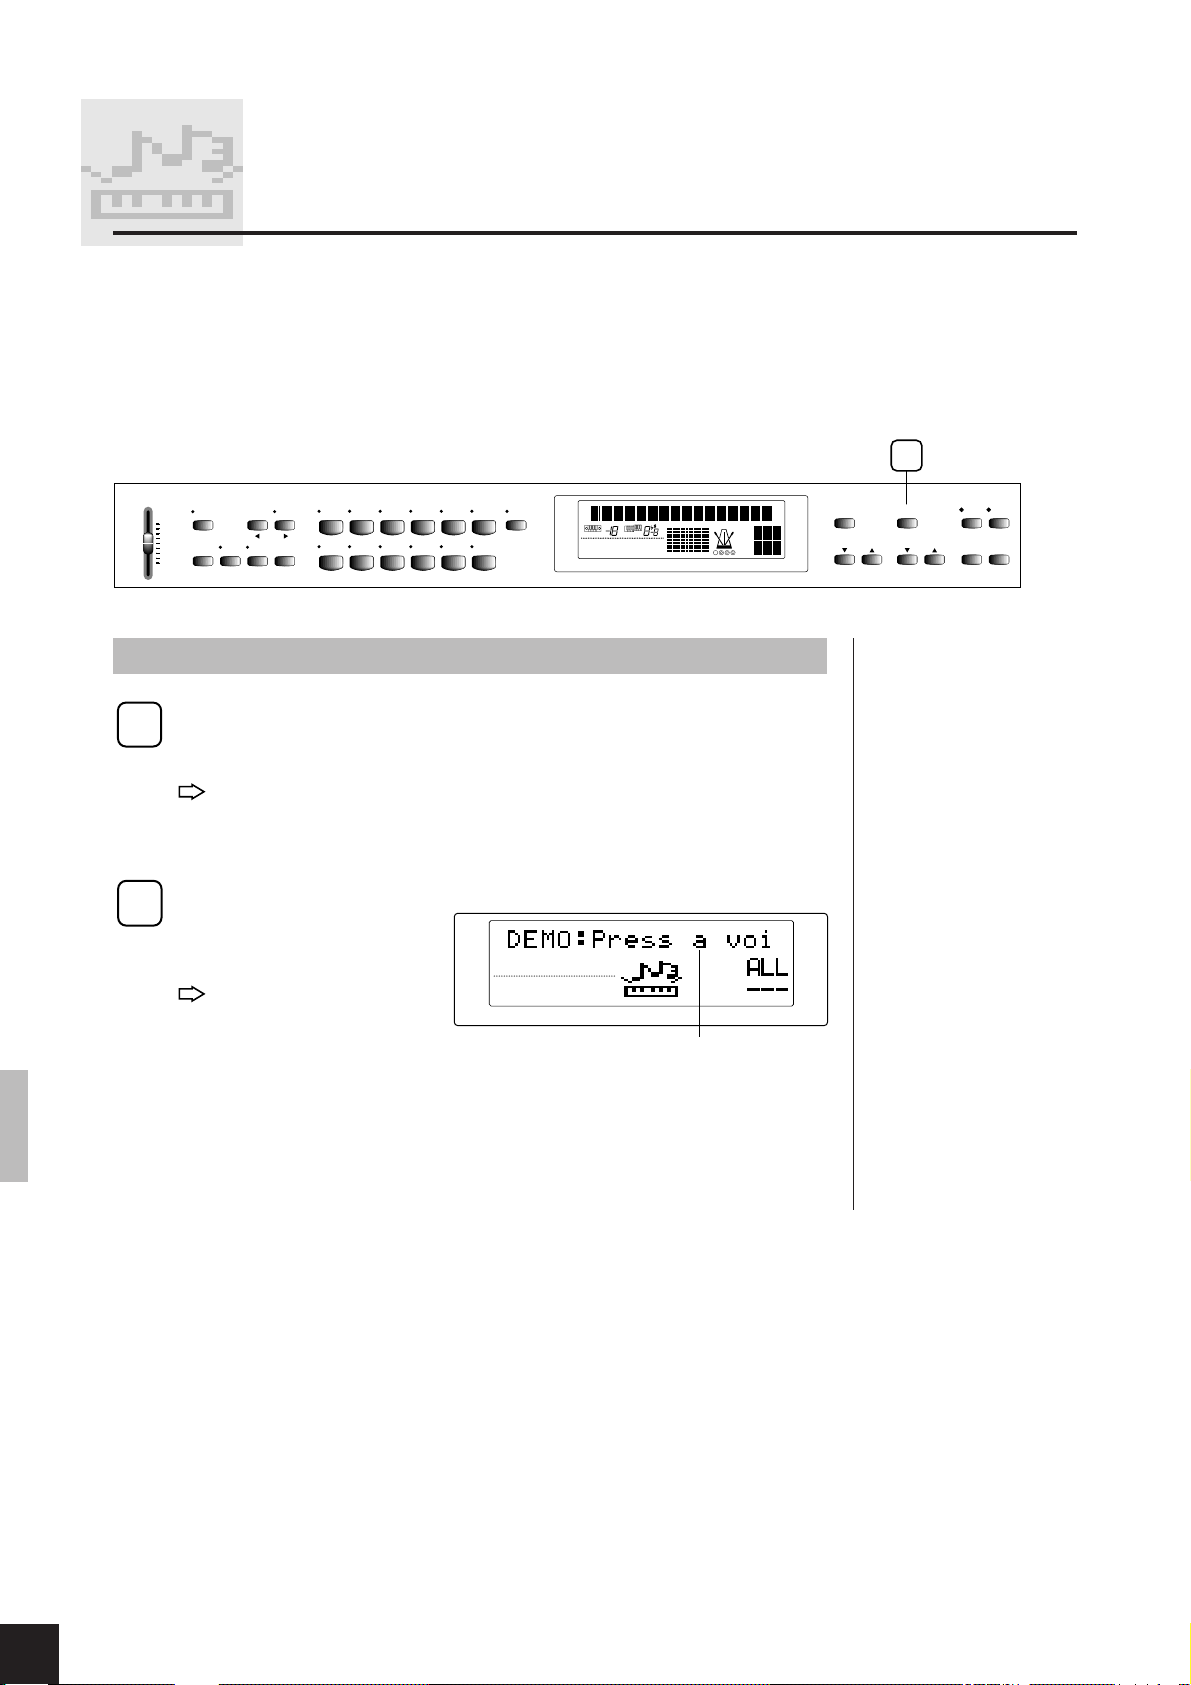
Select the DEMO/PIANO SONG mode.
2
Press the [DEMO/PIANO
SONG] button on the right
side of the panel.
The voice indicators
begin cycling on and
off. The screen indicates the new mode and
prompts you for a song selection.
ROOM
NORMAL
BRILLIANCE
REVERB EFFECT TOUCH
MEDIUM
Press a voice selector or SONG SELECT button.
TEMPO
/
SONG
SELECT
RECORDER
12
START
/
STOP
REC
MEASURE
DEMO
TEMPO
–
/ NO+ / YES
PIANO SONG
SONG
TEMPO
METRONOME
For a listing of the internal
demos and piano songs...
See page 46.
The Clavinova does not receive
MIDI signals while DEMO/PIANO
SONG mode is active. It is not
possible to transmit demo and
piano song data to other devices
over MIDI.
DEMO/PIANO SONG mode
cannot be selected if the
Clavinova is in RECORDING
mode or if it is playing back a
recorded performance.
The word song, as used here,
SONG
refers to any stored sequence of
performance data. Demo songs
and piano songs both exist as
stored performance data.
We’ll begin by playing some demos. Then we’ll proceed to play some of the
piano songs and try out the special practice features.
CLP-811/611 Playing the Demos and Piano Songs
8
Page 13
Playing the Demos
3
MASTER VOLUME
FUNCTION
MAX
BRILLIANCE REVERB EFFECT TOUCH
MIN
TRANSPOSE SPLIT
VIBES STRINGS CHOIR BASS
ORGAN
(After completing steps [1] and [2] above...)
Begin playback by selecting a voice.
3
Press the voice selector
corresponding to the demo
that you want to hear.
The voice indicator
begins flashing and the
Clavinova starts playing the demo.
Adjusting the volume
Move the [MASTER V OLUME] up or down to adjust the volume while
listening to the playback.
HARPSICHORD
VARIATIONPIANO 1 PIANO 2 CLAVI.TONE E.PIANO1 E.PIANO2
PIPE
ORGAN
COMBINATION
NORMAL MEDIUM
BRILLIANCE
TRANSPOSE
MELLOW
NORMAL
BRIGHT
BRILLIANCE
HALL 1
REVERB EFFECT TOUCH
SPLIT
CHORUS
ROOM
SYMPHONIC
HALL 1
HALL 2
TREMOLO
STAGE
ECHO
REVERB EFFECT TOUCH
MEDIUM
HARD
SOFT
FIXED
TEMPO
5 4
DEMO
MEASURE
SONG
TEMPO
METRONOME
TEMPO
–
/ NO+ / YES
PIANO SONG
SELECT
Continuous playback...
You can choose to have demos
and piano songs play out one
after another, in either numerical
or random order. For details, see
“Playing the Piano Songs” on the
next page.
SONG
Using [VARIATION]...
If you press [VARIATION] while in
DEMO/PIANO SONG mode, the
Clavinova will begin playback of
a randomly selected piano song.
RECORDER
/
12
SONG
START
/
REC
STOP
Adjusting the tempo
Although each demo song
includes its own tempo
setting, you are free to
adjust the playback tempo
by pressing TEMPO [▼]
or [▲]. To return the
playback tempo to its
NORMAL MEDIUM
HALL 1
BRILLIANCE
REVERB EFFECT TOUCH
Displays playback tempo as an offset (-99 to
+99) from the demo song's internal tempo
setting. A TEMPO indication of "---" means that
playback is at the song's preset tempo.
original setting, press both
TEMPO buttons ([▼] + [▲]) at the same time.
Stopping the playback
4
You can stop playback of the ongoing song by pressing either the
[START/STOP] button or else the flashing voice selector.
Terminating DEMO/PIANO SONG mode
5
Press the [DEMO/PIANO SONG] button.
The screen returns to the previous display.
TEMPO
Tempo reset...
Selecting a different song for
SONG
playback automatically resets the
tempo (so that the new song will
replay at its internal tempo
setting). During continuous
playback, the tempo automatically resets each time the song
changes.
Unlike piano songs, demo songs
cannot be used for one-handed
and repetition-type practice. (See
page 11, 12)
CLP-811/611 Playing the Demos and Piano Songs
9
Page 14

Playing the Piano Songs
MASTER VOLUME
FUNCTION
MAX
BRILLIANCE REVERB EFFECT TOUCH
MIN
TRANSPOSE SPLIT
VIBES STRINGS CHOIR BASS
ORGAN
HARPSICHORD
VARIATIONPIANO 1 PIANO 2 CLAVI.TONE E.PIANO1 E.PIANO2
PIPE
ORGAN
COMBINATION
TRANSPOSE
MELLOW
NORMAL
BRIGHT
BRILLIANCE
SPLIT
ROOM
CHORUS
HALL 1
SYMPHONIC
HALL 2
TREMOLO
STAGE
ECHO
REVERB EFFECT TOUCH
MEDIUM
HARD
SOFT
FIXED
MEASURE
SONG
TEMPO
(After completing steps [1] and [2] on page 8...)
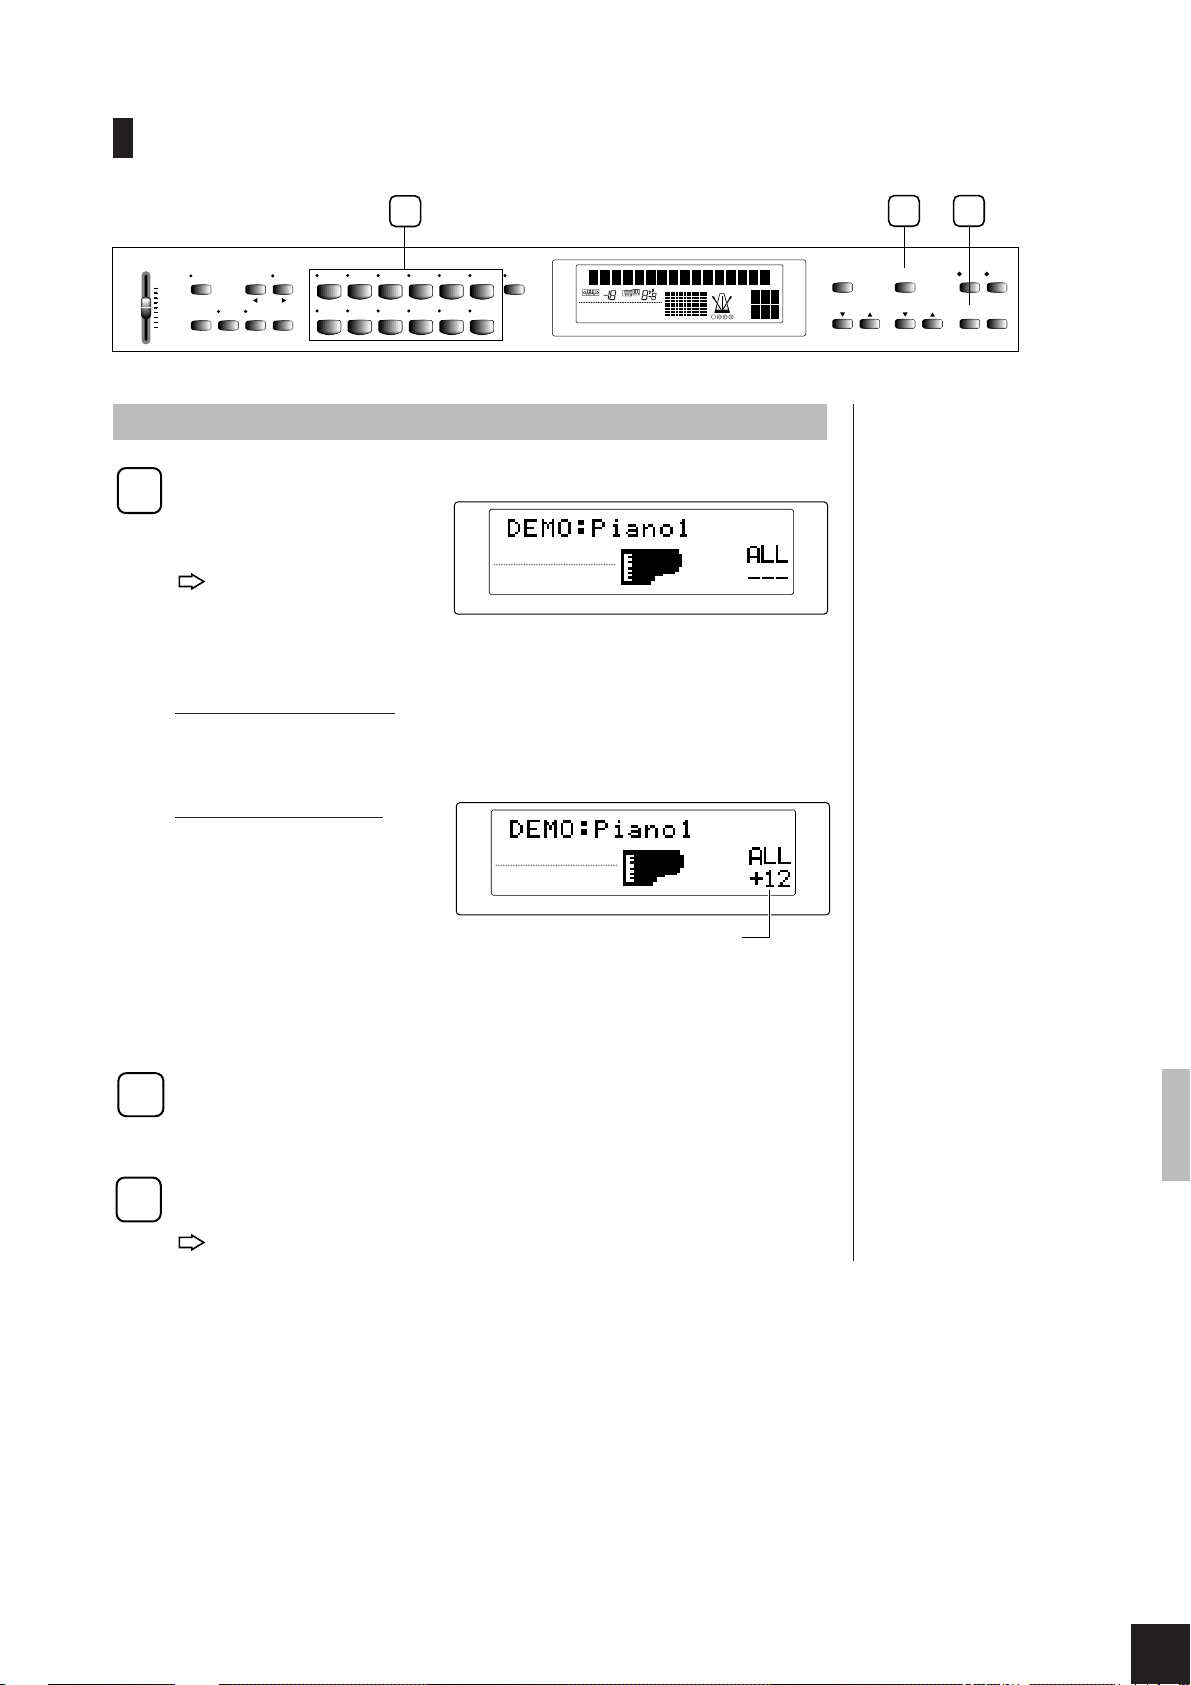
Select song(s) and begin playback.
3
3
-1 Press SONG SELECT
([▼] or [▲]) as necessary to
make your selection. You
can select a single song (by
song number), or you can
choose continuous playback of all songs. The “SONG” indication on the
screen indicates the selection.
1,..,30
ALL
RND
(Alternative: You can select a random song by pressing [VARIATION].
In this case, playback will begin immediately.)
Selects playback of one piano song, by its song number.
Selects sequential continuous play of all demo and piano songs.
Selects continuous play of the demo and piano songs, in random order.
Song name Song No.
ROOM
NORMAL
BRILLIANCE
REVERB EFFECT TOUCH
MEDIUM
SONG
TEMPO
3
-1
METRONOME
–
/
NO + / YES
TEMPO
5
DEMO
PIANO SONG
/
SONG
SELECT
3
If you select ALL and then
press a voice selector ....
The Clavinova will begin
sequential playback beginning
with the demo song for the
selected voice.
-2
RECORDER
12
START
/
REC
STOP
4
3
-2 After making your selection, press [START/STOP] to begin playback.
Adjusting the volume
Move the [MASTER V OLUME] up or down to adjust the volume while
listening to the playback.
Adjusting the tempo
Each piano song includes its
own tempo setting. Once
you have selected a song,
howev er, you are free to
NORMAL
BRILLIANCE
ROOM
MEDIUM
REVERB EFFECT TOUCH
SONG
TEMPO
change the setting (either
before playback starts or
while it in progress) by
pressing TEMPO [▼] or
Displays playback tempo as an offset (-99 to
+99) from the piano song's internal tempo
setting. A TEMPO indication of "---" means
that playback is at the song's preset tempo.
[▲]. To return playback to
its original setting, press both TEMPO buttons ([▼] + [▲]) at the same time.
Stopping the playback
4
The Clavinova automatically prompts for new song selection when
playback is finished. You can stop the song while playback is in progress
by pressing the [START/STOP] button. You can then select another song
as described in Step [3] above.
Terminating DEMO/PIANO SONG mode
5
Press the [DEMO/PIANO SONG] button.
The screen returns to the display shown just before you entered this mode.
Reset of playback tempo...
Selecting a different song for
playback automatically resets the
tempo (so that the new song will
replay at its internal tempo
setting). During continuous
playback, the tempo automatically resets each time the song
changes.
Next we will see how to switch off either the left-hand or right-hand part of a
piano song so that you can practice the part yourself (one-hand practice). We
will also see how to repeatedly play a single selected song phrase (to facilitate
repetition-type practice).
10
CLP-811/611 Playing the Demos and Piano Songs
Page 15
One-Hand Practice with Piano Songs
Each piano song has its left-hand and right-hand parts recorded on separate tracks: the right-hand part in
Track [1], and the left-hand part in Track [2]. This makes it possible for you to switch off either part at any
time. This feature is ideal for one-handed practice: just switch off one of the parts, then play the missing
notes yourself in accompaniment with the other part.
MASTER VOLUME
FUNCTION
MAX
BRILLIANCE REVERB EFFECT TOUCH
MIN
TRANSPOSE SPLIT
VIBES STRINGS CHOIR BASS
ORGAN
HARPSICHORD
VARIATIONPIANO 1 PIANO 2 CLAVI.TONE E.PIANO1 E.PIANO2
PIPE
ORGAN
COMBINATION
TRANSPOSE
MELLOW
NORMAL
BRIGHT
BRILLIANCE
SPLIT
ROOM
CHORUS
SYMPHONIC
HALL 1
TREMOLO
HALL 2
STAGE
ECHO
REVERB EFFECT TOUCH
MEDIUM
HARD
SOFT
FIXED
Procedure
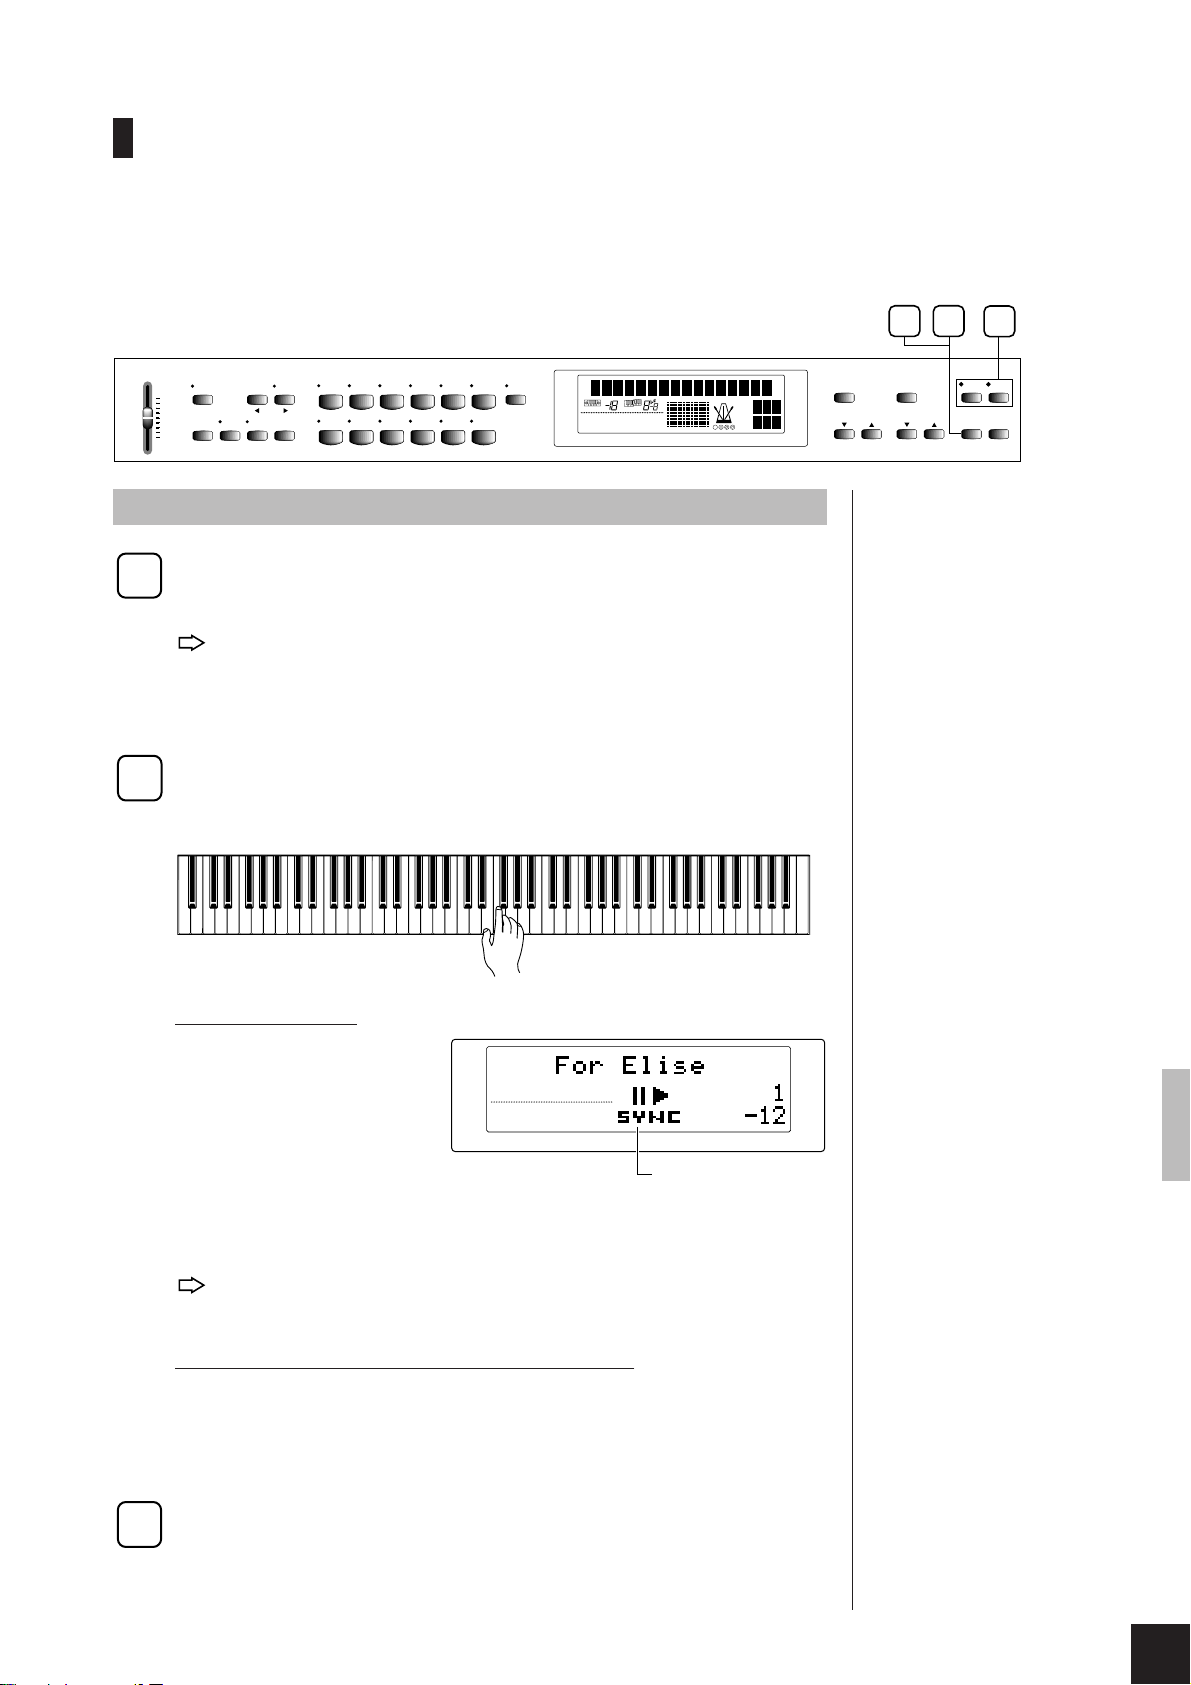
Switch off the part that you want to play by yourself.
1
After selecting a piano song as described above, simply press [1] or
[2] to mute (switch off) the right or left part.
When you switch off the track, the indicator above the track button
goes off. (When you first select the song, both indicators will be on.)
• You can toggle each part OFF and ON by pressing the track button as
needed.
Start playback and begin practice.
2
Press [START/STOP] to begin playback. Play the muted part yourself,
for practice.
Synchronous start
You can set up one-part
playback so that it begins
precisely when you strike
the keyboard. To select this
feature, hold down the track
button that you have set ON
(either [1] or [2]) and press
[START/STOP]. This sets the instrument into SYNCHRO START mode.
Playback of the selected part will then begin when you hit a key on the
keyboard.
When you select SYNCHRO START, a corresponding marking
appears at the center of the display.
Using the left pedal as a START/STOP switch.
You can set the left pedal to operate in the same way as the [START/
STOP] button, so that you can start and stop playback without using your
hands. Left-pedal operation is determined by function F9; see page 33 for
details.
NORMAL
BRILLIANCE
ROOM
REVERB EFFECT TOUCH
MEDIUM
SYNCHRO START marking
SONG
TEMPO
MEASURE
2 3
DEMO
/
TEMPO
/
NO + / YES
–
PIANO SONG
SONG
SELECT
SONG
TEMPO
METRONOME
1
RECORDER
12
START
/
REC
STOP
Parts cannot be switched off
during continuous (“ALL” or
“RND”) playback.
Switching parts ON/OFF
during playback...
The [1] and [2] buttons can be
used to switch tracks on and off
even while playback is in
progress.
Adjusting the volume of the
muted part...
After switching off a part, you
may notice that you can still hear
it sounding in the background at
low volume. This sound is
intentionally left to provide a
timing guide for your practice.
You are free to adjust its volume,
or to switch it off entirely, by
using function F12. See page 34
for details.
If you hold down an unlit track
button and press [START/
STOP]...
The track button comes on and
the Clavinova enters SYNCHRO
START. The track will start
playing back when you hit a key
on the keyboard.
Stopping the playback
3
The Clavinova automatically prompts for new song selection when
playback is finished. You can stop the song while playback is in progress
by pressing the [START/STOP] button.
Reset of part selection...
The Clavinova automatically sets
both tracks ON when you select
another song.
CLP-811/611 Playing the Demos and Piano Songs
11
Page 16
Repetition Practice with Piano Songs
This feature lets you extract a phrase from any piano song and play it repeatedly. By combining this
function with the “one-hand practice” feature described above, you can select and then practice a specific
passage as many times as you like.
1 2
MASTER VOLUME
FUNCTION
MAX
BRILLIANCE REVERB EFFECT TOUCH
MIN
TRANSPOSE SPLIT
VIBES STRINGS CHOIR BASS
ORGAN
HARPSI-
CHORD
VARIATIONPIANO 1 PIANO 2 CLAVI.TONE E.PIANO1 E.PIANO2
PIPE
ORGAN
COMBINATION
TRANSPOSE
MELLOW
NORMAL
BRIGHT
BRILLIANCE
SPLIT
ROOM
CHORUS
SYMPHONIC
HALL 1
TREMOLO
HALL 2
STAGE
ECHO
REVERB EFFECT TOUCH
MEDIUM
HARD
SOFT
FIXED
Procedure
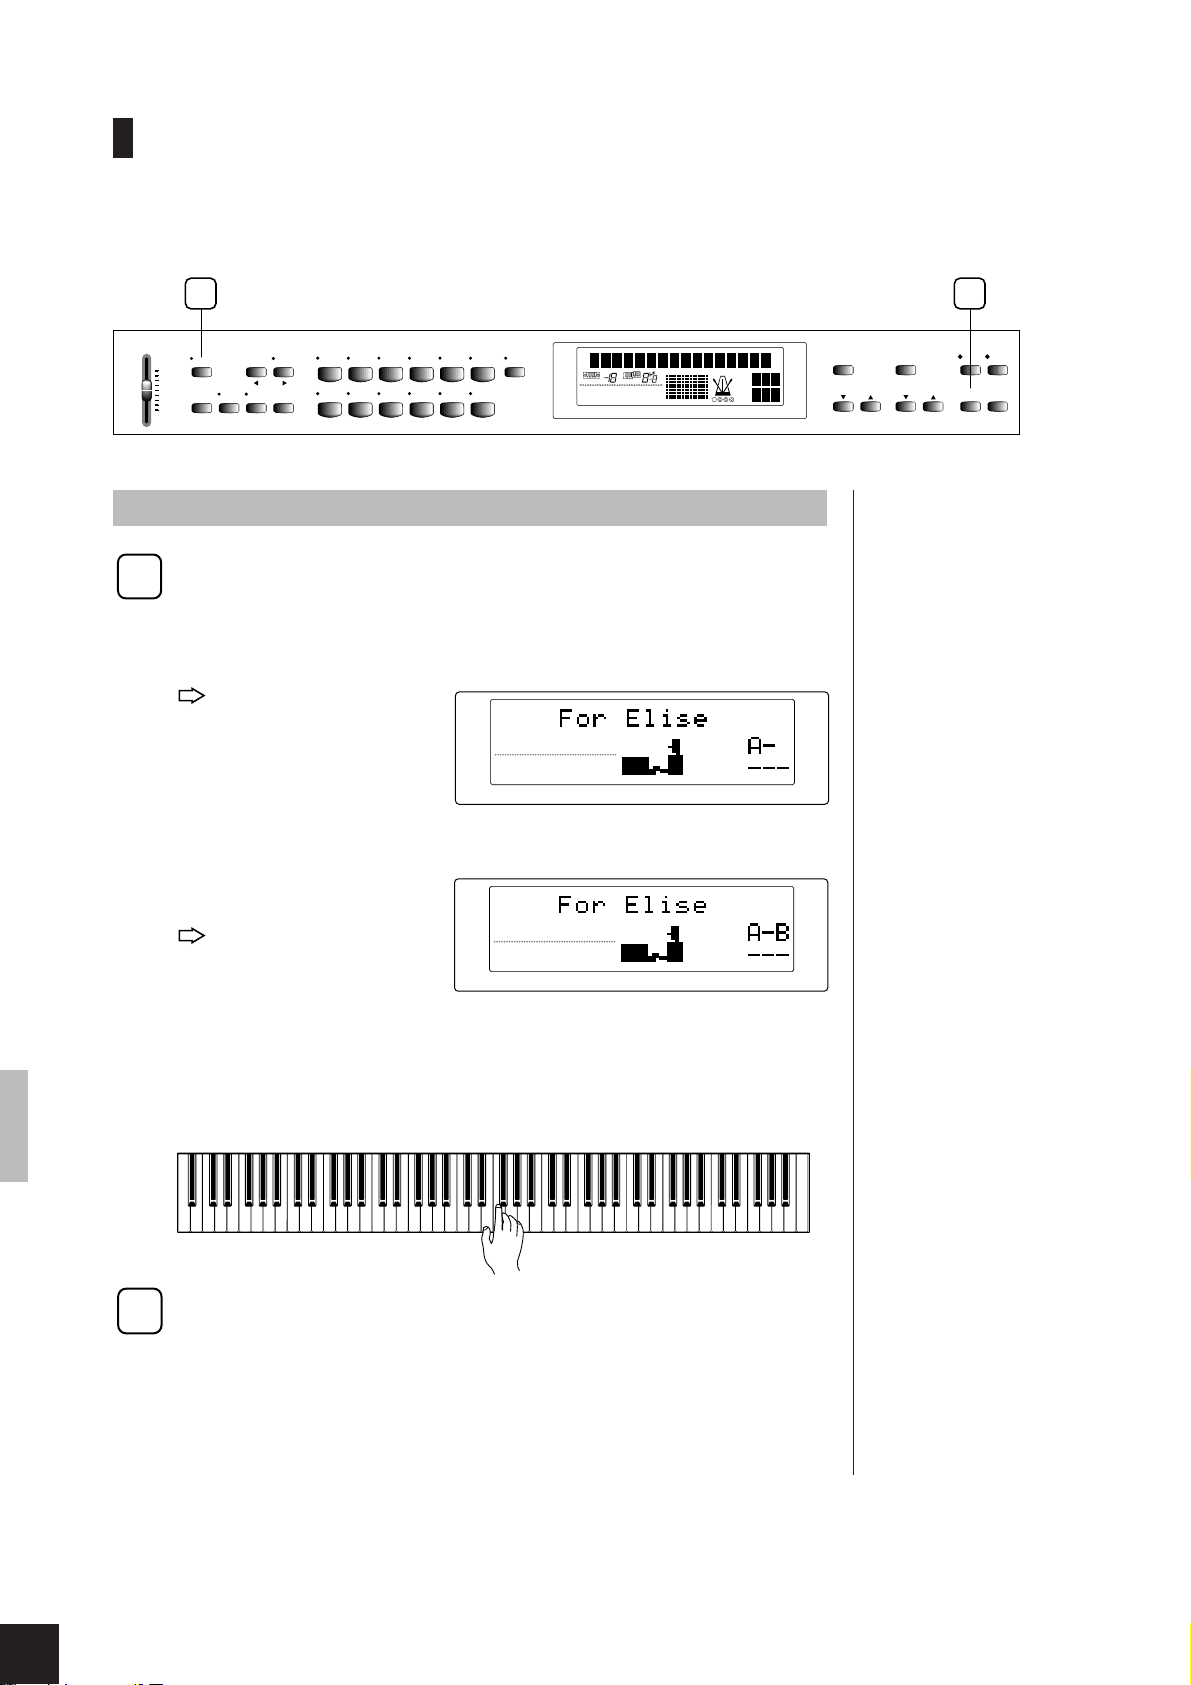
Set the phrase start and end points (“A” and “B”), and then
1
begin practice.
Select a piano song (by song number), then begin playback and listen for
the desired start point. When playback reaches the beginning of the
phrase you want to repeat, press [FUNCTION].
The Clavinova marks
this point as Point A.
The screen displays
“A–”.
Continue listening for the end point of the phrase you want to repeat.
When playback reaches the
end point, press [FUNC-
TION] once again.
The Clavinova marks
this point as Point B.
The screen now displays “A-B”.
ROOM
NORMAL MEDIUM
BRILLIANCE
REVERB EFFECT TOUCH
ROOM
NORMAL MEDIUM
BRILLIANCE
REVERB EFFECT TOUCH
TEMPO
TEMPO
/
SONG
SELECT
RECORDER
12
START
/
STOP
REC
MEASURE
DEMO
TEMPO
–
/
NO + / YES
PIANO SONG
SONG
TEMPO
METRONOME
This feature is not available with
continuous (“ALL” or “RND”)
playback.
If you want the phrase to start
at the beginning of the song...
Press [FUNCTION] before you
begin the playback.
SONG
SONG
Playback now automatically jumps back to the start point and the selected
sequence begins repeating. You can now practice the passage as many
times as you like.
Stopping the playback
2
To interrupt repeat play temporarily while retaining the Point A and B
settings, press [START/STOP] once. You can then resume the repeat
playback by pressing [START/STOP] once again.
To clear the A and B settings, press [FUNCTION].
If you select a different song....
The A and B settings are
automatically cleared.
12
CLP-811/611 Playing the Demos and Piano Songs
Page 17
Selecting and Playing Voices
Your Clavinova offers you an excellent selection of great-sounding voices (11 voices on
model CLP-611, 12 voices on model CLP-811). You can use the VARIATION, BRILLIANCE, REVERB, and EFFECT features to vary the sound and feel of each voice.
The Clavinova also allows you to mix any two voices together (“DUAL mode”), and to
select different voices for the right and left ranges of the keyboard (“SPLIT mode”). A
built-in metronome is also provided.
Selecting a Voice
Voice selector
MASTER VOLUME
FUNCTION
MAX
BRILLIANCEREVERB EFFECT TOUCH
MIN
TRANSPOSE SPLIT
VIBES STRINGS CHOIR BASS
ORGAN
HARPSICHORD
VARIATIONPIANO 1 PIANO 2 CLAVI.TONEE.PIANO1 E.PIANO2
PIPE
ORGAN
COMBINATION
TRANSPOSE
MELLOW
NORMAL
BRIGHT
BRILLIANCE
SPLIT
ROOM
CHORUS
SYMPHONIC
HALL 1
TREMOLO
HALL 2
ECHO
STAGE
REVERB EFFECT TOUCH
MEDIUM
HARD
SOFT
FIXED
MEASURE
SONG
TEMPO
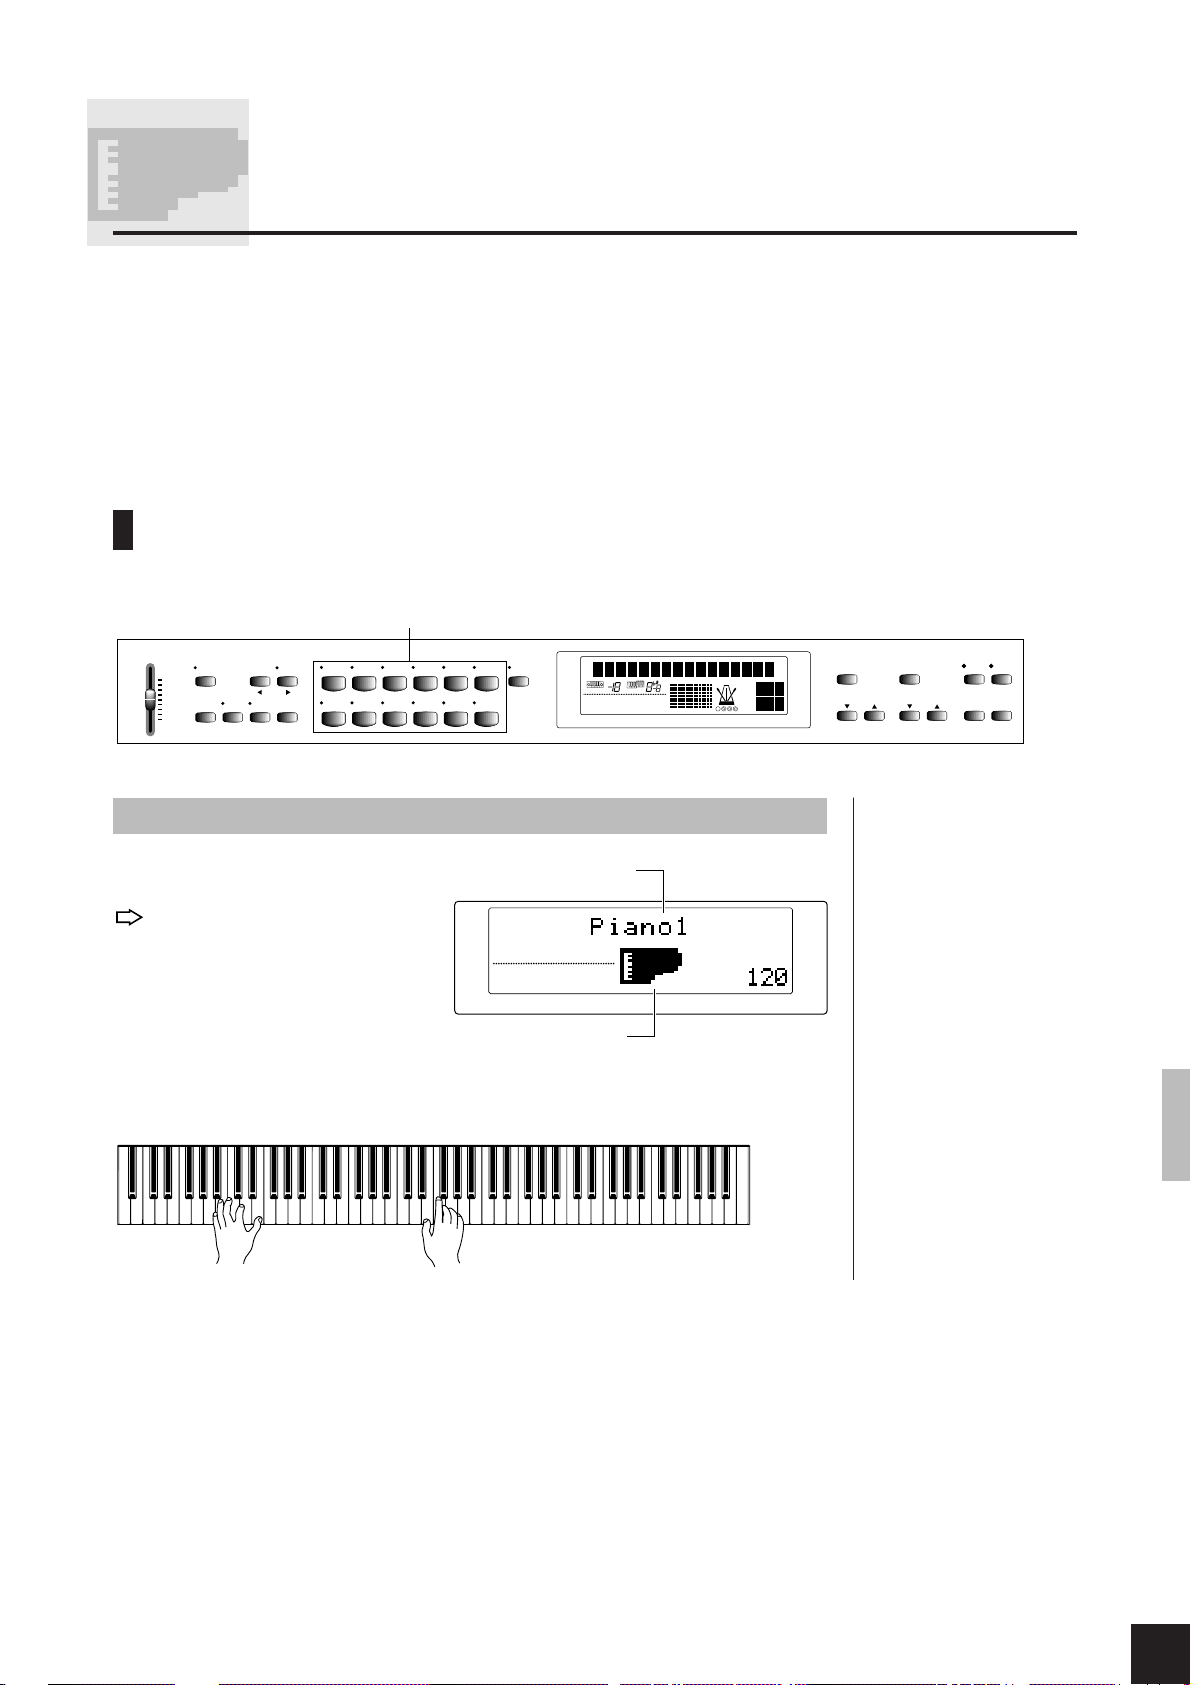
Procedure
ROOM
NORMAL
BRILLIANCE
REVERB EFFECT
Instrument icon
Name of voice
MEDIUM
TOUCH
TEMPO
To select a voice, press the corresponding voice selector.
The voice indicator lights up.
Try playing the voice. Adjust the volume as necessary by moving the [MASTER
VOLUME] slider.
METRONOME
–
/ NO + / YES
TEMPO
DEMO
PIANO SONG
SELECT
RECORDER
/
12
SONG
START
/
STOP
To familiarize yourself with the
features of each voice...
You can get a good feel for each
voice by listening to its built-in
demo (see page 46 of this
manual).
About the EFFECT settings...
Each voice is set to its standard
(default) effect at time of
shipping. For infor mation about
effects settings and how to
change them, see page 15.
The ORGAN COMBINATION
voice...
...can be set to any of eight builtin organ types. You can edit each
of these types to produce your
own customized sounds. You use
function F6 to set the voice up;
see page 30 for details.
REC
CLP-811/611 Selecting and Playing Voices
13
Page 18
Using the Pedals
q
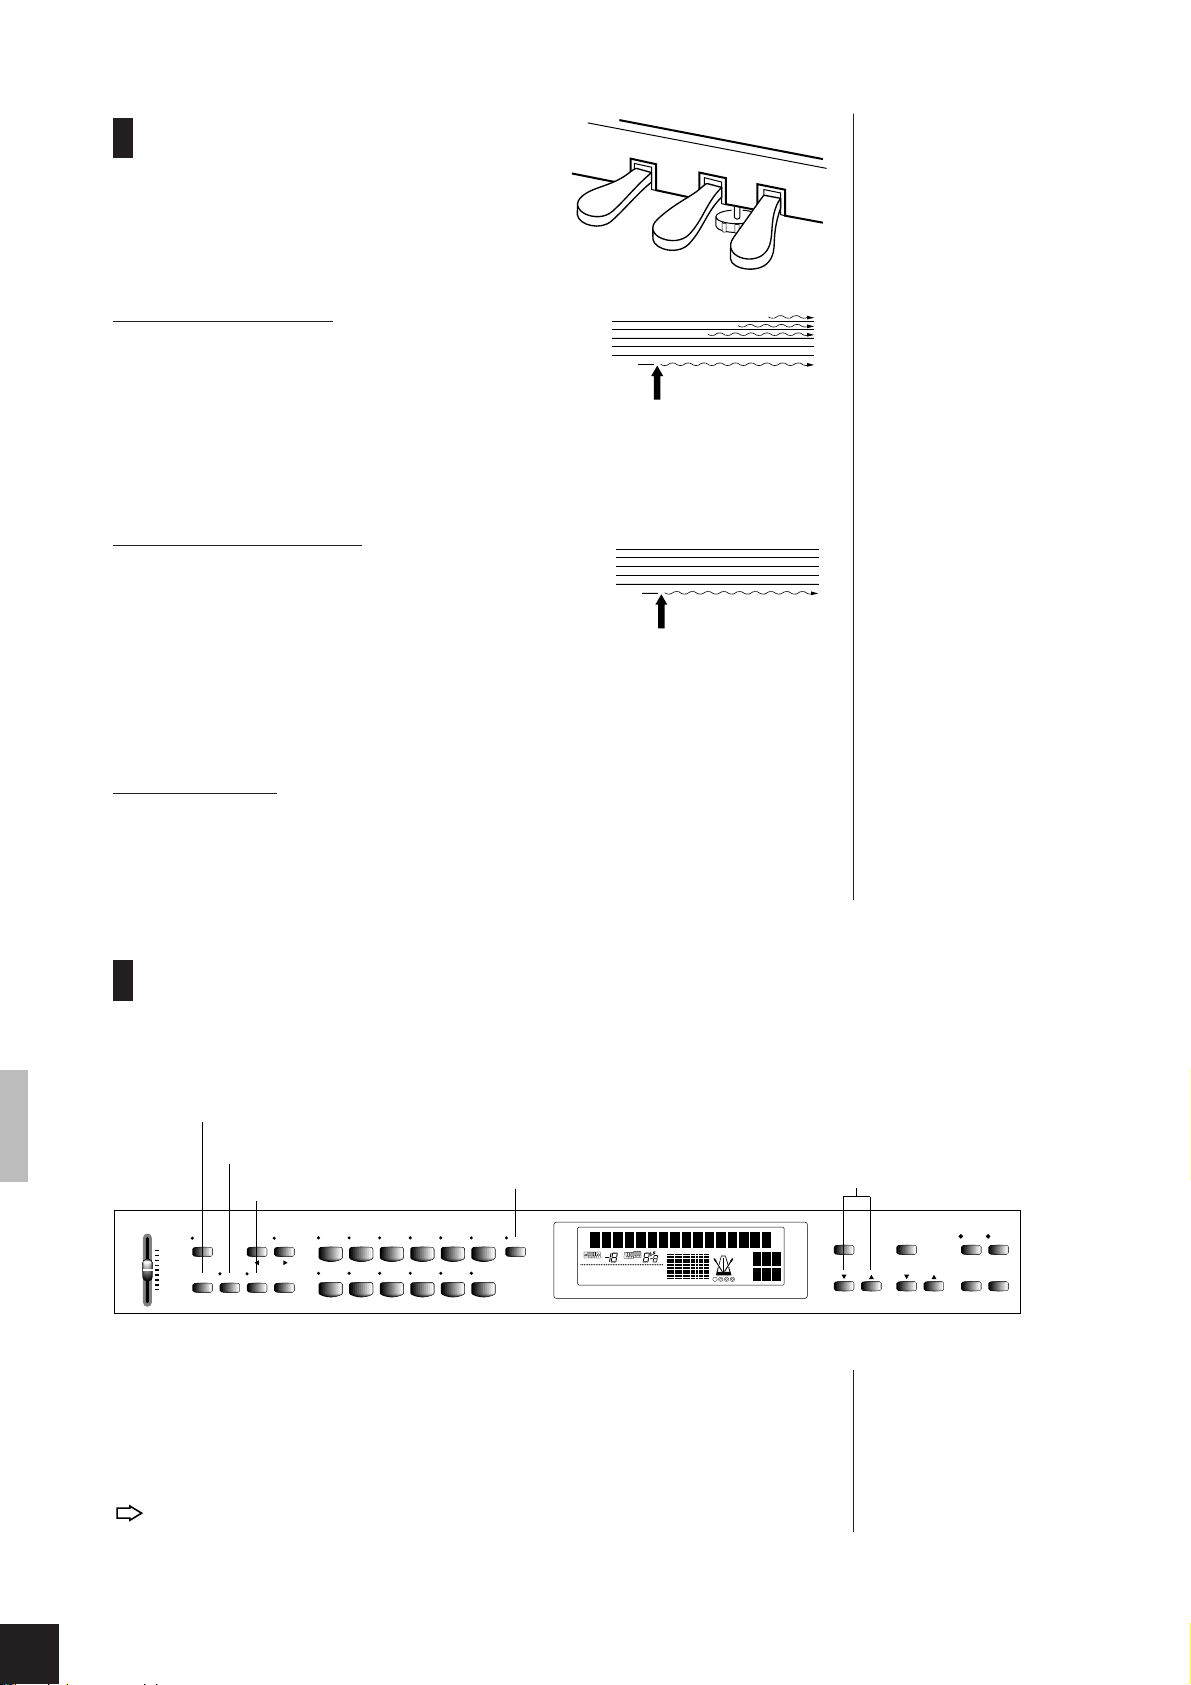
This section explains the use of the instrument’s three pedals.
Damper (Right) Pedal
The damper pedal functions in the same way as a
damper pedal on an acoustic piano. While the
damper pedal is pressed notes played have a long
sustain. Releasing the pedal immediately stops
(damps) any sustained notes.
Sostenuto (Center) Pedal
This pedal sustains only those notes whose keys
are being pressed when the pedal first goes down.
q
h
If you step down on the damper
pedal here, the note already in
play and the three subsequent
notes will continue to sound after
their keys are released.
h
.
q
.
.
q
.
q
.
q
.
Keys that you strike after the pedal is already down
are not held. This makes it possible to sustain a
chord, for example, while at the same time playing
other notes staccato.
If you step down on the sostenuto
pedal here, only the first note will be
held.
Soft (Left) Pedal
This pedal reduces the volume and slightly changes the timbre of the notes you
play. The pedal has no affect on notes that are already playing when the pedal is
first pressed.
Variable damper-pedal action...
The sustain length produced by
the damper pedal varies
according to how far you press
the pedal down. The pedal is
factory-set for 8-level action, but
you can change this setting using
function F11 (see page 34).
Changing the function of the
left pedal...
You can switch the function of the
left pedal so that it operates as a
second [START/STOP] button
rather than as a soft pedal. To
change the operation, use
function F9 (see page 33).
Changing the Sound ... [VARIATION],
[BRILLIANCE], [REVERB], [EFFECT]
[BRILLIANCE]
[REVERB]
[VARIATION]
HARPSICHORD
ORGAN
COMBINATION
VARIATIONPIANO 1 PIANO 2 CLAVI.TONE E.PIANO1 E.PIANO2
TRANSPOSE
MELLOW
NORMAL
BRIGHT
BRILLIANCE
SPLIT
CHORUS
ROOM
HALL 1
SYMPHONIC
HALL 2
TREMOLO
STAGE
ECHO
REVERB EFFECT TOUCH
MEDIUM
MASTER VOLUME
FUNCTION
MAX
BRILLIANCE REVERB EFFECT TOUCH
MIN
[EFFECT]
TRANSPOSE SPLIT
PIPE
VIBES STRINGS CHOIR BASS
ORGAN
[VARIATION]
You use this feature to select a variation on the standard voice.
Procedure
Press [VARIATION] to toggle the variation voice on and off.
The indicator lights up if the variation is selected.
HARD
SOFT
FIXED
MEASURE
[–/NO] [+/YES]
SONG
TEMPO
DEMO
METRONOME
PIANO SONG
TEMPO
–
/ NO+ / YES
Default setting = OFF.
/
SELECT
RECORDER
12
SONG
START
/
REC
STOP
14
CLP-811/611 Selecting and Playing Voices
Page 19
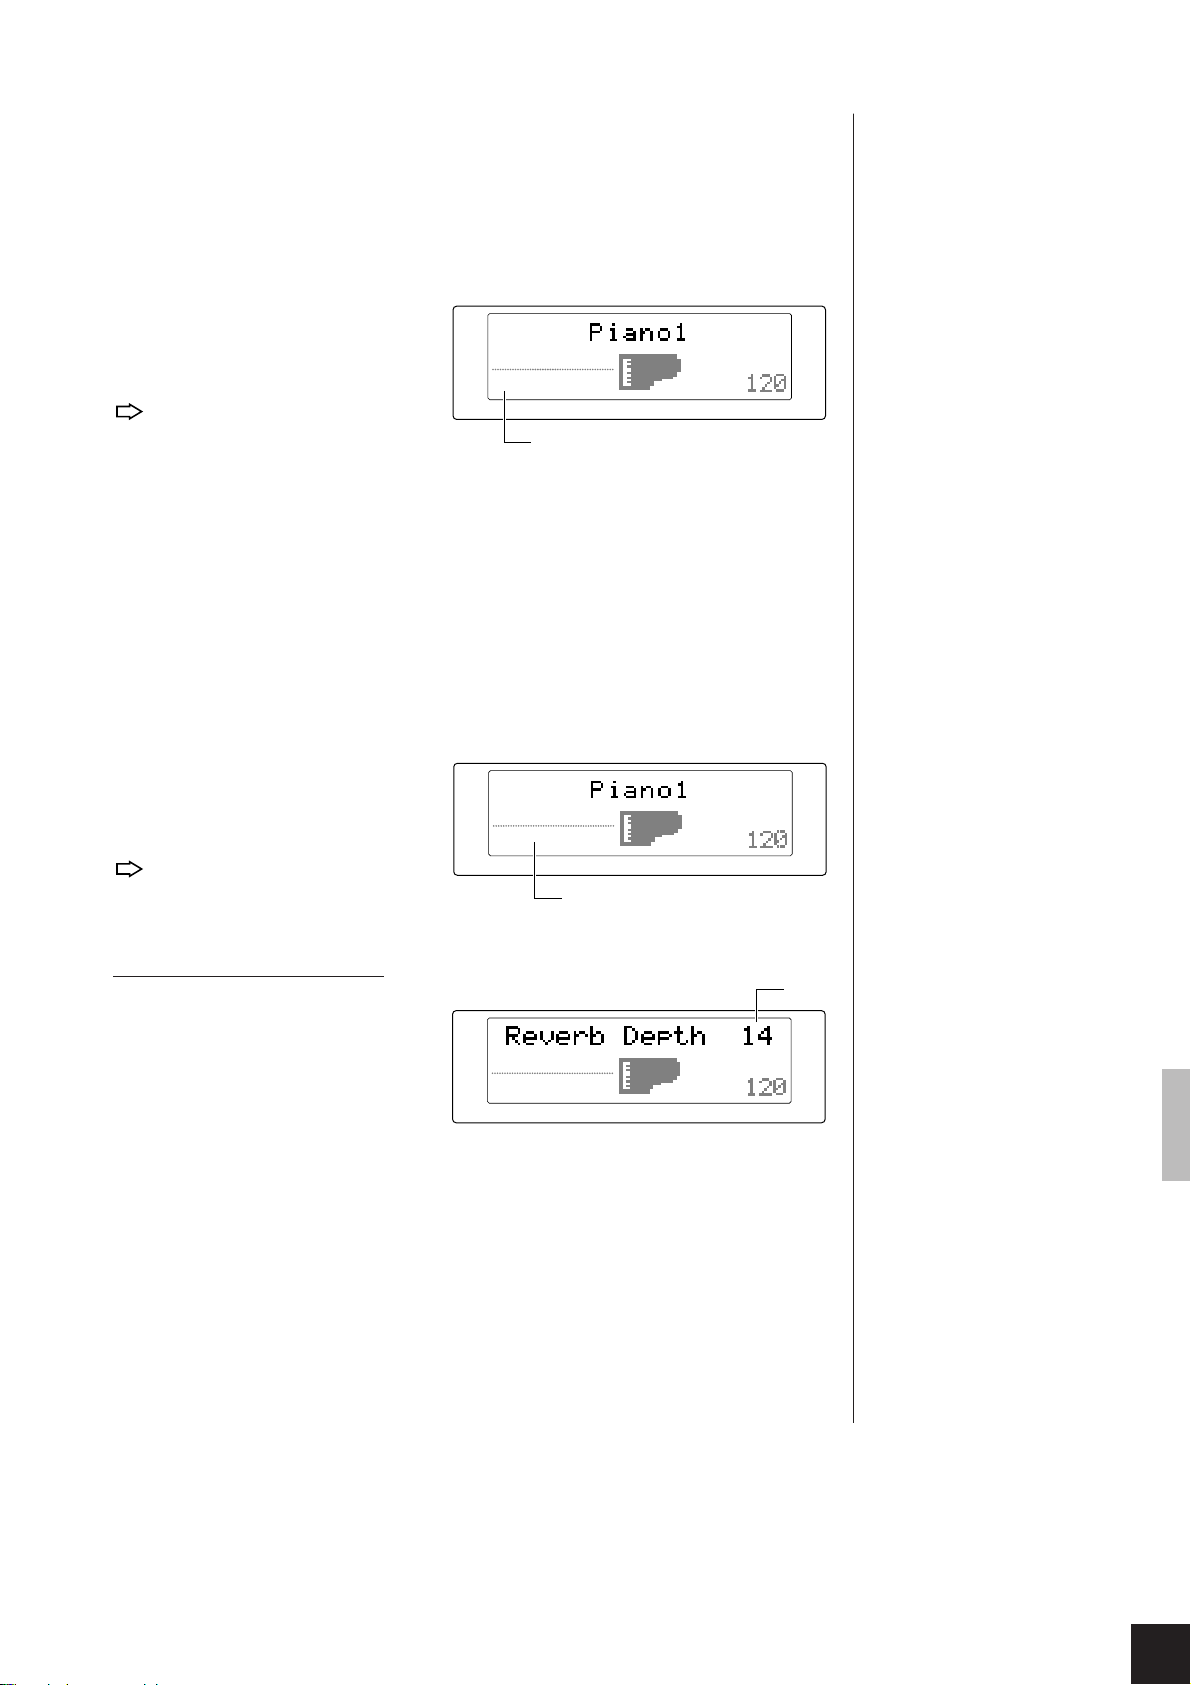
[BRILLIANCE]
Use this feature to set the brightness of the output sound. You can select from
three levels.
The BRILLIANCE setting does
not apply to the ORGAN
COMBINATION voice. Instead,
you can use function F6 (see
page 30) to edit this voice.
MELLOW
NORMAL
BRIGHT
Light, mellow tone
Standard brightness (=default setting)
Clear and penetrating sound
Procedure
Press [BRILLIANCE] as necessary to select the desired setting,
while watching the screen.
The screen displays the current
setting.
ROOM
BRIGHT
BRILLIANCE
REVERB EFFECT TOUCH
Selected brilliance
MEDIUM
TEMPO
[REVERB]
This feature sets the reverb type applied to the Clavinova’s sound. Each setting
produces reverb acoustics similar to a particular performance environment. You
are also free to adjust the “reverb depth.”
OFF
ROOM
HALL 1
HALL 2
STAGE
Procedure
Press [REVERB] as necessary to
select the desired setting, while
watching the screen.
The screen shows the current
setting. (Nothing is shown if
reverb is set to OFF.)
No reverb applied.
Acoustics of midsize room
Sound of small concert hall
Sound of large concert hall
Stage-performance acoustics (=default setting)
BRIGHT
BRILLIANCE
HALL 1
MEDIUM
REVERB EFFECT TOUCH
Selected reverb
TEMPO
The reverb type and depth
settings are common to all
voices.
Changing the reverb depth
Hold down the [REVERB] button
Depth
to display the current depth setting.
To change the depth setting:
continue to hold down [REVERB]
while pressing [-/NO] or [+/YES].
You can set to any value between 0
BRIGHT
BRILLIANCE
HALL 1
REVERB EFFECT TOUCH
MEDIUM
TEMPO
and 20. The default setting is 8.
[EFFECT]
Use this button to select an effect for the voice. You can set a separate effect for
each voice. Within each voice you can also set separate depth levels for each of
the four effects.
OFF
CHORUS
SYMPHONIC
TREMOLO
ECHO
No effect
Shimmering, broadening effect
Adds a deep, symphonic backdrop
Tremolo effect
Reverberating echo effect
“Depth” refers to the amount of
reverb applied.
Depth = 0: No reverb
Depth = 20: Maximum reverb
Default settings...
A standard (default) effect is set
for each voice prior to shipping.
CLP-811/611 Selecting and Playing Voices
15
Page 20
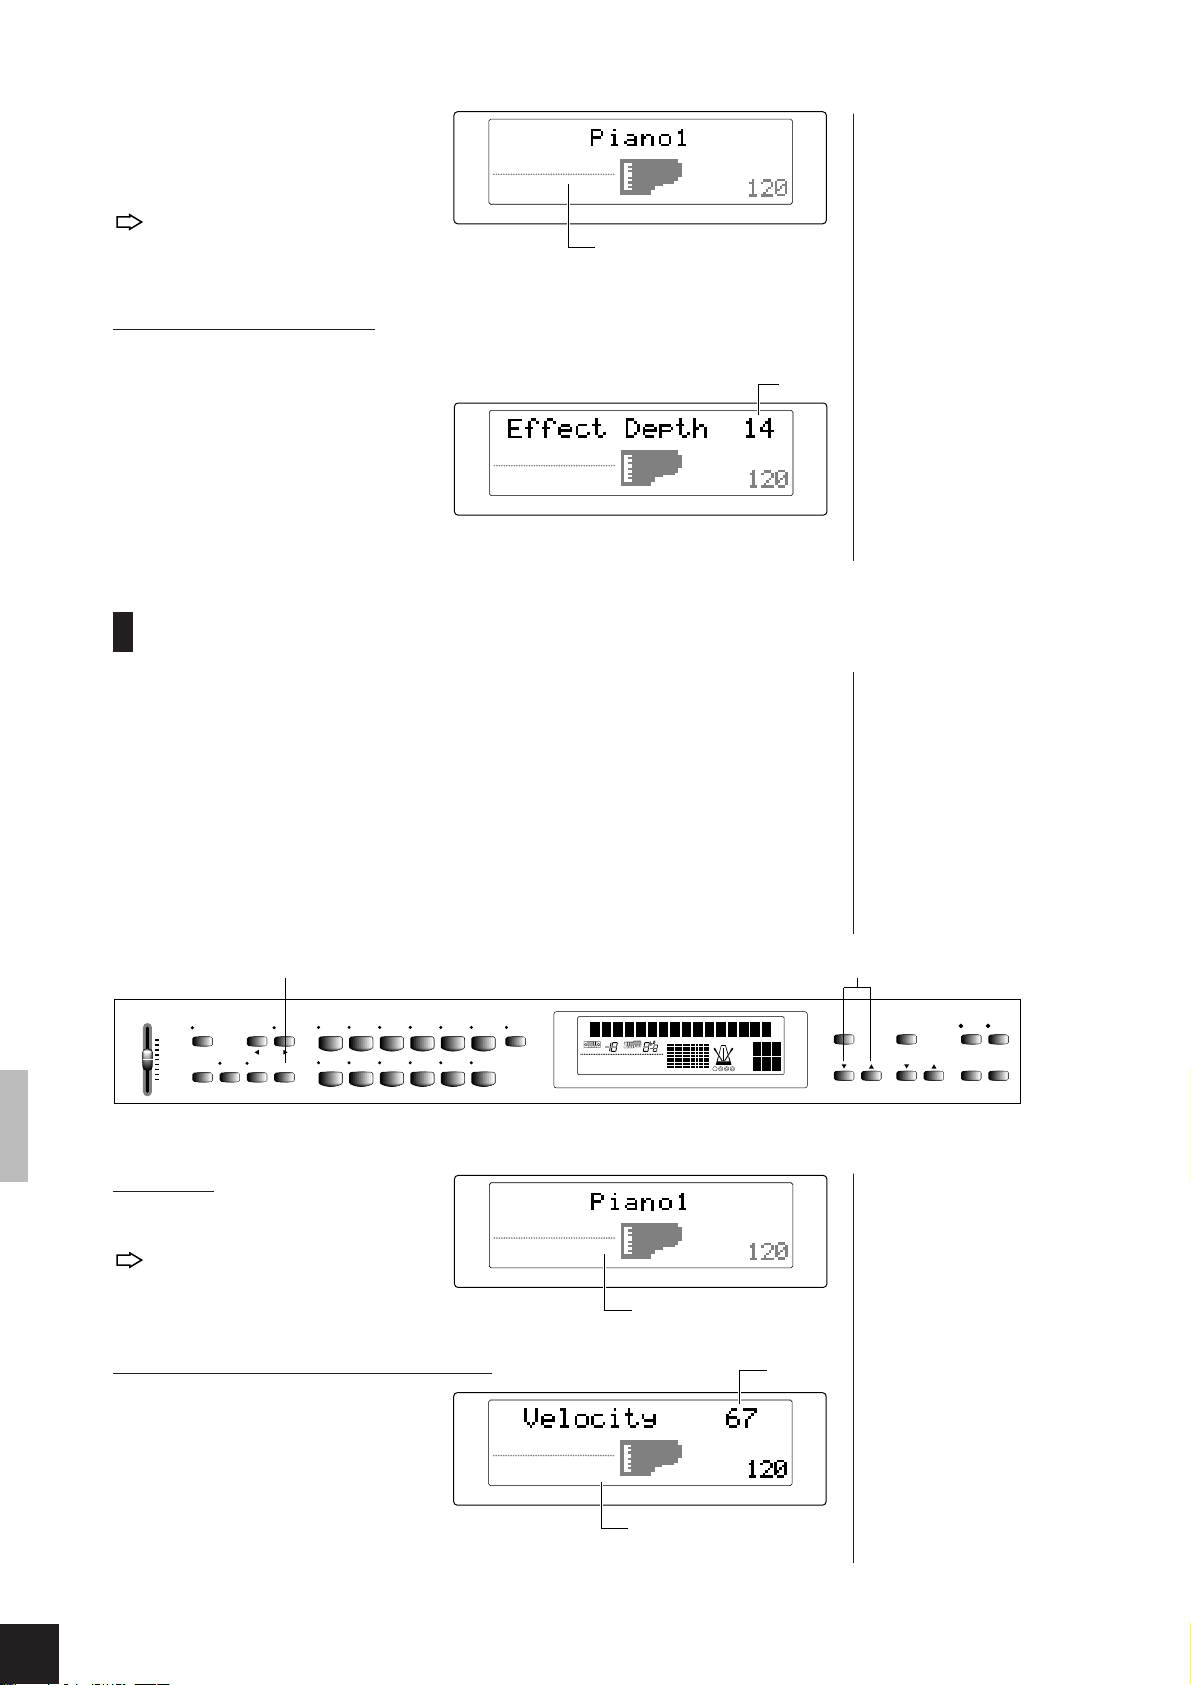
Procedure
Press [EFFECT] as necessary to
select the desired setting, while
watching the screen.
The screen shows the current
setting. (Nothing is shown if
the effect is set to OFF.)
BRIGHT
BRILLIANCE
CHORUS
HALL 1
REVERB EFFECT TOUCH
MEDIUM
Selected effect
TEMPO
Changing the effect depth
Hold down the [EFFECT] button
to display the depth setting for the
currently selected effect. (No value
Depth
will be shown if the effect is set to
OFF.) To change the depth setting:
CHORUS
continue to hold down [EFFECT]
while pressing [-/NO] or [+/YES].
BRIGHT
BRILLIANCE
HALL 1
REVERB EFFECT TOUCH
MEDIUM
TEMPO
You can set to any value between 0
and 20.
TOUCH
You use this feature to set the relationship between key striking force and the
resulting sound volume. Select from among four settings in accordance with
personal preference, voice type, and performance goal.
HARD:
MEDIUM:
SOFT:
FIXED:
Considerable force is required to produce maximum loudness.
Standard keyboard action (=default setting)
Allows maximum loudness to be produced with relatively light key
pressure.
All notes are produced at uniform volume, regardless of striking
force. You can select the volume by setting the velocity value, as
described below.
Depth setting...
Depth = 0: No effect
Depth = 20: Maximum effect
Default depths...
Standard default depths are set
up for each effect type within
each voice.
This setting does not affect the
physical action of the keyboard.
The TOUCH setting applies to all
voices.
[TOUCH]
MASTER VOLUME
FUNCTION
MAX
BRILLIANCEREVERB EFFECT TOUCH
MIN
TRANSPOSE SPLIT
VIBES STRINGS CHOIR BASS
ORGAN
HARPSICHORD
PIPE
ORGAN
COMBINATION
Procedure
Press [TOUCH] to change the
setting.
The display indicates the
current selection.
Volume adjustment for FIXED setting
If FIXED touch is selected, you
can hold down the [TOUCH]
button to display and change the
velocity (volume) setting. To
change the setting, hold down
[TOUCH] and press [-/NO] or
[+/YES]. You can set to any value
between 1 and 127; the default setting is 64.
VARIATIONPIANO 1 PIANO 2 CLAVI.TONEE.PIANO1 E.PIANO2
NORMAL
BRILLIANCE
NORMAL
BRILLIANCE
TRANSPOSE
MELLOW
NORMAL
BRIGHT
BRILLIANCE
ROOM
REVERB EFFECT TOUCH
ROOM
REVERB EFFECT TOUCH
ROOM
HALL 1
HALL 2
STAGE
REVERB EFFECT TOUCH
MEDIUM
FIXED
SPLIT
CHORUS
HARD
MEDIUM
SYMPHONIC
SOFT
TREMOLO
FIXED
ECHO
Selected touch
Only if FIXED
TEMPO
TEMPO
[–/NO] [+/YES]
SONG
MEASURE
TEMPO
Volume
METRONOME
–
/ NO + / YES
TEMPO
DEMO
PIANO SONG
SELECT
RECORDER
/
12
SONG
START
STOP
The clavinova measures
keyboard striking force by
monitoring the velocity at which
the key moves downward when
hit. If touch is HARD, MEDIUM,
or SOFT, this physical velocity
determines the volume.
Velocity = 1: Minimum volume
Velocity = 127: Maximum volume
The FIXED-touch velocity setting
applies to all voices.
/
REC
16
CLP-811/611 Selecting and Playing Voices
Page 21
TRANSPOSE
This feature allows you to shift the pitch of the entire keyboard, so that you
can continue to play in a signature that you are comfortable with while at the
same time “transposing” to match the key of a singer or of another instrument. You can set the transposition in semitone increments. If you set it to 5,
for example, then each keyboard C will produce the sound of F, and any song
played in key of C will be produced in key of F.
[TRANSPOSE]
MASTER VOLUME
FUNCTION
MAX
BRILLIANCE REVERB EFFECT TOUCH
MIN
TRANSPOSE SPLIT
VIBES STRINGS CHOIR BASS
Procedure
Hold down [TRANSPOSE] and
press [-/NO] or [+/YES] to set the
transposition interval, in semitone
increments. You can set to any
value from -12 to +12; the default
setting is 0.
HARPSI-
CHORD
ORGAN
VARIATIONPIANO 1 PIANO 2 CLAVI.TONE E.PIANO1 E.PIANO2
PIPE
ORGAN
COMBINATION
TRANSPOSE
MELLOW
NORMAL
BRIGHT
BRILLIANCE
SPLIT
ROOM
CHORUS
HALL 1
SYMPHONIC
HALL 2
TREMOLO
STAGE
ECHO
REVERB EFFECT TOUCH
MEDIUM
HARD
SOFT
FIXED
Transposition value (semitones)
TRANSPOSE
NORMAL
BRILLIANCE
ROOM
REVERB EFFECT TOUCH
MEDIUM
If transposition is set to nonzero, these indications and
the numerical setting will remain on the screen.
TEMPO
MEASURE
[–/NO] [+/ YES]
SONG
TEMPO
METRONOME
–
/ NO+ / YES
TEMPO
DEMO
PIANO SONG
SELECT
RECORDER
/
12
SONG
START
STOP
Transposition settings...
-12: Down by twelve semitones
(one octave)
0: No transposition; notes
produce their standard pitch
+12: Up by twelve semitones
(one octave)
High and low pitch limitations
The CLP-811/611 does not
produce pitches above C7 (the
highest note on an 88-key
keyboard) or below A-1 (the
lowest note). If you transpose up
n
semitones, the highest
by
keys on the keyboard are
automatically sounded one octave
lower than the expected tone. If
you transpose down, the lowest
keys are automatically raised.
/
REC
n
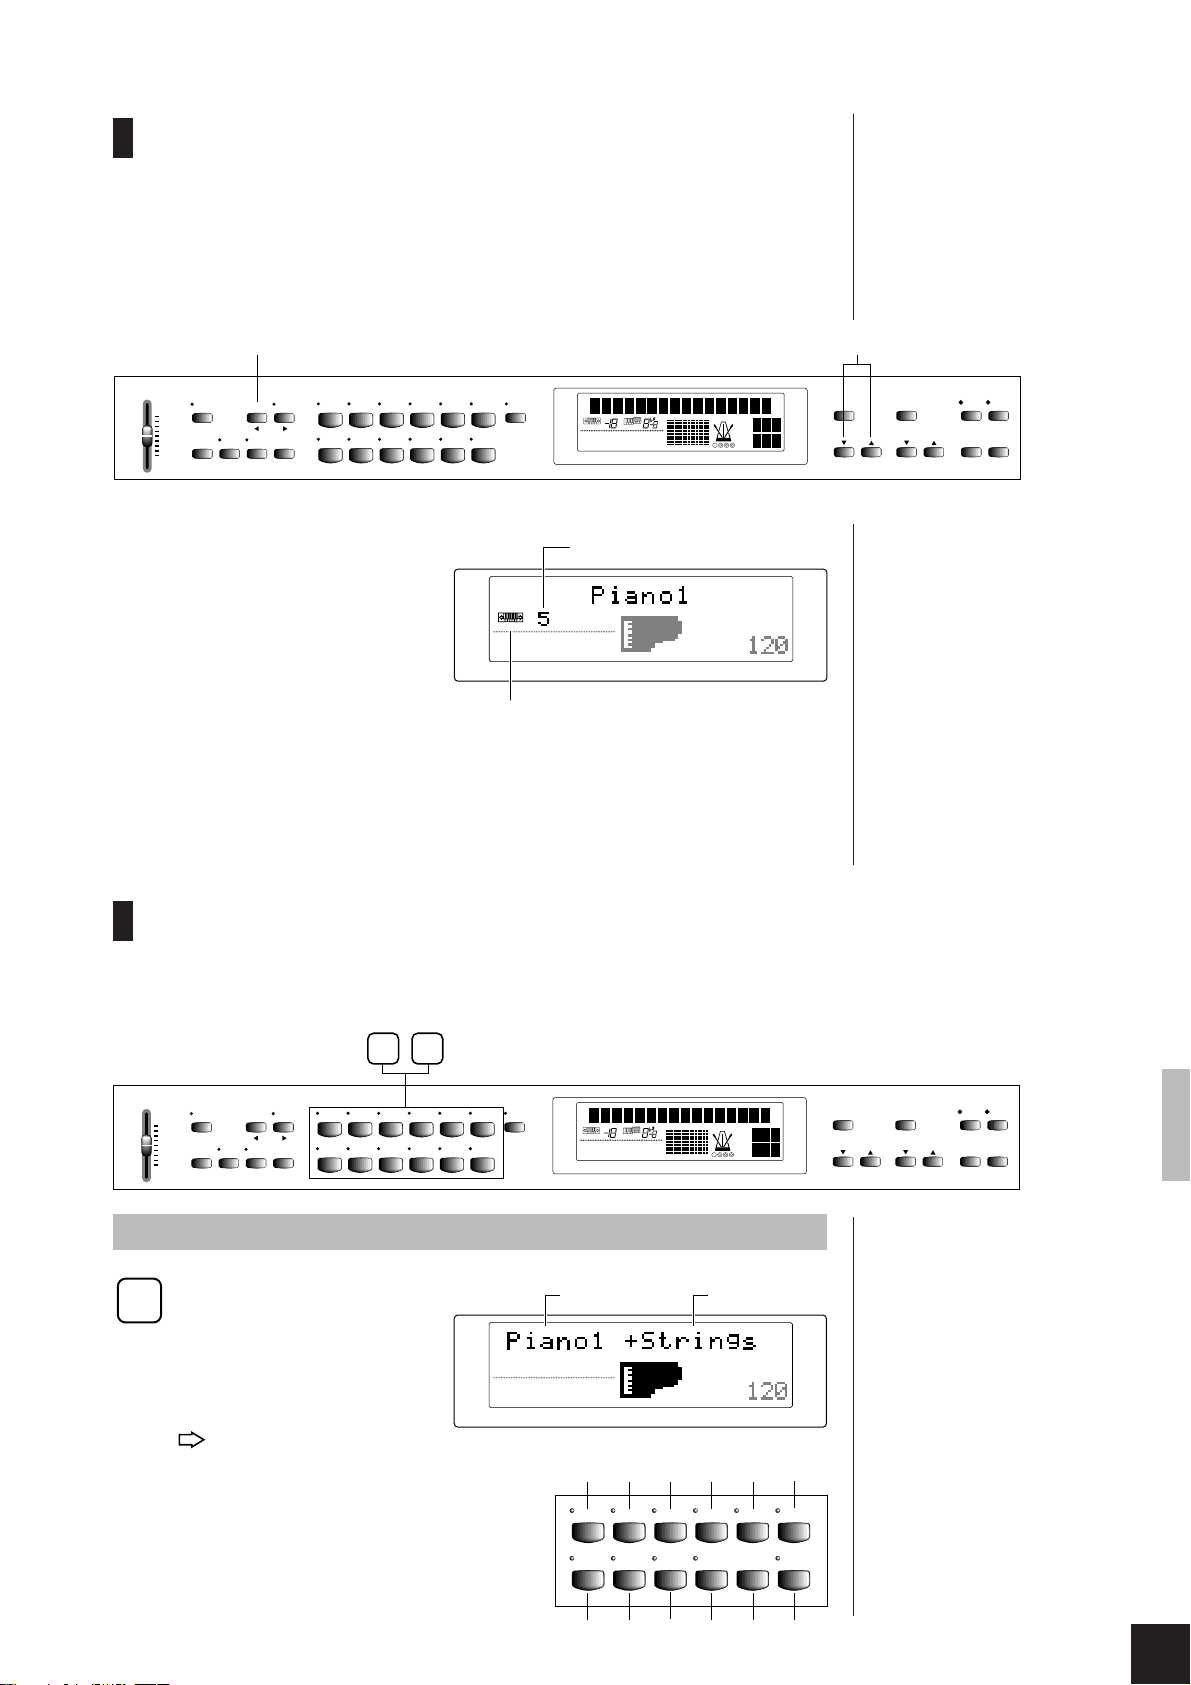
DUAL Mode (Mixing two voices together)
This feature selects simultaneous play of any two voices. You can combine dissimilar voices for a duetlike sound, or try working with similar voices to create a complex, layered type of sound.
1 2
MASTER VOLUME
Procedure
1
FUNCTION
MAX
MIN
TRANSPOSE SPLIT
BRILLIANCE REVERB EFFECT TOUCH
VIBES STRINGS CHOIR BASS
Entering DUAL mode
Simply press the two
appropriate voice selectors
at the same time (hold one
down and then press the
other).
The voice indicators for
both voices will come on.
The screen shows the name
*
for both voices, with the
lowest-numbered voice first
(in accordance with the voice
numbering shown at right).
ORGAN
PIPE
ORGAN
COMBINATION
HARPSICHORD
VARIATIONPIANO 1 PIANO 2 CLAVI.TONE E.PIANO1 E.PIANO2
ROOM
NORMAL
BRILLIANCE
REVERB EFFECT TOUCH
Voice numbering 1
(CLP-811)
TRANSPOSE
SPLIT
MELLOW
NORMAL
BRIGHT
BRILLIANCE
ROOM
CHORUS
SYMPHONIC
HALL 1
TREMOLO
HALL 2
ECHO
STAGE
REVERB EFFECT TOUCH
MEDIUM
HARD
SOFT
FIXED
First voice
(Voice #1)
MEDIUM
3
2
PIANO 1 PIANO 2 CLAVI.TONE E.PIANO1 E.PIANO2
VIBES STRINGS CHOIR BASS
7
9
8
SONG
MEASURE
TEMPO
Second voice
(Voice #2)
TEMPO
4
5
PIPE
ORGAN
ORGAN
COMBINATION
10
11
METRONOME
–
/
NO + / YES
TEMPO
DEMO
PIANO SONG
SONG
SELECT
12
START
/
REC
STOP
RECORDER
/
DUAL or SPLIT...
It is not possible to use the DUAL
and SPLIT features at the same
time.
Handling of VARIATION
The current VARIATION setting
for each voice remains in effect
when you first enter DUAL mode;
the VARIATION indicator will be
lit if VARIATION is selected for
either or both voices. Once you
have entered the mode, each
press of [VARIATION] switches
6
HARPSICHORD
variation ON or OFF for both
voices together. If you need to
set variation ON for one voice
only, you must do so before
entering DUAL mode.
12
CLP-811/611 Selecting and Playing Voices
17
Page 22
You can use function F4 to
make various settings related to
dual play — see page 29 for
details.
If you select [STRINGS] as
one of the voices, you can use
function F4 to select a slower
string attack.
Terminating DUAL
2
mode...
Handling of effects
If both voices are set to their standard effects at the time you enter DUAL mode, the
Clavinova will automatically select the effect and depth to be applied for the combination. In
all other cases, the Clavinova will set the effect as follows.
[Type]
a) If both voices are set to the same effect...
Each voice retains its original effect.
b) If effect for one voice only is OFF...
Each voice retains its original effect settings. One voice receives no effect; the other
receives the effect set up prior to entry into DUAL mode.
c) If the two voices are set to different effects ...
The effect setting for Voice
forced off until DUAL mode terminates.
d) If you change the EFFECT type while DUAL mode is in progress, the Clavinova will
#
1 is used for both voices. The effect setting for Voice #2 is
apply the newly selected effect to both voices.
[Depth]
You can set the depth to any level using function F4.
Pressing any one of the voice
selectors will select the corresponding voice and return you
to normal mode.
SPLIT Mode (Dividing the keyboard)
This feature allows you to divide the keyboard into left and right zones. You can select the split point,
and assign a different voice to each zone.
[SPLIT]
Voice selector
MASTER VOLUME
FUNCTION
MAX
BRILLIANCE REVERB EFFECT TOUCH
MIN
TRANSPOSE SPLIT
VIBES STRINGS CHOIR BASS
ORGAN
HARPSI-
CHORD
VARIATIONPIANO 1 PIANO 2 CLAVI.TONE E.PIANO1 E.PIANO2
PIPE
ORGAN
COMBINATION
TRANSPOSE
MELLOW
NORMAL
BRIGHT
BRILLIANCE
SPLIT
ROOM
CHORUS
SYMPHONIC
HALL 1
TREMOLO
HALL 2
ECHO
STAGE
REVERB EFFECT TOUCH
MEDIUM
HARD
SOFT
FIXED
Procedure
Enter SPLIT mode.
1
Press [SPLIT].
The SPLIT indicator
lights up.
The Clavinova
automatically
NORMAL
BRILLIANCE
selects the default
voice (BASS if CLP-811; STRINGS if CLP-611) for the left zone.
You can use function F5 to make various settings related to split play —
see page 29 for details.
Select the split point.
2
Hold down [SPLIT] and hit
the key at which you want
to split the keyboard. If you
omit this operation, the
Clavinova automatically
sets the split point to F♯2.
ROOM
REVERB EFFECT TOUCH
NORMAL
BRILLIANCE
SPLIT
MEDIUM
SPLIT
ROOM
MEDIUM
REVERB EFFECT TOUCH
Split point
TEMPO
/
SONG
SELECT
RECORDER
12
START
/
STOP
REC
DEMO
METRONOME
MEASURE
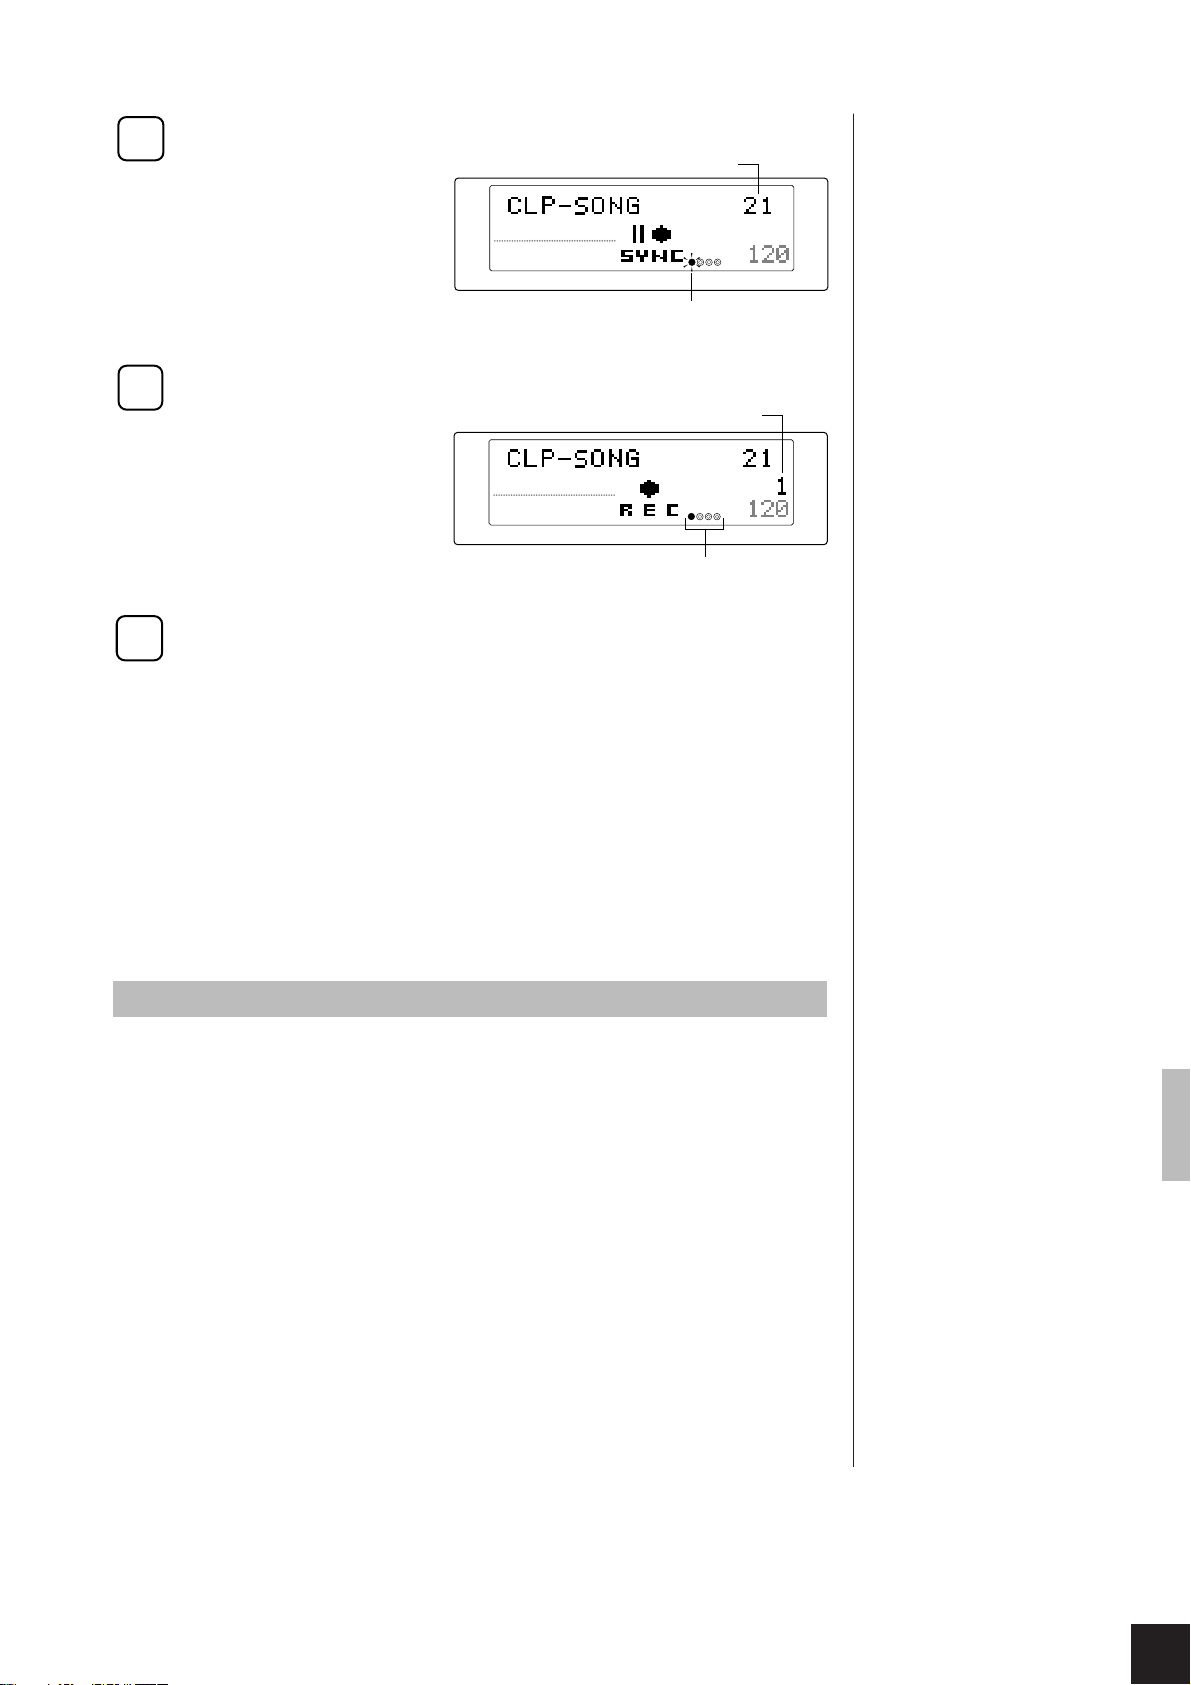
SONG
TEMPO
Voice for right zoneVoice for left zone
PIANO SONG
TEMPO
–
/ NO+ / YES
SPLIT or DUAL...
It is not possible to use the DUAL
and SPLIT features at the same
time.
The “split point” is the highest
note in the left zone.
Handling of VARIATION
You can select VARIATION
independently for each of the two
voices. During SPLIT mode, the
VARIATION lamp and voice
indicator show the status of the
right-zone voice only.
While you are holding the
[SPLIT] button down, however,
the lamps change to show the
status for the left-zone voice.
You can also use function F5 to
set the split point (see page 29).
TEMPO
18
CLP-811/611 Selecting and Playing Voices
Page 23

Select the voice for the
3
right zone.
Press a voice selector to select
the voice for the right zone.
Select the voice for the
4
left zone.
Hold down [SPLIT] and press
a voice selector to select the
voice. (The voice indicator for
the currently selected left-zone
voice lights up while [SPLIT]
is held down.)
Terminating SPLIT
5
mode...
Press and release the [SPLIT]
button.
The SPLIT indicator goes
off.
Handling of EFFECTS
If both voices are set to their standard effects at the time you enter SPLIT mode, the
Clavinova will automatically select the effect and depth to be applied for the combination. In
all other cases, the Clavinova will set the effect as follows.
[Type]
a) If both voices are set to the same effect...
Each voice retains its original effect.
b) If effect for one voice only is OFF...
Each voice retains its original effect settings. One voice receives no effect; the other
receives the effect set up prior to entry into SPLIT mode.
c) If the two voices are set to different effects...
The effect setting for the right-hand voice is used for both voices. The effect setting for
the left voice is forced off until SPLIT mode terminates.
d) If you change the EFFECT type while SPLIT mode is in progress, the Clavinova will
apply the newly selected effect to both voices.
[Depth]
You can set the depth to any level using function F5.
Using the METRONOME
The CLP-811/611 includes a built-in metronome with adjustable tempo, volume and beat.
1 2
MASTER VOLUME
FUNCTION
MAX
BRILLIANCE REVERB EFFECT TOUCH
MIN
TRANSPOSE SPLIT
VIBES STRINGS CHOIR BASS
ORGAN
HARPSICHORD
VARIATIONPIANO 1 PIANO 2 CLAVI.TONE E.PIANO1 E.PIANO2
PIPE
ORGAN
COMBINATION
TRANSPOSE
MELLOW
NORMAL
BRIGHT
BRILLIANCE
SPLIT
ROOM
CHORUS
SYMPHONIC
HALL 1
TREMOLO
HALL 2
STAGE
ECHO
REVERB EFFECT TOUCH
MEDIUM
HARD
SOFT
FIXED
Procedure
Switch on the metro-
1
nome and set the tempo.
ROOM
Press the [METRONOME] button.
NORMAL
BRILLIANCE
REVERB EFFECT TOUCH
The metronome comes
on and begins tapping.
Animated metronome icon
Adjust the tempo.
Press TEMPO [▼][▲] as
necessary to set the tempo. You
can set to any value between
32 and 280. The default setting
NORMAL
BRILLIANCE
ROOM
REVERB EFFECT TOUCH
is 120.
Adjust the metronome volume.
Hold down [METRONOME] and press [-/NO] or [+/YES] to adjust the
metronome volume. The screen continues to display the volume setting
while the button is held down. You can set to any value between 1 and 20;
the default is 10.
Switching off the metronome...
2
Press and release the [METRONOME] button.
The metronome goes off.
MEDIUM
Metronome volume
MEDIUM
Tempo
TEMPO
TEMPO
MEASURE
SONG
TEMPO
METRONOME
–
DEMO
PIANO SONG
TEMPO
/
NO + / YES
You can also use function F7 to
set up the metronome. In
addition to volume setting, F7
also allows you to select a beat.
The metronome will generate the
corresponding beat pulse, and a
flashing beat display will appear
under the metronome icon. (See
page 32.)
/
SONG
SELECT
Beat marker
RECORDER
12
START
/
REC
STOP
CLP-811/611 Selecting and Playing Voices
19
Page 24
Using the Recorder
Your Clavinova includes a two-track recorder that lets you record and play back a keyboard performance. If you like, you can build a two-track song by recording separate
performances (and separate voices) onto each track.
The recording function is a useful adjunct to any keyboard study program, since it lets
you hear exactly how you sound from the listener’s perspective. It can also be just plain
fun.
The recorder registers the following data.
■ Common to Both Tracks
● Tempo ● Reverb type & depth ● Effect type
■ Independent for Each Track
● Notes played ● Voice selection ● Voice variation
● Dual-mode voices ● Split-mode voices ● Damper pedal
● Soft pedal ● Sostenuto pedal ● Brilliance level
● Effect depth ● DUAL-mode settings (F4) ● SPLIT-mode settings (F5)
DUAL-and SPLIT-mode settings cannot be changed while recording is in progress.
NOTE
Recording
Procedure
Make initial settings.
1
Select the voice you want to use. (If you are using SPLIT or DUAL
mode, select both voices.) You may also want to set the volume and
tempo values.
If you have already recorded to one track and wish to listen
2
to it while recording on the other, check that the indicator
for the track you want to hear is lit up green. If the lamp is
off, press the track button ([1] or [2]) once to set it on.
Enter RECORDING-mode standby.
3
Press the [REC] button once to enter recording standby. The track-
indicator over one of the track buttons will light up red.
The lamp will come on only if the
track contains recorded data.
Before beginning a recording...
You may find it convenient to
press both buttons to check
whether data already exists. If
either lamp comes on, then the
corresponding track contains
data that will be lost when you
being recording to it.
If you have not recorded
anything since power-on, the
lamp above button [1] will come
on. If you have already
recorded, then the lamp above
the most recently recorded track
will come on.
You cannot enter RECORDING
mode while the Clavinova is in
DEMO/PIANO SONG mode.
20
CLP-811/611 Using the Recorder
To release RECORDING-mode
standby...
Press the [REC] button a second
time.
Page 25
Select the track you want to record.
4
The red indicator shows the
Remaining memory
currently selected track. If
you wish to change the
selection, press the appropriate track button ([1] or
[2]).
NORMAL
BRILLIANCE
ROOM
REVERB EFFECT TOUCH
MEDIUM
Flashing
Start the recording.
5
Recording begins automati-
Measure count
cally when you play a note
at the keyboard. As an
alternative, you can begin
ROOM
the recording by pressing
the [START/STOP] button.
NORMAL
BRILLIANCE
REVERB EFFECT TOUCH
MEDIUM
Beat
Stop the recording.
6
You can stop the recording by pressing either [REC] or [START/STOP].
The indicator above the recorded track will change to green, to indicate
that the track contains data.
TEMPO
MEASURE
TEMPO
If the selected track already
contains recorded data...
That data will be lost when you
begin actual recording as
described in Step 5 below.
The approximate amount of
remaining memory...
appears at the upper right of the
screen (in kilobytes). The starting
value (with both tracks empty) is
21.
The first metronome dot
flashes in time with the current
tempo setting.
Using the left pedal as a
ST ART/STOP switch...
You can set the left pedal to
operate in the same way as the
[START/STOP] button, so that
you can start and stop recording
without using your hands. Leftpedal operation is determined by
function F9; see page 33 for
details.
The screen counts the
measures (in accordance with
the TEMPO setting) as recording
proceeds. The metronome dot
display keeps track of the beat.
You are free to switch the
metronome sound on or off. The
metronome sound is not included
in the recording.
Changing initial settings
After recording is completed, it remains possible to modify the initial settings
that you selected at Step 1 above. (It is not possible, however, to modify SPLIT
or DUAL settings.)
When making such a change, BE CAREFUL! DO NOT hit any keys on the
keyboard and do not press the [START/STOP] button, as doing so will cause
erasure of all your data.
To make a change, proceed as follows.
(a) Press [REC] to enter RECORDING mode.
(b) If necessary, press the track button for the track you want to change (so
that the indicator is red).
(c) Make the changes. To change the voice selection, for example, you
would press the appropriate voice selector.
(d) Press [REC] again to exit RECORDING mode.
Maximum recording capacity...
is approximately 4,200 notes, but
varies somewhat according to
pedal usage and other such
factors. The recording indicator
begins flash when memory is
almost full. If memory becomes
completely full, recording stops
and the Memory Full! message
appears.
If you begin making a change at
Step (c) but then wish to
cancel it, you can do so by
pressing the other track button
and then pressing [REC].
Tempo, reverb type/depth, and
effect type settings...
apply to both tracks. If you
change the value for one track,
the change automatically applies
to both.
CLP-811/611 Using the Recorder
21
Page 26

Erasing a track
To erase a track, proceed as follows:
(a) Press [REC] to enter RECORDING mode.
(b) Select the track you want to erase (so that the indicator is red).
(c) Press [START/STOP] twice.
Playback
To select a track for playback, press the corresponding track button so that the
indicator comes on green. You can then start the playback by pressing
[START/STOP]. Note that you are free to select either or both tracks. (If a track
is empty, its indicator will not come on.)
Playback always begins from the
Measure count
start of the recorded data, and
stops automatically at the end of
the recorded data. The LCD
displays the measure count as
NORMAL
BRILLIANCE
ROOM
REVERB EFFECT TOUCH
MEDIUM
MEASURE
TEMPO
playback progresses. You can stop
playback at any time by pressing the [START/STOP] button.
If both tracks contain data, then once you have started playback you can
toggle sound for either track ON or OFF by pressing the corresponding track
button.
You cannot start playback
while the Clavinova is in DEMO/
PIANO SONG mode or
FUNCTION mode. (But note that
FUNCTION mode is automatically released when you press
either of the track buttons.)
It is possible to play along on the
keyboard during playback.
To adjust the playback volume
and tempo...
Use the [MASTER VOLUME]
slider and the [TEMPO] buttons.
To restore the initial TEMPO
setting, press both TEMPO
buttons at the same time.
The Clavinova retains the
recording even after power
goes off, and will hold it for
about a week without power. If
you wish to maintain the data for
a long period of time, be sure to
switch the power on at least a
few minutes each week.
You can use the MIDI Bulk
Dump function to save your
recording to an external storage
device (such as a Yamaha DOU10 Disk Orchestra Unit). See
page 34 for details.
If you use the metronome
during playback...
It will automatically switch off
when playback is finished.
A track will not produce any
sound if its indicator is off.
This is in contrast to built-in
piano songs, where even a
deselected track may play back
at low volume as a practice aid
(see page 11).
Playback data is not transmit-
ted through the MIDI OUT
connector.
22
CLP-811/611 Using the Recorder
Page 27

Synchro Start
The Synchro Start feature lets you set recorder playback so that it begins automatically when you play on the keyboard.
To select this feature simply hold
down one of the recorded track
buttons and press [START/STOP].
A “SYNC” indication will appear
on the screen to indicate that the
Clavinova is in Synchro Start
NORMAL
BRILLIANCE
ROOM
REVERB EFFECT TOUCH
MEDIUM
Flashing
SONG
TEMPO
standby, and the first metronome
dot will flash in time with the current tempo setting.
Function of Left Pedal
You can set the left pedal so that it functions as a second [START/STOP]
button. This makes it possible for you to use your foot to start and stop playback
and recording, so that your hand does not have jump from the panel to the
keyboard. Left-pedal operation is selected by function F9; see page 33 for
details.
CLP-811/611 Using the Recorder
23
Page 28

Configuration Functions (FUNCTION mode)
The Clavinova‘s FUNCTION mode provides a variety of configuration functions that
you can use to customize the operating environment. When you first receive the
Clavinova, all parameters are preset to their factory defaults. The configuration functions give you the freedom to adjust the settings to suit your needs.
FUNCTION mode consists of 15 or 16 main functions (F1 to F15 on CLP-811,
F1 to F14 on CLP-611). Six of these are further divided into subfunctions. The
table below illustrates the structure.
Function Table
Main Functions
[F1.Tune]
(Keyboard fine tuning)
[F2.KTune]
(Key-by-key fine tuning)
[F3.Scale]
(Temperament selection)
[F4.DualFunc.]
(DUAL-mode settings)
[F5.SplitFunc.]
(SPLIT-mode settings)
[F6.OrganEdit]
(ORGAN COMBINATION settings)
[F7.Metronome]
(Metronome settings)
Subfunctions
4.1 D.Balance (Voice volume balance)
4.2 D.Detune (Voice tuning divergence)
4.3 Vc1.Octave (Octave shift for Voice #1)
4.4 Vc2.Octave (Octave shift for Voice #2)
4.5 Vc1.EffDpt (Effect depth for Voice #1)
4.6 Vc2.EffDpt (Effect depth for Voice #2)
4.7 Str.Atk (Attack speed for STRINGS
voice)
ResetOK? (Return to factory defaults.)
4.8
5.1 SplitPoint (Split point)
5.2 S.Balance (Voice volume balance)
5.3
VcR.Octave
5.4
VcL.Octave (Octave shift for left zone)
5.5
VcR.EffDpt (Effect depth for right zone)
5.6
VcL.EffDpt (Effect depth for left zone)
(Octave shift for right zone)
5.7 Sus.Pedal (Effective range of
damper pedal)
5.8
ResetOK? (Return to factory defaults.)
6.1 ****** (Organ type)
[Where “******” is replaced by type name,
such as “JAZZ ORGAN1”.]
6.2 VoiceEdit (Voice edit settings)
6.3 AtkMode (Attack mode)
6.4 RotSP.Spd (Speed of rotary-
speaker effect)
6.5 RotSP.Dpt (Depth of rotaryspeaker effect)
6.6
ResetOK? (Return to factory defaults.)
7.1 Beat
7.2 Volume
Page
27
27
28
29
29
29
29
29
29
29
29
29
30
30
30
30
30
30
30
31
31
31
31
31
31
32
32
Attack: Initial, sharp segment of
sound produced immediately
following key strike.
Rotary-speaker effect:
Shimmering sound effect
obtained by rotating the speaker.
24
CLP-811/611 Configuration Functions (FUNCTION mode)
Page 29

Main Functions
[F8.Display]
(Display mode)
[F9.L.Pedal]
(Function of left pedal)
[F10.DamperDpt]
(Damper-pedal depth)
[F11.Damper]
(Number of damper-pedal levels)
[F12.CancelVol]
(Volume of muted piano-song track)
[F13.MIDIFunc.]
(MIDI settings)
CLP-811 only:
[F14.MicRevDpt]
(Microphone reverb depth)
[F14/F15.Backup]
(Backup ON/OFF settings)
* F14 on CLP-611
F15 on CLP-811
Subfunctions
13.1 TxCh. (MIDI transmitting channel)
13.2 RxCH. (MIDI receiving channel)
13.3 Local (Local control ON/OFF)
13.4 PrgChg (Program Change enable/
disable)
13.5 CtrChg (Control Change enable/
disable)
13.6 MIDITran (Transposition of outgoing MIDI data)
13.7
SetupSnd (Transmit Panel setup file)
13.8
BulkDump (Bulk data dump)
14.1/15.1 Voice (Voice settings)
14.2/15.2 MIDI (MIDI settings)
14.3/15.3 Tune (Tuning and tempera-
ment settings)
14.4/15.4 Pedal (Pedal settings)
14.5/15.5 Display (Display mode)
Page
32
33
33
34
34
34
34
35
35
35
35
35
35
36
36
36
36
36
36
CLP-811/611 Configuration Functions (FUNCTION mode)
25
Page 30

Basic Procedure
This section explains the procedure for viewing and changing the function settings.
1 5
MASTER VOLUME
FUNCTION
MAX
BRILLIANCE REVERB EFFECT TOUCH
MIN
2 4 3 4 4
TRANSPOSE SPLIT
VIBES STRINGS CHOIR BASS
Procedure
Enter FUNCTION mode.
1
Press [FUNCTION].
The FUNCTION indicator lights up.
Select the main function.
2
Select the main function
using the [t] and [s]
buttons directly to the right
of the [FUNCTION]
button. (The arrow markings
are printed under the buttons.) Main functions run
from F1 to F15 (on the
CLP-811) or F14 (on the CLP-611).
ORGAN
HARPSI-
CHORD
VARIATIONPIANO 1 PIANO 2 CLAVI.TONE E.PIANO1 E.PIANO2
PIPE
ORGAN
COMBINATION
TRANSPOSE
MELLOW
NORMAL
BRIGHT
BRILLIANCE
SPLIT
ROOM
CHORUS
SYMPHONIC
HALL 1
HALL 2
TREMOLO
STAGE
ECHO
REVERB EFFECT TOUCH
MEDIUM
HARD
SOFT
FIXED
MEASURE
SONG
TEMPO
METRONOME
–
DEMO
PIANO SONG
TEMPO
/ NO+ / YES
It is not possible to enter
FUNCTION mode directly from
SELECT
12
SONG
START
/
REC
STOP
RECORDER
/
DEMO/PIANO SONG mode or
RECORDING or playback is in
progress.
Function number
Function name
ROOM
NORMAL
BRILLIANCE
REVERB EFFECT TOUCH
MEDIUM
TEMPO
Change the setting or select the subfunction using the
3
[-/NO] and [+/YES] buttons.
If there are no subfunctions: Pressing the button changes the value.
If there are subfunctions: Press [+/YES] to move to a subfunction.
Proceed using the following three sets of buttons.
4
■ Use the [t] and [s] buttons to cycle through subfunctions and main
functions.
■ Use the [-/NO] and [+/YES] buttons to set the value for the item
marked by the blinking cursor on the screen. Press both buttons at the
same time to return the value to its factory default.
■ If you are working at a screen with multiple settings, use SONG
SELECT [▼], [▲] to select the item you want to set. The selected
item will blink on the screen. (This operation is effective only with
screens that present more than one value.)
To terminate FUNCTION mode...
5
Press the [FUNCTION] button.
The FUNCTION indicator goes off, and the screen return to the
previous display.
26
CLP-811/611 Configuration Functions (FUNCTION mode)
Page 31

Function descriptions
F1.Tune (Keyboard fine tuning)
You use this function to fine-tune the pitch over
the entire keyboard. This function is useful, for
example, when you need to adjust tuning when
playing with other instruments.
1 To access this item, enter FUNCTION mode and
select main function F1.
21
ROOM
NORMAL
BRILLIANCE
2 The screen shows the current pitch (in hertz) for key
A3. You can adjust the pitch (in increments of about
0.2 hertz) by pressing [-/NO] or [+/YES]. The adjustment automatically carries over to all keys on the
keyboard.
Values: 427.0 to 453.0 (hertz)
Default: 440.0 (hertz)
• Hertz: Frequency, in cycles per second; abbreviated as
“Hz”. The frequency of a sound wave determines its
pitch, with higher frequencies producing higher pitches.
You can make the same adjustment directly from
NOTE
the keyboard without entering [FUNCTION]
mode, as follows.
To raise the pitch (by about 0.2 Hz)...
Hold down the two lowest white keys (A-1 and B-1) and
hit any key from C3 to B3.
To lower the pitch (by about 0.2 Hz)...
Hold down the two lowest keys (A-1 and A♯-1) and hit any
key from C3 to B3.
To reset to standard pitch...
Hold down the three lowest keys (A-1, A♯-1, B-1) and hit
any key from C3 to B3.
You can also adjust pitch in increments of about 1
NOTE
Hz (without entering FUNCTION mode) as
follows.
To raise or lower the pitch...
Hold down keys A-1 and B-1 (the two lowest white keys)
or else A-1 and A♯-1 (the two lowest keys), and press [-/
NO] or [+/YES].
To reset to standard pitch...
Hold down keys A-1 and B-1 or else A-1 and A♯-1 and
press
[-/NO] and [+/YES] at the same time.
(Note that the screen will show the TUNE display when
you hold down keys A-1 and either A♯-1 or B-1, and will
then return to normal display when these keys are released.)
MEDIUM
REVERB EFFECT TOUCH
TEMPO
F2.KTune (Key-by-key fine tuning)
This function lets you adjust the pitch of individual keys, so that you can set up your own
customized scaling system (temperament). The
function also allows you to switch this customized scaling system OFF or ON at any time.
1 To access this item, enter FUNCTION mode and
proceed to main function F2.
21
ROOM
NORMAL
BRILLIANCE
2 The screen indicates whether the function is ON or
OFF. You can toggle the setting by pressing either
[-/NO] or [+/YES]. You must set the function ON if
you wish to adjust the tuning.
Values: ON, OFF
Default: OFF
• The ON/OFF setting determines whether this customized
tuning is used during play. Set ON to use the tuning, or
OFF to use standard tuning.
3 After setting the function ON, hit the key that you
want to tune.
ROOM
NORMAL
BRILLIANCE
The screen displays the name of the struck key.
4 You can now adjust the pitch for that key by pressing
[-/NO] or [+/YES]. Adjustment is in 1-cent increments, and is indicated as a relative value (“0”
produces standard pitch).
Values: -50,...,+50 (cents)
Default: 0 (standard pitch) for all keys
You can repeat this procedure (3 and 4) to adjust pitch
for as many keys as you like.
Cent: One-hundredth of a semitone. (100 cents = 1 semitone)
To reset fine tuning of all keys to “0”...
1 Press down the three lowest keys on the keyboard
(A-1, A♯-1, and B-1) at the same time. The screen will
display the following.
MEDIUM
REVERB EFFECT TOUCH
MEDIUM
REVERB EFFECT TOUCH
TEMPO
3 4
TEMPO
ROOM
NORMAL
BRILLIANCE
REVERB EFFECT TOUCH
MEDIUM
TEMPO
2 Press [+/YES] to reset.
CLP-811/611 Configuration Functions (FUNCTION mode)
27
Page 32
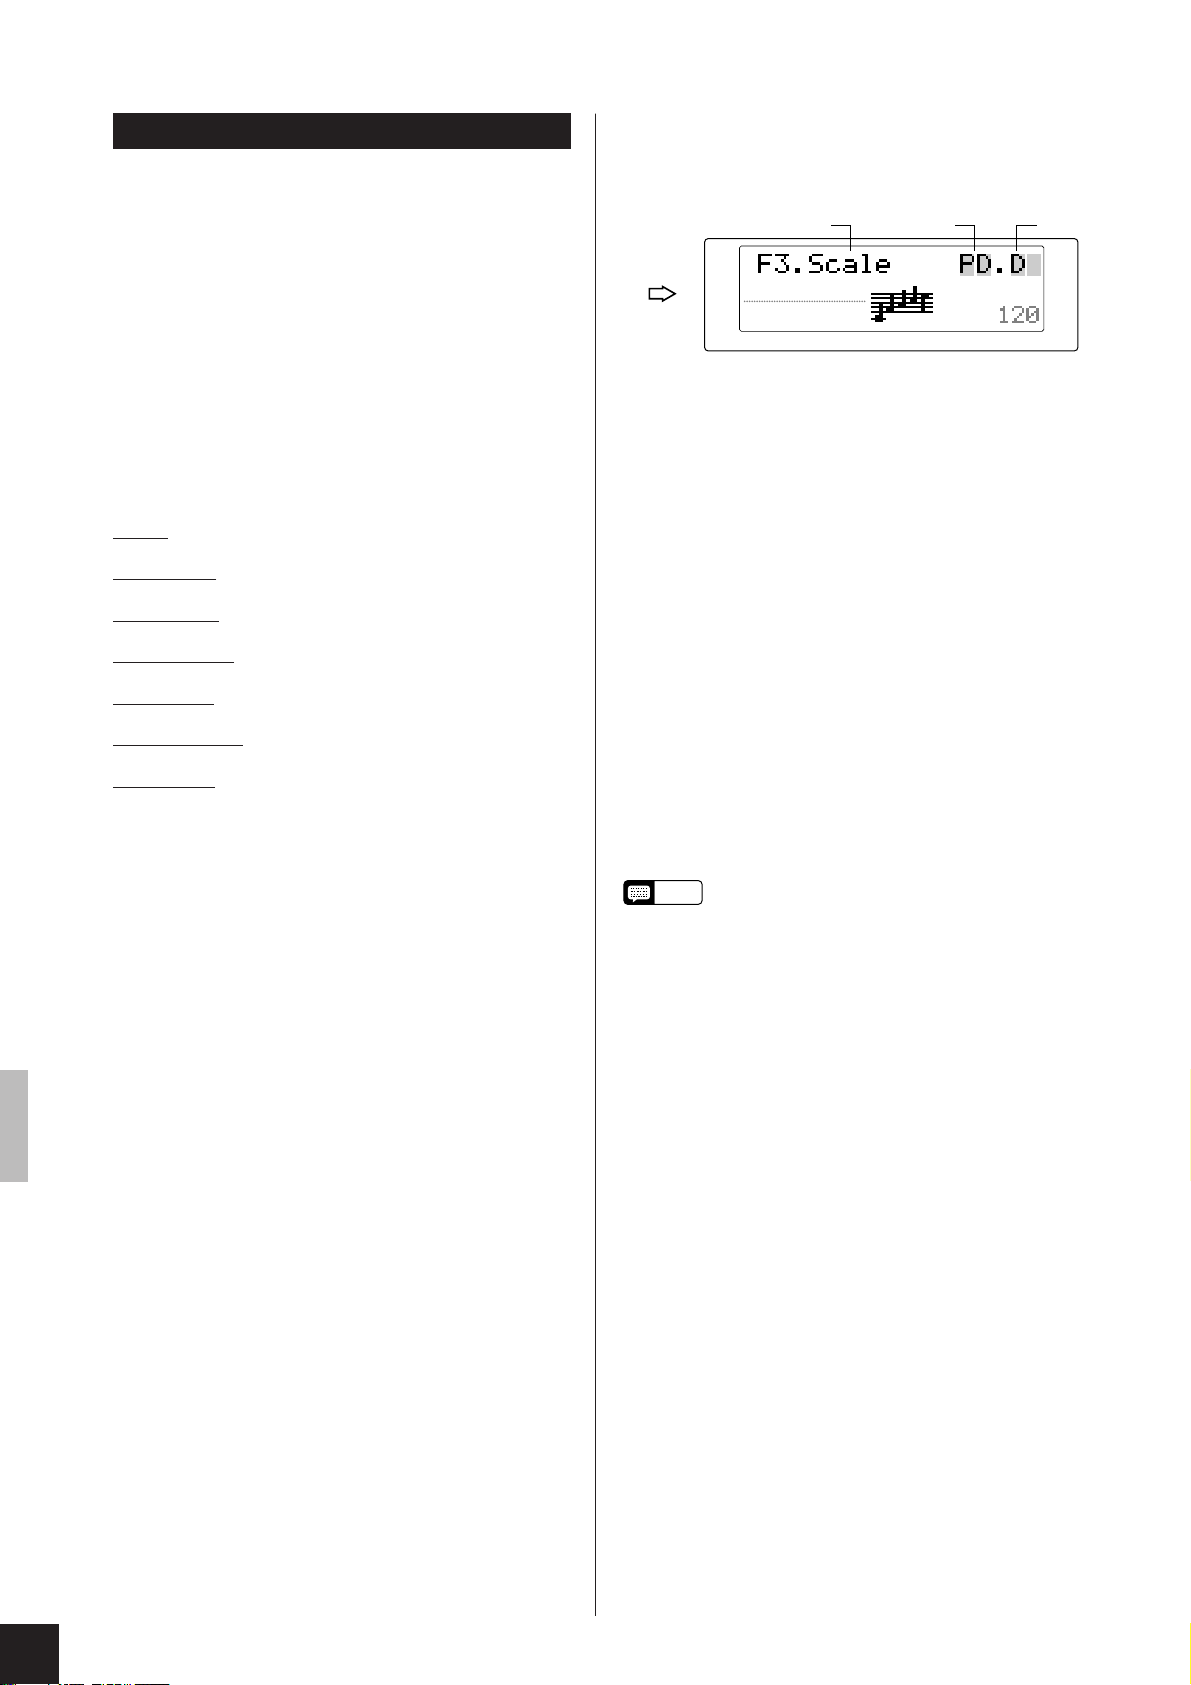
F3.Scale (Temperament selection)
This function selects the tuning system, or temperament.
The equal temperament now standard on present-
day pianos was preceded by a series of other
temperaments. These various temperaments had
an important influence on music composition and
instrument development in their day. Selecting
one of these other temperaments allows you to
experience the original sound of older musical
pieces.
The Clavinova lets you to select from seven
different temperaments, as follows.
Equal
Pure Major
Pure minor
Pythagorean
1 To view or change the temperament setting, enter
FUNCTION mode and proceed to main function F3.
The screen displays the current temperament value
and key (if applicable).
321
ROOM
NORMAL
BRILLIANCE
REVERB EFFECT TOUCH
2 To change the temperament: Be sure that the blinking
cursor is located over the temperament value. (If
necessary, press SONG SELECT [▼] to move the
cursor.) Then press [-/NO] or [+/YES] to change the
setting.
Values: EQ. Equal
PM. Pure major
Pm. Pure minor
PY. Pythagorean
ME. Mean tone
WE. Werckmeister
KI. Kirnberger
Default: EQ. Equal
MEDIUM
TEMPO
Mean Tone
Werckmeister
Kirnberger
3 If you select a non-equal temperament, you must also
select the key you want to play it in. (Tuning is
different for each key.) To do this, press SONG
SELECT [▲] to move the cursor to the key-selection
area, and then press [-/NO] or [+/YES] to change the
setting.
Values: C, D♭, D, E♭, E, F, F♯, G, A♭, A, B♭, B
Default: C
You use the SONG SELECT arrows to select the
NOTE
parameter you want to set (so that the parameter
is marked by a blinking cursor). You then use the
[-/NO] or [+/YES] button to set the value.
28
CLP-811/611 Configuration Functions (FUNCTION mode)
Page 33
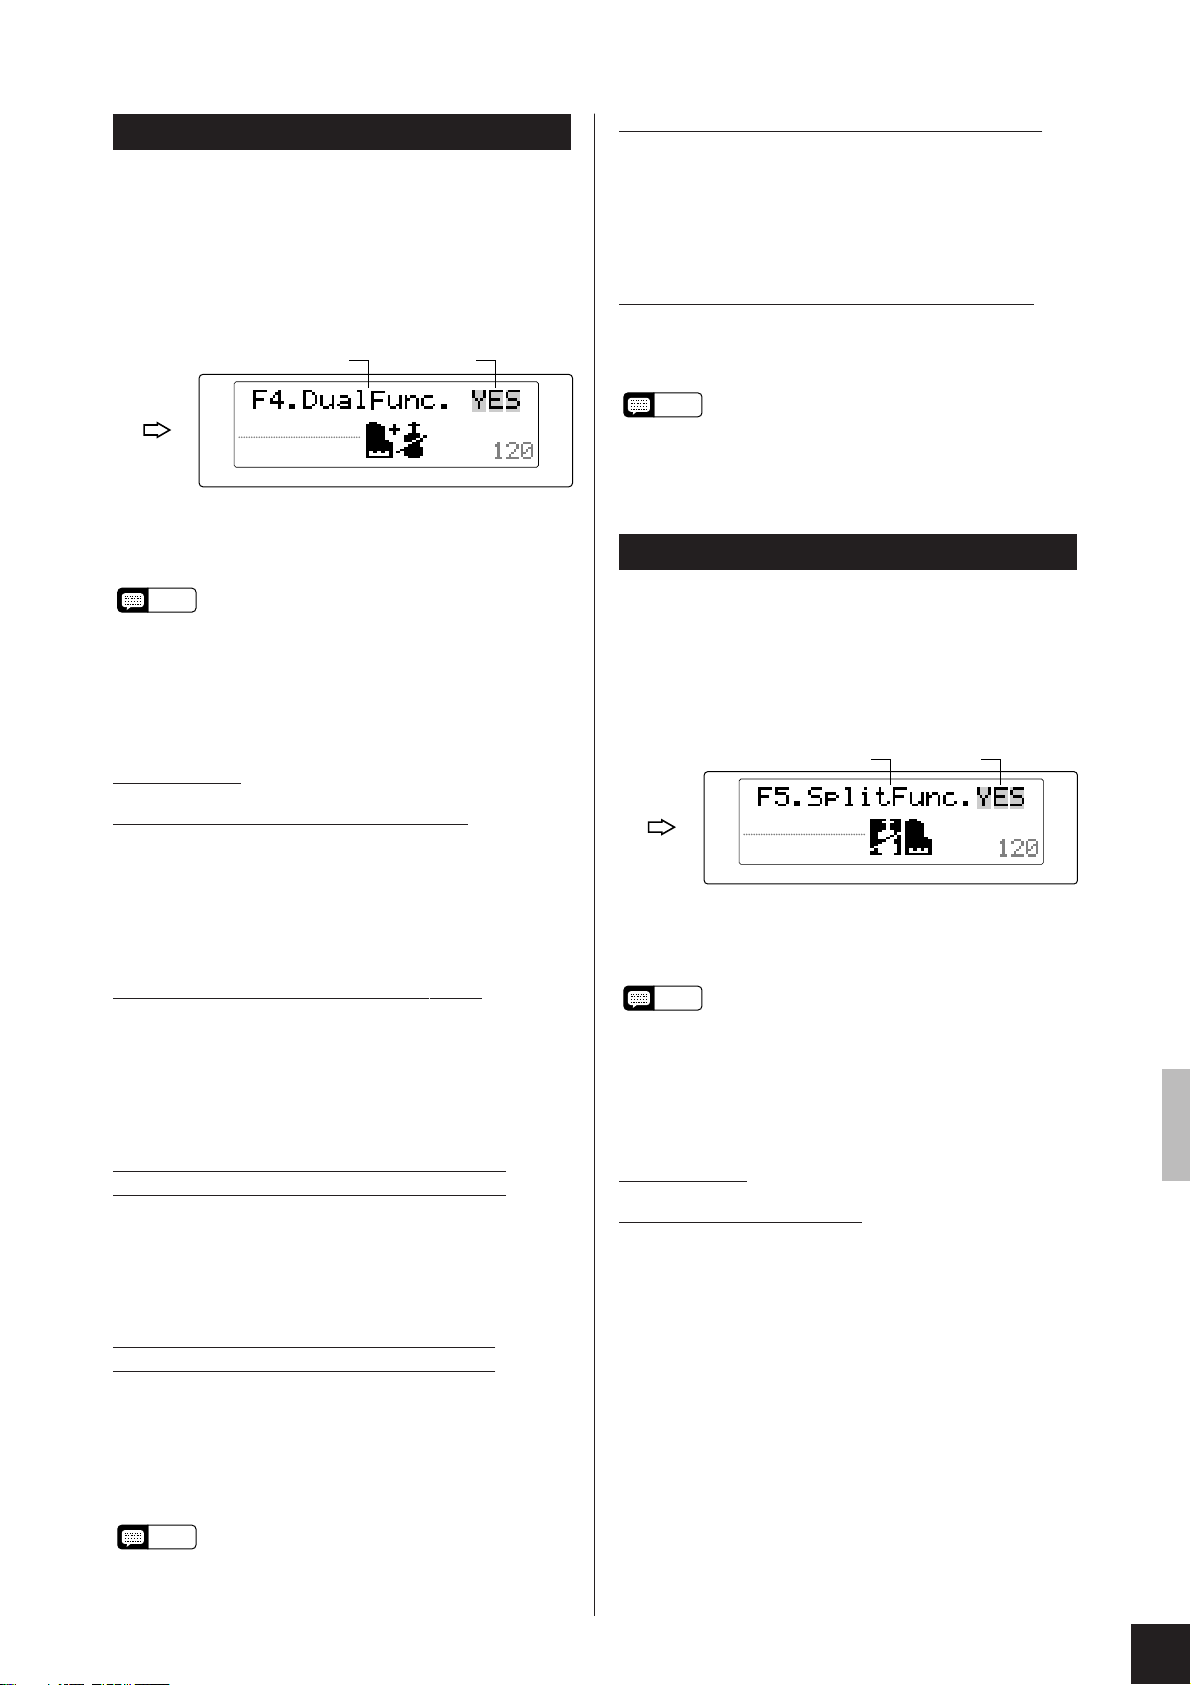
F4.DualFunc. (Settings for DUAL mode.)
You use this function to set various parameters for
DUAL-mode play.
1 To access this function: first activate DUAL mode (by
pressing two voice selectors at the same time), then
press [FUNCTION], and then press [t] or [s] to
proceed to F4.
21
ROOM
NORMAL
BRILLIANCE
REVERB EFFECT TOUCH
2 Next, press [+/YES] to enter the subfunction group.
Then use [t], [s] to move among the different
subfunctions, and [-/NO], [+/YES] to set the values.
If you are not working in DUAL mode...
NOTE
The top right of the screen will display a triple
dash (---) and you will not be able to enter the
subfunction group. To enable entry, activate
DUAL mode by pressing two voice selectors at
the same time. (You can do this without leaving
FUNCTION mode).
MEDIUM
TEMPO
4.7 Str.Atk (Attack speed for STRINGS voice)
Values: SLOW, FAST
Default: FAST
Sets the attack speed (the initial rise speed) for the STRINGS
voice. A SLOW attack can create an interesting ambience for
certain types of songs. (Note that this setting is effective only if
STRINGS is selected as one of the voices.)
4.8 ResetOK? (Return to factory defaults.)
Press [+/YES] to return all of the DUAL-mode subfunction
settings to the factory defaults. (Factory defaults are different
for each voice combination.)
As a shortcut, you can switch directly into
NOTE
FUNCTION mode’s F4.DualFunc. area by
holding down the two appropriate voice selectors
and pressing [FUNCTION]. Once you have
changed the settings, press [FUNCTION] again
to quit the mode.
F5.SplitFunc. (Settings for SPLIT mode.)
You use this function to set various parameters for
SPLIT-mode play.
1 To access this function: first enter SPLIT mode, then
press [FUNCTION], and then press [t] or [s] to
proceed to F5.
Subfunctions
4.1 D.Balance (Voice volume balance)
Settings: 0,...,20 [10 = equal balance]
[Above 10, Voice 1 is louder.]
Default: V aries according to voice combination
Sets the relative volumes for the two voices. This function is
useful when you want to highlight one voice while playing the
other as a backdrop.
4.2 D.Detune (Voice tuning divergence)
Introduces slight pitch difference between the two voices,
producing a somewhat fatter sound.
Values: -10,...,+10 [0: No detuning]
[0 → +10: Voice #1 pitch rises]
[0 → -10: Voice #2 pitch rises]
Default: Varies according to voice combination
4.3 Vc1.Octave (Octave shift for Voice #1)
4.4 Vc2.Octave (Octave shift for Voice #2)
Values: -1, 0, +1
Default: V aries according to voice combination
These subfunctions allow you to shift each voice up or down
an octave. Each combination produces its own distinctive
sound and acoustics.
4.5 Vc1.EffDpt (Effect depth for Voice #1)
4.6 Vc2.EffDpt (Effect depth for Voice #2)
Values: 0,...,20
Default: V aries according to voice combination
These subfunctions allow you to set the depth for each voice’s
effect. Setting is not available if the effect is set OFF. Note that
you cannot change a voice’s effect selection while working in
FUNCTION mode; you must first return to normal mode.
“Voice #1” is identified by the first (left-side)
NOTE
voice name on the screen. For information about
how the Clavinova selects the voice order, see
page 17.
21
ROOM
NORMAL
BRILLIANCE
REVERB EFFECT TOUCH
MEDIUM
TEMPO
2 Next, press [+/YES] to enter the subfunction group.
Then use [t], [s] to move among the different
subfunctions, and [-/NO], [-/YES] to set the values.
If you are not working in SPLIT mode when you
NOTE
enter the main F5 screen...
The top right of the screen will display a triple
dash (---) and you will not be able to enter the
subfunction group. To enable entry, you must first
quit FUNCTION mode and press the [SPLIT]
button.
Subfunctions
5.1 SplitPoint (Split point)
Values: Any key on keyboard
Default: F♯2
Selects the split point. The selected key becomes the top note
of the left zone.
• Once you are at this screen, you can select the split point
simply by pressing the appropriate key.
• To set the split point without entering FUNCTION mode:
Hold down [SPLIT] and press the appropriate key, see page
18.
CLP-811/611 Configuration Functions (FUNCTION mode)
29
Page 34
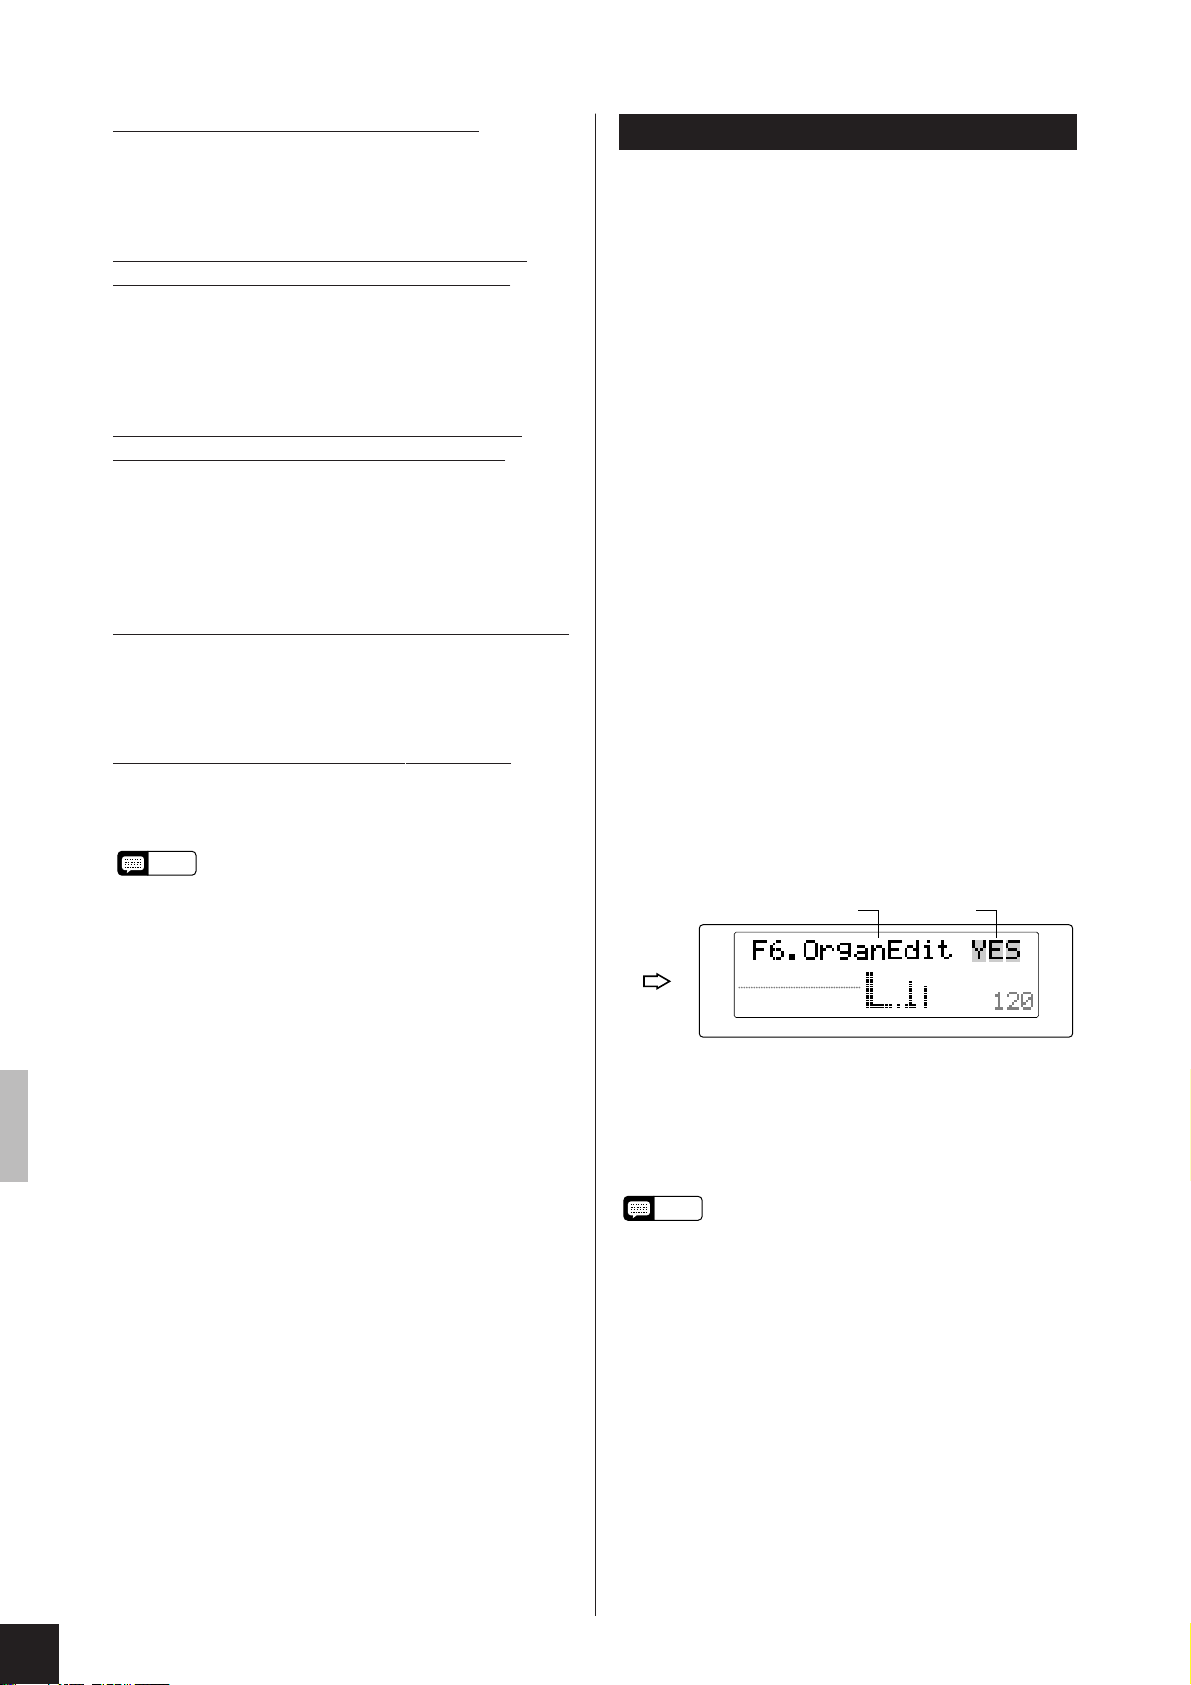
5.2 S.Balance (Voice volume balance)
Values: 0,...,20 [10 = equal balance]
[Right voice gets louder as value increases.]
Default: V aries according to voice combination
Sets the relative volumes for the two voices.
5.3 VcR.Octave (Octave shift for right zone)
5.4 VcL.Octave (Octave shift for left zone)
Values: -1, 0, +1
Default: V aries according to voice combination
These subfunctions allow you to shift each voice up or down
an octave. Set the values in accordance with the range of the
music you are playing.
5.5 VcR.EffDpt (Effect depth for right zone)
5.6 VcL.EffDpt (Effect depth for left zone)
Values: 0,...,20
Default: V aries according to voice combination
These subfunctions allow you to set separate effect depths for
each zone. Setting is not available if the effect is OFF. Note
that you cannot change a voice’s effect selection while
working in FUNCTION mode; you must first exit the mode.
5.7 Sus.Pedal (Effective range of damper pedal)
Values: L, L+R, R
Default: L+R
Selects whether the damper pedal operates on both zones
(L+R), on the left zone only (L), or on the right zone only (R).
5.8 ResetOK? (Return to factory defaults.)
Press [+/YES] to reset all of the SPLIT-mode subfunction
settings to their factory-default values. (Factory defaults are
different for each voice combination.)
As a shortcut, you can switch directly into
NOTE
FUNCTION mode’s F5.SplitFunc. area by
holding down [SPLIT] and pressing the [FUNC-
TION] button. Once you have changed the
settings, press [FUNCTION] again to return to
normal mode.
F6.OrganEdit (ORGAN COMBINATION settings)
The CLP-811/611 offers you eight different
editable organ types. You use the OrganEdit
function to edit these types, and to select the type
to be played.
• You can use the Backup function (F15 on the CLP-811, F14
on the CLP-611) to select whether editing results are
retained after power goes off. See page 36.
You edit an organ voice by adjusting its various
stops — each represented as a separate bar that
appears on the display — and by setting a variety
of other edit parameters. Specifically, you can edit
the following items for each of the eight organ
types.
• Volume levels for each of eight continuous tones
• Response time for continuous tones
• Volume levels for each of three decay (attack) tones
• Attack length for the three decay tones
• Attack mode (EACH or FIRST)
• Rotary speaker effect (depth and speed)
As an example, you can build a very realistic
percussive organ sound by applying appropriate
decay volumes and attack length. Or you might
create a pipe-organ sound by combining slow
response with a weak attack.
1 To access this function: first select the ORGAN
COMBINATION voice, then enter FUNCTION mode
and go to main function F6.
21
ROOM
NORMAL
BRILLIANCE
REVERB EFFECT TOUCH
MEDIUM
TEMPO
30
CLP-811/611 Configuration Functions (FUNCTION mode)
2 Next, press [+/YES] to enter the subfunction group.
Then use [t], [s] to move among the different
subfunctions, and [-/NO], [-/YES] to set the values.
(But see additional information below regarding
operation of the VoiceEdit subfunction.)
If the ORGAN COMBINATION voice is not yet
NOTE
selected when you move to the main F6 screen...
The top right of the screen will display a triple
dash (---), and you will not be able to enter the
subfunction group. To enable entry, you must
first select the ORGAN COMBINATION voice.
(You can do this without leaving FUNCTION
mode.)
Page 35
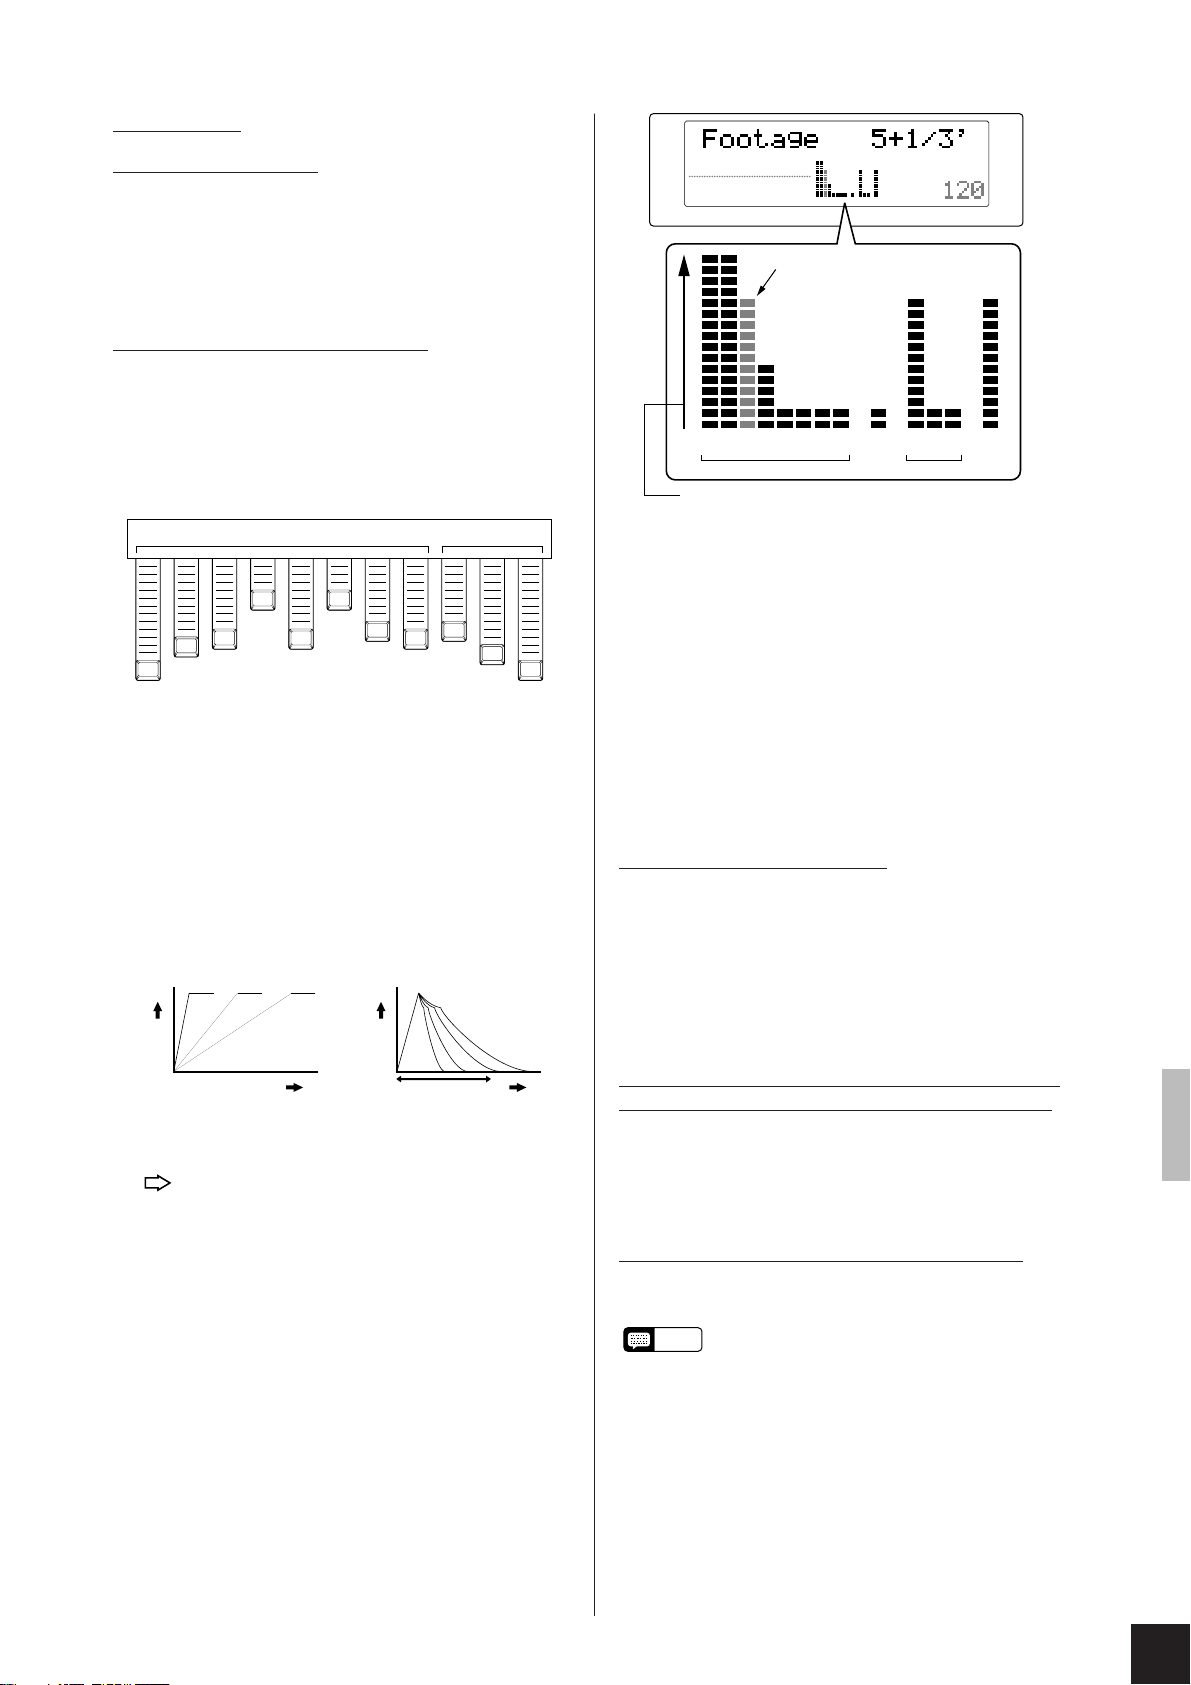
Subfunctions
BRILLIANCE
REVERB
NORMAL
ROOM
EFFECT TOUCH
MEDIUM
TEMPO
16'8'5+1/3'4'2+2/3' 2+2/3'
Footage
Response AtkLength
2'
1+1/3'
1'
4' 2'
AtkFootage
Each parameter (each bar on the graphic) can be set to any of eight levels.
Selected bar flashes on and off.
6.1 ****** (Organ type) [ Where “******” is replaced by
the type name, such as “JAZZ ORGAN1”. If the selected
type has been edited, a “*” appears after the name.]
Values: JAZZ ORGAN1, JAZZ ORGAN2, JAZZ OR-
GAN3, JAZZ 16 '1', BASIC 16 '8', THEATER 16',
OLD ORGAN, WONDERFUL
Default: JAZZ ORGAN1
6.2 VoiceEdit (Voice edit settings)
Each voice allows you to set independent volumes for eight
continuous tones and three decaying attack tones. You can also
set a response time (for the continuous tones) and an attack
length (for the decay tones).
Tones and Volumes
Continuous tones Decay tones
16'
16-foot
8'
8-foot
4'
5+1/3'
4-foot
5+1/3-foot
2+2/3'
2+2/3-foot
2'
2-foot
1+1/3'
1+1/3-foot
1'
1-foot
4'
4-foot
• The 8-foot stop sets the volume for the fundamental tone.
The 4-foot, 2-foot, and 1-foot stops respectively set volumes
for the overtones that are one octave, two octaves, and three
octaves up. The 16-foot stop sets the volume for the tone that
is one octave lower than the fundamental tone.
Response Time and Attack Length
Continuous Tone Decay Tone
Volume
Greater response time →
Time
Volume
Longer attack length →
Attack length
Procedure
1 Go to the [6.2 VoiceEdit] screen, and then press SONG
SELECT [▼] or [▲] to move into the editing component.
The screen displays a bar graph. Each bar corresponds to a different parameter, and can be set to any
of eight levels.
2 You can now use SONG SELECT [▼], [▲] to move from
bar to bar, and the [+/YES] and [-NO] buttons to change
the bar levels. The currently selected bar is displayed in
blinking mode.
3 When you are finished editing, you can press [t] or [s]
to move to another subfunction.
2+2/3'
2+2/3-foot
2'
2-foot
Time
Edit parameters are as follows.
Footage 16' (Continuous-tone volume)
Footage 8' (Continuous-tone volume)
Footage 5+1/3' (Continuous-tone volume)
Footage 4' (Continuous-tone volume)
Footage 2+2/3' (Continuous-tone volume)
Footage 2' (Continuous-tone volume)
Footage 1+1/3' (Continuous-tone volume)
Footage 1' (Continuous-tone volume)
Response (Response time for continuous tones)
AtkFootage 4' (Decay-tone)
AtkFootage 2+2/3' (Decay-tone)
AtkFootage 2' (Decay-tone)
AtkLength (Length of decay tones)
6.3 AtkMode (Attack mode)
This parameter sets the attack mode for the organ voice
selected by subfunction 6.1. Choose either of the following.
EACH: Apply attack tones to all notes. (This is the
default.)
FIRST: Apply attack tones only to the first held note of
any note combination (legato sequence). If at
least one key is down, all subsequent keys are
produced without attack tones.
6.4 RotSP.Spd (Speed of rotary-speaker effect)
6.5 RotSP.Dpt (Depth of rotary-speaker effect)
Values: 0,...,20
Default: Varies according to organ type
These parameters set up the rotary-speaker effect. The speed
setting selects the speaker’s rotation speed. The depth setting
selects the intensity of the effect.
6.6 ResetOK? (Return to factory defaults.)
Press [+/YES] to return all of the edit settings for the selected
voice type to their factory defaults.
As a shortcut, you can switch directly into
NOTE
FUNCTION mode’s F6.OrganEdit area by
holding down the [ORGAN COMBINATION]
button and pressing [FUNCTION]. When you
are ready to exit from FUNCTION mode, press
[FUNCTION] once again.
CLP-811/611 Configuration Functions (FUNCTION mode)
31
Page 36

F7.Metronome (Metronome settings)
21
This function sets the beat and volume for the
metronome.
1 To access these settings, enter FUNCTION mode and
go to main function F7.
21
ROOM
NORMAL
BRILLIANCE
MEDIUM
REVERB EFFECT TOUCH
TEMPO
2 Next, press [+/YES] to enter the subfunction group. If
necessary, use [t] or [s] to select the subfunction
(either “Beat” or “Volume”), and then use [+/YES] or
[-NO] to set the value.
Subfunctions
7.1 Beat
Values: NORMAL (no beat), 2, 3, 4, 5, 6
Default: NORMAL
7.2 Volume
Values: 1,...,20
Default: 10
You can also set the metronome volume without
NOTE
entering FUNCTION mode. Simply hold down
the [METRONOME] button and press [-NO] or
[+/YES] to change the setting.
As a shortcut, you can switch directly into the
NOTE
metronome setup function by holding down
[METRONOME] and pressing [FUNCTION].
Once you have changed the settings, press
[FUNCTION] again to return to normal mode.
ROOM
NORMAL
BRILLIANCE
MEDIUM
REVERB EFFECT TOUCH
TEMPO
2 Press [-/NO] or [+/YES] to change the setting.
Values: NORM, CHORD, VELO, MIDI
Default: NORM
Explanation
NORM (normal)
Voice name
ROOM
CHORD
NORMAL
BRILLIANCE
REVERB EFFECT TOUCH
Name of chord played at keyboard
ROOM
NORMAL
BRILLIANCE
REVERB EFFECT TOUCH
Volume of each note being hit
MEDIUM
MEDIUM
TEMPO
Instrument icon
TEMPO
F8.Display (Display mode)
This function selects the type of information
displayed in the screen areas indicated below.
Here
ROOM
NORMAL
BRILLIANCE
1 To access this item, enter FUNCTION mode and go to
main function F8.
MEDIUM
REVERB EFFECT TOUCH
TEMPO
Here
♯
♭
D♭CE
DA
EF
♭
GB
♭
ABF
• The bar graph shows the volume of each note being hit,
where the leftmost bar indicates note C (of any octave) and
the rightmost bar shows note B (of any octave). If you hit
two or more like-named notes (for example, C1 and C3), the
graph indicates the volume for the loudest of these.
32
CLP-811/611 Configuration Functions (FUNCTION mode)
Page 37
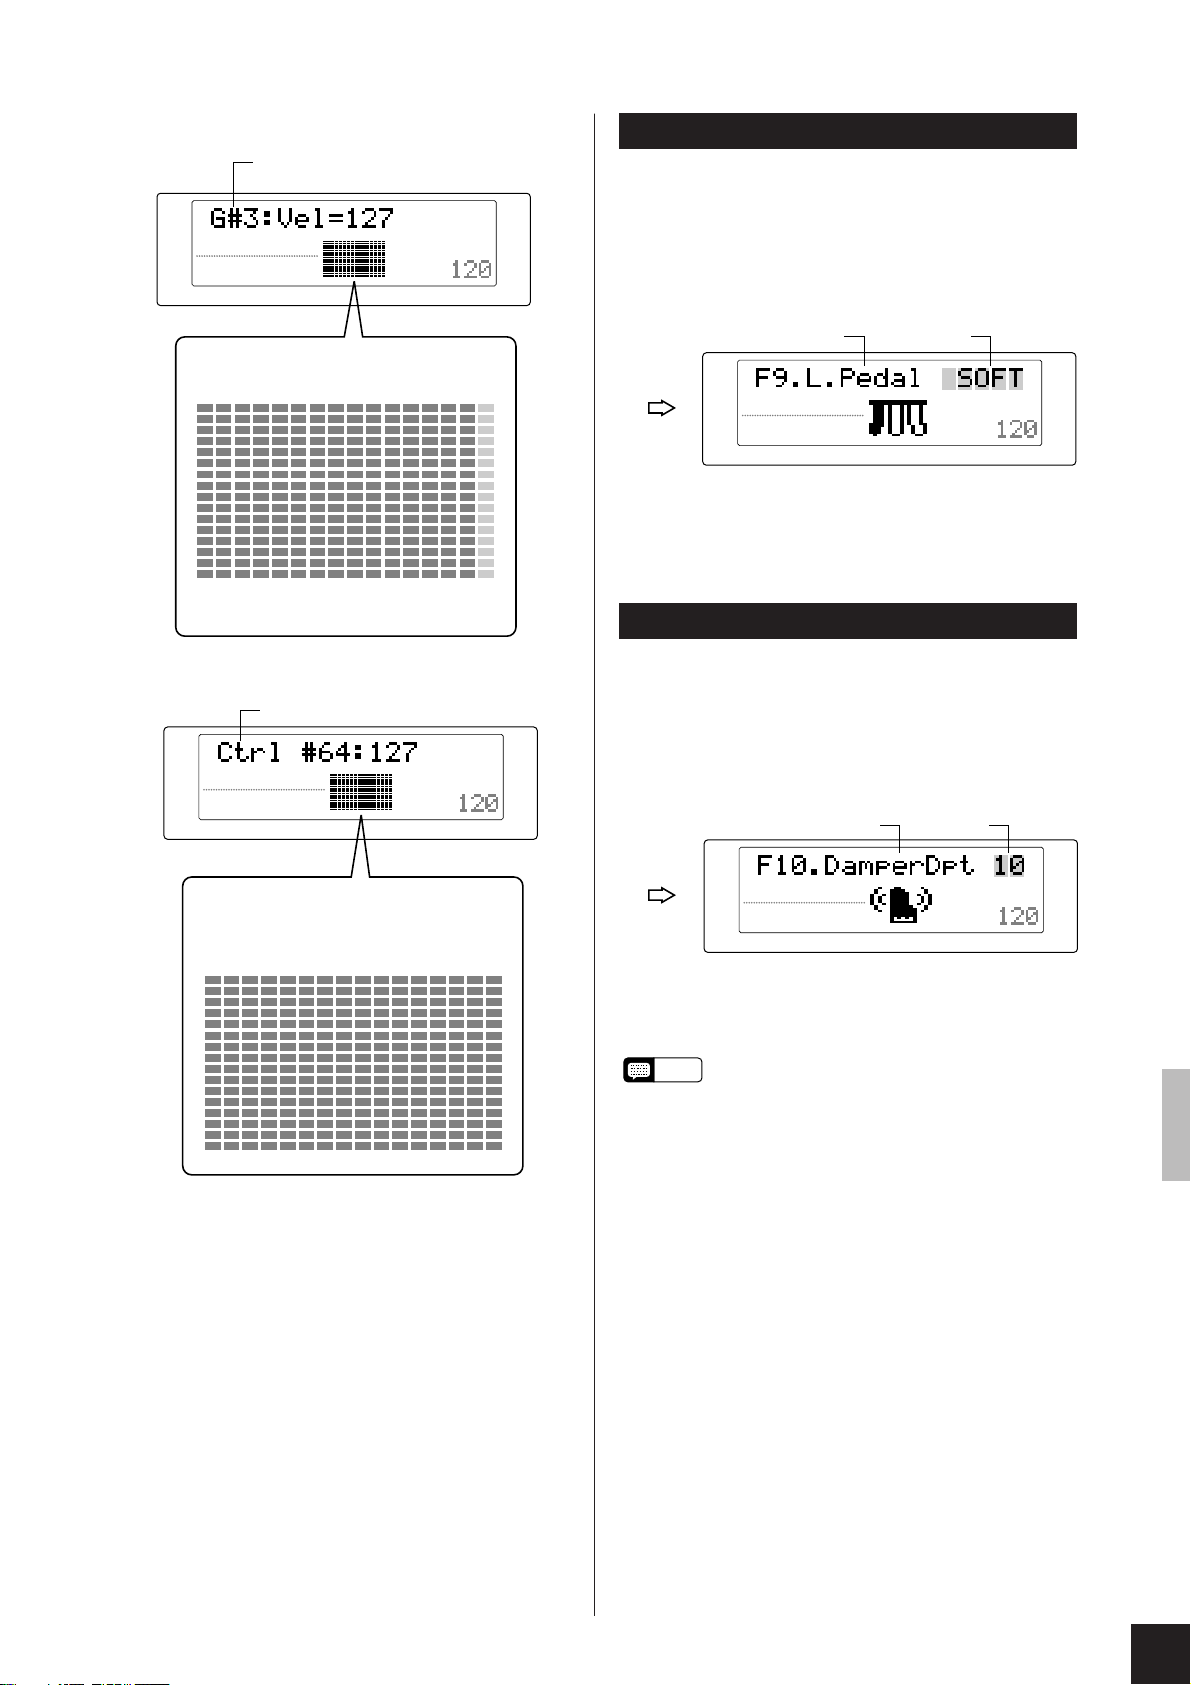
VELO (velocity)
ROOM
NORMAL
BRILLIANCE
Shows velocity of most recent note played within
each keyboard area. Each bar corresponds to a
different area (15 areas).
A-1
C♯0
‘
‘
♯
0
C0
F
Name and velocity (1 to 127) of last note played
MEDIUM
REVERB EFFECT TOUCH
G0
C♯1
G1
C♯2
‘
‘
‘
♯
♯
1
C1
2
F
C2
F
G2
C♯3
C3
‘
C♯4
‘
‘
‘
♯
3
C3
F
C4
F
TEMPO
C4
C♯5
G5
C♯6
‘
‘
♯
4
C5
G6
‘
‘
‘
♯
F
‘
♯
5
6
C6
F
C7
F9.L.Pedal (Function of left pedal)
This setting determines whether the left pedal
operates as a soft pedal (its normal function) or as
a second, foot-driven START/STOP switch.
1 To access this item, enter FUNCTION mode and go to
main function F9.
21
ROOM
NORMAL
BRILLIANCE
REVERB EFFECT TOUCH
2 Press [-/NO] or [+/YES] to change the setting.
Values: SOFT, START
Default: SOFT
MEDIUM
TEMPO
F10.DamperDpt (Damper-pedal depth)
MIDI
Incoming MIDI message (realtime display)
ROOM
NORMAL
BRILLIANCE
REVERB EFFECT TOUCH
Indicates volume of Clavinova notes being
played by external MIDI device. Each bar
shows volume of the loudest note on the
corresponding reception channel (channels 1 to
16).
12345678910111213141516
MEDIUM
TEMPO
• The display format for incoming messages is as follows.
Selects the amount of resonance applied by the
damper pedal to the PIANO 1 acoustic piano
voice.
1 To access this item, enter FUNCTION mode and go to
main function F10.
21
ROOM
NORMAL
BRILLIANCE
REVERB EFFECT TOUCH
2 Press [-/NO] or [+/YES] to change the setting.
Values: 0,...,20
Default: 10
This setting is effective for the PIANO 1 voice
NOTE
only.
MEDIUM
TEMPO
Message Type Indication
Note on/off xxx:Vel:yyy (where xxx = note name
yyy = velocity)
Program Change Prog #zzz
Control Change Ctrl #zzz:zzz
Exclusive Ex.Data
The screen does not report Aftertouch and Pitchbend
messages.
CLP-811/611 Configuration Functions (FUNCTION mode)
33
Page 38
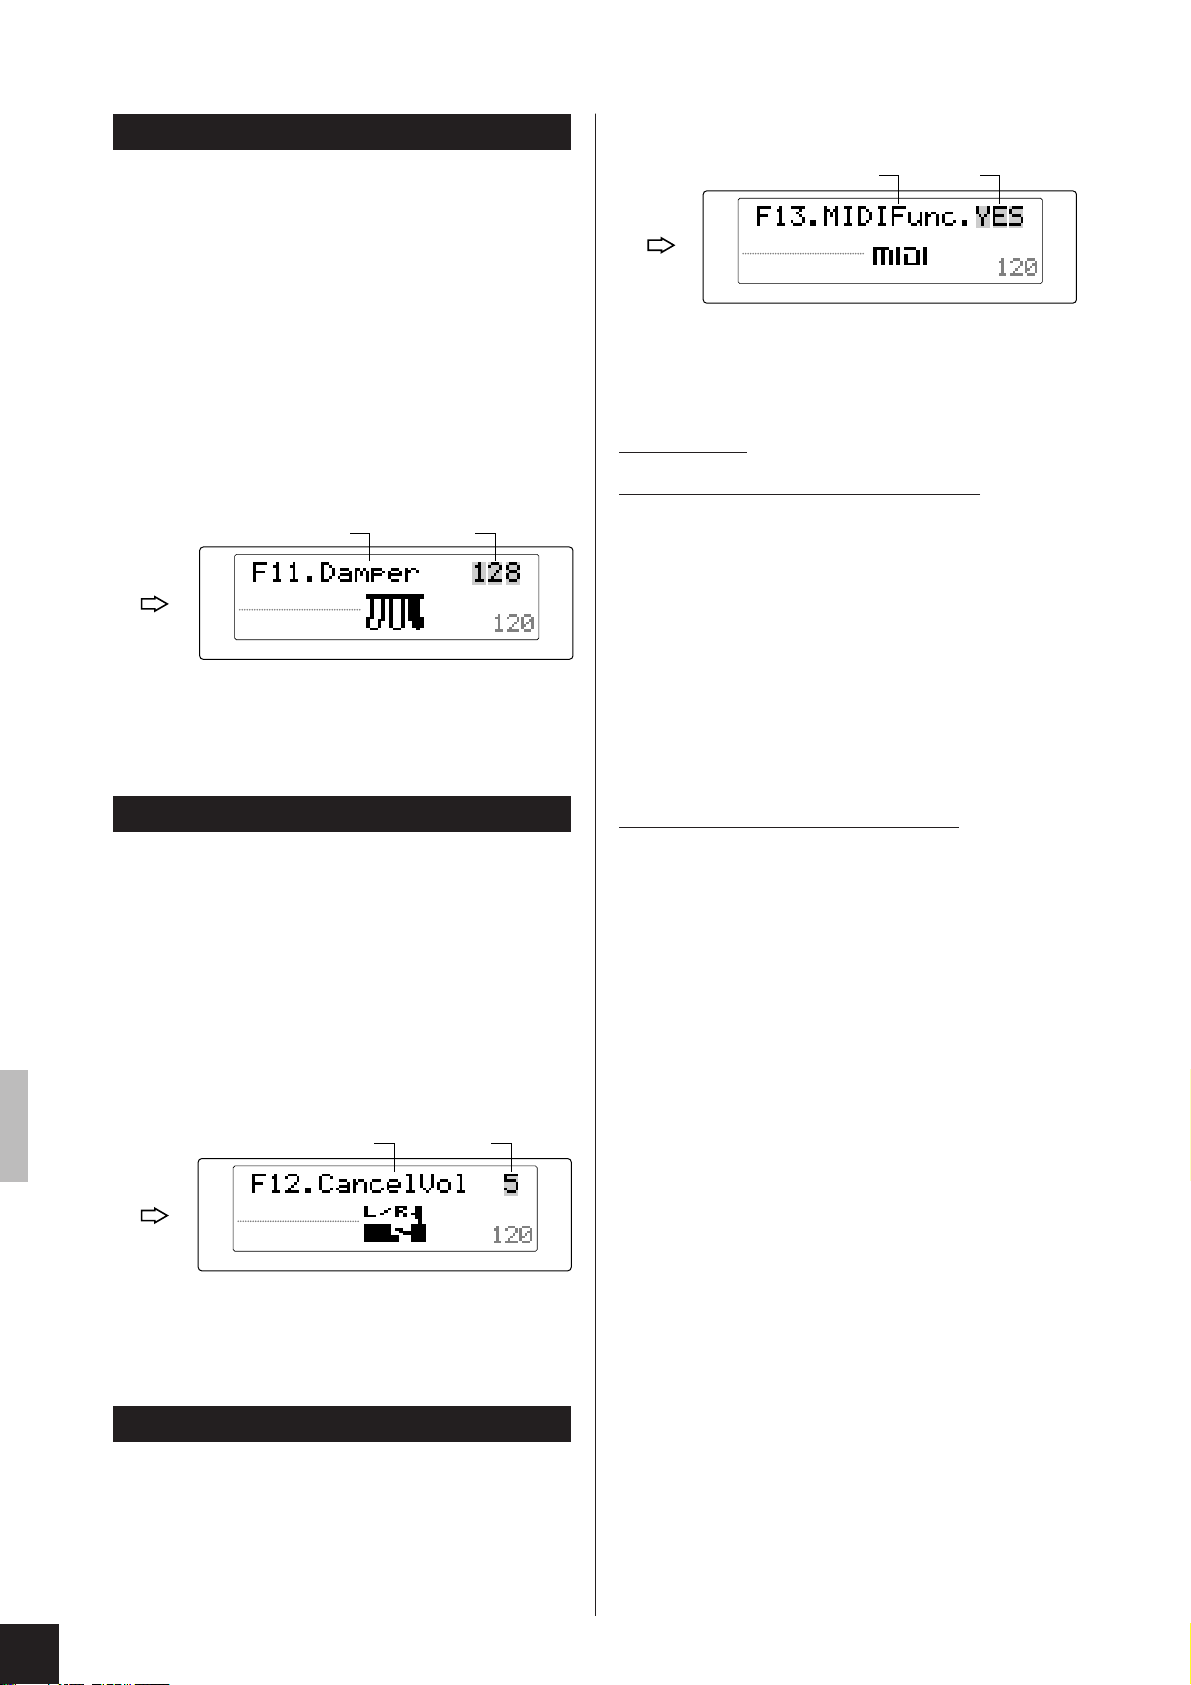
F11.Damper (Number of damper-pedal levels)
Under normal settings, the length of the damper
pedal’s sustain effect varies according to how far
you displace the pedal — the harder you step
down, the longer the notes are held. You use
function F11 to set the number of discrete displacement levels recognized by the Clavinova.
You may find this feature useful during recording: setting the value to “2” (pedal ON/OFF only)
can reduce the amount of data generated by pedal
action, allowing you to record a longer series of
notes.
1 To access this item, enter FUNCTION mode and go to
main function F11.
21
ROOM
NORMAL
BRILLIANCE
2 Press [-/NO] or [+/YES] to change the setting.
Values: 2, 8, 128 (levels)
Default: 8
MEDIUM
REVERB EFFECT TOUCH
TEMPO
F12.CancelVol (Volume of muted piano-song track)
When playing one of the Clavinova’s 30 built-in
piano songs, you can elect to switch off either part
(left-hand or right-hand) so that you can practice
along. Under default settings, the Clavinova
continues to play back the deselected part at a low
volume to serve as a practice guide. You can use
the F12 setting to make this playback louder or
softer, or to switch it off entirely.
1 To access this setting, enter FUNCTION mode and go
to main function F12.
21
1 To access these settings, enter [FUNCTION] mode
and go to main function F13.
21
ROOM
NORMAL
BRILLIANCE
MEDIUM
REVERB EFFECT TOUCH
TEMPO
2 Next, press [+/YES] to enter the subfunction group.
Then use [t], [s] to move among the different
subfunctions, and [-/NO], [+/YES] to set the values.
Subfunctions
13.1 TxCh. (MIDI transmitting channel)
Values: 1,...,16; OFF
Default: 1
Selects the channel the Clavinova uses to transmit performance-related messages to external MIDI devices. (Only devices
set to receive on this channel will respond to these messages.)
• For DUAL and SPLIT mode play...
If TxCh is set to any value other than OFF, the Cla vinova
will always use Channel 2 to transmit data from Voice 2 (in
DUAL mode) or from the left zone (in SPLIT mode). If the
setting is OFF, the Clavinova will not transmit an y data for
either voice.
• The Clavinova does not transmit data for demo songs, piano
songs, and recorded performances.
13.2 RxCH. (MIDI receiving channel)
Values: ALL; 1&2; 1,...,16
Default: ALL
Selects the channel the Clavinova uses to receive performancerelated messages from external MIDI devices. The Clavinova
will not recognize any messages received over non-selected
channels.
• If setting is ALL
The Clavinova operates as a multitimbral playback device,
responding indepently to messages over all channels. This
setting is ideal when you want to use a sequencer to drive a
multivoice arrangement.
• If setting is 1&2
The Clavinova responds to messages received over channels
1 and 2 only.
ROOM
NORMAL
BRILLIANCE
MEDIUM
REVERB EFFECT TOUCH
2 Press [-/NO] or [+/YES] to change the setting.
Values: 0,...,20
Default: 5
F13.MIDIFunc. (MIDI settings)
This function sets up the various MIDI parameters. For general information about your
Clavinova’s MIDI support, refer to “MIDI Data
Format” on page 48.
34
CLP-811/611 Configuration Functions (FUNCTION mode)
TEMPO
• Panel settings and keyboard play are not affected by received
MIDI data (with the exception of MIDI data for reverb type,
reverb depth, and effect type).
• The Clavinova does not receive MIDI messages when
operating in DEMO/PIANO SONG mode.
Page 39

13.3 Local (Local control ON/OFF)
Values: ON, OFF
Default: ON
Selects whether the Clavinova keyboard produces sound from
the Clavinova. More precisely, determines whether the
Clavinova’s keyboard drives the Clavinova’s internal tonegenerator system.
Under normal circumstances this setting is left ON, so that the
Clavinova keyboard produces sound from the Clavinova’s tone
generator. If you want to use the keyboard to control an
external MIDI device only, however, you would set this value
to OFF. This setting makes it possible, for example, to use the
keyboard to play an external device, while at the same time
using another external device to play the Clavinova.
13.4 PrgChg (Program Change enable/disable)
Values: ON, OFF
Default: ON
A MIDI Program Change message instructs the receiving
device to switch voices.
If you are using the Clavinova to control an external device, for
example, then each time you change the voice selection (by
pressing a different voice selector), the Clavinova will issue a
Program Change message telling the external device to switch
to the same-numbered voice. (Each voice is associated with a
unique program-change number.)
Similarly, if the Clavinova is playing MIDI data received from
an external device, then receipt of a Program Change message
will cause the Clavinova to change the voice used to reproduce
this data. (Note that this change applies only to the MIDI data;
the voice produced by the Clavinova keyboard does not
change.)
There are times when you may want to disable the use of
Program Change messages, so that voice switching at both
sides must be handled locally. You can do this by setting the
PrgChg value to OFF. In this case, the Clavinova will not
generate messages when voice selectors are pressed, and will
not respond to any Program Change messages that it receives.
• Program-change numbers on the CLP-811/611
Program-change number assignments on the CLP-811/611
are in conformance with the XG standard. Refer to “MIDI
Data Format” (page 48) for specific information.
13.5 CtrlChg (Control Change enable/disable)
Values: ON, OFF
Default: ON
Control Change messages transfer performance-related control
information from one MIDI device to another. Such information includes pedal actions and volume settings.
If you are using the Clavinova to control an external device, for
example, then each time you step on the damper pedal a
corresponding Control Change message is issued to that
device.
If you are using an external device to control the Clavinova,
then Control Change messages received from that device will
cause appropriate changes at the Clavinova side. These
changes apply only to incoming MIDI data; panel settings and
keyboard sound do not change. (But note that reverb-depth
control change is an exception, since it affects both MIDI and
local sound.)
There are times when you may want to disable the use of
Control Change messages. You can do this by setting the
CtrlChg value to OFF, so that the Clavinova will not generate
these messages, and will not respond to any such messages that
it receives.
• Control Change implementation on the CLP-811/
611...
Refer to “MIDI Data Format” (page 48) for details.
13.6 MIDITrans (Transposition of outgoing MIDI
data)
Values: -12,...,12 (in semitones)
Default: 0 (no transposition)
Use this function to set transposition of note data being sent
out from the Clavinova. Note that this operation has no relation
to the keyboard transpotion set up by the [TRANSPOSE]
button.
13.7 SetupSnd (Transmit Panel setup file.)
This operation transmits the Clavinova’s current panel
configuration to an external MIDI sequencer such as the
YAMAHA DOU-10 Disk Ochestra Unit, so that it can be
restored to the Clavinova at a later time.
For example, assume that you want to record a performance to
a sequencer so that you can later play it back at the Clavinova
while at the same time playing along locally at the keyboard. In
this case you might find it convenient to first record the panel
configuration you will want to use for local play. The panel
will then set itself automatically just before playback begins.
Procedure
1 Set the panel to the configuration that you want to record.
2 Run a MIDI cable from the MIDI OUT connector on the
Clavinova to the MIDI IN connector on the sequencer.
3 Enter FUNCTION mode and move to subfunction 13.7
SetupSnd.
4 Press [+/YES] to transmit the setup.
The screen displays Completed briefly to indicate
that transfer is completed.
• Transmitted data...
In addition to the Panel data indicated on page 50 of the
“MIDI Data Format” section, the Clavinova also transmits
the key-by-key fine tuning data set up within the F2.KTune
function.
• To reload the data from the external device...
1. Run a MIDI cable from the MIDI OUT on the sequencer
to the MIDI IN at the Clavinova.
2. Begin transmission from the sequencer. (Refer to the
sequencer’s operation manual.)
The Clavinova automatically receives and loads the
data.
It is not possible to reload the setup data into a
NOTE
different Clavinova model. If you stored setup
data for a CLP-811, for example, then you can
reload the data to any CLP-811, but not to a CLP-
611.
13.8 BulkDump (Bulk data dump.)
This feature lets you permanently save recordings you have
made with the Clavinova’s RECORDER. The Bulk Dump
operation sends the performance data from both RECORDER
tracks to an external MIDI storage device such as the Yamaha
DOU-10 Disk Orchestra Unit. (Note that this information is
sent in the form of bulk data, rather than as sequence data.) The
saved data can later be restored by retransmission.
Procedure
1 Run a MIDI cable from the MIDI OUT connector on the
Clavinova to the MIDI IN connector on the storage device.
2 Set the storage device into the appropriate receiving mode.
(Refer to the device’s operating manual for instructions.)
CLP-811/611 Configuration Functions (FUNCTION mode)
35
Page 40
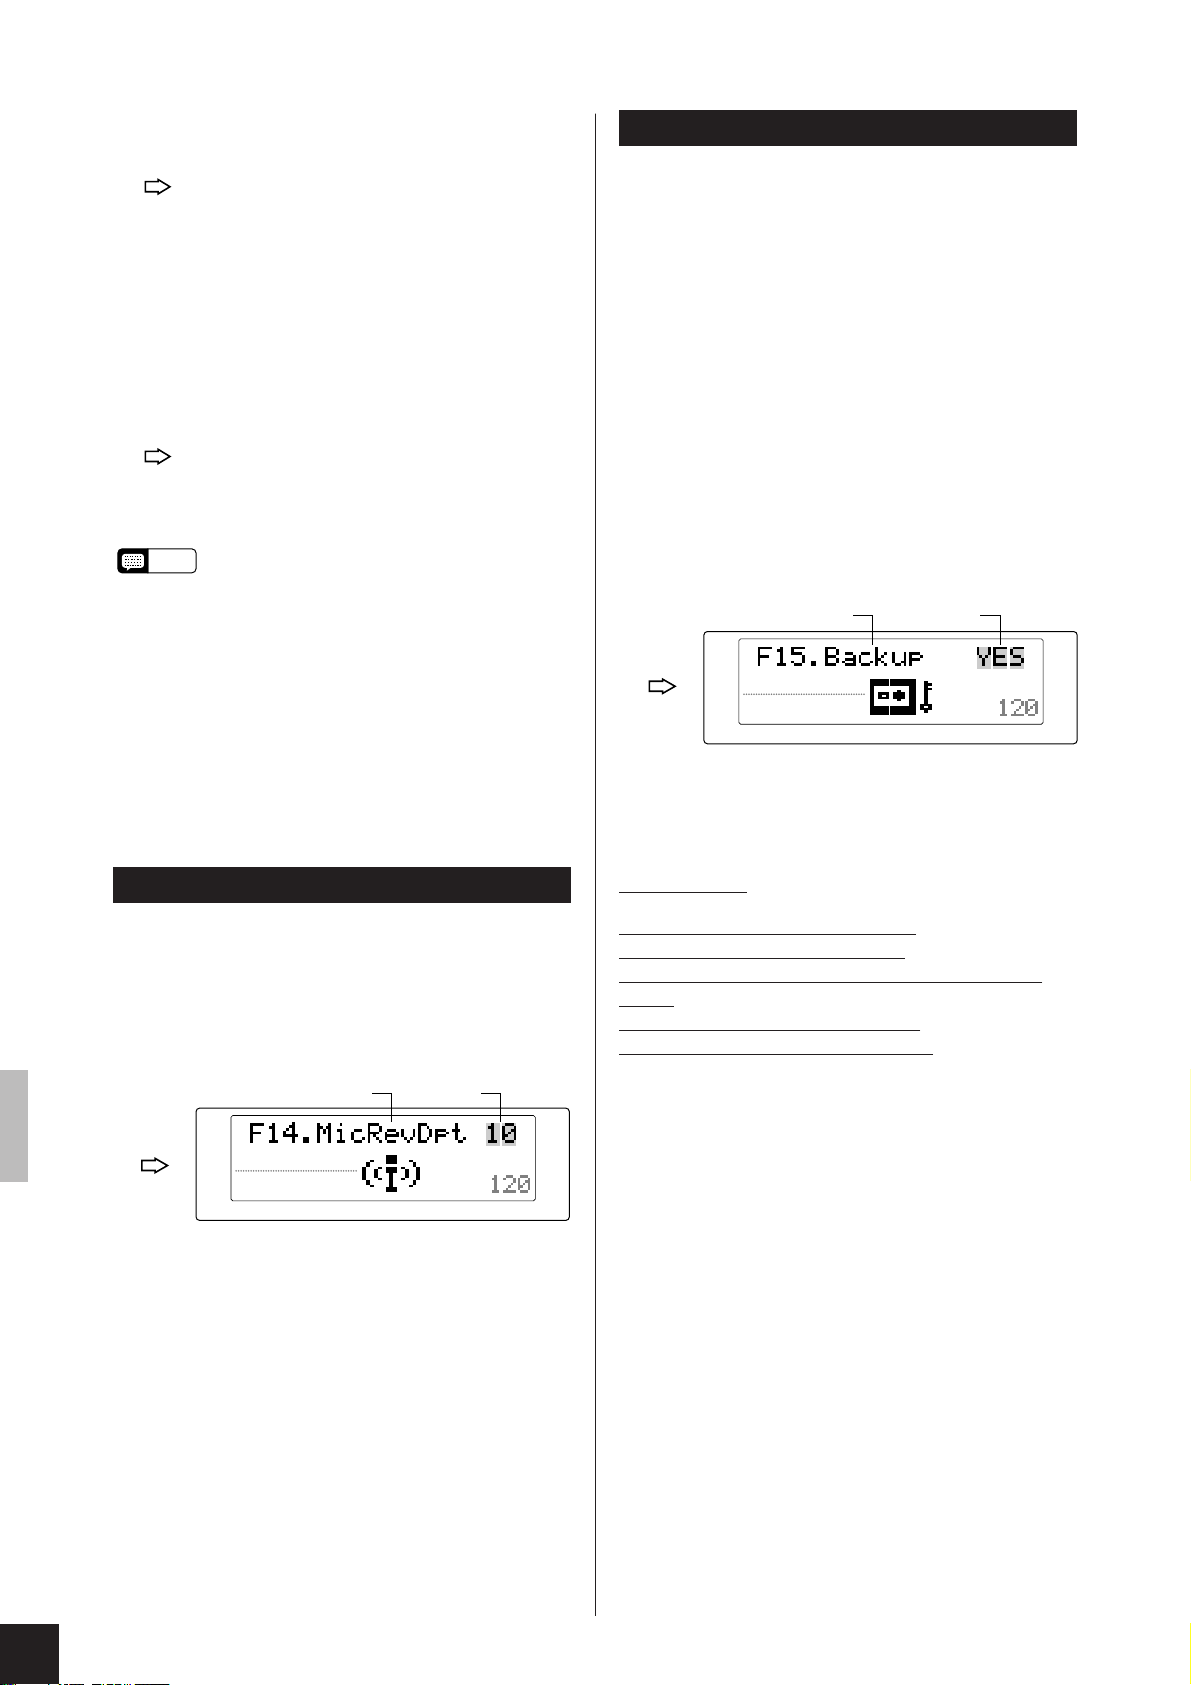
3 At the Clavinova, select function F13 and move to
subfunction 13-8 BulkDump.
4 Press [+/YES] to begin the dump.
The screen displays Working while transmission is in
progress, and then Completed to indicate that the
operation is finished. It then returns to the original
Bulk Dump screen.
5 When transfer is finished, you can terminate FUNCTION
mode and resume normal play.
To reload the saved data:
1. Run a MIDI cable from MIDI OUT on the storage device
to MIDI IN at the Clavinova.
2. Start transmission from the storage device. (Refer to the
device’s operation manual.)
The Clavinova automatically receives and restores the
incoming data. The restored data is then available for
normal playback.
F14/F15.Backup (Backup ON/OFF settings)
(F14 on the CLP-611; F15 on the CLP-811.)
The Clavinova’s backup feature allows you to retain selected
settings while power is off so that they can be restored when
power comes back ON. Each BACKUP subfunction sets
backup ON or OFF for a specific group of settings.
• If backup for a group is set OFF, all settings within that
group return to their factory defaults each time power comes
on. (A listing of factory defaults appears on page 47.) If
backup is set ON, then existing settings are automatically
restored.
• Memory backup remains effective for about a week, after
which all settings will return to their factory defaults. If you
wish to retain your settings for a long period of time, please
be sure to switch the Clavinova on for at least a few minutes
each week.
• It is not possible to reload data into a different
NOTE
Clavinova model. Data from a CLP-811, for
example, can be loaded into another CLP-811,
but not into a CLP-611.
• You cannot send or receive bulk data while the
Clavinova is in RECORDING mode or while it
is playing back recorded data.
• You cannot receive bulk data while the
Clavinova is in FUNCTION mode.
• When transmitting bulk data, the Clavinava
will not transmit other types of MIDI data and
will not recognize incoming MIDI messages.
(On CLP-811 only:)
F14.MicRevDpt (Microphone reverb depth)
This function sets the reverb depth (intensity of
reverb effect) applied to microphone input. (Note
that this function is not available on the CLP-611.)
1 To access this setting, enter FUNCTION mode and go
to main function F14.
21
1 To access this setting, enter FUNCTION mode and go
to the main function F14 (CLP-611) or F15 (CLP-811).
21
ROOM
NORMAL
BRILLIANCE
MEDIUM
REVERB EFFECT TOUCH
TEMPO
2 Next, press [+/YES] to enter the subfunction group.
Then use [t], [s] to move among the different
subfunctions, and [-/NO], [+/YES] to set the values.
Subfunctions
14.1/15.1 Voice (Voice settings)
14.2/15.2 MIDI (MIDI settings)
14.3/15.3 Tune (Tuning and temperament settings)
14.4/15.4 Pedal (Pedal settings)
14.5/15.5 Display (Display mode)
Values: ON, OFF
Default: OFF*
ROOM
NORMAL
BRILLIANCE
MEDIUM
REVERB EFFECT TOUCH
2 Press [-/NO] or [+/YES] to change the setting.
Values: 0,...,20
Default: 10
36
CLP-811/611 Configuration Functions (FUNCTION mode)
* But note that the Backup ON/OFF settings themselves, as
well as recorded performance data, are always backed up.
TEMPO
Page 41

Parameters in Each Group
14.1/15.1 Voice (Voice settings)
• Voice selection
• DUAL mode ON/OFF status and voice combination
• The [F4.DualFunc.] settings (for each voice combination)
• SPLIT mode ON/OFF status and voice combination
• The [F5.SplitFunc.] settings (for each voice combination)
• REVERB type and depth
• EFFECT type and depth (for each voice)
• BRILLIANCE setting
• VARIATION ON/OFF status (for each voice)
• TOUCH setting
• All [F6.OrganEdit] settings
• All [F7.Metronome] settings
• The [F14.MicRevDpt] setting (CLP-811 only)
14.2/15.2 MIDI (MIDI settings)
All MIDI settings ([F13.MIDIFunc.] settings 13-1 to 13-6)
14.3/15.3 Tune (Tuning and temperament settings)
• Current TRANSPOSE setting
• Keyboard fine tuning ([F1.Tune] setting)
• Key-by-key fine tuning ([F2.KTune] settings)
• Temperament selection ([F3.Scale] settings)
14.4/15.4 Pedal (Pedal settings)
• Left-pedal function ([F9.L.Pedal] setting)
• Damper-pedal depth ([F10.DamperDpt] setting)
• Number of damper-pedal levels ([F11.Damper] setting)
14.5/15.5 Display (Display mode)
Display mode ([F8.Display] setting)
• To reset all values to their factory defaults...
Switch the power OFF, then hold down the highest key on
the keyboard (key C7) and switch the power back on. Note
that this operation will also delete all recorded performance
data.
For a listing of the factory default values, see page 47.
CLP-811/611 Configuration Functions (FUNCTION mode)
37
Page 42

The Clavinova’s Device Connectors
PHONES
MASTER VOLUME
TRANSPOSE SPLIT VARIATION
FUNCTION
MAX
BRILLIANCEREVERB EFFECT TOUCH
MIN
POWER
PIANO1
VIBES STRINGS CHOIR
PIANO2 CLAVI.TONE E.PIANO1 E.PIANO2
ORGAN
HARPSICHORD
PIPE
ORGAN
BASS
COMBINATION
SONG
TRANSPOSE
SPLIT
MEASURE
ROOM
MELLOW
CHORUS
HARD
SYMPHONIC
HALL 1
NORMAL
MEDIUM
TEMPO
HALL 2
BRIGHT
SOFT
TREMOLO
STAGE
FIXED
ECHO
BRILLIANCE
REVERB EFFECT TOUCH
RECORDER
DEMO
/
/R2/
L
1
PIANO SONG
METRONOME
SONG
START
/
REC
TEMPO
STOP
SELECT
/
NO + / YES
–
CLP-
911
STEREO SAMPLING
3
MIN MAX
1
CLP-611
1 MIC. VOL. dial, and 2 MIC. jack (CLP-811)
Connecting a microphone to the MIC jack (a standard phone jack) lets you sing along. The input
from the microphone is mixed with the keyboard sound and produced at the Clavinova’s speakers.
• MIC. V OL. dial
Use the dial to adjust the input volume from the microphone.
Microphone reverb depth...
NOTE
Although the reverb type setting is always the same for both keyboard and microphone, the CLP-811 allows you to set an independent reverb depth for the microphone input. (You make this setting using function F14; see page 36.)
CLP-811
PHONESMIC.MIC. VOL.
32
(CLP-811)
3 PHONES jacks
The Clavinova provides two headphone jacks (standard phone jacks), so that two people can listen
in at the same time. Connecting a headphone set to either jack automatically cuts off the internal
speakers.
38
CLP-811/611 The Clavinova’s Device Connectors
Recommended headphones:
Yamaha HPE-160
Page 43

4
AUX IN jacks (R and L/L+R)
AUX OUT jacks (R and L/L+R)
5
• AUX IN R and L/L+R
These standard phone jacks accept
connection from a synthesizer, tonegenerator module (such as the
YAMAHA DOU-10 Disk Orchestra
Unit), or other such playback
device. Sound transmitted from the
external device is produced by the
Clavinova’s internal speakers. Make
the connection (using standard
audio cord) as illustrated at right.
A line-level mono source can be connected to the L/L+R jack.
NOTE
IN OUT
Standard
phone plugs
MIDI
AUX IN
RL
IN OUT
IN OUT
THRU
HOST SELECT TO HOST
PC-2 PC-1
MIDI
Mac
AUX OUT
/
L+R
/
L+R
RL
6
Clavinova
MIDI
AUX IN
RL
/
L+R
MIDI
AUX IN
RL
4
THRU
HOST SELECT TO HOST
PC-2 PC-1
MIDI
AUX OUT
RL/L+R
AUX IN
THRU
/
L+R
Mac
Audio cord
78
HOST SELECT TO HOST
PC-2 PC-1
MIDI
Mac
AUX OUT
RL/L+R
5
AC INLET
DOU-10 or
Synthesizer, tonegenerator
module,...
OUTPUT
(CLP-811)
Never feed AUX OUT output
back into the AUX IN jacks.
When using AUX OUT to
connect to an external device, do
not connect that device back to
the AUX IN at the Clavinova side.
Since the AUX OUT signal
always includes all sound
received at the AUX IN jacks,
interconnection will create a
feedback loop that will distort the
sound and may cause damage to
your equipment.
Audio cord (and adaptors, if
required) should be nonresistance type.
The Clavinova’s [MASTER
VOLUME] slider and REVERB
setting do not affect the sound
received at the AUX IN jacks.
• AUX OUT R and L/L+R
You use these standard phone
jacks to feed Clavinova output
to an external stereo recorder,
amplifier, or other such device.
This makes it possible, for
example, to record the sound to
a tape recorder or cassette, or
to produce it through external
Clavinova
MIDI
IN OUT
AUX IN
RL
/
Standard
phone plugs
THRU
L+R
HOST SELECT TO HOST
PC-2 PC-1
MIDI
AUX OUT
/
L+R
RL
Mac
AUX OUT
or
Pin-phone
adaptors
Pin plugs
Stereo
speakers. Make the connection
(using standard audio cord) as
Audio cord
shown above.
When connecting to a stereo unit, set the [MASTER VOLUME] slider to center position and
adjust the volume at the recording side.
If a line is inserted into the L/L+R jack only, the Clavinova mixes left- and right-
NOTE
channel signals and outputs them over this line. This ensures that you don’t lose any
of the Clavinova’s sound.
MIDI IN, OUT, and THRU connectors
6
These are used to connect to external MIDI devices. Note that you must set the HOST SELECT
switch (described below) to MIDI in order to enable use of these connectors.
For basic information about MIDI connections and operation, refer to page 48.
HOST SELECT switch, and 8 TO HOST connector
7
TO HOST connector....
Allows direct connection to a personal computer.
HOST SELECT switch...
Sets the connection type. If connecting directly to a personal computer, you use this switch to
select the computer type. If connecting via MIDI, set this switch to the MIDI position. Refer to
“Connecting to a Personal Computer” (page 40) for detail.
AUX IN
Pin plugs
CLP-811/611 The Clavinova’s Device Connectors
39
Page 44

Connecting to a Personal Computer
Although the CLP-811/611 can be connected to a personal computer via the MIDI IN/OUT connectors and
a MIDI interface, the TO HOST connector and HOST SELECT switch allow direct connection to Apple
Macintosh, IBM-PC/AT, or NEC PC-9801/9821 series personal computers for sequencing and other music
applications without the need for a separate MIDI interface.
1.Connecting to an Apple Macintosh Series
Connect the TO HOST connector of the Clavinova to the modem or printer port on your
Macintosh, depending on which port your MIDI software is using for MIDI data communication, using a standard Macintosh 8-pin system peripheral cable. Set the HOST SELECT switch
to the “Mac” position.
You may also have to make other MIDI interface settings on the computer side, depending on
the type of software you use (refer to your software owner’s manual). In any case the clock
speed should be set to 1 MHz.
●“Mac” Cable Connections
HOST SELECT TO HOST
PC-2 PC-1
MIDI
Mac
Set to the
“Mac”
position.
Apple Macintosh
Series Computer
MINI DIN
8-PIN
• 8-pin system peripheral cable.
• Data transfer rate: 31,250 bps.
2 (HSK i)1
MINI DIN
1 (HSK 0)2
8-PIN
5 (RxD-)3
4 GND4
3 (TxD-)5
8 (RxD+)6
7 (GP i)7
6 (TxD+)8
■Trademarks
• Apple and Macintosh are trademarks of Apple Computer, Inc.
• IBM-PC/AT is a trademark of International Business Machines Corporation.
All other trademarks are the property of their respective holders.
40
CLP-811/611 The Clavinova’s Device Connectors
Page 45

2.Connecting to an IBM-PC/AT Series Computer
Connect the TO HOST connector of the Clavinova to the RS-232C port on your IBM computer, using a standard 8-pin MINI DIN → 9-pin D-SUB cross cable. Set the HOST SELECT
switch to the “PC-2” position.
Refer to your software owner’s manual for information on any settings you might have to make
on the computer side.
●“PC-2” Cable Connections
HOST SELECT TO HOST
PC-2 PC-1
MIDI
Mac
Set to the
“PC-2”
position.
IBM-PC/AT Series
Computer
MINI DIN
8-PIN
4 5 (GND)
8
8 (CTS)1
D-SUB
7 (RST)2
9-PIN
2 (RxD)3
3 (TxD) 5
• 8-pin mini DIN → 9-pin D-SUB cable. Use a “PC-1” type cable if your computer uses a
25-pin serial port.
• Data transfer rate: 38,400 bps.
●“PC-1” Cable Connections
MINI DIN
8-PIN
4 7 (GND)
8
5 (CTS)1
D-SUB
4 (RTS)2
25-PIN
3 (RxD)3
2 (TxD) 5
• 8-pin mini DIN → 25-pin D-SUB cable.
• When using the [TO HOST] terminal of the CLP-811/611, first turn the power off
NOTE
on both the CLP-811/611 and the computer before connecting the cable. After
connecting the cable, turn the power of the computer on first, then the CLP-811/
611.
• When not using the [TO HOST] terminal of the CLP-811/611, make sure the cable
is disconnected from the [TO HOST] terminal. If the cable is left connected, the
CLP-811/611 may not function properly.
• When the HOST SELECT switch is set to “Mac”, “PC-1”, or “PC-2, no data
transfer occurs via the MIDI connectors. To use the MIDI connectors for connection via a standard MIDI interface, set the HOST SELECT switch to “MIDI”.
• If your system doesn’t work properly with the connections and settings listed
above, your software may require different settings. Check your software operation
manual and set the HOST SELECT switch to the position that provides the
appropriate data transfer rate.
● Connector Pin Numbers
MINI DIN 8-PIN
678
\
34
5
1
2
D-SUB 25-PIN
13
123456789
14 15 16 17
10 11 12
18 19 20 21 22 23 24 25
D-SUB 9-PIN
594837261
CLP-811/611 The Clavinova’s Device Connectors
41
Page 46

Troubleshooting
If you encounter what appears to be a malfunction, please check the following points before assuming that
your Clavinova is faulty.
1. No Sound When the Power is Turned ON
Is the AC plug properly connected to the Clavinova and an AC wall outlet? Check the AC connection
carefully. Is the MASTER VOLUME control turned up to a reasonable listening level?
Also make sure that a pair of headphones is not plugged into the PHONES jack, and that Local
Control (see page 35) is ON.
2. The Damper Pedal Doesn’t Work
If the damper pedal doesn’t function, or if notes are sustained even when the pedal is not pressed,
check that the pedal cord is properly plugged into the main unit (see page 58:CLP-811, see page
64:CLP-611).
3. The Clavinova Reproduces Radio or TV Sound
This can occur if there is a high-power transmitter in your vicinity. Contact your Yamaha dealer.
4. Intermittent Static Noise
This is usually due to turning ON or OFF a household appliance or other electronic equipment which
is fed by the same AC line as your Clavinova.
5. Interference Appears On Radio or TV Sets Located Near the Clavinova
The Clavinova contains digital circuitry which can generate radio-frequency noise. The solution is to
move the Clavinova further away from the affected equipment, or vice versa.
6. Distorted Sound When the Clavinova is Connected to An External Amplifier/
Speaker System
If the Clavinova is connected to a stereo system or instrument amplifier and the sound is distorted,
reduce the setting of the Clavinova volume control to a level at which the distortion ceases.
7. KSN NG error message appears on the screen.
This message indicates that there is an internal problem. Please contact your dealer for assistance.
42
CLP-811/611 Troubleshooting
Page 47

Options
● BC-8 Bench
A comfortable bench styled to match your Yamaha Clavinova.
● HPE-160 Stereo Headphones
High-performance lightweight dynamic headphones with extra-soft ear pads.
● DOU-10 Disk Orchestra Unit
Offers a range of MIDI recording and playback functions, plus the Yamaha Disk Orchestra Collection,
Disklavier PianoSoftTM, General MIDI, and Standard MIDI File disk playback capability.
CLP-811/611 Options
43
Page 48

Index
• For a full overview of the contents of this manual: Refer to Contents on page 1.
• To locate information about specific buttons and connectors: Refer to Panel Controls
and Connectors on pages 4 and 5.
• To locate information about FUNCTION-mode parameters: See the Function Table on
pages 24 to 25.
This index is intended to help you locate information not covered by the sections mentioned above. Note that an asterisk (*) after a page number indicates that the information is in the page’s sidebar (to the right of the main text).
C
Computer, connection to ............................... 40-41
Configuration functions.................................. 24-37
Connectors.................................................... 38-39
D
Damper pedal......................................................14
number of levels ..................................... 14*, 34
DEMO/PIANO SONG mode............................ 8-12
Demo songs .......................................................8,9
listing of ..........................................................46
Depth
Damper pedal.................................................33
EFFECT depth ...............................................16
REVERB depth ..............................................15
Display...................................................................6
DUAL mode................................................... 17-18
F
Factory defaults.....................................................7
listing of ..........................................................47
Resetting to ....................................................37
FUNCTION mode.....................................7*, 24-37
H
Headphones..........................................................3
M
Main functions, list of..................................... 24-25
Memory backup.....................................................7
setting ON or OFF ......................................... 36
Microphone reverb...............................................36
MIDI............................................................... 34-36
Music stand ...........................................................2
Muted-part volume adjustment .................... 11*, 34
P
Parts, left- and right-hand................................... 11
Muting a part .......................................... 11*, 34
Pedals .................................................................14
changing function of left pedal................ 14*, 33
Piano songs.....................................................8, 10
one-hand practice.......................................... 11
repetition practice .......................................... 12
Power ....................................................................3
Power indicator......................................................3
R
Recording (Recorder feature)........................ 20-23
Changing initial settings ................................ 21
Initial settings .................................................20
K
Key cover...............................................................2
L
Left pedal, function ....................................... 14*,33
44
CLP-811/611 Index
Page 49

S
Setup File ............................................................35
Shortcuts to FUNCTION mode
To [F4.DualFunc.] .......................................... 29
To [F5.SplitFunc.] ..................................... 29-30
To [F6.OrganEdit] ..................................... 30-31
To [F7.Metronome] ........................................ 32
Soft pedal ............................................................14
changing function of ............................... 14*, 33
Songs .............................................................. 8-12
listing of ..........................................................46
Sostenuto pedal ..................................................14
SPLIT mode .................................................. 18-19
Split point ............................................................18
Subfunctions, list of ....................................... 24-25
SYNCHRO Start
For recorder playback .................................... 23
For song playback ......................................... 11
T
Temperament ......................................................28
Scale ..............................................................28
Tracks, recorder............................................. 20-21
erasing a track................................................22
(
See also
Parts)
V
Volume adjustment................................................3
CLP-811/611 Index
45
Page 50
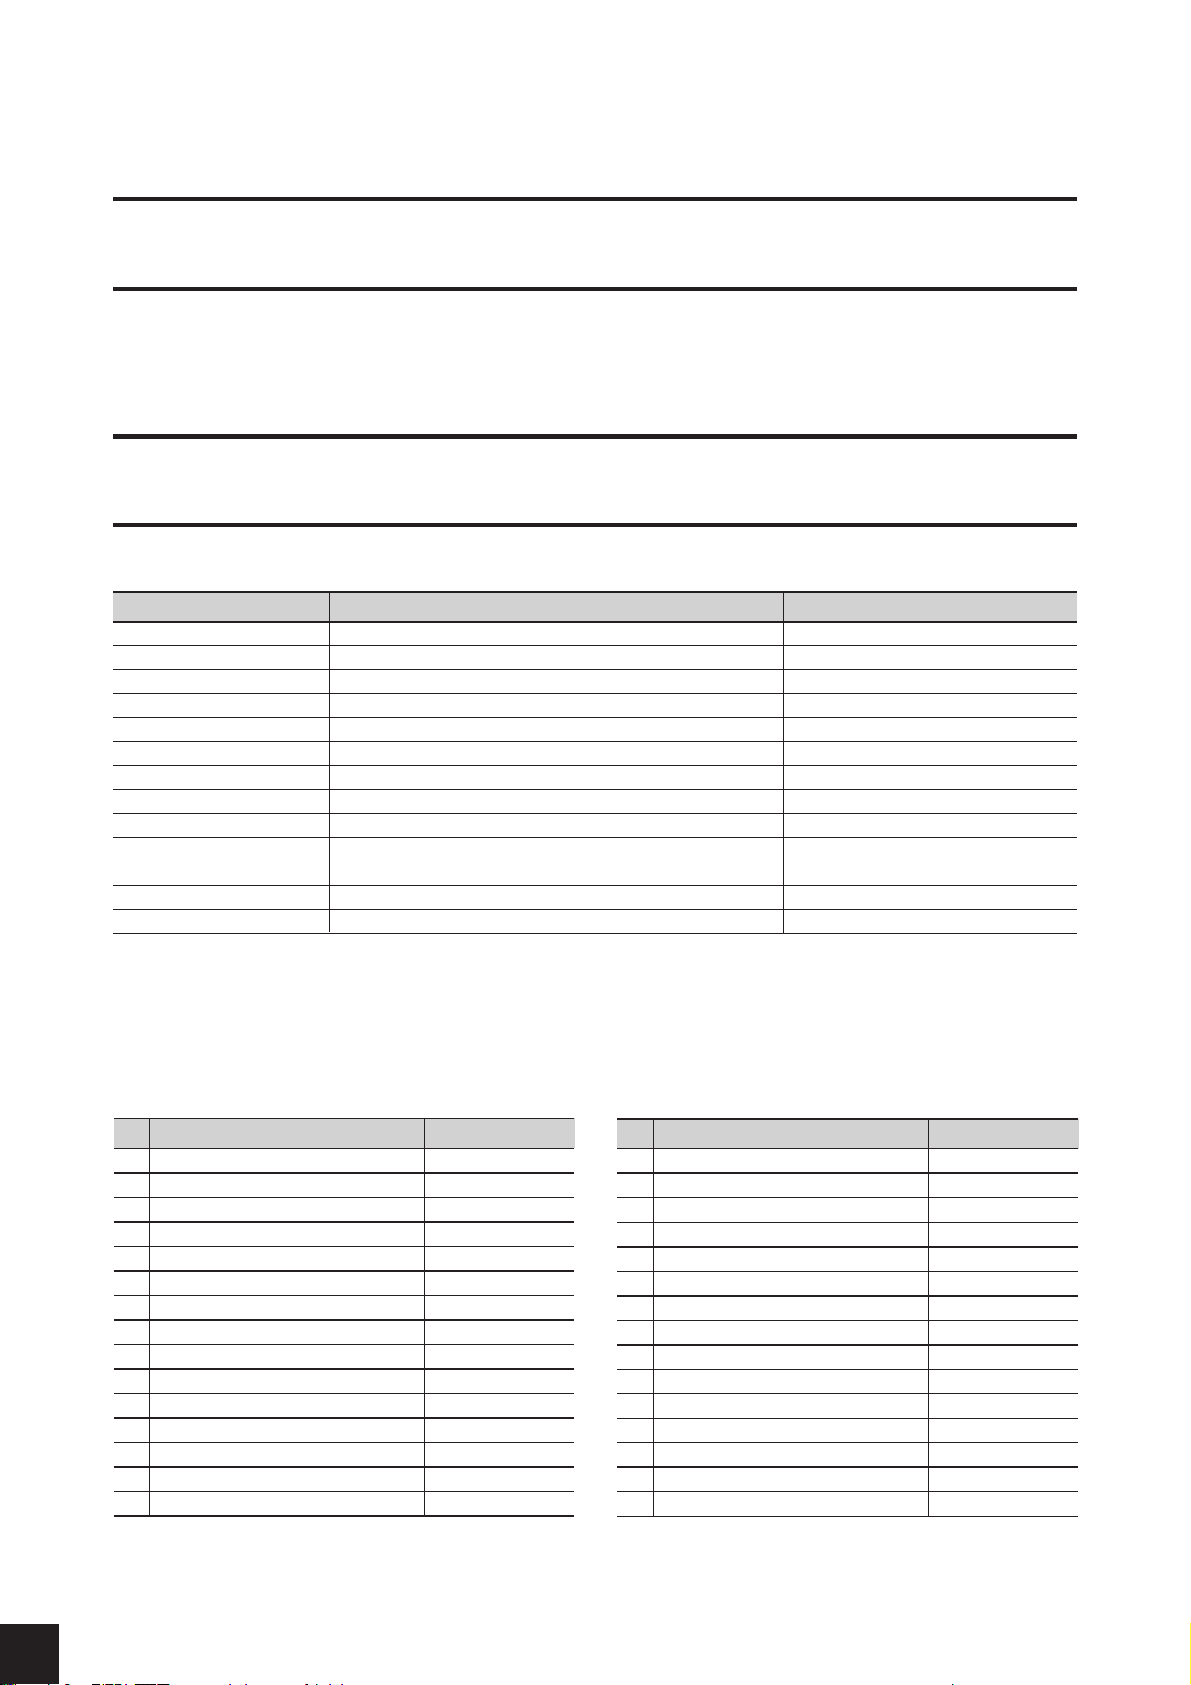
Demo and Piano Songs Lists
Listen der Demo-Songs und der Piano-Songs
Liste des morceaux de démonstration et des
morceaux de piano
Listas de canciones de demostración y piano
Demo Songs / Demo-Songs / Morceaux de démonstration / Canciones de demostración
Voice Name Title Composer
Piano1 Ballad No. 1 G minor op. 23 F.F. Chopin
Piano2 Lake Louise Y. Kuramoto
Clavinova Tone Consolation No. 3 F. Liszt
E.Piano1 original (© 1996 by YAMAHA CORPORATION) E.Piano2 original (© 1996 by YAMAHA CORPORATION) Harpsichord “Allemande” from French Suite No. 5 BWV816 J.S. Bach
Vibes Study in A minor op.70 G. Pfeiffer
Strings Salut D’amour op.12 E. Elgar
Choir My Old Kentucky Home S.C. Foster
Pipe Organ “Prelude No.1 C Major” from Eight Short J.S. Bach
Prelude and Fugues, BWV553 - 560
Organ Combination original (© 1996 by YAMAHA CORPORATION) Bass (CLP-811) Greensleeves Traditional
Some demo pieces are excerpts from or rearrangements of the original work.
Einige Demo-Songs sind Auszüge aus oder Arrangements von Originalwerken.
Certains morceaux de démonstration sont des extraits ou des réarrangements de l’oeuvre originale.
Algunas canciones de demostración son extractos del trabajo original o arreglos del mismo.
Piano Songs / Piano-Songs / Morceaux de piano / Canciones de piano
No.
1 Für Elise L.v.Beethoven
2 Dolly’s Dreaming and Awakening T.Oesten
3 Blumenlied G.Lange
4
“Marche Turke” from Sonata A major K.331
5 Waltz “Petit Chien” op.64-1 F.F.Chopin
6 Türkicher Marsch L.v.Beethoven
7 SpinnerLied A.Ellmenreich
8 Alpenabendröte T.Oesten
9 Sonatine Anh.6 L. v. Beethoven
10 Melodie op.68-1 R. A. Schumann
11 Heidenröslen G.Lange
12 La chevaleresque J.F.F.Burgmüller
13 Minuet G major BWV Anh.114 J.S.Bach
14 Ronde alla Turca J.F.F.Burgmüller
15 Minuet G minor K.1e W. A. Mozart
Title Composer
W.A.Mozart
No.
16 The Harvest Time G. Lange
17 Impromptu op.90-2 F.P.Schubert
18 Waltz op.64-2 F.F.Chopin
19 Nocturne op.9-2 F.F.Chopin
20 Sonata C major K.545 1st Mov. W.A.Mozart
21 1ére Arabesque C.A.Debussy
22 La Prière d’une Vierge T.Badarzewska
23 Frühlingslied J.L.F.Mendelssohn
24 La Viollette L.Streabbog
25 Ecossaise G major L. v. Beethoven
26 Arabesque J.F.F.Burgmüller
27 The Entertainer S.Joplin
28 Gavotte G. P. Telemann
29 Little Serenade J. Haydn
30 Allegro B major K.3 W. A. Mozart
Title Composer
46
CLP-811/611
Demo and Piano Songs Lists/Listen der Demo-Songs und der Piano-Songs/Liste des morceaux de démonstration et des morceaux de piano/Listas de canciones de demostración y piano
Page 51
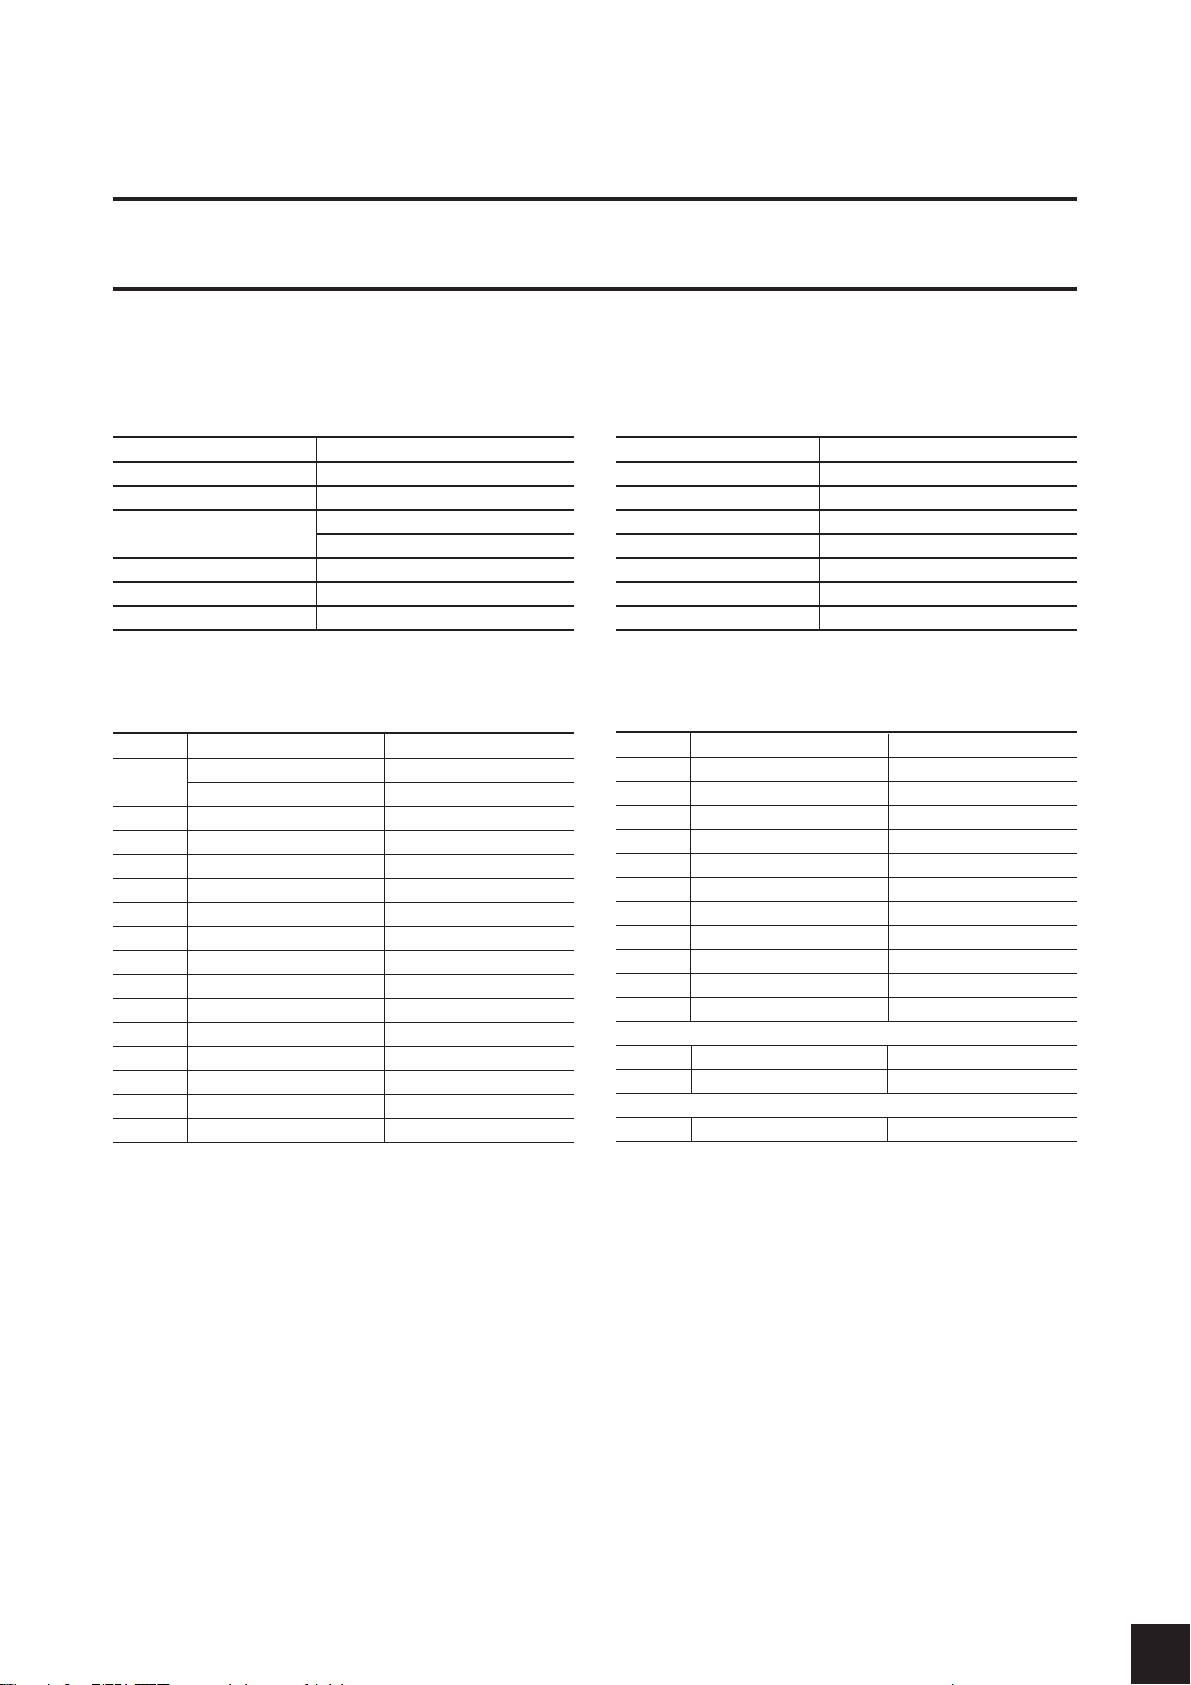
Factory Defaults / Werksvoreinstellungen
Réglages d’usine par défaut / Ajustes de fábrica
The following is a listing of the Clavinova’s factory defaults.
Die folgende Liste ist eine Zusammenstellung der werksseitigen Voreinstellungen des Clavinova.
Vous trouverez ci-dessous une liste des réglages par défaut du Clavinova.
La siguiente es una relación de los ajustes de fábrica del Clavinova.
Voice selection PIANO1
DUAL mode OFF
SPLIT mode OFF
SPLIT mode Voice #2 BASS (on CLP-811)
STRINGS (on CLP-611)
REVERB type STAGE
REVERB depth 8
EFFECT type Varies by voice
EFFECT depth Varies by effect type and voice
BRILLIANCE NORMAL
TRANSPOSE 0
TOUCH setting MEDIUM
Fixed-touch velocity 64
Metronome OFF
Metronome volume 10
TEMPO 120
FUNCTION-mode settings / Einstellungen des FUNCTION-Modus’ /
Réglages du mode FONCTION / Ajustes del modo FUNCTION
F1 Tuning A3=440Hz
F2 Key-by-key tuning OFF
Tuning values All values = 0
F3 Scale (temperament) EQ (equal)
F4-1 DUAL/Voice volume balance Varies by voice combination
F4-2 DUAL/Detuning Varies by voice combination
F4-3,F4-4 DUAL/Octave shift Varies by voice combination
F4-5,F4-6 DUAL/Effect depth Varies by voice combination
F4-7 DUAL/STRING attack FAST
F5-1 SPLIT/Split point F♯2
F5-2 SPLIT/Voice volume balance Varies by voice combination
F5-3,F5-4 SPLIT/Octave shift Varies by voice combination
F5-5,F5-6 SPLIT/Effect depth Varies by voice combination
F5-7 SPLIT/Damper-pedal range L+R
F6-1 Organ Type JAZZ ORGAN1
F6-2~5 Organ Edit settings Varies by organ type
F7-1 Metronome beat Normal (No beat)
F7-2 Metronome volume 10
F8 Display mode NORMAL
F9 Left-pedal function SOFT pedal
F10 Damper-pedal depth 10
F11 Damper-pedal levels 8
F12 Volume of muted part 5
F13-1 MIDI/Transmitting channel 1
F13-2 MIDI/Receiving channel ALL
F13-3 MIDI/Local control ON
F13-4 MIDI/Program Change enable ON
F13-5 MIDI/Control Change enable ON
F13-6 MIDI/Transposition 0
If CLP-811
F14 Microphone reverb depth 10
F15 Backup settings All OFF
If CLP-611
F14 Backup settings All OFF
Factory Reset
You can return all settings to their factory defaults by holding down key C7 (the highest key) while switching on the
power. Note that this reset covers all settings—dual mode, split mode, reverb, effect, touch, and so on. Note also that the
reset will erase the contents of the recorder, and will return all Backup settings to OFF.
Zurücksetzen aller Parameter
Sie können alle Einstellungen zurück auf die Werksvoreinstellungen bringen, indem Sie während des Einschaltens Taste
C7 (die höchste Taste) gedrückt halten. Beachten Sie, daß diese Funktion alle Einstellungen betrifft - den Dual-Modus,
den Split-Modus, den Hall, die Effekte, die Anschlagsdynamik usw. Bedenken Sie auch, daß der gesamte Inhalt des
Rekorders gelöscht wird, und daß alle Einstellungen der Backup-Funktion auf OFF gestellt werden.
Réinitialisation d’usine
Vous pouvez réinitialiser tous les réglages à leurs valeurs par défaut en maintenant enfoncée la touche C7 (Do7 - la
touche la plus haute) à la mise sous tension. Cette réinitialisation couvre alors tous les réglages - mode double, mode
partagé, réverbération, effet, toucher, etc. Elle effacera également tout le contenu de l’enregistreur et tous les réglages
de copie de sauvegarde seront désactivés (remis sur OFF).
Reposición de los ajustes de fábrica
Es posible restablecer todos los ajustes a sus valores originales de fábrica manteniendo pulsada la tecla C7 (la nota más
alta) mientras se enciende el instrumento. Advierta que esta operación de reposición afecta a todos los ajustes del modo
dual, dividido, reverberación, efectos, pulsación, etc. Tenga también presente que la reposición borrará los contenidos de
la grabadora y volverá a desactivar todos los ajustes de memoria de seguridad.
CLP-811/611 Factory Defaults/Werksvoreinstellungen/
Réglages d’usine par défaut/Ajustes de fábrica
47
Page 52
MIDI Data Format
MIDI
IN OUT THRU
MIDI-Datenformat
Introduction to MIDI
MIDI (for “Musical Instrument Digital Interface”)
is an internationally recognized standard for communication of musical performance and control data
among supporting devices. Such devices include
electronic musical instruments, computers, and
sequencers. MIDI communication is carried out
through standard MIDI connectors and cables.
MIDI makes it possible for you to use your
Clavinova to control playback at remote devices,
and to use remote devices to control playback at
your Clavinova.
• MIDI operates on digital data. All data is con-
verted to appropriate digital format prior to
transmission.
• Different MIDI devices offer differing levels of
MIDI support. The level of available support is
given in the device’s “MIDI Implementation
Chart.” (The Implementation Chart for your
Clavinova appears on page 66.) In general, you
will want to avoid transmission of MIDI communications that are not supported at the receiving side.
MIDI Connectors
IN OUT THRU
MIDI
Einführung zu MIDI
MIDI (Akronym für “Musical Instrument Digital
Interface”) ist ein international anerkannter Standard für den Austausch musikalischer Spiel- und
Steuerdaten zwischen Geräten, die dieses Format
unterstützen. Diese Geräte sind unter anderen
elektronische Musikinstrumente, Computer,
Sequenzer und Effektgeräte. Die MIDI-Kommunikation findet über standardisierte MIDI-Buchsen
und -Kabel statt.
MIDI ermöglicht es Ihnen, mit Ihrem Clavinova die
Wiedergabe und den Klang anderer Geräte zu
steuern, und umgekehrt von anderen Geräten aus
die Wiedergabe und den Klang Ihres Clavinova zu
beeinflussen.
• MIDI funktioniert mittels digitaler Daten. Alle
Daten werden vor der Übertragung in das
entsprechende, digitale Format konvertiert.
• Die verschiedenen MIDI-Geräte bieten verschiedene Ebenen der MIDI-Kommunikation. Die
kommunizierbaren Parameter werden in der sog.
“MIDI-Implementationstabelle” jedes Gerätes
angegeben (Die Implementationstabelle des
Clavinova befindet sich auf Seite 66.) Im allgemeinen ist es sinnvoll, die Übertragung von
MIDI-Daten zu vermeiden, die empfangsseitig
nicht verarbeitet werden.
MIDI IN Receives incoming MIDI data.
MIDI OUT Transmits outgoing MIDI data.
MIDI THRU Relays all data received at the MIDI
MIDI Cable
MIDI connection requires use of dedicated MIDI
cables.
• You set up the Clavinova’s MIDI parameters
using Function F13 (MIDIFunc.). See page 34.
• Information about MIDI can be found in a wide
variety of readily available magazines and
books.
MIDI-Buchsen
IN connector.
MIDI IN Empfängt ankommende MIDI-
Daten.
MIDI OUT Sendet abgehende MIDI-Daten.
MIDI THRU Leitet alle am MIDI IN empfange-
nen Daten unverändert weiter.
MIDI-Kabel
MIDI-Verbindungen erfordern spezielle MIDIKabel.
• Die MIDI-Parameter des Clavinova stellen Sie
mit Funktion F13 (MIDIFunc.) ein. Siehe Seite
34.
• Informationen über MIDI sind in vielen Musikmagazinen und Büchern verfügbar.
48
CLP-811/611 MIDI Data Format/MIDI-Datenformat/Format de données MIDI/Formato de datos MIDI
Page 53

Format de données MIDI
MIDI
IN OUT THRU
Formato de datos MIDI
Introduction au système MIDI
Le système MIDI, de l’anglais “Musical Instrument
Digital Interface” (interface pour instruments de
musique numériques) est une interface de communication utilisée de par le monde qui permet le
partage de données musicales entre divers instruments ou équipements musicaux MIDI et la commande mutuelle de ces équipements. Les instruments impliqués sont notamment les instruments de
musique électroniques, des ordinateurs et des
séquenceurs. Les communications MIDI s’effectuent par le biais de connecteurs et de câbles MIDI
standards.
Le système MIDI permet d’utiliser le Clavinova
pour contrôler la reproduction sur des appareils
éloignés ou d’utiliser des appareils distants pour
contrôler la reproduction sur le Clavinova.
• Le système MIDI concerne les données numériques. Toutes les données sont converties dans le
format approprié avant la transmission.
• Différents appareils MIDI peuvent offrir un
niveau différent de compatibilité MIDI. Le
niveau de compatibilité disponible est repris
dans le “tableau d’implémentation MIDI” de
l’appareil. (Le tableau d’implémentation MIDI
du Clavinova se trouve à la page 66). En règle
générale, il convient d’éviter la transmission de
communications MIDI qui ne sont pas supportées du côté récepteur.
Introducción a MIDI
El sistema MIDI (“Musical Instrument Digital
Interface” = intercomunicación digital entre instrumentos musicales) es una norma internacionalmente
aceptada para el intercambio de datos de control y
de interpretaciones musicales entre dispositivos de
soporte. Entre tales dispositivos se encuentran los
instrumentos musicales electrónicos, los ordenadores y los secuenciadores. La comunicación MIDI se
realiza a través de conectores y cables MIDI normalizados.
El sistema MIDI le permite utilizar el Clavinova
para controlar la reproducción en dispositivos
remotos, así como utilizar los dispositivos remotos
para controlar la reproducción del Clavinova.
• MIDI opera con datos digitales. Todos los datos
son convertidos al formato digital adecuado
antes de la transmisión.
• Los dispositivos MIDI diferentes ofrecen niveles
distintos de soporte MIDI. El nivel de soporte
disponible se facilita en la “Tabla de
Implementación MIDI” del equipo (la del
Clavinova se ofrece en la página 66). Por lo
general, intentará evitar la transmisión de comunicaciones MIDI que no sean soportadas por el
equipo receptor.
Conectores MIDI
Connecteurs MIDI
MIDI IN Reçoit les données MIDI entrantes.
MIDI OUT Transmet les données MIDI
MIDI THRU Sert de relais pour toutes les
Câble MIDI
La connexion MIDI demande l’utilisation de câbles
MIDI appropriés.
• Vous pouvez configurer les paramètres MIDI du
Clavinova à l’aide de la fonction F13
(MIDIFunc.). Voir page 34.
• Vous trouverez de plus amples informations
concernant le système MIDI dans toute une série
d’ouvrages et de magazines de lecture aisée.
IN OUT THRU
sortantes.
données reçues à la borne MIDI IN.
MIDI
MIDI IN Recibe los datos MIDI entrantes.
MIDI OUT Transmite los datos MIDI salientes.
MIDI THRU Reenvía todos los datos recibidos a
la entrada MIDI IN.
Cable MIDI
Las conexiones MIDI requieren el uso de cables
MIDI específicos.
• Los parámetros MIDI del Clavinova se configu-
ran con la función F13 (MIDIFunc.). Véase
página 34.
• Existe información sobre MIDI en una amplia
variedad de revistas y libros de difusión pública.
CLP-811/611 MIDI Data Format/MIDI-Datenformat/Format de données MIDI/Formato de datos MIDI
49
Page 54

1. NOTE ON/OFF
[9nH] → [kkH] → [vvH]
9nH = Note ON/OFF event (n = Channel No.)
kkH = Note No.
(Sending: 09H~78H = A-2~C8)
(Receiving: 00H~7FH = C-2~G8) *1
vvH = velocity
(Note ON = 01H~7FH. Note OFF = 00H.)
[8nH] → [kkH] → [vvH]
8nH = Note OFF (n = Channel No.)
kkH = Note No. (00H~7FH = C-2~G8)
vvH = velocity
*1: If received value exceeds the supported range
for the selected voice, the note is adjusted by
the necessary number of octaves.
2. Control Change
[BnH] → [ccH] → [vvH]
BnH = Control Change (n = Channel No.)
ccH = Control No.
vvH = Control value
1) Bank Select
ccH Parameter Value (vvH)
00H Bank select MSB 01H: Normal
20H Bank select LSB 00H~7FH
70H Brilliance: Normal Variation: OFF
71H Normal ON
72H Bright OFF
73H Bright ON
74H Mellow OFF
75H Mellow ON
* Bank selection processing does not occur until
receipt of next Program Change message.
* Bank Select messages are not effective on the
Organ Combination voice.
00H~7FH: Incorrect sounding
2) Main Volume (Receive only)
ccH Parameter Value (vvH)
07H Volume 00H~7FH
3) Expression
ccH Parameter Value (vvH)
0BH Expression 00H~7FH
4) Damper Pedal
ccH Parameter Value (vvH)
40H Damper 00H~7FH
5) Sostenuto Pedal
ccH Parameter Value (vvH)
42H Sostenuto
00H~3FH:OFF 40H~7FH:ON
6) Soft Pedal
ccH Parameter Value (vvH)
43H Soft pedal
00H~3FH:OFF 40H~7FH:ON
7) Attack Time
ccH Parameter Value (vvH)
49H Attack time 00H~7FH
Effect-1 Depth (Reverb Send Level)
8)
ccH Parameter Value (vvH)
5BH Effect-1 depth 00H~7FH
* Adjusts the send level for the reverb effect.
9) Effect-4 Depth (Variation-Effect
Send Level)
ccH Parameter Value (vvH)
5EH Effect-4 depth 00H~7FH
3. Mode Messages
[BnH] → [ccH] → [vvH]
BnH = Control Event (n = Channel No.)
ccH = Mode Message No.
vvH = Mode Message value
1) All Sound Off
ccH Controller Value (vvH)
78H All Sound Off 00H
* Turns off all sound on the specified channel.
Does not reset Note On and Hold On conditions
established by Channel Messages.
2) Reset All Controllers
ccH Controller Value (vvH)
79H Reset All Controllers 00H
* Resets controllers as follows.
Controller Reset Value
Expression 127 (Max.)
Damper Pedal 0 (OFF)
Sostenuto 0 (OFF)
Soft Pedal 0 (OFF)
3) All Notes Off
ccH Controller Value (vvH)
7BH All Notes Off 00H
* Switches OFF all the notes that are currently ON
on the specified channel. Any notes being held
by the damper or sostenuto pedal will continue
to sound until the pedal is released.
4) Omni Off (Receive only)
ccH Controller Value (vvH)
7CH Omni Off 00H
* Same processing as All Notes Off.
5) Omni On (Receive only)
ccH Controller Value (vvH)
7DH Omni On 00H
* Same processing as All Notes Off.
6) Mono (Receive only)
ccH Controller Value (vvH)
7EH Mono 00H
* Same processing as All Sound Off.
7) Poly (Receive only)
ccH Controller Value (vvH)
7FH Poly 00H
* Same processing as All Sound Off.
● Remarks
1. The Clavinova will not send or accept Control
Change messages if the FUNCTION-mode
Control Change setting is OFF.
2. The Clavinova does not transmit Local ON/OFF
and Omni ON/OFF messages. (All Notes Off is
transmitted as a series of Note Off messages.)
3. The Clavinova saves the bank select value (MSB
and LSB; receivable in any order) to its internal
buffer. This value is then used to determine the
voice selection upon receipt of the next Program
Change message.
4. The Clavinova always operates in multitimbral
polyphonic mode. The mode does not change in
response to Omni ON/OFF, Mono, and Poly
messages.
4. Program Change
[CnH] → [ppH]
CnH = Program Change (n = Channel No.)
ppH = Program Change No.
* The Clavinova will not send or accept Program
Change messages if the FUNCTION-mode
Program Change setting is OFF.
* Program number assignments are as follows.
Voice Program Change No.
PIANO 1 00H
PIANO 2 01H
CLAVI. TONE 58H
E. PIANO 1 05H
E. PIANO 2 04H
HARPSICHORD 06H
VIBES 0BH
STRINGS 30H
CHOIR 34H
PIPE ORGAN 13H
ORGAN CONBINATION
BASS (CLP-811) 20H
10H
5. System Realtime Messages
1) Active Sensing
[FEH]
* Transmitted every 200 msec.
* If the Clavinova receives no MIDI signals for
400 msec. following receipt of an FEH, it will
execute processing equivalent to All Sound Off
→ All Notes Off → Reset All Controllers.
2) Clock
[F8H]
* Clock signal is issued 96 times per whole note.
* If Exclusive Message specifies use of an external
clock, the Clavinova counts 96 clock signals as
one whole note.
3) Start
[FAH]
* Transmitted at rhythm start.
* Receipt causes song to start.
4) Stop
[FCH]
* Transmitted at rhythm stop.
* Receipt causes song to stop.
* If error occurs during MIDI reception, the
Clavinova switches off damper, sostenuto, and
soft effects and then executes All Notes Off
processing (for all channels).
6. System Exclusive Message
(Yamaha MIDI Format)
[F0H] → [43H] → [0nH]→ [7CH] → ... → [F7H]
F0H,43H,0nH,7CH: n = Channel No.
01H,36H: Data length
43H,4CH,20H,20H: CL
43H,4CH,50H,27H,39H,36H:
30H,30H: (Version x,y)
[Panel Data]
[Checksum (1 byte)]=0-(43H+4CH+20H+..... data end)
F7H: End of Exclusive
[Panel-data content]
(1) Voice
(2) DUAL ON/OFF
(3) DUAL voice
(4) DUAL balance
(5) DUAL detuning
(6) DUAL Voice
(7) DUAL Voice#2 octave shift
(8) DUAL Voice#1 effect depth
(9) DUAL Voice#2 effect depth
(10) DUAL/STRINGS slow attack ON/OFF
(11) SPLIT ON/OFF
(12) SPLIT voice
(13) SPLIT point
(14) SPLIT balance
(15) SPLIT Voice
(16) SPLIT Voice
(17) SPLIT Voice#1 effect depth
(18) SPLIT Voice#2 effect depth
(19) SPLIT damper mode
(20) Reverb type
(21) Reverb depth
(22) Effect type 1
(23) Effect type 2
(24) Effect depth
(25) Brilliance
(26) Variation
(27) Variation #2 ON/OFF
(28) Touch sensitivity
(29) FIXED-touch velocity
(30) Left pedal function (Soft/Start)
(31) Key-specific tuning ON/OFF
(32) Tempo (absolute value; LSB)
(33) Tempo (absolute value; MSB)
(34) Organ Combination voice No.
(35)~(51) Organ Combination data 1
#
1 octave shift
#
1 octave shift
#
2 octave shift
#
1 ON/OFF
CLP’96
50
CLP-811/611 MIDI Data Format/MIDI-Datenformat/Format de données MIDI/Formato de datos MIDI
Page 55

(52)~(68) Organ Combination data 2
(69)~(85) Organ Combination data 3
(86)~(102) Organ Combination data 4
(103)~(119) Organ Combination data 5
(120)~(136) Organ Combination data 6
(137)~(153) Organ Combination data 7
(154)~(170) Organ Combination data 8
* The Clavinova does not accept requests to
transfer panel data.
7. System Exclusive Messages
(Universal System Exclusives)
1) Universal Realtime Message
[F0H] → [7FH] → [XnH]→ [04H]→ [01H] →
RRRR
RR
H] → [mmH] → [F7H]
[
RRRR
MIDI Master Volume
* This message changes the volume for all
channels at the same time.
* Receipt of this message affects the volume on
the MIDI receiving channel(s) only. Panel
volume does not change.
F0H: Exclusive status
7FH: Universal realtime
7FH: ID of target device
04H: Sub-ID #1 (Device control message)
01H: Sub-ID #2 (Master Volume)
RRRR
RR
H: Volume LSB
RRRR
mmH: Volume MSB
F7H: End of Exclusive
-orF0H: Exclusive status
7FH: Universal realtime
XnH: X is ignored; n=0~F
04H: Sub-ID #1 (Device control message)
01H: Sub-ID #2 (Master Volume)
RRRR
RR
H: Volume LSB
RRRR
mmH: Volume MSB
F7H: End of Exclusive
2) Universal Non-Realtime Message
(GM ON)
[F0H] → [7EH] → [XnH]→ [09H]→ [01H] →
[F7H]
GM (General MIDI) Mode ON
F0H: Exclusive status
7EH: Universal non-realtime
7FH: ID of target device
09H: Sub-ID #1 (General MIDI message)
01H: Sub-ID #2 (General MIDI ON)
F7H: End of Exclusive
-or-
F0H: Exclusive status
7EH: Universal non-realtime
XnH: X is ignored; n=0~F
09H: Sub-ID #1 (General MIDI message)
01H: Sub-ID #2 (General MIDI ON)
F7H: End of Exclusive
* Receipt of the GM ON message causes MIDI
parameters to reinitialize. Allow sufficient time
for processing to execute (about 50 msec) before
sending the Clavinova another message.
8. System Exclusive Messages
(XG Standard)
1) XG Native Parameter Change
[F0H] → [43H] → [1nH]→ [4CH]→ [hhH] →
[mmH] → [
F0H: Exclusive status
43H: Yamaha
1nH: Device No.
4CH: XG model ID
hhH: Address High
mmH: Address Mid
RRRR
RR
RRRR
RRRR
RR
H] → [ddH] ... → [F7H]
RRRR
(If transmission, n=0. If reception, n=0~F.)
H: Address Low
ddH: Data
: :
F7H: End Of Exclusive
2) Bulk Dump (Receive only)
[F0H] → [43H] → [0nH]→ [4CH] → [aaH] →
[bbH] → [hhH] → [mmH] → [
... → [ccH] → [F7H]
F0H: Exclusive status
43H: Yamaha
0nH: Device No. (n=0~F.)
4CH: XG model ID
aaH: Byte count
bbH: Byte count
hhH: Address High
mmH: Address Mid
RRRR
RR
H: Address Low
RRRR
ddH: Data
: :
ccH: Checksum
F7H: End Of Exclusive
* Receipt of this message causes reinitialization of
relevant parameters and Control Change v alues.
Allow sufficient time for processing to execute
(about 50 msec) before sending the Clavinova
another message.
* XG Native Parameter Change message may
contain two or four bytes of parameter data
(depending on the parameter size).
* For information about the Address and Byte
Count values, refer to Table 1 below. Note that
the table’s Total Size value gives the size of a
bulk block. Only the top address of the block
(00H, 00H, 00H) is valid as a bulk data address.
* Transmission of excessive bulk-data length may
cause error at the receiving side. Keep message
length within 512 bytes. If you need to send
more than 512 bytes, break the transmission into
multiple parts and allow at least 120 msec
between each transmission.
RRRR
RR
H] → [ddH] →
RRRR
<Table 1>
MIDI Parameter Change (SYSTEM)
Address (H) Size (H) Data (H) Parameter Description Default (H)
00 00 00 4 020C~05F4 MASTER TUNING -50~+50 [cents] 00 04 00 00 * Value below 020CH selects -50 cents.
01 1st byte bits (3~0) → Bits 15~12 400 Value above 05F4H selects +50 cent.
02 2nd byte bits (3~0) → Bits 11-8
03 3rd byte bits (3~0) → Bits 7-4
04 1 00~7F MASTER VOLUME 0~127 7F
05 1
06 1 34~4C TRANSPOSE -12~+12 [semitones] 40 *
7E 0 XG SYSTEM ON 00=XG System ON
7F 0
Total Size 7
RESET ALL PARAMETERS
4th byte bits (3~0) → Bits 3-0
Values 28H to 33H select -12 to -1, respectively.
Values 4DH to 58H select +1 to +12, respectively.
00= ON (Receive only)
<Table 2>
MIDI Parameter Change (EFFECT 1)
* For a listing of REVERB, CHORUS, and VARIATION type numbers, refer to the Effect MIDI maps.
Address (H) Size (H) Data (H) Parameter Description Default (H)
02 01 00 2 00~7F REVERB TYPE MSB Refer to the Effect MIDI Map. 01 (=HALL 1)
0C 1 00~7F REVERB RETURN -∞dB…0dB…+6dB (0…64…127) 40
02 01 40 2 00~7F VARIATION TYPE MSB Refer to the Effect MIDI Map. 00 (No effect)
Note: “VARIATION TYPE” corresponds to the Clavinova’s panel-set effect type.
00~7F REVERB TYPE LSB 00: Basic Type 00
00~07F VARIATION TYPE LSB 00: Basic Type 00
<Table 3>
MIDI Parameter Change (Multipart)
Address (H) Size (H) Data (H) Parameter Description Default (H)
08 nn 11 1 00~7F DRY LEVEL 0~127 7F
nn= Part number
CLP-811/611 MIDI Data Format/MIDI-Datenformat/Format de données MIDI/Formato de datos MIDI
51
Page 56

<Table 4>
Effect MIDI Map (REVERB)
MSB LSB
00H 01H 02H 03H~
00H No effect ←←←
01H HALL 1 HALL 2 HALL 1 ←
02H ROOM ←←←
03H STAGE ←←←
<Table 5>
Effect MIDI Map (VARIATION)
MSB LSB
00H 01H 02H 03H~
00H~06H
No effect ←←←
07H ECHO ←←←
41H CHORUS ←←←
44H SYMPHONIC ←←←
46H TREMOLO ←←←
9. System Exclusive Messages
(Clavinova MIDI compliance)
[F0H] → [43H] → [73H]→ [xxH] → [nnH] →
[F7H]
F0H: Exclusive status
43H: Yamaha
73H: Clavinova
Device ID (CLP’96:3BH; CLP common:01H)
xxH:
nnH: Substatus
Control nn
Internal clock 02H
External clock 03H
Bulk data:
F7H: End Of Exclusive
* Substatuses 02H and 03H can be received by
Device ID 01H as well as by 3BH.
1) Bulk Dump Format for Key-by-Key
Tuning Data
F0H,43H,73H
3BH:
06H: Bulk ID
00H: Bulk No.
00H,00H,0BH,00H: Data length
[Bulk data]: low(A-1), high (A-1) ...
[Checksum (1 byte)] = 0 - sum(bulk data)
F7H: End Of Exclusive
06H (followed by bulk data)
Device ID (CLP’96:3BH)
(Bulk dump format for keyspecific tuning data)
low (C7), high (C7)
2) Bulk Dump Format for Sequence
Data
F0H,43H,73H
nnH: Device ID (CLP-811:40H; CLP-611:3EH)
06H: Bulk ID
05H: Bulk No.
(Sequence-data bulk dump format)
0xH,0xH,0xH,0xH: Data length = xxxx bytes
[Bulk data]: low,high,...,low,high
[Checksum (1 byte)] = 0 - sum(bulk data)
F7H: End Of Exclusive
3) Bulk Data Format for Organ
Combination
F0H,43H,73H
3BH: Device ID
06H: Bulk ID
06H: Bulk data format for
00H,00H,01H,01H: Data length = 11H bytes
0nH: n = Channel No.
[16']
[8']
[5+1/3']
[4']
[2+2/3']
[2']
[1+1/3']
[1']
[Response]
[Attack 4']
[Attack 2+2/3']
[Attack 2']
[Attack length]
[Attack mode] (00H=FIRST; 01H=EACH)
[Rotary-speaker speed]
[Rotary-speaker depth]
[Checksum (1 byte)] = 0 - sum(bulk data)
F7H: End Of Exclusive
organ combination
10.System Exclusive Message
(Special operators)
RRRR
RR
[F0H] → [43H] → [73H]→ [xxH] → [
[0nH] → [ccH] → [vvH] → [F7H]
F0H: Exclusive status
43H: Yamaha
73H: Clavinova
3BH: Device ID (CLP’96n:3BH)
RRRR
RR
H: SK special operator
RRRR
RRRR
H] →
0nH:
Control MIDI Change (n = Special Operator Channel No.)
cc: Control No.
dd: Value
F7H: End Of Exclusive
Control ON ccH ddH
SPLIT POINT Always 00H 14H Split key No.
METRONOME Always 00H 1BH 00H:OFF
DAMPER LEVEL Ch:00~0FH 3DH (Sets channel-
CHANNEL DETUNING
VOICE RESERVE Ch:00~0FH 45H 00H:RESERVE
*1 When RESERVE=ON, received volume and
expression data becomes effective at next Key
ON. RESERVE=OFF is the normal setting.
Ch:00~0FH 43H (Sets channel-
01H: –
02H:2/4
03H:3/4
04H:4/4
05H:5/4
06H:6/4
7FH:Normal
specific piano
damper level)
00H~7FH
specific
detuning)
00H~7FH
OFF
7FH:ON *1
11.Additional System Exclusive
Message
[F0H] → [43H] → [1nH]→ [27H] → [30H] →
[00H]→ [00H] → [
* This message changes master tuning for all
channels. (If this and XG master-tuning message
are both received then last received becomes
effective.)
1) Master tuning
[00H] → [mmH] → [
F0H: Exclusive status
43H: Yamaha
1nH: (If transmission, n=0. If reception, n=0~F.)
27H: TG100 Device ID
30H: Sub-ID
00H:
00H:
mmH: Master Tuning MSB
RRRR
RR
H: Master Tuning LSB
RRRR
ccH: Any value up to 7FH.
F7H: End Of Exclusive
RRRR
H]→ [ccH]→ [F7H]
RR
RRRR
RRRR
RR
H] → [ccH]
RRRR
52
CLP-811/611 MIDI Data Format/MIDI-Datenformat/Format de données MIDI/Formato de datos MIDI
Page 57
Specifications / Technische Daten
Spécifications techniques / Especificaciones
CLP-811 CLP-611
Keyboard 88 keys (A-1 to C7)
Tone Generator AWM (Advanced Wave Memory)
Polyphony 64 notes max. 32 notes max.
Voices PIANO 1, PIANO 2 CLAVINOVA TONE, ELECTRIC PIANO 1, ELEC-
TRIC PIANO 2, HARPSICHORD, VIBES, STRINGS, CHOIR, PIPE
ORGAN, ORGAN COMBINATION, BASS (CLP-811 only), and voice
variations.
Reverb ROOM, HALL 1, HALL 2, STAGE
Effects CHORUS, SYMPHONIC, TREMOLO, ECHO
Brilliance MELLOW, NORMAL, BRIGHT
Controls DUAL, SPLIT, METRONOME, TRANSPOSE, TOUCH (HARD, ME-
DIUM, SOFT, FIXED), MICROPHONE VOLUME (CLP-811 only),
MICROPHONE REVERB (CLP-811 only), various functions.
Display Large liquid-crystal display
Recorder 2-TRACK RECORDING/PLAYBACK; adjustable TEMPO
Pedals DAMPER, SOSTENUTO, SOFT
Demos 12 demo songs and 30 piano songs 11 demo songs and 30 piano songs
Connectors AUX OUT R & L/L+R (output impedance 600Ω);
AUX IN R & L/L+R (input impedance 10kΩ, input sensitivity -10dBm);
MIC jack (CLP-811 only) ; two PHONES jacks; TO HOST; MIDI IN/
OUT/THRU
Main Amplifiers 120W (60W × 2)
Speakers
Dimensions Music stand 1436mm × 513mm × 906mm 1418mm × 511mm × 879mm
(W × D × H) down (56-9/16 × 20-3/16 × 35-11/16) (55-13/16 × 20-1/8 × 34-5/8)
Music stand up 1436mm × 513mm × 1014mm 1418mm × 511mm × 1051mm
Weight 67.0kg (147 lbs 9 oz) 60.0kg (132 lbs 3 oz)
Specifications and appearance are subject to change without notice for purpose of product improvement.
Die Technischen Daten und das Äußere können sich mit dem Ziel der Weiterentwicklung des Produktes
jederzeit ohne Ankündigung ändern.
14cm × 2, 5cm × 2, elliptical (5 × 9cm) × 2
(56-9/16 × 20-3/16 × 39-15/16) (55-13/16 × 20-1/8 × 41-3/8)
14cm × 2, 5cm × 2
Les spécifications techniques et l’aspect du Clavinova peuvent être sujets à modifications sans avis préalable,
dans un but d’amélioration continue du produit.
Las especificaciones técnicas y las características físicas están sujetas a modificaciones para fines de mejora
de producto sin previo aviso.
CLP-811/611 Specifications/Technische Daten/Spécifications techniques/Especificaciones
53
Page 58

31
HINWEIS
HINWEIS
2
Phone jacks
Klinkenbuchsen
Prises pour casque d’écoute
Tomas de auriculares
CLP-811 Assembly Procedure
NOTE
• Be careful not to confuse parts, and be sure to install all parts
in the correct direction. Please assemble in accordance with
the sequence given below.
• Assembly should be carried out by at least two persons.
• Be sure to use the correct screw size, as indicated above. Use
of incorrect screws can cause damage.
• Be sure to tighten up all screws upon completing assembly of
each unit.
• To disassemble, reverse the assembly sequence given below.
1 Have a Phillips-head screwdriver ready.
Styrofoam pads
Styroporteile
Coussinets en mousse
Planchas de poliestireno
Four wide roundhead screws 1
Vier breite Rundkopfschrauben 1
Quatre grosses vis à tête ronde 1
Cuatro tornillos anchos de cabeza redonda
(6✕20mm)
Four wide flathead screws 2
Vier breite Flachkopfschrauben 2
Quatre grosses vis à tête plate 2
Cuatro tornillos anchos de cabeza plana 2
(6✕20mm)
Two thin flathead screws 3
Zwei dünne Flachkopfschrauben 3
Deux fines vis à tête plate 3
Dos tornillos finos de cabeza plana 3
(4✕20mm)
Four tapered screws 4
Vier Senkkopfschrauben 4
Quatre vis pointues 4
Cuatro tornillos cónicos 4
1
(4✕20mm)
Two short roundhead screws 5
Zwei kurze Rundkopfschrauben 5
Deux petites vis à tête ronde 5
Dos tornillos cortos de cabeza redonda 5
(4✕12mm)
Two cord clamps 6
Zwei Kabelhalter 6
Deux pinces de fixation pour câbles 6
Dos bridas de cable 6
Montage des CLP-811
• Achten Sie darauf, die Teile nicht zu verwechseln, und installieren Sie
alle Teile in der richtigen Ausrichtung. Gehen Sie beim Zusammenbau
bitte in der angegebenen Reihenfolge vor.
• Die Montage sollte von mindestens zwei Personen vorgenommen
werden.
• Achten Sie darauf, die richtige Schraubengröße zu verwenden, wie es
oben gezeigt ist. Die Verwendung der falschen Schrauben kann zu
Schäden führen.
• Achten Sie während der Montage darauf, bei jedem Arbeitsgang alle
Schrauben festzuziehen.
• Für die Demontage muß die angegebene Reihenfolge umgekehrt
befolgt werden.
2 Open the box. Take out the two styrofoam
pads and place them on the floor. Then
take out main unit (A) and place it on top
of the pads.
NOTE
Position the pads so as to protect the phone jacks on the base of
the unit.
3 Remove all parts from the box. Confirm
that all of the parts indicated above are
present.
4 Fasten lower board (E) to the left and
right sideboards.
First, unravel the pedal cord bundled to the bottom of
lower board (E). Then align the ends of lower board (E)
with the right sideboard (C) and left sideboard (B).
Finally, fasten in place with the four wide roundhead
screws 1.
1 Halten Sie einen
Kreuzschlitzschraubendreher bereit.
2 Öffnen Sie den Karton. Nehmen Sie die
beiden Styroporteile heraus und legen Sie sie
auf den Boden. Nehmen Sie dann die Haupteinheit (A) heraus, und legen Sie es auf die
Styroporteile.
Positionieren Sie die Styroporteile so, daß die Klinkenbuchsen am Boden
des Gerätes geschützt sind.
3 Nehmen Sie alle Teile aus dem Karton. Sehen
Sie nach, ob alle oben gezeigten Teile vorhanden sind.
4 Bringen Sie die Unterseite (E) an den linken
und rechten Seitenteilen an.
Lösen Sie dazu zunächst das Pedalkabel auf, das unten an der
Unterseite zusammengebündelt ist (E). Richten Sie dann die
Enden der Unterseite (E) mit dem rechten Seitenteil (C) und dem
linken Seitenteil (B) aus. Schrauben Sie die Unterseite schließlich
mit den vier breiten Rundkopfschrauben 1 fest.
54
CLP-811/611
CLP-811 Assembly Procedure/Montage des CLP-811/CLP-811 Montage Procédure/Montaje del modelo CLP-811
Page 59

Main unit (A)
Haupteinheit (A)
Appareil principal (A)
Unidad principal (A)
4
Left sideboard (B)
Linkes Seitenteil (B)
Panneau latéral gauche (B)
Panel lateral izquierdo (B)
Power cord (F)
Netzkabel (F)
Cordon d’alimentation (F)
Cable de alimentación (F)
Backboard (D)
Rückseite (D)
Panneau arrière (D)
Panel de fondo (D)
Pedal cord bundled at back of board.
Pedalkabel an der Unterseite.
Cordon des pédales enroulé à l’arrière du panneau.
Cable de pedal enrollado en el reverso del panel.
Right sideboard (C)
Rechte Seitenteil (C)
Panneau latéral droit (C)
Panel lateral derecho (C)
Lower board (E)
Unterseite (E)
Panneau inférieur (E)
Panel inferior (E)
CLP-811 Montage Procédure
REMARQUE
• Veiller à ne pas mélanger les pièces et à les installer dans le sens
correct. Veuillez assembler l’instrument dans l’ordre indiqué ci-dessous.
• La présence de deux personnes minimum est nécessaire pour
procéder au montage.
• Toujours utiliser des vis aux dimensions correctes, comme indiqué cidessus. l’utilisation de vis aux dimensions incorrectes pourrait en effet
endommager l’instrument.
• Resserrer convenablement toutes les vis après le montage de chaque
élément.
• Pour démonter le Clavinova, inverser l’ordre des indications données cidessous.
Four wide roundhead screws 1
Vier breite Rundkopfschrauben 1
Quatre grosses vis à tête ronde 1
Cuatro tornillos anchos de cabeza redonda 1
(6✕20mm)
Montaje del modelo CLP-811
NOTA
• Observe cuidado para no confundir las piezas, y asegúrese de montar
todas ellas en el sentido correcto. Proceda al montaje en el orden
indicado a continuación.
• El montaje deberá realizarse al menos por dos personas.
• Procure utilizar los tornillos del tamaño adecuado, según se indica
arriba. El empleo de tornillos inadecuados puede ocasionar daños en el
instrumento.
• Asegúrese de apretar bien todos los tornillos después de montar cada
unidad.
• Para desmontar las unidades, invierta la secuencia de montaje
facilitada a continuación.
1 Préparer un tournevis Phillips (en croix).
2 Ouvrir le carton d’emballage. Sortir les deux
coussinets en mousse et les placer sur le sol.
Sortir ensuite l’appareil principal (A) et le
placer sur les coussinets.
REMARQUE
Placer les coussinets de sorte à protéger les connecteurs pour casques
d’écoute, sur la face arrière.
3 Retirer toutes les pièces du carton. Vérifier
que toutes les pièces indiquées ci-dessus sont
présentes.
4 Attacher la partie inférieure (E) aux parties
latérales gauche et droite du coffret.
Défaire en premier lieu le cordon de la pédale fixé à la partie
inférieure (E). Aligner ensuite les extrémités de la partie
inférieure (E) sur les extrémités de la partie latérale droite (C) et
de la partie latérale gauche (B). Finalement, visser en place à
l’aide des quatre vis à tête ronde 1.
1 Prepare un destornillador de estrella.
2 Abra la caja. Retire las dos planchas de
poliestireno y colóquelas sobre el suelo. A
continuación extraiga la unidad principal (A)
y colóquela sobre las planchas.
NOTA
Sitúe las planchas de forma que queden protegidas las tomas de
auriculares de la base de la unidad.
3 Extraiga todas las piezas de la caja. Comprue-
be que no falta ninguna de las piezas arriba
indicadas.
4 Asegure el panel inferior (E) a los laterales
derecho e izquierdo.
En primer lugar, desenrolle el cable del pedal fijado en la base del
panel inferior (E). Seguidamente, alinee los bordes del panel
inferior (E) con los paneles laterales derecho (C) e izquierdo (B).
Por último, ensámblelo en su sitio con los cuatro tornillos anchos
de cabeza redonda 1.
CLP-811/611
CLP-811 Assembly Procedure/Montage des CLP-811/CLP-811 Montage Procédure/Montaje del modelo CLP-811
55
Page 60

HINWEIS
Four tapered screws 4
Vier Senkkopfschrauben 4
Quatre vis pointues 4
Cuatro tornillos cónicos 4
(4✕20mm)
Two short roundhead screws 5
Zwei kurze Rundkopfschrauben 4
Deux petites vis à tête ronde 4
Dos tornillos cortos de cabeza redonda 4
(4✕12mm)
65
At least 4 inches(10 cm)
Mindestens 10 cm
Minimum 10 cm
Mínimo 10 cm
5 Install backboard (D).
Rest the bottom of backboard (D) on the leg ledges (on
both sideboards), and pivot the top of the board into place.
Fasten the upper part of the backboard to the two sideboards using the short roundhead screws 5. Fasten the
lower part of the backboard in four places using the
tapered screws 4.
6 Install main unit (A).
Lift the main unit, holding it on the bottom as shown in
the diagram. Be sure to grasp the board at least 4 inches
(10 cm) away from the sides. Slide the unit onto the
sideboards from the front, and continue sliding until it is
all the way back.
NOTE
Be careful to avoid snagging your hands or clothes when
installing the main unit.
7 Fasten main unit (A) into place.
First check from the sides to confirm that there is no gap.
Then move to the back and check the gaps between the
main unit and the right and left sideboards. Adjust so that
these gaps are equivalent, and fasten in place (at both ends
of the rear side) with two of the wide flathead screws 2.
Next, move to the front and screw in the two thin flathead
screws 3, and then the remaining two flathead screws 2.
5 Bringen Sie die Rückseite (D) an.
Setzen Sie die Unterkante der Rückseite (D) auf die Fußvorsprünge (auf beiden Seitenteilen), und kippen Sie die Oberkante
der Rückseite an die Haupteinheit. Befestigen Sie die Oberkante
der Rückseite mit den kurzen Rundkopfschrauben 5 an den
beiden Seitenteilen. Befestigen Sie den unteren Teil der Rückseite
an vier Stellen mit den vier Senkkopfschrauben 4.
6 Montieren Sie die Haupteinheit (A).
Heben Sie die Haupteinheit an, indem Sie darunter greifen, wie in
der Abbildung gezeigt. Achten Sie darauf, das Teil mindestens 10
cm von den Seiten entfernt zu greifen. Schieben Sie die Einheit
von vorne auf die Seitenteile, bis sie ganz hinten anschlägt.
Achten Sie darauf, daß Sie während der Installation der Haupteinheit nicht
Ihre Hände oder Ihre Kleidung verletzen.
7 Befestigen Sie die Haupteinheit (A).
Überprüfen Sie von der Seite, daß keine Lücke zu sehen ist.
Überprüfen Sie dann von hinten aus den Spalt zwischen der
Haupteinheit und den linken und rechten Seitenteilen. Richten
Sie die Haupteinheit so aus, daß beide Abstände gleich sind, und
schrauben Sie die Haupteinheit an den beiden Enden der
Rückseite mit zwei breiten Flachkopfschrauben 2 fest.
Schrauben Sie dann an der Vorderseite die beiden dünnen
Flachkopfschrauben 3 und die beiden übrigen Flachkopfschrauben 2 fest.
56
CLP-811/611
CLP-811 Assembly Procedure/Montage des CLP-811/CLP-811 Montage Procédure/Montaje del modelo CLP-811
Page 61

7
Two wide flathead screws 2
Zwei breite Flachkopfschrauben
Deux grosses vis à tête plate 2
Dos tornillos anchos de cabeza plana
(6✕20mm)
Two wide flathead screws 2
Zwei breite Flachkopfschrauben 2
Deux grosses vis à tête plate 2
Dos tornillos anchos de cabeza plana 2
Two thin flathead screws 3
2
2
Zwei dünne Flachkopfschrauben 3
Deux fines vis à tête plate 3
Dos tornillos finos de cabeza plana 3
(4✕20mm)
(6✕20mm)
5 Installer le panneau arrière (D)
Reposer le bas du panneau arrière (D) sur le rebord des pieds (des
deux panneaux latéraux) et faire pivoter le dessus du panneau
pour le mettre en place. Fixer la partie supérieure du panneau
arrière aux deux panneaux latéraux à l’aide des petites vis à tête
ronde 5. Attacher la partie inférieure du panneau arrière à quatre
endroits à l’aide des vis pointues 4.
6 Installer la partie principale (A)
Soulever la partie principale, en la soutenant par le fond comme
illustré sur le diagramme. Toujours veiller à saisir le panneau à
au moins 10 cm des extrémités. Glisser la partie principale sur les
panneaux latéraux en commençant par l’avant et la faire glisser
jusqu’à ce qu’elle soit insérée à fond.
REMARQUE
Faire attention de ne pas coincer ses mains ou ses vêtements lors de
l’installation de la partie principale.
7 Fixer la partie principale (A).
Vérifier tout d’abord de côté pour s’assurer qu’il n’y a pas de
vide. Se mettre ensuite derrière et vérifier les espaces entre la
partie principale et les panneaux latéraux gauche et droit. Régler
l’ensemble de sorte que les espaces soient équivalents de chaque
côté et les fixer en place (aux deux extrémités de la partie arrière)
avec deux des grosses vis à tête plate 2. Se déplacer ensuite vers
l’avant et visser les deux petites vis à tête plate 3 puis les deux
grosses vis à tête plate restantes 2.
5 Instale el panel posterior (D).
Apoye la base del panel posterior (D) sobre los rebordes de las
patas (en ambos paneles laterales), y gire la parte superior del
panel para colocarlo en su posición. Asegure la parte alta del
panel posterior a los dos paneles laterales utilizando los tornillos
cortos de cabeza redonda 5. Atornille la parte baja del panel
posterior a cuatro puntos empleando los tornillos cónicos 4.
6 Instale la unidad principal (A).
Levante la unidad principal, sosteniéndola por la base como se
muestra en la ilustración. Procure sujetar el panel como mínimo a
10 cm de los bordes. Inserte la unidad en los paneles laterales
desde la parte frontal, y deslícela hasta el fondo.
NOTA
Tenga cuidado con las manos y la ropa cuando instale la unidad principal.
7 Asegure la unidad principal (A) en su posi-
ción.
Primero observe desde los lados para asegurarse de que no queda
ninguna abertura. Después sitúese en la parte posterior y revise
las aberturas existentes entre la unidad principal y los paneles
derecho e izquierdo. Ajústelos para que queden igual y asegúrelos
en su posición (en ambos extremos de la parte posterior) con dos
de los tornillos anchos de cabeza plana 2.
A continuación, colóquese en la parte frontal y atornille los dos
tornillos finos de cabeza plana 3, y después los dos de cabeza
plana restantes 2.
CLP-811/611
Downloaded from:
CLP-811 Assembly Procedure/Montage des CLP-811/CLP-811 Montage Procédure/Montaje del modelo CLP-811
57
Page 62

8
Two cord clamps 6
Zwei Kabelhalter 6
Deux pinces de fixation pour câbles
Dos bridas de cable 6
6
AC INLET
T
LE
IN
AC
8 Connect up the pedal cord and power cord.
Hold the pedal-cord connector so that the hook is facing
away from the backboard, the backboard, and plug it into
the main unit. Then adhere the two cord clamps 6 to the
backboard at the locations shown in the diagram. Set the
pedal cord securely into the clamps. Finally, connect the
power cord (F) to the main unit.
9 Extend the adjuster.
Turn the adjuster so that it is set firmly against the floor.
0 Set the voltage selector (if applicable),
and plug the power cord into a standard
wall outlet.
If your unit is equipped with a voltage selector, make sure
that the value is set to the voltage level used in your area
(110V, 127V, 220V or 240V). To change the setting, turn
the selector (with a screwdriver) so that the appropriate
value is aligned with the pointer on the panel. Note that
the selector is set to 240V at time of shipment.
After completing the adjustment, you can plug the cord
into a wall outlet. In some areas you may need to attach a
(supplied) adaptor to the plug to enable connection to the
standard local outlet.
■ After completing the assembly, please
check as follows.
• Are there any parts left over?
➔ Review the assembly procedure and correct any errors.
• Is the Clavinova clear of doors and other movable fixtures?
➔ Move the Clavinova to an appropriate location.
• Does the Clavinova make a rattling noise when you shake
it?
➔ Tighten all screws.
• Does the lower board rattle or give way when you step on
the pedals?
➔ T urn the adjuster so that it is set firmly against the floor.
• Are the pedal and power cords inserted securely into the
inlets?
➔ Check the connections.
• If the main unit creaks or is otherwise unsteady when you
play on the keyboard, refer to the assembly diagrams and
retighten all screws.
8 Schließen Sie das Pedalkabel und das Netz-
kabel an.
Halten Sie den Stecker des Pedalkabels so, daß der Haken zur
Tastaturseite weist, und stecken Sie ihn an die Haupteinheit.
Bringen Sie dann die beiden Kabelhalter 6 an der Rückseite an
den in der Abbildung gezeigten Positionen an. Stecken Sie das
Pedalkabel sicher in die Kabelhalter. Stecken Sie zum Schluß das
Netzkabel (F) an die Haupteinheit.
9 Ziehen Sie den Höhenversteller heraus.
Drehen Sie den Höhenversteller so, daß er fest gegen den
Fußboden drückt.
0 Stellen Sie den Spannungsumschalter ein
(wenn nötig), und stecken Sie dann das
Netzkabel in eine Netzsteckdose.
Wenn Ihr Gerät mit einem Spannungsumschalter ausgestattet ist,
vergewissern Sie sich, daß der eingestellte Wert auf die
Versorgungsspannung Ihrer Gegend eingestellt ist (110 V, 127 V,
220 V oder 240 V). Um die Einstellung zu ändern, drehen Sie den
Schalter (mit einem Schraubendreher), so der korrekte Wert mit
dem Zeiger auf dem Panel übereinstimmt. Beachten Sie, daß der
Schalter zur Zeit der Auslieferung auf 240 V eingestellt ist.
Wenn Sie die Einstellung vorgenommen haben, können Sie das
Kabel in eine Netzsteckdose stecken. In einigen Gegenden
müssen Sie evtl. einen (mitgelieferten) Adapter am Stecker
anbringen, um diesen in die Netzsteckdose einstecken zu können.
■ Wenn der Zusammenbau beendet ist, prüfen
Sie bitte folgende Dinge:
• Sind Teile übrig geblieben?
➔ Gehen Sie den Vorgang des Zusammenbaus noch einmal durch
und korrigieren Sie eventuelle Fehler.
• Befindet sich das Clavinova weit genug v on Türen und anderen beweglichen V orrichtungen entfernt?
➔ Bewegen Sie das Clavinova an einen entsprechend sicheren
Ort.
• Macht das Clavinova Klappergeräusche, wenn Sie es schütteln?
➔ Ziehen Sie alle Schrauben fest.
• Klappert die Unterseite oder gibt sie nach, wenn Sie das Pedal treten?
➔ Drehen Sie den Höhenversteller, bis er fest auf dem Fußboden
steht.
• Sind Pedal- und Netzkabel richtig an den Buchsen angeschlossen?
➔ Prüfen Sie die Verbindung.
• Wenn die Haupteinheit knarrt oder beim Spielen wackelt, betrachten Sie die Abbildungen und ziehen Sie alle Schrauben noch einmal
nach.
58
CLP-811/611
CLP-811 Assembly Procedure/Montage des CLP-811/CLP-811 Montage Procédure/Montaje del modelo CLP-811
Page 63

9 0
240
110
220
127
8 Raccorder le cordon des pédales et le cordon
d’alimentation
Tenir la fiche du cordon des pédales de telle sorte que le crochet
soit tourné à l’opposé du panneau arrière et la brancher dans la
partie principale. Appliquer ensuite les deux pinces de fixation du
cordon 6 sur le panneau arrière aux emplacements marqués sur
le diagramme. Faire passer le cordon des pédales fermement
entre les pinces de fixation. Finalement, raccorder le cordon
d’alimentation (F) à la partie principale.
9 Etendre le stabilisateur
Tourner le stabilisateur afin qu’il repose fermement sur le sol.
0 Régler le sélecteur de tension (le cas échéant)
et brancher le cordon d’alimentation dans une
prise secteur normale.
Si votre appareil est équipé d’un sélecteur de tension, toujours
s’assurer qu’il est bien positionné sur la tension en vigueur dans
votre région (110V, 127V, 220V ou 240V). Pour modifier le
réglage, tourner le sélecteur (à l’aide d’un tournevis) de sorte que
la valeur souhaitée s’aligne sur le pointeur du panneau. Le
sélecteur est réglé sur 240V à la sortie d’usine.
Après avoir effectué les réglages, vous pouvez brancher le cordon
dans une prise secteur. Dans certaines régions, vous devrez peutêtre relier la fiche à un adaptateur (fourni) pour pouvoir raccorder
le Clavinova à une prise secteur locale.
■ Lorsque le montage est terminé, veuillez
mener à bien les vérifications suivantes.
• Reste-t-il des pièces non utilisées?
➔ Passer en revue la procédure de montage et corriger toute er-
reur éventuelle.
• Le Clavinova est-il placé à l’écart des portes et de toute autre structure mobile?
➔ Déplacer le Clavinova vers un emplacement approprié.
• Lorsque vous secouez quelque peu le Clavinov a, entendez-vous un
cliquetis?
➔ Serrer convenablement toutes les vis.
• Le panneau inférieur fait-il du bruit ou s’écarte-t-il lorsque vous appuyez sur les pédales?
➔ Tourner le stabilisateur de sorte que le Clavinova repose
fermement sur le sol.
• Les cordons des pédales et d’alimentation sont-ils bien enfoncés
dans les prises?
➔ Vérifier toutes les connexions.
• Si la partie principale de l’appareil craque ou est instable lorsque
vous jouez sur le clavier, consulter les diagrammes de montage et
resserrer toutes les vis.
8 Conecte el cable del pedal y el cable de
alimentación.
Sostenga el conector del pedal del cable de manera que el gancho
quede orientado en sentido contrario al panel de fondo, y
conéctelo a la unidad principal. Después adhiera las dos bridas de
cable 6 al panel de fondo, en las posiciones indicadas en el
dibujo. Asegure con decisión el cable del pedal a las bridas. Por
último, conecte el cable de alimentación (F) a la unidad principal.
9 Regule el estabilizador.
Gire el estabilizador hasta que apoye firmemente sobre el suelo.
0 Ajuste el selector de tensión (si es necesario),
y conecte el cable de alimentación a una toma
mural estándar.
Si la unidad está provista de un selector de tensión, asegúrese de
que coincide con la tensión de red de su localidad (110 V, 127 V,
220 V o 240 V). Para cambiar el ajuste, gire el selector (con un
destornillador) hasta que la aguja del panel esté alineada con el
valor adecuado. Observe que el selector viene ajustado a 240 V
en el momento de salir de fábrica.
Una vez realizado el ajuste, puede conectar el cable de alimentación a una toma mural. En algunas zonas quizás sea necesario
acoplar un adaptador (incluido con el equipo) al enchufe para
poder conectarlo a la toma mural.
■ Cuando haya concluido el montaje, comprue-
be los siguientes puntos:
• ¿Ha quedado alguna pieza sin instalar?
➔ Revise el procedimiento de montaje y corrija cualquier error
que se haya podido cometer.
• ¿Está el Clavinova alejado del recorrido de puertas y muebles?
➔ Traslade el Clavinova a una posición adecuada.
• ¿Suena algún ruido de holgura cuando se mueve el Clavinova?
➔ Apriete con firmeza todos los tornillos.
• ¿Vibra o cede el panel inferior cuando se pisan los pedales?
➔ Gire el estabilizador hasta que apoye firmemente sobre el
suelo.
• ¿Están perfectamente insertados los cables de pedal y alimentación en los conectores?
➔ Revise las conexiones.
• Si la unidad principal cruje o presenta algún signo de inestabilidad
cuando se toca el teclado, consulte los esquemas de montaje y
vuelva a apretar todos los tornillos.
CLP-811/611
CLP-811 Assembly Procedure/Montage des CLP-811/CLP-811 Montage Procédure/Montaje del modelo CLP-811
59
Page 64

31
HINWEIS
HINWEIS
2
Phone jacks
Klinkenbuchsen
Prises pour casque d’écoute
Tomas de auriculares
CLP-611 Assembly Procedure
NOTE
• Be careful not to confuse parts, and be sure to install all parts
in the correct direction. Please assemble in accordance with
the sequence given below.
• Assembly should be carried out by at least two persons.
• Be sure to use the correct screw sizes. Use of incorrect screws
can cause damage.
• Be sure to tighten up all screws upon completing assembly of
each unit.
• To disassemble, reverse the assembly sequence given below.
Styrofoam pads
Styroporteile
Coussinets en mousse
Planchas de poliestireno
Six long golden screws 1
Sechs lange goldene Schrauben 1
Six longues vis dorées 1
Seis tornillos largos de oro 1
(5✕40mm)
Four medium roundhead screws 2
Vier mittlere Rundkopfschrauben 2
Quatre vis moyennes à tête ronde 2
Cuatro tornillos medianos de cabeza redonda 2
(6✕20mm)
Four medium flathead screws 3
Vier mittlere Flachkopfschrauben 3
Quatre vis moyennes à tête plate 3
Cuatro tornillos medianos de cabeza plana 3
(6✕20mm)
Four tapered screws 4
Vier Senkkopfschrauben 4
Quatre vis pointues 4
Cuatro tornillos cónicos 4
(4✕20mm)
Two short roundhead screws 5
Zwei kurze Rundkopfschrauben 5
Deux petites vis à tête ronde 5
Dos tornillos cortos de cabeza redonda 5
(4✕12mm)
Two cord clamps 6
Zwei Kabelhalter 6
Deux pinces de fixation pour câbles 6
Dos bridas de cable 6
Montage des CLP-611
• Achten Sie darauf, die Teile nicht zu verwechseln, und installieren Sie
alle Teile in der richtigen Ausrichtung. Gehen Sie beim Zusammenbau
bitte in der angegebenen Reihenfolge vor.
• Die Montage sollte von mindestens zwei Personen vorgenommen
werden.
• Achten Sie darauf, die richtige Schraubengröße zu verwenden. Die
Verwendung der falschen Schrauben kann zu Schäden führen.
• Achten Sie während der Montage darauf, bei jedem Arbeitsgang alle
Schrauben festzuziehen.
• Für die Demontage muß die angegebene Reihenfolge umgekehrt
befolgt werden.
1 Have a Phillips-head screwdriver ready.
2 Open the box. Take out the two styrofoam
pads and place them on the floor. Then
take out main unit (A) and place it on top
of the pads.
NOTE
Position the pads so as to protect the phone jacks on the base of
the unit.
3 Remove all parts from the box. Confirm
that all of the parts indicated above are
present.
4 Fasten right sideboard (C) to right leg (G),
and left sideboard (B) to left leg (F). In
each case, join the board to the leg, aligning the notch on the metal fitting with the
indentation on the leg. Fasten in place
with the long gold screws 1.
1 Halten Sie einen
Kreuzschlitzschraubendreher bereit.
2 Öffnen Sie den Karton. Nehmen Sie die
beiden Styroporteile heraus und legen Sie sie
auf den Boden. Nehmen Sie dann die Haupteinheit (A) heraus, und legen Sie es auf die
Styroporteile.
Positionieren Sie die Styroporteile so, daß die Klinkenbuchsen am Boden
des Gerätes geschützt sind.
3 Nehmen Sie alle Teile aus dem Karton. Sehen
Sie nach, ob alle oben gezeigten Teile vorhanden sind.
4 Bringen Sie das rechte Seitenteil (C) am
rechten Bein (G), das linke Seitenteil (B) am
linken Bein (F) an. Verbinden Sie das Seitenteil mit dem Bein, indem Sie die Aussparung
an dem Metallbeschlag mit der Vertiefung im
Bein in Übereinstimmung bringen. Befestigen Sie es mit den langen Goldene Schrauben
1.
60
CLP-811/611
CLP-611 Assembly Procedure/Montage des CLP-611/CLP-611 Montage Procédure/Montaje del modelo CLP-611
Page 65

Main unit (A)
Haupteinheit (A)
Appareil principal (A)
Unidad principal (A)
4
Left sideboard (B)
Linkes Seitenteil (B)
Panneau latéral gauche (B)
Panel lateral izquierdo (B)
Left leg (F)
Linkes Bein (F)
Pied gauche (F)
Pata izquierda (F)
Lower board (E)
Unterseite (E)
Panneau inférieur (E)
Panel inferior (E)
L R
Power cord (H)
Netzkabel (H)
Cordon d’alimentation (H)
Cable de alimentación (H)
Backboard (D)
Rückseite (D)
Panneau arrière (D)
Panel de fondo (D)
Pedal cord bundled at back of board.
Pedalkabel an der Unterseite.
Cordon des pédales enroulé à l’arrière du panneau.
Cable de pedal enrollado en el reverso del panel.
Right sideboard (C)
Rechtes Seitenteil (C)
Panneau latéral droit (C)
Panel lateral derecho (C)
Right leg (G)
Rechtes Bein (G)
Pied droit (G)
Pata derecha (G)
CLP-611 Montage Procédure
REMARQUE
• Veiller à ne pas mélanger les pièces et à les installer dans le sens
correct. Veuillez assembler l’instrument dans l’ordre indiqué ci-dessous.
• La présence de deux personnes minimum est nécessaire pour
procéder au montage.
• Toujours utiliser des vis aux dimensions correctes, comme indiqué à
gauche. L’utilisation de vis aux dimensions incorrectes pourrait en effet
endommager l’instrument.
• Resserrer convenablement toutes les vis après le montage de chaque
élément.
• Pour démonter le Clavinova, inverser l’ordre des indications données cidessous.
1 Préparer un tournevis Phillips (en croix).
2 Ouvrir le carton d’emballage. Sortir les deux
coussinets en mousse et les placer sur le sol.
Sortir ensuite l’appareil principal (A) et le
placer sur les coussinets.
REMARQUE
Placer les coussinets de sorte à protéger les connecteurs pour casques
d’écoute, sur la face arrière.
3 Retirer toutes les pièces du carton. Vérifier
que toutes les pièces indiquées ci-dessus sont
présentes.
4 Attacher le panneau latéral droit (C) au pied
droit (G) et le panneau latéral gauche (B) au
pied gauche (F). Dans chacun des cas, fixer le
panneau au pied en alignant l’encoche de la
ferrure en métal sur l’indentation du pied.
Serrer en place à l’aide des longues vis dorées
1.
R
R
L
Six long gold screws 1
Sechs lange goldene Schrauben 1
Six longues vis dorées 1
Seis tornillos largos de oro 1
(5✕40mm)
Montaje del modelo CLP-611
NOTA
• Observe cuidado para no confundir las piezas, y asegúrese de montar
todas ellas en el sentido correcto. Proceda al montaje en el orden
indicado a continuación.
• El montaje deberá realizarse al menos por dos personas.
• Procure utilizar los tornillos del tamaño adecuado. El empleo de
tornillos inadecuados puede ocasionar daños en el instrumento.
• Asegúrese de apretar bien todos los tornillos después de montar cada
unidad.
• Para desmontar las unidades, invierta la secuencia de montaje
facilitada a continuación.
1 Prepare un destornillador de estrella.
2 Abra la caja. Retire las dos planchas de
poliestireno y colóquelas sobre el suelo. A
continuación extraiga la unidad principal (A)
y colóquela sobre las planchas.
NOTA
Sitúe las planchas de forma que queden protegidas las tomas de
auriculares de la base de la unidad.
3 Extraiga todas las piezas de la caja. Comprue-
be que no falta ninguna de las piezas arriba
indicadas.
4 Asegure el panel derecho (C) a la pata derecha
(G), y el panel izquierdo (B) a la pata izquierda (F). En ambos casos, acople el panel alineando la entalladura de la parte metálica con
los dientes de la pata. Asegúrelo con los
tornillos dorados largos 1.
CLP-811/611
CLP-611 Assembly Procedure/Montage des CLP-611/CLP-611 Montage Procédure/Montaje del modelo CLP-611
61
Page 66
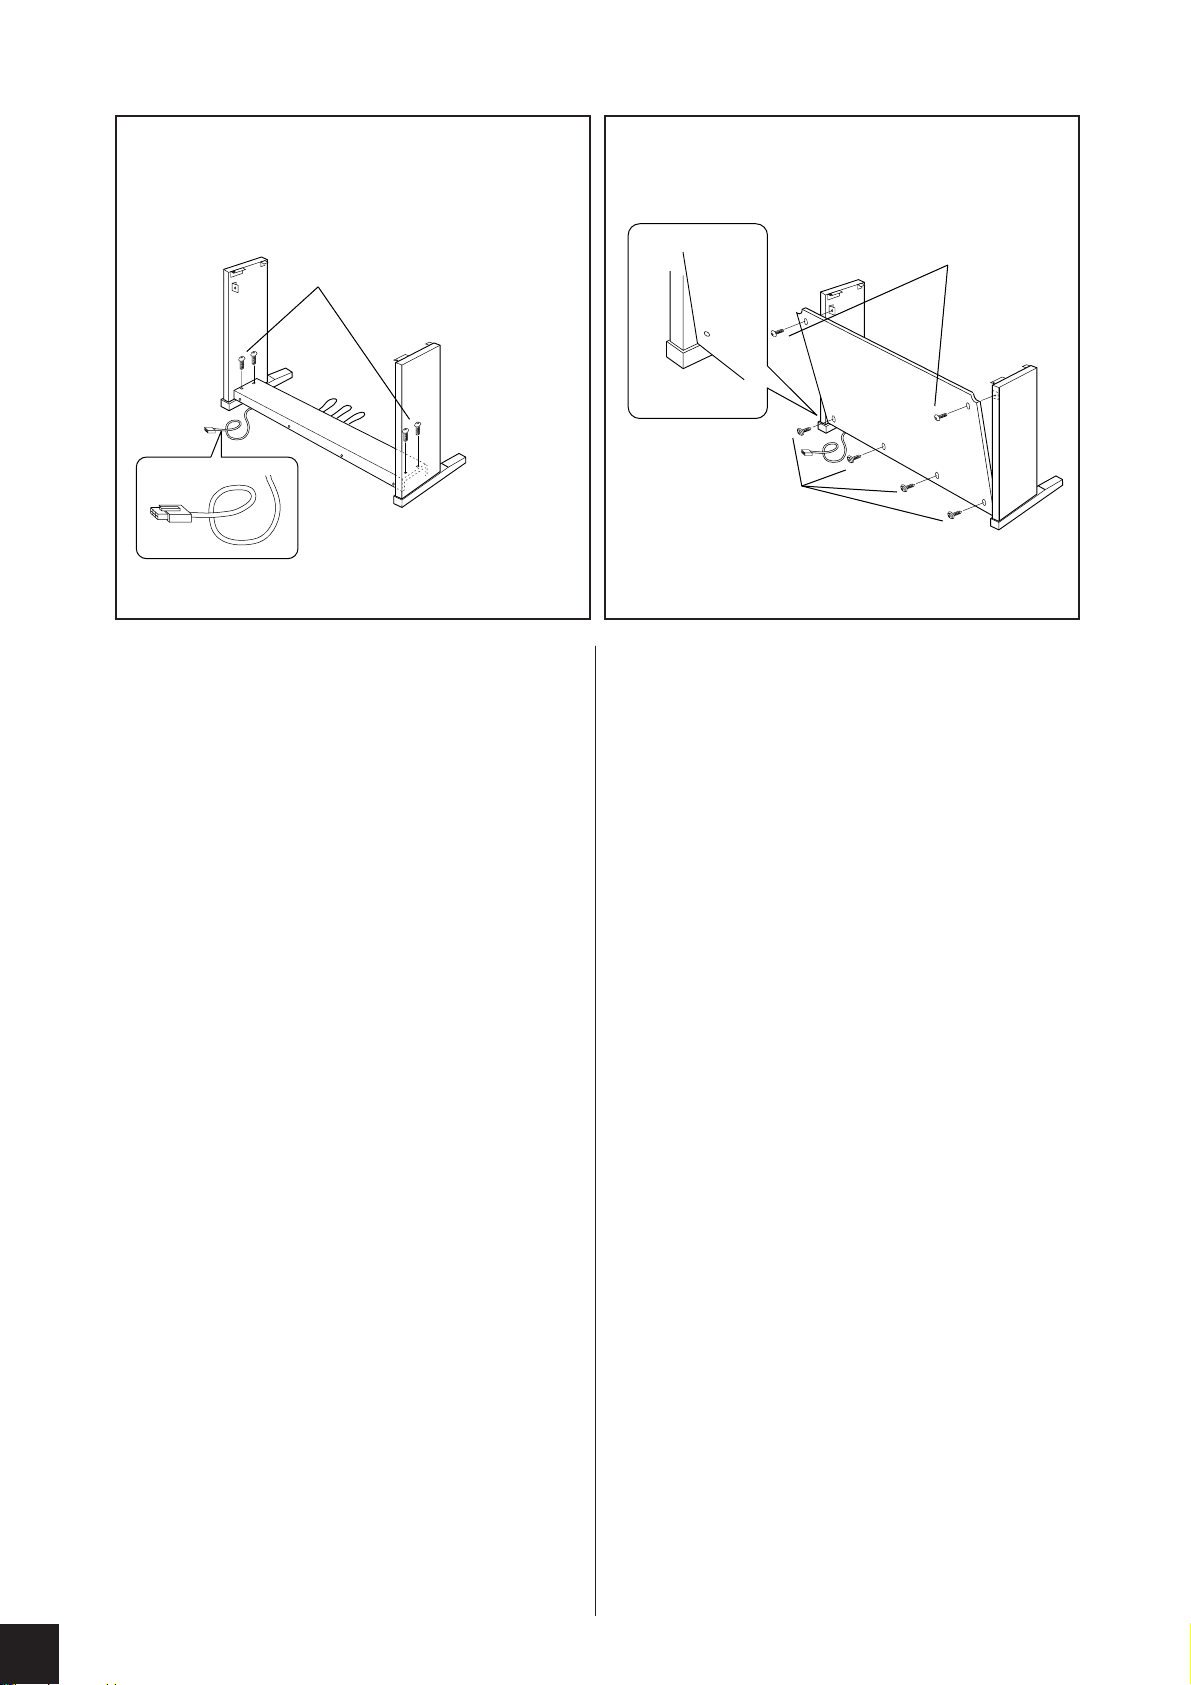
5
6
Four medium roundhead screws 2
Vier mittlere Rundkopfschrauben 2
Quatre vis moyennes à tête ronde 2
Cuatro tornillos medianos de cabeza redonda 2
(6✕20mm)
R
L
5 Install lower board (E).
Unravel the pedal cord bundled to the bottom of lower
board (E). Then align the ends of lower board (E) with the
right sideboard (C) and left sideboard (B). Fasten board
(E) in place with the four medium roundhead screws 2.
6 Install backboard (D).
Rest the bottom of backboard (D) on the leg ledges (on
both sides), and pivot the top of the board into place.
Fasten the upper part of the backboard to the two sideboards using the short roundhead screws 5. Fasten the
lower part of the backboard in four places using the
tapered screws 4.
7 Set main unit (A) into place.
Lift the main unit by holding it on the bottom as shown in
the diagram. Be sure to grasp the board at least 4 inches
(10 cm) away from the sides.
8 Fasten main unit (A).
View the unit from the front, and adjust the position to the
right or left as necessary so that the overhang is equivalent
at both sides. Then, still working from the front, fasten in
place with the four medium flathead screws 3.
Two short roundhead screws 5
Zwei kurze Rundkopfschrauben 5
Deux petites vis à tête ronde 5
Dos tornillos cortos de cabeza redonda 5
(4✕12mm)
R
Four tapered screws 4
Vier Senkkopfschrauben 4
Quatre vis pointues 4
Cuatro tornillos cónicos 4
(4✕20mm)
5 Bringen Sie die Unterseite (E) an.
Lösen Sie dazu zunächst das Pedalkabel auf, das unten an der
Unterseite zusammengebündelt ist (E). Richten Sie dann die
Enden der Unterseite (E) mit dem rechten Seitenteil (C) und dem
linken Seitenteil (B) aus. Schrauben Sie die Unterseite schließlich
mit den vier mittleren Rundkopfschrauben 2 fest.
6 Bringen Sie die Rückseite (D) an.
Setzen Sie die Unterkante der Rückseite (D) auf die Fußvorsprünge (auf beiden Seitenteilen), und kippen Sie die Oberkante
der Rückseite an die Haupteinheit. Befestigen Sie die Oberkante
der Rückseite mit den kurzen Rundkopfschrauben 5 an den
beiden Seitenteilen. Befestigen Sie den unteren Teil der Rückseite
an vier Stellen mit den vier Senkkopfschrauben 4.
7 Montieren Sie die Haupteinheit (A).
Heben Sie die Haupteinheit an, indem Sie darunter greifen, wie in
der Abbildung gezeigt. Achten Sie darauf, das Teil mindestens 10
cm von den Seiten entfernt zu greifen.
8 Befestigen Sie die Haupteinheit (A).
Betrachten Sie das Gerät von vorn, und schieben Sie es in die
Position, in der der Überhang an den linken und rechten Seiten
gleich ist. Schrauben Sie, immer noch von vorn, die Haupteinheit
mit den vier mittleren Flachkopfschrauben 3 fest.
L
62
CLP-811/611
CLP-611 Assembly Procedure/Montage des CLP-611/CLP-611 Montage Procédure/Montaje del modelo CLP-611
Page 67
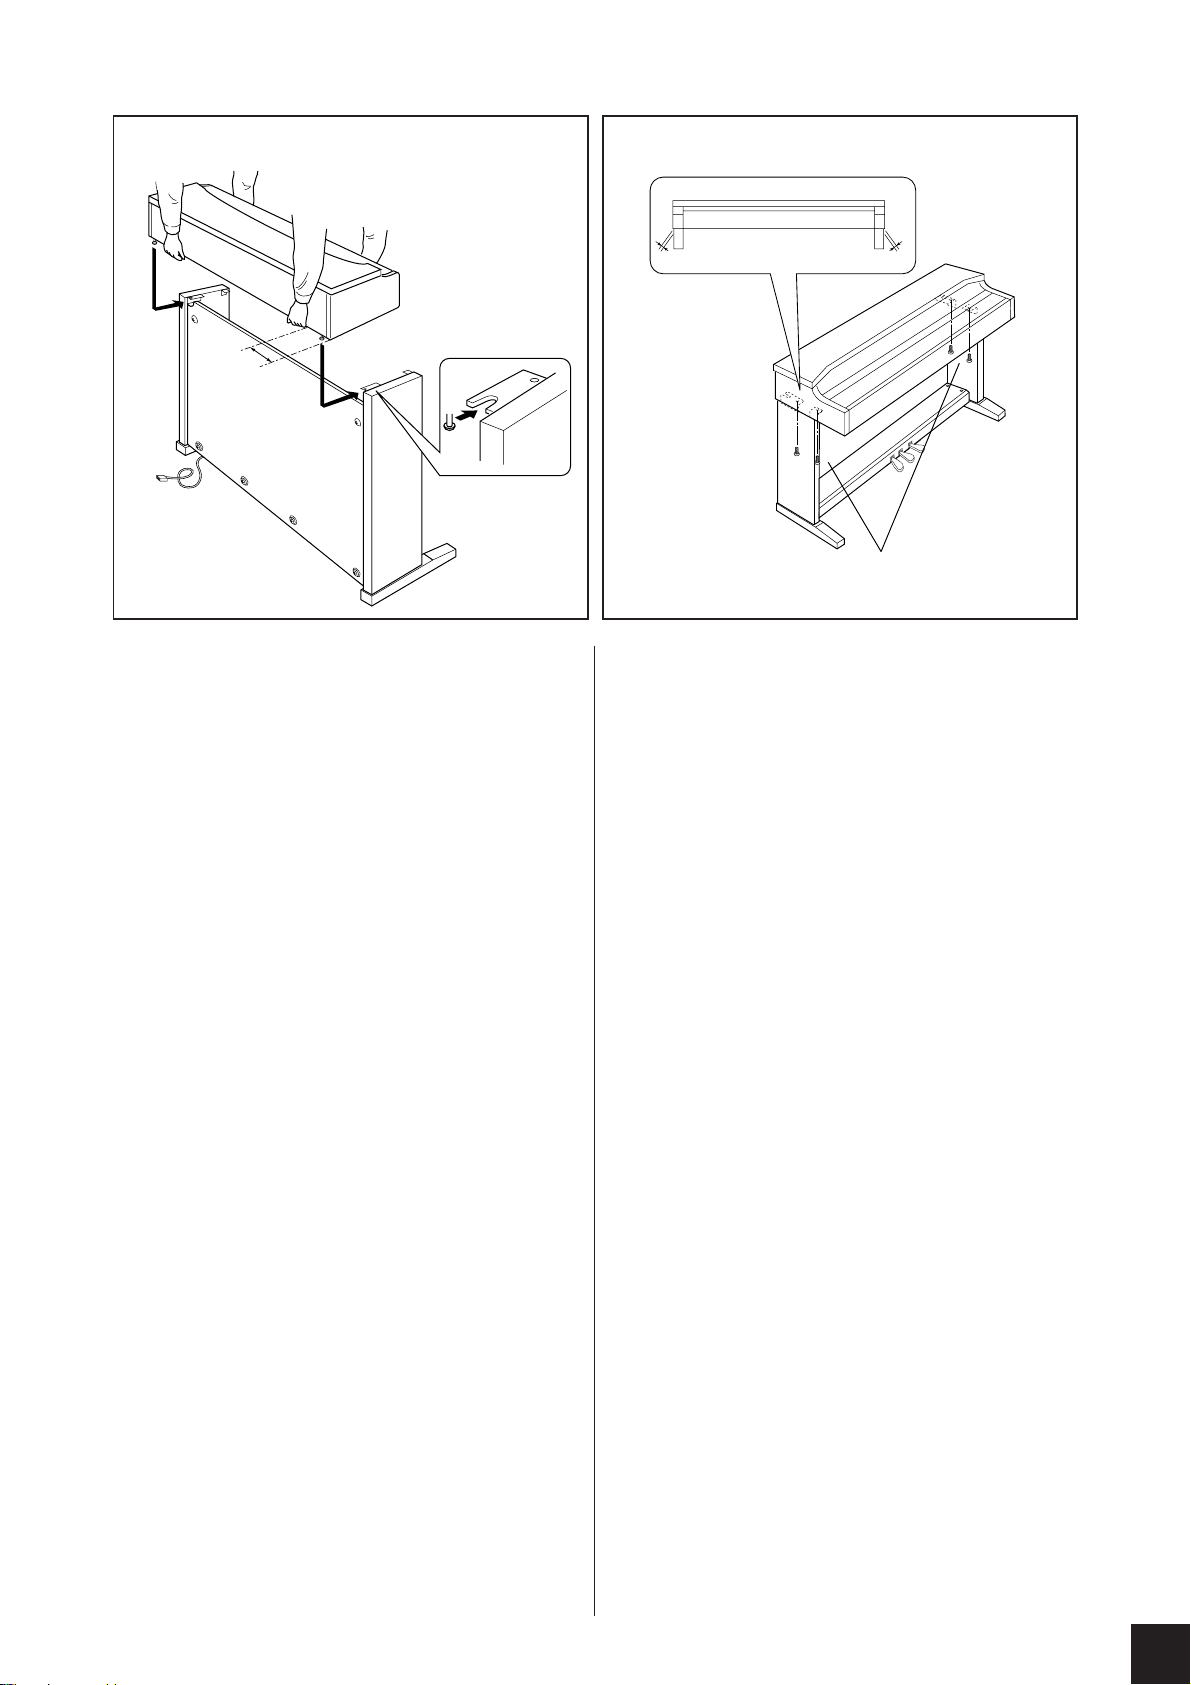
At least 4 inches (10 cm)
Mindestens 10 cm
Minimum 10 cm
Mínimo 10 cm
R
87
Four medium flathead screws 3
L
Vier mittlere Flachkopfschrauben 3
Quatre vis moyennes à tête plate 3
Cuatro tornillos medianos de cabeza plana 3
(6✕20mm)
5 Installer le panneau inférieur (E)
Défaire en premier lieu le cordon de la pédale fixé à la partie
inférieure (E). Aligner ensuite les extrémités de la partie
inférieure (E) sur les extrémités de la partie latérale droite (C) et
de la partie latérale gauche (B). Finalement, visser en place à
l’aide des quatre vis moyennes à tête ronde 2.
6 Installer le panneau arrière (D)
Reposer le bas du panneau arrière (D) sur le rebord des pieds (des
deux panneaux latéraux) et faire pivoter le dessus du panneau
pour le mettre en place. Fixer la partie supérieure du panneau
arrière aux deux panneaux latéraux à l’aide des petites vis à tête
ronde 5. Attacher la partie inférieure du panneau arrière à quatre
endroits à l’aide des vis pointues 4.
7 Installer la partie principale (A)
Soulever la partie principale, en la soutenant par le fond comme
illustré sur le diagramme. Toujours veiller à saisir le panneau à
au moins 10 cm des extrémités.
8 Fixer la partie principale.
Regarder l’appareil de face et régler sa position vers la droite ou
vers la gauche pour que la partie principale dépasse de manière
identique à gauche et à droite. Ensuite, continuer de travailler de
face et visser les quatre vis moyennes à tête plate 3.
5 Instale el panel inferior (E).
Desenrolle el cable del pedal fijado en la base del panel inferior
(E). Seguidamente, alinee los bordes del panel inferior (E) con
los paneles laterales derecho (C) e izquierdo (B). Acople el panel
(E) con los cuatro tornillos medianos de cabeza redonda 2.
6 Instale el panel de fondo (D).
Apoye la base del panel de fondo (D) sobre los rebordes de las
patas (en ambos lados), y gire la parte superior del panel para
colocarlo en su posición. Asegure la parte alta del panel de fondo
a los dos laterales empleando los tornillos cortos de cabeza
redonda 5. Atornille la parte baja del panel de fondo a cuatro
puntos empleando los tornillos cónicos 4.
7 Instale la unidad principal (A).
Levante la unidad principal, sosteniéndola por la base como se
muestra en la ilustración. Procure sujetar el panel como mínimo a
10 cm de los bordes.
8 Asegure la unidad principal (A) en su posi-
ción.
Sitúese delante de la unidad y ajuste los laterales derecho e
izquierdo de forma que el saliente sea equidistante por ambos
lados. A continuación, y también desde la parte frontal, asegúrelos en su posición con los cuatro tornillos medianos de cabeza
plana 3.
CLP-811/611
CLP-611 Assembly Procedure/Montage des CLP-611/CLP-611 Montage Procédure/Montaje del modelo CLP-611
63
Page 68
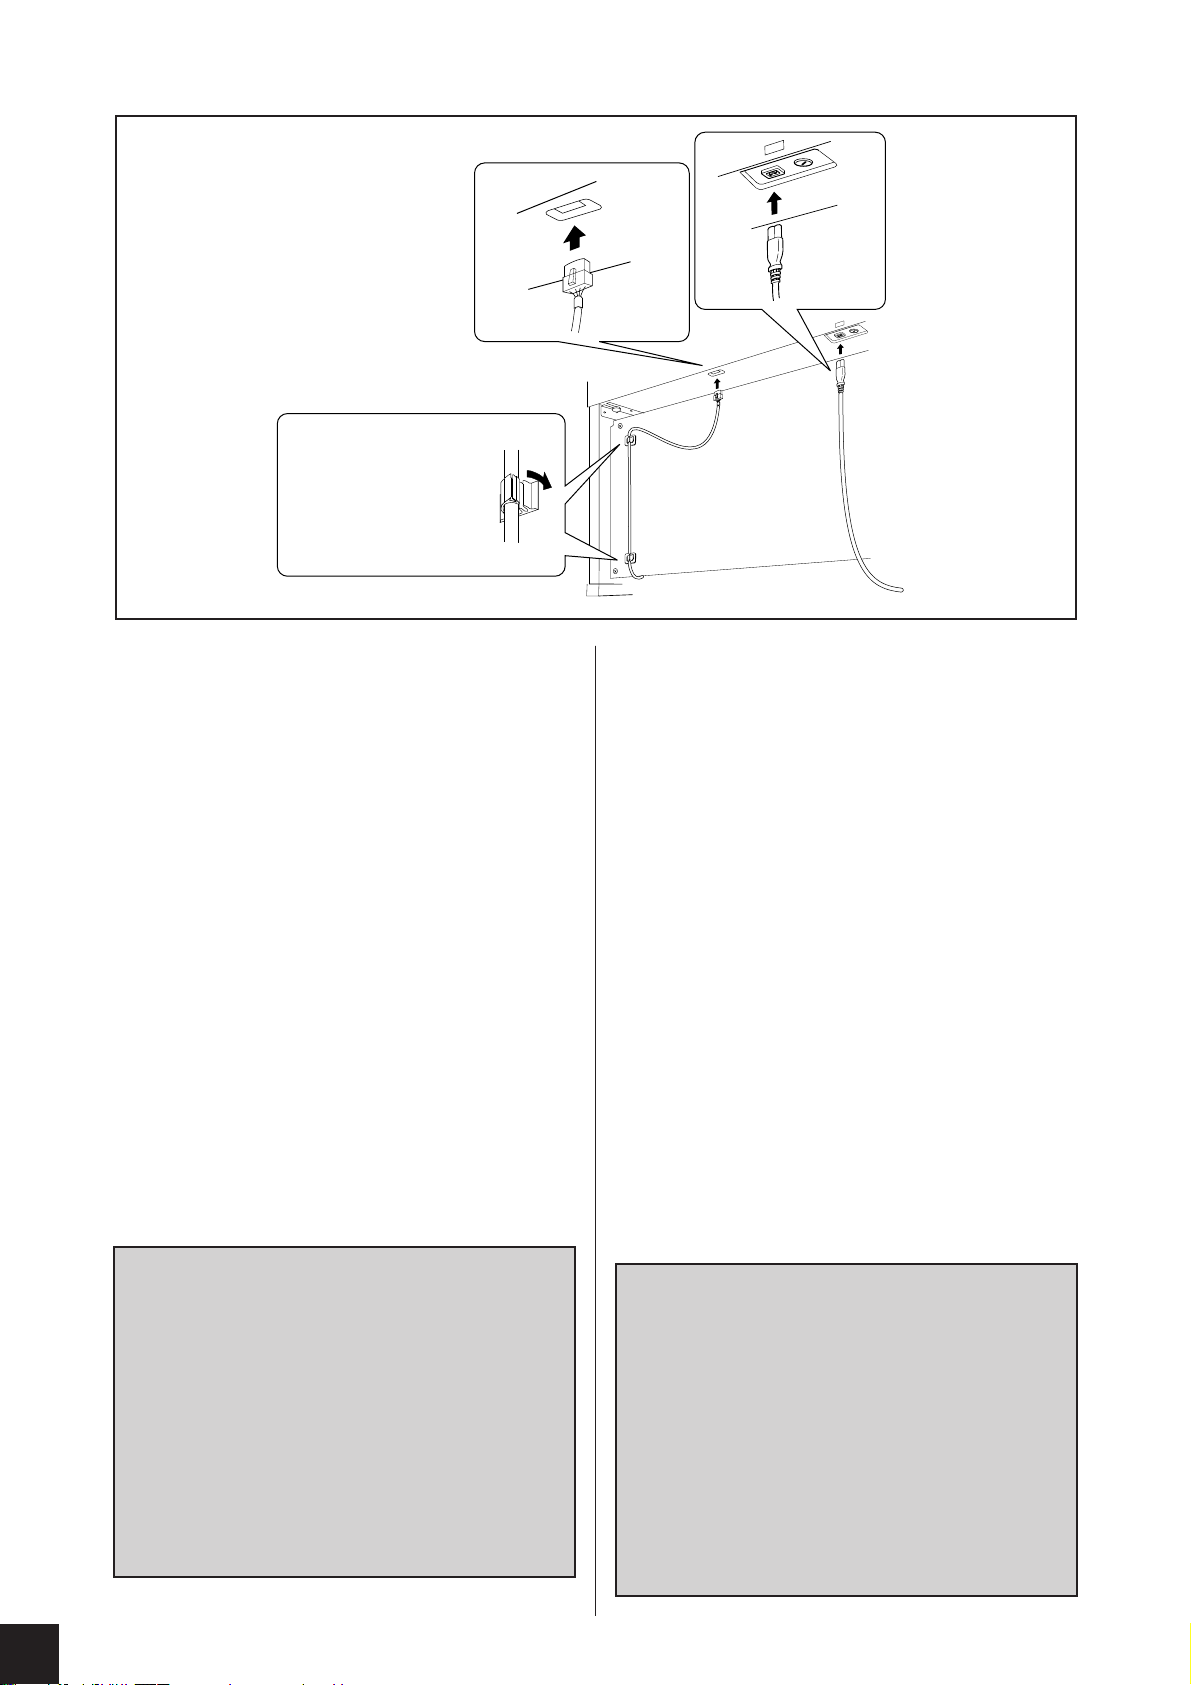
9
Two cord clamps 6
Zwei Kabelhalter 6
Deux pinces de fixation pour câbles 6
Dos bridas de cable 6
T
LE
IN
C
A
AC INLET
9 Connect up the pedal cord and power cord.
Hold the pedal-cord connector so that the hook is facing
away from the backboard, and plug it into the main unit.
Then adhere the two cord clamps 6 to the backboard at
the locations shown in the diagram. Set the pedal cord
securely into the clamps. Finally, connect the power cord
(F) to the main unit.
0 Extend the adjuster.
Turn the adjuster so that it is set firmly against the floor.
A Set the voltage selector (if applicable),
and plug the power cord into a standard
wall outlet.
If your unit is equipped with a voltage selector, make sure
that the value is set to the voltage level used in your area
(110V, 127V, 220V or 240V). To change the setting, turn
the selector (with a screwdriver) so that the appropriate
value is aligned with the pointer on the panel. Note that
the selector is set to 240V at time of shipment.
After completing the adjustment, you can plug the cord
into a wall outlet. In some areas you may need to attach a
(supplied) adaptor to the plug to enable connection to the
standard local outlet.
■ After completing the assembly, please
check as follows.
• Are there any parts left over?
➔ Review the assembly procedure and correct any errors.
• Is the Clavinova clear of doors and other movable fixtures?
➔ Move the Clavinova to an appropriate location.
• Does the Clavinova make a rattling noise when you shake
it?
➔ Tighten all screws.
• Does the lower board rattle or give way when you step on
the pedals?
➔ T urn the adjuster so that it is set firmly against the floor.
• Are the pedal and power cords inserted securely into the
inlets?
➔ Check the connections.
• If the main unit creaks or is otherwise unsteady when you
play on the keyboard, refer to the assembly diagrams and
retighten all screws.
9 Schließen Sie das Pedalkabel und das Netz-
kabel an.
Halten Sie den Stecker des Pedalkabels so, daß der Haken zur
Tastenseite weist, und stecken Sie ihn an die Haupteinheit.
Bringen Sie dann die beiden Kabelhalter 6 an der Rückseite an
den in der Abbildung gezeigten Positionen an. Stecken Sie das
Pedalkabel sicher in die Kabelhalter. Stecken Sie zum Schluß das
Netzkabel (F) an die Haupteinheit.
0 Ziehen Sie den Höhenversteller heraus.
Drehen Sie den Höhenversteller so, daß er fest gegen den
Fußboden drückt.
A Stellen Sie den Spannungsumschalter ein
(wenn nötig), und stecken Sie dann das
Netzkabel in eine Netzsteckdose.
Wenn Ihr Gerät mit einem Spannungsumschalter ausgestattet ist,
vergewissern Sie sich, daß der eingestellte Wert auf die
Versorgungsspannung Ihrer Gegend eingestellt ist (110 V, 127 V,
220 V oder 240 V). Um die Einstellung zu ändern, drehen Sie den
Schalter (mit einem Schraubendreher), so der korrekte Wert mit
dem Zeiger auf dem Panel übereinstimmt. Beachten Sie, daß der
Schalter zur Zeit der Auslieferung auf 240 V eingestellt ist.
Wenn Sie die Einstellung vorgenommen haben, können Sie das
Kabel in eine Netzsteckdose stecken. In einigen Gegenden
müssen Sie evtl. einen (mitgelieferten) Adapter am Stecker
anbringen, um diesen in die Netzsteckdose einstecken zu können.
■ Wenn der Zusammenbau beendet ist, prüfen
Sie bitte folgende Dinge:
• Sind Teile übrig geblieben?
➔ Gehen Sie den Vorgang des Zusammenbaus noch einmal durch
und korrigieren Sie eventuelle Fehler.
• Befindet sich das Clavinova weit genug v on Türen und anderen beweglichen V orrichtungen entfernt?
➔ Bewegen Sie das Clavinova an einen entsprechend sicheren
Ort.
• Macht das Clavinova Klappergeräusche, wenn Sie es schütteln?
➔ Ziehen Sie alle Schrauben fest.
• Klappert die Unterseite oder gibt sie nach, wenn Sie das Pedal treten?
➔ Drehen Sie den Höhenversteller, bis er fest auf dem Fußboden
steht.
• Sind Pedal- und Netzkabel richtig an den Buchsen angeschlossen?
➔ Prüfen Sie die Verbindung.
• Wenn die Haupteinheit knarrt oder beim Spielen wackelt, betrachten Sie die Abbildungen und ziehen Sie alle Schrauben noch einmal
nach.
64
CLP-811/611
CLP-611 Assembly Procedure/Montage des CLP-611/CLP-611 Montage Procédure/Montaje del modelo CLP-611
Page 69
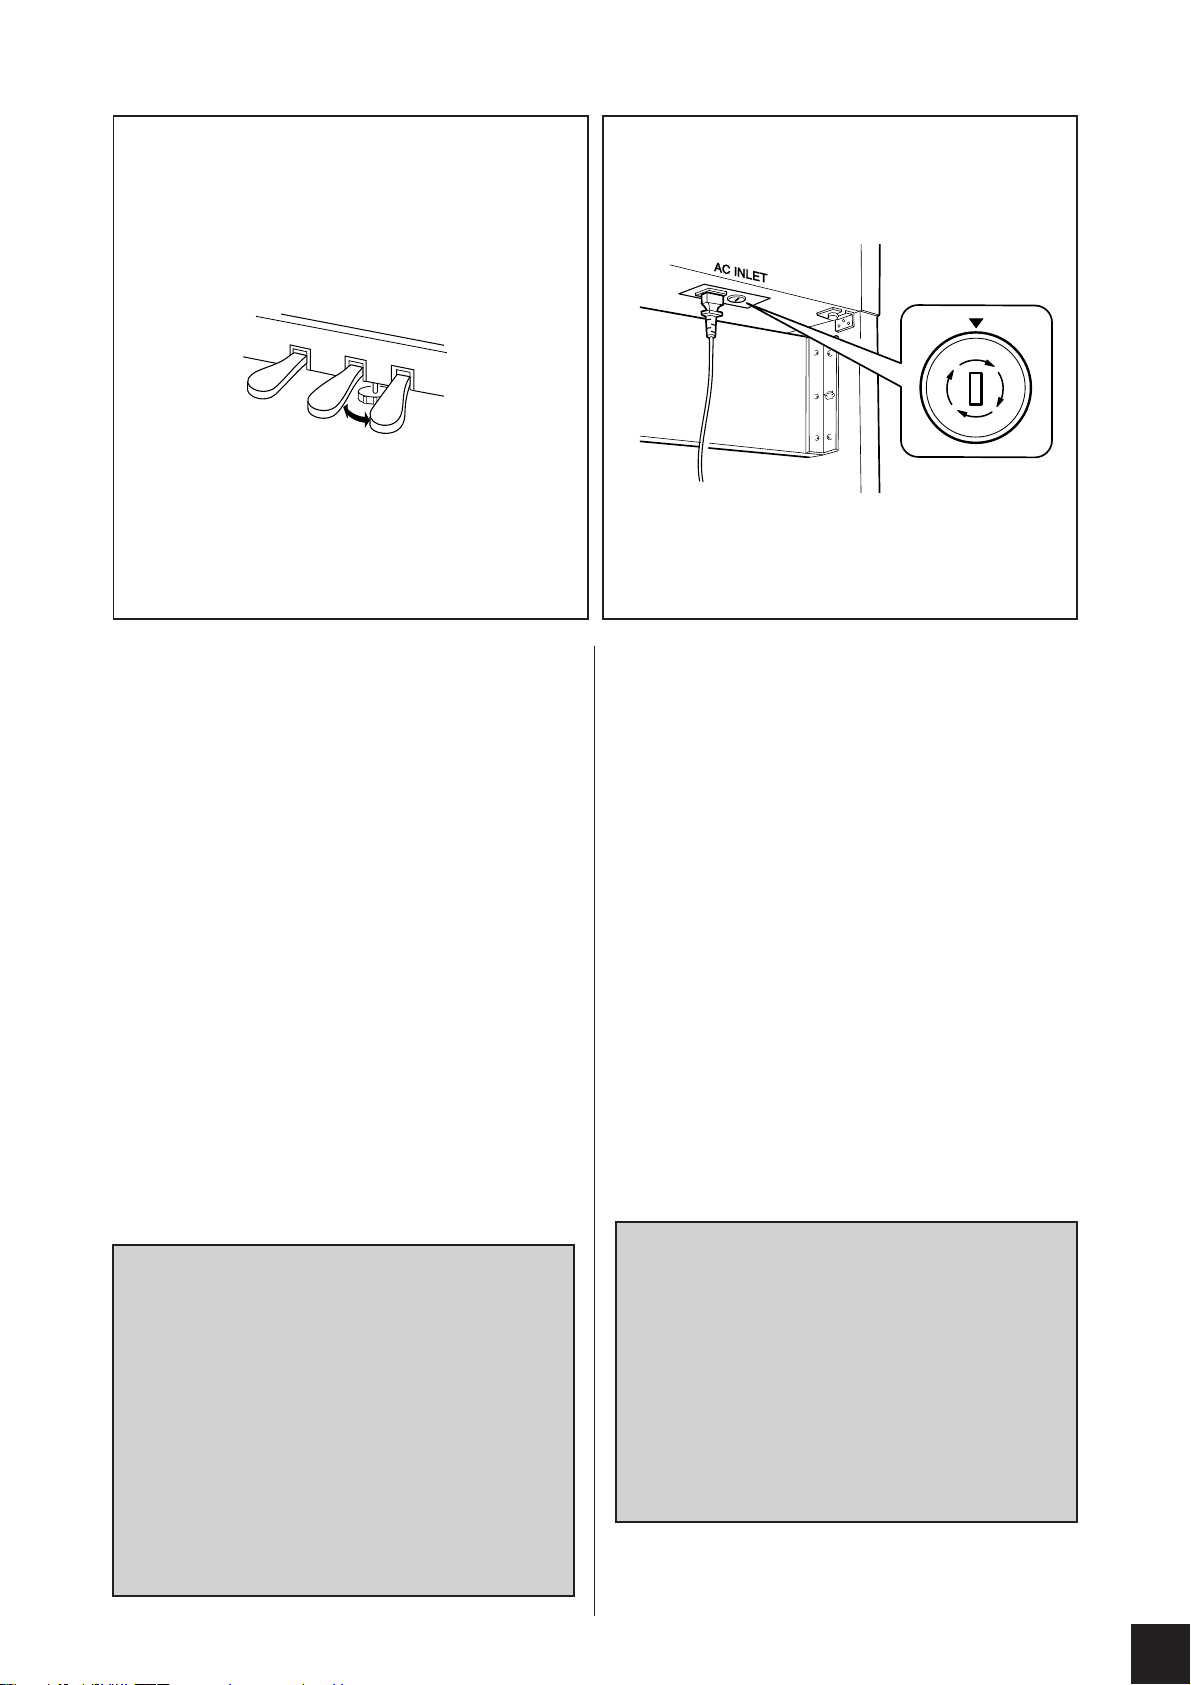
0 A
240
110
220
127
9 Raccorder le cordon des pédales et le cordon
d’alimentation
Tenir la fiche du cordon des pédales de telle sorte que le crochet
soit tourné à l’opposé du panneau arrière et la brancher dans la
partie principale. Appliquer ensuite les deux pinces de fixation du
cordon 6 sur le panneau arrière aux emplacements marqués sur
le diagramme. Faire passer le cordon des pédales fermement dans
les pinces de fixation. Finalement, raccorder le cordon d’alimentation (F) à la partie principale.
0 Etendre le stabilisateur
Tourner le stabilisateur afin qu’il repose fermement sur le sol.
A Régler le sélecteur de tension (le cas échéant)
et brancher le cordon d’alimentation dans une
prise secteur normale.
Si votre appareil est équipé d’un sélecteur de tension, toujours
s’assurer qu’il est bien positionné sur la tension en vigueur dans
votre région (110V, 127V, 220V ou 240V). Pour modifier le
réglage, tourner le sélecteur (à l’aide d’un tournevis) de sorte que
la valeur souhaitée s’aligne sur le pointeur du panneau. Le
sélecteur est réglé sur 240V à la sortie d’usine.
Après avoir effectué les réglages, vous pouvez brancher le cordon
dans une prise secteur. Dans certaines régions, vous devrez peutêtre relier la fiche à un adaptateur (fourni) pour pouvoir raccorder
le Clavinova à une prise secteur locale.
■ Lorsque le montage est terminé, veuillez
mener à bien les vérifications suivantes.
• Reste-t-il des pièces non utilisées?
➔ Passer en revue la procédure de montage et corriger toute
erreur éventuelle.
• Le Clavinova est-il placé à l’écart des portes et de toute autre
structure mobile?
➔ Déplacer le Clavinova vers un emplacement approprié.
• Lorsque vous secouez quelque peu le Clavinova, entendez-vous
un cliquetis?
➔ Serrer convenablement toutes les vis.
• Le panneau inférieur fait-il du bruit ou s’écarte-t-il lorsque vous
appuyez sur les pédales?
➔ Tourner le stabilisateur de sorte que le Clavinova repose
fermement sur le sol.
• Les cordons des pédales et d’alimentation sont-ils bien enfoncés
dans les prises?
➔ Vérifier toutes les connexions.
• Si la partie principale de l’appareil craque ou est instable lorsque
vous jouez sur le clavier, consulter les diagrammes de montage et
resserrer toutes les vis.
9 Conecte el cable del pedal y el cable de
alimentación.
Sostenga el conector del pedal del cable de manera que el gancho
quede orientado en sentido contrario al panel de fondo, y
conéctelo a la unidad principal. Después adhiera las dos bridas de
cable 6 al panel de fondo, en las posiciones indicadas en el
dibujo. Asegure con decisión el cable del pedal a las bridas. Por
último, conecte el cable de alimentación (F) a la unidad principal.
0 Regule el estabilizador.
Gire el estabilizador hasta que apoye firmemente sobre el suelo.
A Ajuste el selector de tensión (si es necesario),
y conecte el cable de alimentación a una toma
mural estándar.
Si la unidad está provista de un selector de tensión, asegúrese de
que coincide con la tensión de red de su localidad (110 V, 127 V,
220 V o 240 V). Para cambiar el ajuste, gire el selector (con un
destornillador) hasta que la aguja del panel esté alineada con el
valor adecuado. Observe que el selector viene ajustado a 240 V
en el momento de salir de fábrica.
Una vez realizado el ajuste, puede conectar el cable de
alimentación a una toma mural. En algunas zonas quizás sea
necesario acoplar un adaptador (incluido con el equipo) al
enchufe para poder conectarlo a la toma mural.
■ Cuando haya concluido el montaje,
compruebe los siguientes puntos:
• ¿Ha quedado alguna pieza sin instalar?
➔ Revise el procedimiento de montaje y corrija cualquier error
que se haya podido cometer.
• ¿Está el Clavinova alejado del recorrido de puertas y muebles?
➔ Traslade el Clavinova a una posición adecuada.
• ¿Suena algún ruido de holgura cuando se mueve el Clavinova?
➔ Apriete con firmeza todos los tornillos.
• ¿Vibra o cede el panel inferior cuando se pisan los pedales?
➔ Gire el estabilizador hasta que apoye firmemente sobre el
suelo.
• ¿Están perfectamente insertados los cables de pedal y alimentación en los conectores?
➔ Revise las conexiones.
• Si la unidad principal cruje o presenta algún signo de inestabilidad
cuando se toca el teclado, consulte los esquemas de montaje y
vuelva a apretar todos los tornillos.
CLP-811/611
CLP-611 Assembly Procedure/Montage des CLP-611/CLP-611 Montage Procédure/Montaje del modelo CLP-611
65
Page 70
FCC INFORMATION (U.S.A.)
1. IMPORTANT NOTICE: DO NOT MODIFY THIS UNIT!
This product, when installed as indicated in the instructions contained in this manual, meets FCC requirements. Modifications not
expressly approved by Yamaha may void your authority, granted
by the FCC, to use the product.
2. IMPORTANT: When connecting this product to accessories and/
or another product use only high quality shielded cables. Cable/s
supplied with this product MUST be used. Follow all installation
instructions. Failure to follow instructions could void your FCC
authorization to use this product in the USA.
3. NOTE: This product has been tested and found to comply with
the requirements listed in FCC Regulations, Part 15 for Class “B”
digital devices. Compliance with these requirements provides a
reasonable level of assurance that your use of this product in a
residential environment will not result in harmful interference with
other electronic devices. This equipment generates/uses radio
frequencies and, if not installed and used according to the instructions found in the users manual, may cause interference harmful
to the operation of other electronic devices. Compliance with FCC
* This applies only to products distributed by YAMAHA CORPORATION OF AMERICA.
IMPORTANT NOTICE FOR THE UNITED KINGDOM
Connecting the Plug and Cord
IMPORTANT. The wires in this mains lead are coloured in accordance with the following code:
BLUE : NEUTRAL
BROWN : LIVE
As the colours of the wires in the mains lead of this apparatus may
not correspond with the coloured makings identifying the terminals
in your plug proceed as follows:
The wire which is coloured BLUE must be connected to the terminal which is marked with the letter N or coloured BLACK.
The wire which is coloured BROWN must be connected to the
terminal which is marked with the letter L or coloured RED.
Making sure that neither core is connected to the earth terminal of
the three pin plug.
regulations does not guarantee that interference will not occur in
all installations. If this product is found to be the source of interference, which can be determined by turning the unit “OFF” and
“ON”, please try to eliminate the problem by using one of the
following measures:
Relocate either this product or the device that is being affected by
the interference.
Utilize power outlets that are on different branch (circuit breaker
or fuse) circuits or install AC line filter/s.
In the case of radio or TV interference, relocate/reorient the antenna. If the antenna lead-in is 300 ohm ribbon lead, change the
lead-in to co-axial type cable.
If these corrective measures do not produce satisfactory results,
please contact the local retailer authorized to distribute this type
of product. If you can not locate the appropriate retailer, please
contact Yamaha Corporation of America, Electronic Service Division, 6600 Orangethorpe Ave, Buena Park, CA90620
The above statements apply ONLY to those products distributed
by Yamaha Corporation of America or its subsidiaries.
• This applies only to products distributed by Yamaha-Kemble Music (U.K.) Ltd.
CAUTION: TO PREVENT ELECTRIC SHOCK, MATCH WIDE
BLADE OF PLUG TO WIDE SLOT, FULLY INSERT.
ATTENTION: POUR ÉVITER LES CHOCS ÉLECTRIQUES,
INTRODUIRE LA LAME LA PLUS LARGE DE LA FICHE DANS LA
BORNE CORRESPONDANTE DE LA PRISE ET POUSSER JUSQU’AU
FOND.
• This applies only to products distributed by Yamaha Canada Music Ltd.
• Ceci ne s’applique qu’aux produits distribués par Yamaha Canada Musique Ltée.
Page 71

IMPORTANT SAFETY INSTRUCTIONS
INFORMATION RELATING TO PERSONAL INJURY, ELECTRICAL SHOCK,
AND FIRE HAZARD POSSIBILITIES HAS BEEN INCLUDED IN THIS LIST.
WARNING- When using any electrical or electronic prod-
uct, basic precautions should always be followed. These precautions include, but are not limited to, the following:
1. Read all Safety Instructions, Installation Instructions,
Special Message Section items, and any Assembly Instructions
found in this manual BEFORE marking any connections, including connection to the main supply.
2. Main Power Supply Verification: Yamaha products are
manufactured specifically for the supply voltage in the area
where they are to be sold. If you should move, or if any doubt
exists about the supply voltage in your area, please contact
your dealer for supply voltage verification and (if applicable)
instructions. The required supply voltage is printed on the
name plate. For name plate location, please refer to the graphic
found in the Special Message Section of this manual.
3. This product may be equipped with a polarized plug
(one blade wider than the other). If you are unable to insert the
plug into the outlet, turn the plug over and try again. If the
problem persists, contact an electrician to have the obsolete
outlet replaced. Do NOT defeat the safety purpose of the plug.
4. Some electronic products utilize external power sup-
plies or adapters. Do NOT connect this type of product to any
power supply or adapter other than one described in the owners
manual, on the name plate, or specifically recommended by
Yamaha.
5. WARNING: Do not place this product or any other
objects on the power cord or place it in a position where anyone could walk on, trip over, or roll anything over power or
connecting cords of any kind. The use of an extension cord is
not recommended! If you must use an extension cord, the
minimum wire size for a 25' cord (or less) is 18 AWG. NOTE:
The smaller the AWG number, the larger the current handling
capacity. For longer extension cords, consult a local electrician.
6. Ventilation: Electronic products, unless specifically
designed for enclosed installations, should be placed in locations that do not interfere with proper ventilation. If instructions for enclosed installations are not provided, it must be
assumed that unobstructed ventilation is required.
7. Temperature considerations: Electronic products
should be installed in locations that do not significantly contribute to their operating temperature. Placement of this product close to heat sources such as; radiators, heat registers and
other devices that produce heat should be avoided.
8. This product was NOT designed for use in wet/damp loca-
tions and should not be used near water or exposed to rain. Examples of wet/damp locations are; near a swimming pool, spa, tub,
sink, or wet basement.
9. This product should be used only with the components
supplied or; a cart, rack, or stand that is recommended by the
manufacturer. If a cart, rack, or stand is used, please observe all
safety markings and instructions that accompany the accessory
product.
10. The power supply cord (plug) should be disconnected from
the outlet when electronic products are to be left unused for extended periods of time. Cords should also be disconnected when
there is a high probability of lightening and/or electrical storm
activity.
11. Care should be taken that objects do not fall and liquids are
not spilled into the enclosure through any openings that may exist.
12. Electrical/electronic products should be serviced by a
qualified service person when:
a. The power supply cord has been damaged; or
b. Objects have fallen, been inserted, or liquids have been
spilled into the enclosure through openings; or
c. The product has been exposed to rain: or
d. The product dose not operate, exhibits a marked change
in performance; or
e. The product has been dropped, or the enclosure of the
product has been damaged.
13. Do not attempt to service this product beyond that de-
scribed in the user-maintenance instructions. All other servicing
should be referred to qualified service personnel.
14. This product, either alone or in combination with an ampli-
fier and headphones or speaker/s, may be capable of producing
sound levels that could cause permanent hearing loss. DO NOT
operate for a long period of time at a high volume level or at a
level that is uncomfortable. If you experience any hearing loss or
ringing in the ears, you should consult an audiologist.
IMPORTANT: The louder the sound, the shorter the time period
before damage occurs.
15. Some Yamaha products may have benches and/or acces-
sory mounting fixtures that are either supplied as a part of the
product or as optional accessories. Some of these items are designed to be dealer assembled or installed Please make sure that
benches are stable and any optional fixtures (where applicable) are
well secured BEFORE using. Benches supplied by Yamaha are
designed for seating only. No other uses are recommended.
PLEASE KEEP THIS MANUAL
92-469-2
Page 72
,,,,,,,,,,,,,,,
,,,,,,,,,,,,,,,
,,,,,,,,,,,,,,,
,,,,,,,,,,,,,,,
,,,,,,,,,,,,,,,
,,,,,,,,,,,,,,,
,,,,,,,,,,,,,,,
,,,,,,,,,,,,,,,
,,,,,,,,,,,,,,,
,,,,,,,,,,,,,,,
,,,,,,,,,,,,,,,
,,,,,,,,,,,,,,,
M.D.G., EMI Division © Yamaha Corporation 1996
VU29860 604CRCP3.3-01A0 Printed in Japan
,,,,,,,,,,,,,,,
,,,,,,,,,,,,,,,
,,,,,,,,,,,,,,,
,,,,,,,,,,,,,,,
Page 73

documentation manual, user maintenance, brochure, user reference, pdf manual
This file has been downloaded from:
User Manual and User Guide for many equipments like mobile phones, photo cameras, monther board, monitors, software, tv, dvd, and othes..
Manual users, user manuals, user guide manual, owners manual, instruction manual, manual owner, manual owner's, manual guide,
manual operation, operating manual, user's manual, operating instructions, manual operators, manual operator, manual product,
 Loading...