

Page 1
Contents
What is the Card Filer?..................................2
Starting the Card Filer...................................3
Top display......................................................4
Menu Bar ........................................................4
MIDI Device Setup .........................................5
MIDI Port Setup (Window s).... .. .. ... .. .. ... .. .. .5
OMS Sett ings (Macinto sh) ........ .. .. ... .. .. ... .. 6
Receiving Files ...............................................7
Transmitting Files...........................................9
Controls ........................................................11
Deleting files and fo lders.. .. ... .. .. ... .. ... .. .. ..1 1
Renaming files and fold ers...... .. ... .. .. ... .. .. 12
Converting SMFs .........................................13
Error Messages............................................15
• Click on t he red-co lored t ext to jump t o t he related item in t his m anual.
• The softw are and t his o w n er’s manual are exclusive c o p yright s o f Yam aha Co rp o ration.
• Cop ying o f t he so ft ware or reproduc t ion o f t his m anual in who le or in p art by any means is
expressly forbidd en without t he written c o nsent of t he m anufac t urer.
• Yamaha makes no rep resentations o r warranties with regard t o t he use o f t h e soft ware and
document ation and cannot be held responsib le for t he results o f t he use o f t his m anual and t he
software.
• Cop ying o f t he c o mmercially available music sequenc e data and/or digital audio files is st rict ly
prohibited exc ep t fo r yo ur personal use.
• The com p any nam es and product nam es in th is Ow ner’s Manual are the tradem arks or
registered tradem arks of t heir respect ive co m p anies.
• The screen displays as illust rated in this Owner’s Manual are for inst ruc t ional p urp o ses, and
may app ear so m ew hat different from t he sc reens w hic h ap pear on your c o m puter.
This owner’s manual assumes that yo u are already familiar with basic Windo ws/ M ac into sh
operation. If you are not ,please refer to t he o wner’s manual which c am e with your
Windo w s /Mac OS so ft ware before using Card Filer.
For information ab ou t hardware requirem ent s, t he interco nnec t ion o f d evices and t he
installat ion o f t he C ard Filer software, refer to t he sep arate “Installation Guide” as well as the
Owner’s Manual for the resp ec t ive MIDI device.
©1999 Yamaha Corporation. All rights reserved.
1
Page 2
What is the Card Filer?
With t he Card Filer, you can receive and transm it d at a b et ween your co m puter and your M IDI
instrument . You c an also u se it t o manage the files stored on you r M IDI instrument’s Memo ry Card
via your com p u t er. The c ard filer can perform t he fo llowing four func t ions.
Receive MIDI instrument Data
You c an save your M IDI instrument’s Memo ry Card d at a o n yo ur c o mput er (Page 8).
Receive
L
LINE 1MIC
/
MONO R
/
LINE 2
FOOT
GAIN
A/D INPUT
FOOT
VOLUME
CONTROLLER
FILTER EFFECT
CUTOFF RESONANCE
EG
ATTACK
DECAY SUSTAIN
SCENE MIXER
1 2
CONTROL PAN
REVERB CHORUS
SUSTAINPHONES INDIVIDUAL OUTPUT21OUTPUT
RELEASE
ARPEGGIO
VEL RATE
VOLUME
OCTAVE
DOWN UP
OUTIN THRU
FOOT
SWITCH
MODE
PHRASE CLIP
PORTAMENTO
VOICE PERFORM
UTILITY CARD
REC
PITCH
ON
/
OFF
HOLD
SEQ PLAY
/
ON
OFF
PLAY
/
STOP
TEMPO
SYSTEM A B C 1 2
JOB
EDIT
COMPARE
STORE
SHIFT PAGE PART
/
ELEMENT
Memory Card
MEMORY
EF
MASTER
PRE1 A B C D E F G H
PRE2
BYPASS
KEYBOARD
DRUM
INT
EXT
EXIT ENTER
DRUM
PLG1 PLG2
/
NO INC/YES
DEC
DATA
MUSIC SYNTHESIZER
Realtime Control
Extended Plug-in System
1 2 3 4 1 2 3 4
ELEMENTSELECT ELEMENTON
1 2 3 4 5 6 7 8
GENERAL
QED ARPEGGIO CONTROL COM LFO EFFECT
9 10 11 12 13 14 15 16
OSC PITCH FILTER AMPLITUDE LFO EQ PLG
POWERCARDmLANMIDIHOST SELECTTO HOSTBREATH
BANK
/
OFF
PROGRAM
PART
CS6x etc...Computer
Transmit MIDI instrument Data
You c an t ransm it data from yo ur c o mput er t o your M IDI instrument’s Memo ry Card (Page 9).
Transmit
L
LINE 1MIC
/
MONO R
/
LINE 2
FOOT
GAIN
A/D INPUT
FOOT
VOLUME
CONTROLLER
FILTER EFFECT
CUTOFF RESONANCE
EG
ATTACK
DECAY SUSTAIN
SCENE MIXER
1 2
CONTROL PAN
REVERB CHORUS
SUSTAINPHONES INDIVIDUAL OUTPUT21OUTPUT
RELEASE
ARPEGGIO
VEL RATE
VOLUME
OCTAVE
DOWN UP
OUTIN THRU
FOOT
SWITCH
MODE
PHRASE CLIP
PORTAMENTO
VOICE PERFORM
UTILITY CARD
REC
PITCH
ON
/
OFF
HOLD
SEQ PLAY
/
ON
OFF
PLAY
/
STOP
TEMPO
SYSTEM A B C 1 2
JOB
EDIT
COMPARE
STORE
SHIFT PAGE PART
/
ELEMENT
Memory Card
MEMORY
EF
MASTER
PRE1 A B C D E F G H
PRE2
BYPASS
KEYBOARD
DRUM
EXT
INT
EXIT ENTER
DRUM
PLG1 PLG2
/
NO INC/YES
DEC
DATA
MUSIC SYNTHESIZER
Realtime Control
Extended Plug-in System
1 2 3 4 1 2 3 4
ELEMENTSELECT ELEMENTON
1 2 3 4 5 6 7 8
GENERAL
QED ARPEGGIO CONTROL COM LFO EFFECT
9 10 11 12 13 14 15 16
OSC PITCH FILTER AMPLITUDE LFO EQ PLG
POWERCARDmLANMIDIHOST SELECTTO HOSTBREATH
BANK
/
OFF
PROGRAM
PART
CS6x etc...Computer
Manage Files on Memory Card
You c an d elete and rename files/fold ers on your M IDI instrument’s Memo ry Card using yo ur
comput er (Page 11).
Delete
abcd.mid
Rename
abcd.mid efgh.mid
2
Page 3
SMF Format Conversion
You c an c o nvert Standard MIDI Files on your c o m puter from Form at 1 t o Form at 0 so t h at t hey
can b e played b ac k o n your MIDI instrum ent (Page 13).
SMF Format1
1 Track
2 Track
3 Track
4 Track
16 Track
Exchange
SMF Format0
1~16 Track
Starting the Card Filer
n You w ill get an error m essage if your c o m puter’s MIDI driver has no t b een p roperly inst alled or if your c o m puter and
MIDI instrument are not interco nnec t ed c o rrect ly. For details about Error Messages, see p age 1 5 .
Once you h ave co nnec t ed your MIDI instrum ent t o yo ur computer and installed the C ard Filer
software, you are read y to st art using the Card Filer.
On Windows
Click [Start], go to Program Files → YAMAHA Card Filer → Card Filer and click the “Card Filer” icon.
On Macintosh
n If you are using the Card Filer o n a M ac int os h comp ut er, open th e “ C ho o ser” from t he Ap ple menu and t urn off
“Ap p le Talk.”
Open t he “YAMAHA Card Filer” fold er and doub le-click the “Card Filer” ic on .
3
Page 4
Top display
When you st art the Card Filer, t h e “ t o p disp lay” will ap p ear as sho wn below.
1
2
3
4
1 Opens the “ Rec eive” w ind o w where you can transfer d at a from your M IDI instrument’s Memo ry
Card to your computer, then save it.
2 Opens the “ Transm it” w indo w w here you c an t ransfer d ata from yo ur computer to your MIDI
instrument .
3 Opens the “ C o nt rol” window w here you c an d elete and rename files/folders o n your M IDI
instrument .
4 Opens the “ SM F Con vert” window where you can c o nvert SM F files on your co m puter from
Format 1 t o Format 0 .
Menu Bar
File
Transfer
Setup
Help
Quits the Card Filer application.
Same as the [Receive] button of the top display.
Same as the [Transmit] button of the top display.
Same as the [Control] button of the top display.
Same as the [SMF Convert] button of the top display.
Opens the “MIDI Port Setup” window
where you can specify your computer’s
“MIDI IN Port” and “MIDI OUT Port” used to
communicate with your MIDI instrument.
Opens the Card Filer Manual PDF file.
Displays the Card Filer’s version, etc.
4
Page 5
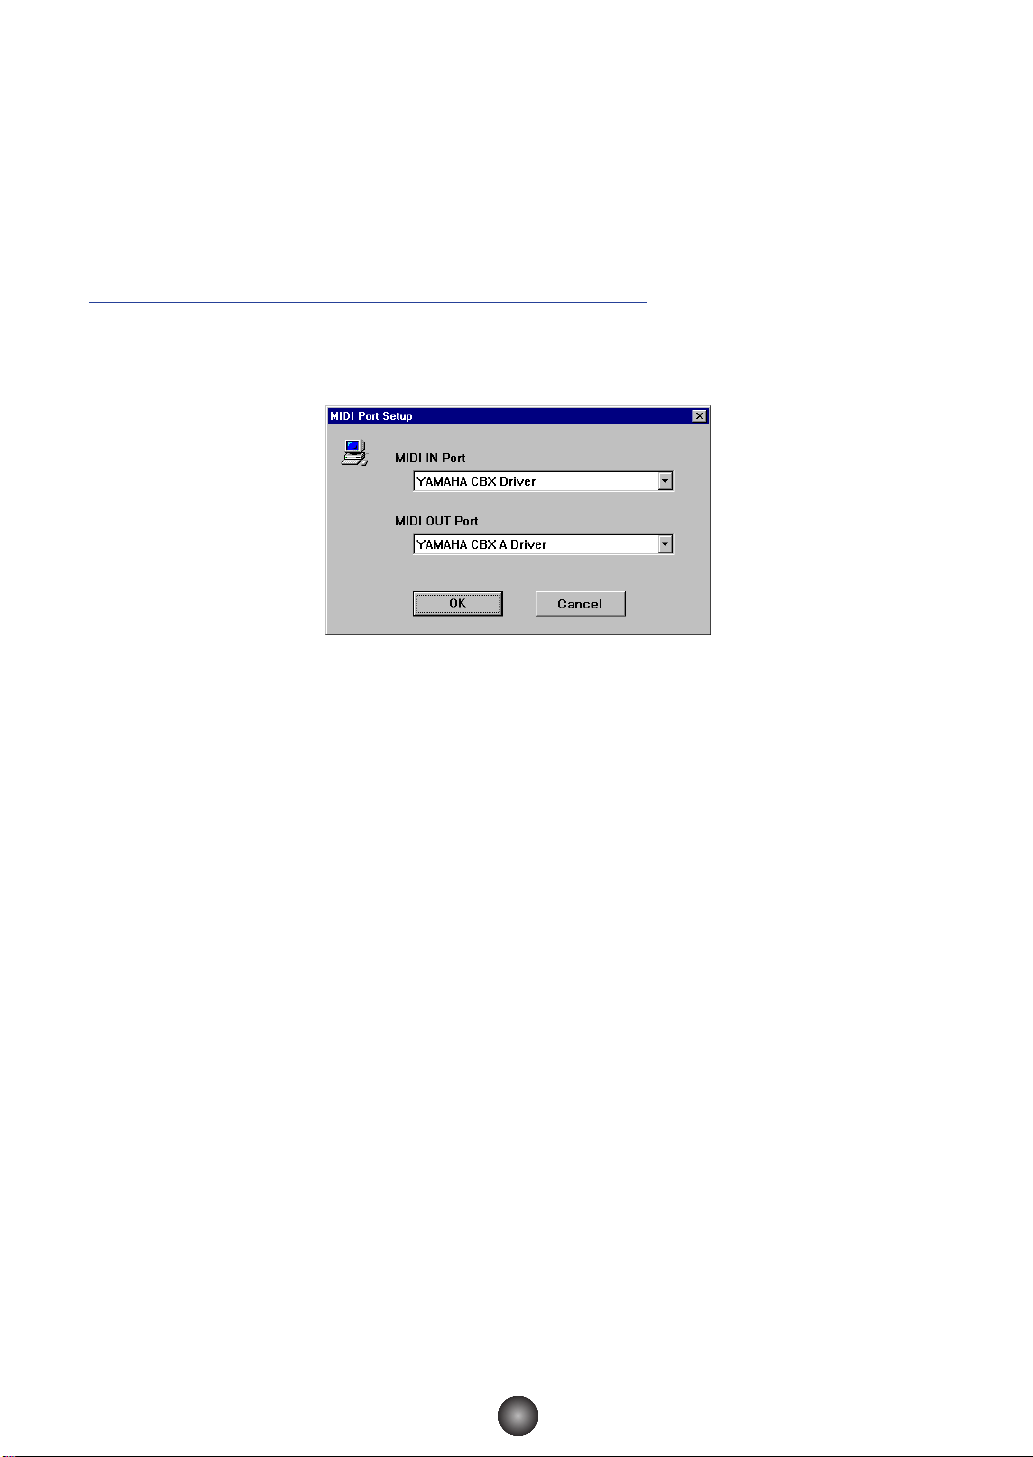
MIDI Device Setup
You w ill need to specify the MIDI device drivers through which your c o m puter w ill
communicat e with your M IDI instrument. Follow t he p rocedure below.
n If you are using a Macintosh, refer to t h e sec t ion “OMS Settings” on p age 6 .
MIDI Port Setup (Windows)
1.Select “MIDI Port Setup” from the “Setup” menu.
The “MIDI Port Setup ” dialog box is d isplayed.
2.Click on each of the “▼” buttons for the “MIDI IN Port” or “MIDI OUT
Port”, select the MIDI driver from the drop-down list that is displayed.
• If the MIDI instrument’s TO HOST terminal is connected directly to the computer’s serial port.
Select the “Yamaha CBX Driver” for t he “MIDI IN Port ”, and t he “Yamaha CBX A Driver” for t he
“M IDI OUT Port”.
• If the MIDI instrument’s MIDI ports are connected to the computer via a MIDI interface.
For bot h t he “MIDI IN Port ” and “ MIDI OUT Port”, select t he M IDI driver that is co mpatib le with
the M IDI int erface you are using.
n For information abo ut how t o inst all YAMAHA CB X Driver, refer to the README file in t he “Mididrv” fo lder o f t he
included C D- ROM .
3.Click [OK].
5
Page 6

OMS Settings (Macintosh)
The Card Filer software uses OMS (Open Music System ) for MIDI input/ o ut put. To use t he
Card Filer soft ware, OMS must b e inst alled beforehand.
n For information abo ut inst alling OMS, refer to t he sep arate Installation Manual.
About OMS
Card Filer uses t he OM S (Open Music Syst em) to t ransfer M IDI data to an ext ernal MIDI
device. OM S is a system ext ension t hat g o es in t he M ac OS Syst em fo lder, designed to
manage th e M IDI data stream (input & out put) in a computer, t o enab le MIDI data t ransfer
between MIDI software and hard w are att ac hed t o t he c o m puter. OMS is a de fact o st andard
of the MIDI environment under the M ac OS, and various music so ft ware manufacturers have
released OMS-c o m patible sequenc er and o t her so ft ware.
OMS has the following merits:
• As OMS- c o mpatib le MIDI applications comm u nicat e with various MIDI devices via OM S, it
is no longer nec essary for you t o set up multip le MIDI drivers for those ap p lications . Thus,
you can avoid conflicts between different d rivers with t he sam e p u rp o se (MIDI c o nt rol).
• Once a Studio Setup is read in OMS, any OM S- compatible app lication will be aware of it,
even if you need to reco nfigure the rout ing o f t he M IDI data stream o r change the current
Stud io Setup. OMS-co m p at ible applications w ill com m o nly recog nize the new
con figuration.
• You c an have different Stud io Setups to choose o ne from ,t o switch t o a d ifferent MIDI
routing (patc hes b et ween MIDI devic es and so ft w are) fast and easily.
• Every tim e t he OM S Setup app lication is opened, any M IDI device connec t ed t o t he
comput er is auto m at ically detec t ed , and its ico n ap p ears with a current M IDI status
(c hannel number, p o rt number, patch es, et c . ). Once d evices are configured with OMS
Setup, ho wever, you need no t c are to o m uch abo ut t h e st atus .
• OMS c an d rive various MIDI int erfaces, inc lud ing t he st andard type (16 c hannels) and the
multi-port t yp e (16 ch annels per p o rt ). If you use a multi-port type, you can co nt rol over 16
channels simultaneously via OMS.
n For more information ab o ut OM S features, see the READ ME file included with OM S.
Setting up OMS
Setup files for the CS6x , C S6R et c ., have already been created for u se w it h t he C ard Filer;
please use the appropriate file for your device. The follow ing example is for the CS6x.
1. First, interconn ec t t he “TO HOST” term inal of the C S6x and t h e M ac into sh serial port, t hen
set the “Host Select” sw itc h o f t he CS6 x t o “Mac. ”
2. Dou b le-click the “OMS Setup” ico n in t he “OMS Ap plication” fo ld er.
3. Cho o se “Open” from t he “File” m enu and select “ C S6x - Mod em” from within the “ OMS
setup for YAMAHA” folder.
n If you are using a comp u t er w ith no modem p o rt (such as the Perform a series), look in the “ CS6 x-Printer”
folder instead.
4. Cho o se “Make Cu rrent” from t he “File” m enu. The setup for your C S6x is now saved as
the c urrent st u d io set up.
5. Cho o se “Quit” from t h e “ File” menu t o close OMS Setup .
n The Card Filer is not c o m patible with versions of OM S earlier than 2.0.
6
Page 7

OMS Port Setup
Having set up OM S, you no w need t o st art up the Card Filer and set the OMS p o rt s.
1. First, start up the Card Filer b y doub le-clicking its ico n.
n If AppleTalk is enabled, you w ill get an alert message. Click “OFF.” It w ill take som e t im e for AppleTalk to b e
disabled.
2. Cho o se “OMS Port Setup” from t he Card Filer’s “Set up ” menu, t hen s elect t he p o rt
settings. In the fo llowing example, the to ne g enerator is a CS6x and its sett ing s are
app lied to OMS.
MIDI In
Select “ CS6 x.”
MIDI Out
Select “ CS6 x.”
3. Click [OK] to close OMS Port Setu p .
Receiving Files
You c an save on yo ur M IDI instrument’s Mem ory C ard data on you r c o mput er.
Receive
L
LINE 1MIC
/
MONO R
/
LINE 2
FOOT
GAIN
A/D INPUT
FOOT
VOLUME
CONTROLLER
FILTER EFFECT
CUTOFF RESONANCE
EG
ATTACK
DECAY SUSTAIN
SCENE MIXER
1 2
CONTROL PAN
REVERB CHORUS
SUSTAINPHONES INDIVIDUAL OUTPUT21OUTPUT
RELEASE
ARPEGGIO
VEL RATE
VOLUME
OCTAVE
DOWN UP
OUTIN THRU
FOOT
SWITCH
MODE
PHRASE CLIP
PORTAMENTO
VOICE PERFORM
UTILITY CARD
REC
PITCH
ON
/
OFF
HOLD
SEQ PLAY
/
ON
OFF
PLAY
/
STOP
TEMPO
SYSTEM A B C 1 2
JOB
EDIT
COMPARE
STORE
SHIFT PAGE PART
CS6x etc...Computer
/
ELEMENT
Memory Card
MEMORY
EF
MASTER
PRE2
PRE1 A B C D E F G H
BYPASS
KEYBOARD
DRUM
EXT
INT
EXIT ENTER
DRUM
PLG1 PLG2
/
NO INC/YES
DEC
DATA
1 2 3 4 1 2 3 4
1 2 3 4 5 6 7 8
GENERAL
9 10 11 12 13 14 15 16
OSC PITCH FILTER AMPLITUDE LFO EQ PLG
MUSIC SYNTHESIZER
Realtime Control
Extended Plug-in System
ELEMENTSELECT ELEMENTON
QED ARPEGGIO CONTROL COM LFO EFFECT
POWERCARDmLANMIDIHOST SELECTTO HOSTBREATH
BANK
/
OFF
PROGRAM
PART
n You d o n ot need to perform a bulk d um p from your M IDI instrument.
7
Page 8

1.Open the “Receive (Card → Computer)” window.
Click [Receive] in the t o p disp lay.
The “Receive (Card → Co m puter)” wind o w will open.
Windows Macintosh
Computer
1
2
1 2
Computer
8
9
5
)
!
4
7
@
#
Memory Card
3
5
6 6
7
8
9
4
Memory Card
Computer
1 “Save in:”: C lick t h is and c ho o se t he destination folder (to save to ) from the d rop-dow n list.
2 File/folder list: This shows the c o ntents of t h e d est ination fo lder.
Memory Card
3 “Look in:”: Click this and choose the source folder (in the memory card) from the drop-down list.
4 [Refresh (Update)]: Click this to up date the c o n t ents o f t he current folder.
5 File/folder list: This shows the c o ntents of t h e sou rce fo lder.
6 “File name (Receive files)”: This shows the nam e o f t he file selected from t he File/folder list.
7 “Files of type:”: C lick t h is and c ho o se t he file type from t he drop-do w n list.
8 [Receive]: C lick t h is to b egin receiving the file.
9 [Cancel]: C lick t h is to c anc el the file transfer.
) [Add]: C ho o se a file and click t his t o ad d it to the “Receive files” list.
! [Add All]: C lick t h is to ad d all files in t he c u rrent fold er t o t he “Receive files” list.
@ [Remove]: C ho o se a file and click t his t o remo ve a file from the “ Receive files” list.
# [Remove All]: C lick t h is to remo ve all files from t he “Receive files” list.
8
Page 9

2.Specify the file(s) and destination folder.
From the b o t t o m list of M IDI instrument M em o ry Card files, cho o se t he files you wish t o t ransfer to
your co m puter.
3.Click [Receive] to begin transferring data from your MIDI instrument to
your computer.
You w ill see the following m essage aft er t he t ransfer is co m plete:
4. Click [OK] to return to the “Receive” window.
Transmitting Files
You c an t ransm it data from yo ur c o mput er t o your M IDI instrument’s Memo ry Card.
Transmit
L
LINE 1MIC
/
MONO R
/
LINE 2
FOOT
GAIN
A/D INPUT
FOOT
VOLUME
CONTROLLER
FILTER EFFECT
CUTOFF RESONANCE
EG
ATTACK
DECAY SUSTAIN
SCENE MIXER
1 2
CONTROL PAN
REVERB CHORUS
SUSTAINPHONES INDIVIDUAL OUTPUT21OUTPUT
RELEASE
ARPEGGIO
VEL RATE
VOLUME
OCTAVE
DOWN UP
OUTIN THRU
FOOT
SWITCH
MODE
PHRASE CLIP
PORTAMENTO
VOICE PERFORM
UTILITY CARD
REC
PITCH
ON
/
OFF
HOLD
SEQ PLAY
/
ON
OFF
PLAY
/
STOP
TEMPO
SYSTEM A B C 1 2
JOB
EDIT
COMPARE
STORE
SHIFT PAGE PART
/
ELEMENT
Memory Card
CS6x etc...Computer
1.Open the “Transmit (Computer → Card)” window.
Click [Transmit] in the to p disp lay.
DEC
DATA
MEMORY
EF
MASTER
PRE1 A B C D E F G H
PRE2
BYPASS
KEYBOARD
DRUM
EXT
INT
EXIT ENTER
DRUM
PLG1 PLG2
/
NO INC/YES
MUSIC SYNTHESIZER
Realtime Control
Extended Plug-in System
1 2 3 4 1 2 3 4
ELEMENTSELECT ELEMENTON
1 2 3 4 5 6 7 8
QED ARPEGGIO CONTROL COM LFO EFFECT
GENERAL
9 10 11 12 13 14 15 16
OSC PITCH FILTER AMPLITUDE LFO EQ PLG
POWERCARDmLANMIDIHOST SELECTTO HOSTBREATH
BANK
/
OFF
PROGRAM
PART
The “Transmit (Comp u t er → Card )” w ind ow w ill open.
9
Page 10

Windows Macintosh
1
1 2
2
3
4
8
9
5
7
6
)
!
4
@
#
3
8
9
6
7
Computer
1 “Look in:”: C lick t h is and c ho o se t he so urc e fold er (to send from ) from the drop-do w n list.
2 File/folder list: This shows the c o ntents of t h e sou rce fo lder.
3 “File name (Transmit Files):”: This sho ws the nam e of the file selected from the File/fo ld er list.
4 “Files of type:”: Click this and c h oo se t h e file type from the drop -do wn list.
Memory Card
5 “Save in:”: C lick t h is and c ho o se t he destination folder (to save to ) from the d rop-dow n list.
6 [Refresh (Update)]: Click t his t o update t he content s of t he c urrent fo ld er.
7 File/folder list: This shows the c o ntents of t h e d est ination fo lder.
8 [Transmit]: Clic k t his t o begin transmitt ing t he file.
9 [Cancel]: C lick t h is to c anc el the file transfer.
) [Add]: C ho o se a file and click t his t o ad d it to the “Transmit files” list.
! [Add All]: C lick t h is to ad d all files in t he c u rrent fold er t o t he “Transmit files” list.
@ [Remove]: C ho o se a file and click t his t o remo ve a file from the “ Transm it files” list.
# [Remove All]: C lick t h is to remo ve all files from t he “Transmit files” list.
2.Specify the file(s) and destination folder.
From the t o p list of files on your computer, choose t ho se t h at you wish to t ransfer to yo ur M IDI
instrument M em o ry Card.
3.Click [Transmit].
You w ill see the following m essage aft er t he t ransfer is co m plete.
4. Click [OK] to return to the “Transmit” window.
10
Page 11

Controls
You c an d elete and rename files/fold ers in the M IDI instrument’s Mem o ry Card u sing you r
comput er.
Delete
abcd.mid
Rename
abcd.mid efgh.mid
Deleting files and folders
1.Open the “Control” window.
Click [Cont rol] in the to p disp lay.
The “Con t rol” window will open.
1 2 3 4 5
1 “Create New Folder” button: Click t his t o c reate a new fo lder within the c urrent fo lder.
2 “Delete” button: C lick t h is to delete the currently selected file or folder. (A co nfirmat ion
prom p t will appear.)
3 “Refresh” button: Click t his t o up date the content s of t he c urrent fo lder.
4 “All Folders” list: This shows the c u rrent fold er and all sub-folders in the m em o ry c ard.
Select a folder here to view its c o nt ent s in t he panel on the right .
5 “Open Folders” list: This shows the c o nt ent s o f t he fo lder select ed in t he p anel on the left.
11
Page 12

2.From the list, choose those file(s)/folder(s) that you wish to delete from
your MIDI instrument Memory Card.
3.Click [Delete].
You w ill see the following c o nfirmat ion message:
n You c anno t delete a folder if it cont ains files. You m ust first remove t he files from w ithin t he fo lder b efo re you c an
delete the folder itself. Emp t y fold ers w ill autom atic ally be deleted.
4.Click [OK] to return to the “Control” window.
Renaming files and folders
1.Open the “Control” window.
Click [Cont rol] in the to p disp lay. The “C on t rol” window will open.
n For details about t he “cont rol” window, see p age 1 1 .
2.Click the file/folder that you wish to rename. Then click it again.
Now enter a name for the file/folder and press the [Enter] key.
n A folder name c an consist of up to 8 characters. A file name can c o ns ist o f up to 8 characters p lus a 3-charact er
extension.
12
Page 13

Converting SMFs
You c an c o nvert Standard MIDI Files on your c o m puter from Form at 1 t o Form at 0 .
SMF Format1
1 Track
2 Track
3 Track
4 Track
16 Track
Exchange
SMF Format0
1~16 Track
What is an SMF?
The SMF (Standard M IDI File) is a type o f file used to exc hange so n g d at a b et ween different
sequenc ers. There are two t yp es o f SM F: Format 0 and Form at 1.
• Format 0 : All data for all MIDI c hannels are com bined into a single trac k . Files in t his
format c an be played b ac k o n t h e CS6 x/CS6R/ S8 0 et c .. .
• Format 1 : There is m o re than o ne t rac k , each c o nt aining d ata fo r multiple MIDI channels.
Therefore, you sho ud use t he SM F co nverter in t he Card Filer p rog ram t o c o nvert yo ur Format
1 SMF d ata t o Form at 0 before transfer to, and p laybac k o n, your M IDI instrument.
1.Open the “SMF Convert” window.
Click [SMF Convert].
The “SMF Convert” w indo w w ill open.
13
Page 14

Windows Macintosh
2 2
3
4
1
1
6
5
5
6
4
1 “Look in:”: C lick this and ch o o s e t h e so urc e fo ld er (to c o n vert from) from the drop -do wn list.
2 File/folder list: This sho ws the content s o f the current fold er.
3 “File name:”: This shows the nam e o f t he file selected from t h e File/folder list.
4 “Files of type:”: C lick t h is and c ho o se t he file type from t he drop-do w n list.
5 [Convert]: C lick t h is to b egin c o nverting t o SM F form at 0.
6 [Cancel]: C lick t h is to c anc el the file conversion.
2.Specify the SMF you wish to convert.
From the list of SM F Format 1 files on your c o m puter, choose t ho se t hat yo u wish to c o nvert to
Format 0. SM F Format 1 filenames are shown in b o ld t yp eface (Windows only). The filenames of
SMF Format 0 and oth er files are sho wn in regular typeface.
n When converting an SM F to Format 0 , t he o riginal Format 1 file will be overwritt en. If necessary, make a backup of
your original Format 1 file prior to conversion.
3.Click [Convert].
You w ill see the following c o nfirmat ion message:
Click [OK] and c o nversion w ill begin. You will see th e follow ing message after co nversion:
4. Click [OK] to return to the “SMF Convert” window.
14
Page 15

Error Messages
“The selected MIDI device is in use. Quit any applications currently using
the device.”
This message is displayed w hen t he C ard Filer starts up and t h e M IDI driver is c u rrently being used
by anot her ap plication. Click [OK], q uit any applications that are using the MIDI d river, and start the
Card Filer again.
“Cannot find the MIDI device. Confirm the MIDI device settings.”
Refer to the README file included with th e M IDI driver (YAMAHA CBX Driver), install the M IDI
driver, and s elect t he c o rrect C OM p o rt , etc.
OMS is not installed.
Install t he OM S so ft ware and make t he correct s et it up acc o rd ing t o t h e sec t ion “OMS sett ings
(Page 6).”
“Data transfer failed. Confirm the current connections (HOST SELECT
switch and others).”
Confirm t he fo llowing and try the op eration again.
• Is the MIDI device properly co nnec t ed t o t he computer?
If not, m ake t he proper c o nnec t ions ac c o rd ing t o t he instructions in th e M IDI instrument’s
Owner’s Manual.
• Is the MIDI device switc hed ON ?
If not, switch t he pow er ON.
• Is the MIDI device’s HOST SELECT switch set correctly?
Make t he c o rrect t he setting acc o rding t o t he inst ruc t ions in th e M IDI instrument’s Owner’s
Manual.
• Is the device p rop erly set up ?
Refer to the README file included with th e M IDI driver (YAMAHA CBX Driver), install the M IDI
driver, and s elect t he c o rrect MIDI d river.
• Set up OM S ac cording t o t h e sec t ion “
OMS sett ings (Page 6).”
“Data transfer is not possible in the current mode. Press the [EXIT]
button, etc., and designate a mode that allows data transfer”
“Failed to create “********.*** (File name)” The disk in the destination drive is full.”
The file co uld no t b e saved t o t he disk bec ause t he d isk is full.
“Specify up to 8 letters for the file name and up to 3 for the extension.”
A folder name can con sist o f u p t o 8 c h aract ers. A file name can consist o f up to 8 characters
plus a 3-charact er ext ension.
15
Page 16

documentation manual, user maintenance, brochure, user reference, pdf manual
This file has been downloaded from:
User Manual and User Guide for many equipments like mobile phones, photo cameras, monther board, monitors, software, tv, dvd, and othes..
Manual users, user manuals, user guide manual, owners manual, instruction manual, manual owner, manual owner's, manual guide,
manual operation, operating manual, user's manual, operating instructions, manual operators, manual operator, manual product,
 Loading...