

Page 1
Page 2

SPECIAL MESSAGE SECTION
This product utilizes batteries or an external power supply (adapter).
DO NOT connect this product to any power supply or adapter other
than one described in the manual, on the name plate, or specifically
recommended by Yamaha.
WARNING: Do not place this product in a position where anyone
could walk on, trip over ,or roll anything over power or connecting
cords of any kind. The use of an extension cord is not recommended! IF you must use an extension cord, the minimum wire size
for a 25' cord (or less ) is 18 AWG. NOTE: The smaller the AWG
number ,the larger the current handling capacity. For longer extension cords, consult a local electrician.
This product should be used only with the components supplied or;
a cart, rack, or stand that is recommended by Yamaha. If a cart, etc.,
is used, please observe all safety markings and instructions that
accompany the accessory product.
SPECIFICATIONS SUBJECT TO CHANGE:
The information contained in this manual is believed to be correct at
the time of printing. However, Yamaha reserves the right to change
or modify any of the specifications without notice or obligation to
update existing units.
This product, either alone or in combination with an amplifier and
headphones or speaker/s, may be capable of producing sound levels that could cause permanent hearing loss. DO NOT operate for
long periods of time at a high volume level or at a level that is
uncomfortable. If you experience any hearing loss or ringing in the
ears, you should consult an audiologist.
IMPORTANT: The louder the sound, the shorter the time period
before damage occurs.
Some Yamaha products may have benches and / or accessory
mounting fixtures that are either supplied with the product or as
optional accessories. Some of these items are designed to be
dealer assembled or installed. Please make sure that benches are
stable and any optional fixtures (where applicable) are well secured
BEFORE using.
Benches supplied by Yamaha are designed for seating only. No
other uses are recommended.
NOTICE:
Service charges incurred due to a lack of knowledge relating to how
a function or effect works (when the unit is operating as designed)
are not covered by the manufacturer’s warranty, and are therefore
the owners responsibility. Please study this manual carefully and
consult your dealer before requesting service.
ENVIRONMENTAL ISSUES:
Yamaha strives to produce products that are both user safe and
environmentally friendly. We sincerely believe that our products and
the production methods used to produce them, meet these goals. In
keeping with both the letter and the spirit of the law, we want you to
be aware of the following:
Battery Notice:
This product MAY contain a small non-rechargeable battery which (if
applicable) is soldered in place. The average life span of this type of
battery is approximately five years. When replacement becomes
necessary, contact a qualified service representative to perform the
replacement.
This product may also use “household” type batteries. Some of
these may be rechargeable. Make sure that the battery being
charged is a rechargeable type and that the charger is intended for
the battery being charged.
When installing batteries, do not mix batteries with new, or with batteries of a different type. Batteries MUST be installed correctly. Mismatches or incorrect installation may result in overheating and
battery case rupture.
Warning:
Do not attempt to disassemble, or incinerate any battery. Keep all
batteries away from children. Dispose of used batteries promptly
and as regulated by the laws in your area. Note: Check with any
retailer of household type batteries in your area for battery disposal
information.
Disposal Notice:
Should this product become damaged beyond repair, or for some
reason its useful life is considered to be at an end, please observe
all local, state, and federal regulations that relate to the disposal of
products that contain lead, batteries, plastics, etc. If your dealer is
unable to assist you, please contact Yamaha directly.
NAME PLATE LOCATION:
The name plate is located on the bottom of the product. The model
number, serial number, power requirements, etc., are located on this
plate. You should record the model number, serial number, and the
date of purchase in the spaces provided below and retain this manual as a permanent record of your purchase.
Model
Serial No.
Purchase Date
2
PLEASE KEEP THIS MANUAL
92-BP (bottom)
Page 3

FCC INFORMATION (U.S.A.)
1. IMPORTANT NOTICE: DO NOT
MODIFY THIS UNIT!
This product, when installed as indicated in
the instructions contained in this manual,
meets FCC requirements. Modifications
not expressly approved by Yamaha may
void your authority, granted by the FCC, to
use the product.
2. IMPORTANT: When connecting this
product to accessories and/or another
product use only high quality shielded
cables. Cable/s supplied with this product
MUST be used. Follow all installation
instructions. Failure to follow instructions
could void your FCC authorization to use
this product in the USA.
3. NOTE: This product has been tested and
found to comply with the requirements
listed in FCC Regulations, Part 15 for Class
“B” digital devices. Compliance with these
requirements provides a reasonable level
of assurance that your use of this product
in a residential environment will not result
in harmful interference with other electronic
devices. This equipment generates/uses
radio frequencies and, if not installed and
used according to the instructions found in
the users manual, may cause interference
harmful to the operation of other electronic
* This applies only to products distributed by YAMAHA CORPORATION OF AMERICA.
devices. Compliance with FCC regulations
does not guarantee that interference will
not occur in all installations. If this product
is found to be the source of interference,
which can be determined by turning the
unit “OFF” and “ON”, please try to eliminate
the problem by using one of the following
measures:
Relocate either this product or the device
that is being affected by the interference.
Utilize power outlets that are on different
branch (circuit breaker or fuse) circuits or
install AC line filter/s.
In the case of radio or TV interference, relocate/reorient the antenna. If the antenna
lead-in is 300 ohm ribbon lead, change the
lead-in to co-axial type cable.
If these corrective measures do not produce satisfactory results, please contact
the local retailer authorized to distribute
this type of product. If you can not locate
the appropriate retailer, please contact
Yamaha Corporation of America, Electronic
Service Division, 6600 Orangethorpe Ave,
Buena Park, CA90620
The above statements apply ONLY to those
products distributed by Yamaha Corporation of America or its subsidiaries.
(class B)
ADVARSEL!
Lithiumbatteri—Eksplosionsfare ved fejlagtig håndtering. Udskiftning må kun ske med batteri af samme fabrikat og type. Levér det brugte batteri tilbage til leverandoren.
VARNING
Explosionsfara vid felaktigt batteribyte. Använd samma batterityp eller en ekvivalent typ som
rekommenderas av apparattillverkaren. Kassera använt batteri enligt fabrikantens instruktion.
VAROITUS
Paristo voi räjähtää, jos se on virheellisesti asennettu. Vaihda paristo ainoastaan laitevalmistajan suosittelemaan tyyppiin. Hävitä käytetty paristo valmistajan ohjeiden mukaisesti.
(lithium caution)
NEDERLAND / THE NETHERLANDS
• Dit apparaat bevat een lithium batterij voor geheugen back-up.
• This apparatus contains a lithium battery for memory back-up.
• Raadpleeg uw leverancier over de verwijdering van de batterij op het moment dat u het
apparaat ann het einde van de levensduur afdankt of de volgende Yamaha Service Afdeiing:
Yamaha Music Nederland Service Afdeiing
Kanaalweg 18-G, 3526 KL UTRECHT
• For the removal of the battery at the moment of the disposal at the end of the service life
• Gooi de batterij niet weg, maar lever hem in als KCA.
• Do not throw away the battery. Instead, hand it in as small chemical waste.
Tel. 030-2828425
please consult your retailer or Yamaha Service Center as follows:
Yamaha Music Nederland Service Center
Address : Kanaalweg 18-G, 3526 KL UTRECHT
Tel : 030-2828425
(lithium disposal)
3
Page 4
PRECAUTIONS
Yamaha cannot be held responsible for damage caused by improper use
or modifications to the instrument, or data that is lost or destroyed.
PLEASE READ CAREFULLY BEFORE PROCEEDING
* Please keep these precautions in a safe place for future reference.
WARNING
Always follow the basic precautions listed below to avoid the possibility of serious injury or even death from electrical shock,
short-circuiting, damages, fire or other hazards. These precautions include, but are not limited to, the following:
• Do not open the instrument or attempt to disassemble the internal parts or
modify them in any way. The instrument contains no user-serviceable
parts. If it should appear to be malfunctioning, discontinue use immediately and have it inspected by qualified Yamaha service personnel.
• Do not expose the instrument to rain, use it near water or in damp or wet
conditions, or place containers on it containing liquids which might spill
into any openings.
• If the AC adaptor cord or plug becomes frayed or damaged, or if there is a
sudden loss of sound during use of the instrument, or if any unusual
smells or smoke should appear to be caused by it, immediately turn off the
power switch, disconnect the adaptor plug from the outlet, and have the
instrument inspected by qualified Yamaha service personnel.
• Use the specified adaptor (PA-3B or an equivalent recommended by
Yamaha) only. Using the wrong adaptor can result in damage to the instrument or overheating.
• Before cleaning the instrument, always remove the electric plug from the
outlet. Never insert or remove an electric plug with wet hands.
• Check the electric plug periodically and remove any dirt or dust which may
have accumulated on it.
CAUTION
Always follow the basic precautions listed below to avoid the possibility of physical injury to you or others, or damage to the
instrument or other property. These precautions include, but are not limited to, the following:
• Do not place the AC adaptor cord near heat sources such as heaters or
radiators, and do not excessively bend or otherwise damage the cord,
place heavy objects on it, or place it in a position where anyone could walk
on, trip over, or roll anything over it.
• When removing the electric plug from the instrument or an outlet, always
hold the plug itself and not the cord.
• Do not connect the instrument to an electrical outlet using a multiple-connector. Doing so can result in lower sound quality, or possibly cause overheating in the outlet.
• Unplug the AC power adaptor when not using the instrument, or during
electrical storms.
• Before connecting the instrument to other electronic components, turn off
the power for all components. Before turning the power on or off for all
components, set all volume levels to minimum. Also, be sure to set the
volumes of all components at their minimum levels and gradually raise the
volume controls while playing the instrument to set the desired listening
level.
• Do not expose the instrument to excessive dust or vibrations, or extreme
cold or heat (such as in direct sunlight, near a heater, or in a car during the
day) to prevent the possibility of panel disfiguration or damage to the internal components.
• Do not use the instrument near other electrical products such as televisions, radios, or speakers, since this might cause interference which can
affect proper operation of the other products.
• Do not place the instrument in an unstable position where it might accidentally fall over.
• Before moving the instrument, remove all connected adaptor and other
cables.
• When cleaning the instrument, use a soft, dry cloth. Do not use paint thinners, solvents, cleaning fluids, or chemical-impregnated wiping cloths.
Also, do not place vinyl, plastic or rubber objects on the instrument, since
this might discolor the panel or keyboard.
• Do not rest your weight on, or place heavy objects on the instrument, and
do not use excessive force on the buttons, switches or connectors.
• Do not operate the instrument for a long period of time at a high or uncomfortable volume level, since this can cause permanent hearing loss. If you
experience any hearing loss or ringing in the ears, consult a physician.
■ REPLACING THE BACKUP BATTERY
• This instrument contains a non rechargeable internal backup battery which
permits internal data to remain stored even when the power is off. When
the backup battery needs replacing, the message "Err1" appears in the display. When this happens, immediately back up your data (using an external
device such as the floppy disk-based Yamaha MIDI Data Filer MDF3), then
have qualified Yamaha service personnel replace the backup battery.
• Do not attempt to replace the backup battery yourself, in order to prevent
the possible serious hazards. Always have qualified Yamaha service personnel replace the backup battery.
• Never place the backup battery in a location that a child can reach, since a
child might accidentally swallow the battery. If this should happen, consult
a physician immediately.
■ SAVING USER DATA
• Save all data to an external device such as the Yamaha MIDI Data Filer
MDF3, in order to help prevent the loss of important data due to a malfunction or user operating error.
Always turn the power off when the instrument is not in use.
(3)-6
4
Page 5
Congratulations and thank you for purchasing the Yamaha AN200 Desktop
Control Synthesizer!
The AN200 is a combination tone generator and sequencer that puts an enormous amount of
sonic power and real-time performance control in an exceptionally compact and easy-to-use “desktop”
package. As one of the Loopfactory group of instruments, it’s an amazingly high-quality and versatile
tool for loop-based music production. Use it on your gigs, as part of your DJ setup — or as your
secret weapon in your studio arsenal.
With eighteen knobs and umpteen switches, many of them “dedicated” — meaning that a control does specifically and ONLY what its name indicates — the AN200 is a synthesizer control freak’s
dream.
Powering the incredibly rich and huge analog-like Voices of the AN200 is the Analog Physical
Modeling synthesis system. It not only features the same familiar oscillator, filter and other soundshaping controls found on traditional analog synthesizers — it gives you the full spectrum of warm, fat,
and punchy sounds that made those legendary instruments famous.
Play the exceptionally high-quality analog-style Voices of the AN200 with full 5-note polyphony
— from the built-in keyboard or from a MIDI device. Use the built-in 16-step sequencer to create your
own synth and rhythm sequences. And power up the full-featured AN200 Editor on your computer —
to tap into ALL the amazing sonic power the AN200 has to offer.
There’s a lot of important, helpful information in these pages. So read through this manual
carefully — and get the most out of your sophisticated new AN200.
● Packing List
The following items have been included with your AN200. Check to see that you have everything listed here.
• Owner's Manual
• CD-ROM
• AC Power Adaptor*
* Power supply recommendation may vary from country to country. Please check with
your nearest Yamaha dealer for further details.
* The company names and product names in this Owner’s Manual are the trademarks or registered trademarks of
their respective companies.
* The screens as illustrated in this owner’s manual are for instructional purposes only, and may appear somewhat
different from the ones of your instrument.
5
Page 6
Contents
Contents
Contents ............................................................ 6
How to Use This Manual .................................. 8
Panel Controls .................................................. 9
Quick Start Guide ........................................... 11
Parameter Structure ....................................... 12
Tone Generator Signal Flow &
Effect Block Diagram .............................. 13
Chapter 1
Chapter 8
Pattern Playback ....................35
Tip 25 Adjusting the Gate Time....................................35
Tip 26 Transposing the key...........................................36
Tip 27 Swing .................................................................37
Tip 28 Muting tracks .....................................................37
Tip 29 Muting notes during playback ...........................38
Tip 30 Mixer controls — Pan and Volume ...................39
Tip 31 Assigning Patterns to the keyboard buttons.......40
Pattern Basics ........................ 15
Tip 1 Playing a Pattern ............................................... 15
Tip 2 Exploring other Patterns.................................... 15
Tip 3 Switching Patterns on the fly ............................16
Tip 4 Playing it backwards ......................................... 17
Tip 5 Changing the bpm ............................................. 17
Tip 6 Messing with the Beat....................................... 18
Tip 7 Double time, half time....................................... 18
Chapter 2
Song Playback......................... 19
Tip 8 Playing a Song................................................... 19
Chapter 3
Chapter 9
LFO Modulation........................ 41
Tip 32 Modulating the volume......................................41
Tip 33 Modulating the Filter .........................................42
Tip 34 Modulating the pitch..........................................42
Tip 35 Changing the LFO wave....................................43
Chapter 10
EG Basics ............................... 46
Tip 36 Shaping the sound with EG ...............................46
Tip 37 Using EG to control the Filter (FEG) ................49
Tip 38 More about FEG Depth......................................50
Tip 39 Going negative — with FEG Depth ..................51
The Keyboard..........................20
Tip 9 Playing the keyboard......................................... 20
Tip 10 Changing octaves .............................................. 20
Tip 11 Playing the Rhythm track.................................. 21
Tip 12 Velocity............................................................. 21
Chapter 4
Scene Basics ........................... 22
Tip 13 Switching Scenes .............................................. 22
Tip 14 Morphing........................................................... 22
Chapter 5
Chapter 11
Advanced Sound Shaping
Controls ................................. 52
Tip 40 Portamento — the famous gliding pitch effect..52
Tip 41 Metallic sounds and more — with FM Depth ...53
Tip 42 Balancing the waves — VCO 1 and 2 ...............54
Tip 43 Noise Level........................................................55
Tip 44 Making waves — VCO 1 and VCO 2 ...............55
Tip 45 Fat, phatter and phattest!....................................57
Tip 46 Sync Mode and Sync Pitch ................................58
Tip 47 Creating your own original Scenes —
and saving them .................................................59
Effects.................................... 23
Tip 15 What is an Effect? ............................................. 23
Tip 16 Playing with the Effects .................................... 24
Tip 17 Distortion........................................................... 26
Chapter 6
Filter (VCF) .............................. 27
Tip 18 Cutoff and Resonance ....................................... 27
Tip 19 Wild, wild filter sweeps — VCF Types............ 28
Tip 20 FEG Depth ........................................................ 30
Chapter 7
Nuts and Bolts ........................ 31
Tip 21 Show Value .......................................................31
Tip 22 Original Value................................................... 32
Tip 23 Panic! (or “Uh-oh...What do I do now?”) ......... 33
6
Tip 24 Factory Reset..................................................... 34
Chapter 12
Free EG .................................. 60
Tip 48 Free EG..............................................................60
Tip 49 Changing the Length of your Free EG tracks....62
Chapter 13
Pattern Power Tips................. 63
Tip 50 Hit the top of the Pattern! ..................................63
Tip 51 Shake, Retrigger, and Roll!................................64
Tip 52 Selecting a Voice (Copy Voice) ........................65
Tip 53 Starting a Pattern on a different note .................65
Tip 54 Transposing the pitch of a Pattern .....................66
Tip 55 Copying a Pattern (Sequence)............................67
Page 7
Contents
Chapter 14
Pattern Recording ...................68
Tip 56 Erasing a Pattern — and starting from scratch.. 68
Tip 57 Setting the Metronome lead-in.......................... 69
Tip 58 Recording a Pattern in real time........................ 70
Tip 59 Step Recording.................................................. 72
Tip 60 Storing your new Pattern................................... 79
Chapter 15
Song Recording ....................... 81
Tip 61 Erasing a Song — and starting from scratch..... 81
Tip 62 Creating a Song................................................. 82
Tip 63 Setting the BPM (tempo) for your new Song.... 84
Tip 64 More Song editing features ...............................85
Tip 65 Adding Patterns to your Song — Insert Pattern 87
Tip 66 Taking Patterns out of your Song —
Delete Pattern.................................................... 88
Tip 67 Storing your new Song...................................... 89
Chapter 16
Speed Tips for Power Users .... 90
Tip 68 Using [SHIFT] with the [DATA] knob —
for leaps and bounds! ........................................ 90
Tip 69 Using [SHIFT] to “hold” a setting .................... 91
Tip 70 Gang-editing a group of Steps........................... 91
Chapter 17
Real World Tips .......................92
Tip 71 Adjusting the Gate Time with the [DATA]
knob................................................................... 92
Tip 72 Adjusting the pitch with the [DATA] knob ......92
Tip 73 Changing the pitch with the keyboard .............. 93
Tip 74 Stutter fill-in 1................................................... 94
Tip 75 Stutter fill-in 2................................................... 94
Tip 76 Stutter fill-in 3................................................... 95
Tip 77 Assigning Patterns for your gig......................... 95
Tip 78 Chord progressions with Pattern Assign........... 95
Chapter 19
Master Class 2 —
Advanced Music Production ... 103
Tip 86 Playing the AN200 as a synthesizer ................103
Tip 87 Recording to a sequencer.................................104
Tip 88 Recording AN200 knob moves to a sequencer105
Tip 89 Editing the AN200 from a computer ...............106
Tip 90 MIDI sequencer controls —
Start, Continue, Stop........................................107
Tip 91 Saving Patterns and Songs to a MIDI data
filer...................................................................108
Tip 92 Loading back your saved Patterns and Songs..109
Appendix
Function Index...............................................110
About the Included CD-ROM........................ 112
Specifications................................................ 114
Error Messages .............................................114
Troubleshooting............................................ 115
Analog Physical Modeling Synthesis
and the AN200 ........................................116
MIDI Data Format...........................................118
MIDI Implementation Chart...........................139
Rhythm Track Instrument List .....................140
Pattern List.....................................................141
Chapter 18
Master Class 1 — Onstage........96
Tip 79 Sync the AN200 to your sequencer................... 96
Tip 80 Changing the MIDI channels ............................ 97
Tip 81 Loopfactory setup — with the SU200 .............. 98
Tip 82 Loopfactory sync system — with the DX200... 99
Tip 83 Loopfactory sampling .....................................100
Tip 84 Full DJ system — turntable and all! ............... 101
Tip 85 Loopfactory megasetup — with MIDI Thru... 101
7
Page 8
How to Use This Manual
How to Use This Manual
How to USE a manual? Sounds a bit obvious, we admit. (“Open it and read it.”) But here goes:
1 Go straight to the Quick Start Guide.
This tells you simply and in no uncertain terms how to set up your new AN200 and get sound out of it.
2 Work through the 92 Tips.
These are practical, no-nonsense applications that get you actually USING the machine.
If this is your first tone generator or synthesizer, fire up the AN200, open up the manual to Tip 1, and go
from there. Think of it as a game — the more tips you complete, the better you know the machine, and
the sooner you can reach your goal of becoming a true synth wizard. Pay particularly close attention to
the Power Hints scattered throughout — they’re great for further exploration.
If you have years of experience with analog synthesizers, and know all about cutoff frequency, resonance, pulse waves, amplitude modulation, LFOs, VCOs, EGs, and MIDI — and you even dream in hexadecimal — skim through the tips anyway. There’s bound to be some interesting and helpful stuff here,
no matter what your level of expertise. If you need some pertinent info quickly, check the Tech Talk
boxes.
3 Refer to the Appendix when necessary.
Lots of helpful, convenient information in this section, too. If something doesn’t work as expected, go to
Troubleshooting (page 115). If you want a clear, concise explanation of how the synthesizer of the
AN200 works, see Analog Physical Modeling Synthesis and the AN200 (page 116). If you’re not sure
where to go for help but you’ve got a key word in mind, check the Contents (page 6) or look through the
Function Index (page 110).
Have fun!
8
Page 9

Panel Controls
Panel Controls
Main Voice
Control Keyboard
Here’s a quick way to get familiar with your AN200! The front (or top) panel of the AN200 can be roughly
divided into four sections: Main, Control, Voice, and Keyboard. Look through the controls here, and check
out the Tips related to each of them for more information.
The Tip references by each control are not meant to be comprehensive. They either give the
first (or main) Tip in which the control appears, or the group of Tips that are most closely
related.
9
Page 10
Panel Controls
Voice
Keyboard
Main
These are the fundamental controls of the AN200 — for
changing modes, adjusting values, exiting from functions, and so on.
Display and indicators
[SONG] .................................. Tips 8, 62
[PATTERN] .....................................Tip 1
[DATA] knob ............................ Tips 2, 68
[SHOW VALUE] ....................... Tips 21, 22
[STORE]........................... Tips 47, 60, 67
[EXIT]......................................... Tip 23
These controls are for editing and changing the sound of
the Voices.
[SCENE] ................................Tips 13, 14
[FREE EG] ..............................Tips 48, 49
[VOLUME]
[LFO]................................. Tips 32 — 35
[EG] .................................. Tips 36 — 39
[DIST].........................................Tip 17
[COMMON]...................................Tip 45
[VCO 1] .......................................Tip 44
[SYNC]........................................Tip 46
[VCO 2] .......................................Tip 44
[EFFECT/MIXER] ................. Tips 15, 16, 30
[PORTAMENTO] .............................Tip 40
[FM DEPTH] ................................. Tip 41
[NOISE LEVEL] ..............................Tip 43
[VCF]................................. Tips 18 — 20
10
Control
For the most part, these buttons are related to the Patterns — especially for controlling record and playback
operations.
Start/Stop ......................................Tip 1
[TAP] ...........................................Tip 5
Record ....................... Tips 48, 50, 58, 59
[SWING] ................................ Tips 6, 27
[REVERSE].............................. Tips 4, 25
[SHIFT]................................. Tips 68, 69
[OCT <<] ............................... Tips 10, 62
[OCT >>] ............................... Tips 10, 62
[KEYBOARD] ........................... Tips 9, 26
[PATTERN SELECT]........... Tips 3, 31, 77, 78
[SYNTH TRACK]............................. Tip 28
[RHYTHM TRACK] .......................... Tip 28
The Keyboard section has several main uses:
• Playing the Voices................... Tips 9, 86
• Selecting Patterns ...... Tips 2, 3, 31, 77, 78
• Controlling the Sequence Steps
..................................... Tips 29, 58, 59
• Selecting functions and operations
. Tips 28, 51 – 57, 59, 61, 65, 66, 79, 80, 85, 90 – 92
Page 11
Quick Start Guide
Quick Start Guide
Once that you’ve got the AN200 out of the box and checked that all included items were indeed included, it’s
time to set everything up and get playing.
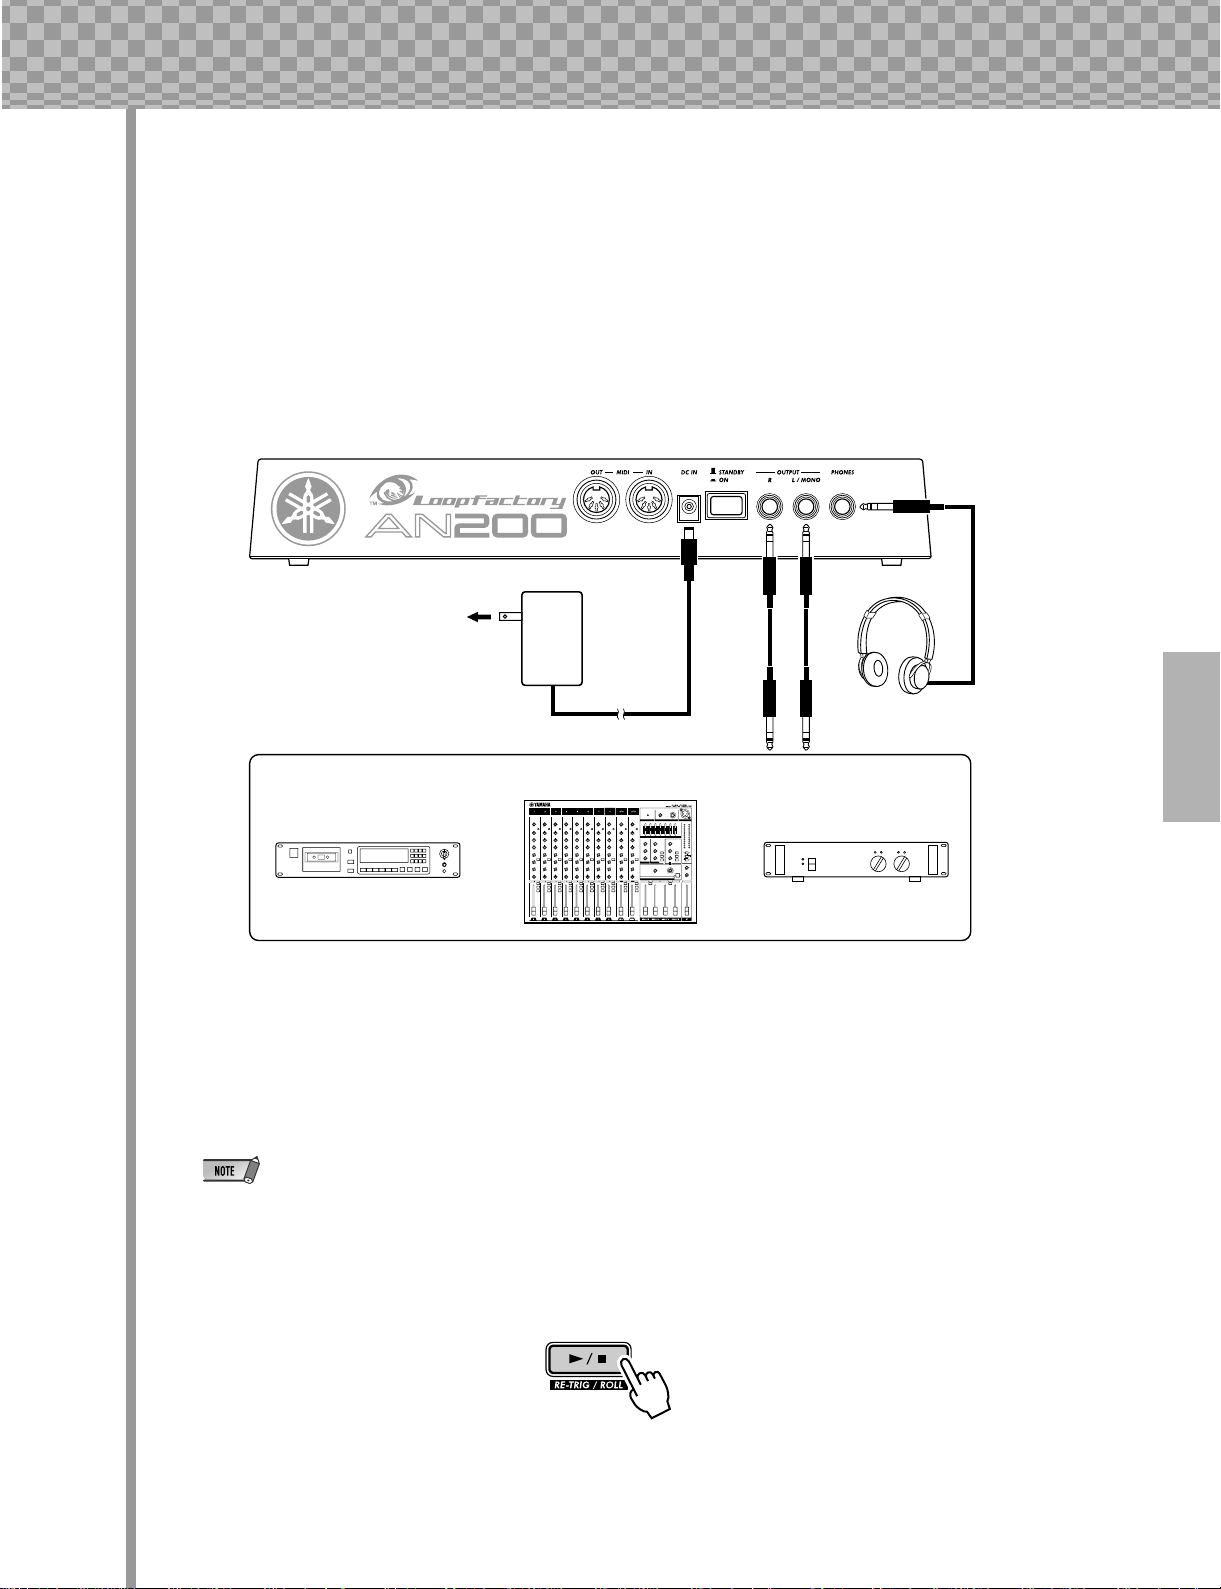
1 Turn the VOLUME control all the way down to the minimum.
2 Connect the OUTPUT jacks (L/MONO and R) to the inputs of your
recorder/mixer/amplifier.
If you’re using a mono system, use only the L/MONO jack. If you’re using headphones, connect them to
the PHONES jack.
AN200
Recorder
AC outlet
AC
Adaptor
Mixer
or
DC IN OUTPUT
PHONES
Headphones
Amplifer
or
3 Plug in the included power adaptor — first, one end into the DC IN termi-
nal, then the other into an AC outlet.
4 Turn on the power with the rear panel power switch. Then, turn on the
power of your recorder/mixer/amplifier.
The AN200 takes a little time to “warm up” after being turned on – roughly 20 seconds. After
the startup routine is finished, your AN200 is ready to play.
5 Press the Start/Stop button on the AN200 to start a Pattern and slowly
turn up the VOLUME control until the level is appropriate.
To stop the Pattern, simply press the Start/Stop button again.
And that’s all there is to it. Now go on to the Tips and start playing!
11
Page 12
Parameter Structure
Parameter Structure
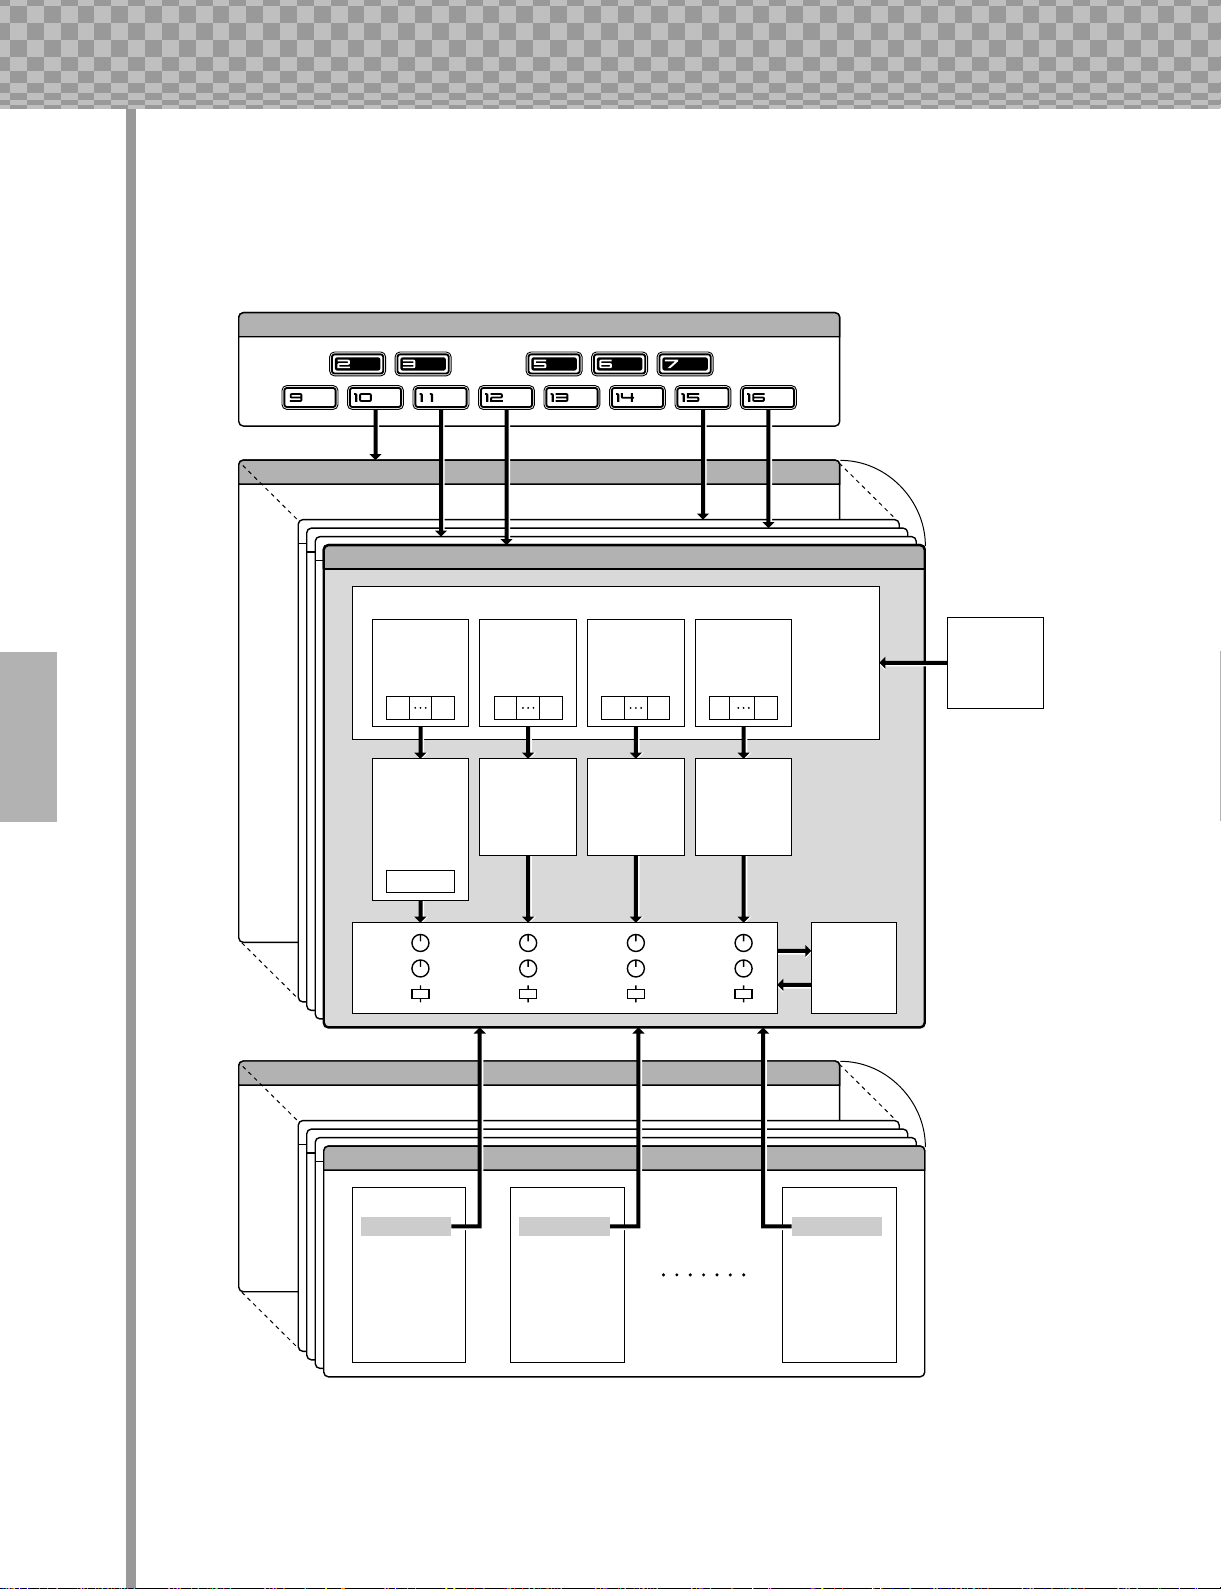
This diagram shows the structure and hierarchy of the Songs, Patterns and Voices of the AN200. As you
work with the AN200 and explore its various functions and features, refer back to this diagram to see how all
the pieces of the puzzle fit together.
Pattern Select Setup
User Pattern 128
Preset Pattern 1
Sequence
Synth
Track
Step
Synth
Voice
Pan
Wet
Vol
16
1
LFO
EG
etc.
Free EG
Rhythm
Track 1
Step
16
1
Rhythm
Voice 1
Cutoff
Resonance
Rhythm
Track 2
Step
16
1
Rhythm
Voice 2
Cutoff
Resonance
Rhythm
Track 3
Step
16
1
Rhythm
Voice 3
Cutoff
Resonance
BPM
Beat
Swing
Effect
Type
Param
256 Preset Patterns
128 User Patterns
System
Gate Time
Reverse
12
Song 10
Song 1
Measure 1
Pattern No.
Pitch Offset
Beat
Swing
Gate Time
Reverse
Track Mute
Measure 2
Pattern No.
Pitch Offset
Beat
Swing
Gate Time
Reverse
Track Mute
10 User Songs
Measure 256
Pattern No.
Pitch Offset
Beat
Swing
Gate Time
Reverse
Track Mute
Page 13
Tone Generator Signal Flow & Effect Block Diagram
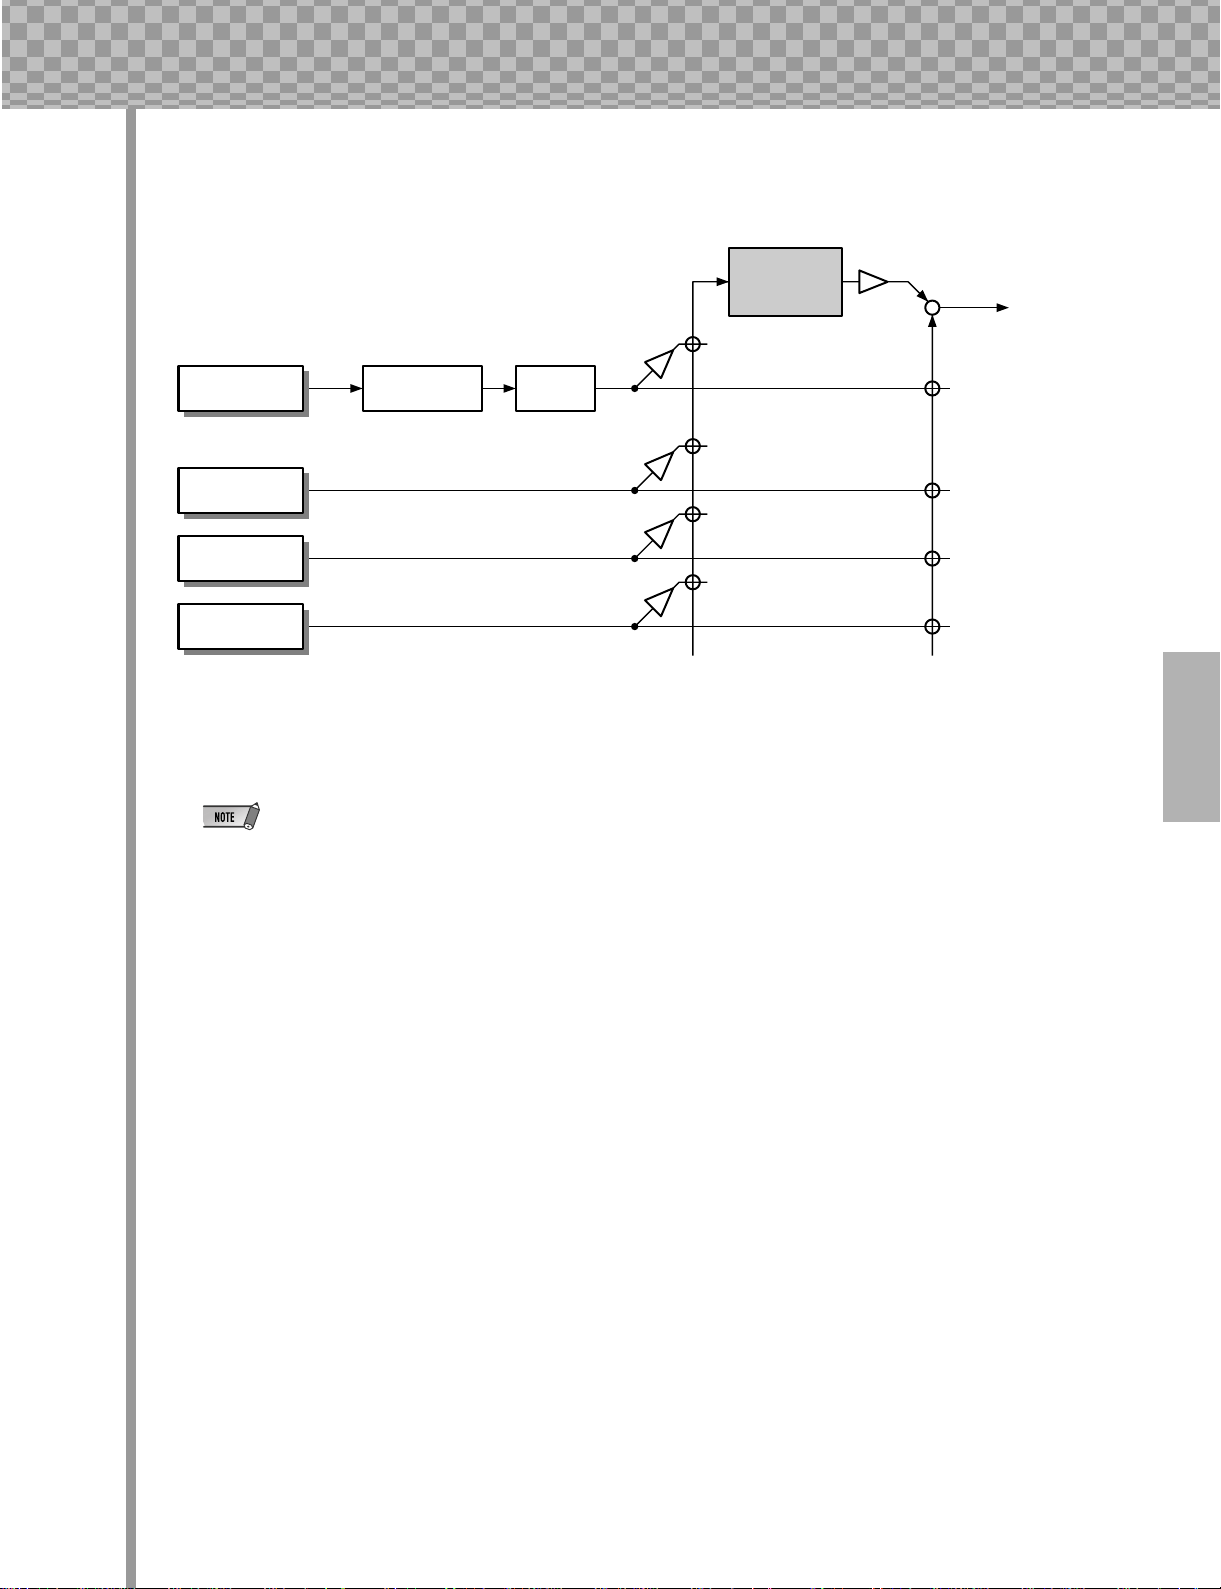
Tone Generator Signal Flow & Effect Block Diagram
Effect section
Out
Synth track Distortion EQ
Rhythm track 1
Rhythm track 2
Rhythm track 3
The EQ processing is accessible only with the AN200 Editor software.
13
Page 14

This is NOT an owner’s manual!
This is NOT an owner’s manual!
At least not an ordinary one. But, then again, the AN200 is no ordinary
instrument. It’s packed with exciting, powerful, yet easy-to-use features that
give you complete, hands-on sonic control — plus tons of dynamic real-time
functions that can bring an extra edge to your live performances!
With all the digital power under this small hood, the AN200 is a stunning
new instrument of the future. Yet it also brings you the very best of the old
analog world — just look at all those knobs for twisting and tweaking your
sound!
We know you don’t like reading manuals. But you owe it to yourself to look
through this collection of hot tips. They show you how to get the most out of
your new AN200 in the shortest time possible.
It’s like having an expert programmer take you by the hand and show you
the ropes, sharing all the tricks and techniques you need to be a master on
the instrument yourself. These tips take you from the bare-bones basics, to
advanced power tips that get you pumping out fat sounds and happening
tracks — in no time flat!
So jump in …
14
Page 15
Chapter 1
1 Playing a Pattern
Here’s where all the fun starts — with the pre-programmed Patterns.
Just press the Start/Stop button, and listen to the Pattern play. The Pattern repeats (loops) until you press
the button again to stop it.
● What exactly are Patterns?
The Patterns are the basic musical building blocks of the AN200 — they provide an instrument sound (also called a “Voice”), plus a looping phrase using
that Voice.
These pre-recorded Patterns give you the rhythmic and melodic foundation you
need for laying down tracks — in your own recording or in performance. Keep
in mind that you can create your own Patterns as well. (See page 68.)
Pattern Basics
Start your synthesizer apprenticeship right here. In this section, you’ll learn
about playing Patterns, and how to use some of the AN200’s powerful tools to
change the sound as it’s playing.
Pattern Mode
Select the Pattern mode by pressing the
[PATTERN] button. The letter “P” in the display indicates the Pattern mode.
2 Exploring other Patterns
The AN200 features a total of 256 specially pre-programmed Patterns. Try some of these out now.
Use the [DATA] knob to select a different Pattern. Notice how the Pattern number in the display changes.
Then press the Start/Stop button to play the Pattern.
Keep in mind that you cannot select Voices
You can also change Patterns during playback! Turn the [DATA] knob while the
Pattern is playing — the new Pattern starts playing immediately after the previous one is finished.
separate from the Patterns. If you want to
hear a certain Voice, select the Pattern containing that Voice. You can copy that Voice
to a different Pattern; see Tip 52.
15
Page 16
Chapter 1 Pattern Basics
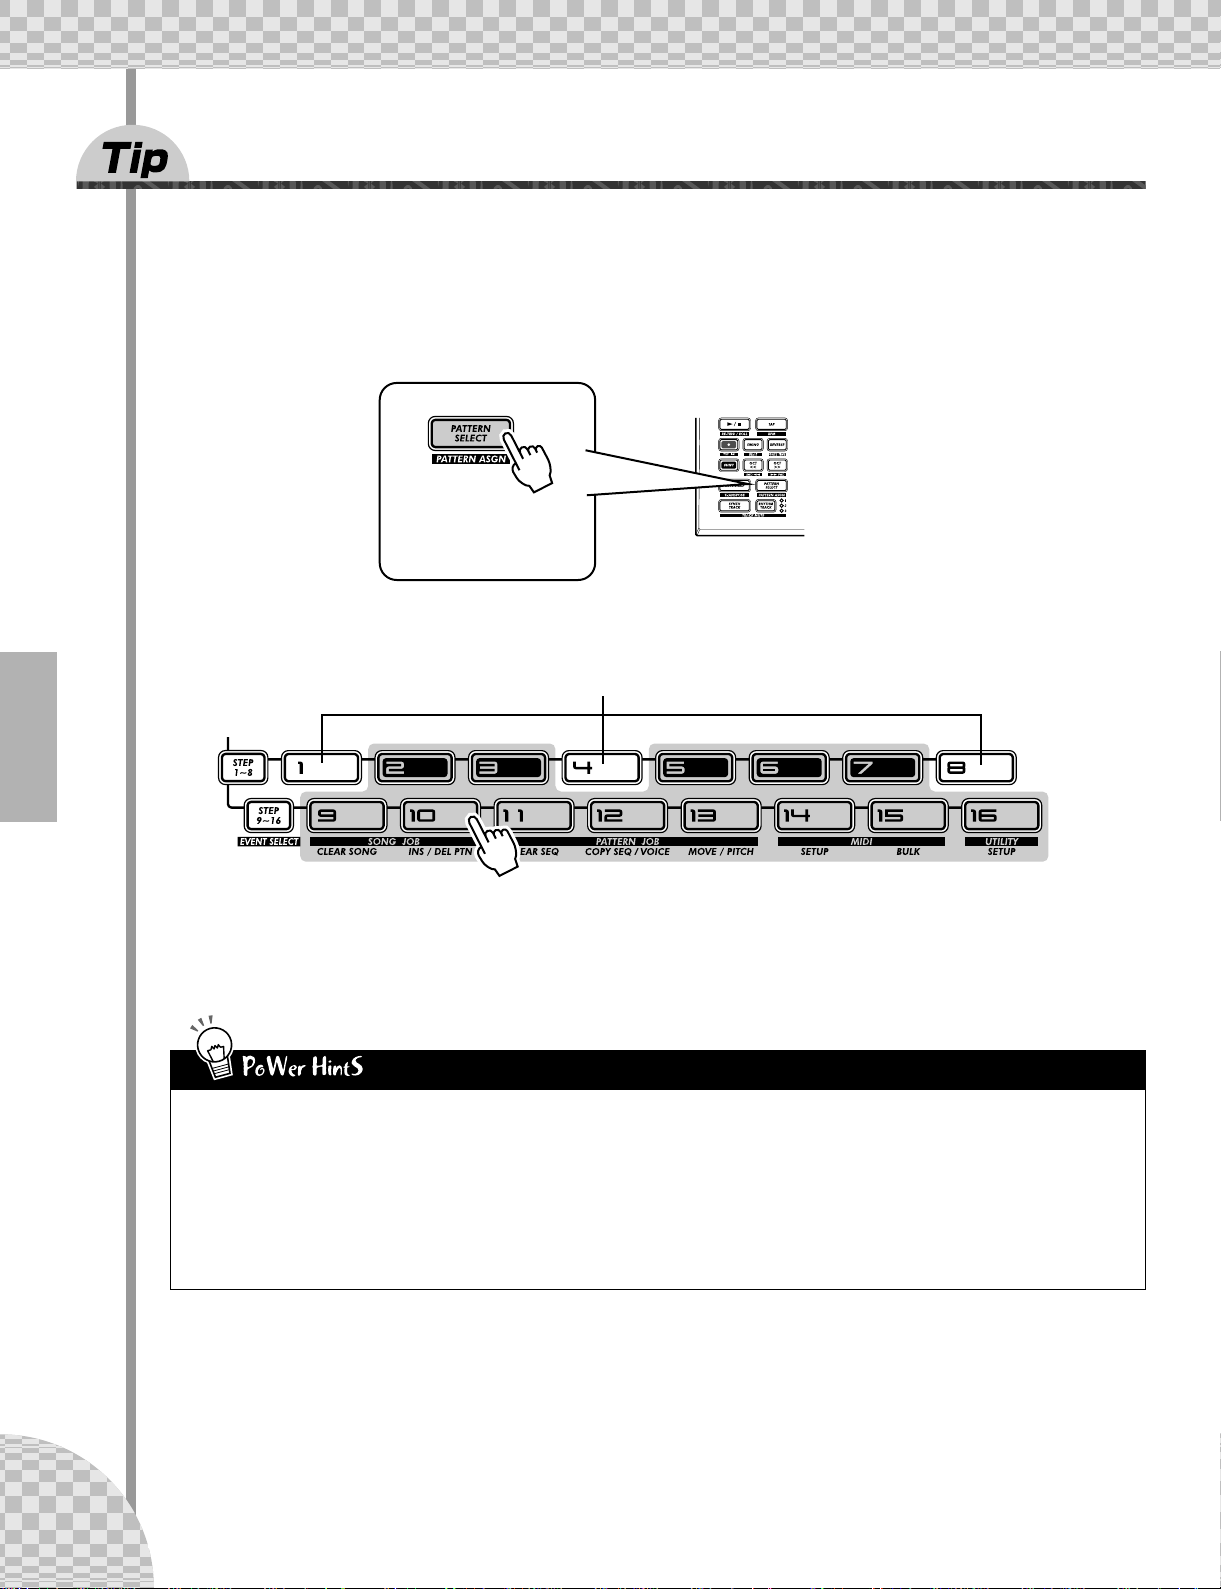
3 Switching Patterns on the fly
Try mixing it up now. The AN200 lets you change Patterns as easily as pressing a button...
Thanks to the Pattern Select function, you can chain together Patterns in real time from the keyboard — as
you perform.
Select a Pattern, then press [PATTERN SELECT].
The button lights.
Start the Pattern. While the Pattern is playing, press one of the keyboard buttons (except 1, 4, and 8).
Avoid these keys — they won’t change the Pattern.
Notice how a new Pattern starts playing as soon as the previous one is finished. This is a great way to string
together various Patterns in a live performance — and create your own songs on the fly. If you want, you
can use the keys to select a Pattern before starting playback as well.
• Repeats
Unless you want the same Pattern to repeat several times, don’t press a
keyboard button more than once. On the other hand, you can quickly
program the Pattern sequence for an entire song if you want, without
having wait for each Pattern to play back. The AN200 remembers all the
buttons you press and how many times you press them, and automatically plays back the Patterns as you programmed — repeats and all.
• Other octaves, more Patterns
Before starting the Pattern, use the [OCT <<]/[OCT >>] buttons to
change the octave range of the keys. That’ll let you select other Patterns!
• Assign them yourself
The Pattern-to-key assignments have been made for you. However, you
can make your own assignments, and put the Patterns you want to use
close together for easy access. (See page 40.)
16
Page 17
Chapter 1 Pattern Basics
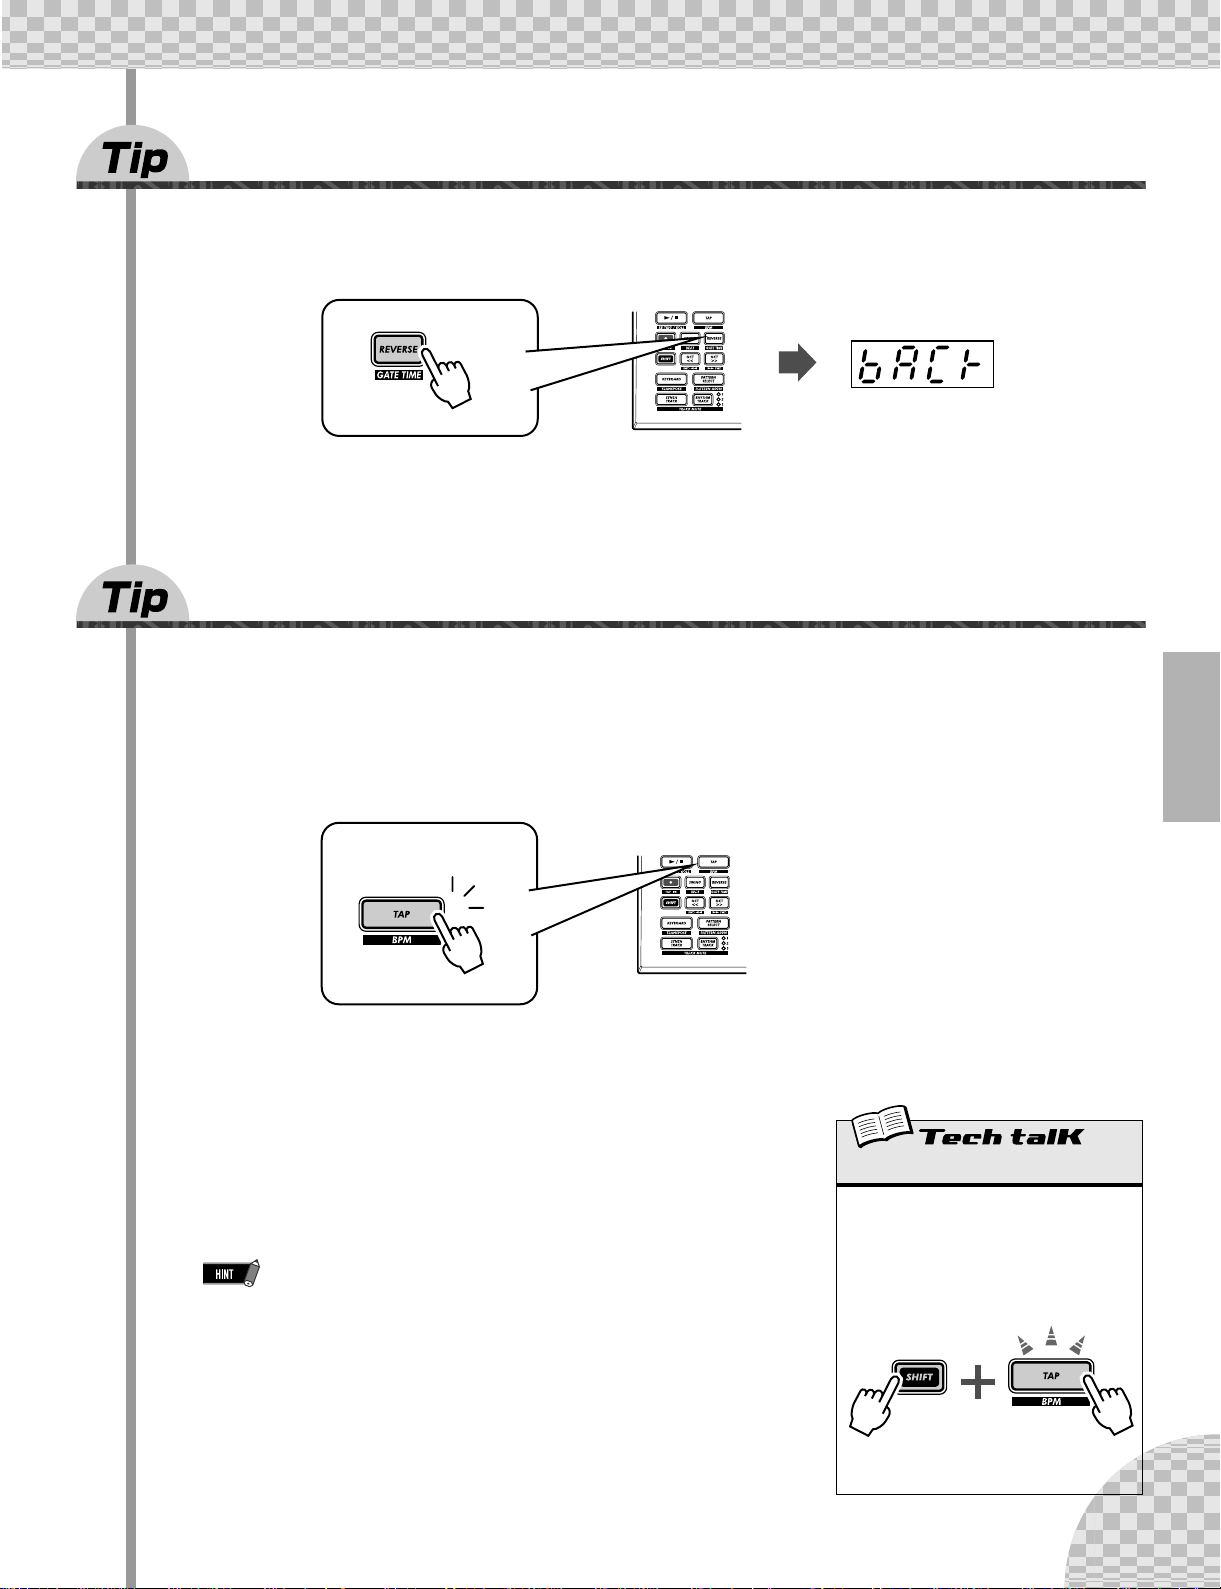
4 Playing it backwards
The Reverse function lets you completely turn the Pattern around, and play all the notes backwards.
Before you start the Pattern (or during playback, if you want), simply press the [REVERSE] button.
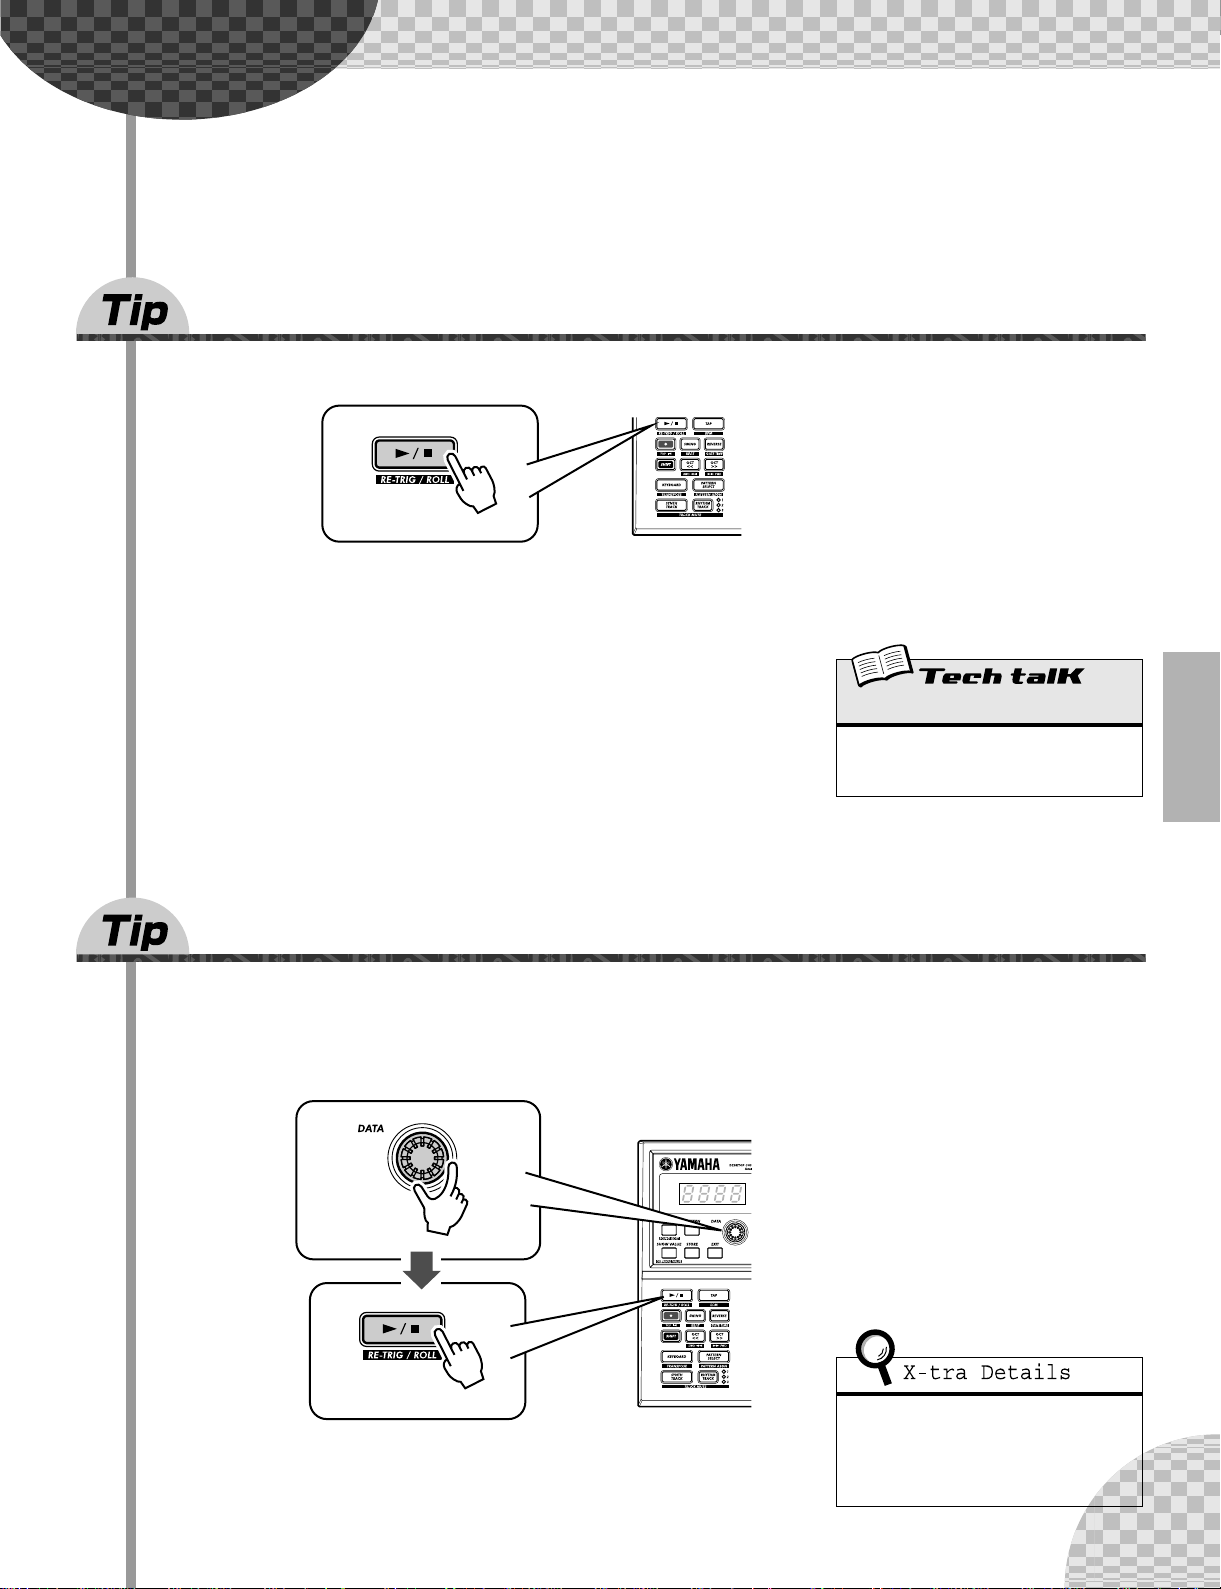
5 Changing the bpm
Now, that you’ve got a Pattern playing, try changing its speed. (This is also called “bpm” — beats per
minute.) The AN200 gives you two ways to do this — tapping out the speed manually, or using the [DATA]
knob to adjust it.
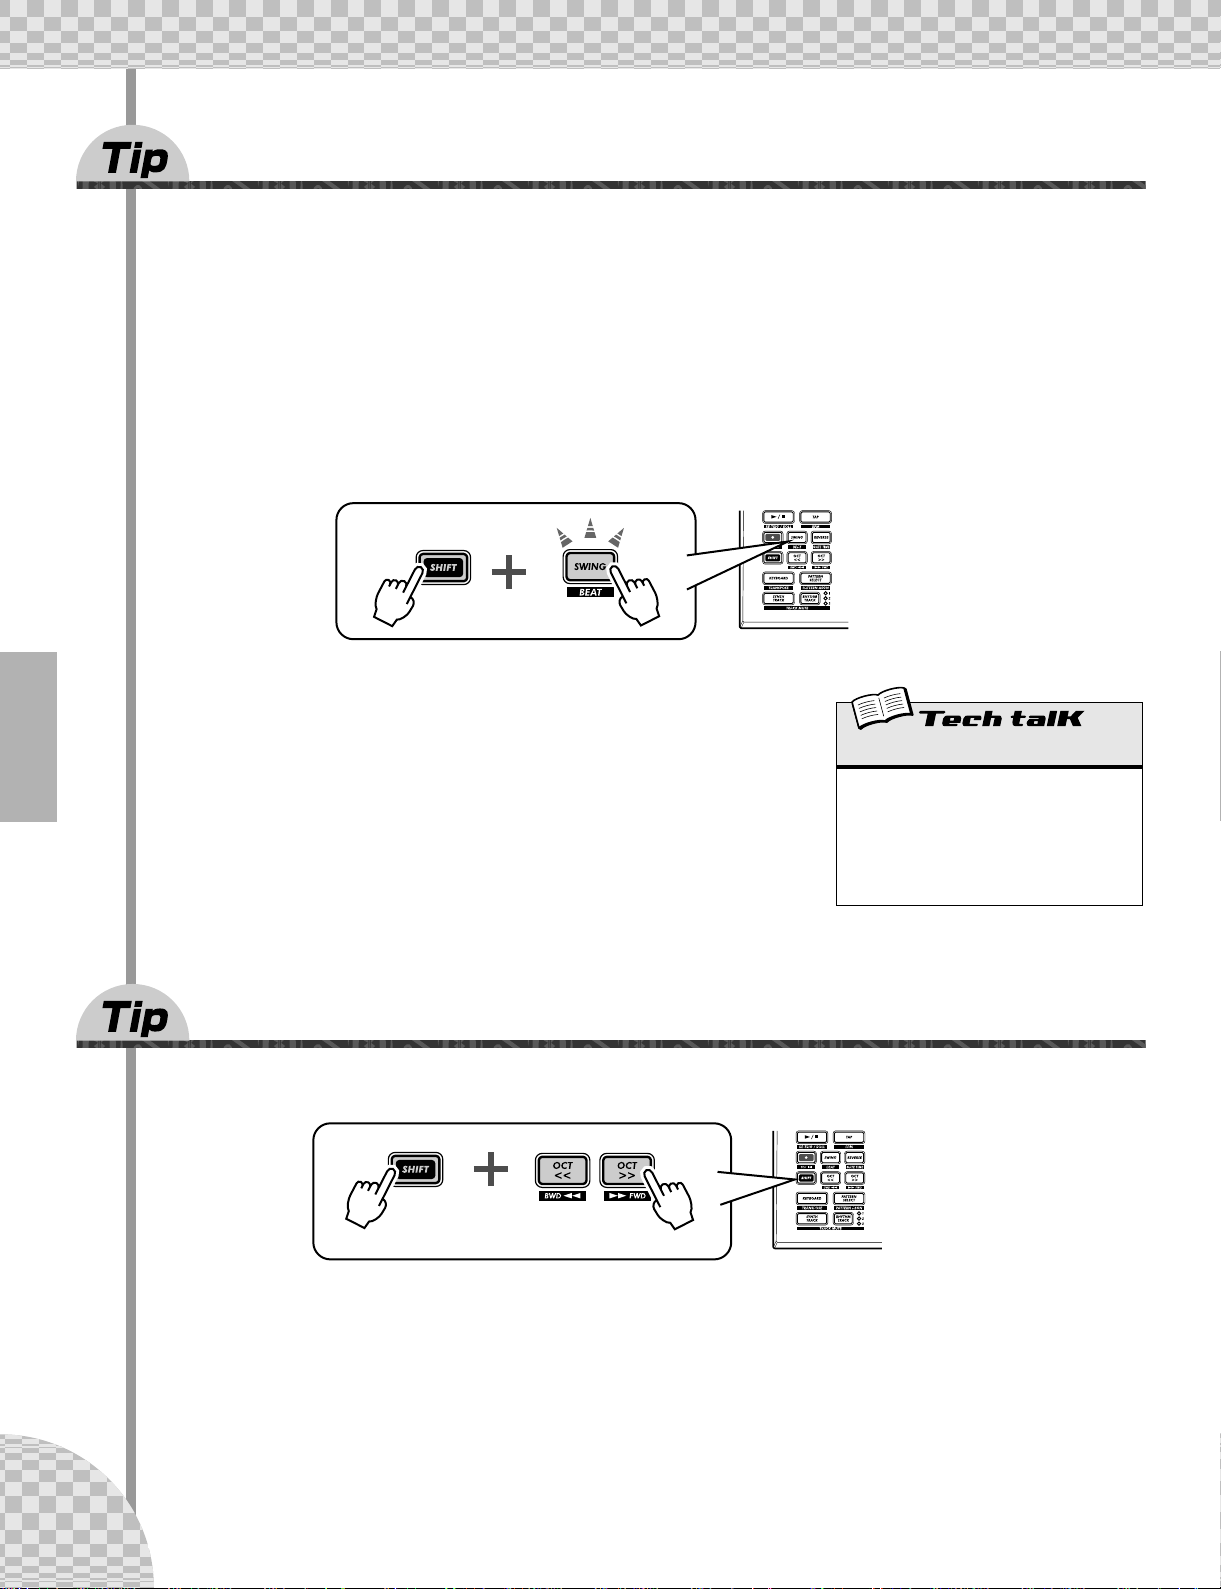
1 Tap the [TAP] button three or four times at the desired speed.
1
2
3
The new bpm is shown in the display. The [TAP] button and BPM lamp flash in time.
2 If you want, adjust the bpm by turning the [DATA]
knob.
BPM
3 Press the Start/Stop button to start the Pattern at the
new bpm.
You can also change the bpm while the Pattern is playing. To do this, simply
start the Pattern before step #1 above.
Determines the speed or tempo of a Pattern.
Operation
Use [TAP] button to tap tempo; then adjust
with [DATA] knob. Or hold down [SHIFT]
and press [TAP/BPM]; then use [DATA]
knob.
Range
20.0 — 300.0 bpm
17
Page 18
Chapter 1 Pattern Basics
6 Messing with the Beat
There’s more than one way to mess with the rhythm. Actually, the AN200 gives you a truckload of ways you
can disturb and deconstruct your beats. One of these is the (appropriately named) Beat function.
You’ll be meeting up with this control again when you record your own Patterns. But let’s see how you can
use it now to change the feel of a Pattern while it’s actually playing...
1 Select a Pattern and start it by pressing the Start/Stop button.
2 While the Pattern is running, hold down [SHIFT] and press [SWING]
(BEAT).
Now, you’ve got Beat called up and ready, so turn the [DATA] knob to
change the setting.
You can tell from the lit number buttons how the Pattern is affected. When
set to “16,” all 16 step buttons are lit and all 16 steps play back normally.
Change the setting to “12,” and Steps 13 - 16 drop out. Notice how the
Pattern not only slows down but “feels” different, too. Change Beat to “8,”
and you’ve only got Steps 1 - 8 happening. That’s half of the original 16step Pattern, and naturally, it plays back at half the speed.
Beat
Determines the number of steps in the
selected Pattern for playback: 16, 12, or 8.
To set, hold [SHIFT] and press [SWING], then
use the [DATA] knob.
Range
16, 12, 8 steps
7 Double time, half time
Here’s a dramatic way to instantly double the speed of a Pattern — or slow it down by one-half.
18
Simply hold down [SHIFT] and press the [OCT <<] button — just before the beginning of the Pattern — to
slow down the bpm by one-half. The first half of the Pattern plays at the new speed, before returning to the
original speed.
To double the bpm, hold down [SHIFT] and press the [OCT >>] button just before the top of the Pattern. The
Pattern plays back twice at the new speed, then returns to normal.
Page 19
Chapter 2
Song Mode
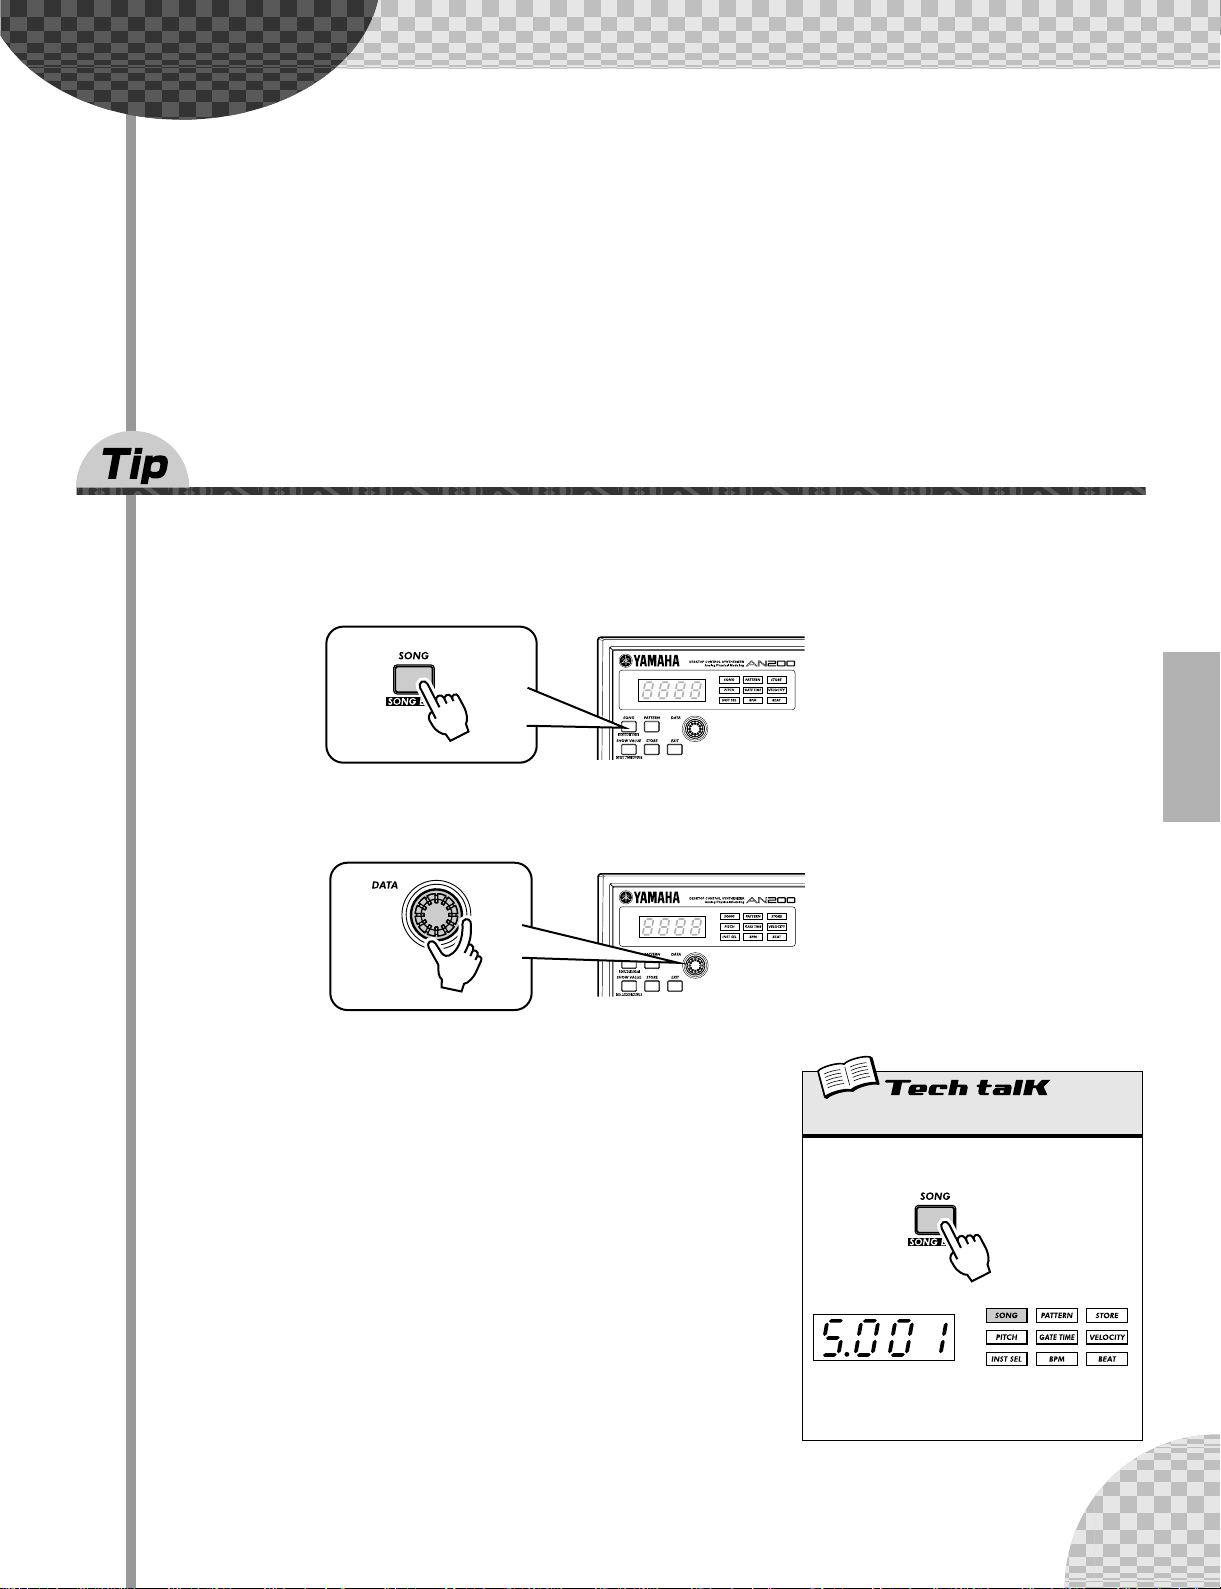
Pressing the [SONG] button selects the Song
mode.
8 Playing a Song
Let’s select a Song now and play it.
1 Press the [SONG] button.
Song Playback
As we said before, the Patterns are the basic building blocks of the AN200.
But what can you build with them?
Songs!
Our team of expert programmers has created a few Songs using the various
Patterns of the AN200. Check these out and hear just how powerful and versatile the AN200 can be for recording your own material.
2 Select the desired Song by turning the [DATA] knob.
3 Press the Start/Stop button to play the Song.
For more about Songs and how to create your own, see page 81.
The letter “S” indicates
the Song mode.
19
Page 20
Chapter 3
9 Playing the keyboard
The built-in keyboard is small — just one octave — but it lets you use all the features of the AN200 without
having to connect a separate keyboard. Try it out now.
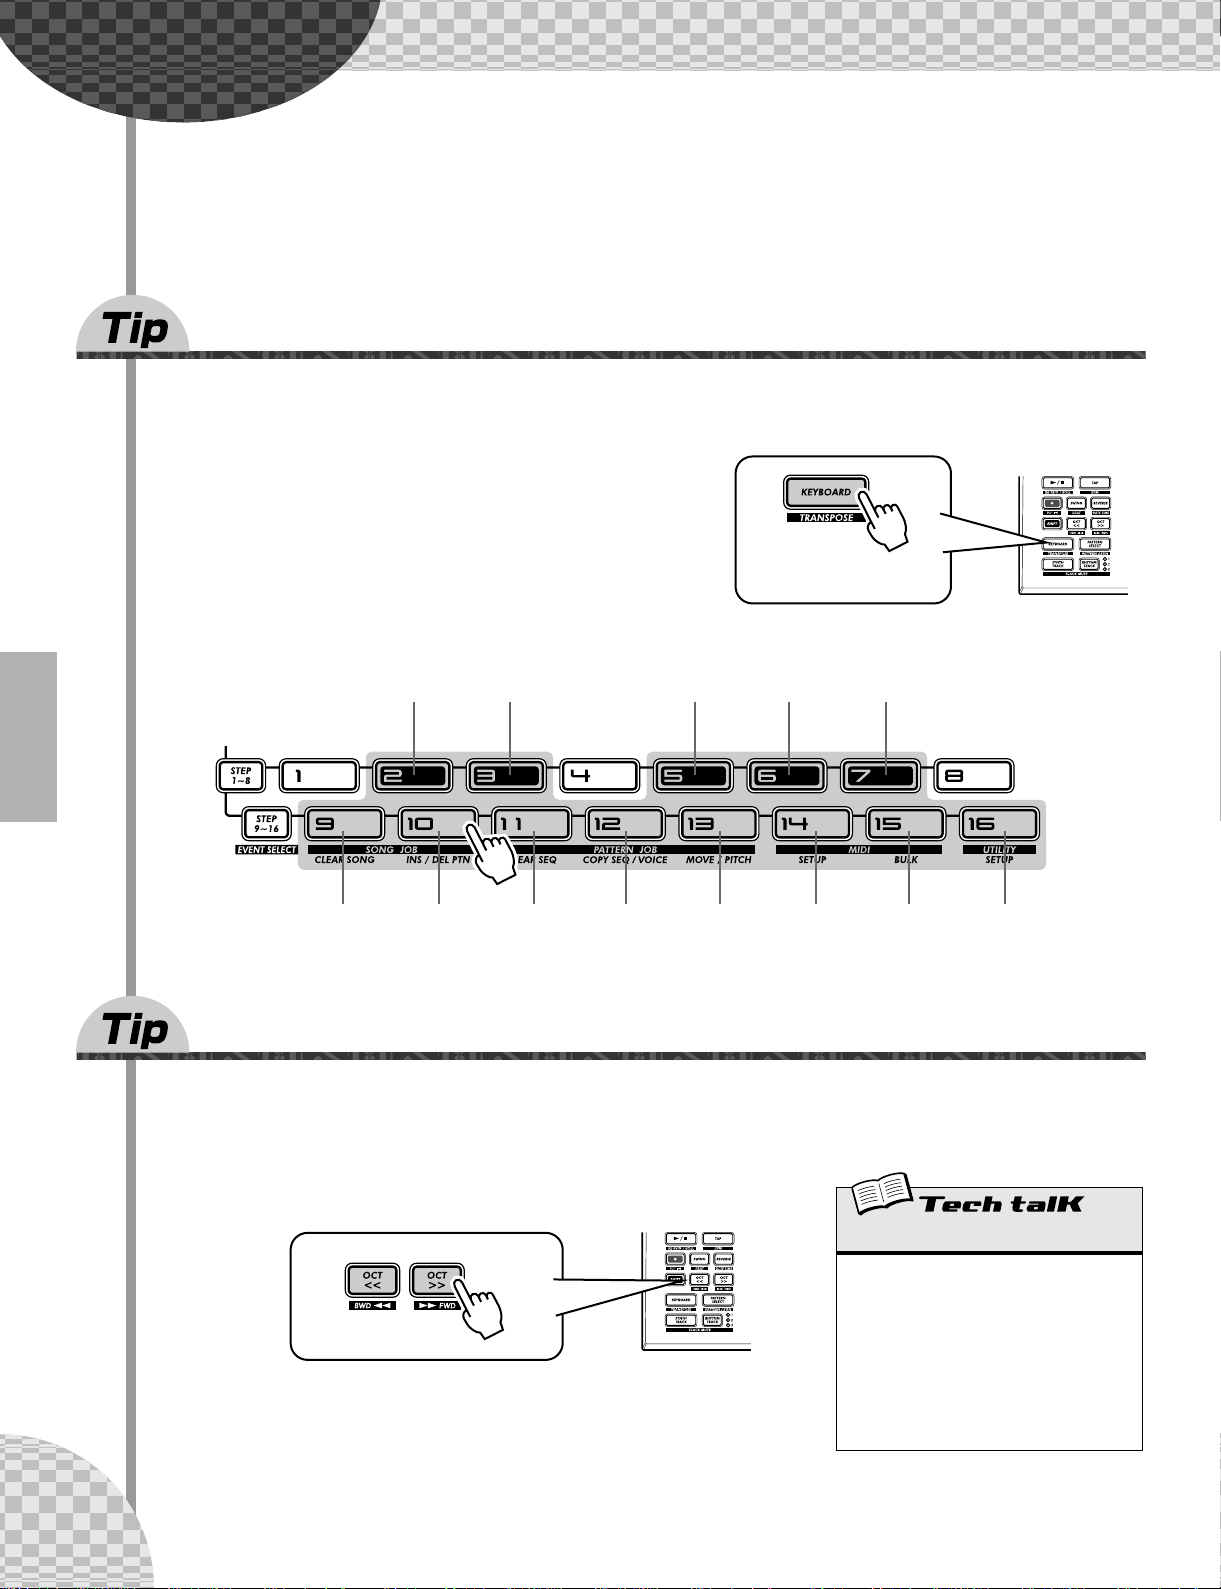
1 Press [KEYBOARD].
The Keyboard
Small and compact as it is, the AN200 also features a one-octave keyboard for
playing and recording the sounds of the instrument.
2 Play the keyboard.
The buttons give you a full octave, from C to C. Keep in
mind that buttons 1, 4, and 8 don’t make any sound here —
they’re not part of the scale.
Db (C#) Eb (D#) Gb (F#) Ab (G#) Bb (A#)
C D E F G A B C
The button lights.
10 Changing octaves
Naturally, one octave doesn’t cover a whole lot of ground. That’s why we’ve included convenient Octave buttons, so you can shift the octave range of the keyboard up or down as needed — quickly and easily.
20
1 While the [KEYBOARD] button is lit, press [OCT >>].
The display shows “C4,” indicating the octave. (“C3” is normal.) Play
the keyboard and listen to the sound. Try some other octave settings,
pressing [OCT <<] and [OCT >>] as desired to shift the octave.
Octave
Determines the octave range of the built-in
keyboard. Press [OCT <<] or [OCT >>] to
change. ([DATA] knob can also be used after
pressing one of these buttons.) Press both
buttons simultaneously to restore normal
range. Some notes may not sound for the
maximum values.
Range
C-2 — C3 (normal) — C8
Page 21
Chapter 3 The Keyboard
11 Playing the Rhythm track
The AN200 also has a special Rhythm track (actually there are three.) that let you play and record drum, percussion, bass and other sounds — giving you the power to easily create your own ultra-hip beats. Naturally,
you can play all these sounds straight from the built-in keyboard...
1 With the [KEYBOARD] button lit, press [RHYTHM TRACK].
The button lights.
Press the button repeatedly to switch among the three Rhythm tracks: 1, 2, and 3.
2 Play the keyboard.
Remember — you can use the [OCT <<]/[OCT >>] buttons to change the range, and call up a whole different set of sounds. For more details on how to use the Rhythm tracks, see page 140.
12 Velocity
All the keys of the built-in keyboard play at a fixed volume — no matter how hard or how soft you play them.
However, you can set this fixed volume yourself, and make the sound as soft or as loud as you need it.
This Velocity setting also controls how loud the sounds are, when you record your own Patterns in Realtime recording (page 70).
1 Hold down [SHIFT] and press button [16], repeatedly
if necessary, until “<EL” appears in the display.
Velocity
Determines the default Velocity setting for the
built-in keyboard of the AN200. This affects
the loudness of the Synth and Rhythm track
sounds, when played from the keyboard. It
also affects the loudness of Real-time
recorded tracks, when the built-in keyboard is
used to record notes.
Velocity is set in the Utility parameters. Hold
down [SHIFT] and press button [16], repeatedly if necessary, until “<EL” appears in the
display. Use the [DATA] knob to change the
value.
Range
1 — 127
2 Use the [DATA] knob to change the value.
Make sure the [KEYBOARD] button is lit, and try out different settings.
21
Page 22
Chapter 4
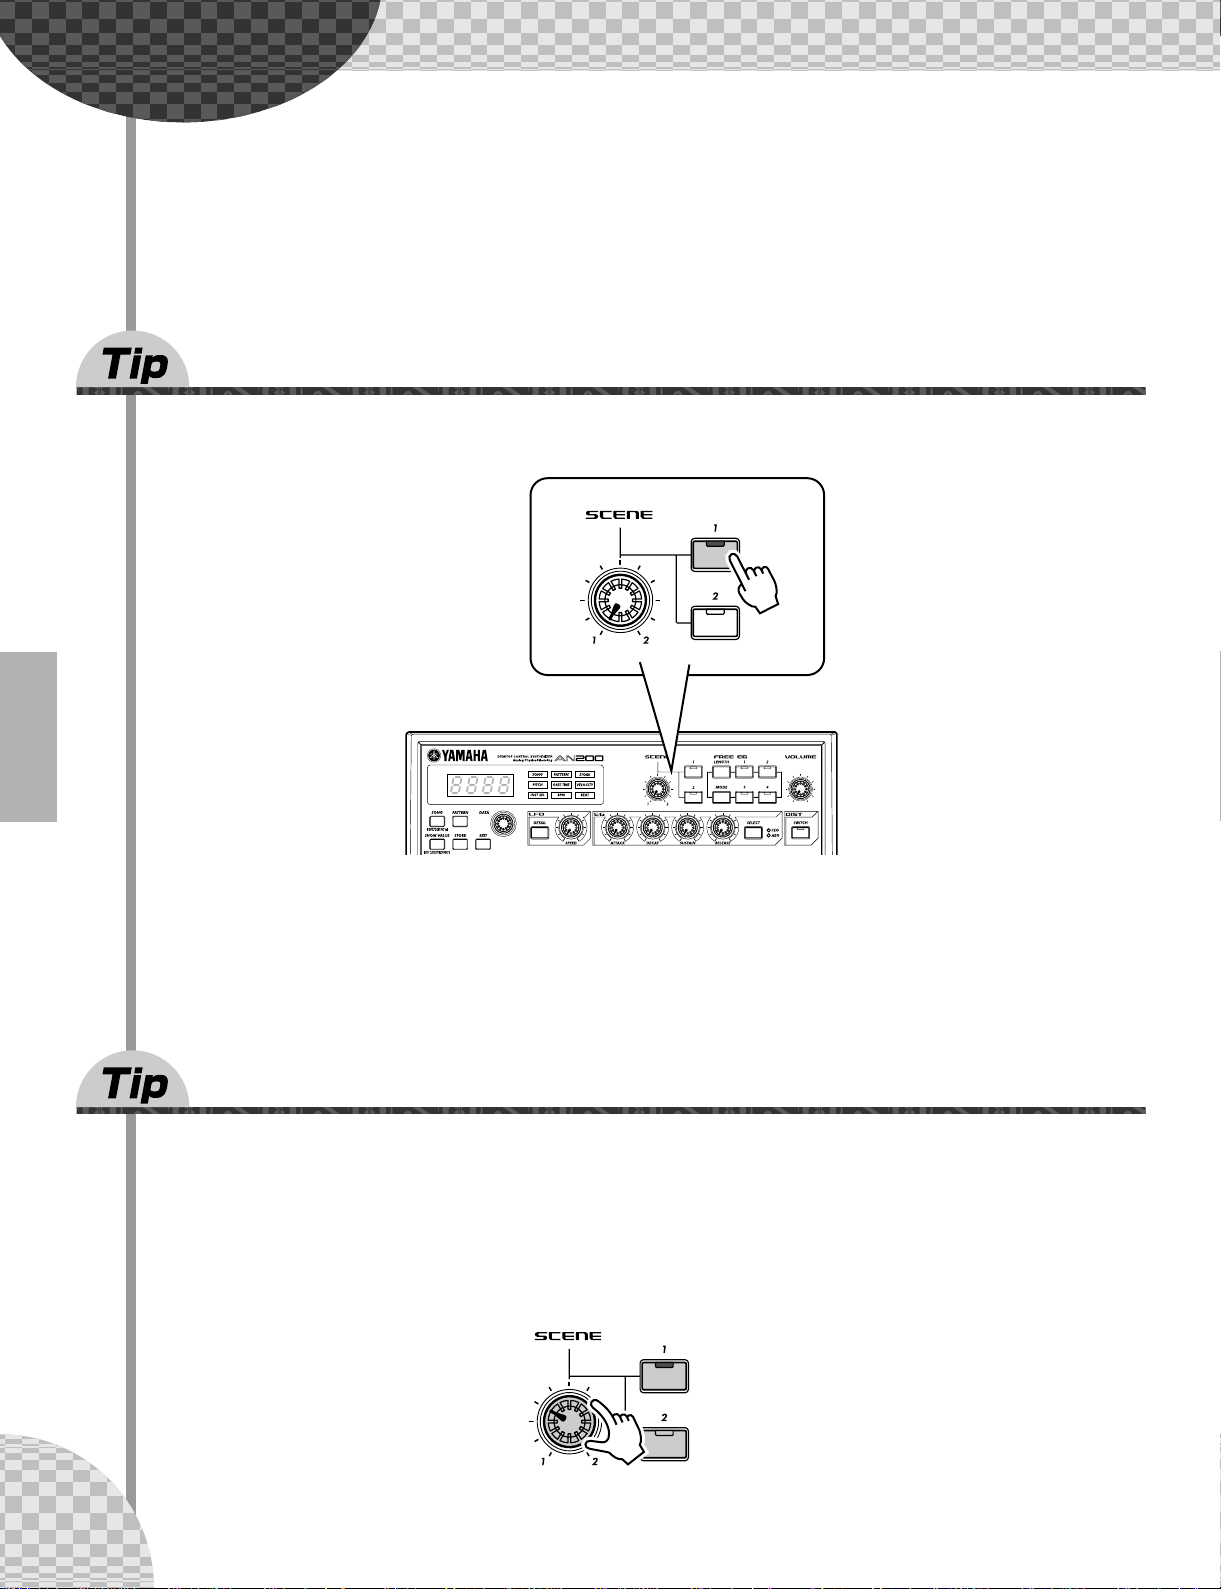
13 Switching Scenes
Here we’ll switch between Scenes, for instant sound changes.
Scene Basics
Scene is one of the most powerful and exciting features of the AN200. It lets
you “morph” between two completely different sounds — in real time, as the
Pattern is playing.
Select a Pattern and start it up. While it’s playing, press the SCENE [2] button. Hear how the sound
changes? Press SCENE [1] to go back to the first sound. Try to do this on the beat, alternating between the
two in rhythm.
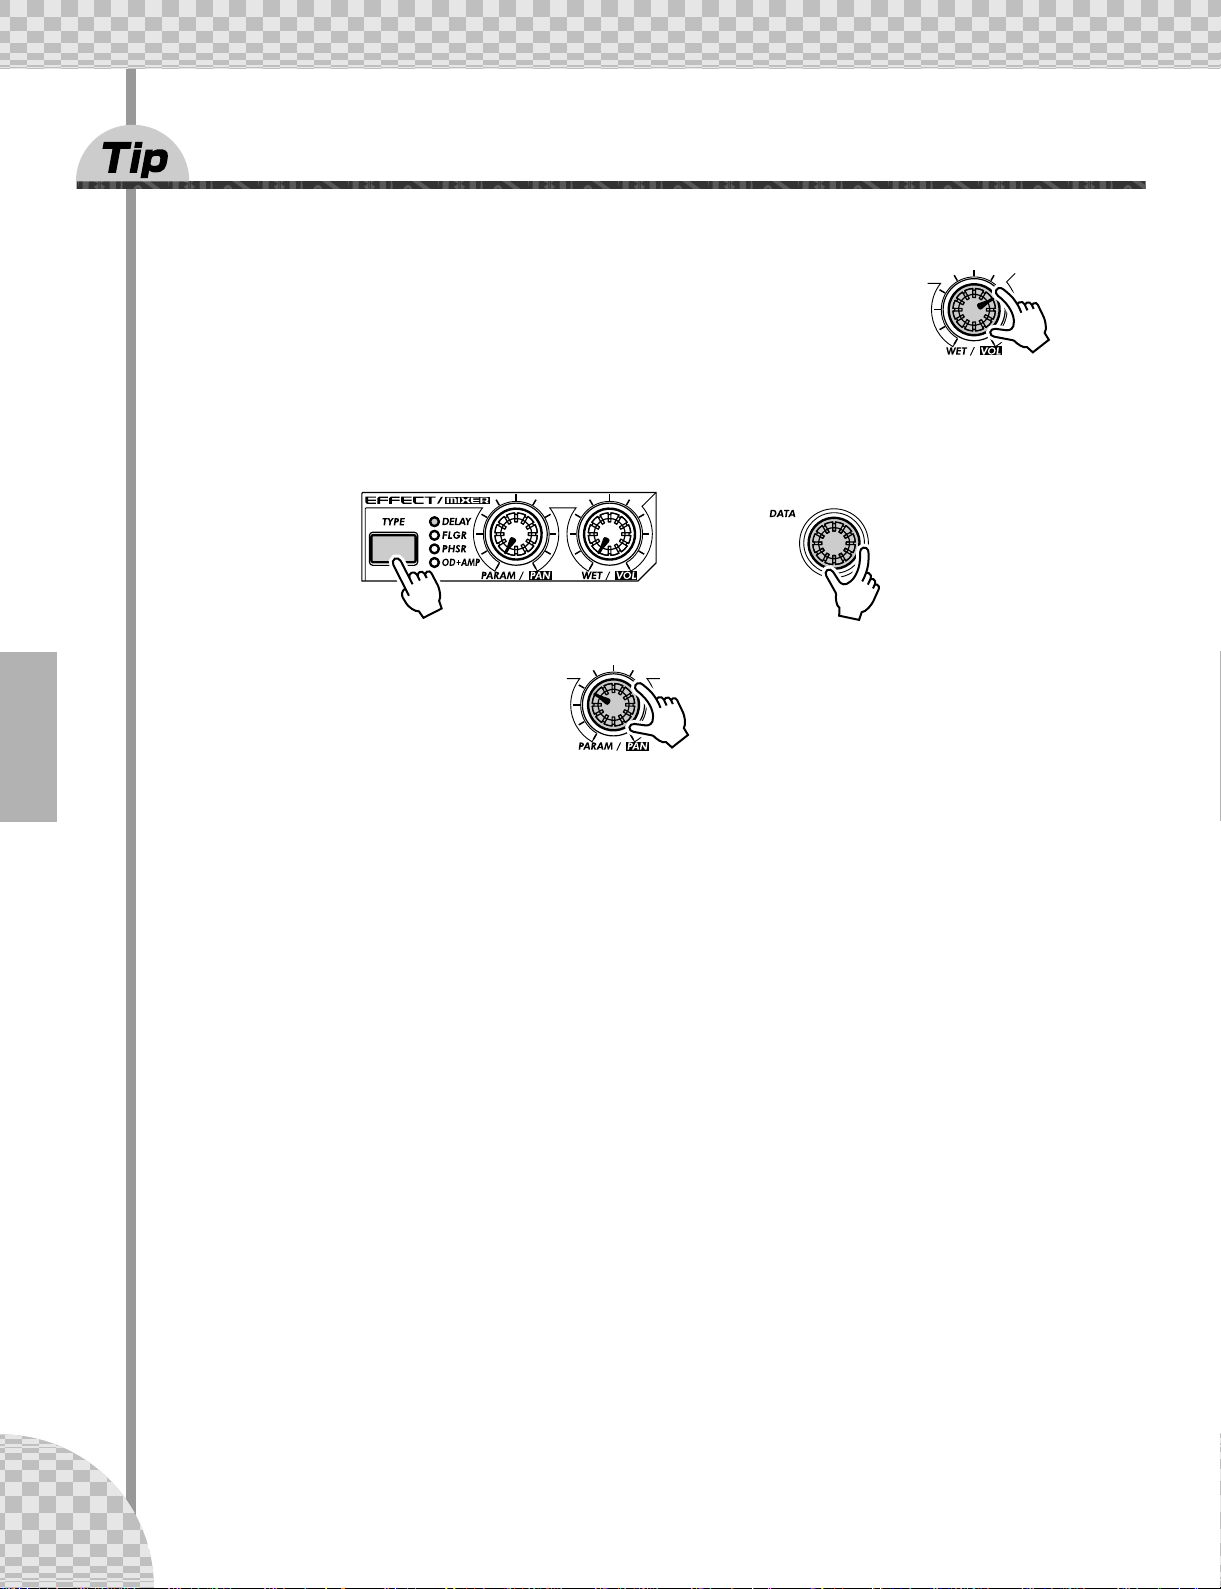
14 Morphing
Let’s try something more subtle now! While playing back a Pattern, turn the [SCENE] knob slowly, back and
forth.
Notice how the sound gradually “morphs” between 1 and 2 — in real time as you work the knob! Do this in
sync with the rhythm and create your own shifting textures!
For more details on Scene, see page 59.
22
Page 23

Chapter 5
15 What is an Effect?
The Effects are the last element in the sound chain — they are the last bit of processing done to the sound
before you hear it.
These real-time Effects — Delay, Flanger, Phaser, Overdrive/Amp — let you mangle the sound in wild and
exciting ways. Although it’s not in the Effect section, there’s also a Distortion effect that lets you add anything from a warm grunge to a full-on metallic assault.
The Effect controls are exceptionally simple and easy to use. Pressing the [TYPE] button changes the Effect
type, while the [PARAM] and [WET] knobs let you adjust the sound and depth of the Effect.
Effects
The effects of the AN200 are more than just icing on the cake — they’re powerful tools you can use to completely transform the sound, and put your tracks
over the top.
Changes the Effect
type (Delay, Flanger,
Phaser, Overdrive/
Amp).
Changes the depth or degree of the Effect.
When set to the minimum (all the way left),
the Effect sound cannot be heard.
Changes the sound of the Effect. (Each
effect lets you control a different key
parameter.)
[WET] knob
Range
0 — 127 (Same for all Effect types.)
23
Page 24
Chapter 5 Effects
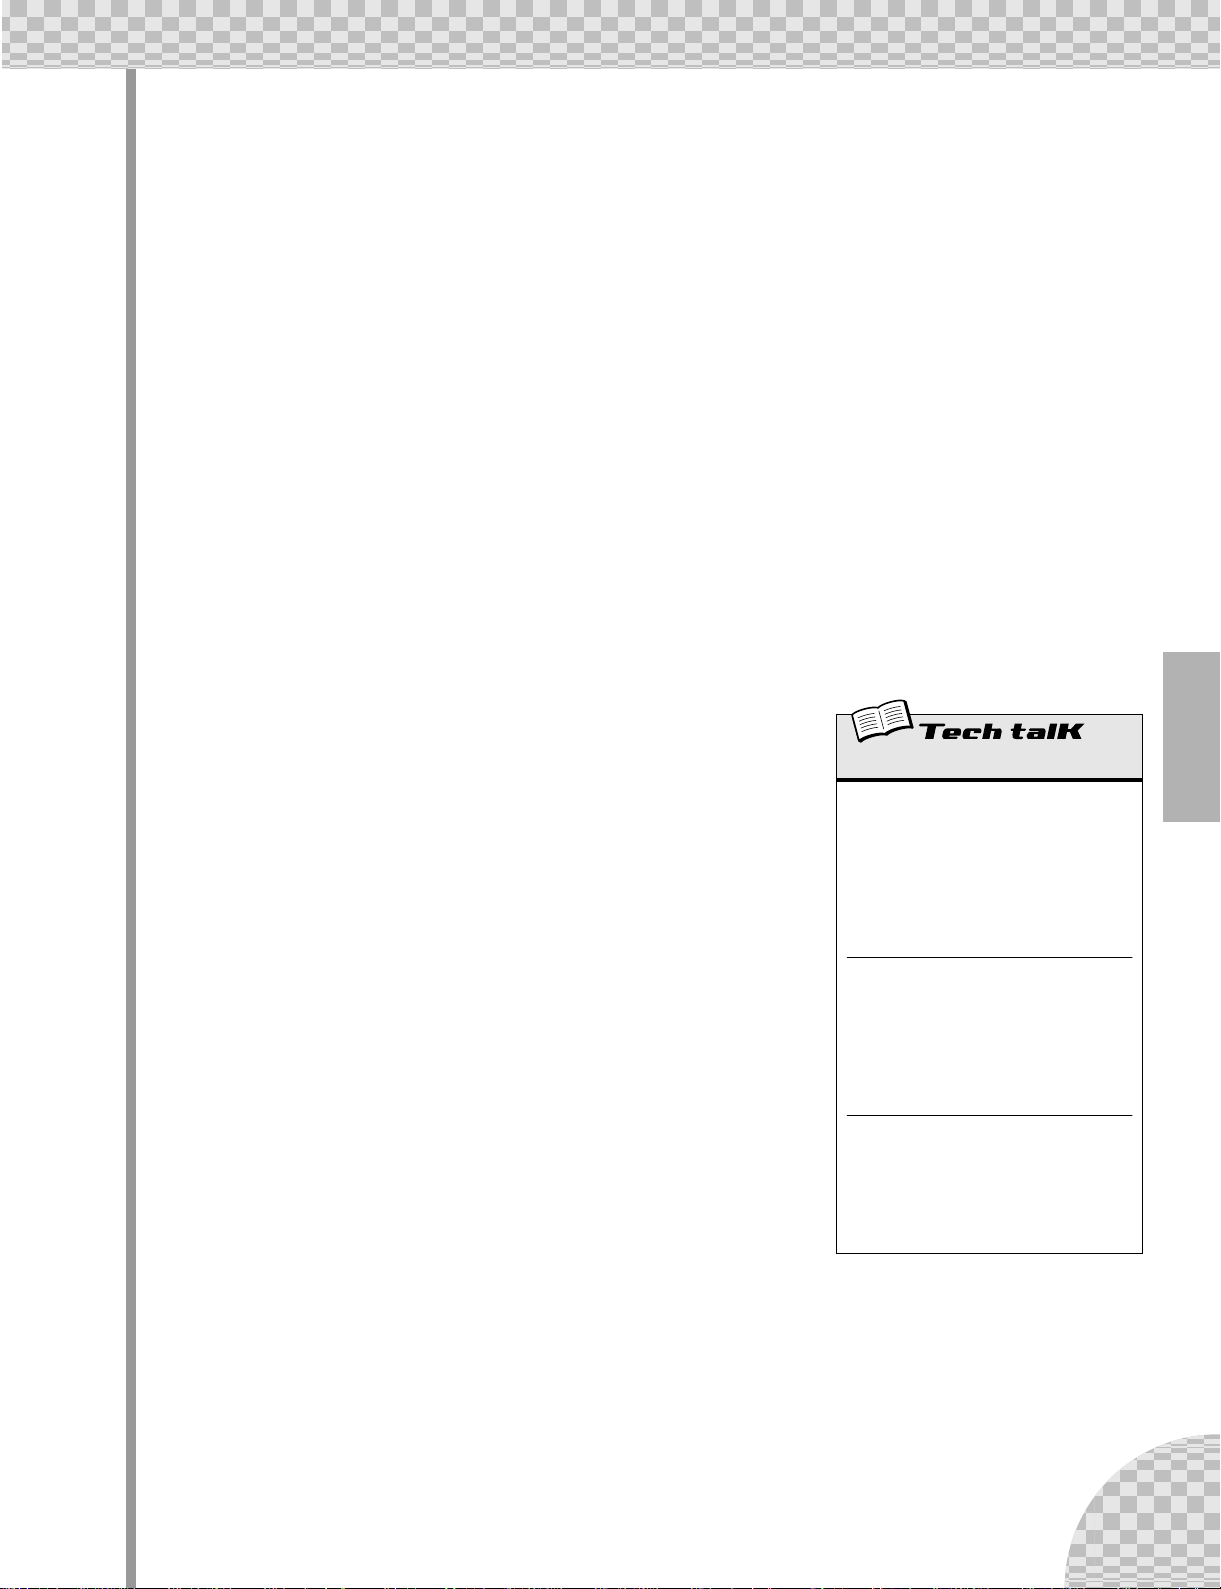
16 Playing with the Effects
Let’s take a look at each of the Effects, and try applying them to the sound.
Before you begin, set the [WET] knob up to about 2:00 or 3:00.
Generally, you should keep the knob at this position. This ensures that you can
properly hear the Effect. (Tweak it later as needed to adjust the Effect balance.)
Now, try out each Effect, and use the same procedure:
1 Select the Effect type.
Press the [TYPE] button, then use the [DATA] knob. Thirteen different types are available.
2 Adjust the Effect depth.
Use the [PARAM] knob.
● Delay
(Delay 1 — 3)
Delay is a popular effect that repeats the sound in rhythm. Play a Pattern and select Delay 1 (dLY1). Try
setting the [PARAM] knob to around 3:00. Hear how the Delay sound pulses with the original sound to create a different, more complex yet “spacier” feel. Try the other Delay types, too.
The key to using Delay effectively (no pun intended) is to keep it in sync with the Pattern. This is a little
tricky and may take some practice. Slowly work the [PARAM] knob and listen carefully for changes in the
rhythm. Keep in mind, there are no “wrong” or “right” settings here — use your ears to come up with settings that feel good.
● Reverb
Reverb (r<rb) is a “hidden” type in the Delay category and it lets you apply an ambient wash of reflections
to the sound. Used subtly, it can make your tracks warmer and more natural sounding — as if they were
being played in a concert hall. More extreme settings can drench the sound in reverb and produce spacy,
other-worldly effects.
24
Try this out on one of the Patterns. Select the Pattern and play it, then tweak the [PARAM] and [WET]
knobs, trying different settings, and hearing how they change the sound. Lower settings result in a shorter
reverb time as well as an overall brighter sound. Higher settings produce a longer reverb time and dampen
the high frequencies as well for a softer, more muffled sound.
Keep in mind that Reverb — like all the Effects — is applied to all tracks, Synth and Rhythm 1 - 3.
Page 25
Chapter 5 Effects
● Flanger
(Flanger 1, 2)
This modulation-based Effect produces a “swishing” or “tunneling” sound. Play a Pattern and select Flanger
1 (FLG1).
Take the [PARAM] knob from minimum to maximum, and notice how the sound grows from a subtle sweeping, metallic sound — like a jet airplane taking off — to a virtually pitch-less sonic meltdown.
● Chorus
Chorus is another modulation effect (“hidden” in the Flanger category) that adds a subtle warmth and depth
to the sound — although you can go for some extreme effects, too.
Try Chorus (CHor) out on a Pattern. Play around with the [PARAM] knob, trying different settings — and
listen for the changes.
Start out with [PARAM] set to 7:00 (minimum). This is no Chorus modulation at all. Now, bring it up slowly
to 8:00, then around 9:00. Hear the modulation working? Doesn’t the sound seem more animated? Even
fatter?
Try higher settings, as well — going to 12:00, then slowly up to 3:00 and beyond. Notice how the pitch
wavers in strange ways — and hear how the sound even brightens up for the highest values.
● Phaser
(Phaser 1 - 3)
Another modulation Effect, Phaser is similar to Flanger, but much more subtle.
It’s perfect for adding some warm animation and movement to the sound.
Play a Pattern and select (PHS1). Set the [PARAM] knob to the minimum (0)
and gradually turn it up — and listen to how the modulation enhances the
sound. Go on to the other Phaser types as well, for more sonic variations.
● Overdrive/Amp
(Amp 1 - 3)
This Effect simulates the overdriven sound of a guitar amp, and lets you apply
varying degrees of distortion to the sound. Start a Pattern and try Amp 1
(AmP1), and tweak the [PARAM] knob. Notice how minimum values produce
a warm, edgy “bite,” while maximum values deliver a full, heavy metal
onslaught.
Try all three Overdrive/Amp types — the differences may not be dramatic, but
they give you a variety of warm and crunch-laden distortion effects to work
with. Some of the Patterns sound especially good with a little grunge...
Effect
Effect Type
Allows you to select one of thirteen Effect
types for processing the sound of the tracks
(Synth and Rhythm 1 - 3). Press the [TYPE]
button, then use the [DATA] knob.
Settings
Delay 1 - 3, Reverb, Flanger 1 and 2, Chorus, Phaser 1 - 3, Overdrive/Amp 1 - 3
Parameter (PARAM)
In general, this allows you to control the
depth of the Effect. (The actual parameter
differs depending on the selected Effect
type.) Use the [PARAM] knob to adjust.
Range
0 — 127
Wet
Allows you to control the volume of the Effect
— in other words, the wet/dry balance. Use
the [WET] knob to adjust.
Range
0 — 127
25
Page 26
Chapter 5 Effects
17 Distortion
The last tip introduced you to a distortion effect, the Overdrive/Amp types. Here’s yet another way to dirty
up the sound — Distortion.
Although not strictly part of the Effect section, Distortion is a strong effect in its own right. Compared to the
warm Overdrive/Amp Effect types, it has more edge and bite. When applied to many of the AN200’s Voices,
it is capable of creating very convincing guitar-like distortion effects.
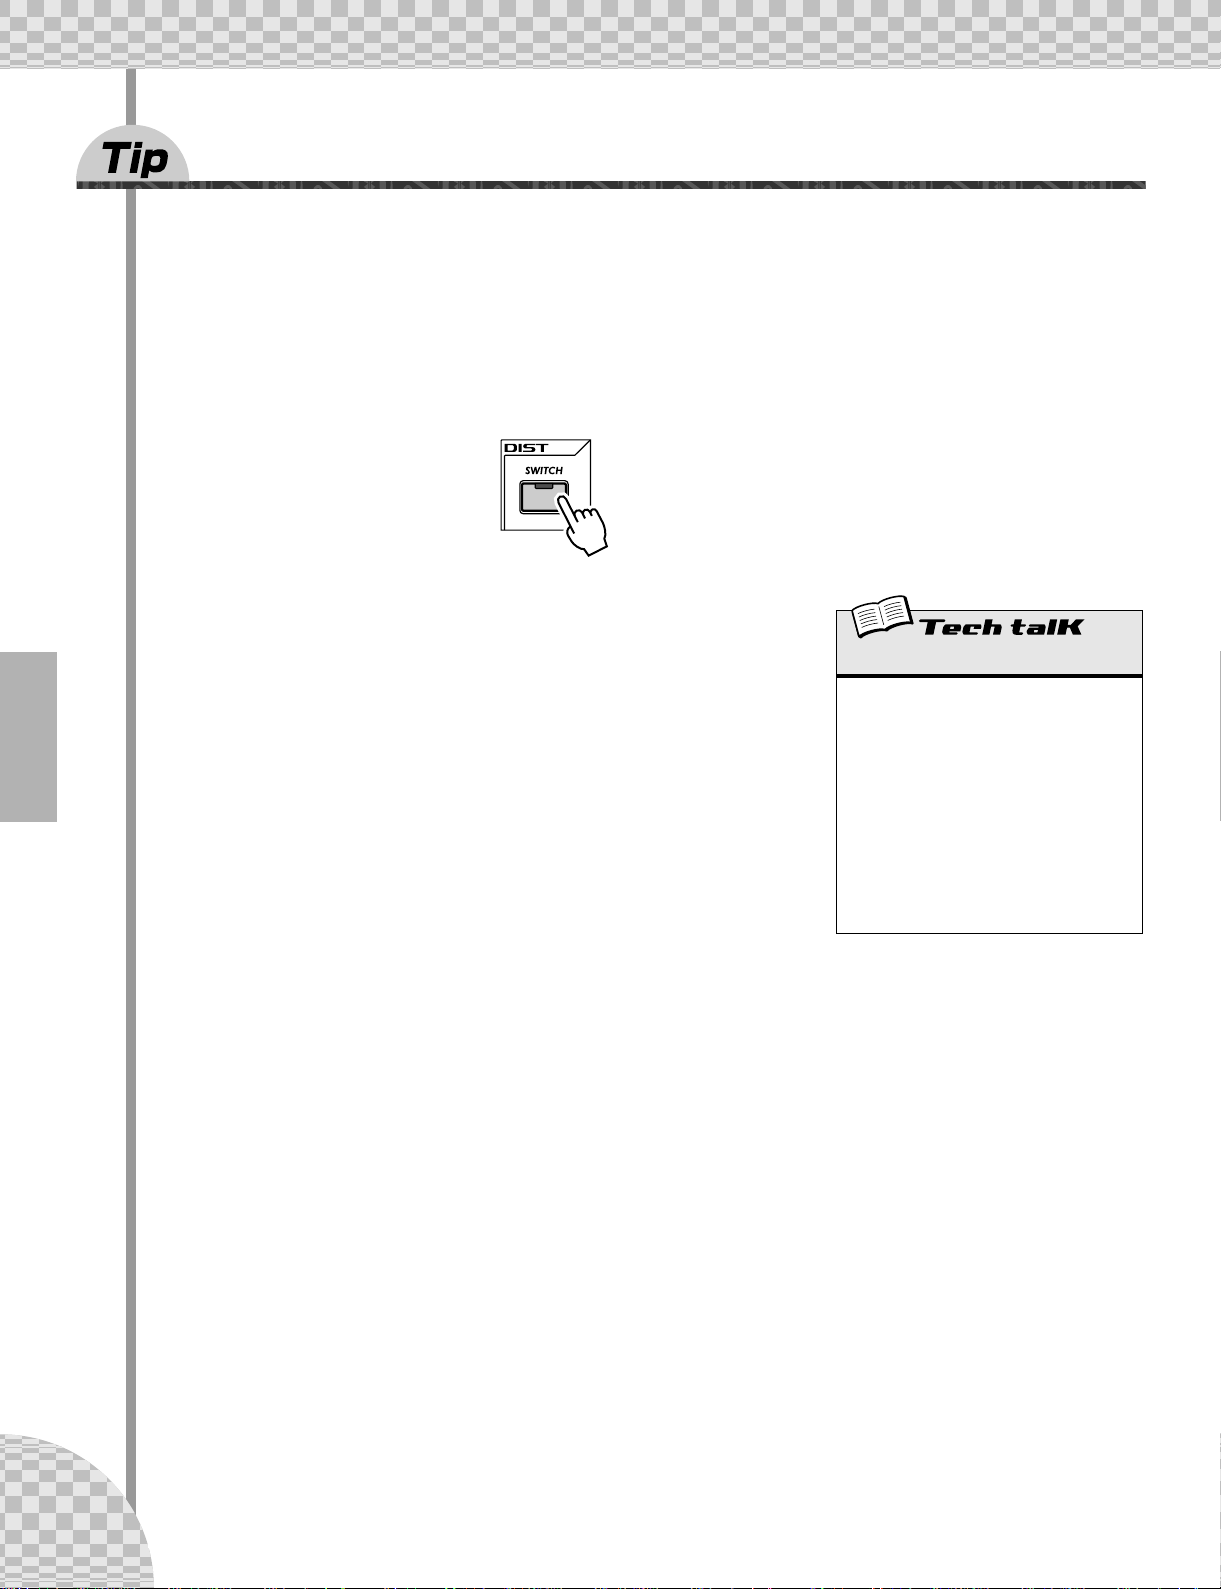
1 Press the DIST [SWITCH] button. (The lamp turns on.)
2 Adjust the balance with the [DATA] knob.
This lets you mix the “dry” no-Distortion sound with the “wet” Distortiononly sound. Try different settings and hear how they change the sound.
Notice how a fully wet “U63” results in a very brittle, edgy sound.
Distortion
Allows you to apply a distortion effect to the
Synth track. (Note that this does not affect
any of the Rhythm tracks.) Press the DIST
[SWITCH] button to turn Distortion on, then
use the [DATA] knob to adjust the dry/wet
balance. A value of “d63” has only the original, unprocessed sound, while a value of
“U63” has only the Distortion-processed
sound.
Range
d63 (dry) — d=U (dry = wet) — U63
(wet)
26
Page 27

Chapter 6
Frequency (pitch)
Volume
Resonance
Filter (VCF)
The VCF or Filter section is one of the most powerful and dynamic on the
entire instrument. Used in the right way, the VCF controls are capable of
transforming sterile, boring sounds into something really dynamic and exciting. Try out the following Tips and see what we mean...
18 Cutoff and Resonance
For your Filter explorations, here’s the best place to start.
These two Filter controls work interdependently — changing one of them affects the sound of the other.
Turn [CUTOFF] to the left and the sound becomes darker or “muffled.” Turn it to the right and the sound
becomes brighter. Turn [RESONANCE] to the right and the Filter peak becomes sharper and more pronounced. Turn it to the left and hear how the Filter flattens out.
Darker Brighter Flatter More pronounced
Also keep in mind that the overall effect of Cutoff and Resonance is controlled by FEG Depth (Tip 20 below).
If FEG Depth is set too high or too low, you may hear little or no change in the sound — no matter how furiously you twist the [CUTOFF] and [RESONANCE] knobs.
Cutoff
Determines the frequency at which the Filter effect starts. The higher
the value, the higher the frequency.
Resonance
Determines the emphasis of the resonant peak of the Filter (at the Cutoff
frequency).
Range
0 — 127
Volume
Cutoff frequency
Frequency (pitch)
Range
Synth track : -12 — 102
Rhythm track 1-3 : -64 — 63
27
Page 28

Chapter 6 Filter (VCF)
19 Wild, wild filter sweeps — VCF Types
The enormous power and versatility of the Filter section continues with the VCF Types. These hidden variations put some really heavy-duty sonic fireworks at your fingertips — just what you need to blow the crowd
away.
Try these settings out for size...
1 Call up a Pattern and press the Start/Stop button. Start out by setting
both [RESONANCE] and [FEG DEPTH] to around 1:00.
2 Simultaneously hold down [SHIFT] and turn the [CUTOFF] knob.
Keep your eyes on the display as you do this — the setting will change! For starters, select “12db” —
which should be around 11:00.
In this shifted condition, the [CUTOFF] knob becomes the VCF Type selector. (That’s why “TYPE” is
printed in black below the knob.)
3 Now, take your finger from the [SHIFT] button, and the knob reverts to its
original identity as the Cutoff control.
Turn it very slowly — especially between 8:00 and 1:00 — as you listen to the gradual changes in the
sound.
4 Not wild enough for you? Let’s move onto another type then...
Hold down [SHIFT] again and turn the [CUTOFF] knob to around 12:00, so that “bPF” is called up in the
display.
Is that any wilder? Still too tame? Let go of [SHIFT] and try tweaking the [CUTOFF] knob between 8:00
and 2:00.
5 Let’s try one more. Hold [SHIFT] and set the [CUTOFF] knob to around
2:00, so that the “HPF” type is selected.
Things can get kind of crazy here, too. Tweak the [CUTOFF] knob some more — especially between
12:00 and 3:00 — and hear what kind of madness you can generate.
28
Don’t forget the [RESONANCE] and [FEG DEPTH] knobs! Work with them too as you tweak the
[CUTOFF] knob. There’s a lot of sonic variation to be had in just these three controls.
Page 29
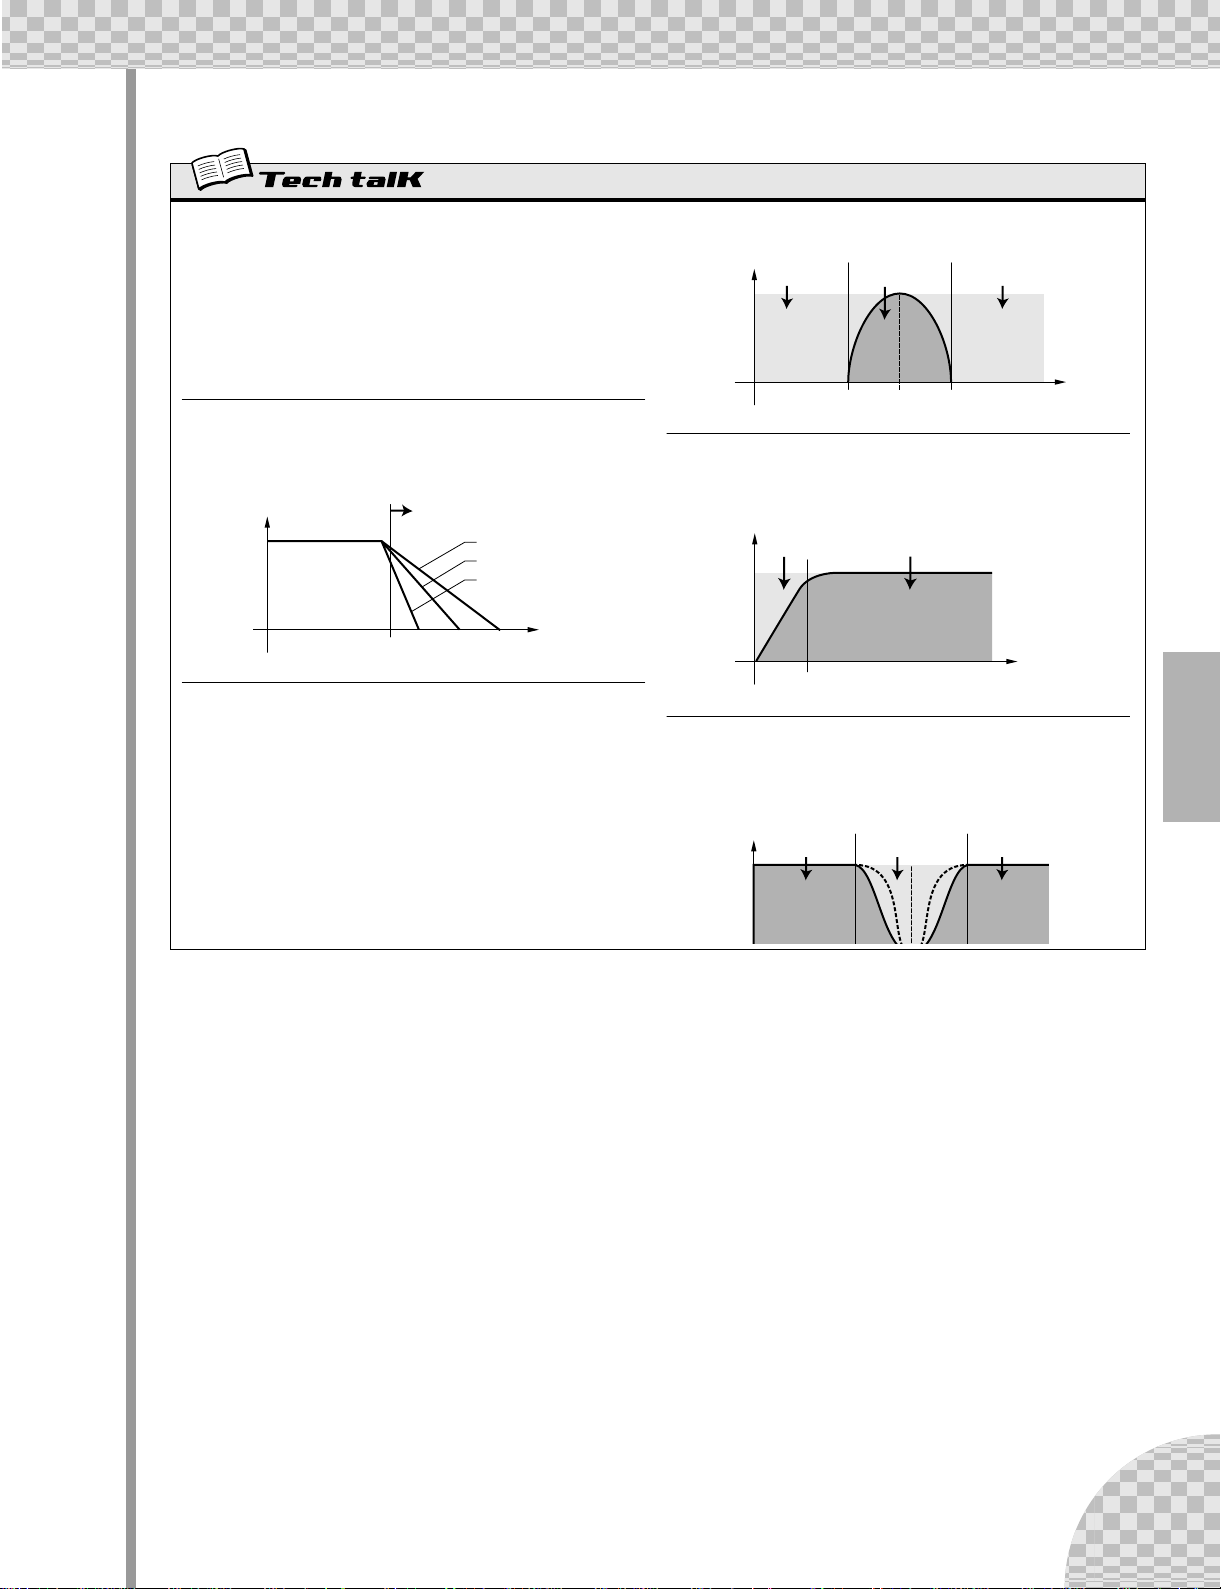
VCF Type
Chapter 6 Filter (VCF)
Determines the filter type used for the VCF section. The filter passes only
a specified range of frequencies while cutting off the rest. There are several completely different types, as well as a variety of filter slopes (see
below).
Settings
24db (Low Pass Filter 24dB/octave), 18db (LPF 18dB/octave),
12db (LPF 12dB/octave), bPF (Band Pass Filter), HPF (High Pass
Filter), bEF (Band Eliminate Filter)
24db, 18db, 12db
The Low Pass Filter passes only those frequencies below the specified
cutoff point. Cutoff curves of 24dB/octave, 18dB/octave and 12dB/
octave can be selected.
Level
Cutoff frequency
Cutoff range
12dB/oct
18dB/oct
24dB/oct
Frequency
BPF
The Band Pass Filter passes only those frequencies in the specified
range, with a cutoff curve of 12dB/octave.
Level
Cutoff range Cutoff range
Range passed
Center frequency
Frequency
HPF
The High Pass Filter passes only those frequencies above the specified
cutoff point, with a cutoff curve of 12dB/octave.
Level
Cutoff range
Cutoff frequency
Range passed
Frequency
BEF
The Band Eliminate Filter passes only those frequencies outside the
specified frequency range. The Resonance setting (see page 27) determines the eliminate range.
Level
Range passed Range passed
Cutoff range
29
Page 30
Chapter 6 Filter (VCF)
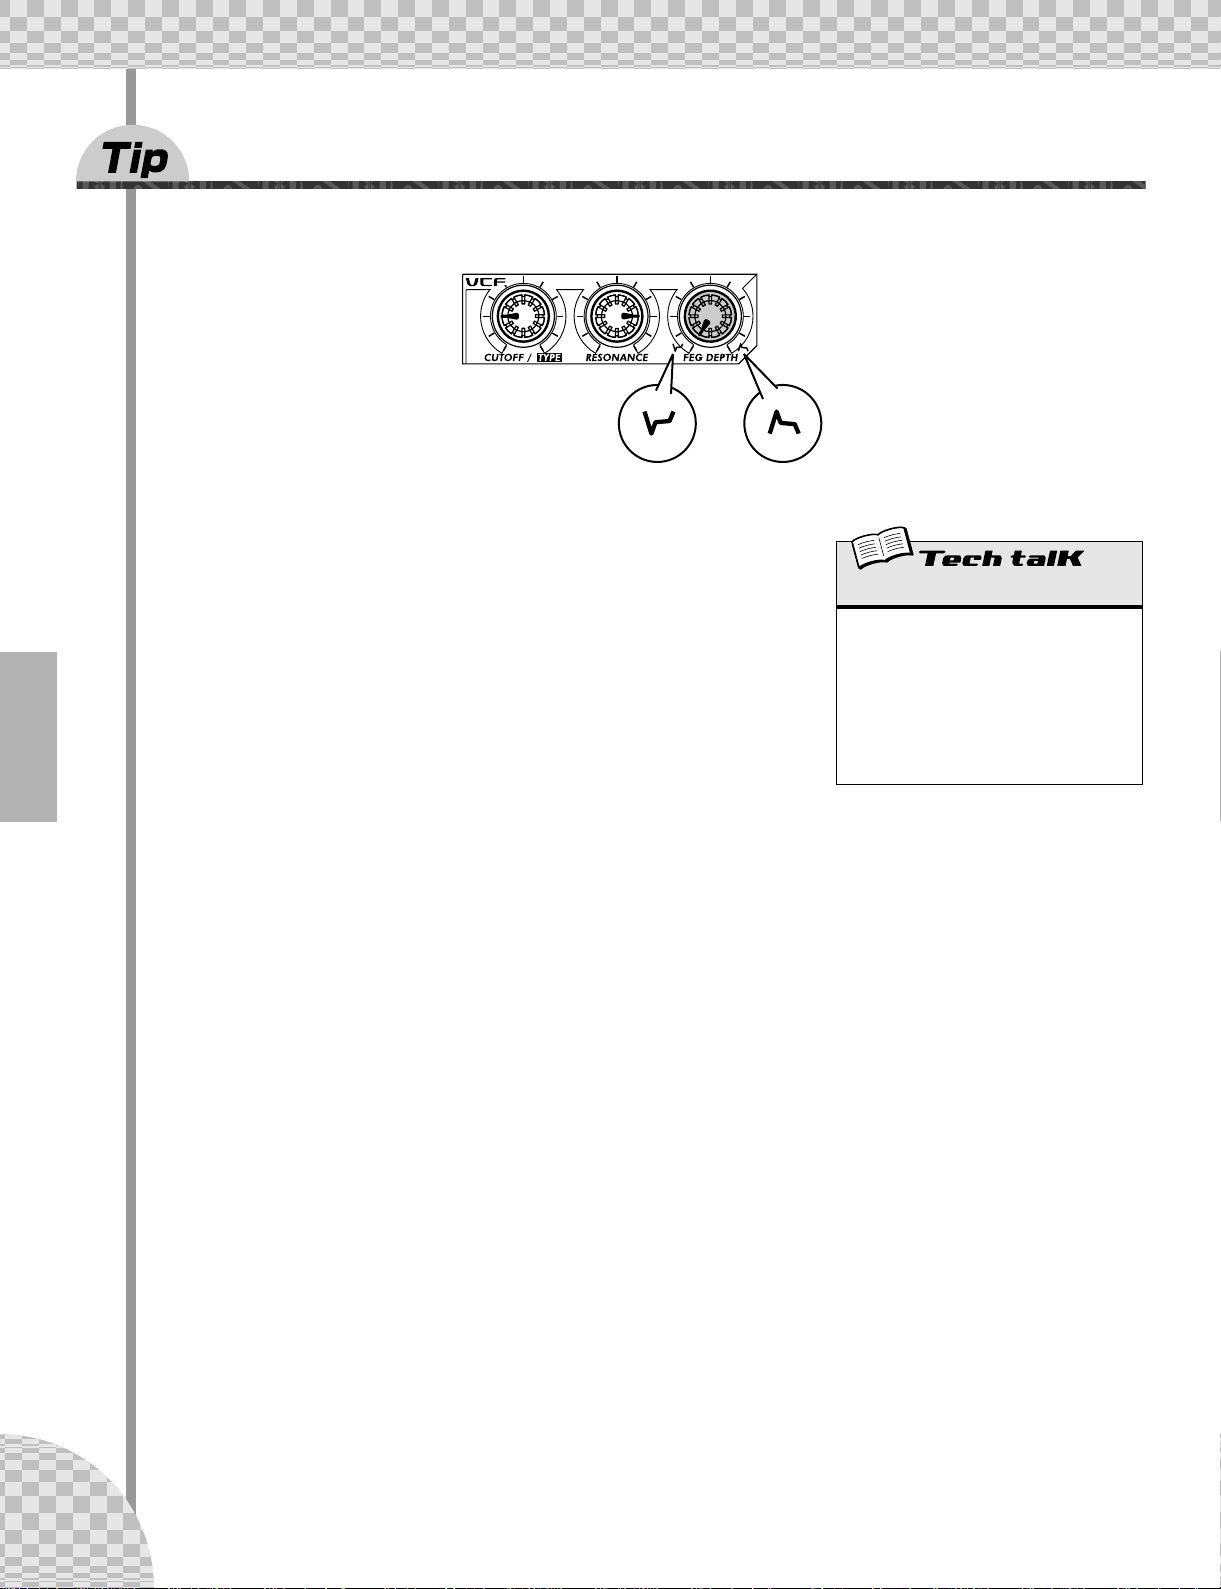
20 FEG Depth
Technically, the FEG Depth controls how the Filter works over time. This is even shown on the panel for you:
Indicates a “dip” in the filter,
just at the start of each note.
With the the [CUTOFF] and [RESONANCE] knobs set respectively to 9:00 and
3:00 (see above), slowly turn the [FEG DEPTH] knob.
Depending on the Pattern selected, negative settings (setting the knob left of
12:00) may result in little or no sound. But once you turn the knob past the
halfway point (12:00), you’ll start to hear the filter “opening up.” Turn the knob
slowly for gradual filter sweep effects. Also try working the knob in time with
the rhythm for dynamic “wah” effects.
Indicates a filter “peak,” just at
the start of the note.
FEG Depth
Determines the degree or depth of the filter
effect over time. Positive values result in a
normal EG; negative values use a “reverse”
EG — producing a filter sweep effect that
dips and comes back up, rather than one that
peaks and goes down.
Range
-128 — 127
30
Page 31

Chapter 7
21 Show Value
Sometimes you’ll want to see what value a knob or button has been set to. Remember that when you call up
different Patterns, the knobs won’t correspond to the settings, so just looking at the knobs won’t help. And
if you turn the knob or press the button, you’re likely to change the setting. What’s a poor knob twister to
do?
Use the Show Value function. This convenient tool lets you see virtually any of the Voice-related settings —
without disturbing or changing them.
1 While you’re editing the Voice of a Pattern, press the [SHOW VALUE] but-
ton.
Nuts and Bolts
Let’s take a break from the fun and games for a moment. Check out the following functions and familiarize yourself with them — they’re very useful,
convenient tools you’ll need as you work with the AN200.
2 Simply turn the knob of the parameter whose value you’d like to see.
For example, to see the Portamento Time value that’s been set for the Voice, turn the [PORTAMENTO]
knob.
Display flashes and indicates the currently set
value for the parameter
(in this case, Portamento).
Naturally, Show Value can be used with all Voice-related buttons as well. For example, to see the current
setting of the VCO 1 Wave, press the VCO 1 [WAVE] button.
LED next to button flashes to indicate current setting.
For buttons that have multiple parameters (such as LFO [DETAIL] or FREE EG [MODE]), press the button
repeatedly to call up the desired parameter.
31
Page 32

Chapter 7 Nuts and Bolts
3 Press the [EXIT] button to return to normal operation.
All of the indicated controls
can be used with the Show
Value function. (Original Value,
too. — See Tip 22 below.)
• Trade Secrets
Use Show Value to pick the brains of our programmers. Do you have a favorite Voice and
would like to find out its settings? Just call up Show Value and take a peek behind the curtain.
Show Value
Allows you to check the current value or setting of a Voice-related parameter, without
changing the value or setting. Press the
[SHOW VALUE] button, then turn the appropriate knob or press the appropriate button.
The current value/setting is displayed. While
Show Value is active, the Voice cannot be
played and the Pattern controls cannot be
used. Press the [EXIT] button to return to
normal operation.
22 Original Value
If you tweak and turn the knobs on a Voice for any length of time, you’re going to come up with a Voice
that’s VERY different from the one you started out with. And at some point in the editing process, you might
wish you could take a peek at the original settings — without erasing your new ones, of course — just to
see how far you’ve strayed.
This is where the Original Value function can help. Similar to Show Value (in Tip 21 above), Original Value
lets you view any of the originally programmed Voice-related settings — simply by turning a knob or pressing a button.
1 While you’re editing the Voice of a Pattern, hold down [SHIFT] and press
the [ORIGINAL VALUE] button.
2 Turn the knob or press the button of the parameter whose value or set-
ting you’d like to see.
For example, to see the original Cutoff value that’s been set for the Voice, turn the [CUTOFF] knob.
Display flashes and indicates the
originally set value for the parameter (in this case, Cutoff).
Original Value can be used with all the same knobs and buttons as Show Value. For details, see Tip 21
above.
3 Press the [EXIT] button to return to normal operation.
32
Page 33

Chapter 7 Nuts and Bolts
● What’s the difference between Original Value and Show Value?
• Show Value — Lets you view the CURRENT settings of the Voice.
• Original Value — Lets you view the ORIGINAL PRESET PROGRAMMED settings of the Voice.
If you haven’t done any editing to a Voice, both of these will display the same values — those of the currently selected Pattern.
• Closer to home
While you’re editing a Voice, you may find yourself way off course — somewhere in outer
space! You can use Original Value to retrace some of your steps and come back closer to
Earth. For example, call up Original Value and check one of the settings — say, FEG DEPTH —
then press [EXIT] and adjust the [FEG DEPTH] knob to bring the value closer to the original.
Keep doing this with other parameters as well, until you get the sound you want.
• Current and original values
Want to easily see how far your edited values are from the original? Just switch between
Show Value and Original Value. To alternate between the two functions, simply press the
appropriate button(s): [SHOW VALUE] for Show, [SHIFT] and [ORIGINAL VALUE] for Original.
No need to exit beforehand — just toggle between the two, turning the knob each time you
switch to check the settings.
Original Value
Allows you to check the originally programmed value or setting of a Voice-related
parameter, without changing the value or setting. Hold [SHIFT] and press the [ORIGINAL
VALUE] button, then turn the appropriate
knob or press the appropriate button. The
original value/setting is displayed. While
Original Value is active, the Voice cannot be
played and the Pattern controls cannot be
used. Press the [EXIT] button to return to
normal operation.
23 Panic! (or “Uh-oh...What do I do now?”)
As you’ve undoubtedly discovered by now, the AN200 is a wonderfully deep and extraordinarily versatile
synthesizer. Sonically, it can take you places you’ve never dreamed of.
Unfortunately, that can be part of the problem. While you’re tweaking a Voice, you may end up drifting in a
synthesized never-never land, or come across nothing but silence or muffled noises, or — maybe worst of
all — meet up face to face with a monster sound that can’t be tamed.
Until you know exactly how the controls work and how they affect the sound, you’ll ocassionally find the
AN200 to be an unpredictable, sometimes uncontrollable beast. Before you unplug it and try to stuff it back
in its box, try these common-sense workarounds and solutions.
● Select a different Pattern.
Or select the same Pattern again. Yes, this will automatically erase any edits you’ve made. But at least
you can come back to square one and start over.
● Press the [EXIT] button.
This won’t always work as you expect. Keep in mind, [EXIT] is mainly used to leave a function or operation. Use it when you find yourself inadvertently doing something you don’t really want to do — such as
deleting a Pattern from a Song (page 88) or clearing a sequence (page 68). Also use it to get out of situations where there is no sound or many buttons just don’t seem to work — such as in Show Value (page
31) or Original Value (page 32).
● Turn off the power.
When all else fails... Actually, we don’t recommend doing this, especially if you’ve got speakers connected. But it IS a quick and sure way to reset everything.
33
Page 34

Chapter 7 Nuts and Bolts
● Do a Factory Reset operation. (See Tip 24.)
Use this only if you suspect something is actually wrong with the AN200. (For the most part, many of
the confusing things about the instrument may just be things that you don’t quite understand yet.)
Remember, this will COMPLETELY ERASE any original work you’ve done or saved — so be careful!
● Check the Troubleshooting section (page 115).
We mean it. The next time you find yourself scratching your head (or tearing your hair out), save yourself a whole lot of grief and read through this section. It’ll make you feel better.
24 Factory Reset
If the AN200 freezes in an operation, crashes, or otherwise behaves erratically, the Factory Reset operation
can usually be counted on to bring things back to normal.
Factory Reset is also used to restore all the factory-programmed Pattern and Song data. For example, if
you’ve created your own Pattern and Song data (and saved it, of course) but want to use the original Patterns and Songs of the AN200, just perform a Factory Reset.
This operation automatically erases any and all of your original Patterns and Songs. If possible,
make sure to save any important data (page 108) before using Factory Reset.
1 Turn the power off.
2 Simultaneously hold down the [SHOW VALUE], [PATTERN] and [EXIT] but-
tons, and turn on the power again.
34
Page 35

Chapter 8
25 Adjusting the Gate Time
Try this simple, fast and cool tool — and change the feel of your tracks.
Select and start a Pattern. Any Pattern will do.
While the Pattern is playing, simultaneously hold down [SHIFT] and press [GATE TIME] ([REVERSE]).
Pattern Playback
We’re going to pick up where we left off in Chapter 1, and give you some more
Pattern Tips. These are simple things you can do to change the sound, pitch,
rhythmic feel, and other aspects of the Patterns — even the Patterns themselves — in real time.
The lamp flashes to indicate Gate Time is active.
Turn the [DATA] knob to change the Gate Time. Notice how the length of the
notes changes as you work the knob.
When you’re done, don’t forget to press [EXIT] (or [SHIFT] + [GATE TIME]) to
leave the function.
Gate Time
Determines the length of each note. The
higher the value, the longer the gate time.
Shorter values produce a clipped sound,
longer ones produce a sustained sound.
Range
1 — 100 (normal) — 200
35
Page 36

Chapter 8 Pattern Playback
26 Transposing the key
The Transpose function lets you change the pitch or key of the Pattern as it plays back. With this, you can
change chords on the fly, and create your own chord progressions — instantly, as you perform.
Let’s try it out. Select a Pattern and start it up. Now, hold down [SHIFT] and press [KEYBOARD].
The button flashes.
As the Pattern plays, try pressing various keys. For example, press [12] — and hear how the key changes.
Press [9], and you’re back to the original pitch. (Remember that buttons 1, 4, and 8 don’t have any effect
here.)
The trick to using this effectively is hitting the pitch changes right on the beat. To get the hang of it, try this
simple example — counting “one, two, three, four” with the Pattern — and stay in time with the rhythm.
one two three four ONE two three four ONE two three four ONE two three four
Try changing pitch on other beats in the Pattern as well — for example, not just on the “one,” but hitting the
“one” and “three” both. Or on all four beats, for some unusual, “busy” changes. And did you know that you
can use the [OCT <<]/[OCT >>] buttons, too? This next example may take a little practice...
two THREE fourone two three fourONE two THREE fourONE two three fourONE
Notice that the octave doesn’t actually change until you hit the number button
on the keyboard.
Experiment with other Patterns as well. And when you’re done, don’t forget to
press the [EXIT] button to leave the function.
Transpose
Determines the key of Pattern playback. To
enable, hold down [SHIFT] and press [KEYBOARD], then press appropriate buttons on
keyboard. Use [OCT <<]/[OCT >>] to change
octave. The number of semitones that the
pitch has been transposed is indicated in the
display.
Range
-24 — 24
36
Page 37

27 Swing
Here’s an instant way to change the rhythmic feel of a Pattern. Play it straight,
or give it some swing.
Call up a Pattern and start it up. While it’s playing, press the [SWING] button
and turn the [DATA] knob.
Try a setting of about 65 - 70 and notice how the Pattern takes on a “bouncy”
feel. Experiment with different settings and different Patterns. Judicious use
of Swing can make the Patterns sound less mechanical — and give your tracks
a more “human,” natural feel.
• The Swing effect differs depending on the selected Pattern. For certain Patterns with few
notes (such as only quarter notes), Swing may have little to no effect.
• When the Beat parameter (page 18) is set to “12,” Swing has no effect on the Pattern.
Chapter 8 Pattern Playback
Swing
Determines the amount of swing or triplet
feel in Pattern playback. (Does not change
the actual recorded data.) While a Pattern is
playing, press the [SWING] button and turn
the [DATA] knob to change the value.
Range
50 (straight) — 83 (maximum swing)
28 Muting tracks
The Patterns of the AN200 contain and play back up to four separate tracks — the Synth track and three
Rhythm tracks. The convenient Track Mute feature lets you selectively mute these tracks — even during
playback.
Track Mute actually has two main applications: one in recording, the other in live performance. When
recording several tracks to a Pattern (page 70), it’s often useful to hear only one or two of your previously
recorded tracks — and Track Mute is ideal for this.
However, where Track Mute REALLY shines is in live performance. Pro DJs and dance music artists can
whip the crowd into a frenzy by dropping parts out and bringing parts in. For example, bringing everything
down to the drums is a great dynamic trick that keeps the dancers grooving. From there, you can gradually
build things up, adding track by track until you have the whole mix cooking. Or bring everything in all at
once, and watch the crowd explode.
1 Call up and start one of the Patterns.
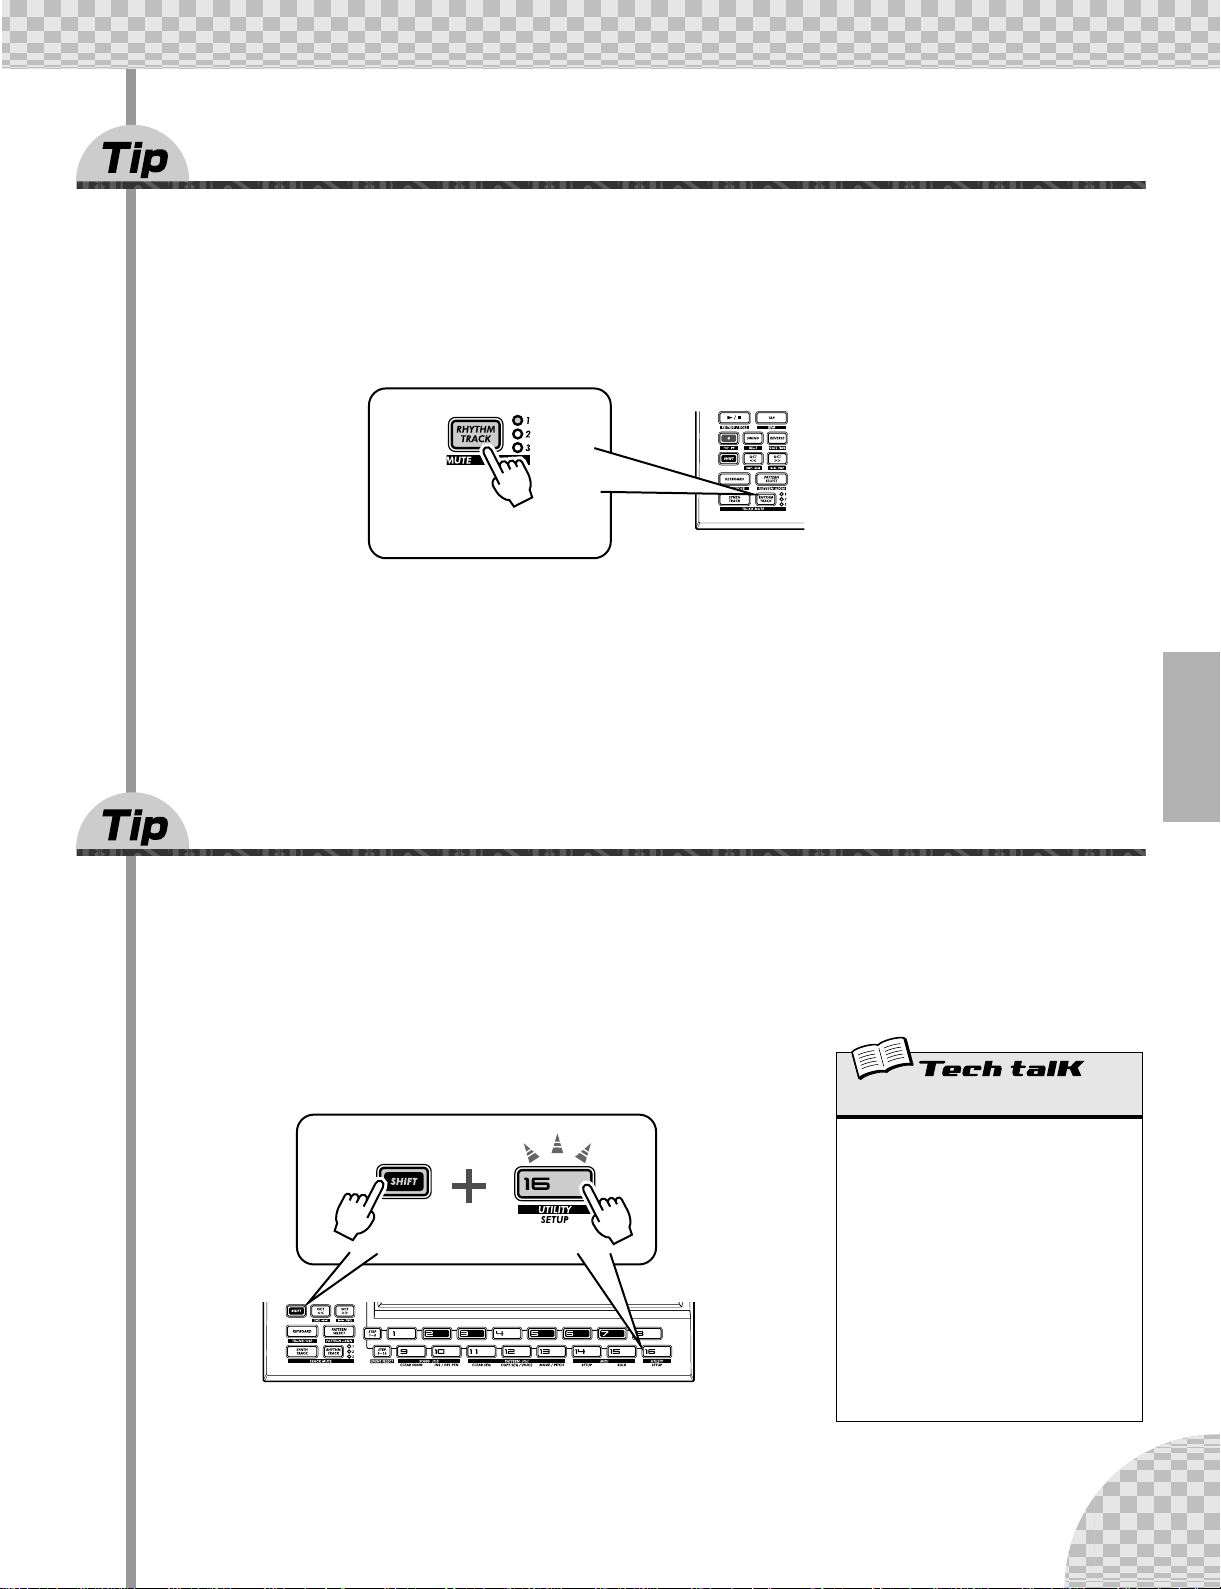
2 Let’s start by muting the Synth track. While holding down [SHIFT], press
[1] on the keyboard.
37
Page 38

Chapter 8 Pattern Playback
Notice how buttons [1], [2], [3], and [4] light while you hold down [SHIFT]
— this means all four tracks are on. Button [1] corresponds to the Synth
track; when you press this, the Synth track cuts out. To bring the Synth
track back in, simply hold down [SHIFT] and press [1] again.
3 Now, do the same with Rhythm tracks 1, 2, and 3 —
which are assigned to buttons [2], [3], and [4], respectively.
While the Pattern is playing, try muting and unmuting the tracks in time
with the rhythm. The lighted buttons let you see at a glance which tracks
are active — a great help when doing this live.
Track Mute
Allows selective muting of the four tracks:
Synth and Rhythm 1 - 3. Two methods are
available:
Method 1
Holding down [SHIFT] and pressing number buttons [1], [2], [3], and [4].
Method 2
Holding down [SHIFT] and pressing
[SYNTH TRACK] or [RHYTHM TRACK].
In Method 2, [RHYTHM TRACK] is an eightway toggle switch. Each button press (as
you hold down [SHIFT]) steps through all
Track Mute settings.
For both methods, the LED next to the track
number lights to indicate that the track is on.
29 Muting notes during playback
Here’s a Tip that’s useful both in live performance AND in creating Patterns. It’s called Step Mute and it lets
you modify an existing Pattern by taking out specific notes — while the Pattern is playing.
Step Mute is another great way to change the rhythmic feel and melodic content of a Pattern — without permanently changing the original data. Let’s try it out...
1 Select a Pattern and start it up.
2 Make sure the Synth track is on (press [SYNTH TRACK] if necessary), then
press one of the keyboard buttons.
The button lamp turns off, indicating the note is
muted.
Hear how the selected note drops out? You can press the same button again to put the note back in. Try
pressing some other buttons and listen to how their presence or absence affects the feel of the Pattern.
38
3 Do the same with the Rhythm Tracks as well.
Press [RHYTHM TRACK] repeatedly to select the desired Rhythm Track: 1, 2, or 3. Then, press the keyboard buttons — just as you did in Step 2 above.
Page 39

Chapter 8 Pattern Playback
• Adding and subtracting beats
Did you notice that you can add sounds, too? This is especially effective in the Rhythm tracks.
If the selected Rhythm track has some unlit buttons — meaning there are spaces in the track
— try pressing some of those buttons to add more drum/percussion hits to the track. Or try
taking some of the lit buttons’ sounds out, and hear what kind of rhythm you come up with.
• Save your edits
If you like the new Pattern you’ve created, store it. (See page 79.) All Step Mute settings are
saved along with the stored Pattern; yet the original data is not changed.
Step Mute
Allows you to mute and unmute specific
steps in a Pattern during playback. Select
and start a Pattern, then select the track you
wish to control: Synth or Rhythm 1, 2, or 3.
Then, press the desired buttons to mute/
unmute the steps.
30 Mixer controls — Pan and Volume
Try these bread-and-butter controls out, and change the mix of the Patterns. Pan and Volume only affect the
Synth track — the Rhythm tracks remain unchanged.
1 Select a Pattern and start it.
2 Let’s try changing the Pan position first.
Hold down the [SHIFT] button, and turn the [PARAM] (PAN) knob.
Pan
Determines the position of the Synth track
sound in the stereo image. Hold down
[SHIFT], and turn the [PARAM] (PAN) knob
to adjust.
Range
Notice how the Synth track sound moves from left to right and back again
as you turn the knob? (We assume you’re listening to this with stereo
headphones or on a stereo speaker system...)
L63 (full left) — Cntr (center) —
r63 (full right)
3 Now, work with the Volume.
Hold down the [SHIFT] button, and turn the [WET] (VOL) knob.
Hear how the Synth sound fades in and out as you tweak the knob?
Remember, this only affects the Synth track — unlike the master [VOLUME]
knob, which controls the overall sound of the AN200.
Volume
Determines the volume of the Synth track.
Hold down [SHIFT], and turn the [WET]
(VOL) knob to adjust.
Range
0 — 127
39
Page 40

Chapter 8 Pattern Playback
31 Assigning Patterns to the keyboard buttons
Remember in Tip 3 how you selected Patterns on the fly, as they were playing? Here’s where you can set
which Patterns are triggered by which keyboard buttons. Any Pattern — even the User Patterns — can go
to any button. Plus, you can use a key range of three octaves, from C2 to B4 — that’s 36 different Pattern
Select locations.
1 Hold down [SHIFT] and press [PATTERN SELECT].
2 Use the [OCT <<]/[OCT >>] buttons to select the
desired octave range.
The button flashes. All keyboard buttons turn off.
3 Press the desired keyboard button. (Remember, [1],
[4], and [8] can’t be used.)
4 Select the Pattern with the [DATA] knob. Your original User Patterns are
fair game as well.
5 Repeat Steps 2 - 4 as often as you want, until you’ve made all the desired
Pattern-to-key assignments.
Once you’re finished, press [EXIT] (or [SHIFT] and [PATTERN SELECT] again) to leave the function.
Now, try using Pattern Select to play the newly assigned Patterns. (Need a
refresher course? See Tip 3 again.)
Pattern Select Assign
● Storing Pattern Select assignments
There’s no need to store! All your Pattern Select Assign settings are stored
automatically as you make them.
Determines the Pattern-to-key assignment
for Pattern Select. Hold down [SHIFT] and
press [PATTERN SELECT]. Select octave
range, then press desired keyboard button
and use [DATA] knob to select Pattern. Pattern assignments are stored automatically.
40
Page 41

Chapter 9
32 Modulating the volume
Get to know your LFO.
This Tip takes you through the basics in setting up and using the LFO. It also introduces you to one of the
more popular LFO applications — modulating volume. Used with some of the other sound shaping controls
on the AN200, this is responsible for the machine gun effects, helicopter-like sounds and a slew of other
industrial noises you hear in a lot of techno, electronica and dance music today.
LFO Modulation
Here’s another crucial cornerstone in synthesizer sound — the LFO.
Although LFO modulation can be used to make the sound warmer and more
natural, its strong forte is in creating wild and extreme special effects.
Explore the following Tips and you’ll soon build up a huge arsenal of powerful tools for mangling the sound in awesome ways.
1 Call up a Pattern.
2 Press [DETAIL], several times if necessary, until “Amd”
(Amplitude Modulation Depth) appears briefly in the
display.
3 Use the [DATA] knob to set the value to “63.”
This is the Amplitude Modulation Depth setting — “amplitude” meaning
“volume.” Setting Amplitude Modulation Depth to 63 puts the LFO in maximum control over the volume of the sound.
4 Press [KEYBOARD] to use the keyboard, and hold
down one of the keys.
Hear how the the sound wavers in and out, in a tremolo effect?
5 As the note sounds, tweak the LFO [SPEED] knob —
and hear how the modulation alternately speeds up
and slows down.
Amplitude Modulation Depth
Determines the amplitude (volume) depth for
the LFO. A value of “63” results in no volume change. To set, press [DETAIL] repeatedly (until “Amd” appears), and use [DATA]
knob to set value. (Pressing [DETAIL]
repeatedly steps through the other LFO Detail
parameters; see page 42.)
Range
-64 (maximum negative) — 0 (no change)
— 63 (maximum positive)
Speed
Determines the speed of the LFO modulation.
Range
Stop (no modulation), 1 — 255
41
Page 42

Chapter 9 LFO Modulation
33 Modulating the Filter
Now, let’s apply the LFO to the Filter — and create some interesting wah-wah effects.
1 Press [DETAIL] until “Fmd” (Filter Modulation Depth) appears briefly in
the display.
2 Use the [DATA] knob to set the value to around “-34.”
This is the Filter Modulation Depth setting. Setting Filter Depth to -34 gives the LFO some control over
the timbre or tonal quality of the sound.
3 Press [KEYBOARD] to use the keyboard, and hold down one of the keys.
Can you hear the wah-wah sound? Try tweaking the [DATA] knob in the range of -64 to -24 and listen to
the changes in Filter modulation. Also try tweaking the sound at the positive end of the spectrum (16 to
46) as well, and listen for the difference.
If you’ve come to this Tip directly from Tip 32 above, you’re hearing the LFO applied to both
Amplitude and Filter. To hear the Filter effect all alone by itself, set Amplitude back to normal
(0).
For more fun:
Try tweaking the VCF controls. Naturally, if the LFO is being applied to the Filter, any changes you make to the Filter section will affect the LFO-modulated
sound as well.
Filter Modulation Depth
Determines the Filter modulation depth for
the LFO. A value of “0” results in no Filter
change. Values toward -64 produce a negative Filter depth; values toward 63 produce a
positive depth. To set, press [DETAIL]
repeatedly (until “Fmd” appears), and use
[DATA] knob.
Range
-64 (maximum negative) — 0 (no change)
— 63 (maximum positive)
34 Modulating the pitch
Try using the LFO to warp the pitch — and discover some more awesome modulation effects.
1 Press [DETAIL] until “Pmd1” (Pitch Modulation Depth 1) appears briefly in
the display.
2 Use the [DATA] knob to set the value to around “0.”
This is Pitch Modulation Depth 1 (for VCO 1). Start out with this minimum value.
42
3 Press [KEYBOARD] to use the keyboard, and hold down one of the keys.
As the sound sustains, slowly turn the knob counter-clockwise, and bring the value down toward
“-127.” Notice how the pitch becomes less and less distinct the further you get from “0.” (This is true
for positive values as well.) For some Voices, the pitch may stay distinct but change radically — over an
octave or more!
Try experimenting with different LFO Speed settings, and also try holding down more than one note.
Page 43

Chapter 9 LFO Modulation
If you’ve come to this Tip directly from the other LFO Tips above, you may want to hear the Pitch
modulation by itself. To do this, set both Amplitude and Filter back to normal (0).
• Double up
Once you start working with VCO 2 (in Tip 57), experiment with the two independent Pitch
Modulation Depth settings (PMD1 and PMD2) for even more interesting textures and pitch
changes.
Determines the two Pitch Modulation Depth
settings for the LFO. Setting 1 (“Pmd1”)
affects VCO 1, while setting 2 (“Pmd2”)
affects VCO 2. A value of “0” results in no
Pitch change. To set, press [DETAIL] (until
“Pmd1” or “Pmd2” appears), and use
[DATA] knob.
Range
-127 (maximum negative) —
0 (no change) — 127 (maximum positive)
35 Changing the LFO wave
The LFO uses one of 21 different waveforms to modulate the sound. The particular wave you select has a
huge effect on the final sound. Try out some of these and see what kind of chaos you can create.
1 Press [DETAIL] until “UA<E” (Wave) appears briefly in
the display.
Pitch Modulation Depth 1, 2
2 Use the [DATA] knob to set the Wave to “trGL” (Trian-
gle).
This selects the Triangle wave. Try some of the other Wave settings and
hear how they change the sound.
• Sample and hold
Use the Sample-and-hold waves (“S-H” 1 - 4) mainly for Pitch modulation effects. Unlike the
other Wave settings, these generate random fluctuations. They’re less suited to modulating
the Amplitude or Filter, since the random differences may be less apparent. Especially with
Amplitude, they may result in unwanted dropouts in the sound. However, they can be very
effective with Pitch, particularly in creating “electronic” sounds and sci-fi effects.
43
Page 44

Chapter 9 LFO Modulation
Determines the LFO waveform.
Settings
● Sine (SinE), 2, 3, 4, 5
Sine
Sine 2
Sine 3
Wave
● Triangle (trGL), 2, 3, 4, 5
Triangle
Triangle 2
Triangle 3
Sine 4
Sine 5
Triangle 4
Triangle 5
44
Page 45

Chapter 9 LFO Modulation
● Square (Squr), 2, 3
Square
Square 2
Square 3
● Saw 1 (SAU1), 2, 3, 4
Saw 1
● Sample-and-hold 1 (S-H1), 2, 3, 4
S-H 1
S-H 2
S-H 3
S-H 4
Saw 2
Saw 3
Saw 4
45
Page 46

Chapter 10
36 Shaping the sound with EG
One of the most important aspects in analog synthesizer sound is how that sound is controlled over time.
The AN200 gives you some very powerful and flexible ways to do this. One of them is the EG section.
EG stands for Envelope Generator — “envelope” here being the control that shapes the sound as it evolves
over time. The EG effectively tells the synthesizer when to bring the volume up or down.
Like most analog synthesizers, the AN200 has four EG controls: Attack, Decay, Sustain, and Release. The
AN200 also lets you use the EG to control the filter — to shape the tone in time.
Let’s take a look at how these work — and hear them in action.
EG Basics
Shape the volume, shape the tone. Use the EG (Envelope Generator) section
to control how your sound moves, grows and evolves.
1 Call up a Pattern, and press [KEYBOARD] to enable
the keyboard buttons.
2 Press the [SELECT] button in the EG section so that
the AEG lamp lights.
Indicates AEG
is selected.
Doing this lets you control only the AEG (Amplitude EG), which affects the volume.
3 As you play the buttons, turn the [ATTACK] knob. Try setting it to around
12:00 and tap the buttons repeatedly.
Notice how the attack of the sound is a little slow? Now, set the knob to its minimum (7:00), and hear
how the attack is instantaneous. Next, try setting the knob to around 2:00 and hear how the sound very
slowly grows louder as you hold the key.
4 Let’s try the [SUSTAIN] knob now.
Keep in mind that Sustain is the ONLY level control in the bunch — the rest of the knobs control time or
rate.
46
Start with [SUSTAIN] set to around 9:00 (a value of 15 - 20). Then play and hold down a note. Do the
same with successively higher settings as well — 12:00 (64), 2:00 (95), and 5:00 (127).
Hear how the sustain or “held” sound of the Voice gets louder with each setting above? For the 5:00 setting, the volume reaches maximum and stays there as long as you hold the note.
Page 47

Chapter 10 EG Basics
5 Next, play with the [DECAY] knob and hear how that affects the sound.
Make sure to reset [SUSTAIN] to around 10:00 or 11:00 — if Sustain is too high, Decay won’t work!
Experiment with the [DECAY] knob. Depending on the Voice and the other EG settings, a short Decay
value (knob around 9:00) may result in a weak, percussive sound. Try adjusting the knob around 11:00
or 12:00 and then slowly move upwards from that as you repeatedly play the key.
6 Now, on to the [RELEASE] knob.
Start by resetting [ATTACK] to 7:00, [DECAY] to 11:00, and [SUSTAIN] to 1:00. Then experiment with
different [RELEASE] knob settings, such as 1:00, 3:00 and 5:00.
Notice that the sound sustains — longer and longer for each setting — after you release the note.
Before you go on to Step 7 below, bring [RELEASE] back to around 1:00, and leave the other knobs
unchanged.
7 To make things more interesting, press [SELECT] to turn on the FEG con-
trols, and use the EG knobs to play around with the filter. (We’ll do more
exploring with the filter in the next tip, too.)
Indicates FEG
is selected.
Play around with the four EG knobs and hear what kinds of sonic mayhem you can create.
Work with the VCF section controls (page 27), too — they have a huge effect on the overall sound and
behavior of the EG. We’ll warn you, though — the results can be complex and unpredicatable. But we
guarantee you’ll discover a whole truckload of sounds you never thought possible.
● What is an EG? What does it do?
To explain by example, let’s take a look at an acoustic instrument — the piano.
The piano doesn’t actually have any EGs inside, but the basic principle is the
same.
AT TAC K
DECAY
When you hit a key on the piano, the sound starts sharply (Attack), but goes
down soon (Decay) to a softer level (Sustain) as the note is held, and quickly
dies out to complete silence (Release) when you lift your finger from the key.
SUSTAIN
RELEASE
47
Page 48

Chapter 10 EG Basics
• Tweak them together
When you start out tweaking the EG, you may want to set [SELECT] to both FEG and AEG.
This eliminates a lot of confusion about which EG is doing what. For example, if you have separate settings and the FEG opens up long after the AEG has already shut down, you’ll probably
not hear much of the sound. Similarly, if the AEG takes its sweet time to unfold — by which
time the FEG has already come and gone — the sound may never come through.
• Tweak them separately
Adjusting both FEG and AEG together (see hint above) is convenient and easy — but it also
results in relatively boring, static Voices. To make really interesting, organic sounds with shifting textures, the trick is to adjust the Filter and Amplitude EGs separately, yet make sure that
they coincide with each other often enough to keep the sound from dropping out entirely.
There are no diagrams to help you with this — you’ll have to use your ears!
EG Select — FEG and AEG
Determines the EG settings for the filter
(FEG) and amplitude or volume (AEG).
Press [SELECT] to enable FEG, AEG or both
(ALL), then use the EG controls (see below)
to change the EG settings.
Settings
FEG
AEG
ALL (both FEG and AEG)
EG Controls
Attack
Determines the time it takes for the sound to
reach full volume when a note is played.
Decay
Determines the time it takes for the sound
volume to reach the Sustain level. This is
similar to the natural decay heard in acoustic
instruments.
Sustain
Determines the level of the sound for when a
note is held. If this is at or near minimum,
the sound will die out as the note is held. If
this is at or near maximum, Decay will have
no effect and the sound will remain at maximum level as long as the note is held.
Release
Determines the time it takes for the sound to
reach minimum volume (or silence) after a
note is released. If Sustain is set too low, this
may have little to no effect on the sound.
Range
0 — 127 (for each knob)
48
Page 49

Chapter 10 EG Basics
37 Using EG to control the Filter (FEG)
In Tip 36 above, we introduced you to the EG and showed you how it works with volume (Amplitude). Now,
let’s take a look at what the EG can do with the Filter.
These specific FEG setting examples will get you started, and give you a definite feel for how to use EG to
change the tonal quality of the sound. In the process, you’ll learn more about how the Filter works, too —
and how you can get it to work for you.
Try out these settings, experiment with them, go wild, go mad! There’s so much you can do with these controls, so many sonic possibilities — this barely scratches the surface.
1 Select a Pattern, then select FEG.
Press the [SELECT] button repeatedly until FEG is lit.
Indicates FEG
is selected.
2 Start by setting a slow Attack on the Filter.
Set [ATTACK] to around 12:00 (value of 65).
3 Play around with the [CUTOFF] knob as you play the keys.
Tweak the knob slowly in the range of 10:00 - 5:00 (30 - 127) as you play single notes in succession.
Listen to how the sound changes. Finally, set the knob to around 8:00 or 9:00 (1 - 15).
4 Now, experiment with the [SUSTAIN] knob.
Try tweaking this to different settings as you play the keys. Make sure you hold the key or keys down —
the sound will change as you hold. Before you go on to the next steps, set this to around 11:00 (50).
5 Before we try out the [RELEASE] knob with the Filter, we’ll need to stretch
out the volume a bit.
Press [SELECT] to call up AEG, then set the AEG’s [RELEASE] to about 2:00 (90 - 95).
6 Now, go back to the FEG (press [SELECT]), and work with the FEG’s
[RELEASE] knob.
Play a series of single notes, and tweak the knob between 11:00 and 4:00 (45 and 120).
Notice how the FEG Release setting determines how much of the sound is heard after key is released. If
the Filter Release is too short, little or none of the sound will come through.
Finally, set this to around 12:00 or 1:00 (65 - 80).
49
Page 50

Chapter 10 EG Basics
7 Just for good measure, play around with the [DECAY] knob a bit.
As with the other controls, tweak this to various settings as you play the keys. Finally, set this to around
1:00 or 2:00 (80 - 90).
8 You’re on your own now!
With the above settings as a starting point, go back to each of the EG knobs and play around with them
some more. Take a crack at using other controls as well — and hear how they change the sound. And
while you’re at it, go on to Tip 38 below — for further FEG explorations.
38 More about FEG Depth
In Tip 37, you learned about the FEG Depth control. Let’s take a closer look (and listen) to it in this Tip —
and the next.
1 If possible, continue with the sound you’ve created in Tip 37 above.
Select a Pattern, and tweak the controls to the basic settings shown below.
FEG
AEG
2 Now, play around with the [FEG DEPTH] knob.
First, set it to around 12:00 and slowly turn it clockwise while you play the keys. Listen for the sound
changes — some of them will probably be quite subtle.
Tweak the knob the other way, and hear how the sound drops out for the negative values (7:00 - 12:00).
Don’t worry about this — we’ll see in Tip 39 below how to effectively use the negative settings.
Finally, set the knob to about 2:00 (50). Experiment with the [RESONANCE] knob, too. Try out a variety
of settings — especially around 1:00 - 4:00 — and hear how they alter the tone.
50
Page 51

Chapter 10 EG Basics
39 Going negative — with FEG Depth
As we promised in the last Tip, here’s a sound-creating pointer that takes advantage of the negative values of
FEG Depth. Try these settings out — and hear what it’s like on the “minus” side of the sound.
1 First, get everything set up with the following settings:
EG [SELECT]........... to “ALL” (both FEG and AEG)
[ATTACK] ................ to around 2:00 (90 - 100)
[DECAY].................. to around 1:00 (80)
[SUSTAIN] .............. to around 3:00 - 4:00 (100 - 120)
[RELEASE].............. to around 1:00 - 2:00 (80 - 90)
[CUTOFF] ................to around 2:00 (100)
[RESONANCE] ........ to around 2:00 (70)
2 Finally, set the [FEG DEPTH] knob to 7:00 (-128) — the maximum negative
value.
3 Now, play several single notes, slightly apart, and listen for the very slow
attack and the long sustain. Hear how the filter slowly sweeps and grows
with the sound?
A negative FEG Depth setting reverses the FEG operation — producing a filter sweep effect that dips down
instead of peaks. This means the sound gets softer and more muffled, until the end — when the filter
sweeps back up again.
Try these, too
• Experiment with higher Cutoff and Resonance settings than the ones shown above.
• Adjust the FM Depth, Sync Pitch, and Noise Level settings — to give the Filter some richer
harmonics to work with, and make the sound more interesting.
• For even greater degrees of weirdness, try some long Portamento settings, too (for example,
around 90 - 110).
51
Page 52

Chapter 11
40 Portamento — the famous gliding pitch effect.
You’ve heard the sound before. Although singers and instrumentalists use it to bend up or down to a central
pitch, Portamento is one of the defining features of analog synthesizers and electronic music.
Portamento packs enormous power. On the one hand, it lets you add subtle sliding “grace notes.” On the
other, it can completely subvert the pitch and give you atonal glides. Ultimately, the effect is dependent on
what notes you play and how far apart you space them. Try it out and see what madness you can come up
with.
Advanced Sound
Shaping Controls
By this point, you’re well on your way to becoming a master synthesizer programmer. You’ve learned about the Patterns, the Scenes, Effects, the Filter,
LFO, EG, and so on — but your education’s not over yet. The AN200 has
actually got quite few more sonic tricks up its sleeve. Let’s try some of them
out now...
1 Call up a Pattern, and set the [PORTAMENTO] knob to about 10:00
(around 25 in the display).
2 Enable the keyboard with [KEYBOARD], then play notes [9] and [16] alter-
nately.
3 Try other settings, too, and hear how the Portamento
effect changes.
Bring Portamento up to about 12:00 (64), then 2:00 (95), and finally the
maximum of 5:00 (127).
Experiment. Try the effect out on some of your other favorite Voices. Also
try tweaking Portamento while the Pattern is playing — and listen to the
resulting sonic mayhem.
Portamento
Determines the Portamento time, or how
long it takes to glide the pitch from one note
to the next. Higher values result in a longer
pitch glide time.
Range
0 — 127
52
Page 53

Chapter 11 Advanced Sound Shaping Controls
41 Metallic sounds and more — with FM Depth
Like the vintage synthesizers of the past, the AN200 is absolutely loaded with modulation options — giving
you the power to mangle the sound in wild and unique ways. Yet it also gives you some intriguing digital
twists — like FM Depth.
Depending on the other Voice settings, FM Depth can be very subtle, adding harmonics or changing the
pitch — almost imperceptibly at times. It can also create harsh, metallic, non-pitched sounds — perfect
when you want to add some industrial edge or noise percussion to your tracks.
1 To start out, select a Pattern.
Try to select a Pattern with a soft, warm Voice that lets you hear some of the more subtle qualities of FM
Depth.
2 Turn the [VCO 1/2] knob all the way left.
This lets you hear only VCO 1 — important because FM Depth only modulates VCO 1.
3 Set the [FM DEPTH] knob to 12:00 (around 0).
This is center or zero for FM Depth — turn the knob in either direction from this point to change the
sound.
Turn it very slowly as you play the keyboard and hear how the Voice changes.
Try this out with a variety of Voices. Depending on the other Voice settings, FM Depth changes can be
very subtle — or extreme and harsh.
• Fine tuning
Since the sound and pitch can radically shift with even the slightest knob tweak, you may want
to use the [DATA] knob instead. This lets you control FM Depth much more slowly. Make sure
you turn [FM DEPTH] first, so that FM Depth is called up for the [DATA] knob.
• In sync — and out
Experiment with various Sync Mode (page 58) and Sync Pitch settings, too. These work
together with FM Depth in modulating VCO 1, and can dramatically alter the character of the
sound.
FM Depth
Determines the amount of modulation created by the FM function. The further the
value is from midpoint (64), the greater the
modulation depth. Some settings can result
in a metallic sound with no discernable pitch;
some settings completely change the pitch.
Range
-64 — 63
53
Page 54

Chapter 11 Advanced Sound Shaping Controls
42 Balancing the waves — VCO 1 and 2
One of the easiest knobs on the AN200 to understand, VCO 1/2 is a simple balance control. It lets you adjust
the relative volume of the two oscillators, VCO 1 and VCO 2. However, the simplicity is deceiving — there’s
a whole lot of power here, too.
Along with the VCO 1 and VCO 2 Wave controls (see Tip 56), this is where you lay the very foundation of the
sound — upon which everything else on the AN200 is built.
1 Select and play a Pattern.
2 Turn the [VCO 1/2] knob all the way left and play the
keyboard.
Now, you’re hearing only VCO 1.
3 Next, turn [VCO 1/2] all the way in the other direction — so that only VCO
2 sounds this time.
Play around with this knob as you hold down a note, and listen to how the two waves blend together.
Notice that the knob features a convenient center detent, letting you easily feel your way back to zero —
which is a 50-50 mix of the two VCOs.
• Soloing VCO 1
Crafting an original Voice from scratch? Soloing VCO 1 (7:00 position) is one of the best ways
to start. Listening only to VCO 1 makes it easier to set the VCO 1 Wave (page 56). It’s essential for FM Depth (page 53) as well, since that function affects only VCO 1. Plus, if you’ve set
the Sync Mode (page 58) to “VCO1 M>S” or “VCO2 > 1,” soloing VCO 1 lets you clearly hear
the modulation that’s happening.
VCO 1/2 Balance
This determines the volume balance of the
two oscillators, VCO 1 and VCO 2.
Range
-64 (VCO 1 only) — 0 (equal balance) —
63 (VCO 2 only)
54
Page 55

Chapter 11 Advanced Sound Shaping Controls
43 Noise Level
Here’s another nifty little knob. This one’s great for throwing some grunge and
bite into the basic wave — letting you dirty up the Voice with some noise.
Why add noise? Why not use the Distortion effect? And what good is “dirt” in
the sound, anyway? (We could hear those questions coming...)
Well, besides the obvious Lo-fi and Industrial music applications — such as
making noise percussion — noise is great for adding harmonic content all
along the frequency spectrum. And that harmonic content added at the beginning of the signal flow makes the sound more interesting when you work with
the filter (VCF) section later on. Much more interesting, in fact.
Use it judiciously, however — too much noise can mask the basic pitch and
character of the sound.
Try selecting a Pattern with a relatively “pure” and soft Voice. Then, work the
[NOISE LEVEL] knob to hear how different degrees of noise affect the sound.
Noise Level
Determines the level of the noise signal
added to the VCOs.
Range
0 — 127
44 Making waves — VCO 1 and VCO 2
Here’s where the sound begins. All of the awesome, amazing sonic stuff on the AN200 starts with the waves
— generated by VCOs 1 and 2.
The AN200 gives you a wide variety of waveforms — not to mention enormous flexibility in combining,
modulating, and processing them.
The subject of waves can be fairly complicated, and you undoubtedly don’t want to read about it. As always,
use your ears! Give a listen to the various waves here and experiment with them. Try them out with the processing sections — especially VCF — and hear how they sound. That’s the best and only way to start creating your own Voices.
■ VCO 1 • • • • • • • • • • • • • • • • • • • • • • • • • • • • • • • • • • • • • • • • • • • • • • • • • • • •
1 Select a Pattern.
2 Solo VCO 1 by turning the [VCO 1/2] knob all the way
left.
3 Set Sync Mode to OFF by pressing [MODE].
4 Press the VCO 1 [WAVE] button repeatedly to select different waves.
Better yet, press [WAVE] and turn the [DATA] knob. That lets you access ALL of the waveforms —
including the “hidden” waves.
The actual waves that are available differ depending on the Sync Mode setting. After trying the waves
that are available when Sync Mode is set to “OFF,” select one of the other two modes, then try out the
new group of waves. (See Tech Talk below and the Wave List on page 56 for details.)
55
Page 56

Chapter 11 Advanced Sound Shaping Controls
■ VCO 2 • • • • • • • • • • • • • • • • • • • • • • • • • • • • • • • • • • • • • • • • • • • • • • • • • • • •
1 Make sure the same Pattern you selected above is still called up.
2 Solo VCO 2 by turning the [VCO 1/2] knob all the way
right.
3 Press the VCO 2 [WAVE] button and use the [DATA]
knob to select the waves.
Unlike with VCO 1, there is only one “hidden” wave in the VCO 2 section (Saw 2), and the
available waves are the same, no matter what the Sync Mode setting is.
In vintage analog synthesizers, the basic waves were generated by “oscillators.” The AN200
does it a bit differently — yet the sound is exactly the same. That’s why we’ve kept the name
“VCO”: Voltage Controlled Oscillator.
VCO 1, VCO 2 Wave
Determines the waveform for the VCO 1 or VCO 2 oscillator. Press the
[WAVE] button (in VCO 1 or VCO 2) repeatedly; use [DATA] knob to select
“hidden” waves (indicated by asterisks below).
VCO 1 Wave
Settings
(Available waves depend on Sync Mode setting; page 58. Asterisks (*)
indicate “hidden” waves, selectable by [DATA] knob.)
When Sync Mode is off:
Saw ( SAU)
* Saw 2 ( SAU2)
Pulse ( PuLS)
Mix ( mi$)
Multi Saw ( m.SAU)
When SYNC is on (“VCO 1 M>S” or “VCO 2 > 1”):
Saw ( SAU)
Pulse ( PuLS)
Inner1 (inr1)
* Inner2 (inr2)
* Inner3 (inr3)
Square ( Squ)
* Noise ( niSE)
VCO 2 Wave
Settings
(Asterisks (*) indicate “hidden” waves, selectable by [DATA] knob.)
* Saw 2 ( SAU2)
Saw ( SAU)
Pulse ( PuLS)
Mix ( mi$)
Triangle ( tri)
Sine ( SinE)
56
Page 57

Chapter 11 Advanced Sound Shaping Controls
45 Fat, phatter and phattest!
How phat do you want to get?
The Key Assign settings let you switch the AN200 between Poly and Mono operation. And, with Unison,
they bring back the humongously phat sounds of vintage synthesizers — letting you beef up the Voices the
old analog way.
1 Call up a Pattern and press [KEYBOARD].
Try to select a Pattern that has a fairly big and fat Voice. Let’s see where we can take it.
2 Right now, POLY should be lit. If not, press [KEY
ASGN] until it is lit, and “PoLY“ is shown in the display.
With the Poly setting, you can play and hold full chords — up to five notes
at the same time.
3 Press [KEY ASGN] again to call up Legato (LGto).
Legato is one of the Mono settings, meaning you can’t play chords here — just one-note lines. But that’s
just fine, because Legato is ideal for leads and solos as well as bass lines.
Play some notes and listen for the effect. Try holding down one note with your left hand while you
quickly play and release others with your right.
Notice how the notes trade off with each other? This is great for rapid trills — yet it keeps the EG consistent throughout, as long as you hold the first note down. Try playing melodies in a smooth, legato style,
too — not releasing one note until you’ve pressed the next.
4 Use the [DATA] knob to call up the “hidden” Mono
(mono) setting.
Play some notes. Try playing them smoothly in legato like you did above.
Notice how each note has a sharp attack, no matter how smoothly you try
to play?
Mono is similar to Legato in that you can play only one note at a time. However, the EG is retriggered, or started from the top, for each new note you
play — whether you play in legato or not.
5 Let’s give the sound some serious attitude now! Call
up the Unison (unSn) setting, with [KEY ASGN] or the
[DATA] knob.
Unison is the same as Legato, except for one very important difference —
it’s incredibly phat. Unison takes maximum advantage of the AN200’s
polyphony by ganging four of the “notes” together in one huge, fat monophonic layer.
Key Assign
Determines how the Voices respond to the
keyboard (or MIDI), and how they use the
available five-note polyphony. To set, press
[KEY ASGN] and use the [DATA] knob.
Settings
Poly (PoLY)
Plays Voices with full five-note polyphony.
Legato (LGto)
Plays Voices monophonically, maximum
one note at a time. Successively played
notes do not retrigger the PEG, FEG, or
AEG — resulting in a smoother note-tonote sound.
Mono (mono)
Plays Voices monophonically, maximum
one note at a time. PEG, FEG, and AEG
are retriggered for each new note played.
Unison (unSn)
Plays four polyphonic notes in unison, or
a one-note layer. In other words, the
response to the keyboard is monophonic, but the number of notes actually
sounding is polyphonic.
57
Page 58

Chapter 11 Advanced Sound Shaping Controls
Sync Pitch
Determines the pitch of the “slave” oscillator
in semitones, available only when Sync Mode
(above) is set to on. This lets you create a
difference in pitch between master and slave
oscillators and control the resulting harmonic
interval. At the “0” setting, the pitch is the
same as the master oscillator. Higher values
increase the interval for a more clangorous
sound. To properly hear the effect, make
sure the VCO 1 level is set high enough (see
page 54).
Range
-64 — 63
Sync Mode
The AN200 tone generator has two oscillator sections: VCO 1 (which actually contains two oscillators), and VCO 2 (which has one). Sync Mode determines how the oscillators are synchronized —
one being a controlling “master,” the other a “slave.” The master oscillator determines the overall
pitch of the sound, and the slave oscillator controls the tone by adding harmonics.
When set to “OFF,” there is no synchronization. When set to “VCO 1 M>S,” the two VCO 1 oscillators are separated inside of the VCO1 and synchronized, with one designated as the controlling
“master” and the other the “slave.” When this is set to “VCO 2>1,” the VCO 1 oscillators are synchronized to VCO 2, with the VCO 2 designated as the “master.”
To set, press [SYNC MODE].
Settings
OFF
Results in no synchronization.
VCO 1 M>S (VCO 1 master into slave)
The two VCO 1 oscillators are separated inside of the VCO1 and synchronized, one controlling
the other. This allows you to use Sync Pitch (below) to control the master/slave sound, yet
still have another oscillator (VCO 2) remaining.
VCO 2 > 1 (VCO 2 into VCO 1)
The two VCO 1 oscillators are synchronized to VCO 2, with the VCO 2 designated as the “master.”
46 Sync Mode and Sync Pitch
Here are two more important additions to your arsenal of sound-shaping power tools. Try them out and
hear how they change the pitch and brighten the sound.
1 Call up a Pattern and start it up.
2 Set the [VCO 1/2] knob all the way left, so that you hear only VCO 1.
3 Press the [SYNC MODE] button to select VCO M>S (<.m-5).
4 Work the [SYNC PITCH] knob, especially between 11:00 and 4:00.
Notice how the basic pitch and the harmonics shift radically as you tweak the knob.
5 Change the SYNC MODE setting to VCO 2>1 and play with SYNC PITCH
again.
• Other waves
Try selecting different waveform for VCO 1, then with Sync Mode set to one of the “on” settings, tweak Sync Pitch. The Noise wave in particular is a good candidate for creating unique
non-pitched effects in which the harmonics are shifted.
• Bring in the highs
When using Sync Mode and Sync Pitch to craft a Voice, make sure to adjust the VCF controls
to appropriate settings, so that you can hear all of the high harmonics being generated.
Remember, you can always back off on the knobs later if the sound is too “edgy.”
58
Page 59

Chapter 11 Advanced Sound Shaping Controls
47 Creating your own original Scenes — and saving
them
The exciting and powerful Scene feature lets you create and use two different Voices within a single Pattern.
Most importantly, it lets you instantly switch between them or gradually “morph” from one to the other — all
in real time.
You tried out some preset Scenes in Tip 23, and heard just how effective, dynamic, and ultimately hip the
function can be. Now, it’s time for you to create a Scene or two of your own.
1 Press SCENE button [1]. This is the Scene you’ll be
working on first.
2 Work the controls and get the sound you want for
Scene 1. Any and all of the Synth knobs can be used.
Only button [1] is lit.
• Only the Voice-related panel knobs can be used for recording to the Scenes; button switch
settings (such as LFO Detail and Key Assign) are ignored.
• Octave cannot be changed for the Scenes. In other words, both Scenes will always be
kept at the same octave setting.
• Remember that you’ll need to store your first Scene before you can create the second
Scene. Switching or morphing to a new scene automatically and irrevocably erases any
changes you’ve made.
3 While holding down [STORE], press SCENE button [1].
Scene 1 has just been stored. Now let’s go on to Scene 2.
Make sure keep holding [STORE] until you’ve pressed SCENE button [1] or [2]. Otherwise,
the AN200 will switch to the Store Pattern operation (page 79).
4 Do the same operation for Scene 2 — repeating Steps
1 - 3 above with SCENE button [2] this time.
Indicates new settings have
been stored to Scene 1.
Scene Recording
Allows you to program two different synth
sounds as Scenes, and use the SCENE controls to switch or crossfade between them.
Press SCENE [1] to select Scene 1, and
change the sound as desired. Store Scene 1
by holding down [STORE] and pressing
SCENE [1]. Repeat the operation for Scene 2,
using SCENE [2]. When finished, store the
Pattern (page 79).
59
Page 60

Chapter 12
Free EG
Here’s another ultra-cool power tool for the control freak in you. The AN200
is packed with an endless supply of sonic mayhem and wild, shifting synthesizer textures, but you can keep it all under control — with Free EG.
48 Free EG
The AN200 has so many real-time control features, it’s hard to get a grip on them all. Feel you need an extra
pair of hands? Or maybe an extra two? No problem. Just use the amazing Free EG feature. The AN200 is
packed with a lot of powerful recording functions — but none are quite as impressive as this.
Free EG gives you up to four tracks for recording your knob moves — letting you incorporate real-time
sound changes and knob moves as a part of the Pattern. So every time you play the Pattern, your knob
changes play right along with it — just as you recorded them.
We call this “Free EG” because it allows you to create unique, complex, continuous parameter changes that
would be impossible to achieve with conventional EGs.
1 Call up the desired Pattern, and press the red Record
button.
You may want to set the Length (Tip 63 below) in this step. Do it BEFORE pressing the
Record button, however; Length cannot be set during Free EG recording.
2 Select the Free EG track you want to record.
Press the appropriate FREE EG button, [1] - [4]. The button lights to indicate the track is ready for
recording.
Indicates recording is in standby.
60
Normally, [1] will be lit — so if you want to record to Track 1, you don’t have to do anything here. If any
track buttons you DON’T want to record to are lit, press them to turn them off.
Remember, you can record to more than one track simultaneously by pressing the appropriate buttons.
(See Power Hints below.)
Page 61

3 Start the Pattern, and make your moves.
Press the Start/Stop button.
The metronome clicks to lead you into the recording, so you can start your
knob moves right with the start of the Pattern.
Remember the rule: One knob, one track. Once you record a certain knob,
no other knob can be recorded to the track (unless you start the whole Free
EG recording again). Any tweaking of other knobs is ignored.
The display number indicates the current measure number. If you’ve set Length (see Tip 63
below) to “2,” the Pattern loops two times for recording, and the display changes accordingly.
4 To stop recording, press the Start/Stop button.
If you want to re-record the track or record moves to other tracks, go back
to Step 2 above and start all over again.
5 To hear your Free EG recording, make sure that the
appropriate track buttons are on, then press the
Start/Stop button to play the Pattern.
Remember to save your newly edited Pattern! (See Tip 60.) All your Free
EG track recordings will be saved right along with it.
• Recording to more than one track at a time
Press the appropriate Free EG Track buttons. During recording, the AN200 automatically
assigns each knob you move to the next available track. For example, let’s say you’re recording to Tracks 1 and 2. You move the CUTOFF knob first, and that’s recorded to Track 1. Then,
while tweaking Cutoff, you move [FEG DEPTH] — which records to Track 2.
• Take your time and let the Pattern loop!
In a variation of the above hint, you can set all the tracks to record, then tweak each one separately as the Pattern loops. Each of your moves is properly recorded to a separate track, and
you can hear the effect of your last knob tweak as you record the next.
• Use the four tracks to your advantage
Record your tweaking of one certain knob to all four tracks, then choose the best “take” from
the four. Just make sure to turn off each button after you record to it — so it doesn’t play back
and disturb your recording of the next button. Listen to each track in turn by turning the
appropriate button on.
• Change the way your Free EG tracks play back
The Type parameter (see Tech Talk below) gives you four different ways to loop the Free EG
tracks. Try these out when playing your Pattern and hear the interesting things they do to your
tracks.
Chapter 12 Free EG
Free EG — Type and Trigger
Type
Determines the type of loop for Free EG playback. Press the [MODE] button repeatedly
until “tYPE” appears, then use the [DATA]
knob to change the setting.
Settings
oFF
No loop.
FUd (Forward)
Free EG sequence loops from start to
end.
FUdH (Forward Half)
Free EG sequence loops from the middle
to the end.
ALt (Alternate)
Free EG sequence loops from start to
end, then end to start.
ALtH (Alternate Half)
Free EG sequence loops from middle to
end, then end to middle.
Trigger (“triG”)
Determines how playback of the Free EG
tracks is triggered. Normally, this should be
set to Free (“FrEE”), so that the tracks play
back when the Pattern is started. Setting this
to MIDI (“midi”) lets you start Free EG
playback from a connected MIDI keyboard or
sequencer.
Press the [MODE] button repeatedly until
“triG” appears, then use the DATA knob to
change the setting.
Settings
FrEE (Free)
Triggers playback of the Free EG tracks
from a random start point, when a Note
On message is received from a connected MIDI device, or when a key on the
AN200 is played, or when the Pattern is
started.
midi (MIDI in Notes)
Triggers playback of the Free EG tracks
from the start, when a Note On message
is received from a connected MIDI
device, or when a key on the AN200 is
played.
ALL (All Notes)
Triggers playback of the Free EG tracks
from the start, when a Note On message
is received from a connected MIDI
device, or when a key on the AN200 is
played, or at the first recorded note of
the Pattern (which may or may not be
the start of the Pattern).
Strt (Sequencer Start)
Triggers playback of the Free EG tracks
from the start, only when the Pattern is
started.
61
Page 62

Chapter 12 Free EG
49 Changing the Length of your Free EG tracks
The flexible little Length feature works both ways — both in recording and playback. It lets you set how long
(in measures) your Free EG moves are recorded for, and it lets you separately set how long it takes for them
to play back.
Set Length before recording any Free EG tracks. Specifically, set it BEFORE you press the red Record button
(but after you’ve selected the Pattern) in Step 1 of Tip 48 above.
Press the [LENGTH] button repeatedly to step through the settings. (Or press [LENGTH] and use the [DATA]
knob.) The number in the display indicates the Length in measures.
If you want to record your knob moves over two measures (two repeats of the Pattern), set this to “2.” If
you want your tweaking to stretch over eight measures, set it to “8.”
Once your tracks have been recorded, you can set Length again just before playback. This controls how
long all four tracks take to play.
• Take your time
Want to make some really slow changes? How about a gradual filter sweep that builds to a climax over several measures? Set a low Length for recording (for example, “0.5”), then before
you play back the Pattern, set a high Length, such as “8.”
• Make it snappy
For really fast changes, just do the opposite of the above. Set a high Length for recording and
a low Length for playback. Keep in mind that each track can be recorded with a separate
Length.
Free EG Length
Determines the time of the Free EG — for
both recording and playback. Each track can
be set independently for recording; however,
the playback setting affects all tracks
together. Since Free EG is based in measures, changing the playback bpm (tempo)
automatically changes the actual time of the
Free EG as well. To set, press [LENGTH]
repeatedly.
Settings
0.5, 1, 1.5, 2, 3, 4, 6, 8 (measures)
62
Page 63

Chapter 13
50 Hit the top of the Pattern!
Here’s an effect that’s long been a staple in dance and techno music. The Top function lets you instantly
retrigger the entire Pattern from the top — so you can produce all those cool stutter effects and create awesome dynamic hits and accents.
Pattern Power
Tips
It’s time to put your AN200 know-how and experience to work — and delve
into these Pattern Power Tips.
The first couple of Tips introduce you to some important tools for working
with the Patterns, such as copying and erasing data. They’re basic nuts-andbolts stuff, but don’t ignore them. You’ll need them for the fun things to follow
— like creating your own original Patterns!
Select and start a Pattern. Then, while the Pattern is playing, hold down [SHIFT] and hit the red Record
([TOP]) button.
Keep holding [SHIFT]
while you hit (press
and release) the
Record button.
Play the button in time with the rhythm, on every beat — like this:
ONE two three four
Watch your timing and keep the beat! Of course, you can get different effects
by playing the button way ahead or way behind the beat, if you want. (We’ll
show you some fancy rhythmic tricks with this in later Tips, too!)
Still, it’s best to hit the button right on the downbeats (“one,” “two,” “three,”
and “four”), and stay in the groove. When you’ve got it right, you’ll feel it.
Top
Instantly returns to beginning (top) of Pattern
during playback. Ideal for creating “stutter”
effects, partial measures, hits, and accents.
While Pattern is playing, hold down [SHIFT]
and press red Record (TOP) button. Release
button and repeat for each time you want Pattern to start from the top.
63
Page 64

Chapter 13 Pattern Power Tips
51 Shake, Retrigger, and Roll!
In Tip 50, you saw how to use the Top function to play your own stutter hits. Here’s a nifty variation on that
function — it’s called Retrigger & Roll.
Retrigger & Roll does just as its name suggests. It retriggers notes of the Synth track, and repeats them —
like a drum roll.
Select a Pattern and start it up. As the Pattern’s running, hold down [SHIFT] and simultaneously press and
hold the Start/Stop button.
Hear the “roll”? And did you notice how the Rhythm tracks keep chugging along, while the Synth track
spins its wheels?
Try this function at various points in the Pattern — the top, the end, the middle — and listen to what happens. Just keep holding down [SHIFT], and press/hold the Start/Stop button at different points in playback.
Keep in mind, Retrigger & Roll differs from Top in three important ways:
1) It only affects the Synth track.
2) It grabs and hits only a few notes — depending where in the Pattern you
press the button.
3) It automatically repeats the hits for you while you hold the button down.
You’ll find that Retrigger & Roll is a slick way to break the rhythm up a bit,
without losing the flow. It’s also great for throwing hip, “what-was-THAT?”
glitches and stutters into your tracks.
Retrigger & Roll has three different settings. To change the setting:
1) Keep the Roll going (simultaneously hold down [SHIFT] and Start/Stop
button).
2) Grab the DATA knob. Make sure you keep holding [SHIFT] and Start/
Stop — and turn the knob to change the setting.
While the Pattern is cycling, hear how the different settings affect the sound.
And try changing the settings in time with the Pattern as well. There are a lot of
cool rhythmic tricks you can create — just by hitting different settings on the
beat.
Retrigger & Roll
During Pattern playback, this stops the Synth
track at the point of execution and loops one,
two, or four notes (depending on the Roll
type below). The Rhythm tracks are not
affected. While a Pattern is playing, simultaneously hold [SHIFT] and press/hold the
Start/Stop button.
Roll Types
Determines how many notes are used for
Retrigger & Roll — one, two, or four. The
more notes used, the slower the roll effect.
While the Pattern is playing and while holding
down both [SHIFT] and the Start/Stop button,
use the DATA knob to change the setting.
Settings
Lo (Lo)
One note or step (corresponds to 16th
notes).
mid (Mid)
Two notes (corresponds to two 16th
notes, or half of a beat). However, when
Beat (page 18) is set to “12,” this
becomes three notes.
Hi (Hi)
Four notes (corresponds to a full beat in
a measure).
Roll Types (in Utility)
The default Roll setting can also be changed
from the Utility parameters. Hold down
[SHIFT] and press button [16], repeatedly if
necessary, until “roLL” appears in the display. Use the [DATA] knob to change the setting. (Settings are same as above.)
64
Page 65

Chapter 13 Pattern Power Tips
52 Selecting a Voice (Copy Voice)
One important step you can take in creating a Pattern is to select the Voice you’ll be using for it.
Keep in mind that each Pattern includes a Voice, and that strictly speaking, Voices CANNOT be selected separate from their Patterns. However, this function lets you select a Voice that you like from one Pattern, and
copy it to another Pattern.
1 First, select the source Pattern — the one that has the Voice you like.
2 Simultaneously hold down [SHIFT] and press [12]
(COPY SEQ/VOICE).
You may have to press the button more than once to call up the “CPY.<”
display.
3 Next, select the destination Pattern.
This is the Pattern you’ll be copying the Voice to. Use the DATA knob.
4 Copy the Voice.
The [12] button should be flashing. Press it once again (the button stops
flashing and stays lit). At the “Y£n” (“Yes or no?”) prompt, press it a third
time to actually copy the Voice to the selected Pattern number, or press
[EXIT] to cancel.
Copy Voice
Allows you to copy a Voice from one Pattern
to another. Select the source Pattern, then
use [SHIFT] and [12] to call up “CPY.<”
(Copy Voice). Select the destination Pattern,
and press [12] twice to execute.
53 Starting a Pattern on a different note
Here’s an interesting way to change the character of a Pattern — without actually changing any of the notes!
The Move Note function simply lets you start playback from any individual step in the Pattern.
For example, in a 16-step Pattern, selecting a value of “-4” moves the Pattern “back” four steps — making
Step 5 the starting point of the Pattern.
1 While the Pattern is stopped, simultaneously hold
down [SHIFT] and press [13] (MOVE/PITCH).
You may have to press the button more than once to call up the “mo<E”
(Move Note) display.
2 If you want, select the particular track (Synth or
Rhythm) you want to move.
Each track can be set independently — just hold down [SHIFT] and press
the appropriate number button [1], [2], [3], or [4].
3 Release [SHIFT] and press [13] once again (the button
stops flashing and stays lit).
At the “Y£n” (“Yes or no?”) prompt, press it a third time to actually change
the value, or press [EXIT] to cancel.
4 Start the Pattern to hear the changes you’ve made.
• Keep in mind that any changes you make to the Pattern with this function are cumulative.
For example, if you change the setting by -4, then make a second setting of -3, the actual
value (compared to the original Pattern) will be -7.
• This CANNOT be used while the Pattern is playing back.
Move Step
Determines the starting step of the Pattern,
shifting the Pattern back or forward by the
specified number of steps. All steps of the
Pattern play as normal; only the starting point
changes. Use [SHIFT] and [13] to call up
“mo<E” (Move Step). If desired, select the
track to be moved; hold down [SHIFT] and
press the appropriate number button [1], [2],
[3], or [4]. (Skipping this step automatically
selects all tracks.) Use the DATA knob to
change the value and press [13] twice to execute.
Range
-15 — 0 — 15 (steps)
65
Page 66

Chapter 13 Pattern Power Tips
54 Transposing the pitch of a Pattern
Try this cool editing tool on your tracks. The Transpose Pattern function lets you change the overall key
(pitch) of a Pattern — including the Rhythm tracks. Shift the pitch way up, or bring it way down — there’s
a lot of range here to work with.
1 While the Pattern is stopped, simultaneously hold down [SHIFT] and
press [13] (MOVE/PITCH).
You may have to press the button more than once to call up the “PtCH” (Transpose Pattern) display.
2 If you want, select the particular track (Synth or Rhythm) you want to
transpose.
Each track can be set independently — just hold down [SHIFT] and press the appropriate number button
[1], [2], [3], or [4].
3 Set the pitch change of the tracks by using the [DATA] knob.
The pitch change value is in semitones. (There are 12 semitones in an octave.) For example, if the original Pattern is in the key of C, a setting of “5” would change the key to F.
Keep in mind that this changes the pitch of the Rhythm tracks as well as the Synth track.
4 Transpose the Pattern.
Press [13] (the button stops flashing and stays lit). At the “Y£n” (“Yes or
no?”) prompt, press it again to actually change the value, or press [EXIT] to
cancel.
5 Start the Pattern to hear the changes you’ve made.
• Keep in mind that any changes you make to the Pattern with this function are cumulative.
For example, if you change the setting by -4, then make a second setting of -3, the actual
value (compared to the original Pattern) will be -7.
• This CANNOT be used while the Pattern is playing back.
Transpose Pattern
Determines the overall key of the Pattern,
shifting all notes in all tracks of the Pattern up
or down in pitch by the specified number of
semitones. Use [SHIFT] and [13] to call up
“PtCH” (Transpose Pattern). If desired,
select the track to be transposed; hold down
[SHIFT] and press the appropriate number
button [1], [2], [3], or [4]. (Skipping this
step automatically selects all tracks.) Use the
DATA knob to change the value and press
[13] twice to execute.
Range
-24 — 0 — 24 (semitones)
66
Page 67

Chapter 13 Pattern Power Tips
55 Copying a Pattern (Sequence)
Earlier in this section, in Tip 52, you learned how to copy a Voice from one Pattern to another. Here you’ll
learn how to copy a Sequence (the Pattern’s notes) from one Pattern to another.
1 First, select the source Pattern — the one that has the Sequence you like.
The word “Sequence” is used here to describe the recorded notes or steps of a Pattern.
(“Pattern” actually is a blanket term that refers not only to the recorded notes, but the Voice,
the Scenes, and the Free EG settings as well.)
2 Simultaneously hold down [SHIFT] and press [12] (COPY SEQ/VOICE).
You may have to press the button more than once to call up the “CPY.S” (Copy Sequence) display.
3 Next, select the destination Pattern.
This is the Pattern you’ll be copying the Sequence to. Use the DATA knob.
Copy Sequence
4 Copy the Sequence.
The [12] button should be flashing. Press it once again (the button stops
flashing and stays lit). At the “Y£n” (“Yes or no?”) prompt, press it a third
time to actually copy the Sequence to the selected Pattern number, or press
[EXIT] to cancel.
Allows you to copy a Sequence from one Pattern to another. Select the source Pattern,
then use [SHIFT] and [12] to call up “CPY.S”
(Copy Sequence). Select the destination Pattern, and press [12] twice to execute.
67
Page 68

Chapter 14
56 Erasing a Pattern — and starting from scratch
The first thing you’ll need to do when you make your own Pattern is to make room for it on the AN200. To
do that, you’ll have to erase or clear one of the factory preset Patterns.
Don’t worry, you won’t be permanently erasing this Pattern. All this operation does is give you a blank slate
on which to create your own Pattern. You can restore the original Pattern by simply re-selecting it (with the
[DATA] knob), or by turning the AN200 off and back on again.
1 Select the Pattern to be cleared.
2 Simultaneously hold down [SHIFT] and press [11] (CLEAR SEQ).
Pattern Recording
By this point, you’ve built up a lot of experience twisting and tweaking the
Voices, and playing around with the Patterns. Now it’s time to strike out on
your own — and create some Patterns yourself. Let’s get started...
The button flashes, and “CLr” (Clear) briefly appears in the display.
We’ve labeled this function “CLEAR SEQ” (Clear Sequence) on the panel to distinguish it
from the DEL PTN (Delete Pattern) function, at button [10].
Clear Sequence — Deletes the note data from a Pattern.
Delete Pattern — Deletes the Pattern number from a Song (see Tip 89).
3 Release [SHIFT] and press [11] once again.
The button stops flashing and stays lit; the display prompts you by asking “Yes or no?” (“Y£n”). Press
it a third time to actually clear the Pattern, or press [EXIT] to cancel.
• Tweak an existing Pattern
Naturally, if there’s a preset Pattern you like and simply needs a bit of tweaking to fit your
specifications, you don’t need to completely clear the Pattern — just edit it, using the tools
described in Tip 59, Step Recording.
Clear Sequence (Pattern)
Allows you to clear the note data of a Pattern.
Select the Pattern, then use [SHIFT] and [11]
to call up “CLr” (Clear). Press [12] twice to
execute.
68
Page 69

Chapter 14 Pattern Recording
57 Setting the Metronome lead-in
When you record your parts in real time, you’ll need a rhythmic guide — a metronome click — to lead you
into the recording, and keep you in time. Here, you can set the length of the Metronome lead-in — in other
words, how long the Metronome clicks before Real-time recording actually starts.
1 Simultaneously hold down [SHIFT] and press [16] (UTILITY SETUP).
You may have to press the button more than once to call up the “mtro” display.
2 Use the DATA knob to change the setting.
For a one-measure lead-in before recording starts, set this to “on1.” For a
two-measure lead-in, set this to “on2.”
You can also turn the Metronome off here, by setting this to “oFF” — in
which case, recording starts immediately (without a lead-in), as soon as
you press the Start/Stop button.
When done, press [EXIT] to return to normal operation.
Metronome
Determines the length of the Metronome
lead-in for Real-time recording. To turn the
Metronome (and the lead-in) off, set this to
“oFF.” Set this to “on1” for a one-measure
lead-in, and “on2” for two measures.
Metronome is set in the Utility parameters.
Hold down [SHIFT] and press button [16],
repeatedly if necessary, until “mtro”
appears in the display. Use the [DATA] knob
to change the setting.
Settings
oFF
No lead-in metronome click.
on1
A one-measure lead-in before recording.
on2
A two-measure lead-in before recording.
69
Page 70

Chapter 14 Pattern Recording
58 Recording a Pattern in real time
Up until this point, you’ve been working with the preset Patterns of the AN200. Now, here’s your chance to
create some Pattern magic yourself — by recording your own original Patterns.
We’ll give you the basic procedure to get you started. You supply the creative ideas and talent. And the
AN200 will provide the sonic horsepower you need to produce some truly hip and happening tracks.
1 Select a blank Pattern — a clean slate for recording your own notes.
(Have you cleared a Pattern for this yet? If not, go back to Tip 56 and do
it now.)
2 Make the Beat setting for the new Pattern: 16, 12, or
8.
Hold down [SHIFT] and press [SWING] (BEAT). Then, turn the DATA knob
to change the setting.
You should make this setting BEFORE recording, since it determines the number of steps you’ll have
available in the Pattern.
A setting of “16” gives you sixteen steps or spaces you can record notes to; a setting of “8” is obviously
half that — eight steps. The “12” setting gives you twelve steps, of course, but also lets you create a
triplet feel — count: “ONE, two, three, TWO, two, three,” etc.
3 Select the track for recording — Synth or one of the
three Rhythm tracks. Press [SYNTH TRACK] for Synth,
or [RHYTHM TRACK] (repeatedly) for Rhythm tracks 1,
2, or 3.
4 Set a comfortable bpm for recording.
Hold [SHIFT] and press the [TAP] button, then use the [DATA] knob.
Keep in mind, you can always change the bpm later. Right now, it’s important to set the bpm so that it’s fast enough to capture the feel you’re after,
yet slow enough to let you easily enter the notes. (Make sure to press [EXIT] when you’re done.)
5 Press [KEYBOARD] to enable the AN200’s keyboard.
Did you know you can use a MIDI keyboard to record the notes? If you’ve
got one, see Tip 86 for info on setting it up.
6 Enable recording — press the red Record button.
70
Page 71

Chapter 14 Pattern Recording
7 Start recording.
Now, let’s get down to business. Press the Start/Stop button. While listening to the metronome, play the
keys on the keyboard.
The AN200 has a nifty “Loop Recording” feature that immediately and automatically plays each note you
record as the Pattern repeats (loops). This lets you hear the Pattern as you’re recording — making it
much easier to “feel” your way to a great recording.
What’s more, the AN200 automatically corrects the timing of the notes you play. This may not always
give you the results you expect — but it will ensure that ALL your notes play back in perfect sync with
the rhythm.
8 Delete your mistakes or unwanted notes.
We know, you probably didn’t make any any mistakes. But just in case you want to know, here’s how you
can patch up your tracks.
While the Pattern is still recording, simultaneously hold down [SHIFT] and press one of the Step buttons.
(Again, avoid Step buttons [1], [4], and [8] — they won’t have any effect.) Listen closely to the playback
and press the appropriate Step button at the right time — right as the note plays. You can erase more
than one note by continuing to hold down [SHIFT] and the Step button — for as long as you want to
erase. Since it may be difficult to precisely erase the offending notes, try slowing down the bpm (page
17) during recording.
9 Stop recording.
Press the Start/Stop button.
10 Finally, save your precious work to the AN200’s internal memory — with
the Store function.
(Actually, you’ll have to see page 79 for info on storing Patterns — we’re
running out of space here... Besides, the Store function deserves it’s own
Tip.)
• Lay down the drums
Generally, it’s a good idea to record your Rhythm track first. In fact, you may want to record
just a very simple drum pattern to start with, and build up from there. You can later embellish
that basic track, or even erase it and come up with an entirely new drum part — once your
other tracks start to take shape.
• Loop Recording
Take advantage of the Loop Recording feature and play just one note or sound at a time. For
example, when building a Rhythm track, start out with just a kick drum sound (select octave
C2 with [OCT <<], and press [9]) — and play it on the “one” and “three” beats. With the kick
looping, play button [3] for a snare drum. Then, go back to octave C3 and use buttons [14]
and [7] to add a rapid-fire hi-hat pattern.
Get the idea? Keep building your tracks part by part in this way until you’ve got just what you
want.
• MIDI keys
Have you bought yourself a MIDI keyboard yet? One that’s at least five octaves long, has
touch sensitive keys, and features Pitch Bend and Modulation wheels? If you haven’t, you’re
missing out on a very easy and powerful way to record! Just hook one up (see Tip 86) — and
lay down your best keyboard licks.
Real-time Recording
Allows you to record the notes to a Pattern in
real time, as opposed to entering them oneby-one (in Step recording; see page 72).
Select a blank Pattern and set the Beat
(below). Select a track with [SYNTH TRACK]
and [RHYTHM TRACK], and press [KEYBOARD]. Press red Record button to enable
recording, then press Start/Stop button to
start, and play the keyboard.
Beat
Determines the number of steps for the Pattern. Hold down [SHIFT] and press [SWING],
and use the DATA knob to change.
Settings
16, 12, 8 steps
71
Page 72

Chapter 14 Pattern Recording
59 Step Recording
In Tip 58, you learned how to record a Pattern in real time, by playing the notes on the keyboard as the Pattern was looping. Now, you’ll learn a completely different method — Step recording.
Real-time recording is like using a tape recorder — whatever you play is recorded as you play it. Step
recording, on the other hand, allows you to enter each note individually — like writing down the notes on a
sheet of music paper.
With Step recording, you not only enter the note itself (Pitch), but its length (Gate Time) and its loudness
(Velocity) as well.
Step recording is ideal for precision — making the placement, rhythmic value, and velocity of each note
exact and consistent. This is great for recording individual drum parts in a rhythm pattern, or single notes in
a syncopated synth bass part. Step also gives you precise control in recording fast or complex passages
that would be difficult or impossible to record in real time.
Last but not least, use Step Recording to edit Patterns. This is a great way to customize existing Patterns
and tweak them to fit your needs — or twist them into completely new tracks.
There’s a lot to be learned here, so take a deep breath — and dive in!
■ Setting Up• • • • • • • • • • • • • • • • • • • • • • • • • • • • • • • • • • • • • • • • • • • • • • • • •
The first three steps below show you how to set up a Pattern for Step Recording.
1 Select a Pattern and clear it.
Call up a Pattern that has the Voice you want to use for your new, original
Pattern. Clear the Pattern by holding down [SHIFT] and pressing [11], then
pressing only [11] twice again.
Remember that the Pattern isn’t really erased — you can get it back by simply turning the AN200 off and back on again.
1
2 Make the Beat setting for the new Pattern: 16, 12, or
8.
Hold down [SHIFT] and press [SWING] (BEAT). Then, turn the DATA knob
to change the setting.
You should make this setting BEFORE recording, since it determines the
number of steps you’ll have available in the Pattern.
2
72
3 Here, you’ll be recording the Synth part, so select the
Synth track.
Press [SYNTH TRACK] (the button lights).
By the way, you can also step-record the Rhythm tracks — but we’ll show you
how to do that a little later on.
Page 73

Chapter 14 Pattern Recording
■ Entering the Notes • • • • • • • • • • • • • • • • • • • • • • • • • • • • • • • • • • • • • • • • • •
In this section, you’ll be entering the notes (pitches) for each of the sixteen steps. We’re going to show you
a quick way to do this. The results here may not be very musical — but they’ll get you started fast and point
you in the right direction.
4 Turn all the Steps on.
In this condition, all the buttons are probably off. (Remember? You cleared the Pattern...) Go down the
line, and press each button so that they are all lit.
Why do this? Generally, when you’re recording the Synth track, it’ll be easier to create a Pattern if all
Steps 1 - 16 are on. This will create a busy Pattern, but you can always take out notes later.
5 While holding down [SHIFT], press [STEP 1-8].
Do this repeatedly, if necessary, to select Pitch entry.
This operation actually accomplishes two things:
1) It selects Steps 1 - 8 for recording.
2) It selects the event type (in this case, Pitch).
Also, notice the flashing [1] button. This indicates that Step 1 is ready for recording.
6 Now, with the PITCH indicator selected, use the knobs above the buttons
to set the Pitch for each Step, 1 - 8.
Each knob corresponds to the Step directly below it. For example, the PORTAMENTO knob controls
entry for Step 1, the VCO 1/2 knob for Step 2, and so on.
Set the knobs (roughly) to the positions indicated above. No, you don’t have to be exact. In fact, you can
set these any way you want. We just figured that twiddling them around 11:00 to 1:00 is easy to do. You
won’t wind up with an earthshakingly memorable melody, but it should at least give you a listenable set
of pitches to work with.
Notice that when you tweak a knob, the corresponding Step button flashes.
7 Now, let’s work with Steps 9 - 16.
Press button [9].
We just showed you the fast way to select Steps 9 - 16 for editing:
1) Edit Steps 1 - 8 first, then
2) Press button [9] to edit the same parameter for Steps 9 -16.
An alternate way is to hold [SHIFT] and press [STEP 9-16], repeatedly if
necessary (like you did in instruction Step 5 above).
73
Page 74

Chapter 14 Pattern Recording
Enter the notes for these Steps in the same way as you did with Steps 1 - 8 above, but use the setting
guide below:
Again, this is ONLY a guide — make your own settings, if you want.
8 Finally, press the Start/Stop button — and hear your new masterpiece.
■ Gate Time • • • • • • • • • • • • • • • • • • • • • • • • • • • • • • • • • • • • • • • • • • • • • • • • •
In the next few steps, let’s work with Gate Time and lengthen some of the notes.
9 Hold down [SHIFT] and press [STEP 1-8], until the GATE TIME indicator is
lit.
10 Set the knobs as shown.
Set knobs [1] and [5] to around 12:00. (The display value should be around 200.)
Set knobs [2], [3], [4], [6], [7], and [8] to around 9:00. (The display value should be around 70 - 75.)
11 Do the same again for Steps 9 - 16.
Press any one of the bottom row buttons (this automatically selects Steps 9 - 16 for editing the same
parameter, Gate Time), then set the knobs to roughly the same positions as shown above.
12 Press the Start/Stop button to hear your stunning new arrangement.
■ Velocity• • • • • • • • • • • • • • • • • • • • • • • • • • • • • • • • • • • • • • • • • • • • • • • • • • •
No matter what unnatural, machine-like melody you’ve programmed above, you can make it sound much
better by putting in a few choice accents — with Velocity.
74
13 Hold down [SHIFT] and press [STEP 1-8], until VELOCITY is selected.
14 Maybe you’ve noticed that you can change any and all of the events
while the Pattern is running. If you HAVEN’T noticed this, press the Start/
Stop button to play the Pattern, and make the changes below.
Page 75

Chapter 14 Pattern Recording
15 Set the knobs as shown.
Set knobs [1] and [5] to around 2:00. (The display value should be around 90 - 100.)
Set knobs [2], [3], [4], [6], [7], and [8] to around 11:00. (The display value should be around 40 - 50.)
Or, make your own settings. After all, you’ve mastered the process now. Plus, since you can hear what
you’re doing — AS you’re doing it — you can come up with some amazing ideas of your own.
■ Step Mute • • • • • • • • • • • • • • • • • • • • • • • • • • • • • • • • • • • • • • • • • • • • • • • • •
We’ve covered this function before (in Tip 29), but let’s check it out again. It’s a handy editing tool that helps
you create great sounding tracks.
16 Is the Pattern still going? If not press the Start/Stop button again.
17 Press some of the Step buttons to mute certain Steps. Try out the exam-
ples below, then experiment with your own settings.
Press buttons [5], [7], [11], and [13]. Listen to the sound of the Pattern as these Steps drop out.
Now, turn them all back on and mute these: [6], [7], [12], [14], and [16].
You’ve got your basic Synth track — now, continue crafting and adding to the Pattern by working on the
Rhythm tracks below.
• Fine tuning
Here’s a smart and easy way to work! Use the “Step” knobs (above
each Step button) to select the Step and make a rough, ‘round about’
setting, then use the DATA knob to tweak and fine-tune the setting.
• Swing
Don’t forget to use Swing. It might not be right for all of your Patterns,
but it doesn’t hurt to try it out. A little Swing may be just what the doctor ordered... Remember, the Swing setting affects all tracks equally.
(See page 37.)
• Other tools
Feel like hearing a different Voice? Call up the Copy Voice function
(page 65), and dial in a new Voice for your Pattern. Pattern Move (page
65) and Pattern Pitch (page 66) are also useful tools you can apply to
your tracks.
• Copy Pattern
If you’ve crafted a really hip Pattern, and you’d like to make a few more
variations — use the Copy Sequence operation (page 67). Once you
have some copies of the Pattern, you can tweak them and change them
around, until you’ve got a whole palette of similar beats and riffs to
work with — for live performance (page 95), or for Song recording
(page 82).
• Mix your methods
Real-time and Step recording are two separate methods — but they can
also be used together. Not at the same time, of course, but in tandem.
For example, you could record a basic beat to Rhythm Track 1 with
Step, then use Real-time to improvise a bass line on the Synth Track.
Or you could combine both methods on a single track — recording a
basic part with Real-time, then using Step to edit it. Which method you
use and how you use it depends partly on the type of music you wish to
create and partly on your own personal preference.
75
Page 76

Chapter 14 Pattern Recording
Rhythm Tracks
The AN200 is filled to the brim with an enormous variety of drum, percussion, and special effects sounds.
Put these to good use with the Step Recording features — and create your own awesome beats and smokin’
rhythms.
■ The Basics — Rhythm Track 1 • • • • • • • • • • • • • • • • • • • • • • • • • • • • • • • • • •
In the next few steps, we’ll walk you through the basics — and give you a quick way to edit. Get these steps
down, and you’ll be whizzing through the tracks in no time.
18 Turn on the Steps you want to record.
Press the buttons shown to turn them on.
19 Select the Instrument Select parameter.
While holding down [SHIFT], press [STEP 1-8]. Do this repeatedly, if necessary, to call up Instrument
Select. (The “INST SEL” indicator lights.)
Instrument Select is only available for the Rhythm tracks. As you may recall from Tip 11, the Rhythm
tracks contain a huge variety of bass, drum, percussion and other sounds — each assigned to a different
key. Instrument Select is the place you go to choose these sounds for Step recording.
Notice that a cryptic name appears in the display. This indicates the
selected sound. For example, the display below indicates that Snare Drum
#14 is called up.
For a complete list of the sounds and their display abbreviations, see page 140.
20 Enter a bass drum sound for all the steps.
Press button [1], then hold down [SHIFT] and turn the [PORTAMENTO] knob to select “bd05.” All
steps 1 - 16 are instantly and automatically set to the same value.
Remember, you can use the [DATA] knob instead for finer control. Just press the appropriate number
button, then tweak the [DATA] knob to dial up the desired sound.
Press the Start/Stop button to hear the new track — a bass drum pulse that will be the foundation of this
new rhythm.
76
In the Fast Lane — Working Smart
Once you get to know your way around the controls, you can Step Record
your tracks fairly quickly. The trick is in getting the system down to a routine. So, here’s the routine!
1) Select the desired track.
Press [SYNTH TRACK] or [RHYTHM TRACK].
2) Turn on the desired Steps.
Press the appropriate Step buttons, so that they light.
3) Call up the desired parameter.
Hold [SHIFT] and press [STEP 1-8] to call up Instrument Select, Pitch,
Gate Time, or Velocity.
4) Press the desired number button and change the value.
Use the knob directly above it, or use the [DATA] knob.
While editing you may want to turn other Steps on or off. To do this
quickly and return to editing:
1) Press [EXIT] (to leave the current parameter).
2) Turn the desired Steps on or off.
3) Press [STEP 1-8] or [STEP 9-16] (to return to current parameter).
And remember — at any point in the operation, you can:
• Select a different track.
Press [SYNTH TRACK] or [RHYTHM TRACK].
• Play the Pattern to hear your edits.
Press the Start/Stop button.
• Mute or un-mute individual tracks.
Hold [SHIFT] and press [1], [2], [3], or [4].
Page 77

Chapter 14 Pattern Recording
■ Overdubbing the Hi-hat — Rhythm Track 2 • • • • • • • • • • • • • • • • • • • • • • • • •
Now, let’s flesh out the rhythm a bit with some hi-hat parts — and add a turntable scratch at the end.
21 Using the “In the Fast Lane” box above as a guide, go on to Rhythm
Track 2, and make the settings as described here.
Turn the indicated buttons on and set them to the instruments shown.
While you’re programming the instruments, let the Pattern play. Hearing the sounds as you
enter them is a great help in constructing hip tracks.
■ Snare and Ethnic Spice — Rhythm Track 3 • • • • • • • • • • • • • • • • • • • • • • • • •
For the final mix, we’ll record a snare backbeat — and throw in some Indian tabla and other percussion for
good measure.
22 Have you got the hang of the things by now? Use “In the Fast Lane” above as a
cheat sheet if necessary, and program Rhythm Track 3 as shown.
77
Page 78

Chapter 14 Pattern Recording
■ Fine Tuning Your Tracks — Pitch, Gate Time, and Velocity • • • • • • • • • • • • • •
Before you run off, remember that the Rhythm Tracks can be edited some more with the Pitch, Gate Time,
and Velocity parameters.
23 We won’t tell you exactly what to do — you can explore these on your
own. However, here are some guidelines and paths to follow:
● Pitch
Yes, the drum and percussion sounds can be pitch-changed. So can all the scratches and sound
effects. Everything’s fair game and nothing’s safe. This is your chance to go wild with the rhythm!
● Gate Time
Experiment with the length of each note — clipping some here, extending some there. Typical uses
include stretching out the sound of a cymbal, so you hear the full decay, or cutting off the sustain of a
tom sound, for a short, sharp chop.
● Velocity
Accentuate the positive. Bring out certain important instruments in the mix by boosting their velocities. Similarly, turn the velocity down for instruments that seem too loud.
24 Last and certainly not least — save your work.
Now that you have the slamming basic track for your new Grammy-winning, Platinum-selling Techno/
Dance hit — you’d better save it. (For information on saving, see Tip 60.)
And that’s it! Unless of course you want to go back and re-edit everything to your own exacting specifications. After all, you’re the boss.
Rhythm Tracks
• Start with the beat
When you record a Pattern, it’s best to start out with the Rhythm tracks. In fact, you might
want to record just a temporary rhythm “scratch track” (for example, bass drum and snare) to
Rhythm Track 1, and build the rest of the Pattern on top of that — erasing or modifying the
scratch track later.
Of course, it’s all up to you! Depending on what style of music you record and your own personal preferences, you may want to start with the Synth track instead.
• Play with Gate Time
Remember Gate Time can also be a “global” effect. Playing back the rhythm you’ve just programmed, mute the Synth track and experiment with different Gate Time settings. (Hold
[SHIFT] and press [REVERSE]; use [DATA] knob to change.) Try settings of 30, 50, and 200
on all three Rhythm tracks — and hear what happens!
• Swing
For an instant hip-hop approach, try changing the Swing! While the Pattern is playing, press
[SWING] and use the [DATA] knob to set the value to 65 or 70.
Step Recording
Allows you to enter the notes to a Pattern in
one-by-one, as opposed to recording them in
real time (in Real-time Recording; see page
70).
1. Clear a Pattern and set the Beat (hold
[SHIFT] and press [SWING]).
2. Select a track with [SYNTH TRACK] and
[RHYTHM TRACK].
3. Turn all desired Steps on by pressing each
Step button.
4. Simultaneously hold [SHIFT] and press
[STEP 1-8] to select Steps 1 - 8 for editing;
press repeatedly to toggle through event
types. (Use [STEP 9-16] in the same way
to select and edit Steps 9 - 16. Or simply
press button [9] after editing Steps 1 - 8.)
5. With event type selected, use knobs above
the Step buttons (and the DATA knob) to
adjust value.
6. Turn steps on/off by pressing [EXIT] (to
leave editing), then pressing appropriate
Step button.
7. Press Start/Stop button to play back. (Can
be done at any point in procedure.)
78
Page 79

Chapter 14 Pattern Recording
Event Parameters — Synth and Rhythm Tracks
Pitch
Determines the pitch of the selected note. For the Synth track, this is
expressed as note names; for the Rhythm tracks, it is expressed as number of semitone steps. (The small “o” in the note name display designates
accidentals. For example, “ ” corresponds to G#.)
Range
C-2 — G8 (-64 — 24 for Rhythm tracks)
Gate Time
Determines the length of the selected note. The higher the value, the
longer the note length. For sounds that have a short decay, higher values
may have little to no effect.
Range
1 — 1600
Velocity
Determines the volume of the selected note. Use this parameter especially
to create accents in the Pattern.
Range
0 — 127
Instrument Select
Determines the instrument sound for the selected note. This parameter is
available only for the Rhythm tracks.
Range
(Refer to list on page 140.)
60 Storing your new Pattern
Now that you’ve created a new Pattern, you’ll want to save it for future recall. The Store function lets you do
this quickly and easily. And remember, any and all changes you’ve made to the accompanying Voice —
including your knob and button settings, Free EG moves, and Effect edits — are stored with the Pattern, too.
The AN200 gives you 128 User memory spaces for saving your original Patterns.
Once you’ve created a Pattern (or Voice) you want to save, DO NOT select another Pattern until
you’ve stored it. Selecting another Pattern (or Song) automatically wipes clean any changes or
edits you’ve made!
■ Turn Memory Protect Off • • • • • • • • • • • • • • • • • • • • • • • • • • • • • • • • • • • • • •
Before you store, make sure the Memory Protect function is off. If it is on, you won’t be able to store your
Pattern.
1 Simultaneously hold down [SHIFT] and press [16]
(UTILITY SETUP).
You may have to press the button more than once to call up the “Prot”
(Memory Protect) display below.
2 If Memory Protect is set to on, use the DATA knob to change it to off
(“oFF”).
Unless you’ve changed the setting yourself, Memory Protect will probably be off.
79
Page 80

Chapter 14 Pattern Recording
■ Store the Pattern• • • • • • • • • • • • • • • • • • • • • • • • • • • • • • • • • • • • • • • • • • • •
Storing your original Pattern is as easy as 1-2-3.
1 First, make sure your new Pattern is selected and that
Memory Protect is off. Then, press [STORE]. (“P.Str”
briefly appears to indicate the Store operation.)
2 Select the desired User Pattern number (1 - 128) with
the DATA knob.
3 Press [STORE] again to actually store the Pattern, or press [EXIT] to can-
cel.
■ Selecting User Patterns• • • • • • • • • • • • • • • • • • • • • • • • • • • • • • • • • • • • • • •
Now that your Pattern is properly saved to memory, you can call it up any time you want. Select it the same
way you select the preset Patterns — pressing [PATTERN] and using the DATA knob. The User Patterns
come after preset Pattern 256.
For a quick way to select User Patterns, hold down [SHIFT] and press the [PATTERN] button. This toggles between the Preset Patterns and the User Patterns.
• Save your Patterns in bulk
If you have a sequencer or MIDI data filer, you can use the AN200’s Bulk Send function (page
108) to save your valuable Pattern and Voice data in multiple “banks” of 128 Patterns. Load
each bank of 128 back to the AN200 when you need it — or share your banks with your
AN200-equipped friends and bandmates. Keep in mind too that you can use Bulk Send with
the computer-based AN200 Editor (page 106) to further edit your Voices.
• Make it a habit
Did we mention that you should save? Save, save, and keep saving! Even if you’re still working on a Pattern or Voice and don’t consider it finished, save it anyway.
Why? Doing this gives you an archive of the changes you’ve made along the way — in case
you want to call one of them up again. You can always delete those archive Patterns later
(page 68) if you need extra memory space. Or, if you’re a “pack rat,” you can use Bulk Send
(see hint above) to save every single thing you’ve ever created.
Memory Protect
Determines whether you can store Patterns
to memory or not. Set this to ON when you
want to avoid inadvertently erasing or replacing any previously stored User Patterns.
Hold down [SHIFT] and press [16] until
“Prot” (Protect) appears briefly in the display. Use the DATA knob to change the setting.
Settings
Off (“oFF”), On (“on”)
Store Pattern
Allows you to save Pattern and Voice data to
one of 128 User memory locations.
With the new Pattern still active and Memory
Protect off, press [STORE]. Select the
desired User number with the DATA knob,
and press [STORE] again to execute, or press
[EXIT] to cancel.
80
Page 81

Chapter 15
61 Erasing a Song — and starting from scratch
The first thing you’ll need to do when you create your own Song is to make room for it on the AN200. To do
that, you’ll have to erase or clear one of the existing Songs.
1 Make sure the Song mode is selected.
Press the [SONG] button.
Song Recording
You’ve got a humongous selection of Patterns at your disposal. It’s time now
to put them together and make some Songs.
2 Select the Song to be cleared.
Make sure that it’s a Song you don’t mind getting rid of. Actually, this
doesn’t really erase the Song right away. The Song data still stays in memory — until you save your new Song to that number.
3 Simultaneously hold down [SHIFT] and press [9]
(CLEAR SONG).
4 Clear the Song.
Release [SHIFT] and press [9] once again (the button stops flashing and
stays lit). At the “Y£n” (“Yes or no?”) prompt, press it a third time to actually clear the Song, or press [EXIT] to cancel.
• Don’t erase... Edit a Song!
Remember, you don’t need to put a Song together from scratch. If there’s a preset Song you
like and simply needs a little customizing to make it your own, just call it up and edit it instead.
Take Patterns out, put new Patterns in, and perform a variety of transformations on the Pattern
data — the info starts on page 84.
Indicates Song
mode is active.
Clear Song
Allows you to clear Pattern assignments and
other edits of a Song. (Remember, this does
NOT affect the actual data of any Patterns.)
Select the Song, then use [SHIFT] and [9] to
call up “CLr” (Clear). Press [9] twice to
execute.
81
Page 82

Chapter 15 Song Recording
62 Creating a Song
Finally, we come to the culminating feature of the AN200. This is the place where you bring together all the
Voices, Scenes, Free EG moves and Patterns you’ve made — and use them to create your own original
Songs.
1 Call up the Song mode and clear a Song.
Give yourself a blank slate for putting together your own Song. (Have you tried clearing a Song yet? If
not, go back to Tip 61 and do it now.)
2 Call up the Song Edit mode.
You’ll need to enter the Song Edit mode to do any Song recording or editing. To do this, simultaneously hold down [SHIFT] and press the [SONG]
button.
The PATTERN indicator should flash. If PATTERN is NOT flashing, press
[PATTERN SELECT] to get it flashing and enable Pattern number entry.
3 Select the measure to which you want to record.
Simultaneously hold down [SHIFT] and use the [OCT <<]/[OCT >>] ([BWD]/[FWD]) buttons to move forward or backward in the Song, measure-by-measure.
Also, try this alternate method below — and move more quickly and easily through the measures.
1) Hold down [SHIFT] and press either of the [BWD]/[FWD] buttons.
2) Then, release the buttons, and use the [DATA] knob.
In this condition, turning the [DATA] knob steps through the measures. For even speedier selection, hold
down [SHIFT] while turning the [DATA] knob — and jump through the Song ten measures at a click.
4 Press the Start/Stop button.
Doing this loops the currently selected Pattern at the currently selected measure. This allows you to hear
your Song edits in the steps below — in real time.
If you want, you can stop playback by pressing the Start/Stop button before going on to Step 5 below.
Or keep it going and continue editing while the Pattern loops.
5 Select the Pattern number to be assigned (to the measure selected
above).
Use the DATA knob. Any of the Patterns can be selected — Preset or User. Remember that you can easily switch between the Preset Patterns and the User Patterns by holding down [SHIFT] and pressing the
[PATTERN] button. (See page 80.)
82
You may also want to record an initial BPM setting at the first measure of your Song. This
determines the basic tempo for the entire Song. For more information, see Tip 63.)
Page 83

Chapter 15 Song Recording
6 Keep assigning Patterns in this way, repeating Steps 3 - 5 above, until
you’ve created a new Song.
In most cases, you’ll want to repeat a Pattern over several measures, rather than having a different Pattern every measure. To do this, first set the Pattern you want to repeat. Then, in the following measures,
turn the DATA knob counter-clockwise until “----” appears in the display.
This setting selects no new Pattern, and keeps the previous Pattern playing through the measures
assigned this way.
By the way, if you’re creating a Song from scratch, you may not need to enter “----” at all. Just skip
over the measures that you want to stay the same — the AN200 automatically repeats the last Pattern,
until the next new entry.
7 To end the Song, record the “End” mark.
Select the measure FOLLOWING the final measure in the Song, then turn the DATA knob counter-clockwise until “End” appears in the display.
For example, if you recorded the “End” mark to measure 33, the Song plays up through measure 32, then
stops.
8 Press [EXIT] (or the [SONG] button) to leave Song editing.
9 Play back your new Song by pressing the Start/Stop button.
However, you’ll have to use the [BWD]/[FWD] buttons ([SHIFT] + [OCT <<]/[OCT >>] buttons) to select
the starting measure. Make sure to return to the beginning measure — if you want to hear the Song all
the way through.
10 Last and most important — don’t forget to store your new Song.
Go on to Tip 67 right now and save your latest masterwork.
• Recording other data
In addition to Pattern numbers, a variety of other data types can be recorded to the measures
of a Song — such as BPM, Gate Time, Swing, and Reverse. (See page 85.) These let you
change various playback characteristics of the Patterns to suit your Song — without actually
having to change the Pattern data itself!
Song Edit Mode
Call up this mode for recording and editing
Songs. Hold down [SHIFT] and press
[SONG]. (The “S” in the display indicates the
Song mode.)
Measure Select
Determines the measure for recording, editing, and playback. Hold down [SHIFT] and
use the [OCT <<]/[OCT >>] buttons.
83
Page 84

Chapter 15 Song Recording
63 Setting the BPM (tempo) for your new Song
In addition to the Patterns, a variety of other settings can be programmed into your Song. One of these is
BPM. It lets you set the playback speed or tempo — for each and every measure, if you want.
Normally, you’ll use this at the start of the Song (see Tip 62, Steps 3 - 5) to make sure the entire Song plays
back at the proper tempo. However, it can also be used to change tempo in middle of the a Song as well.
Work through these steps, and master the procedure. You’ll be using the same method in Tip 64 to program
other settings, too.
1 Enter the Song Edit mode.
Hold down [SHIFT] and press the [SONG] button.
2 Select the desired measure.
Hold down [SHIFT] and use the [OCT <<]/[OCT >>] buttons.
3 Play back the Pattern.
Press the Start/Stop button to loop the Pattern at the selected measure.
4 Call up the BPM setting.
Hold down [SHIFT] and press [BPM] ([TAP]).
5 Set the desired BPM value with the DATA knob.
6 Repeat Steps 2 - 5 above as often as you want, for as
many measures as needed.
In most cases, you’ll want to keep the same BPM setting over several measures, or even over the entire
Song. To do this, enter the “----” setting for as many measures as needed. Or, if you’re programming
the Song from scratch, just skip over the measures that you want to stay the same — the AN200 automatically maintains the last setting, until the next new entry.
• Fine tempo changes
The BPM value has an extremely fine resolution of 1/10 beats per minute — for precise control
over the tempo. Use this to set up very gradual speed changes.
• Speed up, slow down
If your Song fits the conventional verse/chorus structure, you might want to play around with
changing the BPM at the beginning of each section. For example, some artists make their choruses slightly faster than the verses, to generate more excitement each time the chorus
comes. Other songs might benefit from the completely opposite approach — slowing down
the chorus to make it sound more dramatic.
Whichever approach you take, make sure to keep the changes consistent from section to section, and keep them small — you want your listeners to FEEL the changes, not consciously
HEAR them.
Song Edit — BPM (Tempo)
Determines the speed of Pattern playback (in
beats per minute, or bpm), for the selected
measure. First, select the measure by holding down [SHIFT] and using the [OCT <<]/
[OCT >>] buttons. Then, hold down [SHIFT]
and press [BPM] ([TAP]), and use the DATA
knob to set the value.
Range
20.0 — 300.0 bpm
A setting of “----” maintains the previous measure’s value (no change).
84
Page 85

Chapter 15 Song Recording
64 More Song editing features
In Tips 62 and 63 above, you learned how to enter Pattern numbers and BPM values to the measures of your
Song. But that’s not all you can do. In this Tip, we’ll show you how to use the rest of the powerful Song
editing features in your tunes.
By the way, we’ll keep these instructions to the bare-bones minimum. Read about these cool tools, then try
using them in your own Songs and see what you come up with.
Remember, the basic method is the same for all:
1) Enter the Song Edit mode.
(In the Song mode, hold down [SHIFT] and press the [SONG] button.)
2) Select the desired measure.
(Hold down [SHIFT] and use the [OCT <<]/[OCT >>] buttons.)
3) Play back the Pattern.
(Press the Start/Stop button.)
4) Select the event type you want to edit.
(See instructions for each event below.)
5) Set the value.
(Use the DATA knob. In the case of Track Mute below, follow the relevant instructions.)
Naturally, repeat Steps 2 - 5 as often as needed. Press [EXIT] when you’re done editing. And don’t forget to
store your new creation. (See page 89.)
Pattern
(Described in Tip 62 above.)
To select:
Press the [PATTERN SELECT] button.
Pitch Offset
Just as with the similar Pattern control (Transpose; on page 36), this lets you change the playback pitch.
By making different settings throughout various measures in the Song, you can program your own chord
progressions, and have the Patterns change key.
To select:
Hold down [SHIFT] and press the [KEYBOARD] button.
Both the [KEYBOARD] button and the PITCH lamp flash, indicating Pitch Offset is selected.
BPM
(Described in Tip 63 above.)
To select:
Hold down [SHIFT] and press the [TAP] button.
Beat
This lets you change the total number of steps in the Pattern at the selected measure. (For details, see
Tip 6.) One use of this would be to create a half-bar Pattern. For example, if you’ve entered a 16-step
Pattern at the measure, setting this to “8” would effectively cut the Pattern in half. If you’re only aiming
for a brief change, remember to reset the Beat in the next measure or so!
To select:
Hold down [SHIFT] and press the [BEAT] ([SWING]) button.
Both the [SWING] button and the BEAT lamp flash, indicating Beat is selected.
85
Page 86

Chapter 15 Song Recording
Swing
This lets you introduce a swing feel to the Pattern at the selected measure. (See Tip 27 for more information.)
To select:
Press the [SWING] button.
The [SWING] button lights, indicating Swing is selected.
Gate Time
This lets you control the length of the notes for the Pattern at the selected
measure. (See Tip 25 for more information.) You could use this to create
tracks in which the notes grow progressively longer as the Pattern cycles
— by programming successively higher Gate Time values in the measures.
Or have the notes become more and more clipped (staccato) — by making
Gate Time lower and lower in successive measures.
To select:
Hold down [SHIFT] and press the [GATE TIME] ([REVERSE]) button.
Both the [REVERSE] button and the GATE TIME lamp flash, indicating Gate Time
is selected.
Reverse
By setting this to Reverse (“bAC)”), you can have the Pattern at the
selected measure play backwards. (See Tip 25 for more information.)
Alternate between forward and reverse Patterns for special effects. Or program three forward, one reverse — for an interesting four-bar phrase.
To select:
Press the [REVERSE] button.
The [REVERSE] button lights, indicating Reverse is selected.
Track Mute
Add some texture to your Song with this function. By recording Track Mute
events you can have tracks drop in and out of your arrangements, for exciting dynamic changes.
To select and edit:
Hold down [SHIFT] and press either the [SYNTH TRACK] or [RHYTHM TRACK]
button. Then, press the appropriate Step button: [1] for the Synth track, and
[2], [3], and [4] for the Rhythm tracks. The status for each track is shown in the
display.
Indicates Synth track
is on.
• Easier way
Keep in mind — there is an alternate way to select the various event types. You may find it
easier to remember — AND easier to use! Simply hold down [SHIFT] and press [SONG]
repeatedly. This toggles through all of the event settings in order: Pattern Select, Pitch Offset,
BPM (Tempo), Beat, Swing, Gate Time, Reverse, and Track Mute.
Indicates Rhythm track 1
is muted.
Song Edit — Event Select
This lets you select the particular event to be
recorded or edited in a Song. Eight event
types are available: Pattern Select, Pitch Offset, BPM (page 84), Beat, Swing, Gate Time,
Reverse, and Track Mute. To select, make
sure Song Edit mode is active ([SHIFT] +
[SONG]), then press the appropriate button
(using [SHIFT] if necessary). Alternately,
hold down [SHIFT] and press [SONG] repeatedly to toggle through all eight event types.
Pattern Select
Press [PATTERN SELECT].
Range
P.001 — P.256 (Preset Patterns)
U.001 — U.128 (User Patterns)
Pitch Offset
Hold [SHIFT] and press [KEYBOARD].
Range
-24 — 0 (no change) — 24 semitones
BPM
Hold [SHIFT] and press [TAP].
Range
20.0 — 300.0 bpm
Beat
Hold [SHIFT] and press [SWING].
Range
16, 12, 8 steps
Swing
Press [SWING].
Range
50 — 83
Gate Time
Hold [SHIFT] and press [REVERSE].
Range
1 — 200
Reverse
Press [REVERSE].
Settings
Forward (For)
Reverse (bAC))
Track Mute
Hold [SHIFT] and press the [SYNTH TRACK]
button or the [RHYTHM TRACK] button.
Then, press [1], [2], [3], or [4] (for Synth
track and Rhythm tracks 1 - 3). The mute on/
off status for each track is shown in the display.
86
Page 87

Chapter 15 Song Recording
65 Adding Patterns to your Song — Insert Pattern
Naturally, you can add Patterns to your existing Songs — by using the Insert Pattern function. This puts a
new Pattern in the Song at the measure you specify.
It doesn’t matter whether you’re in the Song mode or the Song Edit mode — you can insert a Pattern from
either.
1 First, select the measure you want to insert the Pattern to, by holding
[SHIFT] and using the [OCT <<]/[OCT >>] buttons.
2 Call up the Insert Pattern function.
Hold down [SHIFT] and press [10] (INS/DEL PTN). You may have to press
the button more than once to call up the “inS” (Insert Pattern) display.
3 Next, select the Pattern you want to add to your Song.
Use the DATA knob.
4 Insert the selected Pattern.
The [10] button should be flashing. Press it once again (the button stops flashing and stays lit). At the
“Y£n” (“Yes or no?”) prompt, press it a third time to actually insert the Pattern to the selected measure,
or press [EXIT] to cancel.
Take a look at the illustration below and see what happens when you insert a Pattern.
Measure 1
Pattern 012
Measure 1
Pattern 012
Don’t forget to store your newly edited Song, or you’ll lose any edits you’ve made once you turn the power
off or select another Song or Pattern.
Measure 2
Pattern 012
Measure 2
Pattern 012
Pattern 144
Measure 3
Pattern 013
Measure 3
Pattern 144
Measure 4
Pattern 014
Here, Pattern 144 is inserted to
Measure 3, and all following Patterns are moved over to make
space for the new Pattern.
Measure 4
Pattern 013
Measure 5
Pattern 014
• Replacing a Pattern
If you want to replace a Pattern — in other words, erasing one and putting a new one in its
place — you’ll need to use Delete Pattern (page 88) to delete the Pattern first. Then, use Insert
Pattern to put the new one in.
Insert Pattern
Allows you insert a Pattern to any measure
within an existing Song. All subsequent Patterns/measures are displaced.
With Song (or Song Edit) mode active, hold
[SHIFT] and use [OCT <<]/[OCT >>] buttons
to select desired measure. Hold [SHIFT] and
press [10] to call up “inS” (Insert), select
the desired Pattern number with the DATA
knob, and press [10] twice to execute.
87
Page 88

Chapter 15 Song Recording
66
Taking Patterns out of your Song — Delete Pattern
If you’ve made a mistake in creating your Song, you can always clear it (page 81) and start over. Or you can
use Delete Pattern to erase the offending entry, and keep the other Patterns intact.
Delete Pattern lets you take Patterns out of specific measures in your existing Songs. Keep in mind, however, it makes your Song shorter by one measure AND it doesn’t leave an empty space — any Patterns that
follow the deleted one move back to fill the vacated measure.
Delete Pattern can be used in either the Song mode or the Song Edit mode.
1 First, select the measure that contains the Pattern you want to delete.
Hold [SHIFT] and use the [OCT <<]/[OCT >>] buttons.
2 Call up the Delete Pattern function.
Hold down [SHIFT] and press [10] (INS/DEL PTN). You may have to press
the button more than once to call up the “dEL” (Delete Pattern) display.
3 Delete the Pattern.
The [10] button should be flashing. Press it once again (the button stops flashing and stays lit). At the
“Y£n” (“Yes or no?”) prompt, press it a third time to actually delete the Pattern from the selected measure, or press [EXIT] to cancel.
Here’s an example of what happens when you use Pattern Delete. In the illustration below, we’ll delete
Pattern 013 at Measure 3.
Measure 1
Pattern 012
Measure 1
Pattern 012
Measure 2 Measure 3
Pattern 012
Measure 2
Pattern 012
Pattern 013
Measure 3
Pattern 014
Measure 4
Pattern 014
Here, Pattern 013 is deleted from
Measure 3, and Pattern 014 moves
over to take its place.
Don’t forget to store your newly edited Song, or you’ll lose any edits you’ve
made once you turn the power off or select another Song or Pattern.
Delete Pattern
Allows you delete a Pattern from any measure within an existing Song. All subsequent
Patterns/measures move back to fill the
vacant measure.
With Song (or Song Edit) mode active, hold
[SHIFT] and use [OCT <<]/[OCT >>] buttons
to select desired measure. Hold [SHIFT] and
press [10] to call up “dEL” (Delete), and
press [10] twice to execute.
88
Page 89

Chapter 15 Song Recording
67 Storing your new Song
Now that you’ve created and arranged a new Song, you’ll want to save it for future recall. The AN200 gives
you a total of 10 memory spaces for saving your original Songs.
Once you’ve created a Song you want to save, DO NOT select another Song and DO NOT leave
the Song mode until you’ve stored it. Selecting another Song (or Pattern) automatically wipes
clean any changes or edits you’ve made!
Delete Pattern can be used in either the Song mode or the Song Edit mode.
1 Make sure Memory Protect is turned off.
Hold down [SHIFT] and press [16] until the “Prot” (Protect) display is shown. Then, set Memory Protect to OFF with the DATA knob.
Press the [EXIT] button to leave Memory Protect.
2 With your new Song still up and waiting, press
[STORE].
“S.Str” briefly appears to indicate Store operation.
3 Select the desired Song number (01 - 10) with the
DATA knob.
4 Press [STORE] again to actually store the Pattern, or press [EXIT] to can-
cel.
• Keep on saving
Save ALL of your Songs — memory is cheap! If you have a sequencer or MIDI data filer, you
can use the AN200’s Bulk Send function (page 108) to save your valuable Song data in multiple “banks” of 10 Songs to disk — and build up a whole library of tunes.
However, make sure to save any relevant Pattern data with the Songs and load them together.
If you don’t do this, your Songs and Patterns may not match each other!
• Song backup
You may want to use Store to save different versions of your Song — even as you’re working
on it. This gives you an archive of the changes you’ve made along the way — in case you want
to call one of them up again. You can erase the unneeded versions later if you want.
Store Song
Allows you to save Song data to one of 10
Song memory locations.
With the new Song still active and Memory
Protect off, press [STORE]. Select the
desired Song number with the DATA knob,
and press [STORE] again to execute, or press
[EXIT] to cancel.
89
Page 90

Chapter 16
68 Using [SHIFT] with the [DATA] knob — for leaps
The [DATA] knob is really useful for narrowing in on a value and fine-tuning the parameter settings. However, if you’re in a hurry and want to quickly jump through the available values, it can be cumbersome.
Speed Tips for
Power Users
Work smarter, not harder!
In this section, we’ll show you some nifty ways to put your editing in high gear
— so you can get MORE out of your AN200 in LESS time.
and bounds!
Not when you use the [SHIFT] button, however. To speed up the [DATA] knob, hold down [SHIFT] while you
turn it.
Use this operation especially:
• For selecting Patterns
This speed operation lets you jump 10 Patterns for every click of the [DATA] knob.
• For setting the BPM
Holding [SHIFT] lets you go 10 times faster through the BPM values (1 bpm/click).
• For Instrument Select (in Step Recording, Rhythm Track)
Jump among the instrument selections, then take your finger off [SHIFT] and narrow your selection
down.
Actually, this [SHIFT]-[DATA] knob shortcut is useful for just about ANY value-changing operation. Use it
for the synth-related knobs, and use it to jump around on playback controls, such as Gate Time and Transpose.
90
Page 91

Chapter 16 Speed Tips for Power Users
69 Using [SHIFT] to “hold” a setting
Editing on the AN200 is quick and easy — you press a button or turn a knob, and the setting/value changes.
However, convenient as it is, there are times when you want to select a parameter without changing it.
Here’s an example. Let’s say you’ve selected the “hidden” Reverb Effect in your editing session, and you go
on to edit something else. Wanting to come back to edit Reverb again, you press the EFFECT [TYPE] button.
Whoops... You’ve just changed the Effect Type to Flanger!
To get around this, use [SHIFT]. Hold down [SHIFT], then press EFFECT [TYPE]. Doing this calls up the current Effect Type — without changing it.
Use this operation with ALL of the Voice “button” settings — such as LFO Detail, EG Select, Key Assign, and
so on.
70 Gang-editing a group of Steps
No, we’re not advocating the use of violence here... This convenient Step Recording shortcut lets you
change the setting for up to 16 Steps — instantly and all at the same time.
1 In Step Recording, select the desired parameter for editing: Pitch, Gate
Time, or Velocity. (Or Instrument Select, if you’re working on a Rhythm
track.)
2 Select the Step row you want to start the group from.
For example, if you want to group Steps 5 -16 for editing, select row 1 - 8 (by pressing any button in this
row). If you want to group-edit Steps 11 - 16, select row 9 - 16.
3 Hold down [SHIFT] and turn the knob corresponding
to the first step in the group.
If you’ve selected the top row (1 - 8) in Step #2 above, this will instantly
and automatically set all Steps 5 - 16 to the same value. If you’ve
selected the bottom row (9 - 16), turning the NOISE LEVEL knob will set
Steps 13 - 16 to the same value.
Typical uses of this include:
• Setting all Steps to the same instrument (in the Rhythm tracks).
• Setting all Steps to the same Velocity or Gate Time, then slightly tweaking individual Steps for variation.
• For when several Steps have the same value — you can set all Steps at once, then go back and change
only the Steps you want to have different values.
91
Page 92

Chapter 17
71 Adjusting the Gate Time with the [DATA] knob
Gate Time is a simple, yet effective way to change both the sound and feel of a Pattern. Try this tip in real
time, as the Pattern is playing — for dramatic, dynamic shifts.
1 Select and play a Pattern.
2 Call up Gate Time.
Hold [SHIFT] and press [GATE TIME] ([REVERSE]).
Real World Tips
This chapter is a grab bag full of various practical tips that solidify your programming chops and put you on the way to truly mastering the instrument.
You’ve seen all these features before. Now, try them out in these real-world
examples — and explore some new, uncharted sound-shaping paths on your
own.
3 Tweak the [DATA] knob slowly to the left.
Very gradually, start turning Gate Time down — from 100, down to 40, 20, then even 10 or 1.
Hear what this does to all the tracks? Hear how everything — including the drums — is clipped, creating a tight, muted sound and producing a drop in dynamics.
4 Now, as quickly as you can, bring Gate Time back up to 60, 80 or 100 — or
more.
Hold [SHIFT] while you turn the [DATA] knob — that lets you jump through the values, and instantaneously bring the dynamics back up. Try to do it right before the first beat of a measure — and kick
everything back in on the “one.”
72 Adjusting the pitch with the [DATA] knob
Let’s do some more work with the [DATA] knob. This time we’ll play around with the pitch — using the
Transpose function.
1 Select and play a Pattern.
2 Call up Transpose.
Hold [SHIFT] and press [TRANSPOSE] ([KEYBOARD]).
92
3 While the Pattern is playing, use the [DATA] knob to
bring the pitch up and down.
For wild pitch changes, hold down [SHIFT] while you work the knob. Try alternating on beat between two
widely different values (for example, “-20” and “30”). Try also whipping the pitch way up in 60s
range, then bringing down to the 40s. Try random pitch changes, too, as the Pattern cycles. Lots of fun
stuff here!
Page 93

Chapter 17 Real World Tips
73 Changing the pitch with the keyboard
As you saw in Tip 26, you can use the keyboard of the AN200 to change pitch and even create chord progressions on the fly. But you can get really wild and crazy with this feature, too — and come up with some
truly mad techno mayhem.
1 Select and play a Pattern.
2 Call up Transpose.
Hold [SHIFT] and press [TRANSPOSE] ([KEYBOARD]).
3 Now, “play” the pitch changes from the keyboard.
Try out these specific exercises and see where they take you!
• Starting with button [9] (low C on the keyboard), go up chromatically — pressing each successive key
in turn. Try it in rhythm, pressing a different key every other beat, like this:
ONE two THREE four ONE two THREE four ONE two THREE four ONE two THREE four ONE two THREE four ONE two THREE four
Count “ONE-two-THREE-four,” hitting the buttons on “ONE” and “THREE.”
• Use the [OCT <<]/[OCT >>] buttons, too! Try selecting different octaves on the fly, and pressing various keys.
• Can you play a two-finger trill? (A trill is two notes played alternately — very quickly.) If you can’t do
it with one hand, try two. For example, alternate between buttons [10] and [12] (D and F), like this:
ONE AND TWO AND THREE AND FOUR AND
Here, you play two keys on every beat — count “ONE-AND-TWO-AND-THREE-AND-FOUR-AND,” and hit
each count!
93
Page 94

Chapter 17 Real World Tips
74 Stutter fill-in 1
Remember in Tip 50 how you hit the top of a Pattern? In this Tip, and the two that follow, let’s try some specific “stutter” rhythm examples.
Select and play a Pattern. Then, hold down [SHIFT] and hit the [TOP] (Record) button in the following
rhythm.
ONE TWO THREE FOUR ONE
Start ! Hit it here... ... and here !
Use your left hand to hold down [SHIFT], while your right hand
hits [TOP]. This gives you greater control over the rhythm!
75 Stutter fill-in 2
Select and play a Pattern. Then, hold down [SHIFT] and hit the [TOP] (Record) button in the following
rhythm. Use both hands. This one’s a bit tricky...
Count as shown, and hit each
count indicated by the arrows.
TWOONE THREE FOUR
ONE AND TWO AND THREE AND FOUR AND
94
ONE
Page 95

Chapter 17 Real World Tips
76 Stutter fill-in 3
Select and play a Pattern. Then, hold down [SHIFT] and hit the [TOP] (Record) button in the following
rhythm. Use both hands on this one too. This could take a little practice before you nail it...
ONE TWO THREE FOUR ONE
Start ! Hit it here... ... and here !... and here !
... and
here !
... and
here !
... and
here !
77 Assigning Patterns for your gig
When you perform live, you need to think quick and move fast. So keep things simple — and use this tip to
help you streamline your onstage work.
You saw in Tips 3 and 31 how you can use the Pattern Select feature to instantly switch Patterns as you perform. If you’ve got a lot of Patterns to trigger during a performance, it makes sense to lay them out in the
order you’ll use them. That’s what Pattern Assign is for.
First, make a list of the Patterns you’ll need, in the order you’ll use them. Then, go down the list and assign
the appropriate Pattern to each number button. (Remember how? Hold down [SHIFT] and press [PATTERN
ASSIGN], then press a number button and use the [DATA] knob to select the Pattern.)
78 Chord progressions with Pattern Assign
If you work with chord progressions, you can create copies of a Pattern select setup to different pitches, and
play those Patterns from the keys.
Use the Copy Sequence function (page 67) to copy a Pattern several times. Then, edit each Pattern copy as
needed with the Pitch function (page 66). Finally, use Pattern Assign (page 40) to assign the Patterns to the
appropriate keys.
Keep things simple and logical. Assign a Pattern to the matching key. In other words, if your Pattern is in
the key of C, assign it to button [9]. If the Pattern’s in F, assign it to [12]. A Pattern in G would go to button
[13], and so on.
95
Page 96

Chapter 18
79 Sync the AN200 to your sequencer
The sophisticated sync features of the AN200 let you lock it in step with the rhythm of just about any other
MIDI device, such as a computer, rhythm machine or external sequencer. No drift, no glitching, no slipping
out of sync — the two machines stay perfectly in the same groove.
This is great for live situations. For example, you could use a computer or sequencer for your main tracks
and fly in some AN200 Patterns as you perform — while everything stays in perfect sync.
Master Class 1 —
Onstage
Now that you’ve got the hang of the instrument, it’s time to start strutting your
AN200 chops onstage. There are a lot of truly amazing things you can do with
the AN200 — especially once you put it together with some other MIDI gear.
Here are some ideas to get you started...
In this application, the sequencer is the “master,” or controlling device, and the AN200 is the “slave.”
1 Set up the AN200 and the sequencer.
Connect the two as shown with a standard MIDI cable.
Speaker Speaker
MIDI clock
OUTPUT OUTPUT
AN200
2 Call up the Clock setting on the AN200.
Hold down [SHIFT] and press button [14] (MIDI SETUP), repeatedly if necessary, until “CLo)” appears
in the display.
MIDI IN MIDI OUT
External sequencer
(RM1x, etc.)
INPUT
Mixer
Amplifier
96
3 Set Clock to “External.”
Turn the [DATA] knob until “E$t” is shown.
Page 97

Chapter 18 Master Class 1 — Onstage
4 Start song or sequence playback on the other device.
When you start and stop playback on the connected MIDI device, the Pattern or Song on the AN200 starts and stops at the same time. Naturally,
you can change the bpm on the other device, and the AN200 will instantly
and automatically follow right along.
If you want, you can use the AN200 as the master device. Just make sure
the Clock on the AN200 is set to “Internal” — otherwise, you won’t be able
to start the Patterns or Songs from the AN200, nor control the other device.
For settings on the other device, refer to the relevant owner’s manual. (For
an example showing the AN200 as the master, see Tip 82.)
Clock
Sets the AN200 to either send or receive MIDI
clock messages. This determines whether
the AN200 functions as the master or slave in
MIDI sync applications. When using the
AN200 alone or to control a connected
device, set this to Internal (“int”). When
controlling the AN200 from a connected
device, set this to External (“E$t”). Keep in
mind, the Patterns or Songs cannot be
started from the AN200 if this is set to External.
Hold down [SHIFT] and press button [14]
(MIDI SETUP), repeatedly if necessary, until
“CLo)” appears in the display, then use the
[DATA] knob to make the desired setting.
Settings
int (Internal)
Sends MIDI clock messages, for controlling the sync of another device.
E$t (External)
Receives MIDI clock messages, for syncing to another device.
80 Changing the MIDI channels
In general, you won’t need to fool with these settings. But they’re here if you ever DO need them.
The four tracks of the AN200 — Synth and Rhythm 1 - 3 — are fixed to receive
data over MIDI Channels 1 through 4, respectively. To match the tracks to a
controlling MIDI keyboard or sequencer, you may have to change these settings. Each track also features an “off” setting, so you can disable a track’s
MIDI reception if you want.
Here, we’ll show you how to change the MIDI Receive Channel for the Synth
track. The Rhythm tracks can be changed in the same way.
1 Hold down [SHIFT] and press button [14] (MIDI
SETUP), repeatedly if necessary, until “SY.u1 ” appears
in the display.
2 Change the channel with the [DATA] knob.
MIDI Receive Channel — Synth
Track, Rhythm Tracks 1 - 3
Determines the MIDI channel over which the
appropriate track receives MIDI data. Make
sure the Receive Channel of the desired track
matches the Transmit Channel setting on the
controlling keyboard or sequencer.
Hold down [SHIFT] and press button [14],
repeatedly if necessary, until the desired setting is shown:
“SY.u1 ” — Synth Track (set to default of
Channel 1)
“r1.u2 ” — Rhythm Track 1 (set to default
of Channel 2)
“r1.u3 ” — Rhythm Track 1 (set to default
of Channel 3)
“r1.u4 ” — Rhythm Track 1 (set to default
of Channel 4)
Use the [DATA] knob to change the value.
The “----” setting corresponds to “off.”
Settings
1 — 16, “----” (off)
97
Page 98

Chapter 18 Master Class 1 — Onstage
81 Loopfactory setup — with the SU200
As part of Yamaha’s new Loopfactory series, the AN200 is not just a great analog-style synthesizer — it also
excels in loop-based music production systems. In this Tip and the ones that follow, we’ll take a look at
some of ways you can use the powerful and versatile Loopfactory line to shake up the dance floor.
In this simple setup, the AN200 is paired with the SU200 Sampling Unit — a small phrase sampler with a
special Loop Track feature that time-stretches your samples and keeps them all in sync.
Here, the AN200 is the controlling “master” and the SU200 is the “slave.” (For more about masters and
slaves, see Tips 79 and 82.) Make sure you set the SU200 to External Sync for this one (MIDI Clock in the
Job mode). Naturally, the AN200 must be set to Internal Sync (page 96).
AN200
MIDI clock
MIDI OUT MIDI INOUTPUT
SU200
LINE
INPUT
Speaker
Amplifier
AUDIO IN
Speaker
With this playback sync system, you can have the samples on the SU200 sync up perfectly to the Patterns of
the AN200 — thanks to Loop Track Play. Use the the AN200 as a master “switch” for the whole system —
starting the Patterns and the SU200 tracks simultaneously with the Start/Stop button. And as an added
bonus, the SU200 serves double duty as an audio mixer — outputting the sound of both the AN200 and
SU200.
98
Page 99

Chapter 18 Master Class 1 — Onstage
82 Loopfactory sync system — with the DX200
In case you didn’t know, the AN200 has a sister synthesizer — almost a twin sister, actually. The DX200 has
many of the same sound-shaping controls, plus all of the Pattern and Song features that are found on the AN200.
Yet, as similar as these siblings are, their actual sound is VERY different. The DX200 is a recreation of the
enormously popular DX7 synthesizer, and features a full implementation of the FM Synthesis system that
powered the DX7 — not to mention a stunning array of incredibly dynamic digital FM Voices.
Side by side in a MIDI sequencing environment, these two give you the best of the analog and digital worlds,
and provide an enormous amount of sonic versatility.
But even without a computer or sequencer, you can still get a lot out of these two units, especially in live performance situations — just hook them together and sync them up. With one as the “master” and the other
the “slave,” you can have them play their respective Patterns in perfect sync with each other. Add a DJ
mixer, and you’ve got a compact yet powerful DJ setup for laying down some slammin’ beats.
1 Connect the AN200 and the DX200 as shown.
Here, we’ll use the AN200 as the “master,” to control the DX200.
MIDI clock
INPUT OUTPUTOUTPUTMIDI OUT MIDI IN
DJ
Mixer
MIDI clock master
AN200
Speaker
Amplifier
Speaker
Slave
DX200
2 Set the Clock on the AN200 to Internal.
Hold down [SHIFT] and press button [14] (MIDI SETUP), repeatedly if necessary, until “CLo)” appears
in the display. Use the [DATA] knob to select “int.”
3 Set the Clock on the DX200 to External.
Move over to the DX200 now. Hold down [SHIFT] on the DX200’s panel and press button [14] (MIDI
SETUP), repeatedly if necessary, until “CLo)” appears in the display. Use the [DATA] knob to select
“E$t.”
4 Select the desired Patterns on both the AN200 and the DX200.
5 Finally, press the Start/Stop button on the AN200.
If you’ve hooked everything up correctly and made the proper settings, both machines should go through
their motions the instant you press Start/Stop on the AN200. Press it again, and they’ll stop together on a
dime.
Work the fader on your DJ mixer to switch between the two units as they play, to mix up your rhythms and
create some truly happening tracks.
99
Page 100

Chapter 18 Master Class 1 — Onstage
• Syncing Songs
Naturally, you can also play Songs on both machines in perfect sync
with each other. For best results, you should make sure that:
* The Songs on both the AN200 and the DX200 are of the same length.
* The Patterns on both machines work well with each other.
* Both Songs have the same Beat settings throughout.
* Both Songs don’t deviate too much from each other in the Swing set-
tings, either — unless you’re aiming for some special, weird effects.
• Bulk Send your music
To help out in the Power Hint above, try using the Bulk Send function
(page 108) to transfer Songs between the AN200 and DX200. For
example, program a Song on the AN200, then transfer just the Song
data to the DX200. Keep in mind, this will keep your Songs in sync —
however, the Patterns on the respective machines could be wildly different. If you want to keep everything consistent on both devices, Bulk
Send ALL the data from one machine to the other.
83 Loopfactory sampling
Here’s a nifty little variation on Tip 81 above. First, hook up the outputs of the AN200 and the SU200 to an
external mixer — to pump the sounds out to the crowd. Then, use the Aux Send on the mixer to feed the
AN200 sound to the sampling input on the SU200 — and sample the Patterns of the AN200.
Speaker
To sample the AN200, route the mixer’s Aux Send
to the SU200’s LINE INPUT.
Speaker
Amplifier
AN200
MIDI clock
MIDI
INOUTPUT OUTPUT INPUT
SU200
LINE
INPUT
AUX
SENDMIDI OUT
Mixer
Things can get a little wild and wooly here. Naturally, this system lets you sync the SU200 to the AN200.
However, the sampling function really makes this setup special. Sample some different AN200 Patterns to
the SU200 and have the AN200 play one Pattern while you fly in samples of other Patterns — in perfect
sync, of course. And use the real-time control features on BOTH machines to mess up your beats on the fly
and create some chaos.
Be smart and do your sampling before you take the stage, so you have everything all set up. Or live dangerously, and sample your AN200 beats while you perform.
100
 Loading...