

Page 1
Surround sound TV stand
Quick Reference Guide
English
F
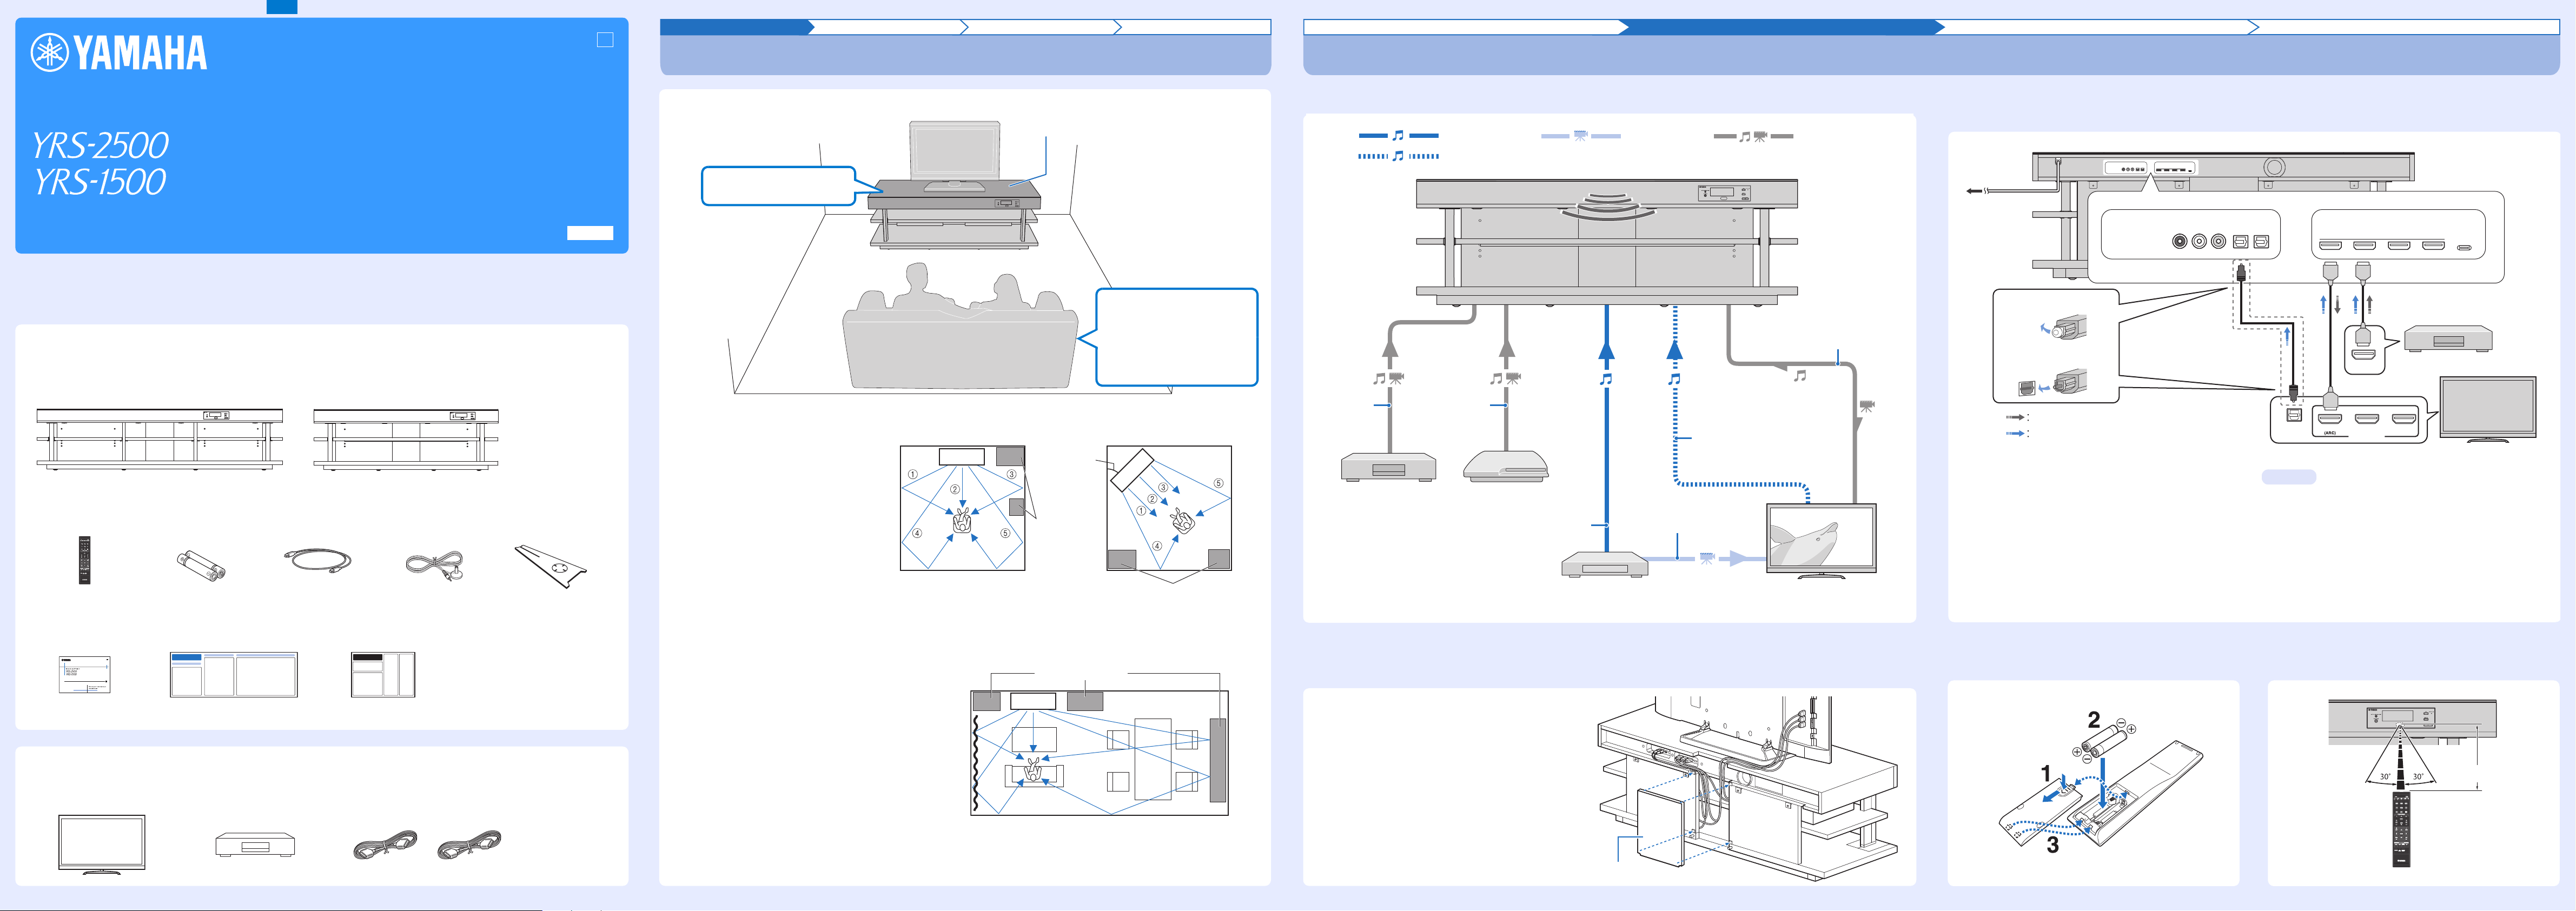
Supplied accessories
Before connecting, make sure you have received all of the following items.
YRS-2500 YRS-1500
The rack must be
assembled before it
can be used. Refer to
the Install Manual for
a list of parts and
assembly
instructions.
Remote control Batteries
(AAA, R03, UM-4) (x2)
Optical cable (1.5 m) IntelliBeam microphone
(6 m)
Cardboard
microphone stand
Owner’s Manual Quick Reference Guide (this booklet) Install Manual
Devices and cables required for connection
The following items are not supplied with this unit.
TV BD/DVD player HDMI cables (x2)
YRS-2500
YRS-1500
This unit creates surround effects by
reflecting sound beams off the walls of your
listening room. The arrows in the diagrams
on the right indicate the images of paths of
5-channel sound beams. To achieve desired
surround sound effects, install this unit
where there are no objects such as furniture
obstructing the path of sound beams.
Parallel installation Corner installation
Objects,
such as
furniture
Objects, such as furniture
40° to 50°
1 Front left channel 2 Center channel 3 Front right channel
4 Surround left channel 5 Surround right channel
Install the unit in the center of
the left and right walls.
• The listening position (such as
sofa, etc.) should be located
at the front of the unit.
• The distance between the
listening position and the unit
should be more than 1.8 m.
Example for installing the unit in living room
• As sound beams normally pass through tables, tables are
not obstacles. And a cupboard installed facing the wall
reflects sounds.
• In a case of the listening room as shown in the illustration
on the right, adjusting the position of the right channel after
AUTO SETUP (as shown in “Carrying out AUTO SETUP for
appropriate surround effects” in this Quick Reference
Guide) enables to achieve more desired surround sound
effects. See page 48 in Owner's Manual.
• As the curtains absorb sounds, the sound features of the
listening room is different from the case with the curtain
opened and the case with the curtain closed. Using saving
settings function enables to save the best settings for each
case of listening room. See page 40 in Owner's Manual.
Objects, such as
furniture
Audio connection Video connection Audio and video
connection
This unit: Plays audio from TV broadcasts, BD/DVD discs, etc.
BD/DVD player
Satellite and cable TV tuner
(not HDMI-compatible)
TV: Plays video from TV
broadcasts, BD/DVD player, etc.
Game console
(HDMI-compatible)
HDMI cableHDMI cable
Optical cable
Video cable
HDMI cable
Optical cable
Use to connect a TV that does not
support audio return channel (ARC) to
this unit.
Audio from TV broadcast
(TVs that support Audio
Return Channel (ARC))
When placing playback devices on the rack,
remove the center rear panel and connect the
playback devices. Run cables through the
indented portion of the rack, and reattach the
center rear panel after all devices are connected.
If longer cables are used, excess portions can be
stored in the space between the center rear panel
and this unit.
Center rear panel
BD/DVD player
TV
1. Remove the cap
2. Check the direction of
the plug
Video signals
Audio signals
12
3
To an AC wall
outlet
1.
HDMI cable (optional)
Input the digital audio/video signals from the BD/DVD player
to this unit.
2.
HDMI cable (optional)
Digital video from the BD/DVD player is displayed on the TV.
3.
To an AC wall outlet
Audio Return Channel (ARC) supported TV
• Connect an HDMI cable to the audio return channel supported
jack (the jack with “ARC” indicated) on TV.
• Activate the HDMI control function of this unit so as to activate
the Audio Return Channel (ARC). See page 29 in the Owner’s
Manual.
What is Audio Return Channel (ARC)?
A function transmits digital audio signal output from TV to this unit
through an HDMI cable. By this function, an optical cable to
connect TV and this unit is not needed.
yTips
Use an optical cable when
connecting a TV that does not
support Audio Return Channel.
Installing the batteries
Battery × 2 (supplied)
(AAA, R03, UM-4)
Press down on
the arrow and
slide the cover in
the direction in
which it points.
Slide the cover back to close it.
Within 6 m
Operation range
En
This Quick Reference Guide provides instructions for connecting a TV and BD/DVD player to this unit, applying settings, and playing
content. For more information on operations, refer to the Owner’s Manual.
Read the safety instructions on page 2 in the Owner’s Manual before using this unit. For instructions on how to operate or set the
external devices, refer to the owner’s manual supplied with each device.
In this manual, the YRS-1500 is used for illustrative purposes.
Installation Connection Settings Playback
Installation
Installation Connection Settings Playback
Connection
When external devices such as a TV, BD/DVD player, and/or game console are connected, audio and video signals are transmitted as
shown below.
■ Connecting a TV and BD/DVD player
For the cable connection, follow the procedure below. See page 19 in the Owner’s Manual when connecting other playback devices
such as a game console.
RL
AUX2 TV OPTICAL
AUX1
OUT (ARC)
HDMI
IN1 IN2 IN3
RL
AUX1
AUX2 TV OPTICAL
HDMI
OUT (ARC) IN1 IN2 IN3
HDMI
OUTPUT
© 2014 Yamaha Corporation Printed in Indonesia ZM27730 [En]
• Do not connect the power cable until all connections are completed.
• Do not use excessive force when inserting the cable plug. Doing so may damage the cable plug and/or jack.
■ Handling cables
■ Preparing remote control
OPTICAL
OUTPUT
123
HDMI INPUT
Page 2
Installation Connection Settings Playback
1.
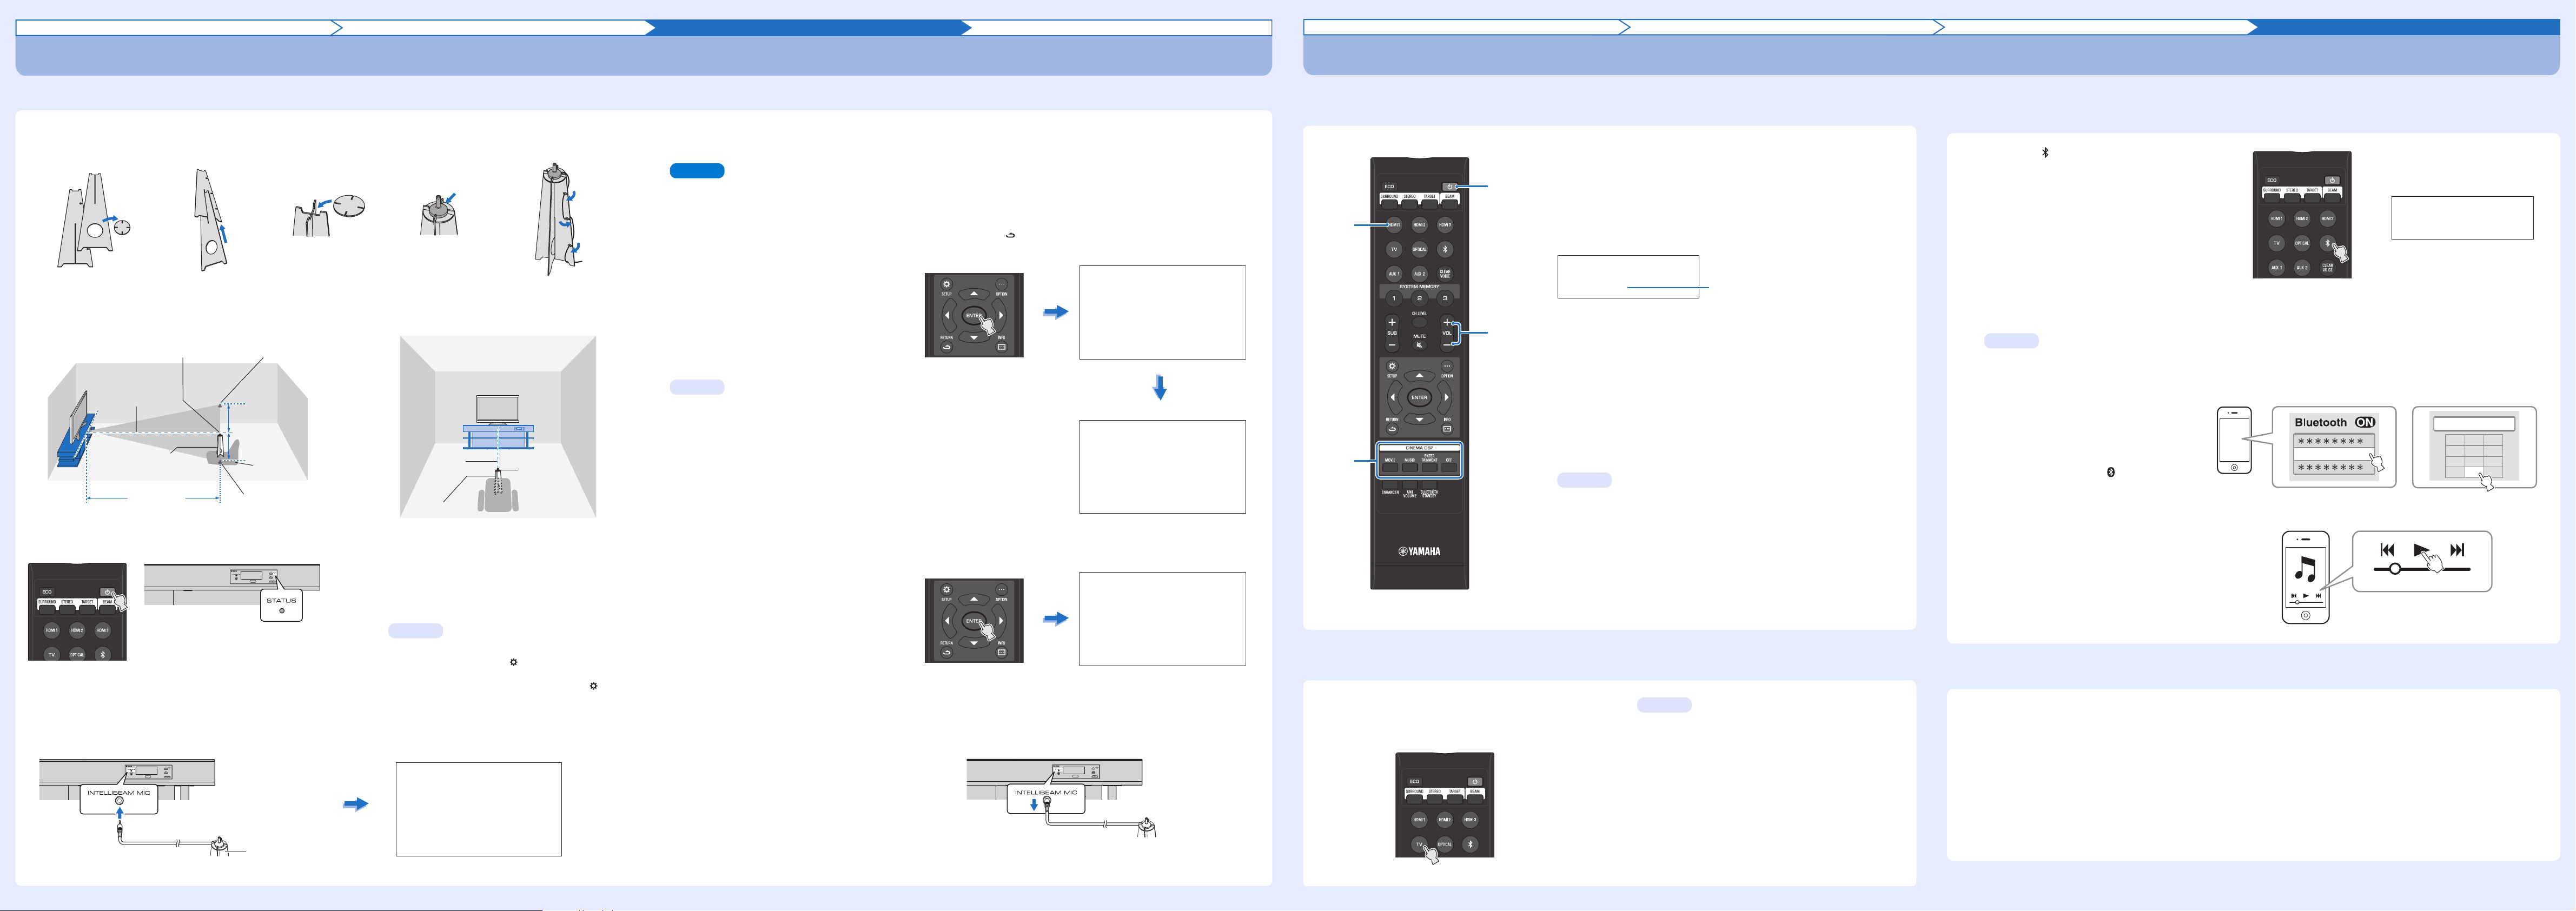
Place the IntelliBeam microphone at your normal listening position.
Assemble the cardboard microphone stand and place the IntelliBeam microphone on top of it horizontally as shown below.
Use the supplied cardboard microphone stand to place the IntelliBeam microphone at the same height as your ears would be when
you are seated.
Make sure that there are no obstacles between the IntelliBeam microphone and the walls in your listening room as these objects
obstruct the path of sound beams.
4.
Connect the IntelliBeam microphone to the INTELLIBEAM MIC jack on the rear of the unit.
5.
Make sure that your listening room is as quiet as possible.
For accurate measurement, turn off air conditioner or other devices that make noises.
Follow the instructions below and then leave the room. If you remain in the room, you may obstruct the beam, or the microphone may
pick up any sounds you make, possibly resulting in improper configuration of settings.
When leaving the room, bring this Quick Reference Guide with you. The AUTO SETUP procedure takes about 3 minutes. Wait outside
the room during the AUTO SETUP procedure.
To cancel the AUTO SETUP procedure after it is started, press the RETURN ( ) key on the remote control.
6.
Press the ENTER key to start the AUTO
SETUP procedure and then leave the room
within 10 seconds.
The screen automatically changes during the AUTO
SETUP procedure.
If the AUTO SETUP procedure is complete, this unit
rings the chimes and the results will be displayed on the
TV.
• The results displayed depend on the position of the
unit.
• If you hear a buzzer sound and an error message
appears on the TV, look for a solution in “If an error
message is displayed” on page 28 in the Owner’s
Manual.
7.
Press the ENTER key.
The measurement results are applied and saved in the
unit.
• You can save several measurement results by
pressing the SYSTEM MEMORY 1, 2, or 3 key. See
page 40 in the Owner’s Manual.
When the SYSTEM MEMORY 1 key is pressed, “M1
Saving” is displayed, and settings are saved.
• If ambient noise is picked up after measurement
begins, an error message is displayed in the “AUTO
SETUP COMPLETE” screen prompting you to begin
measurement again. Press the ENTER key to begin
measurement again.
8.
Remove the IntelliBeam microphone.
The IntelliBeam microphone is sensitive to heat, so
should not be placed anywhere where it could be
exposed to direct sunlight or high temperatures (such as
on top of AV equipment).
2.
Press the z key to turn on this unit.
3.
Turn the TV on and switch the TV’s input
to display video content from this unit.
When this unit is connected to the HDMI input on the
TV (as shown in “Connecting a TV and BD/DVD
player” in this Quick Reference Guide), switch the TV’s
input to “HDMI1”.
You can select the language for the menu display.
Press and hold the SETUP ( ) key until the “OSD
LANGUAGE” menu appears. Press the S/T key to
select the desired language. Press the SETUP ( ) key
again to exit the setup menu.
Remove
Fit in
Fit in
Place horizontally
Run
through
IntelliBeam microphone Upper limit
Center height of
this unit
Within 1 m
Within 1 m
Listening
position
Cardboard
microphone stand
1.8 m or more
Lower limit
Center line
IntelliBeam microphone
Cardboard microphone stand
Glows green
yTip
AUTO SETUP
(PREPARATION & CHECK)
Please connect the MIC.
Please place the MIC at least
1.8m/6ft away from Sound Projector. The MIC should be set
at ear level when seated.
Measurement takes about 3min.
After [ENTER] is pressed,
please leave the room.
[ENTER]:Start [RETURN]:Cancel
IntelliBeam microphone (supplied)
Cardboard microphone
stand (supplied)
Note
AUTO SETUP START
Will begin in 10 sec.
Please leave the room.
----------
[RETURN]:Cancel
(After 3 min.)
SHOW RESULT
MEASUREMENT COMPLETE.
[ENTER]:Save set-up.
[RETURN]:Do not save set-up.
ENVIRONMENT CHECK:Success
BEAM MODE:5Beam/Plus2
yTips
AUTO SETUP COMPLETE
Please remove the MIC
from Sound Projector
and the listening position.
Press [SYSTEM MEMORY] key
to save set-up in the memory.
Confirm that this unit and other devices are properly connected by playing a DVD or BD on the BD/DVD player. The following explains
the playback procedure when this unit, TV, and BD/DVD player are connected as shown in “Connecting a TV and BD/DVD player” in
this Quick Reference Guide.
■ Enjoying TV
6
1
7
3
1.
Press the z key to turn on this unit.
2.
Turn on your TV and BD/DVD player connected to this unit.
3.
Press the HDMI1 key to select the BD/DVD player as the input
source.
4.
Switch the TV’s input to HDMI 1.
5.
Play back a DVD or BD on the BD/DVD player.
6.
Press the VOL (+/-) key to adjust the volume.
7.
Press the CINEMA DSP keys to set your sound preferences.
See page 32 in the Owner’s Manual.
When this unit does not play back, check the following
• The connection between this unit and BD/DVD player.
• The audio output settings of the BD/DVD player is set to digital sound output
(bitstream).
• The TV’s input is switched to this unit.
HDMI1
Input source name
yTips
1.
Select the desired TV channel.
2.
Press the TV key.
• When audio is output from the TV speaker, set TV’s audio
output to any option other than TV. See the instructions
manual of TV for more information.
• HDMI control function
You can use the TV remote control to operate this unit if your
TV supports the HDMI control function. See page 29 in the
Owner’s Manual.
yTips
■ Listening to the sound from a Bluetooth device
You can listen to the wireless sound from a Bluetooth device, such as a smartphone or digital music player.
See also the instructions manual of the Bluetooth device for more information.
■ HOME THEATER CONTROLLER app for smartphones and tablets
For detailed operation, refer to the Owner’s Manual.
1.
Press the key on the remote control.
“Bluetooth” is selected as the input.
2.
Turn on the Bluetooth device to be paired, and perform pairing.
The operation varies depending on the device. Refer to the operation manual of the device.
• Perform pairing with the Bluetooth device and unit within 10 m of each other.
• Pairing is required for connecting a Bluetooth device for the first time.
3.
Select “YRS-2500 Yamaha” or
“YRS-1500 Yamaha” in the Bluetooth
device list on the device.
If a passkey (PIN) is required, enter the number
“0000”.
When pairing is completed, or a completion
message appears on the Bluetooth device.
4.
Play back a song on the Bluetooth device.
“BLUETOOTH”, or the name of the connected device,
is displayed in the front panel display. “_” is displayed
for non-alphanumeric characters in the device name.
BLUETOOTH
yTips
YRS-1500
Yamaha
PIN 0 0 0 0
123
456
7 8 9
0
HOME THEATER CONTROLLER, a dedicated control app for Yamaha Home Theater components, enables basic operation of this unit,
including the ability to turn it off, switch between input sources, adjust volume, and select a sound program, using a smartphone or
tablet.
• The following devices support this app.
- iPod touch (4th generation or later) running iOS 5.1.1 or later
- iPhone 3GS or later devices running iOS 5.1.1 or later
- iPad running iOS 5.1.1 or later
- Android (version 2.3.3 or later) devices
• This app uses Bluetooth wireless communication.
• Search “HOME THEATER CONTROLLER” on Apple’s App Store or Google Play’s website to download the app or obtain the latest
information on the app.
• Android is a trademark of Google Inc.
• iPad, iPhone, iPod, and iPod touch are trademarks of Apple Inc., registered in the U.S. and other countries.
Installation Connection Settings Playback
Carrying out AUTO SETUP for appropriate surround effects
The IntelliBeam technology allows you to achieve sound adjustments that best match your listening environment. It is normal for loud test tones to be output during the AUTO SETUP procedure. Make sure that there are no children around in the listening room while the
AUTO SETUP procedure is in progress.
12345
Playing back
 Loading...