

Page 1

Home Theater Package
(Subwoofer Integrated Receiver + Speaker)
Pack Numérique Home Cinéma
(Récepteur à caisson d’extrêmes graves intégré + Enceinte)
YHT-S401
(SR-301 + NS-BR301)
GF
Owner’s Manual
Mode d’emploi
Bedienungsanleitung
Bruksanvisning
Manuale di istruzioni
Manual de Instrucciones
Gebruiksaanwijzing
Инструкция по эксплуатации
Page 2

Caution: Read this before operating your unit.
1 To assure the finest performance, please read this manual
carefully. Keep it in a safe place for future reference.
2 Install this unit in a well ventilated, cool, dry, clean place –
away from direct sunlight, heat sources, vibration, dust,
moisture, and/or cold. For proper ventilation, allow the
following minimum clearances.
Top: 5 cm
Rear: 5 cm
Sides: 5 cm
3 Locate this unit away from other electrical appliances, motors,
or transformers to avoid humming sounds.
4 Do not expose this unit to sudden temperature changes from
cold to hot, and do not locate this unit in an environment with
high humidity (i.e. a room with a humidifier) to prevent
condensation inside this unit, which may cause an electrical
shock, fire, damage to this unit, and/or personal injury.
5 Avoid installing this unit where foreign objects may fall onto
this unit and/or this unit may be exposed to liquid dripping or
splashing. On the top of this unit, do not place:
– Other components, as they may cause damage and/or
discoloration on the surface of this unit.
– Burning objects (i.e. candles), as they may cause fire,
damage to this unit, and/or personal injury.
– Containers with liquid in them, as they may fall and liquid
may cause electrical shock to the user and/or damage to
this unit.
6 Do not cover this unit with a newspaper, tablecloth, curtain,
etc. in order not to obstruct heat radiation. If the temperature
inside this unit rises, it may cause fire, damage to this unit,
and/or personal injury.
7 Do not plug in this unit to a wall outlet until all connections
are complete.
8 Do not operate this unit upside-down. It may overheat,
possibly causing damage.
9 Do not use force on switches, knobs and/or cords.
10 When disconnecting the power cable from the wall outlet,
grasp the plug; do not pull the cable.
11 Do not clean this unit with chemical solvents; this might
damage the finish. Use a clean, dry cloth.
12 Only voltage specified on this unit must be used. Using this
unit with a higher voltage than specified is dangerous and may
cause fire, damage to this unit, and/or personal injury.
Yamaha will not be held responsible for any damage resulting
from use of this unit with a voltage other than specified.
13 To prevent damage by lightning, keep the power cable and
outdoor antennas disconnected from a wall outlet or the unit
during a lightning storm.
14 Do not attempt to modify or fix this unit. Contact qualified
Yamaha service personnel when any service is needed. The
cabinet should never be opened for any reasons.
15 When not planning to use this unit for long periods of time
(i.e. vacation), disconnect the AC power plug from the wall
outlet.
16 Be sure to read the “Troubleshooting” section in the owner’s
manual on common operating errors before concluding that
this unit is faulty.
17 Before moving this unit, press to set this unit in standby mode,
and disconnect the power supply cable from the wall outlet.
18 Condensation will form when the surrounding temperature
changes suddenly. Disconnect the power supply cable from
the outlet, then leave the unit alone.
19 Install this unit near the wall outlet and where the AC power
plug can be reached easily.
20 The batteries shall not be exposed to excessive heat such as
sunshine, fire or like.
21 Secure placement or installation is the owner’s responsibility.
Yamaha shall not be liable for any accident caused by
improper placement or installation of speakers.
22 Never put a hand or a foreign object into the port located on
the front side of this unit. When moving this unit, do not hold
the port as it might cause personal injury and/or damage to
this unit.
23 Never place a fragile object near the port of this unit. If the
object falls or drops by the air pressure, it may cause damage
to the unit and/or personal injury.
WARNING
TO REDUCE THE RISK OF FIRE OR ELECTRIC
SHOCK, DO NOT EXPOSE THIS UNIT TO RAIN
OR MOISTURE.
As long as this unit is connected to the AC wall outlet,
it is not disconnected from the AC power source even
if you turn off this unit by . In this state, this unit is
designed to consume a very small quantity of power.
■ Special Instructions for U.K. Model
IMPORTANT
THE WIRES IN THE MAINS LEAD ARE
COLOURED IN ACCORDANCE WITH THE
FOLLOWING CODE:
Blue: NEUTRAL
Brown: LIVE
As the colours of the wires in the mains lead of this
apparatus may not correspond with the coloured
markings identifying the terminals in your plug,
proceed as follows:
The wire which is coloured BLUE must be connected
to the terminal which is marked with the letter N or
coloured BLACK. The wire which is coloured
BROWN must be connected to the terminal which is
marked with the letter L or coloured RED.
Making sure that neither core is connected to the earth
terminal of the three pin plug.
■ For U.K. customers
If the socket outlets in the home are not suitable for the
plug supplied with this appliance, it should be cut off and
an appropriate 3 pin plug fitted. For details, refer to the
instructions described below.
Note
The plug severed from the mains lead must be destroyed, as a
plug with bared flexible cord is hazardous if engaged in a live
socket outlet.
i En
Page 3

Contents
INTRODUCTION PREPARATION
INTRODUCTION
Getting started.........................................................2
Supplied parts ............................................................. 2
Remote control preparation ........................................ 2
Controls and functions ................................................ 3
PREPARATION
Placing......................................................................6
Operation by the TV remote control is difficult (with
the speaker beneath/under TV)............................... 6
Attaching the speaker to a wall................................... 7
Connection ...............................................................8
Connecting speakers................................................... 8
Connecting a TV and BD player................................. 9
BASIC OPERATION
Basic playback operation......................................10
Listening with headphones ....................................... 10
Enjoying sound modes ..........................................11
Playback in surround sound...................................... 11
Playback in stereo sound........................................... 11
Clear voice................................................................ 11
Compressed Music Enhancer.................................... 12
UniVolume................................................................ 12
Volume balance adjustment...................................... 12
Listening to FM broadcasts..................................13
Basic tuning operation.............................................. 13
Editing the preset FM station.................................... 13
Playing back iPod/iPhone and USB device.........16
Playing back.............................................................. 16
Repeat/shuffle playback............................................ 17
Displaying music information .................................. 17
Firmware update ....................................................... 17
USEFUL OPERATION
Setup menu.............................................................18
Setup menu list.......................................................... 18
Basic procedure......................................................... 18
Adjusting the volume balance of each channel ........ 19
Adjusting high/low frequency sound (tone control)
.............................................................................. 19
Configuring the HDMI settings................................ 19
Changing the brightness of the front panel display
.............................................................................. 19
Using other speakers................................................. 20
Dynamic range control.............................................. 21
Setting the matrix decode ......................................... 21
Settings for each input source (Option menu)....22
Adjusting input level of each jack
(VOLUME TRIM) ............................................... 22
Adjusting the audio delay (AUDIO DELAY) .......... 22
Assigning the audio input to optical/coaxial digital
input (AUDIO ASSIGN)...................................... 22
Operating the unit by TV’s remote control ........23
What is the HDMI control function?........................ 23
Setting the HDMI control function........................... 23
Registering HDMI components to TV ..................... 24
Changing the connection method and connected
components ........................................................... 24
ADDITIONAL INFORMATION
Troubleshooting.....................................................25
Glossary..................................................................29
Specifications..........................................................31
Available signal information .................................... 32
Notes on remote controls and batteries..................... 33
OPERATION
BASIC
OPERATION
USEFUL
INFORMATION
ADDITIONAL
What you can do with the unit
• Enjoy high quality surround sound (AIR SURROUND XTREME)..........................................................11
• Enjoy clear dialogue and narration (Clear voice).......................................................................................11
• Operate the unit by TV’s remote control (HDMI control function)...........................................................23
• Play back iPod/iPhone in high quality sound (Digital Connection for iPod/iPhone).................................16
• Expand the unit to 5.1 channel using speakers of your choice...................................................................20
■ About this manual
• In this manual, operations that can be performed using either the front panel buttons or the remote control are
explained using the remote control.
• y indicates a tip for your operation. Notes contain important information about safety and operating instructions.
• This manual is produced prior to production. Design and specifications are subject to change in part as a result of
improvements, etc. In case of differences between the manual and the product, the product has priority.
English
1 En
Page 4

INTRODUCTION
Getting started
Supplied parts
This product consists of the following items. Before making connections, make sure you have received all of the following
items.
■ Units
Subwoofer Integrated Receiver (SR-301) Speaker (NS-BR301)
■ Accessories
Speaker cable × 1 (3 m) Remote control × 1 Indoor FM antenna × 1
TV remote
signal receptor × 1
(U.S.A., Canada, Taiwan,
China and Asia models)
Battery × 2 (AAA, R03, UM4) Mounting template × 1 Owner’s Manual
(U.K., Europe, Russia,
Australia and Korea
models)
× 1
Remote control preparation
Before installing batteries or using the remote control, make sure that you read precautions on the remote control and
batteries in “Caution: Read this before operating your unit.”, and “Notes on remote controls and batteries” on the page 33.
■ Installing the batteries ■ Operation range
2 En
Within 6 m (20 ft)
Page 5
Getting started
1 2
Controls and functions
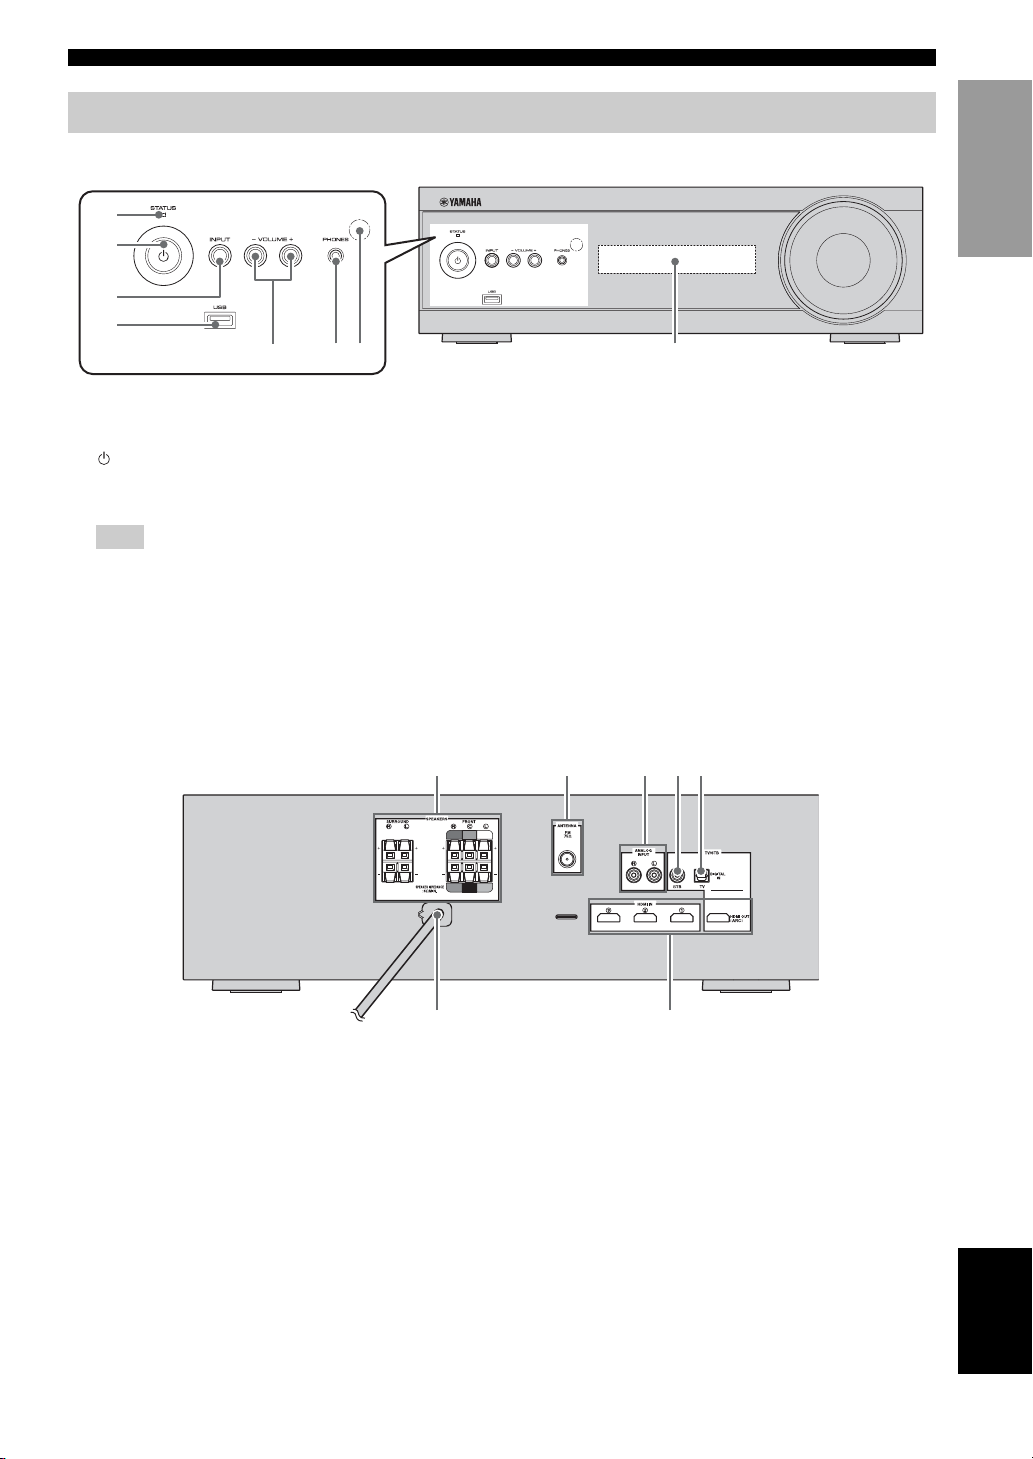
■ Front panel of the subwoofer integrated receiver
1
2
3
4
5
1 STATUS indicator
Lights up to show the system condition. (☞ P. 10)
2 (Power)
Turns on the unit, or sets it to standby mode.
(☞ P. 10)
Note
A small amount of electricity is consumed to receive the
infrared signal from the remote control even when the unit is
in standby mode.
3 INPUT
Selects an input source you want to listen to.
(☞ P. 10)
67
4 USB port
For connecting a USB device. (☞ P. 16)
5 VOLUME –/+
Controls the volume of the unit. (☞ P. 10)
6 PHONES jack
For connecting headphones. (☞ P. 10)
7 Remote control sensor
Receives infrared signals from the remote control.
(☞ P. 2, 5)
8 Front panel display
Shows information about the operational status of the
unit. (☞ P. 4)
INTRODUCTION
8
■ Rear panel of the subwoofer integrated receiver
1 Power Cable
For connecting an AC wall outlet. (☞ P. 8)
2 HDMI IN 1 - 3/HDMI OUT (ARC) jack
• HDMI IN 1 - 3 for connecting HDMI
compatible external components. (☞ P. 9)
• HDMI OUT for connecting an HDMI compatible
TV. (☞ P. 9)
3 DIGITAL IN (TV) jack
For connecting optical digital cable to the TV.
(☞ P. 9)
4 DIGITAL IN (STB) jack
For connecting digital audio pin cable to the STB.
(☞ P. 9)
5 ANALOG INPUT jack
For connecting analog audio cable to external
components. (☞ P. 9)
6 ANTENNA terminal
For connecting supplied FM antenna. (☞ P. 9)
7 SPEAKERS terminal
For connecting speakers. (☞ P. 8)
57 6 43
English
3 En
Page 6

Getting started
■ Front panel display of the subwoofer integrated receiver
1 2 3 4 5
8
7
6
1 HDMI indicator
Lights up during normal communication when HDMI
is selected as an input source.
2 Tuner indicators
TUNED indicator
Lights up when the unit is receiving a station.
(☞ P. 13)
STEREO indicator
Lights up when the unit is receiving a strong signal
from an FM stereo broadcast station in automatic
tuning mode. (☞ P. 13)
AUTO indicator
Flashes when the unit is tuning or presetting station
automatically. (☞ P. 13)
MEMORY indicator
Flashes when the unit is storing a station.
(☞ P. 13, 14)
EMPTY indicator
Lights up when the storing preset number is empty.
(☞ P. 14)
PS/PTY/RT/CT indicator (Europe and Russia
models only)
Lights up according to the available Radio Data
System information. (☞ P. 15)
3 Decoder indicators
The respective indicator lights up when any of the
decoders of the unit is activated.
4 Clear voice indicator
Lights up when Clear voice mode is selected.
(☞ P. 11)
5 VOLUME indicator
• Indicates the current volume level.
• Flashes while the mute function is activated.
(☞ P. 10)
6 Multi information display
Shows the selected input source, current sound mode
and other information.
7 ENHANCER indicator
Lights up when compressed music enhancer function
is activated. (☞ P. 12)
8 UNIVOLUME indicator
Lights up when UniVolume mode is selected.
(☞ P. 12)
4 En
Page 7
Getting started
E
D
C
B
A
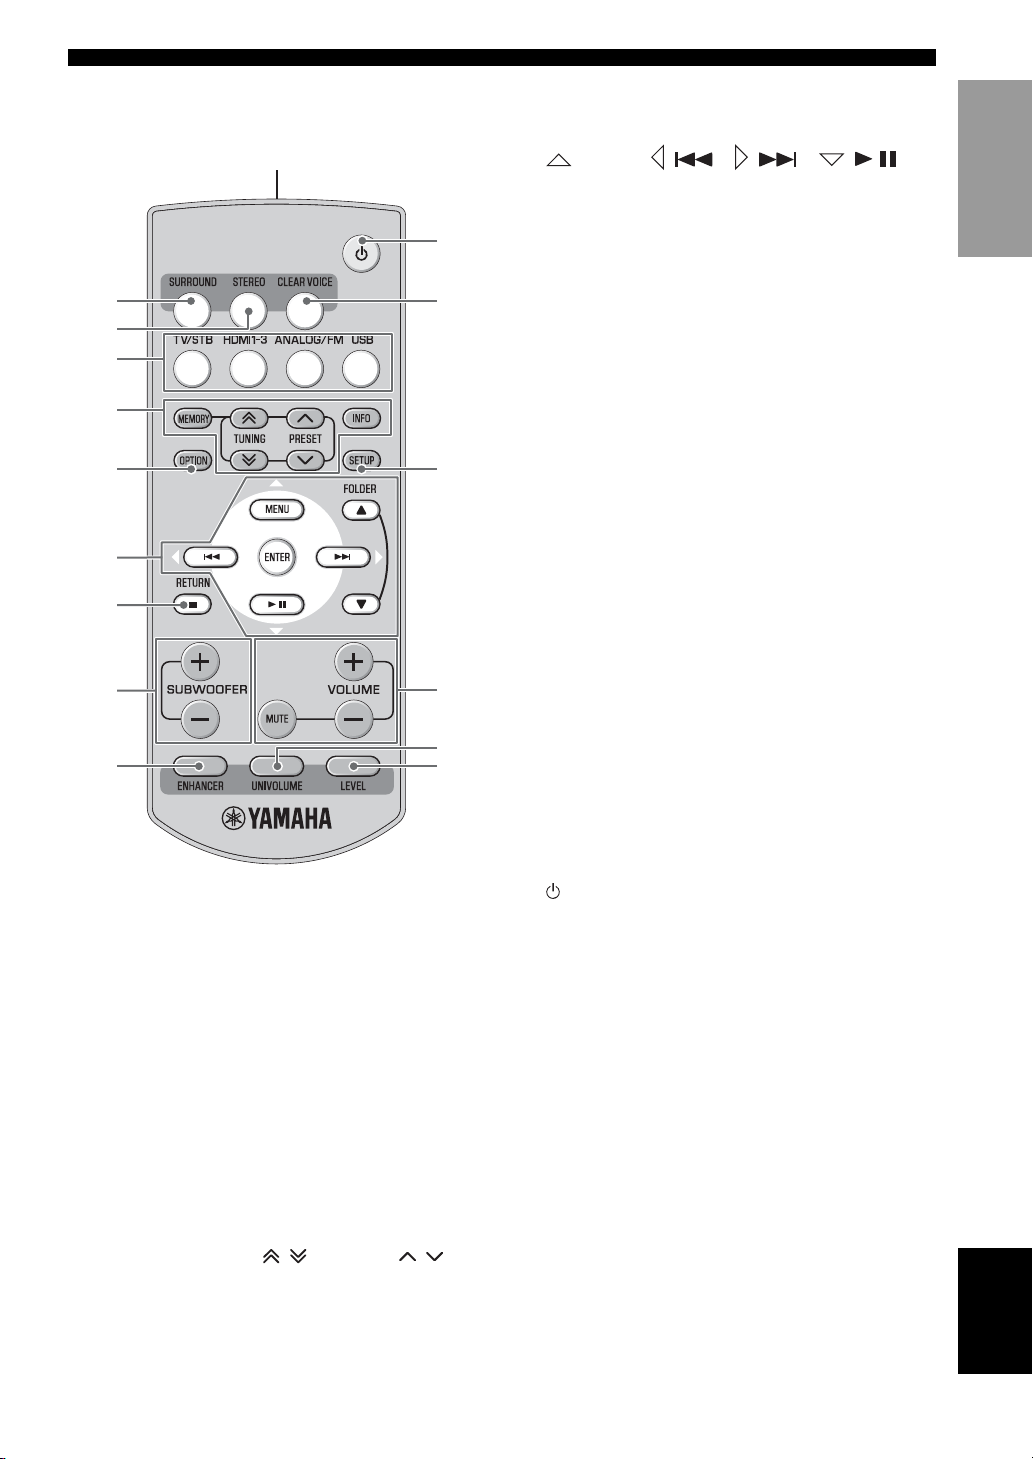
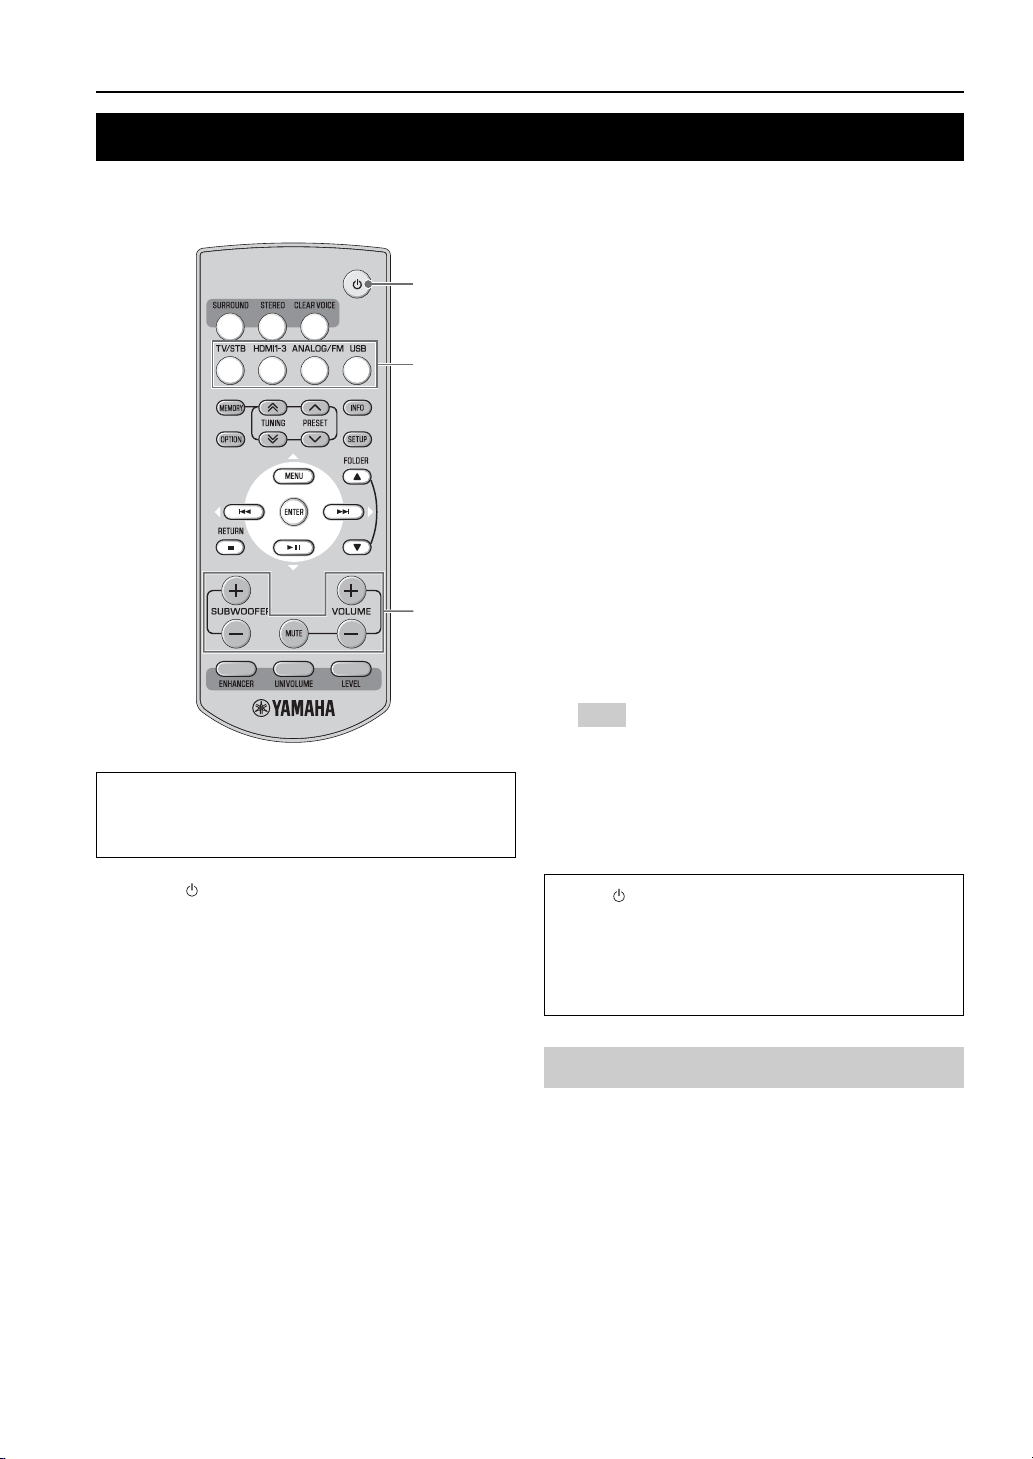
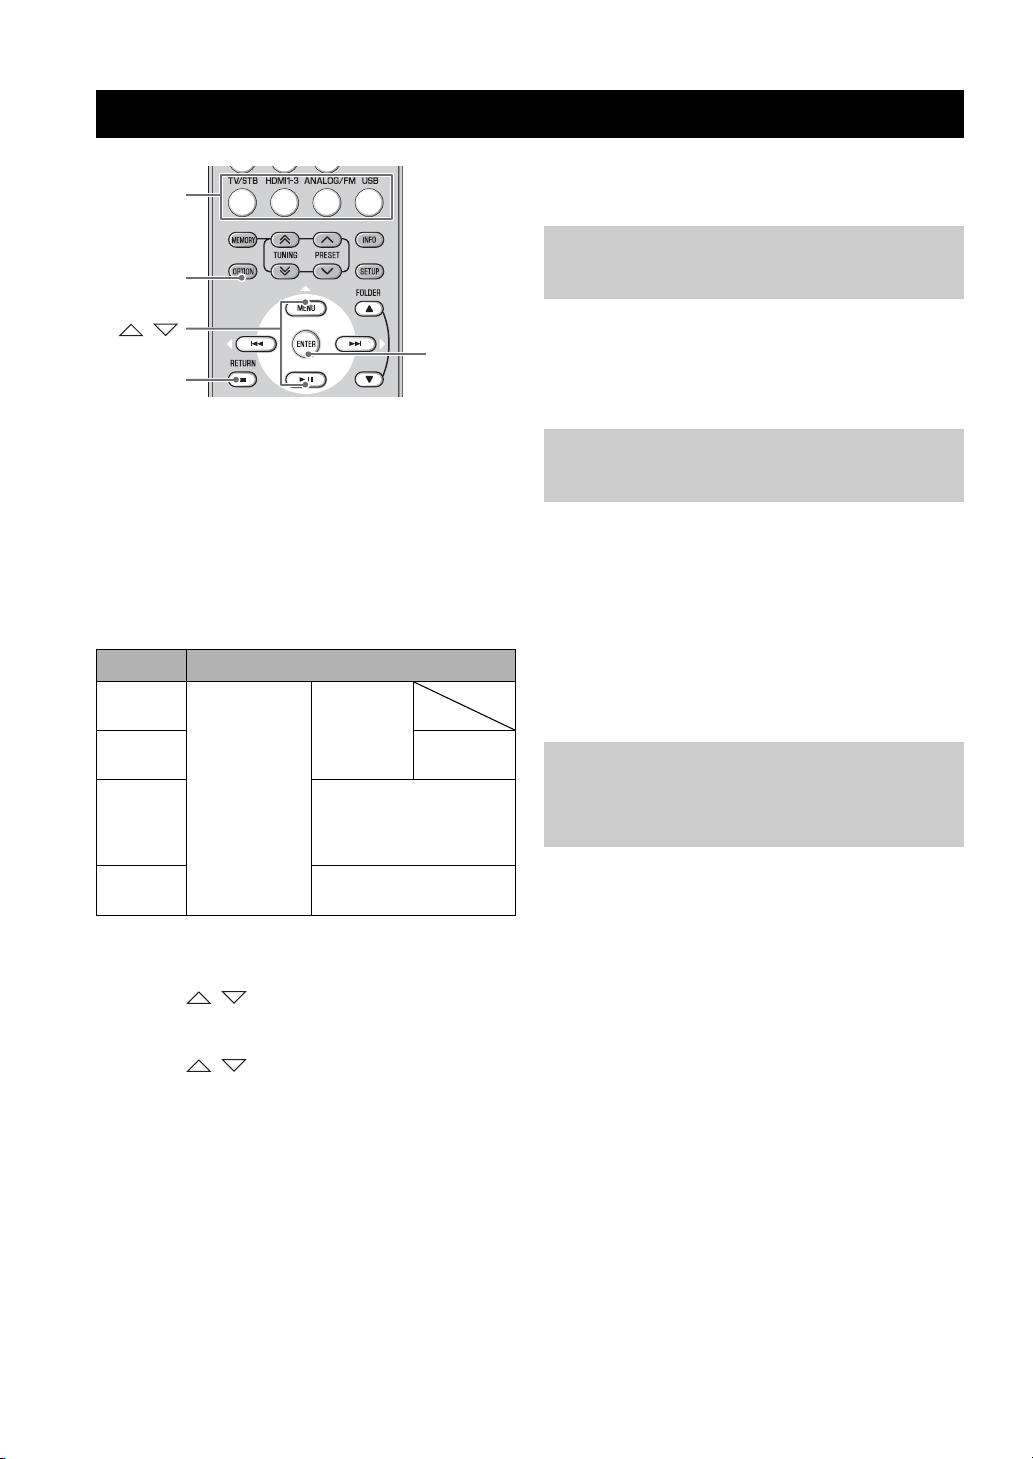
■ Remote control
Infrared signal
transmitter
1
2
3
4
5
6
7
8
9
0
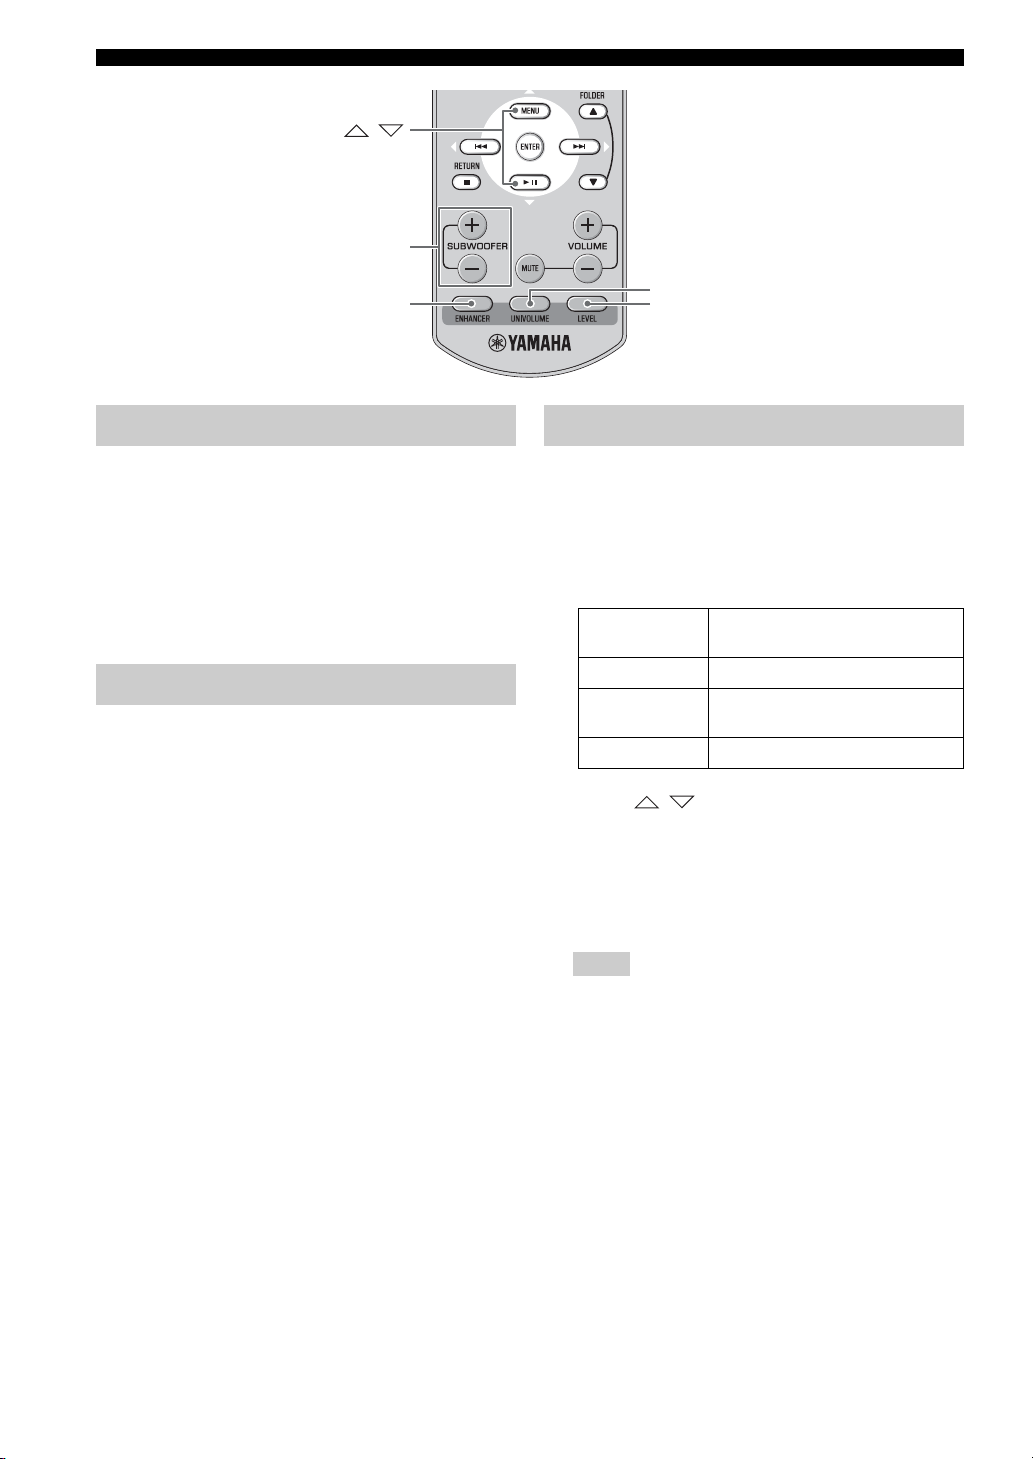
5 OPTION
Enters option menu for each input. (☞ P. 13, 16, 22)
6 (MENU), ( ), ( ), ( ),
ENTER
• Change setting.
• Control iPod/iPhone and USB device such as USB
flash memory, portable music player. (☞ P. 16)
S / T: Scroll screen of iPod/iPhone, or skip folder of
USB device. (☞ P. 16)
7 RETURN
• Cancels preset registration. (☞ P. 13)
• Returns to previous menu in option menu.
(☞ P. 22)
• Stops playback of USB device such as USB flash
memory or portable music player. (☞ P. 16)
8 SUBWOOFER +/–
Adjust volume balance of subwoofer. (☞ P. 10, 19)
9 ENHANCER
Turns Compressed Music Enhancer mode on and off.
(☞ P. 12)
0 LEVEL
Adjusts output level of speakers. (☞ P. 12)
A UNIVOLUME
Turns UniVolume mode on and off. (☞ P. 11)
B VOLUME +/–, MUTE
Control volume of the unit. (☞ P. 10)
C SETUP
Enters the setup menu. (☞ P. 18)
D CLEAR VOICE
Turns Clear voice mode on and off. (☞ P. 11)
INTRODUCTION
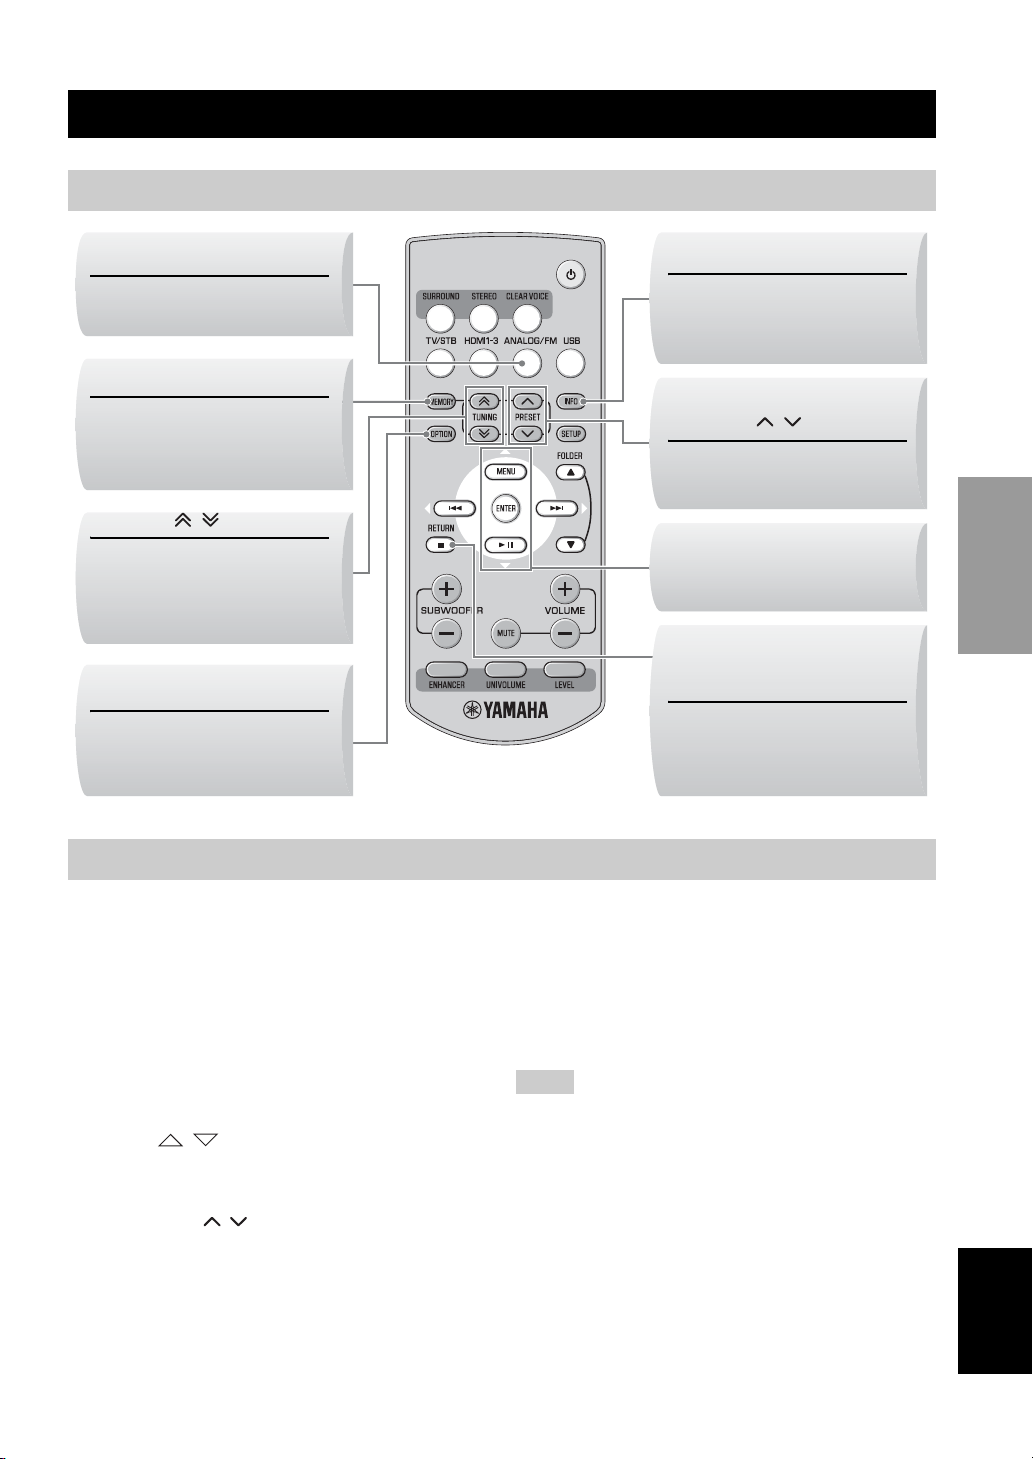
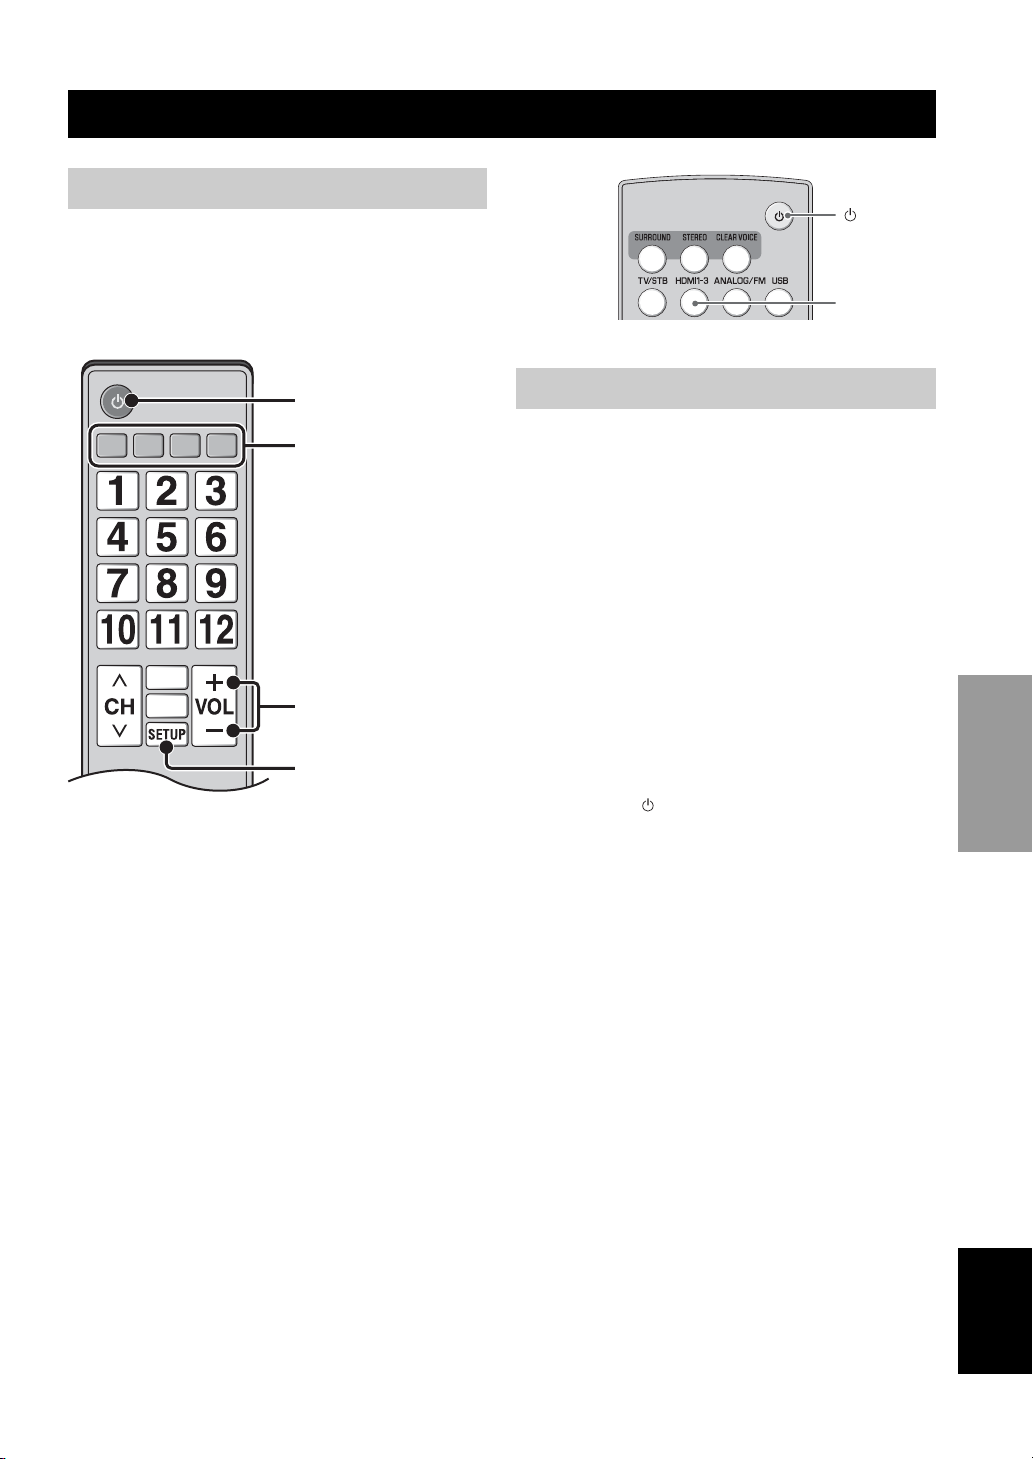
1 SURROUND
Selects the surround mode. (☞ P. 11)
2 STEREO
Turns extended stereo mode on and off alternately.
(☞ P. 11)
3 Input buttons
Select the input source you want to listen to.
(☞ P. 10)
Press the respective input button repeatedly to select
the input source.
TV/STB: TV, STB
HDMI1-3: HDMI1, HDMI2, HDMI3
ANALOG/FM: ANALOG, FM
USB: USB
4 MEMORY, TUNING / , PRESET / ,
INFO
Control an FM tuner. (☞ P. 13)
E (Power)
Turns on the unit, or sets it to standby mode.
(☞ P. 10)
English
5 En
Page 8
PREPARATION
Placing
To enjoy quality sound thoroughly, place this unit in the
appropriate positions, and install the components
properly. The following illustrations are the setting images
of this unit.
Notes
• Do not place this unit on/under any other components such as
BD player in a pile. The vibration of this unit may cause system
failure, etc. in other components.
• Keep enough ventilation space on the side, rear, and bottom
side (that attached legs) of this unit. Do not place this unit on a
thick carpet etc.
• Low frequency sound produced by the subwoofer integrated
receiver may be heard differently depending on the listening
position and subwoofer location. To enjoy desired sounds, try
changing the location of the subwoofer integrated receiver.
• Depending on your installation environment, connections to
external components can be done before installing this unit. We
recommend that you temporarily place and arrange all
components in order to decide which procedure is best done
first.
• When you clean this unit, use a clean, dry and soft cloth (such
as a cloth for glasses).
• Do not press the speaker grille when moving it.
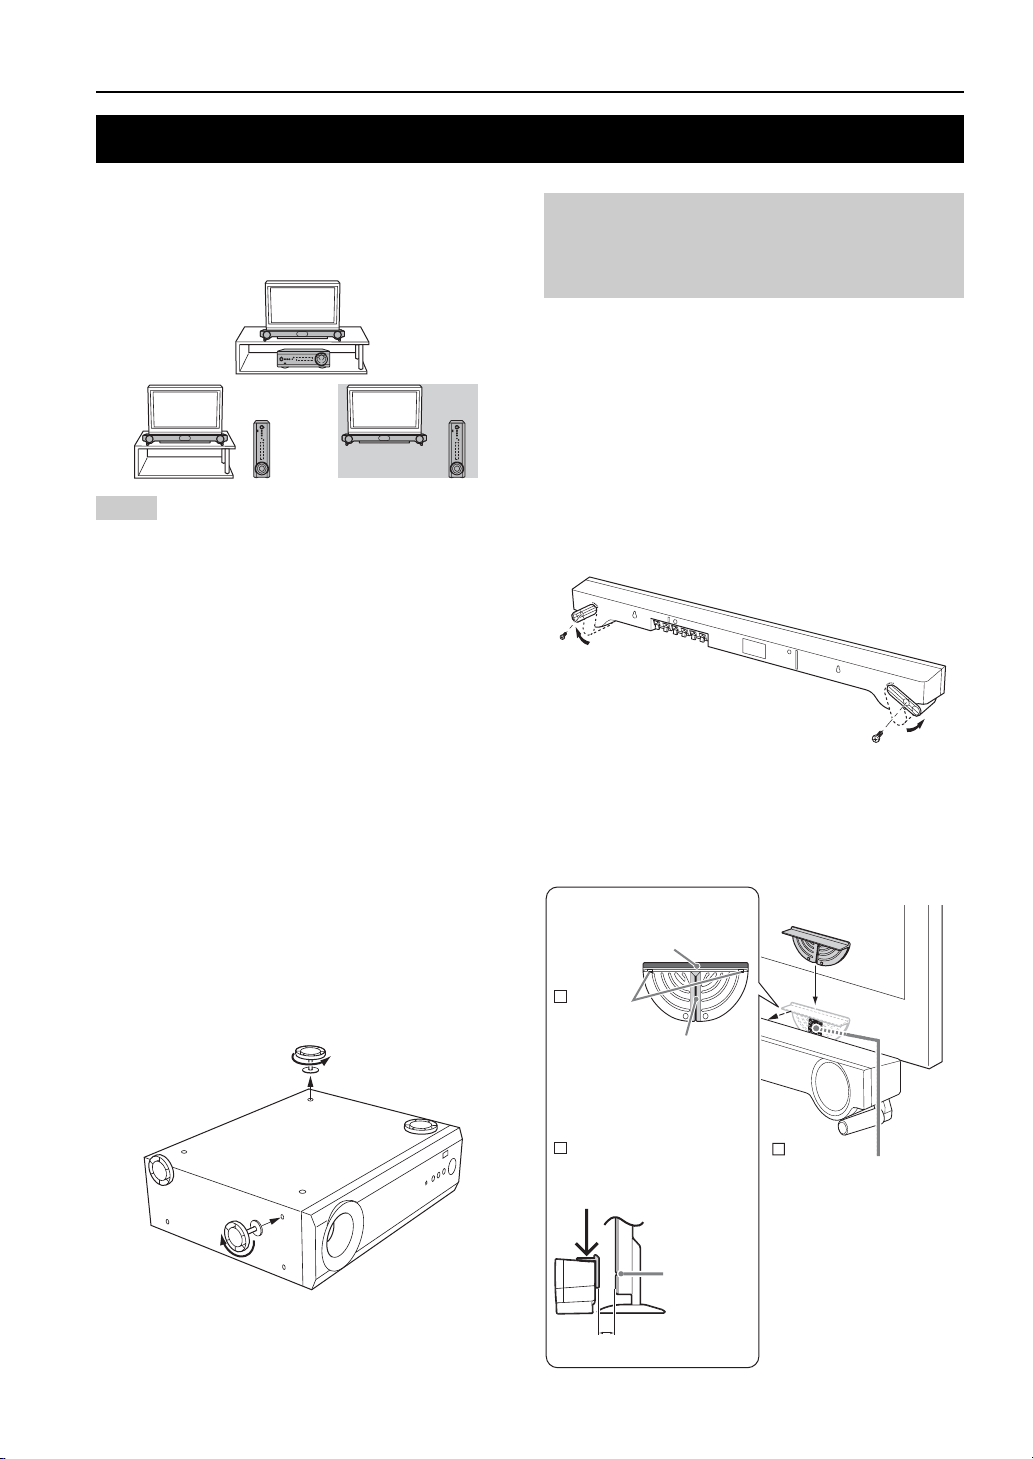
Operation by the TV remote control is difficult (with the speaker beneath/under TV)
TV remote control operation may be difficult if the
speaker hides the sensor of your TV when beneath or
under the TV. Try the solutions below and see whether
this solves the problem.
See the manual of your TV about where the sensor of your
TV remote control is.
1 Adjust the height of the speaker by using the
stands.
Remove the screws that secure the stands of the speaker,
and move the stands to adjust the height. Secure the stands
by the same screws, as illustrated below.
2 Use the TV remote signal receptor
The TV remote signal receptor (supplied) receives the
signal of the TV remote control, and transmits to the TV
remote control sensor. Place the TV remote signal
receptor as shown below.
When placing the subwoofer integrated
receiver in an upright position
Remove the stands and spacers on the bottom of the
subwoofer integrated receiver and attach them to the side,
as illustrated below.
6 En
Signal receiver
1
Remove
the two
transparent
seals
3
Attach the signal receptor
to the top of speaker
Approx. 10 mm (3/8 in)
Signal
emitter
TV remote
control
sensor
2
Position the signal
emitter to face the
center of TV remote
control sensor.
Page 9
Placing
y
• Aim the TV remote control toward the top of TV remote signal
receptor.
• You can operate the TV remote control by using the TV remote
signal receptor even if the unit is in standby mode.
• Some TV remote controls may not work.
• You can attach the TV remote signal receptor in an area where
there are projections, such as the rear of speaker stand, etc.
• Clean the attachment area on the speaker, using a soft, dry
cloth, such as one for cleaning glasses.
• Clean the signal receiver and signal emitter of the TV remote
signal receptor, using a soft, dry cloth, such as one for cleaning
glasses.
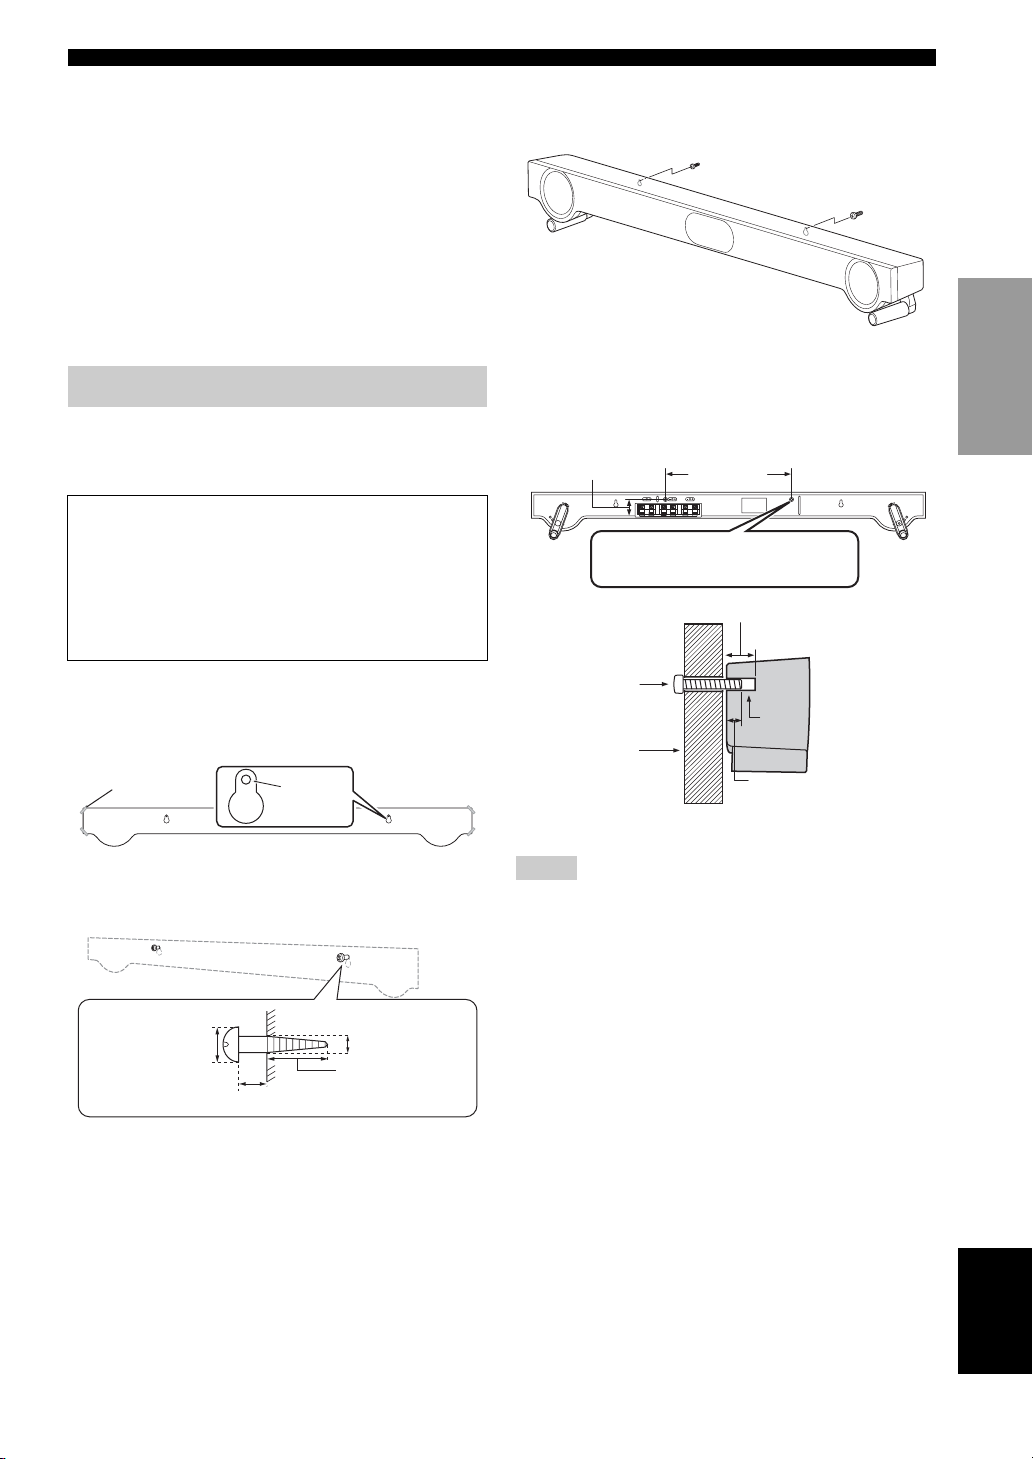
Attaching the speaker to a wall
Installing the speaker using the keyholes
You can attach the speaker to a wall using commercially
available screws (#8, Diameter: 4 mm (3/16”)).
When installing the speaker on a wall, all
installation work must be performed by a
qualified contractor or dealer. The customer
must never attempt to perform this installation
work. Improper or inadequate installation could
cause the speaker to fall, resulting in personal
injury.
3 Hang the speaker on the screws using the
keyholes on the back of the speaker.
Installing the speaker using the screw holes
You can also use the screw holes on the rear of the speaker
for installing the speaker using a commercially available
rack etc.
38.5 mm (1-9/16”)
Screw holes
256 mm
(10-1/16”)
Hole depth: 14 mm (9/16”)
Diameter: 6 mm (1/4”)
14 mm (9/16”)
PREPARATION
1 Attach the supplied mounting template on a
wall and mark the holes of the mounting
template.
Tapes or thumbtacks
Mark
2 Remove the mounting template and then
install screws (not supplied) at the marks.
7 to 9 mm
(1/4” to 3/8”)
2 to 4 mm (1/16” to 3/16”)
4 mm (#8)
Minimum
20 mm (3/4”)
Screw
(M6)
Rack etc.
Screw
hole
Min 7 mm (1/4”)
NS-BR301
Notes
• Attach the speaker to a rack or wall. Do not attach the speaker
to a wall that is made of weak materials such as plaster or
veneered woods. Doing so may cause the speaker to fall.
• Use commercially available screws that can support the weight
of the installation.
• Make sure you use specified screws to attach the speaker. Using
clamps other than specified screws, such as short screws, nails,
or two-sided tape, may cause the speaker to fall.
• When connecting the speaker, fix the speaker cables in place
where they will not become loose. If your foot or hand
accidentally gets caught on a loose speaker cable, the speaker
may fall.
• After attaching the speaker, check that the speaker is fixed
securely. Yamaha will bear no responsibility for any accidents
caused by improper installations.
7 En
English
Page 10
Connection
• Do not connect the power cable until all connections are completed.
• Do not use excessive force when inserting the cable plug. Doing so may damage the cable plug and/or
terminal.
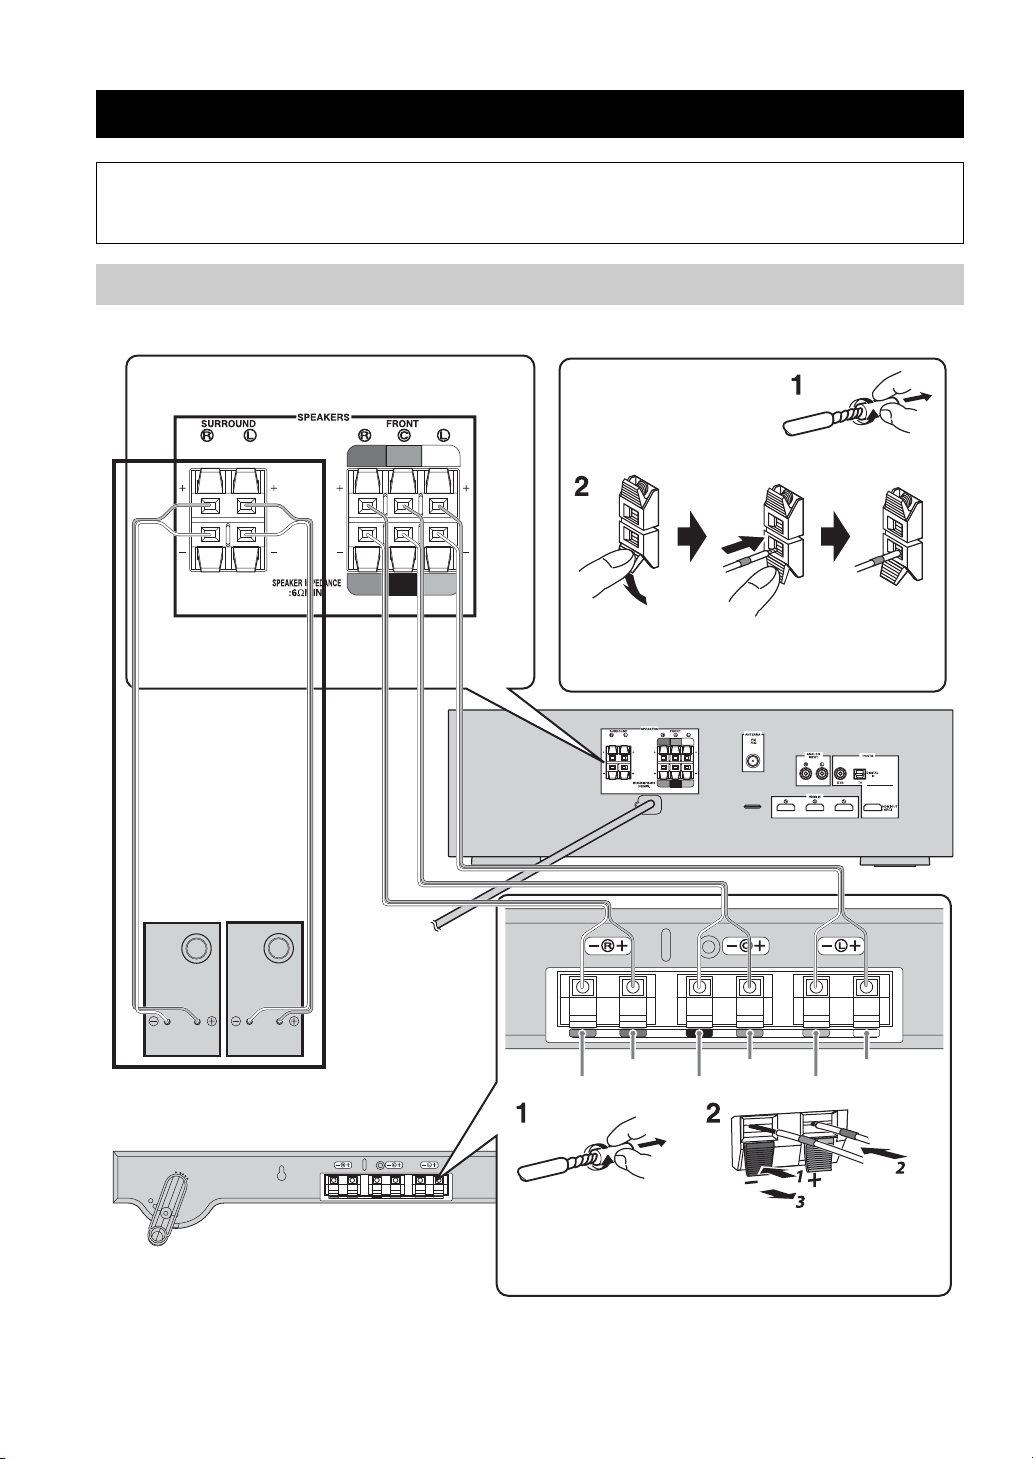
Connecting speakers
Follow the procedure below to connect the subwoofer integrated receiver and speakers.
Twist and pull off the
insulation tube on the lead
wire.
Insert into the terminal by matching the wire color
with the color-coded terminal on the rear panel.
Surround speakers
(sold separately)
RL
5.1ch playback
y
To AC outlet
Speaker (NS-BR301)
Brown Black Gray
Twist and pull off the
insulation tube on the
lead wire.
Red Green White
y
• Additional surround speakers (commercially available) are required for 5.1ch playback.
• Refer to “Using other speakers” (☞ P. 20) when using additional speakers.
8 En
Insert into the terminal by matching
the wire color with the color-coded
terminal on the rear panel.
Page 11
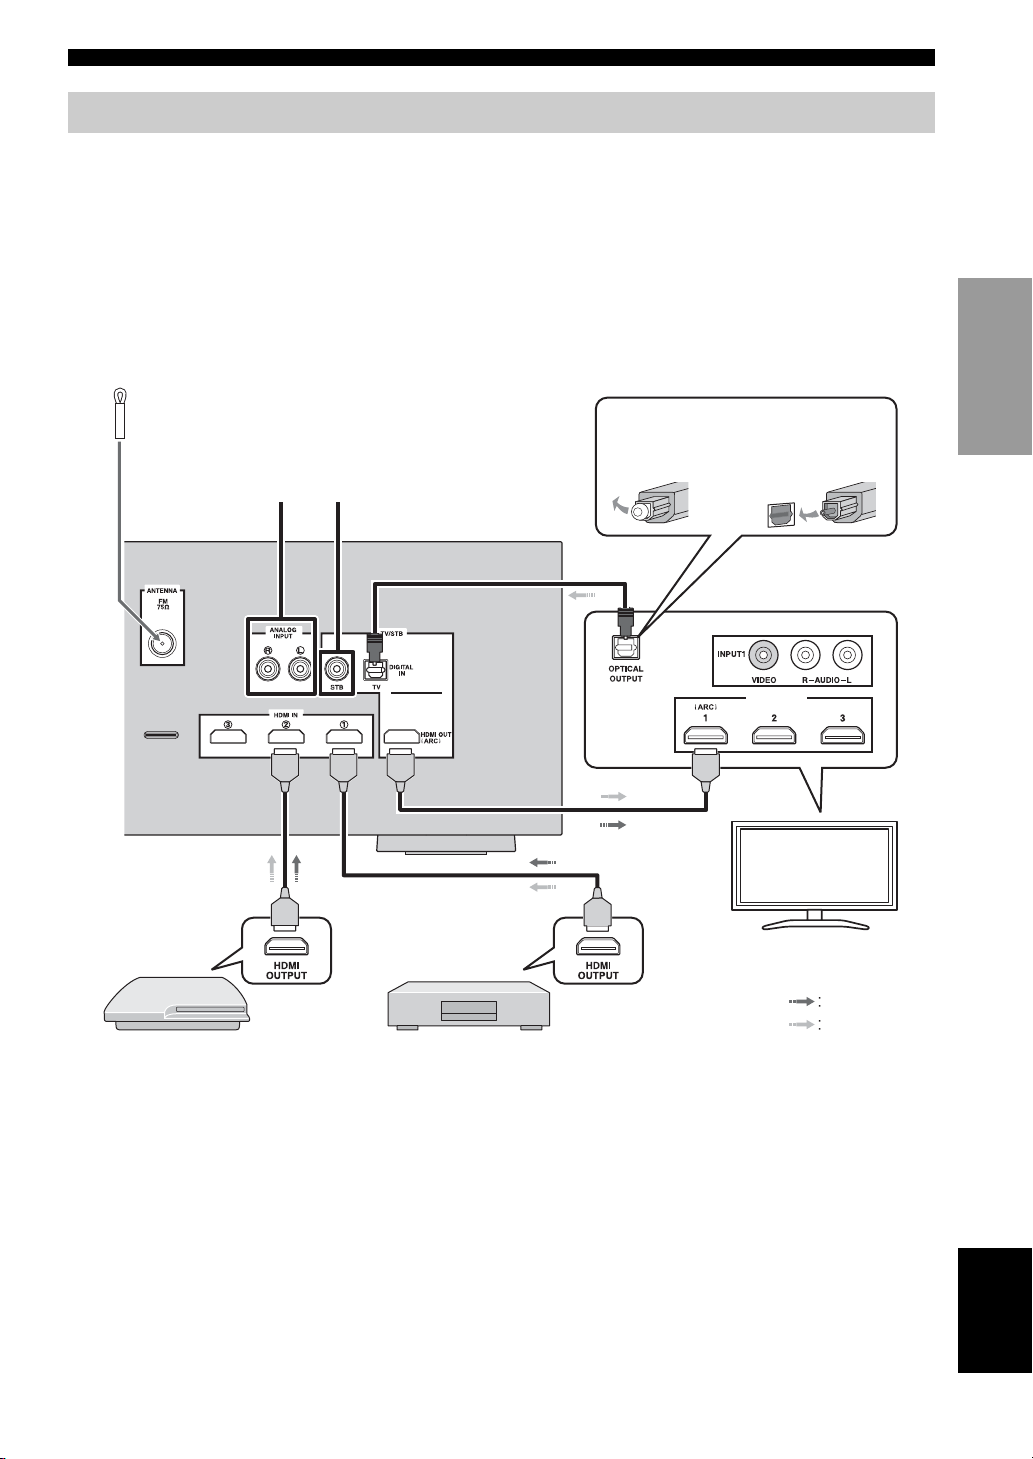
Connecting a TV and BD player
Follow the steps below for cable connection according to the components you use.
1 HDMI cable (sold separately) 2 HDMI cable (sold separately)
Connection
3 Optical cable (sold separately)*
4
*
3
2
*
1
4 Indoor FM antenna (supplied)
y
If the radio wave reception is weak in your area or you want to
improve the radio wave reception, we recommend that you use an
outdoor antenna. For details, consult your nearest authorized
Yamaha dealer or Service Center.
1 Remove the cap 2 Check the
direction of the
plug
1
3*
HDMI INPUT
(Example)
PREPARATION
2
1
1
TV
Video signals
Game console
*1 y
For HDMI control function, an optical cable is not required if the TV’s “ARC” terminal is used “2”. Audio return channel (ARC) carries
digital audio signal (from the TV) to this unit via an HDMI cable. Activate the HDMI control function of this unit to enable ARC
function. (☞ P. 19)
*2
y
Connect analog pin cables (sold separately) to the analog audio output jacks of an external device, such as a VTR, to play back analog
audio sound.
y
*3
Connect a digital audio pin cable (sold separately) to the coaxial digital output jack of a satellite/cable TV tuner to play back digital
sound.
BD player
Audio signals
English
9 En
Page 12
BASIC OPERATION
Basic playback operation
Once you have finished all cable connections and remote control operation, follow the procedure below to start basic
playback operation.
3 Start playback on the selected external
component.
1
For information on the external component, refer to
the instruction manual for the product.
2
4
You can operate the unit by the TV’s remote control
when the HDMI control function is available. See the
page 23 for details.
1 Press (Power).
This unit is turned on and the STATUS indicator
lights green.
The input source and surround mode appear in the
front panel display.
y
This unit has the auto-sleep function, which will
automatically switch the unit to turn off if the unit is left
turned on for 12 hours without any operation being
performed.
2 Press one of the input buttons to select an
input source.
After the input source name has been displayed in the
front panel display for three seconds, the front panel
display returns to its normal display. (Input source
name: surround/stereo mode).
4 Press VOLUME +/– to adjust the volume
level.
Press SUBWOOFER +/– to adjust the
subwoofer level.
y
• To turn off the volume temporarily, press MUTE. While
the mute function is activated, the VOLUME indicator
flashes. To resume the volume, press MUTE again or
press VOLUME +/–.
• When audio is output from both TV speaker and this unit,
mute the TV sound.
• The subwoofer volume can be adjusted separately from
the volume.
• You can also adjust the subwoofer volume listening to test
tone. (☞ P. 19)
• Lowering the subwoofer volume is recommended at night.
Note
When sound of HDMI is output from the TV, the volume
level does not change if you press VOLUME +/– or MUTE
of the remote control.
5 Select surround mode or stereo mode and
set your sound preferences. (☞ P. 11)
Press (Power) again to set the unit to
standby mode.
When the HDMI control function is set to on or the battery of
iPod/iPhone is charged, the STATUS indicator lights red. When
the HDMI control function is set to off, the STATUS indicator
turns off. (☞ P. 3)
Listening with headphones
Insert a headphone plug to the PHONES jack (☞ P. 3) of
this unit.
• The headphone volume, tone control can be set
separately with speaker setting.
• You can enjoy surround and stereo sound using a
headphone same as the speaker. (☞ P. 11)
10 En
Page 13
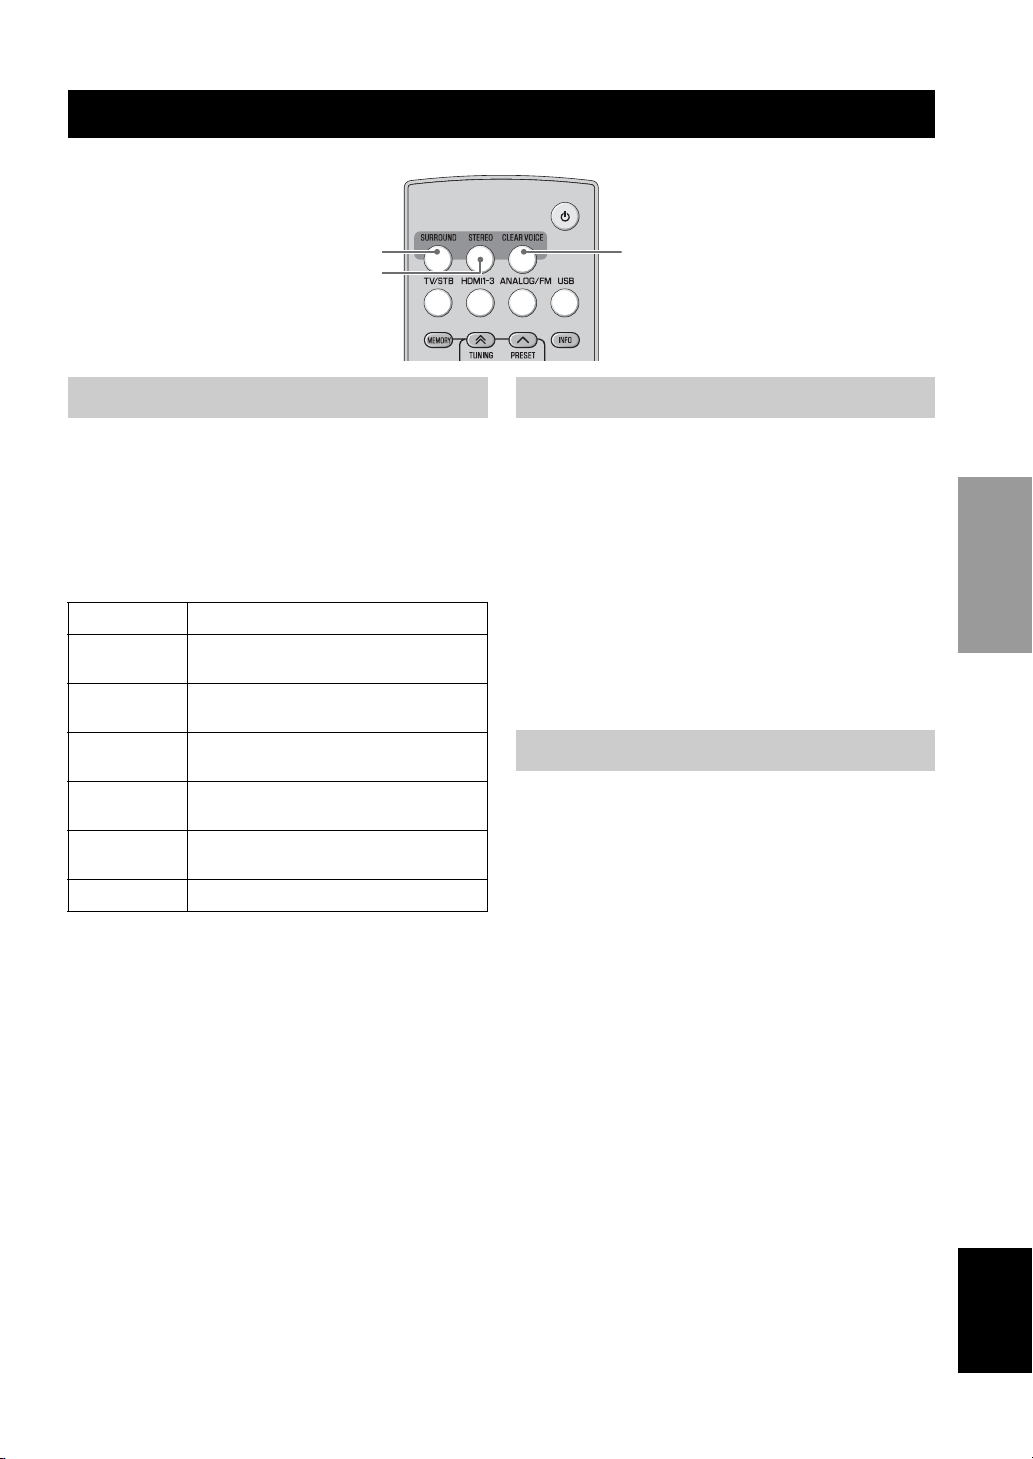
Enjoying sound modes
SURROUND
STEREO
Playback in surround sound
You can enjoy a realistic sound effect.
Press SURROUND to set surround mode.
Press SURROUND repeatedly until desired mode appears
in the front panel display.
Surround mode descriptions in following order
Display Effect
MOVIE This mode is useful when you enjoy movie
MUSIC This mode is useful when you listen to music
SPORTS This mode is useful when you enjoy sports
GAME This mode is useful when you enjoy video
TV PROGRAM
(TV PROG)
STANDARD
*1
This mode is available only during playback with surround
speakers connected. (☞ P. 20)
y
• The unit automatically memorizes the settings assigned to each
input source.
• The unit creates high quality 7.1 channel surround playback by
employing AIR SURROUND XTREME technology in the
absence of surround speakers.
• Depending on settings you choose, the unit may not decode
DTS-HD Master Audio sound or DTS-HD High Resolution
Audio sound. In such cases, only the DTS is decoded.
contents on media.
contents on media.
programs.
games.
This mode is useful when you enjoy a general
TV program.
*1
Play back without sound effect.
CLEAR VOICE
Playback in stereo sound
An extended sound is achieved for a 2 channel source
such as a CD player.
Press STEREO to enter extended stereo mode.
Each time you press STEREO, the function is turned on
(EXTENDED STEREO) and off (STEREO) alternately.
“STEREO”: Reproduces the sound without any effect.
“EXTENDED STEREO”: Reproduces a wider stereo
image.
y
• The default setting is “EXTENDED STEREO”.
• The unit memorizes the settings assigned to each input source.
Clear voice
This function makes dialogue in movies, TV dramas or
play-by-play broadcasting clear to listen to.
Press CLEAR VOICE to turn the function on/off.
When Clear voice is activated, “●” (Clear voice) indicator
is displayed.
y
The unit memorizes the setting assigned to each input source.
OPERATION
BASIC
11 En
English
Page 14
Enjoying sound modes
/
SUBWOOFER +/–
ENHANCER
Compressed Music Enhancer
Play back digitally compressed format such as MP3 and
WMA emphasizing bass and treble extended dynamically.
Press ENHANCER to turn the function on/off.
When Compressed Music Enhancer is activated,
ENHANCER indicator is displayed.
y
The unit memorizes the settings assigned to each input source.
UniVolume
While watching the TV, compensate the excessive volume
differences to make it easier to hear during the following
cases.
• When switching the channel
• When a TV program changed to commercial
• When one program is finished and another program
started
Press UNIVOLUME to turn the function on/off.
When UniVolume is activated, UNIVOLUME indicator is
displayed.
y
The unit memorizes the settings assigned to each input source.
UNIVOLUME
LEVEL
Volume balance adjustment
You can adjust the volume balance of the virtual speakers
and subwoofer during playback.
1 Press LEVEL repeatedly to select adjustable
channels from the followings.
Available options
FRONT L,
FRONT R
CENTER Center speaker
SURROUND L,
SURROUND R
SUBWOOFER Subwoofer
Front speaker (left/right)
Virtual surround speaker, and surround
speakers (left/right)
2 Press / to adjust the volume level
while the channel you selected is displayed.
Adjustable range: –6 to +6 (Default setting: 0)
y
The subwoofer volume is adjustable by pressing
SUBWOOFER +/-.
Notes
• You cannot adjust the volume balance when using the
headphone.
• This setting of each channel is available for all input
source.
12 En
Page 15
Basic tuning operation
Listening to FM broadcasts
ANALOG/FM
Press repeatedly to set the input
to FM.
MEMORY
Stores preset stations manually.
TUNING /
Press to change the frequency by 1
step, or press and hold to search
stations automatically.
OPTION
Enters the option menu when the
input is set to FM.
INFO
Selects the information
displayed in the front panel
display.
PRESET /
Select the preset FM stations.
OPERATION
BASIC
Cursor in the option menu
RETURN
Returns to the previous menu or
cancels the operation.
Editing the preset FM station
■ Automatic preset
You can store up to 40 FM stations (01 to 40).
1 Press ANALOG/FM repeatedly to select FM
input.
2 Press OPTION to enter the option menu.
“1.VOLUME TRIM” appears firstly in the front
panel display.
3 Press / to select “2.AUTO PRESET”
and press ENTER.
y
Press PRESET / repeatedly to select a preset number
to which the first station will be stored.
After approximately 5 seconds, automatic presetting
starts from the lowest frequency and proceeds
through higher frequencies. When the frequency is
stored, the TUNED indicator lights up.
When automatic preset tuning is completed, the front
panel display shows message “Preset Complete” for
three seconds firstly and returns to the option menu
secondly.
y
Press RETURN while searching automatically, automatic preset
is stopped.
Notes
• Any stored station data existing under a preset number is
cleared when you store a new station under the same preset
number.
• If the number of received stations does not reach 40, automatic
preset tuning automatically stops after searching for all the
available stations.
• Only the station with strong signals can be stored. If the desired
station is not stored, or a station is not stored to the desired
preset number, preset the station manually. (☞ P. 14)
13 En
English
Page 16

Listening to FM broadcasts
■ Manual station preset
Use this feature to preset your desired station manually.
1 Tune into a radio station you want to preset.
2 Press MEMORY.
“MANUAL PRESET” appears in the front panel
display, followed soon by the preset number to which
the station will be registered.
y
By pressing down MEMORY for more than 2 seconds, the
station is registered to the lowest empty preset number or a
preset number one higher than the last preset number.
3 Press PRESET / to select the preset
number (01 to 40) to which the station will be
registered.
When you select a preset number to which no station
is registered, EMPTY indicator appears on the
display. When you select a registered preset number,
a registered frequency is displayed on the right of the
preset number.
y
To cancel registration, press RETURN on the remote
control or leave the tuner without any operations for about
30 seconds.
■ Clearing the preset station
1 Press OPTION to enter the option menu.
2 Display “3.CLEAR PRESET” using /
and press ENTER.
Preset number and the frequency appears in the front
panel display.
y
You can cancel the operation and return to the option menu
by pressing RETURN on the remote control.
3 Select the preset number of the registered
station you want to clear using / and
press ENTER.
The preset station registered to the selected preset
number is cleared. To clear the registration of
multiple preset numbers, repeat the above steps.
To end the operation, press OPTION.
■ Using the monaural reception
mode
When the signal of the desired FM station is too weak, set
the reception mode to “MONO” to increase signal quality.
1 Press OPTION to enter the option menu.
4 Press MEMORY again to register.
2 Display “4.STEREO/MONO” by using and
press ENTER.
3 Select “MONO” to set the reception mode to
monaural by using / .
14 En
Page 17

Listening to FM broadcasts
■ Switching the information display
Each time you press INFO, the information display
changes as follows:
Europe and Russia models only
Information type
• SURROUND MODE
Displays the surround mode or stereo mode.
• FREQUENCY
Displays the frequency and preset number.
• PROGRAM SERVICE (PS)
Displays the currently received Radio Data System
program.
• PROGRAM TYPE (PTY)
Displays the type of the currently received Radio Data
System program.
• RADIO TEXT (RT)
Displays the information of the currently received
Radio Data System program.
• CLOCK TIME (CT)
Displays the current time.
■ Using the TP (traffic program)
data service (Europe and Russia
models only)
Use this feature to receive the TP (traffic program) data
service of the Radio Data System station network.
1 Press OPTION to enter the option menu.
2 Press / to select “5.TRAFFIC PROG”
and press ENTER.
The search starts automatically. The AUTO indicator
and “TP” in the multi information display flash
during the search. When a traffic program is received,
“TP” and frequency remain displayed, and the search
finishes.
If the unit fails to receive a traffic program, “TP” and
the frequency turn off, and “TP Not Found” appears
in the front panel display.
y
• Press RETURN to cancel a search.
• If no operation is performed for 30 seconds during search,
the option menu closes and the search is cancelled.
OPERATION
BASIC
15 En
English
Page 18
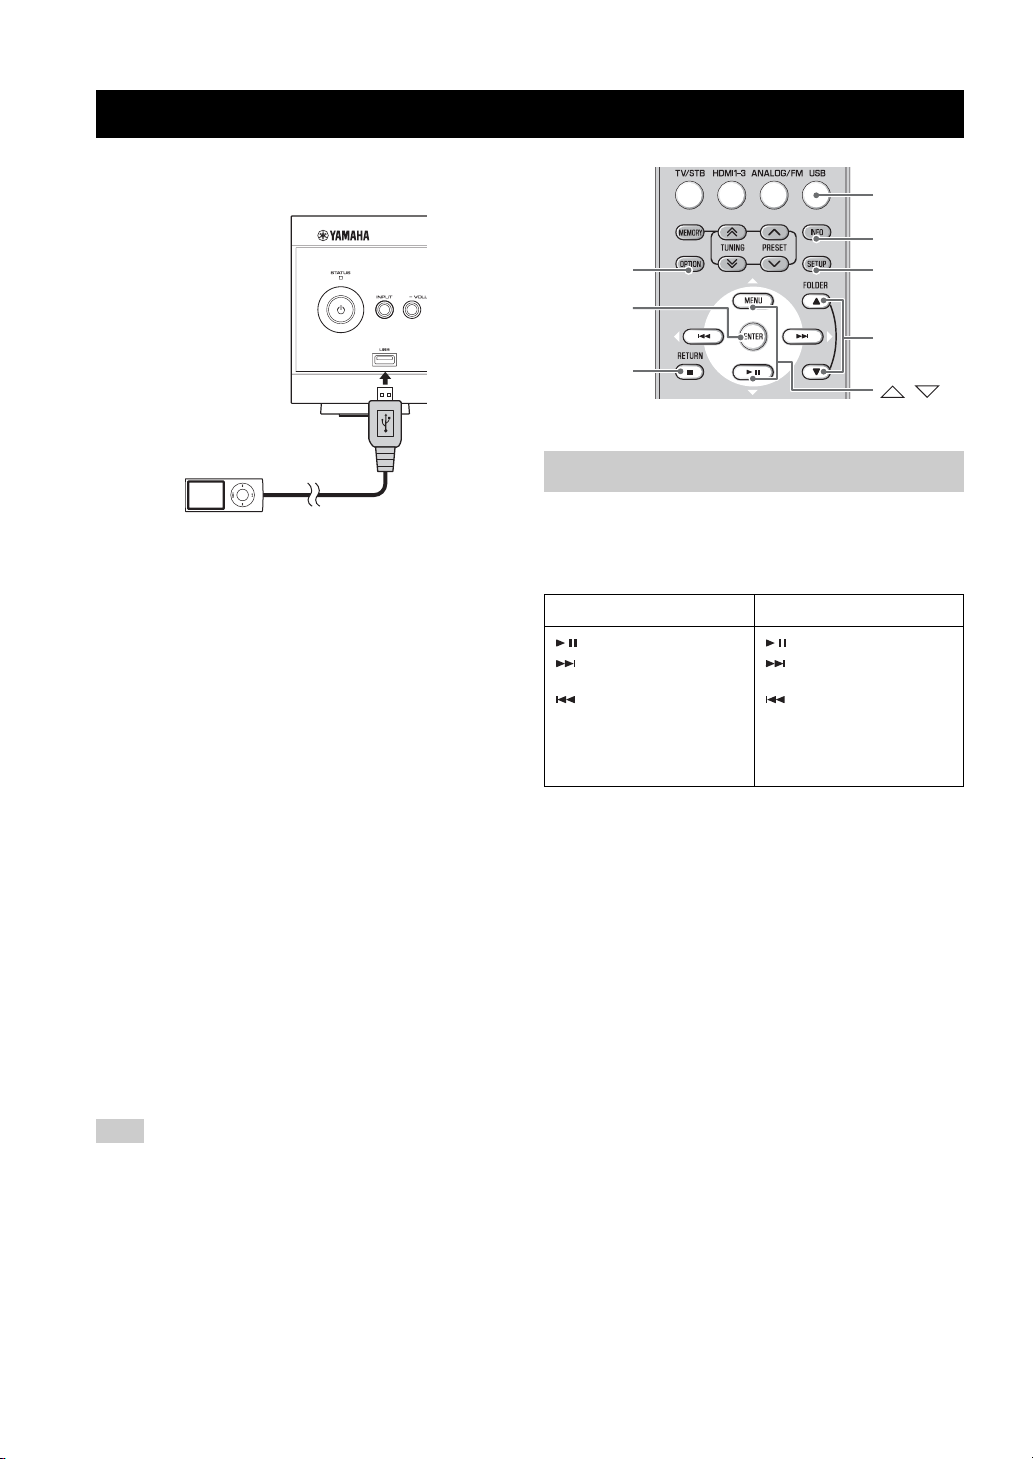
Playing back iPod/iPhone and USB device
Connect a USB device, such as iPod/iPhone, USB flash
memory or portable music player, to play back audio files.
Battery charge feature
The battery of a connected device can be charged when
the unit is on. An iPod/iPhone connected to the unit keeps
on being charged even if the unit is set to standby mode.
Supported iPod/iPhone
iPod classic
iPod nano (3rd Generation to 6th Generation)
iPod touch
iPhone
iPhone 3G
iPhone 3GS
iPhone 4
y
• Some features may not be available depending on the model or
the software version of your iPod/iPhone.
• For a complete list of status messages that appear in the front
panel display, see the “Messages for iPod/iPhone and USB
device” section in “Troubleshooting” (☞ P. 27).
• Be sure to set the volume to minimum before removing your
iPod/iPhone.
Supported USB devices
A USB flash memory and USB portable music player
formatted in FAT format and supporting for USB Mass
Storage Class
USB
INFO
OPTION
ENTER
RETURN
SETUP
FOLDER
▲/▼
/
Playing back
1 Press USB to select USB input.
2 Play back the iPod/iPhone or USB device.
iPod/iPhone USB device
: play/pause
: skip forward (press and
hold: fast-forward)
: skip backward (press and
hold: fast-rewind)
▲/▼: scroll the screen
*1
Resumes playing the music last played back (resume playback)
*2
The folder name appears in the front panel display for three
seconds when skipped.
: play/pause
: skip forward (press and
hold: fast-forward)
: skip backward (press and
hold: fast-rewind)
RETURN: stop
FOLDER ▲/▼: skip the
*2
folder
y
The unit automatically plays back the iPod/iPhone or USB device
in the following cases.
• When setting the input to USB, while the unit is on and an iPod/
iPhone or USB device is connected.
• When the input setting is USB at the time the unit is turned on
with an iPod/iPhone or USB device.
• When a playing iPod/iPhone is connected to the unit that is
turned on. (The input setting is automatically set to USB.)
*1
Note
Some USB devices may not be supported, even in the above.
16 En
Page 19

Playing back iPod/iPhone and USB device
Repeat/shuffle playback
1 Press OPTION to enter the option menu.
2 Press / to select “2.REPEAT” and
press ENTER.
3 Press / to select the available option
and press ENTER.
Available options (Default setting: OFF)
iPod/iPhone USB device
OFF
ONE
ALL
FOLDER
RANDOM
Cancels repeat
playback
Repeats playing back a
music singly
Plays back all the music
repeatedly in your iPod/
iPhone
Cancels repeat
playback
Repeats playing back a
music singly
Plays back all the music
repeatedly in your USB
device
Plays back all the music
repeatedly in the folder
saved in your USB
device
Plays back all the music
at random in the folder
saved in your USB
device
■ Shuffle playback of iPod/iPhone
1 Press OPTION to enter the option menu.
2 Press / to select “3.SHUFFLE” and
press ENTER.
3 Press / to select the parameter and
press ENTER.
Available options (Default setting: OFF)
OFF: Cancels shuffle playback
SONGS: Plays back music in random order.
ALBUMS: Plays back albums in random order.
Displaying music information
You can display information on the music currently
playing back.
Press INFO.
Press INFO repeatedly to switch the information
(displayed for three seconds) in the order below.
iPod/iPhone: SONG (music name) → PLAY TIME
(playback time) → ARTIST (artist name) → ALBUM
(album name) → SONG (music name)
USB device: FILE (file name) → PLAY TIME (playback
time) → SONG (music name) → ARTIST (artist name) →
ALBUM (album name) → FILE (file name)
Notes
• If the information cannot be displayed entirely in the front panel
display, it is scrolled once.
• There are some characters that cannot be displayed in the front
panel display of this unit.
Firmware update
You can update the firmware of this unit.
1 Copy the firmware data into USB flash
memory. Then connect the USB flash
memory to the USB port on the front panel of
this unit.
Make sure that you copy the firmware file into the
root directory of the USB flash memory. Refer to the
documentation associated with the firmware file.
2 Press SETUP.
3 Press / to select “6:FIRMWARE” and
press ENTER.
4 Press / to select “6-2:USB UPDATE”
and press ENTER.
The update starts.
y
• Press / to select “6-1:VERSION” and you can see the
version of this unit firmware displayed in the front panel
display.
• See the “Messages for firmware update” section in
“Troubleshooting” (☞ P. 28) about the messages for firmware
update that appear in the front panel display.
OPERATION
BASIC
17 En
English
Page 20
USEFUL OPERATION
Setup menu
Setup menu list
Menu Sub menu Features Page
1:SP LEVEL 1-1:FRONT L
1-2:FRONT R
1-3:CENTER
1-4:SURROUND L
1-5:SURROUND R
1-6:SUBWOOFER
2:TONE CONTROL 2-1:BASS
2-2:TREBLE
3:HDMI SETUP 3-1:CONTROL
3-2:AUDIO
4:DISPLAY MODE Changing the brightness of the front panel display ☞ P. 19
5:SP SETUP 5-1:SP CHANNEL Selecting the number of channel
5-2:SP TYPE Changing the setting of the speaker type
5-3:SP DISTANCE Setting the distance between the speakers
5-4:CROSSOVER Cutting the crossover register
6:FIRMWARE 6-1:VERSION Displaying the firmware version of this unit
6-2:USB UPDATE Updating the firmware of this unit
7:D.RANGE Adjusting the dynamic range ☞ P. 21
8:MATRIX DECODE 8-1:DECODE MODE Selecting the decoder
8-2:C.IMAGE Adjusting the center image
Adjusting the volume balance with test tone ☞ P. 19
Adjusting high/low frequency sound (tone control) ☞ P. 19
Configuring the HDMI settings ☞ P. 19
☞ P. 20
☞ P. 17
☞ P. 21
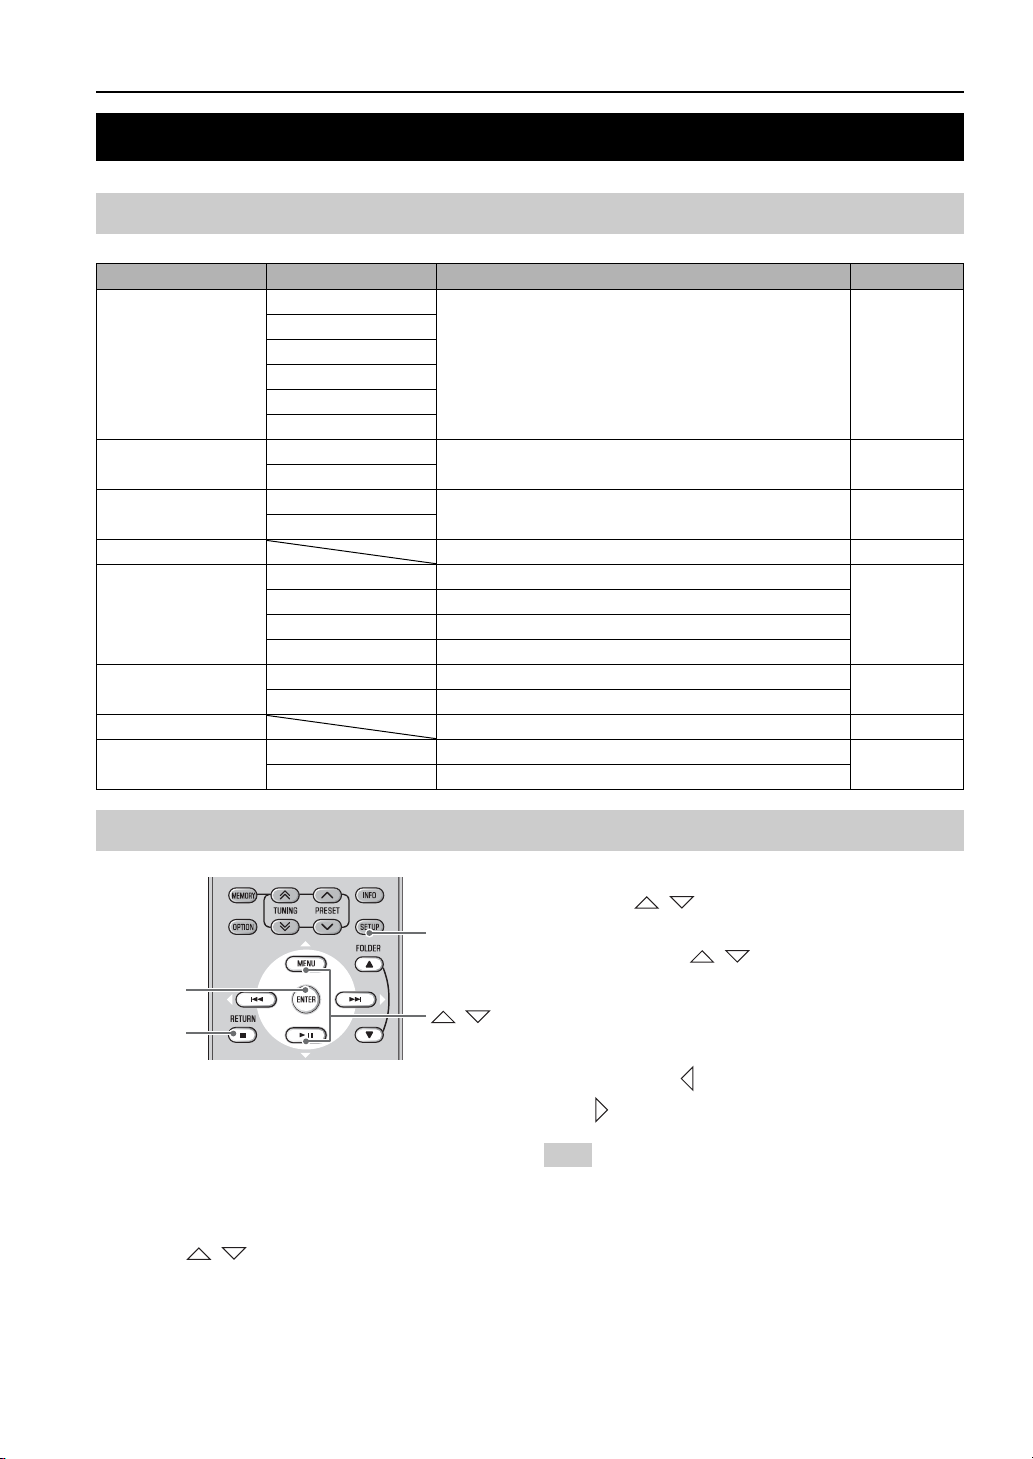
Basic procedure
SETUP
ENTER
RETURN
You can change various settings of this unit using the
setup menu.
/
1 Press SETUP to enter the setup menu.
“1:SP LEVEL” is displayed in the front panel
display.
2 Press / to select menu and press
ENTER.
Repeat this procedure until desired menu/sub menu is
displayed.
3 Press / to adjust the value of each
menu.
Press and hold / to change the setting value
faster.
4 Press SETUP again to exit the setup menu.
y
• Press RETURN or to return to the previous menu.
• Press to enter the next menu.
Note
If you do not operate within 30 seconds after entering the setup
menu, the unit automatically exits the setup menu.
18 En
Page 21
Adjusting the volume balance of each channel
Menu: 1:SP LEVEL
Adjust the volume balance between the channels with test
tones output from each channel.
Sub menu:
“1-1:FRONT L” “1-2:FRONT R”: Adjusts the output
level of the front speaker (left/right) channels.
“1-3:CENTER”: Adjusts the output level of the center
speaker channel.
“1-4:SURROUND L” “1-5:SURROUND R”: Adjusts the
output level of the virtual surround/surround speaker (left/
right) channels.
“1-6:SUBWOOFER”: Adjusts the output level of the
subwoofer channel.
Adjustable range: –6 to +6 (Default setting: 0)
y
• You can also adjust the volume balance while playing the input
device. (☞ P. 12)
• As you complete each channel setting, press LEVEL to move to
the next channel for adjustment.
Adjusting high/low frequency sound (tone control)
Menu: 2:TONE CONTROL
You can adjust the balance of the high frequency range
(Treble) and low frequency range (Bass) of sounds output
from the front speakers to obtain desired tone. When
headphones are connected, adjusts the balance of the highfrequency range and low-frequency range of sounds
output from headphones.
Sub menu
“2-1:BASS”: Adjusts the balance of the low frequency
range (Bass) of sounds output from the speaker.
“2-2:TREBLE”: Adjusts the balance of the high frequency
range (Treble) of sounds output from the speaker.
Adjustable range: –6 to +6 (Default setting: 0)
Setup menu
Available options: OFF, ON (Default setting: OFF)
“OFF”: Deactivates the HDMI control function. The
standby power consumption of this unit decreases.
“ON”: Activates the HDMI control function.
y
To activate the ARC function, set “3-1:CONTROL” to “ON”.
■ Setting the audio output
Sub menu: 3-2:AUDIO
You can select a component to play back HDMI audio
signals. This setting is effective when “3-1:CONTROL” is
set to “OFF”.
Available options: AMP, TV (Default setting:
AMP)
“AMP”: Outputs HDMI sound signals from the speakers
connected to this unit.
“TV”: Outputs HDMI sound signals from the speakers of
a TV connected to this unit.
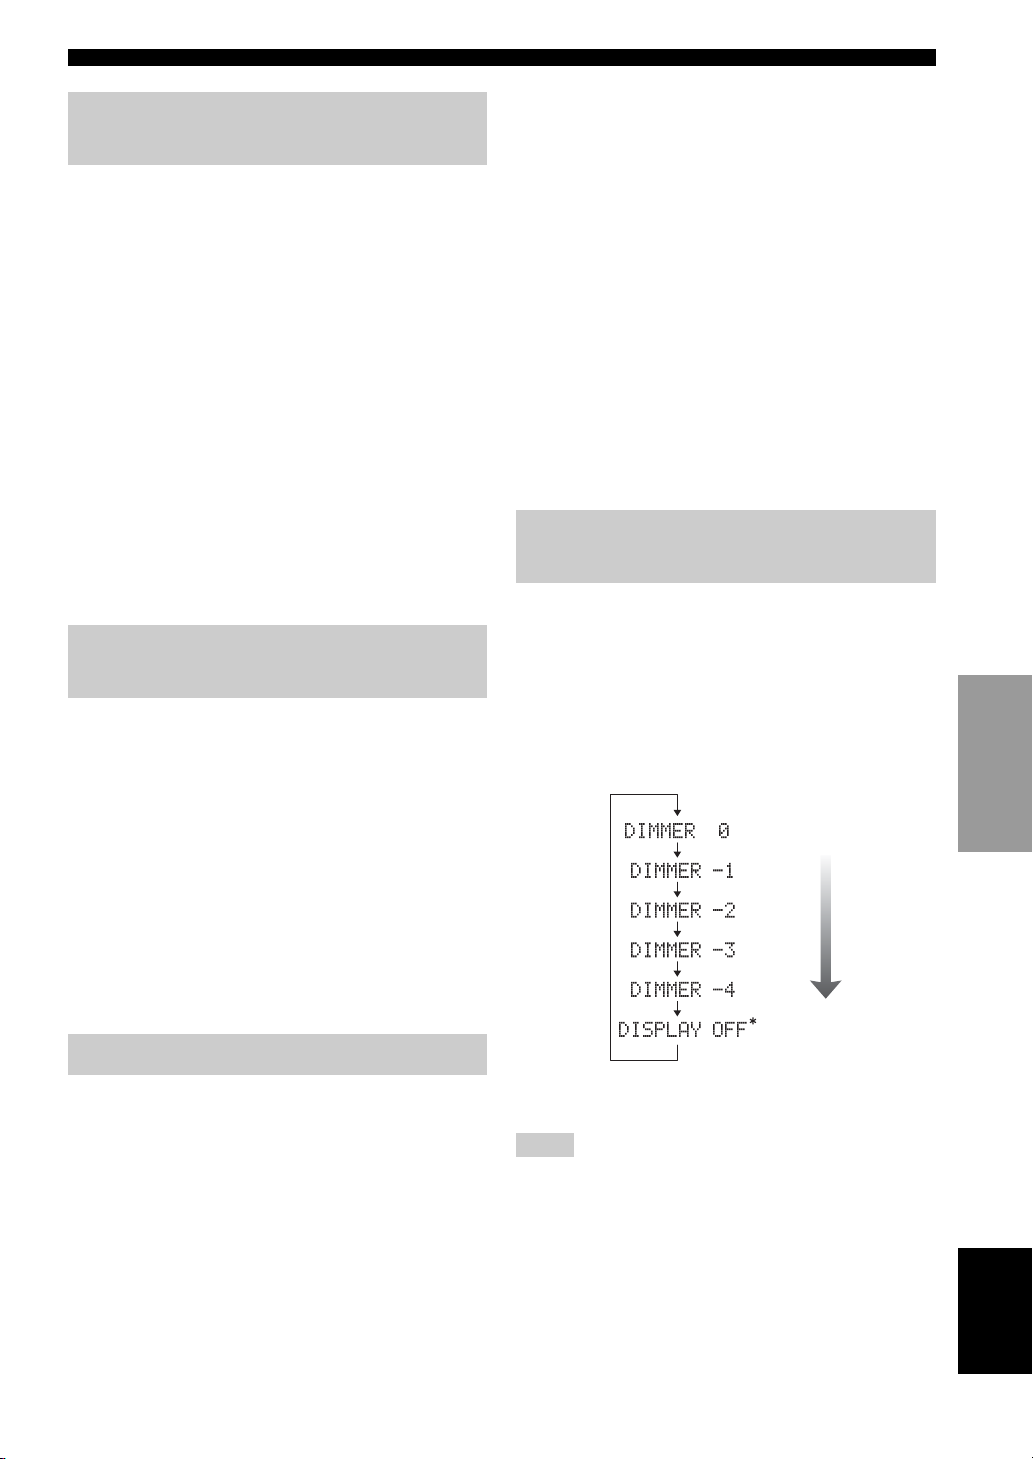
Changing the brightness of the front panel display
You can change the brightness of the front panel display.
You can also turn off the front panel display to view a
movie in a darker environment.
The brightness of the front panel changes as follows.
Menu: 4:DISPLAY MODE
Adjustable range (Default setting: “DIMMER 0”)
Bright
Dark
OPERATION
USEFUL
Configuring the HDMI settings
Menu: 3:HDMI SETUP
You can configure the settings related to HDMI signals
and HDMI control function.
■ Switching HDMI control function
on/off
Sub menu: 3-1:CONTROL
You can set whether to use the HDMI control function.
For details, see “Operating the unit by TV’s remote
control” (☞ P. 23).
*
Selecting DISPLAY OFF turns off the front panel display after
exiting the setup menu.
Notes
• The front panel display lights up momentarily when any
operation is performed with DISPLAY OFF mode selected.
• Only the STATUS indicator remains lit in DISPLAY OFF
mode.
19 En
English
Page 22

Setup menu
Using other speakers
Menu: 5:SP SETUP
You can set the speaker type if you want to add or change
speakers. When you connect only the supplied speaker,
you do not have to change the setting.
■ Selecting the number of channels
and the front speaker type
Sub menu: 5-1:SP CHANNEL
You can select the number of output speakers.
Supplied speaker: Commercially available speakers:
5-1:SP CHANNEL
5-2:SP TYPE
BAR
(Default setting)
BOOK SHELF
OTHER
2CH
*1 *1 *1, 3 *1, 3
(Default setting)
Sub menu: 5-2:SP TYPE
You can select the type of front speakers.
“BAR”: When you use the unit, either on its own or in
addition to other commercially available speakers
“BOOK SHELF”: This setting is not used for this system
“OTHER”: When you connect commercially available
speakers instead of the unit
3CH
4CH 5CH
*3
*1, 2 *1, 2 *1, 2, 3 *1, 2, 3
*1: “5-3:SP DISTANCE” setting available *2: “5-4:CROSSOVER” setting available
*3: “8:MATRIX DECODE” settings available
■ Setting the distance between the
speakers
Sub menu: 5-3:SP DISTANCE
Select a parameter suited for the distance between the
front left and right speakers, to obtain the most suitable
surround effect.
Available options (Default setting: NORMAL)
“WIDE”: When the distance between the front speakers is
over 150 cm (59-1/16”).
“NORMAL”: When the distance between the front
speakers is from 80 cm (31-1/2”) to 150 cm (59-1/16”).
“NARROW”: When the distance between the front
speakers is within 80 cm (31-1/2”).
Notes
• When the surround mode is off, this setting cannot be made.
• This setting can be made only when “2CH” or “3CH” is
selected in “5-1:SP CHANNEL”.
■ Cutting the crossover register
Sub menu: 5-4:CROSSOVER
You can set the cutoff frequency output from the built-in
subwoofer of this unit according to the specification of the
connected speakers.
Available options (Default setting: 150Hz)
80Hz, 100Hz, 120Hz, 150Hz, 200Hz
20 En
Page 23

Dynamic range control Setting the matrix decode
Setup menu
Menu: 7:D.RANGE
You can adjust the dynamic range compression. Dynamic
range is the difference between the smallest sound that can
be heard above the noise of the equipment and the biggest
sound that can be heard without distortion.
Available options: AUTO/MIN, STANDARD, MAX
(Default setting: MAX)
“AUTO/MIN”:
(MIN) Adjust the dynamic range for low volume or a
quiet environment, such as at night, for playing back
bitstream signals except for Dolby TrueHD signals.
(AUTO) Adjust the dynamic range based on information
from the input signal when playing back Dolby TrueHD
signal.
“STANDARD”: The dynamic range recommended for
regular home use.
“MAX”: Outputs sound without adjusting the dynamic
range of the input signals.
Menu: 8:MATRIX DECODE
The matrix decode function expands 2ch stereo sound to
surround sound.
■ Selecting the decoder
Sub menu: 8-1:DECODE MODE
This sub menu is selectable only when “STANDARD” is
selected for the surround mode.
Available options (Default setting: DOLBY PLII)
DOLBY PLII, Neo:6 Cinema, Neo:6 Music
■ Adjusting the center image
Sub menu: 8-2:C.IMAGE
Adjusts the front left and right channel output relative to
the center channel to make the center channel more or less
dominant as necessary. This is adjustable only when
“Neo:6 Music” is selected in “8-1:DECODE MODE”.
Adjustable range (Default setting: 0.3)
0.0 to 1.0
OPERATION
USEFUL
21 En
English
Page 24
Input
OPTION
Settings for each input source (Option menu)
The option menu items are listed below. These settings are
applied to the currently selected input source.
Adjusting input level of each jack (VOLUME TRIM)
/
RETURN
ENTER
1 Press input button to select the desired input
to change the setting.
2 Press OPTION to enter option menu.
The option menu is displayed in the front panel
display.
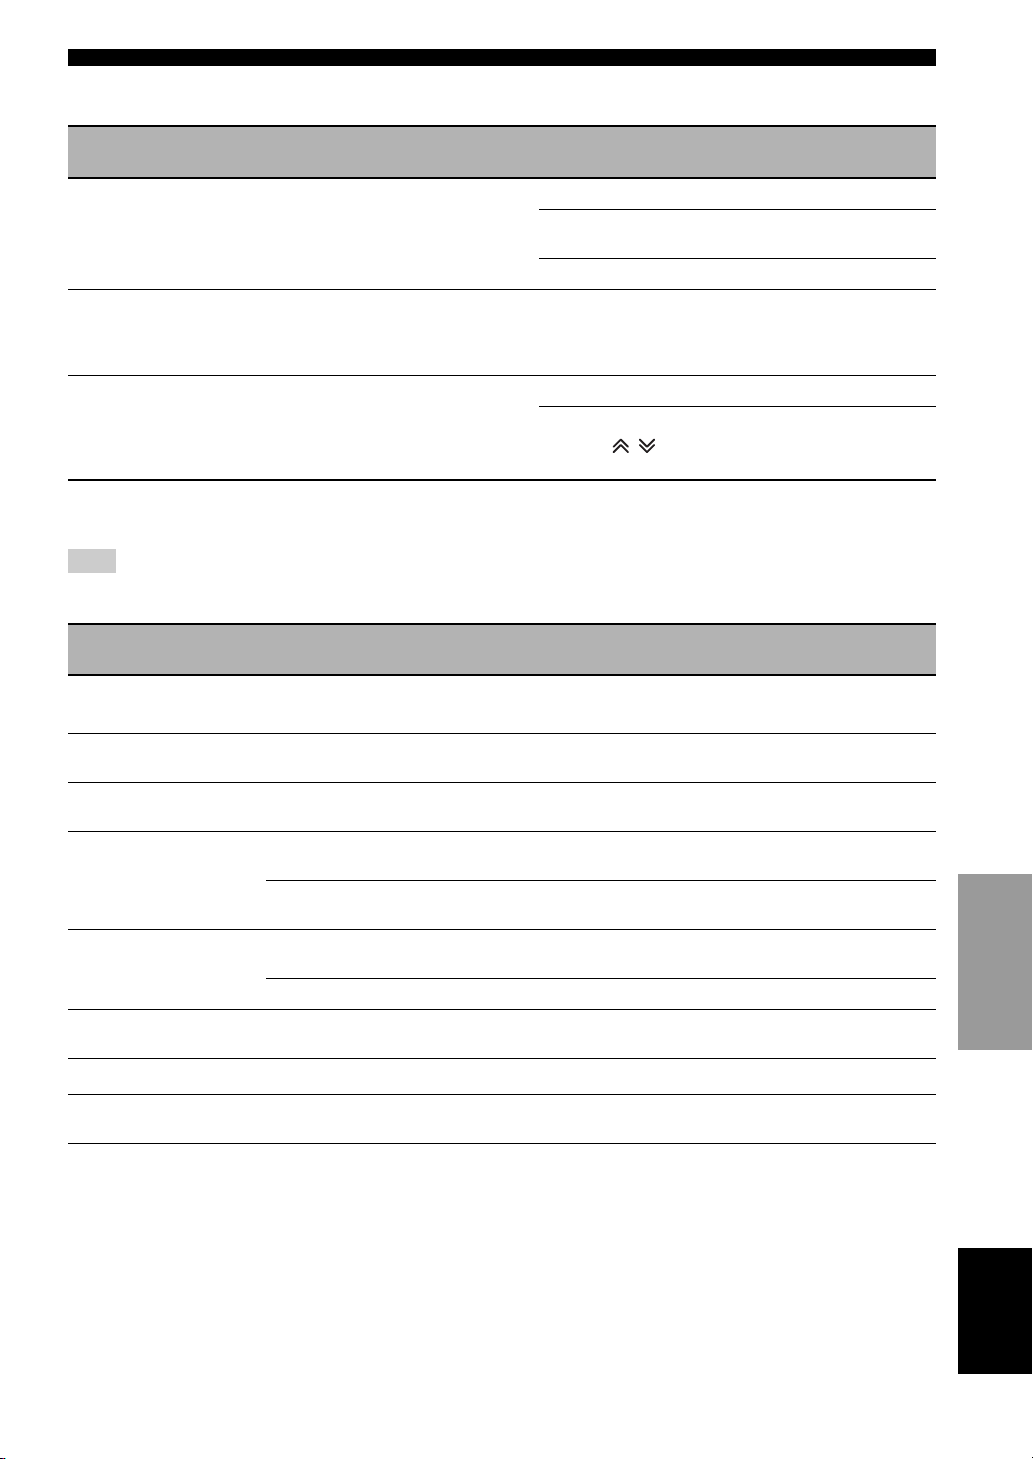
Option menu items
The following menu items are provided for each
input.
Input Menu item
TV/STB/
ANALOG
HDMI1-3
1.VOLUME
FM
USB
*1 See the page 13 for details.
*2 See the page 17 for details.
TRIM
2.AUDIO
DELAY
2.AUTO PRESET
3.CLEAR PRESET
4.STEREO/MONO
5.TRAFFIC PROG
2.REPEAT
3.SHUFFLE
*2
3.AUDIO
ASSIGN
*1
3 Press / to select the menu and press
ENTER.
4 Press / to change the setting value
and press ENTER.
Menu: 1.VOLUME TRIM
Adjust the input level for each jack to compensate for
variations in volume between different input devices.
Adjustable range: –6 to +6 (Default setting: 0)
Adjusting the audio delay (AUDIO DELAY)
Menu: 2.AUDIO DELAY
Flat panel display TV images sometimes lag behind the
sound. You can use this function to delay the sound output
to synchronize it with the video image.
Adjustable range: 0ms to 500ms, AUTO
(Default setting: “AUTO”)
“AUTO”: If you operate HDMI connection to a TV with
the function to automatically adjusting the audio delay,
you can adjust the delay time automatically.
Assigning the audio input to optical/coaxial digital input (AUDIO ASSIGN)
Menu: 3.AUDIO ASSIGN
If a component’s HDMI jack does not carry audio signal,
select HDMI input and use the optical/coaxial input jack
connection for audio.
Available options (Default setting: HDMI)
“HDMI”: Selects HDMI audio signal
“OPTICAL”: Selects the audio signal from optical input
jack
“COAXIAL”: Selects the audio signal from coaxial input
jack
5 Press OPTION to exit the option menu.
Press RETURN to return to the previous menu.
22 En
Page 25
Operating the unit by TV’s remote control
What is the HDMI control function?
You can use the TV remote control to operate this unit if
your TV supports the HDMI control function (ex. REGZA
Link) and is connected to this unit’s HDMI OUT (ARC)
jack. *1
Remote control of TV (Example)
(Power)
Input
selector
Power on/off
Switches input
This unit automatically selects
the input according to the
input source setting on the
TV. Switching input on TV
menu (ex. selecting BD player
on TV menu) also changes
input of this unit.
Volume up/down
Selects a component to
reproduce sounds (this
unit or TV)
y
*1
• Some TV supports switching the UniVolume function on/off
except the above.
• Even if your TV supports the HDMI control function, some
functions may not be available. For details, refer to the manual
supplied with your TV.
• If you use HDMI to connect this unit to a device such as a BD
player that supports HDMI control, you can control that device
using the HDMI control function.
• We suggest that you use products (TV, BD/DVD player, etc.)
from the same manufacturer.
Setting the HDMI control function
1 Turn on all components connected to this
unit with HDMI.
2 Check all components connected with HDMI
and enable the HDMI control function on
each component.
For this unit, set “3-1:CONTROL” in the setup menu
“3:HDMI SETUP” to “ON” (☞ P. 19). *
2
For external components, refer to the manual
supplied with each component. *
3
3 Turn off the TV and then turn on it again.
*2 y
• The default setting is “OFF”.
When “3-1:CONTROL” in the “3:HDMI SETUP” is set to
“ON” in setup menu,
– Even you press (Power) button, the power does not
completely turned off and the signal outputs from the HDMI
IN jack to HDMI OUT (ARC) jack.
– Before turning off the unit, select desired input sources
connected to HDMI IN (1 to 3) jack.
– According to the TV, the TV operation such as changing the
channel may change the setting of surround modes of this
unit.
y
*3
The example of TV settings
• From a setup menu on your TV, select “Link setting” → “HDMI
control setting” (example), then set a setting such as “HDMI
control function” to “ON” (example).
• Setting such as “Speaker priority” should be set to “AV
amplifier”.
OPERATION
USEFUL
23 En
English
Page 26

Operating the unit by TV’s remote control
Registering HDMI components to
*4
TV
1 Select this unit as the input source of the TV.
2 Turn on the HDMI control function supported
component (example: BD player) connected
to this unit.
3 Select the input source of this unit to BD
player and check whether the image in the
player is correctly displayed or not.
When connecting BD player with HDMI 1 jack,
press input selector button repeatedly to select
“HDMI 1”.
4 Check if the HDMI control function works
(turn on this unit or adjust the volume level
using the remote control of the TV).
*4 y
For some HDMI components, you only need to set the HDMI
control function. Registering HDMI components to TV is not
required in this case.
If the HDMI control function is not working
Check the following:
– The TV is connected to the HDMI OUT (ARC) jack
of this unit.
– “3-1:CONTROL” in the “3:HDMI SETUP” is set to
“ON” in setup menu. (☞ P. 19)
– The HDMI control function is enabled on the TV.
(Also check the relative settings such as power
interlock function or speaker priority.)
The HDMI control function is not working even
checking the above,
– Turn off this unit and the TV, and then turn them
back on again.
– Disconnect the AC power supply cable of the unit
and external components connected to the unit with
HDMI.
Plug them in again after about 30 seconds.
– After selecting HDMI 1, HDMI 2 or HDMI 3,
change the input of TV and the one of this unit to
the same input.
Changing the connection method and connected components
When the connected components and jacks are changed,
reset this unit with following procedures.
1 Turn off the HDMI control function of the TV
and player, turn off all connected devices,
and change the connections.
2 Perform the step 1 to 3 of “Setting the HDMI
control function”.
24 En
Page 27

ADDITIONAL INFORMATION
Troubleshooting
Refer to the chart below should this unit not function properly.
If the problem you are experiencing is not listed below, or if the instruction below does not help, set this unit to the
standby mode, disconnect the AC power supply cable, and contact the nearest authorized Yamaha dealer or service
center.
Check the below first.
1 The AC power supply cable of this unit, TV and external components (such as BD player) are firmly connected to the
AC wall outlet.
2 The power supply of this unit, TV and the external components (such as BD player) are turned on.
3 All cables are firmly connected to their respective jacks on each component.
Problem Cause Solution
Power turns on but
immediately shuts off.
The speakers make no
sound.
Sound is too low on
one side.
Speaker channels
other than the front
ones make no sound.
The subwoofer makes
no sound.
The power cable may be connected
improperly.
A speaker cable may be shorted. Make sure all speaker cables are connected
This unit may have received a strong
electrical shock, such as from a
lightening bolt or excessive static
electricity.
The volume may be set to minimum
level.
The mute function may be activated. Cancel the mute function. 10
The input source or input setting may be
incorrect.
The cables may be connected improperly. Make sure all cables are connected properly. 8
“3-2:AUDIO” in the setup menu
“3:HDMI SETUP” is set to “TV”.
“3-1:CONTROL” in the setup menu
“3:HDMI SETUP” is set to “OFF” in
setup menu.
The headphone is connected.
The cables may be connected improperly. Make sure all cables are connected properly.
You may be listening to stereo sounds
without surround mode.
“1:SP LEVEL” in the setup menu
“1-4:SURROUND L ”/“1-5:SURROUND R”
is set to minimum level.
“5-1:SP CHANNEL” is set to “2CH” or
“3CH” in setup menu.
The volume of the subwoofer channel
may be set to minimum level.
The source does not contain lowfrequency signals.
Make sure the power cable is plugged into the
outlet firmly.
properly.
Set this unit to standby mode, and then
disconnect the power cable. Wait for about 30
seconds, connect the power cable, and then turn
the unit on again.
Adjust the volume level.
Select the correct input source or input setting.
Set “3-2:AUDIO” in the setup menu “3:HDMI
SETUP” to “AMP”.
When connecting ARC (Audio Return Channel)
supported TV and this unit using HDMI cable
only, set “3-1:CONTROL” in the “3:HDMI
SETUP” to “ON”.
Connect coaxial digital input jack and TV’s
audio output jack using a digital audio pin cable.
Press the SURROUND button to play back in
sound mode.
Adjust “1:SP LEVEL” in the setup menu
“1-4:SURROUND L”/“1-5:SURROUND R”. 19
Set “5-1:SP CHANNEL” to “4CH” or “5CH”.
Adjust the volume level of the subwoofer.
See
page
8
8
10
10, 19
10
19
19
9
8
11
20
5, 19
INFORMATION
ADDITIONAL
English
25 En
Page 28

Troubleshooting
Problem Cause Solution
The volume level
decreases without any
operation.
Sound is poor (noisy).
This unit does not
operate properly.
A digital or highfrequency equipment
The volume level is automatically set to
70 the next time you turn on the unit to
protect the speakers.
A speaker cable may be shorted. Make sure all cables are connected properly.
This unit may receive a strong electrical
shock, such as from a lightening bolt or
excessive static electricity, or drop in
power supply.
The unit may be placed close to digital
equipment or high-frequency equipment.
Set this unit to standby mode, and then
disconnect the power cable. Wait for about 30
seconds, connect the power cable, and then turn
on this unit.
Place this unit farther away from such
equipment.
produces noises.
The unit settings
change automatically.
The remote control
does not operate the
unit.
The TV remote control
does not work even
when the remote signal
receptor is attached to
the top of the speaker.
When “3-1:CONTROL” in the setup
menu “3:HDMI SETUP” is set to “ON”,
operations of the TV (for example,
changing channels, etc.) may change the
unit settings, such as the surround mode.
The unit may be outside the remote
control operation range.
The remote control sensor of this unit
may be exposed to direct sunlight or
lighting.
The batteries may be worn out. Replace the batteries. 2
The position of TV remote signal
receptor is not appropriate.
The TV remote signal receptor is facing
an incompatible sensor, such as a sensor
for detecting the brightness of the room.
Set “3-1:CONTROL” in the setup menu
“3:HDMI SETUP” to “OFF” or set the unit
again by using its remote control. 19
For information on the remote control operation
range, refer to “Remote control preparation”.
Change the lighting.
Move the TV remote signal receptor to right/left
so as to place its center to the front of TV
remote control sensor.
Place the TV remote signal receptor
approximately 10 mm away from TV.
Place the TV remote signal receptor after
confirming the position of remote control sensor
by referring to the manual of your TV.
See
page
8
10
—
2
—
6
6
6
■ HDMI
Problem Cause Solution
“AUTO” set in the
option menu “2.AUDIO
DELAY” does not
operate.
The HDMI control
function does not
operate properly.
No picture or sound
26 En
The TV does not support automatically
adjusting the audio delay.
The number of the connected HDMI
components is over the limit.
Add the connection of HDMI
components
The connected HDMI component does
not support high-bandwidth digital
copyright protection (HDCP).
See
page
Adjust the delay time manually (0 to 500 ms).
Disconnect some of the HDMI components.
Set “3-1:CONTROL” in the “3:HDMI SETUP”
to “ON” again.
Connect the HDMI component that supports
HDCP. —
22
—
19
Page 29
■ FM
Troubleshooting
Problem Cause Solution
FM stereo reception is
noisy.
There is distortion, and
clear reception cannot
be obtained, even with
a good FM antenna.
The desired station
cannot be tuned into
with the automatic
tuning method.
The characteristics of FM stereo
broadcasts may cause this problem when
the transmitter is too far away, or if the
antenna quality is poor.
There is multi-path interference. Adjust the antenna position to eliminate multi-
The signal is too weak. Use a high-quality directional FM antenna. —
Check the antenna connections. 9
Try using a high-quality directional FM
antenna.
Set the reception mode to “MONO”. 14
path interference.
Set the reception mode to “MONO” and press
TUNING / to change frequency by 1
step.
See
page
—
—
13, 14
■ Messages for iPod/iPhone and USB device
Note
Confirm the connection of your device if any malfunctions except the following message in the front panel display occurred. (☞ P. 16)
Status message Cause Solution
Unknown iPod
The iPod/iPhone or USB device being
used is not supported by this unit.
Connect a supported iPod/iPhone or USB device
to this unit.
See
page
16
No Device
Loading...
No Content
Unable to Play
Connect Error
Root
Disconnected
An iPod/iPhone or USB device is not
connected to this unit.
The iPod/iPhone or USB device is in data
processing.
There is no music file to enable playback. Connect an iPod/iPhone or USB device in which
The music file cannot be read. See whether the music file can be played back by
The format of the selected music file is
not supported.
The selected music file is broken. Select another music file. —
The iPod/iPhone or USB device has a
problem with communication.
Stops and returns to the root directory. The message disappears when playback starts.
An iPod/iPhone or USB device has been
removed from the USB port of this unit.
Connect an iPod/iPhone or USB device in which
playback enabled music files are saved.
The message disappears when data processing
finishes.
playback enabled music files are saved.
another device such as a PC.
Save the music file in a supported format.
Set this unit to the standby mode and reconnect
the iPod/iPhone or USB device again.
The message disappears after 3 seconds.
—
—
—
INFORMATION
—
—
—
—
16
ADDITIONAL
English
27 En
Page 30

Troubleshooting
■ Messages for firmware update
Status message Cause Solution
Connect USB!
No Firmware!
Connect Error
Update... 30%
Update Error
Update Success
Plaese...
Power Off!
An USB flash memory is not connected. Connect the USB flash memory to this unit.
There is no file for firmware in the USB
flash memory connected to this unit.
There is a fault with the file in the USB
flash memory.
The USB flash memory connected to this
unit has a problem with communication
because the selected file in it is broken.
Displays the process of updating.
Error occurs while updating and the
firmware update is not completed.
The firmware update is finished properly.
Indicates to turn the unit to standby mode.
Displays alternately “Update Success” or
“Update Error”.
Indicates to turn the unit to standby mode.
Displays alternately “Update Success” or
“Update Error”.
Copy the firmware update file to the root
directory of the USB flash memory.
Turn the unit to the standby mode and reconnect
the USB flash memory again.
Copy the firmware update file to the USB flash
memory again. —
Update firmware again.
Turn the unit to standby mode.
Turn the unit to standby mode.
y Resetting this unit
When the unit freezes, the problem may solve by resetting the unit.
To reset the unit, press (Power) button of this unit for more than 10 seconds.
See
page
17
—
—
17
—
—
28 En
Page 31

Glossary
■ AIR SURROUND XTREME
This unit employs new technologies and algorithms that
make it possible to achieve 7-channel surround sound with
only front speakers, and without using wall reflections.
Ordinarily, two front speakers, a center speaker, two
surround speakers, two surround back speakers, and a
subwoofer are necessary for enjoying 7.1 channel
surround sound.
Typical 7.1 channel speaker unit
Front speakers
Center
speaker
Subwoofer
Surround speakers
Surround back speakers
Virtual 7.1 channel
The AIR SURROUND XTREME technology, using only
front speakers and subwoofer, enables you to enjoy a
realistic 7.1 channel sound by simulating sound from
virtual speakers at center, surround, and surround backs.
The sound image of the unit
■ Sampling frequency
The number of sampling (process for digitalizing analog
signals) per second. In principle, the higher the sampling
rate, the wider the frequency range that can be played
back, and the higher the quantized bit rate, the finer the
sound that can be reproduced.
■ Dolby Digital
Digital surround sound system which is developed by
Dolby Laboratories provides completely independent
multi-channel audio. With 3 front channels (left, center,
and right) and 2 surround stereo channels, Dolby Digital
provides five full-range audio channels. With an
additional channel especially for bass effects (called LFE,
or low frequency effect), the system has a total of 5.1
channels (LFE is counted as 0.1 channel). By using 2
channel stereo for the surround speakers, more accurate
moving sound effects and surround sound environment
are possible than with Dolby Surround.
■ Dolby Digital Plus
Dolby Digital Plus is an advanced audio technology
developed for high-definition programming and media
including HD broadcasts, and Blu-ray Disc. Selected as an
optional audio standard for Blu-ray Disc, this technology
delivers multichannel sound with discrete channel output.
Supporting bitrates up to 6.0 Mbps, Dolby Digital Plus
can carry up to 7.1 discreet audio channels
simultaneously. Supported by HDMI and designed for the
optical disc players and AV receivers/amplifiers of the
future, Dolby Digital Plus also remains fully compatible
with the existing multichannel audio systems that
incorporate Dolby Digital.
The unit creates the virtual 7.1 channel surround sound
with the subwoofer integrated receiver and the speaker.
C: Center speaker
FR, FL: Front speakers
SW: Subwoofer
SR, SL: Surround virtual speakers
SBR, SBL: Surround back virtual speakers
■ Dolby Pro Logic II
It is an improved matrix decoding technology that
provides better spatiality and directionality on Dolby
Surround programmed material; provides a convincing
three-dimensional sound field on conventional stereo
music recordings; and is ideally suited to bring the
surround experience to automotive sound. While
conventional surround programming is fully compatible
with Dolby Pro Logic II decoders, soundtracks will be
able to be encoded specifically to take full advantage of
Pro Logic II playback, including separate left and right
surround channels.
29 En
INFORMATION
ADDITIONAL
English
Page 32

Glossary
■ Dolby TrueHD
Dolby TrueHD is an advanced lossless audio technology
developed for high-definition disc-based media including
Blu-ray Disc. Selected as an optional audio standard for
Blu-ray Disc, this technology delivers sound that is bitfor-bit identical to the studio master, offering a highdefinition home theater experience. Supporting bitrates up
to 18.0 Mbps, Dolby TrueHD can carry up to 8 discrete
channels of 24-bit/96 kHz audio simultaneously. Dolby
TrueHD also remains fully compatible with the existing
multichannel audio systems and retains the metadata
capability of Dolby Digital, allowing dialog normalization
and dynamic range control.
■ Deep Color
Deep Color refers to the use of various color depths in
displays, up from the 24-bit depths in previous versions of
the HDMI specification. This extra bit depth allows
HDTVs and other displays go from millions of colors to
billions of colors and eliminate on-screen color banding
for smooth tonal transitions and subtle gradations between
colors. The increased contrast ratio can represent many
times more shades of gray between black and white. Also
Deep Color increases the number of available colors
within the boundaries defined by the RGB or YCbCr color
space.
■ DTS
Digital surround sound system developed by DTS, Inc.,
which provides 5.1 channel audio. With an abundance of
audio data, it is able to provide authentic-sounding effects.
■ DTS-HD High Resolution Audio
DTS-HD High Resolution Audio is a high resolution
audio technology developed for high-definition disc-based
media including Blu-ray Disc. Selected as an optional
audio standard for Blu-ray Disc, this technology delivers
sound that is virtually indistinguishable from the original,
offering a high-definition home theater experience.
Supporting bitrates up to 6.0 Mbps for Blu-ray Disc, DTSHD High Resolution Audio can carry up to 7.1 discrete
channels of 24-bit/96 kHz audio simultaneously.
■ DTS-HD Master Audio
The lossless high quality audio format created for next
generation optical disc such as Blu-lay Disc. It is selected
as an audio standard for Blu-ray Disc. Supporting bitrates
up to 24.5 Mbps for Blu-ray Disc, DTS-HD High Master
Audio can carry up to 7.1 discrete channels of 24-bit/96
kHz audio simultaneously.
■ DTS Neo:6
Neo:6 decodes the conventional 2-channel sources for 6channel playback by the specific decoder. It enables
playback with the full-range channels with higher
separation just like digital discrete signal playback. Two
modes are available: Music mode for playing music
sources and Cinema mode for movies.
■ HDMI
HDMI (High-Definition Multimedia Interface) is the first
industry supported, uncompressed, all-digital audio/video
interface. When used in combination with HDCP (Highbandwidth Digital Content Protection), HDMI provides a
secure audio/video interface that meets the security
requirements of content providers and system operators.
■ MP3
One of the audio compression methods used by MPEG. It
employs the irreversible compression method, which
achieves a high compression rate by thinning out the data
of hardly audible part to the human ears. It is said to be
capable of compressing the data quantity by about 1/11
(128 kbps) while maintaining a similar audio quality to
music CD.
■ MPEG-4 AAC
An MPEG-4 audio standard. As it allows compression of
data at a bit rate lower than that of MPEG-2 AAC, it is
used among others for mobile telephones, portable audio
players and other low-capacity devices requiring high
sound quality. In addition to the above types of devices,
MPEG-4 AAC is also used to distribute contents on the
Internet, and as such is supported by computers, media
servers and many other devices.
■ PCM (Pulse Code Modulation)
A signal that is changed to digital format without
compression. A CD is recorded with 16-bit sound at 44.1
kHz, while DVD recording is anywhere from 16 bits at 48
kHz to 24 bits at 192 kHz, which makes it a higher quality
sound than CD.
■ WMA
An audio compression method developed by Microsoft
Corporation. It employs the irreversible compression
method, which achieves a high compression rate by
thinning out the data of hardly audible part to the human
ears. It is said to be capable of compressing the data
quantity by about 1/22 (64 kbps) while maintaining a
similar audio quality to music CD.
■ x.v.Color
A color space standard supported by HDMI. It is a more
extensive color space than sRGB, and allows the
expression of colors that could not be expressed before.
While remaining compatible with the color gamut of
sRGB standards, “x.v.Color” expands the color space and
can thus produce more vivid, natural images. It is
particularly effective for still pictures and computer
graphics.
30 En
Page 33

Specifications
■ SR-301
AUDIO SECTION
• Minimum RMS Output Power
Front Left and Right (1 kHz, 1% THD, 6 Ω) .................45 W+45 W
Center (1 kHz, 1% THD, 6 Ω)...................................................45 W
Surround Left and Right (1 kHz, 1% THD, 6Ω) ............45 W+45 W
Subwoofer (100 Hz, 1% THD, 3 Ω)..........................................90 W
• Maximum Power
Front Left and Right (1 kHz, 10% THD, 6 Ω) ...............50 W+50 W
Center (1 kHz, 10% THD, 6 Ω).................................................50 W
Surround Left and Right (1 kHz, 10% THD, 6Ω) ..........50 W+50 W
Subwoofer (100 Hz, 10% THD, 3 Ω)......................................100 W
FM SECTION
• Tuning Range
[U.S.A. and Canada models] ............................... 87.5 to 107.9 MHz
[Other models] ................................................. 87.50 to 108.00 MHz
• Frequency Step
[U.S.A. and Canada models]................................................200 kHz
[Other models]........................................................................50 kHz
Antenna Input (unbalanced) .......................................................75 Ω
SUBWOOFER SECTION
• Type ..........................................................................Bass reflex type
Non-magnetic shielding type
• Driver...............................................................13 cm (5-1/4 in) cone
• Frequency Response................................................35 Hz to 150 Hz
• Impedance.....................................................................................3 Ω
GENERAL
• Power Supply
[U.S.A. and Canada models]................................... AC120 V, 60 Hz
[Europe, U.K., Korea and Asia models] .....AC220-240 V, 50/60 Hz
[Taiwan model] ....................................................AC110V, 60/50Hz
• Power Consumption.................................................................. 40 W
• Standby Power Consumption
When HDMI control is on
[U.S.A. and Canada models].........................................less than 5 W
[Europe, U.K., Korea and Asia models] .......................less than 5 W
[Taiwan model].............................................................less than 5 W
When HDMI control is off
[U.S.A. and Canada models]......................................less than 0.5 W
[Europe, U.K., Korea and Asia models] ....................less than 0.5 W
[Taiwan model]..........................................................less than 0.5 W
• Dimensions (W × H × D)
Horizontal......................................................... 435 × 135 × 361 mm
Upright ....................................................... 145.5 × 443.5 × 361 mm
• Weight .....................................................................7.9 kg (17.4 Ibs.)
(17-1/8 × 5-3/8 × 14-1/4 in)
(5-3/4 × 17-1/2 × 14-1/4 in)
■ NS-BR301
• Type..........................................................Accoustic suspension type
• Driver (Full range)
Left and Right .................................................5.5 cm (2 in) cone × 2
Center............................................4 × 10 cm (1-1/2 × 4 in) cone × 1
• Frequency Response...............................................150 Hz to 20 kHz
• Impedance ....................................................................................6 Ω
• Dimensions (W × H × D)...............................800 × 97*
*1 Adjustable in 4 steps: 84 mm to 100 mm (from 3-3/8 in to 3-7/8
in)
• Without stands...................................................... 800 × 79 × 70 mm
• Weight .......................................................................1.5 kg (3.3 Ibs.)
Non-magnetic shielding type
1
(31-1/2 × 3-7/8 × 3-1/8 in)
(31-1/2 × 3-1/8 × 2-3/4 in)
× 79.5 mm
This system employs new technologies and algorithms that make it
possible to achieve 7-channel surround sound with only front
speakers, and without using wall reflections.
Manufactured under license from Dolby Laboratories. Dolby, Pro
Logic and the double-D symbol are trademarks of Dolby
Laboratories.
Manufactured under license under U.S. Patent Nos: 5,956,674;
5,974,380; 6,226,616; 6,487,535; 7,212,872; 7,333,929; 7,392,195;
7,272,567 & other U.S. and worldwide patents issued & pending.
DTS-HD, the Symbol, & DTS-HD and the Symbol together are
registered trademarks of DTS, Inc. Product includes software. © DTS,
Inc. All Rights Reserved.
* Specifications are subject to change without notice.
iPod, iPhone
“Made for iPod,” and “Made for iPhone” mean that an electronic
accessory has been designed to connect specifically to iPod, or
iPhone, respectively, and has been certified by the developer to meet
Apple performance standards.
Apple is not responsible for the operation of this device or its
compliance with safety and regulatory standards.
iPhone, iPod, iPod classic, iPod nano, iPod touch and iTunes are
trademarks of Apple Inc., registered in the U.S. and other countries.
“HDMI,” the “HDMI” logo and “High-Definition Multimedia
Interface” are trademarks, or registered trademarks of HDMI
Licensing LLC.
“x.v.Color” is a trademark of Sony Corporation.
“UniVolume” is a trademark of Yamaha Corporation.
31 En
INFORMATION
ADDITIONAL
English
Page 34

Specifications
Available signal information
■ HDMI signal compatibility
Receivable audio signals
Audio signal types Audio signal formats Compatible media
2ch Linear PCM 2ch, 32-192 kHz, 16/20/24 bit CD, DVD-Video, DVD-Audio, etc.
Multi-ch Linear PCM 8ch, 32-192 kHz, 16/20/24 bit DVD-Audio, Blu-ray disc, HD DVD, etc.
Bitstream DTS-HD Master Audio, DTS-HD High
Resolution Audio, DTS, Dolby TrueHD, Dolby
Digital Plus, Dolby Digital
y
• Refer to the supplied instruction manuals of the input source component, and set the component appropriately.
• When CPPM copy-protected DVD-Audio is played back, video and audio signals may not be output depending on the type of the
DVD player.
• This unit is not compatible with HDCP-incompatible HDMI or DVI components. Refer to the supplied instruction manuals of HDMI
or DVI components for HDCP compatibility.
• To decode audio bitstream signals on this unit, set the input source component appropriately so that the component outputs the
bitstream audio signals directly (does not decode the bitstream signals on the component). Refer to the supplied instruction manuals
for details.
Receivable video signals
– This unit is compatible with the video signals of the following resolutions:
• 480i/60 Hz
• 576i/50 Hz
• 480p/60 Hz
• 576p/50 Hz
• 720p/60 Hz, 50 Hz
• 1080i/60 Hz, 50 Hz
• 1080p/60 Hz, 50 Hz, 24 Hz
– Deep Color
– x.v.Color
– 3D video signal
y
The compatible video signal is changed depending on the connected TV.
DVD-Video, Blu-ray disc etc.
■ Digital audio signal (optical/coaxial)
Audio signal types Audio signal formats Compatible media
2ch Linear PCM 2ch, 32-96 kHz, 16/20/24 bit CD, DVD-Video, DVD-Audio, etc.
Bitstream Dolby Digital, Dolby Digital EX, DTS, DTS-ESDVD-Video, etc.
■ iPod/iPhone/USB device
Available sound data compression format
• WAV (8kHz to 48kHz, 16bit)
• MP3 (8kHz to 48kHz, 5kbps to 320kbps)
• WMA (8kHz to 48kHz, 5kbps to 384kbps)
• MPEG4-AAC (8kHz to 48kHz, 8kbps to 320kbps)
32 En
Page 35

Specifications
Notes on remote controls and batteries
• Be careful not to spill liquid on the remote control.
• Be careful not to drop the remote control.
• Do not leave the remote control in a place that is:
– hot or humid, such as near a heater or in a bathroom
– extremely cold
–dusty
• If the effective operation distance of the remote control decreases considerably, replace the batteries with two new
ones as soon as possible.
• Do not use an old battery together with new one.
• Do not use different types of batteries (for example, alkaline and manganese) together.
Their performance will vary, even if they are similar in shape.
• If the batteries run out, immediately remove them from the remote control to prevent an explosion or acid leak.
• Dispose of batteries according to regional regulations.
• If a battery starts leaking, dispose of it immediately. Be careful not to let leaking battery acid come into contact with
your skin or clothing. Before inserting new batteries, wipe the compartment clean.
• Keep batteries away from children. If a battery is accidentally swallowed, contact your doctor immediately.
• When not planning to use the remote control for long periods of time, remove the batteries from the remote control.
• Do not charge or disassemble the supplied batteries.
Information for Users on Collection and Disposal of Old Equipment
and Used Batteries
These symbols on the products, packaging, and/or accompanying documents mean that used electrical and
electronic products and batteries should not be mixed with general household waste.
For proper treatment, recovery and recycling of old products and used batteries, please take them to
applicable collection points, in accordance with your national legislation and the Directives 2002/96/EC
and 2006/66/EC.
By disposing of these products and batteries correctly, you will help to save valuable resources and prevent
any potential negative effects on human health and the environment which could otherwise arise from
inappropriate waste handling.
For more information about collection and recycling of old products and batteries, please contact your local
municipality, your waste disposal service or the point of sale where you purchased the items.
[Information on Disposal in other Countries outside the European Union]
These symbols are only valid in the European Union. If you wish to discard these items, please contact your
local authorities or dealer and ask for the correct method of disposal.
Note for the battery symbol (bottom two symbol examples):
This symbol might be used in combination with a chemical symbol. In this case it complies with the
requirement set by the Directive for the chemical involved.
INFORMATION
ADDITIONAL
English
33 En
Page 36

Attention: Veuillez lire ce qui suit avant d’utiliser l’appareil.
1 Pour utiliser l’appareil au mieux de ses possibilités, lisez
attentivement ce mode d’emploi. Conservez-le soigneusement
pour référence.
2 Installez cet appareil audio dans un endroit bien aéré, frais,
sec et propre - à l’abri de la lumière directe du soleil, des
sources de chaleur ou de vibration, des poussières, de
l’humidité et du froid. Pour une ventilation correcte, respectez
les espaces libres conseillés lors de l’installation.
Au-dessus: 5 cm
À l’arrière: 5 cm
Sur les côtés: 5 cm
3 Placez l’appareil loin des équipements, moteurs et
transformateurs électriques, pour éviter les ronflements
parasites.
4 N’exposez pas l’appareil à des variations brutales de
température, ne le placez pas dans un environnement très
humide (par exemple dans une pièce contenant un
humidificateur) car cela peut entraîner la condensation
d’humidité à l’intérieur de l’appareil qui elle-même peut être
responsable de décharge électrique, d’incendie, de dommage
à l’appareil ou de blessure corporelle.
5 Evitez d’installer l’appareil dans un endroit où des objets
peuvent tomber, ainsi que là où l’appareil pourrait être exposé
à des éclaboussures ou des gouttes d’eau. Sur le dessus de
l’appareil, ne placez pas:
– d’autres appareils qui peuvent endommager la surface de
l’appareil ou provoquer sa décoloration.
– des objets se consumant (par exemple, une bougie) qui
peuvent être responsables d’incendie, de dommage à
l’appareil ou de blessure corporelle.
– des récipients contenant des liquides qui peuvent être à
l’origine de décharge électrique ou de dommage à
l’appareil.
6 Ne couvrez pas l’appareil d’un journal, d’une nappe, d’un
rideau, etc. car cela empêcherait l’évacuation de la chaleur.
Toute augmentation de la température intérieure de l’appareil
peut être responsable d’incendie, de dommage à l’appareil ou
de blessure corporelle.
7 Ne branchez pas la fiche du câble d’alimentation de l’appareil
sur une prise secteur aussi longtemps que tous les
raccordements n’ont pas été effectués.
8 Ne pas faire fonctionner l’appareil à l’envers. Il risquerait de
chauffer et d’être endommagé.
9 N’exercez aucune force excessive sur les commutateurs, les
boutons et les cordons.
10 Pour débrancher la fiche du câble d’alimentation au niveau de
la prise secteur, saisissez la fiche et ne tirez pas sur le câble.
11 Ne nettoyez pas l’appareil au moyen d’un solvant chimique,
ce qui pourrait endommager la finition. Utilisez un chiffon sec
et propre.
12 N’alimentez l’appareil qu’à partir de la tension prescrite.
Alimenter l’appareil sous une tension plus élevée est
dangereux et peut être responsable d’incendie, de dommage à
l’appareil ou de blessure corporelle. Yamaha ne saurait être
tenue responsable des dommages résultant de l’alimentation
de l’appareil sous une tension autre que celle prescrite.
13 Pour empêcher tout dommage causé par les éclairs,
déconnectez la câble d’alimentation et toute antenne
extérieure de la prise murale pendant un orage.
14 Ne tentez pas de modifier ni de réparer l’appareil. Consultez
le service Yamaha compétent pour toute réparation qui serait
requise. Le coffret de l’appareil ne doit jamais être ouvert,
quelle que soit la raison.
15 Si vous envisagez de ne pas vous servir de l’appareil pendant
une longue période (par exemple, pendant les vacances),
débranchez la fiche du câble d’alimentation au niveau de la
prise secteur.
16 Lisez la section intitulée « Guide de dépannage » où figurent
une liste d’erreurs de manipulation communes avant de
conclure que l’appareil présente une anomalie de
fonctionnement.
17 Avant de déplacer l’appareil, appuyez sur pour placer
l’appareil en veille puis débranchez la fiche du câble
d’alimentation au niveau de la prise secteur.
18 La condensation se forme lorsque la température ambiante
change brusquement. En ce cas, débranchez la fiche du câble
d’alimentation et laissez l’appareil reposer.
19 Installez cet appareil à proximité de la prise secteur et à un
emplacement où la fiche du câble d’alimentation est
facilement accessible.
20 Les piles ne doivent pas être exposées à une chaleur extrême,
par exemple au soleil, à une flamme, etc.
21 Le propriétaire est responsable d’installer correctement les
composants. Yamaha ne peut être tenue responsable de toute
installation incorrecte des enceintes.
22 Ne jamais introduire la main ou un corps étranger dans le port
situé sur le côté avant de cette unité. Ne jamais attraper l’unité
par l’orifice du port lors des déplacements, car ceci pourrait
causer des blessures corporelles et/ou endommager l’unité.
e jamais placer un objet fragile à proximité du port de cette
23 N
unité. Si cet objet venait à chuter en raison de la pression de
l’air, il pourrait endommager l’unité et/ou causer des
blessures corporelles.
AVERTISSEMENT
POUR RÉ DUIRE LES RISQUES D’INCENDIE OU
DE SECOUSSE ÉLECTRIQUE, N’EXPOSEZ PAS
CET APPAREIL À LA PLUIE OU À L’HUMIDITÉ.
Aussi longtemps qu’il est branché sur la prise de
courant, cet appareil n’est pas déconnecté du secteur,
même si vous le mettez hors tension à l’aide de la
touche . Dans cet état, l’appareil consomme une très
faible quantité de courant.
i Fr
Page 37

Table des matières
INTRODUCTION PRÉPARATION
INTRODUCTION
Mise en route ...........................................................2
Éléments fournis ......................................................... 2
Préparation de la télécommande................................. 2
Commandes et fonctions............................................. 3
PRÉPARATION
Positionnement ........................................................6
Difficulté d’utilisation de la télécommande du
téléviseur (enceinte placée sous le téléviseur)........ 6
Fixation de l’enceinte au mur ..................................... 7
Raccordements ........................................................8
Raccordement des enceintes....................................... 8
Raccordement d’un téléviseur et d’un lecteur
Blu-ray.................................................................... 9
OPÉRATIONS DE BASE
Lecture de base......................................................10
Utilisation d’un casque ............................................. 10
Choix d’un mode de son .......................................11
Lecture en mode surround ........................................ 11
Lecture en mode stéréo............................................. 11
Fonction Clear Voice................................................ 11
Fonction d’amélioration du son des fichiers audio
compressés............................................................ 12
Fonction UniVolume ................................................ 12
Réglage de l’équilibre du volume............................. 12
Écoute d’émissions FM.........................................13
Fonctionnement de base du syntoniseur................... 13
Modification des stations FM présélectionnées........ 13
Utilisation d’un iPod/iPhone et d’un
périphérique USB..............................................16
Lecture ...................................................................... 16
Lecture répétée/aléatoire........................................... 17
Affichage des informations des fichiers audio ......... 17
Mise à jour du microprogramme .............................. 17
OPÉRATIONS UTILES
Menu de configuration..........................................18
Liste du menu de configuration................................ 18
Procédure de base ..................................................... 18
Réglage de l’équilibre du volume de chaque
canal...................................................................... 19
Réglage du son des hautes/basses fréquences
(réglage de la tonalité).......................................... 19
Configuration des paramètres HDMI ....................... 19
Modification de la luminosité de l’afficheur de la
face avant.............................................................. 19
Utilisation d’autres enceintes.................................... 20
Contrôle de la dynamique......................................... 21
Réglage du décodeur de matrice............................... 21
Réglages pour chaque source d’entrée
(menu Option)....................................................22
Réglage du niveau d’entrée de chaque prise
(VOLUME TRIM) ............................................... 22
Réglage du retard audio (AUDIO DELAY) ............. 22
Affectation d’une entrée audio à la prise numérique
optique/coaxiale (AUDIO ASSIGN).................... 22
Utilisation de l’appareil avec la télécommande
du téléviseur .......................................................23
Qu’est-ce que la fonction de commande HDMI ? .... 23
Réglage de la fonction de commande HDMI ........... 23
Enregistrement des composants HDMI sur le
téléviseur .............................................................. 24
Changement de la méthode de connexion et des
composants raccordés........................................... 24
INFORMATIONS
COMPLÉMENTAIRES
Guide de dépannage ..............................................25
Glossaire.................................................................29
Caractéristiques techniques..................................31
Informations sur les signaux disponibles.................. 32
Remarques à propos des télécommandes et piles ..... 33
OPÉRATIONS
DE BASE
OPÉRATIONS
UTILES
COMPLÉMENTAIRES
INFORMATIONS
Que vous permet de faire cet appareil
• Diffuser un son surround de grande qualité (AIR SURROUND XTREME) ............................................11
• Optimiser la clarté du récit ou des dialogues (fonction Clear Voice) ........................................................11
• Utiliser l’appareil à l’aide de la télécommande du téléviseur (fonction de commande HDMI) ................23
• Profiter d’un son de grande qualité sur un iPod/iPhone (connexion numérique pour iPod/iPhone)..........16
• Configurer l’appareil sur le canal 5.1 en utilisant les enceintes de votre choix.........................................20
■ Quelques mots sur ce mode d’emploi
• Dans ce mode d’emploi, les opérations qui peuvent être exécutées au moyen des touches de la face avant ou de la
télécommande sont décrites comme étant exécutées par cette dernière.
•Le symbole y appelle votre attention sur un conseil d’utilisation. Les remarques contiennent des informations
importantes relatives à la sécurité et à l’utilisation de l’ensemble.
• Ce mode d’emploi a été créé avant la fabrication de l’appareil. Les caractéristiques et la présentation ont pu être
modifiées en vue de l’amélioration du produit, etc. En cas de divergence entre le mode d’emploi et l’appareil, ce
dernier prime.
Français
1 Fr
Page 38

INTRODUCTION
Mise en route
Éléments fournis
Ce produit comprend les éléments suivants. Avant d’effectuer les raccordements, assurez-vous que vous avez reçu tous les
éléments suivants.
■ Appareils
Récepteur à caisson de graves intégré (SR-301) Enceinte (NS-BR301)
■ Accessoires
Câble d’enceinte × 1 (3 m) Télécommande × 1 Antenne FM intérieure × 1
Récepteur de
signaux
de la télécommande
du téléviseur × 1
(modèles pour les
États-Unis, le Canada,
Taïwan, la Chine et
l’Asie)
Pile × 2 (AAA, R03, UM4) Gabarit pour le montage × 1 Mode d’emploi
(modèles pour l’Europe,
la Russie, l’Australie et la
Corée)
× 1
Préparation de la télécommande
Avant d’installer les piles ou d’utiliser la télécommande, lisez attentivement les précautions relatives à la télécommande et
aux piles/accumulateurs aux sections « Attention: Veuillez lire ce qui suit avant d’utiliser l’appareil. » et « Remarques à
propos des télécommandes et piles », page 33.
■ Mise en place des piles ■ Portée de fonctionnement
2 Fr
Moins de 6 m
Page 39

Mise en route
1 2
Commandes et fonctions
■ Face avant du récepteur à caisson de graves intégré
1
2
3
4
5
1 Témoin STATUS
S’allume pour indiquer l’état du système. (☞ P. 10)
2 (Alimentation)
Cette touche permet de mettre l’appareil sous tension
ou en mode veille. (☞ P. 10)
Remarque
Une petite quantité d’électricité est utilisée pour la réception
du signal infrarouge de la télécommande, même lorsque
l’appareil est en mode de veille.
3 INPUT
Pour sélectionner la source d’entrée qui doit être
écoutée. (☞ P. 10)
67
4 Port USB
Ce port permet de raccorder un périphérique USB.
(☞ P. 16)
5 VOLUME –/+
Ces touches permettent de régler le volume de
l’appareil. (☞ P. 10)
6 Borne PHONES
Cette borne permet de raccorder un casque. (☞ P. 10)
7 Capteur de télécommande
Reçoit les signaux émis par la télécommande.
(☞ P. 2, 5)
8 Afficheur de la face avant
L’afficheur de la face avant fournit des informations
relatives à l’état fonctionnel de l’appareil. (☞ P. 4)
8
INTRODUCTION
■ Face arrière du récepteur à caisson de graves intégré
57 6 43
1 Câble d’alimentation
Pour le raccordement vers une prise secteur murale.
(☞ P. 8)
2 Les prises HDMI IN 1 - 3/HDMI OUT (ARC)
• Les prises HDMI IN 1 - 3 permettent de
raccorder des composants externes compatibles
HDMI. (☞ P. 9)
• La prise HDMI OUT permet de raccorder un
téléviseur compatible HDMI. (☞ P. 9)
3 Borne DIGITAL IN (TV)
Cette borne permet de raccorder le câble optique
numérique au téléviseur. (☞ P. 9)
4 Borne DIGITAL IN (STB)
Cette borne permet de raccorder le câble audio
numérique à broches au décodeur. (☞ P. 9)
5 Bornes ANALOG INPUT
Ces bornes permettent de raccorder le câble audio
analogique aux composants externes. (☞ P. 9)
6 Borne ANTENNA
Cette borne permet de raccorder l’antenne FM
fournie. (☞ P. 9)
7 Borne SPEAKERS
Cette borne permet de raccorder les enceintes.
(☞ P. 8)
Français
3 Fr
Page 40

Mise en route
■ Afficheur de la face avant du récepteur à caisson de graves intégré
1 2 3 4 5
8
7
6
1 Témoin HDMI
S’allume si la communication ne présente aucune
anomalie lorsque HDMI est la source d’entrée
sélectionnée.
2 Témoins du syntoniseur
Témoin TUNED
Ce témoin s’allume lorsque l’appareil capte une
station. (☞ P. 13)
Témoin STEREO
Ce témoin s’allume lorsque l’appareil capte un signal
puissant provenant d’une station FM stéréo en mode
de syntonisation automatique. (☞ P. 13)
Témoin AUTO
Ce témoin clignote lorsque l’appareil syntonise ou met
en mémoire les stations automatiquement. (☞ P. 13)
Témoin MEMORY
Ce témoin clignote lorsque l’appareil met une station
en mémoire. (☞ P. 13, 14)
Témoin EMPTY
S’allume lorsque le numéro de présélection est vide.
(☞ P. 14)
Témoin PS/PTY/RT/CT (Modèles pour
l’Europe et la Russie uniquement)
S’allume en fonction des informations dont dispose le
système de radiodiffusion de données de service.
(☞ P. 15)
3 Témoins des décodeurs
Lorsque l’un des décodeurs de l’appareil est activé, le
témoin correspondant s’allume.
4 Témoin de la fonction Clear Voice
Ce témoin s’allume lorsque le mode Clear Voice est
sélectionné. (☞ P. 11)
5 Témoin VOLUME
• Indique le niveau de volume actuel.
• Clignote lorsque la fonction Silencieux est activée.
(☞ P. 10)
6 Afficheur multifonction
Indique la source d’entrée sélectionnée, le mode de
son actuel et d’autres informations.
7 Témoin ENHANCER
S’allume lorsque la fonction d’amélioration du son
des fichiers audio compressés est activée. (☞ P. 12)
8 Témoin UNIVOLUME
S’allume lorsque le mode UniVolume est sélectionné.
(☞ P. 12)
4 Fr
Page 41

Mise en route
E
D
C
B
A
■ Télécommande
Émetteur de signaux
infrarouges
1
2
3
4
5
6
7
8
9
1 SURROUND
Pour sélectionner le mode surround. (☞ P. 11)
2 STEREO
Pour activer et désactiver alternativement le mode
stéréo étendu. (☞ P. 11)
3 Touches d’entrée
Ces touches permettent de sélectionner la source
d’entrée de votre choix. (☞ P. 10)
Appuyez plusieurs fois sur une touche de sélection
d’entrée pour sélectionner la source correspondante.
TV/STB: TV, STB
HDMI1-3: HDMI1, HDMI2, HDMI3
ANALOG/FM: ANALOG, FM
USB: USB
0
5 OPTION
Cette touche permet d’accéder au menu d’options de
chaque entrée. (☞ P. 13, 16, 22)
6 (MENU), ( ), ( ), ( ),
ENTER
• Ces touches permettent de modifier un réglage.
• Elles permettent également de commander l’iPod/
iPhone et le périphérique USB (clé USB, lecteur
audio portable, etc.) (☞ P. 16)
S / T : ces touches permettent de faire défiler l’écran
de l’iPod/iPhone ou de parcourir les dossiers
du périphérique USB. (☞ P. 16)
7 RETURN
• Cette touche permet d’annuler la mise en mémoire
de la station présélectionnée. (☞ P. 13)
• Elle permet également de revenir au menu
précédent au sein du menu d’options.
(☞ P. 22)
• Elle permet par ailleurs d’arrêter la lecture du
périphérique USB (clé USB, lecteur audio
portable, etc.) (☞ P. 16)
8 SUBWOOFER +/–
Ces touches permettent de régler l’équilibre du
volume du caisson de graves. (☞ P. 10, 19)
9 ENHANCER
Cette touche permet d’activer et de désactiver la
fonction d’amélioration du son des fichiers audio
compressés. (☞ P. 12)
0 LEVEL
Cette touche permet de régler le niveau de sortie des
enceintes. (☞ P. 12).
A UNIVOLUME
Pour activer et désactiver le mode UniVolume.
(☞ P. 11)
B VOLUME +/–, MUTE
Ces touches permettent de régler le volume de
l’appareil. (☞ P. 10)
C SETUP
Pour accéder au menu de configuration. (☞ P. 18)
D CL
EAR VOICE
Cette touche permet d’activer et de désactiver le mode
Clear Voice. (☞ P. 11)
E (Alimentation)
Cette touche permet de mettre l’appareil sous tension
ou en mode veille. (☞ P. 10)
INTRODUCTION
4 MEMORY, TUNING / , PRESET / ,
INFO
Pour commander un tuner FM. (☞ P. 13)
Français
5 Fr
Page 42

PRÉPARATION
Positionnement
Pour que les sons produits soient de qualité constante,
vous devez disposer l’appareil au bon endroit et l’installer
correctement. Les illustrations ci-dessous vous indiquent
comment positionner l’appareil.
Remarques
• Ne placez pas l’appareil sur ou sous un autre composant,
notamment un lecteur Blu-ray ; en d’autres termes, évitez
d’empiler les appareils. La vibration de cet appareil risque de
provoquer une panne des autres composants.
• Veillez à laisser suffisamment d’espace pour la ventilation à
l’avant, à l’arrière et sur les côtés (lorsque les pieds sont fixés)
de l’appareil. Ne placez pas l’appareil sur un tapis épais, etc.
• Les sons basse fréquence produits par le caisson de graves
intégré peuvent être perçus différemment selon la position
d’écoute et l’emplacement du caisson de graves. Pour obtenir
les sons souhaités, essayez de changer la position du caisson de
graves intégré.
• Selon l’environnement d’installation, il peut être préférable
d’effectuer les raccordements avant d’installer l’appareil. Il est
conseillé de placer et de disposer temporairement tous les
composants pour mieux voir comment procéder.
• Utilisez un chiffon propre, doux et sec (par exemple, un essuieverre) pour nettoyer l’appareil.
• N’appuyez pas sur la grille de l’enceinte lorsque vous déplacez
cette dernière.
Difficulté d’utilisation de la télécommande du téléviseur (enceinte placée sous le téléviseur)
Lorsque vous placez l’enceinte sous le téléviseur, il est
possible que la télécommande du téléviseur ne fonctionne pas
correctement si l’enceinte obstrue le capteur. Le cas échéant,
appliquez les procédures suivantes pour résoudre le problème.
Consultez le mode d’emploi du téléviseur pour connaître
l’emplacement du capteur de télécommande.
Réglez la hauteur de l’enceinte à l’aide des pieds
1
Retirez les vis qui fixent les pieds de l’enceinte et déplacez
les pieds pour régler la hauteur de l’enceinte. Fixez à nouveau
les pieds à l’aide des vis, comme illustré ci-dessous.
2 Utilisez le récepteur de signaux de la
télécommande du téléviseur
Le récepteur de signaux de la télécommande du téléviseur
(fourni) permet de recevoir les signaux de la télécommande
du téléviseur et de les transmettre au capteur situé sur le
téléviseur. Positionnez le récepteur de signaux de la
télécommande du téléviseur de la façon suivante.
Récepteur de signaux
Placement du récepteur à caisson de graves
intégré en position verticale
Retirez les pieds et les entretoises situés sous le récepteur
à caisson de graves intégré et fixez-les sur le côté, comme
illustré ci-dessous.
6 Fr
1
Retirez les
deux joints
transparents
3
Fixez le récepteur de
signaux sur l’enceinte
Environ 10 mm
Émetteur de
signaux
Capteur de
télécomma
nde sur le
téléviseur
2
Placez l’émetteur de
signaux face au
centre du capteur de
télécommande du
téléviseur.
Page 43

Positionnement
y
• Dirigez la télécommande du téléviseur vers le haut du récepteur
de signaux de la télécommande du téléviseur.
• Vous pouvez utiliser la télécommande du téléviseur via le
récepteur de signaux de la télécommande du téléviseur même si
l’appareil est en mode veille.
• Il est possible que certaines fonctions de la télécommande du
téléviseur ne soient pas disponibles.
• Vous pouvez fixer le récepteur de signaux de la télécommande
du téléviseur sur une partie saillante, par exemple à l’arrière du
support d’enceinte.
• Nettoyez l’emplacement de fixation sur l’enceinte à l’aide d’un
chiffon doux et sec, par exemple un essuie-verre.
• Nettoyez le récepteur et l’émetteur de signaux du récepteur de
signaux de la télécommande du téléviseur à l’aide d’un chiffon
doux et sec, par exemple une essuie-verre.
Fixation de l’enceinte au mur
Installation de l’enceinte à l’aide des orifices en
forme de trou de serrure
Vous pouvez fixer l’enceinte au mur à l’aide de vis
vendues dans le commerce (nº 8, 4 mm de diamètre).
Si l’enceinte doit être fixée à un mur, veillez à
confier ce travail à une personne qualifiée ou à
votre revendeur. Le client ne devrait jamais
essayer d’effectuer ce travail lui-même. Si
l’installation n’est pas correcte ou si elle n’est
pas adaptée, l’enceinte risque en effet de tomber
et des personnes peuvent être blessées.
1 Fixez le gabarit pour le montage fourni au
mur et marquez la position des orifices du
gabarit.
Rubans ou punaises
Marque
3 Suspendez l’enceinte aux vis à l’aide des
orifices en forme de trou de serrure situés au
dos de cette dernière.
Installation de l’enceinte à l’aide des trous de
vis
Vous pouvez également utiliser les trous de vis situés à
l’arrière de l’enceinte pour installer cette dernière sur une
étagère (non fournie), entre autres.
38,5 mm
Trous de vis
Profondeur du trou : 14 mm
Vis
(M6)
Étagère, etc.
256 mm
Diamètre : 6 mm
14 mm
Min. 7 mm
Trou
de vis
NS-BR301
PRÉPARATION
2 Retirez le gabarit pour le montage et installez
les vis (non fournies) aux emplacements
indiqués.
De 7 à 9 mm
De 2 à 4 mm
4mm (nº8)
Minimum
20 mm
Remarques
• Fixez l’enceinte au mur ou sur une étagère. Ne tentez pas
d’installer l’enceinte sur un mur peu solide, notamment en
plâtre ou en bois plaqué. L’enceinte pourrait tomber.
• Utilisez des vis disponibles dans le commerce pouvant
supporter le poids de l’installation.
• Veillez à utiliser les vis spécifiées pour fixer l’enceinte.
L’enceinte risque de tomber si vous utilisez des éléments de
fixation autres que les vis spécifiées, notamment des vis plus
courtes, des clous ou du ruban double-face.
• Lorsque vous raccordez l’enceinte, fixez soigneusement les
câbles d’enceinte de sorte qu’ils ne soient pas lâches. Un câble
lâche peut être accidentellement accroché d’une main ou d’un
pied, ce qui peut provoquer la chute de l’enceinte.
• Après avoir installé l’enceinte, vérifiez qu’elle est correctement
fixée. Yamaha décline toute responsabilité en cas d’accidents
provoqués par des installations incorrectes.
Français
7 Fr
Page 44

Raccordements
• Ne raccordez le cordon d’alimentation que lorsque toutes les liaisons sont terminées.
• N’exercez aucune force excessive pour introduire la fiche. Cela aurait pour effet d’endommager la fiche
et/ou la prise.
Raccordement des enceintes
Suivez la procédure décrite ci-après pour raccorder le récepteur à caisson de graves intégré et les enceintes.
Dévissez et retirez le tube
isolant du fil de sortie.
Insérez-le dans la borne en faisant correspondre la
couleur du fil à la borne de couleur située sur la face
arrière.
Enceintes surround
(vendues
séparément)
DG
Lecture 5,1 canaux
y
À la prise secteur
Enceinte (NS-BR301)
Rouge
Marron
Dévissez et retirez le tube
isolant du fil de sortie.
Vert
Noir
Insérez-le dans la borne en faisant
correspondre la couleur du fil à la
borne de couleur située sur la face
arrière.
Blanc
Gris
y
• Des enceintes surround supplémentaires (disponibles dans le commerce) sont nécessaires pour la lecture 5,1 canaux.
• Reportez-vous à la section « Utilisation d’autres enceintes » (☞ P. 20) lors de l’utilisation d’enceintes supplémentaires.
8 Fr
Page 45

Raccordement d’un téléviseur et d’un lecteur Blu-ray
Suivez les procédures décrites ci-après pour raccorder les câbles en fonction du composant sélectionné.
1 Câble HDMI (vendu séparément) 2 Câble HDMI (vendu séparément)
Raccordements
3 Câble optique (vendu séparément)*
4
*
3
2
*
1
4 Antenne intérieure FM (fournie)
y
Si la réception des ondes radio est médiocre ou si vous désirez
l’améliorer, nous vous suggérons d’utiliser une antenne extérieure.
Pour de plus amples détails, veuillez consulter le revendeur Yamaha
agréé ou le service après-vente le plus proche.
1 Retirer le
capuchon
1
3*
2 Vérifier le sens
de la fiche
HDMI INPUT
(Exemple)
PRÉPARATION
2
1
1
Téléviseur
Signaux vidéo
Console de jeux
*1 y
Pour la fonction de commande HDMI, aucun câble optique n’est nécessaire lors de l’utilisation de la borne « ARC » du téléviseur « 2».
Le canal de retour audio (ARC) transmet le signal audio numérique (du téléviseur) à cet appareil via un câble HDMI. Activez la
fonction de commande HDMI de cet appareil pour activer la fonction ARC. (☞ P. 19)
*2
y
Raccordez les câbles analogiques à broches (vendus séparément) aux bornes de sortie audio analogiques d’un périphérique externe
(p. ex., un magnétoscope) pour reproduire le son analogique.
y
*3
Raccordez un câble audio numérique à broches (vendu séparément) à la borne de sortie audio numérique coaxiale d’un syntoniseur TV
par satellite/câble pour reproduire le son numérique.
Lecteur Blu-ray
Signaux audio
Français
9 Fr
Page 46

OPÉRATIONS DE BASE
Lecture de base
Lorsque vous avez raccordé tous les câbles et préparé le boîtier de télécommande, procédez de la façon suivante pour
effectuer la lecture de base.
4 Appuyez sur VOLUME +/– pour régler le
niveau de volume.
1
2
Appuyez sur SUBWOOFER +/– pour régler le
niveau du caisson de graves.
y
• Pour couper temporairement le son, appuyez sur MUTE.
Lorsque le son est coupé, le témoin VOLUME clignote.
Pour rétablir le son, appuyez à nouveau sur MUTE ou
appuyez sur VOLUME +/–.
• Si le son est diffusé via l’enceinte du téléviseur et via cet
appareil, coupez le son du téléviseur.
• Le volume du caisson de graves et celui de l’appareil
peuvent être réglés séparément.
• Il est également possible de régler le volume du caisson de
graves en écoutant la tonalité d’essai. (☞ P. 19)
• Il est recommandé de baisser le volume du caisson de
graves la nuit.
4
Vous pouvez commander l’appareil à l’aide de la
télécommande du téléviseur lorsque la fonction de
commande HDMI est disponible. Reportez-vous à la
page 23 pour obtenir de plus amples informations.
1 Appuyez sur (Alimentation).
L’appareil se met sous tension et le témoin STATUS
s’allume en vert.
La source d’entrée et le mode surround apparaissent
sur l’afficheur de la face avant.
y
Cet appareil dispose d’une fonction de mise en veille
automatique qui met l’appareil hors tension si aucune
opération n’est effectuée dans les 12 heures qui suivent sa
mise sous tension.
2 Appuyez sur l’une des touches d’entrée pour
sélectionner une source d’entrée.
Le nom de la source d’entrée apparaît sur l’afficheur
de la face avant pendant trois secondes, puis
l’affichage normal est rétabli. (Nom de la source
d’entrée : mode surround/stéréo).
Remarque
Lorsque le son de l’entrée HDMI est reproduit sur le
téléviseur, il est impossible de régler le niveau de volume en
appuyant sur les touches VOLUME +/– ou MUTE de la
télécommande.
5 Sélectionnez le mode surround ou le mode
stéréo et définissez vos préférences
sonores. (☞ P. 11)
Appuyez une nouvelle fois sur
(Alimentation) pour mettre l’appareil en
mode veille.
Lorsque la fonction de commande HDMI est activée ou que la
batterie de l’iPod/iPhone est chargée, le témoin STATUS s’allume
en rouge. Lorsque la fonction de commande HDMI est désactivée,
le témoin STATUS s’éteint. (☞ P. 3)
Utilisation d’un casque
Reliez la fiche d’un casque à la borne PHONES (☞ P. 3)
de l’appareil.
• Lorsque vous utilisez un casque, vous pouvez régler
séparément le volume du casque et celui de la tonalité.
• Vous pouvez également profiter d’un son surround et
d’un son stéréo lorsque vous utilisez un casque.
(☞ P. 11)
3 Démarrez la lecture sur le composant
externe sélectionné.
Pour de plus amples détails concernant le composant
externe, reportez-vous à son mode d’emploi.
10 Fr
Page 47

Choix d’un mode de son
SURROUND
STEREO
Lecture en mode surround
Vous pouvez obtenir des effets sonores réalistes.
Appuyez sur la touche SURROUND pour régler
le mode surround.
Appuyez plusieurs fois sur la touche SURROUND
jusqu’à ce que le mode de votre choix apparaisse sur
l’afficheur de la face avant.
Description des modes surround disponibles
Affichage Effet
MOVIE Sélectionnez ce mode lorsque vous regardez
MUSIC Sélectionnez ce mode lorsque vous écoutez de
SPORTS Sélectionnez ce mode lorsque vous regardez
GAME Sélectionnez ce mode lorsque vous utilisez des
TV PROGRAM
(TV PROG)
STANDARD
*1
Ce mode est disponible uniquement lors du raccordement des
enceintes surround. (☞ P. 20)
y
• L’appareil mémorise automatiquement les réglages affectés à
chaque source d’entrée.
• L’appareil crée un son surround 7.1 canaux haute qualité grâce
à la technologie AIR SURROUND XTREME en l’absence
d’enceintes surround.
• Selon les réglages choisis, il se peut que l’appareil ne décode
pas le son DTS-HD Master Audio ou le son DTS-HD High
Resolution Audio. Dans ces cas-là, seul le DTS est décodé.
des films enregistrés sur un support.
la musique enregistrée sur un support.
des émissions sportives.
jeux vidéo.
Sélectionnez ce mode lorsque vous regardez
toutes sortes d’émissions de télévision
générales.
*1
Sélectionnez ce mode lorsque vous ne
souhaitez activer aucun effet sonore.
CLEAR VOICE
Lecture en mode stéréo
Ce mode permet d’obtenir un son plus étendu pour une
source 2 canaux telle qu’un lecteur de CD.
Appuyez sur la touche STEREO pour accéder
au mode stéréo étendu.
Chaque fois que vous appuyez sur la touche STEREO,
cette fonction est alternativement activée (EXTENDED
STEREO) et désactivée (STEREO).
« STEREO » : reproduit le son sans aucun effet.
« EXTENDED STEREO » : reproduit un son stéréo plus
étendu.
y
• Le réglage par défaut est « EXTENDED STEREO ».
• L’appareil mémorise les réglages affectés à chaque source
d’entrée.
Fonction Clear Voice
Cette fonction permet d’optimiser la clarté des dialogues
lorsque vous regardez des films, des séries TV ou des
émissions intégrales.
Appuyez sur la touche CLEAR VOICE pour
activer/désactiver cette fonction.
Lorsque la fonction Clear Voice est activée, le témoin
« ● » (Clear Voice) s’affiche.
y
L’appareil mémorise les réglages affectés à chaque source
d’entrée.
OPÉRATIONS
DE BASE
11 Fr
Français
Page 48

Choix d’un mode de son
/
SUBWOOFER +/–
ENHANCER
Fonction d’amélioration du son des fichiers audio compressés
Vous pouvez lire les fichiers compressés (par exemple au
format MP3 et WMA) en amplifiant les graves et les aigus
de façon dynamique.
Appuyez sur la touche ENHANCER pour
activer/désactiver cette fonction.
Lorsque la fonction d’amélioration du son des fichiers
audio compressés est activée, le témoin ENHANCER
s’affiche.
y
L’appareil mémorise les réglages affectés à chaque source
d’entrée.
Fonction UniVolume
Lorsque vous regardez la télévision, vous pouvez
compenser les différences de volume excessives pour un
plus grand confort d’écoute, notamment dans les cas
suivants :
• lorsque vous changez de chaîne ;
• lorsqu’une émission est interrompue par une annonce
publicitaire ;
• lorsqu’un programme se termine et qu’un autre
commence.
Appuyez sur la touche UNIVOLUME pour
activer/désactiver cette fonction.
Lorsque la fonction UniVolume est activée, le témoin
UNIVOLUME s’affiche.
y
L’appareil mémorise les réglages affectés à chaque source
d’entrée.
UNIVOLUME
LEVEL
Réglage de l’équilibre du volume
Vous pouvez régler l’équilibre du volume des enceintes
virtuelles et du caisson de graves lors de la lecture.
1 Appuyez plusieurs fois sur la touche LEVEL
pour sélectionner l’un des canaux ajustables
suivants.
Options disponibles
FRONT L,
FRONT R
CENTER enceinte centrale
SURROUND L,
SURROUND R
SUBWOOFER caisson de graves
enceintes avant (gauche/droite)
enceinte surround virtuelle et enceintes
surround (gauche/droite)
2 Appuyez sur / pour régler le niveau de
volume une fois affiché le canal de votre
choix.
Plage de réglage : de –6 à +6 (réglage par
défaut : 0)
y
Vous pouvez régler le volume du caisson de graves en
appuyant sur SUBWOOFER +/-.
Remarques
• Il est impossible de régler l’équilibre du volume lors de
l’utilisation d’un casque.
• Le réglage de chaque canal est disponible pour toutes les
sources d’entrée.
12 Fr
Page 49

Écoute d’émissions FM
Fonctionnement de base du syntoniseur
ANALOG/FM
Appuyez plusieurs fois sur cette
touche pour sélectionner l’entrée FM.
MEMORY
Cette touche permet de mettre en
mémoire les stations
manuellement.
TUNING /
Appuyez sur l’une de ces touches pour
modifier la fréquence d’un pas ou
maintenez-la e nfoncée pour rechercher
les stations automatiquement.
OPTION
Cette touche permet d’accéder
au menu d’options lorsque FM
est l’entrée sélectionnée.
INFO
Cette touche permet de sélectionner
les informations affichées sur
l’afficheur de la face avant.
PRESET /
Ces touches permettent de
sélectionner les stations FM
présélectionnées.
OPÉRATIONS
DE BASE
Curseur dans le menu
d’options
RETURN
Cette touche permet de revenir
au menu précédent ou d’annuler
une opération.
Modification des stations FM présélectionnées
■ Mise en mémoire automatique
Il est possible de mettre 40 stations FM en mémoire (01 à 40).
1 Appuyez plusieurs fois sur la touche
ANALOG/FM pour sélectionner l’entrée FM.
2 Appuyez sur la touche OPTION pour accéder
au menu d’options.
L’indication « 1.VOLUME TRIM » apparaît sur
l’afficheur de la face avant.
3
Appuyez sur / pour sélectionner
« 2.AUTO PRESET », puis appuyez sur ENTER.
y
Appuyez plusieurs fois sur la touche PRESET / pour
désigner le numéro de présélection sous lequel la première
station doit être mémorisée.
Après 5 secondes environ, la mise en mémoire
automatique commence, à partir de la fréquence la
plus basse et en procédant vers les fréquences plus
élevées. Une fois la fréquence mémorisée, le témoin
TUNED s’allume.
Lorsque la mise en mémoire automatique est
terminée, le message « Preset Complete » apparaît
sur l’afficheur de la face avant pendant trois
secondes, puis le menu d’options est rétabli.
y
Appuyez sur la touche RETURN lors de la recherche
automatique pour mettre fin à la mise en mémoire automatique.
Remarques
• Les données relatives à une station qui peuvent exister sous un
numéro de présélection sont effacées au moment où de
nouvelles données sont sauvegardées sous ce numéro.
• Si le nombre des stations ne permet pas de remplir les
40 mémoires, la mise en mémoire automatique s’arrête après
examen de toutes les stations disponibles.
• Seules les stations qui présentent un signal puissant peuvent être
mémorisées. Si la station souhaitée n’est pas mémorisée, ou si
une station n’est pas mémorisée sous le numéro de présélection
souhaité, présélectionnez la station manuellement. (☞ P. 14)
Français
13 Fr
Page 50

Écoute d’émissions FM
■ Mise en mémoire manuelle de
stations
Utilisez cette fonction pour mettre en mémoire
manuellement les stations souhaitées.
1 Syntonisez la station radio que vous
souhaitez mémoriser.
2 Appuyez sur la touche MEMORY.
Le message « MANUAL PRESET » apparaît sur
l’afficheur de la face avant, suivi du numéro de
présélection sous lequel la station va être mémorisée.
y
Maintenez enfoncée la touche MEMORY pendant au moins
2 secondes pour mémoriser la station sous le numéro de
présélection vide le plus bas ou sous le numéro de
présélection qui suit le dernier numéro mémorisé.
3 Appuyez sur PRESET / pour
sélectionner le numéro de présélection (01 à
40) sous lequel la station va être mémorisée.
Lorsque vous sélectionnez un numéro de présélection
sous lequel aucune station n’est mémorisée, le témoin
EMPTY apparaît sur l’afficheur. Lorsque vous
sélectionnez un numéro de présélection mémorisé, la
fréquence mémorisée s’affiche à droite du numéro de
présélection.
y
Pour annuler la mémorisation, appuyez sur la touche
RETURN de la télécommande ou n’effectuez aucune
opération sur le syntoniseur pendant au moins 30 secondes.
4 Appuyez à nouveau sur la touche MEMORY
pour reprendre la mémorisation.
■ Effacement d’une station mise en
mémoire
1 Appuyez sur la touche OPTION pour accéder
au menu d’options.
2 Affichez « 3.CLEAR PRESET » à l’aide de la
touche / , puis appuyez sur ENTER.
Le numéro de présélection et la fréquence
apparaissent sur l’afficheur de la face avant.
y
Vous pouvez annuler l’opération et revenir au menu
d’options en appuyant sur la touche RETURN de la
télécommande.
3 Sélectionnez le numéro de présélection de la
station mémorisée que vous souhaitez
effacer à l’aide des touches / , puis
appuyez sur ENTER.
La station mémorisée sous le numéro de présélection
sélectionné est effacée. Pour effacer le contenu
mémorisé sous plusieurs numéros de présélection,
répétez les étapes ci-dessus.
Pour terminer l’opération, appuyez sur la touche
OPTION.
■ Utilisation du mode de réception
mono
Si le signal de la station FM sélectionné est trop faible,
réglez le mode de réception sur « MONO » pour
augmenter la qualité du signal.
1 Appuyez sur la touche OPTION pour accéder
au menu d’options.
14 Fr
2 Affichez « 4.STEREO/MONO » à l’aide de la
touche , puis appuyez sur ENTER.
3 Sélectionnez « MONO » pour régler le mode
de réception mono à l’aide des touches
/.
Page 51

Écoute d’émissions FM
■ Affichage des informations à
l’écran
Chaque fois que vous appuyez sur la touche INFO, les
informations qui apparaissent sur l’afficheur changent
comme suit :
Modèles pour l’Europe et la Russie uniquement
Type d’informations
• SURROUND MODE
Affiche le mode surround ou le mode stéréo.
• FREQUENCY
Affiche la fréquence et le numéro de présélection.
• PROGRAM SERVICE (PS)
Affiche le programme du système de radiodiffusion de
données de service actuellement reçu.
• PROGRAM TYPE (PTY)
Affiche le type de programme du système de
radiodiffusion de données de service actuellement
reçu.
• RADIO TEXT (RT)
Affiche les informations concernant le programme du
système de radiodiffusion de données de service
actuellement reçu.
• CLOCK TIME (CT)
Affiche l’heure actuelle.
■ Utilisation du service de données
TP (émission d’informations
routières) (modèles pour l’Europe
et la Russie uniquement)
Utilisez cette fonction pour recevoir le service de données
TP (émission d’informations routières) correspondant au
réseau de stations du système de radiodiffusion de
données de service.
1 Appuyez sur la touche OPTION pour accéder
au menu d’options.
2 Appuyez sur / pour sélectionner
« 5.TRAFFIC PROG », puis appuyez sur
ENTER.
La recherche démarre automatiquement. Le témoin
AUTO et l’indication « TP » clignotent sur
l’afficheur multifonction pendant la recherche. Lors
de la réception d’une émission d’informations
routières, l’indication « TP » et la fréquence restent
affichées et la recherche cesse.
Si l’appareil ne parvient pas à capter une émission
d’informations routières, l’indication « TP » et la
fréquence disparaissent, et le message « TP Not
Found » apparaît sur l’afficheur de la face avant.
y
• Appuyez sur la touche RETURN pour annuler la
recherche.
• Si vous n’effectuez aucune opération pendant 30 secondes
pendant la recherche, le menu d’options se ferme et la
recherche est annulée.
OPÉRATIONS
DE BASE
15 Fr
Français
Page 52

Utilisation d’un iPod/iPhone et d’un périphérique USB
Vous pouvez raccorder un périphérique USB, tel qu’un
iPod/iPhone, une clé USB ou un lecteur audio portable,
pour lire des fichiers audio.
Fonction de charge de la batterie
Il est possible de charger la batterie du périphérique
raccordé lorsque l’appareil est sous tension. Si vous
raccordez à l’appareil un périphérique, notamment un
iPod/iPhone, celui-ci continue de se charger même lorsque
vous mettez l’appareil en mode veille.
iPod/iPhone pris en charge
iPod classic
iPod nano (3
iPod touch
iPhone
iPhone 3G
iPhone 3GS
iPhone 4
y
• Il est possible que certaines fonctions ne soient pas compatibles
selon le modèle ou la version du logiciel de votre iPod/iPhone.
• Pour obtenir la liste complète des messages d’état qui
apparaissent sur l’afficheur de la face avant, reportez-vous à la
section « Messages relatifs à l’iPod/iPhone et au périphérique
USB » du chapitre « Guide de dépannage » (☞ P. 27).
• Veillez à régler le volume au minimum avant de retirer votre
iPod/iPhone.
Périphériques USB pris en charge
Clés USB et lecteurs audio portables USB formatés en
FAT et prenant en charge la classe de stockage de masse
USB
Remarque
Il est possible que certains des périphériques USB décrits cidessus ne soient pas pris en charge.
e
génération à 6e génération)
USB
INFO
OPTION
ENTER
RETURN
SETUP
FOLDER
▲/▼
/
Lecture
1 Appuyez plusieurs fois sur la touche USB
pour sélectionner l’entrée USB.
2 Démarrez la lecture sur l’iPod/iPhone ou le
périphérique USB.
iPod/iPhone Périphérique USB
: lecture/pause
: avance d’un morceau
(maintenir la touche enfoncée
pour une avance rapide)
: recul d’un morceau
(maintenir la touche enfoncée
pour un retour rapide)
▲/▼ : défilement de l’écran
*1
Cette touche permet de reprendre la lecture du dernier fichier
audio lu (reprise de la lecture).
*2
Le nom du dossier sauté apparaît sur l’afficheur de la face
avant pendant trois secondes.
: lecture/pause
: avance d’un morceau
(maintenir la touche enfoncée
pour une avance rapide)
: recul d’un morceau
(maintenir la touche enfoncée
pour un retour rapide)
RETURN : arrêt
FOLDER ▲/▼ : saut d’un
*2
dossier
y
L’appareil démarre automatiquement la lecture de l’iPod/iPhone
ou du périphérique USB dans les cas suivants :
• lors de la sélection de l’entrée USB alors que l’appareil est sous
tension et qu’un iPod/iPhone ou un périphérique USB est
raccordé ;
• lors de la sélection de l’entrée USB pendant la mise sous
tension de l’appareil à l’aide d’un iPod/iPhone ou d’un
périphérique USB ;
• lorsqu’un iPod/iPhone en cours de lecture est raccordé à
l’appareil alors que celui-ci est sous tension. (l’entrée est
automatiquement réglée sur USB.)
*1
16 Fr
Page 53

Utilisation d’un iPod/iPhone et d’un périphérique USB
Lecture répétée/aléatoire
1 Appuyez sur la touche OPTION pour accéder
au menu d’options.
2 Appuyez sur / pour sélectionner
« 2.REPEAT », puis appuyez sur ENTER.
3 Appuyez sur / pour sélectionner l’une
des options disponibles, puis appuyez sur
ENTER.
Options disponibles (réglage par défaut :
OFF)
iPod/iPhone Périphérique USB
OFF
ONE
ALL
FOLDER
RANDOM
La lecture en boucle est
annulée
La lecture du morceau
en cours est répétée
La lecture de tous les
morceaux enregistrés
sur l’iPod/iPhone est
répétée
La lecture en boucle est
annulée
La lecture du morceau
en cours est répétée
La lecture de tous les
morceaux enregistrés
sur le périphérique USB
est répétée
La lecture de tous les
morceaux enregistrés
dans le dossier de votre
périphérique USB est
répétée
Tous les morceaux
enregistrés dans le
dossier de votre
périphérique USB sont
lus de manière aléatoire
■ Lecture aléatoire de l’iPod/iPhone
1 Appuyez sur la touche OPTION pour accéder
au menu d’options.
2 Appuyez sur / pour sélectionner
« 3.SHUFFLE », puis appuyez sur ENTER.
Affichage des informations des fichiers audio
Vous pouvez afficher les informations relatives au fichier
audio en cours de lecture.
Appuyez sur INFO.
Appuyez plusieurs fois sur la touche INFO pour afficher
diverses informations (chacune pendant trois secondes)
dans l’ordre suivant :
iPod/iPhone : SONG (titre du morceau) → PLAY TIME
(durée de lecture) → ARTIST (nom de l’artiste) →
ALBUM (titre de l’album) → SONG (titre du morceau)
Périphérique USB : FILE (nom du fichier) → PLAY
TIME (durée de lecture) → SONG (titre du morceau) →
ARTIST (nom de l’artiste) → ALBUM (titre de l’album)
→ FILE (nom du fichier)
Remarques
• S’il s’avère impossible d’afficher simultanément toutes les
informations sur l’afficheur de la face avant, elles défilent une
fois.
• Notez également qu’il est impossible d’afficher certains
caractères.
Mise à jour du microprogramme
Vous pouvez mettre à jour le microprogramme de cet
appareil.
1 Pour cela, chargez les données du
microprogramme dans la clé USB.
Raccordez ensuite la clé USB au port USB
situé sur la face avant de l’appareil.
Veillez à copier le fichier du microprogramme dans
le répertoire racine de la clé USB. Consultez la
documentation livrée avec le fichier du
microprogramme.
2 Appuyez sur la touche SETUP.
OPÉRATIONS
DE BASE
3 Appuyez sur / pour sélectionner
l’option de votre choix, puis appuyez sur
ENTER.
Options disponibles (Réglage par défaut :
OFF)
OFF : annule la lecture aléatoire.
SONGS : lit les morceaux dans un ordre aléatoire.
ALBUMS : lit les albums dans un ordre aléatoire.
3 Appuyez sur / pour sélectionner
« 6:FIRMWARE », puis appuyez sur ENTER.
4 Appuyez sur / pour sélectionner « 6-
2:USB UPDATE », puis appuyez sur ENTER.
La mise à jour commence.
y
• Appuyez sur / pour sélectionner « 6-1:VERSION »
afin d’afficher la version du microprogramme de l’appareil sur
l’afficheur de la face avant.
• Reportez-vous à la section « Messages relatifs à la mise à jour
du microprogramme » du chapitre « Guide de dépannage »
(☞ P. 28) pour obtenir de plus amples informations sur les
messages relatifs à la mise à jour du microprogramme qui
apparaissent sur l’afficheur de la face avant.
17 Fr
Français
Page 54

OPÉRATIONS UTILES
Menu de configuration
Liste du menu de configuration
Menu Sous-menu Fonctions Page
1:SP LEVEL 1-1:FRONT L
1-2:FRONT R
1-3:CENTER
1-4:SURROUND L
1-5:SURROUND R
1-6:SUBWOOFER
2:TONE CONTROL 2-1:BASS
2-2:TREBLE
3:HDMI SETUP 3-1:CONTROL
3-2:AUDIO
4:DISPLAY MODE Modification de la luminosité de l’afficheur de la face avant ☞ P. 19
5:SP SETUP 5-1:SP CHANNEL Sélection du nombre de canaux
5-2:SP TYPE Modification du réglage du type d’enceinte
5-3:SP DISTANCE Réglage de la distance entre les enceintes
5-4:CROSSOVER Coupure de l’enregistrement du répartiteur
6:FIRMWARE 6-1:VERSION Affichage de la version du microprogramme de l’appareil
6-2:USB UPDATE Mise à jour du microprogramme de l’appareil
7:D.RANGE Réglage de la dynamique ☞ P. 21
8:MATRIX DECODE 8-1:DECODE MODE Sélection du décodeur
8-2:C.IMAGE Réglage de l’image centrale
Réglage de l’équilibre du volume à l’aide de la tonalité d’essai ☞ P. 19
Réglage du son des hautes/basses fréquences (réglage de la
tonalité)
Configuration des paramètres HDMI ☞ P. 19
☞ P. 19
☞ P. 20
☞ P. 17
☞ P. 21
Procédure de base
SETUP
ENTER
RETURN
Vous pouvez modifier plusieurs réglages de cet appareil à
l’aide du menu de configuration.
/
1 Appuyez sur la touche SETUP pour accéder
au menu de configuration.
L’indication « 1:SP LEVEL » apparaît sur l’afficheur
de la face avant.
2 Appuyez sur / pour sélectionner le
menu, puis appuyez sur ENTER.
Répétez cette procédure jusqu’à ce que le menu/sousmenu souhaité s’affiche.
3 Appuyez sur / pour régler la valeur de
chaque menu.
Maintenez la touche / enfoncée pour
modifier la valeur de réglage plus rapidement.
4 Appuyez à nouveau sur la touche SETUP
pour quitter le menu de configuration.
y
• Appuyez sur RETURN ou sur pour revenir au menu
précédent.
• Appuyez sur la touche pour accéder au menu suivant.
Remarque
Si vous n’effectuez aucune opération dans les 30 secondes qui
suivent l’accès au menu de configuration, l’appareil quitte
automatiquement ce mode.
18 Fr
Page 55

Réglage de l’équilibre du volume de chaque canal
Menu : 1:SP LEVEL
Permet de régler l’équilibre du volume entre les canaux à
l’aide de tonalités d’essai provenant de chaque canal.
Sous-menu :
« 1-1:FRONT L » « 1-2:FRONT R » : permet de régler le
niveau de sortie des canaux de l’enceinte avant (gauche/
droite).
« 1-3:CENTER » : permet de régler le niveau de sortie du
canal de l’enceinte centrale.
« 1-4:SURROUND L » « 1-5:SURROUND R » : permet
de régler le niveau de sortie des canaux des enceintes
virtuelles surround/surround (gauche/droite).
« 1-6:SUBWOOFER » : permet de régler le niveau de
sortie du canal du caisson de graves.
Plage de réglage : de –6 à +6 (réglage par défaut : 0)
y
• Il est également possible de régler l’équilibre du volume lors de
la lecture du périphérique d’entrée. (☞ P. 12)
• À la fin du réglage de chaque canal, appuyez sur la touche
LEVEL pour passer au canal suivant.
Menu de configuration
Options disponibles : OFF, ON (Réglage par
défaut : OFF)
« OFF » : désactive la fonction de commande HDMI. La
consommation en veille de cet appareil diminue.
« ON » : active la fonction de commande HDMI.
y
Pour activer la fonction ARC, réglez « 3-1:CONTROL » sur
«ON».
■ Réglage de la sortie audio
Sous-menu : 3-2:AUDIO
Vous pouvez sélectionner un composant pour reproduire
les signaux audio HDMI. Ce réglage est disponible
lorsque « 3-1:CONTROL » est réglé sur « OFF ».
Options disponibles : AMP, TV (Réglage par
défaut : AMP)
« AMP » : reproduit les signaux sonores HDMI provenant
des enceintes raccordées à l’appareil.
« TV » : reproduit les signaux sonores HDMI provenant
des enceintes d’un téléviseur raccordé à l’appareil.
Modification de la luminosité de l’afficheur de la face avant
Réglage du son des hautes/basses fréquences (réglage de la tonalité)
Menu : 2:TONE CONTROL
Vous pouvez régler l’équilibre des fréquences élevées
(aigus) et des basses fréquences (graves) des sons
provenant des enceintes avant afin d’obtenir la tonalité
désirée. Lors de l’utilisation d’un casque, permet de régler
l’équilibre des hautes fréquences et des basses fréquences
des sons provenant du casque.
Sous-menu
« 2-1:BASS » : permet de régler l’équilibre des basses
fréquences (graves) des sons provenant de l’enceinte.
« 2-2:TREBLE » : permet de régler l’équilibre des hautes
fréquences (aigus) des sons provenant de l’enceinte.
Plage de réglage : de –6 à +6 (réglage par défaut : 0)
Configuration des paramètres HDMI
Menu : 3:HDMI SETUP
Vous pouvez définir les paramètres liés aux signaux
HDMI et à la fonction de commande HDMI.
■ Activation/désactivation de la
fonction de commande HDMI
Sous-menu : 3-1:CONTROL
Vous pouvez activer/désactiver la fonction de commande
HDMI. Pour plus de détails, reportez-vous à la section
« Utilisation de l’appareil avec la télécommande du
téléviseur » (☞ P. 23).
Vous pouvez modifier la luminosité de l’afficheur de la
face avant. Il est également possible de désactiver
l’afficheur de la face avant afin de visionner un film dans
un environnement plus sombre.
La luminosité de l’afficheur de la face avant change
comme suit.
Menu : 4:DISPLAY MODE
Plage de réglage (Réglage par défaut : « DIMMER
0»)
Lumineux
Sombre
*
Si vous sélectionnez DISPLAY OFF, l’afficheur de la face
avant s’éteint après avoir quitté le menu de configuration.
Remarques
• L’afficheur de la face avant s’allume temporairement à chaque
exécution d’une opération alors que le mode DISPLAY OFF est
sélectionné.
• Seul le témoin STATUS reste allumé en mode DISPLAY OFF.
OPÉRATIONS
UTILES
Français
19 Fr
Page 56

Menu de configuration
Utilisation d’autres enceintes
Menu : 5:SP SETUP
Vous pouvez régler le type d’enceinte si vous souhaitez
changer les enceintes ou en ajouter. Il n’est pas nécessaire
de modifier ce réglage si vous ne raccordez que l’enceinte
fournie.
■ Sélection du nombre de canaux
et du type d’enceinte avant
Sous-menu : 5-1:SP CHANNEL
Vous pouvez sélectionner le nombre d’enceintes de sortie.
Enceinte fournie : Enceintes vendues dans le commerce :
5-1:SP CHANNEL
5-2:SP TYPE
BAR
(Réglage par défaut)
BOOK SHELF
2CH
*1 *1 *1, 3 *1, 3
Sous-menu : 5-2:SP TYPE
Vous pouvez sélectionner le type d’enceintes avant.
« BAR » : lors de l’utilisation de cet appareil, seul ou en
combinaison avec d’autres enceintes vendues dans le
commerce
« BOOK SHELF » : ce réglage n’est pas utilisé pour ce
système
« OTHER » : lors du raccordement d’enceintes vendues
dans le commerce au lieu de cet appareil
3CH
(Réglage par
défaut)
4CH 5CH
*3
OTHER
*1, 2 *1, 2 *1, 2, 3 *1, 2, 3
*1 : réglage « 5-3:SP DISTANCE » disponible *2 : réglage « 5-4:CROSSOVER » disponible
*3 : réglages « 8:MATRIX DECODE » disponibles
■ Réglage de la distance entre les
enceintes
Sous-menu : 5-3:SP DISTANCE
Sélectionnez un paramètre correspondant à la distance
entre les enceintes avant gauche et droite afin d’obtenir
l’effet surround le mieux adapté.
Options disponibles (Réglage par défaut :
NORMAL)
« WIDE » : lorsque la distance entre les enceintes avant
est supérieure à 150 cm.
« NORMAL » : lorsque la distance entre les enceintes
avant est comprise entre 80 cm et 150 cm.
« NARROW » : lorsque la distance entre les enceintes
avant est inférieure ou égale à 80 cm.
Remarques
• Lorsque le mode surround est désactivé, ce réglage n’est pas
disponible.
• Ce réglage est disponible uniquement lorsque vous sélectionnez
« 2CH » ou « 3CH » dans « 5-1:SP CHANNEL ».
■ Coupure de l’enregistrement du
répartiteur
Sous-menu : 5-4:CROSSOVER
Vous pouvez régler la fréquence de coupure provenant du
caisson de graves intégré de cet appareil en fonction des
spécifications des enceintes raccordées.
Options disponibles (Réglage par défaut : 150Hz)
80Hz, 100Hz, 120Hz, 150Hz, 200Hz
20 Fr
Page 57

Menu de configuration
Contrôle de la dynamique Réglage du décodeur de matrice
Menu : 7:D.RANGE
Vous pouvez régler la compression de la dynamique. La
dynamique représente l’intervalle entre le son le plus
faible pouvant être perçu au-dessus du bruit de
l’équipement et le son le plus élevé sans distorsion.
Options disponibles : AUTO/MIN, STANDARD,
MAX (Réglage par défaut : MAX)
«AUTO/MIN»:
(MIN) : dynamique recommandée pour la reproduction de
signaux de flux de données audio (sauf les signaux Dolby
TrueHD) à un niveau de volume faible ou dans un
environnement calme (par exemple la nuit).
(AUTO) : réglage automatique de la dynamique en
fonction des informations provenant du signal d’entrée
lors de la reproduction de signaux Dolby TrueHD.
« STANDARD » : dynamique recommandée pour un
usage domestique standard.
« MAX » : le son est émis sans réglage de la dynamique
des signaux d’entrée.
Menu : 8:MATRIX DECODE
La fonction de décodage de la matrice permet d’étendre le
son stéréo à 2 canaux au son surround.
■ Sélection du décodeur
Sous-menu : 8-1:DECODE MODE
Ce sous-menu est disponible uniquement lorsque vous
sélectionnez « STANDARD » en mode surround.
Options disponibles (Réglage par défaut :
DOLBY PLII)
DOLBY PLII, Neo:6 Cinema, Neo:6 Music
■ Réglage de l’image centrale
Sous-menu : 8-2:C.IMAGE
Ce sous-menu permet de régler la sortie des canaux avant
gauche et droit par rapport au canal central afin que celuici soit prédominant ou secondaire, selon les cas. Ce sousmenu est disponible uniquement lorsque vous
sélectionnez « Neo:6 Music » en mode « 8-1:DECODE
MODE ».
Plage de réglage (Réglage par défaut : 0.3)
0.0 à 1.0
OPÉRATIONS
UTILES
21 Fr
Français
Page 58

Réglages pour chaque source d’entrée (menu Option)
Les éléments du menu d’options sont répertoriés ci-
Entrée
dessous. Ces réglages s’appliquent à la source d’entrée
actuellement sélectionnée.
OPTION
/
RETURN
ENTER
1 Appuyez sur l’une des touches de sélection
pour sélectionner l’entrée dont vous
souhaitez modifier le réglage.
2 Appuyez sur la touche OPTION pour accéder
au menu d’options.
Le menu d’options apparaît sur l’afficheur de la face
avant.
Éléments du menu d’options
Chaque entrée dispose des éléments de menu
suivants.
Entrée Élément de menu
TV/STB/
ANALOG
HDMI1-3
1.VOLUME
FM
USB
*1 Reportez-vous à la page 13 pour obtenir de plus amples
informations.
*2 Reportez-vous à la page 17 pour obtenir de plus amples
informations.
TRIM
2.AUDIO
DELAY
2.AUTO PRESET
3.CLEAR PRESET
4.STEREO/MONO
5.TRAFFIC PROG
2.REPEAT
3.SHUFFLE
*2
3.AUDIO
ASSIGN
*1
3 Appuyez sur / pour sélectionner le
menu, puis appuyez sur ENTER.
4 Appuyez sur / pour modifier la valeur
du réglage, puis appuyez sur ENTER.
Réglage du niveau d’entrée de chaque prise (VOLUME TRIM)
Menu : 1.VOLUME TRIM
Ce menu permet de régler le niveau d’entrée de chaque
prise afin de compenser les variations de volume entre les
différents périphériques d’entrée.
Plage de réglage : de –6 à +6 (Réglage par
défaut : 0)
Réglage du retard audio (AUDIO DELAY)
Menu : 2.AUDIO DELAY
Il arrive que les images d’un téléviseur à écran plat
apparaissent après le son. Vous pouvez utiliser cette
fonction pour retarder la reproduction du son afin de le
synchroniser avec l’image vidéo.
Plage de réglage : 0ms à 500ms, AUTO
(Réglage par défaut : « AUTO »)
« AUTO » : si vous utilisez la connexion HDMI vers un
téléviseur doté d’une fonction de réglage automatique du
retard audio, vous pouvez régler automatiquement le
retard audio.
Affectation d’une entrée audio à la prise numérique optique/coaxiale (AUDIO ASSIGN)
Menu : 3.AUDIO ASSIGN
Si la prise HDMI d’un composant ne transmet aucun
signal audio, sélectionnez l’entrée HDMI et utilisez la
prise d’entrée optique/coaxiale pour diffuser le son.
Options disponibles (Réglage par défaut : HDMI)
« HDMI » : sélection du signal audio HDMI
« OPTICAL » : sélection du signal audio provenant de la
prise d’entrée optique
« COAXIAL » : sélection du signal audio provenant de la
prise d’entrée coaxiale
5 Appuyez sur la touche OPTION pour quitter
le menu d’options.
Appuyez sur RETURN pour revenir au menu
précédent.
22 Fr
Page 59

Utilisation de l’appareil avec la télécommande du téléviseur
Qu’est-ce que la fonction de commande HDMI ?
Vous pouvez utiliser la télécommande du téléviseur pour
commander l’appareil, à condition que le téléviseur
prenne en charge la fonction de commande HDMI (p. ex.,
REGZA Link) et qu’il soit raccordé à la prise HDMI OUT
(ARC) de l’appareil. *1
(Alimentation)
Sélecteur
d’entrée
Télécommande du téléviseur (Exemple)
Mise sous/hors tension
Sélection de l’entrée
Cet appareil sélectionne
automatiquement l’entrée en
fonction du réglage de la
source d’entrée défini sur le
téléviseur. Il est également
possible d’utiliser le menu du
téléviseur pour changer
l’entrée de l’appareil
(notamment en sélectionnant
le lecteur Blu-ray dans le
menu du téléviseur).
Augmentation/
réduction du volume
Sélection d’un
composant en vue de
reproduire le son du
téléviseur (cet appareil
ou le téléviseur)
y
*1
• Certains téléviseurs permettent d’activer et de désactiver la
fonction UniVolume.
• Même si votre téléviseur prend en charge la fonction de
commande HDMI, il est possible que certaines fonctions ne
soient pas disponibles. Pour plus de détails, consultez le mode
d’emploi fourni avec votre téléviseur.
• Si vous utilisez la borne HDMI pour raccorder cet appareil à un
autre périphérique, notamment à un lecteur Blu-ray prenant en
charge la fonction de commande HDMI, vous pouvez
commander ce périphérique via la fonction de commande
HDMI.
• Nous vous conseillons d’utiliser des produits (téléviseur, lecteur
Blu-ray/lecteur DVD, etc.) du même fabricant.
Réglage de la fonction de commande HDMI
1 Mettez sous tension tous les composants
raccordés à cet appareil via HDMI.
2 Vérifiez tous les composants raccordés via
HDMI et activez la fonction de commande
HDMI sur chacun d’eux.
Pour cet appareil, réglez « 3-1:CONTROL » dans le
menu de configuration « 3:HDMI SETUP » sur
«ON» (☞ P. 19). *
2
Pour les composants externes, consultez le mode
d’emploi fourni avec chaque composant. *
3
3 Mettez le téléviseur hors tension, puis à
nouveau sous tension.
*2 y
• Le réglage par défaut est « OFF ».
Lorsque vous réglez « 3-1:CONTROL » dans le menu
«3:HDMI SETUP» sur «ON»,
– Même si vous appuyez sur la touche (Alimentation),
l’appareil ne s’éteint pas complètement et le signal passe de la
prise HDMI IN à la prise HDMI OUT (ARC).
– Avant de mettre l’appareil hors tension, sélectionnez les
sources d’entrée souhaitées raccordées à la prise HDMI IN
(1 à 3).
– Selon le téléviseur, certaines opérations, telles que changer de
chaîne, peuvent modifier le réglage des modes surround de cet
appareil.
y
*3
Exemples de réglages sur le téléviseur
• Dans le menu de configuration de votre téléviseur, sélectionnez
« Réglage de la liaison » → « Réglage de la commande HDMI »
(exemple), puis définissez un réglage, par exemple « Fonction
de commande HDMI », sur « ON ».
• Un réglage de type « Priorité des enceintes » doit être défini sur
« Amplificateur AV ».
OPÉRATIONS
UTILES
23 Fr
Français
Page 60

Utilisation de l’appareil avec la télécommande du téléviseur
Enregistrement des composants HDMI sur le téléviseur
*4
1 Sélectionnez cet appareil comme source
d’entrée du téléviseur.
2 Mettez sous tension le composant prenant
en charge la fonction de commande HDMI
(p. ex., le lecteur Blu-ray) raccordé à
l’appareil.
3 Réglez la source d’entrée de cet appareil sur
le lecteur Blu-ray et vérifiez si les images du
lecteur s’affichent correctement.
Lorsque vous raccordez le lecteur Blu-ray via la prise
HDMI 1, appuyez plusieurs fois sur la touche du
sélecteur d’entrée pour sélectionner « HDMI 1 ».
4 Vérifiez que la fonction de commande HDMI
fonctionne correctement (mettez l’appareil
sous tension ou réglez le volume à l’aide de
la télécommande du téléviseur).
*4 y
Pour certains composants HDMI, il est uniquement nécessaire de
sélectionner la fonction de commande HDMI. L’enregistrement
des composants HDMI sur le téléviseur n’est pas nécessaire dans
ce cas.
Changement de la méthode de connexion et des composants raccordés
Lorsque vous raccordez d’autres composants ou utilisez
d’autres prises, réinitialisez l’appareil en appliquant la
procédure suivante.
1 Désactivez la fonction de commande HDMI
du téléviseur et du lecteur, mettez hors
tension tous les périphériques raccordés et
modifiez les raccordements.
2 Exécutez les étapes 1 à 3 de la section
« Réglage de la fonction de commande
HDMI ».
Si la fonction de commande HDMI ne fonctionne
pas
Vérifiez les points suivants :
– Le téléviseur est-il raccordé à la prise HDMI OUT
(ARC) de l’appareil.
– Le réglage « 3-1:CONTROL » de « 3:HDMI
SETUP » est-il défini sur « ON » dans le menu de
configuration. (☞ P. 19)
– La fonction de commande HDMI est-elle activée
sur le téléviseur. (Vérifiez également les réglages
correspondants, tels que la fonction de verrouillage
d’alimentation ou la priorité des enceintes.)
Si la fonction de commande HDMI ne fonctionne
toujours pas :
– Mettez l’appareil et le téléviseur hors tension, puis à
nouveau sous tension.
– Débranchez le câble d’alimentation de l’appareil et
celui des composants externes raccordés via HDMI.
Branchez-les à nouveau au bout de 30 secondes.
– Après avoir sélectionné HDMI 1, HDMI 2 ou
HDMI 3, réglez le téléviseur et l’appareil sur la
même entrée.
24 Fr
Page 61

INFORMATIONS COMPLÉMENTAIRES
Guide de dépannage
Reportez-vous au tableau suivant si l’appareil ne fonctionne pas correctement.
Si votre problème n’est pas répertorié dans ce tableau ou si les instructions fournies ne vous sont pas utiles, mettez l’appareil en
veille, débranchez le cordon d’alimentation et contactez le revendeur Yamaha agréé ou le service après-vente le plus proche.
Vérifiez tout d’abord les points suivants.
1 Le cordon d’alimentation de l’appareil, celui du téléviseur et celui des composants externes (lecteur Blu-ray, etc.)
sont-ils correctement raccordés à la prise secteur.
2 L’appareil, le téléviseur et les composants externes (lecteur Blu-ray, etc.) sont-ils sous tension.
3 Tous les câbles sont-ils correctement raccordés aux prises correspondantes sur chaque composant.
Anomalies Causes possibles Solution
L’alimentation se
coupe immédiatement
après la mise en
service.
Les enceintes
n’émettent aucun son.
Le son est très faible
d’un côté.
Les canaux d’enceinte
autres que les canaux
avant n’émettent
aucun son.
Le caisson de graves
n’émet aucun son.
Le cordon d’alimentation n’est pas
convenablement branché.
Les câbles d’enceinte sont en courtcircuit.
L’appareil a reçu un choc électrique
puissant dû à un éclair ou à une décharge
excessive d’électricité statique.
Le niveau du volume est réglé trop bas. Réglez le niveau du volume. 10, 19
Le silencieux a peut-être été activé. Désactivez le silencieux. 10
La source d’entrée ou le réglage d’entrée
n’est peut-être pas correct.
Les câbles ne sont pas convenablement
raccordés.
Le réglage « 3-2:AUDIO » du menu de
configuration « 3:HDMI SETUP » est
défini sur « TV ».
Le réglage « 3-1:CONTROL » du menu
de configuration « 3:HDMI SETUP » est
défini sur « OFF ».
Un casque est raccordé.
Les câbles ne sont pas convenablement
raccordés.
Vous écoutez peut-être une source stéréo
sans mode surround.
Le réglage « 1:SP LEVEL » dans le menu de
configuration
« 1-4:SURROUND L »/« 1-5:SURROUND
R » est défini sur le niveau minimum.
Le réglage « 5-1:SP CHANNEL » est
défini sur « 2CH » ou sur « 3CH » dans le
menu de configuration.
Le volume du canal du caisson de graves
est réglé au niveau minimal.
La source ne contient aucun signal de
basses fréquences.
Assurez-vous que la fiche du cordon d’alimentation
est complètement introduite dans la prise secteur.
Assurez-vous que tous les câbles d’enceinte
sont raccordés convenablement.
Mettez l’appareil en veille, puis débranchez le
cordon d’alimentation. Attendez environ
30 secondes, rebranchez le cordon d’alimentation,
puis remettez l’appareil sous tension.
Sélectionnez la source d’entrée ou le réglage
d’entrée correct.
Assurez-vous que tous les câbles sont
convenablement reliés.
Définissez le réglage « 3-2:AUDIO » dans le
menu de configuration « 3:HDMI SETUP » sur
«AMP».
Lorsque vous reliez un téléviseur prenant en
charge la fonction de retour audio (ARC) à cet
appareil uniquement à l’aide d’un câble HDMI,
réglez « 3-1:CONTROL » dans le menu
« 3:HDMI SETUP » sur « ON ».
Raccordez la prise d’entrée numérique coaxiale
et la prise de sortie audio du téléviseur à l’aide
d’un câble audio numérique à broches.
Assurez-vous que tous les câbles sont
convenablement reliés.
Appuyez sur la touche SURROUND pour
démarrer la lecture en mode son.
Définissez le réglage « 1:SP LEVEL » dans le
menu de configuration
« 1-4:SURROUND L »/« 1-5:SURROUND
R».
Définissez le réglage « 5-1:SP CHANNEL » sur
« 4CH » ou sur « 5CH ». 20
Réglez le niveau de volume du caisson de
graves.
Voir
page
8
8
10
10
8
19
19
9
8
11
19
5, 19
COMPLÉMENTAIRES
INFORMATIONS
Français
25 Fr
Page 62

Guide de dépannage
Anomalies Causes possibles Solution
Le volume diminue
sans aucune
intervention de
l’utilisateur.
Le son est de
mauvaise qualité
Le niveau de volume sera automatiquement
réglé sur le niveau 70 la prochaine fois que
vous mettrez l’appareil sous tension afin de
protéger les enceintes.
Les câbles d’enceinte sont en courtcircuit.
Assurez-vous que tous les câbles sont
convenablement reliés.
(bruits).
L’appareil ne
fonctionne pas
correctement.
Un appareil numérique
ou haute fréquence
L’appareil a reçu un choc électrique
puissant dû à un éclair ou à une décharge
excessive d’électricité statique, ou une
chute de tension s’est produite.
L’appareil est trop près d’un appareil
numérique ou à haute fréquence.
Mettez l’appareil en veille, puis débranchez le
cordon d’alimentation. Attendez environ
30 secondes, branchez le câble d’alimentation,
puis mettez l’appareil sous tension.
Éloignez l’appareil de l’équipement concerné.
produit des bruits.
Les réglages de
l’appareil changent
automatiquement.
La télécommande
n’agit pas sur
l’appareil.
La télécommande du
téléviseur ne
fonctionne pas, même
lorsque vous fixez le
récepteur de signaux
de la télécommande du
téléviseur sur
l’enceinte.
Lorsque le réglage « 3-1:CONTROL » du
menu de configuration « 3:HDMI SETUP »
est défini sur « ON », certaines opérations
sur le téléviseur (notamment le changement
de chaînes) peuvent modifier les réglages
de l’appareil, tels que le mode surround.
Vous utilisez la télécommande hors de sa
portée de fonctionnement.
La télécommande de l’appareil est
exposée à la lumière du soleil ou d’un
éclairage.
Les piles sont épuisées. Remplacez les piles. 2
Le récepteur de signaux de la
télécommande du téléviseur n’est pas
correctement positionné.
Le récepteur de signaux de la télécommande
du téléviseur est face à un capteur non
compatible, notamment un capteur permettant
de détecter la luminosité de la pièce.
Définissez le réglage « 3-1:CONTROL » du
menu de configuration « 3:HDMI SETUP » sur
« OFF » ou configurez à nouveau l’appareil à
l’aide de sa télécommande.
Pour de plus amples détails concernant cette
question, reportez-vous à la section
« Préparation de la télécommande ».
Changez l’éclairage.
Déplacez le récepteur de signaux de la
télécommande du téléviseur vers la droite ou
vers la gauche de façon à placer le centre du
récepteur face au capteur.
Placez le récepteur de signaux de la télécommande
du téléviseur à environ 10 mm du téléviseur.
Placez le récepteur de signaux de la
télécommande du téléviseur après avoir vérifié
la position du capteur de télécommande sur le
mode d’emploi du téléviseur.
Voir
page
8
10
—
19
2
—
6
6
6
■ HDMI
Anomalies Causes possibles Solution
Le réglage « AUTO »
sélectionné dans le
menu d’options
Le téléviseur ne prend pas en charge
automatiquement le réglage du retard
audio.
Réglez le retard audio manuellement (de 0 à
500 ms).
« 2.AUDIO DELAY » ne
fonctionne pas.
La fonction de contrôle
HDMI ne fonctionne
pas correctement.
Absence d’image et de
son
Il y a trop de composants HDMI
raccordés.
D’autres composants HDMI ont été
raccordés à l’appareil par la suite.
Le composant HDMI raccordé ne prend
pas en charge le système de protection
des contenus numériques en haute
définition (HDCP).
Déconnectez certains composants HDMI.
Définissez à nouveau le réglage
« 3-1:CONTROL » dans le menu « 3:HDMI
SETUP » sur « ON ».
Raccordez un composant HDMI prenant en
charge le système HDCP.
26 Fr
Voir
page
22
—
19
—
Page 63

■ FM
Guide de dépannage
Anomalies Causes possibles Solution
La réception FM en
stéréophonie est
parasitée.
Présence de
distorsion. Impossible
Les caractéristiques des émissions FM
stéréophoniques sont à l’origine de cette
anomalie si l’émetteur est trop éloigné,
ou encore si le niveau d’entrée sur
l’antenne est médiocre.
L’appareil est soumis aux effets de trajets
multiples.
Vérifiez les raccordements de l’antenne. 9
Tentez d’utiliser une antenne FM directionnelle
de bonne qualité.
Réglez le mode de réception sur « MONO ». 14
Réglez la position de l’antenne pour supprimer
les trajets multiples.
d’obtenir une
réception claire, même
Voir
page
—
—
avec une antenne FM
de bonne qualité.
Il n’est pas possible
d’effectuer la
syntonisation
automatique sur la
station désirée.
Le signal capté est trop faible. Tentez d’utiliser une antenne FM directionnelle
de bonne qualité.
Réglez le mode de réception sur « MONO »,
puis appuyez sur TUNING / pour
modifier la fréquence d’un pas.
—
13, 14
■ Messages relatifs à l’iPod/iPhone et au périphérique USB
Remarque
Vérifiez la connexion de votre périphérique si des dysfonctionnements autres que ceux liés aux messages ci-dessous se produisent.
(☞ P. 16)
Message d’état Causes possibles Solution
Unknown iPod
No Device
Loading...
No Content
Unable to Play
Connect Error
Root
Disconnected
L’appareil ne prend pas en charge l’iPod/
iPhone ou le périphérique USB en cours
d’utilisation.
Aucun iPod/iPhone ou périphérique USB
n’est raccordé à l’appareil.
Des données sont en cours de traitement
sur l’iPod/iPhone ou le périphérique USB.
Il n’existe aucun fichier audio. Raccordez un iPod/iPhone ou un périphérique
La lecture du fichier audio est impossible. Essayez de lire le fichier audio sur un autre
Le format du fichier audio sélectionné
n’est pas pris en charge.
Le fichier audio sélectionné est
endommagé.
L’iPod/iPhone ou le périphérique USB
présente un problème de communication.
S’arrête et revient au répertoire racine. Ce message disparaît lorsque la lecture
L’iPod/iPhone ou le périphérique USB a
été débranché du port USB de cet
appareil.
Raccordez un iPod/iPhone ou un périphérique
USB pris en charge par cet appareil. 16
Raccordez un iPod/iPhone ou un périphérique
USB contenant des fichiers audio pouvant être
lus.
Ce message disparaît à la fin du traitement des
données.
USB contenant des fichiers audio pouvant être
lus.
périphérique, notamment sur un ordinateur.
Enregistrez le fichier audio dans un format pris
en charge.
Sélectionnez un autre fichier audio.
Mettez l’appareil en mode veille et reconnectez
l’iPod/iPhone ou le périphérique USB.
commence.
Ce message disparaît au bout de 3 secondes.
Voir
page
—
—
—
—
—
—
—
—
16
COMPLÉMENTAIRES
INFORMATIONS
Français
27 Fr
Page 64

Guide de dépannage
■ Messages relatifs à la mise à jour du microprogramme
Message d’état Causes possibles Solution
Connect USB!
No Firmware!
Connect Error
Update... 30%
Update Error
Update Success
Please...
Power Off!
Aucune clé USB n’est raccordée. Raccordez une clé USB à l’appareil.
La clé USB raccordée à l’appareil ne
contient aucun fichier de mise à jour du
microprogramme.
Le fichier de la clé USB est endommagé. Mettez l’appareil en mode veille et reconnectez
La clé USB raccordée à l’appareil
présente un problème de communication,
car le fichier sélectionné qu’elle contient
est endommagé.
La progression de la mise à jour s’affiche.
Une erreur est survenue lors de la mise à
jour et la mise à jour du microprogramme
est inachevée.
La mise à jour du microprogramme a
abouti.
Il est nécessaire de mettre l’appareil en
mode veille. Les messages « Update
Success » et « Update Error » s’affichent
en alternance.
Il est nécessaire de mettre l’appareil en
mode veille. Les messages « Update
Success » et « Update Error » s’affichent
en alternance.
Copiez le fichier du microprogramme dans le
répertoire racine de la clé USB. —
la clé USB.
Copiez à nouveau le fichier du microprogramme
dans la clé USB.
Relancez la mise à jour du microprogramme.
Mettez l’appareil en mode veille.
Mettez l’appareil en mode veille.
Voir
page
17
—
—
17
—
—
y Réinitialisation de l’appareil
Si l’appareil se bloque, vous pouvez le réinitialiser.
Pour cela, maintenez la touche (Alimentation) enfoncée pendant au moins 10 secondes.
28 Fr
Page 65

Glossaire
■ AIR SURROUND XTREME
Cet appareil fait appel à de nouveaux algorithmes et
technologies permettant de restituer un son surround
7 canaux à l’aide de deux enceintes avant seulement, sans
utiliser de réflexion murale.
Généralement, deux enceintes avant, une enceinte
centrale, deux enceintes surround, deux enceintes
surround arrière et un caisson de graves sont nécessaires
pour obtenir un son surround 7.1 canaux.
Exemple de système 7.1 canaux standard
Enceintes avant
Enceinte
centrale
Caisson de graves
Enceintes surround
Enceintes surround arrière
Son virtuel à 7.1 canaux
La technologie AIR SURROUND XTREME, qui n’utilise
que les enceintes avant et le caisson de graves, permet de
bénéficier d’un son 7.1 canaux réaliste en simulant le son
provenant d’enceintes virtuelles centrales, surround et
arrière surround.
Image acoustique de l’appareil
■ Fréquence d’échantillonnage
Il s’agit du nombre d’échantillonnages (numérisation des
signaux analogiques) par seconde. En principe, plus la
fréquence d’échantillonnage est élevée plus le spectre est
large, et plus le taux binaire de quantification est élevé,
plus le niveau sonore peut être clairement traduit.
■ Dolby Digital
Système surround numérique mis au point par Dolby
Laboratories et fournissant un son multicanaux
complètement indépendant. Avec 3 canaux avant (gauche,
centre et droit) et 2 canaux arrière stéréophoniques, Dolby
Digital est un système à 5 canaux audio intégraux. Un
canal supplémentaire, sur lequel ne circulent que les effets
basse fréquence (dénommé canal LFE, ou effet basse
fréquence) complète l’ensemble à 5.1 canaux (le canal
LFE est compté pour 0.1 canal). En utilisant 2 canaux
stéréo pour les enceintes surround, il est possible d’obtenir
des effets sonores plus rigoureux que ceux du Dolby
Surround, en particulier lorsque la source se déplace.
■ Dolby Digital Plus
Dolby Digital Plus est une technologie audio avancée
développée pour la programmation et les supports haute
définition tels que les émissions en HD ou les disques Bluray. Sélectionnée comme norme audio facultative pour les
disques Blu-ray, cette technologie fournit un son
multicanaux avec une sortie de voie discrète. Compatible
avec des débits binaires supérieurs à 6,0 Mbps, la
technologie Dolby Digital Plus peut transmettre
simultanément jusqu’à 7.1 canaux audio discrets. Prise en
charge par la norme HDMI et conçue pour les lecteurs de
disques optiques et les récepteurs/amplificateurs AV de
nouvelle génération, Dolby Digital Plus reste également
100 % compatible avec les systèmes audio multicanaux
existants qui incorporent la technologie Dolby Digital.
COMPLÉMENTAIRES
INFORMATIONS
L’appareil crée le son surround virtuel 7.1 canaux à l’aide
du caisson de graves intégré et de l’enceinte.
C : enceinte centrale
FR, FL : enceintes avant
SW : caisson de graves
SR, SL : enceintes surround virtuelles
SBR, SBL : enceintes surround arrière virtuelles
■ Dolby Pro Logic II
Il s’agit d’une méthode de matriçage améliorée qui fournit
une meilleure sensation de l’espace et de la direction des
sons pour les enregistrements effectués en Dolby
Surround ; cette méthode restitue en trois dimensions les
enregistrements de musique stéréo classiques de façon
convaincante. Ce son est idéal pour restituer tout le
mouvement des sons d’ambiance. Alors que les
enregistrements surround classiques sont entièrement
compatibles avec les décodeurs Dolby Pro Logic II, les
pistes son sont décodées d’une façon spéciale pour tirer le
maximum du Pro Logic II lors de la lecture, en séparant
entre autre les canaux surround gauche et droit.
Français
29 Fr
Page 66

Glossaire
■ Dolby TrueHD
Dolby TrueHD est une technologie audio sans perte
avancée développée pour les supports haute définition,
notamment pour les disques Blu-ray. Sélectionnée comme
norme audio facultative pour les disques Blu-ray, cette
technologie fournit un son bit pour bit identique au son des
studios d’enregistrement pour une expérience home cinéma
haute définition. Compatible avec des débits binaires
supérieurs à 18,0 Mbps, la technologie Dolby TrueHD peut
transmettre simultanément jusqu’à 8 canaux audio discrets
de 24 bits/96 kHz. Dolby TrueHD reste également 100 %
compatible avec les systèmes audio multicanaux existants
et conserve la fonction de métadonnées dont dispose la
technologie Dolby Digital permettant de normaliser les
dialogues et de contrôler la dynamique.
■ Deep Color
Deep Color indique l’utilisation de plusieurs profondeurs
de couleur dans les écrans, jusqu’à 24 bits dans les
versions précédentes de la spécification HDMI. Cette
profondeur de bit extra permet aux téléviseurs haute
définition et à d’autres types d’écrans d’afficher non pas
des millions de couleurs, mais des milliards de couleurs, et
d’éliminer tout effet de bande en proposant des transitions
et des gradations de couleurs subtiles. Ce contraste
amélioré peut représenter de nombreux tons de gris entre
le blanc et le noir. En outre, Deep Color augmente le
nombre de couleurs disponibles au sein des limites
établies par les espaces colorimétriques RVB ou YCbCr.
■ DTS
Système de son surround numérique mis au point par
DTS, Inc., fournissant un son réparti sur 5.1 canaux. Il
produit de réels effets sonores en faisant appel à une
grande masse de données audio.
■ DTS-HD High Resolution Audio
DTS-HD High Resolution Audio est une technologie
audio haute résolution développée pour les supports haute
définition, notamment pour les disques Blu-ray.
Sélectionnée comme norme audio facultative pour les
disques Blu-ray, cette technologie fournit un son
pratiquement identique au son d’origine pour une
expérience home cinéma haute définition. Compatible
avec des débits binaires supérieurs à 6,0 Mbps pour les
disques Blu-ray, la technologie DTS-HD High Resolution
Audio peut transmettre simultanément jusqu’à 7.1 canaux
audio discrets de 24 bits/96 kHz.
■ DTS-HD Master Audio
DTS-HD Master Audio est le format audio haute qualité
sans perte créé pour la prochaine génération de disques
optiques, tels que les disques Blu-ray. Sélectionné comme
norme audio pour les disques Blu-ray, ce format prend en
charge des débits binaires supérieurs à 24,5 Mbps pour les
disques Blu-ray et peut transmettre simultanément jusqu’à
7.1 canaux audio discrets de 24 bits/96 kHz.
■ DTS Neo:6
La technologie Neo:6 permet de décoder les sources à
2 canaux conventionnelles pour une lecture à 6 canaux via
le décodeur spécifique. Elle permet la lecture pleine
gamme des canaux avec une résolution supérieure,
identique à la lecture des signaux numériques discrets.
Deux modes sont disponibles : le mode musique pour la
lecture des sources audio et le mode cinéma pour la
lecture des sources vidéo.
■ HDMI
HDMI (High-Definition Multimedia Interface) est la
première interface permettant la transmission de toutes
sortes de données audio/vidéo numérisées non
compressées. Utilisée en combinaison avec le système de
protection des contenus numériques haute définition
HDCP (High-bandwidth Digital Content Protection),
HDMI fournit une interface audio/vidéo sécurisée
conforme aux exigences des fournisseurs de contenu et
des opérateurs système.
■ MP3
MP3 est l’une des méthodes de compression audio
utilisées par MPEG. Ce format utilise une méthode de
compression irréversible, qui permet d’obtenir un taux de
compression élevé en comprimant les données des parties
à peine audible par l’oreille humaine. Ce format est
capable de compresser les données d’environ
1/11 (128 kbps) tout en maintenant une qualité audio
identique à celle du CD.
■ MPEG-4 AAC
Format audio MPEG-4. Étant donné qu’il permet la
compression des données à un débit inférieur à celui du
format MPEG-2 AAC, ce format est utilisé, entre autres,
pour les téléphones portables, les lecteurs audio portables
et autres périphériques de faible capacité nécessitant une
qualité sonore élevée. Le format MPEG-4 AAC est
également utilisé pour distribuer du contenu sur Internet ;
il est par conséquent pris en charge par les ordinateurs, les
serveurs multimédias et de nombreux autres
périphériques.
■ PCM (Pulse Code Modulation)
Signal au format numérique obtenu sans compression. La
gravure de CD utilise 16 bits et une fréquence de
44,1 kHz ; celle des DVD varie de 16 bits et 48 kHz à
24 bits et 192 kHz, ce qui permet d’obtenir une meilleure
qualité sonore.
■ WMA
WMA est une méthode de compression audio développée
par Microsoft Corporation. Ce format utilise une méthode
de compression irréversible, qui permet d’obtenir un taux
de compression élevé en comprimant les données des
parties à peine audible par l’oreille humaine. Ce format est
capable de compresser les données d’environ
1/22 (64 kbps) tout en maintenant une qualité audio
identique à celle du CD.
■ x.v.Color
x.v.Color est un espace colorimétrique pris en charge par
HDMI. Il s’agit d’un espace colorimétrique plus étendu
que sRVB et qui permet l’expression de nouvelles
couleurs. Tout en restant compatible avec la gamme de
couleurs des normes sRVB, « x.v.Color » étend l’espace
colorimétrique et fournit des images plus naturelles et plus
vivantes. Il est beaucoup plus efficace pour les images
figées et les images informatiques.
30 Fr
Page 67

Caractéristiques techniques
■ SR-301
SECTION AUDIO
• Puissance de sortie efficace minimale
Avant gauche et droit (1 kHz, 1 % DHT, 6 Ω).............45 W + 45 W
Centrale (1 kHz, 1 % DHT, 6 Ω)...............................................45 W
Surround gauche et droit (1 kHz, 1 % DHT, 6 Ω)........45 W + 45 W
Caisson de graves (100 Hz, 1 % DHT, 3 Ω) .............................90 W
• Puissance maximale
Avant gauche et droit (1 kHz, 10 % DHT, 6 Ω)...........50 W + 50 W
Centrale (1 kHz, 10 % DHT, 6 Ω).............................................50 W
Surround gauche et droit (1 kHz, 10 % DHT, 6 Ω)......50 W + 50 W
Caisson de graves (100 Hz, 10 % DHT, 3 Ω) .........................100 W
SECTION FM
• Plage de syntonisation
[Modèles pour les États-Unis et le Canada] ..........87,5 à 107,9 MHz
[Autres modèles]................................................87,50 à 108,00 MHz
• Pas en fréquence
[Modèles pour les États-Unis et le Canada] .........................200 kHz
[Autres modèles].....................................................................50 kHz
Entrée d’antenne (asymétrique)..................................................75 Ω
SECTION CAISSON DE GRAVES
• Type .........................................................................Type Bass reflex
À blindage non magnétique
• Excitateur....................................................................Cône de 13 cm
• Réponse en fréquence ................................................35 Hz à 150 Hz
• Impédance.....................................................................................3 Ω
GÉNÉRALITÉS
• Alimentation
[Modèles pour les États-Unis et le Canada] ...........120 V CA, 60 Hz
[Modèles pour l’Europe, le Royaume-Uni, la Corée et l’Asie]
....................................................................220-240 V CA, 50/60 Hz
[Modèles pour Taïwan].....................................110 V CA, 60/50 Hz
• Consommation .......................................................................... 40 W
• Consommation en veille
Lorsque la fonction de commande HDMI est activée
[Modèles pour les États-Unis et le Canada].................moins de 5 W
[Modèles pour l’Europe, le Royaume-Uni, la Corée et l’Asie]
......................................................................................moins de 5 W
[Modèles pour Taïwan]................................................moins de 5 W
Lorsque la fonction de commande HDMI est désactivée
[Modèles pour les États-Unis et le Canada]..............moins de 0,5 W
[Modèles pour l’Europe, le Royaume-Uni, la Corée et l’Asie]
...................................................................................moins de 0,5 W
[Modèles pour Taïwan].............................................moins de 0,5 W
• Dimensions (L × H × P)
En position horizontale .................................... 435 × 135 × 361 mm
En position verticale................................... 145,5 × 443,5 × 361 mm
• Poids......................................................................................... 7,9 kg
■ NS-BR301
• Type.............................................................Acoustique à suspension
• Excitateur (Pleine gamme)
Gauche et droit....................................................Cône de 5,5 cm × 2
Central................................................................ Cône 4 × 10 cm × 1
• Réponse en fréquence .............................................150 Hz à 20 kHz
• Impédance ....................................................................................6 Ω
• Dimensions (L × H × P).................................800 × 97*
*1 Réglable en 4 étapes : 84 mm à 100 mm
• Sans les pieds ....................................................... 800 × 79 × 70 mm
• Poids......................................................................................... 1,5 kg
À blindage non magnétique
1
× 79,5 mm
Ce système emploie de nouveaux algorithmes et technologies
permettant de restituer un son surround 7 canaux à l’aide de deux
enceintes avant seulement, sans utiliser de réflexion murale.
Fabriqué sous licence de Dolby Laboratories. Dolby, Pro Logic et le
symbole du double D sont des marques de commerce de Dolby
Laboratories.
Fabriqué sous licence sous les brevets américains nº : 5,956,674 ;
5,974,380 ; 6,226,616 ; 6,487,535 ; 7,212,872 ; 7,333,929 ;
7,392,195 ; 7,272,567, et d’autres brevets américains et
internationaux autorisés et en attente. DTS-HD et son symbole, et
DTS-HD et son symbole sont des marques déposées de DTS, Inc. Ce
produit contient un logiciel. © DTS, Inc. Tous droits réservés.
* Les spécifications peuvent être modifiées sans avis préalable.
iPod, iPhone
Les étiquettes « Made for iPod » et « Made for iPhone » signifient
qu’un accessoire électronique a été développé spécifiquement pour
l’iPod ou l’iPhone, respectivement, et que son fabricant certifie qu’il
répond aux normes de performances d’Apple.
Apple décline toute responsabilité quant au fonctionnement de ce
périphérique ou à sa conformité aux normes de sécurité en vigueur.
iPhone, iPod, iPod classic, iPod nano, iPod touch et iTunes sont des
marques de commerce d’Apple Inc., déposées aux États-Unis et dans
d’autres pays.
« HDMI », le logo « HDMI » et « High-Definition Multimedia
Interface » sont des marques ou des marques déposées de HDMI
Licensing LLC.
« x.v.Color » est une marque de commerce de Sony Corporation.
« UniVolume » est une marque de commerce de Yamaha
Corporation.
COMPLÉMENTAIRES
INFORMATIONS
Français
31 Fr
Page 68

Caractéristiques techniques
Informations sur les signaux disponibles
■ Compatibilité du signal HDMI
Signaux audio recevables
Types de signal audio Formats de signal audio Support compatible
PCM linéaire 2 canaux 2 canaux, 32-192 kHz, 16/20/24 bits CD, DVD vidéo, DVD audio, etc.
PCM linéaire multicanaux 8 canaux, 32-192 kHz, 16/20/24 bits DVD audio, disque Blu-ray, DVD HD, etc.
Bitstream DTS-HD Master Audio, DTS-HD High
Resolution Audio, DTS, Dolby TrueHD, Dolby
Digital Plus, Dolby Digital
y
• Consultez la documentation fournie avec le composant de la source d’entrée et réglez le composant en conséquence.
• Lors de la lecture d’un DVD vidéo protégé contre la copie, il est possible que les signaux audio et vidéo ne soient pas reproduits selon
le type de lecteur DVD.
• Cet appareil n’est pas compatible avec des composants HDMI ou DVI ne prenant pas en charge le système HDCP. Consultez les
modes d’emploi fournis avec les composants HDMI ou DVI pour plus d’informations sur la compatibilité HDCP.
• Pour décoder les signaux de flux de données audio sur cet appareil, réglez le composant de la source d’entrée de façon adéquate afin
que le composant reproduise les signaux de flux de données audio directement (pas de décodage sur le composant). Consultez la
documentation pour obtenir de plus amples informations.
Signaux vidéo recevables
– Cet appareil est compatible avec les signaux vidéo des résolutions suivantes :
• 480i/60 Hz
• 576i/50 Hz
• 480p/60 Hz
• 576p/50 Hz
• 720p/60 Hz, 50 Hz
• 1080i/60 Hz, 50 Hz
• 1080p/60 Hz, 50 Hz, 24 Hz
– Deep Color
– x.v.Color
– Signal vidéo 3D
y
La signal vidéo compatible change selon le téléviseur raccordé.
DVD vidéo, disque Blu-ray, etc.
■ Signal audio numérique (optique/coaxial)
Types de signal audio Formats de signal audio Support compatible
PCM linéaire 2 canaux 2 canaux, 32-96 kHz, 16/20/24 bits CD, DVD vidéo, DVD audio, etc.
Bitstream Dolby Digital, Dolby Digital EX, DTS, DTS-ESDVD vidéo, etc.
■ iPod/iPhone/périphérique USB
Formats de compression de données audio disponibles
• WAV (8 kHz à 48 kHz, 16 bits)
• MP3 (8 kHz à 48 kHz, 5 kbps à 320 kbps)
• WMA (8 kHz à 48 kHz, 5 kbps à 384 kbps)
• MPEG4-AAC (8 kHz à 48 kHz, 8 kbps à 320 kbps)
32 Fr
Page 69

Caractéristiques techniques
Remarques à propos des télécommandes et piles
• Veillez à ne renverser aucun liquide sur la télécommande.
• Ne laissez pas tomber la télécommande.
• Ne laissez pas la télécommande aux endroits suivants :
– endroits chauds et humides, près d’un appareil de chauffage ou dans une salle de bains
– endroits très froids
– endroits poussiéreux
• Si la portée de la télécommande diminue considérablement, remplacez dès que possible les piles par deux piles
neuves.
• N’utilisez pas à la fois une pile neuve et une pile usagée.
• N’utilisez pas, en même temps, des piles de type différent (par exemple, une pile alcaline et une pile au manganèse).
En effet, leurs performances peuvent varier même si leur forme est identique.
• Lorsque les piles sont usées, retirez-les sans tarder de la télécommande pour éviter qu’elles n’explosent ou ne fuient.
• Mettez les piles au rebut conformément à la réglementation locale.
• Si une pile fuit, mettez-la immédiatement au rebut. Veillez à ce que l’électrolyte d’une pile ne vienne en contact ni
avec votre peau ni avec un vêtement. Avant de mettre en place les piles, nettoyez leur logement.
• Tenez les piles à l’écart des enfants. En cas d’ingestion accidentelle, contactez immédiatement un médecin.
• Si vous pensez ne pas utiliser la télécommande pendant une période prolongée, retirez les piles.
• Ne chargez pas et ne démontez pas les piles fournies.
Information concernant la collecte et le traitement des piles usagées et
des déchets d’équipements électriques et électroniques
Les symboles sur les produits, l’emballage et/ou les documents joints signifient que les produits électriques
ou électroniques usagés ainsi que les piles ne doivent pas être mélangés avec les déchets domestiques
habituels. Pour un traitement, une récupération et un recyclage appropriés des déchets d’équipements
électriques et électroniques et des piles usagées, veuillez les déposer aux points de collecte prévus à cet
effet, conformément à la réglementation nationale et aux Directives 2002/96/EC et 2006/66/EC.
En vous débarrassant correctement des déchets d’équipements électriques et électroniques et des piles
usagées, vous contribuerez à la sauvegarde de précieuses ressources et à la prévention de potentiels effets
négatifs sur la santé humaine qui pourraient advenir lors d’un traitement inapproprié des déchets.
Pour plus d’informations à propos de la collecte et du recyclage des déchets d’équipements électriques et
électroniques et des piles usagées, veuillez contacter votre municipalité, votre service de traitement des
déchets ou le point de vente où vous avez acheté les produits.
[Information sur le traitement dans d’autres pays en dehors de l’Union Européenne]
Ces symboles sont seulement valables dans l’Union Européenne. Si vous souhaitez vous débarrasser de
déchets d’équipements électriques et électroniques ou de piles usagées, veuillez contacter les autorités
locales ou votre fournisseur et demander la méthode de traitement appropriée.
Note pour le symbole « pile » (les deux symboles du bas) :
Ce symbole peut être utilisé en combinaison avec un symbole chimique. Dans ce cas il respecte les
exigences établies par la Directive pour le produit chimique en question.
COMPLÉMENTAIRES
INFORMATIONS
Français
33 Fr
Page 70

Vorsicht: Vor der Bedienung dieses Gerätes durchlesen.
1 Um optimales Leistungsvermögen sicherzustellen, lesen Sie
bitte die Anleitung aufmerksam durch. Bewahren Sie die
Anleitung danach für spätere Nachschlagzwecke sorgfältig
auf.
2 Stellen Sie dieses Klangsystem an einem gut belüfteten,
kühlen, trockenen und sauberen Ort auf - schützen Sie es vor
direktem Sonnenlicht, Wärmequellen, Vibrationen, Staub,
Feuchtigkeit und/oder Kälte. Lassen Sie für die Belüftung um
das Gerät mindestens so viel Platz frei, wie im Folgenden
angegeben.
Oben: 5 cm
Hinten: 5 cm
Seiten: 5 cm
3 Stellen Sie dieses Gerät entfernt von anderen elektrischen
Haushaltgeräten, Motoren oder Transformatoren auf, um
Brummgeräusche zu vermeiden.
4 Setzen Sie dieses Gerät keinen plötzlichen
Temperaturänderungen von kalt auf warm aus, und stellen Sie
dieses Gerät nicht an Orten mit hoher Luftfeuchtigkeit auf
(z.B. in Räumen mit Luftbefeuchtern), um Kondensation im
Inneren des Gerätes zu vermeiden, da es anderenfalls zu
elektrischen Schlägen, Feuer, Beschädigung dieses Gerätes
und/oder zu persönlichen Verletzungen kommen kann.
5 Vermeiden Sie die Aufstellung dieses Gerätes an Orten, an
welchen Fremdkörper in das Gerät fallen können bzw. an
welchen Flüssigkeiten auf das Gerät verschüttet werden
können. Stellen Sie auf der Oberseite des Gerätes niemals
Folgendes auf:
– Andere Komponenten, da diese Beschädigung und/oder
Verfärbung der Oberfläche dieses Gerätes verursachen
können.
– Brennende Objekte (z.B. Kerzen), da diese Feuer,
Beschädigung des Gerätes und/oder persönliche
Verletzungen verursachen können.
– Mit Flüssigkeiten gefüllte Behälter, da diese umfallen und
die Flüssigkeit auf das Gerät verschütten können, wodurch
es zu elektrischen Schlägen für den Anwender und/oder zu
Beschädigung des Gerätes kommen kann.
6 Decken Sie dieses Gerät niemals mit Zeitungen, Tischdecken,
Vorhängen usw. ab, damit die Wärmeabfuhr nicht behindert
wird. Falls die Temperatur im Inneren des Gerätes ansteigt,
kann es zu Feuer, Beschädigung des Gerätes und/oder zu
persönlichen Verletzungen kommen.
7 Schließen Sie dieses Gerät erst an eine Wandsteckdose an,
nachdem alle anderen Anschlüsse ausgeführt wurden.
8 Stellen Sie dieses Gerät niemals mit der Unterseite nach oben
auf, da es sonst beim Betrieb zu Überhitzung mit möglichen
Beschädigungen kommen kann.
9 Wenden Sie niemals Gewalt bei der Bedienung der Schalter,
Knöpfe und/oder Kabel an.
10 Wenn Sie das Netzkabel von der Wandsteckdose abtrennen,
fassen Sie immer den Netzstecker an; ziehen Sie niemals an
dem Kabel.
11 Reinigen Sie dieses Gerät niemals mit chemisch behandelten
Tüchern; anderenfalls kann das Finish beschädigt werden.
Verwenden Sie ein reines, trockenes Tuch.
Verwenden Sie nur die für dieses Gerät vorgeschriebene
12
Netzspannung. Falls Sie eine höhere als die vorgeschriebene
Netzspannung verwenden, kann es zu Feuer, Beschädigung
dieses Gerätes und/oder zu persönlichen Verletzungen kommen.
Yamaha kann nicht verantwortlich gemacht werden für Schäden,
die auf die Verwendung dieses Gerätes mit einer anderen als der
vorgeschriebenen Spannung zurückzuführen sind.
13 Um Beschädigungen durch Blitzschlag zu vermeiden, ziehen
Sie den Netzstecker von der Netzdose ab, wenn es ein
Gewitter gibt.
14 Versuchen Sie niemals ein Modifizieren oder Ändern dieses
Gerätes. Falls eine Wartung erforderlich ist, wenden Sie sich
bitte an einen Yamaha-Kundendienst. Das Gehäuse sollte
niemals selbst geöffnet werden.
15 Falls Sie das Gerät für längere Zeit nicht verwenden (z.B.
während der Ferien), ziehen Sie den Netzstecker von der
Netzdose ab.
16 Lesen Sie unbedingt den Abschnitt „Störungsbehebung“
durch, um übliche Bedienungsfehler zu berichtigen, bevor Sie
auf eine Störung des Gerätes schließen.
17 Bevor Sie dieses Gerät an einen anderen Ort transportieren,
drücken Sie die -Taste, um das Gerät auf den
Bereitschaftsmodus zu schalten, und ziehen Sie danach den
Netzstecker von der Netzdose ab.
Es kommt zu Kondensatbildung, wenn die
18
Umgebungstemperatur plötzlich ändert. Ziehen Sie den
Netzstecker von der Netzdose ab, und lassen Sie das Gerät ruhen.
19 Stellen Sie dieses Gerät in die Nähe der Steckdose und so auf,
dass der Netzstecker gut zugänglich ist.
20 Die Batterien dürfen nicht starker Hitze wie direktem
Sonnenschein, Feuer o.ä. ausgesetzt werden.
21 Eine sichere Aufstellung oder Installation liegt in der
Verantwortung des Besitzers. Yamaha übernimmt keinerlei
Haftung für Unfälle, die auf unsachgemäße Aufstellung oder
falschen Anschluss von Lautsprechern zurückzuführen sind.
22 Stecken Sie niemals eine Hand oder einen Gegenstand in die
Öffnung auf der vorderen Geräteseite. Verwenden Sie beim
Transport dieses Gerätes nicht die öffnungen zum Tragen, da
dies Personenschäden und/oder Schäden am Gerät
verursachen könnte.
23 Stellen Sie niemals zerbrechliche Gegenstände neben die
Öffnung dieses Gerätes. Wenn der Gegenstand durch
Luftdruck herunterfällt, könnte er einen Brand, eine
Beschädigung des Gerätes und/oder Personenschäden
verursachen.
WARNUNG
UM DIE GEFAHR EINES FEUERS ODER EINES
ELEKTROSCHOCKS ZU VERMEIDEN, DARF
DAS GERÄT WEDER REGEN NOCH
FEUCHTIGKEIT AUSGESETZT WERDEN.
Dieses Gerät ist nicht vom Netz abgetrennt, solange
der Netzstecker eingesteckt ist, auch wenn Sie das
Gerät selber mit dem Schalter ausschalten. In
diesem Zustand nimmt das Gerät ständig eine geringe
Menge Strom auf.
i De
Page 71

Inhalt
EINFÜHRUNG VORBEREITUNGEN
EINFÜHRUNG
Erste Schritte...........................................................2
Lieferumfang .............................................................. 2
Vorbereitung der Fernbedienung................................ 2
Bedienelemente und Funktionen ................................ 3
VORBEREITUNGEN
Aufstellen des Systems............................................6
Die Bedienung über die Fernsehfernbedienung ist
schwierig (wenn sich der Lautsprecher unter dem
Fernsehgerät befindet)............................................ 6
Befestigen des Lautsprechers an der Wand................ 7
Anschlüsse................................................................8
Anschließen der Lautsprecher .................................... 8
Anschließen eines Fernsehgeräts und BD-Players ..... 9
GRUNDFUNKTIONEN
Grundlegende Wiedergabefunktionen................10
Verwenden von Kopfhörern ..................................... 10
Einstellen von Klangmodi.....................................11
Wiedergabe im Surroundsound ................................ 11
Wiedergabe im Stereosound..................................... 11
Clear Voice ............................................................... 11
Compressed Music Enhancer.................................... 12
UniVolume................................................................ 12
Anpassen der Lautstärkebalance............................... 12
Empfangen von FM-Sendungen ..........................13
Grundlegende Vorgehensweise bei der
Sendersuche.......................................................... 13
Programmieren gespeicherter FM-Sender................ 13
Wiedergeben von iPod/iPhone und
USB-Geräten......................................................16
Wiedergabe............................................................... 16
Wiederholungs-/Zufallswiedergabe.......................... 17
Anzeigen von Musikinformationen .......................... 17
Firmware-Update...................................................... 17
WEITERE FUNKTIONEN
Konfigurationsmenü..............................................18
Liste der Optionen im Konfigurationsmenü............. 18
Grundlegendes Vorgehen ......................................... 18
Anpassen der Lautstärkebalance für jeden einzelnen
Kanal..................................................................... 19
Einstellen der Höhen/Tiefen des Klangs
(Klangsteuerung).................................................. 19
Konfigurieren der HDMI-Einstellungen................... 19
Ändern der Helligkeit des Bedienfelddisplays ......... 19
Verwenden anderer Lautsprecher............................. 20
Steuerung des Dynamikbereichs............................... 21
Einstellen der Matrix-Decodierung .......................... 21
Einstellungen für die einzelnen Eingangsquellen
(Optionenmenü).................................................22
Anpassen des Eingangspegels für jede Buchse
(VOLUME TRIM) ............................................... 22
Anpassen der Tonverzögerung
(AUDIO DELAY) ............................................... 22
Zuordnen des Audioeingangs zum optischen
Digitaleingang/digitalen Koaxialeingang
(AUDIO ASSIGN) ............................................... 22
Bedienen der Geräts mit der
Fernsehfernbedienung.......................................23
Was ist die HDMI-Steuerfunktion?.......................... 23
Einstellen der HDMI-Steuerfunktion........................ 23
Registrieren von HDMI-Komponenten am
Fernsehgerät ......................................................... 24
Ändern der Anschlussart und der angeschlossenen
Komponenten........................................................ 24
ZUSÄTZLICHE INFORMATIONEN
Störungsbehebung.................................................25
Glossar....................................................................29
Technische Daten...................................................31
Informationen zu den verfügbaren Signalen............. 32
Hinweise zu Fernbedienungen und Batterien ........... 33
FUNKTIONEN
GRUND-
FUNKTIONEN
WEITERE
INFORMATIONEN
ZUSÄTZLICHE
Was mit diesem Gerät möglich ist
• Hochwertiger Surroundsound (AIR SURROUND XTREME)..................................................................11
• Klare Dialoge und Kommentare (Clear Voice)..........................................................................................11
• Bedienen des Geräts über die Fernsehfernbedienung (HDMI-Steuerfunktion).........................................23
• Wiedergabe vom iPod/iPhone in hochwertigem Klang (Digitalanschluss für iPod/iPhone).....................16
• Erweiterung des Geräts auf 5.1-Kanal mit Lautsprechern Ihrer Wahl.......................................................20
■ Zu dieser Bedienungsanleitung
• In dieser Bedienungsanleitung werden Funktionen, die sowohl über das Bedienfeld als auch mit der Fernbedienung
ausgeführt werden können, anhand der Fernbedienung erläutert.
• y Verweist auf einen Tipp für die Bedienung. Hinweise enthalten wichtige Informationen zu Sicherheit und Betrieb.
• Diese Bedienungsanleitung wurde vor der Produktion gedruckt. Design und Spezifikationen können sich aufgrund von
Verbesserungen o.Ä. ändern. Bei Unterschieden zwischen Bedienungsanleitung und Produkt hat das Produkt Vorrang.
1 De
Deutsch
Page 72

EINFÜHRUNG
Erste Schritte
Lieferumfang
Dieses Produkt besteht aus den folgenden Teilen. Stellen Sie vor dem Anschließen sicher, dass Sie alle der folgenden Teile
erhalten haben.
■ Geräte
Receiver mit integriertem Subwoofer (SR-301) Lautsprecher (NS-BR301)
■ Zubehör
Lautsprecherkabel × 1 (3 m) Fernbedienung × 1 FM-Zimmerantenne × 1
Fernbedienungs-
Signalempfänger × 1
(Modelle für die USA,
Kanada, Taiwan, China
und Asien)
Batterie × 2 (AAA, R03, UM4) Montageschablone × 1 Bedienungsanleitung
(Modelle für GB, Europa,
Russland, Australien und
Korea)
× 1
Vorbereitung der Fernbedienung
Lesen Sie vor dem Einlegen der Batterien oder der Verwendung der Fernbedienung unbedingt die Vorsichtshinweise zur Fernbedienung und den
Batterien unter „Vorsicht: Vor der Bedienung dieses Gerätes durchlesen.“ und „Hinweise zu Fernbedienungen und Batterien“ auf Seite 33 durch.
■ Einsetzen der Batterien ■ Funktionsreichweite
2 De
Bis zu 6 m
Page 73

Erste Schritte
1 2
Bedienelemente und Funktionen
■ Bedienfeld des Receivers mit integriertem Subwoofer
1
2
3
4
5
1 STATUS-Anzeige
Gibt Aufschluss über den Systemstatus. (☞ S. 10)
2 (Netzschalter)
Schaltet das Gerät ein oder versetzt es in den
Bereitschaftsmodus. (☞ S. 10)
Hinweis
Um das Infrarotsignal der Fernbedienung empfangen zu
können, benötigt das Gerät selbst im Bereitschaftsmodus
eine geringe Menge Strom.
3 INPUT
Wählt die Eingangsquelle, die wiedergegeben werden
soll. (☞ S. 10)
67
4 USB-Anschluss
Zum Anschluss eines USB-Geräts. (☞ S. 16)
5 VOLUME –/+
Regelt die Lautstärke des Geräts. (☞ S. 10)
6 PHONES-Buchse
Zum Anschließen von Kopfhörern. (☞ S. 10)
7 Fernbedienungssensor
Empfängt Infrarotsignale von der Fernbedienung.
(☞ S. 2, 5)
8 Bedienfelddisplay
Zeigt Informationen zum Betriebsstatus des Geräts an.
(☞ S. 4)
8
EINFÜHRUNG
■ Rückseite des Receivers mit integriertem Subwoofer
57 6 43
1 Netzkabel
Zum Anschließen an eine Netzsteckdose. (☞ S. 8)
2 HDMI IN 1 - 3/HDMI OUT (ARC)-Buchsen
• HDMI IN 1 - 3 zum Anschließen HDMIkompatibler externer Komponenten. (☞ S. 9)
• HDMI OUT zum Anschließen eines HDMIkompatiblen Fernsehgeräts. (☞ S. 9)
3 DIGITAL IN (TV)-Buchse
Zum Anschließen eines Fernsehgeräts über ein
optisches Digitalkabel. (☞ S. 9)
4 DIGITAL IN (STB)-Buchse
Zum Anschließen eines digitalen Audioklinkenkabels
an die STB. (☞ S. 9)
5 ANALOG INPUT-Buchsen
Zum Anschließen externer Komponenten über ein
analoges Audiokabel. (☞ S. 9)
6 ANTENNA-Anschluss
Zum Anschließen der mitgelieferten FM-Antenne.
(☞ S. 9)
7 SPEAKERS-Anschlüsse
Zum Anschließen von Lautsprechern. (☞ S. 8)
Deutsch
3 De
Page 74

Erste Schritte
■ Bedienfelddisplay des Receivers mit integriertem Subwoofer
1 2 3 4 5
8
7
6
1 HDMI-Anzeige
Leuchtet bei normaler Kommunikation, wenn HDMI
als Eingangsquelle ausgewählt ist.
2 Tuner-Anzeigen
TUNED-Anzeige
Leuchtet auf, wenn das Gerät einen Sender empfängt.
(☞ S. 13)
STEREO-Anzeige
Leuchtet auf, wenn das Gerät beim automatischen
Sendersuchlauf ein starkes Signal von einem FMStereosender empfängt. (☞ S. 13)
AUTO-Anzeige
Blinkt, wenn das Gerät automatisch Sender einstellt
oder speichert. (☞ S. 13)
MEMORY-Anzeige
Blinkt, wenn das Gerät einen Sender speichert.
(☞ S. 13, 14)
EMPTY-Anzeige
Leuchtet auf, wenn unter der Speicherplatznummer
kein Sender gespeichert ist. (☞ S. 14)
PS-/PTY-/RT-/CT-Anzeige (nur Modelle für
Europa und Russland)
Leuchten je nach den verfügbaren RadiodatensystemInformationen auf. (☞ S. 15)
3 Decoder-Anzeigen
Wenn ein Decoder des Geräts aktiviert ist, leuchtet die
entsprechende Anzeige auf.
4 Clear Voice-Anzeige
Leuchtet, wenn der Clear Voice-Modus ausgewählt
ist. (☞ S. 11)
5 VOLUME-Anzeige
• Zeigt den aktuellen Lautstärkepegel an.
• Blinkt bei aktivierter Stummschaltungsfunktion.
(☞ S. 10)
6 Multiinformationsdisplay
Zeigt die ausgewählte Eingangsquelle, den aktuellen
Klangmodus und andere Informationen an.
7 ENHANCER-Anzeige
Leuchtet, wenn die Funktion „Compressed Music
Enhancer“ aktiviert ist. (☞ S. 12)
8 UNIVOLUME-Anzeige
Leuchtet, wenn der UniVolume-Modus ausgewählt
ist. (☞ S. 12)
4 De
Page 75

Erste Schritte
E
D
C
B
A
■ Fernbedienung
Sender für
Infrarotsignale
1
2
3
4
5
6
7
8
9
1 SURROUND
Dient zum Auswählen des Surround-Modus.
(☞ S. 11)
2 STEREO
Schaltet den erweiterten Stereo-Modus wechselweise
ein und aus. (☞ S. 11)
3 Eingangstasten
Dienen zum Auswählen der Eingangsquelle, die
wiedergegeben werden soll. (☞ S. 10)
Drücken Sie die entsprechende Eingangstaste
wiederholt, um die Eingangsquelle auszuwählen.
TV/STB: TV, STB
HDMI1-3: HDMI1, HDMI2, HDMI3
ANALOG/FM: ANALOG, FM
USB: USB
4 MEMORY, TUNING / , PRESET / ,
INFO
Dienen zum Steuern eines FM-Tuners. (☞ S. 13)
0
5 OPTION
Wechselt zum Optionenmenü für den jeweiligen
Eingang. (☞ S. 13, 16, 22)
6 (MENU), ( ), ( ), ( ),
ENTER
• Ändert die Einstellung.
• Steuerung eines iPod/iPhone und eines USBGeräts wie einem USB-Flashspeicher, tragbaren
Musikplayer. (☞ S. 16)
S / T: Scrollt den Bildschirm des iPod/iPhone oder
überspringt Ordner beim USB-Gerät.
(☞ S. 16)
7 RETURN
• Hebt die Speichersenderregistrierung auf.
(☞ S. 13)
• Kehrt zum vorherigen Menü im Optionenmenü
zurück. (☞ S. 22)
• Stoppt die Wiedergabe des USB-Geräts, wie einem
USB-Flashspeicher oder tragbaren Musikplayer.
(☞ S. 16)
8 SUBWOOFER +/–
Dienen zum Einstellen der Lautstärkebalance des
Subwoofers. (☞ S. 10, 19)
9 ENHANCER
Schaltet den Modus Compressed Music Enhancer ein
oder aus. (☞ S. 12)
0 LEVEL
Passt den Ausgabepegel der Lautsprecher an.
(☞ S. 12)
A UNIVOLUME
Schaltet den UniVolume-Modus ein bzw. aus.
(☞ S. 11)
B VOLUME +/–, MUTE
Regelt die Lautstärke des Geräts. (☞ S. 10)
C SETUP
Ruft das Konfigurationsmenü auf. (☞ S. 18)
D CLEAR VOICE
Schaltet den Clear Voice-Modus ein bzw. aus.
(☞
S. 11)
E (Netzschalter)
Schaltet das Gerät ein oder versetzt es in den
Bereitschaftsmodus. (☞ S. 10)
EINFÜHRUNG
Deutsch
5 De
Page 76

VORBEREITUNGEN
Aufstellen des Systems
Für eine höchstmögliche Klangqualität muss dieses Gerät
an einer geeigneten Stelle aufgestellt und die
Komponenten müssen korrekt angeschlossen werden. Die
folgenden Abbildungen zeigen die Möglichkeiten zur
Anordnung dieses Geräts.
Hinweise
• Stellen Sie dieses Gerät nicht in einem Stapel über/unter andere
Komponenten wie einen BD-Spieler. Die Vibrationen dieses
Geräts können bei anderen Komponenten Systemfehler usw.
hervorrufen.
• Lassen Sie an den Seiten, hinter und unter dem Gerät (mittels
der angebrachten Füße) genügend Platz zur Belüftung frei.
Stellen Sie dieses Gerät nicht auf einen dicken Teppich o. Ä.
• Vom Receiver mit integriertem Subwoofer wiedergegebene
niederfrequente Töne können je nach Position des Zuhörers und
des Subwoofers unterschiedlich wahrgenommen werden.
Ändern Sie den Aufstellort des Receivers mit integriertem
Subwoofer, um den gewünschten Klang zu erzielen.
• Je nach dem Aufstellort und seiner Umgebung können die
Anschlüsse an externe Komponenten bereits vor der Installation
dieses Geräts vorgenommen werden. Es empfiehlt sich, alle
Komponenten provisorisch zu platzieren und anzuordnen, um
sich dann für die beste Vorgehensweise zu entscheiden.
• Wenn Sie dieses Gerät reinigen, verwenden Sie ein sauberes,
trockenes und weiches Tuch (wie z. B. ein Brillenputztuch).
• Drücken Sie nicht auf das Lautsprechergitter, wenn Sie den
Lautsprecher bewegen.
Die Bedienung über die Fernsehfernbedienung ist schwierig (wenn sich der Lautsprecher unter dem Fernsehgerät befindet)
Die Bedienung über die Fernsehfernbedienung kann schwierig sein, wenn der
Lautsprecher den Sensor des Fernsehgeräts verdeckt, wenn er sich unterhalb
des Fernsehgeräts befindet. Versuchen Sie die unten aufgeführten
Lösungsvorschläge, um zu prüfen, ob sich das Problem so beheben lässt.
Schlagen Sie in der Bedienungsanleitung des Fernsehgeräts
nach, wo sich der Sensor der Fernsehfernbedienung befindet.
1 Passen Sie die Höhe des Lautsprechers über
die Standfüße an.
Entfernen Sie die Schrauben, welche die Standfüße des Lautsprechers sichern, und
verschieben Sie die Standfüße, um die Höhe anzupassen. Sichern Sie die Standfüße
mit den gleichen Schrauben, wie in der Abbildung unten dargestellt.
2 Verwenden des Fernsehfernbedienungs-
Signalempfängers
Der Fernsehfernbedienungs-Signalempfänger (mitgeliefert)
empfängt das Signal der Fernsehfernbedienung und überträgt es an
den Sensor des Fernsehgeräts. Stellen Sie den
Fernsehfernbedienungs-Signalempfänger wie unten dargestellt auf.
Signalempfänger
Wenn Sie den Receiver mit integriertem
Subwoofer in aufrechter Position aufstellen
Entfernen Sie die Standfüße und Abstandshalter von der
Unterseite des Receivers mit integriertem Subwoofer, und
bringen Sie diese an der Seite an, wie unten dargestellt.
6 De
1
Entfernen Sie
die beiden
transparenten
Siegel
3
Bringen Sie den Signalempfänger
an der Oberseite des
Lautsprechers an
Ca. 10 mm
Signalsender
Fernbedienungssensor des
Fernsehgeräts
2
Positionieren Sie den
Signalsender so, dass
er auf die Mitte des TVFernbedienungssensors
weist.
Page 77

Aufstellen des Systems
y
• Richten Sie die Fernsehfernbedienung in Richtung der
Oberseite des Fernsehfernbedienungs-Signalempfängers.
• Sie können die Fernsehfernbedienung über den
Fernsehfernbedienungs-Signalempfänger bedienen, auch wenn
sich das Gerät im Bereitschaftsmodus befindet.
• Einige Fernsehfernbedienungen funktionieren möglicherweise
nicht.
• Sie können den Fernsehfernbedienungs-Signalempfänger in
dem Bereich anbringen, in dem es vorstehende Teile gibt, wie
z. B. an der Rückseite des Lautsprecherständers usw.
• Reinigen Sie den Befestigungsbereich am Lautsprecher mit
einem weichen, trockenen Tuch, wie z. B. einem
Brillenputztuch.
• Reinigen Sie den Signalempfänger und Signalsender des
Fernsehfernbedienungs-Signalempfängers mit einem weichen,
trockenen Tuch, wie z. B. einem Brillenputztuch.
Befestigen des Lautsprechers an der Wand
Befestigen des Lautsprechers mithilfe der
Montageschlitze
Sie können den Lautsprecher mit handelsüblichen
Schrauben (Nr. 8, Durchmesser: 4 mm) an der Wand
befestigen.
Bei der Montage des Lautsprechers an der Wand
müssen alle Installationsarbeiten von einem
qualifizierten Fachmann oder Händler
durchgeführt werden. Auf keinen Fall darf der
Kunde versuchen, diese Installationsarbeiten
selbst durchzuführen. Durch eine falsche oder
ungeeignete Installation kann der Lautsprecher
herunterfallen und Verletzungen verursachen.
1 Befestigen Sie die mitgelieferte
Montageschablone an der Wand und
zeichnen Sie die Bohrungen mithilfe der
Montageschablone an.
Klebebänder oder Reißnägel
Markierung
2 Entfernen Sie die Montageschablone und
drehen Sie an den markierten Stellen die
Schrauben (nicht mitgeliefert) hinein.
7 bis 9 mm
2 bis 4 mm
4 mm (Nr. 8)
Minimum
20 mm
3 Hängen Sie den Lautsprecher mit den
Montageschlitzen auf der
Lautsprecherrückseite an den Schrauben
ein.
Befestigen des Lautsprechers mithilfe der
Schraubenbohrungen
Sie können den Lautsprecher auch mit den
Schraubenbohrungen auf der Lautsprecherrückseite
montieren, wenn Sie ein handelsübliches Fernsehmöbel
o. Ä. verwenden.
38,5 mm
Schraubenbohrungen
Schraube
(M6)
Fernsehmöbel
usw.
Hinweise
• Befestigen Sie den Lautsprecher in einem Fernsehmöbel oder
an der Wand. Befestigen Sie den Lautsprecher auf keinen Fall
an einer Wand aus schwachem Material, wie beispielsweise
Gipskarton oder furnierten Brettern. Andernfalls könnte der
Lautsprecher herunterfallen.
• Verwenden Sie handelsübliche Schrauben, die das Gewicht des
Geräts tragen können.
• Achten Sie darauf, zum Befestigen des Lautsprechers die
angegebenen Schrauben zu verwenden. Wenn Sie nicht die
angegebenen Schrauben, sondern andere Befestigungsteile, wie
Kurzschrauben, Nägel oder doppelseitiges Klebeband,
verwenden, kann der Lautsprecher herunterfallen.
• Fixieren Sie die Lautsprecherkabel beim Anschließen des
Lautsprechers an einer Stelle, wo sie sich nicht lösen können.
Falls Sie versehentlich mit dem Fuß oder der Hand in einem
losen Lautsprecherkabel hängen bleiben, kann der Lautsprecher
herunterfallen.
• Vergewissern Sie sich nach der Montage des Lautsprechers,
dass dieser sicher befestigt ist. Yamaha übernimmt keine
Haftung für Unfälle, die auf eine unsachgemäße Installation
zurückzuführen sind.
256 mm
Bohrungstiefe: 14 mm
Durchmesser: 6 mm
14 mm
Schraubenbohrung
Mind. 7 mm
NS-BR301
VORBEREITUNGEN
Deutsch
7 De
Page 78

Anschlüsse
• Schließen Sie das Netzkabel erst an, wenn alle Anschlüsse vollständig durchgeführt sind.
• Gehen Sie beim Einstecken des Kabelsteckers keinesfalls gewaltsam vor. Andernfalls könnte der
Kabelstecker und/oder der Anschluss beschädigt werden.
Anschließen der Lautsprecher
Gehen Sie zum Anschließen des Receivers mit integriertem Subwoofer und der Lautsprecher wie im Folgenden erläutert vor.
Drehen Sie die Isolierhülse
am Kabel und ziehen Sie sie
ab.
Achten Sie beim Anschließen des Kabels darauf, die
farbigen Kabeladern mit den gleichfarbigen
Anschlüssen an der Rückseite zu verbinden.
SurroundLautsprecher
(separat erhältlich)
y
RL
An Netzsteckdose
5.1-Kanal-Wiedergabe
Lautsprecher (NS-BR301)
Braun
Rot
Drehen Sie die
Isolierhülse am Kabel
und ziehen Sie sie ab.
Schwarz
Grün
Achten Sie beim Anschließen des Kabels darauf,
die farbigen Kabeladern mit den gleichfarbigen
Anschlüssen an der Rückseite zu verbinden.
Grau
Weiß
y
• Für die 5.1-Kanal-Wiedergabe sind zusätzliche Surround-Lautsprecher (im Handel erhältlich) erforderlich.
• Schlagen Sie unter „Verwenden anderer Lautsprecher“ (☞ S. 20) nach, wenn Sie zusätzliche Lautsprecher verwenden.
8 De
Page 79

Anschlüsse
Anschließen eines Fernsehgeräts und BD-Players
Befolgen Sie die unten aufgeführten Schritte für den Kabelanschluss entsprechend der verwendeten Komponenten.
1 HDMI-Kabel (separat erhältlich) 2 HDMI-Kabel (separat erhältlich)
3 Optisches Kabel (separat erhältlich)*
4
*
3
2
*
1
4 FM-Zimmerantenne (mitgeliefert)
y
Falls in Ihrer Region ein schlechter Radioempfang herrscht oder Sie
diesen verbessern wollen, empfiehlt sich die Verwendung einer
Außenantenne. Für Einzelheiten wenden Sie sich bitte an Ihren
nächstgelegenen Yamaha-Vertragshändler oder -Kundendienst.
1 Entfernen Sie
die Kappe
1
3*
2 Überprüfen Sie
die Ausrichtung
des Steckers
HDMI INPUT
(Beispiel)
VORBEREITUNGEN
2
1
1
TV
Videosignale
Spielekonsole
*1 y
Bei der HDMI-Steuerfunktion ist kein optisches Kabel erforderlich, wenn der „ARC“-Anschluss des Fernsehgeräts verwendet wird „2“.
Der Audio Return Channel (ARC) überträgt Audiosignale (vom Fernsehgerät) über ein HDMI-Kabel an dieses Gerät. Aktivieren Sie die
HDMI-Steuerfunktion bei diesem Gerät, um die ARC-Funktion zu aktivieren. (☞ S. 19)
*2
y
Schließen Sie analoge Klinkenkabel (separat erhältlich) an die analogen Audioausgänge eines externen Geräts, wie z. B. einem
Videorecorder, an, um analoge Audiosignale wiederzugeben.
y
*3
Schließen Sie ein digitales Audioklinkenkabel (separat erhältlich) an den digitalen Koaxialausgang eines Satelliten-/KabelFernsehtuners an, um Digitalsignale wiederzugeben.
BD-Player
Audiosignale
Deutsch
9 De
Page 80

GRUNDFUNKTIONEN
Grundlegende Wiedergabefunktionen
Sobald Sie alle Kabelanschlüsse hergestellt und die Fernbedienung vorbereitet haben, stehen Ihnen folgende
grundlegenden Wiedergabefunktionen zur Verfügung.
4 Drücken Sie VOLUME +/–, um den
Lautstärkepegel einzustellen.
1
2
4
Drücken Sie SUBWOOFER +/–, um den
Subwooferpegel einzustellen.
y
• Zur vorübergehenden Stummschaltung des
Wiedergabetons drücken Sie MUTE. Bei aktivierter
Stummschaltungsfunktion blinkt die VOLUME-Anzeige.
Wenn der Ton wieder zu hören sein soll, drücken Sie
MUTE erneut oder drücken Sie VOLUME +/–.
• Wird der Ton sowohl über den Lautsprecher des
Fernsehgeräts als auch über dieses Gerät ausgegeben,
schalten Sie den Ton des Fernsehgeräts auf stumm.
• Die Lautstärke des Subwoofers kann unabhängig von der
Lautstärke angepasst werden.
• Sie können die Subwoofer-Lautstärke auch mit Hilfe des
Prüftons einstellen. (☞ S. 19)
• Es wird empfohlen, die Subwoofer-Lautstärke nachts zu
reduzieren.
Sie können das Gerät auch über die Fernbedienung
Ihres Fernsehgeräts bedienen, wenn die HDMISteuerfunktion verfügbar ist. Einzelheiten dazu finden
Sie auf Seite 23.
1 Drücken Sie (Netzschalter).
Das Gerät schaltet sich ein und die STATUS-Anzeige
leuchtet grün.
Die Eingangsquelle und der Surround-Modus werden
im Bedienfelddisplay angezeigt.
y
Dieses Gerät verfügt über eine Abschaltautomatik, die das
Gerät automatisch ausschaltet, wenn es in eingeschaltetem
Zustand 12 Stunden lang nicht bedient wird.
2 Drücken Sie eine der Eingangstasten zur
Auswahl einer Eingangsquelle.
Nachdem der Eingangsquellenname drei Sekunden
lang im Bedienfelddisplay angezeigt wurde, kehrt das
Bedienfelddisplay zur normalen Anzeige zurück.
(Eingangsquellenname: Surround-/Stereomodus)
3 Starten Sie die Wiedergabe an der
ausgewählten externen Komponente.
Informationen zu der externen Komponente finden
Sie in der dazugehörigen Bedienungsanleitung.
Hinweis
Wenn der Ton von HDMI-Signalen über das Fernsehgerät
ausgegeben wird, können Sie den Lautstärkepegel nicht mit
den Tasten VOLUME +/– oder MUTE der Fernbedienung
ändern.
5 Wählen Sie den Surround-Modus oder den
Stereo-Modus und nehmen Sie die
gewünschten Toneinstellungen vor.
(☞ S. 11)
Drücken Sie (Netzschalter) erneut , um das
Gerät in den Bereitschaftsmodus zu
schalten.
Ist die HDMI-Steuerfunktion eingeschaltet oder wird die Batterie
des iPod/iPhone gerade aufgeladen, leuchtet die STATUSAnzeige rot. Wird die HDMI-Steuerfunktion ausgeschaltet,
erlischt die STATUS-Anzeige. (☞ S. 3)
Verwenden von Kopfhörern
Stecken Sie den Stecker des Kopfhörers in die PHONESBuchse (☞ S. 3) dieses Geräts.
• Lautstärke und Klangsteuerung können separat für den
Kopfhörer und die Lautsprecher eingestellt werden.
• Sie können den Surround- und Stereosound sowohl
über Kopfhörer als auch über den Lautsprecher hören.
(☞ S. 11)
10 De
Page 81

Einstellen von Klangmodi
SURROUND
STEREO
Wiedergabe im Surroundsound
Zur originalgetreuen Wiedergabe von Klangeffekten.
Drücken Sie SURROUND, um den SurroundModus einzustellen.
Drücken Sie wiederholt SURROUND, bis der gewünschte
Modus im Bedienfelddisplay erscheint.
Beschreibung der Surround-Modi in folgender
Reihenfolge
Display Effekt
MOVIE Dieser Modus eignet sich für die Wiedergabe
MUSIC Dieser Modus eignet sich für die Wiedergabe
SPORTS Dieser Modus eignet sich für Sportsendungen.
GAME Dieser Modus eignet sich für Videospiele.
TV PROGRAM
(TV PROG)
STANDARD
*1
Dieser Modus steht nur bei der Wiedergabe mit SurroundLautsprechern zu Verfügung. (☞ S. 20)
y
• Das Gerät speichert automatisch alle Einstellungen der
einzelnen Eingangsquellen.
• Wenn keine Surround-Lautsprecher angeschlossen sind,
erzeugt das Gerät eine 7.1-Kanal-Surround-Wiedergabe hoher
Qualität, indem die AIR SURROUND XTREME-Technologie
eingesetzt wird.
• Abhängig von den gewählten Einstellung wird das Gerät
DTS-HD Master Audio-Klang oder DTS-HD High Resolution
Audio-Klang möglicherweise nicht decodieren. In diesen Fällen
wird nur DTS decodiert.
von Filmen auf Medien.
von Musik auf Medien.
Dieser Modus eignet sich für allgemeine
Fernsehsendungen.
*1
Wiedergabe ohne Klangeffekt.
CLEAR VOICE
Wiedergabe im Stereosound
2-Kanal-Tonquellen, wie beispielsweise CD-Player,
können mit verbesserter Klangwirkung wiedergegeben
werden.
Drücken Sie STEREO, um in den erweiterten
Stereo-Modus zu schalten.
Mit jedem Tastendruck auf STEREO schaltet sich die
Funktion abwechselnd ein (EXTENDED STEREO) und
aus (STEREO).
„STEREO“: Der Stereoton wird ohne Effekte
wiedergegeben.
„EXTENDED STEREO“: Die räumliche Wirkung des
Stereotons wird verstärkt.
y
• Die Standardeinstellung ist „EXTENDED STEREO“.
• Das Gerät speichert alle Einstellungen der einzelnen
Eingangsquellen.
Clear Voice
Diese Funktion macht die Dialoge in Filmen und TVFilmen bzw. Sportkommentare deutlicher hörbar.
Drücken Sie CLEAR VOICE, um die Funktion
ein-/auszuschalten.
Ist die Clear Voice-Funktion aktiviert, leuchtet die
Anzeige „●“ (Clear Voice).
y
Das Gerät speichert alle Einstellungen der einzelnen
Eingangsquellen.
FUNKTIONEN
GRUND-
11 De
Deutsch
Page 82

Einstellen von Klangmodi
/
SUBWOOFER +/–
ENHANCER
Compressed Music Enhancer
Geben Sie digital komprimierter Formate, wie MP3 und
WMA, mit verbesserter dynamischer Betonung der Bässe
und Höhen wieder.
Drücken Sie ENHANCER, um die Funktion ein-/
auszuschalten.
Wenn der Compressed Music Enhancer aktiviert ist,
leuchtet die Anzeige ENHANCER.
y
Das Gerät speichert alle Einstellungen der einzelnen
Eingangsquellen.
UniVolume
Gleichen Sie große Lautstärkeunterschiede beim
Fernsehen aus, um das Hören in den folgenden Fällen zu
erleichtern.
• Beim Umschalten des Kanals
• Wenn das TV-Programm von einer Werbepause
unterbrochen wird
• Wenn ein Programm beendet ist und ein neues
Programm beginnt
Drücken Sie UNIVOLUME, um die Funktion ein-/
auszuschalten.
Wenn UniVolume aktiviert ist, leuchtet die Anzeige
UNIVOLUME.
y
Das Gerät speichert alle Einstellungen der einzelnen
Eingangsquellen.
UNIVOLUME
LEVEL
Anpassen der Lautstärkebalance
Sie können die Lautstärkebalance der virtuellen
Lautsprecher und des Subwoofers während der
Wiedergabe einstellen.
1 Drücken Sie wiederholt LEVEL, um einen der
folgenden Kanäle zum Anpassen
auszuwählen.
Verfügbare Optionen
FRONT L,
FRONT R
CENTER Mittlerer Lautsprecher
SURROUND L,
SURROUND R
SUBWOOFER Subwoofer
Vorderer Lautsprecher (links/rechts)
Virtueller Surround-Lautsprecher und
Surround-Lautsprecher (links/rechts)
2 Drücken Sie / , um den
Lautstärkepegel während der Wiedergabe
des ausgewählten Kanals anzupassen.
Einstellbereich: –6 bis +6
(Standardeinstellung: 0)
y
Die Subwoofer-Lautstärke kann durch Drücken von
SUBWOOFER +/- angepasst werden.
Hinweise
• Die Lautstärkebalance kann nicht eingestellt werden,
wenn Sie Kopfhörer verwenden.
• Diese Einstellung der einzelnen Kanäle ist für alle
Eingangsquellen verfügbar.
12 De
Page 83

Empfangen von FM-Sendungen
Grundlegende Vorgehensweise bei der Sendersuche
ANALOG/FM
Drücken Sie die Taste mehrmals,
um den Eingang auf FM zu stellen.
MEMORY
Zum manuellen Abspeichern
von Sendern.
TUNING /
Zum Ändern der Frequenz um 1
Ziffer drücken Sie die Tasten, zur
automatischen Sendersuche halten
Sie sie gedrückt.
OPTION
Zum Aufrufen des
Optionenmenüs, wenn FM als
Eingang eingestellt ist.
INFO
Zum Auswählen, welche
Informationen im Bedienfelddisplay
angezeigt werden.
PRESET /
Zum Auswählen gespeicherter
FM-Sender.
FUNKTIONEN
GRUND-
Cursor im Optionenmenü
RETURN
Zurück zum vorherigen Menü
oder Abbrechen eines Vorgangs.
Programmieren gespeicherter FM-Sender
■
Automatische Senderspeicherung
Sie können bis zu 40 FM-Sender speichern (01 bis 40).
1 Drücken Sie zur Auswahl des FM-Eingang
mehrmals ANALOG/FM.
2 Drücken Sie OPTION, um in das
Optionenmenü zu wechseln.
„1.VOLUME TRIM“ erscheint zunächst im
Bedienfelddisplay.
3 Drücken Sie / zur Auswahl von
„2.AUTO PRESET“, und drücken Sie ENTER.
y
Drücken Sie mehrmals PRESET /, um eine
Speicherplatznummer auszuwählen, unter der der erste
Sender gespeichert werden soll.
Nach ca. 5 Sekunden beginnt die automatische
Sendersuche mit der niedrigsten Frequenz und sucht
das Frequenzband nach oben ab. Wenn eine Frequenz
y
Wenn Sie während der automatischen Sendersuche RETURN
drücken, wird die automatische Senderspeicherung gestoppt.
• Alle unter einer Speicherplatznummer registrierten Senderdaten
• Falls weniger als 40 empfangbare Sender gefunden werden,
• Nur Sender mit starken Signalen können gespeichert werden.
gespeichert wird, leuchtet die TUNED-Anzeige auf.
Wenn die automatische Senderspeicherung
abgeschlossen ist, erscheint zunächst die Meldung
„Preset Complete“ drei Sekunden lang im
Bedienfelddisplay, dann wird wieder das
Optionenmenü angezeigt.
Hinweise
werden beim Speichern eines neuen Senders unter der gleichen
Speicherplatznummer gelöscht.
stoppt die automatische Senderspeicherung nach dem Absuchen
aller verfügbaren Senderfrequenzen automatisch.
Deutsch
Falls der gewünschte Sender nicht gespeichert oder ein Sender
nicht unter der gewünschten Speicherplatznummer gespeichert
wird, müssen Sie den Sender manuell speichern. (☞ S. 14)
13 De
Page 84

Empfangen von FM-Sendungen
■ Manuelle Senderspeicherung
Verwenden Sie diese Funktion zur manuellen
Speicherung des gewünschten Senders.
1 Stellen Sie den zu speichernden
Radiosender ein.
2 Drücken Sie MEMORY.
„MANUAL PRESET“ erscheint im
Bedienfelddisplay und kurz darauf die
Speicherplatznummer, unter der der Sender
gespeichert wird.
y
Wenn Sie MEMORY länger als 2 Sekunden gedrückt
halten, wird der Sender unter der niedrigsten freien
Speicherplatznummer oder der Speicherplatznummer, die
der letzten Speicherplatznummer folgt, gespeichert.
3 Drücken Sie PRESET / zur Auswahl der
Speicherplatznummer (01 bis 40), unter der
der Sender gespeichert werden soll.
Wenn unter der ausgewählten Speicherplatznummer
kein Sender gespeichert ist, erscheint die EMPTYAnzeige im Display. Wenn unter der gewählten
Speicherplatznummer bereits ein Sender gespeichert
wurde, wird die gespeicherte Frequenz rechts neben
der Speicherplatznummer angezeigt.
y
Wenn Sie einen Sender nicht speichern wollen, drücken Sie
RETURN auf der Fernbedienung bzw. bedienen Sie den
Tuner etwa 30 Sekunden lang nicht.
4 Drücken Sie zum Speichern erneut MEMORY.
■ Löschen einer
Senderspeicherung
1 Drücken Sie OPTION, um in das
Optionenmenü zu wechseln.
2 Zeigen Sie „3.CLEAR PRESET“ durch
Drücken von / an, und drücken Sie
ENTER.
Eine Speicherplatznummer und eine Frequenz
erscheinen im Bedienfelddisplay.
y
Mit der Taste RETURN auf der Fernbedienung können Sie
den Vorgang abbrechen und zum Optionenmenü
zurückkehren.
3 Wählen Sie mit / die
Speicherplatznummer des gespeicherten
Senders, den Sie löschen möchten, und
drücken Sie ENTER.
Der unter der ausgewählten Speicherplatznummer
programmierte Sender wird gelöscht. Wenn Sie
weitere gespeicherte Sender löschen wollen, gehen
Sie wie in den Schritten oben erläutert vor.
Zum Beenden des Vorgangs drücken Sie OPTION.
■ Verwenden des monauralen
Empfangsmodus
Wenn das Signal des gewünschten FM-Senders zu
schwach ist, stellen Sie den Empfangsmodus auf
„MONO“. Damit lässt sich die Signalqualität verbessern.
1 Drücken Sie OPTION, um in das
Optionenmenü zu wechseln.
14 De
2 Zeigen Sie „4.STEREO/MONO“ durch
Drücken von an, und drücken Sie
ENTER.
3 Wählen Sie mit / die Option „MONO“,
um den Empfangsmodus auf monaural
einzustellen.
Page 85

Empfangen von FM-Sendungen
■ Wechseln der Informationen im
Display
Mit jedem Tastendruck auf INFO wechseln die
Informationen im Display wie folgt:
Nur Modelle für Europa und Russland
Informationstyp
• SURROUND MODE
Hier wird angezeigt, ob der Surround-Modus oder der
Stereo-Modus eingestellt ist.
• FREQUENCY
Die Frequenz und die Speicherplatznummer werden
angezeigt.
• PROGRAM SERVICE (PS)
Das gerade empfangene Radiodatensystem-Programm
wird angezeigt.
• PROGRAM TYPE (PTY)
Der Typ des gerade empfangenen RadiodatensystemProgramms wird angezeigt.
• RADIO TEXT (RT)
Informationen zum gerade empfangenen
Radiodatensystem-Programm werden angezeigt.
• CLOCK TIME (CT)
Die aktuelle Uhrzeit wird angezeigt.
■ Verwenden des TP
(Verkehrsfunk)-Datenservice (nur
Modelle für Europa und
Russland)
Verwenden Sie diese Funktion zum Empfang des TP
(Verkehrsfunk)-Datenservice des Radiodatensystems des
Sendernetzes.
1 Drücken Sie OPTION, um in das
Optionenmenü zu wechseln.
2 Drücken Sie / zur Auswahl von
„5.TRAFFIC PROG“, und drücken Sie
ENTER.
Die Suche startet automatisch. Die AUTO-Anzeige
und „TP“ blinken während der Suche im
Multiinformationsdisplay. Wenn ein Verkehrsfunk
empfangen wird, werden „TP“ und die Frequenz
weiterhin angezeigt und die Suche wird beendet.
Wenn das Gerät keinen Verkehrsfunk empfangen
kann, erlöschen „TP“ und die Frequenz, und „TP Not
Found“ wird im Bedienfelddisplay angezeigt.
y
• Zum Abbrechen der Suche drücken Sie RETURN.
• Wenn während der Suche 30 Sekunden lang keine
Funktion ausgeführt wird, schließt sich das Optionenmenü
und die Suche wird abgebrochen.
FUNKTIONEN
GRUND-
15 De
Deutsch
Page 86

Wiedergeben von iPod/iPhone und USB-Geräten
Schließen Sie ein USB-Gerät, z. B. einen iPod/ein iPhone,
einen USB-Flashspeicher oder einen tragbaren
Musikplayer, an, um Audiodateien wiederzugeben.
Akkuladefunktion
Die Batterie eines angeschlossenen Geräts kann
aufgeladen werden, wenn das Gerät eingeschaltet ist. Ein
an das Gerät angeschlossener iPod/ein angeschlossenes
iPhone werden auch dann aufgeladen, wenn sich das Gerät
im Bereitschaftsmodus befindet.
Unterstützte iPod-/iPhone-Modelle
iPod classic
iPod nano (3. Generation bis 6. Generation)
iPod touch
iPhone
iPhone 3G
iPhone 3GS
iPhone 4
y
• Je nach Modell und Softwareversion des iPod/iPhone stehen
manche Funktionen möglicherweise nicht zur Verfügung.
• Eine vollständige Liste der im Bedienfelddisplay erscheinenden
Statusmeldungen finden Sie im Abschnitt „Meldungen für iPod/
iPhone und USB-Gerät“ unter „Störungsbehebung“ (☞ S. 27).
• Stellen Sie sicher, dass die Lautstärke vor dem Entfernen des
iPod/iPhone auf die niedrigste Stufe gestellt ist.
Unterstützte USB-Geräte
USB-Flashspeicher und tragbare USB-Musikplayer im
FAT-Format mit Unterstützung für die USBMassenspeicherklasse
Hinweis
Einige USB-Geräte werden möglicherweise nicht unterstützt,
obwohl sie oben aufgeführt sind.
USB
INFO
OPTION
ENTER
RETURN
SETUP
FOLDER
▲/▼
/
Wiedergabe
1 Drücken Sie mehrmals USB zur Auswahl des
USB-Eingangs.
2 Starten Sie die Wiedergabe am iPod/iPhone
oder USB-Gerät.
iPod/iPhone USB-Gerät
: Wiedergabe/Pause
: Vorwärts springen
(gedrückt halten: schneller
Vorlauf)
: Rückwärts springen
(gedrückt halten: schneller
Rücklauf)
▲/▼: Scrollt den Bildschirm
*1
Fährt mit der Wiedergabe der zuletzt gespielten Musik fort
(Wiedergabe fortfahren)
*2
Beim Überspringen erscheint der Ordnername drei Sekunden
lang im Bedienfelddisplay.
: Wiedergabe/Pause
: Vorwärts springen
(gedrückt halten: schneller
Vorlauf)
: Rückwärts springen
(gedrückt halten: schneller
Rücklauf)
RETURN: Stopp
FOLDER ▲/▼: Ordner
überspringen
*2
y
Das Gerät beginnt in den folgenden Fällen automatisch mit der
Wiedergabe des iPod/iPhone oder des USB-Geräts.
• Wenn der Eingang auf USB gesetzt wird, während das Gerät
eingeschaltet und ein iPod/iPhone oder ein USB-Gerät
angeschlossen ist.
• Wenn der Eingang beim Einschalten des Geräts auf USB
gestellt ist und ein iPod/iPhone oder USB-Gerät angeschlossen
ist.
• Wenn ein eingeschalteter iPod oder ein eingeschaltetes iPhone
an das eingeschaltete Gerät angeschlossen wird. (Als Eingang
wird automatisch USB eingestellt.)
*1
16 De
Page 87

Wiedergeben von iPod/iPhone und USB-Geräten
Wiederholungs-/ Zufallswiedergabe
1 Drücken Sie OPTION, um in das
Optionenmenü zu wechseln.
2 Drücken Sie / zur Auswahl von „2.
REPEAT“, und drücken Sie ENTER.
3 Drücken Sie / zur Auswahl der
verfügbaren Option, und drücken Sie ENTER.
Verfügbare Optionen (Standardeinstellung:
OFF)
iPod/iPhone USB-Gerät
OFF
ONE
ALL
FOLDER
RANDOM
Bricht die wiederholte
Wiedergabe ab
Wiederholt die
Wiedergabe eines
einzelnen Musikstücks
Wiederholt die
Wiedergabe der
gesamten Musik auf
dem iPod/iPhone
Bricht die wiederholte
Wiedergabe ab
Wiederholt die
Wiedergabe eines
einzelnen Musikstücks
Wiederholt die
Wiedergabe der
gesamten Musik auf
dem USB-Gerät
Wiederholt die
Wiedergabe der
gesamten Musik, die in
dem Ordner auf dem
USB-Gerät gespeichert
ist
Wiederholt in zufälliger
Reihenfolge die
Wiedergabe der
gesamten Musik, die in
dem Ordner auf dem
USB-Gerät gespeichert
ist
■ Zufallswiedergabe des iPod/
iPhone
1 Drücken Sie OPTION, um in das
Optionenmenü zu wechseln.
2 Drücken Sie / zur Auswahl von
„3.SHUFFLE“, und drücken Sie ENTER.
3 Drücken Sie / zur Auswahl des
Parameters, und drücken Sie ENTER.
Verfügbare Optionen (Standardeinstellung:
OFF)
OFF: Bricht die Zufallswiedergabe ab
SONGS: Gibt Lieder in zufälliger Reihenfolge
wieder.
ALBUMS: Gibt Alben in zufälliger Reihenfolge
wieder.
Anzeigen von Musikinformationen
Sie können Informationen zu der aktuell wiedergegebenen
Musik anzeigen.
Drücken Sie INFO.
Drücken Sie wiederholt INFO, um die (drei Sekunden
lang angezeigten) Informationen in der unten
beschriebenen Reihenfolge zu wechseln.
iPod/iPhone: SONG (Titel) → PLAY TIME
(Wiedergabezeit) → ARTIST (Künstlername) → ALBUM
(Album) → SONG (Titel)
USB-Gerät: FILE (Dateiname) → PLAY TIME
(Wiedergabezeit) → SONG (Titel) → ARTIST
(Künstlername) → ALBUM (Album) → FILE
(Dateiname)
Hinweise
• Wenn die Information nicht vollständig im Bedienfelddisplay
angezeigt werden kann, wird sie einmal gescrollt.
• Einige Zeichen können nicht im Bedienfelddisplay dieses
Gerätes angezeigt werden.
Firmware-Update
Sie können die Firmware dieses Geräts aktualisieren.
1 Laden Sie die Firmwaredaten auf einen USB-
Flashspeicher. Schließen Sie dann den USBFlashspeicher an den USB-Anschluss am
Bedienfeld dieses Geräts an.
Stellen Sie sicher, dass sich Ihre Kopie der
Firmwaredatei im Stammverzeichnis des USBFlashspeichers befindet. Schlagen Sie in der
Dokumentation zur Firmwaredatei nach.
2 Drücken Sie SETUP.
3 Drücken Sie / zur Auswahl von
„6:FIRMWARE“, und drücken Sie ENTER.
4 Drücken Sie / zur Auswahl von
„6-2:USB UPDATE“, und drücken Sie ENTER.
Die Aktualisierung beginnt.
y
• Drücken Sie / , um „6-1:VERSION“ auszuwählen und
die Version der Firmware dieses Gerätes im Bedienfelddisplay
anzuzeigen.
• Zu den Meldungen für Firmware-Updates, die im
Bedienfelddisplay angezeigt werden, siehe Abschnitt
„Meldungen bei einem Firmware-Update“ unter
„Störungsbehebung“ (☞ S. 28).
FUNKTIONEN
GRUND-
Deutsch
17 De
Page 88

WEITERE FUNKTIONEN
Konfigurationsmenü
Liste der Optionen im Konfigurationsmenü
Menü Untermenü Funktionen Seite
1:SP LEVEL 1-1:FRONT L
1-2:FRONT R
1-3:CENTER
1-4:SURROUND L
1-5:SURROUND R
1-6:SUBWOOFER
2:TONE CONTROL 2-1:BASS
2-2:TREBLE
3:HDMI SETUP 3-1:CONTROL
3-2:AUDIO
4:DISPLAY MODE Ändern der Helligkeit des Bedienfelddisplays ☞ S. 19
5:SP SETUP 5-1:SP CHANNEL Auswählen der Kanalanzahl
5-2:SP TYPE Ändern der Einstellung des Lautsprechertyps
5-3:SP DISTANCE Einstellen des Abstands zwischen den Lautsprechern
5-4:CROSSOVER Begrenzung des Übergangsregisters
6:FIRMWARE 6-1:VERSION Anzeigen der Firmware-Version dieses Geräts
6-2:USB UPDATE Aktualisieren der Firmware dieses Geräts
7:D.RANGE Anpassen des Dynamikbereichs ☞ S. 21
8:MATRIX DECODE 8-1:DECODE MODE Auswählen des Decoders
8-2:C.IMAGE Anpassen des Tons des mittleren Lautsprechers
Anpassen der Lautstärkebalance mit dem Prüfton ☞ S. 19
Einstellen der Höhen/Tiefen des Klangs (Klangsteuerung) ☞ S. 19
Konfigurieren der HDMI-Einstellungen ☞ S. 19
☞ S. 20
☞ S. 17
☞ S. 21
Grundlegendes Vorgehen
SETUP
ENTER
RETURN
Sie können verschiedene Einstellungen dieses Geräts über
das Konfigurationsmenü ändern.
/
1 Drücken Sie SETUP, um in das
Konfigurationsmenü zu wechseln.
„1:SP LEVEL“ wird im Bedienfelddisplay angezeigt.
2 Drücken Sie / zur Auswahl des Menüs,
und drücken Sie ENTER.
Wiederholen Sie diese Schritte, bis das gewünschte
Menü/Untermenü angezeigt wird.
3 Passen Sie mit / den Wert für die
einzelnen Menüoptionen an.
Wenn Sie / gedrückt halten, ändern sich die
Einstellwerte schneller.
4 Drücken Sie SETUP erneut, um das
Konfigurationsmenü auszublenden.
y
• Drücken Sie RETURN oder , um zum vorherigen Menü
zurückzukehren.
• Drücken Sie , um in das nächste Menü zu wechseln.
Hinweis
Wenn Sie das Gerät nicht innerhalb von 30 Sekunden nach dem
Aufrufen des Konfigurationsmenüs bedienen, blendet das Gerät
das Konfigurationsmenü automatisch aus.
18 De
Page 89

Anpassen der Lautstärkebalance für jeden einzelnen Kanal
Menü: 1:SP LEVEL
Passen Sie die Lautstärkebalance zwischen den Kanälen
mit den aus den einzelnen Kanälen ausgegebenen
Prüftönen an.
Untermenü:
„1-1:FRONT L“ „1-2:FRONT R“: Passt den
Ausgabepegel der Kanäle für den vorderen Lautsprecher
(links/rechts) an.
„1-3:CENTER“: Passt den Ausgabepegel des Kanals für
den mittleren Lautsprecher an.
„1-4:SURROUND L“ „1-5:SURROUND R“: Passt den
Ausgabepegel der Kanäle für die virtuellen Surround-/
Surround-Lautsprecher (links/rechts) an.
„1-6:SUBWOOFER“: Passt den Ausgabepegel des
Kanals für den Subwoofer an.
Einstellbereich: –6 bis +6 (Standardeinstellung: 0)
y
• Sie können die Lautstärkebalance auch anpassen, während das
Eingabegerät in Betrieb ist. (☞ S. 12)
• Wenn Sie die Einstellung für einen Kanal beendet haben,
drücken Sie LEVEL, um zum nächsten Kanal zu wechseln.
Konfigurationsmenü
Verfügbare Optionen: OFF, ON
(Standardeinstellung: OFF)
„OFF“: Die HDMI-Steuerfunktion wird deaktiviert. Die
Leistungsaufnahme dieses Geräts wird im
Bereitschaftsbetrieb verringert.
„ON“: Die HDMI-Steuerfunktion wird aktiviert.
y
Zum Aktivieren der ARC-Funktion stellen Sie „3-1:CONTROL“
auf „ON“.
■ Einstellen der Audioausgabe
Untermenü: 3-2:AUDIO
Sie können eine Komponente zur Wiedergabe des HDMIAudiosignals auswählen. Diese Einstellung ist aktiviert,
wenn „3-1:CONTROL“ auf „OFF“ gesetzt ist.
Verfügbare Optionen: AMP, TV
(Standardeinstellung: AMP)
„AMP“: HDMI-Tonsignale werden über die an dieses
Gerät angeschlossenen Lautsprecher ausgegeben.
„TV“: HDMI-Tonsignale werden über die Lautsprecher
des an dieses Gerät angeschlossenen Fernsehgeräts
ausgegeben.
Ändern der Helligkeit des Bedienfelddisplays
Einstellen der Höhen/Tiefen des Klangs (Klangsteuerung)
Menü: 2:TONE CONTROL
Sie können die Balance der hohen Frequenzen (Höhen)
und der tiefen Frequenzen (Bässe) für die vorderen
Lautsprechern so einstellen, dass Sie den gewünschten
Klang erzielen. Passen Sie, wenn Kopfhörer
angeschlossen sind, die Balance der hochfrequenten Töne
und der niederfrequenten Töne der über den Kopfhörer
ausgegebenen Töne an.
Untermenü
„2-1:BASS“: Passt die Balance an die vom Lautsprecher
ausgegebenen tieffrequenten Töne (Bässe) an.
„2-2:TREBLE“: Passt die Balance an die vom Lautsprecher
ausgegebenen hochfrequenten Töne (Höhen) an.
Einstellbereich: –6 bis +6 (Standardeinstellung: 0)
Konfigurieren der HDMI-Einstellungen
Menü: 3:HDMI SETUP
Sie können die Einstellungen in Bezug auf die HDMISignale und die HDMI-Steuerfunktion konfigurieren.
■ Ein-/Ausschalten der HDMI-
Steuerfunktion
Untermenü: 3-1:CONTROL
Sie können einstellen, ob die HDMI-Steuerfunktion
verwendet wird. Einzelheiten dazu finden Sie unter
„Bedienen der Geräts mit der Fernsehfernbedienung“
(☞ S. 23).
Sie können die Helligkeit des Bedienfelddisplays ändern.
Ebenso können Sie das Bedienfelddisplay ausschalten, um
einen Film in einer dunkleren Umgebung anzusehen.
Die Helligkeit im Bedienfelddisplay ändert sich
folgendermaßen.
Menü: 4:DISPLAY MODE
Einstellbereich (Standardeinstellung: „DIMMER 0“)
Hell
Dunkel
*
Wenn Sie DISPLAY OFF auswählen, wird das
Bedienfelddisplay nach dem Beenden des
Konfigurationsmenüs ausgeschaltet.
Hinweise
• Wenn DISPLAY OFF ausgewählt wurde und eine beliebige
Funktion ausgeführt wird, leuchtet das Bedienfelddisplay kurz auf.
• Im DISPLAY OFF-Modus leuchtet nur die STATUS-Anzeige weiter.
FUNKTIONEN
WEITERE
Deutsch
19 De
Page 90

Konfigurationsmenü
Verwenden anderer Lautsprecher
Menü: 5:SP SETUP
Sie können den Lautsprechertyp einstellen, wenn Sie
Lautsprecher hinzufügen oder wechseln wollen. Wenn Sie
nur den mitgelieferten Lautsprecher anschließen,
brauchen Sie die Einstellung nicht zu ändern.
■ Auswählen der Kanalanzahl und
des vorderen Lautsprechertyps
Untermenü: 5-1:SP CHANNEL
Sie können die Anzahl der Ausgabelautsprecher
auswählen.
Mitgelieferter Lautsprecher: Im Handel erhältliche Lautsprecher:
5-1:SP CHANNEL
5-2:SP TYPE
BAR
(Standardeinstellung)
BOOK SHELF
2CH
*1 *1 *1, 3 *1, 3
(Standardeinstellung)
Untermenü: 5-2:SP TYPE
Sie können den Typ der vorderen Lautsprecher
auswählen.
„BAR“: Wenn Sie das Gerät entweder allein oder in
Verbindung mit anderen im Handel erhältlichen
Lautsprechern verwenden
„BOOK SHELF“: Diese Einstellung wird für dieses
System nicht verwendet
„OTHER“: Wenn Sie im Handel erhältliche Lautsprecher
anstelle des Geräts anschließen
3CH
4CH 5CH
*3
OTHER
*1, 2 *1, 2 *1, 2, 3 *1, 2, 3
*1: „5-3:SP DISTANCE“-Einstellung verfügbar *2: „5-4:CROSSOVER“-Einstellung verfügbar
*3: Die Einstellungen „8:MATRIX DECODE“ sind verfügbar
■ Einstellen des Abstands
zwischen den Lautsprechern
Untermenü: 5-3:SP DISTANCE
Wenn Sie den Parameter für den Abstand zwischen dem
linken und dem rechten vorderen Lautsprecher einstellen,
können Sie einen optimalen Raumklangeffekt erzielen.
Verfügbare Optionen (Standardeinstellung:
NORMAL)
„WIDE“: Wenn der Abstand zwischen den vorderen
Lautsprechern mehr als 150 cm beträgt.
„NORMAL“: Wenn der Abstand zwischen den vorderen
Lautsprechern 80 cm bis 150 cm beträgt.
„NARROW“: Wenn der Abstand zwischen den vorderen
Lautsprechern bis zu 80 cm beträgt.
Hinweise
• Wenn der Surroundmodus deaktiviert ist, kann diese
Einstellung nicht vorgenommen werden.
• Diese Einstellung kann nur vorgenommen werden, wenn
„2CH“ oder „3CH“ unter „5-1:SP CHANNEL“ ausgewählt ist.
■
Begrenzung des Übergangsregisters
Untermenü: 5-4:CROSSOVER
Sie können die Grenzfrequenzausgabe des integrierten
Subwoofers dieses Gerätes gemäß der Spezifikation der
angeschlossenen Lautsprecher einstellen.
Verfügbare Optionen (Standardeinstellung: 150Hz)
80Hz, 100Hz, 120Hz, 150Hz, 200Hz
20 De
Page 91

Konfigurationsmenü
Steuerung des Dynamikbereichs Einstellen der Matrix-Decodierung
Menü: 7:D.RANGE
Sie können die Komprimierung des Dynamikbereichs
anpassen. Der Dynamikbereich ist die Differenz zwischen
dem schwächsten über dem Geräuschpegel der Geräte
hörbaren Ton und dem stärksten ohne Verzerrung
hörbaren Ton.
Verfügbare Optionen: AUTO/MIN, STANDARD,
MAX (Standardeinstellung: MAX)
„AUTO/MIN“:
(MIN) Passen Sie zum Wiedergeben von BitstreamSignalen außer Dolby TrueHD-Signalen den
Dynamikbereich für eine geringe Lautstärke oder eine
ruhige Umgebung, z. B. nachts, an.
(AUTO) Passen Sie bei der Wiedergabe von Dolby
TrueHD-Signale den Dynamikbereich entsprechend den
Informationen des Eingangssignals an.
„STANDARD“: Der für den normalen Heimgebrauch
empfohlene Dynamikbereich.
„MAX“: Gibt den Ton wieder, ohne den Dynamikbereich
des Eingangssignals anzupassen.
Menü: 8:MATRIX DECODE
Die Matrix-Decodierfunktion erweitert 2-KanalStereosound zu Surroundsound.
■ Auswählen des Decoders
Untermenü: 8-1:DECODE MODE
Dieses Untermenü kann nur ausgewählt werden, wenn für
den Surround-Modus „STANDARD“ ausgewählt wurde.
Verfügbare Optionen (Standardeinstellung:
DOLBY PLII)
DOLBY PLII, Neo:6 Cinema, Neo:6 Music
■ Anpassen des Tons des mittleren
Lautsprechers
Untermenü: 8-2:C.IMAGE
Passt die Ausgabe des vorderen linken und rechten Kanals
im Verhältnis zum mittleren Kanal an, um den mittleren
Kanal nach Bedarf mehr oder weniger dominierend zu
machen. Diese Anpassung ist nur möglich, wenn „Neo:6
Music“ in „8-1:DECODE MODE“ ausgewählt wurde.
Einstellbereich (Standardeinstellung: 0.3)
0.0 bis 1.0
FUNKTIONEN
WEITERE
21 De
Deutsch
Page 92

Einstellungen für die einzelnen Eingangsquellen (Optionenmenü)
Die Optionen des Optionenmenüs sind im Folgenden
Eingang
aufgelistet. Diese Einstellungen werden auf die aktuell
ausgewählte Eingangsquelle angewendet.
OPTION
/
RETURN
ENTER
1 Drücken Sie zum Ändern der Einstellung die
Eingangstaste, um den gewünschten
Eingang auszuwählen.
2 Drücken Sie OPTION, um in das
Optionenmenü zu wechseln.
Das Optionenmenü wird im Bedienfelddisplay
angezeigt.
Optionen im Optionenmenü
Die folgenden Menüoptionen stehen für jeden
Eingang zur Verfügung.
Eingang Menüoption
TV/STB/
ANALOG
HDMI1-3
1.VOLUME
FM
USB
*1 Einzelheiten dazu finden Sie auf Seite 13.
*2 Einzelheiten dazu finden Sie auf Seite 17.
TRIM
2.AUDIO
DELAY
2.AUTO PRESET
3.CLEAR PRESET
4.STEREO/MONO
5.TRAFFIC PROG
2.REPEAT
3.SHUFFLE
*2
3.AUDIO
ASSIGN
*1
3 Drücken Sie / zur Auswahl des Menüs,
und drücken Sie ENTER.
4 Drücken Sie / zum Ändern des
Einstellwertes, und drücken Sie ENTER.
5 Zum Verlassen des Optionenmenüs drücken
Sie OPTION.
Drücken Sie RETURN, um zum vorherigen Menü
zurückzukehren.
Anpassen des Eingangspegels für jede Buchse (VOLUME TRIM)
Menü: 1.VOLUME TRIM
Passen Sie den Eingangspegel für jede Buchse an, um
Lautstärkeschwankungen zwischen den verschiedenen
Eingabegeräten zu auszugleichen.
Einstellbereich: –6 bis +6
(Standardeinstellung: 0)
Anpassen der Tonverzögerung (AUDIO DELAY)
Menü: 2.AUDIO DELAY
Fernsehbilder auf einem Flachbildschirm werden
manchmal zeitversetzt zum Klang ausgegeben. Sie
können diese Funktion nutzen, um die Klangausgabe zu
verzögern und so mit dem Videobild zu synchronisieren.
Einstellbereich: 0 ms bis 500 ms, AUTO
(Standardeinstellung: „AUTO“)
„AUTO“: Wenn ein Fernsehgerät über HDMI
angeschlossen ist, das eine Funktion zum automatischen
Einstellen der Tonverzögerung hat, erfolgt die
Tonverzögerung automatisch.
Zuordnen des Audioeingangs zum optischen Digitaleingang/digitalen Koaxialeingang (AUDIO ASSIGN)
Menü: 3.AUDIO ASSIGN
Überträgt die HDMI-Buchse einer Komponente keine
Audiosignale, wählen Sie den HDMI-Eingang und
verwenden Sie zur Audiowiedergabe die Buchse für den
optischen Digitaleingang/digitalen Koaxialeingang.
Verfügbare Optionen
(Standardeinstellung: HDMI)
„HDMI“: Wählt das HDMI-Audiosignal aus
„OPTICAL“: Wählt das Audiosignal der optischen
Eingangsbuchse
„COAXIAL“: Wählt das Audiosignal der digitalen
Koaxialeingangsbuchse
22 De
Page 93

Bedienen der Geräts mit der Fernsehfernbedienung
Was ist die HDMI-Steuerfunktion?
Sie können das Gerät mit der Fernsehfernbedienung
bedienen, wenn Ihr Fernsehgerät die HDMISteuerfunktion unterstützt (z. B. REGZA-Link) und an die
HDMI OUT (ARC)-Buchse dieses Gerätes angeschlossen
ist. *1
Fernsehfernbedienung (Beispiel)
Ein-/Ausschalten
Einstellen der HDMISteuerfunktion
(Netzschalter)
Eingangswähltaste
Wechselt den Eingang
Dieses Gerät wählt den
Eingang automatisch
entsprechend der am
Fernsehgerät eingestellten
Eingangsquelle. Durch
Umschalten des Eingangs im
TV-Menü (z. B. wenn BDPlayer im Fernsehmenü
ausgewählt wird) ändert sich
auch der Eingang dieses
Geräts.
Ton lauter/leiser
Auswählen einer
Komponente zur Ausgabe
des Tons (dieses Gerät
oder Fernsehgerät)
*1
y
• Mit Ausnahme der oben aufgeführten unterstützen einige
Fernsehgeräte das Ein-/Ausschalten der UniVolume-Funktion.
• Auch wenn das Fernsehgerät die HDMI-Steuerfunktion
unterstützt, stehen einige Funktionen möglicherweise nicht zur
Verfügung. Einzelheiten dazu finden Sie in der
Bedienungsanleitung zum Fernsehgerät.
• Wenn Sie dieses Gerät über HDMI an ein Gerät anschließen,
das die HDMI-Steuerung unterstützt, wie z. B. einen BDPlayer, können Sie das Gerät mit der HDMI-Steuerfunktion
bedienen.
• Es empfiehlt sich, Produkte (Fernsehgerät, BD-/DVD-Player
usw.) vom selben Hersteller zu verwenden.
1 Schalten Sie alle Komponenten ein, die über
HDMI an dieses Gerät angeschlossen sind.
2 Prüfen Sie alle Komponenten, die über HDMI
angeschlossen sind, und aktivieren Sie an
jeder einzelnen Komponente die HDMISteuerfunktion.
Für dieses Gerät setzen Sie „3-1:CONTROL“ im
Einstellungsmenü „3:HDMI SETUP“ auf „ON“
(☞ S. 19). *
2
Für externe Komponenten schlagen Sie bitte in der
Bedienungsanleitung zur jeweiligen Komponente
3
nach. *
3 Schalten Sie das Fernsehgerät aus und
wieder ein.
*2 y
• Die Standardeinstellung ist „OFF“.
Wenn „3-1:CONTROL“ unter „3:HDMI SETUP“ im
Optionenmenü auf „ON“ gesetzt ist
– Auch durch Drücken der (Netzschalter)-Taste wird der
Strom nicht vollständig ausgeschaltet, und das Signal wird
von der HDMI IN-Buchse auf die HDMI OUT (ARC)-Buchse
ausgegeben.
– Bevor Sie das Gerät ausschalten, wählen Sie die gewünschte
an die HDMI IN-Buchse angeschlossene Eingangsquelle (1
bis 3).
– Je nach Fernsehgerät ändert die Bedienung des
Fernsehgerätes, z. B. das Wechseln der Kanäle,
möglicherweise die Einstellung der Surround-Modi dieses
Geräts.
y
*3
Beispiel für die Einstellung am Fernsehgerät
• Wählen Sie im Einstellungsmenü Ihres Fernsehgeräts „Link
setting“ → „HDMI control setting“ (Beispiel), und stellen Sie
dann eine Einstellung wie z. B. „HDMI control function“ auf
„ON“ (Beispiel).
• Einstellungen wie z. B. „Speaker priority“ sollten auf „AV
amplifier“ gestellt sein.
FUNKTIONEN
WEITERE
Deutsch
23 De
Page 94

Bedienen der Geräts mit der Fernsehfernbedienung
Registrieren von HDMIKomponenten am Fernsehgerät
*4
1 Wählen Sie am Fernsehgerät dieses Gerät
als Eingangsquelle aus.
2 Schalten Sie die durch die HDMI-
Steuerfunktion unterstützte Komponente
(z. B. BD-Player), die an dieses Gerät
angeschlossen ist, ein.
3 Wählen Sie als Eingangsquelle dieses Geräts
den BD-Player aus und prüfen Sie, ob das
Bild des Players korrekt angezeigt wird oder
nicht.
Wenn Sie den BD-Player an die HDMI 1-Buchse
anschließen, drücken Sie die Eingangswähltaste
wiederholt, um „HDMI 1“ auszuwählen.
4 Überprüfen Sie, ob die HDMI-Steuerung
funktioniert. Schalten Sie dazu dieses Gerät
ein oder passen Sie den Lautstärkepegel mit
der Fernsehfernbedienung an.
*4 y
Für einige HDMI-Komponenten müssen Sie nur die HDMISteuerfunktion einstellen. In diesem Fall ist eine Registrierung
der HDMI-Komponenten am Fernsehgerät nicht erforderlich.
Ändern der Anschlussart und der angeschlossenen Komponenten
Wenn die angeschlossenen Komponenten und Buchsen
geändert werden sollen, setzen Sie das Gerät
folgendermaßen zurück.
1 Schalten Sie die HDMI-Steuerfunktion des
Fernsehgeräts und des Players aus, schalten
Sie alle angeschlossenen Geräte aus und
ändern Sie die Verbindungen.
2 Führen Sie die Schritte 1 bis 3 unter
„Einstellen der HDMI-Steuerfunktion“ aus.
Wenn die HDMI-Steuerfunktion nicht funktioniert
Prüfen Sie Folgendes:
– Das Fernsehgerät muss an die HDMI OUT (ARC)-
Buchse dieses Geräts angeschlossen sein.
– „3-1:CONTROL“ unter „3:HDMI SETUP“ muss
im Optionenmenü auf „ON“ gesetzt sein.
(☞ S. 19)
– Die HDMI-Steuerfunktion muss am Fernsehgerät
aktiviert sein. (Prüfen Sie auch die jeweiligen
Einstellungen wie die Stromsperrfunktion oder
Lautsprecherpriorität.)
Die HDMI-Steuerfunktion funktioniert trotz Prüfung
der oben genannten Funktionen nicht.
– Schalten Sie dieses Gerät und das Fernsehgerät aus
und wieder an.
– Ziehen Sie den Netzstecker des Geräts und der
externen, über HDMI an das Gerät angeschlossenen
Komponenten ab.
Stecken Sie sie nach ca. 30 Sekunden wieder ein.
– Wählen Sie HDMI 1, HDMI 2, oder HDMI 3, und
ändern Sie den Eingang des Fernsehgerätes und
dieses Gerätes auf den gleichen Eingang.
24 De
Page 95

ZUSÄTZLICHE INFORMATIONEN
Störungsbehebung
Schlagen Sie in der unten aufgeführten Tabelle nach, wenn das Gerät nicht ordnungsgemäß funktioniert.
Wenn das bestehende Problem unten nicht aufgeführt ist oder wenn die aufgeführten Anweisungen nicht helfen, schalten
Sie das Gerät in den Bereitschaftsmodus, trennen Sie das Netzkabel und wenden Sie sich an den nächsten autorisierten
Yamaha-Händler oder ein Yamaha-Servicecenter.
Überprüfen Sie zuerst die folgenden Punkte.
1 Das Netzkabel des Geräts, des Fernsehgeräts und der externen Komponenten (wie einem BD-Player) stecken fest in
einer Netzsteckdose.
Die Stromversorgung des Geräts, des Fernsehgeräts und der externen Komponenten (wie einem BD-Player) ist eingeschaltet.
2
3 Alle Kabel sind fest an die entsprechenden Buchsen der jeweiligen Komponente angeschlossen.
Problem Mögliche Ursache Abhilfe
Das Gerät schaltet sich
nach dem Einschalten
sofort wieder aus.
Die Lautsprecher
bleiben stumm.
Auf einer Seite ist der
Ton zu leise.
Die
Lautsprecherkanäle
außer den vorderen
Kanälen bleiben
stumm.
Der Subwoofer bleibt
stumm.
Das Netzkabel ist möglicherweise nicht
korrekt angeschlossen.
Möglicherweise ist ein Laut sprecherkabel
kurzgeschlossen.
Am Gerät ist möglicherweise eine starke
Überspannung aufgetreten,
beispielsweise durch Blitzschlag oder
extreme statische Elektrizität.
Möglicherweise ist die Lautstärke auf den
Minimalpegel eingestellt.
Möglicherweise ist die Stummschaltung aktiviert.
Möglicherweise sind Eingangsquelle
oder Eingangseinstellung falsch.
Die Kabel sind möglicherweise nicht
korrekt angeschlossen.
„3-2:AUDIO“ im Konfigurationsmenü
„3:HDMI SETUP“ ist auf „TV“ gesetzt.
„3-1:CONTROL“ im
Konfigurationsmenü „3:HDMI SETUP“
ist auf „OFF“ gesetzt.
Der Kopfhörer ist angeschlossen.
Die Kabel sind möglicherweise nicht
korrekt angeschlossen.
Möglicherweise hören Sie eine
Stereotonquelle ohne Surround-Modus.
„1:SP LEVEL“ im Konfigurationsmenü
„1-4:SURROUND L “/„1-5:SURROUND R“
ist auf den Minimalpegel gesetzt.
„5-1:SP CHANNEL“ ist im Konfigurationsmenü
auf „2CH“ oder „3CH“ gesetzt.
Möglicherweise ist die Lautstärke des SubwooferKanals auf den Minimalpegel eingestellt.
Die Tonquelle enthält keine
niederfrequenten Tonsignale.
Stellen Sie sicher, dass das Netzkabel fest in die
Netzsteckdose eingesteckt ist.
Stellen Sie sicher, dass alle Lautsprecherkabel
korrekt angeschlossen sind.
Schalten Sie das Gerät in den Bereitschaftsmodus und
ziehen Sie dann das Netzkabel ab. Warten Sie ca. 30
Sekunden, schließen Sie das Netzkabel wieder an und
schalten Sie das Gerät erneut ein.
Korrigieren Sie den Lautstärkepegel.
Beenden Sie die Stummschaltungsfunktion. 10
Wählen Sie die korrekte Eingangsquelle bzw.
Eingangseinstellung.
Stellen Sie sicher, dass alle Kabel korrekt
angeschlossen sind.
Setzen Sie „3-2:AUDIO“ im Konfigurationsmenü
„3:HDMI SETUP“ auf „AMP“.
Wenn Sie ein Fernsehgerät, das ARC (Audio
Return Channel) unterstützt, und dieses Gerät nur
über ein HDMI-Kabel verbinden, setzen Sie „31:CONTROL“ unter „3:HDMI SETUP“ auf „ON“.
Verbinden Sie den digitalen Koaxialeingang
und den Audioeingang des Fernsehgeräts über
ein digitales Audioklinkenkabel.
Stellen Sie sicher, dass alle Kabel korrekt
angeschlossen sind.
Drücken Sie die Taste SURROUND um die
Wiedergabe in dem Klangmodus zu starten.
Passen Sie „1:SP LEVEL“ im
Konfigurationsmenü „1-4:SURROUND L“/
„1-5:SURROUND R“ an.
Setzen Sie „5-1:SP CHANNEL“ auf „4CH“
oder „5CH“.
Korrigieren Sie den Lautstärkepegel des
Subwoofer-Kanals.
Siehe
Seite
8
8
10
10, 19
10
8
19
19
9
8
11
19
20
5, 19
INFORMATIONEN
Deutsch
ZUSÄTZLICHE
25 De
Page 96

Störungsbehebung
Problem Mögliche Ursache Abhilfe
Die Lautstärke wird
geringer, ohne dass
Sie eine Funktion
ausgeführt haben.
Die Tonqualität ist
schlecht (Rauschen).
Das Gerät funktioniert
nicht ordnungsgemäß.
Ein Digital- oder
Hochfrequenzgerät
erzeugt Störrauschen.
Die
Geräteeinstellungen
ändern sich
automatisch.
Das Gerät lässt sich
nicht mit der
Fernbedienung
steuern.
Die Fernsehfernbedienung
funktioniert nicht, obwohl
der FernsehfernbedienungsSignalempfänger an der
Oberseite des Lautsprechers
angebracht ist.
Zum Schutz der Lautsprecher wird der
Lautstärkepegel automatisch auf 70
eingestellt, wenn Sie das Gerät das
nächste Mal einschalten.
Möglicherweise ist ein La utsprecherkabel
kurzgeschlossen.
Am Gerät ist möglicherweise eine starke
Überspannung aufgetreten, beispielsweise
durch Blitzschlag oder extreme statische
Elektrizität, oder es ist ein Spannungsabfall in
der Stromversorgung aufgetreten.
Das Gerät befindet sich möglicherweise
zu nah an Digital- oder
Hochfrequenzgeräten.
Wenn „3-1:CONTROL“ im Konfigurationsmenü
„3:HDMI SETUP“ auf „ON“ gesetzt ist, ändern
sich bei Bedienung des Fernsehgeräts (z. B.
Wechseln des Programms) möglicherweise die
Geräteeinstellungen wie der Surround-Modus.
Möglicherweise befindet sich das Gerät
nicht in der Reichweite der
Fernbedienung.
Möglicherweise ist der
Fernbedienungssensor des Geräts
direktem Sonnenlicht oder Beleuchtung
ausgesetzt.
Möglicherweise sind die Batterien
entladen.
Die Position des FernsehfernbedienungsSignalempfängers ist nicht geeignet.
Der FernsehfernbedienungsSignalempfänger ist auf einen
inkompatiblen Sensor ausgerichtet, wie
einen Sensor zur Erkennung der
Lichtverhältnisse im Raum.
Stellen Sie sicher, dass alle Kabel korrekt
angeschlossen sind.
Schalten Sie das Gerät in den
Bereitschaftsmodus und ziehen Sie dann das
Netzkabel ab. Warten Sie ca. 30 Sekunden,
schließen Sie das Netzkabel an und schalten Sie
das Gerät ein.
Stellen Sie das Gerät in größerer Entfernung zu
solchen Geräten auf.
Setzen Sie „3-1:CONTROL“ im
Konfigurationsmenü „3:HDMI SETUP“ auf
„OFF“ oder stellen Sie das Gerät erneut über die
Fernbedienung ein.
Informationen zur Reichweite der
Fernbedienung finden Sie unter „Vorbereitung
der Fernbedienung“.
Ändern Sie die Beleuchtung.
Ersetzen Sie die Batterien.
Bewegen Sie den FernsehfernbedienungsSignalempfänger nach rechts/links, sodass er sich mittig
vor dem Fernsehfernbedienungs-sensor befindet.
Platzieren Sie den FernsehfernbedienungsSignalempfänger ungefähr 10 mm vom
Fernsehgerät entfernt.
Platzieren Sie den FernsehfernbedienungsSignalempfänger, nachdem Sie die Position des
Fernbedienungssensors anhand der
Bedienungsanleitung des Fernsehgeräts
bestätigt haben.
Siehe
Seite
8
10
—
19
2
—
2
6
6
6
■ HDMI
Problem Mögliche Ursache Abhilfe
Die im Konfigurationsmenü
„2.AUDIO DELAY“
eingestellte Option „AUTO“
funktioniert nicht.
Die HDMISteuerfunktion arbeitet
nicht ordnungsgemäß.
Weder Ton noch Bild
wird wiedergegeben.
26 De
Das Fernsehgerät unterstützt keine
automatische Tonverzögerung.
Es sind zu viele HDMI-Komponenten
angeschlossen.
Es wurden weitere HDMI-Komponenten
an das Gerät angeschlossen.
Die angeschlossenen HDMI-Komponenten
unterstützen HDCP nicht (High-bandwidth
Digital Copyright Protection).
Siehe
Seite
Stellen Sie die Verzögerung manuell ein (0 bis
500 ms).
Trennen Sie einige der HDMI-Komponenten
vom System.
Stellen Sie erneut „3-1:CONTROL“ unter
„3:HDMI SETUP“ auf „ON“ ein.
Schließen Sie eine HDMI-Komponente an, die
HDCP unterstützt. —
22
—
19
Page 97

■ FM
Störungsbehebung
Problem Mögliche Ursache Abhilfe
Der FM-StereoEmpfang ist gestört.
Selbst bei einer guten
FM-Antenne treten
Die charakteristischen Eigenschaften von
FM-Stereo-Sendungen können dieses
Problem verursachen, wenn der Sender
zu weit weg oder die Antennenqualität
schlecht ist.
Es besteht eine Mehrweg-Interferenz. Korrigieren Sie die Antennenposition, um die
Prüfen Sie die Antennenanschlüsse. 9
Verwenden Sie versuchsweise eine hochwertige
FM-Richtantenne.
Stellen Sie als Empfangsmodus „MONO“ ein. 14
Mehrweg-Interferenz zu beseitigen.
Verzerrungen auf und
Siehe
Seite
—
—
ein klarer Empfang ist
nicht möglich.
Der gewünschte
Sender wird mit dem
automatischen
Sendersuchlauf nicht
gefunden.
Das Signal ist zu schwach. Verwenden Sie eine hochwertige FM-
Richtantenne.
Stellen Sie als Empfangsmodus „MONO“ ein
und suchen Sie den Sender, indem Sie die
Empfangsfrequenz mit TUNING /
schrittweise ändern.
—
13, 14
■ Meldungen für iPod/iPhone und USB-Gerät
Hinweis
Überprüfen Sie den Anschluss des Geräts, wenn es zu anderen Fehlfunktionen als den folgenden Meldungen im Bedienfelddisplay
kommt. (☞ S. 16)
Statusmeldung Mögliche Ursache Abhilfe
Unknown iPod
No Device
Loading...
No Content
Unable to Play
Connect Error
Root
Disconnected
Der verwendete iPod/das verwendete
iPhone oder USB-Gerät wird von diesem
Gerät nicht unterstützt.
Der iPod/das iPhone oder USB-Gerät ist
nicht an das Gerät angeschlossen.
Der iPod/das iPhone oder USB-Gerät
verarbeiten derzeit Daten.
Es liegt keine Musikdatei für die
Wiedergabe vor.
Die Musikdatei kann nicht gelesen
werden.
Das Format der ausgewählten Musikdatei
wird nicht unterstützt.
Die ausgewählte Musikdatei ist defekt. Wählen Sie eine andere Musikdatei. —
Der iPod/das iPhone oder USB-Gerät hat
Probleme mit der Kommunikation.
Stoppt und kehrt zum Stammverzeichnis
zurück.
Der iPod/das iPhone oder USB-Gerät
wurde vom USB-Anschluss dieses Geräts
getrennt.
Schließen Sie einen unterstützten iPod/ein
unterstütztes iPhone oder USB-Gerät an dieses
Gerät an.
Schließen Sie einen iPod/ein iPhone oder USBGerät an, auf dem Musikdateien zur Wiedergabe
gespeichert sind.
Die Meldung erlischt, wenn die
Datenverarbeitung beendet ist.
Schließen Sie einen iPod/ein iPhone oder USBGerät an, auf dem Musikdateien zur Wiedergabe
gespeichert sind.
Überprüfen Sie, ob die Musikdatei auf einem
anderen Gerät, wie einem Computer,
wiedergegeben werden kann.
Speichern Sie die Musikdatei in einem
unterstützten Format.
Versetzen Sie dieses Gerät in den
Bereitschaftsmodus und schließen Sie den iPod/
das iPhone oder USB-Gerät erneut an.
Die Meldung erlischt, wenn die Wiedergabe
startet.
Die Meldung erlischt nach 3 Sekunden.
Siehe
Seite
16
—
—
—
—
—
—
—
16
INFORMATIONEN
Deutsch
ZUSÄTZLICHE
27 De
Page 98

Störungsbehebung
■ Meldungen bei einem Firmware-Update
Statusmeldung Mögliche Ursache Abhilfe
Connect USB!
No Firmware!
Connect Error
Update... 30%
Update Error
Update Success
Plaese...
Power Off!
Es ist kein USB-Flashspeicher
angeschlossen.
Auf dem USB-Flashspeicher, der an das
Gerät angeschlossen ist, befindet sich
keine Firmware-Datei.
Die Datei im USB-Flashspeicher ist
fehlerhaft.
Der an das Gerät angeschlossene USBFlashspeicher hat ein Problem mit der
Kommunikation, da die ausgewählte
Datei defekt ist.
Zeigt den Fortschritt der Aktualisierung an.
Bei der Aktualisierung ist ein Fehler
aufgetreten und das Firmware-Update ist
nicht abgeschlossen.
Die Aktualisierung der Firmware wurde
ordnungsgemäß beendet.
Zeigt an, dass Sie das Gerät in den
Bereitschaftsmodus schalten sollen. Es
wird entweder „Update Success“ oder
„Update Error“ angezeigt.
Zeigt an, dass Sie das Gerät in den
Bereitschaftsmodus schalten sollen. Es
wird entweder „Update Success“ oder
„Update Error“ angezeigt.
Schließen Sie den USB-Flashspeicher an dieses
Gerät an. 17
Kopieren Sie die Firmware-Updatedatei in das
Stammverzeichnis des USB-Flashspeichers. —
Schalten Sie das Gerät in den
Bereitschaftsmodus und schließen Sie den USBFlashspeicher erneut an.
Kopieren Sie die Firmware-Updatedatei erneut
auf den USB-Flashspeicher.
Aktualisieren Sie die Firmware erneut.
Schalten Sie das Gerät in den
Bereitschaftsmodus.
Schalten Sie das Gerät in den
Bereitschaftsmodus.
Siehe
Seite
—
—
17
—
—
y Zurücksetzen des Geräts
Wenn das Gerät „einfriert“, lässt sich das Problem möglicherweise durch Zurücksetzen des Geräts beheben.
Um das Gerät zurückzusetzen, drücken Sie die Taste (Netzschalter) des Geräts mindestens 10 Sekunden lang.
28 De
Page 99

Glossar
■ AIR SURROUND XTREME
Dieses Gerät setzt neue Technologien und Algorithmen
ein, die einen 7-Kanal Surroundsound nur mit
Frontlautsprechern und ohne die Nutzung von
Wandreflexionen ermöglichen.
Im Normalfall sind für 7.1-Kanal-Surroundsound zwei
vordere Lautsprecher, ein mittlerer Lautsprecher, zwei
Surround-Lautsprecher, zwei hintere SurroundLautsprecher und ein Subwoofer erforderlich.
Typische 7.1-Kanal-Lautsprechereinheit
Vordere Lautsprecher
Mittlerer
Lautsprecher
Subwoofer
Surround-Lautsprecher
Hintere SurroundLautsprecher
Virtueller 7.1-Kanal
Die AIR SURROUND XTREME-Technologie erzielt
allein mit vorderen Lautsprechern und einem Subwoofer
realistischen 7.1-Kanal-Surround-Sound, indem das
System einen mittleren sowie Surround- und SurroundBack-Lautsprecher simuliert.
Klangbild des Geräts
■ Abtastfrequenz
Anzahl der Abtastvorgänge (Digitalisierung von
Analogsignalen) pro Sekunde. Je höher die Abtastrate,
desto breiter ist im Prinzip der wiedergegebene
Frequenzbereich, und je höher die quantisierte Bit-Rate,
desto originalgetreuer der wiedergegebene Klang.
■ Dolby Digital
Das von den Dolby Laboratories entwickelte digitale
Surround-Sound-System ermöglicht eine Tonwiedergabe
über mehrere, völlig unabhängige Tonkanäle. Mit
3 vorderen Kanälen (links, Mitte und rechts) und
2 Surround-Stereo-Kanälen bietet Dolby Digital fünf
Vollbereichs-Audiokanäle. Mit einem zusätzlichen Kanal
speziell für Basseffekte (LFE oder Niederfrequenzeffekt
genannt) besitzt das System insgesamt 5.1-Kanäle (LFE
wird als 0.1-Kanal gezählt). Mithilfe von 2-Kanal-Stereo
bei den Surround-Lautsprechern werden klangliche
Bewegungseffekte exakter wiedergegeben als bei Dolby
Surround und es entsteht eine überzeugende SurroundSound-Umgebung.
■ Dolby Digital Plus
Dolby Digital Plus ist eine erweiterte Audiotechnologie,
die für High-Definition-Programmierung und -Medien
entwickelt wurde, darunter auch HD-Sendungen und Bluray-Discs. Ausgewählt als optionaler Audiostandard für
Blu-ray-Discs liefert diese Technologie Mehrkanalsound
mit diskreter Kanalausgabe. Dolby Digital Plus unterstützt
Bitraten bis 6,0 Mbps und kann gleichzeitig bis zu
7.1 diskrete Audiokanäle übertragen. Dolby Digital Plus
wird von HDMI unterstützt und wurde für die optischen
Discplayer und AV-Empfänger/-Verstärker der Zukunft
entwickelt. Daher ist es auch mit den bestehenden
Mehrkanal-Audiosystemen voll kompatibel, die Dolby
Digital bieten.
INFORMATIONEN
ZUSÄTZLICHE
Das Gerät erzeugt mit dem Receiver mit integriertem
Subwoofer und dem Lautsprecher einen virtuellen
7.1-Kanal-Surroundsound.
C: Mittlerer Lautsprecher
FR, FL: Vordere Lautsprecher
SW: Subwoofer
SR, SL: Virtuelle Surround-Lautsprecher
SBR, SBL: Virtuelle Surround-Back-Lautsprecher
■ Dolby Pro Logic II
Dies ist eine verbesserte MatrixDekodierungstechnologie, die bei Tonquellen, die in
Dolby Surround programmiert wurden, eine bessere
Raumwirkung und Richtungsgenauigkeit bietet. Dadurch
entsteht bei herkömmlichen Stereo-Musikaufnahmen ein
überzeugendes dreidimensionales Klangfeld. Die
Technologie eignet sich ideal, um die Bewegung von
Tonquellen zu simulieren. Zwar sind herkömmlich
programmierte Surround-Tonaufnahmen vollständig mit
Dolby Pro Logic II-Decodern kompatibel, doch können
Soundtracks auch speziell codiert werden, um alle
Vorzüge der Pro Logic II-Wiedergabe auszuschöpfen,
einschließlich der getrennten linken und rechten
Surround-Kanäle.
29 De
Deutsch
Page 100

Glossar
■ Dolby TrueHD
Dolby TrueHD ist eine erweiterte verlustfrei
Audiotechnologie, die für Medien auf Grundlage von
High-Definition-Discs, darunter auch Blu-ray-Discs,
entwickelt wurde. Ausgewählt als optionaler
Audiostandard für Blu-ray-Discs liefert diese Technologie
Klang, der Bit für Bit mit dem Originalstudiotonträger
identisch ist und ermöglicht so High-DefinitionHeimkinoklang. Dolby TrueHD unterstützt Bitraten bis zu
18,0 Mbps und kann bis zu 8 diskrete 24-Bit-/96-kHzAudiokanäle gleichzeitig übertragen. Dolby TrueHD ist
auch vollständig kompatibel mit den bestehenden
Mehrkanal-Audiosystemen und übernimmt die
Metadatenfähigkeit von Dolby Digital, wodurch eine
Dialognormalisierung und dynamische Bereichssteuerung
möglich ist.
■ Deep Color
Deep Color bezeichnet die Nutzung unterschiedlicher
Farbtiefen bei Anzeigegeräten und ist eine
Weiterentwicklung der 24-Bit-Farbtiefe in früheren
Versionen der HDMI-Spezifikation. Dank der
zusätzlichen Farbtiefe lassen sich auf dem Bildschirm von
HD-Fernsehgeräten und anderen Anzeigegeräten statt
Millionen jetzt Milliarden von Farben darstellen.
Außerdem lassen sich damit Farbstreifen auf dem
Bildschirm vermeiden und nahtlose Farbübergänge sowie
subtile Farbabstufungen erzielen. Auch der Kontrast
wurde verbessert, so dass jetzt ein Vielfaches an
Graustufen zwischen Schwarz und Weiß dargestellt
werden kann. Darüber hinaus stellt Deep Color innerhalb
des definierten RGB- oder YCbCr-Farbraums mehr
Farben zur Verfügung.
■ DTS
Von DTS, Inc., entwickeltes digitales Surround-SoundSystem mit 5.1-Kanal-Audio. Dank einer Fülle an
Audiodaten kann es authentische Klangeffekte erzeugen.
■ DTS-HD High Resolution Audio
DTS-HD High Resolution Audio ist eine hochauflösende
Audiotechnologie, die für Medien auf Grundlage von
High-Definition-Discs, darunter auch Blu-ray-Discs,
entwickelt wurde. Ausgewählt als optionaler
Audiostandard für Blu-ray-Discs liefert diese Technologie
Klang, der vom Original fast nicht zu unterscheiden ist,
und ermöglicht so High-Definition-Heimkinoklang. DTSHD High Resolution Audio unterstützt Bitraten bis zu
6,0 Mbps für Blu-ray-Discs und kann bis zu 7.1 diskrete
24-Bit-/96-kHz-Audiokanäle gleichzeitig übertragen.
■ DTS-HD Master Audio
Das verlustfreie hochwertige Audioformat, das für die
nächste Generation optischer Discs, wie Blu-ray-Discs,
entwickelt wurde. Es wurde als Audiostandard für Bluray-Discs ausgewählt. DTS-HD High Master Audio
unterstützt Bitraten bis zu 24,5 Mbps für Blu-ray-Discs
und kann bis zu 7.1 diskrete 24-Bit-/96-kHz-Audiokanäle
gleichzeitig übertragen.
■ DTS Neo:6
Neo:6 decodiert die konventionellen 2-Kanal-Quellen für
die 6-Kanal-Wiedergabe mit einem speziellen Decoder.
Dieser ermöglicht die Wiedergabe mit VollbereichKanälen höherer Kanaltrennung, gleich der Wiedergabe
von diskreten Digitalsignalen. Es stehen zwei Modi zur
Auswahl: „Music-Modus“ für Musikquellen und
„Cinema-Modus“ für Filmquellen.
■ HDMI
HDMI (High-Definition Multimedia Interface) ist die
erste branchenweit unterstützte, unkomprimierte,
vollständig digitale Audio-/Video-Schnittstelle. In
Kombination mit HDCP (High-bandwidth Digital Content
Protection) bildet HDMI eine sichere Audio-/
Videoschnittstelle, die die Sicherheitsanforderungen von
Content-Anbietern und Systembetreibern erfüllt.
■ MP3
Eines der von MPEG verwendeten
Audiokomprimierungsverfahren. Es nutzt das nicht
umkehrbare Komprimierungsverfahren, das eine hohe
Komprimierungsrate erzielt, indem die Daten der für das
menschliche Ohr kaum hörbaren Bereiche ausgedünnt
werden. Es kann die Datenmenge um bis zu 1/11
(128 kbps) komprimieren, während eine mit Musik-CDs
vergleichbare Audioqualität beibehalten wird.
■ MPEG-4 AAC
Ein MPEG-4-Audiostandard. Er ermöglicht eine
Komprimierung der Daten mit einer niedrigeren Bitrate
als MPEG-2 AAC und wird unter anderem für
Mobiltelefone, tragbare Audioplayer und andere Geräte
mit geringer Kapazität verwendet, die eine hohe
Tonqualität erfordern. Neben den oben aufgeführten
Geräten wird MPEG-4 AAC auch genutzt, um Inhalte im
Internet zu verbreiten. Es wird daher von Computern,
Medienservern und vielen anderen Geräten unterstützt.
■ PCM (Pulse Code Modulation)
Ein Signal, das ohne Komprimierung in ein Digitalformat
umgewandelt wird. Eine CD wird mit 16-Bit-Klang bei
44,1 kHz aufgenommen, eine DVD dagegen mit 16 Bit
bei 48 kHz bis 24 Bit bei 192 kHz, was deren
Klangqualität im Vergleich zu einer CD verbessert.
■ WMA
Ein Audiokomprimierungsverfahren, das von der
Microsoft Corporation entwickelt wurde. Es nutzt das
nicht umkehrbare Komprimierungsverfahren, das eine
hohe Komprimierungsrate erzielt, indem die Daten der für
das menschliche Ohr kaum hörbaren Bereiche ausgedünnt
werden. Es kann die Datenmenge um bis zu 1/22
(64 kbps) komprimieren, während eine mit Musik-CDs
vergleichbare Audioqualität beibehalten wird.
■ x.v.Color
Ein von HDMI unterstützter Farbraumstandard. Der
Farbraum ist umfangreicher als bei sRGB und ermöglicht
die Darstellung von Farben, die bisher noch nicht
wiedergegeben werden konnten. „x.v.Color“ ist mit der
Farbskala der sRGB-Standards kompatibel, erweitert
jedoch den Farbraum, so dass damit äußerst naturgetreue
Bilder in lebhaften Farben angezeigt werden können. Der
Standard ist bei Standbildern und Computergrafiken
besonders wirksam.
30 De
 Loading...