

Page 1
Quick-Connect Poster
YHT-685
Home Theater in a Box
2
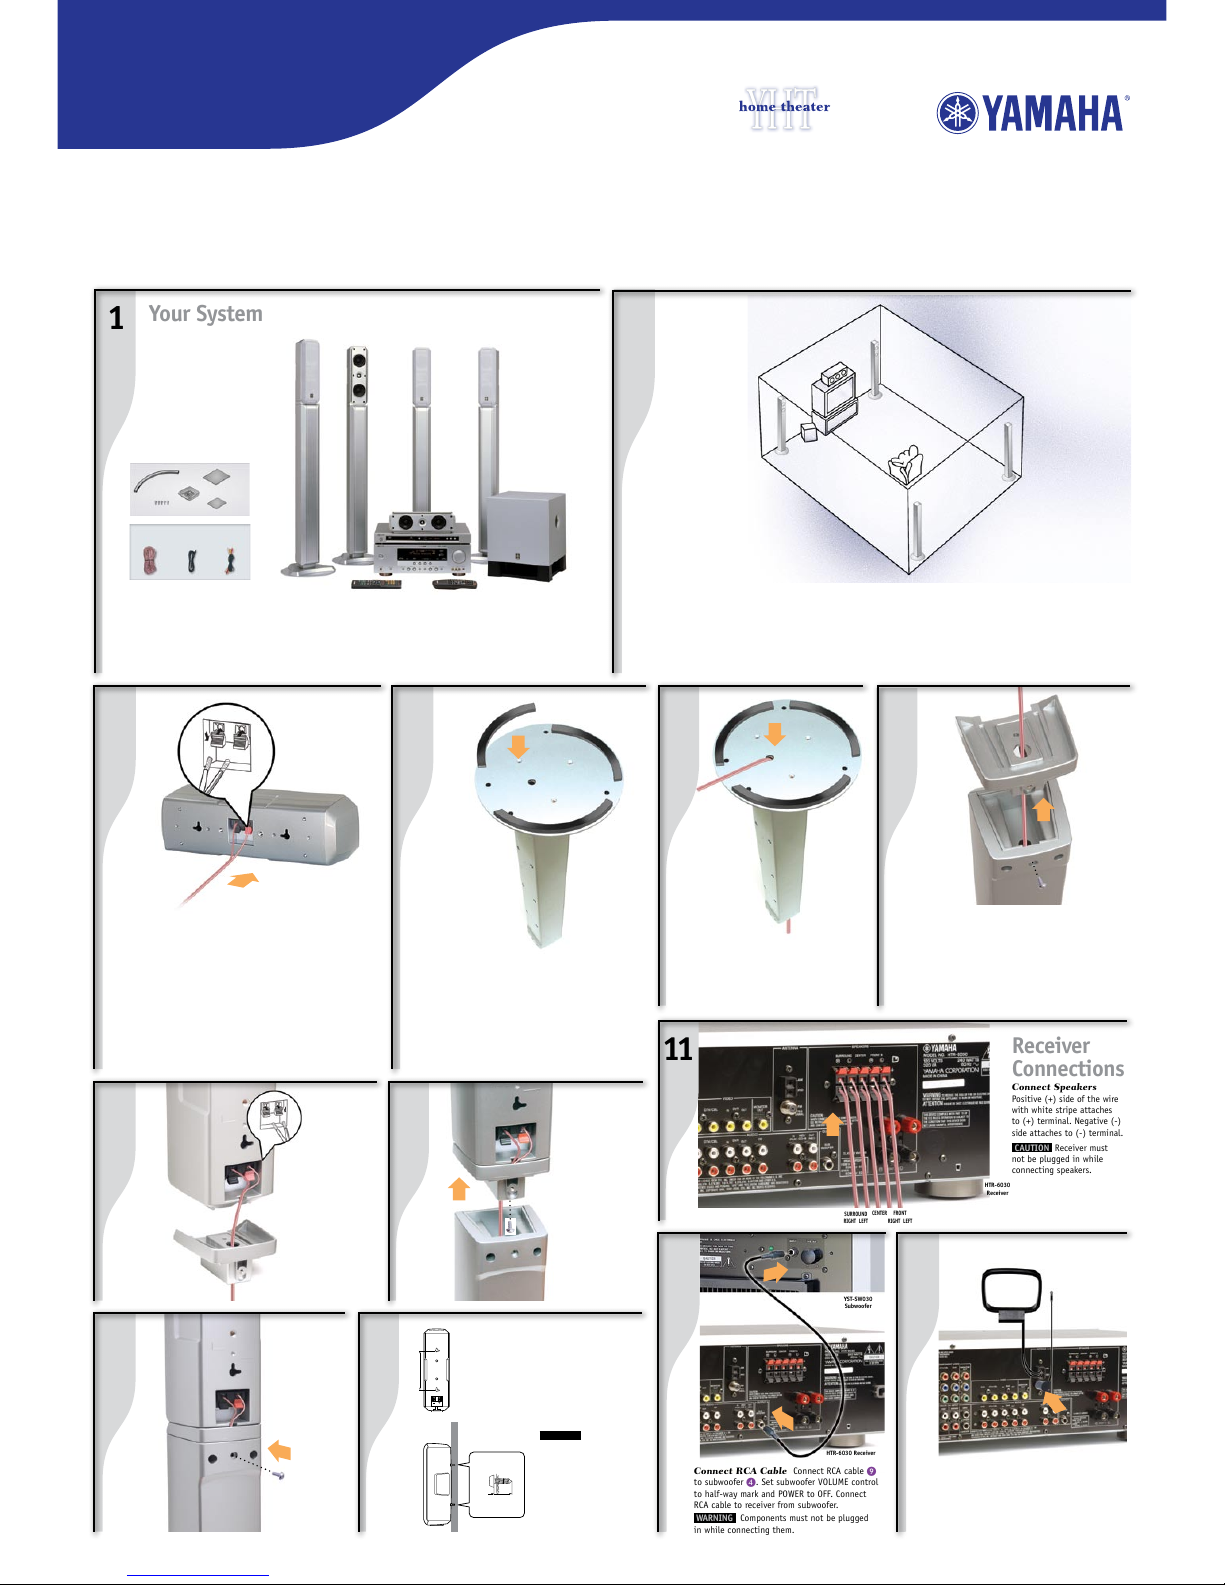
Your System
Room
Layout
Speaker Placement After connection of the speakers place them so they appear in the
approximate positions as shown in the diagram above.
Yamaha created this package to greatly enhance your audio and home theater enjoyment. This Quick-Connect
Poster will help you get started. Follow the steps to connect the speakers first. Then connect your DVD Player
and other components. Refer to your Owner’s Manuals as well as those that came with your other components
for complete instructions and precautions. Be sure that all components are not plugged in while making
connections. You will need the following which are not included in the package: Phillips screwdriver, wire
cutter/stripper, optional for wall mounting: brackets, toggle bolts, molly anchor screws or sheet metal screws.
1
Inspect Contents After unpacking, inspect the contents to confirm you have the above items: two front
speakers, B two surround speakers, C one center speaker, D subwoofer, 5 HTR-6030 A/V Receiver with
remote control, F DV-S5860SL DVD Player with remote control, G speaker wire, H subwoofer RCA cable,
I audio/video RCA cable, J non-skid pads, K screws, L support bases and adapters (attached to speaker stands)
M fasteners. Also included, but not shown, are AM and FM antennas and related Owner’s Manuals.
D
5
B
(4)
(4)
(4)
(2)
(12)
K
L
M
H I
54
Thread Speaker Wire Pass the
speaker wire through the underside of
speaker stand.
3 6
Turn Speaker Stand Right-Side-Up Remove
screw that holds adapter in, carefully set aside, then
remove adapter from speaker stand.
Thread Speaker Wire Make sure speaker wire
continues to pass through the adapter.
Attach Bottom Pads Apply pads J to bottom of
speaker stand as shown.
Front and Surround
Speaker Assembly
13
Cut speaker wire to appropriate lengths for all speaker
connections. Connect speaker wire for center speaker C. The
positive (+) side of the wire with the white stripe attaches to
the red terminal. The negative (-) side attaches to the black
terminal. (See your HTR-6030 Owner’s Manual for more
information on speaker wire connections.)
Note: Fasteners M are included for secure speaker mounting.
See your NS-AP8600/SPS-8600 Owner’s Manual for further
instructions.
Connect Center
Speaker Wire
11
Connect RCA Cable Connect RCA cable I
to subwoofer D. Set subwoofer VOLUME control
to half-way mark and POWER to OFF. Connect
RCA cable to receiver from subwoofer.
WARNING Components must not be plugged
in while connecting them.
Connect Antennas to Receiver Locate AM
loop antenna and indoor FM antenna. Keeping
receiver unplugged, connect as shown. For more
information about obtaining clear reception and
grounding, see your Owner’s Manual.
Antenna Connection
Indoor
FM Antenna
AM Loop Antenna
YST-SW030
Subwoofer
HTR-6030 Receiver
HTR-6030
Receiver
HTR-6030 Receiver
Receiver
Connections
FRONT
RIGHT LEFT
CENTER
SURROUND
RIGHT LEFT
Connect Speakers
Positive (+) side of the wire
with white stripe attaches
to (+) terminal. Negative (-)
side attaches to (-) terminal.
CAUTION Receiver must
not be plugged in while
connecting speakers.
12
C
87
9
Connect
Front and
Surround
Speaker
Wire Positive
(+) side of the
wire with white
stripe attaches
to (+) terminal.
Negative (-)
side attaches to
(-) terminal.
Attach
Adapter to
the Speaker
using the
supplied screw
K.
Push Together
the speaker and
adapter into the
speaker stand.
Attach adapter to
the speaker stand
using the screw
that was set aside
in Step 6.
10
-IN
v
v
Mounting Speakers
to Wall (Optional)
Fasten mounting screws
into a firm wall or wall
support. Leave 7/32 in.
between head and wall.
Hang the keyholes on
the speaker backs on the
protruding screws.
WARNING Please contact
a reliable source about
the best type of hardware
for your particular wall’s
construction. Secure
installation is purchaser’s
responsibility. See your
owner’s manual for
additional precautions.
Subwoofer
Connection
6
J
Page 2
CD Player
Connection
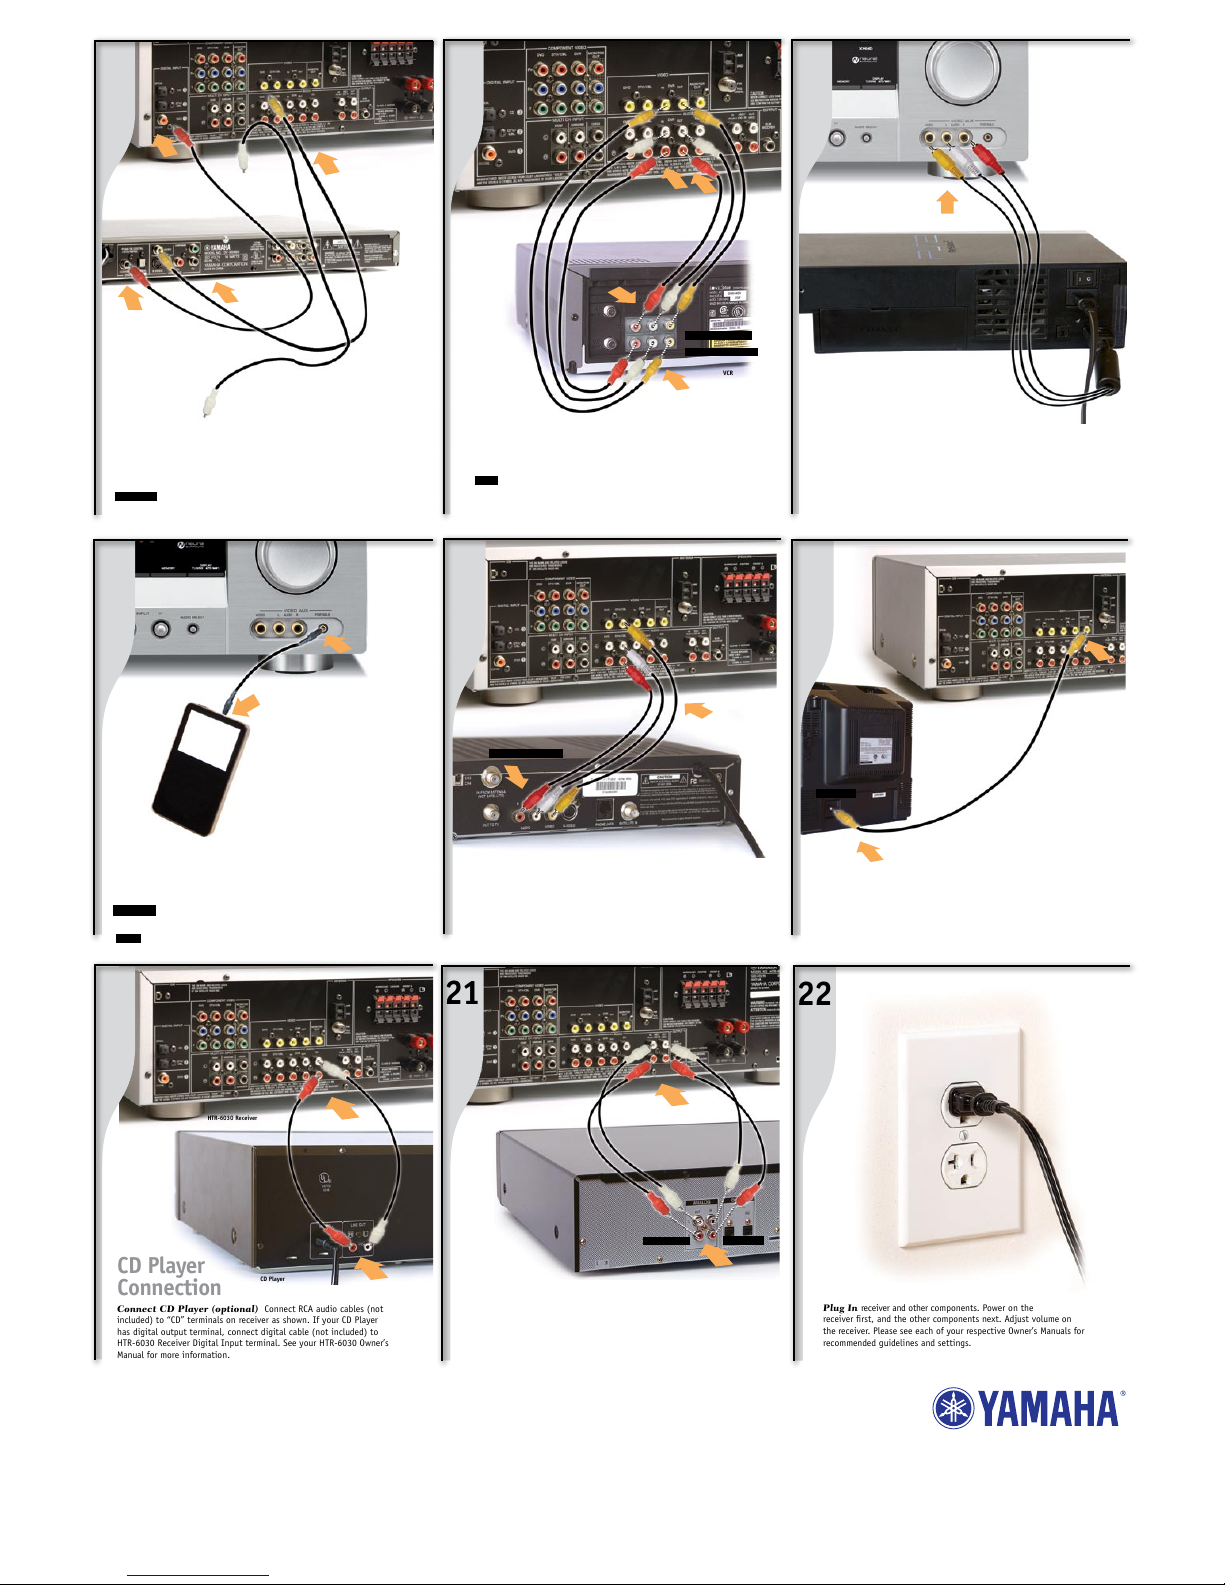
Connect CD Player (optional) Connect RCA audio cables (not
included) to “CD” terminals on receiver as shown. If your CD Player
has digital output terminal, connect digital cable (not included) to
HTR-6030 Receiver Digital Input terminal. See your HTR-6030 Owner’s
Manual for more information.
HTR-6030 Receiver
CD Player
VCR
14 15
16
17 18 19
20
Enjoy the Yamaha Home Theater Experience
Be sure to put batteries in your remotes (see Owner’s Manuals for instructions).
Refer to your Owner’s Manuals for each component in your system for more information.
Now, relax and enjoy the unparalleled sound of your Yamaha Home Theater system.
YAMAHA ELECTRONICS CORPORATION, USA
6660 Orangethorpe Avenue
Buena Park, CA 90620
http://www.yamaha.com
Phone: 1-800-292-2982
©2007 Yamaha Electronics Corporation
Printed in USA
Part No. 685QCP
03/07
VCR Connection
DSS/Cable/HDTV Tuner Box
Video Monitor
Video Game Console
Connect VCR (optional) Connect audio/video cables (not included)
as shown.
NOTE VCR shown is for illustration purposes only. When using a hi-fistereo VCR, set the Tuner/Line switch on the VCR to “Line” position to
record from another source connected to the HTR-6030 receiver.
Connect DSS/Cable/HDTV Tuner Box (optional) Connect RCA
audio/video cables (not included) and optional optical cable (not pictured)
to “DTV/CBL” terminals on receiver to A/V OUT connections on Box as shown.
DSS/Cable/HDTV
Tuner Connection
21
Video Monitor Connection
Connect a Video Monitor (optional) Connect an RCA video cable
(not included) to receiver Monitor OUT from your video monitor as shown.
AUDIO/VIDEO IN
AUDIO/VIDEO OUT
HTR-6030 Receiver
DV-S5860SL DVD Player
HTR-6030 Receiver
HTR-6030 Receiver
HTR-6030 Receiver
HTR-6030 Receiver
Video Game
Console Connection
Connect Game Console or Video Camera (optional)
Connect RCA audio/video cables (not included) as shown.
Audio/Video
OUT
MD/CD-R Recorder
MD/CD-R
Player Connection
Connect MD/CD-R Recorder (optional) Connect RCA audio
cables (not included) to “MD/CD-R” terminals on receiver as shown.
WARNING Components must not be plugged in while connecting them.
Wait until all connections are made before plugging in your components.
AUDIO IN
AUDIO OUT
VIDEO IN
AUDIO/VIDEO OUT
DVD Player Connection
HTR-6030 Receiver
Connect DVD Player Top: Connect RCA audio/video cables I to receiver:
Yellow to “DVD,” Red to “Digital Input DVD Coaxial” as shown, and leave White
unplugged. Bottom: Connect audio/video cables to DVD player from receiver:
Yellow to “Video”, Red to “Coaxial”, and leave White unplugged.
Plug In receiver and other components. Power on the
receiver first, and the other components next. Adjust volume on
the receiver. Please see each of your respective Owner’s Manuals for
recommended guidelines and settings.
22
MP3 Player
HTR-6030 Receiver
Connect MP3 Player (optional) Connect a 3.5 mm stereo mini cable
(not included) from line out or headphone jack of the MP3 player to the
PORTABLE input on the receiver as shown.
WARNING MP3 player volume must be turned down to half before connecting.
Consult the MP3 player’s Owner’s Manual for further instructions.
NOTE
The PORTABLE mini jack input takes priority over the AUDIO L/R jacks.
MP3 Player Connection
 Loading...