

Yamaha YF09RJ Owner's Manual
READ THIS MANUAL CAREFULLY!
It contains important safety information.
OWNER’S MANUAL
YF09RJ
WARNING
This ATV should not be ridden by anyone under 10 years of age.
BD3-F8199-72

EBU28981
Read this manual carefully before operating this vehicle. This manual should stay with this ve-
hicle if it is sold.

EBU17171
INTRODUCTION
EBU34400
Congratulations on your purchase of the Yamaha YF09RJ. This ATV represents the result of many years
of Yamaha experience in the production of fine sporting, touring, and pacesetting racing machines. With
the purchase of this Yamaha, you can now appreciate the high degree of craftsmanship and reliability that
have made Yamaha a leader in these fields.
This manual will provide you with a good basic understanding of the features and operation of this ATV.
This manual includes important safety information. It provides information about special techniques and skills necessary to ride the ATV. It also includes basic maintenance and inspection proce-
dures. If you have any questions regarding the operation or maintenance of your ATV, please consult a
Yamaha dealer.
AN IMPORTANT SAFETY MESSAGE:
Read this manual together with TIPS FOR THE ATV RIDER carefully and completely before operating
your ATV. Make sure you understand all instructions.
Pay close attention to the warning and notice labels on the ATV.
This ATV should not be operated by a child under 10 years of age.
AN IMPORTANT NOTE TO PARENTS:
This ATV is not a toy. Before you let your child ride this ATV, you should understand the instructions and
warnings in this Owner’s Manual. Then be sure your child understands and will follow them. Children differ
in skills, physical abilities and judgment. Some children may not be able to operate an ATV safely. Parents
should supervise their child’s use of the ATV at all times. Parents should permit continued use only if they
determine that the child has the ability to operate the ATV safely.

Your ATV was delivered with an adjustable speed limiter. Yamaha recommends that all beginners start off
to limit the amount of speed available while they learn. The adjusting screw may be gradually turned out
as the beginner becomes more familiar with operating the ATV. Parents should decide when to adjust the
ATV for more power as their youngster’s riding skills improve. Once the ATV rider can operate with skill at
the top speed permitted by adjusting the vehicle speed limiter alone, the engine speed limiter plate can be
removed. Since removal of this limiter will result in a significant increase in power, turn the vehicle speed
limiter adjusting screw completely back in again; adjust it out in stages as done previously.
If your child is a beginner or is inexperienced, he or she should take a training course.

EBU17331
WARNING
NOTICE
TIP
IMPORTANT MANUAL INFORMATION
EBU17343
FAILURE TO FOLLOW THE WARNINGS CONTAINED IN THIS MANUAL CAN RESULT IN SERIOUS INJURY OR DEATH.
Particularly important information is distinguished in this manual by the following notations:
This is the safety alert symbol. It is used to alert you to potential personal injury hazards. Obey all safety messages that follow this symbol to avoid possible injury or death.
A WARNING indicates a hazardous situation which, if not avoided,
could result in death or serious injury.
A NOTICE indicates special precautions that must be taken to avoid
damage to the vehicle or other property.
A TIP provides key information to make procedures easier or clearer.
* Product and specifications are subject to change without notice.

EBU17351
IMPORTANT NOTICE
EBU17363
This ATV is designed and manufactured for off-road use only. It is illegal and unsafe to operate this ATV
on any public street, road or highway.
This ATV complies with all applicable off-road noise level and spark arrester laws and regulations in effect
at the time of manufacture.
Please check your local riding laws and regulations before operating this ATV.
EBU33790
YF09RJ
OWNER’S MANUAL
©2017 by Yamaha Motor Co., Ltd.
1st edition, January 2017
All rights reserved.
Any reprinting or unauthorized use
without the written permission of
Yamaha Motor Co., Ltd.
is expressly prohibited.
Printed in Taiwan.

WARNING
EWB00012
Indicates a hazardous situation which, if not
avoided, could result in death or serious injury.
EBU17421
TABLE OF CONTENTS
LOCATION OF THE WARNING AND
SPECIFICATION LABELS ..............................1-1
SAFETY INFORMATION ................................ 2-1
Front brake lever......................................... 4-5
Rear brake lever ......................................... 4-5
Parking brake ............................................. 4-6
Drive select lever ........................................ 4-7
Kickstarter .................................................. 4-7
Fuel tank cap .............................................. 4-8
Fuel ............................................................. 4-9
Fuel cock .................................................. 4-11
Starter (choke) ......................................... 4-12
Seat .......................................................... 4-13
Adjusting the front shock absorber
assemblies.............................................. 4-13
Adjusting the rear shock absorber ........... 4-15
DESCRIPTION................................................ 3-1
Left view...................................................... 3-1
Right view.................................................... 3-1
Controls and instruments............................3-2
INSTRUMENT AND CONTROL
FUNCTIONS................................................... 4-1
Main switch ................................................. 4-1
Indicator lights............................................. 4-2
Handlebar switches .................................... 4-2
Throttle lever ............................................... 4-3
Speed limiter ............................................... 4-3
PRE-OPERATION CHECKS .......................... 5-1
Fuel ............................................................. 5-3
Engine oil .................................................... 5-3
Transmission oil.......................................... 5-3
Front and rear brakes ................................. 5-3
Throttle lever............................................... 5-3
Drive chain.................................................. 5-3
Tires ............................................................ 5-3
Chassis fasteners ....................................... 5-6
Instruments and switches........................... 5-6
OPERATION .................................................. 6-1
Starting a cold engine................................. 6-1

Starting a warm engine ...............................6-3
Operating the drive select lever and
driving in reverse ....................................... 6-3
Engine break-in ........................................... 6-4
Parking ........................................................ 6-5
Parking on a slope ...................................... 6-5
Accessories and loading.............................6-6
RIDING YOUR ATV ........................................7-1
GETTING TO KNOW YOUR ATV ................ 7-2
RIDE WITH CARE AND GOOD
JUDGMENT .............................................. 7-2
BE CAREFUL WHERE YOU RIDE............... 7-9
TURNING YOUR ATV................................ 7-12
CLIMBING UPHILL ................................... 7-13
RIDING DOWNHILL .................................. 7-16
CROSSING A SLOPE................................ 7-17
CROSSING THROUGH SHALLOW
WATER.................................................... 7-18
RIDING OVER ROUGH TERRAIN .............7-20
SLIDING AND SKIDDING..........................7-20
WHAT TO DO IF... ..................................... 7-21
WHAT TO DO... ......................................... 7-22
PERIODIC MAINTENANCE AND
ADJUSTMENT................................................ 8-1
Owner’s manual and tool kit .......................8-2
Periodic maintenance chart for the
emission control system........................... 8-3
General maintenance and lubrication
chart.......................................................... 8-5
Checking the spark plug............................. 8-9
Engine oil .................................................. 8-11
Transmission oil ........................................ 8-14
Cleaning the air filter element ................... 8-15
Cleaning the spark arrester ...................... 8-18
Adjusting the carburetor........................... 8-19
Adjusting the engine idling speed ............ 8-19
Adjusting the throttle lever free play ......... 8-20
Valve clearance......................................... 8-21
Brakes....................................................... 8-21
Checking the front and rear brake
shoes ...................................................... 8-21
Adjusting the front brake lever free play... 8-22
Adjusting the rear brake lever free play .... 8-24
Drive chain slack....................................... 8-25
Lubricating the drive chain ....................... 8-27
Checking and lubricating the cables ........ 8-28
Checking and lubricating the front and
rear brake levers ..................................... 8-29
Checking the wheel hub bearings ............ 8-29
Lubricating the front knuckle pivots ......... 8-30
Lubricating the steering shaft ................... 8-30
Battery ...................................................... 8-31

Replacing the fuse .................................... 8-34
Removing a wheel..................................... 8-34
Installing a wheel.......................................8-35
Troubleshooting ........................................ 8-36
Troubleshooting chart............................... 8-37
CLEANING AND STORAGE ........................... 9-1
Cleaning ......................................................9-1
Storage........................................................ 9-2
SPECIFICATIONS ........................................ 10-1
CONSUMER INFORMATION .......................11-1
Identification numbers .............................. 11-1
YAMAHA MOTOR CANADA LTD. ATV
WARRANTY GUIDE ................................11-4
INDEX........................................................... 12-1
1
1
9 10
2
4
5
7
3
6
8 1211
EBU17661
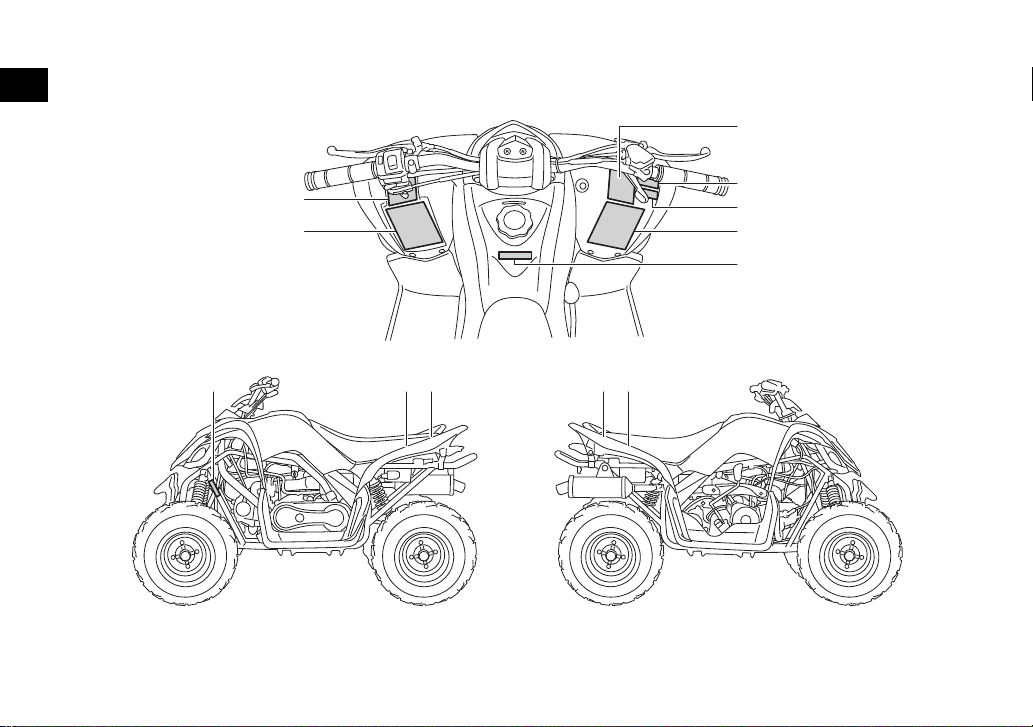
LOCATION OF THE WARNING AND SPECIFICATION LABELS
1-1

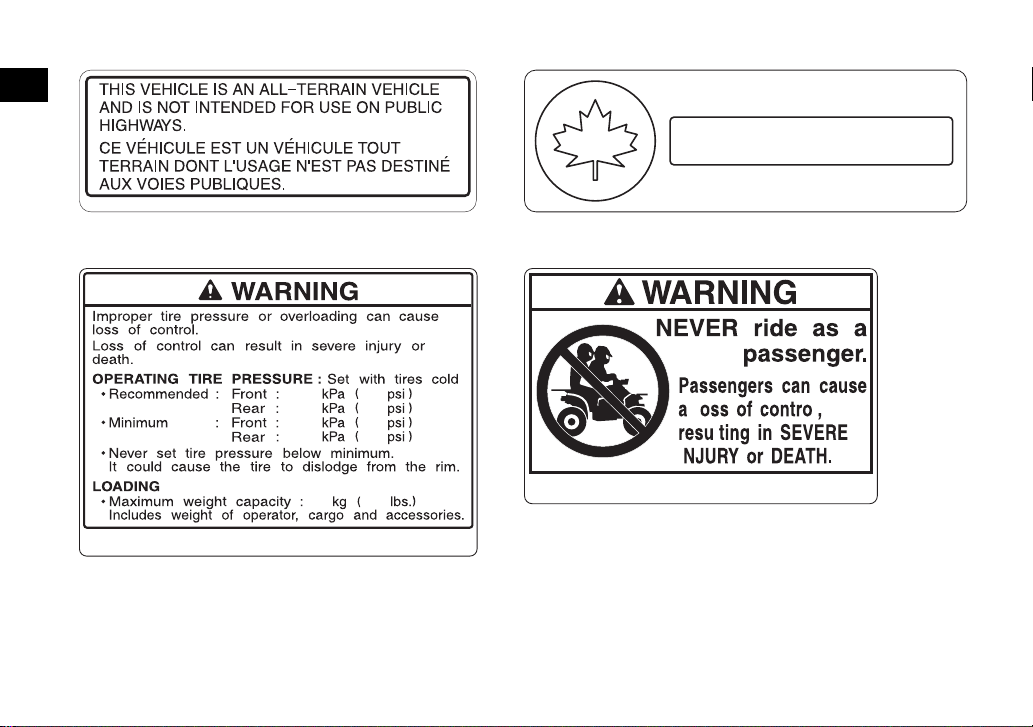
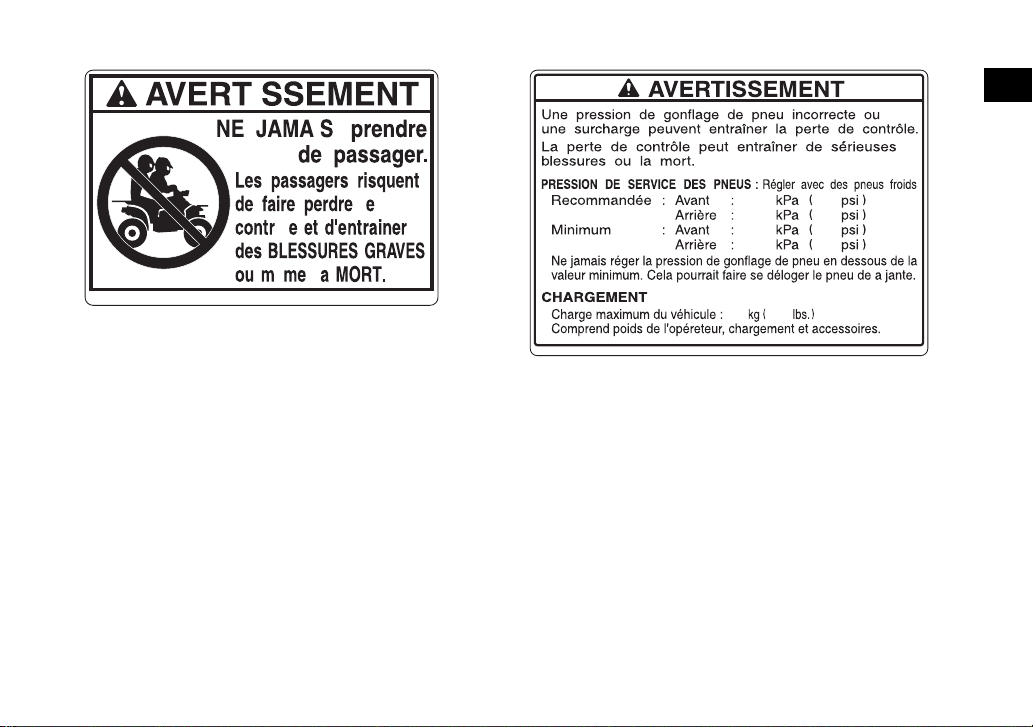
EBU17672
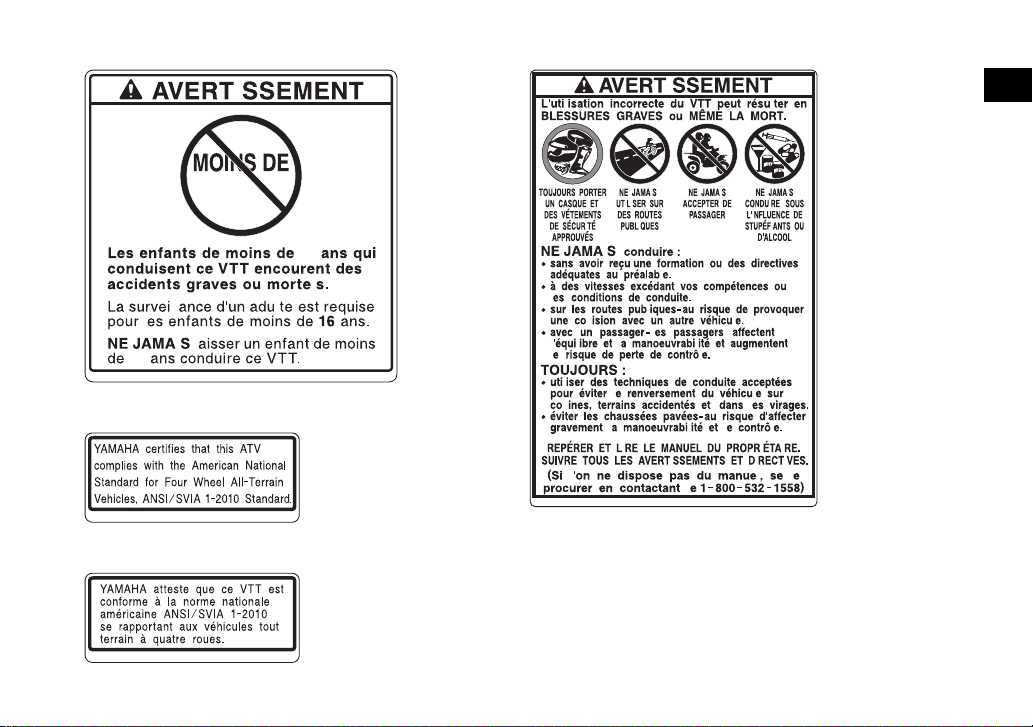
Read and understand all of the labels on your ATV. These labels contain important information for safe and
proper operation.
Never remove any labels from your ATV. If a label becomes difficult to read or comes off, request a replacement label from your Yamaha dealer.
1
1-2
1
BD3-F1568-00
ll
ll
l
l
l
l
ll
ll
I
I
I
I
l
I
l
l
I
l
l
I
l
l
l
I
I
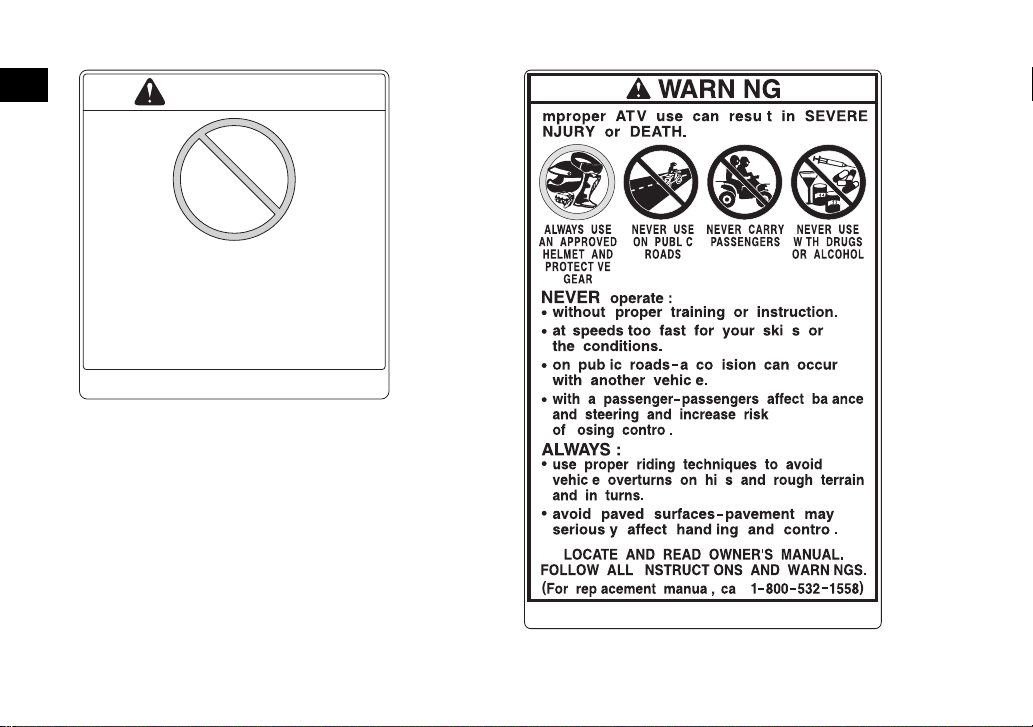
WARNING
UNDER
10
Operation of this ATV by children
under the age of 10 increases the
risk of severe injury or death.
Adult supervision required for children
under age 16.
NEVER permit children under age 10
to operate this ATV.
BD3-F816L-00
12
1-3
3
I
6
II
I
1
I
I
10
10
I
10
I
I
I
I
I
I
BD3-F816L-10
4
BD3-F817J-40
I
I
I
I
I
I
I
IIII
I
II
I
I
I
I
I
I
I
I
I
I
I
II
I
I
I
I
I
II
I
I
I
II
I
I
I
BD3-F1568-10
5
BD3-F817J-50
1-4
1
BD3-F416E-40
3.524.0
3.524.0
3.020.7
3.020.7
18182
BD3-F816M-60
BD3-F151H-00
I
I
I
I
•
C
M
V
S
S
•
C
A
N
A
D
A
•
N
S
V
A
C
•
T
R
A
N
S
P
O
R
T
506
3JK-82377-30
CAN ICES-2 / NMB-2
7
9
8
10
1-5
11 12
I
I
1
I
I
ô
ê
I
BD3-F151H-10
1-6
3.524.0
3.524.0
3.020.7
3.020.7
18182
BD3-F816M-10
EBU17432
SAFETY INFORMATION
EBU34414
2
AN ATV IS NOT A TOY AND CAN BE HAZARDOUS TO OPERATE.
An ATV handles differently from other vehicles, including motorcycles and cars. A collision or rollover can occur quickly, even during routine
maneuvers such as turning and riding on hills or
over obstacles, if you fail to take proper precautions.
SEVERE INJURY OR DEATH can result if you do
not follow these instructions:
Read this manual and all labels carefully and fol-
low the operating procedures described.
Never operate an ATV without proper training or
instruction. Take a training course. Beginners
should receive training from a certified instructor. Contact an authorized ATV dealer to find
out about the training courses nearest you.
Never allow a child under 10 years old to oper-
ate this ATV.
Never allow a child under 16 years old to oper-
ate an ATV without adult supervision.
SAFETY INFORMATION
Do not allow continued use of the ATV by a child
if he or she does not have the abilities to operate
it safely.
Never carry a passenger on an ATV.
Always avoid operating an ATV on any paved
surfaces, including sidewalks, driveways, parking lots and streets.
Never operate an ATV on any public street, road
or highway, even a dirt or gravel one.
Never operate an ATV without wearing an ap-
proved motorcycle helmet that fits properly.
You should also wear eye protection (goggles
or face shield), gloves, boots, a long-sleeved
shirt or a jacket, and long pants.
Never consume alcohol or drugs before or while
operating this ATV.
Never operate at speeds too fast for your skills
or the riding conditions. Always go at a speed
that is proper for the terrain, visibility, operating
conditions, and your experience.
Never attempt wheelies, jumps, or other stunts.
2-1

Always inspect your ATV each time you use it to
make sure it is in safe operating condition. Always follow the inspection and maintenance
procedures and schedules described in this
manual.
Always keep both hands on the handlebars and
both feet on the footrests of the ATV during operation.
Always go slowly and be extra careful when op-
erating on unfamiliar terrain. Always be alert to
changing terrain conditions when operating the
ATV.
Never operate on excessively rough, slippery or
loose terrain until you have learned and practiced the skills necessary to control the ATV on
such terrain. Always be especially cautious on
these kinds of terrain.
Always follow proper procedures for turning as
described in this manual. Practice turning at low
speeds before attempting to turn at faster
speeds and never turn at excessive speeds.
Never operate the ATV on hills too steep for the
ATV or for your abilities. Practice on smaller hills
before attempting larger hills.
Always follow proper procedures for climbing
hills as described in this manual. Check the terrain carefully before you start up any hill. Never
climb hills with excessively slippery or loose
surfaces. Shift your weight forward. Never open
the throttle suddenly or make sudden gear
changes. Never go over the top of a hill at high
speed.
Always follow proper procedures for going
down hills and for braking on hills as described
in this manual. Check the terrain carefully before
you start down any hill. Shift your weight backward. Never go down a hill at high speed. Avoid
going down a hill at an angle that would cause
the vehicle to lean sharply to one side. Go
straight down the hill where possible.
Always follow proper procedures for crossing
the side of a hill as described in this manual.
Avoid hills with excessively slippery or loose
surfaces. Shift your weight to the uphill side of
the ATV. Never attempt to turn the ATV around
on any hill until you have mastered the turning
technique described in this manual on level
ground. Avoid crossing the side of a steep hill if
possible.
2
2-2

Always use proper procedures if you stall or roll
backwards when climbing a hill. To avoid stalling, use the proper gear and maintain a steady
speed when climbing a hill. If you stall or roll
2
backwards, follow the special procedure for
braking described in this manual. Dismount on
the uphill side or to a side if pointed straight uphill. Turn the ATV around and remount, following
the procedure described in this manual.
Always check for obstacles before operating in
a new area.
Never attempt to operate over large obstacles,
such as large rocks or fallen trees. Always follow
proper procedures when operating over obstacles as described in this manual.
Always be careful when skidding or sliding.
Learn to safely control skidding or sliding by
practicing at low speeds and on level, smooth
terrain. On extremely slippery surfaces, such as
ice, go slowly and be very cautious in order to
reduce the chance of skidding or sliding out of
control.
Never operate an ATV in fast flowing water or in
water deeper than that recommended in this
manual. Remember that wet brakes may have
reduced stopping ability. Test your brakes after
leaving water. If necessary, apply them several
times to let friction dry out the linings.
Always be sure there are no obstacles or people
behind you when you operate in reverse. When
it is safe to proceed in reverse, go slowly.
Always use the size and type of tires specified in
this manual.
Always maintain proper tire pressure as de-
scribed in this manual.
Never exceed the stated load capacity for an
ATV. Cargo should be properly distributed and
securely attached. Reduce speed and follow instructions in this manual for carrying cargo or
pulling a trailer. Allow greater distance for braking.
Do not operate your ATV during darkness un-
less it is equipped with a properly functioning
headlight. Off-road riding is inherently dangerous and additionally, off-road trails do not have
streetlights to guide you.
Never maintain an ATV without proper knowl-
edge. Contact an authorized ATV dealer to inform you on basic ATV maintenance. Certain
maintenance can only be carried out by certified
staff.
2-3

In the event of an accident
1. If serious injuries are incurred, you may be
safer staying next to your vehicle; it may
shield you from oncoming riders. Depending
on your injuries and position in the trail; you
must make a judgment call as to whether you
should move to a position off the trail. If you
have sustained head, neck, or back injuries,
or cannot feel your limbs, you should not
move. Keep your helmet on and remain motionless. Lie down next to your vehicle and
wait for help.
2. If less serious injuries are incurred and you
can walk, then move to a position off the trail.
Check yourself for injuries and apply first aid
as needed.
3. If your injuries are light, when safe to do so,
move your vehicle off the trail to avoid collisions with oncoming riders. Check for injuries
and apply first aid as necessary. If you can
physically operate your vehicle, inspect your
vehicle. If the vehicle is in safe operating condition and you can safely operate it, restart it
and ride gently back to camp or other known
location where you can receive medical at-
tention. If necessary, contact your riding party
or local authorities to let them know where
you are and what has happened.
In the event of a breakdown
1. If your vehicle will not restart or is not in safe
operating condition, turn off the main switch
and engine stop switch. If the breakdown occurs at twilight or night, leave the main switch
on so that your lights may warn other riders of
your stopped vehicle.
2. Get out of danger. Check for oncoming vehicles and when safe, push your vehicle to the
side of the trail or even off the main trail to
avoid any possible collisions with oncoming
riders. If you cannot move your vehicle by
yourself, when safe, walk to the nearest vantage point and signal an oncoming rider to
help you push your vehicle to a safe place off
the trail.
3. Inspect your vehicle for any immediate hazardous conditions. The most obvious hazardous conditions are leaking fuel and
ungrounded or broken wiring. Visually check
for broken wiring and leaking fuel. Leaking
fuel can be confirmed by the odor of gasoline.
2
2-4

4. Once immediate safety hazards are confirmed not to exist, you may remove your helmet to more closely inspect your vehicle.
Check for external signs of wear, broken
2
parts, fluid leaks, cracks in the frame, suspension damage, wheel damage, and so on.
Fuel, oil, and coolant usually give off a noticeable odor.
5. If your vehicle will not restart or if it is unsafe
to ride, then turn off all vehicle systems (engine stop switch, main switch, and fuel cock),
and then signal or go for help.
Aftermarket Parts, Accessories, and Modifications
While you may find aftermarket products similar in
design and quality to genuine Yamaha accessories, recognize that some aftermarket accessories
or modifications are not suitable because of potential safety hazards to you or others. Installing
aftermarket products or having other modifications performed to your vehicle that change any of
the vehicle’s design or operation characteristics
can put you and others at greater risk of serious
injury or death. You are responsible for injuries related to changes in the vehicle. Keep the following
guidelines in mind, as well as those found in the
Loading section (page 6-7) when mounting accessories.
Never install accessories that would impair the
performance of your ATV. Carefully inspect the
accessory before using it to make sure that it
does not in any way reduce ground clearance,
limit suspension travel, steering travel or control
operation.
Accessories fitted to the ATV can create insta-
bility due to improper weight distribution.
Bulky or large accessories may seriously affect
the stability of the ATV.
Certain accessories can displace the operator
from his or her normal riding position. This improper position limits the freedom of movement
of the operator and may limit control ability,
therefore, such accessories are not recommended.
Use caution when adding electrical accesso-
ries. If electrical accessories exceed the capacity of the ATV’s electrical system, an electric
failure could result, which could cause a dangerous loss of lights or engine power. Also, the
battery tends to discharge more quickly if electrical accessories are added.
2-5
WARNING
EWB00073
WARNING
Avoid Carbon Monoxide Poisoning
All engine exhaust contains carbon monoxide,
a deadly gas. Breathing carbon monoxide can
cause headaches, dizziness, drowsiness, nausea, confusion, and eventually death.
Carbon Monoxide is a colorless, odorless,
tasteless gas which may be present even if you
do not see or smell any engine exhaust. Deadly
levels of carbon monoxide can collect rapidly
and you can quickly be overcome and unable
to save yourself. Also, deadly levels of carbon
monoxide can linger for hours or days in enclosed or poorly ventilated areas. If you experience any symptoms of carbon monoxide
poisoning, leave the area immediately, get
fresh air, and SEEK MEDICAL TREATMENT.
Do not run engine indoors. Even if you try to
ventilate engine exhaust with fans or open
windows and doors, carbon monoxide can
rapidly reach dangerous levels.
Do not run engine in poorly ventilated or par-
tially enclosed areas such as barns, garages,
or carports.
Do not run engine outdoors where engine
exhaust can be drawn into a building through
openings such as windows and doors.
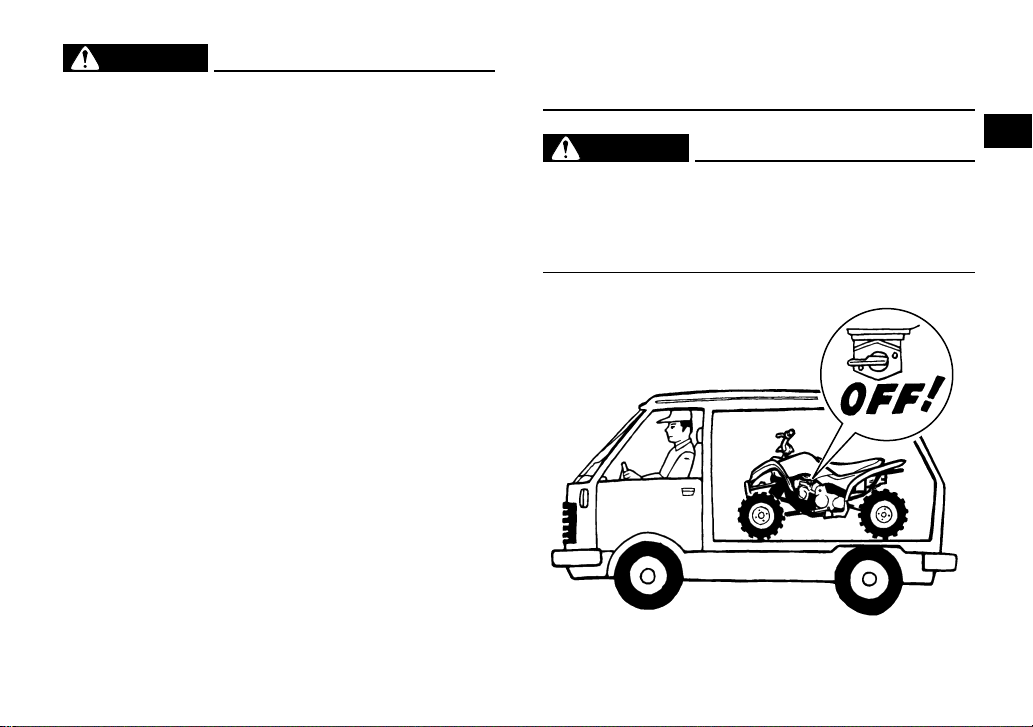
EWB02592
When transporting the ATV in another vehicle,
be sure it is kept upright and that the fuel cock
is in the “OFF” position. Otherwise, fuel may
leak out of the carburetor or fuel tank.
2
2-6
EBU17681
1 2 3 4,5
76
12 3
65 4
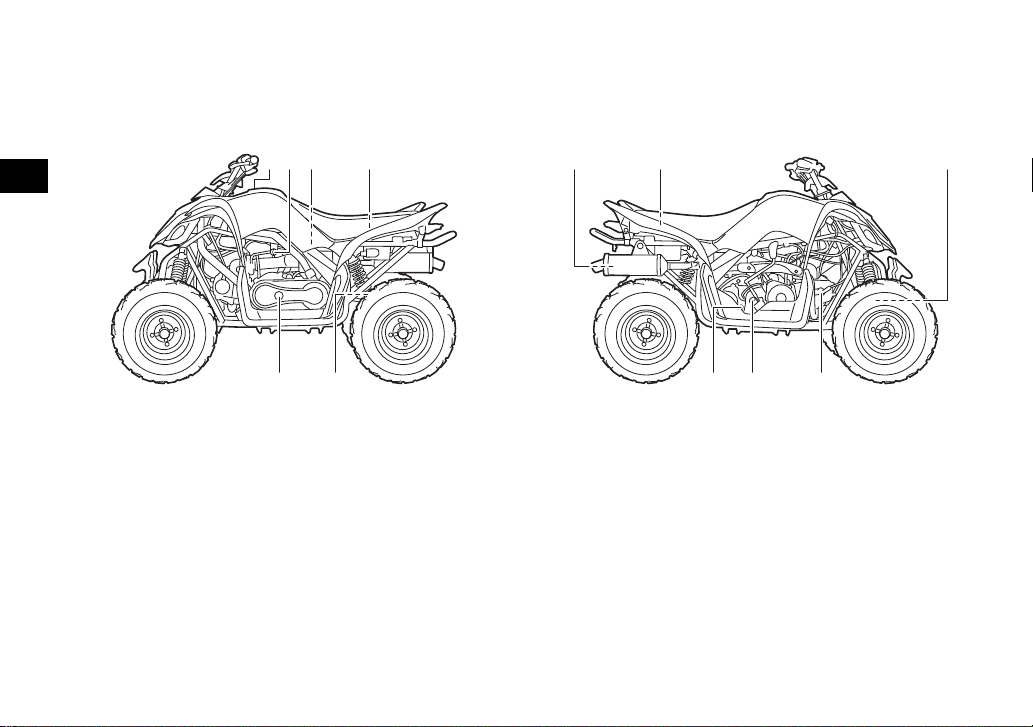
DESCRIPTION
EBU17691
Left view
3
1. Fuel tank cap
2. Fuel cock
3. Air filter
4. Fuse
5. Battery
6. Rear shock absorber spring preload adjuster
7. Kickstarter lever cap
EBU17701
Right view
1. Spark arrester
2. Owner’s tool kit
3. Front shock absorber spring preload adjuster
4. Spark plug
5. Engine oil filler cap
6. Transmission oil filler cap
3-1
EBU17714
TIP
1 2 3 5 6 74
8
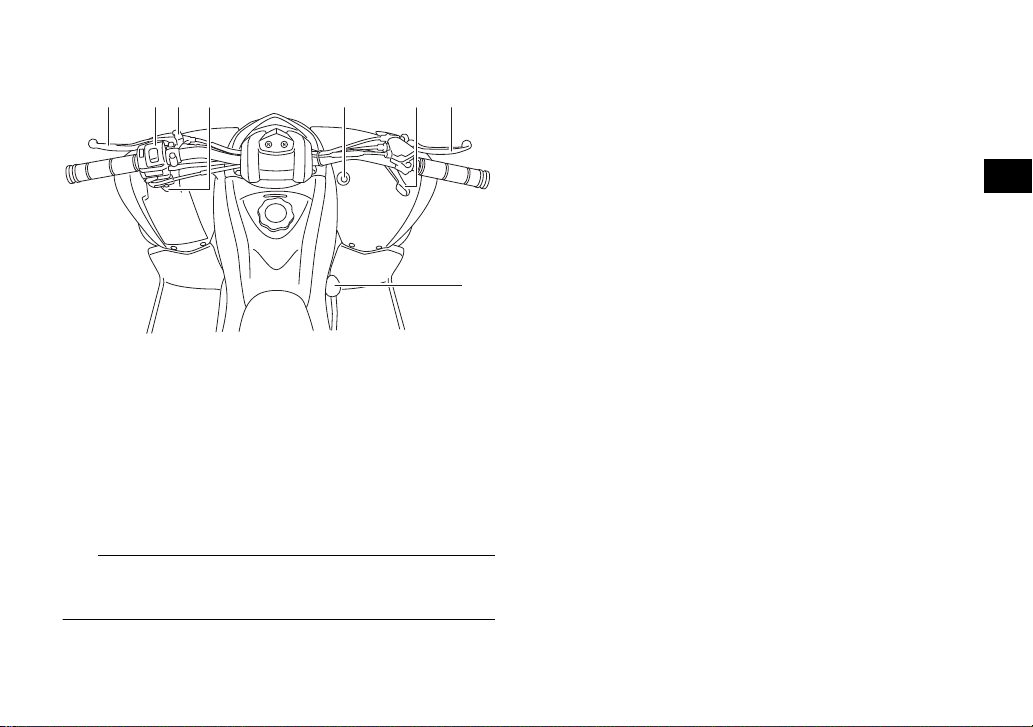
Controls and instruments
1. Rear brake lever
2. Handlebar switches
3. Parking brake lock plate
4. Starter (choke)
5. Main switch
6. Throttle lever
7. Front brake lever
8. Drive select lever
The ATV you have purchased may differ slightly
from the figures shown in this manual.
3
3-2

EBU17729
WARNING
ONOFF
INSTRUMENT AND CONTROL FUNCTIONS
EWB00012
Indicates a hazardous situation which, if not
avoided, could result in death or serious injury.
EBU33850
4
Main switch
The positions of the main switch are as follows:
ON
All electrical systems are supplied with power, and
the engine can be started. The key cannot be removed.
OFF
All electrical systems are off. The key can be removed.
4-1
EBU17794
1 2
2
1
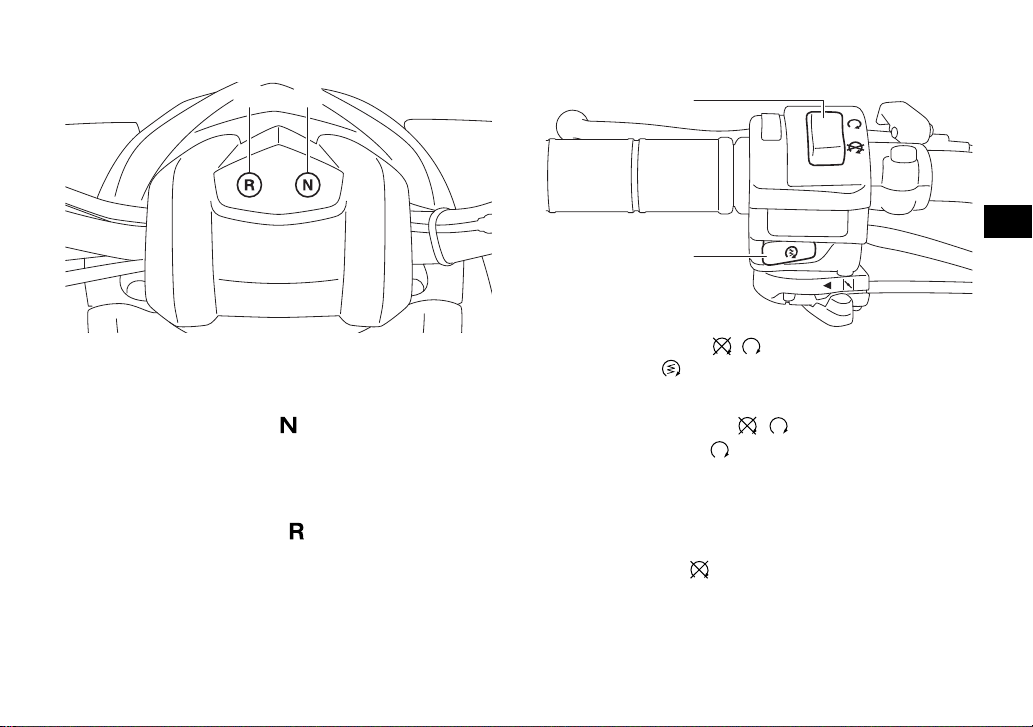
Indicator lights
EBU18066
Handlebar switches
4
1. Reverse indicator light “R”
2. Neutral indicator light “N”
EBU17861
Neutral indicator light “ ”
This indicator light comes on when the transmission is in the neutral position.
EBU17831
Reverse indicator light “ ”
This indicator light comes on when the transmission is in the reverse position.
1. Engine stop switch “ / ”
2. Start switch “ ”
EBU18081
Engine stop switch “ / ”
Set this switch to “ ” before starting the engine.
The engine stop switch controls the ignition and
stops the engine when it is running. Use this
switch to stop the engine in an emergency situation. The engine will not start or run when this
switch is set to “ ”.
4-2
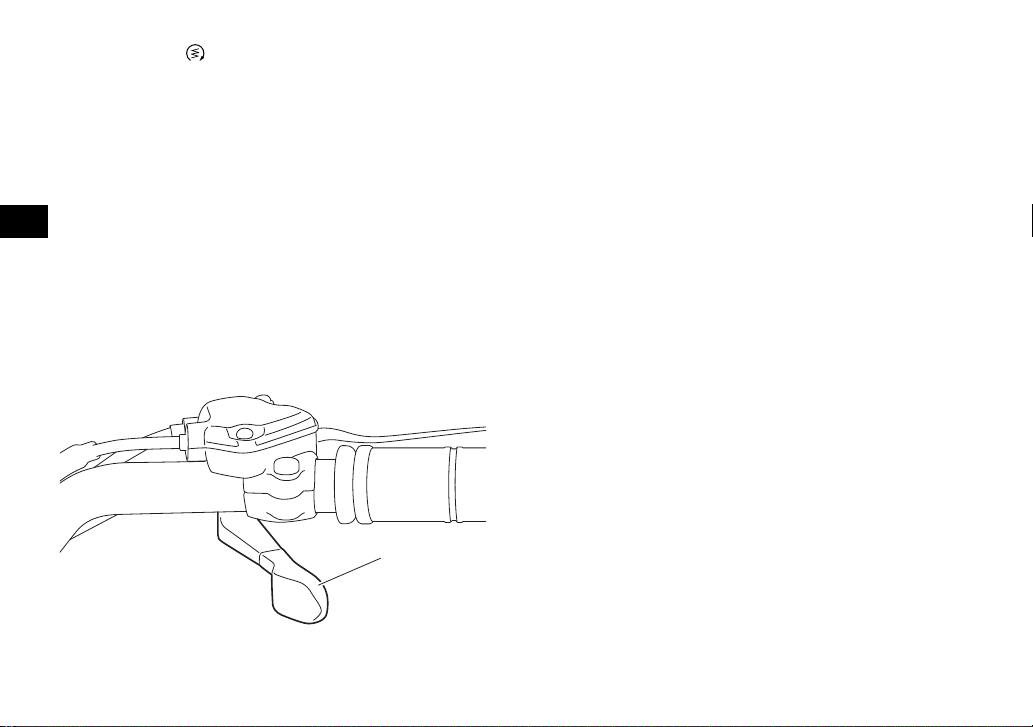
EBU18102
1
Start switch “ ”
Push this switch to crank the engine with the starter. See the starting instructions on page 6-1 prior
to starting the engine.
EBU18283
Throttle lever
Once the engine is running, pushing the throttle le-
4
ver will increase the engine speed.
Regulate the speed of the ATV by varying the
throttle position. Because the throttle is springloaded, the ATV will decelerate, and the engine
will return to an idle any time the throttle lever is released.
1. Throttle lever
Before starting the engine, check the throttle to be
sure it is operating smoothly. Make sure it returns
to the idle position as soon as the lever is released.
EBU33801
Speed limiter
Your ATV was delivered with two speed limiter devices. A vehicle speed limiter adjusting screw and
a removable engine speed limiter plate. Yamaha
recommends that all beginning riders start off with
the vehicle speed limiter adjusting screw fully
turned in and the engine speed limiter plate installed to limit the amount of speed available while
they learn.
The vehicle speed limiter keeps the throttle from
fully opening, even when the throttle lever is
pushed to the maximum. The adjusting screw may
be gradually turned out as the beginner becomes
more familiar with operating the ATV. Parents
should decide when to adjust the ATV for more
power as their youngster’s riding skills improve.
Once the ATV rider can operate with skill at the top
speed permitted by adjusting the vehicle speed
limiter alone, the engine speed limiter plate can be
removed. Since removal of this plate will result in
a significant increase in power, turn the vehicle
4-3

speed limiter adjusting screw completely back in
1
3
2
(b)
(a)
again and adjust it out in stages as done previously.
Vehicle speed limiter
1. Loosen the locknut.
2. To increase the maximum engine power
available and the maximum speed of the ATV,
turn the adjusting screw in direction (a). To
decrease the maximum engine power available and the maximum speed of the ATV, turn
the adjusting screw in direction (b). Do not
turn the adjusting screw out more than 10
mm (0.39 in) or the throttle cable could be
damaged. Always make sure the throttle lever
free play is adjusted to 1.5–4.0 mm (0.06–
0.16 in). (See page 8-20.) WARNING! Im-
proper adjustment of the speed limiter and
throttle could cause throttle cable damage
or improper throttle operation. You could
lose control, resulting in an accident.
[EWB00242]
4
1. Locknut
2. Adjusting screw
3. No more than 10 mm (0.39 in)
3. Tighten the locknut.
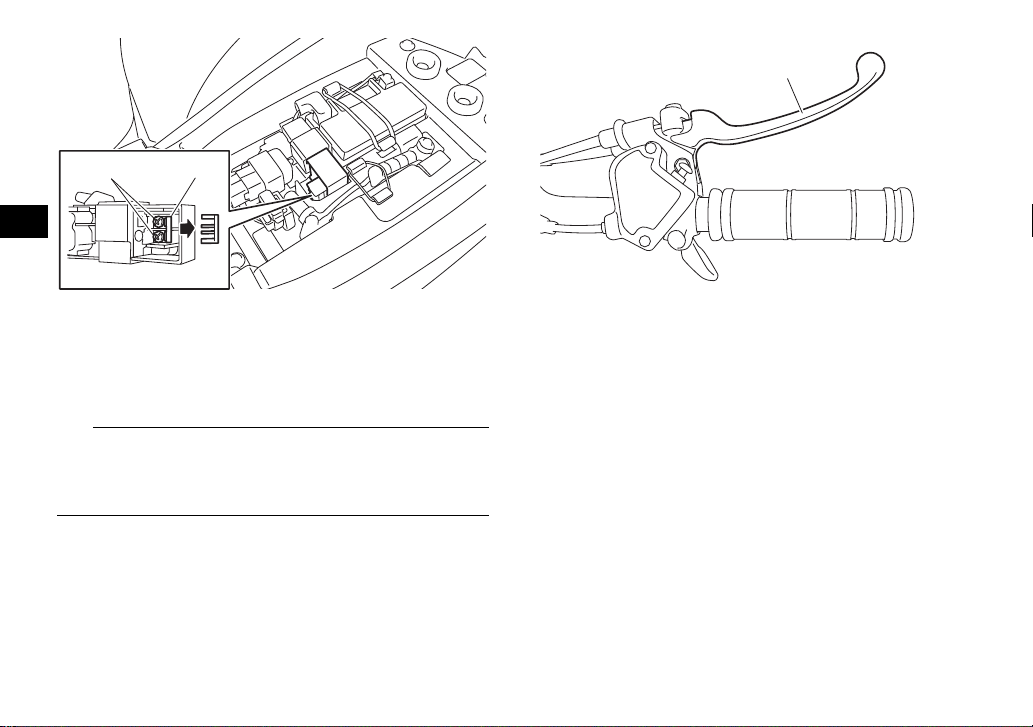
Engine speed limiter plate
When the engine speed limiter plate is installed,
engine speed is limited to 4900 r/min. When this
plate is removed, top engine speed (8500 r/min) is
available.
Remove the plate as follows.
1. Remove the seat. (See page 4-13.)
2. Loosen the screws, and then remove the
plate as shown.
4-4
4
TIP
12
1
1. Screw
2. Engine speed limiter plate
3. Tighten the screws.
4. Install the seat.
Store the engine speed limiter plate with the owner’s manual so that it is readily available whenever
you want to reduce top engine speed.
EBU18392
Front brake lever
The front brake lever is located on the right handlebar. To apply the front brake, pull the brake lever toward the handlebar grip.
1. Front brake lever
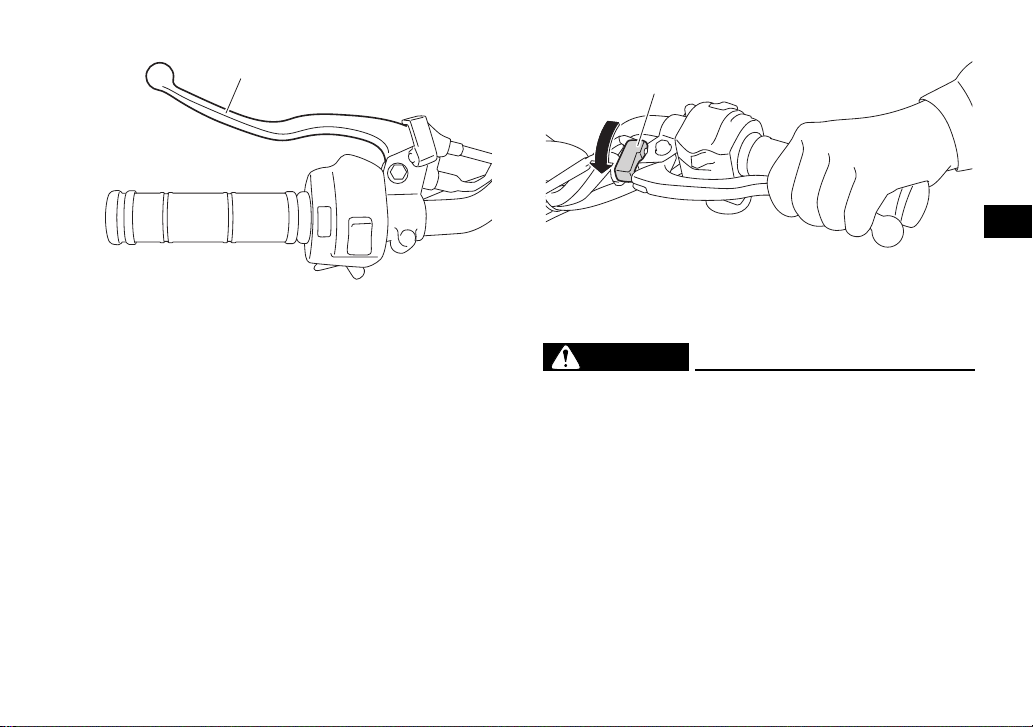
EBU18402
Rear brake lever
The rear brake lever is located on the left handlebar. To apply the rear brake, pull the brake lever
toward the handlebar grip.
4-5
4
WARNING
1
1
1. Rear brake lever
EBU18462
Parking brake
Use the parking brake before starting the engine
or after parking the ATV, especially on a slope. Apply the rear brake lever and push down the lock
plate to apply the parking brake. Squeeze the rear
brake lever to release the parking brake.
1. Parking brake lock plate
EWB00221
Always set the parking brake before starting
the engine. The ATV could start moving unexpectedly if the parking brake is not applied. This could cause loss of control or a
collision.
Always be sure you have released the park-
ing brake before you begin to ride. The brake
could overheat if you ride the ATV without releasing the parking brake. You could lose
4-6
braking performance which could cause an
1
1
accident. You could also wear out the brakes
prematurely.
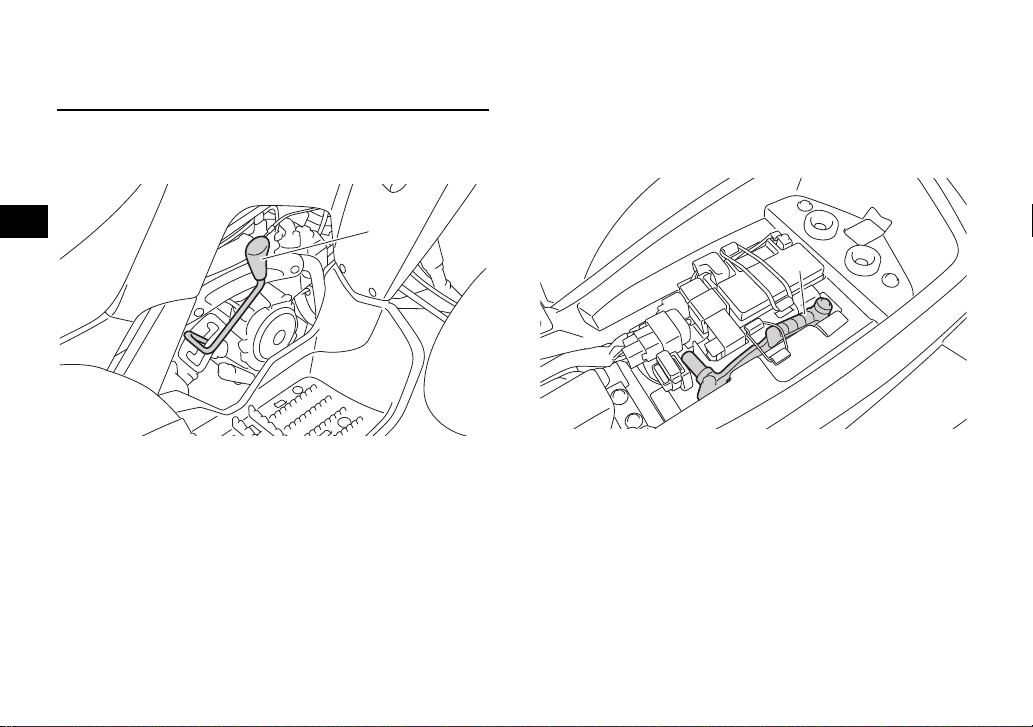
EBU18583
Drive select lever
4
EBU33893
Kickstarter
Use the kickstarter to start the engine when the
battery voltage is low.
1. Remove the seat (page 4-13), and then remove the kickstarter lever.
1. Drive select lever
The drive select lever is used to shift the transmission into the forward, neutral and reverse positions. See page 6-3 for drive select lever
operation.
1. Kickstarter lever
2. Remove the kickstarter lever cap.
4-7
 Loading...