

Page 1
Digital Piano
Digital Piano
YDP-
88
II
IMPORTANT
Check Your Power Supply
Make sure that your local AC mains
voltage matches the voltage specified on the name plate on the bottom
panel. In some areas a voltage selector may be provided on the rear
panel of the main keyboard unit near
the power cord. Make sure that the
voltage selector is set for the voltage
in your area. The voltage selector is
set at 240V when the unit is initially
shipped. To change the setting use a
“minus” screwdriver to rotate the selector dial so that the correct voltage
appears next to the pointer on the
panel.
Page 2

PRECAUTIONS
PLEASE READ CAREFULLY BEFORE PROCEEDING
* Please keep these precautions in a safe place for future reference.
WARNING
Always follow the basic precautions listed below to avoid the possibility of serious injury or even death from electrical shock,
short-circuiting, damages, fire or other hazards. These precautions include, but are not limited to, the following:
• Do not open the instrument or attempt to disassemble the internal parts or
modify them in any way. The instrument contains no user-serviceable parts.
If it should appear to be malfunctioning, discontinue use immediately and
have it inspected by qualified Yamaha service personnel.
• Do not expose the instrument to rain, use it near water or in damp or wet
conditions, or place containers on it containing liquids which might spill into
any openings.
• If the power cord or plug becomes frayed or damaged, or if there is a sudden loss of sound during use of the instrument, or if any unusual smells or
smoke should appear to be caused by it, immediately turn off the power
CAUTION
Always follow the basic precautions listed below to avoid the possibility of physical injury to you or others, or damage to the
instrument or other property. These precautions include, but are not limited to, the following:
switch, disconnect the electric plug from the outlet, and have the instrument inspected by qualified Yamaha service personnel.
• Only use the voltage specified as correct for the instrument. The required
voltage is printed on the name plate of the instrument.
• Before cleaning the instrument, always remove the electric plug from the
outlet. Never insert or remove an electric plug with wet hands.
• Check the electric plug periodically and remove any dirt or dust which may
have accumulated on it.
• Do not place the power cord near heat sources such as heaters or radiators,
and do not excessively bend or otherwise damage the cord, place heavy
objects on it, or place it in a position where anyone could walk on, trip over,
or roll anything over it.
• When removing the electric plug from an outlet, always hold the plug itself
and not the cord. Pulling by the cord can damage it.
• Do not connect the instrument to an electrical outlet using a multiple-connector. Doing so can result in lower sound quality, or possibly cause overheating in the outlet.
• Remove the electric plug from the outlet when the instrument is not to be
used for extended periods of time, or during electrical storms.
• Before connecting the instrument to other electronic components, turn off
the power for all components. Before turning the power on or off for all
components, set all volume levels to minimum.
• Do not expose the instrument to excessive dust or vibrations, or extreme
cold or heat (such as in direct sunlight, near a heater, or in a car during the
day) to prevent the possibility of panel disfiguration or damage to the internal components.
• Do not use the instrument near other electrical products such as televisions, radios, or speakers, since this might cause interference which can
affect proper operation of the other products.
• Do not place the instrument in an unstable position where it might accidentally fall over.
• Before moving the instrument, remove all connected cables.
• When cleaning the instrument, use a soft, dry cloth. Do not use paint thinners,
solvents, cleaning fluids, or chemical-impregnated wiping cloths. Also, do
not place vinyl or plastic objects on the instrument, since this might discolor the panel or keyboard.
• Do not rest your weight on, or place heavy objects on the instrument, and
do not use excessive force on the buttons, switches or connectors.
• Take care that the key cover does not pinch your fingers, and do not insert
a finger or hand in the key cover gap.
• Never insert or drop paper or metallic or other objects between the slits of
the key cover and the keyboard. If this happens, immediately turn off the
power and remove the electric plug from the outlet and have the instrument inspected by qualified Yamaha service personnel.
• Do not place the instrument against a wall (allow at least 3 cm/one-inch
from the wall), since this can cause inadequate air circulation, and possibly
result in the instrument overheating.
• Read carefully the attached documentation explaining the assembly process. Failure to assemble the instrument in the proper sequence might result in damage to the instrument or even injury.
• Do not operate the instrument for a long period of time at a high or uncomfortable volume level, since this can cause permanent hearing loss. If you
experience any hearing loss or ringing in the ears, consult a physician.
■USING THE BENCH (if included)
• Do not play carelessly with or stand on the bench. Using it as a tool or stepladder or for any other purpose might result in accident or injury.
• Only one person should sit on the bench at a time, in order to prevent the
possibility of accident or injury.
• If the bench screws become loose due to extensive long-term use, tighten
them periodically using the included tool.
■SAVING USER DATA
• Save all data to an external device such as the Yamaha DOU-10 Disk Orchestra Unit, in order to help prevent the loss of important data due to a
malfunction or user operating error.
Yamaha cannot be held responsible for damage caused by improper use or modifications to the instrument, or data that is lost or destroyed.
Always turn the power off when the instrument is not in use.
(1)B_EL/CL
Page 3

Introduction
Thank you for choosing a Yamaha YDP-88II Digital Piano. Your YDP-88II is a fine musical instrument
that employs advanced Yamaha music technology. With the proper care, your YDP-88II will give you many
years of musical pleasure.
● Yamaha’s AWM (Advanced Wave Memory) tone
generator system offers rich, realistic voices.
● Touch-sensitive keys provides extensive expressive control and outstanding playability.
● Dual play mode allows 2 voices to be played
simultaneously.
● Metronome feature with variable tempo facilitates
practice.
● Record and play back anything you play on the
keyboard (up to approximately 1,300 notes).
● MIDI compatibility and a range of MIDI functions
make the YDP-88II useful in a range of advanced
MIDI music systems.
In order to make the most of your YDP-88II’s performance potential and features, we urge you to read
this Owner’s Manual thoroughly, and keep it in a safe place for later reference.
Contents
■
The Control Panel.........................................................2
Connections .................................................................. 4
Selecting & Playing Voices .......................................... 5
Playing the Demonstration Tunes ...............................6
The Dual Mode .............................................................7
●
Adjusting the Balance Between the Dual-mode
Voices .............................................................. 7
●
Shifting a Dual-Mode Voice Up One Octave .... 7
The Pedals ....................................................................8
●
Soft (Left) Pedal ............................................... 8
●
Sostenuto (Center) Pedal.................................8
●
Damper (Right) Pedal....................................... 8
Transposition ................................................................8
Pitch Control................................................................. 9
●
Tuning Up .........................................................9
●
Tuning Down..................................................... 9
●
To Restore Standard Pitch ............................... 9
The Metronome & Tempo Control .............................10
■
The Metr onome .................................................10
●
Metronome Volume ........................................10
●
Metronome Time Signature............................ 10
■
T empo Contr ol................................................... 10
Using the Recorder .................................................... 11
■
Recording ..........................................................11
●
Changing the Initial Settings ..........................12
●
Erasing the recorded data.............................. 12
Playback ............................................................ 12
●
Fast Forward Playback................................... 12
MIDI Functions ...........................................................13
●
A Brief Introduction to MIDI ............................13
●
MIDI “Messages” Transmitted & Received by
the YDP-88II ....................................................... 13
●
MIDI Transmit & Receive Channel Selection.. 14
●
MIDI Transmit Transpose................................ 14
■
Other MIDI Functions ....................................... 14
●
Local Control ON/OFF ...................................15
●
Program Change ON/OFF ............................. 15
●
Control Change ON/OFF ...............................15
●
The Multi-Timbre Mode ..................................16
●
The MIDI Split & Left Local OFF Mode .......... 16
●
Bulk Data Dump .............................................16
Troubleshooting .......................................................... 17
Options & Expander Modules ...................................17
Keyboard Stand Assembly ........................................18
MIDI Data Format ...................................................... 24
MIDI Implementation Chart....................................... 25
Specifications.............................................................. 26
The serial number of this product may be found on the bottom of the unit. You
should note this serial number in the space provided below and retain this manual
as a permanent record of your purchase to aid identification in the event of theft.
Model No.
Serial No.
Page 4
The Control Panel
1
POWER
PHONES Jacks
(Bottom Panel)
MASTER VOLUME
MIN MAX
MIDI/TRANSPOSE
PIANO
E. PIANO 1
E. PIANO 2
HARPSI-
CHORD
ORGAN
METRONOME
TEMPO
32 280120
RECORDER
PLAY REC
DEMO
234 5 768
RECORDER
PLAY REC
DEMO
Pitch control keys
(See page 9)
Left voice shift up key
MASTER VOLUME
MIN MAX
C1 D1 E1 F1 G1 A1 B1 C2 D2 E2 G2 A2 B2 C3 D3 E3 F3 A3 B3 C4 D4 E4 F4 G4F2 G3
B0A0G0F0E0D0C0B-1A-1
F2 G3
MIDI/TRANSPOSE
PIANO
E. PIANO 1
Transpose keys
(See page 8)
(See page 7)
Balance keys (See page 7)
HARPSICHORD
ORGANE. PIANO 2
METRONOME
32 280120
TEMPO
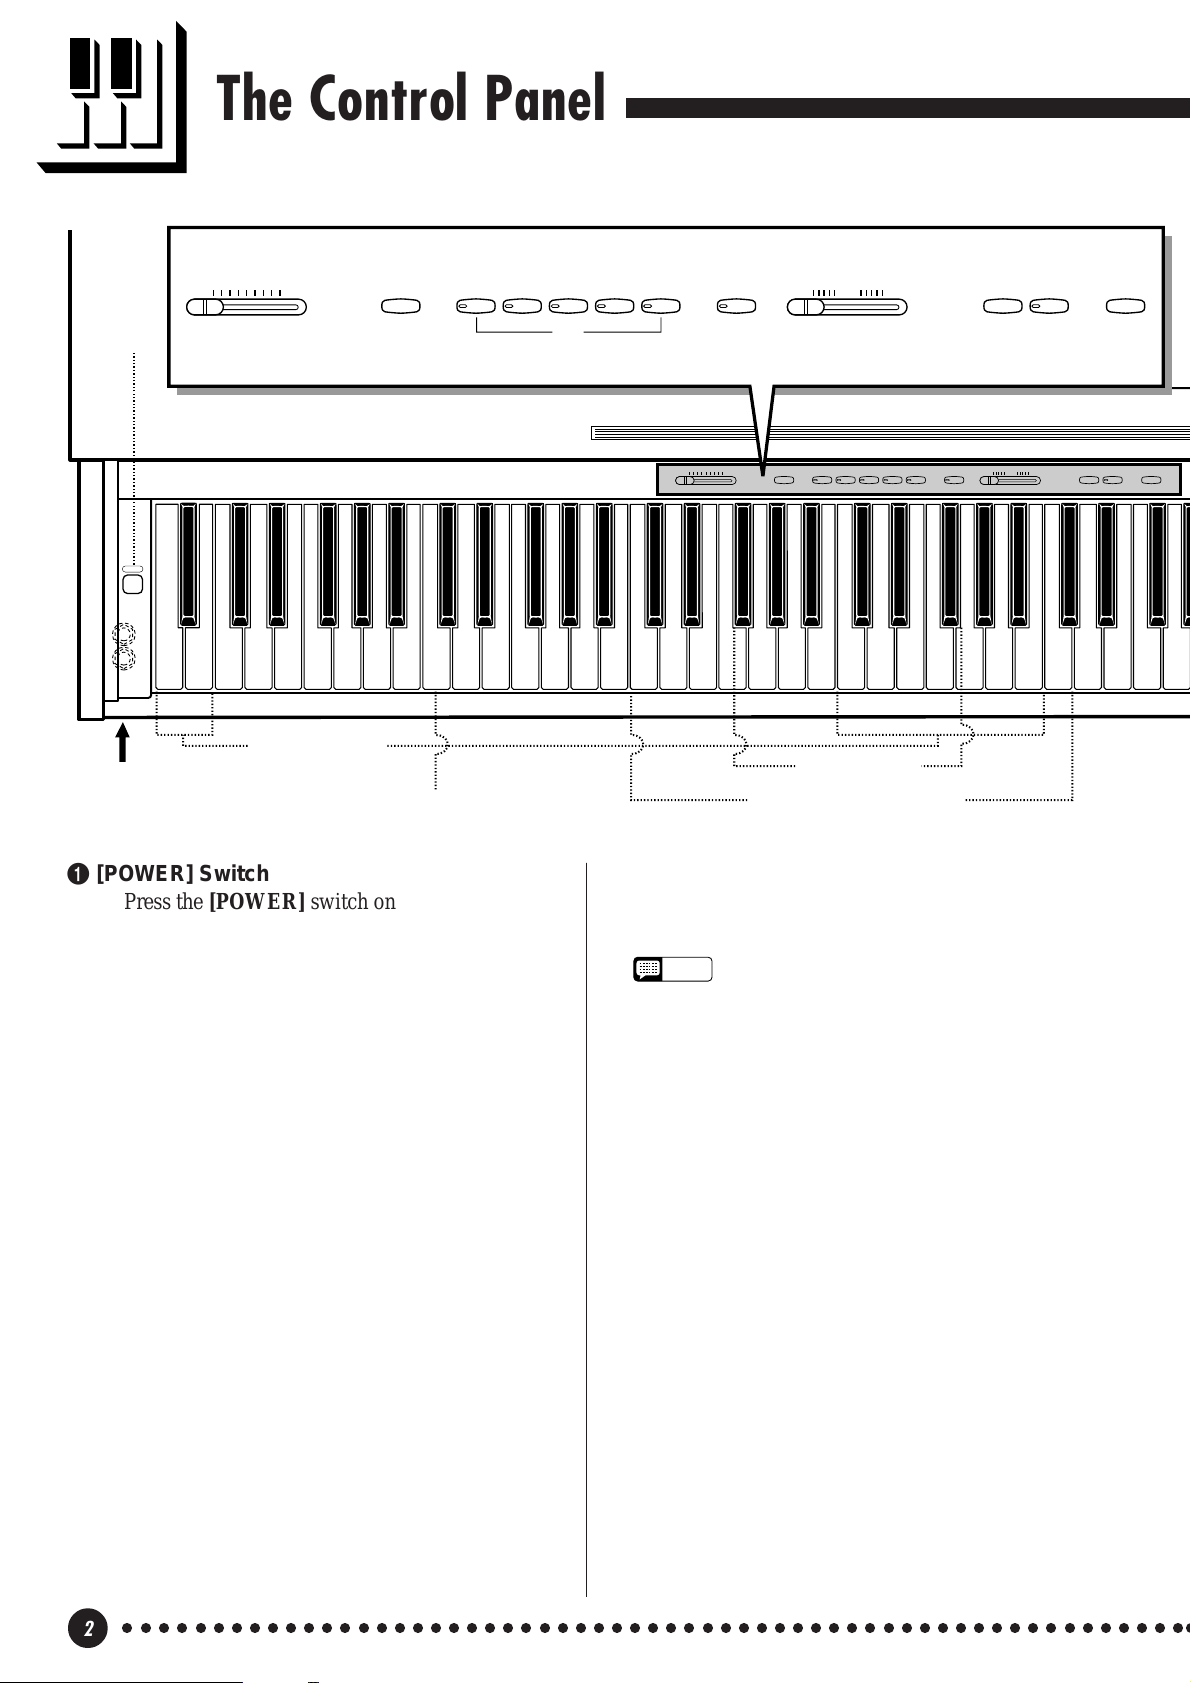
1 [POWER] Switch
Press the [POWER] switch once to turn the power
ON, a second time to turn the power OFF. When the
power is initially turned ON, the [PIANO] voice
selector LED will light.
2 [MASTER VOLUME] Control
The [MASTER VOLUME] control adjusts the
volume (level) of sound produced by the YDP-88II’s
internal stereo sound system. The [MASTER V OL-
UME] control also adjusts headphone volume when a
pair of headphones is plugged into the PHONES jack
(page 5).
3 [MIDI/TRANSPOSE] Button
The [MIDI/TRANSPOSE] button allows access
to the YDP-88II’s TRANSPOSE function (to shift the
pitch of the entire keyboard up or down) and MIDI
functions. For details refer to “TRANSPOSITION”
on page 8, and “MIDI FUNCTIONS” on page 13,
respectively.
4 Voice Selectors
The YDP-88II has five voice selectors. Simply
press any of the voice selectors to select the corresponding voice. The voice selector LED will light to
indicate which voice is currently selected.
The YDP-88II also has a DUAL mode in which
two voices can be played simultaneously across the
full range of the keyboard — see page 7 for details.
NOTE
• The PIANO voice is automatically selected
whenever the [POWER] switch is initially turned
ON.
5 [METRONOME] Button
Turns the metronome sound on and off. The
[TEMPO] control, below, is used to set the tempo of
the metronome sound. More precise tempo settings
can be achieved by using the [METRONOME]
button and the YDP-88II keyboard as described on
page 10.
6 [TEMPO] Control
This control adjusts the tempo of the YDP-88II
metronome function as well as the playback tempo of
the recorder function. The tempo range is from 32 to
280 quarter-note beats per minute.
7 RECORDER [PLAY] and [REC]
Buttons
These buttons control the YDP-88II recorder,
letting you record and play back just about anything
you play on the keyboard — up to a maximum of
about 1,300 notes. See page 11 for details.
○○○○○○○○○○○○○○○○○○○○○○○○○○○○○○○○○○○○○○○○○○○○○○○○○○○○○○○○○○○○
2
Page 5
DIGITAL PIANO YDP-88II
The Control Panel
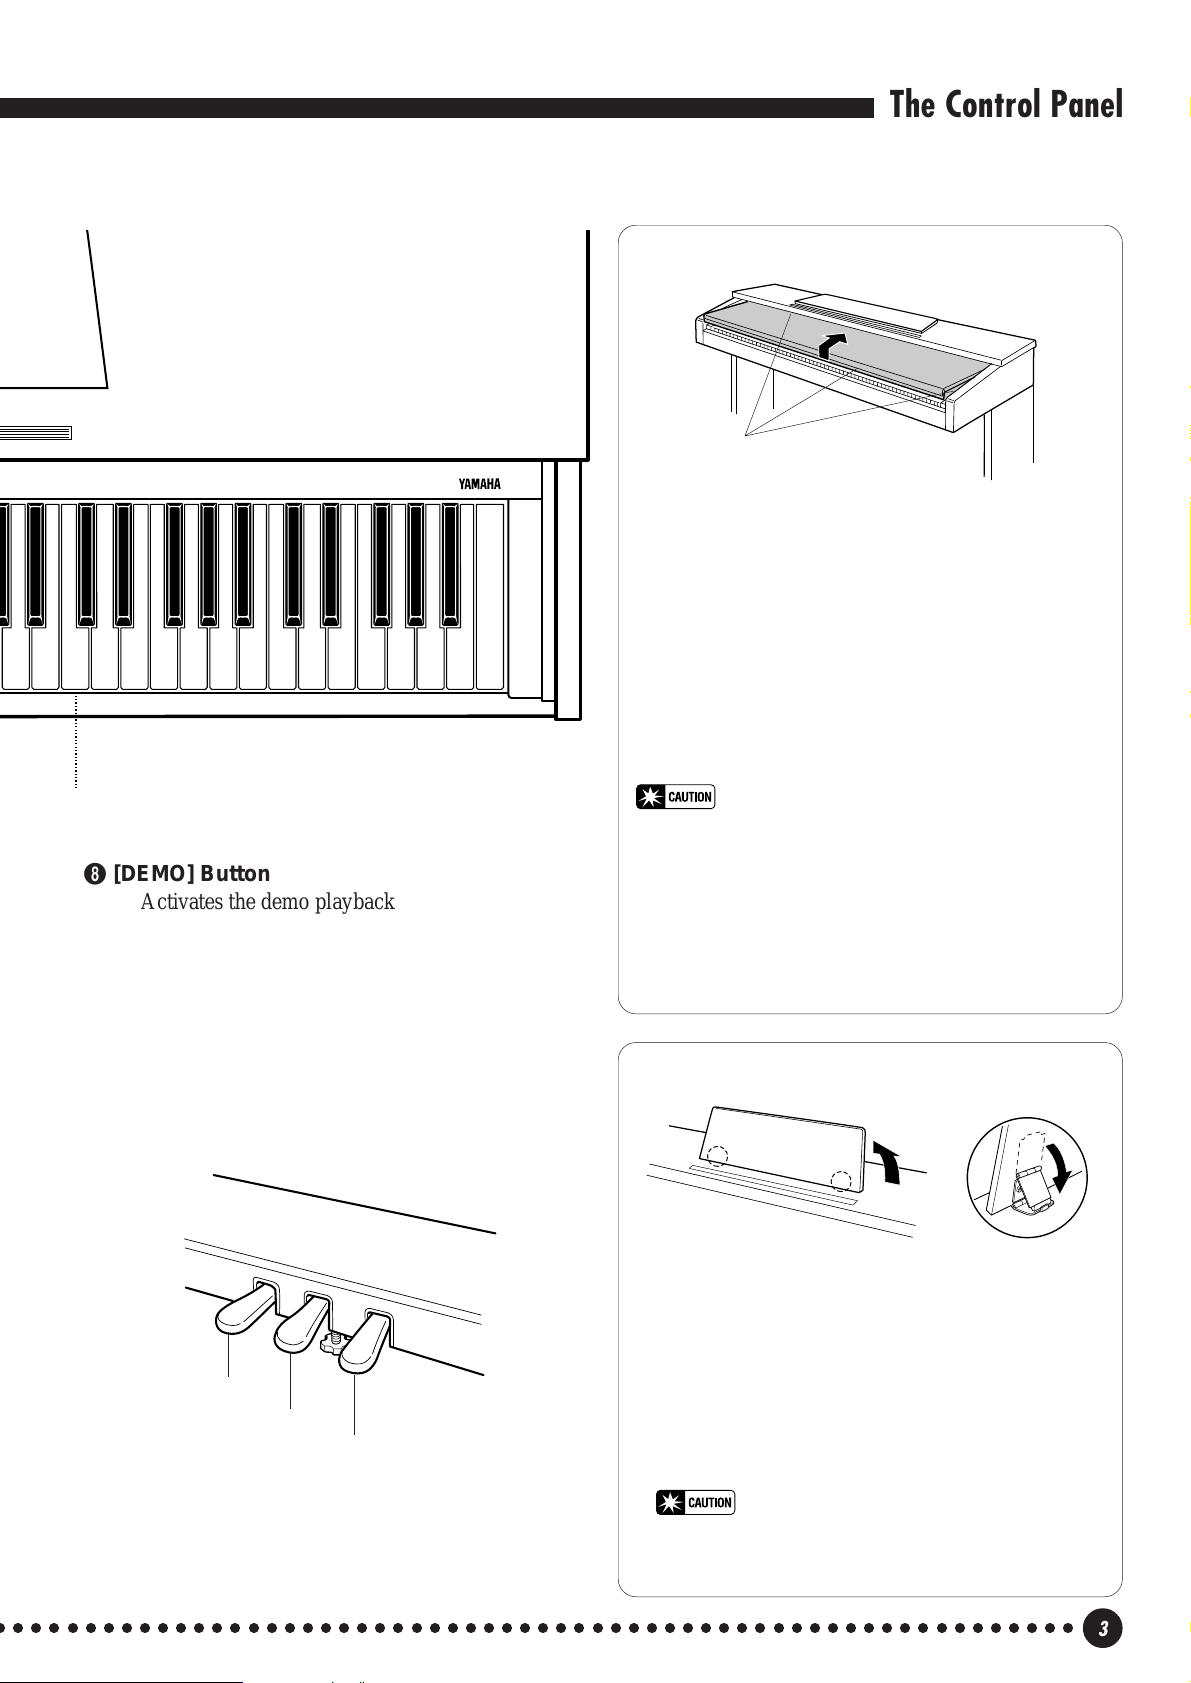
● Key Cover
Be careful to avoid catching your
fingers when opening or closing
the cover.
■ To open the key cover:
ZLift the cover slightly (not too much).
XSlide the cover open.
A4 B4 C5 D5 E5 F5 G5 A5 B5 C6
Right voice shift up key
(See page 6)
8 [DEMO] Button
Activates the demo playback mode in which you
can select playback of five pre-programmed demonstration sequences. See page 6 for details.
9 Pedals
The soft (left), sostenuto (center) and damper
(right) pedals provide a range of expressive control
capabilities similar to the pedal functions on an
acoustic piano. See page 8 for details.
Soft pedal
Sostenuto pedal
D6 E6 F6 G6 A6 B6 C7
9
Damper pedal
■ To close the key cover:
ZSlide the cover toward you.
XGently lower the cover over the keys.
• Hold the cover with both hands when moving it, and do not
release it until it is fully opened or closed. Be careful to
avoid catching fingers (yours or others) between the cover
and main unit.
• Do not place objects on top of the key cover. Small objects
placed on the key cover may fall inside the main unit when
the cover is opened and may not be able to be removed.
This could cause electric shock, short circuit, fire or other
serious damage to the instrument.
● The Music Stand
If you will be using sheet music with your
YDP-88II, raise the music stand built into its top
panel by lifting the rear edge of the music stand,
then flip down the music stand braces and engage
them with the corresponding recesses.
The music stand can be lowered after slightly
lifting it and folding the two brackets which
support it against the back of the stand.
• Do not try to use the music stand in a half-raised
position. Also, when lowering the stand, make sure to
press it until it is all the way down.
○ ○○○○○○○○○○○○○○○○○○○○○○○○○○○○○○○○○○○○○○○○○○○○○○○○○○○○○○○○○○○
3
Page 6

Connections
AUX OUT
L/L+RR
Stereo System
MIDI
IN OUT
DOU-10
MIDI
IN
OUT
AUX OUT
R L/L+R
240V
110V
220V
130V
VOLTAGE
SELECTOR
12
1 AUX OUT L/L+R and R Jacks
The AUX OUT L/L+R and R jacks deliver the output of the
YDP-88II for connection to an instrument amplifier, mixing console,
PA system, or recording equipment. If you will be connecting the
YDP-88II to a monaural sound system, use only the L/L+R jack.
When a plug is inserted into the L/L+R jack only, the left- and rightchannel signals are combined and delivered via the L/L+R jack so
you don’t lose any of the YDP-88II’s sound.
2 MIDI IN and OUT Connectors
The MIDI IN connector receives MIDI data from an external
MIDI device (such as the DOU-10 Disk Orchestra Unit) which can
be used to control the YDP-88II. The MIDI OUT connector transmits MIDI data generated by the YDP-88II (e.g. note and velocity
data produced by playing the YDP-88II keyboard).
More details on MIDI are given in “MIDI FUNCTIONS” on
page 13.
● PHONES Jacks
(Bottom Panel)
Two pairs of standard pair of stereo headphones can be plugged
in here for private practice or late-night playing. The internal
speaker system is automatically shut off when a pair of headphones
is plugged into either of the PHONES jacks.
○○○○○○○○○○○○○○○○○○○○○○○○○○○○○○○○○○○○○○○○○○○○○○○○○○○○○○○○○○○○
4
Page 7

Selecting & Playing Voices
Turn Power On...................................................................................................
After making sure that the YDP-88II’s AC cord is properly plugged
POWER
into a convenient AC wall outlet, press the [POWER] switch located to
the left of the keyboard to turn the power ON. In some areas a plug
adaptor may be provided to match the pin configuration of the AC wall
outlets in your area.
When the power is turned ON, the [PIANO] voice selector LED
will light (the PIANO voice is automatically selected whenever the
power is turned ON).
Set the Volume..................................................................................................
PIANO
MASTER VOLUME
MIN MAX
E. PIANO 1
E. PIANO 2
HARPSI-
CHORD
ORGAN
Initially set the [MASTER VOLUME] control about half way
between the “MIN” and “MAX” settings. Then, when you start playing,
re-adjust the [MASTER VOLUME] control for the most comfortable
listening level.
Select a Voice.....................................................................................................
Select the desired voice by pressing one of the voice selectors.
Play................................................................................................................................
The YDP-88II offers keyboard touch response, so the volume and
timbre of notes played can be controlled according to how “hard” you
play the keys. The amount of variation available depends on the selected voice.
○ ○○○○○○○○○○○○○○○○○○○○○○○○○○○○○○○○○○○○○○○○○○○○○○○○○○○○○○○○○○○
5
Page 8

Playing the Demonstration Tunes
MIN MAX
MASTER VOLUME
The YDP-88II includes five demo tunes that effectively demonstrate its sound
capabilities. Here’s how you can select and play the demo tunes:
PIANO
E. PIANO 1
DEMO
E. PIANO 2
HARPSI-
CHORD
ORGAN
Engage the Demo Mode .........................................................................
Press the [DEMO] button to engage the demo mode — the voice
selectors will flash in sequence.
Select a Demo Tune.....................................................................................
Press one of the flashing voice selectors to start playback of the
corresponding demo tune — featuring the voice normally selected by
that voice selector button. The demo tunes will play in sequence until
stopped, starting with the selected tune. The voice selector indicator
will flash during demo playback.
● The Demo Tunes
• [PIANO] button:..................... Piano Sonata A major K.V. 331 3rd movement
“Turkischer Marsch” by W. A. Mozart
• [E. PIANO 1] button: ............. “Pavane pour une infante défunte” by M. J.
Ravel
• [HARPSICHORD] button: ..... “The Harmonious Blacksmith” by G. F. Händel
• [ORGAN] button:................... Wedding March from “A Midsummer Night
Dream” by J. L. F. Mendelssohn
* The demonstration pieces listed above are short excerpts from the original composi-
tions. The other demo tune is original (© 1997 by YAMAHA CORPORATION).
DEMO
Set the Volume ..................................................................................................
Use the [MASTER VOLUME] control to adjust the volume.
NOTE
• The [TEMPO] control does not affect demo playback.
Play a Different Demo...............................................................................
You can start playback of any other demo tune during playback by
simply pressing the corresponding voice selector. Playback will stop
and the playback-ready mode described in step 2, above, will be reengaged if you press the voice selector of the demo that is currently
playing.
Stop the Demo ..................................................................................................
Press the [DEMO] button when you want to stop demo playback
and return to the normal play mode.
○○○○○○○○○○○○○○○○○○○○○○○○○○○○○○○○○○○○○○○○○○○○○○○○○○○○○○○○○○○○
6
Page 9

The Dual Mode
The DUAL mode makes it possible to play two voices simultaneously across
the entire range of the keyboard. To activate the DUAL mode simply press two
voice selectors at the same time (or press one voice selector while holding
another). The voice indicators of both selected voices will light when the DUAL
mode is active. To return to the normal single-voice play mode, press any single
voice selector.
Adjusting the Balance Between the Dual-mode
Voices
.........................................................................................................................
C
2
Left voice
maximum.
IANO 2
HARPSI-
CHORD
C
3
Equal
balance.
ORGAN
Right voice
maximum.
The volume levels of the two voices combined in the DUAL mode
are normally set automatically to produce a pleasing balance (see
“Default Settings” below). The balance can be adjusted manually by
using the C2 through C4 keys on the keyboard while pressing the two
voice selectors corresponding to the voices to be combined in the
C
4
DUAL mode.
The C3 key produces equal (50:50) balance between the two voices,
while keys to the left of C3 increase the volume of the left voice in
relation to the right voice, and keys to the right of C3 increase the
volume of the right voice in relation to the left voice. By “left” and
“right” voice we refer to the relative positions of the voice selectors —
i.e. in a HARPSICHORD/ORGAN combination HARPSICHORD is
the left voice and ORGAN is the right voice.
● Default Settings
Voice Combinations Balance keys
PIANO/ORGAN ....................................... E2
E. PIANO 1/ORGAN................................ F2
E. PIANO 2/ORGAN................................ E2
HARPSICHORD/ORGAN........................ G2
* All other voice combinations are set to C3 (equal balance).
IANO 2
HARPSI-
CHORD
ORGAN
Shifting a Dual-Mode Voice Up One Octave......................
Depending on which voices you combine using the DUAL mode,
the combination may sound better if one of the voices is shifted up an
octave. To shift the right voice, press the C5 key while pressing the two
1
C
5
C
voice selectors corresponding to the voices to be combined in the
DUAL mode. Press C5 again to shift the voice back to its normal range.
Use the C1 key in the same way to shift the left voice.
All voice combinations are set to the same octave by default.
Left voice
shift up.
○ ○○○○○○○○○○○○○○○○○○○○○○○○○○○○○○○○○○○○○○○○○○○○○○○○○○○○○○○○○○○
Right voice
shift up.
7
Page 10

Soft pedal
Sostenuto pedal
The Pedals
The YDP-88II has three foot pedals that produce a range of expressive
effects similar to those produced by the pedals on an acoustic piano.
Soft (Left) Pedal...............................................................................................
The soft pedal reduces the volume and slightly changes the timbre of
notes played while the pedal is pressed. The soft pedal will not affect
notes which are already playing when it is pressed.
Sostenuto (Center) Pedal......................................................................
If you play a note or chord on the keyboard and press the sostenuto
pedal while the note(s) are held, those notes will be sustained as long as
Damper pedal
the pedal is held (as if the damper pedal had been pressed) but all
subsequently played notes will not be sustained. This makes it possible
to sustain a chord, for example, while other notes are played “staccato.”
Damper (Right) Pedal................................................................................
The damper pedal functions in the same way as a damper pedal on
an acoustic piano. When the damper pedal is pressed notes played have
a long sustain. Releasing the pedal immediately stops (damps) any
sustained notes.
Transposition
The YDP-88II’s TRANSPOSE function makes it possible to shift the pitch of
the entire keyboard up or down in semitone intervals up to a maximum of six
semitones. “Transposing” the pitch of the YDP-88II keyboard facilitates playing in
difficult key signatures, and you can easily match the pitch of the keyboard to the
range of a singer or other instrumentalist.
The [MIDI/TRANSPOSE] button and keys F#2 through F#3 on the keyboard are used for transposition.
Z Press and hold the [MIDI/TRANSPOSE] button.
X Press a key between F#2 and F#3 according to the desired amount
of transposition.*
C Release the [MIDI/TRANSPOSE] button.
* Pressing the C3 key produces normal keyboard pitch. Pressing the
key to the left of C3 (B2) transposes the pitch of the keyboard down
a semitone, the next key to the left (Bb2) transposes down a whole
tone (two semitones), etc., down to the F#2 key which transposes
down 6 semitones. Upward transposition is accomplished in the
same way using the keys to the right of C3, up to F#3 which transposes up 6 semitones.
MIDI/TRANSPOSE
F#
2
-6 -4 -2 +1
-5 -3 -1 0 +2 +4 +5
Transpose
down.
Normal
pitch.
3
C
+3 +6
Transpose
#
F
3
up.
NOTE
• Notes below and above the A-1 — C7 of the YDP-88II sound one octave
higher and lower, respectively.
○○○○○○○○○○○○○○○○○○○○○○○○○○○○○○○○○○○○○○○○○○○○○○○○○○○○○○○○○○○
8
Page 11

A-1B
Pitch Control
Pitch control makes it possible to tune the YDP-88II over a ±50-cent range
(approximate) in approximately 1.6-cent intervals. A hundred “cents” equals one
semitone, so the tuning range provided allows fine tuning of overall pitch over a
range of approximately a semitone. Pitch control is useful for tuning the YDP88II to match other instruments or recorded music.
Tuning Up ...............................................................................................................
Z To tune up (raise pitch), hold the A-1 and B-1 keys simultaneously.
-1
3
C
3
B
X Press any key between C3 and B3. Each time a key in this range is
pressed the pitch is increased by approximately 1.6 cents, up to a
maximum of 50 cents above standard pitch.
C Release the A-1 and B-1 keys.
A#
-1
A
A#
A-1B
Tuning Down .......................................................................................................
-1
3
C
3
B
Z To tune down (lower pitch), hold the A-1 and A#-1 keys simulta-
neously .
X Press any key between C3 and B3. Each time a key in this range is
pressed the pitch is decreased by approximately 1.6 cents, up to a
maximum of 50 cents below standard pitch.
C Release the A-1 and A#-1 keys.
To Restore Standard Pitch*.................................................................
-1
-1
3
C
3
B
Z To restore standard pitch (A3 = 440 Hz), hold the A-1, A#-1 and
B-1 keys simultaneously.
X Press any key between C3 and B3.
C Release the A-1, A#-1 and B-1 keys.
* Standard pitch (A3 = 440 Hz) is set when the [POWER] switch is
initially turned ON.
NOTE
• The PITCH CONTROL function has no effect when LOCAL OFF is active
(see “MIDI FUNCTIONS,” page 13).
9
Page 12

The Metronome & Tempo Control
The YDP-88II built-in metronome is a convenient feature for practice, and it
can also provide a solid rhythmic guide when recording using the Recorder
feature, described below.
The Metronome
NO 1
METRONOME
E. PIANO 2
METRONOME
HARPSI-
CHORD
TEMPO
32 280120
ORGAN
METRONOME
The metronome sound is turned on and off via the [METRO-
NOME] button. Press the [METRONOME] button so that its indicator
lights to turn the metronome on, then again so the indicator goes out to
turn the metronome off.
Metronome V olume ......................................................................................
The volume of the metronome sound can be independently adjusted
by using the [TEMPO] control while holding the [METRONOME]
button. Sliding the control to the right increases the metronome volume.
Metronome Time Signature.................................................................
The time signature of the metronome sound can be set by pressing
the appropriate voice selector button while holding the [METRO-
NOME] button, as follows:
[METRONOME] + [PIANO] No accent (default)
[METRONOME] + [E. PIANO 1] 2 time
[METRONOME] + [E. PIANO 2] 3 time
[METRONOME] + [HARPSICHORD] 4 time
[METRONOME] + [ORGAN] 6 time
Tempo Control
TEMPO
32 280120
METRONOME
Tempo/Key Chart
Tempo
Tempo
○○○○○○○○○○○○○○○○○○○○○○○○○○○○○○○○○○○○○○○○○○○○○○○○○○○○○○○○○○○
10
34
A-1C
323638
4044505458
0
42464852566062
6468747882
C
1
66707276808486
The tempo of the metronome and recorder playback can be con-
trolled in two ways:
■ Use the panel [TEMPO] control to set the required tempo from 32
to 280 quarter-note beats per minute.
■ For more precise tempo settings press the appropriate key on the
keyboard while holding the [METRONOME] button.
889298
C
2
909496
100
102
104
106
108
C
110
140
142
144
146
148
150
152
154
156
C
158
160
5
116
126
128
130
132
C
134
136
4
138
112
122
3
114
120
118
124
164
168
172
176
180
184
188
192
216
196 232
C
6
204
220
200
212
224
240
248
256
264208
C
7
272
280
Page 13

Using the Recorder
The YDP-88II recorder lets you record what you play on the keyboard and
then play it back. This is a useful adjunct to any keyboard study program, since it
lets you hear exactly how you sound from the listener’s perspective. It can also
be just plain fun.
The recorder actually records the following data:
● Notes played ● Voice selection
● Dual mode voices ● Dual balance ● Dual mode octave shift
● Damper pedal ● Soft pedal
● Sostenuto pedal (not recorded as an initial setting)
● Tempo (Initial setting only.)
Recording
PIANO
PLAY REC
E. PIANO 1
RECORDER
E. PIANO 2
HARPSI-
CHORD
ORGAN
Engage the Record Ready Mode..................................................
Press the RECORDER [REC] button to engage the record ready
mode (recording does not actually start yet). The [REC] button indicator will light.
Make All Necessary Initial Settings ...........................................
Before actually beginning to record, select the voice you want to
record with (or voices if you will be using the dual mode). You might
also want to set the volume and tempo controls.
Start Recording................................................................................................
Recording will begin automatically as soon as you play a note on the
keyboard or press the [PLAY] button.
NOTE
• If the metronome was on when you started recording, you’ll be able to
keep time with the metronome while recording, but the metronome sound
will not be recorded.
• You can record up to a maximum of about 1,300 notes, depending on
pedal usage and other factors. The [REC] button indicator will begin to
flash when recorder memory is almost full, and recording will stop
automatically.
RECORDER
PLAY REC
Stop Recording................................................................................................
Press either the RECORDER [REC] or [PLAY] button to stop
recording.
11
Page 14

Using the Recorder
Changing the Initial Settings.............................................................
The initial voice (including dual mode) and tempo settings made in
step 2 of the recording procedure are actually recorded by the YDP88II. These initial settings can be changed after the recording is finished
by pressing the [REC] button to engage the record ready mode, making
the required changes, and then pressing the [REC] button again to exit
from the record ready mode and register the changes. If you do this, be
careful not to press the [PLAY] button or a key on the keyboard, either
of which will start recording and erase all previous recorded data.
Erasing the recorded data....................................................................
The recorded data can be erased by first pressing the [REC] button
to engage the record ready mode, and then pressing the [PLAY] button
twice without recording any data.
MIDI/TRANSPOSE
RECORDER
PLAY REC
RECORDER
PLAY REC
Playback
To play back what you’ve recorded, simply press the RECORDER
[PLAY] button. Playback starts from the beginning of the recorded
data, and will stop automatically at the end of the recorded data. You
can also stop playback at any time by pressing the [PLAY] button.
NOTE
• It is possible to play along on the keyboard during playback.
• The playback volume and tempo can be adjusted by using the [MASTER
VOLUME] and [TEMPO] controls, respectively.
• If the metronome is being used during playback, the metronome will stop
when playback is stopped.
• All recorder data will be erased when the YDP-88II power is turned off. It
is possible to store recorded data to an external MIDI storage device such
as the Yamaha DOU-10 Disk Orchestra Unit by using the Bulk Dump
function described on page 16.
• The playback data is not transmitted via the MIDI OUT connector.
Fast Forward Playback ............................................................................
When you want to locate a specific point in a recording you can
quickly move forward through the recording while monitoring the
sound by pressing the [REC] button while holding the [MIDI/TRANS-
POSE] button.
○○○○○○○○○○○○○○○○○○○○○○○○○○○○○○○○○○○○○○○○○○○○○○○○○○○○○○○○○○○
12
Page 15

MIDI Functions
A Brief Introduction to MIDI...............................................................................................................................................
Data Being Recorded
MIDI Cable
MIDI INMIDI OUT
Playback Data
MIDI IN MIDI INMIDI OUTMIDI OUT
DOU-10
YDP-88II
MIDI, the Musical Instrument Digital Interface, is a worldstandard communication interface that allows MIDI-compatible
musical instruments and equipment to share musical information and
control one another. This makes it possible to create “systems” of
MIDI instruments and equipment that offer far greater versatility and
control than is available with isolated instruments. For example, most
MIDI keyboards (including the YDP-88II, of course) transmit note
and velocity (touch response) information via the MIDI OUT
connector whenever a note is played on the keyboard. If the MIDI
OUT connector is connected to the MIDI IN connector of a second
keyboard (synthesizer, etc.) or a tone generator (essentially a
synthesizer with no keyboard), the second keyboard or tone generator
will respond precisely to notes played on the original transmitting
keyboard. The result is that you can effectively play two instruments
at once, providing thick multi-instrument sounds.
DOU-10
YDP-88II
This same type of musical information transfer is used for MIDI
sequence recording. A sequence recorder can be used to “record”
MIDI data received from a YDP-88II, for example. When the
recorded data is played back, the YDP-88II automatically “plays” the
recorded performance in precise detail.
The examples given above really only scratch the surface. MIDI
can do much, much more. The YDP-88II offers a number of MIDI
functions that allows it to be used in fairly sophisticated MIDI
systems.
NOTE
• Always use a high-quality MIDI cable to connect MIDI
OUT to MIDI IN terminals. Never use MIDI cables
longer than about 15 feet, since cables longer than this
can pick up noise which can cause data errors.
MIDI “Messages” Transmitted & Received by the YDP-88II............................................................
The MIDI information (messages) transmitted and received by
the YDP-88II are as follows:
● Note and Velocity Data
This information tells the receiving keyboard or tone generator to
play a certain note (specified by the MIDI note number) at a certain
dynamic level (specified by the MIDI velocity value). Note and
velocity data is transmitted by the YDP-88II whenever a key is
pressed, and the YDP-88II’s internal AWM tone generator will “play”
the corresponding note(s) whenever note and velocity data is received
from an external MIDI device.
● Program Change Numbers
The YDP-88II transmits a MIDI program change number between
0 and 4 when one of its voice selectors is pressed. This normally
causes the correspondingly numbered voice to be selected on a
receiving MIDI device. The YDP-88II will respond in the same way,
automatically selecting the appropriate voice when a MIDI program
change number is received. See “Program Change ON/OFF” on page
15 for information on turning program change number reception and
transmission ON or OFF.
● Control Change Numbers
Control Change data representing Damper pedal operation is
transmitted by the YDP-88II whenever one of these pedals is used. If
the receiving device is a tone generator or another keyboard, it will
respond in the same way as the YDP-88II’s internal tone generator
when one of the pedals is used. The YDP-88II also receives and
responds to the appropriate control change data. See “Control Change
ON/OFF” on page 15 for information on turning control change
number reception and transmission ON or OFF.
13
 Loading...