

Page 1
PEDAL TIMPANI
TP3100(EA) Series
TP3123(EA) / TP3126(EA) / TP3129(EA) / TP3132(EA)
Owner’s Manual
Thank you for purchasing a Yamaha Timpani.
Please read through this manual carefully as it contains impor-
tant information about your instrument’s care.
Before using your timpani for the first time be sure to carefully
read the instructions on “Initial Preparation” pages 6 and 7.
Contents
Precautions ................................................. 2
Nomenclature & Lubrication ..................... 3
Transporting and Setting Up the Timpani ... 4
English
Setting up the Timpani ....................................... 4
Adjusting Pedal Height....................................... 5
Tr ansporting ....................................................... 5
Relocating the Tuning Indicator.......................... 5
Initial Preparation ....................................... 6
Adjusting the Pitch..................................... 8
Head Tuning ....................................................... 8
Pedal Adjustment ............................................... 9
Tuning Indicator Adjustment ............................ 10
Replacing the Head .................................. 11
1
Page 2
Precautions
Always use the timpani in a safe manner.
In order to prevent damage or injury, we urge you to carefully read and follow the instructions
listed below.
In the case of use by young children, we recommend proper guidance be given by a knowledge-
able adult.
Disregarding these warnings or misuse may result in death or personal injury.
Warnings
•Never place the timpani on unstable surfaces such
as an unstable riser or sloped surface. The timpani
may tip over or fall resulting in damage or injury.
•Never lean on or climb on the instrument. It may overturn resulting in damage or injury.
• Be careful around the instrument. Bumping into it may
result in injury or cause it to overturn. Keep small
children away from the instrument.
•Never place your fingers or foot into the moving parts
or the space under the pedal or base. Serious injury
can result if fingers or feet become pinched.
• When rolling the timpani on its casters, grip it by its
frame and move it only on smooth, flat surfaces.
1. Do not move on sloping, rough, or gravel surfaces.
2. Do not run with the timpani. It may be difficult to stop
the instrument which can cause injury or damage.
• If the timpani must be carried, do so with two or more
persons, make sure to grip the timpani by its lugs.
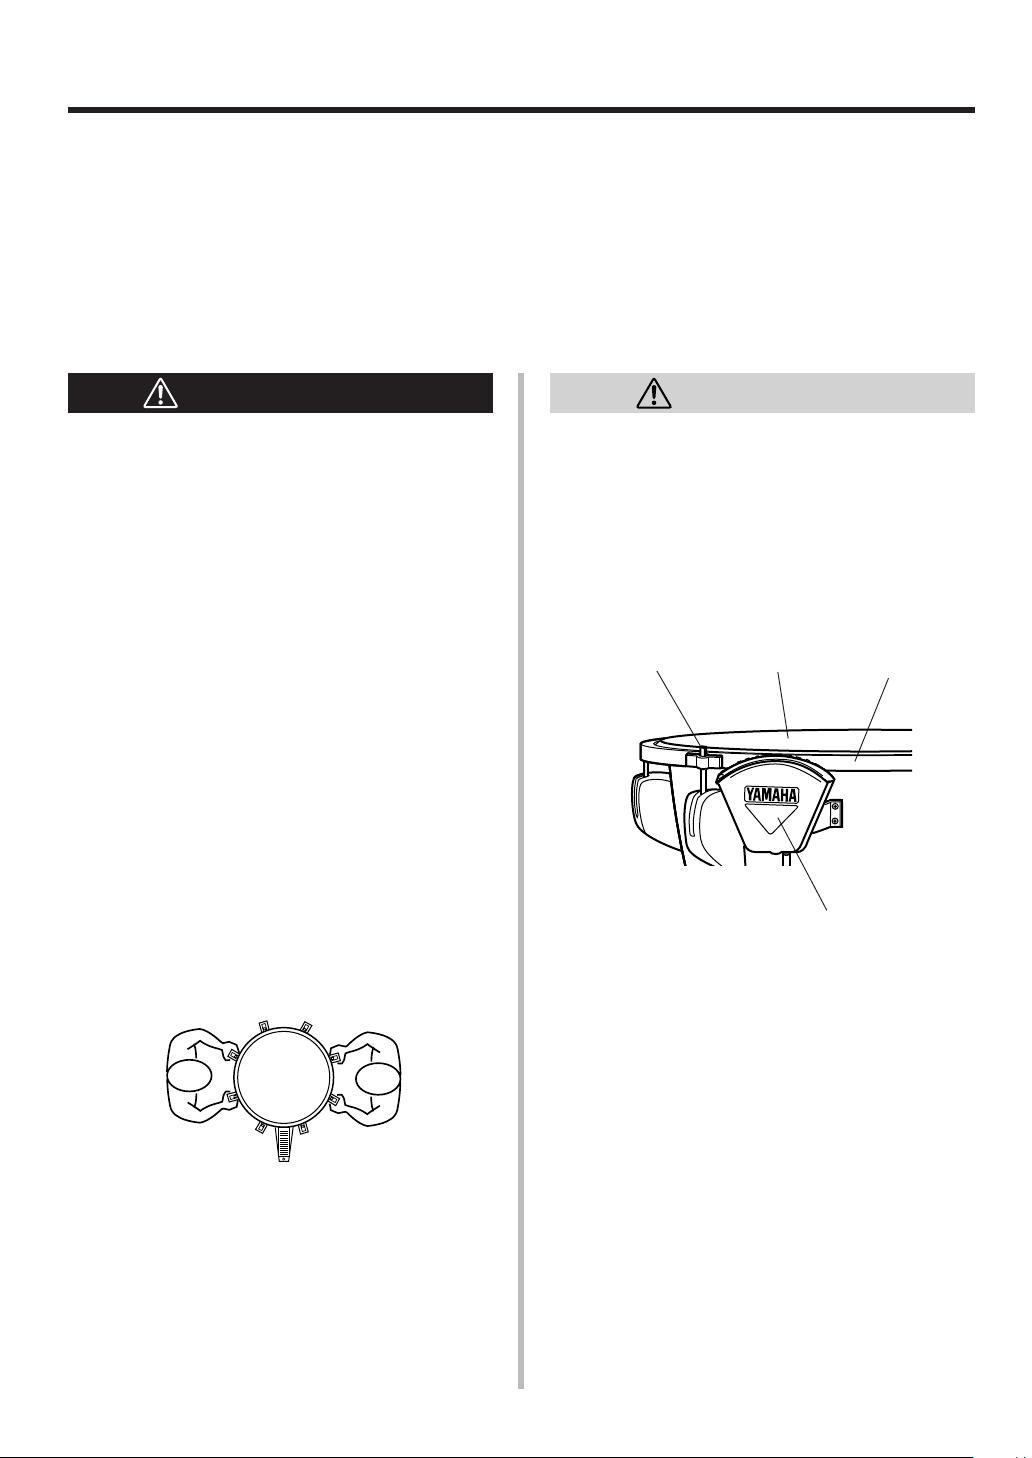
Caution
• Replace torn heads as soon as possible. The torn
edge of the head is sharp and can cut hands or fingers.
• When operating the pedal, do not touch the hoop,
head, or tuning indicator. Fingers may become caught
or pinched resulting in injury.
Tuning bolt
• Do not put your hands inside any of the parts of the
timpani (inside the tuning indicator, base, lugs, etc.)
Head
Hoop
Tuning Indicator
• Do not use the mallet for anything besides playing
the instrument.
Do not allow children strike others with the mallet as
it can cause injury or become damaged.
2
Page 3
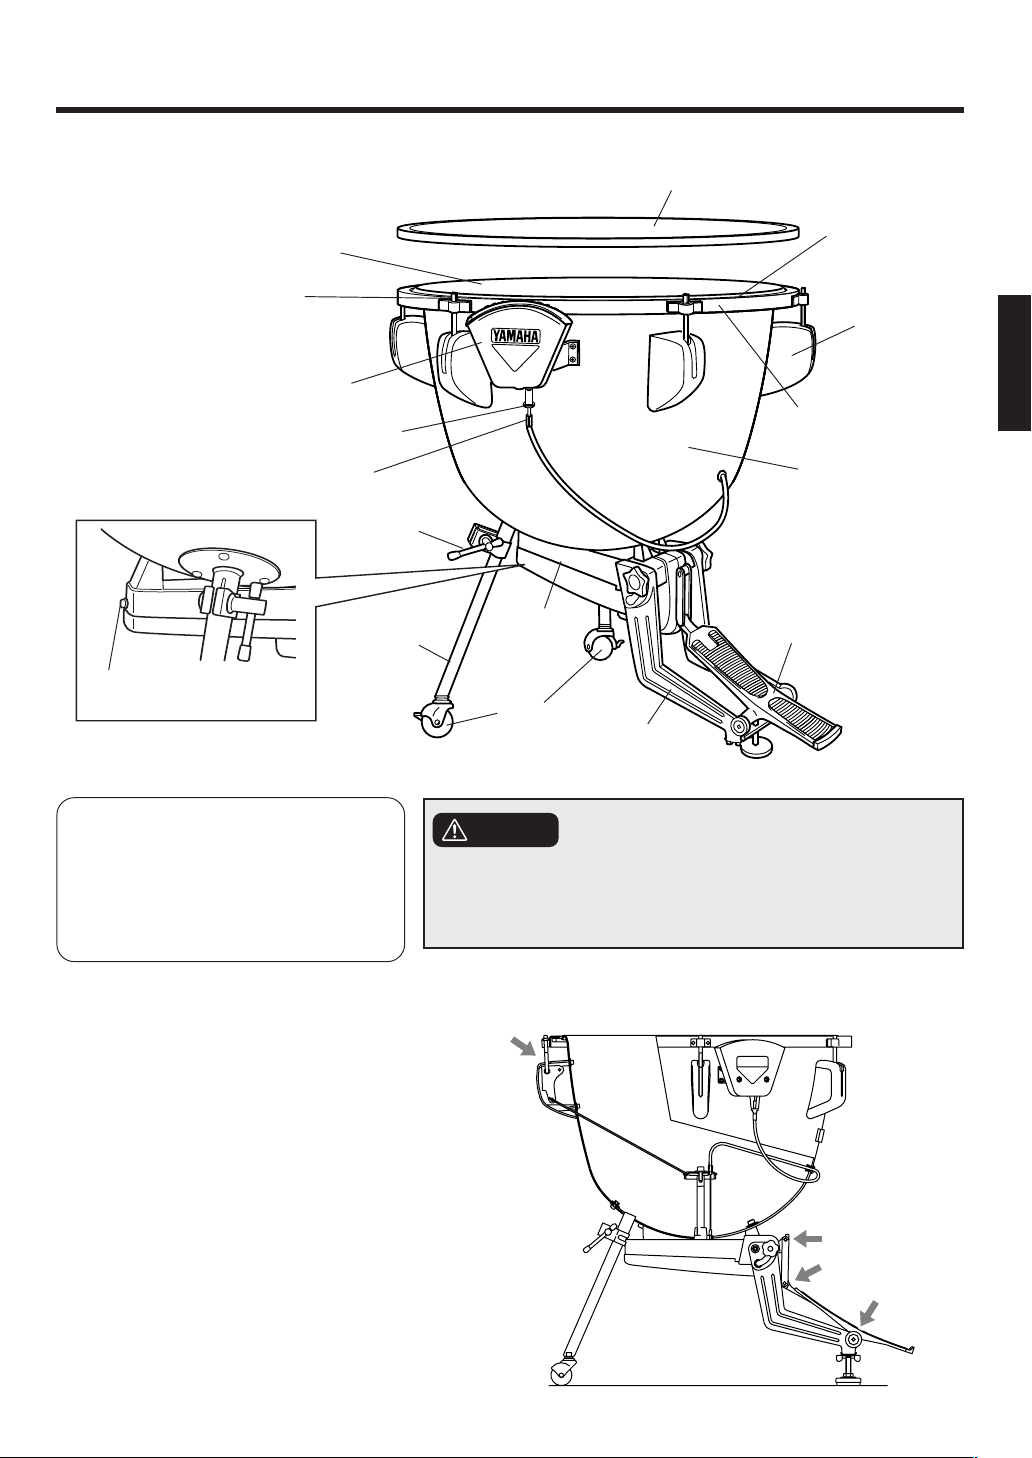
Nomenclature & Lubrication
■ Nomenclature
Tuning Bolt
Tuning Indicator
Pointer Lock Nut
Pointer Adjustment Knob
Spring Tension
Adjustment Bolt
Head
Leg Lock
Bolt Handle
Sliding Leg
Base
Caster
Head Protector
Kettle Edge
Lug
Hoop (Counter Hoop)
Kettle
Pedal
Pedal Leg
Supplied Accessories
• Tuning Key ......................................... 1
• Mallets ......................................... 1 set
• Hex Wrench....................................... 1
• Spring Adjustment Wrench................ 1
Caution
Never place your fingers or foot into the moving parts or the
space under the pedal or base.
Serious injury can result if fingers or feet become pinched.
■ Lubrication
Apply a high quality grease or lubricant to the moving
parts indicated by the arrows in the diagram on the right.
This should be done at least once a year, or as needed.
*A spray type lubricant is recommended.
* Do not touch the lubricated parts.
3
Page 4
Transporting and Setting Up the Timpani
■ Setting up the Timpani
The TP-3100(EA) series features a folding design to
reduce the space required to store or transport the timpani. Use the procedure described below when setting
up or storing the timpani.
Caution
Never place your fingers or foot into the moving parts or the space under the pedal or base.
Serious injury can result if fingers or feet become pinched.
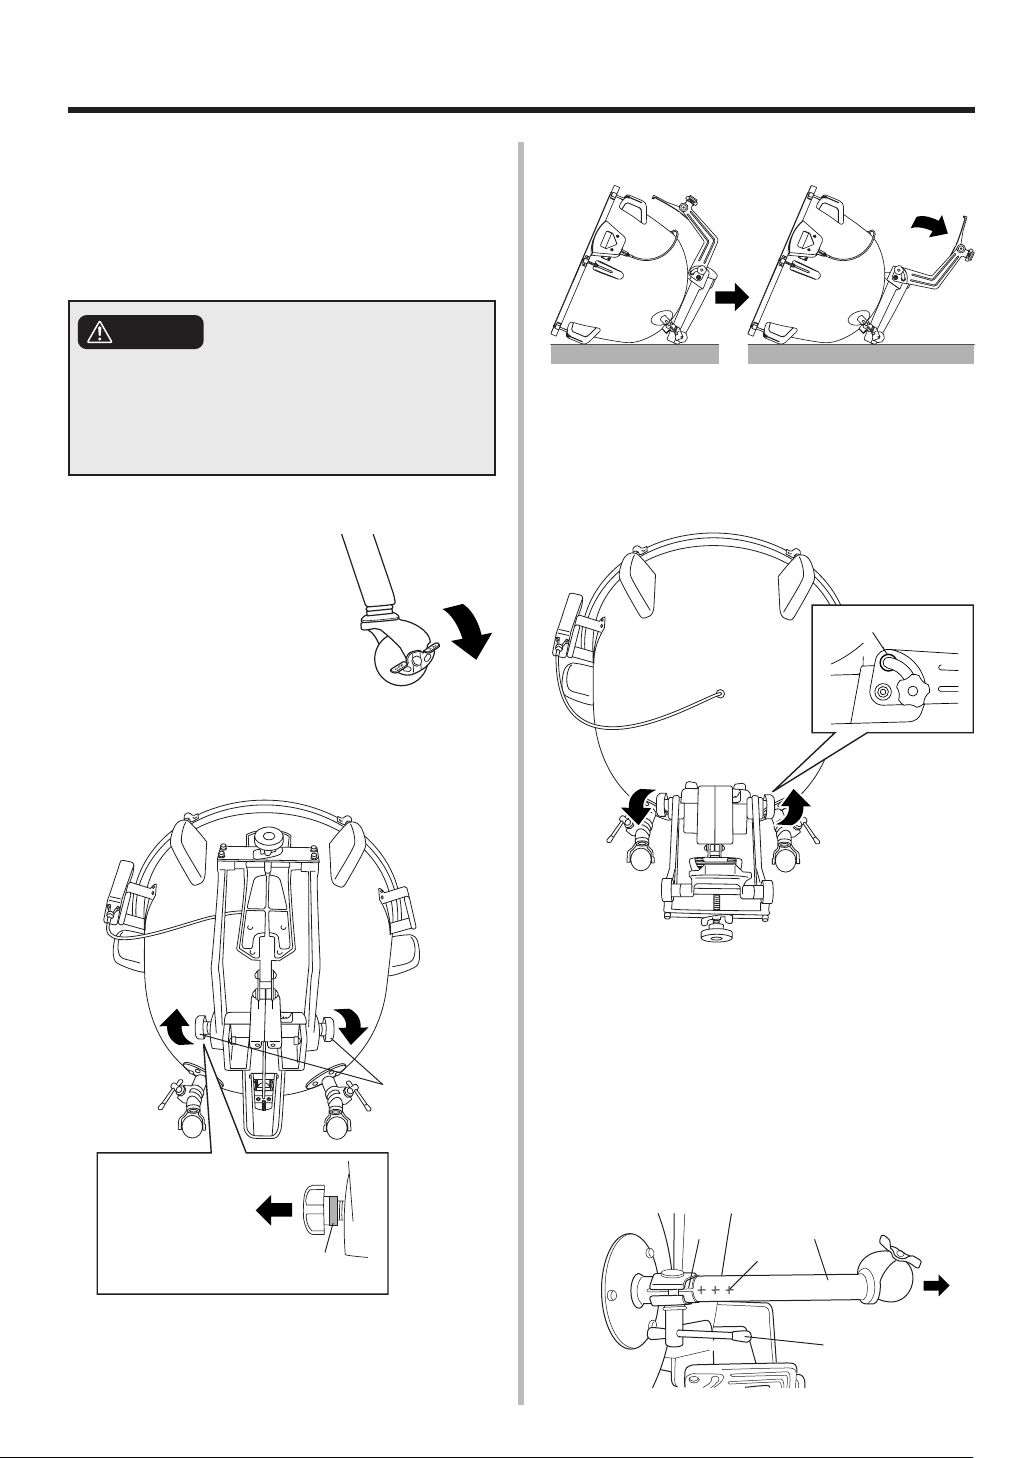
1 First make sure that the
casters are locked (Fig. A).
Then with the timpani positioned as shown in the illustration below, use both
hands to loosen the left and
right side lock bolts. Loosen
the bolts until the large
metal washer comes out of
the guide hole. (Fig. B)
Fig. A
Lock
2 Gently lower the pedal section.
3 Lower the pedal section until the large metal
washer shown in Fig. B aligns with the guide hole
shown in Fig. C and then tighten the lock bolt.
Tighten until the large metal washer shown in Fig.
B fits completely into the guide hole.
Guide Hole
Fig. C
4 Lay the timpani on its side, grasp the leg lock bolt
handle and loosen the leg lock bolt.
5 Slowly extend the sliding leg then tighten the leg
Lock Bolts
Fig. B
Loosen the lock bolts until the
large metal washer is fully visible.
4
lock bolt at the chosen length. Make sure that the
marks on the sliding leg are aligned with the slit
in the leg holder. The casters may not function
properly if the marks are misaligned. Make sure
the marks are properly aligned.
Slit
Sliding Leg
Mark
Leg Lock Bolt
Page 5

Transporting and Setting Up the Timpani
6 Tu rn the timpani over and extend and secure the
other leg. Make sure that the marks on the sliding leg are aligned with the slit in the leg holder.
7 Return the timpani to an upright position, and then
adjust the length of the left and right legs.
8 When it comes time to store or pack up the tim-
pani, simply reverse the setup procedure order.
Caution
Make sure your fingers do not get pinched between the pedal and kettle when folding the
pedal or pedal base.
Serious injury can result if fingers or feet become pinched.
■ Adjusting Pedal Height
Loosen the stopper and use the height adjustment
screw to adjust pedal height. After determining the
height, tighten the stopper to secure.
■ Transporting
When moving the timpani over a distance, such as from
room to room, make sure that the instrument is carried
by at least two persons.
The casters on the sliding legs are convenient when
moving the timpani short distances over smooth surfaces
such as when changing stage setups, etc. To move the
timpani, unlock the casters, then slightly lift the timpani
by the lugs so that the pedal frame is off of the ground
and slowly move the timpani forward or backward as
shown in the illustration below.
Be careful not to damage the legs while moving the
timpani.
* Damage may occur if the timpani is dropped or
falls from a high place.
Height Adjustment Screw
Stopper
■ Relocating the Tuning Indicator
The timpani is shipped with a universal style tuning indicator already attached (performer’s left side) however,
the tuning indicator can be relocated for German style tuning (performer’s right side).
Using the supplied hex wrench, remove the two bolts holding the tuning indicator in place as shown in the
diagram below, then slide the bolts through the holes on the tuning indicator from the opposite side. In either
position, make sure that the note indicator bridge is easily viewable.
Universal Style Attachment German Style Attachment
Tuning Indicator Bolt
Tuning Indicator Bolt
5
Page 6

Initial Preparation
Your Yamaha timpani is equipped with a plastic head carefully mounted and adjusted at the factory.
However, new heads tend to stretch during shipping and storage, so it may be necessary to re-tune the
instrument before using. Please perform the following steps to check and, if necessary, readjust your
instrument.
1 The area between the kettle edge and the inner
circle of the counter hoop is called the collar.
Please make sure that the width of this collar is
uniform, as shown in the illustration titled “Correct”.
Correct
Kettle
edge
If the collar is not uniform (illustration titled
“Wrong”), keep the heel of the pedal fully depressed as shown in Fig. C, and align the head
and hoop as shown in the illustration titled “Correct”.
Collar
Counter
hoop
Kettle
edge
Wrong
Collar
Counter
hoop
2 Make sure that the end of the wire tube is not
disengaged from the adjuster of the tuning indicator as shown in Fig. A. If it is disengaged, insert it into the adjuster as shown in Fig. B.
3 If the heel of the pedal is fully lowered as in Fig.
C, proceed with step 5.
If the pedal position is as shown in Fig. D or the
toe of the pedal is fully lowered, perform step
first.
Fig. C
Fig. D
4
Caution
Never place your fingers or foot into the moving parts or the space under the pedal or base.
Serious injury can result if fingers or feet become pinched.
Fig. B
4 Fully depress the heel of the pedal as shown in
Adjuster
Wire tube
Fig. A
6
Fig. C. Hold the pedal in this position, as it will
return otherwise.
Page 7

Initial Preparation
5 Using the supplied timpani key, tighten the tun-
ing bolts by 1/4 of a turn (90°) in the order shown
below.
It is very important to always turn all tuning
bolts by the same amount.
Timpani key
29”, 32” 23”, 26”
6 Ta ke your foot off the pedal.
• Heel still moves up
→ Repeat steps
• Heel stays down
→ Go to step 7.
4 through 6.
7 Put your foot on the pedal and fully depress it in
either direction (toe and heel).
• Heel feels heavier than toe
→ Go to step
• Toe and heel feel equal
→ Go to step
• Heel feels lighter than toe (*1)
→ Head is too tight and should be loosened.
Keeping the heel of the pedal depressed,
loosen the first tuning bolt by 1/2 turn and
then re-tighten it by 1/4 of a turn. Perform
this operation for all other tuning bolts in
the order shown in step
repeat this procedure, until proper tension
is obtained.
8.
11.
5. If necessary,
8 Fully depress the heel of the pedal as shown in
Fig. C.
9 Tighten each tuning bolt by 1/8 of a turn (45°) in
the order shown in step
5.
10 • Toe and heel feel equal
→ Go to step
• Heel still feels heavier than toe
→ Repeat steps
• Heel feels lighter than toe
→ Head is tightened too much. Loosen the
head as described in step
11.
8 through 10.
7 (*1).
11 Move the pedal into an intermediate position, as
shown in Fig. D , and remover your foot from the
pedal. Confirm that the pedal stays in this position and does not move.
If the pedal stops in this position, adjustment
is complete. Return the pedal to the position
shown in Fig. C.
• If the toe of the pedal moves downward
→ Repeat steps
• If the heel of the pedal moves downward
→ Head is tightened too much. Loosen the
head as described in step
8 through 10.
7.
12 Strike the head lightly with the supplied mallet.
The standard striking point is shown below.
The standard striking
point lies at distance B
from the kettle edge,
which corresponds
Striking point
For pitch reference, a tuner or piano can be used.
As the toe of the pedal is pressed down, the pitch
is raised.
For details on precise tuning refer to “Adjusting
the Pitch” on the following page.
approximately to 1/4 to
1/3 of the distance
between the kettle
edge and the center of
the head.
Note As the head will stretch over time, readjustment should be performed periodically
(starting with step
7 ).
7
Page 8

Adjusting the Pitch
When using the timpani for the first time, be sure to set it up according to the
instructions of “Initial Preparation” on pages 6 and 7.
■ Head Tuning
1 Tuning is adjusted on the lowest note of the tim-
pani. For this reason, the heel of the pedal must
stay fully lowered during the tuning procedure.
The pitch of the lowest note (and the tonal range)
depends on the size of your timpani. For example,
as shown in the chart below, the lowest sound of
a 26" timpani should be tuned to A. When tuned
properly, your Yamaha timpani will play throughout its full tonal range with balanced tension in
the paddle.
■ Standard Tonal Ranges for Yamaha Timpani
32” (81cm) 29” (74cm) 26” (66cm) 23” (58cm)
Keep the heel of the pedal fully lowered during
the tuning procedure (steps
if not specified otherwise.
2 through 7 below)
When loosening the tuning bolts, always loosen
them by double the desired amount, and then
return (re-tighten) them by half. When the sound
lies within 1 halftone below the desired pitch after loosening the tuning bolts (repeatedly, if necessary), proceed with step
3.
3 Lightly strike the head with the mallet about 2
inches (5 cm) from the kettle edge at each tuning
bolt. Check which tuning bolt has the highest
sound.
• Pitch of the highest sound is higher than the
tuning note (*2)
→ Loosen the corresponding tuning bolt by
about 1/16 to 1/18 of a turn. First loosen
the bolt by double the desired amount, and
then return (re-tighten) it by half. After loosening the tuning bolt, repeat from the beginning of step
• Pitch of the highest sound is lower than the
tuning note
→ Go to step
3.
4.
2 Strike the head and check the sound.
The standard striking point is shown below.
Striking point
• Sound is lower than the tuning note
→ Go to step 3.
• Sound is higher than the tuning note
→ Loosen the tuning bolts by an equal
amount in the order shown in the figure of
step
5 on page 7.
8
The standard striking
point lies at distance B
from the kettle edge,
which corresponds
approximately to 1/4 to
1/3 of the distance
between the kettle
edge and the center of
the head.
4 Tighten the other bolts little by little (by about 1/
16 to 1/8 of a turn) until the sounds at the corresponding striking points match the pitch of the
highest sound. Please note that tightening one
bolt also raises the pitch at neighboring and opposite tuning bolts. Thus, after tightening the tuning bolt with the lowest sound, again check the
pitch at the other tuning bolts before tightening
the tuning bolt with the next lowest pitch. While
alternately tightening the other bolts, do not touch
the tuning bolt with the highest pitch (reference
pitch).
Page 9

Adjusting the Pitch
5 Loosen all over-tightened bolts according to the
procedure described in step 3 (*2). When the pitch
is approximately the same at each bolt, repeatedly depress the toe and heel of the pedal several times.
6 Repeat steps 3 through 5 until the pitch at each
bolt is exactly the same.
7 Check the sound by striking the head as de-
scribed in step 2.
• Sound is lower than the tuning note
→ Tune the instrument by tightening all tun-
ing bolts by an equal amount (max.
1/16 of a turn).
• Sound is higher than the tuning note
→ Tune the instrument by loosening all tun-
ing bolts by an equal amount (max.
1/16 of a turn) according to the procedure
described in step
3.
8 Operate the pedal as described in step 5. If the
pitch does not change, the instrument is tuned
properly.
(If the pitch changes, repeat from step
7.)
■ Pedal Adjustment
After depressing the toe and heel of the pedal, turn the
spring tension adjustment bolt as described below.
Spring Tension
Adjustment Bolt
• Heel moves up when releasing the foot from the
pedal after depressing the heel, or the heel feels
heavier than the toe.
→ Tu rn the spring tension adjustment bolt to the
left (counterclockwise).
•Toe moves up when releasing the foot from the
pedal after depressing the toe, or the toe feels
heavier than the heel
→ Tu rn the spring tension adjustment bolt to the
right (clockwise).
Use the supplied spring adjustment wrench to turn the
spring adjustment bolt. Do not turn too many full rotations at once, and re-check the adjustment every 2 turns
by pressing the toe and heel of the pedal.
The instrument is now tuned to the lowest sound
(note) of its tonal range. Depress the toe of the
pedal to change to a higher pitch (note).
9 After tuning, perform ■ Pedal Adjustment and
then ■ Tuning Indicator Adjustment.
Caution
Never place your fingers or foot into the moving parts or the space under the pedal or base.
Serious injury can result if fingers or feet become pinched.
Note Do not loosen the spring tension ad-
justment bolt by more than 3 rotations
at a time, as the toe of the pedal tends
to drop abruptly after a specific point.
● Pedal balance spring mechanism
Your Yamaha timpani is equipped with a unique pedal
balance spring mechanism (a coil spring counteracting
the tension of the head) which allows you to freely
change the pitch (note) of the instrument. When the pedal
is moved, the pitch of the head will change, and the bal-
ance spring ensures that the pedal angle (pitch) will not
change when you remove your foot from the pedal.
9
Page 10

Adjusting the Pitch
■ Tuning Indicator Adjustment
The tuning indicator shows where to set the pedal for each note. After tuning the instrument, you must set each note
on the indicator to its proper position.
1 After you have tuned your timpani to the lowest
note of its tonal range, make sure that the pointer
is located within 10 mm from the pedal-side end
of the indicator rail.
* If not, refer to “Adjusting the Pointer Position”.
2 Slide the lowest note of the indicator (“A” in the
case of a 26" timpani—see “Standard Tonal
Ranges for Yamaha Timpani” on page 8) to the
position where its center line coincides with the
pointer.
3 Tune the instrument to the next higher pitch (note)
by moving the pedal, and then slide the corresponding note on the rail to the respective pointer
position. Repeat for each remaining note.
Indicator rail
● Adjusting the Pointer Position
First loosen the pointer lock nut and then turn the adjuster as follows:
•Pointer is located beyond the lower rail end
when the heel of the pedal is lowered fully (lowest note).
→ Tu rn the adjuster to the left (counter clockwise)
until the pointer is aligned with the lowest note
of the indicator.
•Pointer moves beyond the upper rail end before
the toe of the pedal reaches the end of its stroke,
or Pointer does not reach the lower rail end
when the heel of the pedal is lowered fully (lowest sound)
→ Tu rn the adjuster to the right (clockwise) to
correct the pointer position as required.
Indicator rail
Note
Pointer
10
Pointer
Note
Adjuster
Adjuster nut
Page 11

Replacing the Head
1 Loosen the tuning bolts on opposite sides of the
timpani.
Caution
Do not touch the pedal when loosening the tuning bolts (loosening the head). Also, never place
your fingers or foot into space under the pedal,
around its base, or its moving parts. Changes
in spring tension can cause the pedal to suddenly move, posing a great danger.
2 After removing all tuning bolts, mark the pedal
side of the hoop with cellophane tape, so that the
hoop can be re-mounted in the same position as
it was prior to removal. Remove the head together
with the hoop. Be careful not to lose any of the
tuning bolts and prevent dust from adhering to
them. Also, avoid touching the tuning bolt threads,
as they are greased.
Hoop
3 Place the new head with the hoop on the kettle.
When using a Yamaha timpani head, make sure
its YAMAHA logo is on the side opposite the pedal.
The hoop must be re-mounted in the same position as marked with cellophane tape in step
the proper order, tighten the tuning bolts alternately by hand until the head is tensioned slightly.
At this time, make sure that the head and hoop
are centered on the kettle.
Tighten each tuning bolt an additional 1/4 of a
turn using the timpani key. Repeat at least 4 times.
2. In
4 Adjust the timpani as described on page 6 “Initial
Preparation” starting with step 5.
For precise tuning, refer to the section “Adjusting
the Pitch” on page 8.
Cellophane tape
Pedal
* Be careful not to make any scratches in the edge
tape attached to the kettle’s edge. If the tape is peel-
ing or badly damaged, it must be replaced with Tim-
pani Edge Tape (TPT-100 Teflon™ tape).
● Interval for head replacement
The maximum head life normally is approximately 2
years and depends on the frequency and duration of
use. However, the head should always be replaced be-
fore the sound quality deteriorates dramatically. If a head
is left on and used more than two years, the following
problems may occur:
• It may become impossible to tune the head to the
proper pitch range.
• It may become impossible to balance the pedal.
• The main unit mechanisms themselves may become
damaged.
When the head is slightly tensioned and its surface looks
wavy or shows dents, it is time to replace the head with
a new one.
11
 Loading...