

Page 1
-
- -
-
-
-
-
-
-
- -
-
-
-
- -
--
-
-
-
-
-
-
-
-
-
-
~
-
TM
APRIL
1988
e
YAMAHA
®
Page 2

Page 3
-
- -
- -
- -
-
-
-
-
-
April1988
4
5
RX5
RX5
-
-..
-
"Ultra
John
by
"Mega-Gated BD"
edits by
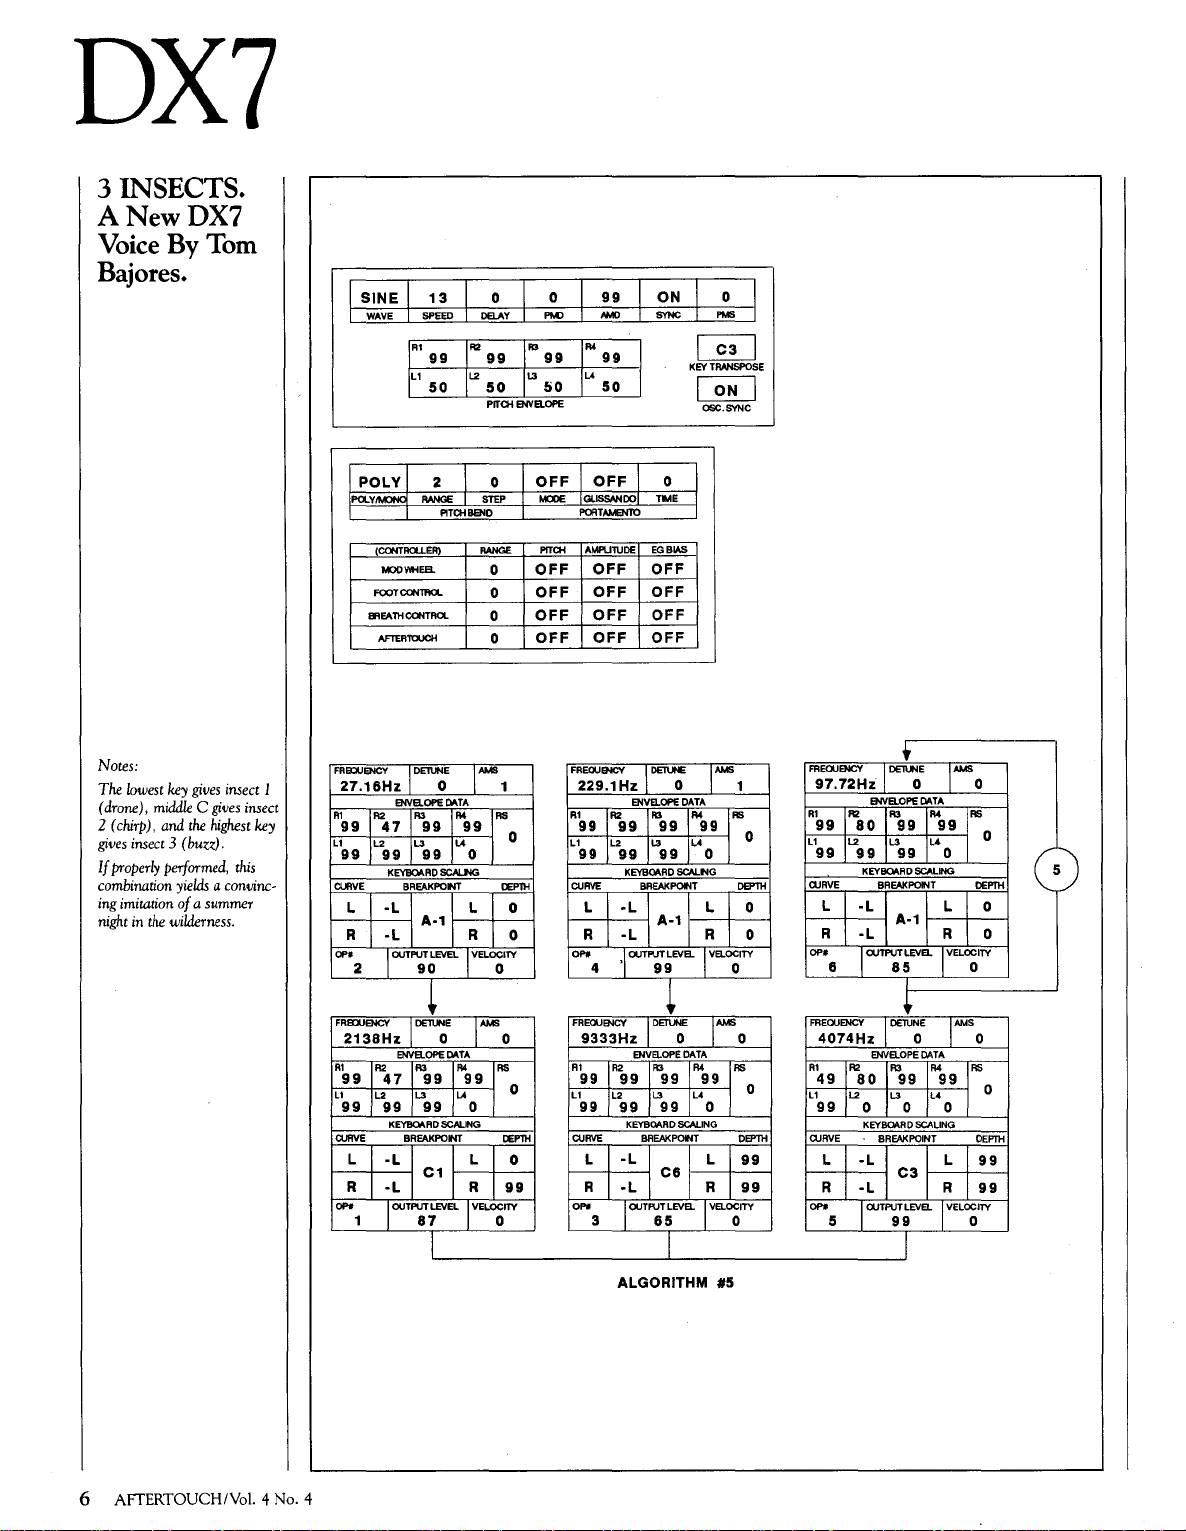
6 3 INSECTS
A new DX7 voice created by Tom Bajores.
-
-
Snare"
John
and
"ELhi-hat/ closed," two new
M. Lehmkuhl.
M. Lehmkuhl.
---
and
"Techno-ZAP," two new
~
--
-
-
Volume
RXS
4,
Number
Issue
voice edits
RXS
voice
-
-
-
-
-
-
~
-
#31
Editor
Tom Darter
Operations
Sibyl Darter
Editorial Board
Charles Feilding
4
Bob
Rick Hewitt
Mark Koenig
J.P. Lincoln
Phil Moon
Jim Smerdel
Steve Thatcher
Cover
Jim Hagopian
Dee Dee Cawley
Frye
Photograph
7
8
MOVINGKEYS
A new DX7 voice created by Kent Sparling.
AIPON2
A new DX7 voice created by David Levin.
9 ANOLGBELL
A new DX7 voice created
10
12
15
18 Hot Tips
19 Back Issues
©1988 Yamaha Music Corporation USA.
electronically, mechanically, photocopying, recording,
RX120
An
introduction to Yamaha's newest digital rhythm
programmer.
TX16W
Part one
TX16W
QX5/FB,01
Using QXS macros to expand
By
Steve Ahola.
Reader tips for
Important information for all AfterTouch readers.
No
part
of
digital wave filtering sampler.
of
this publication may
or
otherwise, without
by
David Forbus.
By
Tom Darter.
a detailed, two-part guide to using
By
Scott
the
versatility
the
FB-01, SPX90, and more.
be
reproduced, stored in a recrieval system, or transmitted in any form
the
prior written permtssion
of
Yamaha lnternattonal Corporation.
of
the
Yamaha
Plunkett.
the
FB-01.
or
by
any means,
AFTERTOUCH
lished monthly. Third class
postage paid at Long
Prairie, MN and additional
points
of
SUBSCRIPTIONS:
Address subscription
respondence to AFTERTOUCH,
Northridge,
7938.
Send form 3579 to P.O.
Box 7938, Northridge,
91327-7938.
Vol.
4 No.
entry.
P.O.
CA
POSTMASTER:
4/
AFTERTOUCH 3
is
Box
91327-
pub-
Free.
cor-
7938,
CA
Page 4
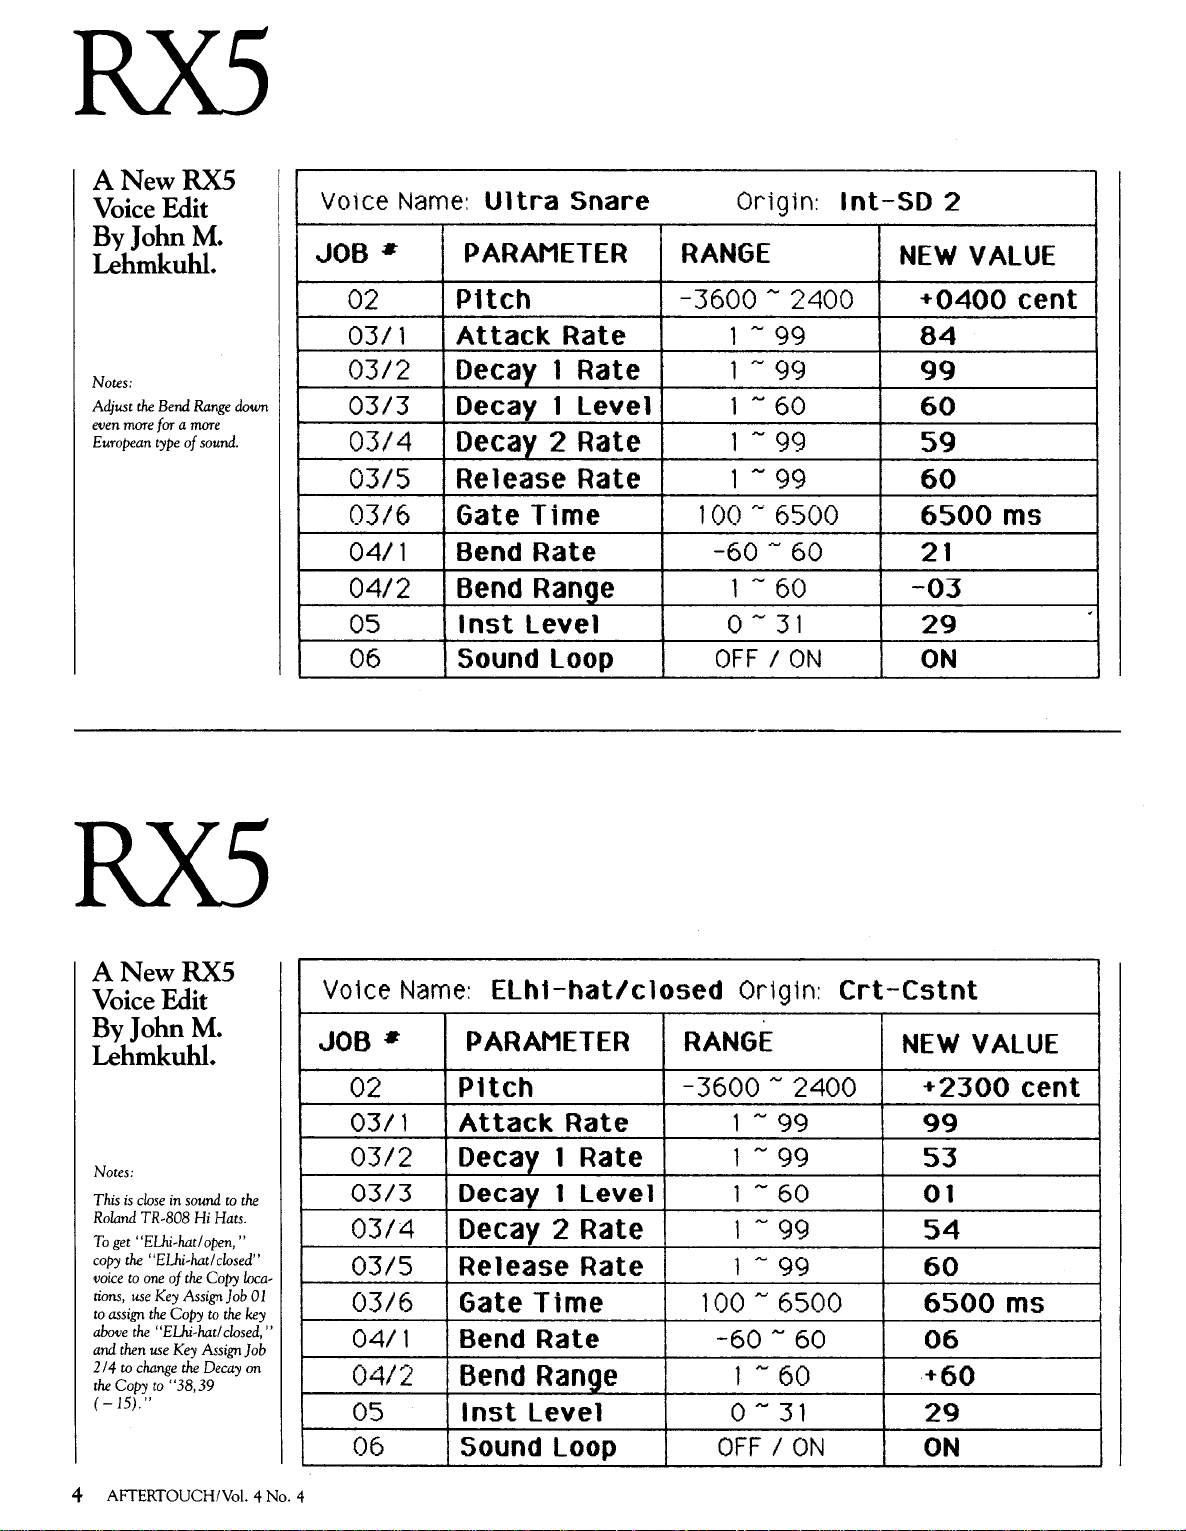
ANewRX5
Voice Edit
ByJohnM.
Lehmkuhl.
Vo1ce
JOB •
Name:
Ultra
Snare
PARAMETER
Origin:
RANGE
lnt-SD
NEW
2
VALUE
Notes:
Adjust
the
even
more
European
Bend
Range
far a more
type
of
sound.
down
02
03/1
03/2
03/3
03/4
03/5
03/6
04/1
04/2
OS
06
P1tch
Attack
Decay 1
Rate
Rate
Decay 1 Leve 1
Decay 2
Re
1 ease
Gate
Bend
Rate
Rate
Time
Rate
Bend Range
lnst
Level
Sound Loop
-3600-
1 -
2400
99
1 ~ 99
1 ~ 60
1 -
99
1 -
99
100 ~ 6500
-601 -
60
60
0-31
OFF I ON
+0400
84
99
60
59
60
6500
21
-03
29
ON
cent
ms
.
ANewRX5
Voice Edit
ByJohnM.
Lehmkuhl.
Notes:
This
is
close
in
sound
to
Roland
TR-808
To
get
"ELhi-hatlopen,"
copy
the
"ELhi-hatl
voice
to
one
tions,
to
assign
above
and
2 I 4 to
the
(
-15)."
4 AITERTOUCH/Vol. 4 No. 4
of
use
Key
the
Copy
the
"EUi-hatl closed,"
then
use
Key
change
Copy
to
"38,39
Hi
Hats.
closed"
the
Copy
Assign]ob
to
the
Assign
the
Decay
the
loca-
01
key
]ob
on
Voice
JOB •
02
03/1
03/2
03/3
03/4
03/S
03/6
04/1
04/2
OS
06
Name:
ELh1-hat/closed
PARAMETER
P1tch
Attack
Decay 1
Decay 1 Leve 1
Decay 2
Re
1 ease
Gate
Time
Bend
Bend Range
lnst
Level
sound
Rate
Rate
Rate
Rate
Rate
Loop
Origin:
RANGE
-36001 1 1 -
1
-99
1 -
100-
-601 -
0-
OFF I ON
2400
99
99
60
99
6500
60
60
31
Crt-Cstnt
NEW
+2300
99
53
01
54
60
6500
06
+60
29
ON
VALUE
cent
ms
Page 5
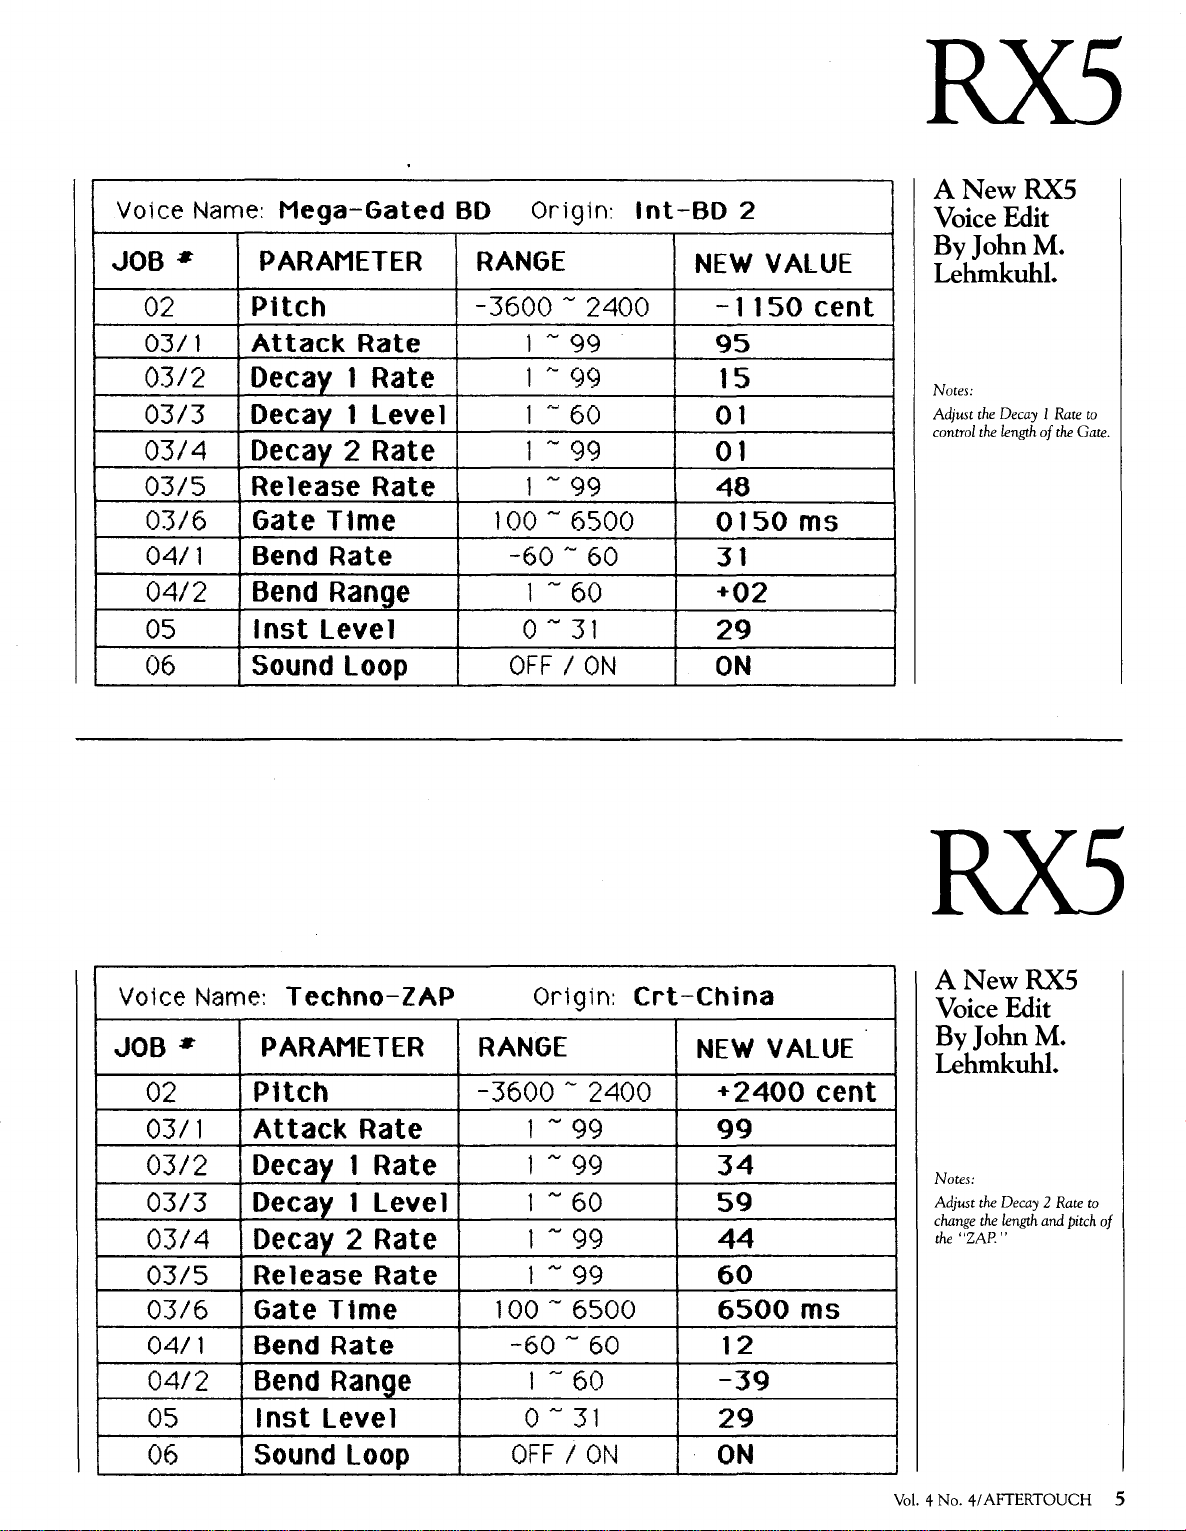
Voice Name:
JOB •
02
03/1
03/2
03/3
03/4
03/S
03/6
04/1
04/2
OS
Mega-Gated
PARAMETER
P1tch
Attack
Decay 1
Rate
Rate
Decay 1 Leve 1
Decay 2
Re
1 ease
Rate
Rate
Gate T1me
Bend
Rate
Bend Range
lnst
Level
BD
Origin:
RANGE
-3600 ~ 2400
1
~
99
1 ~ 99
1
,.
60
1 ~ 99
1 ~ 99
100-6500
-60 ~ 60
1 ~ 60
0 ~ 31
lnt-BD
NEW
2
VALUE
-1150
95
15
01
01
48
0150
31
+02
29
cent
ms
ANewRX5
Voice Edit
ByJohnM.
Lehmkuhl.
Notes:
Adjust
the
control
Decay 1 Rate
the
length
of
the
to
Gate.
06
Voice Name:
JOB •
02
03/1
03/2
03/3
03/4
03/S
03/6
04/1
04/2
OS
Sound Loop
Techno-ZAP
PARAMETER
P1tch
Attack
Decay 1
Rate
Rate
Decay 1 Leve 1
Decay 2
Re
1 ease
Rate
Rate
Gate T1me
Bend
Rate
Bend Range
lnst
Level
OFF I ON
Origin:
RANGE
-36001 ~ 99
1 ~ 99
1 ~ 60
1 ~ 99
1
~
100-
-60 ~ 60
1 ~ 60
0 ~ 31
2400
99
6500
ON
Crt-China
NEW
+2400
99
34
59
44
60
6500
12
-39
29
VALUE
cent
ms
ANewRX5
Voice Edit
ByJohnM.
Lehmkuhl.
Notes:
Adjust
the
the
"ZAP."
Decay 2 Rate
length
and
change
the
pitch
to
of
06
Sound Loop
OFF I ON
ON
I
Vol.
4 No.
4/
AFTERTOUCH 5
Page 6
DX7
3
INSECTS.
ANewDX7
Voice
Bajores.
By
Tom
SINE
WAVE
13
SPEED
0
DELAY
I'M)
99
IWD
ON
SYNC
0
0
PMS
~
KEY
TRANSPOSE
~
OSC.SYNC
Notes:
The
lowest
(drone),
middle C gives
2
(chirp),
gives
insect 3 (buzz)
If
properly
combination
ing
imitation
night
in
the
key
gives
insect
and
the
highest
.
performed,
yields a convincof a
summer
wilderness.
insect
this
key
(CONTR<l.I.ER)
MODWHEB.
FOOT
CClNllla.
BREATH
CONTRa.
AFTERTOUCH
FRBJUENCY I DETUNE
I
27.16Hz
ENVB.OPE
R1 IR2
99
L1
99 99 99
CURVE
L
R
CPO
FREQUENCY I DETIJNE
2138Hz
R1 IR2
99
u
99 99 99
CURVE
L
R I
OPo
I"'
47
IL2
11.3
K~RDSCAUIG
BREAKPOINT
I
-L
I l L I
I
-L
I I R I 0
I
OUTPUTLEVEL I VELOCITY
2
1
ENVB.OPE
47
.IL2
11.3
K~RDSCALING
BREAKPOINT
I
-L
-L
I
OUTPUT
90
I"'
I I L I
I I R I
87
RANGE
0
0
0
0
lAM\
0
DATA
IA4
llA
IRS
0
)
0
DEPTH
0
0
99 99
A-1
~
lAMS
DATA
IA4
llA
0
0
IRS
I o
DEPTH
0
99
0
o
99 99
C1
LEVEL I VELOCITY
I
AMPlll\JDE
PITCH
OFF
OFF
OFF
OFF
FRECUEHCY
229.1Hz
R1 IR2
99
L1
99
CURVE
L
R l
OPO
4
FRECUe«:Y I DETIJNE
9333Hz
R1
99
u
99
CURVE
L
R I
OPO
3
OFF
OFF
OFF
OFF
I
ENVB.OPE
99
IL2
99 99
KEYBDARD
BREAKPOINT
I
-L
-L
j R 0
·I
OUTPUT
ENVaOPE
IR2
99
IL2
99 99
KEYBOARD
BREAKPOINT
J
-L
-L
I
OUTPUT
ALGORITHM
EGBIAS
OFF
OFF
OFF
OFF
DEl\JNE
\"M\
0
DATA
I"'
IA4
99
llA
0
SCALING
IRS
I
DEPTH
0
0
99
11.3
I I L I 0
A-1 I I
LEVB. I VELOCITY
99
~
JAMSo
0
DATA
IA3
IR4
IL4
0
SCALING
#5
IRS
I 0
DEPTH
/99
99
0 5
99 99
IL3
/ I L
C6
I I R I
LEVB. I VB.OCITY
65
I I
FREQUENCY I DETIJNE
97.72Hz
R1 IR2
99
L1
)L2
99
CURVE
L
I
R I
CPO
6
FREQUENCY I DEl\JNE
4074Hz
R1 IR2
49
L1
IL2
99
CURVE
L I
R I
OPo
lAMS
DATA
IA4
99
IL4
0
0
IRS
I 0
DEPTH
0
o
'
ENVB.OPE
I"'
80
99
11.3
99
99
KEYBDAAD
SCALING
BREAKPOINT
-L
I I L I 0
A-1
-L
I I R I 0
I
OUTPUTLEVB. I VELOCITY
85
~
\MIS
OAT"
IR4
99
IL4 I
O
IRS
0
DEPTH
99
99
0
o
ENVB.OPE
I"'
80
99
11.3
0 0 0
KEYBOARD
SCALING
BREAKPOINT
-L
I I L I
C3
-L
I I R I
I
OUTPUT
LEVEL I VELOCITY
99
5
6 AFfERTOUCH/Vol. 4 No. 4
Page 7

DX7
SINE
WAVE
BREAlH
FREOOENCY I DETUNE
10.00Hz
R1
64
L1
99 99 99
CURVE
L I
R
OP•
2
FREOUENCY
1.00
R1
55
L1
99 99
CURVE
L I
R I
OP•
1
IR1
IL1
(CONTRa.LER)
MOO
WHEEL
FOOT
CONTROL
CONTROL
AFTER
TOUCH
ENVELOPE
IR2
IR3
99 99
IL2
lu
KEYBOARD
BREAKPOINT
-L
I I L I 0
I
-L
I 1 R l 0
I
OUTPUT
56
I
DETUNE
ENVELOPE
IR2
IR3
99 99
IL2
lu
KEYBOARD
BREAKPOINT
-L
I I L I 0
-L
I I R I
1
OUTPUT
99
44
SPEED
45
47
-7
SCALNG
A-1
LEVEL I VELOCITY
~
-7
99
SCALNG
G3
LEVEL I VELOCITY
I
DO.TA
IR4
74
lu
DO.TA
IR4
58
lu
0 4
DELAY
R2
99
l2
50
PITCH
RANGE
99
0
0
0
lAMS
IRS
I
0
0
lAMS
IRS
1
0
0
R3
L3
ENVELOPE
0
2
OEPn-t
2
2
OEPn-t
99
I'M)
99
50
PITCH
OFF
OFF
OFF
OFF
35
AMD
IR4
99
IL4
50
AMPLITUDE
ON
OFF
OFF OFF
OFF
FREClU91CY
1.00
Rl
IR2
99
99 99
L1
IL2 IL3
99
99 99
CURVE
L I
-L
R I
-L
OPO
I
4
FREClUB<CY
1.318Hz
Rl
IR2
90
99
L1
ll2
99
99
KEYBOARD
CURVE
L
I
-L
I
-L
R
OPO
I
3
ALGORITHM
OFF
SYNC
~
I
KEY
I
ENVELOPE
KEYBOARD
OUTPUT
ENVB.OPE
OUTPUT
~
OSC.SYNC
EGBIAS
OFF
OFF
OFF
I
DETUNE
0
DATA
IR3
t J
32
IL4
SCALING
BREAKPOINT
I I L l 0
A·1
I I R I 0
LEVEL I VELOCITY
78
~
I
DETUNE
o
DATA
IR3
IR4
99
41 0
IL3
IL4
99
SCALING
BREAKPOINT
I I L l
A-1
I I R l 0
LEVEL
JVB..OCITY
99
I
PMS
TRANSPOSE
lAMS
0
...
I
0
DEPlH
0
lAMS
1
J
...
I
0
DEPlH
0
0
#6
0
FREQUENCY I DETUNE
2.455Hz
Rl
91
L1
99
CURVE
L I
R
OP•
6
FREQUENCY
1.00
Rl
96
L1
99
CURVE
L
R I
OP•
5
_i
+5
ENVELOPE
IR2
IR3
99
47 47
Jl2
r
99 99
KEYBOARD
SCALING
BREAKPOINT
-L
I l L I 0
A-1
j -E j j R j
I
OUTPUT
LEVEL I VELOCITY
83
1
I DElUNE
+7
ENVB..OPEGA.TA
lR2
IR3
76
80
ll2
IL3
0
99
KEYBO\RO
SCALING
BREAKPOINT
I
-L
I I L l
G3
-L
I I R I 0
I
OUTPUT
LEVB. I
99
I
DO.TA
IR4
J•
IR4
4
IL
lAMS
J
0
lAMS
J
47
0
VELOCITY
0
1
...
DEPTH
7
0
...
I
DEPTH
0
0
99
1
3
MOVING
KEYS.
DX7
ANew
Voice
..
By
Kent Sparling.
Notes:
This
sound
is
qualities
strings. It
for
chord
the
speed
by
adjusting
Fine
#6.
The
volume
Ops.
#3-4. Season
nonimitative,
of horn, organ,
makes a good
sketches,
and
its
of
"move-
the
Mod
Ops.
#3
wheel
#
Fre-
and
1-2
ofOp.
for
con-
to
with
and
pad
has
a nice animation of
own.
Change
ment''
quency
Op.
trols
4
and
taste!
Vol.
4 No.
4/
AFTERTOUCH 7
Page 8

DX7
AIPON 2.
ANewDX7
Voice
David Levin.
By
TRI
WAVE
32
0
0 0
ON
SYNC
PMS
~
KEY TRANSPOSE
~
OSC.SYNC
Notes:
This
patch
some
of
work
on
waves.
While
this
patch
dependent
a
similar
patch
is
subtle
in
the
middle
is
based
Bill
Schottstaedt'
complex
not a
has
similar
changes
perception.
and
octaves.
loosely
on
s
modulating
"piano,
time-
that
evoke
This
best
played
CONTROLLER
MOO
WHEEL
FOOT
CONTRa..
BREATH
CONTRa.
AFTERTQ.JQ-t
"
RANGE
PITCH
0
OFF OFF
0
OFF
0
OFF OFF OFF
0
OFF
FREOJENCY I
1.00
AI
81
L1
99
CURVE
L
R I
01'1
3
FAEOUENCY
1.00
A1
80
Lt
99 94
CURVE
L
R l
OP•
2
AMPLITUDE
OFF
OFF
ENV~LOPo
IA2
IR3
74
IL2 I'"'
92
K
EYBOAAD
BREAKPOINT
I
+L
I I L I
·L
I I R J
l
OUTPUT
I~E
ENVELOPE
JA2
IA3
68
IL2
I'"'
KEYBOARD
BREAKPOINT
I
+L
I I L I 6
·L
l l R j
I
OUTPUT
85
EGBIAS
OFF
OFF
OFF
DE'T\..HE
lAMS
0
DATA
lA<
18
35
IL4
30
0
SCALING
C3
LEVELl
VELOCITY
70
~
lAMS
DATA
lA<
0
30
IL4
30
0
SCALI'IG
G4
LEVEL I VELOCITY
0
IRS
I
DEPlH
2
0
IRS
I
DEPlH
54
4
5
11
68
4
FREQUENCY
AI
88
L1
99 95
CURVE
01'10
FREQUENCY
At
83
L1
99
CURVE
01'10
1.00
IA2
26
J.
L I
R j
l
6
1.00
IA2
19
r J'"'
90
L
l . L j
R I
l
5
·L I G3
·L
-L
l~E
ENVELOPE
IR3
J'"'
KEYBOARD SCALING
BREAKPOINT
j j R j
OUTPUT
J~E
ENVELOPE
IR3
KEYBOARD SCALING
BREAKPOINT
I
OUTPUT
_1
J""'
0
DATA
lA<
18
0 0
IRS
4 7 4
r 1
DEPlH
l L J 0
30
LEVEL I VELOCITY
40
3
1
JAMSo
DATA
lA<
JL4
"I
B.
IRS
50
J 1
L l 0
R I 71
l
VB..OCITY
DEPlH
4
27
0 0
A#3l
LEV
83
3
8 AFTERTOUCH/Vol. 4 No. 4
FREQUENCY
5.00
m
IA2 IA3
83
L1
ll2
99
CURVE
L
l
R I
Of'•
1
~
I
DETUNE
+1
ENVELOPE
DATA
18
90
·L
-L
JA<
16
I'"'
IL4
0 0
KEYBOARD
SCALING
BREAKPOINT
I I L I 0
A#3
I I R I
I
OUTPUT
LEVEL l VELOCITY
99
I
lAMS
JAS
48
0
I 3
DEPlH
10
4
ALGORITHM #4
FAEOUe.ICY
5.00
A1
IA2 IA3
88
L1
IL2
99
CURVE
L I
R 1
01'10
4
1
l
DETLNE
·1
ENVELOPE
DATA
28
90
K
-L
·L
l
CXJTPUT
lA<
27
I'"'
IL4
0 0
EYBOAAD
SCALING
BREAKPOINT
I l L l 0
A·1
l l R l 0
LEVEL I VELOCITY
98
l
J
JAMSo
IRS
55
3
l
DEPlH
3
Page 9

DX7
ANOLG
BELL.
DX7
David
ANew
Voice
Forbus.
By
CONTROLLER
MOO
WHEEl.
FOOT
CONTRa.
BREATH
CONTRa.
AFTERlOUCH
FRECUENCY I DETLt<E
0.50
Rl
98
L1
99
CURVE
L I
R l
OPt
2
IR2
IL2
0
ENVB.OPE
IR3
12
71
IL3
0
32
KEYBOARD
SCALING
BREAKPOINT
·L
I I L I 0
·L
I
A-11
I
OUTPUT
LEVEL I VELOCITY
78
DATA
IR4
ILO
RANGE
0
0
0
0
lAMS
IRS
28
I
0
R I 0
0
2
DEPTH
0
PITCH
OFF
OFF
OFF
OFF
AMPLITUDE
OFF
OFF
OFF
OFF
FREOUB'«:V
0.50
R1
IR2 IR3 IR4
99
12
L1
IL2 IL3
99
CURVE
L I
R l
OPt
4
OFF
SYNC
KEY
EGBIAS
OFF
OFF
OFF
OFF
JD~
ENVELOPE
DATA
71
0
KEYBOARD
·L
·L
I
ILO
32
SCALING
BREAKPOINT
I I L I 0
A·1
I l R I 0
OUTPUT
LEVB. I
75
6
PMS
~
TRANSPOSE
~
OSC.SVNC
lAMS
IRS
28
I
0
VELOCITY
0
2
DEPTH
0
FREQUENCY
0.50
Rl
t
98
L1
IL2
99
CURVE
L
I
I
R
OPt
6
I
OETU~E
'
ENVB.OPE
DA.TA
1R3
1 2 71
IL3
0
32
KEYBOARD
SCALING
BAEAKPOtNT
·L
I I L I
A-1
·L
I I R I 0
I
OUTPUT
LEVB. I
78
lAMS
1R4
28
IL4 I
0
VELOCITY
r
0
0
2
DEPTH
0
Notes:
This
bell
patch
has
a
texture
than
ciated
with
good
for
music
Tangerine
4
con'' era.
Dream's
those
digital
in
different
most
synths.
the
style
"Rubi-
asso-
It
is
of
ENVB.OPE
IR2
IR3
33
IL2
IL3
0
KEYBOARD
BREAKPOINT
I
·L
I l L I 0
I
·L
I I R I 0
I
OUTPUT
99
~
71
32
A-1
LEVEL I VELOCITY
I
FREQUENCY J DETUNE
1.000Hz
Rl
95
L1
99
CURVE
L
R
OPt
1
o
DATA
IR4
ILO
SCALING
JAMSo
25
0
IRS
I 2
DEPTH
0
FREOUB'«:V
10.00Hz
Rl
95
Ll
CURVE
OPt
..
I
DETLt<E
ENVB.OPE
IR2
IR3 IR4
33
71
t t t J
99
0
32
KEYBOARD
BREAKPOINT
L
l
·L
I I L I 0
R I
3
A·1
·L
I I R I 0
l
OUTPUT
99
ALGORITHM #5
~
JAMS 0
o
DATA
IRS
25
0
SCALING
DEPTH
LEVEL l VB.OCITY
I
0
FREQUENCY I OETUNE
1.023Hz
2
Rl
95
Ll
99
CURVE
L I
R I
OPt
5
t
o
ENVB.OPE
IR2
IL2
33
·L
·L
J
DATA
IR3
IR4
71
25
IL3
0
KEYBOARD
ILO
32
SCALING
BREAKPOINT
I I L I 0
A·1
I I R I 0
OUTPUTLEVB. I VELOCITY
99
I
lAMS
IRS
I
0
0
0
2
DEPTH
Vol.
4 No.
4/
AITERTOUCH 9
Page 10

RX120
An
lntro
..
duction To
Yamaha's
Newest
Rhythm
grammer.
Tom Darter.
RX
120
programmer
digital
Digital
Pro
By
rhythm
.
..
AMAHA'S
programmer takes a different approach
Y
the
creation of electronic drum
parts .
It
is
inexpensive drum machine
plete with a large repertoire
covering a wide range
of requiring
pattern
structure,
preset patterns, which
number of programmable song structures.
designed for a specific purpose,
bodies a number
On
basic
other
programming basic rhythm patterns into
unit-this
writer/musicians
preset rhythmic patterns, which can be used to
create
structures.
Voices
plement
including acoustic and electronic drum sounds,
percussion instruments, sound effects,
before beginning
As
with
the
one
rhythm
hand,
other
In
a wide variety
And
The
RX120 comes equipped with a full com-
NEW
RX120 digital rhythm
and
percussion
designed for musicians who
that
of
of
musical styles. Instead
the
musician
the
RX120 provides a wide variety of
all
electronic
of
hand,
patterns
it
is
basic work has already been done.
words, the RX120 provides song-
Patterns
of
38
sampled
to
create each stylistic
the
creation
can
be combined into a
musical
carefully chosen tradeoffs:
it
is
not
possible to program
into
the
not
necessary
with
a large
of
programmable
percussive
want
comes com-
preset
patterns,
of
the
RX120 em-
unit; on
to
spend time
repertoire
sounds,
and
a song
devices
to
an
the
the
of
song
two
FM
percussion voices. (For a complete list of
these voices, see
number diagram.)
The
unit
permanent
ROCK1
ROCK2
ROCK3
ROCK4
ROCKS
POP1
POP2
POP3
ROCKN'ROLL
FUNK
16BEAT 1
16BEAT 2
16BEAT 3
16BEAT 4
16BEAT 5
DISCO
DISCO
SHUFFLE 1
SHUFFLE 2
SHUFFLE3
REGGAE
SAMBA
SALSA
MERENGUE
the
accompanying MIDI note
contains
(ROM) memory,
1
2
.
40
preset
as
follows:
patterns
in
10 AITERTOUCH/Vol. 4 No. 4
Page 11

MAMBO
CHACHA
RHUMBA
BEGUINE
TANGO
BOSSANOVA
WALTZ 1
WALTZ2
JAZZ WALTZ
MARCH
COUNTRY
TWIST
SWING
SLOW
JAZZ
MEDIUM JAZZ
BALLAD
This
list
doesn't
tell
the
complete story,
though: Each one of these preset patterns features three basic variations, plus two fill-ins,
one break, one intra, and one ending, for a
total of eight
of
these options,
ways
to
play each preset. Given all
the
unit actually contains a
total of 320 preset patterns.
Since patterns are
unit's
front
panel
keys; instead, it has pattern keys. There
front-panel key for each
patterns, plus
the various
Songs
And
other
pattern
MIDI
In addition to
ory,
the RX120 also contains 20 memory loca-
not
programmable, the
does
not
have
instrument
one
of
the
forty basic
keys to call up each
options.
the
40 preset patterns in mem-
one
is
of
tions to program and store your songs. Each
song memory can be up to
can
therefore
contain
500 bars long, and
500 different
patterns
designations.
The
unit also has full MIDI implementation.
As with
other
Yamaha digital rhythm programmers, the RX120's sampled percussion voices
can be played from a MIDI keyboard. Each of
the 38 sounds
number
your MIDI keyboard
RX120's sounds will respond to changes in
(see
is
assigned its own MIDI note
the
accompanying diagram). If
is
velocity sensitive, the
ve-
locity with changes in volume.
And, even though the RX120
patterns played
on
it via an external MIDI key-
cannot
record
board, these velocity-sensitive keyboard performances
sequencer.
by
tially played using
can
be stored into
Then,
the
sequencer, recreating
the
the
an
external MIDI
RX120
can
be "played"
the
patterns ini-
external MIDI keyboard.
In
other
words,
the
RX120
can
be used
inexpensive MIDI percussion tone generator.
The
Yamaha RX120 digital rhythm program-
mer weighs just 3.25 pounds.
It
is
available now
at authorized Yamaha music dealers for a suggested retail price
of
$350.00. For more infor-
mation, write to: Yamaha Music Corporation
USA,
P.O. Box 6600, Buena Park,
a
Digital Musical Instruments Division,
CA
90622-6600.
Instrument
Bass Drum 1
Bass Drum 2
Snare Drum 1
Snare Drum 2
Snare Drum 3
Rim
Shot
1
Rim
Shot
2
Tom 1
Tom 2 D2
Tom 3 C2
Electric Tom 1
Electric Tom 2
Electric Tom 3
High-hat
High-hat
High-hat
Ride 1
Ride 2 (edge)
Crash
China
Cowbell
Claps
Timbale
Timbale
Tambourine B3
Conga High
Conga
Conga
Bongo
Bongo
Agogo
Agogo
Whistle
Shaker
Cuica High
Cuica
FM Percussion 1
FM Percussion 2 B4
(cup)
High
Low
High
Low
High
Low
High
Low
Low
Open
Closed
Pedal
Mute
Open
Note Number
A1
G#1
E2
C#2
B1
D#2.
A#1
F2
G1
F#1
F1
B2
A2
A#2
D3
D#3
C3
C#3
G2
F#2 54
A#3
A3
F#3
F3
E3
G#3
G3 67
D#4
D4
F#4
G#2 56
F4
E4
A#4
45
44
52
49
47
51
46
53
50,
48
43
42
41
59
57
58
62
63
60
61
55
70
69
71
66
65
64
68
75
74
78
77
76
82
83
as
an
This
chart
note
numbers
RX
120' s percussion
shows
assigned
the
MIDI
to
the
voices.
Vol.
4 No. 4/AFTERTOUCH
11
Page 12

TX16W
A
Detailed
Guide
The
TX16WSam
pler,
To
Using
Yamaha
Part 1.
..
By
Scott Plunkett.
EARNING A NEW
basically a two-step process: First, you play
L
through to get
begin
to
learning a new musical instrument, such
Yamaha
you're finding your
look some
the
instrument a little bit easier. After you've
mastered
digging a little deeper to find those
tures-the
tion while you were taking your first samples.
This two-part clinic
techniques
familiar with the Yamaha TX16W and are ready
to
explore some
cedures in this article have been collected from
TX16W
out
of
your sampler with
For those of you who aren't acquainted with
the
TX16W, check out
in
the
November 1987 issue of After Touch, and
then
read
an
idea
this clinic
familiar with
ductions to each section
better idea
they work.
Memory Statistics
One
is
the
TX16W
of
(Mb)
6 Mb with
With
the
sample up
sampling rate; with 6 Mb you
2 minutes at the 33k rate.
As a convenience, memory in
shown
of
blocks instead
and disk memory
INTERNAL
Empty
Mb
available
loaded.
Filter table file= 976 blocks.
are loaded with the system disk.
the
general picture, and
explore
TX16W
the
users to help you get
of
of
the
amount
comes with a generous 1.5 megabytes
memory, which
in
the
RAM=
unit).
the
sampler,
way
of
the
small details
basic system, though, it's worth
ones
that
for those
of
its unique features.
the
tips
in
the unit's capabilities. Even though
is
mainly for users who are already
the
TX16W, there are brief intro-
of
what
features you'll find and how
biggest concerns
of
the
addition
standard
to
1.5Mb
21
seconds
more manageable form
of
is
allocated
MEMORY
12340 blocks (in a standard 1.5
This
is
when
nothing
PIECE
subtleties.
is
around, it's easy
didn't quite get your atten-
is
a collection
of
you
the
the
introduction article
the following article
that
memory
can
of
extra memory cards.
of memory, you can
of
number
the
amount
of
music
then
you
The
process
very similar. While
that
make using
"subtle" fea-
of
who
are getting
the
most music
least effort.
will give your a
with
any sampler
available.
be expanded
sound at
can
sample nearly
the
TX16W
of
of
bytes. Internal
as
follows:
of
but
the
The
16 filter tables
You
as
to
over-
tips and
The
pro-
to
The
the
33k
number
memory
system
can
of
the
get
de-
to
is
is
is
lete any
to
though,
your ability to use filters,
you know what you're doing,
Available
1.5 Mb
table files are loaded, this
memory
SINGLE DISK
New
room available
Maximum
disk=
can
can't
contains. This means
disk will be needed to save everything
internal memory. If you want to put all of
your work
limit the amount
8300 blocks.
that
blocks.
saved to disk,
the
disk space.
mance, voice and timbre, filter, and system
files all take up room
don't
cause they are initially loaded with
tem
check available RAM.
Voice & Timbre
mance
disk=
Each time you save one
it
space.
Checking Available
Any
nal memory you have left, hold down ENTER
and
TX16W display will show you
blocks used
able. This
ing
making intelligent decisions about
of samples you
most
modes,
or
all of
them
from your system disk
make
room
for
samples.
that
deleting filter tables will limit
so
until you're sure
don't
RAM=
disk=
about 8300 blocks. Even though you
expand
change how much information a disk
this
The
internal memory
take up room in internal memory be-
and therefore aren't included when you
21
takes up
11364 blocks (in a standard
unit).
After
the
system
is
the
that
you have available for samples.
7582 blocks. This
on
a newly formatted disk.
internal
the
memory
on
a single disk, you'll have to
of
memory you use to about
There
number
first
-The second reason
on
disk=
blocks; System
is
so
976 blocks
on
the
indicated
works
that
disk=
53
is
the
memory
of
the TX16W, you
that
more
are a couple of reasons
instead
the
filter tables aren't
that
don't
take up
is
on
disks,
but
96 blocks; Perfor-
blocks;
on
disk=
of
these files
amount
RAM
time you want to know how much inter-
press
the
"-"
(minus)
and
the
number
is
your most important ally in avoid-
the
"Wave Memory Full!" message
can
take. Since it works in al-
every
one
of
the
TX16W's
check
often, especially
button.
the
of
blocks still avail-
Remember,
try this.
and
filter
amount of
amount of
to
single
than
one
in
the
of
7582
are used in
that
perfor-
apparently
the
sys-
Filter
number of
the
when
on
21
blocks.
to
disk,
of
disk
The
and
number
operating
you're
12 AFTERTOUCH/Vol. 4 No. 4
Page 13

sampling or working in
if
Similarly,
fit
on
a disk, you
you want
Memory job (Utility, job 4, press
twice) to look
disk.
The
the
display.
at
unused disk memory will be shown
Initializing Waves
The
TX16W has a special wave edit buffer
where new samples reside
editing takes place.
edit
buffer
with
memory when you're ready to edit them.
advantage of this system
from a bad edit by instantly reloading
the
wave edit buffer.
to
find
can
use
the
the
amount
To
Open
of
Memory
and
You
normally load
samples from
is
that
out
if a file will
Unused
Disk
YES/+
space left
where sample
the
wave
internal
you
can
the
wave
recover
stored
on
in
The
wave from internal memory instead of having to
wait
for
a lengthy reload from disk.
Working with
the
wave edit buffer
is
fairly
straightforward, but there are two points you
should keep in mind:
1)
The
wave edit buffer
memory
RAM.
share
This
means
stored in internal wave memory and
the edit buffer takes up double
from
and
the internal wave
the
same
that
any
wave
the
available
that's
is
also
in
amount
of
RAM.
2)
The
wave edit buffer should be treated
single entity. Even though you
16
waves in
the
buffer, you
can
can't
individually
delete them.
If
you
don't
keep the first rule in mind, you'll
soon find yourself facing the dreaded
Memory Full!" message when you try
new sample. This usually happens
few
already stored a
more samples in
samples
the
wave edit buffer (although
and
when
have a
this can happen with just a couple of very long
samples).
You
can
make room
in
wave memory
by using the Initialize function (Utility, job 5)
to delete waves,
individual waves
destroying
the
waves will be deleted together (remem-
all
ber rule 2, above).
entire wave edit buffer
but
any
in
the edit buffer will wind up
the
sample you want
You
attempt
could
and
to initialize
to
store, since
initialize
sample again, but
you can usually save yourself this trouble by
lowing these steps:
1)
Save the waves in internal memory
(Utility, job 3).
edit
to
to
as
up to
"Wave
store a
you've
few
the
fol-
disk
2)
Initialize any or all
of
the
internal waves
(Utility, job 5).
3)
Store
the
waves in the wave edit buffer to
1
a
internal wave memory (Utility, job 1).
4)
Initialize
the
wave
edit
buffer
job 5).
the
5) Load
original waves back to
wave memory from the disk (Utility, job 2).
You'll probably never have to deal with this
procedure if you
often
(using
But, even if you forget
you
can
avoid problems by making sure you
initialize
the
check
the
procedure
wave
your available memory
outlined
to
check
edit
buffer
through editing your samples.
Up
The
Backing
When
first load
sounds.
the
the
The
System
TX16W
system disk before you can load
system disk
operating instructions for
with
the
filter tables. Since it's critical
have
an
operating system disk, it's a good idea
to make a copy immediately, so
away your
original
though you're making
Disk
is
turned on, you must
contains
the
TX16W, along
that
for safe
an
keeping.
exact duplicate
system disk, the procedure for backing it up
slightly different from the usual disk copy:
a
I)
Copy
the
system disk using
the
command (Utility, job 6). It will appear
a full disk copy
filter tables will
is
taking place, but only the
end
up
on
the
disk.
2) Use
the
Save System Program job (Utility,
job 4, press
YES/+
1 once} to
that's currently in the
system disk.
saving
When
to
disk, you can use this
TX16W
the
system
put
system disk.
put
Before you
disk, make sure
off
the
TX16W,
new system disk.
should load
Disk
Formatting
Before you
away your original system
that
your new copy works. Turn
turn
as
normal.
it back
The
on
system and filter tables
Shortcuts
can
use a new 3.
5"
and
disk, you need
to format it for use in the TX16W.
first go to
press the
the
Format job (Utility, job 4) and
YES/ + 1
button
to begin formatting,
(Utility,
the
internal
above).
the
memory,
when
the
that
you
can
Disk Copy
destination
the system
onto
your new
is
finished
as
your new
insert the
When
you're
basic
you
put
Even
of
the
is
that
you
Vol.
4 No.
4/
AFTERTOUCH 13
Page 14

TX16W
the
display will ask you
disk.
Once
the
tine off
insert
formatted
disk in this process, so you
some
procedure:
1) Leave a previously
2) Move
if
When
the
to
formatting procedure over in order
another
out
another
again,
You
disks
Changing
the
system disk, it will
the
blank
TX16W
disk
swapping
TX16W's disk drive
mat
job (Utility, job 4). If you have a disk
samples
memory protect tab
to
that
your samples.
button
The
disk
instead.
You
you
display flashes
believe
your
can repeat this procedure for
in
get into with all
there's
the
cursor
to
TX16W
and
will ask you to insert a blank disk
can
use
want
you're done formatting your first disk,
that
disk. All you really need
newly
blank disk.
the
TX16W
as
you like.
Individual Files
CmuUwd
TX16W
disk.
disk
the
drive, make sure
no
danger
to
Go
start
the
will skip asking for the system
another
to
format
"END,"
you have
formatted
When
will format
to
insert the system
gets the formatting rou-
then
ask you to
As
it
turns
out,
any
can
fill in for the system
can
save yourself
with
the
following
formatted
when
is
up (this
of
your sample disks), so
of
accidentally ruining
and
formatting
disk formatting shortcut
more
which may lead you
to
In A Setup
disk
you go to
is
a good
press the
procedure.
than
start
to
disk
and
you press
the
as
in
the
the
For-
that
the
habit
Yes/
+ 1
one
disk.
the
whole
to
format
do
is
take
insert
YES/+
new disk.
many new
change to a performance,
new performance file to disk
the
setup.
with
save
the
though, because
entire disk, when only a single parameter may
been
have
another change later, you'll have to save
setup again. Before you get caught up
less
"save setup, change parameter, save setup"
routine, try
your new file into
of
1)
Make sure you store your newly edited per-
formance (Utility, job 1).
2)
Go
to
and
check
that
you want to
mance.
remember exactly how it's spelled and where
the
letters are placed.
Go
to
3)
and
scroll to
Enter
saw in
cursor
new
file
the
performance file
the
setup, so make sure
with your changes.
1
You
can use
any
of
the file types in a setup-performance,
voice and timbre, filter, system.
thing
to
remember
exact same number
as
the
setup file.
The
entire setup again. This wastes time,
the
changed.
the
following method to just insert
the
the
Disk Load display (Utility, job 2)
the
number
Look
the
Disk Save display (Utility, job 3)
the
the
same number
the
Disk
to
Go
and press YES/ + 1 to put your
on
disk. Remember, this will replace
the
same technique for replacing
and
want to save
so
obvious way to do it
TX16W
contain
at
Load
is
and
has to rewrite
If
you decide
existing setup.
and
name
your new perfor-
the
name
Save Performance job.
and
name
display. Move
that
was
that
The
that
you have to use the
name for your new
the
that
it loads
is
to
the
to
make
the
in
an
end-
of
the setup
closely
previously in
you're happy
and
that
you
the
important
file
14
AITERTOUCH/Vol. 4 No. 4
When
you save a setup,
the
TX16W
tables) are saved
way to save and load all your work, and lets you
avoid
the
mances, voices
The
only disadvantage
longer
to
file types are involved)
load just
Sooner or later you'll probably run
scenario: You'll load a setup,
(except
problem
save
and
one
of
to
and
the
the
entire contents
the
system
disk.
This
of
separately loading perfor-
timbres, waves, and filters.
is
that
load a setup (since all
than
file
types.
and
is
a convenient
it takes
it does
to
make
filter
much
of
save or
into
a small
of
the
this
This
is
the
end
of
the
clinic.
Next
month
you'll learn a technique for
creating new voices
to
create
voice layering,
uses
dynamic
while, have fun trying
learned this
convincing
the
filters
expression
month.
and
and
and
a method
to
first part
timbres quickly, a way
ensemble sounds using
velocity
performances.
out
of
the
TX16W
of
crossfading
curves
the things you've
that
to
add
Mean-
Page 15

QXS/FB~Ol
HE
MACRO
tal sequence recorder
T
powerful tools. I have discovered a number
uses for
one thing, they can be used to increase the
flexibility
live performance situations. However, before
describing these applications, I will
explaining some
QXS's macros.
the
of
FEATURE
macro memories
the
FB-01
digital tone module
of
the basic functions
of
the
is
one
in
the QXS; for
QXS digi-
of
its most
start
of
of
in
by
the
Inserting Macros
I read through the QXS owners manual two
times looking for specific instructions
insert macros into recorded tracks
but
not
fully
explained
ual), and never did find them. I eventually
ured out how to do it, and thought I'd share it
with
my
fellow readers.
The
Event Edit function
for a particular macro
Enter
the
Event Edit mode by pressing
SHIFT and TEMPO keys, and locate
sure where you want the macro to begin using
the
F3
(
<)
and
F4 ( >)
{if at all possible); otherwise, choose one close
to it, and
pressing
the
whatever.
The
"M" of the first line; once again, use the
and
which you want
is
done, press
the cursor to the second line. Use
keys to scroll through
you locate
once more, and use the F3/F4 keys to choose
the specific macro number.
To execute
and
warning here: Pressing the SHIFT and START
keys
to create the macro call.
takes, you may want to label the RECORD,
STOP,
tive
STOP=
QX5 Macros
One
then
enter the "Change" mode by
the
F1
(Job)
event
listed
cursor should now be blinking
F4 ( >)
keys to set this to the exact beat
the
the
"MACRO."
the
STOP/CONTINUE
will erase whatever event you started from
and START buttons with their respec-
Edit
mode
Insert; and
And
use
of
the
on
page 3
is
used,
is
inserted into Track #
keys. Find the exact beat
key.
It
is a
note, a measure,
macro to begin.
F2
{cursor) key once to move
the
10 event names until
Then
insertion, press the SHIFT
keys.
To
functions:
START=
The
FB-01
QXS macro call feature
on
how to
{as
illustrated
of
the
man-
fig-
and
the
call
1.
the
the
mea-
doesn't matter if
or
on
the
F3
(
<)
on
Once
that
the
F3/F4
press the
avoid such mis-
REC
Replace.
One
=Delete;
F2
note
key
of
described above
System Exclusive messages to an
allows an unlimited number of Configurations
to be stored and recalled. (The
store only 16,
quickly.) Changing the Configuration in the
middle of a song
than
changing only the voices with Program
Change messages.
To record
QXS, you need to
FB-01's MIDI
port.
Once
tion you want to save, press the FB-01 SYSTEM
SETUP
Dump xxxxxx." Use the - 1 I + 1 buttons to
select:
"#x
TEM SETUP
reads:
"#x
At
this point, set up the QXS for REALTIME
Recording, making sure
and
ON.
of"-"
to begin
ing begins, press
FB-01 to begin
01's display reads: "Dump/completed!", press
the
cease recording.
edit its timing, press the
buttons
mode.
labelled:
the System Exclusive message to start at
of the track,
"clocks" you must move it back
message reads:
the Clock Move job to move the track back this
number
pressing SHIFT and TRACK. Press
key until the display reads:
...
ber, which
mined
START key to execute
Configuration dump, starting at the top
track.
mode to confirm this:
back Track #
contains music data. Before doing this, change
the
for Track
STOP/CONTINUE
To verify
on
You
of
To do this, enter the Track Edit mode
"Use
the
in
Track
You
FB-01
that
I find very useful
which
an
OUT
you have come up with a Configura-
button
Dump
button
sure?
CONFIG."
(The
display should
the
countdown, and, after the record-
the
that
the
the
QXS to
should find
"EXCL 001 240(FO)."
so
"M-0001-01-00/96."
clocks.
F3
(
<)
is
the number
the
previous paragraph. Press
#1
should
may want to re-enter
1,
along with another track
setup to a different Configuration. As
may be used up very
can
be a lot more dramatic
FB-01 Configuration
run
a MIDI cable from the
port to the QXS's MIDI IN
until
the
display reads:
CONFIG."
again,
so
that
Track # 1
show"*"
#1)
Press the START button
the
+ 1 /YES
data dump.
button
dump was recorded,
SHIFT
enter
one
first calculate
"8>CLOCK
key to enter a
of
clocks you deter-
the
clock move.
now
contain
The
final test
is
to send
FB-01, which
FB-01 itself can
on
"#x
Press the SYS-
that
the display
is
clear
instead
button
on
the Event Edit
or
You
the
so
the
Once
the
the QXS to
and
TEMPO
more
will want
the
number of
that
the
Then
the
F1
negative
an
Event Edit
is
on
and
events
first
(Job)
MOV
num-
FB-01
of
to play
that
the
the
FB-
top
use
by
the
the
UsingQX5
Macros
Expand
Versatility
The
Steve Ahola.
to
FB
To
The
Of
..
o
1.
By
Vol.
4 No. 4/AFTERTOUCH
15
Page 16

QXS/FB--01
soon
as
the
FB-01
receives
Configuration should change
just recorded
Perhaps it should be mentioned here
FB-01 will receive and respond to data dumps in
any of its normal Play
"MIDI Data Receive" mode for
the
dump
Track
at any point in
section
(At
lute necessity
the
contents
ory
locations.
notebook and include
entries.)
on
the
"works,"
#1
with a blank macro,
the
song (as explained in
of
this article).
this point, I ought
of
keeping
of
the
QXS track
I use a
the
QXS.
modes-there
you
can
to
mention
an
small
the
date
C-mued
data dump,
to
the
one
that
is
no
special
the
FB-01. If
now
exchange
to
be called forth
the
the
abso-
up-to-date log
and
macro mem-
spiral-
bound
and
time
of
the
you
the
first
of
all
dump
successfully.
accidently lose your new Configuration or erase
an old Configuration you wanted
It
should also be noted
tion
dump calls
tions,
not
the
this
means
selected are
#2
and you later change the contents of these
banks, the Configuration dump will call forth
the
new voices
originally saved. For
mended
voices from
(The
saving Voice Banks
you can select voices in Banks # 1 and # 2 with
no
problem.)
is
in
that
the
material below discusses the possibility of
By
doing
so, you
to
that
the
forth
specific memory loca-
actual voices themselves.
that,
if
the
voices you
the
user-defined Banks
stored
you use this technique to store
permanent ROM Banks
in
that
on
macros; if
the
locations you
reason, it
won't
save.
Configura-
What
#1
is
recom-
#3-7.
that
is
done,
have
and
Operational Details
In
the material above, I omitted a
to make
the
scroll through
the
most cases, you will
toggled
data dumps,
settings such
Configuration. "System
setting
number
with this feature, since each
only
code unique
exception to
FB-01s
dently, in which case you would assign separate
System
comfortable using
this article, it would probably be a good idea
store your new Configuration temporarily
the
memory locations, before beginning
procedure outlined earlier.
SYSTEM
reads:
using
then
button
would recommend using one particular loca-
tion, like
storage, until
the
instructions easier to follow.
FB-01, using
status
ON
on
to
to System Exclusive messages addressed to a
that
channel
Another
FB-01
#xx
the
read: "xx sure? xx." Pushing
will execute
the
SYSTEM SETUP button,
the
various functions to check
of
"Combine"
for
both
as
this will load voice function
as
the
QXS; it
"1"
on
to
that
you wanted to control indepen-
numbers to each
note
itself,
SETUP
Config/ stor xx," and enter a number
data entry buttons.
#16,
the
and
"System
want
"Combine"
transmitting and receiving
Pitchbend
ch#"
is
customary to set this
all
of
your MIDI equipment
that
particular
rule would be if you
on
the FB-01: Until you are
the
techniques described
in
one
of
its 16 user-defined
To
button
for temporary Configuration
QXS has recorded
until
the
storage operation. I
few
details
ch
#."
Range
unit
do this, press
with
must
match
will respond
model.
of
them.
the
the
The
display will
the
had
display
+ 1/YES
the
On
to
the
One
two
QXS
data
In
be
the
in
to
on
the
When
QXS, the tempo should be set
mate tempo range
FB-01 data dump. Data recorded at mm = 40
may overload the FB-01 buffer if it
back
Configuration change may
necessary, you
"clocks" between
will
mm
mm
The
mines its proper placement within the song.
The
before
new Configuration.
01
QXS transmits a
note
together.
the
the
thin
the
Another
is
the
setup includes
back System Exclusive messages,
rearrange
goes directly to
the
signal
nect
OUT
recording
at
mm
= 300;
work
properly.
= 40,
the
= 300,
the
length
dump
should
the
beat
may be shifting gears,
(or notes) may be delayed or skipped al-
You
optimum placement, so it doesn't chop off
previous
out
Configuration change.
FB-01 MIDI
note
any affected parts immediately before
factor
routing of
the
on
to
the RX21.
a spare MIDI cable to the
port, and plug
the
data
dump
onto
the
to
the
approxi-
of
the song
in
could
each
messages are 7 clocks apart; with
interval
of
the
total data dump also deter-
be executed a few clocks
the FB-01
If
this
Note
may need to experiment to find
either. If necessary, you could
to
be considered
the
MIDI cables.
an
RX21, which does
MIDI chain:
the
FB-01 MIDI IN port, with
THRU
that
that
will use the
is
played
the
opposite case, the
not
be smooth. If
adjust
event
(One
is
the
number
so
that
the dump
example:
68 clocks.)
is
to begin using the
is
not
done,
so
to
speak, when the
On
message, and
the
QXS MIDI
port passing the MIDI
You
may want to con-
FB-01
into
the
with
the
on
playback
My
MIDI
not
echo
so
I had to
OUT
MIDI
QXS MIDI
FB-
that
of
16 AFfERTOUCH/Vol. 4
No.4
Page 17

IN
port
as
needed
dumps.
Musical Applications
In
practice,
described
than
seem.
applications of these techniques.
Switching Configurations
song
you switch voices (as possible using Program
Change
eight-instrument
ment
combination in between.
stereo
levels,
single Configuration macro.
gets around many
Change messages
the
Change
using the same MIDI channel, which
problem if you like to double up parts
same channel, using your synthesizer or
tone generator to augment
So
Configurations from
these techniques to record voice
For each song
all
#1
then
can
it
age (the FB-01 itself has
ture). Customizing voice Banks
be very helpful
scroll quickly through
use
(using
01
board). Similarly, you
Configuration memory setups using
both
performances.
Some
helpful even if your MIDI setup doesn't include
an
has a MIDI bulk data dump feature, you
experiment with recording
QX5, and
in
this article
these technical instructions have made it
This
section
can
be a very powerful tool.
messages), but you
setup with
pan
locations, keyboard splits, volume
or
LFO settings, all by
same voice
messages will affect all
far,
I have only mentioned recording voice
of
the voices you plan to use into voice Banks
and
#2,
record this
be stored
without
either
or
the
Program
for
permanent
of
these techniques
FB-01. If your synthesizer
then
for
recording
the
execution
is
a lot less complicated
will discuss
can
mono
setup
8-note
of
bank
or
performance, you could load
in whatever order you want, and
data
on
in
live performances,
having
the
-1/
enter
polyphony, or
You
the
limitations
(i.e.,
new
on
the
FB-01, and Program
the
the
FB-0
with
the
cassette for
no
cassette storage fea-
the
voices you
to
change
+ 1 buttons
Change
buttons
can
load
storage and for particular
the
the
Event Edit
FB-01
data
of
the
techniques
the
general
in
the
middle of a
Not
only
can
switch from
to
a one-instru-
to
any
can
also switch
the
insertion
Using this
of
voices must be
instruments
FB-01 voices).
1;
you
can
bank
QX5, from where
permanent
#1
and
voice
on
on
and
and
tips may be
or
tone
dumps
of
method
Programs
can
be a
on
another
also use
setups.
stor-
#2
can
as
you
can
want
Banks
your
your key-
save all 16
the
QX5,
generator
can
on
your
Search
an
in
the
to
FB-
mode to see if you "caught" anything. If you
did, these techniques may help you expand
existing storage
unit.
One
tip
is
setup
Program Changes. For example, if you switch
voices
throughout a song, record
essary) a 13-bar macro
to
gram
beginning
having to insert,
into
macros. If you decide to switch
to a brighter one, you will have only
macro
Changes to locate
final track.
a
a different voice for
chorus;
edit.
ture should perhaps be mentioned
A particularly tricky riff
and
the
verse/ chorus structure
the
which gives you complete freedom
the
to generate a skeleton track
sures, and use
intra, verse, chorus, bridge,
This
that
overdub more creative parts
tracks
mechanical. I find this very helpful
up with separate
same song, without having
involve
all,
tional memory storage locations,
is
the
of
tions
be
using macros for
to
the
brass voice
Change
the
song, you will have to insert only four
to
once
The
more traditional uses
then
song.
verse
song linearly.
To do this, use
technique works well
don't
to
The
most basic use
the
but
"merely" uses
a very powerful feature. Having worked with
QX21 for a year (with only 2 tracks capable
being stored
on
the
The
QX5
used to expand
and
recall capabilities
that
is
helpful
a brass ensemble for a 12-bar chorus
back
of
the
edit,
You
may decide instead
again, you have only
inserted into
And
if you
and
the
the
the
change from verse to verse; you could
keep
short
Event Edit insertion
on
QX5 are very impressive.
is
a very powerful tool, which
in
practically
at
least some
(and
edit as nec-
with
a Program
at
the
top,
and
another
to
the
original voice
13th
measure.
say,
eight Program Changes
rather
Event Edit mode to insert
the
cassette),
the
than
and
edit
the
final two bars
can
the
appropriate places
haven't
of
a song, you
chorus to separate macros,
Measure Edit
sound
and long versions
of
the
versatility
Rather
the
four
in
a very complex
one
of
the
at
be step recorded,
yet decided
in
"Create"
of
perhaps 120 mea-
and
ending macros.
with
the
onto
from
to
redo everything.
the
macros
technique
macros as 32 addi-
which
the
40 storage loca-
of
the
of
that
any
QX5
of
your
Change
Pro-
at
than
brass voice
one
simple
Program
to
switch to
of
macro
macro fea-
this point.
can
copy
arranging
basic parts
other
QX5
being
too
in
coming
of
doesn't
by itself
can
the
FB-0
the
the
to
in
the
job
the
the
at
1.
Vol.
4 No. 4/ AITERTOUCH
17
Page 18

Hot
Tips
Reader Tips
For
The
ffi
SPX90,
And
More.
..
Ol,
Converting
the
FB-01
By
Jerry
I find
the
OX
01. I do this
FB-01 parameter value ranges. To do this I
simple proportion. For example, if the output
level
as
follows:
X
(127
99
is
This works out
(127
Therefore, "X"
off
to
output level for
I
use
eters, substituting 31 or
above formula (depending
01 value), and also substituting for the 99
above formula (depending
mum
ballpark for the sound
just the values slightly for
cially
I realize
the
different resolutions
their total range
does give me a good starting point for using
DXlOO-style voices
SPX90
By
Bill
One
Reverb &
often used
ahead
thus allowing only those signals with sufficient
amplitude to "open"
ambient treatment.
adjusting
instrument levels of
(and your mixer's effects send level), you
DX100-Style
J.
Miller
that
I am able
100,
DX2
7,
and DX21 for use
by
changing the values to fit the
on
a DX100 operator
-:-
12
7 =
80
-:-
is
the
maximum
the
maximum
to
be:
X 80)
-:-
99 = X
is
equal to 102.6, which rounds
103.
103
is
the
the
same formula for
value).
the
of
of
This
ADSR
&
Thompson
the
the
values).
that
this
on
RX
Series
my favorite programs
Gate
(preset
Gated
Reverb, it positions
reverb processor in
threshold level
Patches
to
convert patches for
is
99
output
output
the
corresponding operator
FB-01.
15
on
on
usually gets me
of
the patch. I
the
method
of
the two instruments, but it
on
my FB-01.
Interaction
#20).
the
gate and receive
In
other
the
rhythm programmer
For
Use
on
my
use
80,
the
formula
for
the
FB-01, and
for
the
DX100.)
the
other
param-
for
the
12
7 in the
the
maximum
in
the
DXlOO
best sounds (espe-
doesn't recognize
the
values within
on
Unlike
the
words,
of
the
maxi-
into
then
the SPX90
the
more
the
signal path,
by
carefully
SPX
and
On
FB-
FB-
the
the
ad-
gate
the
the
can
is
have the reverb only triggered
the
snare
and
toms, while allowing the hi-hat,
shaker, and cowbell to remain "dry." In fact,
setting the accent levels for each instrument
with this in mind will prevent
level from getting
beats
introduce
notes:
a
is
1) Getting the kick (BD) level
without engaging
difficult,
ments to 0
track
using a
program (such
return the levels
the
"Reverb &
open
reverb, any and all sounds present
pulse will get
getting the reverb
use
that
that
beat, especially
ism to
of
remember
instruments
tom), while
ally to open
sufficient level to kick it
a drummer and a percussionist have only four
hands between them. Especially with intense
ambience,
SPX90, starting from the Reverb &
(#20):
The
the
note
so I turn
and
of
the
YMClO), usually with a different SPX
kick from the drum mix, and reinstate the
Gate"
2)
When
the
gate,
the
RX's Clear
overlap with
not
having
the
programming; the same
kick/
snare
in
less
Here
are some example settings for
Reverb Time: 2.0
High:
0.6
Delay: 22.0
HPF:
80Hz
LPF:
Thru
Trg Level:
Hold: 484
Release: 44
MIDI Trg: OFF
Trigger Level
Hold
and
durations.
the
the
effect. Two
the
the
levels
record the kick
MT2X (after printing a sync track
as
"Early Reflection"); then, I
to
their previous state, remove
program.
the
SPX receives enough level to
thus
providing
the
treatment. In order to avoid
on
the hi-hat, for instance,
button
the
snare.Jn
the
hat
on
16th-note feels, lends real-
overlap.
this
arrangement
on
one
beat
not
having enough level individu-
the
gate, can combine to produce
is
more. Happy tracks!
ms
71
ms
ms
is
the critical tweak. Adjust
Release for different tempos and
by
(for instance)
the
reverb, while accented
ambience
and snare
One
off.
is
of
the other instru-
by
itself onto one
input
on
to erase any events
general, I find
on
other
is
(say,
rimshot
Bear in mind, even
unaccented
important
hot
enough
frequently
to
the
that
clock
the same
is
often true
thing
that
two
and
the
Gate
preset
to
18
AFTERTOUCH!Vol. 4
No.4
Page 19

Back
Issues
.
INCE
S
AfterTouch index in
sue, requests from readers for back issues have
jumped
cially surprising because requests for back issues
have been heavy
we
first announced their availability.
Unfortunately,
requests has depleted our stock
the case
of
back issues has been completely
and
severely depleted.
This
fulfill back issue requests:
out a back issue when
mail out.
However, due to
material from our earlier issues, Yamaha
TET
Lfor
looking for many different kinds
other
for
the
THE
PUBLICATION
by
an
astounding number.
and
steady, from
this
of
many
of
our earlier issues,
the
stock
of
most of
makes it impossible for
we
the
US
HEAR
all
users
FROM YOU!
of
Yamaha professional musical products, so please join in. We're
Have you created
members
CXSM
of
II
the
music
of
the
January 1988
This
the
massive
of
back issues: In
handed
the
remaining issues
us
to
We
simply
don't
have any left to
enormous
an
incredible
the
is
espe-
moment
number
the
supply
out,
continue
can't
mail
demand
is
con-
We
want AfterTouch to be
of
material.
patch
sidering various ways to
is-
information available. Unfortunately, since
approach
quite costly, it will be impossible
offering
free.
Yamaha will
of
research into
ation
here
In
is
more requests for back issues.
magazines
to
requests.
If you have already
not
that
sorry for this inconvenience.
for
for
the
to
reprinting
the
information from previous issues for
announce
the
in
the
next
few
in
the
pages of AfterTouch.
the
meantime, please
left
with
yet received your issues, you should assume
your order was impossible to fulfill.
DX7 II,
the
continue
this
AfterTouch back issue situ-
months-watch
which
sent
in
an
information network
DXlOO, or any
to
material
the
results
do
not send
There
to
a request
make this
will
to
continue
of
for it right
us
are no more
fulfill
but
We
of
Yamaha FM digital synthesizer family? How about a program
computer
or
a great
pattern
or
voice for
the
RXS?
Send
any
be
its
any
your
have
are
the
in
your patches, programs, and patterns. If we use your material, we'll give you full
credit
Yamaha After Touch products?
hot
ments, or have you discovered
paper and send it
tion
write it up,
article always covers
double-spaced pages
patches,
close a self-addressed, stamped envelope
products, send it along too,
After Touch. (We regret
but
lish direct
to our
numbers
plus $25.00 for
Have you discovered a trick
each
item used.
that
Send
increases
it in to our
the
musical flexibility of
"Hot
Tips" column. If
tip, you'll receive full credit plus a check for $25.00.
Have you developed a new approach to
an
important secret regarding their use?
to
us.
Don't
worry about your writing
down. If we decide to use your material
put
your
name
on
it,
and
send you a check for $100.00.
at
least
one
magazine
of
typescript.)
By
the
way,
we
or
manuscripts.
cannot
assume liability for
We
will only be able to
If you just have a question regarding
and
we'll do our best to answer it
that
we
won't
we will use all
Finally, if you just
contact
"Letters" column. We'll do
of
all those
AfterTouch
of
your questions to guide
want
to
get something off your chest, or if you'd like to estab-
with
other
Yamaha After Touch product users, send
who
are interested
is
your publication. Let
our
one
of
the Yamaha After Touch instru-
as
a full article
page-which
the
safe
return
with
your submission.
the
use
of
Yamaha professional musical
be able to answer questions through
us
in our choice
best to
in
us
print
names, addresses,
starting
up
regional users groups.
hear from you!
one
of
the
we
use your
Put
it
style-just
get
the
informa-
in
After Touch, we'll
(An
AfterTouch
translates to at least four
return
of
unused ideas,
unused material if you en-
in
the
pages
the
mail,
of
future topics.)
in
something
and
phone
on
of
Vol.
Important
Information
All
For
After Touch
Readers.
Write
To:
AfTERTOUCH,
P.O.
Box
Northridge,
91327-7938.
4 No.
41
AFfERTOUCH 19
7938,
CA
Page 20

AFTERTOUCH
P.
0.
Box
7938
Northridge, CA
91327~
7938
20
AITERTOUCH!Vol. 4 No. 4
 Loading...