

Yamaha RTX5000 Instruction Manual

ZN38620
RTX5000
Router
Instruction Manual
Thank you very much for purchasing the Yamaha RTX5000.
Please carefully read this manual before use to ensure appropriate installation and conguration.
Please ensure to follow all the warnings and precautions provided in this manual in thereby ensuring appropriate
and safe use.
Please retain this manual in a safe place for future reference.
Please ensure you have all the following accessories
• Power Cable (1 pc)
• LAN cable (1 pc)
• Serial Cable (1 pc)
• Power Cable Clamp (1 pc)
• Metal Fittings & Screws for Rack Mount (2 Metal Fittings, 10 Screws)
• Instruction Manual (this document)
• CD-ROM (1 pc)
Particular usage in this manual
Abbreviations
The following product names will be abbreviated as below in this manual
• Yamaha RTX5000: This product
• Microsoft® Windows®:Windows
• 10BASE-T/100BASE-TX/1000BASE-T Cable: LAN Cable
Concerning trademarks
• All the company and product names used in this manual are registered trademarks or trademarks of the
companies concerned.
• This product is equipped with RSA® BSAFE™ software of RSA Security Inc. RC4 and BSAFE are the
registered trademarks of RSA Security Inc. in the U.S. and other countries.
• This document provides information on using the basic functions of the product. More detailed information is available from the
following website, (http://www.yamaha.com/products/en/network/). Please ensure to refer to it as necessary.
• No part of this document may be copied or used in any form without prior permission from Yamaha.
• The contents of this document and the specications for main body may be changed for improvement without advanced notice.
• Our company cannot accept any responsibility for any damages such as the loss of any information that occurs as a result of using the
product. Please be forewarned.
Important notice
Caution when Transferring/Disposing of the Product
• When transferring/disposing of the product please perform the following.
1. Delete the netvolante DNS registration.
2. Initialize all the congurations.
• If you transfer the product you will also need to transfer the instruction manuals.
• A lithium battery is used in the product as a power backup for the clock function. Ensure to follow the
instructions of your local government when disposing of the battery.
Safety precautions
Please ensure to carefully read and observe the following precautions in thereby ensuring safe use of the product.
The cautionary advice provided in this document concerns the appropriate and safe use of the product and the
prevention of any risk to customers and other people, or damage to any assets.
Please ensure to retain it somewhere anyone using the product can access at any time after having rst thoroughly
read it.
1. This product is intended for use in general ofces and was not designed for use in any elds requiring a high
degree of reliability in the handling of human lives or valuable assets.
2. Please ensure to only use the included dedicated power cable. Failure to observe this could result in re,
electric shock, or damage to the product.
3. Ensure to immediately remove the power cable from the outlet in case of any of the following. Failure to
observe this could result in re or an electric shock.
• Any abnormal odor or noise occurs;
• Smoke is emitted;
• The product is broken; or
• The product has been exposed to water.
4. Ensure not to handle the product and power cable with wet hands. Failure to observe this could result in
electric shock or damage to the product.
5. Do not insert any metal, paper, or foreign objects into any of the gaps in the panel. Failure to observe this
could result in re, electric shock, or damage to the product.
6. Do not disassemble or alter this product in any way. Failure to observe this could result in re, electric
shock, or damage to the product.
7. Ensure not to damage the cable. Failure to observe this could result in re, electric shock, or damage to the
product.
• Ensure not to place any heavy objects on the cable.
• Ensure not to process the cable in any way.
• Ensure not use any staples to x the cable in place.
• Ensure not to apply excessive force to the cable.
• Ensure to keep the cable away from anything hot.
8. Please ensure to only use a power source voltage designated. Use of the product with a different power
voltage could result in re, electric shock, and damage to the product.
9. Connect the power plug to an outlet that you can see and reach in thereby ensuring that you can easily
remove it if the necessity arises.
10. Ensure to fully and securely insert the power plug into the outlet. Being insufciently inserted could result in
an electric shock. It could also lead to dust accumulating on the plug, which could then result in heat or re.
11. Ensure not to touch any of the ports with your ngers or anything metallic. Failure to observe this could
result in electric shock or damage to the product.
12. Ensure the product does not fall or strongly impacted. The internal parts could break, which could then result
in electric shock, re, or damage to the product.
13. Ensure not to install the product anywhere dusty/humid, or where it will be exposed to oily smoke/steam,
corrosive gas. Failure to observe this could result in re, electric shock, or damage to the product.
14. Ensure adequate heat ventilation. Failure to observe this could result in re or damage to the product.
• Ensure not to cover the product with a cloth or tablecloth.
• Ensure the product does not get pushed into a narrow, poorly ventilated place.
• Ensure the ventilation holes and fan do not get blocked.
15. The RTX5000 utilizes a fan to cool the inside of the equipment down. Ensure to periodically conrm that
the fan is operating normally. If the fan does fail then it will not cool the equipment down enough and could
result in re or damage to the equipment. Ensure to immediately turn off the equipment if the fan does fail.
16. Ensure not to touch the product or the power cable if you hear any thunder. Failure to observe this could
result in electric shock.
17. Please install the product transverse. Installation of the product upside down or longitudinal results in re,
electric shock, or failure.
18. Ensure not to install the product anywhere unstable or where it will be exposed to vibrations as it could fall
over or turn upside down, thus resulting in injury or damage to the product.
19. Ensure not to install the product anywhere it will be exposed to direct sunlight or extraordinarily high
temperatures (near a heater, etc.). Failure to observe this could result in damage to the product.
20. Ensure not to use the product anywhere it will be exposed to rapid changes in the ambient temperature. Any
rapid change in the ambient temperature could result in condensation on the product, which could then result
in damage to the product. Ensure to leave the product for a while until it has dried off with the power turned
off if any condensation has occurred.
21. Ensure not to stack the product with other equipment. Failure to observe this could result in heat building up
and damage to the product.
22. Ensure to use the included screws when you mount the product on a rack. Using screws not included may
result in the cause of failure and drop off.
23. Ensure to earth any static electricity from your body or clothing before touching the product. Failure to
observe this could result in damage to the product.
Operating Precautions
1. Our company does not take any responsibility for all of losses occurred as the result of wrong usage and
settings of this product, so please be forewarned.
2. Please do not place the product on the location where magnetic eld is strong.
3. Ensure not to connect any noise generating devices on the same power line as the product. Failure to observe
this could result in a malfunction or damage to the product.
4. Use of the product can result in noise being generated in telephones, radios, and TVs. If any noise does
occur then please change the place or direction in which the product is installed.
5. A 1000BASE-T connection will require an Enhanced Category 5 (CAT5e) or better LAN cable.
6. Do not wire communication cable closer to power cable, etc. Large induced voltage could result in
malfunction.
7. During the time when you do not use this product, ensure to remove the power plug from outlet.
8. If you reprovision the power of this product to be ON, take interval for more than 10 seconds after PWR
Lamp extinction.
9. Do not turn the power of this product to be OFF during revision up and setting saving. Failure to observe
this could result in the possibility, unable normal start-up of this product.
SOFTWARE LICENSE AGREEMENT
This License Agreement (the "AGREEMENT") is a legal agreement between you and Yamaha Corporation
("YAMAHA") under which YAMAHA is providing the firmware of YAMAHA’s router products (the
"PRODUCT") and relat ed software program, documentation and electronic files (collec tively, the
"SOFTWARE").
This AGREEMENT applies to the SOFTWARE which YAMAHA provides you and the installed copy thereof,
subject to the provision of 1-1 herein, into the PRODUCT or personal computer owned by you.
1. GRANT OF LICENSE:
1-1. YAMAHA grants you a personal non-exclusive license to install the SOFTWARE and use the SOFTWARE
on the PRODUCT or other devices, including but not limited to the personal computer, which you own.
1-2. You shall not assign, sublicense, sell, rent, lease, loan, convey or otherwise transfer to any third party, upload
to a web site or a server computer to which specied or unspecied persons may access, or copy, duplicate,
translate or convert to another programming language the SOFTWARE except as expressly provided herein.
You shall not alter, modify, disassemble, decompile or otherwise reverse engineer the SOFTWARE and you
also shall not have any third party to do so.
1-3. You shall not modify, remove or delete a copyright notice of YAMAHA contained in the SOFTWARE.
1-4. Except as expressly provided herein, no license or right, express or implied, is hereby conveyed or granted
by YAMAHA to you for any intellectual property of YAMAHA.
2. OWNERSHIP AND COPYRIGHT:
The SOFTWARE is protected under the copyright laws and owned by YAMAHA. You agree and acknowledge
that YAMAHA transfers neither ownership interest nor intellectual property in the SOFTWARE to you under this
AGREEMENT or otherwise.
3. EXPORT RESTRICTIONS:
You agree to comply with all applicable export control laws and regulations of the country involved, and not to
export or re-export, directly or indirectly, the SOFTWARE in violation of any such laws and regulations.
4. SUPPORT AND UPDATE:
YAMAHA, YAMAHA's subsidiaries and affiliates, their distributors and dealers are not responsible for
maintaining or helping you to use the SOFTWARE. No updates, bug-xes or support will be made available to
you for the SOFTWARE.
5. DISCLAIMER OF WARRANTY:
5-1. THE SOFTWARE IS PROVIDED "AS IS" WITHOUT WARRANTY OF ANY KIND, EITHER
EXPRESS OR IMPLIED, INCLUDING, BUT NOT LIMITED TO THE IMPLIED WARRANTIES OF
MERCHANTABILITY AND FITNESS FOR A PARTICULAR PURPOSE.
5-2. IN NO EVENT SHALL YAMAHA, YAMAHA'S SUBSIDIARIES AND AFFILIATES, THEIR
DISTRIBUTORS AND DEALERS BE LIABLE FOR ANY DAMAGES WHATSOEVER (INCLUDING
WITHOUT LIMITATION, LOSS OF BUSINESS PROFITS, LOSS OF BUSINESS INFORMATION,
LOS S OF BUSINESS INTERRUPTION OR OTHER INCIDENTAL OR CON SEQUENTIAL
DAMAGES) ARISING OUT OF THE SOFTWARE, USE THEREOF, OR INABILITY TO USE
THEREOF EVEN IF YAMAHA, YAMAHA'S SUBSIDIARIES AND AFFILIATES, THE IR
DISTRIBUTORS OR DEALERS HAVE BEEN ADVISED OF THE POSSIBILITY OF SUCH
DAMAGES. SOME STATES DO NOT ALLOW THE LIMITATION OR EXCLUSION OF LIABILITY
FOR INCIDENTAL OR CONSEQUENTIAL DAMAGES, SO THE ABOVE LIMITATION OR
EXCLUSION MAY NOT APPLY TO YOU.
5-3. YAMAHA, YAMAHA'S SUBS IDIARIES AND AFFILIATES, THEI R DISTRIBUTORS AND
DEALERS SHALL HAVE NO OBLIGATION TO INDEMNIFY YOU AGAINST ANY CLAIM OR
SUIT BROUGHT BY A THIRD PARTY ALLEGING THAT THE SOFTWARE OR USE THEREOF
INFRINGES ANY INTELLECTUAL PROPERTY OF SUCH THIRD PARTY.
6. TERM:
6-1. This AGREEMENT becomes effective upon your agreeing the terms and conditions herein and continues in
effect unless or until terminated in accordance with the provision of 6-2 or 6-3 herein.
6-2. You may terminate this AGREEMENT by deleting the SOFTWARE installed into the PRODUCT.
6-3. This AGREEMENT will also terminate if you fail to comply with any of the terms and conditions of this
AGREEMENT.
6-4. In case this AGREEMENT is terminated in accordance with the provision 6-3, you shall promptly delete the
SOFTWARE.
6-5. Notwithstanding anything contains herein, Sections 2 through 6 shall survive any termination or expiration
hereof.
7. SEVERABILITY:
In the event that any provision of this AGREEMENT is declared or found to be illegal by any court or tribunal
of competent jurisdiction, such provision shall be null and void with respect to the jurisdiction of that court or
tribunal and all the remaining provisions of this AGREEMENT shall remain in full force and effect.
8. U.S. GOVERNMENT RESTRICTED RIGHTS NOTICE:
The SOFTWARE is a "commercial item," as that term is dened at 48 C.F.R. 2.101 (Oct 1995), consisting of
"commercial computer software" and "commercial computer software documentation," as such terms are used in
48 C.F.R. 12.212 (Sept 1995). Consistent with 48 C.F.R. 12.212 and 48 C.F.R. 227.7202-1 through 227.72024 (June
1995), all U.S. Government End Users shall acquire the SOFTWARE with only those rights set forth herein.
10. GOVERNING LAW:
This AGREEMENT shall be governed by and construed in accordance with the lows of Japan without reference
to the principles of conict of laws.
Open Source Software Used in this Product
Please refer to YAMAHA Network Equipment Home Page for the details of licensing article.
http://www.yamaha.com/products/en/network/
9. ACKNOWLEDGMENT:
You agree that this AGREEMENT is the complete and exclusive statement of agreement between you and
YAMAHA concerning the subject matter hereof and supersedes all proposals or prior agreements, verbal
or written, and any other communications between you and the parties relating to the subject matter hereof.
NO amendment to this AGREEMENT shall be effective unless signed by a duly authorized representative of
YAMAHA.
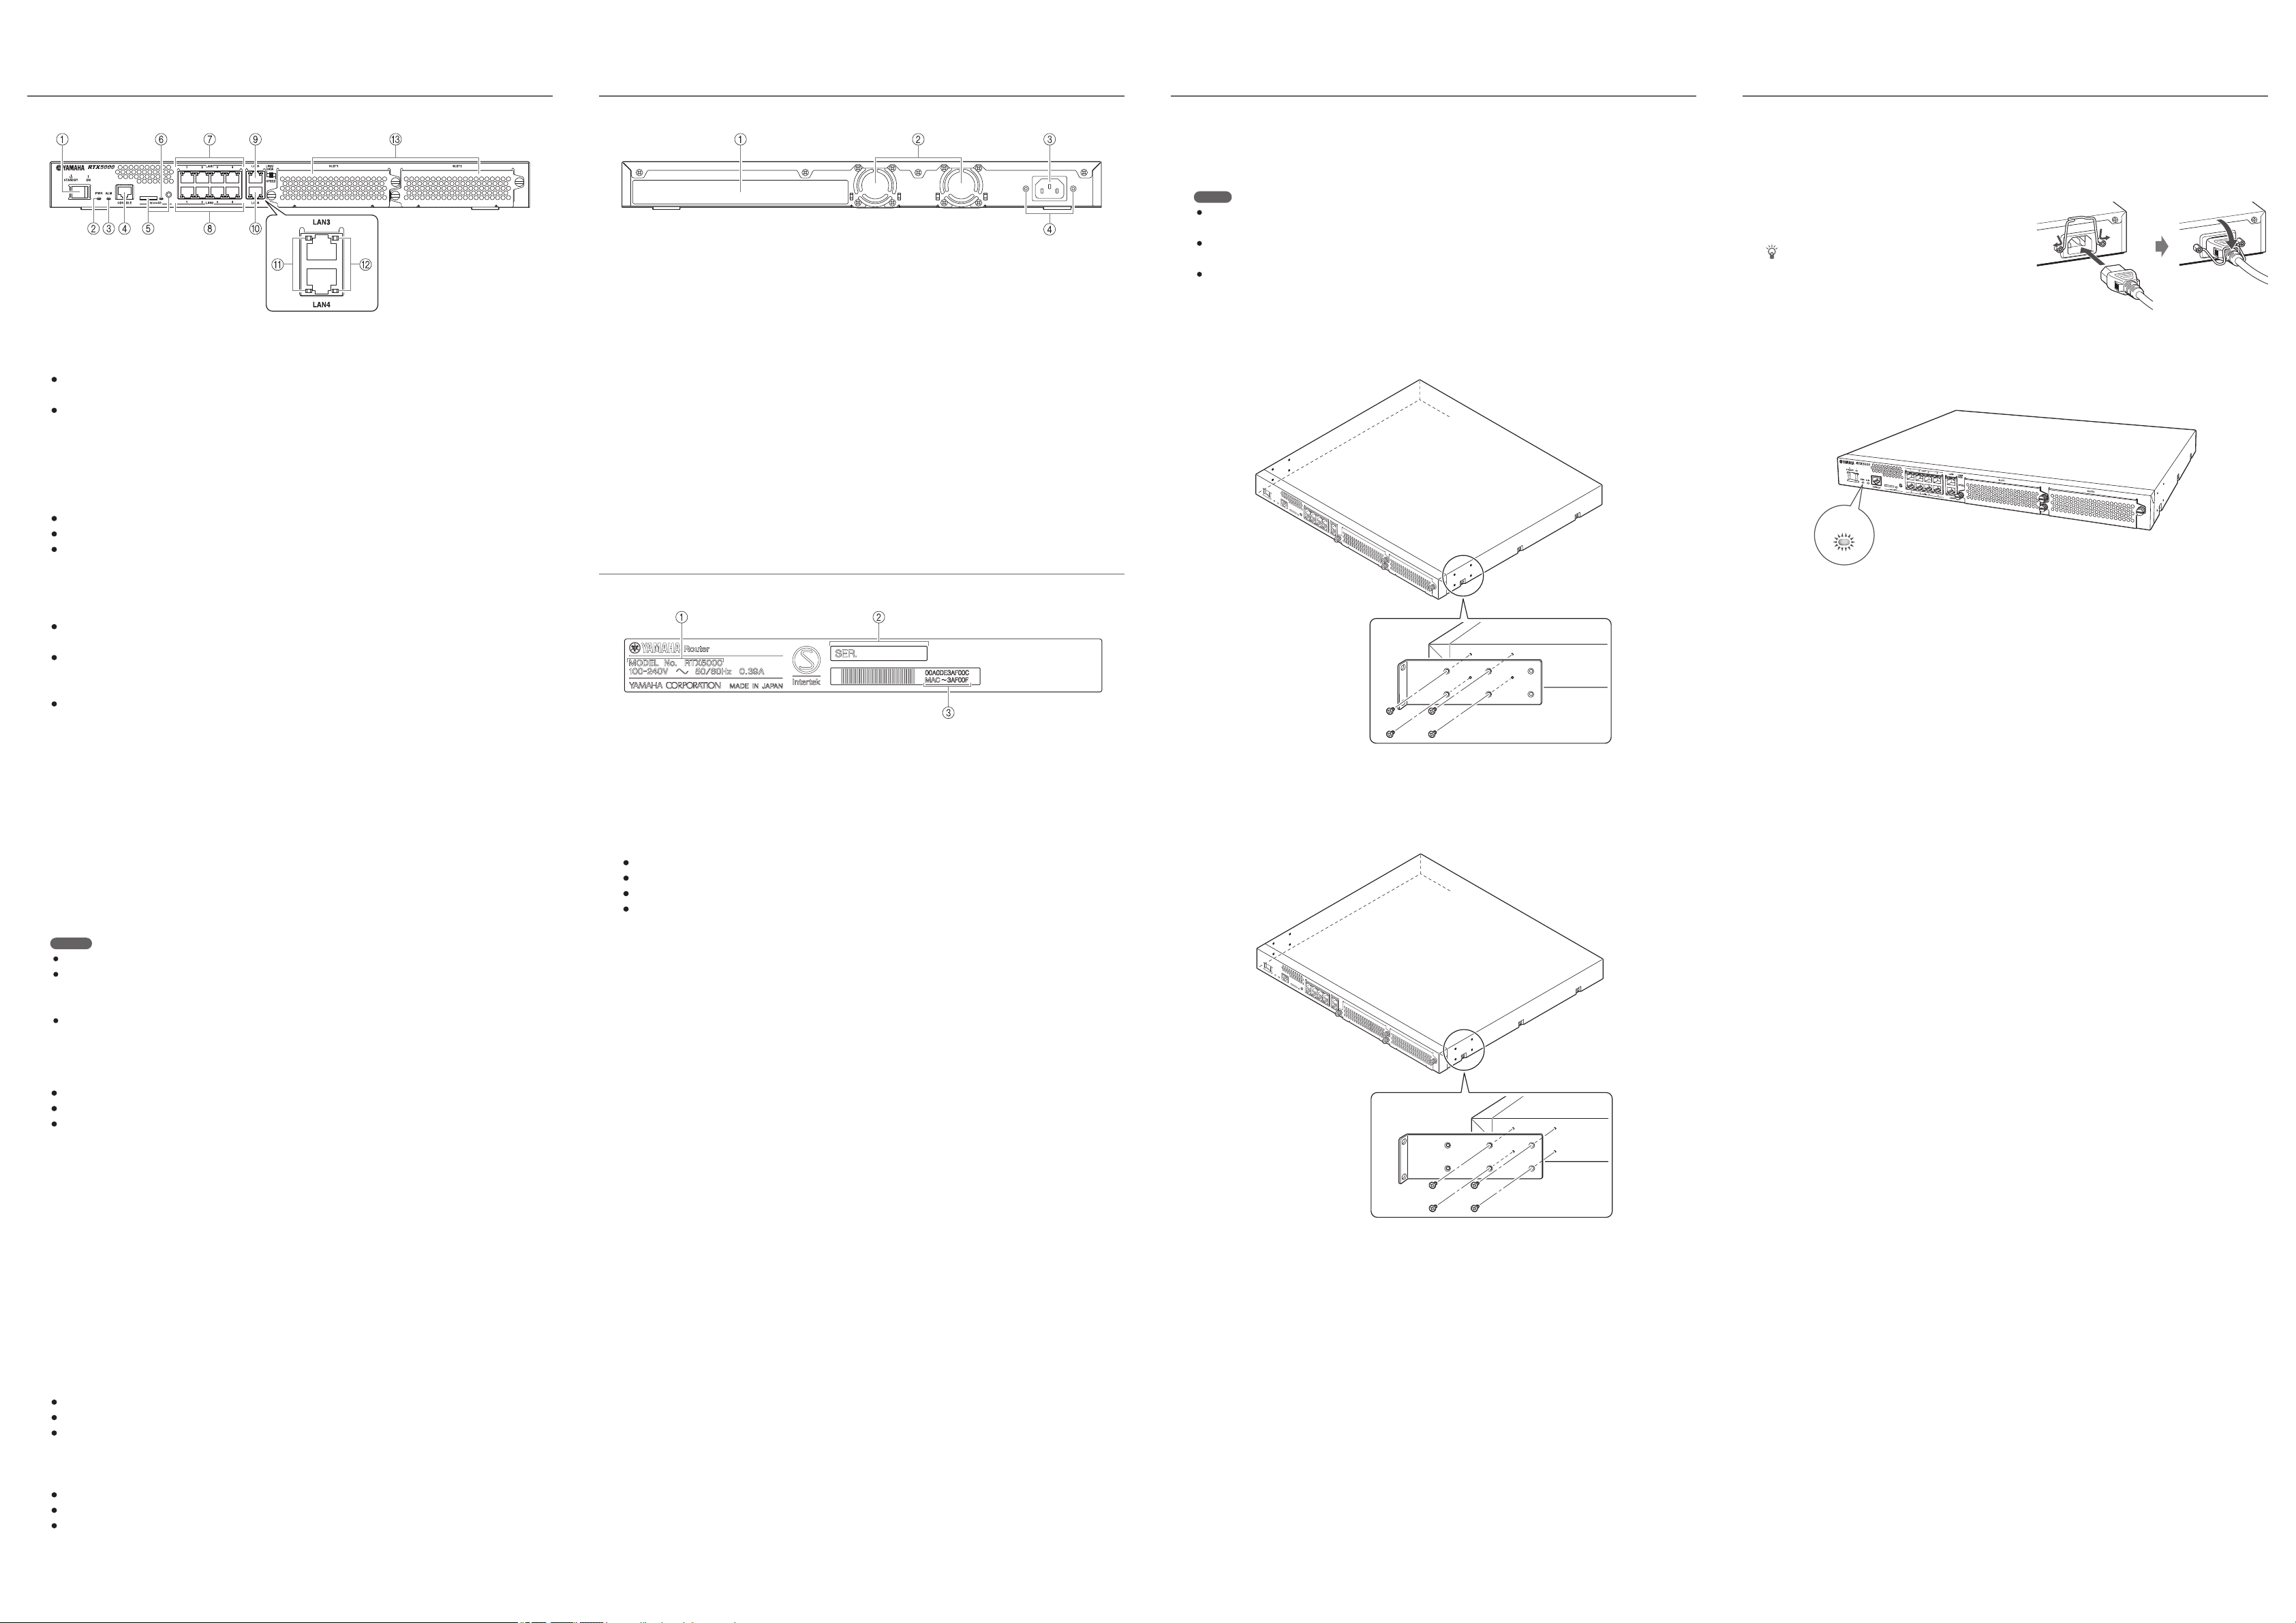
Name and function of the individual parts
Preparation
Front Surface
POWER Switch
Turning ON/STANDBY of the product power supply.
• ON: Turn the POWER Switch to be ON after connecting the power cable with the product when you start up
the product.
• STANDBY: Turn the POWER switch to be STANDBY when you cease the operation of the product. The
power of product is automatically turned off after the end processing such as log le saving.
In addition, the problem may be resolved by turning the POWER Switch to be STANDBY and turning the
switch to be ON again when trouble occurred on the product such as no recognition of CONSOLE Port, etc.
PWR Lamp
The lamp indicates the power status of product.
• Turns Off: Power is OFF.
• Turns Green: Under operation.
• Flashes Green: Under start-up just after POWER Switch being ON or under shut down just after POWER
Switch being STANDBY.
ALM Lamp
Indicates the trouble information of product: Red ALM lamp turns on in the following cases;
• Abnormal Self-Diagnosis
The lamp turns ON when failure is detected in the product.
• Fan Stopping
The lamp turns ON when stopping fan which exhausts heat generated by the product.
Stop the use immediately.
• Abnormal Temperature in the Product
The lamp turns ON when product internal temperature is abnormal.
Ensure to install the product properly upon reviewing installation environment in order for internal product
temperature being proper
Fan operation status and internal product temperature are able to be confirmed with [show environment]
command.
CONSOLE Port
This is the RJ-45 port for setting.
Connect to RS-232C terminal (COM Port) of PC with the included RJ-45/DB-9 serial cable.
e
microSD Slot and Button
This is the slot to insert microSD/ microSDHC card.
When removing the microSD card, press microSD Button for more than 2 seconds and remove the card after
microSD Lamp being OFF.
Notes
• The microSD slot in this product may not guarantee the performance of all microSD cards.
• The performance check of microSD card is possible with the command, external-memory performance-test go. Refer to the
following URL for the details of microSD card;
http://www.yamaha.com/products/en/network/
• We would recommend the data on microSD to be backed up periodically. Our company does not take any responsibility for the loss
due to data loss and destruction during your usage of this product. Please be forewarned.
f
microSD Lamp
This indicates connection/ usage status of microSD card.
• Turns Off: microSD card is not inserted in the slot. Or, microSD card is in the status of removable.
• Turns Green: microSD card is inserted.
• Flashes Green: Accessing to the microSD card.
LAN-1 Port
This is the 10BASE-T,100BASE-TX,1000BASE-T Port.
This is the 4-Port Switching Hub.
h
LAN-2 Port
This is the 10BASE-T,100BASE-TX,1000BASE-T Port.
This is the 4-Port Switching Hub.
i
LAN-3 Port
This is the 10BASE-T,100BASE-TX,1000BASE-T Port.
Rear Surface
Nameplate
Equipment name, serial number, MAC address, etc., of this product are written.
Refer to [Nameplate] for details.
Ventilation Hole
The product internal heat is ventilated with a fan forcibly.
When installing the product, please give consideration not to block the ventilation hole. If not installed properly,
this might be the cause of failure and re.
Power Inlet
Insert the power cable included. Connect the power plug into the outlet of AC 100-240V (50/60Hz).
Metal Fitting for Preventing Power Cable Disconnection
Insert the included metal tting for preventing power cable disconnection (U-shaped type) into the metal tting
hole at main body side before mounting the power cable.
Pull up the metal tting for preventing power cable disconnection after mounting the power cable. This prevents
the sudden disconnection of the power cable.
Nameplate
Equipment Name
Serial Number
MAC Address
MAC address allocated to each of LAN1, LAN2, LAN3 and LAN4 is written. For example, the following MAC
addresses are set on LAN-1 through LAN-4.
• LAN-1 MAC Address: [00:A0:DE:3A:F0:0C]
• LAN-2 MAC Address: [00:A0:DE:3A:F0:0D]
• LAN-3 MAC Address: [00:A0:DE:3A:F0:0E]
• LAN-4 MAC Address: [00:A0:DE:3A:F0:0F]
19-inch Rack installation
The product is compatible with 1U size of 19-inch rack mounting. When mounting the product into 19-inch rack,
use rack mount metal ttings included (2 PCS) and screws included (8 PCS).
The 19-inch rack mounting metal ttings should be equipped as the main body front surface facing the front
direction.
Note
• If the main body of the rack has a door, sufcient care should be taken not to touch any LAN and power cables when mounting the
main body and the necessary wiring.
• When mounting metal tting on the product, mount 4 screws per metal tting to x it securely in place with a Philips-Head screw
driver.
• Never use screws other than countersunk screws for metal tting mounting included.
Method-A: Mount the rack screw surface of metal fitting for 19-inch rack mounting and the front
surface of the product in the same plane.
Mount the metal tting for 19-inch rack mounting on the product.
Securely x by using 4 countersunk screws for metal tting mounting included.
Method-B: Mount at the 4cm back position than the Method-A.
Mount the metal tting for 19-inch rack mounting on the product.
Securely x by using 4 countersunk screws for metal tting mounting included.
Connections
Connect the LAN port of the network equipment to the LAN port of the product using a
1
LAN cable.
Connect the power cable of the product to a
2
Power Inlet.
Tip
It is recommended that Metal Fitting for Preventing Power Cable
Disconnection included should be mounted in order to prevent
sudden power cable disconnection. Insert the metal tting into the
hole at main body side before connecting power cable included and
x by pressing down the metal tting after power cable connection.
Connect the power cable of the product to an outlet.
3
PWR Lamp turns ON when turn the POWER Switch to be ON.
PWR
Turn the power of the network equipment connected to the product ON.
4
The lamp of the port to which the network equipment is connected being ON or ashing indicates the status is
normal.
The lamp did not turn ON and is not flashing
/
Ensure to verify that the LAN cable is properly connected and the power of the connected network equipment is ON.
1. Insert the metal
fitting into the
hole on the side
of the main body.
2. Clamp the
cable in place by
pressing down on
the metal fitting.
Major specifications
External Dimensions (width x height x depth (protrusions excluded)):
445mm x 44mm x 400mm
Weight:
4.7kg (accessories excluded)
Power Voltage, Frequency:
AC100-240V (50/60Hz)
Power consumption:
Max. 38 W
Current Consumption:
0.39A, Max
LAN Interface:
Ethernet (RJ-45), 10BASE-T/100BASE-TX/1000BASE-T
Number of Ports: 4 (LAN1/LAN2 port is 4 port switching hub)
Polarity: Straight/ Cross Auto-Distinction or Straight Fixed
Communication Mode: Auto-Negotiation or Fixed Setting
Serial Interface:
RS-232C (DTE Fixed) - RJ-45
Data Transfer Speed: 9,600 bits/sec
microSD Slot:
microSD/ microSDHC (microSDXC is not supported)
File System: FAT or FAT32
Operating environment:
Ambient temperature: 0 ~ 40 ºC
Ambient humidity: 15 ~ 80% (no condensation)
LAN-4 Port
This is the 10BASE-T, 100BASE-TX, 1000BASE-T Port.
LINK/DATA Lamp
This indicates the status of LAN Port.
• Turns Off: LAN is under the status of unusable. (Link lost)
• Turns Green: LAN is under the status of usable. (Link established)
• Flashes Green: Data is owing in the LAN. (Data under transfer)
Speed Lamp; 10/100/1000
This indicates the connection speed of LAN port.
• Turns Off: No connection or connected with 10BASE-T
• Turns Orange: Connected with 100BASE-TX
• Turns Green: Connected with 1000BASE-T
Expansion Slot
Never open the slot.
Storage environment:
Ambient temperature: -20 ~ 50 ºC
Ambient humidity: 10 ~ 90% (no condensation)
Indication function (LED):
Front panel: PWR, ALM, LAN (LINK/DATA, SPEED)×10, microSD
Regulatory Compliance:
Safety: IEC 60950-1, EN 60950-1
EMC: EN 55022 Class A, EN 55024
Accessories:
Power Cable (1 pc), LAN cable (1 pc), Serial Cable (1 pc), Power Cable Clamp (1 pc),
Metal Fittings & Screws for Rack Mount (2 Metal Fittings, 10 Screws),
Instruction Manual (this document), CD-ROM (1 pc)
(April 2014, 1st edition)
 Loading...