

Yamaha NS-P7900, NS-6900, NS-7900 Owner's Manual

21
Thank you for choosing this YAMAHA speaker system.
Each speaker set consisting of the components shown on the table.
NS-6900/NS-7900/NS-P7900
Speaker System
OWNER’S MANUAL
■ Read this before using the speaker
• Any time you note distortion, reduce the volume control on
your amplifier to a lower setting. Never allow your
amplifier to be driven into “clipping”. Otherwise the
speaker may be damaged.
• When using an amplifier with a rated output power higher
than the nominal input power of the speaker, care should
be taken never to exceed the speaker’s maximum input.
• Do not attempt to clean the speaker with chemical
solvents as this might damage the finish. To clean, wipe
with a dry, soft cloth.
•To prevent the enclosure from warping or discoloring, do
not place the speaker where it will be exposed to direct
sunlight or excessive humidity.
PRECAUTIONS
The speaker is constructed with the
majority of the weight located in its
upper portion, and is thus susceptible to
falling over if proper care is not taken to
insure its stability. If the speaker falls
over, it may damage the speaker or be
the cause of injury (or even death) to
persons and/or damage to personal
property.
PRECAUTIONS WHEN POSITIONING THE FRONT SPEAKERS
Vibrations or jolts associated with earthquakes and other
phenomena or activities may cause the speaker to fall over.
For safety reasons, using commercially available products
that increase stability in the speaker is recommended (metal
fittings or chains, etc.).
■ Use the stands included with the speaker
to increase stability:
Be sure to use the stands regardless of where the speaker
is positioned. Attaching the stands included with the
speaker reinforces the base of the speaker not to fall over.
Please be cautioned that even though the stands are
connected, this does not guarantee that the speaker will not
fall over.
• When the front cover is removed, take care not to touch
the speaker units with your hands or to exert excessive
force with tools.
• Do not place the speaker where it is liable to be knocked
over or struck by falling objects. Stable placement will
also ensure better sound performance.
• Secure placement or installation is the owner’s
responsibility.
YAMAHA shall not be liable for any accident caused by
improper placement or installation of the speaker.
• This speaker features a magnetically shielded design, but
there is still a chance that placing it too close to a TV set
might impair picture color. Should this happen, move the
speaker away from the TV set.
SUPPLIED ACCESSORIES
SETTING UP THE SPEAKER
Speaker cable (4m) x 1
■ For safe and proper use of the speaker:
• Position the speaker in a location that is solid, level, smooth,
and low (with respect to the floor).
• Do not push or apply pressure to the side of the speaker
when moving, or lean objects against the side of the speaker.
• Do not sit on or set objects on top of the speaker.
Pad x 4Stand x 4 Tapping screw (4mm) x 8Speaker cable (4m) x 1
Fastener x 2
Speaker cable (10m) x 2
Front speaker (NS-6900/NS-7900)
Center speaker (NS-C7900)
■ Using front speakers as 2ch stereo
speakers
Better stereo images will be obtained when the front
speakers are slightly angled in towards the listeners.
■ Using front/center/surround speakers in a
multi channel system
Position the front speakers on both sides of the TV. The
positioning of speakers is important, because it controls
the whole sound quality of a multi channel system. Set up
the speakers on the basis of your listening position by
following the owner’s manual supplied with your amplifier.
The following diagram shows the recommended speaker
layout.
NS-C7900
NS-E7900
NS-6900/
NS-7900
PLACING THE SPEAKER
Notes
• Do not place the speaker on top of the TV which area
is smaller than the bottom area of the speaker. If
placed, the speaker may drop out causing an injury
to you.
• Do not place the speaker on top of the TV with an
inclination.
• Do not touch the adhesive surface after peeling off
the seal as this will weaken its adhesive strength.
• Thoroughly wipe clean the surface where the
fastener is to be applied. Note that adhesive strength
is weakened if the surface is dirty, oily or wet and
that this may cause the center speaker to drop.
■ Mounting the surround speakers on the
wall
You can mount the surround speakers on the wall using
the holes of the brackets attached to the back of the
speakers.
1
Fasten two screws into a firm wall or wall support at
the interval as shown below.
2
Hang the speaker by mounting the holes on the
protruding screws.
* Make sure that the screws are securely affixed by the
narrow parts of the holes.
Wall/ wall
support
Tapping screw
(3.5–4 mm)
(Available at the
hardware store)
40 mm
Min.
20 mm
3 mm
WARNING:
• This speaker weighs 1.9 kg. Do not mount it on thin
plywood or a wall with soft surface material. If
mounted, the screws may come out of the flimsy
surface and the speaker may fall. This damages the
speaker or causes personal injury.
• Do not install the speaker to a wall with nails,
adhesives, or any other unstable hardware. Longterm use and vibrations may cause it to fall.
• To avoid accidents resulting from tripping over loose
speaker cable, fix it to the wall.
■ Attaching the stand to the front speaker
When positioning the front speaker, be sure to attach the
supplied stand to the 8 specified holes located on the
bottom of the speaker to increase stability.
1
Put the 4 mm tapping screws through the two holes on
the stand, and screw into the two holes on the bottom of
the speaker.
2
When both screws are attached, tighten both of the
screws so that the stand is firmly in place.
3
Attach the pads to the bottom of the end portion of the
stand.
4
Attach the other stands in the same manner and confirm
that all 4 stands are firmly attached.
Note
• Be careful not to apply force to the side of the speaker,
otherwise the speaker may fall causing damage to the
speaker or personal injury.
Tapping screw
Pad
Stand
■ Placing the center speaker
When placing the speaker on top of the TV, be sure to
attach the supplied fasteners at two points on both
bottom of the speaker and top of the TV to prevent the
speaker from falling down.
Peel off
the seal
NS-E7900
NS-C7900
NS-6900/NS-7900
NS-6900/
NS-7900
NS-6900/
NS-7900
G
NS-6900
NS-7900
NS-P7900
x 1
x 1
x 1
x 2
Front speaker
Front speaker
Center speaker
Surround speaker
Surround speakers (NS-E7900)
Note:
These speakers feature a magnetically shielded design,
but there is still a chance that placing them too close to a
TV set might impair picture color or create a buzzing
noise. Should this happen, move the speaker away from
the TV set.
Printed in China
NS-6900/7900/P7900-G
NS-C7900
NS-E7900
NS-6900_7900_P7900_G_en.p65 6/9/06, 10:51 AM1
NS-6900/7900/P7900
3 4
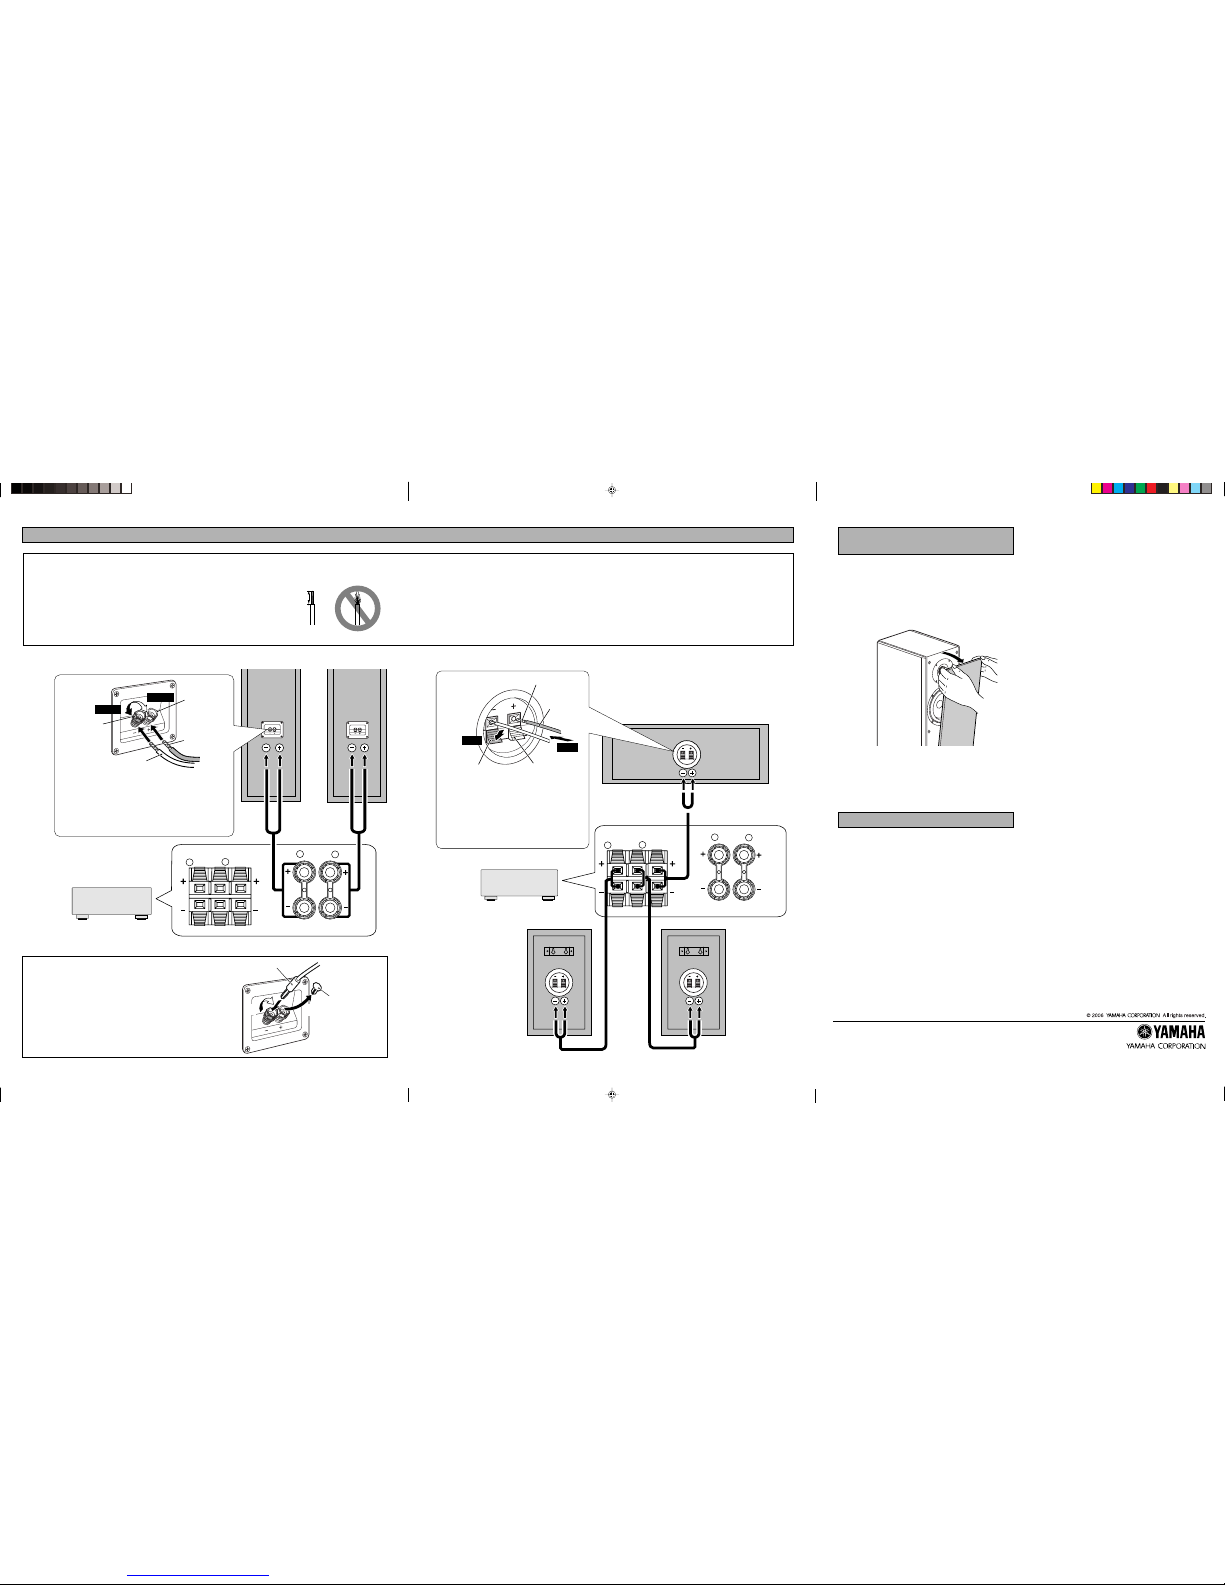
CONNECTING TO YOUR AMPLIFIER
SPECIFICATIONS
1
Remove the cover by pulling it toward you.
2
Tighten the terminal knob.
3
Simply insert the banana plug into the terminal.
Banana plug
REMOVING THE FRONT COVER OF
THE FRONT SPEAKER
The front cover is fastened to the enclosure at six points and
can be removed if desired. To remove the cover, hold on to
both sides and slowly pull straight away from the speaker. To
reattach, line up the six holes on the speaker with the six
corresponding pegs on the inner surface of the cover and
push gently.
Note
When the cover is removed, take care not to touch the
speaker units with your hands or to exert excessive
force with tools.
■ NS-7900
Type...
2-way bass reflex speaker system, Magnetically shielded type
Driver.........................................................16 cm cone woofer x 2,
2.5 cm soft dome tweeter
Impedance..................................................................................6 Ω
Frequency Response..........................................32 Hz to 25 kHz
Rated Input Power.................................................................50 W
Maximum Input Power.........................................................180 W
Sensitivity...............................................................88 dB/2.83 V/m
Crossover Frequency............................................................2 kHz
Dimensions (W x H x D)...........................195 x 1020 x 345 mm
Weight...................................................................................17.5 kg
■ NS-P7900
NS-C7900
Type......................2-way acoustic suspension speaker system,
Magnetically shielded type
Driver............................................................
8 cm cone woofer x 2,
2.5 cm balanced dome tweeter
Impedance..................................................................................6 Ω
Frequency Response..........................................70 Hz to 30 kHz
Rated Input Power..................................................................25 W
Maximum Input Power.........................................................100 W
Sensitivity...............................................................88 dB/2.83 V/m
Crossover Frequency.........................................................12 kHz
Dimensions (W x H x D) ............................ 395 x 130 x 150 mm
Weight.....................................................................................3.3 kg
NS-E7900
Type......................2-way acoustic suspension speaker system,
Magnetically shielded type
Driver...........................................................8 cm cone woofer x 1,
2.5 cm balanced dome tweeter
Impedance..................................................................................6 Ω
Frequency Response..........................................70 Hz to 40 kHz
Rated Input Power..................................................................20 W
Maximum Input Power............................................................80 W
Sensitivity..............................................................85 dB/2.83 V/m
Crossover Frequency.........................................................13 kHz
Dimensions (W x H x D) .......................... 130 x 217 x 150 mm
Weight.....................................................................................1.9 kg
• Specifications subject to change without notice due to
product improvements.
• Care should be taken not to exceed the input power values
noted above.
■ Using a banana plug
R
CENTER
SURROUND
FRONT
L
R
L
Black (–)
Red (+)
Bare wire
NS-6900/NS-7900
LeftRight
Amplifier
NS-6900/NS-7900
Insulation coating
Loosen
Tighten
R
CENTER
SURROUND
FRONT
L
R
L
Black (–)
Red (+)
Bare wire
NS-E7900
LeftRight
Amplifier
NS-C7900
Insulation
coating
Insert
Push
NS-E7900
Cover
3
■ NS-6900
Type...
2-way bass reflex speaker system, Magnetically shielded type
Driver.........................................................16 cm cone woofer x 1,
2.5 cm soft dome tweeter
Impedance..................................................................................6 Ω
Frequency Response..........................................34 Hz to 25 kHz
Rated Input Power..................................................................40 W
Maximum Input Power.........................................................150 W
Sensitivity...............................................................87 dB/2.83 V/m
Crossover Frequency............................................................4 kHz
Dimensions (W x H x D) ............................ 195 x 980 x 345 mm
Weight...................................................................................16.5 kg
NS-6900/NS-7900
■ Connections
• Connect the input terminals at the rear of the speakers to the speaker output terminals of the amplifier
with the speaker cable.
• Connect the (+) terminals on the amplifier and the speakers using one side of the cable. Connect the
(–) terminals on both components using the other side of the cable.
• Connect one speaker to the left (marked L) terminals of your amplifier, and another speaker to the right (marked R) terminals,
making sure not to reverse the polarity (+, –). If one speaker is connected with reversed polarity, the sound
will be unnatural and lack bass.
2
■ Connecting the front speaker
■ Connecting the center/surround speakers
1
YAMAHA ELECTRONICS CORPORATION, USA 6660 ORANGETHORPE AVE., BUENA PARK, CALIF. 90620, U.S.A.
YAMAHA CANADA MUSIC LTD. 135 MILNER AVE., SCARBOROUGH, ONTARIO M1S 3R1, CANADA
YAMAHA ELECTRONIK EUROPA G.m.b.H. SIEMENSSTR. 22-34, 25462 RELLINGEN BEI HAMBURG, GERMANY
YAMAHA ELECTRONIQUE FRANCE S.A. RUE AMBROISE CROIZAT BP70 CROISSY-BEAUBOURG 77312 MARNE-LA-VALLEE CEDEX02, FRANCE
YAMAHA ELECTRONICS (UK) LTD. YAMAHA HOUSE, 200 RICKMANSWORTH ROAD WATFORD, HERTS WD1 7JS, ENGLAND
YAMAHA SCANDINAVIA A.B. J A WETTERGRENS GATA 1, BOX 30053, 400 43 VSTRA FRLUNDA, SWEDEN
YAMAHA MUSIC AUSTRALIA PTY, LTD. 17-33 MARKET ST., SOUTH MELBOURNE, 3205 VIC., AUSTRALIA
Always turn off your amplifier before making any connections.
■ Before connecting
• Remove the insulation coating at extremity of each speaker cable by
twisting the coating off.
10-15 mm
Good
No Good
How to connect:
1 Loosen the knob.
2 Insert the bare wire core of the speaker cable into the
hole on the terminal.
3 Tighten the knob to secure the wire.
How to connect:
1 Press and hold the terminal tab.
2 Insert the bare wire core.
3 Release your finger from the tab to allow it to
lock securely on the bare wire core.
4 Test the security of the connection by pulling
gently on the cable at the terminal.
Note:
• Do not let uninsulated bare wires touch each other as this could damage
the speaker or the amplifier.
• Securely twist the bare wires and lump them together to prevent them
causing a short circuit.
NS-6900_7900_P7900_G_en.p65 7/12/06, 2:25 PM2
 Loading...