

Yamaha NP-S303 User Manual
Network Player
G
Owner’s Manual
This product is designed for use at home to enjoy listening to audio.
Before using this product, read the safety instructions described in the supplied Quick Start Guide.
EN

CONTENTS
BEFORE USING THE UNIT 4
Accessories . . . . . . . . . . . . . . . . . . . . . . . . . . . . . . . . . . . . . . . . . . . . . . . . . . . . . . 4
About this manual. . . . . . . . . . . . . . . . . . . . . . . . . . . . . . . . . . . . . . . . . . . . . . . . 4
FEATURES 5
What you can do with the unit. . . . . . . . . . . . . . . . . . . . . . . . . . . . . . . . . . . . . 5
Using the MusicCast CONTROLLER app . . . . . . . . . . . . . . . . . . . . . . . . . . . . . . . . . . . . . . . . . . . . . . . . .6
Part names and functions . . . . . . . . . . . . . . . . . . . . . . . . . . . . . . . . . . . . . . . . . 7
Front panel . . . . . . . . . . . . . . . . . . . . . . . . . . . . . . . . . . . . . . . . . . . . . . . . . . . . . . . . . . . . . . . . . . . . . . . . . . . .7
Rear panel . . . . . . . . . . . . . . . . . . . . . . . . . . . . . . . . . . . . . . . . . . . . . . . . . . . . . . . . . . . . . . . . . . . . . . . . . . . . . 8
Remote control . . . . . . . . . . . . . . . . . . . . . . . . . . . . . . . . . . . . . . . . . . . . . . . . . . . . . . . . . . . . . . . . . . . . . . . .9
PREPARATION 11
1 Connecting to an amplifier. . . . . . . . . . . . . . . . . . . . . . . . . . . . . . . . . . . .11
2 Preparing to connect to a network . . . . . . . . . . . . . . . . . . . . . . . . . . . .12
Connecting a network cable. . . . . . . . . . . . . . . . . . . . . . . . . . . . . . . . . . . . . . . . . . . . . . . . . . . . . . . . . . 12
Preparing a wireless antenna. . . . . . . . . . . . . . . . . . . . . . . . . . . . . . . . . . . . . . . . . . . . . . . . . . . . . . . . . 12
3 Connecting the power cord . . . . . . . . . . . . . . . . . . . . . . . . . . . . . . . . . . .13
PLAYING AUDIO 23
Listening to Internet radio . . . . . . . . . . . . . . . . . . . . . . . . . . . . . . . . . . . . . . .23
Selecting an Internet radio station . . . . . . . . . . . . . . . . . . . . . . . . . . . . . . . . . . . . . . . . . . . . . . . . . . . . 23
Playing music files stored on your USB device . . . . . . . . . . . . . . . . . . . . . 24
Connecting a USB storage device . . . . . . . . . . . . . . . . . . . . . . . . . . . . . . . . . . . . . . . . . . . . . . . . . . . . . 24
Playing songs stored on a USB storage device . . . . . . . . . . . . . . . . . . . . . . . . . . . . . . . . . . . . . . . . . 24
Playing music files stored on a media server (PC/NAS) . . . . . . . . . . . . .26
Media sharing setup. . . . . . . . . . . . . . . . . . . . . . . . . . . . . . . . . . . . . . . . . . . . . . . . . . . . . . . . . . . . . . . . . . 26
Selecting and playing music stored on a PC (or server). . . . . . . . . . . . . . . . . . . . . . . . . . . . . . . . . 27
Listening to music via AirPlay . . . . . . . . . . . . . . . . . . . . . . . . . . . . . . . . . . . . 28
Playing a song from iTunes/iPhone . . . . . . . . . . . . . . . . . . . . . . . . . . . . . . . . . . . . . . . . . . . . . . . . . . . 28
Listening to music via Bluetooth. . . . . . . . . . . . . . . . . . . . . . . . . . . . . . . . . . 30
Playing audio from Bluetooth devices on the unit . . . . . . . . . . . . . . . . . . . . . . . . . . . . . . . . . . . . . .30
Playing audio from this unit through Bluetooth-compatible speakers or headphones . . . 31
Useful functions . . . . . . . . . . . . . . . . . . . . . . . . . . . . . . . . . . . . . . . . . . . . . . . . 32
Switching information on the display . . . . . . . . . . . . . . . . . . . . . . . . . . . . . . . . . . . . . . . . . . . . . . . . . 32
Registering favorite content (Preset function) . . . . . . . . . . . . . . . . . . . . . . . . . . . . . . . . . . . . . . . . .32
Displaying audio signal information. . . . . . . . . . . . . . . . . . . . . . . . . . . . . . . . . . . . . . . . . . . . . . . . . . . 33
Enabling/disabling automatic playback . . . . . . . . . . . . . . . . . . . . . . . . . . . . . . . . . . . . . . . . . . . . . . . 34
4 Turning on the power to the unit . . . . . . . . . . . . . . . . . . . . . . . . . . . . . .13
Turning on the power to the unit for the first time . . . . . . . . . . . . . . . . . . . . . . . . . . . . . . . . . . . . 13
5 Connecting the unit to the network . . . . . . . . . . . . . . . . . . . . . . . . . . . 14
Connecting to a network by using MusicCast CONTROLLER . . . . . . . . . . . . . . . . . . . . . . . . . . . 14
Connecting to a network using another method . . . . . . . . . . . . . . . . . . . . . . . . . . . . . . . . . . . . . . 16
Connecting a mobile device to the unit directly (Wireless Direct) . . . . . . . . . . . . . . . . . . . . . . 21
Verifying the network connection status. . . . . . . . . . . . . . . . . . . . . . . . . . . . . . . . . . . . . . . . . . . . . . 22
2

Setup 35
Configuring various functions (Setup menu) . . . . . . . . . . . . . . . . . . . . . .35
Setup menu items . . . . . . . . . . . . . . . . . . . . . . . . . . . . . . . . . . . . . . . . . . . . . . . . . . . . . . . . . . . . . . . . . . . 35
Configuring the system settings (Advanced Setup menu) . . . . . . . . . .39
Viewing the firmware version (VERSION). . . . . . . . . . . . . . . . . . . . . . . . . . . . . . . . . . . . . . . . . . . . . . 39
Initializing the unit (INIT) . . . . . . . . . . . . . . . . . . . . . . . . . . . . . . . . . . . . . . . . . . . . . . . . . . . . . . . . . . . . . 39
Updating the firmware (UPDATE). . . . . . . . . . . . . . . . . . . . . . . . . . . . . . . . . . . . . . . . . . . . . . . . . . . . . 39
Updating the unit’s firmware via the network . . . . . . . . . . . . . . . . . . . . .40
APPENDIX 41
Troubleshooting . . . . . . . . . . . . . . . . . . . . . . . . . . . . . . . . . . . . . . . . . . . . . . . .41
General. . . . . . . . . . . . . . . . . . . . . . . . . . . . . . . . . . . . . . . . . . . . . . . . . . . . . . . . . . . . . . . . . . . . . . . . . . . . . . 41
Bluetooth . . . . . . . . . . . . . . . . . . . . . . . . . . . . . . . . . . . . . . . . . . . . . . . . . . . . . . . . . . . . . . . . . . . . . . . . . . . . 42
USB/Network . . . . . . . . . . . . . . . . . . . . . . . . . . . . . . . . . . . . . . . . . . . . . . . . . . . . . . . . . . . . . . . . . . . . . . . . 43
Display messages . . . . . . . . . . . . . . . . . . . . . . . . . . . . . . . . . . . . . . . . . . . . . . .45
Supported devices and file formats. . . . . . . . . . . . . . . . . . . . . . . . . . . . . . .46
Trademarks . . . . . . . . . . . . . . . . . . . . . . . . . . . . . . . . . . . . . . . . . . . . . . . . . . . . . 47
Specifications . . . . . . . . . . . . . . . . . . . . . . . . . . . . . . . . . . . . . . . . . . . . . . . . . . .48
3
BEFORE USING THE UNIT
Batteries (AA, R03, UM-4)
NOTICE
NOTE
Accessories
Make sure that the following accessories are supplied with the product. Please note the following when you read this manual:
Remote control Power cord
* The supplied power cord
varies depending on the
region of purchase.
Batteries (x2)
(AA, R03, UM-4)
Inserting batteries into the remote control
Insert the batteries in the proper orientation.
Owner’s Manual (CD-ROM)
Quick Start Guide
RCA stereo cable
About this manual
• This manual explains preparations and operations for everyday users of the unit.
• Due to product improvements, specifications and appearance are subject to change
without notice.
• This manual explains operations performed primarily on the supplied remote control.
• In this manual, illustrations of English menu screens are used as examples.
• In this manual, iPhone, iPad and iPod touch are collectively referred to as “iPhone”.
Unless otherwise noted, the term “iPhone” as used in this manual also refers to an
iPhone, iPad, or iPod touch.
• Explanation of graphic symbols used in this manual:
– “ WARNING” is intended to alert you to the possibility of death or serious injury.
– “ CAUTION” is intended to alert you to the possibility of personal injury.
– is intended to provide information to avoid product malfunction,
damages, incorrect operation, or data loss.
– is intended to provide supplemental information that might be handy.
• For details on streaming services, visit the following website:
http://download.yamaha.com/
• You can also find information regarding streaming services in the Owner’s Manual
(CD-ROM).
4
FEATURES
5V
A
USB
Wi
BLUETOOTH
Fi
RETURNSOURCE
CONNECT
SELECT
PUSH
ENTER
1 Internet radio
2 Streaming service
3 PC
4 AirPlay (iTunes)
5 Network Attached
Storage (NAS)
4 AirPlay (iPhone)
6 Bluetooth
7 MusicCast CONTROLLER
Modem
Router *
Mobile device
8 USB
This unit
Amplifier
* You will need a commercially available wireless LAN
router (access point) if you plan to use a mobile device.
What you can do with the unit
This unit is a network player compatible with a network source such as a media server or mobile device.
1 Listening to Internet radio (page 23)
2 Listening to Streaming service
3 Playing music files stored on your PC (page 27)
4 Playing music files with AirPlay (page 28)
5 Playing music files stored on a Network Attached Storage (NAS) device
(page 27)
6 Playing audio content from a Bluetooth device (page 30)
7 Playing music using MusicCast CONTROLLER (page 14)
8 Playing music files stored on your USB device (page 24)
5
Using the MusicCast CONTROLLER app
Wireless LAN router
Using the free MusicCast CONTROLLER app installed on a mobile device enables you
to use your mobile device like a remote control to set up and operate MusicCastcompatible devices. You can also share and play music on multiple MusicCastcompatilbe devices located in different rooms.
For more information on MusicCast CONTROLLER, visit the following website:
http://www.yamaha.com/musiccast/
Download and install the (free) MusicCast CONTROLLER app to your
mobile device from the App Store or Google Play.
Use the MusicCast CONTROLLER app to configure a network (MusicCast network) as
shown below:
* If you use this unit to play audio from another MusicCast-compatible device,
“MC Link” will appear on the unit’s display.
6
Part names and functions
5V
A
USB
Wi
BLUETOOTH
Fi
RETURNSOURCE
CONNECT
SELECT
PUSH
ENTER
1 762 3 9 0 A4 5
MUTE
8
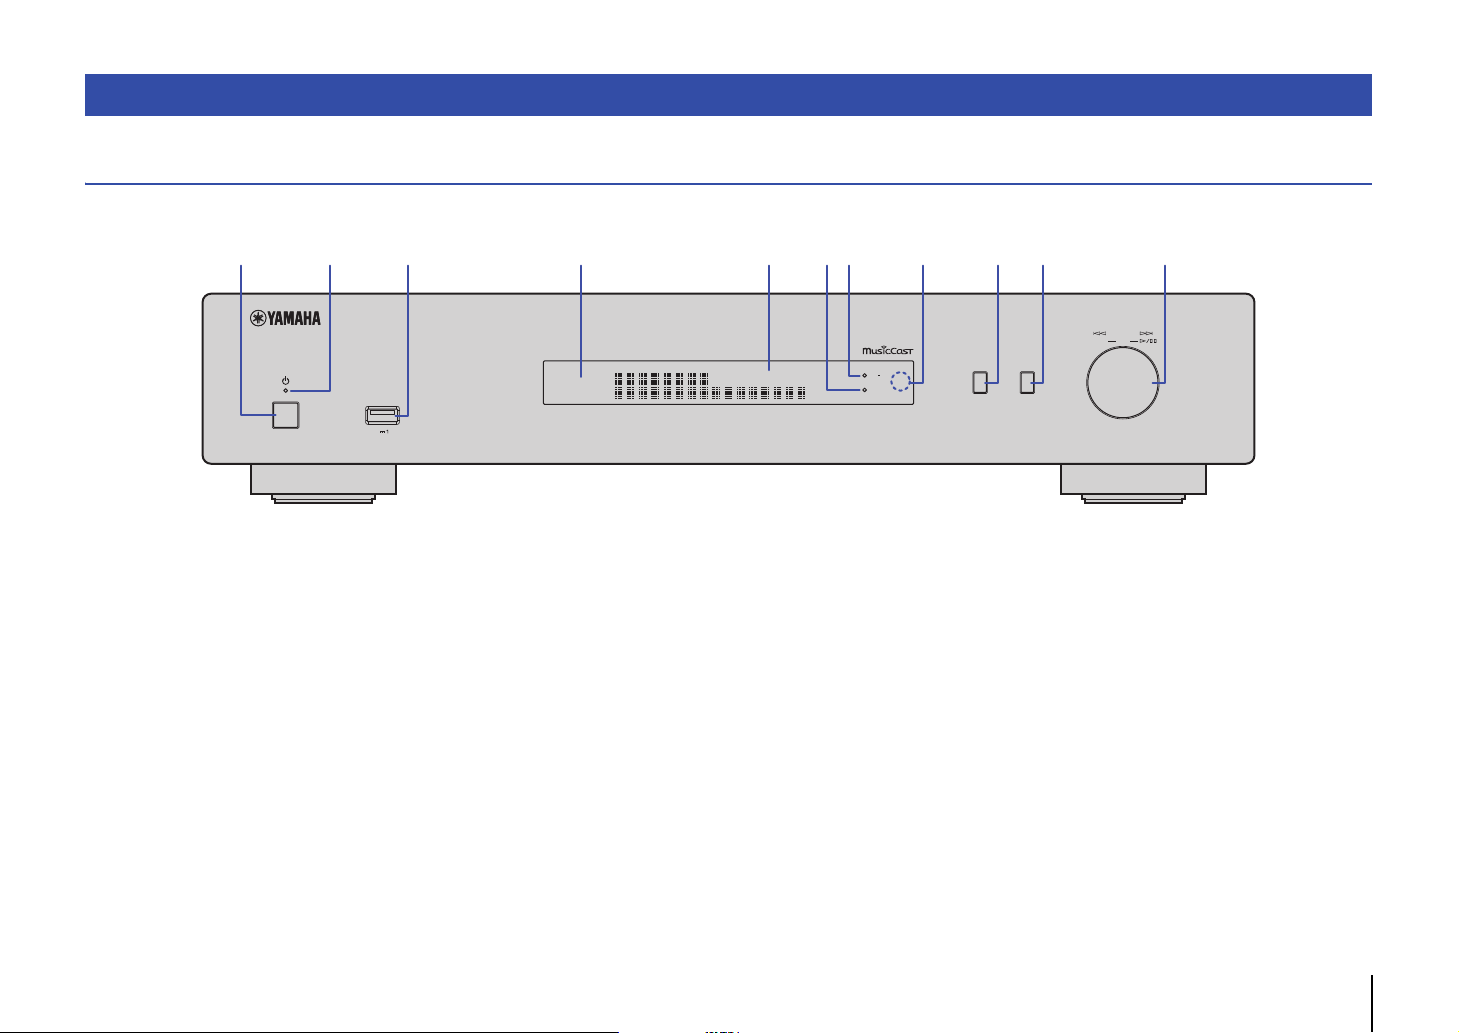
Front panel
1 z (power)
Turns on/off the unit.
2 Power indicat or
Indicates the unit’s power status.
Brightly lit: Power is on
Dimly lit: Standby mode
Off: Power is off
3 USB jack
Used to connect a USB device (page 24).
4 Display
Shows information about the operational status of this
unit.
5 MUTE
Blinks when audio is muted.
6 Bluetooth indicator
Lights up when the unit connects to a Bluetooth
device (page 30).
7 Wi-Fi indicator
Lights up when the unit is:
– connecting to a wireless network (page 16).
– registering with MusicCast, even if the unit is
– connecting to a wireless network using Wireless
8 Remote control sensor
Receives infrared signals from the remote control.
9 SOURCE
Switches the unit's audio source.
0 RETURN
Displays the next higher level of the menu.
CONNECT
Use this button to operate the unit via the MusicCast
CONTROLLER (page 14).
connected to a wired connection (page 14).
Direct (page 21).
A Jog dial
To select a menu item or song
Rotate the dial to select an item, then press it to
confirm the selection.
To control playback of the music stored on the
USB device, PC, or server
Rotate the dial to skip to the previous or next song.
Press the dial to switch between play and pause.
7
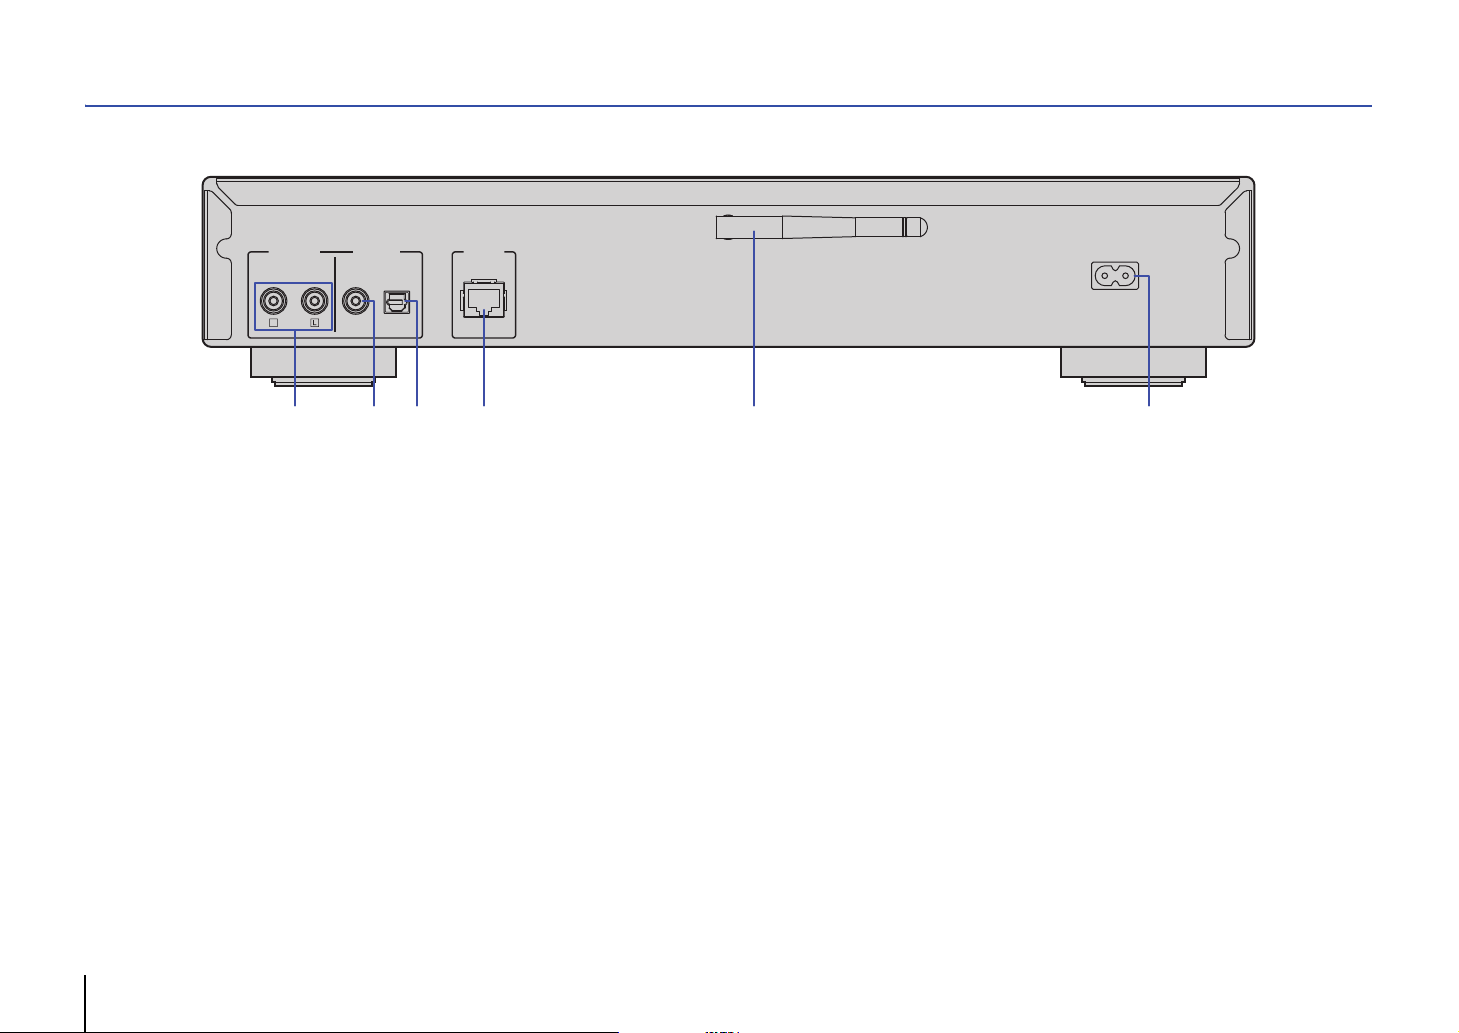
Rear panel
AC IN
NETWORK
DIGITAL OUT
COAXIAL OPTICAL
ANALOG OUT
R
2 3 64 51
* Illustration above shows Europe model.
1 ANALOG OUT connectors
Output stereo analog audio signals. Connect the unit
to your amplifier or audio system using the RCA
stereo cable (supplied) (page 11).
2 DIGITAL OUT (COAXIAL) connector
Outputs digital audio signals. Connect the unit to
your amplifier or audio system using a coaxial digital
audio cable (commercially available) (page 11).
3 DIGITAL OUT (OPTICAL) connector
Outputs digital audio signals. Connect the unit to
your amplifier or audio system using an optical digital
audio cable (commercially available) (page 11).
4 NETWORK connector
Connect the unit to a network using a LAN cable
(commercially available) (page 12).
5 Wireless antenna
Use this antenna to connect the unit to a network
wirelessly (Wi-Fi) (page 14). It is also used to enable
the Bluetooth function (page 30).
8
6 AC IN connector
Connect the supplied power cord here (page 13).
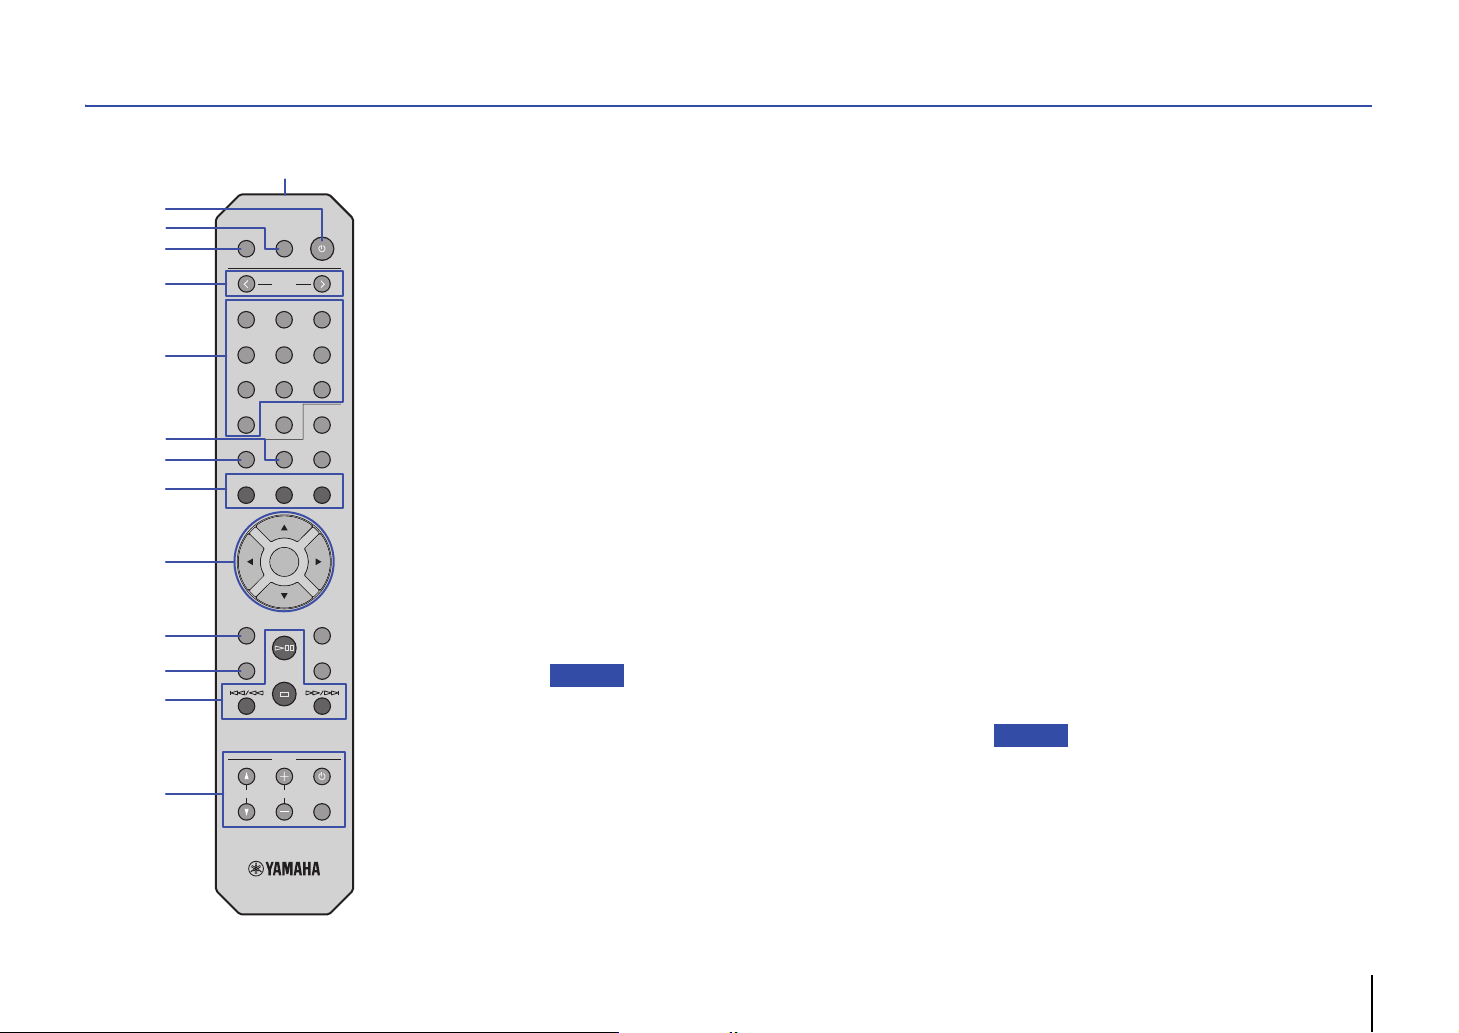
Remote control
NOTE
NOTE
2
3
4
5
6
7
8
9
0
A
B
C
D
1
DIMMERMUTE
PRESET
1
23
456
89
7
SHUFFLE
ENTER
AMP
VOLUME
HOMEMEMORY
NOW PLAYING
BLUETOOTH
RETURN
OPTION
MUTE
1
0
REPEAT
NET USB
SETUP
DISPLAY
INPUT
1 Remote control signal transmitter
Transmits infrared signals to the main unit.
2 z (power)
Switches this unit between on and standby mode.
3 DIMMER
Enables you to adjust the brightness of the display to
5 levels. Each press of the button changes the
brightness.
4 MUTE
Turns mute on or off.
5 PRESET j / i
Recalls a preset song from your PC or USB device, or
tunes in to a preset Internet radio station (page 33).
6 Preset number keys
Enable you to enter a number to register or recall a
preset (page 32, 33).
7 SHUFFLE
Changes the shuffle settings.
8 REPEAT
Changes the repeat settings.
9 Source select keys
Select the source to which you want.
• Pressing NET (network sources) repeatedly selects a
different network source each time.
0 / / / (cursor keys), ENTER
Use the cursor keys to select an item, and then press
ENTER to confirm the selection.
A SETUP
Display the Setup menu (page 35).
B DISPLAY
Switches information shown on the display, such as
playback information (page 32).
C Playback control keys
pe (Play/Pause)
Starts or pauses playback.
s (Stop)
Stops playback.
b/w (Skip backward/Search backward)
Skips back to the top of the currently-playing song or
the top of the previous song. It also searches tracks
backward if the button is pressed and held during
playback.
f/a (Skip forward/Search forward)
Skips forward to the top of the next song. It also
searches tracks forward if the button is pressed and
held during playback.
D Amplifier control keys
Controls a Yamaha amplifier.
For details on using the amplifier, refer to the manual
supplied with the amplifier.
z (power)
Turns the amplifier on or off.
INPUT (
B
/ C )
Switches input sources on the amplifier.
VOLUME (+ / –)
Adjusts the amplifier volume.
MUTE
Turns mute on or off on the amplifier.
• Certain Yamaha amplifiers might not support these
remote control functions.
9
DIMMERMUTE
30° 30°
Within 6 m
(20 ft)
PRESET
1
23
456
89
7
SHUFFLE
ENTER
HOMEMEMORY
NOW PLAYING
BLUETOOTH
1
0
REPEAT
NET USB
E
F
G
E HOME
Moves directly to the top level of the menu when you
are selecting music files, folders, etc.
This can be convenient if you want to navigate the
menu levels quickly.
F MEMORY
Register a song stored on your PC or USB device, or
register an Internet radio station as a preset
(page 32).
G NOW PLAYING
Displays the song information while you are selecting
or browsing music files, folders, etc.
H RETURN
Displays the next higher level of the menu.
I OPTION
Displays audio signal information (page 33).
It also enables or disables automatic playback
(page 34).
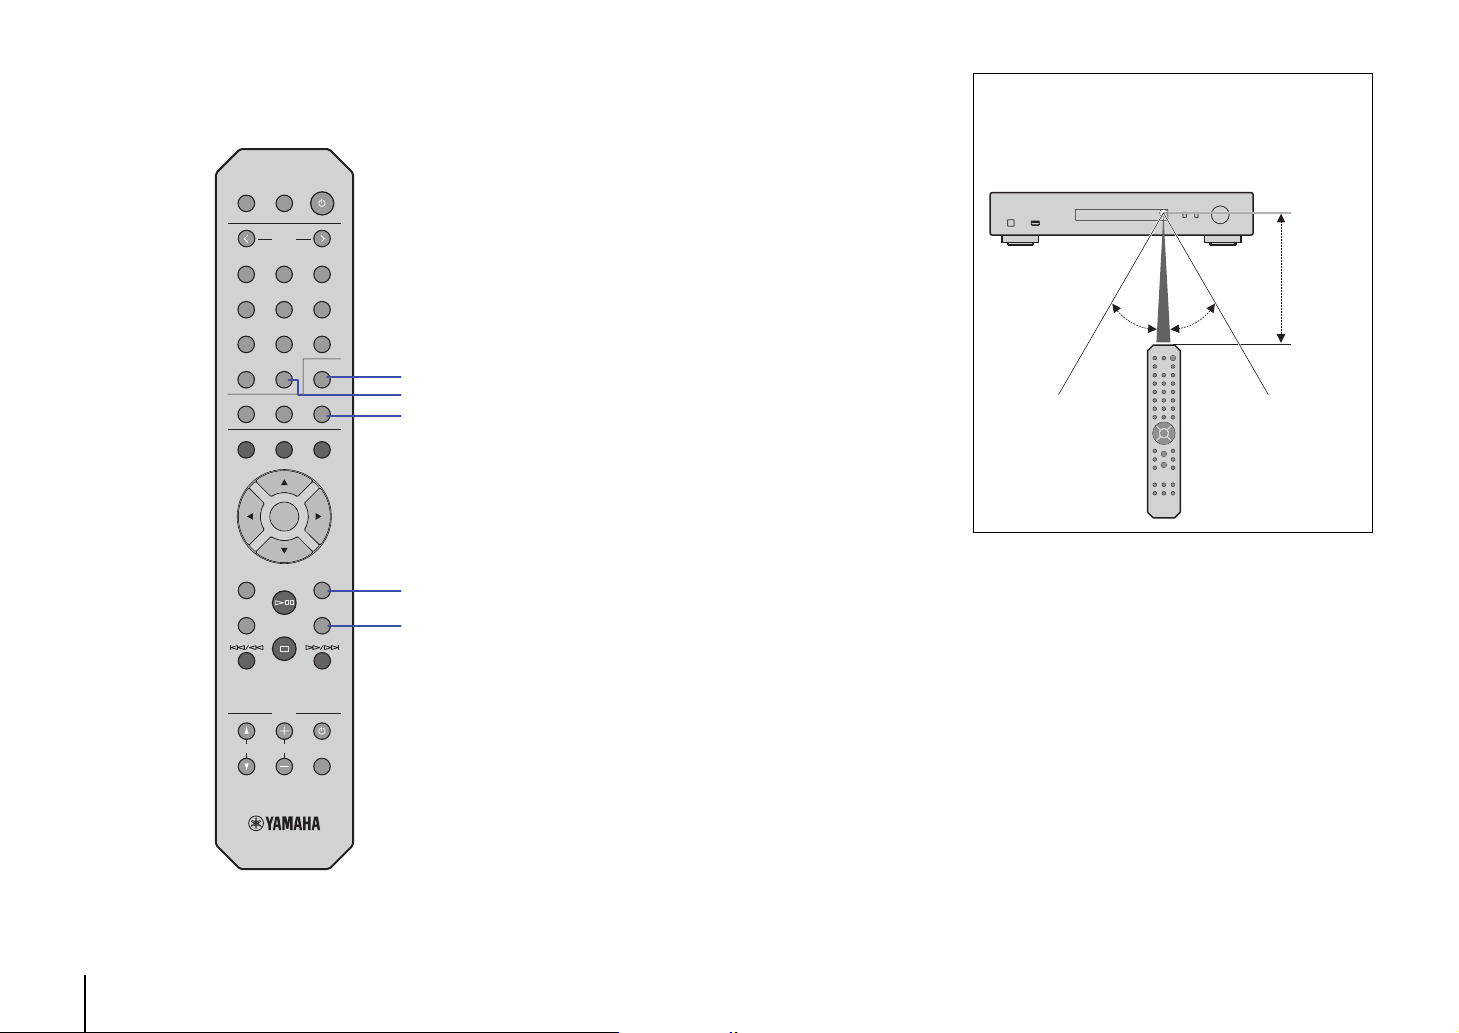
The operating range of the remote control
Point the remote control toward the remote control
sensor on the unit from within the range shown in the
figure below.
10
SETUP
DISPLAY
INPUT
AMP
VOLUME
RETURN
H
OPTION
I
MUTE
PREPARATION
NOTE
AC IN
NETWORK
DIGITAL OUT
COAXIAL OPTICAL
ANALOG OUT
R
AmplifierAmplifier
RCA stereo cable
(supplied)
Coaxial digital audio cable
(commercially available)
Optical digital cable
(commercially available)
* Illustration above shows Europe model.
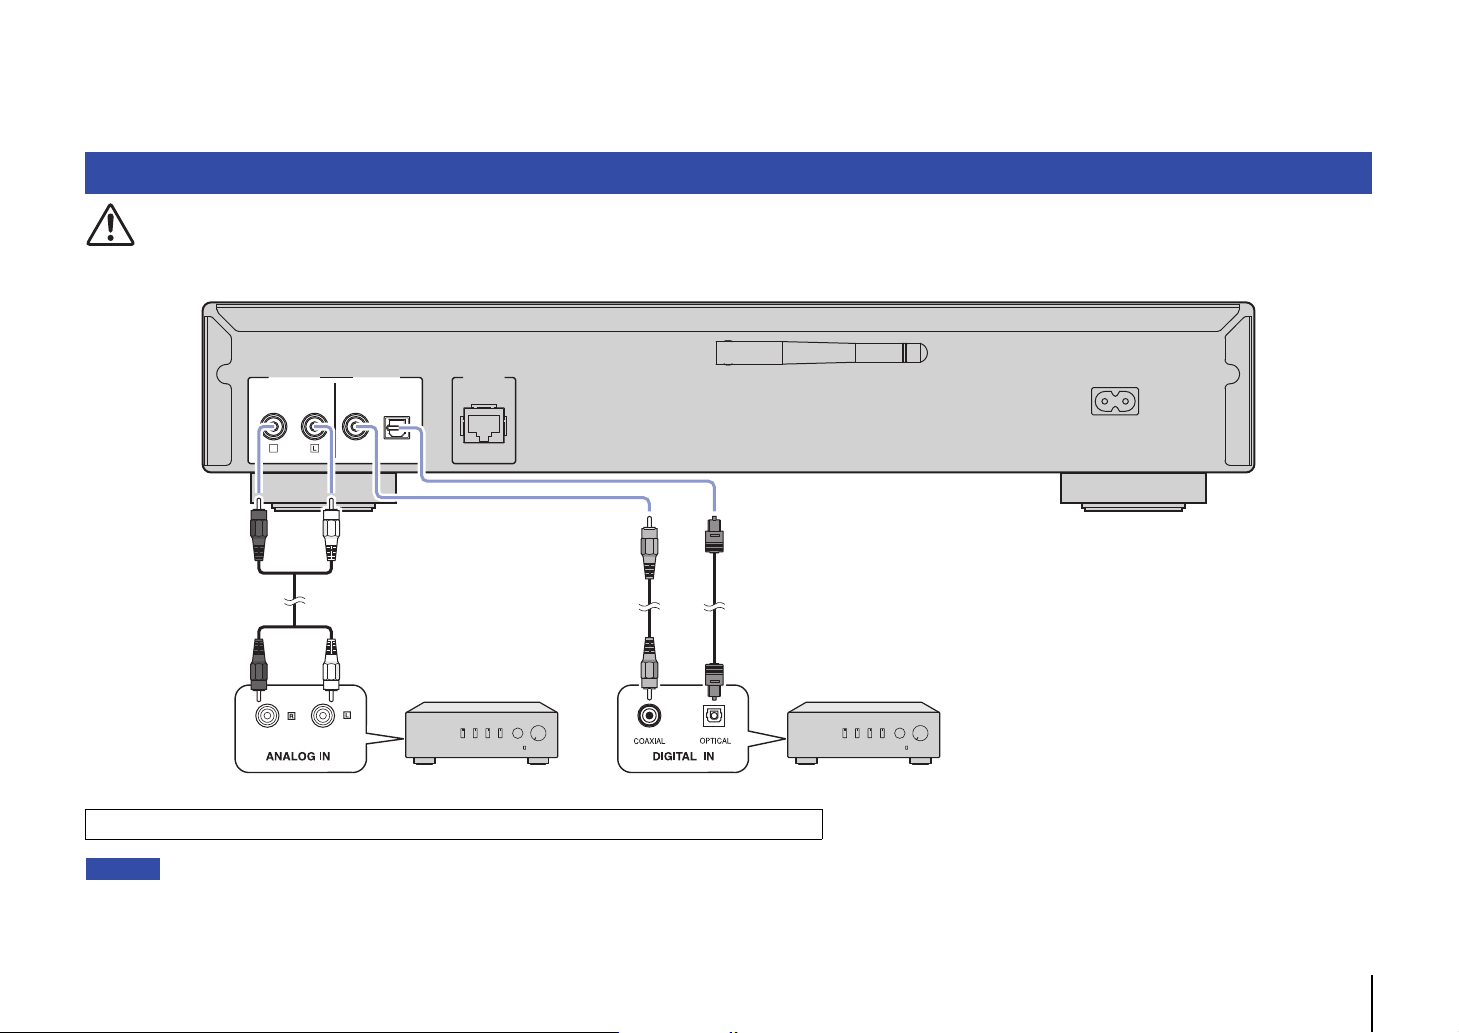
1 Connecting to an amplifier
CAUTION
• Do not plug the power cords of this unit and all other connected devices into AC outlets until all connections are complete.
Only PCM signals can be output from the DIGITAL OUT (OPTICAL/COAXIAL) jacks of this unit.
• On some audio devices (such as an amplifier) that are digitally connected, audio output might be interrupted at the beginning of a track.
• DSD signals and signals over 192kHz will not be output from the DIGITAL OUT jacks of this unit.
• Digital signals output from this unit cannot be recorded.
11
NOTE
NOTE
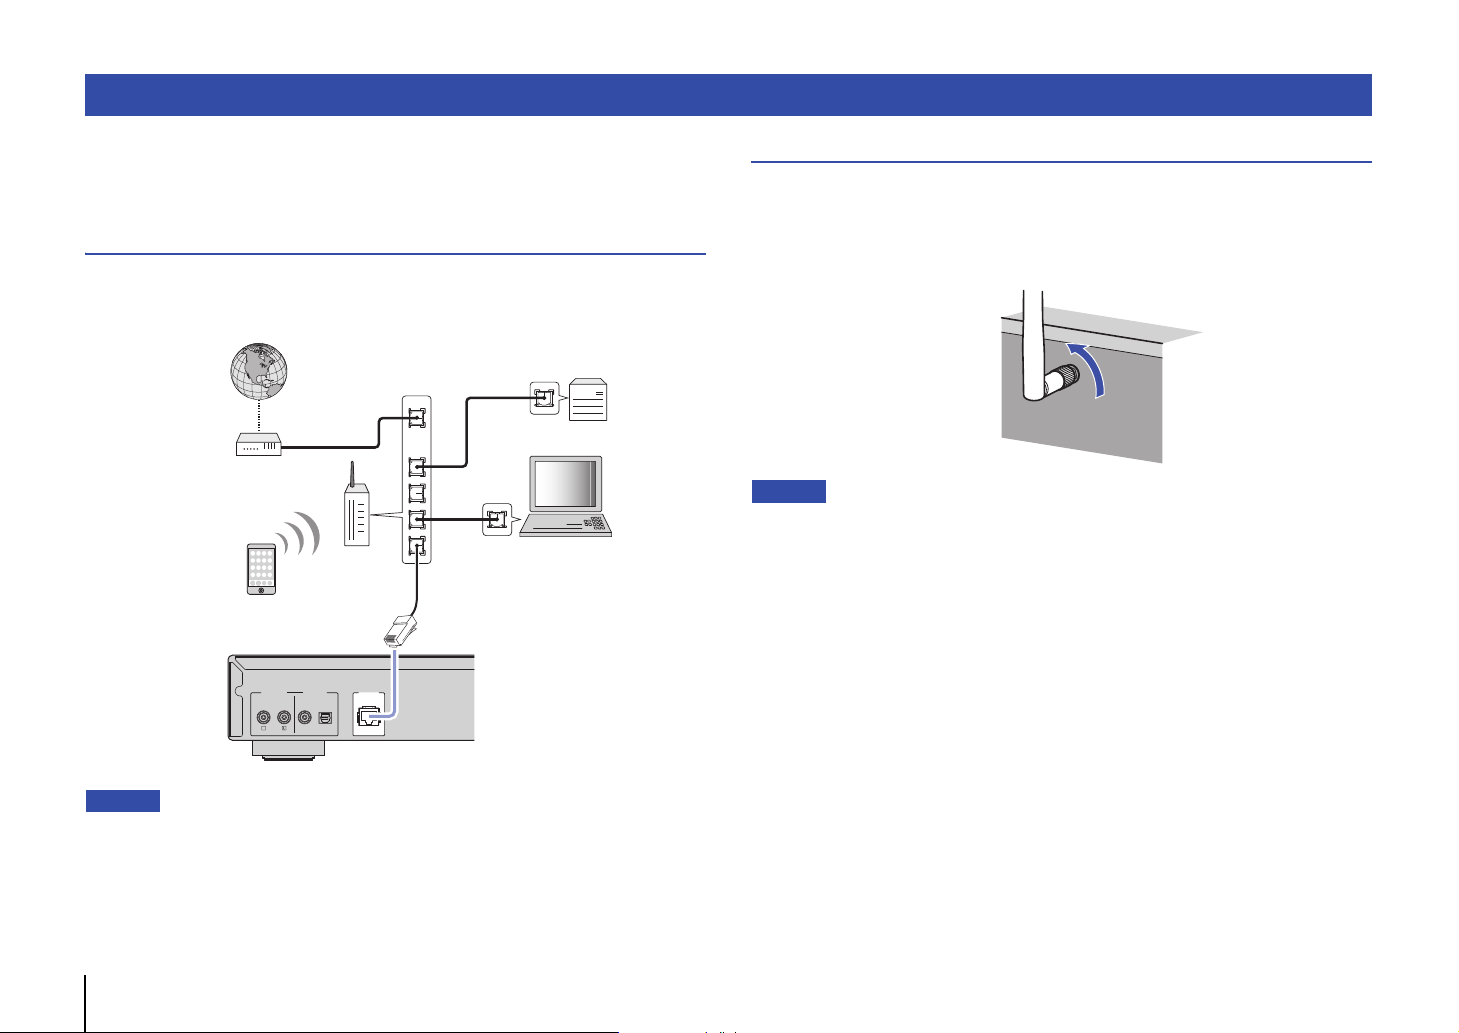
2 Preparing to connect to a network
DIGITAL OUT
COAXIAL OPTICAL
ANALOG OUT
R
NETWORK
LAN
WAN
Network Attached Storage
(NAS)
Internet
Modem
Wireless
router
Network cable
PC
This unit (rear)
On this unit, you can tune in to an Internet radio station, or play music files that are
stored on your PC or a Digital Living Network Alliance (DLNA) server (such as a
Network Attached Storage (NAS) device).
Connecting a network cable
To use a wired network, connect the unit to your router with a commercially-available
STP network cable (CAT-5 or higher straight cable).
Preparing a wireless antenna
If you connect the unit to a wireless network and use the Bluetooth function, set the
wireless antenna in the upright position. For information on how to connect the unit to a
wireless network, see “Connecting the unit to the network” (page 14). For information
on how to connect the unit to a Bluetooth device, see “Listening to music via Bluetooth”
(page 30).
• Do not apply excessive force to the wireless antenna. Doing so might damage the antenna.
12
• To switch from a wireless network connection to a wired network connection, change “Connection”
under “Network” in the Setup menu to “Wired” (page 36).
3 Connecting the power cord
AC IN
To an AC wall outlet
This unit (rear)
power cord (supplied)
* Illustration above shows Europe model.
5V
A
USB
Wi
BLUETOOTH
Fi
RETURNSOURCE
CONNECT
SELECT
PUSH
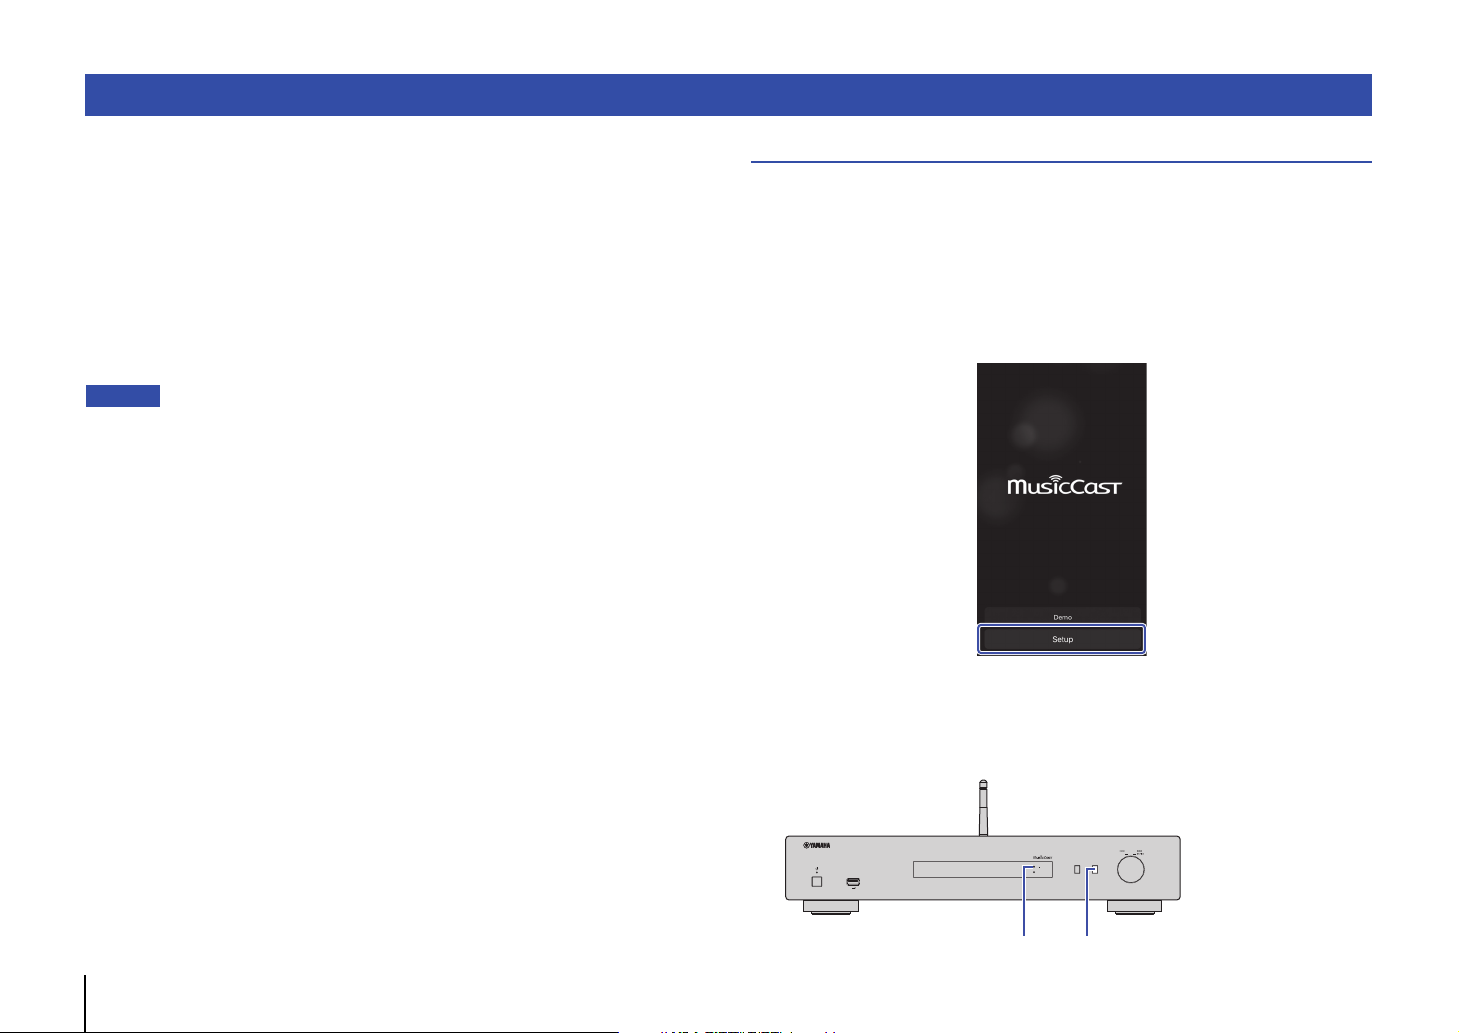
ENTER
z (power)
NP-S303 XXXXXX
WAC
4 Turning on the power to the unit
After all the connections are complete, connect the supplied power cord to the AC IN
jack on this unit, and then plug into a home AC outlet.
To turn on the power to the unit, press z (power) on the front panel.
Turning on the power to the unit for the first time
When you turn on the power to the unit for the first time after you purchase or initialize it,
the unit will indicate “WAC” on the display, and share the network settings of the iOS
device (iPhone) to connect to a wireless network (unless the unit is already connected
to a wired network).
If you use this function, proceed to Step 7 in “Sharing the iOS device setting” (page 16).
If you connect the unit to a wireless network using another method, press RETURN and
proceed to the next page.
WAC (Wireless Accessory Configuration)
13
NOTE
5 Connecting the unit to the network
Wi-Fi indicator CONNECT
Select a connection method that is suitable for your environment.
This section describes how to use the MusicCast CONTROLLER app to connect the
unit to a wireless network.
If you want to connect the unit to a wireless network without using MusicCast
CONTROLLER, refer to page 16 for more information. To use MusicCast CONTROLLER
while the unit is connected to a network by cable, perform Steps 1 through 4 in the
section “Connecting to a network using MusicCast CONTROLLER”.
The following functions are available only if you use the MusicCast CONTROLLER app.
• Playback music from music streaming services.
• Sending signals via Bluetooth (page 30)
• If you want to play high-resolution audio sources via the network, a wired connection is
recommended for more stable playback (page 12).
• Your mobile device must already be connected to the wireless LAN router (access point).
• To manually connect the unit to a network wirelessly, have the SSID and security key for the
wireless router (access point) ready.
Connecting to a network by using MusicCast CONTROLLER
This section explains how to register the unit with MusicCast and set up the unit for the
network connection.
Install MusicCast CONTROLLER.
1
Download and install the MusicCast CONTROLLER app (free) to your mobile
device from the App Store or Google Play.
Start the MusicCast CONTROLLER app on your mobile device, and
2
then tap “Setup”.
Follow the instructions on the display of the mobile device to operate
3
MusicCast CONTROLLER, and then press and hold down the
CONNECT on the front panel of the unit for 5 seconds.
“CONNECT” appears on the display and the WiFi indicator blinks.
14
SELECT
PUSH
ENTER
RETURNSOURCE
Wi
Fi
USB
5V
A
BLUETOOTH
CONNECT
NOTE
Tap here to start settings.
Normal mode
Extend mode
Follow the instructions on the display of the mobile device to operate
4
MusicCast CONTROLLER to make the network settings.
Now the unit is registered with MusicCast and the network settings are complete.
Use MusicCast CONTROLLER to play the music.
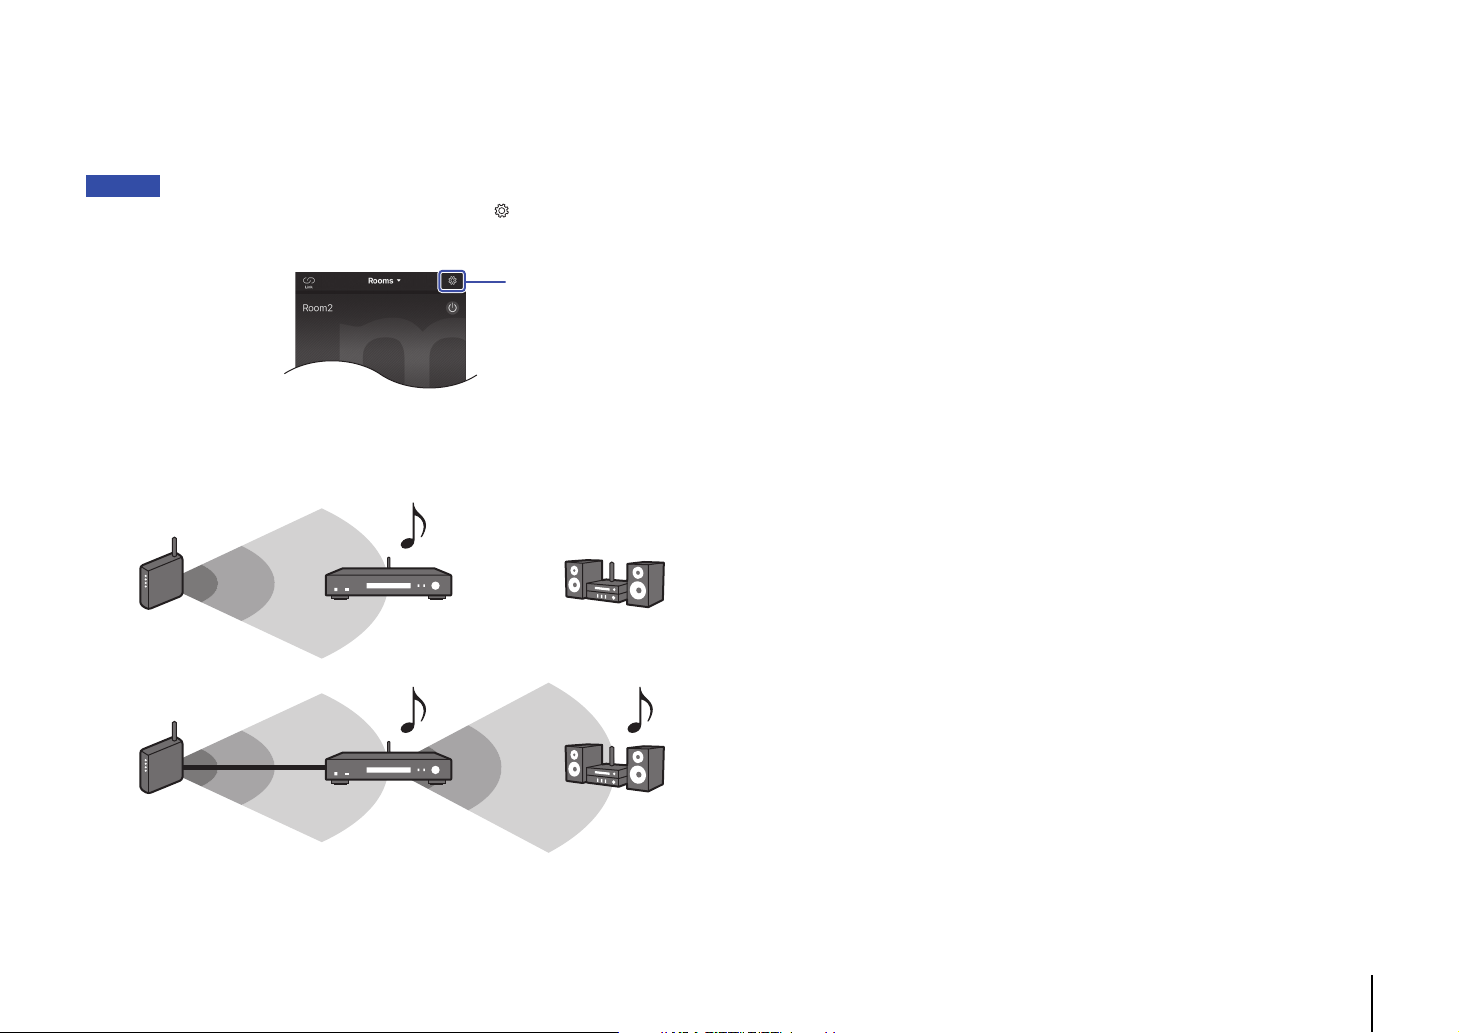
• To set up additional MusicCast-compatible devices, tap the icon (Settings) in the upper-right
corner of the MusicCast CONTROLLER screen, and then select “Add New Device”.
• If you make a “wired” connection between a MusicCast-compatible device and the router, you can
expand the reception range (Extend mode). Extend mode will automatically engage in if you install
a MucicCast-compatible device in a location where the reception from the router is poor.
15
 Loading...