

Page 1

NP-30
YNP-25
Digital Keyboard
Owner’s Manual
Page 2

SPECIAL MESSAGE SECTION
This product utilizes batteries or an external power supply (adapter). DO
NOT connect this product to any power supply or adapter other than one
described in the manual, on the name plate, or specifically recommended by Yamaha.
WARNING: Do not place this product in a position where anyone could
walk on, trip over, or roll anything over power or connecting cords of any
kind. The use of an extension cord is not recommended! If you must use
an extension cord, the minimum wire size for a 25’ cord (or less) is 18
AWG. NOTE: The smaller the AWG number, the larger the current handling capacity. For longer extension cords, consult a local electrician.
This product should be used only with the components supplied or; a
cart, rack, or stand that is recommended by Yamaha. If a cart, etc., is
used, please observe all safety markings and instructions that accompany the accessory product.
SPECIFICATIONS SUBJECT TO CHANGE:
The information contained in this manual is believed to be correct at the
time of printing. However, Yamaha reserves the right to change or modify
any of the specifications without notice or obligation to update existing
units.
This product, either alone or in combination with an amplifier and headphones or speaker/s, may be capable of producing sound levels that
could cause permanent hearing loss. DO NOT operate for long periods
of time at a high volume level or at a level that is uncomfortable. If you
experience any hearing loss or ringing in the ears, you should consult an
audiologist.
IMPORTANT: The louder the sound, the shorter the time period before
damage occurs.
Some Yamaha products may have benches and / or accessory mounting
fixtures that are either supplied with the product or as optional accessories. Some of these items are designed to be dealer assembled or
installed. Please make sure that benches are stable and any optional fixtures (where applicable) are well secured BEFORE using.
Benches supplied by Yamaha are designed for seating only. No other
uses are recommended.
NOTICE:
Service charges incurred due to a lack of knowledge relating to how a
function or effect works (when the unit is operating as designed) are not
covered by the manufacturer’s warranty, and are therefore the owners
responsibility. Please study this manual carefully and consult your dealer
before requesting service.
ENVIRONMENTAL ISSUES:
Yamaha strives to produce products that are both user safe and environmentally friendly. We sincerely believe that our products and the production methods used to produce them, meet these goals. In keeping with
both the letter and the spirit of the law, we want you to be aware of the
following:
Battery Notice:
This product MAY contain a small non-rechargeable battery which (if
applicable) is soldered in place. The average life span of this type of battery is approximately five years. When replacement becomes necessary,
contact a qualified service representative to perform the replacement.
This product may also use “household” type batteries. Some of these
may be rechargeable. Make sure that the battery being charged is a
rechargeable type and that the charger is intended for the battery being
charged.
When installing batteries, do not mix batteries with new, or with batteries
of a different type. Batteries MUST be installed correctly. Mismatches or
incorrect installation may result in overheating and battery case rupture.
Warning:
Do not attempt to disassemble, or incinerate any battery. Keep all batteries away from children. Dispose of used batteries promptly and as regulated by the laws in your area. Note: Check with any retailer of
household type batteries in your area for battery disposal information.
Disposal Notice:
Should this product become damaged beyond repair, or for some reason
its useful life is considered to be at an end, please observe all local,
state, and federal regulations that relate to the disposal of products that
contain lead, batteries, plastics, etc. If your dealer is unable to assist
you, please contact Yamaha directly.
NAME PLATE LOCATION:
The name plate is located on the bottom of the product. The model number, serial number, power requirements, etc., are located on this plate.
You should record the model number, serial number, and the date of purchase in the spaces provided below and retain this manual as a permanent record of your purchase.
Model
Serial No.
Purchase Date
92-BP (bottom)
NP-30/YNP-25 Owner’s Manual
2
PLEASE KEEP THIS MANUAL
Page 3
FCC INFORMATION (U.S.A.)
1. IMPORTANT NOTICE: DO NOT MODIFY THIS UNIT!
This product, when installed as indicated in the instructions contained in this manual, meets FCC requirements. Modifications not
expressly approved by Yamaha may void your authority, granted by
the FCC, to use the product.
2. IMPORTANT: When connecting this product to accessories and/
or another product use only high quality shielded cables. Cable/s
supplied with this product MUST be used. Follow all installation
instructions. Failure to follow instructions could void your FCC
authorization to use this product in the USA.
3. NOTE: This product has been tested and found to comply with the
requirements listed in FCC Regulations, Part 15 for Class “B” digital
devices. Compliance with these requirements provides a reasonable level of assurance that your use of this product in a residential
environment will not result in harmful interference with other electronic devices. This equipment generates/uses radio frequencies
and, if not installed and used according to the instructions found in
the users manual, may cause interference harmful to the operation
of other electronic devices. Compliance with FCC regulations does
* This applies only to products distributed by YAMAHA CORPORATION OF AMERICA.
OBSERVERA!
Apparaten kopplas inte ur växelströmskällan (nätet) så länge som den
ar ansluten till vägguttaget, även om själva apparaten har stängts av.
ADVARSEL: Netspæendingen til dette apparat er IKKE afbrudt,
sålæenge netledningen siddr i en stikkontakt, som er t endt — også
selvom der or slukket på apparatets afbryder.
VAR OITUS: Laitteen toisiopiiriin kytketty käyttökytkin ei irroita koko
laitetta verkosta.
not guarantee that interference will not occur in all installations. If
this product is found to be the source of interference, which can be
determined by turning the unit “OFF” and “ON”, please try to eliminate the problem by using one of the following measures:
Relocate either this product or the device that is being affected by
the interference.
Utilize power outlets that are on different branch (circuit breaker or
fuse) circuits or install AC line filter/s.
In the case of radio or TV interference, relocate/reorient the
antenna. If the antenna lead-in is 300 ohm ribbon lead, change the
lead-in to co-axial type cable.
If these corrective measures do not produce satisfactory results,
please contact the local retailer authorized to distribute this type of
product. If you can not locate the appropriate retailer, please contact
Yamaha Corporation of America, Electronic Service Division, 6600
Orangethorpe Ave, Buena Park, CA90620
The above statements apply ONLY to those products distributed by
Yamaha Corporation of America or its subsidiaries.
(class B)
(standby)
Entsorgung leerer Batterien (nur innerhalb Deutschlands)
Leisten Sie einen Beitrag zum Umweltschutz. Verbrauchte Batterien
oder Akkumulatoren dürfen nicht in den Hausmüll. Sie können bei
einer Sammelstelle für Altbatterien bzw. Sondermüll abgegeben werden. Informieren Sie sich bei Ihrer Kommune.
(battery)
IMPORTANT NOTICE FOR THE UNITED KINGDOM
Connecting the Plug and Cord
IMPORTANT. The wires in this mains lead are coloured in accordance with the following code:
As the colours of the wires in the mains lead of this apparatus
may not correspond with the coloured makings identifying the terminals in your plug proceed as follows:
The wire which is coloured BLUE must be connected to the terminal which is marked with the letter N or coloured BLACK.
The wire which is coloured BROWN must be connected to the
terminal which is marked with the letter L or coloured RED.
Making sure that neither core is connected to the earth terminal
of the three pin plug.
BLUE : NEUTRAL
BROWN : LIVE
• This applies only to products distributed by Yamaha-Kemble
Music (U.K.) Ltd.
(2 wires)
NP-30/YNP-25 Owner’s Manual
3
Page 4
PRECAUTIONS
PLEASE READ CAREFULLY BEFORE PROCEEDING
* Please keep this manual in a safe place for future reference.
WARNING
Always follow the basic precautions listed below to avoid the possibility of serious injury or even death from electrical
shock, short-circuiting, damages, fire or other hazards. These precautions include, but are not limited to, the following:
Power supply/AC power adaptor
• Only use the voltage specified as correct for the instrument. The required voltage
is printed on the name plate of the instrument.
• Use the specified adaptor (PA-5D, PA-150 or an equivalent recommended by
Yamaha) only. Using the wrong adaptor can result in damage to the instrument
or overheating.
• Check the electric plug periodically and remove any dirt or dust which may have
accumulated on it.
• Do not place the AC adaptor cord near heat sources such as heaters or radiators,
and do not excessively bend or otherwise damage the cord, place heavy objects
on it, or place it in a position where anyone could walk on, trip over, or roll
anything over it.
Do not open
• Do not open the instrument or attempt to disassemble the internal parts or
modify them in any way. The instrument contains no user-serviceable parts. If it
should appear to be malfunctioning, discontinue use immediately and have it
inspected by qualified Yamaha service personnel.
Water warning
• Do not expose the instrument to rain, use it near water or in damp or wet
conditions, or place containers on it containing liquids which might spill into
any openings. If any liquid such as water seeps into the instrument, turn off the
power immediately and unplug the power cord from the AC outlet. Then have the
instrument inspected by qualified Yamaha service personnel.
• Never insert or remove an electric plug with wet hands.
Fire warning
• Do not put burning items, such as candles, on the unit.
A burning item may fall over and cause a fire.
If you notice any abnormality
• If the AC adaptor cord or plug becomes frayed or damaged, or if there is a
sudden loss of sound during use of the instrument, or if any unusual smells or
smoke should appear to be caused by it, immediately turn off the power switch,
disconnect the adaptor plug from the outlet, and have the instrument inspected
by qualified Yamaha service personnel.
CAUTION
Always follow the basic precautions listed below to avoid the possibility of physical injury to you or others, or damage
to the instrument or other property. These precautions include, but are not limited to, the following:
Power supply/AC power adaptor
• When removing the electric plug from the instrument or an outlet, always hold
the plug itself and not the cord.
• Unplug the AC power adaptor when not using the instrument, or during
electrical storms.
• Do not connect the instrument to an electrical outlet using a multiple-connector.
Doing so can result in lower sound quality, or possibly cause overheating in the
outlet.
Battery
• Always make sure all batteries are inserted in conformity with the +/- polarity
markings. Failure to do so might result in overheating, fire, or battery fluid
leakage.
• Always replace all batteries at the same time. Do not use new batteries together
with old ones. Also, do not mix battery types, such as alkaline batteries with
manganese batteries, or batteries from different makers, or different types of
batteries from the same maker, since this can cause overheating, fire, or battery
fluid leakage.
• Do not dispose of batteries in fire.
• Do not attempt to recharge batteries that are not intended to be charged.
• When the batteries run out, or if the instrument is not to be used for a long time,
remove the batteries from the instrument to prevent possible leakage of the
battery fluid.
• Keep batteries away from children.
• If the batteries do leak, avoid contact with the leaked fluid. If the battery fluid
should come in contact with your eyes, mouth, or skin, wash immediately with
water and consult a doctor. Battery fluid is corrosive and may possibly cause
loss of sight or chemical burns.
Location
• Do not expose the instrument to excessive dust or vibrations, or extreme cold or
heat (such as in direct sunlight, near a heater, or in a car during the day) to
prevent the possibility of panel disfiguration or damage to the internal
components.
• Do not use the instrument in the vicinity of a TV, radio, stereo equipment, mobile
phone, or other electric devices. Otherwise, the instrument, TV, or radio may
generate noise.
• Do not place the instrument in an unstable position where it might accidentally
fall over.
(4)-12 1/2
NP-30/YNP-25 Owner’s Manual
4
Page 5

PRECAUTIONS
• Before moving the instrument, remove all connected adaptor and other cables.
• When setting up the product, make sure that the AC outlet you are using is easily
accessible. If some trouble or malfunction occurs, immediately turn off the
power switch and disconnect the plug from the outlet. Even when the power
switch is turned off, electricity is still flowing to the product at the minimum
level. When you are not using the product for a long time, make sure to unplug
the power cord from the wall AC outlet.
• Use only the stand specified for the instrument. When attaching the stand or
rack, use the provided screws only. Failure to do so could cause damage to the
internal components or result in the instrument falling over.
• Do not place objects in front of the instrument’s air vent, since this may prevent
adequate ventilation of the internal components, and possibly result in the
instrument overheating.
Connections
• Before connecting the instrument to other electronic components, turn off the
power for all components. Before turning the power on or off for all components,
set all volume levels to minimum. Also, be sure to set the volumes of all
components at their minimum levels and gradually raise the volume controls
while playing the instrument to set the desired listening level.
Maintenance
• When cleaning the instrument, use a soft, dry cloth. Do not use paint thinners,
solvents, cleaning fluids, or chemical-impregnated wiping cloths.
Handling caution
• Do not insert a finger or hand in any gaps on the instrument.
• Never insert or drop paper, metallic, or other objects into the gaps on the panel
or keyboard. If this happens, turn off the power immediately and unplug the
power cord from the AC outlet. Then have the instrument inspected by qualified
Yamaha service personnel.
• Do not place vinyl, plastic or rubber objects on the instrument, since this might
discolor the panel or keyboard.
• Do not rest your weight on, or place heavy objects on the instrument, and do not
use excessive force on the buttons, switches or connectors.
• Do not use the instrument/device or headphones for a long period of time at a
high or uncomfortable volume level, since this can cause permanent hearing
loss. If you experience any hearing loss or ringing in the ears, consult a
physician.
Yamaha cannot be held responsible for damage caused by improper use or modifications to the instrument.
Always turn the power off when the instrument is not in use.
When using a power adaptor, even when the power switch is in the “STANDBY” position, electricity is still flowing to the instrument at the minimum level. When you are not
using the instrument for a long time, make sure you unplug the AC power adaptor from the wall AC outlet.
Make sure to discard used batteries according to local regulations.
(4)-12 2/2
NP-30/YNP-25 Owner’s Manual
5
Page 6

Introduction
Thank you for purchasing the Yamaha NP-30/YNP-25!
We recommend that you read this manual carefully
so that you can fully take advantage of the advanced and
convenient functions of the NP-30/YNP-25.
We also recommend that you keep this manual in a safe and
handy place for future reference.
Main Features
Graded Touch Keyboard
Features well balanced weight gradations of the keys—heavy in the lower end, light in the upper keys.
AWM Stereo Sampling
The Yamaha NP-30/YNP-25 offers unmatched sonic realism and natural grand-piano type playability as well as
Yamaha’s original “AWM Stereo Sampling” tone-generation technology for rich, musical voices.
In particular, the Grand Piano 1 and 2 voices feature samples painstakingly recorded from a full concert grand piano,
while the Electric Piano 1 and 2 voice features multiple samples for different velocities (Dynamic Sampling); in other
words, it uses different samples depending on the strength of your playing.
NP-30/YNP-25 Owner’s Manual
6
Page 7

About this Owner’s Manual
This manual consists of three main sections: Introduction, Reference and Appendix.
Introduction (page 6):
Please read this section first.
Reference (page 14):
This section explains how to make detailed settings for the instrument’s various functions.
Appendix (page 28):
This section features a variety of essential, detailed information on the instrument.
*The illustrations as shown in this owner’s manual are for instructional purposes only, and may appear somewhat different from
those on your instrument.
*Copying of the commercially available musical data including but not limited to MIDI data and/or audio data is strictly prohibited
except for your personal use.
*For the sake of simplicity, both models NP-30 and NP-30S are hereafter referred to in this Owner’s Manual as NP-30.
This product incorporates and bundles computer programs and contents in which Yamaha owns copyrights or with respect to
which it has license to use others’ copyrights. Such copyrighted materials include, without limitation, all computer software, style
files, MIDI files, WAVE data, musical scores and sound recordings. Any unauthorized use of such programs and contents outside of
personal use is not permitted under relevant laws. Any violation of copyright has legal consequences. DON’T MAKE, DISTRIBUTE
OR USE ILLEGAL COPIES.
•The company names and product names in this Owner’s Manual are the trademarks or registered trademarks of their respective
companies.
Accessories
• Owner’s Manual
This manual contains complete instructions for operating your instrument.
• Quick Operation Guide
• Music Rest
NP-30/YNP-25 Owner’s Manual
7
Page 8

Ta b le of Contents
Introduction
Main Features............................................................................................... 6
About this Owner’s Manual .........................................................................7
Accessories ...................................................................................................7
Application Index ......................................................................................... 9
Panel Controls and Terminals....................................................................10
Before Using...............................................................................................11
Power Requirements ................................................................................................... 11
Turning the Power On ................................................................................................12
Setting the Volume...................................................................................................... 13
Using the Pedal ............................................................................................................ 13
Using Headphones ...................................................................................................... 13
Music Rest.................................................................................................................... 13
Reference
Listening to the Demo Songs ....................................................................14
Listening to the Piano Preset Songs..........................................................15
Using the Metronome................................................................................16
Selecting & Playing Voices......................................................................... 18
Selecting Voices ........................................................................................................... 18
Combining Voices (Dual)........................................................................................... 19
Adding Variations to the Sound – Reverb ................................................................. 20
Transposition............................................................................................................... 21
Fine tuning of the Pitch............................................................................................... 21
Touch Sensitivity ......................................................................................................... 22
Connecting MIDI Instruments ...................................................................23
Connecting MIDI [IN] [OUT] terminals ..................................................................23
MIDI’s Capability ........................................................................................................ 23
Connecting a Personal Computer ..............................................................................24
MIDI Functions ........................................................................................... 25
MIDI Transmit/Receive Channel Selection ............................................................... 25
Local Control ON/OFF ............................................................................................... 25
Program Change ON/OFF.......................................................................................... 26
Control Change ON/OFF ........................................................................................... 26
Troubleshooting.........................................................................................27
Optional Equipment...................................................................................27
Appendix
MIDI Data Format ...................................................................................... 28
MIDI Implementation Chart ...................................................................... 32
Specifications .............................................................................................34
Index...........................................................................................................35
NP-30/YNP-25 Owner’s Manual
8
Page 9

Application Index
Use this index to find reference pages that may be helpful for your particular application and situation.
Listening
Listening to demo songs with different voices.....................................................................Listening to the Demo Songs on page 14
Playing
Using the sustain pedal............................................................................................................................... Using the Pedal on page 13
Changing the key of the NP-30/YNP-25 to facilitate playing in difficult/unfamiliar key signatures ........ Transposition on page 21
Fine tuning the pitch of the entire instrument when you play the instrument along with other instruments or CD music
.........................................................................................................................................................Fine tuning of the Pitch on page 21
Selecting a touch sensitivity type............................................................................................................. Touch Sensitivity on page 22
Using a built-in metronome............................................................................................................ Using the Metronome on page 16
Changing voices
Viewing the list of voices ............................................................................................................................Selecting Voices on page 18
Simulating a concert hall ..................................................................................Adding Variations to the Sound – Reverb on page 20
Combining two voices ............................................................................................................... Combining Voices (Dual) on page 19
Connecting the NP-30/YNP-25 to other devices
What is MIDI?..................................................................................................................................................About MIDI on page 23
Connecting a computer ................................................................................................ Connecting a Personal Computer on page 24
NP-30/YNP-25 Owner’s Manual
9
Page 10
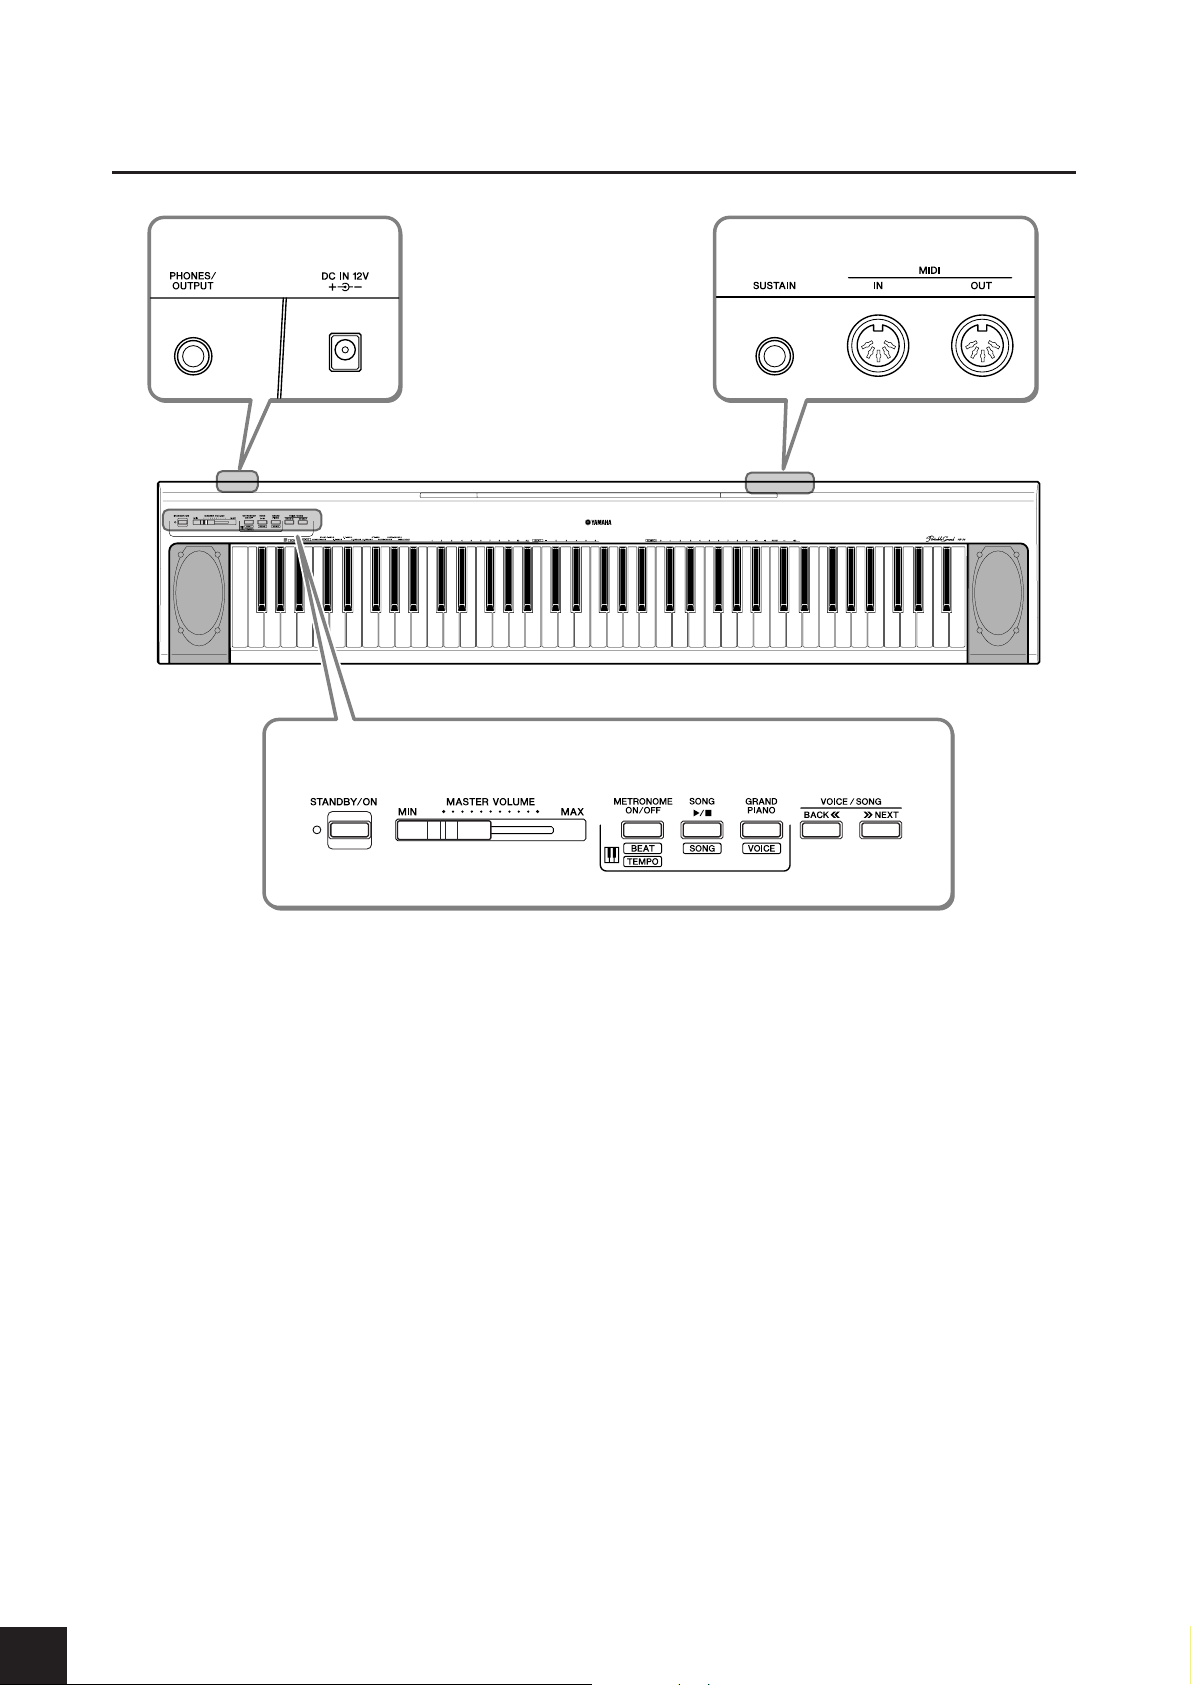
Panel Controls and Terminals
Panel Controls and Terminals
9)
Shows the jacks and terminals
as seen when viewed from the
rear of the instrument.
12 345
7
Shows the jacks and terminals
as seen when viewed from the
rear of the instrument.
6
8
1 [STANDBY/ON] switch ................ page 11
For turning the power on or off.
2 [MASTER VOLUME] slider ........... page 13
For adjusting the volume level of the entire sound.
3 [METRONOME ON/OFF] button
..................................................... page 16
For using the metronome.
WW
AA
WW
4 [SONG
For playing the demo songs and the piano preset
songs.
AA
/
] button................ page 14, 15
5 [GRAND PIANO] button
..........................................page 18-20, 22
For selecting voices from 10 internal sounds including Grand Piano 1 and 2 (page 18). You can also
combine two voices (page 19) or add reverb effects to
the selected voice for your keyboard performance
(page 20).
6 VOICE/SONG [BACK<<], [>>NEXT]
button ............................ pages 14, 15, 18
While playing a voice demo or piano preset song,
pressing these buttons can be selected next or previous song. These buttons can be also changed a voice.
7 [SUSTAIN] jack .............................page 13
For connecting an optional pedal (FC5), FC3 foot
pedal or FC4 foot switch.
8 MIDI [IN] [OUT] terminals........... page 23
For connecting external MIDI devices, allowing the
use of various MIDI functions.
9 [PHONES/OUTPUT] jack ..............page 13
For connecting a set of standard stereo headphones,
allowing private practice.
) [DC IN 12V] jack...........................page 11
For connecting the power adaptor.
NP-30/YNP-25 Owner’s Manual
10
Page 11
Before Using
Before Using
Be sure to do the following operations BEFORE turning on the power.
Power Requirements
Although the instrument will run either from an optional AC adaptor or batteries, Yamaha recommends use of an AC adaptor whenever possible. An AC adaptor is more environmentally friendly
than batteries and does not deplete resources.
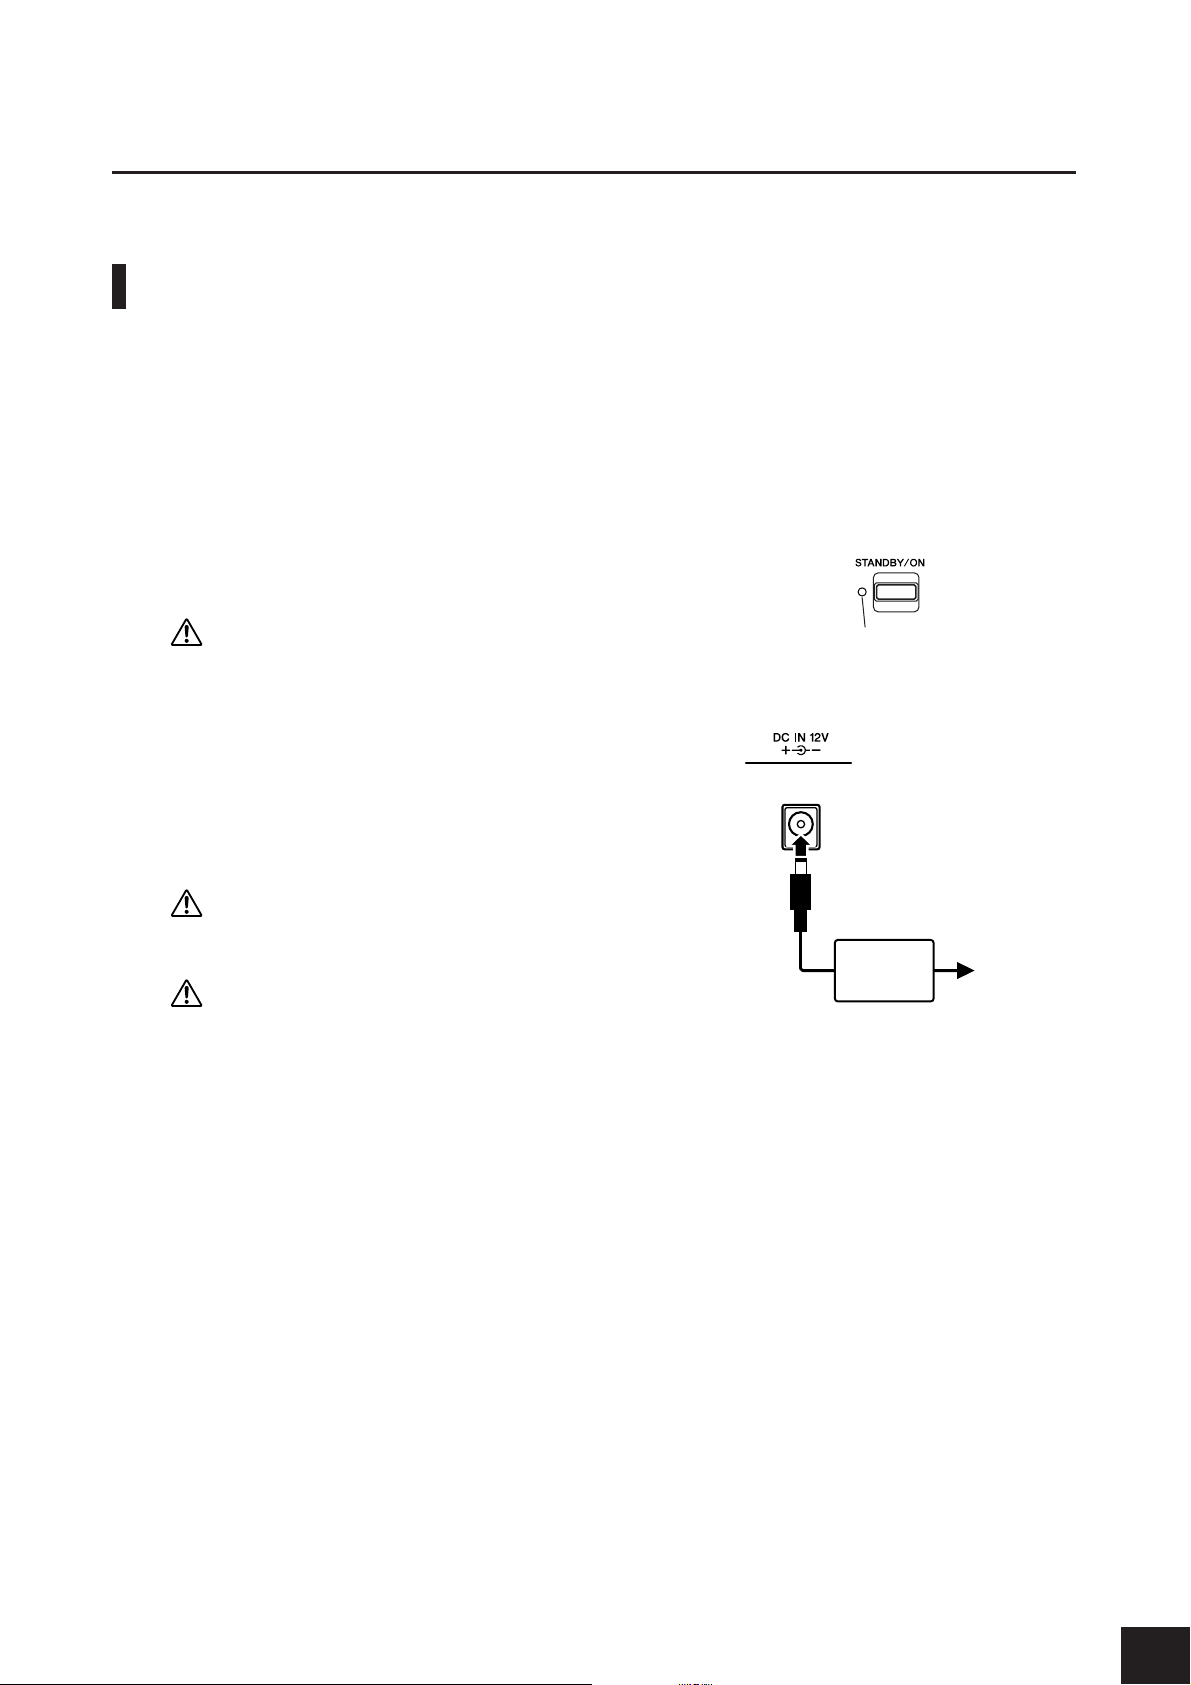
Using an AC Power Adaptor...............................................................
1. Make sure that the [STANDBY/ON] switch
of the instrument is set to STANDBY.
WARNING
Use the specified adaptor (PA-5D, PA-150, or an equivalent recommended by Yamaha) only. The use of other adaptors may result in
irreparable damage to both the adaptor and the instrument.
2. Connect the AC adaptor to the power sup-
ply jack.
3. Plug the AC adaptor into an AC outlet.
CAUTION
Unplug the AC Power Adaptor when not using the instrument, or
during electrical storms.
CAUTION
Even when the instrument is turned off, electricity is still flowing to
the instrument at the minimum level.
When you are not using the instrument for a long time, make sure
you unplug the AC power adaptor from the wall AC outlet.
unlit
2.
3.
AC outletAdaptor
NP-30/YNP-25 Owner’s Manual
11
Page 12
Before Using
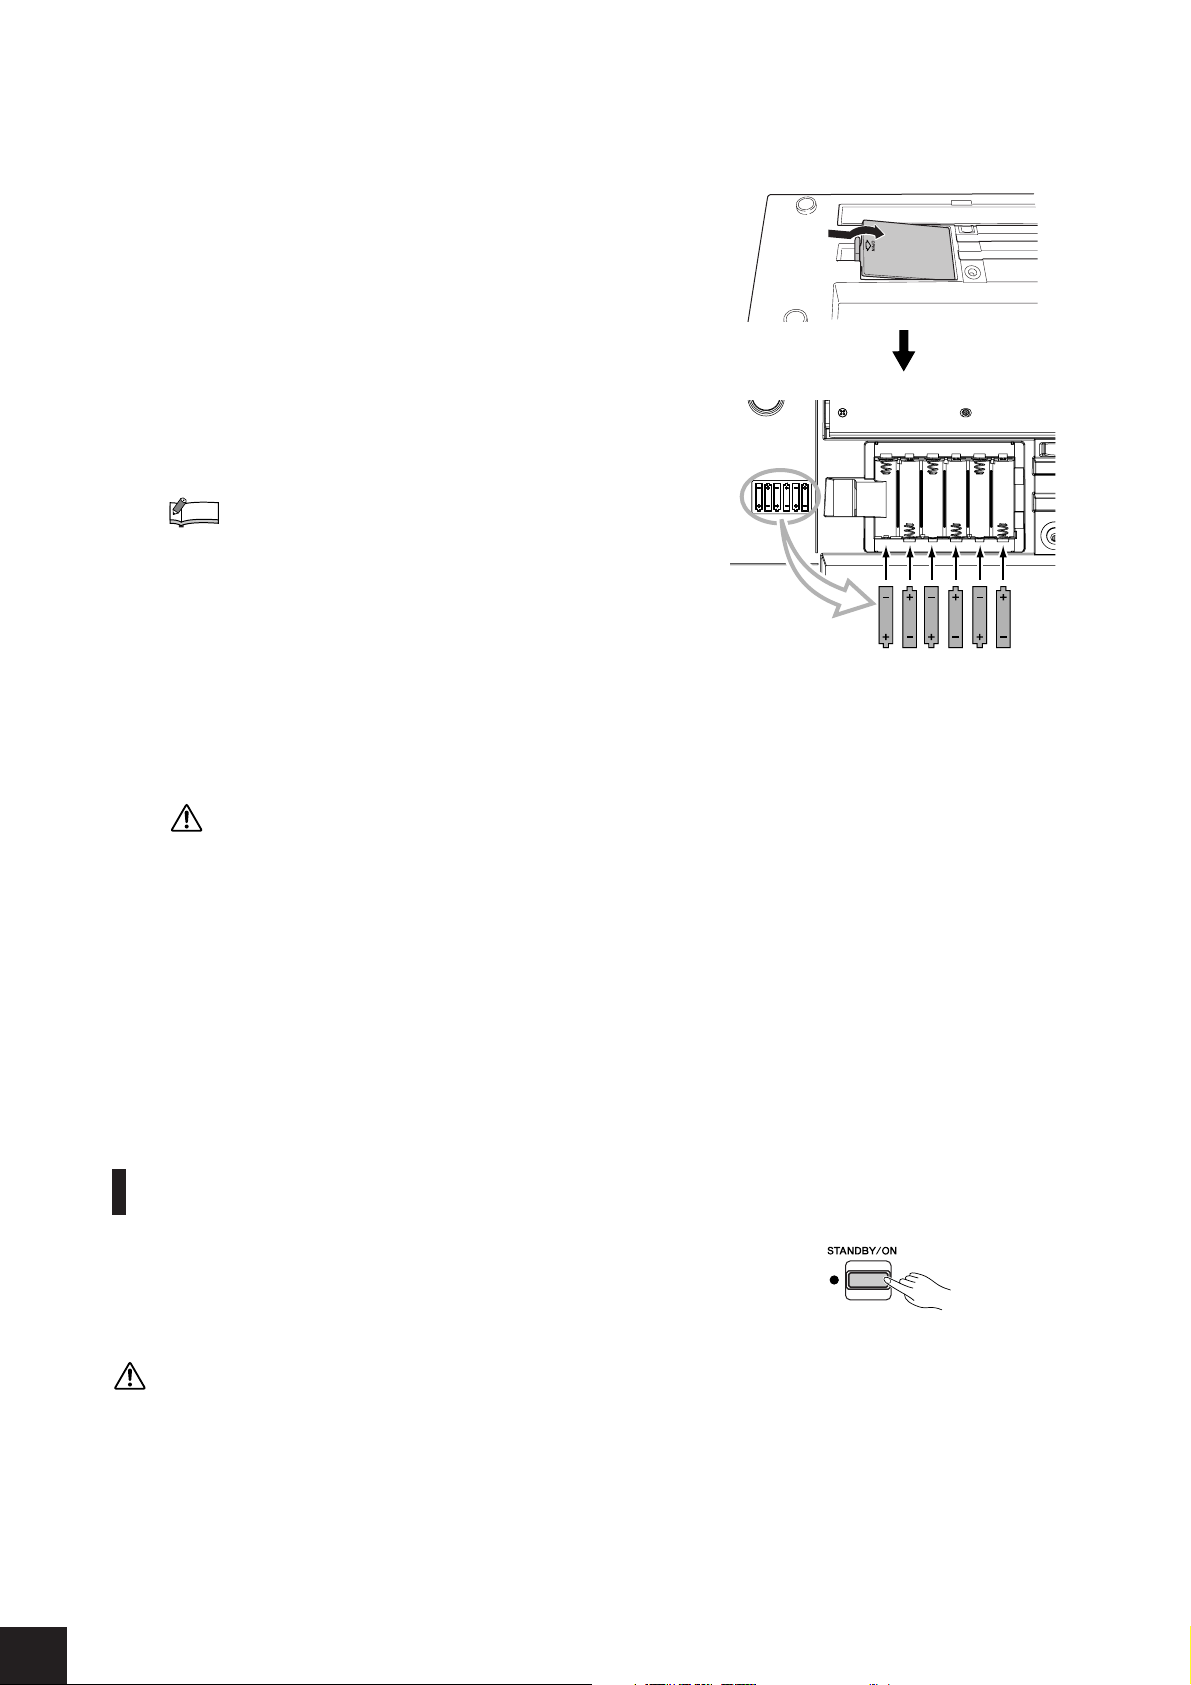
Using Batteries ....................................................................................
1. Open the battery compartment cover
located on the instrument’s bottom panel.
2. Insert the six new alkaline batteries, being
careful to follow the polarity markings on
the side of the compartment.
3. Replace the compartment cover, making
sure that it locks firmly in place.
NOTE
For battery operation the instrument requires six 1.5V
“AA” size, LR6 or equivalent batteries. (Alkaline batteries are recommended.) When battery power becomes
too low for proper operation, the volume may be
reduced, the sound may be distorted, and other problems may occur. When this happens, make sure to
replace all batteries, following the precautions listed
below.
Use alkaline batteries for this instrument. Other types of batteries
(including rechargeable batteries) may have sudden drops of power
when battery power becomes low.
Make sure to install the batteries with the proper orientation, maintaining the correct polarity (as shown). Incorrect battery installation
may result in heat, fire and/or leaking of corrosive chemicals.
When the batteries run down, replace them with a complete set of six
new batteries. NEVER mix old and new batteries. Do not use different
kinds of batteries (e.g. alkaline and manganese) at the same time.
If the instrument is not to be in use for a long time, remove the batteries from it, in order to prevent possible fluid leakage from the battery.
Never connect or disconnect the AC power adaptor when the
power is on and the batteries are installed. Doing so will turn
the power off.
CAUTION
Tu rning the Power On
Press the [STANDBY/ON] switch to turn on the power.
The power indicator located to the left of the [STANDBY/ON] switch
lights up.
Pressing the switch again turns the power off.
CAUTION
When using a power adaptor, even when the power is off, a small amount of
electricity is still being consumed by the instrument. When you are not using
the instrument for a long time, make sure to unplug the AC power adaptor
from the wall AC outlet, and/or remove the batteries from the instrument.
NP-30/YNP-25 Owner’s Manual
12
Page 13

Setting the Volume
Initially set the [MASTER VOLUME] slider about halfway between the
“MIN” and “MAX” settings. Then, when you start playing, re-adjust the
[MASTER VOLUME] slider to the most comfortable listening level.
Before Using
TERMINOLOGY
MASTER VOLUME:
The volume level of the entire keyboard sound
Using the Pedal
[SUSTAIN] jack
This jack is for connecting an optional pedal.
The pedal functions in the same way as a damper pedal on an acoustic
piano. Connect an optional pedal to this jack and press the pedal to sustain the sound.
Do not press the footswitch while turning the power on. Doing this
changes the recognized polarity of the footswitch, resulting in reversed
footswitch operation.
If you connect an optional pedal of FC3, the half pedal function* can be
used.
* half pedal function
While you playing the piano with SUSTAIN and if you need to delete the
cloudy sound, release the foot from pedal to half position.
NOTE
Make sure that power is OFF when connecting or disconnecting the
pedal.
The level increases.The level decreases.
FC5
Using Headphones
Connect a set of headphones to the [PHONES/OUTPUT] jack.
CAUTION
To protect your hearing, avoid listening to the NP-30/YNP-25 at a high volume level for long periods of time.
Music Rest
The NP-30/YNP-25 includes a music rest that can be attached to the
instrument by inserting it into the slot at the top of the control panel.
CAUTION
Since speakers are built into the instrument you should be careful to never
leave any video tapes, cassette tapes, floppy disks or any kind of magnetic
storage media on the panel—doing so may result in data loss or damage to
the items. Also avoid using the instrument near a television or computer
monitor, since interference may result.
NP-30/YNP-25 Owner’s Manual
13
Page 14

Reference
Listening to the Demo Songs
Listening to the Demo Songs
Demo songs are provided that effectively demonstrate each of the voices.
1. Press the [STANDBY/ON] switch to turn the power
on.
When the power is turned ON, the power indicator located to the left of the [STANDBY/ON]
switch lights up.
2. Adjust the volume.
Initially set the [MASTER VOLUME] slider about
half way between the “MIN” and “MAX” settings.
Then, when you start playing, re-adjust the
[MASTER VOLUME] slider to the most comfort-
able listening level.
WW
3. Press the [SONG
ten to the demo songs.
The GRAND PIANO 1 demo song will start. Demo
songs provided for each voice and the piano preset
songs will play back in sequence until you press the
[SONG
Changing a Demo Song
You can change to another demo song during playback by pressing the VOICE/SONG [BACK<<] or
[>>NEXT]
the keyboard, press one of the C1–A1 keys while
holding down the [SONG
WWWW/
AAAA] button.
button. For selecting a demo song using
AA
WW
/
AA
] button to lis-
WWWW/
AAAA] button.
NOTE
Refer to the voice list on page 18
for more information on the characteristics of each preset voice.
NOTE
The demo songs will not be transmitted via MIDI.
Demo Song List
• The demonstration pieces listed above are short rearranged excerpts of the original
compositions.
• All other songs are original (© 2005 Yamaha Corporation).
4. Press the [SONG
stop the voice demo.
NP-30/YNP-25 Owner’s Manual
14
C1 A1
C1
KeyVoice Name Title Composer
G1 HARPSICHORD 1 Gavotte J.S. Bach
G#1 HARPSICHORD 2 Invention No. 1 J.S. Bach
WW
AA
WW
/
AA
] button to
A1
Page 15

Listening to the Piano Preset Songs
Listening to the Piano Preset Songs
The NP-30/YNP-25 provides performance data for piano songs as well as voice demo songs, for
your listening pleasure.
WW
1. While holding down the [SONG
one of the C2–A2 keys to select a song to play back.
The number of each piano preset song is assigned to the C2–A2 keys.
While holding down the [SONG
songs consecutively in sequence.
C2
WWWW/
AAAA] button, press the A#2 key to play all preset
C1 C2 A2
AA
WW
/
AA
] button, press
ALL
TERMINOLOGY
Song:
On the NP-30/YNP-25, performance data is called a “Song.”
This includes demonstration
tunes and piano preset tunes.
Preset:
Preset Data supplied with the
internal memory of the NP-30/
YNP-25 shipped from the factory.
NOTE
You can play the keyboard along
with the preset song. You can
change the voice playing on the
keyboard.
NOTE
When you select a different song
(or a different song is selected
during chained playback), an
appropriate reverb type will be
selected accordingly.
A2
NOTE
The piano preset songs are not
transmitted via MIDI.
Piano Preset Song List
No. Title Composer
1 Menuett G dur BWV.Anh.114 J.S. Bach
2Turkish March (Piano Sonate No.11 K.331) W.A. Mozart
3 Für Elise L.v. Beethoven
4Valse op.64-1 “Petit chien” F.F. Chopin
5Träumerei R. Schumann
6 Dolly’s Dreaming and Awakening T. Oesten
7Arabesque J.F.F. Burgmüller
8 Humoresque A. Dvorák
9 The Entertainer S. Joplin
10 La Fille aux Cheveux de Lin C.A. Debussy
Press the VOICE/SONG [BACK<<] or [>>NEXT] button to change to the next piano song.
WW
2. Press the [SONG
AA
WW
/
AA
] button to
stop playback.
To continue playing other songs, see step 1 above.
ˆ
NP-30/YNP-25 Owner’s Manual
15
Page 16

Using the Metronome
Using the Metronome
This instrument features a built-in metronome (a device that keeps an accurate tempo) that is convenient for practicing.
1. Press the [METRONOME ON/OFF]
button to turn on the metronome.
Start the metronome.
Determine the time signature
While holding down the [METRONOME ON/OFF] button, press one of the C3–
F3 keys.
The first beat is accented with a bell sound and the rest with clicks.
Default set is 0/4 (C3). In this setting, clicks sound in all beats.
Key Time signature
C3 0/4
C#3 2/4
D3 3/4
D#3 4/4
C3 F3C1 C2
E3 5/4
F3 6/4
C3
F3
Adjust the Tempo
The tempo of the metronome and song playback can be set from 32 to 280 beats
per minute.
A number is assigned to each of the following keys.
While holding down the [METRONOME ON/OFF] button, press a sequence of
C4–A4 keys to specify a three-digit number.
Select a number starting from the left-most digit. For example, to set the tempo
“95,” press the C4 (0), A4 (9) and F4 (5) keys in sequence.
A4C4 C5 C6
NP-30/YNP-25 Owner’s Manual
16
C4
A4
Page 17

Increasing the tempo value in steps of one:
While holding down the [METRONOME ON/OFF] button, press the C#5 key.
Decreasing the tempo value in steps of one:
While holding down the [METRONOME ON/OFF] button, press the B4 key.
Increasing the tempo value in steps of ten:
While holding down the [METRONOME ON/OFF] button, press the D5 key.
Decreasing the tempo value in steps of ten:
While holding down the [METRONOME ON/OFF] button, press the A#4 key.
Resetting the tempo to default:
While holding down the [METRONOME ON/OFF] button, press the C5 key.
A#4 (-10)
C#5 (+1)
D5 (+10)
B4 (-1)
C5 (default)
C6
Using the Metronome
A#4
D5
Adjusting the volume
You can change the volume of the metronome sound.
While holding down the [METRONOME ON/OFF] button, press one of the C1–
G2 keys to determine the volume.
Pressing a higher key in the key range results in a higher volume, while pressing
a lower key results in lower volume.
C1
(1)
G2
(20)
2. Press the [METRONOME ON/OFF]
button to stop the Metronome.
NOTE
Metronome volume range:
C1 (1)–G2 (20)
Default setting: A1 (10)
NP-30/YNP-25 Owner’s Manual
17
Page 18

Selecting & Playing Voices
Selecting & Playing Voices
Selecting Voices
1. While holding down the [GRAND PIANO] button,
press one of the C1–A1 keys to select a voice.
C1 A1
C1
A1
Pressing the VOICE/SONG [BACK<<] or [>>NEXT]
button switches among the following ten voices.
KeyVoice Name Description
C1 Grand Piano 1
C#1Grand Piano 2 Clear piano with bright reverb. Good for popular music.
D1 E. Piano 1 An electronic piano sound created by FM synthesis. Good for
D#1E. Piano 2
E1 Church Organ 1
F1 Church Organ 2
F#1
Strings Spacious and large-scale string ensemble. Try combining this voice
G1 Harpsichord 1
G#1 Harpsichord 2
A1 Vibraphone
Recorded samples from a full concert grand piano. Perfect for classical compositions as well as any other style that requires acoustic
piano.
popular music.
The sound of an electric piano using hammer-struck metallic “tines.”
Soft tone when played lightly, and an aggressive tone when played
hard.
This is a typical pipe organ sound (8' + 4' + 2'). Good for sacred music
from the Baroque period.
This is the organ’s full coupler sound, often associated with Bach’s
“Toccata and Fugue.”
with piano in DUAL.
The definitive instrument for baroque music. Since the strings of a
harpsichord are plucked, there is no touch response.
Mixes the same voice an octave higher for a more brilliant tone.
The sound of a vibraphone played with relatively soft mallets.
NOTE
To familiarize yourself with the
characteristics of the voices, listen to the demo songs for each
voice (page 14).
TERMINOLOGY
Voice:
On the NP-30/YNP-25, the term
“voice” means “instrument
sound.”
NOTE
When you select a voice, an
appropriate reverb type will be
selected automatically (page 20).
2. Adjust the volume.
Re-adjust the [MASTER VOLUME] slider for the most comfortable listening
level during your performance.
NP-30/YNP-25 Owner’s Manual
18
Page 19

Selecting & Playing Voices
Combining Voices (Dual)
You can play voices simultaneously across the entire range of the keyboard. In this way, you can
combine similar voices to create a thicker sound.
1. While holding down the [GRAND PIANO] button,
press two keys in the range of C1 through A1 simultaneously (or press one key while holding another)
to engage Dual.
Refer to “Selecting Voices” on page 18 for more information on the voices that
are assigned to the keys.
C1 A1
The voice assigned to the lower key will be designated as Voice 1, and the voice
assigned to the higher key will be designated as Voice 2.
You can make the following settings for Voices 1 and 2 in Dual:
Setting the Octave
You can shift the pitch up and down in octave steps for Voice 1 and Voice 2 independently. Depending on which voices you combine in Dual, the combination
may sound better if one of the voices is shifted up or down an octave.
While holding down the [GRAND PIANO] button, press one of the C4–F4 keys.
Voice 2Voice 1
F4 C5 C6C4
Voice 1
Setting the Balance
You can adjust the volume balance between two voices. For example, you can set
one voice as the main voice with a louder setting, and make the other voice softer.
While holding down the [
keys.
A setting of “0” produces an equal balance between the two Dual voices. Settings
below “0” increase the volume of Voice 2 in relation to Voice 1, and settings above
“0” increase the volume of Voice 1 in relation to Voice 2.
C4 -1
C#40 E4 0
D4 +1 F4 +1
GRAND
Voice 2
PIANO] button, press one of the F#4–F#5
D#4-1
F#5 (+6)F#4 (-6)
NOTE
Reverb in Dual
The reverb type assigned to
Voice 1 will take priority. If the
reverb assigned to Voice 1 is set
to OFF, the reverb assigned to
Voice 2 will be in effect.
C5(0) C6C4
2. While holding down the [GRAND PIANO] button,
press one of the C1–A1 keys (or press the [GRAND
PIANO/VOICE] button) to exit Dual and return to
the normal single-voice play.
NP-30/YNP-25 Owner’s Manual
19
Page 20

Selecting & Playing Voices
Adding Variations to the Sound – Reverb
This control enables you to select four different types of reverb effect that add extra depth and
expression to the sound to create a realistic acoustic ambience.
KeyReverb Type Description
C2 Room This setting adds a continuous reverb effect to the sound, similar to the
acoustic reverberation you would hear in a room.
C#2 Hall1 For a “bigger” reverb sound, use the HALL 1 setting. This effect simulates
the natural reverberation of a small-size concert hall.
D2 Hall2 For a truly spacious reverb sound, use the HALL 2 setting. This effect sim-
ulates the natural reverberation of a large concert hall.
D#2 Stage Simulates the reverb of a stage environment.
E2 Off No effect is applied.
Selecting a Reverb Type
While holding down the [GRAND PIANO] button, press one of the C2–E2 keys
to select a reverb type.
C1 C2 E2
Adjusting Reverb Depth
While holding down the [GRAND PIANO] button, press one of the C3–A#3
keys to adjust the reverb depth for the selected voice.
A#3: depth 10
C3: depth 0
The depth value increases as you press higher keys.
B3C1 C2
While holding down the [GRAND PIANO] button, press the B3 key to set the
reverb to the depth most suitable for the selected voice.
NOTE
Reverb depth range:
0 (no effect)–
10 (maximum depth)
NOTE
The default reverb type (including
OFF) and depth settings are different for each voice.
NP-30/YNP-25 Owner’s Manual
20
Page 21

Selecting & Playing Voices
Tr ansposition
The Transpose function makes it possible to shift the pitch of the entire keyboard up or down in
semitone intervals to facilitate playing in difficult key signatures, and to let you easily match the
pitch of the keyboard to the range of a singer or other instruments. For example, if you set the
transposition amount to “+5,” playing key C produces pitch F. In this way, you can play a song as
though it were in C major, and the NP-30/YNP-25 will transpose it to the key of F.
Setting the amount of transposition
WW
AA
WW
While holding down the [SONG
AA
/
] and [GRAND PIANO] buttons, press one
of the F#2–F#3 keys to set the desired amount of transposition.
F#3F#2
TERMINOLOGY
Transpose:
Changing the key signature. On
the NP-30/YNP-25, transposing
shifts the pitch of the entire keyboard.
C1 C2
To transpose the pitch down (in semitone steps)
While holding down the [SONG
WWWW/
AAAA] and [GRAND PIANO] buttons, press any
key between F#2 and B2.
To transpose the pitch up (in semitone steps)
While holding down the [SONG
WWWW/
AAAA] and [GRAND PIANO] buttons, press any
-2 +1 +3-4
-6 +6
0-1
-3-5 +2 +4+5
NOTE
Transposition range:
F#2 (-6 semitones)–
C3 (normal pitch)–
F#3 (+6 semitones)
key between C#3 and F#3.
To restore the normal pitch
While holding down the [SONG
WWWW/
AAAA] and [GRAND PIANO] buttons, press the
C3 key.
Fine tuning of the Pitch
You can fine tune the pitch of the entire instrument. This function is useful when you play the NP30/YNP-25 along with other instruments or CD music.
Setting the Pitch
To raise the pitch
in about 1cent steps (100 cents
= 1 semitone):
Hold down the E0, F0 and G0
keys simultaneously and press any
key between C3 and B3.
To lower the pitch
in about 1cent steps (100 cents
= 1 semitone):
Hold down the E0, F0 and F#0
keys simultaneously and press any
key between C3 and B3.
To restore standard pitch:
Hold down the E0, F0, F#0 and
G0 keys simultaneously and press
any key between C3 and B3.
F0
F#0
F0
F#0
F0
NOTE
Setting range: -65–+65 cents
C1 C2 C3 B3G0E0
C1E0
C1G0E0
C2 C3 B3
C2 C3 B3
The default setting (0 cent) is
A3=440Hz. In the 440Hz region,
1Hz=approximately 4 cents.
Pressing the key 8 times for
example, will set A3 at approximately 442Hz.
TERMINOLOGY
Default setting:
The “Default setting” refers to the
factory setting obtained when you
first turn on the power to the NP30/YNP-25.
NP-30/YNP-25 Owner’s Manual
21
Page 22

Selecting & Playing Voices
Touch Sensitivity
You can adjust the volume level that changes depending on how fast or strong you hit the keys.
The following four settings are available.
KeyTouch Sensitivity Description
A5 FIXED The volume level does not change at all regardless of whether you play
the keyboard soft or hard.
A#5 SOFT The volume level does not change much when you play the keyboard soft
or hard.
B5 MEDIUM This is the standard piano touch response (default setting).
C6 HARD The volume level changes very widely from pianissimo to fortissimo to
facilitate dynamic and dramatic expression. You have to hit the keys hard
to produce a loud sound.
Setting the Touch Sensitivity Type
While holding down the [GRAND PIANO] button, press one of the A5–C6 keys
to select the desired touch sensitivity.
A5 C6
NOTE
The touch sensitivity settings may
have little or no effect with Church
Organ 1, 2 and Harpsichord 1, 2
voices that are not normally
responsive to keyboard dynamics.
Default setting: B5
NP-30/YNP-25 Owner’s Manual
22
Page 23

Connecting MIDI Instruments
Connecting MIDI Instruments
The NP-30/YNP-25 features MIDI IN/OUT terminals, allowing you to connect the NP-30/YNP-25 to
other instruments and devices—including computers—and take advantage of the various performance and recording capabilities in MIDI applications.
Connecting MIDI [IN] [OUT] terminals
MIDI [IN] [OUT] terminals
Use MIDI cables to connect external MIDI devices to these
connectors.
About MIDI
MIDI (Musical Instrument Digital Interface) is a standard format for data transmission/reception. It enables the transfer of performance data and commands between
MIDI devices and personal computers. Using MIDI, you can control a connected MIDI
device from the NP-30/YNP-25, or control the NP-30/YNP-25 from a connected MIDI
device or computer.
NOTE
Since MIDI data that can be
transmitted or received varies
depending on the type of MIDI
device, check the “MIDI Implementation Chart” to find out what
MIDI data and commands your
devices can transmit or receive.
The MIDI Implementation Chart
appears on
page 32
.
MIDI’s Capability
MIDI functions enable you to transfer performance data between MIDI devices.
CAUTION
Before connecting the instrument to other electronic components, turn off the power of all the
components.
● Transferring performance data to and from another
MIDI device
MIDI [OUT] terminal
Instrument
MIDI [IN] terminal MIDI [OUT] terminal MIDI [IN] terminal
MIDI cables
(optional)
MIDI device
● Transferring MIDI data to and from a computer
MIDI [OUT]
MIDI [IN]
terminal
terminal
USB terminal
You cannot transmit the voice
demo songs and the piano preset
songs from the NP-30/YNP-25 to
another MIDI device.
For MIDI connections, use a standard (optional) MIDI cable, available at most musical instrument
stores.
NOTE
Instrument
USB-MIDI
interface
(optional)
Computer
NP-30/YNP-25 Owner’s Manual
23
Page 24

Connecting MIDI Instruments
Connecting a Personal Computer
By connecting a computer to the MIDI terminals, you can transfer data between the NP-30/YNP-25
and the computer via MIDI.
CAUTION
When connecting the NP-30/YNP-25 to a computer, first turn off the power to both the NP-30/
YNP-25 and the computer before connecting any cables. After making connections, turn on the
power to the computer first, then to the NP-30/YNP-25.
Connecting the USB port on the computer to the
NP-30/YNP-25 via an optional USB-MIDI interface
(such as the Yamaha UX16)
Use a USB-MIDI interface device to connect the USB port on your computer to the
NP-30’s/YNP-25’s MIDI terminals. You must install the USB-MIDI interface (such as
the UX16) driver. For more information, refer to the user’s manual that came with the
USB-MIDI interface device.
MIDI [OUT]
Instrument
MIDI [IN]
terminal
terminal
USB-MIDI
interface
(optional)
USB terminal
Computer
NOTE
When the NP-30/YNP-25 is used
as a tone module, performance
data with voices that are not
found on the NP-30/YNP-25 will
not be played correctly.
NOTE
You must install a software application on the computer to be able
to transfer MIDI data between the
NP-30/YNP-25 and a computer.
NP-30/YNP-25 Owner’s Manual
24
Page 25

MIDI Functions
You can make detailed adjustments to MIDI settings.
MIDI Transmit/Receive Channel Selection
MIDI Functions
In any MIDI control setup, the MIDI channels of the transmitting and
receiving devices must be matched for proper data transfer.
This parameter enables you to specify the channel on which the NP30/YNP-25 transmits or receives MIDI data.
Setting the Transmit Channel
While holding down the [SONG
of the C1–E2 keys.
Setting the Receive Channel
While holding down the [SONG
of the C4–F5 keys.
WWWW/
AAAA] and [GRAND PIANO] buttons, press one
WWWW/
AAAA] and [GRAND PIANO] buttons, press one
E2 F5
C1 C4
11 14 169
742 11 14 169
56810121315
31
Tr ansmit Channel
(C1–E2)
OFF
742
56810121315
31
Receive Channel
(C4–F5)
1+2
ALL
NOTE
In Dual, Voice 1 data is transmitted on its specified channel and
Voice 2 data is transmitted on the
next greater channel number relative to the specified channel. In
this case, no data is transmitted if
the transmit channel is set to
“OFF.”
ALL:
“Multi-timbre” Receive. This
allows simultaneous reception of
different parts on all 16 MIDI
channels, enabling the NP-30/
YNP-25 to play multi-channel
song data received from a music
computer or sequencer.
1+2:
“1+2” Receive. This allows simultaneous reception on channels 1
and 2 only, enabling the NP-30/
YNP-25 to play 1 and 2 channel
song data received from a music
computer or sequencer.
Program change and other like
channel messages received will
not affect the NP-30’s/YNP-25’s
panel settings or the notes you
play on the keyboard.
Data for the demo song and
piano preset songs cannot be
transmitted via MIDI.
Local Control ON/OFF
“Local Control” refers to the fact that, normally, the NP-30/YNP-25 keyboard controls its internal
tone generator, allowing the internal voices to be played directly from the keyboard. This situation
is “Local Control On,” since the internal tone generator is controlled locally by its own keyboard.
Local control can be turned OFF, however, so that the NP-30/YNP-25 keyboard does not play the
internal voices, but the appropriate MIDI information is still transmitted via the MIDI OUT terminal
when notes are played on the keyboard. At the same time, the internal tone generator responds to
MIDI information received via the MIDI IN terminal.
While holding down the [SONG
WWWW/
AAAA] and [GRAND PIANO] buttons, press the
C6 key. Pressing the C6 key repeatedly toggles between Local Control On and
Off.
C6
Default setting: ON
NP-30/YNP-25 Owner’s Manual
25
Page 26

MIDI Functions
Program Change ON/OFF
Normally the NP-30/YNP-25 will respond to MIDI program change numbers received from an
external keyboard or other MIDI device, causing the same numbered voice to be selected on the
corresponding channel (the keyboard voice does not change). The NP-30/YNP-25 will normally
also send a MIDI program change number whenever one of its voices is selected, causing the same
numbered voice or program to be selected on the external MIDI device if the device is set up to
receive and respond to MIDI program change numbers. This function makes it possible to cancel
program change number reception and transmission so that voices can be selected on the NP-30/
YNP-25 without affecting the external MIDI device.
While holding down the [SONG
C#6 key. Pressing the C#6 key repeatedly toggles between Program Change On
and Off.
WWWW/
AAAA] and [GRAND PIANO] buttons, press the
C#6
NOTE
For information on program
change numbers for each of the
NP-30’s/YNP-25’s voices, refer to
MIDI Data Format on page 28.
Default setting: ON
Control Change ON/OFF
Normally the NP-30/YNP-25 will respond to MIDI control change data received from an external
MIDI device or keyboard, causing the voice on the corresponding channel to be affected by pedal
and other “control” settings received from the controlling device (the keyboard voice is not
affected). The NP-30/YNP-25 also transmits MIDI control change information when the pedal or
other appropriate controls are operated.
This function makes it possible to cancel control change data reception and transmission so that,
for example, the NP-30’s/YNP-25’s pedal and other controls can be operated without affecting an
external MIDI device.
While holding down the [SONG
D6 key. Pressing the D6 key repeatedly toggles between Control Change On and
Off.
NP-30/YNP-25 Owner’s Manual
26
WWWW/
AAAA] and [GRAND PIANO] buttons, press the
D6
NOTE
For information on control
changes that can be used with
the NP-30/YNP-25, refer to MIDI
Data Format on page 28.
Default setting: ON
Page 27

Troubleshooting
Troubleshooting
Problem Possible Cause and Solution
The NP-30/YNP-25 does not turn on. The NP-30/YNP-25 has not been plugged in properly. Securely insert the female plug
into the jack on the NP-30/YNP-25, and the male plug into a proper AC outlet
(page 11).
The batteries are low or dead. Replace all six batteries with completely new alkaline
ones, or use the optional AC adaptor.
Noise is heard from the speakers or headphones.
The overall volume is low, or no sound is
heard.
The sound is distorted. If you are using manganese batteries with the instrument, try replacing them with a
The sustain pedal has no effect. The pedal cable/plug may not be properly connected. Make sure to securely insert
The noise may be due to interference caused by the use of a mobile phone in close
proximity to the NP-30/YNP-25. Turn off the mobile phone, or use it further away from
the NP-30/YNP-25.
The batteries are low or dead. Replace all six batteries with completely new alkaline
ones, or use the optional AC adaptor.
The Master Volume is set too low; set it to an appropriate level using the [MASTER
VOLUME] control.
Make sure a pair of headphones is not connected to the headphones jack (page 13).
Make sure that Local Control (page 25) is ON.
The batteries are low or dead. Replace all six batteries with completely new alkaline
ones, or use the optional AC adaptor.
set of new alkaline batteries. Alternately, you could use the AC adaptor instead, or
try turning down the volume.
the pedal plug into the SUSTAIN jack (page 13).
Optional Equipment
Foot Pedal (FC3/FC4/FC5)
Keyboard Stand (L-2C)
USB-MIDI interface (UX16 )
Headphones (HPE-150/HPE-30)
NP-30/YNP-25 Owner’s Manual
27
Page 28

Appendix
MIDI Data Format
If you’re already very familiar with MIDI, or are using a computer to control your music hardware with computer-generated MIDI
messages, the data provided in this section can help you to control the NP-30/YNP-25.
1. NOTE ON/OFF
Data format: [9nH] -> [kk] -> [vv]
9nH = Note ON/OFF event (n = channel number)
kk = Note number (Transmit: 09H–78H = A-2–C8 /
Receive: 00H–7FH = C-2–G8)
vv = Velocity (Key ON = 01H–7FH, Key OFF = 00H)
Data format: [8nH] -> [kk] -> [vv] (reception only)
8nH = Note OFF event (n = channel number)
kk = Note number: 00H–7FH = C-2–G8)
vv = Velocity
2. CONTROL CHANGE
Data format: [BnH] -> [cc] -> [vv]
BnH = Control change (n = channel number)
cc = Control number
vv = Data Range
(1) Bank Select
ccH Parameter Data Range (vvH)
00H Bank Select MSB 00H:Normal
20H Bank Select LSB 00H...7FH
Bank selection processing does not occur until receipt of next
Program Change message.
(2) Main Volume
ccH Parameter Data Range (vvH)
07H Volume MSB 00H...7FH
(3) Expression (reception only)
ccH Parameter Data Range (vvH)
0BH Expression MSB 00H...7FH
(4) Sustain
ccH Parameter Data Range (vvH)
40H Sustain MSB 00H...7FH
(5) Sostenuto (reception only)
ccH Parameter Data Range (vvH)
42H Sostenuto 00H...3FH:off, 40H...7FH:on
(6) Soft Pedal (reception only)
ccH Parameter Data Range (vvH)
43H Soft Pedal 00H...3FH:off, 40H...7FH:on
(7) Effect1 Depth (Reverb Send Level)
ccH Parameter Data Range (vvH)
5BH Effect1 Depth 00H...7FH
Adjusts the reverb send level.
(8) Effect4 Depth (Variation Effect Send Level)
ccH Parameter Data Range (vvH)
5EH Effect4 Depth 00H...7FH
(9) RPN
65H RPN MSB
64H RPN LSB
06H Data Entry MSB
26H Data Entry LSB
60H Data Increment
61H Data Decrement
* Parameters that are controllable with RPN:
• Coarse Tune
• Fine Tune
• Pitch Bend Range
3. MODE MESSAGES
Data format: [BnH] -> [cc] -> [vv]
BnH = Control event (n = channel number)
cc = Control number
vv = Data Range
(1) All Sound Off
ccH Parameter Data Range (vvH)
78H All Sound Off 00H
(2) Reset All Controllers
ccH Parameter Data Range (vvH)
79H Reset All Controllers 00H
Resets controllers as follows.
Controller Value
Expression 127 (max)
Sustain Pedal 0 (off)
Sostenuto 0 (off)
Soft Pedal 0 (off)
(3) Local Control (reception only)
ccH Parameter Data Range (vvH)
7AH Local Control 00H (off), 7FH (on)
(4) All Notes Off
ccH Parameter Data Range (vvH)
7BH All Notes Off 00H
Switches OFF all the notes that are currently ON on the specified channel. Any notes being held by the sustain or sostenuto pedal will continue to sound until the pedal is released.
(5) Omni Off (reception only)
ccH Parameter Data Range (vvH)
7CH Omni Off 00H
Same processing as for All Notes Off.
(6) Omni On (reception only)
ccH Parameter Data Range (vvH)
7DH Omni On 00H
Same processing as for All Notes Off.
(7) Mono (reception only)
ccH Parameter Data Range (vvH)
7EH Mono 00H
Same processing as for All Sound Off.
(8) Poly (reception only)
ccH Parameter Data Range (vvH)
7FH Poly 00H
Same processing as for All Sound Off.
• When Control Change is turned OFF, Control Change messages will not be transmitted or received.
• Local on/off, OMNI on/off are not transmitted. (The appropriate
note off number is supplied with “All Note Off” transmission).
• When a voice bank MSB/LSB is received, the number is
stored in the internal buffer regardless of the received order,
then the stored value is used to select the appropriate voice
when a program change message is received.
•Poly mode is always active. This mode will not change when
the instrument receives a MONO/POLY mode message.
NP-30/YNP-25 Owner’s Manual
28
Page 29

4. PROGRAM CHANGE
Data format: [CnH] -> [ppH]
CnH = Program event (n = channel number)
ppH = Program change number
P. C . #=Program Change number
NP-30/YNP-25 MSB LSB
Grand Piano 1 0 122 1
Grand Piano 2 0 112 1
E. Piano 1 0 122 6
E. Piano 2 0 122 5
Church Organ 1 0 123 20
Church Organ 2 0 122 20
Strings 0 122 49
Harpsichord 1 0 122 7
Harpsichord 2 0 123 7
Vibraphone 0 122 12
P.C.##
##
• When program change reception is turned OFF, no program
change data is transmitted or received.
• When you specify a program change as a number in the
range of 0–127, specify a number that is one less than the
program change number listed above. For example, to specify
program change number 1, you would specify a value of 0.
5. Pitch Bend Change (reception only)
[EnH] -> [ccH] -> [ddH]
ccH = LSB
ddH = MSB
6. SYSTEM REALTIME MESSAGES
[rrH]
F8H: Timing clock
FAH: Start
FCH: Stop
FEH: Active sensing
Data Transmission Reception
F8H
FAH Song start
FCH Song stop
FEH
Tr ansmitted every
96 clocks
Tr ansmitted every
200 milliseconds
• If an error occurs during MIDI reception, the Sustain, Sostenuto, and Soft effects for all channels are turned off and an All
Note Off occurs.
Received as 96-clock tempo timing
when MIDI clock is set to External.
Song start
Not received when the MIDI clock is
set to Internal.
Song stop
Not received when the MIDI clock is
set to Internal.
If a signal is not received via MIDI for
more than 400 milliseconds, the
same processing will take place for All
Sound Off, All Notes Off and Reset All
Controllers as when those signals are
received.
7. SYSTEM EXCLUSIVE MESSAGES
(Universal System Exclusive)
(1) Universal Realtime Message
Data format: [F0H] -> [7FH] -> [XnH] -> [04H] -> [01H] ->
[llH] -> [mmH] -> [F7H]
MIDI Master Volume
• Simultaneously changes the volume of all channels.
• When a MIDI master volume message is received, the volume
only has affect on the MIDI receive channel, not the panel
master volume.
F0H = Exclusive status
7FH = Universal Realtime
7FH = ID of target device
04H = Sub-ID #1=Device Control Message
01H = Sub-ID #2=Master Volume
llH = Volume LSB
mmH =
Volume MSB
F7H = End of Exclusive
or
F0H = Exclusive status
7FH = Universal Realtime
XnH = When received, n=0–F.
X = irrelevant
04H = Sub-ID #1=Device Control Message
01H = Sub-ID #2=Master Volume
llH = Volume LSB
mmH =
Volume MSB
F7H = End of Exclusive
(2) Universal Non-Realtime Message (GM On)
General MIDI Mode On
Data format: [F0H] -> [7EH] -> [XnH] -> [09H] -> [01H] ->
F0H = Exclusive status
7EH = Universal Non-Realtime
7FH = ID of target device
09H = Sub-ID #1=General MIDI Message
01H = Sub-ID #2=General MIDI On
F7H = End of Exclusive
or
F0H = Exclusive status
7EH = Universal Non-Realtime
XnH = When received, n=0–F.
09H = Sub-ID #1=General MIDI Message
01H = Sub-ID #2=General MIDI On
F7H = End of Exclusive
When the General MIDI mode ON message is received, the
MIDI system will be reset to its default settings.
This message requires approximately 50ms to execute, so
sufficient time should be allowed before the next message is
sent.
[F7H]
X = irrelevant
NP-30/YNP-25 Owner’s Manual
29
Page 30

8. SYSTEM EXCLUSIVE MESSAGES (XG Standard)
(1) XG Native Parameter Change
Data format: [F0H] -> [43H] -> [1nH] -> [4CH] -> [hhH] ->
F0H = Exclusive status
43H = YAMAHA ID
1nH = When received, n=0–F.
4CH = Model ID of XG
hhH = Address High
mmH =
llH = Address Low
ddH = Data
|
F7H = End of Exclusive
Data size must match parameter size (2 or 4 bytes).
When the XG System On message is received, the MIDI system will be reset to its default settings.
The message requires approximately 50ms to execute, so
sufficient time should be allowed before the next message is
sent.
(2) XG Native Bulk Data (reception only)
Data format: [F0H] -> [43H] -> [0nH] -> [4CH] -> [aaH] ->
F0H = Exclusive status
43H = YAMAHA ID
0nH = When received, n=0–F.
4CH = Model ID of XG
aaH = ByteCount
bbH = ByteCount
hhH = Address High
mmH =
llH = Address Low
ddH = Data
| |
| |
ccH = Check sum
F7H = End of Exclusive
• Receipt of the XG SYSTEM ON message causes reinitialization of relevant parameters and Control Change values. Allow
sufficient time for processing to execute (about 50 msec)
before sending the NP-30/YNP-25 another message.
• XG Native Parameter Change message may contain two or
four bytes of parameter data (depending on the parameter
size).
•For information about the Address and Byte Count values,
refer to Table 1 below. Note that the table’s Total Size value
gives the size of a bulk block. Only the top address of the
block (00H, 00H, 00H) is valid as a bulk data address.
[mmH] -> [llH] -> [ddH] -> [F7H]
When transmitted, n=0.
Address Mid
[bbH] -> [hhH] -> [mmH] -> [llH] ->[ddH] ->...->
[ccH] -> [F7H]
When transmitted, n=0.
Address Mid
10.
SYSTEM EXCLUSIVE MESSAGES (Special Control)
Data format: [F0H] -> [43H] -> [73H] -> [7FH] -> [4BH] ->
[11H] -> [0nH] -> [ccH] -> [vvH] -> [F7H]
F0H = Exclusive status
43H = Yamaha ID
73H = Digital Piano ID
7FH = Extended Product ID
4BH = Product ID
11H = Special control
0nH = Control MIDI change (n=channel number)
cc = Control number
vv = Value
F7H = End of Exclusive
Control Channel ccH vvH
Channel Detune
Voice Reserve
When Volume, Expression is received for Reserve On, they
*
will be effective from the next Key On. Reserve Off is normal.
ch: 00H–0FH 43H (Sets the Detune value
for each channel)
00H–7FH
ch: 00H–0FH 45H 00H : Reserve off 7FH
: on*
11. SYSTEM EXCLUSIVE MESSAGES (Others)
Data format:
Master Tuning (XG and last message priority) simultaneously
changes the pitch of all channels.
F0H = Exclusive Status
43H = Yamaha ID
1nH = When received, n=0–F.
27H = Model ID of TG100
30H = Sub ID
00H =
00H =
mmH = Master Tune MSB
llH = Master Tune LSB
ccH = irrelevant (under 7FH)
F7H = End of Exclusive
[F0H] -> [43H] -> [1nH] -> [27H] -> [30H] -> [00H]
-> [00H] -> [mmH] -> [llH] -> [ccH] -> [F7H]
When transmitted, n=0.
9. SYSTEM EXCLUSIVE MESSAGES
(Digital Piano MIDI Format)
Data format:
F0H = Exclusive status
43H = Yamaha ID
73H = Digital Piano ID
01H = Product ID (digital piano common)
nnH = Substatus
02H Internal MIDI clock
03H External MIDI clock
F7H = End of Exclusive
NP-30/YNP-25 Owner’s Manual
30
[F0H] -> [43H] -> [73H] -> [01H] -> [nnH] -> [F7H]
Page 31

<Table 1>
MIDI Parameter Change table (SYSTEM)
Address (H) Size (H) Data (H) Parameter Description Default value (H)
00 00 00 4 020C–05F4(*1) MASTER TUNE -50–+50[cent] 00 04 00 00
01 1st bit 3–0 ➝ bit 15–12 400
02 2nd bit 3–0 ➝ bit 11–8
03 3rd bit 3–0 ➝ bit 7–4
04 1 00–7F MASTER VOLUME 0–127 7F
7E 00 XG SYSTEM ON 00=XG sytem ON
7F 00 RESET ALL PARAMETERS 00=ON (receive only)
TOTAL SIZE 07
*1: Values lower than 020CH select -50 cents. Values higher than 05F4H select +50 cents.
4th bit 3–0 ➝ bit 3–0
<Table 2>
MIDI Parameter Change table (EFFECT 1)
Refer to the “Effect MIDI Map” for a complete list of Reverb, Chorus and Variation type numbers.
Address (H) Size (H) Data (H) Parameter Description Default value (H)
02 01 00 2 00–7F REVERB TYPE MSB Refer to Effect MIDI Map 01 (=HALL1)
00–7F REVERB TYPE LSB 00 : basic type 00
02 01 40 2 00–7F VARIATION TYPE MSB Refer to Effect MIDI Map 00 (=Effect off)
• “VARIATION” refers to the EFFECT on the panel.
00–7F VARIATION TYPE LSB 00 : basic type 00
<Table 3>
MIDI Parameter Change table (MULTI PART)
Address (H) Size (H) Data (H) Parameter Description Default value (H)
08 nn 11 1 00–7F DRY LEVEL 0–127 7F
nn = Part Number
• Effect MIDI Map
REVERB
MSB LSB
ROOM 02H 10H
HALL 1 01H 10H
HALL 2 01H 11H
STAGE 03H 10H
OFF 00H 00H
EFFECT
MSB LSB
CHORUS 42H 10H
PHASER 48H 10H
TREMOLO 46H 10H
ROTARY SP 47H 10H
OFF 00H 00H
NP-30/YNP-25 Owner’s Manual
31
Page 32

MIDI Implementation Chart
Version : 1.0
Bank Select
Modulation
Main Volume
Panpot
Expression
Data Entry
Portamento Control
Effect Depth
RPN Inc,Dec
Sustain
RPN LSB,MSB
1 - 16
1 - 16
˛
˛
0 - 127
3
0 - 127
TransmittedFunction Recognized Remarks
1
1 - 16
Default
Changed
3˛**************
Default
Messages
0 - 127
**************
Altered
Model NP-30/NP-30S/YNP-25 MIDI Implementation Chart
Ø 9nH,v=1-127
˛
Ø 9nH,v=1-127
˛
Note ON
Note OFF
˛
˛
˛
˛
Key's
Ch's
ШШШШШШШШШШШ
Ø
˛ Ø 0 - 24 semi
˛ Ø ˛ ˛
1
7
0,32
˛ Ø˛˛ Ø
10
11
6,38
64
66,678491,94
Ø
˛ ˛
96-97
100-101
YAMAHA [ Digital Keyboard ] Date : 18-JAN-2007
NP-30/YNP-25 Owner’s Manual
32
Basic
Channel
Mode
Note
Number : True voice
Velocity
After
Touch
Pitch Bend
Control
Change
Page 33

Ø : Yes
˛ : No
˛
Ø 0 - 127
Ø
**************
Ø 0 - 127
˛
Ø
˛
˛
Ø
Ø
Ø (120,126,127)
˛
˛
Ø
Ø
ØØ˛ØØ
Ø (121)
Ø (122)
Ø (123-125)
Ø
˛
˛
Cntrls
All
Reset
Prog
Change : True #
System Exclusive
Common : Song Pos.
: Song Sel.
: Tune
System : Clock
Real Time : Commands
: All Sound Off
Aux :
: Local ON/OFF
Mes- : All Notes OFF
sages: Active Sense
Notes:
: Reset
Mode 1 : OMNI ON , POLY Mode 2 : OMNI ON ,MONO
Mode 3 : OMNI OFF, POLY Mode 4 : OMNI OFF,MONO
NP-30/YNP-25 Owner’s Manual
33
Page 34

Specifications
Keyboard 76 keys (Graded Touch)
Sound Source AWM Stereo Sampling
Polyphony (Max.) 32
Voice Selection 10
Effect Reverb
Volume Master Volume
Controls Dual, Metronome, Transpose, Tuning, Touch (Hard/Medium/Soft/Fixed)
Pedal SUSTAIN PEDAL*
Demo Songs 10 Voice Demo Songs, 10 Piano Preset Songs
MIDI
Jacks/Connectors MIDI (IN/OUT), PHONES/OUTPUT, DC IN 12V, SUSTAIN
Main Amplifiers 6 W + 6 W
Speakers (12 cm × 6 cm) × 2
Dimensions (W × D × H) 1,244mm × 259mm × 100mm [49" × 10-1/4" × 4"]
Weight 5.4 kg (11 lbs., 14 oz.)
Power Supply
Power Consumption 20 W
Accessories Owner’s Manual, Music Rest
Local On/Off, Transmit/Recieve channel, Program change On/Off,
Control change On/Off
Adaptor: PA-5D, PA-150, or an equivalent recommended by Yamaha
Batteries: Six AA size, LR-6 or equivalent
•When an optional FC3 Foot Pedal is connected, the half pedal effect can be used.
•Specifications and descriptions in this owner’s manual are for information purposes only. Yamaha Corp. reserves the right to change
or modify products or specifications at any time without prior notice. Since specifications, equipment or options may not be the
same in every locale, please check with your Yamaha dealer.
NP-30/YNP-25 Owner’s Manual
34
Page 35

Index
Index
C
Combining Voices (Dual)...............................................19
Connecting a Personal Computer..................................24
D
DC IN 12V.......................................................................11
Default setting .................................................................21
Demo Songs.....................................................................14
Dual..................................................................................19
G
[GRAND PIANO] button.............................18, 19, 20, 22
M
[MASTER VOLUME] slider...........................................13
Metronome......................................................................16
MIDI [IN] [OUT] ...........................................................23
MIDI Data Format ..........................................................28
MIDI Implementation Chart..........................................32
MIDI terminals................................................................23
Music Rest........................................................................13
S
Song .................................................................................15
WW
[SONG
Specifications................................................................... 34
[STANDBY/ON] switch .................................................12
Start/stop playback.......................................................... 15
[SUSTAIN] jack .............................................................. 13
AA
WW
/
AA
] button ..................................................14, 15
Demo songs ............................................................... 14
Piano Preset Song...................................................... 15
T
Touch Sensitivity.............................................................22
Transposition ..................................................................21
Troubleshooting.............................................................. 27
Tuning ➝Fine tuning of the Pitch................................. 21
V
Voice ................................................................................ 18
VOICE/SONG [BACK<<], [>>NEXT] button
........................................................................... 14, 15, 18
O
Optional Equipment .......................................................27
P
Panel Controls and Terminals........................................10
[PHONES/OUTPUT] jack .............................................13
Piano Preset Songs ..........................................................15
PRECAUTIONS ............................................................4, 5
Preset songs ➝ Piano Preset Songs ................................15
R
Reverb ..............................................................................20
NP-30/YNP-25 Owner’s Manual
35
Page 36

Memo
NP-30/YNP-25 Owner’s Manual
36
Page 37

Memo
NP-30/YNP-25 Owner’s Manual
37
Page 38

Limited Warranty
90 DAYS LABOR 1 YEAR PARTS
Yamaha Corporation of America, hereafter referred to as Yamaha, warrants to the original consumer of a product included in the categories listed
below, that the product will be free of defects in materials and/or workmanship for the periods indicated. This warranty is applicable to all models
included in the following series of products:
NP, YNP SERIES OF DIGITAL KEYBOARDS
If during the first 90 days that immediately follows the purchase date, your new Yamaha product covered by this warranty is found to have a defect
in material and/or workmanship, Yamaha and/or its authorized representative will repair such defect without charge for parts or labor.
If parts should be required after this 90 day period but within the one year period that immediately follows the purchase date, Yamaha will, subject
to the terms of this warranty, supply these parts without charge. However, charges for labor, and/or any miscellaneous expenses incurred are the
consumers responsibility. Yamaha reserves the right to utilize reconditioned parts in repairing these products and/or to use reconditioned units as
warranty replacements.
THIS WARRANTY IS THE ONLY EXPRESS WARRANTY WHICH YAMAHA MAKES IN CONNECTION WITH THESE PRODUCTS. ANY
IMPLIED WARRANTY APPLICABLE TO THE PRODUCT, INCLUDING THE WARRANTY OF MERCHANT ABILITY IS LIMITED TO
THE DURATION OF THE EXPRESS WARRANTY. YAMAHA EXCLUDES AND SHALL NOT BE LIABLE IN ANY EVENT FOR
INCIDENTAL OR CONSEQUENTIAL DAMAGES.
Some states do not allow limitations that relate to implied warranties and/or the exclusion of incidental or consequential damages. Therefore, these
limitations and exclusions may not apply to you.
This warranty gives you specific legal rights. You may also have other rights which vary from state to state.
CONSUMERS RESPONSIBILITIES
If warranty service should be required, it is necessary that the consumer assume certain responsibilities:
1. Contact the Customer Service Department of the retailer selling the product, or any retail outlet authorized by Yamaha to sell the product for
assistance. You may also contact Yamaha directly at the address provided below.
2. Deliver the unit to be serviced under warranty to: the retailer selling the product, an authorized service center, or to Yamaha with an explanation
of the problem. Please be prepared to provide proof purchase date (sales receipt, credit card copy, etc.) when requesting service and/or parts
under warranty.
3. Shipping and/or insurance costs are the consumers responsibility.* Units shipped for service should be packed securely.
*Repaired units will be returned PREPAID if warranty service is required within the first 90 days.
IMPORTANT: Do NOT ship anything to ANY location without prior authorization. A Return Authorization (RA) will be issued that has
a tracking number assigned that will expedite the servicing of your unit and provide a tracking system if needed.
4. Your owners manual contains important safety and operating instructions. It is your responsibility to be aware of the contents of this manual and
to follow all safety precautions.
EXCLUSIONS
This warranty does not apply to units whose trade name, trademark, and/or ID numbers have been altered, defaced, exchanged removed, or to
failures and/or damages that may occur as a result of:
1. Neglect, abuse, abnormal strain, modification or exposure to extremes in temperature or humidity.
2. Improper repair or maintenance by any person who is not a service representative of a retail outlet authorized by Yamaha to sell the product, an
authorized service center, or an authorized service representative of Yamaha.
3. This warranty is applicable only to units sold by retailers authorized by Yamaha to sell these products in the U.S.A., the District of Columbia,
and Puerto Rico. This warranty is not applicable in other possessions or territories of the U.S.A. or in any other country.
Please record the model and serial number of the product you have purchased in the spaces provided below.
Model___________________________ Serial #________________________________ Sales Slip #________________________________
Purchased from____________________________________________________________ Date______________________________________
(Retailer)
YAMAHA CORPORATION OF AMERICA
Electronic Service Division
6600 Orangethorpe Avenue
Buena Park, CA 90620
KEEP THIS DOCUMENT FOR YOUR RECORDS. DO NOT MAIL!
NP-30/YNP-25 Owner’s Manual
38
Page 39

For details of products, please contact your nearest Yamaha
representative or the authorized distributor listed below.
Pour plus de détails sur les produits, veuillez-vous adresser à Yamaha ou
au distributeur le plus proche de vous figurant dans la liste suivante.
Die Einzelheiten zu Produkten sind bei Ihrer unten aufgeführten
Niederlassung und bei Yamaha Vertragshändlern in den jeweiligen
Bestimmungsländern erhältlich.
Para detalles sobre productos, contacte su tienda Yamaha más cercana
o el distribuidor autorizado que se lista debajo.
NORTH AMERICA
CANADA
Yamaha Canada Music Ltd.
135 Milner Avenue, Scarborough, Ontario,
M1S 3R1, Canada
Tel: 416-298-1311
U.S.A.
Yamaha Corporation of America
6600 Orangethorpe Ave., Buena Park, Calif. 90620,
U.S.A.
Tel: 714-522-9011
CENTRAL & SOUTH AMERICA
MEXICO
Yamaha de México S.A. de C.V.
Calz. Javier Rojo Gómez #1149,
Col. Guadalupe del Moral
C.P. 09300, México, D.F., México
Tel: 55-5804-0600
BRAZIL
Yamaha Musical do Brasil Ltda.
Rua Joaquim Floriano, 913 - 4' andar, Itaim Bibi,
CEP 04534-013 Sao Paulo, SP. BRAZIL
Tel: 011-3704-1377
ARGENTINA
Yamaha Music Latin America, S.A.
Sucursal de Argentina
Viamonte 1145 Piso2-B 1053,
Buenos Aires, Argentina
Tel: 1-4371-7021
PAN AMA AND OTHER LATIN
AMERICAN COUNTRIES/
CARIBBEAN COUNTRIES
Yamaha Music Latin America, S.A.
Torre Banco General, Piso 7, Urbanización Marbella,
Calle 47 y Aquilino de la Guardia,
Ciudad de Panamá, Panamá
Tel: +507-269-5311
EUROPE
THE UNITED KINGDOM
Yamaha-Kemble Music (U.K.) Ltd.
Sherbourne Drive, Tilbrook, Milton Keynes,
MK7 8BL, England
Tel: 01908-366700
IRELAND
Danfay Ltd.
61D, Sallynoggin Road, Dun Laoghaire, Co. Dublin
Tel: 01-2859177
GERMANY
Yamaha Music Central Europe GmbH
Siemensstraße 22-34, 25462 Rellingen, Germany
Tel: 04101-3030
SWITZERLAND/LIECHTENSTEIN
Yamaha Music Central Europe GmbH,
Branch Switzerland
Seefeldstrasse 94, 8008 Zürich, Switzerland
Tel: 01-383 3990
AUSTRIA
Yamaha Music Central Europe GmbH,
Branch Austria
Schleiergasse 20, A-1100 Wien, Austria
Tel: 01-60203900
CZECH REPUBLIC/SLOVAKIA/
HUNGARY/SLOVENIA
Yamaha Music Central Europe GmbH,
Branch Austria, CEE Department
Schleiergasse 20, A-1100 Wien, Austria
Tel: 01-602039025
POLAND
Yamaha Music Central Europe GmbH
Sp.z. o.o. Oddzial w Polsce
ul. 17 Stycznia 56, PL-02-146 Warszawa, Poland
Tel: 022-868-07-57
THE NETHERLANDS/
BELGIUM/LUXEMBOURG
Yamaha Music Central Europe GmbH,
Branch Benelux
Clarissenhof 5-b, 4133 AB Vianen, The Netherlands
Tel: 0347-358 040
FRANCE
Yamaha Musique France
BP 70-77312 Marne-la-Vallée Cedex 2, France
Tel: 01-64-61-4000
ITALY
Yamaha Musica Italia S.P.A.
Viale Italia 88, 20020 Lainate (Milano), Italy
Tel: 02-935-771
SPAIN/PORTUGAL
Yamaha-Hazen Música, S.A.
Ctra. de la Coruna km. 17, 200, 28230
Las Rozas (Madrid), Spain
Tel: 91-639-8888
GREECE
Philippos Nakas S.A. The Music House
147 Skiathou Street, 112-55 Athens, Greece
Tel: 01-228 2160
SWEDEN
Yamaha Scandinavia AB
J. A. Wettergrens Gata 1
Box 30053
S-400 43 Göteborg, Sweden
Tel: 031 89 34 00
DENMARK
YS Copenhagen Liaison Office
Generatorvej 6A
DK-2730 Herlev, Denmark
Tel: 44 92 49 00
FINLAND
F-Musiikki Oy
Kluuvikatu 6, P.O. Box 260,
SF-00101 Helsinki, Finland
Tel: 09 618511
NORWAY
Norsk filial av Yamaha Scandinavia AB
Grini Næringspark 1
N-1345 Østerås, Norway
Tel: 67 16 77 70
ICELAND
Skifan HF
Skeifan 17 P.O. Box 8120
IS-128 Reykjavik, Iceland
Tel: 525 5000
OTHER EUROPEAN COUNTRIES
Yamaha Music Central Europe GmbH
Siemensstraße 22-34, 25462 Rellingen, Germany
Tel: +49-4101-3030
AFRICA
Yamaha Corporation,
Asia-Pacific Music Marketing Group
Nakazawa-cho 10-1, Naka-ku, Hamamatsu,
Japan 430-8650
Tel: +81-53-460-2312
MIDDLE EAST
TURKEY/CYPRUS
Yamaha Music Central Europe GmbH
Siemensstraße 22-34, 25462 Rellingen, Germany
Tel: 04101-3030
OTHER COUNTRIES
Yamaha Music Gulf FZE
LOB 16-513, P.O.Box 17328, Jubel Ali,
Dubai, United Arab Emirates
Tel: +971-4-881-5868
ASIA
THE PEOPLE’S REPUBLIC OF CHINA
Yamaha Music & Electronics (China) Co.,Ltd.
25/F., United Plaza, 1468 Nanjing Road (West),
Jingan, Shanghai, China
Tel: 021-6247-2211
HONG KONG
Tom Lee Music Co., Ltd.
11/F., Silvercord Tower 1, 30 Canton Road,
Tsimshatsui, Kowloon, Hong Kong
Tel: 2737-7688
INDONESIA
PT. Yamaha Music Indonesia (Distributor)
PT. Nusantik
Gedung Yamaha Music Center, Jalan Jend. Gatot
Subroto Kav. 4, Jakarta 12930, Indonesia
Tel: 21-520-2577
KOREA
Yamaha Music Korea Ltd.
8F, 9F, Dongsung Bldg. 158-9 Samsung-Dong,
Kangnam-Gu, Seoul, Korea
Tel: 080-004-0022
MALAYSIA
Yamaha Music Malaysia, Sdn., Bhd.
Lot 8, Jalan Perbandaran, 47301 Kelana Jaya,
Petaling Jaya, Selangor, Malaysia
Tel: 3-78030900
PHILIPPINES
Yupangco Music Corporation
339 Gil J. Puyat Avenue, P.O. Box 885 MCPO,
Makati, Metro Manila, Philippines
Tel: 819-7551
SINGAPORE
Yamaha Music Asia Pte., Ltd.
#03-11 A-Z Building
140 Paya Lebor Road, Singapore 409015
Tel: 747-4374
TAIWAN
Yamaha KHS Music Co., Ltd.
3F, #6, Sec.2, Nan Jing E. Rd. Taipei.
Taiwan 104, R.O.C.
Tel: 02-2511-8688
THAILAND
Siam Music Yamaha Co., Ltd.
891/1 Siam Motors Building, 15-16 floor
Rama 1 road, Wangmai, Pathumwan
Bangkok 10330, Thailand
Tel: 02-215-2626
OTHER ASIAN COUNTRIES
Yamaha Corporation,
Asia-Pacific Music Marketing Group
Nakazawa-cho 10-1, Naka-ku, Hamamatsu,
Japan 430-8650
Tel: +81-53-460-2317
OCEANIA
AUSTRALIA
Yamaha Music Australia Pty. Ltd.
Level 1, 99 Queensbridge Street, Southbank,
Victoria 3006, Australia
Tel: 3-9693-5111
NEW ZEALAND
Music Houses of N.Z. Ltd.
146/148 Captain Springs Road, Te Papapa,
Auckland, New Zealand
Tel: 9-634-0099
COUNTRIES AND TRUST
TERRITORIES IN PACIFIC OCEAN
Yamaha Corporation,
Asia-Pacific Music Marketing Group
Nakazawa-cho 10-1, Naka-ku, Hamamatsu,
Japan 430-8650
Tel: +81-53-460-2312
[PK] 40
HEAD OFFICE Yamaha Corporation, Pro Audio & Digital Musical Instrument Division
Nakazawa-cho 10-1, Naka-ku, Hamamatsu, Japan 430-8650
Tel: +81-53-460-3273
Page 40

Yamaha Home Keyboards Home Page (English Only)
http://music.yamaha.com/homekeyboard
Yamaha Manual Library
http://www.yamaha.co.jp/manual/
U.R.G., Pro Audio & Digital Musical Instrument Division, Yamaha Corporation
© 2007 Yamaha Corporation
WJ15960 004POXXXX.X-XXB0
Printed in China
 Loading...