

Page 1
ZY37450
(10)
(2)
(1)
(11)
(9)
(8)
(7)
(15)
(12)
(14)
(13)
(16)
(19)
(15)
(9)
(2)
(2)
(4)
(5)
(18)
(3)
(6)
(5)
(9)
(17)
(17)
(7)
Published 07/2017 发行 : POA0
ハイハットスタンド / Hi-hat stand / Pied de Charleston / HiHat-Ständer / Supporte per Hi‐Hat
HHS3
取扱説明書 / Owner’s Manual / Mode d'emploi / Bedienungsanleitung / Manuale di istruzioni
10-1 Nakazawa-cho, Naka-ku, Hamamatsu, 430-8650 Japan
Manual Development Group
© 2017 Yamaha Corporation
Printed in Taiwan
P. 1
fミュート本体を楽器のベルに差し込んだ後、以下の手順で しっかりと装着してください。
日本語
このたびは、ヤマハ製品をご購入いただき、誠にありがとうございます。
本製品はアルミ材で軽量化しつつも従来の剛性を維持したドラムセットハード
ウェアです。本製品の機能を活かし、安全に使うためには、この取扱説明書を
よく読んでからご使用ください。お読みになったあとは製品と共に保管し、い
つでもご覧になれるようにしてください。
【同梱品】
・
収納用バンド・保護袋・安全上のご注意・サービス拠点情報
■ 安全上のご注意
・
従来のクロムめっき製品に比べ、表面が傷つきやすい仕様になっております。
使用時、運搬時にはぶつけたり、激しく擦れたりしないようご注意ください。
運搬時には同梱の保護袋に入れて持ち運んでください。
・ 軽量スタンドのため、極度な重量楽器をセッティングした場合、バランスが
悪くなることが想定されます。演奏、展示の際には楽器をセッティング後ご
確認の上ご使用ください。
English
Thank you for purchasing this Yamaha product.
This product is made from aluminum, which makes it lighter yet retains the rigidity
of conventional drum hardware. To use the product safely and get the most out of
its features, be sure to read this Owner’s Manual carefully. After reading, be sure
to keep it with the product so that you can easily refer back to it again as needed.
Package Contents :
Safety Precautions
• Compared to conventional chrome plating, the surface on this product tends to
scratch easily. When transporting, try to avoid hitting or scraping the product. Make
sure to place in the supplied inner bags when transporting.
• Unusually heavy instruments may be difficult to balance on these stands as the
stand itself is light in weight. After setting up and before using for performance or
display, check the instrument for stability.
Binding strap, Inner bag, Precautions (leaflet), Service Offices list (leaflet)
JA
EN
■ セットアップ
ハイハットスタンドを立てる
1 収納用バンドを外し、ウイングボルト
を広げます。
2 安定する位置を決めたら、ウイングボルト
NOTE このとき、ベースフレーム(3)の底部を床面から1〜2mm浮かせ
るように設定してください。
3 ヒール(4)から伸びている連結棒(5)を、ベースフレーム(3)の2
カ所の孔にそれぞれ内側からはめこみます。
4 踏み込んだときスタンドが奥にずれないようにするには、ベースフ
レーム(
ストッパー頭部を時計方向に回すとスパイク部分が床に出てきます。
床を傷付けないようにカーペットなどを敷いてお使いください。
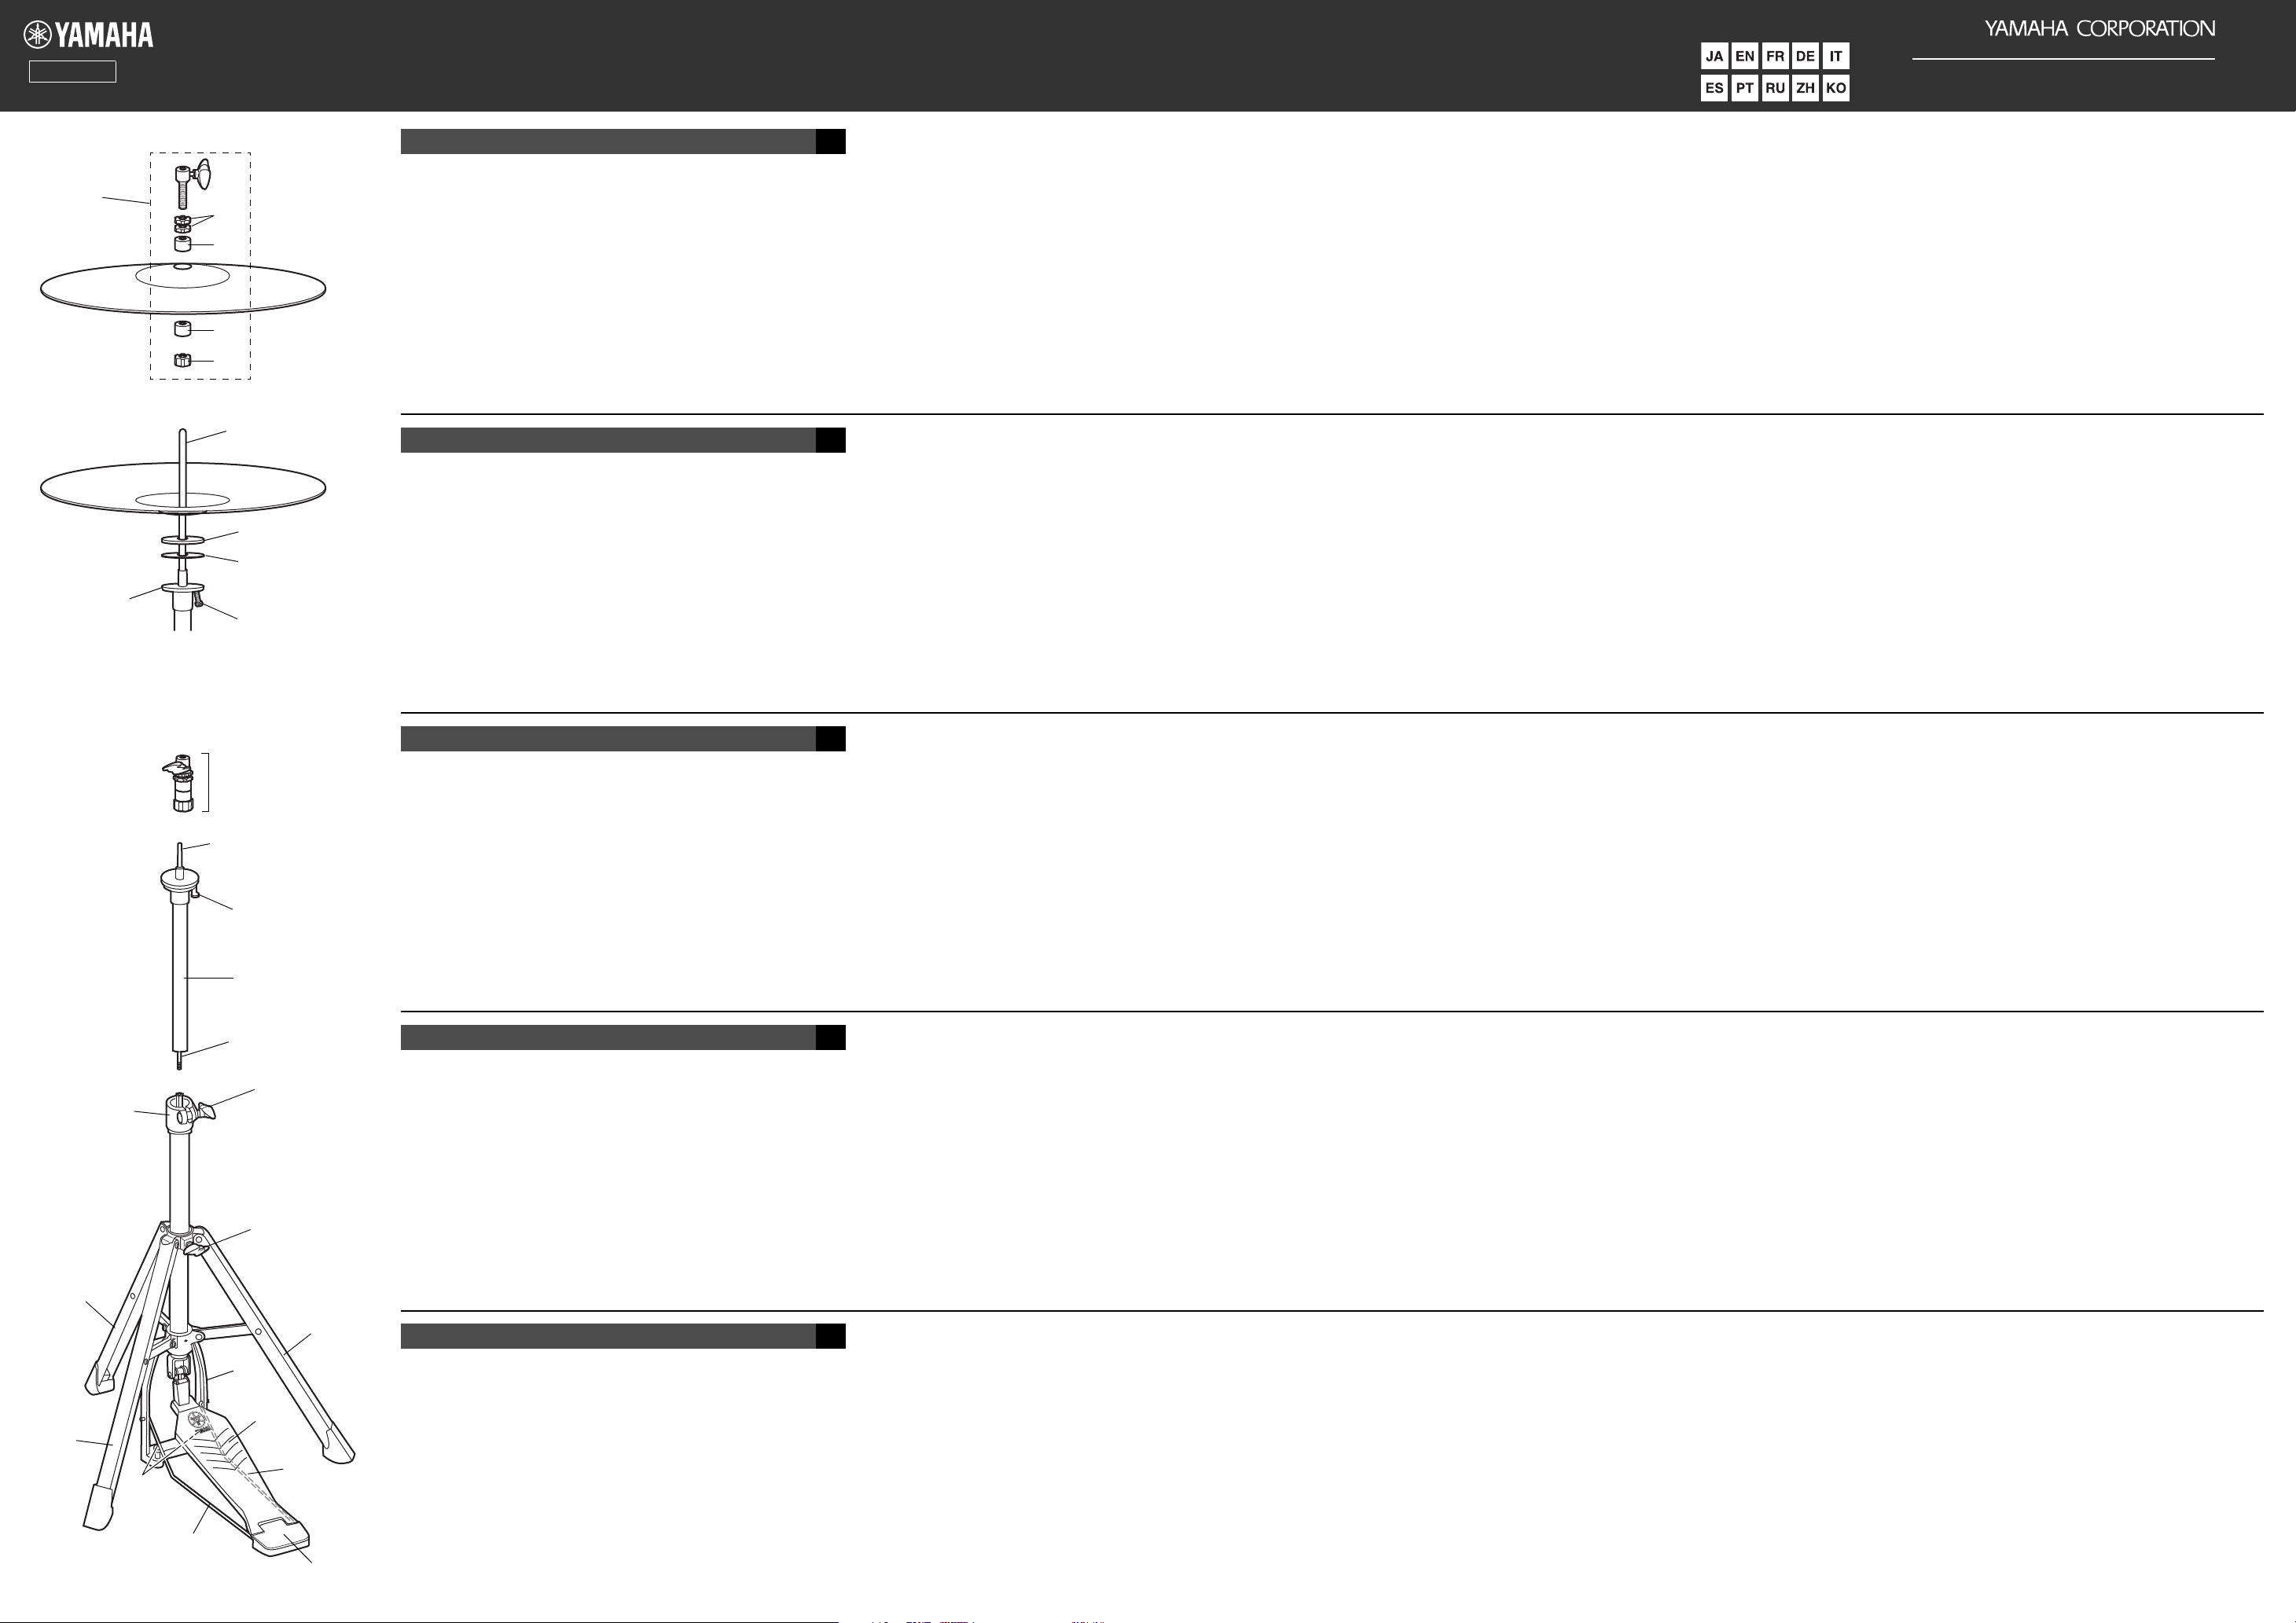
Setup
Setting Up the Hi-hat Stand
1 Remove the binding strap, loosen the wing bolt (1) and extend the
three legs (
2
Place the stand in a stable position, and then tighten the wing bolt (1).
NOTE At this point, make sure that the bottom of the base frame (3) is
3 Connect the rods (5) extending from the heel (4), to the two holes
located on the inside of the base frame (3).
4 Use the stoppers (6) located on the bottom of the base frame (3) to
prevent the stand from sliding backwards while playing. Turning the
stopper head clockwise extends the spikes out, toward the floor.
Put the stand on a carpet to prevent scratching the floor.
3)の下部2カ所に用意されたストッパー(6)を使います。
2).
raised about 1 to 2 mm above the floor.
(1)
を緩めて、三本の脚
(1)
を締め付けます。
(2)
5 ハイハットクラッチ(
トシャフト(
6 締付ベース(
(
9)をしっかりとネジ込みます。
7 ハイハットシャフト(9)の上から上部パイプ(8)を被せ、演奏しや
すい高さで締付ベース(
ます。
9)を引き抜きます。
10)内部のジョイント(11 )に、ハイハットシャフト
7)を取り外して上部パイプ(8)からハイハッ
10)のウイングナット(11)を締めて固定し
ハイハットシンバルを取り付ける
ハイハットのボトムシンバルを受皿(12)の上に、トップシンバルを
ハイハットクラッチ(
5 Remove the hi-hat clutch (
upper pipe (
6 Screw the hi-hat shaft (
clamp base (
7 Slide the upper pipe section (
tighten the wing nut (
fortable playing height using the wing nut.
Attaching the Hi-hat Cymbals
Place the bottom hi-hat cymbal onto the bottom seat (12), and attach the hi-
hat clutch (
7) to the top hi-hat cymbal.
7)に、それぞれ取り付けます。
7) and pull the hi-hat shaft (9) out of the
8).
9) into the joint (11) located inside of the
10).
8) over the hi-hat shaft (9), and then
11) to secure to the base section (10) at com-
1受皿(12)の上に、HSメタルワッシャー(13)、フェルトワッ
シャー(
傾きはツマミボルト(
2 ハイハットクラッチ(7)の下部のクラッチナット(16)を一旦外し
て、二枚のフェルト(
ナット(
3 トップシンバルを取り付けたハイハットクラッチ(
シャフト(
間隔になるようにして、固定します。
4 ハイハットクラッチ(7)上部の二つ一組のロックナット(19)で、
トップシンバルの固定具合を調節します。
1 Place the HS metal washer (
the bottom seat (
of the bottom cymbal.
2 Remove the clutch nut (16) from the hi-hat clutch (7), place the top
cymbal between the two felts (
(
3 Slide the hi-hat clutch (
shaft (
space between the cymbals, and fix the hi-hat clutch in place.
4 Use the pair of lock nuts (19) on the top of the hi-hat clutch (7) to
adjust how tight the top hi-hat cymbal is held.
14
)、ボトムシンバルの順に載せます。ボトムシンバルの
15
)で調整します。
17)の間にトップシンバルを挟み、クラッチ
16)が止まるまで指で締め直します。
7)をハイハット
9)に通し、ペダル(18)を踏んでシンバル同士が適当な
13), felt washer (14) and bottom cymbal on
12) in that order. Use the bolt (15) to adjust the angle
17), and then re-tighten the clutch nut
16) with your fingers.
7) attached to the top cymbal onto the hi-hat
9) then step on the pedal (18) to put a suitable amount of
Français
Nous vous remercions d'avoir acheté ce produit Yamaha.
Ce produit est fabriqué en aluminium, ce qui le rend plus léger que les batteries classiques, mais tout aussi rigide. Pour utiliser le produit en toute sécurité et tirer pleinement
parti de ses fonctionnalités, veuillez lire attentivement ce mode d'emploi. Conservez-le
ensuite avec le produit afin de pouvoir le consulter chaque fois que nécessaire.
FR
Contenu de l'emballage : Sangle de fixation, sac intérieur, liste des précautions à
prendre (brochure), liste des bureaux de service clientèle (brochure)
Précautions de sécurité
• Par rapport au placage traditionnel en chrome, la surface de ce produit a tendance
à se rayer facilement. Pour tout transport, veillez à éviter tout choc ou rayure et
prenez soin de le ranger dans les sacs intérieurs fournis.
• Il peut être difficile d'équilibrer les instruments particulièrement lourds, car les
pieds sont légers. Après avoir installé l'instrument et avant de l'exposer ou de vous
en servir, vérifiez sa stabilité.
Deutsch
Vielen Dank für den Kauf dieses Produkts von Yamaha.
Dieses Produkt ist aus Aluminium und damit bei gleicher Steifigkeit leichter als
herkömmliche Drums-Hardware. Lesen Sie diese Bedienungsanleitung sorgfältig durch, um das Produkt sicher und mit zufriedenstellendem Ergebnis benutzen
zu können. Bewahren Sie sie nach dem Durchlesen in der Nähe des Produkts
auf, sodass Sie sie bei Bedarf jederzeit zur Hand haben.
DE
Lieferumfang : Transportsicherung, Produktbeutel, Merkblatt mit Sicherheitsvorkeh-
rungen, Liste der Servicebüros
Sicherheitsvorkehrungen
• Verglichen mit verchromter Hardware kann diese leichter verkratzen. Achten Sie
beim Transport daher darauf, das Produkt nirgendwo anzustoßen oder entlangzuziehen. Verstauen Sie die Teile für den Transport in den mitgelieferten Beuteln.
• Da die Ständer leicht sind, lassen sich ungewöhnlich schwere Instrumente auf ihnen
nur schwer ausbalancieren. Prüfen Sie die Stabilität des Aufbaus, ehe Sie die Instrumente spielen oder aufstellen.
Configuration
Installation du pied de Charleston
1 Retirez la sangle de fixation, desserrez la vis papillon (1) et écartez
les trois pieds (
2 Installez le pied en position stable, puis resserrez la vis papillon (
NOTE À cette étape, vérifiez que le bas du socle (3) se trouve à envi-
3 Insérez les tiges (5) qui sortent la pédale (4) dans les orifices situés
à l'intérieur du socle (
4 Utilisez les butées (
pied de glisser vers l'arrière lors de l'utilisation. En tournant la tête de
la butée vers la droite, vous sortez les pointes vers le sol. Placez le
pied sur un tapis afin d'éviter de rayer le sol.
Vorbereitung
Aufbau des HiHat-Ständers
1 Entfernen Sie die Transportsicherung, lösen Sie die Flügelschraube
(
1) und klappen Sie die drei Beine aus (2).
2 Bringen Sie den Ständer in eine stabile Position und ziehen Sie die
Flügelschraube fest (
HINWEIS
3 Stecken Sie die Stangen (5) aus der Pedalferse (4) in die beiden
Löcher im Inneren des Rahmens (
4 Mit den Stoppern (6) an der Rahmenunterseite (3) wird verhindert,
dass der Ständer beim Spielen nach hinten rutscht. Drehen Sie den
Stopperkopf im Uhrzeigersinn, um die Spikes in Richtung Boden
auszufahren. Um Kratzer im Boden zu vermeiden, stellen Sie den
Ständer auf einen Teppich.
2).
1).
ron 1 ou 2 mm au-dessus du sol.
3).
6) situées au bas du socle (3) afin d'empêcher le
1).
An dieser Stelle müssen Sie sicherstellen, dass sich die Unterseite des Rahmens (3) 1–2 mm über dem Boden befindet.
3).
5 Retirez le dispositif de serrage de la Charleston (
du tube supérieur (
6 Vissez l'axe de la Charleston (
l'intérieur de la base de serrage (
7 Faites glisser la partie supérieure du tube (8) sur l'axe de la Charles-
ton (9), puis resserrez la vis papillon (11) afin de la fixer sur la base
10) à une hauteur confortable pour l'utilisation.
(
Fixation des Charlestons
Placez la Charleston inférieure sur l'emplacement inférieur (12), puis fixez
le dispositif de serrage (
5 Entfernen Sie die HiHat-Kupplung (
stange (
6 Schrauben Sie die HiHat-Zugstange (
(11) im Klemmensatz (10).
7 Schieben Sie das obere Rohr (
hen Sie dann die Flügelmutter fest, (
der gewünschten Höhe zu befestigen.
Anbringen der HiHat-Becken
Setzen Sie das untere HiHat-Becken auf den unteren Ring (12) und befesti-
gen Sie die HiHat-Kupplung (
9) aus dem oberen Rohr (8).
8).
9) dans le raccord (11) qui se trouve à
10).
7) sur la Charleston.
7) und ziehen Sie die HiHat-Zug-
9) in das Verbindungsstück
8) über die HiHat-Zugstange (9). Zie-
11) um es am Standfuß (10) auf
7) am oberen HiHat-Becken.
7) et sortez l'axe (9)
1 Placez la rondelle métallique HS (
cymbale inférieure sur l'emplacement inférieur (
isez le boulon (
2 Retirez la vis du dispositif de serrage (16) de la Charleston (7), pla-
cez la cymbale supérieure entre les deux feutres (
au doigt la vis du dispositif de serrage (16).
3 Faites glisser le dispositif de serrage de la Charleston (7) fixé sur la
cymbale supérieure sur l'axe de la Charleston (9), puis appuyez sur
la pédale (18) pour espacer les cymbales correctement et mettez le
dispositif de serrage de la Charleston en place.
4 Réglez le serrage de la Charleston supérieure à l'aide des deux
écrous de blocage (
Charleston (7).
1 Legen Sie die HS-Unterlegscheibe aus Metall (13), den Unterlegring
aus Filz (
untere Auflage (
des unteren Beckens ein.
2 Entfernen Sie die Mutter (
Sie das obere Becken zwischen die beiden Filzstücke (
hen Sie die Mutter (16) handfest an.
3 Schieben Sie die Einheit aus HiHat-Kupplung (
Becken auf die HiHat-Zugstange (
bis der gewünschte Abstand zwischen den Becken erreicht ist. Fixieren Sie dann die HiHat-Kupplung.
4 Stellen Sie mithilfe der Kontermuttern (19) oben an der HiHat-Kupp-
lung (
7) ein, wie fest das obere HiHat-Becken gehalten werden soll.
15) pour régler l'angle de la cymbale inférieure.
19) situés en haut du dispositif de serrage de la
14) und das untere Becken in dieser Reihenfolge auf die
12). Stellen Sie mit der Schraube (15) den Winkel
13), la rondelle de feutre (14) et la
12), dans cet ordre. Util-
17), puis resserrez
16) von der HiHat-Kupplung (7), setzen
17) und zie-
7) und oberem
9) und treten Sie das Pedal (18),
Italiano
Grazie per aver acquistato questo prodotto Yamaha.
Questo prodotto è realizzato in alluminio che lo rende più leggero mantenendo
comunque la rigidità dell'hardware per batterie tradizionale. Per utilizzare il prodotto in sicurezza e sfruttare al massimo le sue funzionalità, leggere attentamente questo Manuale di istruzioni. Dopo averlo letto, conservarlo con il prodotto
in modo da poterlo consultare facilmente in futuro in caso di necessità.
Contenuto della confezione : Cinghia di fissaggio, busta interna, precauzioni
(opuscolo), elenco dei centri di assistenza (opuscolo)
Precauzioni per la sicurezza
• Rispetto alla cromatura tradizionale, la superficie di questo prodotto tende a graffiarsi facilmente. Durante il trasporto, cercare di evitare di colpire o graffiare il prodotto. Accertarsi di collocarlo nelle buste interne in dotazione durante il trasporto.
• Gli strumenti insolitamente pesanti possono essere difficili da bilanciare sui supporti, perché il supporto stesso è leggero. Dopo la configurazione e prima di utilizzarlo per una performance o l'esposizione, controllare la stabilità dello strumento.
IT
Configurazione
Configurazione del supporto per Hi-Hat
1 Rimuovere la cinghia di fissaggio, allentare la vite ad alette (1) ed
estendere le tre gambe (
2 Collocare il supporto in una posizione stabile e serrare la vite ad alette (1).
NOTA
3 Collegare le aste (5) che si estendono dall'appoggio per tallone (4),
ai due fori situati all'interno del telaio base (
4 Utilizzare i fermi (6) situati sulla parte inferiore del telaio base (3) per
evitare che il supporto scivoli indietro mentre si suona. Ruotando la
testa del fermo in senso orario si estendono gli spike verso il pavimento.
Sistemare il supporto su un tappeto per evitare di graffiare il pavimento.
A questo punto, verificare che la parte inferiore del telaio base (3)
sia sollevata di circa 1-2 mm da terra.
2).
3).
5 Rimuovere il giunto per Hi-Hat (7) ed estrarre l'albero per Hi-Hat (9)
dal tubo superiore (
6 Avvitare l'albero per Hi-Hat (
base del morsetto (
7 Far scorrere la sezione del tubo superiore (
(
9), quindi serrare il dado ad alette (11) per fissare la sezione base
10) a un'altezza comoda per suonare, utilizzando il dado ad alette.
(
Montaggio dei piatti Hi-Hat
Posizionare il piatto Hi-Hat inferiore nella sede inferiore (12) e montare il
giunto Hi-Hat (
7) sul piatto Hi-Hat superiore.
8).
9) sul giunto (11) situato all'interno della
10).
8) sull'albero per Hi-Hat
1 Posizionare la rondella di metallo HS (13), la rondella di feltro (14) e
il piatto inferiore sulla sede inferiore (12) in questo ordine. Utilizzare il
bullone (15) per regolare l'angolazione del piatto inferiore.
2 Rimuovere il dado del giunto (
piatto superiore tra i dure feltri (
16) con le dita.
giunto (
3 Far scorrere il giunto Hi-Hat (
sull'albero per Hi-Hat (
ziare i piatti in modo adeguato e fissare il giunto Hi-Hat in posizione.
4 Utilizzare la coppia di controdadi (19) sulla parte superiore del giunto
Hi-Hat (
superiore.
7) per regolare quanto deve essere stretto il piatto Hi-Hat
16) dal giunto Hi-Hat (7), posizionare il
17) e serrare nuovamente il dado del
7) collegato al piatto superiore
9), quindi premere il pedale (18) per distan-
Page 2
Pie de charles / Estante de hi‐hat / АСтойка для хай-хэт / 踩镲架 / 하이 햇 스탠드
(10)
(2)
(1)
(11)
(9)
(8)
(7)
(15)
(12)
(14)
(13)
(16)
(19)
(15)
(9)
(2)
(2)
(4)
(5)
(18)
(3)
(6)
(5)
(9)
(17)
(17)
(7)
HHS3
Manual de instrucciones / Manual do proprietário / Руководство пользователя / 使用说明书 / 사용자 매뉴얼
P. 2
Español
Gracias por comprar este producto Yamaha.
Este producto está fabricado en aluminio, por eso es más ligero pero sigue conservando la rigidez de un herraje para baterías convencional. Para usar el producto de
manera segura y sacar el máximo partido de sus funciones, lea atentamente el
Manual de instrucciones. Después de leerlo, asegúrese de guardarlo con el producto para poder volver utilizarlo como referencia cuando lo necesite.
ES
Contenido del paquete : Correa de sujeción, bolsa interior, precauciones (folleto),
lista de centros de servicio (folleto)
Precauciones de seguridad
• La superficie de este producto tiende a rayarse fácilmente, en comparación con revestimiento de cromo convencional. Durante el transporte, intente evitar golpear o rayar el producto. Asegúrese de guardarlo en las bolsas interiores suministradas cuando lo transporte.
• Puede resultar difícil equilibrar instrumentos inusualmente pesados en estos pies,
ya que el pie es ligero. Tras la instalación y antes de usar el instrumento para interpretar o exponer, compruebe la estabilidad del mismo.
Português
Obrigado por adquirir este produto Yamaha.
Este produto é feito de alumínio, o que o torna mais leve, porém conserva a rigidez
dos componentes de bateria convencionais. Para usar o produto com segurança e
aproveitar ao máximo suas funções, leia este Manual do Proprietário com atenção.
Após a leitura, guarde-o junto com o produto para consultá-lo conforme necessário.
PT
Conteúdo do pacote : Cinta de fixação, bolsa interna, Precauções (folheto), lista de
assistências técnicas (folheto)
Precauções de segurança
• Diferentemente do revestimento cromado convencional, a superfície deste produto
está mais suscetível a arranhões. Evite bater ou raspar o produto ao transportá-lo.
Durante o transporte, guarde o produto nas bolsas internas fornecidas.
• Pode ser difícil equilibrar instrumentos muito pesados sobre estas estantes, pois
elas são leves. Confirme a estabilidade do instrumento após montá-lo e antes de
utilizá-lo em apresentações ou para exposição.
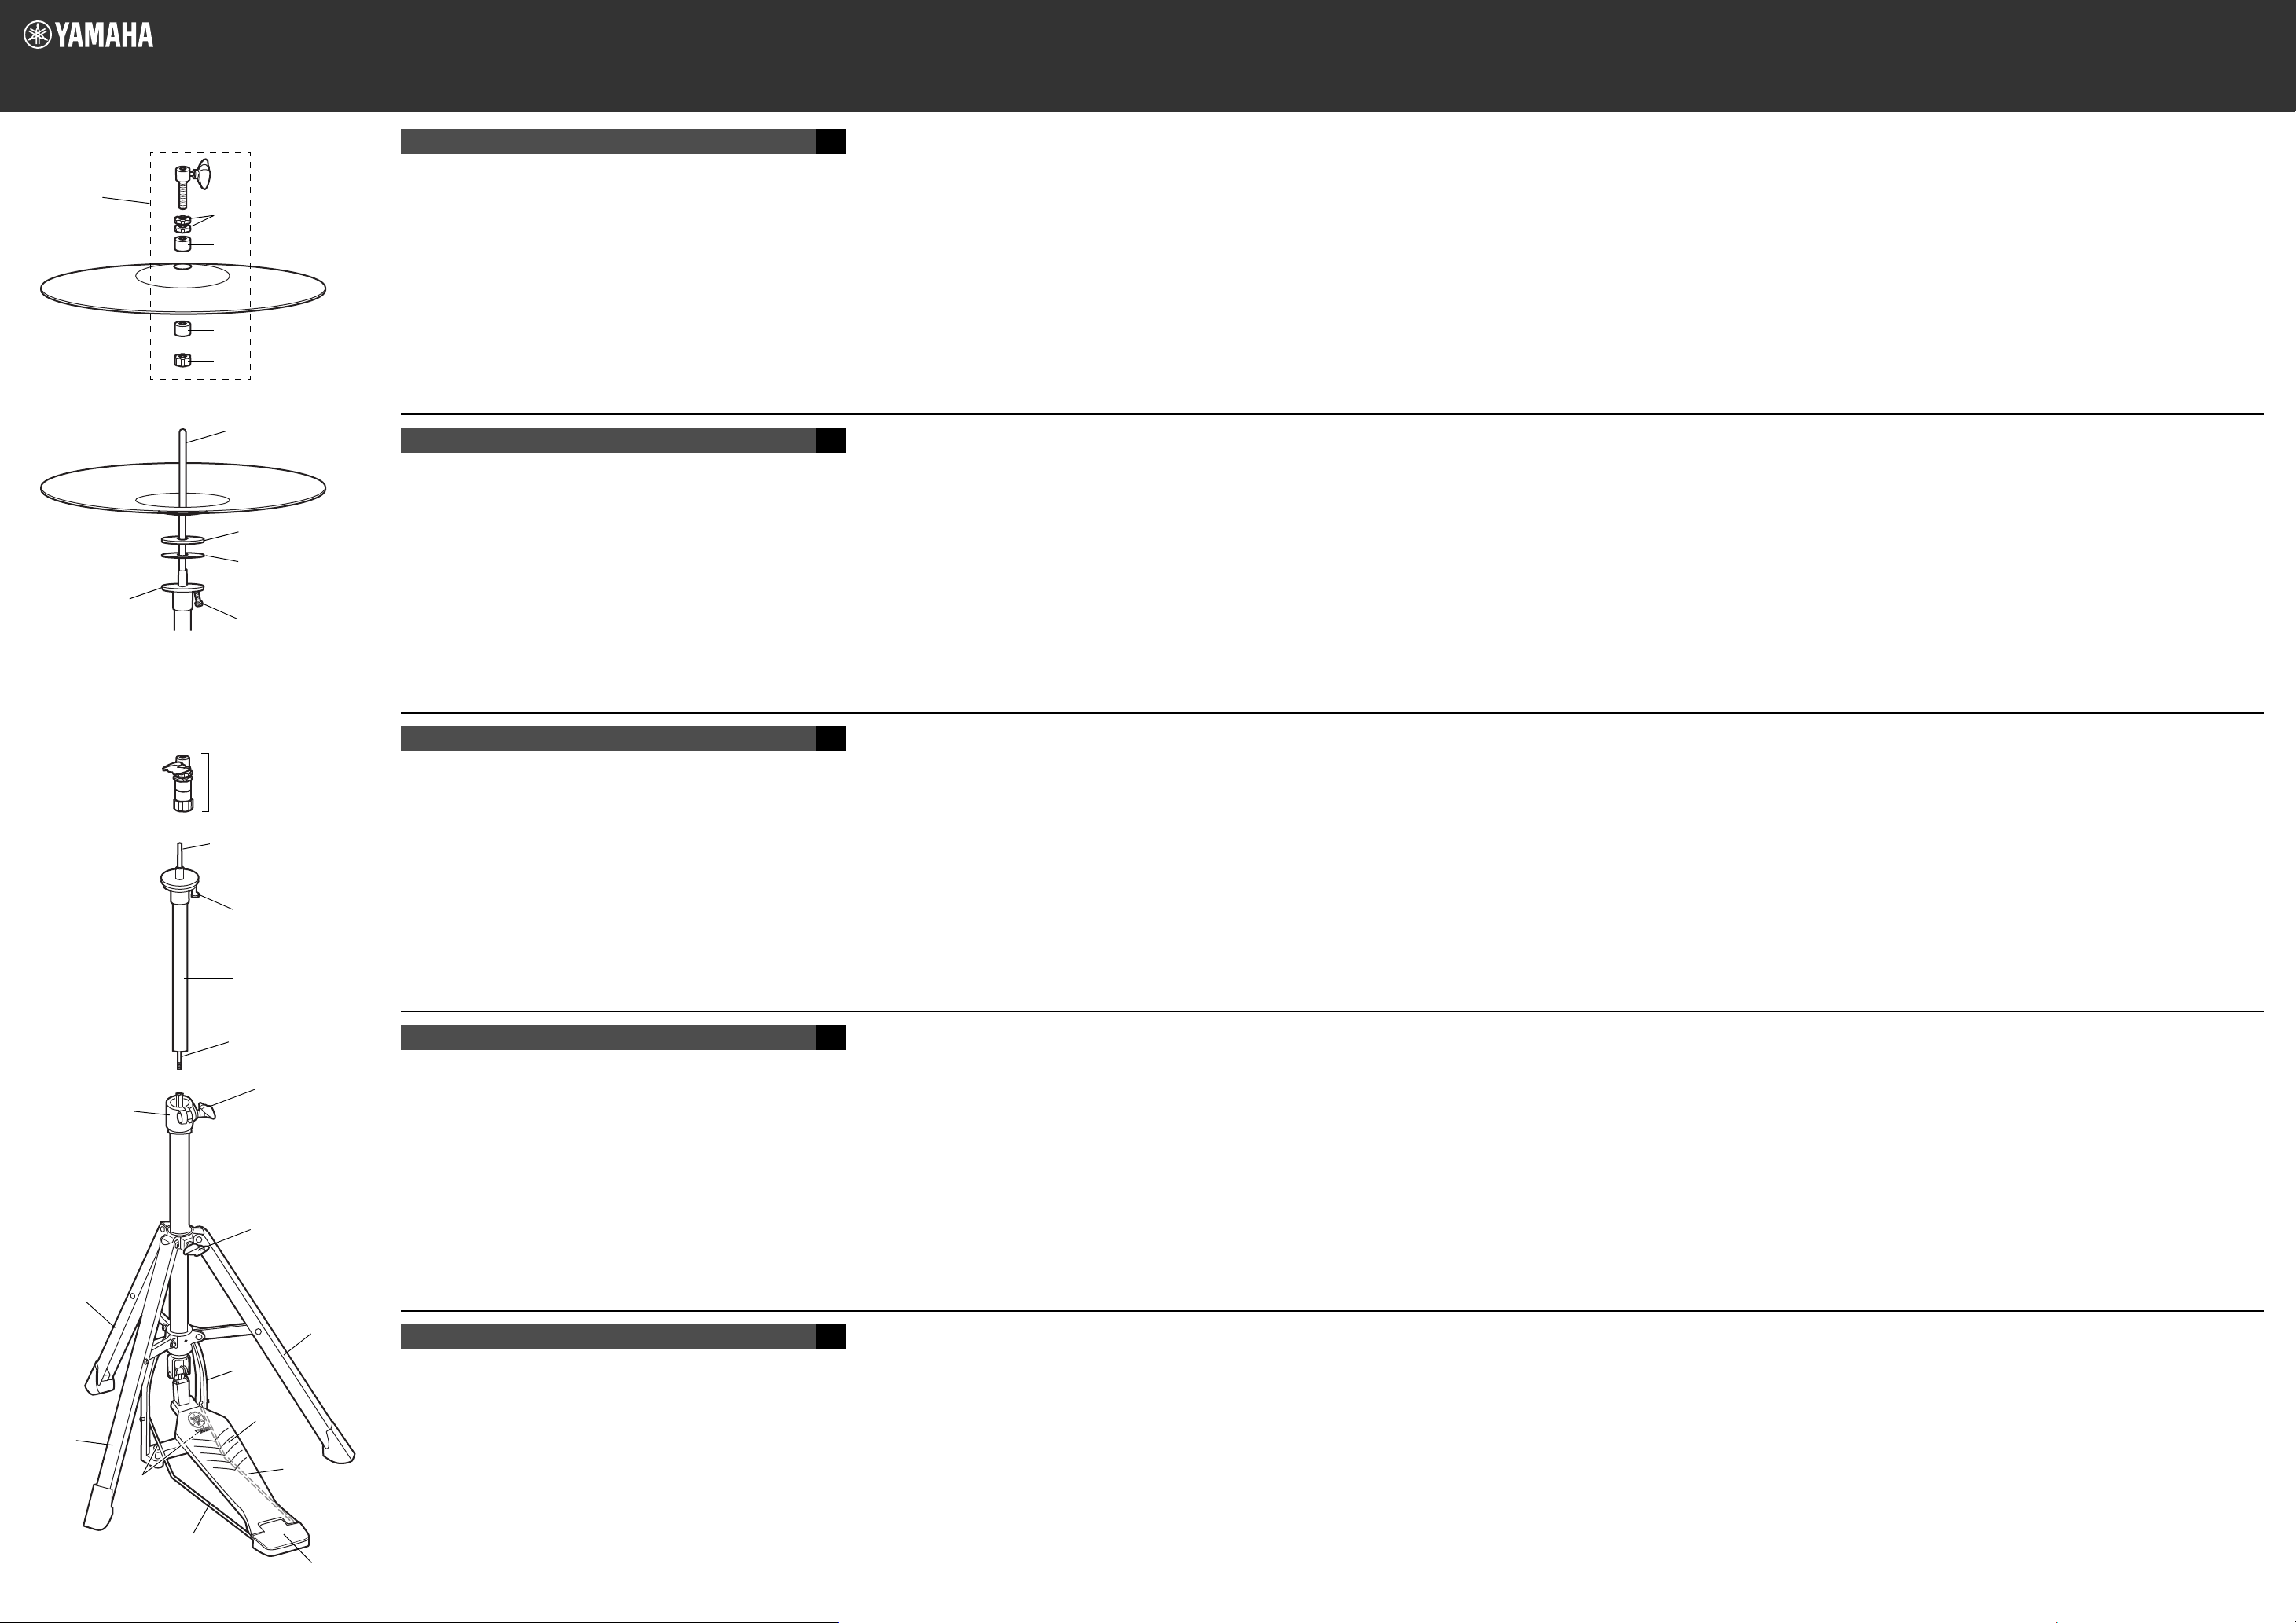
Configuración
Instalación del pie de charles
1 Quite la correa de sujeción, afloje el tornillo de mariposa (1) y
extienda los tres pies (
2 Coloque el pie en una posición estable y, a continuación, apriete el
tornillo de mariposa (
NOTA En este punto, asegúrese de que la parte inferior de la estruc-
tura (3) está separada entre 1 y 2 mm del suelo.
3 Acople las varillas (5) extendiéndolas desde el talón (4), hasta los
dos orificios situados en el interior de la estructura (
4 Use los topes (6) situados en la parte inferior de la estructura (3)
para evitar que el pie se deslice hacia atrás mientras toca. Si se gira
la cabeza del tope hacia la derecha, los clavos se extienden hacia el
suelo. Coloque el pie en una alfombra para no rayar el suelo.
Configuração
Montagem da estante de hi‐hat
1 Remova a cinta de fixação, afrouxe o parafuso borboleta (1) e alar-
gue as três pernas (
2 Coloque a estante em uma posição estável e aperte o parafuso bor-
boleta (
1).
OBSERVAÇÃO
tura de base (3) esteja elevada de 1 a 2 cm acima do chão.
3 Encaixe as hastes (5) que vão da ponta do pedal (4) até os dois ori-
fícios situados na parte interna da estrutura de base (
4 Utilize os fixadores (
3) para evitar que a estante deslize para trás ao tocar. Girar a
base (
cabeça do fixador no sentido horário abaixa as hastes na direção do
chão. Coloque a estante sobre um tapete para não arranhar o chão.
2).
1).
3).
2).
Neste ponto, certifique-se de que a parte inferior da estru-
3).
6) situados na parte inferior da estrutura de
5 Quite la abrazadera del charles (
del tubo superior (
6 Atornille el eje del charles (
base de sujeción (
7 Deslice la sección superior del tubo (
a continuación, apriete la tuerca de mariposa (
sección de la base (
Acople del charles
Coloque el plato inferior del charles en el asiento inferior (12) y acople la
abrazadera del charles (
5 Remova o engate do hi-hat (
superior (
6 Parafuse o eixo do hi-hat (
da base da braçadeira (
7 Deslize a seção do tubo superior (
aperte a porca borboleta (
uma altura confortável para tocar.
Fixação dos pratos do hi-hat
Coloque o prato inferior do hi-hat sobre o encaixe inferior (12) e fixe o
engate do hi-hat (
8).
8).
10).
10) a una altura cómoda para tocar.
7) al plato inferior del charles.
10).
7) no prato superior do hi-hat.
7) y extraiga el eje del charles (9)
9) en la unión (11) que hay dentro de la
8) sobre el eje del charles (9) y,
11) para fijarla a la
7) e retire o eixo do hi-hat (9) do tubo
9) na junção (11) situada na parte interna
8) sobre o eixo do hi-hat (9) e
11) para fixá-lo na seção da base (10) em
1 Coloque la arandela metálica HS (13), la almohadilla (14) y el plato
inferior en el asiento inferior (
para ajustar el ángulo del plato inferior.
2 Quite la tuerca de la abrazadera (16) de la abrazadera del charles (7),
coloque el plato superior entre las dos almohadillas (
ción, vuelva a apretar la tuerca de la abrazadera (
3 Deslice la abrazadera del charles (7) que está acoplada al plato
superior en el eje del charles (
para dejar un espacio suficiente entre los platos y fijar la abrazadera
del charles en la posición adecuada.
4 Use el par de tuercas de bloqueo (
abrazadera del charles (
charles superior.
1 Coloque a arruela metálica HS (13), a arruela de feltro (14) e o
prato inferior no encaixe inferior (
15) para ajustar o ângulo do prato inferior.
fuso (
2 Remova a porca (
rior entre os dois feltros (17) e aperte novamente a porca do engate
16) com os dedos.
(
3 Insira o engate do hi-hat (
9), pise no pedal (18) para ajustar um espaço adequado
hi-hat (
entre os pratos e fixe o engate do hi-hat.
4 Utilize o par de contraporcas (19) na parte superior do engate do hi-
7) para ajustar o aperto do prato superior do hi-hat.
hat (
16) do engate do hi-hat (7), coloque o prato supe-
12) en ese orden. Use el tornillo (15)
17
) y, a continua-
16
) con los dedos.
9) y, a continuación, pise el pedal (18)
19) en la parte superior de la
7) para fijar el ajuste del plato superior del
12), nessa ordem. Utilize o para-
7) encaixado no prato superior no eixo do
Pусский
Благодарим вас за приобретение этого продукта Yamaha.
Он изготовлен из алюминия, поэтому легкий, но не менее жесткий, чем обычные ударные инструменты и принадлежности к ним. Внимательно прочтите данное руководство владельца, чтобы эффективно и безопасно пользоваться
всеми возможностями продукта. После прочтения сохраните руководство, чтобы к нему всегда можно было обратиться, если возникнут вопросы по продукту.
RU
Комплект поставки : соединительный ремень, внутренний чехол, «Меры пре-
досторожности» (листовка), «Перечень сервисных центров» (листовка)
Меры предосторожности
• В отличие от традиционных хромированных изделий, данный продукт легко поцарапать. Во время транспортировки берегите его от ударов и острых предметов.
Используйте для транспортировки внутренние чехлы.
• Слишком тяжелые инструменты может быть трудно уравновесить на таких легких
стойках. После установки и перед использованием для исполнения или показа проверьте устойчивость инструмента
中文
感谢您购买本 Yamaha 产品。
本产品采用铝质材料,既轻便,又像传统架子鼓器材一样坚固。为安全
地使用本产品并充分发挥其功能,请仔细阅读本使用说明书。通读本说
明书之后,请务必将其与本产品一起妥善保管,以便日后需要时查阅。
.
ZH
包装清单 : 绑带、内袋、注意事项(手册)、办事处列表(手册)
安全注意事项
• 与传统镀铬层相比,本产品表面更容易刮伤,因此在运输过程中,请
注意避免撞击或刮擦本产品,并确保将其放在附带提供的内袋中。
•
由于支架本身较轻,因此将通常较重的乐器放在这种支架上时会难以保持
平衡。在安装支架之后,用于表演或展示之前,请检查乐器是否稳固。
Установка
Установка стойки для хай-хэта
1 Снимите соединительный ремень, ослабьте барашковый болт
1) и выдвиньте три ножки (2).
(
2 Установите стойку так, чтобы она не шаталась, а затем затяни-
те барашковый болт (
ПРИМЕЧАНИЕ.
основания (3) поднят на 1–2 мм над полом.
3 Вставьте стержни (5), выдвинутые из пятки (4), в два отверс-
тия внутри рамы основания (
4 Установите фиксаторы (6) внизу рамы основания (3) таким
образом, чтобы стойка не скользила назад во время игры. Для
выдвижения шипов наружу, к полу, поворачивайте головку
фиксатора по часовой стрелке. Ставьте стойку на ковер, чтобы
не поцарапать пол.
1
).
На данном этапе нужно убедиться, что низ рамы
3).
安装
安放踩镲架
1 取下绑带,松开翼形螺栓 (1),撑开三条支腿 (2)。
2 将支架放在平稳位置,然后拧紧翼形螺栓 (
注意:此时,请确保将底架 (3) 升高至地板上方 1 至 2 毫米高度处。
3 将连接杆 (5) 从后跟 (4) 延伸连接至底架 (3) 内的两个孔中。
4 使用底架 (
顺时针转动挡块头部,使脚钉向地板伸出。将支架放在地毯上,防止
刮伤地板。
5 取下踩镲离合器 (
3) 底部的挡块 (6),防止支架在演奏期间向后滑动。
7),将踩镲轴 (9) 从上管道 (8) 拉出。
1)。
5 Снимите муфту хай-хэта (
из верхней трубки (
6 Вкрутите стержень хай-хэта (
женное внутри основания зажима (
7 Надвиньте верхнюю трубчатую секцию (8) на стержень хай-
Прикрепление тарелок хай-хэта
Разместите нижнюю тарелку хай-хэта на нижнем посадочном месте
(
12) и прикрепите муфту хай-хэта (7) к верхней тарелке хай-хэта.
6 将踩镲轴 (
7 将上管道部分 (
9
хэта (
сировать секцию основания (
), а затем затяните барашковую гайку (11), чтобы зафик-
9) 拧入卡箍底座 (10) 内的接头 (11 ) 中。
8) 沿踩镲轴 (9) 上方滑动,然后拧紧翼形螺帽 (11),
以便使用该翼形螺帽将底座部分 (
7) и вытяните стержень хай-хэта (9)
8).
9) в соединение (11), располо-
10).
10
) на удобной для игры высоте.
10) 固定在舒适的演奏高度。
1 Установите металлическую шайбу HS (13), фетровую шайбу
14) и нижнюю тарелку на нижнее посадочное место (12) в
(
указанном порядке. Отрегулируйте угол нижней тарелки с
помощью болта (
2 Снимите гайку муфты (
верхнюю тарелку между двумя фетрами (
гайку муфты (
3 Надвиньте муфту хай-хэта (7), прикрепленную к верхней
тарелке, на стержень хай-хэта (
18), чтобы создать достаточный зазор между тарелками, и
(
зафиксируйте муфту хай-хэта в нужном положении.
4 С помощью двух стопорных гаек (
муфты хай-хэта (
жет двигаться верхняя тарелка хай-хэта.
15).
16) с муфты хай-хэта (7), расположите
17) и снова затяните
16) пальцами.
9), затем станьте на педаль
19), расположенных вверху
7), отрегулируйте, насколько свободно смо-
连接脚踏钹
将底部脚踏钹放在底座 (12) 上,将踩镲离合器 (7) 连接到顶部脚踏钹上。
1 将 HS 金属垫圈 (13)、毡垫圈 (14) 和底钹依次放在底座 (12) 上。
用螺栓 (
2 将离合器螺母 (
(
3 将与大钹连接的踩镲离合器 (
(
4 使用踩镲离合器 (
固程度。
15) 调节底钹的角度。
16) 从踩镲离合器 (7) 上取下来,将大钹放在两块毡
17) 之间,然后重新用手指拧紧离合器螺母 (16)。
7) 滑到踩镲轴 (9) 上,然后踩动踏板
18),使吊镲之间间隔适当的空间,再将踩镲离合器固定到位。
7) 顶部的一对锁紧螺母 (19) 调节顶部脚踏钹的紧
한국어
Yamaha 제품을 구매해 주셔서 감사합니다.
본 제품은 알루미늄으로 만들어져 가벼우면서도 기존 드럼 하드웨어의
강도를 유지합니다. 제품을 안전하게 사용하고 기능을 최대한 활용하려면
사용 설명서를 주의해서 읽으십시오. 읽은 후, 나중에 필요할 때 언제든
쉽게 참조할 수 있도록 제품과 함께 보관하십시오.
패키지 구성 :
바인딩 스트랩, 보관 가방, 주의사항(전단지), 서비스 센터 목록(전단지)
KO
안전 주의사항
•기존의 크롬 도금에 비해 본 제품의 표면은 쉽게 긁히는 경향이 있습니다.
운반할 때 제품이 부딪치거나 긁히지 않도록 주의하십시오. 운반할 때 제공된
보관 가방에 넣으십시오.
•스탠드 자체가 가볍기 때문에 너무 무거운 악기는 스탠드에서 균형을 맞추기
어려울 수 있습니다. 구성 후 연주하거나 전시하기 전에 악기 배치가
안정적인지 확인하십시오.
구성
하이햇 스탠드 설치
1 바인딩 스트랩을 분리합니다. 윙 볼트(
늘립니다.
2 안정적인 위치에 스탠드를 배치하고 윙 볼트(1)를 조입니다.
참고 이때, 베이스 프레임(3) 의 밑면이 바닥에서 1~2mm 정도 떨어져
있는지 확인하십시오.
3힐(4)에서 늘린 로드(5)를 베이스 프레임(3) 내부에 있는 2개의
구멍이 끼웁니다.
4 연주 도중 스탠드가 뒤쪽으로 미끄러지지 않도록 4 베이스 프레임(3)
바닥에 있는 스토퍼(6)를 사용합니다. 스토퍼 헤드를 시계 방향으로
돌리면 스파이크가 바닥을 향해 나옵니다. 바닥이 긁히지 않도록
스탠드를 카펫 위에 놓습니다.
1)를 풀고 세 개의 다리(2)를
7
5 하이햇 클러치(
파이프(
6 하이햇 샤프트(
조입니다.
7 하이햇 샤프트(
편안한 높이의 베이스 섹션(
8
)를 분리하고 하이햇 샤프트(9)를 상단
)에서 꺼냅니다.
9
)를 클램프 베이스(10) 내부에 있는 조인트(11)에
9
) 위로 상단 파이프 섹션(8)을 민 다음, 연주하기
하이햇 심벌 부착
하단 시트(
하이햇 상단 심벌에 연결합니다.
12)에 하이햇 상단 심벌을 올려 놓고 하이햇 클러치(7)를
10
)지점에 윙 너트를 (11)를 조입니다.
1 하단 시트(
순서대로 놓습니다. 볼트(
조정합니다.
2하이햇 클러치(7)에서 클러치 너트(16)를 분리하고, 두 개의
펠트(
손가락으로 다시 조입니다.
3 상단 심벌에 부착된 하이햇 클러치(7)를 하이햇 샤프트(9)로 밀고
페달(18)을 밟아 심벌 사이에 적당한 간격을 만들고 하이햇 클러치를
제 위치에 고정합니다.
4하이햇 클러치(7) 상단의 잠금 너트(19) 한 쌍을 사용하여 상단
하이햇 심벌이 고정되는 정도를 조정합니다.
12)에 HS 금속 와셔(13), 펠트 와셔(14) 및 하단 심벌을
15)를 사용하여 하단 심벌의 각도를
17
) 사이에 상단 심벌을 놓은 다음, 클러치 너트(16)를
 Loading...